

Walkthrough Menu
- General Tips
- Chapter 1: Tree Portal
- Chapter 2: Forest of Fireflies
- Chapter 3: Misty Swamp
- Chapter 4: Dwarven Caves
- Chapter 5: Underground Lift
- Chapter 6: Dark Lord's Castle
- Chapter 7: Alchemist's Tower
- Chapter 8: Magic Potions
General Tips
- This is the official guide for Lost Lands: Dark Overlord.
- This guide will not mention each time you have to zoom into a location; the screenshots will show each zoom scene.
- We will use the acronym HOP for Hidden-object puzzles. Interactive items will be color-coded and some will be numbered; please follow the numbers in sequence.
- The HOP lists may be random; our lists may vary from yours.
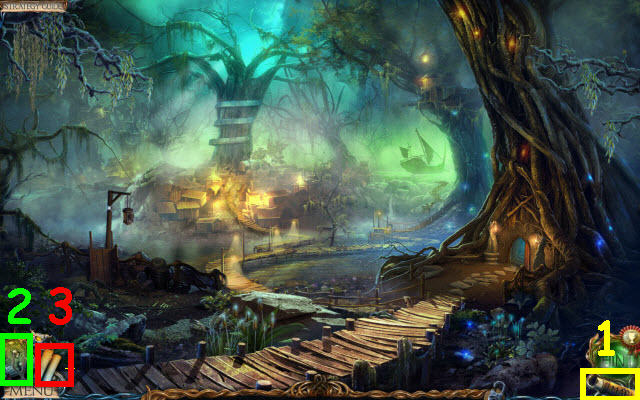
- Use the map (1) to check objective locations and fast travel to previously unlocked locations.
- Select the journal (2) for clues and story updates.
- Select the scroll (3) for your task list.
Chapter 1: Tree Portal
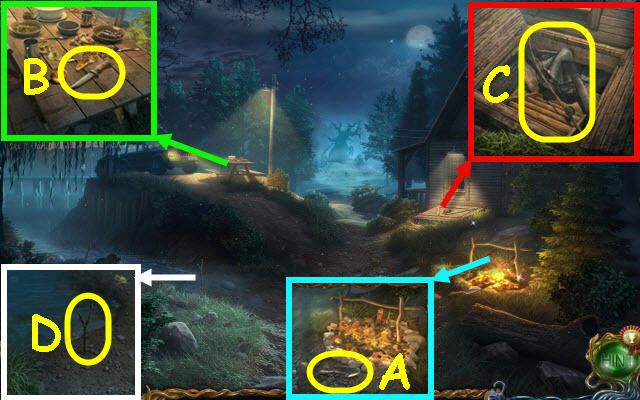
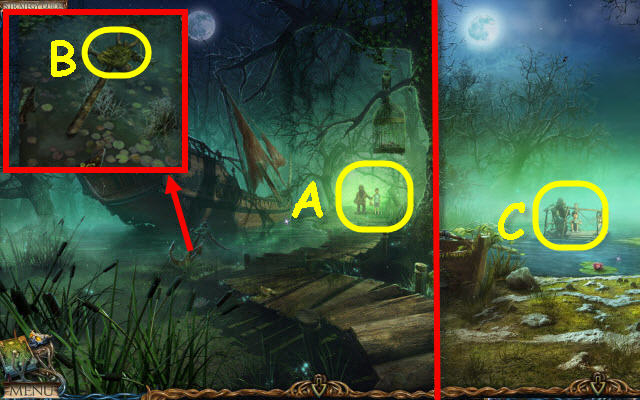
- Take the TROWEL (A).
- Take the KNIFE (B).
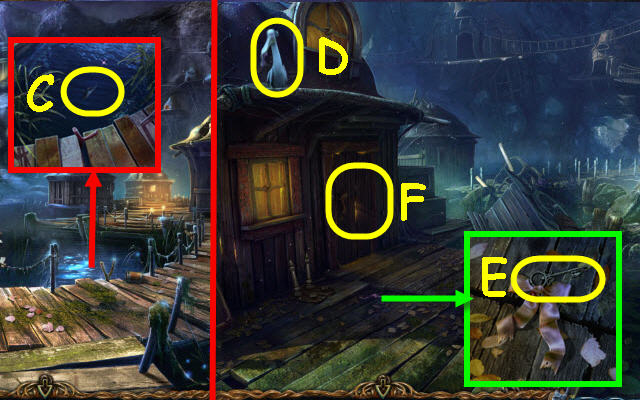
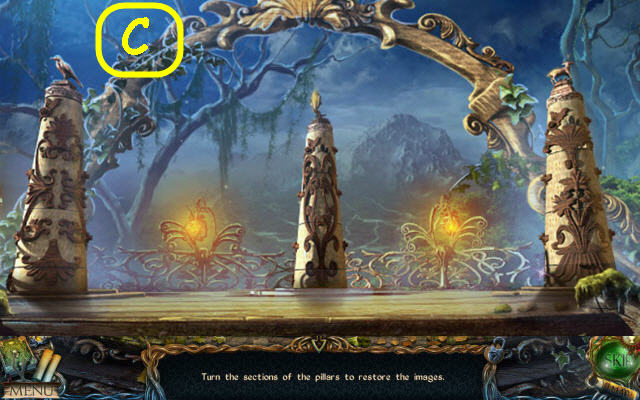
- Use the KNIFE on the rope and open the hatch; take the FISHING ROD (C).
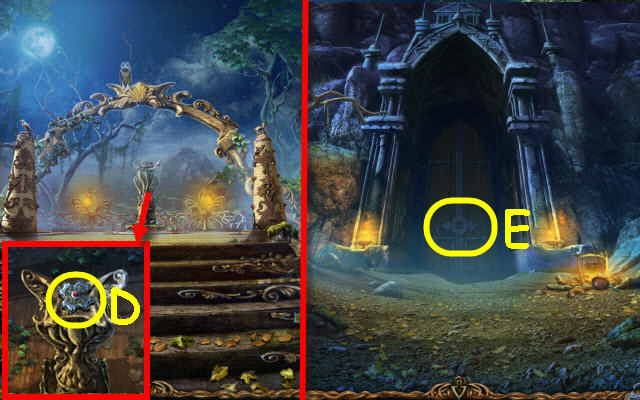
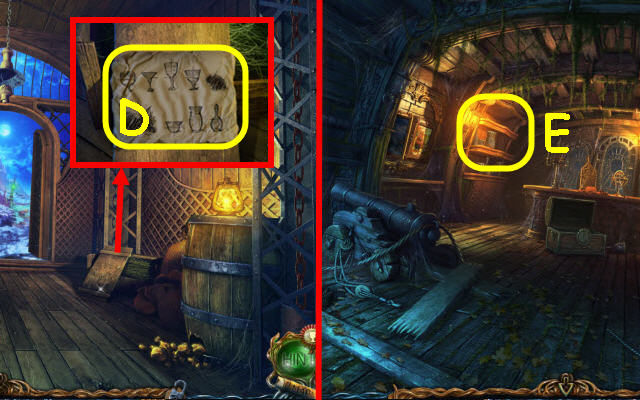
- Place the FISHING ROD in the holder; receive a WOODEN DISC (D).
- Go forward.
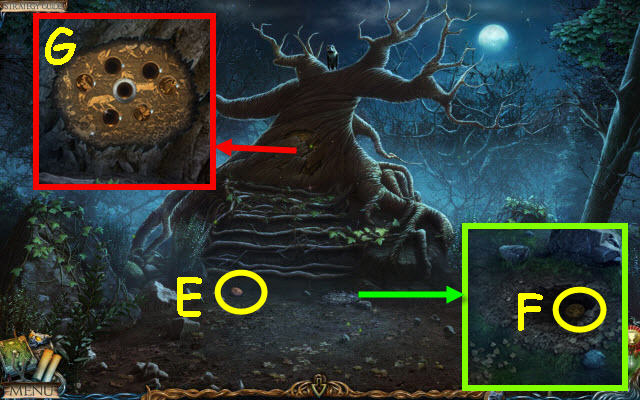
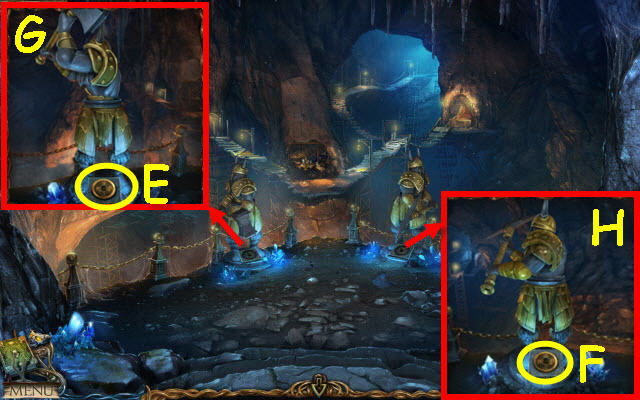
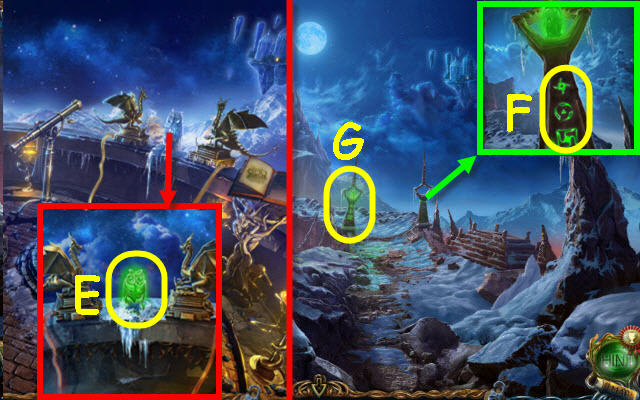
- Take the 2nd WOODEN DISC (E).
- Use the TROWEL on the dirt; take the 3rd WOODEN DISC (F).
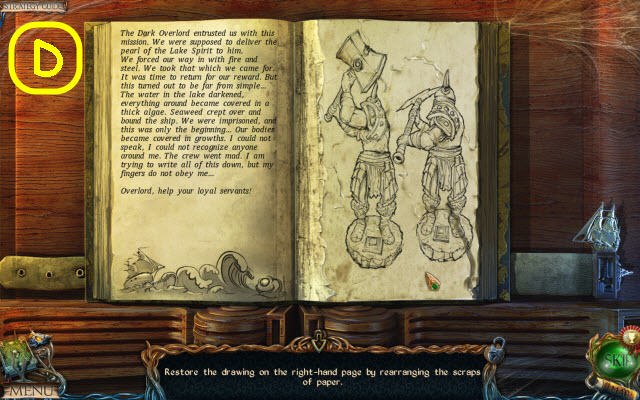
- Remove the wood; insert the 3 WOODEN DISCS in the slots to trigger a puzzle (G).
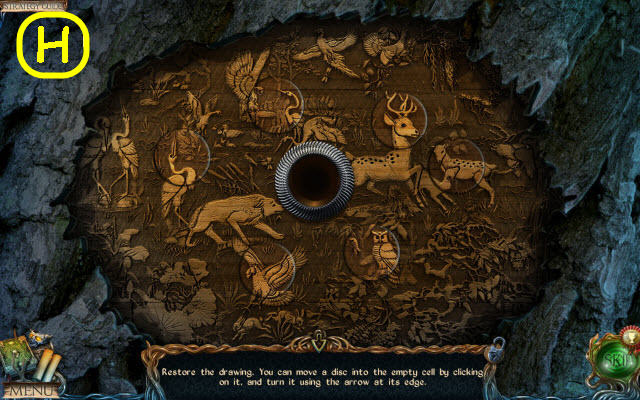
- Restore the drawing.
- Solution (H).
Chapter 2: Forest of Fireflies

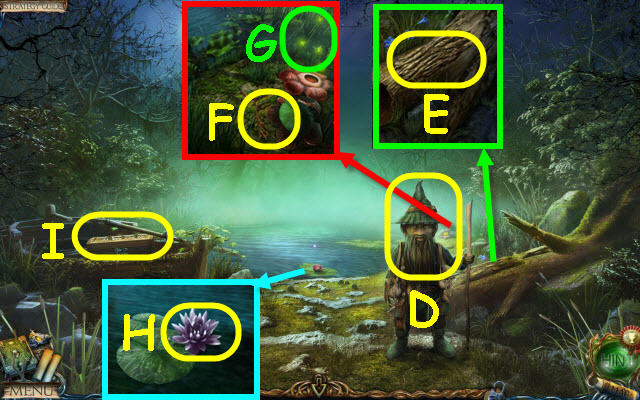
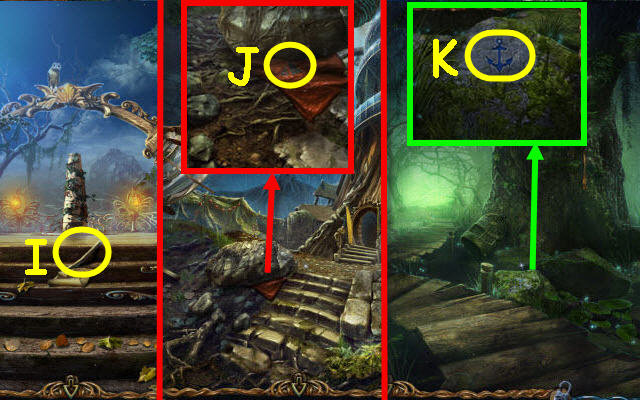
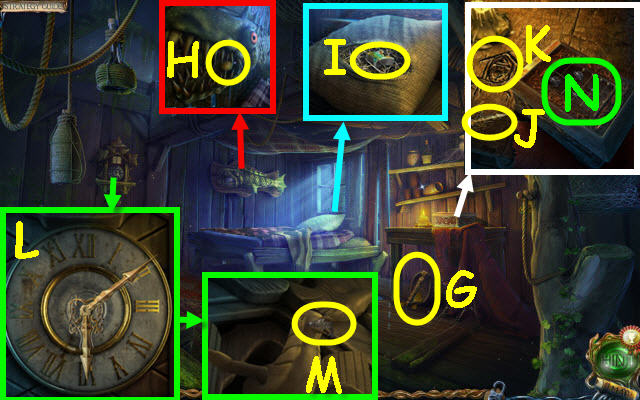
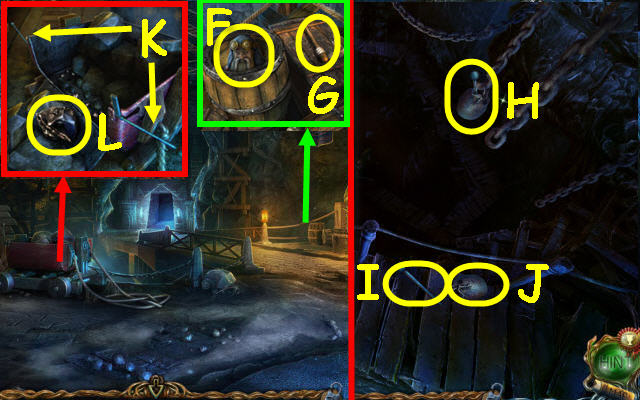
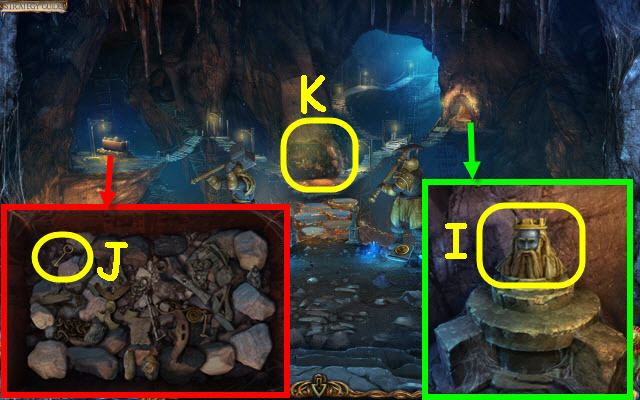
- Select Jimmy (I).
- Take the DRIED TWIG (J).
- Take the DAGGER (K).
- Use the DRIED TWIG on the birds; receive an OWL (L).
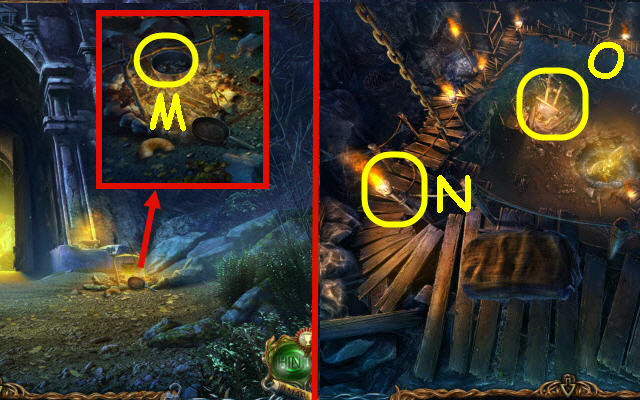
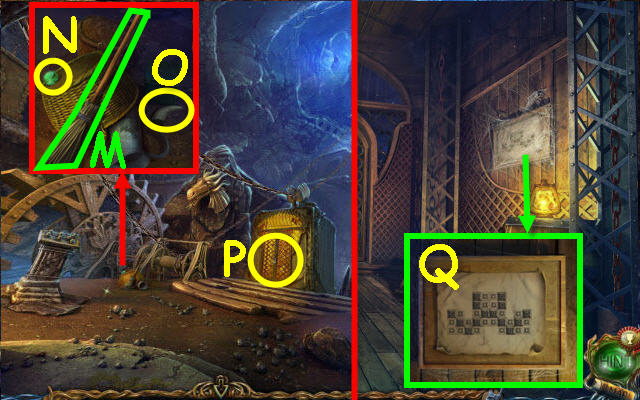
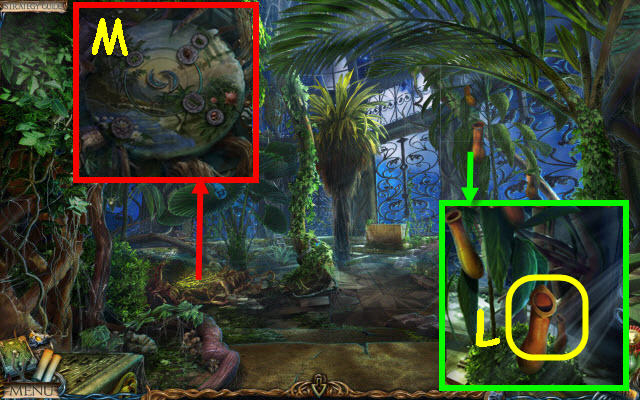
- Go forward (M).
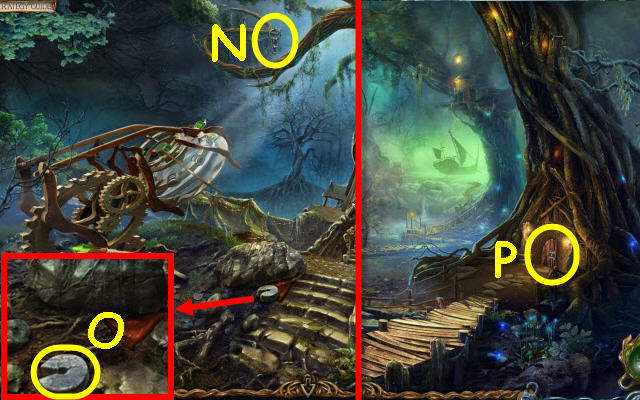
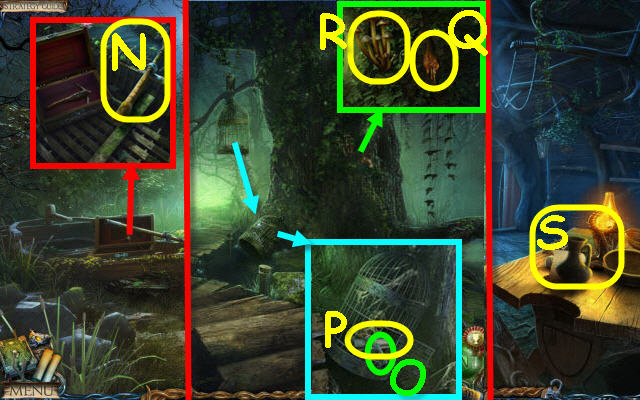
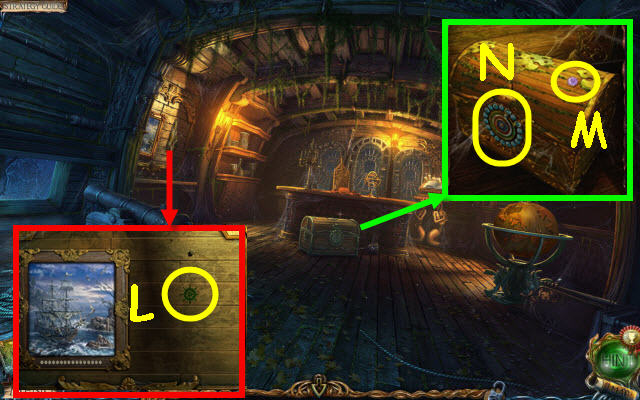
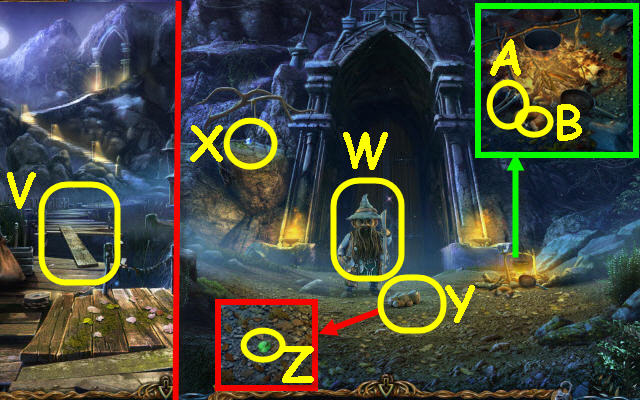
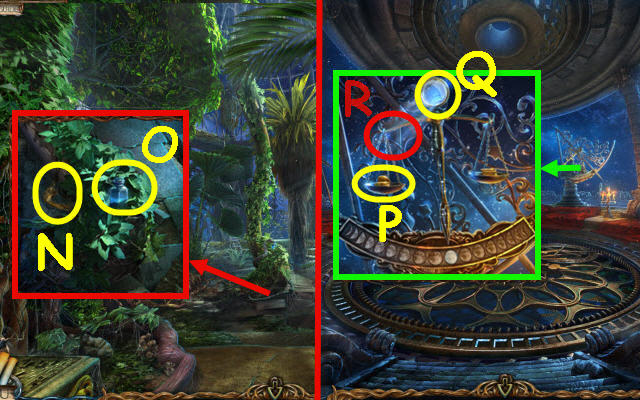
- Use the OWL to get the DOOR-KNOCKER (N).
- Take the WEIGHT (O).
- Back out.
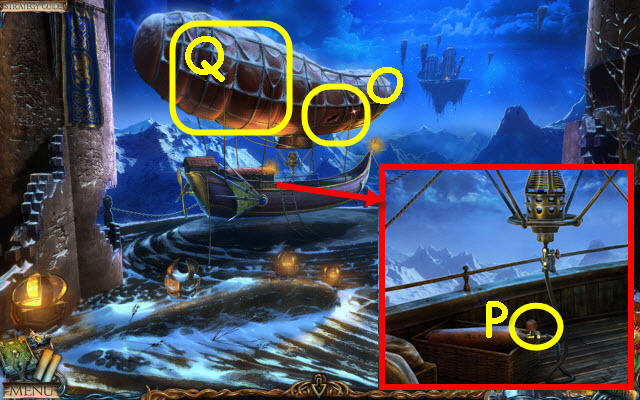
- Place the DOOR-KNOCKER on the door; select it (P).
- Enter the tree.
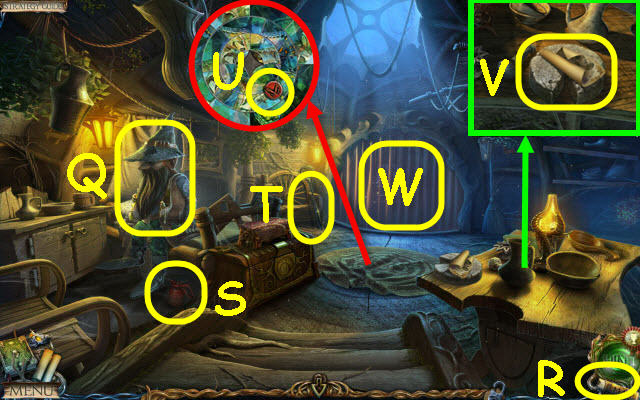
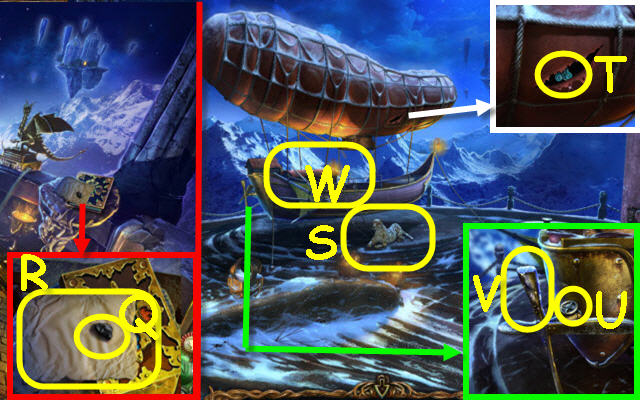
- Speak to Uri (Q). Receive a map which will be added to your toolbar (R).
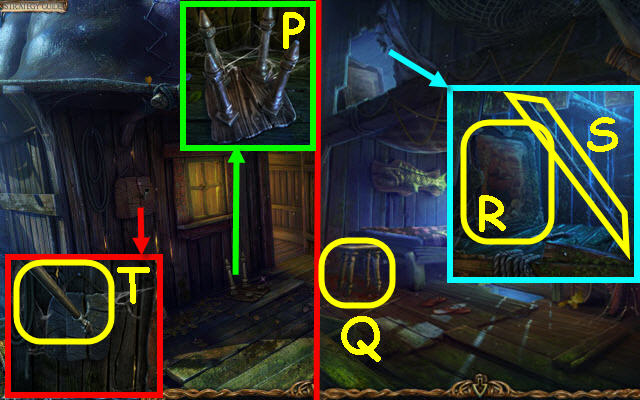
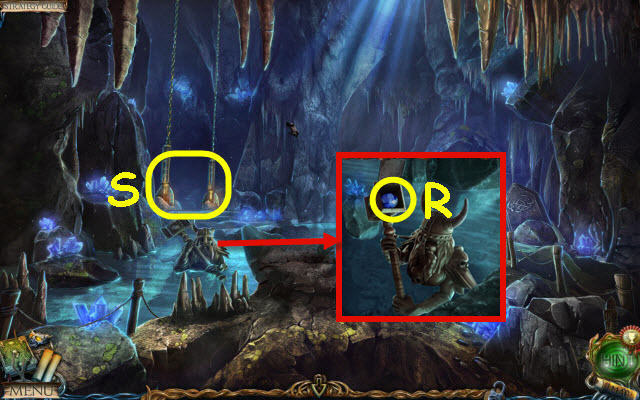
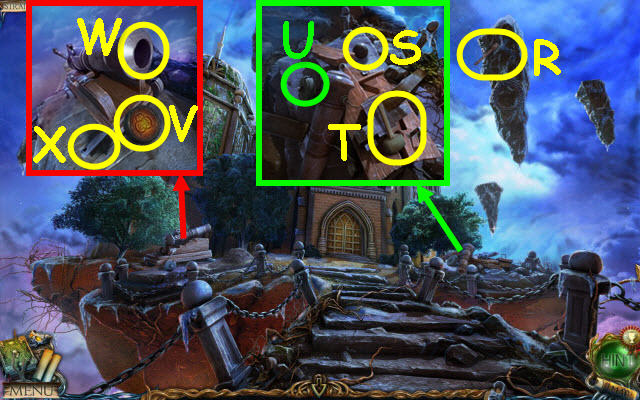
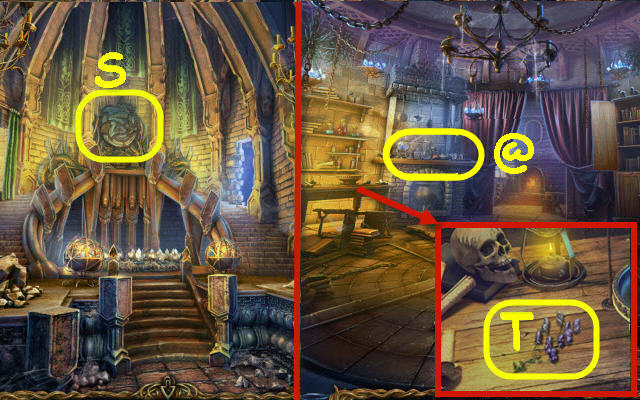
- Take the OIL (S) and BUTTERFLY NET (T).
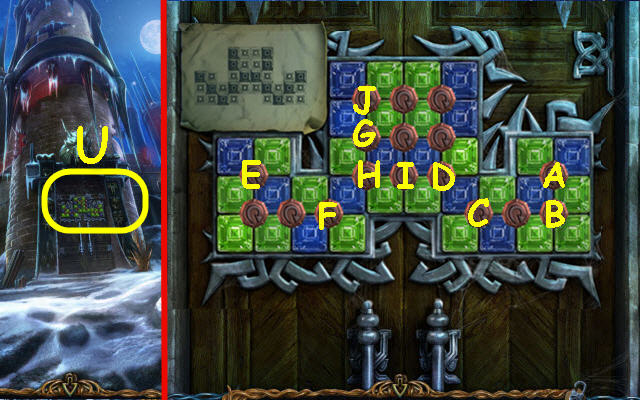
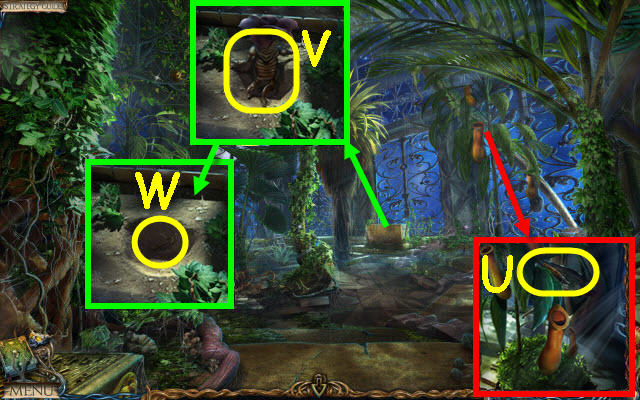
- Lift the rug; take the RED DISC (U).
- Read the recipe; take the 2nd WEIGHT (V).
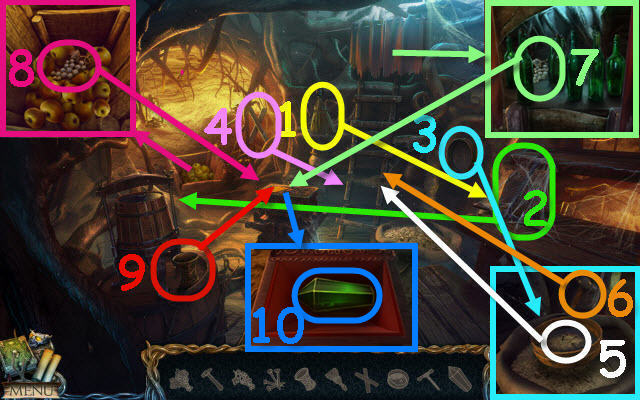
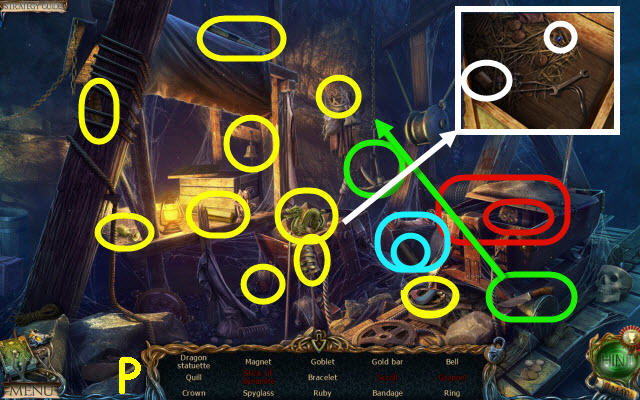
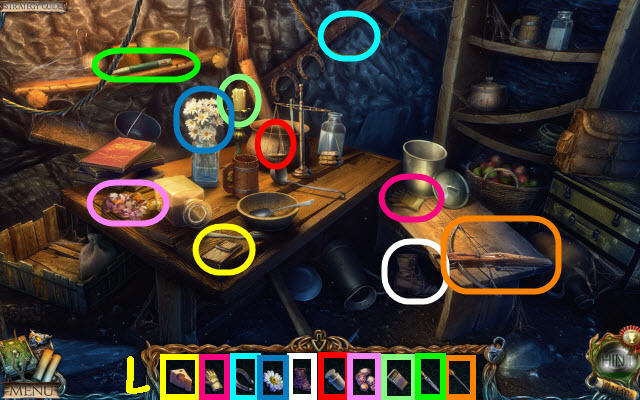
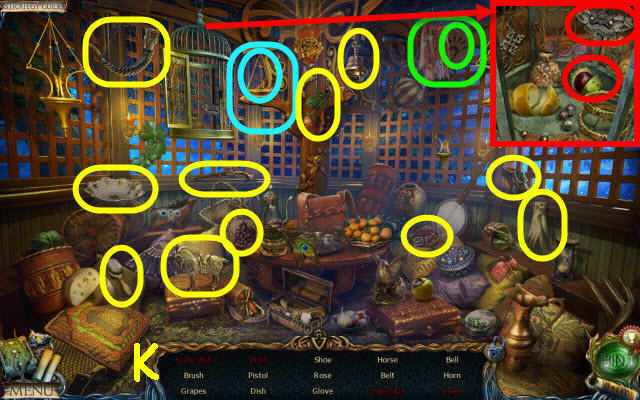
- Open the curtain to trigger a HOP (W).
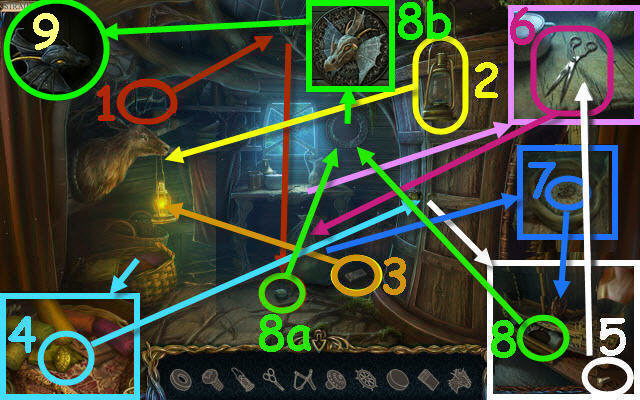
- Play the HOP.
- You receive a HEAD (1-9).
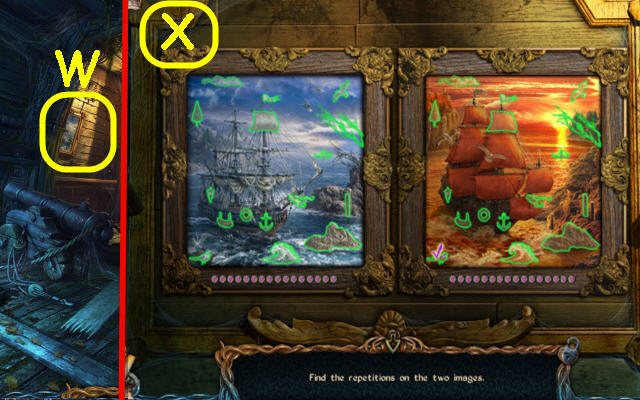
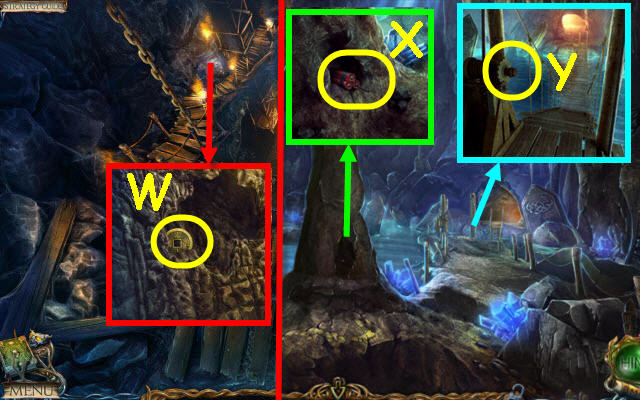
- Go to Outside the Tree.
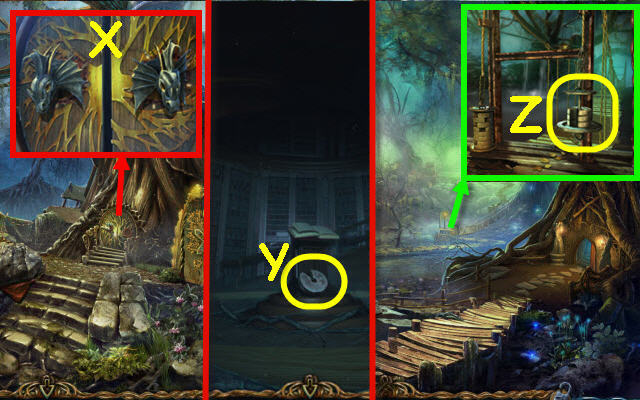
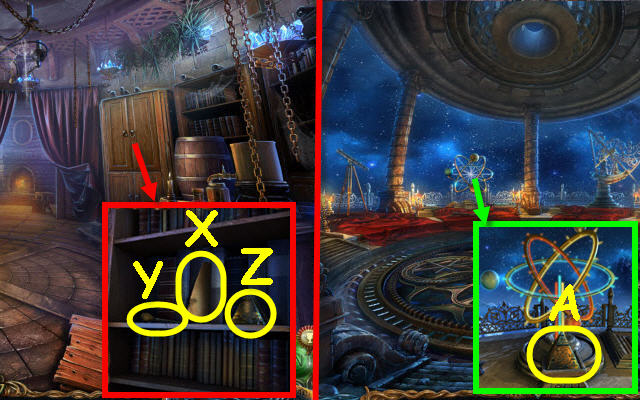
- Place the HEAD on the door; select each head twice and enter (X).
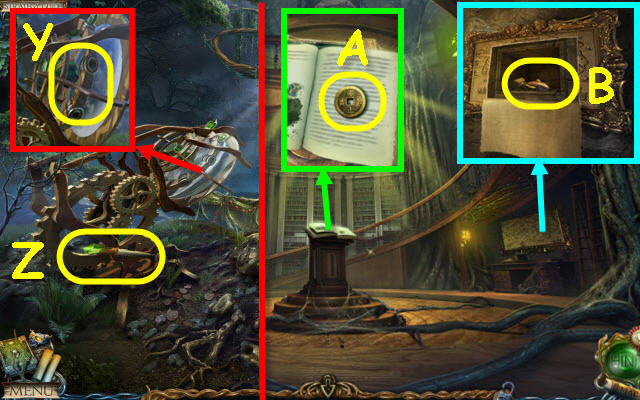
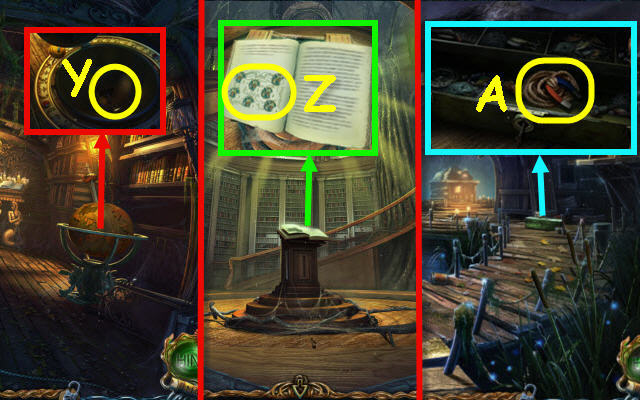
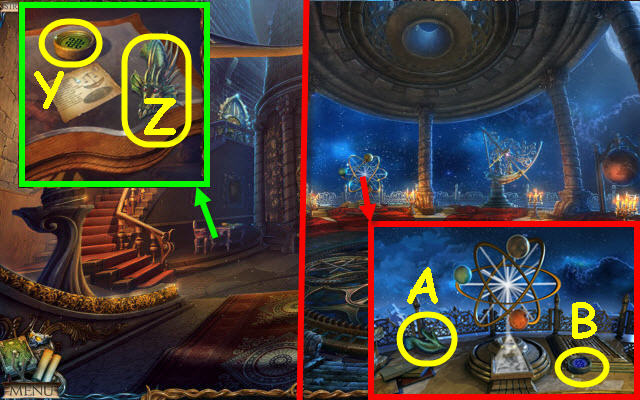
- Take the 3rd WEIGHT (Y).
- Back out twice.
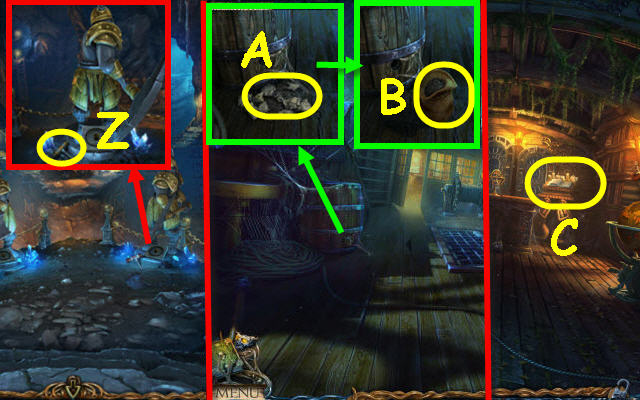
- Place the 3 WEIGHTS on the scale (Z); cross the bridge.
- Select Timmy (A).
- Take the PONDWEED (B).
- Go forward.
- Select Timmy (C).
Chapter 3: Misty Swamp
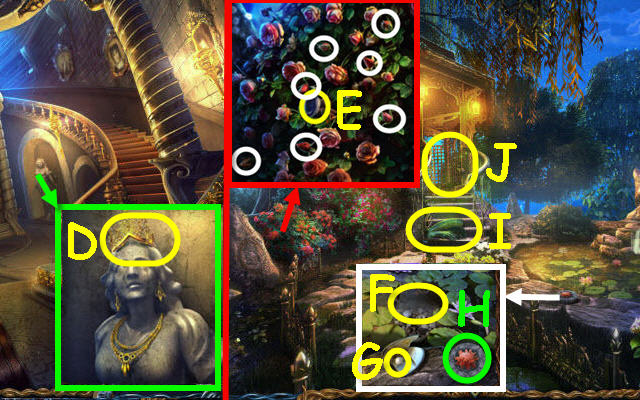
- Speak to Uri (D).
- Take the BARK (E).
- Select the flower; use the DAGGER on the root and take the FLOWER ROOT (F).
- Use the BUTTERFLY NET to get the FIREFLIES (G).
- Use the DAGGER on the LILY (H); take it.
- Select the box to trigger a puzzle (I).

- Arrange the figurines.
- Solution: Cx3, B, A, Cx4, B, A, Cx4, B, A, Cx3, B, A, C, B and A.
- Take the 2nd RED DISC (J).
- Go to The Forest.
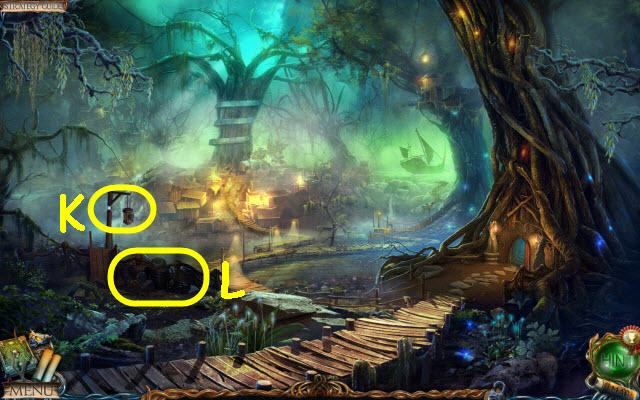
- Place the FIREFLIES in the lantern (K).
- Zoom into the debris to access a HOP (L).
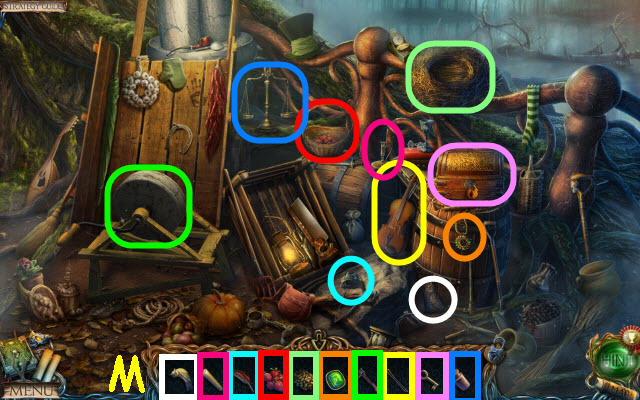
- Play the HOP.
- You receive a CLAW HAMMER (M).
- Go to The Swamp.
- Use the CLAW HAMMER on the bolts to receive an OAR (N).
- Back out.
- Use the OAR on the cage; open it. Take the EMPTY BOTTLE (O) and PAGE WITH A CONSTELLATION (P).
- Use the DAGGER and EMPTY BOTTLE to get TREE SAP (Q).
- Use the DAGGER to get MUSHROOMS (R).
- Go to Uri's Cottage.
- Examine the table (S).
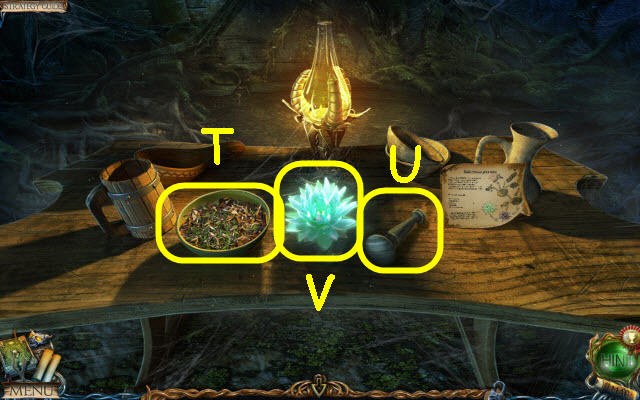
- Place the PONDWEED, BARK, FLOWER ROOT and MUSHROOMS in the bowl (T); use the pestle (U) on it.
- Place the LILY in the holder; use the bowl and TREE SAP on it. Take the ENCHANTED LILY (V).
- Go to The Swamp.
- Place the ENCHANTED LILY on the pad (W).
- Speak to the Lake Spirit (X).
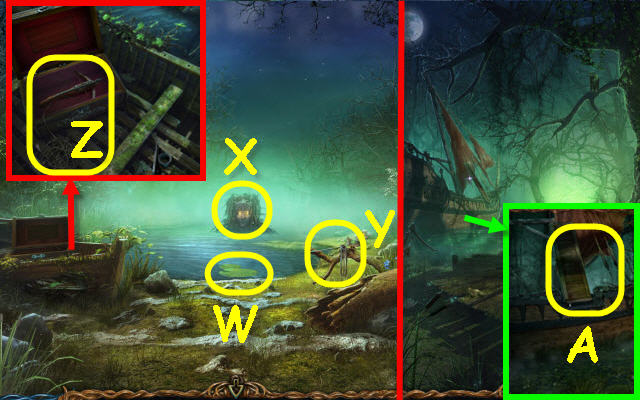
- Take the ARROW WITH ROPE (Y).
- Place the ARROW WITH ROPE on the crossbow; take the LOADED CROSSBOW (Z).
- Back out.
- Use the LOADED CROSSBOW on the gangplank (A).
- Enter the ship.
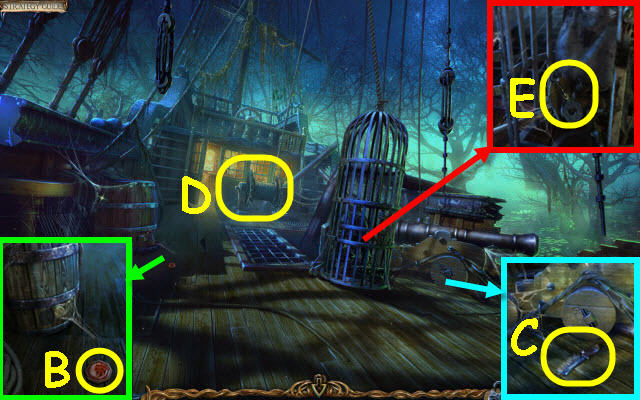
- Take the RED OCTAGON (B) and BRUSH (C).
- Use the OIL on the winch; select it (D).
- Use the DAGGER on the rope and open the door; take the MECHANISM PART (E).
- Go forward.
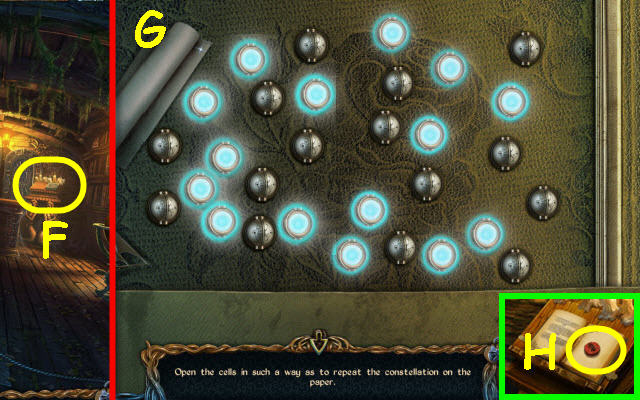
- Open the book; place the PAGE WITH A CONSTELLATION on it to trigger a puzzle (F).
- Open the correct cells.
- Solution (G).
- Take the 3rd RED DISC (H).
- Go to Outside the Tree.
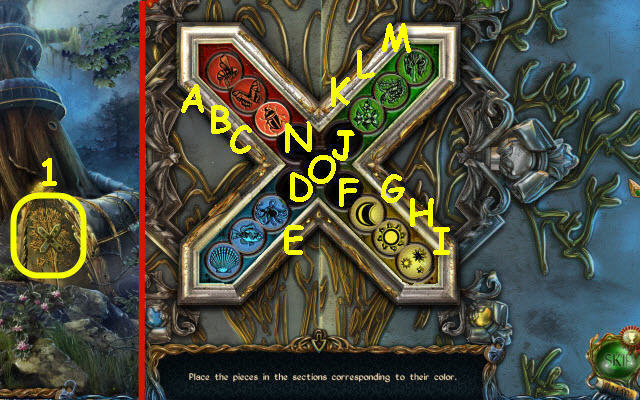
- Place the 3 RED DISCS on the door to trigger a puzzle (1).
- Move the pieces to their matching slots.
- Solution: C-J, B-F, A-D, F-A, D-N, E-F, N-E, J-D, K-B, L-C, M-N, D-M, F-L, G-K, H-J, I-D, N-I, J-H, C-J, B-G, J-B and D-C.
- Enter the passage.
- Read the note; take the STICK (I).
- Back out.
- Use the STICK on the rock; note the clue (J).
- Go to Outside the Ship.
- Use the BRUSH on the moss; note the 2nd clue (K).
- Go to The Captain's Cabin.
- Remove the cloth; get the 3rd clue (L).
- Take the PURPLE OCTAGON (M).
- Select the lock and place the MECHANISM PART on it to trigger a puzzle (N).
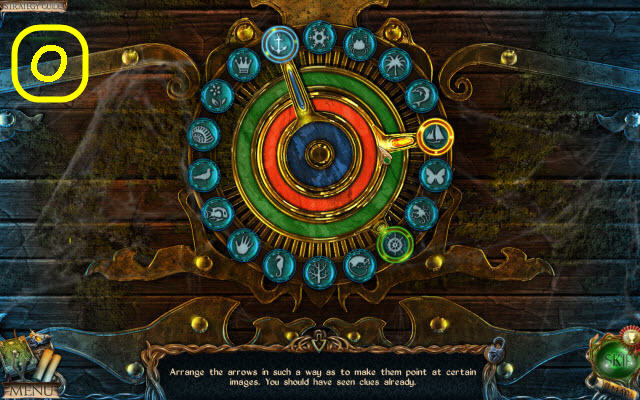
- Use the clues in your journal to set the arrows.
- Solution (O).
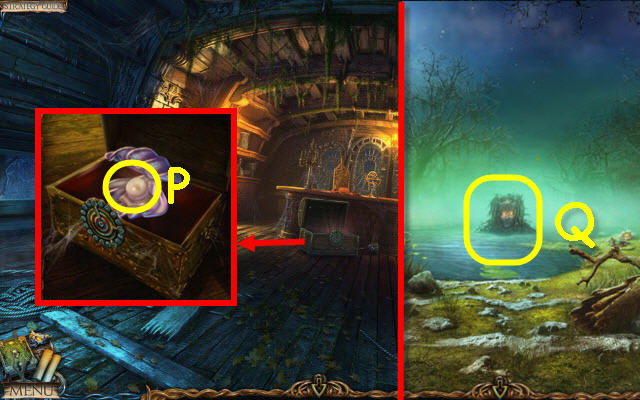
- Open the shell; take the PEARL (P).
- Go to The Swamp.
- Give the PEARL to the Lake Spirit (Q).
- Go forward.
Chapter 4: Dwarven Caves
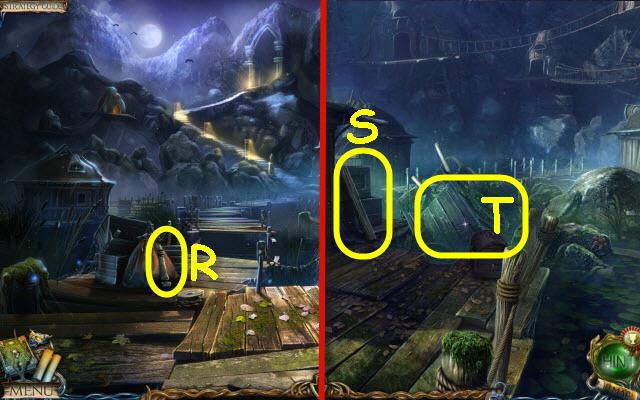
- Take the STOOL LEG (R).
- Go to Outside the Cottage on the Water.
- Take the LONG PLANK (S).
- Zoom into the cart to access a HOP (T).
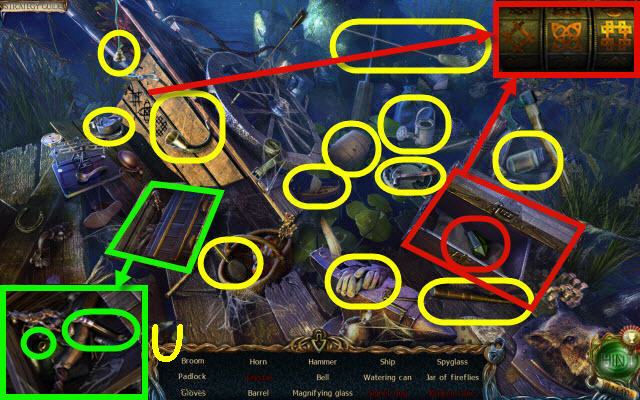
- Play the HOP.
- You receive a CRYSTAL (U).
- Back out.
- Place the LONG PLANK on the gap (V).
- Go up the stairs.
- Speak to Uri (W).
- Use the OWL to get the 1st SAPPHIRE (X).
- Take the TEDDY BEAR (Y) and 1st EMERALD (Z).
- Take the TONGS (A) and BREADCRUMBS (B).
- Back out.
- Use the BREADCRUMBS and BUTTERFLY NET in the water to receive a FISH (C).
- Return to Outside the Cottage on the Water.
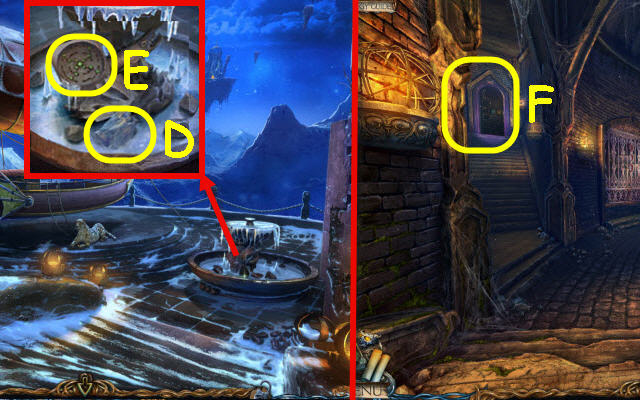
- Give the FISH to the pelican (D); take the KEY (E).
- Use the KEY in the lock (F); turn it.
- Enter the Cottage on the Water.
- Take the 2nd STOOL LEG (G).
- Use the TONGS to get the GOLD OCTAGON (H).
- Use the DAGGER on the pillow; take the MOSAIC PIECE (I).
- Take the CLOCK HAND (J) and note the clue (K).
- Place the CLOCK HAND on the clock; set it per the clue (L).
- Take the FISH FIGURINE (M).
- Place the FISH FIGURINE on the box; select it to trigger a puzzle (N).
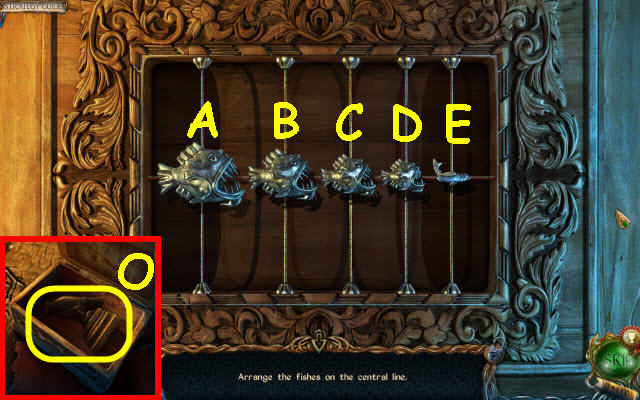
- Place all fish in the center.
- Move the following fish to the center line: A, B, C, D, E, A, C and E.
- Take the BIRD FIGURINE (O).
- Back out.
- Place the 2 STOOL LEGS on the STOOL (P); take it.
- Enter the cottage.
- Place the STOOL on the floor (Q).
- Take the PICTURE (R) and STICK (S).
- Back out.
- Place the STICK in the hook and select it 3x to receive a BOAT HOOK (T).
- Go to Uri's Cottage.

- Place the MOSAIC PIECE on the mosaic to trigger a puzzle (U).
- Swap the pieces to complete the image (V).
- Zoom into the center opening to access a HOP.
- Play the HOP.
- You receive a 2nd CRYSTAL (1-10).
- Go to The Captain's Cabin.
- Place the PICTURE on the wall to trigger a puzzle (W).
- Find the matches.
- Solution (X). Take the DEER FIGURINE.
- Go to Outside the Tree.
- Place the 2 CRYSTALS in the slots (Y).
- Pull the lever (Z).
- Enter The Library.
- Take the COIN (A).
- Use the DAGGER on the map; take the FISH FIGURINE (B).
- Go to The Top of the Tree.
- Starting on the left, place the BIRD FIGURINE, FISH FIGURINE, and DEER FIGURINE on the pedestals to trigger a puzzle.
- Rotate the sections to complete the pattern.
- Solution (C).
- Take the GATE KEY (D).
- Go to The Gates.
- Place the GATE KEY on the gate (E).
- Go forward.
Chapter 5: Underground Lift
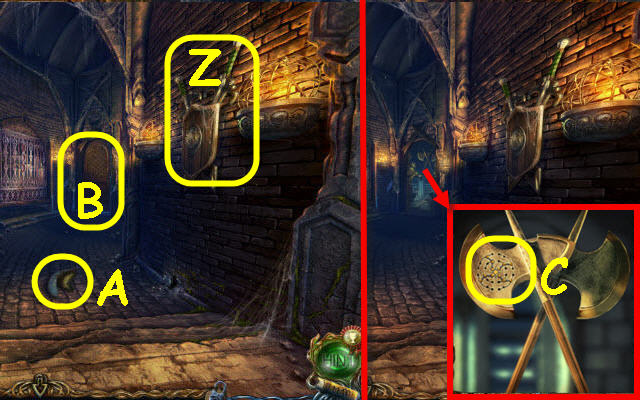
- Open the lid; take the STATUE HEAD (F).
- Select the torch 3x to receive a TORCH (G).
- Go to The Underground Descent.
- Use the BOAT HOOK on the sack (H); take the LEVER (I) and SACK (J).
- Back out.
- Place the LEVER in the slot; pull the 2 levers (K) and take the TAR (L).
- Back out.
- Place the TAR in the pot and dip the TORCH in it; receive a TORCH (M).
- Go to The Underground Descent.
- Use the TORCH on the holder (N).
- Zoom into the HOP (O).
- Play the HOP.
- You receive DYNAMITE (P).

- Take the SPADE (Q) and 2nd EMERALD (R).
- Go to The Underground Lake.
- Take the HANDLE (S).
- Go to The Demon Statue.

- Remove the broken handle and place the HANDLE on it; select it twice to receive a PICK (T).
- Use the SPADE on the rubble; select the tapestry and take the WOODEN COG (U).
- Use the DAGGER on the rope; take the 2nd SAPPHIRE (V) and read the book.
- Back out.
- Use the PICK on the wall; take the 2nd COIN (W).
- Go to The Underground Lake.
- Use the DYNAMITE and TORCH in the hole (X).
- Place the WOODEN COG on the winch (Y).
- Enter The Hanging Bridges on the right.
- Take the CORKSCREW (Z).
- Go to The Ship.
- Use the CORKSCREW on the cork; take the TORN PAGE (A).
- Use the SACK on the powder; take the GUNPOWDER (B).
- Go forward.
- Place the TORN PAGE on the book to trigger a puzzle (C).
- Assemble the pages.
- Solution (D).
- Go to The Hanging Bridges.
- Place a COIN in each base (E-F).
- Arrange the statues per the clues in your journal.
- See screenshots for solution (G-H).
- Remove the cover; take the 2nd STATUE HEAD (I).
- Move the items to find the KEY (J).
- Zoom into the alcove to access a HOP (K).
- Play the HOP.
- You receive a 3rd SAPPHIRE (L).
- Go to At the Lift.
- Take the BROOM (M), 3rd EMERALD (N) and STONE HORN (O).
- Use the KEY on the padlock; remove it and enter (P).
- Use the BROOM on the cobwebs; take the DIAGRAM (Q).
- Go to The Underground Lake.
- Place the STONE HORN on the helmet; take the 4th SAPPHIRE (R).
- Go forward (S).
- Take the 4th EMERALD (T).
- Place the 4 SAPPHIRES in the slots (U).
- Place the 4 EMERALDS in the slots to trigger a puzzle (V).
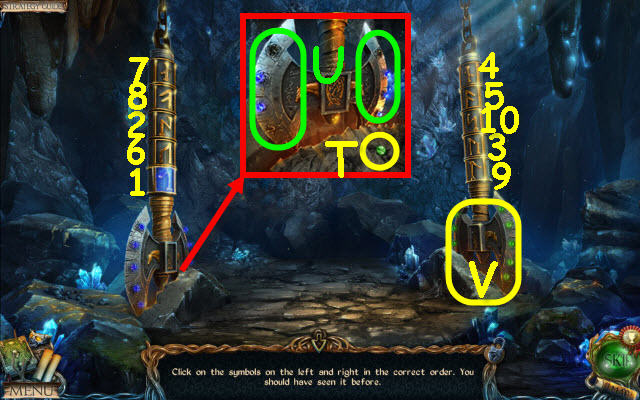
- Select the runes in order: 1-10.
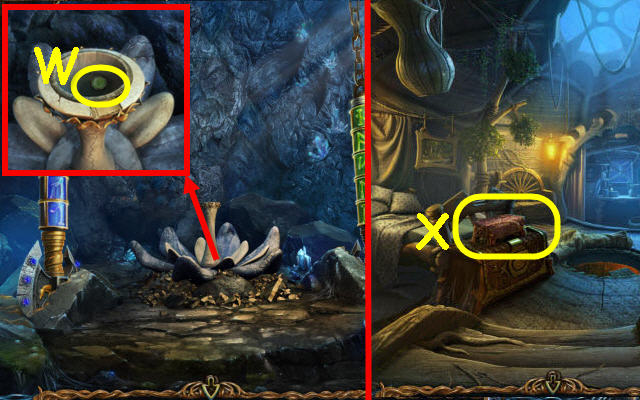
- Read the note; take the GREEN OCTAGON (W).
- Go to Uri's Cottage.
- Remove the cloth; place the RED OCTAGON, PURPLE OCTAGON, GOLD OCTAGON and GREEN OCTAGON in the slots to trigger a puzzle (X).
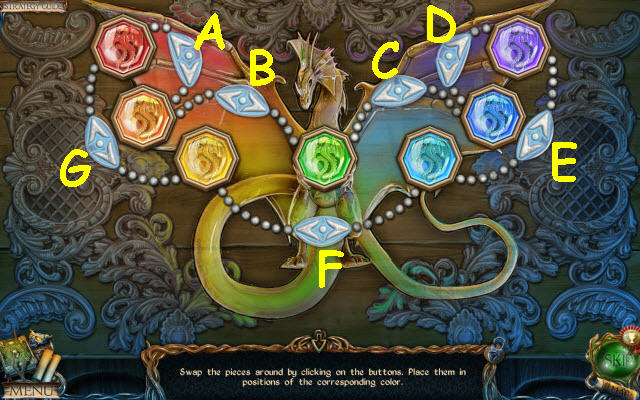
- Place the octagons in their matching slots.
- Solution: B, A, G, A, G, F, D, E, D, C and E.
- Take the SOLVENT and CONTINENT FIGURE.
- Go to The Captain's Cabin.
- Place the CONTINENT FIGURE on the globe; take the CROSS-SHAPED KEY (Y).
- Go to The Library.
- Use the SOLVENT on the stain; select the diagram to get a clue (Z).
- Go to The Bank at the Cliffs.
- Use the CROSS-SHAPED KEY on the lock; take the MAGNET (A).
- Go to The Cottage on the Water.
- Use the MAGNET to retrieve the STAR MEDALLION (B).
- Go to At the Lift.
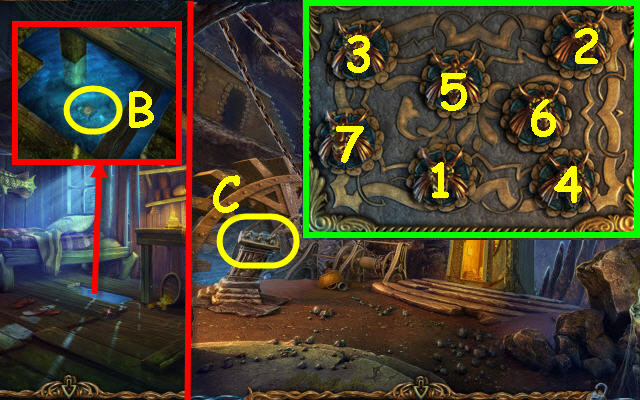
- Examine the pedestal to trigger a puzzle (C).
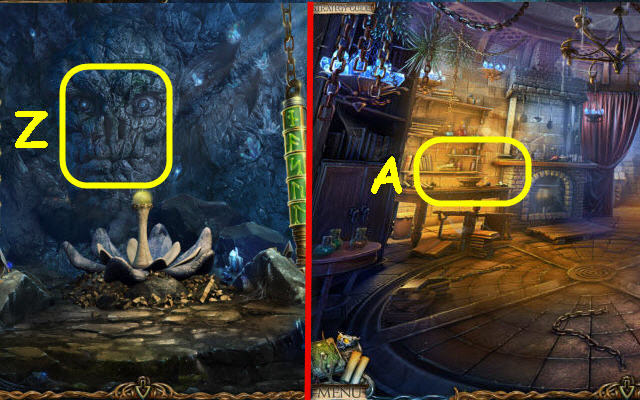
- Select the heads in order: 1-7.
- Go to The Library.
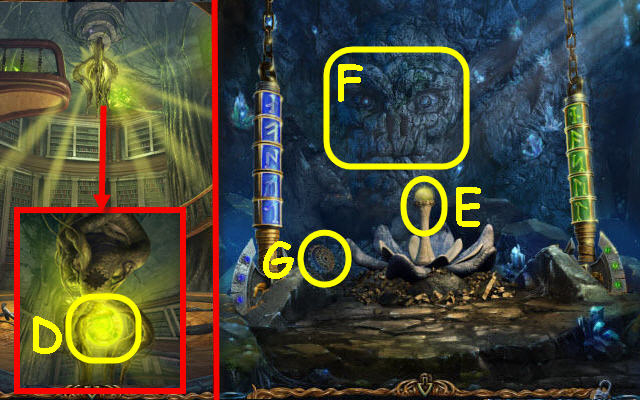
- Place the STAR MEDALLION in the slot; receive an ORB (D).
- Go to The Underground Lake Shore.
- Place the ORB on the pedestal (E).
- Speak to the Spirit (F).
- Take the COG (G).
- Go to The Lift.
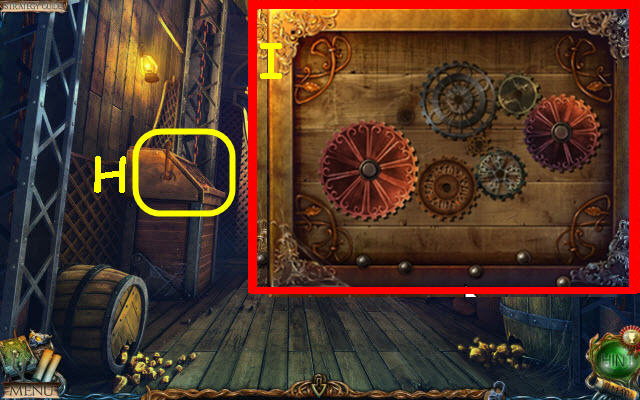
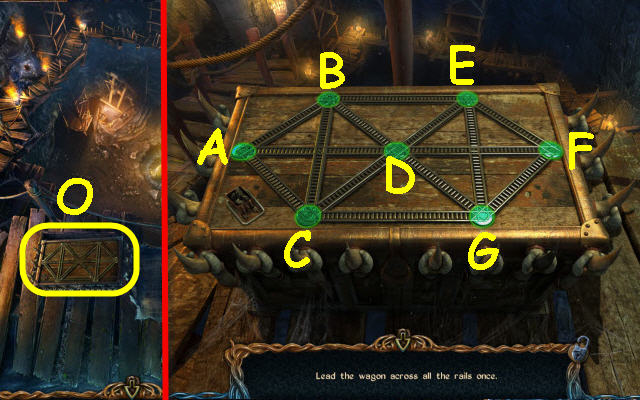
- Place the COG on the panel to trigger a puzzle (H).
- Connect all the cogs (I).
- Select the door; go forward.
Chapter 6: Dark Lord's Castle
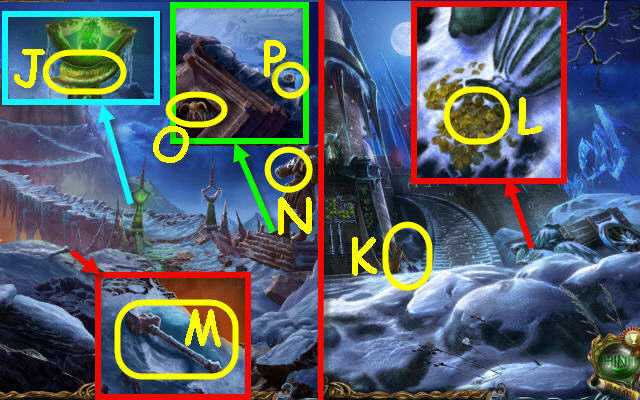
- Take the 1st BAS-RELIEF PIECE (J).
- Go forward.
- Take the SHOVEL (K) and COINS (L).
- Back out.
- Use the SHOVEL on the snow; take the HAMMER (M).
- Place the HAMMER in the statue's hands (N).
- Take the 3rd STATUE HEAD (O).
- Send the OWL to retrieve the VALVE (P).
- Go forward.
- Open the tent and zoom in to access a HOP.
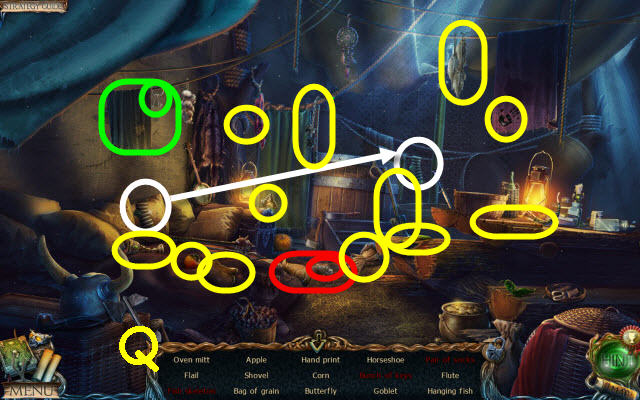
- Play the HOP.
- You receive an OVEN MITT (Q).
- Go to The Caves.
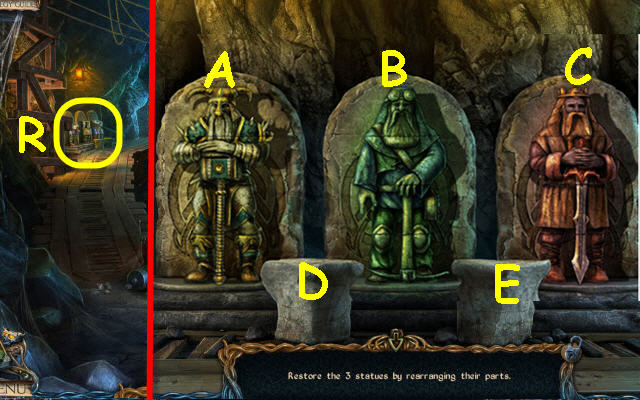
- Place the 3 STATUE HEADS on the statues to trigger a puzzle (R).
- Restore the statues.
- Solution: B-Dx3, A-Ex2, A-B, D-E, D-A, C-D, C-A, C-B, D-B, E-Cx2, D-C, and E-A.
- Take the MOSAIC PIECES.
- Go to The Demon Statue.
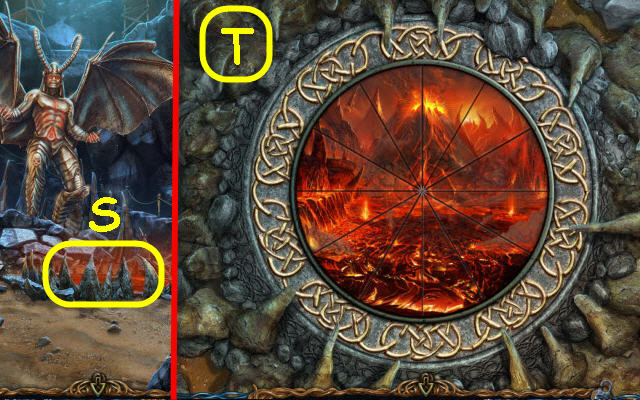
- Place the MOSAIC PIECES on the mosaic to trigger a puzzle (S).
- Swap any two pieces to complete the image (T).
- Read the note; take the BUTTONS.
- Go to Outside the Castle.
- Place the DIAGRAM and BUTTONS on the door to trigger a puzzle (U).
- Solution: A, Bx2, Cx3, D, E, F, G, Hx2, F, I and Jx2.
- Go forward.
- Select anywhere; receive a KEY.
- Use the OWL to retrieve the 2nd BAS-RELIEF PIECE (V).
- Use the OVEN MITT to get the SWORD (W).
- Take the FIRE SYMBOL (X).
- Open the curtain and enter The Corridors (Y).
- Push in both swords (Z); take the 3rd BAS-RELIEF PIECE (A).
- Use the KEY in the lock (B).
- Select the symbol for a clue (C).
- Go to Exit to the Dirigible.
- Use the SWORD on the ice; take the OBJECT IN ICE (D) and select the clue (E).
- Go to The Corridors.
- Examine the door to trigger a puzzle (F).
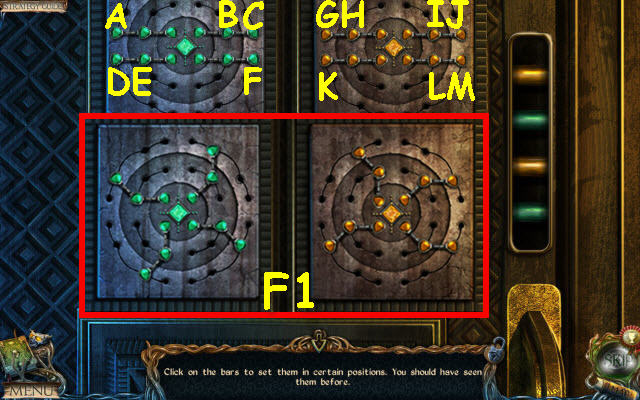
- Duplicate the position as noted in your journal.
- Solution (F1): A, C, B, D, E, D, E, F, G, H, G, H, J, I, J, K, M, L and M.
- Go up the stairs.
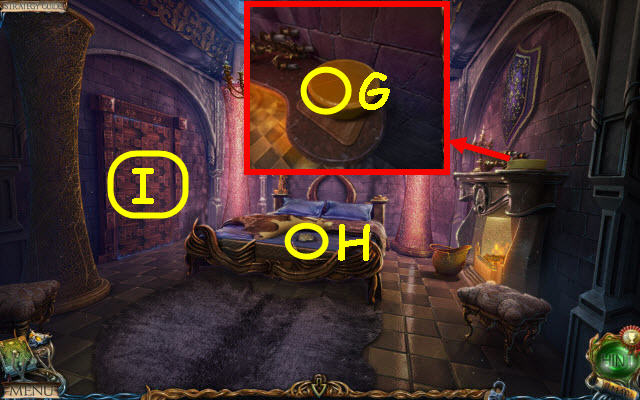
- Speak to the Alchemist.
- Use the DAGGER on the cheese; take a PIECE OF CHEESE (G).
- Move the hide; take the SYMBOL (H).
- Open the door and zoom in to access a HOP (I).
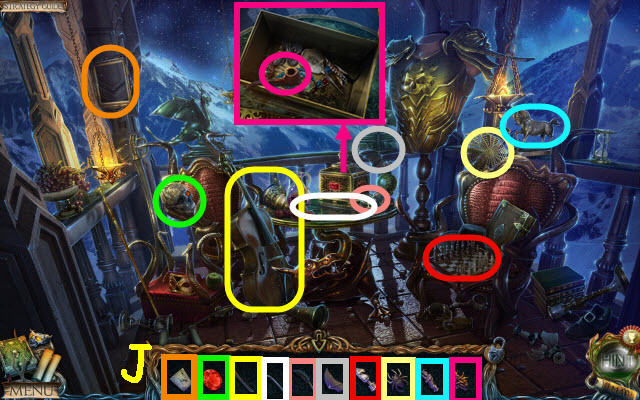
- Play the HOP.
- You receive PINCERS (J).
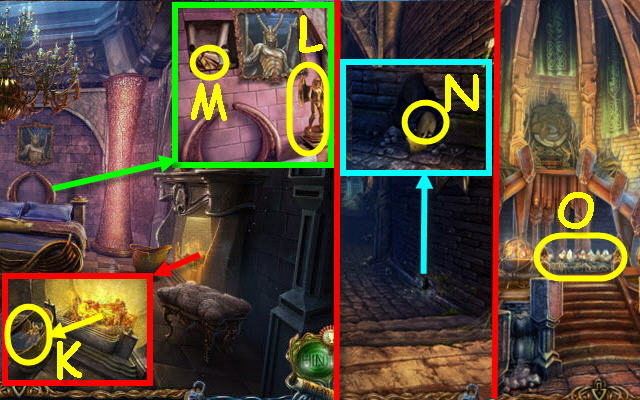
- Place the OBJECT IN ICE on the fire; use the PINCERS on it and take the STATUETTE (K).
- Place the STATUETTE on the bedpost (L); take the PIECES (M) and read the note.
- Back out.
- Place the PIECE OF CHEESE by the hole; take the RAT (N).
- Back out.
- Place the PIECES on the mosaic to trigger a puzzle (O).
- Switch the pieces to complete the image (P).
- Take the PROPELLER BLADE and 2nd SYMBOL.
- Go to The Viewing Point.
- Take the COAL (Q) and BLANK PIECE OF PAPER (R).
- Go to Exit to the Dirigible.
- Use the RAT on the leopard (S).
- Take the AIR SYMBOL (T) and 2nd VALVE (U).
- Remove the top propeller and place the PROPELLER BLADE on it (V).
- Select the airship to trigger a puzzle (W).
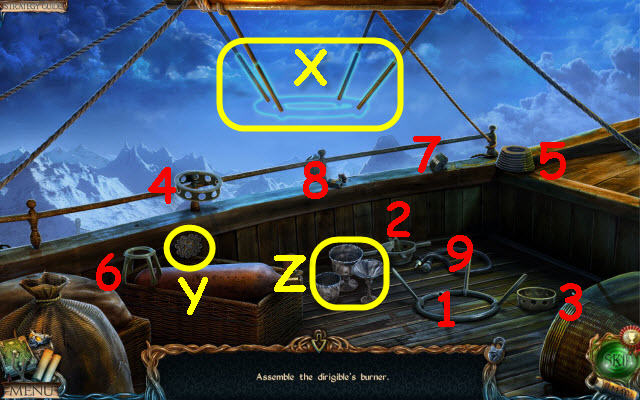
- Assemble the burner.
- Place the items on the outlines (X) as numbered (1-9).
- Take the 3rd SYMBOL (Y) and CUPS (Z).
- Go to The Corridors.

- Place the 3 SYMBOLS in their matching slots (A).
- Zoom into the alcove to trigger a puzzle (B).
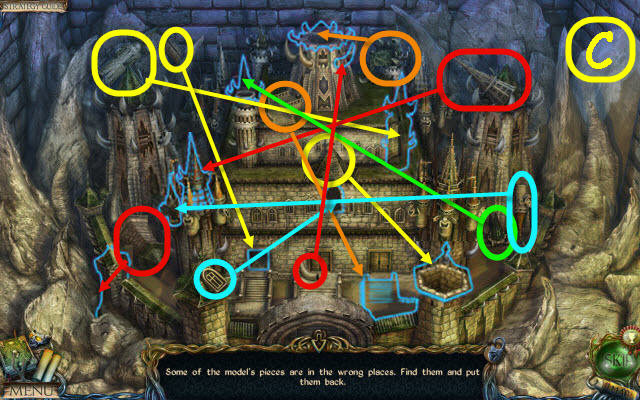
- Assemble the castle (C).
- Take the EARTH SYMBOL.
- Go to The Lift.
- Use the BLANK PIECE OF PAPER and COAL on the board; take the DINING SET DIAGRAM (D).
- Go to The Captain's Cabin.
- Place the CUPS and DINING SET DIAGRAM on the shelves to trigger a puzzle (E).
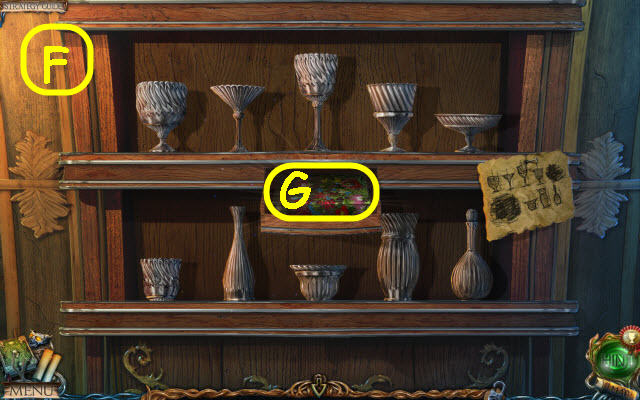
- Arrange the cups as shown (F).
- Take the BOOK (G).
- Go to The Library.
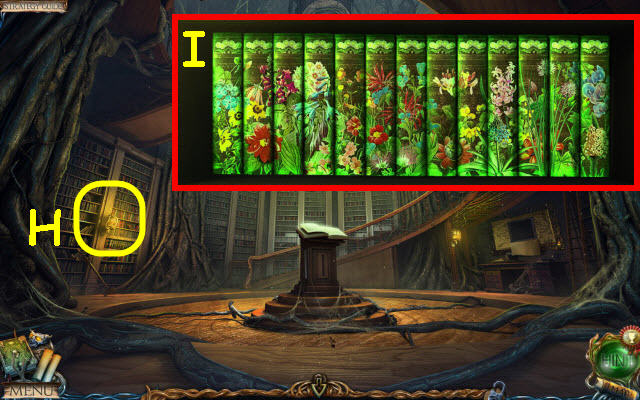
- Place the BOOK on the shelf to trigger a puzzle (H).
- Complete the image (I).
- Take the WATER SYMBOL.
- Go to The Viewing Point.
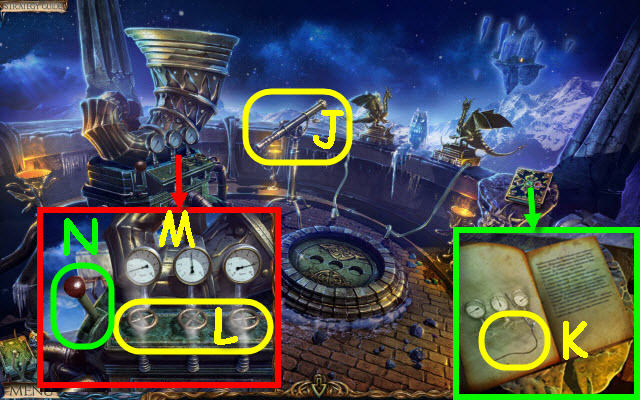
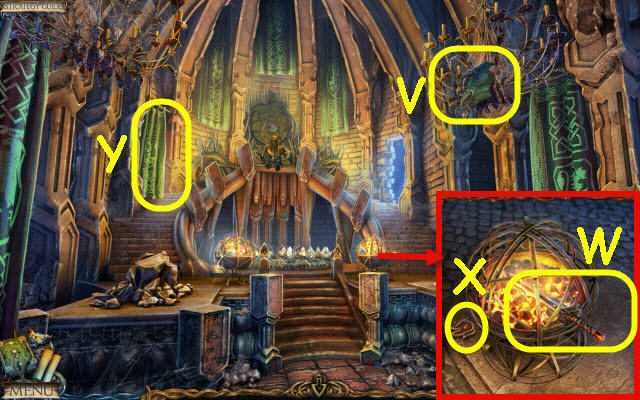
- Look through the telescope (J).
- Place the FIRE SYMBOL, AIR SYMBOL, EARTH SYMBOL and WATER SYMBOL in their matching slots; take the NEEDLE (K) and select the diagram for a clue.
- Place the 2 VALVES on the stems to trigger a puzzle; rotate to set the gauges per the clue (L).
- See gauges for solution (M); pull the lever (N).
- Go to Exit to the Dirigible.
- Use the NEEDLE on the hole (O).
- Select the airship (Q)
- Turn the Valve (P).
- Select the airship again.
Chapter 7: Alchemist's Tower
- Use the OWL to retrieve the RAMROD (R).
- Take the CANNON BALL (S) and MALLET (T).
- Use the MALLET on the WHEEL (U); take it.
- Take the RUNE (V).
- Place the GUNPOWDER, CANNON BALL and RAMROD in the cannon (W).
- Place the WHEEL on the axle (X); use the MALLET on it.
- Push the cannon twice; go forward.
- Read the note; take the 2nd RUNE (Y) and 4th BAS-RELIEF PIECE (Z).
- Go up the staircase.
- Take the 5th BAS-RELIEF PIECE (A) and 3rd RUNE (B).
- Go to The Viewing Point.
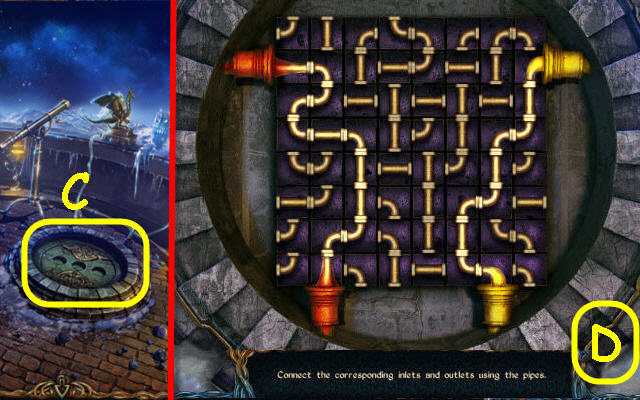
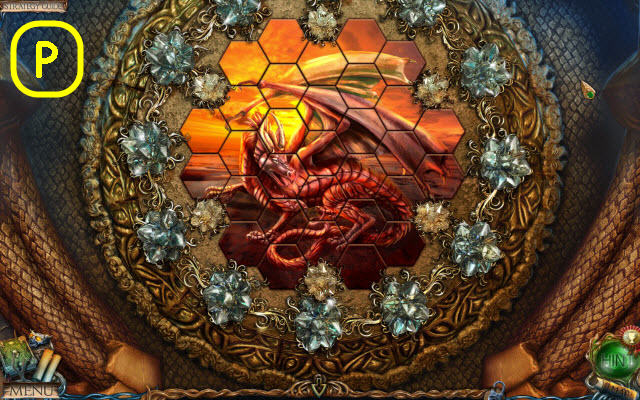
- Place the 3 RUNES in their matching slots and zoom in to trigger a puzzle (C).
- Connect the pipes as shown (D).
- Turn the dragon heads to face the owl; take the GLASS OWL (E).
- Go to The Path to the Castle.
- Place the GLASS OWL on the pillar; select the runes (F).
- Select the runes to get a clue (G).
- Go to The Tower Hall.
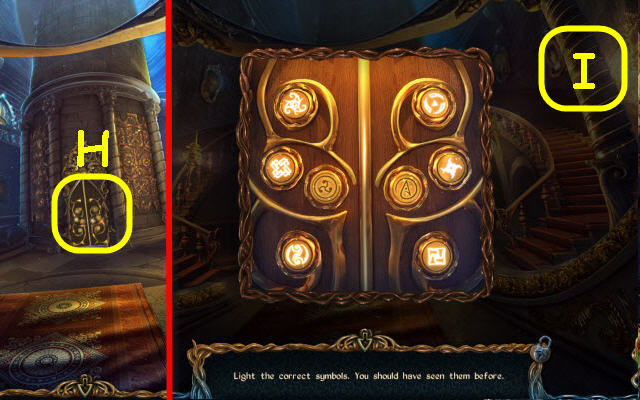
- Examine the door to trigger a puzzle (H).
- Select the correct runes (I).
- Go forward.
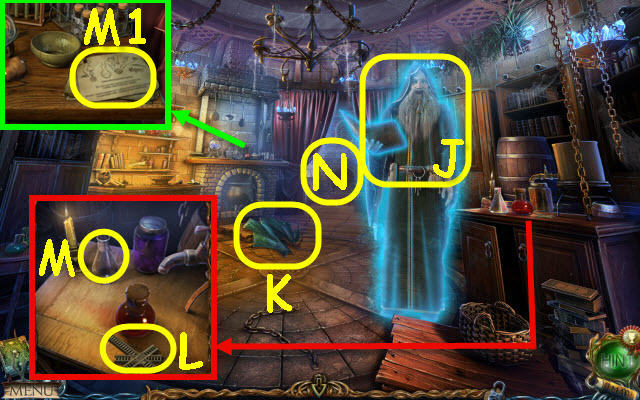
- Speak to the Alchemist (J).
- Take the 6th BAS-RELIEF PIECE (K).
- Take the RAILS (L) and FLASK (M).
- Read the recipe (M1).
- Zoom into the alcove to access a HOP (N).
- Play the HOP.
- You receive the DRIED NIGHTSHADE BERRIES (1-8).
- Go to The Underground Descent.
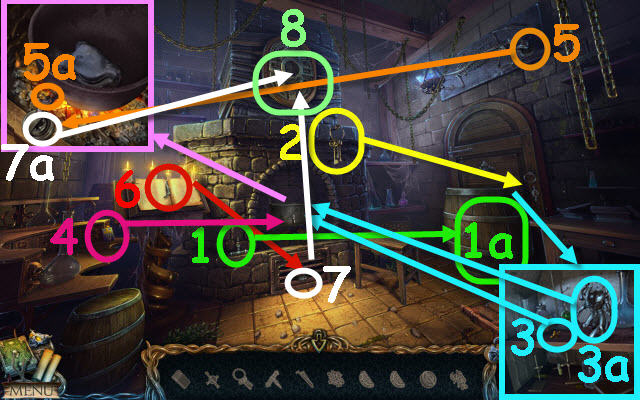
- Remove the cover; place the RAILS on the chest to trigger a puzzle (O).
- Solution: A, B, C, A, D, G, C, D, E, B, D, F, G, E and F.
- Take the 7th BAS-RELIEF PIECE and CIRCLE SEGMENT.
- Go to The Tower Hall.
- Place the CIRCLE SEGMENT on the lock to trigger a puzzle (P).
- Line up all matching pieces (Q).
- Enter The Greenhouse.
- Use the OWL to retrieve the SUN FIGURINE (R).
- Go to The Observatory.
- Place the SUN FIGURINE in the center; take the TABLET PIECE (S).
- Go to The Dwarf's Room.
- Place the TABLET PIECE on the tablet to trigger a puzzle (T).
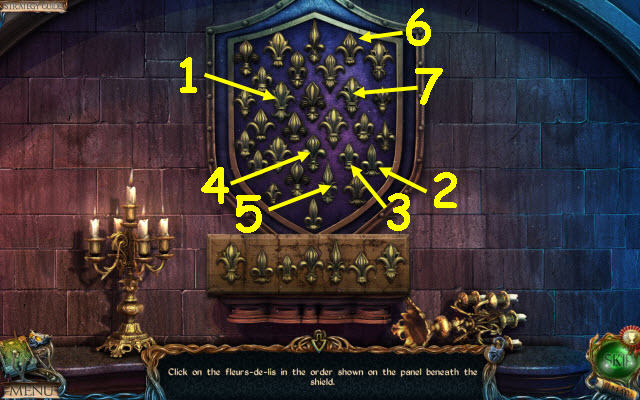
- Select the fleurs-de-lis in order 1-7.
- Take the 8th BAS-RELIEF PIECE and GLOVE.
- Go to The Greenhouse.
- Move the leaves; take the TROWEL (U).
- Use the TROWEL on the dirt; use the GLOVE to get the MANDRAKE ROOT (V).
- Take the KEY (W).
- Go to The Alchemist's Laboratory.
- Use the KEY on the lock; take the RECIPE (X), DROPPER (Y) and PYRAMID (Z).
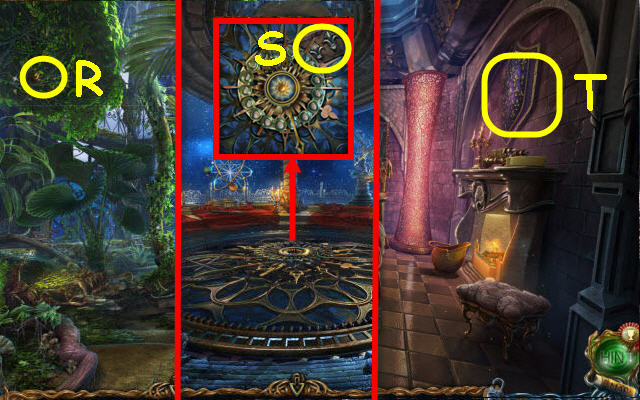
- Go to The Observatory.
- Place the PYRAMID on the pedestal to trigger a puzzle (A).
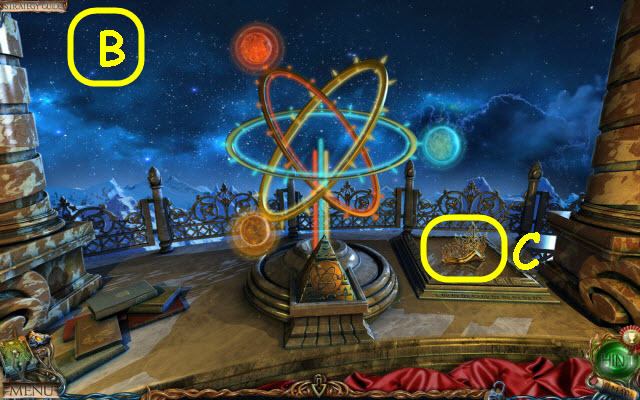
- Drag the planets to their correct location (B).
- Take the CROWN (C).
- Go to The Tower Hall.
- Place the CROWN on the statue (D).
- Enter The Indoor Patio.
- Take the LENS (E); pick the 7 ROSEBUDS circled in white.
- Use the FLASK on the water; receive a FLASK OF WATER (F).
- Move the oyster and use the DAGGER on it; take the PEARL (G) and MOSAIC PIECE (H).
- Take the 9th BAS-RELIEF PIECE (I).
- Zoom into the gazebo to access a HOP (J).
- Play the HOP.
- You receive a SCALE DISH (K).
- Go to The Greenhouse.
- Use the DROPPER in the plant; receive a PITCHER PLANT NECTAR (L).
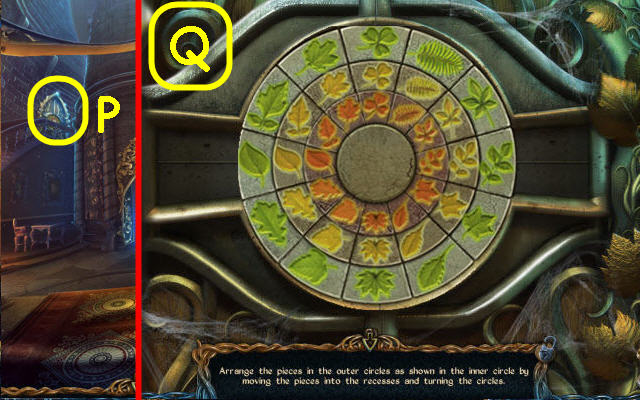
- Use the DAGGER on the vines; place the MOSAIC PIECE on the disk to trigger a puzzle (M).
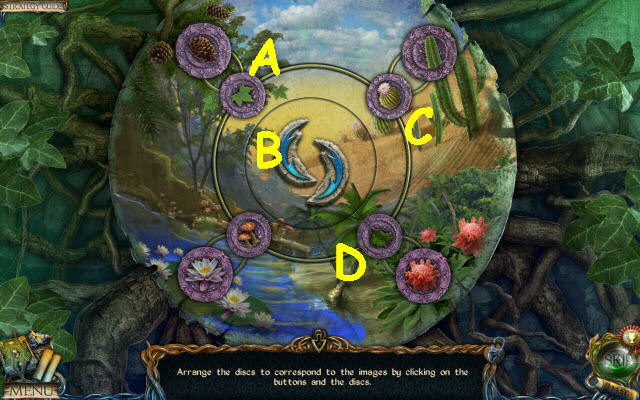
- Arrange the discs.
- Select the following: B, A, C, D and Bx3.
- Take the 10th BAS-RELIEF PIECE and FLUTE.
- Use the FLUTE on the snake; take the COPPER POWDER (N) and SNAKE SCALES (O).
- Go to The Observatory.
- Place the SCALE DISH on the scale; place the COINS on the scale (P).
- Move 4 coins from the left scale to the right; place the LENS in the top (Q).
- Use the FLASK OF WATER on the beam (R) to receive LUNAR TEARS.
- Go to The Throne Room.
- Place the 10 BAS-RELIEF PIECES on the bas-relief (in their matching slots) to receive the DRAGON'S BLOOD (S).
- Go to The Alchemist's Laboratory.
- Take the ACONITE (T).
- Zoom into the mantle (@).
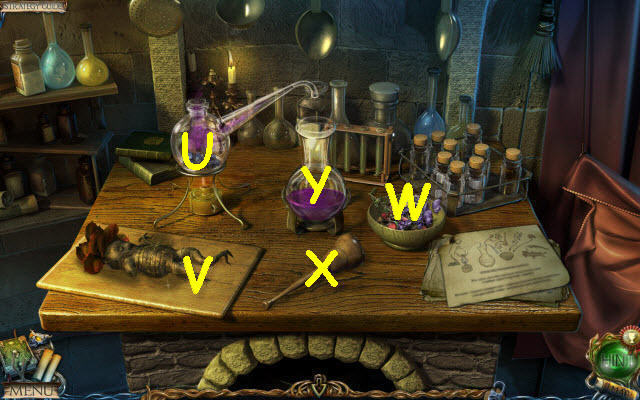
- Place the DRIED NIGHTSHADE BERRIES in the beaker (U).
- Place the MANDRAKE ROOT on the board; use the DAGGER on it and select it (V).
- Place the 7 ROSEBUDS and ACONITE in the mortar (W); select the pestle (X).
- Place the PITCHER PLANT NECTAR in the beaker (Y); select the mortar (W).
- Take the LIFE POTION (Y).
- Go to The Underground Lake Shore.
Chapter 8: Magic Potions
- Give the LIFE POTION to the Mountain Spirit (Z); receive a LIVING STONE.
- Go to The Alchemist's Laboratory.
- Zoom into the table; place the RECIPE on it (A).
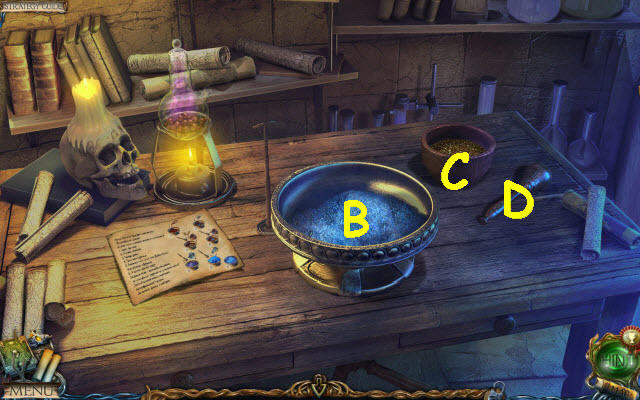
- Place the DRAGON'S BLOOD and COPPER POWDER in the bowl (B).
- Place the SNAKE SCALES in the mortar (C); use the pestle (D) on it and select it.
- Place the PEARL in the mortar (C); use the pestle on it and select it.
- Use the pestle on the bowl (B); place the LIVING STONE and LUNAR TEARS in it. Use the pestle on it; take the ANTIPHILOSOPHER'S POWDER (B).
- Go to The Demon Statue.
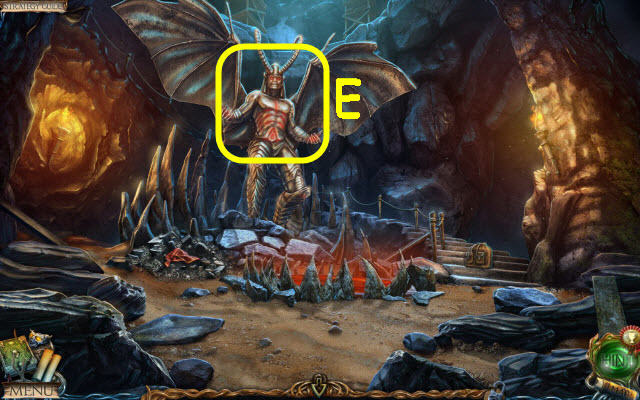
- Use the ANTIPHILOSOPHER'S POWDER on the demon (E).
- The TEDDY BEAR will be automatically used.
- Congratulations, you've completed Lost Lands: Dark Overlord.
Created at: 2014-03-23