

Walkthrough Menu
- General Tips
- Chapter 1: The Glade
- Chapter 2: The Upper Corridor
- Chapter 3: The Dwarf Temple
- Chapter 4: The Mountain Giants Village
- Chapter 5: The Werewolf's Hut
- Chapter 6: The Dead Lake
- Chapter 7: The Junction
- Chapter 8: Death's Castle
General Tips
- This is the official guide for Lost Lands: The Four Horsemen.
- Hidden-object puzzles are referred to as HOPs. This guide will not show screenshots of the HOPs, however, it will mention when an HOP is available and the inventory item you'll collect from it.
- This guide will not mention each time you have to zoom into a location; the screenshots will show each zoom scene.
Chapter 1: The Glade
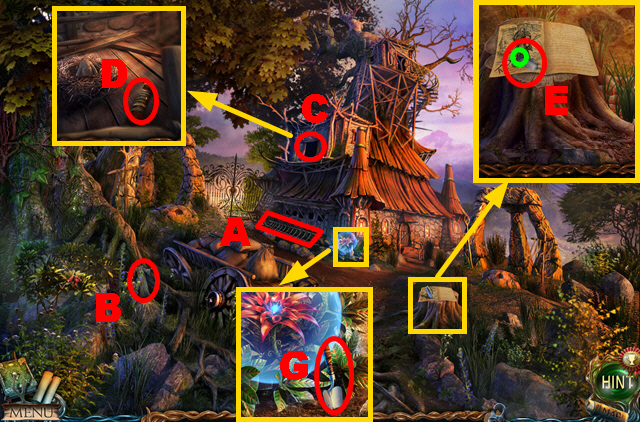
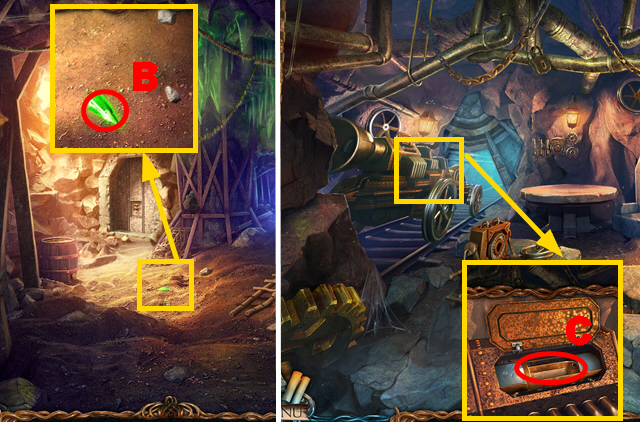
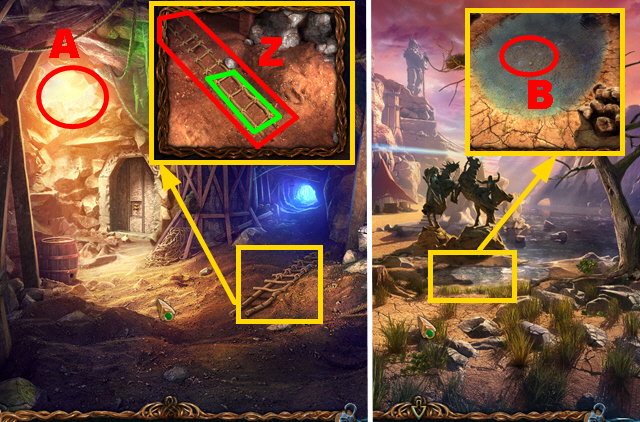
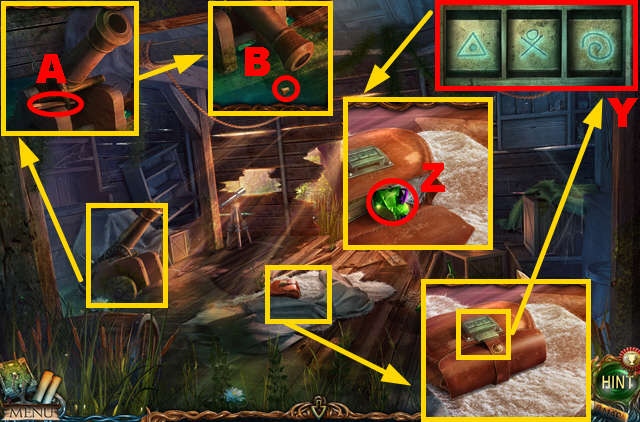
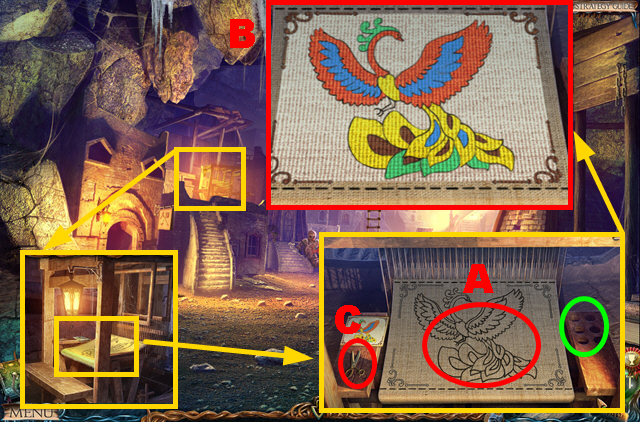
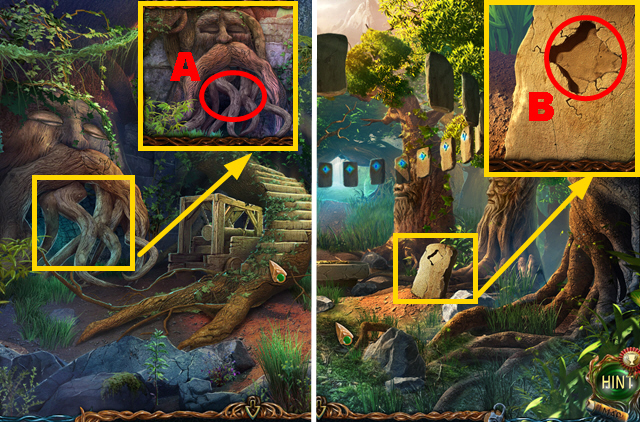
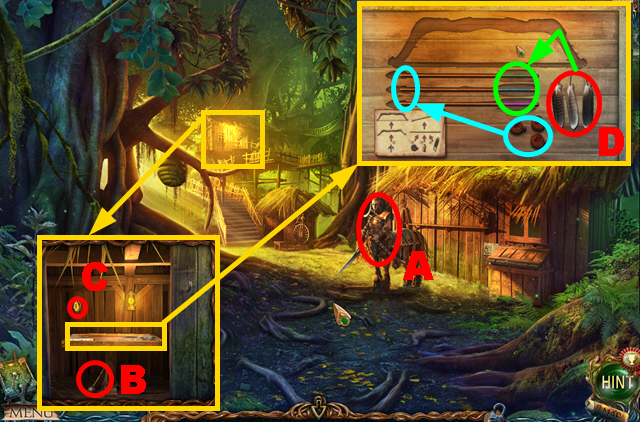
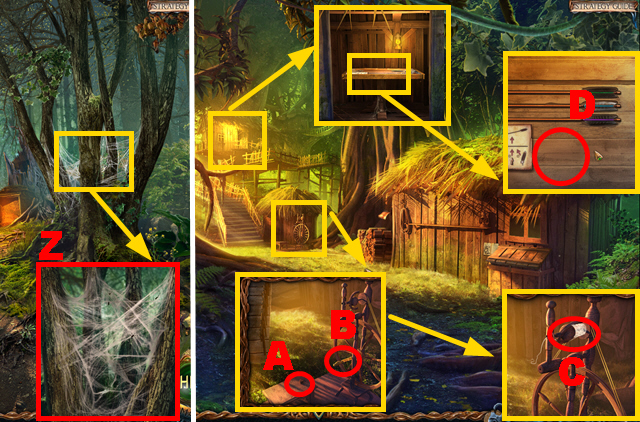
- Take the LADDER (A) and MONK FIGURINE 1/8 (B).
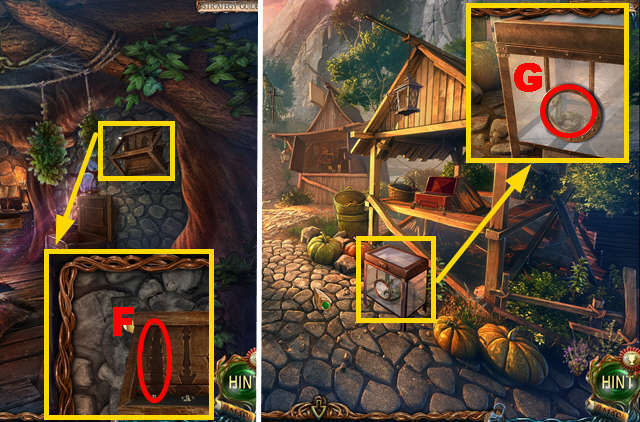
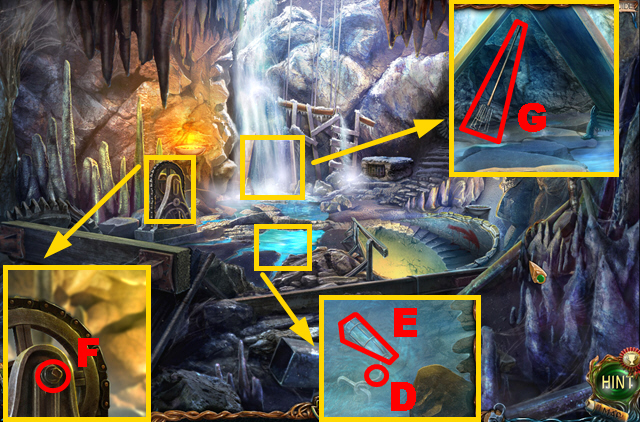
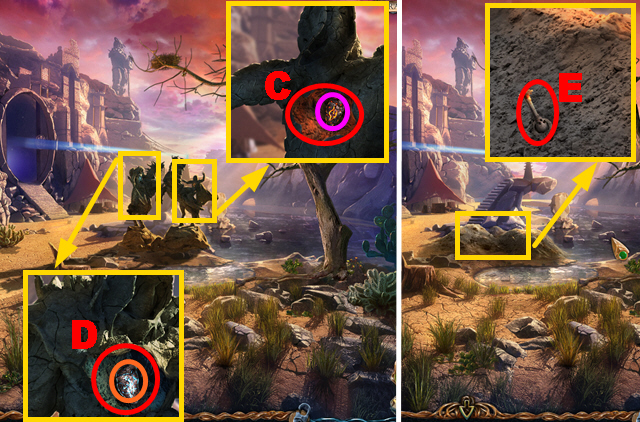
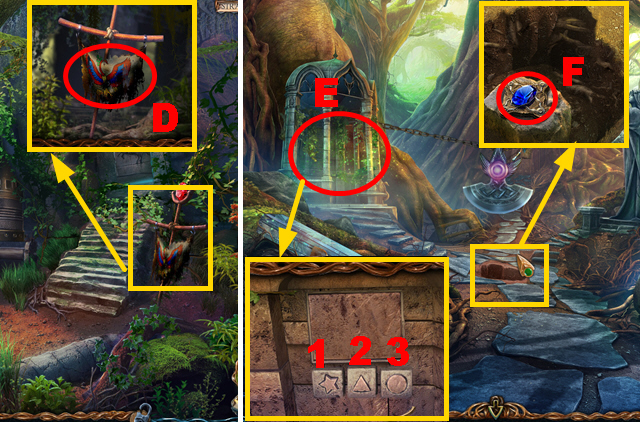
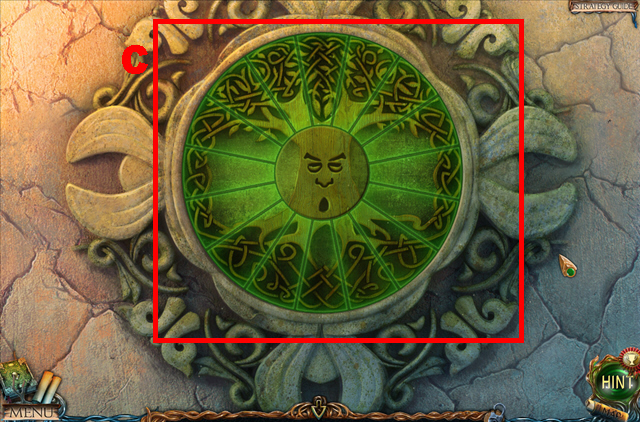
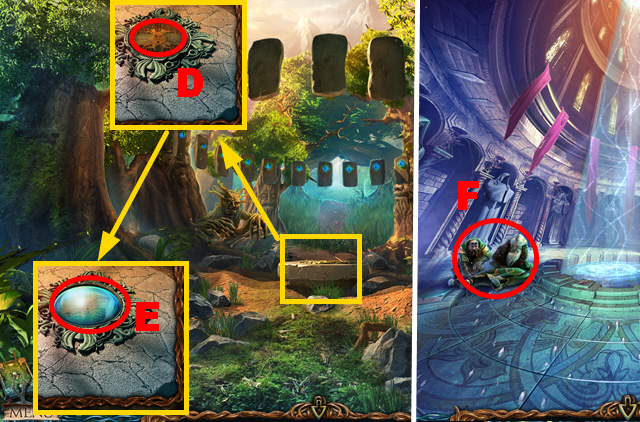
- Place the LADDER (C); take the KNIFE HANDLE (D).
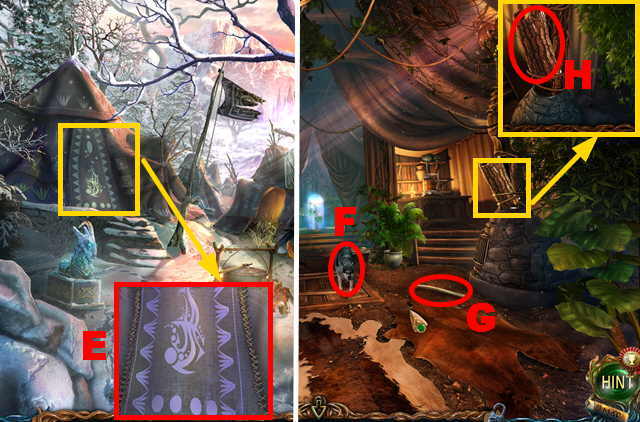
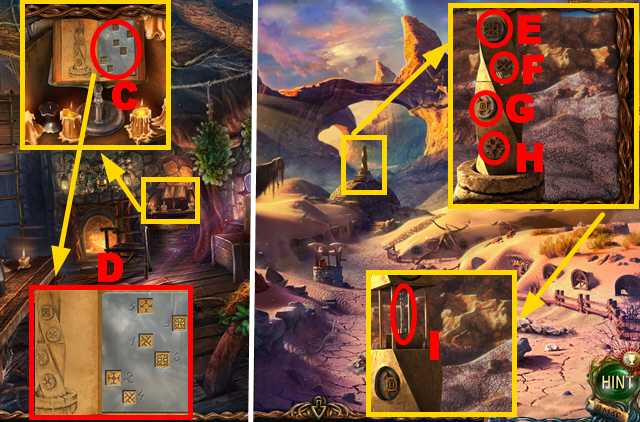
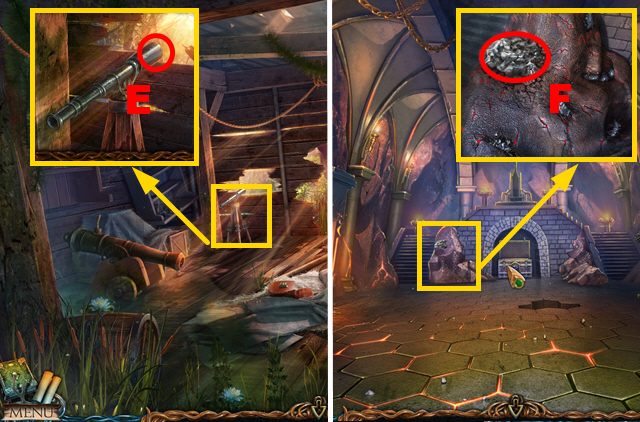
- Place the KNIFE HANDLE (green); take the KNIFE (E).
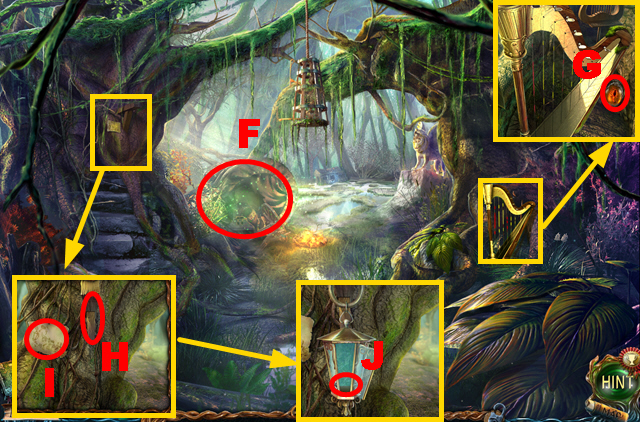
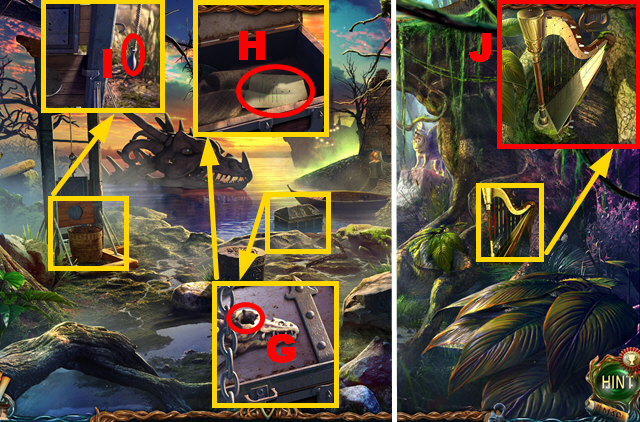
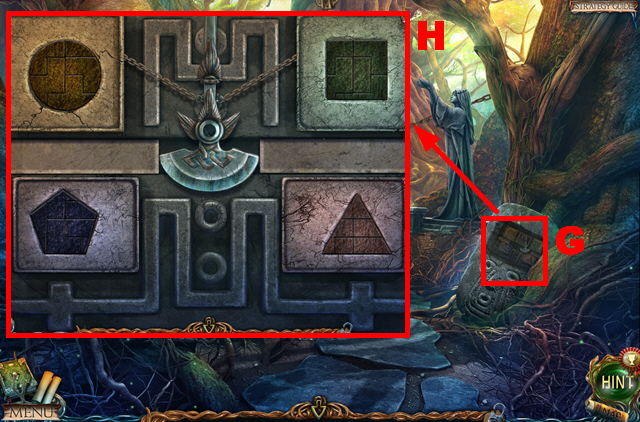
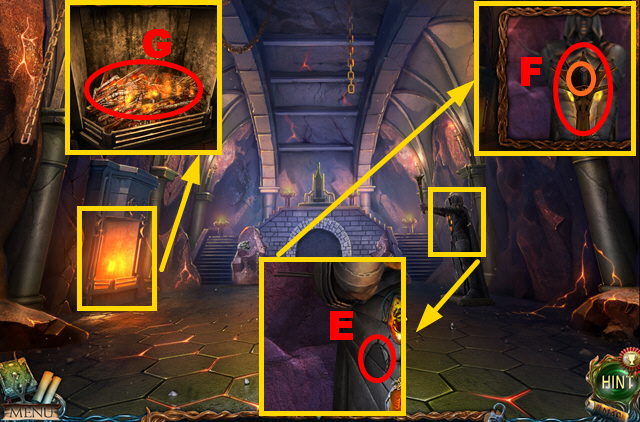
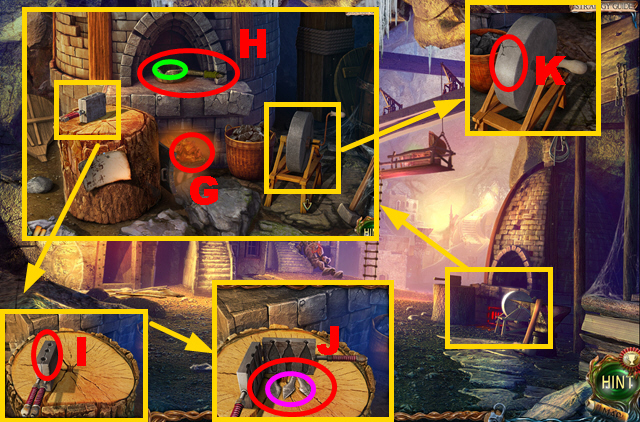
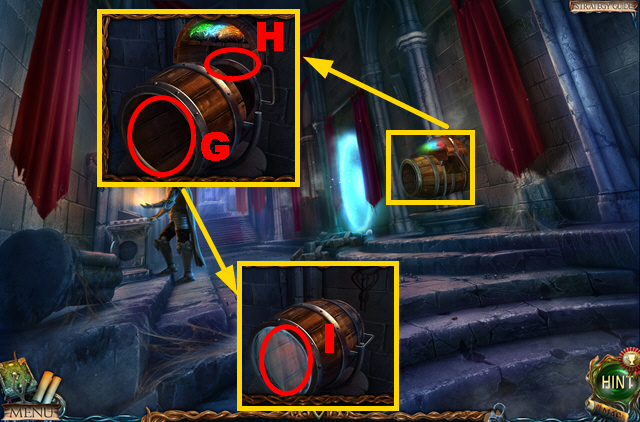
- Take the SHOVEL (G).
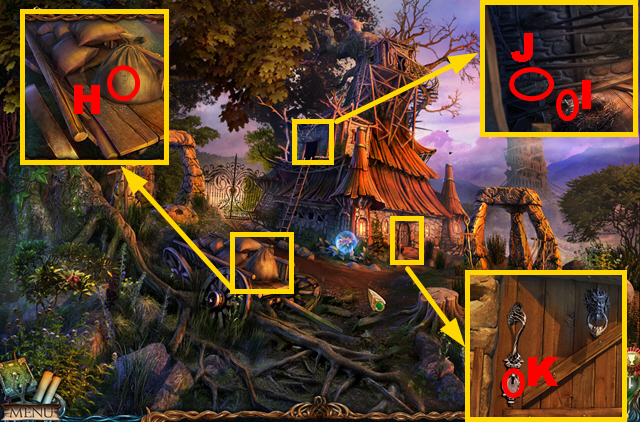
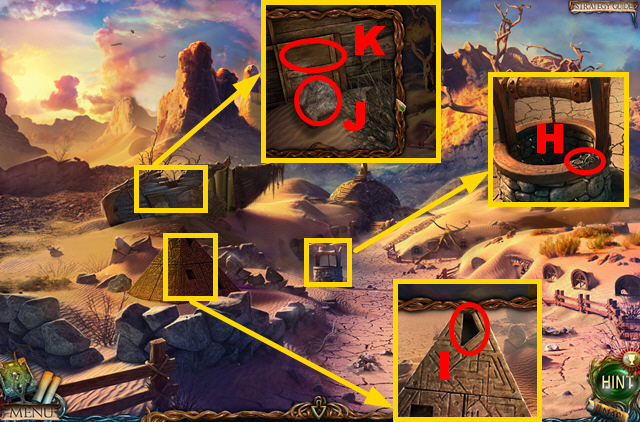
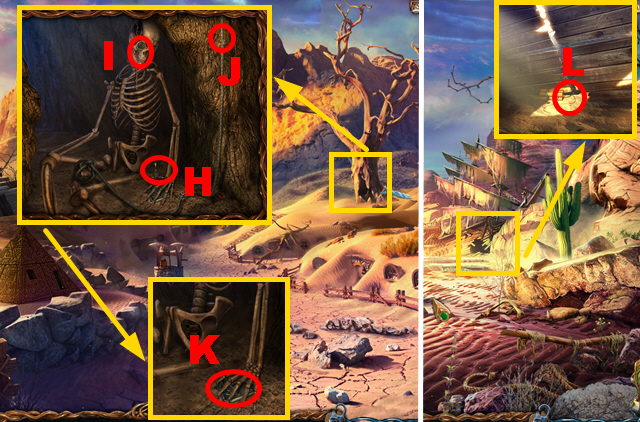
- Use the KNIFE (H).
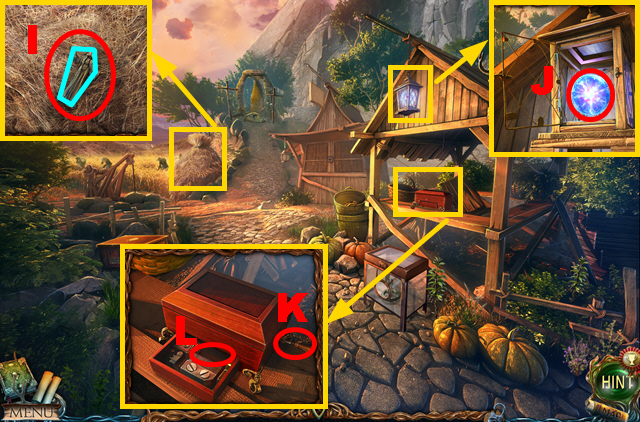
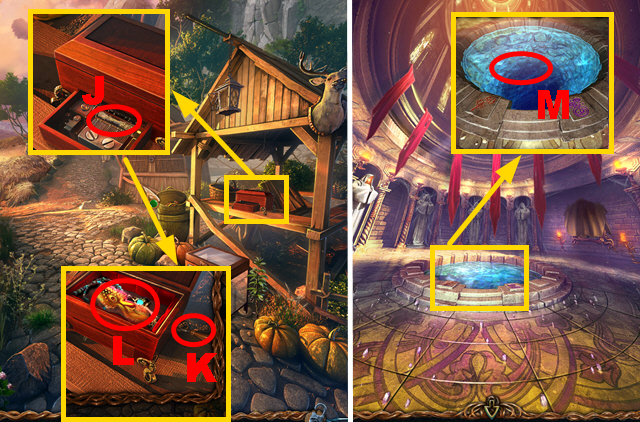
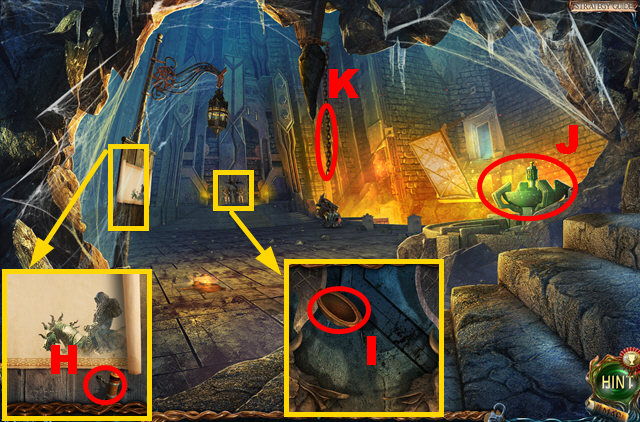
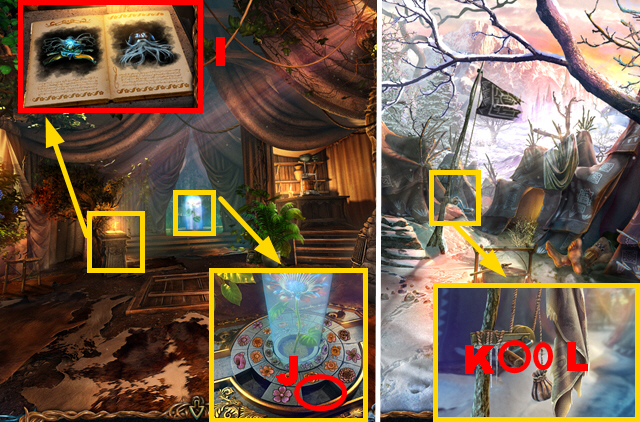
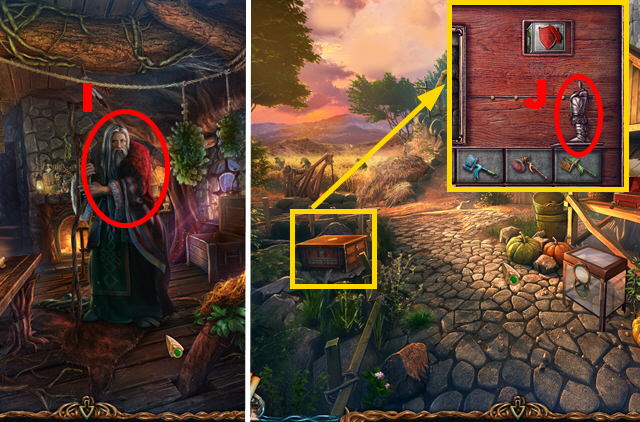
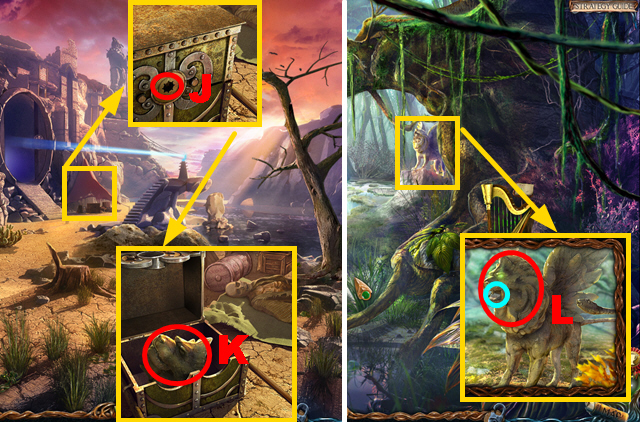
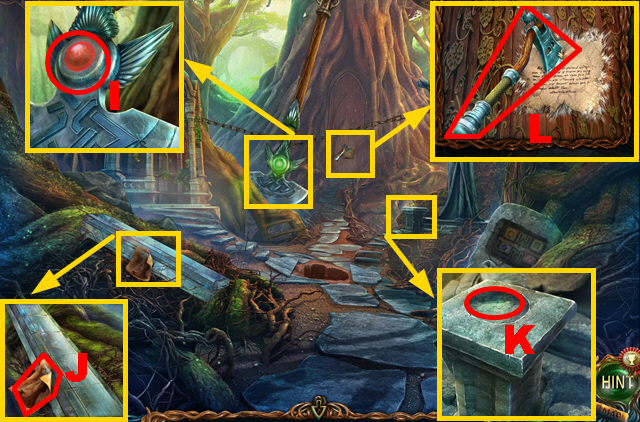
- Take the KEY (I) and MONK FIGURINE 2/8 (J).
- Place the KEY (K); turn it.
- Enter Maaron's Cottage.
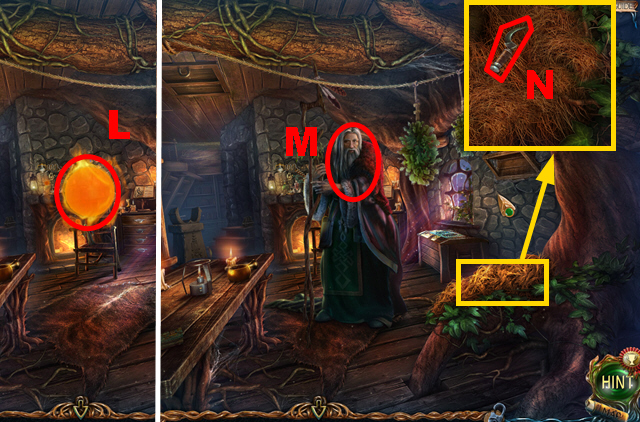
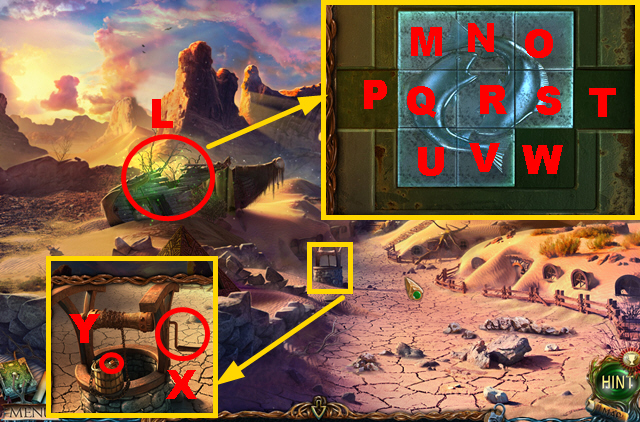
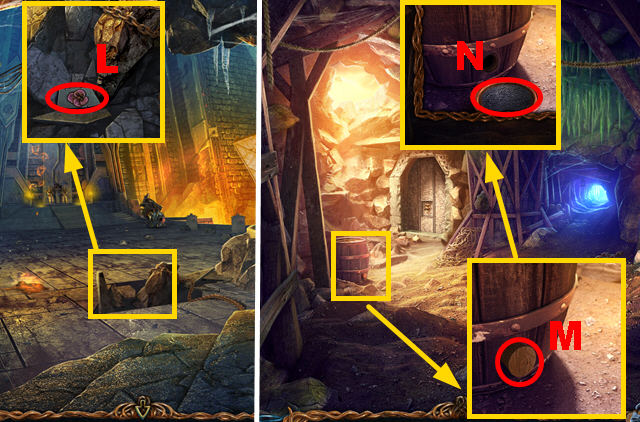
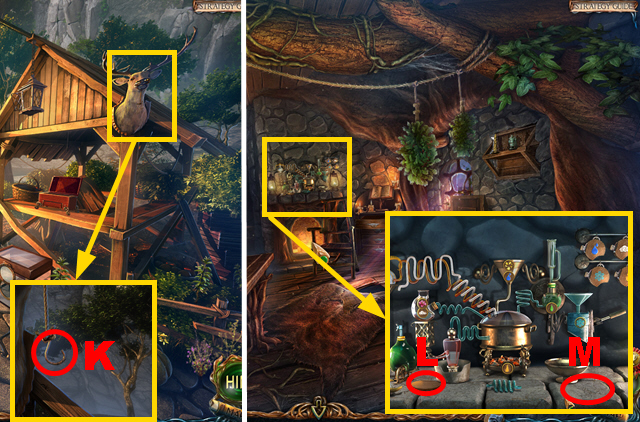
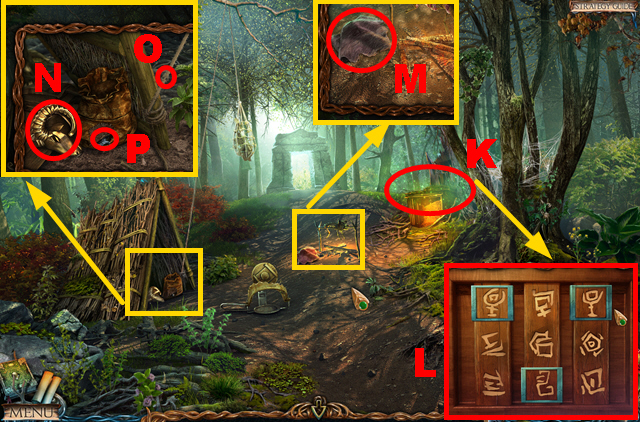
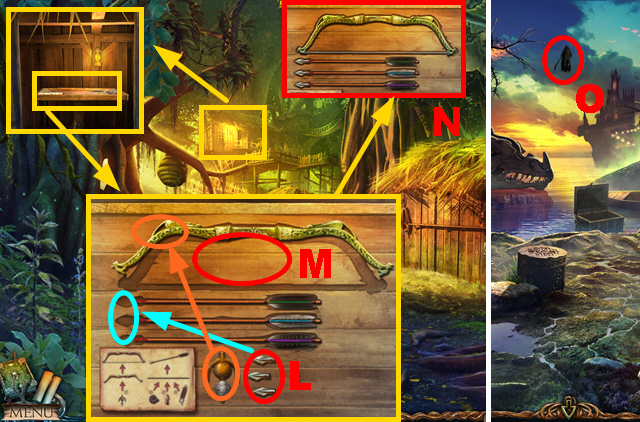
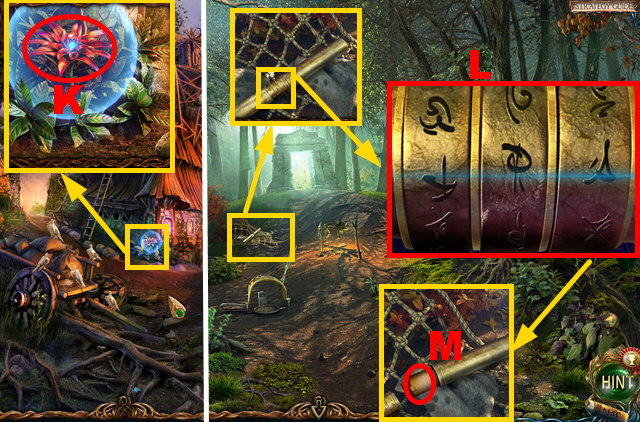
- Grab the sphere (L).
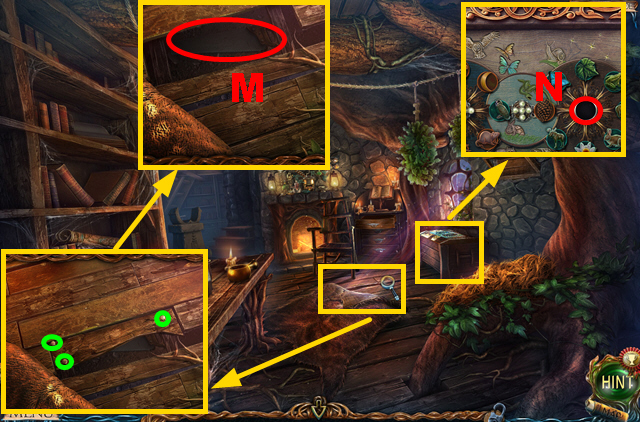
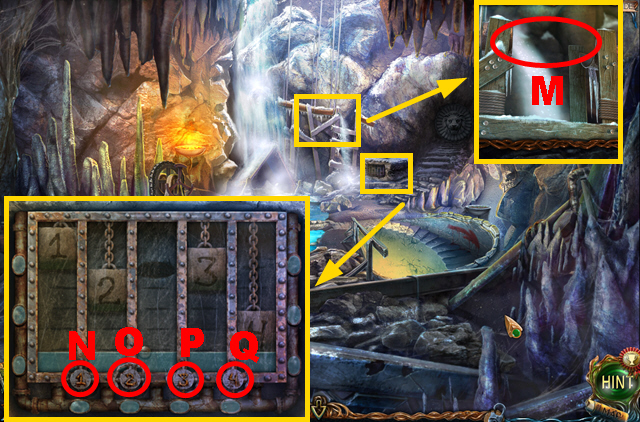
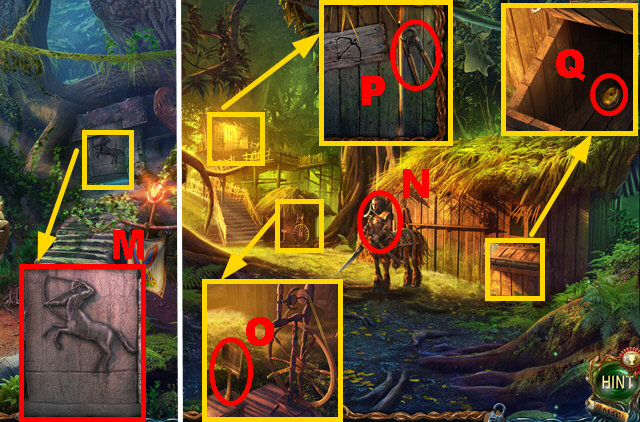
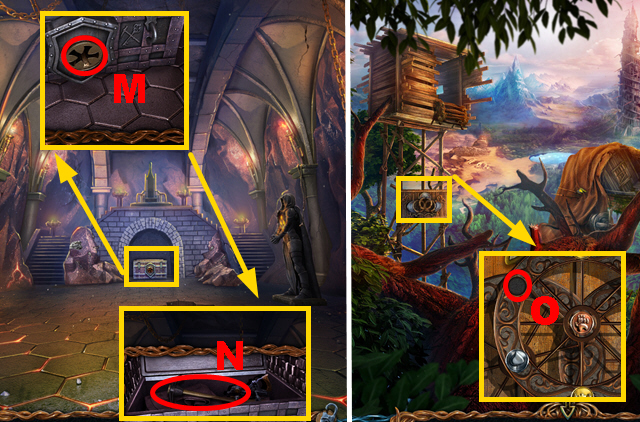
- Talk to the man (M); you acquire the RUNE.
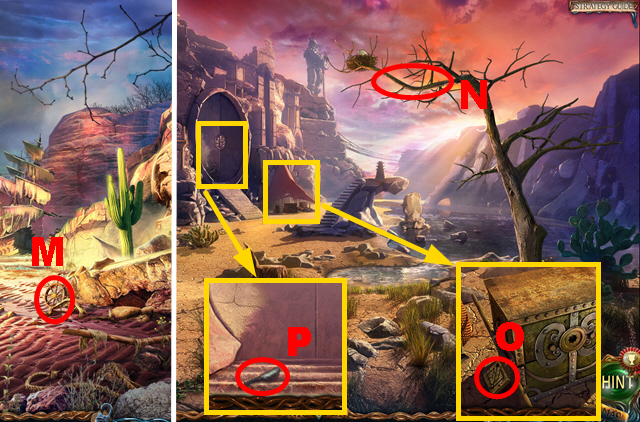
- Remove hay twice; take the SICKLE (N).
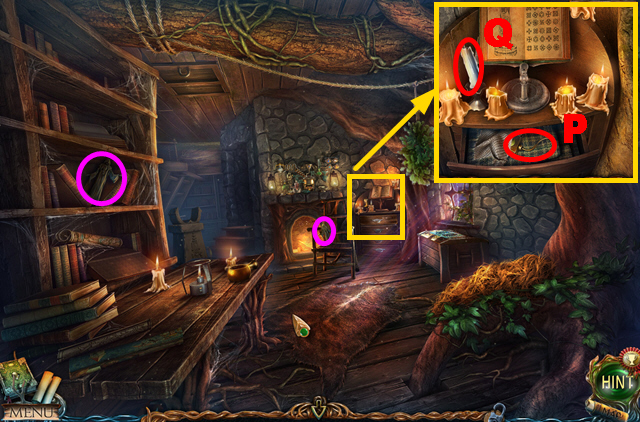
- Take 2 MONK FIGURINES (purple).
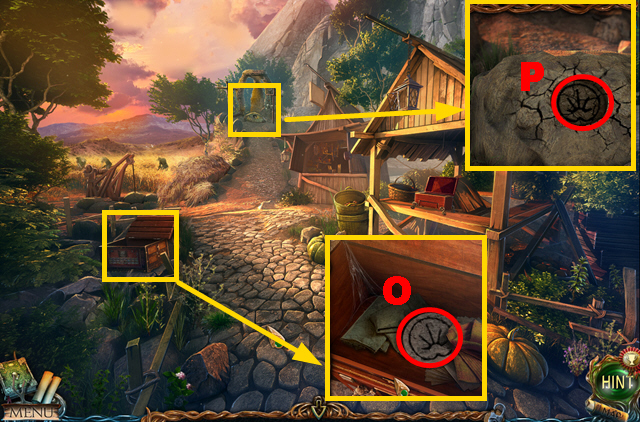
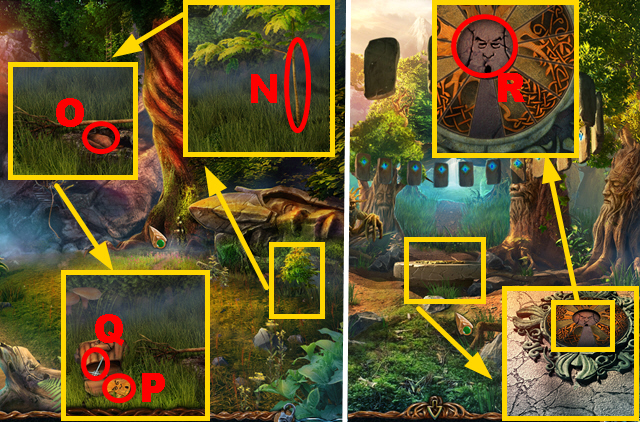
- Open the drawer, move the cloth; take the FULL OIL CAN (P) and CANDLE (Q).
- Walk down.
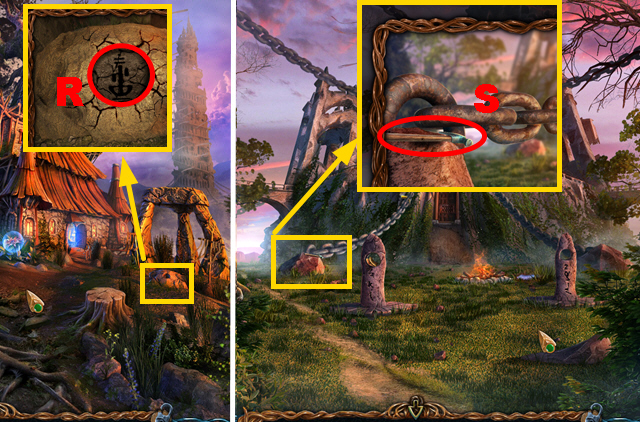
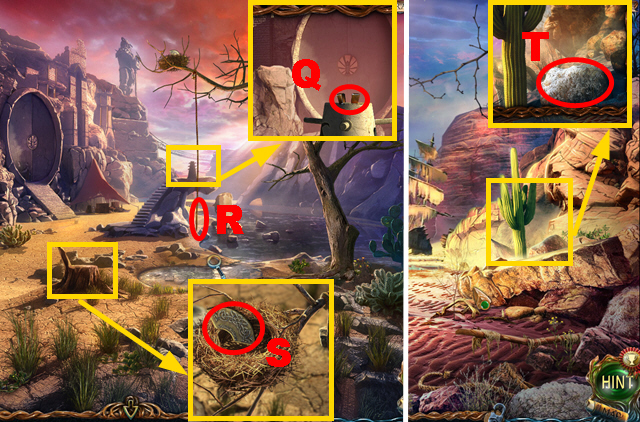
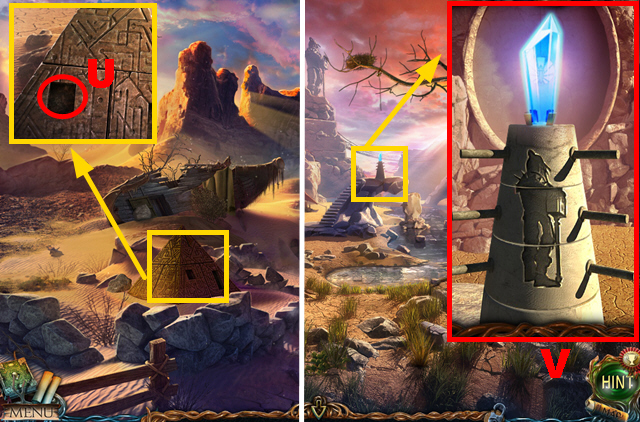
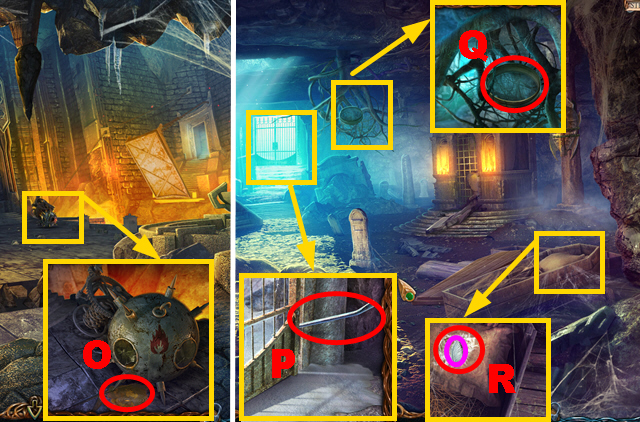
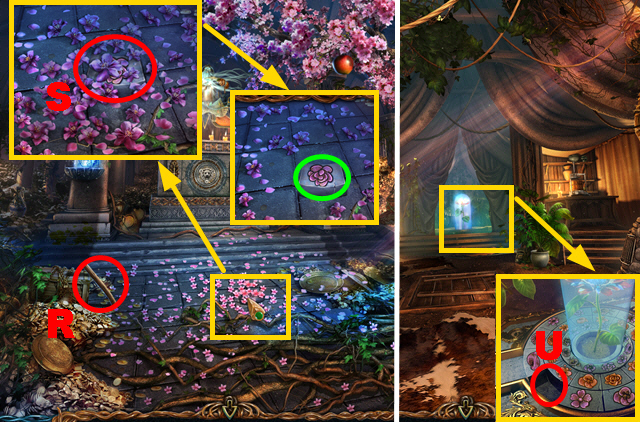
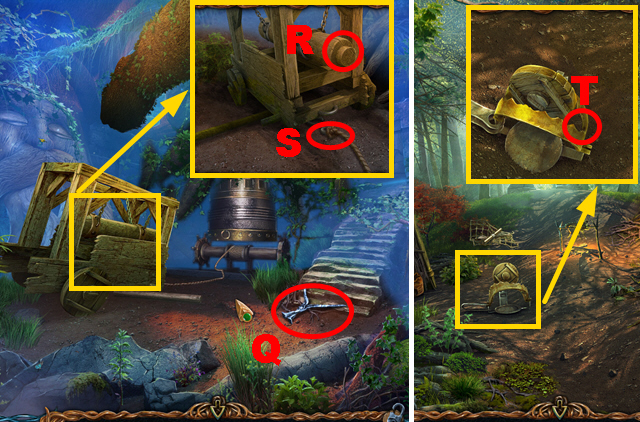
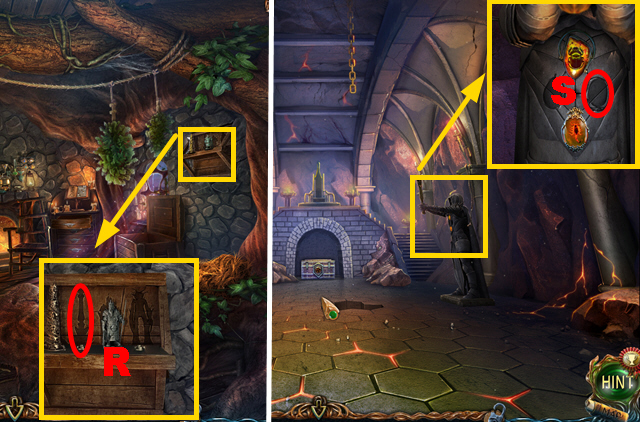
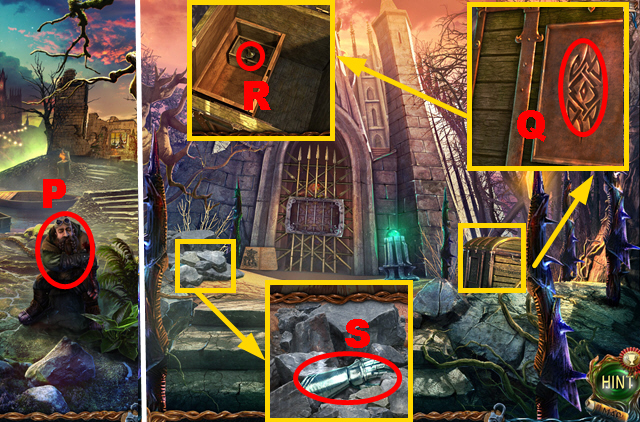
- Place the RUNE (R).
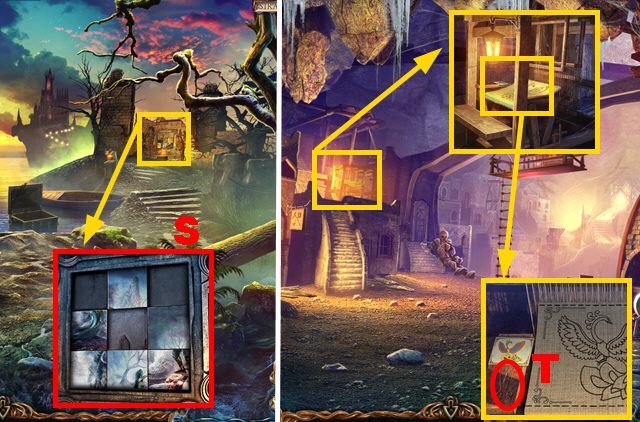
- Take the HAMMER (S).
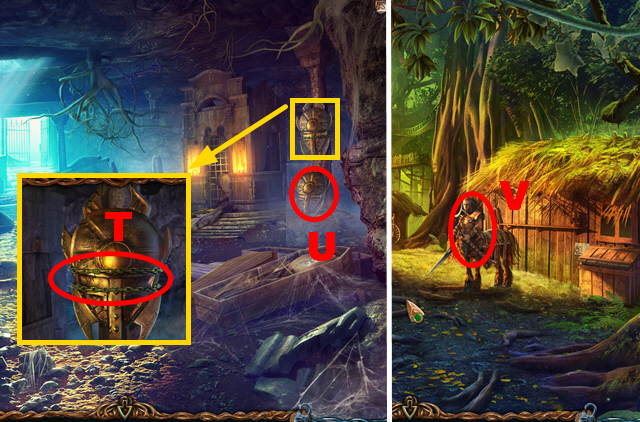
- Turn left.
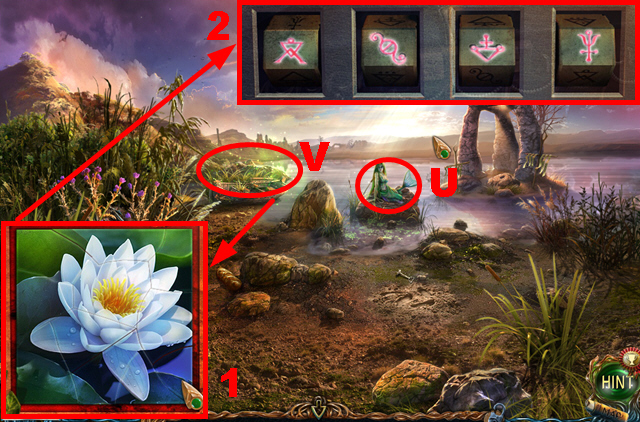
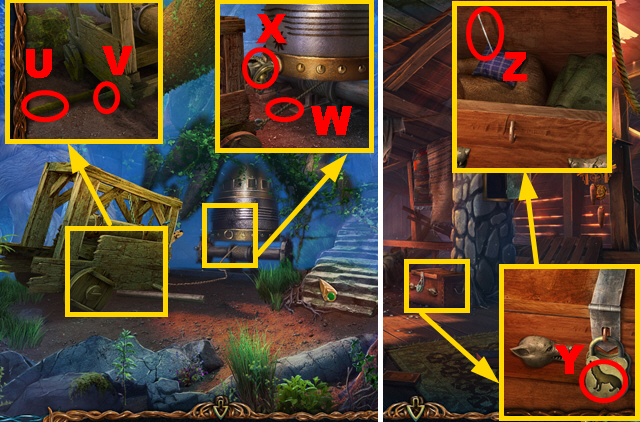
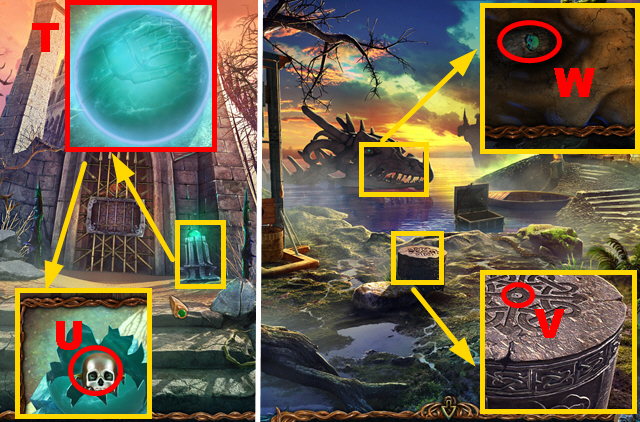
- Talk to the mermaid (U).
- Play the HOP (V).
- HOP puzzle solutions: (1) and (2).
- You receive the STOPCOCK.
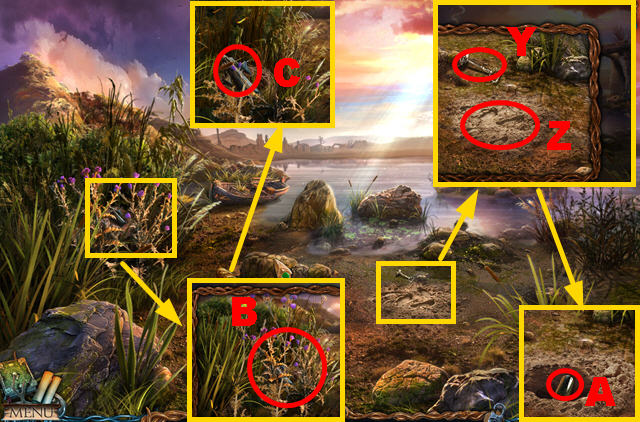
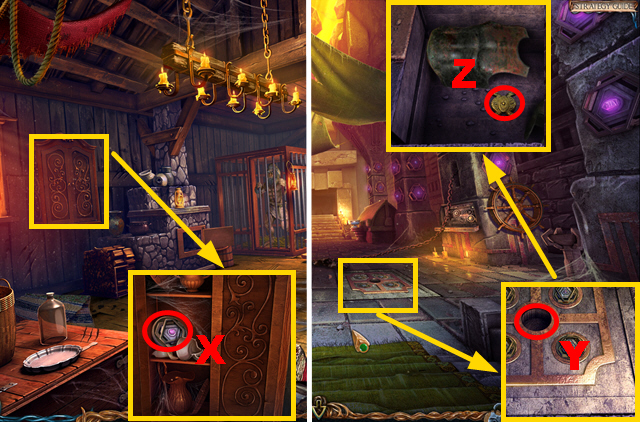
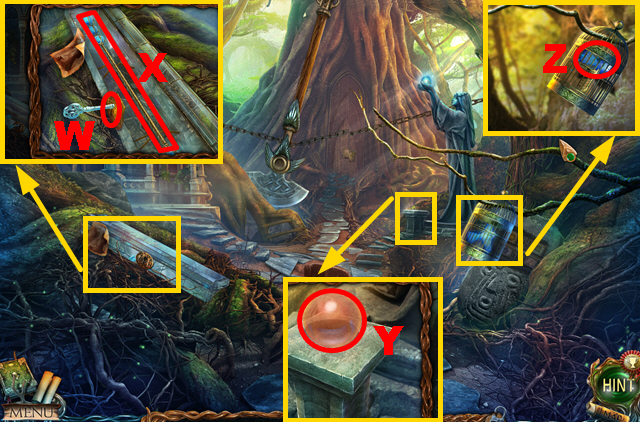
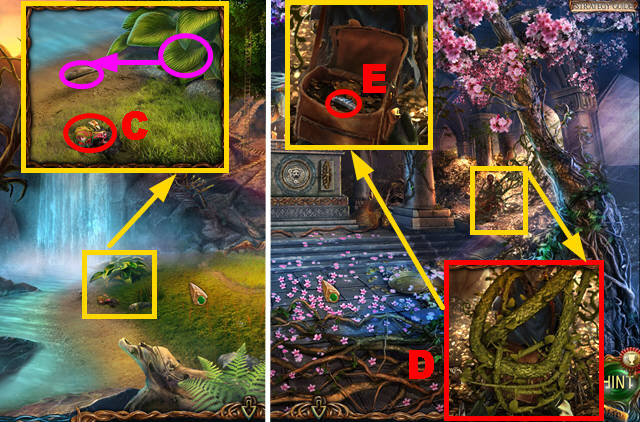
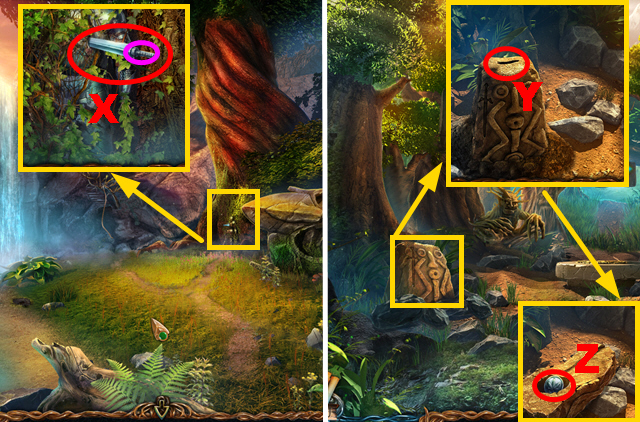
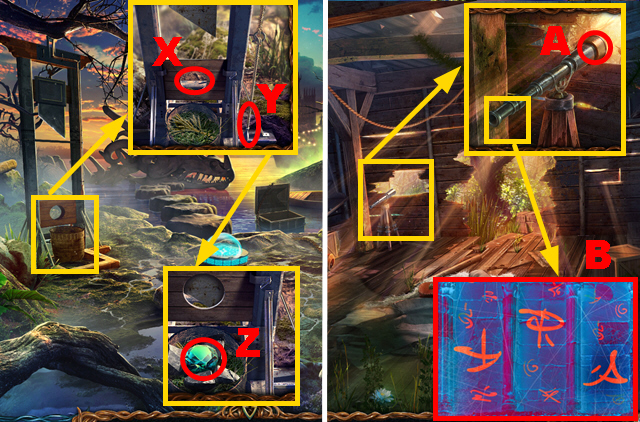
- Take the KEY (Y); use the SHOVEL (Z).
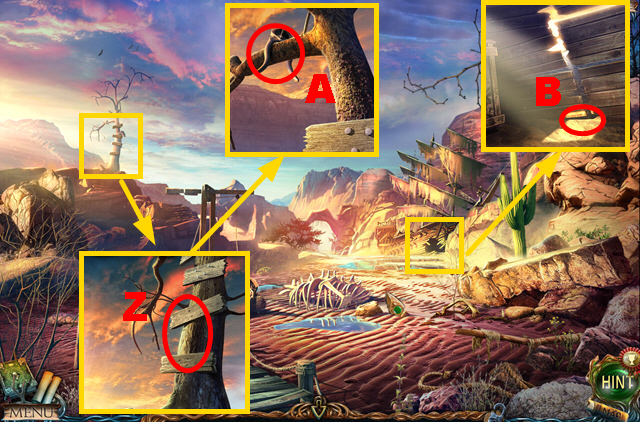
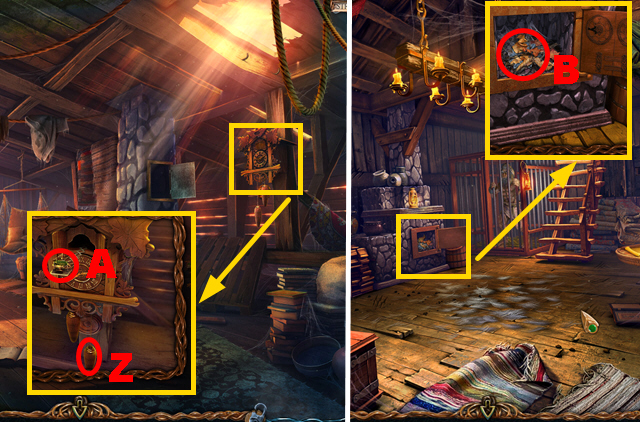
- Take the MUSIC BOX DRUM (A).
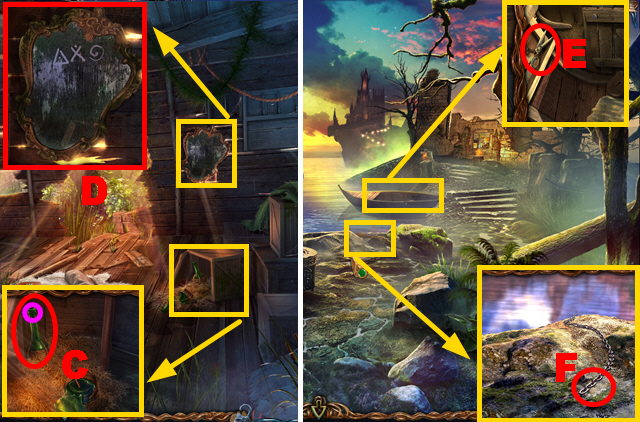
- Use the SICKLE (B); take MONK FIGURINE 5/8 (C).
- Walk down twice.
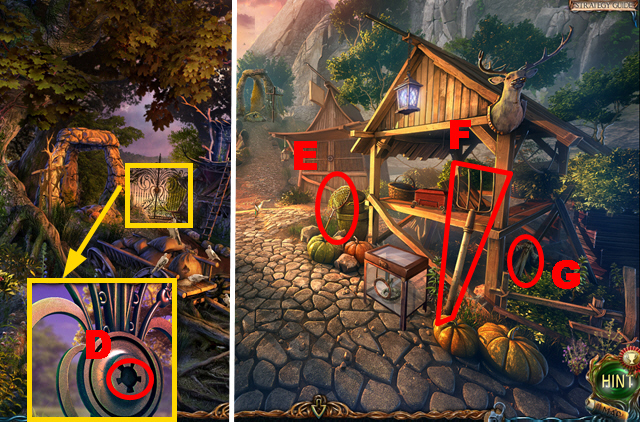
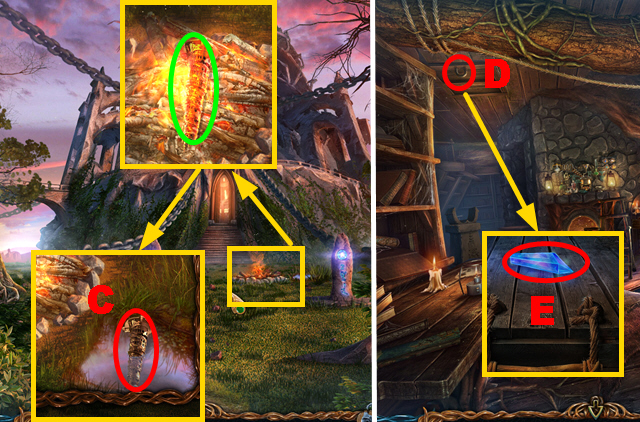
- Place the KEY (D).
- Turn left.
- Take the NET (E), PITCHFORK (F), and MONK FIGURINE 6/8 (G).
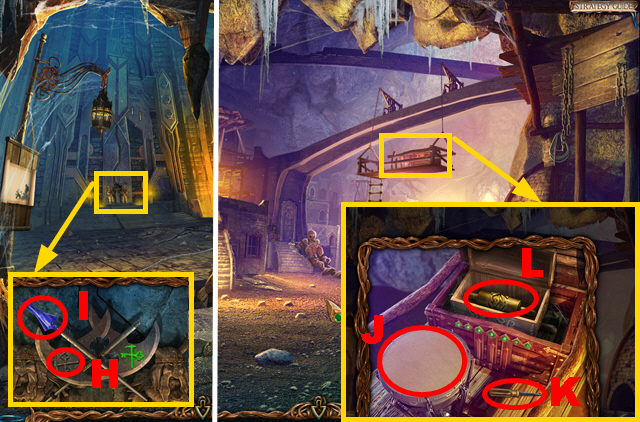
- Use the PITCHFORK (I); take MONK FIGURINE 7/8 (blue).
- Open the lantern; take the ENERGY SPHERE (J).
- Turn the handle (K); place the MUSIC BOX DRUM (L).
- Go to Maaron's Cottage.
- Move the carpet; use the HAMMER three times (green).
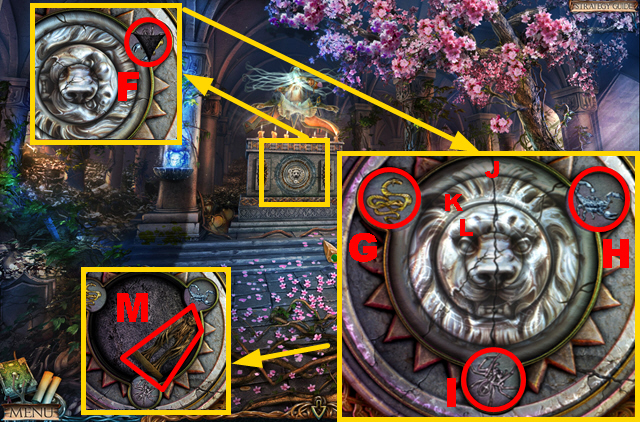
- Move the board; take the SAW (M).
- Place the STOPCOCK (N).
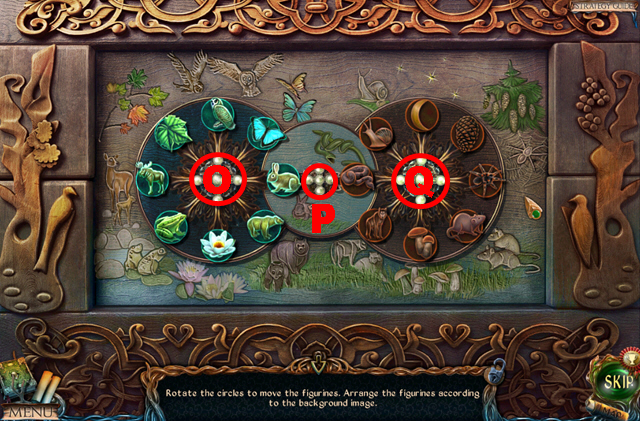
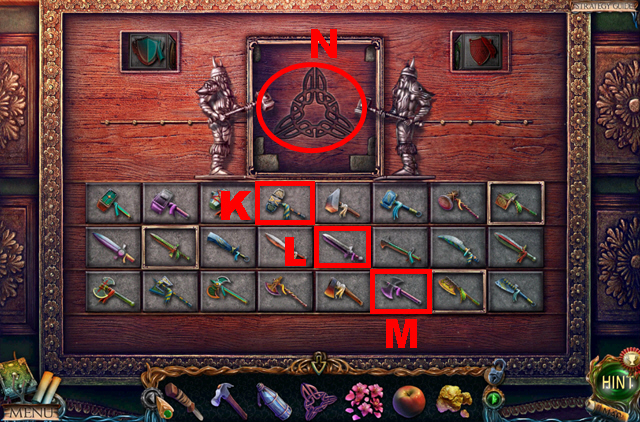
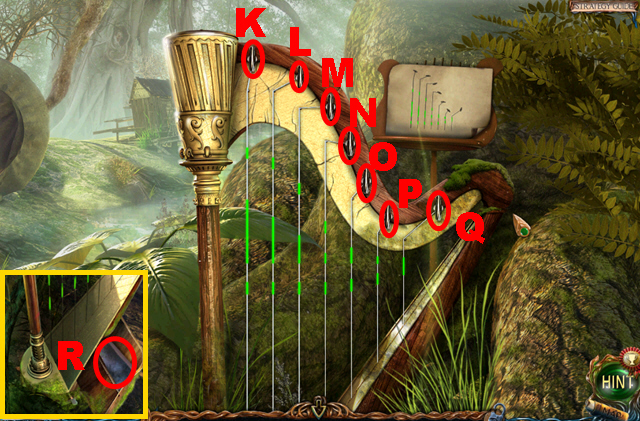
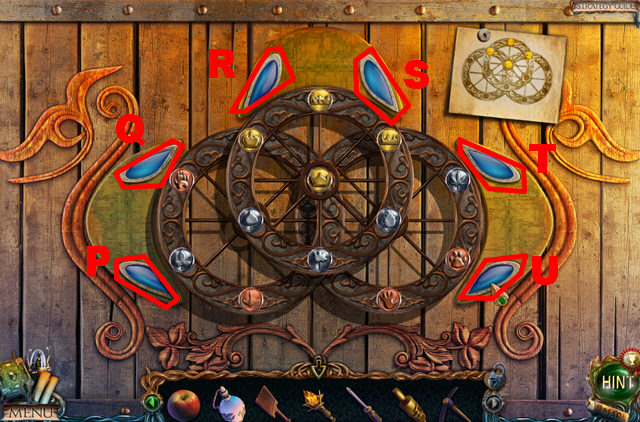
- Play the mini-game.
- Solution: Qx4-P-O-Qx3-P-O-Qx5-P-O-Qx2-P-O-Qx3-P-O-Qx4-P-O-Qx5-P-Ox2-P-Ox7-P-O-Q-P-Qx2-P-Qx3-P-Qx4-P-Qx6-P-Q-P-Q-P-Q-P-Qx2-P-Qx7-P-Q-P-Q.
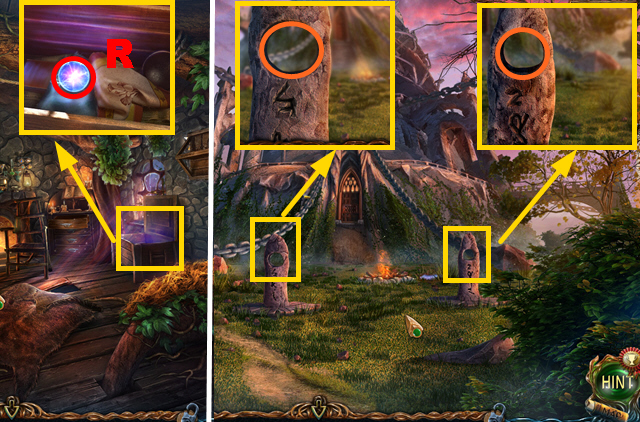
- Take the ENERGY SPHERE (R).
- Walk down, turn right.
- Place 2 ENERGY SPHERES (orange).

- Use the SAW (S); take the WATER PORTAL ACTIVATION (T) and MONK FIGURINE 8/8 (U).
- Place 8 MONK FIGURINES (V).
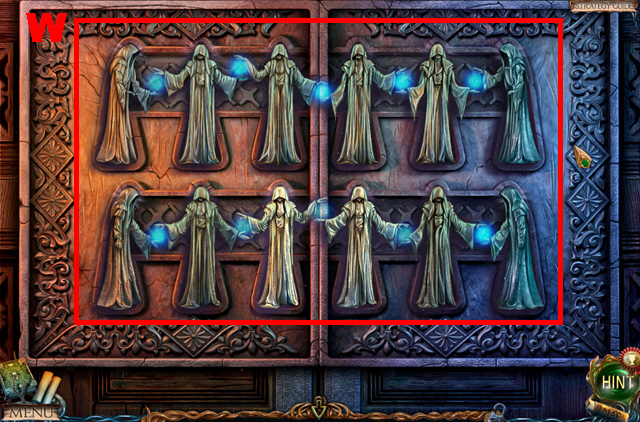
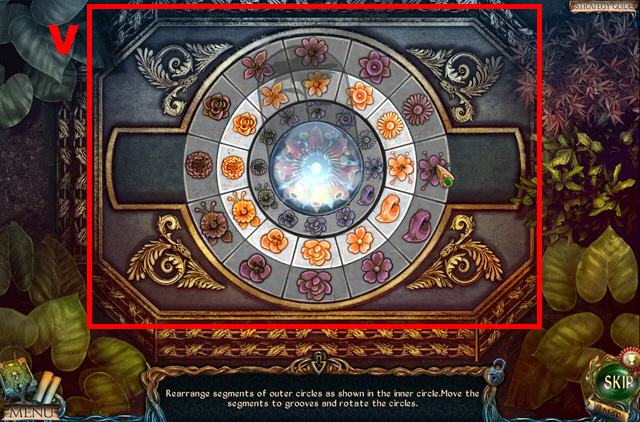
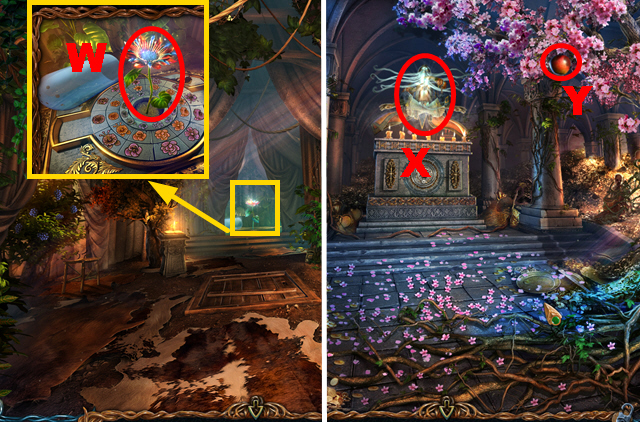
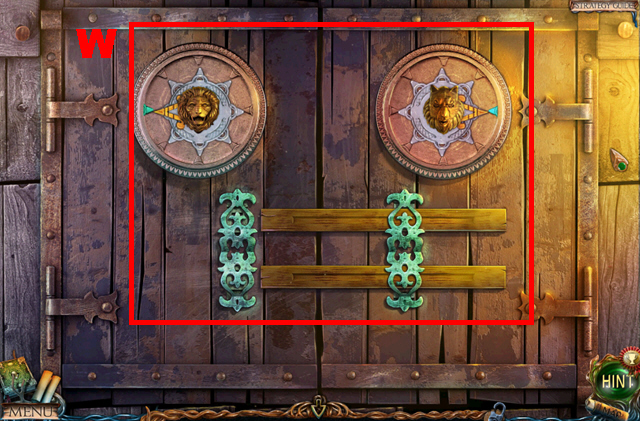
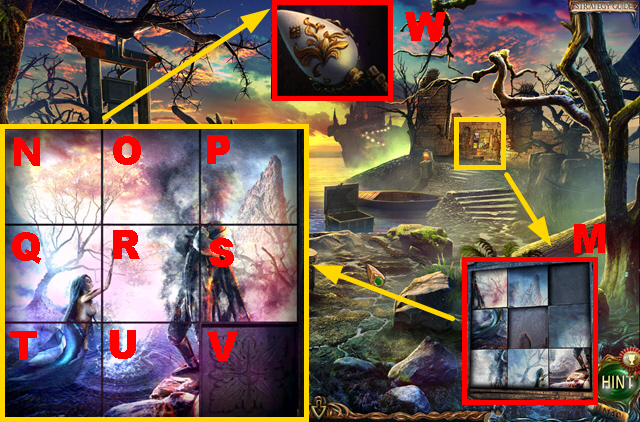
- Play the mini-game.
- Solution: (W).
- Move forward.
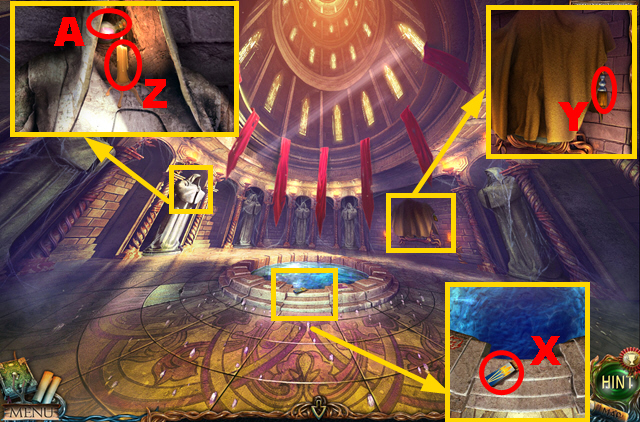
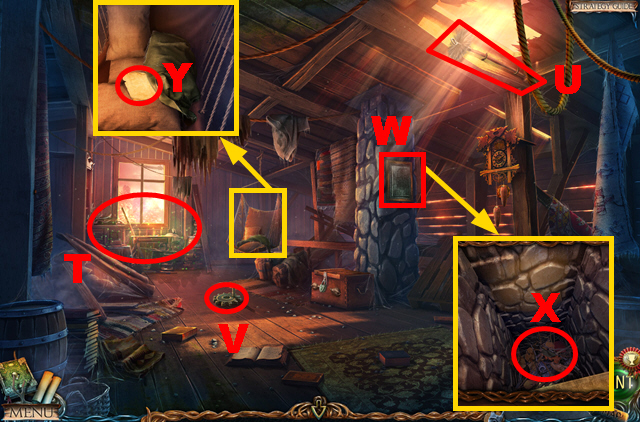
- Take the MATCHBOX (X).
- Use the KNIFE (Y) to acquire the TASSEL.
- Use the CANDLE and MATCHBOX (Z); take the PURPLE ESSENCE (A).
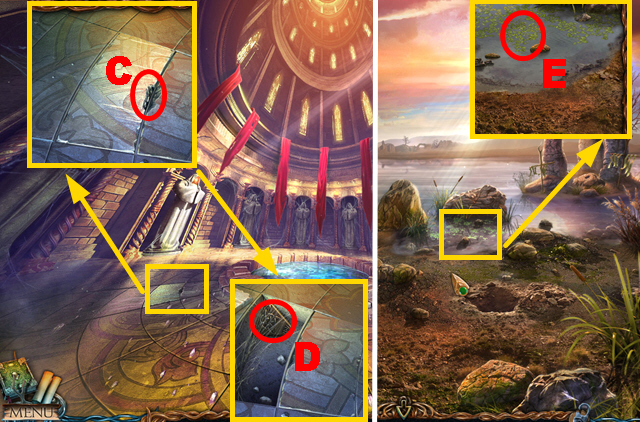
- Use the KNIFE (C); take the MOSAIC FRAGMENT (D).
- Walk down, turn left.
- Use the NET (E) to acquire the DUCKWEED.
- Go to Maaron's Cottage.
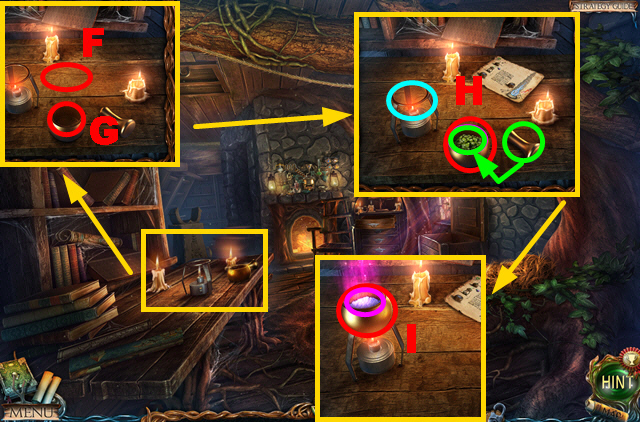
- Place the WATER PORTAL ACTIVATION (F) and DUCKWEED (G).
- Use the pestle (green).
- Put the mortar (H) on the burner (blue); use the PURPLE ESSENCE (purple).
- Take the POWDER OF FLYING (I).
- Walk down, turn left.
- Use the TASSEL (J); close the compartment.
- Turn the handle (K); take the PHOENIX FEATHER (L).
- Go to the Tower Hall.
- Place the PHOENIX FEATHER and POWDER OF FLYING (M).
Chapter 2: The Upper Corridor
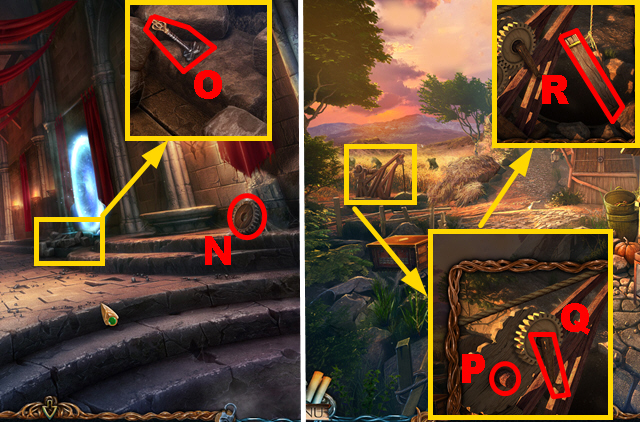
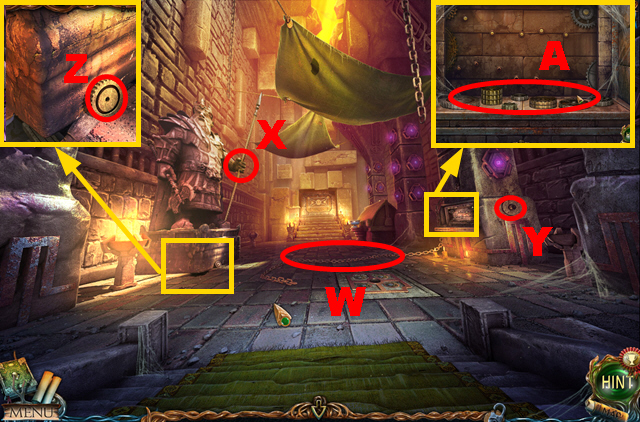
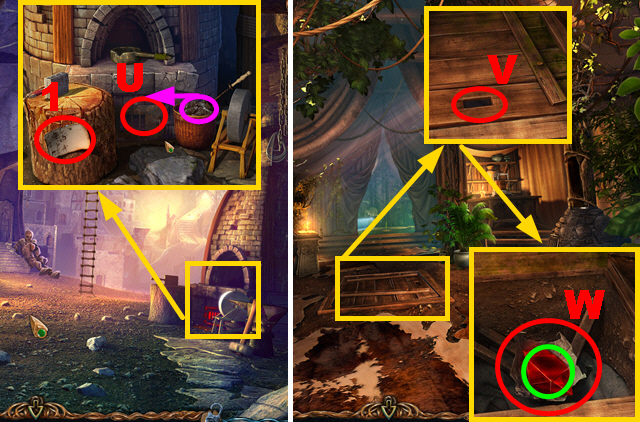
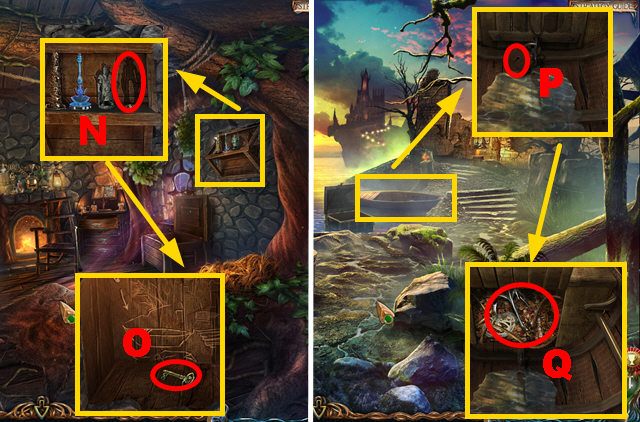
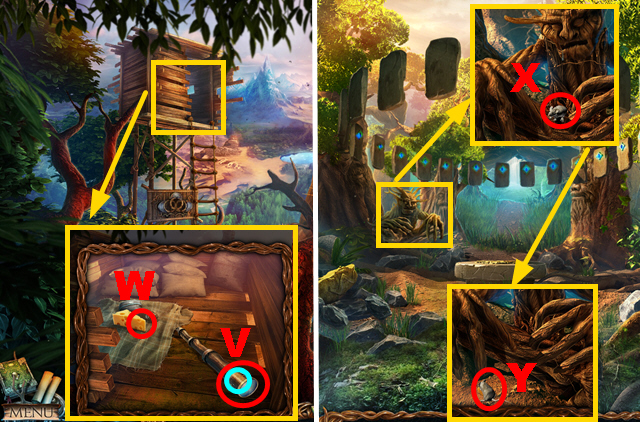
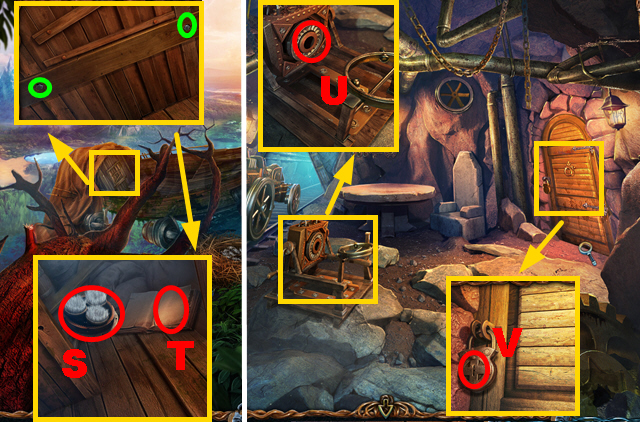
- Take the WOODEN GEAR (N).
- Remove 3 stones; take the KEY (O).
- Go to the Halfling Settlement.
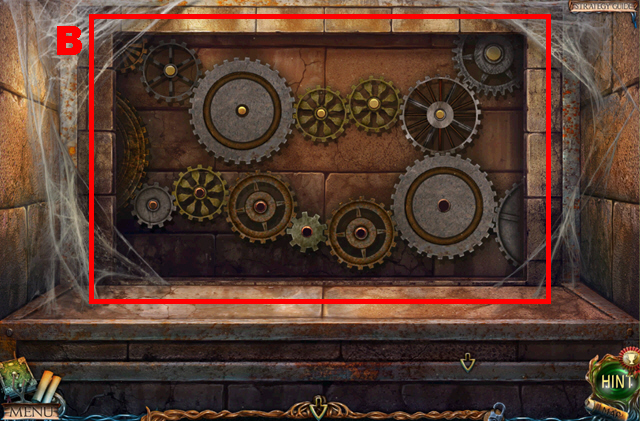
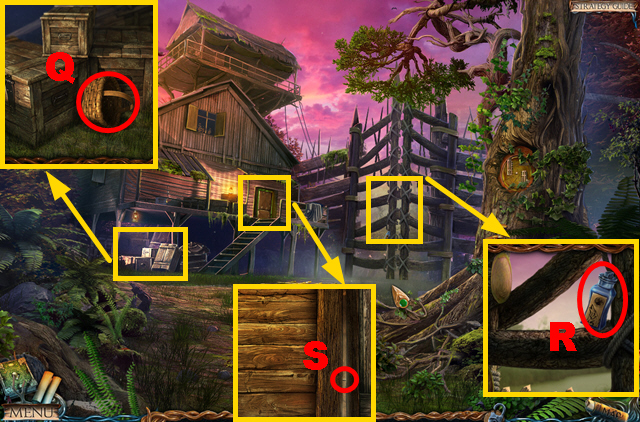
- Place the WOODEN GEAR (P); turn the handle (Q).
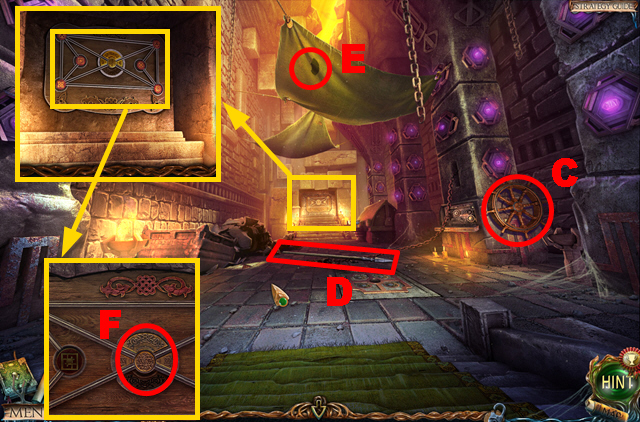
- Take the PLANK (R).
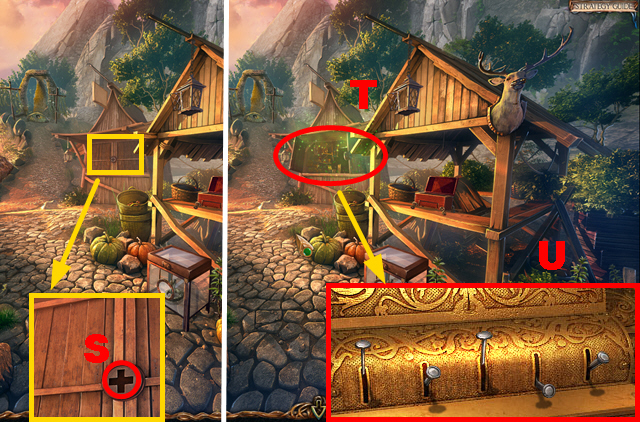
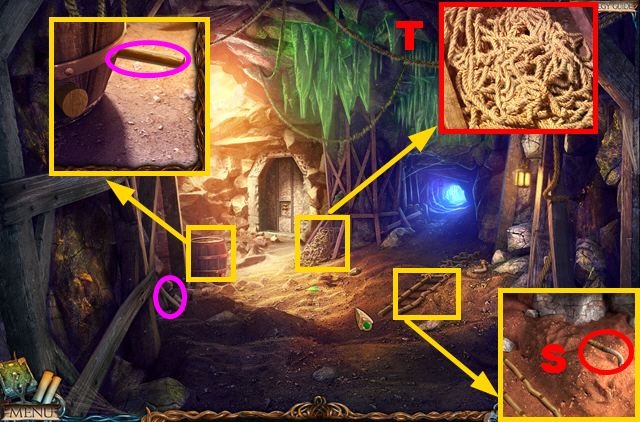
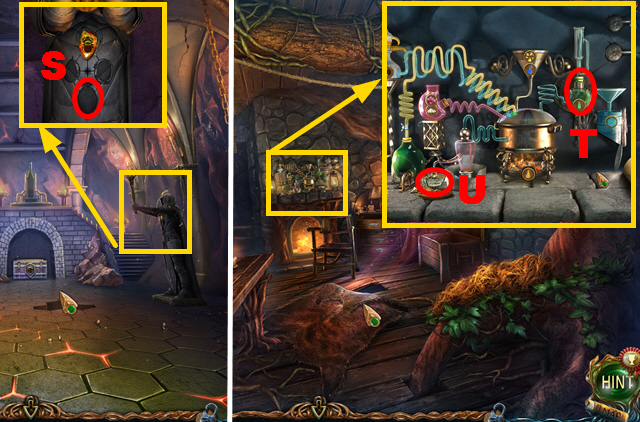
- Use the KEY (S).
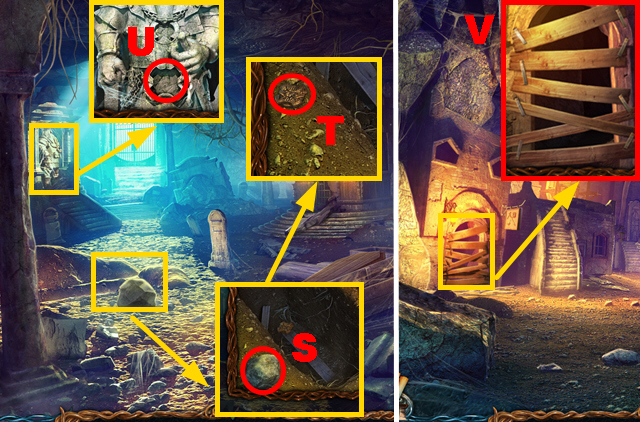
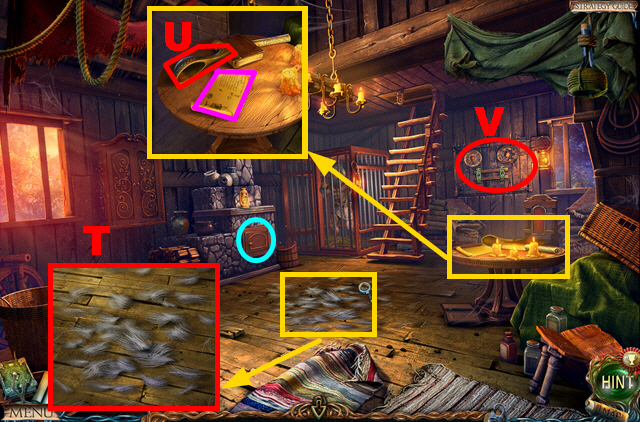
- Play the HOP (T).
- HOP puzzle solution: (U).
- You receive the STONE CHIP.
- Go to the Lake of Life.
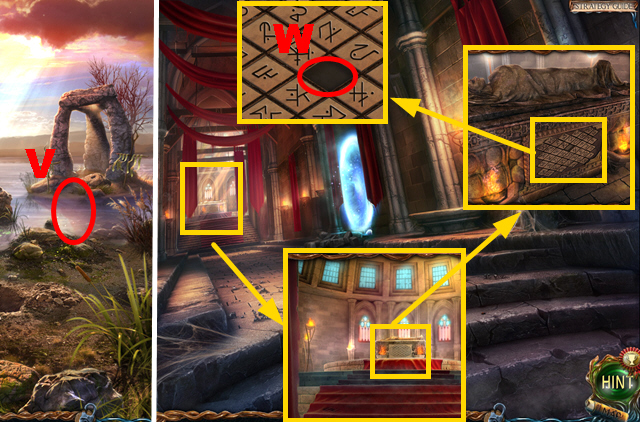
- Place the PLANK (V).
- Go to the Upper Corridor.
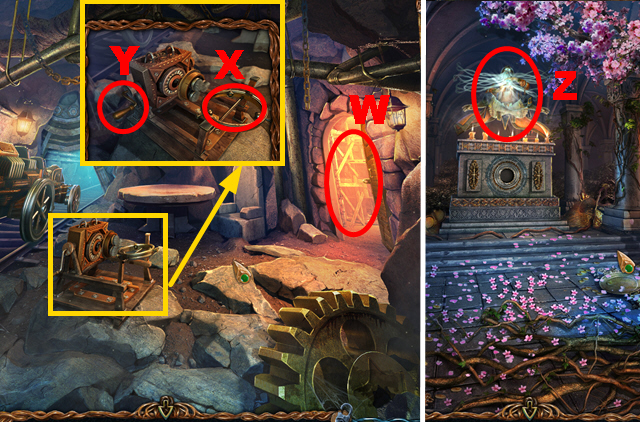
- Place the STONE CHIP (W).
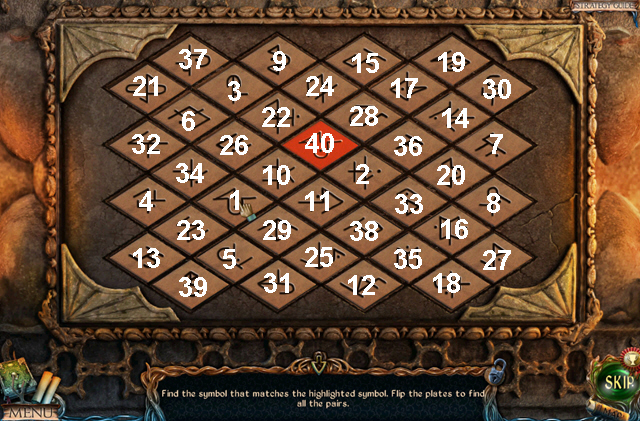
- Play the mini-game.
- Solution: 1-40.
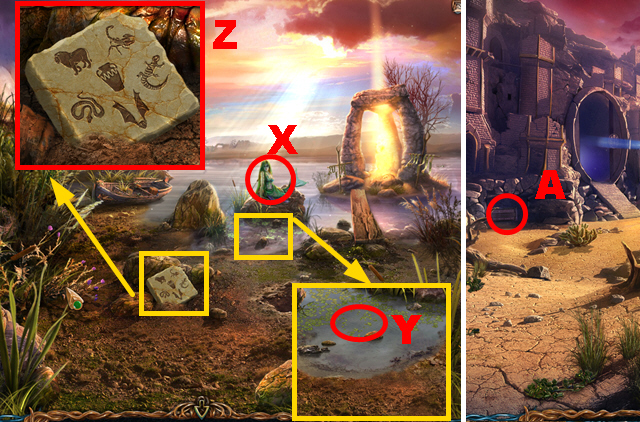
- Take the RUNE (X).
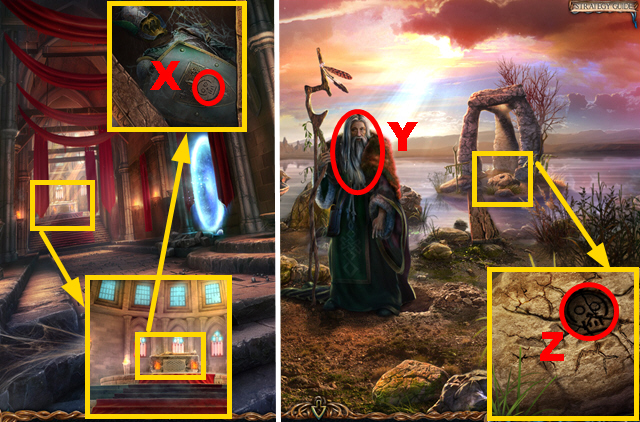
- Walk down twice, turn left.
- Talk to the man (Y); you receive the MOSAIC FRAGMENT.
- Place the RUNE (Z).
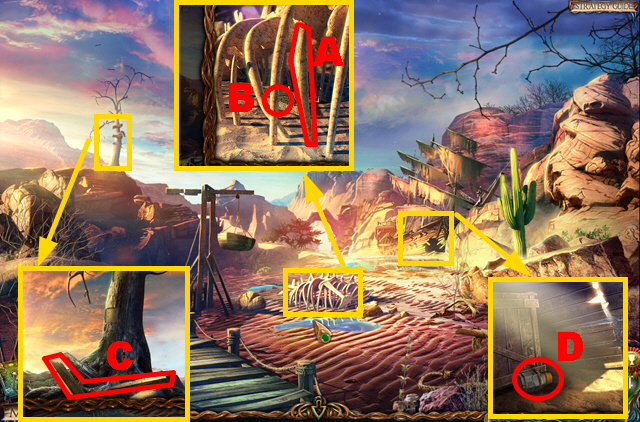
- Take the WHALE RIB (A) and STONE RUNE (B).
- Take the PLANKS (C) and JAR OF FLIES (D).
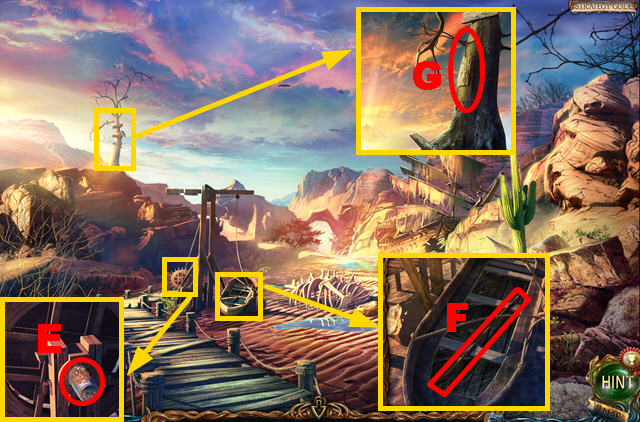
- Use the FULL OIL CAN (E).
- Take the GAFF (F).
- Place the PLANKS (G).
- Move forward.
- Take the NAILS (H).
- Place the STONE RUNE (I).
- Use the WHALE RIB (J); open the compartment (K).
- Play the HOP (L).
- HOP puzzle solution: Q-right-U-up-V-left-R-down-Q-right-U-up-Q-left-R-left-Q-down-S-left-R-left-O-down-N-right-M-right-Q-up-S-left-R-left-O-down-S-right-N-right-Q-right-R-up-U-up-Q-right-V-left-W-left-P-right-O-down-S-down-T-left-S-up-W-up.
- You receive the HANDLE.
- Place the HANDLE (X); turn it.
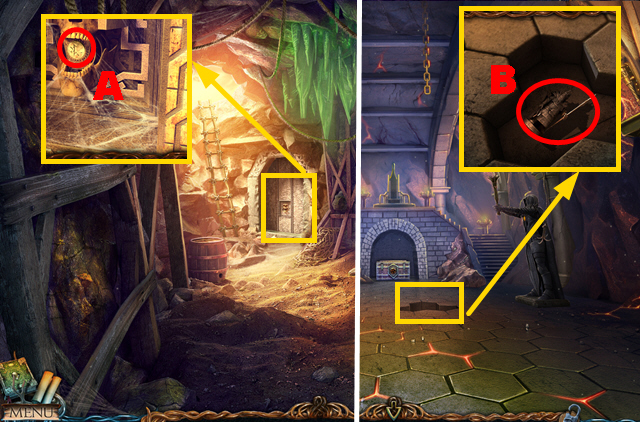
- Remove soil twice; take the DYNAMITE (Y).
- Walk down.
- Use the NAILS and HAMMER (Z); take the TONGS (A).
- Place the DYNAMITE (B).
- Walk down twice.
- Use the TONGS (green); take the TOWER FIGURINE (C).
- Go to Maaron's Cottage.
- Use the GAFF (D).
- Take the CRYSTAL (E).
- Place the TOWER FIGURINE (F).
- Walk down, turn left.
- Place the JAR OF FLIES (G) to acquire the SNAKE IN A JAR.
- Go to the Abandoned Halfling Settlement.
- Use the SNAKE IN A JAR (H); take the MONOCLE (I).
- Use the KNIFE (J) to acquire the STONE ON A ROPE.
- Move the hand; take the MOSAIC FRAGMENT (K).
- Walk down.
- Place the MONOCLE (L).
- Take the SHIP'S WHEEL (M).
- Turn right.
- Place the STONE ON A ROPE (N).
- Take the STONE RUNE (O) and BRUSH (P).
- Place the CRYSTAL (Q).
- Pull the rope (R).
- Take the MOSAIC FRAGMENT (S).
- Walk down.
- Use the BRUSH (T).
- Turn left.
- Place the STONE RUNE (U).
- Go to the Canyon.
- Arrange the image correctly: (V).
- Turn left.
Chapter 3: The Dwarf Temple
- Connect the chain (W) to statue (X).
- Place the SHIP'S WHEEL (Y).
- Take the GEAR (Z).
- Place the GEAR (A).
- Play the mini-game.
- Solution: (B).
- Rotate the wheel (C).
- Take the SPEAR (D).
- Use the SPEAR (E) to acquire the MOSAIC FRAGMENT.
- Place 5 MOSAIC FRAGMENTS (F).
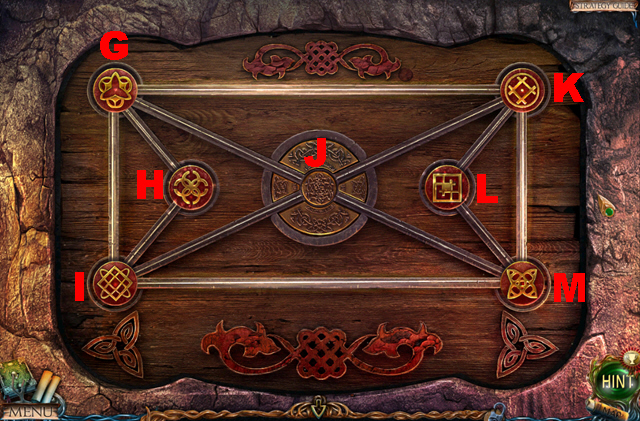
- Play the mini-game.
- Solution: G-K-J-I-M-J-K-L-M-J-G-H-I-J-G-K-J-M-L-K-J-G-H-I-M-J-G-H-I-M-J-G-H-I-M-J-G-I-J-M-L-K-G-J-K-L-M-J-I-M-J.

- Take the STONE RUNE (N) and NOTE WITH THE SYMBOLS (O).
- Go to the Abandoned Halfling Settlement.
- Place the STONE RUNE (P).

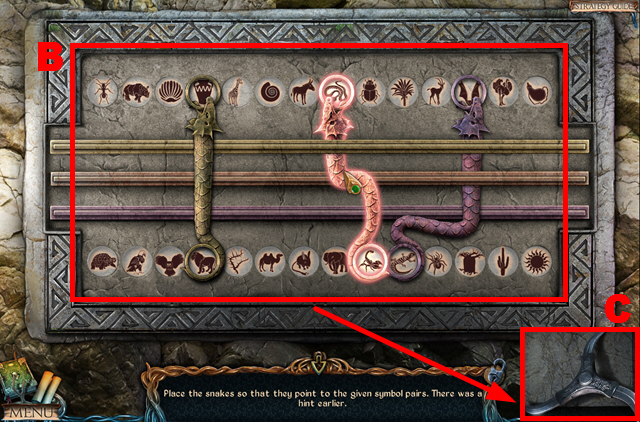
- Place the NOTE WITH THE SYMBOLS (green).
- Enter the correct symbols (Q).
- Take the device (R).
- The dwarf will talk to you.
- Take 2 STEPS (purple), LEVER (S), and ROPE SECTIONS (T).
- Turn right.
- Take the GLOVE (U) and FLYWHEEL (V).
- Place the LEVER (W).
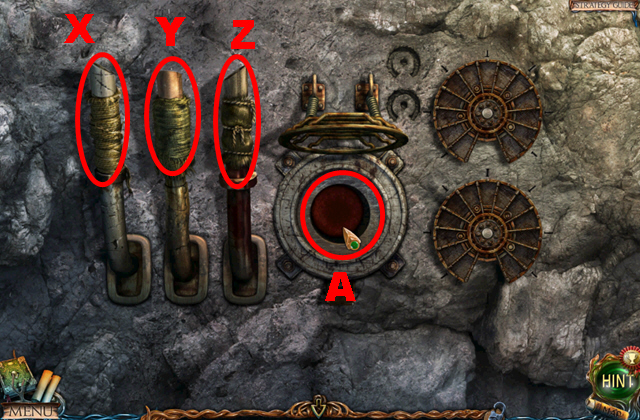
- Play the mini-game.
- Solution: Z-Yx2-Xx3-Yx2-Zx2-Yx6.
- Push the button (A).
- Walk down.
- Collect the CRYSTAL (B) with the GLOVE.
- Turn right.
- Open the compartment, place the CRYSTAL (C); close the capsule and compartment.
- Move forward.
- The dwarf will talk to you.
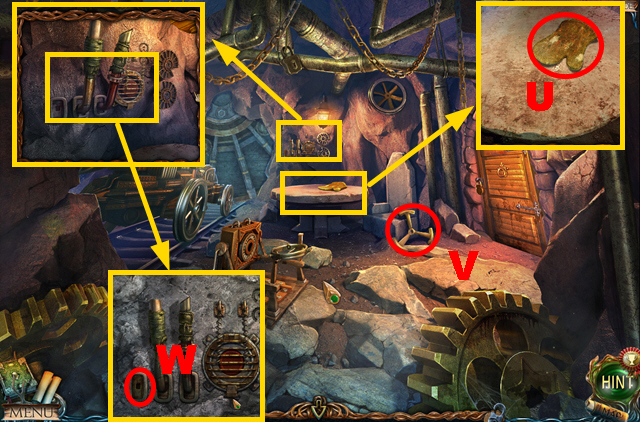
- Use the KNIFE (D); take the BOTTLE OF COLD WATER (E).
- Place the FLYWHEEL (F).
- Take the YIELD REMOVER (G).
- Go downstairs.
- Take the CORKSCREW (H) and BOWL (I).
- Play the HOP (J) to acquire the HAMMER.
- Pull the chain twice (K).
- Take the CIRCLE SECTOR (L).
- Walk down three times.
- Use the BOWL and CORKSCREW (M); take the POWDER (N).
- Go to the Square.
- Use the POWDER (O).
- Turn right twice.
- Take the CROWBAR (P) and SIEVE (Q).
- Use the KNIFE (R); take the FEATHER (purple).
- Push the stone (S); take the MEDALLION (T).
- Place the MEDALLION (U).
- Walk down.
- Use the CROWBAR (V).

- Play the HOP (W).
- HOP puzzle solution: (X).
- You receive the EMERALD SYMBOL.
- Walk down.
- Place the EMERALD SYMBOL (Y); take the EMERALD KEY (Z).
- Turn right twice.
Chapter 4: The Mountain Giants Village

- Place the EMERALD KEY (A).
- Move forward.
- Play the HOP (B) to acquire the SYMBOL.
- Use the FEATHER (C); take the MEAT (D).
- Use the KNIFE (E); open the tent.
- Turn left.
- Throw the MEAT (F).
- Take the STEP (G) and TROUGH (H).
- Read the book (I).
- Place the CIRCLE SECTOR (J).
- Walk down.
- Turn the handle (K); use the KNIFE (L) to acquire the LEATHER SACK.
- Walk down four times.
- Place the TROUGH (M).
- Play the mini-game.
- Solution: N-O-P-Q-N-O-P-Q-N-O-P-Q-N-P-Q-N-P-Q-N-P-Q-N-P-Q-N-Q-N-Q-N-Q-N-Q-N-Qx2.
- Turn right.
- The man will talk to you.
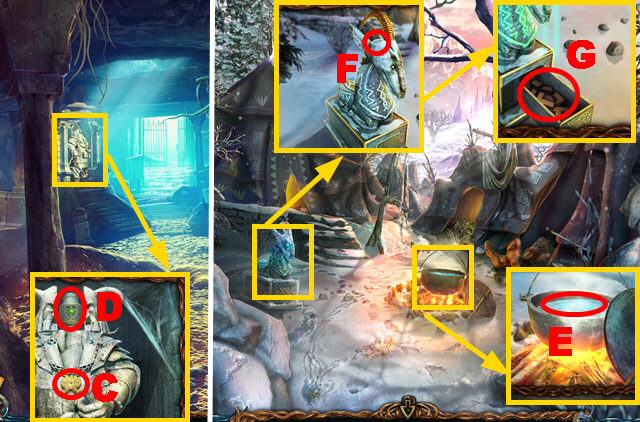
- Take the STEP (R), DIVINE TREE FLOWERS (S), and CIRCLE SECTOR (green).
- Go to the Marquee.
- Place the CIRCLE SECTOR (U).
- Play the mini-game.
- Solution: (V).
- Use the KNIFE (W) to acquire the FLOWER.
- Go to Mountgore's Temple.
- Use the FLOWER (X).
- Use the YIELD REMOVER (Y) to collect MOUNTGORE'S APPLE.
- Go to the Mines.
- Place 4 STEPS and the ROPE SECTIONS (green); take the LADDER (Z).
- Place the LADDER (A).
- Go to the Canyon.
- Use the SIEVE (B) to acquire the GOLD ORE.
- Use the HAMMER twice (C) and (D); take 2 STONE HEARTS (purple) and (orange).
- Remove sand; take the KEY (E).
- Turn left.

- Place the LEATHER SACK (F); collect the ash (G) to acquire the SACK OF ASHES.
- Walk down four times.
- Use the HAMMER (H) to acquire the HORN.
- Go to Maaron's Cottage.
- Give 2 STONE HEARTS to the druid (I); you receive the DWARF FIGURINE.
- Walk down, turn left.
- Place the DWARF FIGURINE (J).
- Play the mini-game.
- Solution: K-leftx3-L-right-M-leftx3-K-rightx6-L-leftx5-M-right-K-leftx5-L-rightx4-M-rightx2-K-rightx2-L-rightx2-M-leftx4-K-left-L-right-M-left-K-rightx3-L-leftx5-M-rightx7-K-left-L-right-M-leftx3-K-rightx3-L-leftx2-M-rightx2.
- Place the SYMBOL (N).
- Take the RUNE (O).
- Place the RUNE (P).
- Take the BASKET (Q) and BUBBLE (R).
- Use the KNIFE (S).
- Move forward.
Chapter 5: The Werewolf's Hut
- The werewolf will talk to you.
- Take the WOOL (T) and SCOOP (U); read the recipe (purple).
- Open the compartment (blue).
- Examine the area (V).
- Play the mini-game.
- Solution: (W).
- Open the cupboard; take the MEDALLION (X).
- Go to the Dwarf Temple.
- Place the MEDALLION (Y); push it.
- Move the armor; take the MEDALLION (Z).
- Go to the Mines.
- Place the KEY (A).
- Enter the Fire's Dwelling.
- Take the DWARF FIGURINE (B).
- Go to the Dwarf Cemetery.
- Place the MEDALLION (C); take the URN OF ASHES (D).
- Move forward.
- Remove the lid; use the SCOOP (E) to acquire the SAUCEPAN OF BOILING LIQUID.
- Use the SAUCEPAN OF BOILING LIQUID and HORN (F); take the PUZZLE (G).
- Turn left.

- Place the BASKET (H); collect the berries (orange).
- Take the BASKET OF BERRIES (I).
- Place the BUBBLE (J) and BASKET OF BERRIES (K); pound the berries (L).
- Use the SACK OF ASHES and URN OF ASHES (green); close the bottle (purple).
- Take the TURNING POTION (M).
- Go to the Fire's Dwelling.
- Place the PUZZLE (N).
- Play the mini-game.
- Solution: (O).
- Take the MOONDUST (P).
- Go to Maaron's Cottage.

- Place the DWARF FIGURINE (Q).
- Go to the Werewolf's Hut.
- Use the TURNING POTION (R); you receive the KEY.
- Use the KEY (S); open the trapdoor.
- Go upstairs.
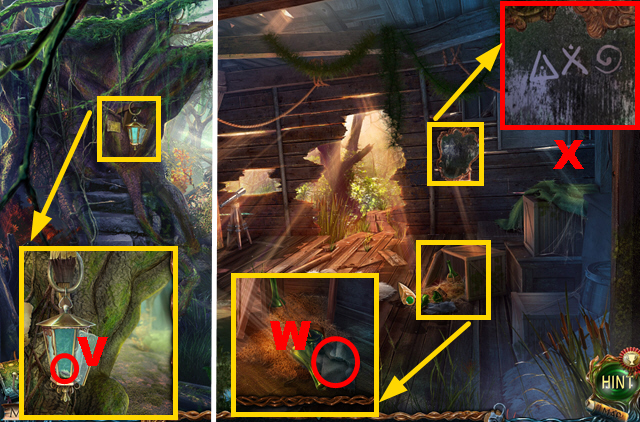
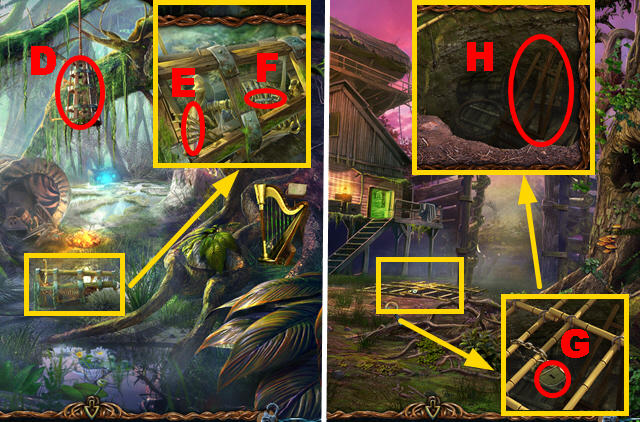
- Play the HOP (T) to acquire the LANTERN.
- Take the BRUSH (U) and LATCHING MECHANISM GEAR (V).
- Open the compartment (W); use the BRUSH (X).
- Remove the blanket; take the LANTERN POTION RECIPE (Y).
- Pull the weight (Z); take the VIAL (A).
- Walk down.
- Remove debris; take the STONE FLOWER (B).
- Walk down.

- Place the LATCHING MECHANISM GEAR (C); turn it.
- Take the LEVER (D).
- Move forward.
- Place the LEVER (E); pull it.
- Walk down, turn right.
- Play the HOP (F) to acquire the WEIGHT.
- Take the STONE OF FIRE (G).
- Read the note (I); place the LANTERN (H) and WOOL (J).
- Go to the Halfling Settlement.
- Place the WEIGHT (K) to acquire the HANDLE.
- Go to Maaron's Cottage.
- Place the LANTERN POTION RECIPE (M) and VIAL (L).
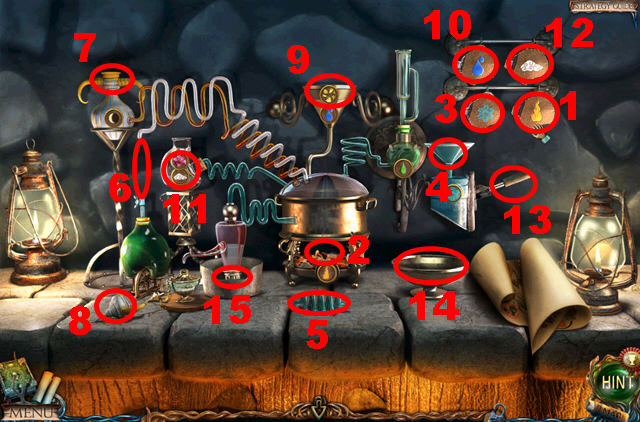
- Potion preparation: 1-2-3-4-5-6-MOONDUST-7-8-7-GOLD ORE-9-10-9-DIVINE TREE FLOWERS-11-12-11-13-14-15.
- Go to the Upper Corridor.
- Place the STONE FLOWER (N); take the FLASK (O) and GLASS PIPE (P).
- Go to the Forsaken Sea.
- Place the GLASS PIPE (Q) and FLASK (R) to acquire the CACTUS JUICE.
- Go to the Fire's Dwelling.
- Place the STONE OF FIRE (S).
- Go to Maaron's Cottage.
- Use the CACTUS JUICE (T); take the LANTERN POTION (U).
- Go to the Swamps.
- Use the LANTERN POTION (V).
- Move forward.
- Take the ALCOHOL-SOAKED CLOTH (W).
- Make note of the symbols (X).
- Enter the correct code (Y); take the PRECIOUS STONE (Z).
- Use the HAMMER (A); take the CORK (B).
Chapter 6: The Dead Lake
- Place the CORK (purple); take the BOTTLE OF RUM (C).
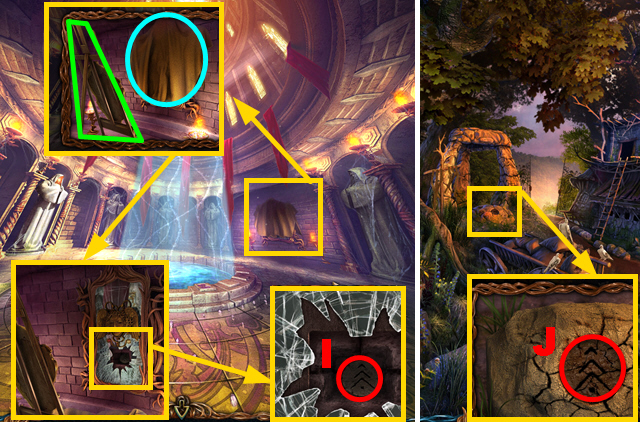
- Clean the mirror; take the MIRROR (D).
- Move forward.
- Take the SCISSORS (E).
- Pull the chain twice (F).
- Place the PRECIOUS STONE (G); take the TUNING TABLE (H).
- Pull the rope (I).
- Walk down twice.
- Place the TUNING TABLE (J).
- Play the mini-game.
- Solution: Kx4-Lx3-Mx5-Nx2-Ox5-Px7-Qx5.
- Take the FRESCO DETAIL (R).
- Move forward twice.
- Place the FRESCO DETAIL (S).
- Go to the Dwarf Slums.
- Place the SCISSORS (T).
- Read the recipe (1).
- Open the compartment; use the coal (purple) and BOTTLE OF RUM (U).
- Go to the Marquee.
- Place the HANDLE (V); pull it.
- Open the package; take the RED STONE (green) and read the note (W).
- Walk down three times.

- Open the compartment; place the RED STONE (X).
- Take the JACK (Y).
- Turn right.
- Use the JACK (Z); take the parcel (orange).
- Use the KNIFE (A); open the parcel and book.
- Take the PUNCH CARD (B).
- Go to Maaron's Cottage.
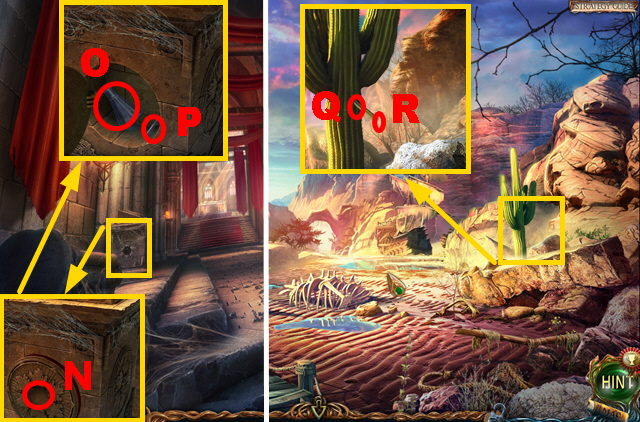
- Place the PUNCH CARD (C); make note of the symbols (D).
- Go to the Abandoned Halfling Settlement.
- Push the symbols: F-H-E-F-G-E.
- Take the KEY (I).
- Go to the Canyon.
- Use the KEY (J); take the CHIMERA HEAD (K).
- Go to the Swamps.
- Place the CHIMERA HEAD (L); take the FRESCO DETAIL (blue).
- Move forward twice.
- Place the FRESCO DETAIL (M).
- Play the mini-game.
- Solution: O-P-S-R-O-N-Q-R-O-P-S-R-Q-N-O-R-U-T-Q-R-U-V.
- Take the VIAL FOR LIVING WATER (W).
- Go to the Lake of Life.
- Talk to the mermaid (X).
- Place the VIAL FOR LIVING WATER (Y) to acquire the LIVING WATER.
- Inspect the plate (Z).
- Go to the Canyon.
- Inspect the area (A).
- Play the mini-game.
- Solution: (B).
- Take the BOOMERANG (C).
- Go to the Swamps.
- Throw the BOOMERANG (D).
- Take the note (E) and KEY (F).
- Walk down.
- Use the KEY (G); take the EASEL (H).
- Go to the Tower Hall.
- Place the EASEL and MIRROR (green); remove the blanket (blue).
- Take the RUNE (I).
- Walk down twice.
- Place the RUNE (J).
- Play the HOP (K).
- HOP puzzle solution: (L).
- You receive the COLORFUL THREADS.
- Take the BOAR SKIN (M).
- Take the RAM (N); use the KNIFE (O).
- Remove the patch; take the WOLF FIGURINE (P).
- Move forward.
Chapter 7: The Junction
- Take the TONGS (Q).
- Place the RAM (R); move the rope (S).
- Walk down.
- Place the TONGS (T); push the tongs to acquire the WHEEL.
- Move forward.
- Pull the rod (U); place the WHEEL (V).
- Pull the rope (W) and ram (X).
- Go to the Attic.
- Place the WOLF FIGURINE (Y); open the chest.
- Take the NEEDLE (Z).
- Go to the Dwarf Slums.
- Place the COLORFUL THREADS (green) and NEEDLE (A).
- Play the mini-game.
- Solution: (B).
- Cut the tapestry with the scissors (C) to acquire the TAPESTRY.
- Go to the Junction.
- Place the TAPESTRY (D).
- Turn left.
- Play the HOP (E).
- HOP puzzle solution: 1-2-3-1-2.
- You receive the PENDULUM FIGURINE.
- Take the MEDALLION (F).
- Examine the area (G).
- Play the mini-game.
- Solution: (H).
- Take the FOREST HUNTERS' STAR (I).
- Read the note (J).
- Place the FOREST HUNTERS' STAR (K).
- Take the AXE (L).
- Walk down.
- Use the AXE (M).
- Turn right.
- Talk to the centaur (N).
- Take the COMB (O) and PINCERS (P).
- Open the compartment; take the STONE OF FIRE (Q).
- Go to Maaron's Cottage.
- Place the PENDULUM FIGURINE (R).
- Go to the Fire's Dwelling.
- Place the STONE OF FIRE (S).
- Go to the Dwarf Cemetery.
- Use the PINCERS (T); take the DWARF SHIELD (U).
- Go to the Centaurs Village.
- Give the DWARF SHIELD to the centaur (V); you receive the CRYSTAL KEY.
- Give the BOAR SKIN to the centaur.
- Walk down, turn left.
- Place the CRYSTAL KEY (W); take the STAFF (X).
- Use the STAFF (Y).
- Open the cage; take the BIRD (Z).
- Walk down.
- Use the BIRD (A).
- Turn left.
- Place the MEDALLION (B).
- Move forward.
- Take the VENOM (C); use the leaf (purple) to acquire the FISH.
- Go to Mountgore's Temple.
- Use the VENOM (D).
- Open the bag; take the PATTERN FRAGMENT (E).
- Place the PATTERN FRAGMENT (F).
- Play the mini-game.
- Solution: G-H-J-clockwise-Ix2-J-counterclockwise-I-J-cw-Ix2-J-ccw-Gx2-Ix2-J-ccw-Hx2-J-cw-Hx2-J-ccw-Hx2-Ix2-J-cw-I-Gx2-J-ccw-Hx2-G-I-J-cw-H-J-cw-Hx2-J-ccw-H-J-cw-Hx2-I-Gx2-J-cw-G-J-ccw-G-J-cw-Gx2-K-cw-L-ccw.
- Take the ONTUS FIGURINE (M).
- Go to Maaron's Cottage.
- Place the ONTUS FIGURINE (N); take the KEY (O).
- Go to the Dead Lake.
- Use the KEY (P); take the HOOK (Q).
- Go to the Waterfall.

- Throw the HOOK (R).
- Climb up.
- Take the SWORD HILT (S).
- Use the KNIFE (T); take the RED TREE TWIG.
- Use the FISH (U); take the FEATHERS (V) and SAPPHIRE SYMBOL (W).
- Walk down.
- Place the SWORD HILT (purple); take the SWORD (X).
- Walk down.
- Place the SWORD (Y); take the CHIP (Z).
- Go to the Centaurs Village.
- Use the RED TREE TWIG (A).
- Take the DOOR KNOCKER (B) and STONE OF FIRE (C).
- Place the FEATHERS (D); use the feathers (green) and leather (blue).
- Go to the Fire's Dwelling.
- Place the STONE OF FIRE (E).
- Remove dirt; place the ALCOHOL-SOAKED CLOTH (orange).
- Take the TORCH (F).
- Place the TORCH (G) to acquire the BURNING TORCH.
- Go to the Square.
- Place the SAPPHIRE SYMBOL (H); take the KEY (I).
- Turn right.
- Use the DOOR KNOCKER (J); open the chest.
- Take the SCREWDRIVER (K) and ROLLER-SHAPED SEAL (L).
- Go to the Fire's Dwelling.
- Place the KEY (M); take the PICKAXE (N).
- Go to the Red Tree Top.
- Place the CHIP (O).
- Play the mini-game.
- Solution: R-U-R-P-R-U-P-U.
- Use the SCREWDRIVER (blue); open the sack.
- Take the LENS (V) and CHEESE (W).
- Walk down twice.
- Use the CHEESE (X); take the MOUSE (Y).
- Walk down twice.
- Use the MOUSE and COMB (Z) to acquire the COMB WITH THREAD.
- Move forward, turn right.
- Place the COMB WITH THREAD (A); turn the handle (B).
- Take the BOWSTRING (C).
- Place the BOWSTRING (D).
- Go to the Abandoned Farm.
- Place the LENS (E).
- Go to the Fire's Dwelling.
- Use the PICKAXE to acquire the METAL (F).
- Go to the Dwarf Slums.
- Use the BURNING TORCH (G) and METAL (green).
- Take the MELTED METAL (H); use the MELTED METAL (I).
- Open the mold; use the BOTTLE OF COLD WATER (J).
- Take the UNFINISHED ARROWHEADS (purple).
- Place the UNFINISHED ARROWHEADS (K) to acquire the ARROWHEADS.
- Go to the Centaurs Village.
- Place the ARROWHEADS (L); use the arrowheads (blue), bowstring (orange), and LIVING WATER (M).
- Take the BOW AND ARROWS (N).
- Go to the Dead Lake.
- Shoot the BOW AND ARROWS (O).
Chapter 8: Death's Castle
- Talk to the dwarf (P); give MOUNTGORE'S APPLE to him.
- Move forward.
- Use the ROLLER-SHAPED SEAL (Q).
- Open two boxes; take the SPINNING TOP (R).
- Remove 3 stones; take the ARMORED GLOVE (S).
- Place the ARMORED GLOVE (T); take the SKULL FIGURINE (U).
- Walk down.
- Place the SPINNING TOP (V); turn it.
- Collect the PETRIFIED EYE with the HAMMER (W).
- Place the PETRIFIED EYE (X); pull the rope (Y).
- Take the DRAGON EYE (Z).
- Walk down.
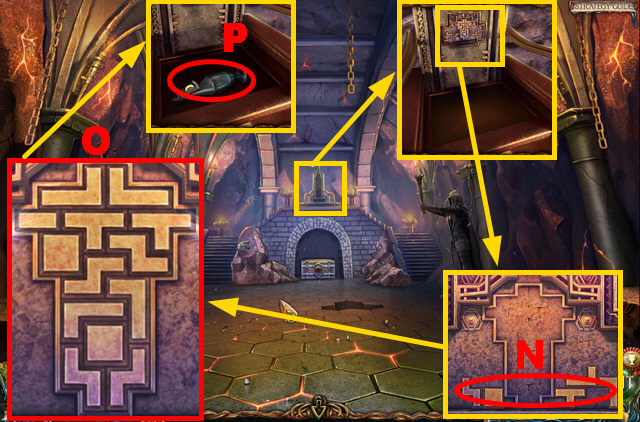
- Place the DRAGON EYE (A); make note of the symbols (B).
- Move forward twice.
- Place the SKULL FIGURINE (C).
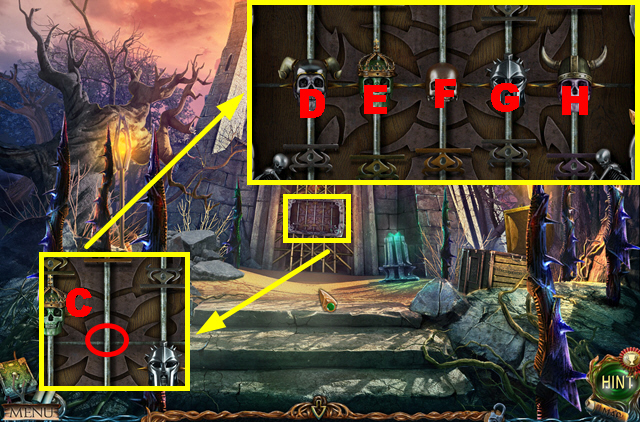
- Play the mini-game.
- Solution: H-center-F-center-D-down-F-center-G-center-H-center-D-down-G-up-E-center-H-center-F-center-D-center-F-center-H-center-F-center.
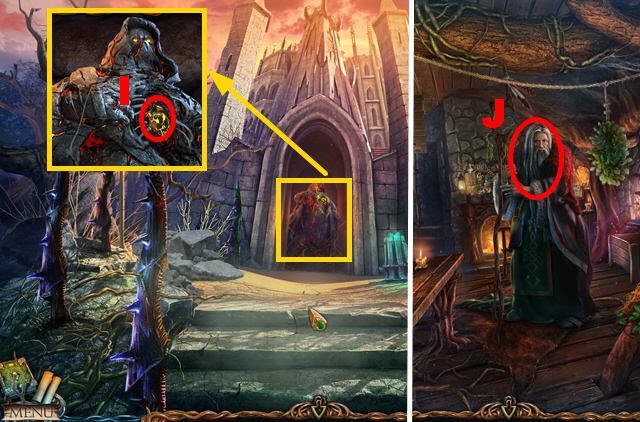
- Use the HAMMER (I) to acquire the STONE HEART.
- Go to Maaron's Cottage.
- Give the STONE HEART to the man (J); you acquire the SPRAY and KEY.
- Walk down.
- Use the SPRAY (K) to acquire the FLOWER.
- Turn left.
- Arrange the symbols correctly (L); read the note (M).
- Go to the Waterfall.
- Pull out the tree (N) and bag (O); open the bag.
- Take the WOODEN DISC (P) and T-WRENCH (Q).
- Walk down.
- Place the WOODEN DISC (R).
- Move forward twice.
- Use the T-WRENCH (green); open the door.
- Take the BRUSH (S) and CLEAN SHEET (T).
- Go to Folnur's Refuge.
- Place the BRUSH (U).
- Use the KEY (V).
- Play the HOP (W) to acquire the OLD LENS.
- Place the OLD LENS (X).
- Turn the handle (Y); take the LENS.
- Go to Mountgore's Temple.
- Use the FLOWER (Z); you acquire the WOODEN PART.

- Place the CLEAN SHEET (A); take the SPELL SCROLL.
- Go to the Ontus Glade.
- Place the WOODEN PART (B).
- Play the mini-game.
- Solution: (C).
- Place the LENS (D); take the LIGHT-FILLED LENS (E).
- Go to the Tower Hall.
- Talk to the men (F).
- Go up.
- Place the LIGHT-FILLED LENS (G); shut the barrel (H).
- Place the SPELL SCROLL (I).
- Congratulations, you have completed Lost Lands: The Four Horsemen.
Created at: 2015-02-13