

Walkthrough Menu
- General Tips
- Chapter 1: Around the Druid Valley
- Chapter 2: Floating Islands
- Chapter 3: Underground
- Chapter 4: Castle of Madness
- Chapter 5: From the Grave
General Tips
- This is the official guide for Lost Lands: The Golden Curse.
- This guide does not mention each time you have to zoom into a location; the screenshots show each zoom scene.
- Hidden-object puzzles are referred to as HOPs. This guide does not show screenshots of the HOPs, however, it is mentioned when a HOP is available and the inventory item collected.
- This guide gives step-by-step solutions for all puzzles that are not random. Please read the instructions in the game for each puzzle.
Chapter 1: Around the Druid Valley
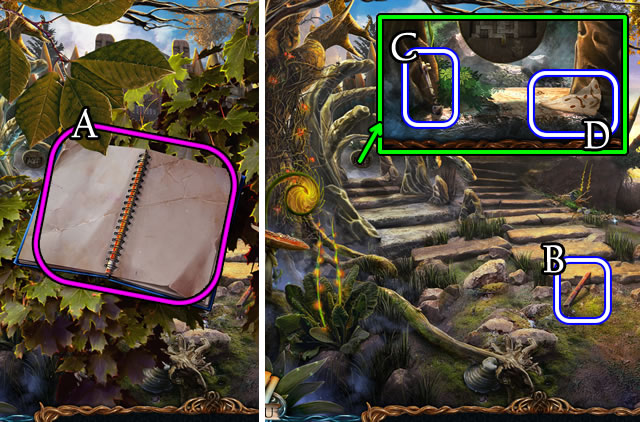
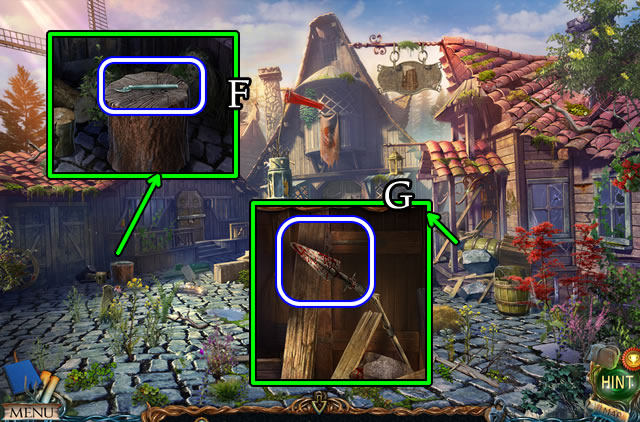
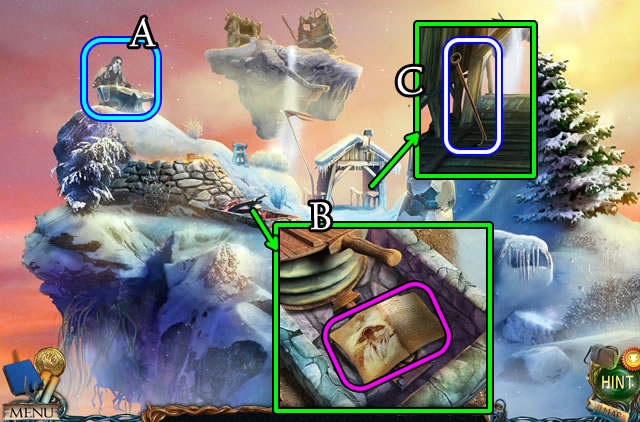
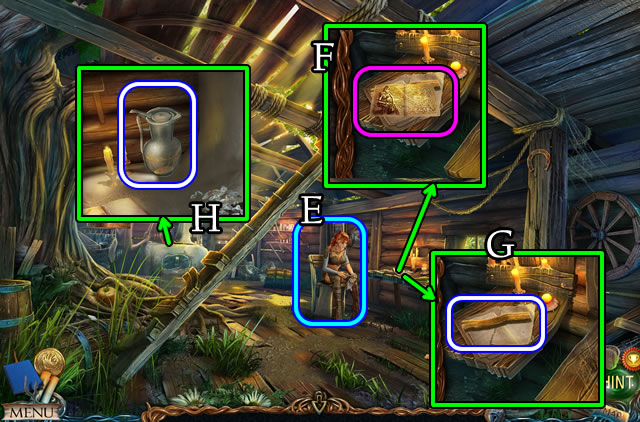
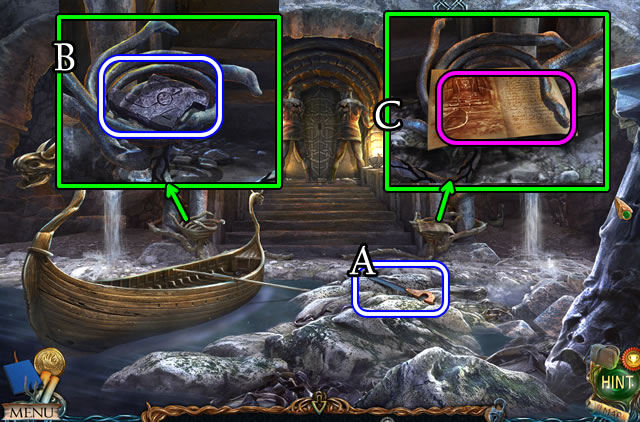
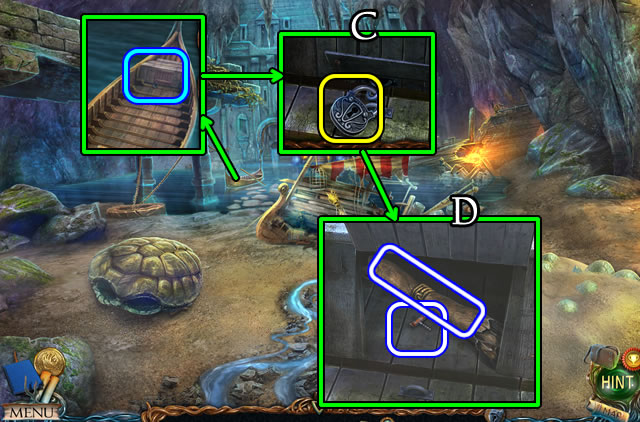
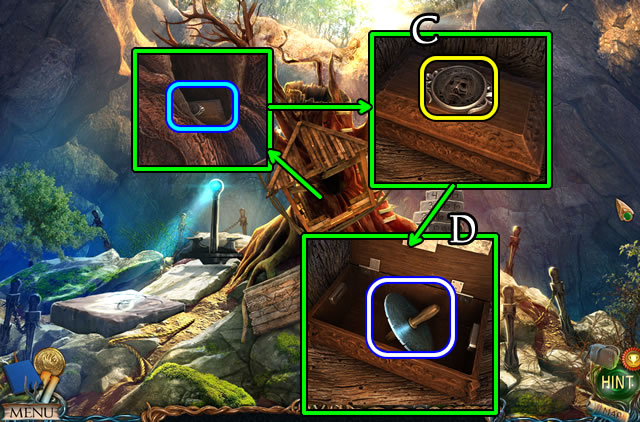
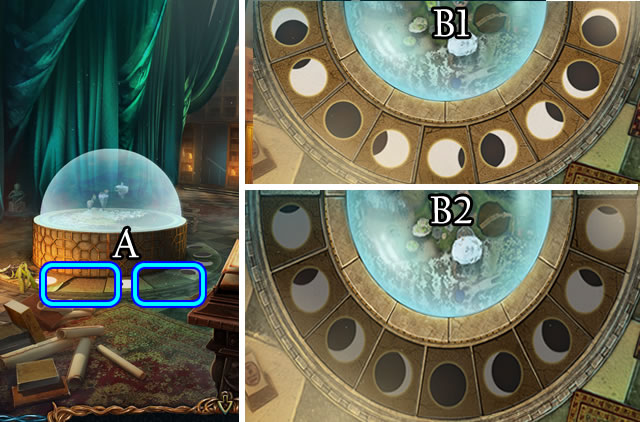
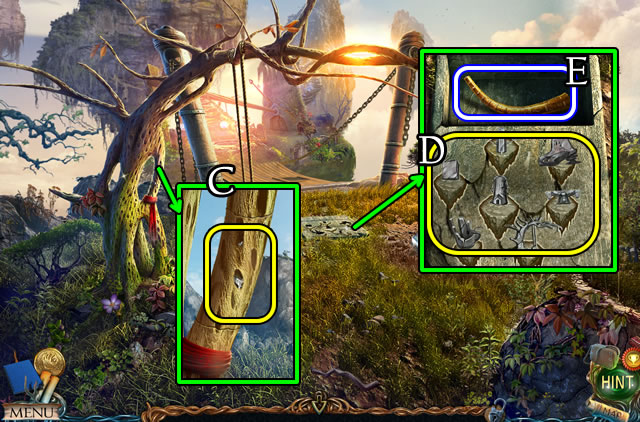
- Uncover and take the Notebook (A). Select the branch.
- Take the HAMMER HANDLE (B).
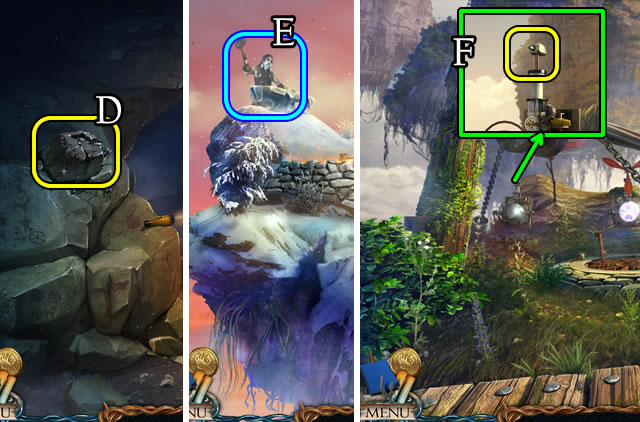
- Take XYLOPHONE HAMMER 1/3 (C) and MAP FRAGMENT (D).
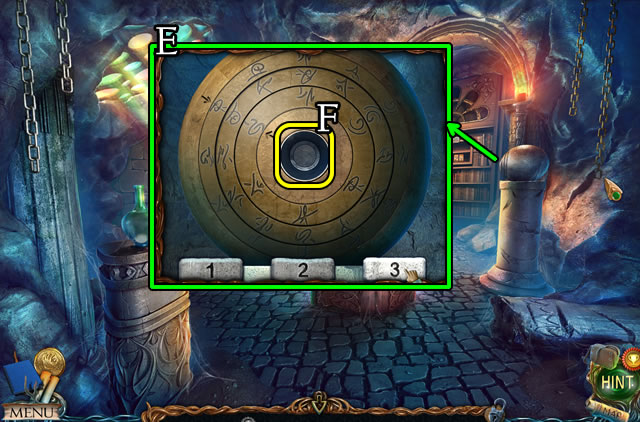
- Take Manuscripts 1/28 (E). Take the HAMMER HEAD (F).
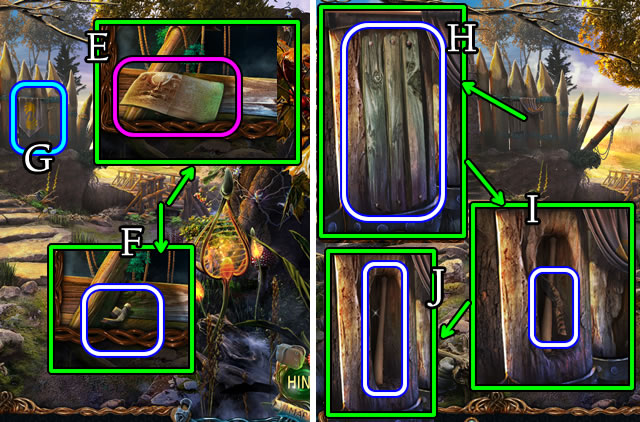
- Combine the HAMMER HEAD and HAMMER HANDLE for a HAMMER (Inventory).
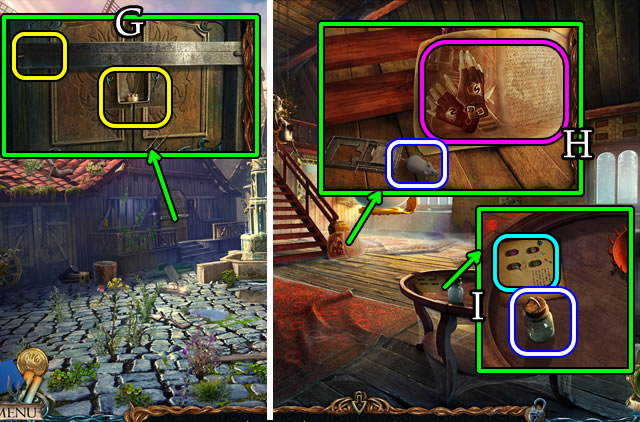
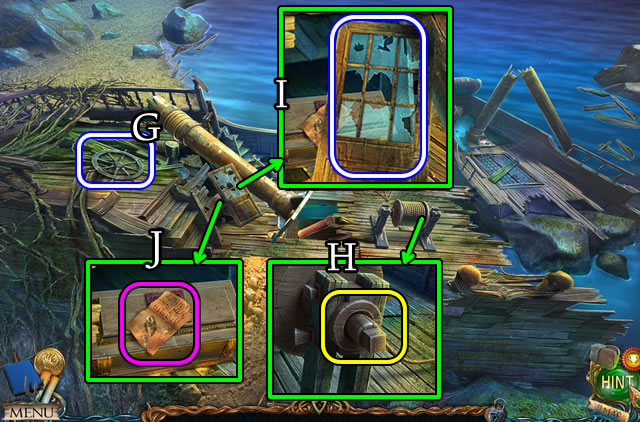
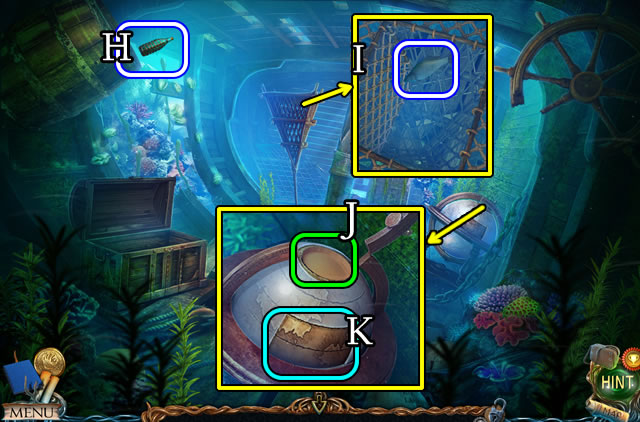
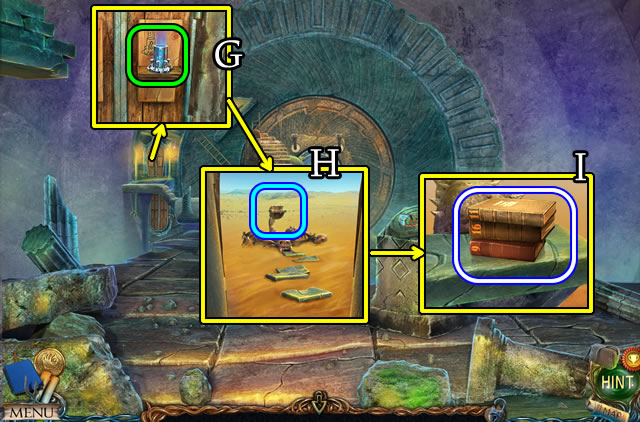
- Select (G). Use the HAMMER for NAILS; take the PLANKS (H).
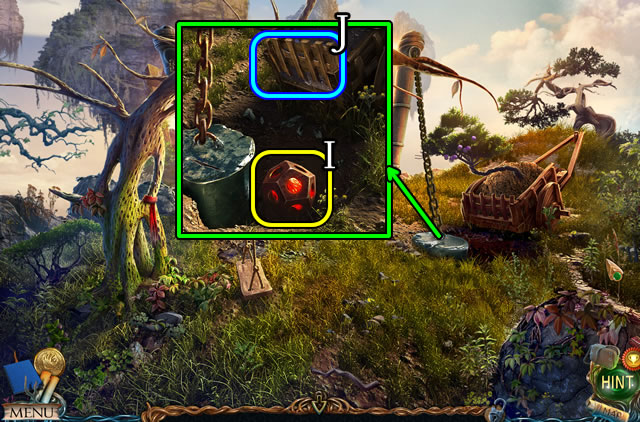
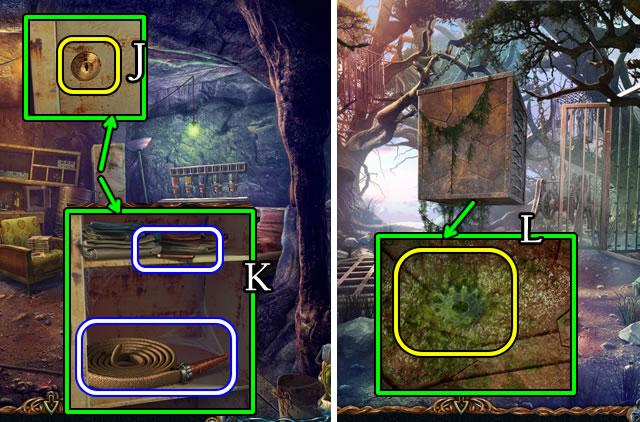
- Take the KNIFE (I) and PICK-AXE HANDLE (J).
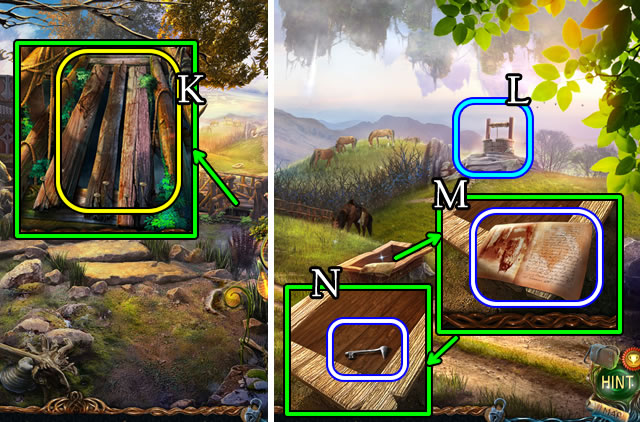
- Place the PLANKS and NAILS (K); use the HAMMER.
- Walk forward.
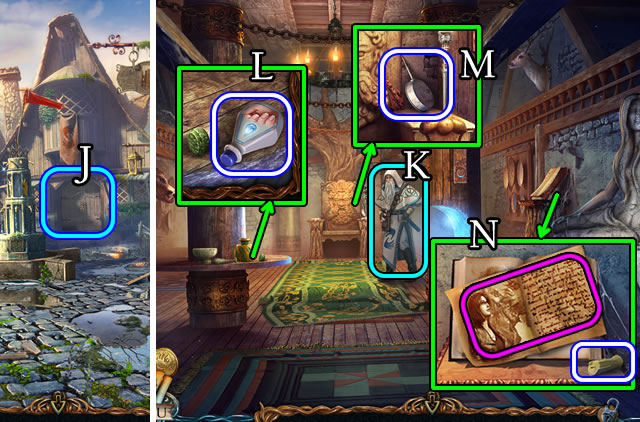
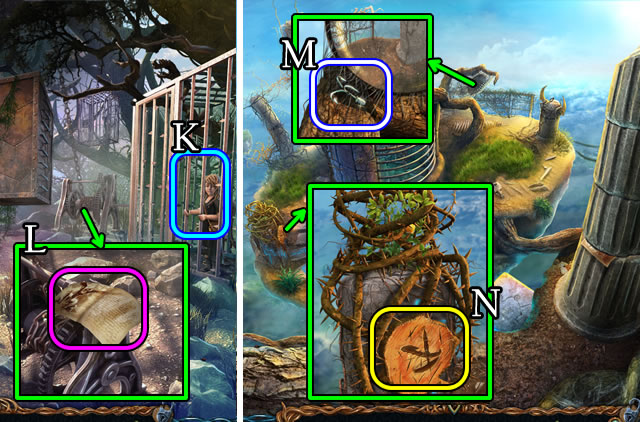
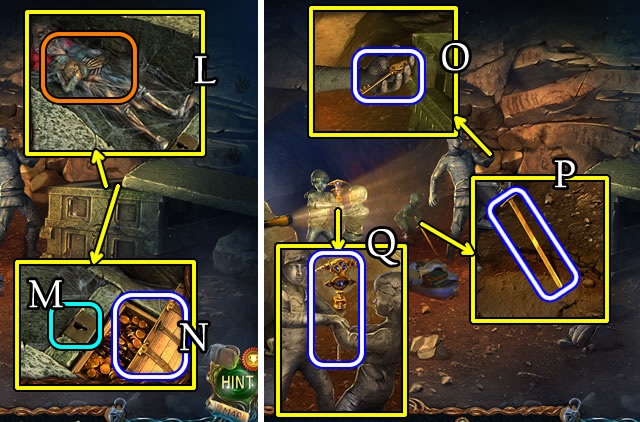
- Select (L); speak to the girl.
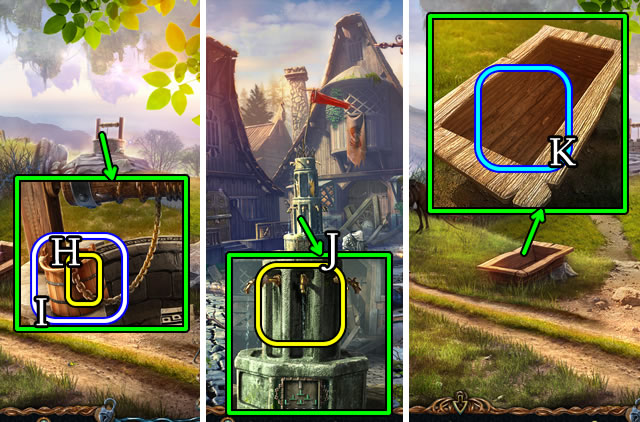
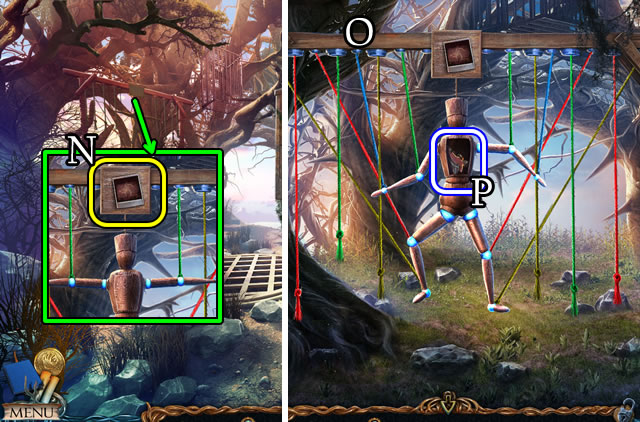
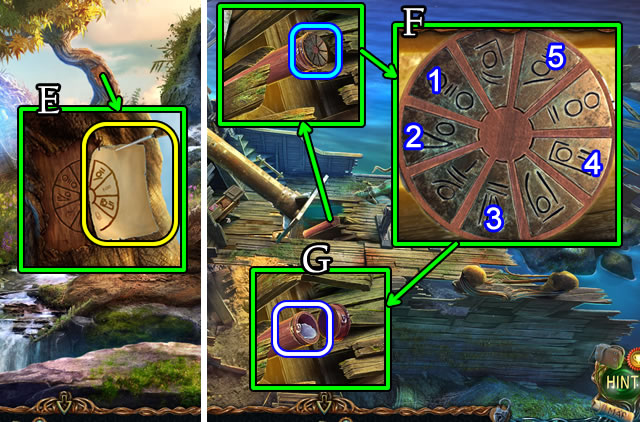
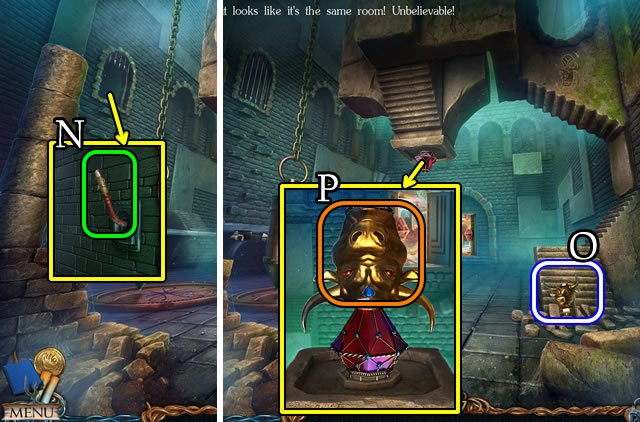
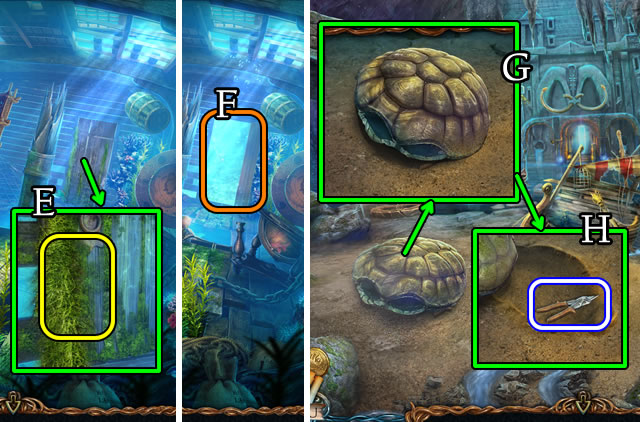
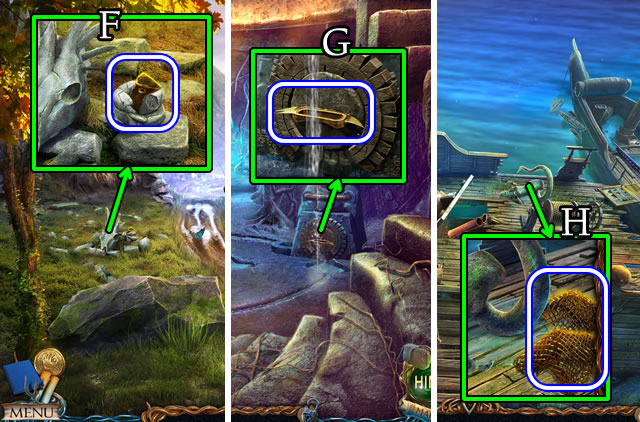
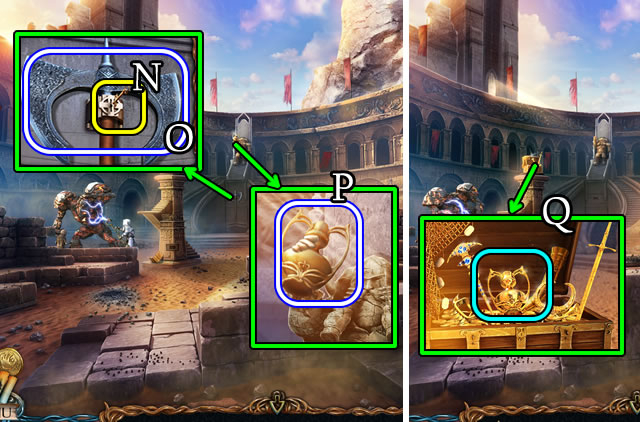
- Take Manuscripts 2/28 (M). Take XYLOPHONE HAMMER 2/3 (N).
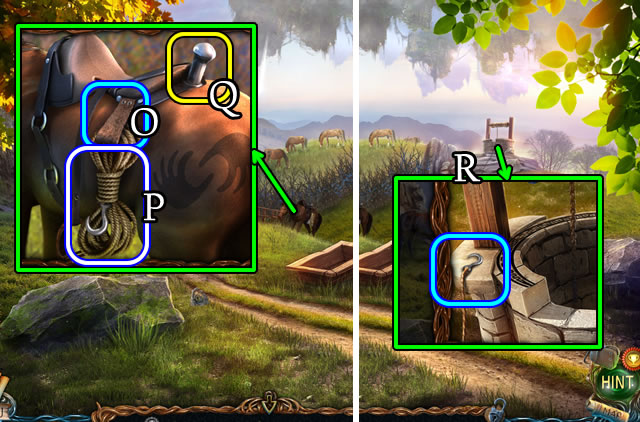
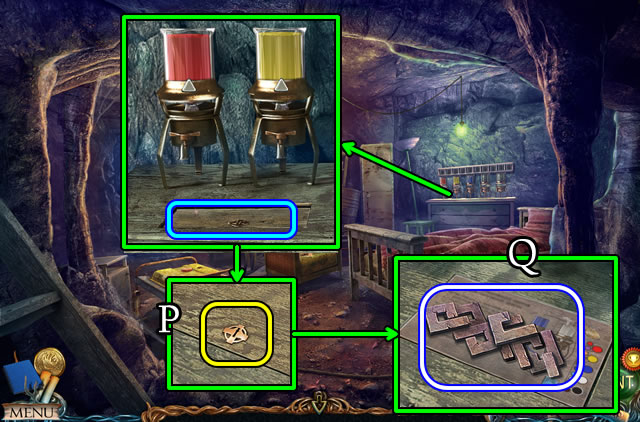
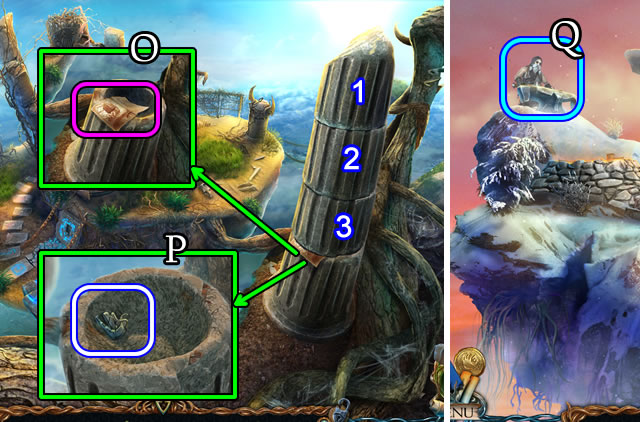
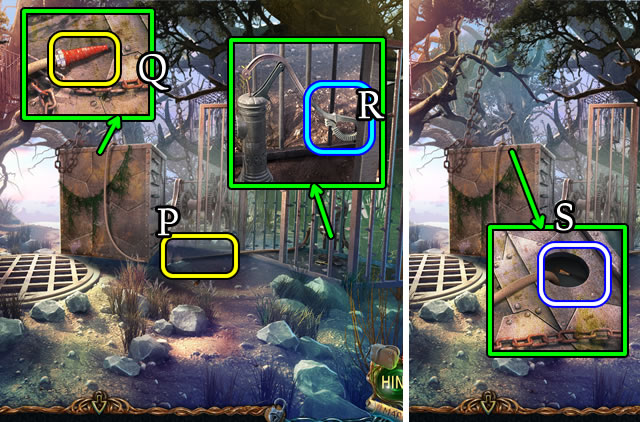
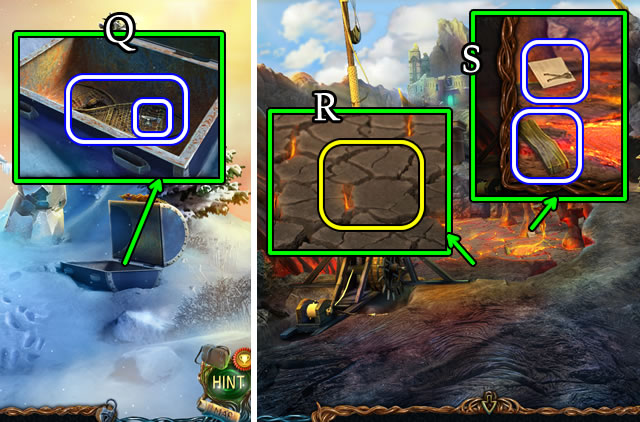
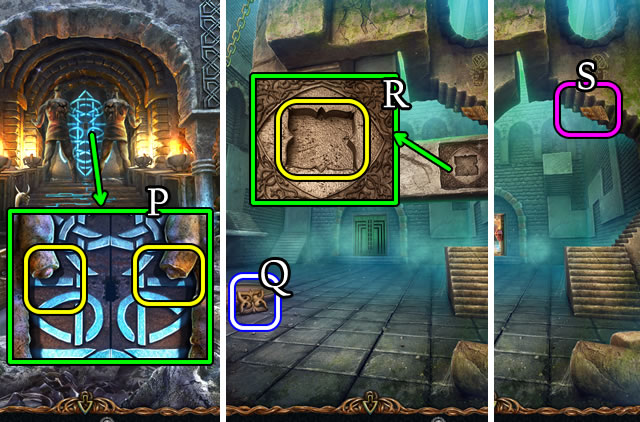
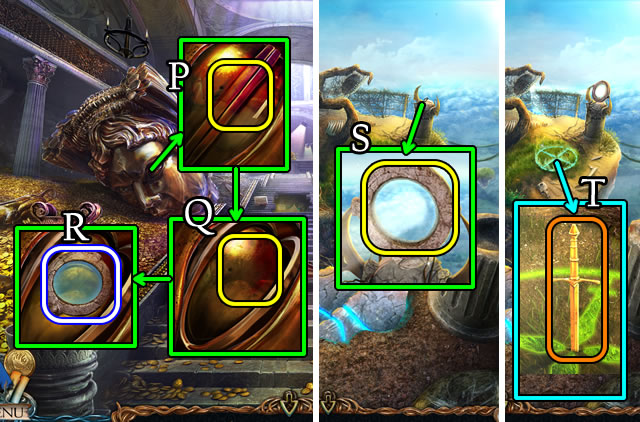
- Use the KNIFE (O) for a ROPE WITH HOOK (P).
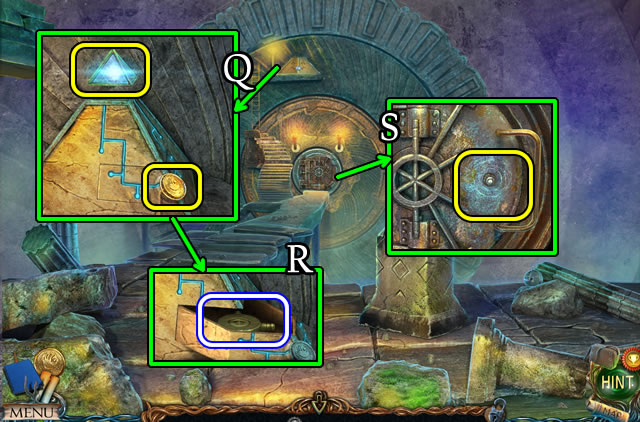
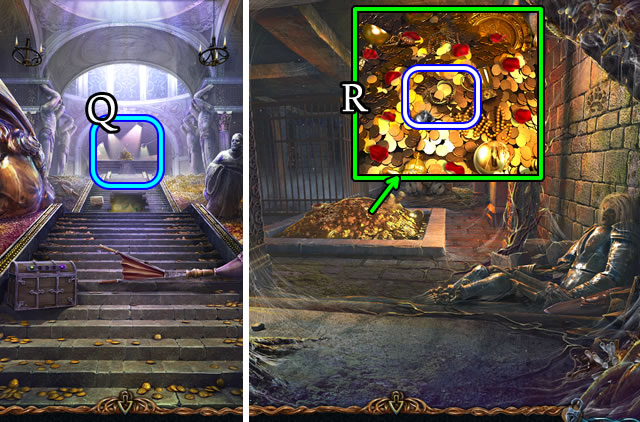
- Place the ROPE WITH HOOK (Q).
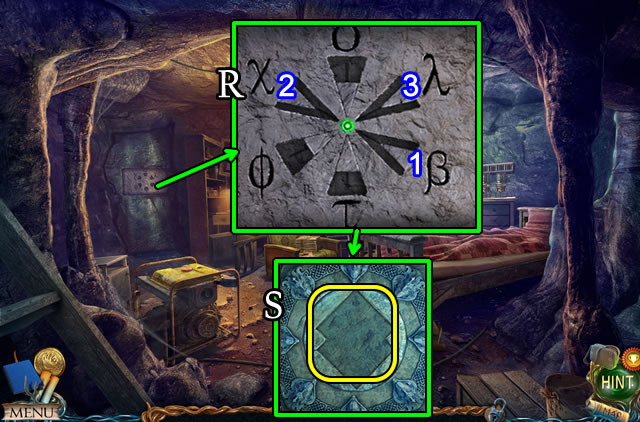
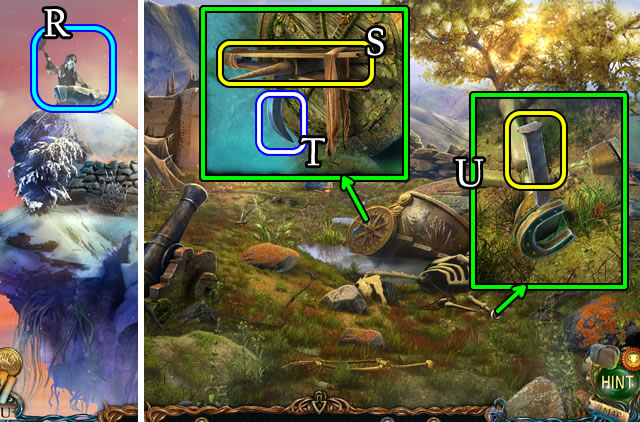
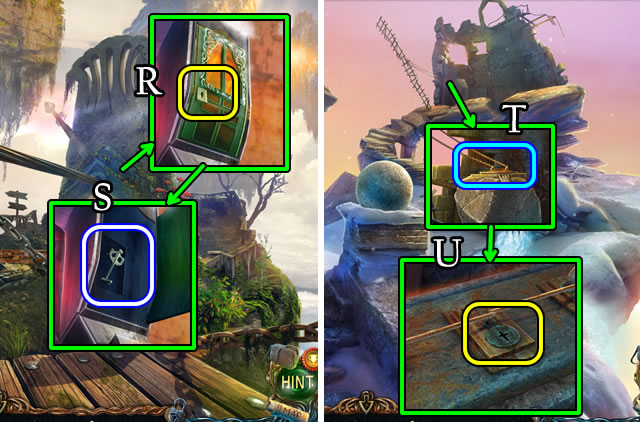
- Select the hook (R).
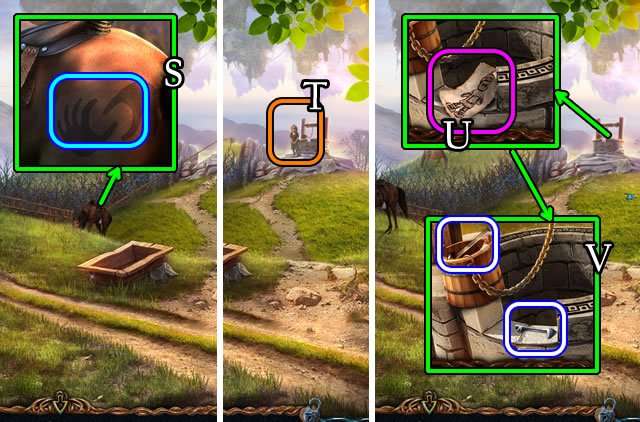
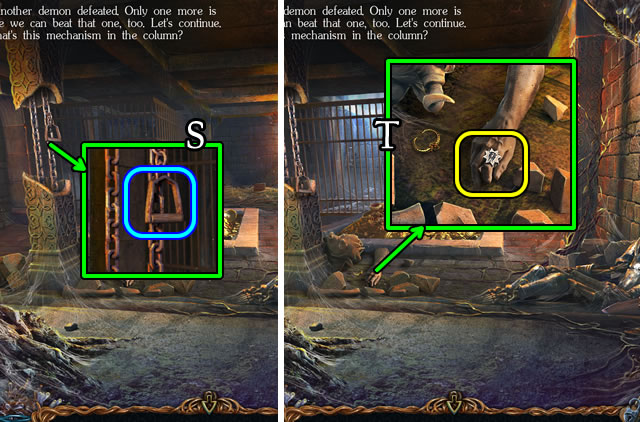
- Touch (S).
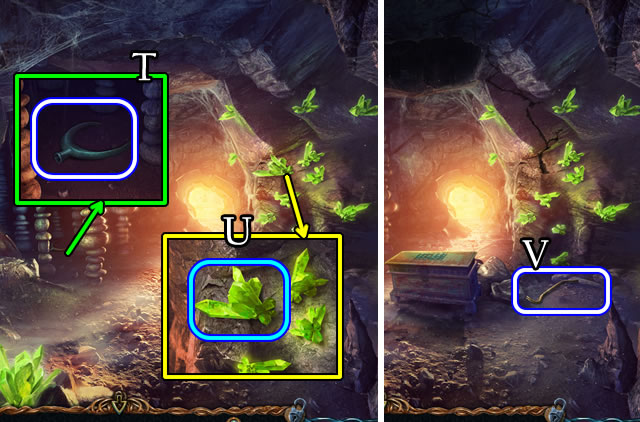
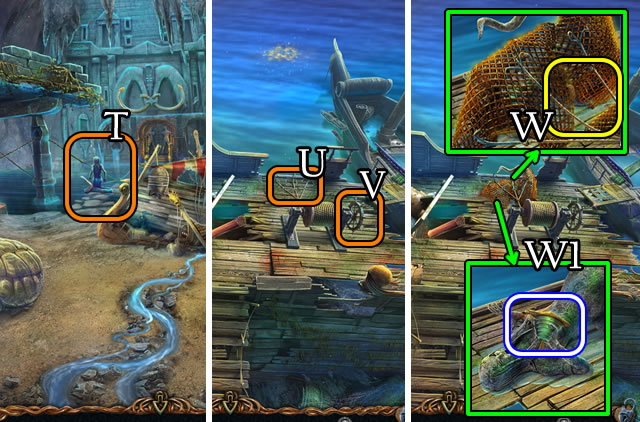
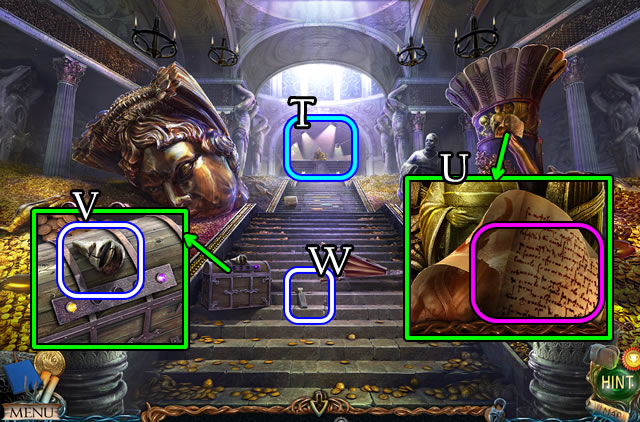
- Speak to the girl (T); receive SHEET MUSIC.
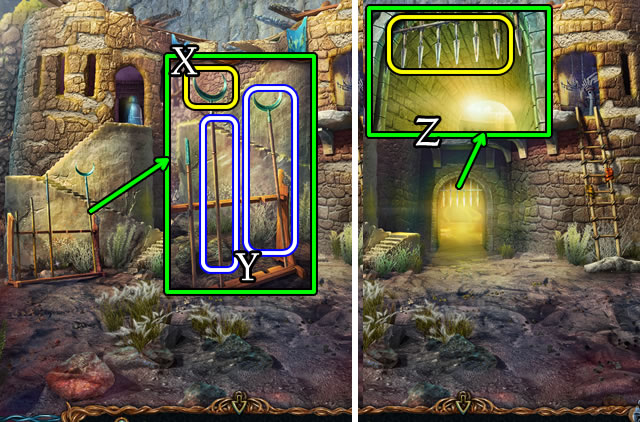
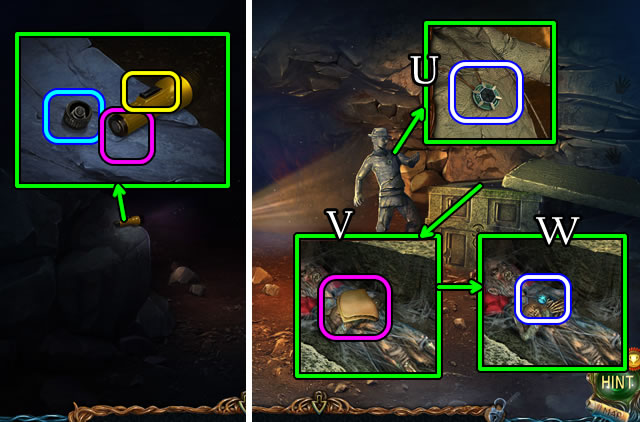
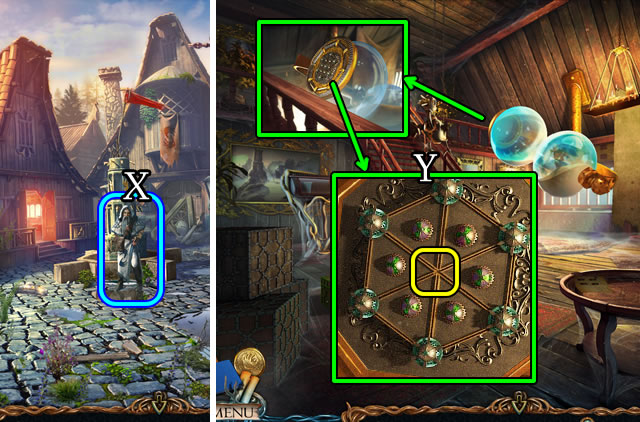
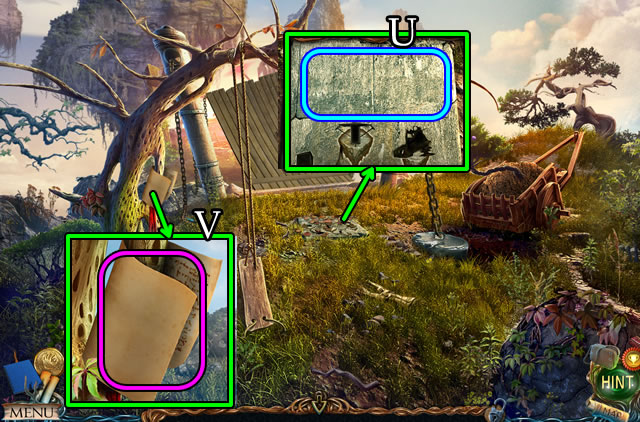
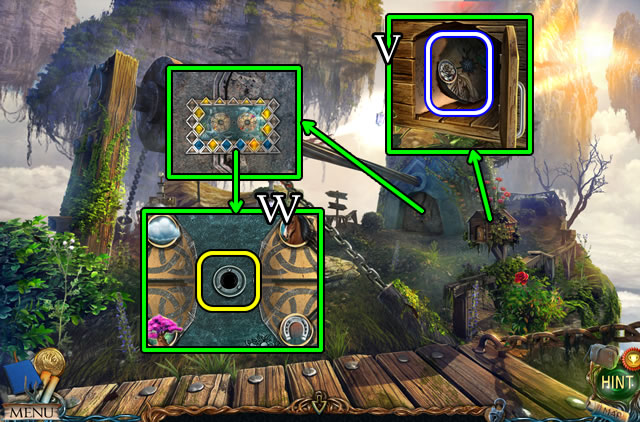
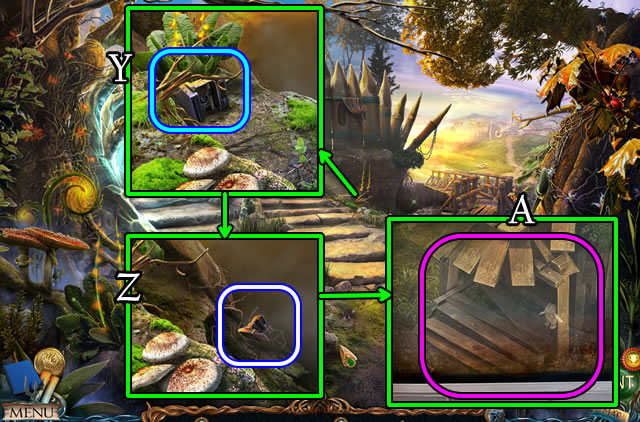
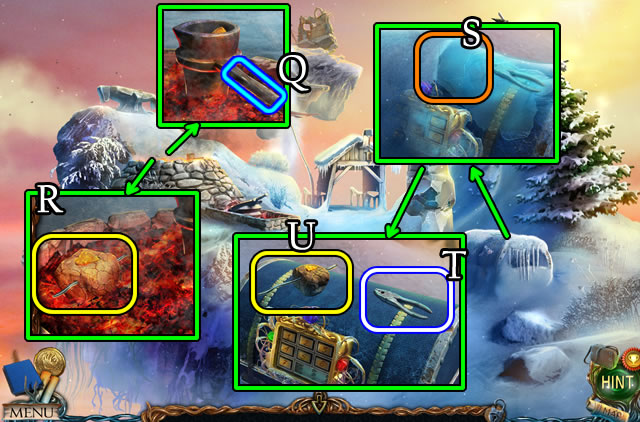
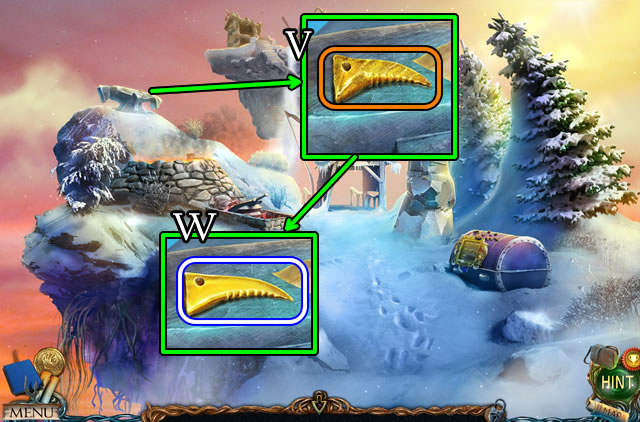
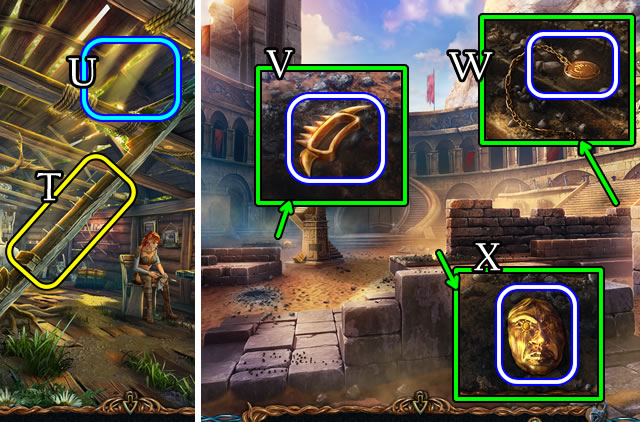
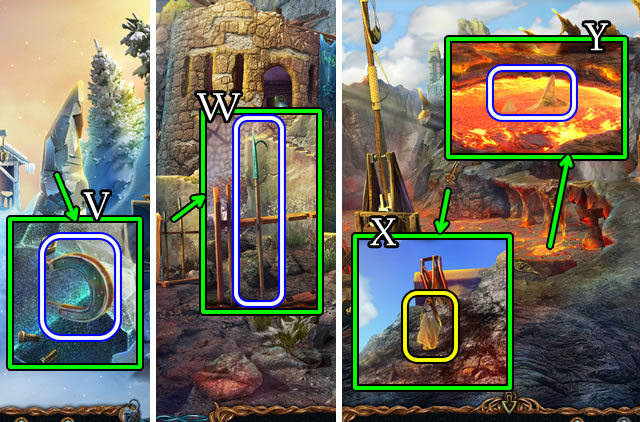
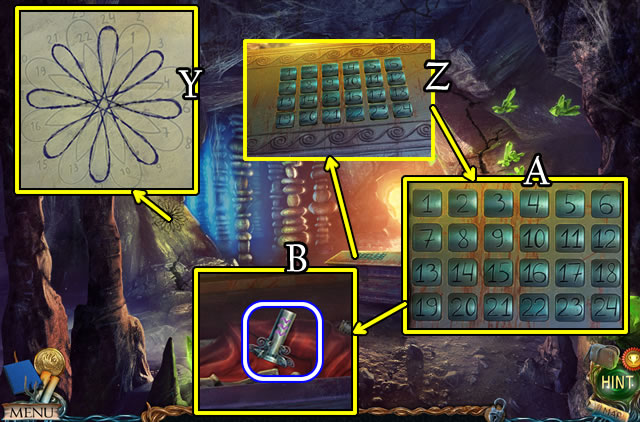
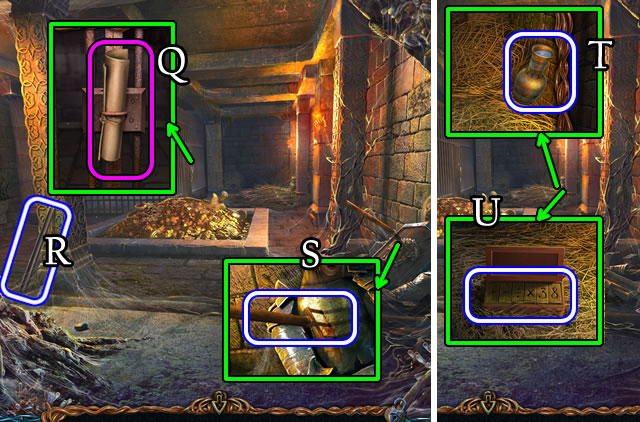
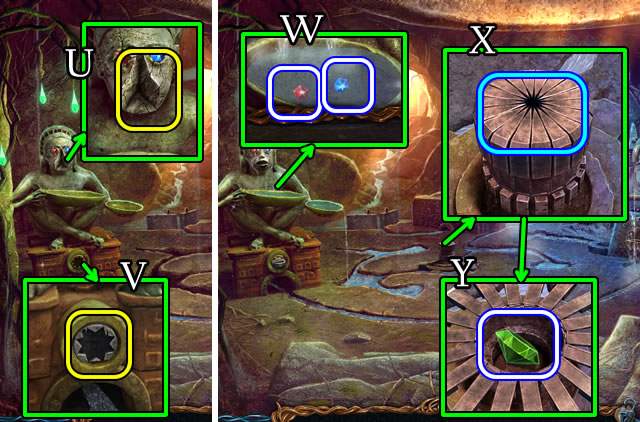
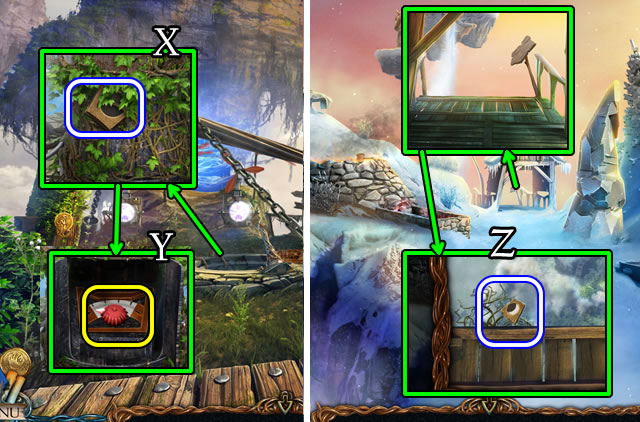
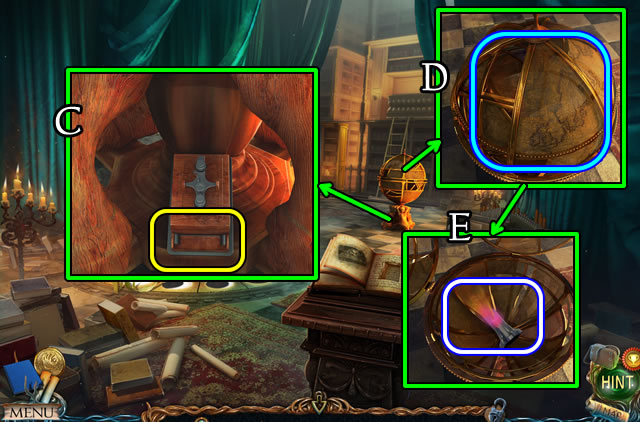
- Take the drawing (U). Take XYLOPHONE HAMMER 3/3 and HALF A PAIR OF CLIPPERS (V).
- Walk down.
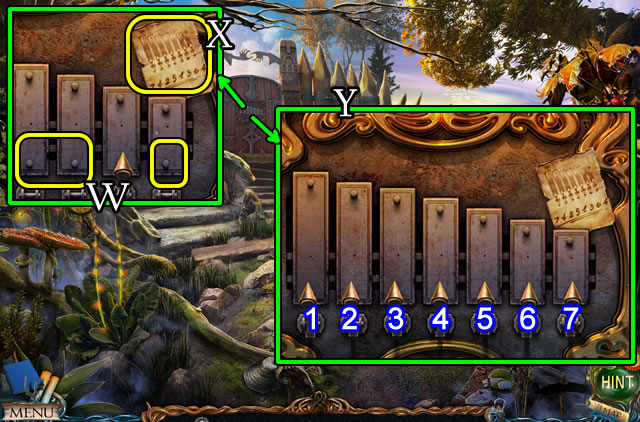
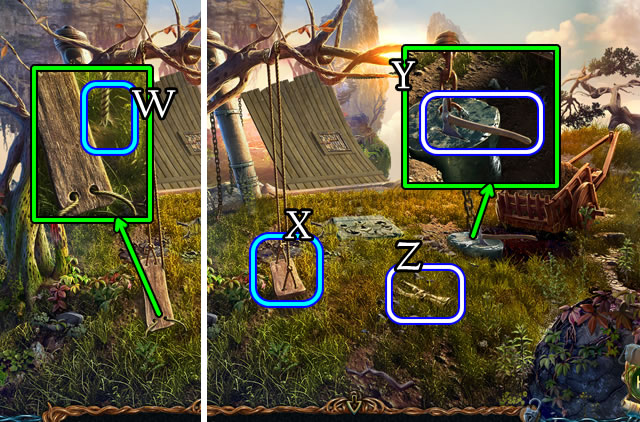
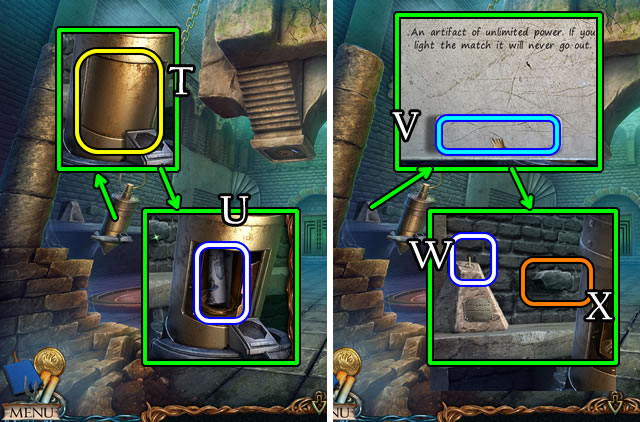
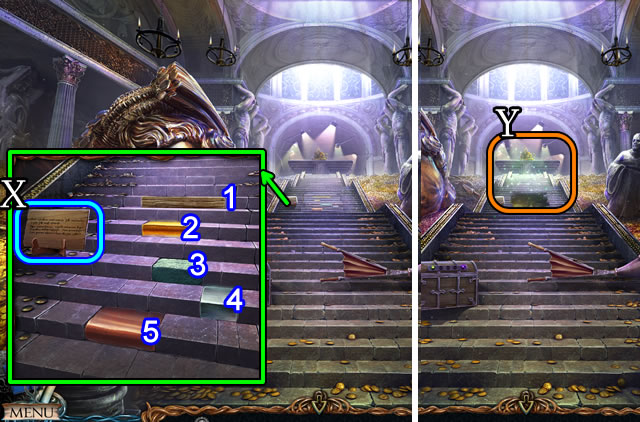
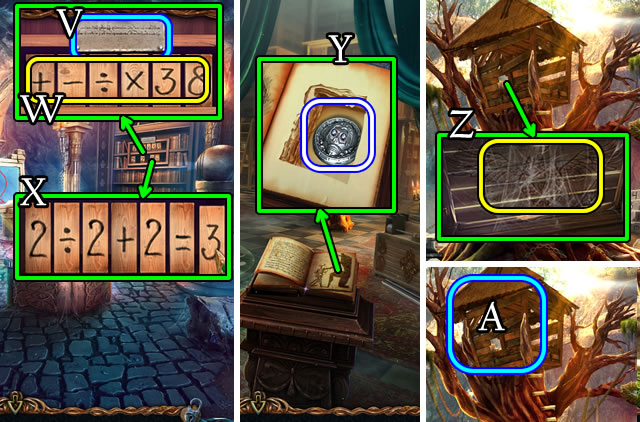
- Place XYLOPHONE HAMMERS 3/3 (W) and the SHEET MUSIC (X).
- Solution (Y). 7-4-2-5-1-3-6-4.
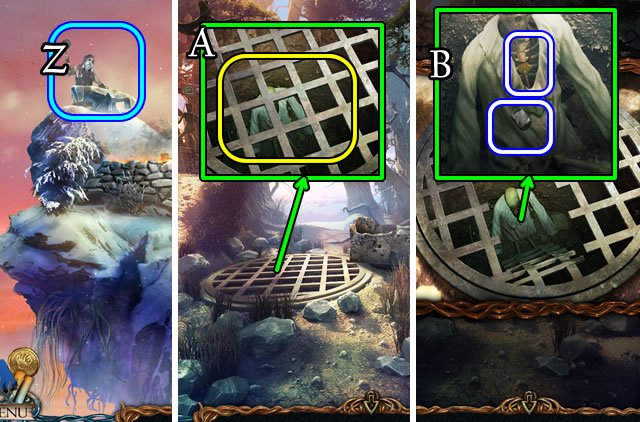
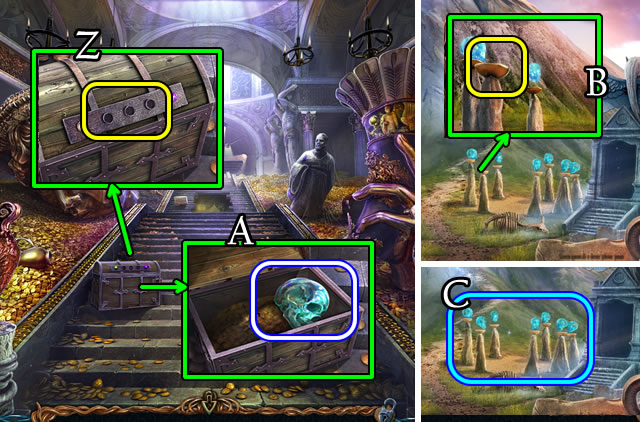
- Walk forward.
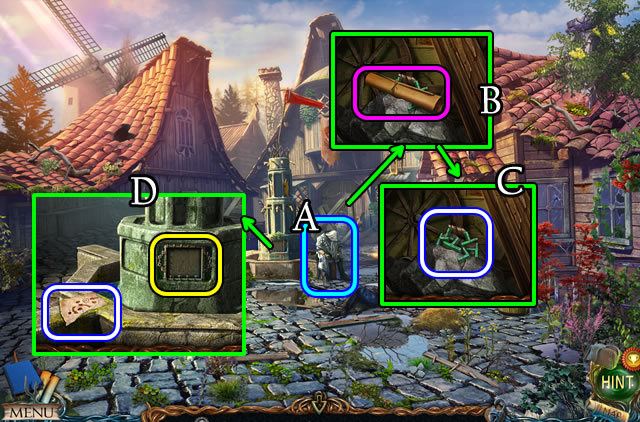
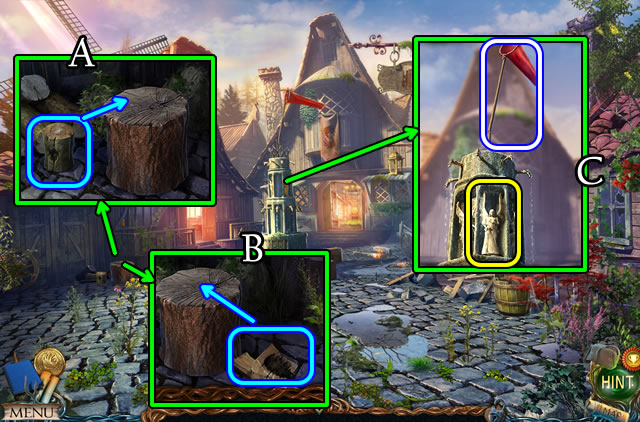
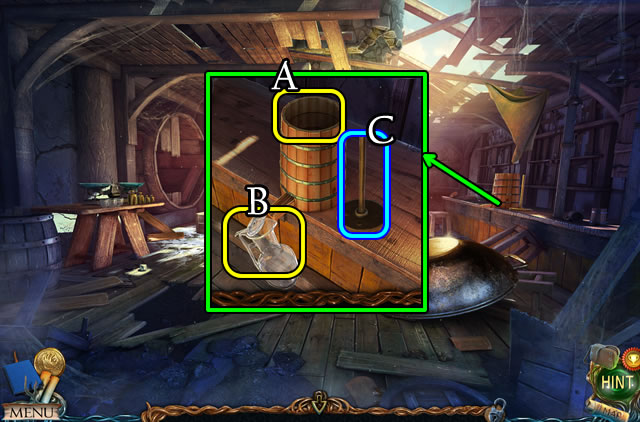
- Speak to the grandfather (A).
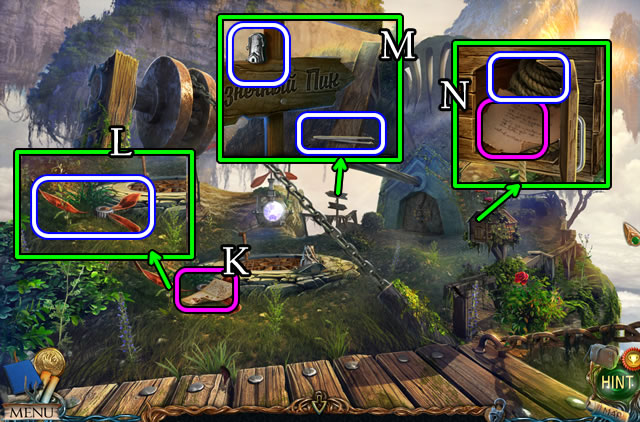
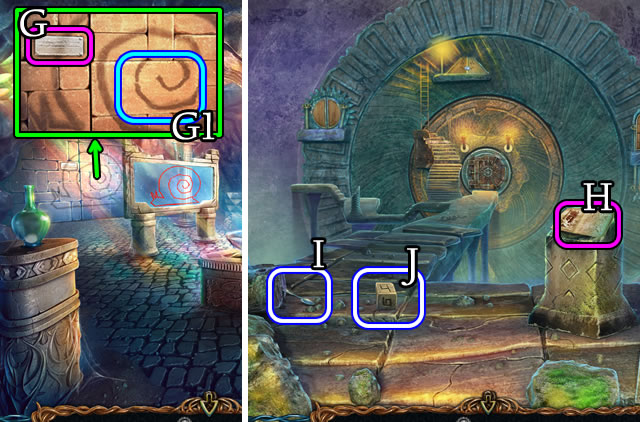
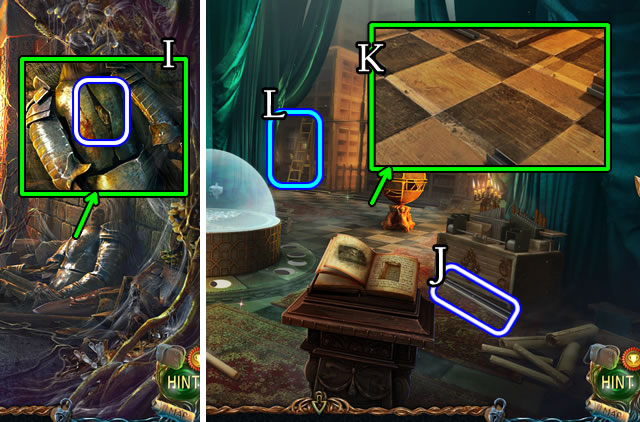
- Uncover and take Manuscripts 3/28 (B). Take the BRACKETS (C).
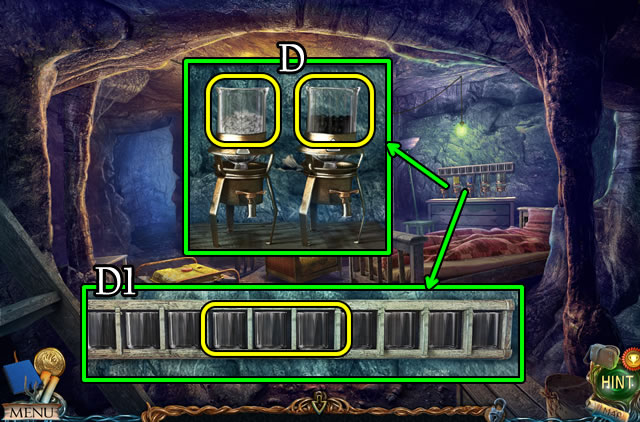
- Take the MAP FRAGMENT. Place the BRACKETS (D).
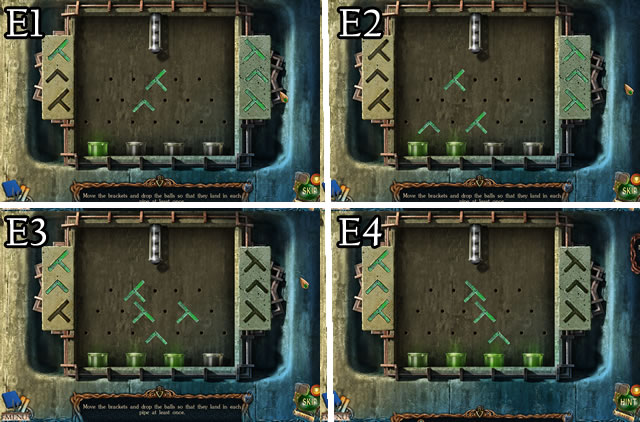
- Solution (E1-E2-E3-E4).
- Grab the HALF A PAIR OF CLIPPERS (F) and BLOODY SPEAR (G).
- Walk down; cross the bridge.
- Combine the two HALF A PAIR OF CLIPPERS for CLIPPERS (Inventory).
- Use the CLIPPERS (H). Take the BUCKET (I).
- Walk down and through the gates.
- Place the BUCKET (J) for a BUCKET OF WATER.
- Return to the Hills.
- Pour the BUCKET OF WATER (K).
- Walk forward.
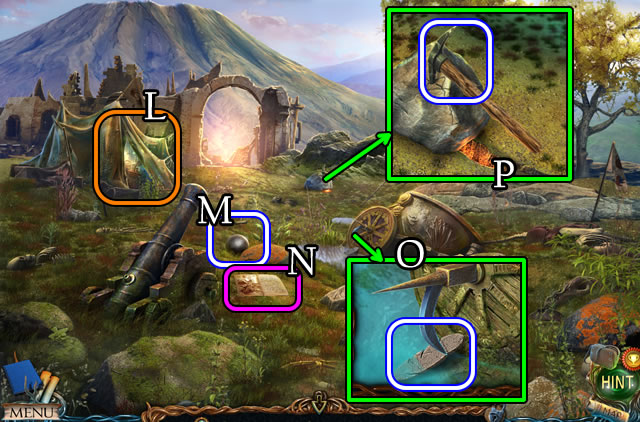
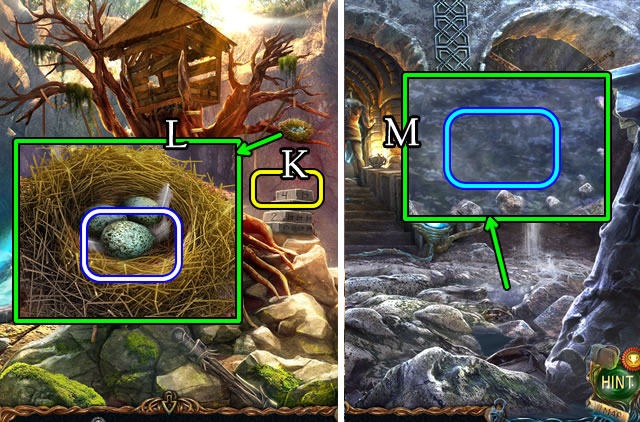
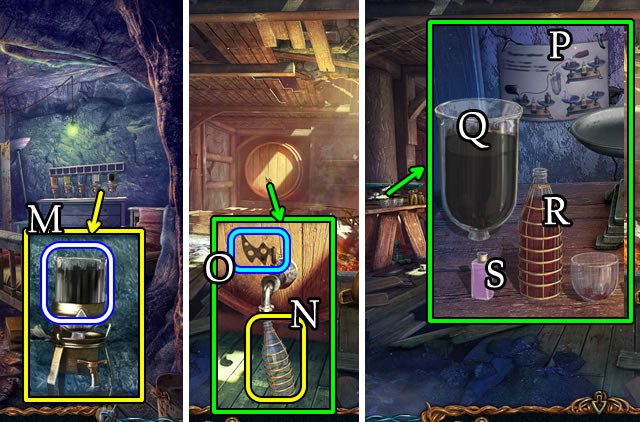
- Play the HOP (L) to receive OINTMENT.
- Take the CANNONBALL (M) and Manuscripts 4/28 (N).
- Take STONE FEATHERS 1/6 (O).
- Select then take the BROKEN PICK-AXE (P).
- Walk forward.
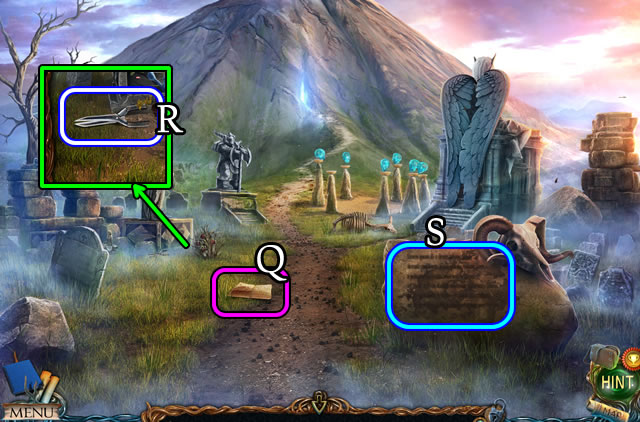
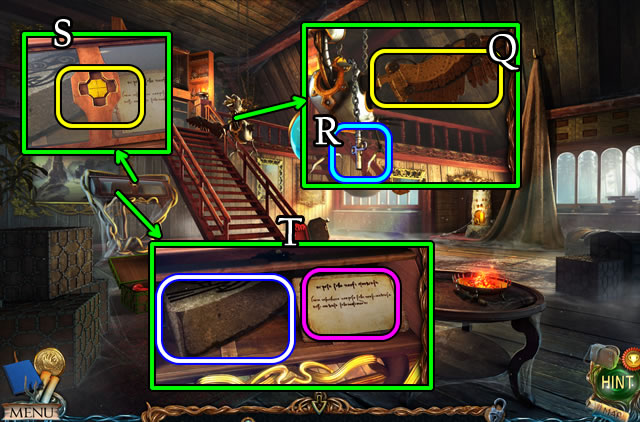
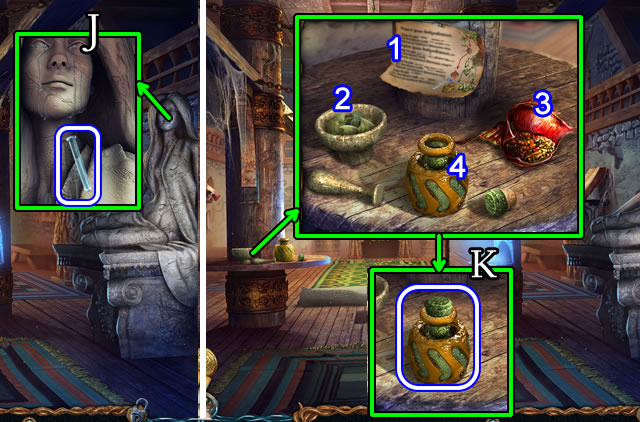
- Take Manuscripts 5/28 (Q). Grab the GARDEN SHEARS (R).
- Select (S) 3x. Note the inscription.
- Walk forward.
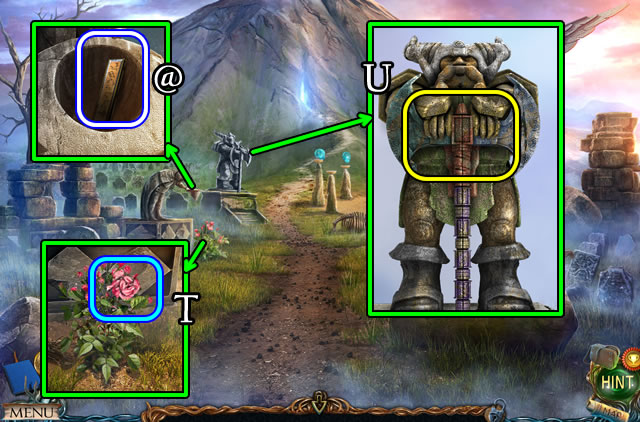
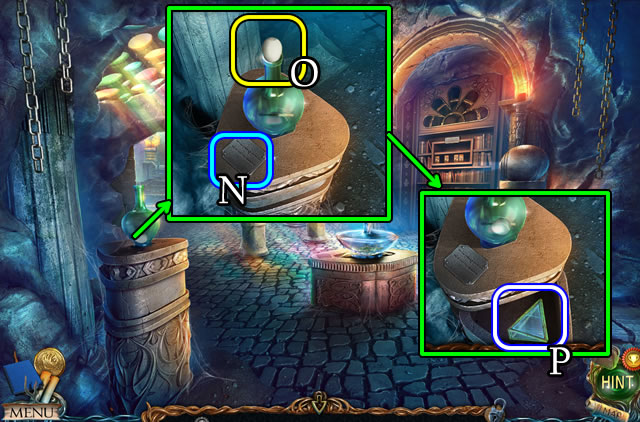
- Grab the SPEAR HEAD (T).
- Combine the BROKEN PICK-AXE, HAMMER and PICK-AXE HANDLE for a PICK-AXE (Inventory).
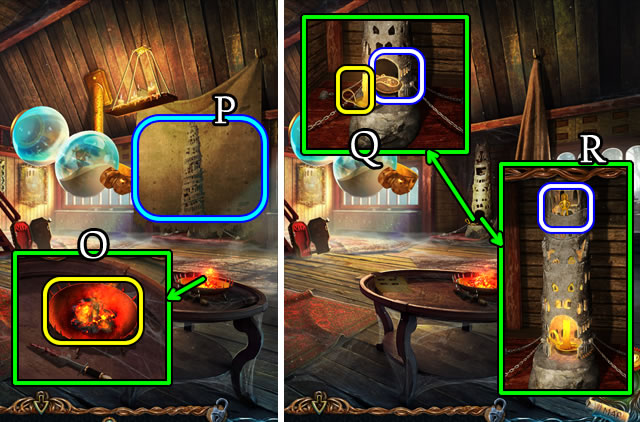
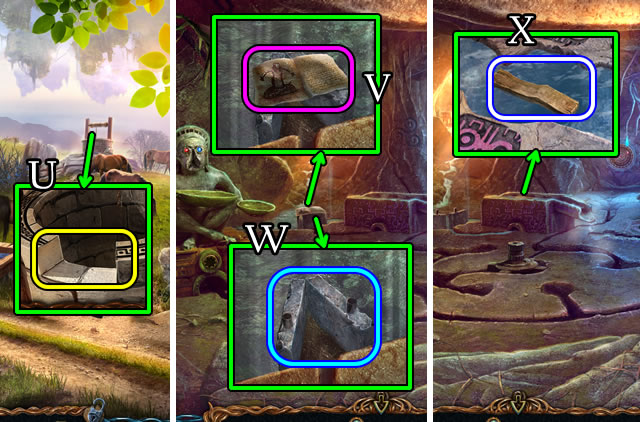
- Use the PICK-AXE for VOLCANIC CRYSTAL (U).
- Take the CROWBAR (V).
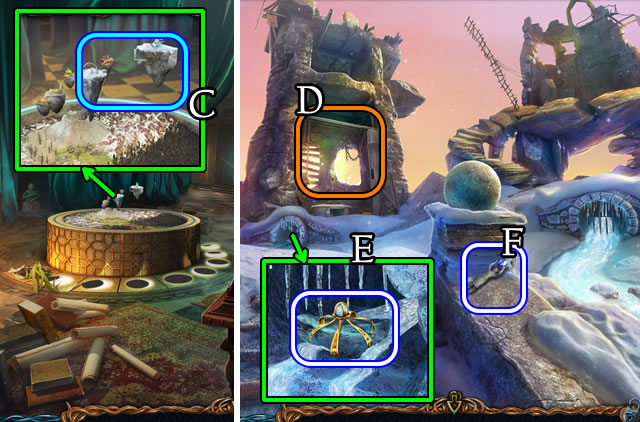
- Walk forward.
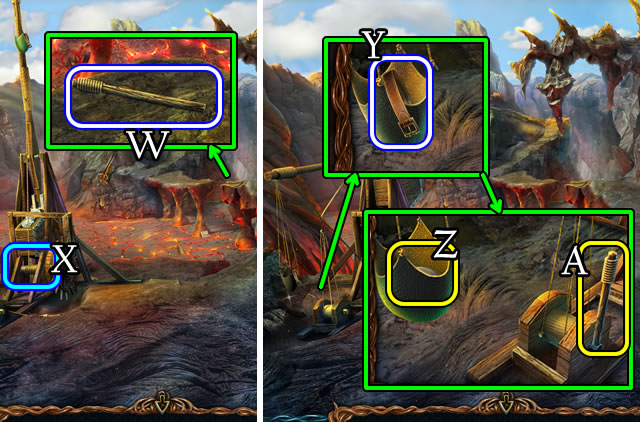
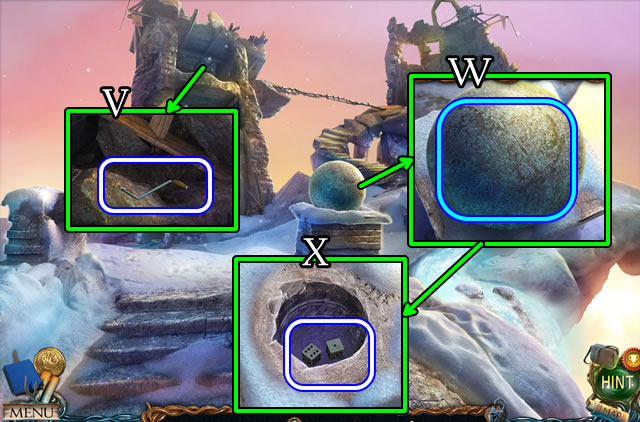
- Take the LEVER (W).
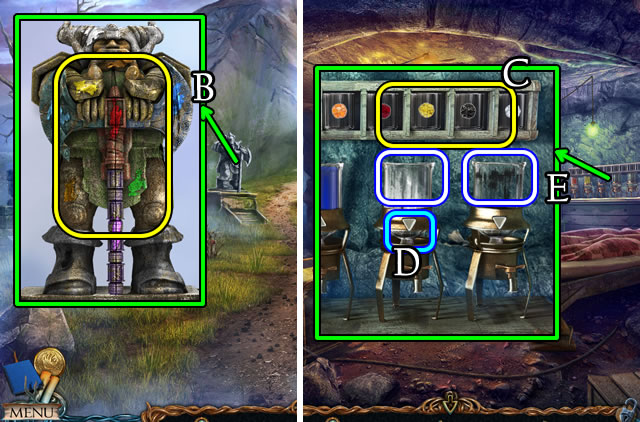
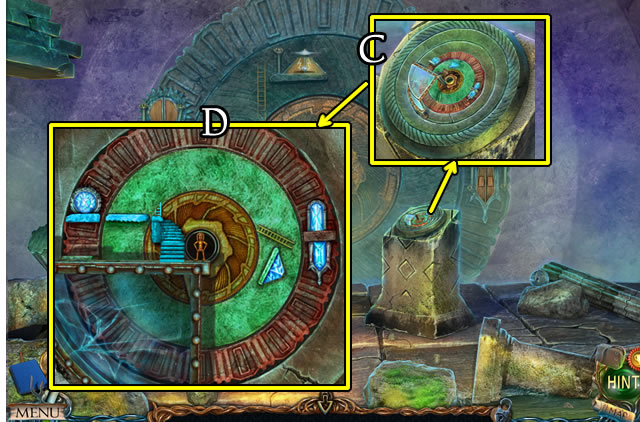
- Select (X). Take the BELT (Y), place the CANNONBALL (Z) and LEVER (A). Pull the lever.
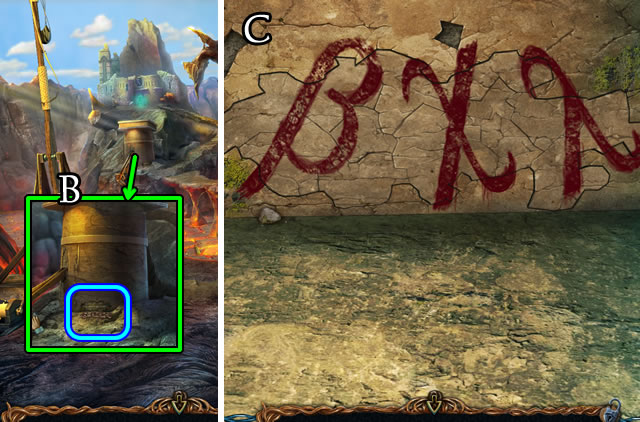
- Select (B).
- Solution (C).
- Walk forward.
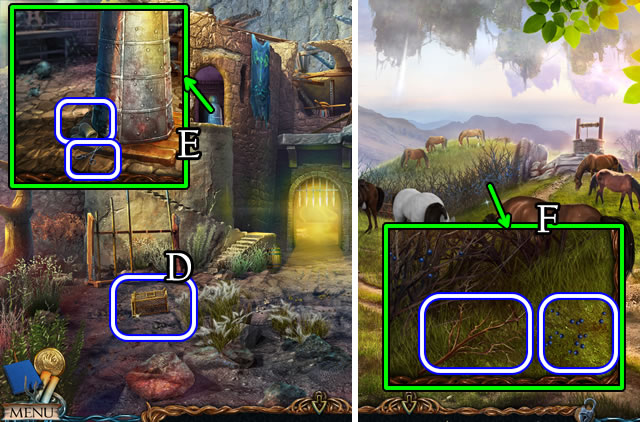
- Grab the CAGE TRAP (D).
- Take the CLAMP and BANDAGE (E).
- Walk down 5x.
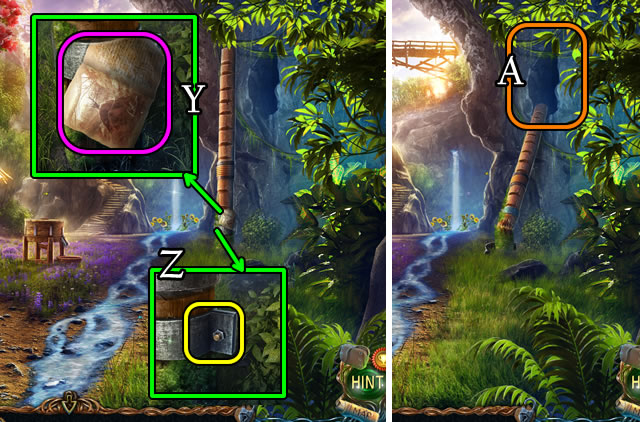
- Use the GARDEN SHEARS. Take the BLACKTHORN BERRIES and BLACKTHORN TWIG (F).
- Walk down and through the gates.
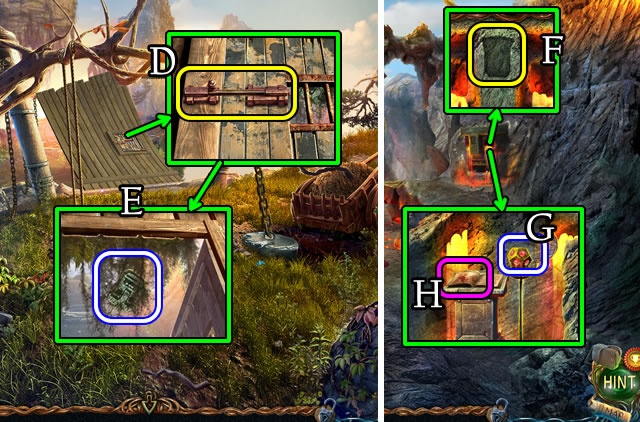
- Use the CROWBAR; place the VOLCANIC CRYSTAL (G).
- Walk left.
- Take Manuscripts 6/28 and the MOUSE (H).
- Note the directions; take the FLASK (I).
- Return to the Volcanic Cavern.
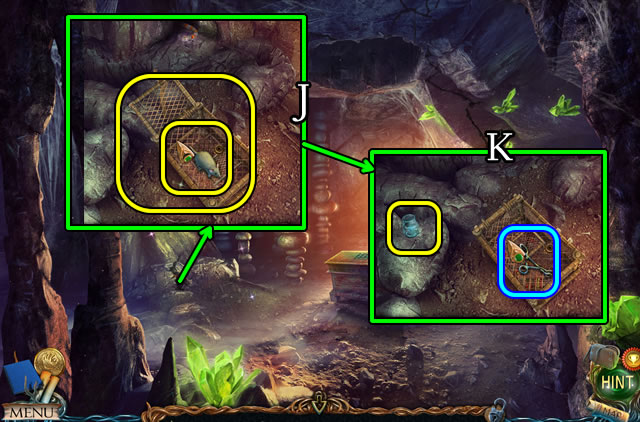
- Place the CAGE TRAP; place the MOUSE (J).
- Place the FLASK. Use the CLAMP (K). Take the VIPER VENOM.
- Return to the Relic Repository.
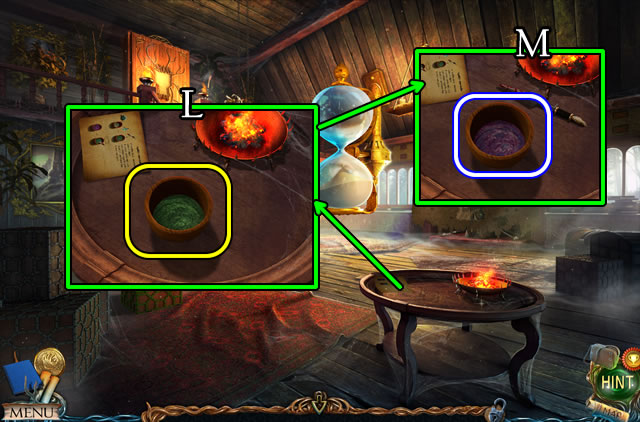
- Place the OINTMENT (L). Add the BLACKTHORN BERRIES, VIPER VENOM and BLOODY SPEAR.
- Take the POTION (M).
- Walk down.
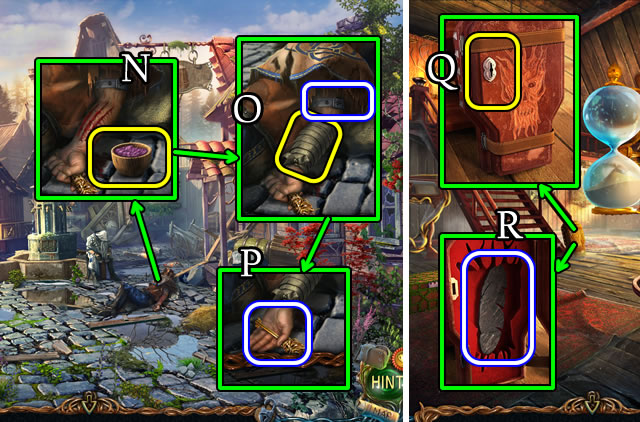
- Place and select the POTION (N).
- Apply the BANDAGE; take the BELT (O). Take the KEY (P).
- Walk left.
- Use the KEY (Q); take STONE FEATHERS 2/6 (R).
- Return to the Arena Entrance.

- Take STONE FEATHERS 3/6 (S).
- Use both BELTS (T); take the LADDER.
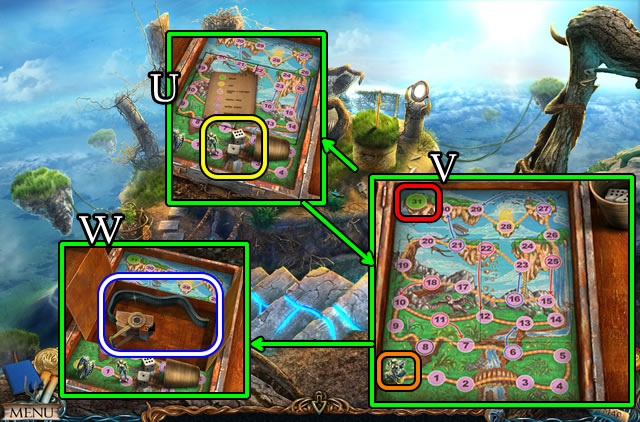
- Attempt to go forward (U).
- Place the LADDER (V).
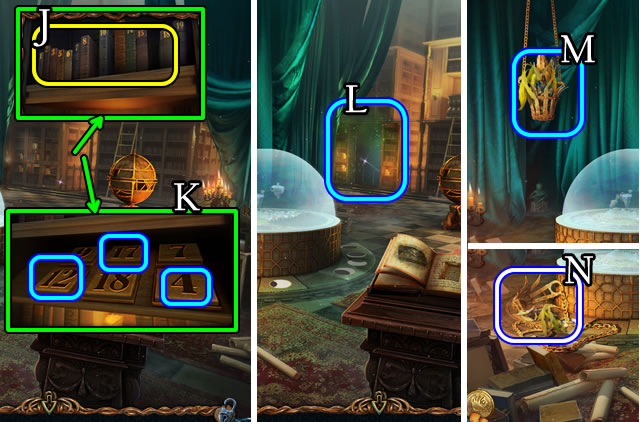
- Take Manuscripts 7/28 (W). Select the wheel.
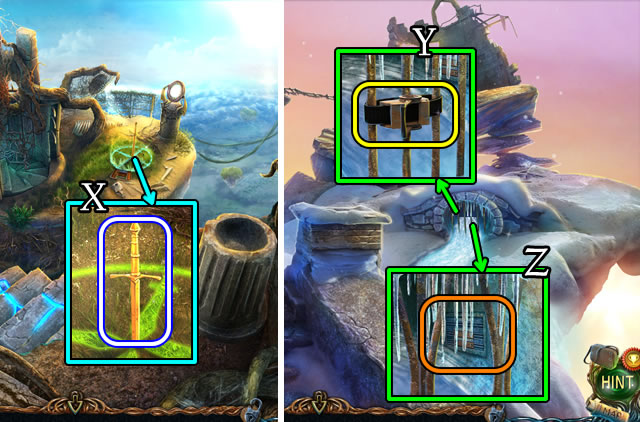
- Place the SPEAR HEAD (X).
- Take TWO-PRONGED SPEAR 1/2-2/2 (Y).
- Place TWO-PRONGED SPEARS 2/2 (Z).
- Walk forward.

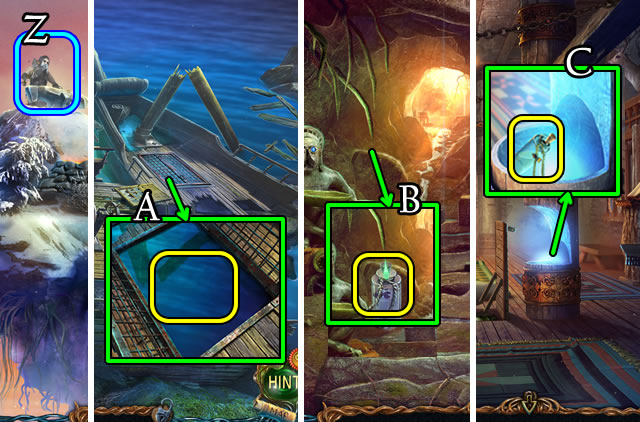
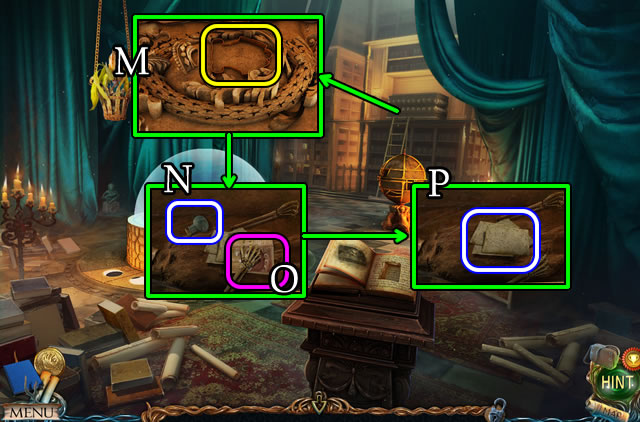
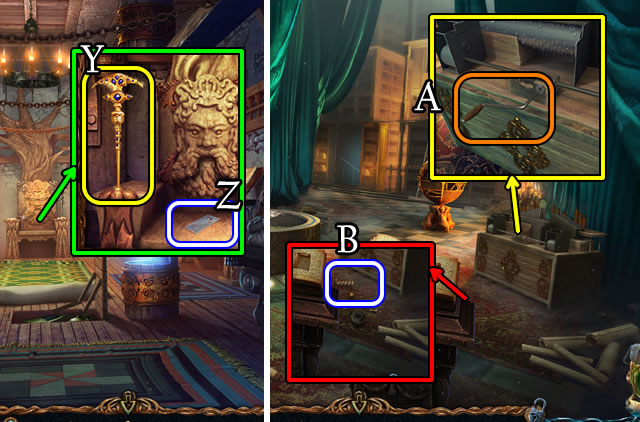
- Grab the CHEWING GUM (A).
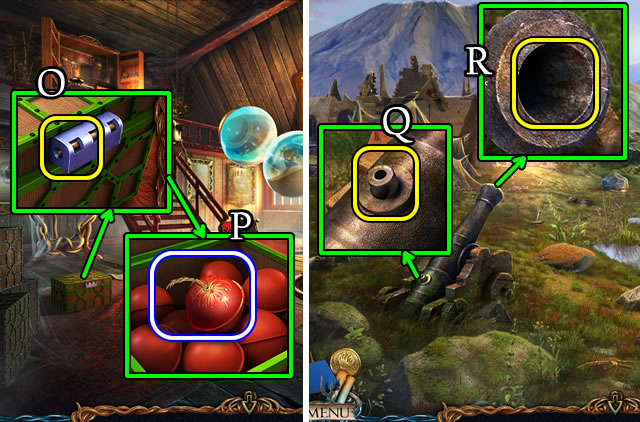
- Take Manuscripts 8/28 (B). Take the BATTERY (C).
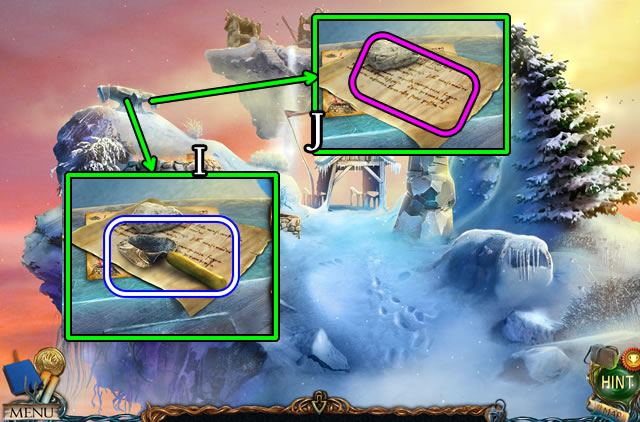
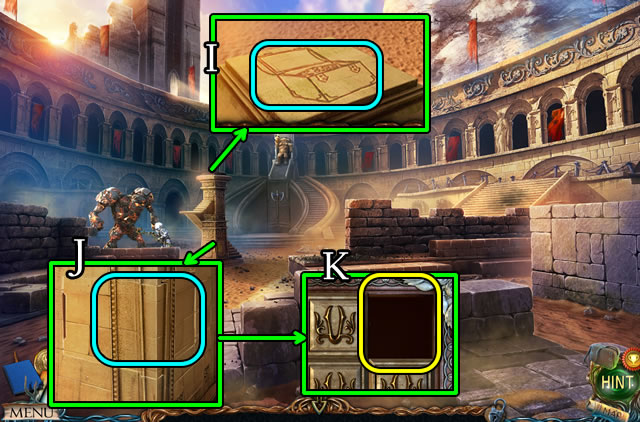
- Touch (D). Take the MAP FRAGMENT (E). Select and read the diary.
- Walk down 3x.
- Unwrap and select the CHEWING GUM for used CHEWING GUM (Inventory).
- Combine the MAP FRAGMENTS and the CHEWING GUM for a MAP (Inventory).
- Place the MAP (G).
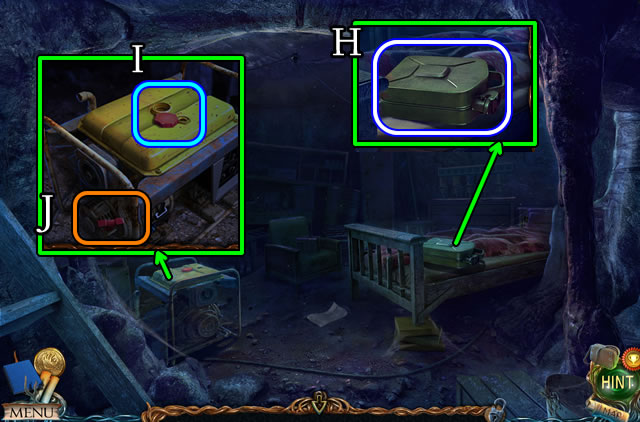
- Grab the FULL JERRY CAN (H).
- Remove the cap, place the FULL JERRY CAN and replace the cap (I). Pull the handle 3x (J).
- Play the HOP (K); receive STONE FEATHERS 4/6.
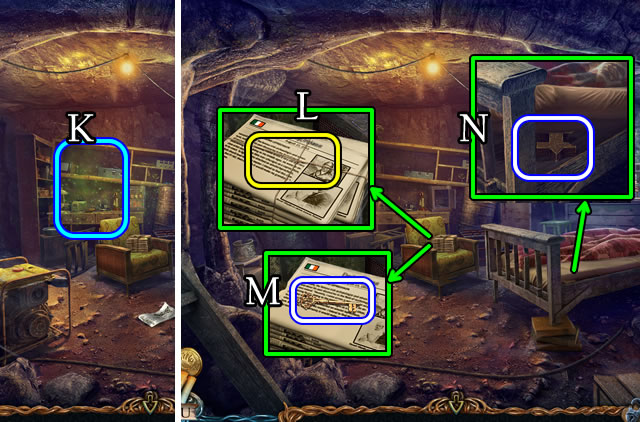
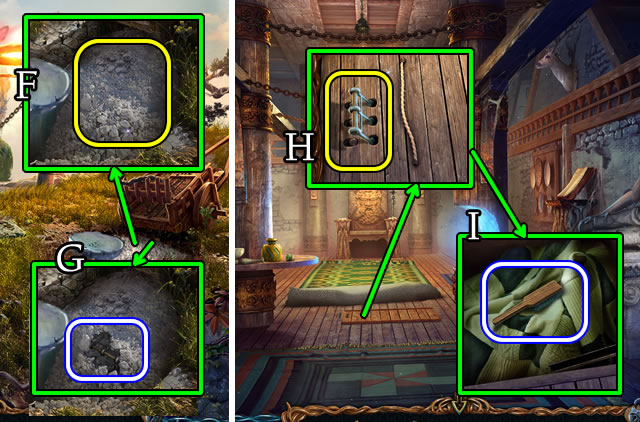
- Use the KNIFE (L), lift the newspaper and take the KEY (M).
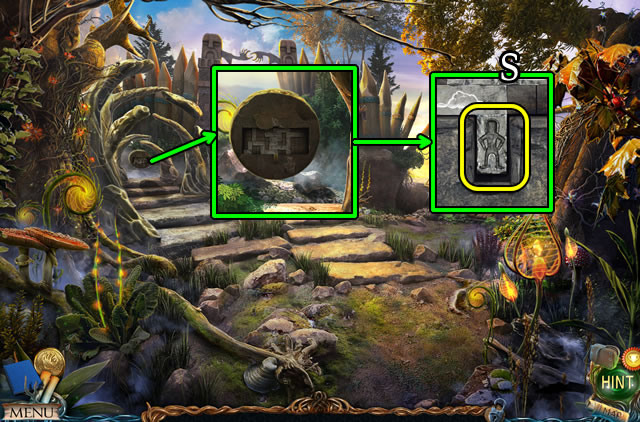
- Lift the mattress; take the STONE FIGURINE (N).
- Use the KEY (P).
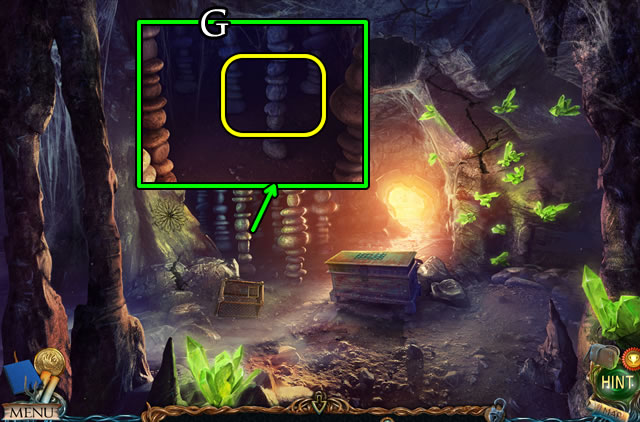
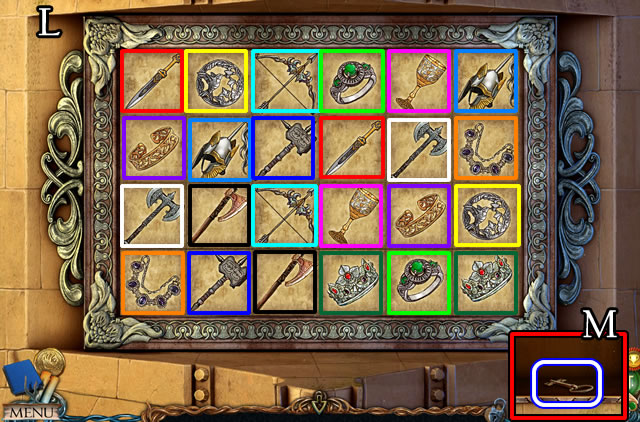
- Uncover and take the PUZZLE PIECES (Q).
- Solution (R). 1-2-3.
- Place the PUZZLE PIECES (S).
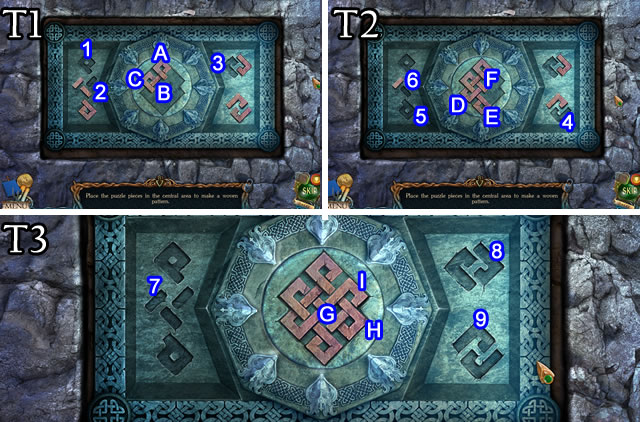
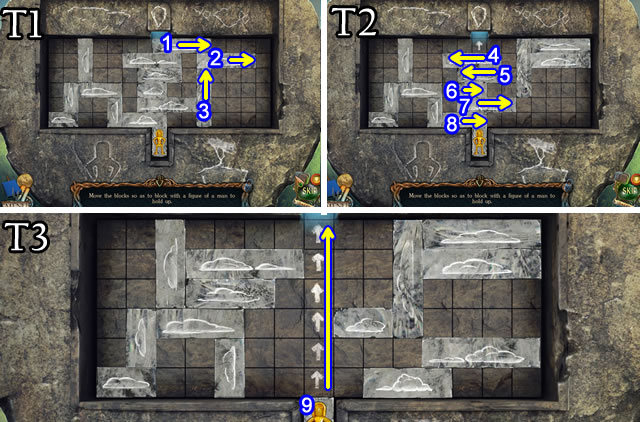
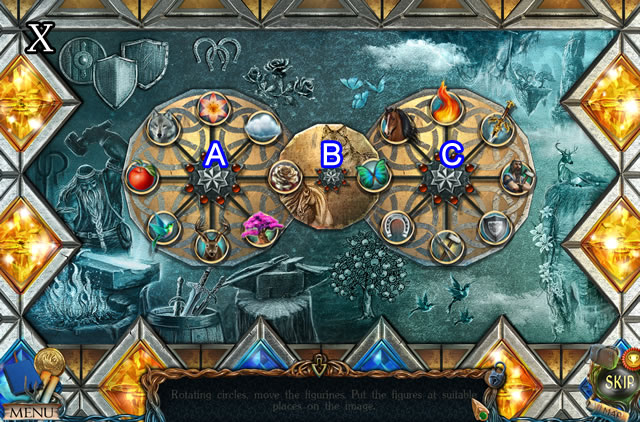
- Solution (T1-T2-T3). (1-A)-(2-B)-(3-C)-(4-D)-(5-E)-(6-F)-(7-G)-(8-H)-(9-I).
- Walk forward.
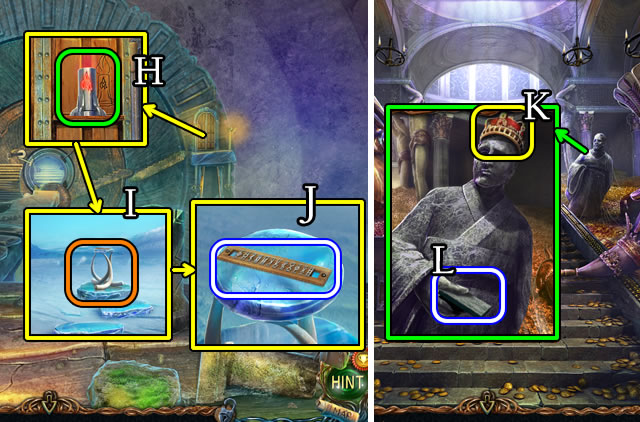
- Remove the cap (blue), exchange the BATTERY (pink) and replace the cap. Touch the switch (yellow).
- Take the MEDALLION PART (U).
- Take Manuscripts 9/28 (V). Take the MEDALLION PART (W).
- Return to the Druid Village.
- Speak to the grandfather (X). Receive STONE FEATHERS 5/6.
- Walk left.
- Select the hourglass 2x.
- Combine the MEDALLION PARTS for a MEDALLION (Inventory).
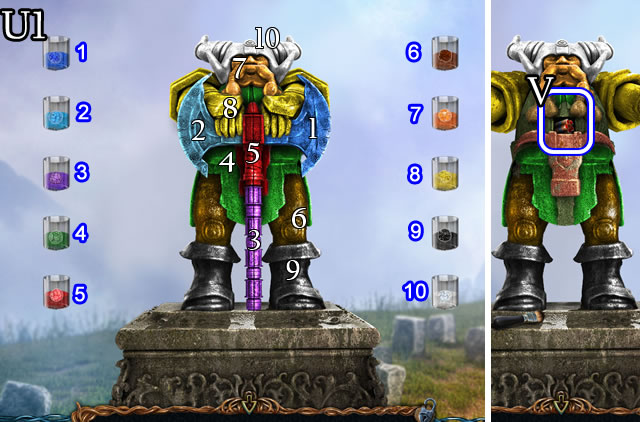
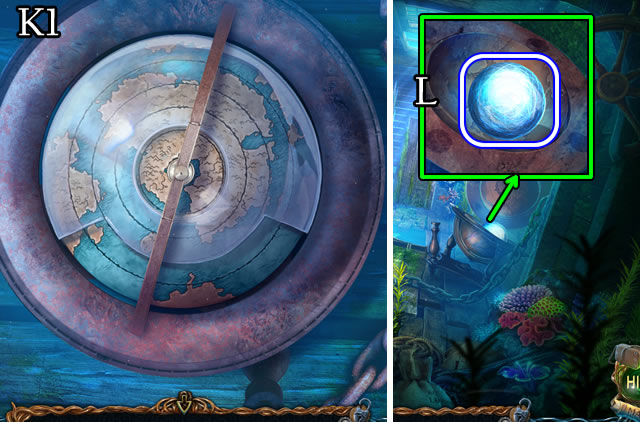
- Place the MEDALLION (Y) and select.
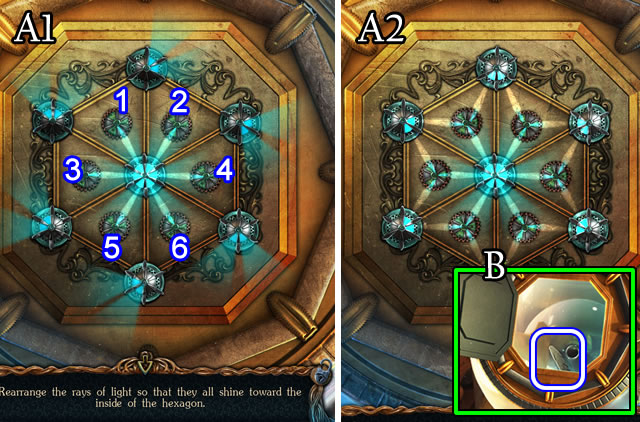
- Solution (A1-A2). 6-1-5-4-3-6.
- Take STONE FEATHERS 6/6 (B).
- Return to the Ancient Graveyard.
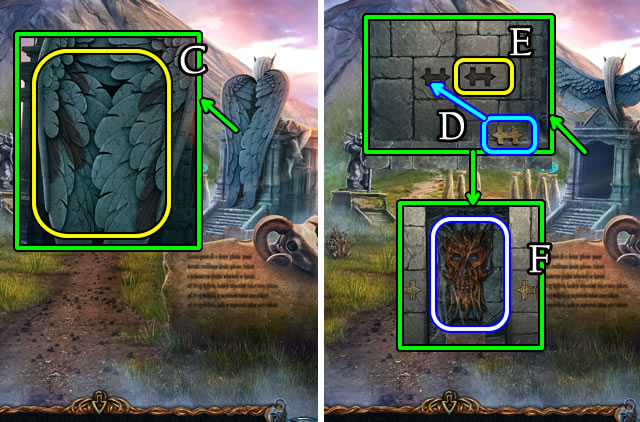
- Place STONE FEATHERS 6/6 (C).
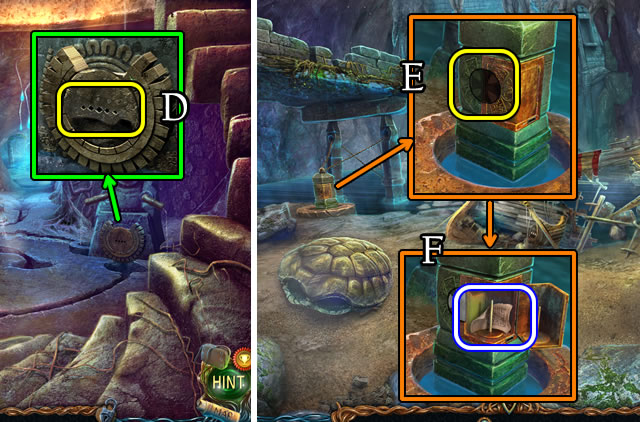
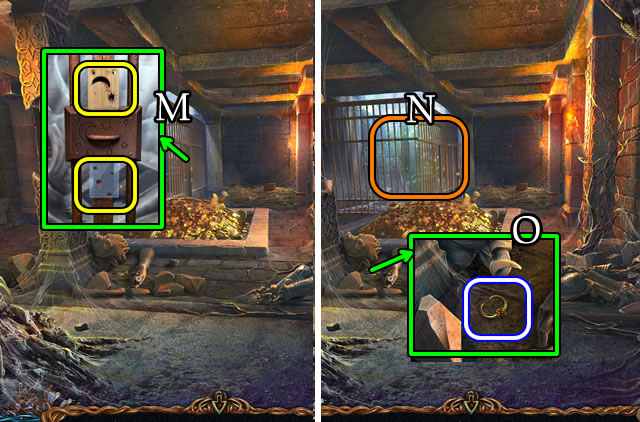
- Drag the stone piece. (D) Place the STONE FIGURINE (E).
- Take the MASK (F).
- Return to the Relic Repository.
- Place the MASK (G).
- Play the HOP (H) to put on gloves.
- Return to the Arena.
- Pick up the coin (I); receive a CURSED HARPY COIN.
- Return to the Druid Village.
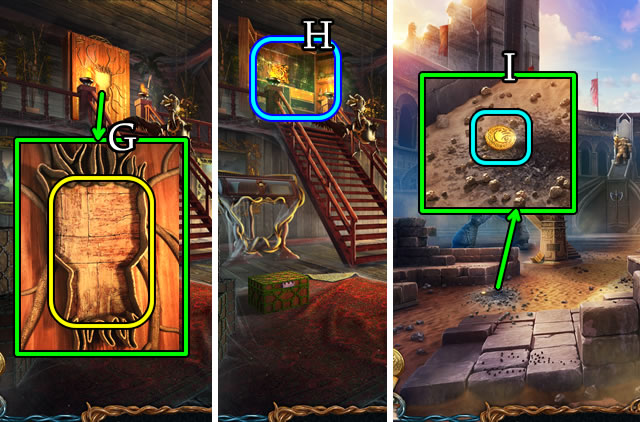
- Open (J) and walk forward.
- Speak to the grandfather (K).
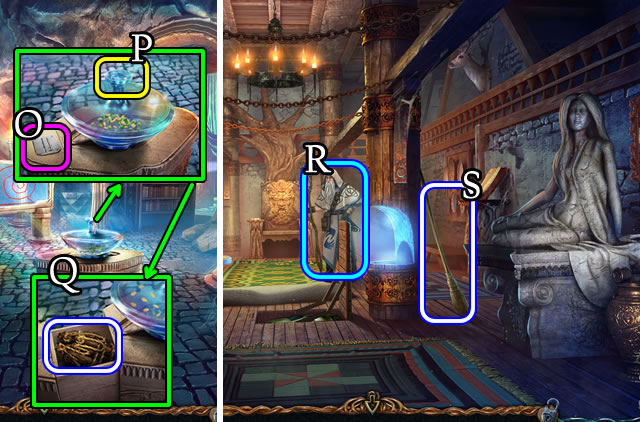
- Take the NAIL POLISH REMOVER (L) and OILCAN (M).
- Take Manuscripts 10/28 and the CANDLE (N). Read the book.
- Walk down and left.
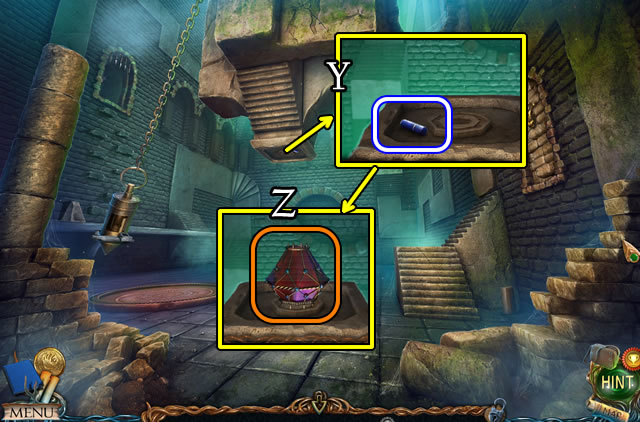
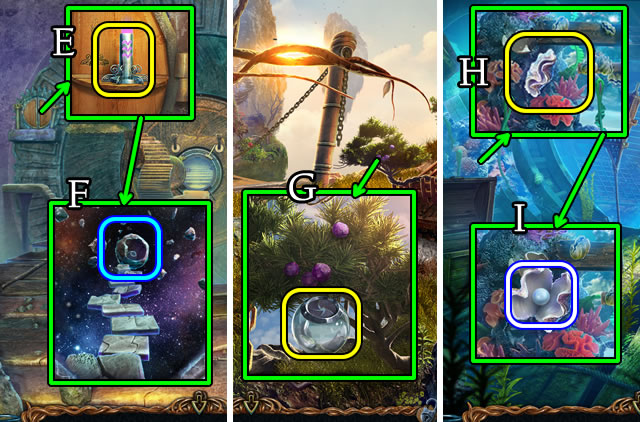
- Place the CANDLE (O); receive a BURNING CANDLE.
- Select (P).
- Place the BURNING CANDLE; take the POWDER FLASK (Q).
- Touch the candle; take the HUMAN FIGURINE (R).
- Walk down 2x.
- Place the HUMAN FIGURINE (S).
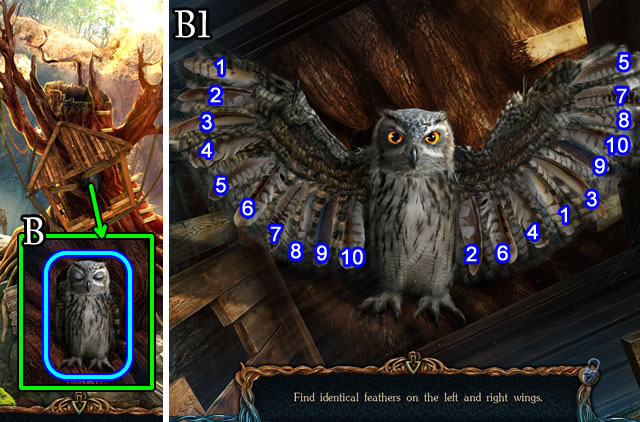
- Solution (T1-T2-T3). 1-2-3-4-5-6-7-8-9.
Chapter 2: Floating Islands
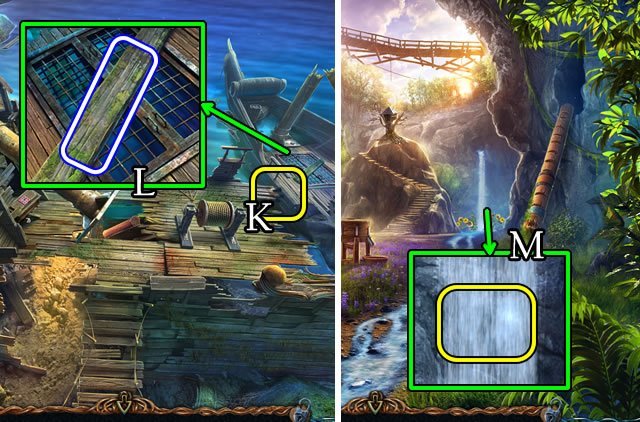
- Uncover and select (U).
- Take Manuscripts 11/28 (V).
- Select (W).
- Touch (X).
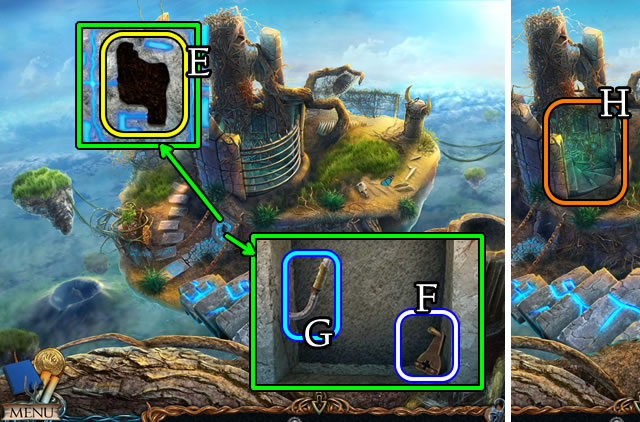
- Take the AXE (Y).
- Grab the FIGURINE (Z).
- Return to the Druid Village.
- Place the log (A). Use the AXE 2x.
- Place the piece of wood (B). Use the AXE. Take the FIREWOOD.
- Place the FIGURINE. Take the WINDSOCK (C).
- Return to the Lower Island.
- Touch the WINDSOCK (Inventory); for a NET.
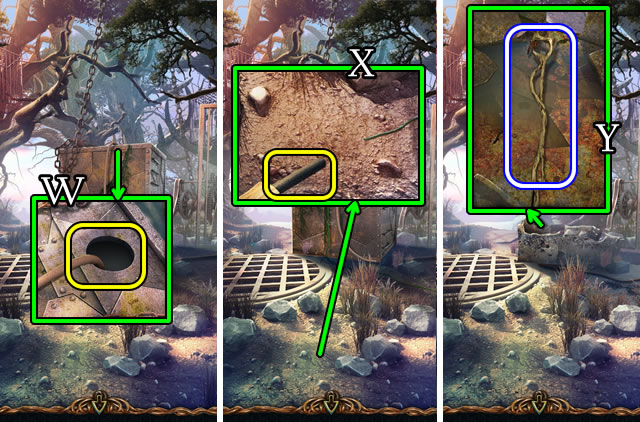
- Use the OILCAN (D). Slide the latch; open the door.
- Use the NET; receive a STAMP (E).
- Return to the Volcanic Crater.
- Place the STAMP (F).
- Open and take the CORE OF FLAMES (G).
- Take Manuscripts 12/28 (H). Read the book.
- Return to the Lower Island.
- Place the CORE OF FLAMES (I).
- Select (J).
- Walk left.
- Take Manuscripts 13/28 (K).
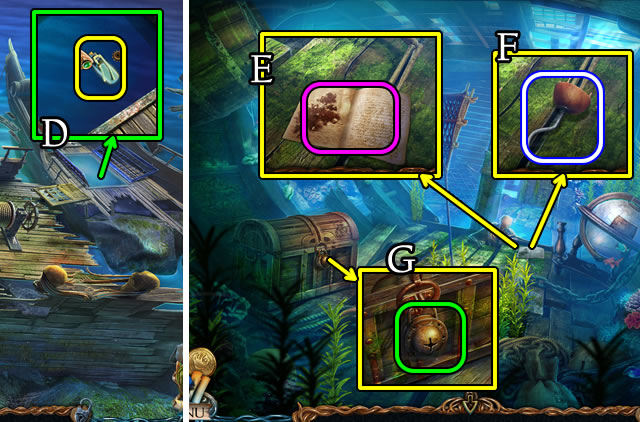
- Take the BROKEN BLADES (L).
- Take the 'METRONOME' TILE and TWEEZERS (M).
- Open; take the note and ROPE (N).
- Return to the Relic Repository.
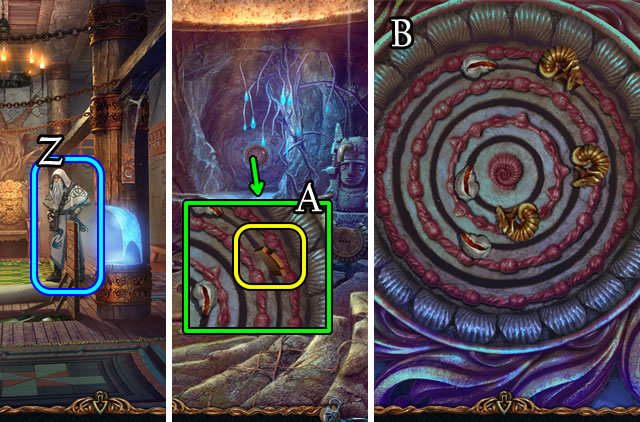
- Use the TWEEZERS (O).
- Take the FIRECRACKER (P).
- Return to the Plains of the Dead.
- Combine the ROPE and NAIL POLISH REMOVER for an ALCOHOL-SOAKED ROPE (Inventory).
- Use the POWDER FLASK; place the ALCOHOL-SOAKED ROPE (Q).
- Place the FIRECRACKER (R).
- Select (S).
- Use the BLACKTHORN TWIG (T).
- Take the MECHANICAL EYE (U).
- Return to the Crossroads.
- Take the DEVICE PART (V).
- Place the DEVICE PART (W).
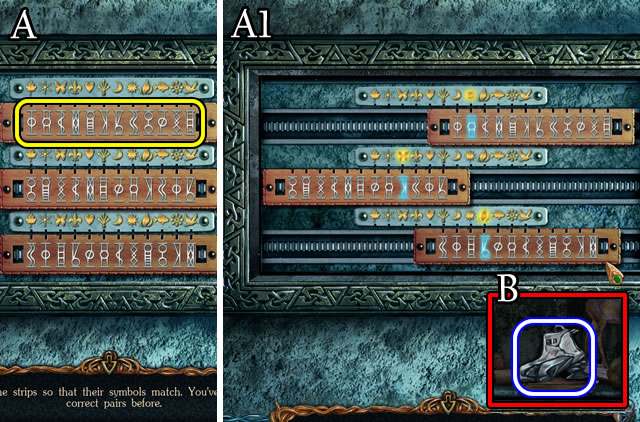
- Solution (X). C-Ax3-B-C-A-B-C-A-B-C-A-B-Ax4-B-C-B-C-Ax5-B-C-Ax2-B-Cx2-A-B-Ax6-B-A-B-A-B-A-B-A-B-Ax5-B-Ax2-B-Ax7.
- Walk right.
- Speak to the blacksmith (A); give him the BROKEN BLADES.
- Take Manuscripts 14/28 (B).
- Take the POLE HOOK (C).
- Return to Leproch's Tomb.
- Use the POLE HOOK (D) to receive COAL.
- Return to Anvil Peak.
- Give the COAL (E); receive BLADES.
- Walk down.
- Place the BLADES (F).
- Walk forward.

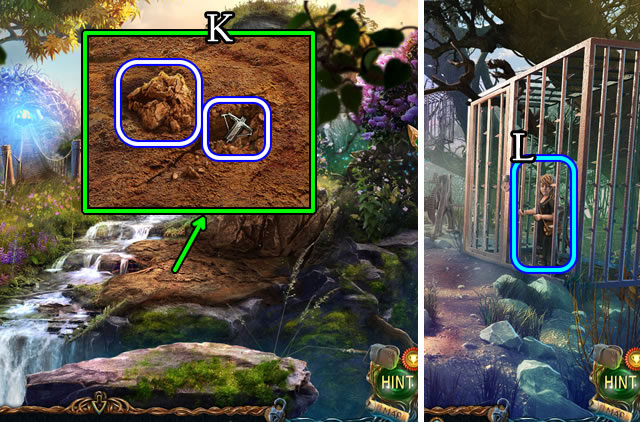
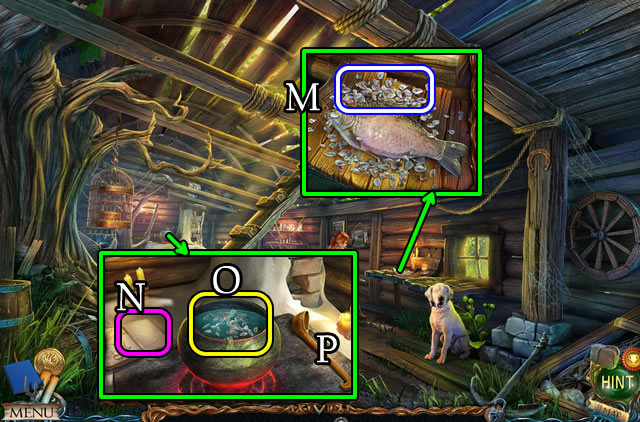
- Play the HOP (G) to receive a MOTHER FIGURINE.
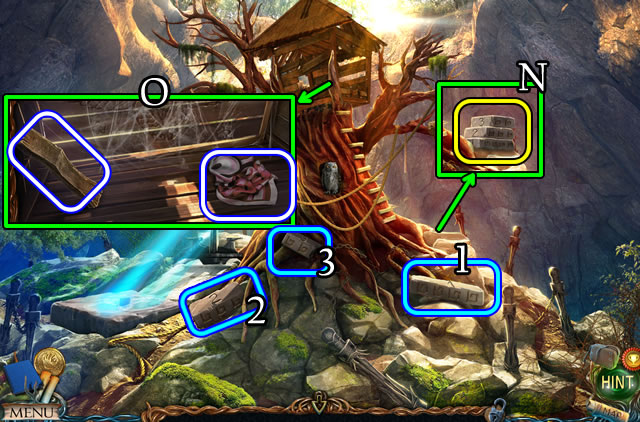
- Take the YOUNG ROSE BUSH (H).
- Pull the lever (I), place the arrows and release (J).
- Walk forward.
- Speak to the girl (K); receive a HARPY CLAW.
- Take Manuscripts 15/28 (L).
- Walk forward.
- Take the FISH HOOK (M).
- Touch the HARPY CLAW (Inventory); receive a SHOELACE and HARPY CLAW.
- Place the HARPY CLAW (N). Take the LEMON.
- Touch stones (1-2-3).
- Take MANUSCRIPTS 16/28 (O).
- Take the 'TOWER' TILE (P).
- Return to Anvil Peak. Speak to the Blacksmith (Q).
- Return to the Druid Village.
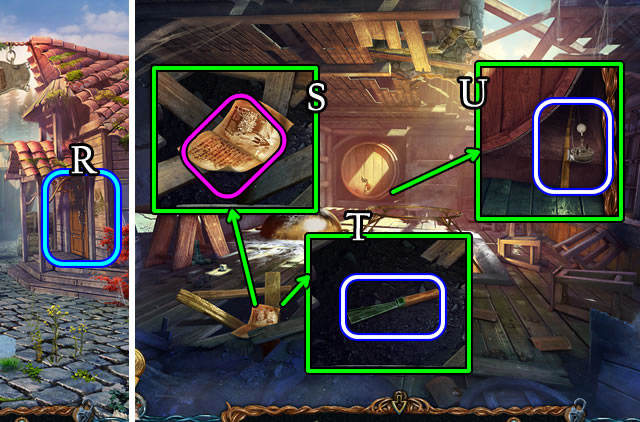
- Open the door (R); walk right.
- Take Manuscripts 17/28 (S). Uncover and take the SCRAPER (T).
- Take the FISHING ROD (U).
- Remove the boards; take the FAN (V). Take the WET BOWL (W).
- Open, uncover and take the WRENCH (X).
- Walk down 2x.
- Combine the FISHING ROD and FISH HOOK for a FISHING ROD (Inventory).
- Attempt to take the camera (Y).
- Use the FISHING ROD (Z).
- Select the snapshot (A). Receive a CAMERA.
- Return to the Ancient Graveyard.
- Use the SCRAPER (B) for a DYE SET.
- Return to Leproch's House.
- Place the DYE SET (C). Use the WRENCH (D).
- Take the FLASK FOR WHITE PAINT and the FLASK FOR BLACK PAINT (E).
- Return to the Lower Island.
- Place the FLASK FOR WHITE PAINT (F); receive FLASK OF CHALK DUST.
- Take the LEVER (G).
- Return to the Elders' House.
- Move the carpet. Place, then select the LEVER (H).
- Take the METAL BRUSH (I).
- Walk down, then right.
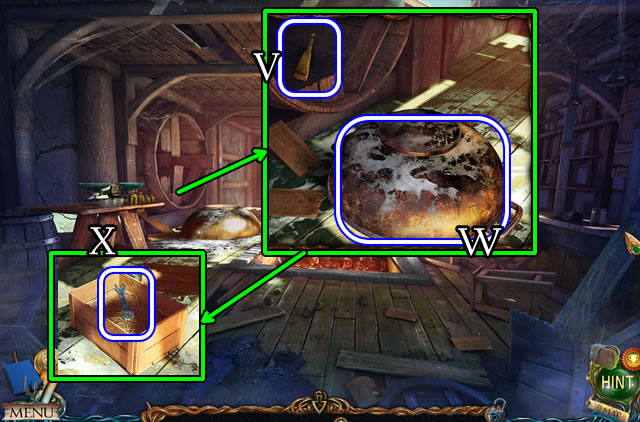
- Place the FIREWOOD and WET BOWL (J). Use the FAN.
- Select the bowl. Place the FLASK FOR BLACK PAINT (K). Use the METAL BRUSH (L); receive a FLASK OF SOOT.
- Use the CAMERA for a PHOTO OF LITTLE MAN (M).
- Return to Island of Exile.
- Place the PHOTO OF LITTLE MAN (N).
- Solution (O).
- Take the METAL WING (P).
- Return to the Relic Repository.
- Place the METAL WING (Q). Select (R) to receive a KEY.
- Use the KEY (S).
- View the note and STONE SLAB (T).
- Return to the Hills.
Chapter 3: Underground
- Place the STONE SLAB (U).
- Climb down the well.
- Take Manuscripts 18/28 (V).
- Touch the stones (W).
- Take STEP 1/4 (X).
- Walk forward.
- Take Manuscripts 19/28 (Y).
- Use the WRENCH (Z). Remove the nut.
- Play the HOP (A); receive BLESSED WATER.

- Use the KNIFE 3x (B); for SUNFLOWERS.
- Take the DOLL (C).
- Touch the DOLL (Inventory) for a PEDAL-KEY and FIORA'S DOLL.
- Place and select the PEDAL-KEY (D).
- Walk left.
- Speak to the woman (E); receive a MAGIC HAMMER.
- Take Manuscripts 20/28 (F).
- Take STEP 2/4 (G).
- Take the FLASK FOR SUNFLOWER OIL (H).
- Return to Anvil Peak.
- Take the SHOVEL (I) and note and diagram (J).
- Return to the Hanging Gardens.
- Use the SHOVEL. Take the CLAY and 'BALLISTA' TILE (K).
- Walk forward.
- Give (L) FIORA'S DOLL; receive BLACKSMITH'S PINCERS.
- Return to Anvil Peak.
- Touch the CLAY (Inventory); combine it with the HARPY CLAW for a CLAY FORM.
- Place the CURSED HARPY COIN (M).
- Place the CLAY FORM (N), insert the wire (O) and select the form.
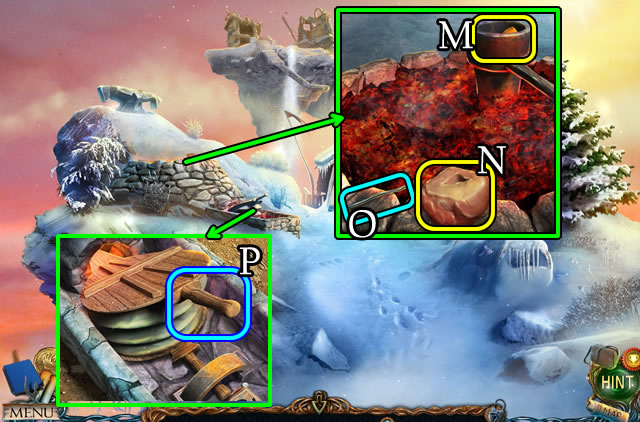
- Touch the bellows 3x (P).
- Select the crucible (Q).
- Use the BLACKSMITH'S PINCERS (R) for a NIPPER WITH A CAST.
- Remove the snow. Place the NIPPER WITH A CAST (S).
- Take the PLIERS (T). Use the HAMMER (U).
- Take the GOLDEN CLAW CASTING.
- Combine the GOLDEN CLAW CASTING and PLIERS for a GOLDEN CLAW CASTING (Inventory).
- Place the GOLDEN CLAW CASTING (V). Use the MAGIC HAMMER. Take a GOLDEN CLAW (W).
- Combine the GOLDEN CLAW with the SHOELACE for a GOLDEN HARPY CLAW (Inventory).
- Return to the Tavern.
- Place the SUNFLOWERS (A) and FLASK FOR SUNFLOWER OIL (B). Select (C) for SUNFLOWER OIL.
- Return to Leproch's House.
- Place the FLASK OF CHALK DUST and the FLASK OF SOOT (D).
- Add the SUNFLOWER OIL.
- Place the DYE SET (D1).
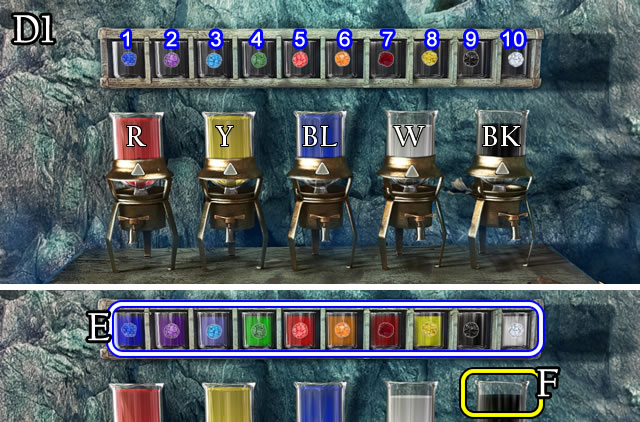
- Solution (D1). (1-BLx2)-(2-BL,R)-(3-BL,W)-(4-BL,Y)-(5-Rx2)-(6-R,Y)-(7-R,BK)-(8-Yx2)-(9-BKx2)-(10-Wx2).
- Take the PAINT SET (E).
- Place the GOLDEN HARPY CLAW (F); receive a FAKE HARPY CLAW.
- Return to the Island of Exile.

- Place the FAKE HARPY CLAW (G).
- Speak to Fiora (H).
- Take the PAPER CLIP (I).
- Return to Leproch's House.
- Touch the PAPER CLIP 4x (Inventory) for an UNBENT PAPER CLIP.
- Use the UNBENT PAPER CLIP (J).
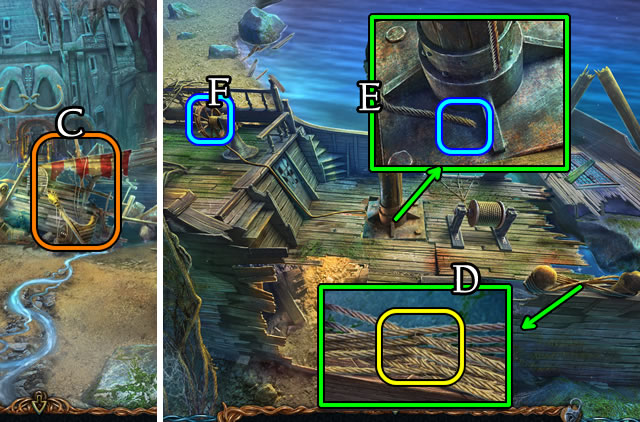
- Take the FIRE HOSE and FLINT STONE (K).
- Return to the Island of Exile.
- Combine the LEMON and KNIFE for a HALF A LEMON (Inventory).
- Use HALF A LEMON (L); receive a GEAR.

- Place the GEAR (M) and pull (N).
- Place and select the FIRE HOSE (O).
- Select (P-Q).
- Touch (R).
- Take the BRUSH (S).
- Return to the Ancient Graveyard.
- Replace the bush with the YOUNG ROSE BUSH; use the BLESSED WATER.
- Take the BUTTON (@).
- Select the rose (T); take ROSE PETALS.
- Place the PAINT SET and BRUSH (U).
- Solution (U1).
- Take the TNT (V).
- Return to the Island of Exile.
- Place the TNT (W).
- Use the FLINT STONE (X) and KNIFE.
- Walk forward.
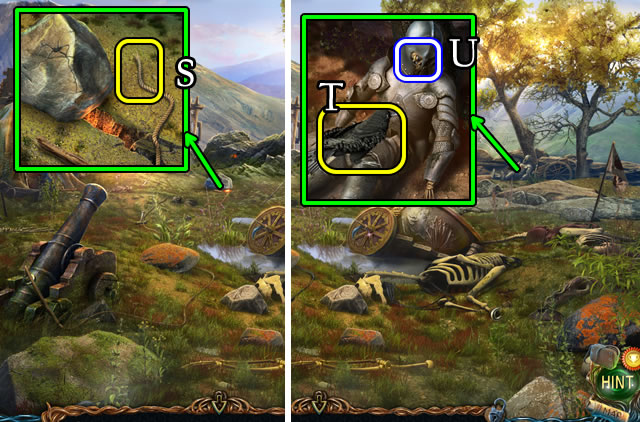
- Take MAARON'S STAFF (Y).
- Return to the Elders' House.
- Give MAARON'S STAFF (Z); receive a DRAGON FIGURINE.
- Return to the Cave.
- Place the DRAGON FIGURINE (A).
- Solution (B).
- Walk forward.
- Play the HOP (C) for a CAULDRON.
- Walk left.
- Use the KNIFE (D).
- Touch (E).
- Touch (F).
- Take (G), then place the STEERING WHEEL (H).
- Take the DOOR (I) and Manuscripts 21/28 (J).
- Place the DOOR (K).
- Take the LONG LOG (L).
- Walk down 2x and forward.
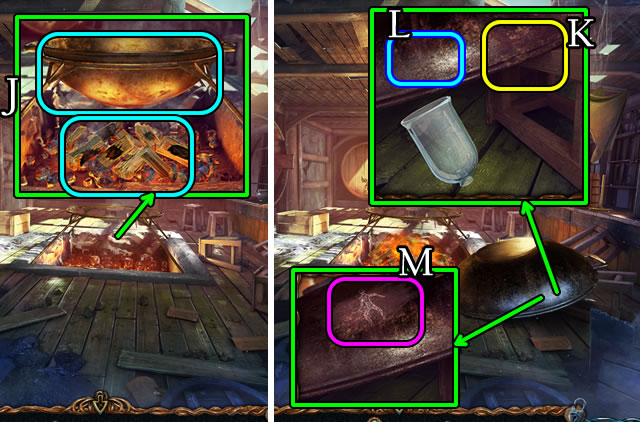
- Place the CAULDRON for a CAULDRON OF WATER (M).
- Climb the steps.
- Place the rocks 1-2-3 (N).
- Take the SILK HEADSCARF and STEP 3/4 (O).
- Return to Anvil Peak.
- Place the BUTTON (P).
- Solution (P1). 5-3-7-2-4-6-1.
- Take the 'ANVIL' TILE and SNOW SHOES (Q).
- Return to the Volcanic Crater.
- Place the SNOW SHOES (R).
- Take the PACKAGE OF NYLONS and STEP 4/4 (S).
- Return to the Fisherman's Hut.
- Place the STEPS 4/4 (T).
- Play the HOP (U) for a MECHANICAL EYE.
- Return to the Arena.
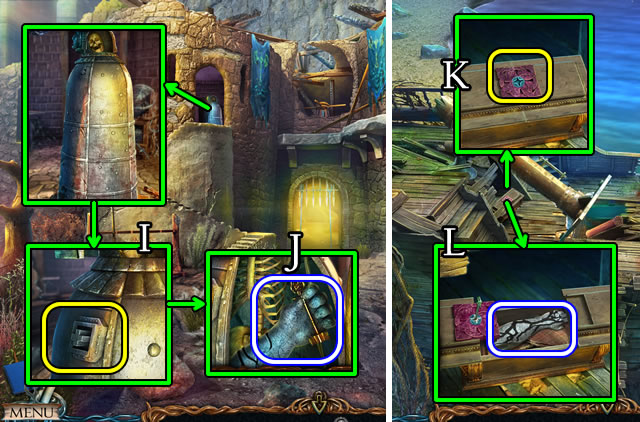
- Take SOLIDUS'S CURSED KNUCKLES (V), the CURSED MINOTAUR AMULET (W) and GOLD MASK (X).
- Walk down.

- Place each MECHANICAL EYE and the GOLD MASK (A).
- Take the STACKING TOY (B) and TILE-KEY (C).
- Return to the CAVE.
- Place, then select SOLIDUS'S CURSED KNUCKLES (D).
- Walk forward.
- Place the TILE-KEY (E).
- Take the GLUE FORMULA (F).
- Return to the Fisherman's Hut.
- Speak to the woman (G); receive SCISSORS.
- Return to the Hills.
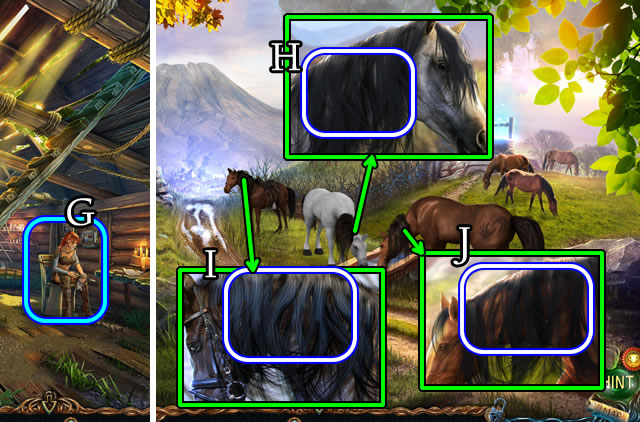
- Use the SCISSORS for HORSE'S MANE 1/3-2/3-3/3 (H-I-J).
- Return to the Hanging Gardens.

- Place the LONG LOG (K).
- Use the KNIFE to get CORKWOOD BARK (L).
- Return to the Fisherman's Hut.
- Give HORSE'S MANE 3/3 and CORKWOOD BARK (M). Receive an AXIS PIN.
- Walk down.
- Place the AXIS PIN (N).
- Move the branches; take the FLASK (O).
- Take the BROKEN MILLSTONE DISK (P) and WOODEN BOARDS (Q).
- Return to Anvil Peak.
- Give the BROKEN MILLSTONE DISK (R); receive a CHISEL.
- Return to the Plains of the Dead.
- Open and select the PACKAGE OF NYLONS for NYLON STOCKINGS (Inventory).
- Combine the WOODEN BOARDS, NYLON STOCKINGS and KNIFE for a HOMEMADE LEVER (Inventory).
- Place the HOMEMADE LEVER (S). Select 2x. Take the HOOK'S BLADE (T).
- Use the CHISEL and HAMMER; take a HORSESHOE (U).
- Return to Anvil Peak.
- Place the HORSESHOE (V). Take a MAGNETIZED HORSESHOE.
- Return to the Arena Entrance.
- Combine the HOOK'S BLADE and HAMMER for a HOOK (Inventory).
- Place the HOOK; take a POLE HOOK (W).
- Walk down.
- Use the POLE HOOK for a GLOVE and PIECE OF A GLOBE (X).
- Combine the MAGNETIZED HORSESHOE and GLOVE for an ENCHANTED HORSESHOE WITH GLOVE (Inventory).
- Use the ENCHANTED HORSESHOE GLOVE for a CHAIN-MAIL FISH (Y).
- Return to Anvil Peak.
- Give the CHAIN-MAIL FISH (Z). Receive a FIXED MILLSTONE DISK.
- Return to the Schooner Wreckage.
- Untie the FLASK (Inventory) for a note and FLASK FOR ELIXIR.
- Open the hatch.
- Place the FLASK FOR ELIXIR (A); receive a FLASK OF LAKE WATER.
- Walk down 2x.
- Place the FLASK OF LAKE WATER (B); receive a POTION FLASK.
- Return to the Elders' House.
- Place the POTION FLASK (C) for an ELIXIR OF WATERBREATHING.
- Return to the Schooner Wreckage.
- Place the ELIXIR FOR WATERBREATHING (D).
- Take Manuscripts 22/28 (E). Take the PIRATE HOOK (F).
- Use the PIRATE HOOK (G).
- Take the BOTTLE WITH A LETTER (H).
- Open and take the FISH (I).
- Unlatch and place the PIECE OF A GLOBE (J). Select (K).
- Solution (K1).
- Take the ENERGY BALL (L).
- Return to the Fisherman's Hut. Receive a FISHING NET.
- Place the FISH; use the KNIFE; take FISH SCALES (M).
- Place and select the GLUE FORMULA (N).
- Place the CAULDRON OF WATER. Add the FISH SCALES (O).
- Stir (P). Add the FISHING NET for a GLUE-COVERED NET.
- Walk down.
- Place the GOLD MASK (Q). Place and select the FIXED MILLSTONE DISK (R).
- Place the GLUE-COVERED NET (S). Take a CURSED NET.
- Return to the Underground Lake.
- Place the CURSED NET (T).
- Walk left.
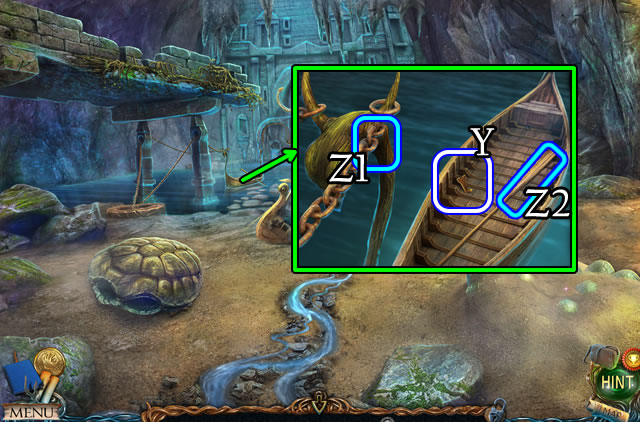
- Select (U-V). Select (W) and use the KNIFE.
- Use the HAMMER (W1); take the STACKING TOY.
- Walk down.
- Place the STACKING TOY (X).
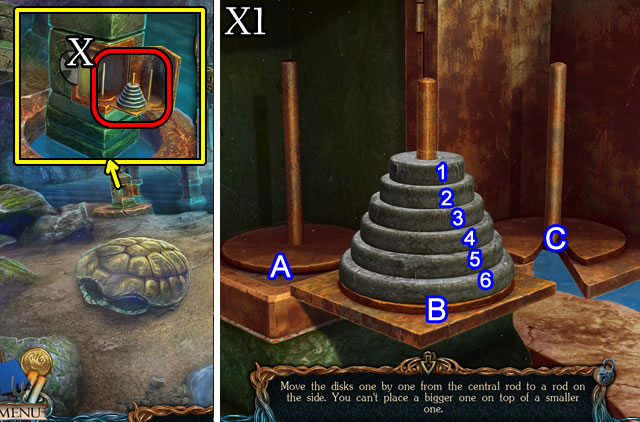
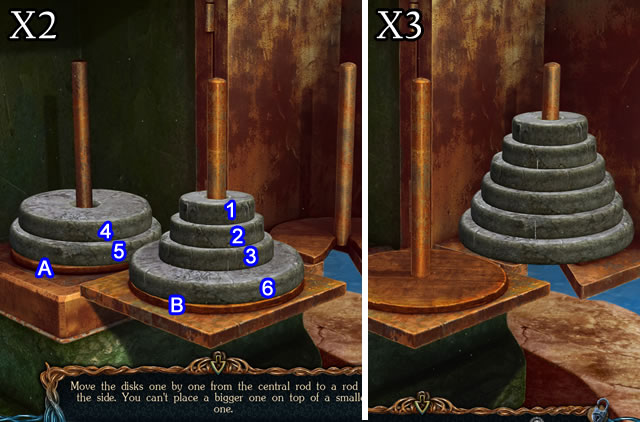
- Solution (X1). (1-A)-(2-C)-(1-C)-(3-A)-(1-B)-(2-A)-(1-A)-(4-C)-(1-C)-(2-B)-(1-B)-(3-C)-(1-A)-(2-C)-(1-C)-(5-A)-(1-B)-(2-A)-(1-A)-(3-B)-(1-C)-(2-B)-(1-B)-(4-A).
- Solution (X2-X3). (1-A)-(2-C)-(1-C)-(3-A)-(1-B)-(2-A)-(1-A)-(6-C)-(1-C)-(2-B)-(1-B)-(3-C)-(1-A)-(2-C)-(1-C)-(4-B)-(1-B)-(2-A)-(1-A)-(4-B)-(1-C)-(2-B)-(1-B)-(5-C)-(1-A)-(2-C)-(1-C)-(3-A)-(1-B)-(2-A)-(1-A)-(4-C)-(1-C)-(2-B)-(1-B)-(3-C)-(1-A)-(2-C)-(1-C).
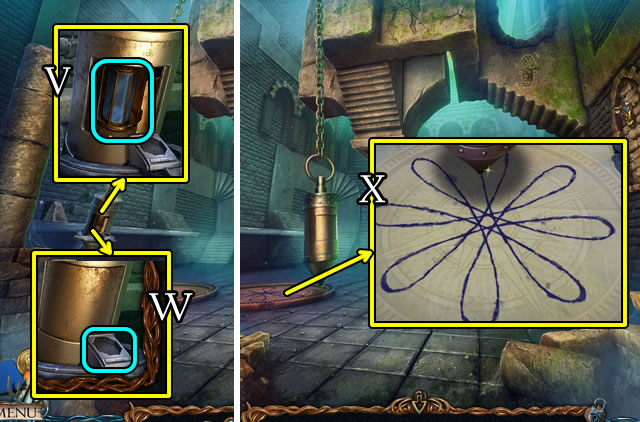
- Take the KEY PART (Y). Touch (Z1-Z2).
- Go forward.
Chapter 4: Castle of Madness
- Grab the WOOD SAW (A).
- Take the STONE TILE (B).
- Take Manuscripts 23/28 (C).
- Return to the Harpy's Nest.
- Place the STONE TILE (E).
- Take the KEY PART (F).
- Pull the lever (G).
- Play the HOP (H); receive an ENERGY BALL.
- Return to the Arena Entrance.
- Combine both KEY PARTS for a KEY (Inventory).
- Place and select the KEY (I).
- Take ATLAS'S ARM (J).
- Return to the Schooner Wreckage.
- Take the KEY from ATLAS'S ARM (Inventory).
- Use the KEY (K). Take ATLAS'S ARM (L).
- Return to the Castle of Madness.

- Place each ENERGY BALL (M-N).
- Select (O).
- Solution (O1).
- Take a DIAMOND KEY from ATLAS'S ARM (Inventory).
- Place each of ATLAS'S ARMS (P).
- Walk forward.
- Take (Q), then place the PIECE OF PATTERN (R).
- Take Manuscripts 24/28 (S).
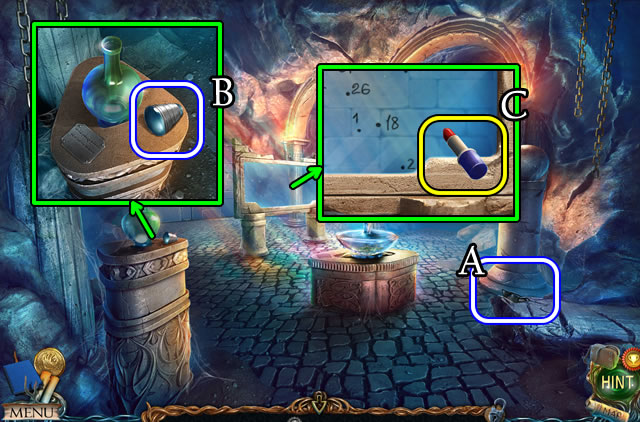
- Touch 2x (T). Take the INK FORMULA (U).
- Touch (V). Take the EVERLASTING MATCH (W).
- Touch (X).
- Take the LIPSTICK (Y).
- Place the DIAMOND KEY (Z).
- Walk right.
- Grab the SUNGLASSES (A).
- Take the LENS (B).
- Place the LIPSTICK (C).

- Solution (D).
- Solution (E). 1x2-2x10-3x6.
- Place the LENS (F).
- Touch (G-G1).
- Walk left.
- Take Manuscripts 25/28 (H).
- Grab the SPOON (I) and STONE BLOCK (J).
- Return to the Tree of Life.
- Place the STONE BLOCK (K).
- Take the EGG (L).
- Return to the Castle of Madness.
- Place the EGG (M). Use the SPOON for a BOILED EGG.
- Select the BOILED EGG (Inventory) for a peeled BOILED EGG.
- Walk forward and right.
- Select (N).
- Place the EVERLASTING MATCH and BOILED EGG (O).
- Take the CRYSTAL PYRAMID (P).
- Walk left.
- Place the CRYSTAL PYRAMID and CURSED MINOTAUR AMULET (Q).
- Take the HAND WHEEL KEY (R).
- Place the HAND WHEEL KEY (S).
- Walk forward.
- Speak to the man (T); receive DIAMONDS AND GRAINS.
- Take Manuscripts 26/28 (U).
- Take the PIECE OF THE STATUE (V) and BOTTLE OF COLOGNE (W).
- Select (X).
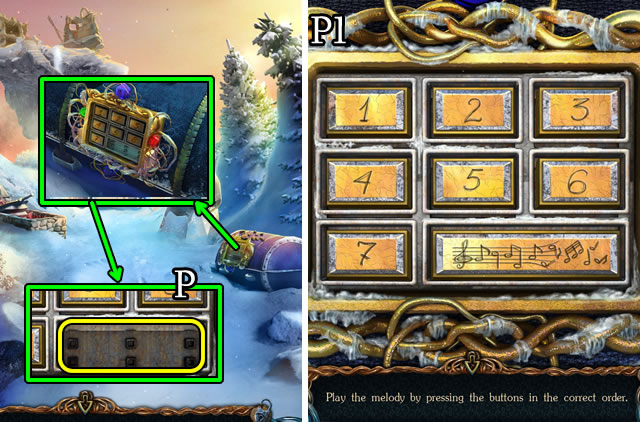
- Solution. 1-3-5-4-2.
- Play the HOP (Y); receive an EMPTY CARTRIDGE.
- Return to Anvil Peak.
- Speak to the blacksmith (Z); receive a METAL SAW.
- Return to the Island of Exile.
- Use the METAL SAW (A).
- Take the 'CUBE' TILE and KEY (B).
- Return to the Underground Lake.
- Use the KEY (C).
- Take the CORKSCREW and LEATHER ROLL (D).
- Combine the BOTTLE WITH A LETTER and CORKSCREW. Receive an EMPTY BOTTLE and NOTE (Inventory).
- Return to the Hanging Garden.
- Place the NOTE (E).
- Return to the Schooner Wreckage.
- Solution (F). 1-2-3-4-5.
- Take the TRACING PAPER (G).
- Return to Anvil Peak.

- Give the LEATHER ROLL and SUNGLASSES (H); receive a SLIDING BOLT KEY.
- Place and select the SLIDING BOLT KEY (I).
- Take the BELLOWS (J).
- Return to the Fisherman's Hut.
- Place the DIAMONDS AND GRAINS (K).
- Slide the drawer in, then out. Take the DIAMONDS (L).
- Return to Leproch's House.
- Take the FLASK OF BLACK PAINT (M).
- Return to the Tavern.
- Place the EMPTY BOTTLE (N), select (O) for a BOTTLE OF WINE.
- Place the INK FORMULA (P), FLASK OF BLACK PAINT (Q), BOTTLE OF WINE (R) and BOTTLE OF COLOGNE (S).

- Solution (T1-T2-T3).
- Take the INK INGREDIENTS (U).
- Return to the Labyrinth.
- Combine the EMPTY CARTRIDGE and INK INGREDIENTS for a CARTRIDGE (Inventory).
- Place the CARTRIDGE (V) and select; take the KEY.
- Place the KEY (W).
- Place, then take the TRACING PAPER (X).
- Return to the Volcanic Cavern.
- Place the TRACING PAPER (Y).
- Select (Z).
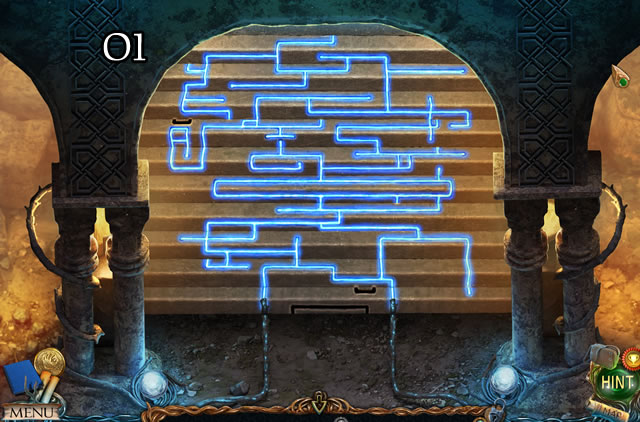
- Solution (A). 3-6-9-12-15-18-21-24.
- Take the AIR ELEMENT (B).
- Return to the Room of Insanity.
- Select (C).
- Solution (D).
- Place the AIR ELEMENT (E).
- Select 2x (F). Take the VACUUM CONTAINER.
- Return to the Lower Island.
- Place the VACUUM CONTAINER (G); receive CONES OF PARALYSIS.
- Return to the Sunken Hull.
- Place the CONES OF PARALYSIS (H).
- Use the KNIFE. Take the PEARL (I).
- Return to The Safe.
- Give the DIAMONDS and PEARL (J); receive a WHISTLE.
- Remove (K).
- Place the WHISTLE (L) and BELLOWS (M).
- Select the bellows; receive a LEVER. Select the bellows.
- Place, then select the LEVER (N).
- Take the BULL-HEAD KEY (O).
- Place, then select the BULL-HEAD KEY (P).
- Walk right.
- Take Manuscripts 27/28 (Q).
- Grab the RAIL 1/2 (R).
- Uncover and take the TRIDENT (S).
- Take the JUG OF WATER (T); use the TRIDENT.
- Open and take the TILES (U).
- Return to the Room of Riddles.
- Select (V). Place the TILES (W).
- Solution (X).
- Walk right.
- Turn the page. Take the CASKET BUTTON (Y).
- Return to the Tree of Life.
- Use the SILK HEADSCARF (Z).
- Touch (A).
- Select (B) 2x.
- Solution (B1).
- Place the CASKET BUTTON (C).
- Take the DISK KNIFE (D).
- Return to the Sunken Hull.
- Use the DISK KNIFE (E).
- Play the HOP (F) for a BENCH PIECE.
- Walk down 2x.
- Use the BENCH PIECE (G). Take METALWORKING SCISSORS (H).
- Return to the Minotaur's Lair.
- Use the METALWORKING SCISSORS. Select for a PIECE OF THE PATTERN (I).
- Return to the Great Library.
- Take RAIL 2/2 (J).
- Place RAILS 2/2 (K).
- Select (L).
- Place the PIECE OF THE PATTERN (M) and open.
- Take the EMPTY BEAKER (N). Uncover and take Manuscripts 28/28 (O).
- Take the KEEPER'S MANUSCRIPT (P).
- Return to The Safe.
- Give the KEEPER'S MANUSCRIPT (Q).
- Return to the Minotaur's Lair.
- Place the ROSE PETALS. Uncover and take the CURSED BULL RING (R).
- Pull the lever (S).
- Use the HAMMER (T). Take the SIGNET RING.
- Return to the Cave.
- Place the PIECE OF THE STATUE (U).
- Place and select the SIGNET RING (V).
- Take the SAPPHIRE and RUBY (W).
- Select (X). Take the EMERALD (Y).
- Return to The Safe.
- Place the SAPPHIRE, RUBY and EMERALD (Z).
- Take the JADE SKULL (A).
- Return to the Ancient Graveyard.
- Place the JADE SKULL (B).
- Select (C).

- Solution (C1-C2). (F-A)-(C-F)-(B-G)-(B-E)-(B-G)-(C-D)-(B-E)-(E-D)-(D-C)-(E-D)-(E-B).
- Take the WATER ELEMENT (D).
- Return to the Room of Insanity.

- Select (E).
- Solution (F).
- Place the WATER ELEMENT (G).
- Select (H), then take the BOOKS (I).
- Return to the Great Library.
- Place the BOOKS (J).
- Solution (K). 4-12-17.
- Play the HOP (L) for a SPELL BOOK.
- Select (M). Take the HANGING BUCKET (N).
- Walk down.
Chapter 5: From the Grave
- Select (O). Place the JUG OF WATER (P).
- Take the ROPE LADDER (Q).
- Return to the Elders' House.
- Give the SPELL BOOK (R); receive a LEVER and ELIXIR OF ANIMATION FORMULA.
- Grab the BROOM (S).
- Return to the Underground Lake.
- Use the BROOM (T).
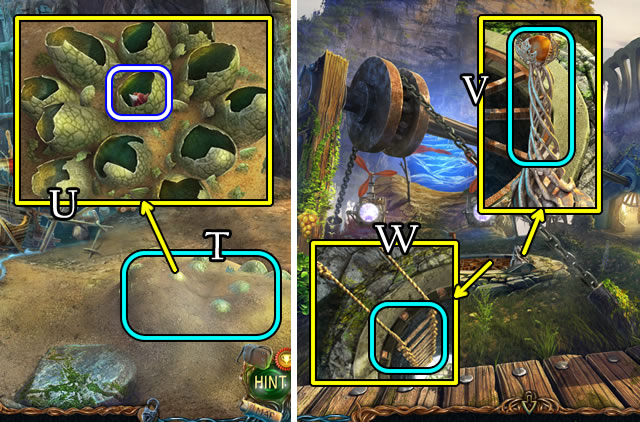
- Break the eggs. Take the SWITCH and DRAGON-EGG SHELLS (U).
- Return to the Crossroads.
- Place and select the LEVER (V).
- Place the ROPE LADDER (W).
- Take the FULL-ECLIPSE TILE (X).
- Use the KNIFE. Uncover to place and select the SWITCH (Y).
- Return to Anvil Peak.
- Use the HANGING BUCKET for a HALF-ECLIPSE TILE (Z).
- Return to the Great Library.
- Place the HALF-ECLIPSE TILE and FULL-ECLIPSE TILE (A).
- Solution (B1-B2).
- Select (C).
- Return to Anvil Peak. Walk left.
- Play the HOP (D); receive a CROWN PIECE.
- Take the CROWN PART (E).
- Take the FATHER FIGURINE (F).
- Return to the Tree of Life.

- Place the MOTHER FIGURINE and FATHER FIGURINE (G).
- Touch (H).
- Take the TREE OF LIFE FRUIT (I).
- Return to the Elders' House.
- Place the EMPTY BEAKER for NYMPH'S TEARS (J).
- Place the ELIXIR OF ANIMATION FORMULA (1), DRAGON-EGG SHELLS (2) and TREE OF LIFE FRUIT (3).
- Crush, then place (4) the DRAGON-EGG SHELLS.
- Place the NYMPH'S TEARS (4).
- Use the KNIFE (3). Place the TREE OF LIFE FRUIT (4).
- Cap then take the ELIXIR OF ANIMATION (K).
- Return to Leproch's Tomb.
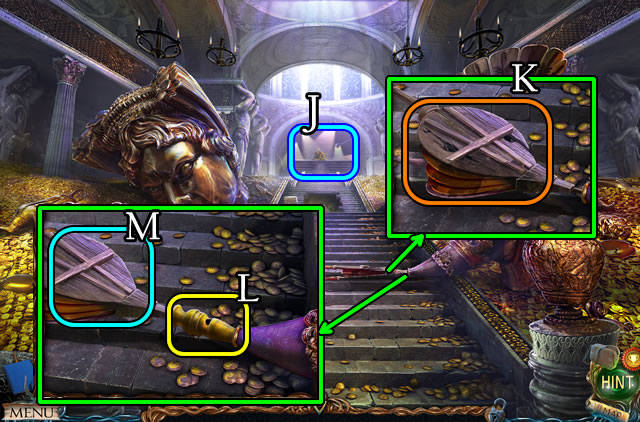
- Use the ELIXIR OF ANIMATION (L); receive a KEY.
- Use the KEY (M). Take CHEST OF GOLD 1/9 (N).
- Take the CURSED KEY (O).
- Use the KNIFE, take the CURSED SWORD (P).
- Use the HAMMER, take the CURSED SCEPTER (Q).
- Return to the Crossroads.
- Place and select the CURSED KEY (R). Receive CHEST OF GOLD 2/9.
- Open and take the KEY (S).
- Return to the Ruined Temple.
- Select (T) and place the KEY (U).
- Uncover and take the HANDLE (V).
- Touch (W); take the DICE (X).
- Return to the Elders' House.
- Place the CURSED SCEPTER (Y).
- Take the GLASS PUNCHCARD (Z).
- Take (Y) for CHEST OF GOLD 3/9.
- Return to the Great Library.
- Place and select the HANDLE (A).
- Take the SPRING (B).
- Place the SPRING (C).
- Select (D).
- Take the FIRE ELEMENT (E).
- Return to the Room of Insanity.
- Select (F).
- Solution (G).
- Place the FIRE ELEMENT (H).
- Select (I) and take the PLANK (J).
- Walk forward.
- Combine the CROWN PIECE and the CROWN PART for a CROWN (Inventory).
- Place the CROWN (K). Take the STONE TABLET (L).
- Combine the STONE TABLET and HAMMER for a WOODEN PUNCHCARD.
- Return to the Minotaur's Lair.
- Place the GLASS PUNCHCARD and WOODEN PUNCHCARD (M).
- Play the HOP (N); receive a SPREADING TOOL.
- Take CHEST OF GOLD 4/9 (O).
- Return to The Safe.
- Use the SPREADING TOOL (P).
- Select 3x (Q). Take the LENS (R).
- Return to the Harpy's Nest.
- Place and select the LENS (S).
- Place the CURSED SWORD (T).
- Uncover and open the box. Place the DICE (U).
- Solutions are random (V).
- Take the RATCHET STRAP (W).
- Take CHEST OF GOLD 5/9 (X).
- Return to the Ruined Temple.
- Place and select the RATCHET STRAP (Y).
- Select (Z).
- Place the PLANK (A).
- Solution (A1).
- Take the 'SANCTUARY' TILE (B).
- Return to the Lower Island.
- Use the WOOD SAW (C); select for a 'WOOD-NETWORK' TILE.
- Place the 'ANVIL', 'BALLISTA', 'METRONOME', 'CUBE', 'TOWER', 'SANCTUARY' and 'WOOD-NETWORK' TILES (D).
- Take CHEST OF GOLD 6/9 (E).
- Return to the Hills.
- Use the HAMMER. Take CHEST OF GOLD 7/9 (F).
- Go down the well.
- Take the CHEST OF GOLD 8/9 (G).
- Return to the Schooner Wreckage.
- Take CHEST OF GOLD 9/9 (H).
- Return to the Arena.
- Place the CHEST OF GOLD 9/9 (I). Receive a TILE.
- Open (J) and place the TILE (K).
- Solution (L).
- Take the KEY (M).
- Place and select the KEY (N). Take the POLE AXE (O).
- Use the POLE AXE (P); receive a GOLDEN CUP.
- Place the GOLDEN CUP (Q).
- Congratulations. You have completed playing Lost Lands: The Golden Curse.
Created at: 2015-12-06