

Walkthrough Menu
- General Tips
- Chapter 1: The Hotel
- Chapter 2: The Town
- Chapter 3: The Cabin
- Chapter 4: The Crossroads
- Chapter 5: The Ruins
- Chapter 6: The Weeping Woman
General Tips
- This is the official guide for Lost Legends: The Weeping Woman.
- This guide will not show when you have to zoom into a location; the screenshots will show each zoom scene.
- Hidden-object puzzles are referred to as HOPs. This guide will not show screenshots of the HOPs, however, it will mention when an HOP is available and the inventory item you'll collect from it.
- Mini-games are sometimes randomized; your solution may vary.
- Use the Map to travel to a location.
Chapter 1: The Hotel
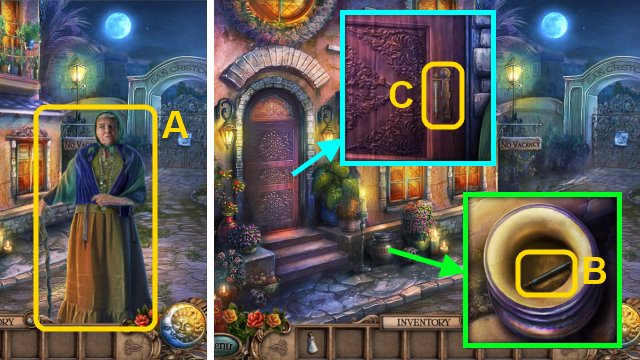
- Talk to the woman (A); you receive the WEEPING WOMAN FIGURINE.
- Take the DOOR HANDLE (B).
- Place the DOOR HANDLE on the door (C); open it.
- Walk left.
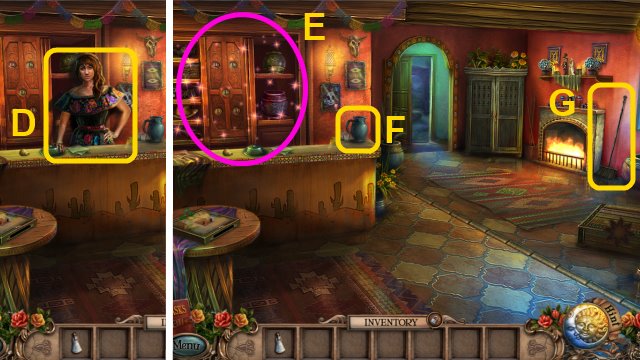
- Talk to the woman (D).
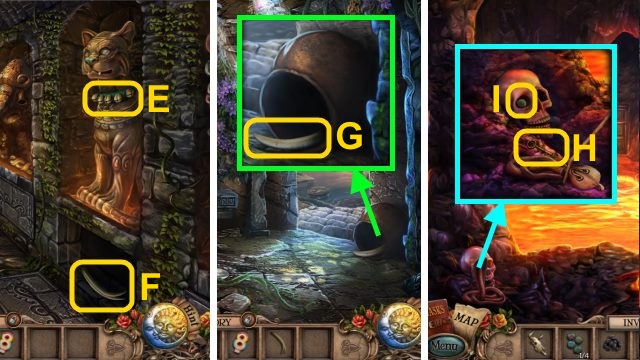
- Play the HOP to receive the OIL CAN (E).
- Take the WATER PITCHER (F).
- Take the FIREPLACE BROOM (G).
- Walk forward.
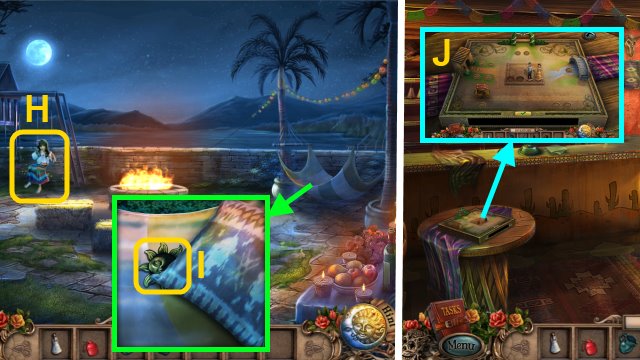
- Talk to Catalina (H); you receive the DOMINGO FIGURINE.
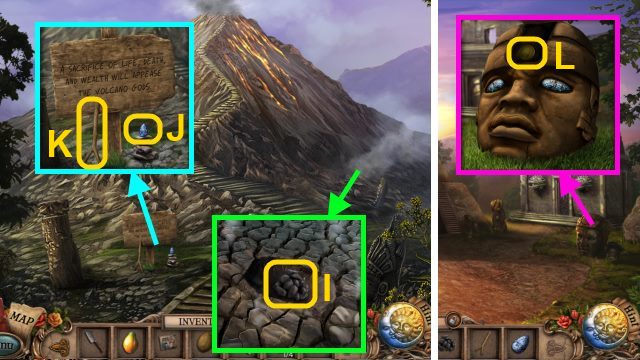
- Take the SUN EMBLEM (I).
- Walk down.
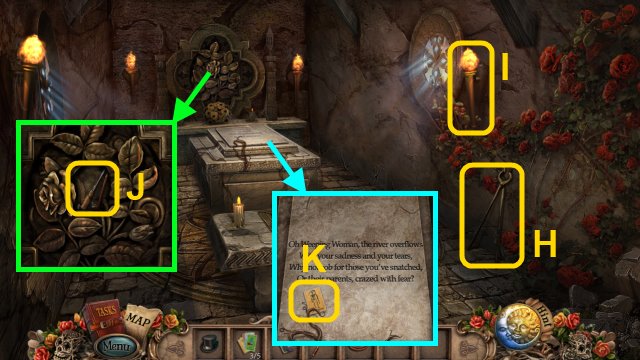
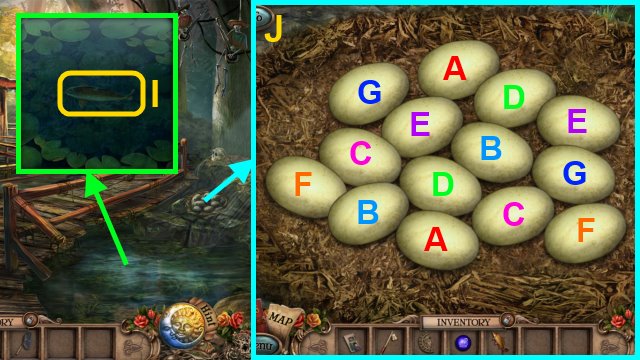
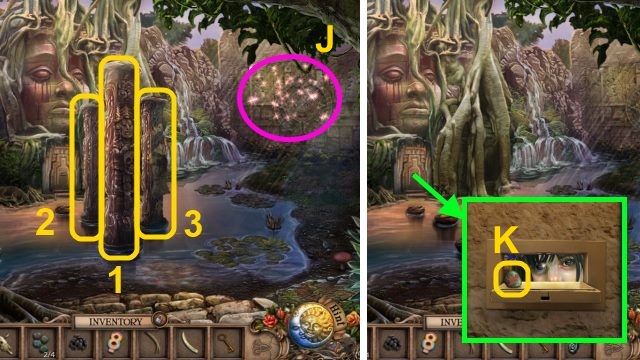
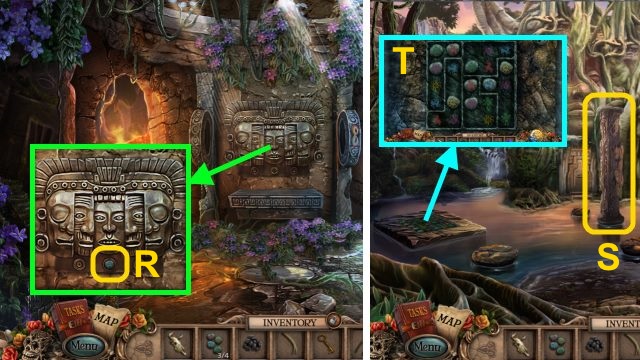
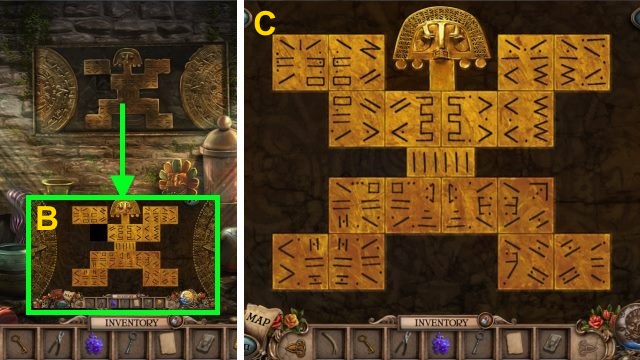
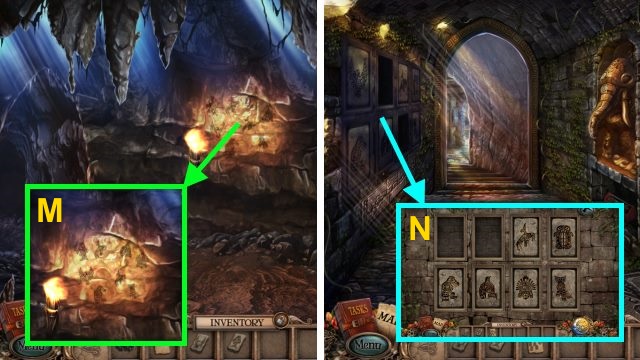
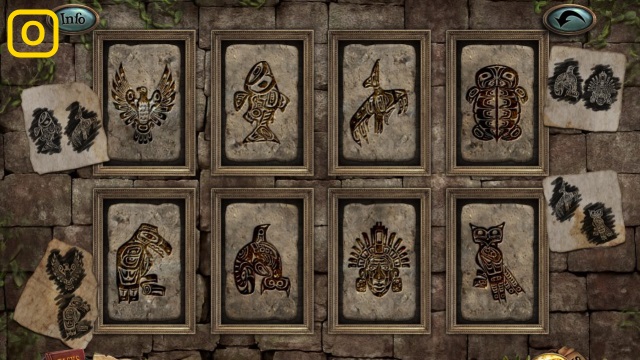
- Place the WEEPING WOMAN FIGURINE and DOMINGO FIGURINE on the board for a mini-game (J).

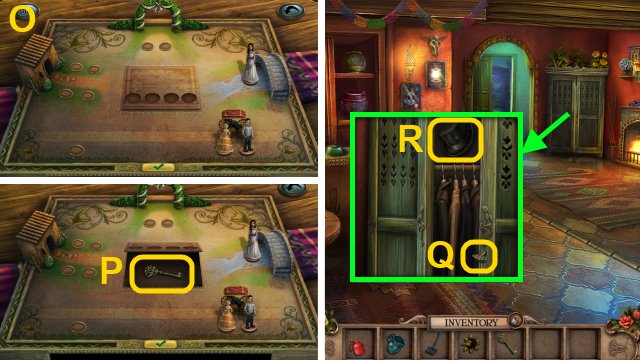
- Solution (K-O).
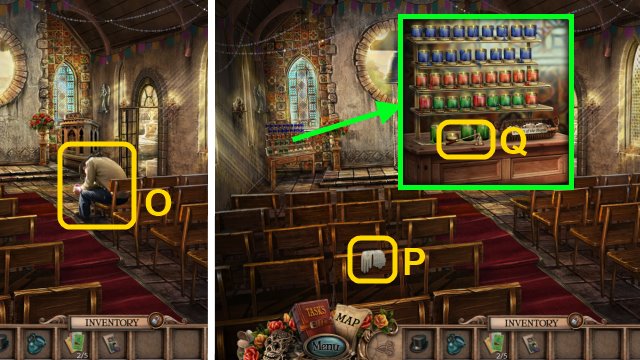
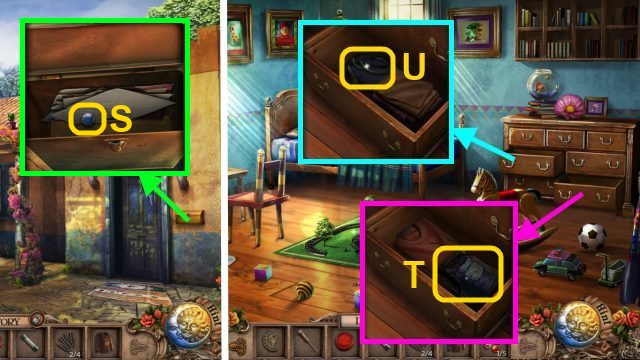
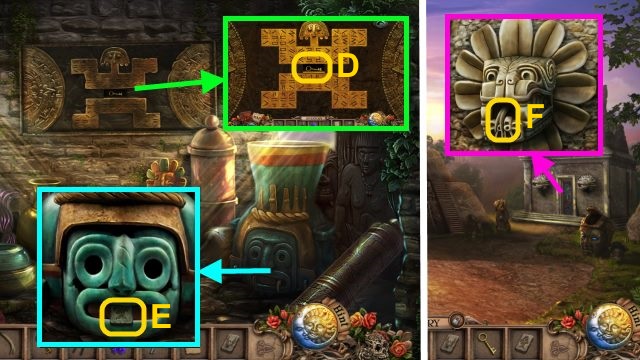
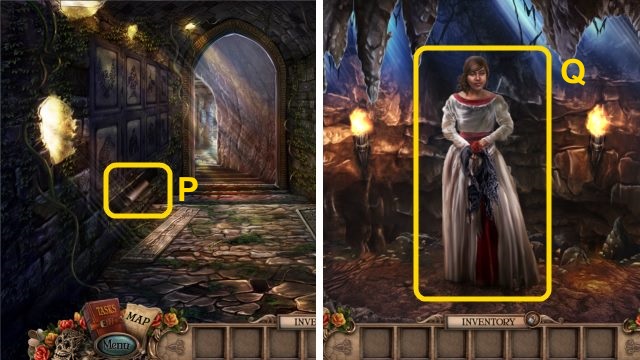
- Take the ARMOIRE KEY (P).
- Use the ARMOIRE KEY on the cabinet (Q); take the TOP HAT (R).
- Walk forward.
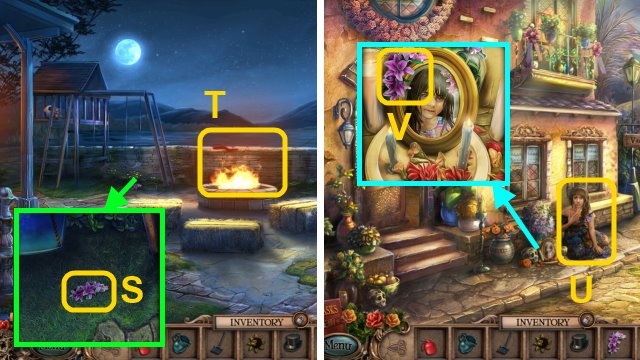
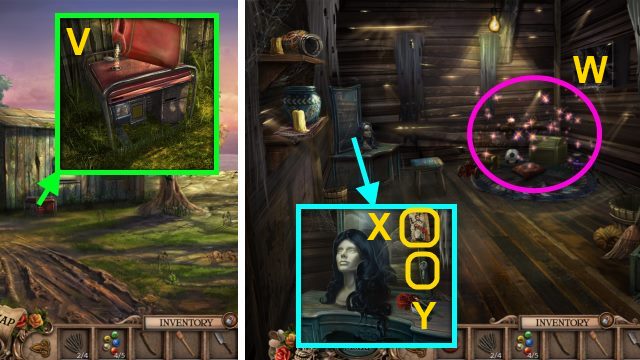
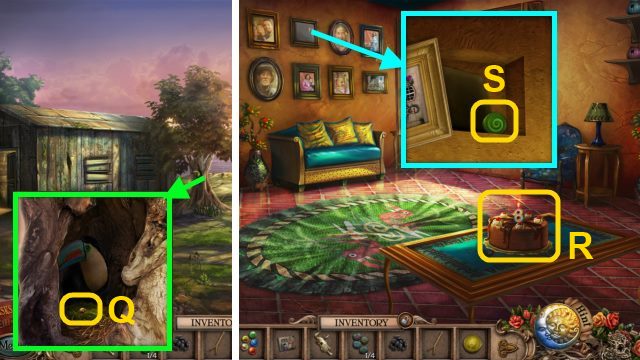
- Take CATALINA'S FLOWERS (S).
- Examine the wall (T).
- Talk to the woman (U).
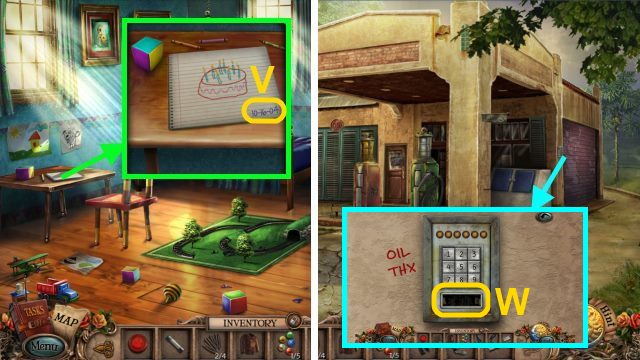
- Place CATALINA'S FLOWERS on the frame (V).
- Walk right.
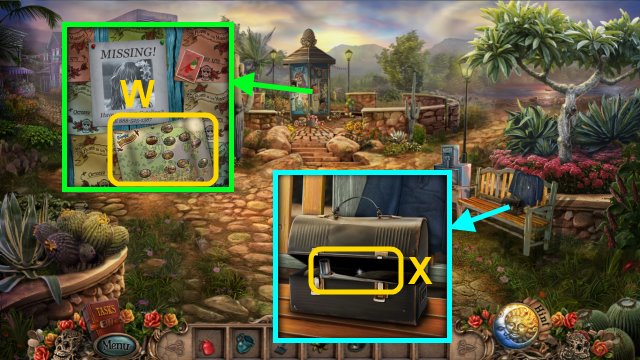
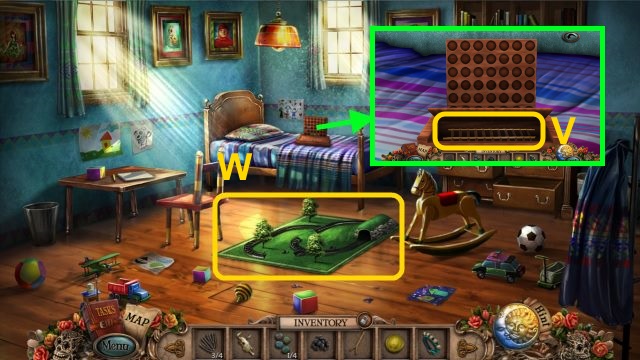
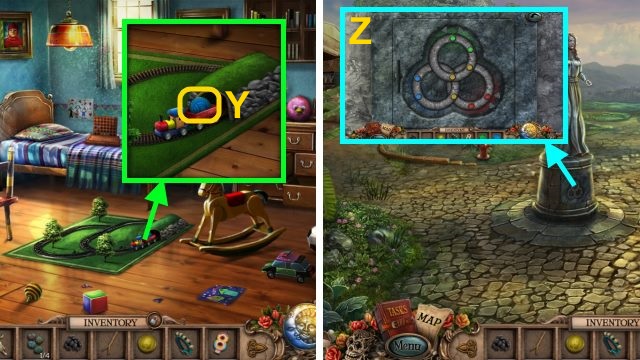
- Take the Map (W).
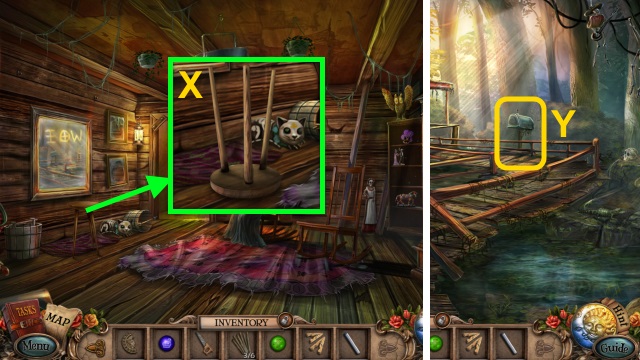
- Use the OIL CAN on the box; open it.
- Take the SOCKET WRENCH (X).
- Walk right.
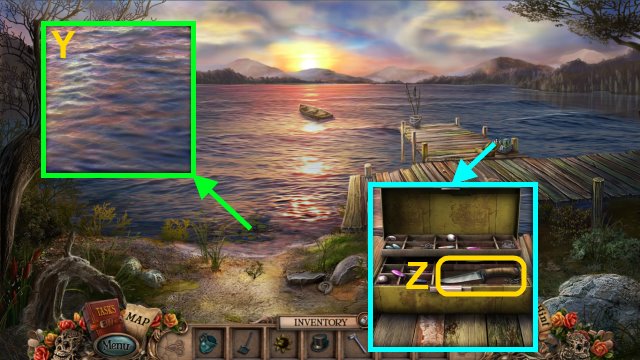
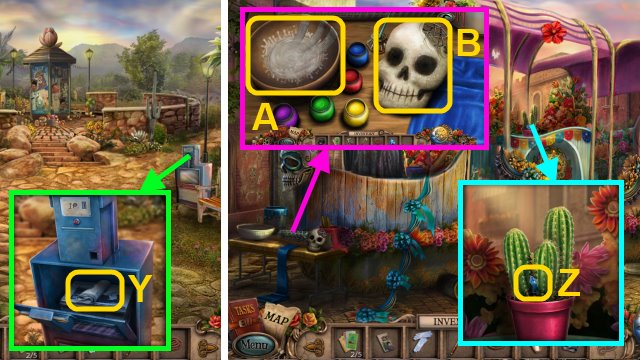
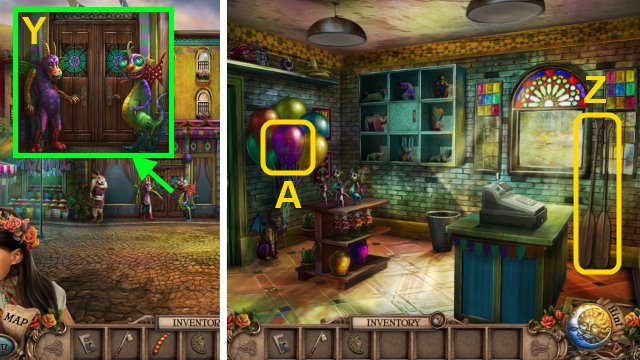
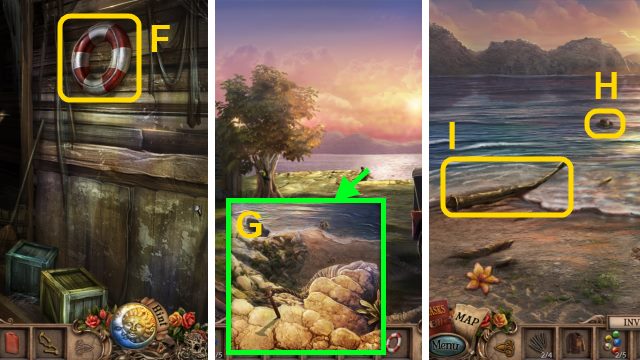
- Use the WATER PITCHER on the water to receive the PITCHER OF WATER (Y).
- Take the FISHING KNIFE (Z).
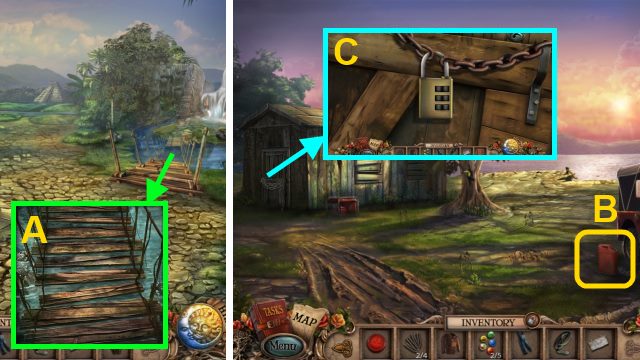
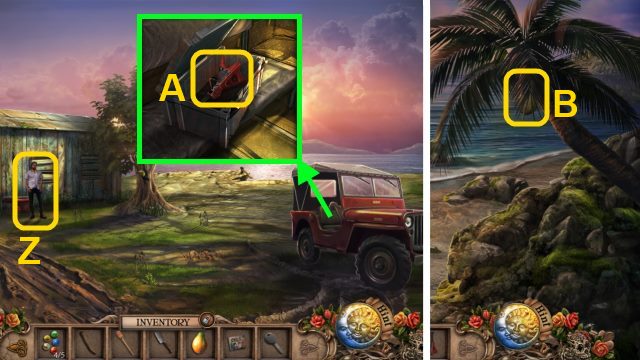
- Go to the Hotel; walk left then forward.
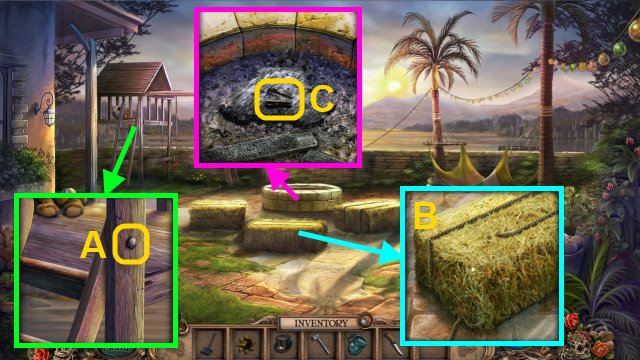
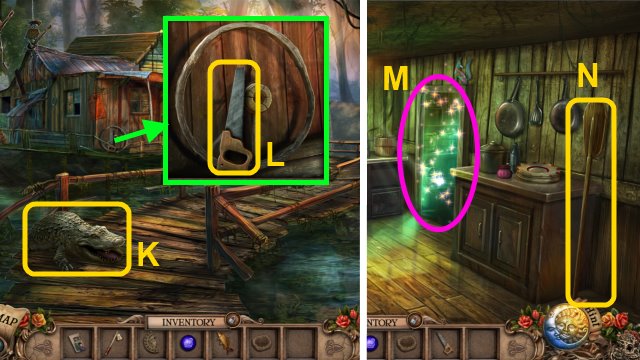
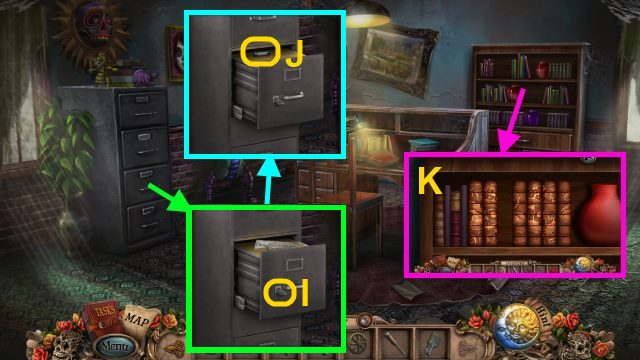
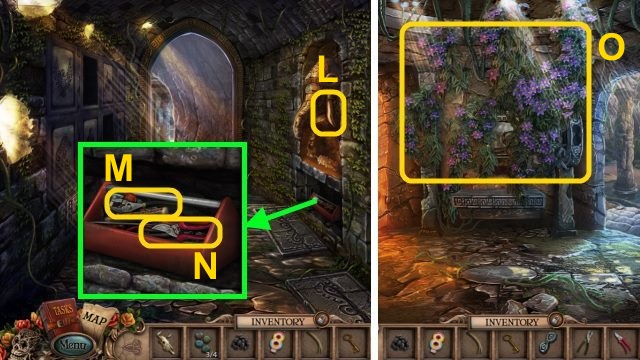
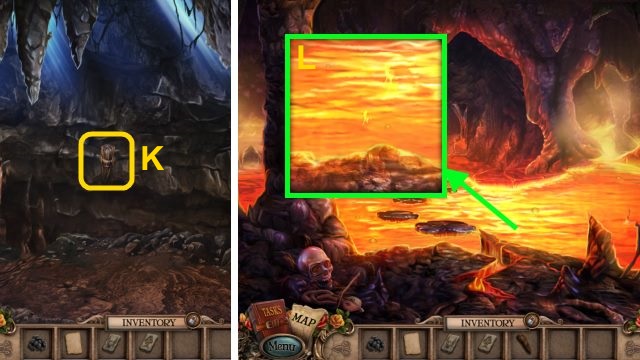
- Use the SOCKET WRENCH on the bolt (A); take the LADDER.
- Use the FISHING KNIFE on the rope; take the HAY (B).
- Use the FIREPLACE BROOM on the ashes; take the STAPLE REMOVER (C).
- Walk down twice.
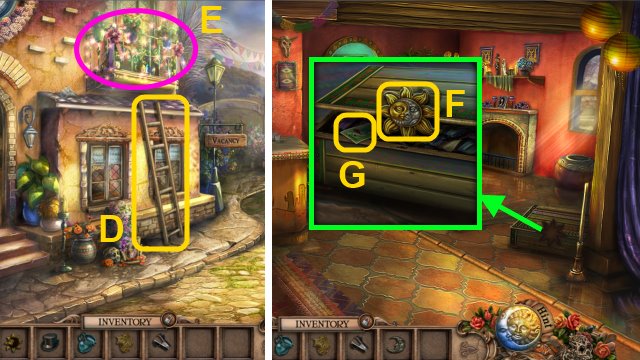
- Place the LADDER under the balcony (D).
- Play the HOP to receive the MOON EMBLEM (E).
- Walk left.
- Place the SUN EMBLEM and MOON EMBLEM on the box (F).
- Take the LOTERIA CARDS (1/5) (G).
- Go to the Town Circle.
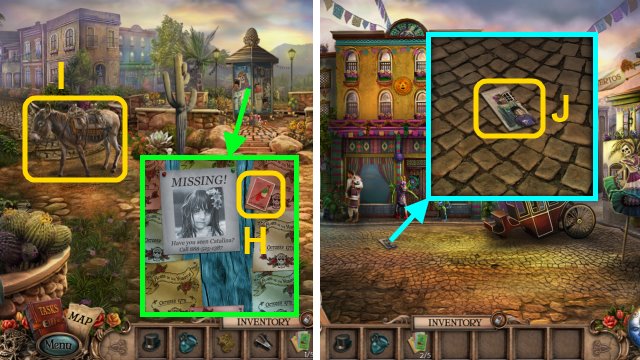
- Use the STAPLE REMOVER to take the LOTERIA CARDS (2/5) (H).
- Give the HAY to the donkey (I).
- Walk left.
- Take the TORN PHOTO (J).
- Walk left, then forward.
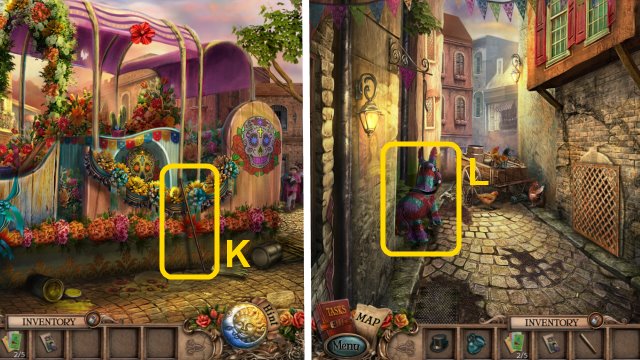
- Take the BROOMSTICK (K).
- Walk down, then right.
- Use the BROOMSTICK on the pinata (L).
- Play the HOP to receive the CHURCH KEY (M).
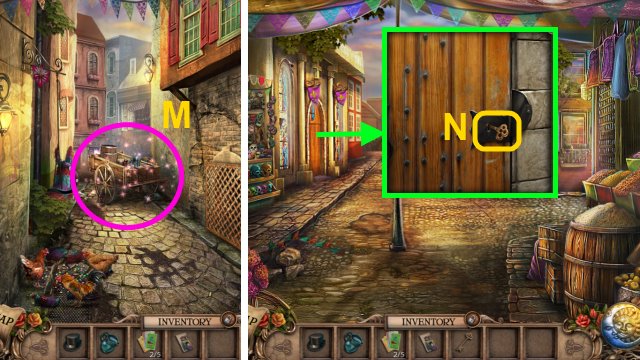
- Walk down.
- Use the CHURCH KEY on the door (N).
- Walk left.
Chapter 2: The Town
- Talk to the man (O).
- Take the GLOVES (P).
- Take the CANDLE SNUFFER (Q).
- Walk forward.
- Play the HOP to receive the SCOOP (R).
- Take the HEDGE CLIPPERS (S).
- Walk down.
- Use the HEDGE CLIPPERS on the rope (T).
- Take the ROPE (U).
- Walk down.
- Use the SCOOP on the barrel to receive the SCOOP OF FLOUR (V).
- Talk to the woman to play a mini-game (W).
- Solution (X).
- You receive the PESO.
- Go to the Town Circle.
- Place the PESO in the slot; take the NEWSPAPER (Y).
- Go to the Parade Float.
- Use the GLOVES to take the TEARDROP GEM (Z).
- Put the PITCHER OF WATER, SCOOP OF FLOUR, and NEWSPAPER in the bowl; take the PAPER-MACHE(A).
- Place the PAPER-MACHE on the skull for a mini-game (B).
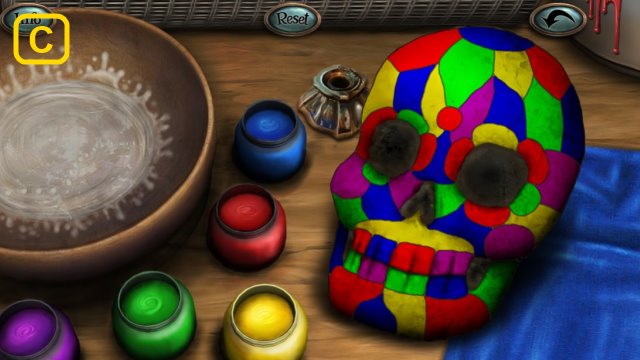
- Random Solution (C).
- You receive the PAINTED SKULL.
- Walk down.
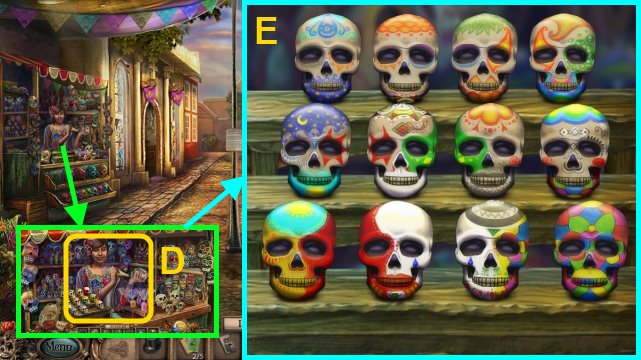
- Give the PAINTED SKULL to the woman for a mini-game (D).
- Solution (E).
- You receive LOTERIA CARDS (3/5).
- Walk left, then forward.
- Move the sign (F); place the TEARDROP GEM in the slot for a mini-game.
- Random Solution (G).
- Walk forward.
- Take the METAL TONGS (H) and TORCH (I).
- Move the rose; take the SCREWDRIVER (J).
- Take the LOTERIA CARDS (4/5) (K).
- Go to the Town Square.

- Use the METAL TONGS to take the LOTERIA CARDS (L).
- Walk left, then right.
- Use the SCREWDRIVER on the grate (M).
- Use the TORCH on the tunnel (N); take the HOOK (O).
- You receive the GRAPPLING HOOK.
- Go to the Riverside.
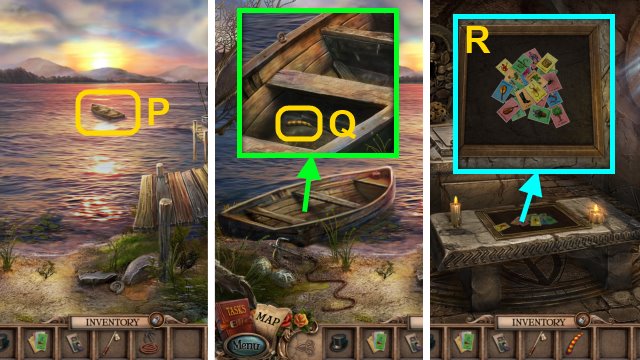
- Use the GRAPPLING HOOK on the boat (P).
- Take the CREATURE HORN (Q).
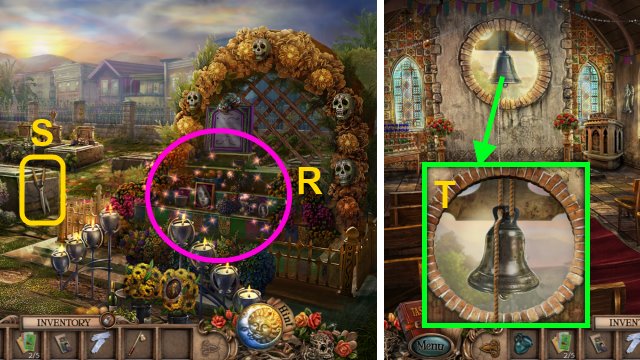
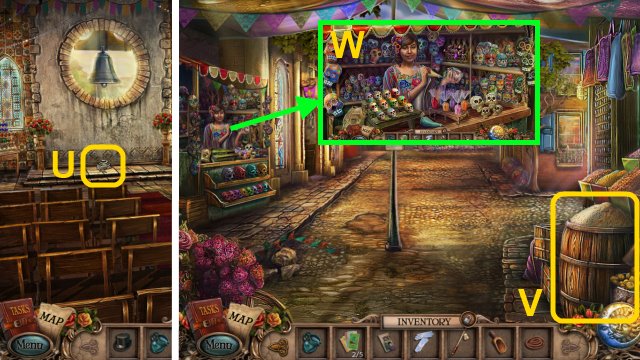
- Go to the Church; walk forward twice.
- Place the LOTERIA CARDS on the pile for a mini-game (R).
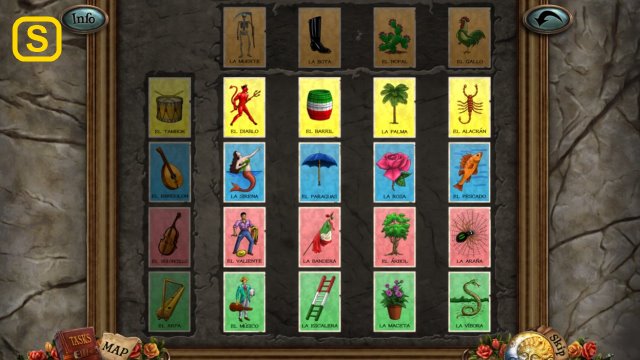
- Random Solution (S).

- Talk to the Weeping Woman (T).
- Take the VEIL (U).
- Take the RELIC PIECE (V).
- Go to the Parade Float.
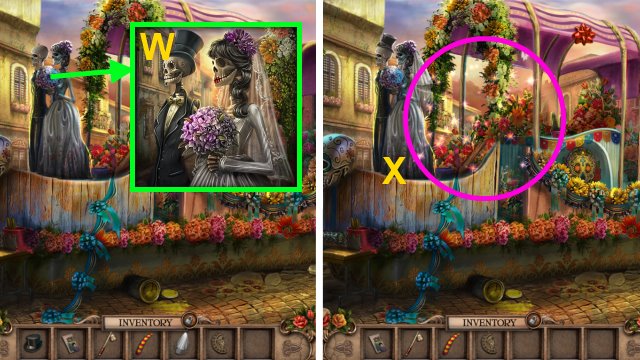
- Place the TOP HAT on the groom; place the VEIL on the bride (W).
- Play the HOP to receive the CREATURE EYE (X).
- Go to the Town Square.
- Place the CREATURE HORN and CREATURE EYE on the statues (Y).
- Walk forward.
- Take the OARS (Z).
- Take the BALLOON (A).
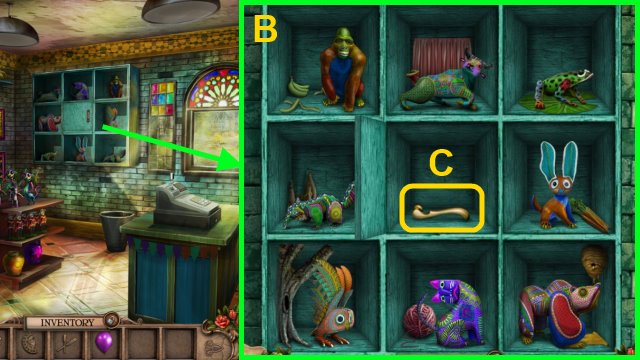
- Examine the shelves for a mini-game.
- Solution (B).
- Take the book and CARRIAGE HANDLE (C).
- Walk down.
- Use the CARRIAGE HANDLE on the door (D).
- Play the HOP to receive the FISHING NET (E).
- Walk down.
- Use the BALLOON on the cactus to receive the BLUE ORB (F).
- Walk right.
- Use the FISHING NET on the pole; take the FISHING NET (G).
- Place the OARS in the boat (H).
- Go forward.
Chapter 3: The Cabin
- Use the FISHING NET to take the CARP (I).
- Examine the nest for a mini-game.
- Solution (J).
- You receive the NEST.
- Give the CARP to the alligator (K).
- Take the SAW (L).
- Walk forward twice.
- Play the HOP to receive the TEA BAG (M).
- Use the SAW on the oar to receive the WHEEL SPOKES (2/6) (N).
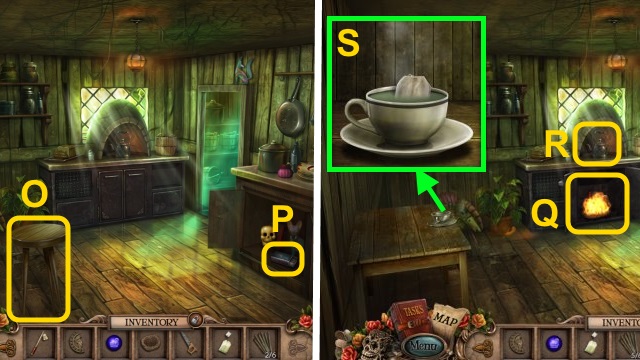
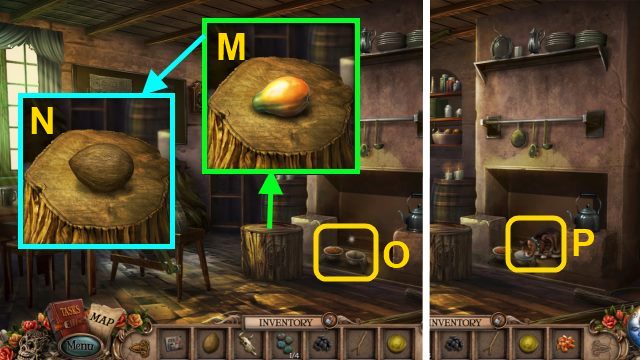
- Take the STOOL (O).
- Open the cupboard; take the MATCHES (P).
- Open the furnace; place the NEST inside.
- Use the MATCHES on the nest (Q); take the HOT WATER (R).
- Place the TEA BAG in the teacup; pour the HOT WATER.
- Take the TEA (S).
- Walk down.
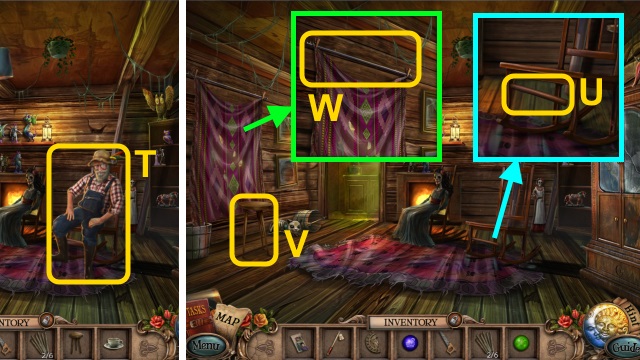
- Give the TEA to the man (T); you receive the GREEN ORB.
- Take the WHEEL SPOKES (3/6) (U).
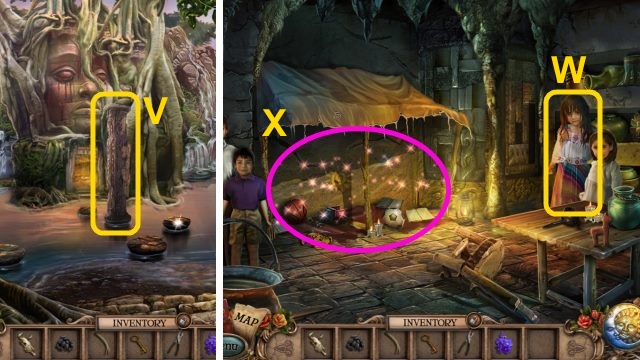
- Place the STOOL under the curtain (V); take the CLOTHESPINS and METAL ROD (W).
- Flip the stool; use the SAW to take the WHEEL SPOKES (X).
- Walk down.
- Examine the mailbox for a mini-game (Y).

- Solution (Z).
- Take the BOOK (A).
- Place the WHEEL SPOKES on the wheel; take the CARRIAGE WHEEL (B).
- Go to the Town Square, walk forward.
- Place the BLUE ORB and GREEN ORB on the door for a mini-game (C).
- Solution (D): D, F, E, G, F, E, C, D, F, H, G, E, D, B, A, C, E, D, B, C, D, F, G, I, H, F, G, E, C, D, F, E.
- Walk left.
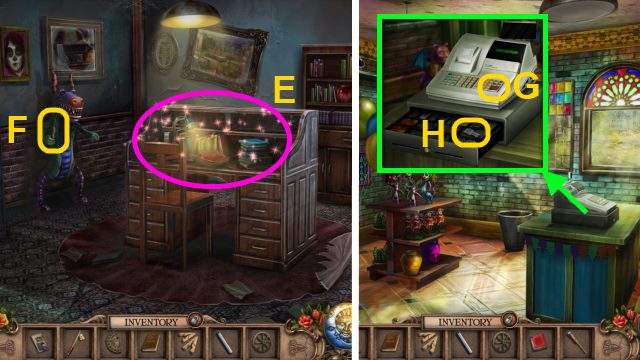
- Open the desk; play the HOP to receive the CASH REGISTER BUTTON (E).
- Take the ICEPICK (F).
- Walk down.
- Take the note; Place the CASH REGISTER BUTTON on the register (G).
- Take the CABINET KEY (H).
- Walk left.
- Use the CABINET KEY on the cabinet (I).
- Read the newspapers; take the FUSE (J).
- Place the BOOK on the shelf for a mini-game (K).
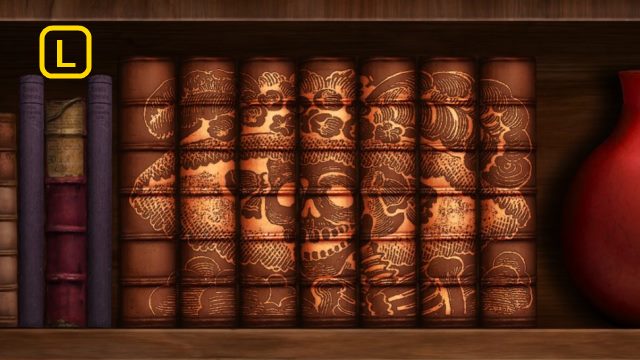
- Solution (L).
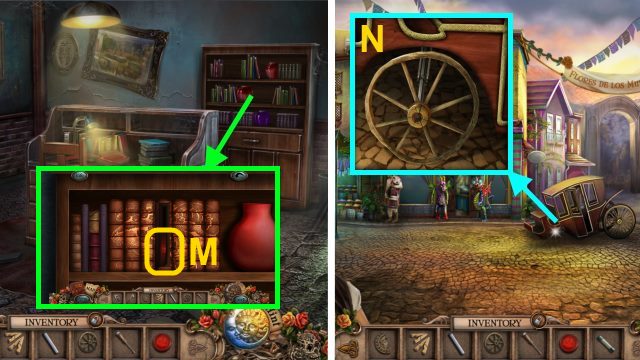
- Take the FIRE DISC (M).
- Walk down twice.
- Place the METAL ROD and CARRIAGE WHEEL on the carriage (N); push it.
- Walk right.
Chapter 4: The Crossroads
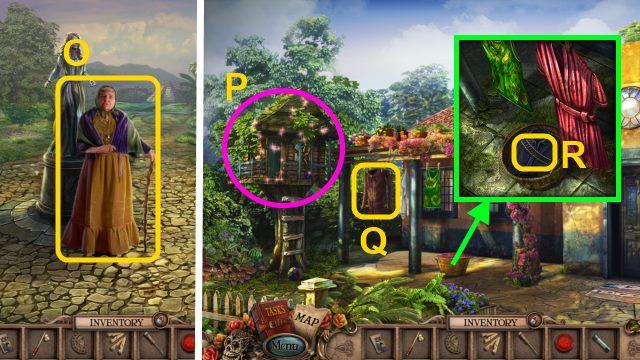
- Talk to the woman (O).
- Walk forward, then right.
- Play the HOP to receive the TRAIN TRACKS (1/4) (P).
- Take the SHIRT (Q).
- Use the CLOTHESPINS on the robe; take the TRAIN TRACKS (2/4) (R).
- Open the mailbox.
- Read the card; take the MARBLES (1/5) (S).
- Walk forward, then left.
- Open the drawers.
- Move the clothes; take the OVERALLS (T).
- Move the clothes; take the BELT (U).
- Take DIEGO'S BIRTHDAY (V).
- Go to the Weeping Woman statue, then left.
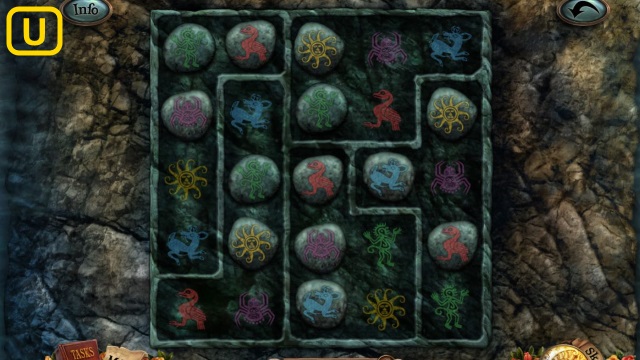
- Place the FUSE on the keypad for a mini-game (W).
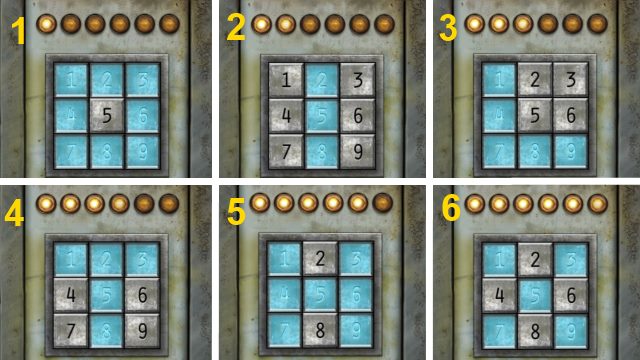
- Solution (1-6).
- Play the HOP to receive the CROWBAR (X).
- Open the cooler.
- Use the ICEPICK; take the MARBLES (2/5) (Y).
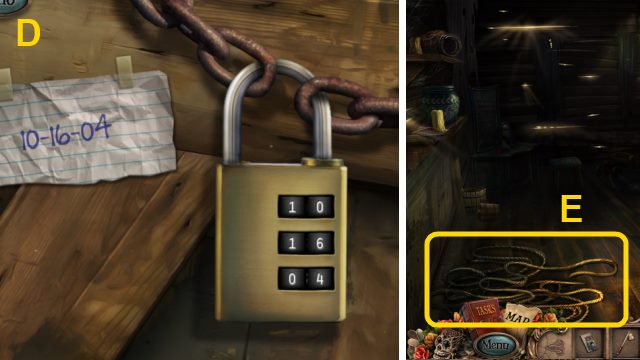
- Go to the House.
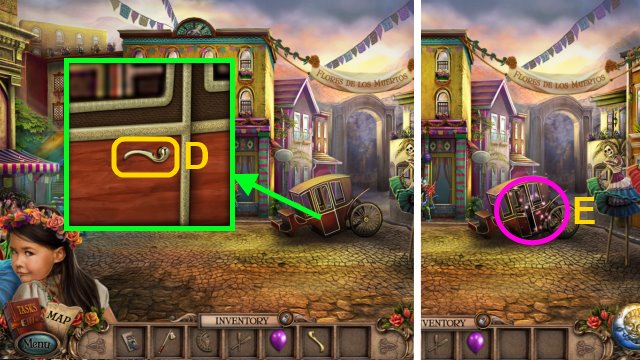
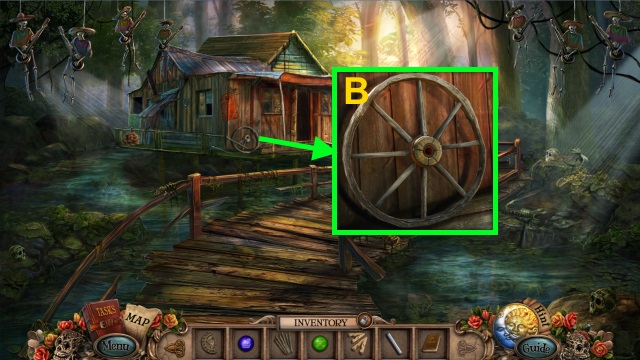
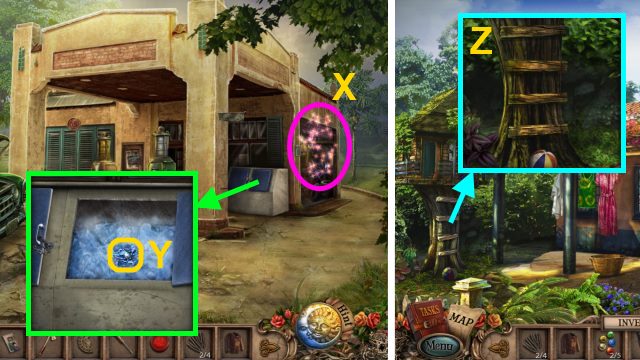
- Use the CROWBAR to take the PLANKS (Z).
- Walk down twice.
- Place the PLANKS on the bridge (A).
- Walk right, then forward.
- Take the EMPTY GAS CAN (B).
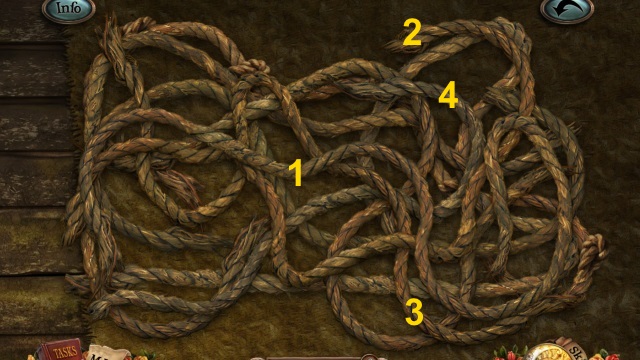
- Place DIEGO'S BIRTHDAY by the lock for a mini-game (C).
- Solution (D).
- Walk left.
- Examine the ropes for a mini-game (E).
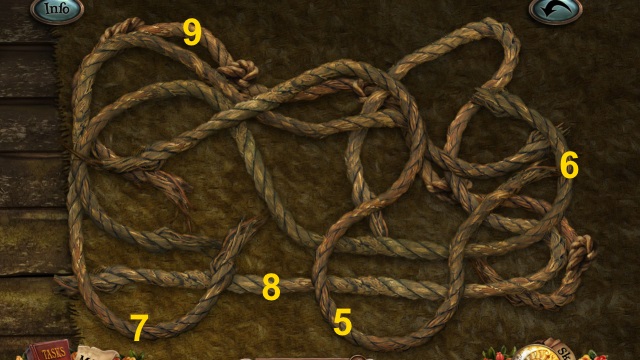
- Solution (1-9).
- You receive the KNOTTED ROPE.
- Take the LIFESAVER (F).
- Walk down.
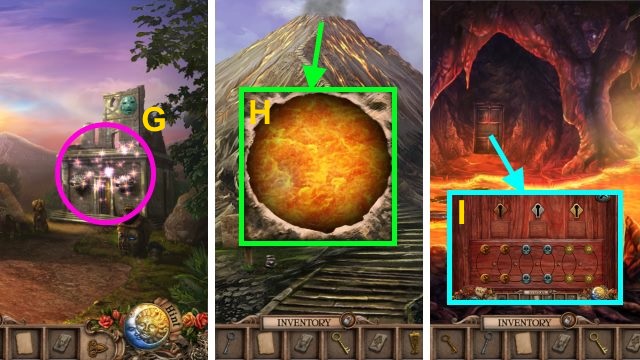
- Use the KNOTTED ROPE on the cliff (G).
- Go forward.
- Use the LIFESAVER to take the STRAW HAT (H).
- Take the DRIFTWOOD (I).
- Go to the Weeping Woman Statue, forward, then left.
- Use the tiller; take the MARBLES (3/5) (J).
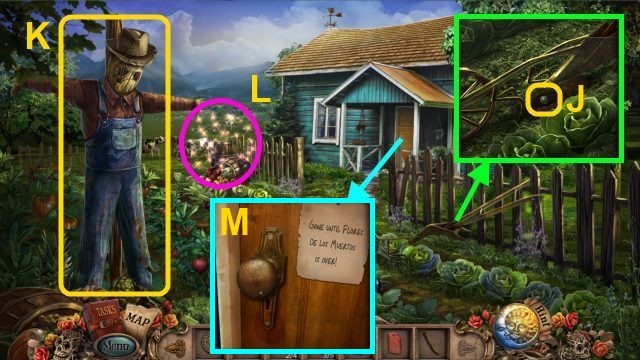
- Place the SHIRT, OVERALLS, and STRAW HAT on the scarecrow (K).
- Play the HOP to receive the FARM KEY (L).
- Use the FARM KEY on the door (M).
- Walk forward.
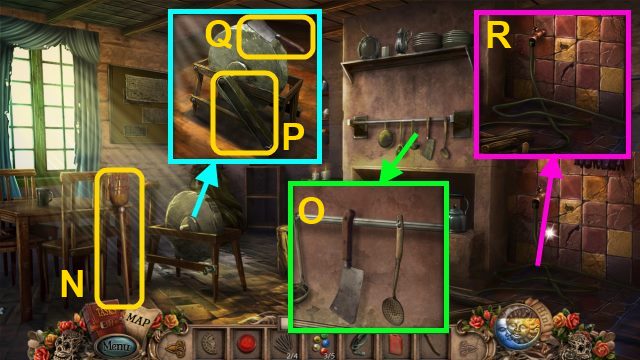
- Take the FRUIT PICKER (N).
- Take the DULL CLEAVER and SLOTTED LADLE (O).
- Place the BELT on the grindstone (P); use the DULL CLEAVER to receive the CLEAVER (Q).
- Use the CLEAVER to take the HOSE (R).
- Walk down twice.
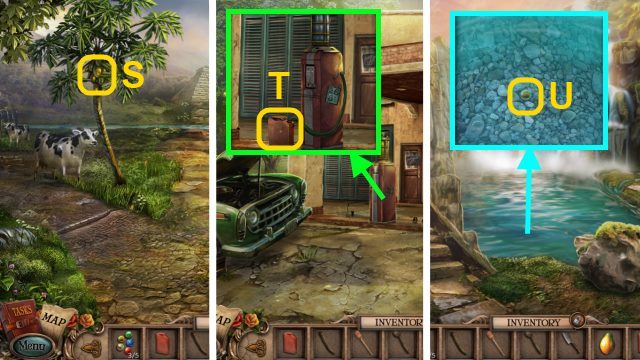
- Use the FRUIT PICKER to take the PAPAYA (S).
- Walk down, then left.
- Place the EMPTY GAS CAN under the pump; attach the hose.
- Take the GAS (T).
- Walk down, then right.
- Use the SLOTTED LADLE to take the MARBLES (4/5) (U).
- Walk forward.
- Move the cap; pour the GAS in the generator (V).
- Walk left.
- Play the HOP to receive the TRAIN TRACKS (3/4) (W).
- Take the TORN PHOTO (X); you receive the FAMILY PHOTO.
- Take the JEEP KEY (Y).
- Walk down.
Chapter 5: The Ruins
- Talk to the man (Z).
- Use the JEEP KEY on the box; take the CAR JACK (A).
- Go forward.
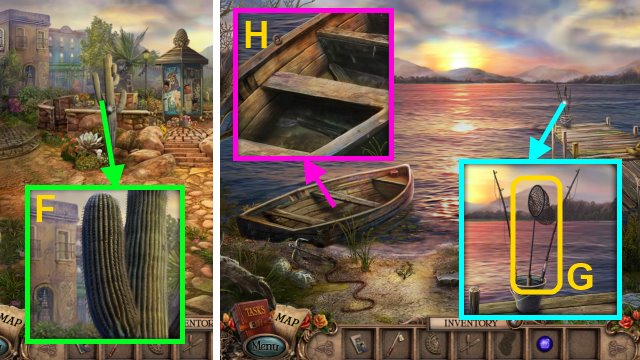
- Use the FRUIT PICKER to take the COCONUT (B).
- Go to the Gas Station.
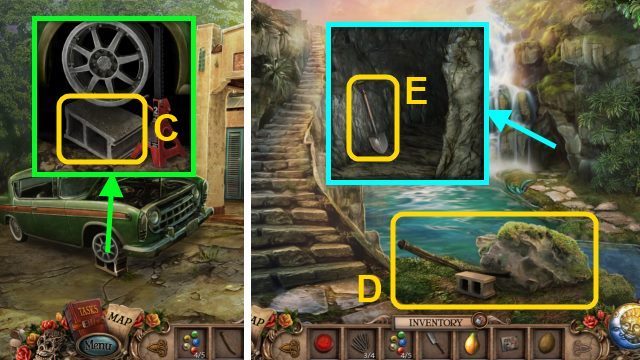
- Use the CAR JACK on the car; take the CINDER BLOCK (C).
- Walk down, then right.
- Use the CINDER BLACK and DRIFTWOOD to move the rock (D).
- Take the SHOVEL (E).
- Walk forward twice.
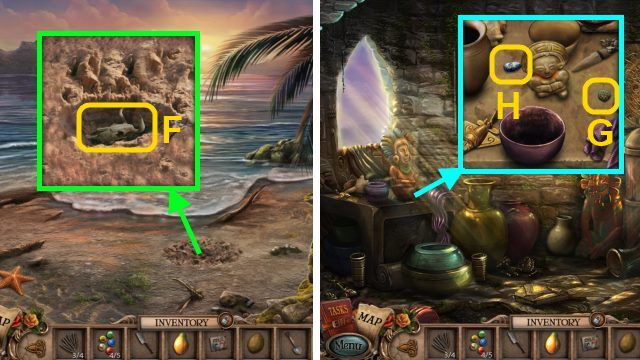
- Use the SHOVEL on the sand; take the COW SKULL (F).
- Go to the Weeping Woman Statue, walk forward twice, then go up.
- Move the bowl and scarf; take the PAINTED STONES (1/4) (G).
- Move the statue and vase; take the EYE GEM (H).
- Walk down, then left.
- Take the LAVA ROCKS (I).
- Take the EYE GEM (J) and Y-SHAPED STICK (K).
- Walk down.
- Place the 2 EYE GEMS in the statue; take the EARTH DISC (L).
- Go to the Farm; walk forward.
- Place the PAPAYA on the stump (M); use the CLEAVER to receive the CUT PAPAYA.
- Place the COCONUT on the stump (N); use the CLEAVER to receive the COCONUT JUICE.
- Pour the COCONUT JUICE in the bowl (O).
- Take the BELL COLLAR (P).
- Go to the Waterfall; walk forward.
- Give the CUT PAPAYA to the toucan; take the MARBLES (Q).
- Go to the House; walk forward.
- Use the CANDLE SNUFFER on the cake (R); take the BIRTHDAY CANDLE.
- Place the FAMILY PHOTO in the frame; take the AIR DISC (S).
- Walk left.
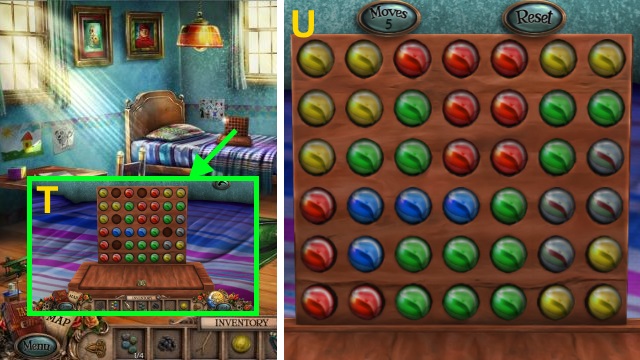
- Place the MARBLES on the board for a mini-game (T).
- Solution (U): white, blue, green, red, yellow.
- Take the TRAIN TRACKS (V).
- Place the TRAIN TRACKS on the mat for a mini-game (W).
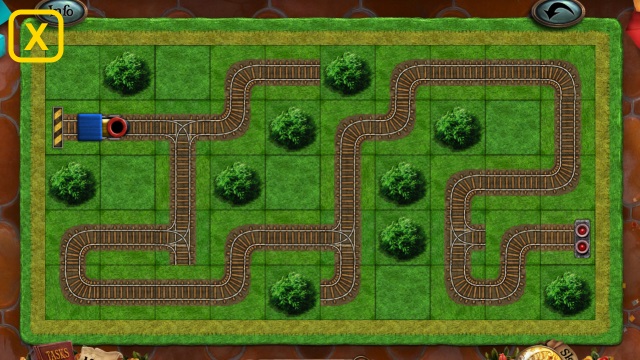
- Solution (X).
- Take the WATER DISC (Y).
- Go to the Weeping Woman Statue.
- Place the FIRE DISC, EARTH DISC, AIR DISC, and WATER DISC on the plaque for a mini-game (Z).
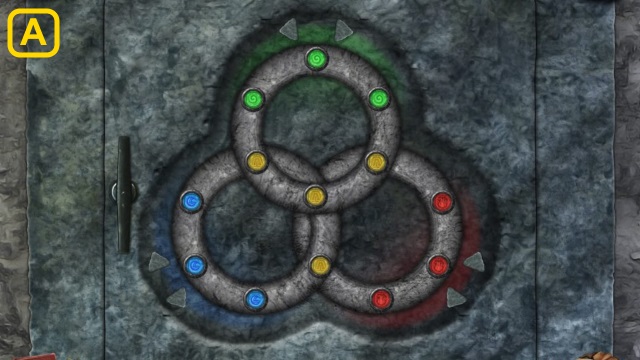
- Random Solution (A).

- Take the RELIC PIECE (B).
- Walk forward twice.
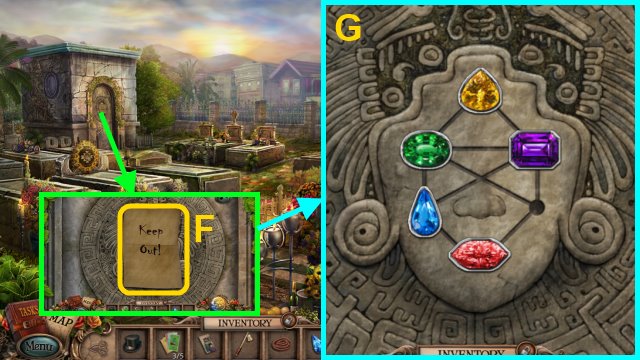
- Place the 2 RELIC PIECES in the slot for a mini-game (C).
- Solution (D): 1-5.
- Walk forward.
Chapter 6: The Weeping Woman
- Place the BELL COLLAR (E) on the cat; take the STONE TONGUE (F).
- Walk forward.
- Take the ELEPHANT TUSK (G).
- Walk left.
- Use the Y-SHAPED STICK on the snake; take the BRONZE KEY (H) and PAINTED STONES (2/4) (I).
- Walk down, then right.
- Play the HOP to receive the INFINITY STONE (J).
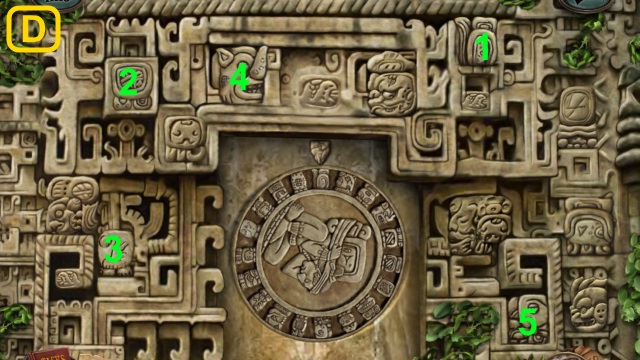
- Move the pillars (1-3).
- Take the PAINTED STONES (3/4) (K).
- Walk down twice.
- Place the ELEPHANT TUSK on the elephant (L).
- Take the PLIERS (M) and SHEARS (N).
- Walk forward.
- Use the SHEARS on the flowers to receive the LIVE FLOWERS (O).

- Place the INFINITY STONE (P) and BIRTHDAY CANDLE (Q) in the slots.
- Take the PAINTED STONES (R).
- Walk right.
- Move the pillar (S); place the PAINTED STONES on the board for a mini-game (T).
- Solution (U).
- Move the pillar (V).
- Walk forward.
- Talk to Catalina to receive the SILVER KEY (W).
- Play the HOP to receive the PARCHMENT PAPER (X).
- Take the BIRD TABLET (Y).
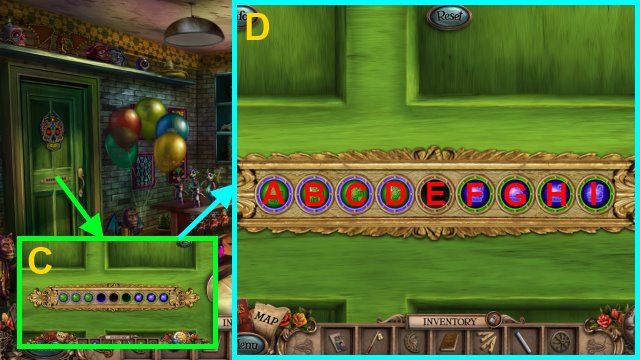
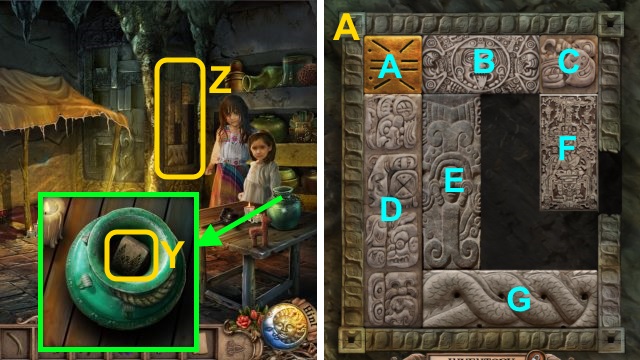
- Examine the wall for a mini-game (Z).
- Solution (A): F-down, C-down, B-right, A-right, E-right, A-down, B-left, E-up, C-up, F-up, A-right, E-down, E-left, F-left, A-up, A-right.
- You receive the GOLD SQUARE.
- Go to the Ruins, then up.
- Place the GOLD SQUARE on the mosaic for a mini-game (B).
- Solution (C).
- Take the GOLDEN KEY (D).
- Use the PLIERS on the statue; take the FISH TABLET (E).
- Walk down.
- Place the STONE TONGUE in the statue (F); pull it.
- Play the HOP to receive the GOLDEN GOBLET (G).
- Walk left.
- Place the COW SKULL, LIVE FLOWERS, and GOLDEN GOBLET in the volcano (H).
- Go to the Underground Lava.
- Use the BRONZE KEY, SILVER KEY, and GOLD KEY on the lock and turn them for a mini-game (I).
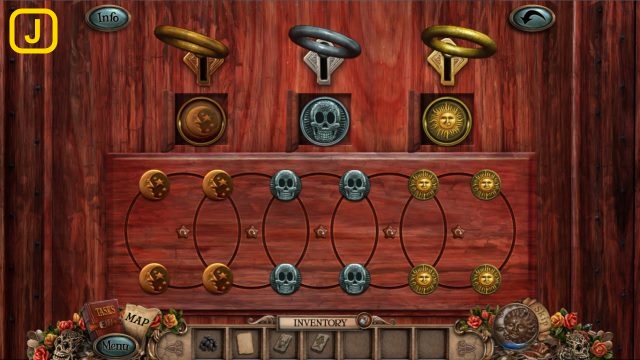
- Random Solution (J).
- Walk forward.
- Take the UNLIT TORCH (K).
- Walk down.
- Use the UNLIT TORCH on the lava to receive the LIT TORCH (L).
- Walk forward.
- Use the LIT TORCH on the wall.
- Place the PARCHMENT PAPER on the symbols; use the LAVA ROCKS to receive the CHARCOAL RUBBINGS (M).
- Walk down three times.
- Place the BIRD TABLET and FISH TABLET in the slot; use the CHARCOAL RUBBINGS for a mini-game (N).
- Solution (O).
- Take the paper (P).
- Go to the Underground Lava; walk forward.
- Walk left, right, forward, then right.
- Talk to the woman (Q).
- Congratulations! You have completed Lost Legends: The Weeping Woman.
Created at: 2014-08-24