

Walkthrough Menu
- General Tips
- Chapter 1: Call of Cthulhu
- Chapter 2: The Museum's Backroom
- Chapter 3: Robinson Crusoe
- Chapter 4: The Pirate Fortress
- Chapter 5: The Three Musketeers
- Chapter 6: The Hunter's Lodge
- Chapter 7: Jack the Ripper
- Chapter 8: The Palace
General Tips
- This is the official guide for Lost Souls: Timeless Fables.
- This guide will not mention each time you have to zoom into a location; the screenshots will show each zoom scene.
- We will use the acronym HOP for Hidden-object puzzles. Interactive items will be color-coded.
- Use the map to travel to a location.
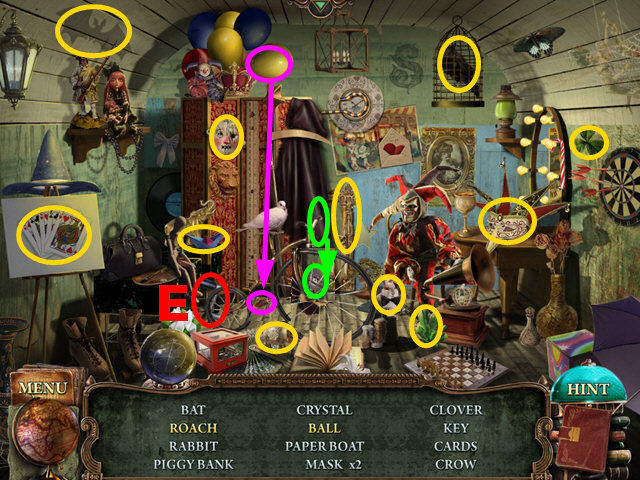
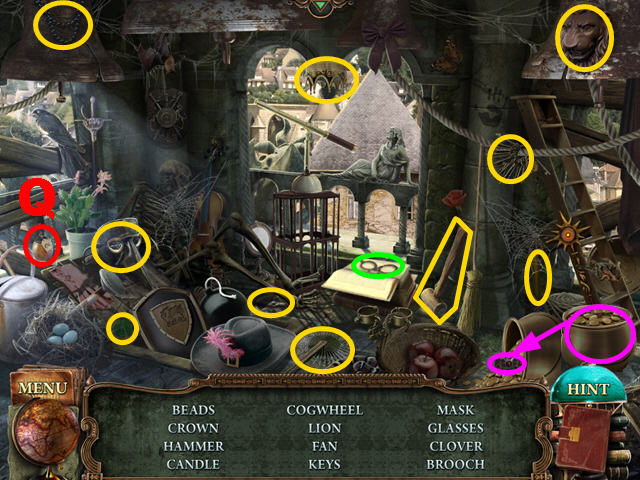
Chapter 1: Call of Cthulhu
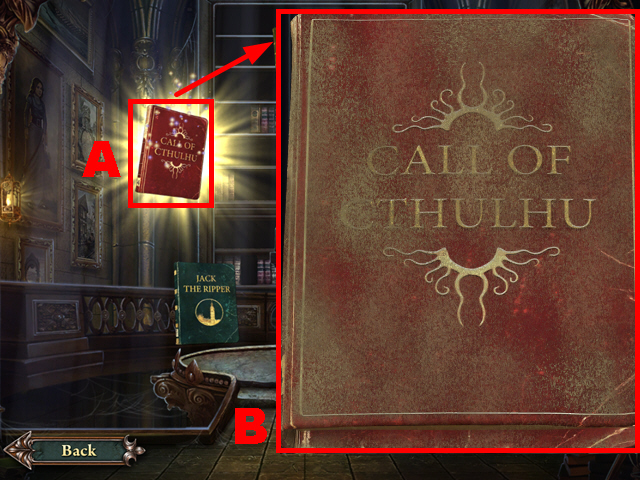
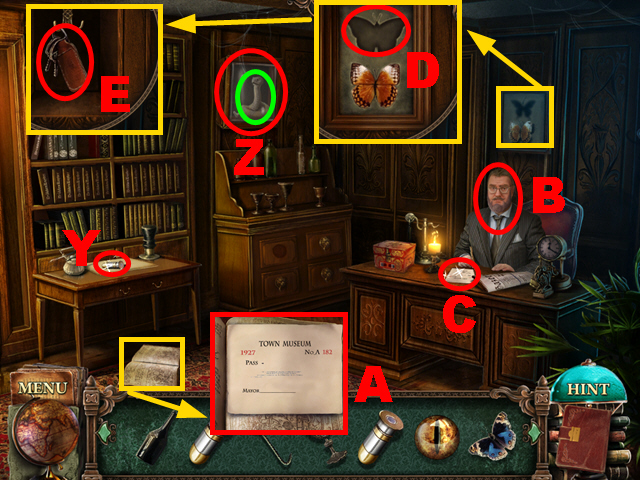
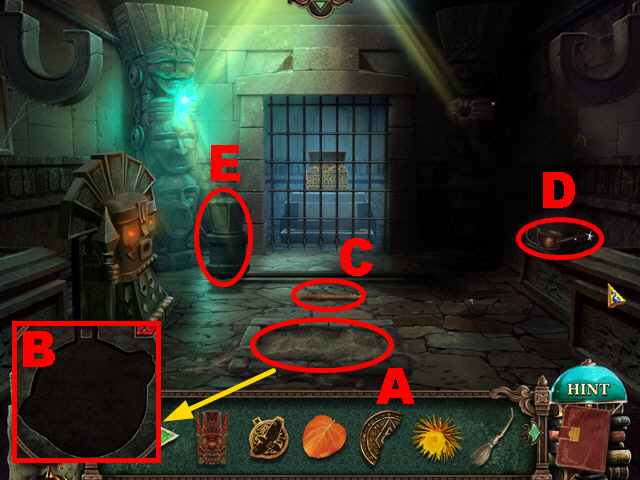
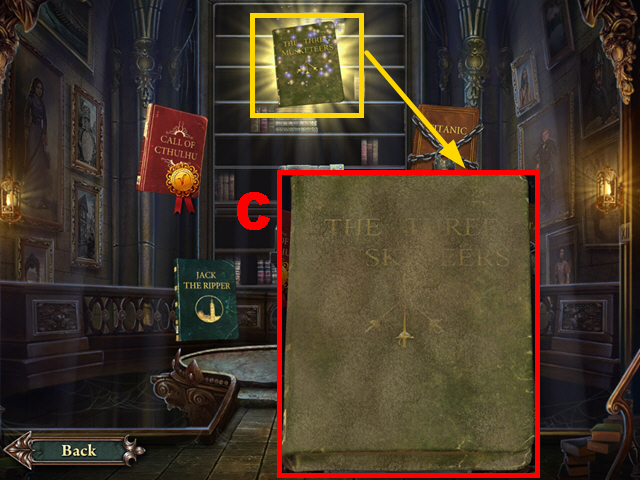
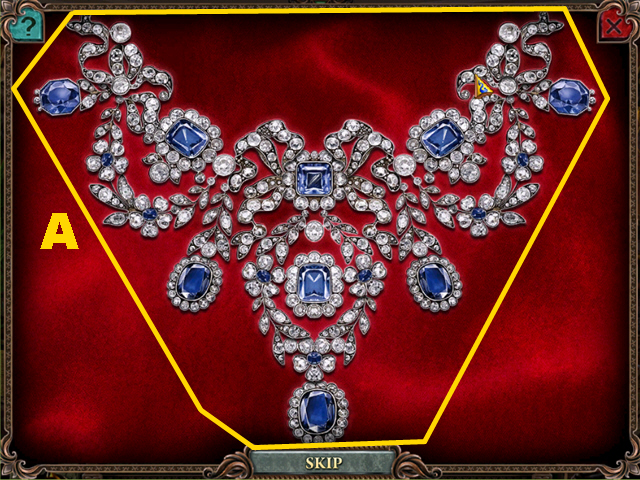
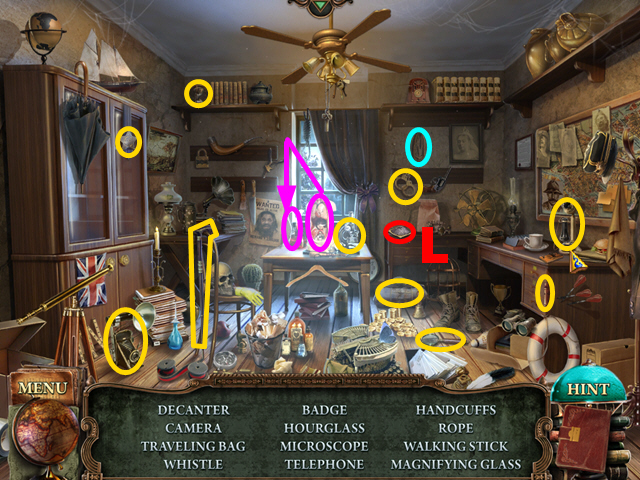
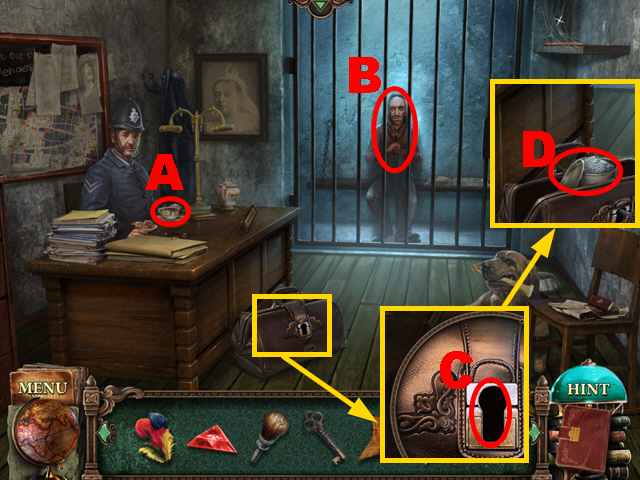
- Select the book (A).
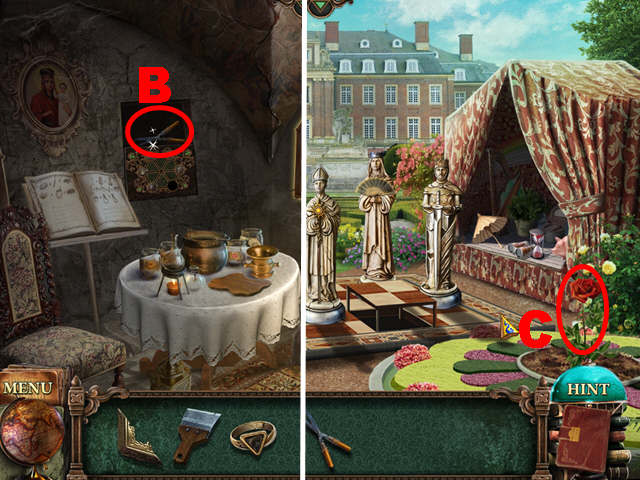
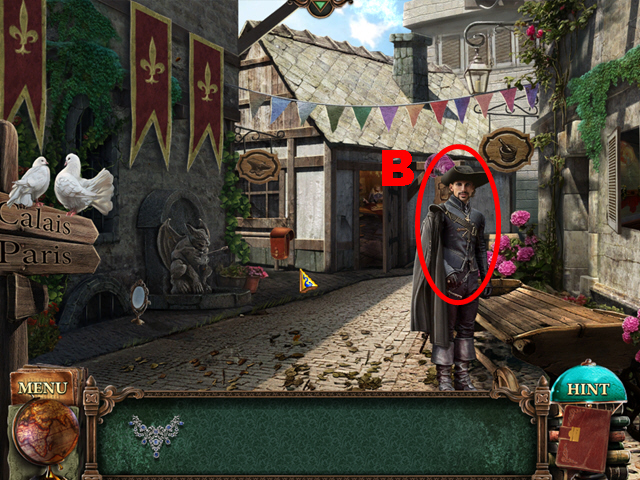
- Clean the book (B).
- Move forward.
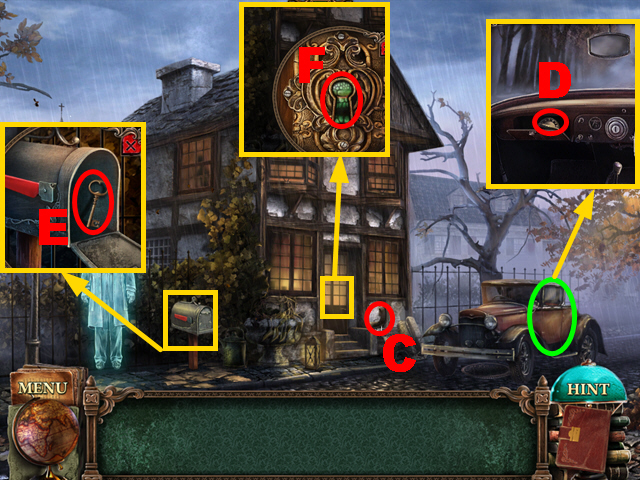
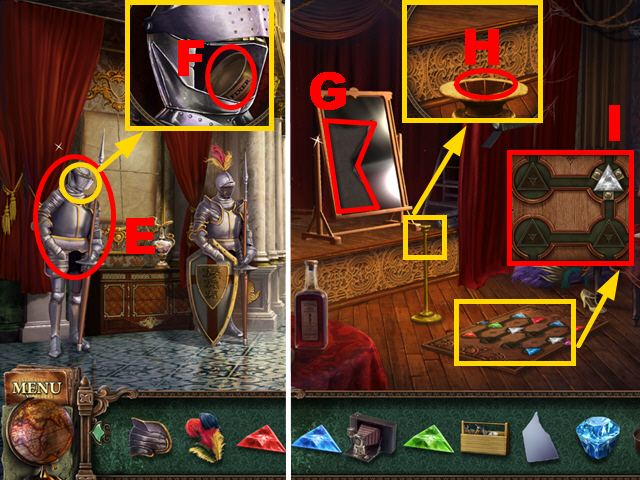
- Take the STATUE PIECE (C).
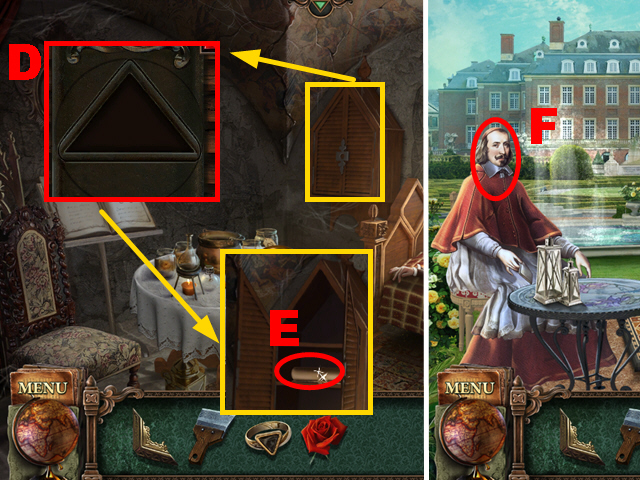
- Open the car door (green).
- Open the compartment; take the SWITCH (D).
- Open the mailbox; take the KEY (E).
- Use the KEY (F); turn it.
- Move forward.
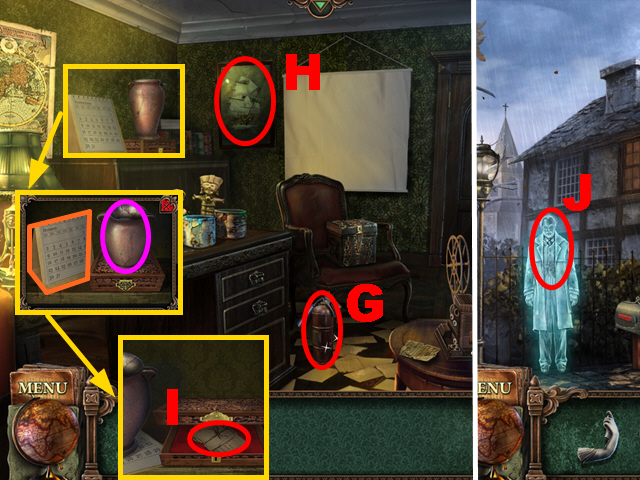
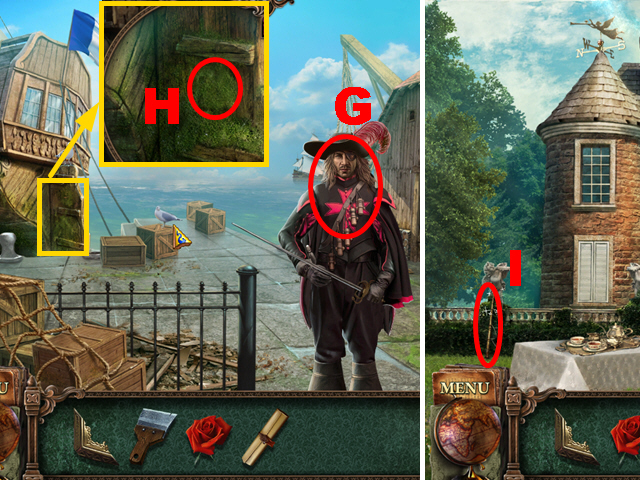
- Take the EXTINGUISHER (G).
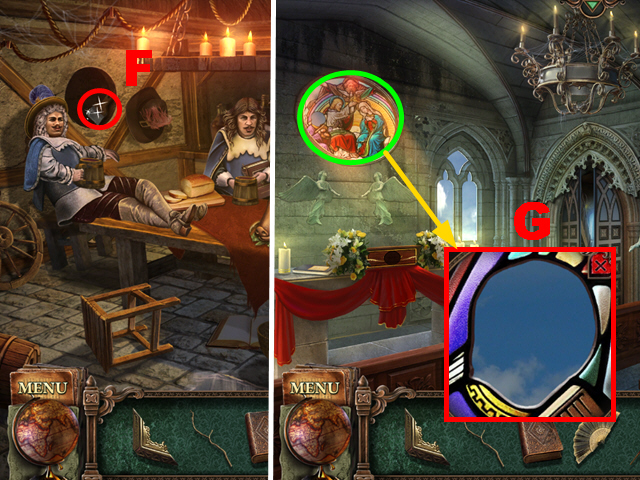
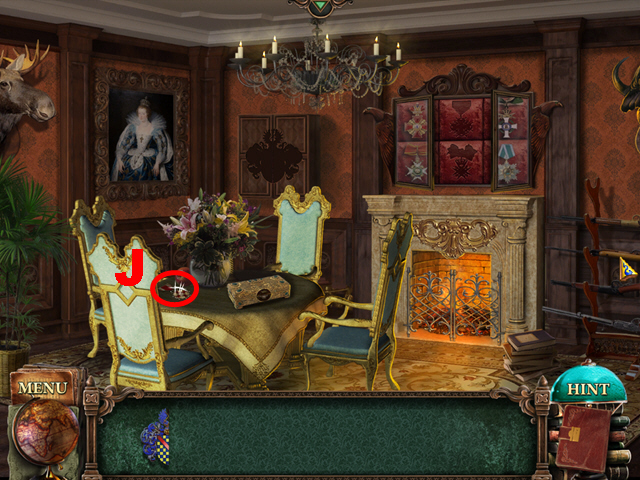
- Remove the painting (H).
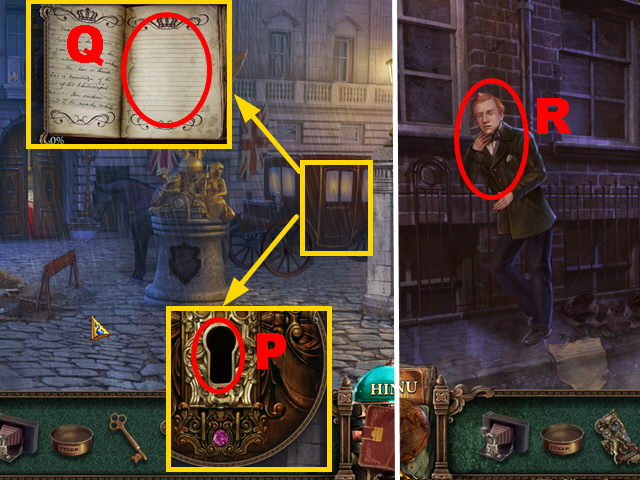
- Flip around the calendar (orange); move aside the vase (purple).
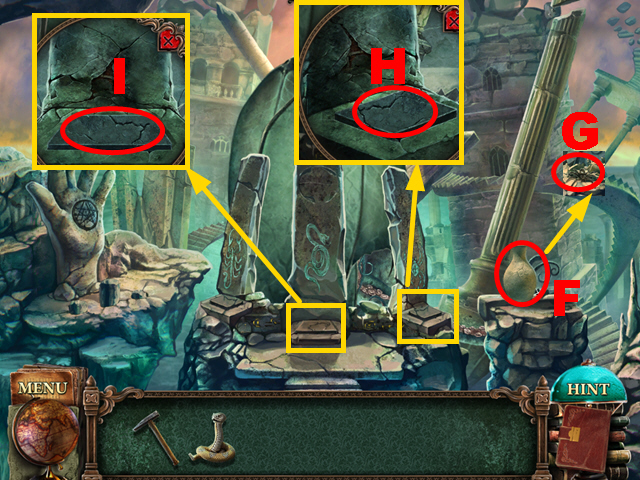
- Open the box; take the PROFESSOR'S PAPERS (I).
- Walk down.
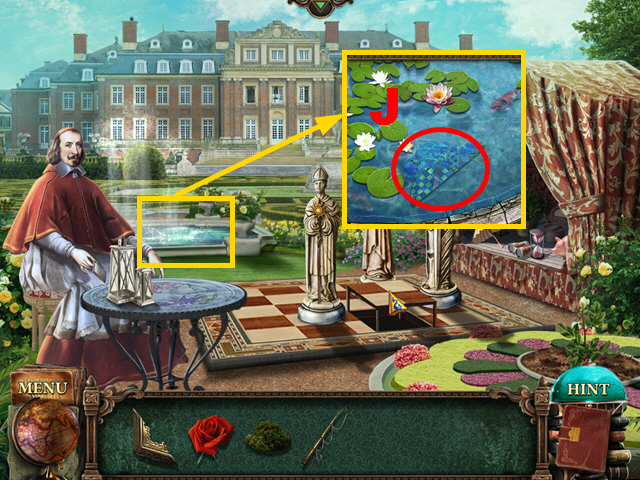
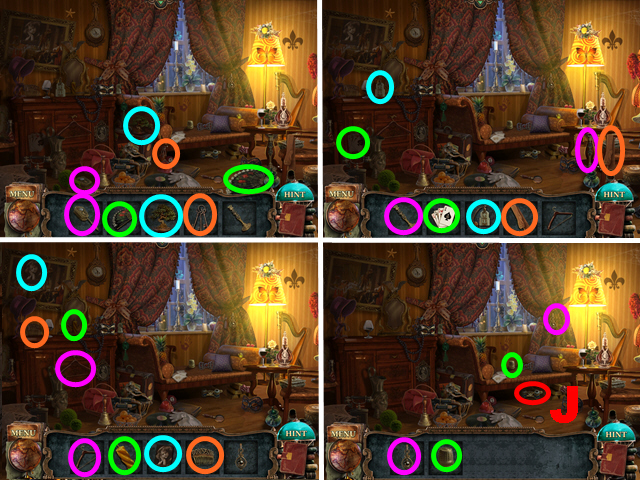
- Give the PROFESSOR'S PAPERS to the ghost (J); you receive the METAL HAND.
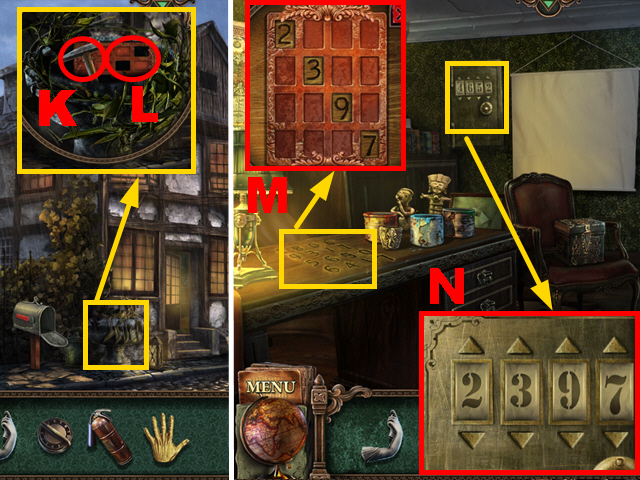
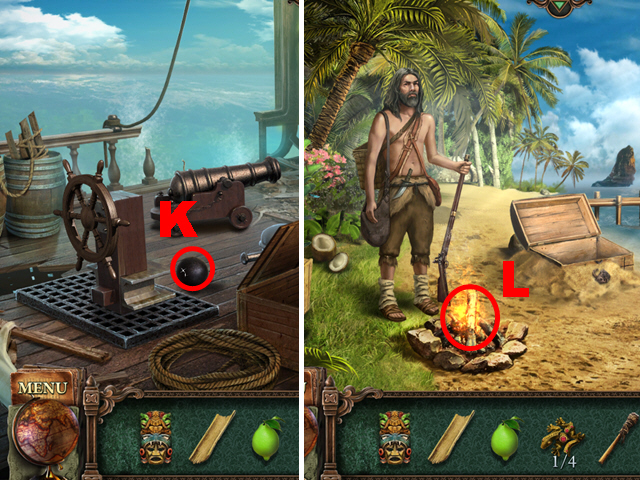
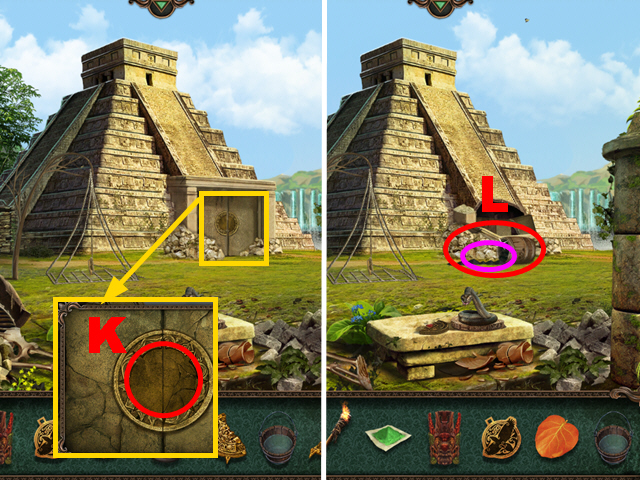
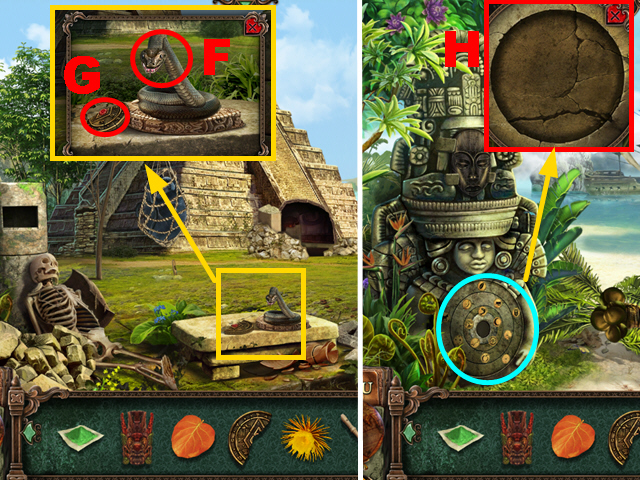
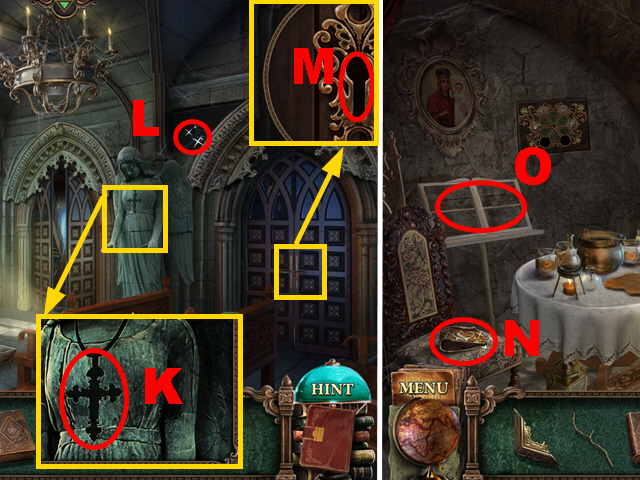
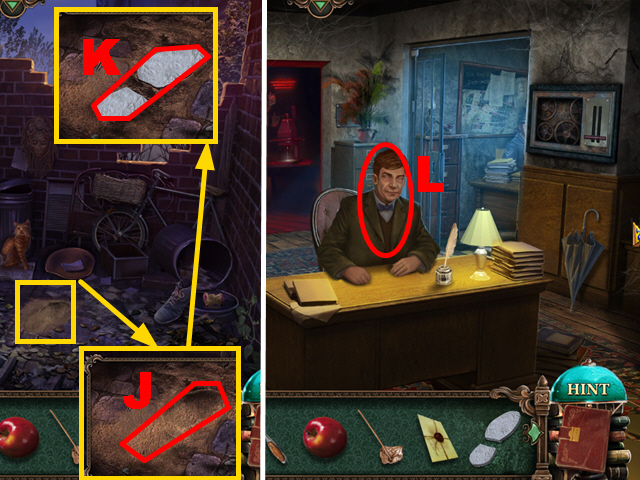
- Remove the leaves twice; take the HAMMER (K) and STENCIL (L).
- Move forward.
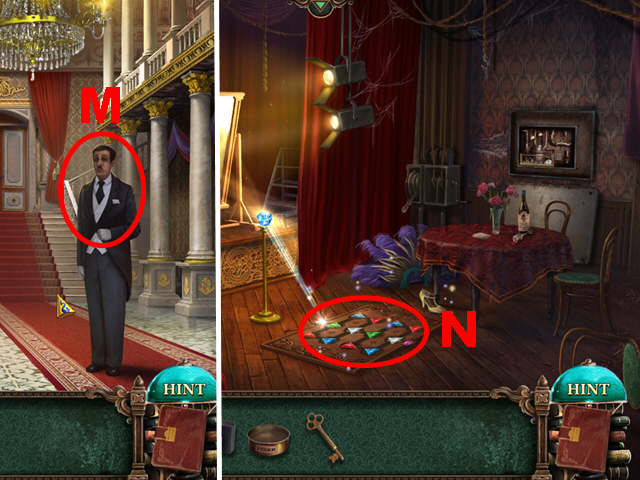
- Place the STENCIL (M).
- Enter the correct code '2397' (N).
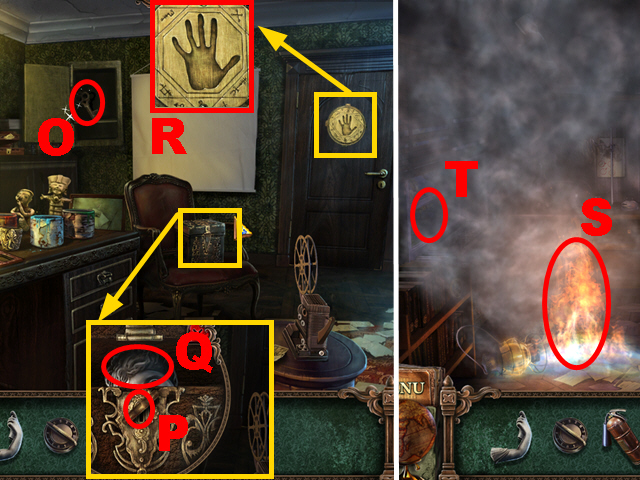
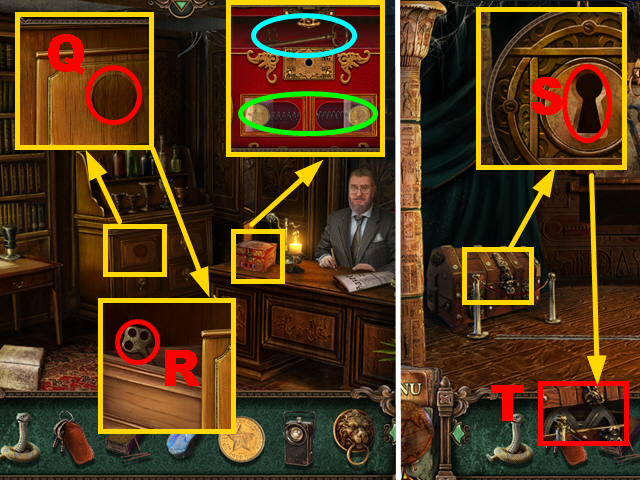
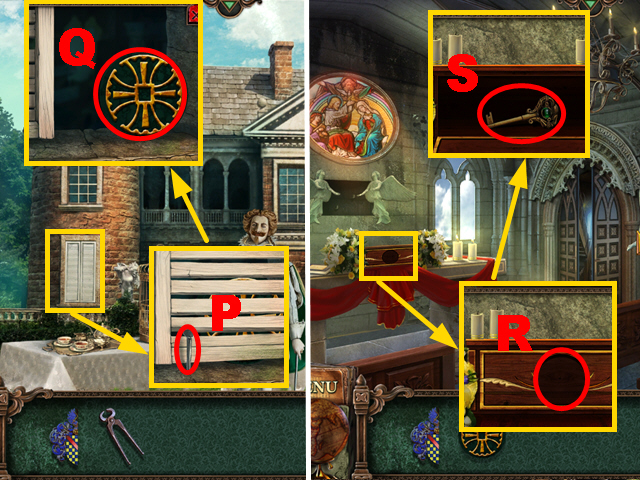
- Take the KEY (O).
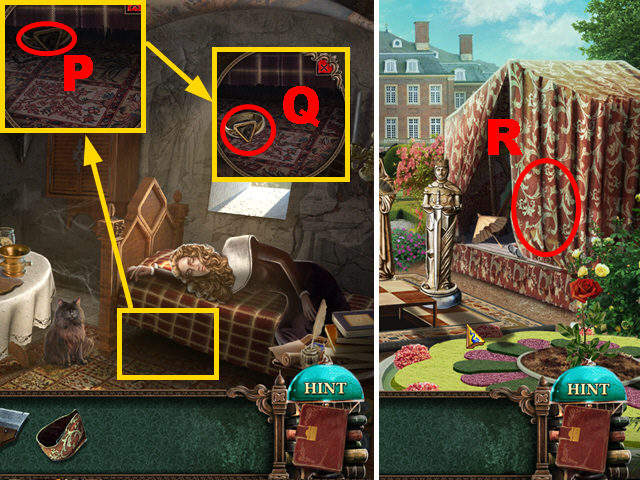
- Place the KEY (P); turn it twice.
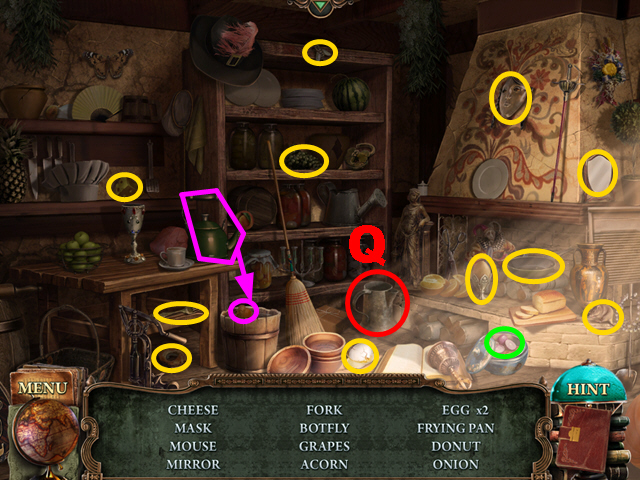
- Take the STATUE PIECE (Q).
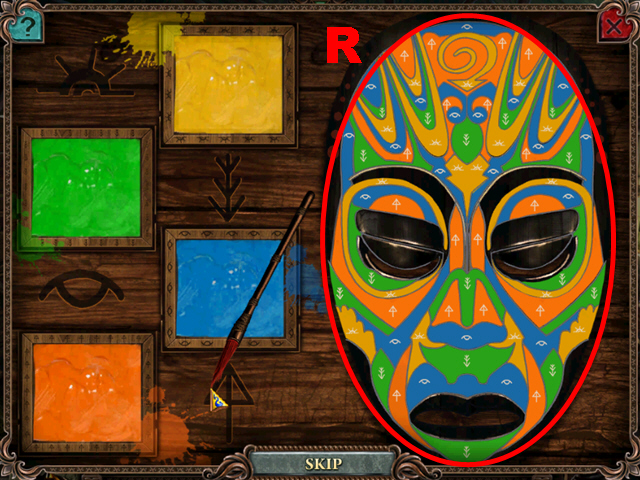
- Place the METAL HAND (R).
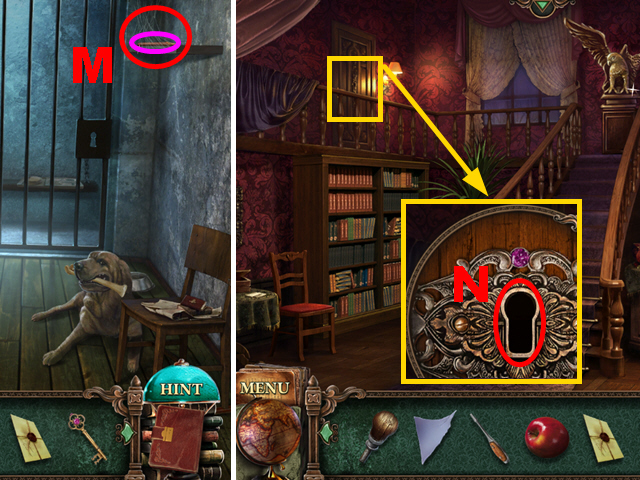
- Move forward.
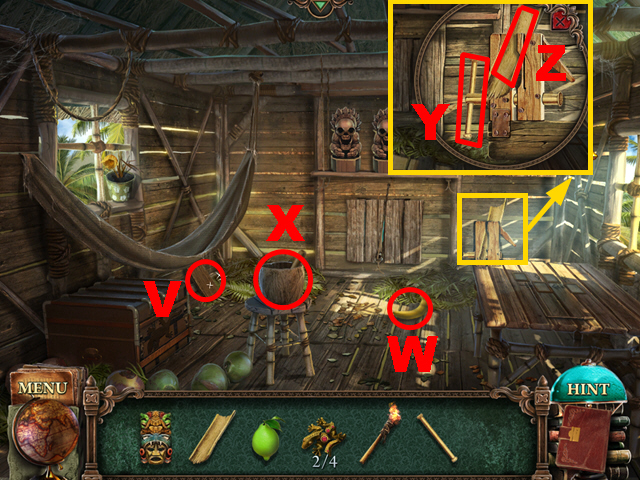
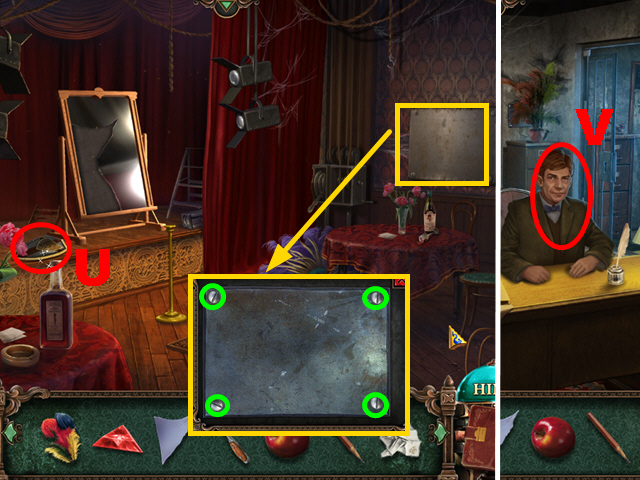
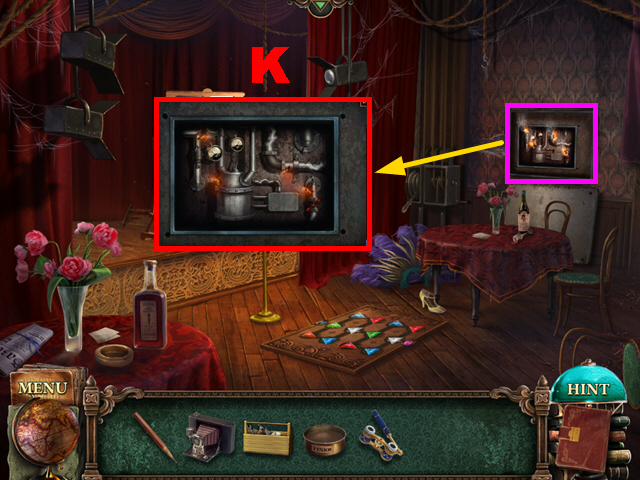
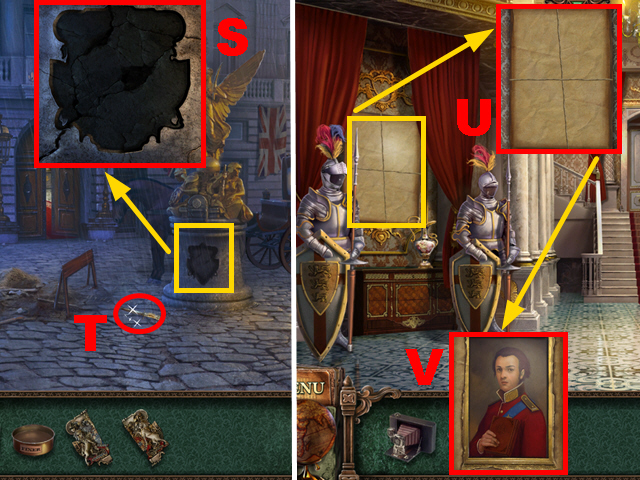
- Use the EXTINGUISHER twice (S).
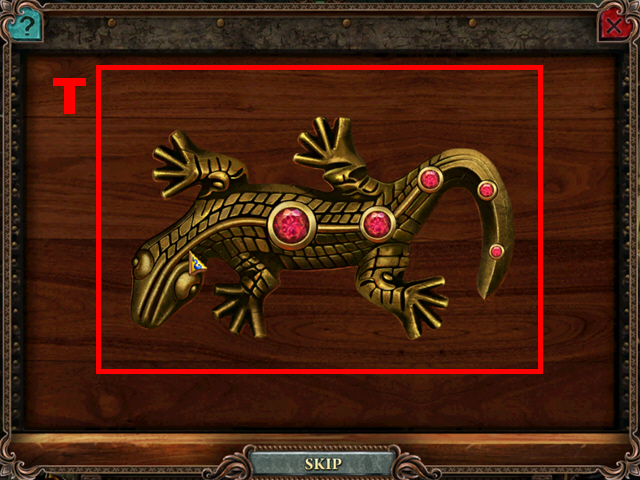
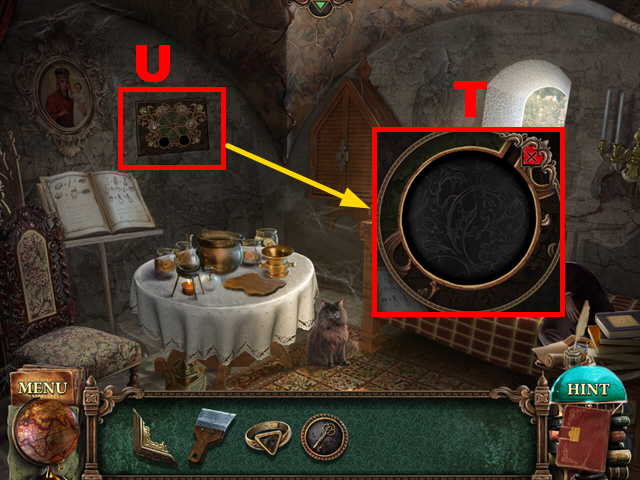
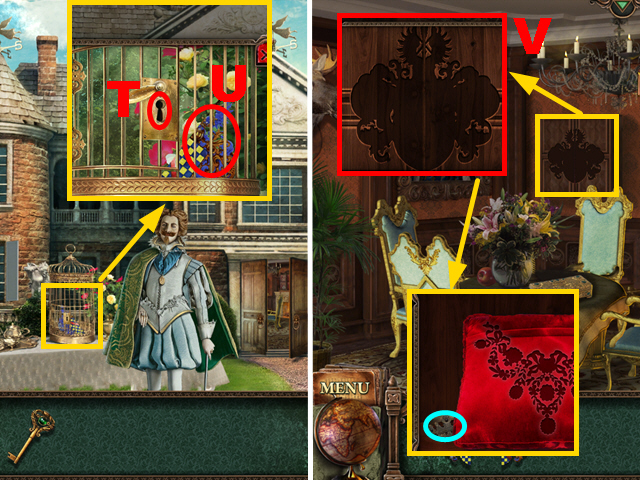
- Open the window (T).
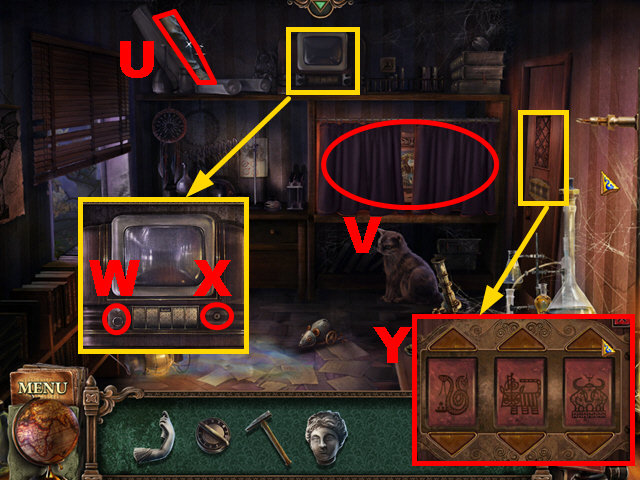
- Take the STATUE PIECE (U).
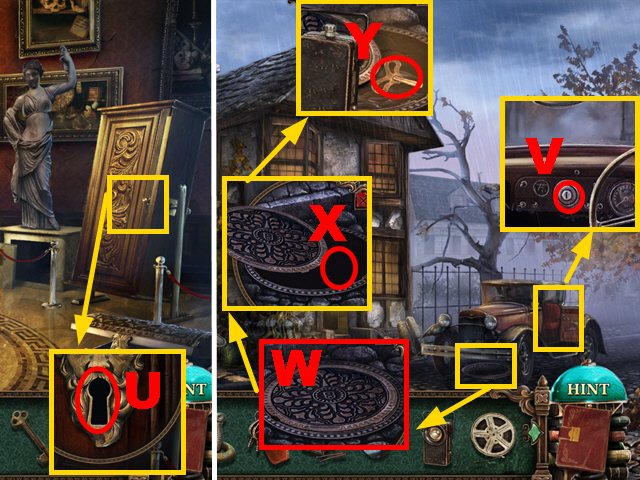
- Open the curtain (V).
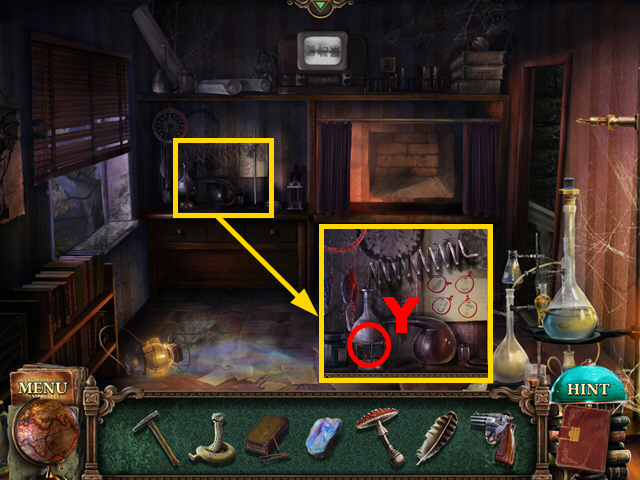
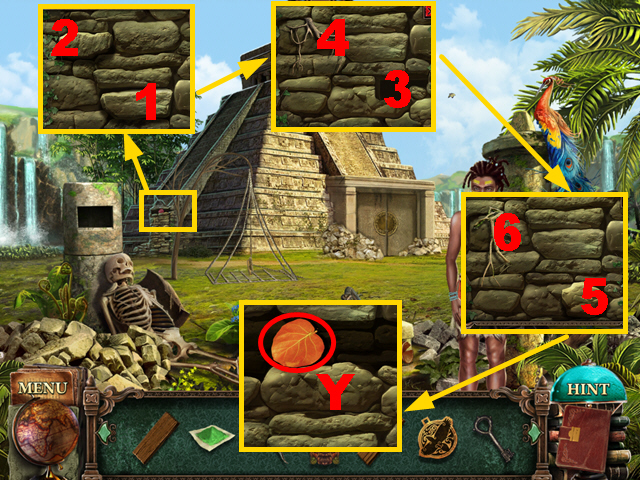
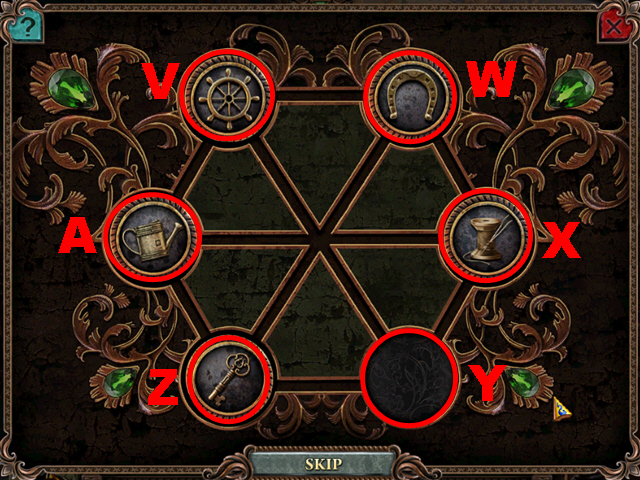
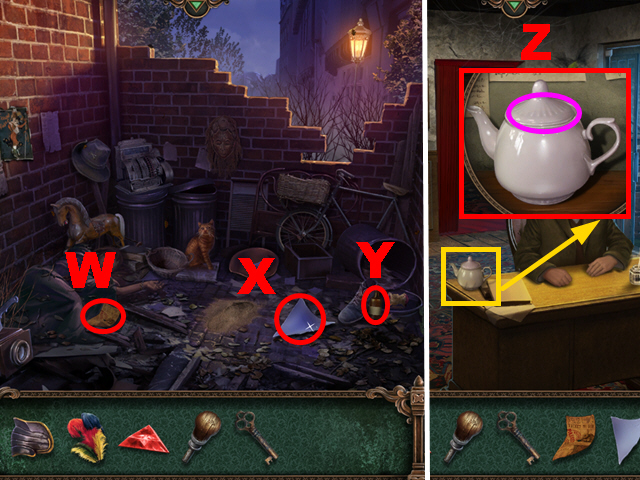
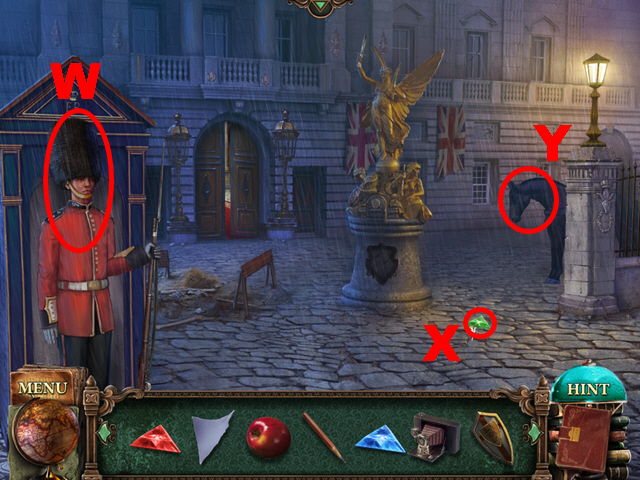
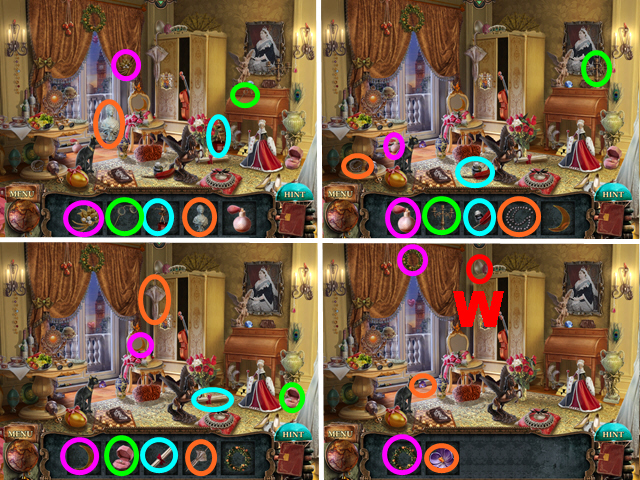
- Push the button (W).
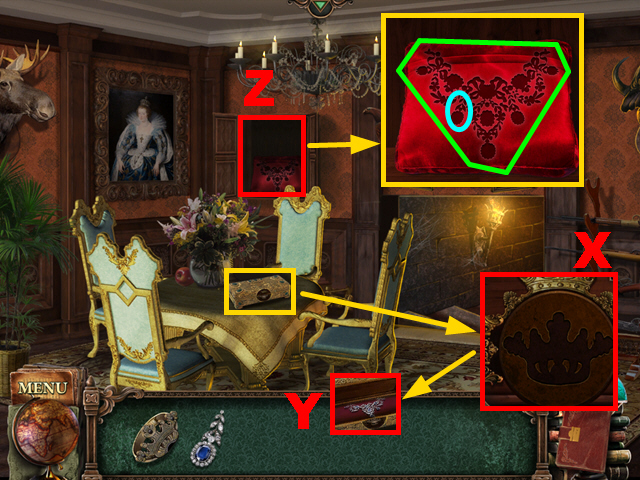
- Place the SWITCH (X); turn it three times.
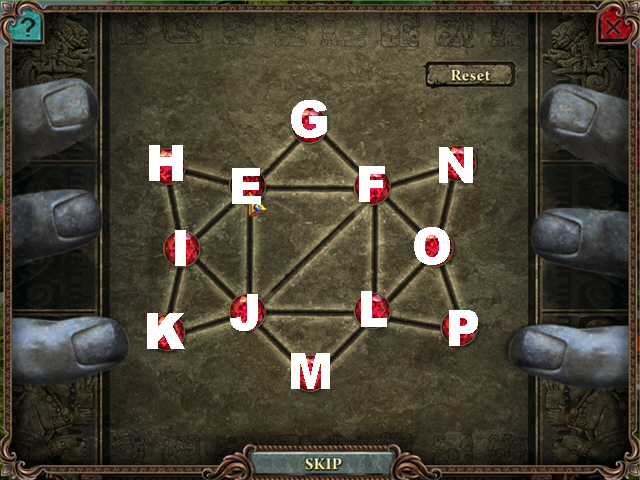
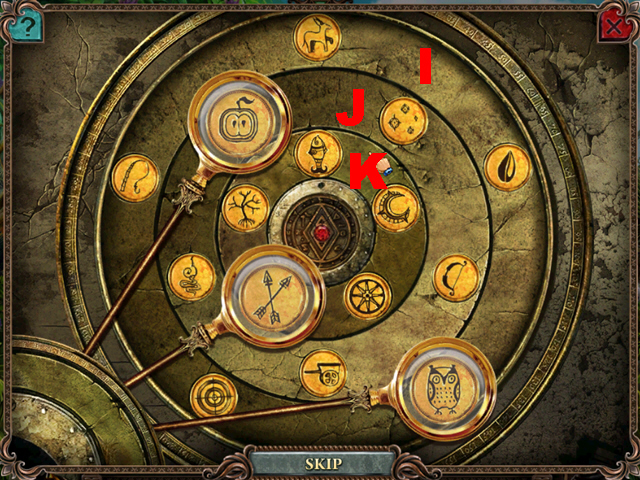
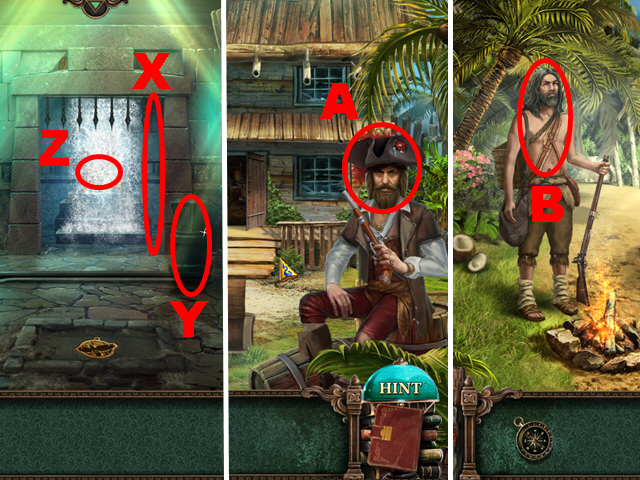
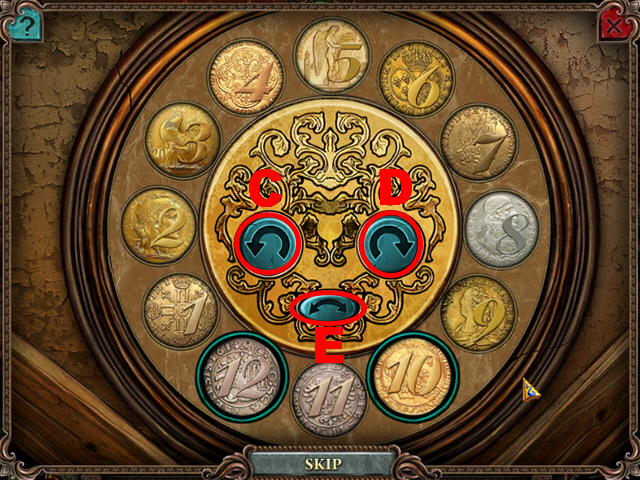
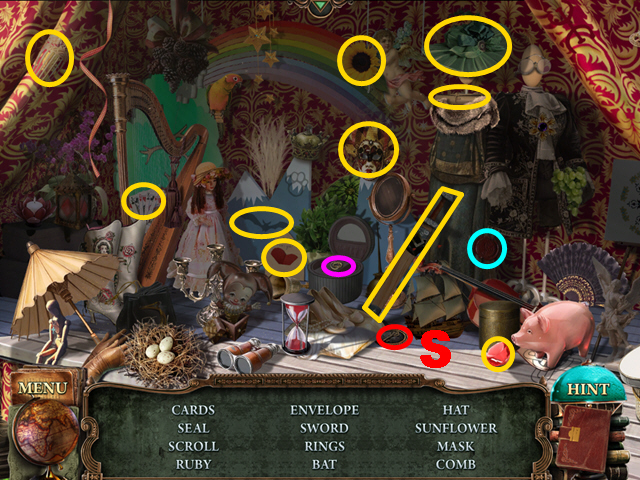
- Select the correct symbols (Y).
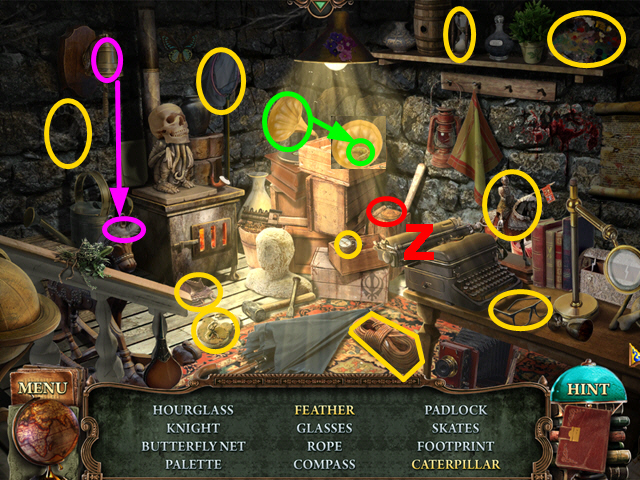
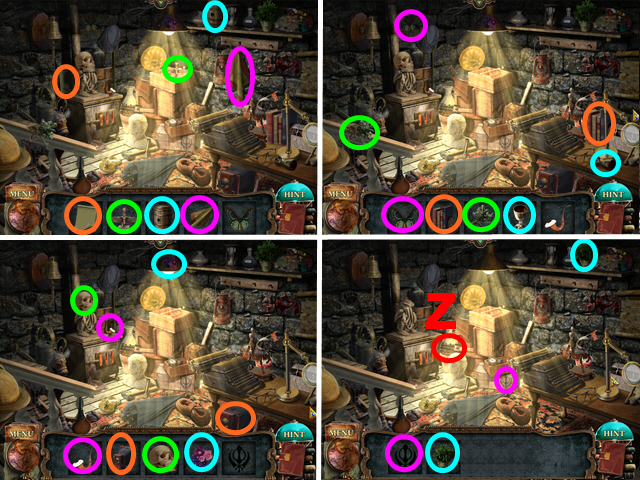
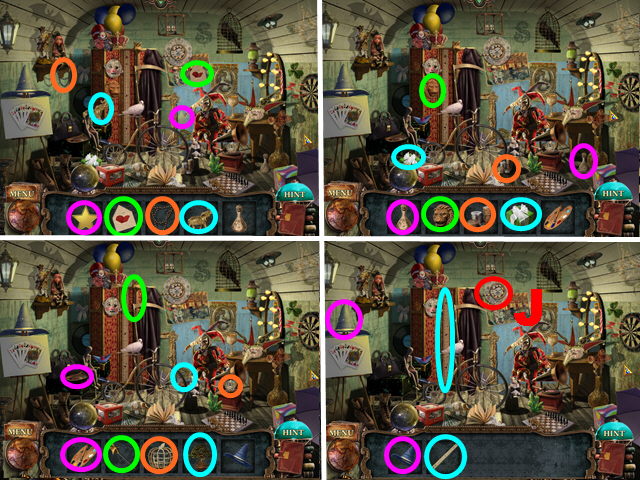
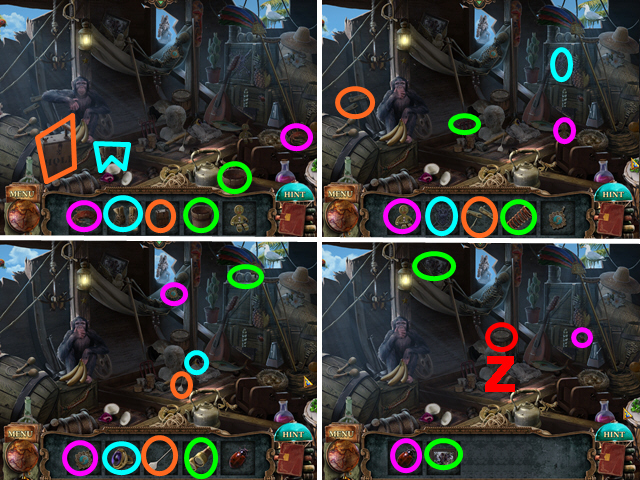
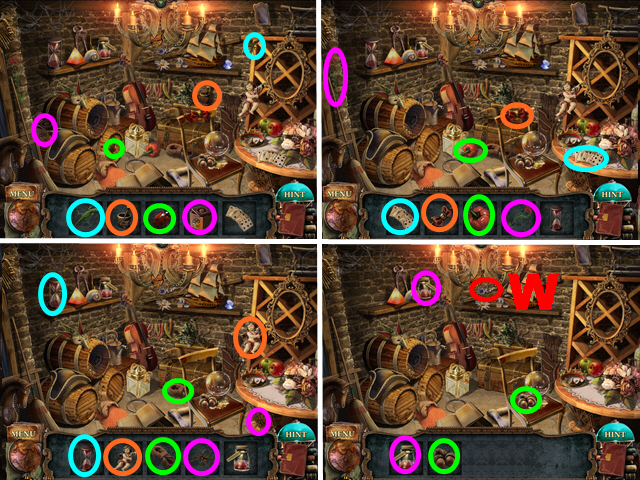
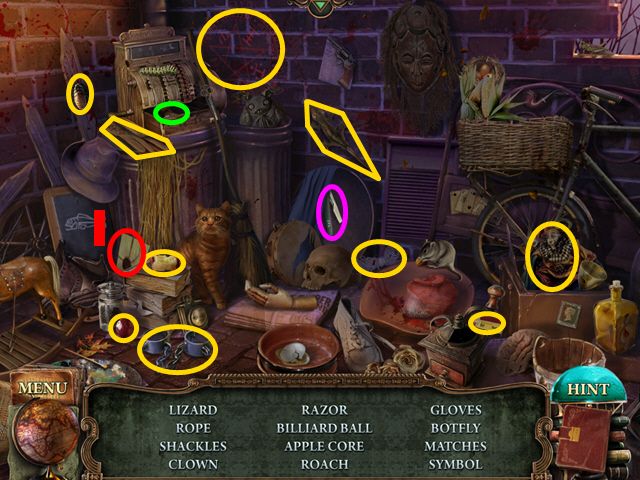
- Play the HOP.
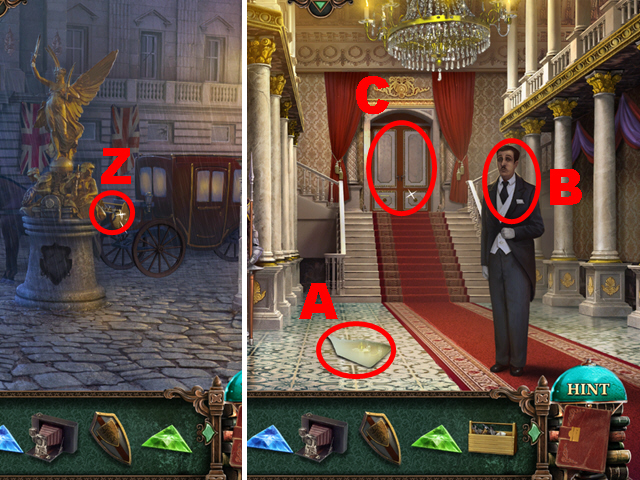
- Take the COIN (Z).
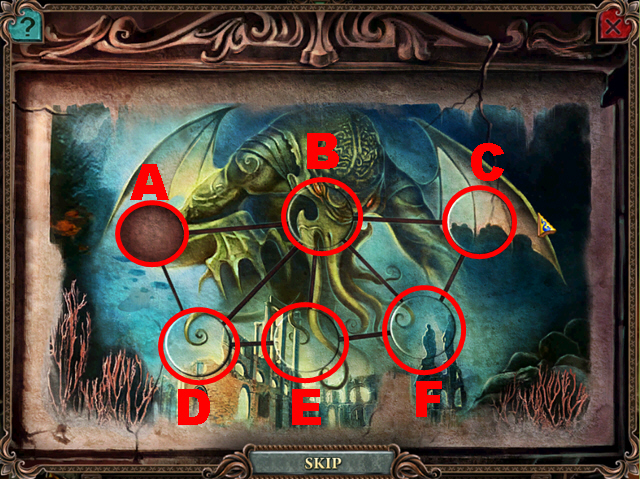
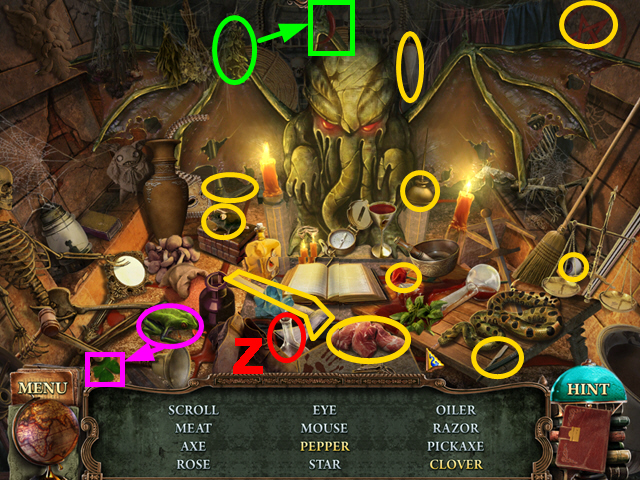
- Play the mini-game.
- Solution: B, E, F, C, B, D, E, F, C, B, A.
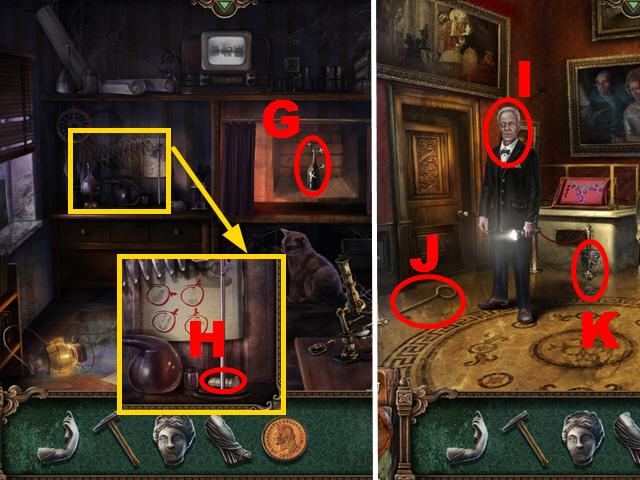
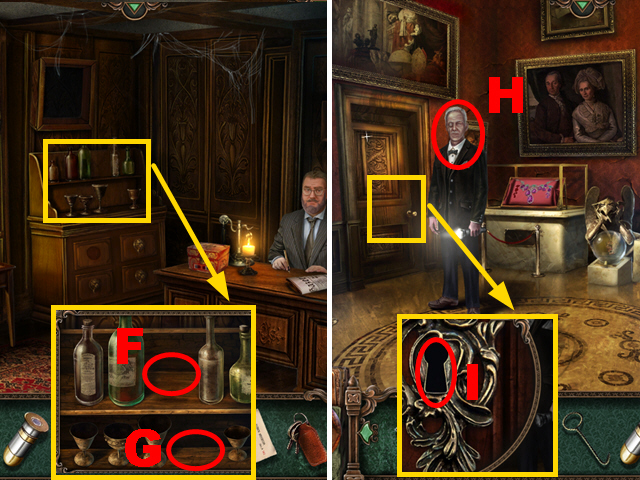
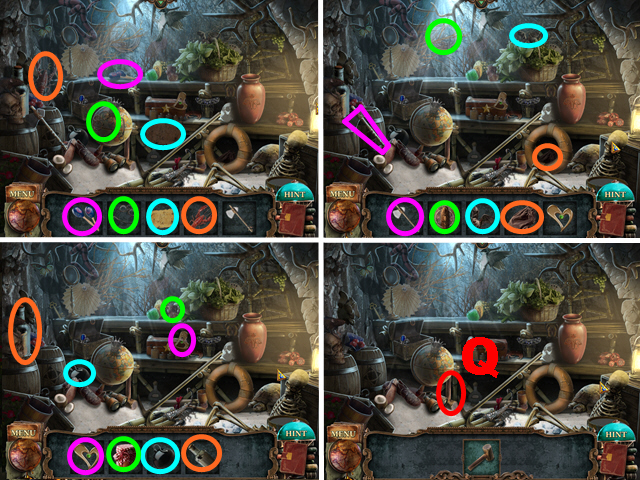
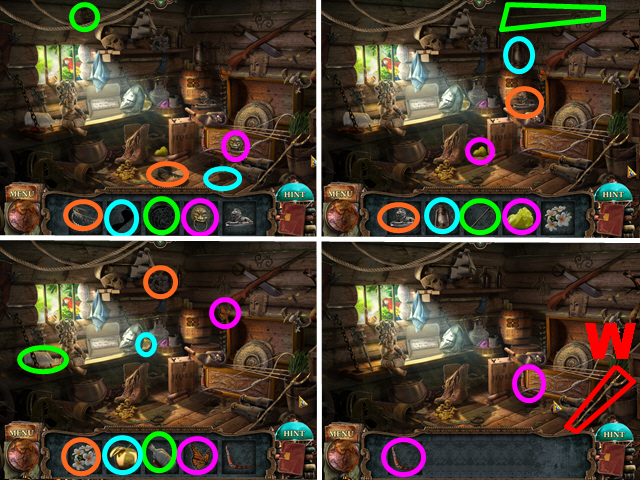
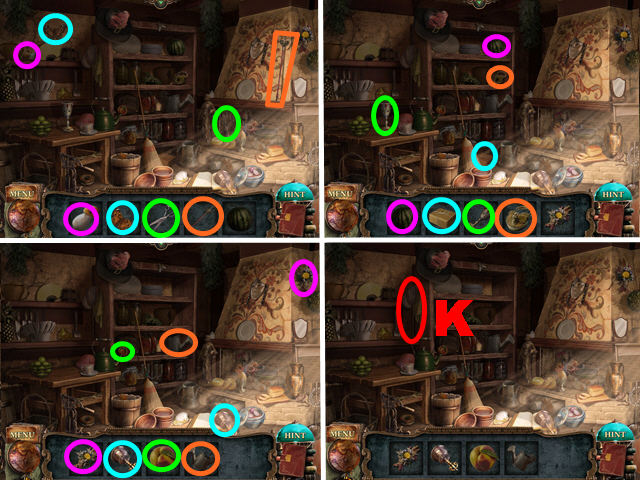
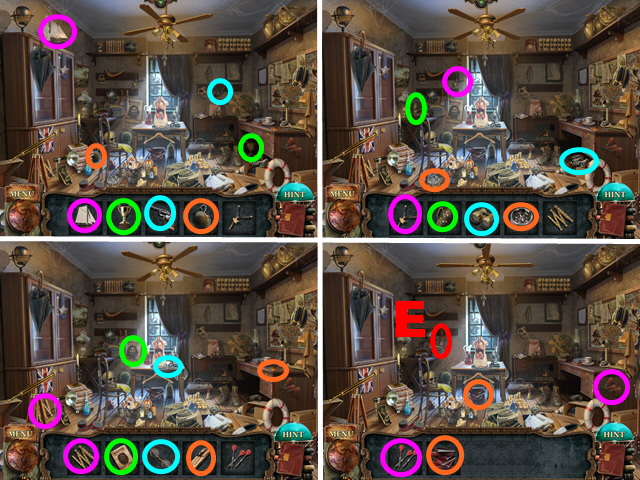
- Take the BOTTLE (G) and BULLET (H).
- Go to the Museum.
- Talk to the man (I).
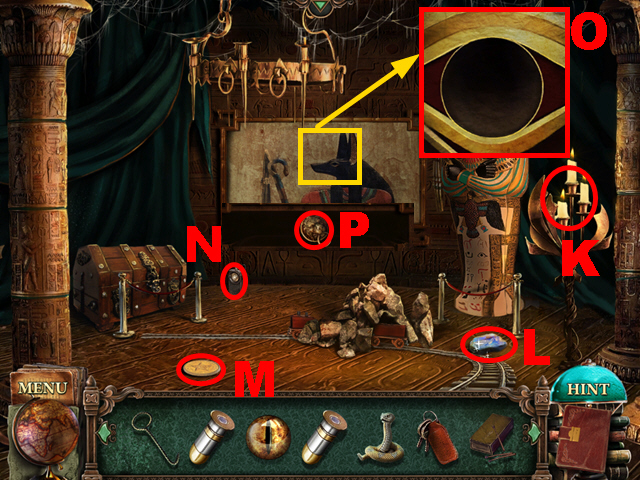
- Take the HOOK (J) and GOBLET (K).
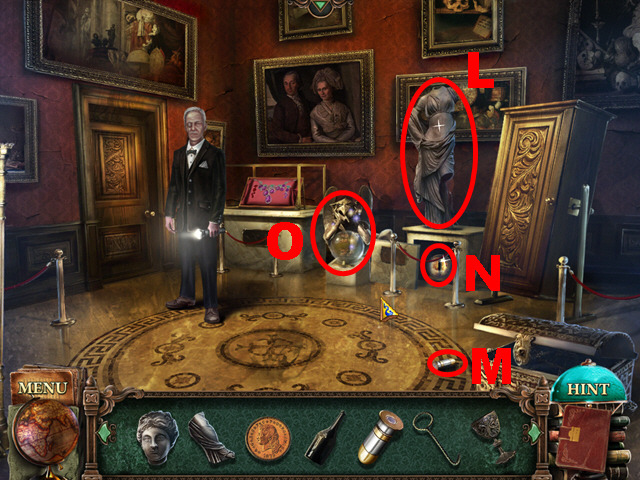
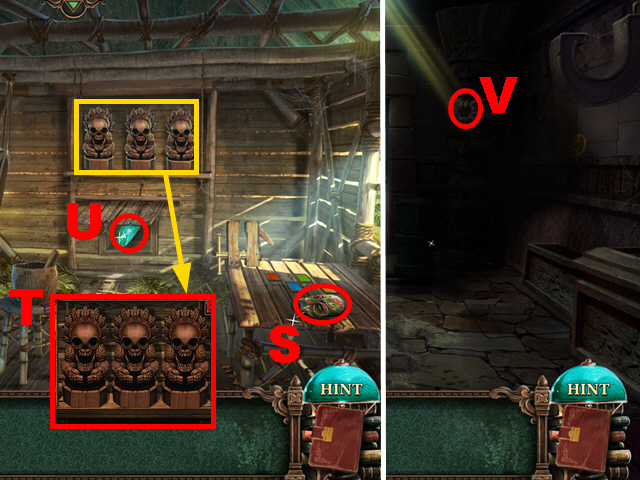
- Place 3 STATUE PIECES (L).
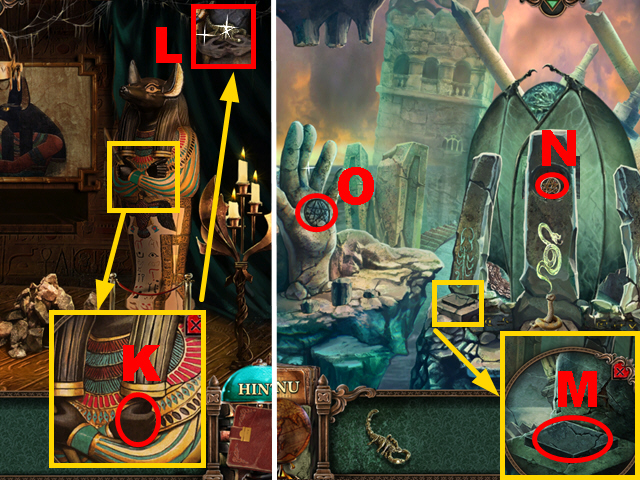
- Take the BULLET (M) and EYE (N).
- Examine the gargoyle (O).
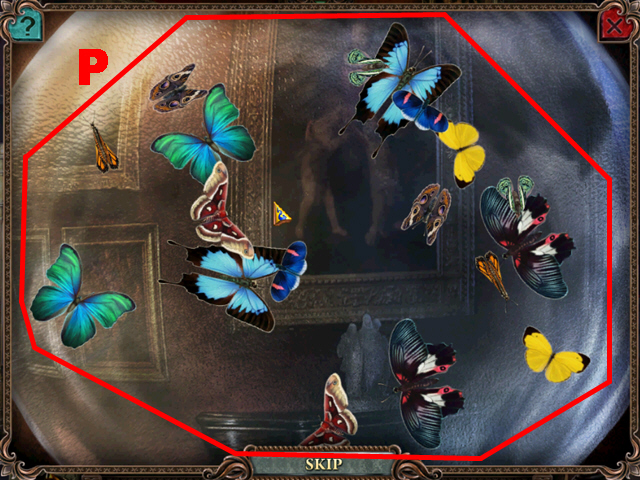
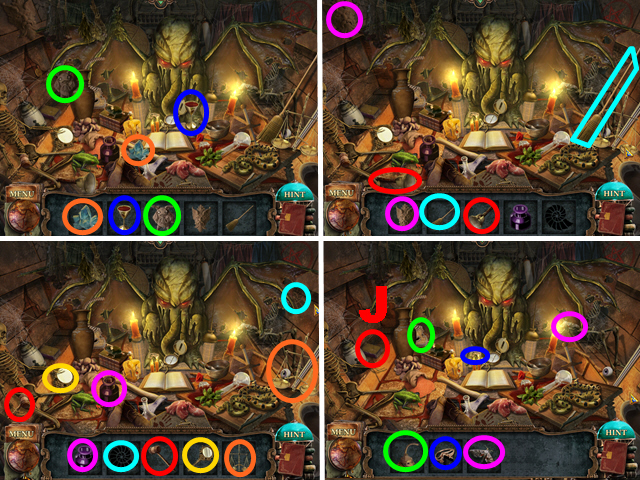
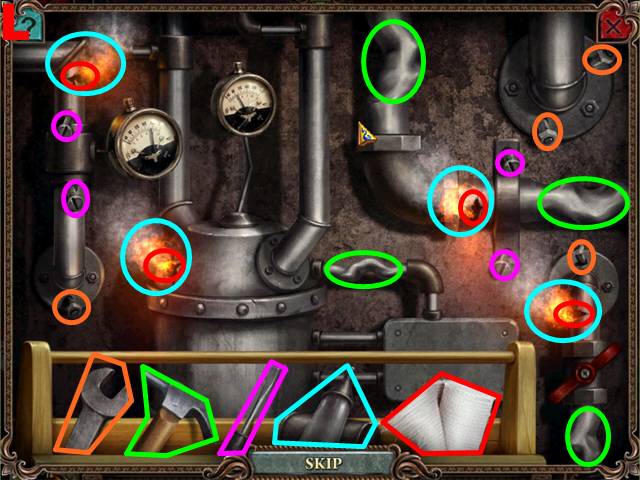
- Play the mini-game.
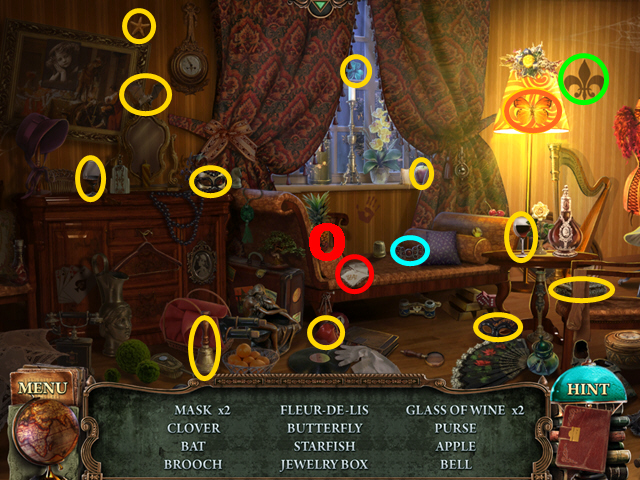
- To solve this puzzle (P), catch 8 pairs of butterflies.
- You receive the BUTTERFLY.
- Go to the Town Hall.
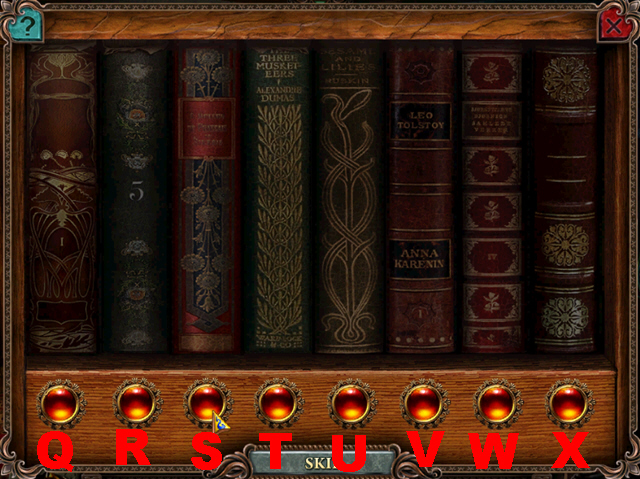
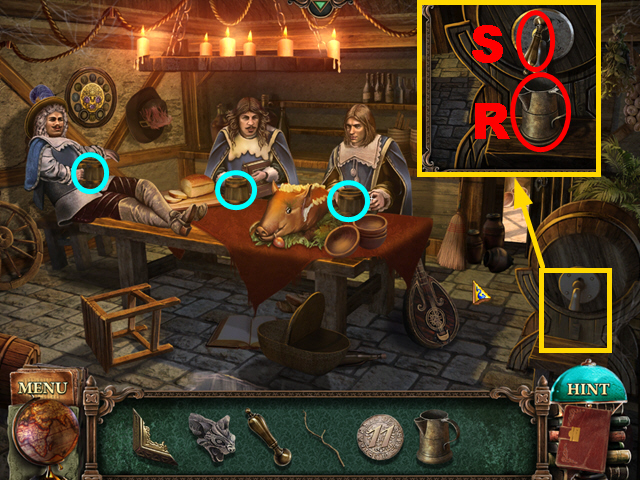
- Play the mini-game.
- Solution: R, U, V, W, R, T, V, X, U, S.
- Take the BULLET (Y).
- Use the HAMMER (Z); take the SNAKE FIGURINE (green).
- Turn a page; take the PASS FORM (A).
- Give the PASS FORM to the man (B); take the MUSEUM PASS (C).
- Place the BUTTERFLY (D); take the CAR KEYS (E).
- Place the BOTTLE (F) and GOBLET (G).
- Go to the Museum.
- Give the MUSEUM PASS to the man (H); you receive the KEY.
- Place the KEY (I); turn it.
- Go to the Town Hall.
- Play the HOP.
- Take the MATCHES (J).
- Go to the Museum, turn left.
Chapter 2: The Museum's Backroom
- Use the MATCHES (K).
- Take the MOON STONE (L), COIN (M), and FLASHLIGHT (N).
- Place the EYE (O); take the DRAWER HANDLE (P).
- Go to the Town Hall.
- Place 2 COINS (green); take the KEY (blue).
- Place the DRAWER HANDLE (Q); open the drawer.
- Take the KEY (R).
- Go to the Museum, turn left.
- Place the KEY (S); turn it twice.
- Take the FILM (T).
- Walk down.
- Place the KEY (U); turn it.
- Go to the Professor's House.
- Place the CAR KEYS (V); turn them.
- Use the HOOK (W) and FLASHLIGHT (X); take the KEY (Y).
- Move forward twice.
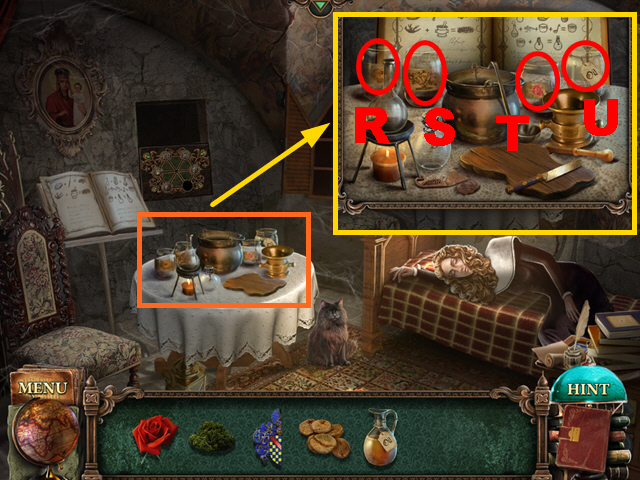
- Play the HOP.
- Take the ENGINE (Z).
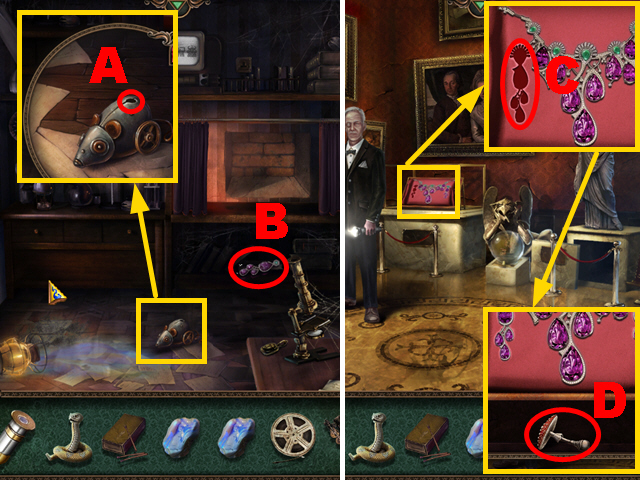
- Place the KEY (A); turn it twice.
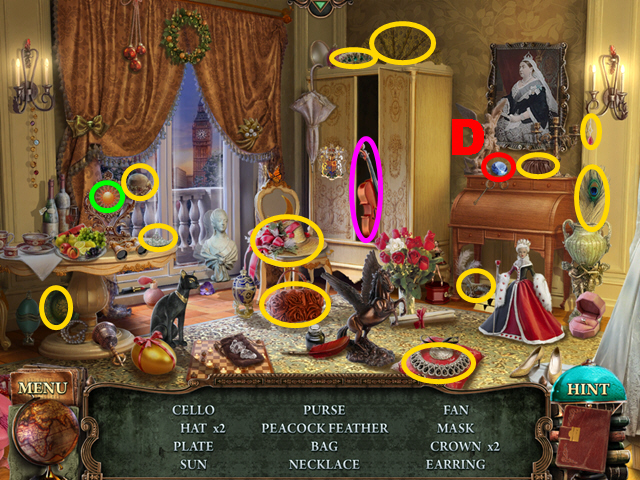
- Take the JEWELRY (B).
- Go to the Museum.
- Place the JEWELRY (C); take the TOADSTOOL (D).
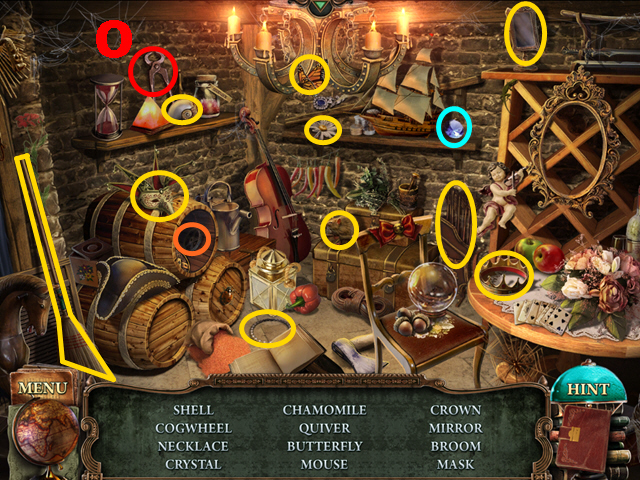
- Play the HOP.
- Take the PROJECTOR HANDLE (E).
- Turn left.
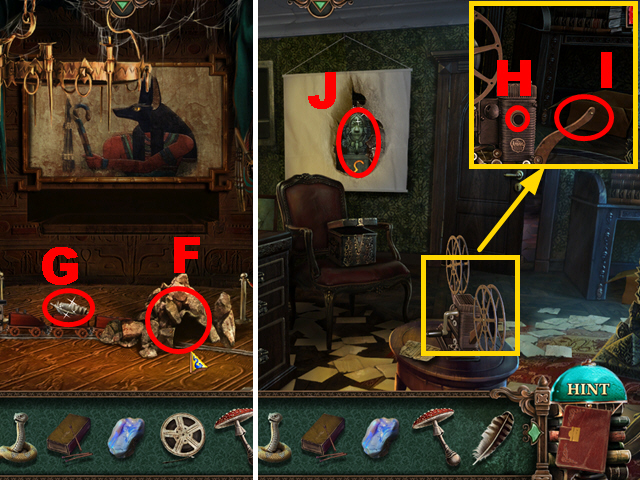
- Place the ENGINE (F); take the FEATHER (G).
- Go to the Professor's House, move forward.
- Place the PROJECTOR HANDLE (H) and FILM (I); turn the handle.
- Take the FIGURINE (J).
- Go to the Portal.
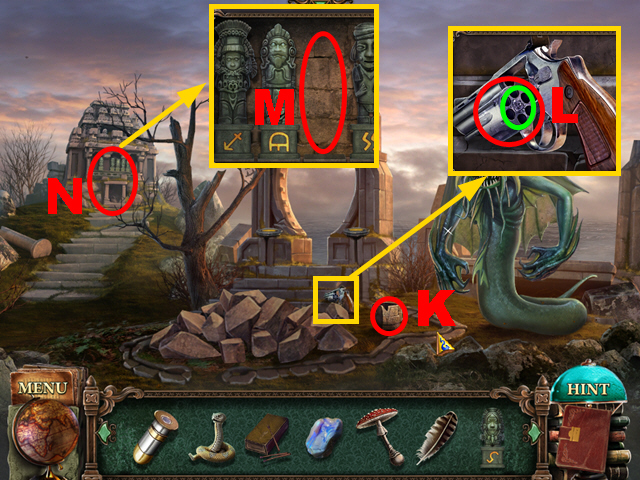
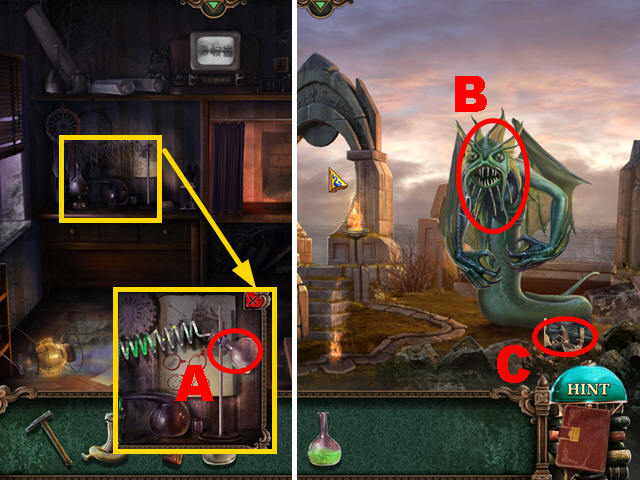
- Take the STATUE PART (K).
- Use 3 BULLETS (green); close the cylinder (L) to acquire the REVOLVER.
- Place the FIGURINE (M).
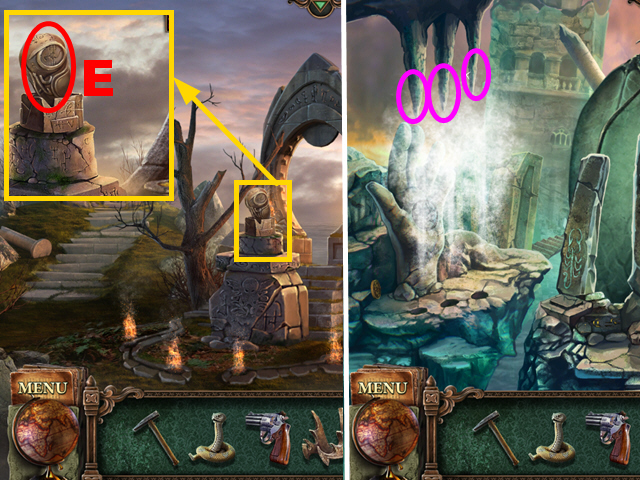
- Examine the building (N).
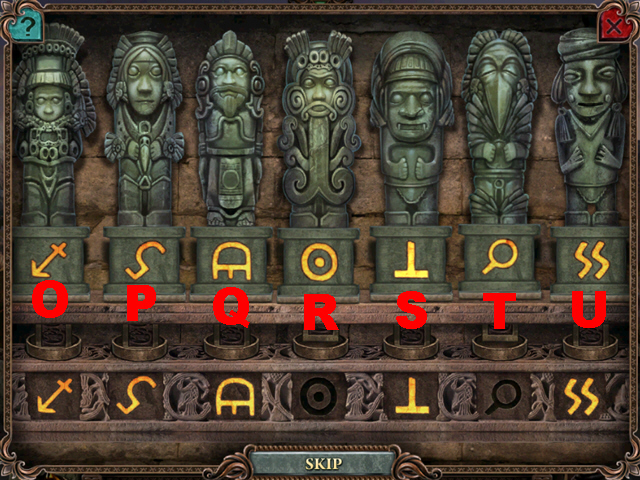
- Play the mini-game.
- Solution: P, O, P, S, U, S, U, T, U, S.
- You receive the STATUE PART.

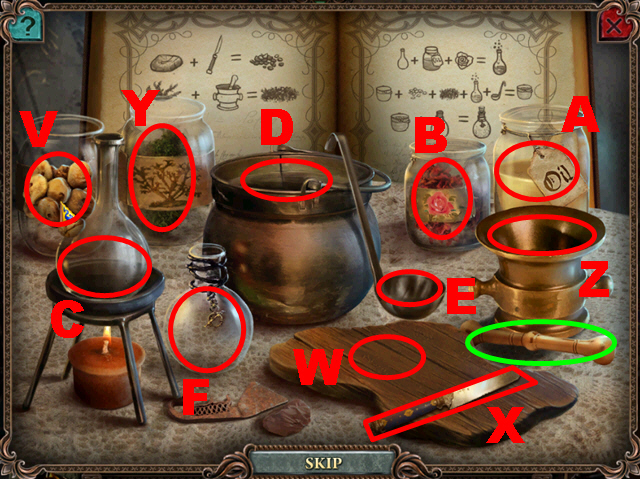
- Use the MATCHES (V) and (W).
- Place 2 STATUE PARTS (X).
- Go to the Professor's House, move forward twice.
- Use the MATCHES, MOON STONE, TOADSTOOL, and FEATHER (Y).
- Go to the Town Hall.
- Play the HOP.
- Take the FLASK (Z).
- Go to the Professor's House, move forward twice.
- Place the FLASK (A); take the POTION (B).
- Go to the Portal.
- Throw the POTION (C).
- Take the STATUE PART (D).
- Place the STATUE PART (E).
- Move forward.
- Shoot the REVOLVER three times (purple).
- Use the HAMMER (F); take the SPIDER FIGURINE (G).
- Place the SPIDER FIGURINE (H) and SNAKE FIGURINE (I).
- Go to the Museum.
- Play the HOP.
- Take the SCEPTER (J).
- Move forward.
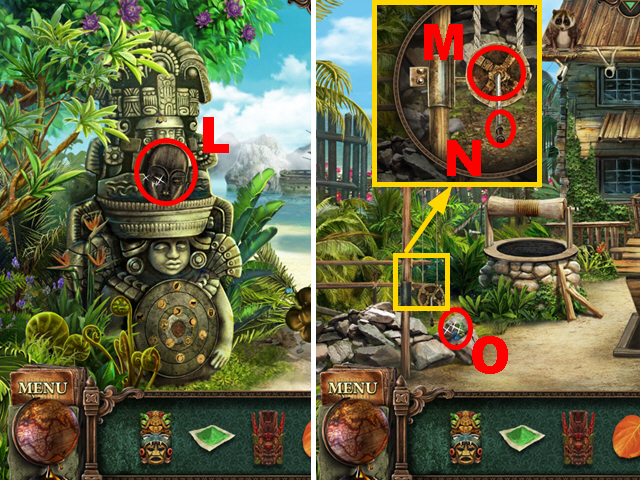
- Place the SCEPTER (K); take the SCORPION FIGURINE (L).
- Go to the Portal, move forward.
- Place the SCORPION FIGURINE (M).
- Take the AMULET (N); place the AMULET (O).
Chapter 3: Robinson Crusoe
- Clean the book (P).
- Move forward.
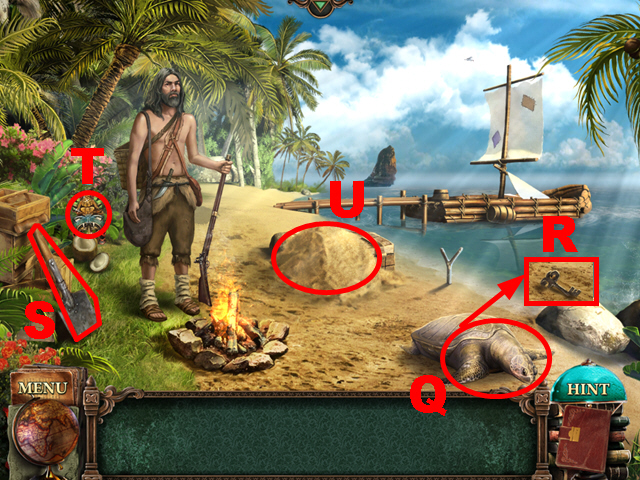
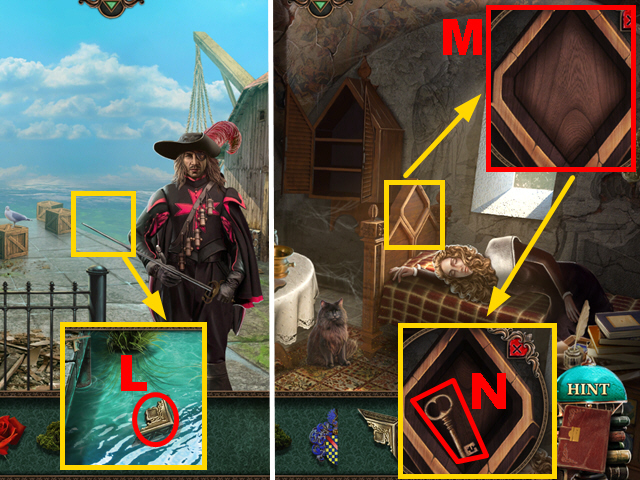
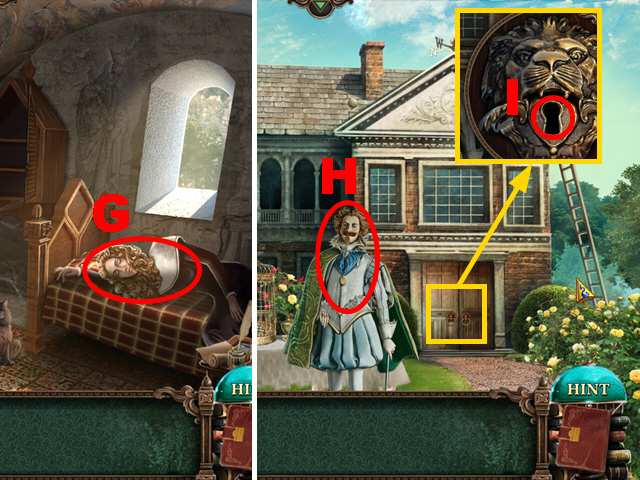
- Chase away the turtle (Q); take the CHEST KEY (R).
- Take the SHOVEL (S) and MASK (T).
- Use the SHOVEL (U).
- Place the CHEST KEY (V); turn it twice.
- Take the AXE (W).
- Go to the Beach.
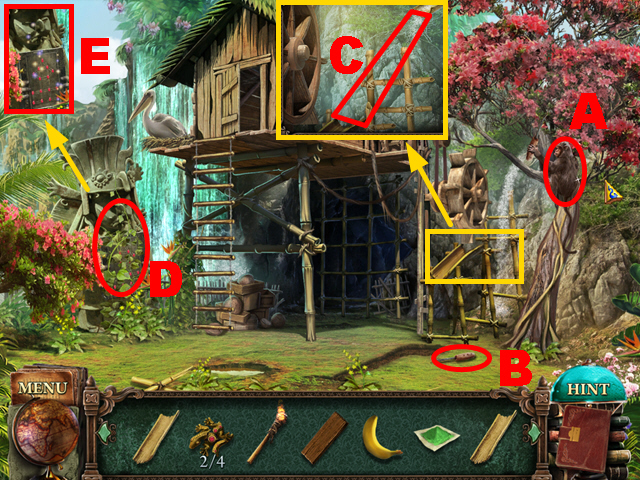
- Take the PADDLE (X), BAMBOO CHUTE (Y), and SHIP'S WHEEL (Z).
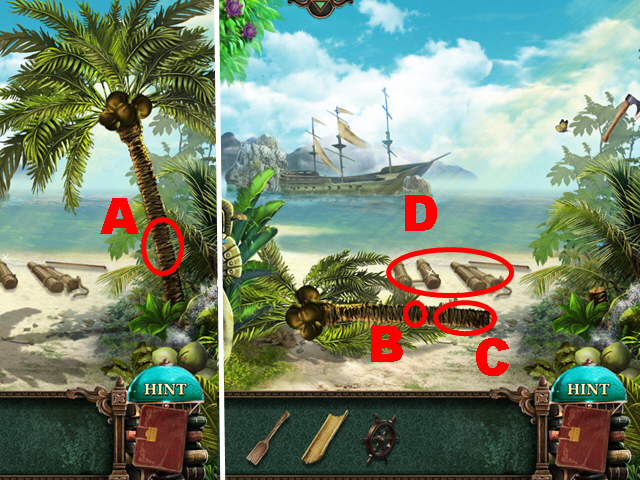
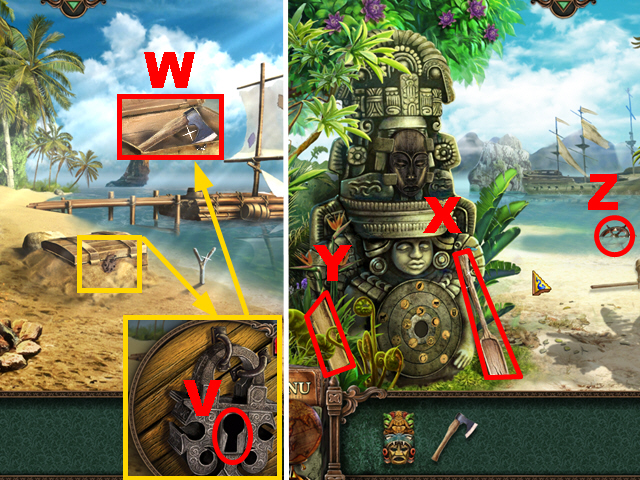
- Use the AXE (A).
- Use the AXE (B); take the TIMBER (C).
- Place the TIMBER and PADDLE (D).
- Move forward.
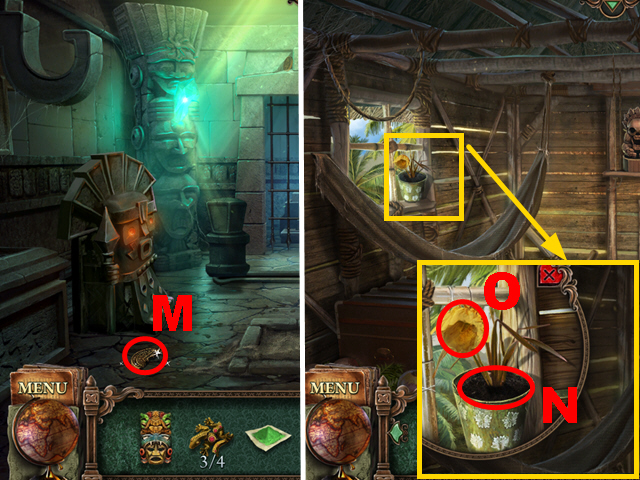
- Take the LIME (E), LIZARD PIECE 1/4 (F), and BURNT OUT TORCH (G).
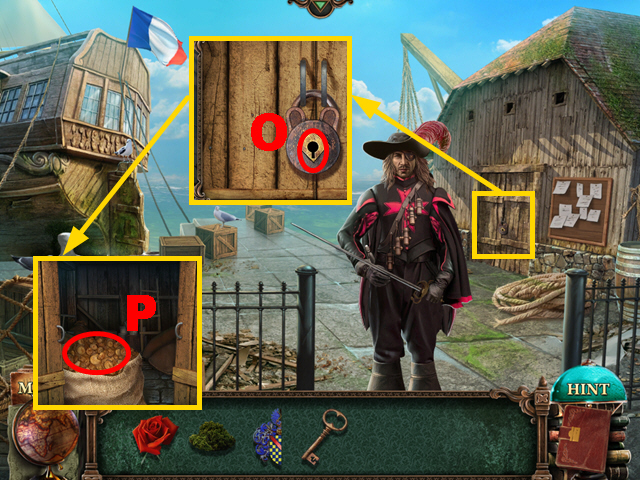
- Open the crate (H); take the BELT (I).
- Place the SHIP'S WHEEL (J); turn it.
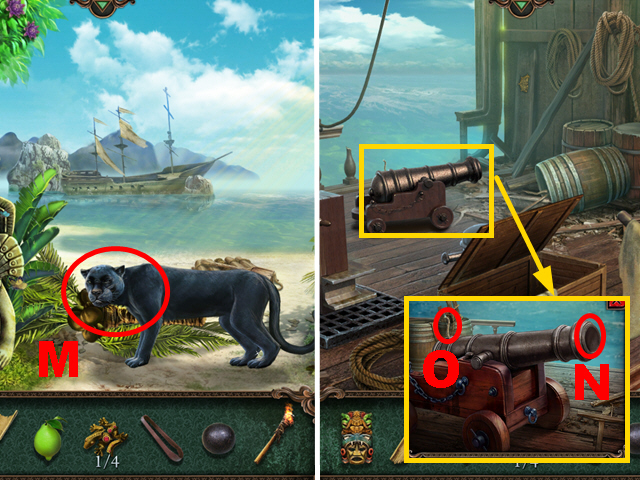
- Take the CANNONBALL (K).
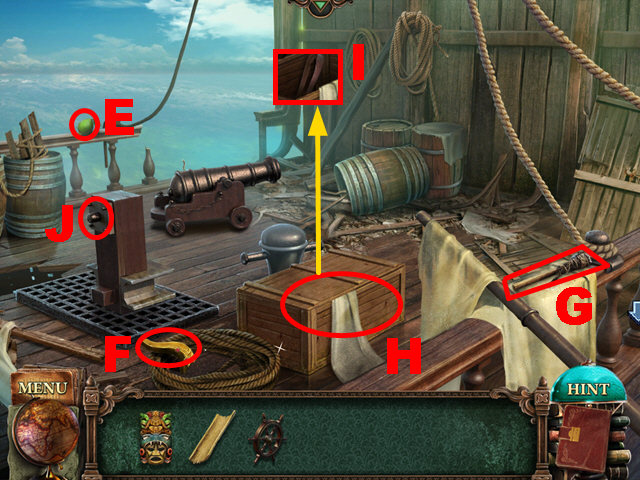
- Go to the Wharf.
- Place the BURNT OUT TORCH (L) to acquire the BURNING TORCH.
- Go to the Beach.
- Try to move forward.
- Use the BURNING TORCH (M).
- Move forward.
- Place the CANNONBALL (N); use the BURNING TORCH (O).
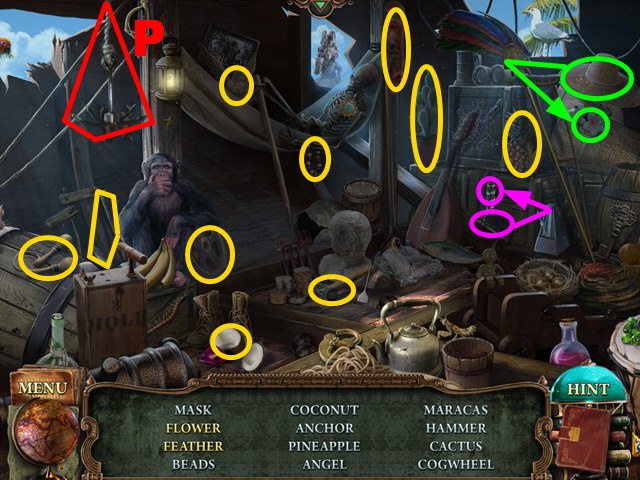
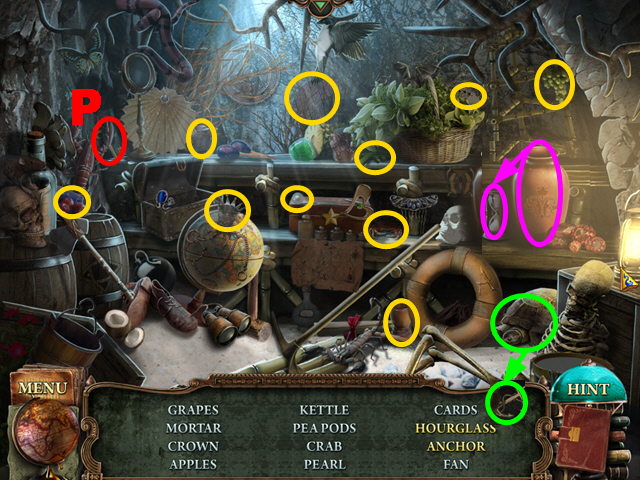
- Play the HOP.
- Take the GRAPPLING HOOK (P).
- Go to the Hut.
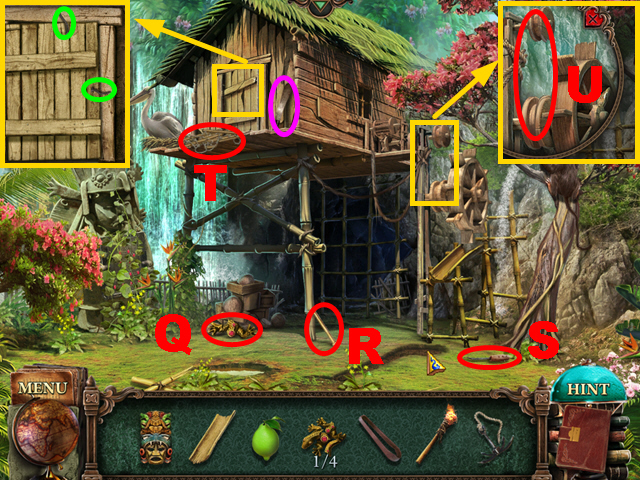
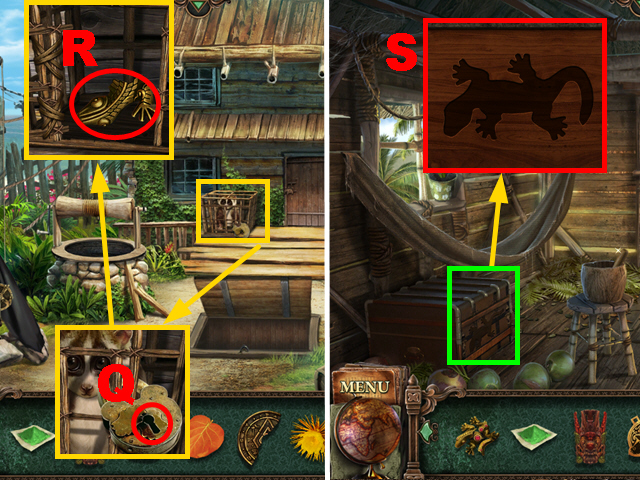
- Take the LIZARD PIECE 2/4 (Q) and LEVER (R).
- Grab the chisel (S).
- Throw the GRAPPLING HOOK (T).
- Take the MACHETE (purple).
- Move aside the nails (green); open the door.
- Place the BELT (U).
- Move forward.
- Take the PLANK (V) and BANANA (W).
- Place the LIME (X) to acquire the GREEN POWDER.
- Place the LEVER (Y); turn it twice.
- Take the BAMBOO CHUTE (Z).
- Walk down.
- Give the BANANA to the monkey (A); take the CHISEL (B).
- Place 2 BAMBOO CHUTES (C).
- Use the MACHETE (D).
- Examine the statue (E).
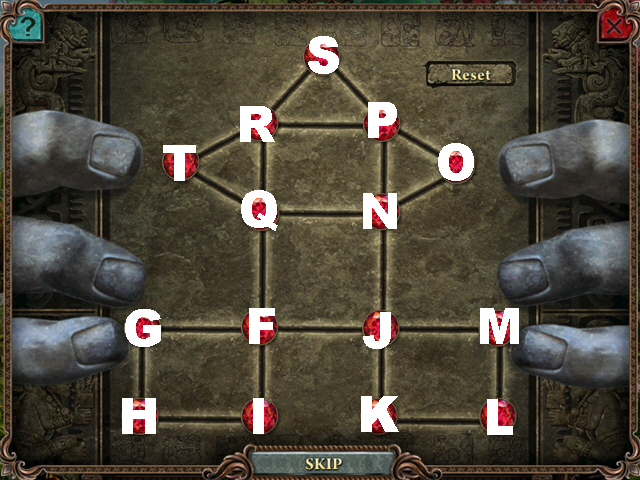
- Play the mini-game.
- Solution part 1: F, G, H, I, F, J, K, L, M, J, N, O, P, N, Q, R, P, S, R, T, Q, F.
- Solution part 2: U, V, W, U, X, W, Y, X, A, Y, Z, A, B, X, C, B, D, C, U.
- Solution part 3: E, F, G, E, H, I, E, J, I, K, J, L, M, J, F, O, N, F, L, O, P, L.
- Play the HOP.
- Take the MALLET (Q).
- Take the MASK (R).
- Go to the Pyramid.
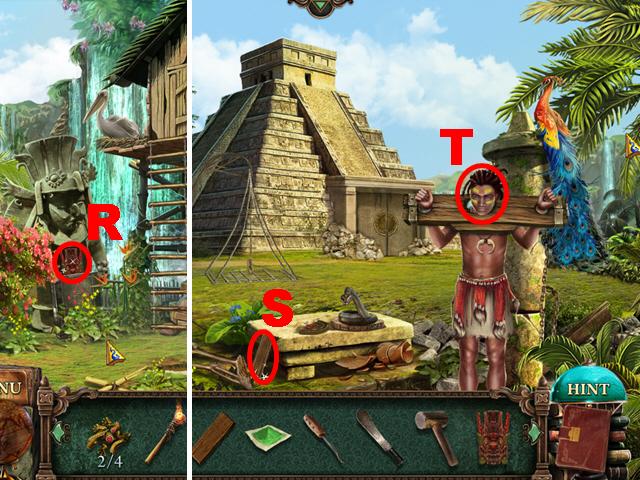
- Take the PLANK (S).
- Talk to the man (T).
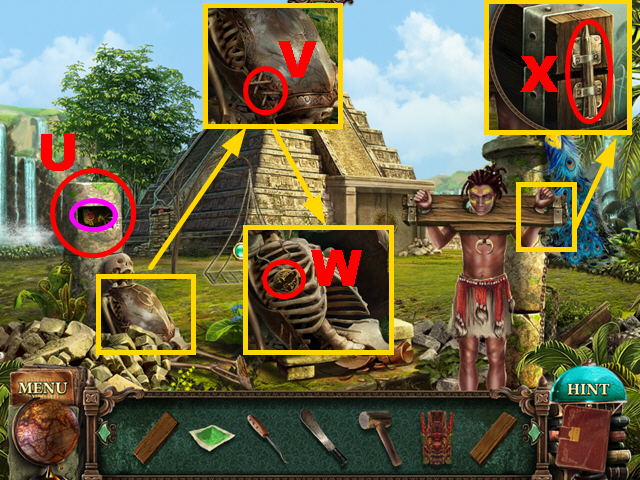
- Rotate the stone (U); open the compartment.
- Take LIZARD PIECE 3/4 (purple).
- Use the MACHETE (V); remove the chest plate.
- Take the MEDALLION (W).
- Use the MALLET (X); you receive the BASEMENT KEY.
- Climb up: 1-6.
- Take the ORANGE LEAF (Y).
- Go to the Beach, move forward.
- Play the HOP.
- Take the BARREL OF GUNPOWDER (Z).
Chapter 4: The Pirate Fortress
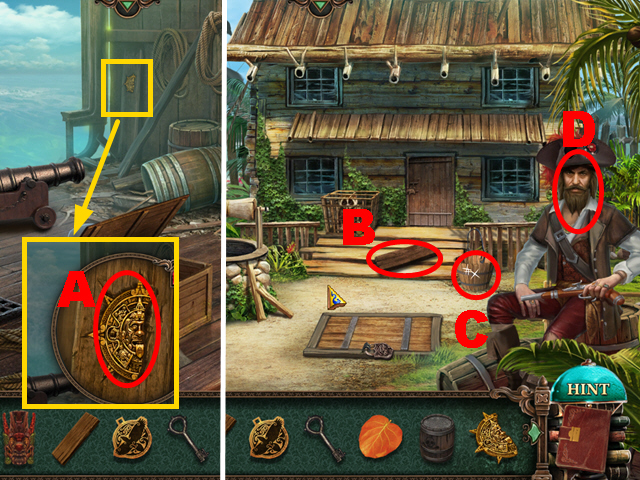
- Collect the SUN PIECE with the CHISEL (A).
- Go to the Pirate Fortress.
- Take the PLANK (B) and EMPTY BUCKET (C).
- Talk to the pirate (D).
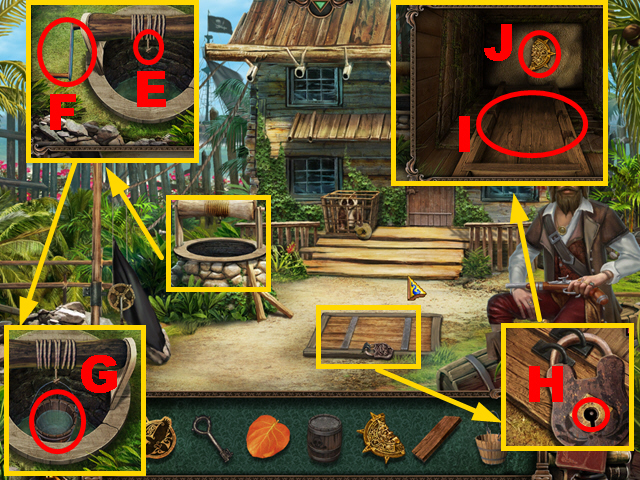
- Place the EMPTY BUCKET (E); turn the handle twice (F).
- Take the BUCKET OF WATER (G).
- Place the BASEMENT KEY (H); turn it twice.
- Place 3 PLANKS (I); take the SUN PIECE (J).
- Go to the Pyramid.
- Place 2 SUN PIECES (K).
- Place the BARREL OF GUNPOWDER (L); use the BURNING TORCH (purple).
- Move forward.
- Take the MEDALLION PIECE (M).
- Go to the Hut, move forward.
- Use the BUCKET OF WATER (N); take the YELLOW FLOWER (O).
- Walk down.
- Play the HOP.
- Take the KEY (P).
- Go to the Pirate Fortress.
- Place the KEY (Q); turn it.
- Move aside the animal; take LIZARD PIECE 4/4 (R).
- Go to the Hut, move forward.
- Place 4 LIZARD PIECES (S).
- Examine the chest (green).
- Play the mini-game.
- Solution: (T).
- Take the HACKSAW (U) and BROOM (V).
- Go to the Pyramid.
- Go to the Pirate Fortress.
- Use the HACKSAW (W).
- Open the door.
- Play the HOP.
- Take the ROD (X).
- Go to the Wharf.
- Place the ROD (Y) to acquire the FRESH FISH.
- Go to the Pyramid.
- Place the FRESH FISH (Z).
- Move forward.
- Use the BROOM (A); place the MEDALLION (B).
- Take the RECORDER (C) and OIL CAN (D).
- Move the mechanism (E).
- Walk down.
- Play the RECORDER (F); take the MEDALLION PIECE (G).
- Go to the Beach.
- Place 2 MEDALLION PIECES (H).
- Examine the statue (blue).
- Play the mini-game.
- Solution: Jx4, Kx2, I, J, Kx2, I, Jx2, Kx2, I, Jx4, Kx2, I, Jx2, Kx2.
- Take the MASK (L).
- Go to the Pirate Fortress.
- Use the OIL CAN (M); turn the lever (N).
- Take the BLUE BERRIES (O).
- Go to the Hut, move forward.

- Place the ORANGE LEAF, YELLOW FLOWER, and BLUE BERRIES (P) to acquire the ORANGE POWDER, YELLOW POWDER, and BLUE POWDER.
- Place the YELLOW POWDER (1), GREEN POWDER (2), BLUE POWDER (3), ORANGE POWDER (4), and MASK (purple).
- Examine the table (Q).
- Play the mini-game.
- Solution: (R).
- Take the PAINTED MASK (S).
- Place the PAINTED MASK and 2 MASKS (T).
- Take the CRYSTAL (U).
- Go to the Pyramid, move forward.
- Place the CRYSTAL (V).
- Go to the Pirate Fortress.
- Play the HOP.
- Take the BEAR SPEAR (W).
- Go to the Pyramid, move forward.
- Place the BEAR SPEAR (X); move the stone (Y).
- Take the CHEST OF GOLD (Z).
- Go to the Pirate Fortress.
- Give the CHEST OF GOLD to the pirate (A).
- You receive the COMPASS.
- Go to the Wharf.
- Give the COMPASS to the man (B).
Chapter 5: The Three Musketeers
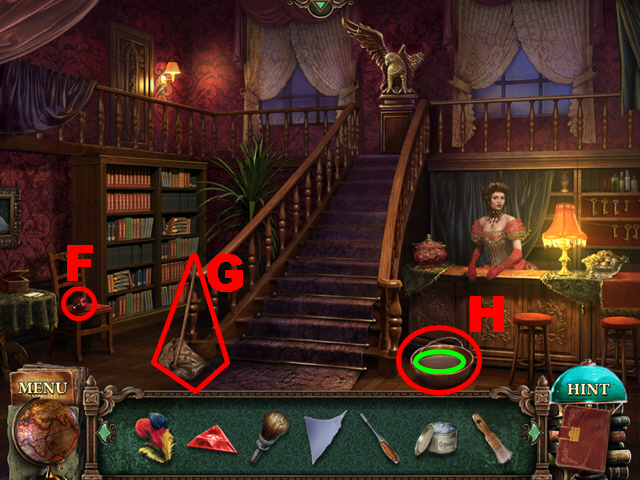
- Clean the book (C).
- Move forward.
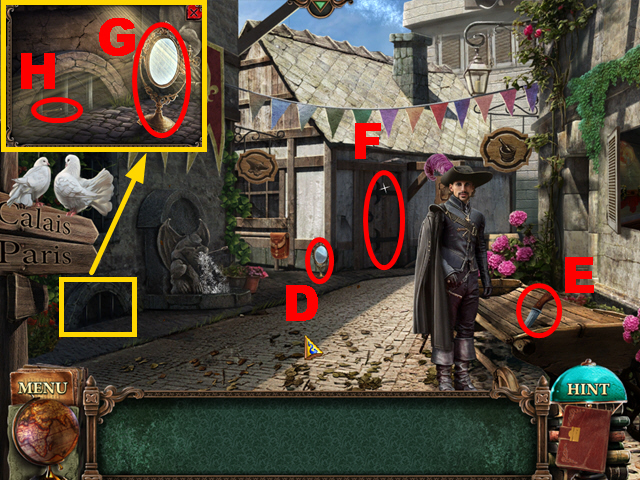
- Take the MIRROR (D) and KNIFE (E).
- Open the door (F).
- Place the MIRROR (G); move it.
- Take the KEY (H).
- Move forward.
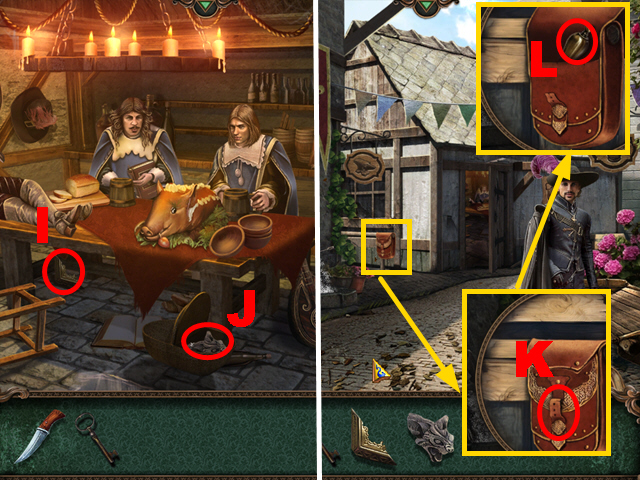
- Take the EMBLEM PIECE (I).
- Open the basket; take the GARGOYLE'S HEAD (J).
- Walk down.
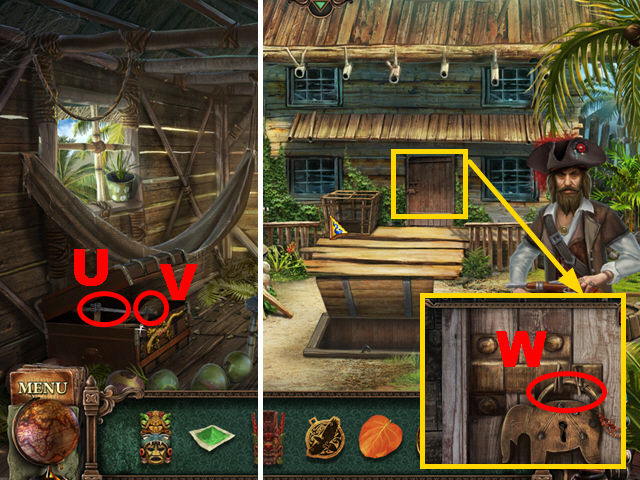
- Use the KNIFE (K); take the HANDLE (L).
- Move forward.
- Place the KEY (M); turn it twice.
- Go to the Port.
- Take the TWIG (N) and SILVER COIN (O).
- Talk to the man (P).
- Go to the Meng Street, move forward.
- Play the HOP.
- Take the JUG (Q).
- Place the JUG (R) and HANDLE (S); turn the handle.
- Take the JUG OF WINE.
- Use the JUG OF WINE (blue).
- You receive the GOLD COIN.
- Go to the Versailles Park.
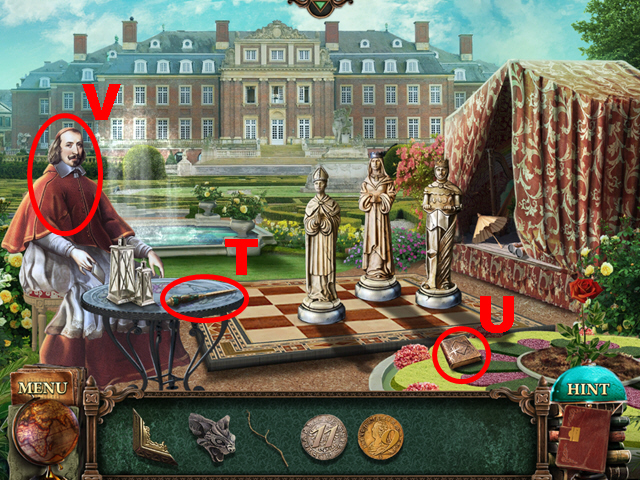
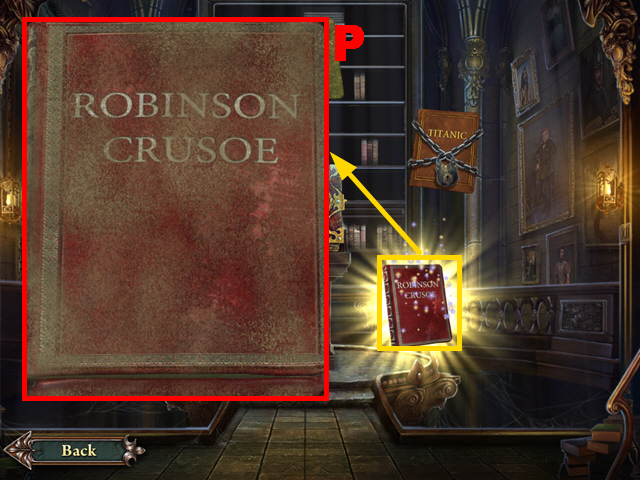
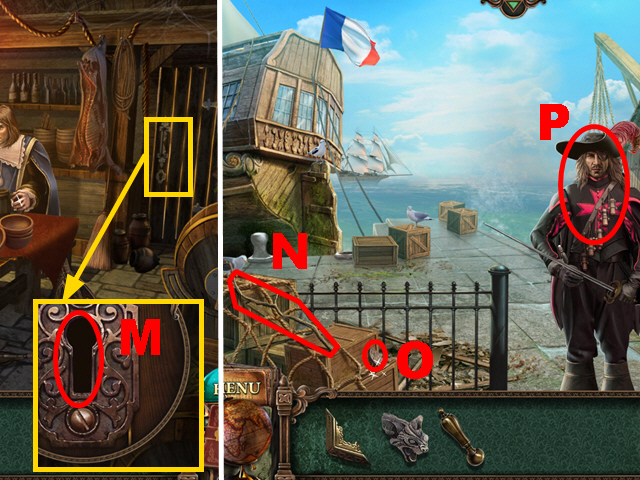
- Take the BRADAWL (T) and BOOK (U).
- Talk to the man (V).
- Go to the Abbey.

- Take the FAN (W).
- Use the BRADAWL (X).

- Play the HOP.
- Take the STAFF (Y).
- Go to the Meng Street.
- Place the GARGOYLE'S HEAD (Z); take the PIECE OF STAINED GLASS (A).
- Move forward.
- Place the SILVER COIN and GOLD COIN (B).
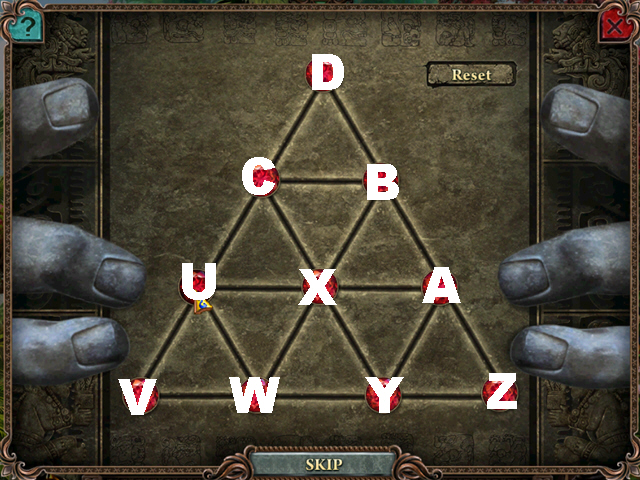
- Examine the wall (purple).
- Play the mini-game.
- Solution: Cx2, E, Cx3, E, Dx2, E, Cx4, E, Dx2, E, Cx5, E, Dx2, E, Dx2, E, Cx3, E, Cx2, E.
- Take the SCRAPER (F).
- Go to the Abbey.
- Place the PIECE OF STAINED GLASS (G).
- Examine the window (green).
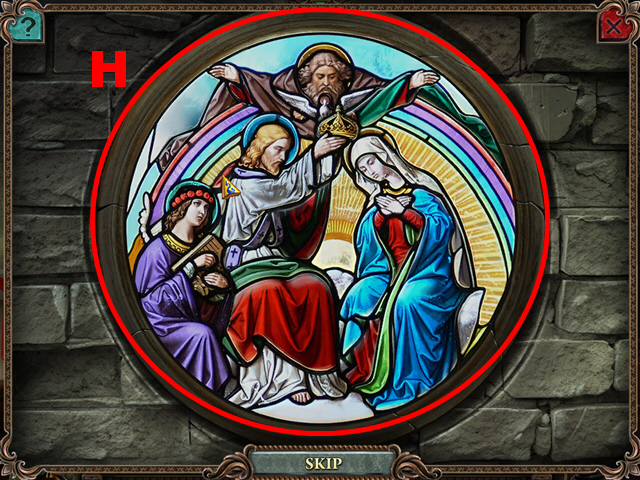
- Play the mini-game.
- Solution: (H).
- Take the SWORD (I).
- Go to the Versailles Park.
- Place the STAFF (1), FAN (2), and SWORD (3).
- Take the CROSS (J).
- Go to the Abbey.
- Place the CROSS (K).
- Take the KEY (L).
- Use the KEY (M); turn it twice.
- Turn right.
- Take the BAND (N).
- Place the BOOK (O).
- Use the TWIG (P); take the SIGNET RING (Q).
- Go to the Versailles Park.
- Use the BAND (R).
- Play the HOP.
- Take the STRANGE COIN (S).
- Go to the Abbey, move forward.
- Place the STRANGE COIN (T).
- Examine the wall (U).
- Play the mini-game.
- Solution: V, A, X, W, Z, A, X, Y.
- Take the SECATEURS (B).
- Go to the Versailles Park.
- Collect the ROSE with the SECATEURS (C).
- Go to the Abbey, move forward.
- Use the SIGNET RING (D); turn it.
- Take the ANCIENT SCROLL (E).
- Go to the Versailles Park.
- Give the ANCIENT SCROLL to the man (F).
- You receive the PASS.
- Go to the Port.
Chapter 6: The Hunter's Lodge
- Give the PASS to the man (G).
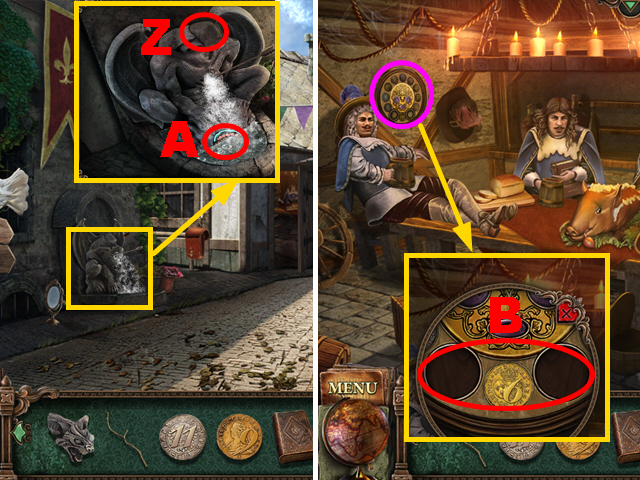
- Collect the MOSS with the SCRAPER (H).
- Go to the Hunter's Lodge.
- Take the FISHING ROD (I).
- Go to the Versailles Park.
- Collect the HALF COAT OF ARMS with the FISHING ROD (J).
- Go to the Meng Street, move forward.
- Play the HOP.
- Take the BUTTERFLY NET (K).
- Go to the Port.
- Collect the EMBLEM PIECE with the BUTTERFLY NET (L).
- Go to the Abbey, move forward.
- Place 2 EMBLEM PIECES (M); take the KEY (N).
- Go to the Port.
- Place the KEY (O); turn it twice.
- Take the FIGS (P).
- Go to the Abbey.
- Play the HOP.
- Take the OIL (Q).
- Move forward.
- Place the FIGS (R), MOSS (S), ROSE (T), and OIL (U).
- Examine the table (orange).
- Play the mini-game.
- Solution: V-W, X-W x3, Y-Z, green-Z x2, A-C, B-C, W-D, Z-D, C-D, E-D, F-D.
- You receive the ANTIDOTE.
- Use the ANTIDOTE (G); you receive the LETTER.
- Go to the Hunter's Lodge.
- Give the LETTER to the man (H); you receive the KEY.
- Place the KEY (I); turn it twice.
- Move forward.
- Take the MEDAL (J).
- Go to the Versailles Park.
- Play the HOP.
- Take the GLOVES (K).
- Go to the Hunter's Lodge.
- Use the GLOVES (L); take the WEATHERCOCK (purple).
- Place the WEATHERCOCK (M); take the MEDAL (N).
- Move forward.
- Place 2 MEDALS (green).
- Play the HOP.
- Take the PINCERS (O).
- Walk down.
- Use the PINCERS (P); take the MEDALLION (Q).
- Go to the Abbey.
- Place the MEDALLION (R); take the KEY (S).
- Go to the Hunter's Lodge.
- Place the KEY (T); turn it twice.
- Take the HALF COAT OF ARMS (U).
- Move forward.
- Place 2 HALVES COAT OF ARMS (V); take the CROWN RING (blue).
- Play the HOP.
- Take the STUDS PIECE (W).
- Place the CROWN RING (X); take the BROKEN STUDS (Y).
- Place the BROKEN STUDS (green) and STUDS PIECE (blue).
- Examine the compartment (Z).
- Play the mini-game.
- Solution: (A).
- You receive the STUDS.
- Go to the Meng Street.
- Give the STUDS to the man (B).
- The man will talk to you.
Chapter 7: Jack the Ripper

- Clean the book (A).
- Move forward.
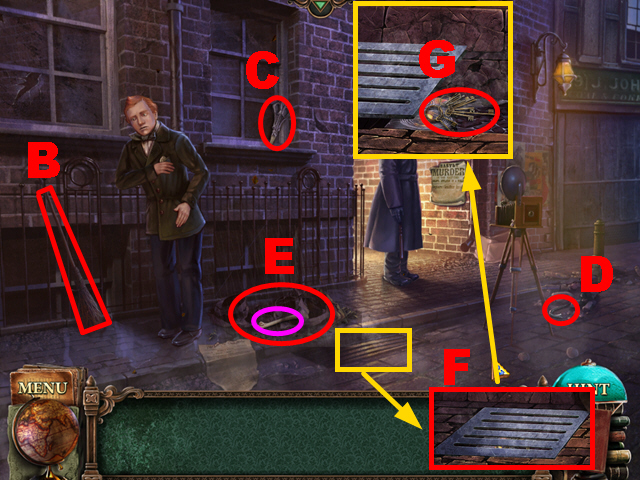
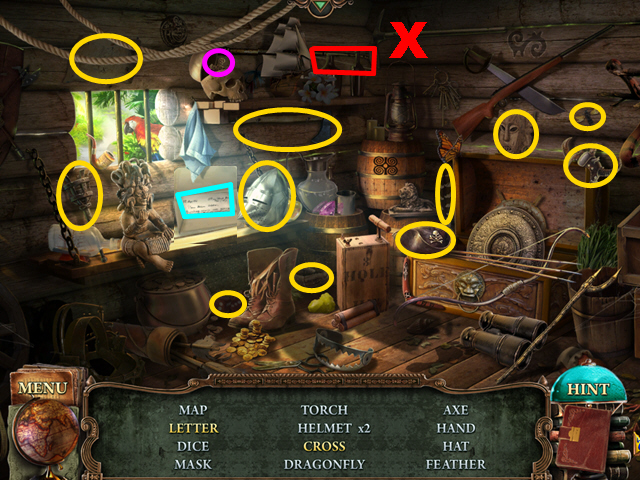
- Take the BROOM (B), SCISSORS (C), and CROWBAR (D).
- Use the BROOM (E); take the BONE (purple).
- Use the CROWBAR (F); take the BUNCH OF KEYS (G).
- Go to the Police Department.
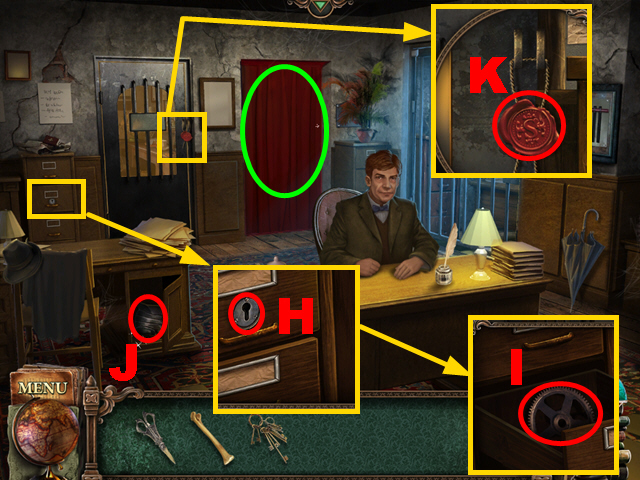
- Use the BUNCH OF KEYS (H); take the COGWHEEL (I).
- Move the curtain (green).
- Open the compartment; take the SHOULDER ARMOR (J).
- Use the SCISSORS (K).
- Play the HOP.
- Take the MAGNESIUM POWDER (L).
- Place the COGWHEEL (M); pull the lever (N).
- Turn right.
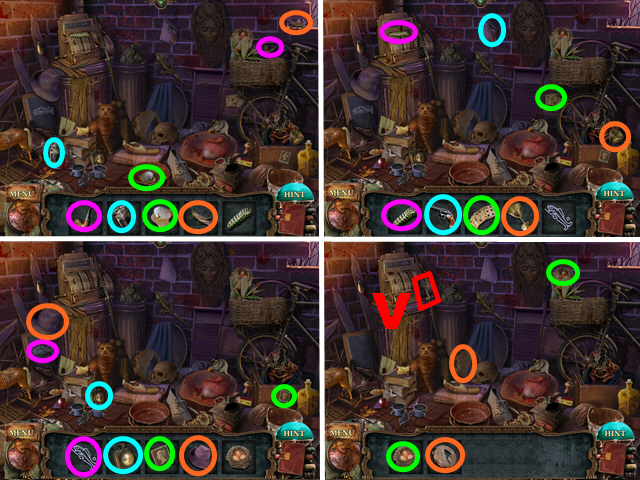
- Take the PLUME (O) and CRYSTAL (P).
- Talk to the man (Q).
- Use the BONE (R); take the LEVER (S).
- Go to the Dark Alley.
- Place the MAGNESIUM POWDER (T); pull the string (U).
- Move forward.
- Play the HOP.
- Take the KEY (V).
- Take the TICKET (W), MIRROR SHARD (X), and SLEEPING DRAUGHT (Y).
- Go to the Police Department.
- Use the SLEEPING DRAUGHT (purple); take the TEA WITH SLEEPING DRAUGHT (Z).
- Turn right.
- Use the TEA WITH SLEEPING DRAUGHT (A).
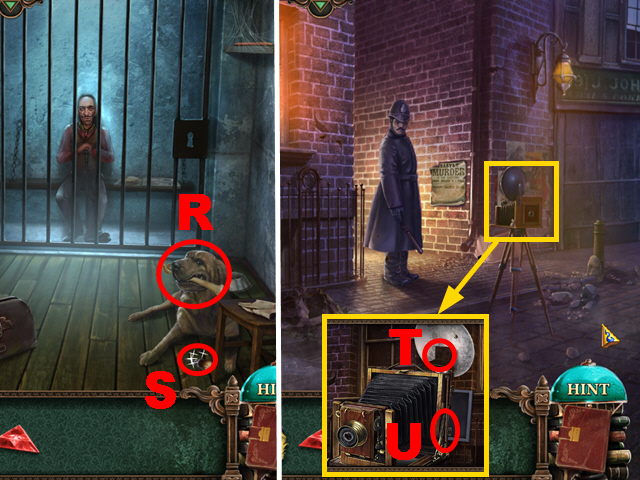
- Talk to the prisoner (B); give the TICKET to him.
- You receive the SCREWDRIVER.
- Place the KEY (C); turn it.
- Take the GYPSUM (D).
- Walk down.
- Play the HOP.
- Take the ARCHEOLOGIST'S BRUSH (E).
- Go to the Hotel.
- Take the APPLE (F) and MOP (G).
- Use the GYPSUM (green); take the GYPSUM PLASTER (H).
- Go to the Dark Alley, move forward.
- Play the HOP.
- Take the LETTER (I).
- Use the BRUSH and GYPSUM PLASTER (J); take the FOOTPRINT CAST (K).
- Go to the Police Department.
- Give the FOOTPRINT CAST to the man (L); you receive the ROOM KEY.
- Turn right.
- Use the MOP (M); take the PENCIL (purple).
- Go to the Hotel.
- Use the ROOM KEY (N); turn it twice.
- Play the HOP.
- Take the AV MONOGRAMMED HANDKERCHIEF (O).

- Give the LETTER to the woman (P); you receive the WING.
- Place the WING (Q).
- Turn left.
- Take the CRYSTAL (R) and CAMERA (S).
- Place the LEVER (T); pull it.
- Take the SHIELD (U).
- Use the SCREWDRIVER (green).
- Go to the Police Department.
- Give the AV MONOGRAMMED HANDKERCHIEF to the man (V); you receive the PALACE PASS.
- Go to the Palace.
Chapter 8: The Palace
- Give the PALACE PASS to the guard (W).
- Take the CRYSTAL (X).
- Use the APPLE (Y).
- Take the TOOLS (Z).
- Move forward.
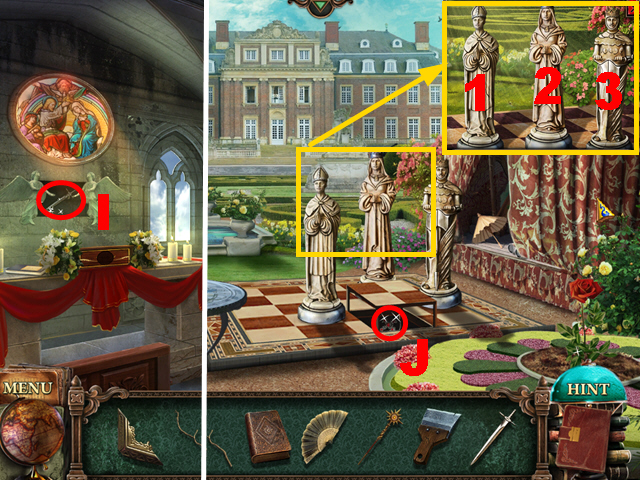
- Take the MIRROR SHARD (A).
- Talk to the man (B).
- Open the door (C).
- Play the HOP.
- Take the CRYSTAL (D).
- Place the SHOULDER ARMOR, PLUME, and SHIELD (E).
- Take the FIXER (F).
- Go to the Hotel, move forward.
- Place the CRYSTAL (G) and 2 MIRROR SHARDS (H).
- Place 3 CRYSTALS (I).
- Move the mirror.
- Walk down.
- Play the HOP.
- Take the BINOCULARS (J).
- Move forward.
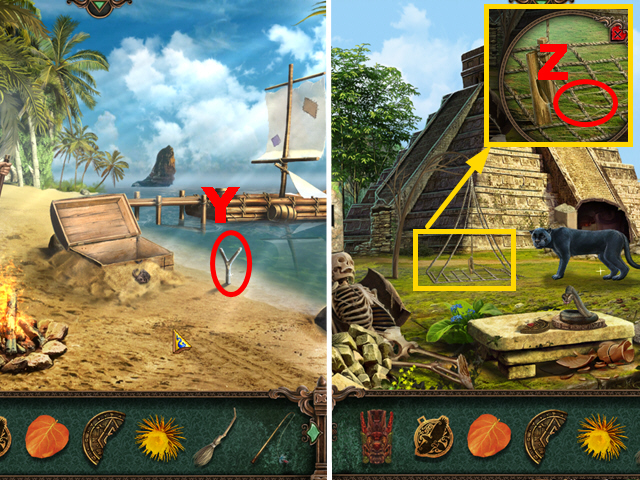
- Place the TOOLS (K).
- Examine the compartment (purple).
- Play the mini-game.
- To solve this puzzle (L), use the tools on damages framed in the same color.
- Go to the Palace, move forward.
- Give the BINOCULARS to the man (M); you receive the CARRIAGE KEY.
- Go to the Hotel, move forward.
- Examine the floor (N).

- Play the mini-game.
- Solution: (O).
- You receive the COAT OF ARMS PIECE.
- Go to the Palace.
- Place the CARRIAGE KEY (P); turn it twice.
- Draw the page with the PENCIL (Q); you receive the NOTEPAD.
- Go to the Dark Alley.
- Give the NOTEPAD to the man (R); you receive the COAT OF ARMS PIECE.
- Go to the Palace.
- Place 2 COAT OF ARMS PIECES (S).
- Take the KNIFE (T).
- Move forward.
- Use the KNIFE (U).
- Use the CAMERA (V) to acquire the NEGATIVE.
- Play the HOP.
- Take the LENS (W).
- Go to the Police Department.
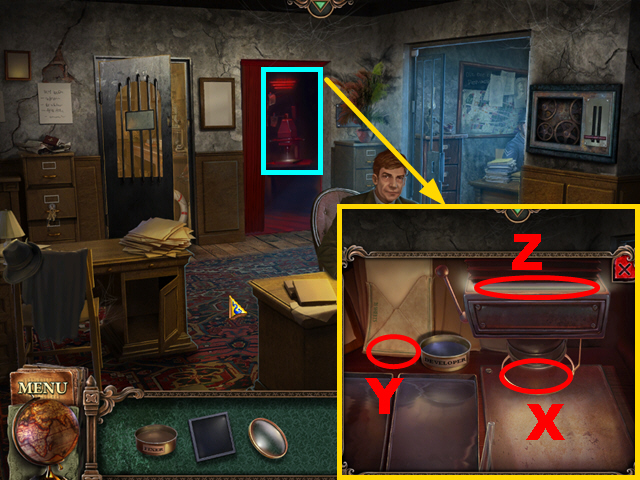
- Place the LENS (X), FIXER (Y), and NEGATIVE (Z).
- Examine the room (blue).
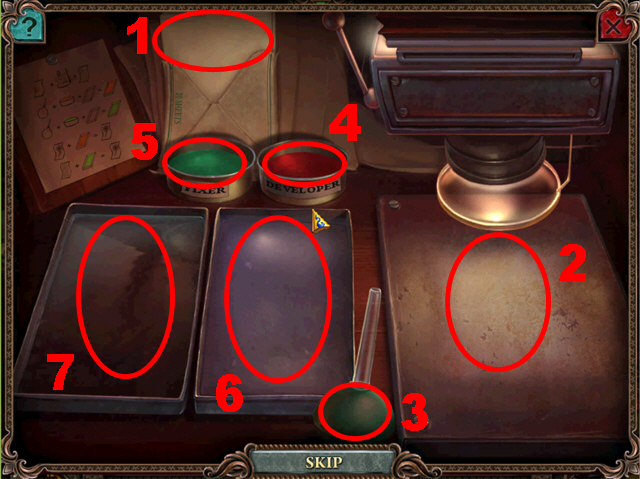
- Play the mini-game.
- Solution: 1-2, 3-4, 3-5, 2-6, 6-7.
- You receive the PHOTOGRAPH.
- Go to the Dark Alley.
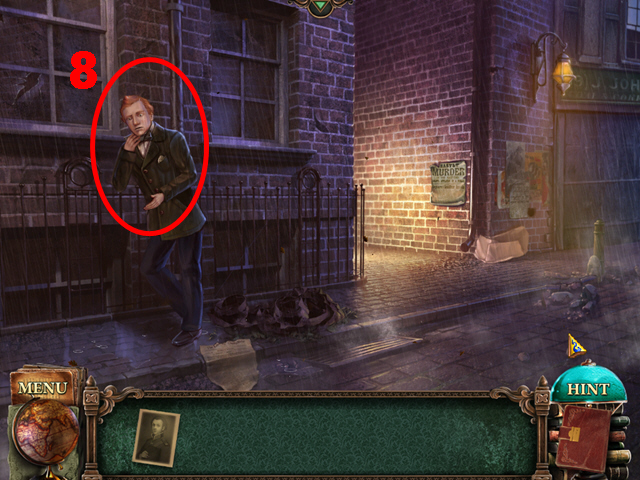
- Give the PHOTOGRAPH to the man (8).
- Congratulations, you have completed Lost Souls: Timeless Fables.
Created at: 2014-06-06