

Walkthrough Menu
- General Tips
- Chapter 1: Lucio
- Chapter 2: The Dwarf
- Chapter 3: The Lumberjack
- Chapter 4: The Nymph
- Chapter 5: The King
- Chapter 6: Lerione
General Tips
- This is the official guide for Love Chronicles: A Winter's Spell.
- This guide will not mention each time you have to zoom into a location; the screenshots will show each zoom scene.
- Hidden-object puzzles are referred to as HOPs. This guide will not show HOP solutions. It will identify the location of the HOP and the inventory item acquired.
- This guide will show solutions for non-random puzzles. Please read the in-game instructions for each puzzle.
Chapter 1: Lucio
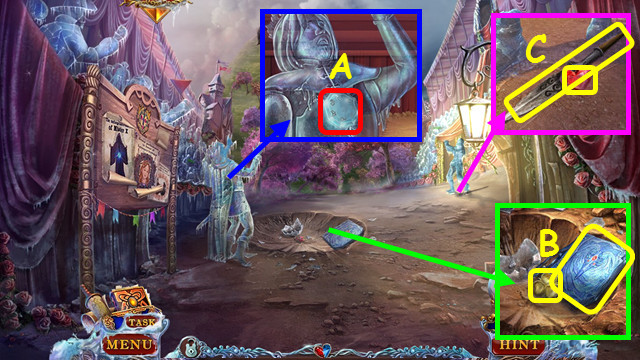
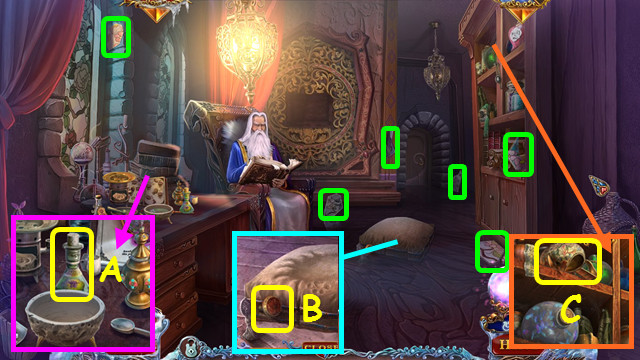
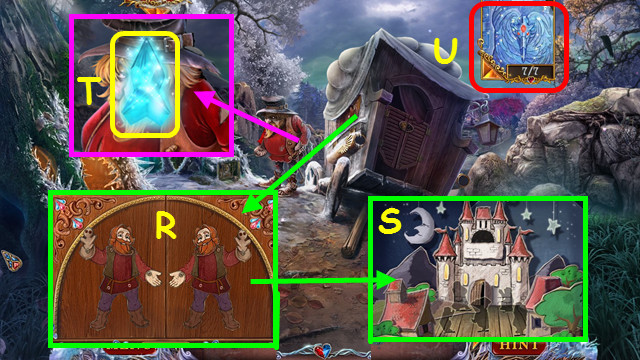
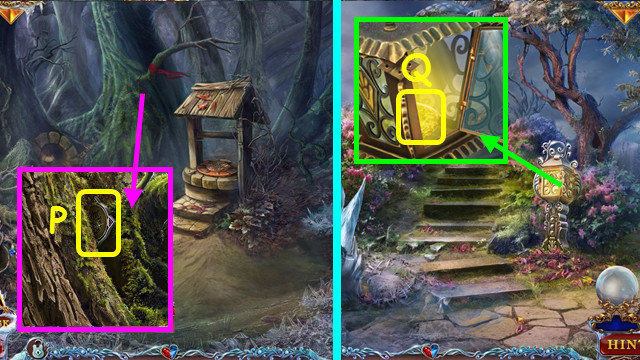
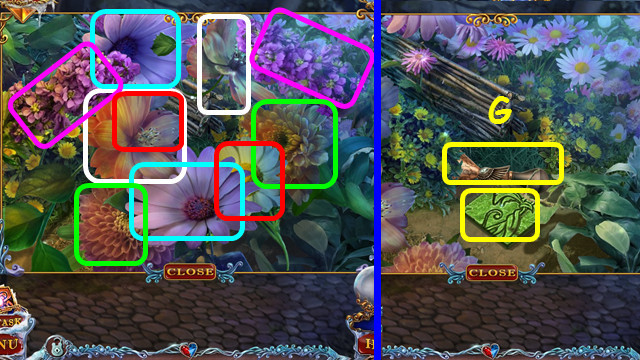
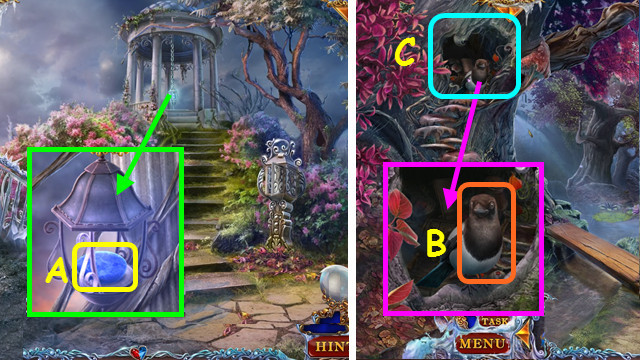
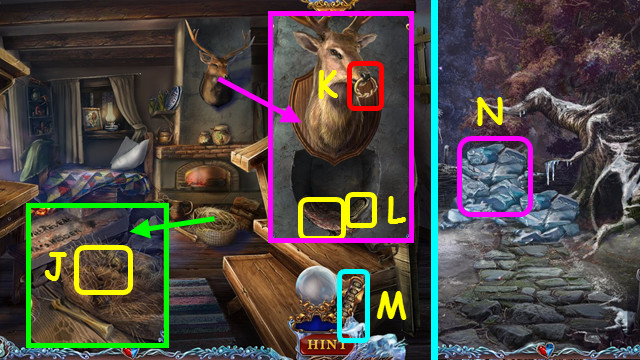
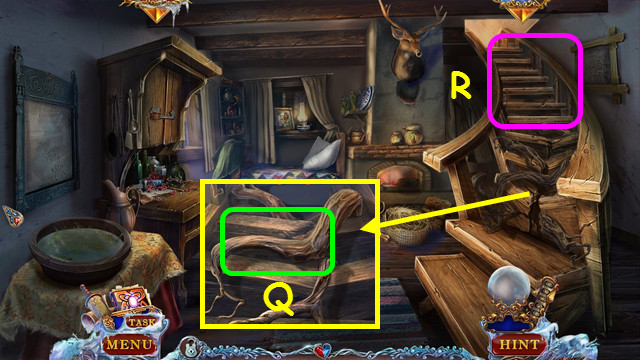
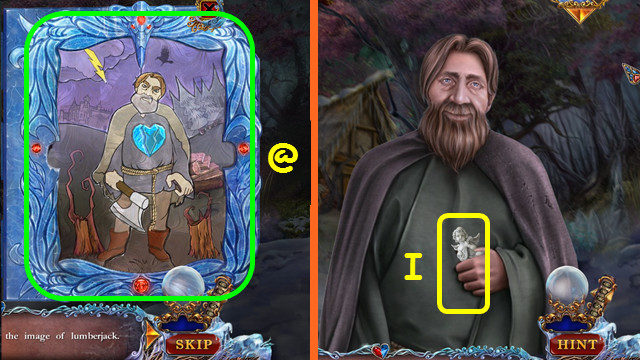
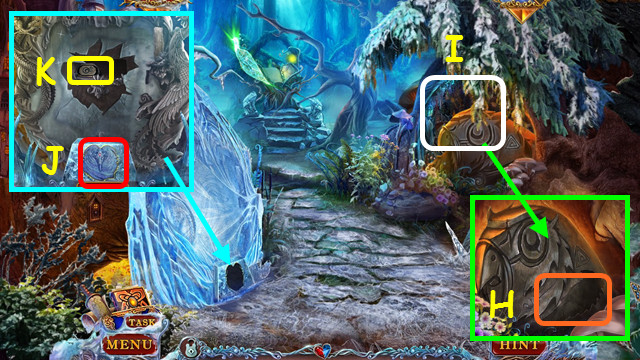
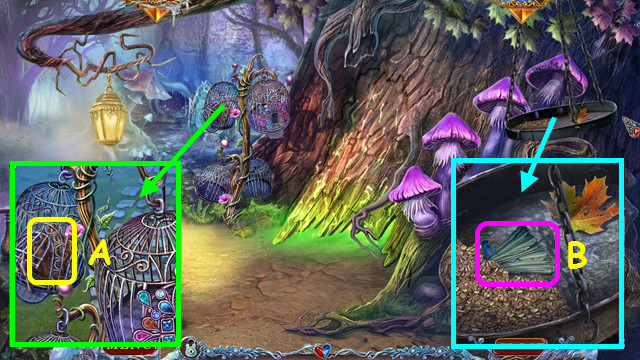
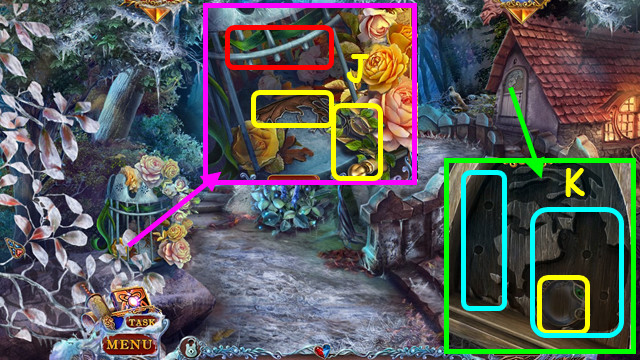
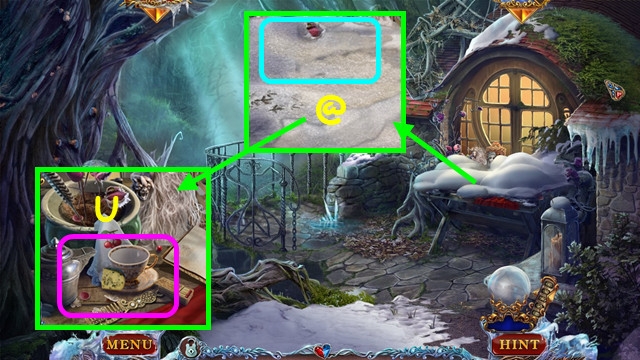
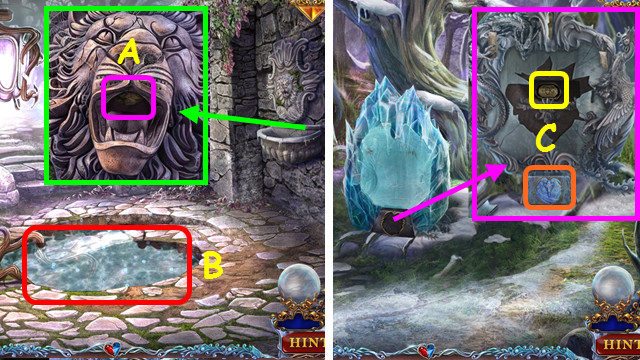
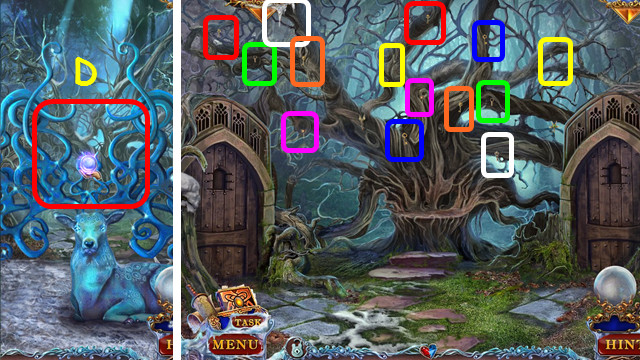
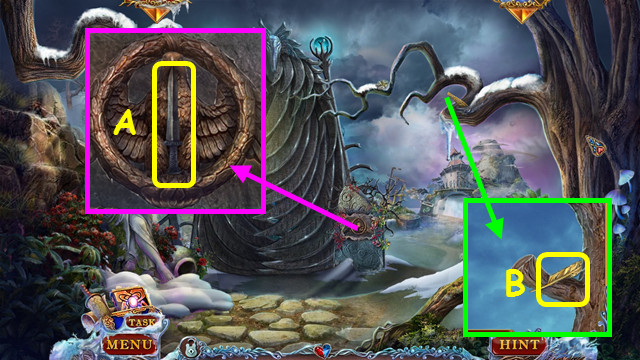
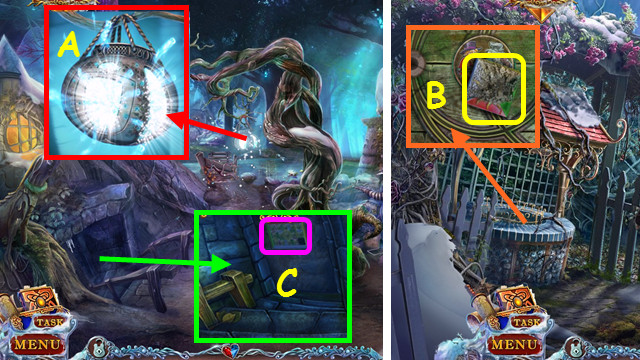
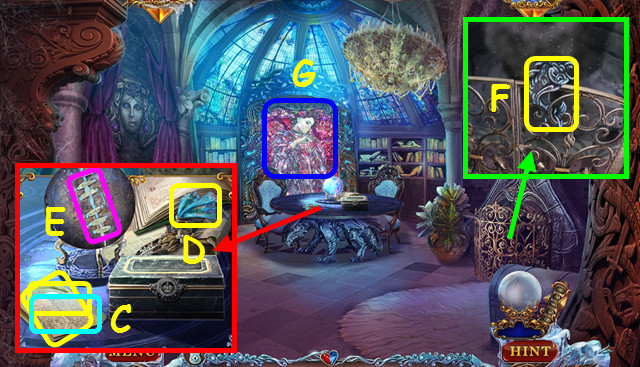
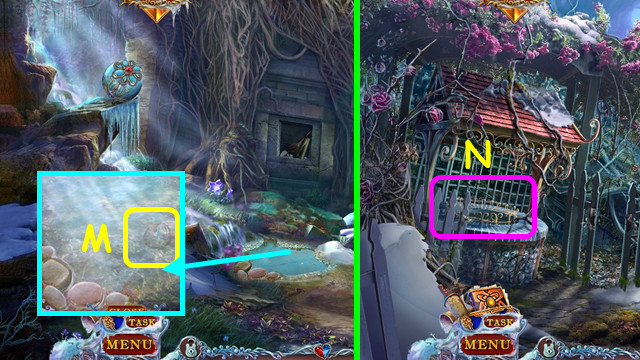
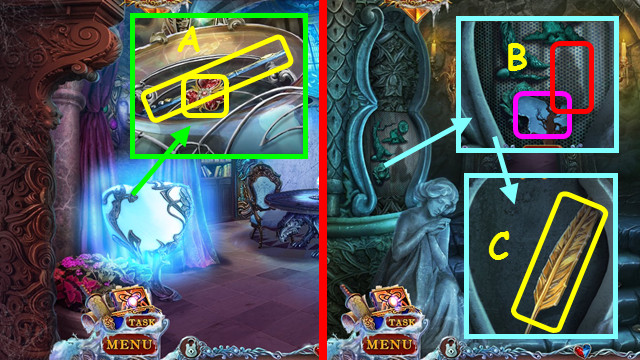
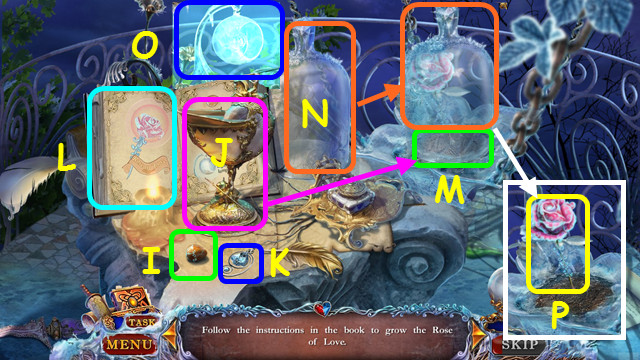
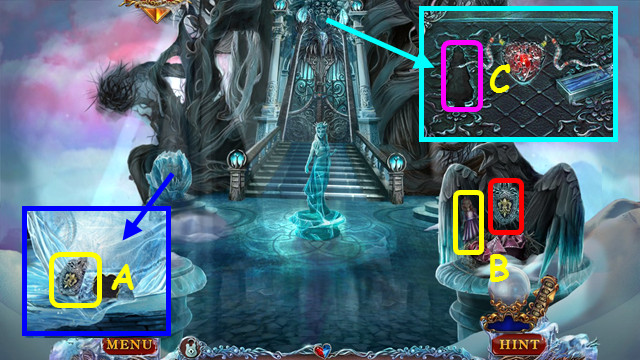
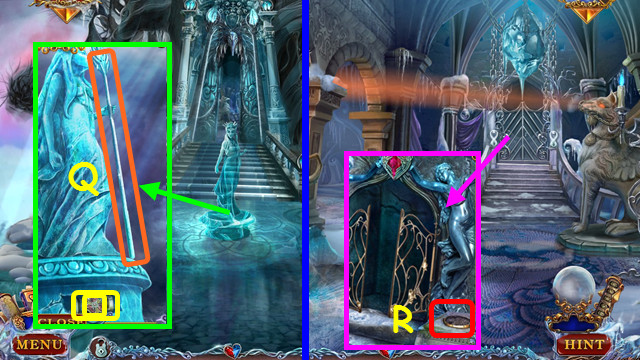
- Look at the frozen King for a code (A).
- Take the BROKEN TIARA PART and ICY BOOK (B).
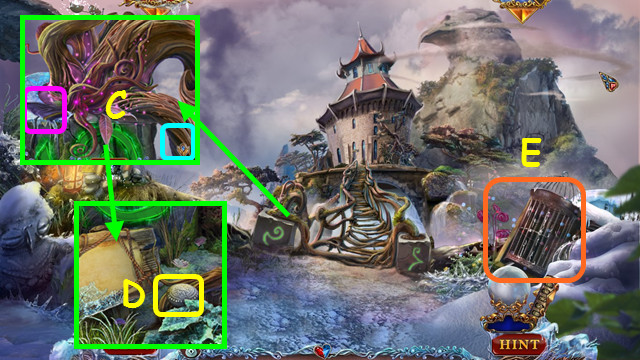
- Take the 1/3 HEART and SPEARHEAD (C).
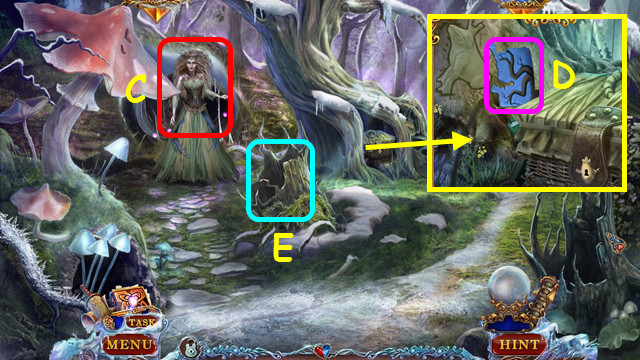
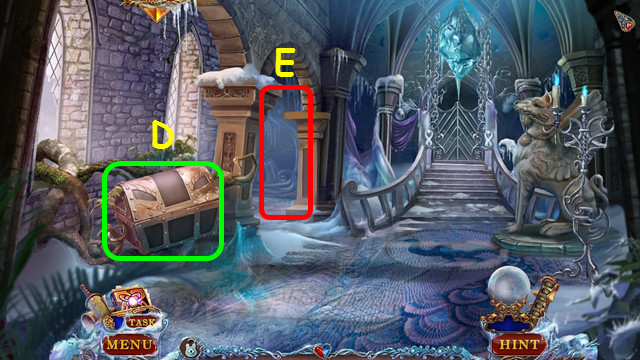
- Walk forward.
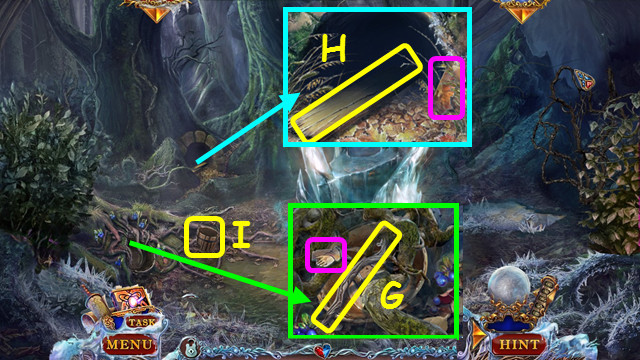
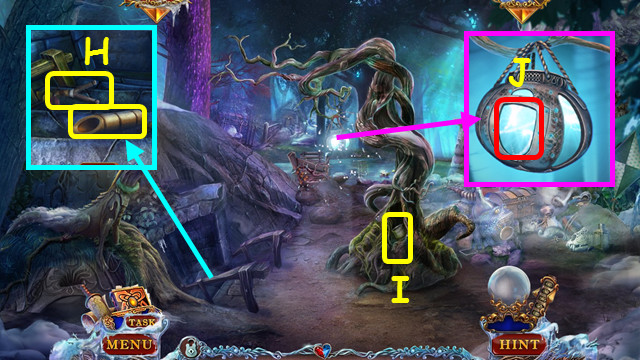
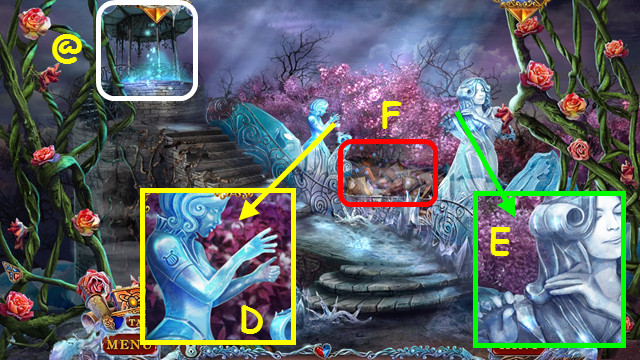
- Take the 1/3 STONE TOKEN (D).
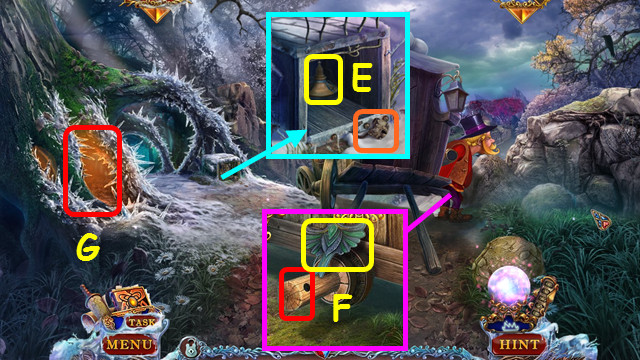
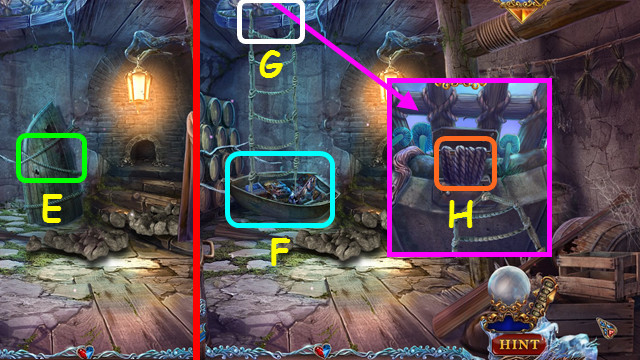
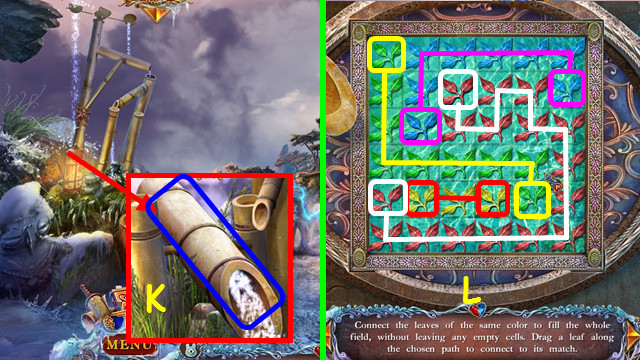
- Use the SPEARHEAD (E).
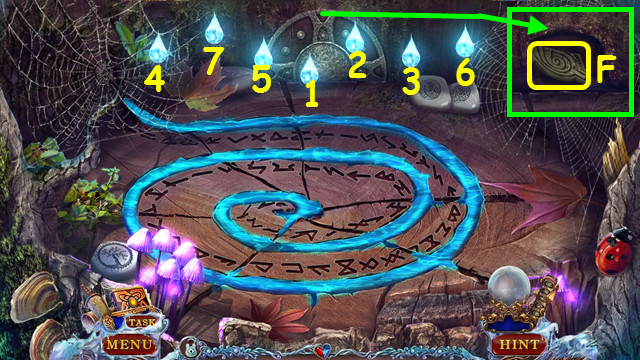
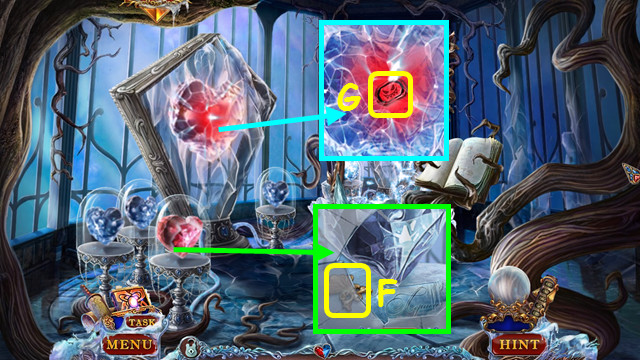
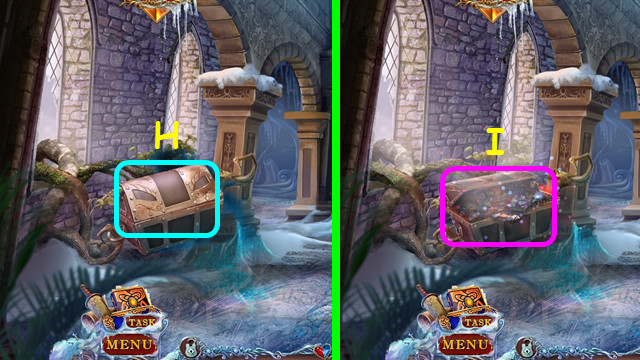
- Play the HOP to earn the 2/3 STONE TOKEN (F).
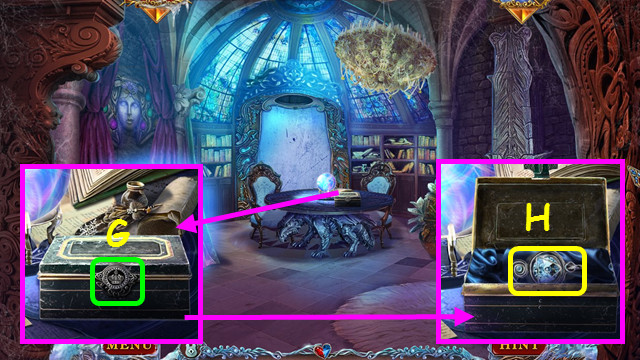
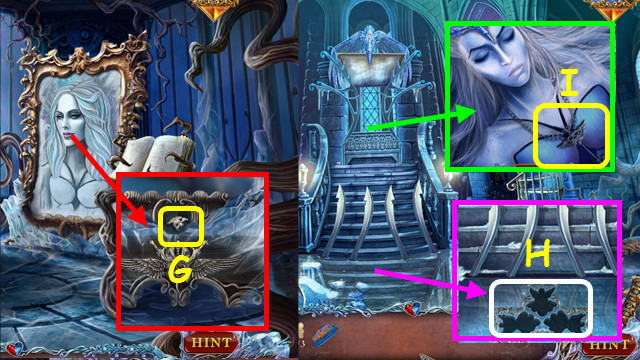
- Move the leaves; take the 3/3 STONE TOKEN (G).
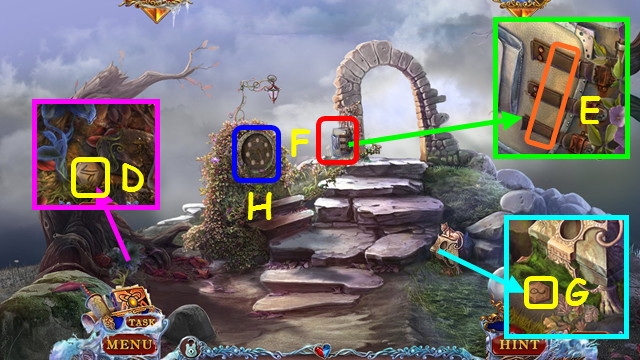
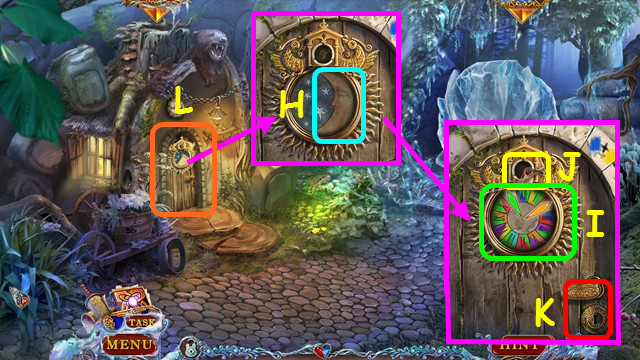
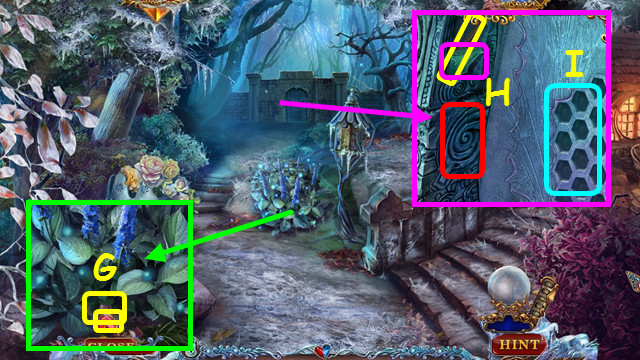
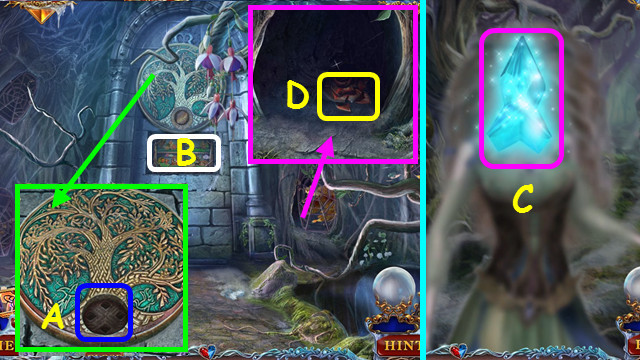
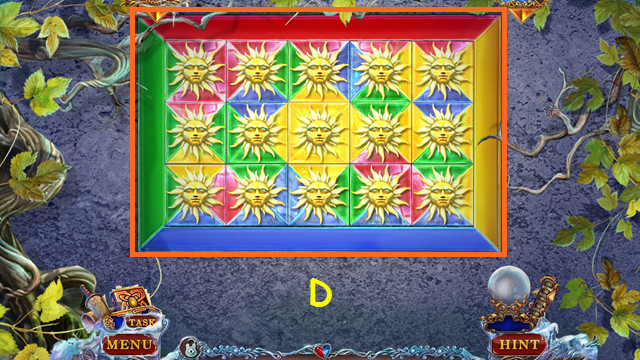
- Select the mini-game (H).
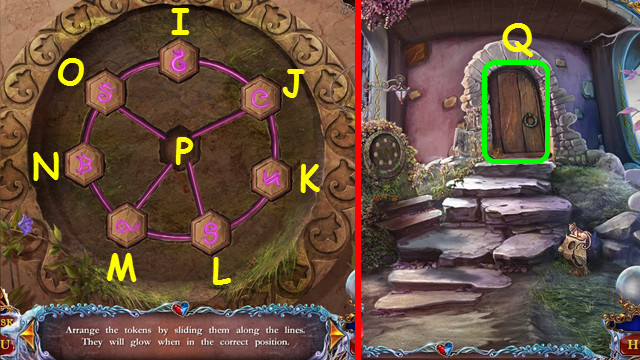
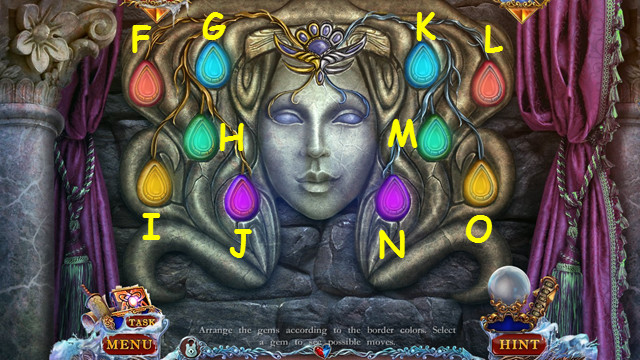
- Place the 3 STONE TOKENS in the openings.
- Solution: M-N-O-P-M-L-K-J-P.
- Open the door; walk forward (Q).
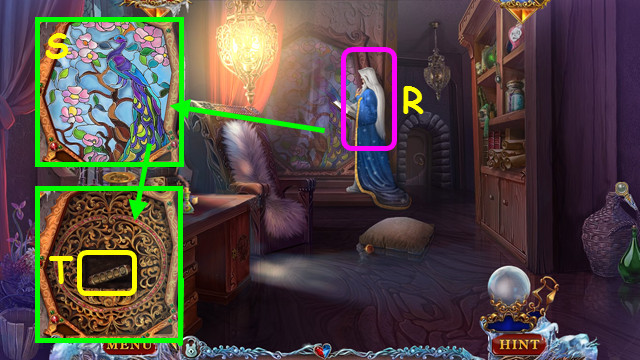
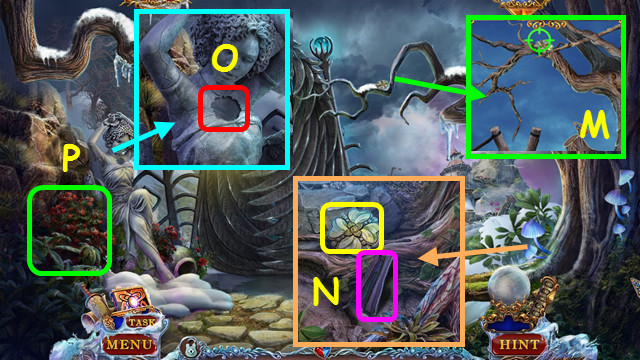
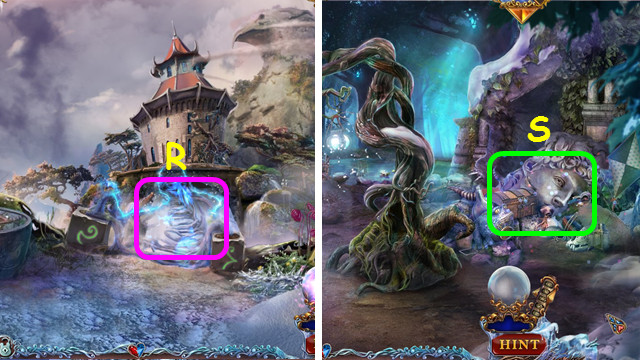
- Talk to Lucio (R).
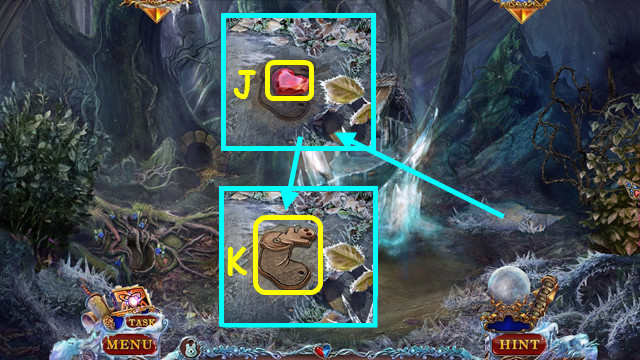
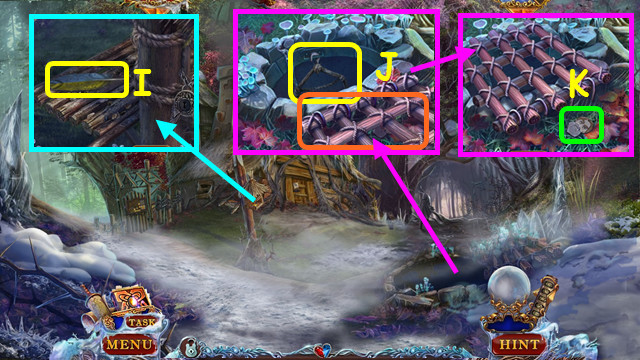
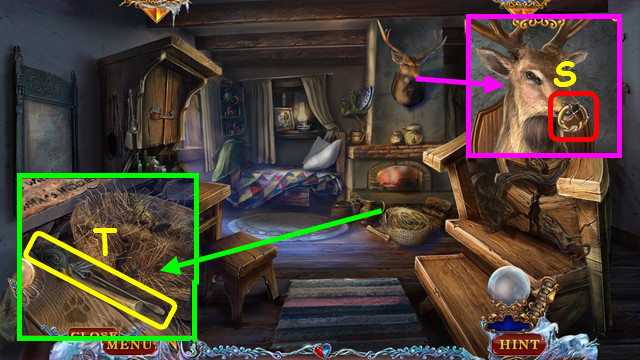
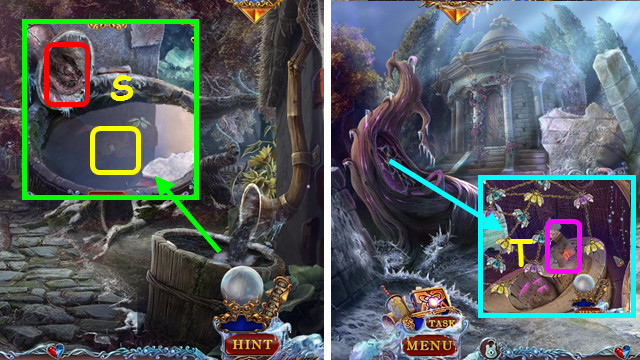
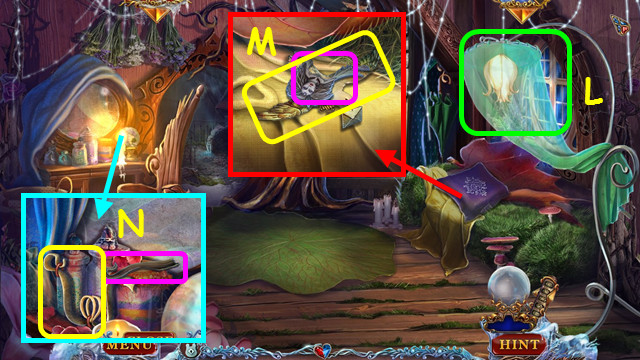
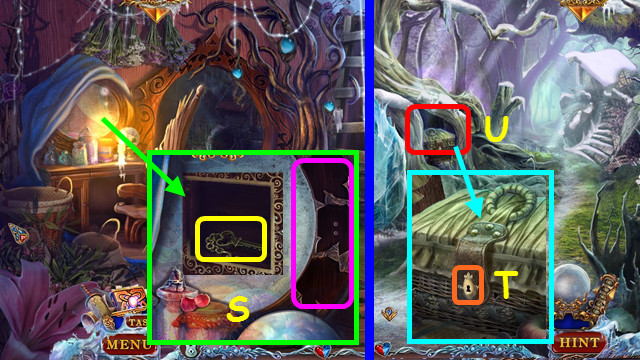
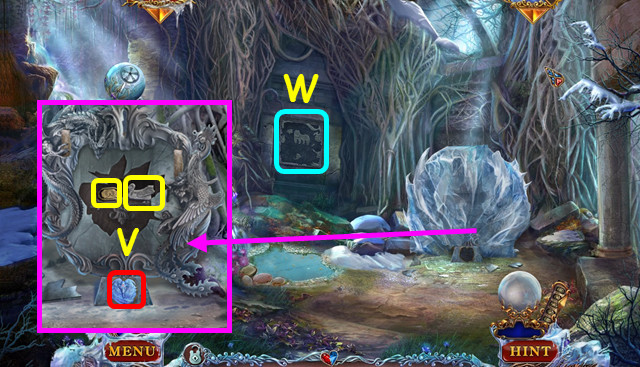
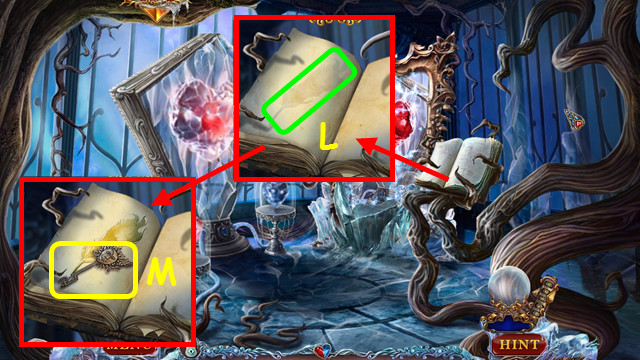
- Select the stained glass (S); take the HISTORY SCROLL (T).

- Select the HISTORY SCROLL (U).
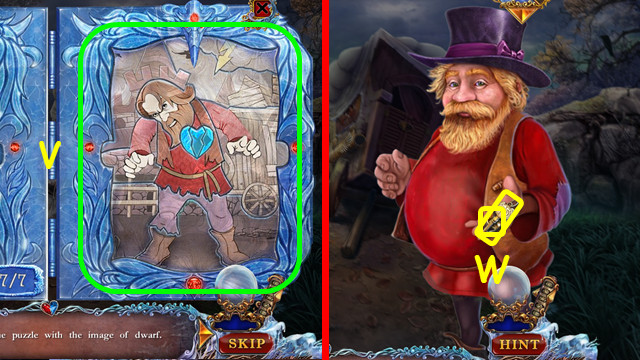
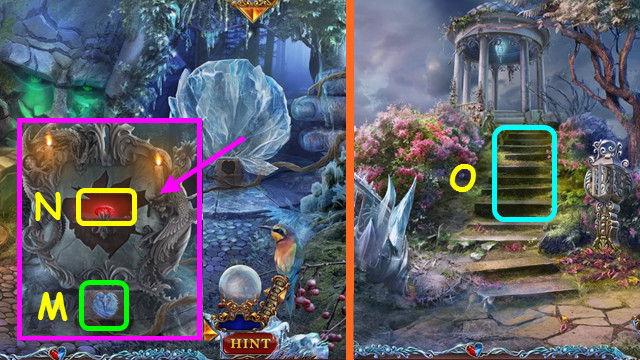
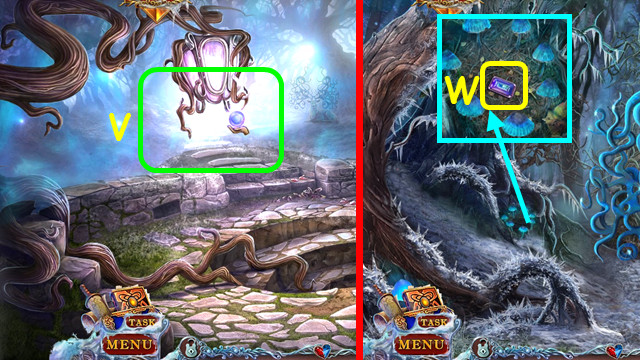
- Select the rune; play the HOP (V).
- Select the charge button (W).
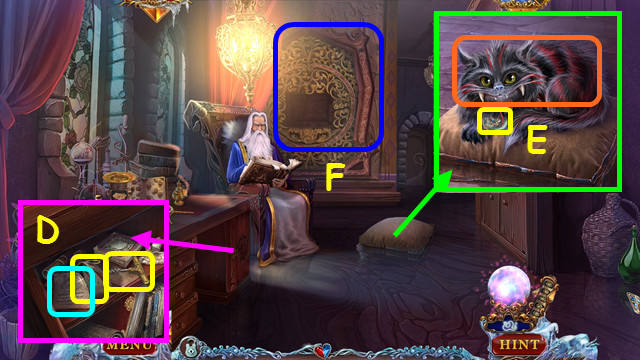
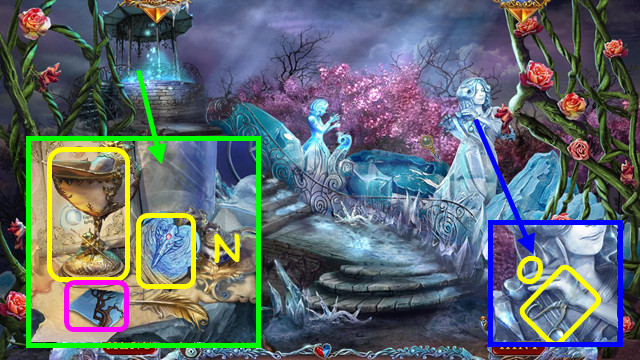
- Take the CORKED FLASK (A).
- Collect the 6 MIRROR SHARDS (green).
- Take the KNOB (B).
- Take the EMPTY LADLE (C).
- Use the KNOB; read the note, take the VISIBILITY POWDER and CORKSCREW (D).
- Combine the CORKED FLASK and CORKSCREW to make the EMPTY FLASK (inventory).
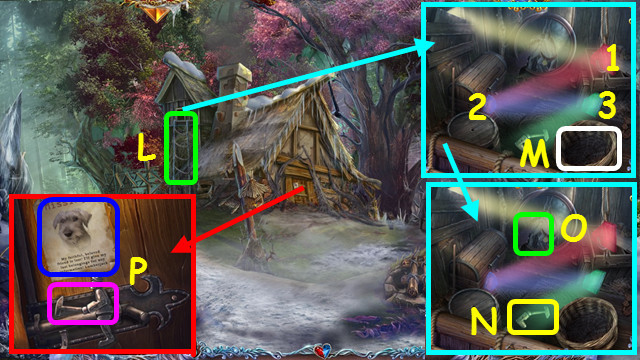
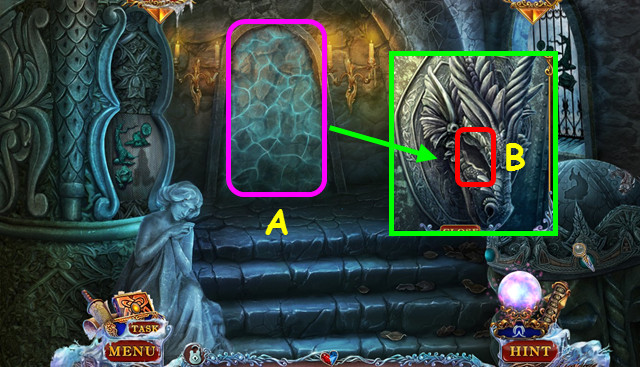
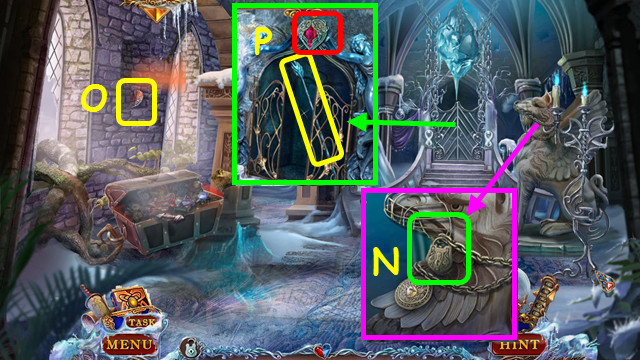
- Use the VISIBILITY POWDER; take the CAT MEDALLION (E).
- Select the frame (F).
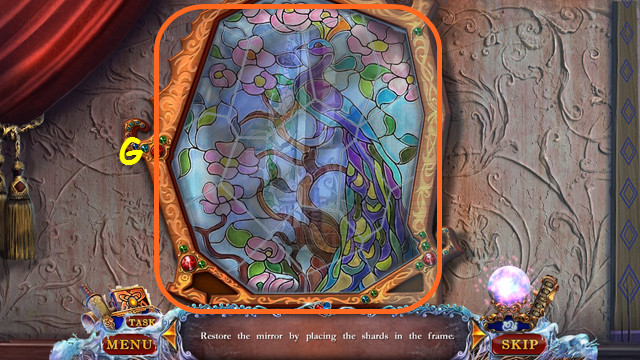
- Place the 6 MIRROR SHARDS.
- Restore the stained glass (G).
- Walk down.
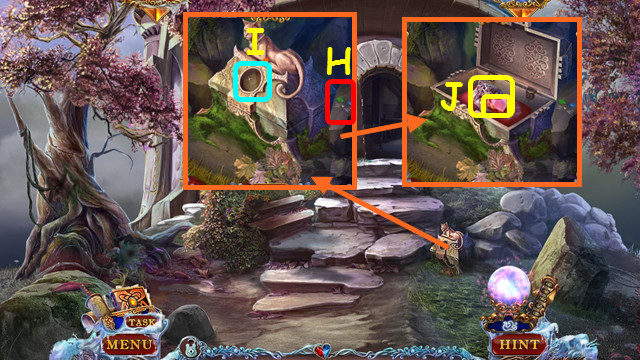
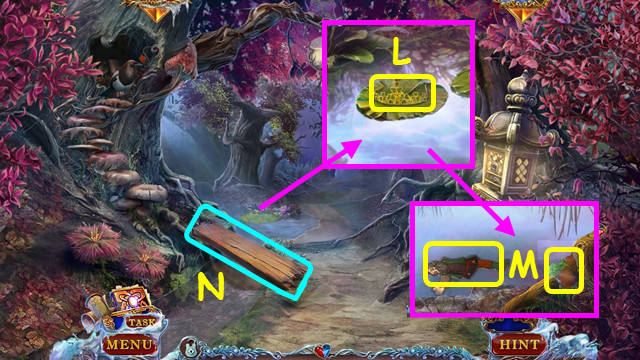
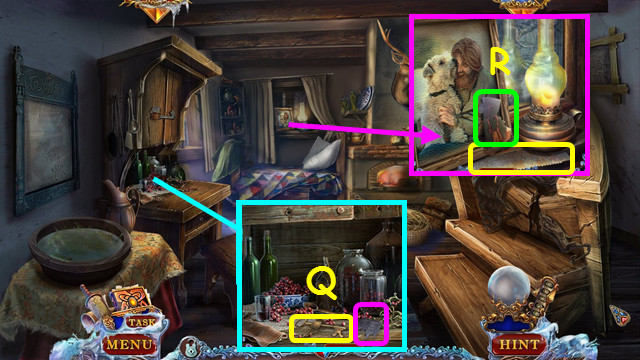
- Change the eyes on the CAT MEDALLION (inventory) to match the drawing (H).
- Place the CAT MEDALLION (I).
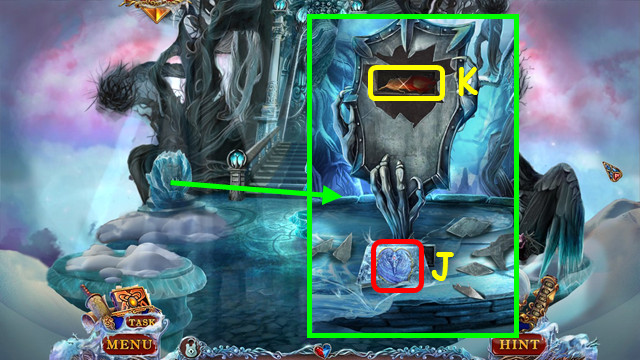
- Take the 2/3 HEART and AMETHYST (J).
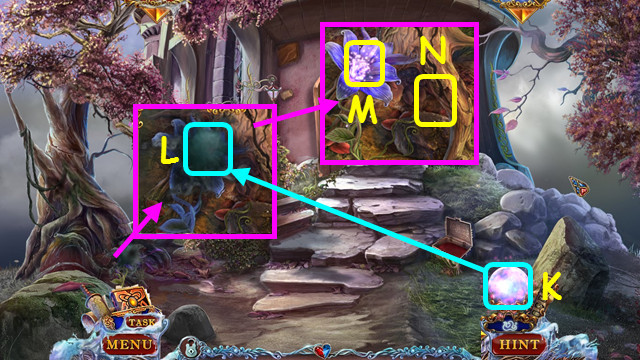
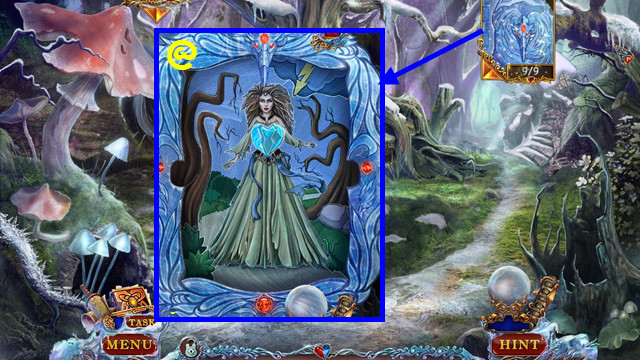
- Use the CRYSTAL BALL (K) on the dark magic (L).
- Use the EMPTY FLASK to take the SWEETFLOWER NECTAR (M).
- Use the EMPTY LADLE to collect the TREE TEARS (N).
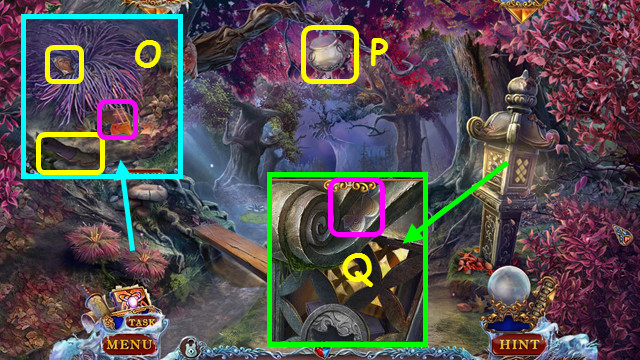
- Walk forward and select the desk on the left.
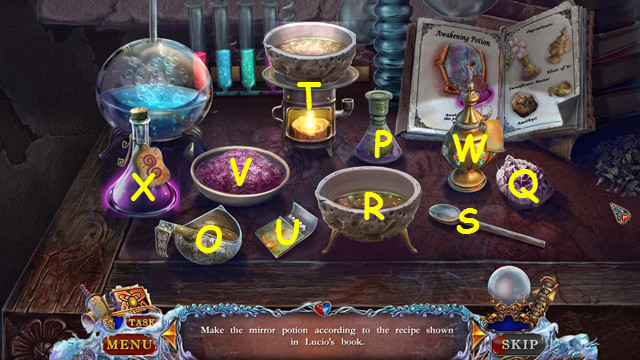
- Place the TREE TEARS (O), SWEETFLOWER NECTAR (P), and AMETHYST (Q).
- Place the tree tears and sweetflower nectar in the bowl (R); use the spoon (S) on the bowl.
- Place the bowl on the burner (T); use the matches (U) on the burner.
- Place the amethyst in the mortar (V); pour the mortar into the bowl.
- Use the spoon on the bowl.
- Use the bottle (W) on the bowl; select the bowl.
- Take the MIRROR POTION (X).
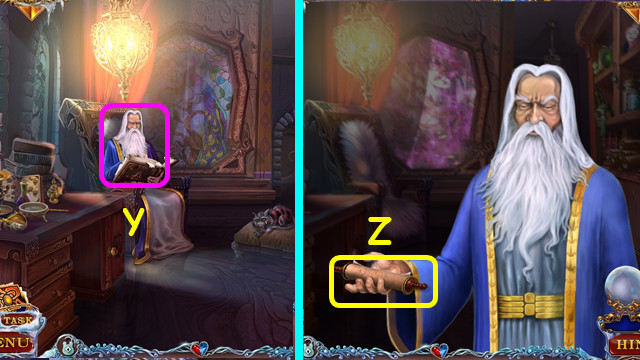
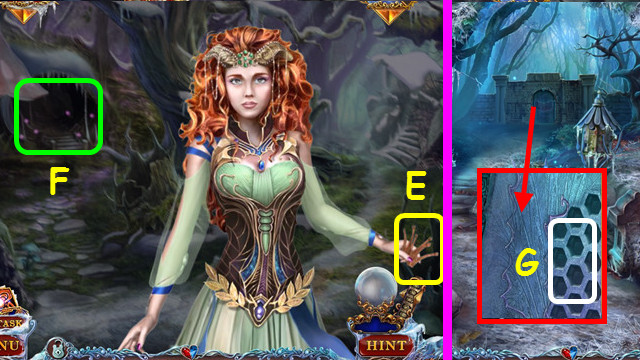
- Give the MIRROR POTION (Y).
- Take the scroll (Z).
- Walk forward 2x.
Chapter 2: The Dwarf
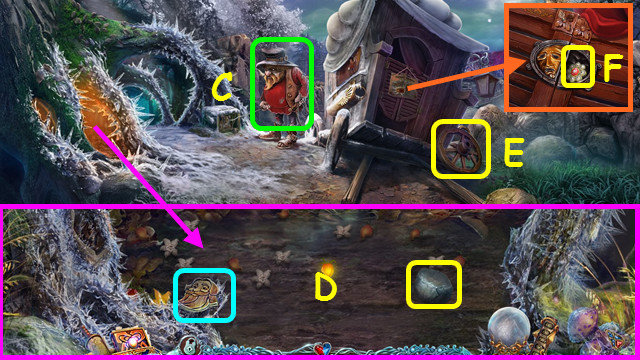
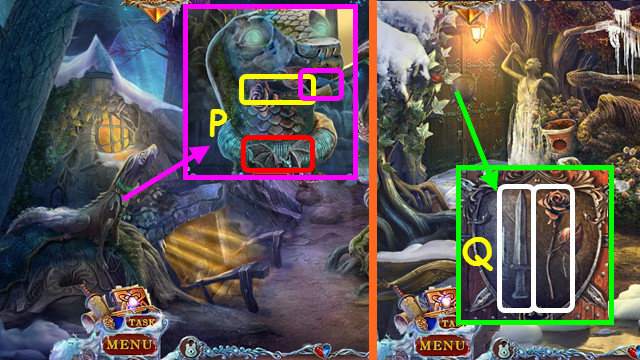
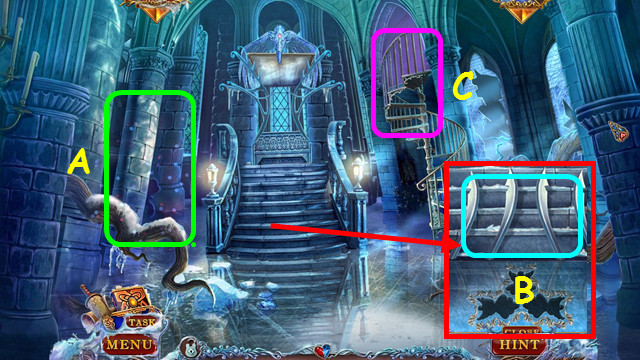
- Talk to the Dwarf (C).
- Take the 1/7 PUZZLE PIECE and STONE (D).
- Take the WHEEL (E).
- Read the sign; take the BROOCH (F).
- Walk left.
- Take the 2/7 PUZZLE PIECE and STICK (G).
- Take the WOODEN PLANK and 3/7 PUZZLE PIECE (H).
- Take the BROKEN BUCKET (I).
- Take the 3/3 HEART (J).
- Combine the BROKEN TIARA, the 3 HEARTS, and BROOCH to make the TIARA FLOWER (inventory).
- Use the STONE; take the FIGURE'S ARM (K).
- Walk down 2x.
- Use the STICK and take the TIARA (L).
- Combine the TIARA and the TIARA FLOWER (inventory).
- Take the 4/7 PUZZLE PIECE and BROKEN FIGURINE (M).
- Place the WOODEN PLANK (N).
- Take the 5/7 PUZZLE PIECE, FIGURE'S LEG and 1/3 WOODEN TOKEN (O).
- Combine the BROKEN FIGURINE, FIGURE'S LEG, and FIGURE'S ARM to make the THEATER FIGURINE (inventory).
- Use the STICK to take the OPEN LANTERN (P).
- Take the 6/7 PUZZLE PIECE (Q).
- Walk forward.
- Place the THEATER FIGURINE and adjust the head and limbs to match the right figure (R).
- Play the HOP (S).
- Take the 7/7 PUZZLE PIECE (T).
- Select the ICY BOOK (U).
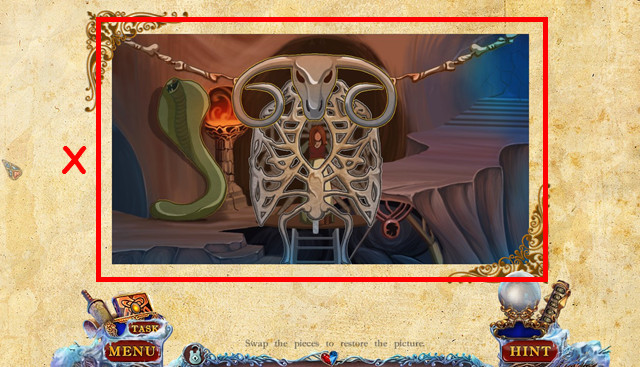
- Restore the picture (V).
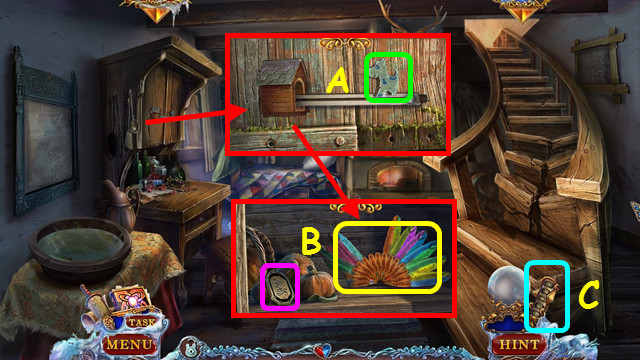
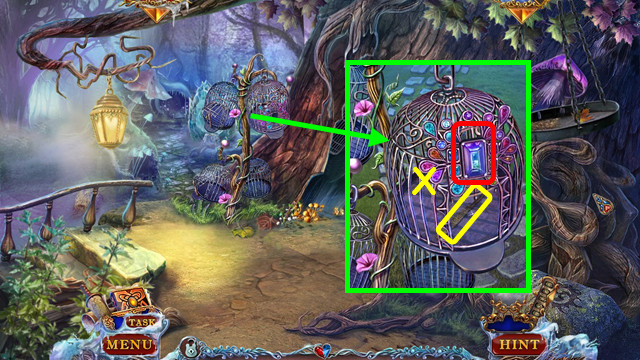
- Take the CAGE KEY and MASK (W).

- Place the MASK (A).
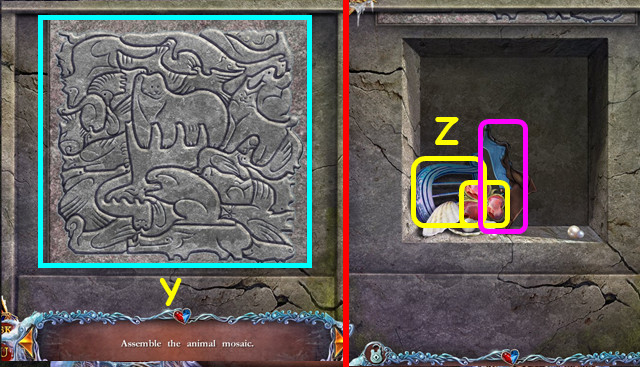
- Play the HOP to earn a rune (B).
- Select the HISTORY SCROLL (C); and then the glowing rune.
- Play the HOP and charge the crystal ball.
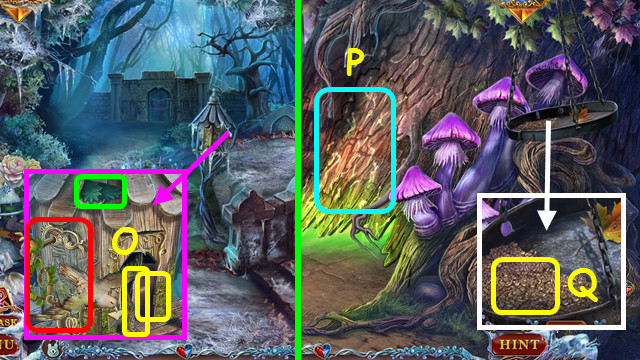
- Use the CAGE KEY; take the LANTERN LID (E).
- Combine the OPEN LANTERN and LANTERN LID to make the EMPTY LANTERN (inventory).
- Take the BIRD FIGURINE and place the WHEEL (F).
- Select the cave (G).
- Place the EMPTY LANTERN (H).
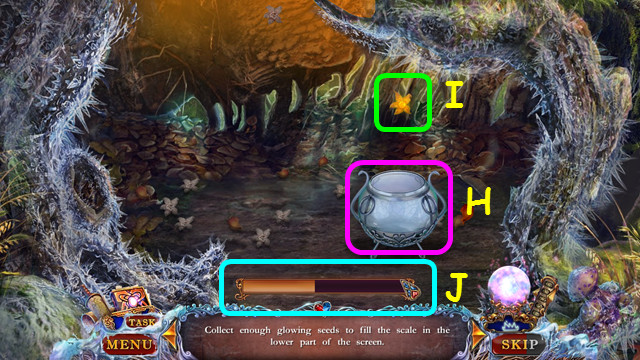
- Slide the lantern to catch the lighted seeds (I) until the bar (J) is full.
- You earn the LANTERN.
- Walk left.

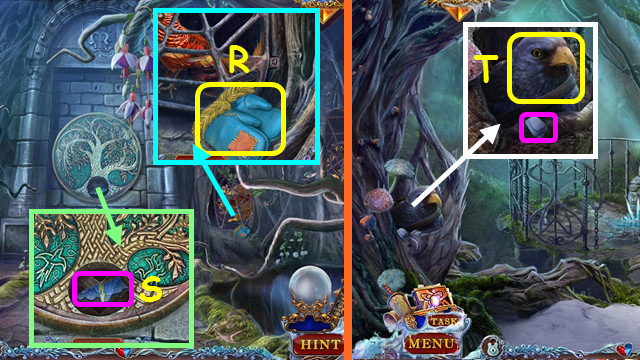
- Place the LANTERN; take the LENS (K).
- Use the CRYSTAL BALL (L).
- Take the LANTERN KEY (M).
- Walk down 2x.

- Move the leaf; place the BIRD FIGURINE (N).
- Take the BRUSH (O).
- Return to the Well.
- Use the BRUSH; take the 2/3 WOODEN TOKEN (P).
- Walk down and forward.
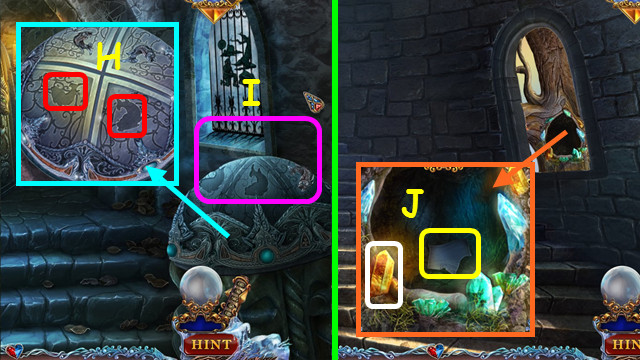
- Place the LANTERN KEY; open the door and take the YELLOW STONE (Q).
- Walk right.
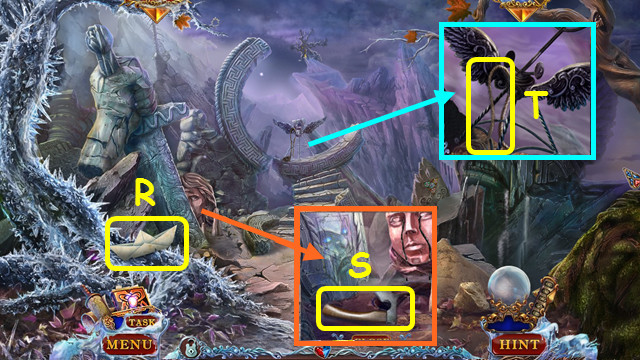
- Take the PAPER BOAT (R).
- Unfold the PAPER BOAT, turn the paper over, and take the EYE (inventory).
- Move the stones; take the AXE (S).
- Take the ROPE (T).
- Combine the BROKEN BUCKET and ROPE to make the EMPTY BUCKET (inventory).
- Go to the Well.
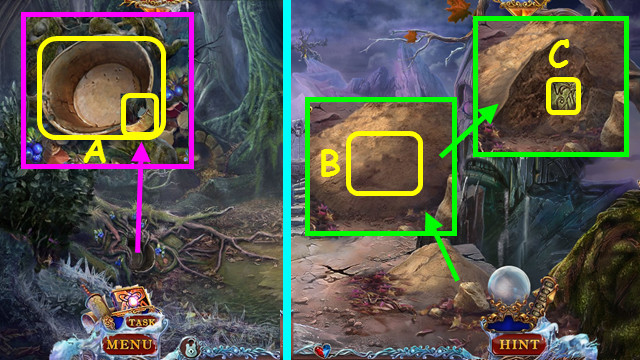
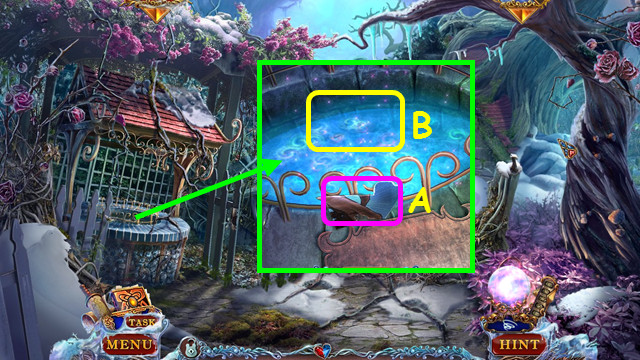
- Use the AXE; take the BOWL and MOON (A).
- Return to the Warrior.
- Use the BOWL to take the BOWL OF SAND (B).
- Take the 1/2 COLORED TILE (C).
- Walk down.
- Use the BOWL OF SAND (D).
- Walk left.
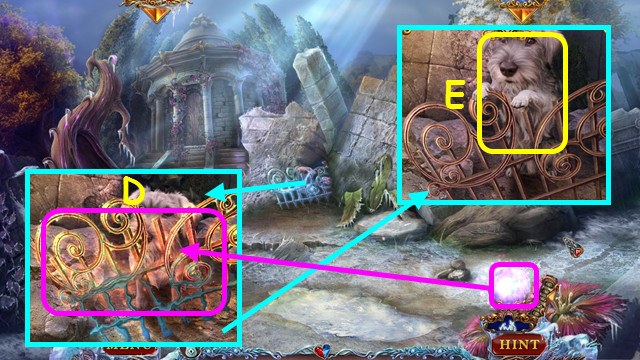
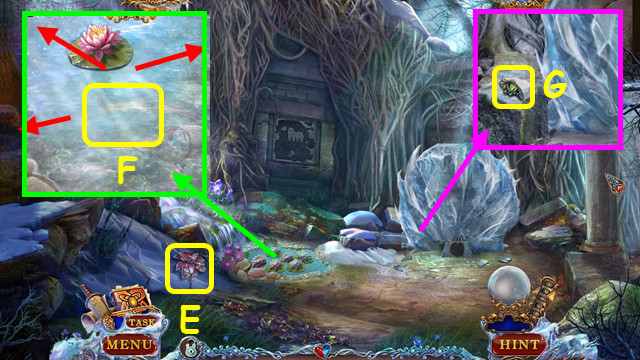
- Place the EYE (E).
- Select the flowers (F).
- Select the pairs of flowers (color-coded).
- Take the 2/2 COLORED TILE and HORN (G).
- Read the note and place the MOON (H).
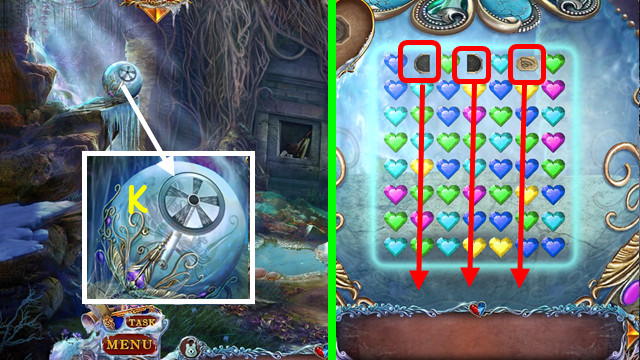
- Set the clock as shown (I).
- Take the KEY (J) and use it on the lock (K).
- Play the HOP to earn the ICE RAVEN (L).
- Place the ICE RAVEN (M).
- Take the RED STONE (N).
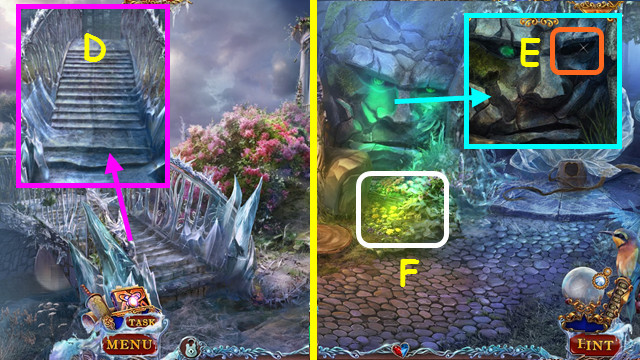
- Walk down and select the steps (O).
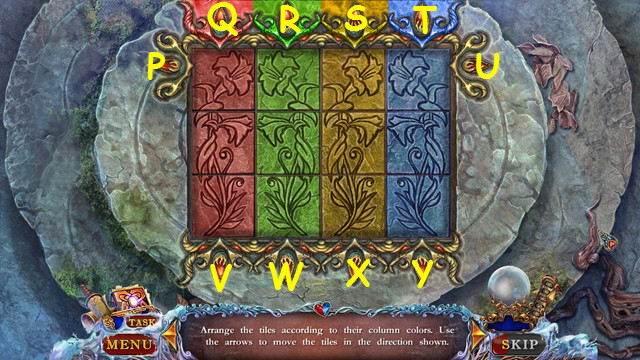
- Place the 2 COLORED TILES in the grid.
- Press P-Q-U-V-U-U-R-P-Q-R-R-S-T-P-P-W-P-P-P-Q-P-V-P-P.
- Take the BLUE STONE (A).
- Walk down 2x.
- Use the HORN (B).
- Play the HOP to earn the 3/3 WOODEN TOKEN (C).
- Return to the Well and select the well cover.
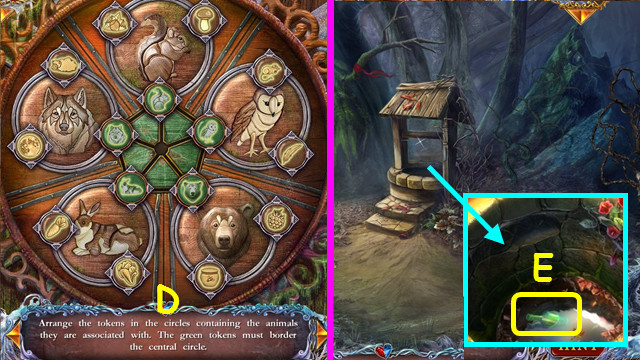
- Place the 3 WOODEN TOKENS on the board.
- Arrange the token s as shown (D).
- Use the EMPTY BUCKET to take the BOTTLE WITH SCROLL (E).
- Shake the scroll out of the BOTTLE WITH SCROLL (inventory).
- Go to the Warrior.
- Place the RED STONE, YELLOW STONE, and BLUE STONE (F).
- Swap the triangles as shown (G).
- Play the HOP to earn the BROKEN SPYGLASS (H).
- Combine the BROKEN SPYGLASS and LENS to make the SPYGLASS (inventory).
- Place and select the SPYGLASS (I).
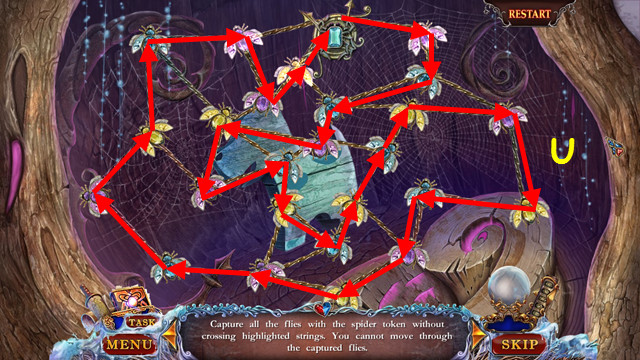
- Play the HOP.
Chapter 3: The Lumberjack
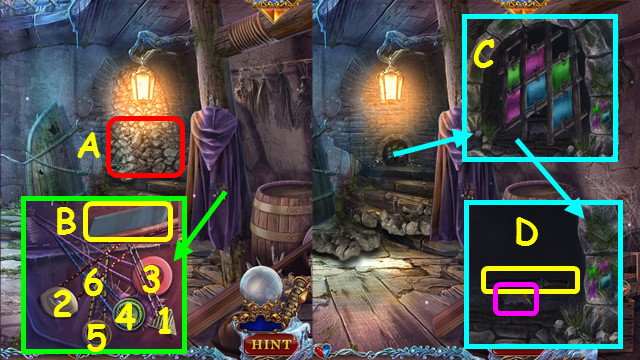
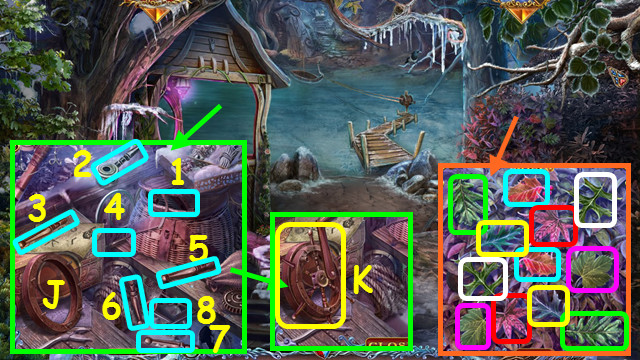
- Touch the rocks (A).
- Select the buttons 1-6; take the STAINED GLASS SHARD (B).
- Place the STAINED GLASS SHARD; change the pieces as shown (C).
- Take the 1/9 PUZZLE PIECE and KNIFE (D).
- Use the KNIFE to take the ROPE (E).
- Play the HOP to earn the HOOK (F).
- Combine the ROPE, KNIFE, and HOOK to make the ROPE LADDER (inventory).
- Place the ROPE LADDER (G).
- Use the KNIFE, remove the ties, and go up the ladder (H).
- Take the 1/3 FEATHER (I).
- Take the ROPE LADDER; replace the cover (J).
- Take the 2/9 PUZZLE PIECE (K).
- Place the ROPE LADDER (L).
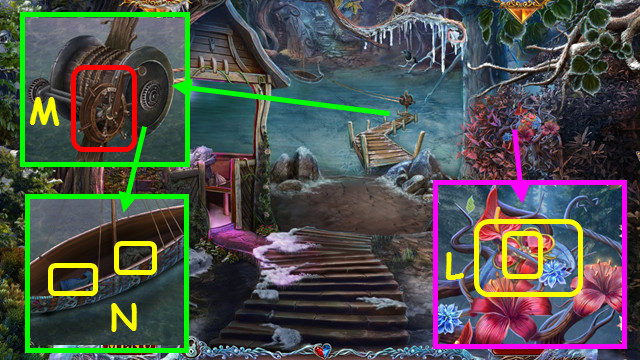
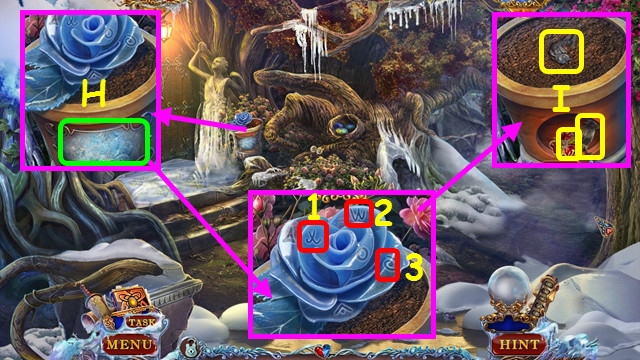
- Take the pieces from the basket (M); place to aim the light (1-3).
- Take the TOY ARM (N) and 3/9 PUZZLE PIECE (O).
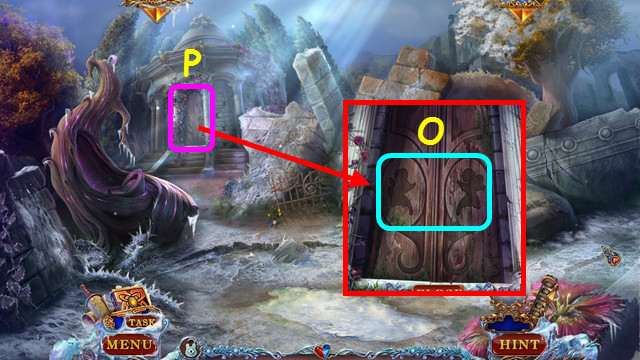
- Place the TOY ARM; read the poster, open the latch, and go inside (P).
- Take the 4/9 PUZZLE PIECE and BIRDHOUSE KEY (Q).
- Take the HANDSAW BLADE and 5/9 PUZZLE PIECE (R).
- Pull the ring (S).
- Take the SCREWDRIVER (T).
- Walk down.
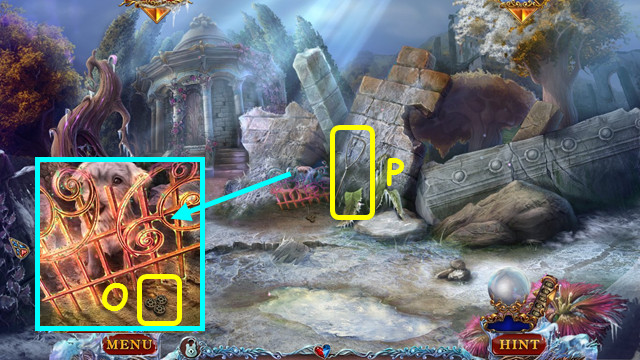
- Use the BIRDHOUSE KEY; take the GATE FRAGMENT (U).
- Take the 6/9 PUZZLE PIECE; place the GATE FRAGMENT (V).
- Make the 4 matches (1-4) and press the button (A).
- Arrange the pipes as shown (B).
- Press the flowers (6-10).
- Restore the picture (C).
- Press the tokens (D-G).
- Walk left.
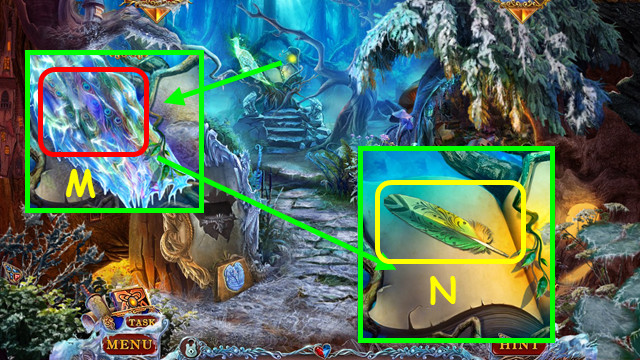
- Take the 2/3 FEATHER (H).
- Take the 7/9 PUZZLE PIECE; open the laces and take the MAGNET (I).
- Take the HANDSAW HANDLE (@).
- Walk down and forward.
- Use the MAGNET to take the NOSE RING (J).
- Place the NOSE RING (K).
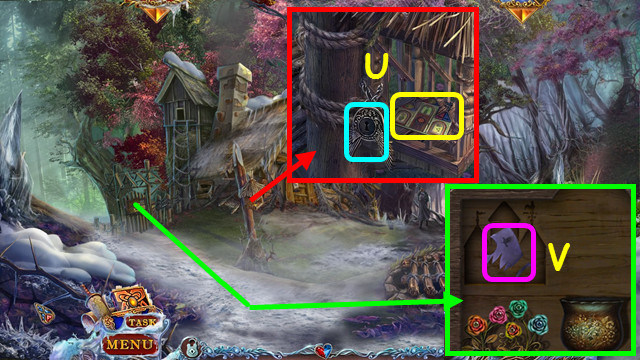
- Take the RAG and RUNE (L).
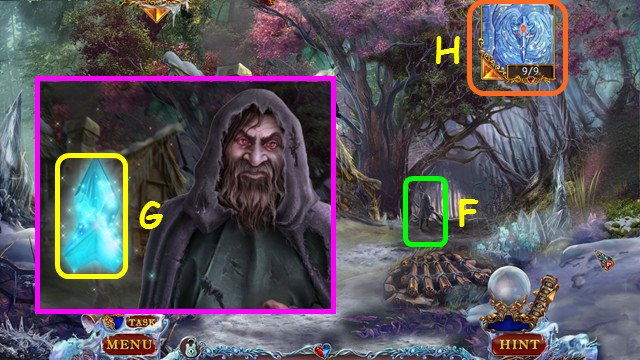
- Select the HISTORY SCROLL (M), then the glowing rune for a HOP.
- Charge the crystal ball.
- Walk down and left.
- Use the CRYSTAL BALL (N).
- Walk forward.
- Take the BOLTS (O).
- Combine the HANDSAW BLADE, HANDSAW HANDLE, BOLTS, and SCREWDRIVER to make the HANDSAW (inventory).
- Take the LANDING NET POLE (P).
- Walk down 2x; go forward.
- Use the HANDSAW (Q).
- Play the HOP to earn the NET (R).
- Combine the LANDING NET POLE and NET to make the LANDING NET (inventory).
- Walk down and left.
- Place the RAG; use the LANDING NET to take the SPIDER FIGURINE (S).
- Walk forward.
- Take the 8/9 PUZZLE PIECE; place the SPIDER FIGURINE (T).
- Move the spider along the marked path (U).
- Take the DOG FIGURINE.
- Walk down 2x; go forward.
- Place the DOG FIGURINE (A).
- Take the RUNE and the BROKEN FAN (B).
- Select the HISTORY SCROLL (C) and then the glowing rune.
- Play the HOP and charge the crystal ball.
- Walk down, left, and forward.
- Use the CRYSTAL BALL (D).
- Take the LUMBERJACK'S PET (E).
- Walk down 2x.
- Give the LUMBERJACK'S PET (F).
- Take the 9/9 PUZZLE PIECE (G).
- Select the Icy Book (H).
- Restore the picture (@).
- Take the 1/2 ANGEL (I).
- Walk on the right path.
- Place the pieces on the rim (J) in order (1-8).
- Take the WHEEL LEVER (K).
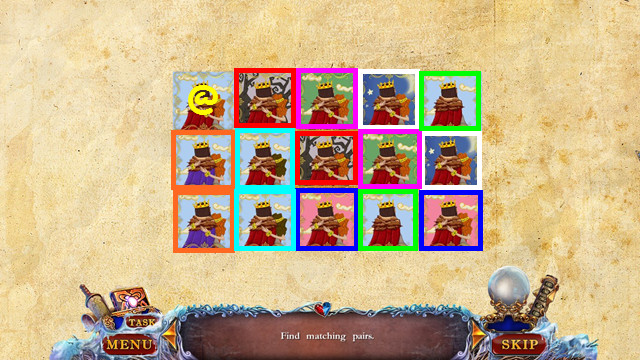
- Select matching pairs (color-coded).
- Take the TIARA FLOWER and RAVEN'S LEFT WING (L).
- Combine the TIARA and the TIARA FLOWER (inventory).
- Place the WHEEL LEVER and turn it (M).
- Take the RAVEN'S RIGHT WING and the 2/2 ANGEL (N).
- Walk down, left and forward.
- Place the 2 ANGELS (O).
- Walk forward.
- Play the HOP to earn the SAIL (P).
- Walk down 2x; go right.
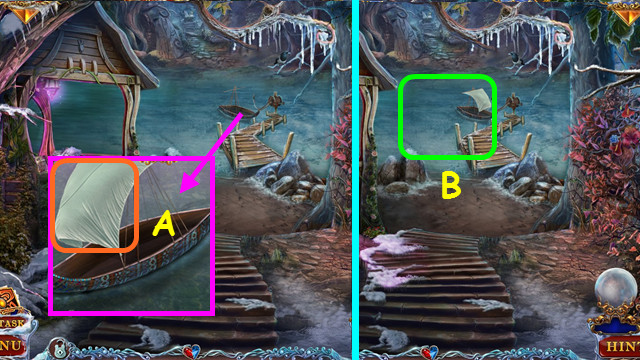
- Place the SAIL (A).
- Select the water (B).
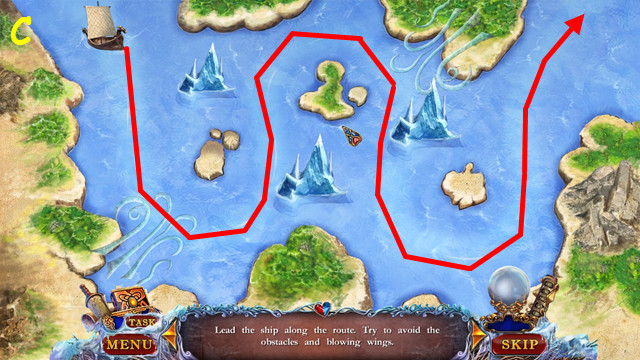
- Drag the boat along the path, avoiding the icebergs (C).
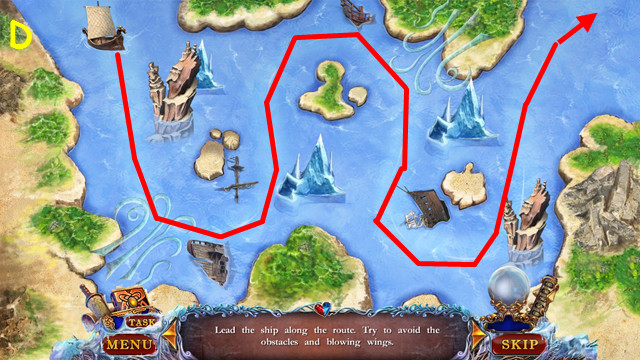
- Drag the boat along the path, avoiding the icebergs and wrecks (D).
- Go forward.
- Take the 1/2 BOX PART (E).
- Take the 2/2 BOX PART (F).
- Walk down.
- Place the 2 BOX PARTS; take the OWL WING (G).
- Walk forward.
- Place the OWL WING (H).
- Play the HOP to earn the BROKEN ICE RAVEN (I).
- Combine the BROKEN ICE RAVEN, RAVEN'S LEFT WING, and RAVEN'S RIGHT WING to make the ICE RAVEN (inventory).
- Place the ICE RAVEN (J).
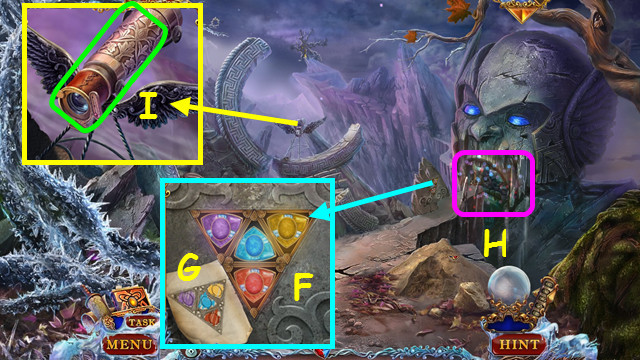
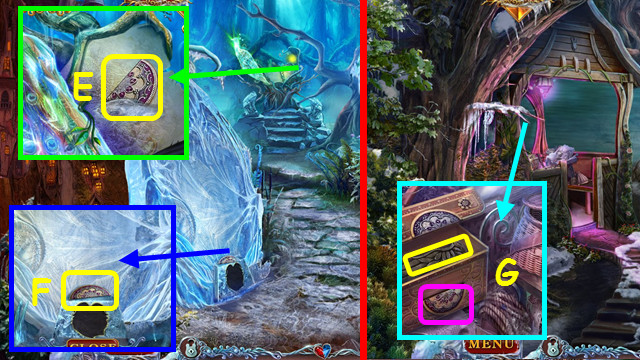
- Take the RUNE (K).
- Select the HISTORY SCROLL, and then the glowing rune; play the HOP and charge the crystal ball.
- Use the CRYSTAL BALL (M).
- Take the clue and 3/3 FEATHER (N).

- Combine the BROKEN FAN and the 3 FEATHERS (inventory).
- Arrange the feathers as shown (O).
- Walk down 2x; go forward.
- Use the FAN (P).
- Return to the Book.
- Select the book (Q).
- Select the pairs of runes (color-coded).
- Walk forward.
Chapter 4: The Nymph
- Take the MAIDEN FIGURINE (A).
- Take the 1/9 PUZZLE PIECE (B).
- Walk forward.
- Talk to the Nymph (C).
- Take the 2/9 PUZZLE PIECE (D).
- Select the stump (E).
- Select the drops (1-7).
- Take the WALL FRAGMENT (F).
- Walk right.
- Move the leaves; take the TIARA FLOWER and QUEEN TOKEN (G).
- Combine the TIARA and the TIARA FLOWER (inventory).
- Place the WALL FRAGMENT; take the 3/9 PUZZLE PIECE and FILE (H).
- Note the token mini-game (I).
- Use the FILE; take the LEVER STEM and TREE FIGURINE (J).
- Take the MAGNIFIER; place the TREE FIGURINE and MAIDEN FIGURINE (K).
- Walk right .
- Move the curtain (L).
- Read the note and move the pillow; take the 4/9 PUZZLE PIECE and LEVER FIGURINE (M).
- Take the 5/9 PUZZLE PIECE and LEVER HANDLE (N).
- Combine the LEVER STEM, LEVER HANDLE, and LEVER FIGURINE to make the BIRDHOUSE LEVER (inventory).
- Walk down.
- Use the BIRDHOUSE LEVER; take the RUNE, EMPTY POUCH, and 6/9 PUZZLE PIECE (O).
- Select the HISTORY SCROLL, and then the glowing rune; play the HOP and charge the crystal ball.
- Walk down twice.
- Use the CRYSTAL BALL (P).
- Use the EMPTY POUCH to take the SEED POUCH (Q).
- Walk right.
- Take the MITTENS (R).
- Take the 7/9 PUZZLE PIECE (S).
- Walk down, forward, right 2x, and forward.
- Take the 8/9 PUZZLE PIECE and use the SEED POUCH (T).
- You earn the TREE SYMBOL BASE.
- Use the MITTENS 3x (@).
- Play the HOP for the WOODEN LEAF (U).
- Combine the TREE SYMBOL BASE and WOODEN LEAF to make the TREE SYMBOL (inventory).
- Walk down 4x; go right.
- Place the TREE SYMBOL (A).
- Play the HOP (B).
- Take the 9/9 PUZZLE PIECE (C).
- Walk down and right.
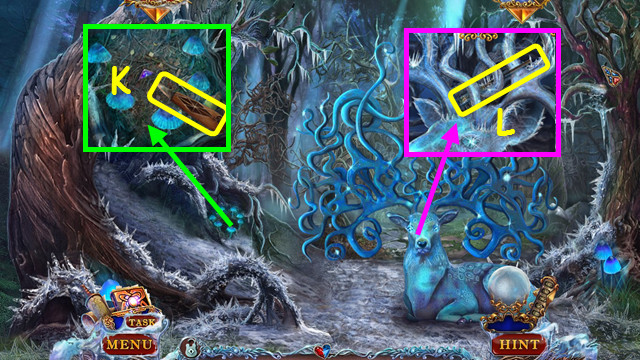
- Take the 1/3 WOODEN FLOWER (D).
- Walk down and left.
- Select the ICY BOOK.
- Restore the picture (@).
- Take the FROG'S CROWN (E).
- Play the HOP to earn the LERIONE TOKEN (F).
- Walk right.
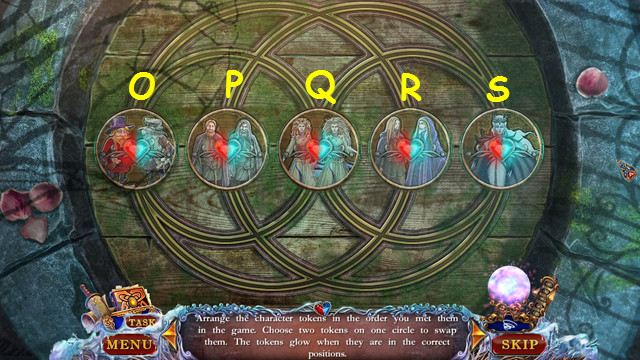
- Place the QUEEN TOKEN and the LERIONE TOKEN (G).
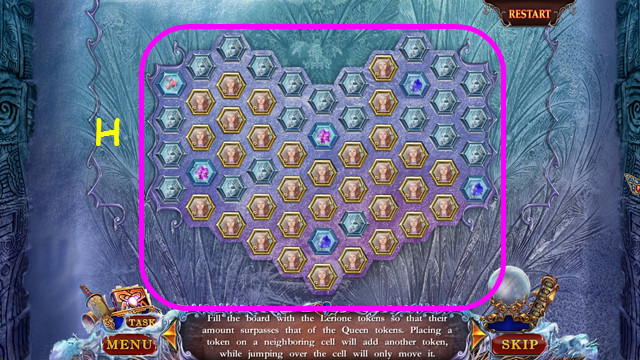
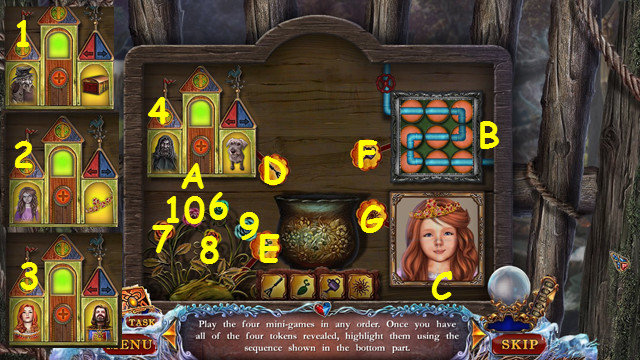
- This mini-game has random movements.
- Our solution (H).
- Walk forward.

- Take the 2/3 WOODEN FLOWER (I).
- Take the SCREW (J).
- Walk forward.
- Take the POCKET KNIFE (K).
- Take the CLAMP'S LEFT HALF (L).
- Walk down 3x.
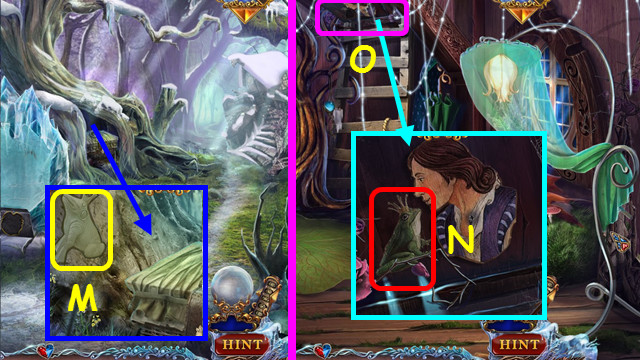
- Use the POCKET KNIFE to take the FROG (M).
- Combine the FROG and FROG'S CROWN to make the FROG PRINCESS (inventory).
- Walk right 2x.
- Place the FROG PRINCESS (N).
- Play the HOP to earn the PINK GLASS PANEL (O).
- Walk down and forward.
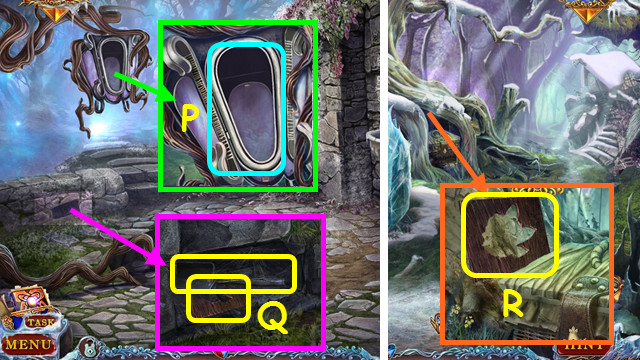
- Place the PINK GLASS PANEL (P).
- Take the SCOOP and FLOWER STENCIL (Q).
- Walk down 2x.
- Use the FLOWER STENCIL and POCKET KNIFE to take the 3/3 WOODEN FLOWER (R).
- Walk right 2x.
- Place the 3 WOODEN FLOWERS; take the BASKET KEY (S).
- Walk down 2x.
- Use the BASKET KEY (T).
- Play the HOP to earn the RUNE (U).
- Select the scroll and rune; play the HOP and charge the crystal ball.
- Walk right and forward.
- Use the CRYSTAL BALL (V).
- Walk forward.
- Use the SCOOP to take the LUMINOUS GEM (W).
- Walk down 4x.
- Place the LUMINOUS GEM; take the CLAMP'S RIGHT HALF (X).
- Combine the CLAMP'S LEFT HALF, CLAMP'S RIGHT HALF, and SCREW to make the CLAMP (inventory).
- Walk forward, right, and forward.
- Use the CLAMP (A).
- Play the HOP to earn the ICE RAVEN (B).
- Walk down 2x.
- Place the ICE RAVEN; take the RUNE (C).
- Select the HISTORY SCROLL, and then the glowing rune; play the HOP and charge the crystal ball.
- Walk right and go forward 2x.
- Use the CRYSTAL BALL (D).
- Walk forward.
- Use the MAGNIFIER; find pairs of keys (color-coded).
- Walk forward.
Chapter 5: The King
- Take the SWORD (A).
- Take the 1/3 METAL FEATHER (B).
- Walk forward.
- Take the 1/11 PUZZLE PIECE; press the button to pan down (C).
- Take the 1/2 SLINGSHOT STONE (D).
- Play the HOP to earn the 1/3 WELL TOKEN (E).
- Walk forward.

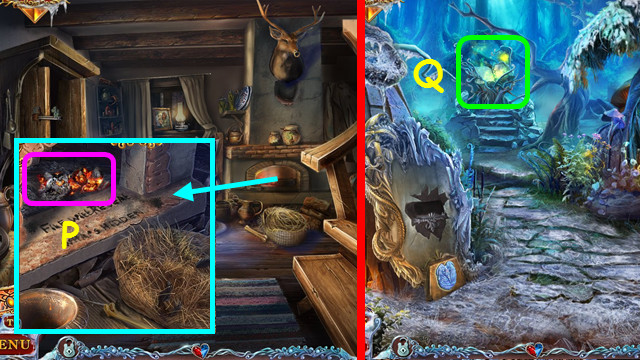
- Take the PAINT SCRAPER (F).
- Take the 2/11 PUZZLE PIECES (G).
- Walk right.
- Take the SLINGSHOT and BAMBOO PIPE (H).
- Take the MUG (I).
- Try to open the lamp (J).
- Walk down 2x.
- Place the BAMBOO PIPE (K).
- Connect the leaves as shown (L).
- Take the 2/2 SLINGSHOT STONE.
- Combine the SLINGSHOT and 2 SLINGSHOT STONES to make the SLINGSHOT WITH STONES (inventory).
- Walk down.
- Use the SLINGSHOT WITH STONES; click when the target is green (M).
- Take the FLOWER MEDALLION and 3/11 PUZZLE PIECES (N).
- Place the FLOWER MEDALLION (O).
- Play the HOP for a RUNE (P).
- Select the HISTORY SCROLL, and then the glowing rune; play the HOP and charge the crystal ball.
- Walk forward.
- Use the CRYSTAL BALL (R).
- Walk forward and right.
- Play the HOP to earn the RUNE (S).
- Select the HISTORY SCROLL, and then the glowing rune.
- Restore the picture (T).
- Charge the crystal ball.
- Use the CRYSTAL BALL (A).
- Walk forward.
- Take the DIRTY GLASS PIECE (B).
- Combine the DIRTY GLASS PIECE and the PAINT SCRAPER to make the COLORED GLASS PIECE (inventory).
- Walk down and select the mini-game (C).
- Place the COLORED GLASS PIECE in the frame.
- Place the tiles as shown (D).
- Walk left.
- Take the LILY EMBLEM (E).
- Move the flowers; use the MUG to take the MUG OF HOT WATER (F).
- Take the DRAGON EYE (G).
- Walk down 2x.
- Use the MUG OF HOT WATER (H).
- Press the symbols (1-3).
- Take the 1/2 FISH, TIARA FLOWER, and BRASS BIRD (I).
- Combine the TIARA and TIARA FLOWER (inventory).
- Walk right and forward.

- Place the BRASS BIRD (J).
- Play the HOP to earn the ROSE SEED (K).
- Take the BAT (L).
- Place the LILY EMBLEM; walk left (M).
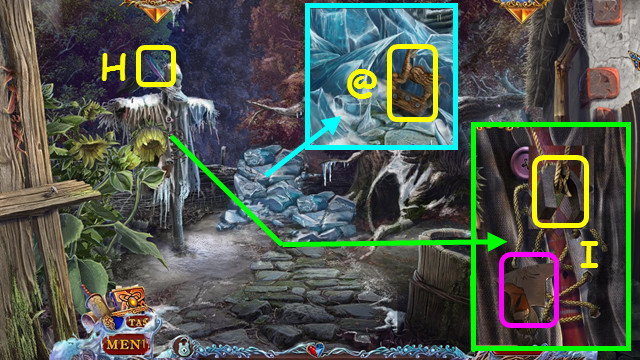
- Take the ICE RAVEN, 4/11 PUZZLE PIECE, and EMPTY GOBLET (N).
- Take the SCISSORS (O).
- Walk down 2x.
- Place the BAT; take the METAL ROSE and 5/11 PUZZLE PIECE (P).
- Walk down.
- Place the SWORD and METAL ROSE (Q).
- Walk left.
- Take the SHEEPSKIN BLANKET (R).
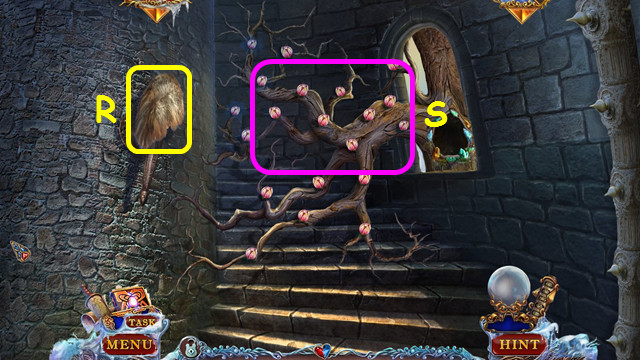
- Select the branch (S).
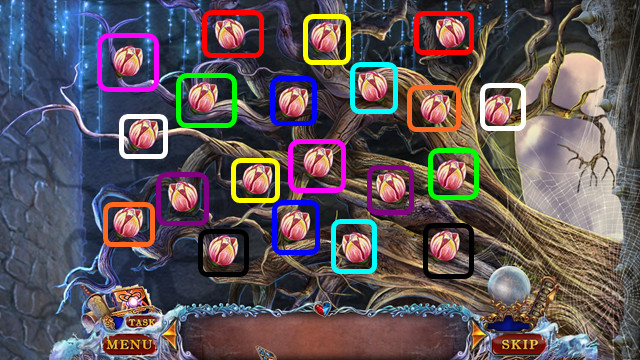
- Select pairs of symbols (color-coded).
- Walk down.

- Place the SHEEPSKIN BLANKET (T).
- Take the 2/3 WELL TOKEN (U).
- Walk right and left.
- Place the ICE RAVEN; take the RUNE and MOSAIC PIECE (V).
- Note the wall (W).
- Select the HISTORY SCROLL, and then the glowing rune.
- Restore the picture (X).
- Charge the crystal ball.
- Select the wall.
- Place the MOSAIC PIECE on the side.
- Restore the mosaic (Y).
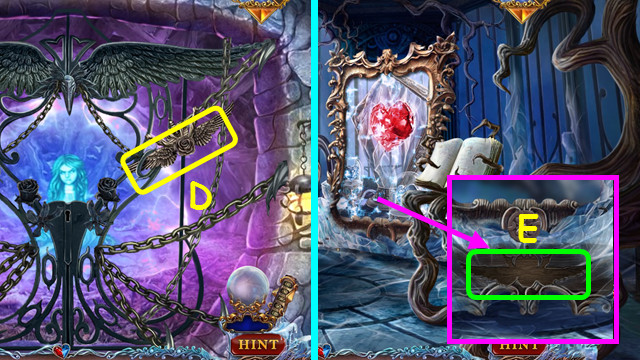
- Take the TIARA FLOWER, HARP, and 6/11 PUZZLE PIECE (Z).
- Combine the TIARA and TIARA FLOWER (inventory).
- Walk down 2x; go left, and forward.
- Use the CRYSTAL BALL (A).
- Place the DRAGON EYE (B).
- Walk forward.
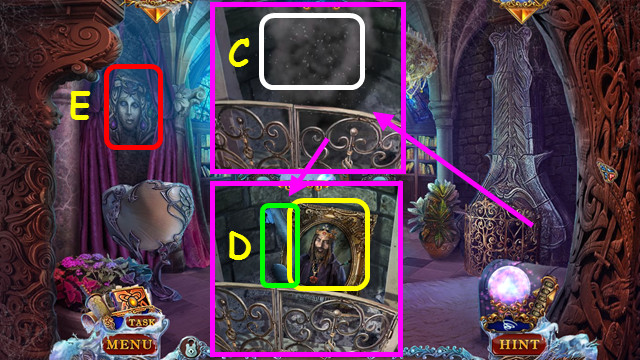
- Read the note; take the LADY'S PORTRAIT and SPHERE TOP (C).
- Take the SILK CLOTH (D).
- Use the SCISSORS (E).
- Take the 2/2 FISH (F).
- Play the HOP to earn the TONGS (G).
- Walk down.
- Place the 2 FISH (H).
- Play the HOP to earn the HAIR PIN (I).
- Walk down.
- Use the SILK CLOTH; take the 7/11 PUZZLE PIECE (J).
- Walk down, go right, and left.
- Place the SPHERE TOP (K).
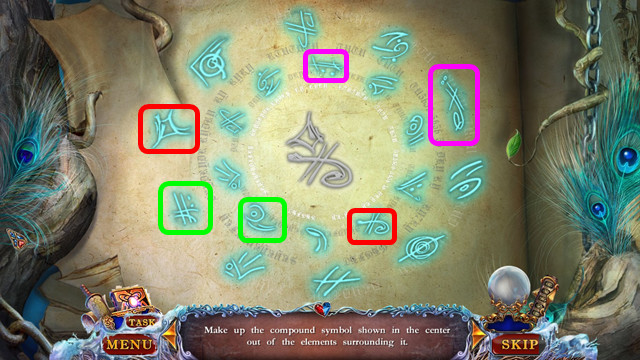
- Play the match three game to move the 3 rune pieces to the bottom (red).
- Select the HISTORY SCROLL, and then the glowing rune.
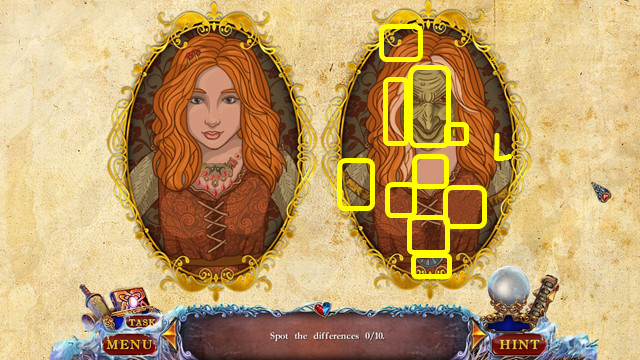
- Select the differences (L).
- Charge the crystal ball.
- Use the TONGS to take the 3/3 WELL TOKEN (M).
- Walk down and forward.
- Select the well (N).
- Place the 3 WELL TOKENS on the rings.
- Swap P-S, Q-S, O-Q, O-R, O-Q, Q-S, O-Q, Q-S, P-S, O-R, Q-S.
- Take the 8/11 PUZZLE PIECE (A).
- Use the EMPTY GOBLET to take the MAGIC WATER (B).
- Walk down 2x, go left, forward 2x.
- Use the CRYSTAL BALL (C).
- Take the 9/11 PUZZLE PIECE and KING'S PORTRAIT (D).
- Tear the KING'S PORTRAIT and take the MAN'S FIGURINE (inventory).
- Select the stone face (E).
- Place the HAIR PIN on the face.
- Select O-J-I-J-N-L-M-J-F-G-H-G-G-L-K-L.
- Take the TIARA FLOWER and the FLUTE (A).
- Combine the TIARA and TIARA FLOWER (inventory).
- Walk down.
- Take the 10/11 PUZZLE PIECE and place the MAN'S FIGURINE (B).
- Take the 2/3 METAL FEATHER (C).
- Walk down 2x, go right, forward, and left.
- Place the HARP (D); place the FLUTE (E).
- Play the HOP to earn the SIGNET RING (F).
- Note the gazebo (@).
- Walk down 3x, go left, and forward 2x.
- Place the SIGNET RING (G).
- Take the CRYSTAL OF LIGHT (H).
- Walk down 3x, go right, forward, and left.
- Select the gazebo.
- Place the ROSE SEED (I), MAGIC WATER (J), and CRYSTAL OF LIGHT (K).
- Read the instructions (L).
- Place the rose seed in the hole and move the dirt over it (M).
- Use the goblet with magic water and the bell jar (N) on the dirt.
- Place the crystal of light in the holder (O).
- Remove the bell jar and take the ROSE OF LOVE (P).
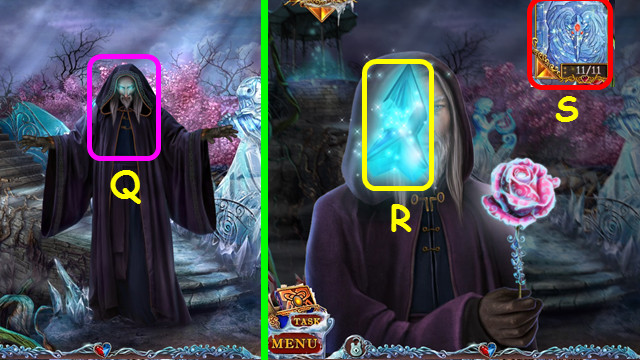
- Use the ROSE OF LOVE (Q).
- Take the 11/11 PUZZLE PIECE (R).
- Select the ICY BOOK (S).
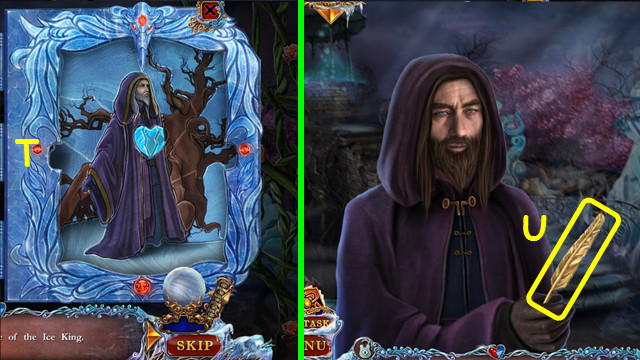
- Restore the picture (T).
- Take the 3/3 METAL FEATHER (U).
- Walk down 5x.
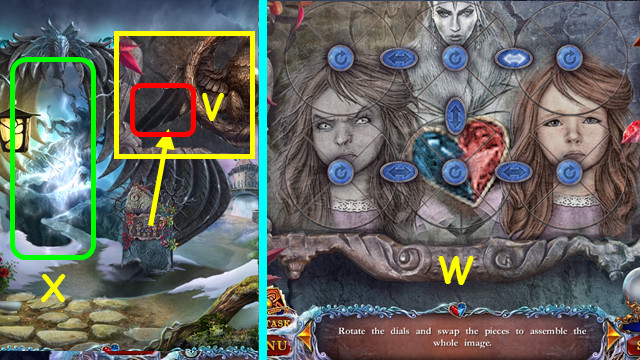
- Place the 3 METAL FEATHERS (V).
- Restore the picture (W).
- Enter the opening (X).
Chapter 6: Lerione
- Take the ROYAL EMBLEM (A).
- Use the ROYAL EMBLEM; take LERIONE'S FIGURINE (B).
- Place LERIONE'S FIGURINE (C); walk forward.
- Touch the chest (D).
- Walk left (E).
- Take the 1/3 ROYAL MOLDING (F).
- Take the RUNE (G).
- Select the HISTORY SCROLL, and then the glowing rune.
- Match the pairs (color-coded).
- Turn over the final card (@).
- Charge the crystal ball.
- Walk down.
- Use the CRYSTAL BALL (H).
- Open the lid; play the HOP to earn the ICE RAVEN (I).
- Walk down.
- Place the ICE RAVEN (J).
- Take the PHOENIX FEATHER (K).
- Return to the Hall with Hearts.
- Take the note, turn the page, and use the PHOENIX FEATHER (L).
- Take the MUZZLE KEY (M).
- Walk down.
- Use the MUZZLE KEY and remove the muzzle (N).
- Take the HEART'S HALF (O).
- Place the HEART'S HALF; take the ICE QUEEN'S STAFF (P).
- Walk down.
- Place the ICE QUEEN'S STAFF; take the TIARA FLOWER and HOURGLASS (Q).
- Combine the TIARA and TIARA FLOWER to make the TIARA (inventory).
- Walk forward.
- Place the HOURGLASS (R).
- Walk forward.
- Play the HOP to earn the 2/3 ROYAL MOLDING (A).
- Touch the stairs (B).
- Go up the spiral staircase (C).
- Take the ICE QUEEN EMBLEM (D).
- Walk down 2x and go left.
- Place the ICE QUEEN EMBLEM (E).
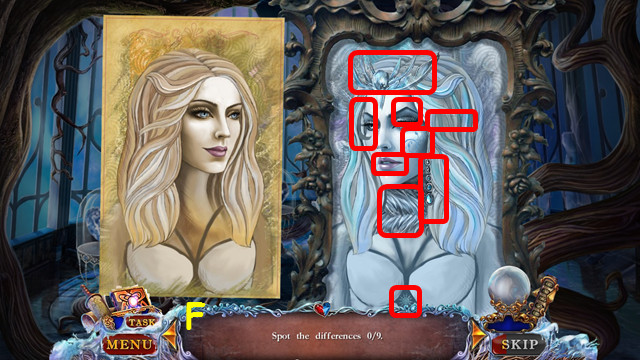
- Place the LADY'S PORTRAIT on the left (F).
- Find the differences (red).
- Take the 3/3 ROYAL MOLDING (G).
- Walk down and forward.
- Place the 3 ROYAL MOLDING (H).
- Take the LERIONE'S CELL KEY (I).
- Go up the spiral staircase.
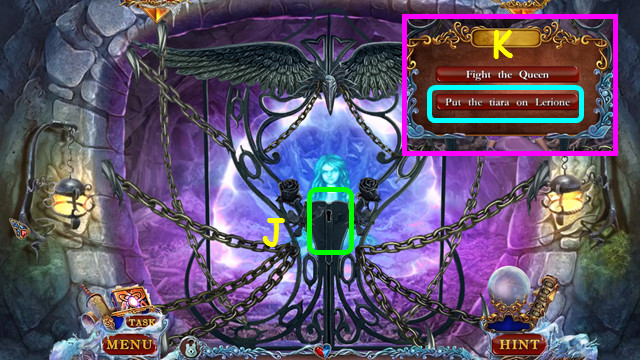
- Use the LERIONE'S CELL KEY (J).
- Select 'Put tiara on Lerione' (K).
- The other option is covered later.
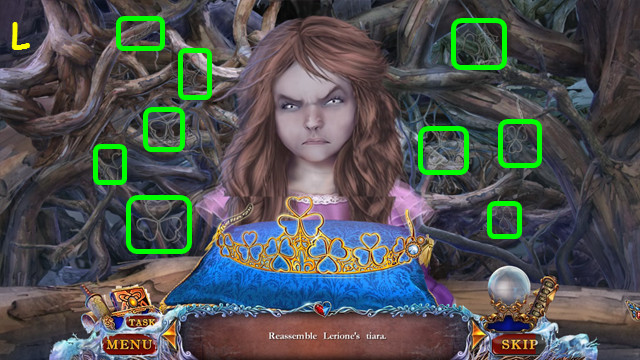
- Restore the tiara, part I (L).
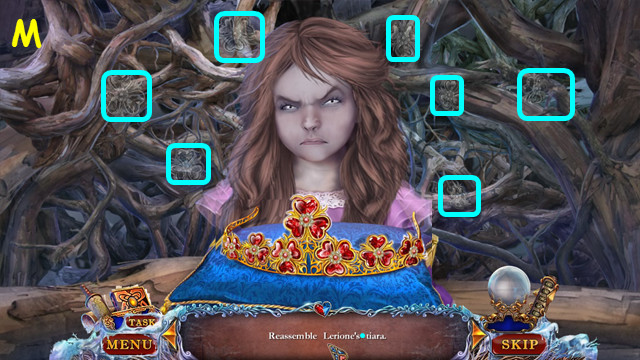
- Restore the tiara, part II (M).
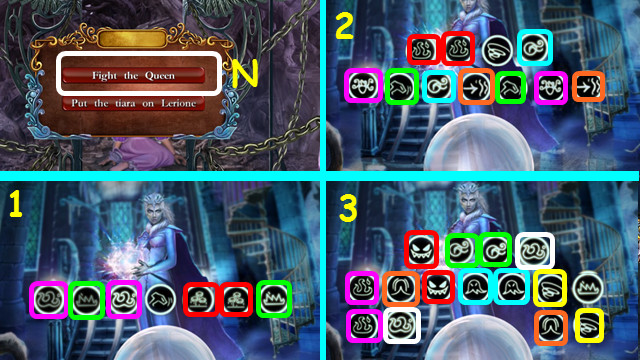
- If you select 'Fight the Queen' (N).
- Match the symbols sets (1-3).
- Congratulations! You have completed Love Chronicles: A Winter's Spell!
Created at: 2015-02-06