

Walkthrough Menu
- General Tips
- Chapter 1: The Banks of Foggy Lake
- Chapter 2 The House Interior
- Chapter 3 The Workshop
- Chapter 4: The Cave
- Chapter 5: The History Gallery
General Tips
- This is the official guide for Love Chronicles: Beyond the Shadows.
- This guide will not mention each time you have to zoom into a location; the screenshots will show each zoom scene.
- Hidden-object puzzles are referred to as HOPs. This guide will not show HOP solutions. It will identify the location of the HOP and the inventory item acquired.
- This guide will show solutions for non-random puzzles. Please read the in-game instructions for each puzzle.
- In this game, you will sometimes have to select the new scene to trigger dialog, cut-scenes, or tasks prior to interacting with the scene.
Chapter 1: The Banks of Foggy Lake
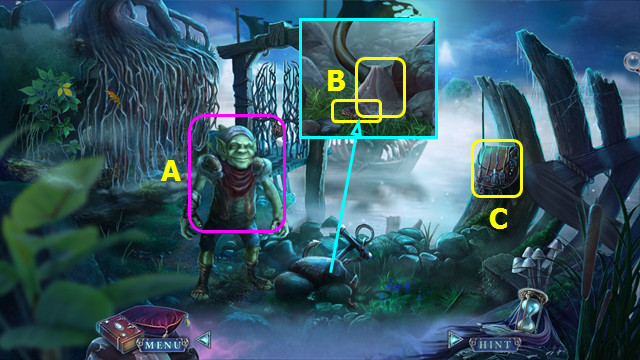
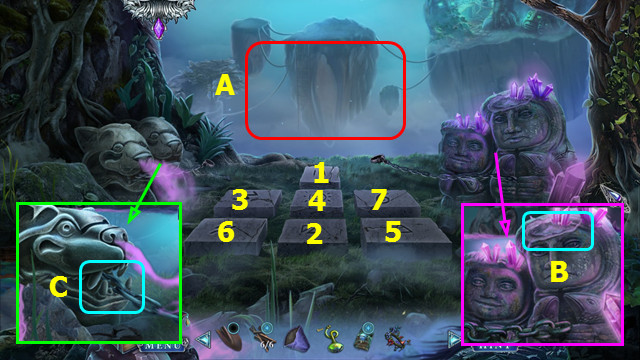
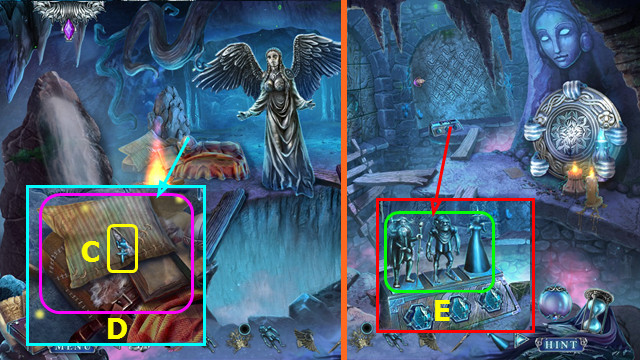
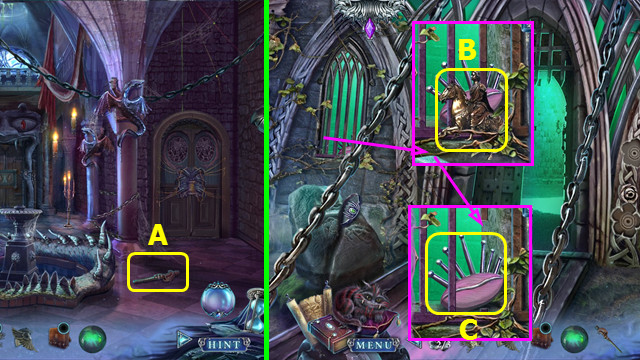
- Talk to the Little Troll (A).
- Move the 3 rocks; take the HANDKERCHIEF and RUBY KEY (B).
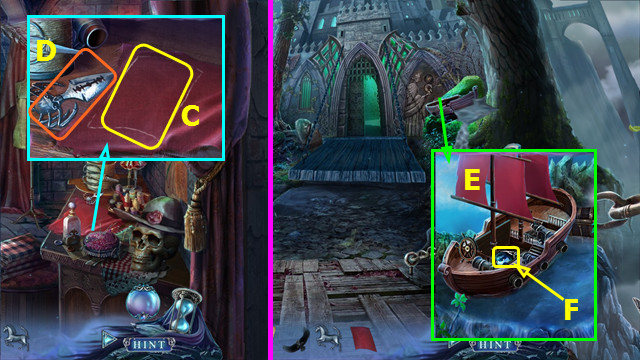
- Take the SHOULDER BAG (C).
- Open the SHOULDER BAG; take the MIRROR and BLACK CANDLE (inventory).
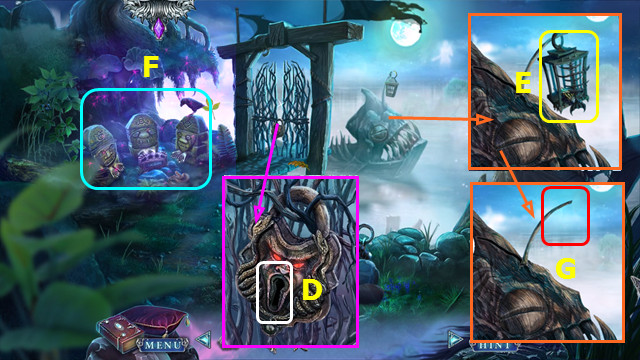
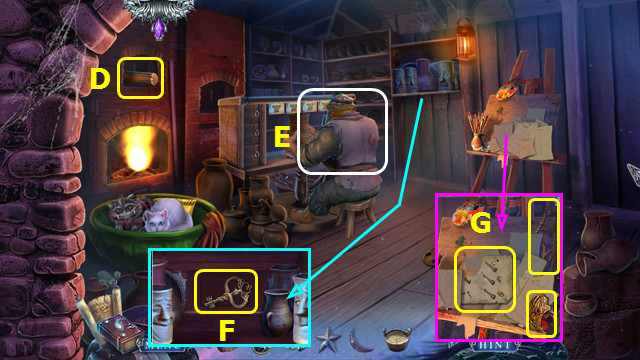
- Use the RUBY KEY (D).
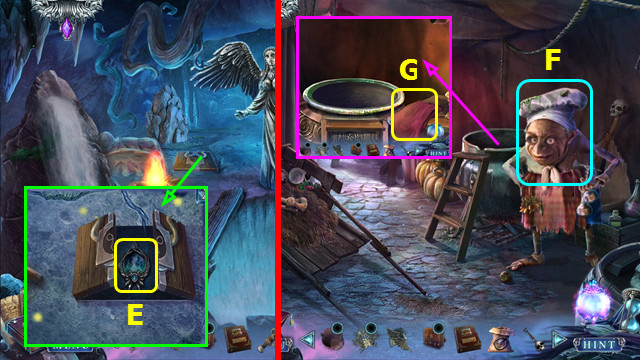
- Take the LANTERN (E).
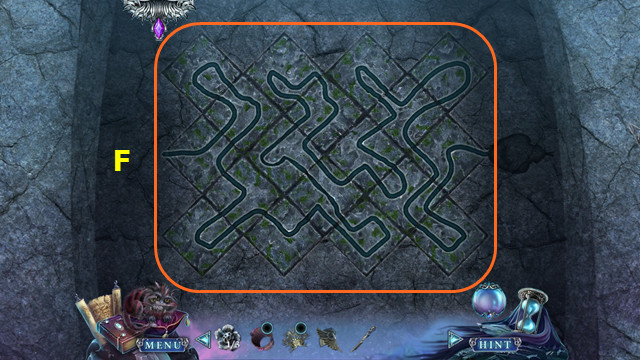
- Play the HOP (F); use the BLACK CANDLE on the fire to make the LIT CANDLE.
- Open the LANTERN and take the DAGGER HANDLE; place the LIT CANDLE and close the cover to make the LIT LANTERN (inventory).
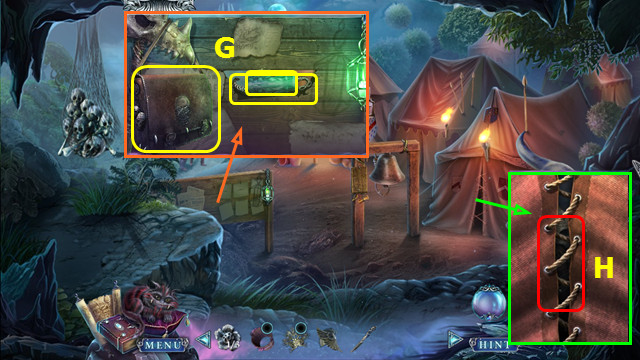
- Place the LIT LANTERN (G).
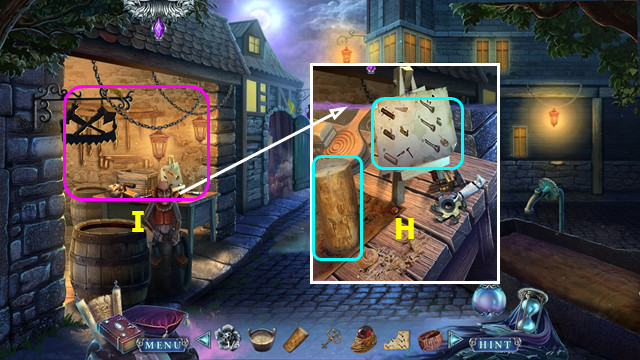
- Go forward.
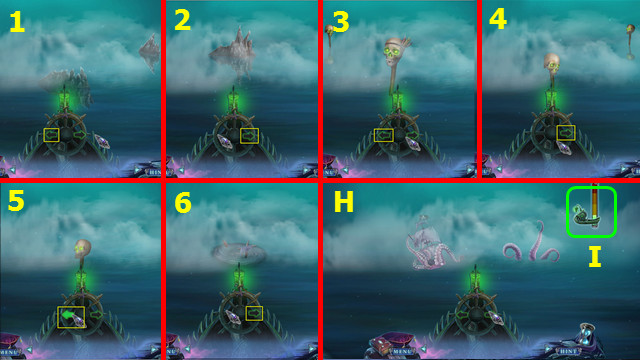
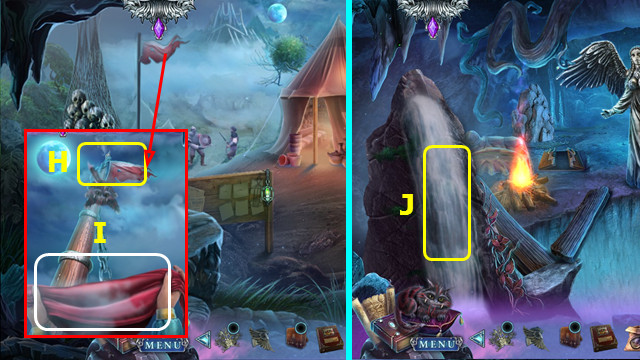
- Select the arrows left-right-left-right-left-right (1-6).
- Let the boat go forward (H).
- If you hit the obstacles 3 times, the sequence will start over (I).

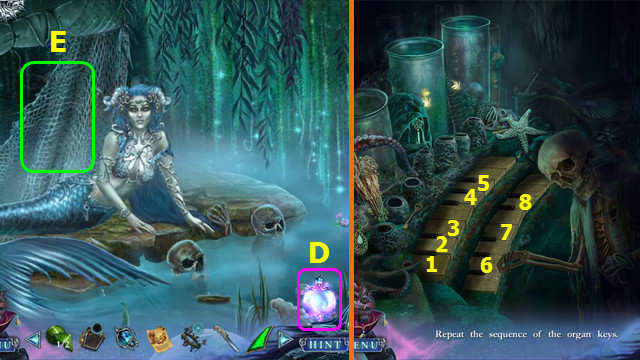
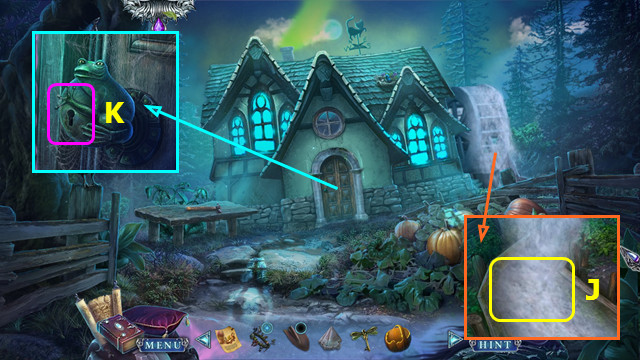
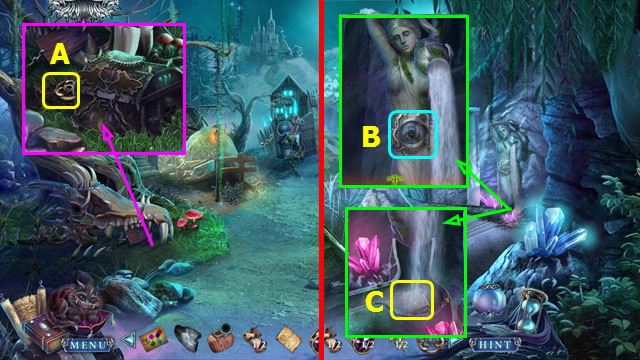
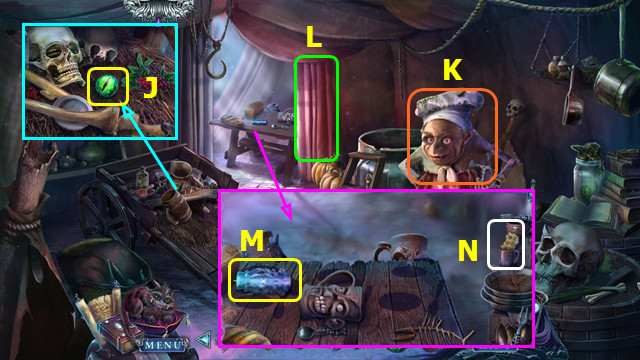
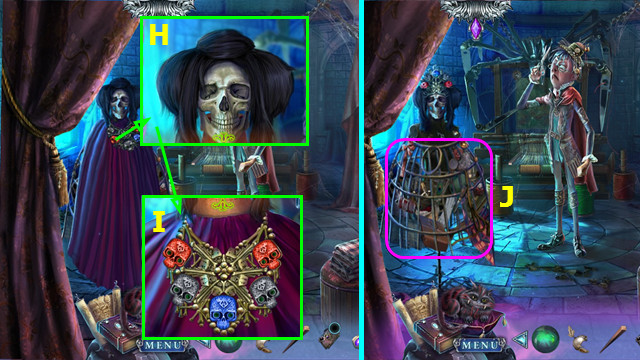
- Talk to the Mermaid (K).
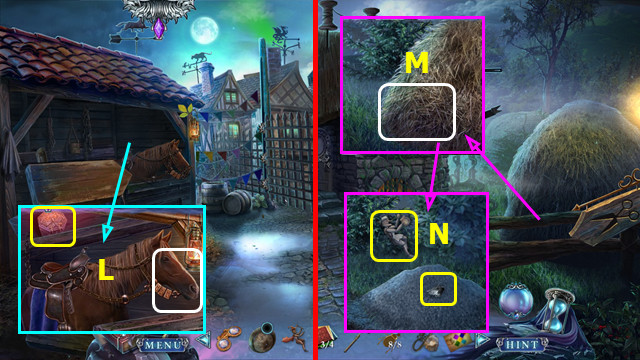
- Take the 1/2 JADE EYE GEM (L).
- Go forward.
- After talking to the Healer, you earn the MAP.
- Try to go forward. After the cut-scene, go forward.
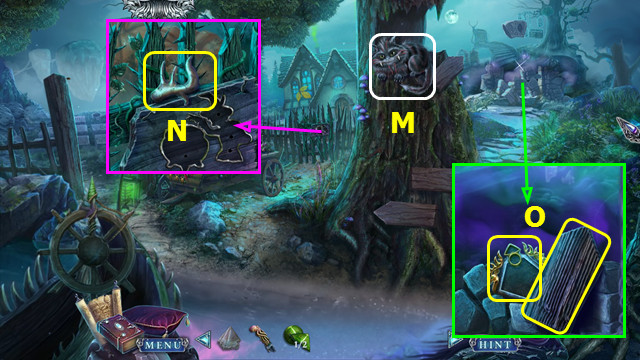
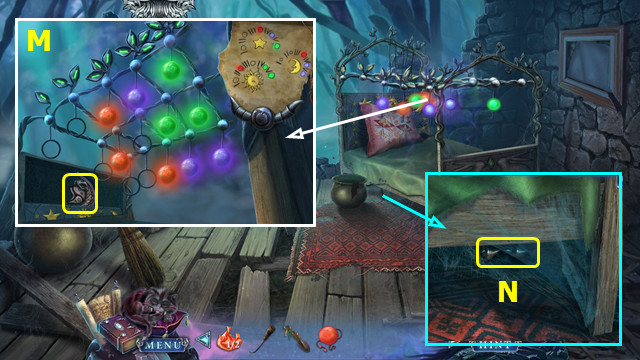
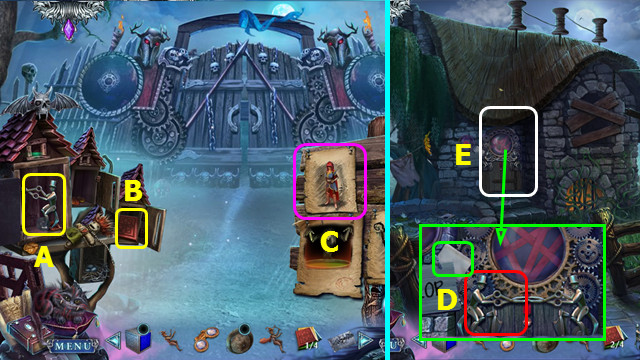
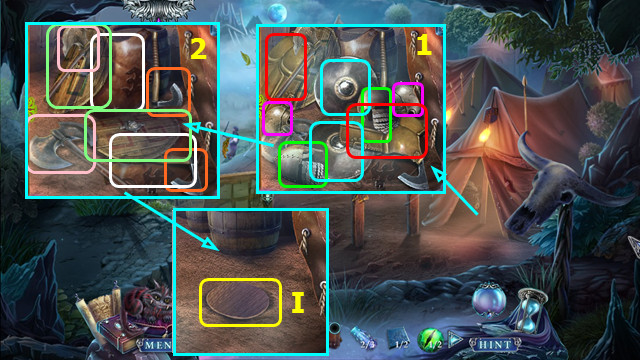
- Talk to Sebastian (M).
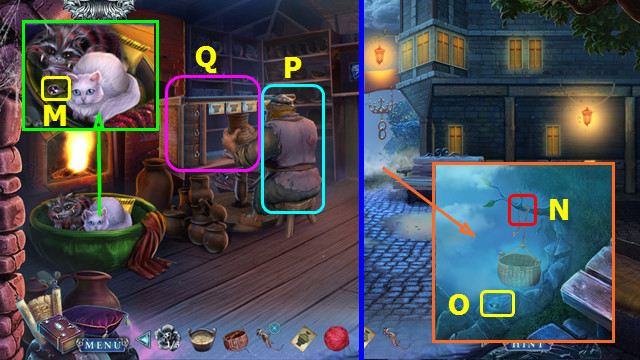
- Take the BONE HORN (N).
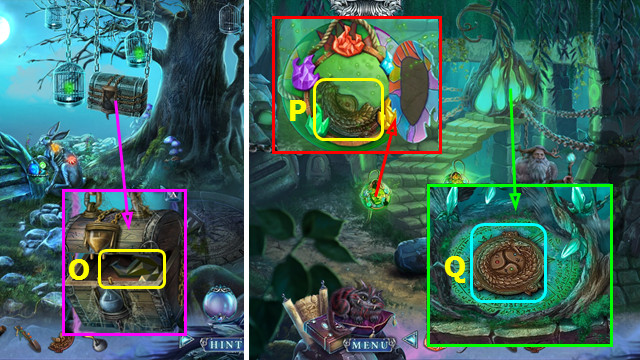
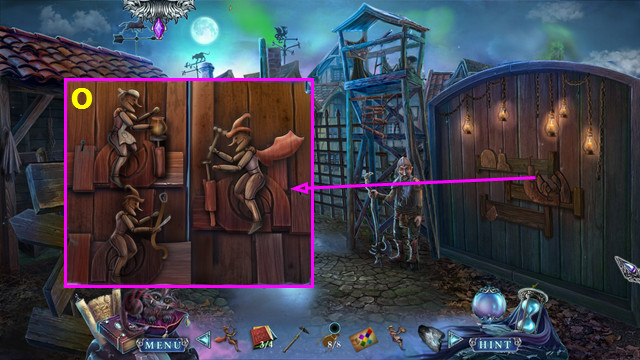
- Take the 1/2 ROAD SIGNS and BROKEN AMULET (O).
- Walk left.
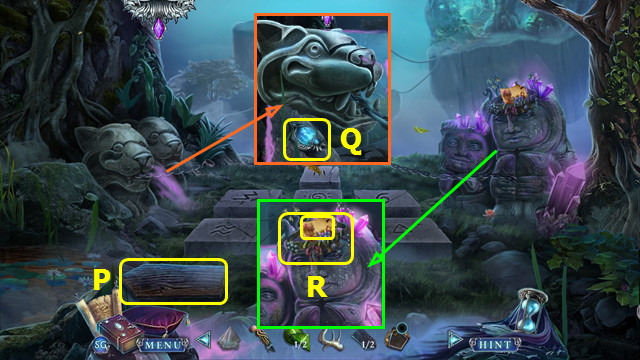
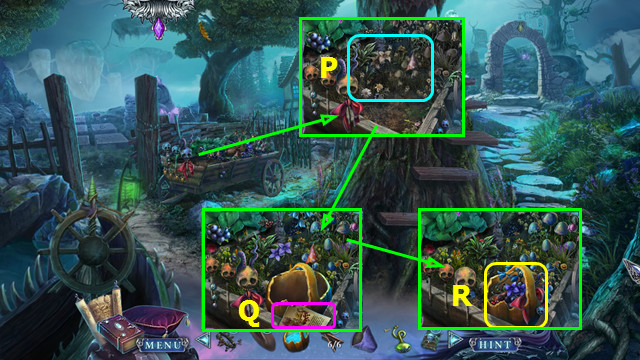
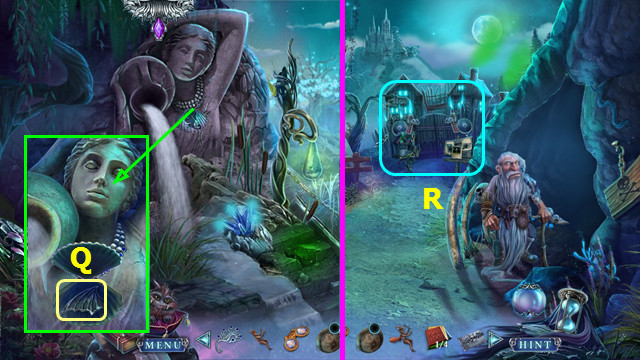
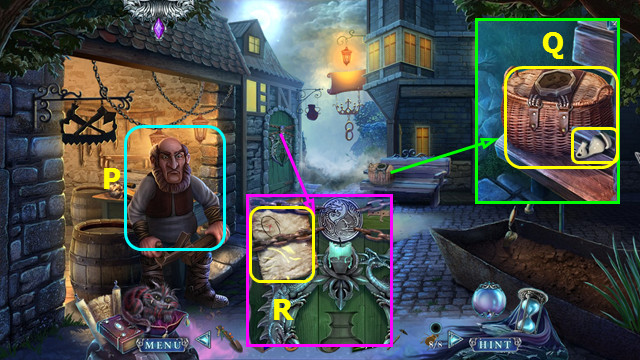
- Take the 2/2 ROAD SIGNS (P).
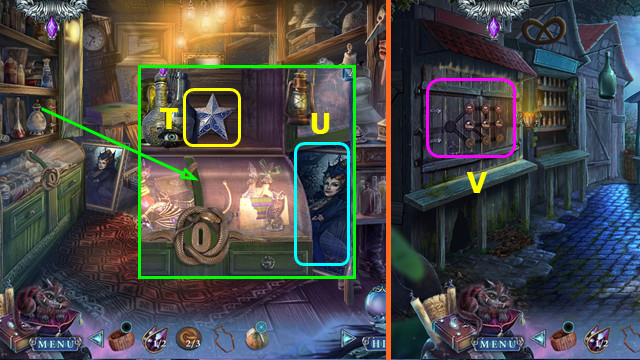
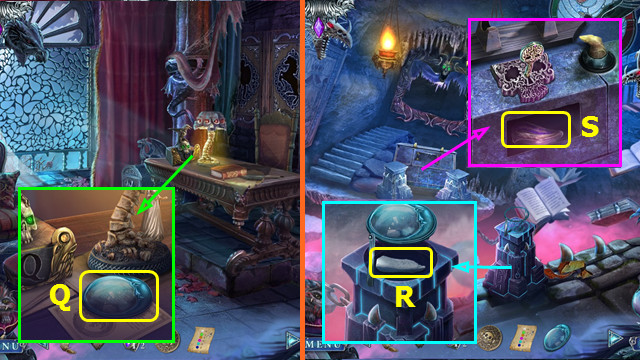
- Take the MAGIC BALL GEM (Q).
- Take the WREATH NOTE and DRIED WREATH (R).
- Walk down.
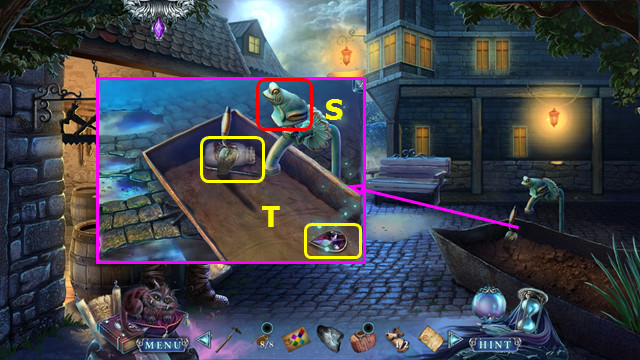
- Pan down (S).
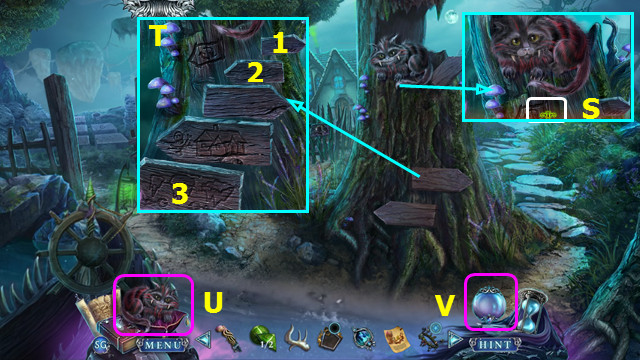
- Place the 2 ROAD SIGNS (T).
- Select 1-3.
- You earn the PACKAGE and SEBASTIAN; he will sit on the menu bar (U).
- Open the PACKAGE and take the MAGIC BALL (inventory); it will rest on the menu bar (V).
- Place the MAGIC BALL GEM on the MAGIC BALL; select the charged MAGIC BALL to return it to inventory (inventory).
- Walk down.
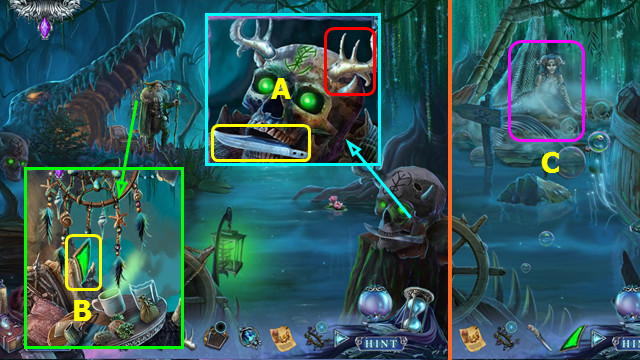
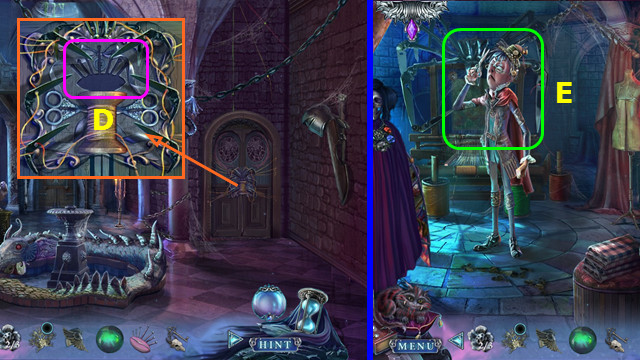
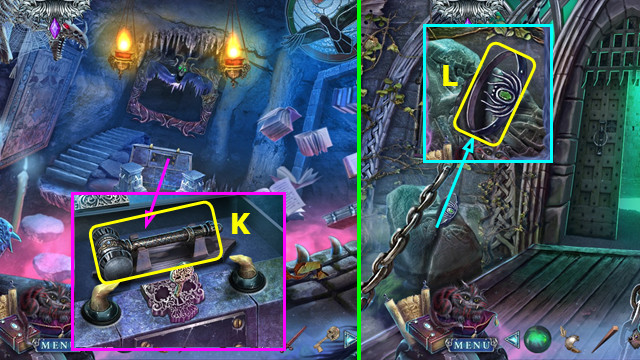
- Place the BONE HORN; take the DAGGER BLADE (A).
- Combine the DAGGER BLADE and DAGGER HANDLE to make the DAGGER (inventory).
- Use the DAGGER to take the EMERALD FIN (B).
- Walk down.
- Select (C).
- Select the MAGIC BALL; choose light or dark magic (D).
- Select (E).
- Press 3-5-7, 2-4-6-8, 6-1-5-8-3.
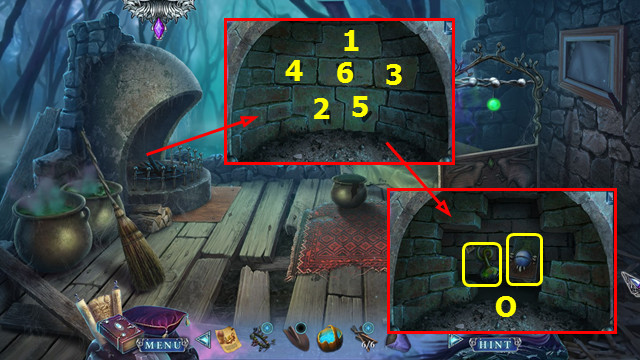
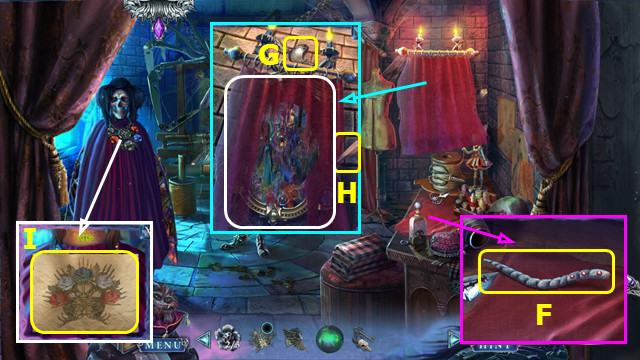
- Play the HOP; earn the CAULDRON TOKEN.
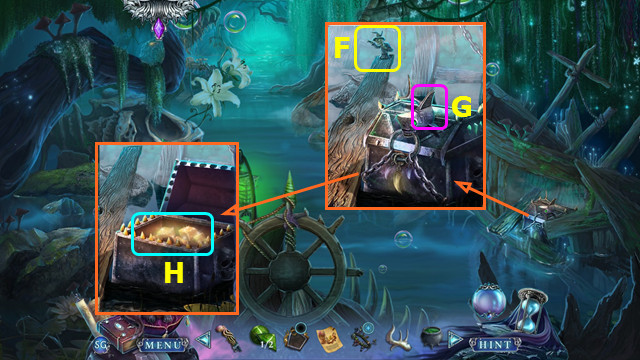
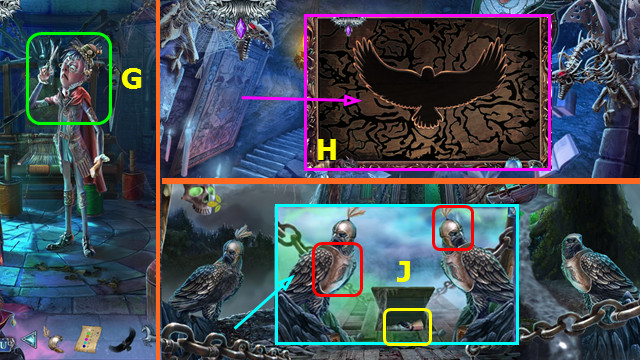
- Use SEBASTIAN to take the WITCH TOKEN (F).
- Place the EMERALD FIN (G).
- Select (H).
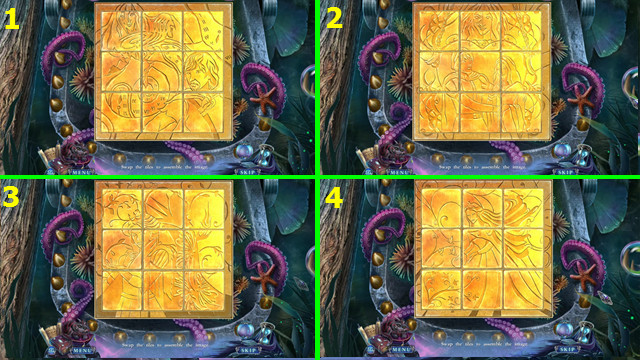
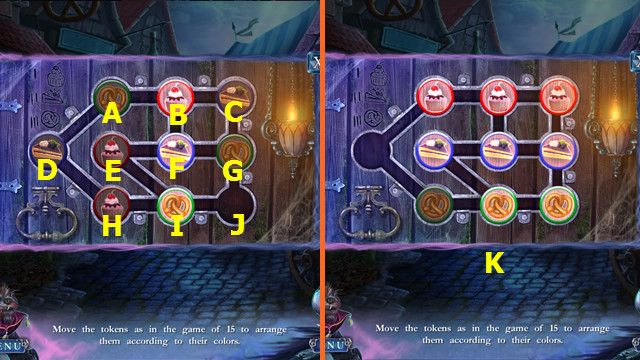
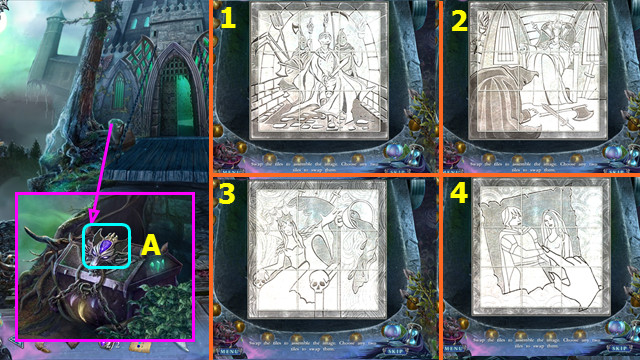
- Restore the images 1-4.
- Take the BROOM TOKEN.
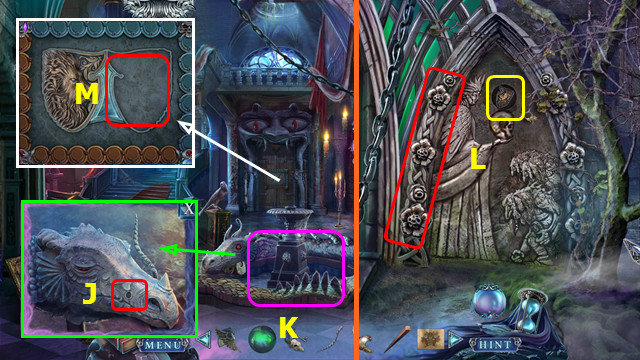
- Go forward 2x.
- Place the BROOM TOKEN, CAULDRON TOKEN, and WITCH TOKEN (K).
- Go forward.
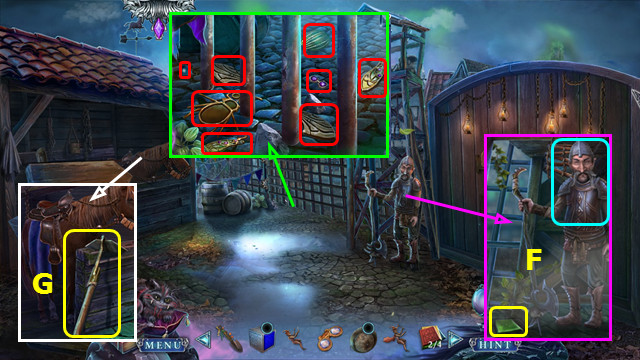
- Take the POKER (L).
- Take the 2/2 JADE EYE GEM (M).
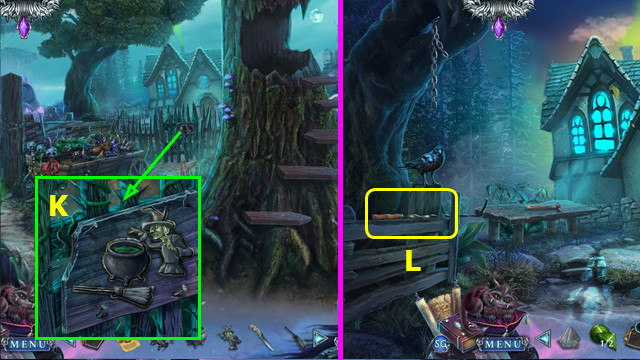
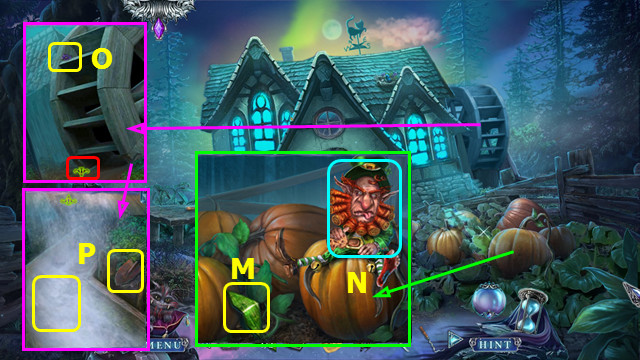
- Talk to the Leprechaun (N).
- Use SEBASTIAN to take the BUTTERFLY ORCHID PATTERN; pan down (O).
- Use the HANDKERCHIEF to make the WET HANDKERCHIEF; take the TROWEL BLADE (P).
- Walk down 3x.

- Use the POKER to take the JEWELRY BOX (Q).
- Combine the JEWELRY BOX and BUTTERFLY ORCHID PATTERN; take the TIGER'S EYE GEM (inventory).
- Combine the BROKEN AMULET, 2 JADE EYE GEMS, and TIGER'S EYE GEM to make the DEER AMULET (inventory).
- Go forward 2x.
- Place the DEER AMULET (R).
- Walk right.
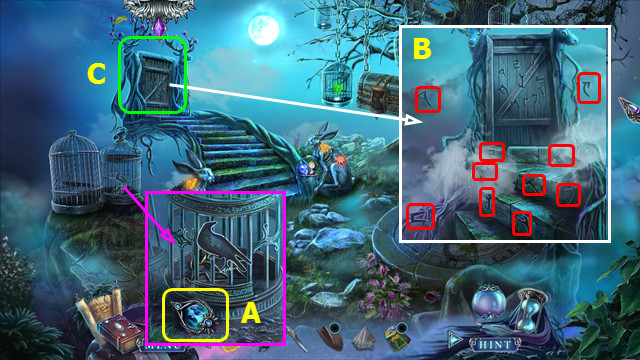
- Take the MAGIC BALL GEM (A).
- Use the MAGIC BALL GEM on the MAGIC BALL (inventory).
- Select the 10 symbols (B).
- Play the HOP (C).
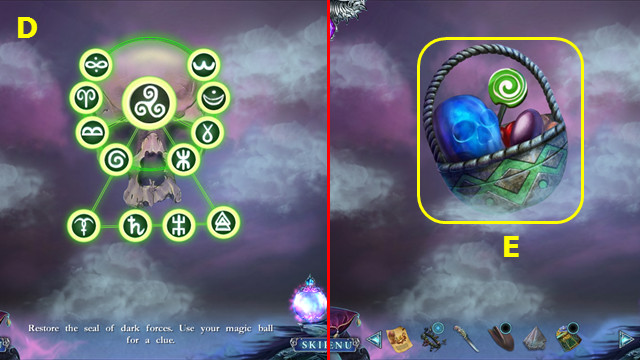
- Restore the symbols (D).
- Take the TREAT BASKET (E).
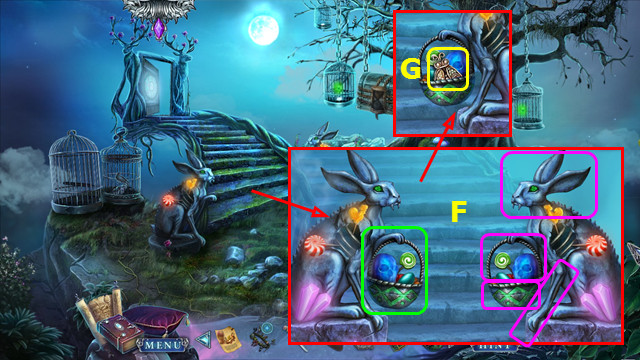
- Place the TREAT BASKET; restore the right hare (F).
- Take the MOTH CHARM (G).
- Combine the JEWELRY BOX and MOTH CHARM: take the DRAGONFLY KEY (inventory).
- Walk down and forward.
- Use the MAGIC BALL; choose light or dark magic (H).
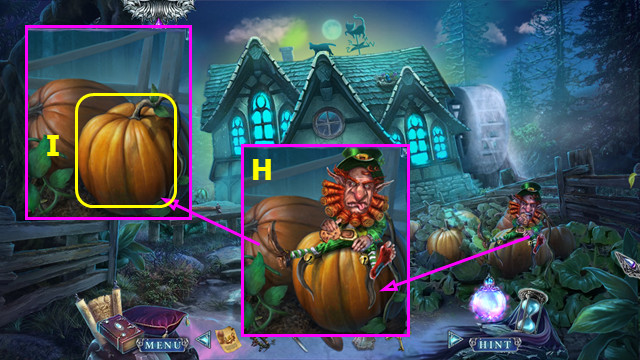
- Use the DAGGER to take the PUMPKIN (I).
- Combine the PUMPKIN and DAGGER; drag the dagger along the marked lines 2 times to make the PUMPKIN BUCKET (inventory).
- Use the PUMPKIN BUCKET to take the BUCKET OF WATER (J).
- Use the DRAGONFLY KEY (K).
- Walk forward.
Chapter 2: The House Interior
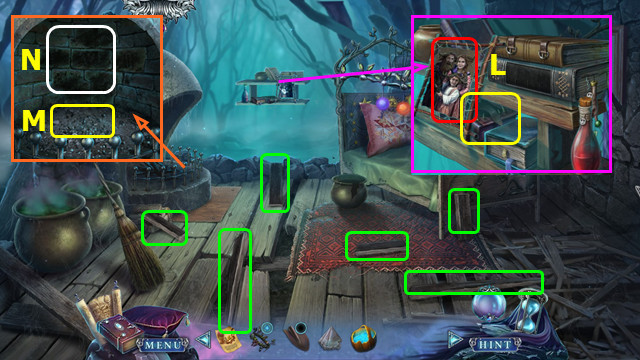
- Take the 6 LADDER PARTS (green).
- Look at the picture and read the book; take the PAPER SHEET (L).
- Fold the PAPER SHEET 3 times to make the PAPER BAG (inventory).
- Use the PAPER BAG to take the PAPER BAG WITH SOOT (M).
- Use the WET HANDKERCHIEF (N).
- Press 1-6.
- Take the ACID and BOOK OF PROPHECIES (O).
- Walk down 2x.
- Use the BUCKET OF WATER (P).
- Place the WREATH NOTE and play the HOP (Q).
- Take the BASKET OF PLANTS (R).
- Combine the DRIED WREATH and BASKET OF PLANTS to make the FRESH WREATH (inventory).
- Walk left.
- Use the PAPER BAG WITH SOOT (A).
- Use the FRESH WREATH (B).
- Use the ACID (C).
- Select 1-7.
- Go forward.
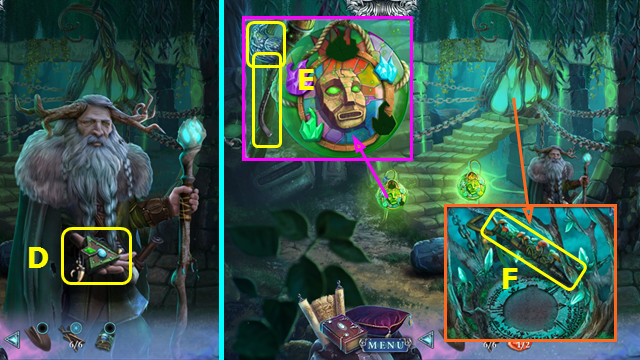
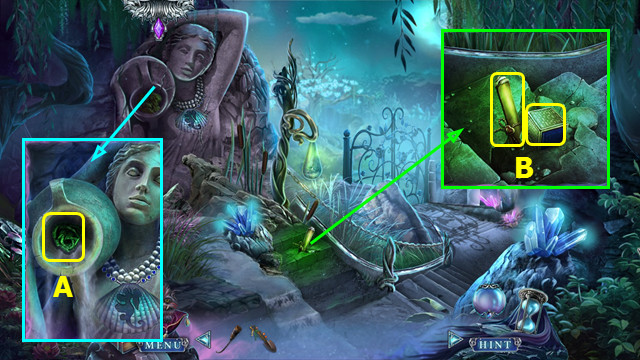
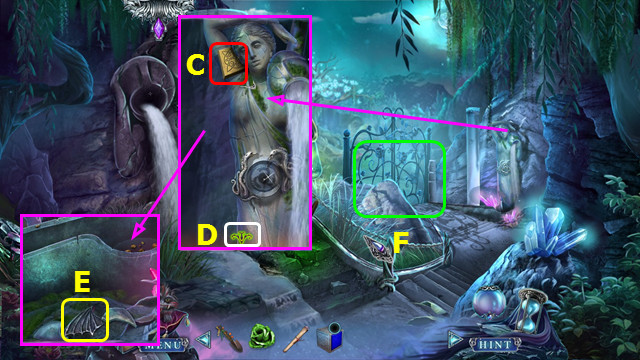
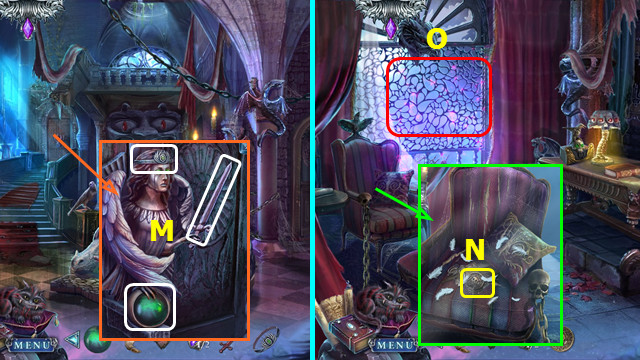
- Take the HEALER'S AMULET (D).
- Combine the BOOK OF PROPHECIES and the HEALER'S AMULET; take the 1/2 STAINED GLASS PIECE (inventory).
- Take the NAIL PULLER and SILVER CROW (E).
- Take the HANDLE (F).
- Combine the TROWEL BLADE and HANDLE to make the GARDENING TROWEL (inventory).
- Walk down 2x.
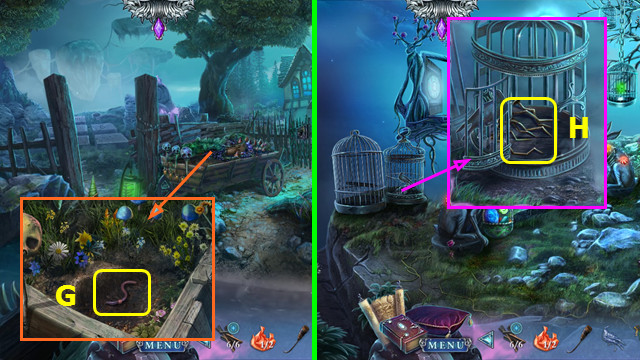
- Use the GARDENING TROWEL; take the WORM (G).
- Walk right.
- Place the SILVER CROW; take the BENT NAILS (H).
- Walk down and forward.
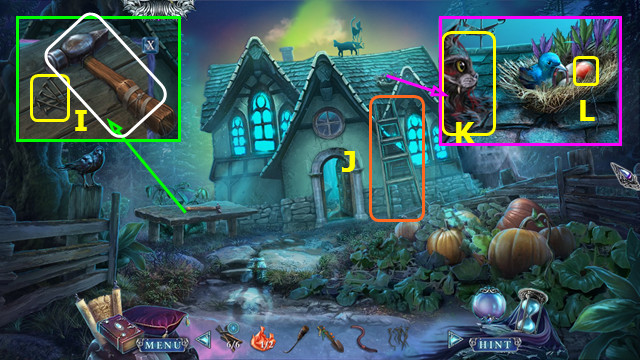
- Place the BENT NAILS and use the HAMMER on them; the HAMMER will go to inventory; take the NAILS (I).
- Combine the LADDER PARTS, NAILS, and HAMMER to make the LADDER (inventory).
- Place the LADDER (J).
- Select (K); SEBASTIAN returns to inventory.
- Use the WORM; take the GLASS BEAD (L).
- Go forward.
- Place the GLASS BEAD and restore the beads; take the 1st MEDALLION HALF (M).
- Use SEBASTIAN; take the HOURGLASS SYMBOL (N).
- Walk down 2x; go right.
- Use the HOURGLASS SYMBOL; take the 2/2 STAINED GLASS PIECE (O).
- Walk down, left, and forward.
- Place the 2 STAINED GLASS PIECES; take the 2nd MEDALLION HALF (P).
- Combine the 2 MEDALLION HALVES to make the UNIVERSE MEDALLION (inventory).
- Use the UNIVERSE MEDALLION (Q).
- Walk right.
- Remove the moss; take the IRON ROSE (A).
- Take the NOTE WITH ROSES; use the NAIL PULLER to take the STRANGE CUBE (B).
- Select (C); pan down (D).
- Move the shards; take the 1/2 BAT WING (E).
- Select (F).
- Place the IRON ROSE and NOTE WITH ROSES.
- Swap the roses as shown (G).
- Walk forward.
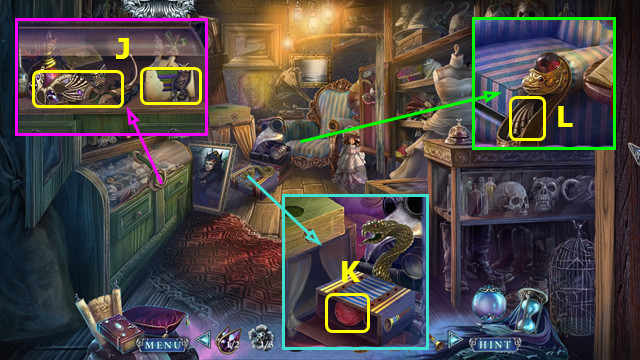
- Talk to the Guard; take the SILVER SEA HORSE (H).
- Touch the butterflies; use SEBASTIAN to take the LEATHERWORKER FIGURINE (I).
- Take the BINOCULARS EMBLEM (J).
- Walk left.
- Take the LEAKY BOWL WITH ENGRAVING (K).
- Sort the clothing; green in the left basket and pink in the right basket (L).
- Take the CARPENTER FIGURINE (M).
- Select (N).
- Take the 1/4 CUBE SIDE (O).
- Take the BROKEN LETTER EMBLEM (P).
- Walk down 2x.
- Place the SILVER SEA HORSE; take the 2/2 BAT WING (Q).
- Combine the BROKEN LETTER EMBLEM and 2 BAT WINGS to make the WINGED LETTER EMBLEM (inventory).
- Walk forward.
- Select (R).
- Place the WINGED LETTER EMBLEM; take the TAILOR FIGURINE (A).
- Take the 2/4 CUBE SIDE (B).
- Select (C).
- Walk down and left.
- Read the note and place the TAILOR FIGURINE (D).
- Play the HOP to dress like a villager (E).
- Walk down and forward 2x.
- Talk to the Guard; take the 3/4 CUBE SIDE (F).
- Take the HOE (G).
- Take the 8 FLY ADORNMENTS (red).
- Walk down and left.
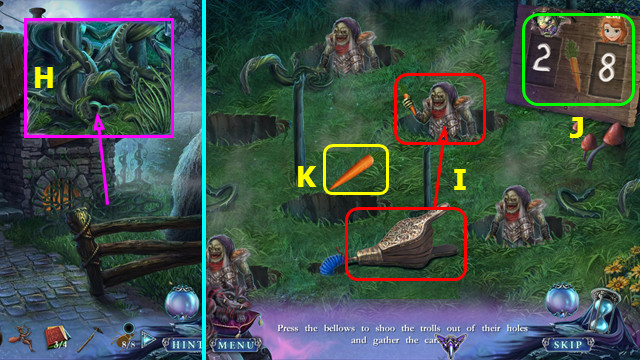
- Use the HOE (H).
- Press the bellows (I); select the troll with the carrot.
- Collect 8 carrots to win (J).
- Take the CARROT (K).
- Walk down and forward.
- Use the CARROT; take the OWL BOX (L).
- Open the OWL BOX; take the FLINT AND STEEL and the CUBE DIAGRAM (inventory).
- Walk down and left.
- Use the FLINT AND STEEL (M).
- Take the POTTER FIGURINE and CHARCOAL (N).
- Walk down and forward.
- Place the CARPENTER FIGURINE, LEATHERWORKER FIGURINE, and POTTER FIGURINE (O).
- Walk right.
Chapter 3: The Workshop
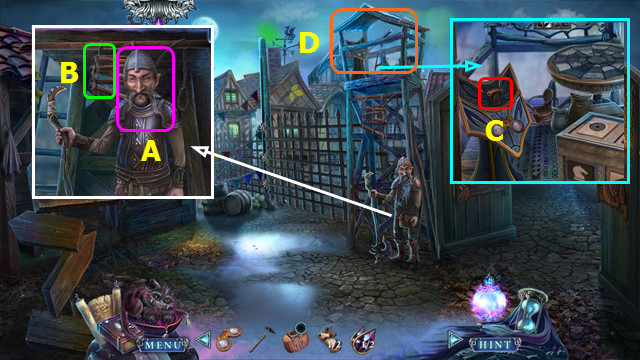
- Talk to the Carpenter (P).
- Take the TOOL BASKET and 1/2 KNIGHT (Q).
- Take the TREASURE MAP (R).
- Combine the LEAKY BOWL WITH ENGRAVING, TREASURE MAP, and CHARCOAL to determine the treasure location (inventory).
- Select (S).
- Take the GLUE; move the reeds and take the 1/2 PURPLE GEM (T).
- Combine the 8 FLY ADORNMENTS and GLUE to make the 1/2 JEWELED BEETLE (inventory).
- Walk down 2x.
- Use the GARDENING TROWEL; take the VALVE (A).
- Walk down.
- Pan up; use the VALVE (B).
- Take the 4/4 CUBE SIDE (C).
- Combine the STRANGE CUBE, 4 CUBE SIDES, and CUBE DIAGRAM (inventory).
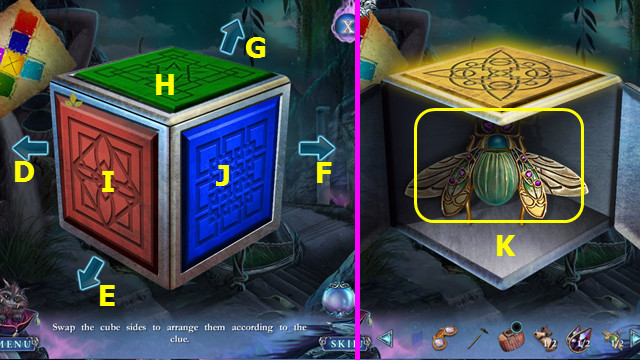
- Select F-H-I-Ex2-J-H.
- Take the 2/2 JEWELED BEETLE (K).
- Walk forward.
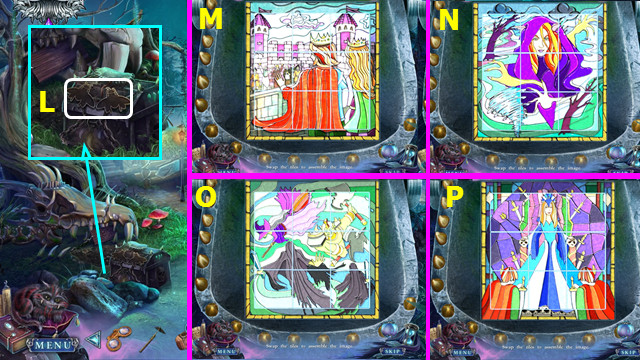
- Place the 2 JEWELED BEETLES (L).
- Restore the images (M-P).
- Take the MAGIC BALL GEM; use the MAGIC BALL GEM on the MAGIC BALL (inventory).
- Walk forward.
- Use the MAGIC BALL; select light or dark magic (A).
- Use the HOE and select the ladder (B).
- Place the BINOCULARS EMBLEM; move the lever (C).
- Play the HOP (D).
- Walk forward.
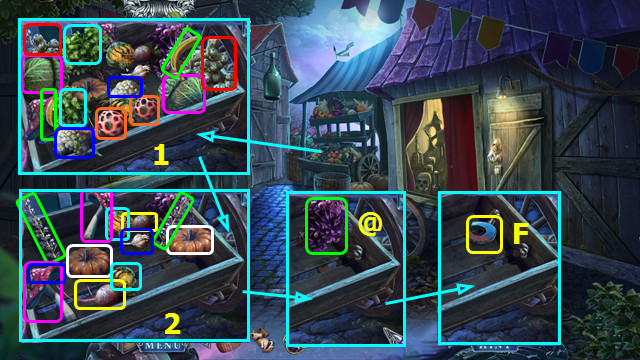
- Select pairs of fruits (color-coded) (1-2).
- Move the purple bunch (@): take the MAGNET (F).
- Walk down 2x; go left.

- Use the MAGNET to take the GRAPES CHARM (G).
- Walk down; go forward 2x.
- Place the GRAPES CHARM (H).
- Select (I).
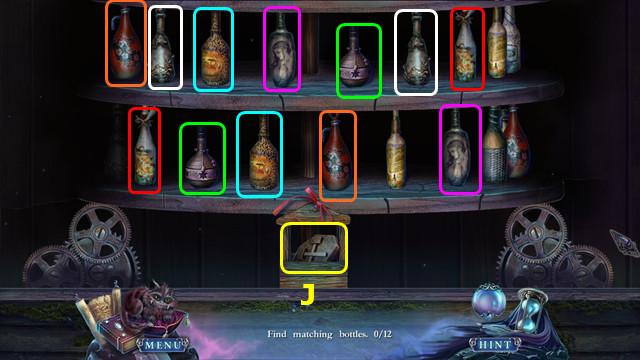
- Select pairs as the shelves rotate (examples are color-coded).
- Collect 12 pairs.
- Take the TOOLS SYMBOL (J).
- Combine the TOOL BASKET and TOOLS SYMBOL; use the pliers to take the FLAT WIRE PIECE. Take the 2/2 KNIGHT and empty the basket (inventory).
- Walk down.
- Place the 2 KNIGHTS; take the MAGIC BALL GEM (K).
- Use the MAGIC BALL GEM on the MAGIC BALL (inventory).
- Walk right.
- Use the MAGIC BALL; select light or dark magic (L).
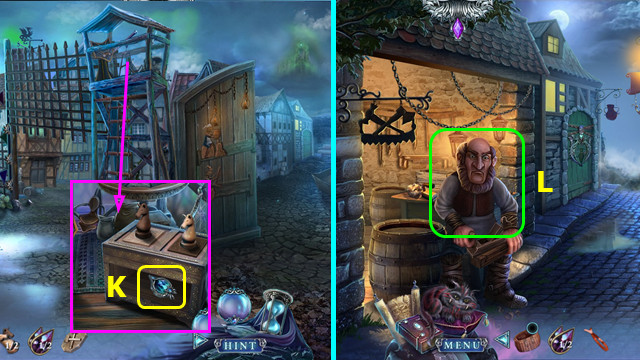
- Take the KEY WITH HAND CHARM and 1/3 PRETZEL TOKEN (M).
- Use the FLAT WIRE PIECE; take the VASE MOLD (N).
- Walk down and forward.
- Use the KEY WITH HAND CHARM (O).
- Walk right.

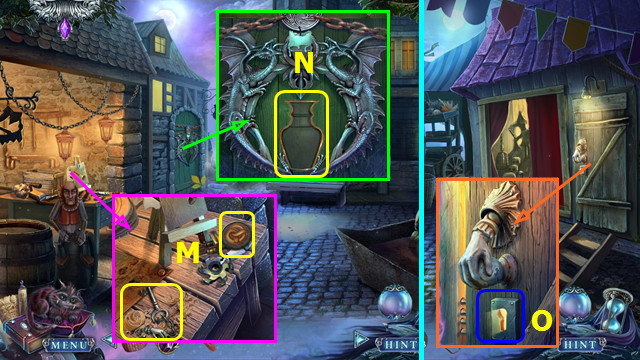
- Open the drape (P).
- Take the PACKAGE FROM LUCIO; take SEBASTIAN (Q).
- Turn the page; take the 2/3 PRETZEL TOKEN (R).
- Open the PACKAGE FROM LUCIO; take the 1/3 STONE FLOWER (inventory).
- Play the HOP; earn the 3/3 PRETZEL TOKEN (S).
- Move the items; take the STAR TOKEN (T).
- Look at the portrait (U).
- Walk down.
- Select (V).
- Place the 3 PRETZEL TOKENS.
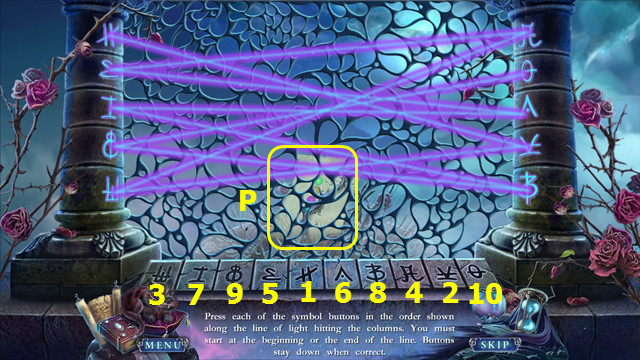
- Select G-F-B-C-G-J-I-E-F-G-C-B-A-D-H-I-E-F-B-A-D-H-I-E-F-B-A-D-H-I-E-F-G-C-B-A-D.
- Final positions (K).
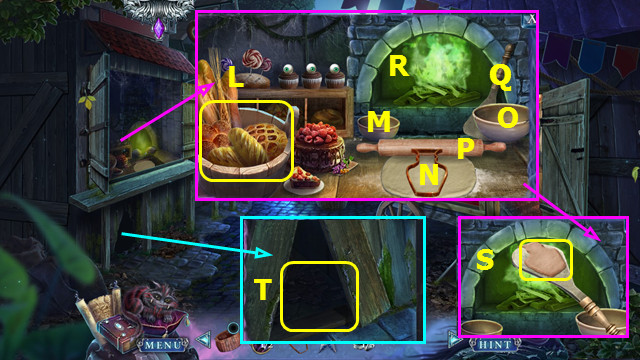
- Remove the pastries 3x; take the BUCKET (L).
- Use (M) on (N).
- Place (O) on (N).
- Use (P) on (N).
- Use the VASE MOLD on (N).
- Use (Q) on (N) and (R).
- Take the VASE-SHAPED COOKIE (S).
- Use SEBASTIAN; take the CRESCENT MOON SYMBOL (T).
- Walk down and right.
- Place and press the VASE-SHAPED COOKIE (A).
- Place the BUCKET (B). Use the trowel to put clay in the bucket (C) 4x.
- Take the BUCKET OF CLAY (B).
- Walk left.
- Take the LOG (D).
- Talk to the Potter (E).
- Move the pots. Place the STAR TOKEN and CRESCENT MOON SYMBOL; take the SERPENT KEY (F).
- Take the SERPENT HEAD and ROPE; move the papers and take the FLUTE BLUEPRINT (G).
- Combine the TOOL BASKET and ROPE to make the BASKET WITH ROPE (inventory).
- Walk down.
- Sort the papers and place the FLUTE BLUEPRINT; place the LOG (H).
- Play the HOP; earn the WOODEN FLUTE (I).
- Walk down, forward, and right.
- Use the SERPENT KEY; take the BELT BASE and AMPHORA SKETCH (J).
- Use the WOODEN FLUTE; take the WOOL YARN (K).
- Place the SERPENT HEAD; take the DRAGON WING (L).
- Return to the Pottery Shop.
- Use the WOOL YARN; SEBASTIAN returns to inventory. Take the 2/2 PURPLE GEM (M).
- Combine the BELT BASE, DRAGON WING, and 2 PURPLE GEMS to make the GEMSTONE DRAGON (inventory).
- Walk down.
- Place the BASKET WITH ROPE (N). Use SEBASTIAN to take the MAGIC BALL GEM (O).
- Use the MAGIC BALL GEM on the MAGIC BALL (inventory).
- Walk left.
- Use the MAGIC BALL; select light or dark magic (P).
- Select (Q).
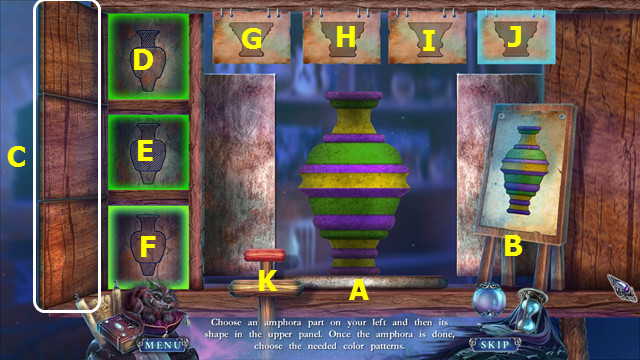
- Use the BUCKET OF CLAY (A) and place the AMPHORA SKETCH (B).
- Open the 3 doors (C).
- Select D-H, E-I, F-J.
- Select (K).
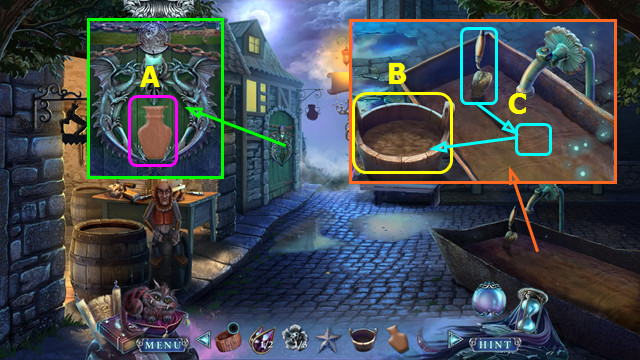
- Paint to match the sketch; take the AMPHORA (A).
- Add the GEMSTONE DRAGON to the AMPHORA to make the DRAGON AMPHORA (inventory).
- Return to the Antique Collector's Cart.
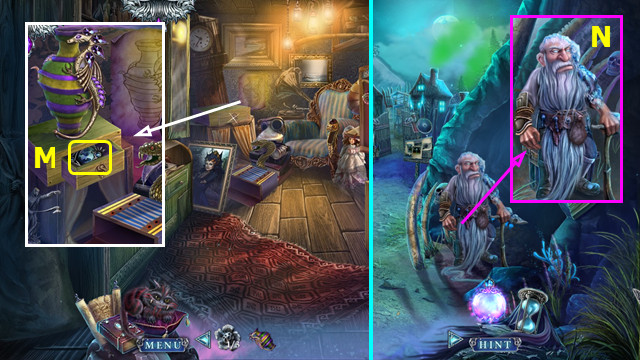
- Place the DRAGON AMPHORA; take the MAGIC BALL GEM (M).
- Use the MAGIC BALL GEM on the MAGIC BALL (inventory).
- Walk down 3x.
- Use the MAGIC BALL; choose light or dark magic (N).
- Walk right.
Chapter 4: The Cave
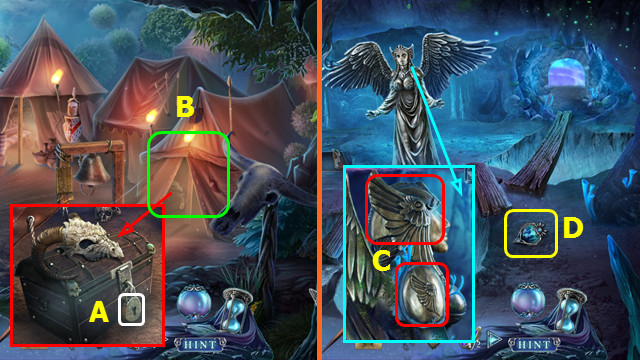
- Take the BROKEN BUCKET and read the note (O).
- Take the UNFINISHED CROWN and HEALER FIGURINE (P).
- Use SEBASTIAN to take the TROLL FIGURINE (Q).
- Go right.
- Take the KNIFE (A).
- Take the WINGED HELMET (B).
- Walk down.
- Use the KNIFE; take the WITCH FIGURINE (C).
- Move the bedding (D).
- Walk right.
- Place the HEALER FIGURINE, the TROLL FIGURINE, and the WITCH FIGURINE (E).
- Restore the path (F).
- Walk forward.
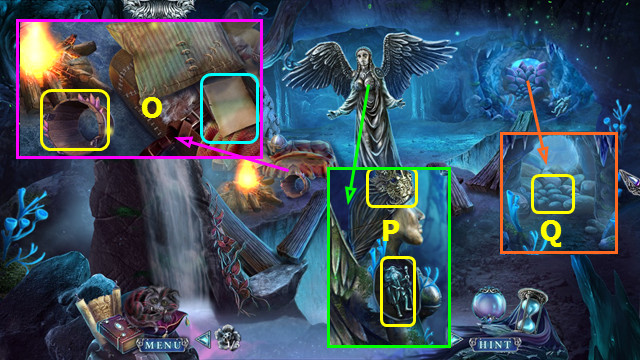
- Take the GUARD'S BAG and move the papers; take the 1/3 ALTAR CANDLES and JEWELED DAGGER (G).
- Open the GUARD'S BAG; take the 2/3 ALTAR CANDLES and 1/2 STONE TILE (inventory).
- Use the KNIFE on the JEWELED DAGGER to take the 1/2 EMERALD EYE (inventory).
- Use the KNIFE and open the tent; pan right (H).
- Select pairs (color-coded) (1-2).
- Take the WOODEN DISC (I).
- Go forward.
- Move the items; take the 2/2 EMERALD EYE (J).
- Talk to the Cook (K).
- Move the drape (L).
- Take the 3/3 ALTAR CANDLES (M).
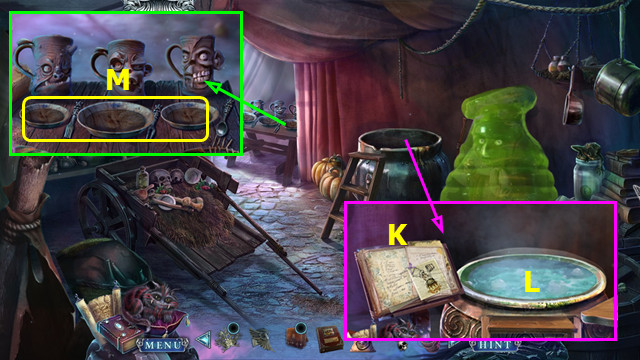
- Select (N).
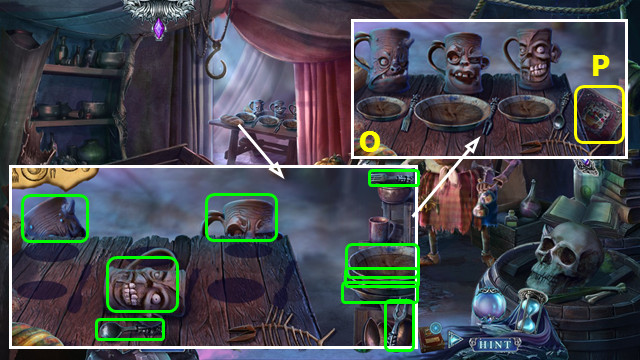
- Select the 3 mugs, 3 plates, and 3 utensils (green).
- Restore to the correct positions (O).
- Take the RECIPE BOOK (P).
- Read the RECIPE BOOK; take the 2/2 STONE TILE and SOUP RECIPE (inventory).
- Walk down 2x.
- Place the 3 ALTAR CANDLES; take the 2/3 STONE FLOWER (Q).
- Place the 2 STONE TILES (R).
- Take the CLAPPER and place the 2 EMERALD EYES (S).
- Restore the 3 images (A-C).
- Take the HORNED STAFF and SACK OF VEGETABLES (D).
- Walk down.
- Use the HORNED STAFF; take the MAGIC BALL GEM (E).
- Use the MAGIC BALL GEM on the MAGIC BALL (inventory).
- Return to the Camp Kitchen.
- Use the MAGIC BALL; select light or dark magic (F).
- Take the TABLECLOTH (G).
- Walk down.
- Use SEBASTIAN (H), and then the TABLECLOTH to take the BUCKET HANDLE (I).
- Combine the BROKEN BUCKET, WOODEN DISC, and BUCKET HANDLE to make the BUCKET (inventory).
- Walk down 2x.
- Use the BUCKET to take the BUCKET OF WATER (J).
- Return to the Camp Kitchen.
- Place the SOUP RECIPE (K).
- Place the BUCKET OF WATER and the SACK OF VEGETABLES (L).
- Play the HOP that appears; earn the POT OF SOUP.
- Use the POT OF SOUP (M).
- Walk down.
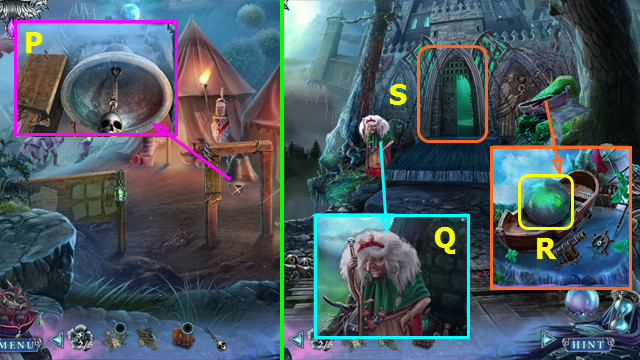
- Place and select the CLAPPER (P).
- Walk left.
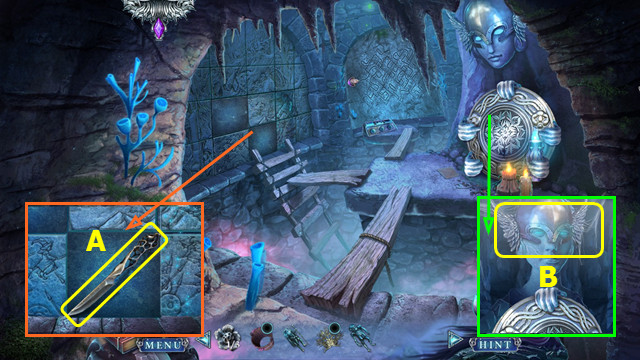
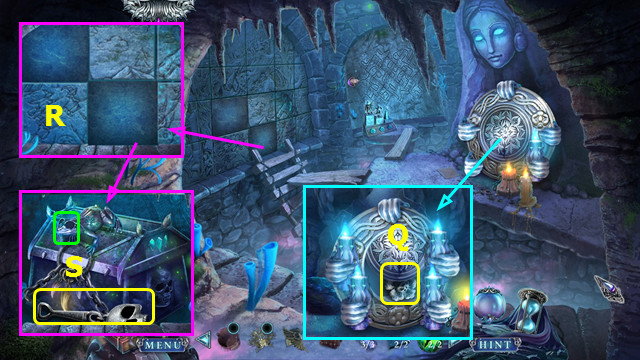
- Talk to the Old Witch (Q).
- Take the EMERALD ORB (R).
- Select (S); go forward.
- Take the FILE (A).
- Walk down.
- Take the RIDER CHARM (B).
- Combine the GUARD'S BAG and RIDER CHARM; take the SKULL KEY (inventory).
- Use the FILE; take the PINCUSHION EMBLEM (C).
- Walk forward.
- Place the PINCUSHION EMBLEM (D).
- Walk right.
- Talk to the Royal Tailor (E).
- Take the DRAGON WHISKER (F).
- Use SEBASTIAN to take the HAWK HELMET (G).
- Take the WEDGE and remove the torn curtain (H).
- Pan down; take the QUEEN'S CROWN DIAGRAM (I).
- Walk down.
- Place the DRAGON WHISKER (J).
- Play the HOP; earn the 3/3 STONE FLOWER (K).
- Walk down.
- Place the 3 STONE FLOWERS; take the LION SHIELD (L).
- Walk forward.
- Place the LION SHIELD (M).
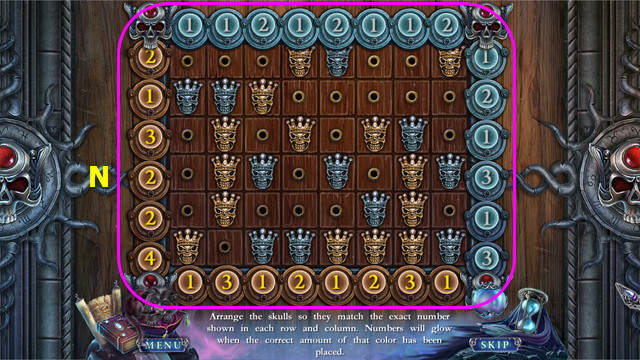
- Arrange the skulls as shown (N).
- Walk forward.
Chapter 5: The History Gallery
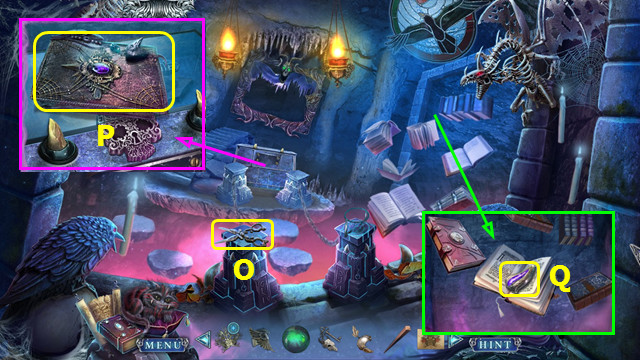
- Take the GARDEN SHEARS (O).
- Take the QUEEN'S DIARY (P).
- Take the 1/2 JEWELED EAR (Q).
- Return to the Guard Camp.
- Use the SKULL KEY (A).
- Play the HOP; earn the SHOULDER ARMOR (B).
- Walk down 2x.
- Place the WINGED HELMET and SHOULDER ARMOR (C).
- Take the MAGIC BALL GEM (D).
- Use the MAGIC BALL GEM on the MAGIC BALL (inventory).
- Go to the Garden.
- Use the MAGIC BALL; select light or dark magic (E).
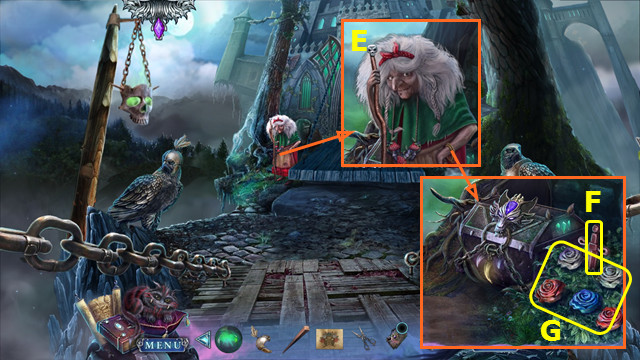
- Take the STONE SWORD (F).
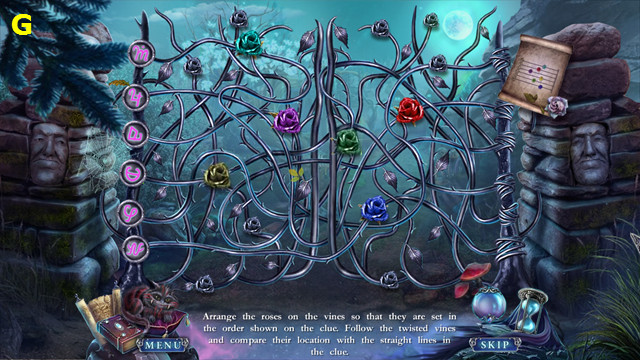
- Use the GARDEN SHEARS to take the ROSES (G).
- Combine the UNFINISHED CROWN, QUEEN'S CROWN DIAGRAM, and ROSES; arrange the roses to match the diagram. Take the ROSE CROWN (inventory).
- Go to the Royal Tailor's Room.
- Pan up; place the ROSE CROWN (H).
- Restore the skulls (I).
- Play the HOP; earn the GOLD SKULL KEY (J).
- Walk down and forward.
- Use the GOLD SKULL KEY; take the HAMMER (K).
- Walk down 2x.
- Use the WEDGE and HAMMER; take the SMALL CROWN (L).
- Go forward.
- Place the EMERALD ORB, STONE SWORD, and SMALL CROWN (M).
- Walk left.
- Use SEBASTIAN; take the COIN (N).
- Open the drapes; play the HOP (O).
- Select 1-10.
- Take the COLOR KEY (P).
- Move the papers; take the LENS (Q).
- Walk down and forward.
- Place the LENS; take the CHALK (R).
- Use the COIN; take the 2/2 JEWELED EAR (S).
- Walk down 2x.
- Place the 2 JEWELED EARS (A).
- Restore the images (1-4).
- Take the RAVEN EMBLEM and CHARCOAL PENCIL.
- Open the QUEEN'S DIARY and use CHARCOAL PENCIL; turn the page and take the HORSE EMBLEM (inventory).
- Go to the Royal Tailor's Room.
- Use the CHALK (C).
- Take and use the knife on the cloth; take the SAIL (D).
- Walk down 2x.
- Restore the ship and place the SAIL (E).
- Take the MAGIC BALL GEM (F).
- Use the MAGIC BALL GEM on the MAGIC BALL (inventory).
- Go forward and right.
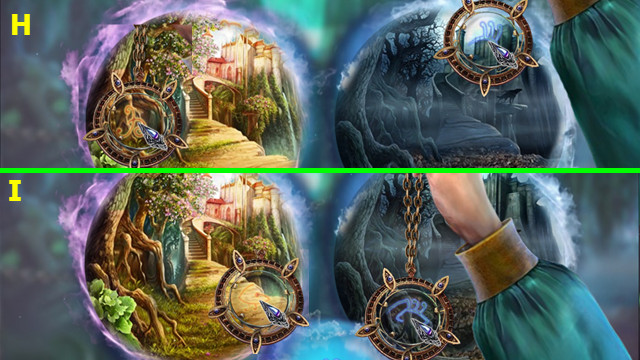
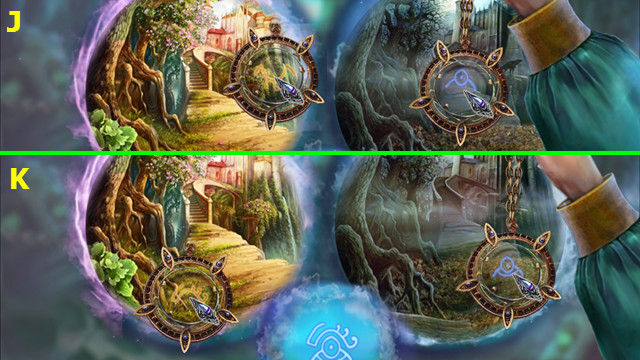
- Use the MAGIC BALL; select light or dark magic (G).
- Walk down and forward.
- Place the RAVEN EMBLEM (H).
- Play the HOP; take the BREASTPLATE.
- Walk down 2x.
- Place the BREASTPLATE and HAWK HELMET; take the SOLVENT (J).
- Walk forward and right.

- Use the SOLVENT (K).
- Select L-M-L-L-M-L-L-M.
- Move the brick; take the TAPESTRY DIAGRAM (N).
- Select (O).
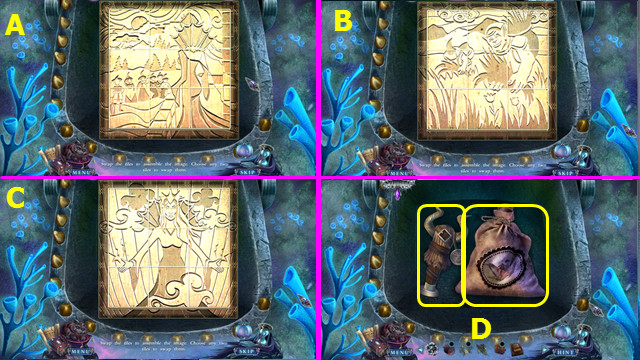
- Place the COLOR KEY and TAPESTRY DIAGRAM.
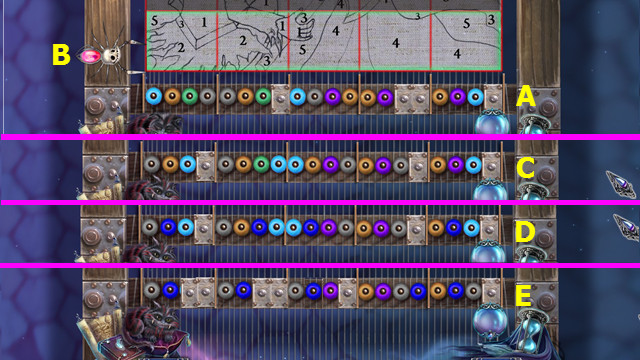
- Set the colors (A); select the spider (B).
- Set the colors (C); select the spider (B).
- Set the colors (D); select the spider (B).
- Set the colors (E); select the spider (B).
- Take the TAPESTRY.
- Walk down and forward.

- Place the TAPESTRY; take the LETTER Q (F).
- Walk down and left.
- Place the LETTER Q; take the KNIGHT EMBLEM (G).
- Place the KNIGHT EMBLEM and the HORSE EMBLEM (H).
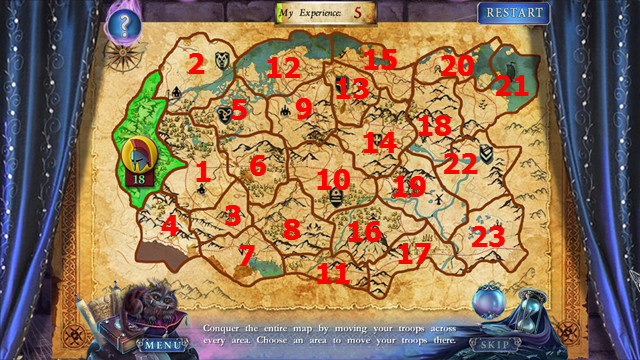
- Select 1-23.
- Take the amulet.
- Select the sets of symbols (H-N).
- The symbols are generated randomly; your solution may vary.
- Congratulations! You have completed Love Chronicles: Beyond the Shadows!
Created at: 2016-05-08