

Walkthrough Menu
- General Tips
- Chapter 1: The Town
- Chapter 2: Forest Kingdom
- Chapter 3: The Airship
- Chapter 4: Underwater Kingdom
- Chapter 5: Sky Kingdom
General Tips
- This is the official guide for Love Chronicles: Death's Embrace.
- This guide won't tell you when to zoom into a location; the screenshots show each zoom scene.
- Hidden-object puzzles are referred to as HOPs. Only the locations of the HOPs will be shown.
- Use the Map to fast travel to a location.
Chapter 1: The Town
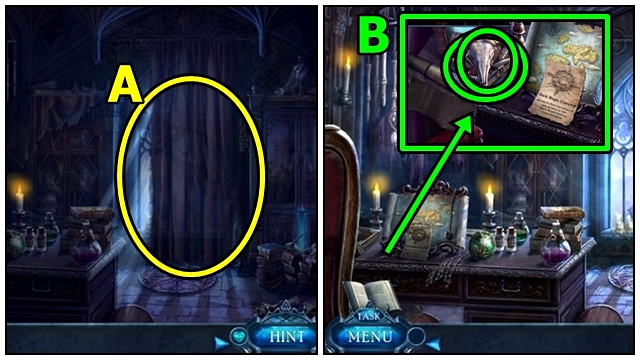
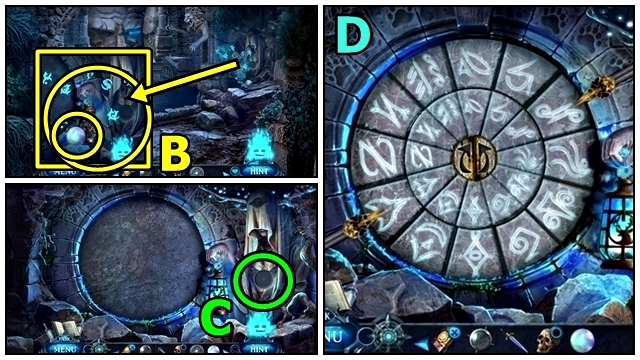
- Open (A).
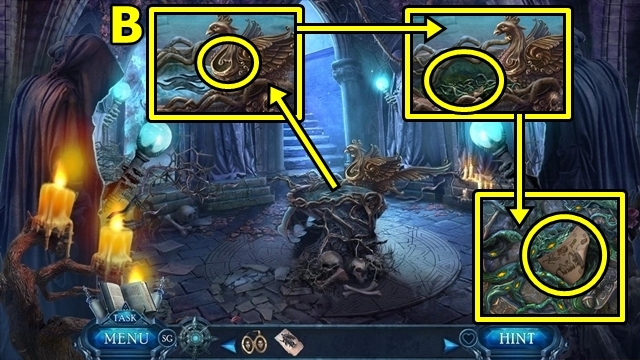
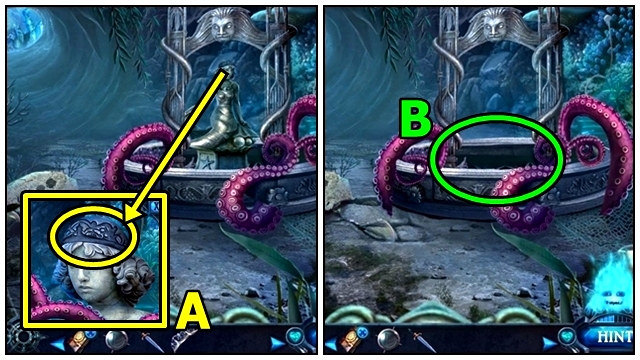
- Move skull (B); flip through book; take VIOLET BIRD.
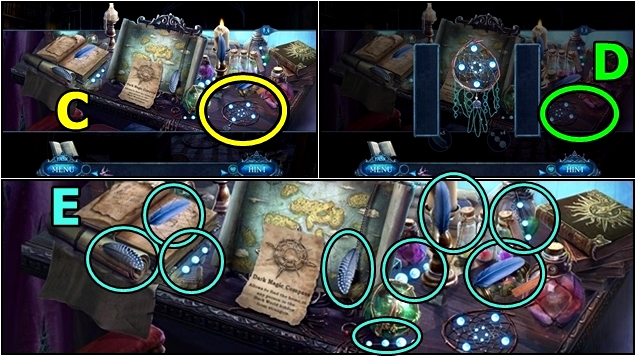
- Examine (C-D).
- Take items (E).
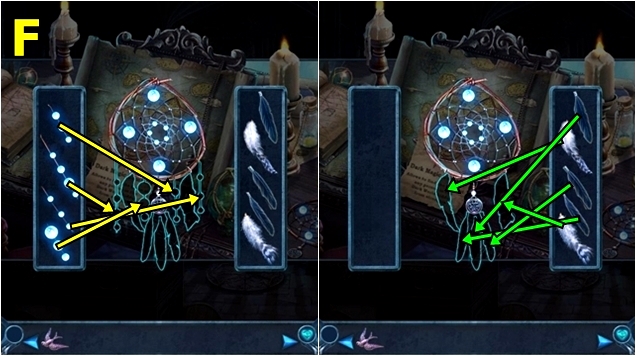
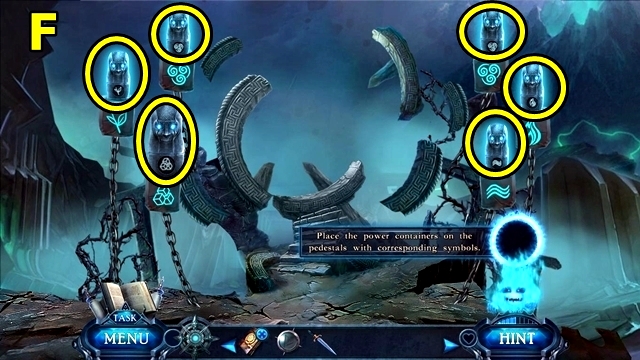
- Replace items (F). Take AMULETS (1/2).
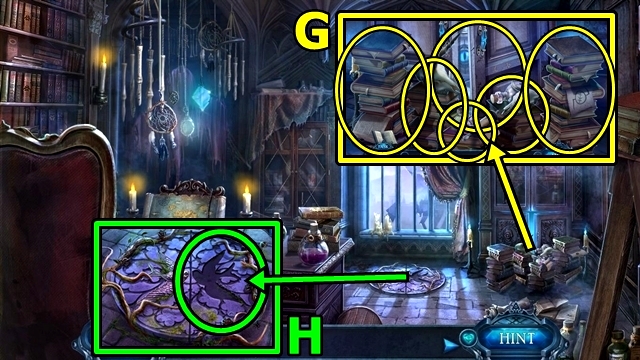
- Move items (G); open doors. Play HOP; receive DARK MAGIC CHEST.
- Insert VIOLET BIRD (H); open.
- Move down.
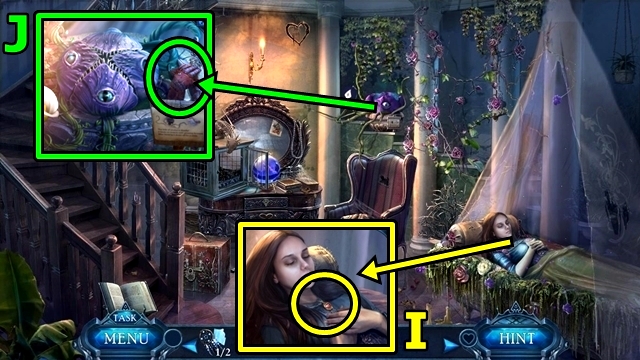
- Take OPHELIA'S LOCKET (I).
- Take FIREPROOF GLOVES (J).
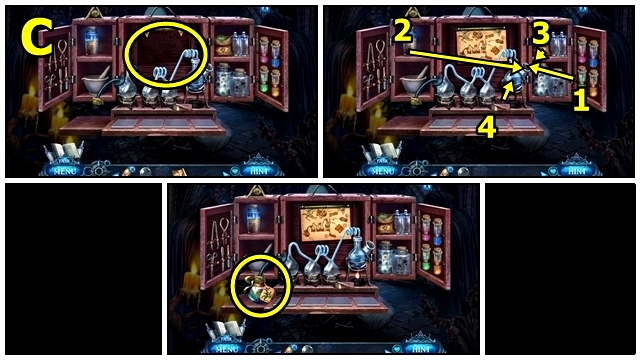
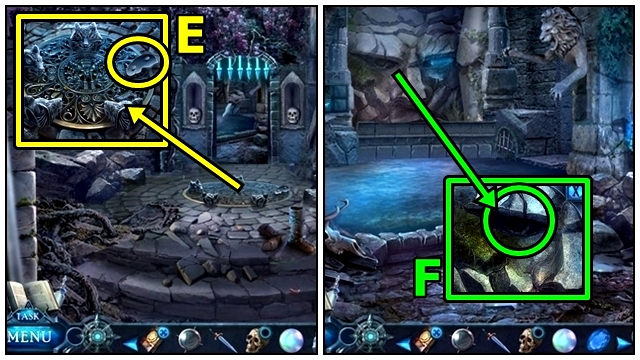
- Use FIREPROOF GLOVES (K). Examine crystal ball. Take POTIONS CASE. Take heart piece. Open drawer; move photo; take heart pieces. Insert heart emblem; open drawer; take TRAVEL BAG.
- Move up.
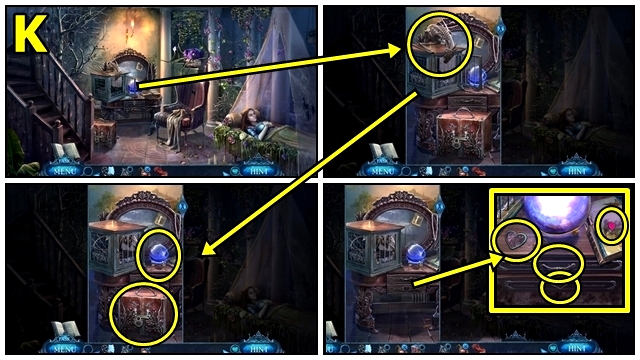
- Open OPHELIA'S LOCKET; take SUN MEDALLION.
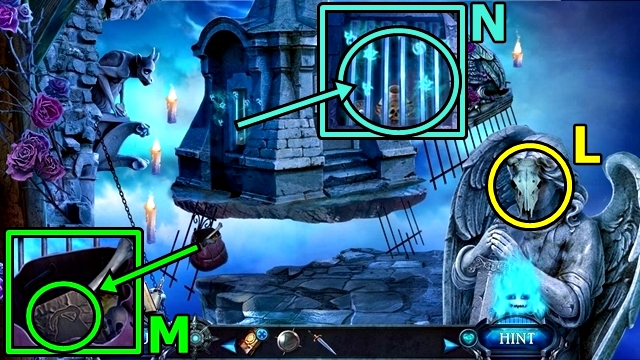
- SUN MEDALLION on POTIONS CASE (L); open case; take AMULETS (2/2).
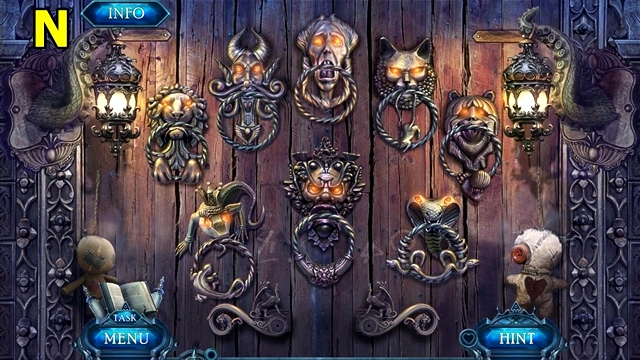
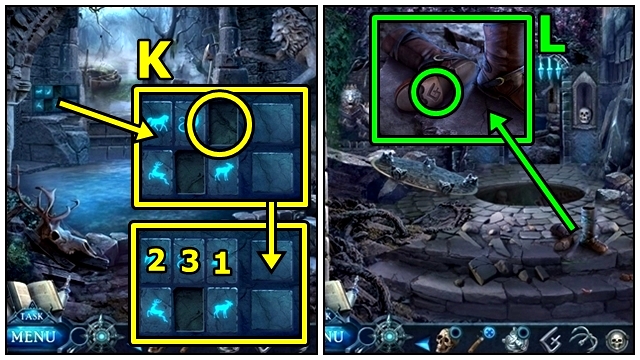
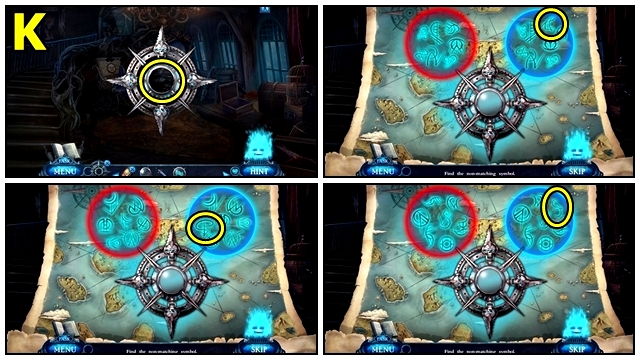
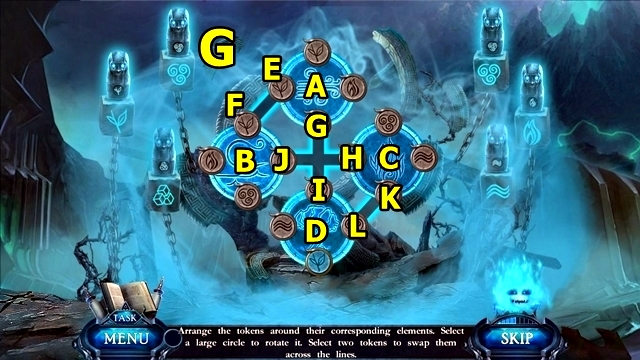
- Place AMULETS (M).
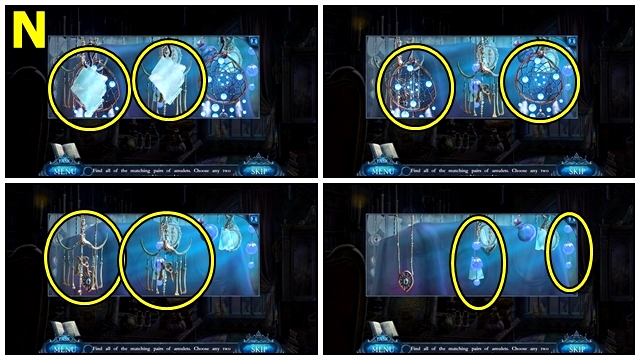
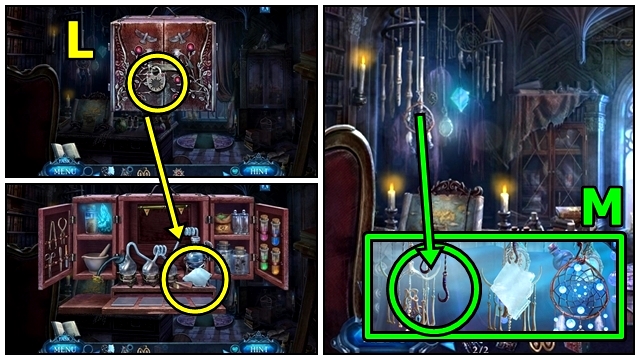
- Solution: (N).
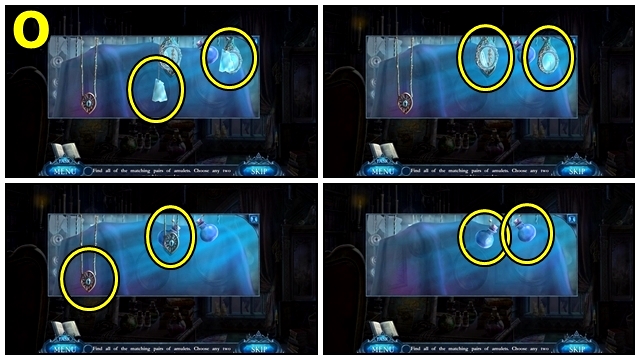
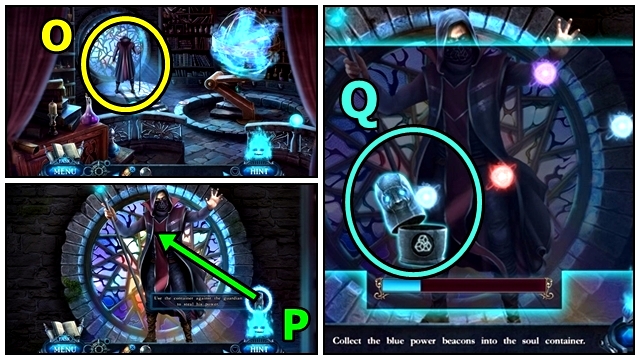
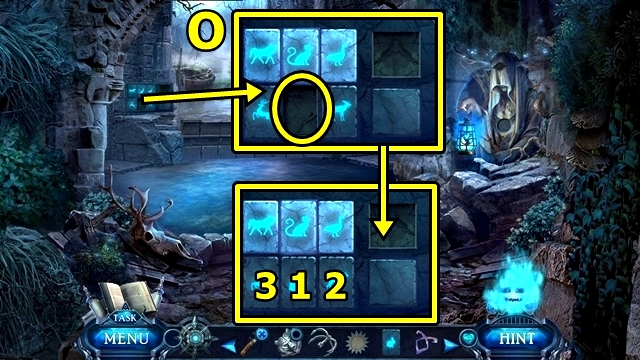
- Solution: (O). Take BOTTLE OF FIREFLIES.
- Move down.
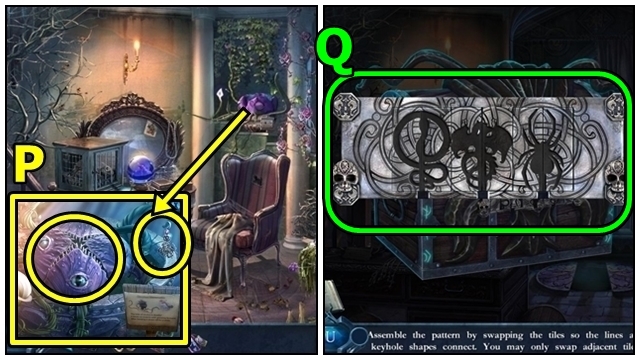
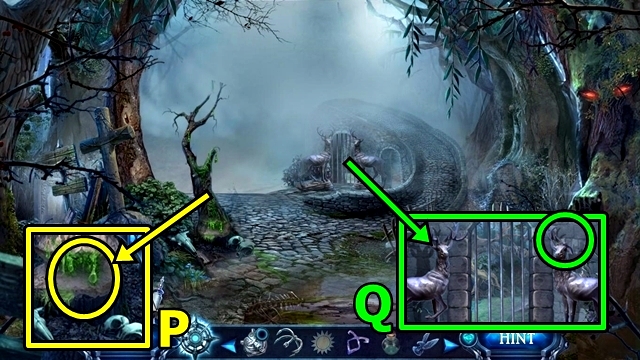
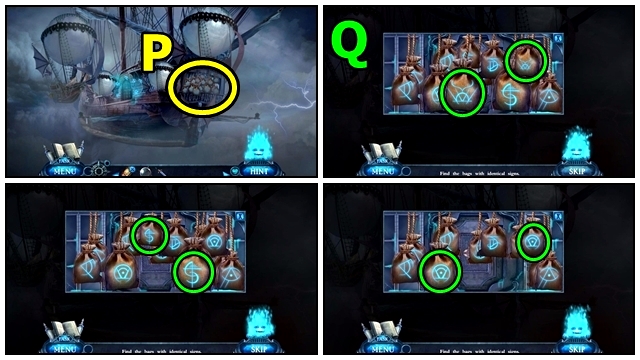
- Offer BOTTLE OF FIREFLIES (P); take CHEST KEYS.
- Move up.
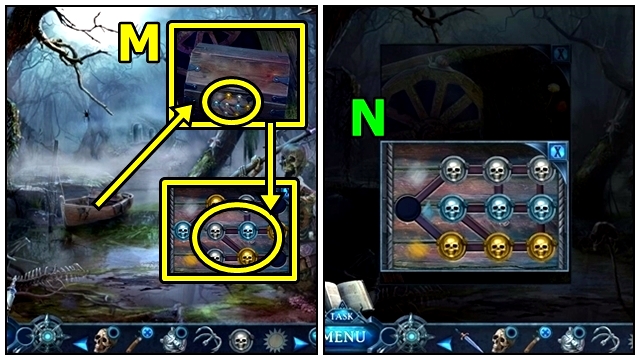
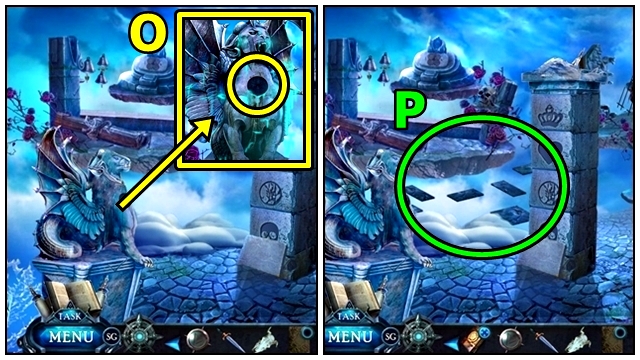
- CHEST KEYS on DARK MAGIC CHEST.
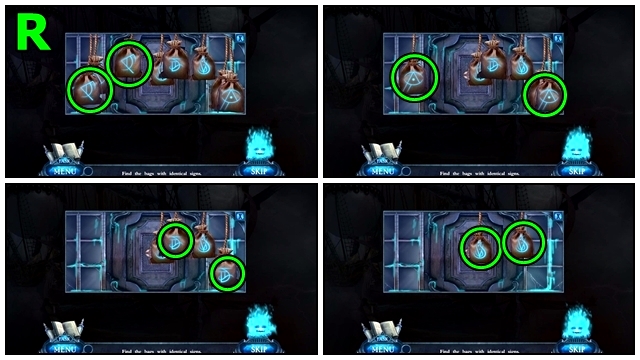
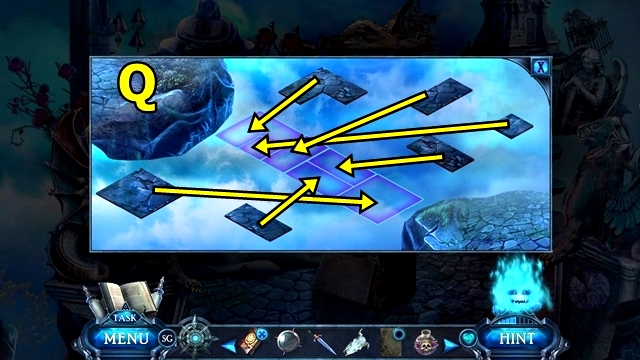
- Solution: (Q).
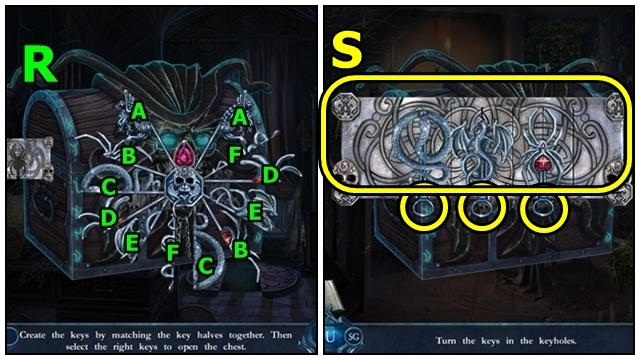
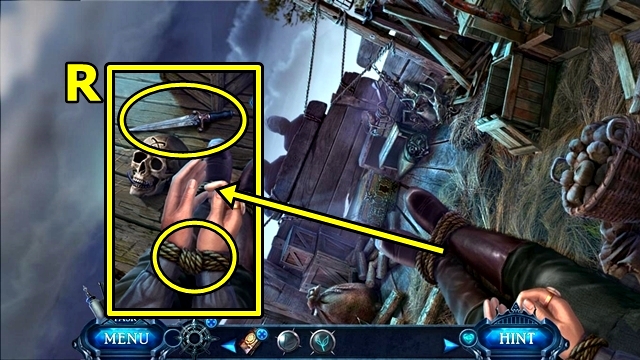
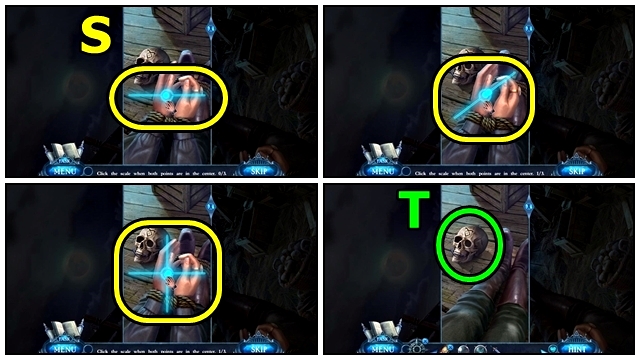
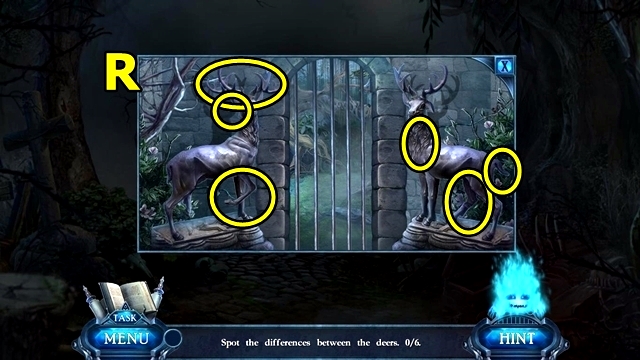
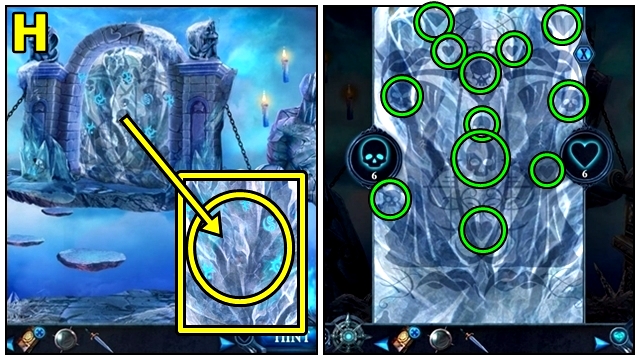
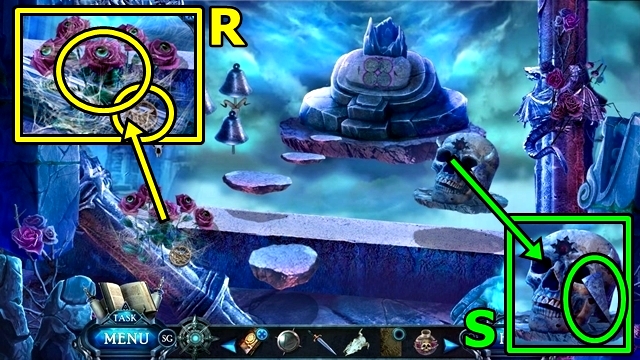
- Solution: (R-S). Take book; turn pages; take WITCH RUNE and PHOBOS DRAWING.
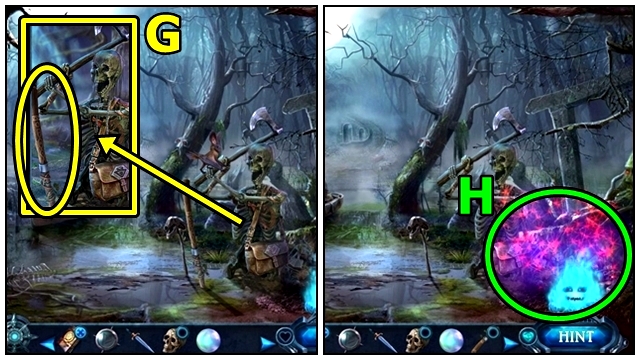
- Open TRAVEL BAG; take DAGGER and COMPASS SKETCH PART.
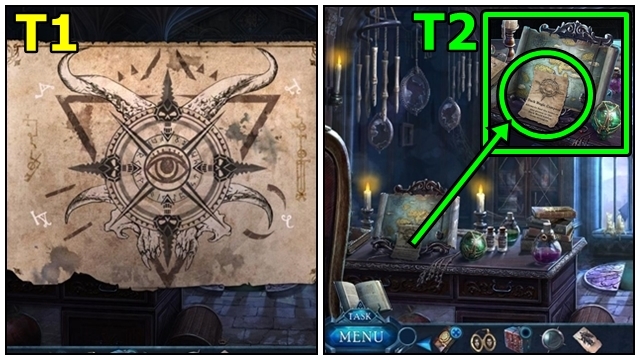
- COMPASS SKETCH PART on DARK MAGIC CHEST.
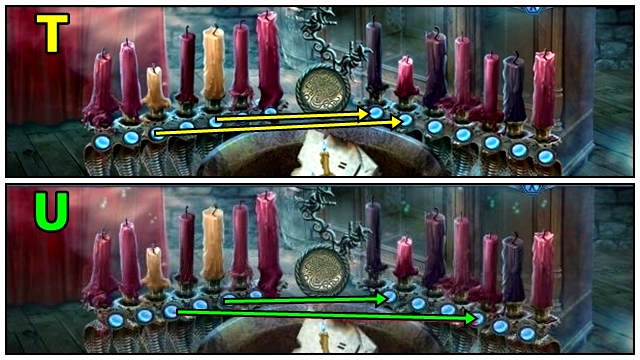
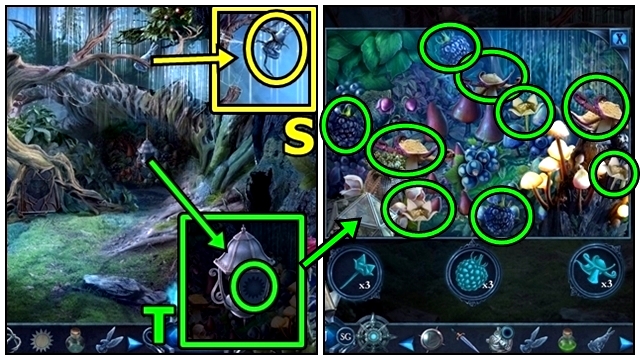
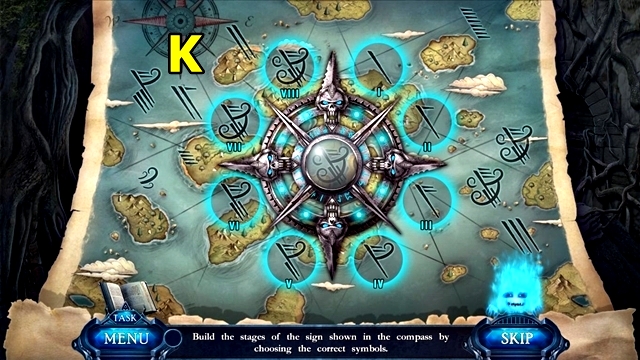
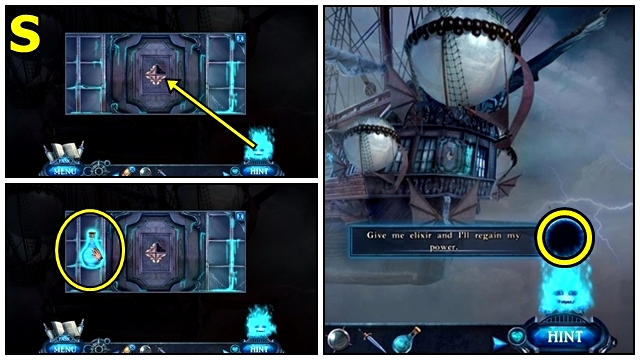
- Solution: (T1). Insert WITCH RUNE; take DARK COMPASS.
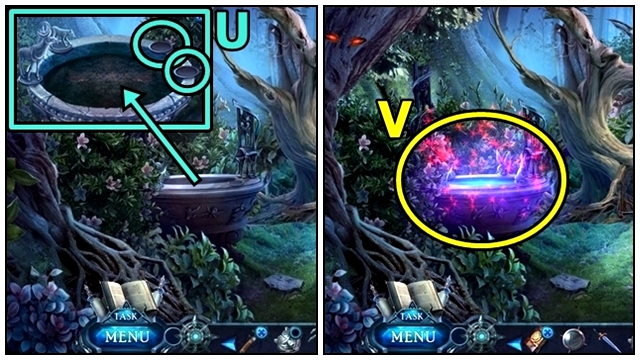
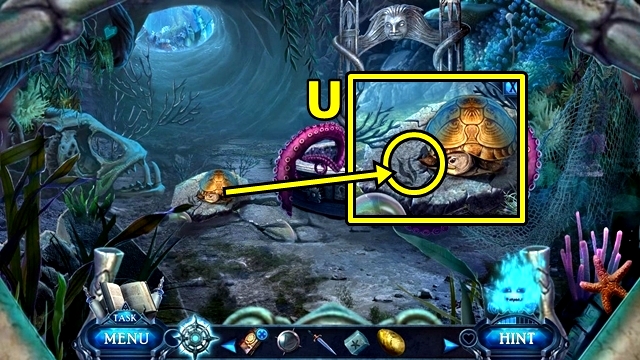
- Read note (T2). Insert DARK COMPASS.
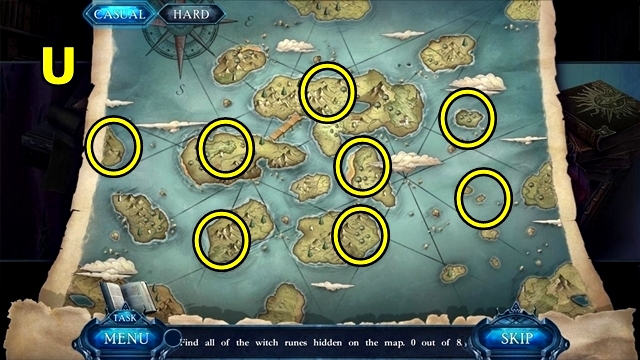
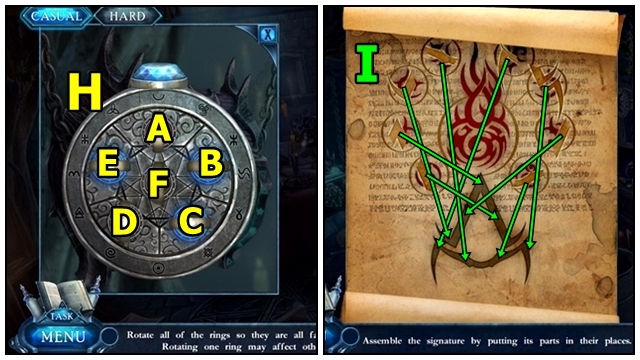
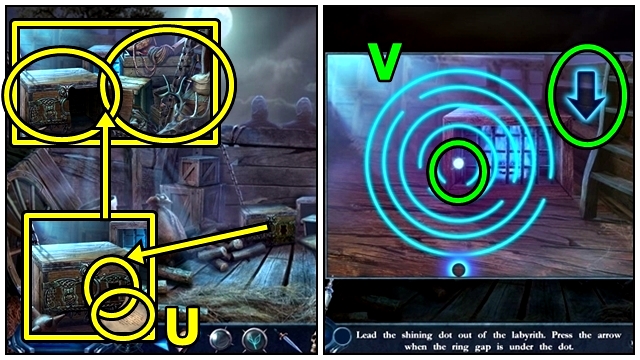
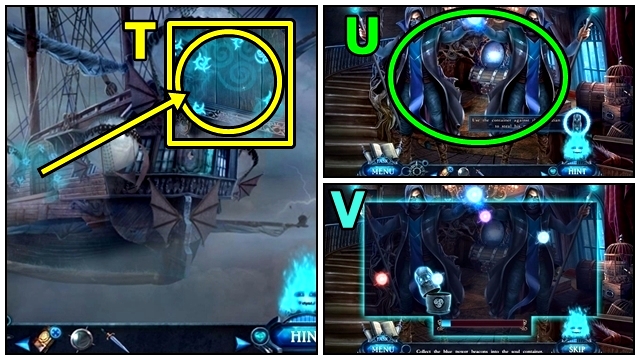
- Solution: (U).
- Move forward.

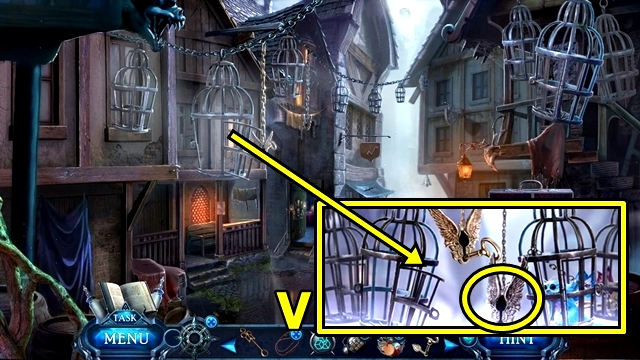
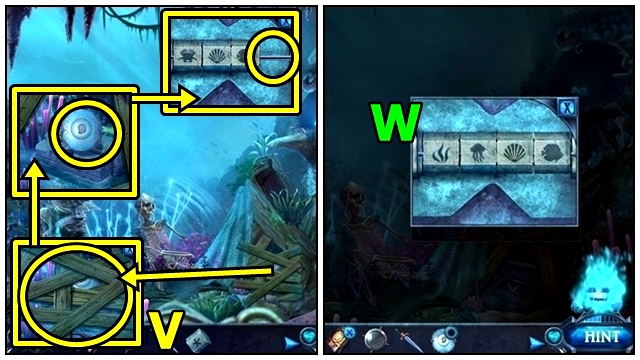
- Examine (V).
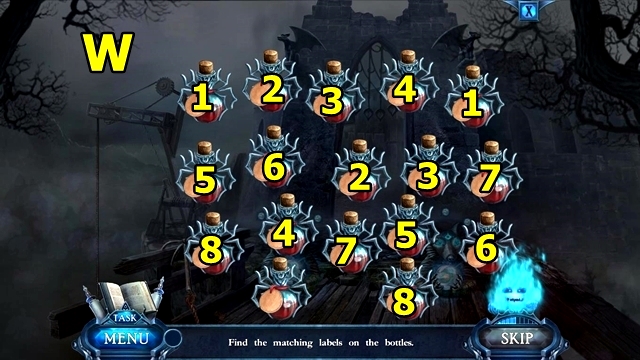
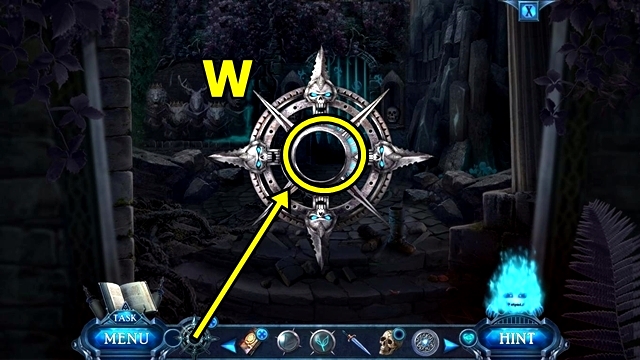
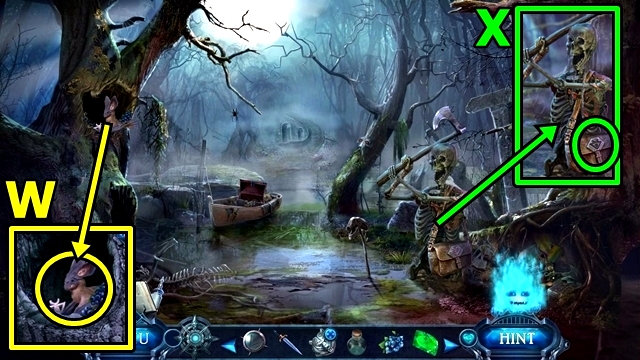
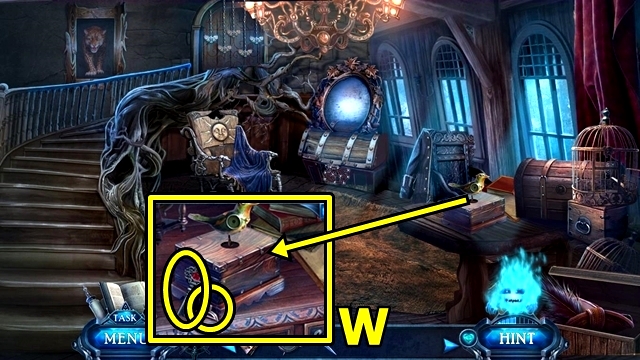
- Press (W).

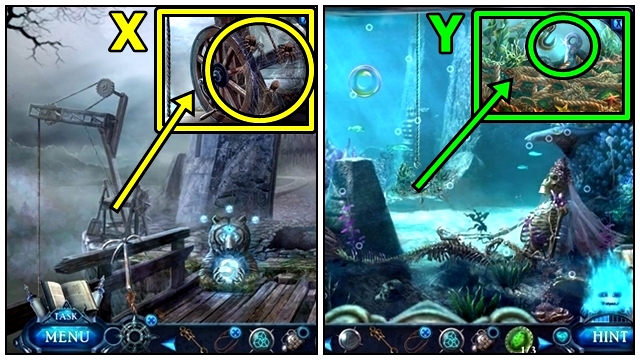
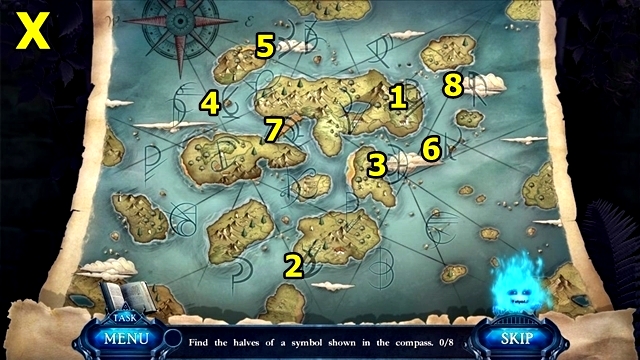
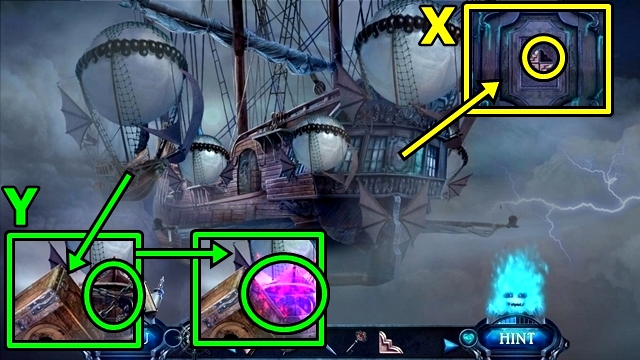
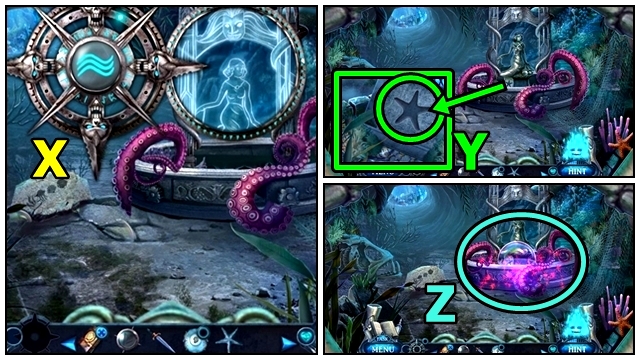
- Use DAGGER (X).
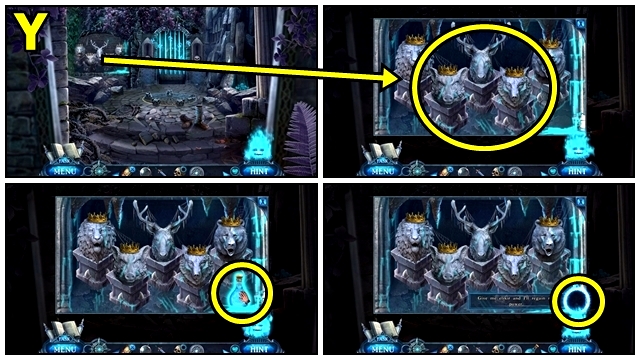
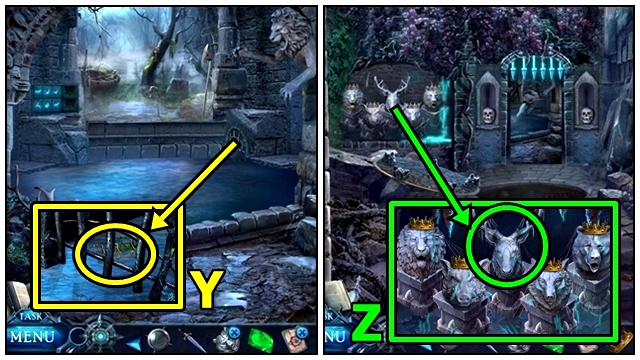
- Solution: Press matching daggers that pass through bubbles (Y).
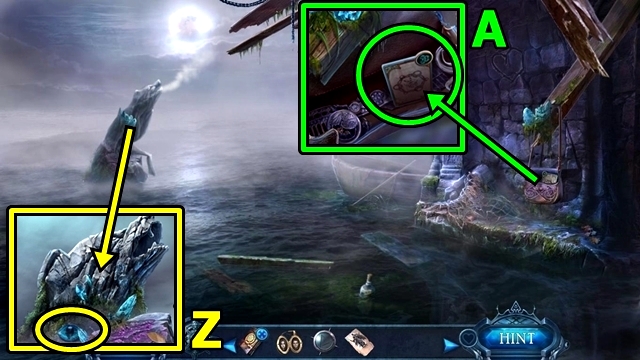
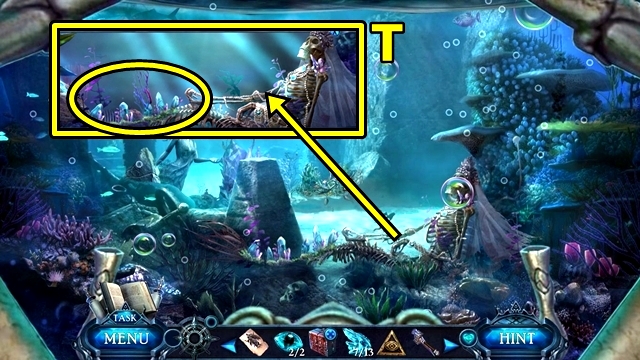
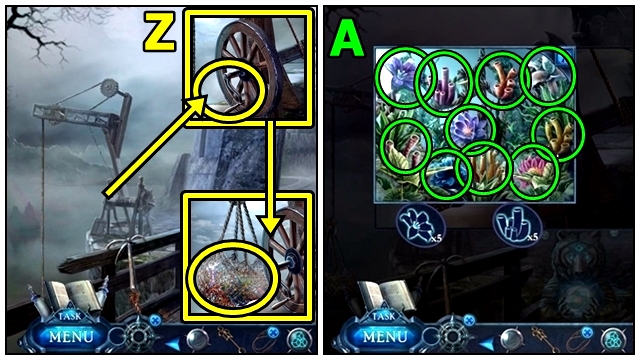
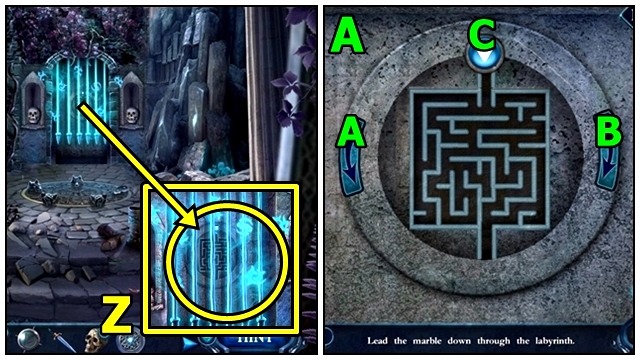
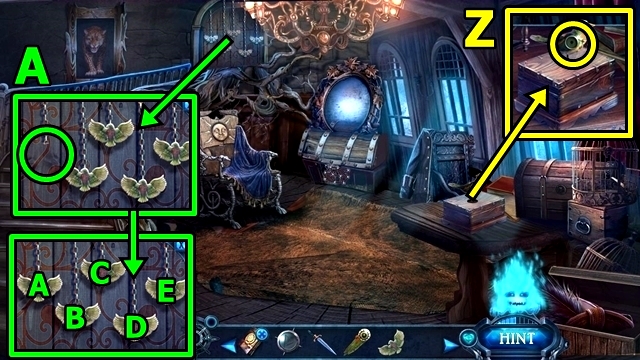
- Take STONE EYES (1/2) (Z).
- Take FISH SPELL (A).
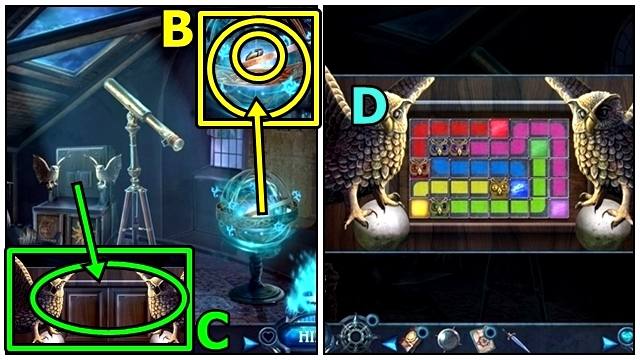
- Examine FISH SPELL.
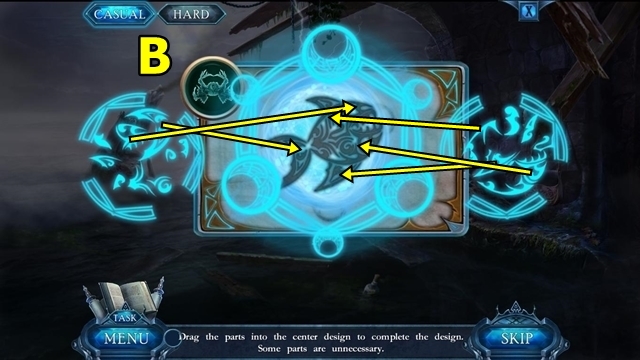
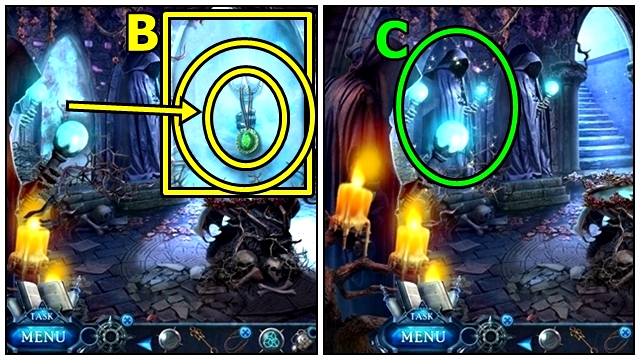
- Solution: (B).

- Solution: (C).
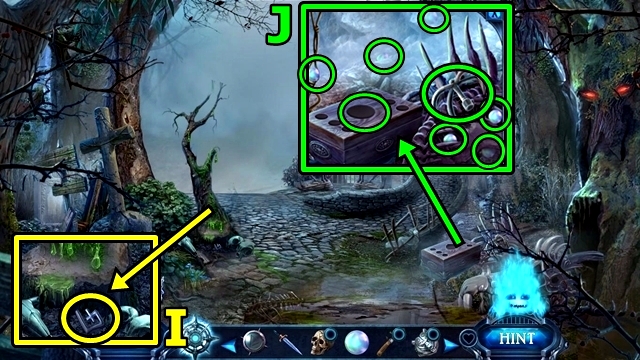
- Move down.
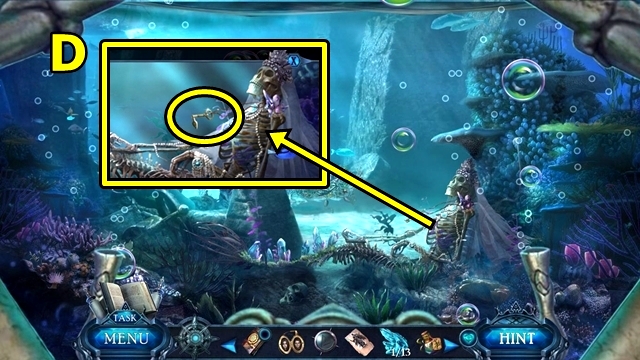
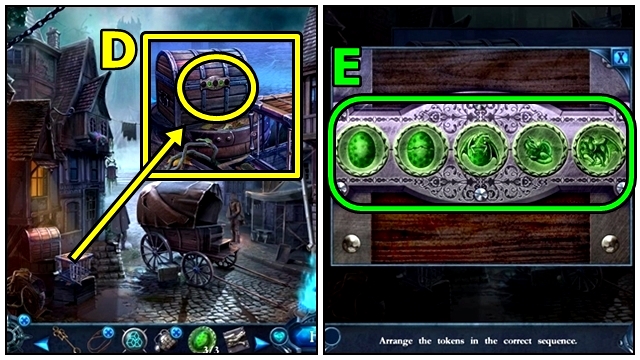
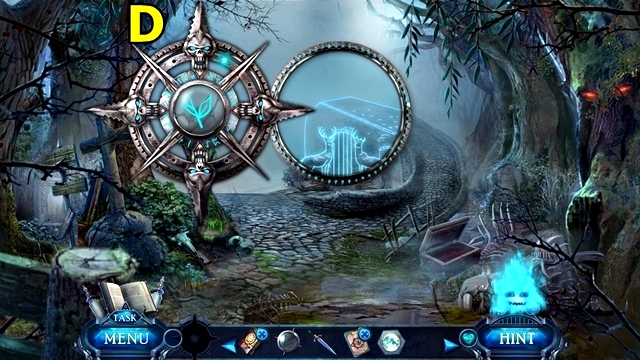
- Take GOLDEN KEY (D).
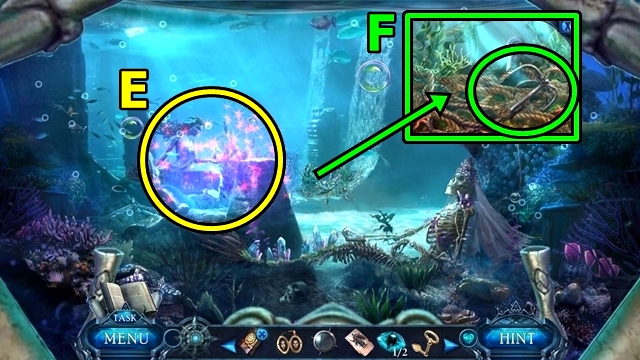
- Play HOP (E); receive POTIONS CASE.
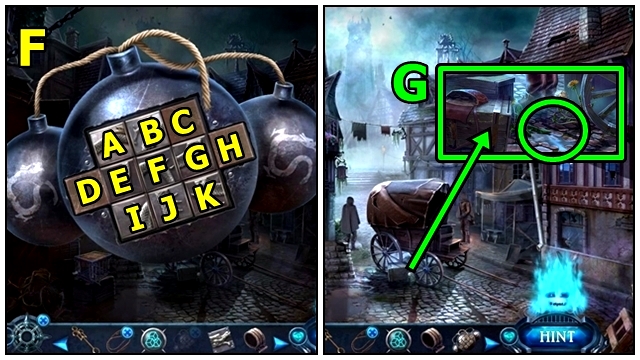
- Take GRAPPLING HOOK (F).
- Move up.
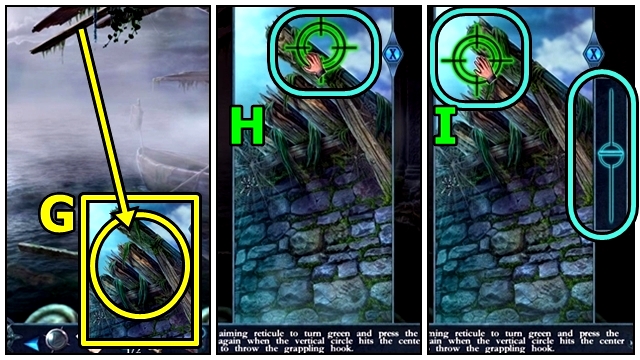
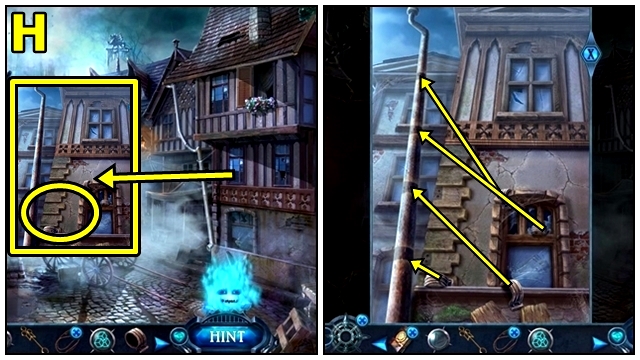
- Use GRAPPLING HOOK (G).
- Solution: (H-I).
- Move up, then forward.
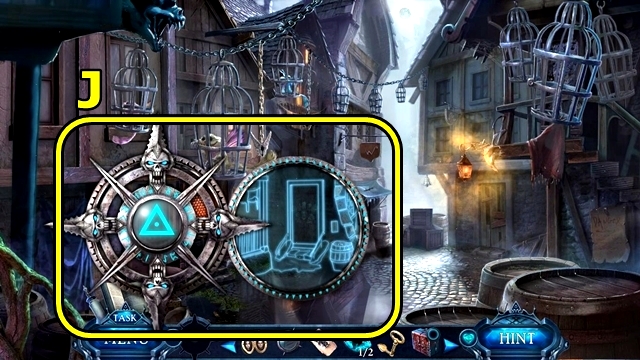
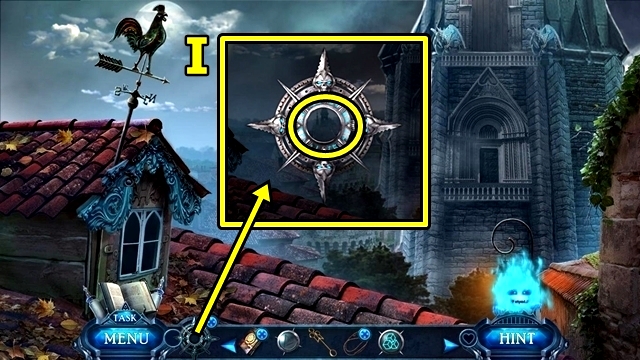
- Align Dark Compass (J).
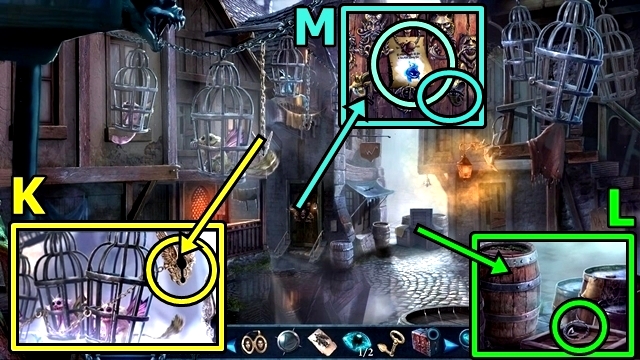
- Insert GOLDEN KEY (K); take DOOR KNOCKERS (1/2).
- Take DOOR KNOCKERS (2/2) (L).
- Read note (M); add DOOR KNOCKERS.
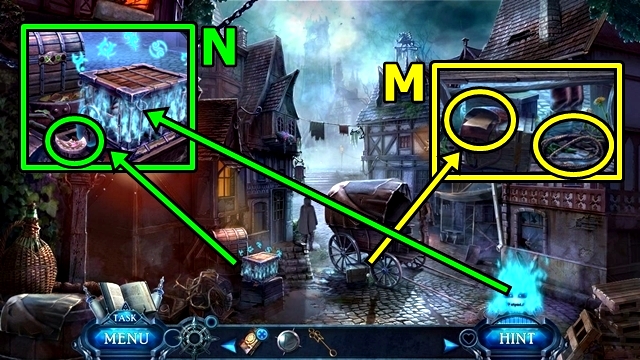
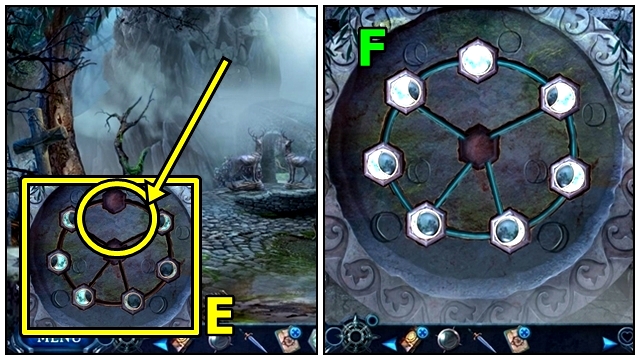
- Solution: (N).
- Enter Witch's House.
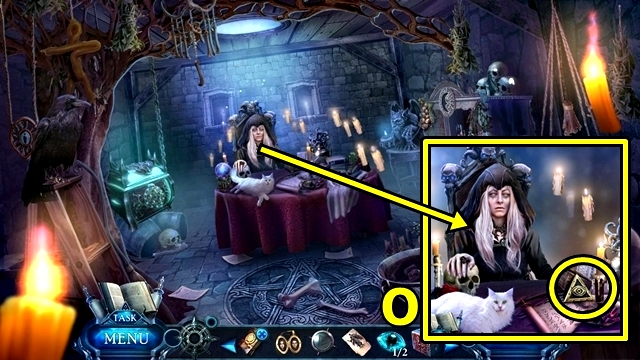
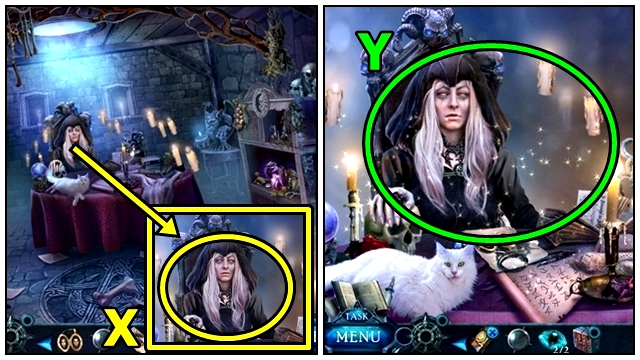
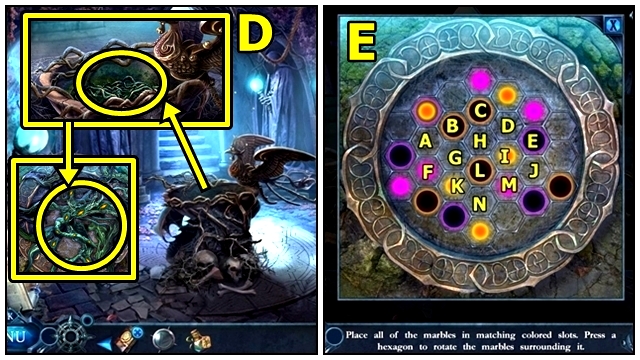
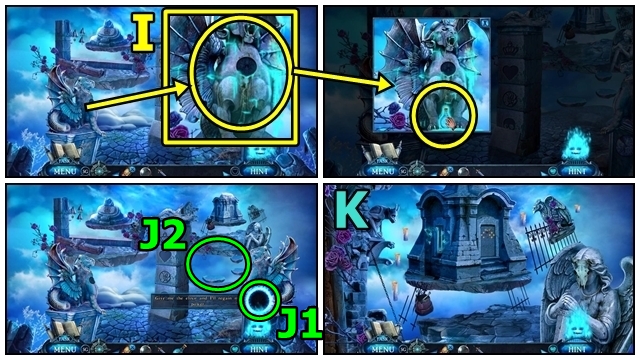
- Talk (O). Receive RAW GEMS (1/13). Take ALL-SEEING EYE.
- Take STONE EYES (2/2) (P).
- Take HAMMER AND CHISEL (Q).
- Return to Under Bridge.
- Use HAMMER AND CHISEL (R); receive RAW GEMS (5/13).
- Use HAMMER AND CHISEL (S); receive RAW GEMS (7/13).
- Move down.
- Use HAMMER AND CHISEL (T); receive RAW GEMS (12/13).
- Return to Witch's House.

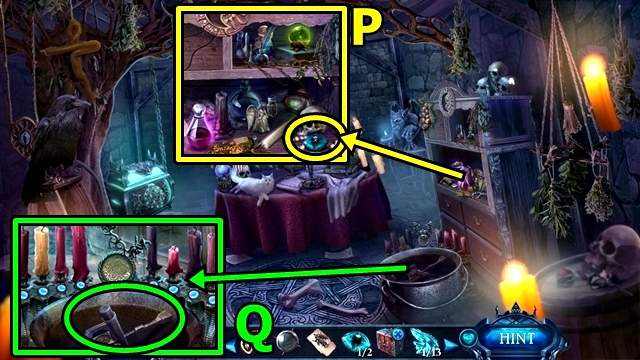
- Open POTIONS CASE (U). Add ALL-SEEING EYE (); take RAW GEMS (13/13).
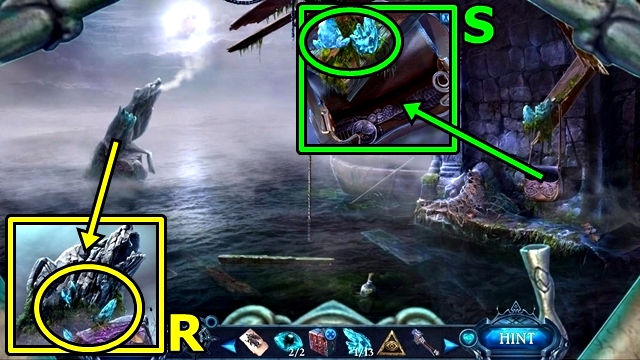
- Reassemble RAW GEMS (V-W); take GEMSTONE RUNES.
- Offer GEMSTONE RUNES (X), then OPHELIA'S LOCKET and PHOBOS DRAWING.
- Play mini-game (Y).
- Solution: (Z). Receive JEWELED FEATHER.
- Return to Bridge.
- Add STONE EYES (A).
- Enter Hidden Chamber.
- Insert JEWELED FEATHER (B). Take POTION RECIPE.
- Open POTIONS CASE (C). Add POTION RECIPE. Make recipe. Take PLANT KILLER.
- Use PLANT KILLER (D).
- Solution: C-J-D-Jx3-A-Bx3-Ix5-D-F-K-Gx2-N-Lx3-K (E). Take POUCH OF GEMS and TOWER KEY.
- Return to Witch's House.
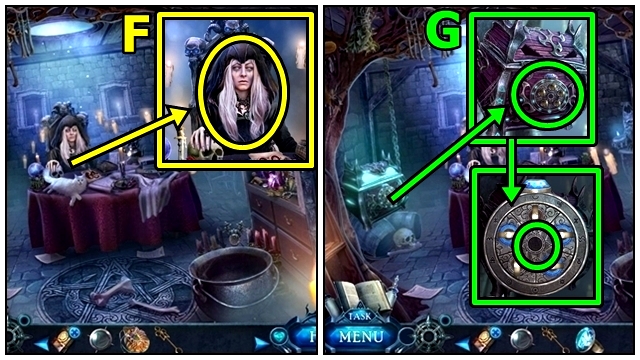
- Offer POUCH OF GEMS (F). Receive WITCH'S RING.
- Insert WITCH RING'S (G).
- Solution: (H) Casual: F-A-B-C-D; Hard: Fx2-Ax2-Bx2-Cx2-Dx2.
- Solution: (I).
- Move down.

- Examine (J).
- Talk (K).
- Go (L).
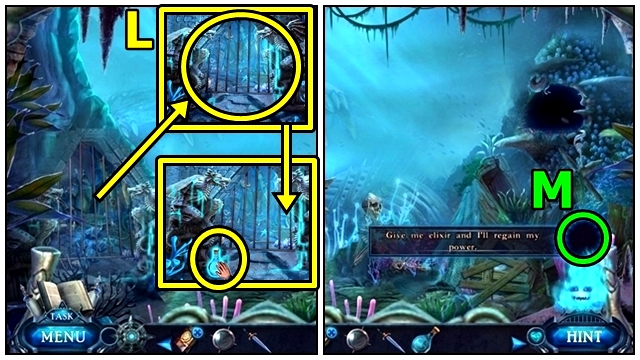
- Take ROPE (M) and CANDLES CLUE.
- Take MOON (N). Use Dark Spirit; receive HEALTHY BIRD.
- Move down.
- Place HEALTHY BIRD (O); receive FIRST GUARDIAN SYMBOL.
- Play mini-game (P).
- Solution: L-C-I-K-Ix2-J-Ax2-J (Q). Take MAGIC SMOKE BOMBS.
- Enter Witch's House.
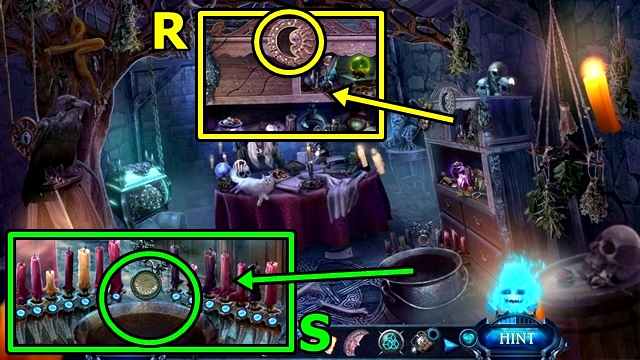
- Insert MOON (R); take BOTTLES.
- Place CANDLES CLUE (S).
- Solution: Casual (T). Hard (U). Take SILVER KEY.
- Move down.
- Insert SILVER KEY (V); take EGG TOKEN (1/3).
- Return to Bridge.
- Examine BOTTLES.
- Solution: (W). Take PESTICIDE.
- Use PESTICIDE (X).
- Move down twice.
- Attach hook (Y).
- Return to Bridge.
- Turn handle (Z). Examine.
- Find items (A). Take EGG TOKEN (2/3).
- Return to Hidden Chamber.
- Take EGG TOKEN (3/3) (B). Use Dark Spirit.
- Play HOP (C); receive DRAGON'S HEAD.
- Go to Town Square.
- Insert EGG TOKENS (D).
- Solution: (E). Take DRAIN CLAMP.
- DRAGON'S HEAD onto MAGIC SMOKE BOMBS.
- Solution: E-D, I-E, J-I, F-J, B-F, A-B, G-H, K-G, J-K, I-J, E-I, F-E, E-A, D-E, E-F, I-E, J-I, F-J, E-F, I-E, E-D, F-E, G-F, E-I, F-E, H-G, G-F, K-G, G-H, J-K, F-G, E-F, I-E, F-J, J-I, G-F, F-J, H-G, E-F, D-E (F). Take BURNING SMOKE BOMBS.
- Place BURNING SMOKE BOMBS (G).
- Add DRAIN CLAMP (H). Replace drain clamps.
- Place FIRST GUARDIAN SYMBOL (I) into Dark Compass.
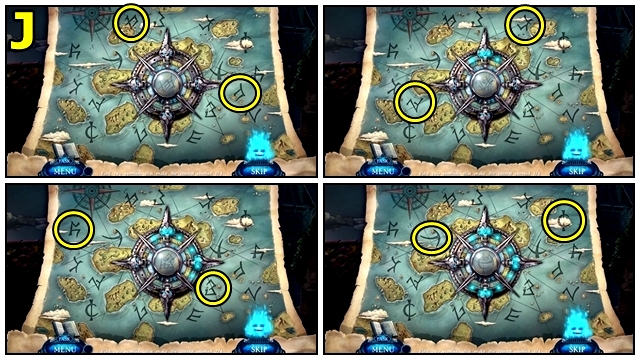
- Solution: (J).
- Fold ROPE; take ROPE LOOP.
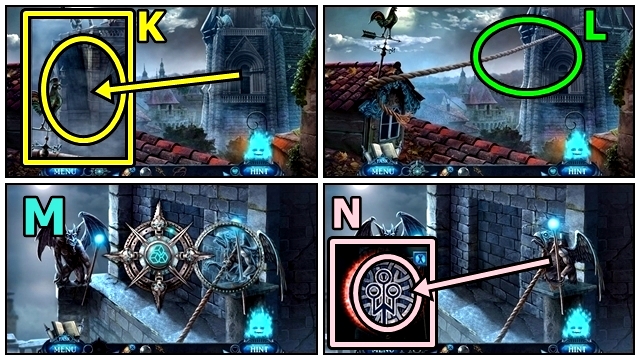
- Use ROPE LOOP (K).
- Climb (L).
- Use Dark Compass (M).
- Insert TOWER KEY (N).
- Enter.
- Talk (O).
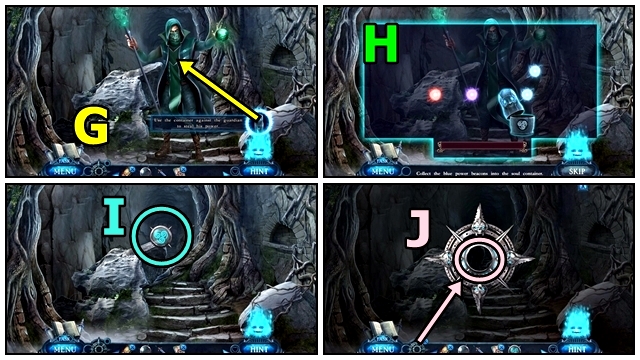
- Use Container (P).
- Solution: (Q).
- Take, use DAGGER (R).
- Solution: (S).
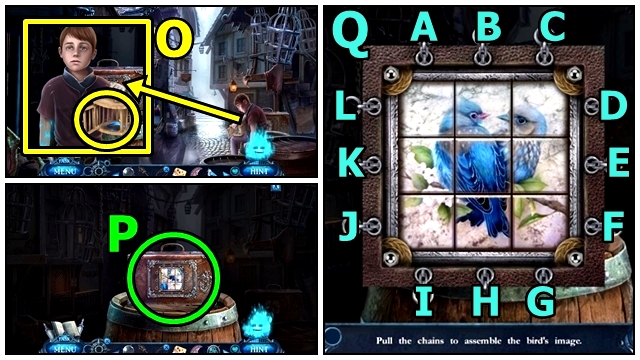
- Take SKULL (T) and OWL.
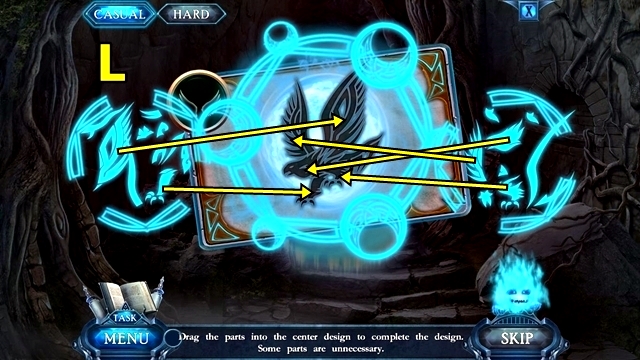
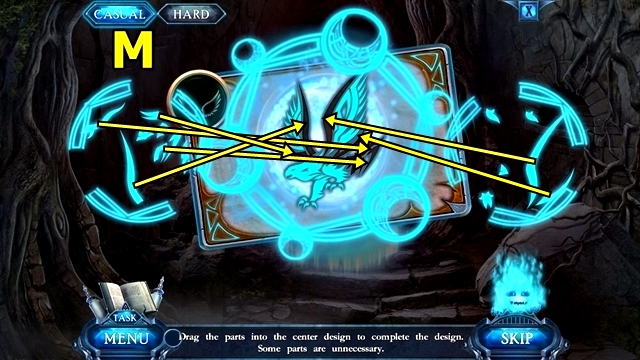
- Read note (U); insert OWL; take ORACLE'S AMULET. Move items.
- Solution: Screenshot shows first step to solve puzzle; continue these steps (V).
- Place SECOND GUARDIAN SYMBOL (W) into Dark Compass.
- Solution: (X).
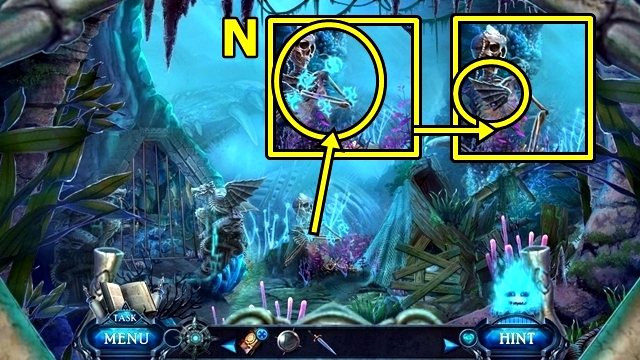
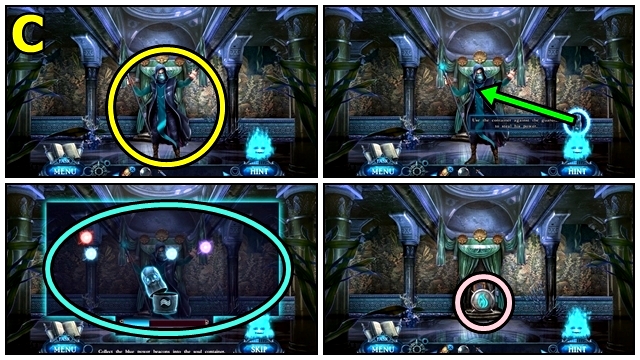
- Use Dark Spirit (Y). Take POWER ELIXIR. Use POWER ELIXIR.
- Use Dark Spirit (Z).
- Solution: C-A-Bx2-A-B-A-B-A-Bx2-Ax3-B-A-B (A).
- Move forward.
Chapter 2: Forest Kingdom
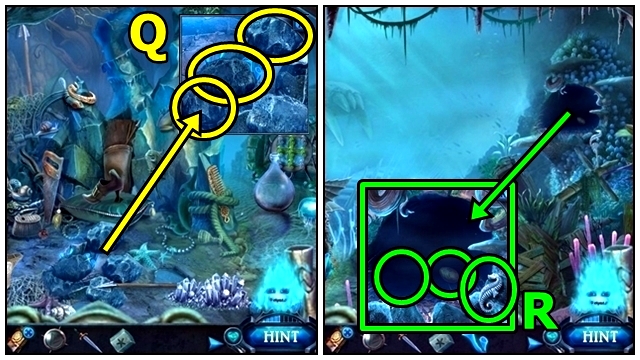
- Take PEARL SPHERE (B). Use Dark Spirit.
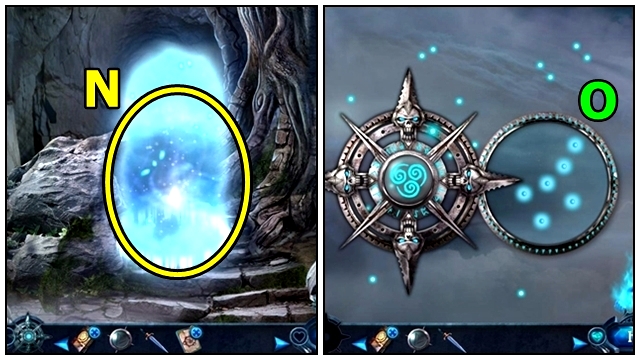
- Insert ORACLE'S AMULET (C).
- Solution: (D). Receive WOLF'S HEAD.
- Return to Trap.
- Place WOLF'S HEAD (E). Take GIANT'S EYE.
- Move forward.
- Insert GIANT'S EYE (F).
- Move forward.
- Take STICK (G).
- Play HOP (H); receive BEAR.
- Move forward.
- Take BOOT SHAPE (I).
- Take HOOK (J). Add PEARL SPHERE. Find pearls; take GOOSE TILE.
- Return to Dungeon.
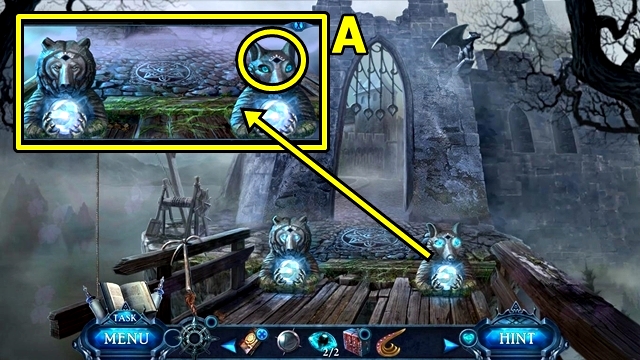
- Insert GOOSE TILE (K). Press goose, horse, cat; take SKULL SYMBOL.
- Move down.
- Insert BOOT SHAPE (L); take SUN.
- Return to Swamp Dock.
- Insert SKULL SYMBOL (M).
- Solution: (N). Take RABBIT TILE and SKULL SYMBOL.
- Move down.
- Add RABBIT TILE (O). Press rabbit, moose and deer. Take EMPTY BOTTLE and EAGLE FIGURINE.
- Return to Mountain Pass.
- Use EMPTY BOTTLE (P); receive ACID RESIN.
- SKULL SYMBOL on SKULL; take ANTLER.
- Add ANTLER (Q).
- Solution: (R).
- Move forward.
- HOOK on STICK; take POLE WITH STICK.
- Use POLE WITH STICK (S); receive RABBIT FIGURINE.
- Insert SUN (T); find items; receive BERRIES.
- Place EAGLE FIGURINE (U) and RABBIT FIGURINE.
- Play HOP (V); take EMERALD.
- Return to Swamp Dock.
- Offer BERRIES (W); receive BAG CLASP.
- Insert BAG CLASP (X); take WINGS CARD.
- Move down.
- Use ACID RESIN (Y); receive CROWN.
- Move down.
- Place CROWN (Z).

- Play HOP (A); receive RUBY.
- Return to Garden Ruins.
- EMERALD and RUBY on BEAR.
- Insert BEAR (B); take ORACLE'S EYE.
- Return to Dungeon.
- Insert ORACLE'S EYE (C). Play HOP; receive FULL MOON.
- Return to Mountain Pass.
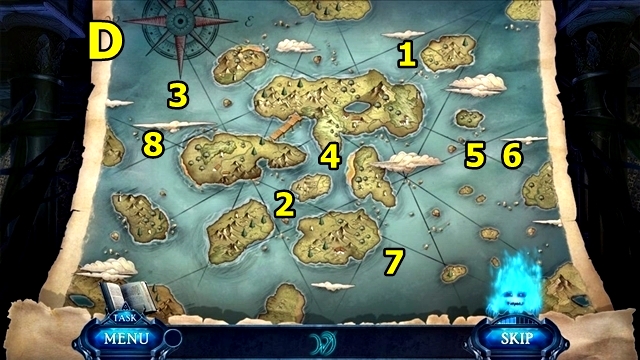
- Use Dark Compass (D).
- Insert FULL MOON (E).
- Solution: (F).
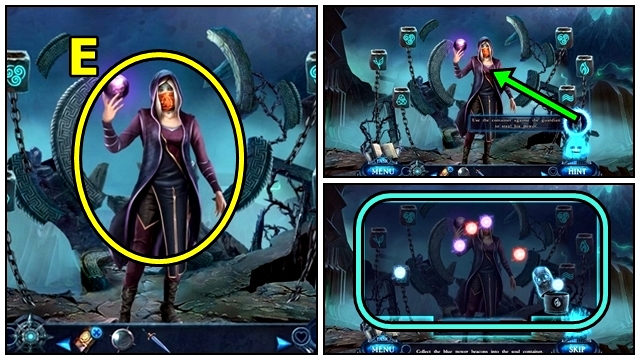
- Use Container (G).
- Solution: (H).
- Take SYMBOL OF THIRD AND FOURTH GUARDIANS (I).
- SYMBOL OF THIRD AND FOURTH GUARDIAN on Dark Compass (J).
- Solution: (K).
- Examine WINGS CARD.
- Solution: (L).
- Solution: (M). Receive MAGIC WINGS.
- Use MAGIC WINGS (N).
- Use Dark Compass (O).
Chapter 3: The Airship
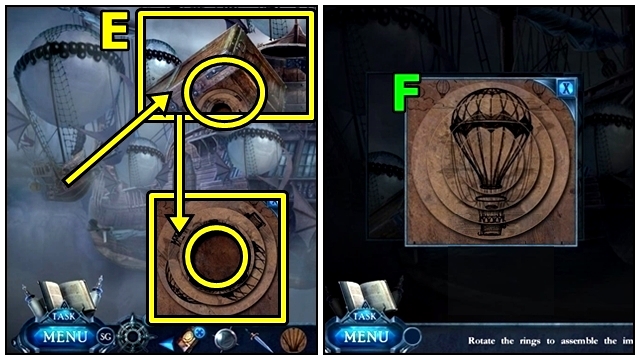
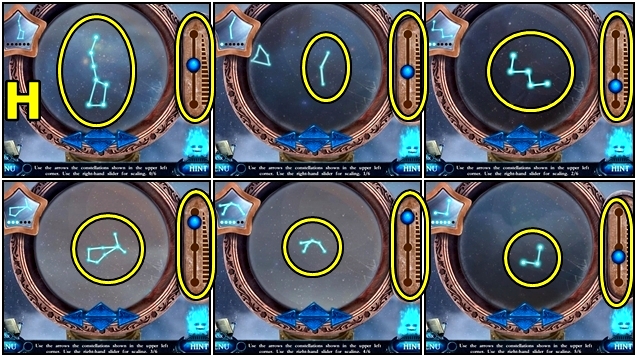
- Play mini-game (P).
- Solution: (Q).
- Solution: (R).
- Use Dark Spirit (S). Find POWER ELIXIR. Offer POWER ELIXIR.
- Use Dark Spirit (T).
- Enter Ship's Bridge.
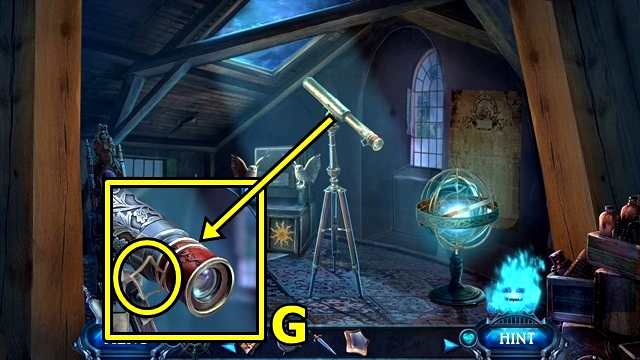
- Use Container (U).
- Solution: (V).
- Take BARREL KEY (W) and PATTERN PIECE.
- Move down.
- Insert PATTERN PIECE (X); take BIRD WING.
- Use BARREL KEY (Y); play HOP; receive BIRD.
- Enter Ship's Bridge.
- Attach BIRD WING (Z). Read note; take OWL'S BEAK (1/2).
- Add BIRD (A). Press C-E-B-A-D.
- Move forward.
- Use Dark Spirit (B). Take OWL'S BEAK (2/2).
- Add OWL'S BEAKS (C).
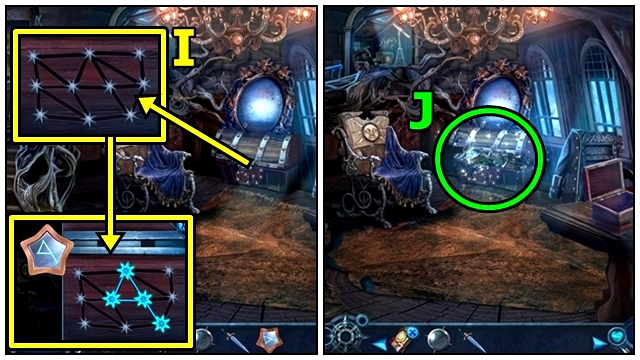
- Solution: (D). Take CENTRAL DISC.
- Return to Airship.
- Add CENTRAL DISC (E).
- Solution: (F). Take STAR LENS.
- Return to Captain's Quarters.
- Add STAR LENS (G).
- Solution: (H). Receive CHEST CLUE.
- Move down.
- Add CHEST CLUE (I). Light stars.
- Play HOP (J); receive SYMBOL OF THE FIFTH GUARDIAN.
- SYMBOL OF THE FIFTH GUARDIAN on Dark Compass. Solution: (K).
- Move forward.
Chapter 4: Underwater Kingdom
- Use Dark Spirit (L). Find POWER ELIXIR.
- Offer POWER ELIXIR (M).
- Use Dark Spirit (N). Take DRAGON WING.

- Add DRAGON WING (O).
- Play HOP (P); receive LOCK PART.
- Move items (Q); take GLOWING CORAL.
- Move down.
- Take SEAHORSE (R). Add GLOWING CORAL; take TURTLE EGG.
- Enter Treasure Room.
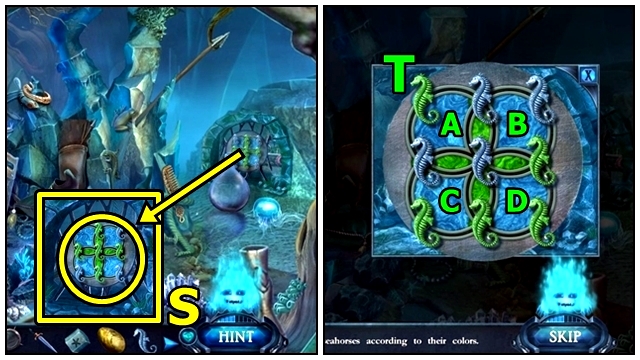
- Add SEAHORSE (S).
- Solution: Dx2-Cx3-Ax3 (T).
- Enter Cavern.
- Offer TURTLE EGG (U), note symbols.
- Return to Ocean Floor.
- Remove boards (V). Take BUBBLE. Add LOCK PART.
- Solution: (W). Take STARFISH.
- Return to Cavern.
- Use Dark Compass (X).
- Insert STARFISH (Y).
- Play HOP (Z); receive SHELL.
- SHELL on BUBBLE; take CROWN.
- Add CROWN (A).
- Go (B).
- Talk (C). Use Container. Solution. Take SYMBOL OF FIFTH GUARDIAN. SYMBOL OF FIFTH GUARDIAN on Dark Compass.
- Solution: (D).
- Move forward.
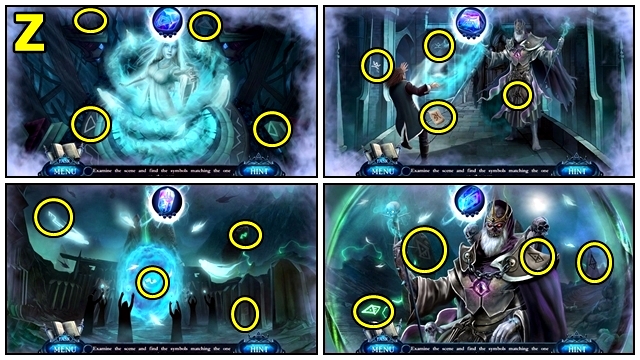
- Talk (E). Use Container. Solution.
- Place Containers (F).
- Solution: C-(H-J)-Bx2-C-(H-J)-Ax2-(G-I)-A-Dx3-(G-I)-Ax2-(E-F)-Bx3-C-(H-J)-Cx3-Dx3-(K-L)-Bx3-A-(E-F)-B-C-(H-J) (G).
- Move forward.
Chapter 5: Sky Kingdom
- Use Dark Spirit (H). Find items.
- Move forward.
- Use Dark Spirit (I). Find POWER ELIXIR.
- Offer POWER ELIXIR (J1).
- Go (J2).
- Solution: (K).
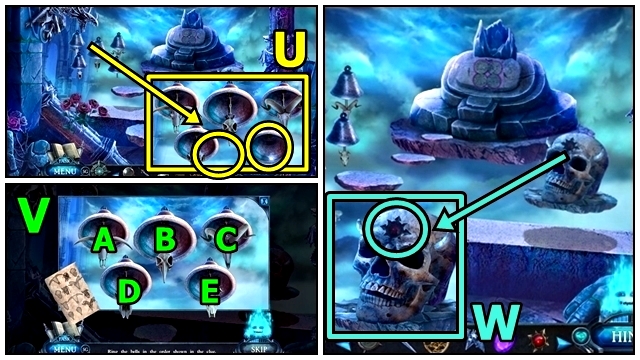
- Take BELL CLAPPER (L).
- Take BOOK OF THE DEAD (M).
- Use Dark Spirit (N); take POISON and EMBLEM.
- Move down.
- Insert EMBLEM (O).
- Examine (P).
- Replace tiles (Q).
- Take left path.
- Use POISON (R); take LIFE SPROUT.
- Take FRESCO SEGMENT (S).
- Move down.
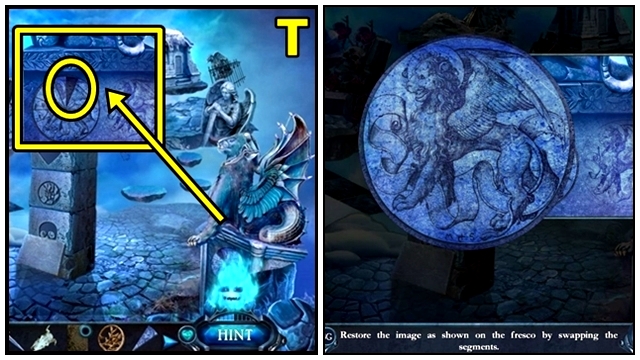
- Add FRESCO SEGMENT (T). Solution. Take BOOK DECORATION.
- Take left path.
- BOOK DECORATION on BOOK OF THE DEAD; take WINGED SKULL and AMETHYST. Turn pages; take BELLS CLUE.
- Add BELL CLAPPER (U) and BELLS CLUE.
- Solution: A-D-C-E-A-B-B (V). Take BLOODSTONE.
- Insert BLOODSTONE (W); take SKULL.
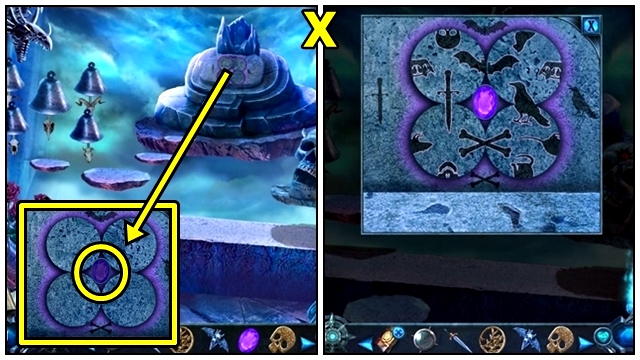
- Insert AMETHYST (X). Solution. Take STONE DISCS (1/2).
- Return to Underworld Gates.

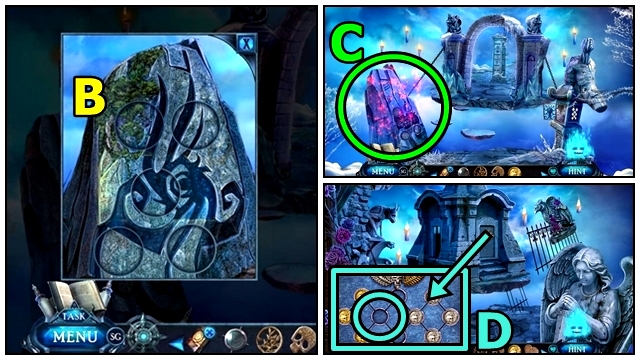
- Use DAGGER (Y); take STONE DISCS (2/2).
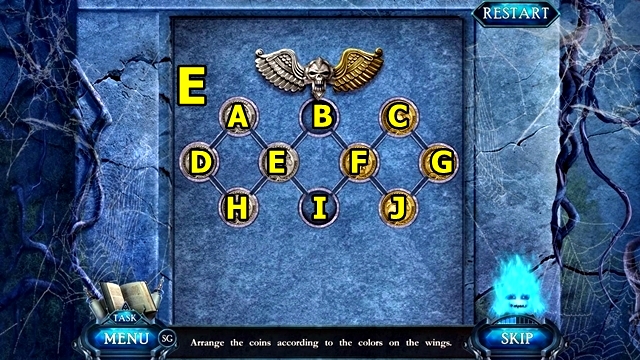
- Insert WINGED SKULL (Z); take COIN.
- Insert STONE DISCS (A).
- Solution: (B).
- Play HOP (C); receive HEART.
- Return to Palace Ruins.
- Insert COIN (D).
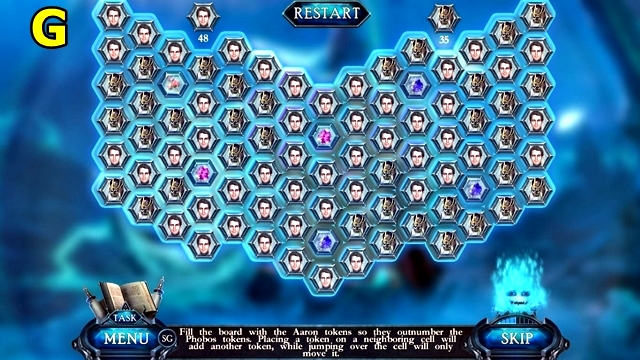
- Solution: (E-B)-(F-I)-(B-F)-(H-E)-(E-B)-(I-E)-(E-H)-(F-I)-(I-E)-(J-F)-(F-I)-(B-F)-(F-J)-(E-B)-(B-F)-(A-E)-(E-B)-(D-A)-(H-D)-(I-E)-(E-H)-(F-I)-(I-E)-(C-F)-(F-I)-(G-C)-(J-G)-(B-F)-(F-J)-(E-B)-(A-E)-(B-F)-(E-B)-(I-E)-(E-A)-(F-I)-(I-E)-(C-F)-(F-I)-(B-F)-(F-C)-(E-B)-(B-F)-(I-E) (E).
- Play HOP; receive CROWN.
- Move down.

- Insert CROWN (F), HEART, LIFE SPROUT and SKULL.
- Move forward.
- Solution: Puzzle is random; screenshot shows a solved puzzle (G).
- Congratulations! You've completed Love Chronicles: Death's Embrace.
Created at: 2017-07-28