
Walkthrough Menu
General Tips
- There are 5 Chapters in the game; each chapter has five locations.
- The scenes in the game are divided into Illusions and Reality. In order to see the Illusions you will have to use special artifacts or activate the Magic Glasses.
- The Magic Glasses will be introduced at the end of Chapter I but you will not begin to use them until Chapter 2.
- To activate the Magic Glasses click on them in the lower right corner. Move your cursor around the scene and click on the items seen through the glasses.
- The mini-games can be skipped once the skip button is recharged. You can click on the restart button to start the mini-game from scratch.
- Hints are unlimited but they need to be charged before they can be used.
- Please note that the solutions for some of the puzzles are random. This strategy guide will try to show you as many alternate solutions as possible.
- At the end of each chapter you can go back and play the Find the Differences puzzle for each scene in that chapter.
Chapter I
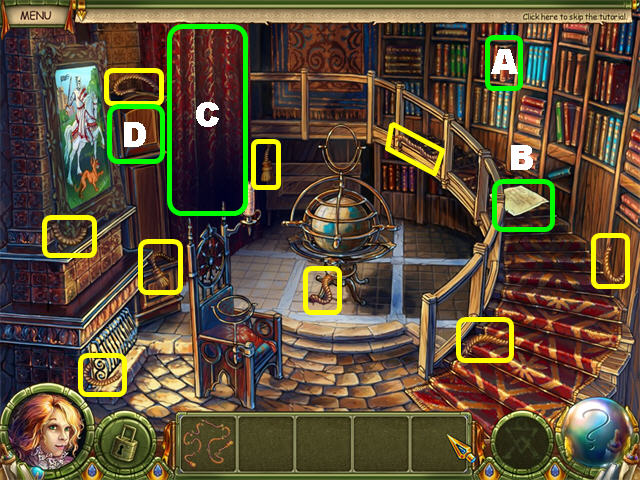
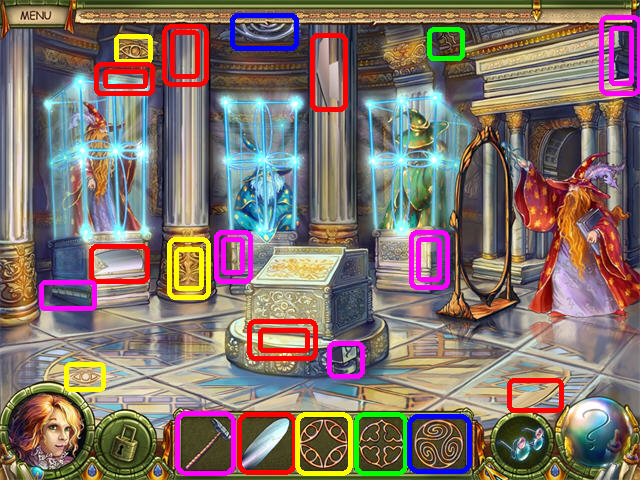
- Click on the BOOK (A) in the upper right corner.
- Click on the PARCHMENT (B) on the steps.
- Pick up the 9 DRAPERY CORD fragments marked in yellow.
- Place the DRAPERY CORD on the CURTAIN (C) in the upper left.
- Zoom into the CLOCK (D) on the left; click it twice for the gear icon to appear.
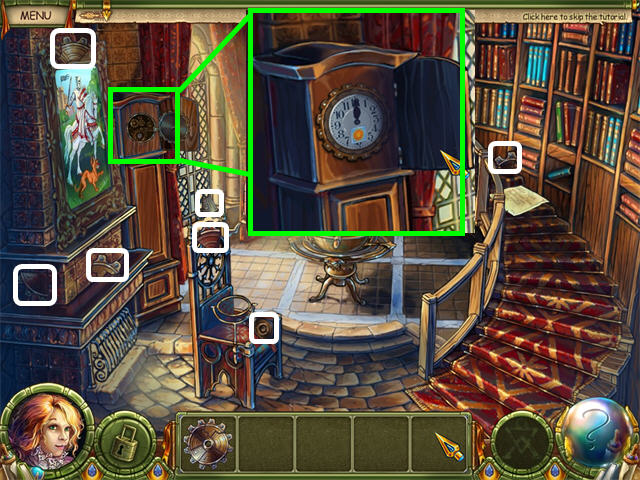
- Pick up the 7 CLOCK GEAR pieces marked in white.
- Place the CLOCK GEAR in the clock on the left.
- Click on the clock again to turn from day to night.
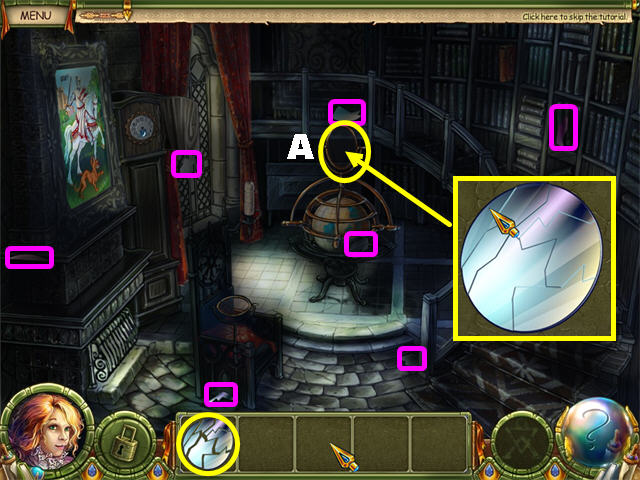
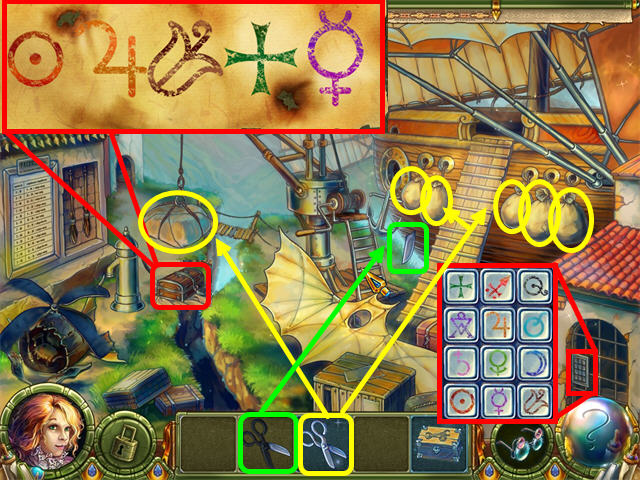
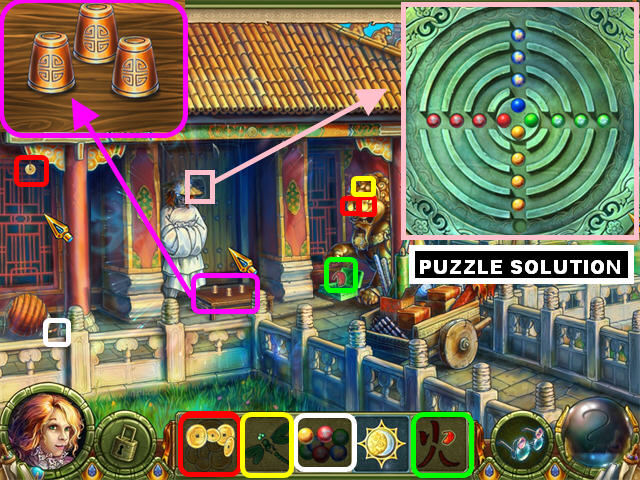
- Pick up the 7 MIRROR fragments marked in purple.
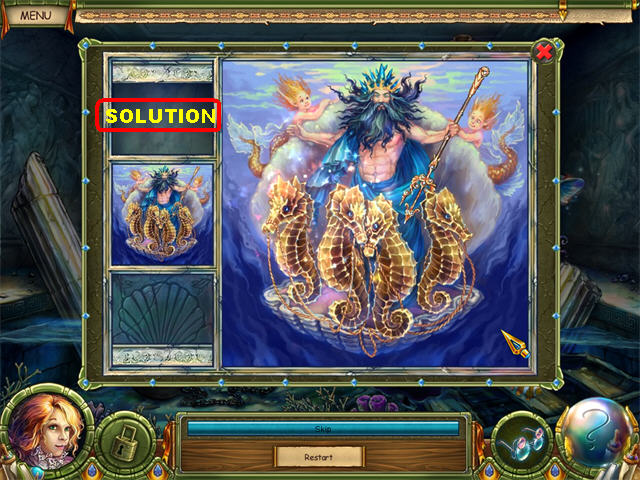
- Click on the MIRROR in inventory to trigger a puzzle.
- Assemble the mirror as shown in the screenshot.
- Place the assembled MIRROR on the STAND (A) above the globe to enable the moonlight shining on the mirror.

- Move your cursor around the scene for hidden pieces to appear.
- The MAGIC LENS pieces are circled in yellow.
- The KEY pieces are circled in red.
- Place the MAGIC LENS on the STAND (A) on the chair.
- Click on the clock and turn it back to day so you can burn the candle on the left.
- Turn the clock back to night.
- Pick up the last KEY (B) fragment in place of the candle.
- Place the DOOR KEY on the DOOR (C) in the upper left to access the lab.
- Pick up all the fragmented items in the scene.
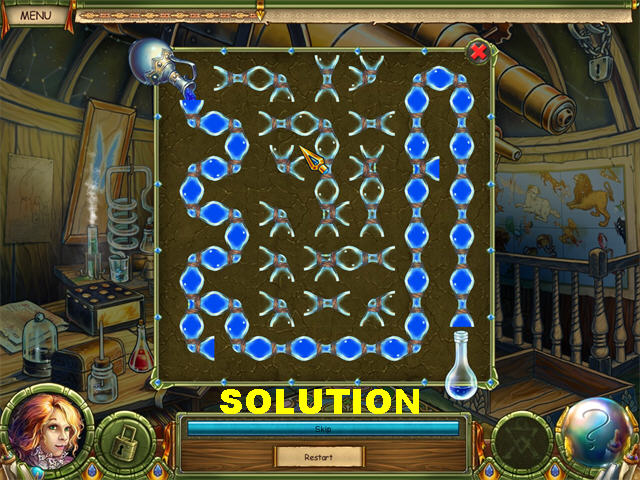
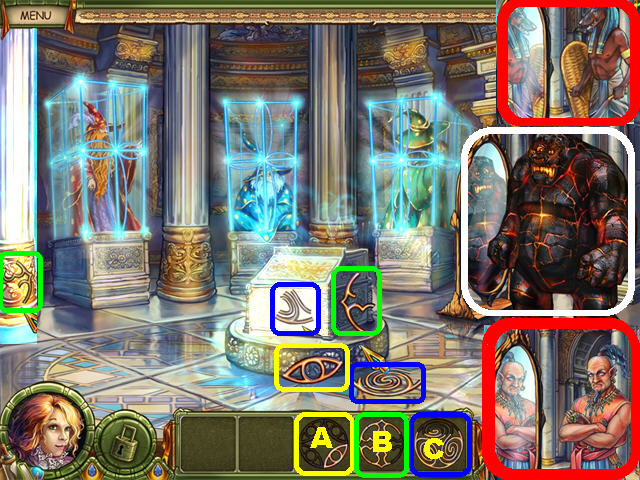
- Place the POTION FOR REMOVING ILLUSIONS on the GLASS TUBES (A) to trigger a puzzle.
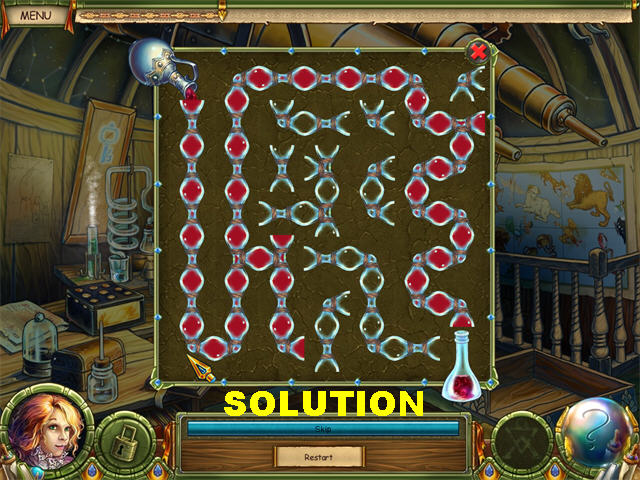
- Click on the tubes to change their positions so the liquid from the flask on top flows to the flask at the bottom.
- Please look at the screenshot for the solution.
- The POTION FOR REMOVING ILLUSIONS is the RED FLASK (B) in the lower left; click on it to remove the illusion.
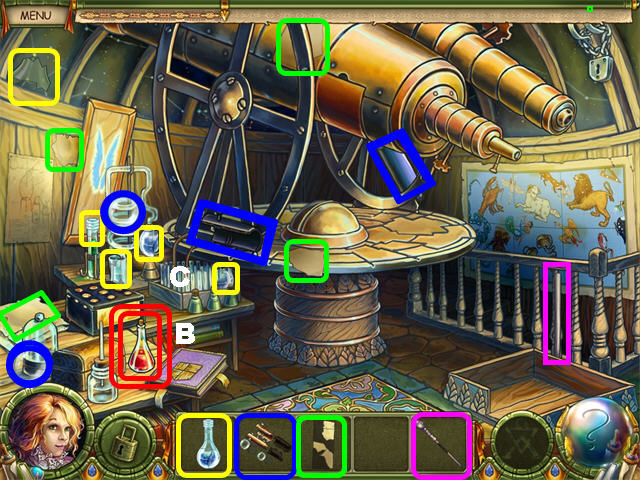
- Pick up the rest of the fragmented items in the scene.
- Place the POTION FOR RESTORING ILLUSIONS on the TUBES (C) on the lower left to trigger a puzzle.
- Click on the tubes to change their positions so the liquid from the flask on top flows to the flask at the bottom.
- Please look at the screenshot for the solution.
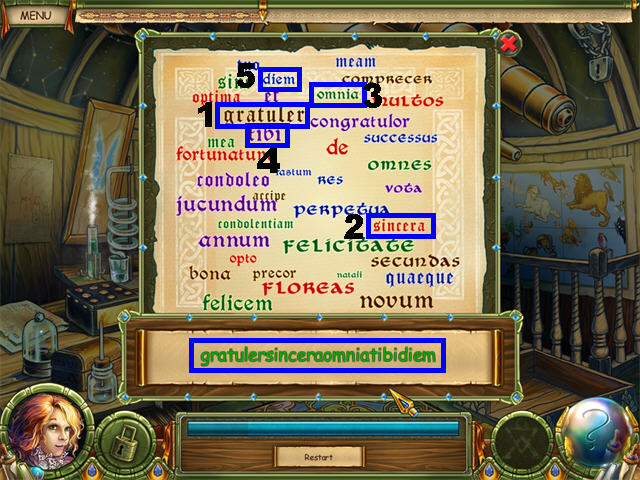
- Place the MAGIC PARCHMENT on the BOARD in the upper left to trigger a puzzle.
- You must click on the portion of the words that coincide with the large word at the bottom.
- Please note that the solutions for this puzzle are random. The screenshot shows you one solution, here are others:GRATULER-SINCERA-OMNIA-TIBI-DIEMNOVUM-OPTO-SECUNDAS-PRECOR-FELICITATEMEA-COMPRECER-ET-CONDOLEO-SECUNDASQUAEQUE-NATALI-MULTOS-PERPETUA-ET NATALI-RES-MULTOS-COMPRECER-PERPETUA
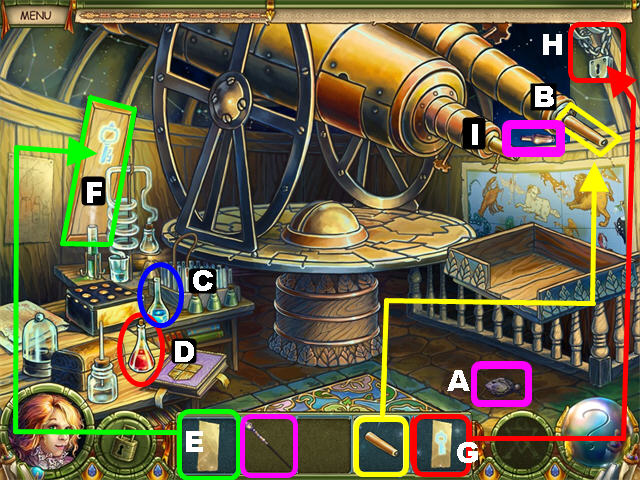
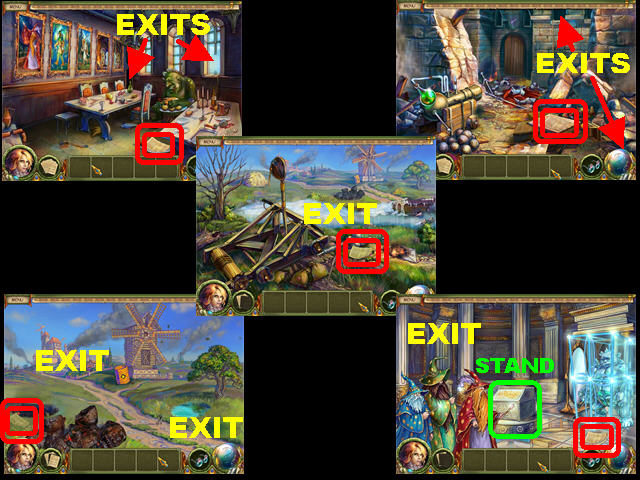
- Place the MAGIC PARCHMENT WITH LEVITATION SPELL on the box in the lower right corner to lift it.
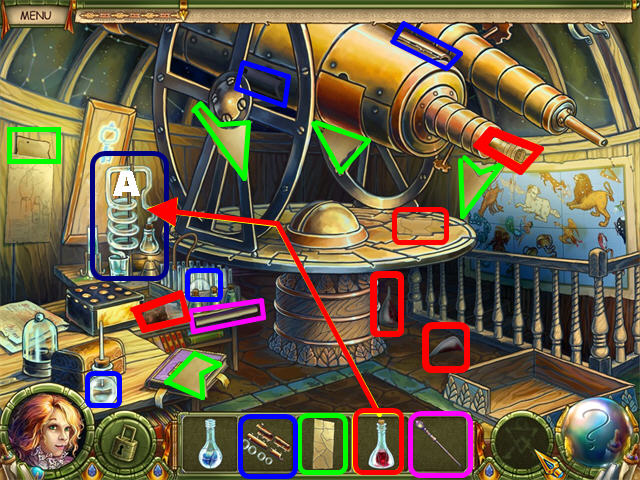
- Pick up the MAGIC WAND (A) piece below the box.
- Place the PART OF THE TELESCOPE on the TELESCOPE (B) on the right.
- Click on the BLUE POTION FOR RESTORING ILLUSIONS (C).
- Place the MAGIC PARCHMENT (E) on the board with the KEY IMAGE (F) on the left to obtain the MAGIC PARCHMENT WITH A KEY SPELL.
- Click on the RED POTION FOR REMOVING ILLUSIONS (D).
- Place the MAGIC PARCHMENT WITH A KEY SPELL (G) on the LOCK (H) in the upper right corner.
- Pick up the MAGIC WAND (I) fragment in the upper right.
- Click on the telescope to trigger a puzzle.
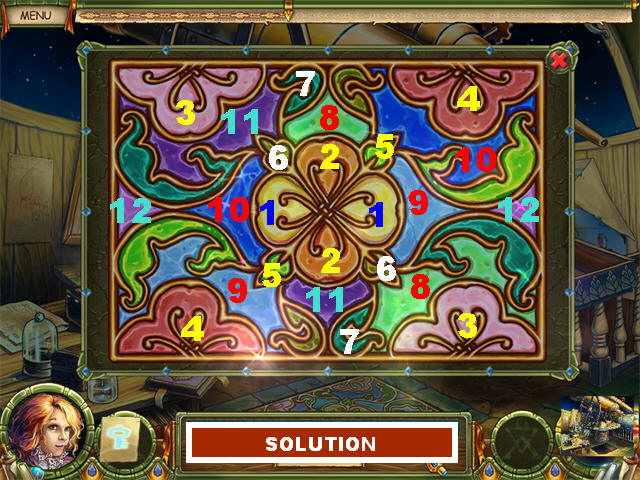
Constellation Puzzle
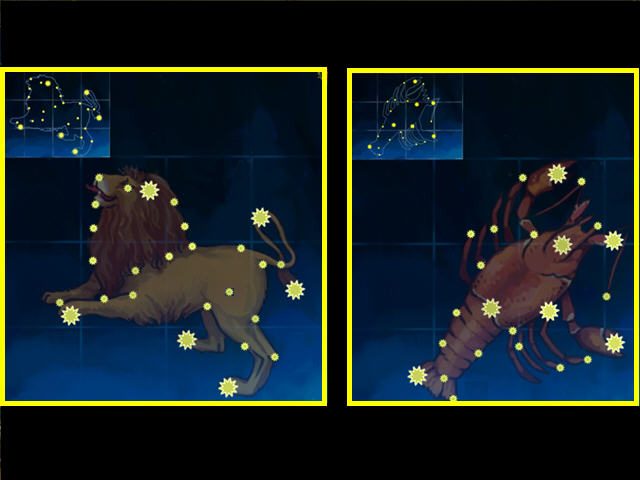


- Drag the stars to the appropriate places by looking the image in the upper left corner.
- Correct pieces will lock in place.
- The more pieces you place correctly the clearer the image will become.
- You have to solve 3 of these puzzles to beat the game.
- The constellations will be different for everyone, please look at the next 3 screenshots for all possible combinations.
- Click on the MAP on the right to trigger a puzzle.
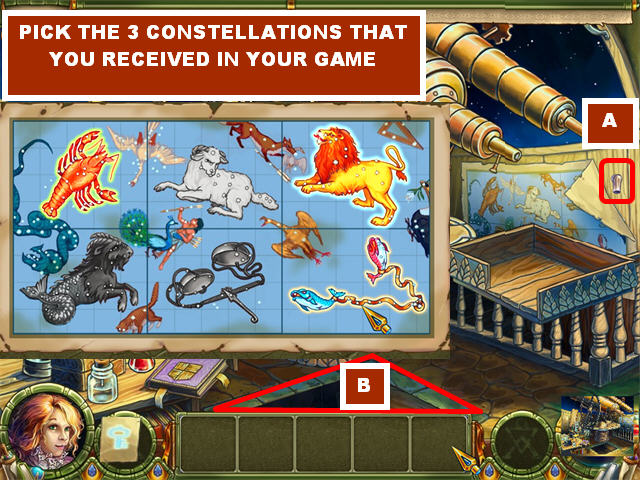
- Pick the 3 CONSTELLATIONS on the map that you’ve just assembled.
- Pick up the last MAGIC WAND (A) piece behind the map.
- Place the MAGIC WAND on the GROUND (B) to trigger a puzzle.
- Click on the 2 matching elements of the puzzle.
- Please look at the screenshot for the solution.
- Go through the floor after the puzzle has been solved to reach the flying ship.
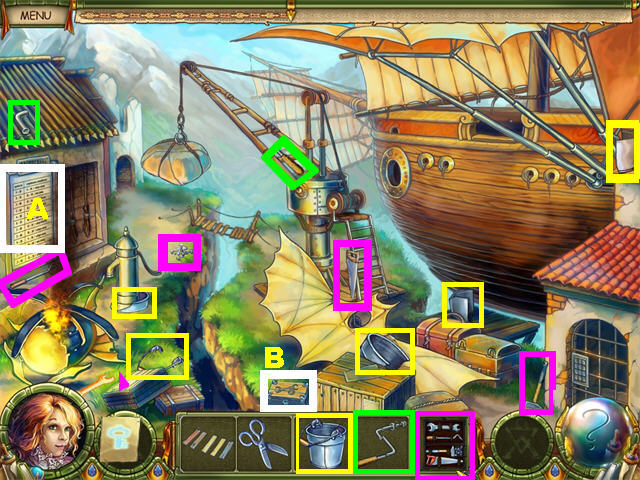
- Click on the SCHEDULE (A) on the left to receive a message.
- Click on the TOOLBOX (B) in the lower center.
- Pick up all the fragmented items in the scene.
- Place the BUCKET on the WATER PUMP (A) on the left.
- Place the BUCKET WITH WATER on the WRENCH (B) in the lower left corner to cool it off; pick up the WRENCH to complete the toolbox.
- Place the TOOLBOX on the CRATE (C) in the lower center and pick up the HANDLE (D) fragment on the side of the crate.
- Place the BUCKET on the WATER PUMP again.
- Place the BUCKET WITH WATER on the burning HELICOPTER (F) in the lower left corner.
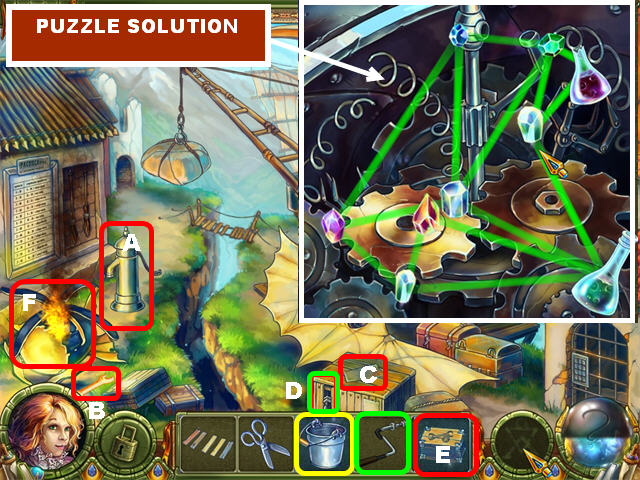
- Place the TOOLBOX (E) on the HELICOPTER (F) to trigger a puzzle.
- Drag the flasks so that none of the beams are touching.
- Uncrossed beams will become green.
- Please look at the screenshot for the solution.
- Click on the Helicopter to change the illusion of the scene.
- The items will only appear once the beam of light is over it.
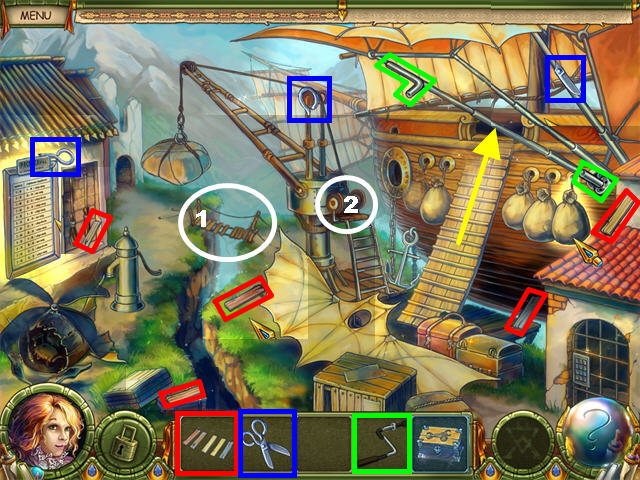
- Please look at the screenshot for the location of the SCISSORS, BOARDS & HANDLE fragments. You cannot pick up the last SCISSOR fragment at this time.
- Zoom into the BRIDGE (1) on the left and place the BOARDS and the TOOLBOX on the bridge.
- Place the HANDLE on the CRANK (2); click on it to lower the package at the other end.
- Click on the steps on the boat to board it. Make sure that you have the correct illusion to board the boat.
- Pick up all the fragmented pieces in the scene.
- Place the MOP on the BUCKET WITH WATER (1) in the lower left.
- Clean the INK STAIN (2) in the lower left with the MOP; click on that spot to see the location of the MAGIC GLASSES (3) in the library.
- Place the BELL CLAPPER on the BELLS to trigger a mini-game.
- Repeat the melody shown on the bells.
- The solutions are random. You must complete 5 rounds of this puzzle to beat the game.
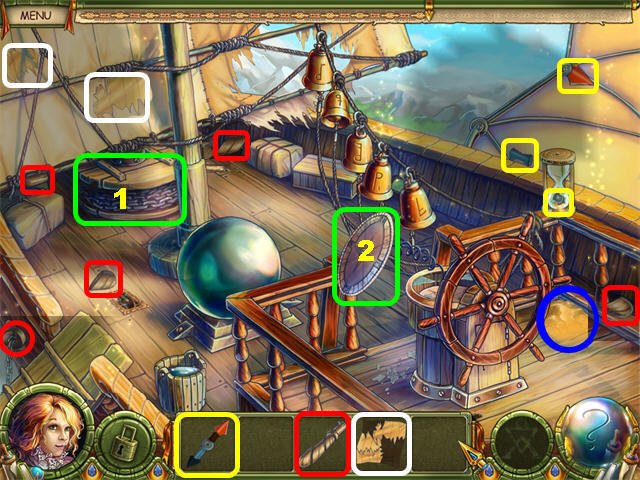
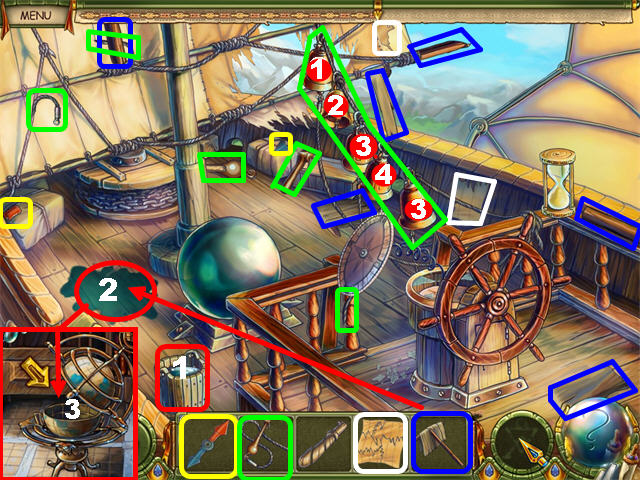
- Pick up the MAGIC SAND circled in blue in the lower right. Throw it over parts of the scene to find fragmented items.
- Please look at the screenshot for the locations of all the items.
- Place the MISSING PART OF THE COMPASS on the COMPASS (2) in the lower center and pick up the LAST SAIL fragment on the ground.
- Place the PIECE OF THE SAIL on the hole in the sail in the upper right to patch it.
- Place the HANDLE on the WINCH (1); click on it to raise the anchor.
- Go back to the library.
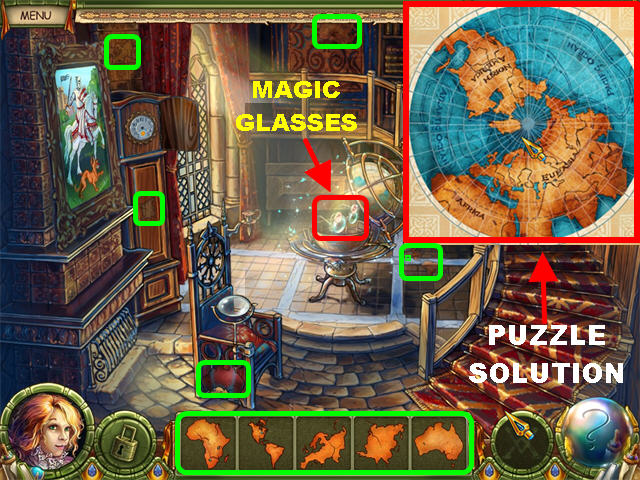
- Pick up the 5 MISSING CONTINENTS in the scene.
- Place the 5 MISSING CONTINENTS on the GLOBE to trigger a puzzle.
- Move the concentric circles around until you form the image shown on the screenshot.
- Pick up the MAGIC GLASSES inside the globe. They allow you to see through illusions. You will use these in the next chapter.
- Click on the clock and turn it back into night so you can exit the scene and go back to the shipyard.
- Click on the helicopter to change the illusion.
- Pick up the last SCISSOR piece below the raised anchor.
- Cut the ROPE above the PACKAGE and the chest will fall.
- Place the TOOLBOX on the chest and click on it to view a code.
- Click on the PUZZLE in the lower right corner and enter the CODE found inside the chest.
- The code must be pressed in the same order as the code. The solution will vary depending on your game.
- Cut each of the 5 BALLASTS on the side of the ship with the SCISSORS.
- Go to the Garden.
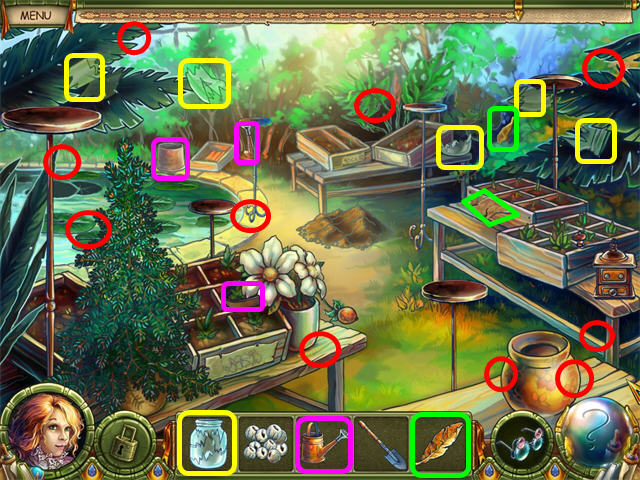
- Pick up all the fragmented items in the scene.
- Drag the JAR around the scene and click on the FIREFLIES scattered around the scene until you catch 10 FIREFLIES.
- The red circles in the screenshot represent the approximate locations of the fireflies.
- Place the FIREFLIES on each of the 5 STANDS in the scene to remove the illusions and find what you need.
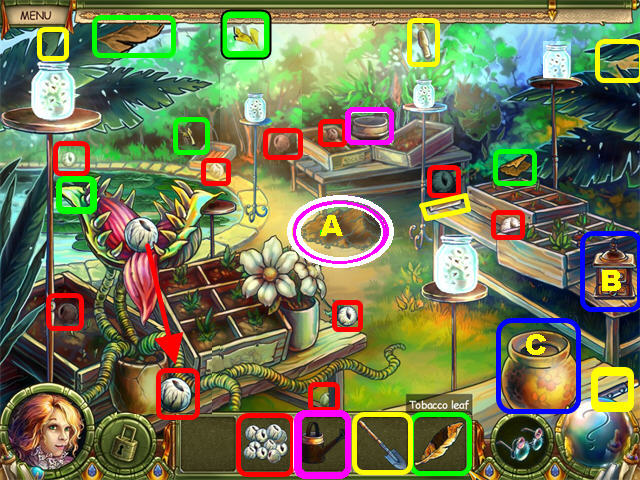
- Please look at the screenshot and pick up all the marked items.
- Dig up the mound of DIRT (A) with the SHOVEL; pick up the last piece of the WATERING CAN when the FIREFLY JAR is on the stand close to it.
- Place the WATERING CAN on the water in the upper left; pick up the TOBACCO LEAF part in the water.
- Grind the TOBACCO LEAF in the HAND MILL (B) in the lower right corner.
- Place the SHOVEL WITH SOIL in the POT (C) in the lower right corner.
- Place the FIREFLY JAR on the stand in the upper left.
- Give the MANDRAKE PLANT the GROUND TOBACCO; pick up the last piece of the MANDRAKE SEEDS that falls in the lower left.
- Place the MANDRAKE SEEDS along with the WATERING CAN WITH WATER in the pot in the lower right.
- Dig up the fully grown MANDRAKE ROOTS with the SHOVEL.
- Click on the MANDRAKE ROOT on the pot.
- Exit on the left, activate the helicopter and go inside the flying ship.
- Place the MANDRAKE ROOT on the round MAGIC ENGINE.
- Click on the SHIP’S WHEEL to complete this chapter.
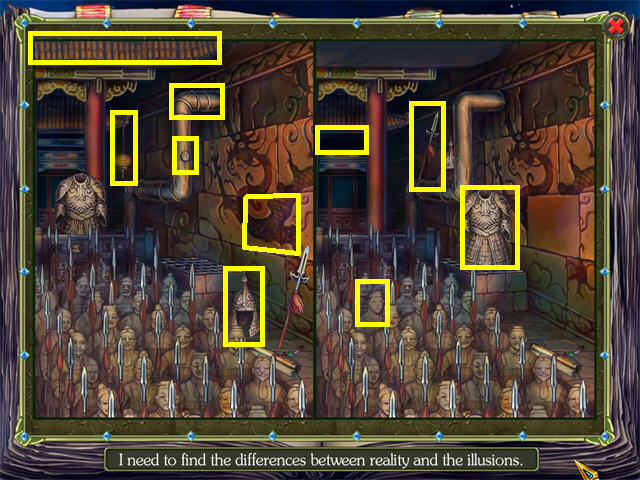
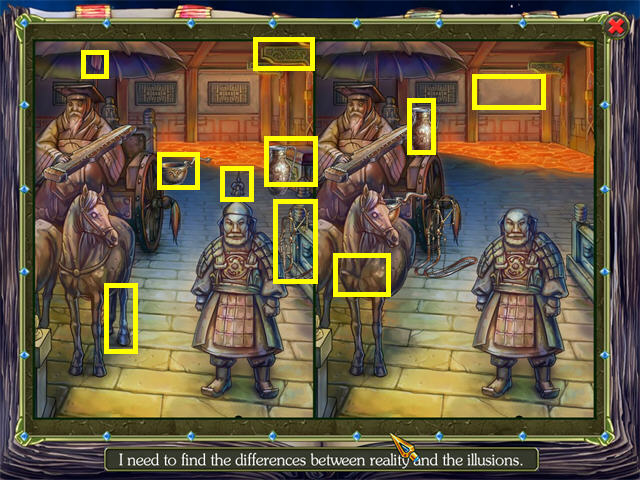
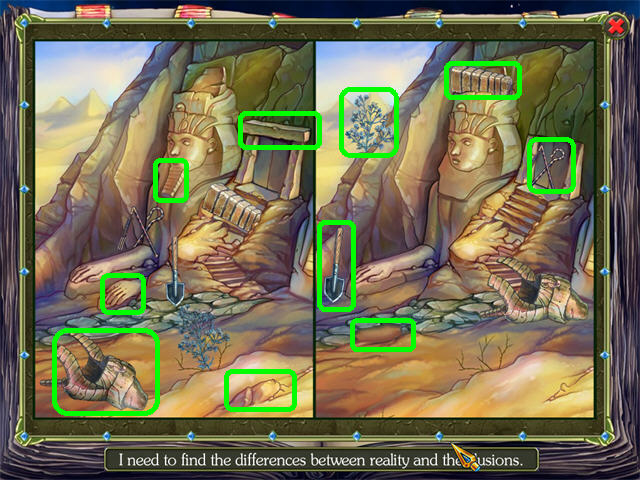
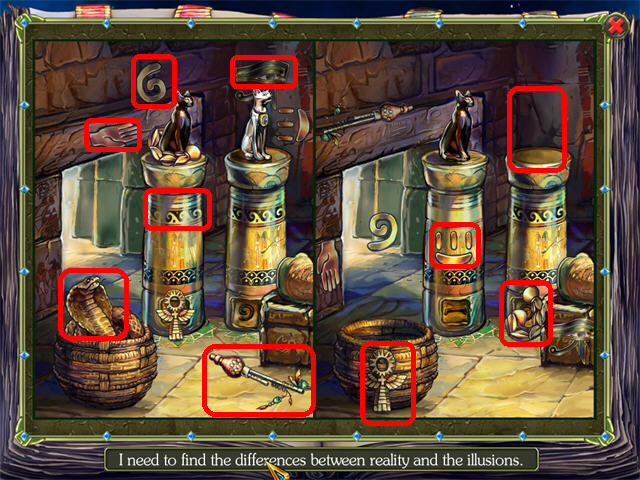
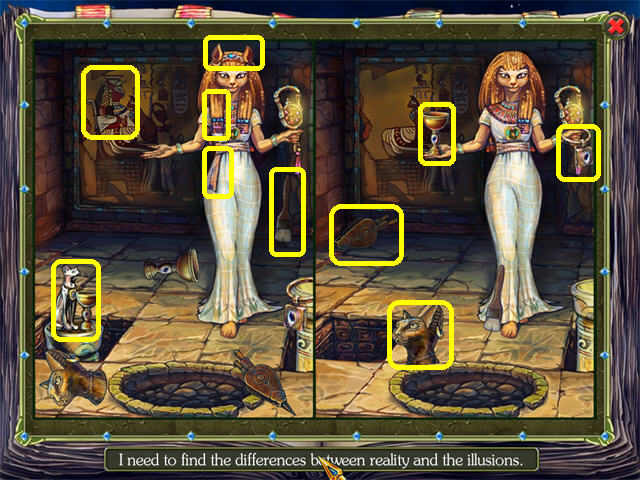
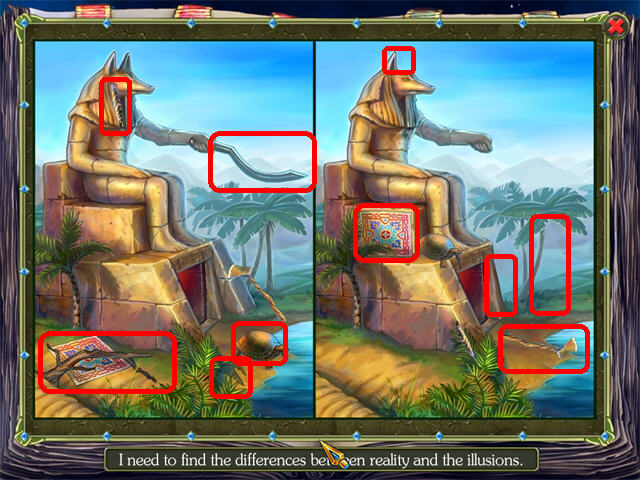
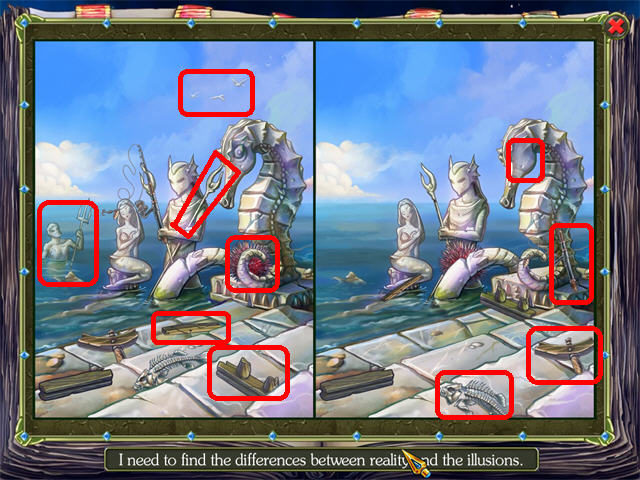
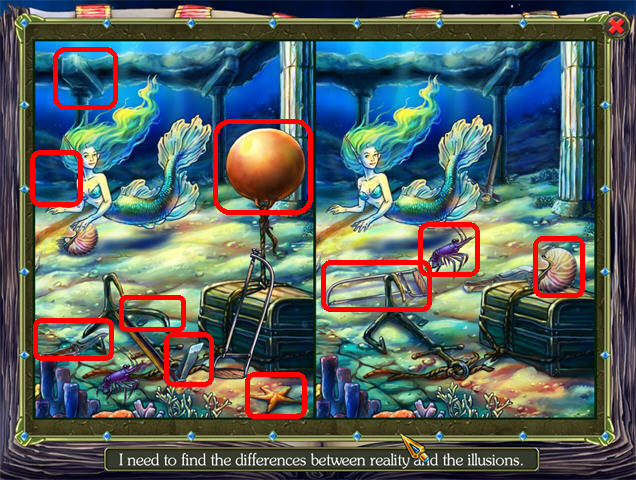
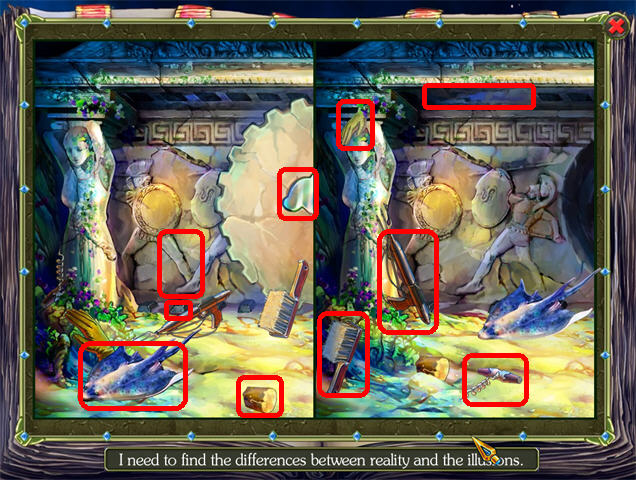
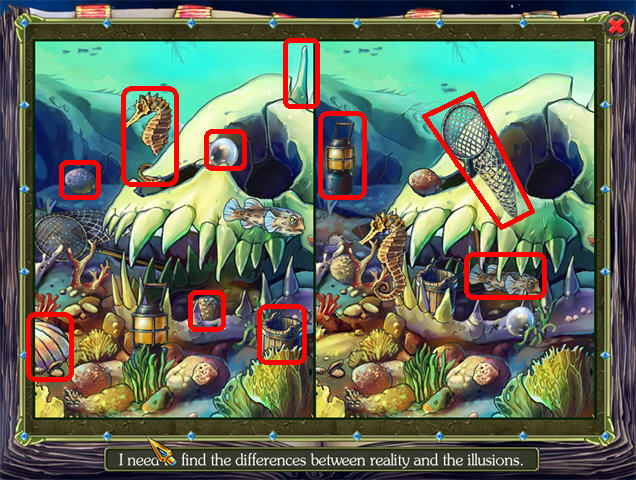
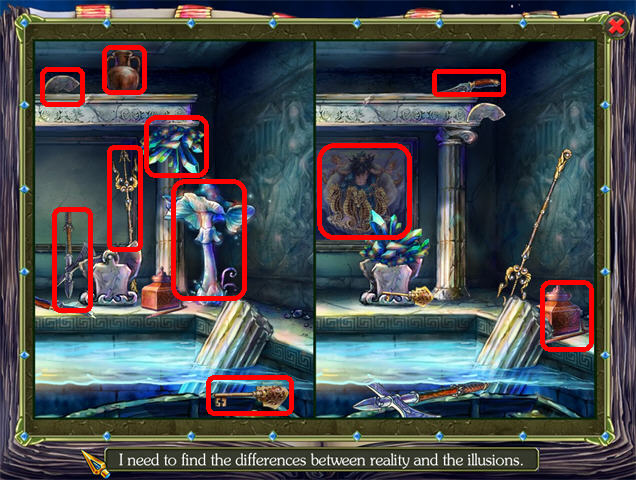
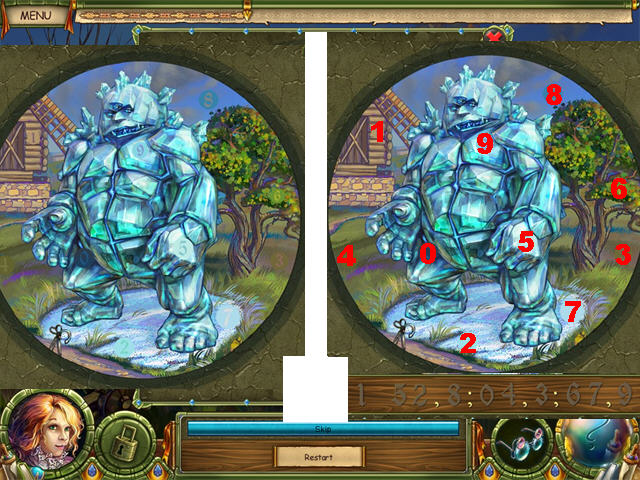
Find the Differences
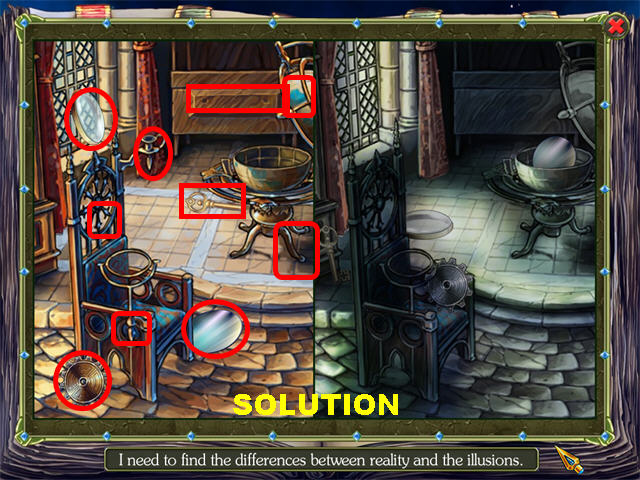
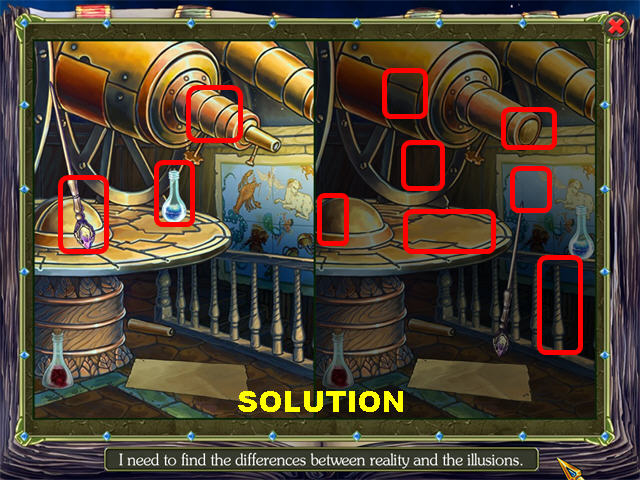
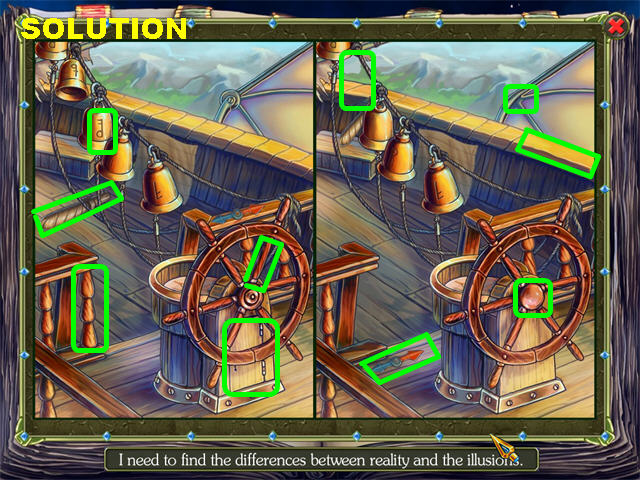
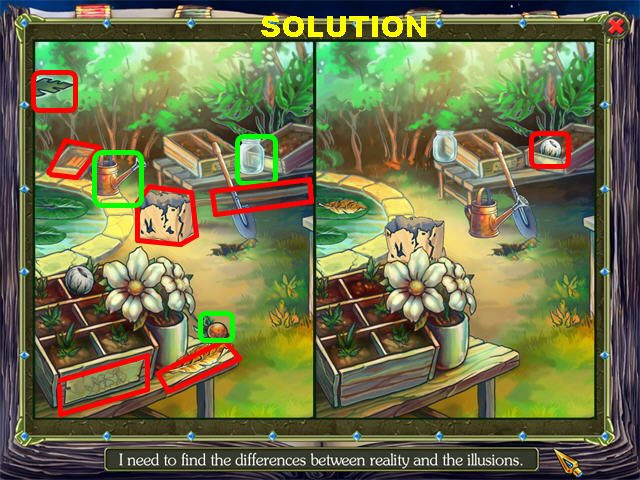
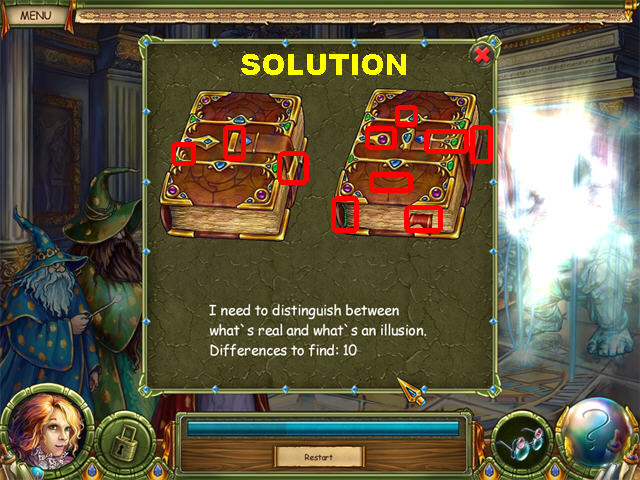
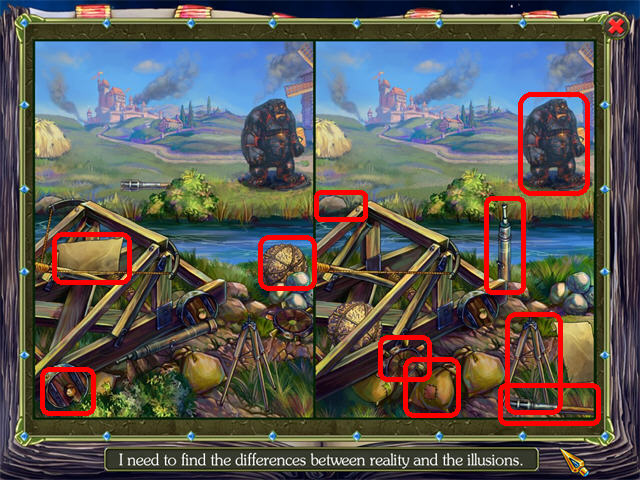
- Go back to Chapter I in the book and find the differences between both images.
- The next 5 images show you the solutions for all 5 puzzles.

Chapter II
Outside Temple
- Beginning in this chapter you can use the MAGIC GLASSES whenever you need them; activate them now.
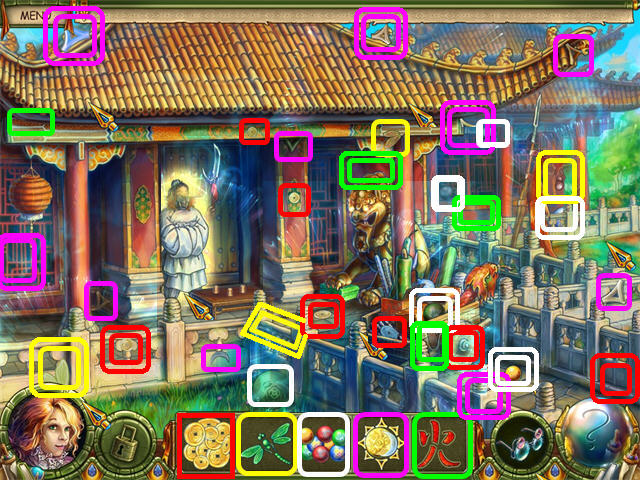
- Pick up the items marked in the screenshot. The items marked in double lines require the use of the MAGIC GLASSES before they can be picked up.
- Place the SUN MEDALLION on the LION STATUE on the right to lift its paw.
- Deactivate the MAGIC GLASSES.
- Click on the LION’S FOREHEAD to obtain the last DRAGONFLY fragment.
- Click on the LION’S EYES to obtain 2 GOLD COINS.
- Zoom into the green box below the lion and place the DRAGONFLY in the empty slot.
- Pick up the last FIRE SYMBOL inside the box.
- Place the FIRE SYMBOL on the firecracker cart next to the lion.
- Activate the MAGIC GLASSES.
- Pick up the GOLD COIN marked in red and the MARBLE in white.
- Give the GOLD COINS to the CHINESE DEMON on the left to play a mini-game.
- You have to guess correctly the location of the ball 5 times for the Demon to let you through the door.
- Pick up the last MARBLE by the door and place them on the door’s peephole to trigger a mini-game.
- You must make rows of matching marbles.
- Click on a marble and it will move to an empty spot.
- Marbles in the middle cannot be moved.
- Please watch the video for a step-by-step solution for this puzzle.
- Go through the door to access the Canal.
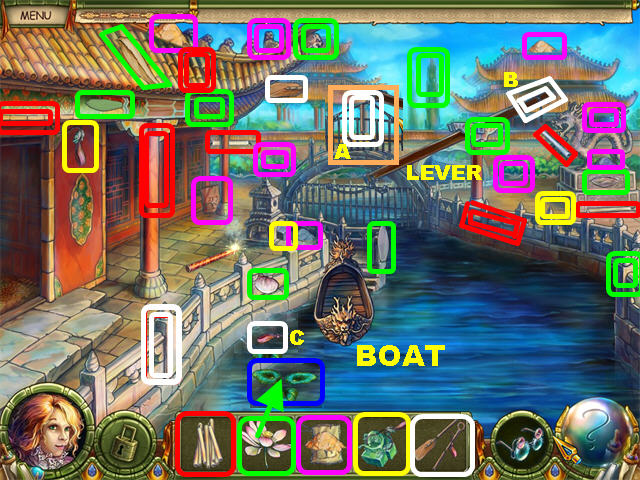
- Pick up the items marked in the screenshot. The items marked in double lines require the use of the MAGIC GLASSES before they can be picked up.
- Place the SACK OF SAND on the lever on the right to lift it.
- Wear the Magic Glasses and pick up the 2 PADDLE PIECES (A & B) in the scene.
- Deactivate the Magic Glasses.
- Place the LOTUS FLOWERS on the leaves on the lily pads in the water; pick up the PADDLE PIECE (C) in the water.
- Place the PADDLE on the BOAT and click on it to reach your next destination. The last piece of the CANDLE and the EMPEROR’S SEAL will have to be picked up later.
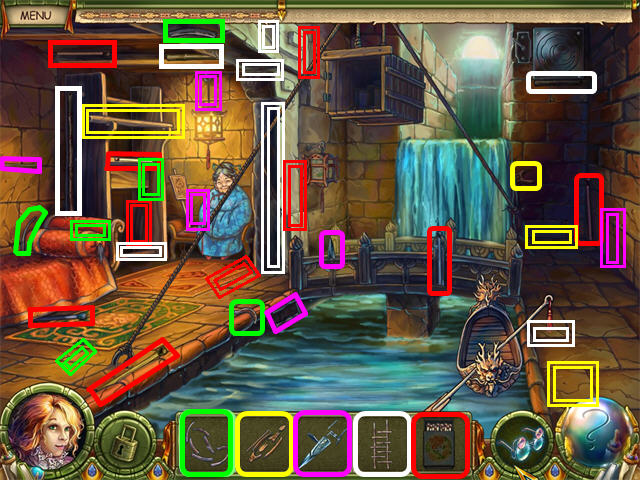
- Pick up the items marked in the screenshot. The items marked in double lines require the use of the MAGIC GLASSES before they can be picked up.
- Place the MATCHES on the LANTERN.
- Pick up the SHUTTLE (A) piece below the lantern.
- Cut the Left ROPE with the STRANGE KNIFE
- Pick up the SHUTTLE piece marked in yellow (B) and the LADDER (C) marked in white. Use the Magic Glasses for the Shuttle piece.
- Use the Magic Glasses to pick up the GEAR BELT (D) piece marked in green in the upper center and then deactivate the glasses.
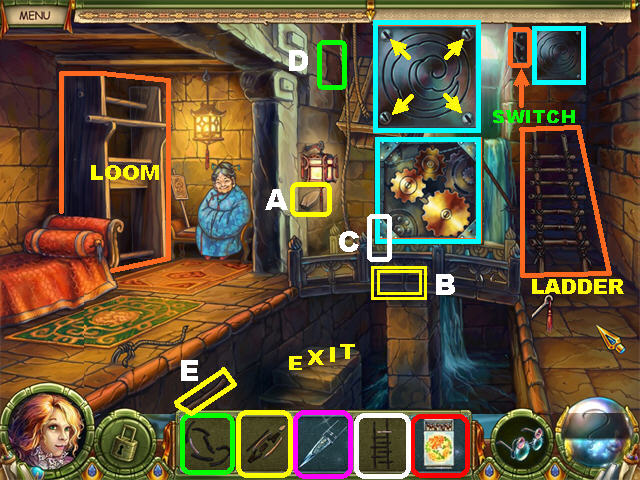
- Place the LADDER on the right and zoom into the PANEL.
- Remove each of the 4 SCREWS with the STRANGE KNIFE.
- Place the GEAR BELT on the GEARS and click on the switch to drain the water in the canal.
- Pick up the SHUTTLE (E) piece on the left.
- Place the SHUTTLE FOR THE LOOM on the LOOM on the left.
- Click on the lower center to return to the previous scene.
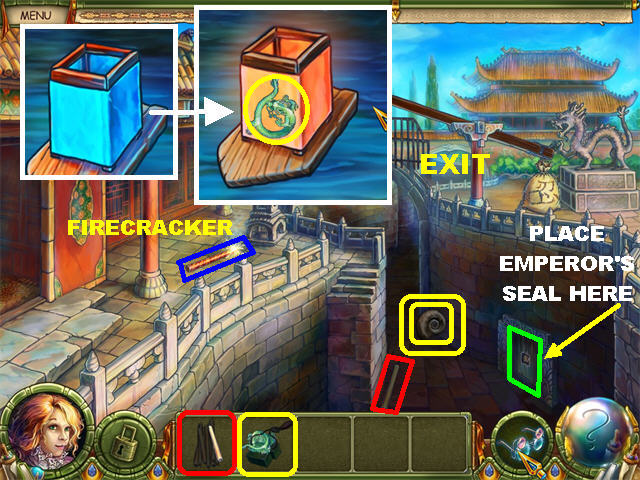
- Activate the Magic Glasses and pick up the EMPEROR’S SEAL fragment on the seashell inside the canal.
- Deactivate the Glasses.
- Pick up the last CANDLE fragment on the left.
- Light the CANDLES with the FIRECRACKER on the left.
- Go back to the previous scene by clicking below the bridge.
- Flip the switch in the upper right to fill up the canal; click on the boat in the water.
- Activate the Magic Glasses and click on the BLUE LANTERN floating in the canal.
- Place the BURNING CANDLES on the blue lantern and pick up the last EMPEROR’S SEAL fragment.
- Click on the boat.
- Click on the switch to drain the water and exit.
- Place the EMPEROR’S SEAL on the door in the lower right; go through it.
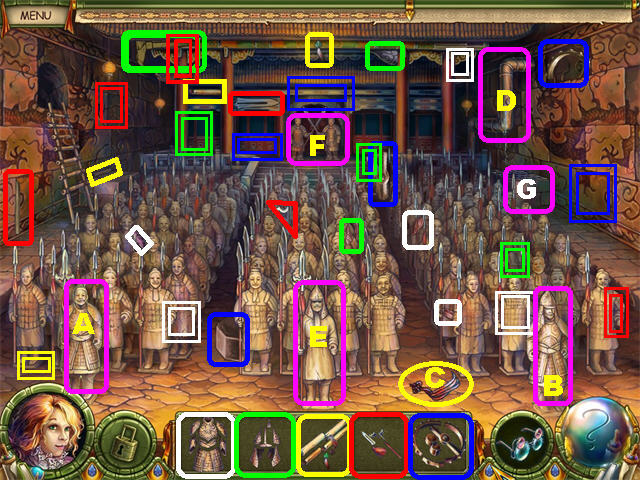
- Pick up the items marked in the screenshot. The items marked in double lines require the use of the MAGIC GLASSES before they can be picked up.
- The HELMET, VALVE & SPEAR will be complete at the end of this search.
- Place the HELMET on the LEFT SOLDIER (A).
- Give the SPEAR to the RIGHT SOLDIER (B) and the whole scene will shake.
- Pick up the last SPELL OF DESTRUCTION (C) fragment that falls in the lower right.
- Place the VALVE on the PIPE (D) in the upper right and click on the valve to turn it.
- Zoom into the GRATE (G) below the pipes, place the SPELL OF DESTRUCTION on it and pick up the last piece of the ARMOR.
- Place the ARMOR on the MIDDLE SOLDIER (E).
- Go through the DOOR (F) in the back of the scene.
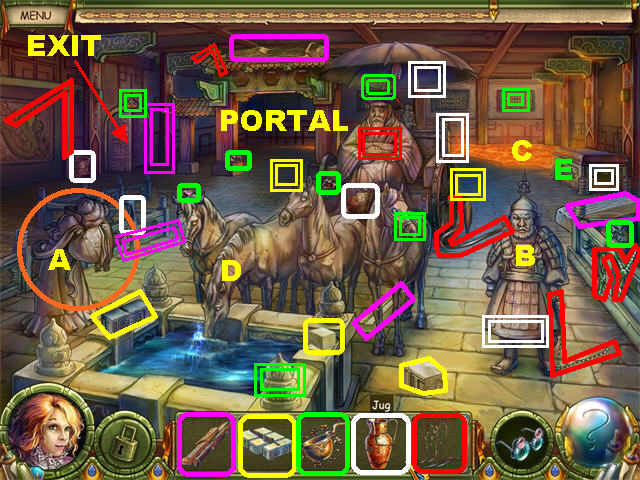
- Click on the left MUSICIAN’S STATUE (A).
- Click on the right STATUE (B).
- Click on the EMPEROR on the horse.
- Pick up the items marked in the screenshot. The items marked in double lines require the use of the MAGIC GLASSES before they can be picked up.
- Give the MUSICAL INSTRUMENT to the MUSICIAN (A) on the left and pick up the last SCOOP WITH IRON fragment next to her.
- The 1ST MAGIC GEM FOR PORTAL (Blue) will go into your inventory.
- Place the SCOOP WITH IRON on the LAVA (C) in the upper right.
- Go through the EXIT on the left and click on the VALVE in the upper right to shut off the water.
- Go back to the Emperor’s Room.
- Place the HARNESS on the SECOND HORSE (D).
- Go back and click on the VALVE in the upper right to turn the water back on.
- Go back to the Emperor’s Room and fill the JUG with water from the fountain.
- Zoom into the CHEST (E) on the right and place the MOLD FOR A SWORD on top of the chest, followed by the SCOOP WITH MELTED IRON and the JUG WITH WATER.
- Pick up the SWORD and give it to the COMMANDER on the right (B). He tells you that you must travel to find the Silkworm.
- The 2ND MAGIC GEM FOR PORTAL (Green) will go into your inventory.
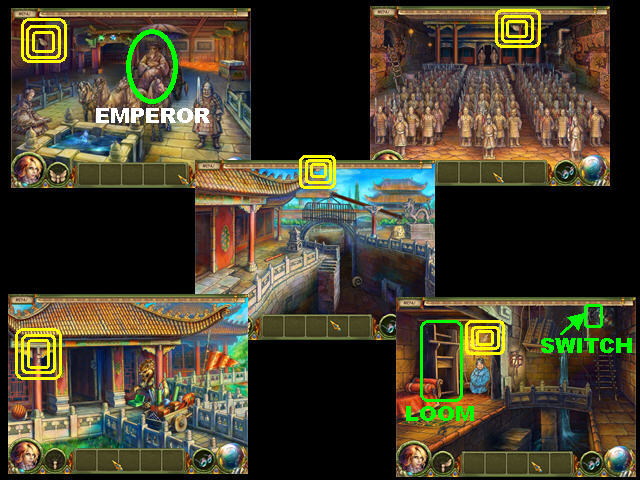
- Go back through all the locations and pick up the SILKWORM pieces as shown in the screenshot.
- When you go to the room with the old lady, click on the switch in the upper right to turn on the water. Click on the boat to go back to the canal and enter the door in the upper left to go back outside.
- Go back to the Old lady after all the parts of the SILKWORM have been picked up and hand it to her.
- Once the SILK THREAD goes into inventory place it on the LOOM on the left to trigger a puzzle.
Cloak Puzzle
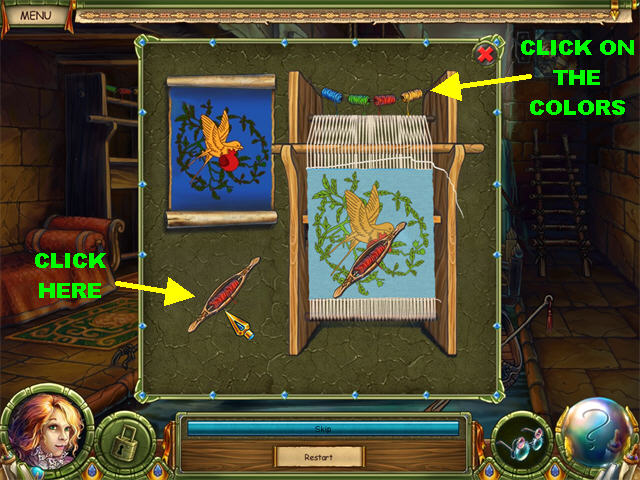
- You must click on the threads in the correct order to form the correct image.
- Click on the color in the upper center and then click on the needle to add the thread to the loom.
- If you make a mistake you will have to start over.
- The solutions are as follows:Bird Puzzle: Blue-Green-Yellow-Red Dragon Puzzle: Yellow-Blue-Red-Green Lion Puzzle: Blue-Yellow-Green-Red Flower Puzzle: Red-Green-Blue-Yellow Eagle Puzzle: Red-Yellow-Green-Blue
- Pick up the SILK CLOAK FOR THE EMPEROR on the bed.
- Turn the water off by clicking on the switch, go back to the Emperor’s Room and hand him the SILK CLOAK FOR THE EMPEROR.
- The 2ND MAGIC GEM FOR PORTAL (White) will enter inventory.
- Place the 3 MAGIC GEMS FOR THE PORTAL above the portal in the back of the scene to end this chapter.
Find the Differences Puzzle
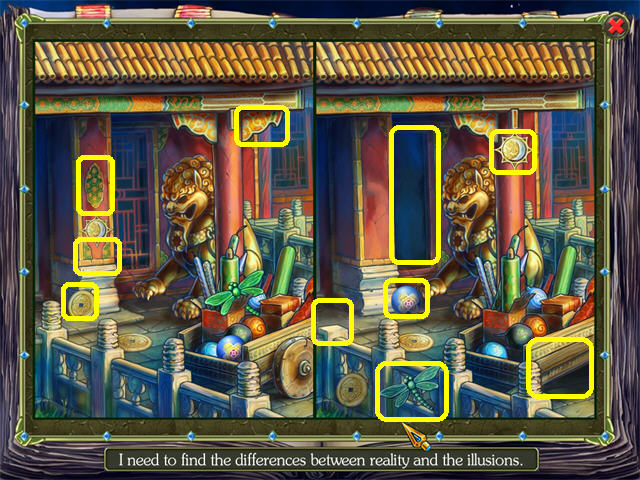
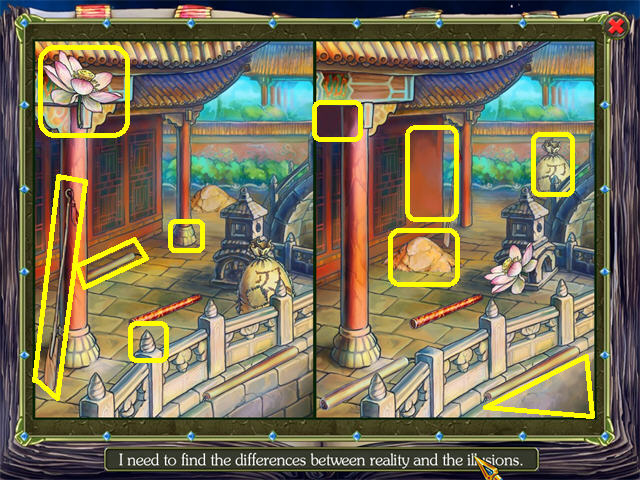
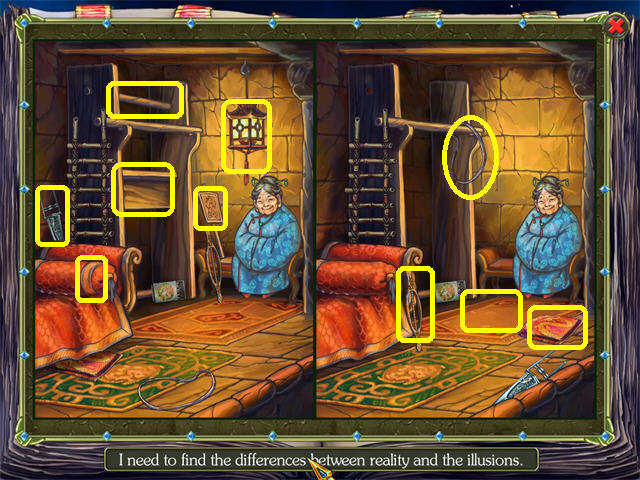
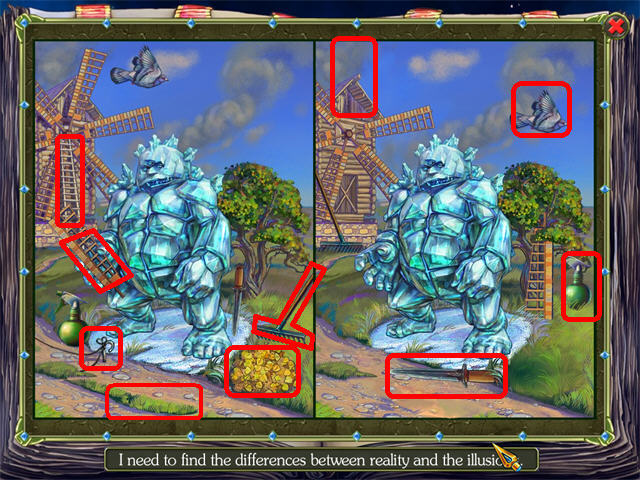
- Go back to Chapter II in the book and find the differences between both images.
- The next 5 images show you the solutions for all 5 puzzles.
Chapter III

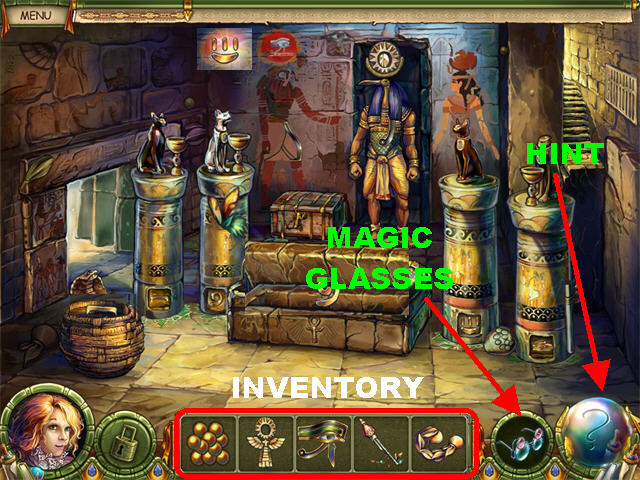
- Pick up the items marked in the screenshot. The items marked in double lines require the use of the MAGIC GLASSES before they can be picked up.
- Put the CAMEL’S THORN’S into the BOWL (A) to make the camel step forward.
- Use the Magic Glasses on the camel’s hump to find the last SHOVEL fragment inside the bag.
- Dig a hole in front of the last STATUE (B) and pick up the last HEADDRESS fragment.
- Place the HEADDRESS on the BALD STATUE (C) on the left and pick up the GLASS EYE from its HAND (D).
- Place the GLASS EYE on the EYE SOCKET (E) of the middle statue and pick up the last fragment of the STONE BEARD at the end of the beam of light.
- Place the STONE BEARD on the chin of the last statue and pick up the last fragment of the PHARAOH’S SCEPTERS from its mouth.
- Zoom into the ENTRYWAY on the left and give the PHARAOH’S SCEPTERS to the pharaoh to trigger a mini-game.
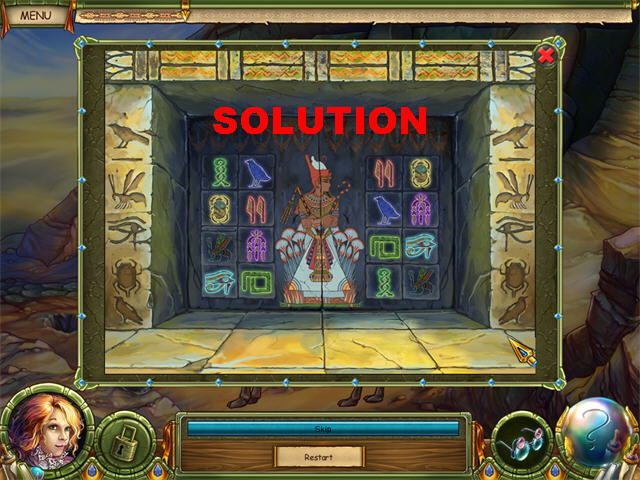
- Click on any 2 tiles to reveal what is behind them. Matching pairs will be eliminated.
- Go through the door after the puzzle has been solved.
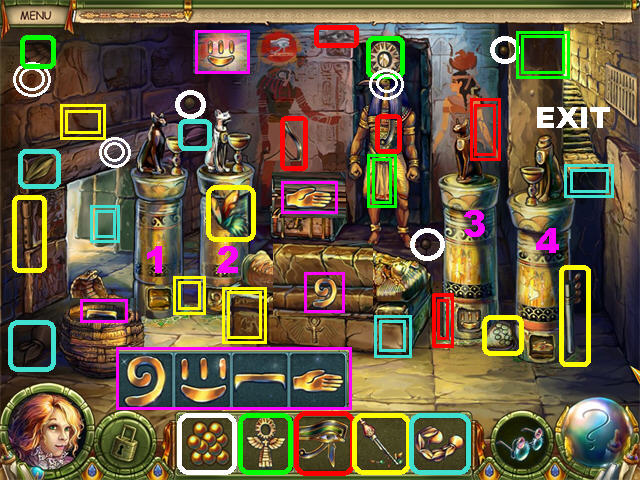
- Pick up the items marked in the screenshot. The items marked in double lines require the use of the MAGIC GLASSES before they can be picked up.
- Place the ANKH at the bottom of the sarcophagus and pick up the COLUMN symbol inside.
- Charm the SNAKE on the left with the SNAKE CHARMER’S FLUTE and pick up the COLUMN symbol.
- Place the EYE OF RA on the EYE SHAPE on the back wall and pick up the COLUMN symbol.
- Zoom into the CHEST in the back, place the SCORPION’S TAIL on the scorpion and pick up the COLUMN symbol.
- Place the STRAIGHT symbol on COLUMN 1, the SPIRAL symbol on COLUMN 2, the PAW symbol on COLUMN 3 and the HAND symbol on COLUMN 4.
- Exit in the upper right corner, you can find the abacus beads later.
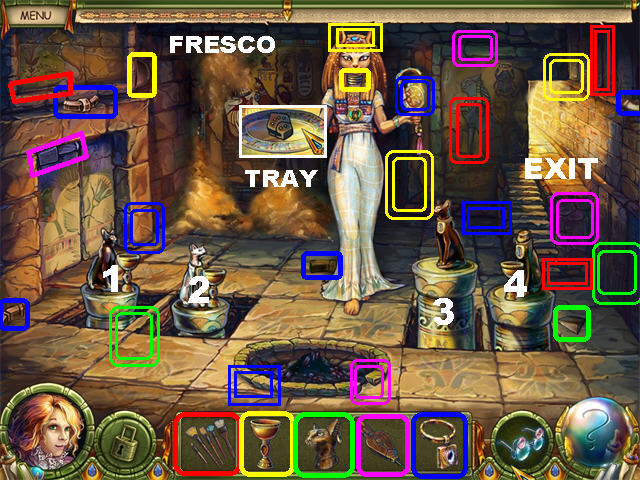
- Pick up the items marked in the screenshot. The items marked in double lines require the use of the MAGIC GLASSES before they can be picked up.
- Place the COLLAR on the first CAT on the left.
- Use the Magic Glasses to see the tray on the statue’s left hand and pick up the last BELLOWS fragment on the tray.
- Place the BELLOWS on the COALS on the ground and pick up the ASHES.
- Place the ASHES on the 2nd CAT on the left.
- Use the Magic Glasses on the tray and pick up the last fragment of the ARCHEOLOGY BRUSHES.
- Place the ARCHEOLOGY BRUSHES on the FRESCO on the back wall and click on it to activate a puzzle.
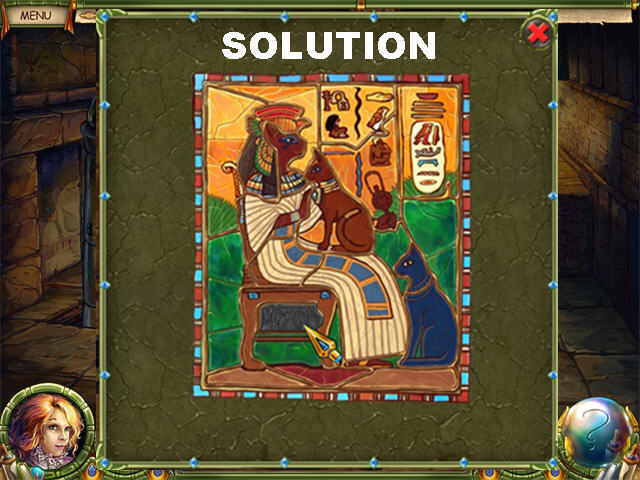
- Drag the puzzle pieces into the center. Correct pieces will lock in place.
- Pick up the last GOBLET fragment on the fresco.
- Place the GOBLET on the third cat.
- Use the Magic Glasses on the tray and pick up the last fragment of the CAT’S HEAD.
- Place the CAT’S HEAD on the last cat statue.
- Exit on the upper right.
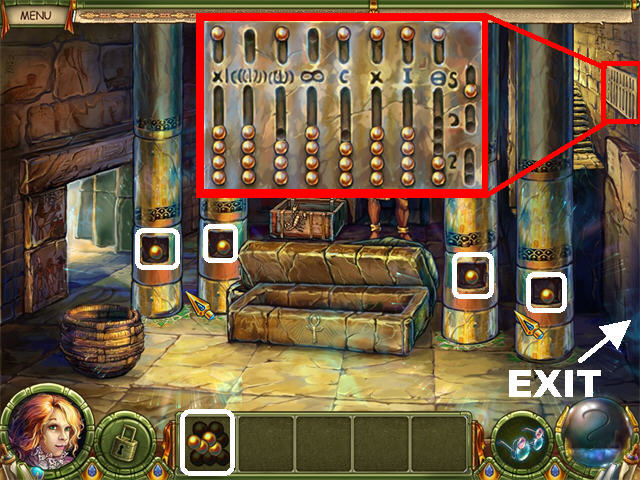
- Activate the Magic Glasses and pick up the 4 ABACUS BEADS in the scene.
- Zoom into the VENT in the upper right.
- Place the ABACUS BEADS on the board and go through the exit in the lower right to access the Hall of Anubis.
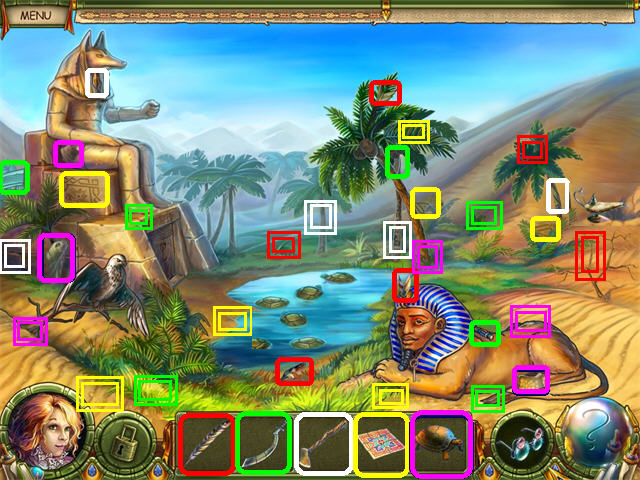
- Pick up the items marked in the screenshot. The items marked in double lines require the use of the MAGIC GLASSES before they can be picked up.
- Give the FEATHER to the FALCON on the left and pick up the last SWORD fragment underneath.
- Give the SWORD to the ANUBIS on the left and pick up the last HOE fragment below its arm.
- Place the HOE on the “X” in the upper right and pick up the last fragment of the TURTLE.
- Activate the Magic Glasses; place the HEADSCARF on the genie lamp on the right, close to the last palm tree.
- Talk to the Genie that appears on the right and he will knock a coconut into the pond.
- Place the TURTLE in the pond and click on the water to activate a puzzle.
Turtle Puzzle
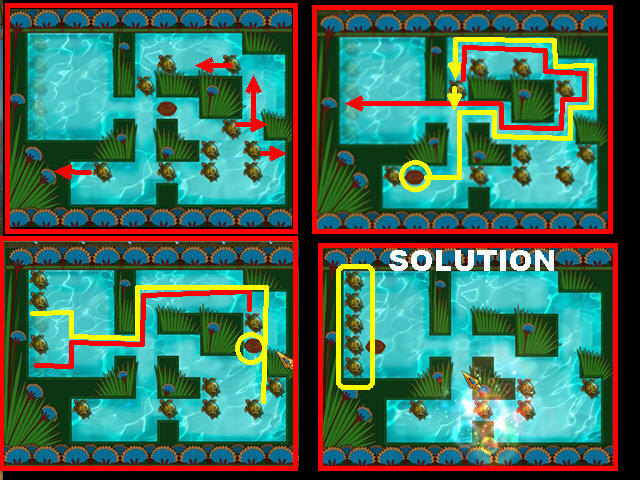
- Your goal is to use the coconut to push 6 turtles to the spot in the upper left.
- Place your cursor in an area in which you want the coconut to go to and green lines will appear showing you the path it will take, click on that spot if you accept.
- You cannot move 2 connected turtles, only one at a time.
- Move your turtles as shown in the screenshot so you can move the turtles easily into their spots.
- Please watch the video for a step-by-step solution for this puzzle.
- Give the COCONUT to the SPHINX to receive the KEY TO THE HALL OF ANUBIS and place it below the Anubis on the left. Enter the next scene.
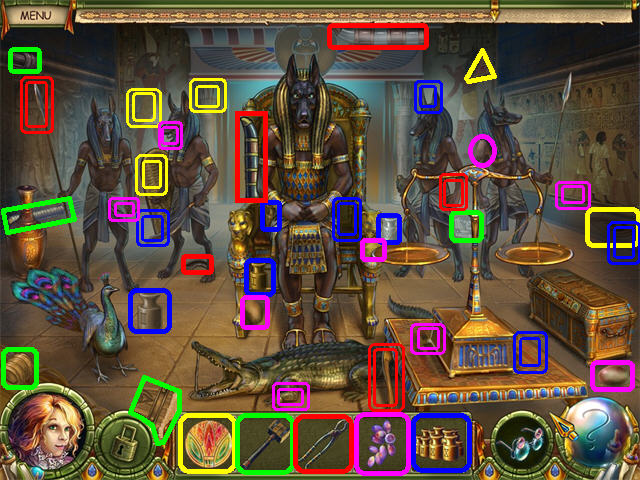
- Pick up the items marked in the screenshot. The items marked in double lines require the use of the MAGIC GLASSES before they can be picked up.
- Break the JUG on the left with the HAMMER and pick up the last GRAPE fragment.
- Cut the BRANCH in the alligator’s mouth with the TWEEZERS; pick up the last WEIGHT fragment next to the alligator’s head.
- Feed the GRAPES to the PEACOCK on the left; pick up the last TILE fragment on the peacock.
- Zoom into the peacock and take a close look at the images on its feathers.
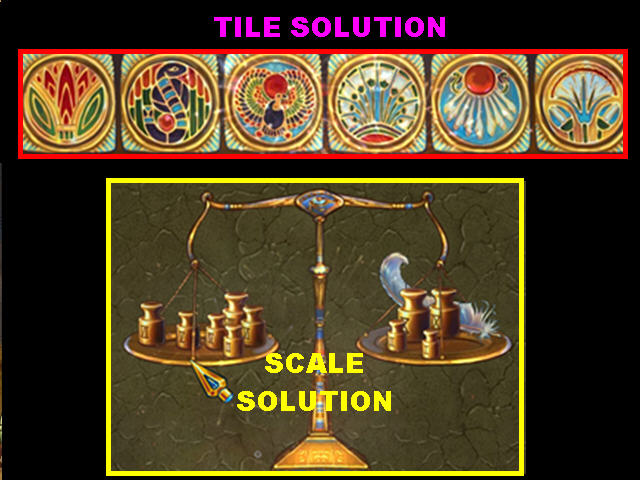
- Zoom into the CHEST on the right and place the TILE in the empty slot to trigger a puzzle.
- Click on 2 tiles to swap their positions.
- Please look at the screenshot for the solution.
- Pick up the FEATHER OF TRUTH inside the chest.
- Place the WEIGHTS and the FEATHER OF TRUTH on the scale.
- Click on the weights to transfer them from the left scale to the right.
- Click on a weight on the right scale to take it out.
- Add the “I-II-IX-X” weights to the scale to solve the puzzle. Please look at the screenshot for the solution.
- Give the FEATHER OF TRUTH (WEIGHED) to Anubis and he will ask you to find the SCARAB.
- Go back to all the locations in the game and look for all the pieces of the SCARAB.
- Exit this scene by clicking in the lower right corner.
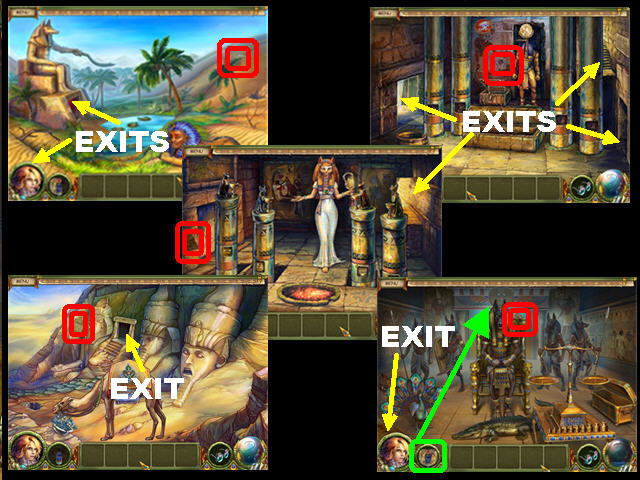
- Please look at the screenshot for the locations of all the SCARAB parts.
- Place the SCARAB above the portal in the top center and click on the portal to end this chapter.
Find the Differences Puzzle
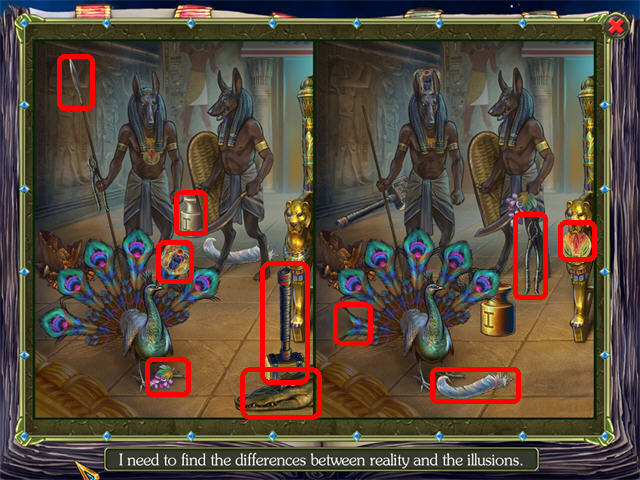
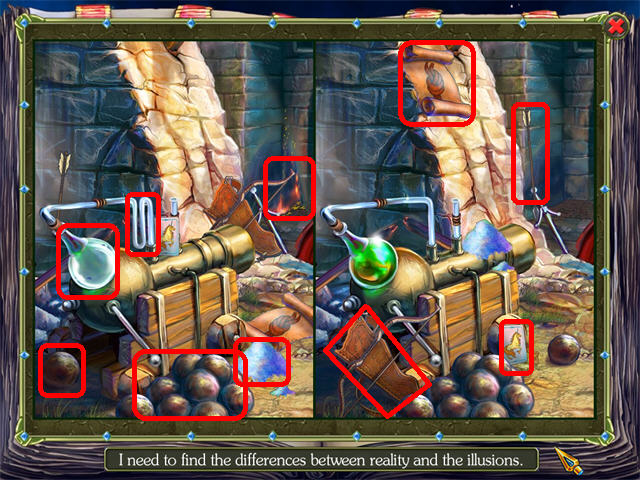
- Go back to Chapter III in the book and find the differences between both images.
- The next 5 images show you the solutions for all 5 puzzles.
Chapter IV: Poseidon
Poseidon
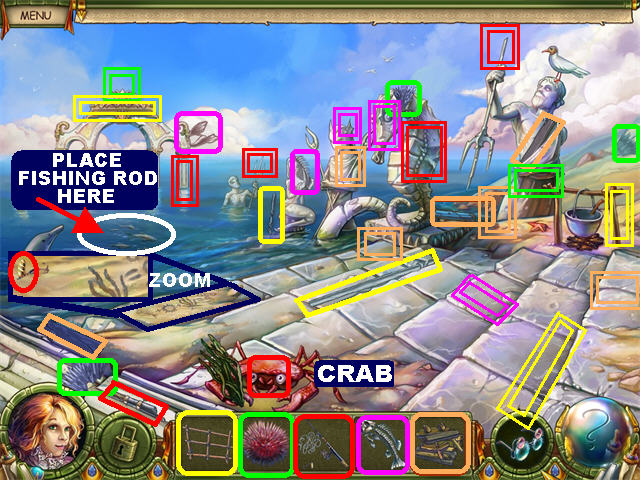
- Pick up the items marked in the screenshot. The items marked in double lines require the use of the MAGIC GLASSES before they can be picked up.
- Zoom into the sand in the lower left and pick up the FISHING ROD fragment.
- Click on the CRAB in the lower right and pick up the FISHING ROD fragment before the crab returns to that spot.
- Place the FISHING ROD on the small group of fishes in the water to trigger a mini-game.
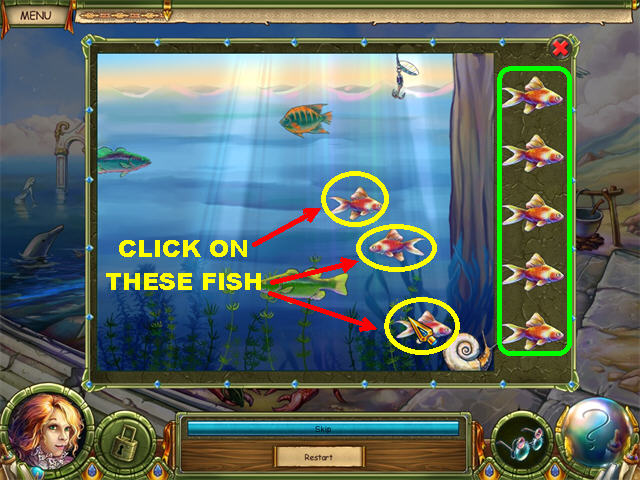
- Capture 5 Fish that look like the silhouette on the right.
- Move the rod around with your cursor and click on it to cast the line. Click again once your mouse is over the fish you need.
- Pick up the last CAGE fragment that appears in the water after the puzzle has been solved.
- Feed the FISH to the SEAGULL in the upper right and pick up the last FISH SKELETON fragment on the statue’s head.
- Feed the FISH to the DOLPHIN in the water and pick up the last WOOD fragment in the water.
- Place the CAGE on the CRAB and grab the SEAWEED from the crab.
- Place the WOOD below the POT on the right.
- Place the FISH SKELETON, SEA URCHIN and the SEAWEED in the boiling pot to make a concoction that allows you to breathe under water.
- Click on the PORTAL on the left to reach the underwater world.
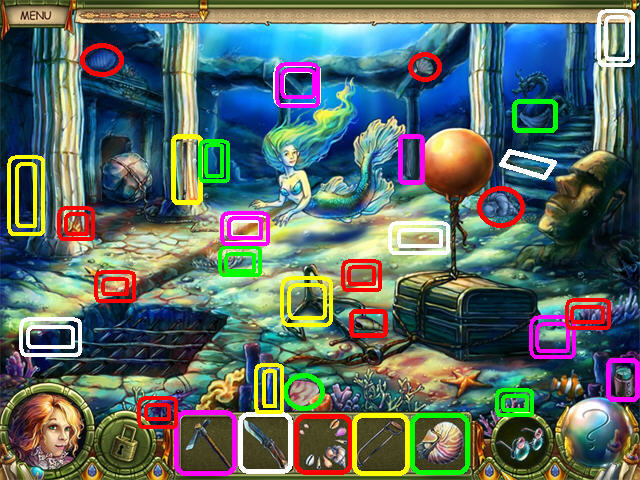
- Pick up the items marked in the screenshot. The items marked in double lines require the use of the MAGIC GLASSES before they can be picked up.
- Give the SEASHELL NECKLACE to the MERMAID and pick up the NAUTILUS & PICKAXE fragments left behind.
- Place the PICKAXE on the statue head on the right and pick up the KNIFE fragment left behind.
- Cut the ROPE on the chest with the KNIFE to make it float away with the balloon.
- Place the NAUTILUS on the BOULDER on the left and enter the cave.
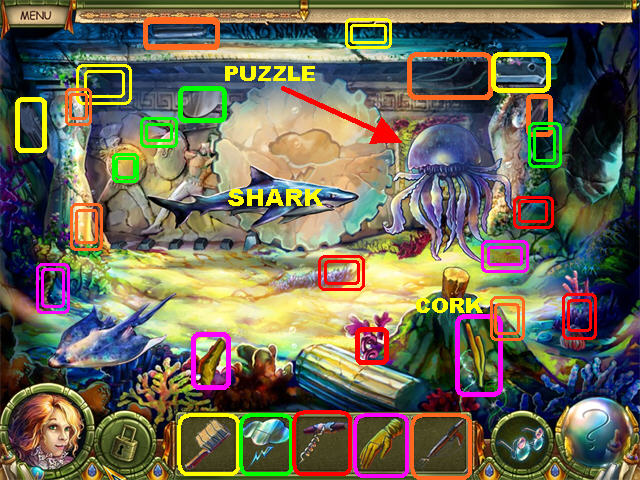
- Pick up the items marked in the screenshot. The items marked in double lines require the use of the MAGIC GLASSES before they can be picked up.
- Place the HARPOON on the shark and pick up the last CORKSCREW fragment.
- Place the CORKSCREW on the CORK in the lower right and pick up the last BRUSH fragment below the board on the back wall.
- Clean the PUZZLE with the BRUSH and click on the back wall once the jellyfish moves away.
Slider Puzzle
- You must move the silver fish to clear the path for the gold fish.
- Please look at the screenshot for the solutions.
Solution 1:
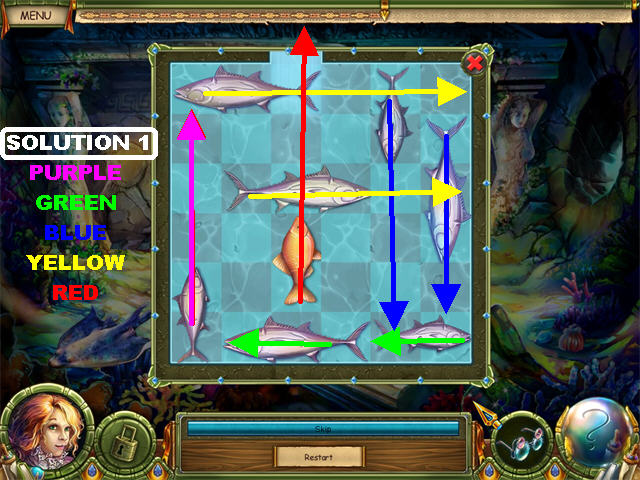
- Move the fish in the direction of the arrows using the colors in this order: Purple-Green-Blue-Yellow-Red.
Solution 2:
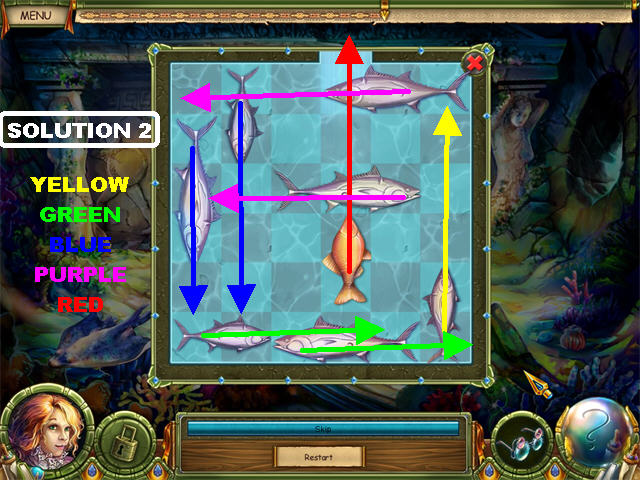
- Move the fish in the direction of the arrows using the colors in this order: Yellow-Green-Blue-Purple-Red
Solution 3:
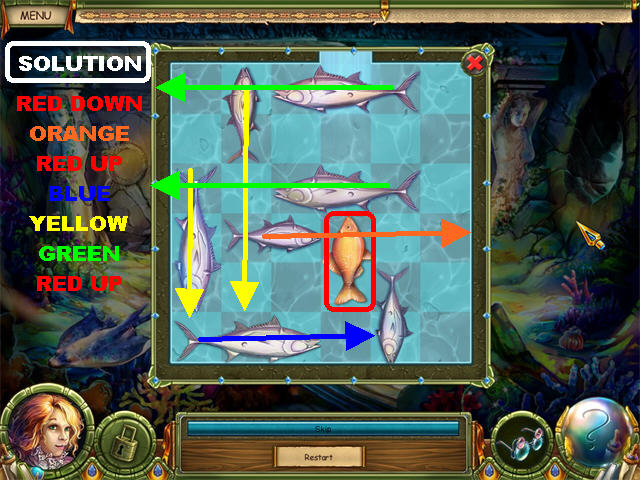
- Move the fish in the direction of the arrows using the colors in this order: Red Down-Orange-Red Up-Blue-Yellow-Green-Red Up
- Pick up the last LIGHTNING fragment below the wheel.
- Place the LIGHTNING on the large wheel in the back wall and pick up the last piece of the RUBBER GLOVE in the crack in the wall.
- Pick up the STINGRAY with the RUBBER GLOVE and go through the wall to reach the fish cave.
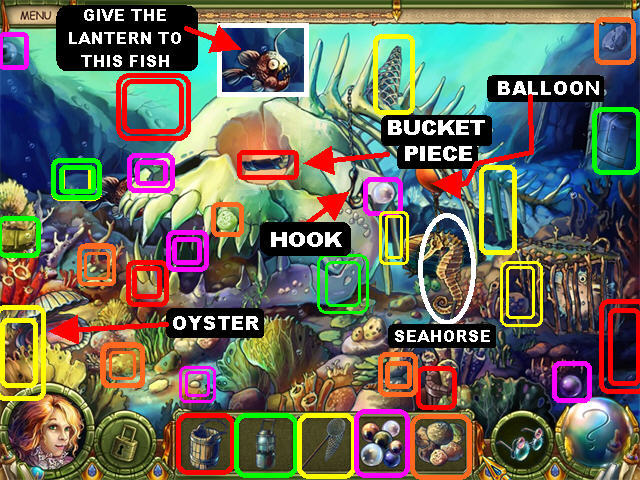
- Pick up the items marked in the screenshot. The items marked in double lines require the use of the MAGIC GLASSES before they can be picked up.
- Catch the SEAHORSE with the FISHING NET; pick up the LANTERN fragment.
- Place the LANTERN on the FISH that is going in and out of the large fish head; pick up the BUCKET fragment in the eye socket when the light is shining on the fish’s eye socket.
- Pick up the PEARL inside the FISH’S mouth with the Magic Glasses once the light is shining on it.
- Place the PEARLS in the oyster in the lower left; pick up the HEAVY STONES fragment behind the oyster once it closes.
- Place the BUCKET on the HOOK in the upper center.
- Place the HEAVY STONES in the BUCKET attached to the hook; the SEA URCHIN will be released.
- Click on the swimming SEA URCHIN to puff it up as it passes over the balloon on the right to release the chest.
- Click on the fish’s skeleton to return to the first scene.
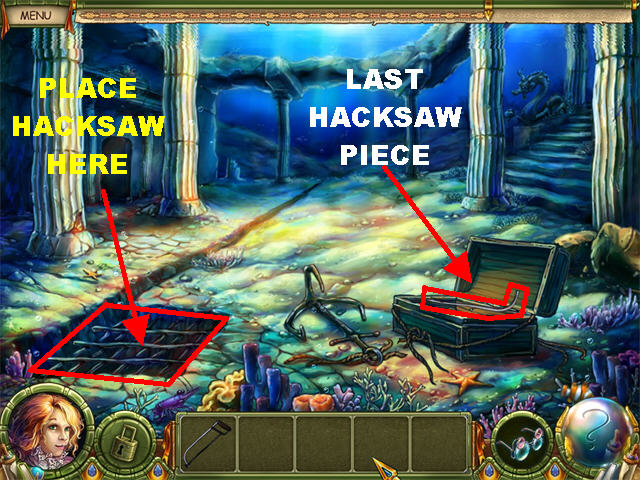
- Pick up the last HACKSAW inside the CHEST on the right.
- Place the HACKSAW on the grating on the lower left.
- Go through the hole in the ground to access Poseidon.
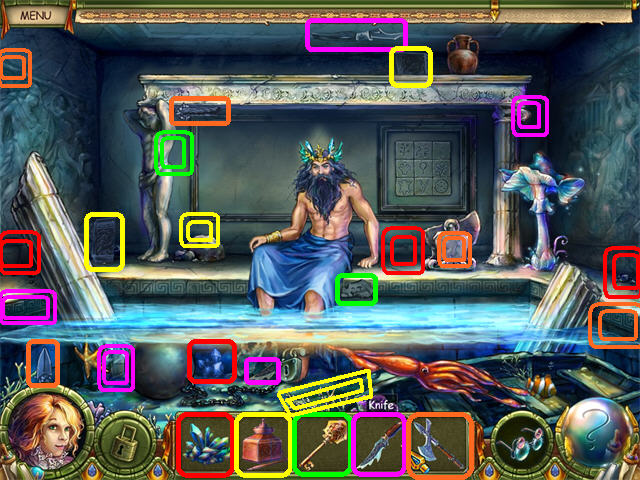
- Pick up the items marked in the screenshot. The items marked in double lines require the use of the MAGIC GLASSES before they can be picked up.
- Remove the STARFISH from the column on left with the KNIFE; pick up the last INKPOT fragment on the column.
- Give the INKPOT on the SQUID in the lower right; activate the Magic Glasses to view the symbols.
- Click on the PUZZLE on the back wall and click on the 3 SYMBOLS that appeared after the squid disappeared.
- Click on the puzzle that appears behind the other puzzle.
- Click on 2 tiles to swap their locations and place the images in the right positions. Correct pieces will lock in place.
- Please look at the screenshot for the solution.
- Pick up the last AXE fragment behind the puzzle.
- Place the AXE on the BOARDS in the lower right; pick up the last CROWN JEWELS fragment.
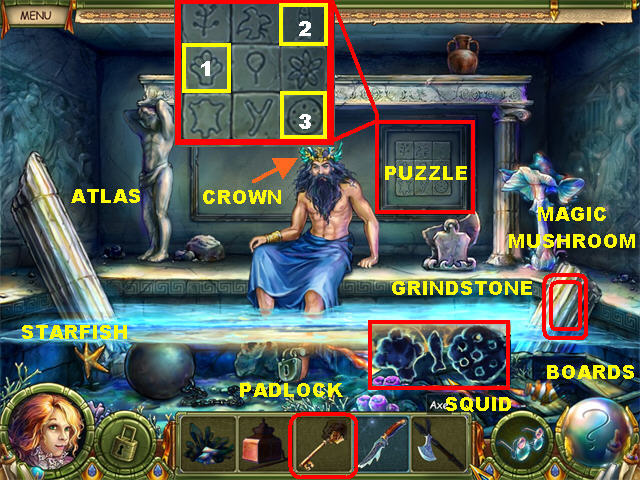
- Place the CROWN JEWELS on POSEIDON’S CROWN; pick up the PART OF A GRINDSTONE from Poseidon’s Hand.
- Repair the GRINDSTONE with the PART OF A GRINDSTONE.
- Sharpen the KNIFE on the GRINDSTONE.
- Cut the MAGIC MUSHROOM on the right with the SHARPENED KNIFE.
- Give the PART OF A MAGIC MUSHROOM to ATLAS on the left; pick up the 2 KEY PARTS in place of the mushroom.
- Activate the Magic Glasses and pick up the KEY FRAGMENT on the column on the right.
- Unlock the PADLOCK in the lower center with the KEY. Poseidon asks you to find the 5 parts of the Trident.
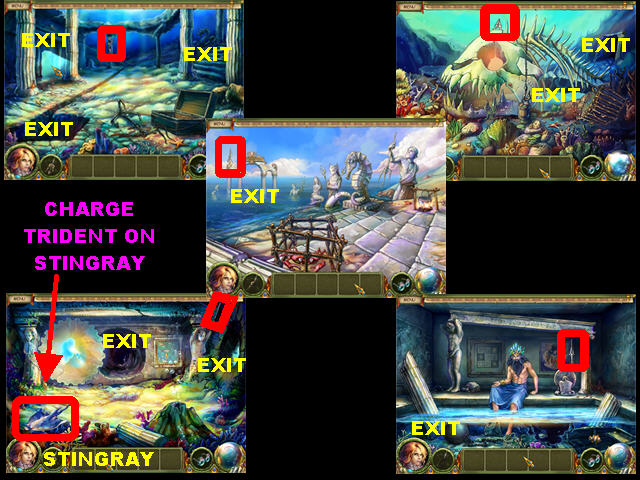
- Go back to each location and find the 5 Uncharged Trident Pieces.
- Please look at the screenshot for the exact locations of all the pieces.
- Place the UNCHARGED TRIDENT on the STINGRAY.
- Go to Poseidon and give him the CHARGED TRIDENT.
Find the Differences Puzzle
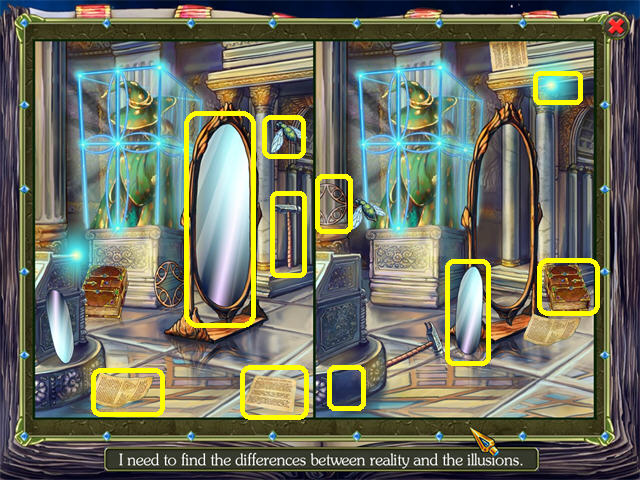
- Go back to Chapter IV in the book and find the differences between both images.
- The next 5 images show you the solutions for all 5 puzzles.
Chapter V
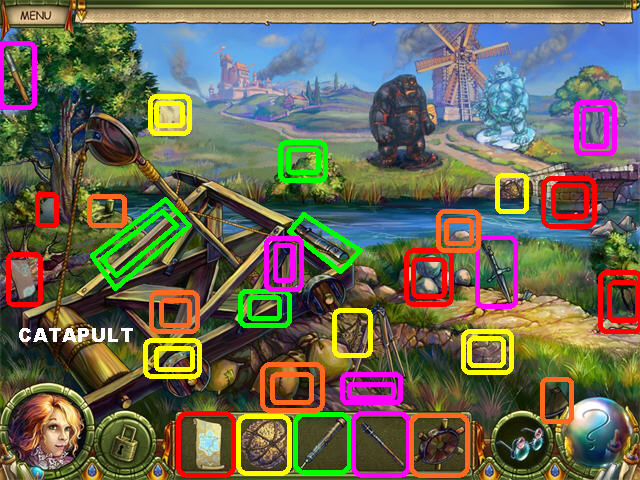
- Pick up the items marked in the screenshot. The items marked in double lines require the use of the MAGIC GLASSES before they can be picked up.
- Fix the BROKEN CATAPULT in the lower left with the PART OF THE CATAPULT; pick up the last ICE SPELL fragment on the left tree.
- Place the HAY BOMB on the holder on the catapult.
- Place the ICE SPELL on the water.
- You will not use the UNLIT TORCH for now.
- Click on the Frozen River to reach the next location.
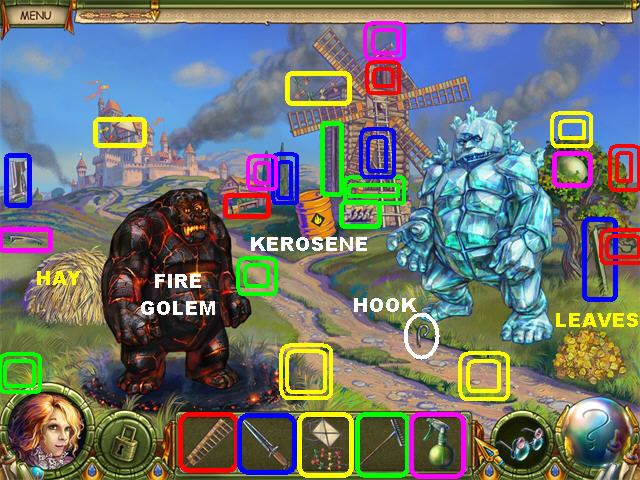
- Pick up the items marked in the screenshot. The items marked in double lines require the use of the MAGIC GLASSES before they can be picked up.
- Place the KITE on the HOOK in the lower right and pick up the last SPRAY BOTTLE that a bird drops on the ground.
- RAKE the LEAVES in the lower right and pick up the last WINDMILL BLADE fragment.
- Place the WINDMILL BLADE on the WINDMILL.
- Place the SPRAY BOTTLE on the KEROSENE.
- Give the SPRAY BOTTLE WITH KEROSENE to the FIRE GOLEM on the left and it will set on fire the HAY in the lower right.
- Pick up the last DAGGER fragment in the lower left.
- Cut the BURNING KITE’S ROPE with the DAGGER.
- Exit the scene by clicking at the bottom of the scene.
- Light the UNLIT TORCH by placing it on the BURNING KITE.
- Melt the TREE on the left with the BURNING TORCH; pick up the last TELESCOPE part on the tree.
- Place the TELESCOPE on the STAND in the lower center to trigger a puzzle.
- Rotate the discs until they form the correct image. Correct pieces will lock in place.
- Please look at the screenshot for the solution.
- Another puzzle will appear immediately after that one has been solved.
- Find the numbers hidden within the scene and click on all of them to complete the puzzle.
- Please look at the screenshot for the solution.
- Place the BURNING TORCH on the BOMB on the catapult and click on the catapult’s wheel in the lower left.
- Cross the Frozen River.
- Fill the SPRAY BOTTLE on the puddle on the right.
- Spray the FIRE GOLEM with the SPRAY BOTTLE WITH WATER to defeat the Fire Golem.
- Click on the Magic Academy on the left.
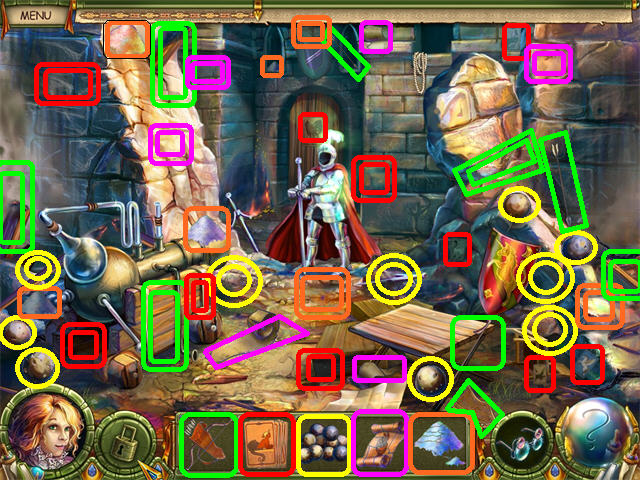
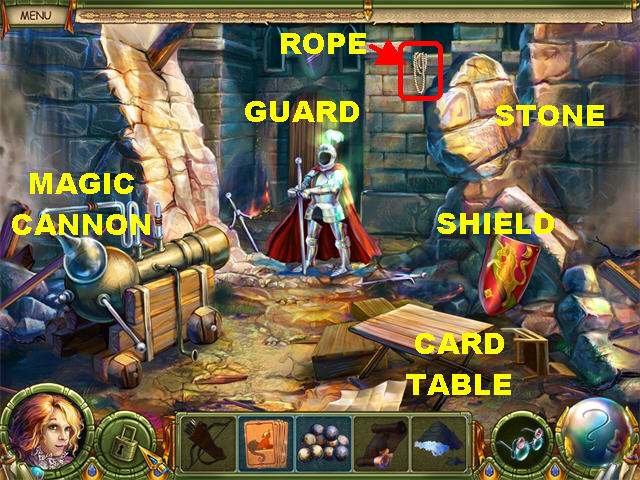
- Pick up the items marked in the screenshot. The items marked in double lines require the use of the MAGIC GLASSES before they can be picked up.
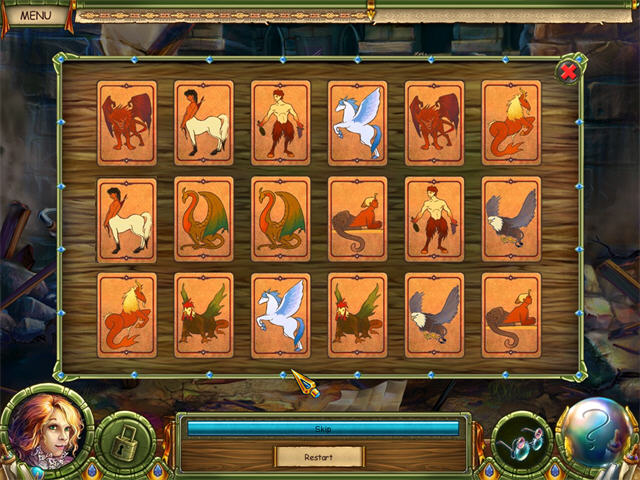
- Put the MAGIC CARDS on the card table on the right to trigger a mini-game.
- Click on any 2 cards to reveal what is behind them. Eliminate all the matching pairs to win the mini-game.
- Please look at the screenshot for the solution. You will receive the UNICORN CARD after the game.
- Activate the Magic Glasses, place the UNICORN CARD on the SHIELD on the right; pick up the last MAGIC GUNPOWDER fragment.
- Place the CANNONBALLS and the MAGIC GUNPOWDER on the MAGIC CANNON on the left.
- Click on the MAGIC CANNON to blast it and the GUARDIAN will leave; pick up the last ARROW fragment on the back door (without the Magic Glasses).
- Place the BOW AND ARROWS on the ROPE in the upper right first and then on the LARGE STONE in the upper right.
- Pick up the last KNOT SPELL fragment behind the stone.
- Place the KNOT SPELL on the ROPE and go through the window.
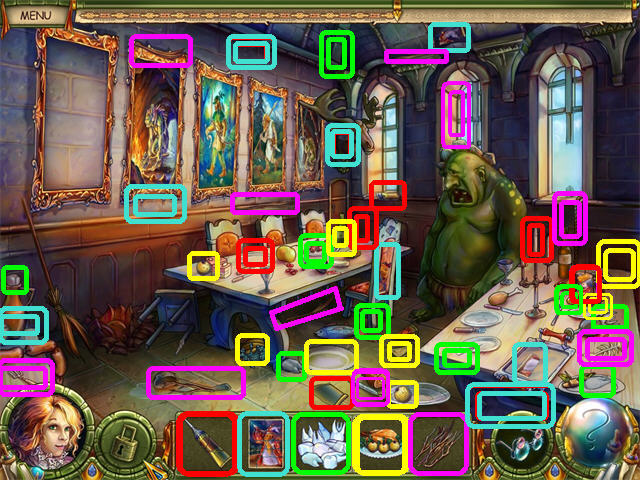
- Pick up the items marked in the screenshot. The items marked in double lines require the use of the MAGIC GLASSES before they can be picked up.
- Place the TWIGS on the BROOM in the lower left; pick up the FALSE TEETH & GLUE fragments that appear on the floor after the broom has finished sweeping.
- Repair the STOOL below the table with the GLUE.
- Activate the Magic Glasses and fix the BROKEN ANTLER with the GLUE; pick up the last CHICKEN AND APPLES fragment on the antlers.
- Give the FALSE TEETH & the CHICKEN AND APPLES to the green monster.
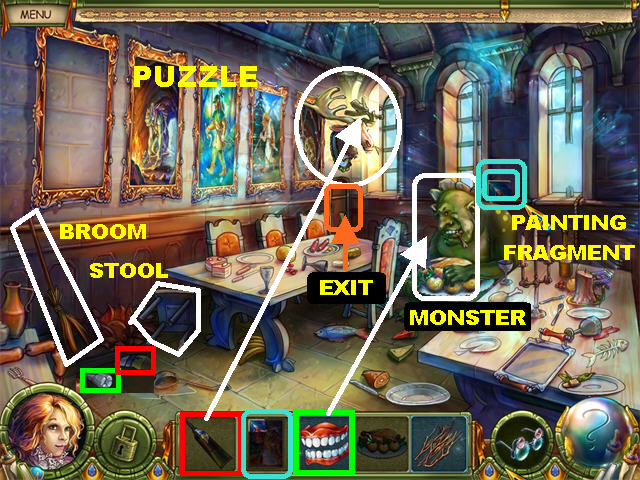
- Using the Magic Glasses, pick up the PAINTING fragment behind the monster’s head.
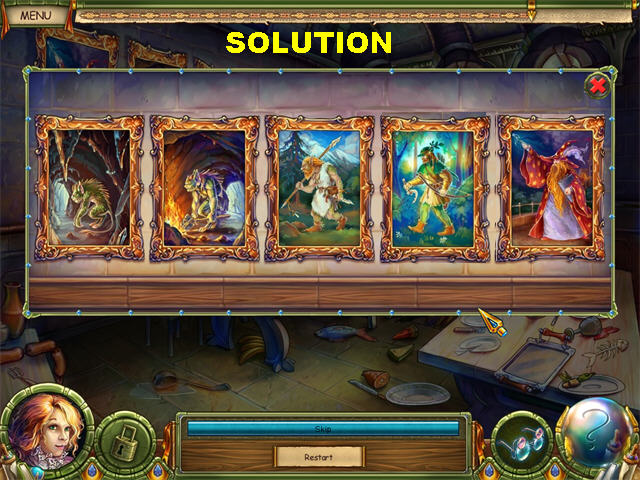
- Zoom into the paintings on the wall and place the PAINTING on the empty frame to trigger a puzzle.
- Place the paintings in chronological order. Click on any 2 paintings to swap their positions.
- Please look at the screenshot for the solution.
- Go through the small door below the moose’s head to enter the next location.
- The characters on the right will constantly change in this scene.
- Pick up the items marked in the screenshot. The items marked in double lines require the use of the MAGIC GLASSES before they can be picked up.
- Place the MIRROR in the MIRROR FRAME on the right.
- You will see the reflection of a particular character appear in the mirror and several characters appear in front of the mirror.
- Use the HAMMER on the mirror when the character in the mirror matches the one standing in front of the mirror.
- Each time you complete this task successfully, parts of the MAGIC KEY will appear in the scene and a new character will appear in the mirror. Complete this task 3 times to obtain 5 KEY fragments.
- Activate the Magic Glasses and pick up the Key fragments.
- Place MAGIC KEY (A) on the third CAGE using the Magic Glasses; pick up the last fragment on the column for MAGIC KEY (B).
- Place MAGIC KEY (B) on the middle CAGE; pick up the last fragment for MAGIC KEY C.
- Place MAGIC KEY (C) on the left CAGE to capture the Illusionist.
- You must now gather all the PAGES from the grounds of the Academy.
- Exit this scene in the upper left.
- Please look at the screenshot for the locations of all the pages.
- Place THE BOOK OF ILLUSIONS on the STAND in the Illusionist’s room once all the pages have been collected to trigger a Find the Differences Puzzle.
- Please look at the screenshot for the solution.
Find the Differences Puzzle
- Go back to Chapter V in the book and find the differences between both images.
- The next 5 images show you the solutions for all 5 puzzles.

 THE END!
Created at: 2010-05-02