

Walkthrough Menu
- General Tips
- Chapter 1: On the Boat
- Chapter 2: Outside the School
- Chapter 3: Inside the School
- Chapter 4: Escape the Basement
- Chapter 5: Enter the Garden
General Tips
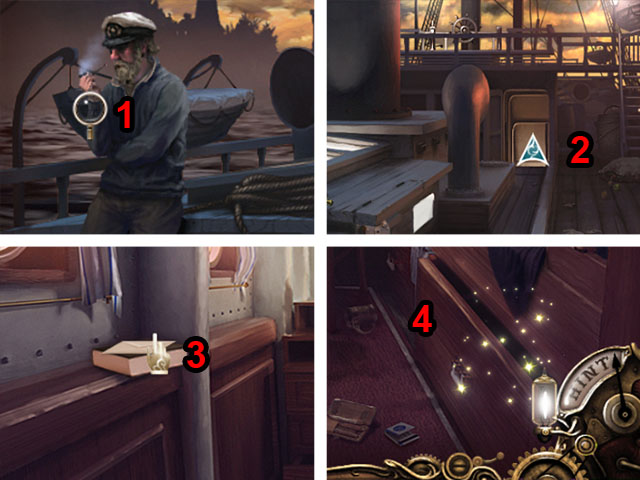 • Press New Game to begin playing. • From the options menu you
can adjust the audio settings, brightness, and pick full
screen mode. • There is only one game mode, but you can play
with the tutorial for extra help. • There are three main
cursors in the game: (1) the magnifying glass cursor is used
to take a closer look at something, (2) the arrow cursor
allows you to move through scenes, and (3) the hand cursor
allows you to pick up an inventory item or important clue. •
Hidden Object Scenes are indicated with sparkles in that area
(4). • Items written in red in Hidden Object Scenes require
additional steps. • You will meet a helpful robot during the
game. Press his button near the hint button when you encounter
something too heavy for your character to lift and he will
lift it for you. • The hint button is in the right corner and
slowly charges up as you play. You can use it during any scene
to get a hint of what to do next or to find the location of a
hidden object.
• Press New Game to begin playing. • From the options menu you
can adjust the audio settings, brightness, and pick full
screen mode. • There is only one game mode, but you can play
with the tutorial for extra help. • There are three main
cursors in the game: (1) the magnifying glass cursor is used
to take a closer look at something, (2) the arrow cursor
allows you to move through scenes, and (3) the hand cursor
allows you to pick up an inventory item or important clue. •
Hidden Object Scenes are indicated with sparkles in that area
(4). • Items written in red in Hidden Object Scenes require
additional steps. • You will meet a helpful robot during the
game. Press his button near the hint button when you encounter
something too heavy for your character to lift and he will
lift it for you. • The hint button is in the right corner and
slowly charges up as you play. You can use it during any scene
to get a hint of what to do next or to find the location of a
hidden object.
Chapter 1: On the Boat
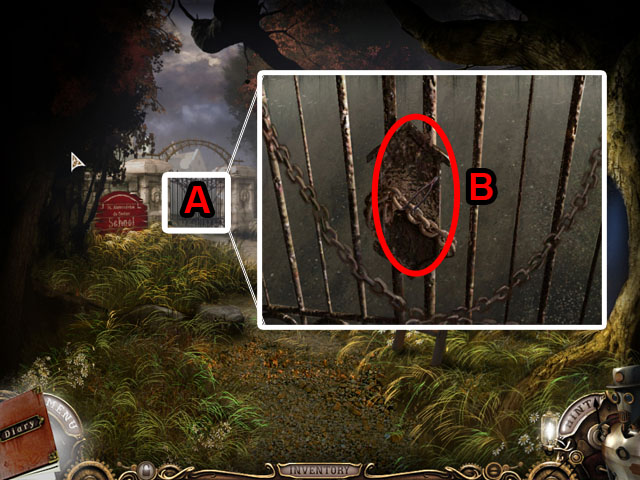
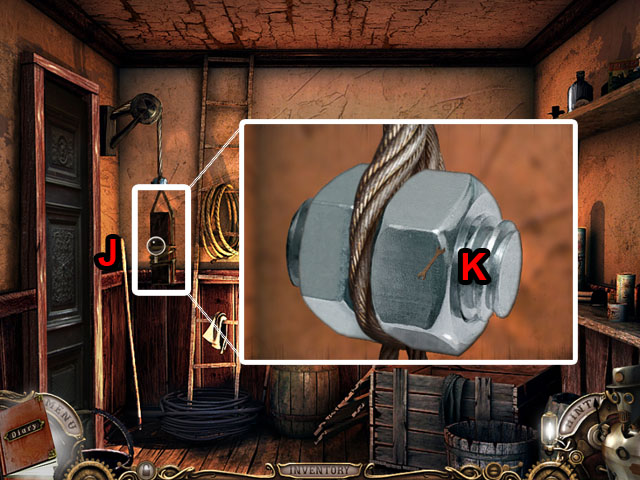
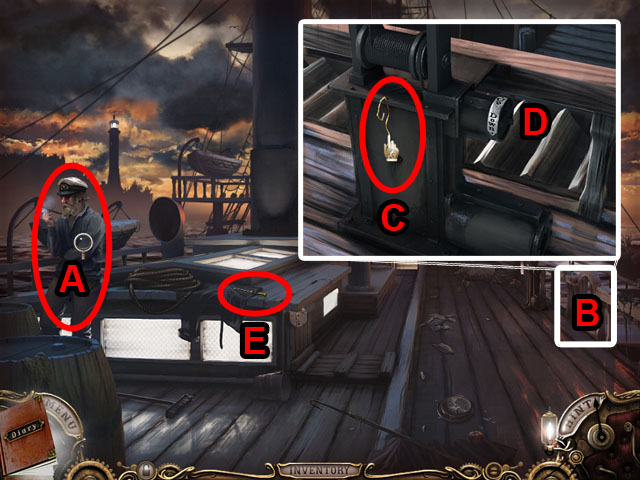 • Inspect the Captain (A) and then zoom into the gate (B). •
Take the PIECE OF WIRE (C) and inspect the crank (D). • Take
the SCREWDRIVER (E). • Travel to the cabin down the stairs.
• Inspect the Captain (A) and then zoom into the gate (B). •
Take the PIECE OF WIRE (C) and inspect the crank (D). • Take
the SCREWDRIVER (E). • Travel to the cabin down the stairs.
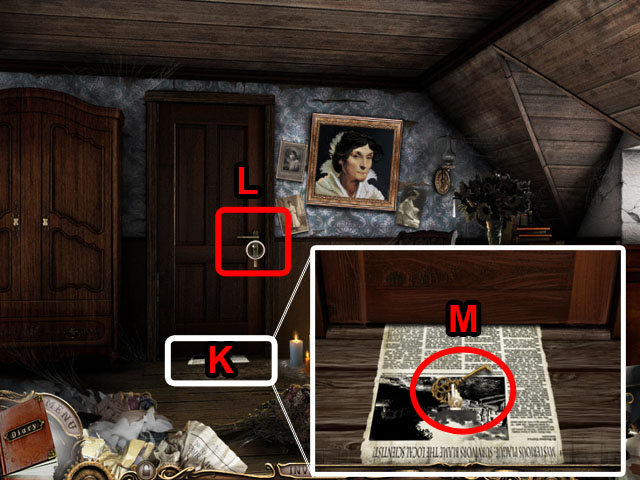
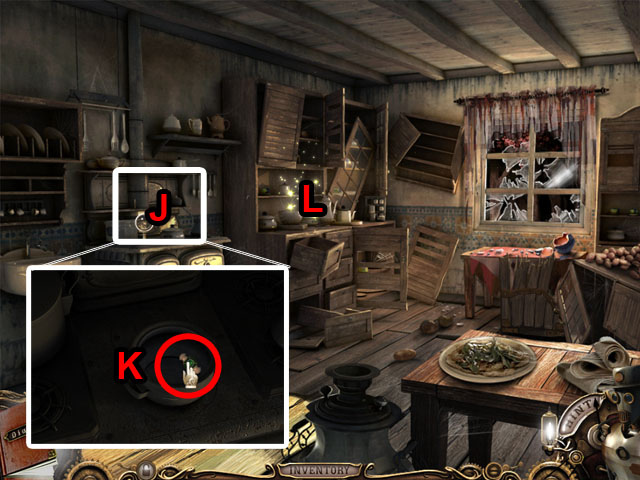
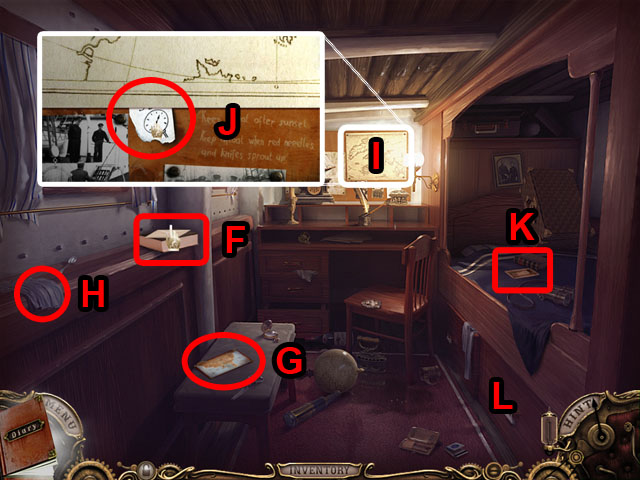 • Take the letter (F) and the map (G). • Remove the old rag
and take the KEY (H). • Zoom in on the map above the desk (I)
and take the NOTE (J). • Zoom in on the bed (K) and take the
picture. • Open the drawer and enter the Hidden Object Scene
(L).
• Take the letter (F) and the map (G). • Remove the old rag
and take the KEY (H). • Zoom in on the map above the desk (I)
and take the NOTE (J). • Zoom in on the bed (K) and take the
picture. • Open the drawer and enter the Hidden Object Scene
(L).
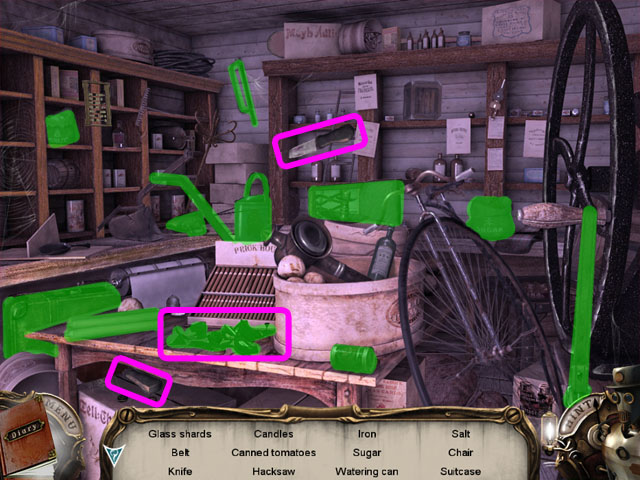
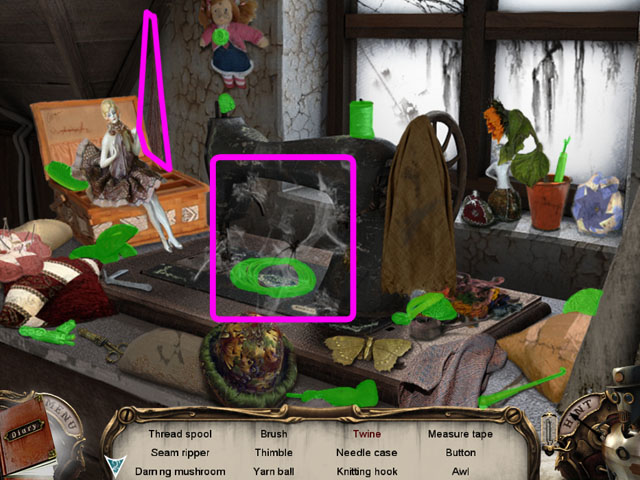
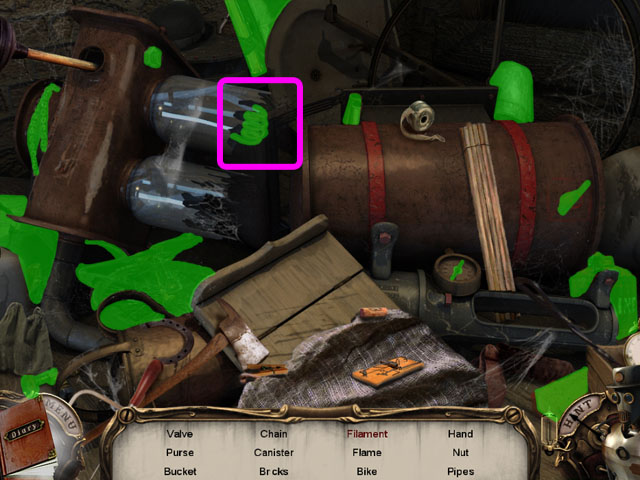
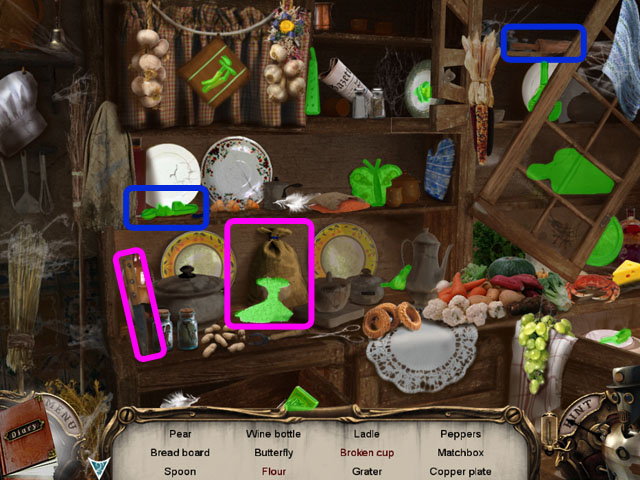
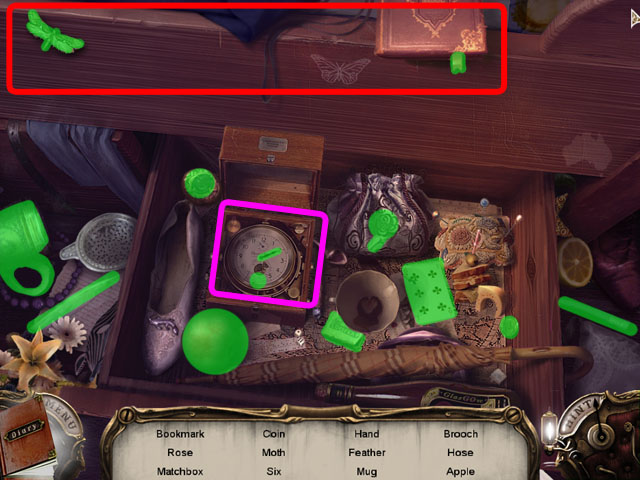 • Find all of the hidden objects. • The objects in red will
need to be found by moving objects out of the way. • Open the
wooden box and move the two articles of clothing circled in
purple. • You will receive a STEAM HOSE.
• Find all of the hidden objects. • The objects in red will
need to be found by moving objects out of the way. • Open the
wooden box and move the two articles of clothing circled in
purple. • You will receive a STEAM HOSE.
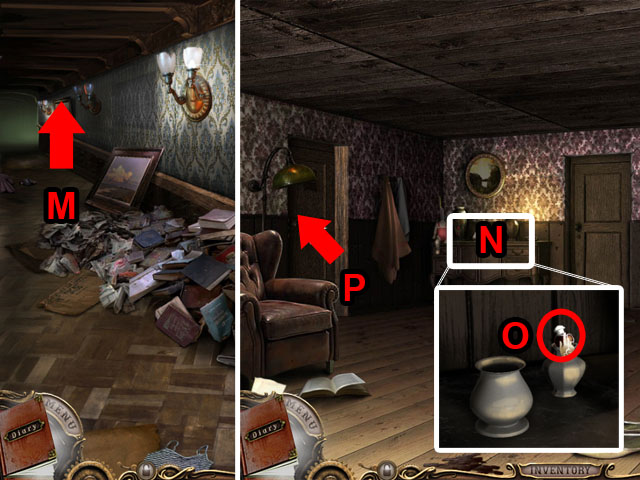
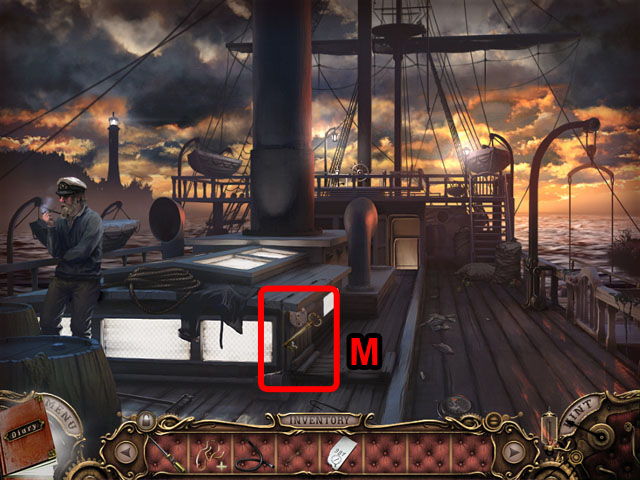 • Exit the cabin and use the KEY on the lock (M). • Enter the
ship’s hold.
• Exit the cabin and use the KEY on the lock (M). • Enter the
ship’s hold.
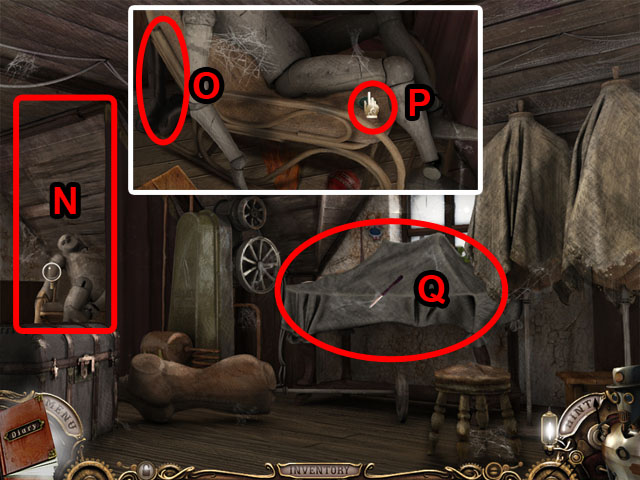
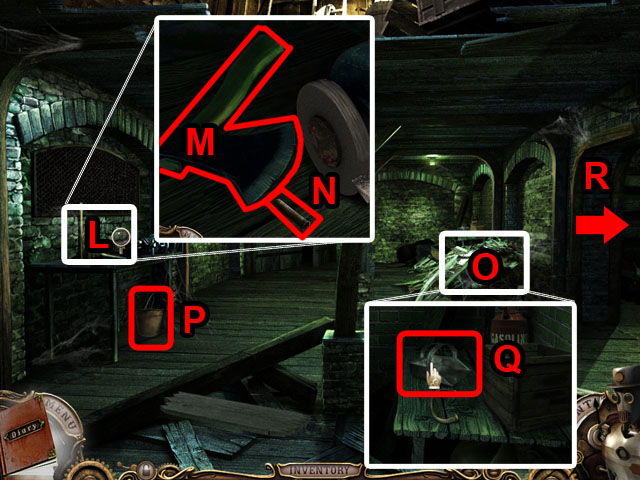
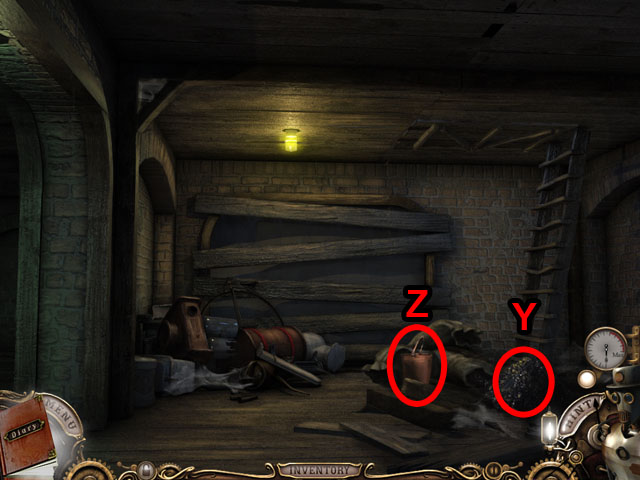
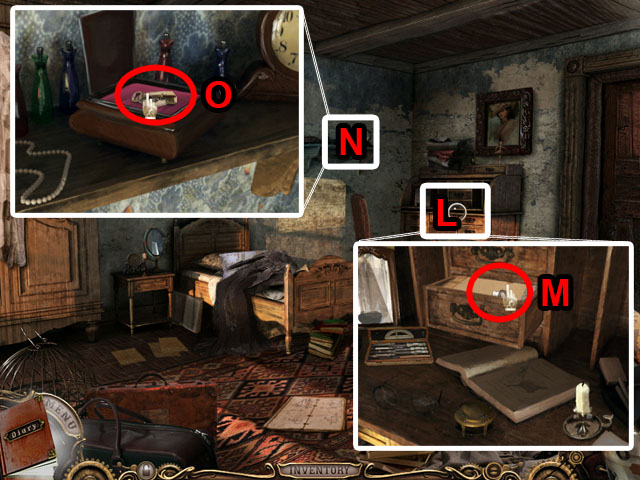
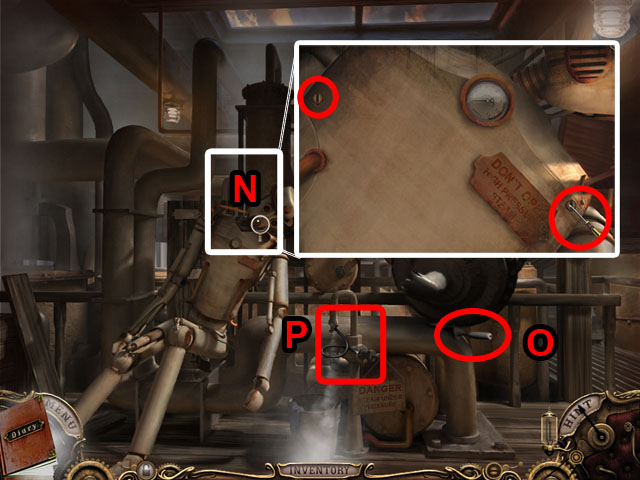 • Inspect the robot (N). • Use the SCREWDRIVER on the two
screws to open the chest. • Take the BROKEN LEVER PART (O). •
Use the STEAM HOSE on the steam (P) and then inspect the robot
again.
• Inspect the robot (N). • Use the SCREWDRIVER on the two
screws to open the chest. • Take the BROKEN LEVER PART (O). •
Use the STEAM HOSE on the steam (P) and then inspect the robot
again.
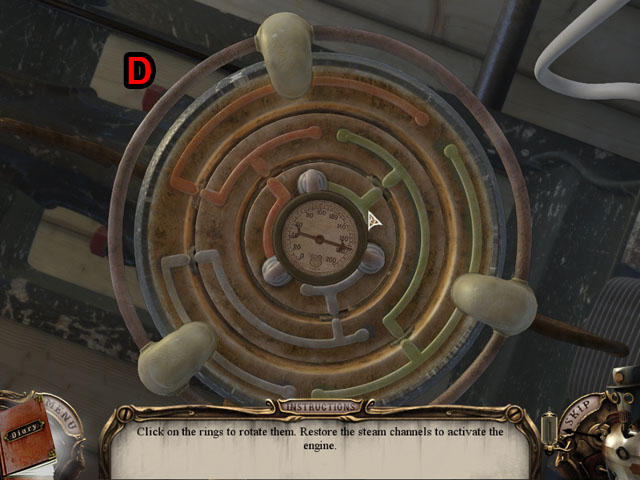
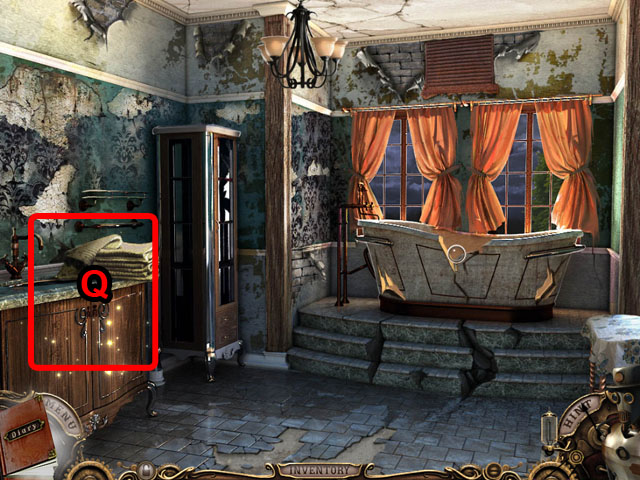
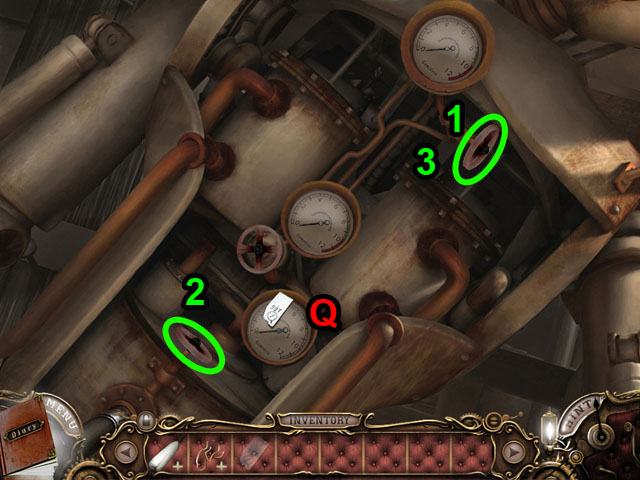 • Use the NOTE on the machinery (Q). • Set the 3 gauges to the
number 997 by adjusting the knob. • Selecting the left side of
the knob will turn it to the right, and to the right side will
turn it to the left. • Adjusting the top knob will move the
top and middle dials. • Adjusting the middle knob will move
the bottom and the middle dials. • Adjusting the bottom knob
will move the bottom and top dials. • First adjust the top
dial to the max of 12 (1). • Then adjust the bottom dial to 7
(2). • Lastly adjust the top dial to 9 (3).
• Use the NOTE on the machinery (Q). • Set the 3 gauges to the
number 997 by adjusting the knob. • Selecting the left side of
the knob will turn it to the right, and to the right side will
turn it to the left. • Adjusting the top knob will move the
top and middle dials. • Adjusting the middle knob will move
the bottom and the middle dials. • Adjusting the bottom knob
will move the bottom and top dials. • First adjust the top
dial to the max of 12 (1). • Then adjust the bottom dial to 7
(2). • Lastly adjust the top dial to 9 (3).
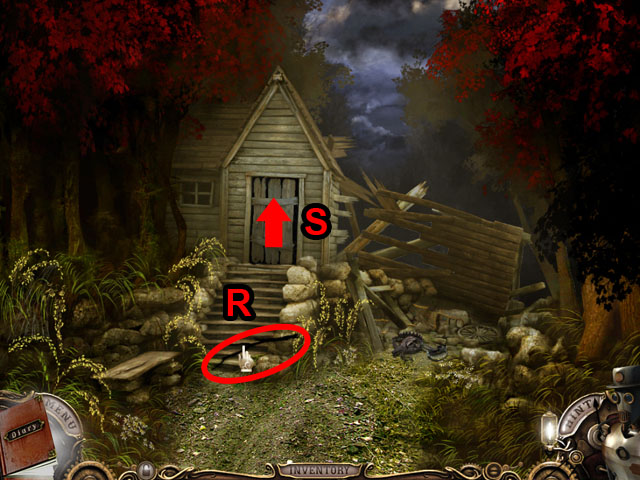
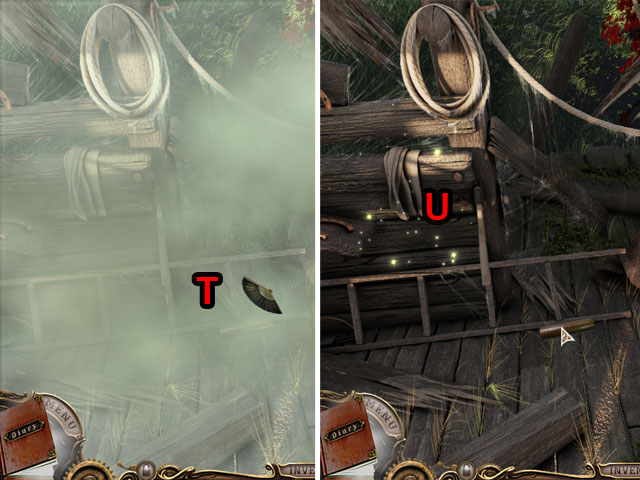
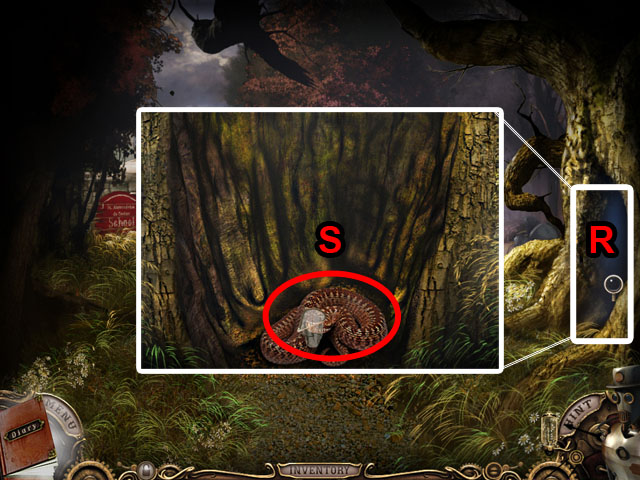
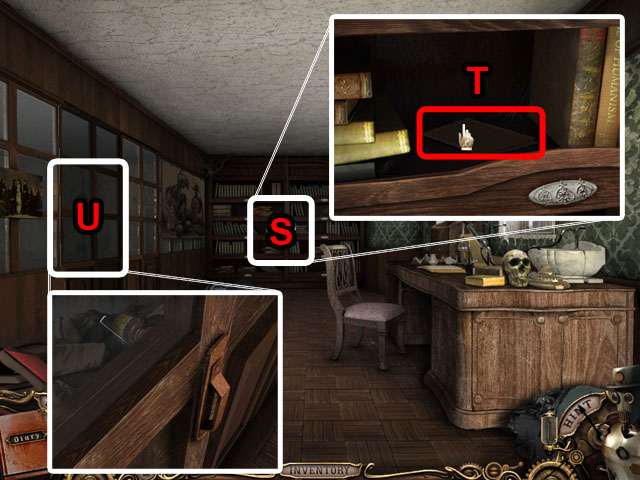
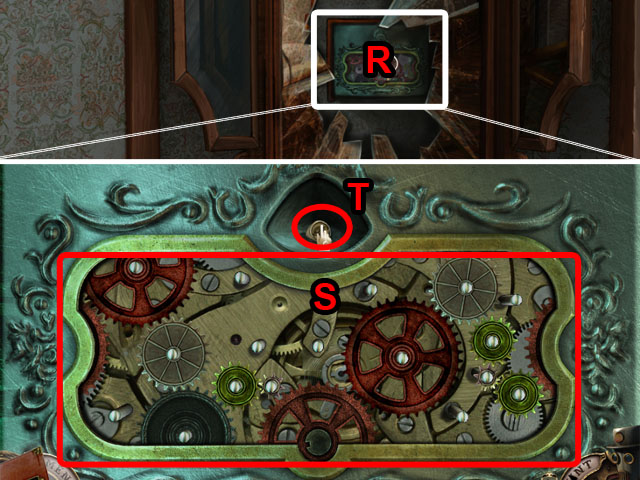
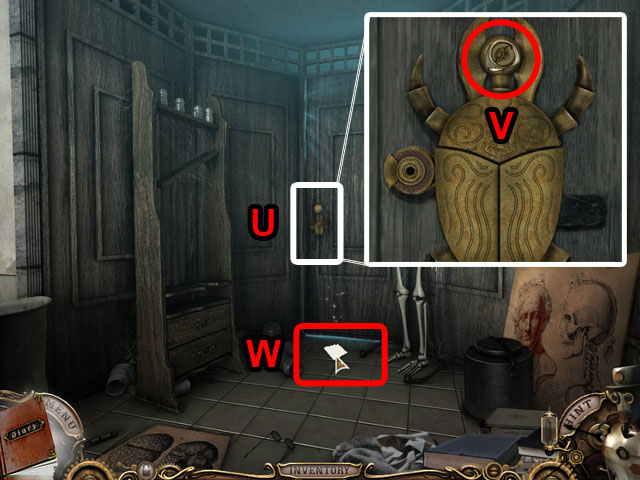
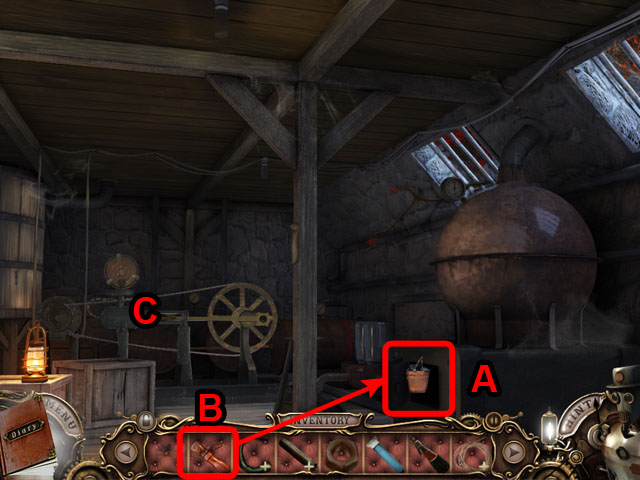
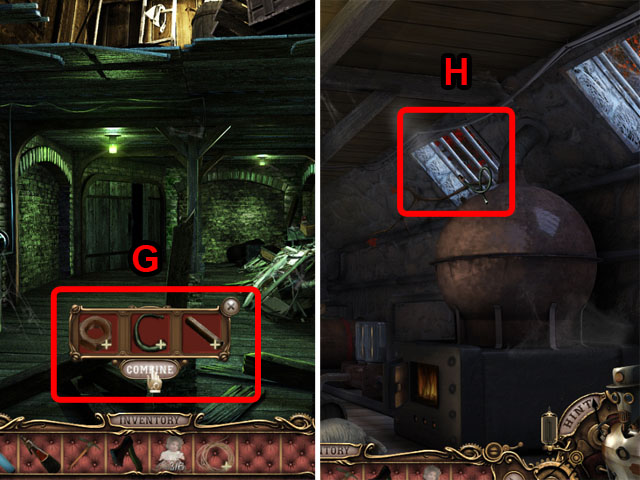
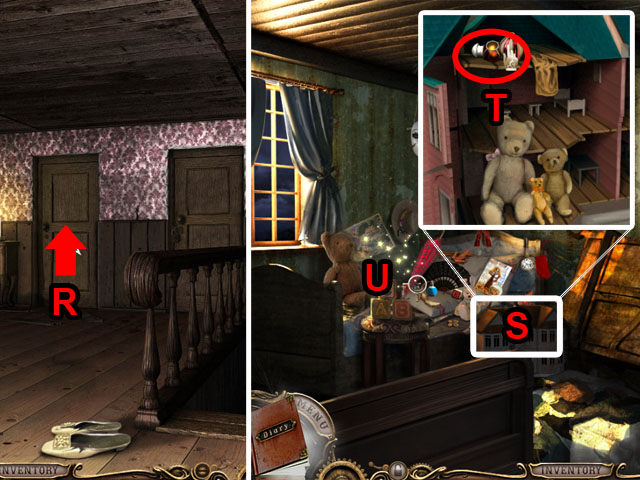
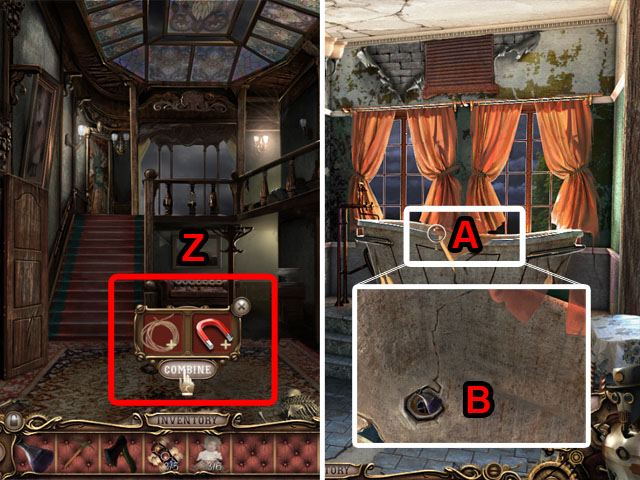
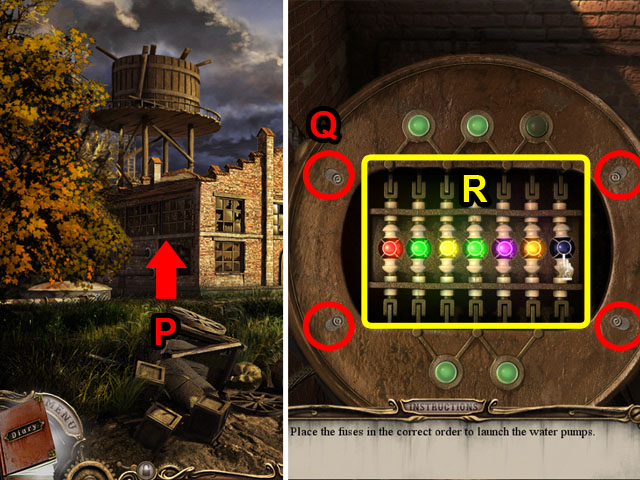
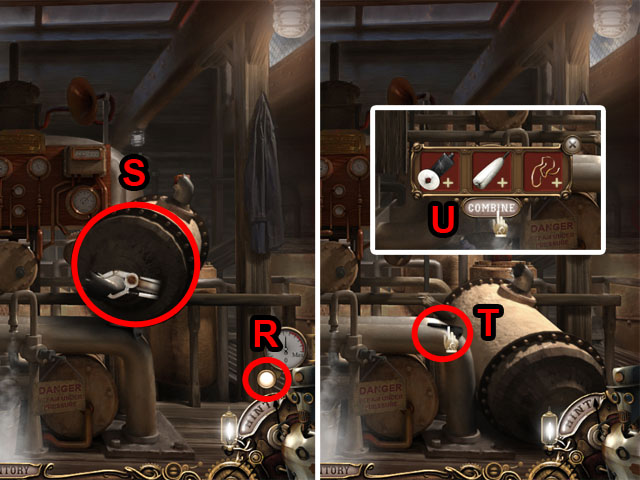 • Use the robot by pressing the button near the hint (R) and
then use it on the large tank (S). • Take the BROKEN LEVER
PART (T). • Combine the parts with a + sign on them in your
inventory (U). • You will receive the REPAIRED LEVER.
• Use the robot by pressing the button near the hint (R) and
then use it on the large tank (S). • Take the BROKEN LEVER
PART (T). • Combine the parts with a + sign on them in your
inventory (U). • You will receive the REPAIRED LEVER.
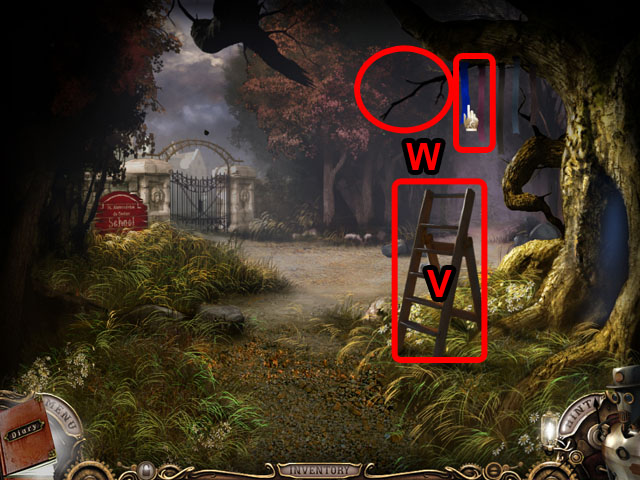
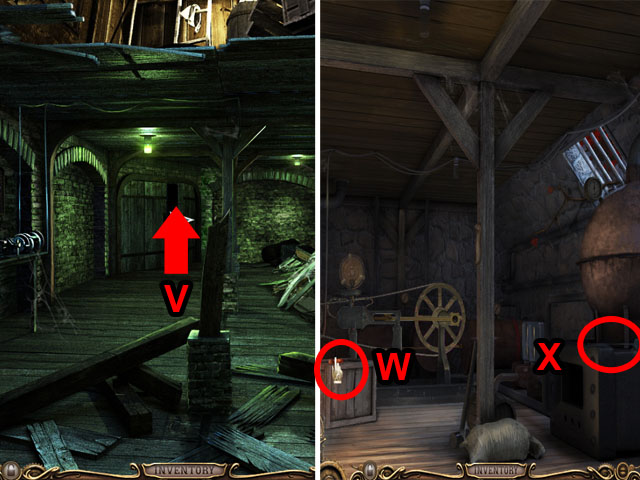
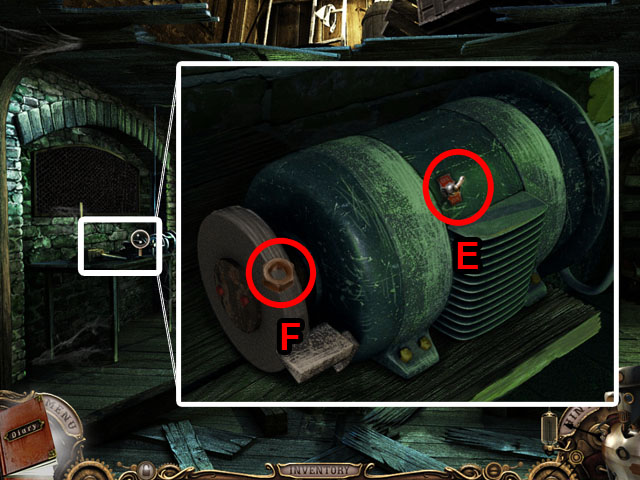
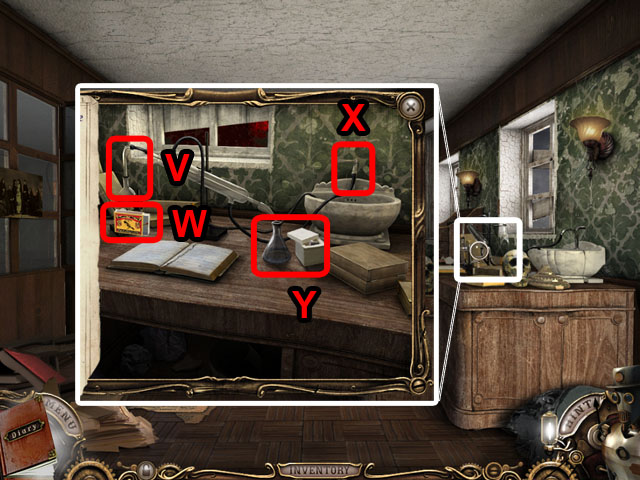
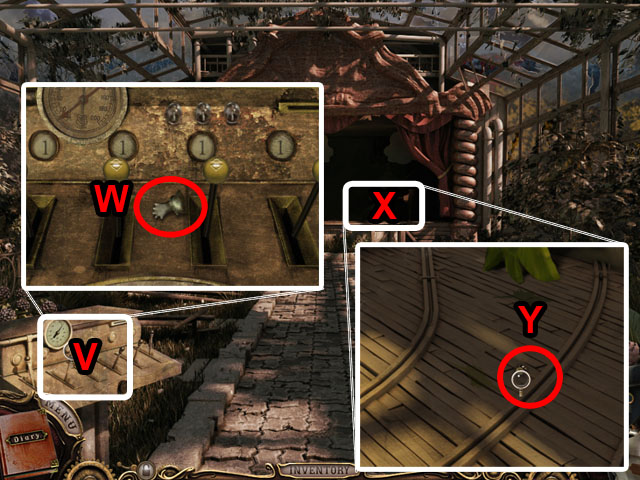
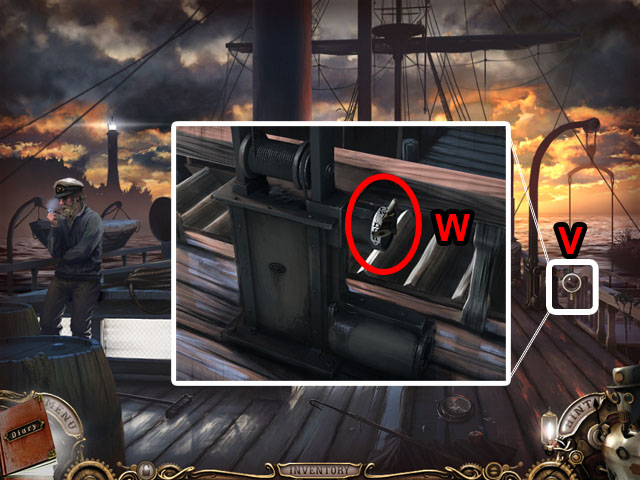 • Exit the hold. • Inspect the side rail (V). • Use the
REPAIRED LEVER on the rail (W) and use the lever. • Exit
towards the right.
• Exit the hold. • Inspect the side rail (V). • Use the
REPAIRED LEVER on the rail (W) and use the lever. • Exit
towards the right.
Chapter 2: Outside the School
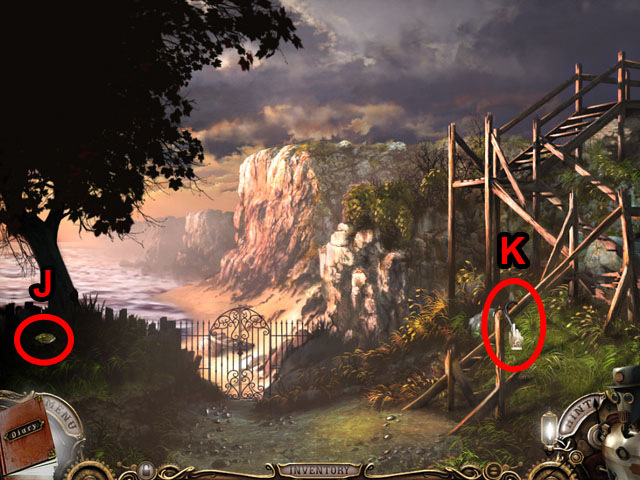
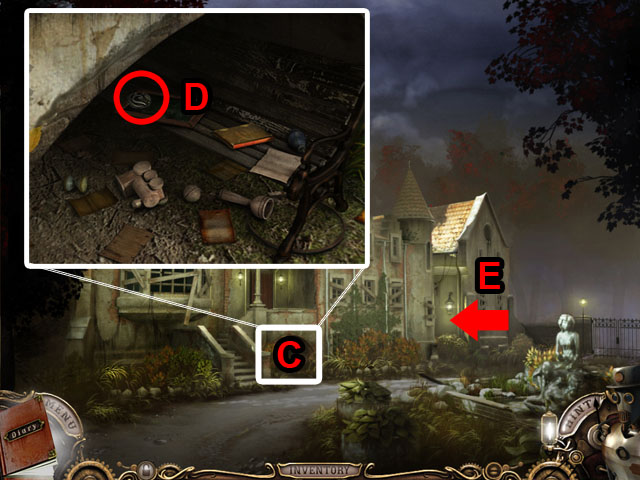
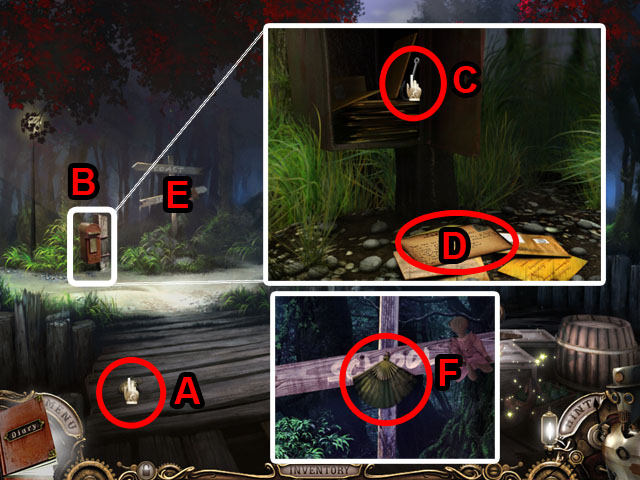 • Take the locket on the ground (A). • Inspect the mailbox and
then use the robots strength to open it (B). • Take the HOOK
(C) and inspect the letter (D). • Inspect the sign (E) and
take the FAN (F).
• Take the locket on the ground (A). • Inspect the mailbox and
then use the robots strength to open it (B). • Take the HOOK
(C) and inspect the letter (D). • Inspect the sign (E) and
take the FAN (F).
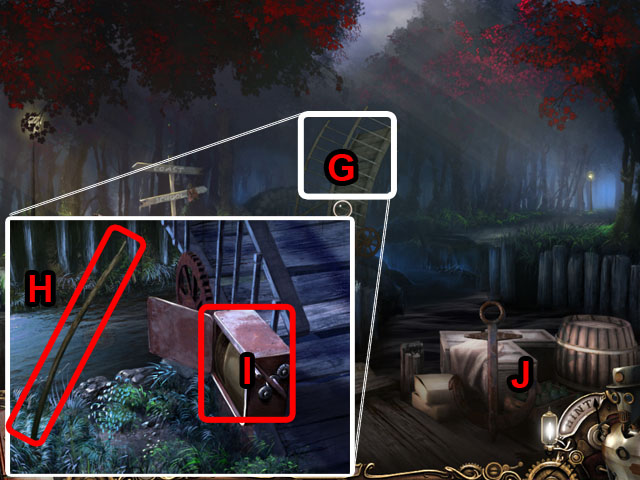 • Inspect the bridge (G). • Take the LONG STICK (H) and
inspect the box (I) to find that it is missing a gear. • Enter
the Hidden Object Scene (J).
• Inspect the bridge (G). • Take the LONG STICK (H) and
inspect the box (I) to find that it is missing a gear. • Enter
the Hidden Object Scene (J).
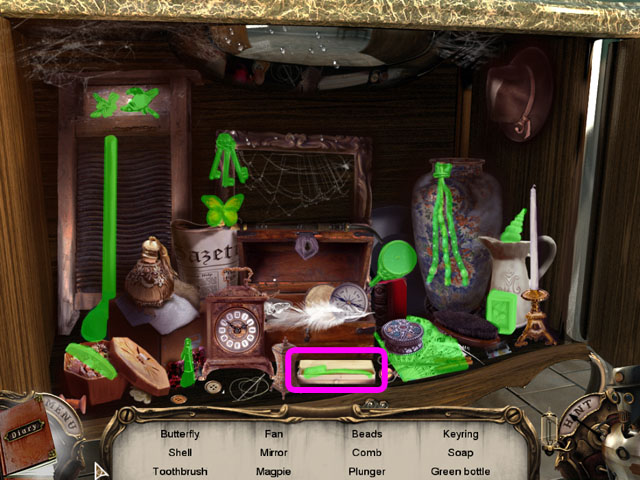
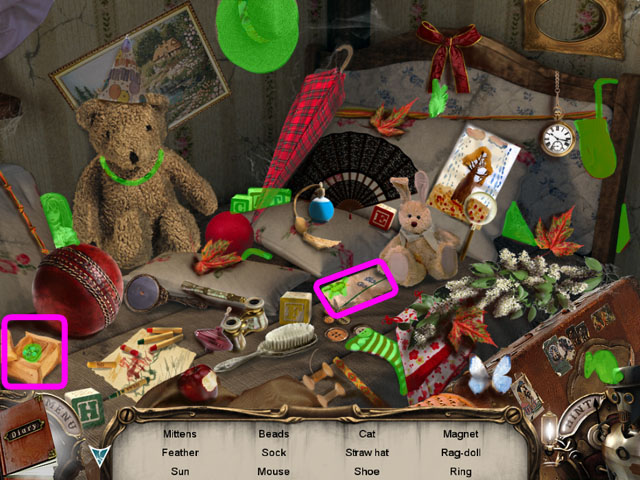
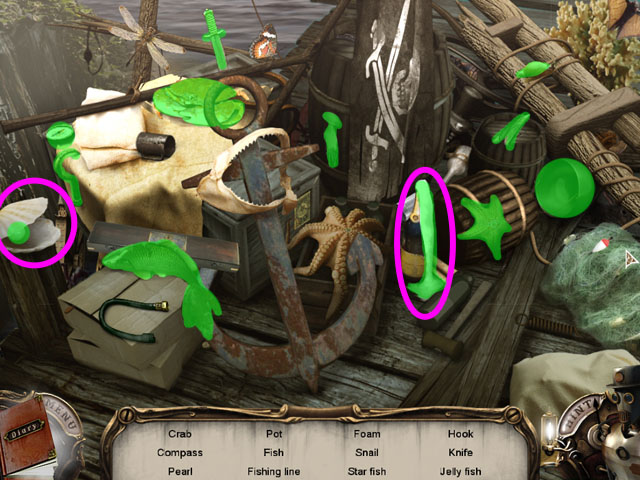 • Find all of the hidden objects. • Shake the bottle and open
the shell to find all of the objects. • You will receive the
FISHING LINE. • Exit the scene and travel to the left.
• Find all of the hidden objects. • Shake the bottle and open
the shell to find all of the objects. • You will receive the
FISHING LINE. • Exit the scene and travel to the left.
 • Pick up the GRAPPLING HOOK (J) and the DISK (K). • Exit the
scene.
• Pick up the GRAPPLING HOOK (J) and the DISK (K). • Exit the
scene.
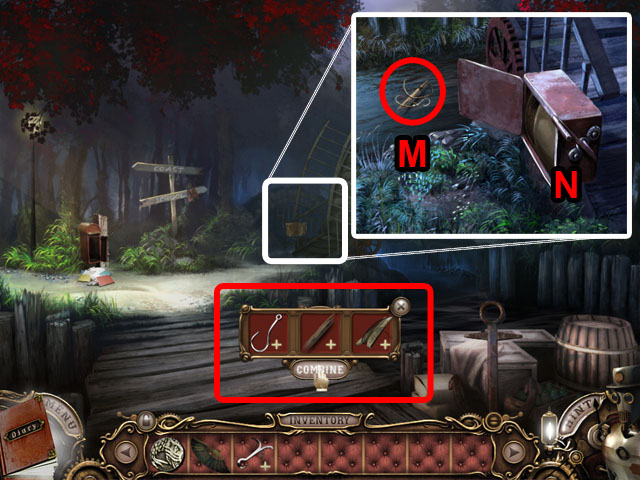 • Combine the FISHHOOK, FISHING LINE and LONG STICK into a
FISHING ROD. • Zoom in on the bridge and use the FISHING ROD
(M) to get the GEAR. • Zoom into the strange machine (N).
• Combine the FISHHOOK, FISHING LINE and LONG STICK into a
FISHING ROD. • Zoom in on the bridge and use the FISHING ROD
(M) to get the GEAR. • Zoom into the strange machine (N).
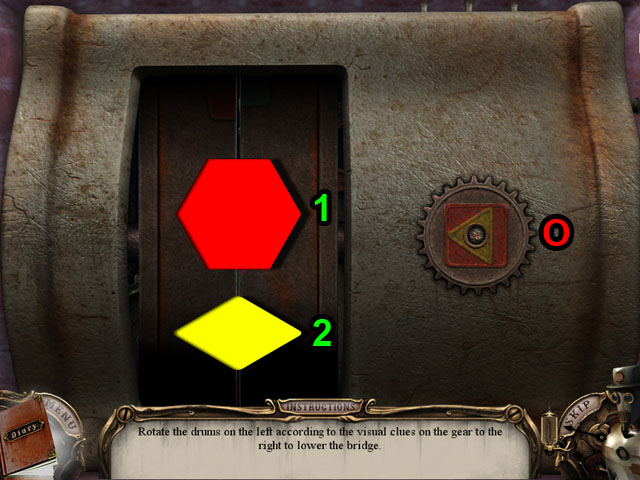 • Use the GEAR on the right side of the machine (O). • Adjust
the left and the right side to make a red hexagon (1). • After
the first door opens, adjust the left and right sides to make
a yellow diamond (2). • Press on the gear to finish the
puzzle. • Travel across the bridge to the right.
• Use the GEAR on the right side of the machine (O). • Adjust
the left and the right side to make a red hexagon (1). • After
the first door opens, adjust the left and right sides to make
a yellow diamond (2). • Press on the gear to finish the
puzzle. • Travel across the bridge to the right.
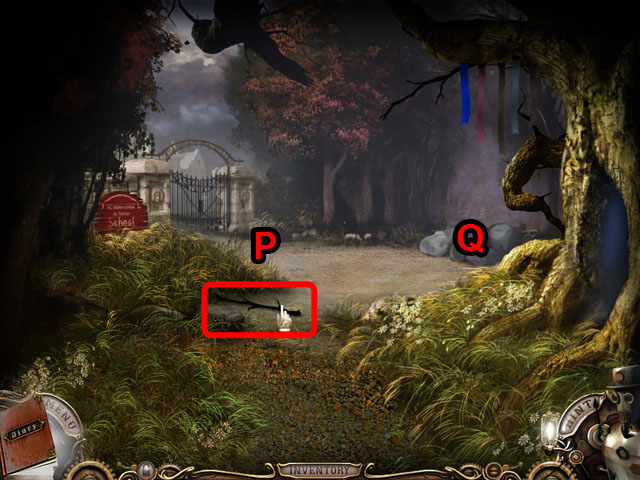 • Take the BRANCH on the ground (P). • Inspect the rocks (Q)
and use the robot’s strength to move them. • Enter the forest
and go to the cabin.
• Take the BRANCH on the ground (P). • Inspect the rocks (Q)
and use the robot’s strength to move them. • Enter the forest
and go to the cabin.
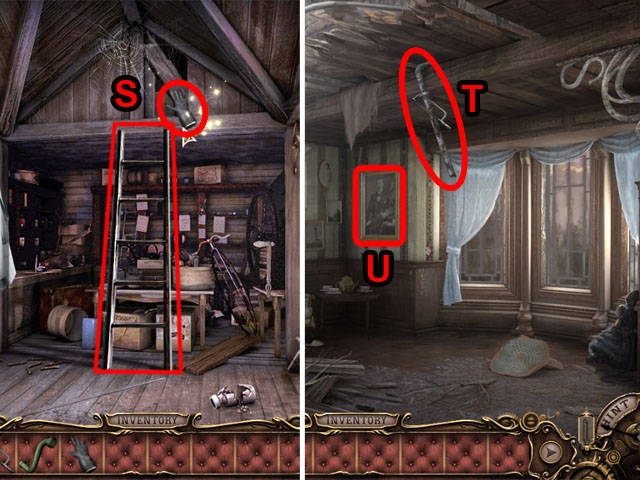
 • Take the BRANCH on the ground (R). • Enter the house (S).
 • Use the FAN to get rid of the smoke (T). • Enter the Hidden
Object Scene (U).
• Use the FAN to get rid of the smoke (T). • Enter the Hidden
Object Scene (U).
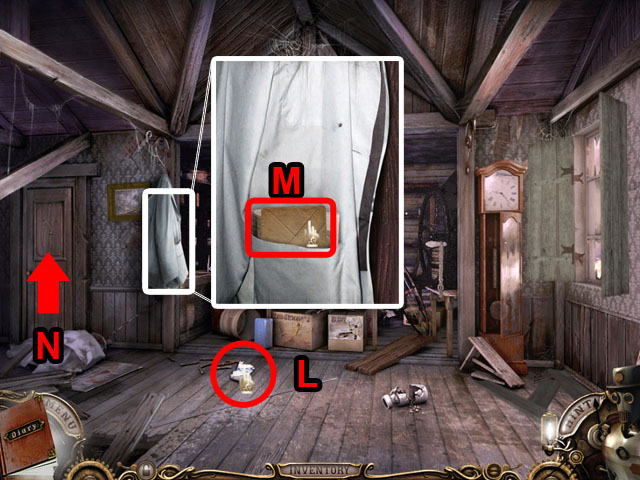
 • Find all of the hidden objects. • Move the cloth to find the
key. • You will receive the STEPLADDER.
• Find all of the hidden objects. • Move the cloth to find the
key. • You will receive the STEPLADDER.
 • Go back twice and use the STEPLADDER (V) under the tree. •
Take the ribbons and then take the STICK (W). • Return to the
cabin through the woods.
• Go back twice and use the STEPLADDER (V) under the tree. •
Take the ribbons and then take the STICK (W). • Return to the
cabin through the woods.
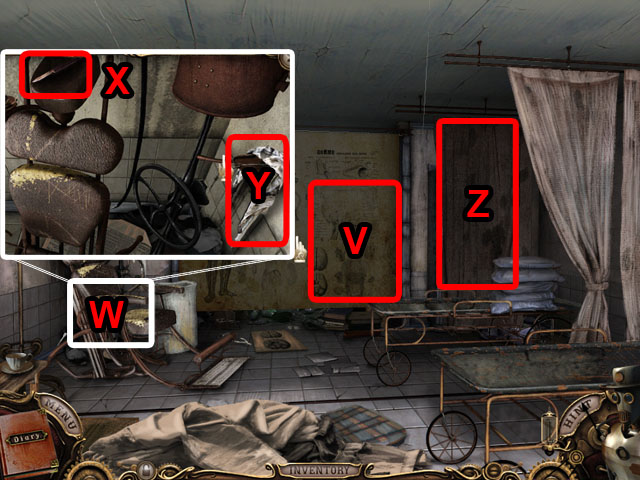
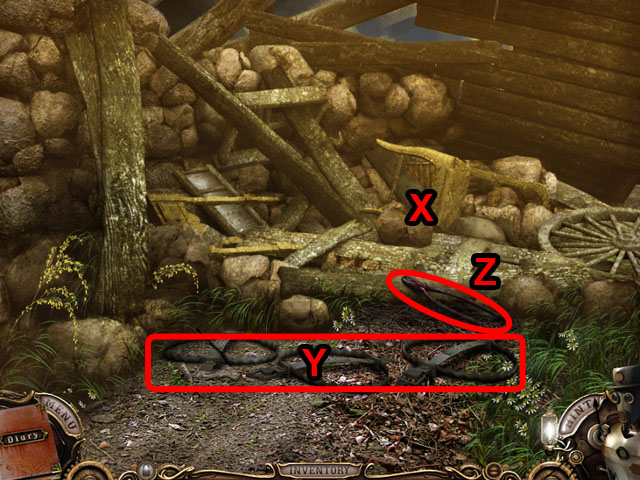 • Inspect the wreckage on the right (X). • Use the 3 STICKS on
the 3 bear traps (Y). • Take the BOLT CUTTERS (Z). • Go back 2
scenes.
• Inspect the wreckage on the right (X). • Use the 3 STICKS on
the 3 bear traps (Y). • Take the BOLT CUTTERS (Z). • Go back 2
scenes.
 • Zoom in on the gate (A). • Use the BOLT CUTTERS on the lock
(B). • Go through the gate.
• Zoom in on the gate (A). • Use the BOLT CUTTERS on the lock
(B). • Go through the gate.
 • Inspect the bench (C) and collect the DISK (D). • Zoom into
the door to check that it has a lock. • Move to the next place
behind the school (E).
• Inspect the bench (C) and collect the DISK (D). • Zoom into
the door to check that it has a lock. • Move to the next place
behind the school (E).
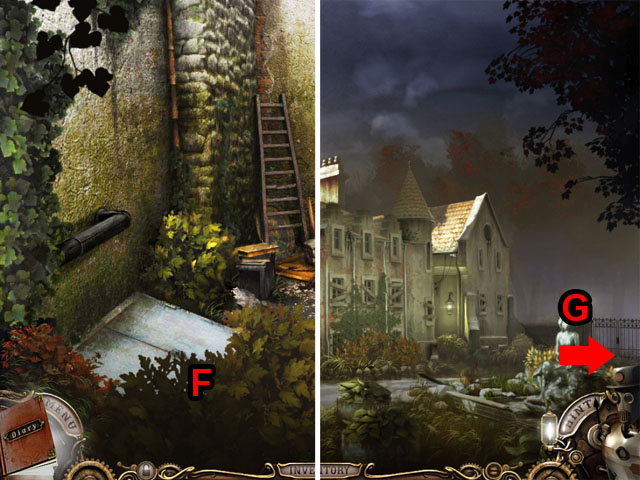 • Inspect the bush (F). • Go back to the last scene. • Travel
to the garden through the gate (G).
• Inspect the bush (F). • Go back to the last scene. • Travel
to the garden through the gate (G).
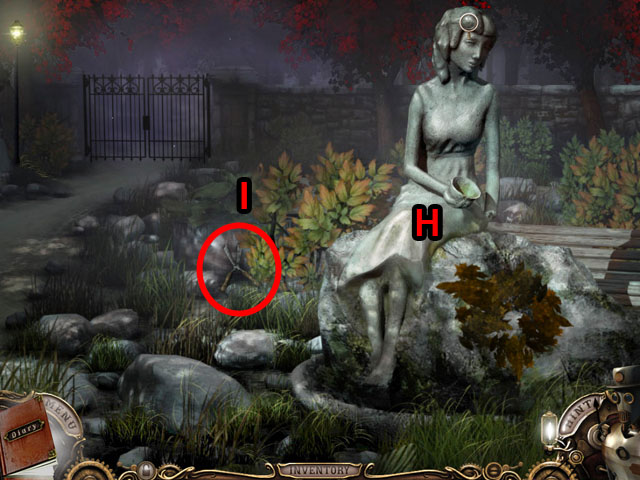 • Inspect the sculpture (H) and take the SHEARS (I). • Go back
2 scenes.
• Inspect the sculpture (H) and take the SHEARS (I). • Go back
2 scenes.
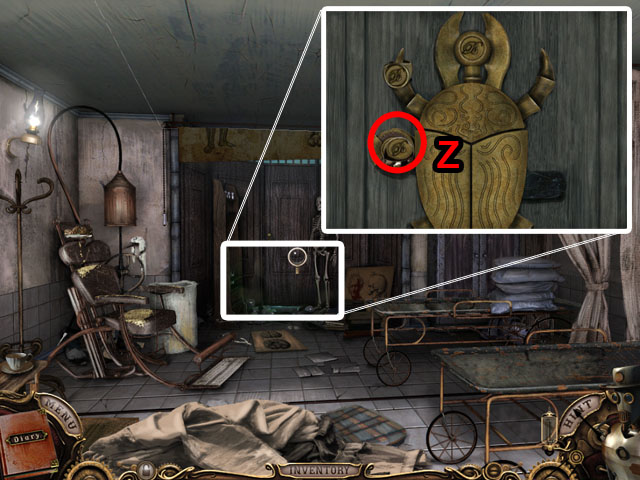
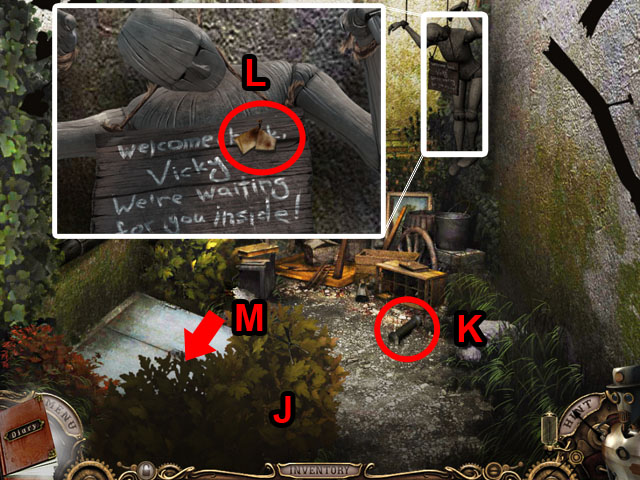 • Cut the bush with the SHEARS (J). • Collect the PIPE PIECE
(K). • Zoom into the wooden doll on the right side and read
the note (L). • Open the hatch and go downstairs (M).
• Cut the bush with the SHEARS (J). • Collect the PIPE PIECE
(K). • Zoom into the wooden doll on the right side and read
the note (L). • Open the hatch and go downstairs (M).
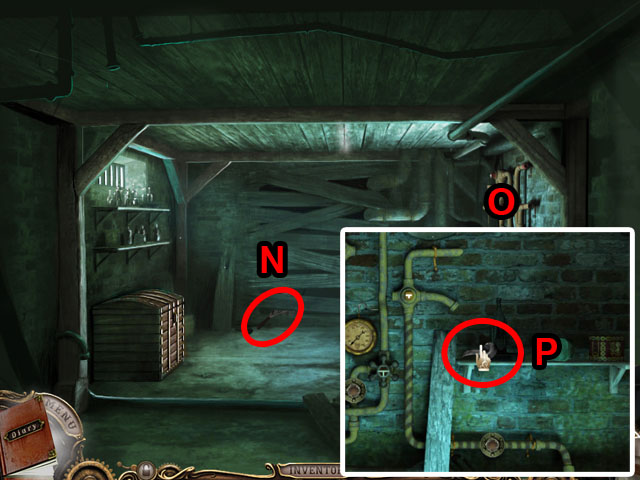 • Take the NET (N). • Inspect the pipes on the left (O). •
Take the VALVE HANDLE (P). • Leave the downstairs and travel
back to the bridge.
• Take the NET (N). • Inspect the pipes on the left (O). •
Take the VALVE HANDLE (P). • Leave the downstairs and travel
back to the bridge.
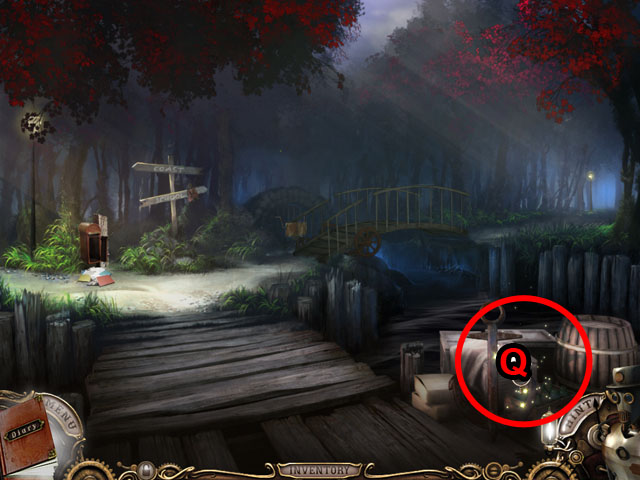 • Enter the Hidden Object Scene (Q).
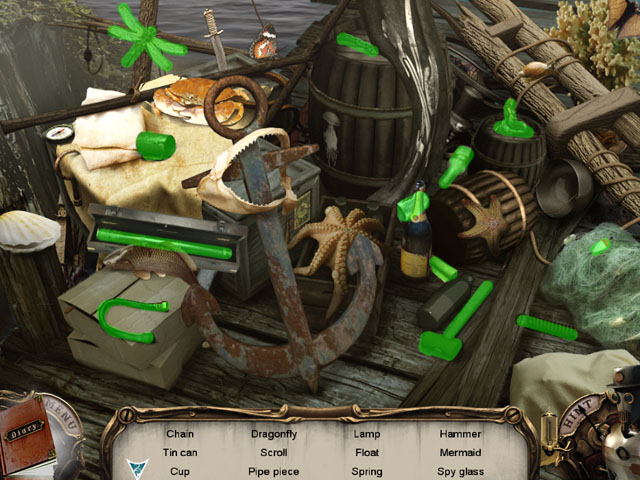 • Find all of the hidden objects. • Move the cloth and open
the case to find all of the objects. • You will receive the
PIPE PIECE.
• Find all of the hidden objects. • Move the cloth and open
the case to find all of the objects. • You will receive the
PIPE PIECE.
 • Return to the school gate. • Zoom in on the tree hollow (R).
• Use the NET on the snake (S); take the PIPE PIECE and the
PUZZLE PIECE.
• Return to the school gate. • Zoom in on the tree hollow (R).
• Use the NET on the snake (S); take the PIPE PIECE and the
PUZZLE PIECE.
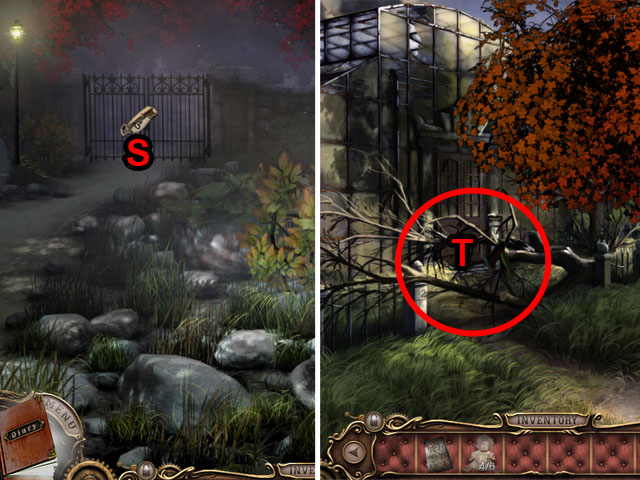
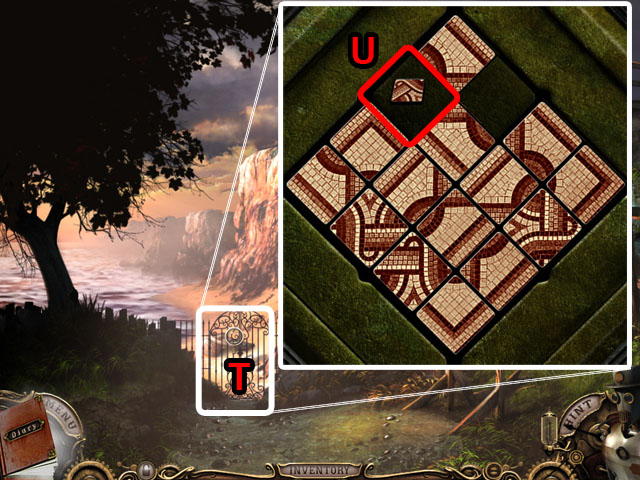 • Return to the bridge scene and go to the left. • Zoom in on
the gate (T). • Use the PUZZLE PIECE on the gate (U) to start
the mini-game.
• Return to the bridge scene and go to the left. • Zoom in on
the gate (T). • Use the PUZZLE PIECE on the gate (U) to start
the mini-game.
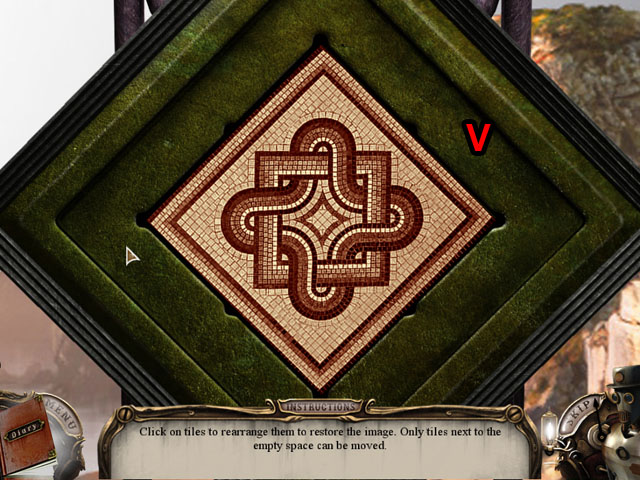 • Press a piece to slide it into the blank spot. • The pieces
with the patterns go in the middle and the pieces with the
lines go on the edges. • The final puzzle will have a space in
the bottom left corner. • See the screenshot for the final
solution (V). • Once finished go through the gate.
• Press a piece to slide it into the blank spot. • The pieces
with the patterns go in the middle and the pieces with the
lines go on the edges. • The final puzzle will have a space in
the bottom left corner. • See the screenshot for the final
solution (V). • Once finished go through the gate.
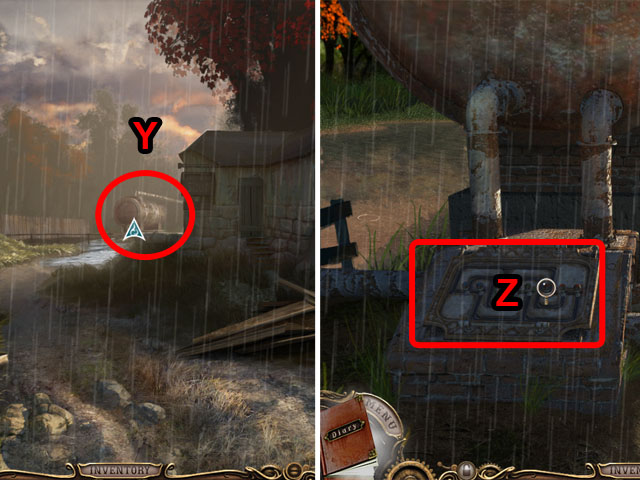
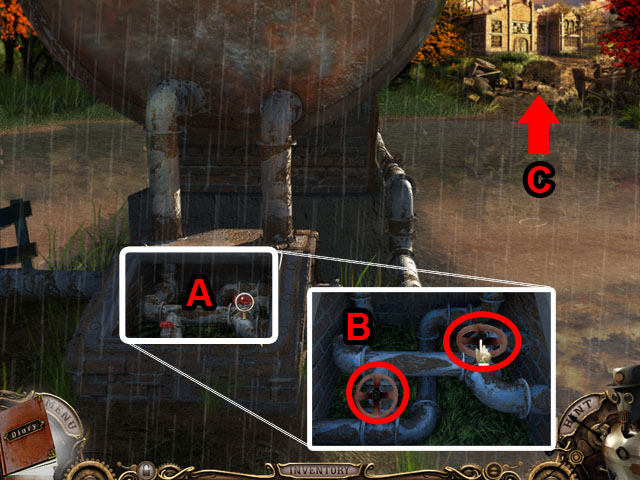
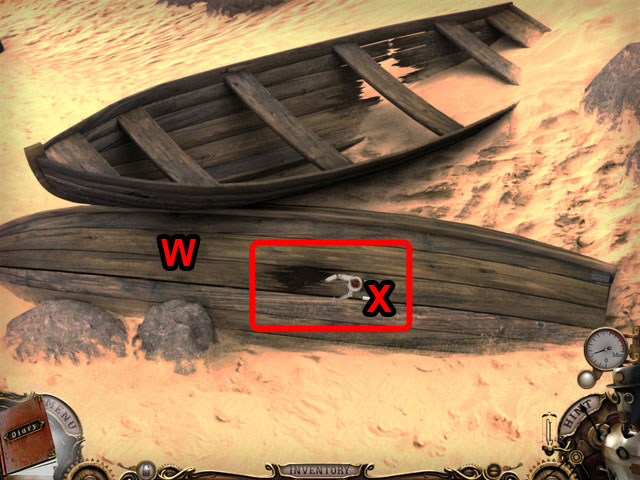 • Inspect the turned over boat (W). • Use the robot’s strength
to break a hole in the boat (X). • Clear off the dust and then
zoom in on the open hole.
• Inspect the turned over boat (W). • Use the robot’s strength
to break a hole in the boat (X). • Clear off the dust and then
zoom in on the open hole.
 • Place the 2 DISKS from your inventory on the holes to start
the mini-game. • In this game you must spin the disks so that
they match. • Spinning one disk will spin the other disks
above and below it on opposite sides in the opposite
direction. • Use the lefts side of the disc to go
counter-clockwise and the right side to go clockwise. • To
finish each side, first spin the top and the bottom of one
side to the correct positions. • Next move the middle piece on
the opposite side once and then fix the top and bottom again.
Repeat this until the middle, top and bottom are all aligned
and then do the same on the opposite side. • See the
screenshot for the final solution (Y). • Take the ROPE from
the boat when you are done (Z).
• Place the 2 DISKS from your inventory on the holes to start
the mini-game. • In this game you must spin the disks so that
they match. • Spinning one disk will spin the other disks
above and below it on opposite sides in the opposite
direction. • Use the lefts side of the disc to go
counter-clockwise and the right side to go clockwise. • To
finish each side, first spin the top and the bottom of one
side to the correct positions. • Next move the middle piece on
the opposite side once and then fix the top and bottom again.
Repeat this until the middle, top and bottom are all aligned
and then do the same on the opposite side. • See the
screenshot for the final solution (Y). • Take the ROPE from
the boat when you are done (Z).
 • Exit the beach. • Use the ROPE and the HOOK together to make
a GRAPPLING HOOK (A). • Use the GRAPPLING HOOK on the stairs
and travel up (B).
• Exit the beach. • Use the ROPE and the HOOK together to make
a GRAPPLING HOOK (A). • Use the GRAPPLING HOOK on the stairs
and travel up (B).
 • Use the robot’s strength to remove the boards (C). • Take
the PIPE PIECE (D). • Enter the small house to the left (E).
• Use the robot’s strength to remove the boards (C). • Take
the PIPE PIECE (D). • Enter the small house to the left (E).
 • Take the CROWBAR (F) and the GLASS PIECE (G). • Inspect the
doll in the corner (H) and watch the cut scene. • Exit the
house.
• Take the CROWBAR (F) and the GLASS PIECE (G). • Inspect the
doll in the corner (H) and watch the cut scene. • Exit the
house.
 • Enter the store (I). • Use the CROWBAR on the WINDOW (J). •
Enter the Hidden Object Scene (K).
• Enter the store (I). • Use the CROWBAR on the WINDOW (J). •
Enter the Hidden Object Scene (K).
 • Find all of the hidden objects. • Break the bottle to get
the glass and add the handle to the blade to find the knife. •
You will receive the HACKSAW.
• Find all of the hidden objects. • Break the bottle to get
the glass and add the handle to the blade to find the knife. •
You will receive the HACKSAW.
 • Collect the GLASS PIECE (L). • Zoom in on the coat and take
the paper (M). • Enter the next room (N).
• Collect the GLASS PIECE (L). • Zoom in on the coat and take
the paper (M). • Enter the next room (N).
 • Take the STEPLADDER (O). • Zoom in on the mirror (P). • Use
the GLASS SHARDS on the mirror (Q).
• Take the STEPLADDER (O). • Zoom in on the mirror (P). • Use
the GLASS SHARDS on the mirror (Q).
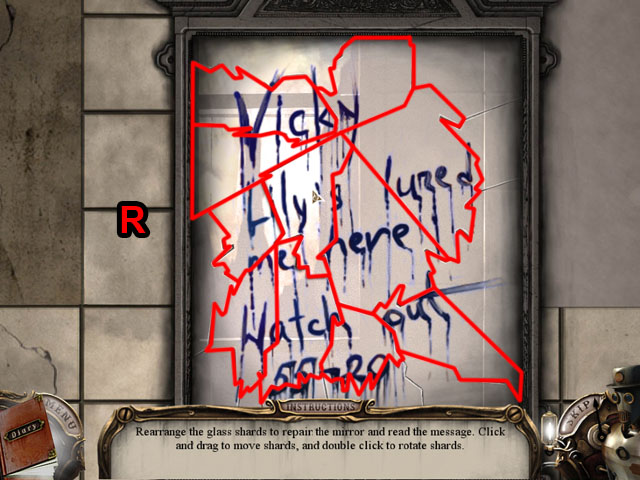 • Rearrange the pieces to complete the puzzle. • Press and
release to move them and press twice quickly to rotate them. •
See the screenshot for the final solution (R).
• Rearrange the pieces to complete the puzzle. • Press and
release to move them and press twice quickly to rotate them. •
See the screenshot for the final solution (R).
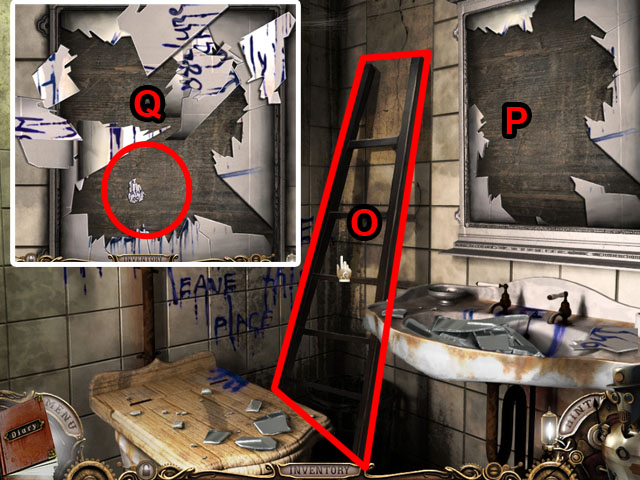
 • Exit the room and use the STEPLADDER to get the GLOVES (S).
• Return to the ruined house and use the HACKSAW to get the
PIPE PIECE (T). • Move the painting (U) to find a safe and
zoom into it.
• Exit the room and use the STEPLADDER to get the GLOVES (S).
• Return to the ruined house and use the HACKSAW to get the
PIPE PIECE (T). • Move the painting (U) to find a safe and
zoom into it.
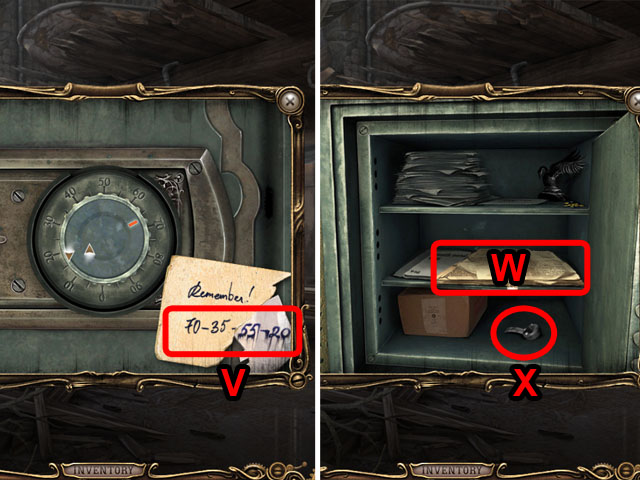 • Input the safe combo by rotating the dial left and then
right 4 times to the numbers in the corner (V). • Read the
paper (W) and take the VALVE HANDLE (X).
• Input the safe combo by rotating the dial left and then
right 4 times to the numbers in the corner (V). • Read the
paper (W) and take the VALVE HANDLE (X).
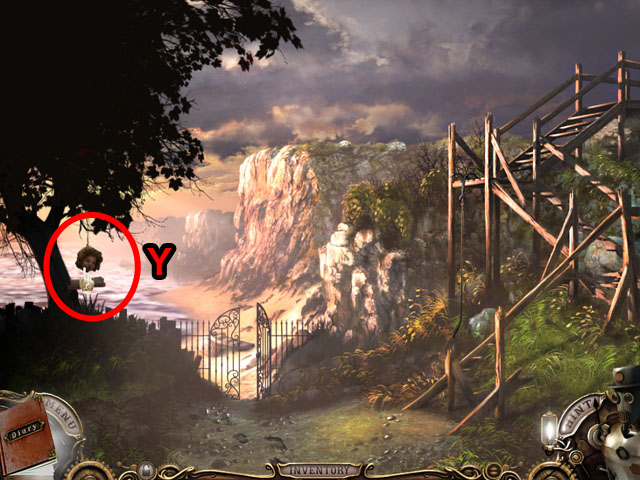 • Exit the town and you will see a doll’s head in a tree (Y).
• Collect the DOLL PIECE.
• Exit the town and you will see a doll’s head in a tree (Y).
• Collect the DOLL PIECE.
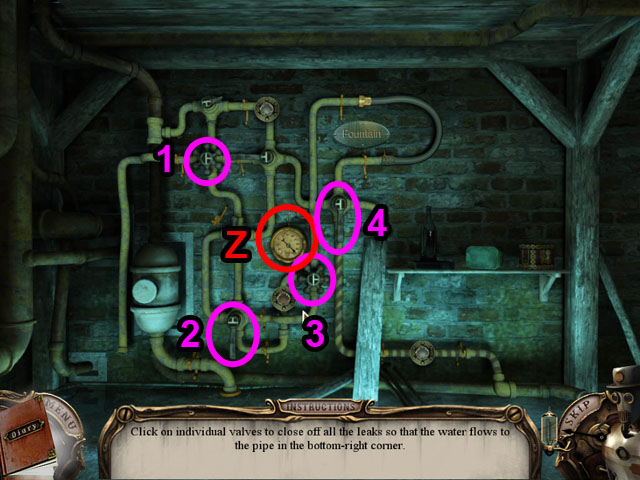 • Return to the school basement and use all of the VALVE and
PIPE parts on the pipes to start the mini-game (Z). • Adjust
the handles (1-4) so that the water is flowing to the end
without spilling out. • Use the diagrams painted on the
handles to help you find the correct solution.
• Return to the school basement and use all of the VALVE and
PIPE parts on the pipes to start the mini-game (Z). • Adjust
the handles (1-4) so that the water is flowing to the end
without spilling out. • Use the diagrams painted on the
handles to help you find the correct solution.
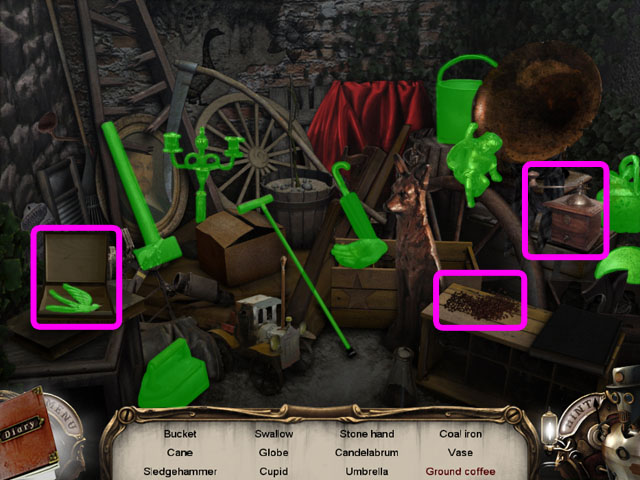 • Exit the basement and enter the Hidden Object Scene. • Find
all of the hidden objects. • Open the box to find the swallow
and use the coffee beans on the grinder to find the ground
coffee. • You will receive the STONE HAND.
• Exit the basement and enter the Hidden Object Scene. • Find
all of the hidden objects. • Open the box to find the swallow
and use the coffee beans on the grinder to find the ground
coffee. • You will receive the STONE HAND.
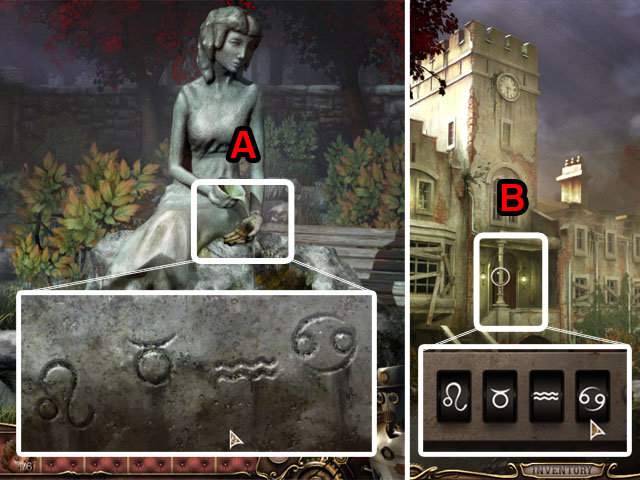 • Walk to the fountain. • Use the STONE HAND on the fountain
(A) to find the password. • Exit the fountain and zoom in on
the front door (B). • Enter the password to enter the school.
• Walk to the fountain. • Use the STONE HAND on the fountain
(A) to find the password. • Exit the fountain and zoom in on
the front door (B). • Enter the password to enter the school.
Chapter 3: Inside the School
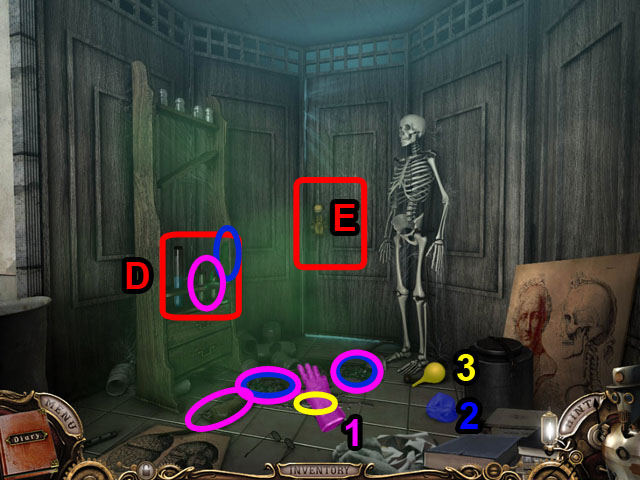
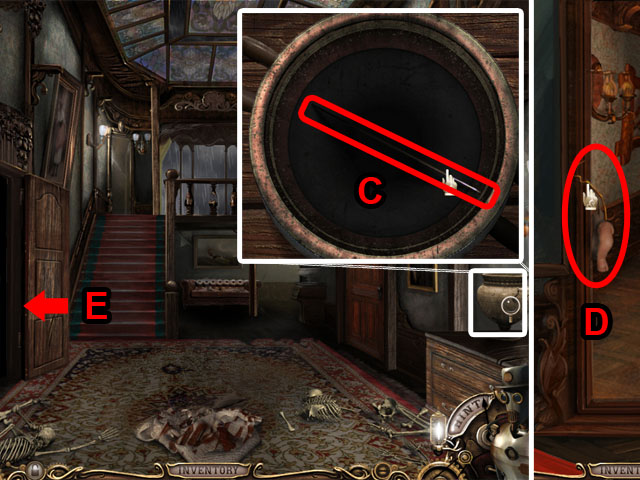 • Zoom in on the vase and take the KNITTING NEEDLE (C). • Go
upstairs to the landing and take the DOLL PIECE and the WIRE
(D). • Return downstairs and enter the room to the left (E).
• Zoom in on the vase and take the KNITTING NEEDLE (C). • Go
upstairs to the landing and take the DOLL PIECE and the WIRE
(D). • Return downstairs and enter the room to the left (E).
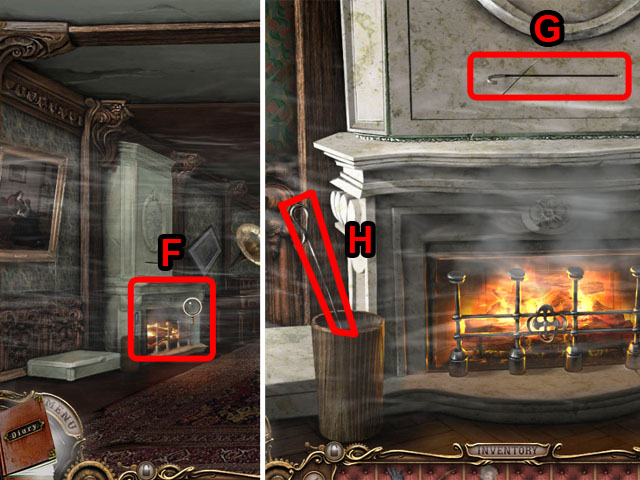 • Zoom in on the fireplace (F). • Use the NEEDLE on the switch
(G). • Take the POKER (H).
• Zoom in on the fireplace (F). • Use the NEEDLE on the switch
(G). • Take the POKER (H).
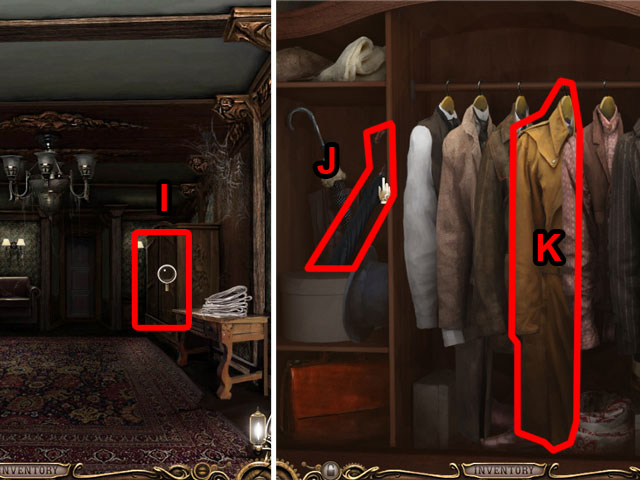 • Inspect the wardrobe (I) and take the UMBRELLA (J). • Zoom
in on the middle suit (K) and take the BASEMENT KEY from
inside it.
• Inspect the wardrobe (I) and take the UMBRELLA (J). • Zoom
in on the middle suit (K) and take the BASEMENT KEY from
inside it.
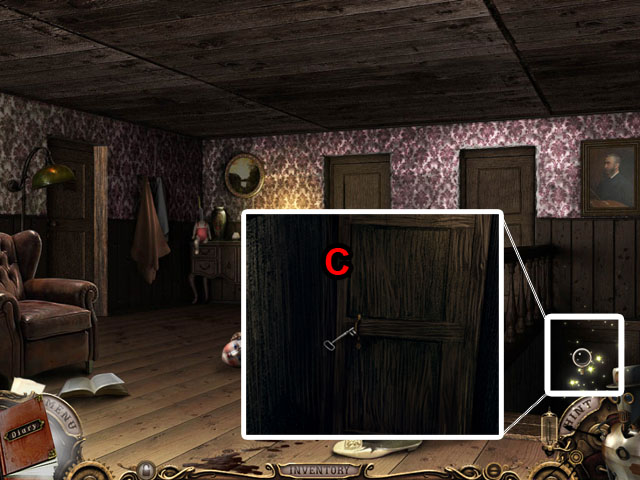
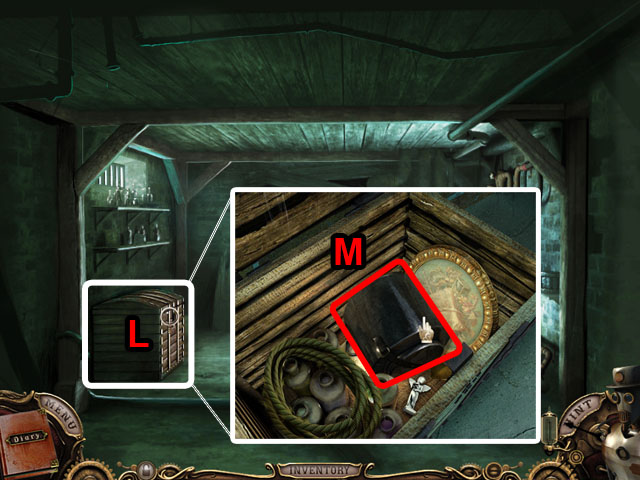 • Exit the house and go down to the basement. • Zoom in on the
chest (L). • Use the BASEMENT KEY to open it and take the
CONTAINER (M).
• Exit the house and go down to the basement. • Zoom in on the
chest (L). • Use the BASEMENT KEY to open it and take the
CONTAINER (M).
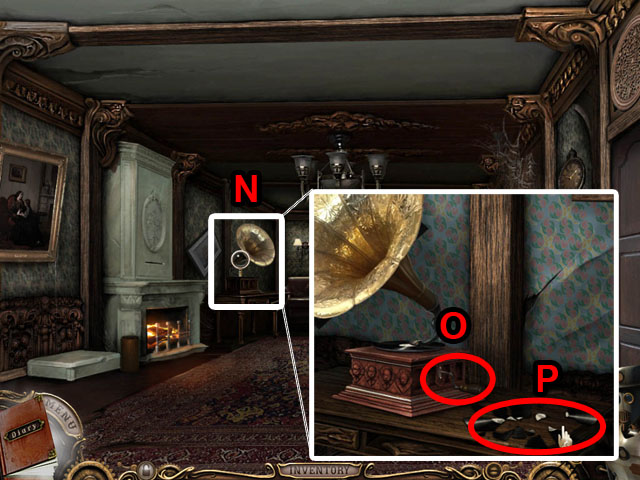 • Return to the room with the fireplace and zoom in on the
record player (N). • Turn the handle (O) and take the RECORD
SHARD (P).
• Return to the room with the fireplace and zoom in on the
record player (N). • Turn the handle (O) and take the RECORD
SHARD (P).
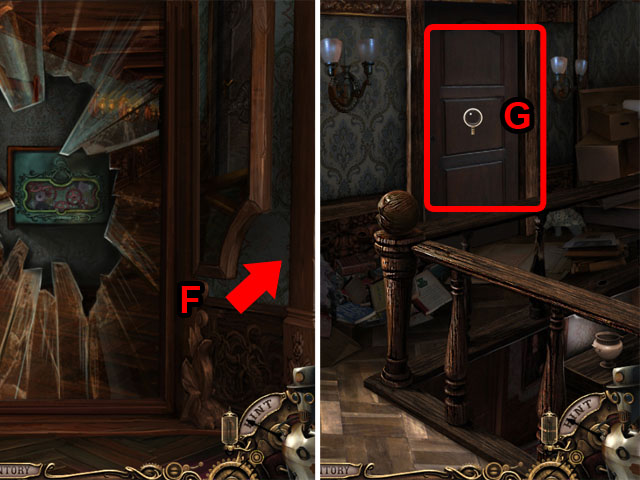
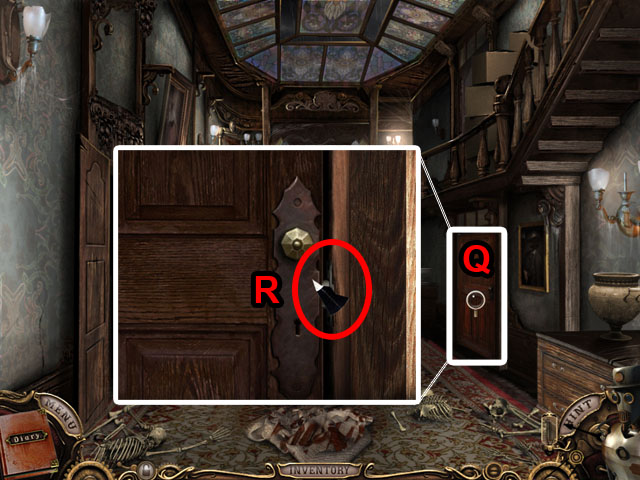 • Exit the room and inspect the door (Q). • Use the RECORD
SHARD to open the door (R). • Enter the door.
• Exit the room and inspect the door (Q). • Use the RECORD
SHARD to open the door (R). • Enter the door.
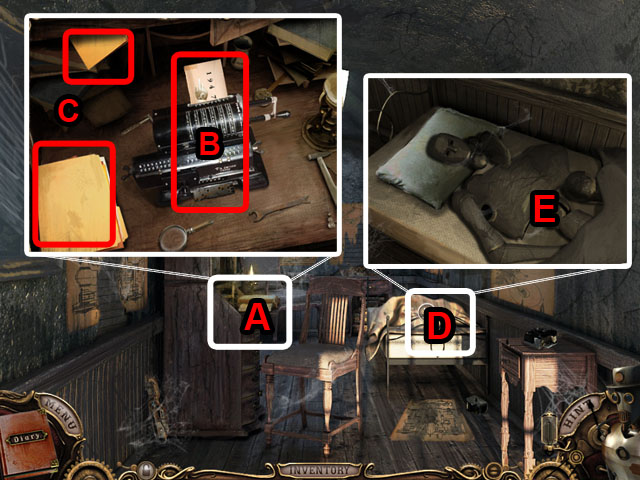
 • Zoom in on the bookcase (S) and take the doctor’s notes (T).
• Zoom in on the glass door (U) and use the POKER on it to
break the glass. • Open the door and go through it.
• Zoom in on the bookcase (S) and take the doctor’s notes (T).
• Zoom in on the glass door (U) and use the POKER on it to
break the glass. • Open the door and go through it.
 • Pull up the poster (V) • Zoom in on the operating chair (W);
take the SCALPEL (X) and the PIECE OF CLOTH (Y). • Pull back
the curtain (Z) and enter the Hidden Object Scene.
• Pull up the poster (V) • Zoom in on the operating chair (W);
take the SCALPEL (X) and the PIECE OF CLOTH (Y). • Pull back
the curtain (Z) and enter the Hidden Object Scene.
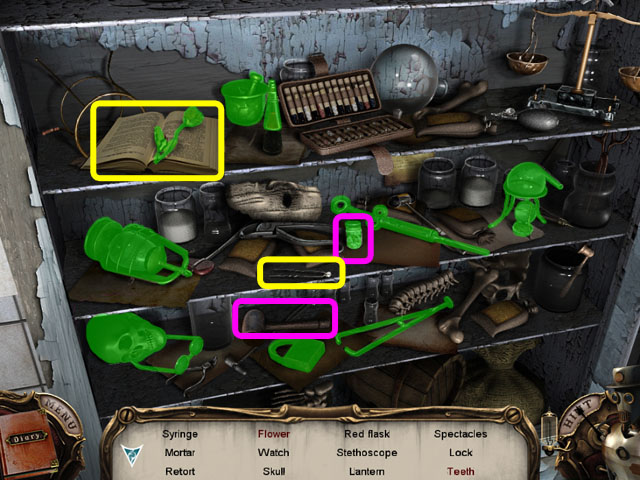 • Find all of the hidden objects. • Use the hammer on the jar
and the pin on the locked book to find all of the objects. •
You will receive the FLASK WITH RED MIXTURE.
• Find all of the hidden objects. • Use the hammer on the jar
and the pin on the locked book to find all of the objects. •
You will receive the FLASK WITH RED MIXTURE.
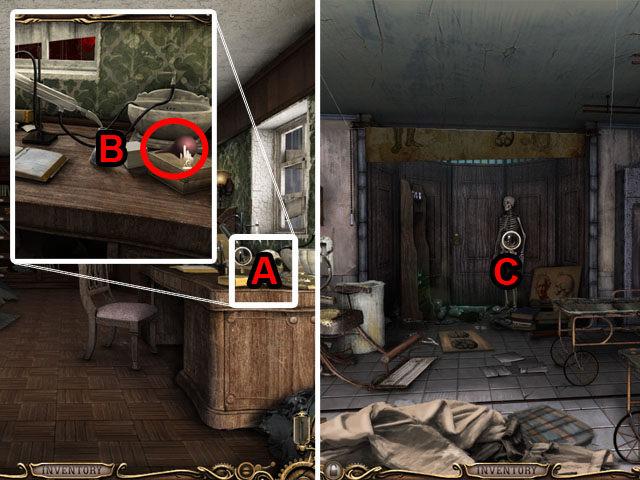 • Return to the doctor’s office and inspect the desk (A). •
Take the BULB from his desk (B). • Return to the operating
room and zoom in on the skeleton (C).
• Return to the doctor’s office and inspect the desk (A). •
Take the BULB from his desk (B). • Return to the operating
room and zoom in on the skeleton (C).
 • Use the CONTAINER, GLOVES, BULB and CLOTH on the green
smoke. • Pick up the glove and use it to grab all of the
broken glass and then dead animal (1). After picking each one
up, drop it in the container. • Use the cloth to pick up all
of the green liquids (2). • Use the bulb to pick up the clear
liquid (3). • Once everything is cleaned up the green smoke
will clear. Take the KNOB and the FLASK OF BLUE LIQUID (D). •
Inspect the door and take the NOTE (E).
• Use the CONTAINER, GLOVES, BULB and CLOTH on the green
smoke. • Pick up the glove and use it to grab all of the
broken glass and then dead animal (1). After picking each one
up, drop it in the container. • Use the cloth to pick up all
of the green liquids (2). • Use the bulb to pick up the clear
liquid (3). • Once everything is cleaned up the green smoke
will clear. Take the KNOB and the FLASK OF BLUE LIQUID (D). •
Inspect the door and take the NOTE (E).
 • Exit the doctor’s office and go up the stairs twice (F). •
Use the DOOR HANLDE (G) on the door and go through it.
• Exit the doctor’s office and go up the stairs twice (F). •
Use the DOOR HANLDE (G) on the door and go through it.
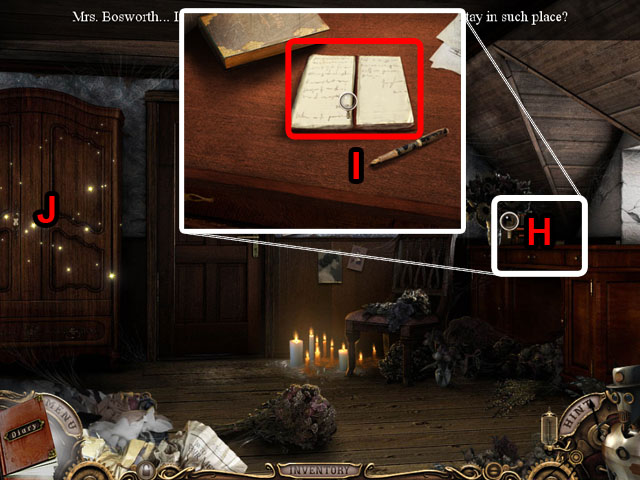 • Inspect the desk (H) and take the note (I). • Zoom in on the
Hidden Object Scene (J).
• Inspect the desk (H) and take the note (I). • Zoom in on the
Hidden Object Scene (J).
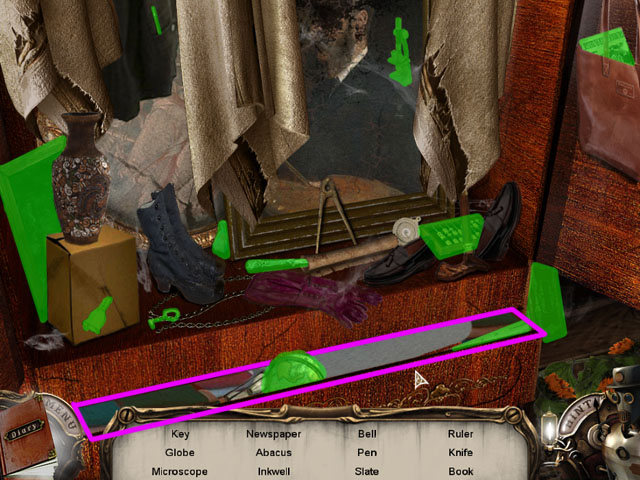 • Find all of the hidden objects. • Open the drawer to find
all of the objects. • You will receive a NEWSPAPER.
• Find all of the hidden objects. • Open the drawer to find
all of the objects. • You will receive a NEWSPAPER.
 • Zoom in on the bottom of the door (K) and use the NEWSPAPER.
• Zoom in on the keyhole (L) and use the WIRE. • Zoom in on
the bottom of the door again and take the KEY (M). • Use the
key on the door and go through it.
• Zoom in on the bottom of the door (K) and use the NEWSPAPER.
• Zoom in on the keyhole (L) and use the WIRE. • Zoom in on
the bottom of the door again and take the KEY (M). • Use the
key on the door and go through it.
 • Move the curtains (N) and zoom in on the mannequin. • Take
the RUBBER BOOTS (O) and the GEAR (P). • Use the SCALPEL on
the sheets (Q) and enter the Hidden Object Scene.
• Move the curtains (N) and zoom in on the mannequin. • Take
the RUBBER BOOTS (O) and the GEAR (P). • Use the SCALPEL on
the sheets (Q) and enter the Hidden Object Scene.
 • Find all of the hidden objects. • Use the broom to shoo away
the spider. • You will receive the TWINE.
• Find all of the hidden objects. • Use the broom to shoo away
the spider. • You will receive the TWINE.
 • Take the twine back downstairs to the landing and inspect
the gear puzzle (R). • Use the GEAR on the puzzle to start it.
• Pick up and place the gears on the pegs until all of the
gears are moving, including the ones that that you can’t move
on the left and right. • See the screenshot for the final
solution (S) and take the SIGNET RING (T).
• Take the twine back downstairs to the landing and inspect
the gear puzzle (R). • Use the GEAR on the puzzle to start it.
• Pick up and place the gears on the pegs until all of the
gears are moving, including the ones that that you can’t move
on the left and right. • See the screenshot for the final
solution (S) and take the SIGNET RING (T).
 • Return to the doctor's operating room and zoom in on the
door (U). • Use the SIGNET RING on the door lock (V). • Read
the new note (W).
• Return to the doctor's operating room and zoom in on the
door (U). • Use the SIGNET RING on the door lock (V). • Read
the new note (W).
 • Exit the house and return to the village at the top of the
stairs near the coast. • Move in towards the water tank (Y)
and zoom in on the controls (Z).
• Exit the house and return to the village at the top of the
stairs near the coast. • Move in towards the water tank (Y)
and zoom in on the controls (Z).
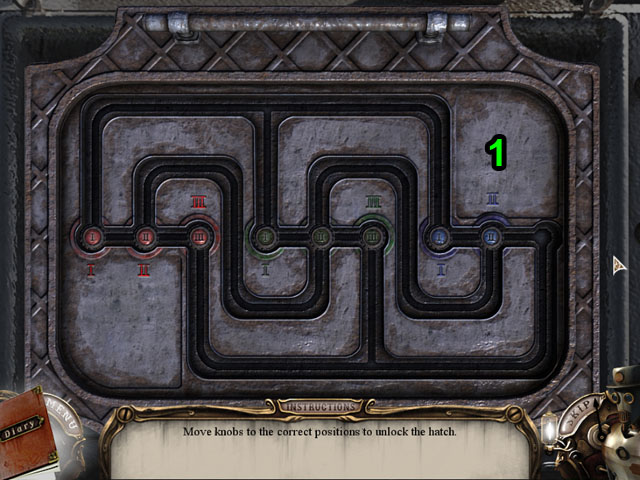 • The goal of this mini-game is to move all of the colored
numbers to the correct positions. • Pressing a number will
move it to the empty spot if possible. There are multiple
tracks, with multiple ways to move a number. • First, start
with the middle set of green numbers. Move them into position
in order. • Next, work on the first set of red numbers on the
left. You can move some of the middle numbers out of place as
long as you keep their order. • Try to put the numbers into
their places in the final order that you want. Once you have 3
numbers in the right place but in the incorrect order it gets
harder to switch them around. • See the screenshot for the
final solution (1).
• The goal of this mini-game is to move all of the colored
numbers to the correct positions. • Pressing a number will
move it to the empty spot if possible. There are multiple
tracks, with multiple ways to move a number. • First, start
with the middle set of green numbers. Move them into position
in order. • Next, work on the first set of red numbers on the
left. You can move some of the middle numbers out of place as
long as you keep their order. • Try to put the numbers into
their places in the final order that you want. Once you have 3
numbers in the right place but in the incorrect order it gets
harder to switch them around. • See the screenshot for the
final solution (1).
 • Zoom in on the pipes (A). • Turn both of the valves (B) and
walk towards the factory (C).
• Zoom in on the pipes (A). • Turn both of the valves (B) and
walk towards the factory (C).
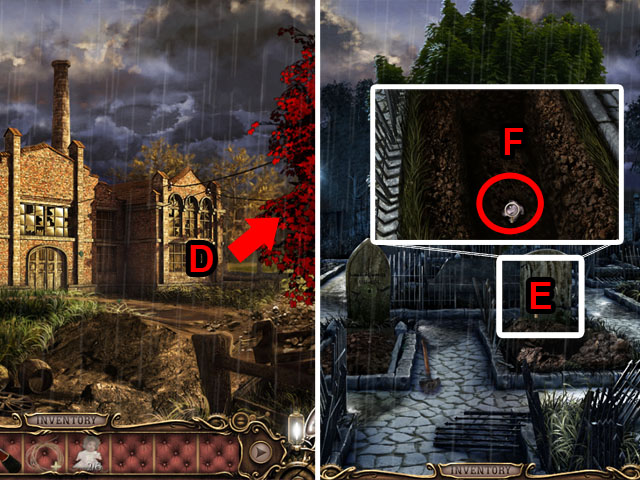 • Walk towards the right to the cemetery (D). • Inspect the
grave (E) and take the DOLL PART (F).
• Walk towards the right to the cemetery (D). • Inspect the
grave (E) and take the DOLL PART (F).
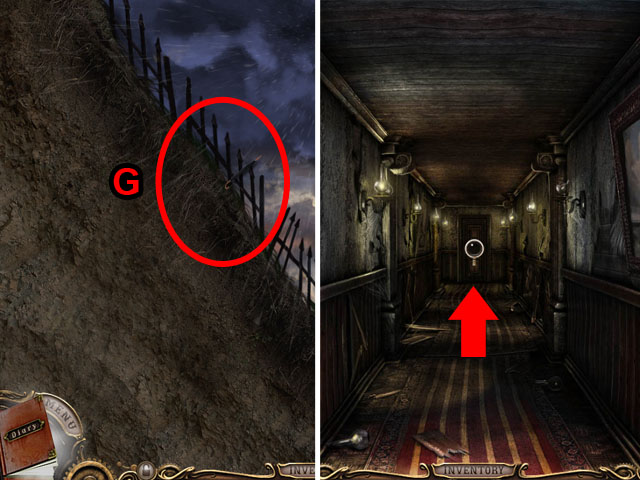 • Use the UMBRELLA on the fence to escape (G). • Return to the
house and follow the dark figure. • Move to the right hallway
and enter the back door.
• Use the UMBRELLA on the fence to escape (G). • Return to the
house and follow the dark figure. • Move to the right hallway
and enter the back door.
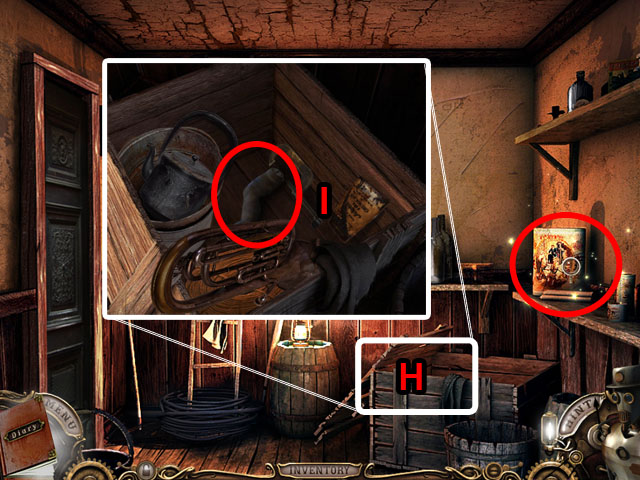 • Zoom in on the crate (H) and take the DOLL PART (I). • Enter
the Hidden Object Scene.
• Zoom in on the crate (H) and take the DOLL PART (I). • Enter
the Hidden Object Scene.
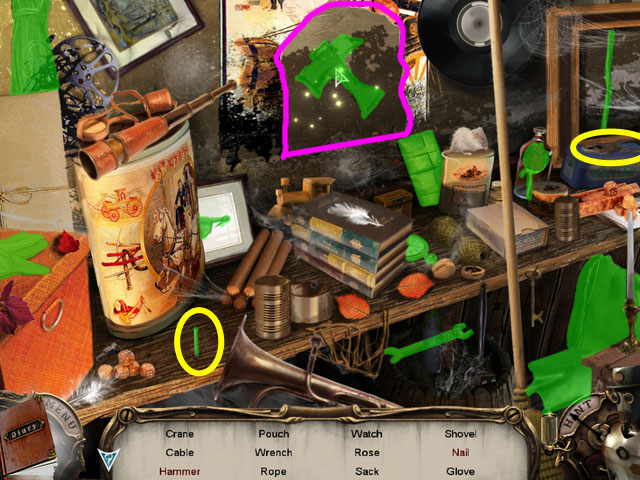 • Find all of the objects. • Tear down the poster and pull the
nail with the pliers. • You will receive a WRENCH.
• Find all of the objects. • Tear down the poster and pull the
nail with the pliers. • You will receive a WRENCH.
 • Zoom in on the rope (J). • Use the WRENCH on the nut (K).
Chapter 4: Escape the Basement
 • Zoom in on the workbench (L). • Take the HATCHET (M) and the
PIPE (N). • Zoom in on the pile of junk (O) and take the TUBE
(Q). • Pick up the BUCKET (P). • Go to the right (R).
• Zoom in on the workbench (L). • Take the HATCHET (M) and the
PIPE (N). • Zoom in on the pile of junk (O) and take the TUBE
(Q). • Pick up the BUCKET (P). • Go to the right (R).
 • Use the BUCKET on the pile of coal (S). • Take the PICKAXE
(T). • Enter the Hidden Object Scene (U).
• Use the BUCKET on the pile of coal (S). • Take the PICKAXE
(T). • Enter the Hidden Object Scene (U).
 • Break the light bulb and find all of the objects. • Receive
a NUT.
• Break the light bulb and find all of the objects. • Receive
a NUT.
 • Return to the previous room and go through the door in the
back (V). • Take the FIRE PISTON (W) and the SHOVEL (X).
• Return to the previous room and go through the door in the
back (V). • Take the FIRE PISTON (W) and the SHOVEL (X).
 • Return to the coal pile and use the SHOVEL (Y). • Take the
BUCKET OF COAL (Z).
• Return to the coal pile and use the SHOVEL (Y). • Take the
BUCKET OF COAL (Z).
 • Return to the furnace room and use the BUCKET OF COAL (A). •
Use the FIRE PISTON (B) to light the fire. • Zoom in on the
gears (C).
• Return to the furnace room and use the BUCKET OF COAL (A). •
Use the FIRE PISTON (B) to light the fire. • Zoom in on the
gears (C).
 • Turn the rings until all of the colored lines match up. •
Start from the outside and line up the dots with the ends of
the pipes, then move to the inside. • Seen the screenshot for
the final solution (D).
• Turn the rings until all of the colored lines match up. •
Start from the outside and line up the dots with the ends of
the pipes, then move to the inside. • Seen the screenshot for
the final solution (D).
 • Exit the room and zoom in on the work bench. • Turn on the
switch (E) and then grind the NUT (F).
• Exit the room and zoom in on the work bench. • Turn on the
switch (E) and then grind the NUT (F).
 • Combine the NUT, PIPE, and HOSE together in your inventory
(G) to get the HANDMADE STEAM HOSE. • Use the HANDMADE STEAM
HOSE on the top of the boiler (H) to charge up the robot.
• Combine the NUT, PIPE, and HOSE together in your inventory
(G) to get the HANDMADE STEAM HOSE. • Use the HANDMADE STEAM
HOSE on the top of the boiler (H) to charge up the robot.
 • Return to the coal pile and use the robot's strength to open
the door (I). • Exit the basement.
• Return to the coal pile and use the robot's strength to open
the door (I). • Exit the basement.
 • Zoom in on the top of the stove (J). • Open the pot lid and
take the FUSE (K). • Enter the Hidden Object Scene (L).
• Zoom in on the top of the stove (J). • Open the pot lid and
take the FUSE (K). • Enter the Hidden Object Scene (L).
 • Cut the bag with the knife and hit the cup with the rolling
pin to find the objects. • Break the cup with the rolling pin.
• You will receive a MATCHBOX.
• Cut the bag with the knife and hit the cup with the rolling
pin to find the objects. • Break the cup with the rolling pin.
• You will receive a MATCHBOX.
 • Travel up the stairs and go to the hallway on the left (M).
• Zoom in on the drawers (N) and take the FUSE (O). • Enter
the door to the left (P) to the bathroom.
• Travel up the stairs and go to the hallway on the left (M).
• Zoom in on the drawers (N) and take the FUSE (O). • Enter
the door to the left (P) to the bathroom.
 • Enter the Hidden Object Scene (Q).
 • Open the box to find the toothbrush • You will receive the
FLASK WTH GREEN MIXTURE.
• Open the box to find the toothbrush • You will receive the
FLASK WTH GREEN MIXTURE.
 • Exit the bathroom and enter the middle room (R). • Zoom in
on the doll house (S) and take the FUSE (T). • Enter the
Hidden Object Scene (U).
• Exit the bathroom and enter the middle room (R). • Zoom in
on the doll house (S) and take the FUSE (T). • Enter the
Hidden Object Scene (U).
 • Take out the letter to find the sun. • Open the box to find
the ring. • You will receive a MAGNET.
• Take out the letter to find the sun. • Open the box to find
the ring. • You will receive a MAGNET.
 • Return to the doctor’s office and zoom in on the desk. • Use
the RED VIAL, GREEN VIAL and BLUE VIAL on the flask at the
right (V). • Then use the MATCHES to light the burner (W). •
Turn on the faucet (X). • Open the white box and click on the
cap and take the VIAL OF ACID (Y).
• Return to the doctor’s office and zoom in on the desk. • Use
the RED VIAL, GREEN VIAL and BLUE VIAL on the flask at the
right (V). • Then use the MATCHES to light the burner (W). •
Turn on the faucet (X). • Open the white box and click on the
cap and take the VIAL OF ACID (Y).
 • Combine the MAGNET and the TWINE in your inventory (Z). •
Return to the bathroom upstairs and zoom in on the bathroom
(A). • Use the ACID on the drain (B). • Use the TWINE WITH
MAGNET on the drain and receive the KEY.
• Combine the MAGNET and the TWINE in your inventory (Z). •
Return to the bathroom upstairs and zoom in on the bathroom
(A). • Use the ACID on the drain (B). • Use the TWINE WITH
MAGNET on the drain and receive the KEY.
 • Exit the bathroom and use the key on the door down the
stairs (C).
• Exit the bathroom and use the key on the door down the
stairs (C).
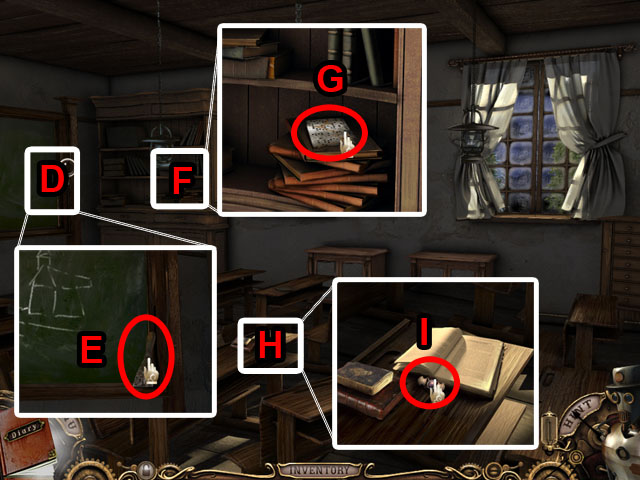 • Zoom in on the chalkboard (D) and take the PAINT SCRAPER
(E). • Zoom in on the bookcase (F) and take the PUNCH CARD
(G). • Zoom in on the desks (H) and take the FUSE (I).
• Zoom in on the chalkboard (D) and take the PAINT SCRAPER
(E). • Zoom in on the bookcase (F) and take the PUNCH CARD
(G). • Zoom in on the desks (H) and take the FUSE (I).
 • Return to the middle bathroom and use the PAINT SCRAPER on
the wall (J). • Use the PICKAXE on the wall (K) and go through
the hole.
• Return to the middle bathroom and use the PAINT SCRAPER on
the wall (J). • Use the PICKAXE on the wall (K) and go through
the hole.
Chapter 5: Enter the Garden
 • Zoom in on the desk (L); open the drawer and take the FUSE
(M). • Zoom in on the shelf (N) and take the GARDEN KEY (O). •
Exit the house and return to the factory.
• Zoom in on the desk (L); open the drawer and take the FUSE
(M). • Zoom in on the shelf (N) and take the GARDEN KEY (O). •
Exit the house and return to the factory.
 • Zoom in on factory (P). • Unscrew the corner holders (Q) and
place the FUSES in the middle. • Switch the places of the
fuses until all of the lights on the top and the bottom light
up. • You will know when you have the right answer when you
get a green light from two fuses connected by a line. Work
from left to right with trial and error until they all are
placed correctly. • See the screenshot for the final solution
(R).
• Zoom in on factory (P). • Unscrew the corner holders (Q) and
place the FUSES in the middle. • Switch the places of the
fuses until all of the lights on the top and the bottom light
up. • You will know when you have the right answer when you
get a green light from two fuses connected by a line. Work
from left to right with trial and error until they all are
placed correctly. • See the screenshot for the final solution
(R).
 • Return to the fountain outside the main house and use the
GARDEN KEY (S) to open it. • Use the HATCHET on the tree 3
times to remove it (T) and then inspect the greenhouse
entrance.
• Return to the fountain outside the main house and use the
GARDEN KEY (S) to open it. • Use the HATCHET on the tree 3
times to remove it (T) and then inspect the greenhouse
entrance.
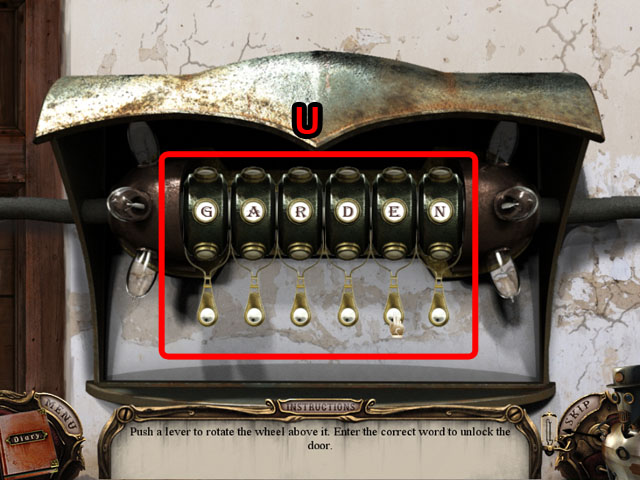 • Each letter you get in the correct position will extinguish
one light. • Rearrange the letters by pressing the buttons at
the bottom and spell the word “GARDEN”. • See the screenshot
for the correct solution (U).
• Each letter you get in the correct position will extinguish
one light. • Rearrange the letters by pressing the buttons at
the bottom and spell the word “GARDEN”. • See the screenshot
for the correct solution (U).
 • Zoom into the controls (V) and take the DOLL PART (W). •
Zoom into the stage (X) and take the SIGNET RING (Y).
• Zoom into the controls (V) and take the DOLL PART (W). •
Zoom into the stage (X) and take the SIGNET RING (Y).
 • Return to the doctor’s operating room door and use the
SIGNET RING on it (Z).
• Return to the doctor’s operating room door and use the
SIGNET RING on it (Z).
 • Zoom in on the desk (A) and use the PUNCH CARD on the
machine, and then take the CODE (B). Investigate the folder as
well (C). • Zoom in on the bed (D) and remove the sheet to
find a mannequin. • Inspect the MANNEQUIN (E).
• Zoom in on the desk (A) and use the PUNCH CARD on the
machine, and then take the CODE (B). Investigate the folder as
well (C). • Zoom in on the bed (D) and remove the sheet to
find a mannequin. • Inspect the MANNEQUIN (E).
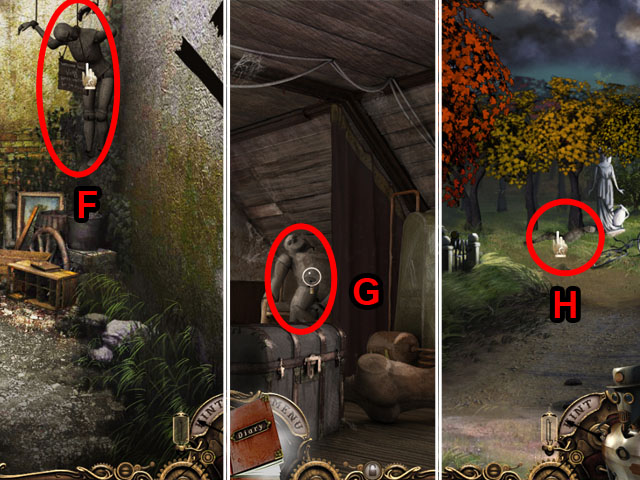 • Return to the basement entrance and take the MANNEQUIN (F).
• Return to the bedroom upstairs and take the MANNEQUIN (G) in
the chair. • Return to the greenhouse entrance and take the
MANNEQUIN (H).
• Return to the basement entrance and take the MANNEQUIN (F).
• Return to the bedroom upstairs and take the MANNEQUIN (G) in
the chair. • Return to the greenhouse entrance and take the
MANNEQUIN (H).
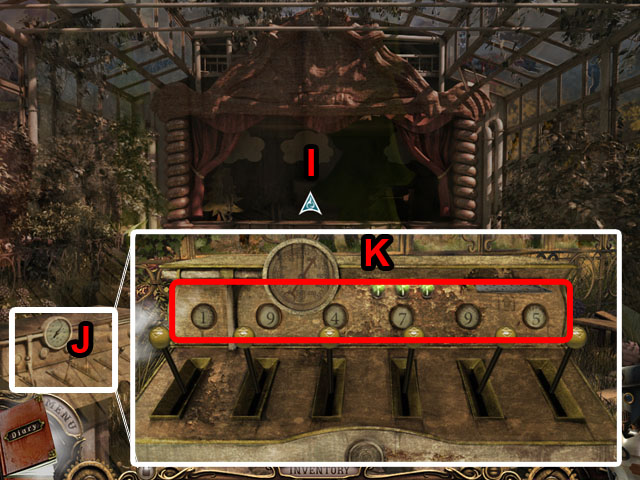 • Place the MANNEQUINS on the stage (I). • Place the PUNCH
CARD in the controls (J) and set the number to 194795, as in
the screenshot (K).
• Place the MANNEQUINS on the stage (I). • Place the PUNCH
CARD in the controls (J) and set the number to 194795, as in
the screenshot (K).
 • Enter the trap door on the stage (L).
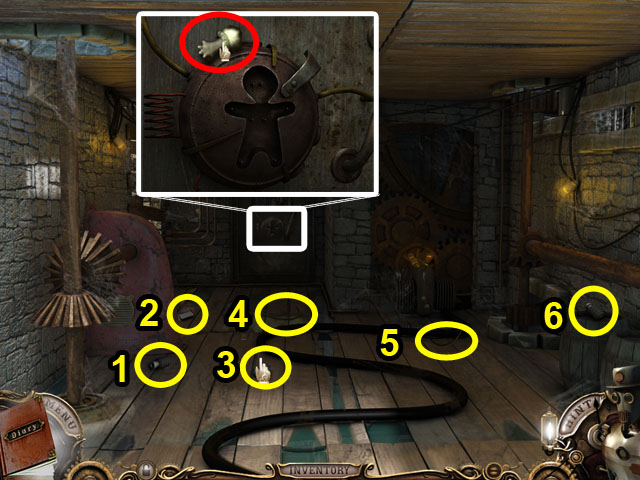 • Zoom in on the lock (M). • Take the last DOLL PIECE. • Find
all of the MACHINE PIECES (1-6). • Place the MACHINE PIECES
and then the DOLL on the middle of the lock. • Congratulations
you have finished Malice: Two Sisters!
• Zoom in on the lock (M). • Take the last DOLL PIECE. • Find
all of the MACHINE PIECES (1-6). • Place the MACHINE PIECES
and then the DOLL on the middle of the lock. • Congratulations
you have finished Malice: Two Sisters!
Created at: 2012-05-05