

Walkthrough Menu
- Chapter Zero: Intro
- Chapter One: Many Husbands of the Lady Seer
- Chapter Two: Rudo Joins in
- Chapter Three: Releasing the Beast
- Chapter Four: Gotto and the Mechanical Butterfly
- Chapter Five: The Constellations
- Chapter Six: The Secret of the Shrine
- Chapter Seven: Cargan's Unreasonable Demands
- Chapter Eight: Into the Sun Tower
- Chapter Nine: Afi Saves the Nose
- Chapter Ten: Restoring the Sun Power
- Chapter Eleven: The Seashell Campanile
- Chapter Twelve: Piping the Mechanagerie
- Chapter Thirteen: Madeleine's Prophecy
- Chapter Fourteen: A Body for Rudo
- Chapter Fifteen: The Ceremony
- Chapter Sixteen: Showdown at Sunset
Chapter Zero: Intro
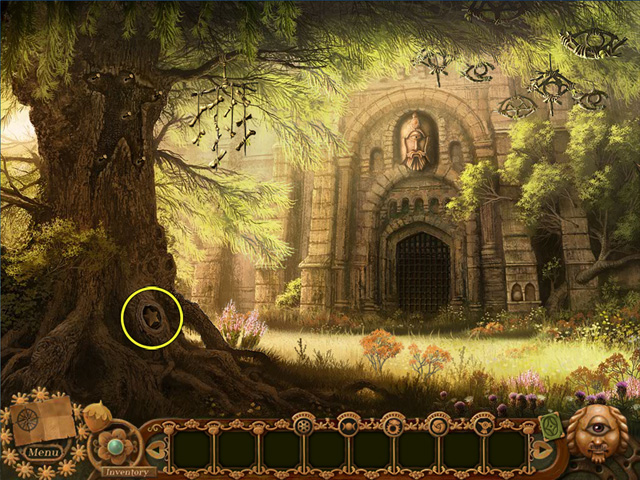
- Move your cursor over the standing stone.The magnifying glass indicates that a scene item can be examined, or that a character has something to say to you. Go ahead and examine the standing stone.
- Now move your cursor over the hatch. The cursor changes to a pointing hand. The pointing hand indicates that a scene item is interactive. Try clicking the hatch. It is not going to budge! Perhaps those shaped hollows are significant?
- TIP: Throughout your adventure, you will discover many devices that can only be activated by one or more specific items. Try to remember where you find these, or jot down a few notes to remind yourself.
- Your third cursor is the grabbing hand. Move the cursor over the green beetle whistle. When your cursor changes to the grabbing hand, click the item to add it to your inventory.
- To close the standing stone window, simply click outside of it.
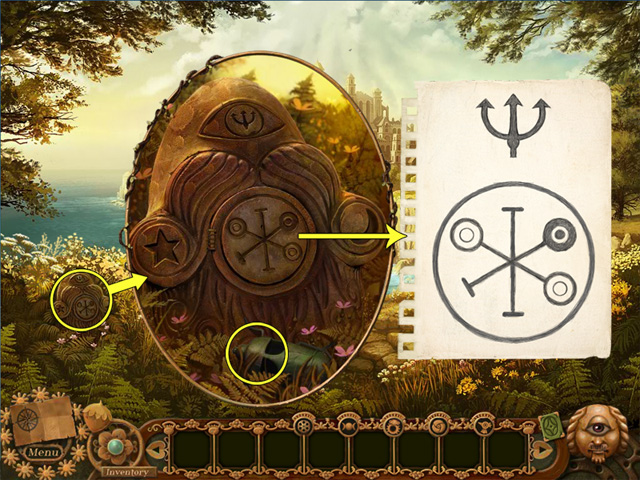
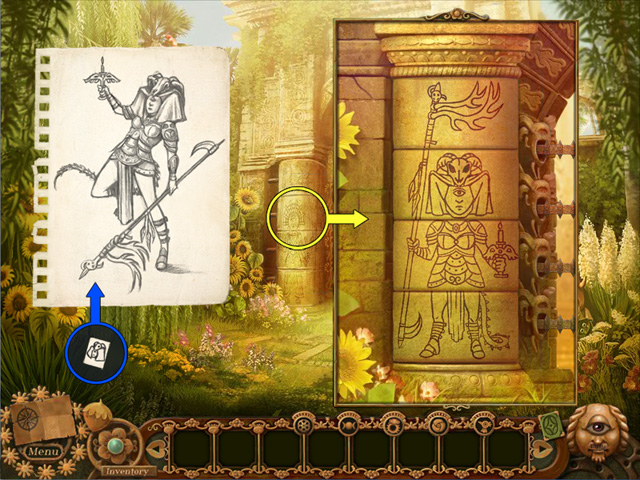
- Edwina sketches the design carved into the standing stone. The trident code sketch is stored in your keepsakes inventory. Here, Edwina will store a record of every important clue she discovers.
- TIP: Remember to check your keepsakes from time to time: when a keepsake is currently useful, it will glow!
- Toggle between your keepsakes inventory and your main inventory by clicking the metal flower.
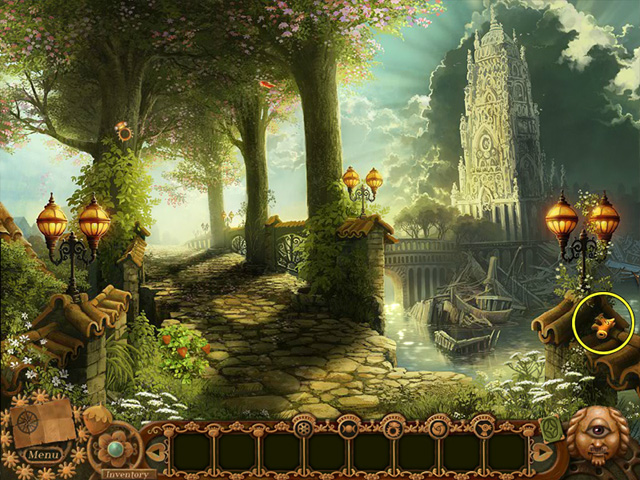
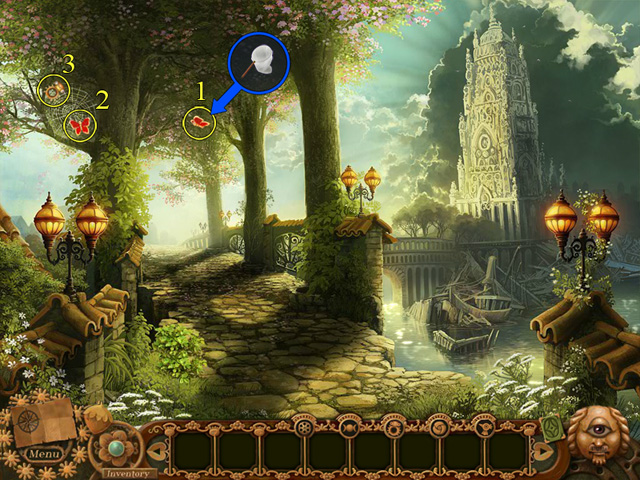
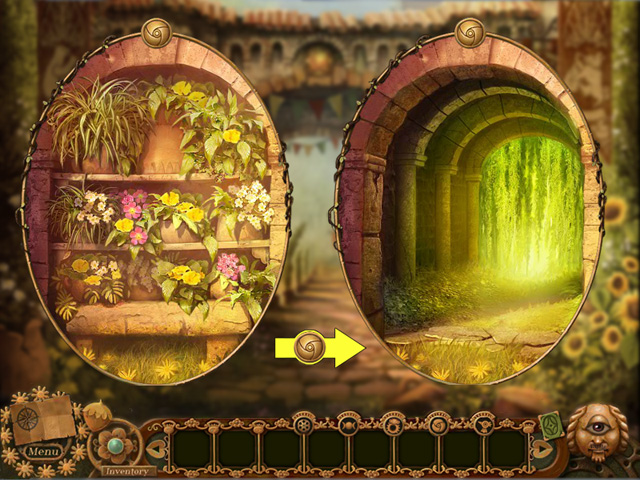
- Areas of interest are indicated by a glint. Feel free to take a look at that mysterious town in the distance.
- Follow the path down to the abandoned fishing village.
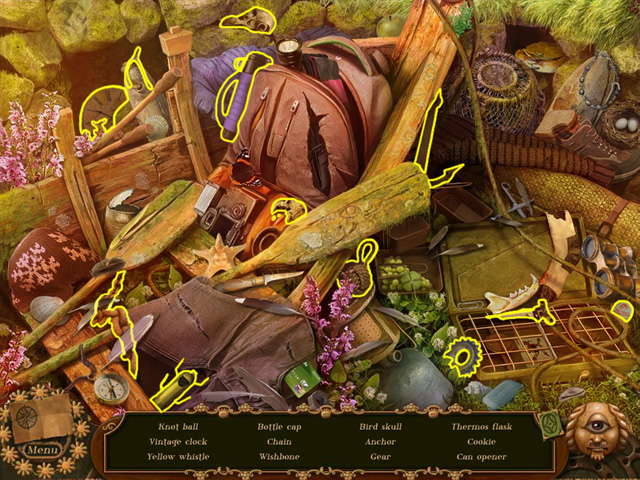
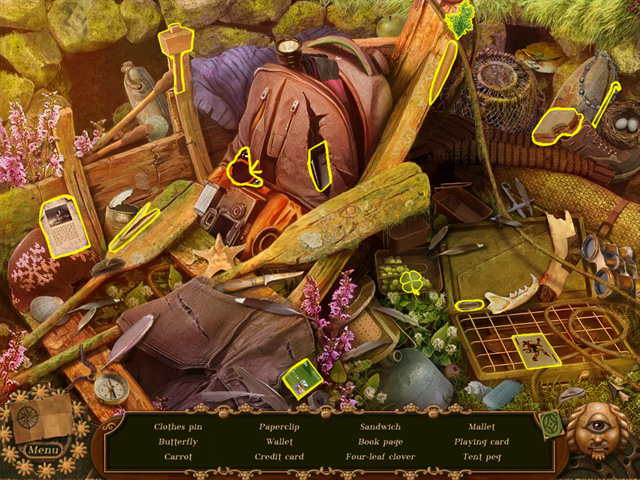
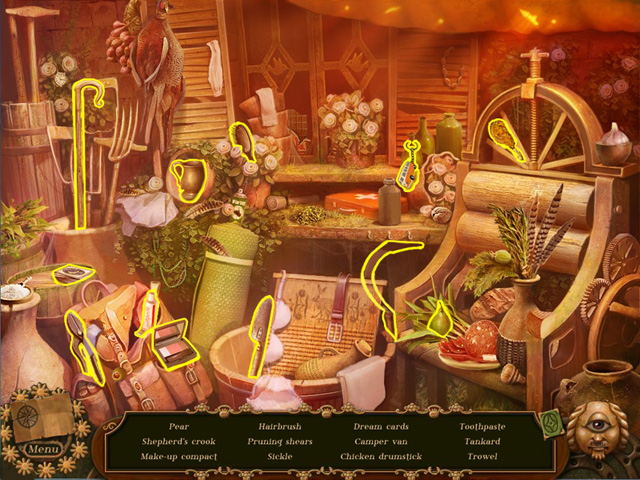
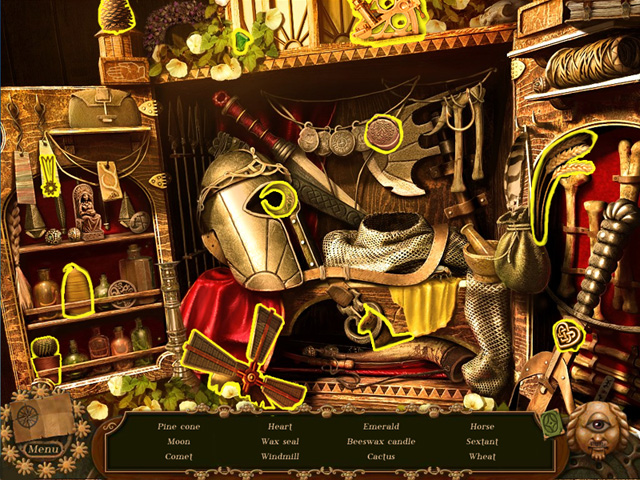
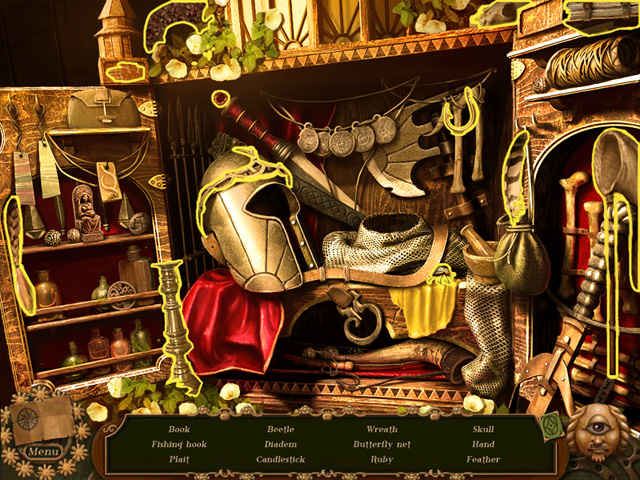
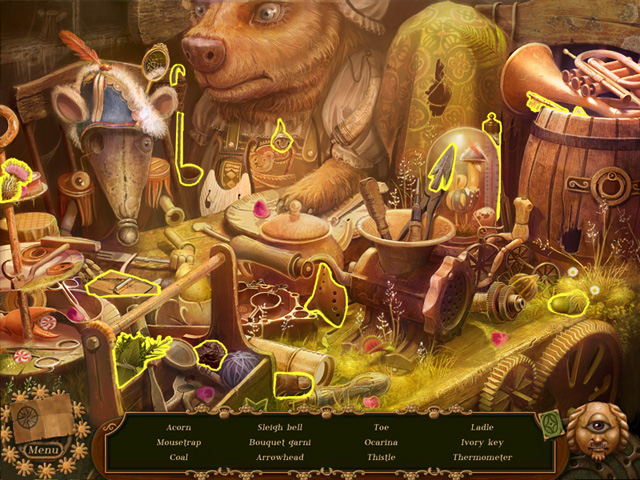
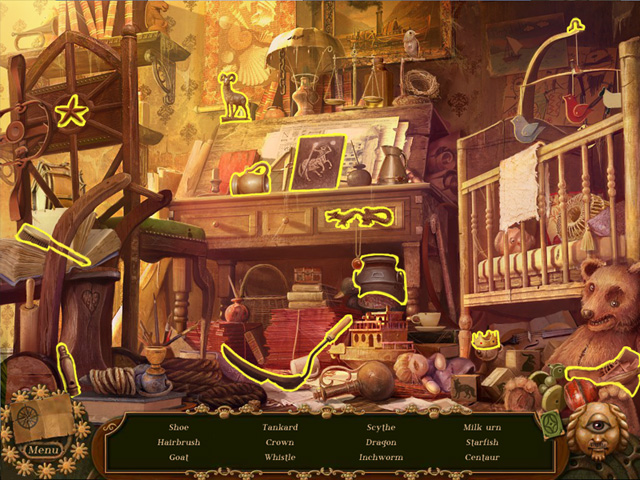
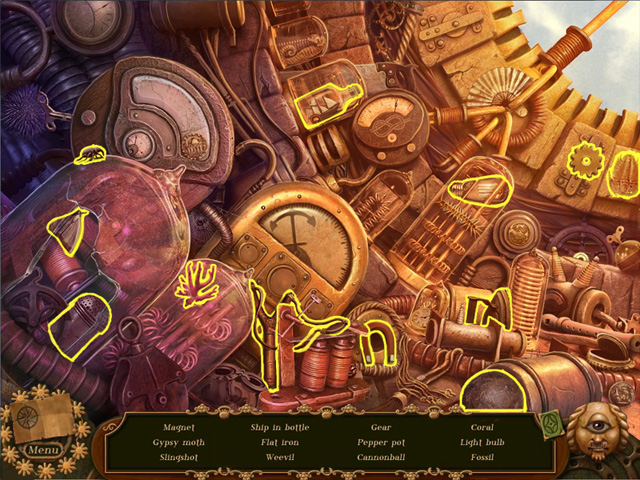
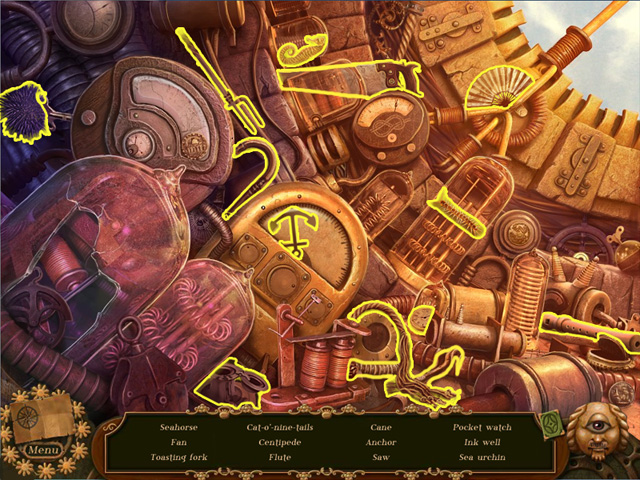
- There is your first Hidden Object scene, indicated by the sparkles. Click on the sparkles to begin the game. Someone has gone through Tom's possessions! What could they be looking for?
- Twelve items have been hidden around the scene, and you will need a keen eye to find them all.
- If an item eludes you, feel free to click the hint button on the bottom right. In Hidden Object games, the hint will locate an item for you. If you use a hint elsewhere in the game, Edwina - or another character - will offer you advice.
- Once a hint is used, you will be unable to receive another hint until the hint meter has refilled. In casual mode, the hint meter recharges quickly. In expert mode, it will take significantly longer to recharge.
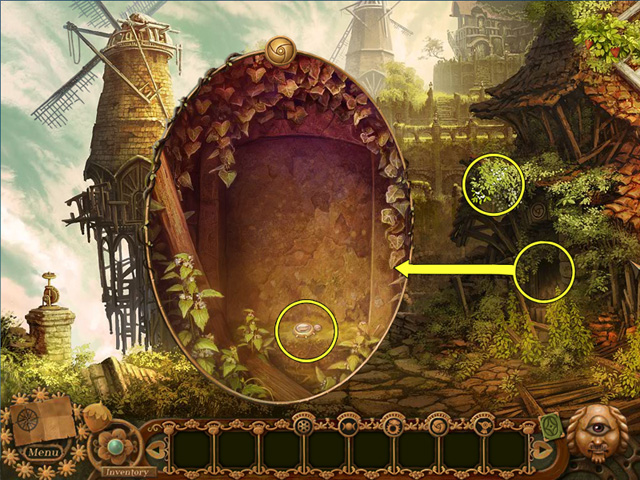
- You receive a yellow beetle whistle. You will need to find two more.
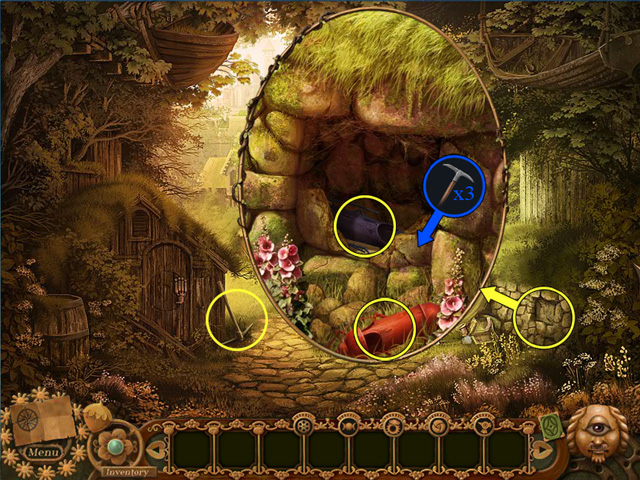
- Take the pickaxe; then examine the stone wall on the right. The last two beetle whistles are hidden in this window.
- Take the red beetle whistle from the grass. The blue beetle whistle is hidden behind that stone slab. A few blows with the pickaxe should take care of that slab.
- Examine the wooden hut. You are going to need a combination to unlock that door.
- Continue towards the town, to the entrance gatehouse.
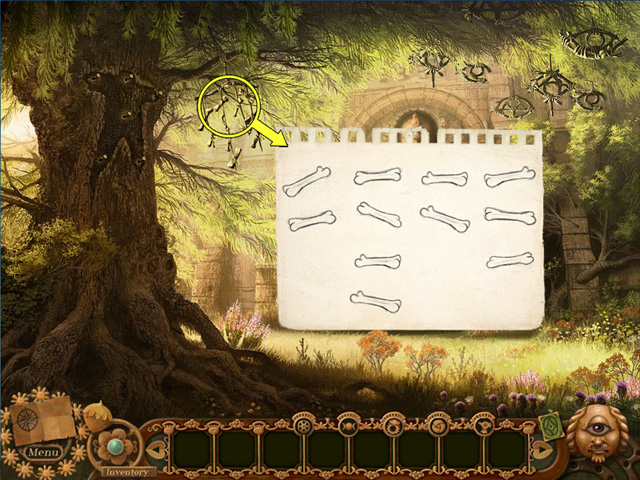
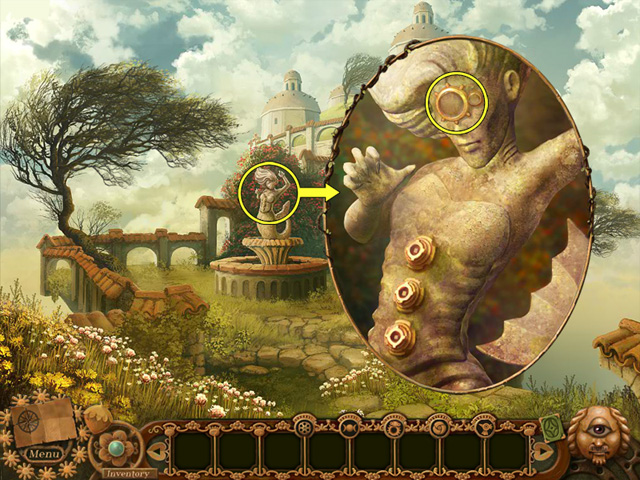
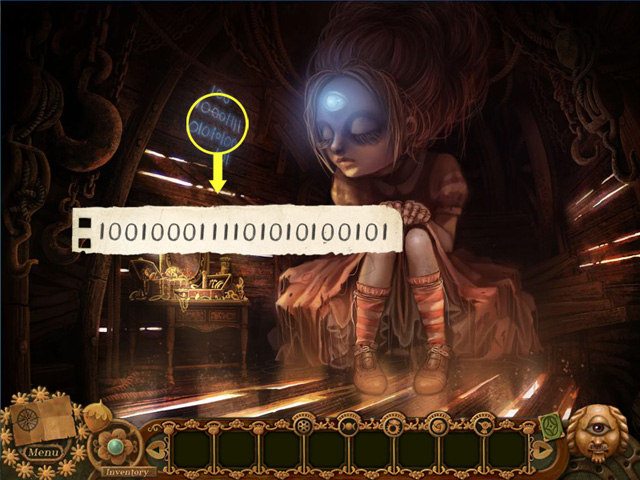
- Here, you should examine the bones hanging from the tree. Edwina will make a sketch - the bone code - and add it to your keepsakes inventory.
- You may also examine the strange shape on the tree, the lock mechanism by the entrance, and the rusted head above the entrance.
- Back to the fishing village! You can now unlock the door on the wooden hut.
- When you have everything you require to complete a puzzle or mini-game, a skip meter will appear. The meter will begin to fill - quickly if you are playing in casual mode, and slowly if you are playing in expert mode. Once the meter has fully charged, click the skip button and the puzzle, or the mini-game, will be instantly solved.
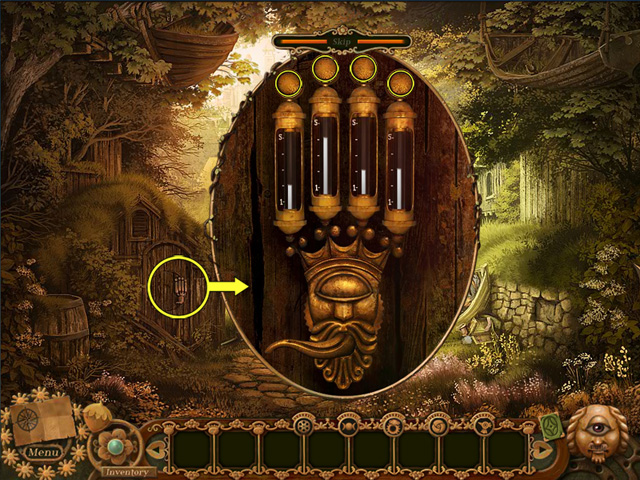
- Open up your bone code. This is the combination for the gauges. Set the gauges accordingly and the door will open.
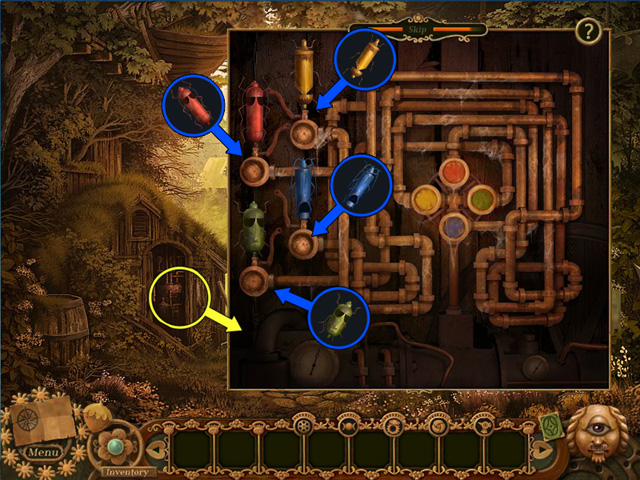
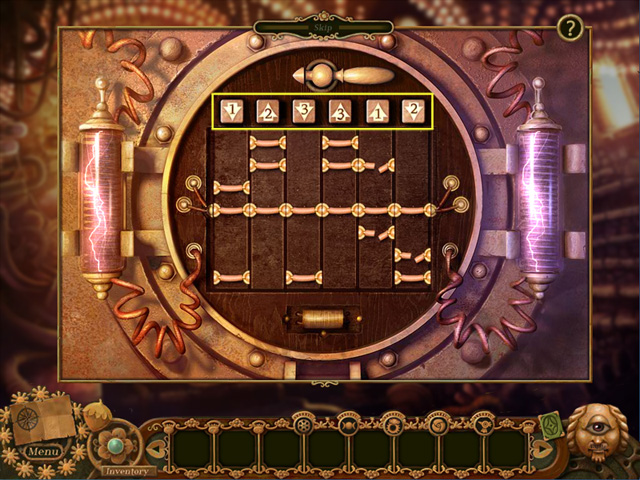
- Now to place your four beetle whistles and activate the steam engine.
- Trace a color from the centre of the engine, all the way to the end of its pipe, and place the whistle of the corresponding color. You will be able to swap the whistles around if you make a mistake.
- On most puzzles and mini-games, you will have access to a help tutorial, activated by clicking on the question mark. This tutorial provides a step-by-step walkthrough of the puzzle or mini-game. Steps that cannot be completed yet are grayed out.
- When all four beetle whistles have been correctly placed, the steam engine shudders to life and the ground trembles.
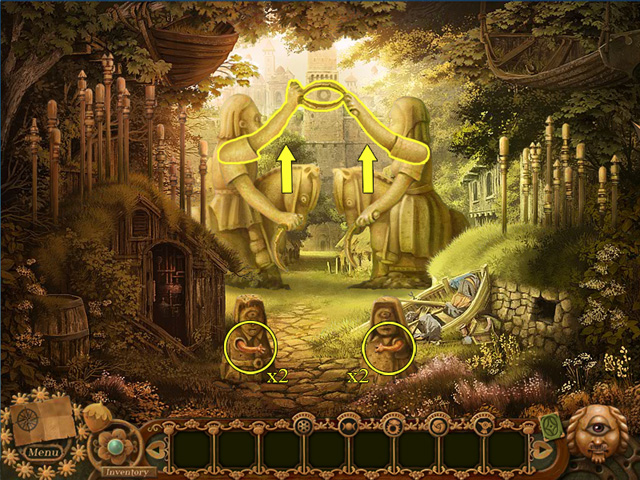
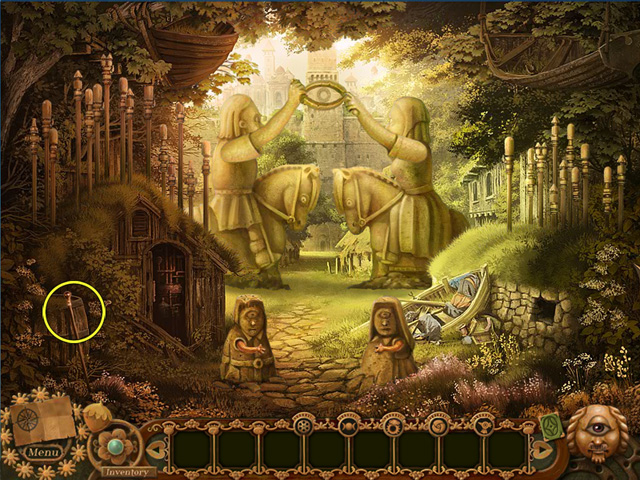
- In the fishing village, four ancient statues rise from the ground. The small statues activate the large statues. Click on the metal arms until the two large statues create an eye shape with their sickles.
- A burst of energy activates something at the gatehouse.
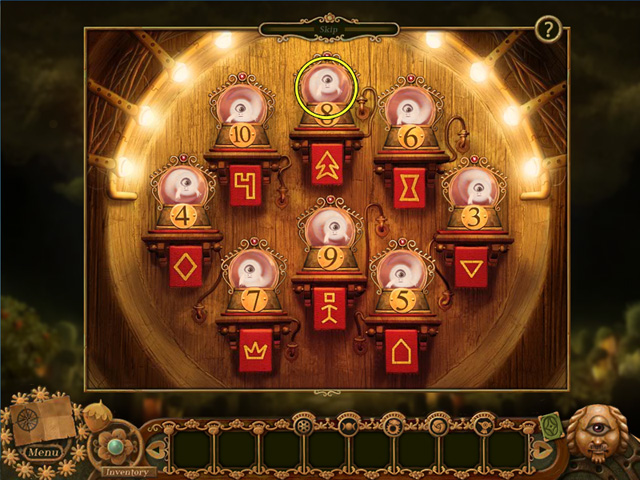
- At the entrance gatehouse, the rusty head is now awake. Click on the head to travel to the psychic plains, and engage in psychic combat.
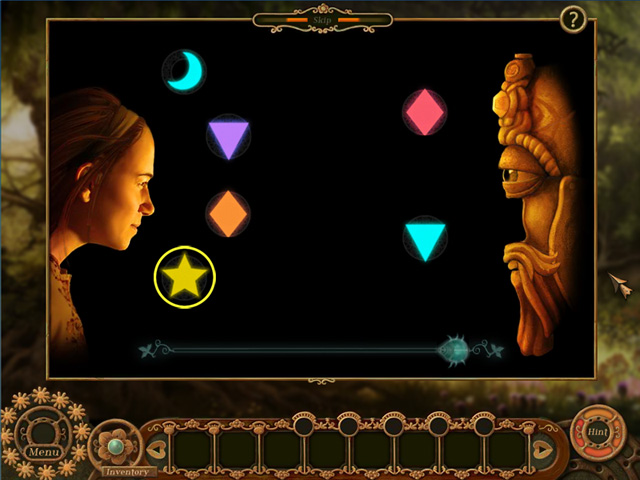
- In each round, you will be presented with two sets of colored shapes. Your set is on the left, the Seer's set is on the right. Only one of your shapes has nothing in common with the Seer's shapes - its shape and color are unique.
- Each time you correctly select the unique shape, a piece of the Seer's face will vanish. When only his eye remains, he returns you to the gatehouse and reveals a secret hollow in the tree.
- Take the star shaped stone from the hollow. Remember the star shaped carving in the standing stone..?
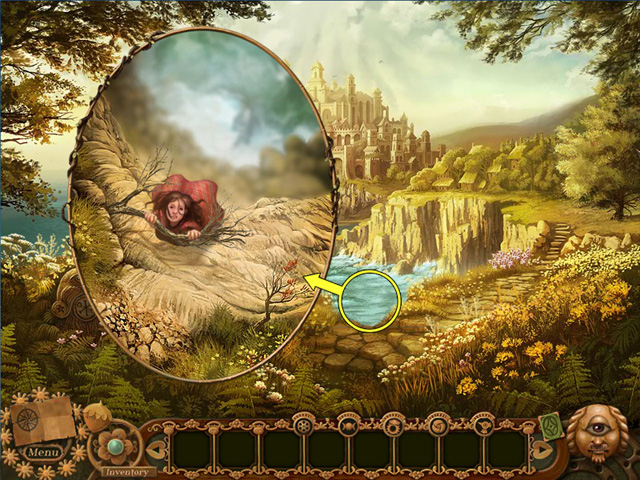
- Miss Thorn waits for you. She explains that Uisdean has taken Tom into the town, and that the town will fade at sunset. She apologizes for her betrayal and offers you a map and a clue. But before you can claim her peace offerings, the cliffs crumble and she falls.
- Look over the edge of the cliff. Miss Thorn is clinging to a branch, high above the rocks and waves. You will need to pull her up with something.
- Return to the fishing village and take Miss Thorn's staff from the barrel.

- Back at the cliff top, reach over the cliff to rescue her.
- Too late; she has vanished.
- Take the map. Once you are inside the town, this will become an invaluable aid.
- The map is added to the interface, at the bottom left.
- There was also a note attached. Uisdean seems to be searching for something, without success. Uisdean's note is added to your keepsakes inventory.
- Before heading off, remember to place that star shaped stone into the standing stone.
- The See-charm.
- Back in the fishing village, a second Hidden Object scene has activated.
- Find the hidden items and receive the town page. Note the combination scrawled onto the page.
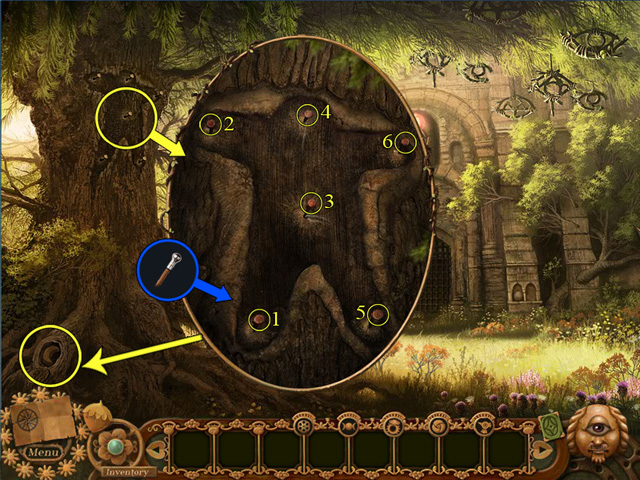
- Return to the gatehouse and consult Uisdean's notes. He has sketched the sequence for the tree code. Examine the silhouette on the tree and tap out the sequence upon the nails using Miss Thorn's staff.
- A second secret hollow opens in the tree roots. Collect the moon shaped stone and return to the standing stone.
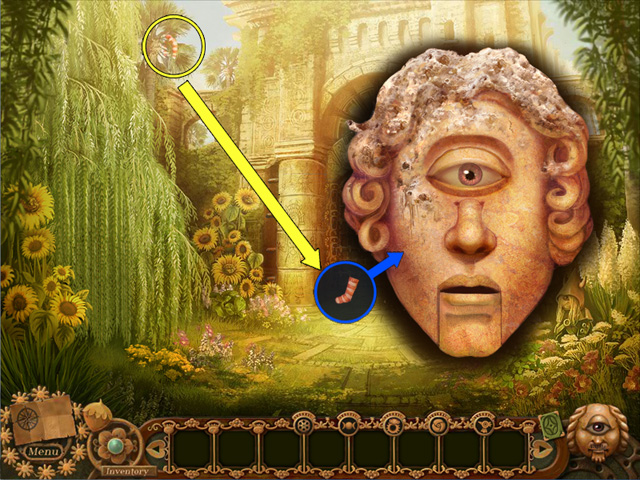
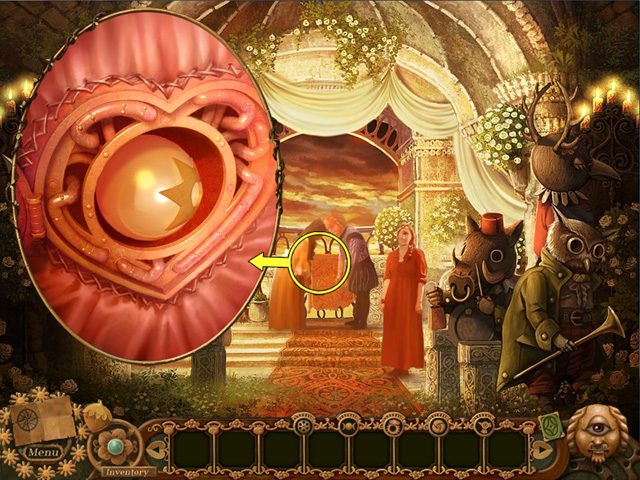
- Insert the moon shaped stone, and the hatch opens. Take the see-charm. This is your first persistent item! Persistent items are powerful tools and are stored in their own unique slots atop the interface.
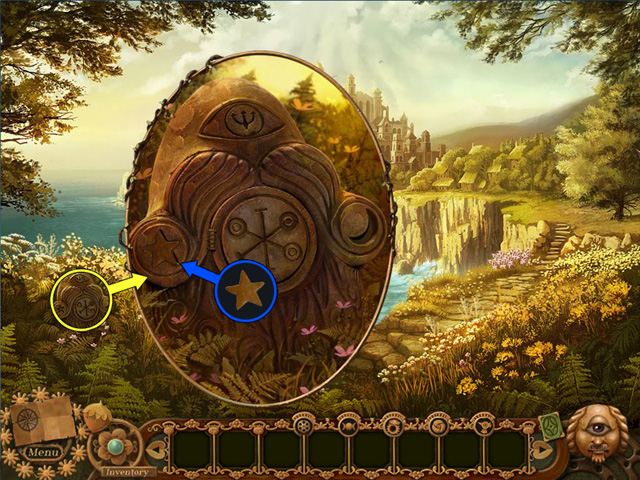
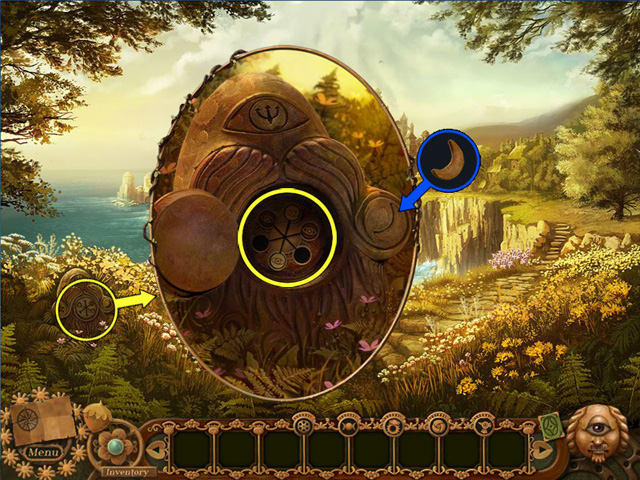
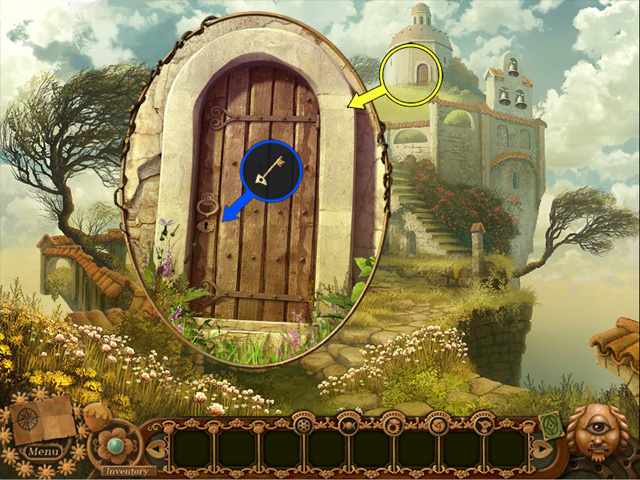
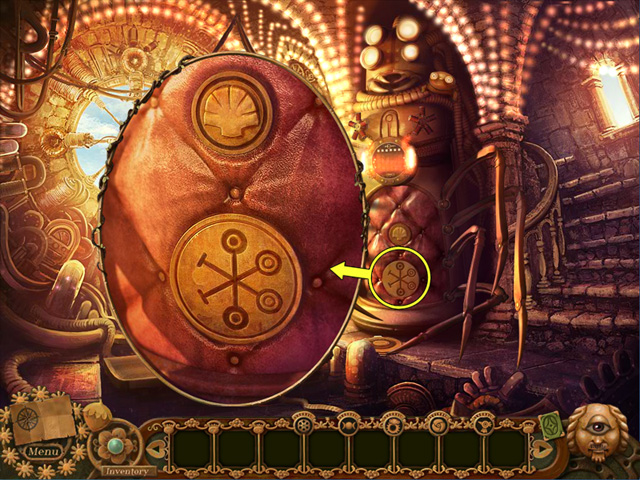
- To open the door to the cyclopean town, you will need to open the shutters on the see-lock, and then insert and solve the see-charm.
- See-charms are cyclopean puzzle keys. Certain doors can only be opened once you have the see-charm and a code unique to that door.
- You now have all you require. Examine the see-lock and select the town page. Follow the combination to rotate the dial and open the shutters.
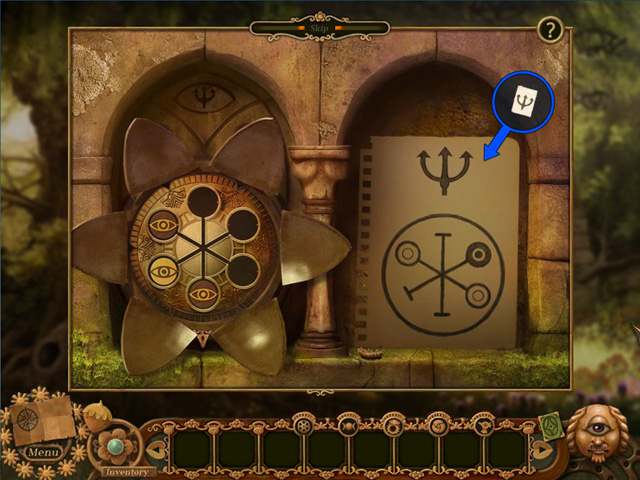
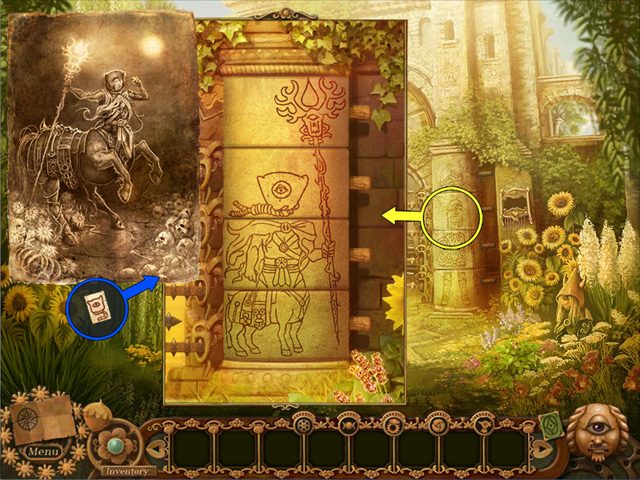
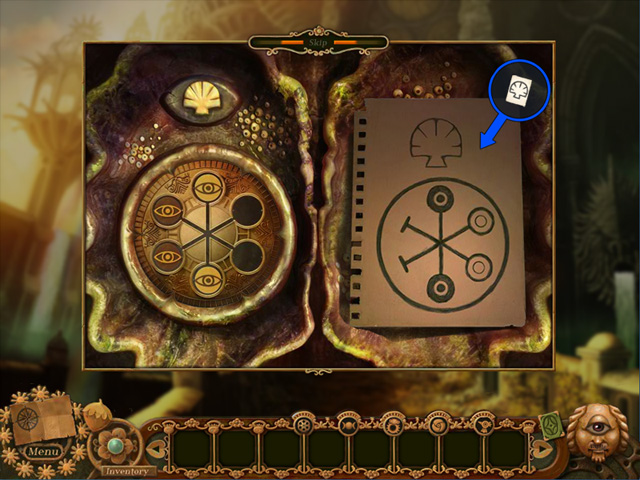
- Once the shutters are open, insert your see-charm by clicking its icon in your persistent items inventory. Now consult the trident code.
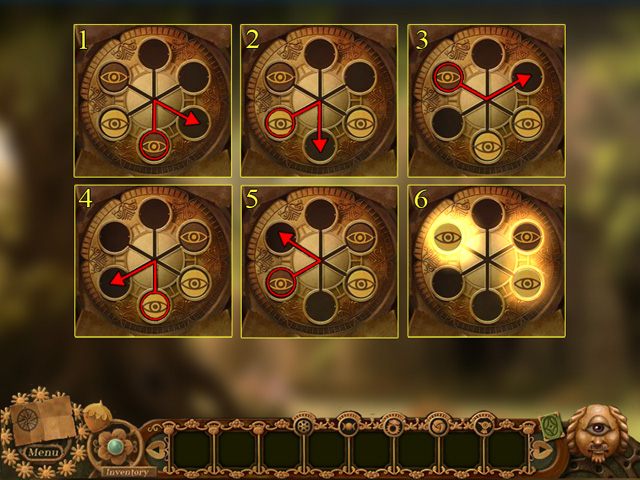
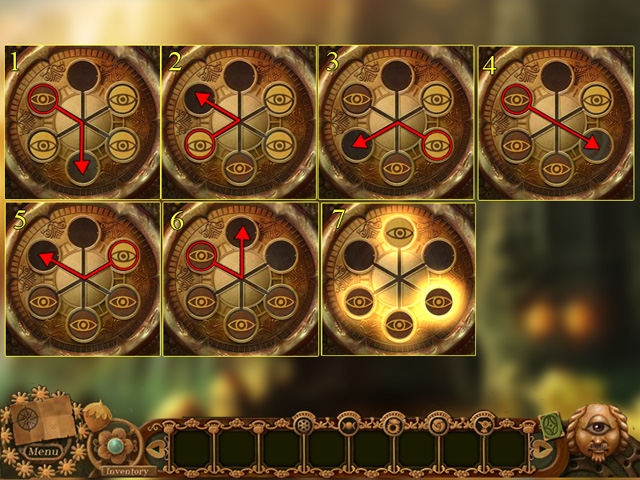
- To solve the see-charm, simply slide the discs around until they match the trident code. But remember: when you slide a disc into position opposite another disc, the disc you moved will flip!
- The doors to the town open. The Seer warns you that, once inside the town, you will be unable to leave. But you would never abandon Tom.
Chapter One: Many Husbands of the Lady Seer
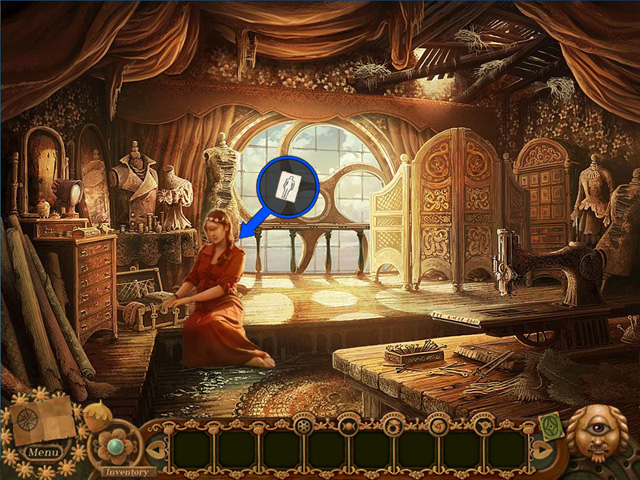
- Welcome to the town of the cyclops!
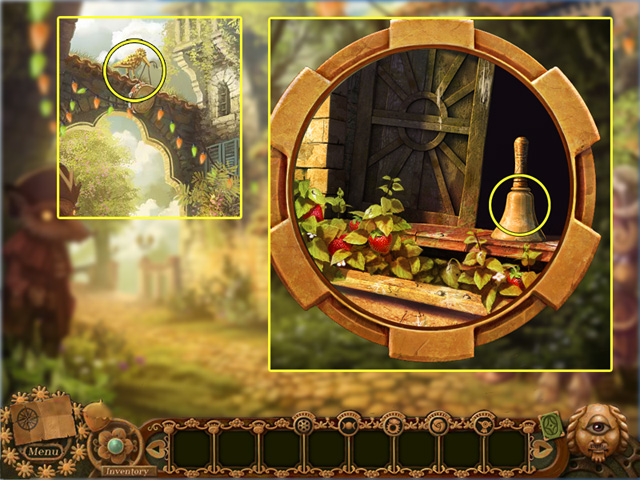
- Take a look round the market square. You will find a mysterious wall of eyes, and a bone sculpture on the far gate. Above the bone sculpture, a rose has been carved into the gate. You will discover several carved roses as you explore the town.
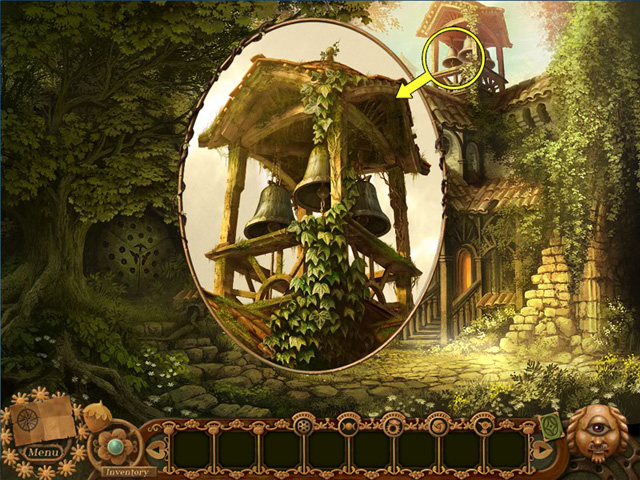
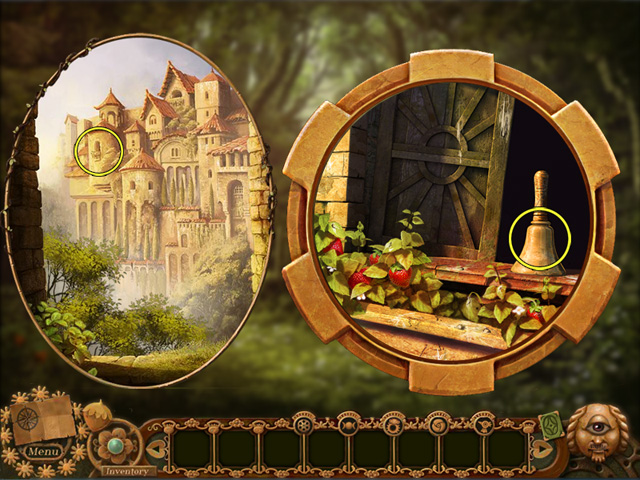
- Before you head into the wooden campanile, take a look at the bells in the tower. You are going to need help, and if you could ring those bells, you would be sure to attract some attention - assuming there is anyone still alive here.
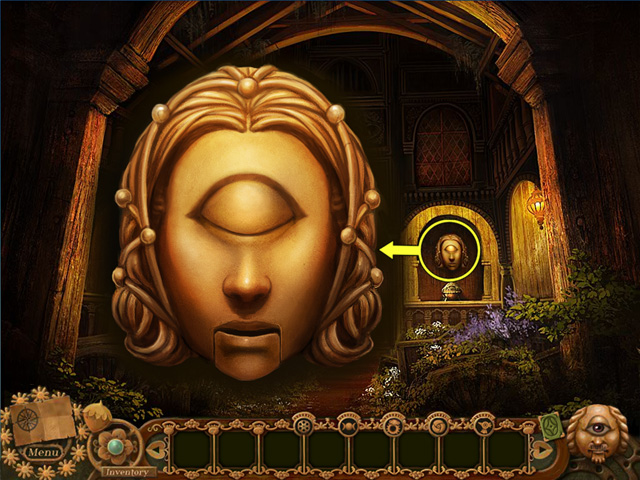
- Inside the wooden campanile, there are more curiosities to examine. Begin with the Seer head - the metal face on the wall. To wake the Seer, you will need your divination tools. These consist of your dream cards, and your rune stones. They were in your backpack.
- Using the Map.
- Note that the compass on your map icon sparkles once you have examined the Seer head. This indicates that a task has been added to your map.
- Click on the compass to open the map. Your map has two modes, which you may toggle between using the icons in the top left corner.
- The first mode, represented by a tower, is overview mode. Here, you will find a bird's eye view of the town. To identify the points of interest, move your cursor over any feature and a name tag will appear. In this mode, you will also be able to travel instantly between key areas - but first you will need to access the secret tunnels!
- The second mode is discovery mode, and is represented by an eye. This mode keeps track of all the locations you have visited, updating as you travel around the town. Edwina's head indicates your current position. You will also notice a red exclamation mark. If you are ever uncertain of your next step, simply head to the location highlighted by the exclamation mark.
- You will be able to check your active tasks in either mode by clicking on an active head. (Active heads are colored, inactive heads are gray.) Click on the Seer head and your first task opens at the bottom of the screen: Wake the Seer. Click the head again to hide the task.
- To close the map, click the map icon at the bottom left.
- If you miss the sparkling compass, the compass will remain gold until you next open the map.
- If the compass is gray, then no task has been added to your map since you last opened it.
- Before leaving the wooden campanile, feel free to take a look at the painting on the wall, the reliquary, and the censer. You should also collect the lavender.
- TIP: Margrave: The Blacksmith's Daughter has been designed to allow you to play, and complete, the game in many different ways. You are as welcome to explore at your leisure as you are to make use of the map, hints, and strategy guide whenever you require.
- Waking the Lady Seer.
- Time to explore a little deeper. Head through the market square and out into the arcades. Something watches you from the window. A faceless creature. This probably won't be the last time you encounter it.
- There are your rune stones, hanging from that arch! They are well out of your reach, but maybe that frog can help..?
- Click on the frog to open the frog lock puzzle. To solve this puzzle, you will need to turn the three dials to reveal precisely eight leaves and four bones.
- With the frog unlocked, its jaw swings open and blackbirds take flight, dislodging your rune stones. Click on the rune stones to add them to your persistent items inventory. Now to find your dream cards.
- Here you have a choice of paths. You may head up towards the windmills via the obsidian gatehouse. For now, we should continue onwards.
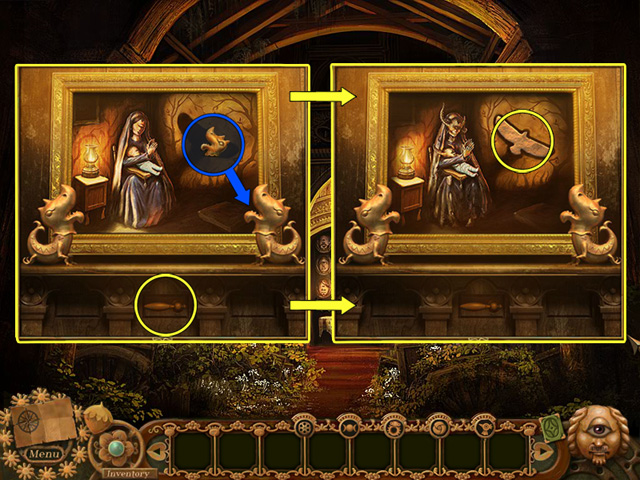
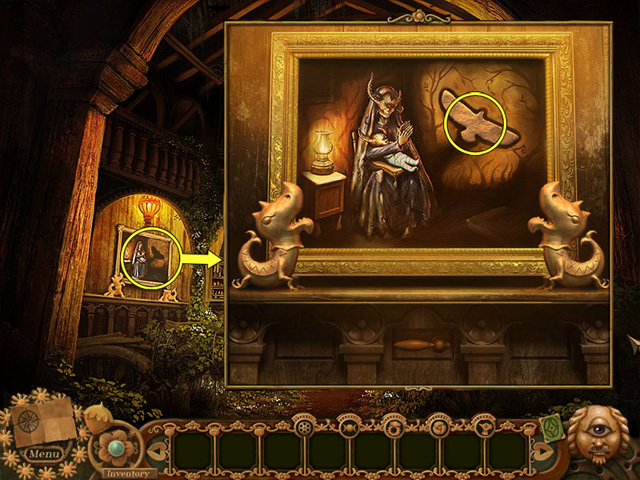
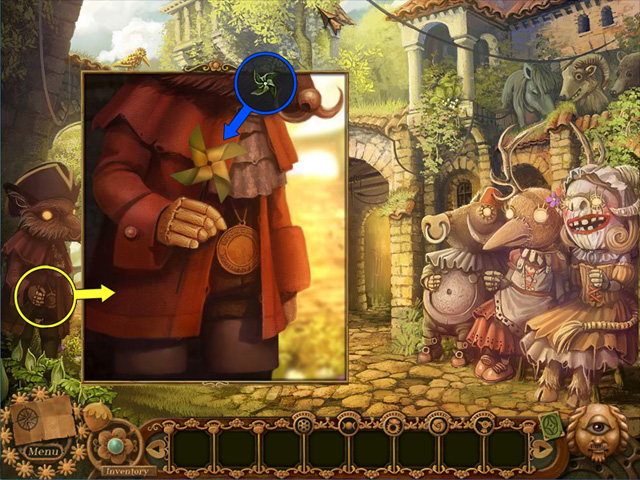
- In the fresco hallways, another Seer slumbers upon the wall. Examine him, and he will wake. Startled, Rudo emits a burst of energy, disintegrating Keelin's favorite chair!
- Before heading out to the plaza, you should collect the charcoal from the remains of the chair. And if you talk with Rudo several more times, you will be able to collect the seaweed adhered to his upper lip. Once you have collected the seaweed, a task is added to your map. Rudo wants you to find him a new mustache.
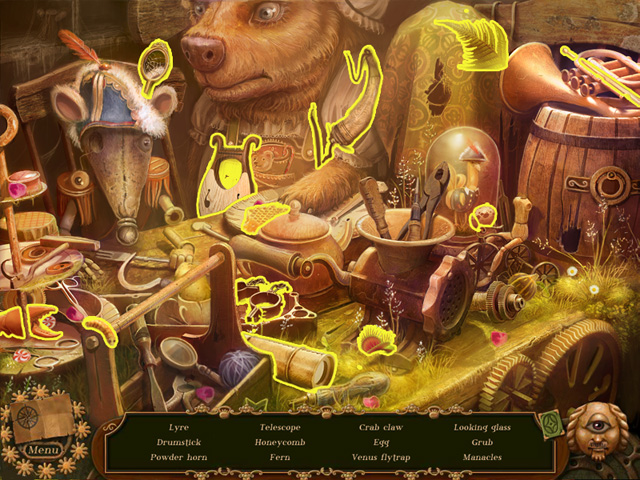
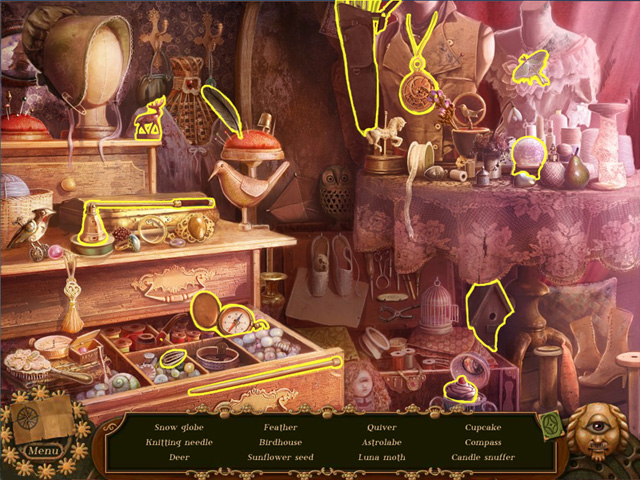
- In the plaza, click on the sparkles to play a new Hidden Object scene. There's your backpack! Someone has rifled through your possessions. Fortunately, they had no interest in your dream cards.
- On completing the Hidden Object scene, the dream cards are added to the rune stones in your persistent items inventory. Together, these make up your divination tools, and are all you need to wake the Seers you encounter.
- Before returning to the sleeping Seer in the wooden campanile, take a look at that shrine on the right. Take the page from the shrine. This must be a shrine to Brites, wife of Oban. When she was captured by the puritans, her hair was threaded with beetles and birds pecked her to death.
- The Brites page is added to your keepsakes inventory.
- Take the beetle lens from the base of the shrine, and place it onto any of the metal rings on the shrine. It looks like you will need to find and place four more to reveal the secret of the shrine.
- Return to the wooden campanile. Feel free to consult discovery mode on your map if you need assistance finding your way back.
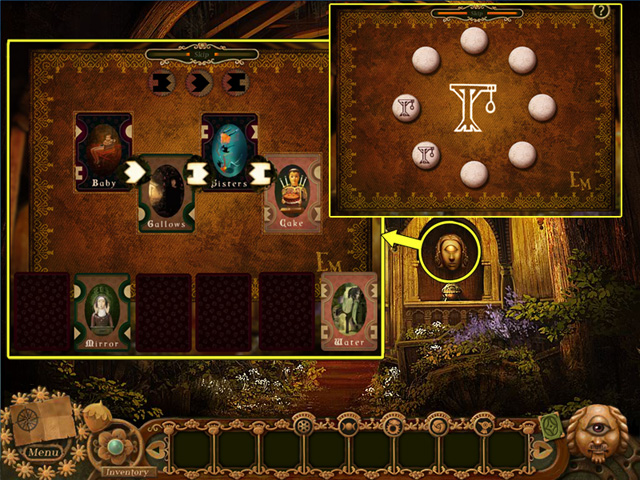
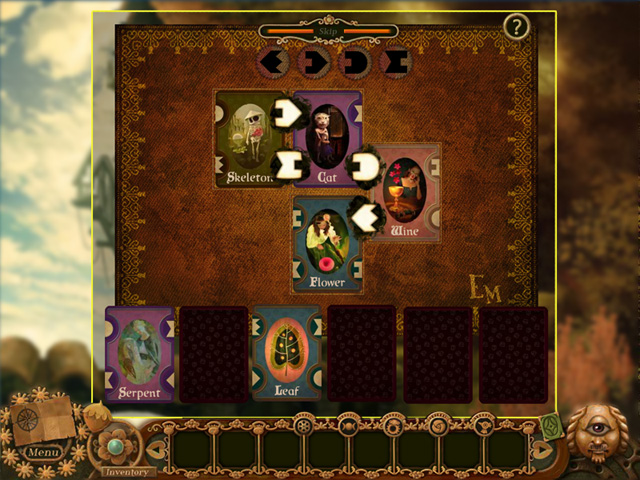
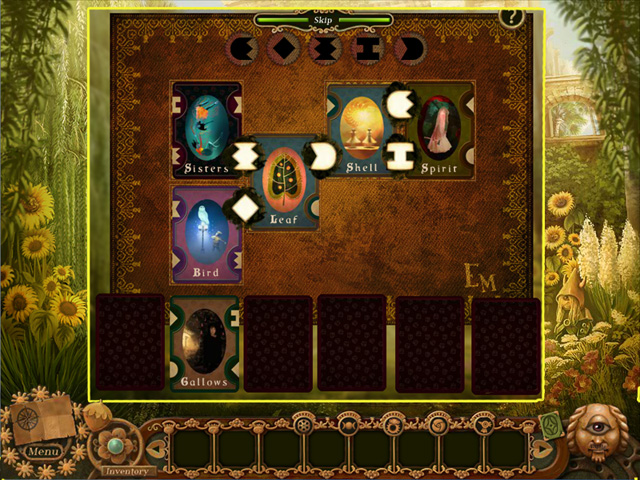
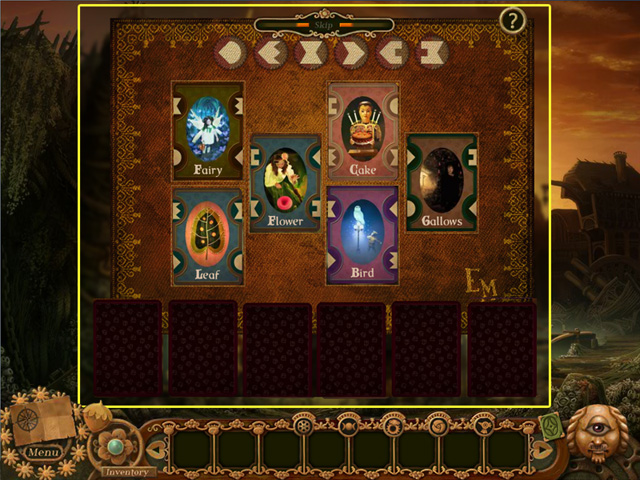
- Click on the sleeping Seer. Notice that your divination tools begin to glow. This indicates that they are currently useful. Click on your divination tools to begin the dream cards game.
- Edwina will talk you through your first dream cards game. Arrange the cards upon the dream mat to create symbols. Once you have matched the symbols at the top of the mat, the Seer's dream will be revealed.
- 'In your dream, I see a BABY. He slumbers upon toppled GALLOWS where his SISTERS feast on CAKE'.
- TIP: You can match the symbols at the top of the mat in any order. There is only one way to match all the symbols.
- With the Seer's dream revealed, you progress to the rune stones portion of the divination games. Here, you will erase the dream and wake the Seer.
- A symbol appears in the centre of the mat. Find the two stones with the matching symbol and keep a close eye on them as they are shuffled around the mat. Once the stones come to a stop, select those two stones. If they are a correct match, they will be removed from play; if they are an incorrect match, they remain in play. Once all the pairs have been matched, the Seer will awake.
- Returning the Lady Seer's Memories.
- Finna has been sleeping for goodness knows how many decades. Once awake, she is unable to recall anything of her life, and unable to offer any assistance to Edwina. Naturally, Edwina has a memory incense recipe to hand! The incense recipe is added to your keepsakes inventory.
- Consult the recipe. To return Finna's memories, you will first need to find charcoal, seaweed, oak moss, and mistletoe. If you have already collected any of these ingredients, their corresponding silhouette on the recipe sheet will be filled in.
- TIP: During certain tasks, Seer heads might have advice for you. This advice is free, and is the equivalent of a free hint! If you need help locating an incense ingredient, speak with Finna.
- You might already have collected the charcoal from the remains of Keelin's chair in the fresco hallway. Also in the fresco hallway, you might have already collected the seaweed from Rudo's upper lip. (You will need to talk with him several times first, until he remains on the screen and you are able to pick the seaweed).
- To collect the oak moss and the mistletoe, you will need to explore further into the town.
- Return to the arcades. Take the door at the top left of the screen to the obsidian gatehouse.
- The oak moss grows on the post at the bottom of the screen, just beneath that copper bird.
- The mistletoe is up by the windmills, and you will need to solve the obsidian puzzle door before you can progress. Time to discover if your memory is better than Finna's!
- Click on the eye of the bird at the bottom of the steps. It sings a musical note! Notes are either green or white. Click on the second bird, at the top of the steps. It also sings a note.
- Examine the door. Two more birds guard the door - a white bird and a green bird. Recreate the sequence of colored notes by clicking the eyes on the white and green birds.
- You will need to repeat this procedure three more times to unlock the door.
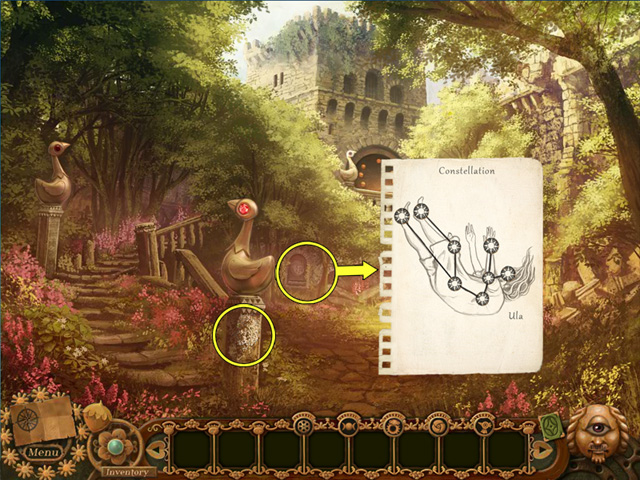
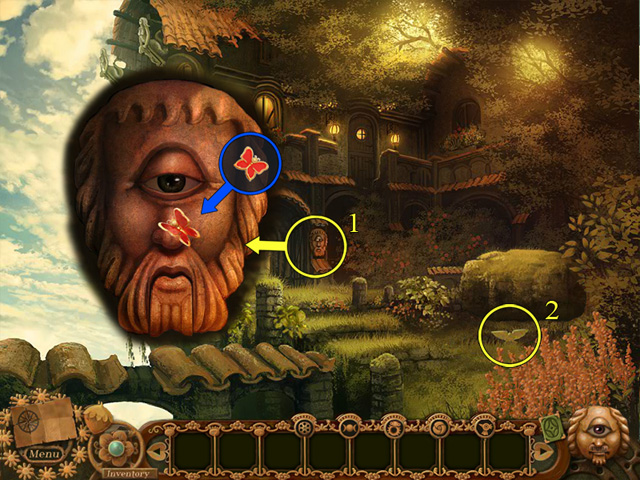
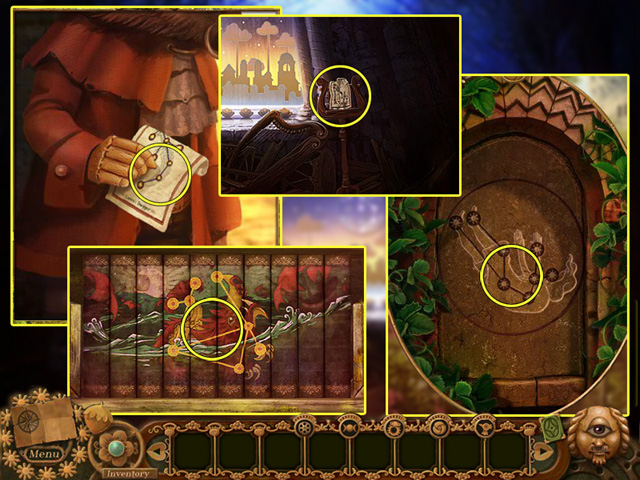
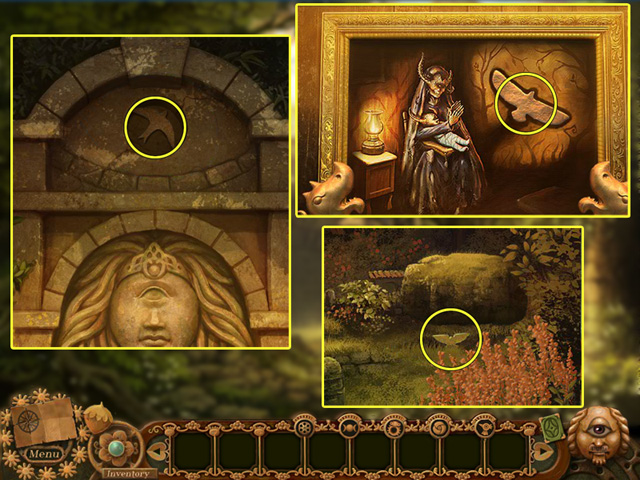
- Before heading up to the windmills, take a look in that alcove, just to the right of the bird at the bottom of the steps. Edwina sketches the Ula constellation. Who is - or was - Ula? And there is that carved rose symbol again!
- It seems like your route through the town ends here! How on earth will you cross that chasm? Maybe that mechanism on the left of the screen conceals the answer?
- Perhaps you can worry about that a little later. For now, collect the mistletoe from the ruins on the right.
- Before returning to Finna, feel free to examine those ruins more closely. Another carved rose symbol! And another beetle lens to add to your inventory.
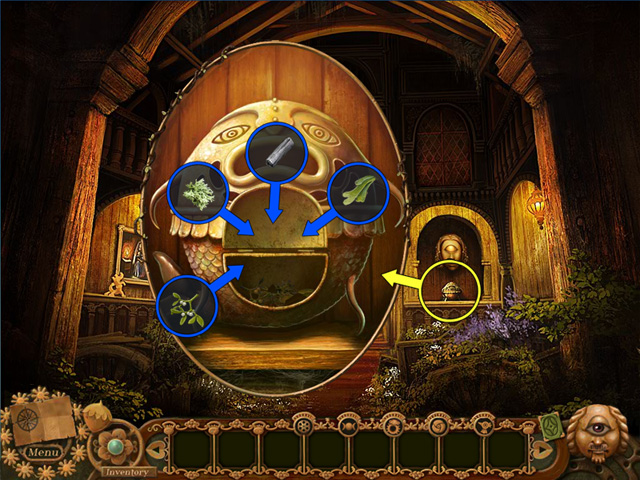
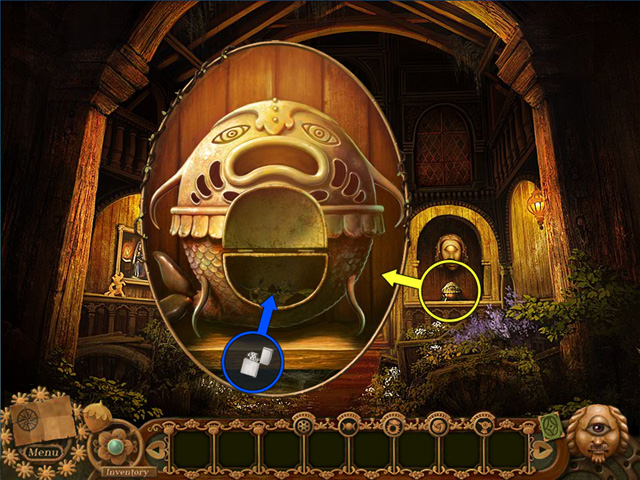
- Back in the wooden campanile, Finna is pleased to see you. Open the censer beneath her, and add your incense ingredients - the charcoal, the seaweed, the oak moss, and the mistletoe.
- Now to light the mixture. Edwina had a lighter in her backpack.

- Return to the plaza and search the Hidden Object scene. There is the lighter.
- In the wooden campanile, use the lighter to light the mixture in the censer. Finna is overwhelmed by the resurrection of so many memories! She needs your help again - she asks you to sketch her relatives so that she will never again forget their faces.
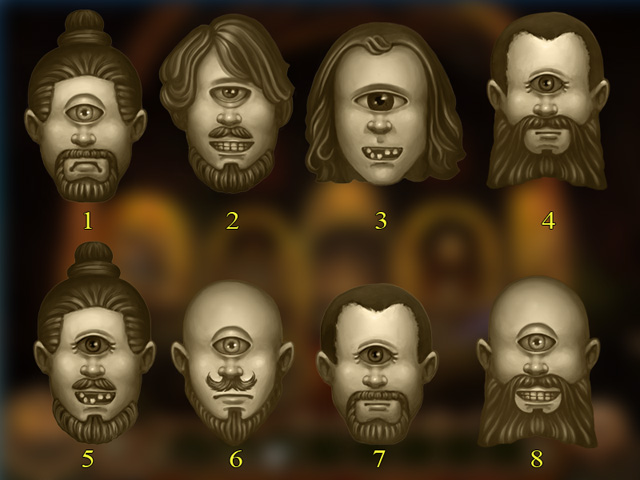
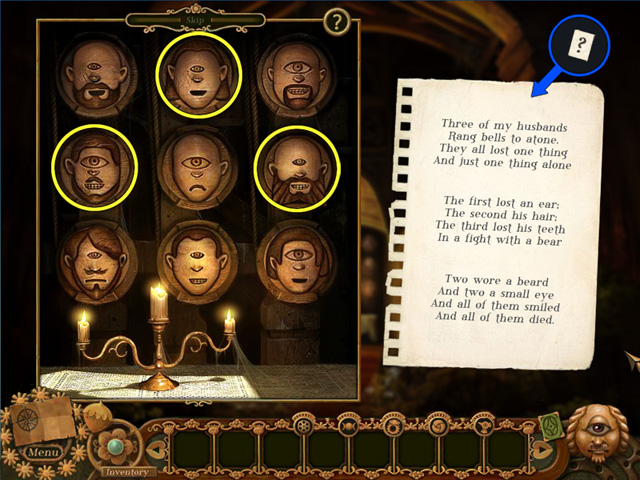
- Your first task in the dead heads mini-game is to memorize the face that Finna shows to you. Pay special attention to the hairstyle, the eye, the mouth, and any facial hair. You will only have a few seconds to commit these to memory.
- When the face fades, your sketchbook is opened. Click on the tabs on the right of the book to cycle through the hairstyles, eyes, mouths, and facial hairstyles. When you are happy that you have sketched the face shown to you, click on the tick mark to submit your sketch.
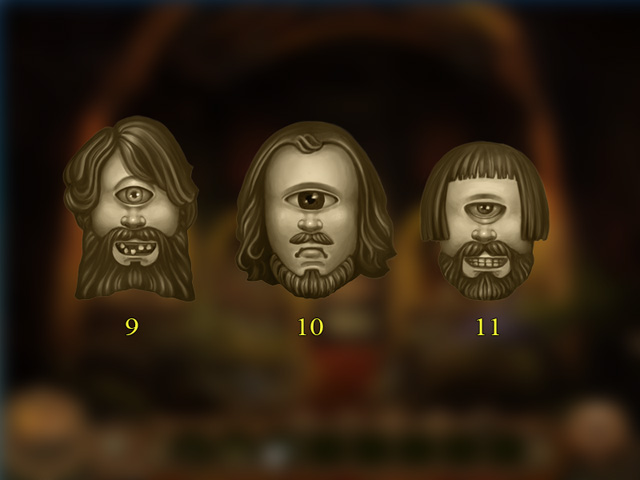
- Finna shows you the face once more. If your sketch is a match, you progress to the next round; if your sketch is a mismatch, Finna will ask you to repeat that round, and show you another face.
- 1st Husband 2. 2nd Husband 3. 3rd Husband 4. 4th Husband 5. 5th Husband 6. Elder Brother 7. Twin Brother 8. Uncle Keon 9. Uncle Mansa 10. Uncle Sayem 11. Younger Brother.
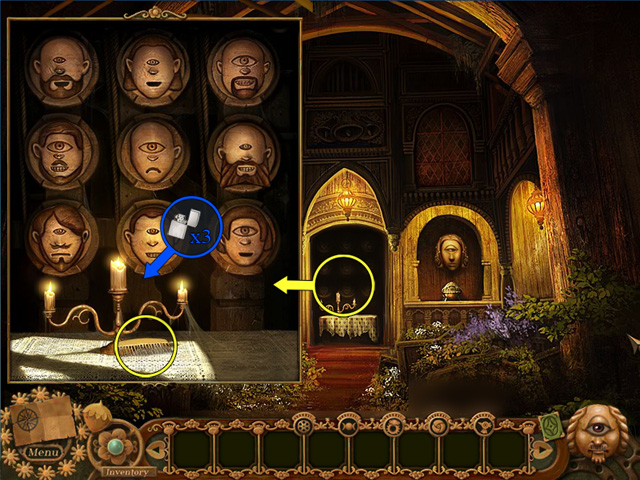
- Once you have correctly sketched three of her relatives, Finna opens the doors to the bell chamber.
- Examine the bell chamber and light the three candles with your lighter.
- Wooden faces! To ring the bells, you will need to choose the three correct faces. But which should you choose?
- Gazini will know. But to reach Gazini, you will first need to find a way across the chasm by the windmills. It is time to recruit a guide.
Chapter Two: Rudo Joins in
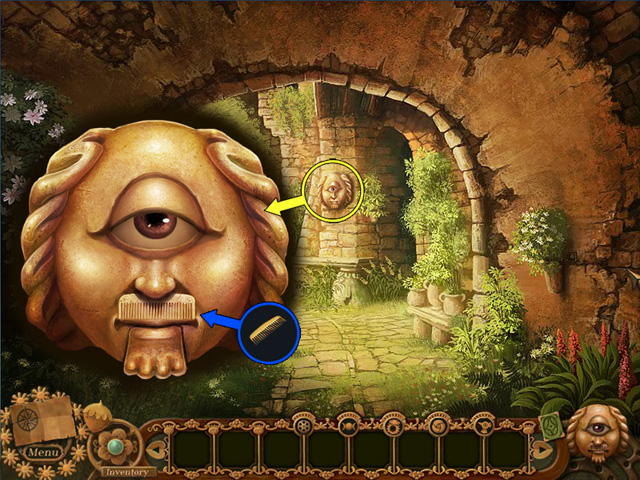
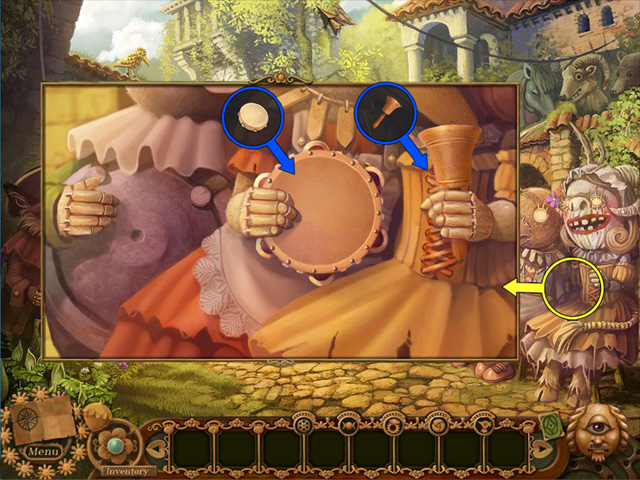
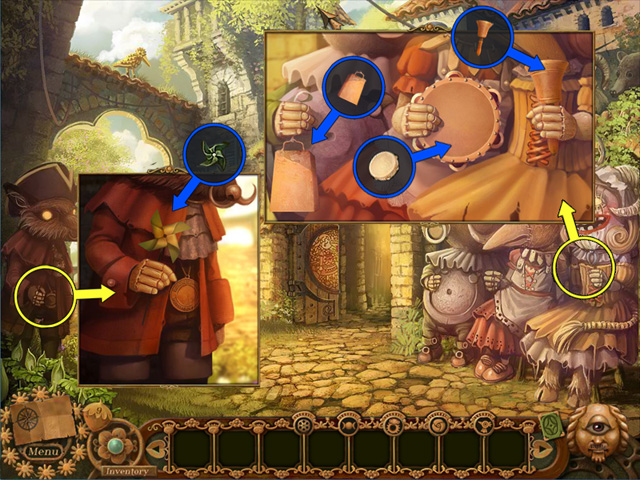
- Take the bone comb from the base of the candlestick in the bell chamber. It would make a wonderful mustache for someone.
- Return to the fresco hallways and examine Rudo. Drag the bone comb onto his top lip. He is one happy Seer!
- Take Rudo down from the wall. He now replaces your hint button. He urges you back to the wooden campanile.
- When you arrive back at the wooden campanile, examine the reliquary. Rudo recites the combination: Right, Up, Down, Centre, Left.
- Press the buttons on the reliquary lock in that sequence, and the reliquary opens.
- Rudo takes a nap. He is now a fully functional hint button. Once you have clicked on Rudo to receive a hint, he will need to recharge. His eyelid closes, and his mouth opens. Once his eye has fully opened, his mouth closes once more, signaling his availability for a new hint.
- Although Rudo knows the town better than anyone, his memories are hazy - an unfortunate side-effect of death - and you will still need to rely on your own guile to find Tom and escape the town.
- With the reliquary unlocked, a new Hidden Object scene becomes available. Find the listed items in the scene to receive a model windmill.
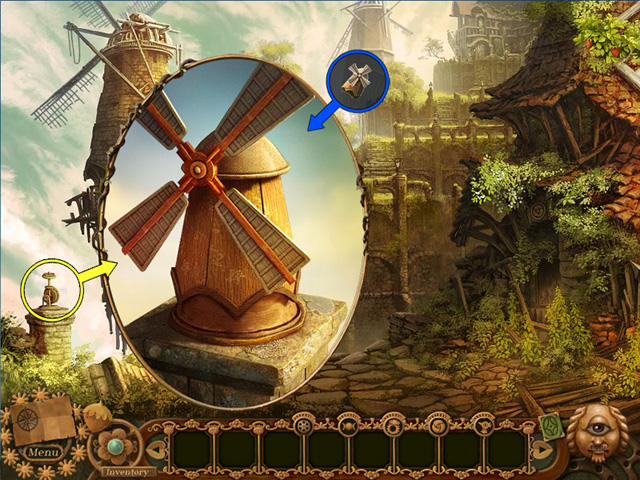
- Take the model windmill up to the windmill cliff top, and place it onto the mechanism. The sails spin, winching up a bridge. Now you are free to travel onwards to the cliff top gatehouse. But before you set off, take a look at that door in the windmill. Something terrifying lives inside.
- At the cliff top gatehouse, Gazini is sound asleep. Examine his sleeping Seer head and select your divination tools from the persistent items inventory. A round of dream cards and rune stones will rouse him.
- 'In your dream, a wooden SKELETON bathes a CAT in WINE and lotus FLOWERS'.
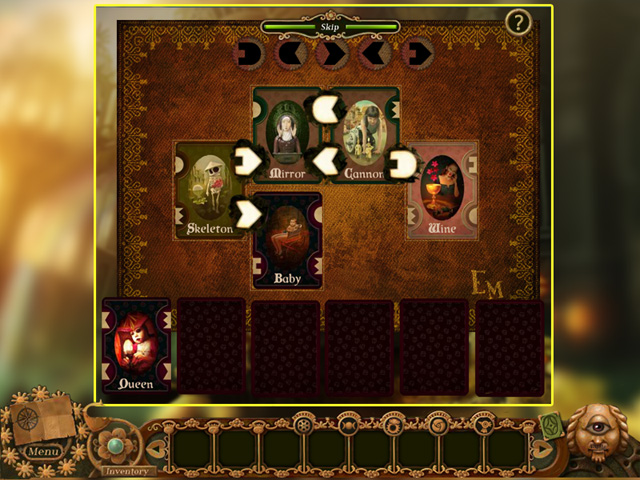
- Once he has woken, speak with Gazini to receive the bell ringer riddle.
- Return to the bell chamber in the wooden campanile. Consult the riddle to solve the dead ringers puzzle. Once you have deciphered it, select the correct three heads and the wooden campanile bells will ring.
- Rudo urges you outside: somebody must have heard the bells!
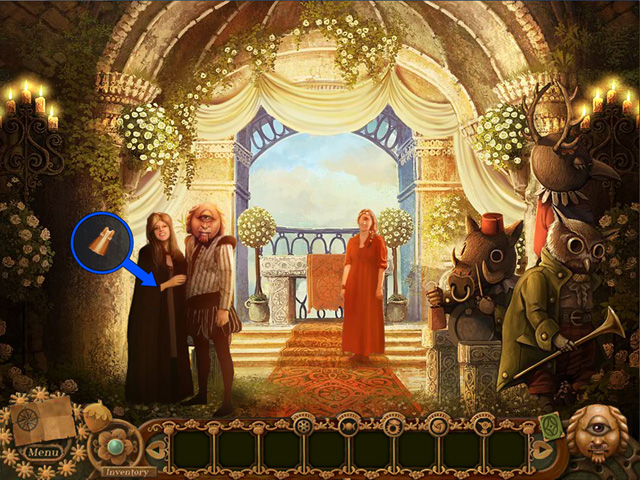
- In the market square, Keelin has come to investigate. But she can offer only bad news: Tom is dead.
- She leaves for her picnic garden, and Rudo suggests you follow.
Chapter Three: Releasing the Beast
- Together, Rudo and Keelin recount the story of the Ouphe, an evil assassin that came to the town many years ago in search of a soul. One-by-one, it slaughtered the townsfolk. Rudo erected puzzle doors and traps to keep himself and Keelin safe, but fell under the assassin's blade before he could finish his task.
- The Ouphe is locked away on the western peninsula. And if Uisdean has found a way through to the Ouphe's domain, he and Tom are likely dead.
- Even if Tom is still alive and Edwina finds him, they still face the task of escaping the town before sunset. And escape is impossible without the eye of Brites - a key which opens every cyclopean door.
- Rudo and Keelin agree to accompany Edwina and leave the town together. Keelin heads off to pack, whilst Rudo remains with Edwina as their search for the eye of Brites begins.
- Rudo hands you a letter from Brites. It's not much of a clue, but it's all you have for now.
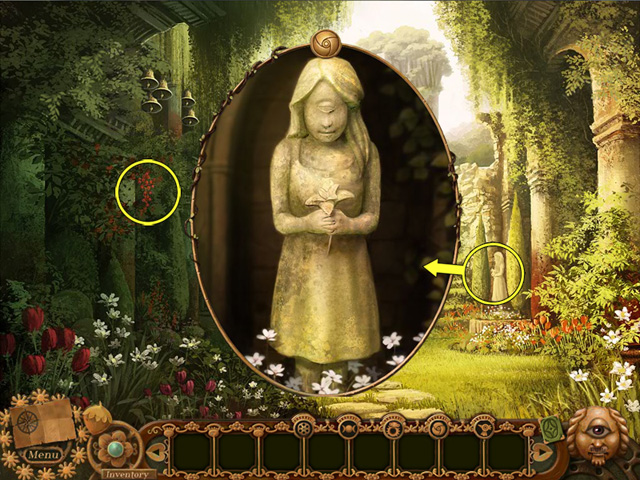
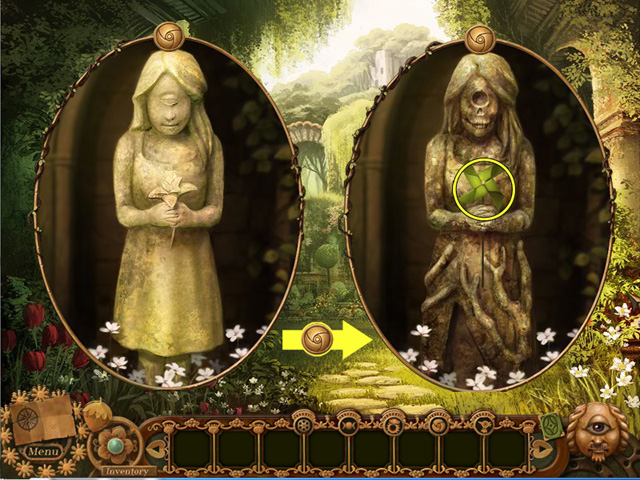
- In the picnic garden, you may examine the statue of a young girl. There's the carved rose symbol again.
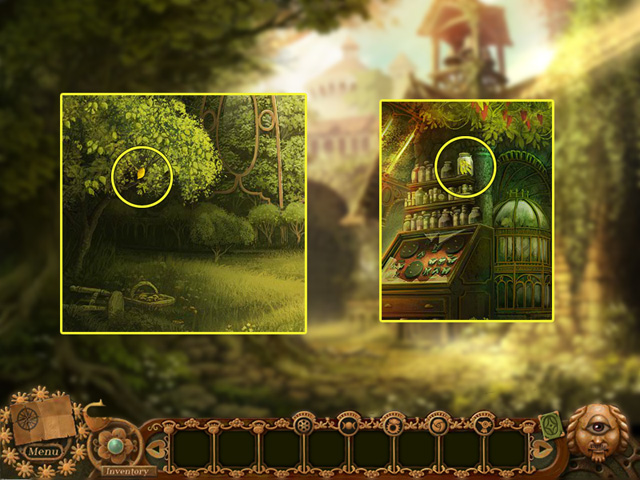
- You may also help yourself to a redcurrant from Keelin's redcurrant bush on the left.
- From the picnic garden, you may explore two new scenes. Through the door on the left, you can access the obsidian campanile. But for now, head onwards up the steps to Rudo's tower.
- Rudo's tower is a treasure seeker's paradise!
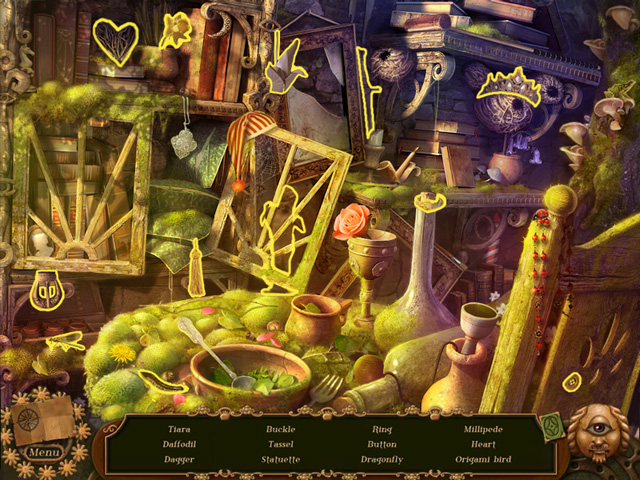
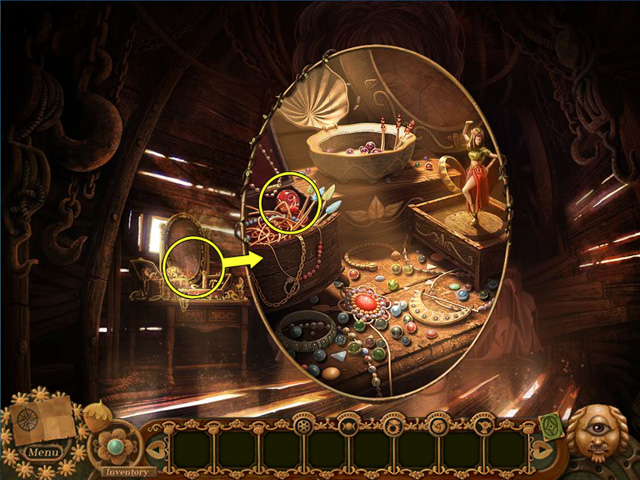
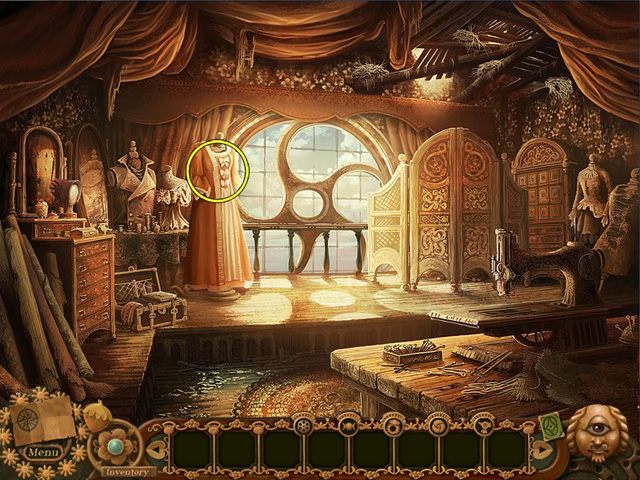
- Click on the sparkles to search the Hidden Object scene. You are rewarded with a tiara.
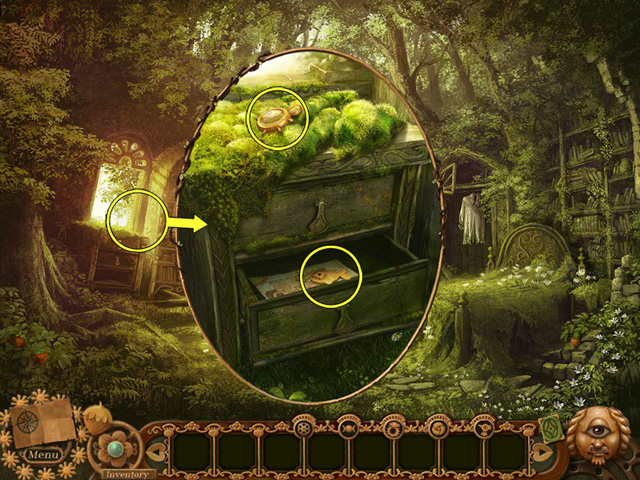
- Examine the chest of drawers on the left and take the beetle lens. Open the drawer and take the fish button and Keelin's drawing.
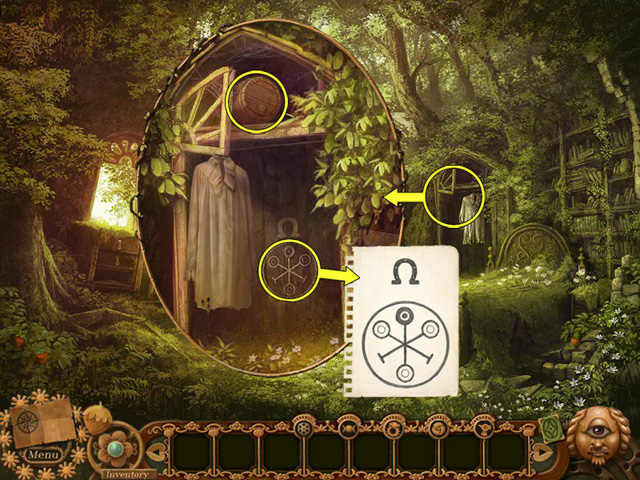
- Examine Rudo's wardrobe and push his nightgown aside. Edwina sketches the horseshoe code which has been drawn onto the wood. And before returning to the scene, take the keg of rum from the top shelf of the wardrobe.
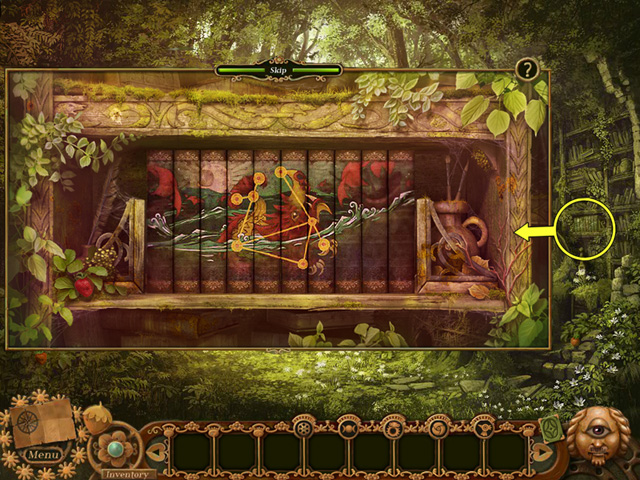
- To the right of Rudo's bed is a bookcase. Examine the books to begin the book puzzle. Swap pairs of books until you have recreated a picture of a sea monster across the spines. With the books correctly arranged, Edwina sketches the Nornhogg constellation.
- Before leaving Rudo's tower, you might want to admire the view from his window!
- TIP: Some glints are colored blue. You will need another assistant to reach them!
- You are welcome to explore the obsidian campanile next. Return to the picnic garden and take the door on the left to enter the obsidian campanile.
- In here, you can take the Oban constellation keepsake from the music stand. You may also examine the wooden discs on the wall. These are web-locks, and you will need something very special before you can activate them!
- Travel back to the windmills and head up to the cliff top gatehouse.
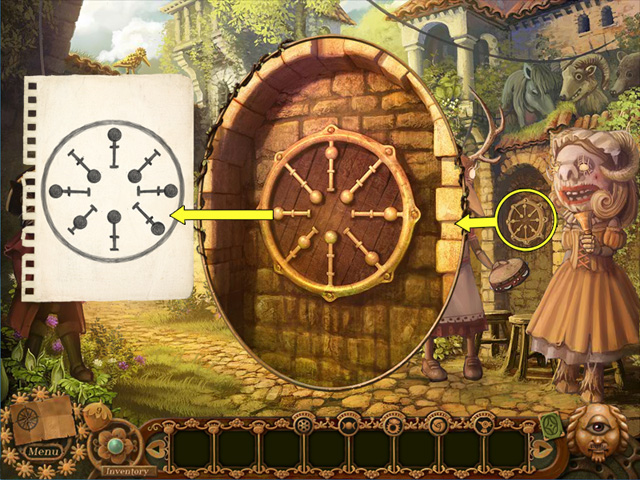
- Now you are armed with the horseshoe code, you are ready to solve the see-lock. But be aware: this is the final line of defense between you and the Ouphe. By solving this see-lock, you will be free to search the town further, just as the Ouphe will be free to emerge from captivity.
- As before, examine the see-lock and insert your see-charm by selecting it from your persistent items inventory. Consult the horseshoe code, and slide and flip the discs to match the code.

- With the gates unlocked, Gazini offers you one final warning and wishes you luck. He also makes one final request of you: His mechanical butterfly has wandered off, and he would like you to return her to him.
Chapter Four: Gotto and the Mechanical Butterfly
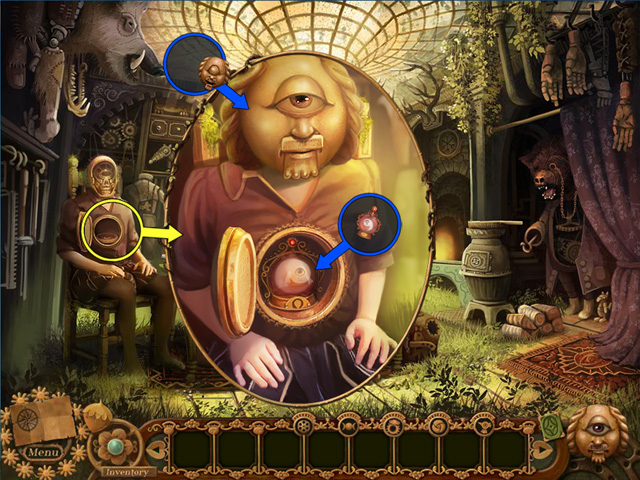
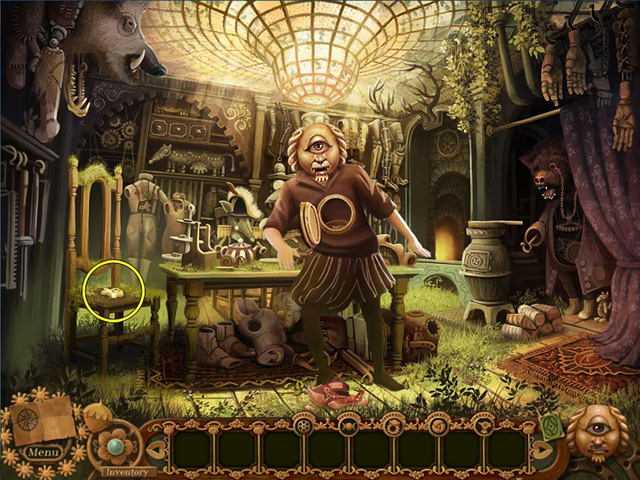
- Head through the gatehouse to the automata courtyard. The town's horologist was a talented man, and was responsible for constructing the automata. When you examine the automata on the right, Rudo is giddy with excitement! These are the parade automata! His mom would take him to see them every summer.
- Examine the automaton on the left and take the Caera's dagger constellation keepsake from its hand.
- You are also free to examine the elaborate door to the horologist's workshop; however, with no handle or keyhole, it seems impossible to open.
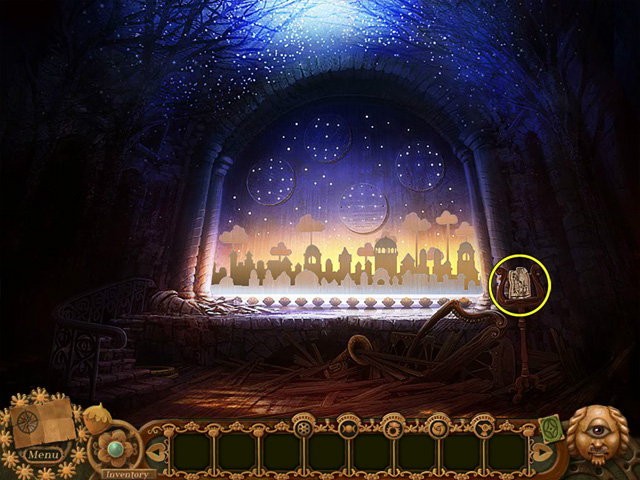
- Follow the path onto the parade bridge. From here, you have an impressive view of the river and a sinister looking tower. All the boats in the river are wrecked. What happened in this place?
- And there is Gazini's mechanical butterfly! You will never catch it without a net.
- Watching from the tree on the left, a mechanical bug whistles and chirrups.
- Before continuing over the bridge, take the sea monster head which nestles at the base of the lanterns on the right.
- The bridge crosses the river to the Isle Lacrimosa - the Island of Tears. Here, you can examine the mermaid fountain and pluck the beetle lens from her eye.
- Also, you might want to take a look at the chapel on the hill. The door is locked, but you are sure to find the key sooner or later.
- Until you find the key to the chapel, you might like to take this opportunity to tidy up your inventory. You may return to the shrine in the plaza and deposit the beetle lenses that you have accumulated; you may fit the fish button onto the mermaid's chest; and when you are ready, you should return to the wooden campanile with your sea monster head.
- Back in the wooden campanile, examine the painting on the wall and place the sea monster head onto the headless statuette. A handle appears. Click the handle, and the painting slides up to reveal an eagle birdstone.
- Click the birdstone to add it to your inventory.
- A new Hidden Object scene is available in the reliquary. Once you have found all the listed items, you will receive a butterfly net. Just what you were looking for!
- Retrace your steps to the parade bridge and take a few swipes at the mechanical butterfly with the net. The elusive thing won't stay still! After your third attempt, the mechanical bug on the tree spins a web and catches the butterfly for you.
- He introduces himself as Gotto, and is eager to join in your search for the eye of Brites.
- Gotto is added to your persistent items inventory. He is your key to solving the web-locks you encounter.
- Return the butterfly to Gazini - simply examine Gazini and drag the butterfly onto his Seer head.
- Gazini rewards you with a demonstration of his mighty might - perhaps the cyclopean equivalent of giving socks at Christmas.
- But as he raises a boulder with his telekinetic powers, you notice a second birdstone.
- Take the pigeon birdstone and add it to your inventory.
- Before heading off to the obsidian campanile, feel free to return to the market square and slot your two birdstones into the wall of eyes.
- One more birdstone to find!
Chapter Five: The Constellations
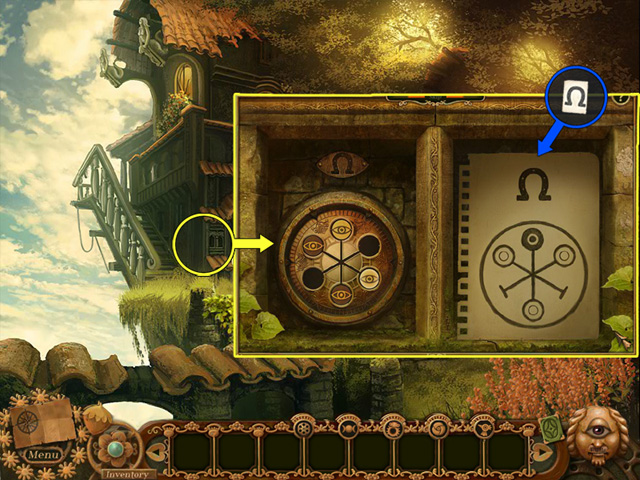
- The cyclopean children used to refer to the obsidian campanile as the theatre of stars. But now they are all dead, and the campanile has been rigged with a curious array of web-locks.
- To solve the constellation web-locks, you will need Gotto and the four constellation keepsakes.
- Take a look in your keepsakes inventory. If you have missed any of the constellation keepsakes, now is the time to retrieve them:
- Ula constellation: Edwina will sketch this when you examine the alcove at the obsidian gatehouse.
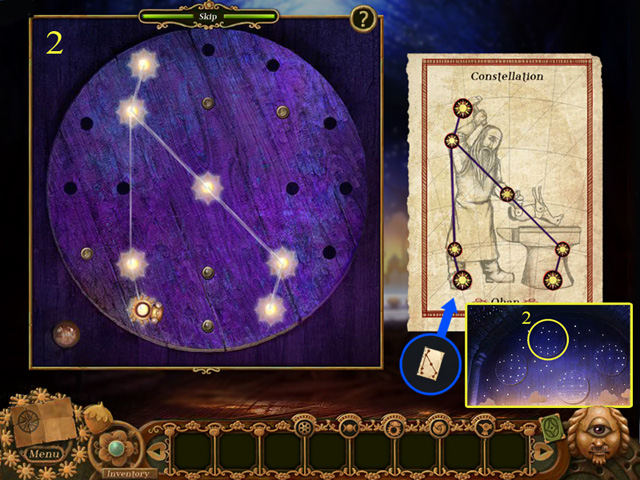
- Oban constellation: Collect this from the music stand in the obsidian campanile.
- Caera's dagger constellation: Take this from the hand of the lone automaton in the automata courtyard.
- Nornhogg constellation: Edwina will sketch this once you have solved the book puzzle in Rudo's tower.
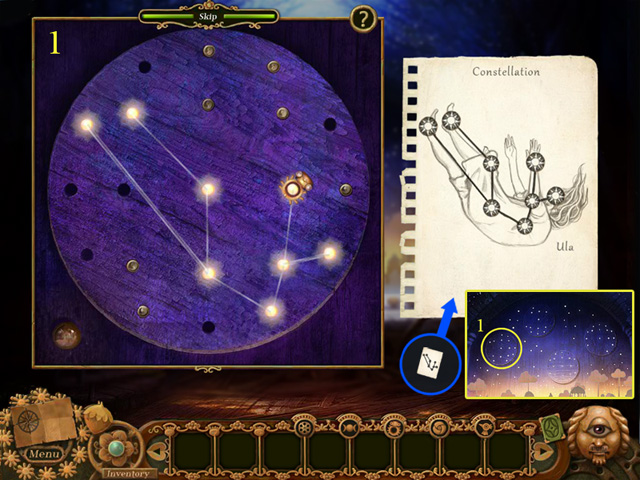
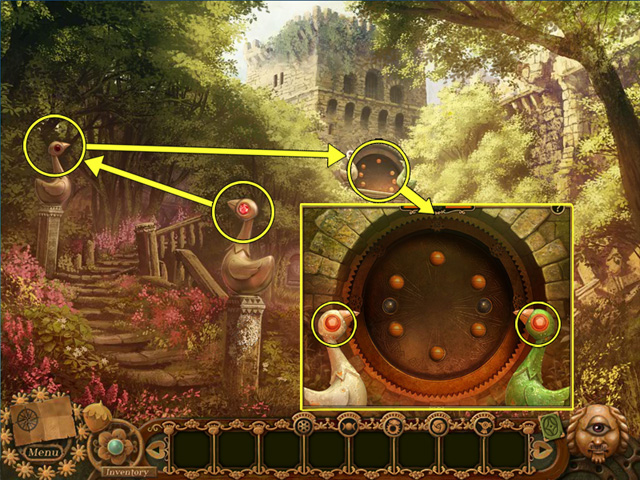
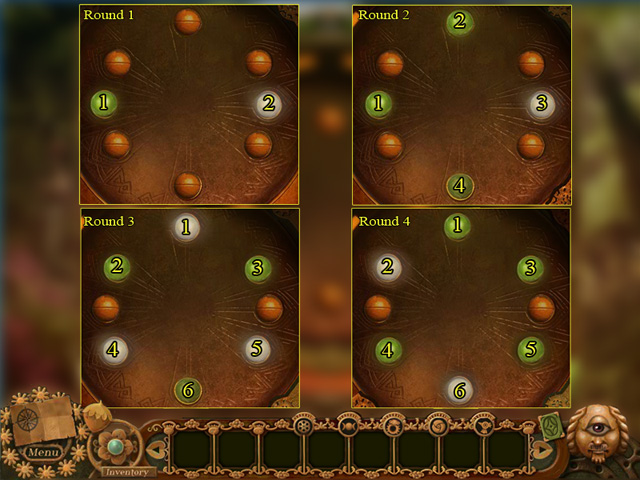
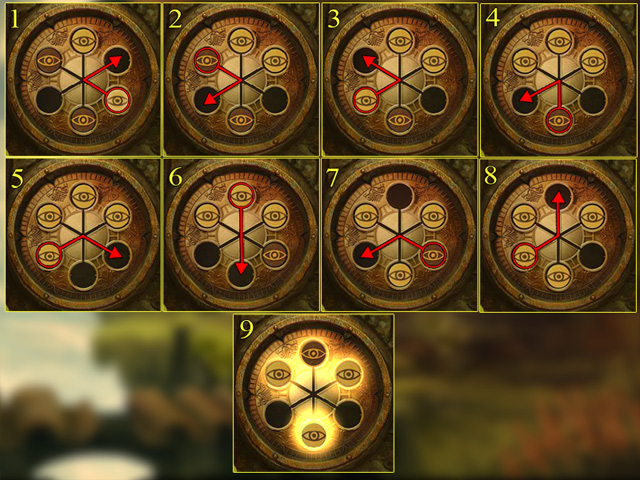
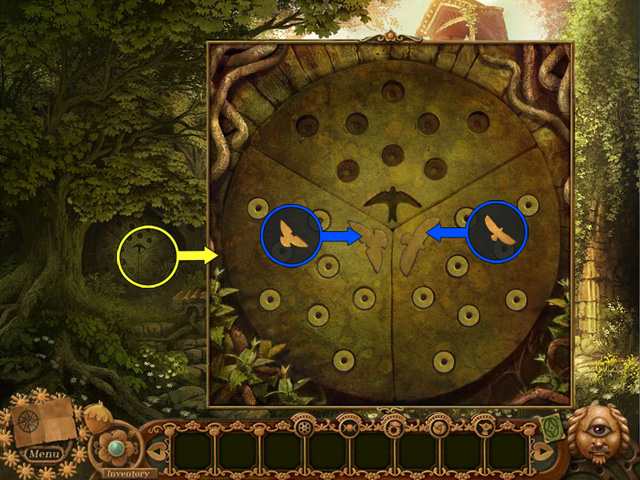
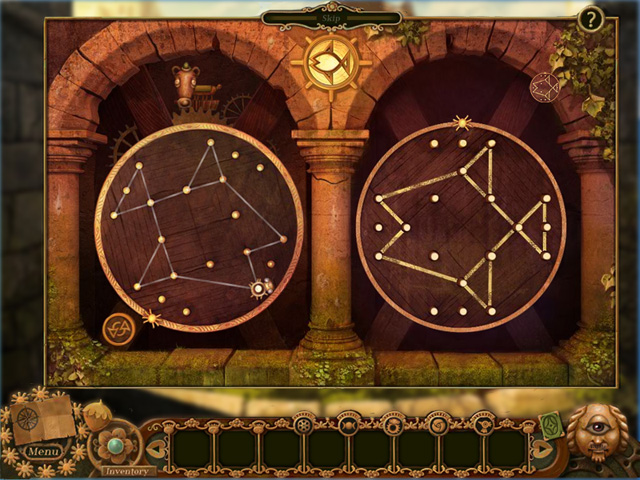
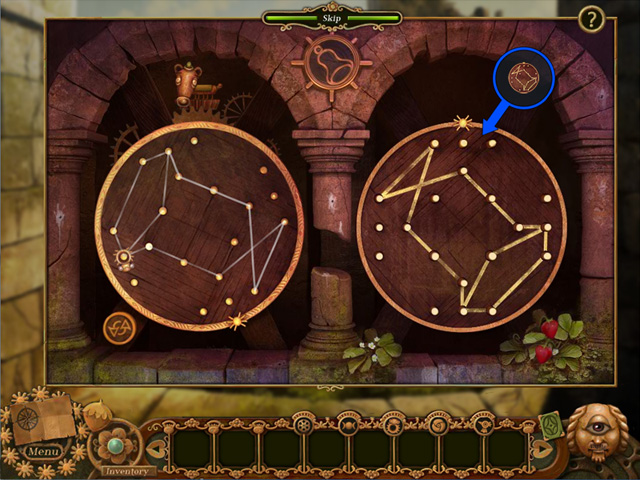
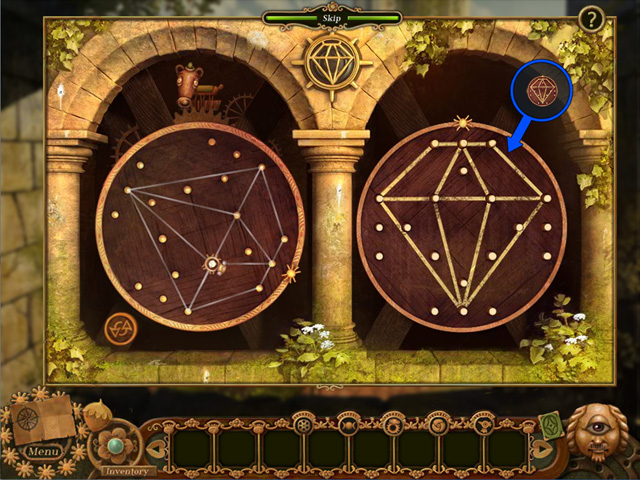
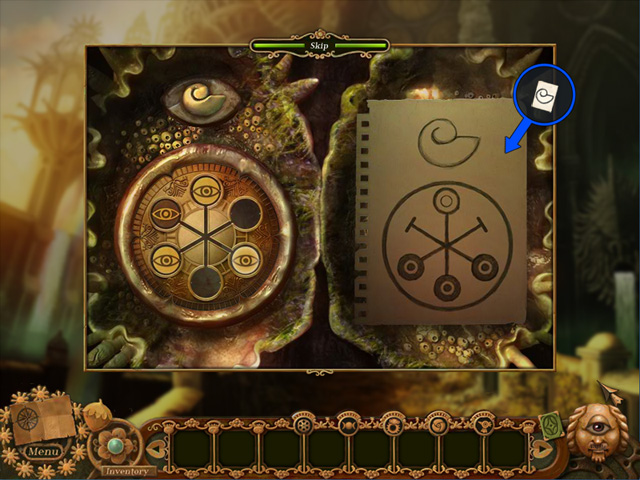
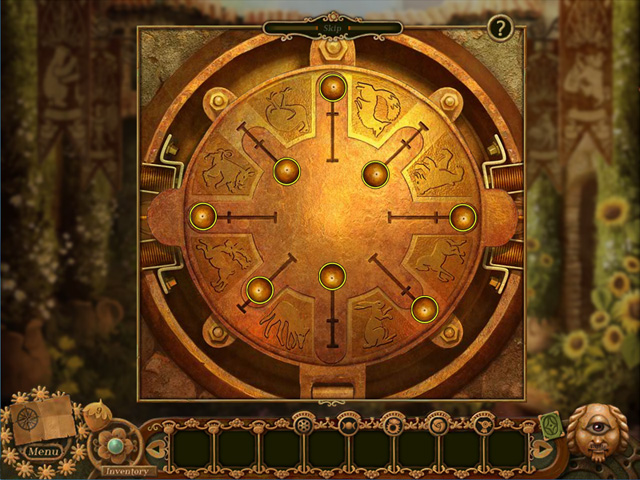
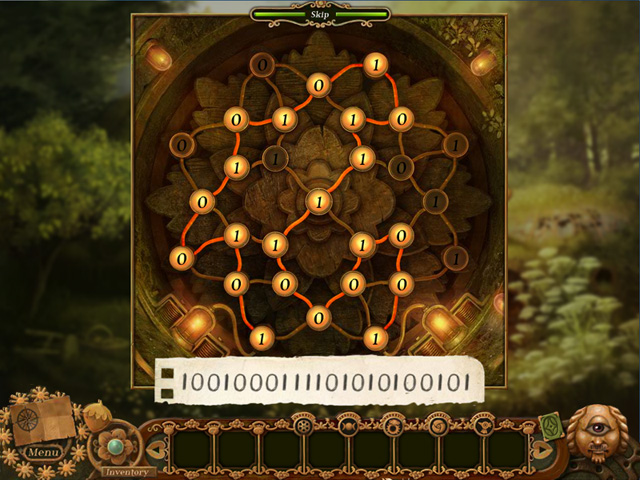
- Examine the left web-lock and consult the Ula constellation.
- Next, click on Gotto in the persistent items inventory. He is added to the web-lock.
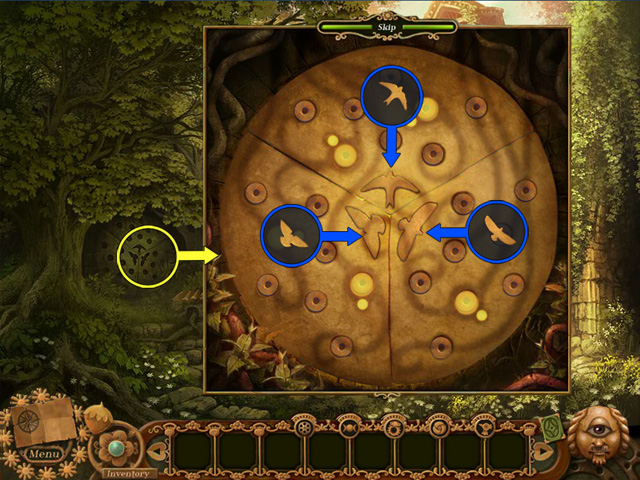
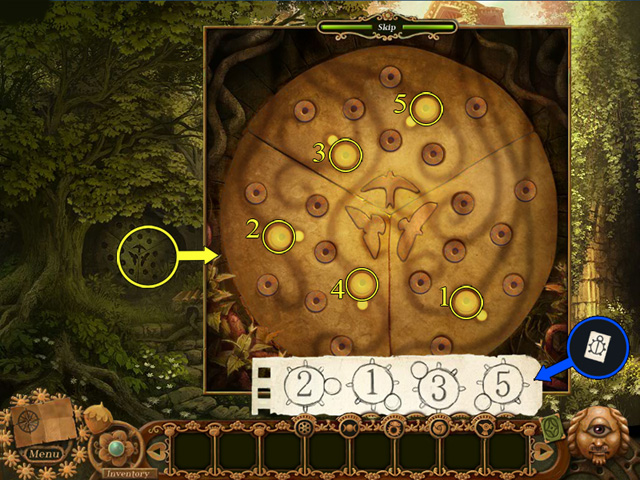
- Your task now is to use Gotto to recreate the constellation illustrated on the keepsake. Guide Gotto around the web-lock by selecting light bulbs.
- If you make a mistake, click the large light bulb in the bottom left of the window. This will reset the web-lock and return Gotto to his starting position.
- Once you have recreated the constellation, you are returned to the scene and can solve the remaining three web-locks.
- The top web-lock is solved with the Oban constellation.
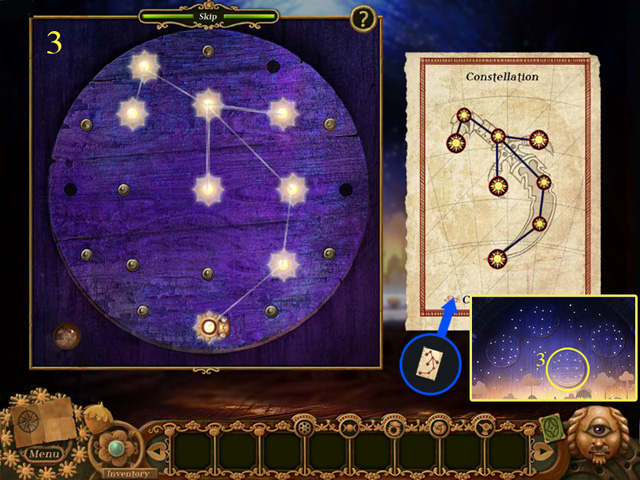
- The bottom web-lock is solved with the Caera's dagger constellation.
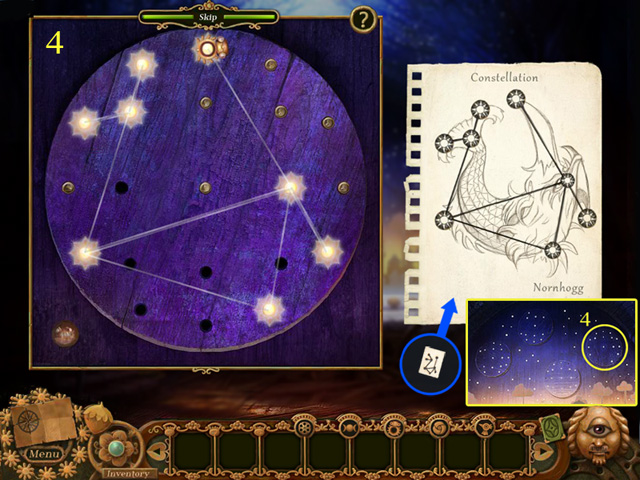
- The right web-lock is solved with the Nornhogg constellation.
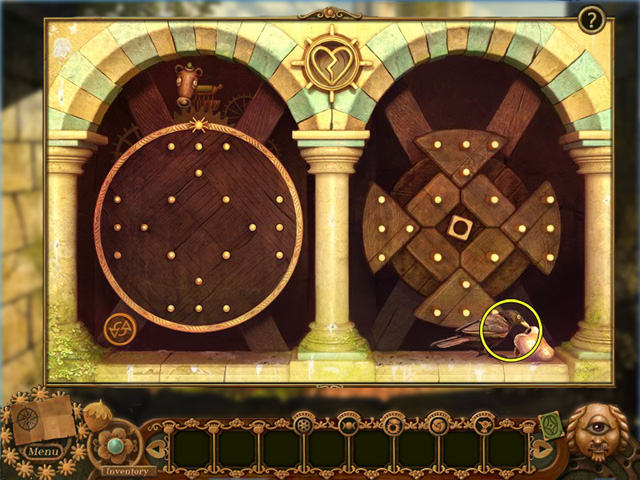
- Once the final constellation web-lock has been solved, an ancient mechanism is activated and the wooden townscape comes to life, ringing the obsidian bells. Finally, a huddle of numbered beetles raises from the floor.
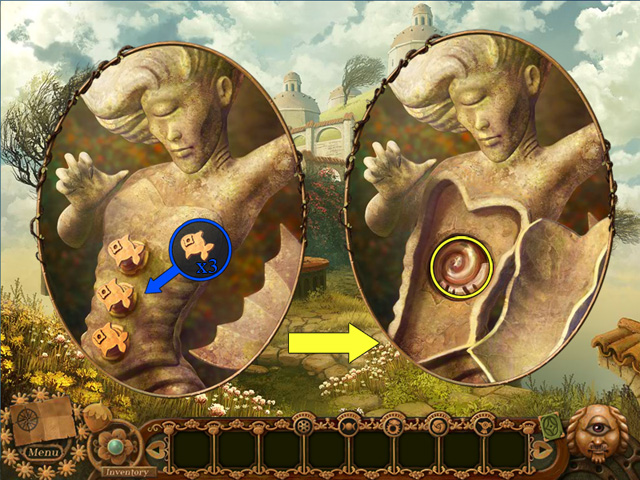
- Examine the numbered beetles. Take the beetle lens, and then close the window. Edwina's sketch of the beetle code is added to your keepsakes inventory.
- You are ready to discover the secret of the shrine.
Chapter Six: The Secret of the Shrine
- Return to the plaza and examine the shrine.
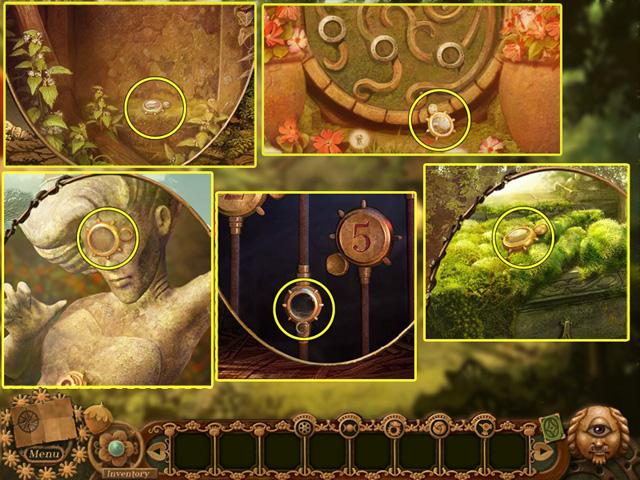
- Ensure that all five beetle lenses are placed onto the shrine.
- If you are missing any beetle lenses, you will need to retrace your steps:
- Beetle lens 1: Collect this from the base of the shrine in the plaza.
- Beetle lens 2: This is hidden amongst the ruins of a windmill, on the right of the windmill scene.
- Beetle lens 3: Return to the Isle Lacrimosa and examine the mermaid fountain. Take the lens from her eye.
- Beetle lens 4: Rudo kept a beetle lens on top of the chest of drawers in his tower.
- Beetle lens 5: Once the constellation web-locks are solved, numbered beetles rise from the ground. The fifth beetle lens is raised with them.
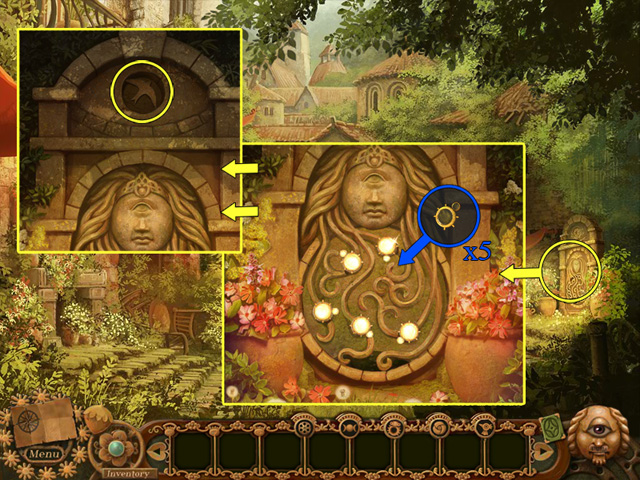
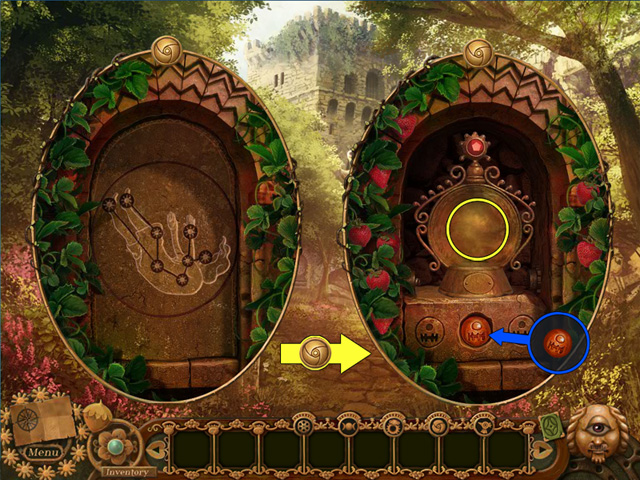
- Once all five beetles are in position, the back of the shrine opens. The lamp light is cast through the lenses and onto the wall of eyes down below. But before you hurry back to the market square, be sure to collect the swallow birdstone which is released at the top of the shrine.
- TIP: If you study the overview mode in your map, you will better understand how the features of the town are connected.
- Return to the market square. The wall of eyes is now illuminated.
- Examine the wall of eyes and ensure that all three birdstones are placed into the wall.
- If you are missing any birdstones, you will find them here:
- Eagle birdstone: Return to the wooden campanile and examine the painting. Attach the sea monster head to the headless statuette, click the handle, and take the birdstone from the recess in the hidden painting.
- Pigeon birdstone: Once you have returned Gazini's butterfly to him, he raises a boulder, revealing the pigeon birdstone.
- Swallow birdstone: Place all five beetle lenses onto the shrine in the plaza. Once the shrine has opened, the swallow birdstone is revealed.
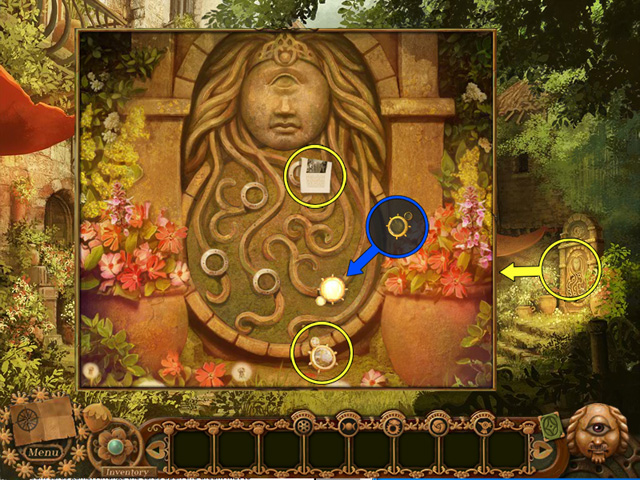
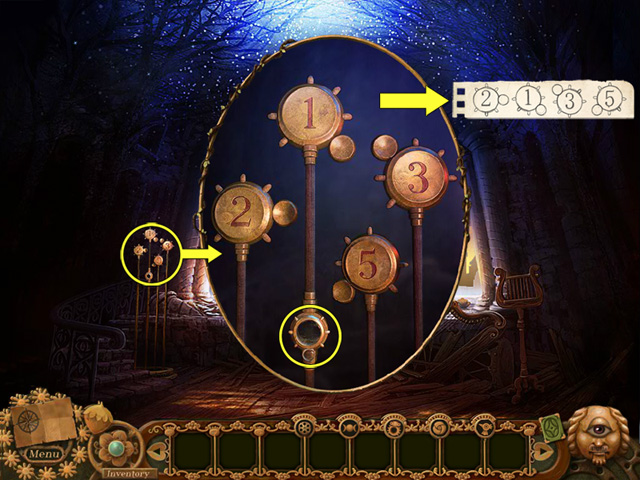
- With each birdstone placed, a panel of eyes raises in the wall. When all the eyes are raised, consult your beetle code.
- To open the wall of eyes, you will need to select a sequence of five eyes.
- The beetle lenses identify the correct five eyes, and the beetle code reveals the sequence.
- If you make a mistake, the selected eyes will reset after your fifth selection.
- The wall of eyes opens, revealing the legendary eye of Brites!
- No sooner have you collected the eye, than Uisdean reappears and his motives become clear.
Chapter Seven: Cargan's Unreasonable Demands
- Nobody would enter the perilous town of the cyclops, knowing that they would never set foot outside the town again. Uisdean selected Edwina to do his bidding: by kidnapping Tom, he was certain Edwina would follow her lover into the town. He was equally certain that she would discover the eye of Brites for him in her bid to escape.
- And now that he has his cherished eye, he vanishes, leaving Edwina with a rose eye. With the rose eye, Edwina will be able to find Tom. Together, they will live out their days in the ruins of the town.
- But what does Uisdean want with the eye? Why has he risked his life to claim it? And how does he plan to escape the town?
- Now you are in trouble, trapped forever in a forsaken town, an assassin roaming the shadowed streets.
- All you can do is search for Tom, and hope you can catch up with Uisdean and recover the eye of Brites.
- Time to try out the rose eye. It is stored in your persistent items inventory.
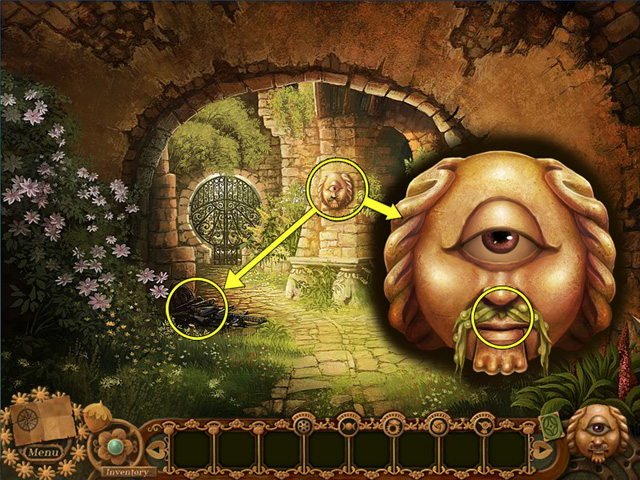
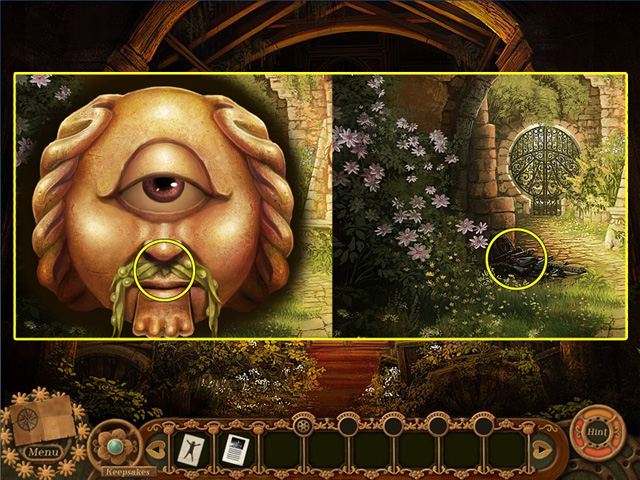
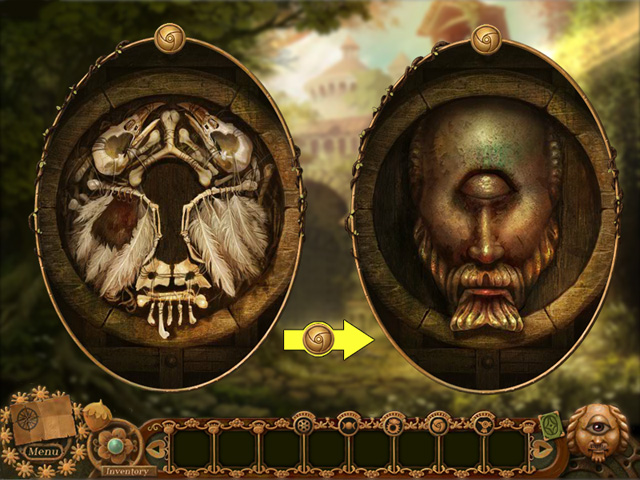
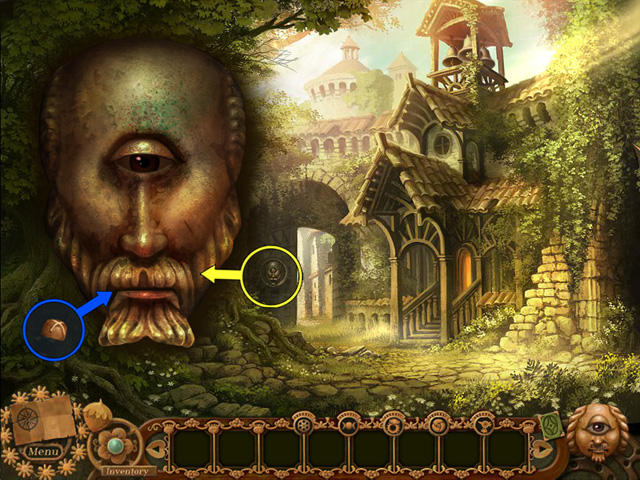
- Examine the bone sculpture on the gate in the market square.
- Remember that carved rose symbol? Wherever you see this symbol, take out your rose eye and reveal the hidden truth.
- Click the rose eye and wipe it over the bone sculpture. Once you have erased the illusion, you will reveal a sleeping Seer head.
- Select your divination tools and wake the Seer.
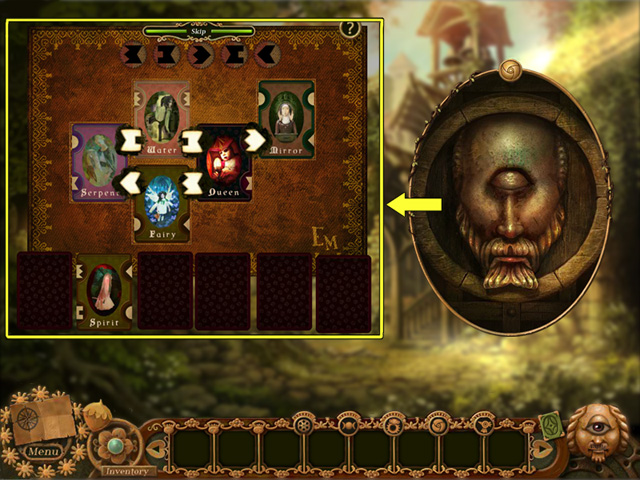
- 'In your dream, a SERPENT cuts through the WATER. Upon its back, the FAIRY QUEEN summons MIRRORS from the heavens'.

- Once awake, Cargan refuses to open the gates until you have fed him a chocolate. He presents you with a truffle recipe and directs you to the chocolatier who lives in the orchard near the windmills.
- If you fancy playing with your rose eye some more, you will find the carved rose symbol in these locations.
- Obsidian gatehouse: Examine the alcove.
- Windmill cliff top: Examine the ruins.
- Picnic garden: Examine the statue.
- The Rum and Berry Truffle.
- Consult your truffle recipe. You will need to find a redcurrant, a keg of rum, lavender, and cinnamon.
- You possibly have all the ingredients except the cinnamon.
- If not, you will need to take a detour.
- Redcurrant: Return to Keelin's picnic garden and search the bushes on the left.
- Rum: Rudo kept a keg of rum in the wardrobe in his tower.
- Lavender: Lavender grows inside the wooden campanile.
- Head up to the windmills and use your rose eye on the ruins to the right.
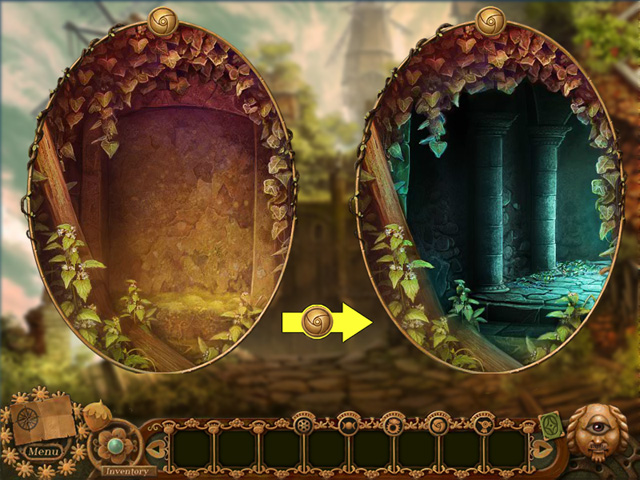
- The rose eye reveals a secret doorway. Head through to the wardian chamber.
- Behind the overgrown ruins of the town, an arcane technology flourishes. It seems that the cyclopean people were more advanced than it first appeared.
- Take the cinnamon from the shelf beneath the cabinet.
- Above the cabinet, you can also collect a ginger root.
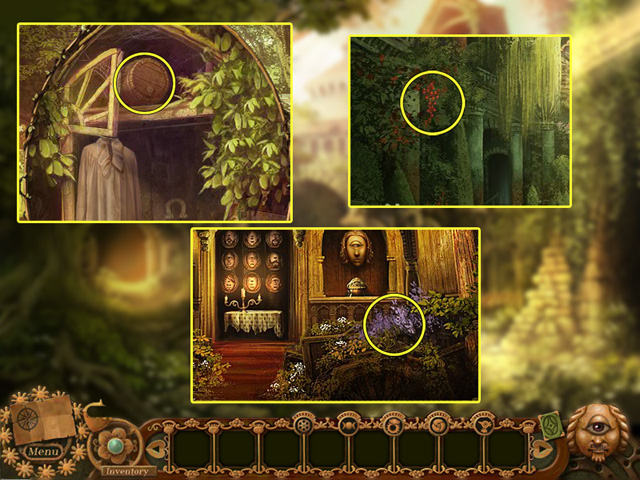
- Before taking your ingredients to the chocolatier, feel free to examine the cabinet and its curious display of wooden moths. And if you examine the painting on the far wall, Edwina will sketch the goddess of life. Be sure to take the bell shield too.
- You might also want to tackle the lock on that case on the right. The wardian lock puzzle works in the same way the frog lock puzzle worked, except that it provides no hint of a goal.
- Consult Keelin's drawing.(If you have yet to collect it, you will need to search the drawers in Rudo's tower.) She has drawn the goal at the bottom: you will need to turn the dials to reveal three spiky flowers and four rounded flowers.
- Once the case is unlocked, take the parchment. The automata code is added to your keepsakes inventory.
- Continue through the wardian chamber and out into the dome garden.
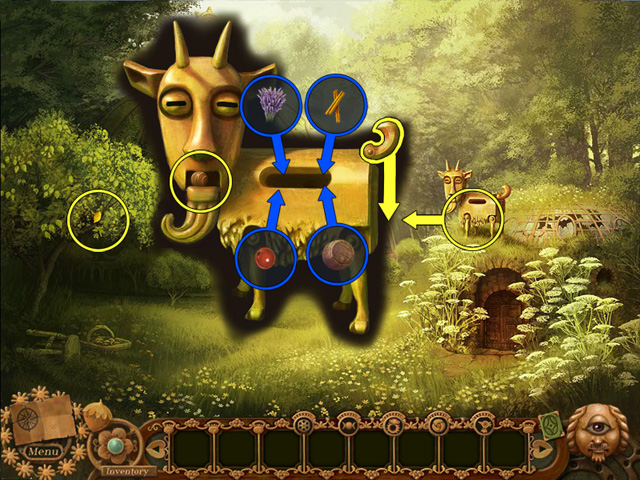
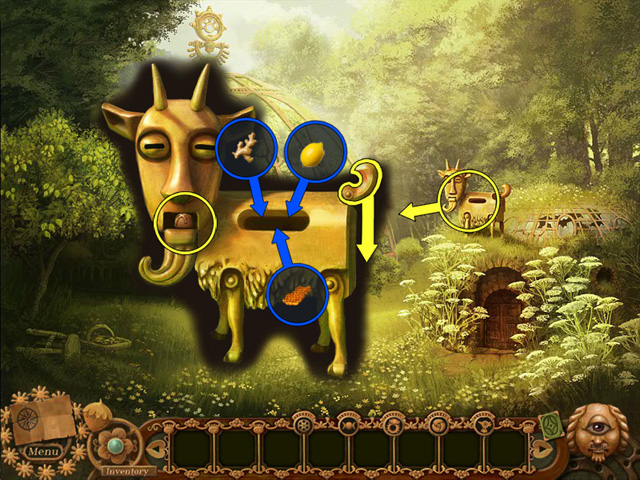
- There is the chocolatier. A mechanical goat.
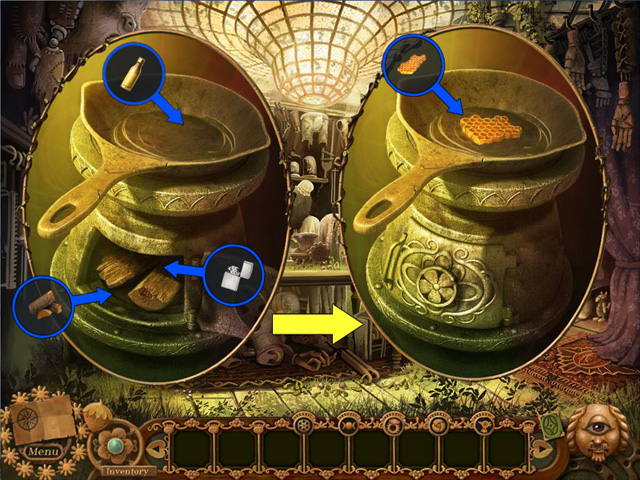
- Examine the goat chocolatier and drop your ingredients into the slot on his body. You can add them in any order. If you add an incorrect ingredient, click his tail and any inserted ingredients will be returned to your inventory.
- Once you have inserted the redcurrant, the rum, the cinnamon and the lavender, click his tail and he will create the chocolate.
- Take the truffle from his mouth.
- Before returning to Cargan with the truffle, you might want to examine the glowing transmitter atop the large dome. There is also a heavy metal door in the small dome, and a hole in the dome just to the right of the door.
- You will also need that ripe lemon.
- Return to the market square and examine Cargan. Drop the chocolate onto his Seer head. Now he will open the gates for you, won't he?
- The Honey and Lemon Cobbler.
- Cargan wants another chocolate: his true favorite chocolate. A honey and lemon cobbler.
- Consult the recipe he provides. You will need a fried honeycomb, a ripe lemon, and a root of ginger.
- Chances are, you will have the ripe lemon and the ginger already. If not, now would be good time to fetch them.
- Ripe lemon: Pluck the lemon from the lemon tree in the dome garden.
- Ginger: Click the jar on the shelf above the moth cabinet in the wardian chamber.
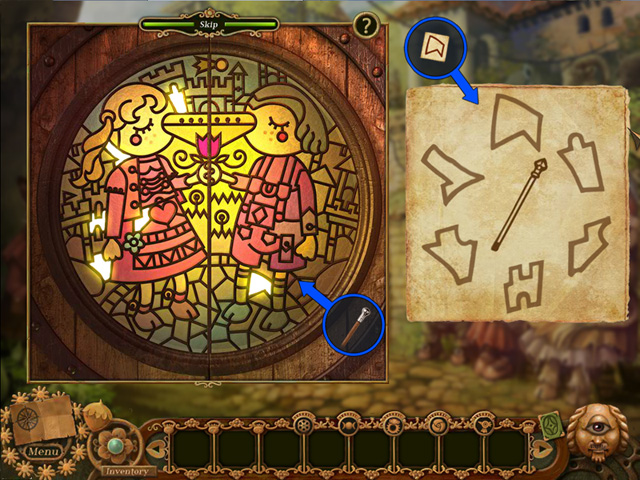
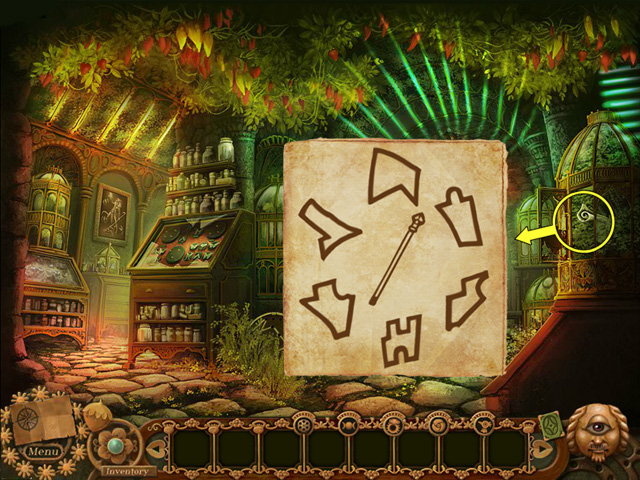
- Return to the automata courtyard and examine the horologist's workshop door.
- To solve this door puzzle, you will need the automata code (from the case in the wardian chamber), and Miss Thorn's staff.
- Open up the automata code. Then select Miss Thorn's staff.
- Search the patterns on the stained glass window for the six shapes depicted on the automata code. When you have found a matching shape, tap it with the staff.
- If the shape is a match, it will glow; if the shape is a mismatch, it will remain unaffected.
- Once you have tapped out all six shapes, the horologist's workshop door will open.
- Head through the doorway to the horologist's workshop.
- Before the Ouphe arrived, the horologist's life was simple and joyous. Of his many mechanical tasks, his greatest pleasure was designing and constructing the town's automata. The cyclopean children would assemble outside his workshop whenever word spread that the horologist had built a new automaton. From cyclopean texts.
- Every midsummer's day, the Parade Master assembles the children on Parade Street. On the cusp of dusk he activates the control panel and the parade begins. With the aid of their parents, each child prepares a wooden flute for the occasion and together the children pipe the mechanagerie over the bridge. We are reminded to respect our kin, our friends, and our gods equally.
- Once the Ouphe arrived in the town, slaughtering the townsfolk, the horologist was tasked with creating mechanical bodies to house the souls of the departed. He was slain before he could complete his task, and the Seers endured without bodies.
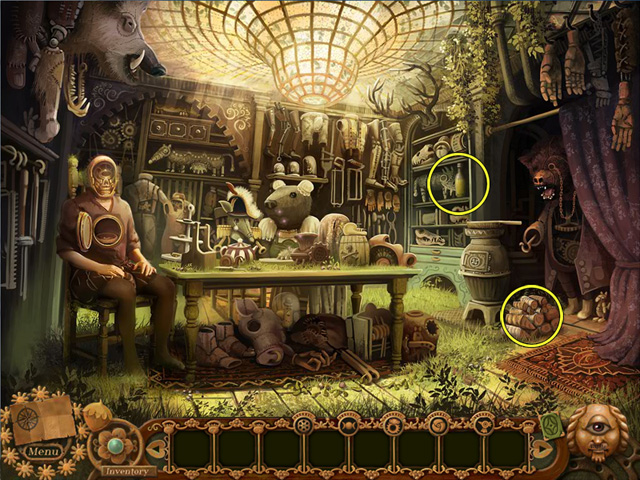
- There is much to do in the horologist's workshop. However, for the time being, click on the sparkles and find the listed items in the Hidden Object scene.
- You receive the ivory key. This will unlock the door to the ivory chapel.
- Leave the workshop and cross the bridge to the Isle Lacrimosa.
- Examine the door and insert the ivory key.
- Uisdean pushes Edwina down the steps. He turns and disappears into the ivory chapel. Once again, you have done his bidding for him.
- Rudo explains that the entrance to a boatyard is hidden on the Isle. Perhaps that is what Uisdean is searching for; perhaps that is his escape plan?
- The steps crumble and fall away, leaving no access to the ivory chapel.
- An automaton has appeared with a message for you – a message from Tom!
- Tom is alive and well! Uisdean has been leading him around the town using a network of secret subterranean tunnels. One of the tunnels leads up into the horologist's workshop.
- Head back to the horologist's workshop and examine the cabinet on the right. This must be the door Tom referred to.
- With no visible means of opening the door, you will have to focus on making Cargan's honey and lemon cobbler. Once his gates are open, you will have access to a new quarter of the town.
- Inside the horologist's workshop, find the listed items in the new Hidden Object scene. You receive a honeycomb. It just needs frying, and then you will have your last ingredient.
- Take the firewood and the olive oil, both of which are by the pot stove. Then examine the pot stove.
- Open the hatch and insert the firewood. Light the firewood with your lighter and the hatch closes.
- Drizzle the olive oil into the pan. Once it is hissing, add the honeycomb. And when the honeycomb has browned, remove it from the pan and add the fried honeycomb to your inventory.
- As you leave the horologist's workshop, Rudo has a brilliant idea. If power is restored to the parade automata, they might be able to provide access to the ivory chapel.
- But the parade automata are powered by the sun tower, and nobody has been into the sun tower in a long, long time.
- Take the ingredients to the goat chocolatier in the dome garden.
- As before, drop the ingredients into the slot in his body, then click his tail.
- Take the honey and lemon cobbler from his mouth.
- Return to the market square, examine Cargan, and feed the cobbler to him.
- Now he wants another chocolate! His true true favorite chocolate!
- Edwina has had enough. She refuses to run any more errands for him and demands that he opens the gates. Stunned, Cargan relents.
- A whole new district of the town has opened to you.
Chapter Eight: Into the Sun Tower
- Head through the gates to Market Street.
- You will notice Hidden Object sparkles high above you. You will need to find a way to reach them.
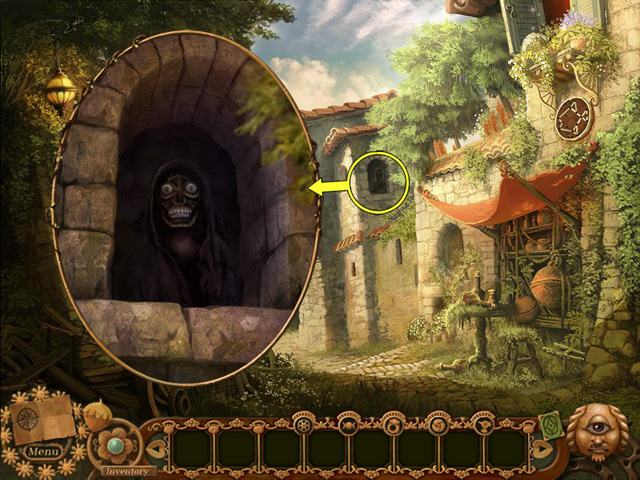
- Something moves in that arched window. The faceless creature seems to be following your progress around the town. Surely it cannot be the Ouphe? What does it want with you?
- Follow the avenue round the corner, down to Parade Street.
- A control panel on the bridge is out of your reach.
- Examine the alcove on the right. You know what to do when you spot the carved rose symbol!
- Click your rose eye and rub it over the illusion to reveal a secret tunnel.
- Head through the tunnel.
- Rudo is overjoyed. You have discovered the entrance to the sun tower!
- Finding a way into the tower might prove to be a trickier prospect.
- Begin by waking that Seer head. Examine the Seer and select your divination tools.
- 'In your dream, two SISTERS each wear a shawl - one of BIRDS, the other of perfumed LEAVES. A treacherous SHELL inhales their SPIRITS'.
- Liberating Afi.
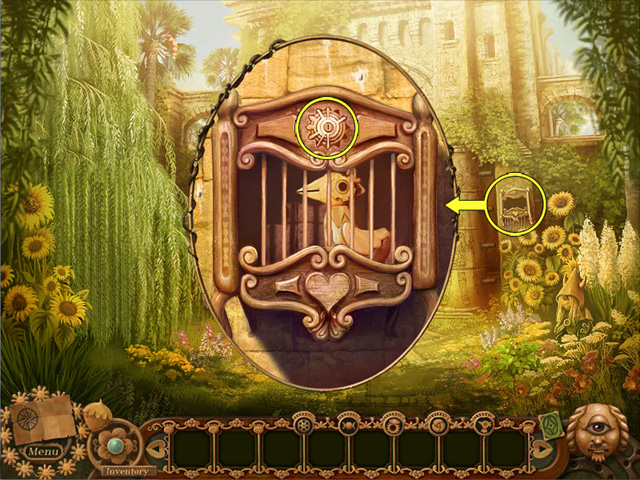
- Once he has woken, Edan presents you with a tiny cage key, and asks you to release Afi from her cage.
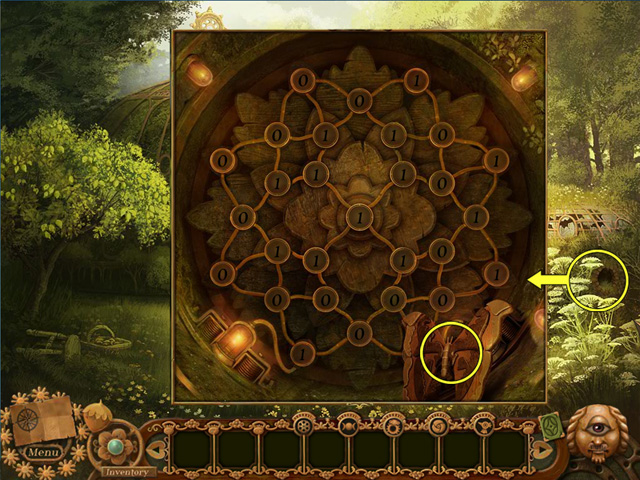
- Examine the cage, and then examine the lock on the cage. Insert the cage key to begin the cage lock puzzle.
- To solve the lock, turn the dials until each of the twelve spokes is positioned uniquely.
- With the cage unlocked, Afi is added to your persistent items inventory. You now have a full suite of persistent items and are ready to tackle anything that comes your way!
- Edan wants you to clean him up. He has been plagued by blackbirds from the moment his Seer head was placed on the sun tower.
- Click on Afi to select her from your persistent items inventory. You have a new Afi cursor.
- With your Afi cursor active, you are able to collect, and interact with, items and devices that were previously out of your reach.
- Move the Afi cursor over the striped stocking high in the tree. Her animated beak indicates that a scene element is interactive or collectible.
- Collect the stocking. Then, with Afi still selected, click on the stocking in your inventory and send Afi with the stocking to Edan's Seer head. Three or four clicks with the stocking should be enough to wipe him clean.
- To deselect Afi, simply click on her grayed out head in the persistent items inventory.
- Gaining Entry to the Sun Tower.
- Once Edan's Seer head has been wiped clean, he retracts the wooden staves and unlocks the two sun pillars.
- Examine the sun pillar on the left. Click on any of the four pillar stones to turn them.
- Open your goddess of life sketch. (If you have yet to claim the goddess of life sketch, return to the wardian chamber and examine the painting).
- Now recreate the goddess of life on the pillar by turning the pillar stones.
- Once solved, a set of iron tongues is retracted. You are halfway to gaining entrance to the tower.
- You will need to solve the right-hand sun pillar too, and for that you will need another sketch.
- Return to Market Street. Select Afi and send her up to the Hidden Object sparkles.
- You are able to see what Afi sees! Such is the strength of your psychic bond with Afi.
- Find the listed items in the Hidden Object scene. A sketch of the sun god is added to your keepsakes inventory.
- Before leaving Market Street, send Afi up for the fish shield.
- Return to the sun tower courtyard. You are just in time to witness the blackbirds eloping with Edan's nose!
- Edan asks you to head to the top of the tower and retrieve his nose.
- Examine the remaining sun pillar. Consult the sun god sketch and match the pillar to the sketch.
- The remaining iron tongues are retracted. You can now enter the sun tower. Just remember to tread silently!
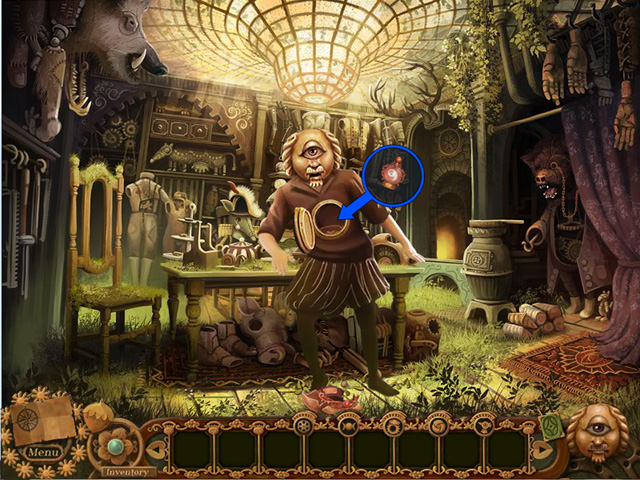
- More arcane devices: a peculiar statuesque generator hooked up to a round window! Take a few moments to poke around the room.
- Click on the sparkles and find the listen items in the Hidden Object scene. A wooden gypsy moth is added to your inventory.
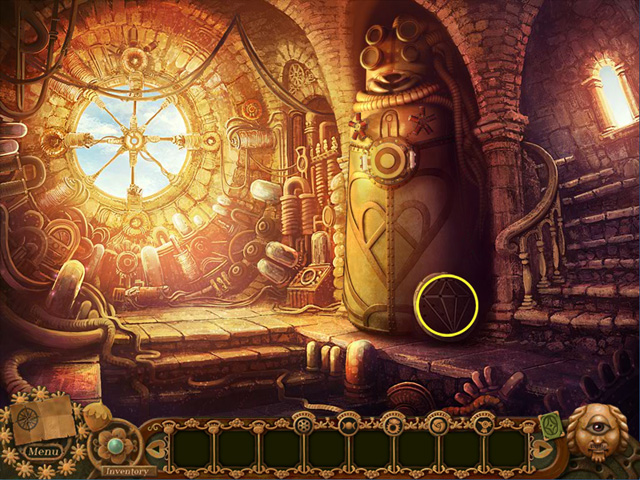
- Take the diamond shield, propped up against the generator.
- Then head up the stairs to the top of the tower.
- The Web-lock Towers.
- From the top of the Sun Tower, you have a view across the town in every direction. And in every direction, you will find a web-lock tower.
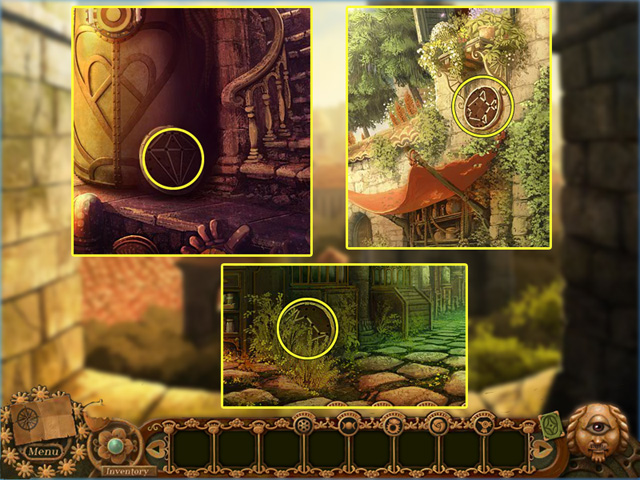
- Send Afi across to one of the towers. Each web-lock tower is divided into two sections. The web-lock is on the left, and an empty wheel is on the right. Afi can attach wooden shields to the empty wheels.
- You might already possess three of the four shields. If not, you will find them here:
- Diamond shield: Inside the sun tower, the diamond shield is propped up against the generator.
- Bell shield: The bell shield is leaning up against the cabinet in the wardian chamber.
- Fish shield: In Market Street, the fish shield is hung beneath the foreground window.
- A power node on each web-lock tower indicates which shield is required to activate each tower.
- The north tower web-lock is activated by the fish shield. Send Afi over to the tower with the fish shield, and attach it to the empty wheel.
- The web-lock disc rotates. Follow the gold marker at the top of the web-lock as it rotates. This will help you to orientate the pattern you are about to make.
- Select Gotto. He takes position on the web-lock, and you can guide him around the web-lock by clicking on the pegs.
- Your objective is to maneuver Gotto to recreate the design on the shield.
- Once you are happy with your design, click the tick mark button on the bottom of the tower and the web-lock will rotate back into position, with the gold marker at the top.
- If the design is a perfect match, the node is illuminated and you can progress to the next tower.
- If the design is a mismatch, Gotto returns to his starting position and the design is erased from the web-lock.
- If you make a mistake and wish to reset the design at any time, click the cross button.
- Before leaving the tower, be sure to send Afi across to the east tower. There is the blackbird with Edan's nose! You will need to scare the bird away. Click the bird several times. Eventually, it flies away - taking the nose with it!
- Now the first three web-lock towers are active. You will need to leave the tower and search for the final shield, and for Edan's nose. But where should you look?
Chapter Nine: Afi Saves the Nose
- Back in the sun tower courtyard, Edan spots the blackbird heading off to the monastery.
- He parts the willow branches, revealing a secret entrance to the subterranean tunnels. These tunnels will allow you to fast-travel between certain areas of the town.
- To use the fast-travel, click on the secret entrance.
- Your map opens in overview mode. Any unlocked fast-travel destinations are now available to you in this mode.
- Click on Rudo's tower and you will travel instantly to that scene.
- In Rudo's tower, take at look out the window.
- The monastery gleams in the evening sun. Now you can send Afi to explore its nooks and crannies.
- When Afi is exploring a distant scene, you will see what Afi sees and an Afi zoom window will open.
- Watch for the powder blue Afi glints: there are four points of interest in the monastery.
- Arch window: The blackbirds roost in this window. Until you have scared them away, they will prevent Afi from taking the heart shield and Edan's nose.
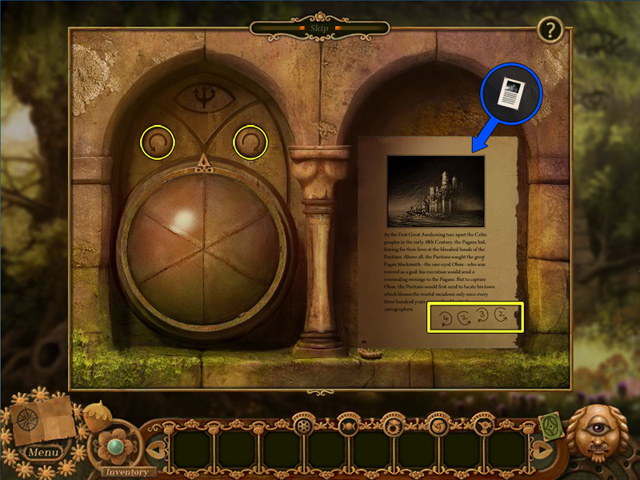
- Shuttered window: Take the handbell.
- Barred window: The birds have woven pieces of paper into a nest. Collect the papers to begin a jigsaw puzzle. Restore the page, and you will learn about the first Seer. You will also discover your next clue to locating the entrance to the secret boatyard: the entrance will be revealed when all the bells of the town are rung in a single day.
- Firecracker cradle: You will be returning here very soon.
- Select the sparkles in Rudo's tower and find the listed items in the Hidden Object scene. You receive a firecracker.
- You now have everything you need to scare away the blackbirds.
- Send Afi back to the monastery - to the firecracker cradle near the bottom of the monastery.
- Drop the firecracker into the cradle and light the fuse with your lighter.
- The firecracker rockets into the sky and explodes, scattering a hundred blackbirds.
- Afi can now return to the arched window and collect the heart shield and Edan's nose.
- Access the secret tunnels through the fireplace in Rudo's tower and return to the sun tower courtyard.
- Select Edan's nose with Afi and return the nose to Edan.
- Edan grants you access to another tunnel. You are now free to hop around the town using the three secret entrances.
- Sun tower courtyard: The secret entrance is through the willow branches.
- Rudo's tower: The secret entrance is through Rudo's fireplace.
- Horologist's workshop: The secret entrance is behind the cabinet.
- TIP: Once you are familiar with the secret tunnels, you will be able to negate a lot of back-tracking!
- Now that you have the final web-shield, return to the top of the tower and send Afi across to the east web-lock tower.
- Place the heart shield and solve the web-lock.
- A web of light is spun between the four web-lock towers. The generator is now active. But you will need to repair the sun plate panel first.
Chapter Ten: Restoring the Sun Power
- When you return to the sun room inside the tower, the hatch to the sun plate falls away.
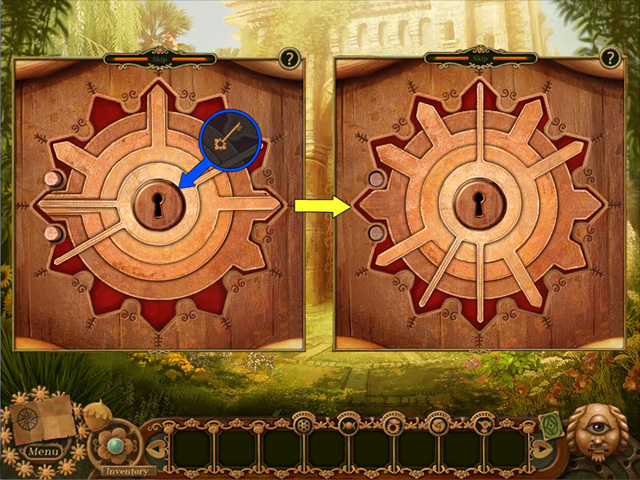
- Examine the sun plate.
- To repair the generator, you will need to realign the wires to create an unbroken connection from the left power node to the right.
- When you click on the handle, the columns of wires will move.
- The numbered plugs indicate how many steps each column of wires will move, and in which direction. There is no penalty for an incorrect attempt, so experiment as much as you desire.
- The First Three Parade Items.
- With the circuit restored, the generator comes to life, screeching as the power of the sun erupts inside its body.
- Gotto leaps across to the generator. You have just revived Gotto's mommy from a very long hibernation.
- Before leaving the tower, be sure to find the listed items in the Hidden Object scene to receive a flute. And take a look at the mommy's belly. Edwina will sketch the scallop code.
- Now that you have powered up the parade automata, your next task is to prepare them for the grand parade!
- Return to the automata courtyard. You can travel there almost instantly by using the secret tunnels to access the horologist's workshop.
- Each of the four parade automata requires a special item.
- You might already have the first three. (Or, if you are a super-curious adventurer, you might have all four!).
- You will find the first three parade items here.
- Pinwheel: In Keelin's picnic garden, examine the statue. Erase the illusion using your rose eye and take the pinwheel.
- Tambourine: In the automata courtyard, a mechanical bird grips the tambourine in its beak. You will need to send Afi up to retrieve it.
- Handbell: In Rudo's tower, send Afi to explore the monastery.
- In the Afi zoom with the shuttered window, take the handbell from the ledge.
- If you click on the parade automata, they will state their preferred item.
- Ensure that you place the parade items into the correct hands!
- With the first three items placed, it is time to retrieve the final item. And to do that, you will have to venture into the sinister seashell campanile.
Chapter Eleven: The Seashell Campanile
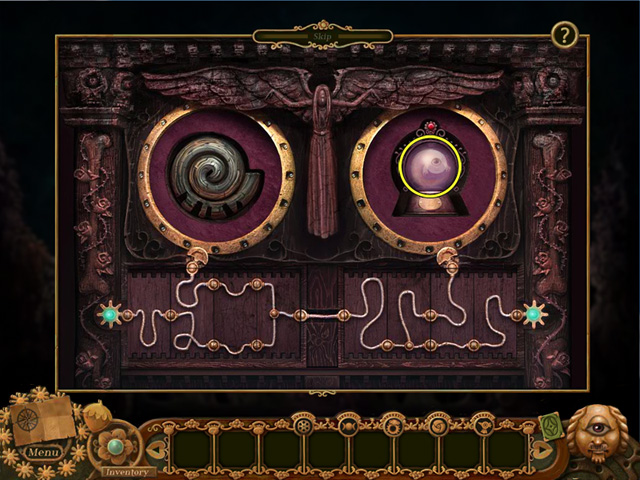
- To access the seashell campanile, you will first need to solve the two see-locks on the seashell bridge.
- The scallop code is etched into the belly of Gotto's mommy, inside the sun tower.
- The ammonite code is carved into a plaque which hangs above the secret entrance in the horologist's workshop.
- On the seashell bridge, solve the two see-locks. The ammonite lock is inside the seashell to the left of the gate; the scallop lock is inside the right-hand seashell.

- With the see-locks solved, the seashell Seer swings into position above the gates.
- You will need to consult your divination tools to wake him.
- 'In your dream, a SKELETON hangs tiny MIRRORS from a BABY to protect it from the elements. Its ribs, each one a CANNON, pour WINE into the wind'.
- Morven wakes, and is alarmed by the drowning figure.
- Send Afi to the face in the water to retrieve... a mask.
- Relieved, Morven opens the gates and you can proceed into the seashell campanile.
- The soul trumpet is powered by dark energy. Rudo's memories are hazy, but he senses this is an evil place.
- Regardless, there is little to be accomplished in here for the time being.
- Send Afi through the open doorway to explore the schoolhouse.
- Afi can explore four places of interest around the schoolhouse:
- Open window: Take the rescue page from the book. Oban was saved by his son, only to see his son murdered.
- Bird bath: Collect the fish button from the bird bath.
- Shuttered window: Collect the cowbell. This is the last of the four parade items.
- Arch window: If you are harvesting the strawberries, you will find several more here to complement your collection.
- Return to the automata courtyard.
- To equip the automata, you will need to place the four parade items into the hands of the four automata.
- The left automaton requires the pinwheel.
- The three automata on the right require, from left to right, the cowbell, the tambourine, and the handbell.
- Before leaving the courtyard, be sure to examine the plaque on the wall. This will provide you with a keepsake of the bridge control panel code.
Chapter Twelve: Piping the Mechanagerie
- Return to Parade Street.
- Send Afi up to the bridge control panel and consult the bridge control panel code. (If you missed this code, you will need to visit the automata courtyard).
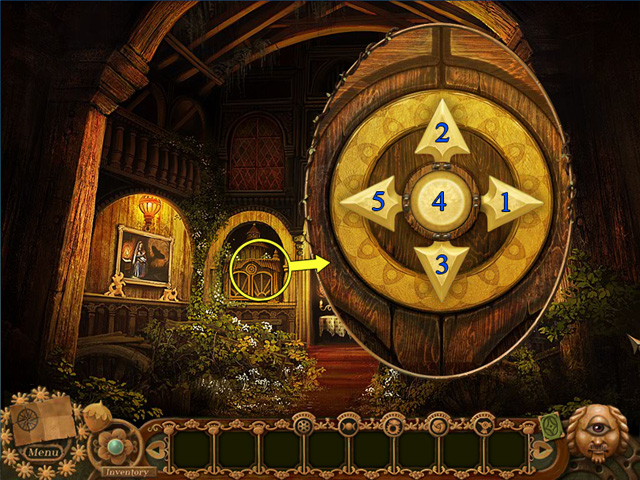
- Slide the beads into position to match the code, and the hatch will swing open.
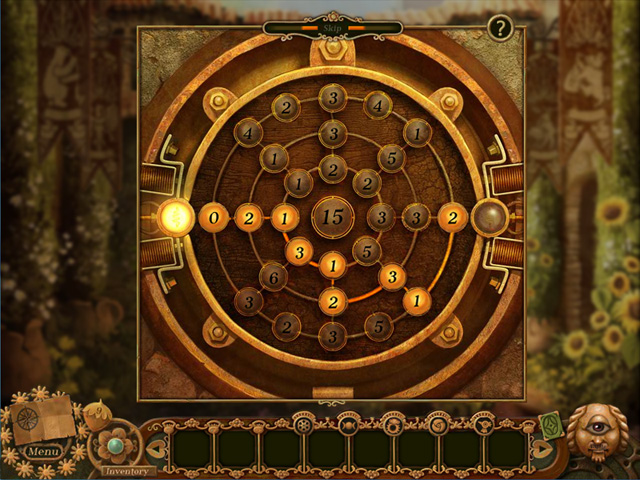
- The next task is to connect the left and right power nodes with precisely fifteen amps of power.
- Starting at the left node, press the buttons and trace a path to the right node. The central counter keeps tally of your current amp value.
- With the control panel active, you are now ready to guide the automata across the bridge!
- Your flute is automatically selected and becomes your parade interface. (If you missed the flute, hurry back into the sun tower and collect if from the Hidden Object scene).
- Rudo will guide you through the separate stages of the parade mini-game.
- Watch the symbols as they travel down the flute. When a symbol enters the central ring, click on the corresponding button. Correctly clicking on an arrow symbol will cause the automaton to leap; correctly clicking on the note symbol will prompt the automaton to play its instrument.
- Once you have piped the first four parade automata across the bridge, your flute is removed and you can relax as the remainder of the automated parade waltzes across the bridge.
- No sooner has the parade ended than trouble strikes again: Tom's pained voice cries out for help.
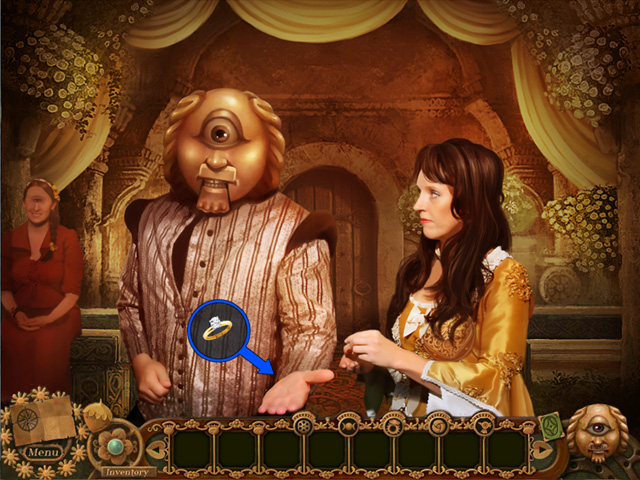
- Head to Market Street. Tom's voice was coming from the window above you.
- Send Afi to the window to begin the Hidden Object scene.
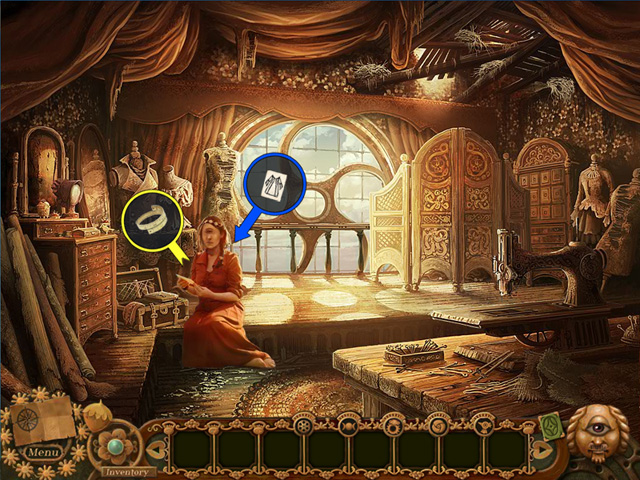
- There's Tom's jacket. He must be close. And in the jacket pocket, you discover an engagement ring!
- Edwina is distraught. Life without Tom would be unimaginable.
- Rudo rouses Edwina from her anguish. Onwards to the ivory chapel!
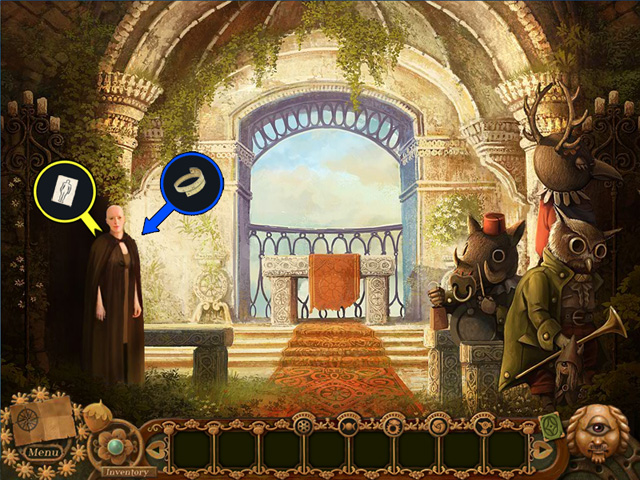
- Back on the Isle Lacrimosa, the stairosaurus provides access to the ivory chapel.
- Before heading inside, feel free to place the second fish button onto the mermaid's chest.
- Once inside the ivory chapel, examine the pillar on the left. Use your rose eye to erase the illusion. You are now face-to-(no) face with the faceless creature.
- What will happen if you give it a nudge?
- The faceless creature lurches at Edwina, taking the mask from her. With the mask placed onto its head, it reveals itself as Miss Thorn.
- Miss Thorn died centuries ago. Uisdean employed cyclopean technology to capture her soul and house it in an automaton body. With the occasional spot of maintenance, Miss Thorn will remain upon the earth for countless lifetimes.
- After her fall from the cliff, she lost her face mask. And judging by her behavior, she might have lost her sanity too.
- She has snatched the eye of Brites from Uisdean. To keep it safe, she locked it inside her mechanical heart, and hid away inside the illusory pillar.
- To unlock her heart and release the eye, she will need her heart's desire - she will need to marry!
- Edwina has no choice. She will have to find Miss Thorn a groom and organize a wedding, and already the sun is poised above the horizon like a Damoclean sword.
Chapter Thirteen: Madeleine's Prophecy
- The sun is soon to set. Edwina has still to find Tom. And then, to escape, she will need to find the secret boatyard; and to leave the boatyard, she will need the eye of Brites; and to retrieve the eye of Brites she will need to find a groom for Miss Thorn.
- Miss Thorn hands you her wedding dress design.
- Rudo suggests you head to the seamstress's workshop to enlist Keelin's aid.
- As you set off to find Keelin, Rudo makes a decision. To escape the town, Edwina will need to find a groom for Miss Thorn. Rudo volunteers for the role - there is no other way. He makes Edwina promise to take Keelin with her.
- Travel to the cliff top gatehouse. Once there, you will notice that the door to the seamstress's workshop is open. Head inside.
- Keelin is packing her possessions. She has found a photo of herself with her brother, taken the day before his murder. You receive Keelin's photo.
- And if you have wondered what Rudo looked like before his demise, Keelin keeps a photo of him on her occasional table.
- Hand the wedding dress design to Keelin. She asks for the bride's measurements and hands you a measuring tape.
- Return to Miss Thorn in the ivory chapel and drop the measuring tape onto her to receive Miss Thorn's measurements.
- It seems that Uisdean has devised a new way to sabotage your quest. He has found a way into the soul chamber and has mixed up the souls.
- As you return to the cliff top gatehouse, the Seer heads shut down across the town and their gates rattle shut to become locked. You are trapped and your guide is unconscious.
- For this chapter of the game, you will need to speak with Keelin if you require a hint.
- In the seamstress's workshop, hand the measurements to Keelin.
- She now requires three bows for the dress.
- On spotting Rudo's sleeping Seer head, she directs you to the soul chamber beneath the dome garden.
- Before setting off, study the Hidden Object scene and find the listed items. You receive a wooden luna moth.
- Head to the dome garden. The transmitter is inactive!
- Send Afi into the hole in the small dome, to the right of the metal door.
- This is the flower lock. You will need a code for it before you can solve it.
- Take the wooden atlas moth and return to the wardian chamber.
- The Moth Cabinet.
- Examine the moth cabinet in the wardian chamber.
- You will certainly have found the gypsy moth in the sun tower, and may even have placed it into the cabinet already.
- You should also have located the other two missing moths. If not, you will need to fetch them.
- Atlas moth: In the dome garden, send Afi into the hole in the small dome and take the atlas moth.
- Luna moth: In the seamstress's workshop, examine the corner of the room to play a Hidden Object scene. Your reward is the luna moth.
- Place all three moths into the cabinet, using the arrangement of the pins to guide you as you place them.
- The panels rotate revealing three bows.
- Collect the bows and return to the seamstress's workshop. Hand the bows to Keelin.
- Keelin has almost completed the dress. In the meantime, you will need the code to the flower lock in the dome garden.
- Keelin hands you the windmill key and suggests you talk with Madeleine.

- The Windmill.
- Return to the windmill cliffs and examine the windmill door. Unlock the door with the windmill key.
- When you are ready, take a deep breath and head inside.
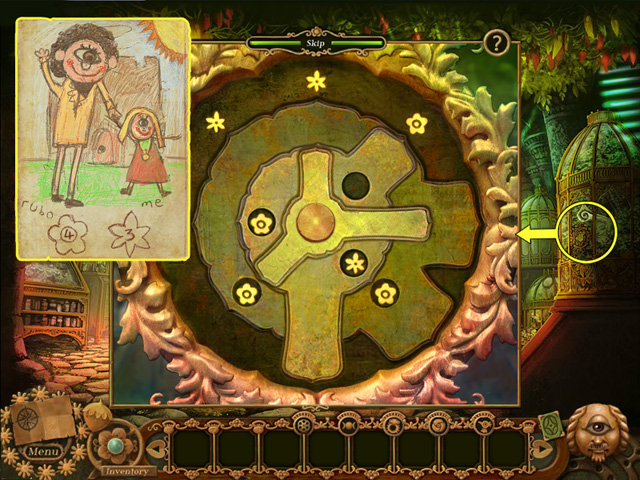
- Madeleine is not of cyclopean design. She arrived many years ago and took up residence inside the windmill. Once their initial apprehension had subsided, the cyclopean townsfolk discovered that Madeleine was a prophet - in return for a shiny trinket, she would offer a glimpse of something invisible to mortal eyes. Often this would be a vision of the future. With Madeleine's guidance, the cyclopean townsfolk had access to all manner of technology and arcana.
- Examine Madeleine's legs. One of her stockings is missing.
- Drag the stripy stocking onto her leg. She turns her head and her third eye opens to project the flower lock code onto the wall of the windmill. Examine the projection and Edwina will make a sketch and add it to your keepsakes inventory.
- Examine Madeleine's vanity unit and take the skull bead.
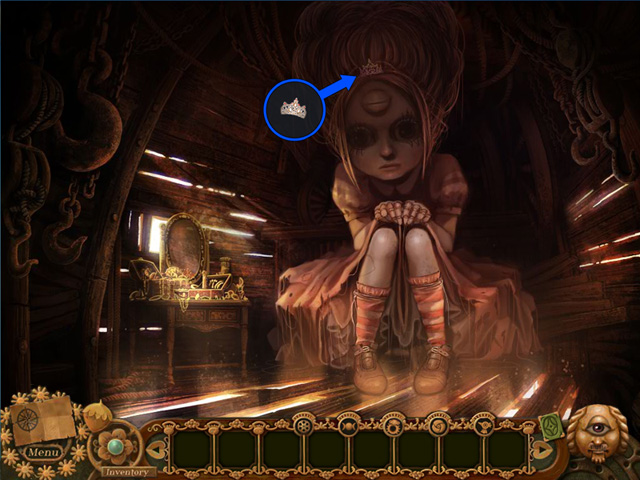
- Now you will need to thank Madeleine for her assistance. Select the tiara in your inventory and drag it onto Madeleine's head.
- As you step from the windmill, Madeleine offers you a free prophecy: Tom will die.
Chapter Fourteen: A Body for Rudo
- Return to the dome garden and send Afi into the hole in the small dome.
- Consult the flower lock code which Madeleine presented you with.
- To solve the flower lock puzzle, you will need to connect the two power nodes by lighting a path through the network of bulbs. The sequence you create must match the sequence on the flower lock code.
- The Soul Chamber.
- When you have cracked the flower lock puzzle, the door to the soul chamber opens.
- Head down into the soul chamber. Here, the Seers' souls are safely stored in soul jars and are nourished by the life-force of the soul tree.
- Examine the soul jars on the tree.
- The soul jars have been switched. To return the jars to their correct shelves, you will need to determine the relationship between the numbers on the soul jars, and the shapes on the shelves.
- To place the soul jar numbered three, look for a symbol with three sides.
- Apply this principle to each of the jars.
- Once the soul jars are correctly positioned, take Rudo's soul down from the top shelf.
- Now that the Seers are awake and their gates are open once more, you can return to the horologist's workshop.
- Examine the handsome body and drop Rudo's soul into the chest cavity. Then drop his Seer face onto the head.
- Overjoyed, Rudo dances across the workshop. His chest plate swings open and his soul jar smashes on the floor releasing his soul.
- As his soul is swept out of the workshop, Rudo pleads with you to activate the soul capture device in the seashell campanile.
- Activating the Soul Trumpet.
- To capture Rudo's soul, you will require an empty soul jar and the soul shell.
- The soul shell is hidden inside the mermaid's chest.
- Take the third fish button from Rudo's seat in the horologist's workshop and head to the Isle Lacrimosa.
- Examine the mermaid fountain and attach the fish button to her chest.
- If you have missed the other two fish buttons, you will need to retrieve them now:
- First fish button: Look in the drawer in Rudo's tower and take the fish button.
- Second fish button: Head to the seashell campanile and send Afi to explore the schoolhouse. The fish button is in the bird bath.
- When all three fish buttons have been placed, the mermaid's chest opens and you may take the soul shell.
- The empty soul jar is hidden in the alcove in the obsidian gatehouse.
- Examine the alcove and select the rose eye. Wipe away the illusory alcove (with the Ula constellation) to reveal the soul jar.
- To unlock the soul jar, drop the skull bead (from the vanity unit in Madeleine's windmill) into the recess and the screws retract.
- Take the soul jar and travel to the seashell campanile.

- Rudo's soul floats around the chamber. If you click on him, he will proffer instructions for activating the soul trumpet.
- Examine the soul cabinet beneath the soul trumpet.
- Drop the soul shell into the cavity on the left; then drop the soul jar into the cavity on the right.
- When they are both in position, the wooden panels slide open to reveal a circuit board.
- To solve the soul cabinet puzzle, you will need to restore the circuit and connect all four outer nodes. To swap the circuit boards around, select any pair and they will switch places.
- Once activated, the soul trumpet inhales, sucking Rudo's soul into the soul jar. The seashell bells begin to toll.
- Take Rudo's soul from the cabinet and return to the horologist's workshop.
- Drop his soul into the chest cavity in his body.
- Rudo scurries away to the ivory chapel to prepare for the wedding.
- Return to the seamstress's workshop. Keelin has completed the wedding dress and left it on the mannequin for you.
- Take the wedding dress and revisit the ivory chapel. The ceremony is about to begin.
Chapter Fifteen: The Ceremony
- Rudo, Miss Thorn, and Keelin are waiting for you at the ivory chapel.
- Drop the wedding dress onto Miss Thorn.
- Edwina conducts the ceremony as quickly and as courteously as she is able.
- But when she asks Rudo to exchange rings with Miss Thorn, Rudo grimaces and holds out his hand. He has no ring.
- Drop the ring into his hand.
- Rudo and Miss Thorn release each other's soul and drift through the window and into the sunset.
- With her heart's desire sated, Miss Thorn's mechanical heart opens.
- Examine Miss Thorn's heart and take the eye of Brites.
- As Edwina admires the eye, a figure looms behind her. Tom has found her! He seems shaken, but unharmed.
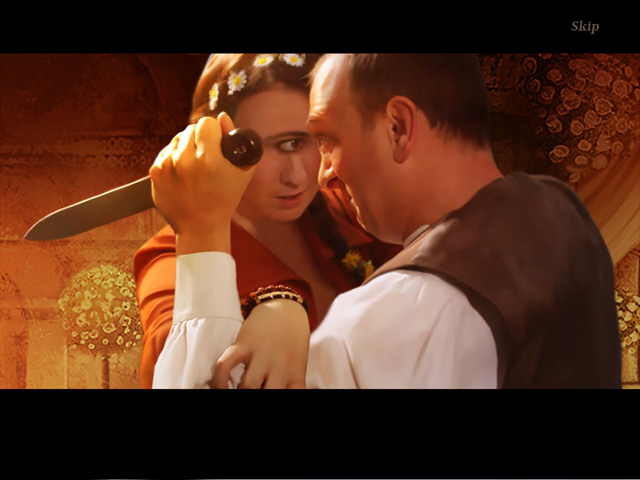
- Behind Tom, Uisdean enters the chapel brandishing a knife, intent on reclaiming the eye.
- Keelin is stunned. Her brother... Uisdean... He is alive!
- At the sight of Keelin, Uisdean is enraged. He survived his injuries. Abandoned by his father and his sister, he has waited three hundred years to claim the eye and, with it, exact his revenge.
- He lunges at Edwina, grasping at the eye. Keelin intervenes, wrestling with her brother.
- Uisdean staggers back, clutching his belly. The knife has cut deep into his flesh.
- He falls to the floor and Keelin sits at his side, holding him close.
- Keelin vows to remain with her brother. She hands you a doll and asks you to find her father on the outside and to give her gift to him.
- Outside, on the Isle Lacrimosa, the chapel bells are ringing. Finally, the entrance to the secret boatyard is revealed as the mermaid fountain sinks into the earth and a spiral staircase unfolds in its wake.
- Tom leads the way, hurrying down the staircase.
- Follow Tom into the cliff passage.
- If you are harvesting the strawberries, this is your last opportunity to complete your collection. Once you set foot into the boatyard, you will be unable to return to the town.
Chapter Sixteen: Showdown at Sunset
- The boatyard reeks of stagnation and decay.
- Tom sets about hoisting the sail on a derelict dinghy, leaving you to figure out a way to open the boatyard gates.
- Above the gates, something stirs. Clumps of seaweed drop into the water, and a vast eye opens. Ula, the first Seer, has woken.
- Ula casts a psychic attack on Tom, rendering him unconscious and floating above the boatyard.
- She then turns her attention to you.
- Ula wants to play a guessing game. You have no option but to participate and hope your answer appeases her.
- You can use your divination tools to help you name her three dogs.
- 'Your dogs were named FAIRYLEAF and FLOWERCAKE and BIRDGALLOWS.

- Far from being appeased, Ula is furious at losing her game to you.
- She garners every drop of unholy power and launches a psychic attack on you.
- You will need to defeat Ula in Psychic Combat.
- After the battle, Ula is incapacitated and Tom drops into the dinghy.
- The sun has almost set. How will you open the boatyard doors?
- Examine the mast on the dinghy. A cradle has been fitted to the top of the mast.
- Send Afi up to the cradle with the eye of Brites and place the eye into the cradle.
- The eye of Brites glows, striking the boatyard beacons with crackling energy.
- With the beacons lit, the boatyard gates part.
- Edwina and Tom sail out to sea. Behind them, the town bleaches into mist, carrying Uisdean and Keelin back to some unknowable universe. Edwina resolves to find Keelin's father - the blacksmith Oban - and to present him with Keelin's gift.
- Night falls, birthing stars upon the heavens. And the Ouphe clings to the dinghy, its search for a soul extending beyond the town of the cyclops.
- Congratulations, you have completed Margrave: The Backsmith's Daughter!
Created at: 2012-10-23