

Walkthrough Menu
- General Tips
- Chapter 1: Grand Hall
- Chapter 2: Mirror Pond
- Chapter 3: Twisted Yard
- Chapter 4: School Atrium
General Tips
- This is the official guide for Maze: Nightmare Realm.
- This guide won't tell you when to zoom into a location; the screenshots show each zoom scene.
- Hidden-object puzzles are referred to as HOPs. Only the locations of the HOPs will be shown.
- Use the Map to fast travel to a location.
Chapter 1: Grand Hall
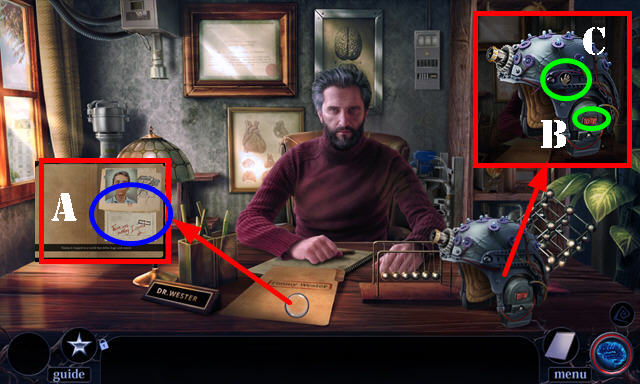
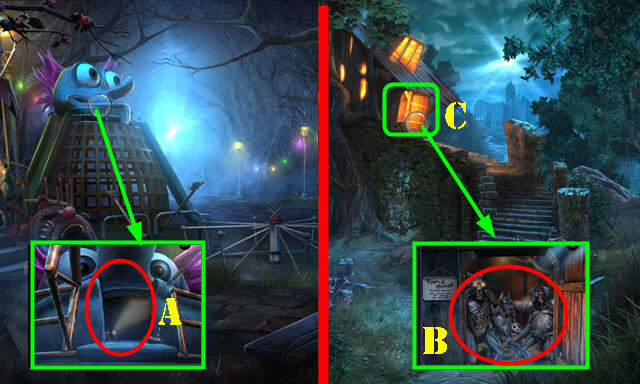
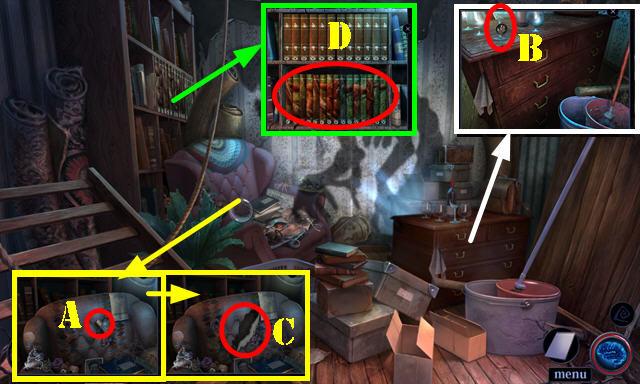
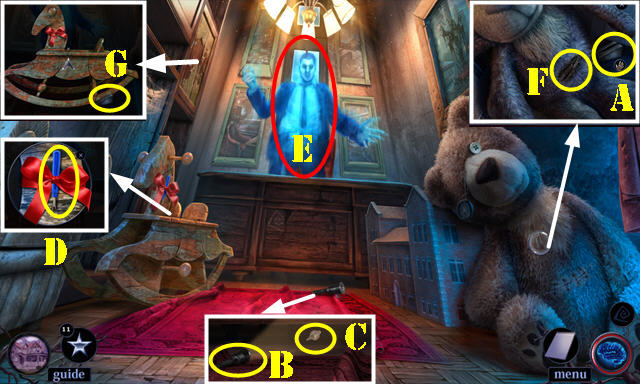
- Look at and open folder (A).
- Select B-C-B.
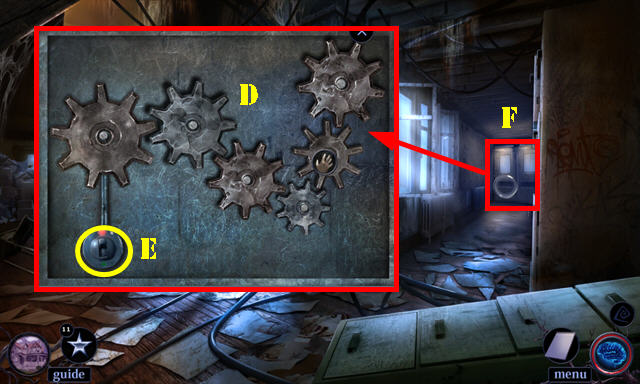
- Select mirror (D).
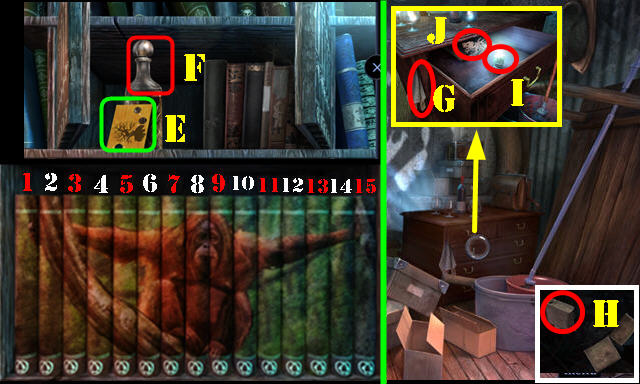
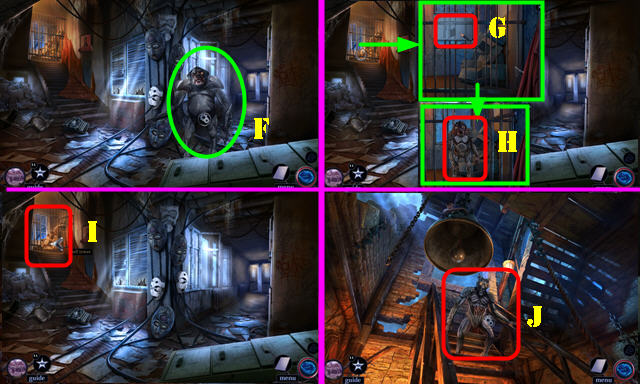
- Move chair (E); open door (F).
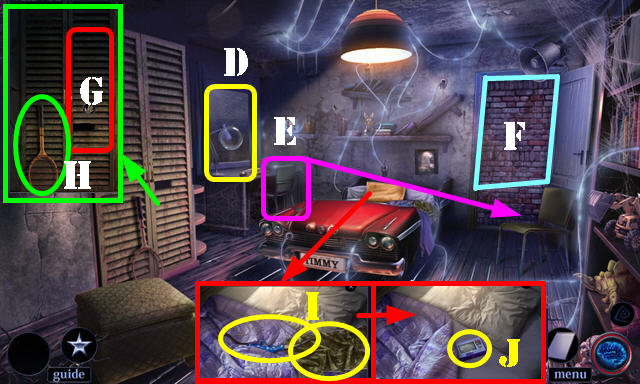
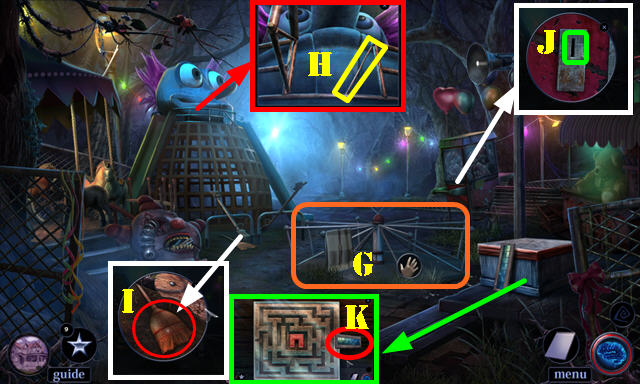
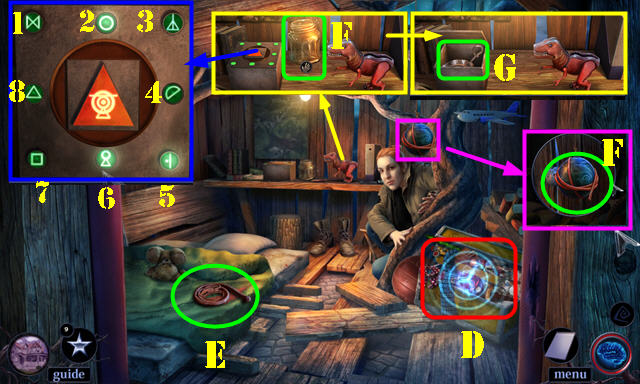
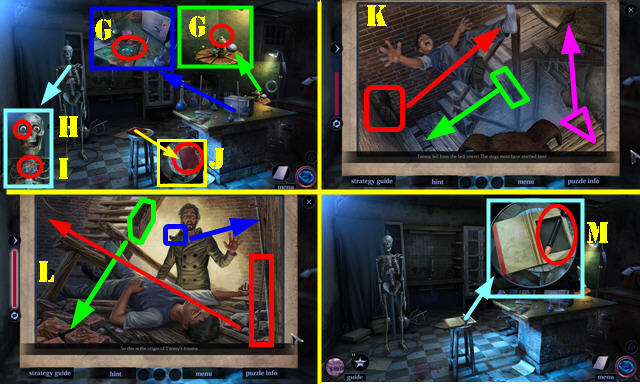
- Open closet door (G). Select tennis racket (H).
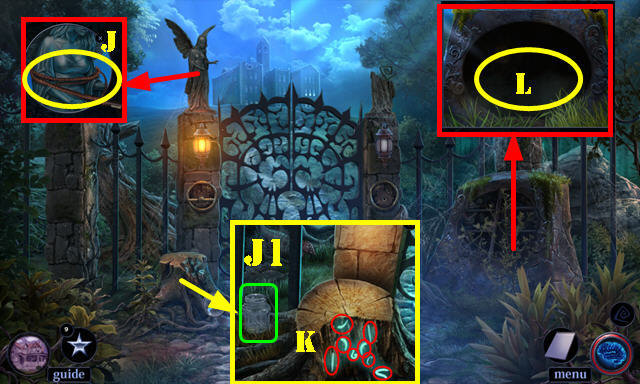
- Take BROKEN BOW and TOWEL (I). Move comforter; take HANDHELD VIDEO GAME (J).
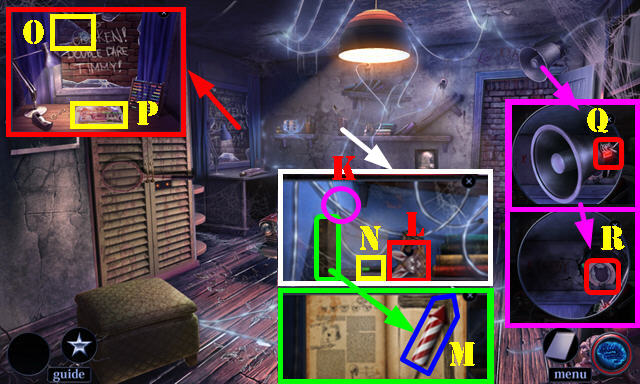
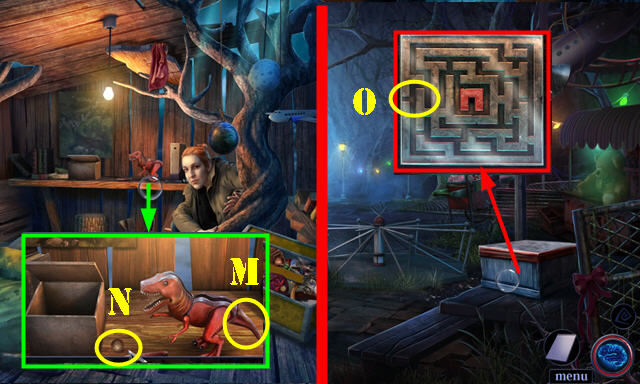
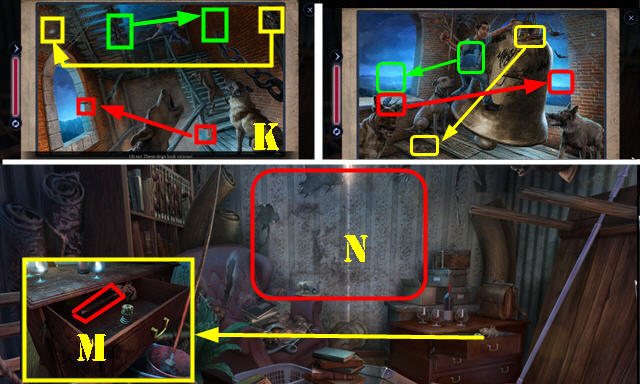
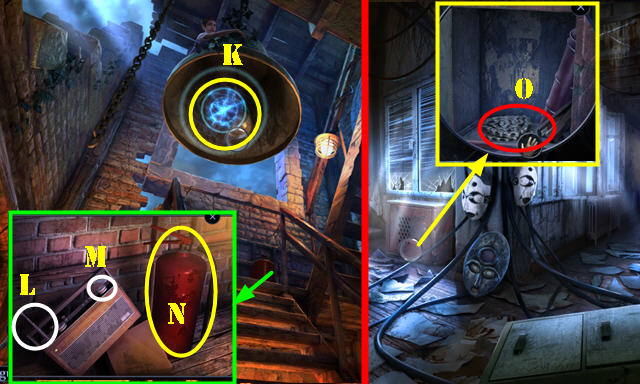
- Select cables (K); take TOY HEAD (L). Open book; take ROCKET (M).
- Move books; take BATTERIES 1/2 (N).
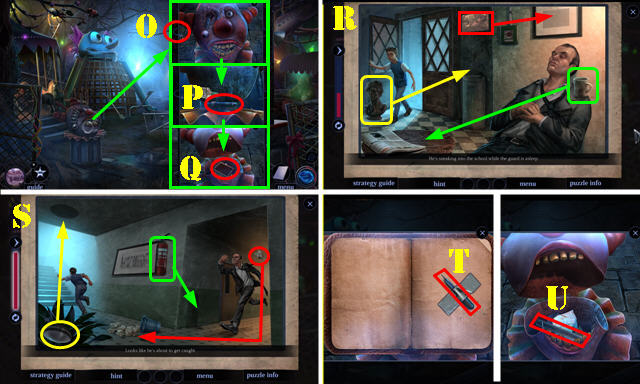
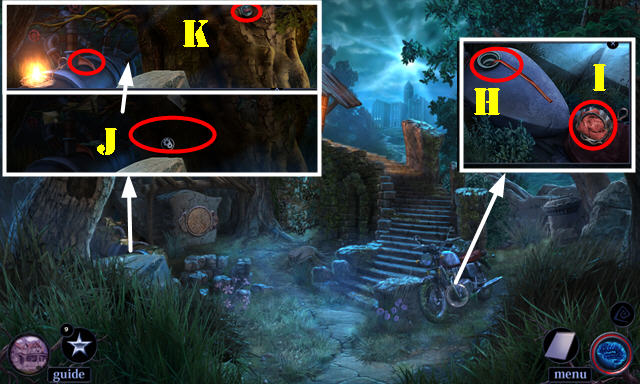
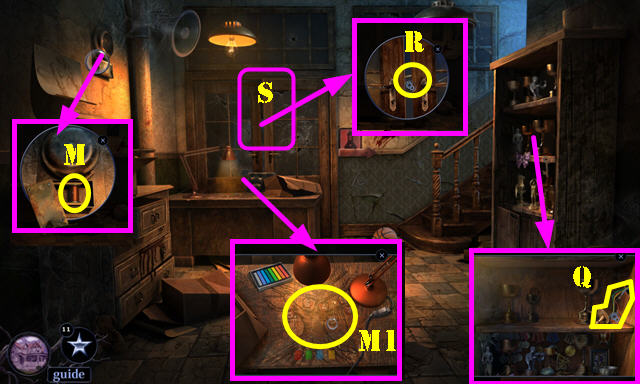
- Use TOWEL (O); receive IMPROVISED BLADE.
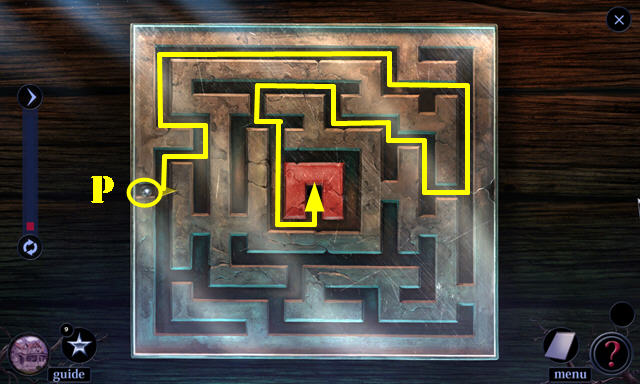
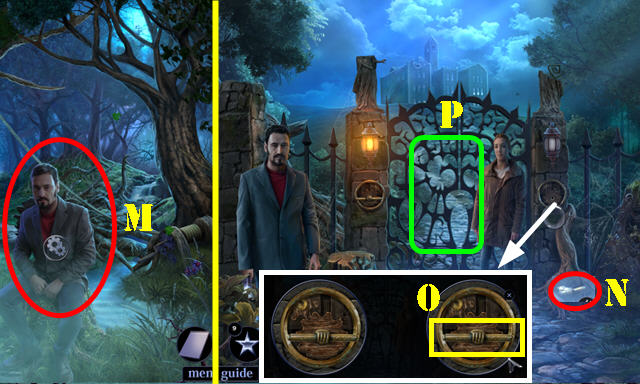
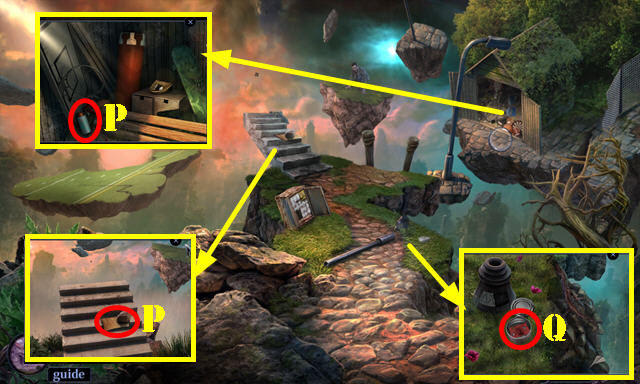
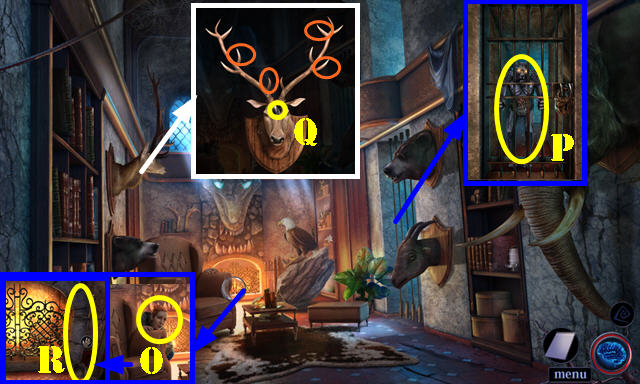
- Take Map and SWITCH (P).
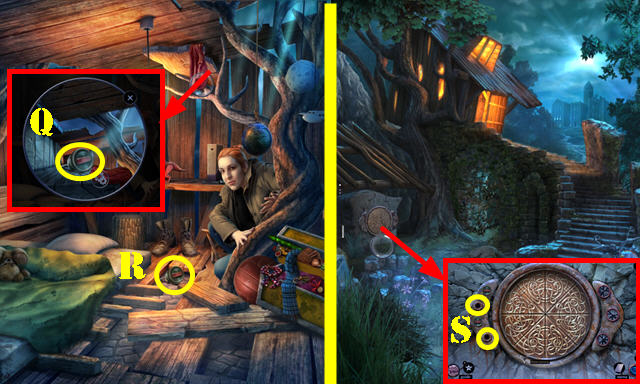
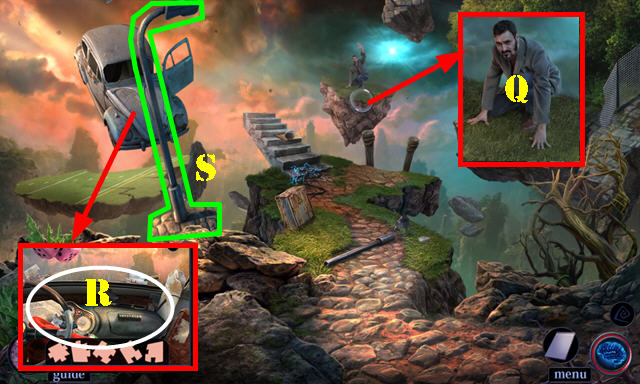
- Place SWITCH and select (Q).
- Receive clue; take ANIMAL TOKEN, and BATTERIES 2/2 (R).
- Open HANDHELD VIDEO GAME; insert BATTERIES 2/2.
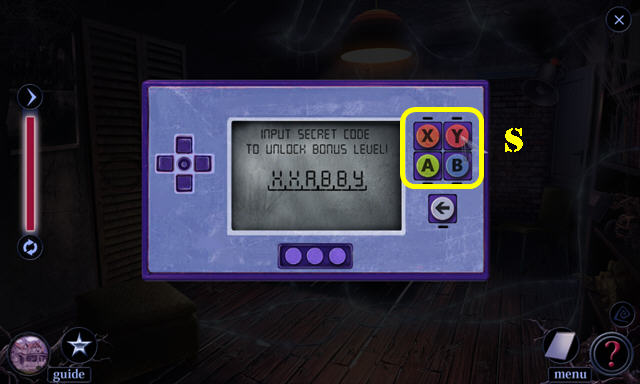
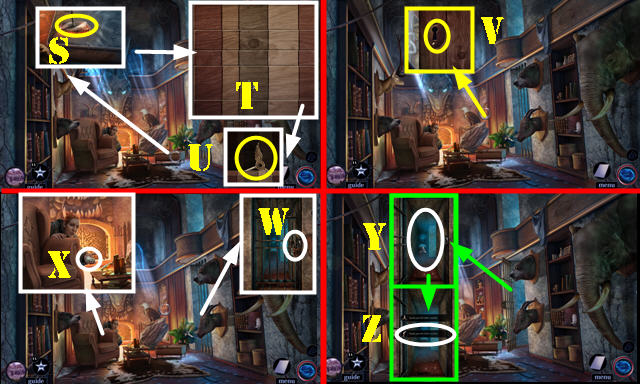
- Solution: X-X-A-B-B-Y (S).
- Take IMPROVISED LIGHTER.
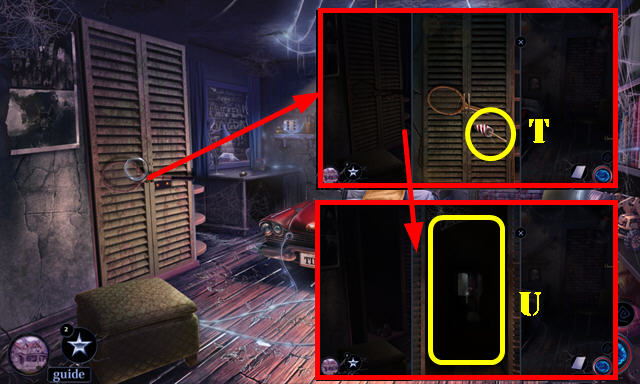
- Place ROCKET; use IMPROVISED LIGHTER (T).
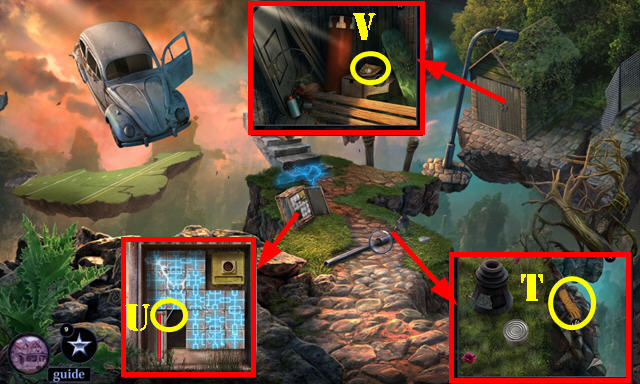
- Open door; go forward (U).
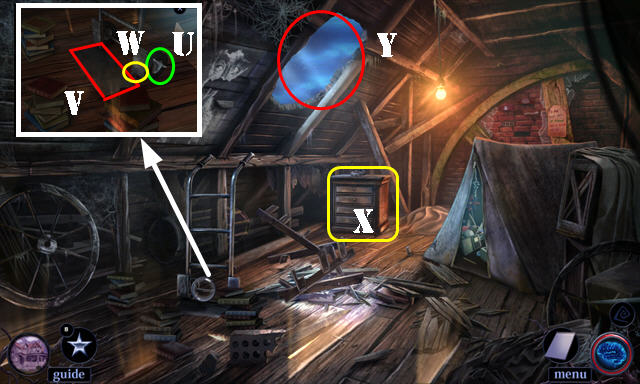
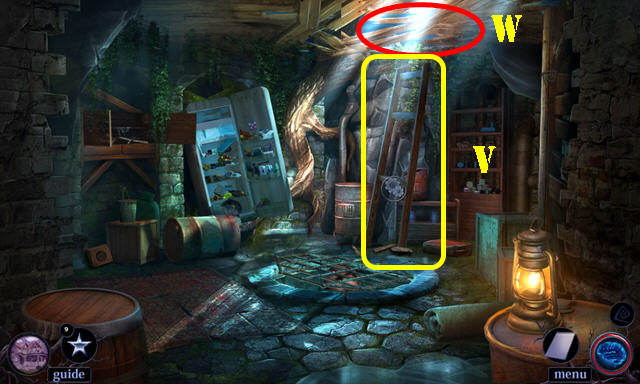
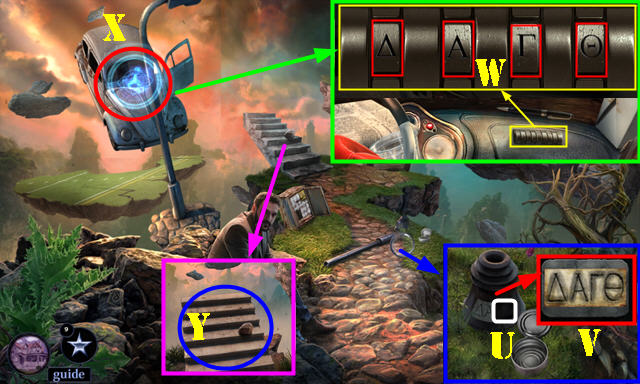
- Flip switch (V).
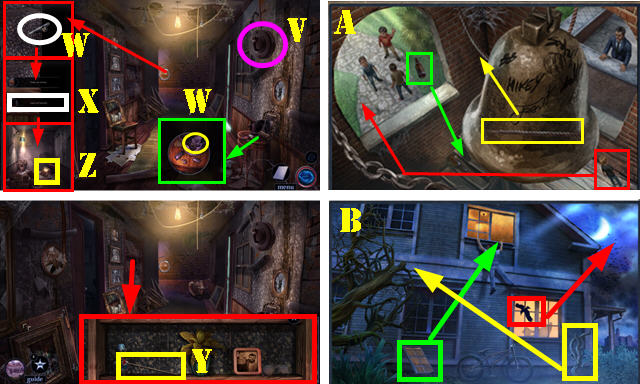
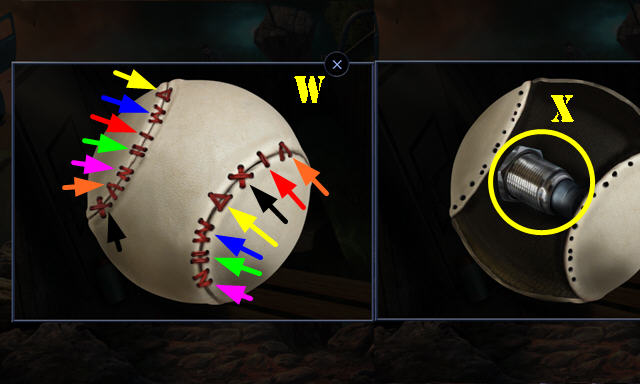
- Take WINTER GARDEN KEY and HOBBY KNIFE (W).
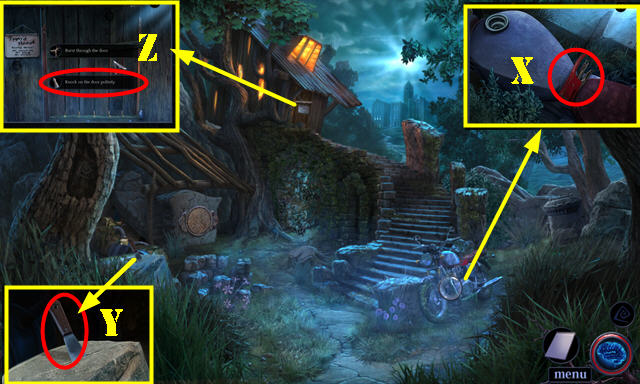
- Select: 'Leap out bravely' (X).
- Move frame; take TOY ARROW (Y).
- Select book; use HOBBY KNIFE and open it (Z).
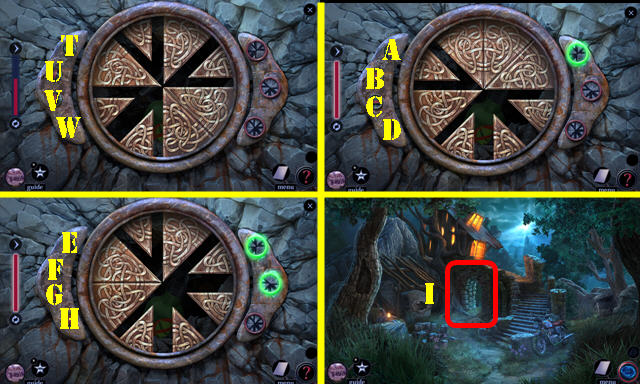
- Solution one (A).
- Solution two (B).
- Take PIGGYBANK DIGIT.
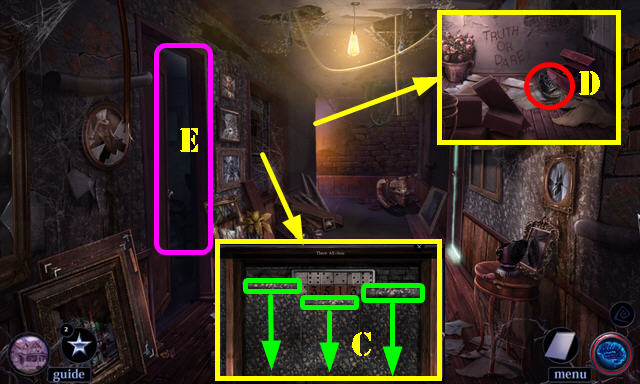
- Remove shelves; roll down wallpapers (C).
- Take SNEAKER (D).
- Take SHOELACE from SNEAKER.
- Go (E).
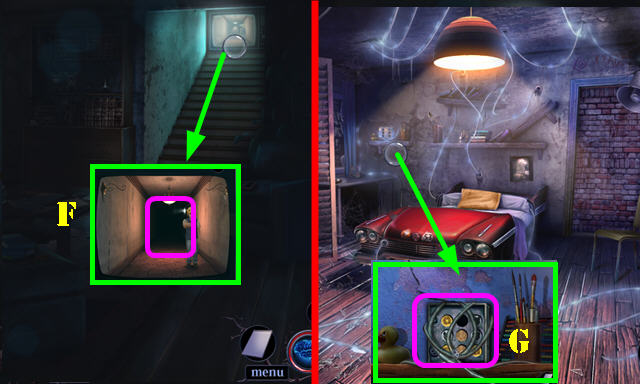
- Try to go (F).
- Go to Timmy's room.
- Use IMPROVISED BLADE (G); place ANIMAL TOKEN.
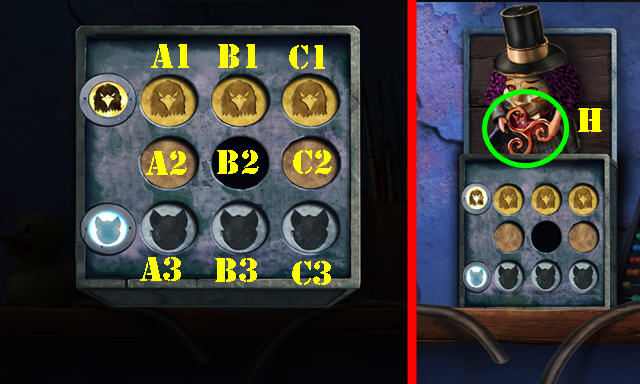
- Solution: B2-B3-A3-A2-B2-B3-C3-C2-C1-B1-B2-B3-C3-C2-C1-B1-B2.
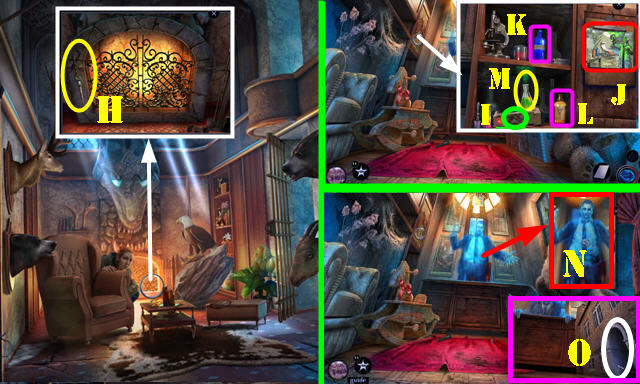
- Take CAR ORNAMENT (H).
- Place CAR ORNAMENT (I).
- Move items; take clue, STROBE LIGHT, and MAGNET (J).
- Go to Corridor.
- Use MAGNET and WINTER GARDEN KEY (K).
- Enter (L).
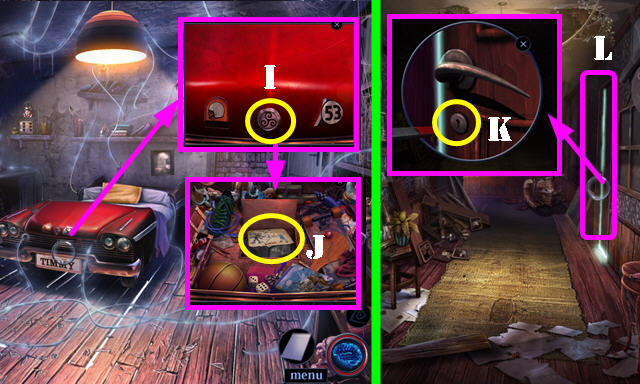
- Use SHOELACE (M). Select when crosshairs are over lock (N). Pull on shoelace.
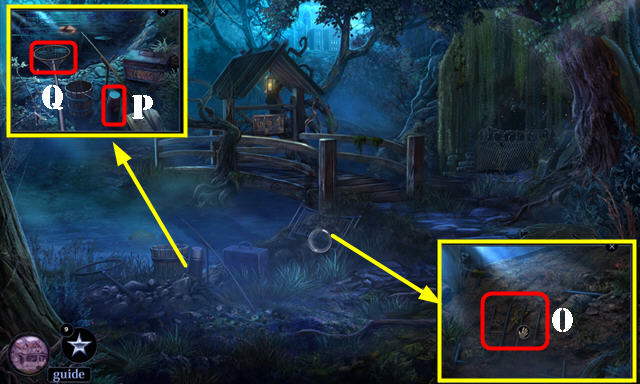
- Play HOP (O); receive PIGGYBANK CODE.
- Take POSTCARD (P).
- Select postcard 3x; receive FOLDED POSTCARD.
- Take NUMBERED TILES (Q).
- Walk down.
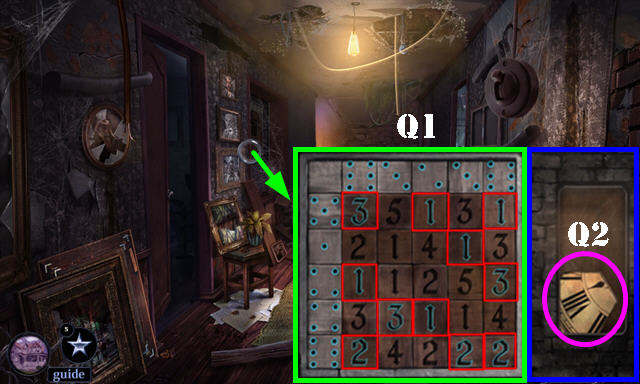
- Place NUMBERED TILES. Solution (Q1).
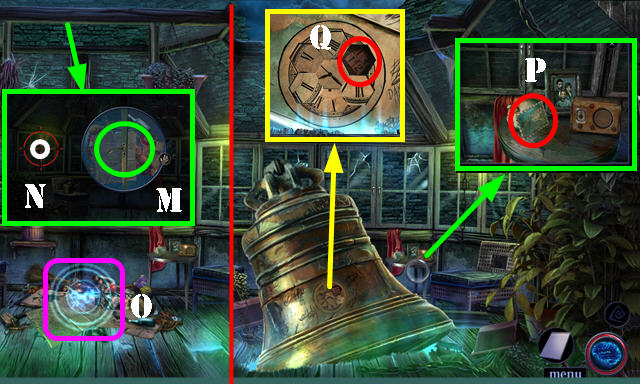
- Take CLOCK PLATE (Q2).
- Go to Winter garden.
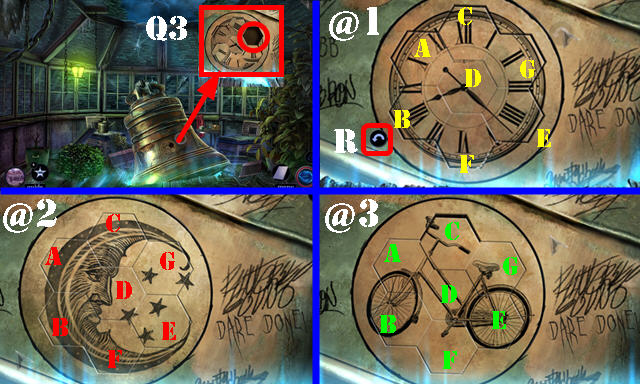
- Place CLOCK PLATE (Q3). The 'R' is for the rotate symbol.
- Solution one (@1): (G-B)-(B)-(Rx5)-(A-F)-(F)-(Rx2)-(A)-(Rx4)-(E-C)-(C)-(Rx3)-(G)-(Rx1).
- Solution two (@2): (C-F)-(F)-(Rx5)-(G-C)-(C)-(Rx5)-(G)-(Rx2)-(E)-(Rx3)-(B)-(Rx1).
- Solution three (@3): (F-C)-(B-E)-(E)-(Rx4)-(A-B)-(B)- (Rx5)-(A-F)-(F)-(Rx5)-(A)-(Rx2)-(G)-(Rx3).
- Take BRICK and STRING.
- Go to Living room.
- Select BROKEN BOW; place TOY ARROW and STRING; select 3x; receive BOW.
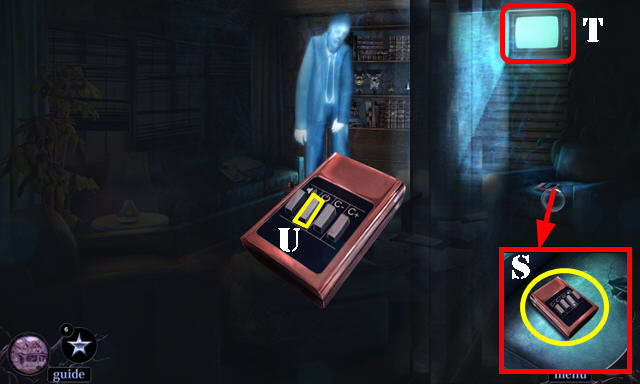
- Use BOW (S); receive TV REMOTE.
- Use TV REMOTE (T); select second button (U).
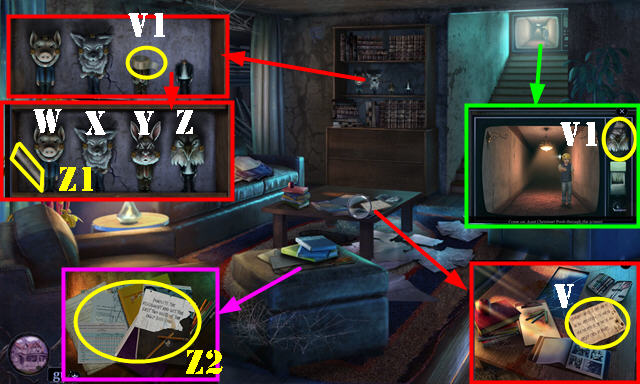
- Take clue (V).
- Take EAGLE HEAD and ADHESIVE TAPE (V1).
- Place EAGLE HEAD and TOY HEAD; select X-W-Z-X-Y-W.
- Take TORN TV LISTING (Z1).
- Move all items (Z2).
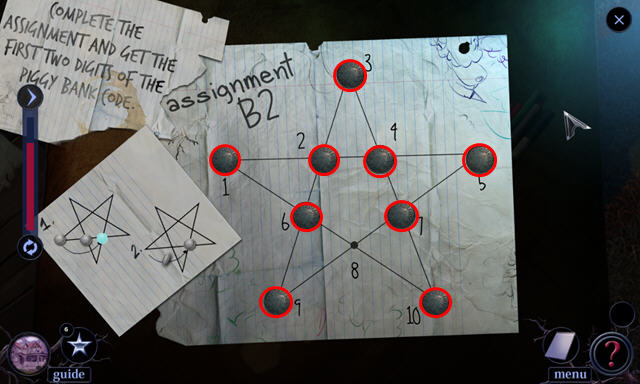
- Solution: (5-8)-(3-7)-(1-4)-(9-2)-(10-6)-(4-1)-(1-8)-(8-5).
- Take DIME.
- Go to Winter garden.
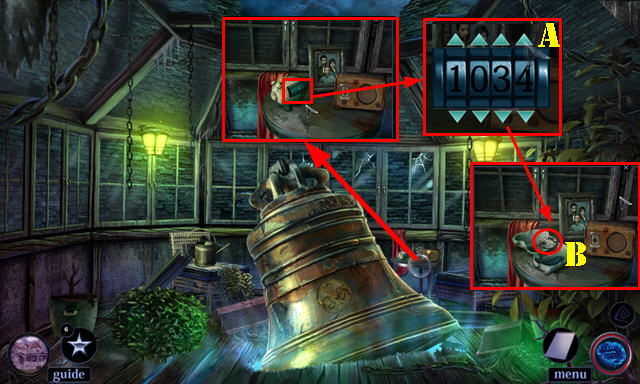
- PIGGYBANK DIGIT and DIME on PIGGYBANK CODE.
- Enter 1034 (A); take WHEEL (B).
- Return to Living room.
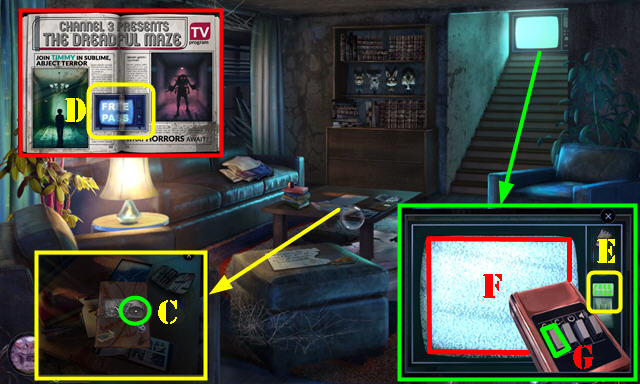
- Select book and place WHEEL (C) and open book. Play HOP; receive TORN PAGE.
- Roll down TORN TV LISTING; place TORN PAGE. Use ADHESIVE TAPE and HOBBY KNIFE (D); receive PASS.
- Use PASS (E) and TV REMOTE (F); select first button twice (G). Go forward twice.
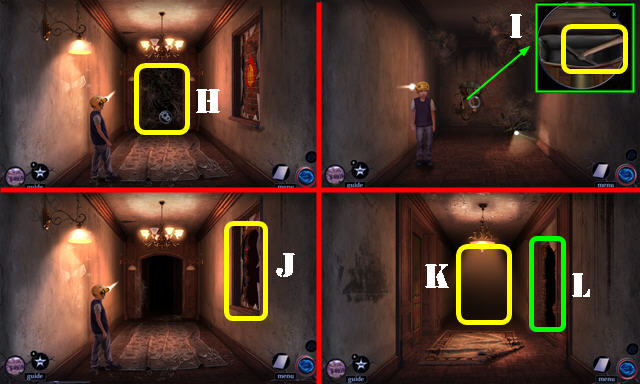
- Try to go forward. Use HOBBY KNIFE (H); go forward.
- Open bag; take PICKAXE (I); walk down.
- Use PICKAXE; go through wall (J).
- Go forward (K) and then walk down.
- Use PICKAXE and go (L).

- Use PICKAXE (M). Play HOP; receive RUSTY LADDER.
- Walk down and go forward.
- Place RUSTY LADDER (N) and go (O).
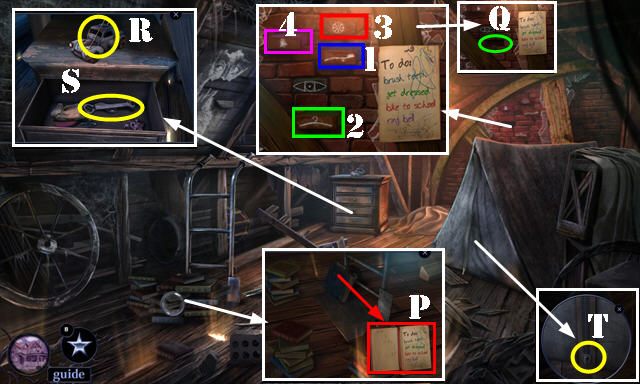
- Move books 3x; open book; take PAPER CLUE (P).
- Place PAPER CLUE and BRICK. Select 1-4; take DRAWER KEY (Q).
- Take WIRE (R).
- Use DRAWER KEY and select; move items; take WRENCH and SPARE BULB (S).
- Use WIRE and pull (T). Play HOP; receive SMALL WHEEL.
- Place SMALL WHEEL (U). Select plate (V); use WRENCH (W).
- Place HANDCART and select (X).
- Select STROBE LIGHT twice; place SPARE BULB; take DEMONSTERIZER.
- Go (Y).
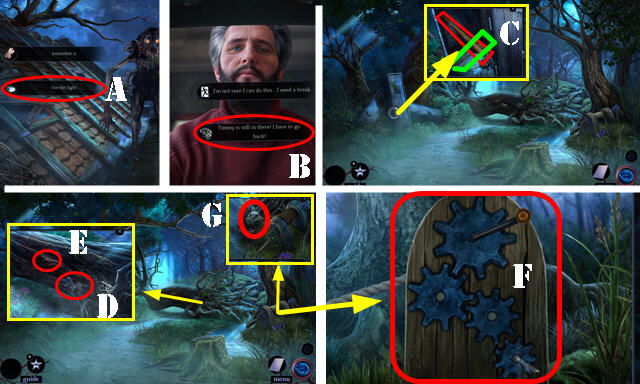
- Select: 'Use the light' (A). DEMONSTERIZER is automatically used; receive STROBE LIGHT.
- Select: 'Timmy is still there! I have to go back! (B).
- Use FOLDED POSTCARD; take BASEBALL BAT and NAIL PULLER (C).
- Use NAIL PULLER 2x (D); take CROOKED NAILS (E). Take WINCH GEAR (D).
- Place WINCH GEAR. Solution (F).
- Select skull (G).
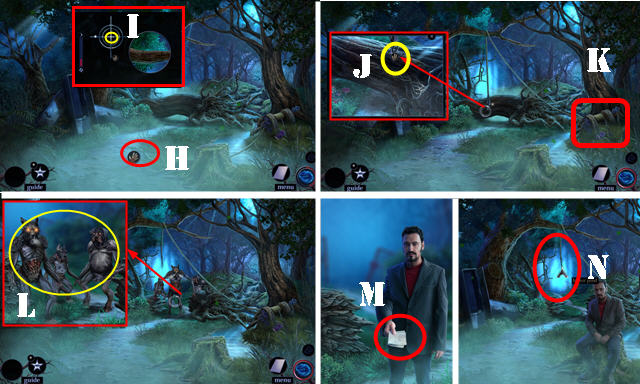
- Select branch (H).
- Stop ball twice in center of target (I).
- Select hook (J) and winch (K).
- Use BASEBALL BAT (L).
- Take Map (M).
- Go (N).
Chapter 2: Mirror Pond
- Select bar; take COAT HANGER and WIRE CUTTERS (O).
- Take HOT COFFEE THERMOS (P).
- Select net (Q); receive DEFLATED BASKETBALL.
- Select COAT HANGER twice; receive HOOK.
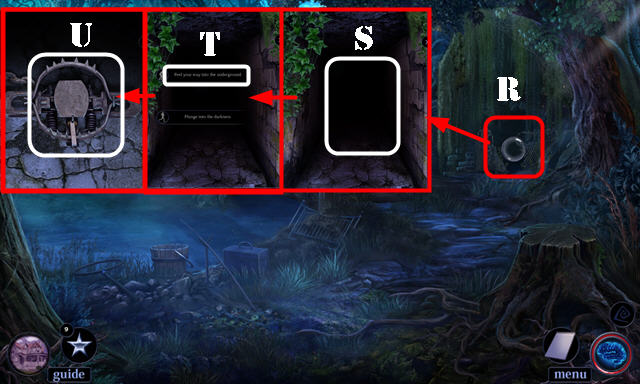
- Use WIRE CUTTERS (R). Try to go forward (S).
- Select: 'Feel your way into the underground' (T).
- Use BASEBALL BAT (U).
- Go (R).
- Place ladder (T).
- Try to go up (U).
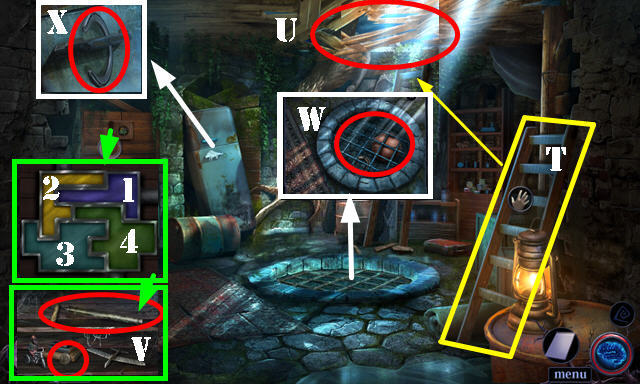
- Play puzzle. Solution: 1-4. Remove board; take BICYCLE PUMP and DIME (V).
- Use DEFLATED BASKETBALL and BICYCLE PUMP. Select pump twice. Use HOOK; take HORSESHOE (W).
- Use HOT COFFEE THERMOS and HORSESHOE (X). Play HOP; receive COMPARTMENT KEY.
- Walk down twice.
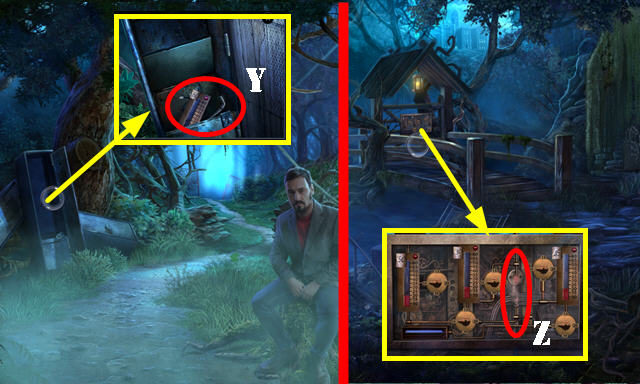
- Use COMPARTMENT KEY; remove lock; take SOCKET WRENCH and PRESSURE GAUGE (Y).
- Go forward.
- Place PRESSURE GAUGE (Z).
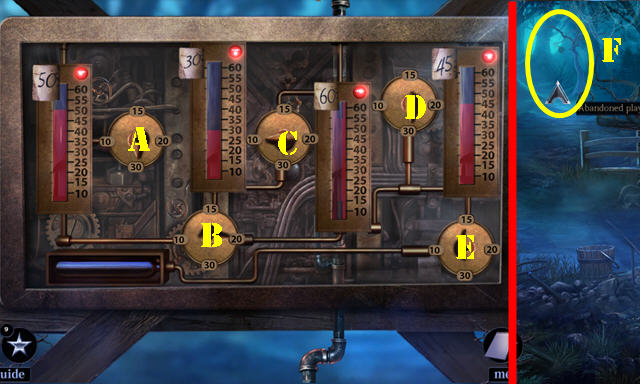
- Solution: Ax3-Bx2-Dx3-E.
- Go (F).
- Select 3x; receive RUNG 1/5 (G).
- Lift bar; take RUNG 2/5 (H).
- Move item; take BROOM (I).
- Select BROOM; take RUNG 3/5.
- Insert DIME (J). Play HOP; receive RUNG 4/5.
- Take SEQUENCE LOCK (K).
- Walk down.

- Place SEQUENCE LOCK. Solution (L).
- Take SALAD DRESSING (M).
- Go (N).
- Select arrow (O). Use SALAD DRESSING (P).
- Open mouth; select book (Q).
- Solution one (R).
- Solution two (S).
- Take EYEDROPPER (T) and RUNG 5/5 (U).
- Go to Warrens.
- Place RUNG 5/5 (V).
- Go (W).
- Remove leaves; take STAPLER (X).
- Take SCRAPER (Y).
- Touch door. Select: 'Knock on the door politely' (Z).
- Go to Abandoned playground.
- Use SCRAPER (A). Play HOP; receive CUT UP TOY.
- STAPLER on CUT UP TOY; receive GLOWING PLUSH PUPPY.
- Go to Stone stairway.
- Use GLOWING PLUSH PUPPY (B).
- Go (C).
- Open toolbox (D). Play HOP; receive MATCHBOX.
- Take BULLWHIP and COMFORTER SCRAP (E).
- Take SURGICAL TUBING and GLASS JAR (F).
- Select (2-5-6)-(3-4-7-8)-(1-2-3-5-8).
- Take CANDLE HOLDER (G).
- COMFORTER SCRAP on CANDLE HOLDER; take CLOTH AND HOLDER.
- Walk down.
- Place SURGICAL TUBING (H).
- Place CLOTH AND HOLDER (I). Select tubing; use MATCHBOX on cloth; receive IMPROVISED TORCH.
- Use IMPROVISED TORCH (J). Play HOP; receive TORN COMIC.
- Take SLAT KNOB 1/2 and DINOSAUR TAIL (K).
- Assemble TORN COMIC (L).
- Take COMIC BOOK PAGE.
- Go to Overgrown treehouse.
- Place DINOSAUR TAIL and select (M).
- Take MAZE PIECE (N).
- Go to Abandoned playground.
- Place MAZE PIECE (O).
- Solution (P).
- Take WINDUP TOY.
- Go to Overgrown treehouse.
- Use WINDUP TOY and select 2x (Q); take SLAT KNOB 2/2 (R).
- Walk down.
- Place SLAT KNOB 2/2 (S).
- Solution (V-T-U)-(D-B-A)-(H-G-E-F).
- Take HERBICIDE SPRAY.
- Use HERBICIDE SPRAY and go (I).
- Use BULLWHIP and select (J).
- Place GLASS JAR (J1); select 8 worms (K); take GLOWWORM JAR.
- Select weeds 3x; use SOCKET WRENCH and place GLOWWORM JAR. Play HOP; receive BATTERIES (L).
- Return to Dark glade.
- Give BATTERIES (M).
- Go to School gate.
- Take HANDLE (N).
- Place HANDLE (O); select.
- Go (P).
Chapter 3: Twisted Yard
- Talk (Q).
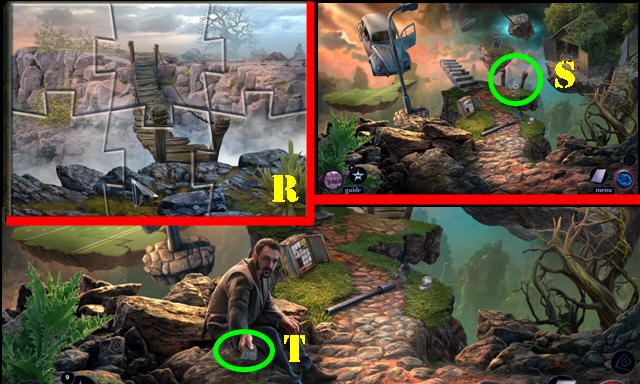
- Play HOP (R); receive BRIDGE PUZZLE.
- Select post (S).
- Move stones; take RUBBER GLOVE (T).
- Select RUBBER GLOVE; take RUBBER GLOVE and CHARCOAL LUMP.
- Open door. Use RUBBER GLOVE (U); receive KNITTING NEEDLE.
- Use KNITTING NEEDLE on lock and select; move items; select baseball (V).
- Solution (W).
- Take CIRCUIT BREAKER (X).
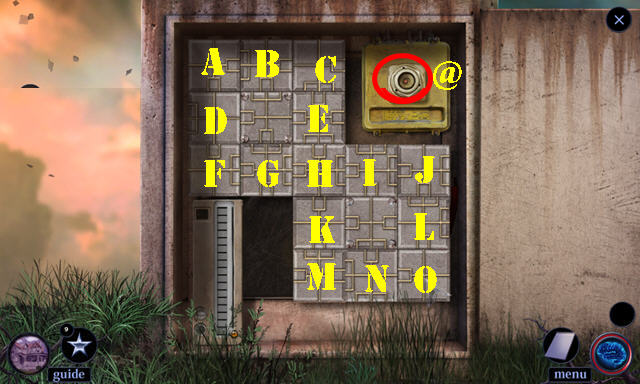
- Place CIRCUIT BREAKER (@).
- Solution: Ax2-Cx2-Bx3-F-E-H-Ix3-J-M-Nx2-O.
- Take ENERGY DRINK BOTTLE and PAPER SCRAP (P).
- Select ENERGY DRINK BOTTLE; take CAN OPENER. Use CROOKED NAILS on bottle; receive IMPROVISED RATTLE.
- Use CAN OPENER; take PERFORATED CARDS 1/4 and MISSING PIECE (Q).
- MISSING PIECE on BRIDGE PUZZLE. Solution (R). Take BRIDGE PUZZLE.
- Place BRIDGE PUZZLE (S).
- Take PARTIAL INSCRIPTION (T).
- Place PARTIAL INSCRIPTION (U).
- Place PAPER SCRAP and CHARCOAL LUMP; take GLOVE BOX COMBINATION (V).
- Place GLOVE BOX COMBINATION; solution (W).
- Play HOP (X); receive UMBRELLA.
- Use UMBRELLA (Y).
- Remove cloth; take LIGHTER (A).
- Take BROKEN GLASS (B).
- Use BROKEN GLASS (C). Play HOP; receive COLORING BOOK.
- Select COLORING BOOK 4x; receive ORANGUTAN PAGE.
- Place ORANGUTAN PAGE (D).
- Solution: 13-9-11-10-12-11-15-13-4-6-5-1-2-5-2-3-2-1.
- Take PERFORATED CARDS 2/4 (E).
- Use EYEDROPPER; receive EYEDROPPER WITH ALCOHOL (F).
- Use LIGHTER (G).
- Select LIGHTER twice; use EYEDROPPER WITH ALCOHOL (H); take WORKING LIGHTER.
- Use WORKING LIGHTER (G).
- Open drawer; extinguish candle (I).
- Move item; play puzzle (J).
- Solution one (K).
- Solution two (L).
- Take BOX CUTTER (M).
- Use BOX CUTTER (N).
- Talk (O).
- Use IMPROVISED RATTLE (P).
- Select antlers (orange). Open compartment; take BRAND (Q).
- Select shovel; use BRAND and select again; receive HOT BRANDING IRON (R).
- Use HOT BRANDING IRON (S). Slide pieces into place (T). Take WINGED KEY (U).
- Use WINGED KEY (V). Play HOP; receive ACID VIAL.
- Use ACID VIAL (W).
- Take LIGHTBULB (X).
- Open door; try to go forward (Y). Select: 'Sneak past the dark corridor' (Z).
- Raise arm; take WEDGE (A).
- Place LIGHTBULB and select (B); take BURNER KNOB (C).
- Take SEAM RIPPER (D).
- Talk (E).
- Use SEAM RIPPER; take PLIERS (F).
- Use WEDGE and select (G).
- Walk down.
- Use PLIERS (H); receive LETTER OPENER.
- Go to Tall room.
- Use LETTER OPENER; place BURNER KNOB and select (I).
- Place COMIC BOOK PAGE (J). Select bottles (K-L); take SMOKEY VIAL (M).
- Use SMOKEY VIAL (N).
- Select scene; go (O).
Chapter 4: School Atrium

- Take PERFORATED CARDS 3/4 (Q).
- Move leaves; take GARDENING GLOVES (R).
- Use GARDENING GLOVES (S); select 2x.
- Open window; move items; take GEOLOGIST'S HAMMER (T).
- Use GEOLOGIST'S HAMMER; take STONE BOOK (U).
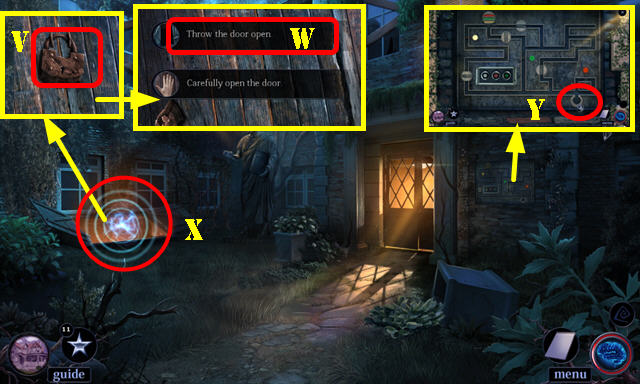
- Use STONE BOOK (V); select: 'Throw the door open' (W).
- Play HOP (X); receive DOOR LEVER.
- Place DOOR LEVER (Y).
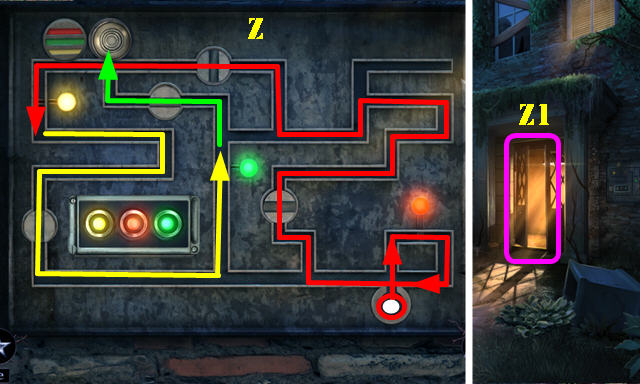
- Solution (Z).
- Go (Z1).
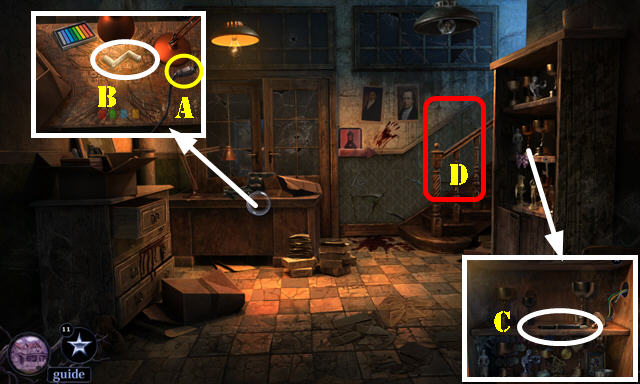
- Flip switch (A). Move items; take CRANK (B).
- Take FOUNTAIN PEN (C).
- Try to go and then go (D).
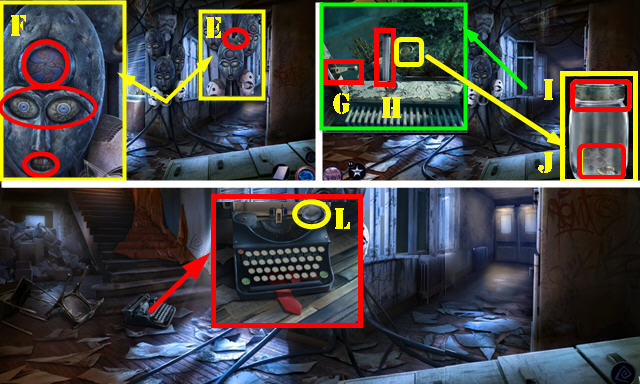
- Take GUITAR PICK (E).
- Arrange mask as shown (F). Take PERFORATED CARDS 4/4.
- Open doors; place CRANK and select (G). Take RULER (H).
- Select leaves 3x; use CAN OPENER (I); take DOOR GEAR 1/3 and DIAMOND RING (J).
- Take PETRI DISH (L).
- Walk down.
- Use RULER; select; take COPPER WIRE COIL (M).
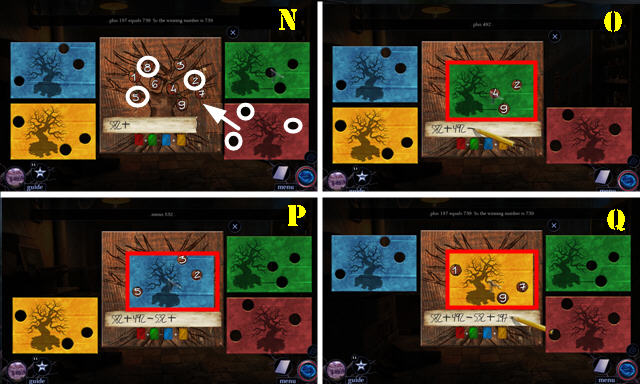
- Place PERFORATED CARDS 4/4 (M1). Place cards as shown (N-Q).
- Select COPPER WIRE COIL 3x; take SPOOL and COPPER WIRE.
- Use COPPER WIRE; select twice (Q). Play HOP; receive SHED KEY.
- Use RULER (R); go (S).
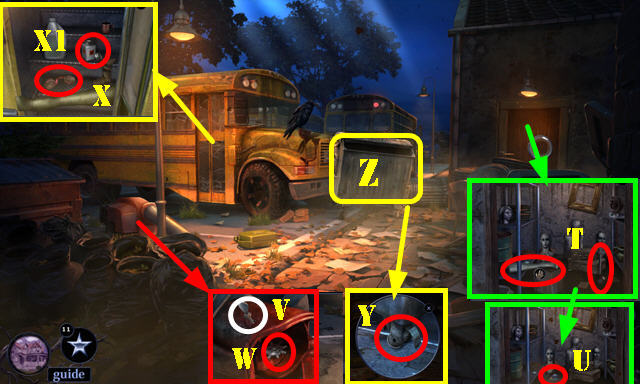
- Move items; use SHED KEY. Select switch; choose: 'Take the mask off' Move dummy. Take PLUNGER and MANNEQUIN LEG (T).
- Open box; take SNOW GLOBE (U).
- DIAMOND RING on SNOW GLOBE; take RADIO KNOB.
- Use GUITAR PICK (V); receive LONG SCREW.
- Remove pipe; take DOOR GEAR 2/3 (W).
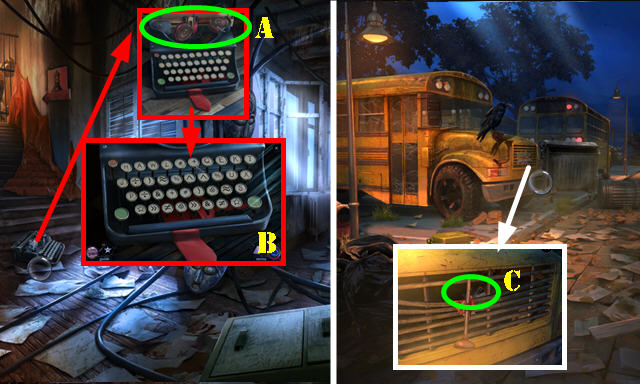
- Remove branch; open door and use MANNEQUIN LEG; take RED RIBBON (X). Remove cap and dip FOUNTAIN PEN (X1); receive SOLVENT.
- Use SPOOL and LONG SCREW (Y). Push bin (Z).
- Go to Gallery.
- Place RED RIBBON (A); solution is random (B).
- Take SCHOOL NECKTIE.
- Go to Parking lot.
- Use SCHOOL NECKTIE and PLUNGER; select. Take DOOR GEAR 3/3 (C).
- Go to Gallery.
- Place DOOR GEAR 3/3. Solution (D). Press button (E).
- Go (F).
- Take EYEBALL and COTTON SWAB (G).
- Place EYEBALL (H); take SUN BULB (I).
- Use SOLVENT; open book (J). Solution (K-L).
- Select book; take GREASE PENCIL (M).
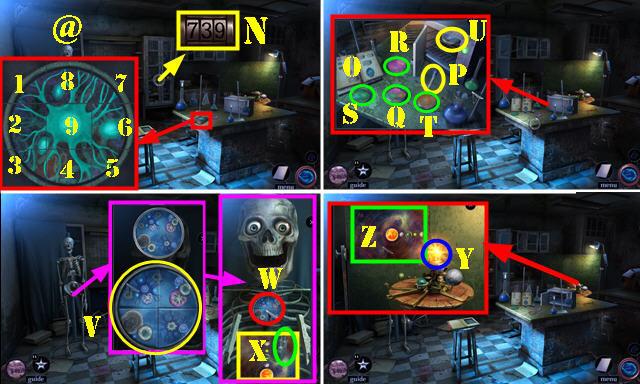
- Enter 739 (N). Play HOP; receive CULTURE.
- Solve puzzle. Solution (@): 2-3-2-1-2-9-1-2-3-4-7-6-5-6-7-8. Take clue.
- Select book (O). Put down PETRI DISH and CULTURE. Select (P-R-Q)-(P-S-Q)-(P-T-Q).
- Open oven; place dish and close door. Press red button. Open door; take CULTURE CLUE (U).
- Place CULTURE CLUE on skeleton. Solution (V). Select dish (W); take SPARE BULB and ASTRONOMY CLUE (X).
- Place SUN BULB (Y) and ASTRONOMY CLUE (Z).
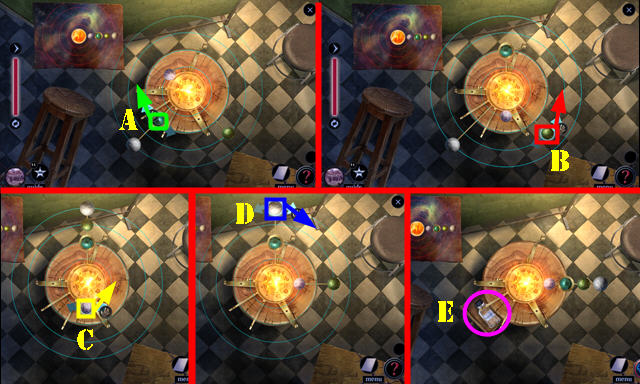
- Solution: (Ax3 clockwise)-(Bx3 counterclockwise)-(Cx2 counterclockwise)-(Dx2 clockwise).
- Take ALCOHOL BOTTLE (E).
- Select ALCOHOL BOTTLE; use COTTON SWAB on it; receive ALCOHOL SWAB.
- Walk down.
- Select STROBE LIGHT twice; place SPARE BULB and select twice; receive STROBE DEMONSTERIZER.
- Use STROBE DEMONSTERIZER (F).
- Use ALCOHOL SWAB and GREASE PENCIL (G). Select twice; try to go forward.
- Use STROBE DEMONSTERIZER (H).
- Go (I).
- Use STROBE DEMONSTERIZER; receive STROBE LIGHT (J).
- Play HOP (K); receive RADIO ANTENNA.
- Remove antenna; place RADIO ANTENNA (L).
- Place RADIO KNOB (M).
- Take FIRE EXTINGUISHER (N).
- Walk down.
- Use FIRE EXTINGUISHER and select; take BIKE CHAIN (O).
- Go to Bell tower.
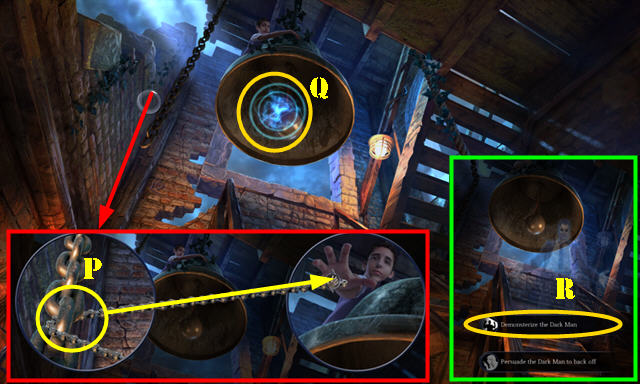
- Place BIKE CHAIN (P); pull to hand.
- Play HOP (Q); receive SPARE BULB.
- Select STROBE LIGHT TWICE; insert SPARE BULB; select twice; receive STROBE DEMONSTERIZER.
- Select 'Demonsterize the Dark Man.' to use the DEMONSTERIZER (R).
Created at: 2017-09-10