

Walkthrough Menu
- General Tips
- Chapter 1: Mountain View Asylum
- Chapter 2: Jonesy
- Chapter 3: The Antidote
- Chapter 4: Doctor Alden
General Tips
- This is the official guide for Maze: Stolen Minds.
- This guide won't tell you when to zoom into a location; the screenshots show each zoom scene.
- Hidden-object puzzles are referred to as HOPs. Only the locations of the HOPs will be shown.
- Use the Map to fast travel to a location.
Chapter 1: Mountain View Asylum
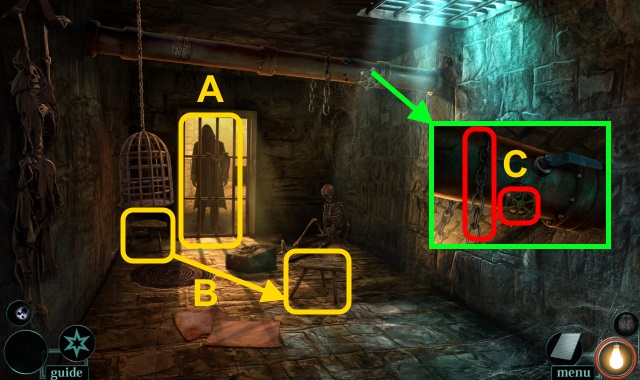
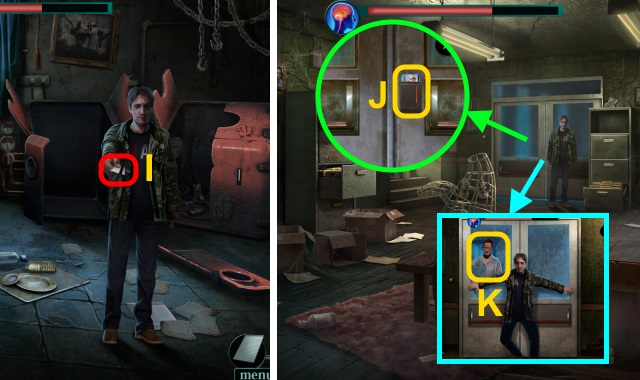
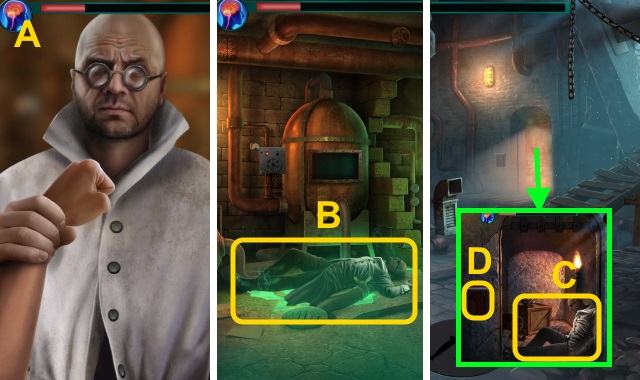
- Talk (A).
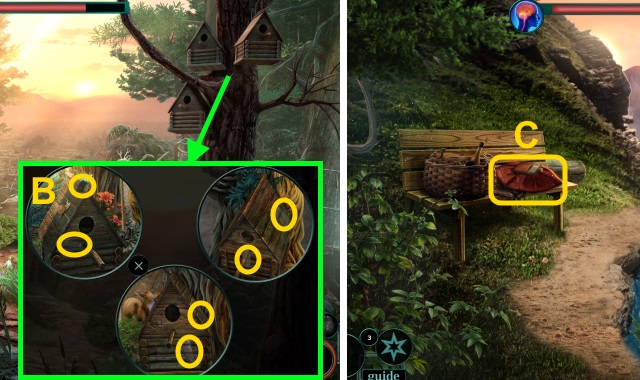
- Place stool (B).
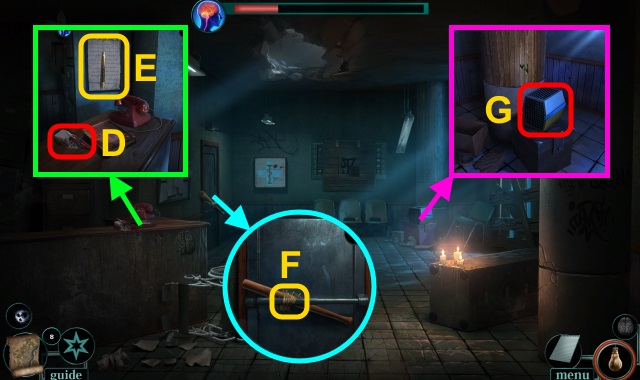
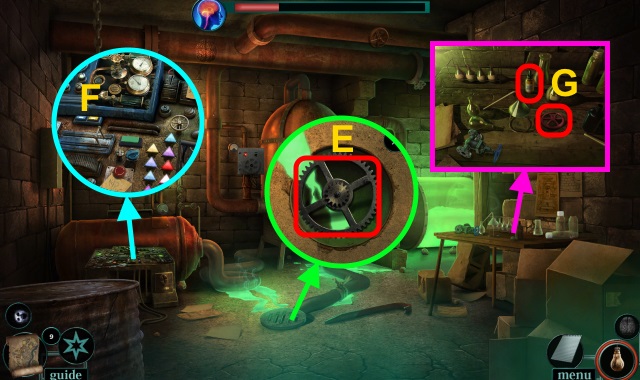
- Take CHAIN and VALVE (C).
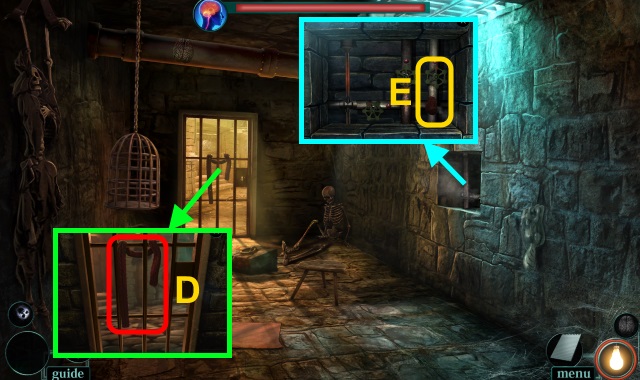
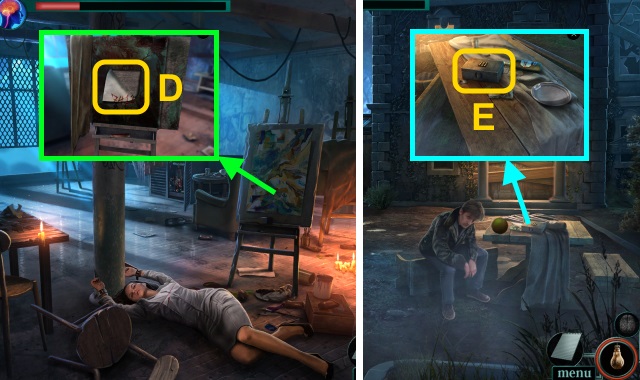
- Take SCARF (D).
- Use SCARF and VALVE (E).

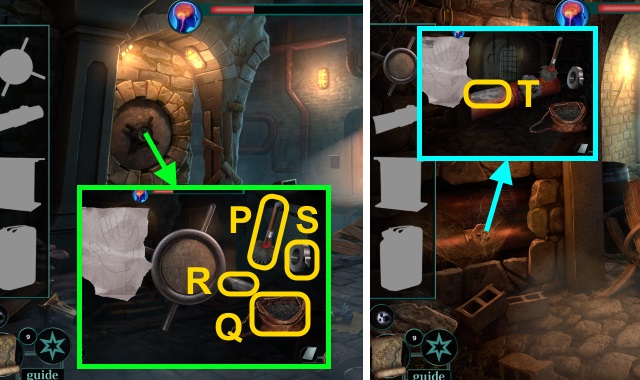
- Solution (F): Ax2-B-Cx2.
- Take PIPE.
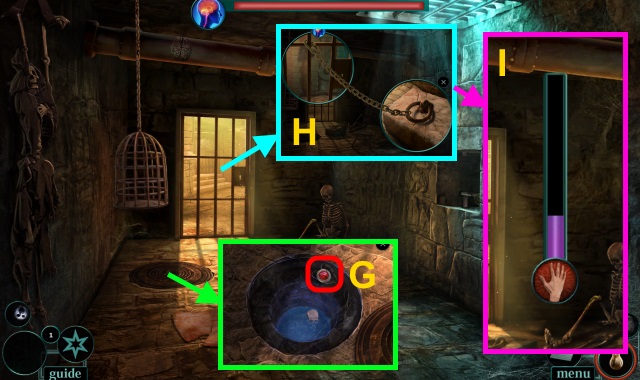
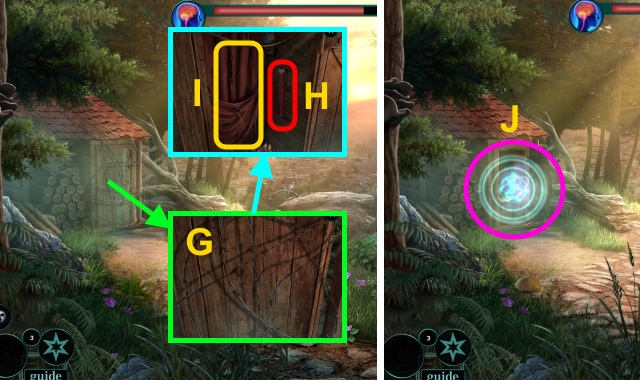
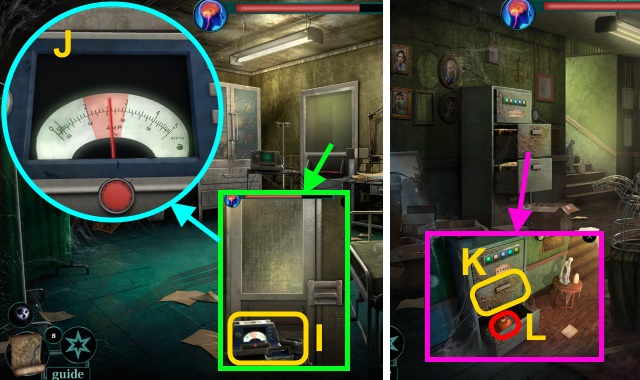
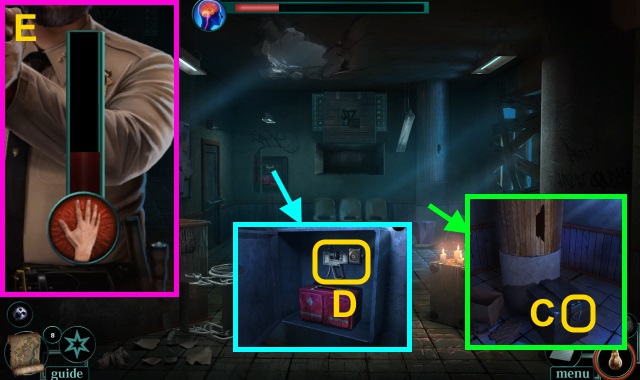
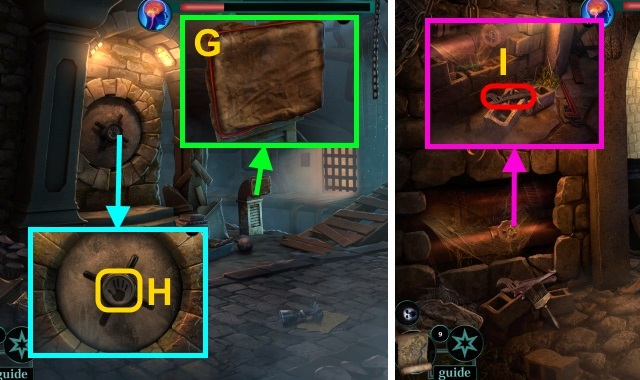
- Use PIPE; open. Take LOCK TOKEN (1/5) and CARABINERS (G).
- CARABINERS on CHAIN; take CHAIN WITH CARABINERS.
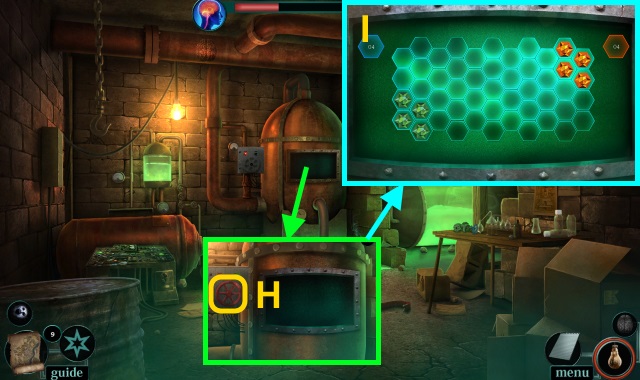
- Place CHAIN WITH CARABINERS (H).
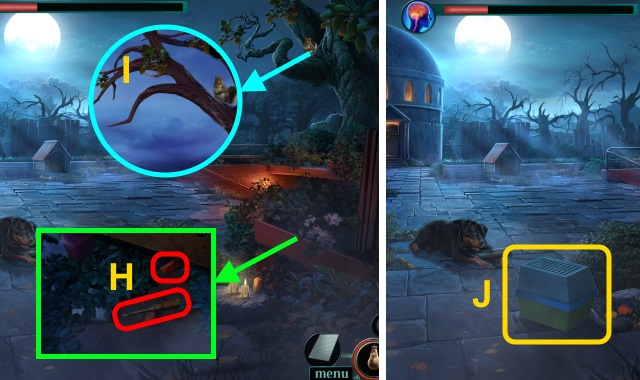
- Solution (I): select meter until it's full.
- Walk forward.

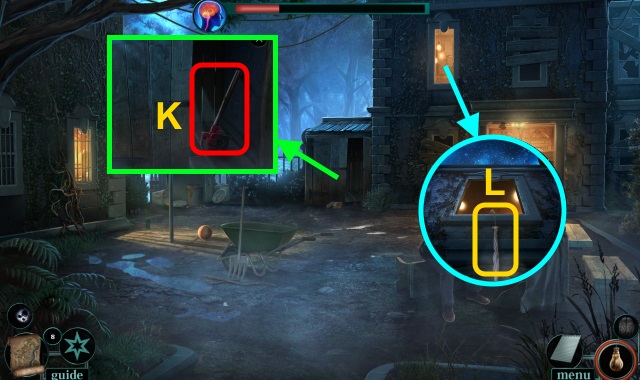
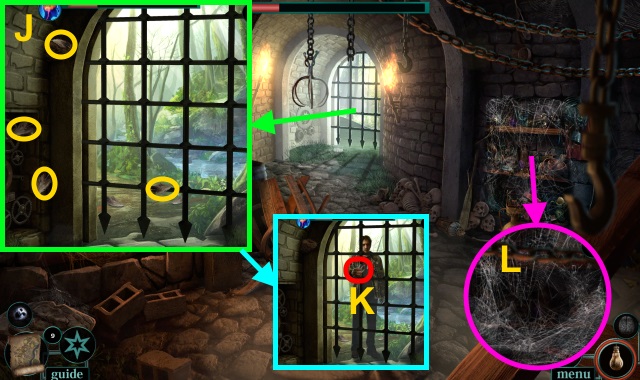
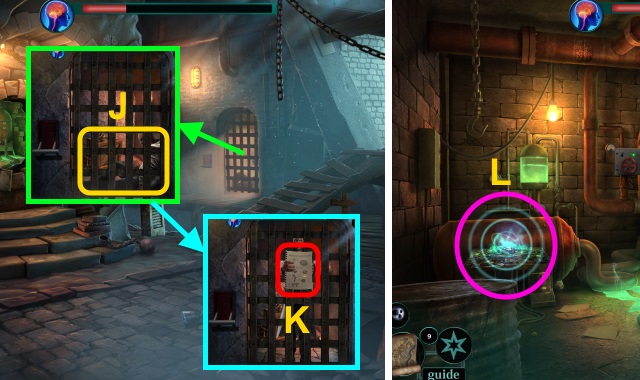
- Take GLASS SHARD (J).
- Remove cloth; take BUCKET (K).
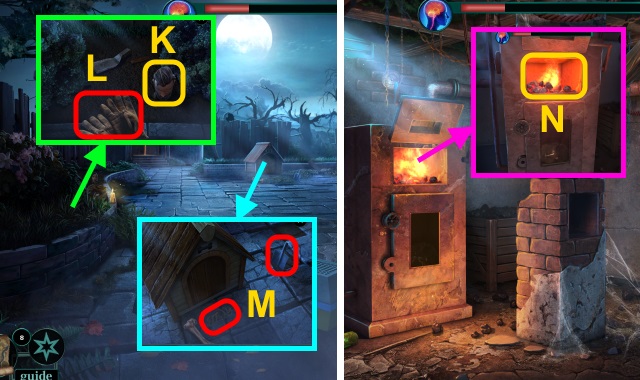
- Use GLASS SHARD (L).
- Walk forward.
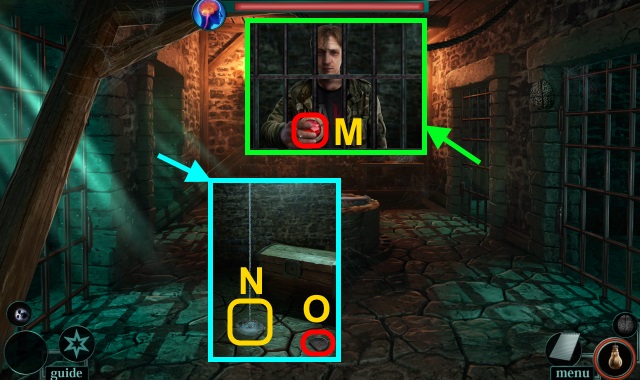
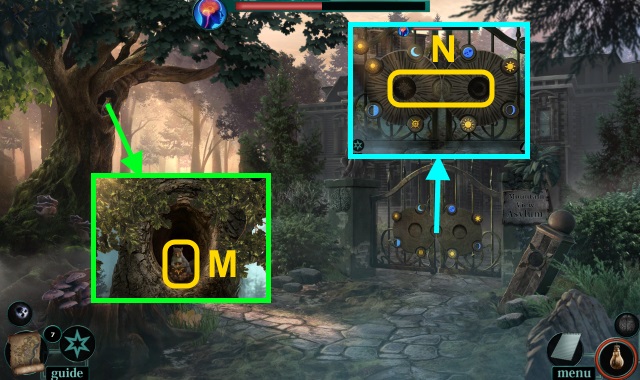
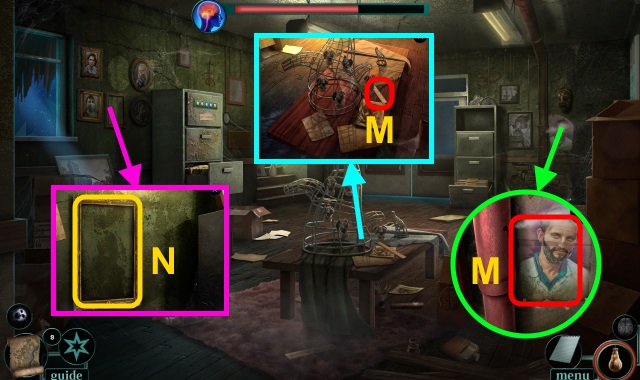
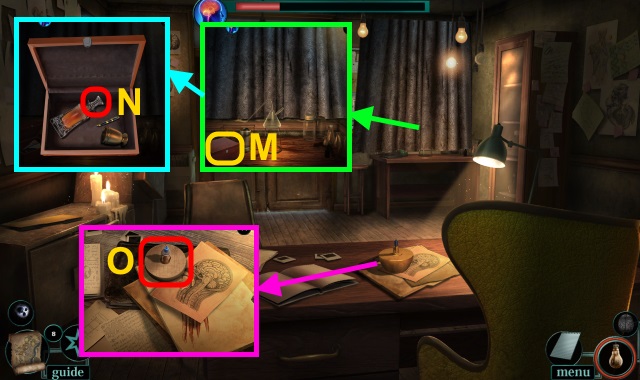
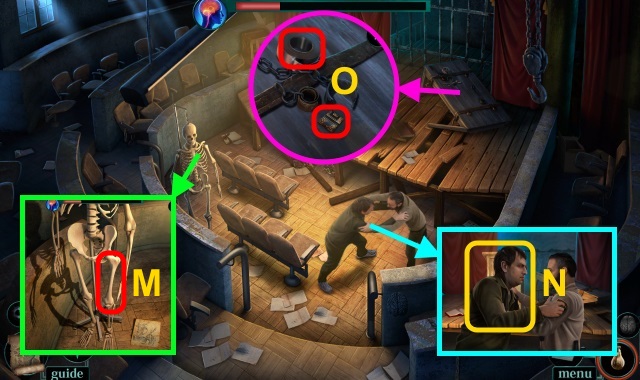
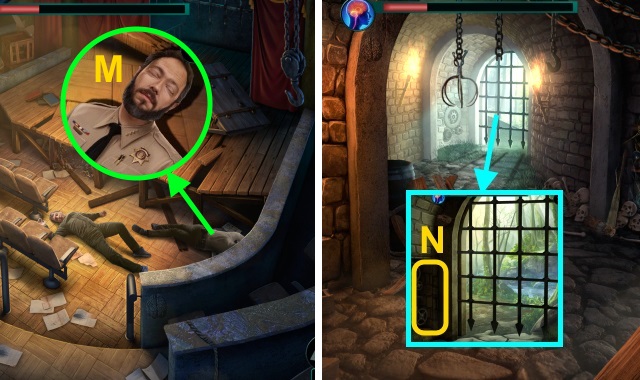
- Examine; take LOCK TOKEN (2/5) (M).
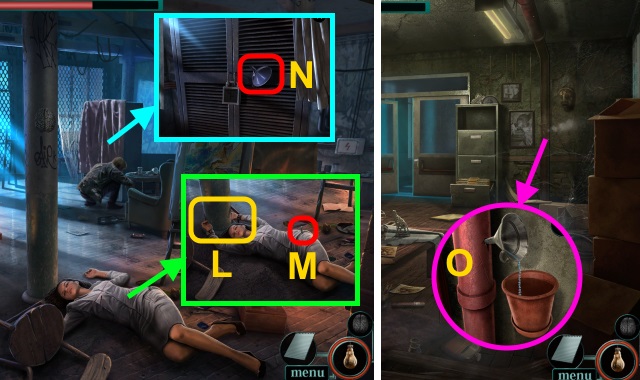
- Use BUCKET; receive BUCKET Of WATER (N). Take WELL PART (O).
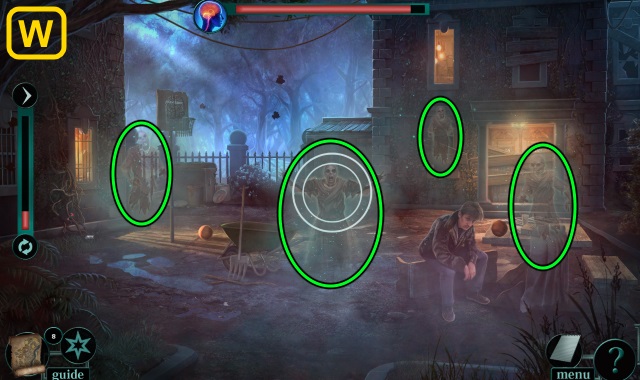
- Select Fight.
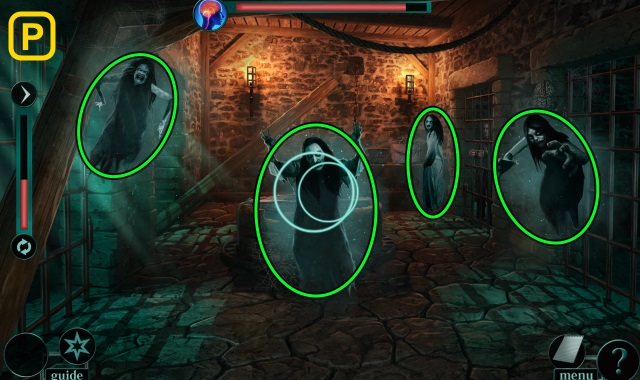
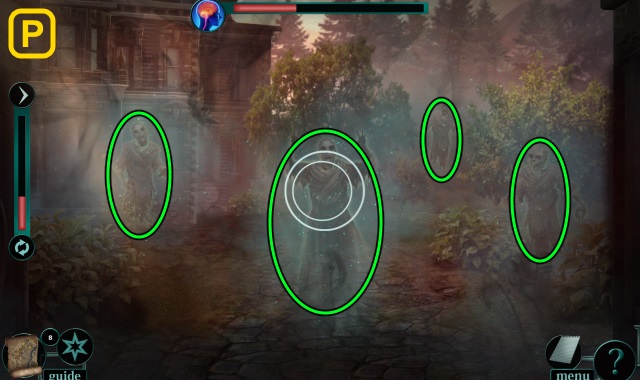
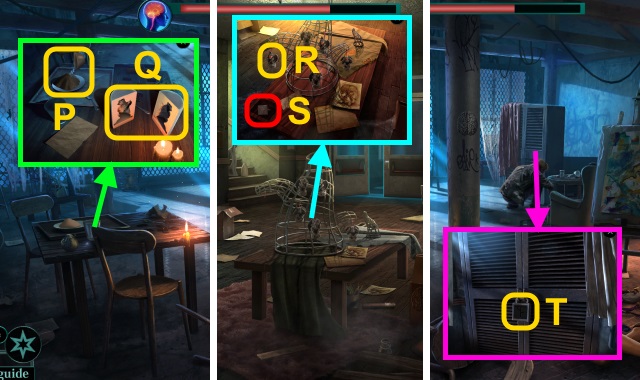
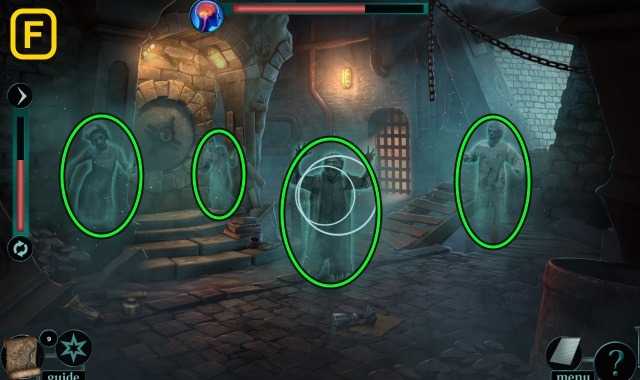
- Solution (P): stop circles over each ghost.
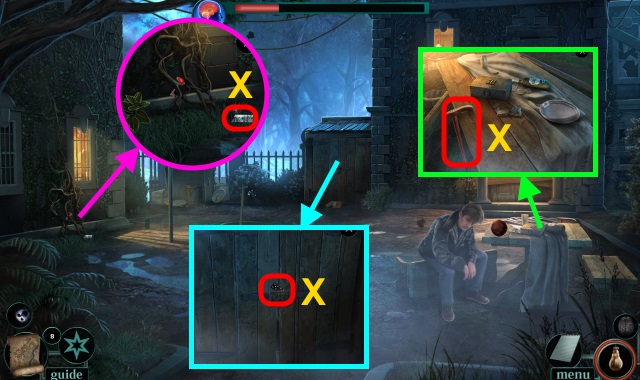
- Walk down.
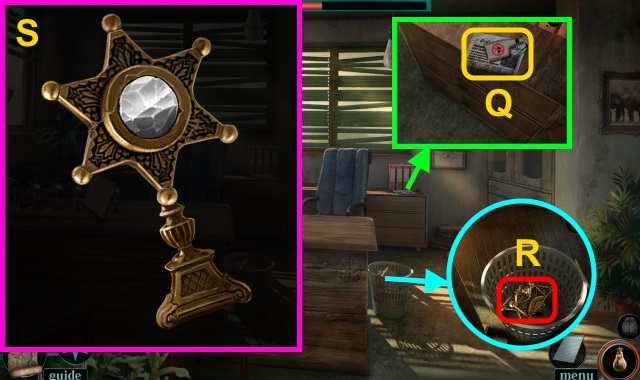
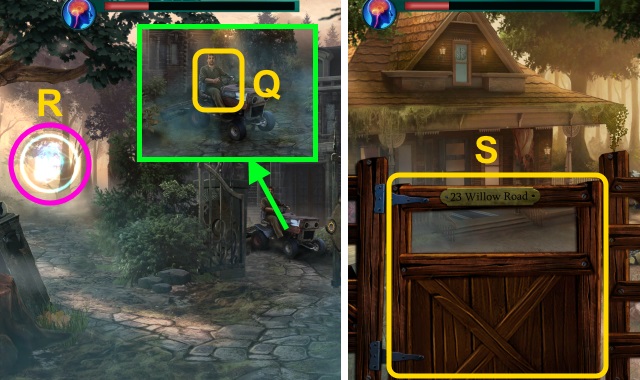
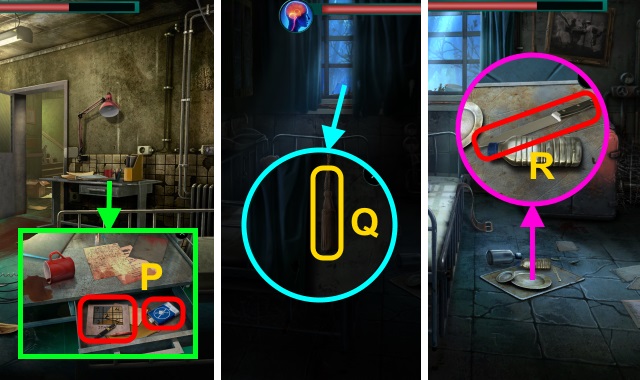
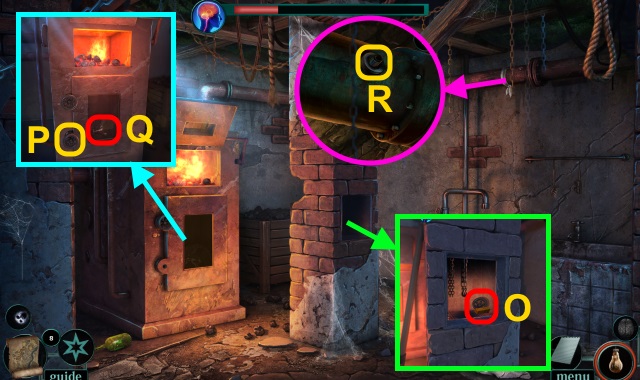
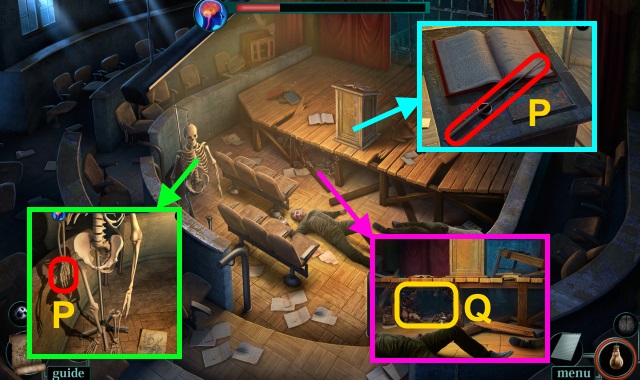
- Pour BUCKET OF WATER; receive BUCKET. Take LANTERN and ROPE (Q).
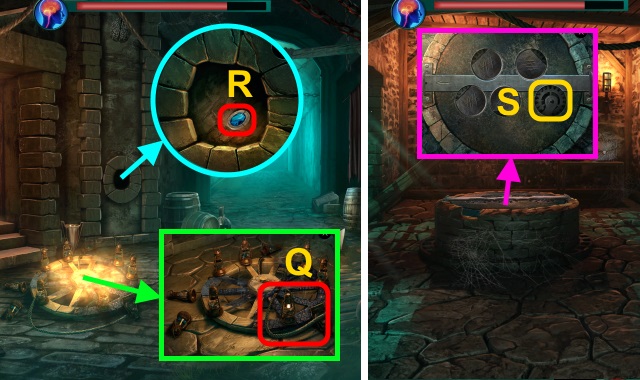
- Use LANTERN; take LOCK TOKEN (3/5) (R).
- Walk forward.
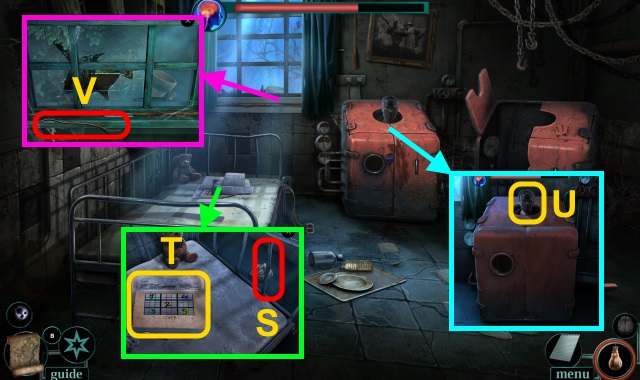
- ROPE on BUCKET; take BUCKET WITH ROPE.
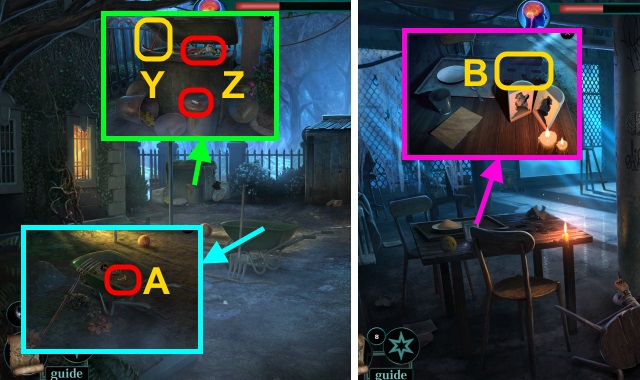
- Place WELL PART (S).
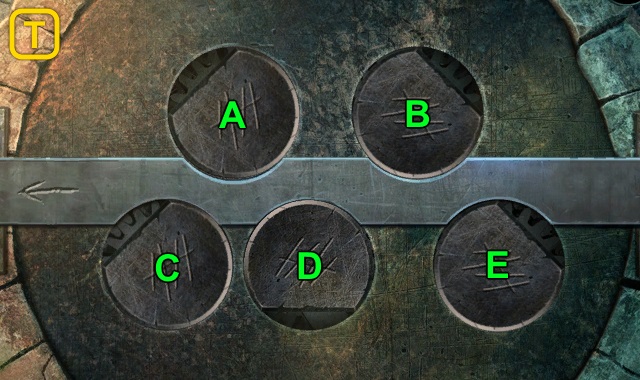
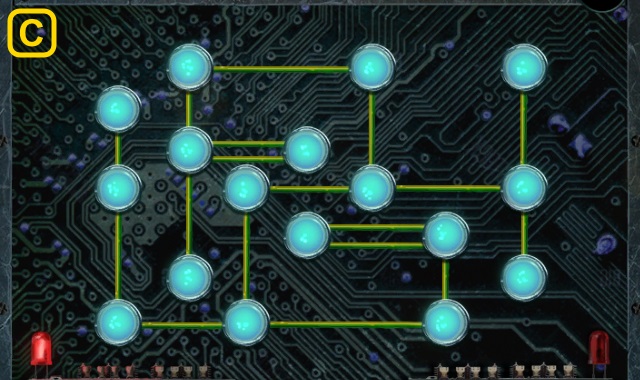
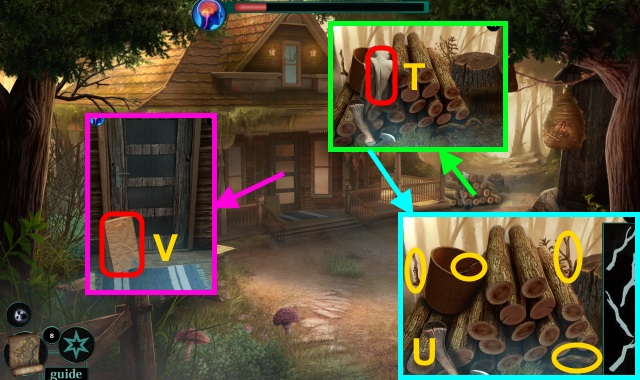
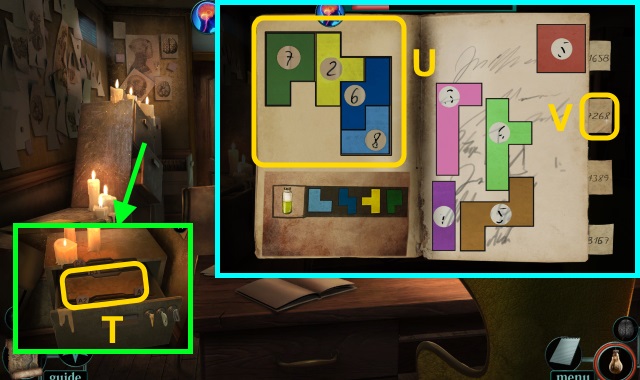
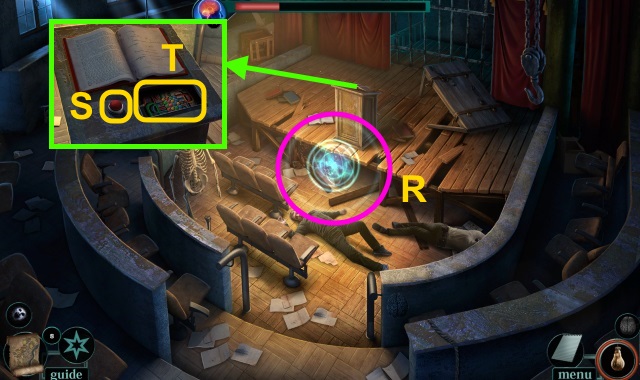
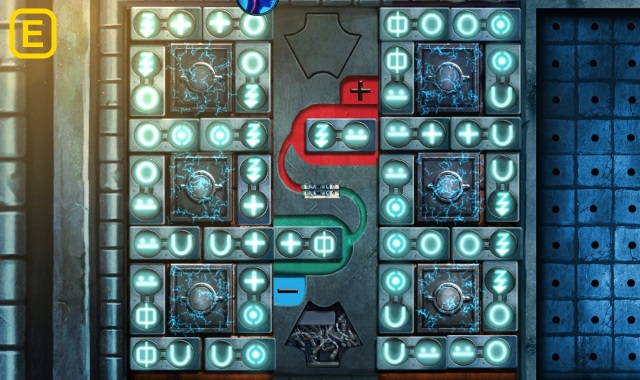
- Solution (T): Dx4-Ax7-Ex2-Bx7.
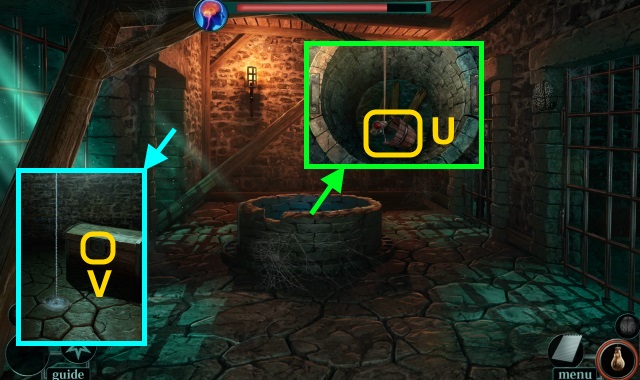
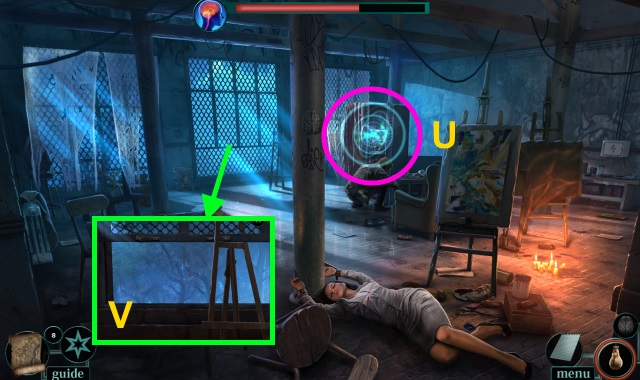
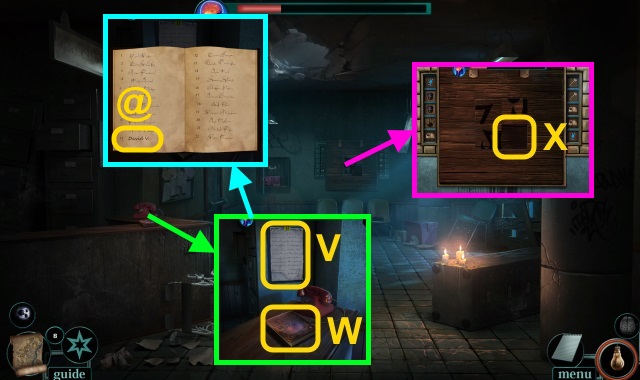
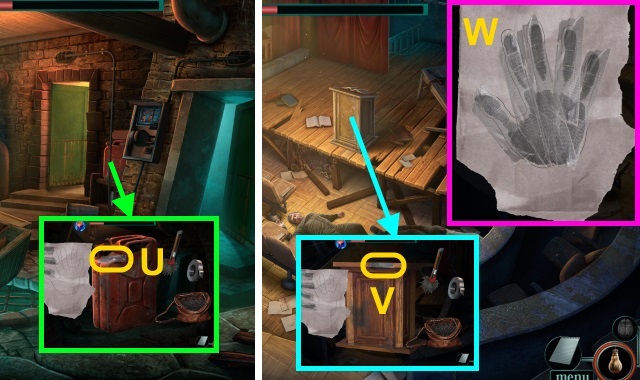
- Examine; open. Use BUCKET WITH ROPE (U); take LOCK TOKEN (4/5), ENGRAVED PLATE, and CHEST KNOB.
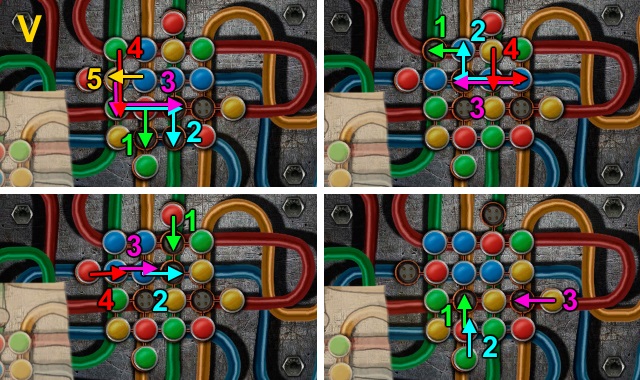
- Examine (V); place CHEST KNOB.
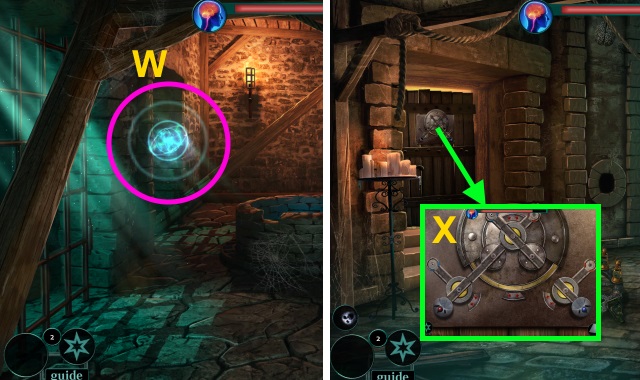
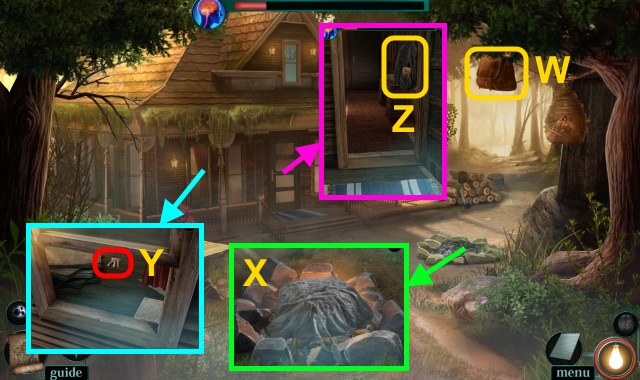
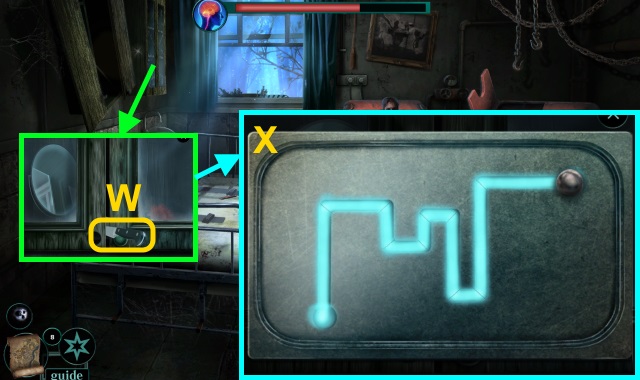
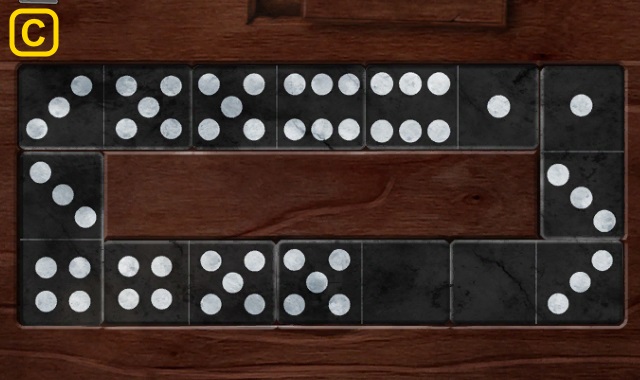
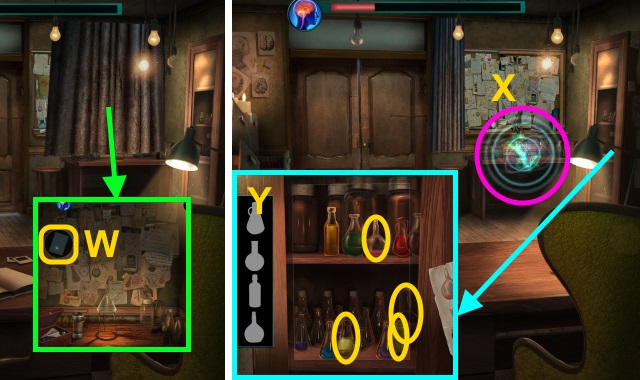
- Play HOP; receive LOCK TOKEN (5/5) (W).
- Walk down.
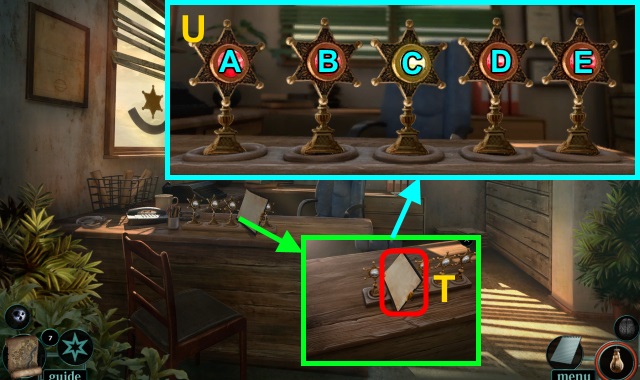
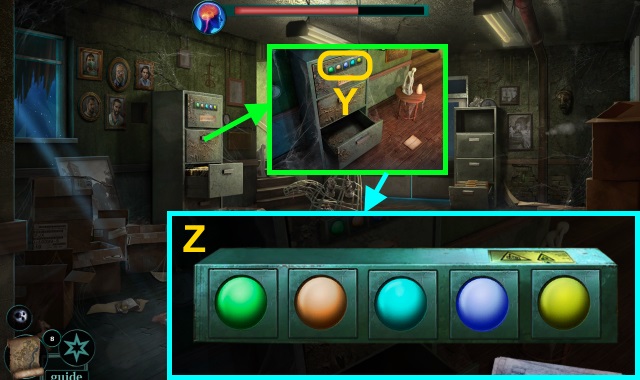
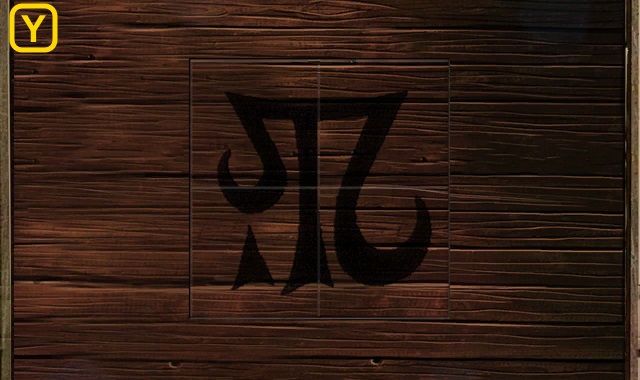
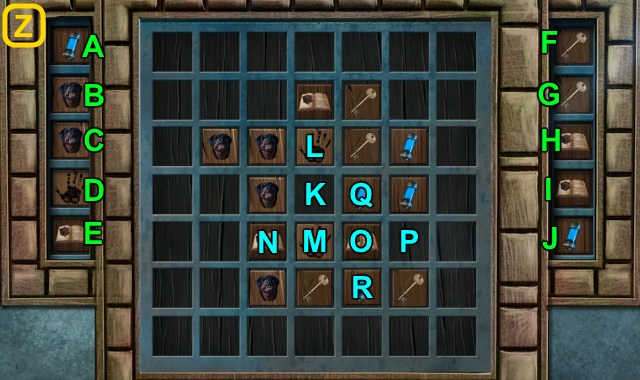
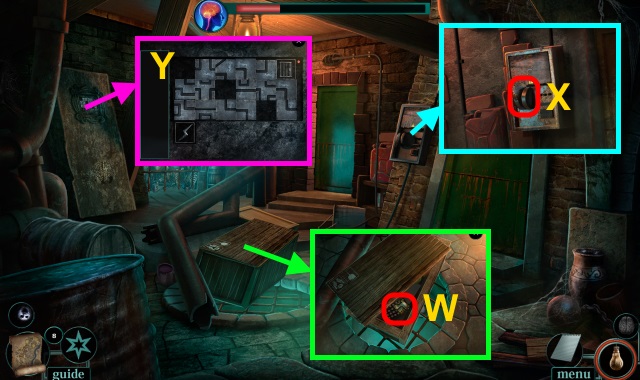
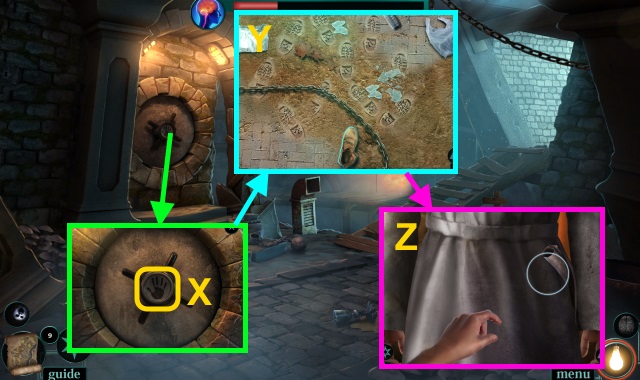
- Place LOCK TOKEN (5/5) (X).
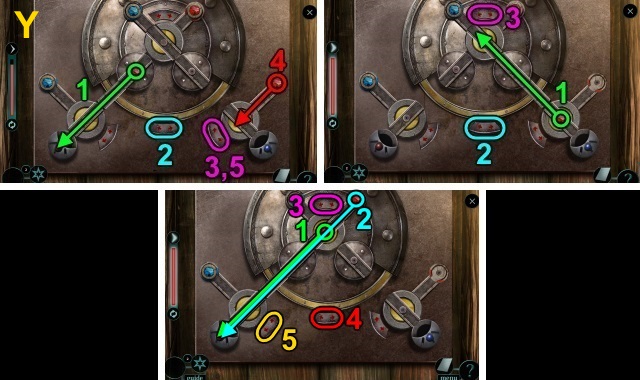
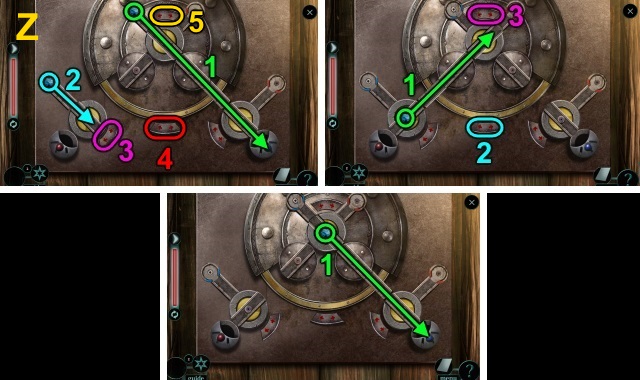
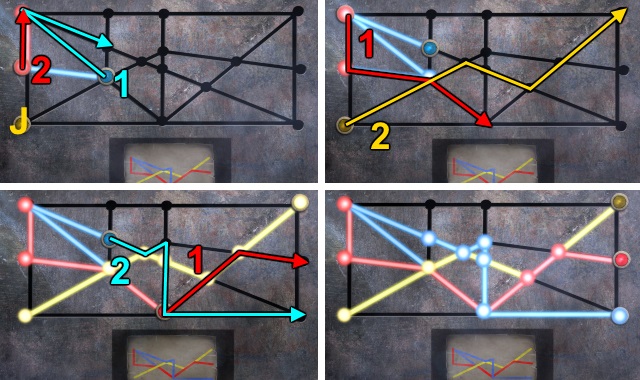
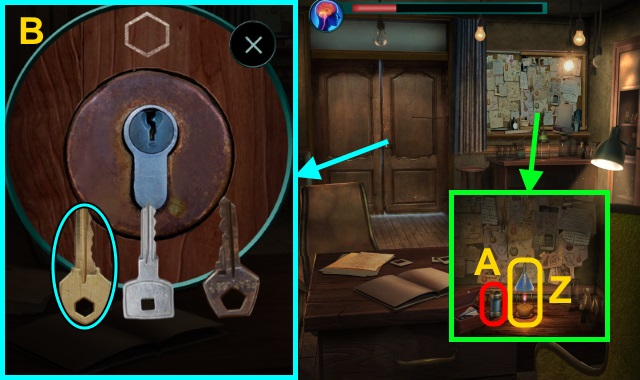
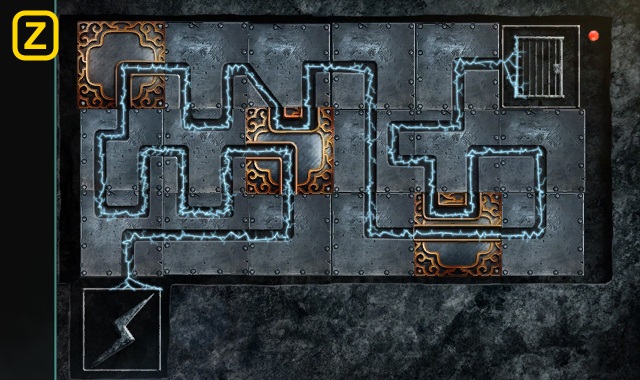
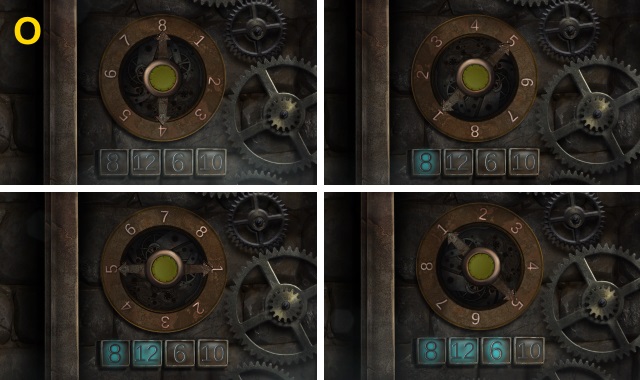
- Solution (Y-Z).
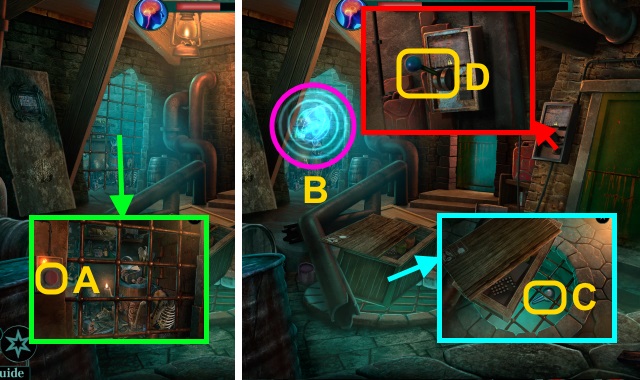
- Walk left.
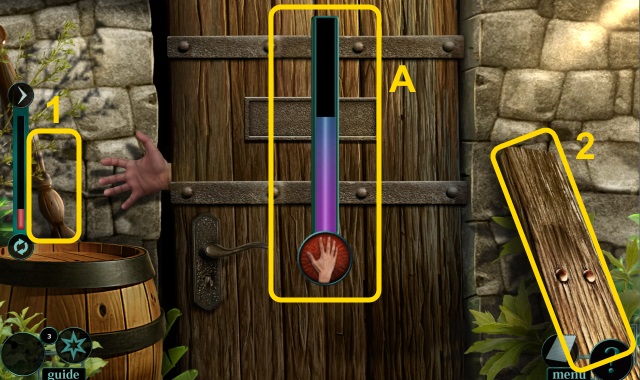
- Select Stay and try to barricade the door behind you.
- Examine door. Solution (A): select meter until it's full.
- Place boards (1-2).
- Move plants and butterfly; collect TAPE PIECES (B).
- Go forward.
- Move items (C); take WORK GLOVES.
- Walk down.

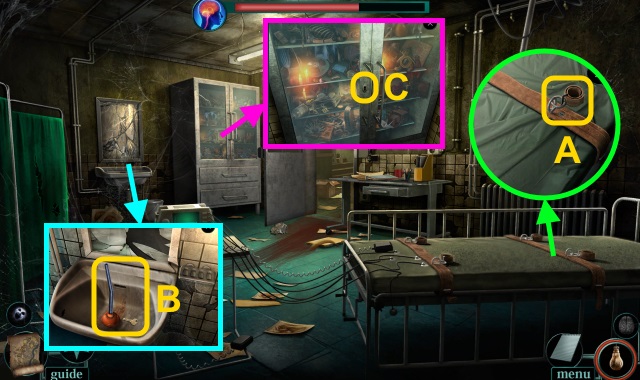
- Remove sign and handle (D). Place PIPE; take AXE. Move plants; use WORK GLOVES (E). Take TOOLBOX.
- Examine TOOLBOX; solution (F).
- Take STRONG GLUE and AIR PUMP HANDLE.
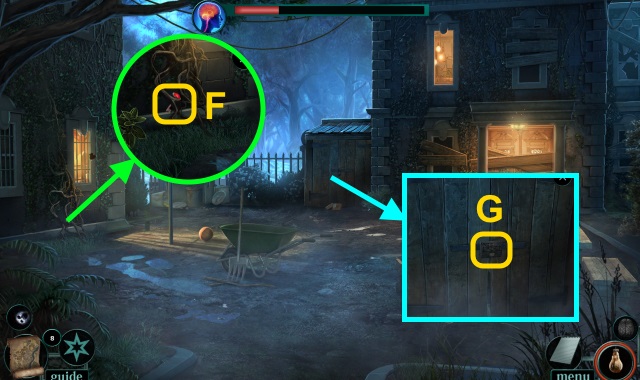
- Use WORK GLOVES and AXE (G); open door.
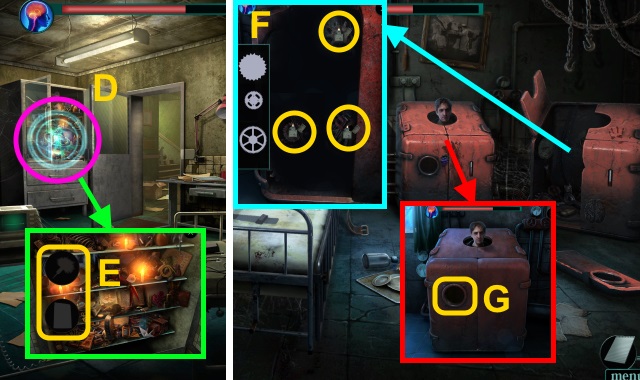
- Take BROKEN AIR PUMP (H). Move curtain (I); use LANTERN.
- Play HOP; receive INFLATABLE RAFT (J).
- Walk forward.
- AIR PUMP HANDLE on BROKEN AIR PUMP; take AIR PUMP.
- GLASS SHARD, TAPE PIECES, and AIR PUMP on INFLATABLE RAFT.
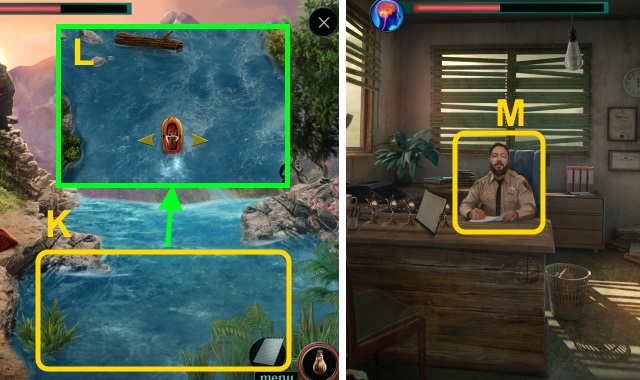
- Use INFLATABLE RAFT (K).
- Solution (L): use arrows to dodge obstacles.
- Walk left.
- Talk (M).
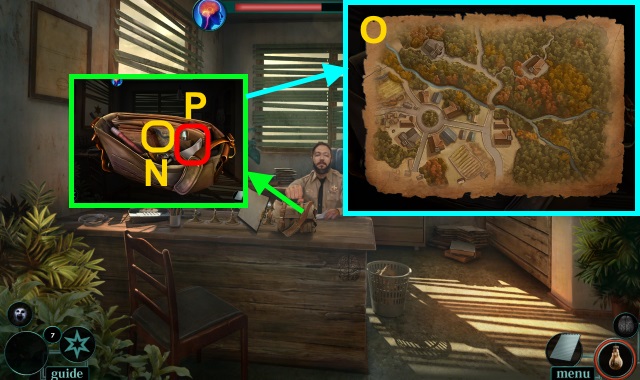
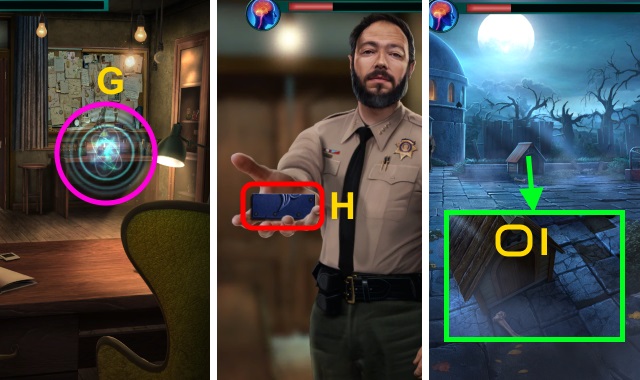
- Examine bag; examine map (N).
- Solution (O); take Map.
- Take HANDKERCHIEF and POCKET KNIFE (P).
- Take VERMIN REPELLANT SPRAY; read newspaper (Q).
- Move items; take BROKEN TROPHY (R).
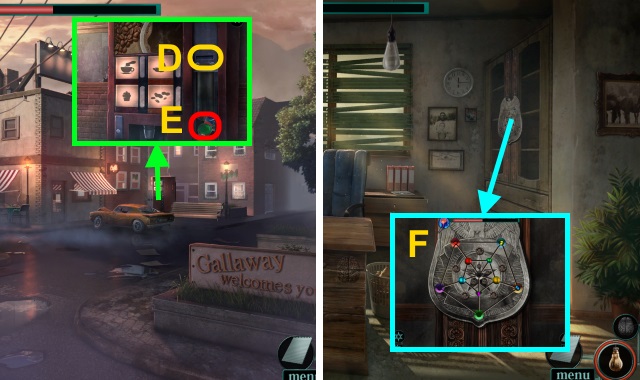
- Examine BROKEN TROPHY; place pieces (S). Use STRONG GLUE; take MENDED TROPHY.
- Take PEN AND PAPER (T); place MENDED TROPHY.
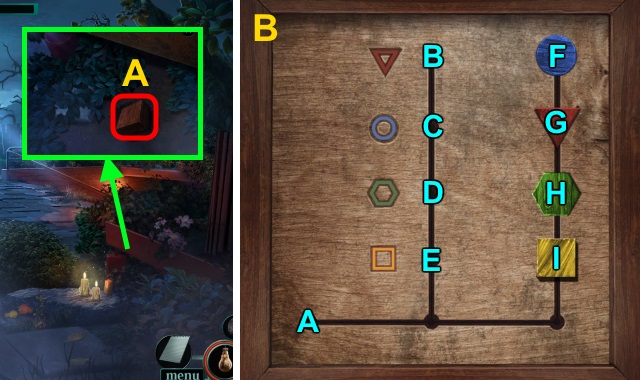
- Solution (U): (C-E)-(A-D)-(B-E).
- Take PINK KNOB.
- Walk down.
- Move can and papers; take COINS (V).
- Use VERMIN REPELLENT SPRAY (W).
- Play HOP; receive DRAWER KEY (X).
- Walk left.
- Use DRAWER KEY (Y); open. Take WIRES and SILVER KNOB.
- Walk down.
- Take clue (Z). Remove cover (A); examine.
- Use WIRES (B).
- Solution (C).
- Use COINS (D); take GREEN KNOB (E).
- Walk left.
- Place PINK KNOB, SILVER KNOB, and GREEN KNOB (F).
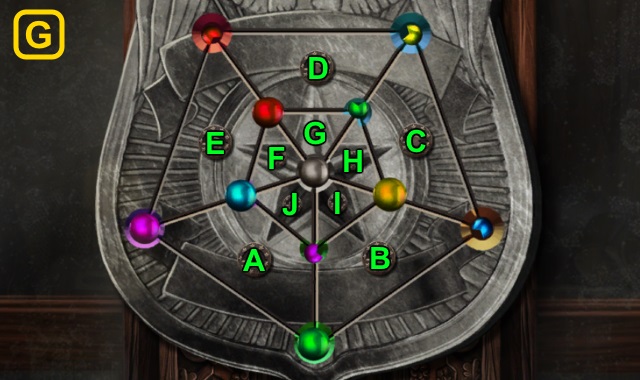
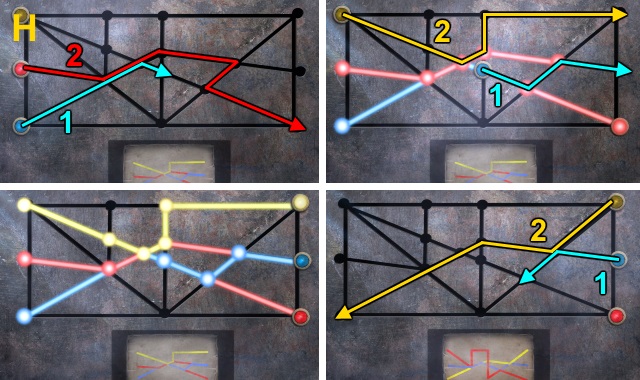
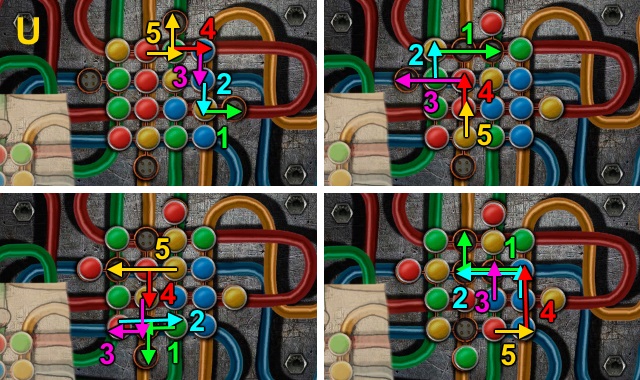
- Solution (G): F-C-G-C-I-B-A-J-A-J-A.
- Jx2-A-Gx2-Dx2-G-D-G-D-G-Dx3.
- Open; take ELECTRIC SHOCK DEVICE.
- Go right.
- Take radio (H).
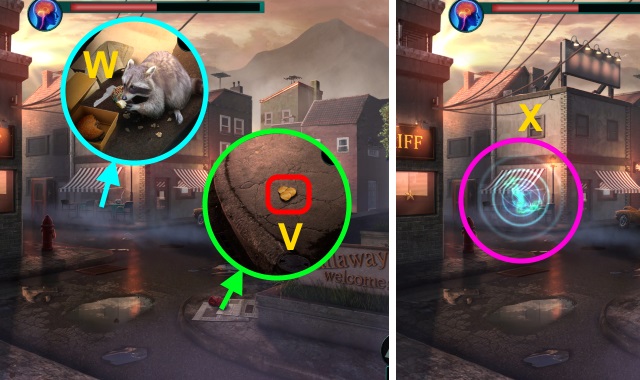
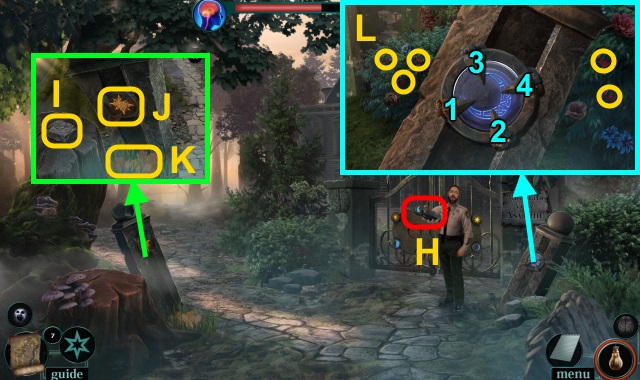
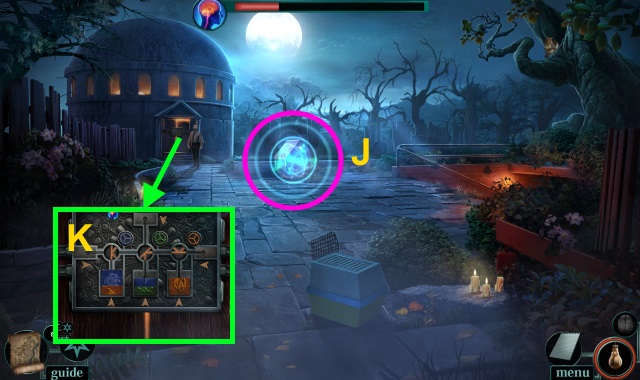
- Use rock (I) on plate 3x (J); move leaves (K).
- Collect BERRIES (L). Select (1-4); take MOON PLATE.
- Give BERRIES (M); take SUN PLATE.
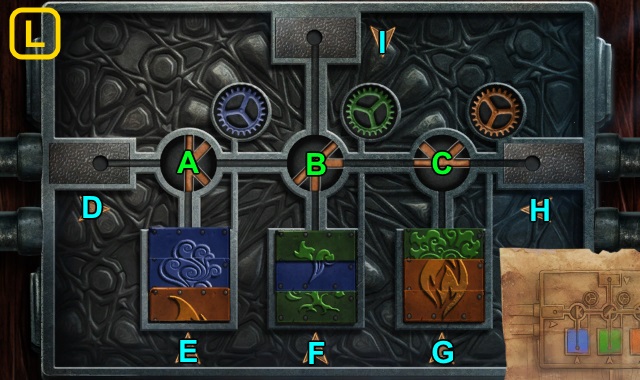
- Place MOON PLATE, SUN PLATE, and ENGRAVED PLATE (N).

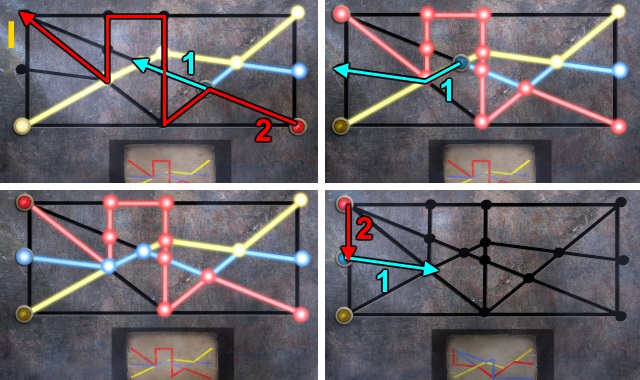
- Solution (O): A-Bx4-Ax3-B-Ax2-B.
- A-Bx3-Ax4-Bx4-A-B-Ax3.
- Solution (P): stop circles over each ghost.
- Give PEN AND PAPER (Q); take ROUTE TO DOCTOR.
- Use ROUTE TO DOCTOR; play HOP (R). Receive LIGHTER FLUID.
- Open gate (S).
- Take WET BED SHEET (T).
- Move plant; collect branches (U). Take BRANCHES.
- Take PACKAGE (V); examine door.
- POCKET KNIFE on PACKAGE; examine pieces. Take FRUIT PICKER.
- Use FRUIT PICKER (W); receive BAG.
- Open bag; take MAGNESIUM FIRE STARTER and SCREWDRIVER.
- LIGHTER FLUID on HANDKERCHIEF; take FLAMMABLE HANDKERCHIEF.
- Use BRANCHES, FLAMMABLE HANDKERCHIEF, MAGNESIUM FIRE STARTER, POCKET KNIFE, and WET BED SHEET (X).
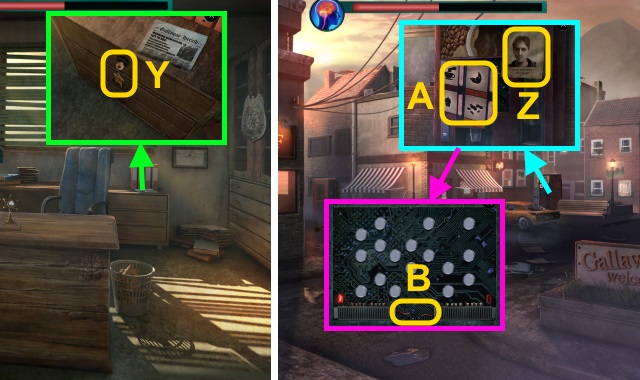
- Use SCREWDRIVER. Move papers; take DOCTOR'S KEYS (Y).
- Use DOCTOR'S KEYS. Examine jacket (Z); read papers. Examine jacket.
- Select Accept your fate and try to escape later.
Chapter 2: Jonesy
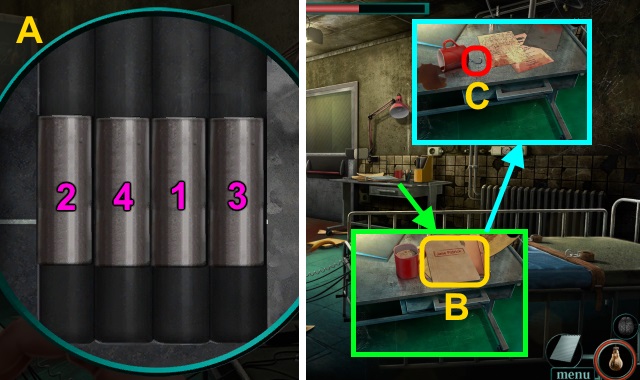
- Solution (A).
- Read file (B). Move papers; take SMALL KEY.
- Take FISH HOOK (C).
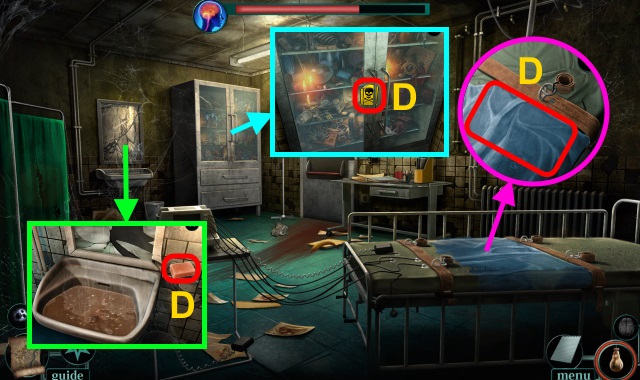
- Take SOAP, POISON STICKER, and SHEET (D).
- Use SMALL KEY (E); open. Take CONNECTORS.
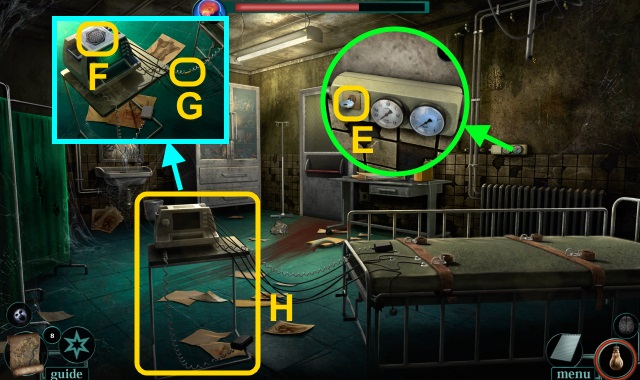
- Examine (F); place POISON STICKER (G). Place CONNECTORS (F).
- Examine cart (H).
- Examine machine 2x (I).
- Solution (J): press button when pointer is over red section.
- Walk forward.
- Examine; use SOAP (K). Close drawer; take PLUNGER CAP (L).
- Take PORTRAIT and RULER (M).
- Place PORTRAIT (N).

- Solution (O).
- Take TRANQUILIZER GUN.
- Walk down.
- Use RULER; take STENCIL and PAINT THINNER (P).
- Walk forward, then left.
- Pull cord (Q).
- Take KNIFE (R).
- Take BRASS ROD (S). Move papers; use STENCIL (T). Take STAFF COMBINATION.
- Use KNIFE (U); receive MASK.
- Take WIRE (V); use PAINT THINNER. Open; take SCREWDRIVER and FLOWER POT.
- Use KNIFE and WIRE (W).
- Solution (X).
- Open; take TRANQUILIZER DART.
- Walk down.
- Place STAFF COMBINATION (Y).
- Solution (Z).
- Take STAFF CHARTS.
- Walk down.
- Use SCREWDRIVER (A); take LEATHER RESTRAINT.
- BRASS ROD on PLUNGER CAP; take PLUNGER.
- Use PLUNGER; take CABINET KEY (B).
- Use CABINET KEY (C).
- Play HOP; receive LIGHTER (D).
- Examine STAFF CHARTS; take CHEMICAL FORMULA.
- Place CHEMICAL FORMULA and TRANQUILIZER DART (E).
- Play HOP; receive DOSED DART (D).
- Walk forward, then left.
- Use LIGHTER; collect gears (F). Take GEARS.
- Place GEARS (G).

- Solution (H).
- Take KEY CARD (I).
- Walk down.
- Use KEY CARD (J).
- Try to go forward.
- Select Shut the door on her.
- DOSED DART on TRANQUILIZER GUN.
- Use TRANQUILIZER GUN (K).
- Go forward.
- Use LEATHER RESTRAINT (L); take CRANK (1/2) (M).
- Move sheets; take FUNNEL (N).
- Walk down.
- Use FUNNEL and FLOWER POT (O); take POT OF WATER.
- Walk forward.
- Use POT OF WATER (P); place mud in mold (Q). Use KNIFE and FISH HOOK on mold; close. Open; take GARGOYLE.
- Walk down.
- Place GARGOYLE (R); take COMPLEX LOCK (S).
- Walk forward.
- Place COMPLEX LOCK (T).
- Play HOP; receive CRANK (2/2) (U).
- Place CRANK (2/2); open window. Examine easel (V).
- Go forward.
- Solution (W): stop circles over each ghost.
- Take CANE, DOMINO (1/2), and RAZOR BLADE (X).
- Examine; use CANE (Y). Take GLASS HOLDER, HOOK, and DOMINO (2/2) (Z).
- Use MASK; take SHED KEY (1/3) (A).
- Walk down.
- Place DOMINO (2/2) (B).
- Solution (C).
- Take SHED KEY (2/3).
- Remove cloth; use RAZOR BLADE (D).
- Go forward.
- Examine (E); enter 7411. Open; take PLIERS.
- Use PLIERS (F); take SHED KEY (3/3).
- Examine (G); place SHED KEY (3/3).
- Solution (H-J).
- Take LEAF BLOWER (K).
- Examine SHEET 4x; receive IMPROVISED ROPE.
- IMPROVISED ROPE and HOOK on LEAF BLOWER; take GRAPPLING GUN.
- Use GRAPPLING GUN (L).
- Select Get inside the office as quickly as possible.
Chapter 3: The Antidote
- Open (M); examine.
- Move items; take DIAMOND CAP (N).
- Take EMPTY BURNER (O). Move papers; take DOCTOR'S JOURNAL.

- Use DIAMOND CAP and GLASS HOLDER; take KEYS (P).
- Read DOCTOR'S JOURNAL.
- Take ALCOHOL (Q); use KEYS (R).
- Solution (S).
- Examine files (T); read. Take DECODER.
- DECODER on DOCTOR'S JOURNAL.
- Solution (U). Select tab (V); take FORMULA.
- Open curtain; place FORMULA (W).
- Play HOP; receive ANTIDOTE FORMULA (X).
- ALCOHOL on EMPTY BURNER; take BURNER.
- Use ANTIDOTE FORMULA; collect bottles (Y). Take CHEMICALS.
- Place BURNER and CHEMICALS (Z); take ANTIDOTE (A).
- Use KEYS; solution (B).
- Walk forward.
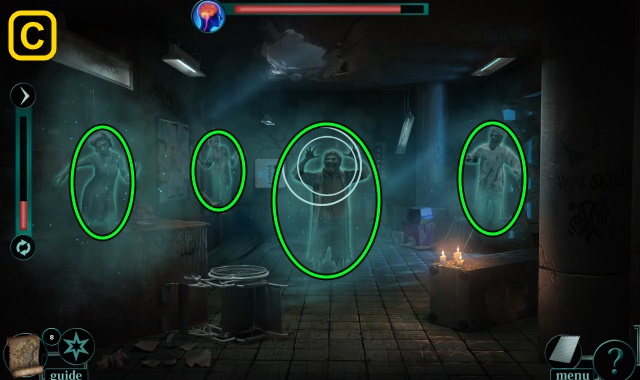
- Solution (C): stop circles over each ghost.
- Take SCALPEL and PEANUTS (D). Examine paper (E); take GOLDEN PEN.
- Use SCALPEL (F); receive BASEBALL BAT.
- Take CAGE (G).
- Walk left.
- Select Give it something to chew on.
- Move leaves; take SCREWDRIVER and RED BOARD GAME TOKEN (H).
- SCREWDRIVER and PEANUTS on CAGE; take BAITED CAGE.
- Use BAITED CAGE (I); receive CAGED SQUIRREL.
- Place CAGED SQUIRREL; examine (J).
- Use SCREWDRIVER (K); take BOBBLE HEAD. Take HEAT RESISTANT GLOVES (L).
- Take SHOELACE and SHOVEL HEAD (M).
- Walk right.
- Use SHOVEL HEAD and HEAT RESISTANT GLOVES (N); receive SHOVEL WITH COALS.
- Use SHOVEL WITH COALS; take YELLOW BOARD GAME TOKEN and OVEN PART (O).
- Place OVEN PART (P); open. Take TAP (Q).
- Place TAP (R).

- Play HOP; receive PLASTIC BAG (S).
- Walk down twice.
- Examine SHOELACE; use GOLDEN PEN. Take PEN HOOK.
- Use PEN HOOK; take PEPPER SPRAY (T).
- Use SCREWDRIVER (U); take GREEN BOARD GAME TOKEN and BODY MIST.
- Examine BOBBLE HEAD; take RIPPED NAME.
- Examine paper (V); place RIPPED NAME. Read book (W).
- Examine name (@); take DOOR CODE NOTE.
- Open PLASTIC BAG; take WOODEN TOKEN.
- Use WOODEN TOKEN (X).
- Solution (Y).
- Solution (Z): (D-K)-(C-L)-(E-M)-(B-N).
- (A-O)-(J-P)-(F-Q)-(G-R)-(H-L)-(I-K).
- Take BARRED DOOR PART (1/2).
- Walk left.
- Use BODY MIST and SHOVEL HEAD; take BOARD GAME and BOX HANDLE (A).
- Open BOARD GAME; place RED BOARD GAME TOKEN, YELLOW BOARD GAME TOKEN, and GREEN BOARD GAME TOKEN.
- Solution (B): (I-B)-(H-C)-(G-A)-(C-G)-(B-H)-(A-B).
- (H-C)-(G-D)-(F-A)-(D-H)-(C-I)-(A-C)-(I-A)-(H-D)-(A-E).
- Take GUN KEY.
- Walk down.
- Place BOX HANDLE (C); open. Take BONE.
- Use GUN KEY (D); receive INJECTION PISTOL.
- ANTIDOTE on INJECTION PISTOL; take INJECTABLE ANTIDOTE.
- Select Wait and use the antidote on the sheriff.
- Solution (E): select meter until it's full.

- Solution (F).
- Use INJECTABLE ANTIDOTE on scene.
- Play HOP (G).
- Take BARRED DOOR PART (2/2) (H).
- Walk forward, then left.
- Place BONE (I).
- Play HOP; receive LARGE DOOR NOTE (J).
- DOOR CODE NOTE on LARGE DOOR NOTE; take COMPLETE DOOR NOTE.
- Place BARRED DOOR PART (2/2) and COMPLETE DOOR NOTE (K).
- Solution (L): F-Bx6-Ax2-F-Bx2-Cx3.
- G-C-H-Bx3-Ax5-E-B-E-Bx3-Cx7.
- E-C-Ax6-D-Ax2-Bx5-I-Bx3-H.
- Walk forward.
Chapter 4: Doctor Alden
- Take THIGH BONE (M).
- Use THIGH BONE (N).
- Move items; take STONE TOKEN (1/3) and TAPE (O).
- Take SKELETON HAND and POINTING STICK (P).
- POINTING STICK and TAPE on SKELETON HAND; take ELONGATED HAND.
- Use ELONGATED HAND (Q).
- Play HOP; receive BUTTON (R).
- Place BUTTON (S); press. Examine (T).
- Solution (U-V).
- Walk forward.
- Open box; take STONE TOKEN (2/3) (W). Move box.
- Take STONE TOKEN (3/3) (X).
- Place STONE TOKEN (3/3) (Y).
- Solution (Z).
- Press button (A).
- Play HOP; receive HUGE MAGNET (B).
- HUGE MAGNET and TAPE on ELONGATED HAND; take HAND WITH MAGNET.
- Use HAND WITH MAGNET (C); receive CONTROL BOX PIECE.
- Use CONTROL BOX PIECE (D).
- Solution (E).
- Select Go through this door.
- Solution (F): stop circles over each ghost.
- Take RUBBER BAND (G); open. Take BROKEN GLASS and FINGERPRINT DUSTING KIT.
- Examine (H).
- Walk right.
- Move items; take ADJUSTABLE WRENCH and CELL HANDLE (I).
- Collect feathers (J).
- Take feathers (K); receive FEATHERS.
- Examine (L).

- Play HOP; receive SMALL BAG (M).
- Use SMALL BAG and BROKEN GLASS (N); receive BAG WITH ASHES.
- Walk down.
- Use CELL HANDLE; open (O). Remove chain and cloth; take CIGAR HOLDER (P).
- FEATHERS and RUBBER BAND on CIGAR HOLDER; take IMPROVISED BRUSH.
- TAPE, IMPROVISED BRUSH, and BAG WITH ASHES on FINGERPRINT DUSTING KIT.
- Use FINGERPRINT DUSTING KIT. Use brush (P) on ashes (Q); use brush on handle (R). Use tape (S) on handle; examine (R).
- Walk right.
- Use FINGERPRINT DUSTING KIT. Use brush on ashes; use brush on pipe. Use tape; examine (T).
- Walk down twice.
- Use FINGERPRINT DUSTING KIT. Use brush on ash; use brush on canister. Use tape; examine (U).
- Walk down.
- Use FINGERPRINT DUSTING KIT. Use brush on ash; use brush on podium. Use tape; examine (V).
- Examine FINGERPRINT DUSTING KIT; place tape (W). Take HANDPRINT.
- Walk forward twice.
- Use HANDPRINT (X).
- Select Sneak up on the doctor.
- Solution (Y): stop shoes over outlines.
- Solution (Z): stop circle over paper.
- Use BAG WITH ASHES and ADJUSTABLE WRENCH (A).
- Examine (B).
- Walk down.
- Examine cell (C); pull handle (D).
- Walk left.
- Examine; take EXIT GEAR (E).
- Examine (F).
- Take MACHINE PART and TRUTH SERUM (G).
- Place MACHINE PART (H).
- Solution is random (I).
- Walk down.
- Open EMPTY PEPPER SPRAY; use TRUTH SERUM. Take TRUTH SERUM GAS.
- Use ADJUSTABLE WRENCH (J); talk.
- Use TRUTH SERUM GAS; take note (K).
- Walk left.
- Play HOP; receive BOTTLE OF WATER (L).
- Walk down three times.
- Use BOTTLE OF WATER (M).
- Go to Maze exit.
- Place EXIT GEAR (N).
- Solution (O).
- Go forward.
- Congratulations! You have completed Maze: Stolen Minds.
Created at: 2018-07-22