

Walkthrough Menu
- General Tips
- Chapter 1: Gehenna Tower
- Chapter 2: The Masked Man
- Chapter 3: The Atrium
- Chapter 4: S.A.R.A
General Tips
- This is the official guide for Maze: The Broken Tower.
- This guide will not show when you have to zoom into a location; the screenshots will show each zoom scene.
- Hidden-object puzzles are referred to as HOPs. This guide will not show screenshots of the HOPs, however, it will mention when an HOP is available and the inventory item you'll collect from it.
- Use the Map to fast travel to a location.
Chapter 1: Gehenna Tower
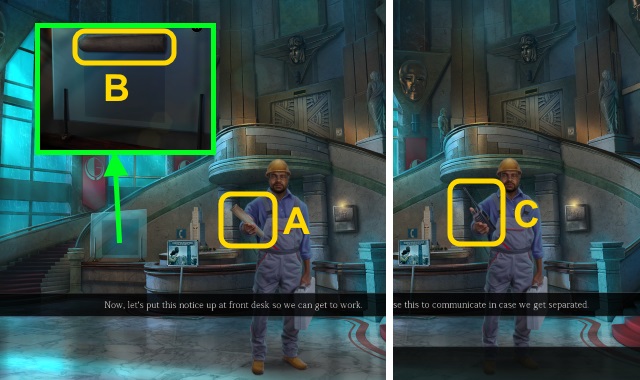
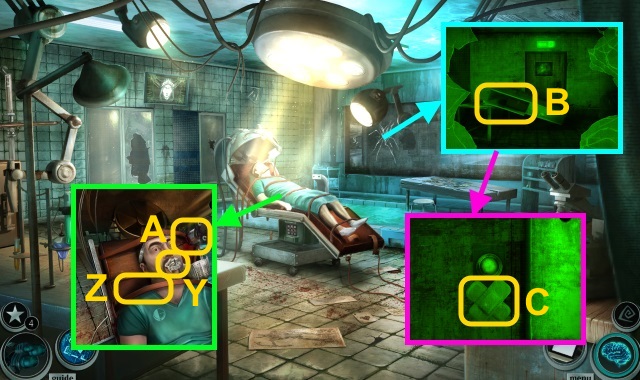
- Take the NOTICE (A).
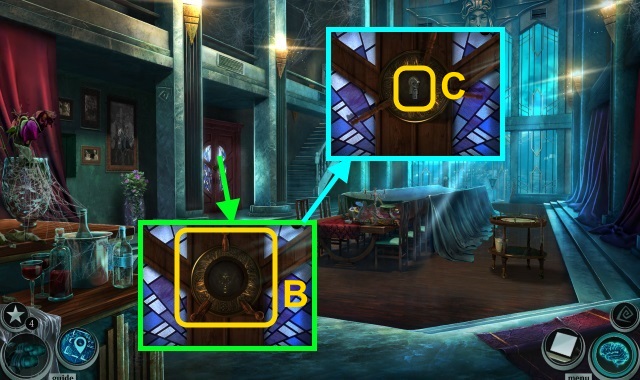
- Place the NOTICE (B); open it.
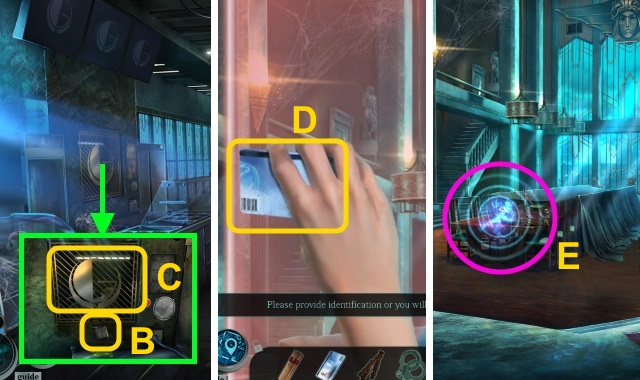
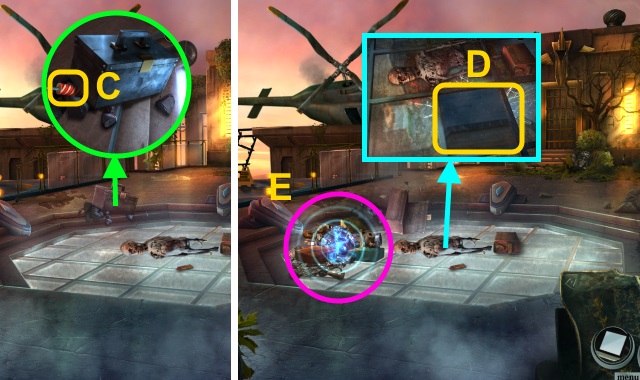
- Take the Walkie Talkie (C); examine it.
- Go upstairs.
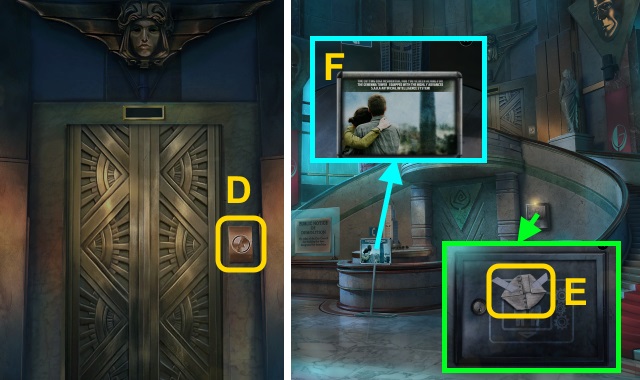
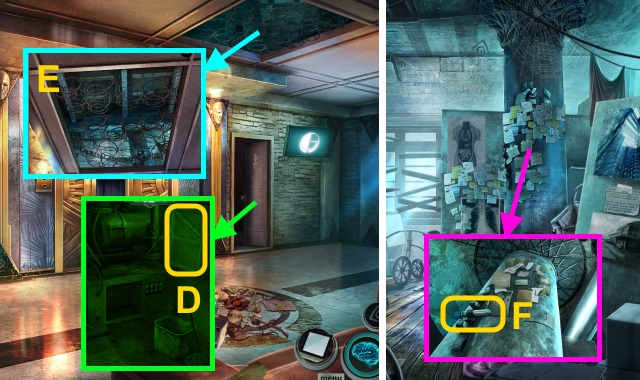
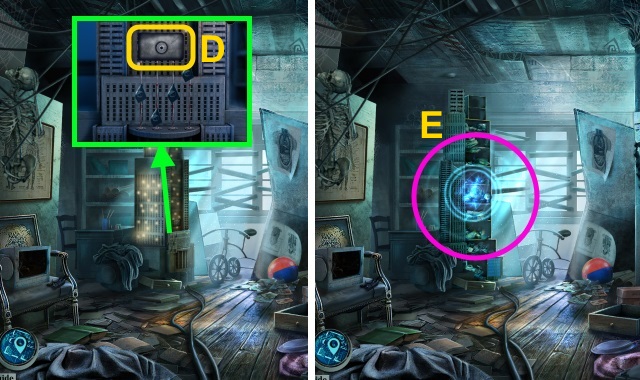
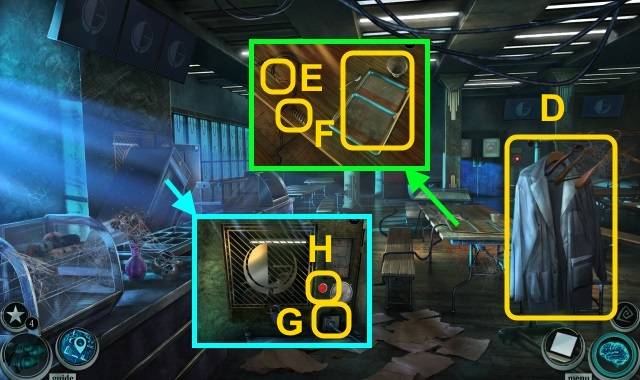
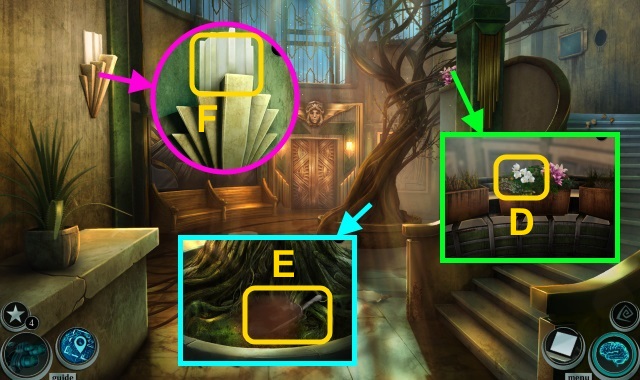
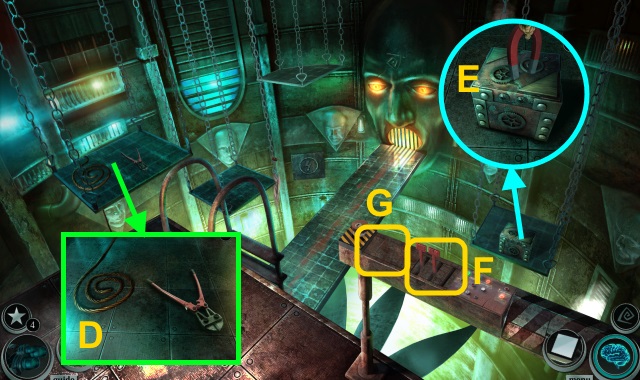
- Press the button (D).
- Walk down.
- Take the FOLDED PAPER (E).
- Open the FOLDED PAPER; take the METAL LOGO.
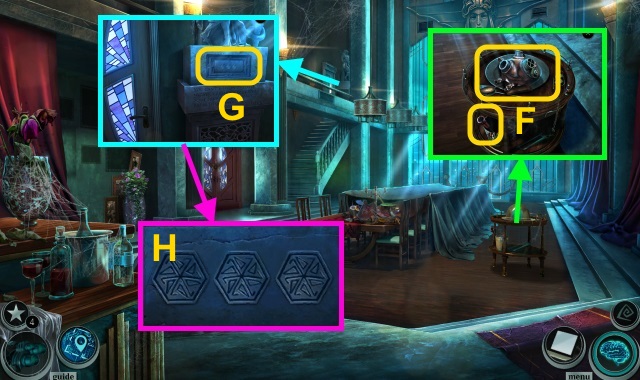
- Move the sign (F).
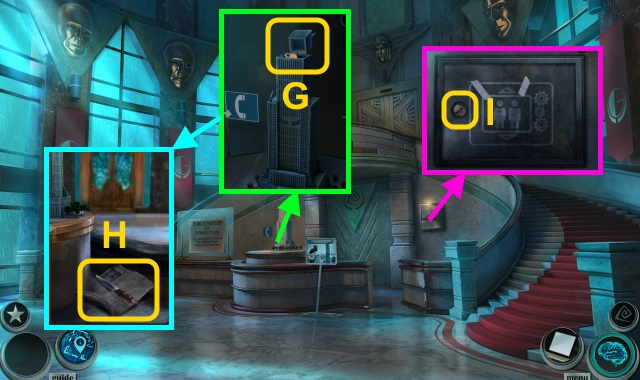
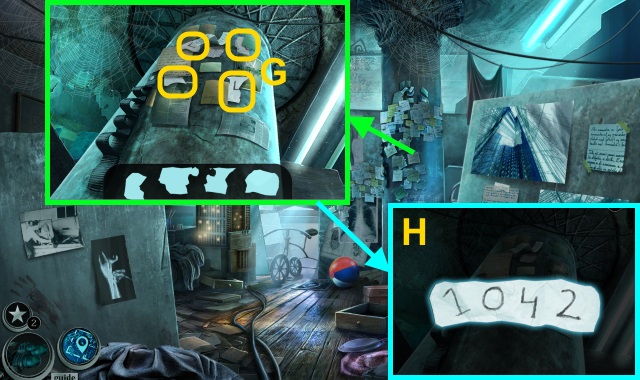
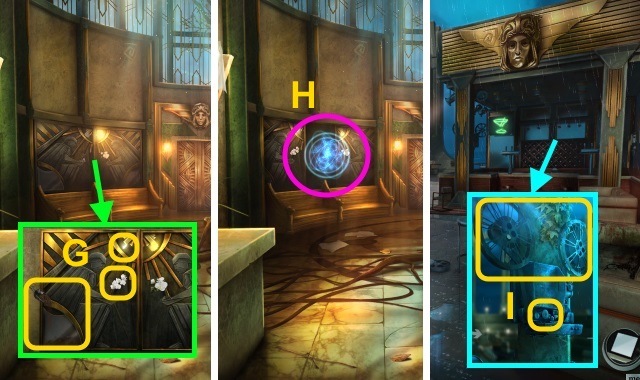
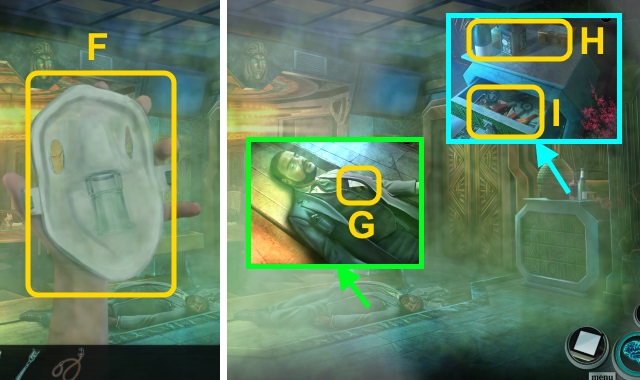
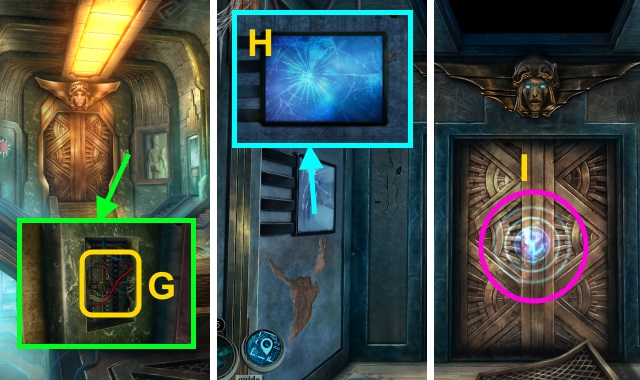
- Attach the METAL LOGO; open the tower. Take the BRONZE KEY (G).
- Look behind the model; open the newspaper. Take the KNIFE (H); move the newspaper.
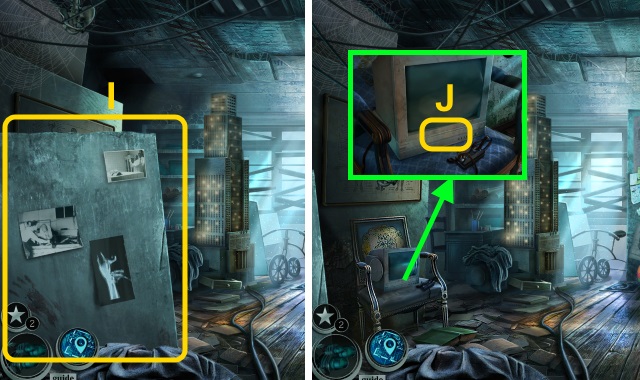
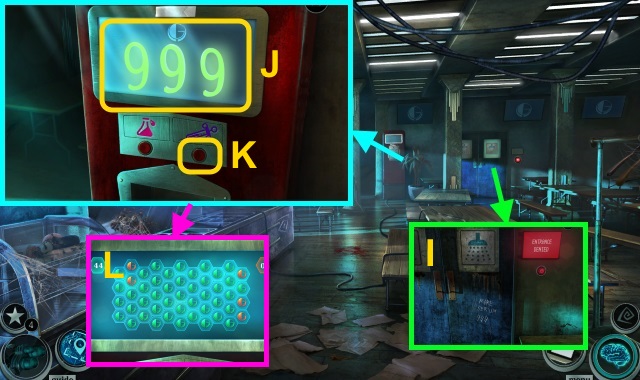
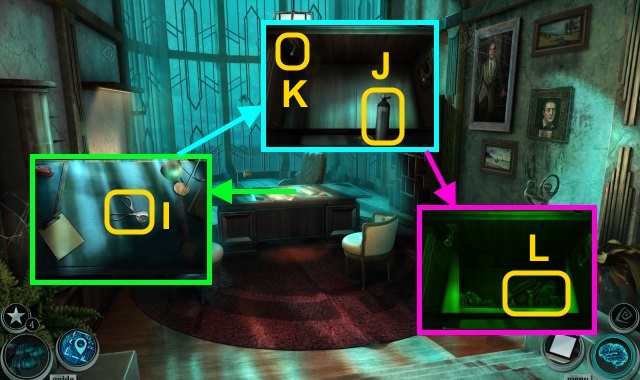
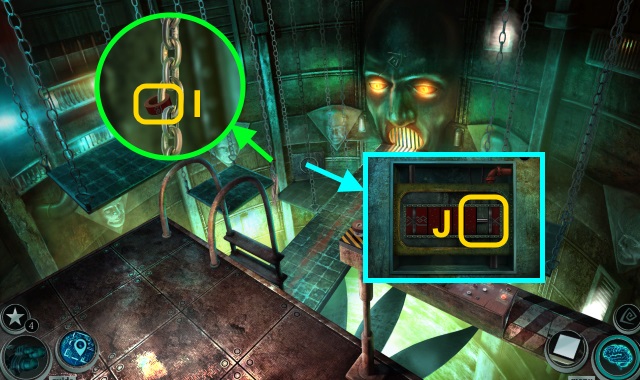
- Use the BRONZE KEY (I); open the cover for a mini-game.
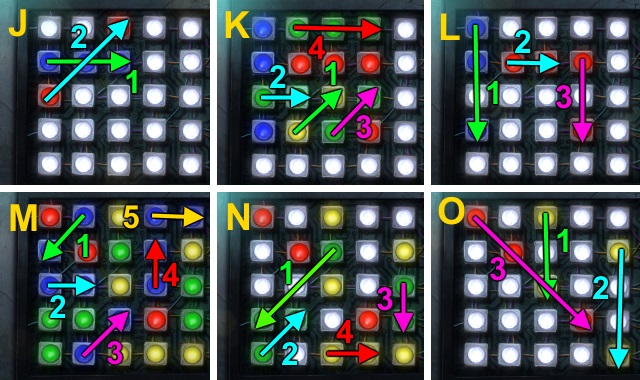
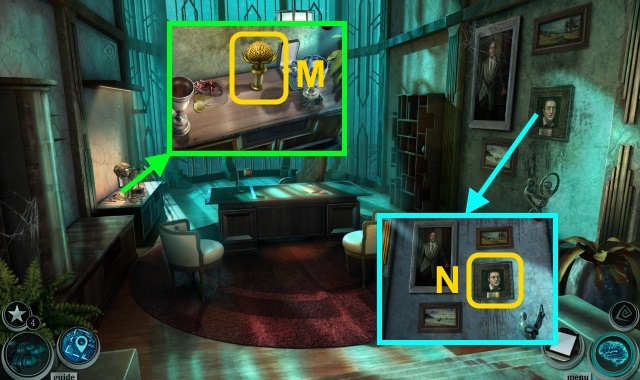
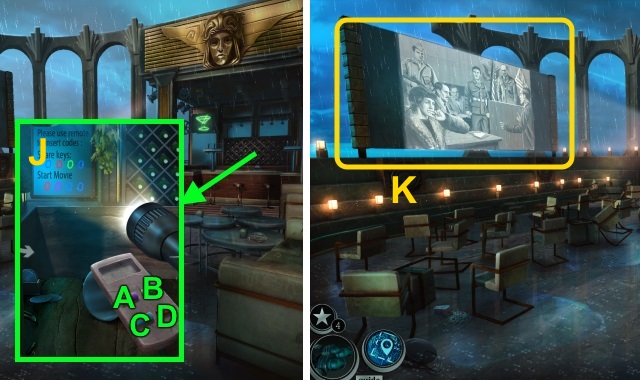
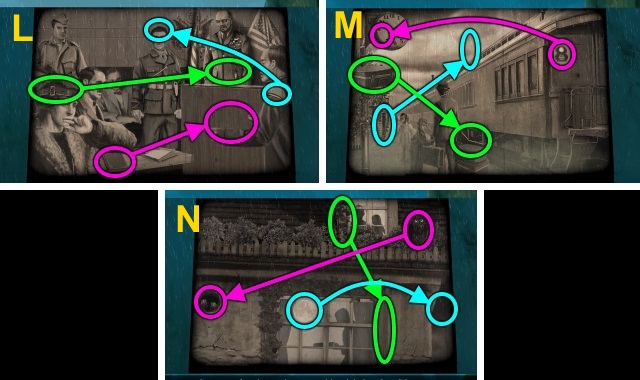
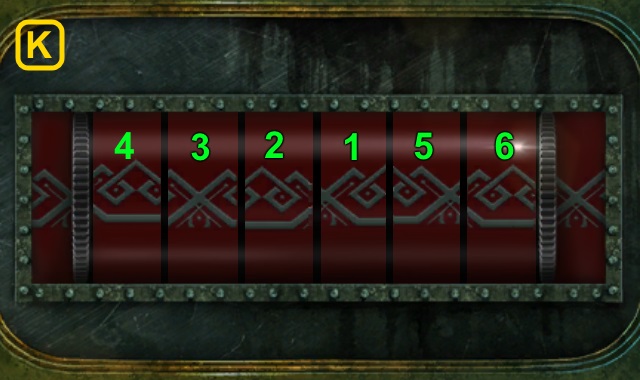
- Solution (J-O).
- Try to walk forward.
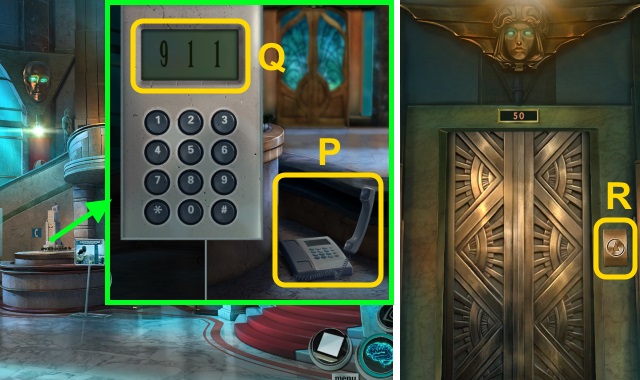
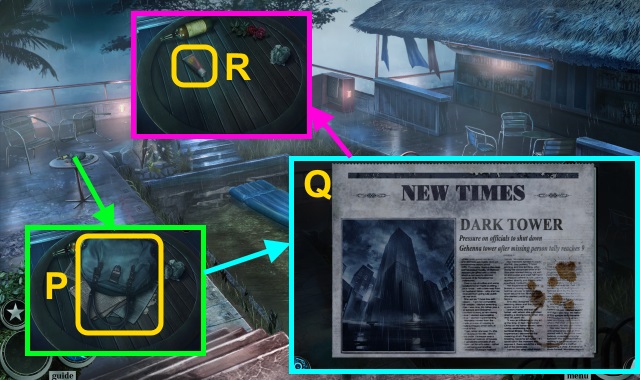
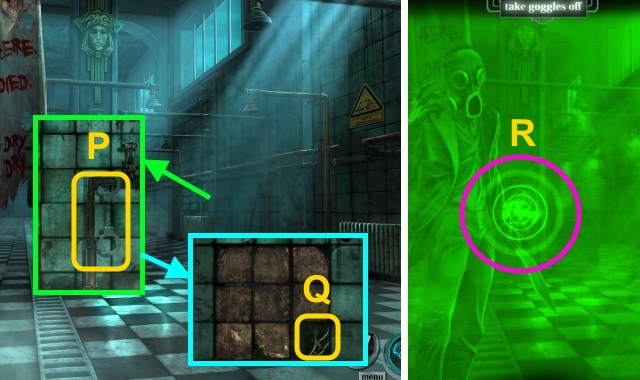
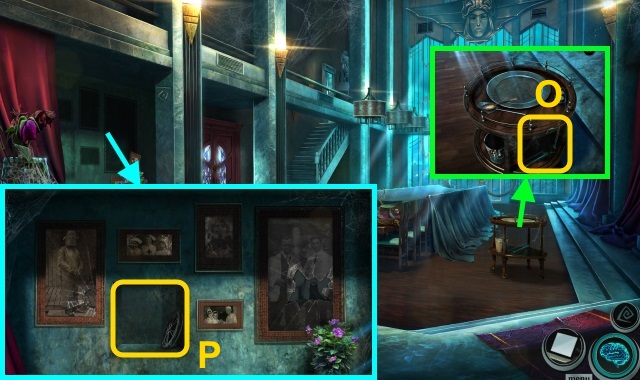
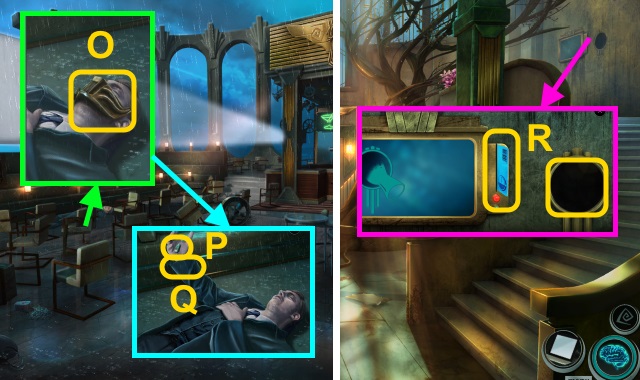
- Use the phone (P); dial 9-1-1 (Q).
- Go upstairs.
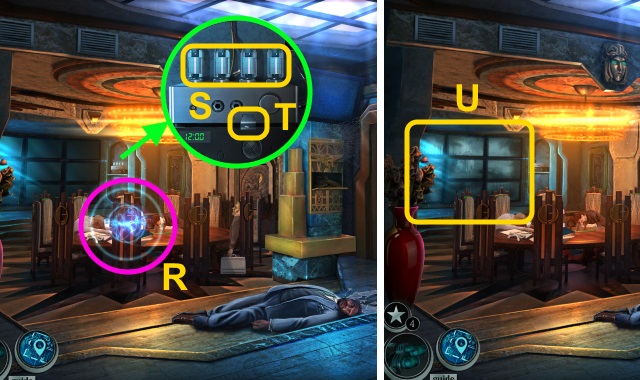
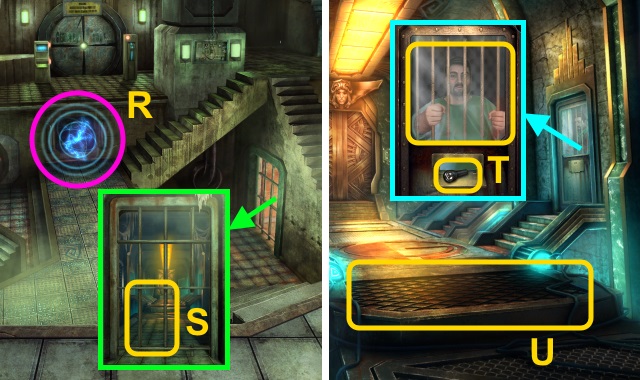
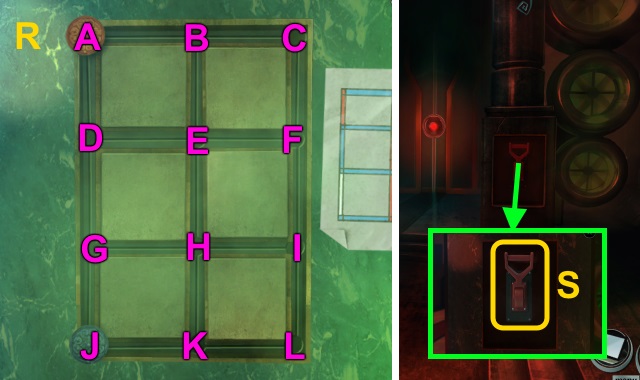
- Press the button (R).
- Try to walk forward; walk forward.
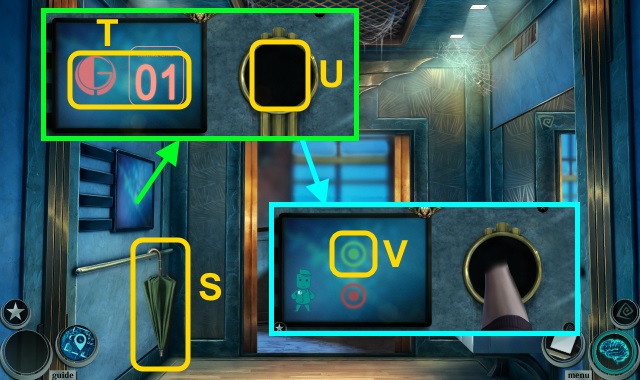
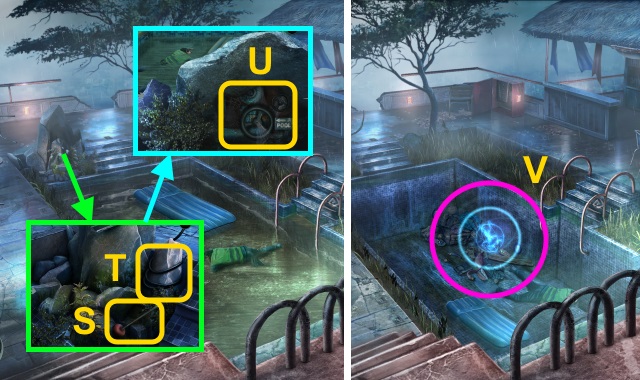
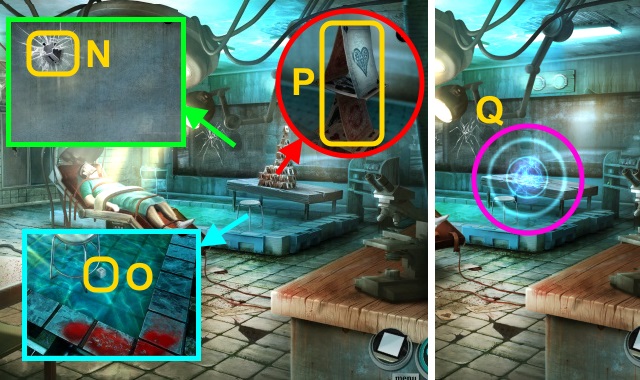
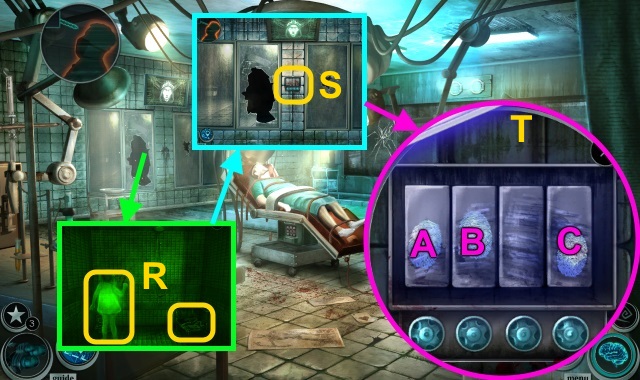
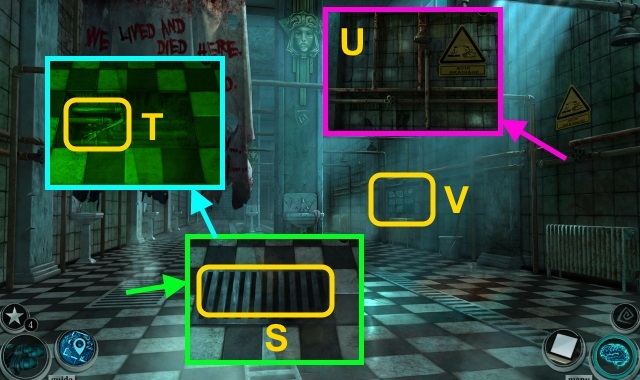
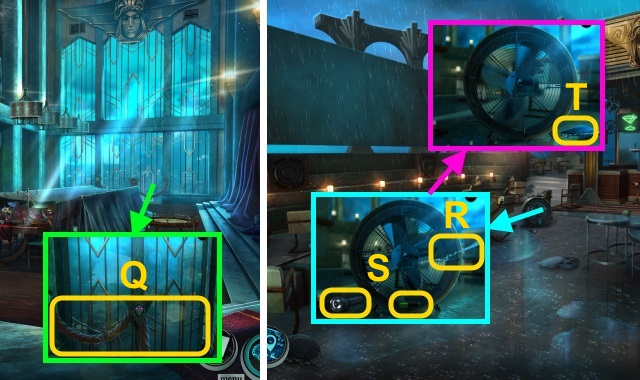
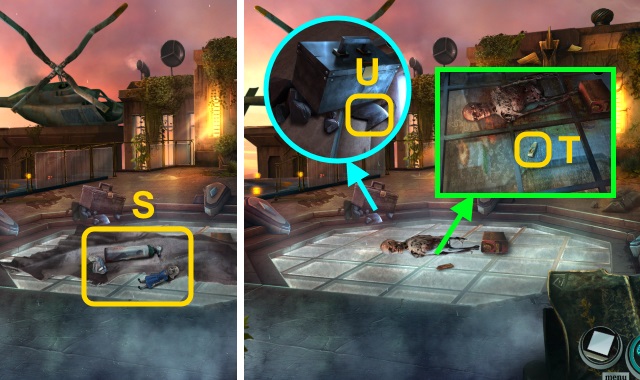
- Take the GREEN UMBRELLA (S).
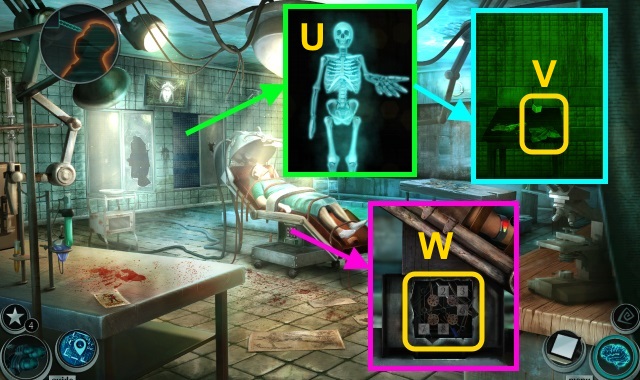
- Examine the screen (T); examine the hole (U).
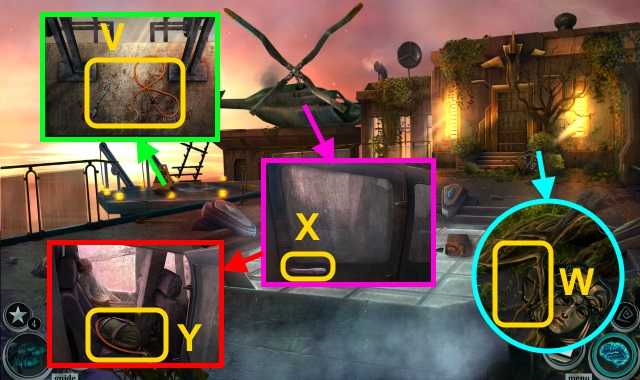
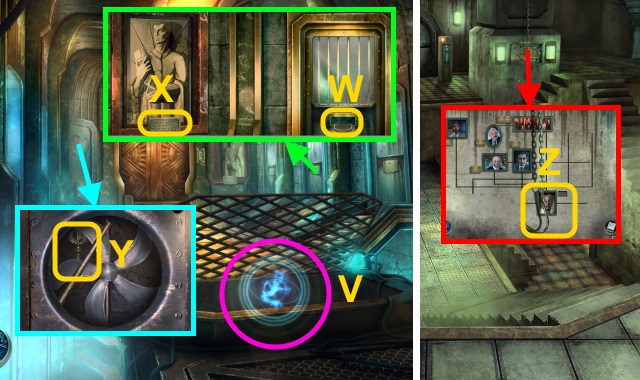
- Press the button (V).
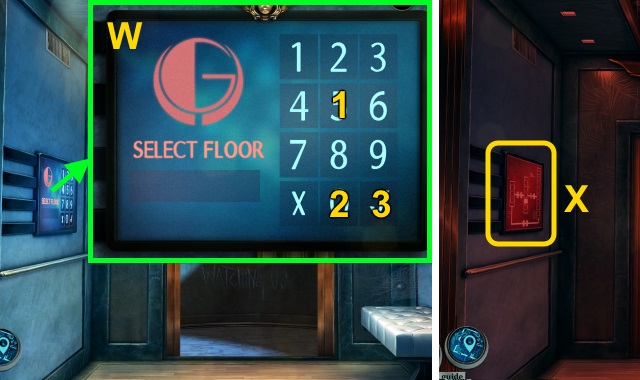
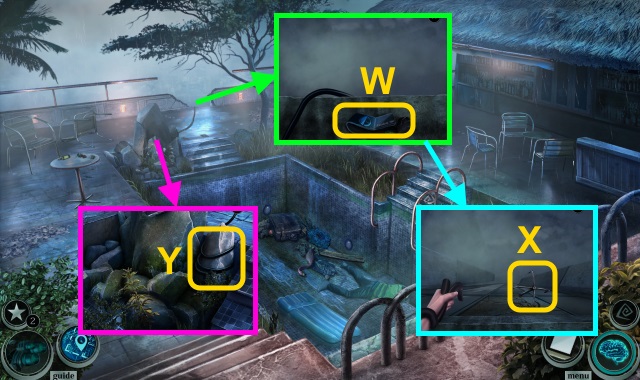
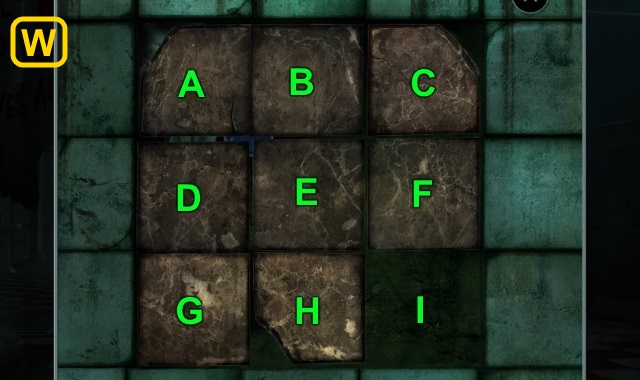
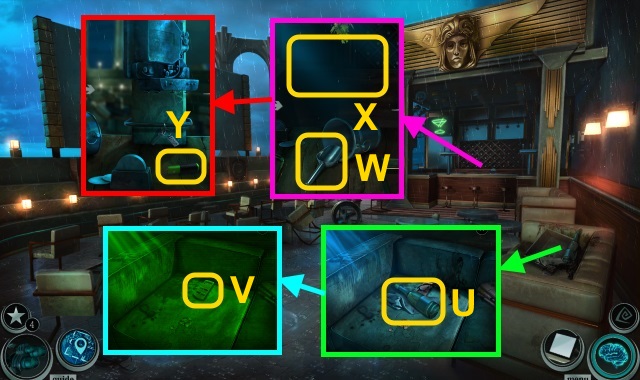
- Press the buttons in order (W).
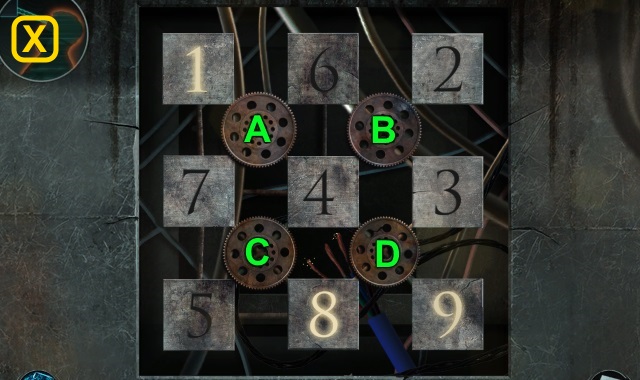
- Examine the screen for a mini-game (X).
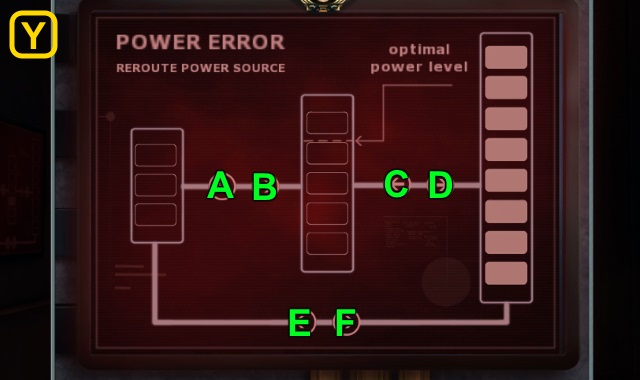
- Solution (Y): E-B-E-B-D-B-E-B.
- Select 'Jump out on the lower floor.'
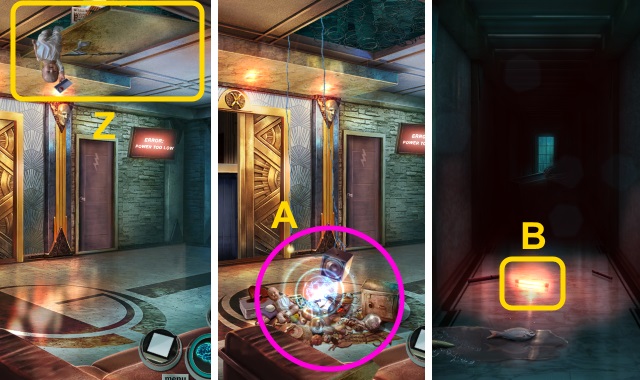
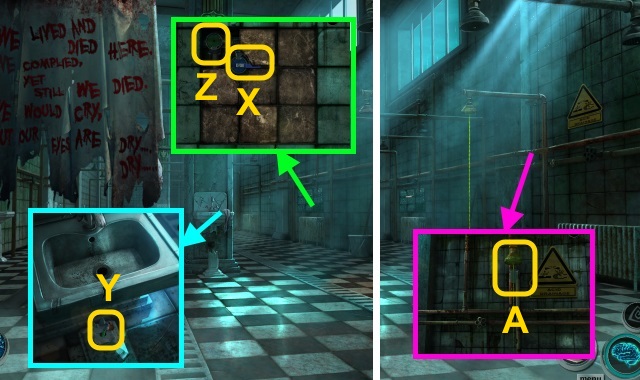
- Examine the ceiling; use the GREEN UMBRELLA (Z).
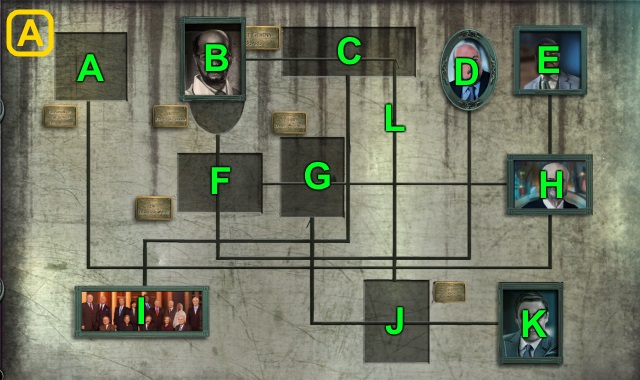
- Play the HOP; receive the KEY CARD (A).
- Try to walk left; walk left, then forward.
- Take the light (B).
- Walk forward.
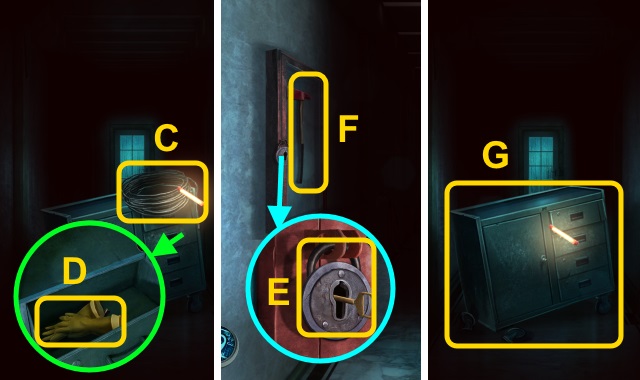
- Take the EXTENSION CORD (C).
- Open the drawer; take the RUBBER GLOVES and TARNISHED KEY (D).
- Walk down twice.
- Use the TARNISHED KEY (E). Take the AXE (F).
- Walk forward twice.
- Examine the cart; use the AXE 4x (G).
- Walk forward.
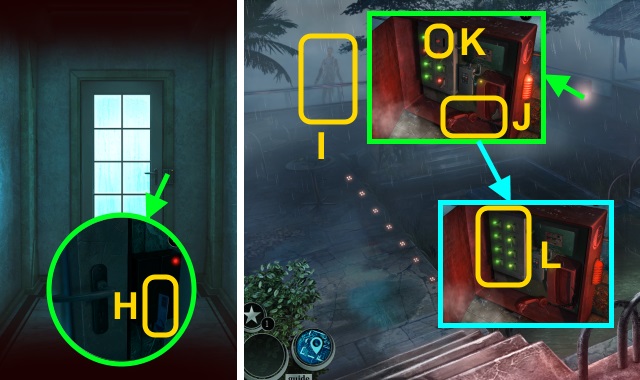
- Use the KEY CARD (H); open the door.
- Walk forward.
- Examine the man (I).
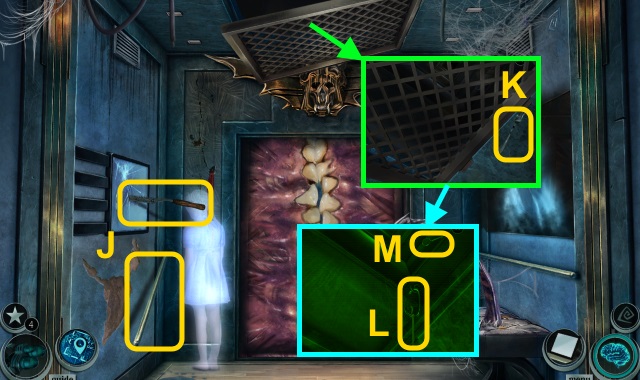
- Open the cover. Examine the phone; place the switch (J) on the board (K).
- Flip the switches (L).
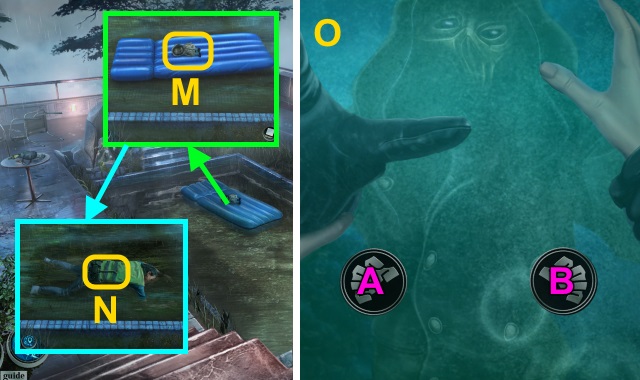
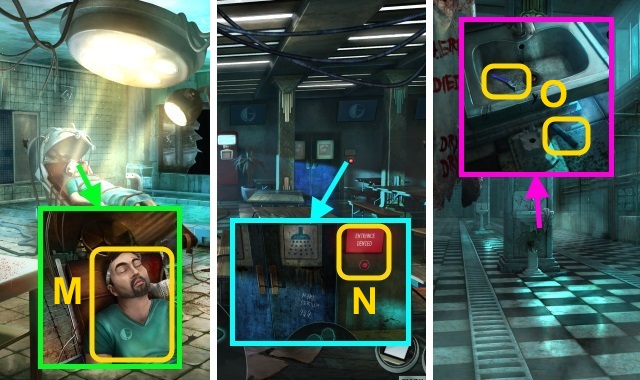
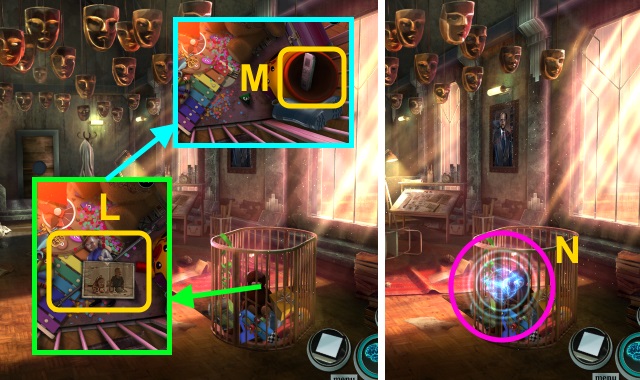
- Take the DOLL (M); move the raft.
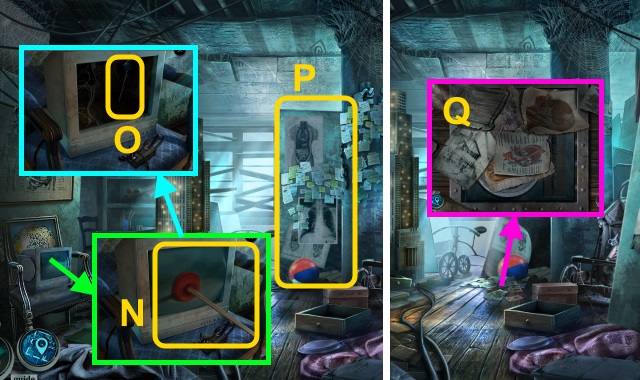
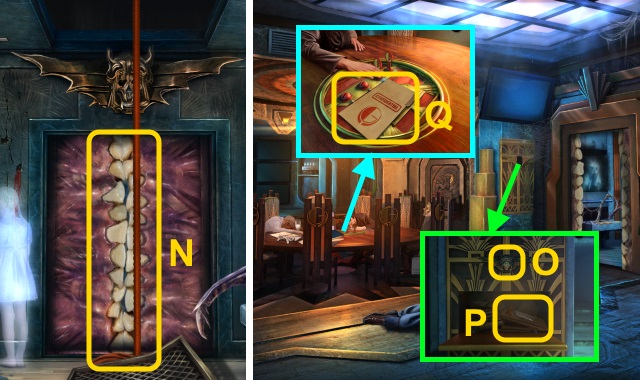
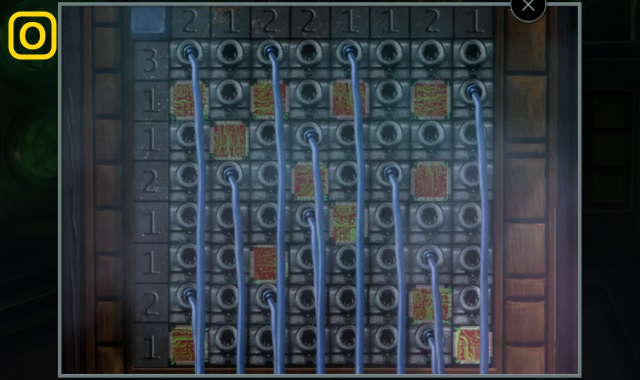
- Take the CROWBAR for a mini-game (N).
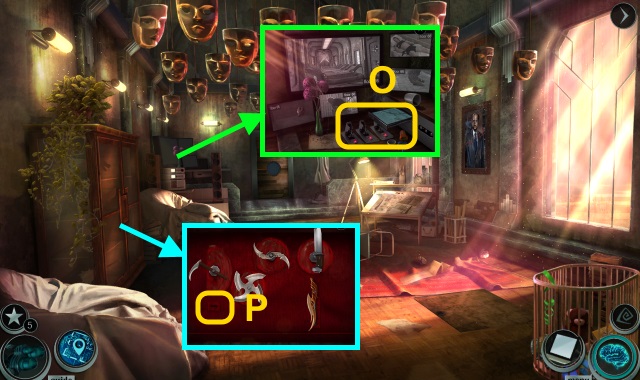
- Solution (O): (Ax2-B)-(B-A-B-A)-(B-A-Bx2-A).
- Examine the DOLL; Use the KNIFE. Open the doll; take the VHS TAPE.
- Take the PURSE (P); move the papers 3x.
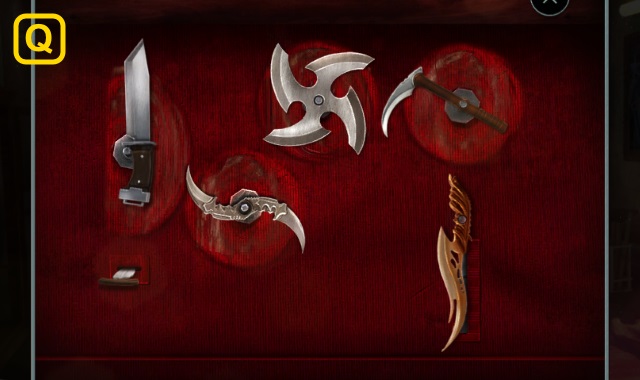
- Arrange the papers (Q); take the newspaper.
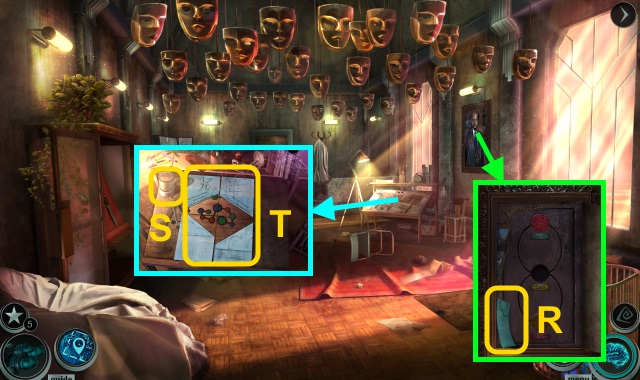
- Take the SUNSCREEN (R).
- Open the PURSE. Take the brochure and LIPSTICK. Use the KNIFE; take the UV LAMP.
- Move the plants; take the PLUNGER (S).
- Tie the EXTENSION CORD (T).
- Look behind the rock; move the stone, plants, and wires. Try to use the CROWBAR; use the SUNSCREEN and CROWBAR (U).
- Play the HOP; receive the BRIEFCASE (V).
- Open the BRIEFCASE; take the Night Vision Goggles.
- Take the bracelet (W).
- Examine the ledge; take the GRAPPLING HOOK REMNANT (X).
- Examine the front of the rock; take the EXTENSION CABLE (Y).
- Examine the GRAPPLING HOOK REMNANT; take the WALL CHUNK. Remove the rope; use the EXTENSION CABLE. Take the GRAPPLING HOOK.
- Walk down.
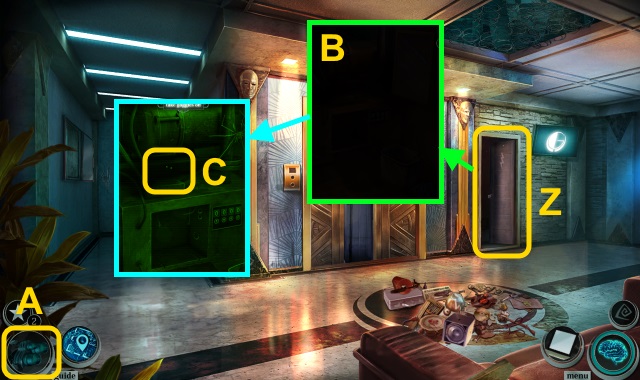
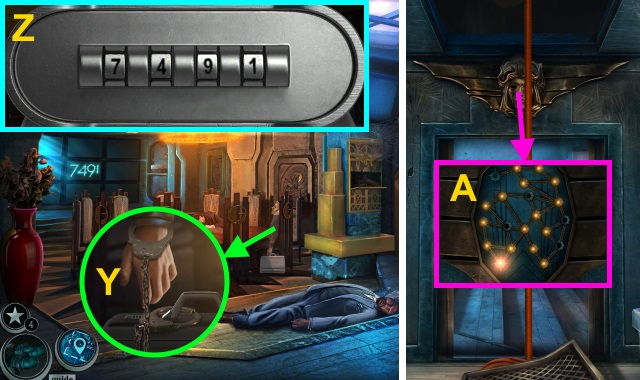
- Open the door (Z).
- Use the Night Vision Goggles (A) on the room (B).
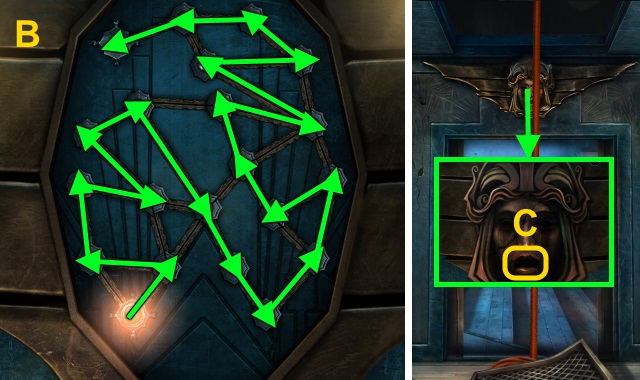
- Examine the eyes (C).
- Use the Night Vision Goggles. Use the WALL CHUNK; take the note and WINDING TOOL (D).
- Examine the wires; use the RUBBER GLOVES 4x (E). Move the wires; use the GRAPPLING HOOK.
- Go up.
- Take the EMPTY TEST TUBE (F).
- Gather the papers (G); arrange them.
- Take the code (H).
- Move the wall (I).
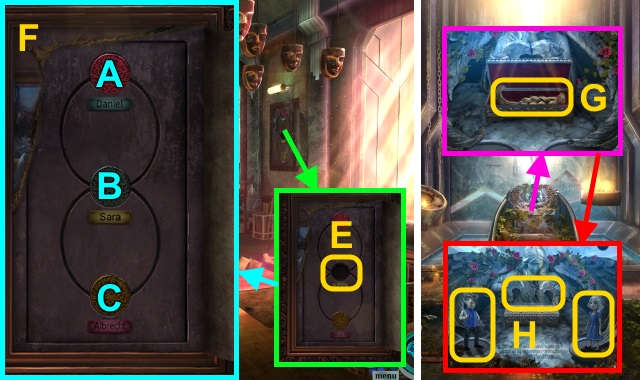
- Place the VHS TAPE for a mini-game (J).
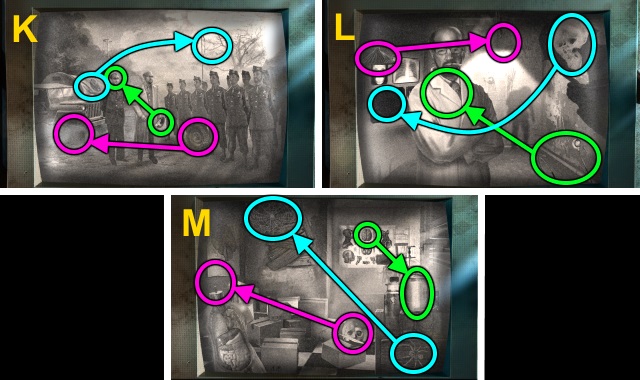
- Solution (K-M).
- Examine the screen. Use the PLUNGER (N); remove the screen.
- Move the parts; take the SMALL FLAG (O).
- Examine the wall (P).
- Move the papers for a mini-game (Q).
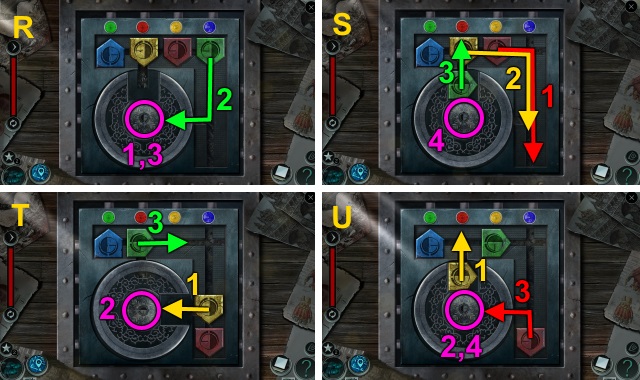
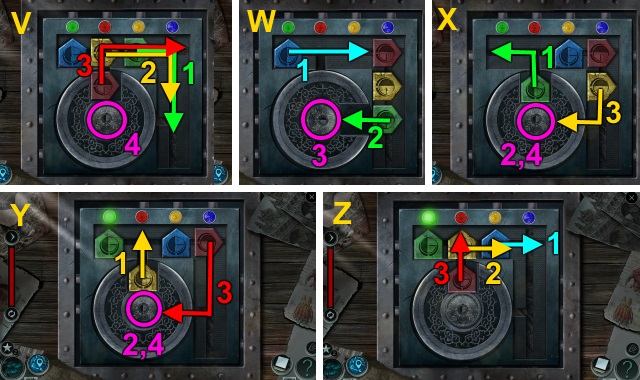
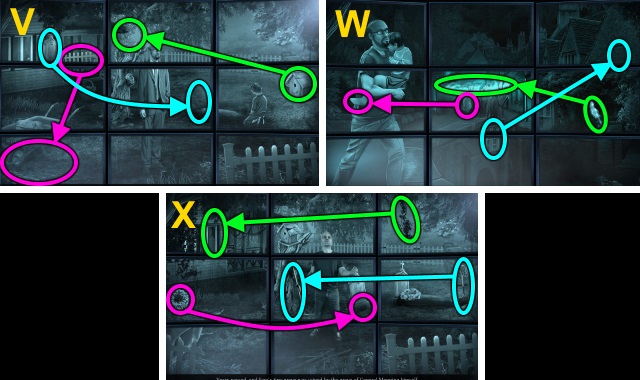
- Solution (R-Z).
- Take the SKETCHBOOK.
- Read the SKETCHBOOK; take the photo.
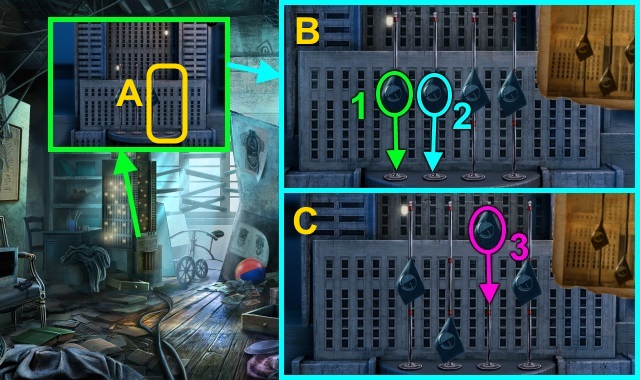
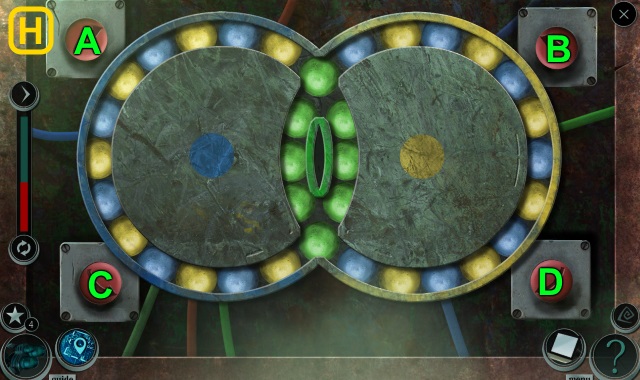
- Place the SMALL FLAG for a mini-game (A).
- Solution (B-C).
- Take the DOCTOR'S PASS; use the WINDING TOOL (D).
- Play the HOP; receive the SMALL GENERATOR (E).
- Walk down.
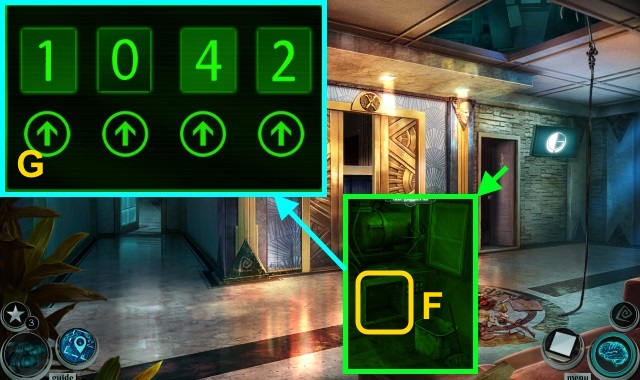
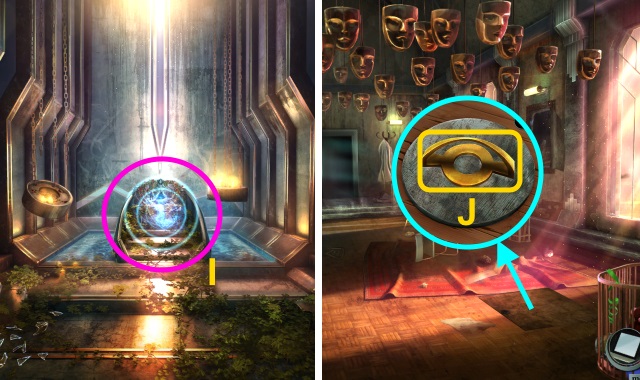
- Use the Night Vision Goggles; place the SMALL GENERATOR (F).
- Enter the code (G).
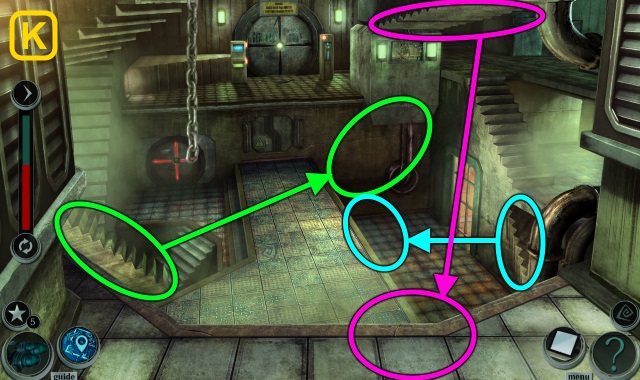
- Walk forward twice.
Chapter 2: The Masked Man
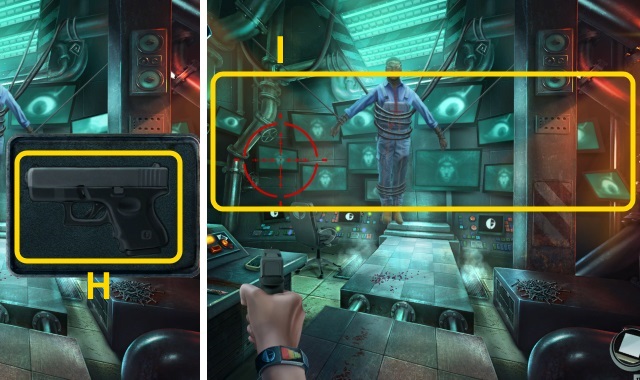
- Examine the gun (H).
- Select 'Shoot the screens with S.A.R.A's face.'
- Shoot the screens (I).
- Select 'Run past them.'
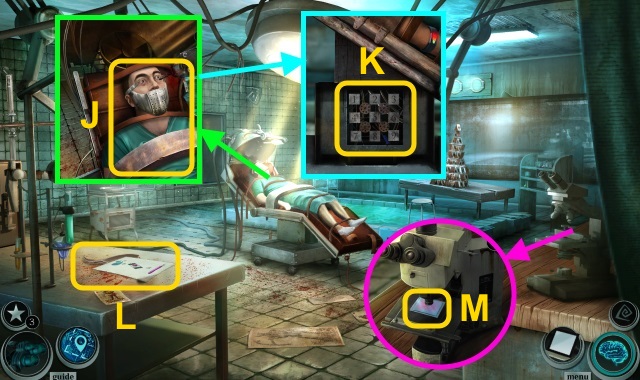
- Examine the man (J); look under the chair.
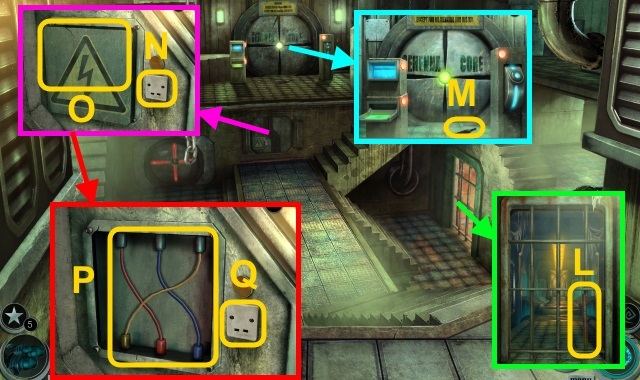
- Move the panel; examine the machinery (K).
- Take the note and DENTAL EXTRACTOR (L).
- Take the SERUM SAMPLE (M).
- Use the DENTAL EXTRACTOR (N); receive the CUBE PIECE (1/4).
- Examine the cube; use the RUBBER GLOVES (O). Receive the CUBE PIECE (2/4). Use the EMPTY TEST TUBE; take the WATER VIAL.
- Combine the WATER VIAL and SERUM SAMPLE; take the SERUM VIAL.
- Examine the cards (P).
- Play the HOP; receive the CUBE PIECE (3/4) (Q).
- Examine the left door; use the Night Vision Goggles. Take the PATIENT BELONGINGS; examine the ghost (R).
- Examine the buttons (S).
- Use the UV LAMP (T); enter the code: A-C-A-B.
- Give the SERUM VIAL (U).
- Use the Night Vision Googles; take the CUBE PIECE (4/4) and CLOTH SCRAP (V).
- Place the CUBE PIECE (4/4) for a mini-game (W).
- Solution (X): Bx3-Dx3-Cx2-D-C-D-C-D-C-Dx2-C-Dx2-C.
- Examine the PATIENT BELONGINGS; take the CLOTH SCRAP and RAZORBLADE. Remove the chair back; take the WOODEN CHAIR LEGS.
- Examine the chair; take the CRUMPLED ARTICLE (Y).
- Use the RAZORBLADE (Z); receive the CUT BELT and DULL RAZORBLADE. Use the DULL RAZORBLADE (A); take the DETACHED DRILL.
- Open the CRUMPLED ARTICLE; take the LOCK PICKING TOOLS.
- Use the DETACHED DRILL and Night Vision Goggles; open the locker. Take the METAL CASE; move the locker (B).
- Examine the door; take the ADHESIVE BANDAGE (C). Use the LOCK PICKING TOOLS; open the door.
- Walk forward.
- Take the PATIENT ROBES (D).
- Examine the PATIENT ROBES; remove the hanger. Take the CLOTH SCRAP (2/3).
- Move the poster; use the ADHESIVE BANDAGE (E).
- Move the spoon; take the OLD FOOD TRAY, SAMPLE CUP, and SPRING (F).
- Examine the METAL CASE; examine the button twice. Remove the spring; place the SPRING. Take the INJECTION PISTOL.
- Move the machine; examine the plug (G). Press the button (H).
- Examine the door (I).
- Take the note; enter the code (J). Press the button for a mini-game (K).
- Solution is random (L). Take the ADRENALINE AMPULE.
- Combine the INJECTION PISTOL and ADRENALINE AMPULE; take the ADRENALINE INJECTION.
- Walk down.
- Use the ADRENALINE INJECTION (M); examine the man.
- Walk forward.
- Examine the scanner (N).
- Walk right.
- Take the PIPE (1/4) and BLUE HANDLE (O).
- Take the PIPE (2/4) and HANDCUFFS (P).
- Examine the wall; examine the wires (Q).
- Use the Night Vision Goggles. Play the HOP; receive the PIPE (3/4) (R).
- Use the CUT BELT (S).
- Use the Night Vision Goggles; take the BROKEN FORK and PIPE (4/4) (T).
- Place the PIPE (4/4) (U).
- Examine the wall for a mini-game (V).
- Solution (W): F-E-B-C-F-E-H-G-D-E-B-A-D-E-B-A.
- Take the CLOTH SCRAP. Place the BLUE HANDLE; turn it (X). Use the OLD FOOD TRAY on the scene; turn the handle again (X).
- Combine the CLOTH SCRAP and CLOTH SCRAP (3/3); take the LONG ROPE.
- Take the SIGNET RING (1/3) and GREEN HANDLE (Y).
- Place the GREEN HANDLE; turn it (Z).
- Use the SAMPLE CUP; take the CUP OF ACID (A).
- Walk down.
- Pour the CUP OF ACID (B).
- Remove the lock and grate (C); examine the food. Use the LONG ROPE.
- Go left.
- Use the DOCTOR'S PASS (D).
- Move the cloth. Play the HOP; receive the SIGNET RING (2/3) (E).
- Remove the cover and food; take the gas mask, SPEECH NOTES, and BLOODY ICE PICK (F).
- Open the SPEECH NOTES; take the SIGNET RING (3/3).
- Remove the cover; examine the statue (G).
- Use the SIGNET RING (3/3) (H).
- Go upstairs.
- Move the papers; take the CIGAR CUTTER (I).
- Look under the desk; take the OXYGEN MASK (J). Examine the handle; place the BLOODY ICE PICK (K). Pull the pick.
- Use the Night Vision Goggles. Move the items; take the PEPPER SPRAY, GHOULISH MASK, and GIRL'S BACKPACK (L).
- Examine the GIRL'S BACKPACK; move the items. Take the GIRL DOLL. Open the diary; examine the MENNING FAMILY PHOTO. Take the PROJECTOR PART.
- Move the trophies; take the HEAVY STATUETTE (M).
- Take MICHAELS' PAINTING (N).
- Walk down.
- Use the CIGAR CUTTER; take the RUSTY MEAT SAW (O).
- Place the photos. Place MICHEALS' PAINTING; take the FILM ROLL (1/2) (P).
- Use the RUSTY MEAT SAW (Q); open the door.
- Walk forward.
- Remove the cover; use the BROKEN FORK (R). Take the BATTERY and SMALL FLASHLIGHT (S).
- Take the BROKEN FORK and SHARP FAN BLADE (T).
- Move the box; take the FLAT CHAMPAGNE and SILK HANDKERCHIEF (U).
- Use the Night Vision Goggles; take the REMOTE CONTROL (V).
- Move the bottles; take the ICE SCOOP (W). Use the SMALL FLASHLIGHT (X).
- Look behind the counter; take the BATTERY (2/2) (Y).
- Open the REMOTE CONTROL; place the BATTERY (2/2). Take the REMOTE.
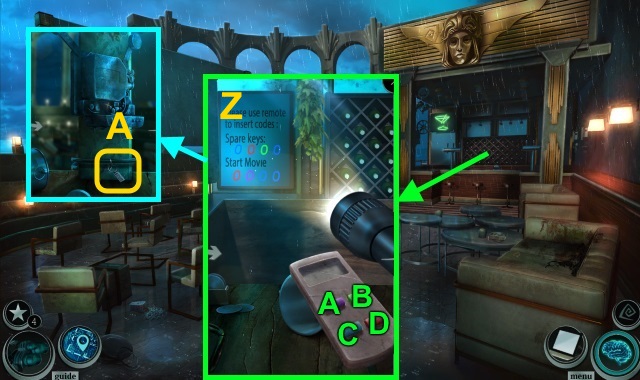
- Examine the counter; use the REMOTE. Enter the code (Z): C-D-B-C.
- Take the ATRIUM KEY (A).
- Walk down.
- Examine the door; remove the handles (B).
- Place the WOODEN CHAIR LEGS; turn the handle 2x. Use the ATRIUM KEY (C).
- Walk left.
Chapter 3: The Atrium
- Use the SHARP FAN BLADE (D); receive the FAKE FLOWER.
- Use the FLAT CHAMPAGNE and ICE SCOOP (E); receive the SOIL SCOOP.
- Use the SILK HANDKERCHIEF and HEAVY STATUETTE (F); take the NEON LIGHTBULB.
- Remove the flower and lightbulb; place the FAKE FLOWER, NEON LIGHTBULB, and SOIL SCOOP (G).
- Play the HOP; receive the FILM ROLL (2/2) (H).
- Walk down, then right.
- Place the PROJECTOR PART and FILM ROLL (2/2) (I).
- Enter the code (J): D-A-Cx2.
- Examine the screen for a mini-game (K).
- Solution (L-N).
- Select 'Use pepper spray.'
- Remove the mask (O).
- Open the hand; take the EVIDENCE FLASH DRIVE (P).
- Move the shirt (Q); take MICHAELS' COMPLIANCE BRACELET. Use the HANDCUFFS.
- Walk down, then left.
- Use the DOCTOR'S PASS and MICHAELS' COMPLIANCE BRACELET (R).
- Walk forward.
- Select 'Jump out.'
- Take the GIRL DOLL and OXYGEN MASK (S); remove the cloth.
- Take the EVIDENCE FLASH DRIVE (T).
- Take the SHARP FAN BLADE (U).
- Move the sign; take the BUNGEE CORD and BROKEN FORK (V).
- Use the SHARP FAN BLADE (W); receive the LONG BRANCH.
- Use the LONG BRANCH (X).
- Use the BUNGEE CORD; take the PILOT'S BUNDLE (Y).
- Open the PILOT'S BUNDLE; take the PLIERS and FIRECRACKER.

- Use the PLIERS (Z); receive the BROKEN CLASP.
- Combine the BROKEN CLASP and BUNGEE CORD; receive the HOOK ROPE.
- Examine the bag (A).
- Use the HOOK ROPE; take the LEATHER BAG (B).
- Open the LEATHER BAG. Move the paper; take the LIGHTER.
- Place the FIRECRACKER (C); use the LIGHTER.
- Play the HOP; receive the CONSTRUCTION HAMMER (D).
- Use the CONSTRUCTION HAMMER (E).
- Go down.
- Use the OXYGEN MASK (F).
- Open the coat; take the note, GARROTE, and BRASS KEY (G).
- Move the bottles; examine the box (H).
- Use the BRASS KEY. Take the EMERGENCY PROTOCOL KEY (1/2), STRONG MAGNET, and TINY S.A.R.A. HEAD; examine the photo (I).
- Walk right.
- Receive the EMPTY OXYGEN MASK.
- Take the SHEARS PART and METAL RAIL (J).
- Use the BROKEN FORK (K).
- Use the Night Vision Goggles; use the HOOK ROPE (L). Take the SHEARS PART (M).
- Use the METAL RAIL (N).
- Walk forward.
- Place the TINY S.A.R.A HEAD (O).
- Take the PUNCH DAGGER. Read the file; take the paper. Take the EMERGENCY PROTOCOL KEY (2/2) (P).
- Examine the folder; take the CONFIDENTIAL FOLDER (Q). Use the EMERGENCY PROTOCOL KEY (2/2).
- Play the HOP; receive the VIRUS ORB (R).
- Open the CONFIDENTIAL FOLDER; take the TIE CLASP. Move the envelopes; take the paper.
- Combine the 2 SHEARS PARTS and TIE CLASP; receive the IMPROVISED CUTTER.
- Take the TINY LIGHTBULBS (S); place the EVIDENCE FLASHDRIVE (T).
- Examine the screens for a mini-game (U).
- Solution (V-X).
- Use the IMPROVISED CUTTER (Y); take the CHAINED BRIEFCASE.
- Examine the CHAINED BRIEFCASE; enter the code (Z). Take the SYRINGE; move the papers. Read the notepad.
- Examine the SYRINGE; read the note.
- Walk right.
- Remove the cover; place the TINY LIGHTBULBS for a mini-game (A).
- Solution (B).
- Place the VIRUS ORB (C).
- Go forward.
Chapter 4: S.A.R.A
- Take the HEAVY CHAIN CUTTER and REINFORCED ROPE (D).
- Combine the STRONG MAGNET and REINFORCED ROPE; take the MAGNET HOOK.
- Use the MAGNET HOOK; take the TIN BOX (E).
- Open the TIN BOX; move the tools. Take the SMALL SWITCH and EMERGENCY HAMMER.
- Place the SMALL SWITCH (F); examine the machine for a mini-game (G).
- Solution (H): C-D-C-D-Cx2-Dx2-Cx3-D-Ax2-Bx2-C-D-C-D.
- Use the HEAVY CHAIN CUTTERS (I); take the BRASS CODE WHEEL.
- Remove the cover; place the BRASS CODE WHEEL for a mini-game (J).
- Solution (K).
- Walk forward.
- Move the toys; take the photo, BOY DOLL, and ELECTRIC PROD (L).
- Move the toys; open the lid (M).
- Play the HOP; receive the DICTAPHONE (N).
- Move the paper and folder; flip the switches. Take the ARCHITECT SKETCH (1/3) (O).
- Open the doors; place the PUNCH DAGGER for a mini-game (P).
- Solution (Q).
- Take the ARCHITECT SKETCH (2/3).
- Move the painting; take the ARCHITECT SKETCH (3/3) (R).
- Move the papers; take the CUP (S).
- Place the ARCHITECT SKETCH (3/3); fold the papers for a mini-game (T).
- Solution (U).
- Take the note.
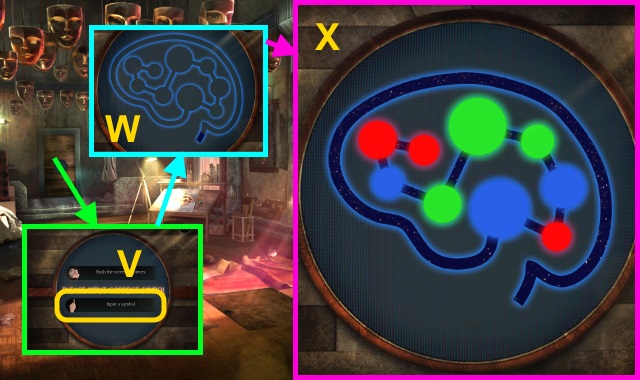
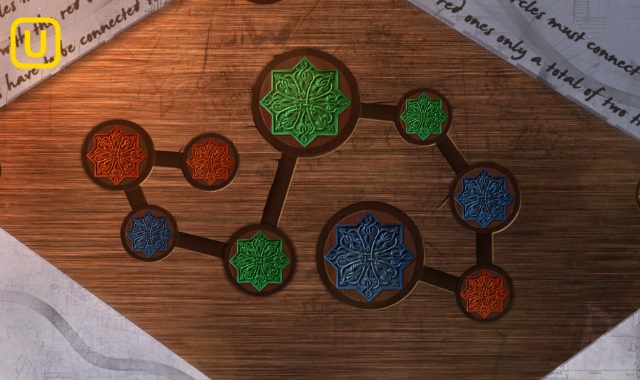
- Select 'Input a Symbol' for a mini-game (V).
- Solution: trace the shape (W), then input the colors (X).
- Walk forward.
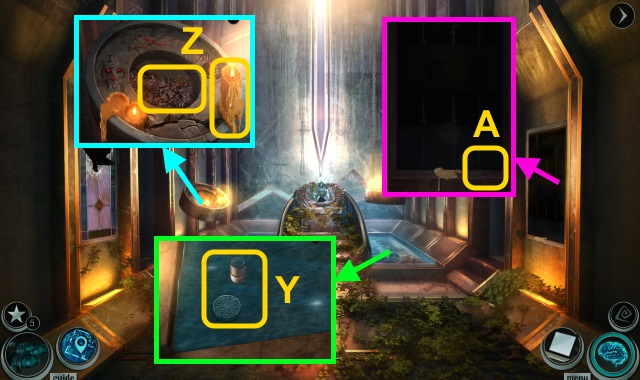
- Use the CUP; take the WATER CUP and BUTTON (Y).
- Use the WATER CUP; take the ROSE KEY and CANDLE (Z).
- Place the CANDLE for a mini-game (A).
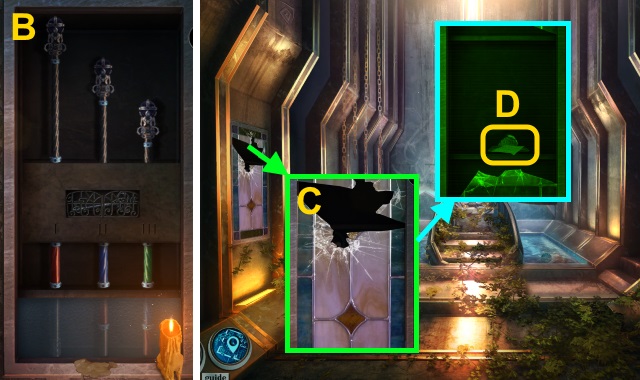
- Solution (B).
- Take the FLEUR-DE-LYS KEY.
- Use the EMERGENCY HAMMER (C); use the Night vision Goggles.
- Use the ROSE KEY and FLEUR-DE-LYS KEY; take the note, photo, and BROKEN HEART (1/2) (D).
- Walk down.
- Place the BUTTON for a mini-game (E).
- Solution (F): B-A-B-C.
- Take the BROKEN HEART (2/2).
- Walk forward.
- Take SARA'S BRAID (G).
- Place the BOY DOLL, GIRL DOLL, and BROKEN HEART (2/2) (H).
- Play the HOP; receive the SECRET PASSAGE KEY (I).
- Walk down.
- Use the SECRET PASSAGE KEY (J).
- Go right, then forward.
- Play the mini-game; solution (K).
- Take the IRON BAR (L).
- Take the BROKEN FILE (M).
- Use the ELECTRIC PROD (N) and BROKEN FILE (O).
- Examine the wires 3x; match the wires (P).
- Use the ELECTRIC PROD (Q).
- Play the HOP; receive the WELDER (R).
- Use the WELDER 2x (S).
- Walk right.
- Talk to Rick; take the FLASHLIGHT (T).
- Use the IRON BAR (U).
- Use the FLASHLIGHT. Play the HOP; receive the FINGERPRINT KIT (V).
- Open the slot; take the DNA SAMPLE PALET (W). Use the GARROTE; receive the MENNING NAMEPLATE (X).
- Combine the DNA SAMPLE PALET and SARA'S BRAID; take the SARA MENNING DNA SAMPLE.
- Examine the fan; select 'it's more ghosts - Attack it with iron bar.' Take the FILES KEY (Y).
- Walk down.
- Take the BLOODY HOOK; place the MENNING NAMEPLATE for a mini-game (Z).
- Solution (A): (H-F)-(I-C)-(K-G)-(E-A).
- (G-K)-(C-I)-(F-H)-(B-J)-(I-C)-(J-L).
- (D-B)-(L-J)-(H-F)-(J-L)-(K-G)-(L-J).
- Take the OXYGEN TANK, note, and OLD DVD.

- Combine the EMPTY OXYGEN MASK and OXYGEN TANK; take the REFILLED OXYGEN MASK.
- Use the FILES KEY (B).
- Use the OLD DVD for a mini-game (C).
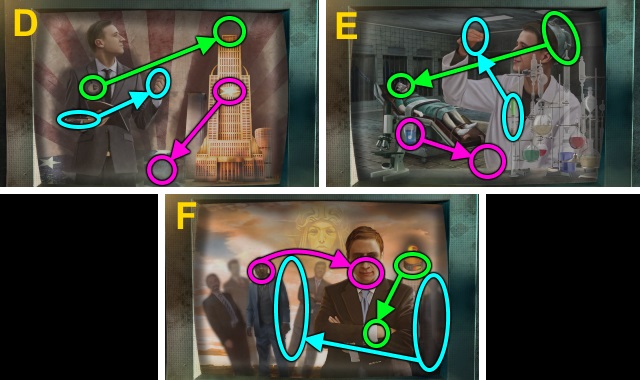
- Solution (D-F).
- Take the RED WIRE.
- Walk right.
- Remove the cover; remove the wire. Place the RED WIRE; examine it (G).
- Walk forward.
- Remove the screen (H).
- Play the HOP; receive MICHAELS' FINGERPRINT (I).
- Walk forward, then down.

- Place the SARA MENNING DNA SAMPLE and MICHAELS' FINGERPRINT (J).
- Select 'Play his father's tape.'
- Take the paper (K).
- Walk forward.
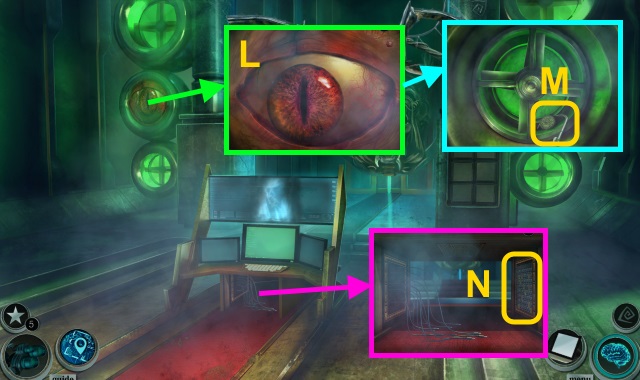
- Examine the eye (L). Use the BLOODY HOOK; take the SWITCHBOARD PEG (1/2) (M).
- Look behind the computer; examine the board for a mini-game (N).
- Solution (O).
- Take the SWITCHBOARD PEG (2/2).
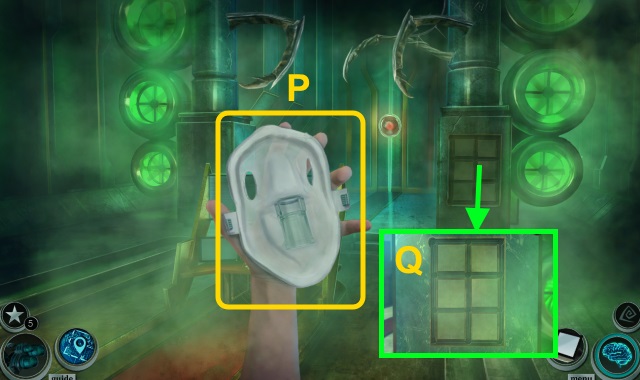
- Use the REFILLED OXYGEN MASK (P).
- Place the SWITCHBOARD PEG (2/2) for a mini-game (Q).
- Solution (R): (J-K-L-I-H-G-D-E-F-C-B).
- (A-D-E)-(B-A)-(E-F-C-B-C-F-I-F-E-H-K-L).
- (A-B-E-D-E-F).
- Flip the switch (S).
- Congratulations! You have completed Maze: The Broken Tower.
Created at: 2016-11-06