

- General Tips
- Chapter 1: Bus Station
- Chapter 2: Drive-in Cinema
- Chapter 3: Barn Loft
- Chapter 4: Science Fair
- Chapter 5: School Front
General Tips
- This is the official guide for Memoirs of Murder: Behind the Scenes.
- This guide will not mention each time you have to zoom into a location; the screenshots will show each zoom scene.
- Hidden-object puzzles are referred to as HOPs. This guide will not show HOP solutions. It will identify the location of the HOP and the inventory item acquired.
- This guide will show solutions for non-random puzzles. Please read the in-game instructions for each puzzle.
- In this game, you will sometimes have to select the new scene to trigger dialog, cut-scenes, or tasks prior to interacting with the scene.
Chapter 1: Bus Station
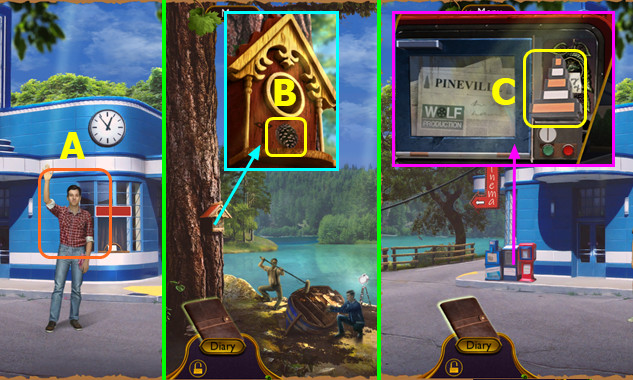
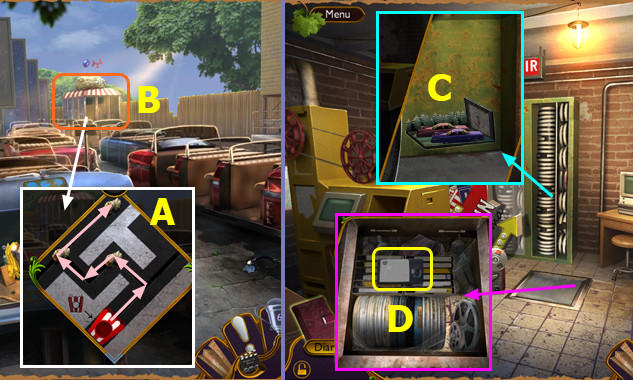
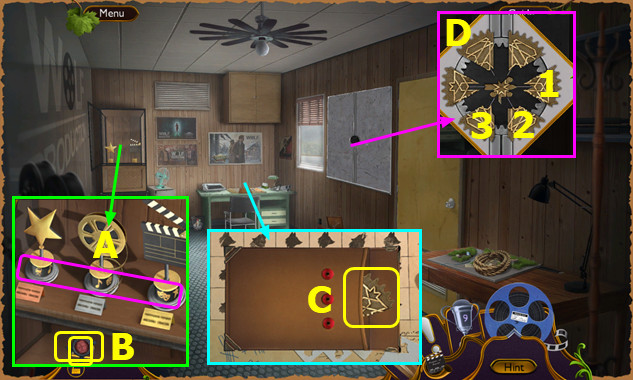
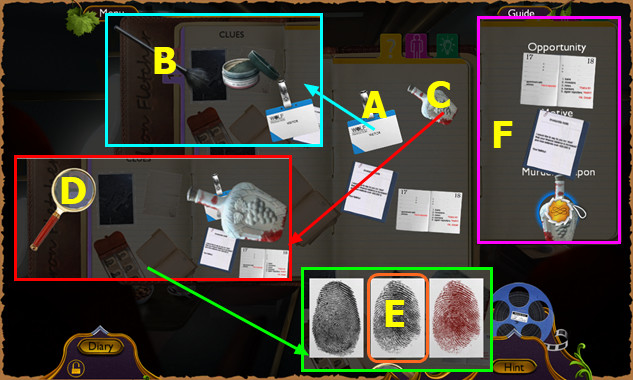
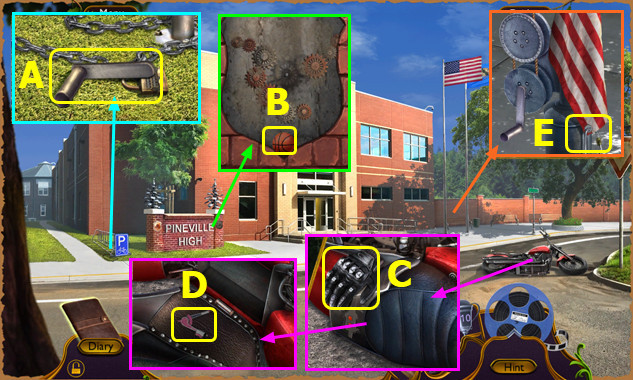
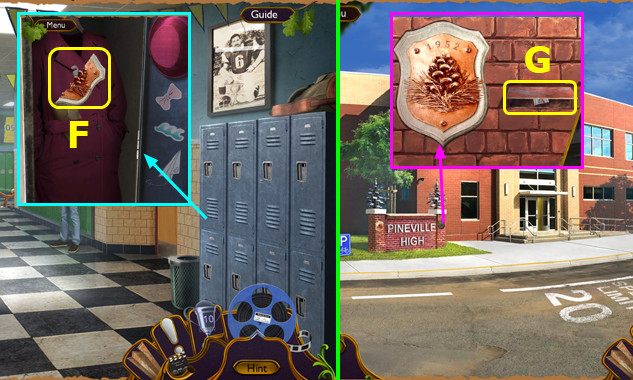
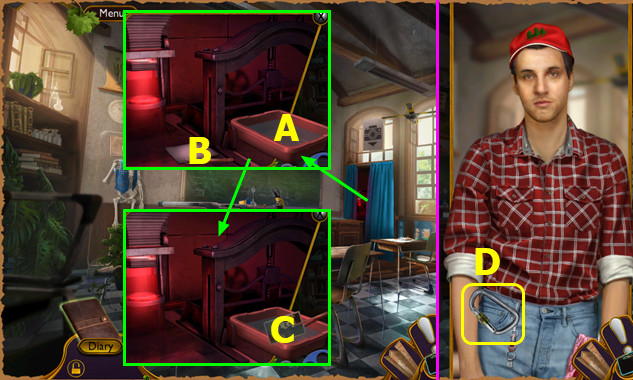
- Talk (A).
- Take PINE EMBLEM (B).
- Pan right.
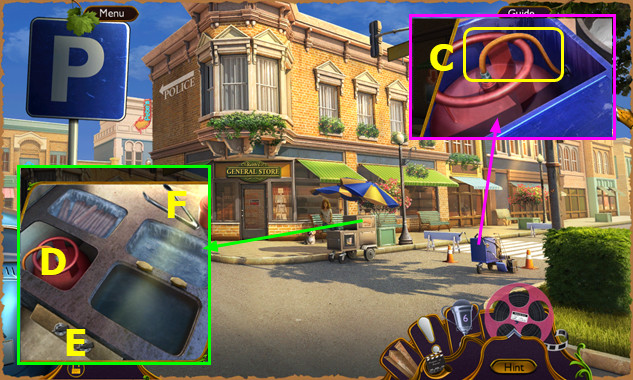
- Take CONE INLAY, read note, and place PINE EMBLEM (C).
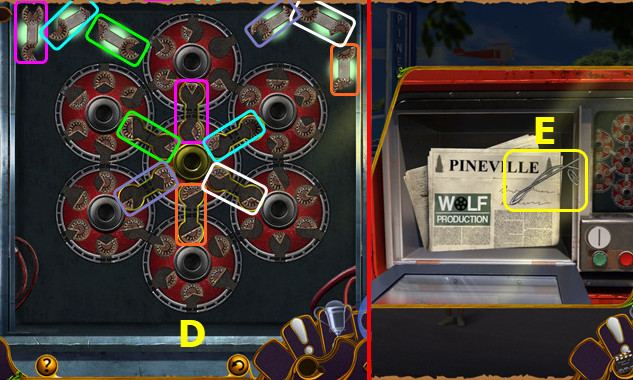
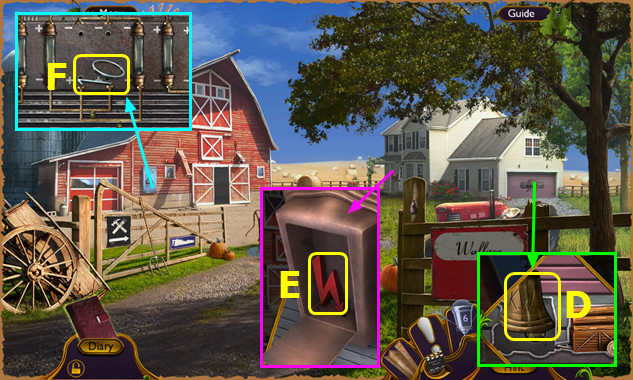
- Turn each outer ring 4x; restore as indicted (D).
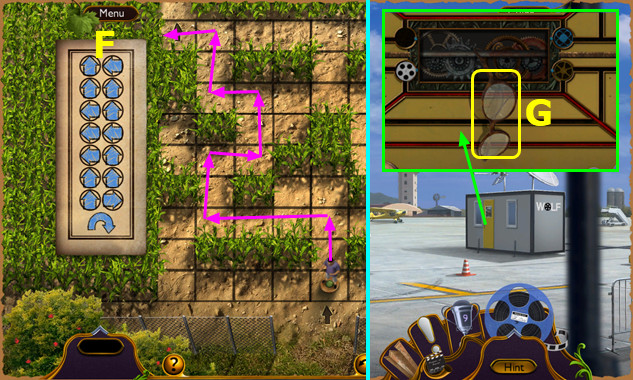
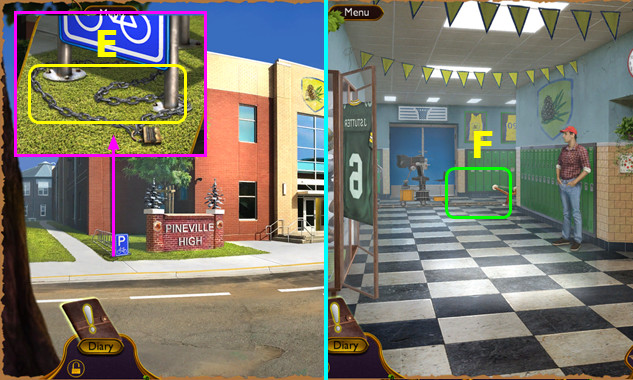
- Read newspaper; take BENT WIRE (E).
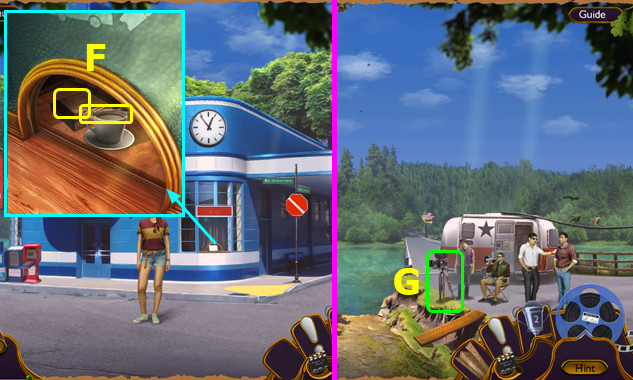
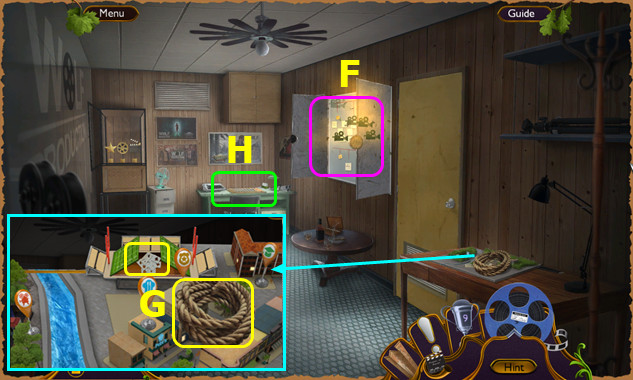
- Read note and take map; use BENT WIRE; select 2x. Take METAL SPOON and PAPERWEIGHT (F).
- Pan left.
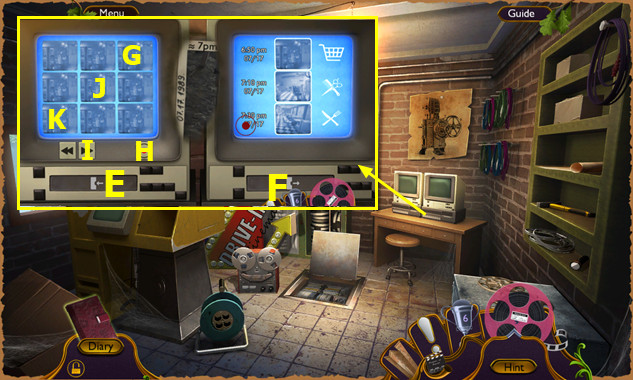
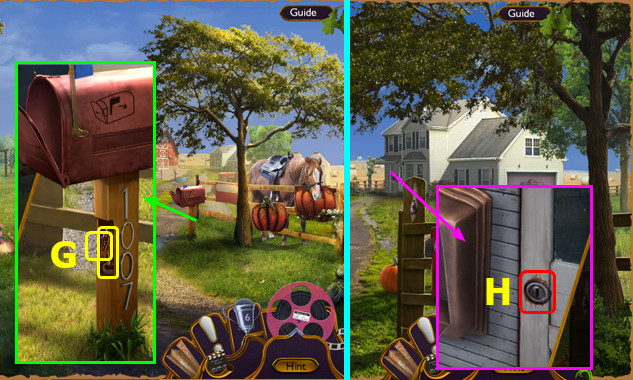
- Use PAPERWEIGHT (G).
- Go right, left, and forward.
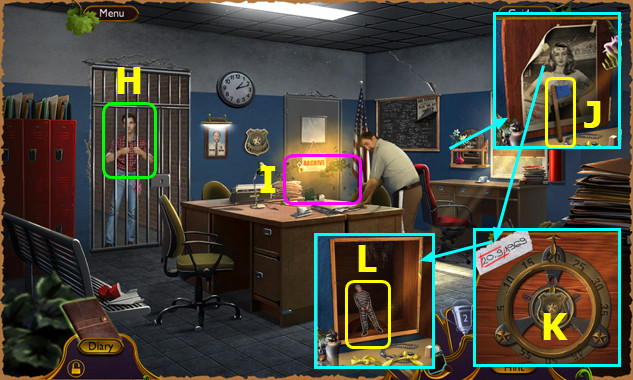
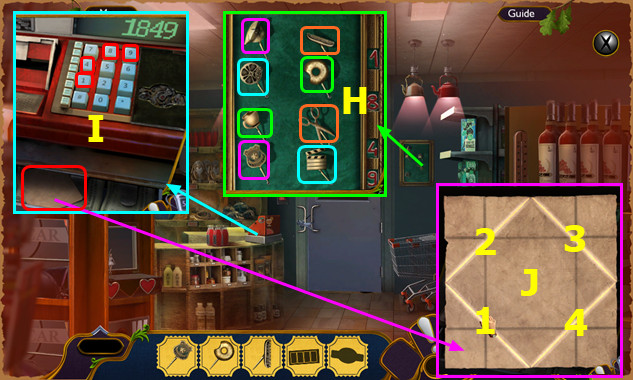
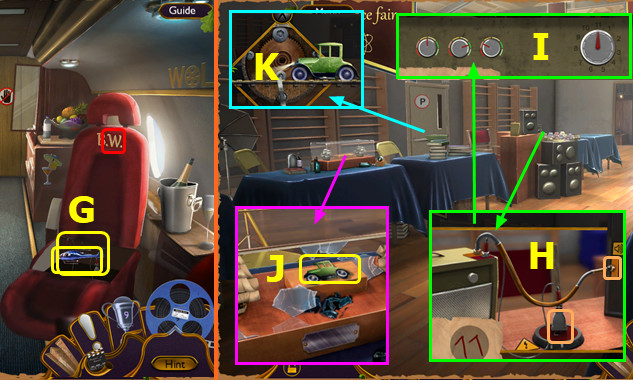
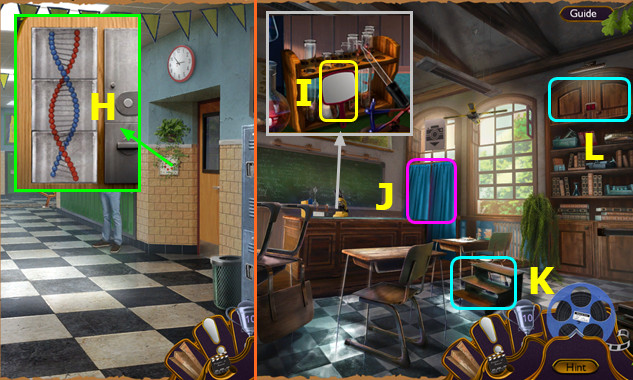
- Talk (H).
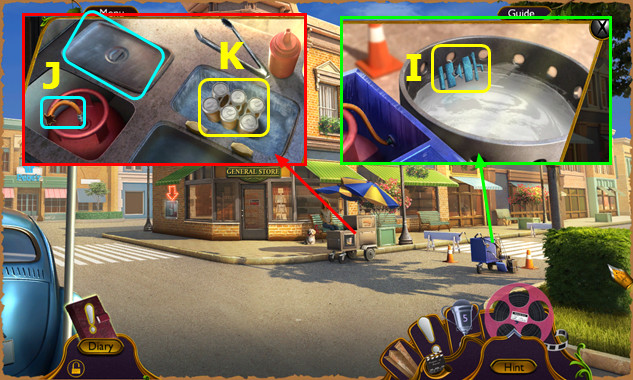
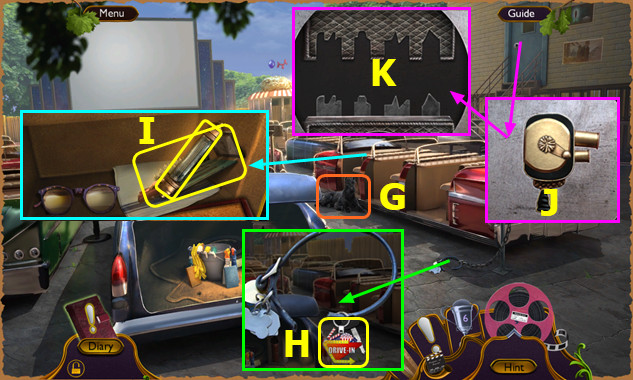
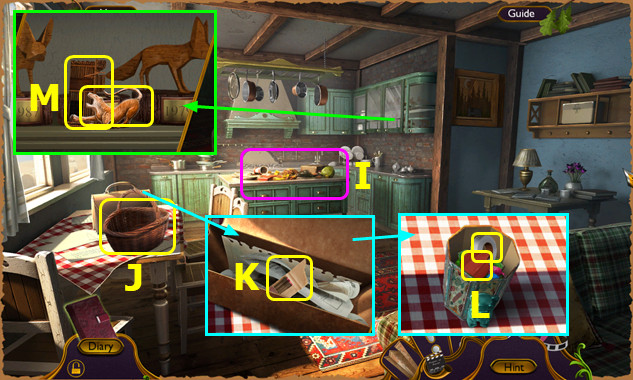
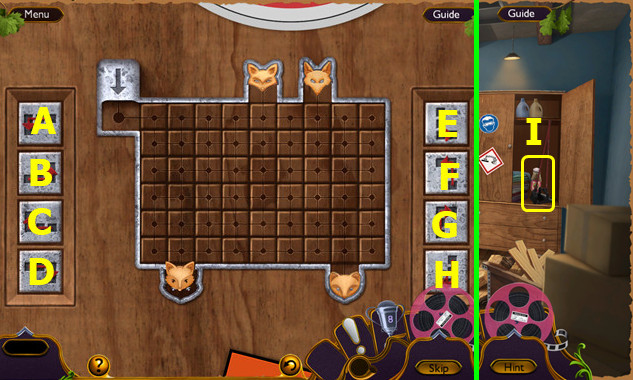
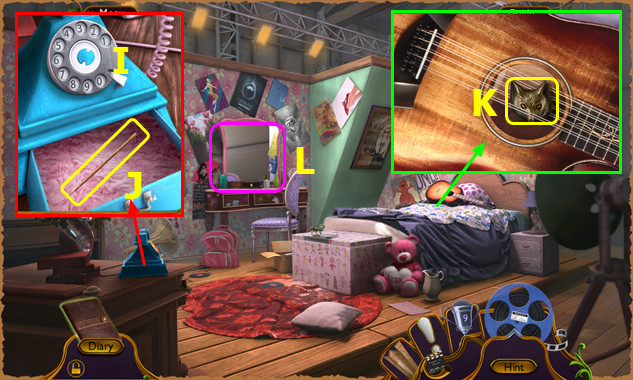
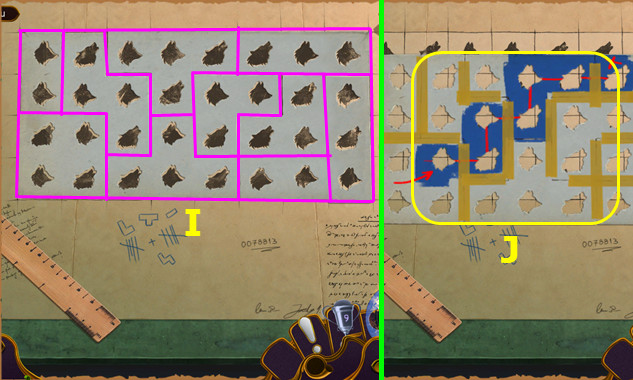
- Play HOP; earn DATE REFERENCE (I).
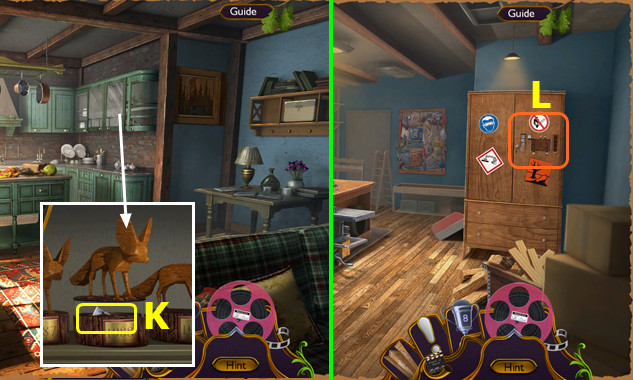
- Take MAILBOX FLAG; remove photo (J).
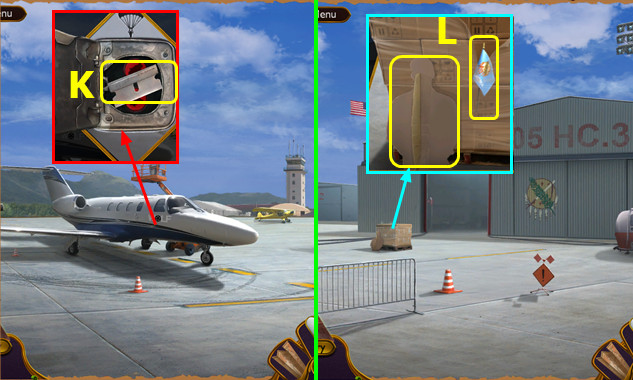
- Place DATE REFERENCE; solution (K).
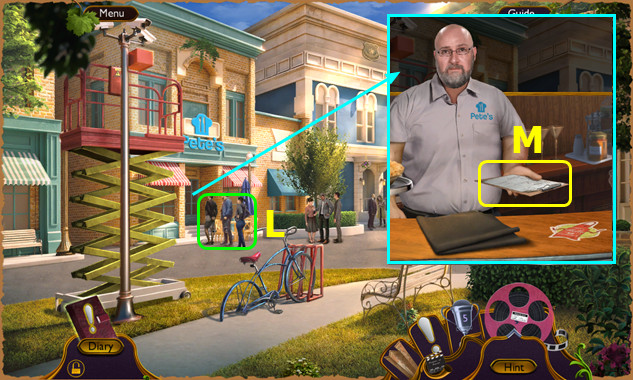
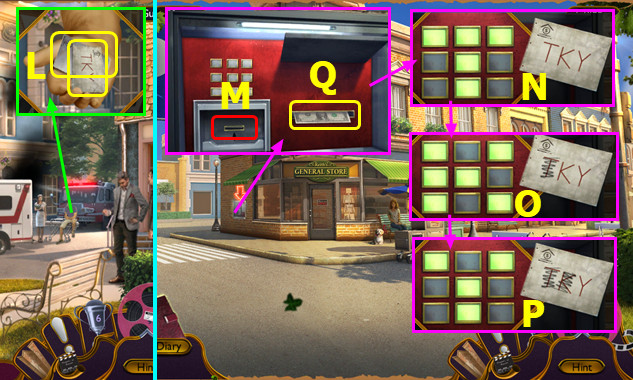
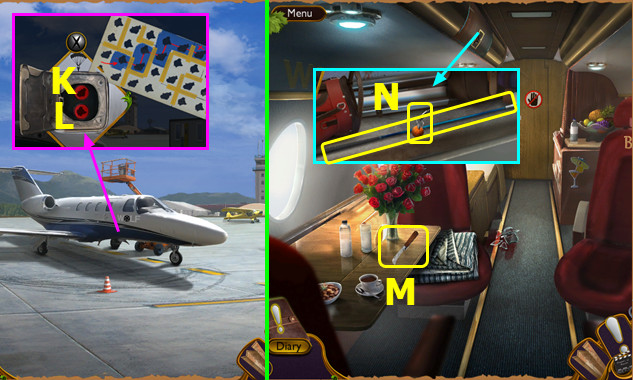
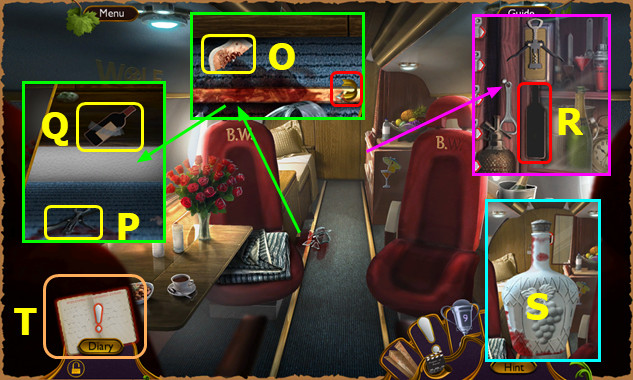
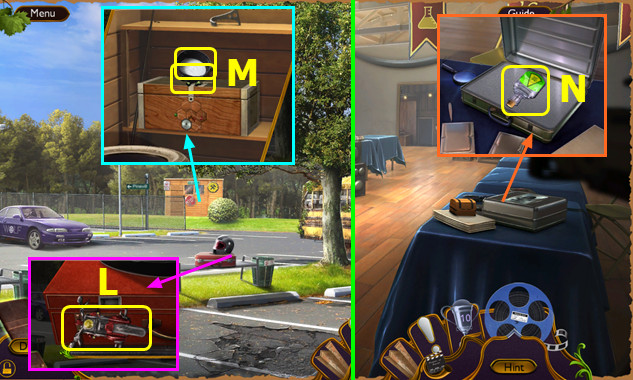
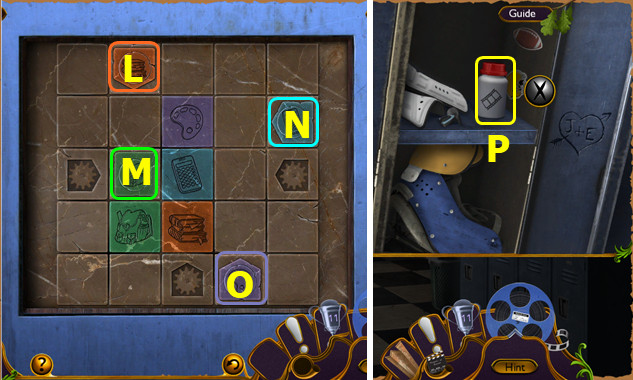
- Read newspaper; take CONVICT TOKEN (L).
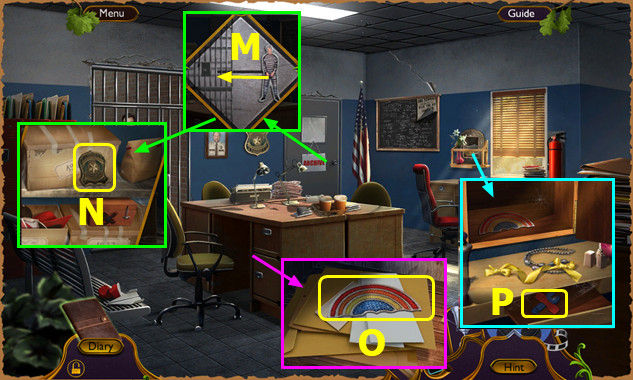
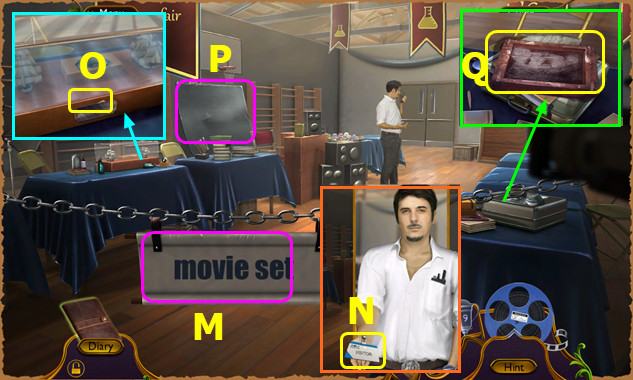
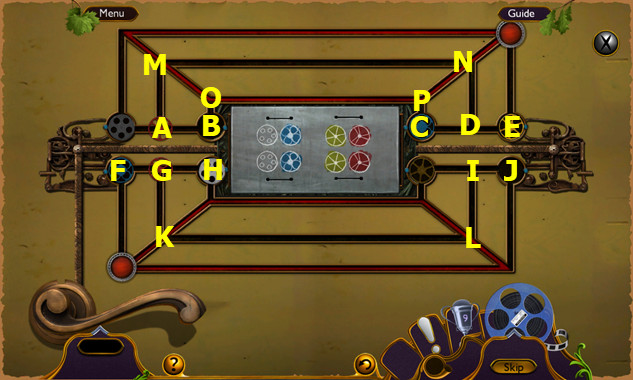
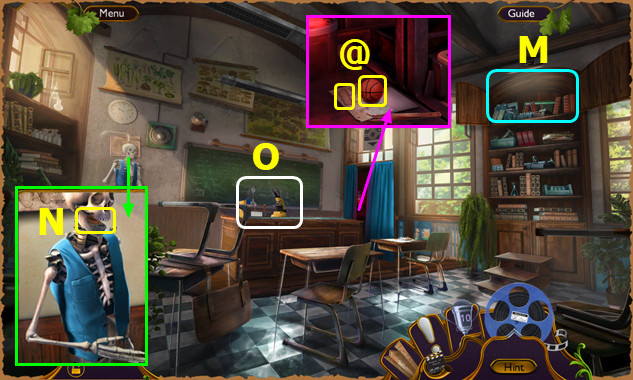
- Place CONVICT TOKEN; slide it left (M).
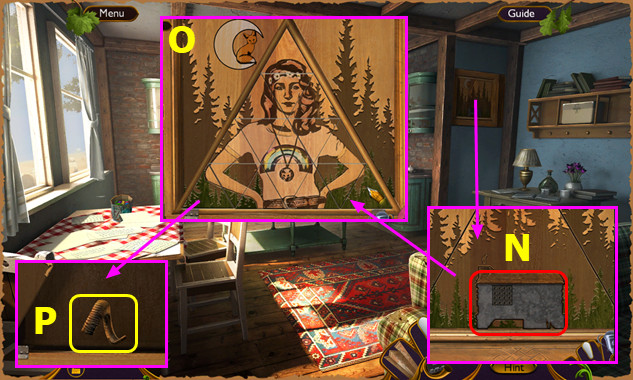
- Take POLICE BADGE (N).
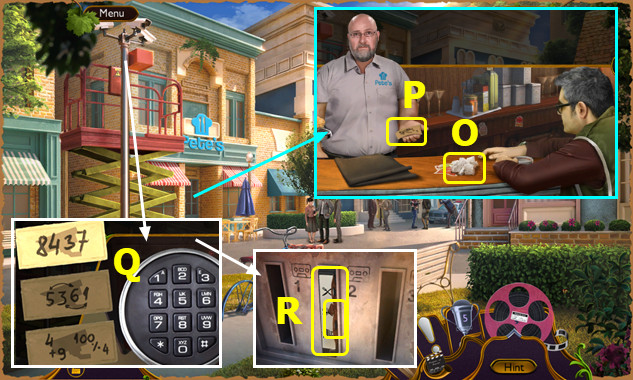
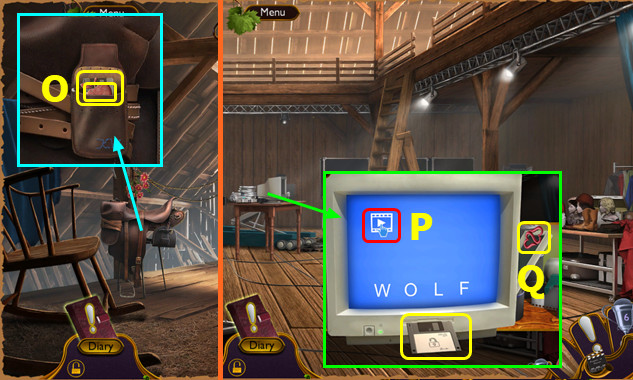
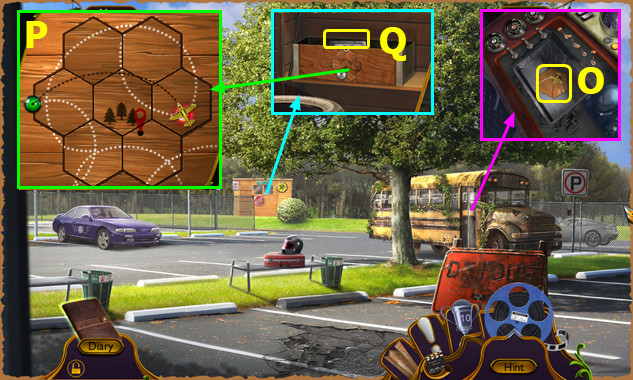
- Place and select POLICE BADGE; take RAINBOW ADORNMENT (O).
- Place RAINBOW ADORNMENT; take TOOL TRINKET (P).
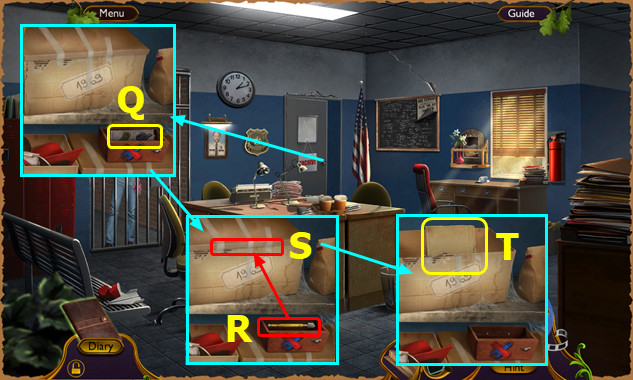
- Place TOOL TRINKET; take 1/3 DOMINOES (Q).
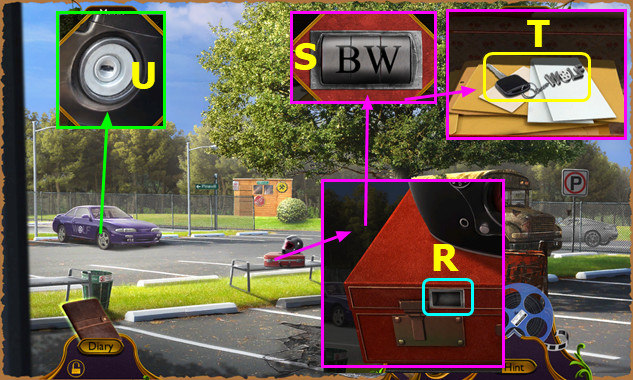
- Use cutter (R) on box (S).
- Read murder cases (T).
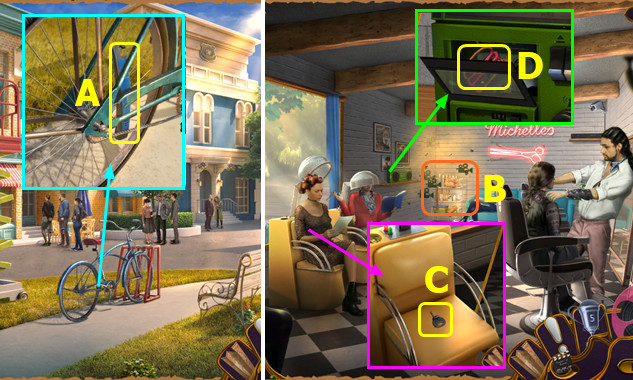
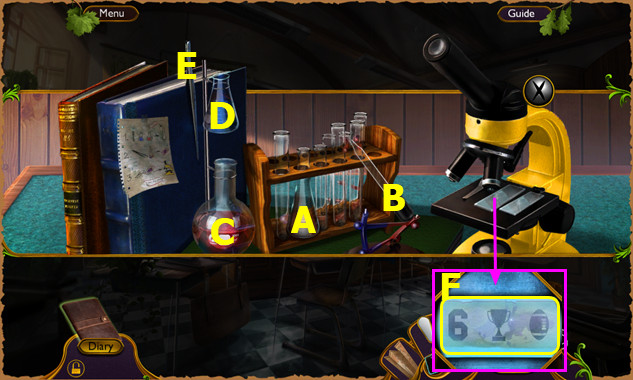
- Take TIRE TOOL (A).
- Go right.
- Play HOP; earn 1/3 PASSWORDS (B).
- Talk; read script; take KEY (C).
- Use METAL SPOON; take 1/2 FOOD TRINKET (D).
- Walk down.
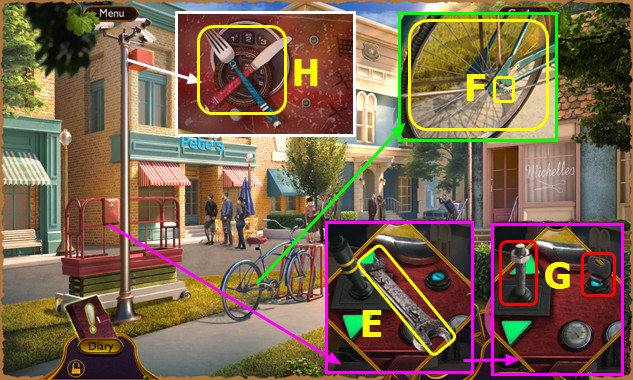
- Take WRENCH (E).
- Use WRENCH; earn SCREW and WHEEL (F).
- Use TIRE TOOL on WHEEL; remove tire and take INNER TUBE.
- Place KEY and SCREW; select (G).
- Take CUTLERY EMBLEM (H).
- Walk down.
- Place CONE INLAY and remove lid; take 2/2 FOOD TRINKET (I).
- Remove lid and old hose (J).
- Place FOOD TRINKET and CUTLERY EMBLEM; remove lid and take SODAS (K).
- Go left.
- Use SODAS (L).
- Take GROCERIES LIST (M).
- Walk down, forward.
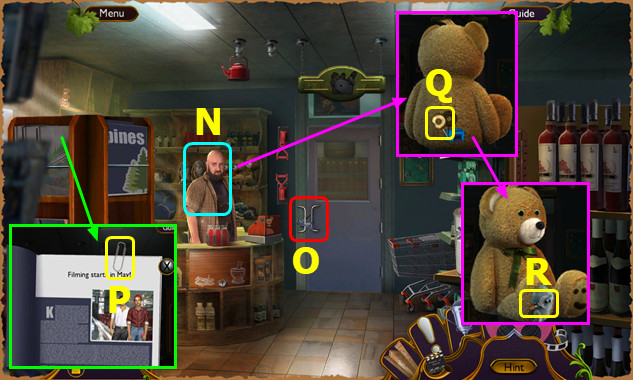
- Give GROCERIES LIST (N).
- Use INNER TUBE (O).
- Take PAPER CLIP (P).
- Turn bear; take FOOD PIN; use PAPER CLIP (Q).
- Take CAN OPENER (R).
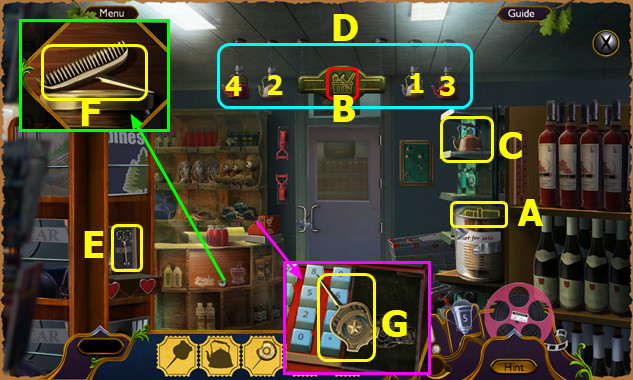
- Use CAN OPENER; take GROCERY SIGN (A).
- Place GROCERY SIGN (B).
- Take KETTLE (C).
- Place KETTLE; select 1-4 (D). Earn HEART EMBLEM.
- Place HEART EMBLEM; take KEY (E).
- Use KEY; take COMB PIN (F).
- Take BADGE PIN (G).
- Place BADGE PIN, COMB PIN, and FOOD PIN; select pairs; take CODE (H).
- Place CODE; select 1-8-4-9; select paper (I).
- Select lines 1-4 (J).
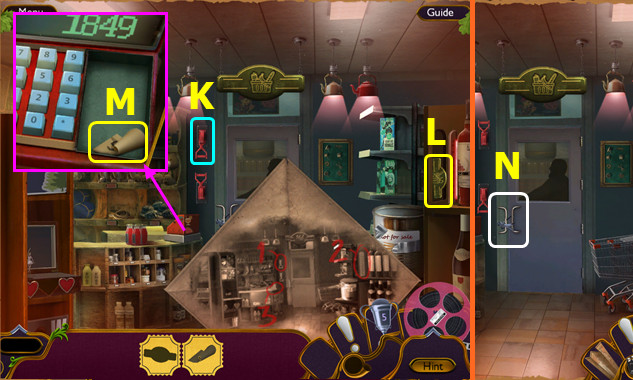
- Select (K).
- Take REGISTER EMBLEM (L).
- Place REGISTER EMBLEM; take 2/3 PASSWORDS (M).
- Select (N); earn GROCERIES.
- Walk down, left.
- Read note; take 1/2 BOAT KEY (O).
- Give GROCERIES; take 3/3 PASSWORDS (P).
- Place PASSWORDS; select (8-4-3-7)-(6-1-5-3)-(1-3-2-5) (Q).
- Read note; take WIND-UP KEY and VIDEOTAPE (R).
- Walk down 2x.

- Use WIND-UP KEY; take CAMERA TRINKET (S).
- Take LICENSE PLATE (T).
- Go forward.
Chapter 2: Drive-in Cinema
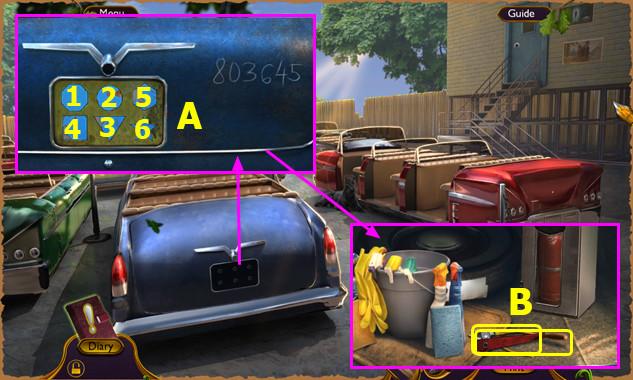
- Place LICENSE PLATE; select 1-2-3-4-5-6 (A).
- Take CRANK and PLIERS (B).
- Go Town Square.
- Use PLIERS; earn GAS HOSE (C).
- Place GAS HOSE (D); select E-F; earn HOT DOG.
- Go Drive-in Cinema.
- Select; use HOT DOG (G).
- Take CINEMA KEY (H).
- Remove shard; use CINEMA KEY; take 1/2 FUSES and SLOT CAR TRACK (I).
- Place and select CAMERA TRINKET (J).
- Solution (K).
- Go right.
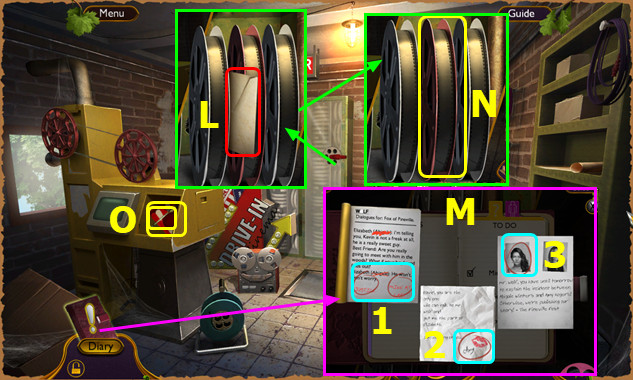
- Place and select CRANK; read note (L).
- Select 1-3 (M).
- Take FILM REEL (N).
- Place FILM REEL; take 2/2 BOAT KEY and POPCORN EMBLEM (O).
- Walk down 2x.
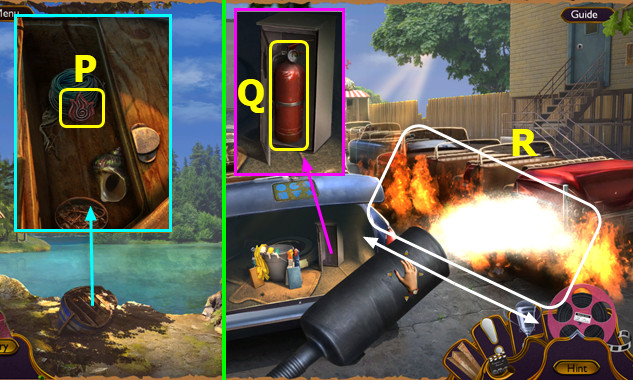
- Use BOAT KEY; take FIRE TRINKET (P).
- Go forward.
- Use FIRE TRINKET; take FIRE EXTINGUISHER (Q).
- Use FIRE EXTINGUISHER; hold and drag to put out fire (R).
- Place POPCORN EMBLEM; drag on path (A).
- Play HOP; earn TOY CAR (B).
- TOY CAR on SLOT CAR TRACK; earn CINEMA TOY.
- Go right.
- Remove reels; place CINEMA TOY (C).
- Read note; take BLANK TAPE (D).
- Place VIDEO TAPE (E) and BLANK TAPE (F).
- Select (G-H)-(I-J-H)-(I-K-H); earn KEVIN'S ALIBI.
- Go Main Street; go forward.
- Talk; take DEBIT CARD and PIN CODE (L).
- Walk down.
- Use DEBIT CARD (M).
- Place PIN CODE; solution (N-O-P).
- Take MONEY (Q).
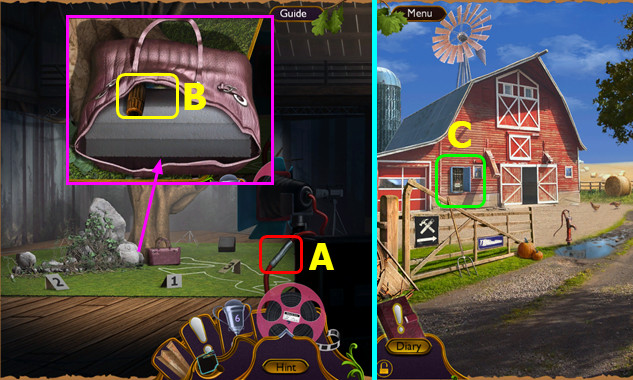
- Walk down.
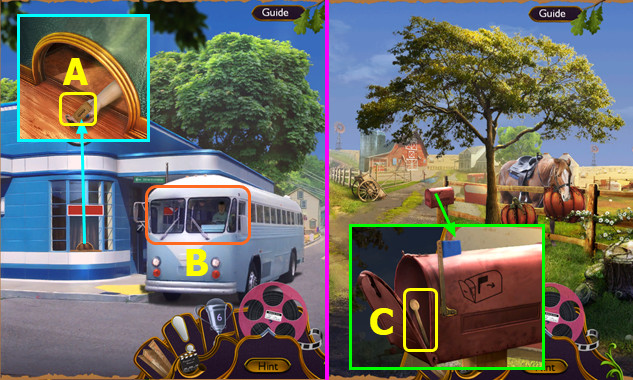
- Use MONEY; take BUS TICKET (A).
- Use BUS TICKET (B).
- Place and select MAILBOX FLAG; read note; take 1/2 BELL TRINKET (C).
- Go right.
- Take 2/2 BELL TRINKET (D).
- Read note; place BELL TRINKET; take LIGHTNING ORNAMENT (E).
- Read note; place LIGHTNING ORNAMENT; take METAL NUMBERS (F).
- Walk down.
- Place and select METAL NUMBERS; take FOX PAW and HOUSE KEY (G).
- Go right.
- Read note; use HOUSE KEY (H).
- Go forward.
- Play HOP; earn BEAR LID (I).
- Take BASKET (J).
- Open briefcase; read notes; take MATCHES (K). Remove briefcase.
- Place BEAR LID; take SWITCH and DUCT TAPE (L).
- Place FOX PAW; slide right; take PANTHER TRINKET and HOUSE ADORNMENT (M).
- Place HOUSE ADORNMENT (N).
- Solution (O).
- Read notes; take HORN (P).
- Walk down, left.
- Use DUCT TAPE (A).
- Take 2/2 FUSES; place PANTHER TRINKET; take TURNING HANDLE (B).
- Walk down.
- Select (C).
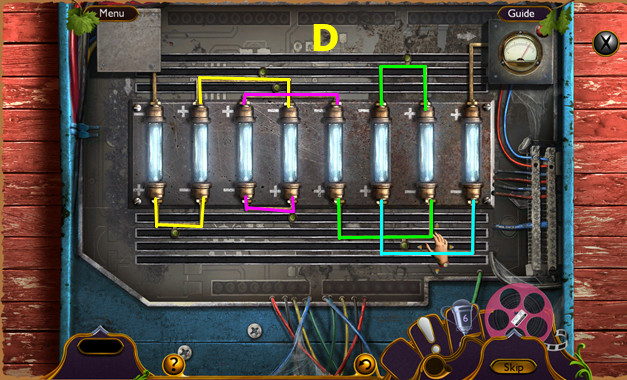
- Place FUSES; solution (D).
- Go left.
- Use TURNING HANDLE (E).
- Play HOP; earn 2/3 DOMINOES (F).
- Pan left.
- Take OLD RAG; place HORN; take 3/3 DOMINOES (G).
- Pan right.
- Go forward (H).
Chapter 3: Barn Loft

- Take INSECTICIDE SPRAYER (I).
- Take PAINT (J).
- Select (K-L).
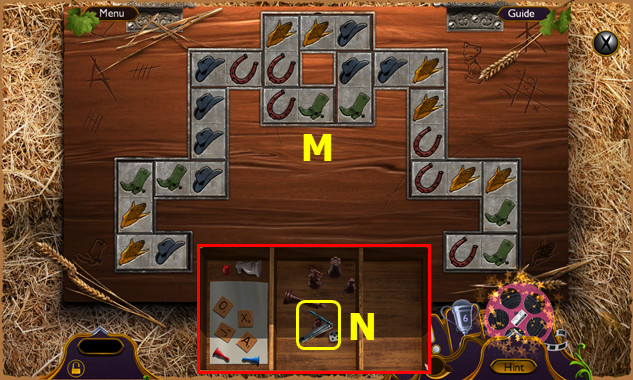
- Place DOMINOES on board; solution (M).
- Take NAIL CLIPPER (N).
- Use NAIL CLIPPER; take 1/2 APPLES and FLOPPY DISK (O).
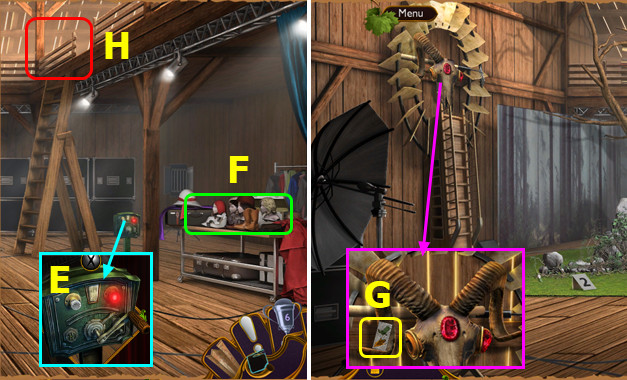
- Walk down.
- Read note, use FLOPPY DISK; select play (P).
- Take floppy disk and HEARTS TRINKET (Q).
- Pan left.
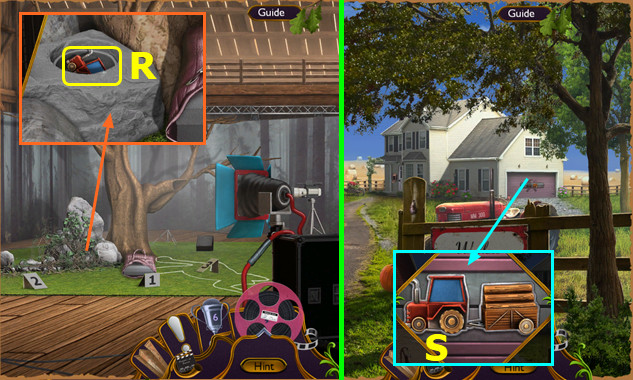
- Remove vines; place HEARTS TRINKET; take TRACTOR EMBLEM (R).
- Walk down.
- Place TRACTOR EMBLEM (S).
- Go right.
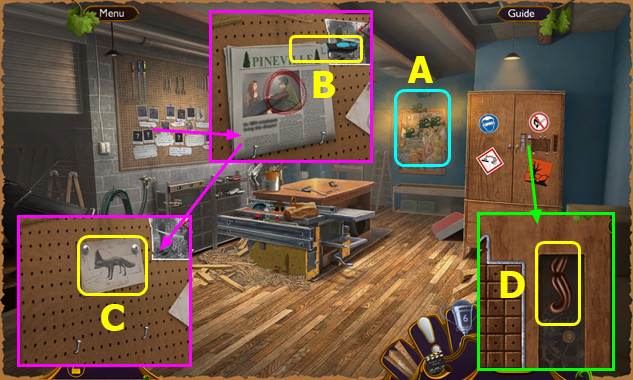
- Play HOP; earn OKLAHOMA PLATE (A).
- Take FILE; read newspaper (B).
- Use OKLAHOMA PLATE; take INSTRUCTIONS (C).
- Take MUSTACHE (D).
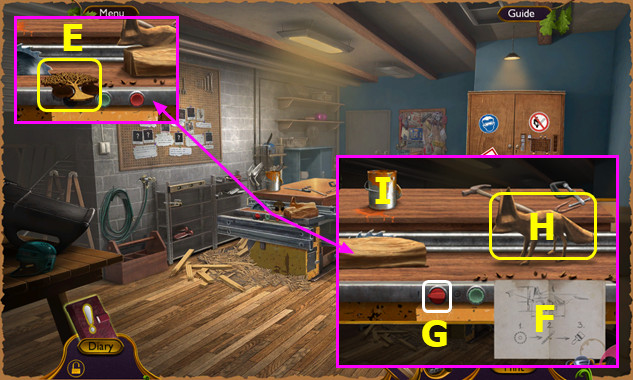
- Take TREE (E).
- Place INSTRUCTIONS (F).
- Place and select SWITCH (G).
- Use FILE (H).
- Place and select PAINT (I).
- Take WOODEN FOX (H).
- Walk down, forward.
- Place WOODEN FOX; take LOCK CONTROLS (K).
- Walk down, right.
- Select (L).
- Place LOCK CONTROLS on right; solution (D-E-D-Fx2-B)-(Dx2-G-B)-(Dx2-E-B-H-D)-(Dx2-B-Hx2-A).
- Read note; take INSECTICIDE BOTTLE (I).
- INSECTICIDE BOTTLE on INSECTICIDE SPRAYER; earn INSECTICIDE.
- Go to Barn Loft.
- Use INSECTICIDE; take SPUR and TORCH (J).
- Use SPUR (K).
- Play HOP; earn RED GEM (L).
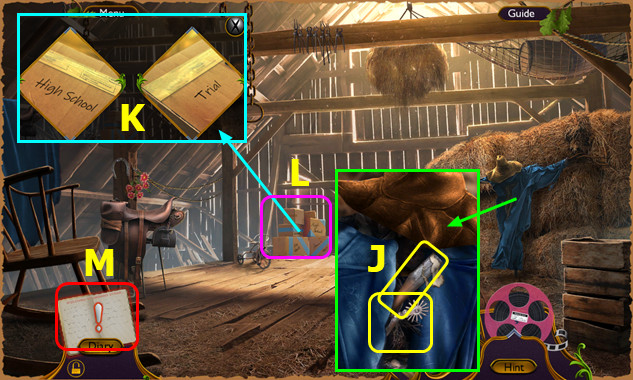
- Select Diary (M).
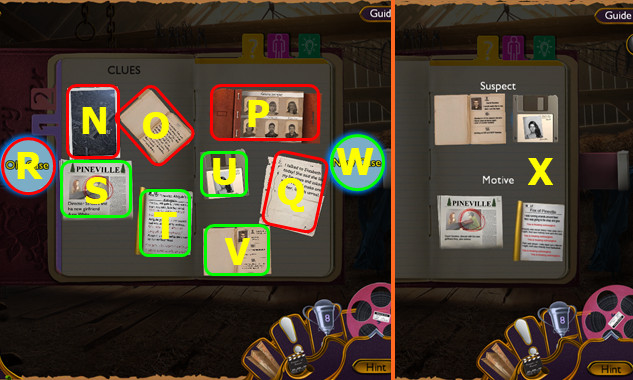
- Select (N-O-P-Q) as old case (R).
- Select (S-T-U-V) as new case (W).
- Solution (X).
- Walk down; pan left.

- Place RED GEM; take CORNFIELD MAP and RAKE (A).
- Walk down 2x.
- Use RAKE (B).
- Take PUMPKIN ORNAMENT (C).
- Go left.
- Use BASKET; earn APPLES (D).
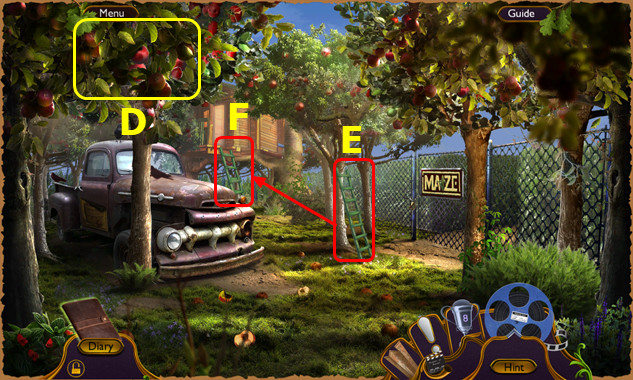
- Move ladder (E-F).
- Walk down.
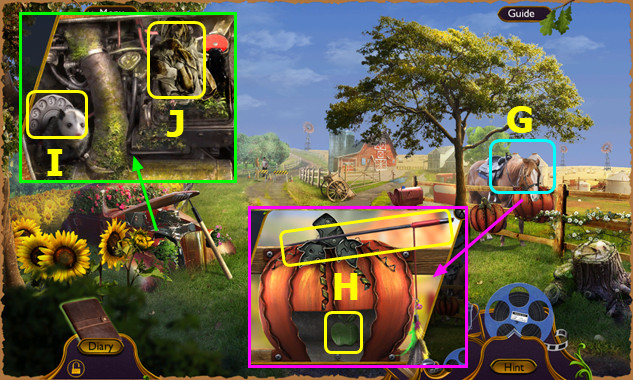
- Give APPLES (G).
- Take FEATHER TOY; place PUMPKIN ORNAMENT; take 2/2 APPLES (H).
- APPLES on TREE; earn APPLE TREE.
- Use FEATHER TOY; take PHONE DIAL (I).
- Use OLD RAG; take GREASED RAG (J).
- GREASED RAG and MATCHES on TORCH; take LIT TORCH.
- Go left.
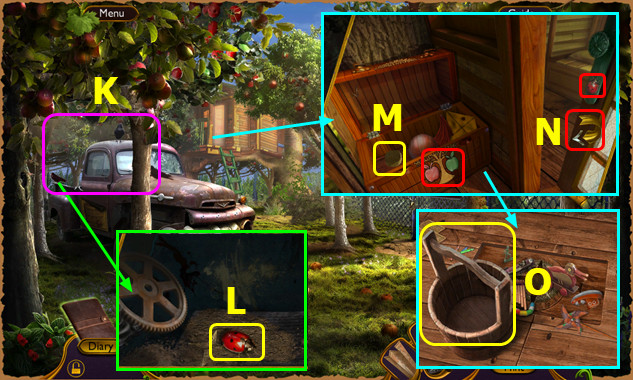
- Use LIT TORCH (K).
- Take LADYBUG (L).
- Place and select APPLE TREE; take SPONGE (M).
- Place LADYBUG; select arrow (N).
- Take BUCKET; remove items (O).
- Walk down, right.
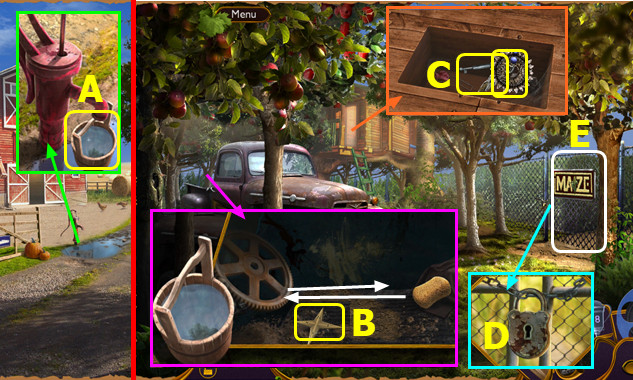
- Place BUCKET; select pump; take WATER (A).
- Walk down, left.
- Place WATER and SPONGE; drag sponge; take STAR HANDLE (B).
- Place STAR HANDLE; take SUN TRINKET and GATE KEY (C).
- Use GATE KEY (D).
- Use CORNFIELD MAP (E).
- Solution (F).
- Pan left.
- Take GLASSES (G).
- Pan right.

- Place MUSTACHE and GLASSES; select arrow (H).
- Take NECKLACE; select arrow (I).
- Place NECKLACE; take PARATROOPER (J).
- Pan left.
- Place PARATROOPER; take RAZOR (K).
- Pan right.
- Take 1/2 CUTOUTS; use RAZOR; take OKLAHOMA FLAG (L).
- Go forward.
Chapter 4: Science Fair
- Select (M).
- Take visitor pass (N).
- Select and take code (O).
- Select (P).
- Remove items; take FOOTPRINT MAKER and instructions (Q).
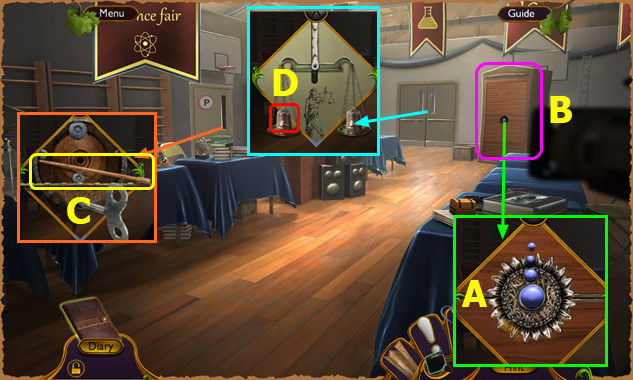
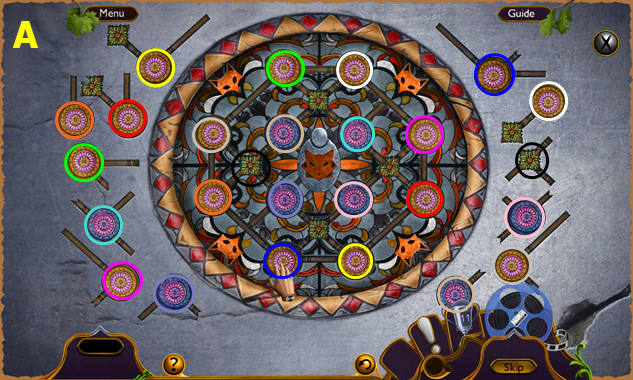
- Place SUN TRINKET; solution (A).
- Play HOP; earn WEIGHT (B).
- Take 1/2 CHOPSTICKS (C).
- Place WEIGHT (D).
- Go forward.

- Place OKLAHOMA FLAG; take GAVEL (E).
- Read file; take SPEAKER CABLE (F).
- Place GAVEL; take 1/2 FOX PINS and FOX HEAD (G).
- Place FOX HEAD (H).
- Go forward.
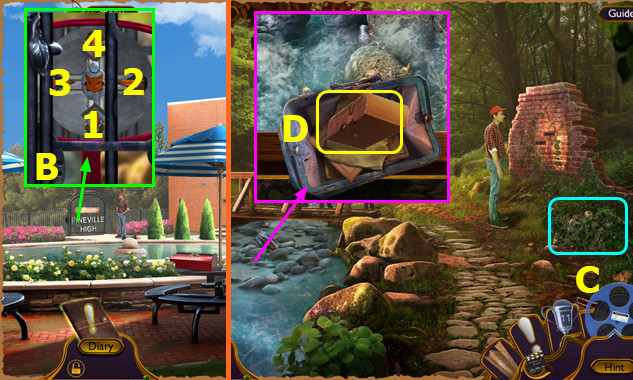
- Take HORSE HEAD and place PHONE DIAL; select 2-5-8-0 (I).
- Read note; take 2/2 CHOPSTICKS (J).
- Select; use CHOPSTICKS; earn 2/2 FOX PINS (K).
- Select (L).
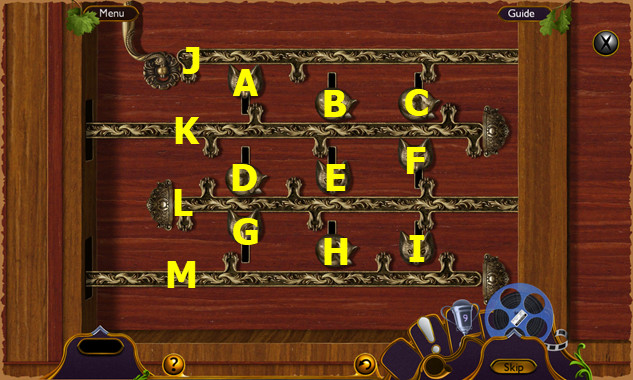
- Place FOX PINS; move J right-C up-K left-A down-J right-A up-K right-C down-J right-B up-C up-L right-F down-K left-D up.
- E up-F up-L right-I up-M left-G down-L right-H up-M left-I down-L right-G up-M left-H down-L right.
- Read planner; take HORSE BODY.
- HORSE HEAD on HORSE BODY; earn CAROUSEL HORSE.
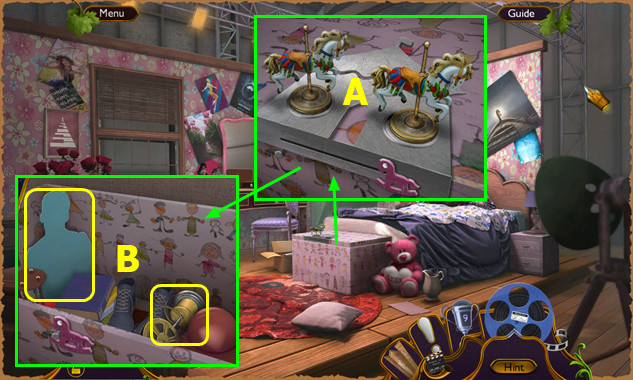
- Place CAROUSEL HORSE; select each horse (A).
- Take MOVIE AWARD and 2/2 CUTOUTS (B).
- Walk down.
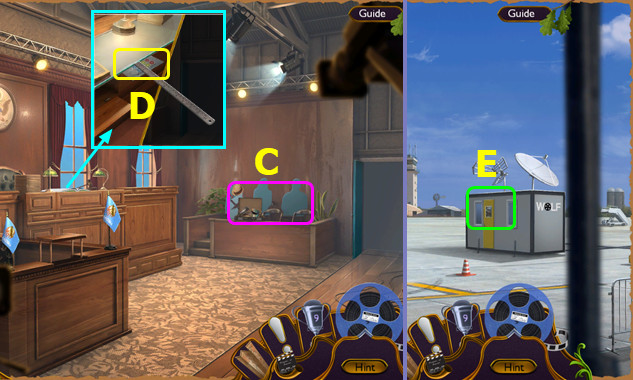
- Place CUTOUTS; play HOP; earn RULER (C).
- Use RULER; take OFFICE REFERENCE (D).
- Walk down 2x.
- Pan left.
- Select (E).
- Place OFFICE REFERENCE; solution (G-K)-(A-M)-(M-N)-(N-D)-(K-L)-(L-I)-(C-P)-(P-O)-(O-B)-(D-N)-(E-C)-(N-D)-(F-G)-(G-K)-(H-F)-(K-G)-(G-H)-(D-E)-(I-J).
- Go right.
- Place MOVIE AWARD; solution (A).
- Take AIRPLANE BADGE and METAL E (B).
- Use METAL E; read note; take LOCK SEGMENT (C).
- Place LOCK SEGMENT; select 1-3 (D).
- Play HOP; earn MODEL PARTS (F).
- Take ROPE; place MODEL PARTS; take SCHEMATIC PIECES (G).
- Select (H).
- Place SCHEMATIC PIECES; solution (I).
- Select; take PLANE CODE (J).
- Go right.
- Place PLANE CODE; solution L-K-L-K-L-Kx2.
- Go forward.
- Take KNIFE (M).
- Place AIRPLANE BADGE; take CAGE KEY and GOLF CLUB (N).
- KNIFE and ROPE on GOLF CLUB; earn IMPROVISED CUTTER.
- Read note; take BROKEN CREST; select arrow (O).
- Read card; take CORKSCREW (P).
- Use IMPROVISED CUTTER; take BOTTLE EMBLEM (Q).
- Place BOTTLE EMBLEM (R); play HOP; earn W CREST.
- Select bottle (S).
- Select Diary (T).
- Select (A-B)-(C-D).
- Select (E).
- Arrange (F).
- Place W CREST; take HELICOPTER TRINKET and POWER CORD (G).
- Go to Science Fair.
- Place SPEAKER CABLE and POWER CORD (H).
- Solution (I).
- Take WIND-UP CAR (J).
- Use WIND-UP CAR (K).
- Go left.
- Take MOTORCYCLE BADGE (L).
- Place HELICOPTER TRINKET; take PLASTER and SKULL ADORNMENT (M).
- Walk down.
- Place SKULL ADORNMENT; take ACID BOTTLE (N).
- CORKSCREW on ACID BOTTLE; earn ACID.
- Go left.
- Use ACID; take WOODEN TILE (O).
- Place WOODEN TILE; solution (P).
- Take BRIEFCASE CYLINDER (Q).
- Place BRIEFCASE CYLINDER (R).
- Solution (S).
- Read note; take CAR KEY (T).
- Use CAR KEY (U).
- Go left.
Chapter 5: School Front
- Take LEVER (A).
- Take 1/3 BALLS (B).
- Take GLOVE; place MOTORCYCLE BADGE (C).
- Read note; take COMPASS (D).
- Take SPATULA: use LEVER; take 1/2 CARABINER (E).
- Go forward.
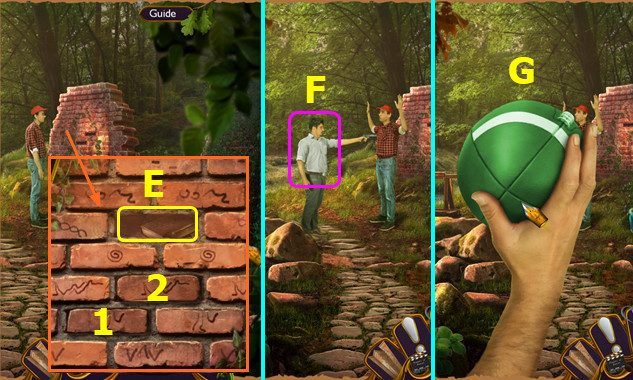
- Use COMPASS; read note; take CREST PART (F).
- CREST PART on BROKEN CREST; take SCHOOL CREST.
- Walk down.
- Place SCHOOL CREST; take DNA SEGMENT (G).
- Go forward.
- Place DNA SEGMENT; solution (H).
- Go right.
- Take MIRROR (I).
- Select (J).
- Select (K-L).
- Read note; take 2/3 BALLS. Read note; take MAGIC PAPER (@).
- Play HOP; earn SKELETON ARM (M).
- Place SKELETON ARM; take CLEATS TILE (N).
- Select (O).
- Place MAGIC PAPER (A).
- Use (B-C)-(B-D)-(E-A).
- Take SHOWCASE CODE (F).
- Walk down.

- Place SHOWCASE CODE; solution (H).
- Play HOP; earn CLEATS (I).
- Take MINIATURE SAW from CLEATS.
- PLASTER, SPATULA, and CLEATS on FOOTPRINT MAKER; select 1-3 (J).
- Place CLEATS TILE (K).
- Solution Nx3-L-N-L-N-L-Nx3-Ox2-N-O-N.
- Take DEVELOPING CHEMICALS (P).
- Go right.
- Place DEVELOPING CHEMICALS (A).
- Select (B).
- Select (C); examine photos.
- Take 2/2 CARABINER (D).
- Walk down 2x.
- Use MINIATURE SAW; take TROLLEY CHAIN (E).
- CARABINER on TROLLEY CHAIN; earn CHAINED HOOKS.
- Go forward.
- Place CHAINED HOOKS (F).
- Go forward.
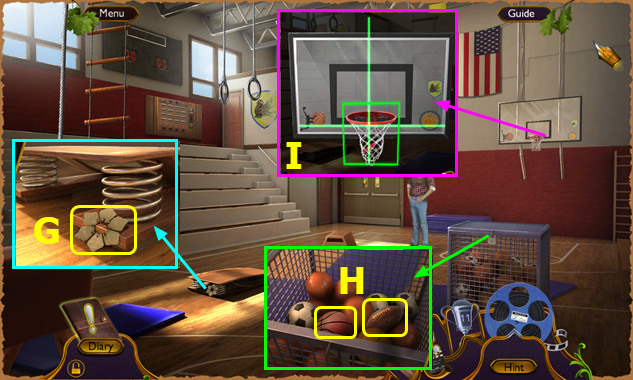
- Take GOLDEN PETALS (G).
- Use CAGE KEY; take BASKETBALL and FOOTBALL (H).
- Use BASKETBALL; stop green lines as shown; earn POCKET KNIFE (I).
- Go forward.
- Read note; take 1/2 WEIGHTED PLATES (J).
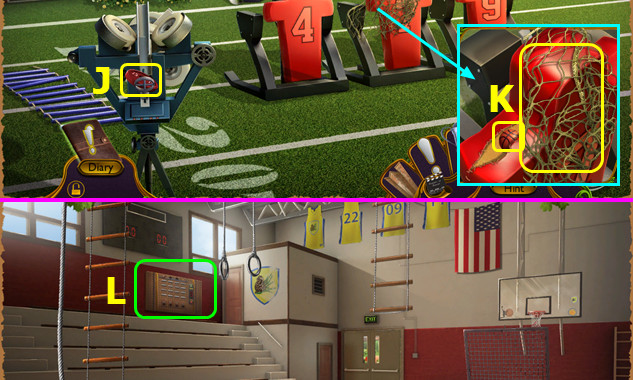
- Take NET; use POCKET KNIFE; take 3/3 BALLS (K).
- Walk down.
- Select (L).
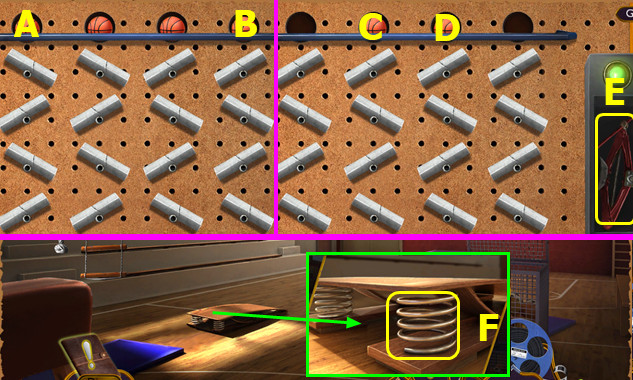
- Place BALLS; arrange pegs as shown; select (A-B).
- Arrange pegs as shown; select (C-D).
- Take JACK (E).
- Use JACK; earn SPRING (F).
- Go forward.
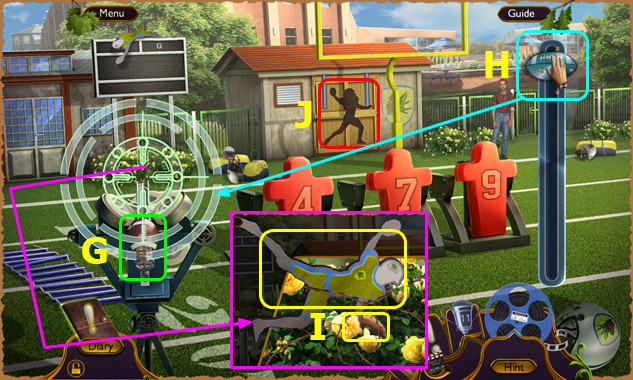
- Place SPRING and FOOTBALL (G).
- Adjust lever (H).
- Use GLOVE; take FOOTBALL EMBLEM and FOOTBALL (I).
- Use FOOTBALL EMBLEM (J).
- Go forward.
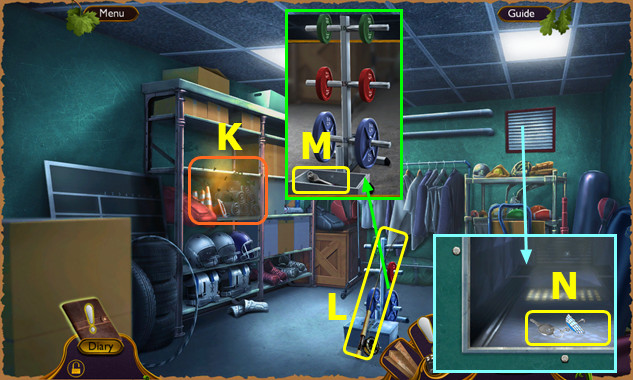
- Play HOP; earn 2/2 WEIGHTED PLATES (K).
- Take FISHING ROD (L).
- Place WEIGHTED PLATES; solution; take SOCKET WRENCH (M).
- Use SOCKET WRENCH; take YARD KEY (N).
- Walk down.
- Use YARD KEY (O).
- Go right.
- Place GOLDEN PETALS; take SHEARS (P).
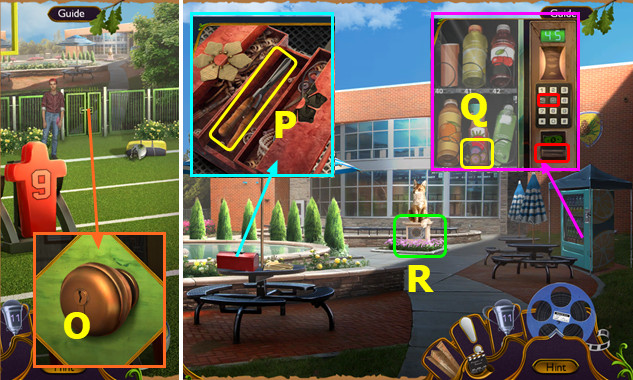
- Use MONEY; press 4-5; earn STONE ORNAMENTS (Q).
- Select (R).
- Read note; place STONE ORNAMENTS; solution (A).
- Earn FOX EMBLEM.
- Place MIRROR and FOX EMBLEM; select 1-4 (B).
- Go left.
- Use SHEARS; play HOP; earn 1/2 DECORATED BRICK (C).
- Use FISHING ROD; open case; take 2/2 DECORATED BRICK (D).
- Place DECORATED BRICKS; push 1-2; read diary (E).
- Use FOOTBALL (F).
- Select when green (G).
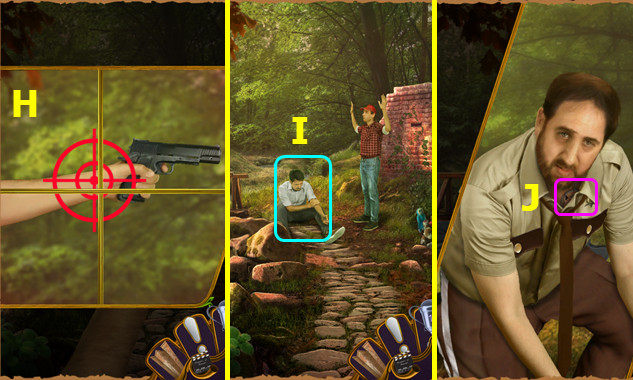
- Select crosshairs as shown (H).
- Use NET (I).
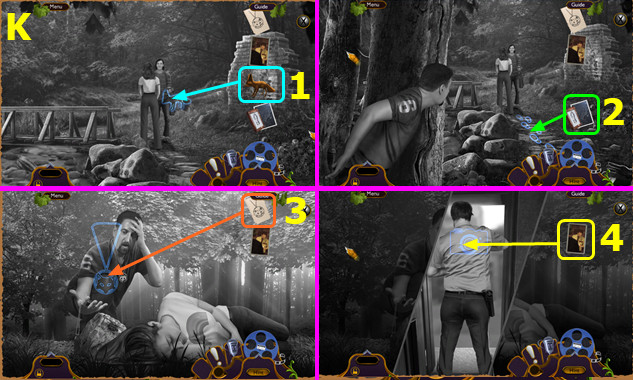
- Select (J).
- Place items 1-4 (K).
- Congratulations! You have completed Memoirs of Murder: Behind the Scenes!
Created at: 2019-09-29