

Walkthrough Menu
General Tips
- This is the official guide for Memoirs of Murder: Welcome to Hidden Pines.
- This guide won't tell you when to zoom into a location; the screenshots show each zoom scene.
- Hidden-object puzzles are referred to as HOPs. Only the locations of the HOPs will be shown.
- Use the Map to fast travel to a location.
Chapter 1: Aaron Fletcher
- Select Aaron Fletcher to begin.
- Read note on scene.
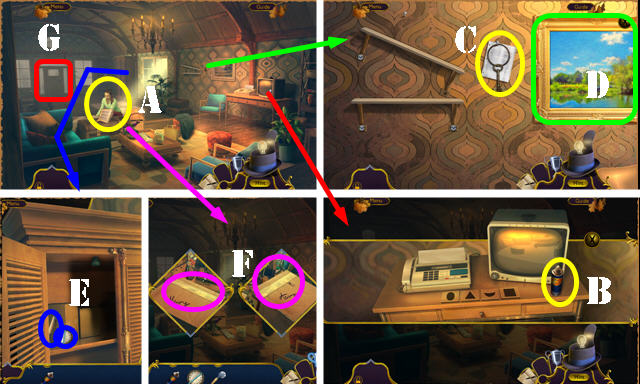
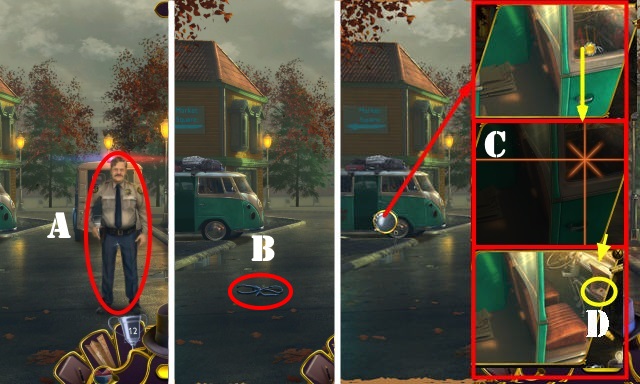
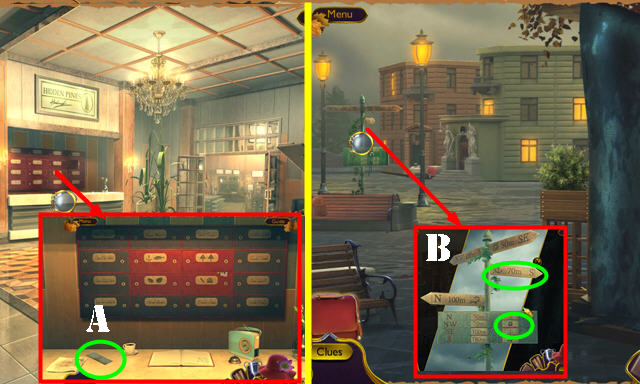
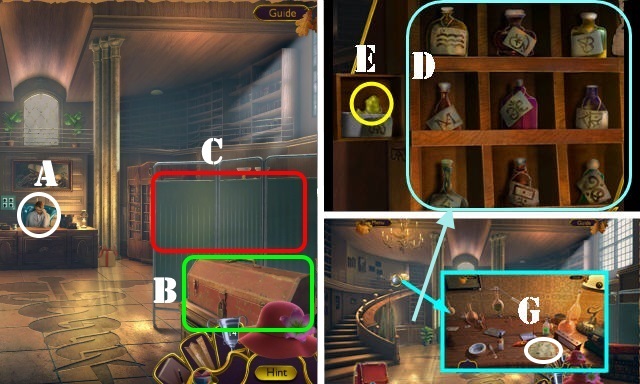
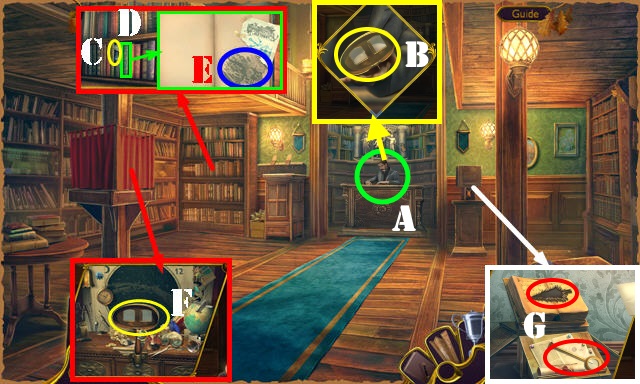
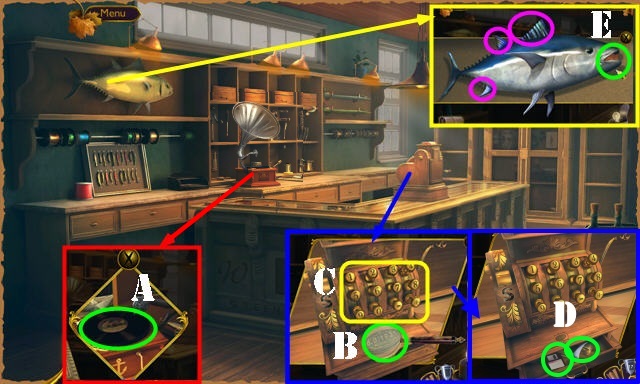
- Talk (A).
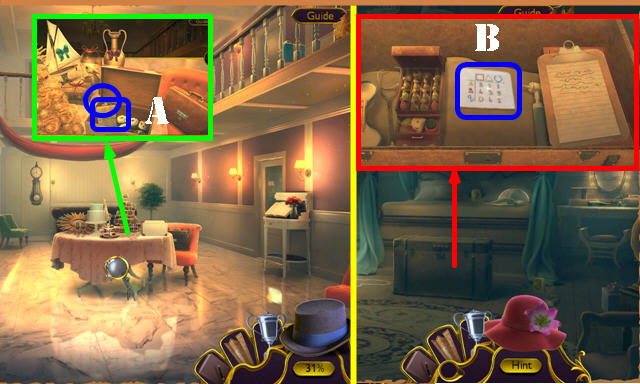
- Take RUST REMOVER (B).
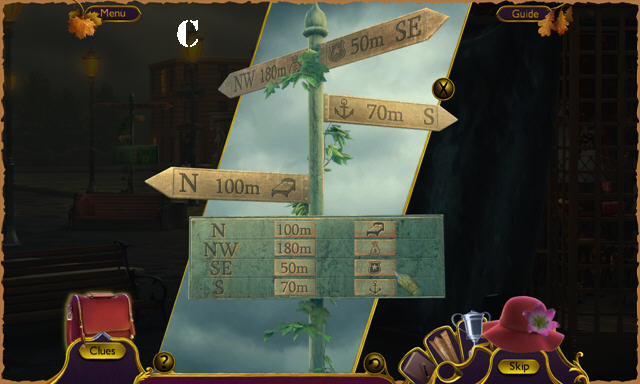
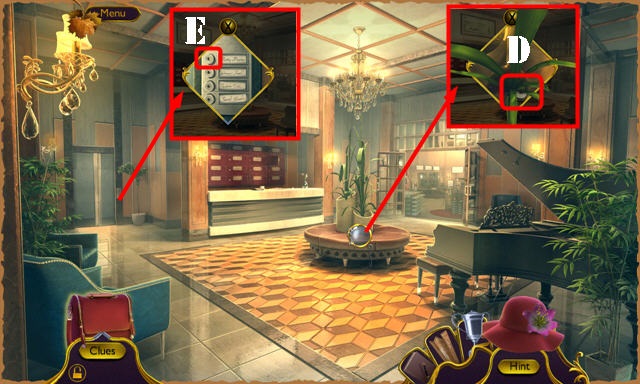
- Take CLOSET KEY; look at note (C). Remove painting (D).
- Use CLOSET KEY; take TV KNOB and PIZZA CUTTER (E).
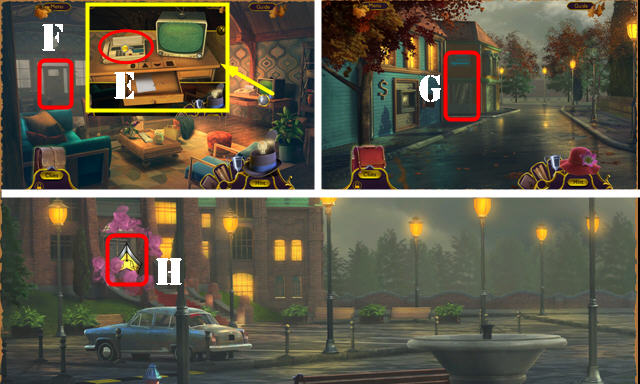
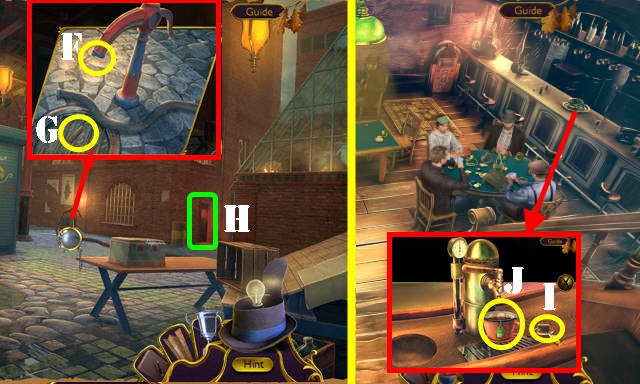
- Use PIZZA CUTTER (F). Play HOP; receive CHAMPAGNE.
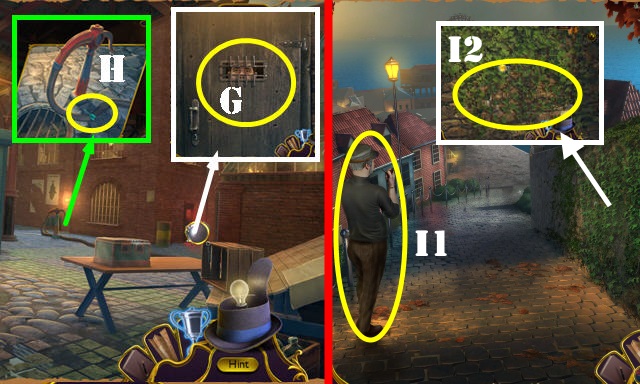
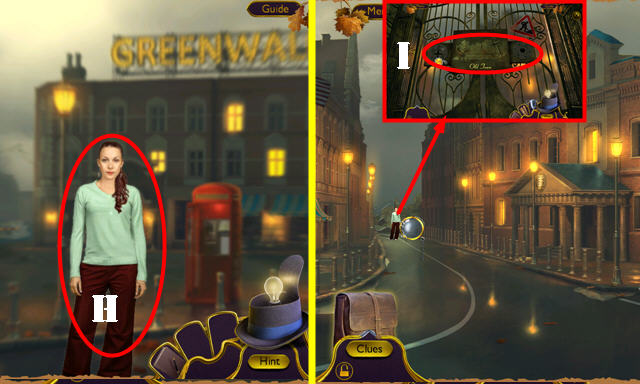
- Go (G); pan right.
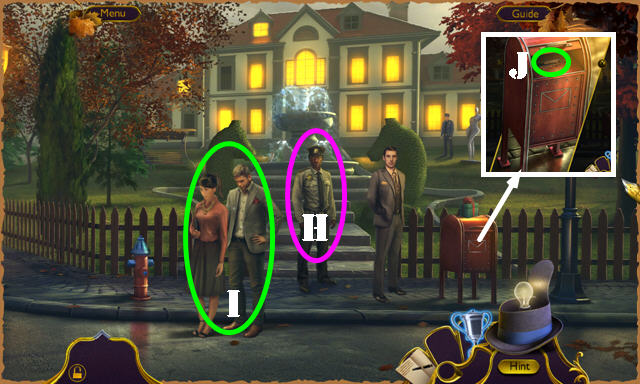
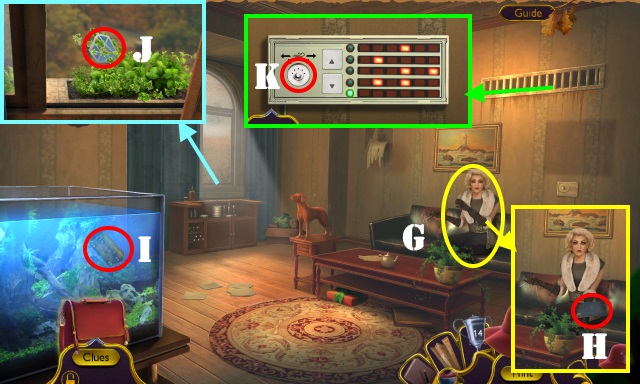
- Talk (H-I).
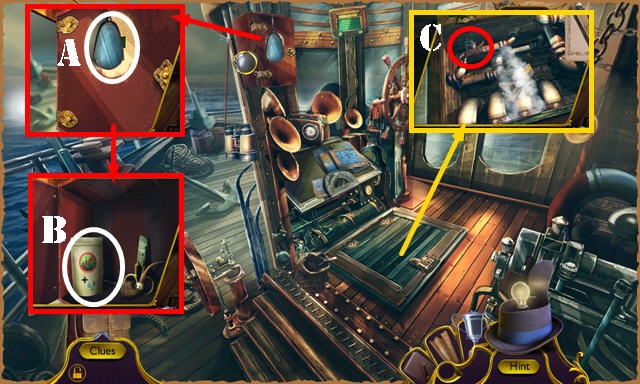
- Use RUST REMOVER; open; take CLOCK HANDS 1/2 (J).
- Pan left.
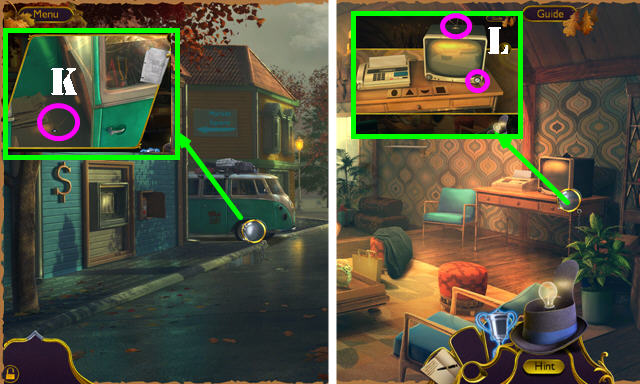
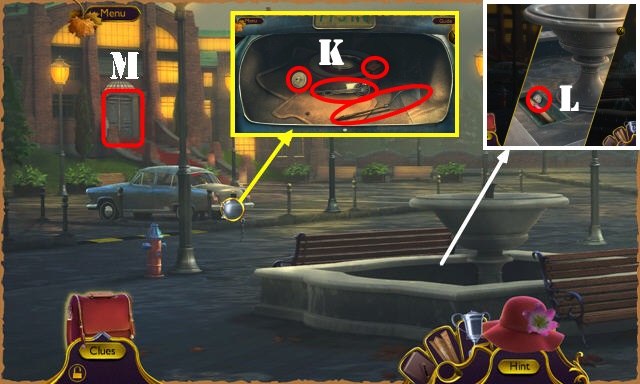
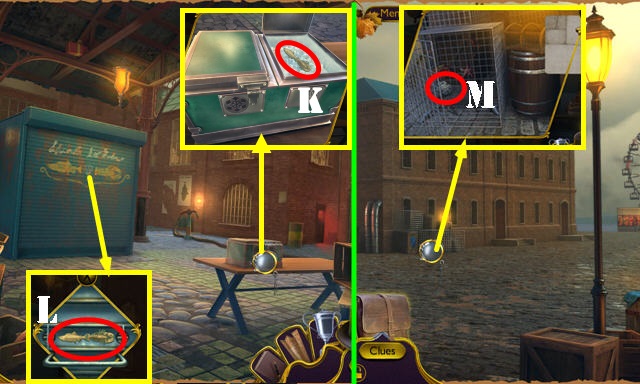
- Look at note, open door and select; take ANTENNA (K).
- Walk down.
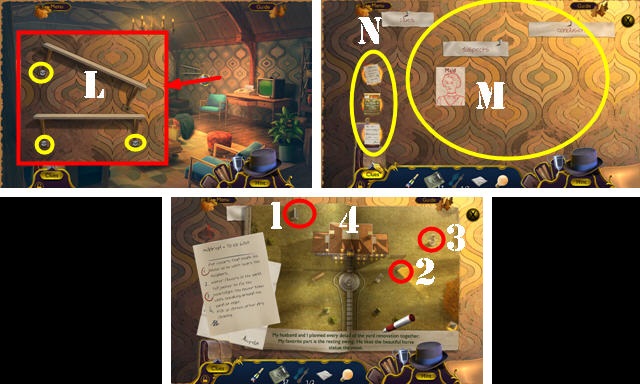
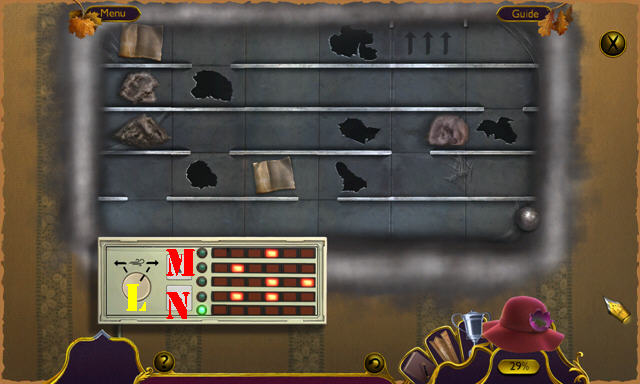
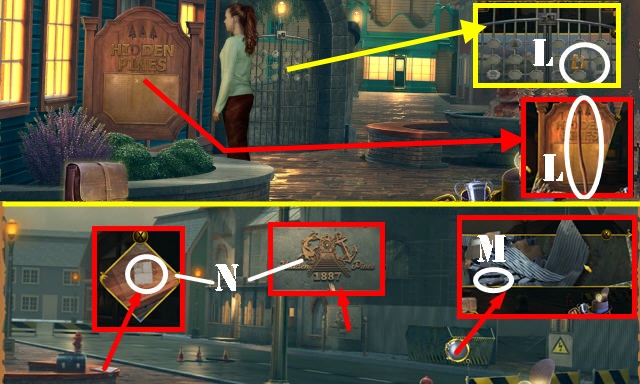
- Place TV KNOB and ANTENNA (L).
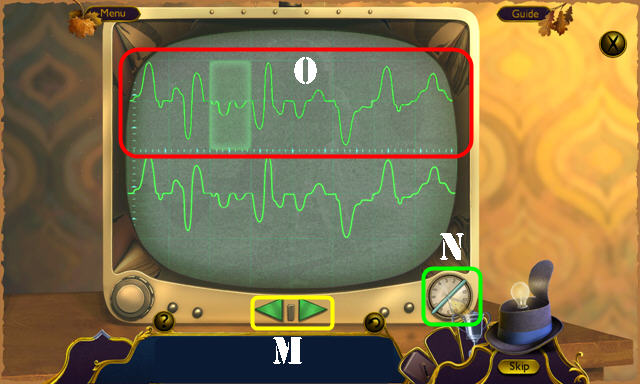
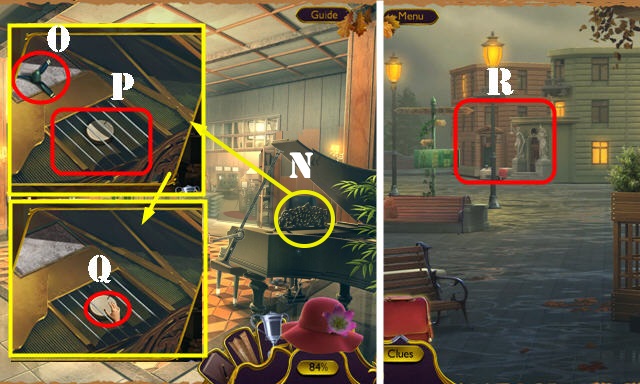
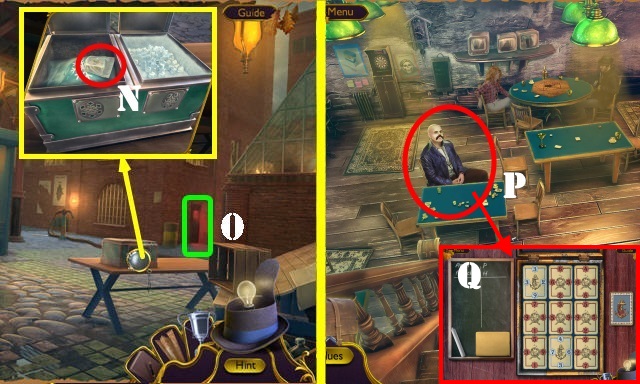
- Use arrows (M) to select a section and the knob (N) to change its shape. Solution (O).
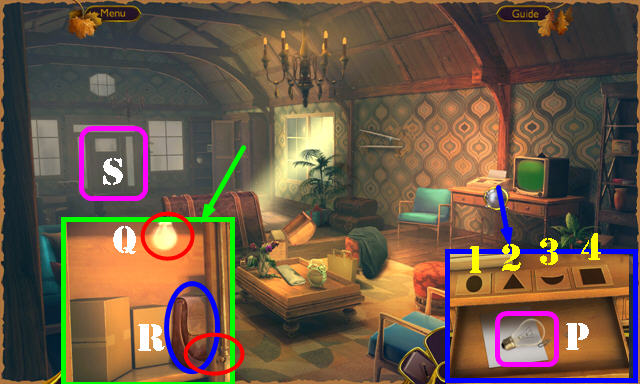
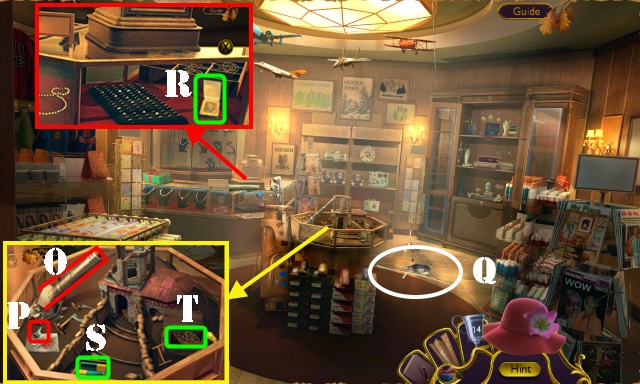
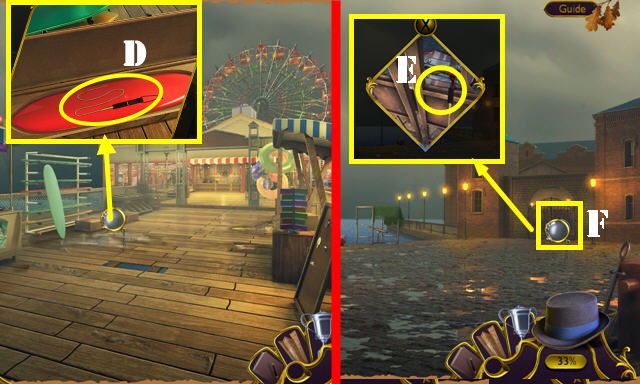
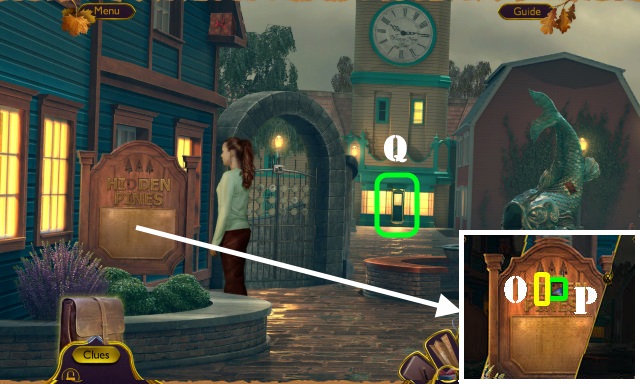
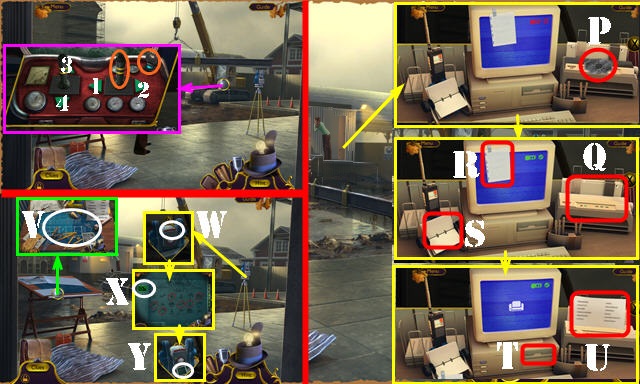
- Select 3-2-4-1; take LIGHTBULB (P).
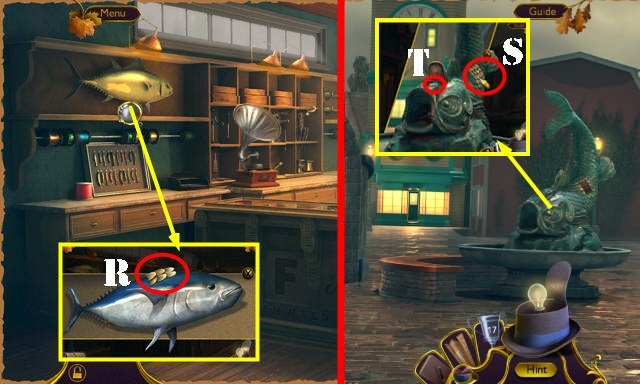
- Place LIGHTBULB (Q); take briefcase and WALLET (R).
- Select WALLET 5x; receive ATM CARD and PERSONAL ID.
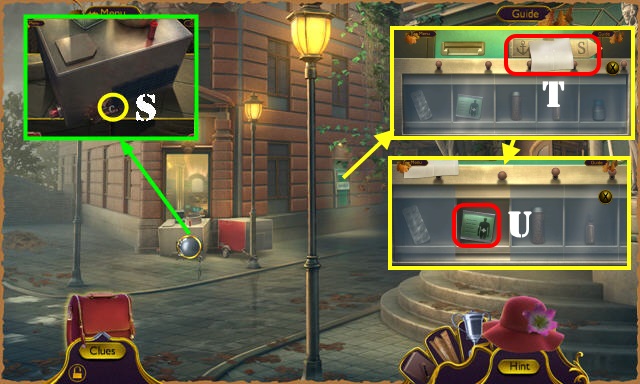
- Go (S); pan left.

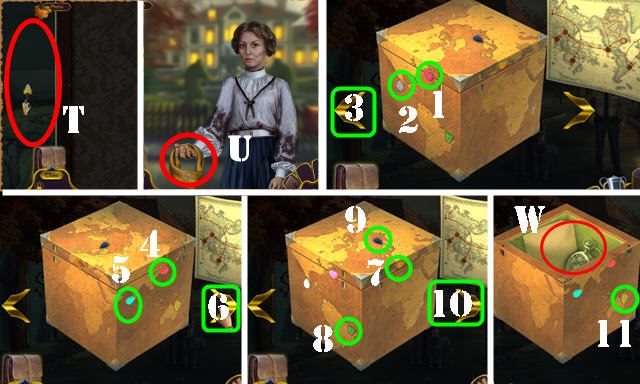
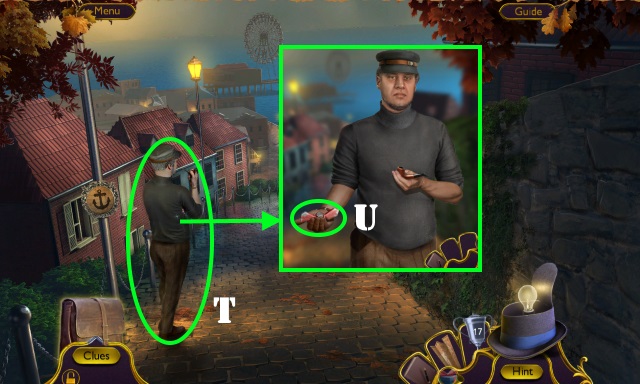
- Use ATM CARD (T). Enter code (1-2-3).
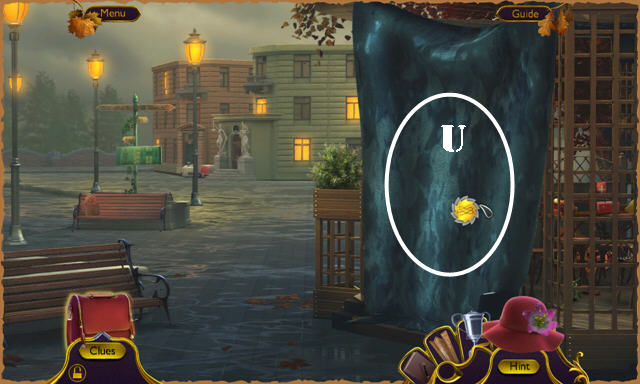
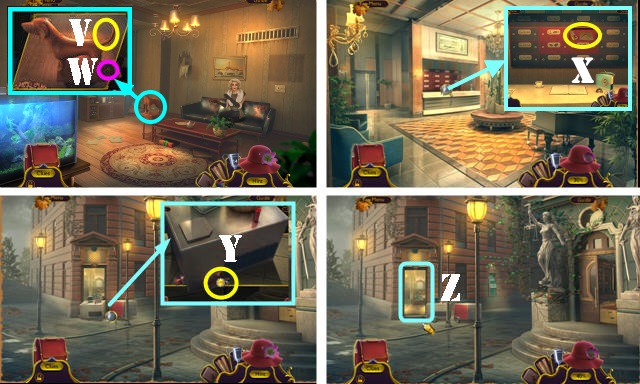
- Select card (U); take MONEY (V).
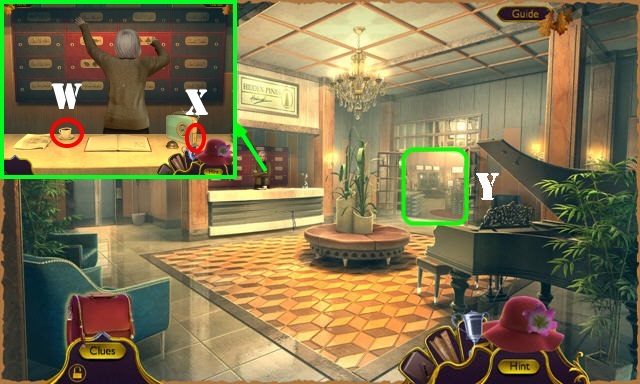
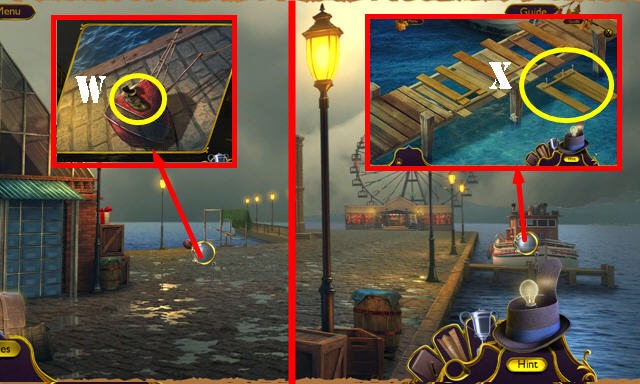
- Give MONEY (W).
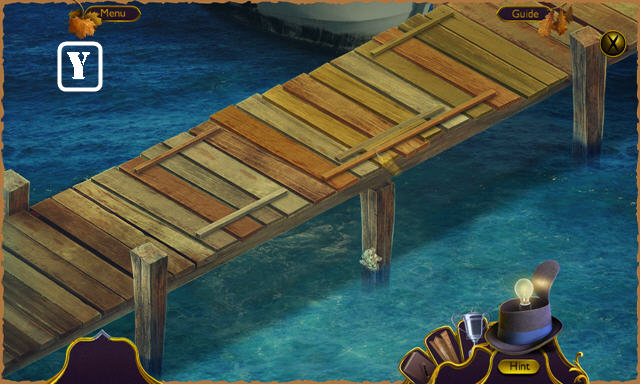
- Look at newspaper and take Map (X).
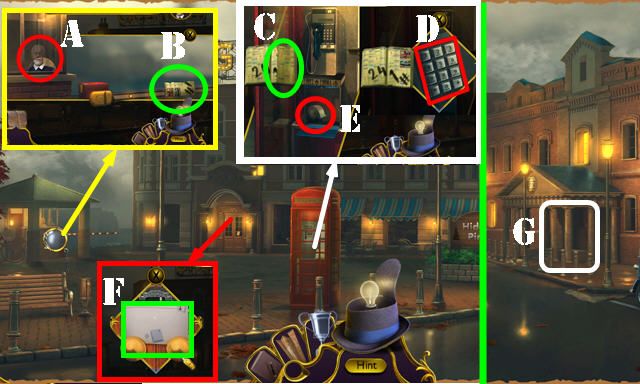
- Pan left. Talk (A). Take PHONE BOOK PAGE (B).
- Open phonebook; place PHONE BOOK PAGE (C); enter (241#)(D); take DUCT TAPE (E).
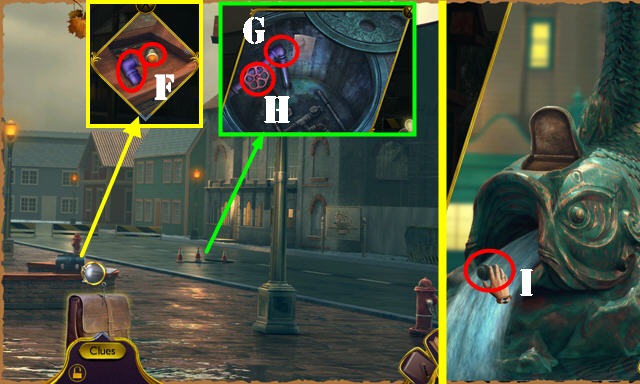
- Look at note (F).
- Pan right. Enter (G).
- Give PERSONAL ID (H).
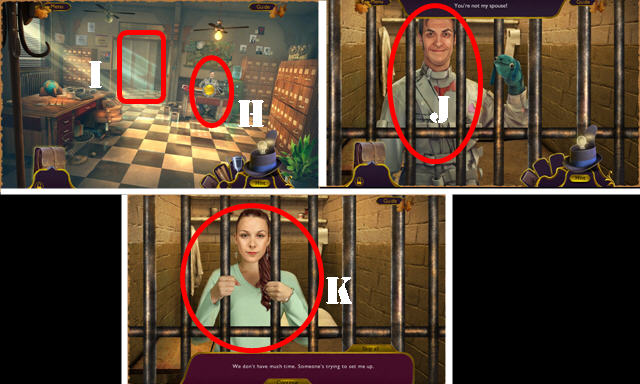
- Go (I).
- Examine cells; talk (J).
- Pan right. Talk (K).
- Try to go forward.
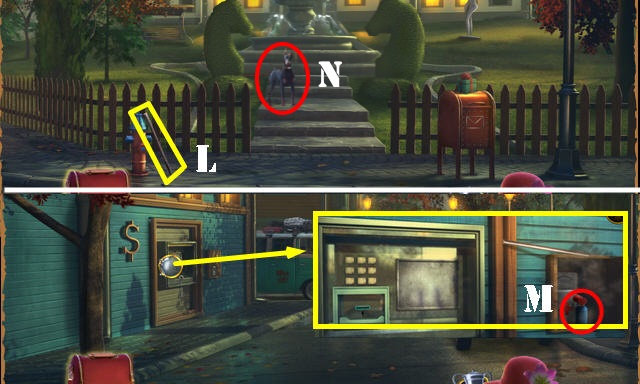
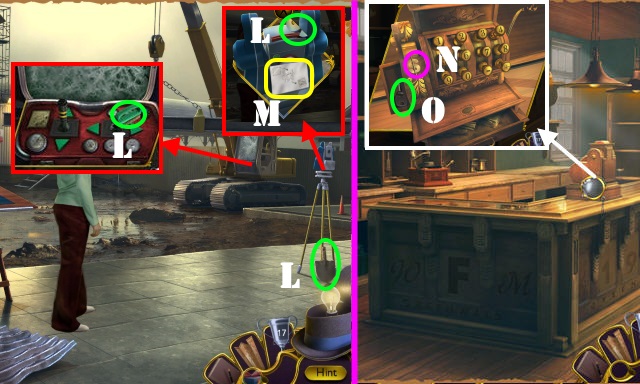
- Take METAL POLE (L).
- Pan left. Use METAL POLE; take AIR HORN (M).
- Pan right. Use AIR HORN (N).
- Go forward.
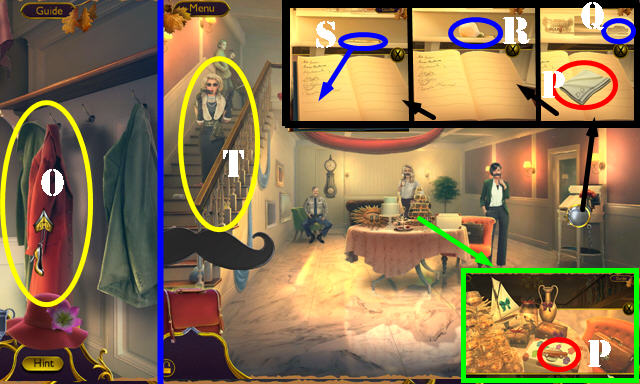
- Hang up jacket (O).
- Go forward.
- Take CAR EMBLEM and NAPKIN (P).
- Place CAR EMBLEM (Q); take YELLOW LIGHTBULB (R).
- Take pen and use it (S).
- Go (T).
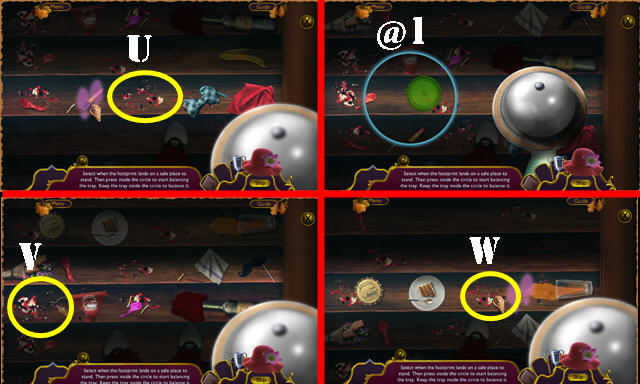
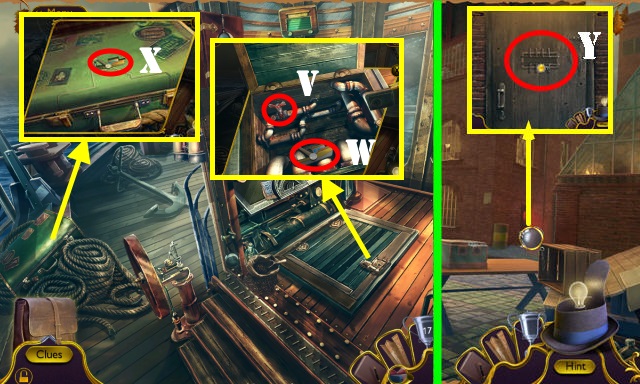
- Select footprint when on a safe place (U-V-W), and then keep circle inside tray (@1).

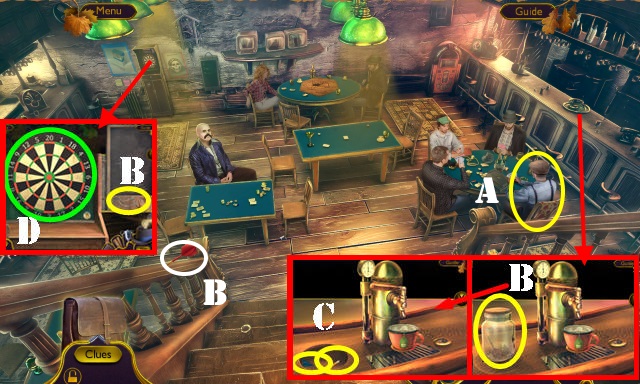
- Flip switch (A).
- Talk (B).
- Take Clue and BOX (C).
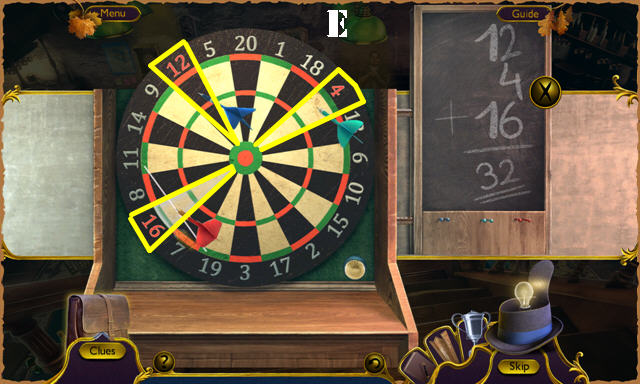
- Take FIREPLACE POKER (D). Select arrow (E); use FIREPLACE POKER and BOX (F).
- Walk down.
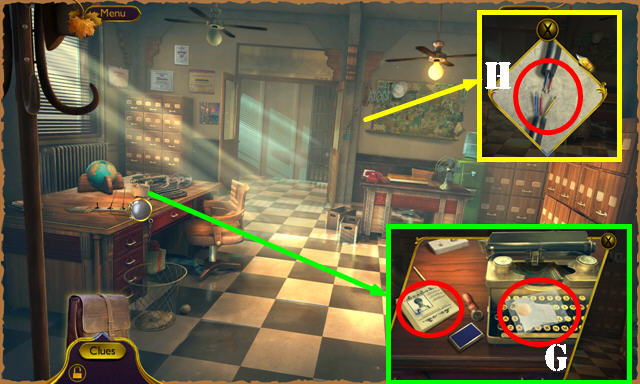
- Open bag; take NAPKIN, YELLOW LIGHTBULB, and Clue. Examine paper (G).
- Use DUCT TAPE (H). Play HOP; receive POLICE VAN KEY. Take Clue on scene.
- Walk down.
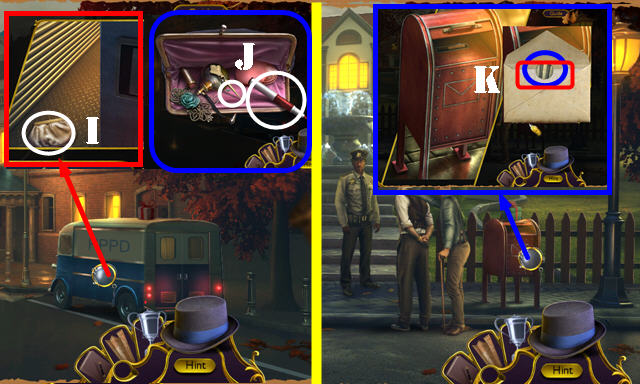
- Use POLICE VAN KEY; take MARY'S BAG (I).
- Open MARY'S BAG; take SAFETY PIN and MARKER (J).
- Walk down.
- Use SAFETY PIN and open letter; take GAME TOKEN and Clue (K).
- Walk down.
- Use GAME TOKEN 3x (L).
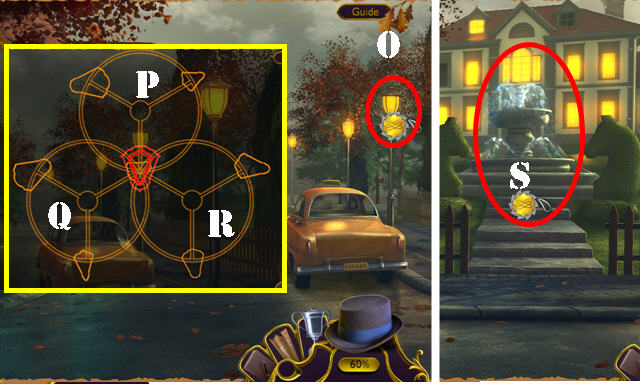
- Use MARKER on board 3x (M). Place items from briefcase (N). Select 1-4. Receive YARD BLUEPRINT.
- Go to Maple Street and pan left.
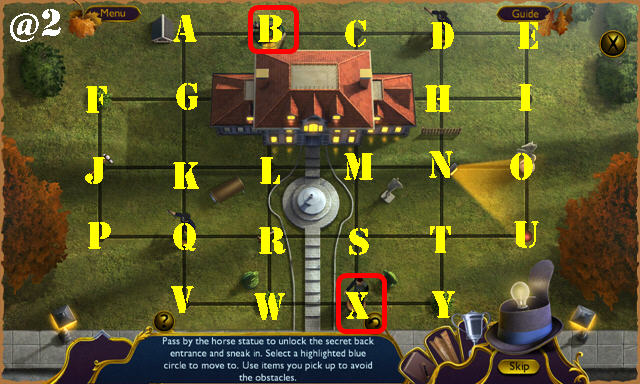
- Use CHAMPAGNE (O).
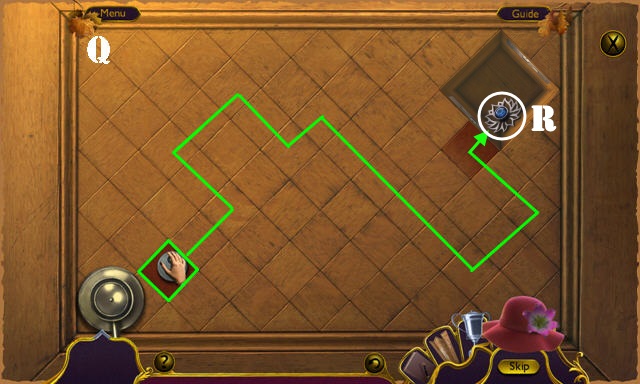
- Select Px2-Qx2-R.
- Pan right.
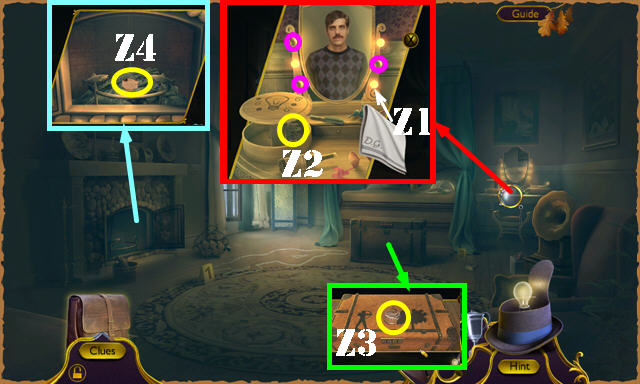
- Place YARD BLUEPRINT (S).
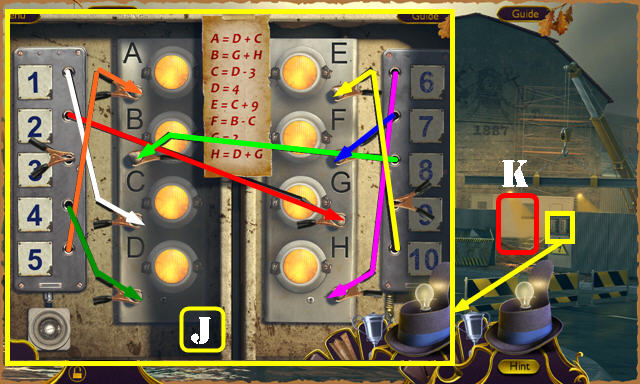
- Solution (@2): S-R-L-R-L-K-G-A-G-K-J-P-J-K-L-M-N-T-U-O-I-H-D-C-B.
- Return to Greenwald Bedroom.
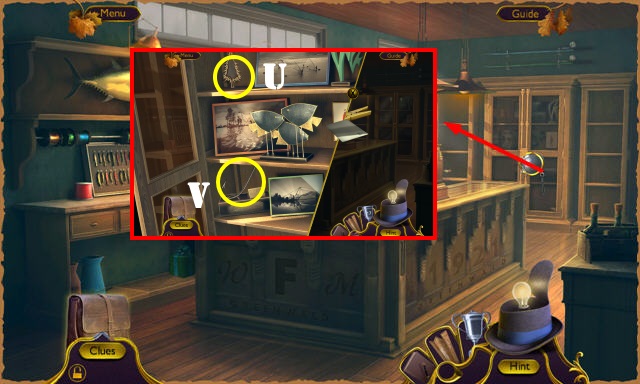
- Remove tape on scene.
- Flip mirror; place YELLOW LIGHTBULB and use NAPKIN (Z1). Select bulbs (purple); take TREE (Z2).
- Take CUPCAKE SYMBOL (Z3).
- Select twice; take Clue (Z4).
- Walk down.
- Place CUPCAKE SYMBOL; take WORLD MAP and ARCHER (A).
- Go to Greenwald Bedroom.
- Place ARCHER and TREE; look at clipboard; take CODE (B).
- Walk down.
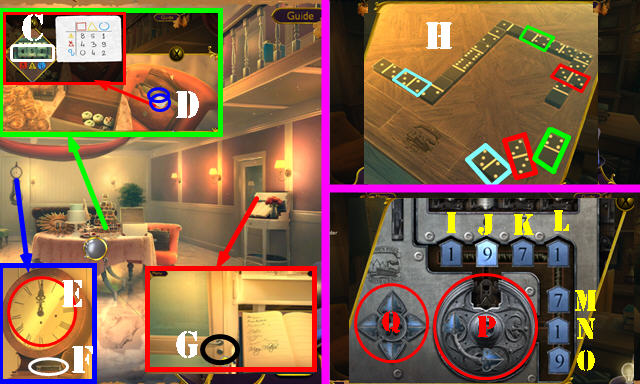
- Place CODE; enter 452 (C); take note and CLOCK HANDS 2/2 (D).
- Place CLOCK HANDS 2/2 (E); select twice. Take OFFICE KEY (F).
- Go forward.
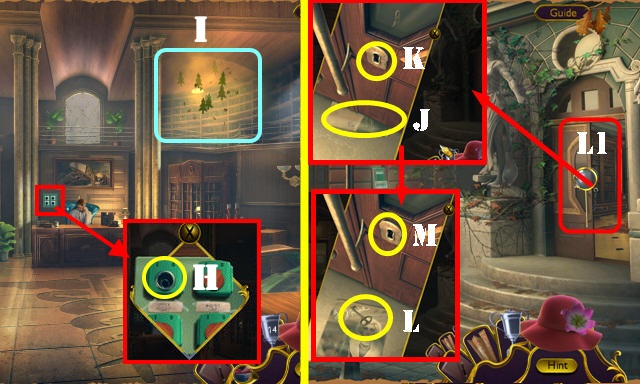
- Use OFFICE KEY (G). Play HOP.
- HOP puzzle solution one (H).
- HOP puzzle solution two. Using the arrows (Q) to move a number plate and the disc (P) to rotate it, move (N-L)-(M-K)-(O-J); receive LETTER OPENER; select Clue on scene.
- Go to Greenwald Bedroom.
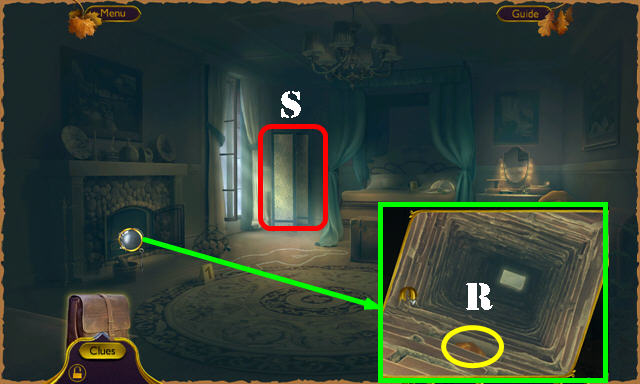
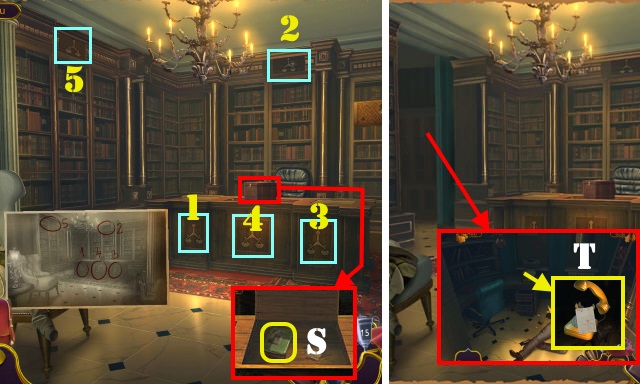
- Select fireplace; use LETTER OPENER; take BOX (R).
- Select door and hide (S).
Chapter 2: Hotel
- Select scene twice; go (T).
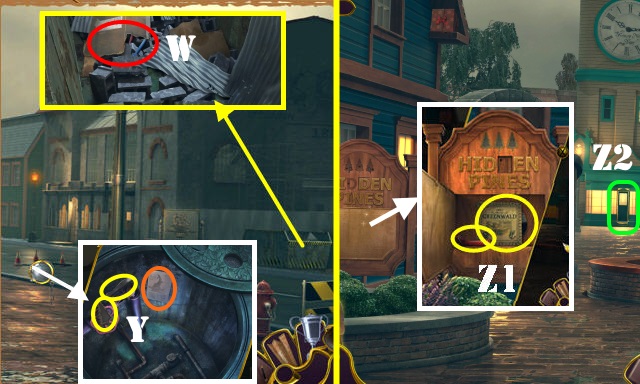
- Talk; take BETTY'S SCARF (U).
- WORLD MAP on BOX. Solution (1-10). Take Clue (W).
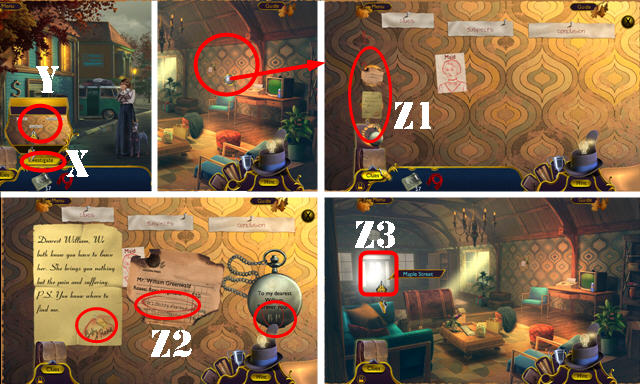
- Select Investigate (X). Go (Y).
- Place all items from briefcase (Z1).
- Select all three; take EVIDENCE (Z2).
- Go (Z3).
- Give EVIDENCE (A).
- Take LEASH (B).
- Examine LEASH 3x; receive ROPE.
- Place ROPE; stop both lines in middle (C); receive NIPPERS.
- Open; take BUSINESS CARD (D).
- Walk down.
- Use BUSINESS CARD (E).
- Try to exit (F).
- Go (F-G-H).

- Give MONEY (I).
- Take SCREWDRIVER (J).
- Walk down.
- Use SCREWDRIVER; take BUTTERFLY NET, CAR JACK, BUBBLE GUM, and WHEEL (K).
- Use BUBBLE GUM; take COIN (L).
- Go (M).
- Use CAR JACK (N); take PROPELLER (O).
- Use NIPPERS (P); receive PIANO WIRE.
- Take THERMOSTAT KNOB (Q).
- Walk down, pan right, and go (R).
- Take C CUFFLINK (S).
- Look at note; take SIGN POST (T). Insert coin.
- Open; take LAXATIVE (U).
- Return to Hotel Reception.
- Use LAXATIVE when receptionist turns around (W).
- Remove cover; take BATTERIES 1/2 (X).
- Go (Y).
- Open door (Z1); play HOP; receive E CUFFLINK.
- Take WALL POSTER (Z2).
- Walk down.
- Look at newspaper; take SIGN CLUE (A).
- Walk down; pan right.
- Place SIGN POST and SIGN CLUE (B).
- Solution (C).
- Take GLOVE.
- Go to Hotel Reception.
- Use GLOVE (D); receive ELEVATOR BUTTON.
- Place ELEVATOR BUTTON (E); select.
- Give BETTY'S SCARF (G). Take folder (H) and select 4x; receive INVESTIGATION EVIDENCE.
- Use BUTTERFLY NET (I); receive CHEST.
- Open door; use PIANO WIRE (J). Receive DIAMOND EMBLEM.
- Place THERMOSTAT KNOB (K).
- Solution (L-M-Nx4-L-Nx4-L-L-M).
- Receive CANNONBALL.
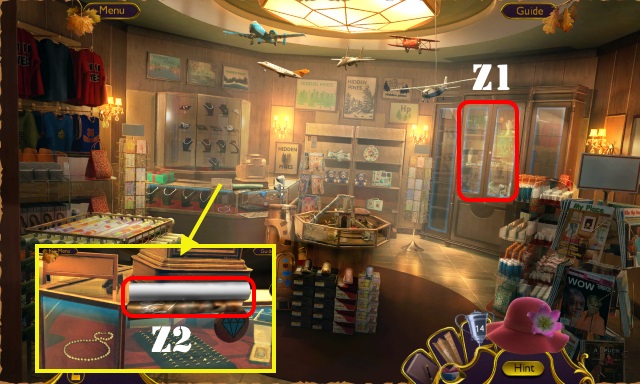
- Return to Gift Shop.
- Use CANNONBALL (O); flip switch (P); take TOY PLANE (Q).
- Place DIAMOND EMBLEM; take LIGHTER (R).
- PROPELLER on TOY PLANE; take BATTERIES 2/2.
- Place BATTERIES 2/2 (S); take METAL BRUSH (T).
- Return to Market Square; pan right.
- Use METAL BRUSH on CHEST; take RAZOR and MAILBOX KEYS 1/2.
- Use RAZOR (U). Play HOP; receive DOG'S TAIL.
- Take Clue on scene.
- Return to Penthouse.
- Place DOG'S TAIL (V); examine. Take MAILBOX KEYS 2/2 (W).
- Walk down.
- Use MAILBOX KEYS 2/2; look at note and take HAIR OIL (X).
- Go to Front of Office.
- Use HAIR OIL and place WHEEL (Y).
- Push cart and enter (Z).
- Give INVESTIGATION EVIDENCE (A).
- Take TOOLBOX (B); move panel (C).
- Swap bottles (D). Take SULFUR (E).
- Examine paper (G); place LIGHTER and SULFUR.
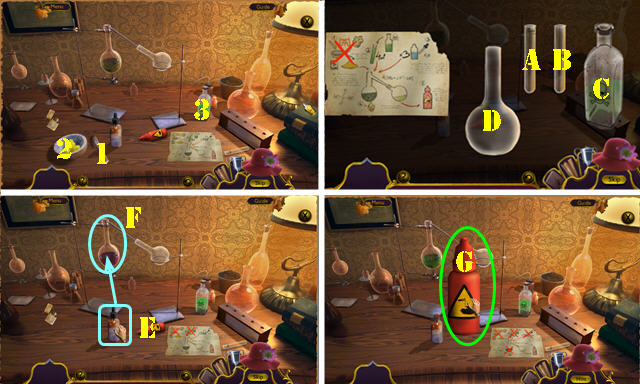
- Select (1-2-3).
- (C-A)-(A-B)-(A-D)-(B-A)-(C-A)-(A-B)-(A-D).
- (E-F)-(E-F)-(E-F). Use lighter on (F).
- Take SULFURIC ACID (G).
- SULFURIC ACID on TOOLBOX. Open and select; take LIGHT SWITCH.
- Place LIGHT SWITCH and select (H). Play HOP (I); receive KNITTING NEEDLE.
- Walk down.
- Use WALL POSTER (J) and KNITTING NEEDLE (K).
- Select poster; take KEY (L).
- Use KEY (M); enter (L1).
- Place C CUFFLINK and E CUFFLINK (purple); take Clue and CADUCEUS (N).
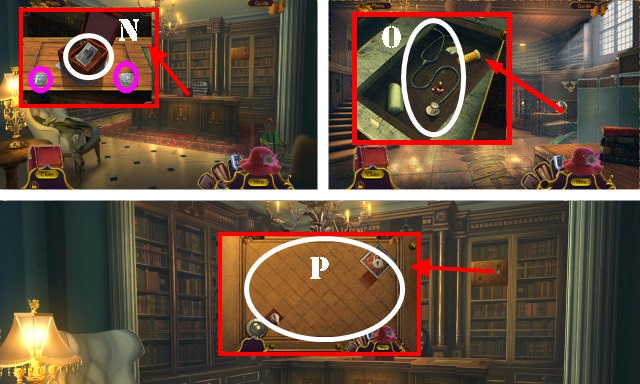
- Return to Doctor's Office.
- Examine seat; place CADUCEUS. Take STETHOSCOPE (O).
- Return to Lawyer's Office.
- Place STETHOSCOPE (P).
- Solution (Q).
- Look at note; take LOTUS EMBLEM (R).
- Place LOTUS EMBLEM; take STORAGE CODE (S).
- Use STORAGE CODE on scene. Select 1-5.
- Take Clue and select phone (T).
- Walk down.
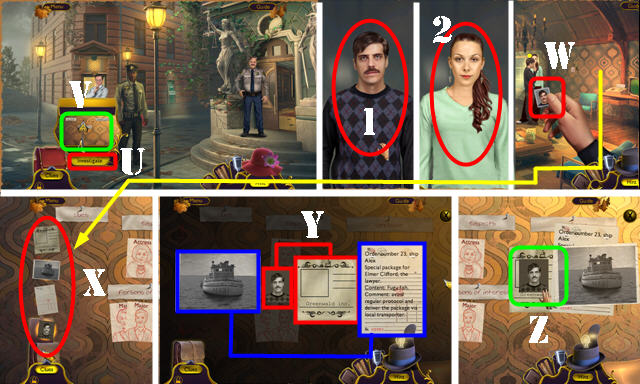
- Select Investigate (U); go (V).
- Select 1-2; take Clue (W).
- Place the 4 Clues on board (X).
- Match clues (Y); take UNSTAMPED PASS (Z).
- Go to Police Station.
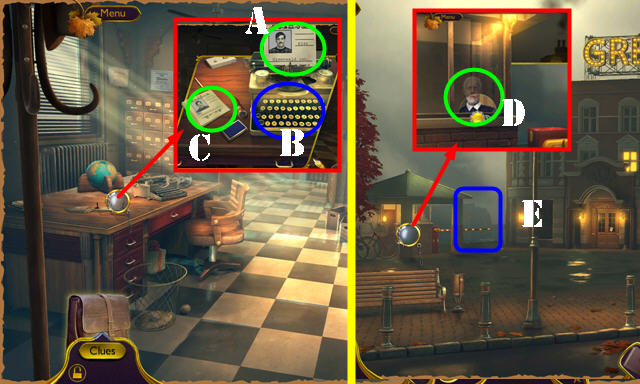
- Place UNSTAMPED PASS (A); select typewriter twice (B). Examine; take PIER PASS (C).
- Walk down; pan left.
- Give PIER PASS (D).
- Go (E).
Chapter 3: Pier
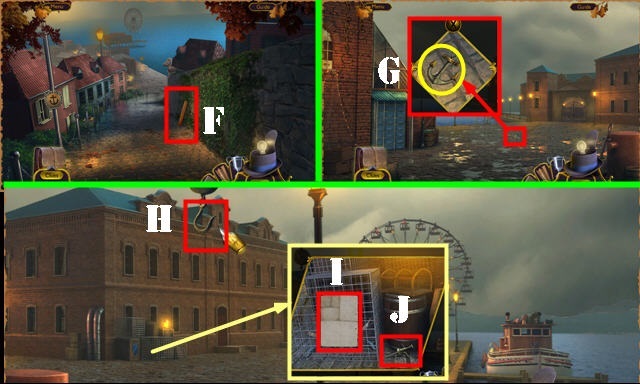
- Take PLANKS 1/3 (F).
- Go forward.
- Take ANCHOR SYMBOL (G).
- Pan right. Take HOOK (H).
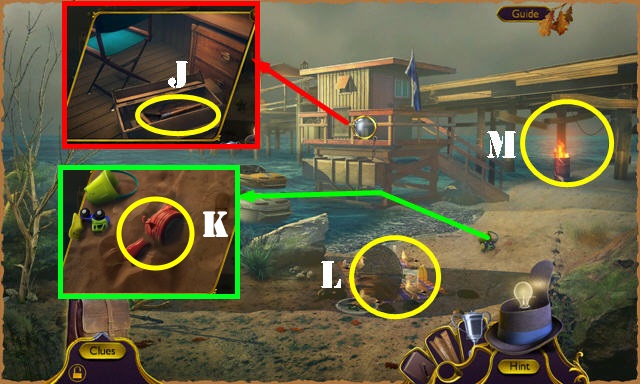
- Look at note (I); take SPRAYER (J).
- Walk down.
- Place ANCHOR SYMBOL; look at note; take HARPOON EMBLEM (K).
- Go forward; pan left.
- Place HARPOON EMBLEM; take OLD PLIERS (L).
- Pan right; go (M).
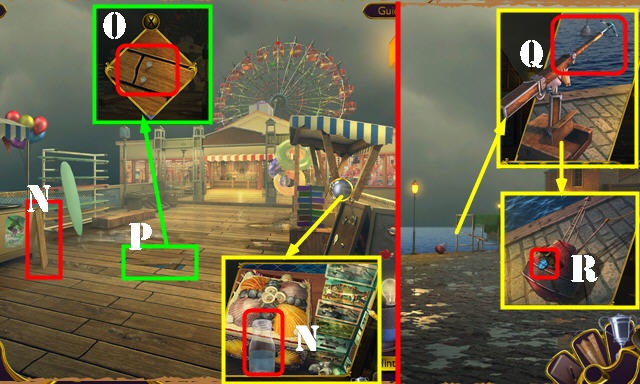
- Take PLANKS 2/3 and WATER BOTTLE (N).
- Use OLD PLIERS (O); take PLANKS 3/3 and HARPOON (P).
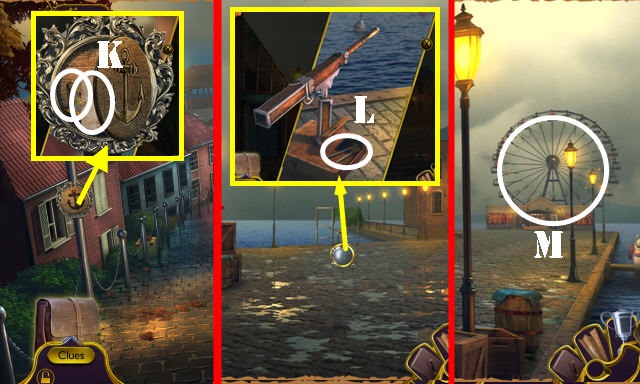
- Walk down; pan left.
- Place HARPOON and select (Q); take BLUE GEM (R).
- Walk down.
- Place BLUE GEM (T); take AMMO (U).
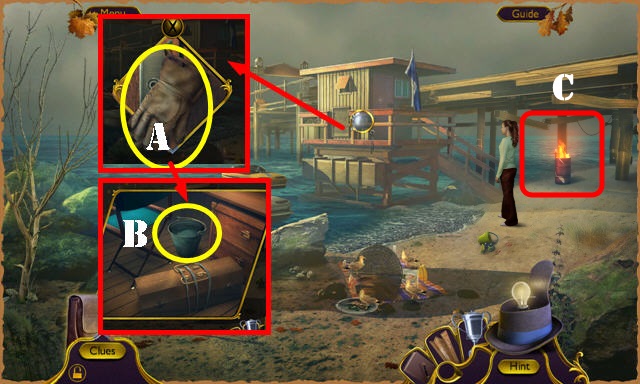
- Return to Boardwalk.
- Select rifle; use AMMO (V). Play HOP; receive KNIFE.
- Walk down; pan left.
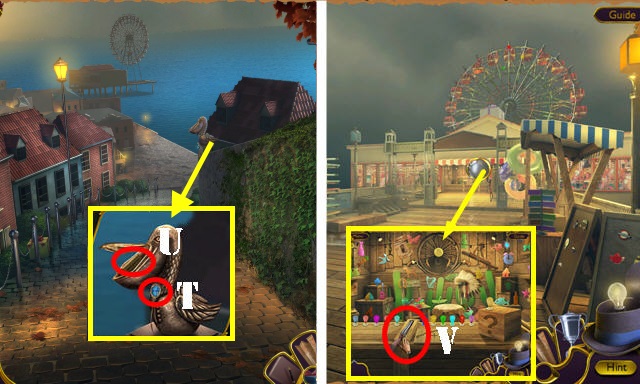
- Use KNIFE; take OLD BOOT (W).
- Select OLD BOOT 3x; receive GREEN CROSS and BOOT.
- Pan right.
- Place PLANKS 3/3; use BOOT (X).
- Solution (Y).
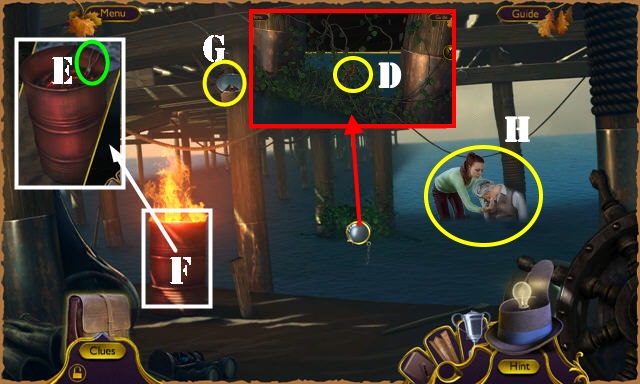
- Take MIRROR (A). Place GREEN CROSS; take HERBICIDE (B).
- Use HOOK; look at book and take SURFING EMBLEM (C).
- Go to Boardwalk.
- Place SURFING EMBLEM; take LEG ROPE (D).
- Walk down; pan left.
- Use MIRROR and LEG ROPE; select (E).
- Enter (F).
- Knock (G).
- Take DARTS 1/3 (H).
- Go to Pier Descent.
- Talk (I1).
- HERBICIDE and SPRAYER on WATER BOTTLE; receive WEED KILLER.
- Use WEED KILLER (I2). Play HOP; receive SEASHELL. Take Clue on scene.
- Return to Boardwalk.
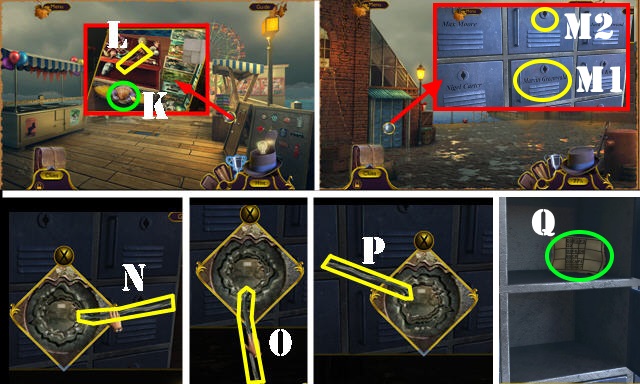
- Place SEASHELL (K); look at note and take WIRE (L).
- Walk down; pan left.
- Open; look at note and take SHIP'S WHEEL (M1). Use WIRE (M2).
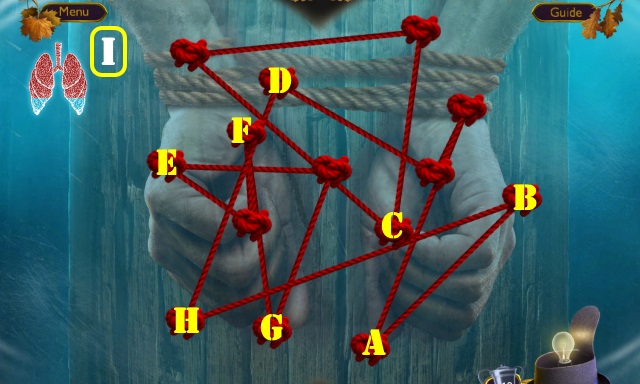
- Solution (N-O-P).
- Take COORDINATES (Q).
- Go to Fishing Boat.
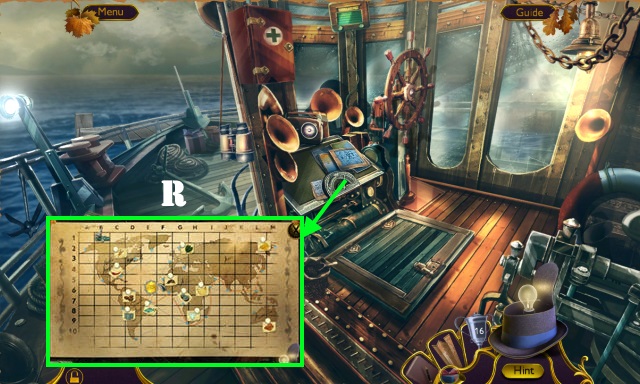
- Place COORDINATES (R).
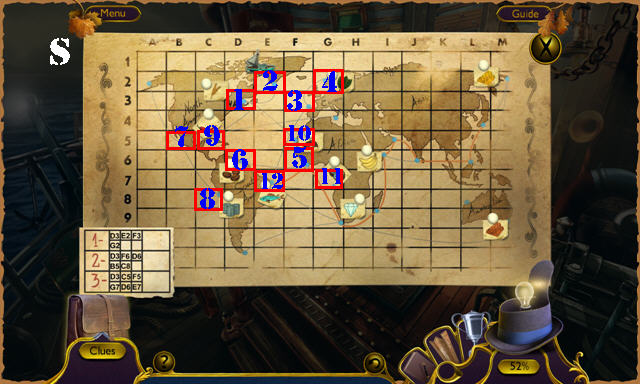
- Solution (S): D3-E2-F3-G2 (1-2-3-4).
- D3-F6-D6-B5-C8 (1-5-6-7-8).
- D3-C5-F5-G7-D6-E7 (1-9-10-11-6-12).
- Take CAPTAIN'S LOG.
- Go to Pier Descent.
- Give CAPTAIN'S LOG (T); take VALVE (U).
- Go to Fishing Boat.
- Place and turn VALVE (V); take SHIP EMBLEM (W).
- Place SHIP EMBLEM (X); select. Play HOP; receive INVITATION.
- Go to Fish Market.
- Use INVITATION (Y).
- Talk (A).
- Take DARTS 2/3, SHOELACE, and CORKED JAR (B).
- Place SHIP'S WHEEL; take DARTS 3/3 and PENCIL (C).
- Place DARTS 3/3 (D).
- Solution (E).
- Take WRENCH.
- Walk down.
- Use WRENCH (F); take CORKSCREW (G).
- CORKSCREW on CORKED JAR; take CROSS GATE KEY and KNOB.
- Go (H).
- Place KNOB (I); take HOT TEA (J).
- Walk down.
- Pour HOT TEA; open. Take FISH EMBLEM (K).
- Place FISH EMBLEM (L). Play HOP; receive REDFISH.
- Walk down; pan right.
- Use REDFISH; take REFRIGERATOR EMBLEM (M).
- Go to Fish Market.
- Place REFRIGERATOR EMBLEM; take CARD DECK (N).
- Go (O).
- Give CARD DECK (P).
- Solution is random (Q).

- Select 7x (T); receive Clue.
- Select Investigate (U); go (V).
- Place both Clues (W). Select 3x (X); take BOOK SYMBOL (Y).
- Return to Town Square.
- Place BOOK SYMBOL (Z1); go (Z2).
- Give MONEY (A); take LENS (B).
- Take FINS 1/3 (C). Select book 2x (D).
- Use PENCIL; take GATE SOLUTION (E).
- Open curtain; place LENS (F). Play HOP; receive BOOK STAND DECORATION.
- Place BOOK STAND DECOARTION; open book and look at note; take PINES 1/3 and ROUND GATE KEY (G).
- Walk down.
- Give ROUND GATE KEY (H).
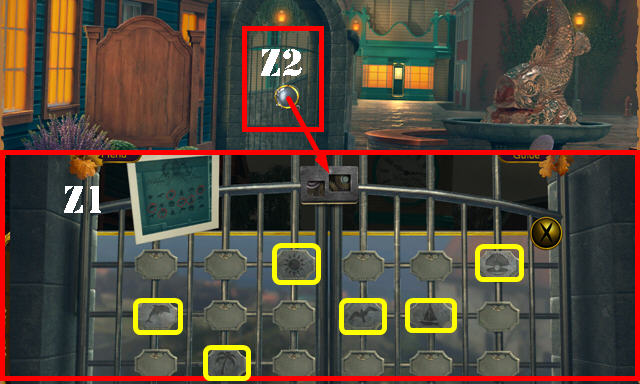
- Use CROSS GATE KEY and place GATE SOLUTION (I).

- Solution. Select 1-2-3. Position handles (J).
- Go to Old Town (K).
Chapter 4: Old Town
- Take LETTER D and STICK (L).
- Pan right.
- Move scrap; take TONER (M).
- Look at sign and note (N).
- Pan left.
- Place LETTER D (O); take FINS 2/3 (P).
- Go (Q).
- Take METAL SCALE (R).
- Walk down.
- Place METAL SCALE (S); take SWORDFISH TRINKET (T).
- Go to Greenwald Shop.
- Place SWORDFISH TRINKET; take PINES 2/3 (U).
- Look at note; take HOOK (V).
- Walk down; pan right.
- STICK and SHOELACE on HOOK; take IMPROVISED HOOK.
- Use IMPROVISED HOOK (W); take COVER LIFTER.
- Use COVER LIFTER; look at note (orange). Take DOOR KNOB and PINES 3/3 (Y).
- Pan left.
- Place PINES 3/3; take CRANK and VINYL (Z1).
- Go (Z2).
- Place VINYL (A). Play HOP; receive MAGNIFYING GLASS.
- Use MAGNIFYING GLASS (B); select 681921 (C). Take FINS 3/3 and FLOPPY (D).
- Place FINS 3/3; select fins (purple); take LOCOMOTIVE TRINKET (E).
- Walk down; pan right.
- Place LOCOMOTIVE TRINKET; take PIPE and FUSE (F).
- Place PIPE and use WRENCH (G); turn valve (H).
- Take JOYSTICK (I).
- Pan right.
- Place FUSE. Solution (J).
- Enter (K).
- Take BRUSH, LETTER S, and SHOVEL BLADE (L).
- Look at note (M).
- Go to Greenwald Shop.
- Place LETTER S (N); take CRANE KEY (O).
- Go to Construction Site.
- Place JOYSTICK and CRANE KEY (orange); turn key. Select 1-4.
- Take BEACH MOTIF (P).
- Select printer; insert TONER (Q).
- Look at note (R). Select rolodex (S).
- Insert FLOPPY; select (T).
- Take BLUEPRINT LEGEND (U).
- Place BLUEPRINT LEGEND (V). Play HOP; receive FILTER.
- Use FILTER (W); select camera icon (X); take PICTURE SOLUTION (Y).
- Walk down; pan left.
- Place BEACH MOTIF and PICTURE SOLUTION. Solution (Z1).
- Go (Z2).
- Take WORK GLOVES (A).
- Place DOOR KNOB; take WATER BUCKET (B).
- Go (C).
- Use WORK GLOVES (D); receive WEDGE.
- Use WATER BUCKET; take WIRE CUTTERS (E).
- Examine drum (F); take DIVING MASK (G).
- Select and then use DIVING MASK (H).
- Solution (I): (A-B)-(C-D)-(E-F)-(G-H).
- Walk down.
- Use WIRE CUTTERS; take SHOVEL HANDLE (J).
- SHOVEL HANDLE and WEDGE on SHOVEL BLADE; take SHOVEL.
- Use SHOVEL; take SIREN (K).
- BRUSH and CRANK on SIREN; take HAND SIREN.
- Use HAND SIREN (L). Play HOP; receive SMELLING SALTS.
- Go (M).

- Use SMELLING SALTS (N); take BOAT EMBLEM (O).
- Walk down.
- Go (P).
- Place BOAT EMBLEM; take BOAT KEY (Q).
- Give BOAT KEY (R).
- Open; select fuel can (S).
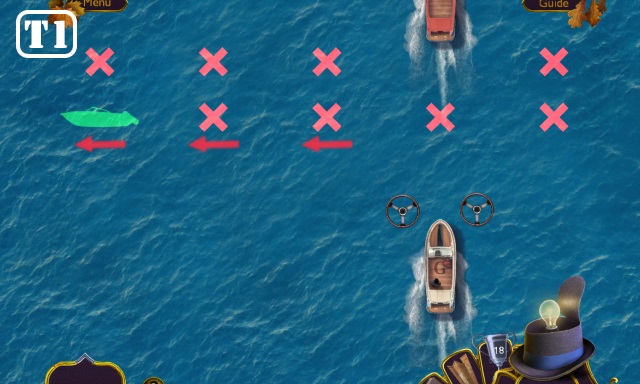
- Move boat left or right to avoid obstacles. Solution is random (T1).
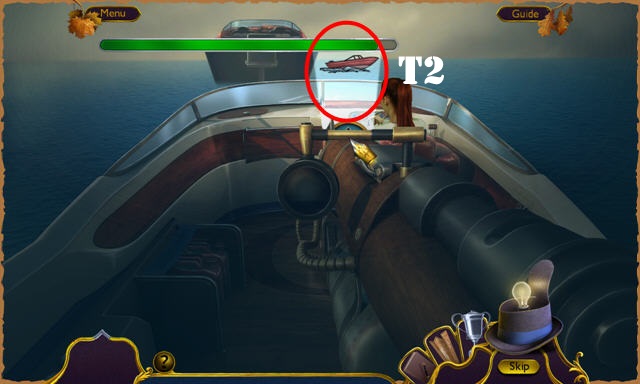
- Solution (T2): shine light on boat until meter is full.
- Congratulations, you've completed Memoirs of Murder: Welcome to Hidden Pines!
Created at: 2018-06-03