
Walkthrough Menu
General Tips
- This is the official guide for Midnight Calling: Arabella.
- This guide won't tell you when to zoom into a location; the screenshots show each zoom scene.
- Hidden-object puzzles are referred to as HOPs. Only the locations of the HOPs will be shown.
- In this game you can choose whether or not you want to take the cat as your animal helper. This walkthrough will describe actions with and without cat.
Chapter 1: Abducted
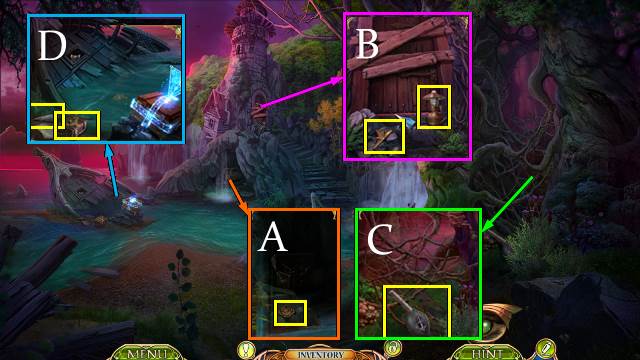
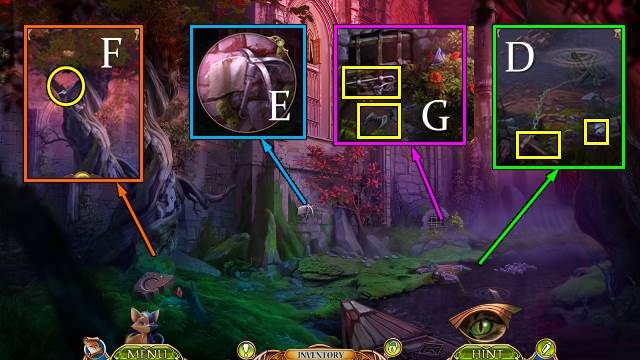
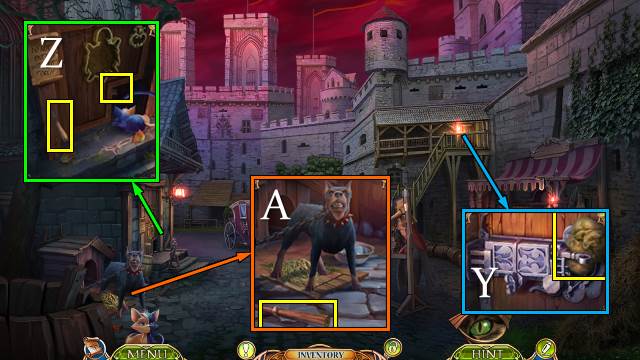
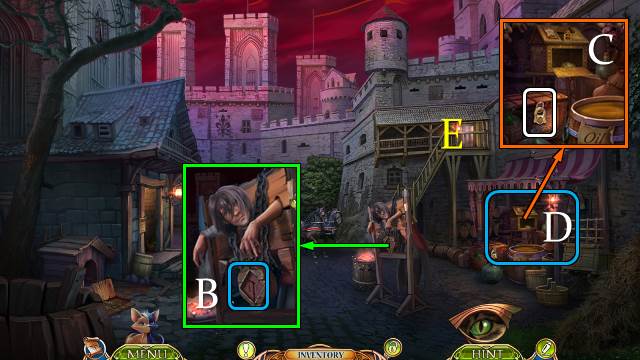
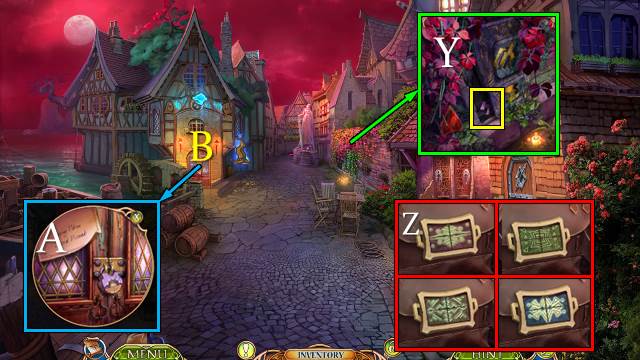
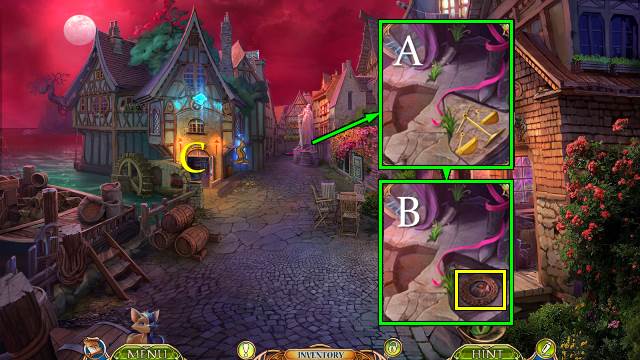
- Take ROSE-SHAPED PIECE (A).
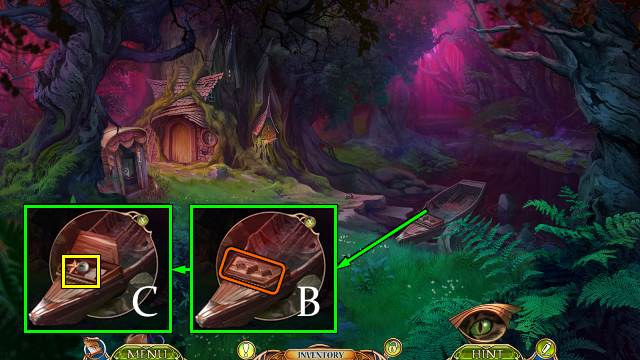
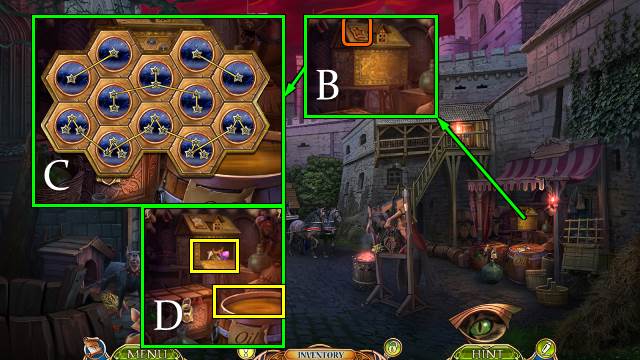
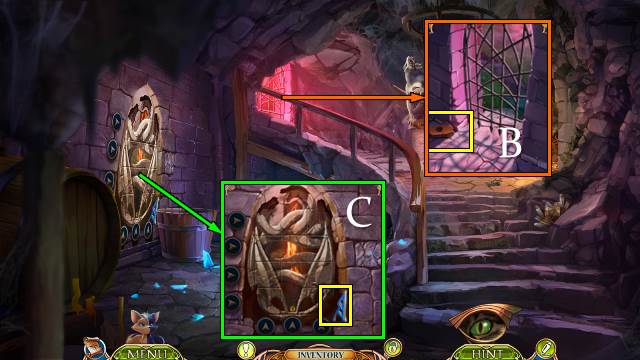
- Take TRAVELER SYMBOL and LAMP (B).
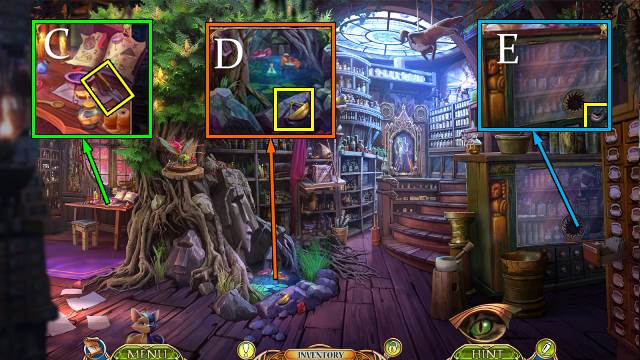
- Take ANCHOR SYMBOL and NET (C).
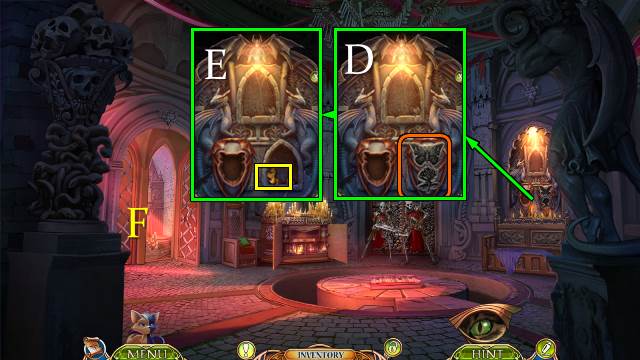
- Take BEAST HORN and CASE. Take FISH with NET (D).
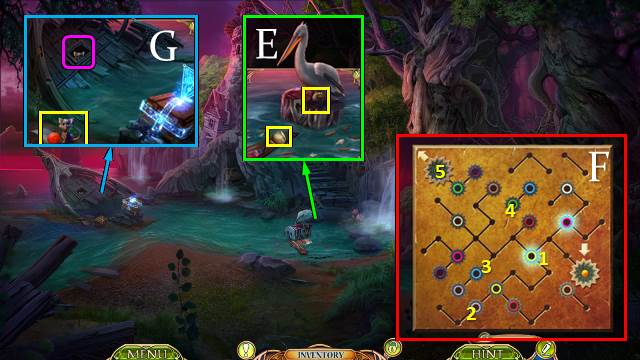
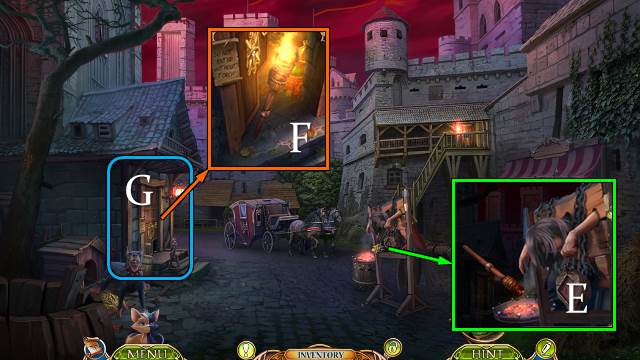
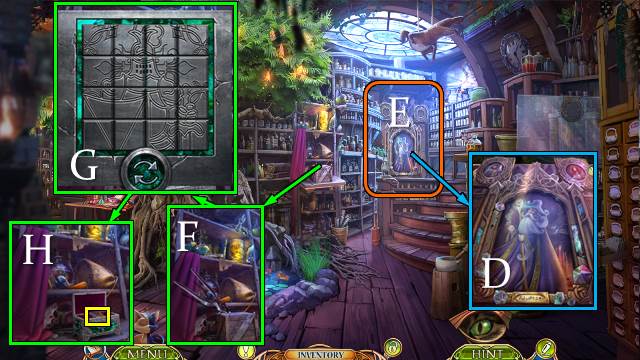
- Take map and TULIP-SHAPED PIECE. Offer FISH; take CHAMOMILE-SHAPED PIECE (E).
- ROSE-SHAPED PIECE, TULIP-SHAPED PIECE and CHAMOMILE-SHAPED PIECE on CASE.
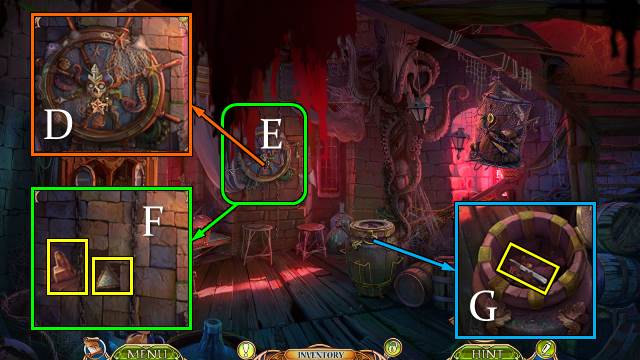
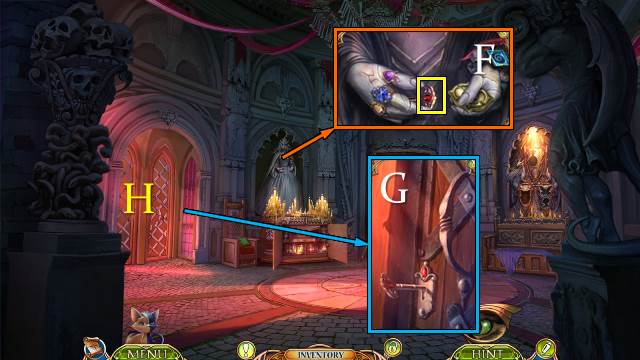
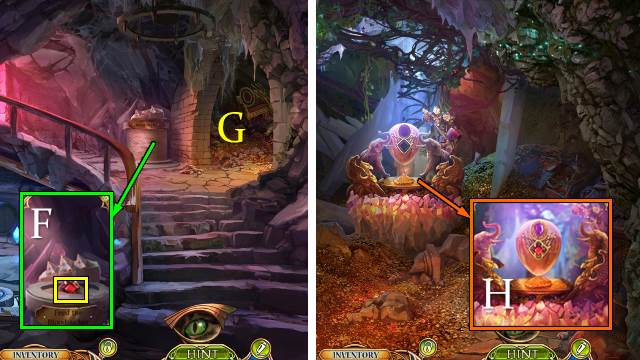
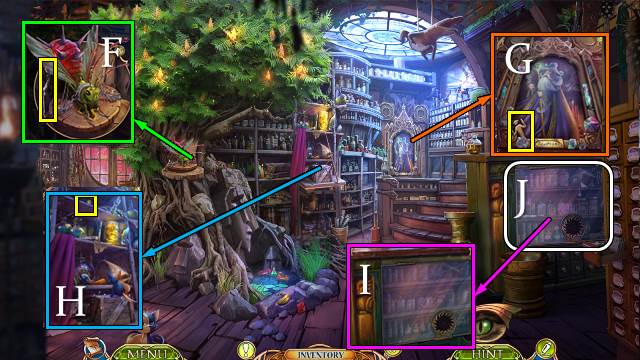
- Solution (F).
- Play HOP; receive YARN.
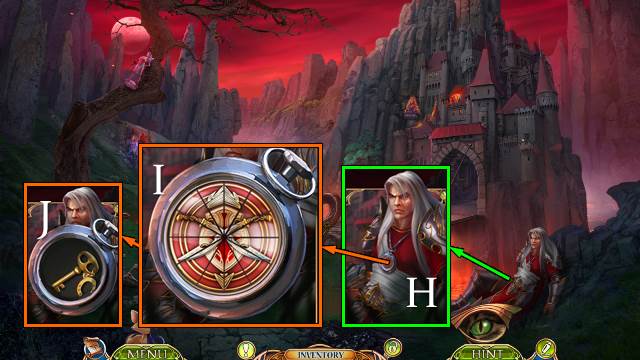
- Throw YARN; take KEY. Choose whether or not to take cat (G).
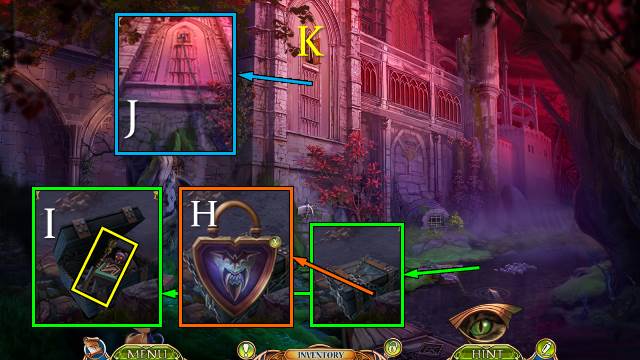
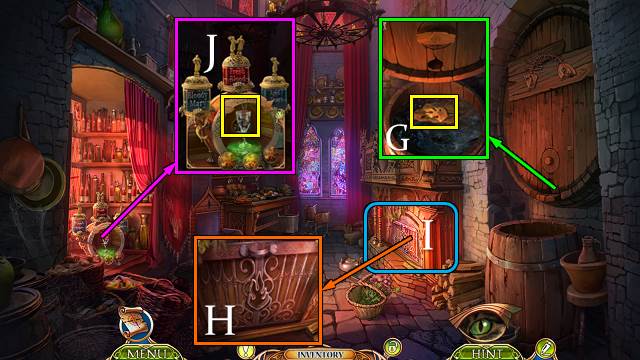
- KEY on CASE; take BLACK HEART and FLINT.
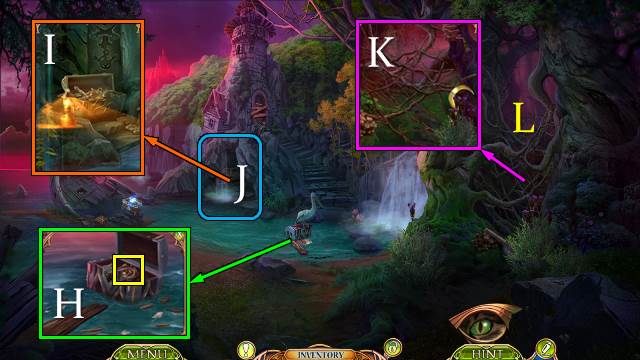
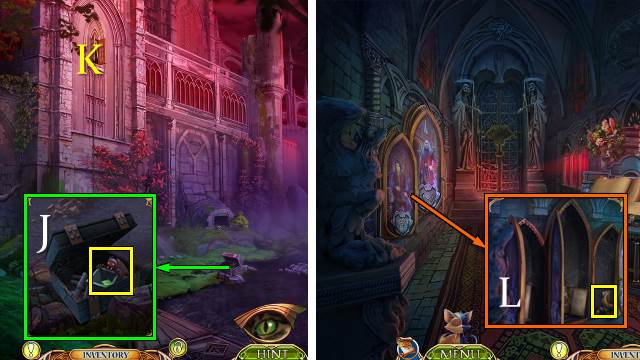
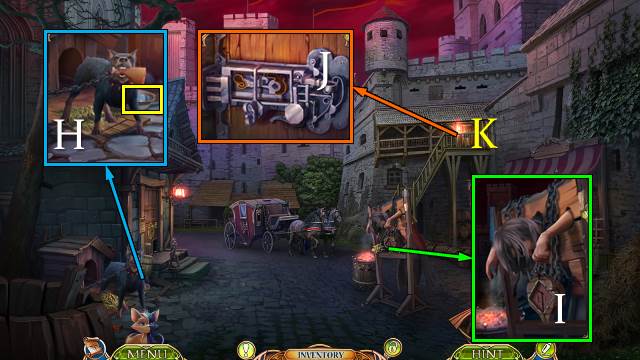
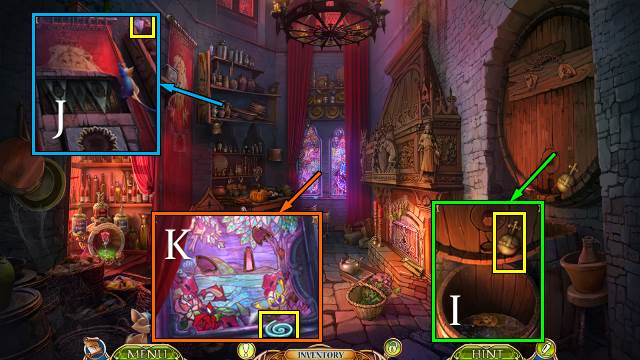
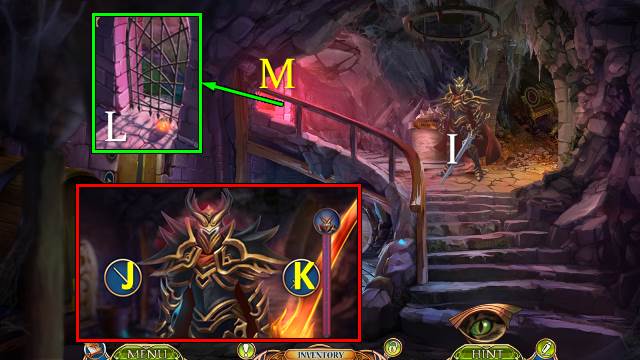
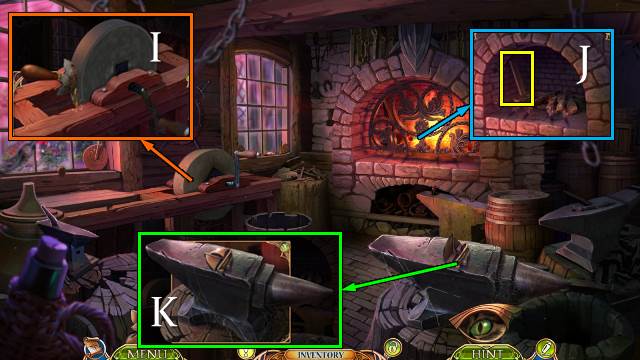
- Place BLACK HEART; take METAL CLIP and FLASK WITH FUEL (J).
- FLASK WITH FUEL and FLINT on LAMP; take LIT LAMP.
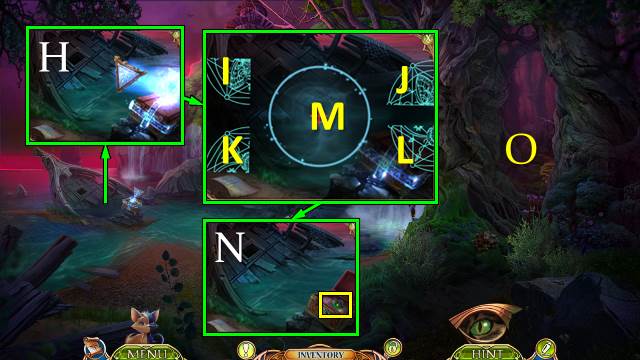
- Place LIT LAMP (I).
- Play HOP (J); receive SICKLE.
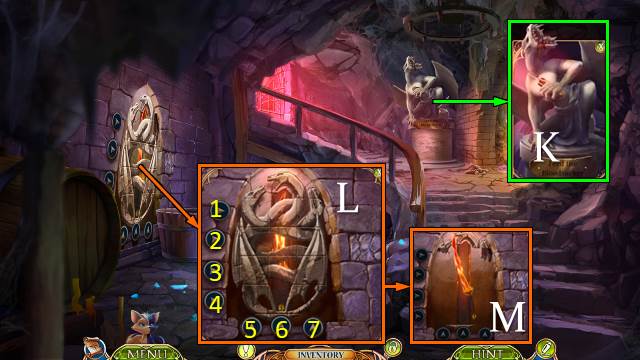
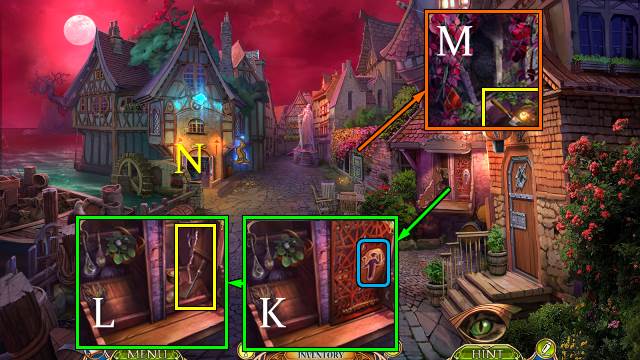
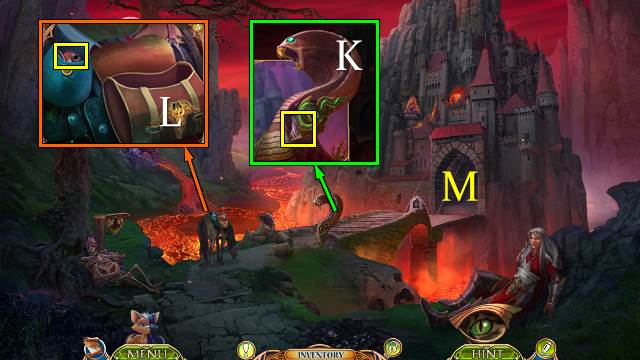
- Use SICKLE (K).
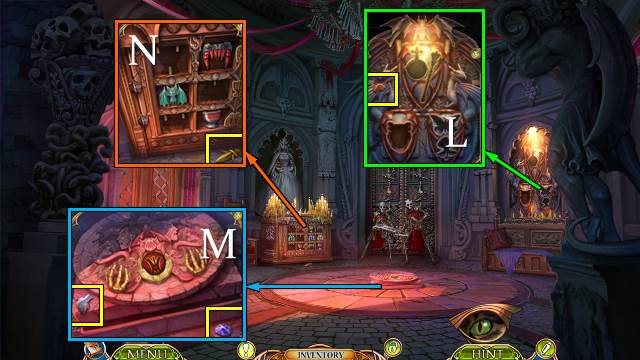
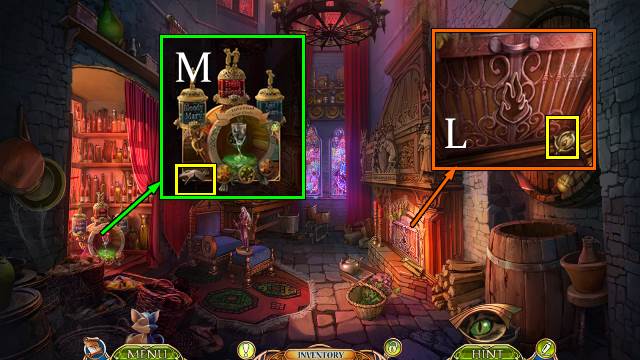
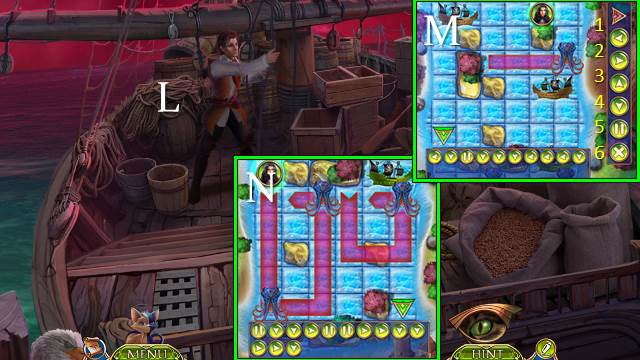
- Go (L).
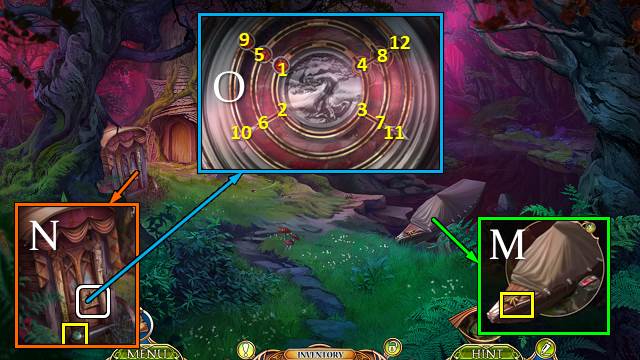
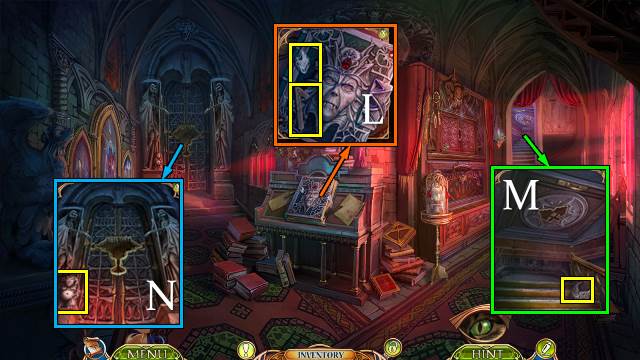
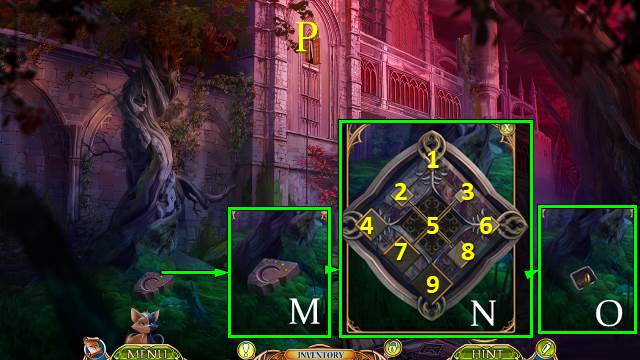
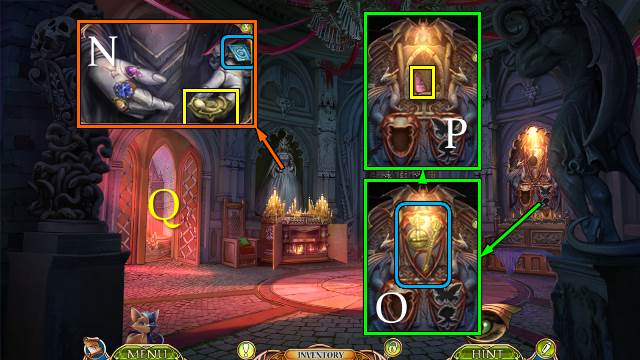
- Take TRAVELER SYMBOL (M).
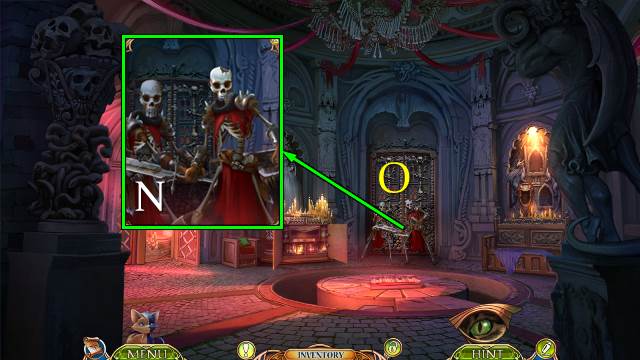
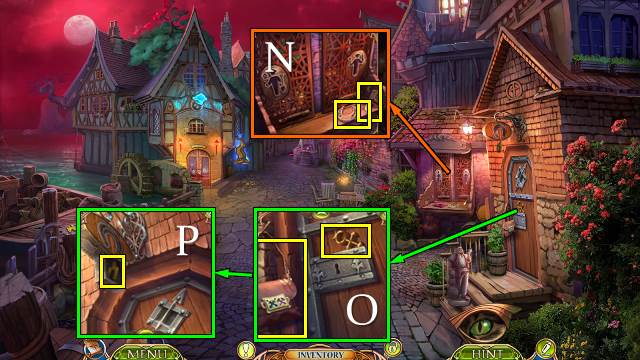
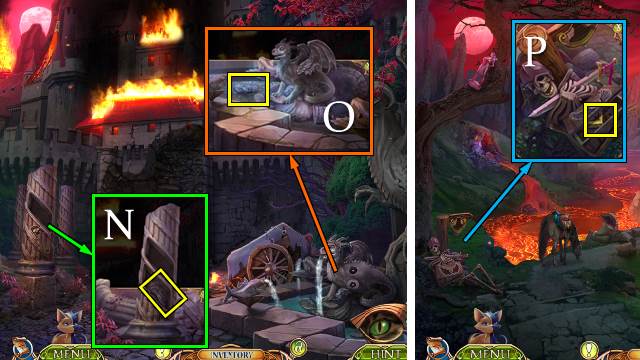
- Take MARINE LOCKET. Place TRAVELER SYMBOL x2 (N).
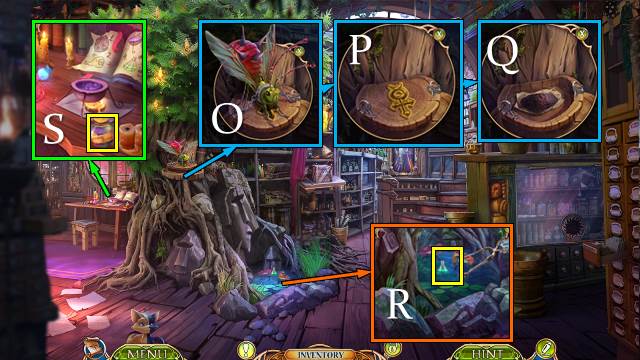
- Solution (O): (1-2)-(2-1)-(1-2)-(2-3)-(3-4)-(9-10)-(10-11)-(11-12)-(12-8)-(5-9)-(9-10)-(10-9)-(9-10)-(10-11)-(11-12).
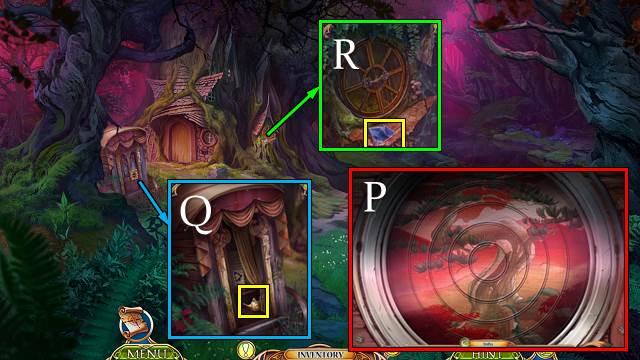
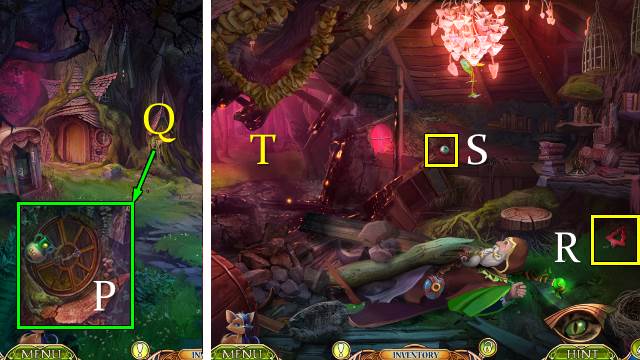
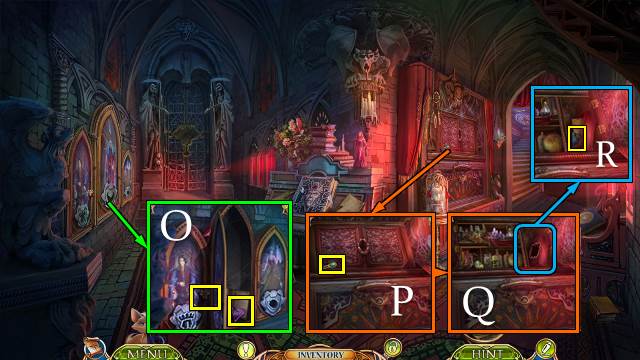
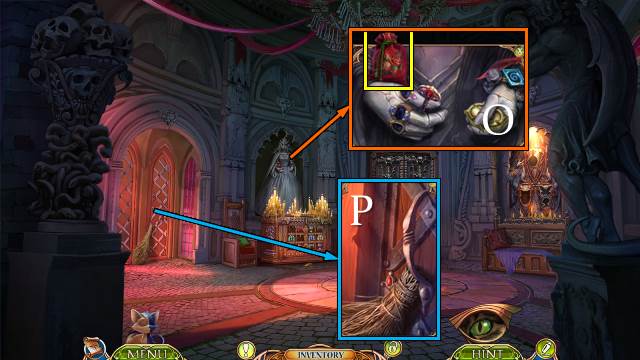
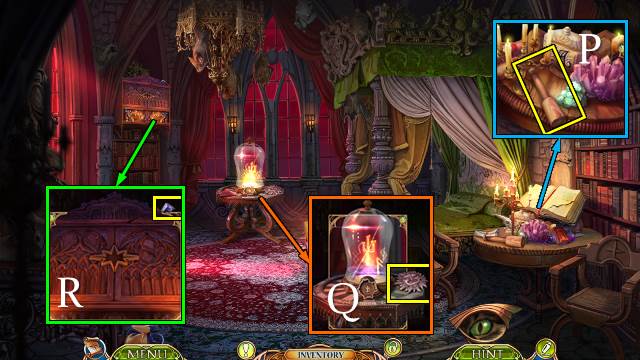
- Solution (P).
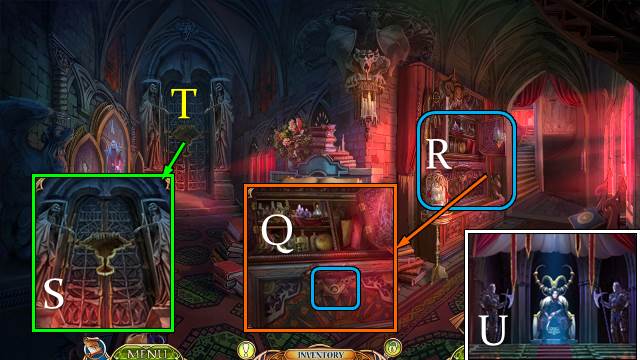
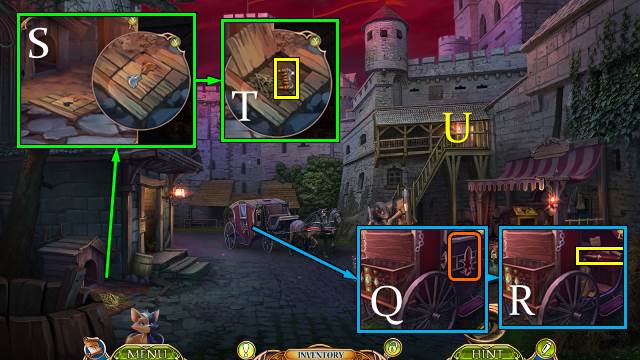
- Take OIL CAN (Q).
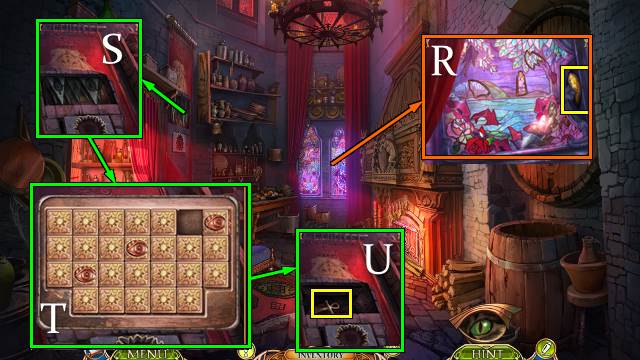
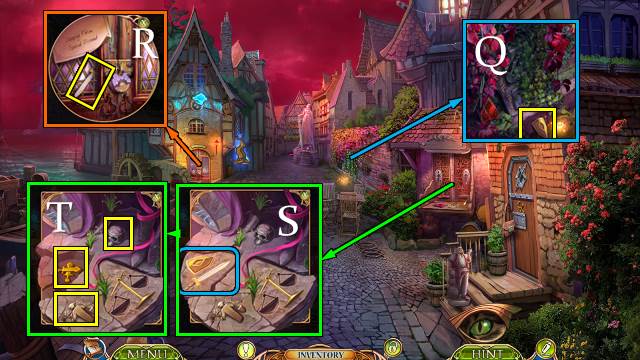
- Take HANDKERCHIEF (R).
- Walk down.
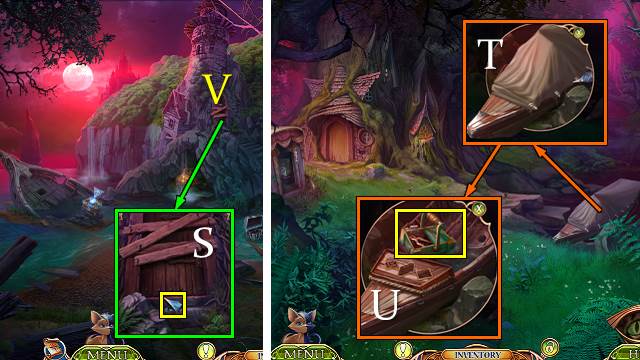
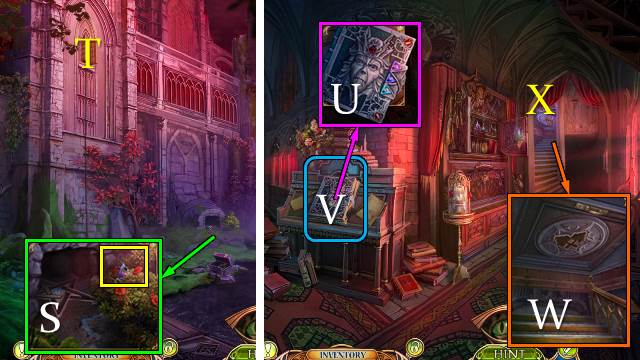
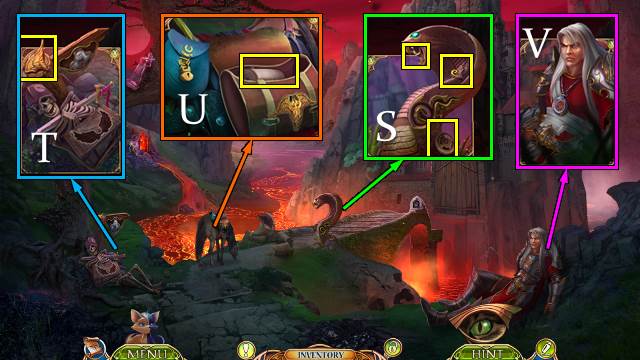
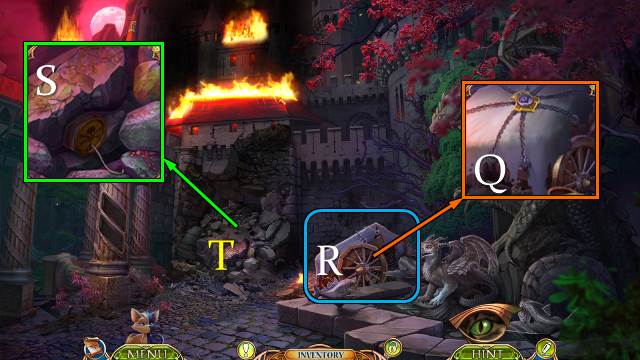
- Take SHARD with HANDKERCHIEF (S).
- Go right.
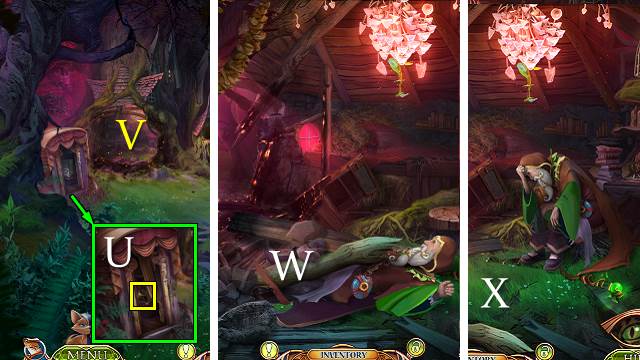
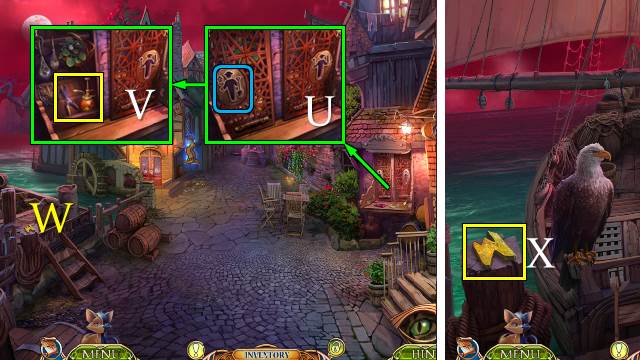
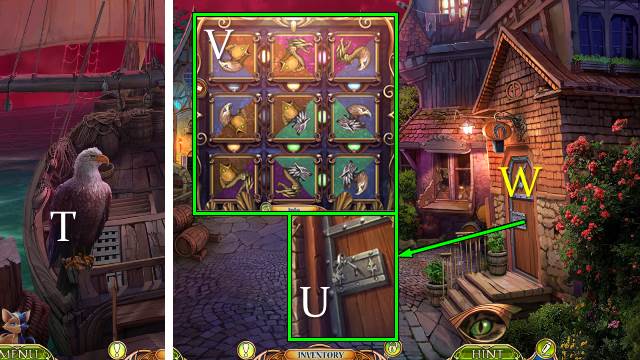
- Use SHARD (T). Use OIL CAN; take PLIERS (U).
- Walk down.
- Use PLIERS (S); open door.
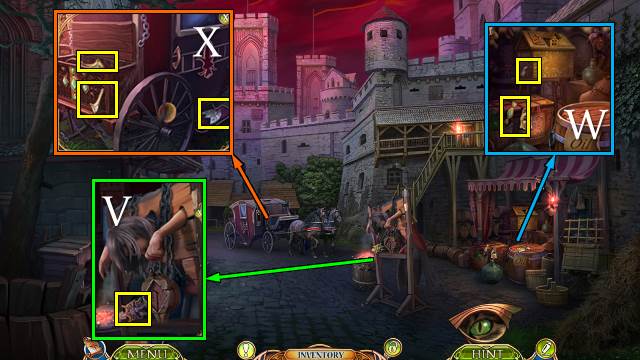
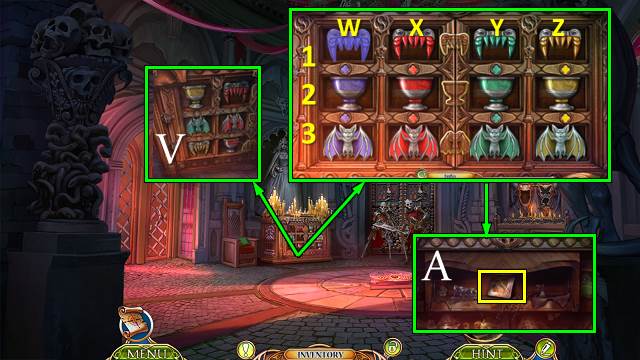
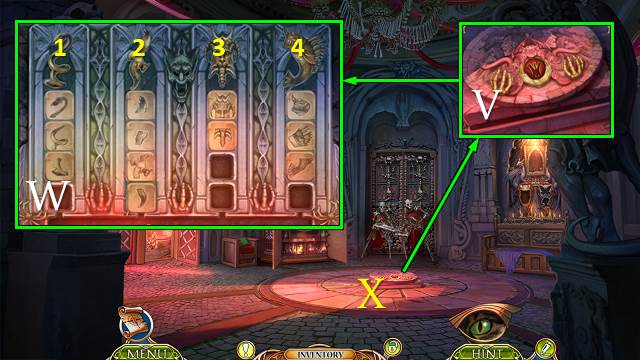
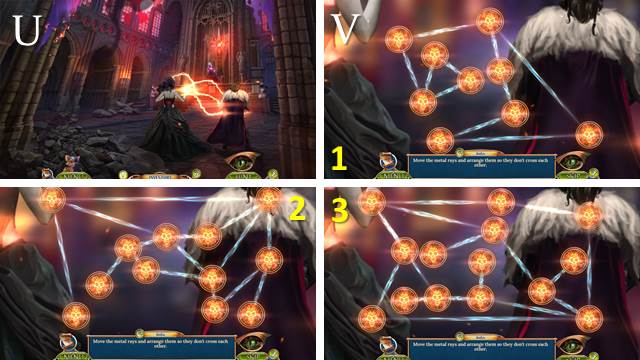
- Go (V).
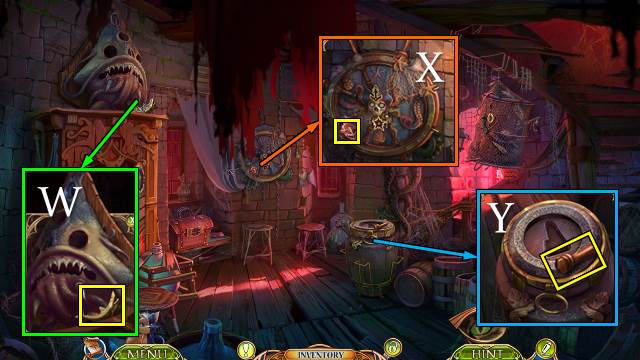
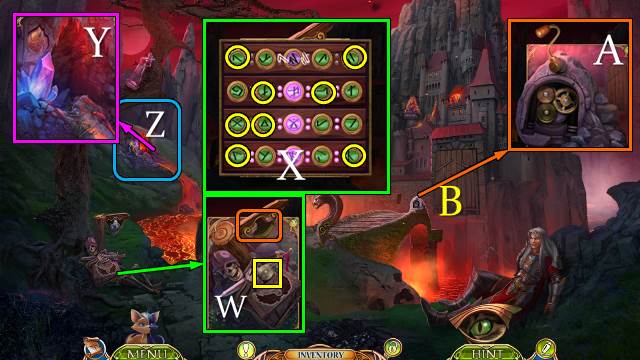
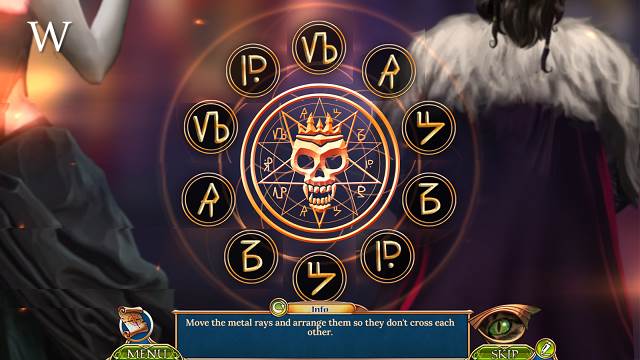
- Take GOLD SHARK (W).
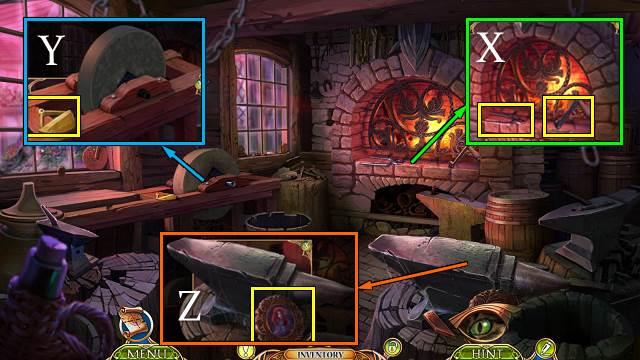
- Take SHIPMASTER BADGE (X).
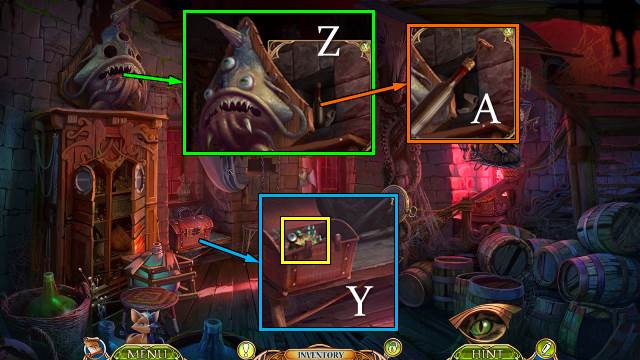
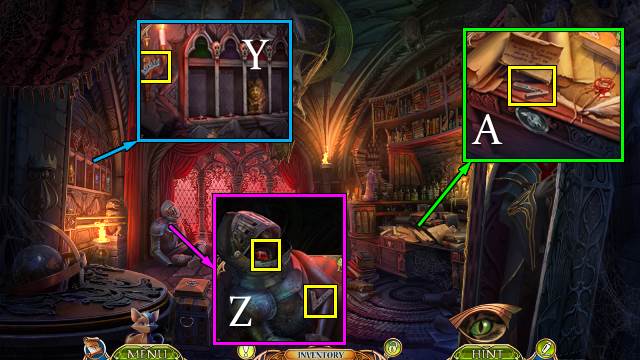
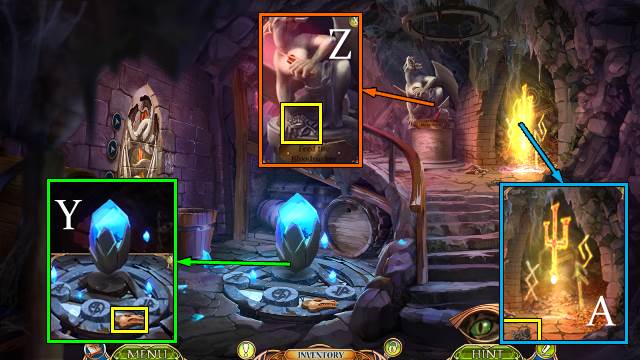
- Take HANDLE 1/2 (Y).
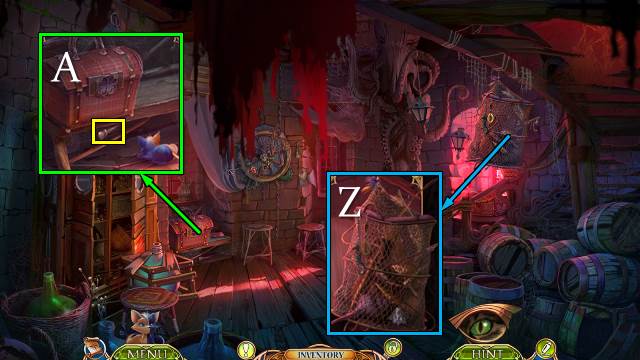
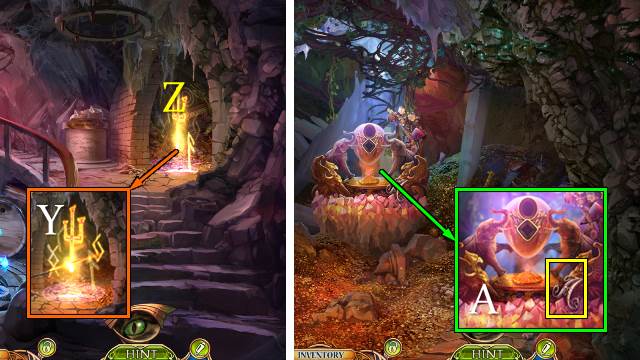
- Use SHARD; play HOP (Z). Receive SILVER OCTOPUS.
- Release cat; take HANDLE 2/2 (A).
- Go down and right.
- GOLD SHARK and SILVER OCTOPUS on MARINE LOCKET; take BOATSWAIN BADGE.
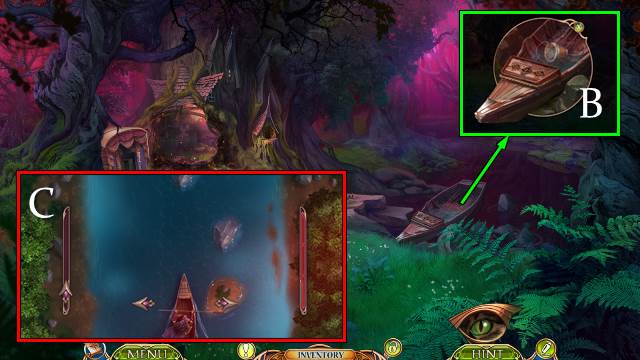
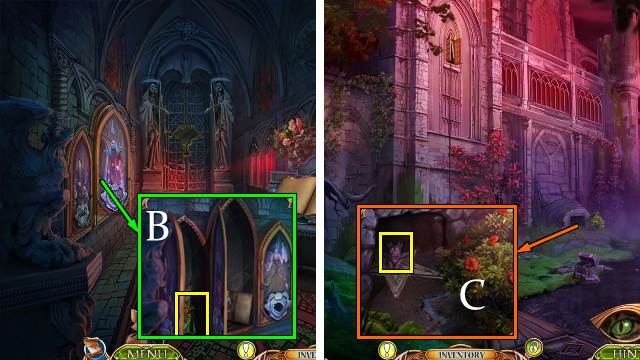
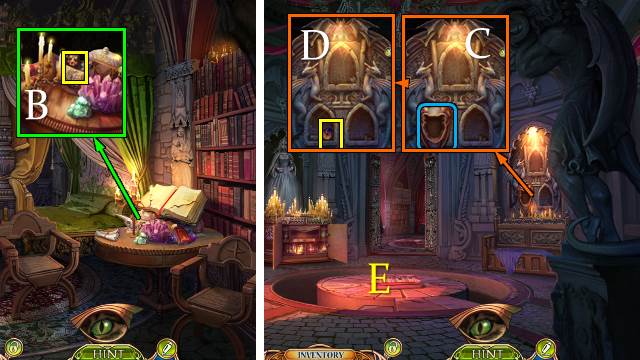
- Place SHIPMASTER BADGE and BOATSWAIN BADGE (B); take BEAST EYE 1/3 and STAR (C).
- Go to Lighthouse.
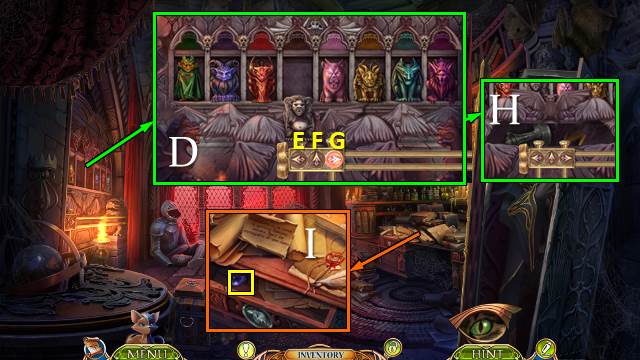
- Place ANCHOR SYMBOL, STAR and HANDLE (D).
- Play HOP (E).
- Take KEEPER AMULET and MAGIC TALISMAN (F).
- Place KEEPER AMULET; take LOCKPICK (G).
- Walk down.
- Place MAGIC TALISMAN (H).
- Solution: Ix3-Jx3-Kx1-Lx1-M.
- Use LOCKPICK; take ACID (N).
- Go (O).
- Use ACID; open shutters (P).
- Go (Q).
- Take FOREST SYMBOL (R).
- Take BEAST EYE 2/3 (S).
- Go (T).
- Place FOREST SYMBOL; take BUCKET and BOAT HOOK (U).
- Go (V).
- Use BOAT HOOK (W).
- Talk (X).
- Receive MAP, EMERALD CLOVER and CORKSCREW.
- Go to Lighthouse.
- Place EMERALD CLOVER; take BEAST EYE 3/3 and DRUID'S CHEST (Y).
- Place BEAST HORN and BEAST EYE (Z).
- Use CORKSCREW (A); receive CORK.
- Go down and right.
- Use CORK and BUCKET; place MAP (B).
- Navigate stream (C).
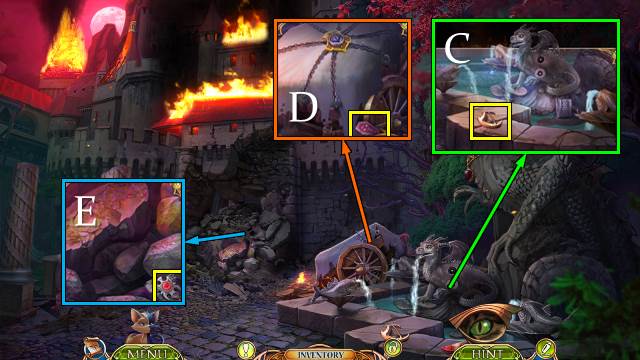
- Take CLOAK SYMBOL and HAMMER; pull chain (D).
- Take CLOTH and use HAMMER (E); receive HOOK.
- Scroll up. Release cat (F); receive/take BAT SYMBOL.
- Use CLOTH and open grate; take SHIELD SYMBOL and FANG SYMBOL (G).
- Place SHIELD SYMBOL, BAT SYMBOL and FANG SYMBOL (H); receive CHAIN. Take SCEPTER (I).
- METAL CLIP and HOOK on CHAIN; take GRAPPLING HOOK.
- Throw GRAPPLING HOOK (J).
- Go (K).
- Take DIAMOND and PENTAGRAM PART (L).
- Take HORNED CREST (M).
- Take FIGURINE (N).
- Place HORNED CREST. Take RUNE and SIGNET RING (O).
- Take HAIR ORNAMENT and use DIAMOND (P). Place SIGNET RING (Q); take RUNE (R).
- Walk down.
- HAIR ORNAMENT on DRUID'S CHEST; take INSECT REPELLENT.
- Use BEE REPELLENT; take RUNE (S).
- Go (T).
- Place RUNE x3 (U).
- Play HOP (V). Take CROSSED KEYS SYMBOL.
- Place CROSSED KEYS SYMBOL (W).
- Go (X).
- Receive PENDANT.
- Take CROWN SYMBOL (Y).
- Use OIL CAN; take RUBY and PENTAGRAM PART (Z).
- Take PENTAGRAM PART (A).
- Walk down.
- Place CLOAK SYMBOL and CROWN SYMBOL; take FIGURINE (B).
- Walk down.
- Place PENTAGRAM PART x3; take FIGURINE (C).
- Go to Castle Tower Room.
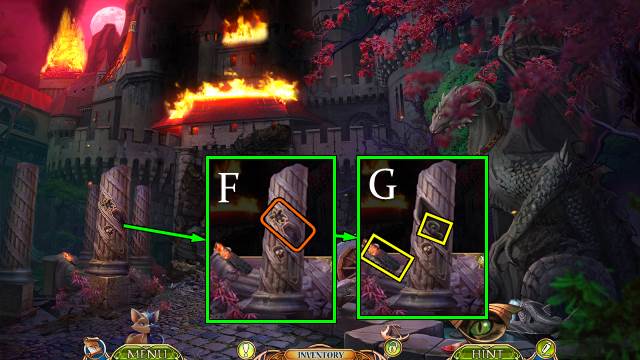
- Place FIGURINE x3 (D).
- Solution: Gx3-F-Gx3-F-E-F-Ex4-F-Gx3-F-Ex2-F-Ex2-F-G-F-G-F-E-F-Gx2-F.
- Take COUNSELLOR SIGNET and FANCY AMULET (H).
- Use COUNSELLOR SIGNET; take SAPPHIRE (I).
- Walk down twice.
- Place FANCY AMULET; take EMERALD (J).
- Go (K).
- DIAMOND, RUBY, SAPPHIRE and EMERALD on PENDANT; take ROSE SYMBOL.
- Place ROSE SYMBOL; take MOON SYMBOL (L).
- Walk down.
- Place MOON SYMBOL (M).
- Solution (N): (1-3-6-3-1-2-5-8-5-2-4)-(7-9-7-5)-(4-7-5).
- Take CABINET KEY (O).
- Go (P).
- Use CABINET KEY (Q).
- Play HOP (R); receive LORD SYMBOL.
- Place LORD SYMBOL (S).
- Go (T).
- Talk (U).
Chapter 2: The Relic
- Take VASSAL BADGE (V).
- Take CHEST HANDLE and PANEL PART (W).
- Place CHEST HANDLE; take ROPE, GLASS PAINTING PART and BADGE PIECE x2 (X).
- Take FIBER (Y).
- Release cat; take CHISEL and LID PART (Z).
- Take TORCH (A).
- FIBER and ROPE on TORCH; receive TORCH WITHOUT FUEL.
- Place LID PART (B).
- Solution (C).
- Take TRILLIANT-CUT JEWEL, DOOR LATCH PIECE and BADGE PIECE. Use CHISEL. Use TORCH WITHOUT FUEL; receive OILED TORCH (D).
- Use OILED TORCH (E); receive LIT TORCH.
- BADGE PIECE x3 on VASSAL BADGE; take VAMPIRE VASSAL BADGE.
- Place VAMPIRE VASSAL BADGE; use LIT TORCH (F).
- Play HOP (G); receive MEAT.
- Offer MEAT; take BOWL OF WATER (H).
- Offer BOWL OF WATER (I); receive DOOR LATCH PIECE.
- Remove cover; place DOOR LATCH PIECE x2 (J).
- Go (K).
- Take BRONZE DOG (L).
- Take ASSCHER CUT JEWEL and STEEL DOG (M).
- Take FLEUR DE LIS (N).
- Take BROOM (O).
- Take POUCH (P).
- Walk down.
- Place FLEUR DE LIS (Q); move items and take STILETTO (R).
- Use BROOM; place STEEL DOG and BRONZE DOG (S). Take PANEL PART (T).
- Go (U).
- STILETTO on POUCH; take PANEL PART.
- Place PANEL PART x3 (V).
- Solution: (Z2-Y2-X2-W2)-(Y2-X2)-(W3-W2-W1)-(X3-X2)-(Y3-Y2-Y1)-(Z3-Z2)-(Z1-Y1-X1-W1)-(Z2-Y2-X2-W2)-(Z3-Y3-X3-W3)-(X1-Y1-Z1)-(X2-Y2-Z2)-(X3-Y3-Z3).
- Take PRISONER'S MARK (A).
- Walk down.
- Place PRISONER'S MARK (B); receive GOLD LEAF.
- Place GOLD LEAF (C).
- Play HOP (D); receive PEAR CUT JEWEL.
- Go (E).
- Place TRILLIANT CUT JEWEL, ASSCHER CUT JEWEL and PEAR CUT JEWEL; take ROOM KEY (F).
- Use ROOM KEY (G).
- Go (H).
- Receive ORB.
- Take ROYAL ORB (I).
- Take BRACELET PIECE (J).
- Use STILETTO. Release cat/use stick (K). Receive GLASS PAINTING PART.
- Take VAMPIRIC SYMBOL (L).
- Take BAS RELIEF PART (M).
- Walk down.
- Place BRACELET PART; take VAMPIRIC SYMBOL (N).
- Place SCEPTER and ROYAL ORB (O); take GLASS PAINTING PART (P).
- Go (Q).
- Place GLASS PAINTING PART x3. Play HOP; take COBRA HEAD (R).
- Place VAMPIRIC SYMBOL x2 (S).
- Solution (T).
- Take ANKH (U).
- Walk down.
- ANKH and COBRA HEAD on ORB; take DUNGEON KEY.
- Use DUNGEON KEY (V).
- Solution (W): (4-1)-(4-3)-(4-3)-(4-3)-(1-4)-(2-4)-(3-4)-(3-4)-(3-2)-(3-1)-(2-3)-(4-3)-(1-4)-(1-3)-(1-3)-(1-2)-(4-1)-(3-1)-(2-4)-(2-1)-(2-1)-(2-3)-(4-2)-(3-2)-(3-2)-(1-2).
- Go (X).
- Take BAS RELIEF PART (Y).
- Take BLACK ROSE (Z).
- Take BLACK BUTTERFLY (A).
- Take RUNE (B).
- Take BARREL PART (C).
- Walk down.
- Place BLACK ROSE and BLACK BUTTERFLY (D); take BLOOD BADGE PART (E).
- Go (F).
- Use BARREL PART; take FIRE SYMBOL (G).
- Place FIRE SYMBOL (H).
- Play HOP (I); receive BLOOD BADGE PART.
- Place BLOOD BADGE PART x2; take GOBLET OF BLOOD (J).
- Go to Secret Dungeon.
- Use GOBLET OF BLOOD (K); receive BAS RELIEF PART.
- Place BAS RELIEF PART x3 (L).
- Solution: 1-1-2-6-5-5-7-7-7-3-3-7-2-2-7-7-7-4-7-3-4.
- Take FLAMING BLADE (M).
- Walk down.
- Use FLAMING BLADE (N).
- Go (O).
- Take PESTLE (P).
- Take BLACK SUN (Q).
- Take RUNE (R).
- Walk down and left.

- Place BLACK SUN; take RUNE (S).
- Go to Secret Dungeon.
- Use PESTLE; take RUNE (T).
- Place RUNE x4; take STAR (U).
- Go to Alessandra's Chamber.

- Place STAR (V).
- Play HOP (W); receive MAGICIAN'S EMBLEM.
- Place MAGICIAN'S EMBLEM; take RUNIC WAND (X).
- Go to Secret Dungeon.
- Use RUNIC WAND (Y).
- Go (Z).
- Take MONOGRAM (A).
- Go to Alessandra's Chamber.
- Place MONOGRAM; take PYRAMID and BEAR (B).
- Walk down.
- Place BEAR (C); take AMETHYST (D).
- Go (E).
- Place PYRAMID; take RUBY (F).
- Go (G).
- Place AMETHYST and RUBY; take RELIC (H).
- Walk down.
- Use FLAMING BLADE (I).
- Solution: (J-K-J-J)-(K-K-J-K-J-J-K)-(J-K-J-K-K-J-K-J-J-K).
- Receive BLACK CASE.
- PESTLE on BLACK CASE. Play HOP; receive INCENDIARY ELIXIR.
- Use INCENDIARY ELIXIR (L).
- Go (M).
Chapter 3: Pursuit
- Talk.
- Take HORSESHOE and DRUID SYMBOL (N).
- Take ALCHEMY SYMBOL and SMITH BAG. Scroll up (O). Place HORSESHOE; take DRUID SYMBOL (P).
- Take POWER SYMBOL (Q).
- Take POWER SYMBOL (R).
- Place POWER SYMBOL x2 (S); take CROSSED SWORDS, SKULL and GARDENER'S SYMBOL (T).
- Place GARDENER'S SYMBOL (U); take ATOMIZER and PRUNERS (V).
- Go (W).
- Take DRUID SYMBOL (X).
- Walk down.
- Use PRUNERS; place DRUID SYMBOL x3. Take CROSSED HAMMERS (Y).
- CROSSED HAMMERS and CROSSED SWORDS on SMITH BAG.
- Solution (Z).
- Take OLD SCREWDRIVER.
- Use OLD SCREWDRIVER (A).
- Go (B).
- Take SPADE (C).
- Take SCALES 1/2 (D).
- Take JAW (E).
- Take TONGS HALF (F).
- Take CARPENTER'S SYMBOL (G).
- Release cat/use stick; receive SMALL BOLT (H).
- JAW and SMALL BOLT on SKULL; take MAGICIAN'S TALISMAN.
- Place MAGICIAN'S TALISMAN (I).
- Play HOP (J); receive FRUIT.
- Walk down.
- Place CARPENTER'S SYMBOL (K); take TONGS HALF and FILE (L).
- Use SPADE; take WHITE ROOT (M).
- Go (N).
- Use FILE (O). Place ALCHEMY SYMBOL (P); take BLACK POWDER (Q).
- COMBINE TONGS HALF x2; take TONGS.
- Take VIAL OF GREEN LIQUID with TONGS (R).
- Add FRUIT, WHITE ROOT, VIAL OF GREEN LIQUID and BLACK POWDER; stir. Take SLEEPING POTION (S).
- Remove container from ATOMIZER; place SLEEPING POTION. Take SLEEPING POTION SPRAY.
- Go to Ship.
- Use SLEEPING POTION SPRAY (T).
- Receive CROOKED AMULET and KEY TO SMITHY.
- Walk down.
- Use KEY TO SMITHY (U).
- Solution (V).
- Go (W).
- Take GRINDSTONE HANDLE and PLIERS (X).
- Take SCALES 2/2; place GRINDSTONE HANDLE (Y).
- Take WOMAN'S PORTRAIT (Z).
- Walk down.
- Place SCALES (A); take BUNDLE and MAN'S PORTRAIT (B).
- Go (C).
- Place WOMAN'S PORTRAIT and MAN'S PORTRAIT (D).
- Play HOP (E); receive HELL'S FIRE CRYSTAL.
- Use PLIERS (F).
- Solution (G).
- Take BLUNT ROUND KNIFE (H).
- Go to Smithy.
- Use BLUNT ROUND KNIFE; receive SHARP ROUND KNIFE (I).
- SHARP ROUND KNIFE on BUNDLE; take BOTTLE.
- Use HELL'S FIRE CRYSTAL and BOTTLE; take HAMMER (J).
- Place CROOKED AMULET. Use HAMMER; take FIXED AMULET (K).
- Go to Ship.
- Offer FIXED AMULET (L).
- Solution: 2-5-6-5-5-5-2-2-2-5-1 (M); 6-5-5-3-6-6-3-3-5-5-3-3-5-1 (N).

- Take CADUCEUS PIECE, remove arrow and breastplate (O).
- Take FANG (P).
- Take OINTMENT and EMERALD (Q).
- Release cat; receive/take CADUCEUS (R).
- Place FANG and EMERALD; receive CADUCEUS PIECE. Take PLATE PIECE and GEARS 1/2 (S).
- Take CADUCEUS PIECE (T).
- CADUCEUS PIECE x3 on CADUCEUS; take MEDICAL SYMBOL.
- Place MEDICAL SYMBOL; take BANDAGE (U).
- Use OINTMENT and BANDAGE (V).
- Receive FIRE SYMBOL and PLATE PIECE.
- Place PLATE PIECE x2 (W).
- Solution (X).
- Take GEARS 2/2 (W).
- Place FIRE SYMBOL (Y).
- Play HOP (Z); receive LEVER.
- Place GEARS and use LEVER (A).
- Go (B).
- Take CAPTAIN'S BADGE (C).
- Take VAMPIRE SYMBOL (D).
- Take VAMPIRE SYMBOL (E).
- Place VAMPIRE SYMBOL x2 (F); take SERPENT SYMBOL and FIREBRAND (G).
- Walk down.
- Place CAPTAIN'S BADGE (H).
- Solution (I).
- Take SADDLEBAG KEY (J).
- Place SERPENT SYMBOL; take DRAGON LEG (K).
- Use SADDLEBAG KEY; take SKULL and WICK (L).
- Go (M).
- Place SKULL; take DRAGON'S WING (N).
- Place DRAGON LEG and DRAGON'S WING; take GUARD EMBLEM (O).
- Walk down.
- Place GUARD EMBLEM; take TRIDENT (P).
- Go forward.
- Place TRIDENT (Q).
- Play HOP (R); receive GUNPOWDER BARREL.
- Place GUNPOWDER BARREL, WICK and FIREBRAND (S).
- Go (T).
- Use RELIC (U).
- Solution (V).
- Solution (W).
- Congratulations, you have completed Midnight Calling: Arabella.
Created at: 2018-07-27