
Walkthrough Menu
- General Tips
- Chapter 1: The Forest Glade
- Chapter 2: The Porch
- Chapter 3: The Attic
- Chapter 4: The Tower
- Chapter 5: The Fort Walls
- Chapter 6: The Catacombs
General Tips
- This is the official guide for Midnight Calling: Jeronimo.
- Hidden-object puzzles are referred to as HOPs. This guide will not show screenshots of the HOPs, however, it will mention when an HOP is available and the inventory item you'll collect from it.
- This guide will not mention each time you have to zoom into a location; the screenshots will show each zoom scene.
Chapter 1: The Forest Glade

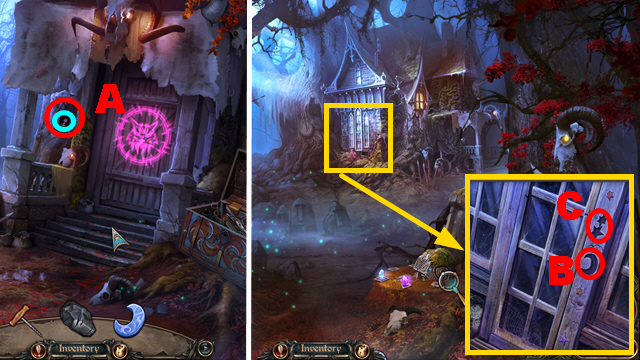
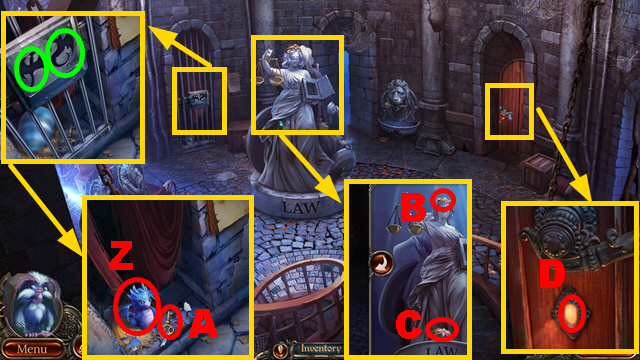
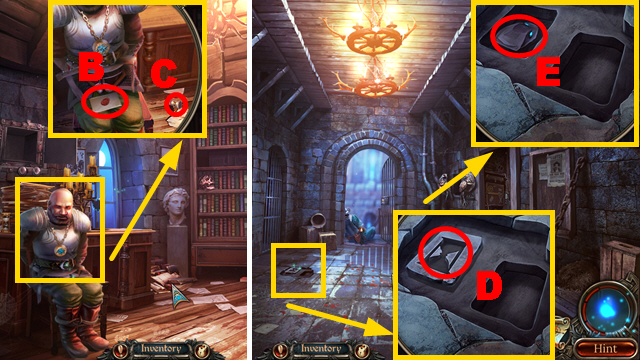
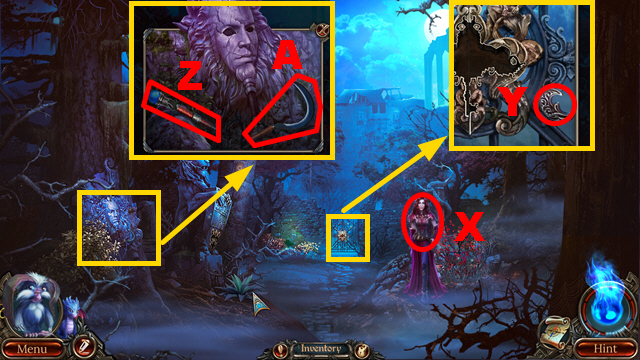
- Talk to the man (A); you receive FEATHERED and the LUCKY COIN.
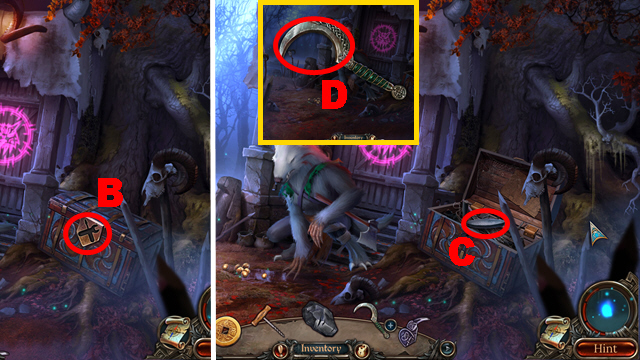
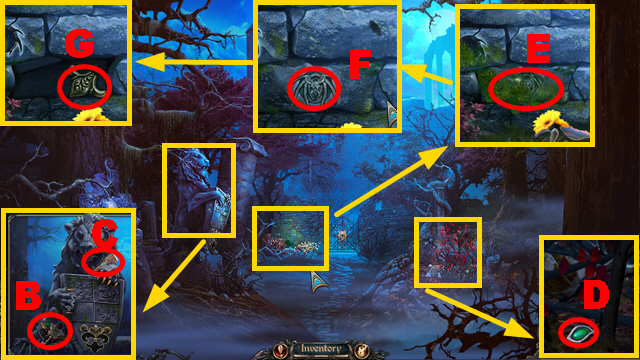
- Take the GATE KEY (B).
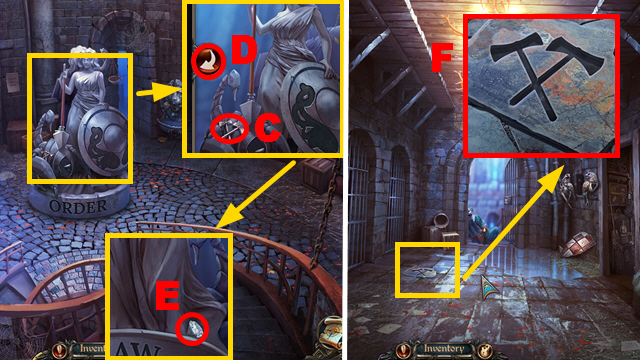
- Use FEATHERED (C); take the AXE SYMBOL (D).
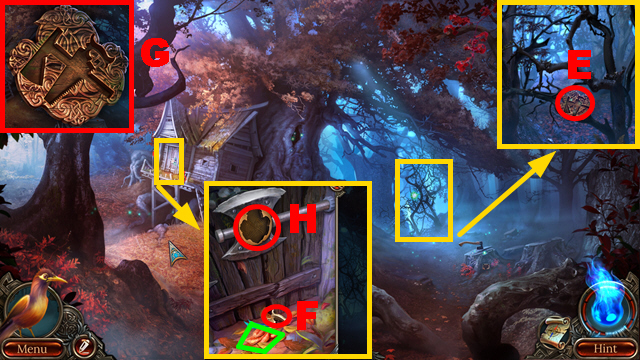
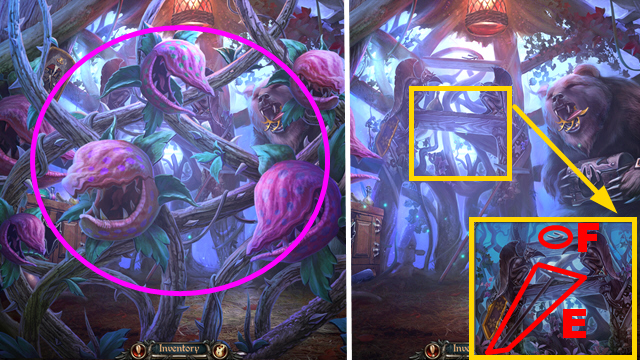
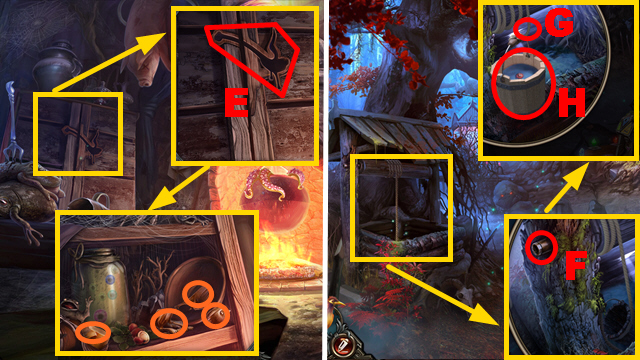
- Take the LUMBERJACK'S EMBLEM (E).
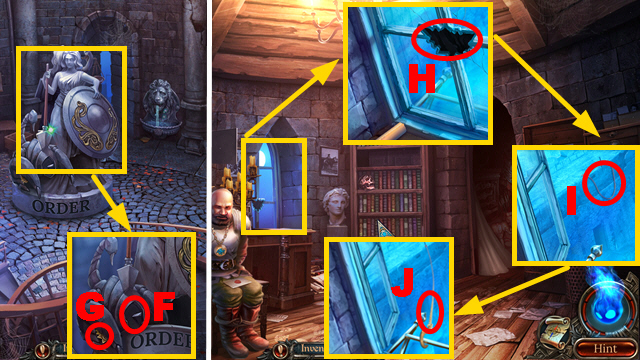
- Remove leaves (green); take the SAW SYMBOL (F).
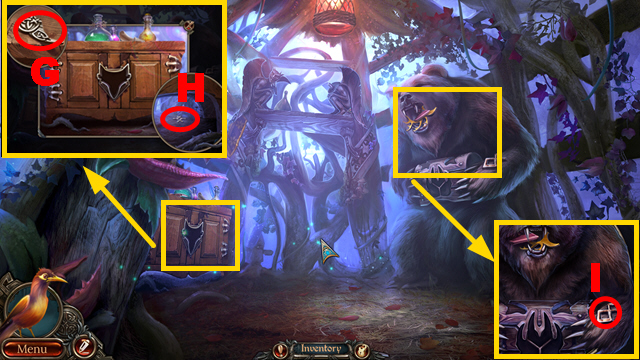
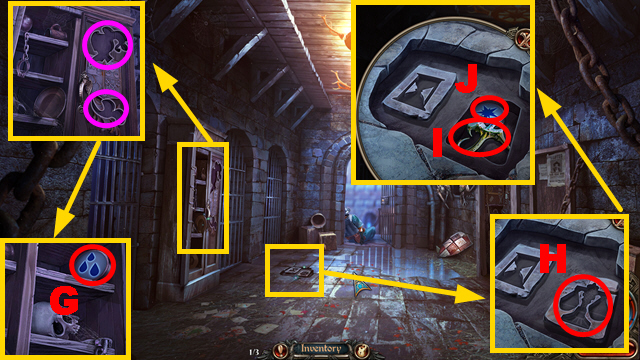
- Place the AXE SYMBOL and SAW SYMBOL on the LUMBERJACK'S EMBLEM (G); take the LUMBERJACK'S EMBLEM.
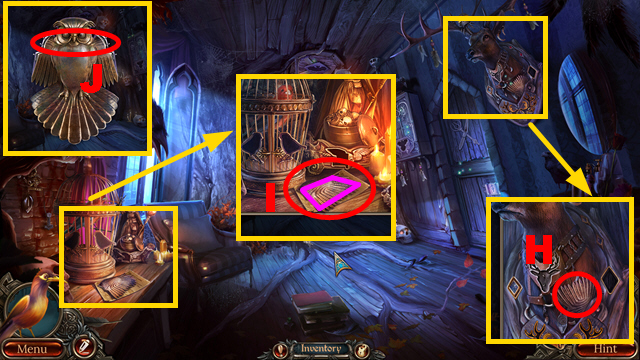
- Place the LUMBERJACK'S EMBLEM (H).
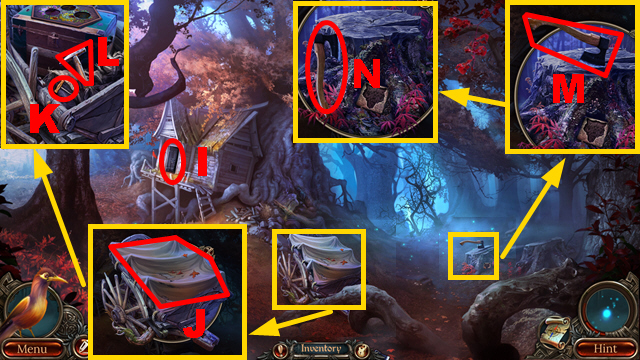
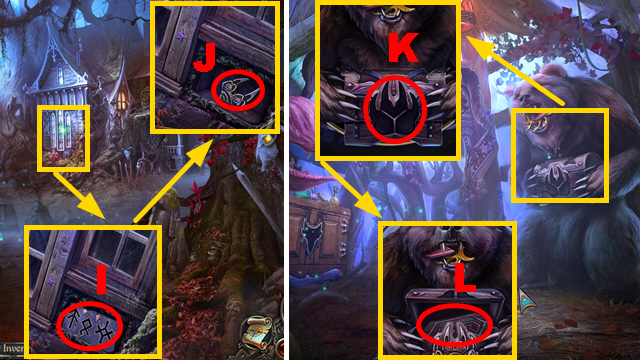
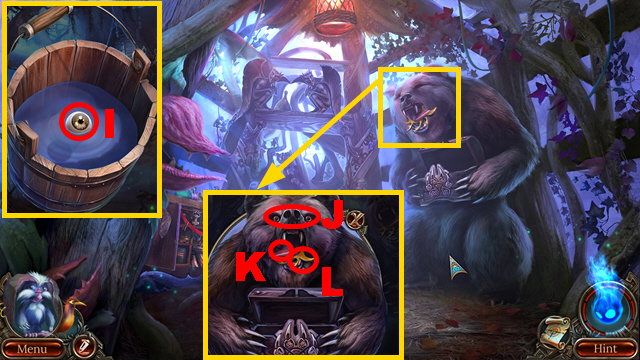
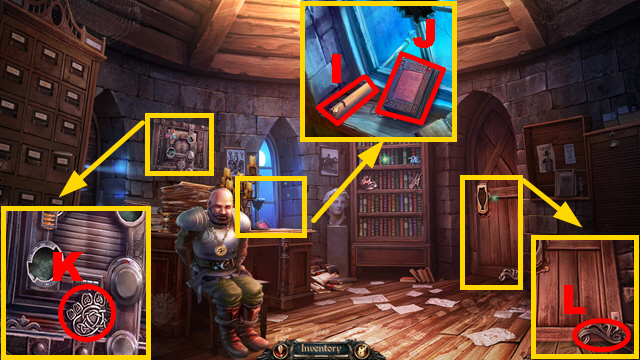
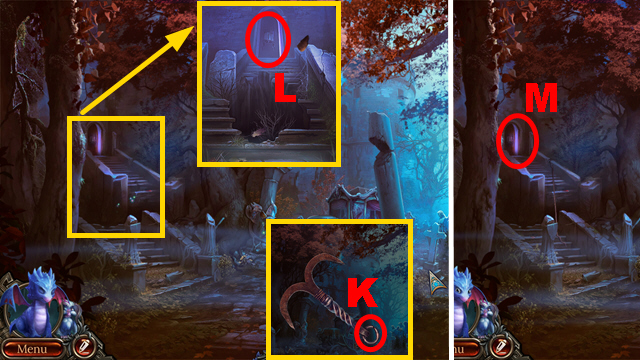
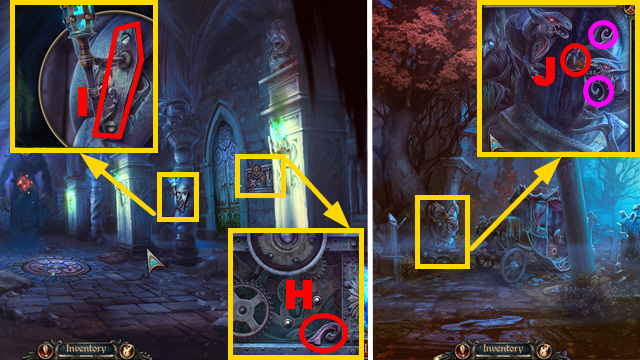
- Play the HOP (I) to receive the DECORATIVE CUTTER.
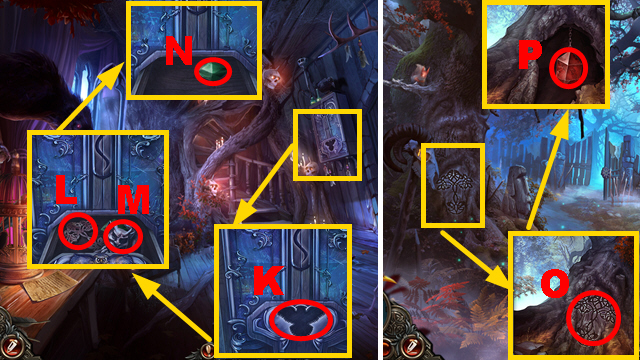
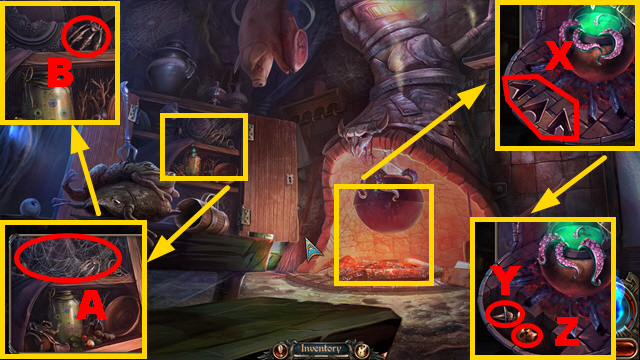
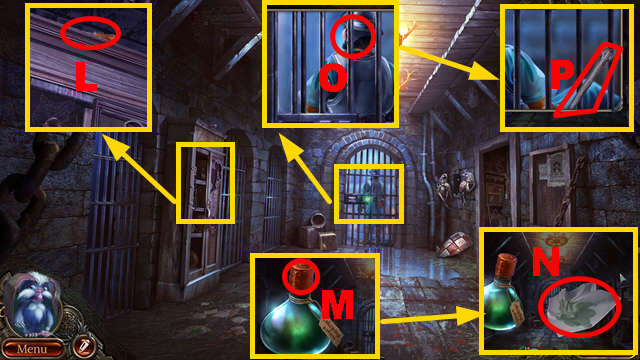
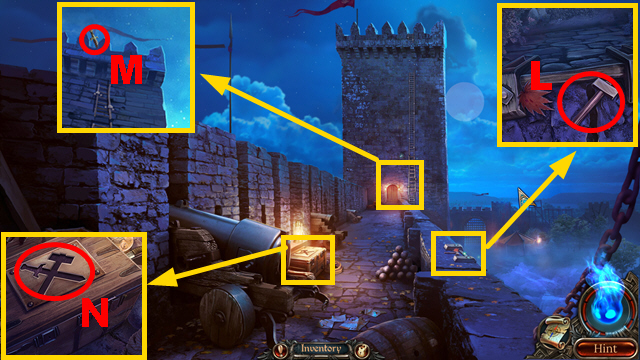
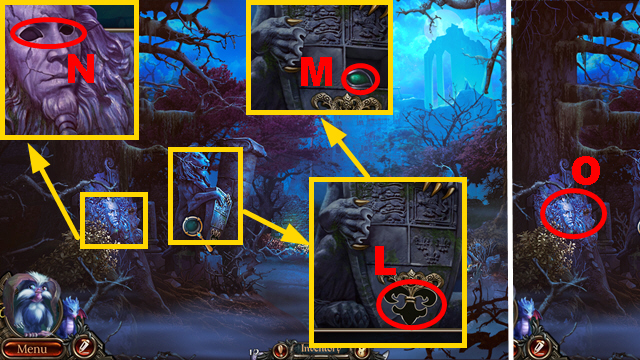
- Use the DECORATIVE CUTTER (J); take the CORKSCREW (K) and HAMMER (L).
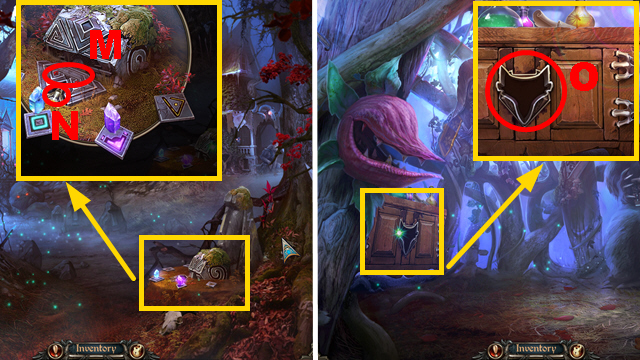
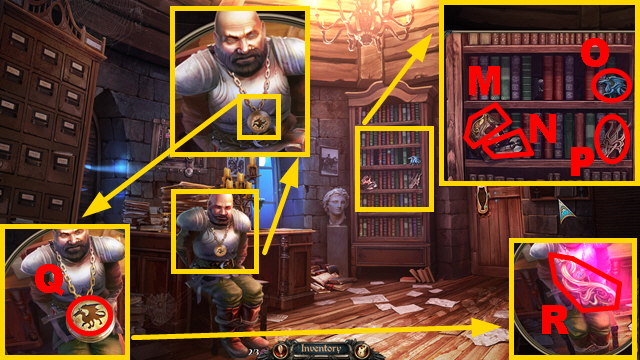
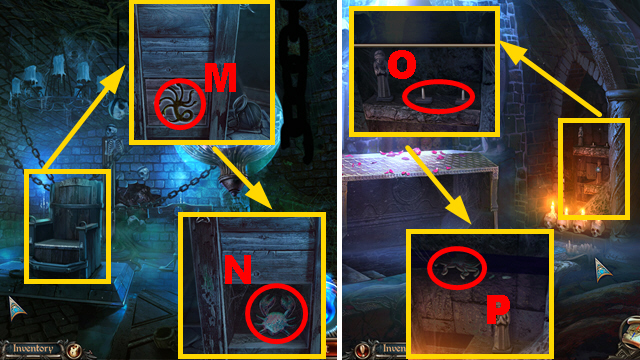
- Use the HAMMER (M); take the LUMBERJACK'S AXE (N).
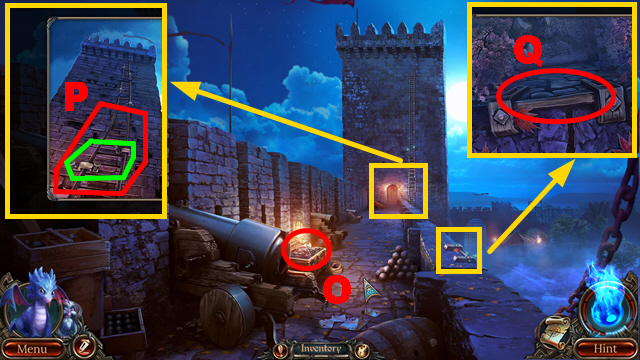
- Use the LUMBERJACK'S AXE twice (O).
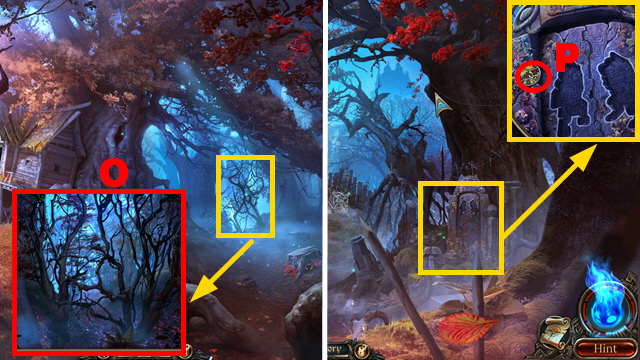
- Move forward.
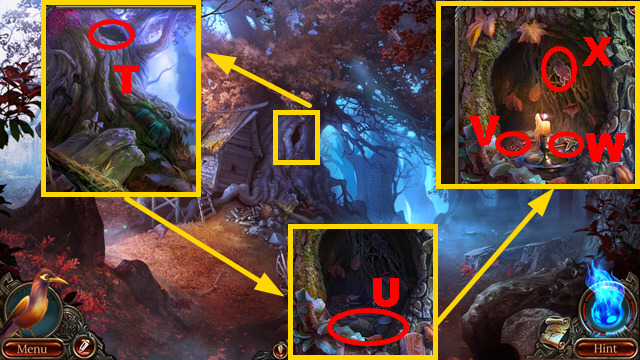
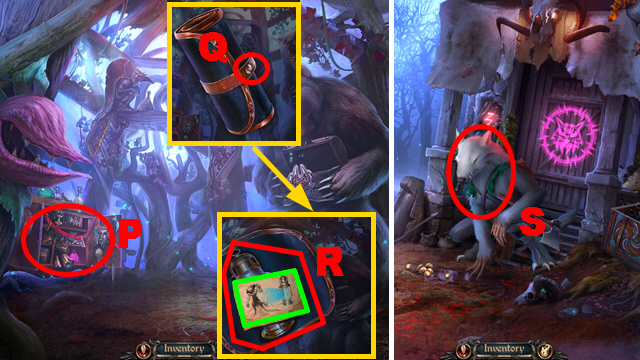
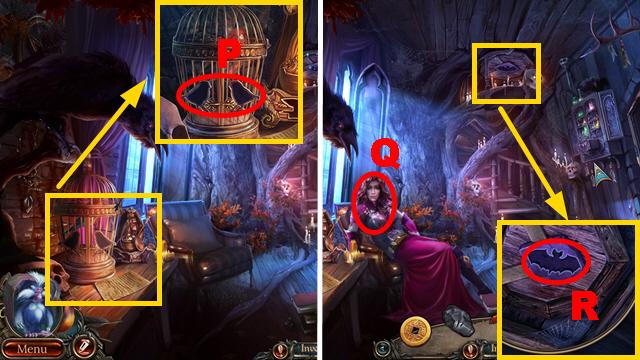
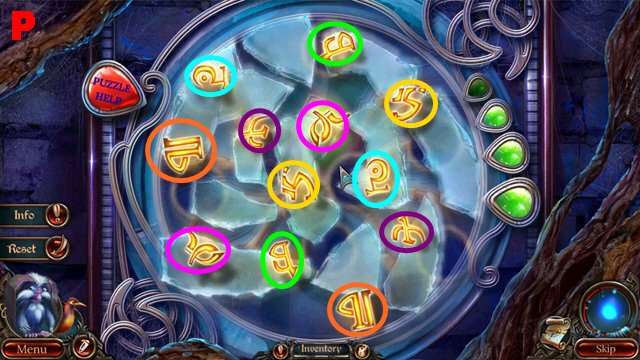
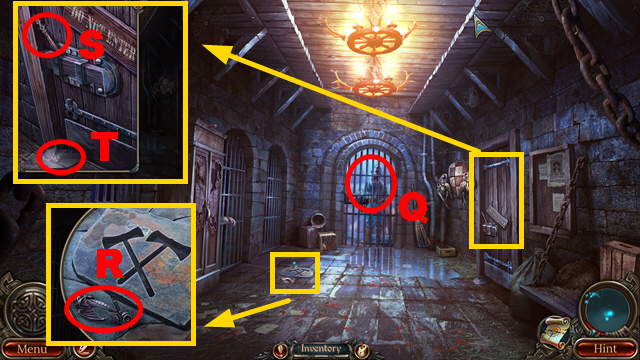
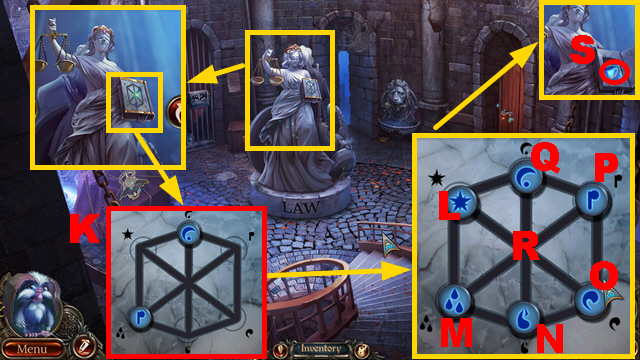
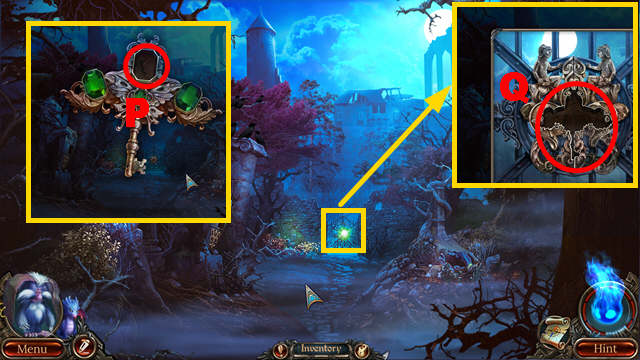
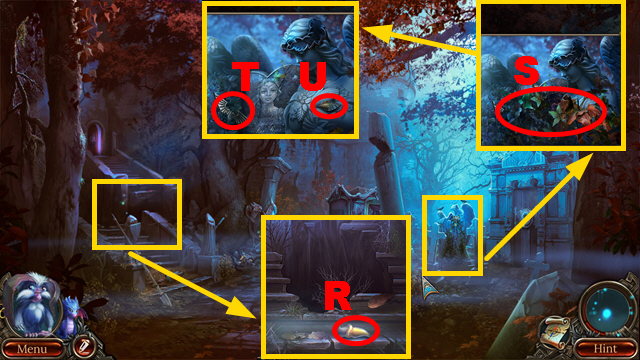
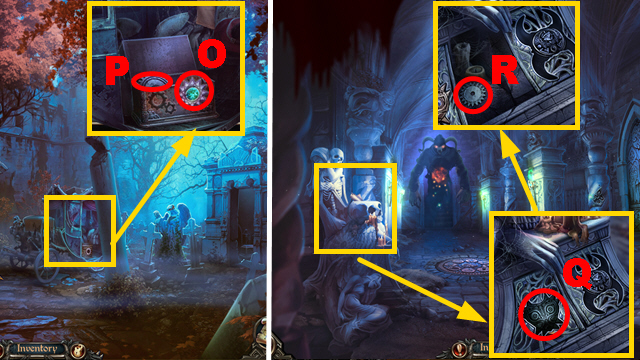
- Take the PATTERNED DISC (P).
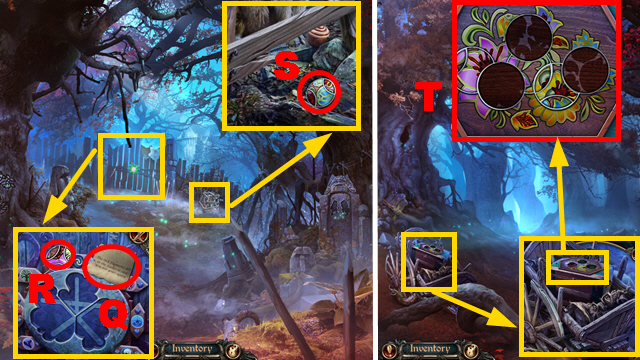
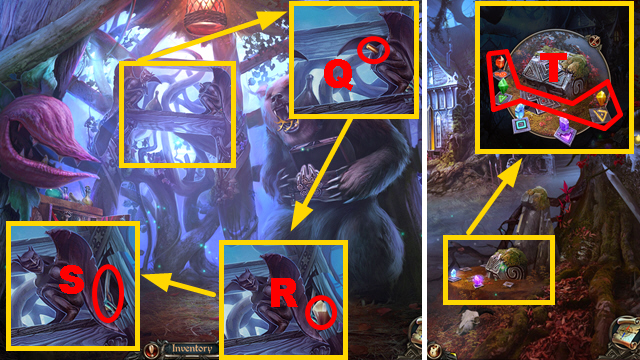
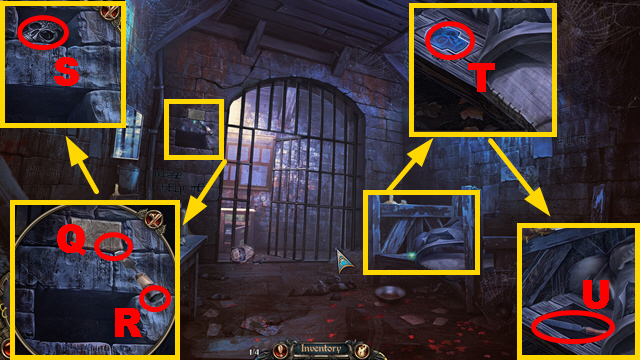
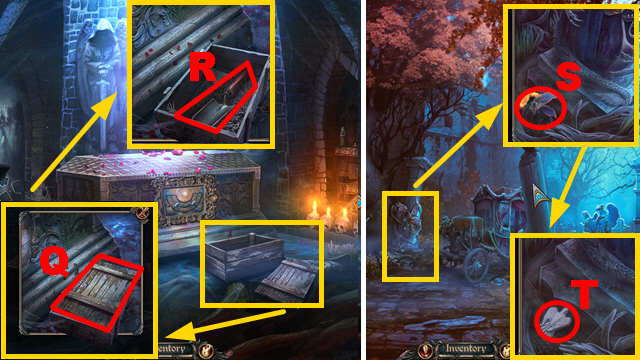
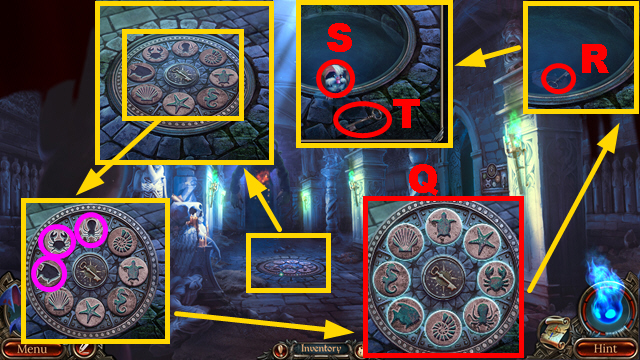
- Read the note (Q); take the PATTERNED DISC (R).
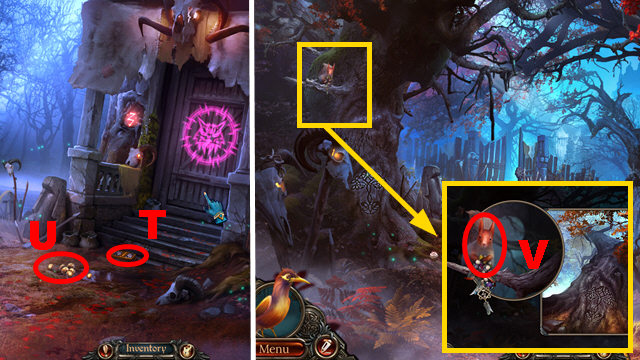
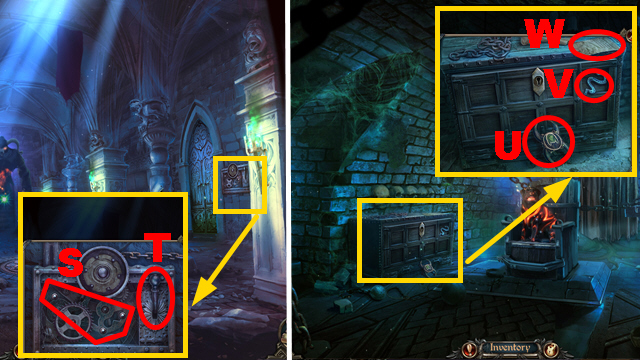
- Take the PATTERNED DISC (S).
- Walk down.
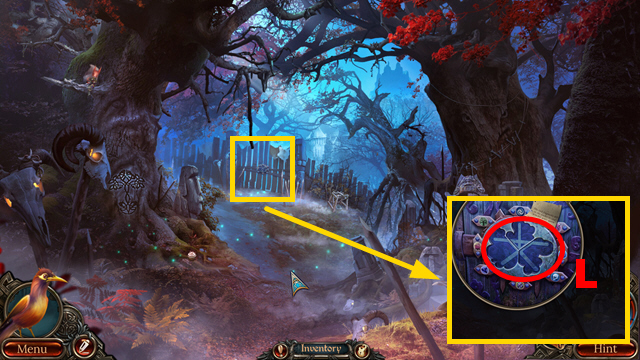
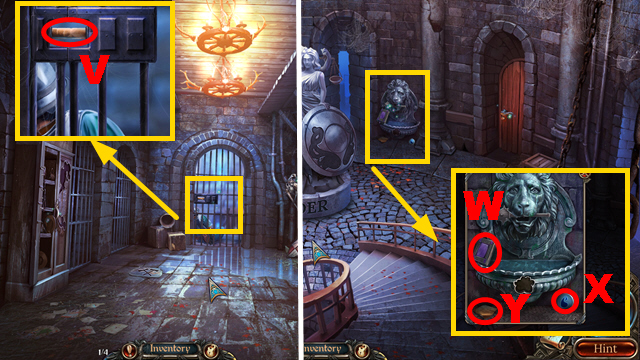
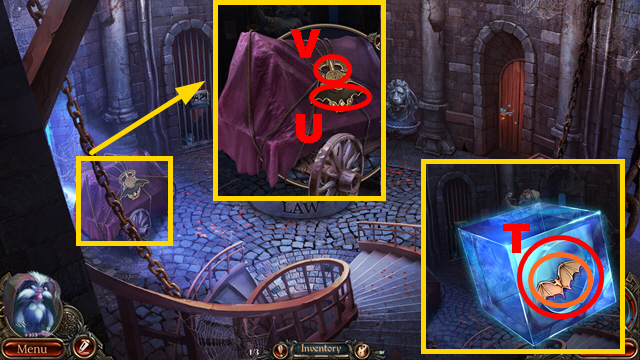
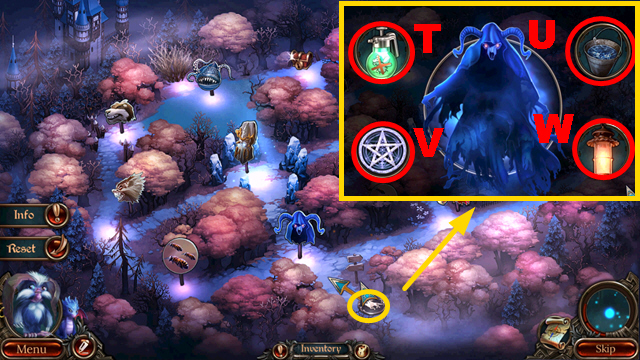
- Place 3 PATTERNED DISCS (T).
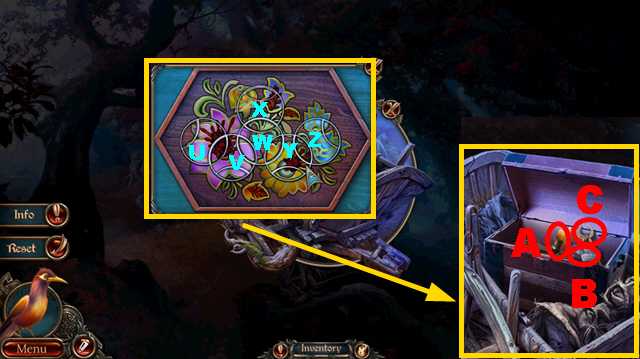
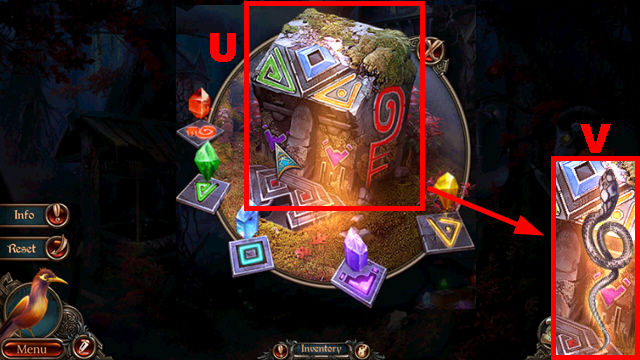
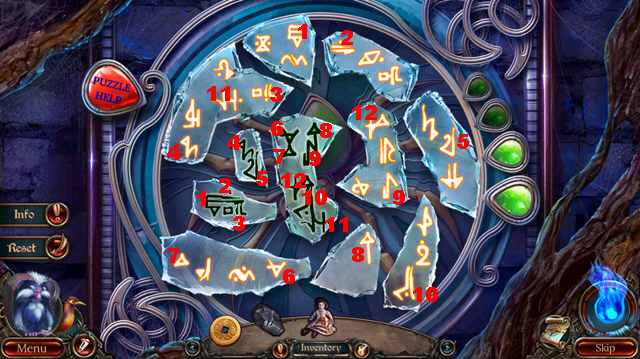
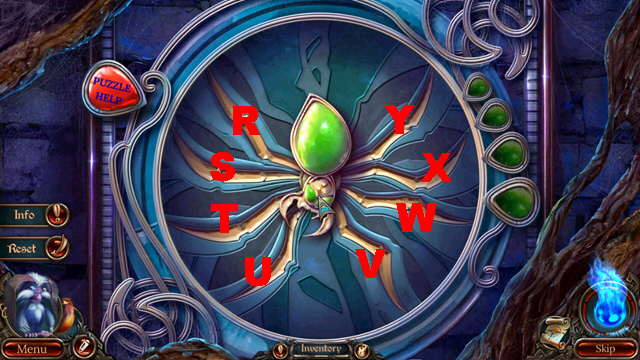
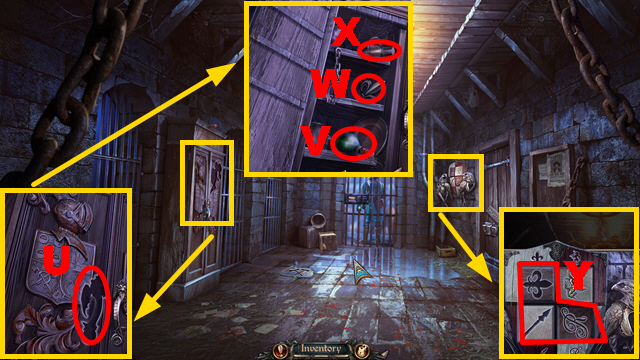
- Play the mini-game.
- Solution: Yx2-W-V-U-Vx2-U-Vx2-Wx2-X-Z-Wx2-Vx2-Wx2-V-X-W-Xx2-W-Xx2-Wx2-X-Wx2-X-W.
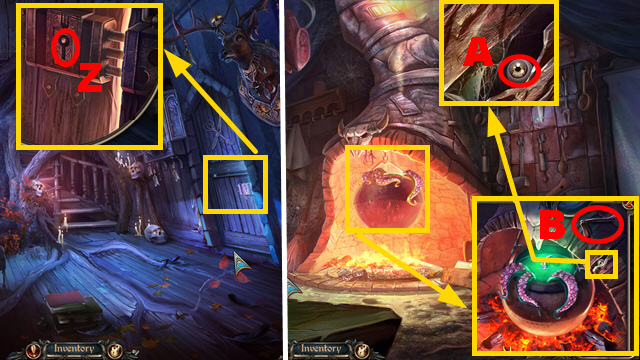
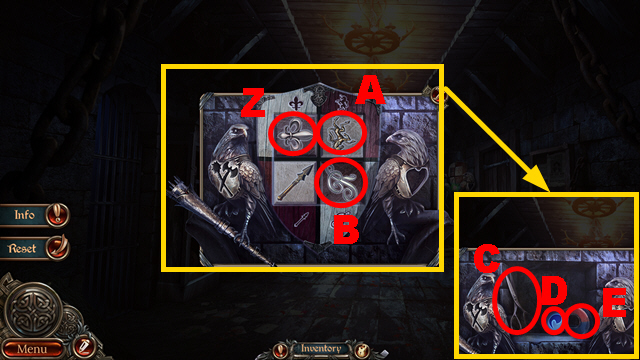
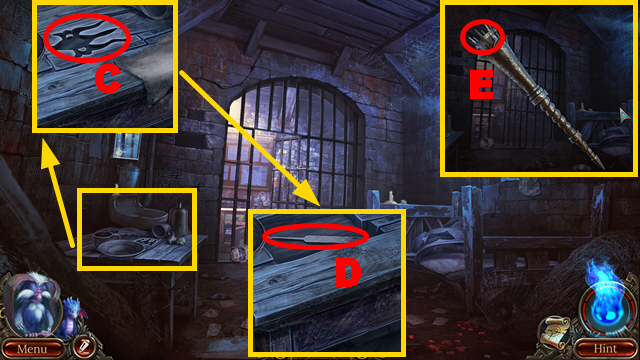
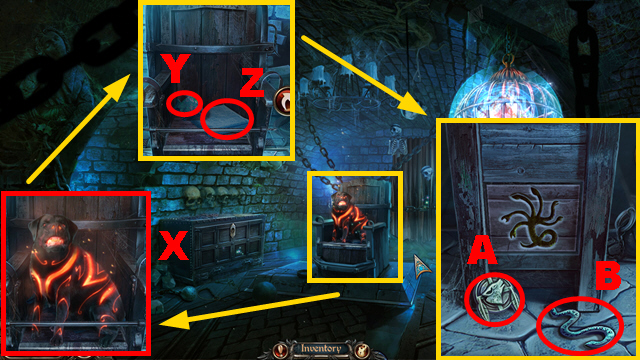
- Take the CANDLE (A), COAL (B), and NAIL PULLER (C).
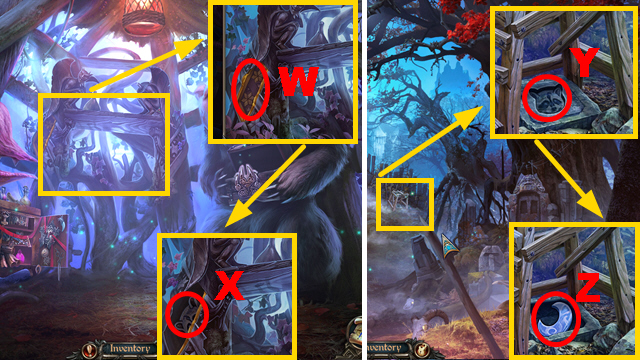
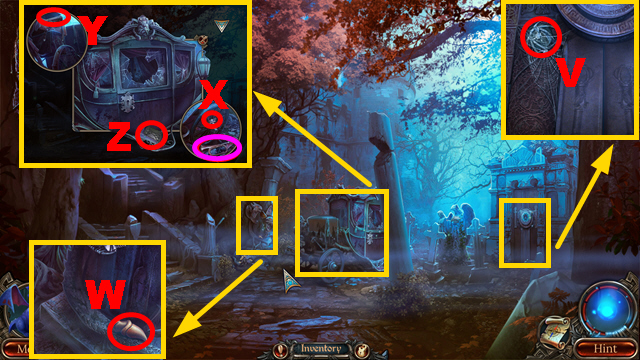
- Move forward.
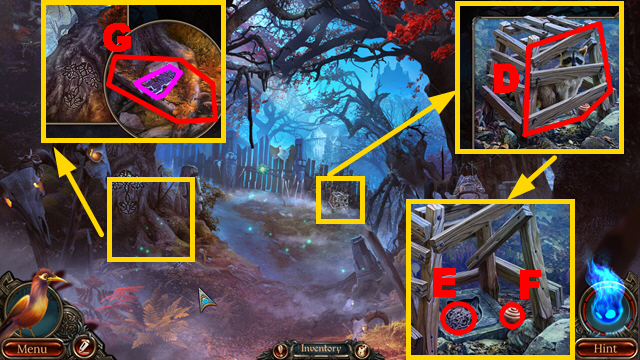
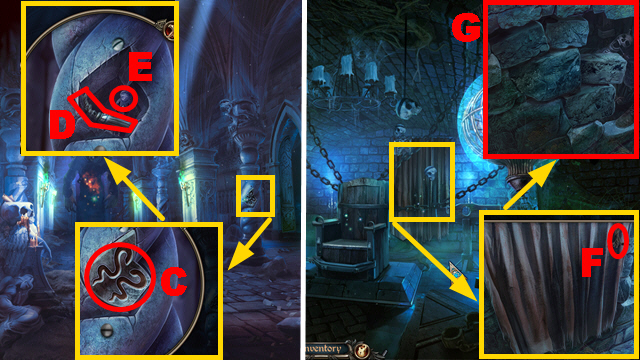
- Use the NAIL PULLER (D); take the WOLF SYMBOL (E) and CUPCAKE (F).
- Place the CUPCAKE (G); take the FIGURE SYMBOL (purple).
- Walk down.
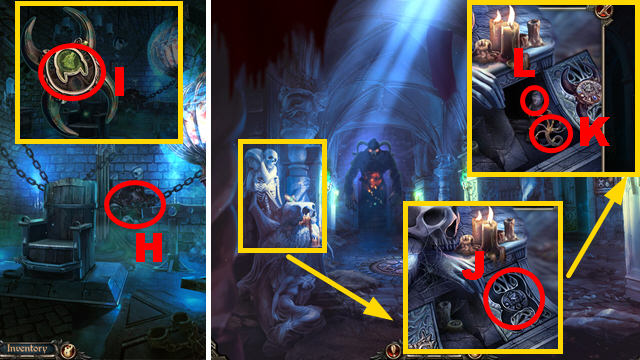
- Place the WOLF SYMBOL (H); take the GATE KEY (I).
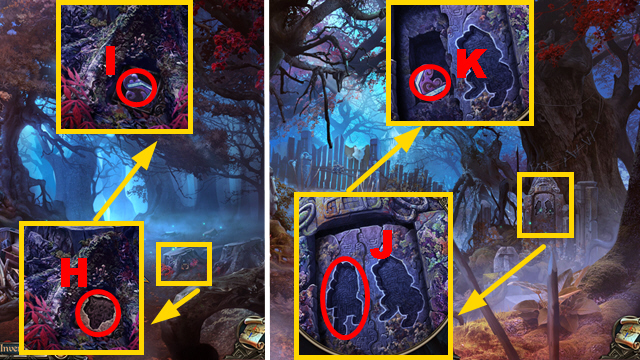
- Move forward.
- Place the FIGURE SYMBOL (J); take the GATE KEY (K).
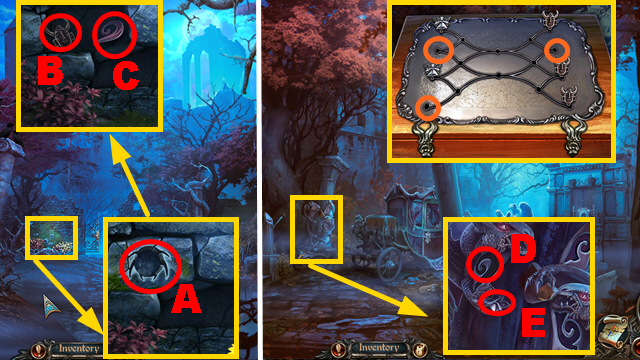
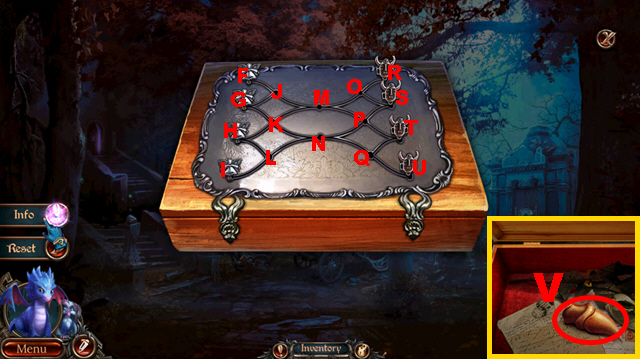
- Place 3 GATE KEYS (L).
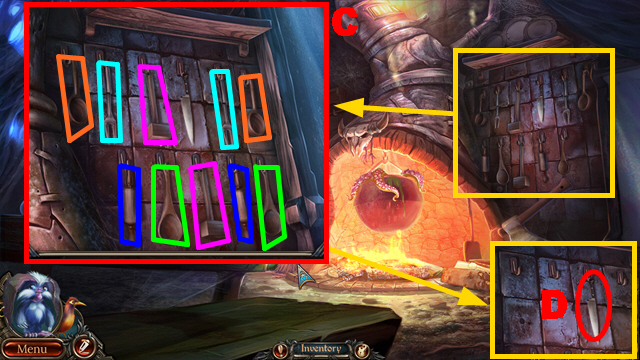
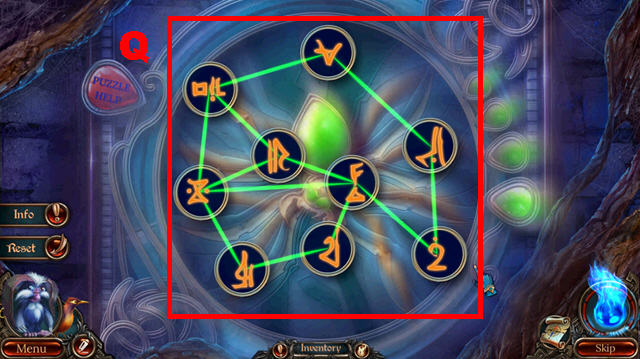
- Play the mini-game.
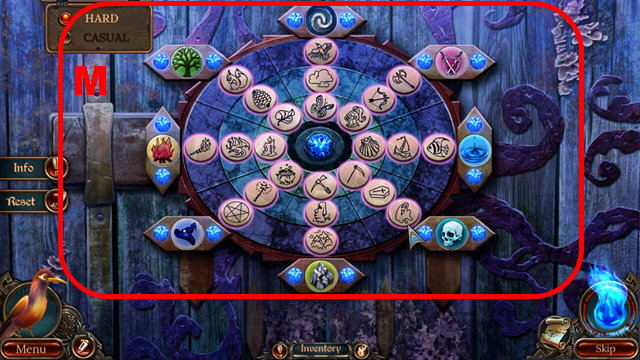
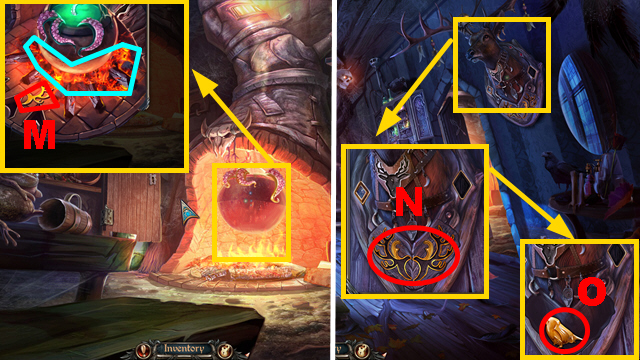
- Solution: (M).
- Move forward.
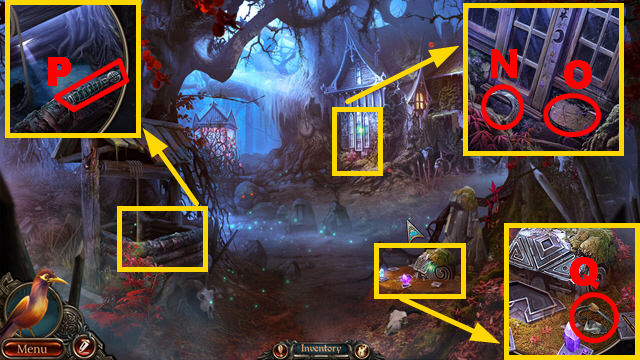
- Examine any area.
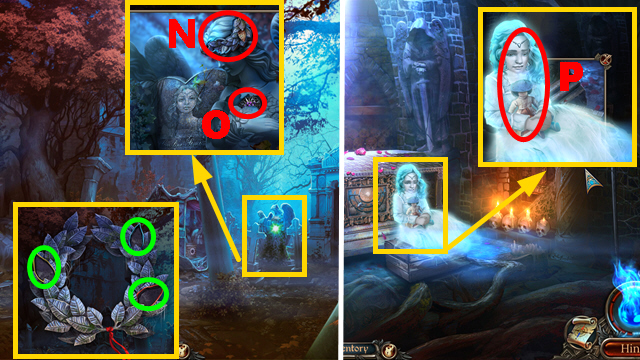
- Take the SICKLE (N); remove the paper (O).
- Take the SICKLE HANDLE (P).
- Take the FLINT AND STEEL (Q).
- Turn left.
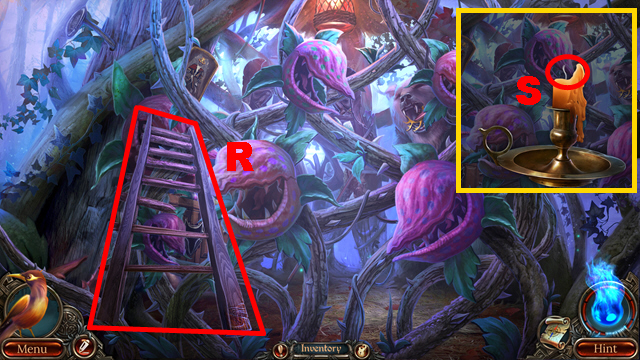
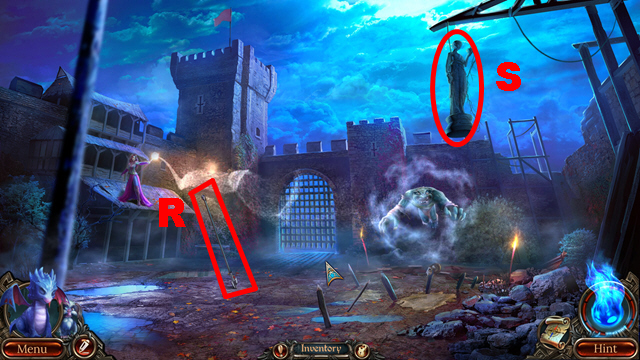
- Take the LADDER (R).
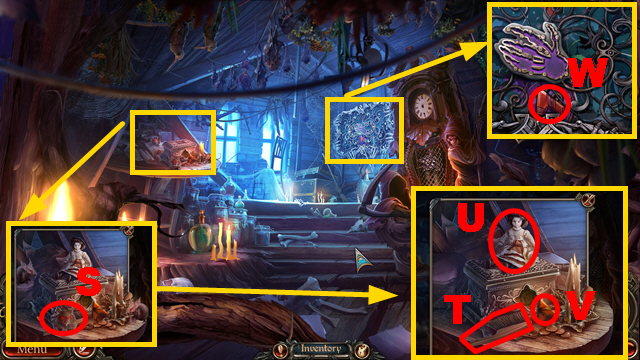
- Light the CANDLE with the FLINT AND STEEL (S); take the CANDLE.
- Walk down three times.
- Place the LADDER (T) and CANDLE (U); take the BEAR PAW FRAGMENT (V), FASTENER (W), and WOLF SYMBOL (X).
- Move forward.
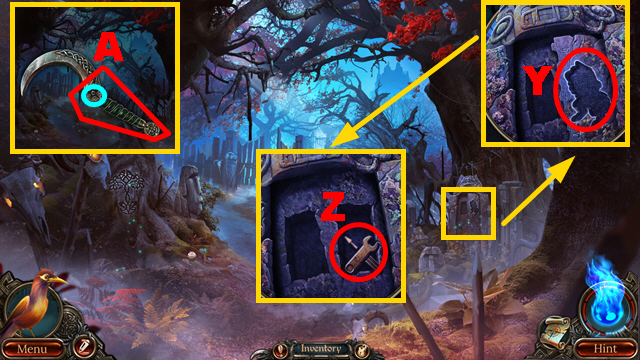
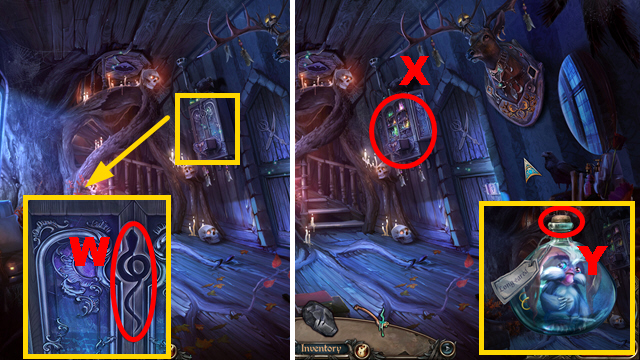
- Place the WOLF SYMBOL (Y); take the TOOL SYMBOL (Z).
- Place the SICKLE HANDLE on the SICKLE (A); use the FASTENER (blue).
- Move forward, turn right.
Chapter 2: The Porch
- Place the TOOL SYMBOL (B); take the WHETSTONE (C).
- Sharpen the SICKLE with the WHETSTONE (D); take the SICKLE.
- Walk down, turn left.
- Use the SICKLE (purple).
- Take the CANE (E); use FEATHERED (F) to acquire the RUNE.
- Take the BEAR PAW FRAGMENT (G); use the CANE (H) to acquire the RUNE.
- Take the RUNE (I).
- Walk down.
- Place 3 RUNES (I); take the BEAR PAW FRAGMENT (J).
- Turn left.
- Place 3 BEAR PAW FRAGMENTS (K); take the PATTERN PIECE (L).
- Walk down.
- Place the PATTERN PIECE (M); take the WEREWOLF SYMBOL (N).
- Turn left.
- Place the WEREWOLF SYMBOL (O).
- Play the HOP (P) to acquire the CASE.
- Open the CASE (Q); read the note (green) and take the PURIFICATION LANTERN (R).
- Walk down, turn right.
- Use the PURIFICATION LANTERN (S).
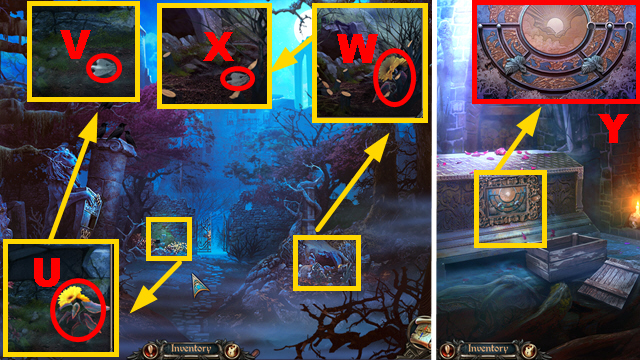
- Take the DECORATION PIECE (T) and NUTS (U).
- Walk down twice.
- Use the NUTS (V) to receive the WITCH'S SYMBOL.
- Move forward, turn left.
- Place the DECORATION PIECE (W); take the RACCOON SYMBOL (X).
- Walk down twice.
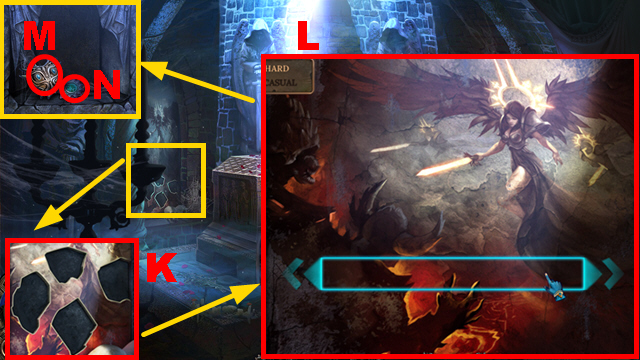
- Place the RACCOON SYMBOL (Y); take the MOON (Z).
- Go to the Porch.
- Use the WITCH'S SYMBOL (A); take the STARS (blue).
- Walk down.
- Place the MOON (B) and STARS (C).
- Enter the Hall.
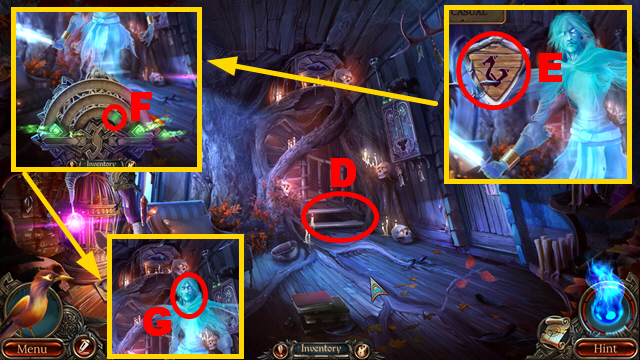
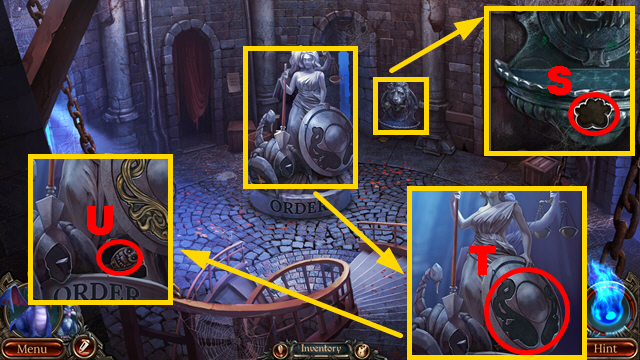
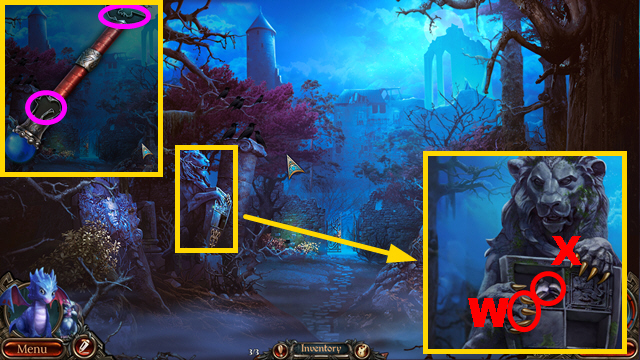
- Try to move forward (D).
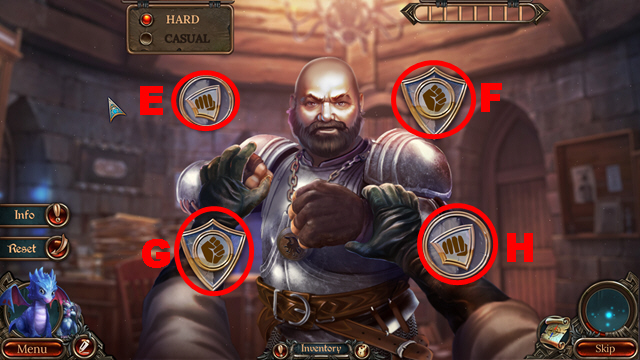
- Play the mini-game.
- Activate the shield when the aim is on it four times (E).
- Select the staff when the aim is in the green area six times (F).
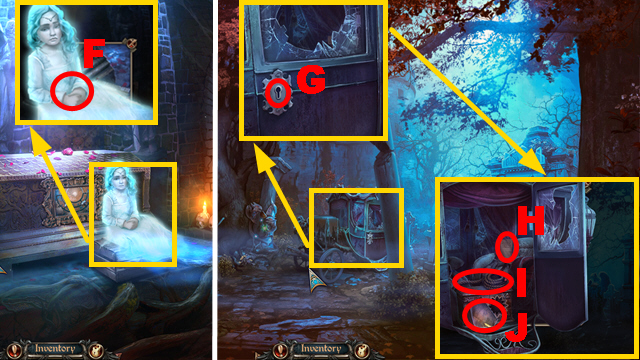
- Talk to the ghost (G) to receive the OWL AMULET.
- Take the WING (H).
- Take the WING (purple); read the note (I).
- Place 2 WINGS on the OWL AMULET (J); take the OWL AMULET.
- Place the OWL AMULET (K); take the WOODEN PATTERN (L), GARGOYLE HEAD (M), and CRYSTAL (N).
- Walk down twice.
- Place the WOODEN PATTERN (O); take the CRYSTAL (P).
- Move forward, turn left.
- Place the GARGOYLE HEAD (Q); take the CRYSTAL (R) and LADLE (S).
- Walk down.
- Place 3 CRYSTALS (T).
- Play the mini-game.
- Solution: (U).
- Take the SNAKE AMULET (V).
- Enter the Hall.
- Place the SNAKE AMULET (W).
- Play the HOP (X) to acquire the BOTTLE.
- Open the BOTTLE with the CORKSCREW (Y); take EARED and the KITCHEN KEY.
- Place the KITCHEN KEY (Z); turn it.
- Turn right.
- Use EARED (A) to acquire BEAR EYE 1/2; take the WELL HANDLE (B).
- Play the mini-game.
- Solution: (C).
- Take the KITCHEN KNIFE (D).
- Place the LADLE (E); collect 4 bird parts (orange) to acquire the BIRD AMULET.
- Walk down twice.
- Place the WELL HANDLE (F); turn it.
- Use the KITCHEN KNIFE (G); take the BUCKET (H).
- Turn left.
- Take BEAR EYE 2/2 (I) out of the BUCKET.
- Place 2 BEAR EYES (J); take the HEARTH AMULET (K) and PATTERN PIECE (L).
- Go to the Kitchen.
- Use the BUCKET (blue); take the PATTERN PIECE (M).
- Walk down.
- Place 2 PATTERN PIECES (N); take the BIRD AMULET (O).
- Place 2 BIRD AMULETS (P).
- Talk to Valeria (Q) to acquire the HATCH KEY.
- Place the HATCH KEY (R).
- Go upstairs.
Chapter 3: The Attic
- Use EARED (S); take the BRUSH (T), DOLL (U), and HEARTH AMULET (V).
- Take the HEARTH AMULET (W).
- Go to the Kitchen.
- Place 3 HEARTH AMULETS (X); take the FIGURINE HEAD (Y) and WOODEN SKULL (Z).
- Use the BRUSH (A); take the SKELETON HAND (B).
- Walk down.

- Place the FIGURINE HEAD (C); take the CLOCK HANDS (D).
- Go upstairs.
- Place the SKELETON HAND (E).
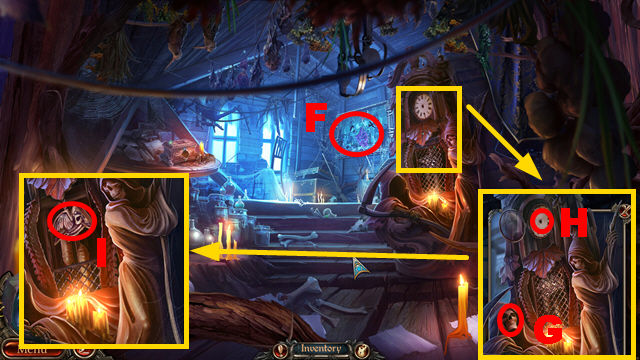
- Play the HOP (F) to acquire the CRYSTAL.
- Place the WOODEN SKULL (G) and CLOCK HANDS (H); take the PATTERN HALF (I).
- Walk down.
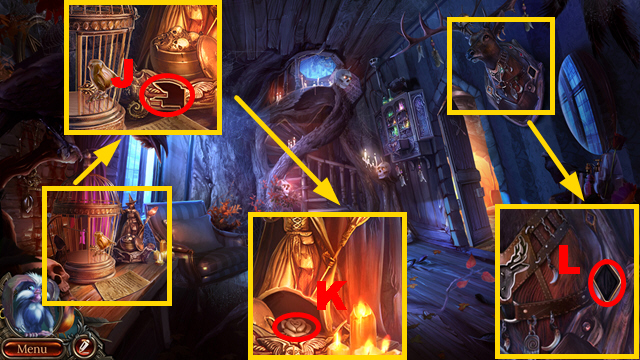
- Place the PATTERN HALF (J); take the ROSE (K).
- Place the CRYSTAL (L).
- Go upstairs.
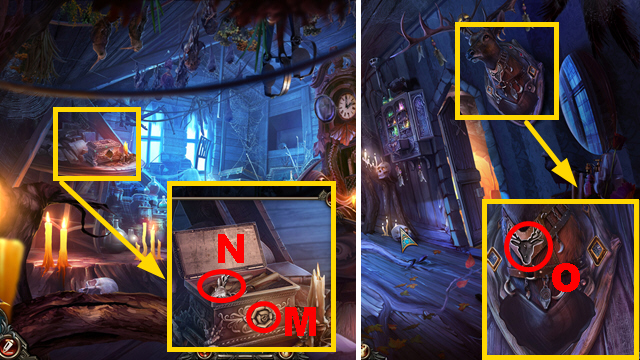
- Place the ROSE (M); take the DEER HEAD (N).
- Walk down.
- Place the DEER HEAD (O).

- Play the mini-game.
- Solution part 1: 1-4.
- Solution part 2: (P).
- Solution part 3: 1-12.
- Solution part 4: (Q).
- Solution part 5: V-R-T-U-X-U-Y-U-T-Y-S-W.
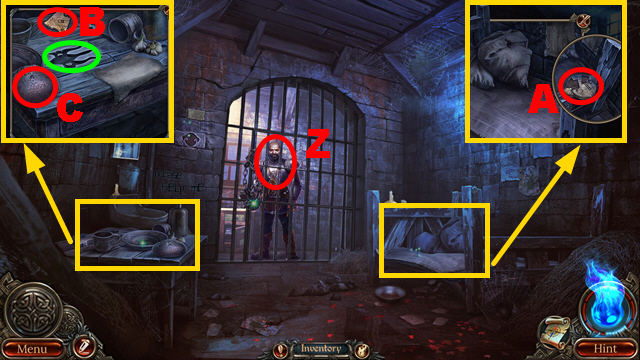
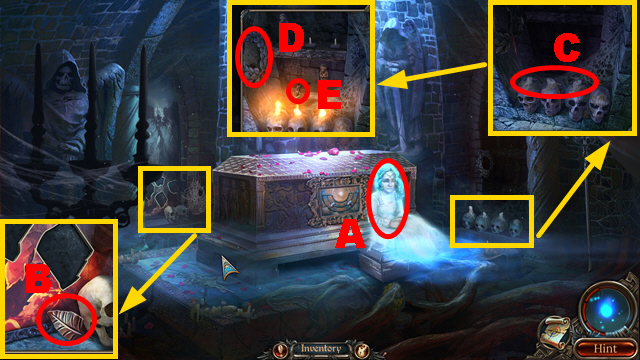
- Talk to the sheriff (Z).
- Take the PRISON AMULET (A).
- Move the plate (green); take the PRISON AMULET PART (B) and BUN (C).
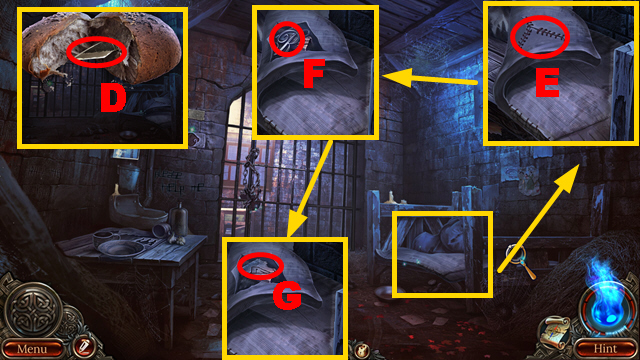
- Open the BUN; take the SHIV (D).
- Move the mattress; use the SHIV (E).
- Take the CREST PART (F) and PRISON AMULET PART (G).
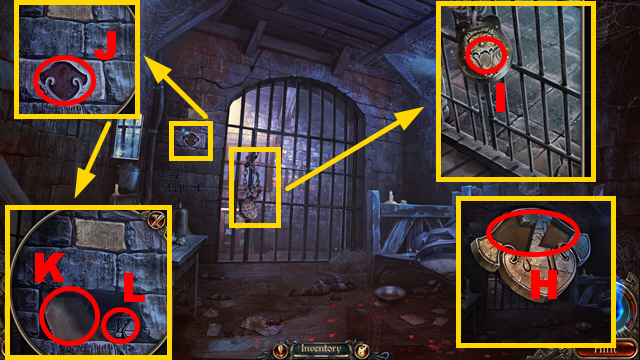
- Place 2 PRISON AMULET PARTS on the PRISON AMULET (H); take the PRISON AMULET.
- Turn the padlock; use the SHIV (I).
- Place the PRISON AMULET (J); take the PAPER (K) and SCALES AMULET (L).

- Apply the COAL to the PAPER (M); take the SKETCH.
- Use the SKETCH (N).
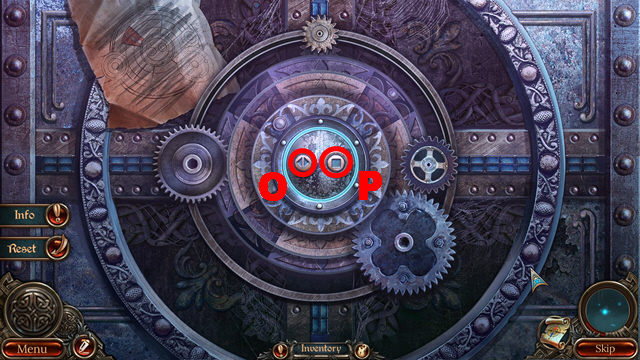
- Play the mini-game.
- Solution: Ox3-Px2-O-P.
- Move forward.
- Examine the area (Q).
- Take the HANDLE (R), CREST PART (S), and CLOTH (T).
- Place the HANDLE (U); take the SLEEPING SOLUTION (V), CREST PART (W), and CHISEL (X).
- Place 3 CREST PARTS (Y).
- Play the mini-game.
- Solution: Z-Ax2-Bx3.
- Take the SCISSORS (C), ROUND SYMBOL 1/4 (D), and MAGNET (E).
- Walk down.

- Use the MAGNET (F) to acquire the COIN.
- Move forward.
- Use the COIN (G).
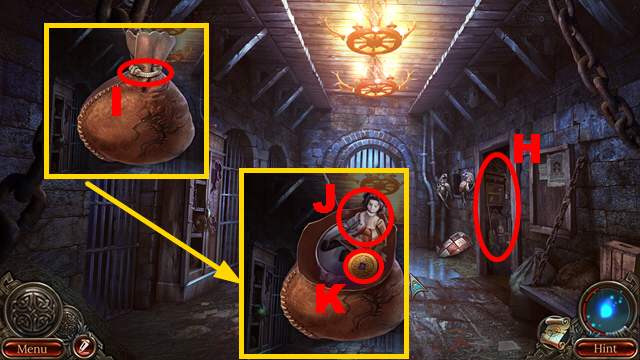
- Play the HOP (H) to acquire the SACK.
- Open the SACK with the SCISSORS (I) to acquire EARED; take the DOLL (J) and LUCKY COIN (K).
- Use EARED (L) to acquire the AWL.
- Apply the AWL and CLOTH to the SLEEPING SOLUTION (M); take the CLOTH WITH SLEEPING SOLUTION (N).
- Use the CLOTH WITH SLEEPING SOLUTION (O); take the CLUB (P).
- Walk down.
- Place the CHISEL (Q); hit it with the CLUB (R).
- Take the SMUGGLER'S KEY (S).
- Place the SMUGGLER'S KEY (T); take the FILE (U).
- Move forward.
Chapter 4: The Tower
- Use the FILE (V).
- Move forward.
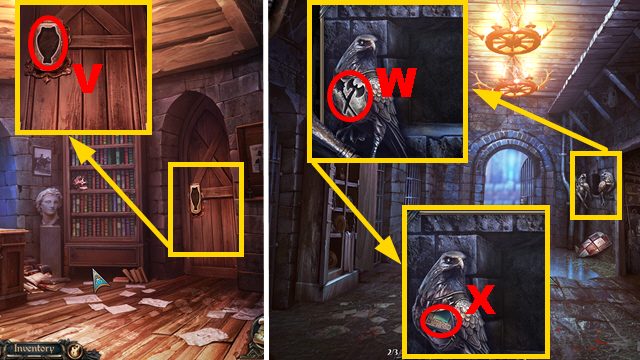
- Examine any area.
- Take BOOK 1/3 (W) and ROUND SYMBOL 2/4 (X); read the note (Y).
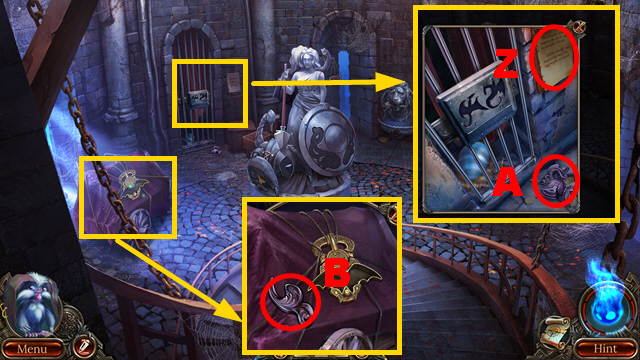
- Read the note (Z); take the CABINET PART (A).
- Take the CABINET PART (B).
- Take the CROSSED AXES (C); change perspective (D).
- Take the DIAMOND (E).
- Walk down.
- Place the CROSSED AXES (F).
- Place 2 CABINET PARTS (purple); take ROUND SYMBOL 3/4 (G).
- Place the SCALES AMULET (H); take the DRAGON SYMBOL (I) and ROUND SYMBOL 4/4 (J).
- Move forward.
- Place 4 ROUND SYMBOLS (K).
- Play the mini-game.
- Solution: R-M-N-O-P-R-N-M-L-R-O-N-M-L-R.
- Take the TESSERACT (S).
- Cut the TESSERACT with the DIAMOND (T); take the GARGOYLE SYMBOL (orange).
- Place the GARGOYLE SYMBOL (U); remove the tarp (V).

- Play the HOP (W) to acquire the SHIELD.
- Walk down.
- Place the SHIELD (X); take the DRAGON SYMBOL (Y).
- Move forward.
- Place 2 DRAGON SYMBOLS (green); take the DRAGON (Z) and OFFICE KEY (A).
- Use the DRAGON (B); take the TIARA (C).
- Insert the OFFICE KEY (D); turn it.
- Turn right.
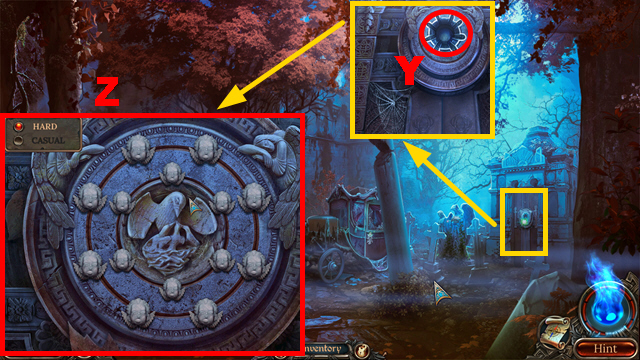
- Examine any area to play the mini-game.
- Casual solution: G-F-H-E.
- Hard solution: G-F-H-Ex2-H-G-F.
- Read the note (I); take BOOK 2/3 (J).
- Take the FOUNTAIN SWITCH (K) and SHIELD DECORATION (L).
- Place the TIARA (M); take the GUARD'S WEAPON (N), COLLUSION AMULET (O) and TABLE KEY (P).
- Place the COLLUSION AMULET (Q); take the SHIELD DECORATION (R).
- Walk down.
- Place the FOUNTAIN SWITCH (S) to acquire the GUARD'S WEAPON.
- Place 2 SHIELD DECORATIONS (T); take the CLOSET TOKEN (U).
- Turn right.
- Place the CLOSET TOKEN (V).
- Walk down twice.
- Place 2 GUARD'S WEAPONS (W) to acquire the TORCH; take BOOK 3/3 (X).
- Move forward, turn right.

- Place 3 BOOKS (Y).
- Play the mini-game.
- Solution: (Z).
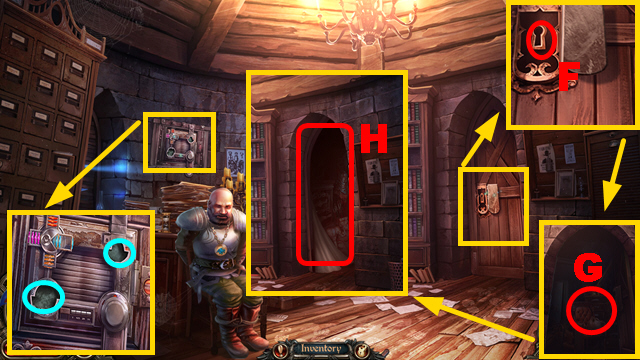
- Use EARED (A); take the SAFE HANDLE (B).
- Walk down three times.
- Place the TABLE KEY (C); take the LOCKPICK (D).
- Light the TORCH (E) with the DRAGON; take the BURNING TORCH.
- Go to the Sheriff's Office.
- Use the LOCKPICK (F) and BURNING TORCH (G).
- Play the HOP (H) to acquire the SAFE HANDLE.
- Place 2 SAFE HANDLES (blue).
- Play the mini-game.
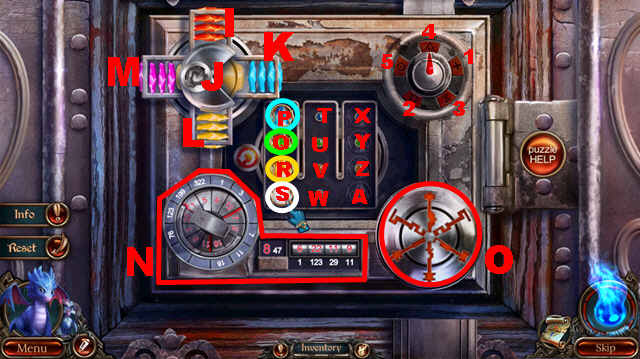
- Solution part 1: Left-Mx2-right-K-left-Jx2-down-Lx2-right-J-up-I-down-Jx2-left-M-up-I-left-J-up-J-right-K-down-L-up-J-right-K-down-J-right-Jx2.
- Solution part 2: 1-5.
- Solution part 3: (N).
- Solution part 4: (O).
- Solution part 5: White-A-yellow-V-white-S-yellow-Z-white-A-green-U-white-S-yellow-V-white-A-yellow-R-white-S-green-Y-white-A-yellow-V-white-S-yellow-Z-white-A-blue-T-white-S-yellow-V-white-A-yellow-R-white-S-green-U.
- White-A-yellow-V-white-S-yellow-Z-white-A-green-Q-white-S-yellow-V-white-A-yellow-R-white-S-blue-X-white-A-yellow-V-white-S-yellow-Z-white-A-green-U-white-S-yellow-V-white-A-yellow-R-white-S-green-Y-white-A-yellow-V-white-S-yellow-Z-white-A.
- You receive the ENVELOPE WITH EVIDENCE.
- Place the ENVELOPE WITH EVIDENCE (B); take the HOURGLASS AMULET (C).
- Walk down twice.
- Place the HOURGLASS AMULET (D); take the SCORPION FRAGMENT (E).
- Move forward.
- Place the SCORPION FRAGMENT (F) to acquire the POLE; take the WINDOW AMULET (G).
- Turn right.
- Place the WINDOW AMULET (H); use the DRAGON (I).
- Use the POLE (J).
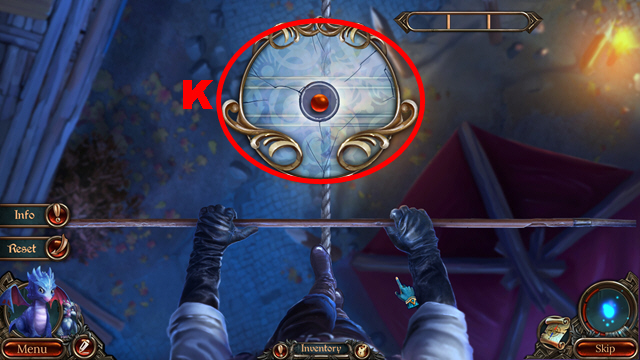
- Play the mini-game.
- Select the ball when it is in the center (K).
Chapter 5: The Fort Walls
- Take the WEAPON AMULET (L).
- Use the DRAGON (M) to acquire the WEAPON AMULET.
- Place 2 WEAPON AMULETS (N).
- Play the HOP (O) to acquire the WAR HAMMER.
- Use the WAR HAMMER (green); take the LADDER (P).
- Place the LADDER (Q).
- Climb down the ladder.
- Take the SPEAR (R).
- Throw the SPEAR (S).
- Play the mini-game.
- Solution: Up-V-left-T-rightx2-U-right-U-leftx3-up-W-up-T-down-right-V-right-V-right-W-leftx2-up-W-right-T-U-V-W-left-up-W.
- Talk to the woman (X).
- Take the LION FRAGMENT (Y), SCEPTER (Z), and SICKLE (A).
- Take the KEEPER MEDALLION (B), SCRAPER (C), and SPHINX EYE 1/2 (D).
- Use the SCRAPER (E); open the compartment (F).
- Take the LION FRAGMENT (G).

- Use the SICKLE (H); take the HUNTING KNIFE (I).
- Use EARED (J); take the LION FRAGMENT (K).
- Place 3 LION FRAGMENTS (L); take SPHINX EYE 2/2 (M).
- Place 2 SPHINX EYES (N).
- Play the HOP (O) to receive the EMERALD.
- Place the EMERALD on the KEEPER MEDALLION (P); take the EMERALD MEDALLION.
- Place the EMERALD MEDALLION (Q).
- Move forward.
- Take STONE CLAW 1/3 (R).
- Use the HUNTING KNIFE (S); take the SCEPTER PART (T) and LEAF (U).
- Take the WALL SYMBOL (V), STONE CLAW 2/3 (W), BOX PART (X), and HORN (purple).
- Use the DRAGON (Y); take the BOX (Z).
- Walk down.
- Place the WALL SYMBOL (A); take the BOX PART (B) and COLUMN PATTERN (C).
- Move forward.
- Place the COLUMN PATTERN (D); take the BOX PART (E).
- Place 3 BOX PARTS on the BOX (orange).
- Play the mini-game.
- Solution: R-M, G-N, M-G, H-R, S-H, N-S, T-N, F-T, N-F, I-P, U-I, P-U.
- Take STONE CLAW 3/3 (V).
- Walk down.
- Place 3 STONE CLAWS (W); take the SCEPTER PART (X).
- Place 2 SCEPTER PARTS on the SCEPTER (purple); take the SCEPTER.
- Move forward.
- Place the SCEPTER (Y).
- Play the mini-game.
- Match pairs of symbols (Z) to solve this randomized puzzle.
- Turn right.
- Look at the girl (A).
- Take the LEAF (B).
- Use the DRAGON (C); take the WREATH (D) and HOOK (E).
- Give the DOLL to Caroline (F) to receive the CARRIAGE KEY.
- Walk down.
- Use the CARRIAGE KEY (G); read the note (H).
- Take the ROPE (I) and FRESCO PART (J).
- Connect the ROPE to the HOOK (K); take the ROPE WITH HOOK.
- Throw the ROPE WITH HOOK (L).
- Play the HOP (M) to acquire the LEAF.
- Place 3 LEAVES on the WREATH (green); take the ANGEL WREATH.
- Place the ANGEL WREATH (N); take the BROOCH (O).
- Turn right.
- Give the BROOCH to Caroline (P).
- Open the crate (Q); take the TROWEL (R).
- Walk down.
- Use the TROWEL (S); take DOVE 1/3 (T).
- Walk down.
- Use the TROWEL (U); take DOVE 2/3 (V).
- Use the TROWEL (W); take DOVE 3/3 (X).
- Go to the Crypt.
- Place 3 DOVES (Y).
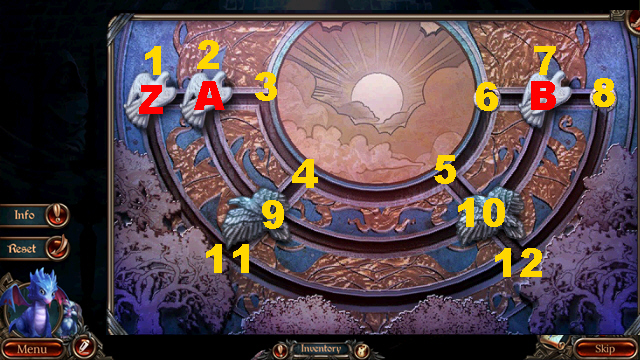
- Play the mini-game.
- Solution: A3-B6-Z11-Z12-Z8-B7-B6-B7-A4-A5-A6.
- Go downstairs.
Chapter 6: The Catacombs

- Try to follow the woman (C).
- Read the note (blue); take the GEAR (D) and COLUMN FRAGMENT (E).
- Take the FRESCO PART (F).
- Take the COLUMN FRAGMENT (H).
- Use the LUCKY COIN (I) to acquire the FRESCO PART.
- Walk down twice.
- Place 2 COLUMN FRAGMENTS (purple); take the FRESCO PART (J).
- Turn right.
- Place 4 FRESCO PARTS (K).
- Play the mini-game.
- Solution: (L).
- Take the ALTAR PART (M) and GEAR SYMBOL (N).
- Walk down.
- Place the GEAR SYMBOL (O); take the GEAR (P).
- Go to the Catacombs.
- Place the ALTAR PART (Q); take the GEAR (R).
- Place 3 GEARS (S); pull the lever (T).
- Turn right.
- Take the ALTAR AMULET (U) and SNAKE (V); read the note (W).
- Use the HORN (X); take the HATCH PART (Y) and TOWEL (Z).
- Take the SHAMAN SIGN (A) and SNAKE (B).
- Turn left.
- Place 2 SNAKES (C); take the CURTAIN TASSEL (D) and FIGURINE (E).
- Turn right.
- Place the CURTAIN TASSEL (F); pull it.
- Use the WAR HAMMER (G).
- Play the HOP (H) to acquire the AMULET PIECE.
- Place the SHAMAN SIGN and AMULET PIECE on the ALTAR AMULET (I); take the ALTAR AMULET.
- Turn left.
- Place the ALTAR AMULET (J); take the SEA SERPENT (K) and FIGURINE (L).
- Turn right.
- Place the SEA SERPENT (M); take the HATCH PART (N).
- Go to the Crypt.
- Place 2 FIGURINES (O); take the HATCH PART (P).
- Go downstairs.
- Place 3 HATCH PARTS (purple).
- Play the mini-game.
- Solution: (Q).
- Use EARED (R) and the TOWEL (S); take the DRAWERS KEY (T).
- Turn right.
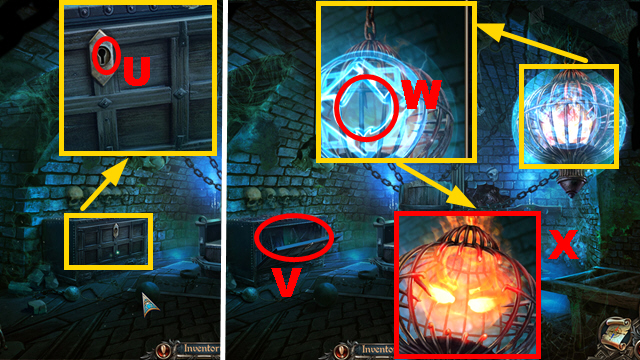
- Insert the DRAWERS KEY (U); turn it.
- Play the HOP (V) to acquire the CAGE AMULET.
- Place the CAGE AMULET (W); use the DRAGON (X).
- Turn left.
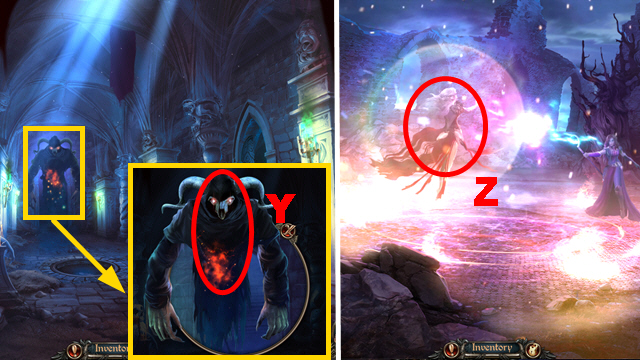
- Use the DRAGON (Y).
- Move forward.
- Use the DRAGON and EARED (Z).
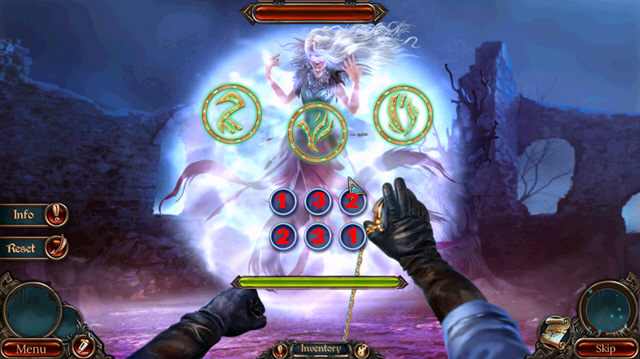
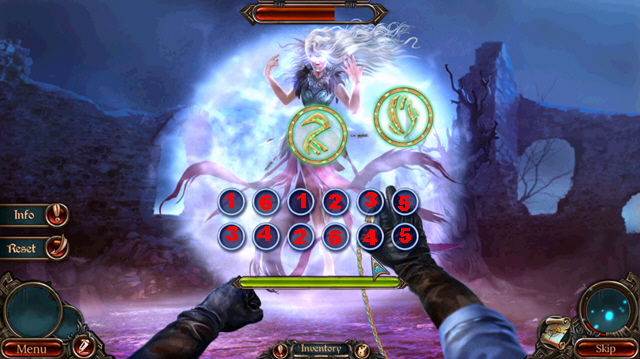
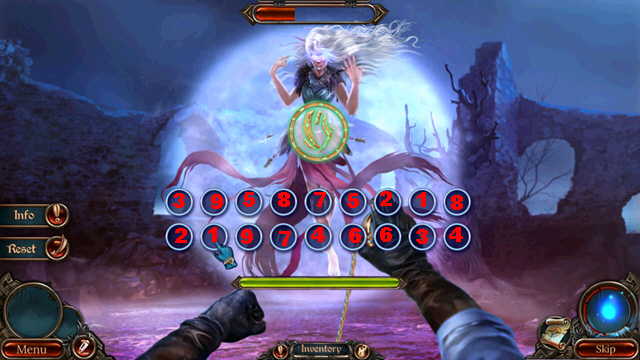
- Play the mini-game.
- Solution round 1: 1-3.
- Solution round 2: 1-6.
- Solution round 3: 1-9.
- Congratulations, you have completed Midnight Calling: Jeronimo.
Created at: 2016-07-10