

Walkthrough Menu
General Tips
- This is the official guide for Midnight Calling: Valeria.
- This guide will not show when you have to zoom into a location; the screenshots will show each zoom scene.
- Hidden-object puzzles are referred to as HOPs. This guide will not show screenshots of the HOPs, however, it will mention when an HOP is available and the inventory item you'll collect from it.
- Use the Map to fast travel to a location.
Chapter 1: The Castle
- Examine the scene.
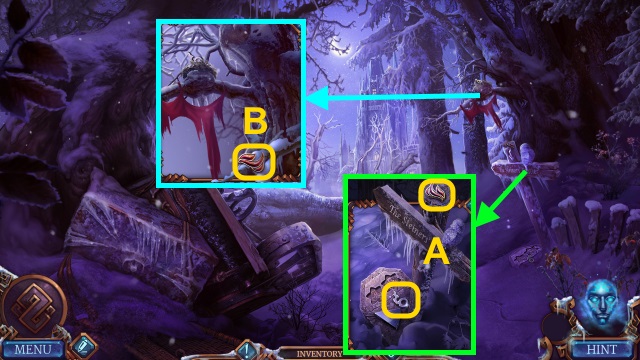
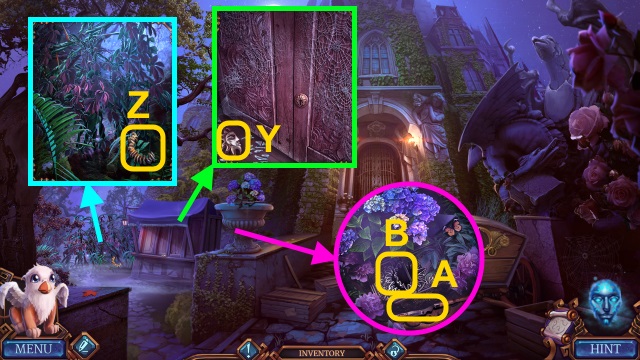
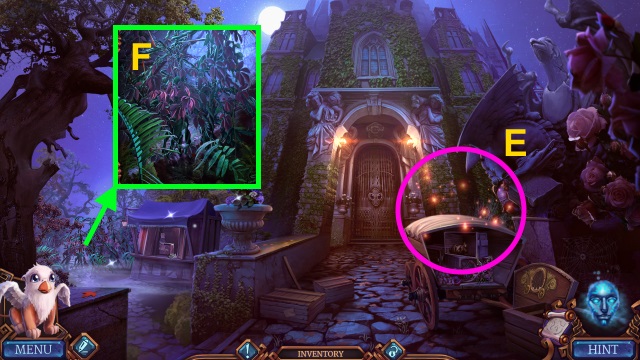
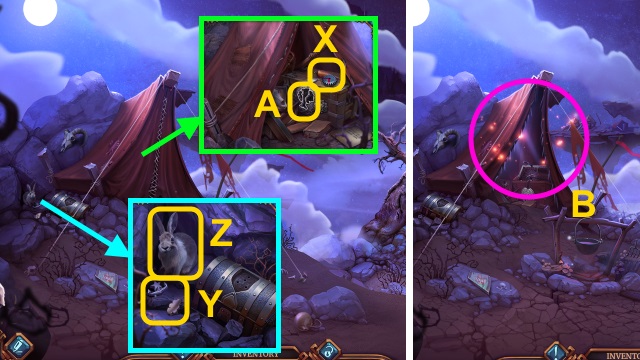
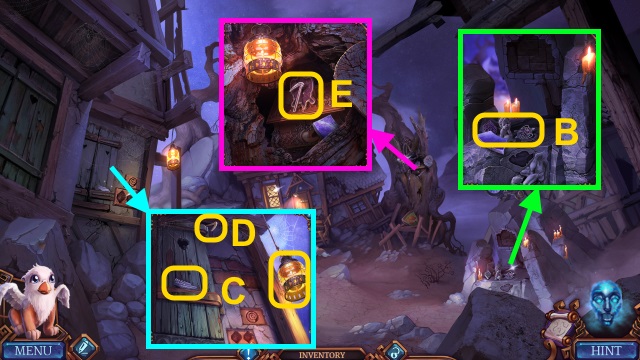
- Take the STRANGE DECORATION (1/3) and FLAME (A).
- Take the FLAME (B).
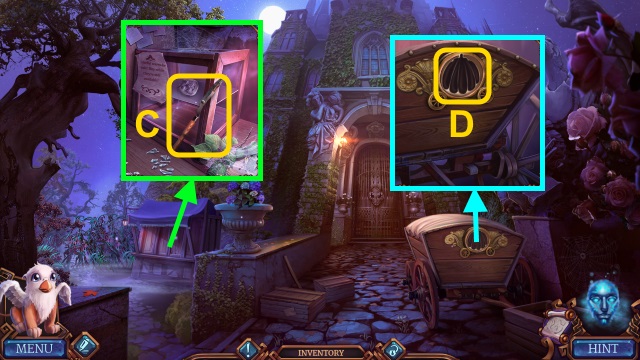
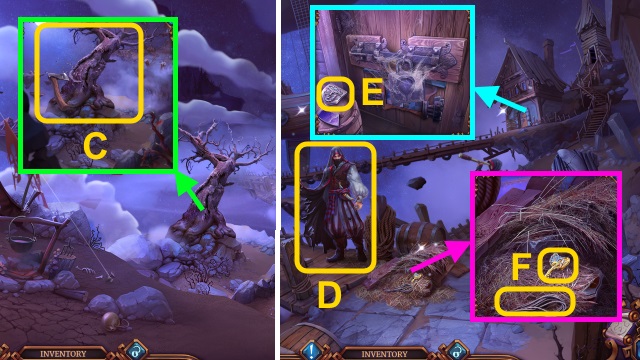
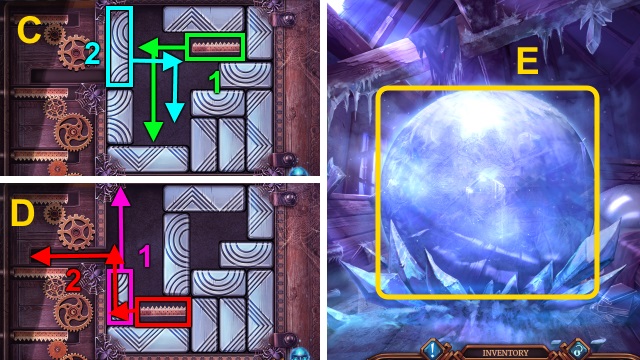
- Examine the scroll (C). Read the letter; take the Map.
- Take the TORCH (D).
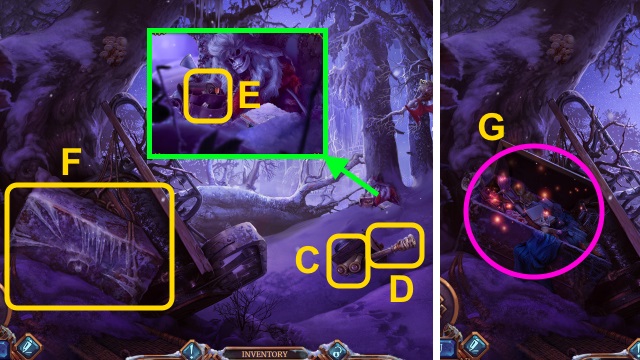
- Place the 2 FLAMES; take the FLINT and CLOCK NUMBER (E).
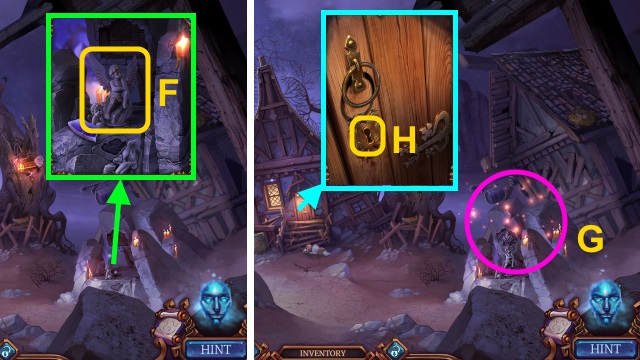
- Combine the TORCH and FLINT; take the LIT TORCH.
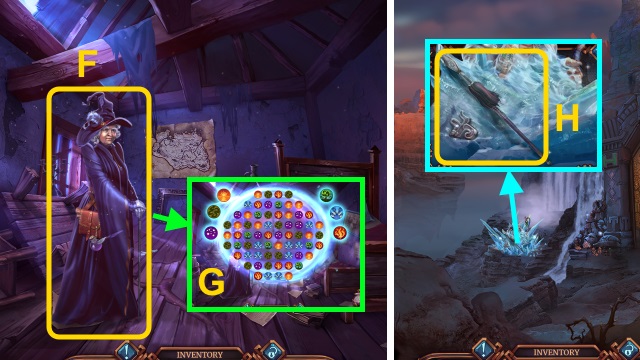
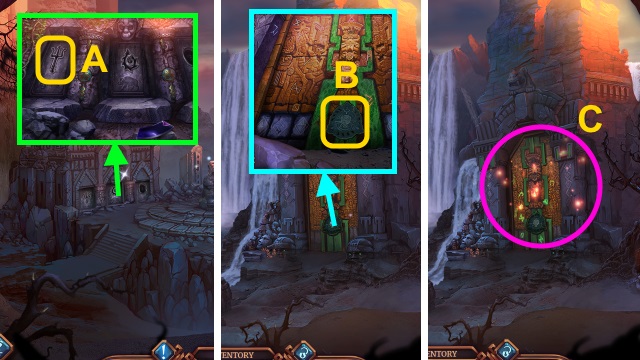
- Use the LIT TORCH (F); open the chest.
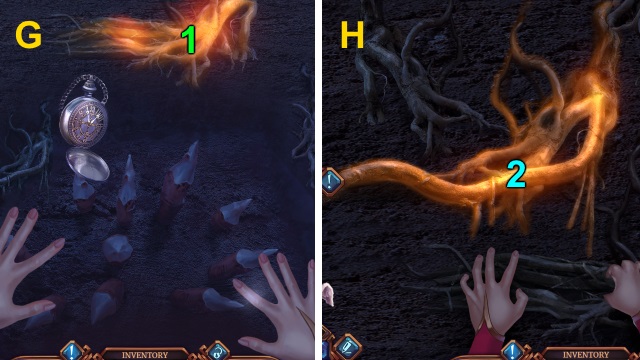
- Play the HOP; receive the SAW (G).
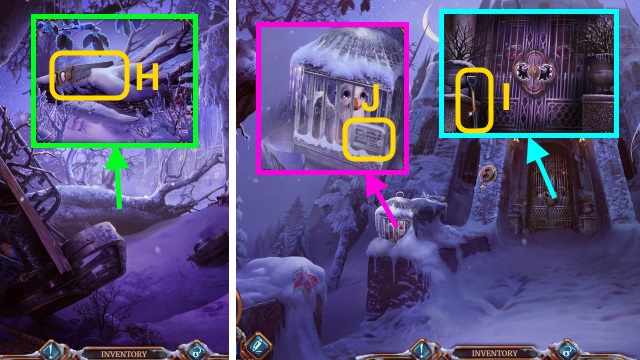
- Use the SAW (H).
- Walk forward.
- Examine the scene.
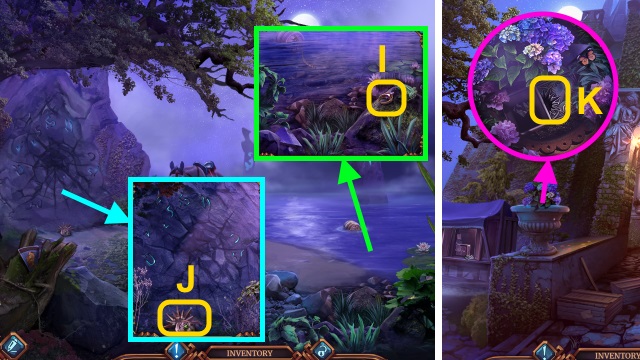
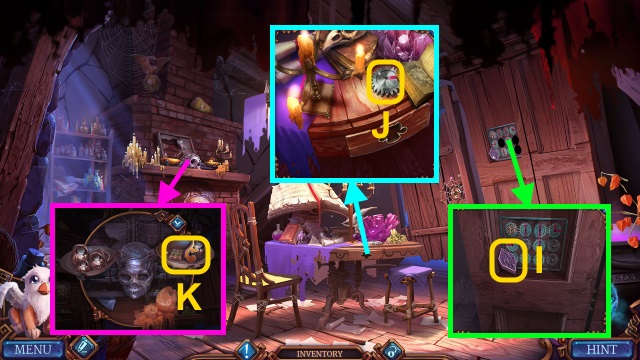
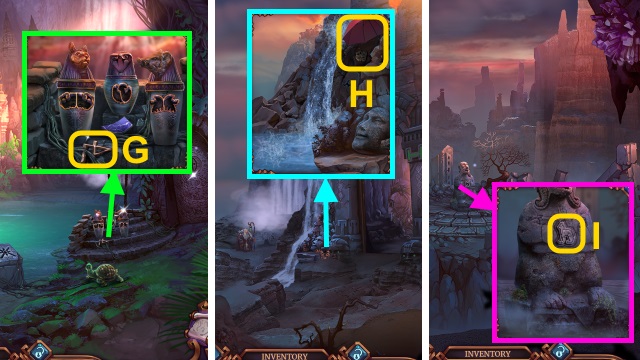
- Take the SHOVEL (I).
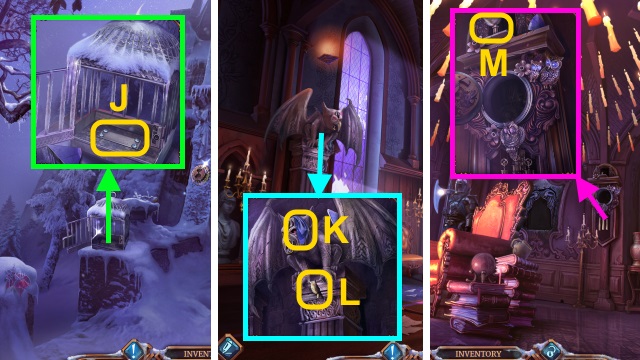
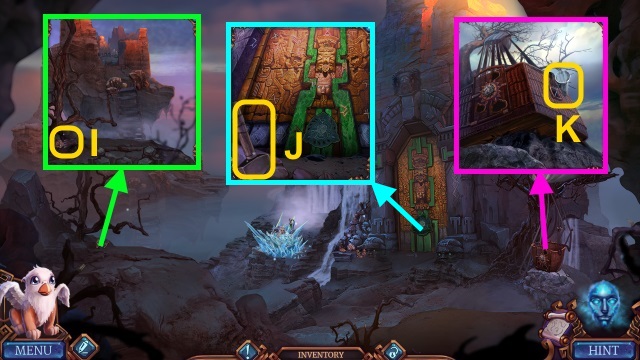
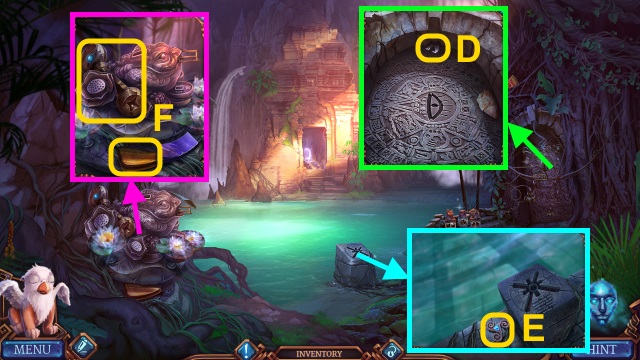
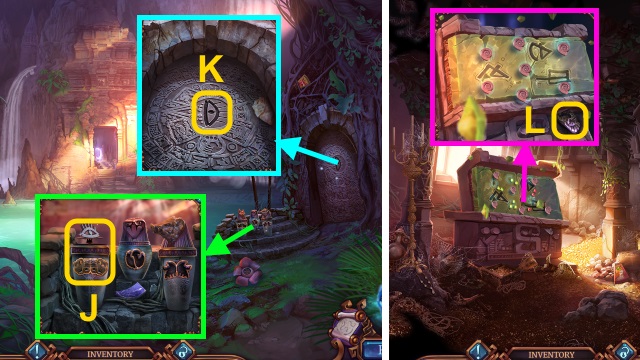
- Use the SHOVEL; examine the lock for a mini-game (J).
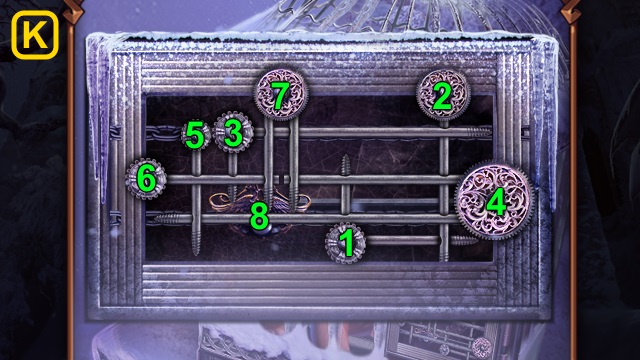
- Solution (K).
- Take the Griffin and STRANGE DECORATION (2/3).
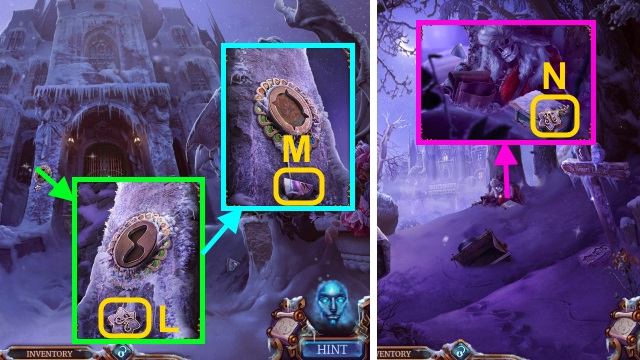
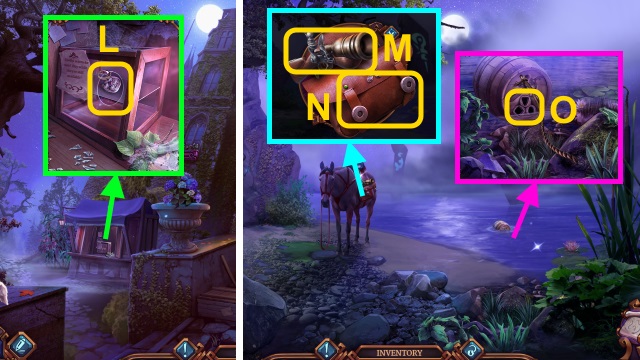
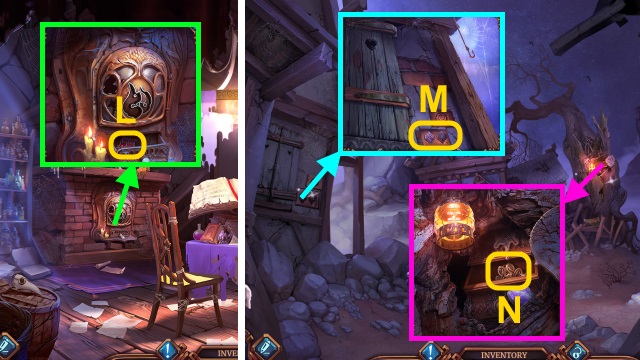
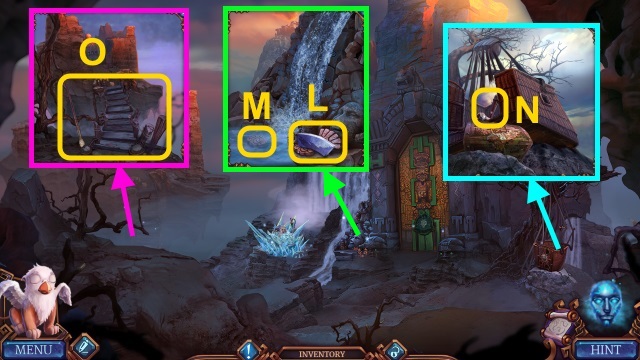
- Take the ROAD SIGN INLAY (L); scroll right.
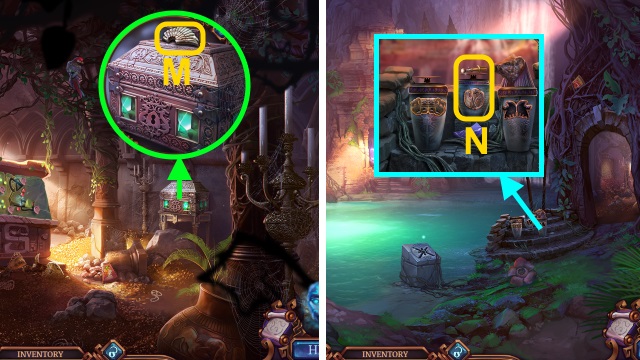
- Take the PICTURE FRAGMENT (M).
- Walk down.
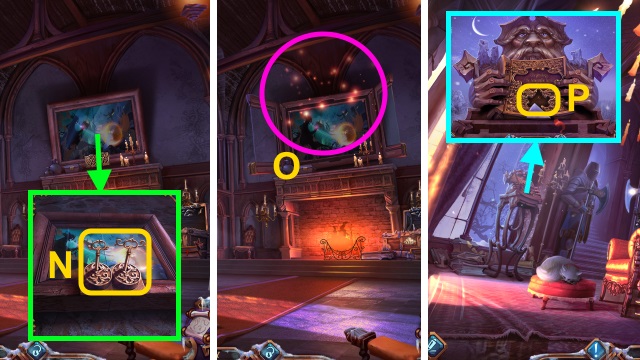
- Use the SHOVEL; take the ROAD SIGN INLAY and STATUE DECORATION (N).
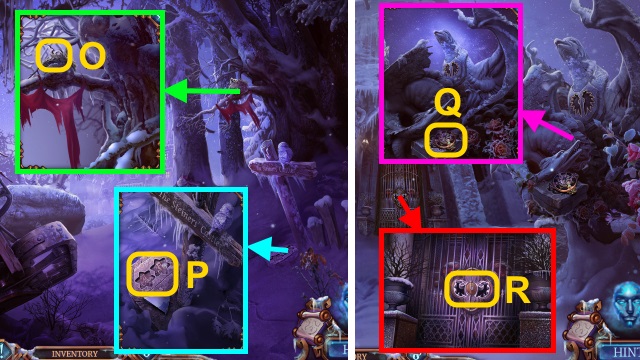
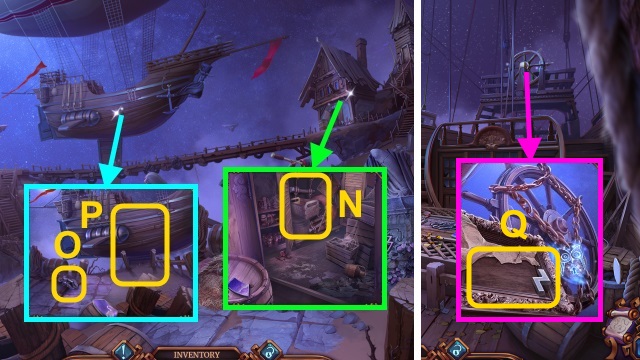
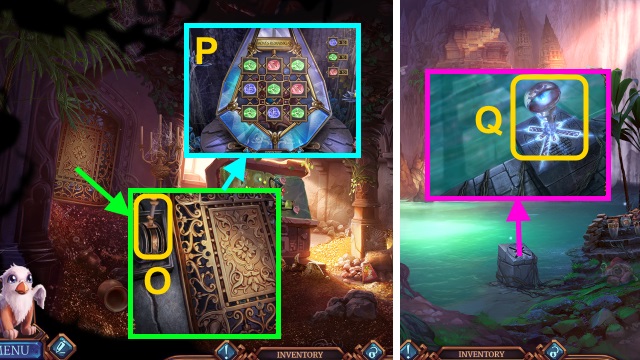
- Use the Griffin (O); receive the STRANGE DECORATION.
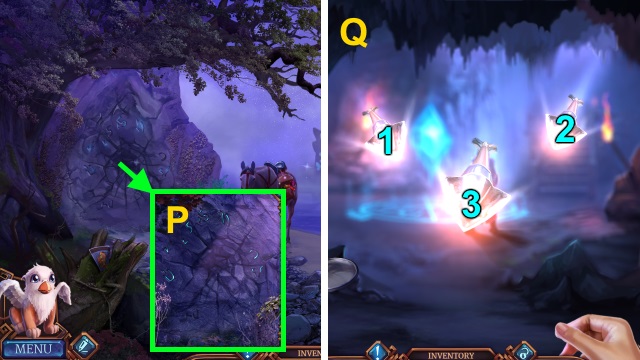
- Place the 2 ROAD SIGN INLAYS (P); take the GATE PART and LOCKPICK.
- Walk forward.
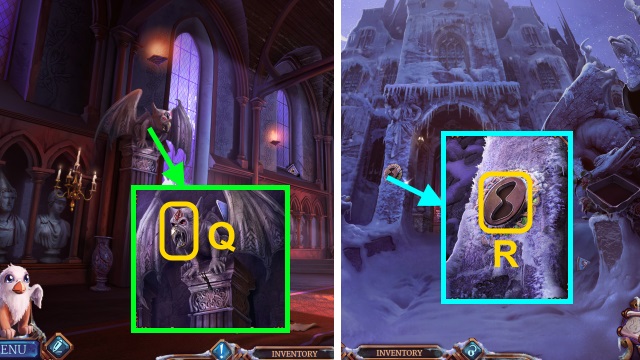
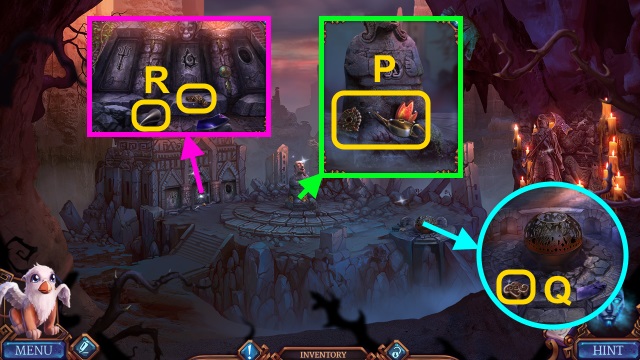
- Take the MAGIC AMULET (Q); place the STRANGE DECORATION. Take the MAGIC LOCK PIECE and GATE PART.
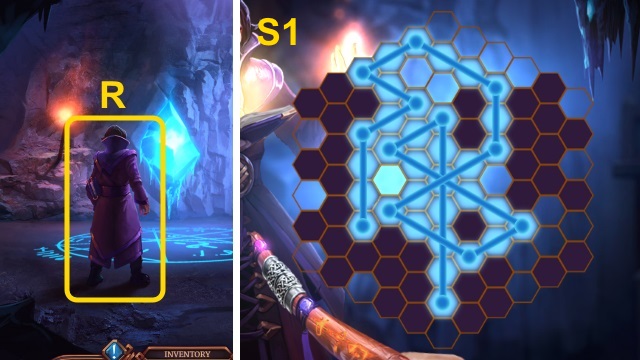
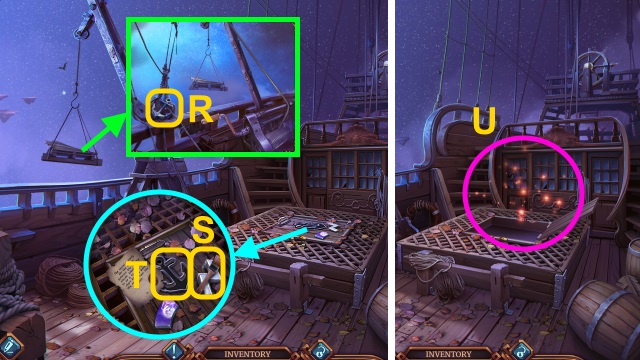
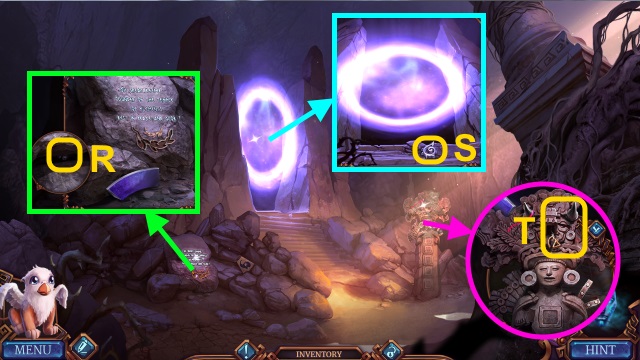
- Place the 2 GATE PARTS for a mini-game (R).
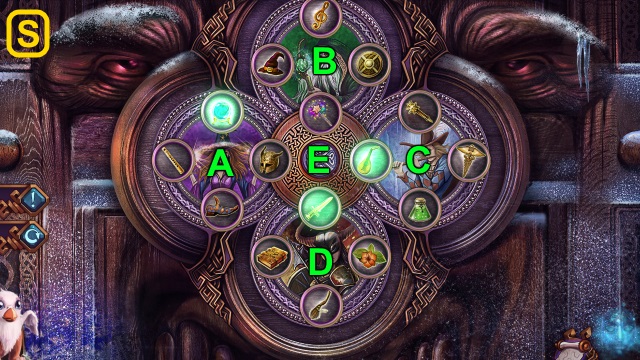
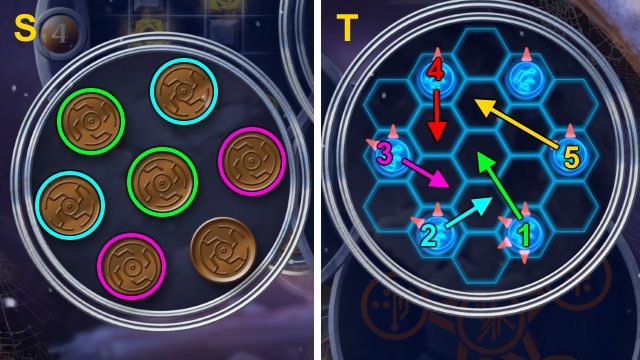
- Solution (S): C-D-Ex3-Ax2-B-D-E.
- A-E-C-D-Ex3-Bx2-Ex2-C-Bx3-E.
- Walk forward.
- Examine the scene.
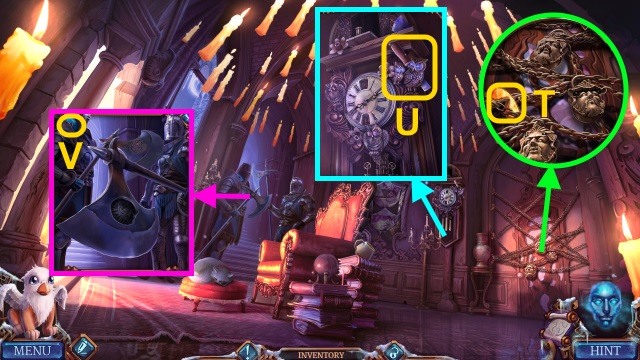
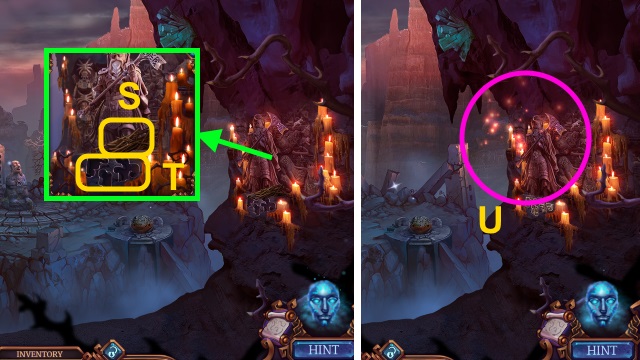
- Take the FIRE SYMBOL (T).
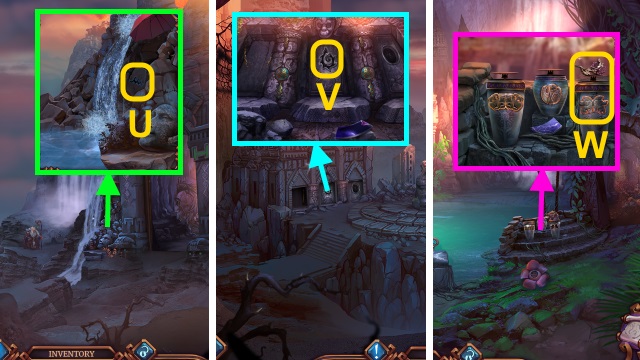
- Take the CHISEL (U).
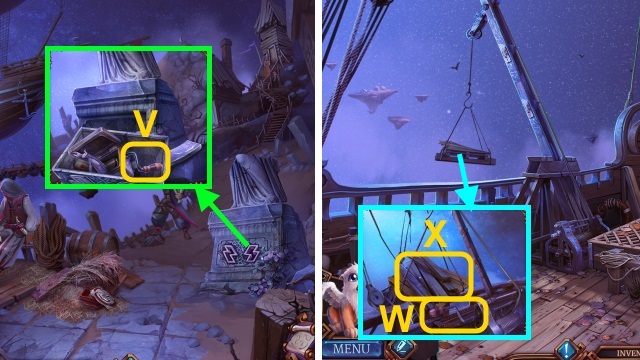
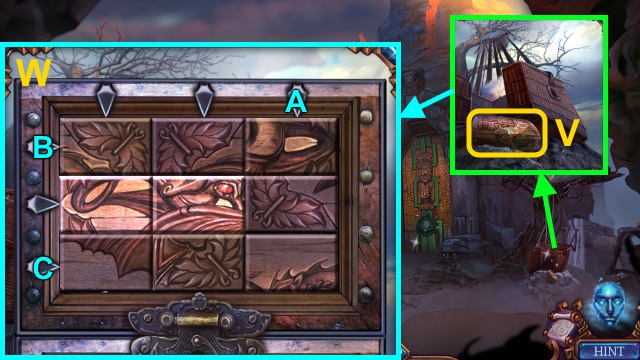
- Take the WATER SYMBOL (V).
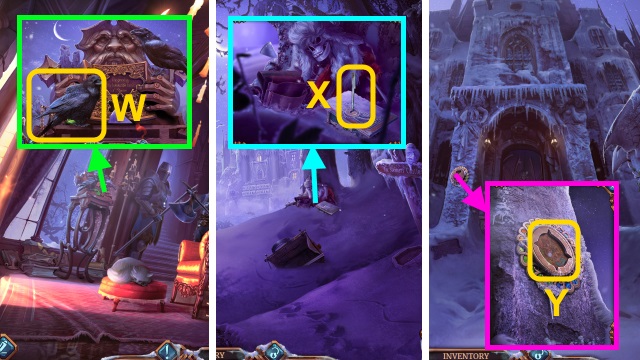
- Use the Griffin (W); take the LOCKET and AIR SYMBOL.
- Combine the MAGIC AMULET, FIRE SYMBOL, WATER SYMBOL, and AIR SYMBOL; take the ELEMENT AMULET.
- Walk down twice.
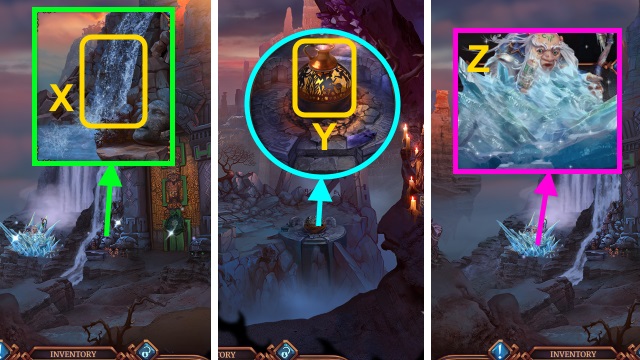
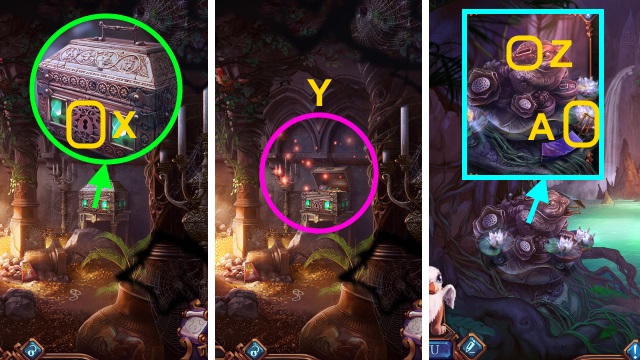
- Use the CHISEL and LOCKPICK (X); take the STATUE DECORATION.
- Walk forward.
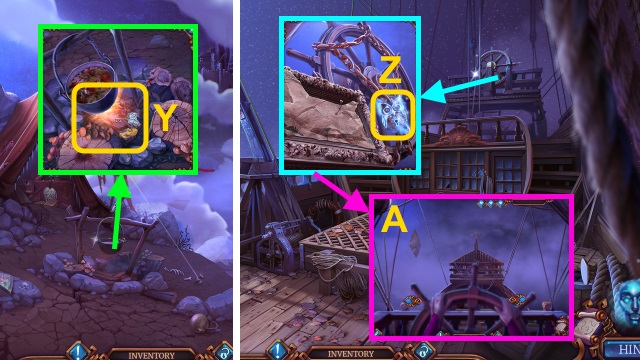
- Place the ELEMENT AMULET (Y). Take the CLOUD AMULET and MAGIC LOCK PIECE.
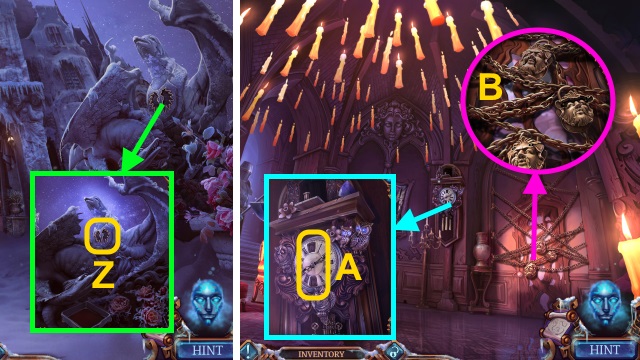
- Place the 2 STATUE DECORATIONS (Z); take the CLOCK NUMBER.
- Walk forward.
- Place the 2 CLOCK NUMBERS (A); take the MAGIC LOCK PIECE.
- Place the 3 MAGIC LOCK PIECES (B).
- Play the HOP; receive the GUARD AMULET (C).
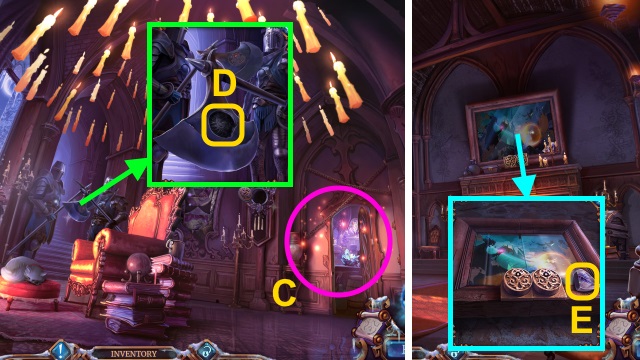
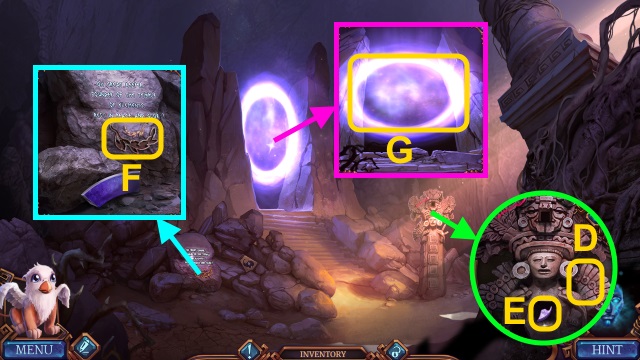
- Place the GUARD AMULET (D).
- Walk left.
- Receive GRANNY'S SYMBOL.
- Take the PICTURE FRAGMENT (E).
- Walk down.
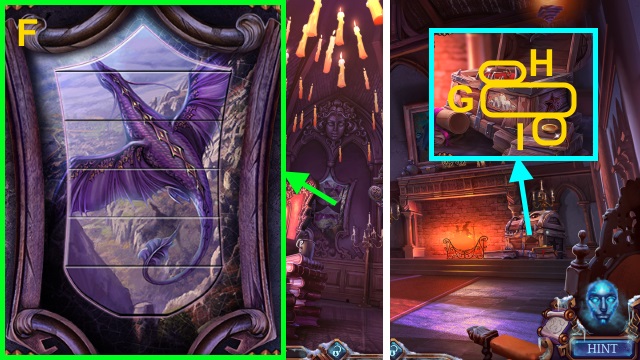
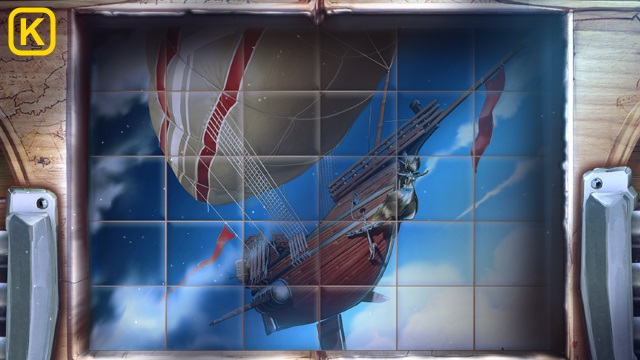
- Place the 2 PICTURE FRAGMENTS for a mini-game; solution (F).
- Take the STAR AMULET.
- Walk left.
- Place the CLOUD AMULET and STAR AMULET (G); take the PAINTING KEY (H) and COIN (I).
- Walk down twice.
- Use the COIN (J); take the TONGS.
- Walk forward, then left.
- Take the CLOTH (K). Use the TONGS (L); receive the BIRD.
- Walk down.
- Place the BIRD (M); receive the PAINTING KEY.
- Walk left.
- Use the 2 PAINTING KEYS (N).
- Play the HOP; receive the BOOK AMULET (O).
- Walk down.
- Place the BOOK AMULET (P); take the GARGOYLE EMBLEM.
- Walk left.
- Place the GARGOYLE EMBLEM; take the HOURGLASS AMULET (Q).
- Walk down twice.
- Place the HOURGLASS AMULET for a mini-game (R).
- Solution (S-T).
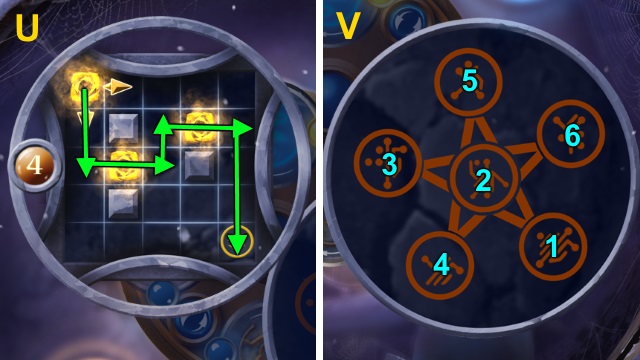
- Solution (U-V).
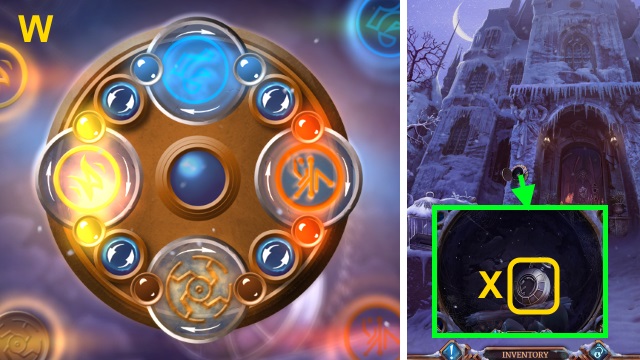
- Solution (W).
- Place GRANNY'S SYMBOL (X).
Chapter 2: Tim
- Examine the scene.
- Use the CLOTH; take the METAL AMULET (Y).
- Take the METAL AMULET (Z).
- Take the DAMAGED SHEARS (A). Use the Griffin; place the 2 METAL AMULETS (B). Take the KIOSK KEY, PUMPKIN AMULET, and TRIANGLE SHAPE.
- Use the KIOSK KEY; take the PART OF SHEARS (C).
- Place the PUMPKIN AMULET (D); use the TONGS.
- Play the HOP; receive the WHETSTONE (E).
- Combine the DAMAGED SHEARS, PART OF SHEARS, and WHETSTONE; take the SHARP SHEARS.
- Use the SHARP SHEARS (F).
- Walk left.
- Play the mini-game; solution (G-H).
- Take the DIAMOND RING (I).
- Take the SADDLEBAG LATCH and METAL SUN AMULET (J).
- Walk down.
- Place the METAL SUN AMULET (K); take the CIRCLE SHAPE.
- Use the DIAMOND RING; take the SADDLEBAG LATCH (L).
- Walk left.
- Take the GUN (M); place the 2 SADDLEBAG LATCHES (N). Move the items; take the SQUARE SHAPE.
- Use the Griffin; place the SQUARE SHAPE, CIRCLE SHAPE, and TRIANGLE SHAPE (O). Take the SWORD and BULLET.
- Combine the GUN and BULLET; receive the LOADED GUN.
- Use the LOADED GUN (P).
- Walk left.
- Use the SWORD for a mini-game; solution (Q).
- Talk to Tim for a mini-game (R).
- Solution (S1).
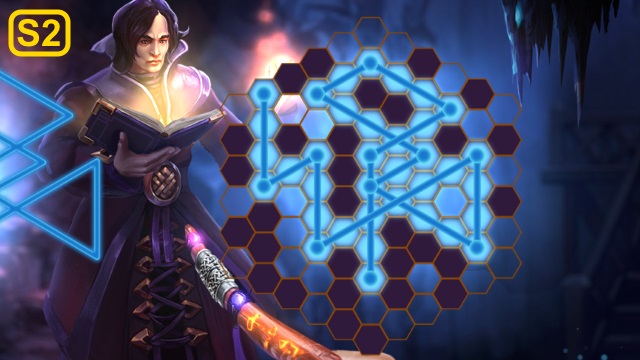

- Solution (S2-T2).
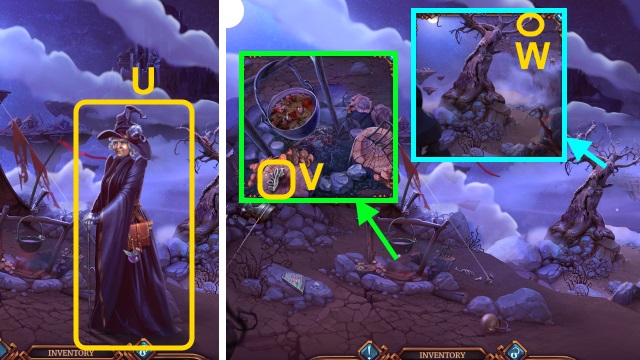
- Talk to your grandmother (U).
- Take the TREE PIECE (V).
- Use the Griffin (W); receive the TREE PIECE.
- Use the SHARP SHEARS; take the GEAR and CARROT (X).
- Take the CAPTAIN'S AMULET and SKY EMBLEM (Y). Give the CARROT (Z); take the TREE PIECE.
- Place the 3 TREE PIECES (A).
- Play the HOP; receive the AXE (B).
- Combine the AXE and WHETSTONE; take the AXE.
- Use the AXE (C).
- Walk right.
- Examine the scene.
- Talk to the man (D); give the DIAMOND RING. Receive the MAP.
- Take the CHEST SIGIL (E).
- Take the RESIN-COATED KEY and ROPE (F).
- Walk down.

- Place the CHEST SIGIL (G); take the SKY EMBLEM (H).
- Place the ROPE; use the Griffin (I). Receive the PITCHFORK HEAD and SKY EMBLEM.
- Walk right.
- Use the CLOTH; place the 3 SKY EMBLEMS for a mini-game (J).
- Solution (K).
- Take the STICK and AIRSHIP PORTRAIT.
- Combine the STICK and PITCHFORK HEAD; take the PITCHFORK.
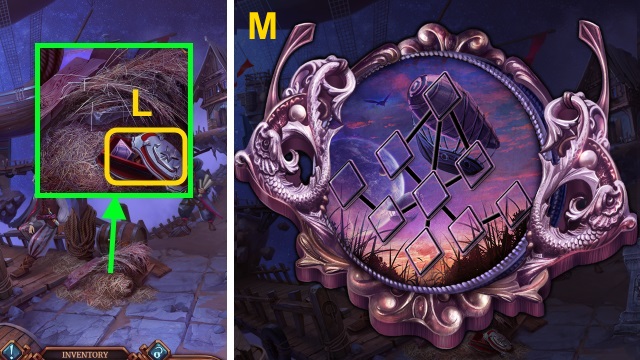
- Use the PITCHFORK. Place the CAPTAIN'S AMULET; take the AIRSHIP PORTRAIT PIECE (L).
- Combine the AIRSHIP PORTRAIT and AIRSHIP PORTRAIT PIECE for a mini-game; solution (M).
- Take the AIRSHIP EMBLEM.
- Place the AIRSHIP EMBLEM; take the ROPE LADDER (N).
- Take the CHERUB FIGURINE (O); place the ROPE LADDER (P).
- Go forward.
- Examine the scene.
- Take the LIGHTNING BOLT; place the MAP (Q).
- Take the ANCHOR EMBLEM (R).
- Take the BRUSH and LIGHTNING BOLT (S); place the ANCHOR EMBLEM (T).
- Play the HOP; receive the BELLOWS (U).
- Walk down.
- Place the 2 LIGHTNING BOLTS; take the HOIST HANDLE (V).
- Go forward.
- Remove the handle; place the HOIST HANDLE (W). Take the BOARDS (X).
- Walk down twice.
- Place the BOARDS; use the BELLOWS. Place the RESIN-COATED KEY (Y); receive the AIRSHIP KEY.
- Walk right, then forward.
- Use the AIRSHIP KEY for a mini-game (Z).
- Solution (A): steer the ship to avoid the rocks.
Chapter 3: The Village
- Take the SECRET SYMBOL and DIAMOND AMULET (B).
- Take the CHERUB WING and LANTERN (C). Use the Griffin (D); receive the SCYTHE EMBLEM.
- Place the LANTERN; take the SCYTHE EMBLEM (E).
- Combine the SECRET SYMBOL and 2 SCYTHE EMBLEMS; take the DARK EMBLEM.
- Place the DARK EMBLEM (E); take the CHERUB WING.
- Place the CHERUB FIGURINE and 2 CHERUB WINGS (F).
- Play the HOP; receive the HOUSE KEY (G).
- Use the HOUSE KEY (H).
- Walk forward.
- Examine the scene.
- Take the DIAMOND AMULET (I).
- Take the GEAR (J).
- Take the FIRE EMBLEM and GREEN BUTTON (K).
- Open the drawer; take the RED BUTTON (L).
- Walk down.
- Place the 2 DIAMOND AMULETS (M); take the GEAR.
- Place the GREEN BUTTON and RED BUTTON; take the DRAWER SYMBOL (N).
- Walk forward.
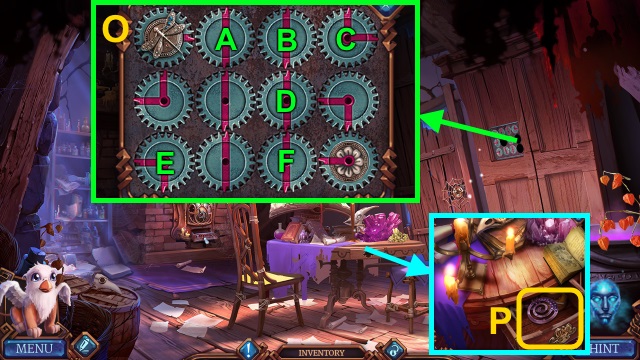
- Place the 3 GEARS for a mini-game.
- Solution (O): A-B-Cx2-D-E-F.
- Take the WEIGHTS (1/3) and MAGIC SCEPTER.
- Place the DRAWER SYMBOL. Arrange the pieces; take the SPIRAL SYMBOL (P).
- Walk down.
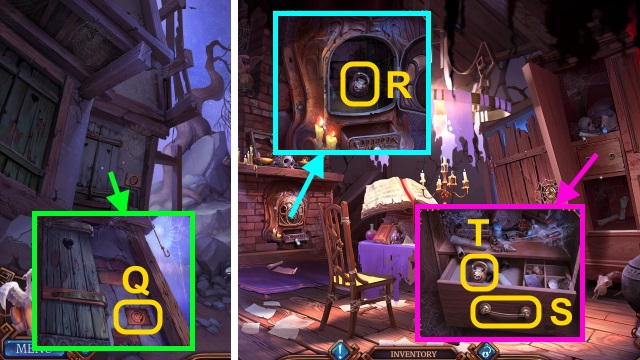
- Place the SPIRAL SYMBOL (Q); take the FIRE EMBLEM and DRAWER HANDLE.
- Walk forward.
- Place the 2 FIRE EMBLEMS; take the WEIGHTS (2/3) (R).
- Place the DRAWER HANDLE (S); take the WEIGHTS (T).
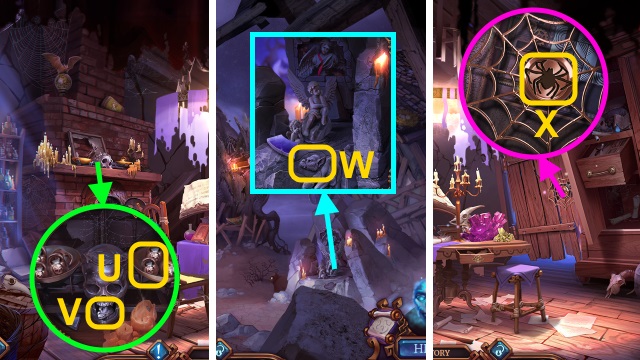
- Place the WEIGHTS (U); take the DEMON EMBLEM (V).
- Walk down.
- Place the DEMON EMBLEM (W); take the SPIDER AMULET.
- Walk forward.
- Place the SPIDER AMULET for a mini-game (X).
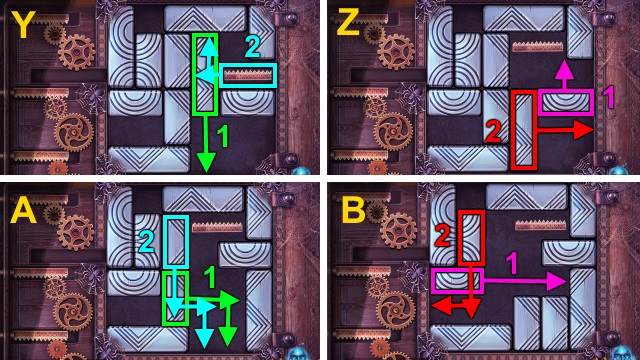
- Solution (Y-D).
- Walk forward.
- Examine the scene.
- Use the MAGIC SCEPTER (E); play the HOP.
- Talk to you grandmother (F); use the LOCKET for a mini-game.
- Solution is random (G).
- Take the STRANGE STONE SYMBOL and SPEAR (H).
- Take the CLOUD AMULETS (1/3) and GLOVE (I).
- Take the HAMMER (J).
- Take the FISHING NET (K).
- Take the WING and CLOUD AMULETS (2/3) (L). Use the FISHING NET (M); receive the CLOUD AMULETS.
- Place the CLOUD AMULETS; take the SPYGLASS and STAKE (N).
- Use the Griffin. Place the STAKE and SPEAR; use the HAMMER (O).
- Walk left.
- Take the BROKEN KEEPER'S EMBLEM, OILCAN, and FIRE SYMBOL (P).
- Take the STRANGE STONE SYMBOL (Q).
- Take the STRANGE STONE SYMBOL and HORN (R).
- Take the STICKS (S); place the 3 STRANGE STONE SYMBOLS (T).
- Play the HOP; receive the PITCHER (U).
- Walk down.
- Use the OILCAN (V); examine the chest for a mini-game.
- Solution (W): A-Bx2-C.
- Take the UMBRELLA and SCREWDRIVER.
- Use the PITCHER (X); receive the PITCHER OF WATER.
- Combine the SPYGLASS and SCREWDRIVER; take the LENS.
- Walk left.
- Use the STICKS, LENS, PITCHER OF WATER and GLOVE (Y); receive the PITCHER OF HOT WATER.
- Walk down.
- Pour the PITCHER OF HOT WATER (Z); receive the SCROLL and TRIDENT INLAY.
- Walk left.
- Place the TRIDENT INLAY (A); take the SCROLL KEY.
- Combine the SCROLL and SCROLL KEY; take the KEEPER'S EMBLEM PART.
- Combine the BROKEN KEEPER'S EMBLEM and KEEPER'S EMBLEM PART; take the KEEPER'S MAGIC EMBLEM.
- Walk down.
- Place the KEEPER'S MAGIC EMBLEM (B).
- Play the HOP (C).
- Walk forward.
Chapter 4: The Temple
- Remove the vines. Use the Griffin (D); receive the CAT EMBLEM.
- Take the WHIRLPOOL SYMBOL (E).
- Take the EARTH SYMBOL and STAFF HANDLE (F).
- Take the RUNE (G).
- Walk down.
- Place the UMBRELLA and WHIRLPOOL SYMBOL; take the CAT AMULET (H).
- Walk left.
- Place the CAT EMBLEM (I); take the CAT AMULET.
- Walk down, then right.
- Place the 2 CAT AMULETS; take the TREASURY AMULET (J).
- Place the TREASURY AMULET (K).
- Walk right.
- Take the EAGLE AMULET (L).
- Take the EAGLE AMULET (M).
- Walk down.
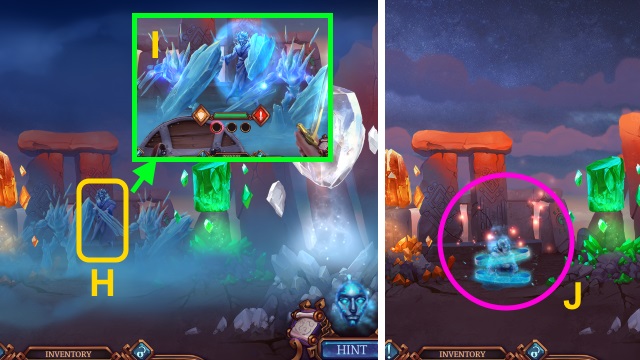
- Place the 2 EAGLE AMULETS; take the LEVER (N).
- Walk right.
- Place the LEVER; pull it for a mini-game (O).
- Solution is random (P).
- Take the STAFF HEAD.
- Combine the STAFF HANDLE and STAFF HEAD; take the KEEPER'S STAFF.
- Walk down.
- Place the KEEPER'S STAFF (Q).
- Walk forward.
- Examine the scene.
- Use the Griffin; receive the WAVE SYMBOL (R).
- Take the SPIRAL INLAY (S).
- Use the BRUSH. Place the HORN; take the RUNE (T).
- Walk down twice.
- Place the WAVE SYMBOL (U); take the BOAR AMULET.
- Walk left.
- Place the SPIRAL INLAY (V); take the BOAR AMULET.
- Walk down, then right.
- Place the 2 BOAR AMULETS; take the LAUREL INLAY and CHEST KEY (W).
- Walk right.
- Use the CHEST KEY (X).
- Play the HOP; receive the COIN WITH HOLE (Y).
- Walk down.
- Use the COIN WITH HOLE (Z); take the RUNE (A).
- Walk right.

- Place the 3 RUNES for a mini-game.
- Solution (B): B-H-G-E-A-G-A-B.
- Take the OVAL INLAY and INCOMPLETE ELEMENTAL AMULET.
- Walk down twice, then left.
- Place the OVAL INLAY (C); take the WING.
- Go to the Sanctuary.
- Place the 2 WINGS (D); take the WATER SYMBOL (E).
- Place the LAUREL INLAY (F); take the SWORD AND SHIELD and AIR SYMBOL.
- Combine the INCOMPLETE ELEMENTAL AMULET, AIR SYMBOL, FIRE SYMBOL, EARTH SYMBOL, and WATER SYMBOL; take the MAGIC ELEMENTAL AMULET.
- Use the MAGIC ELEMENTAL AMULET (G).
- Examine the scene.
- Use the SWORD AND SHIELD for a mini-game (H).
- Solution is random (I).
- Use the MAGIC ELEMENTAL AMULET; play the HOP (J).
- Congratulations! You have completed Midnight Calling: Valeria.
Created at: 2017-02-17