
Walkthrough Menu
- General Tips
- Chapter 1: The Town
- Chapter 2: The Wise Dragon
- Chapter 3: The Tree of Wisdom
- Chapter 4: The Dark Order
General Tips
- This is the official guide for Midnight Calling: Wise Dragon.
- This guide won't tell you when to zoom into a location; the screenshots show each zoom scene.
- Hidden-object puzzles are referred to as HOPs. Only the locations of the HOPs will be shown.
- Use the Map to fast travel to a location.
Chapter 1: The Town
- Examine scene.
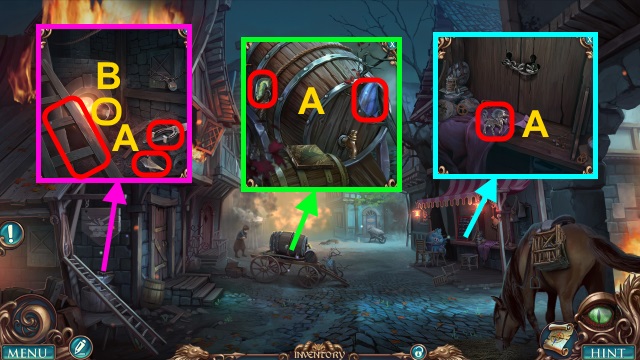
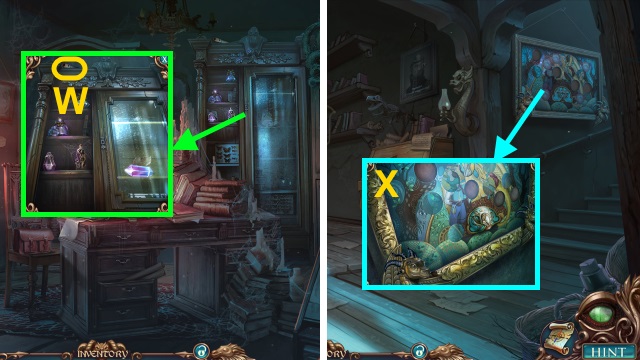
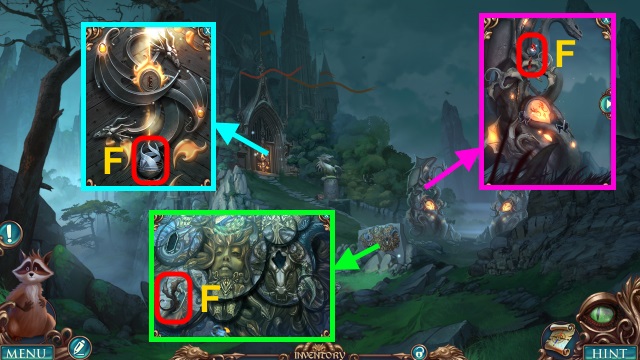
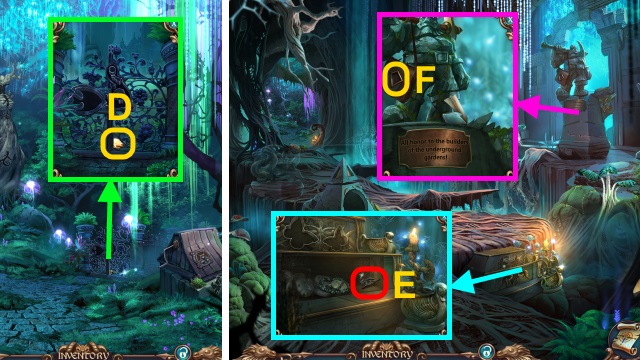
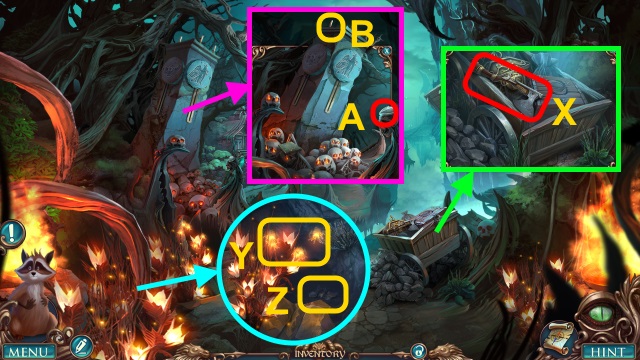
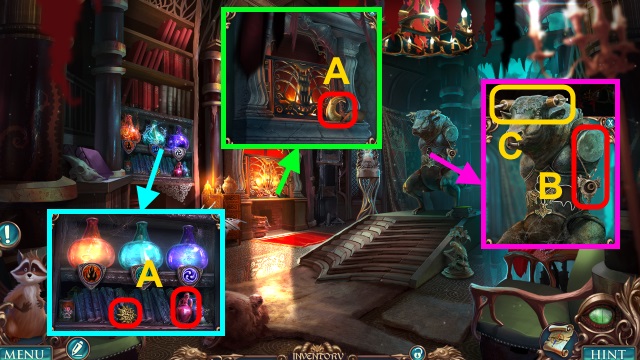
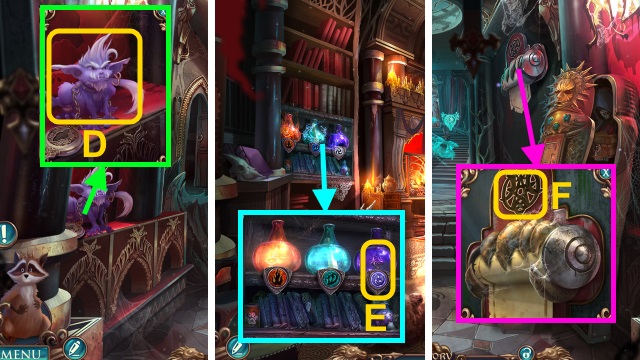
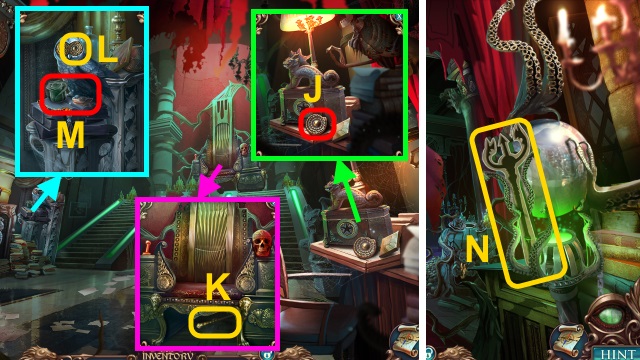
- Take HANDKERCHIEF, ANVIL SIGN (1/2), UNICORN SYMBOL, HORSESHOE, GLASS SHARD, and LADDER (A). Move cart.
- Use HANDKERCHIEF (B); receive BUCKET.
- Use GLASS SHARD (C). Play HOP; receive COMB.
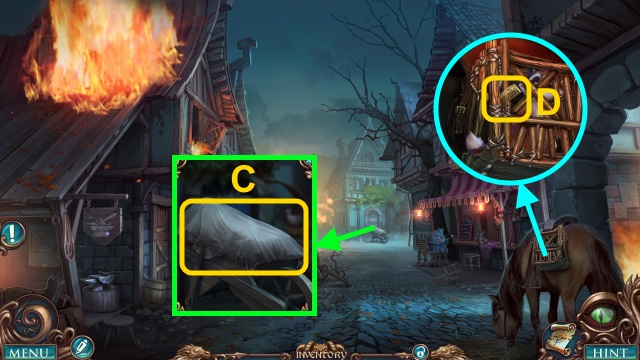
- Examine; use COMB (D). Take Raccoon.

- Use Raccoon (E) on bird (F). Take KNOB and ANVIL SIGN (2/2).
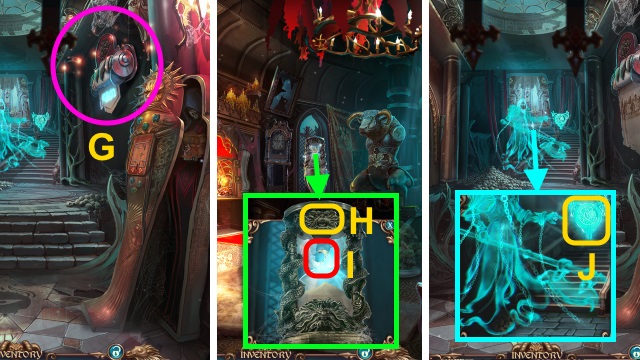
- Use BUCKET and KNOB (G). Take BUCKET WITH WATER.
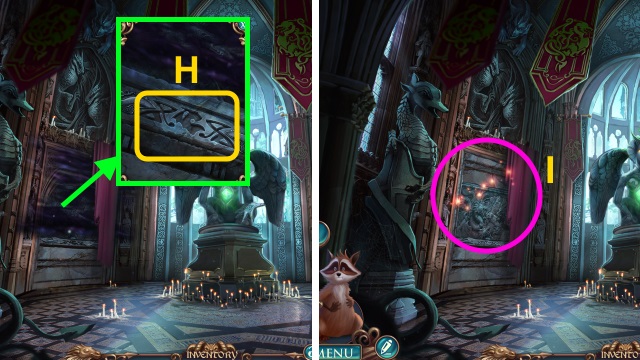
- Place LADDER (H).
- Use BUCKET WITH WATER (I).
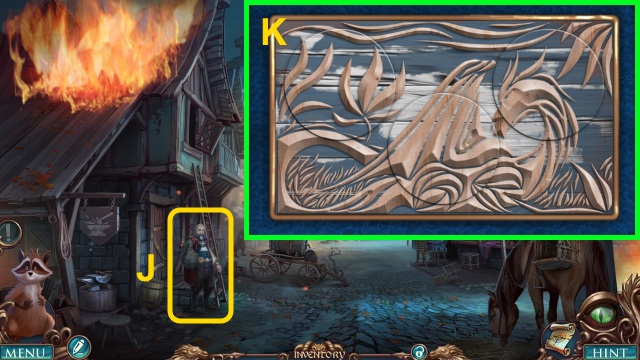
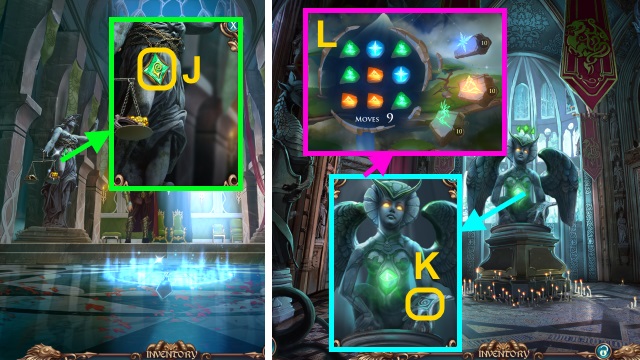
- Talk (J); receive SMALL BOX and WISE DRAGON AMULET.
- ANVIL SIGN on SMALL BOX; solution (K).
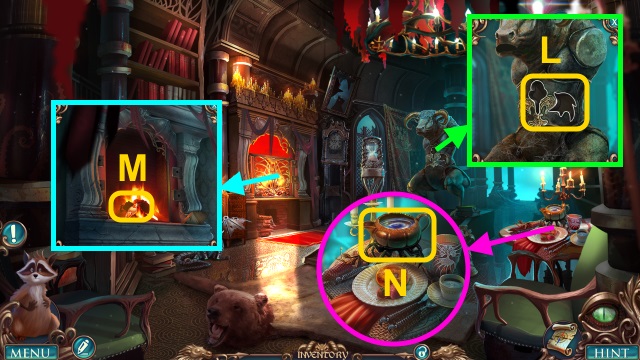
- Take PEGASUS SYMBOL.
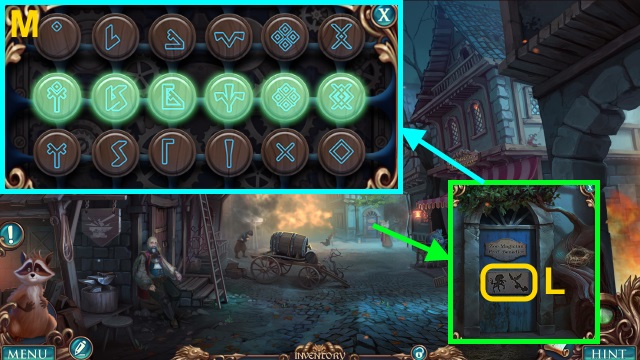
- Place UNICORN SYMBOL and PEGASUS SYMBOL (L).
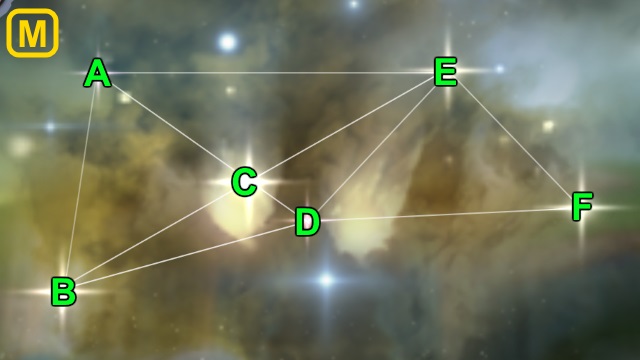
- Solution (M).
- Walk forward.
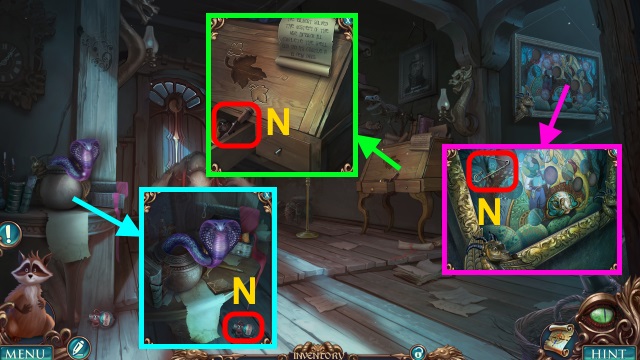
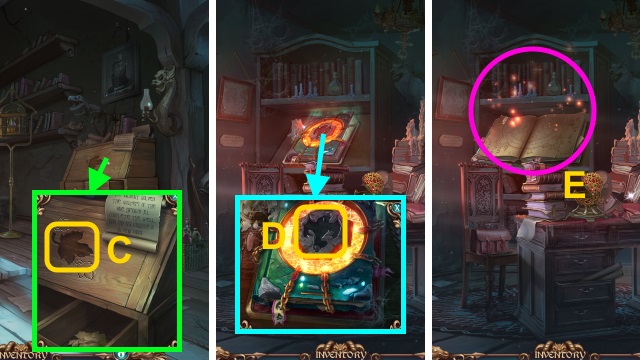
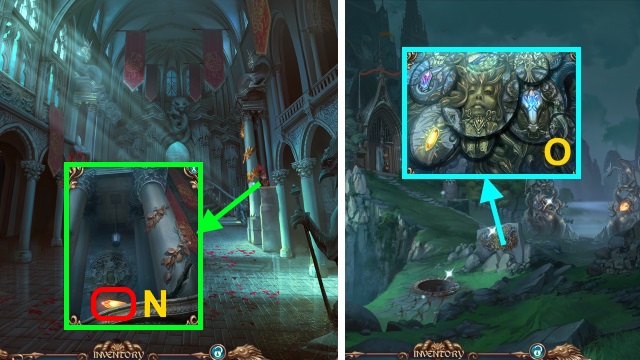
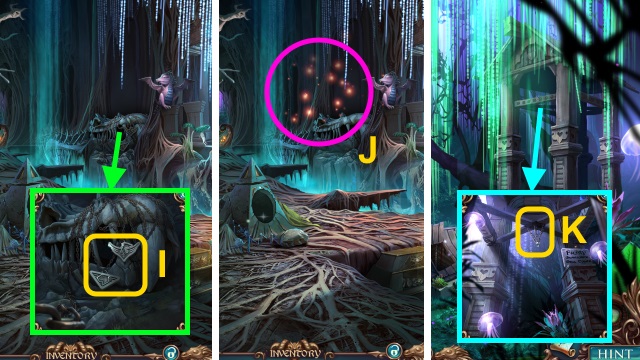
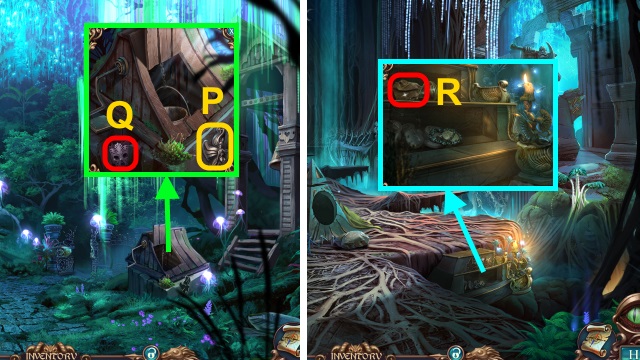
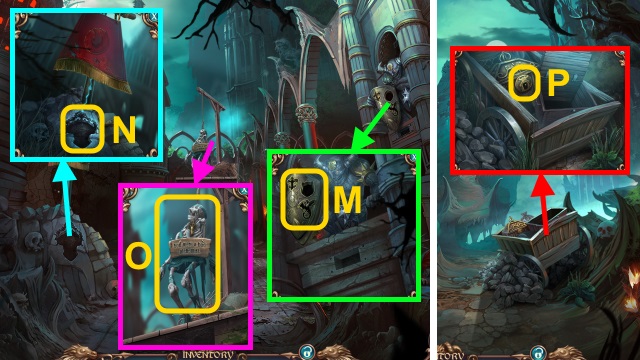
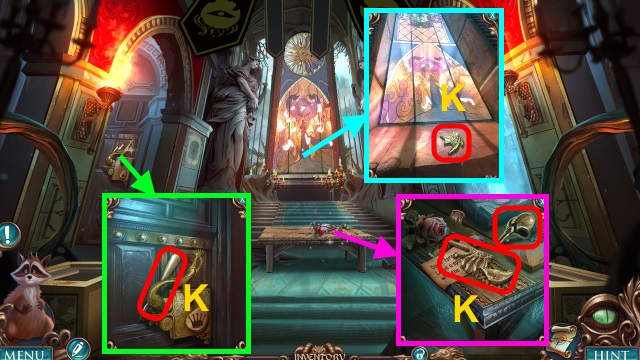
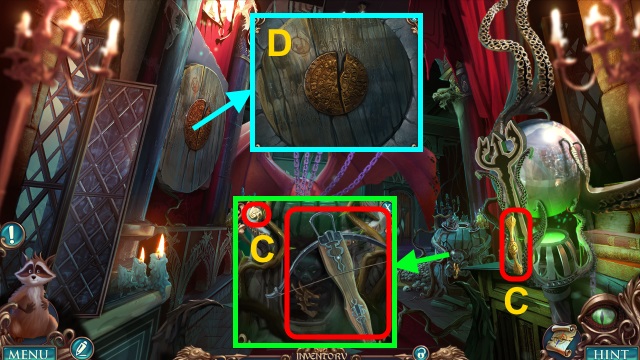
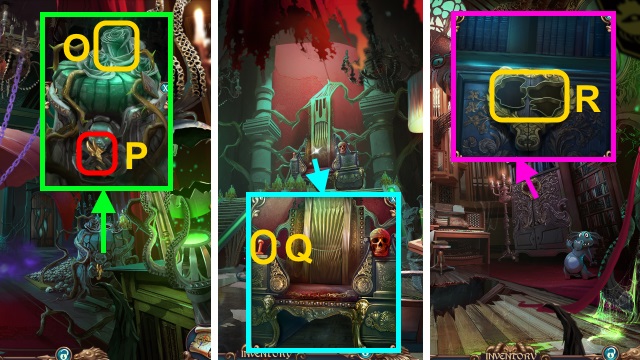
- Take CHISEL, PICTURE PIECE, ANTI-RUST, and HAIRPIN (N).
- Walk down.

- Use CHISEL (O); open.
- Play HOP; receive MEAT PIE (P).
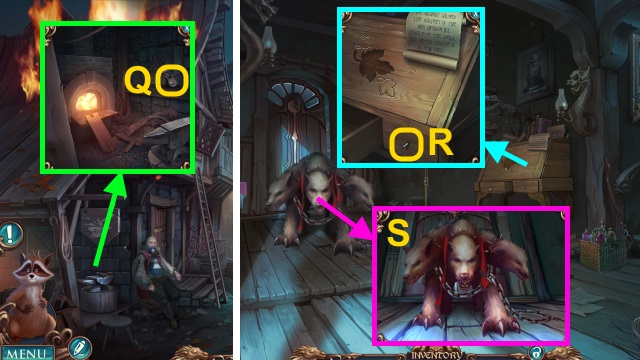
- Examine (Q); use ANTI-RUST and HAIRPIN. Take TONGS.
- Walk forward.
- Use TONGS (R); take BONE, PICTURE PIECE and SEDATIVE.
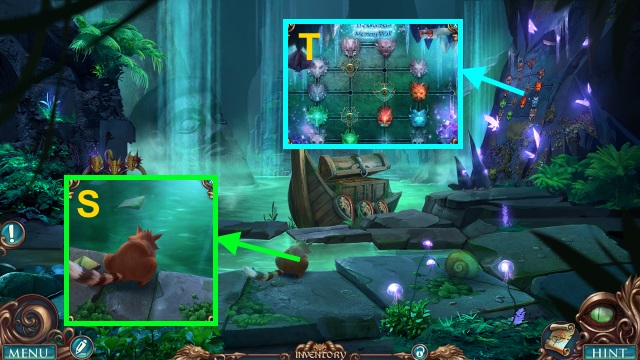
- SEDATIVE on MEAT PIE; take FOOD WITH SEDATIVE.
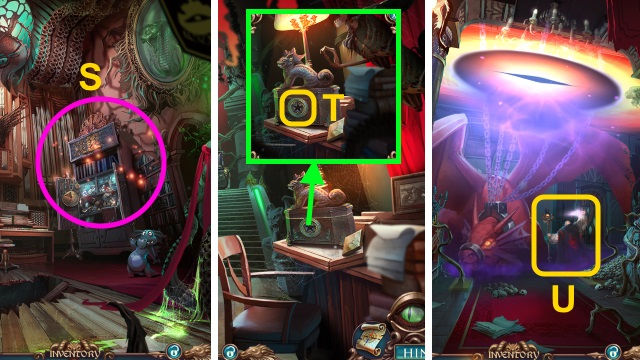
- Give FOOD WITH SEDATIVE (S).
- Walk forward.
- Examine scene.
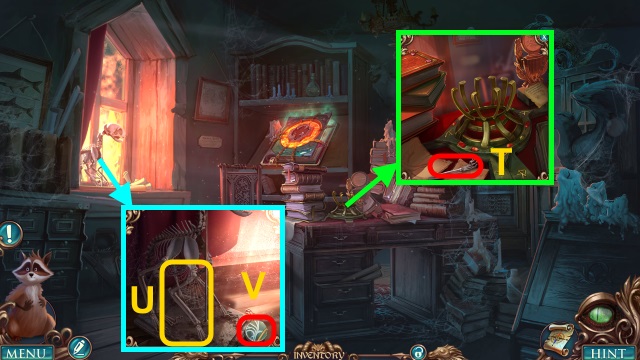
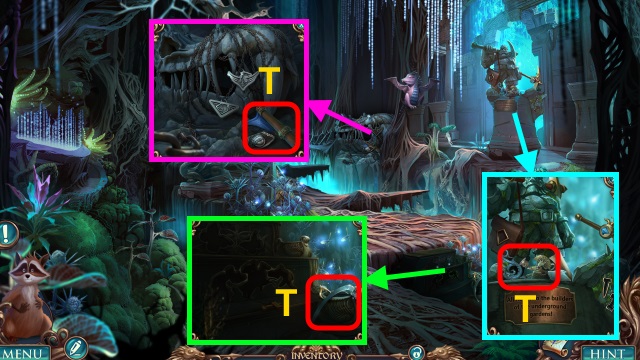
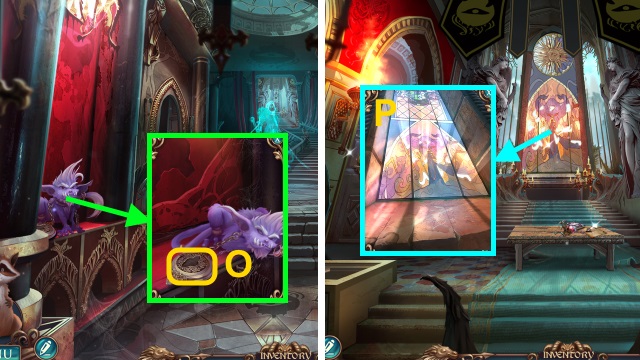
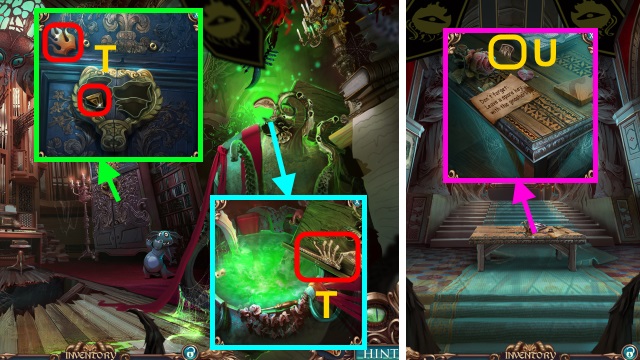
- Take BONE (T).
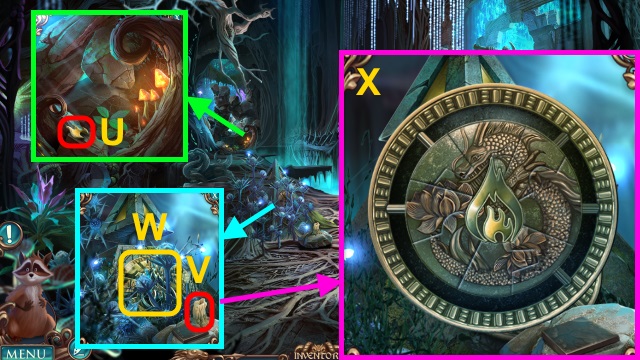
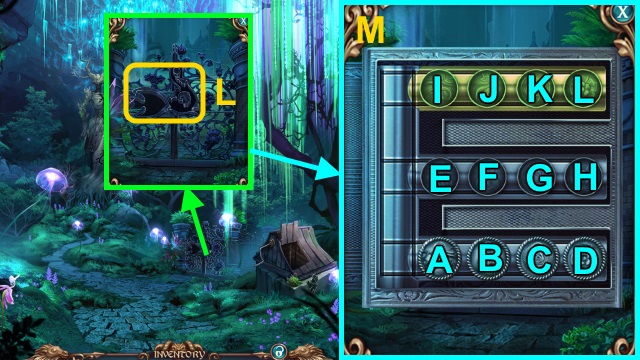
- Place 2 BONES (U); receive PICTURE PIECE. Take PICTURE PIECE (V).
- Use Raccoon; receive FLUTE (W).
- Walk down.
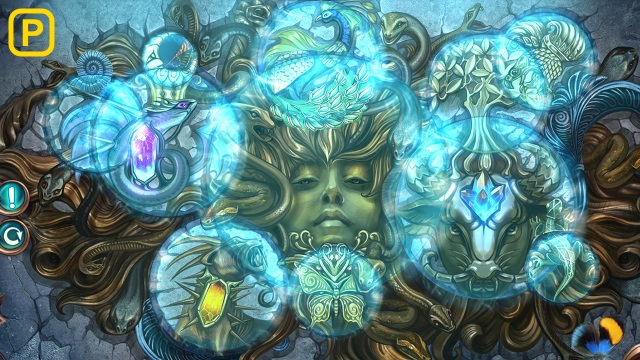
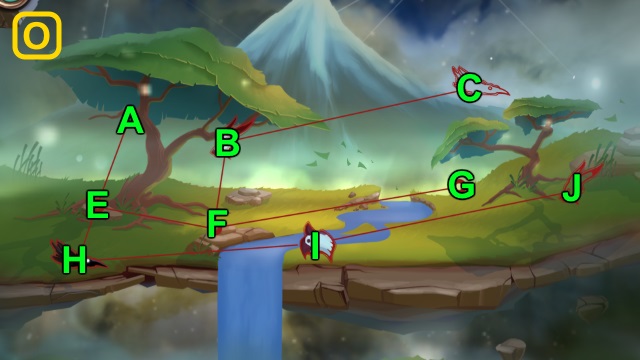
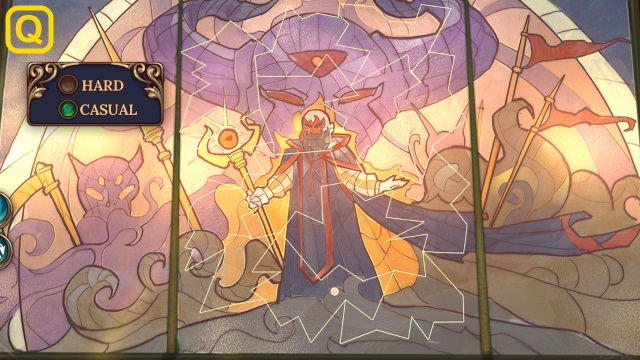
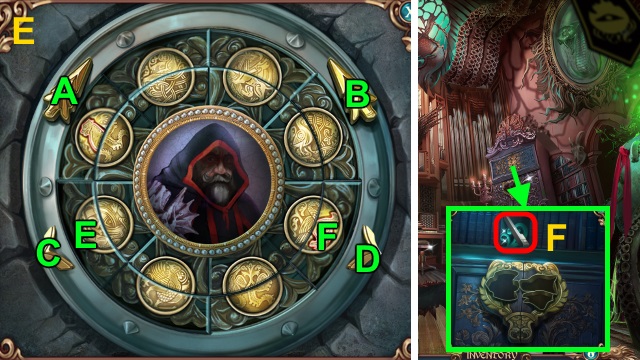
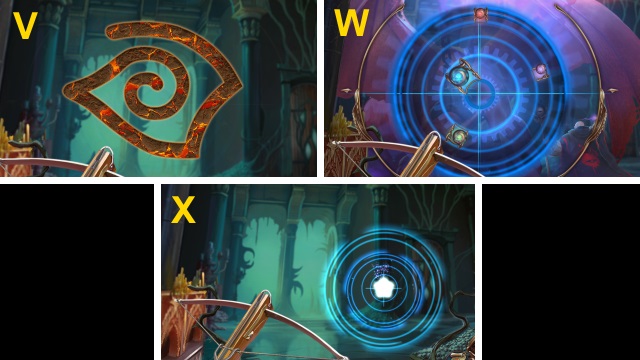
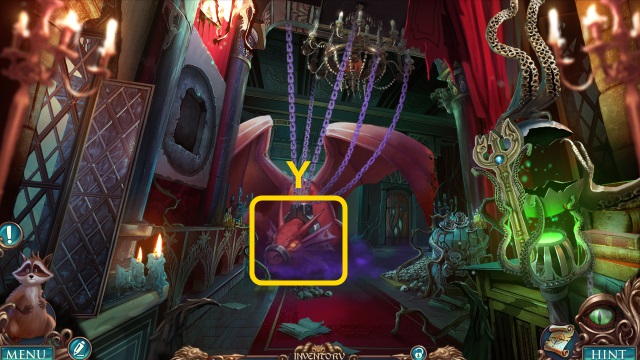
- Place 4 PICTURE PIECES (X).
- Solution (Y): (A-G)-(G-M)-(O)-(H-K)-(G-I)-(F-H)-(O).
- (B-G)-(D-H)-(O)-(C-G)-(O)-(G-N)-(O)-(G-L)-(O)-(E-G).
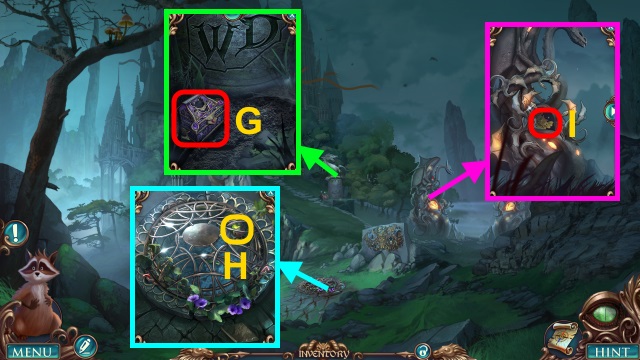
- Take SPHERE.
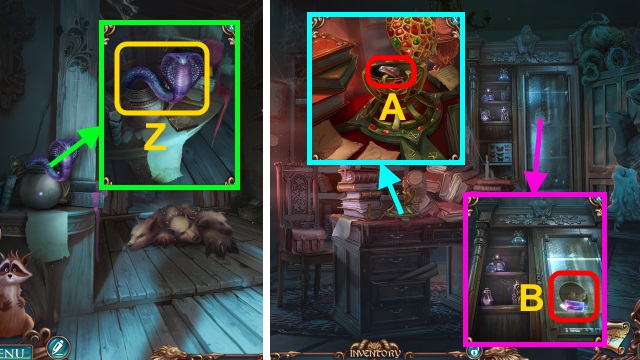
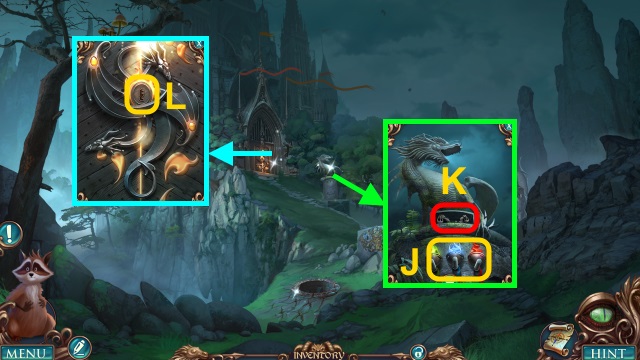
- Use FLUTE (Z); take DIAMOND RING and DRAGON WING.
- Walk forward.
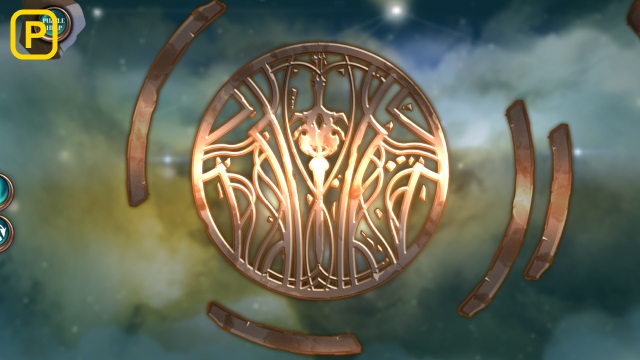
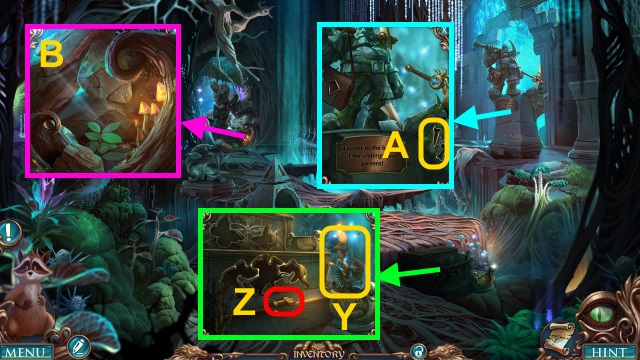
- Place SPHERE; open. Take DRAGON HEAD (A).
- Use DIAMOND RING; take CRYSTAL and WOODEN LEAF (B).
- Walk down.
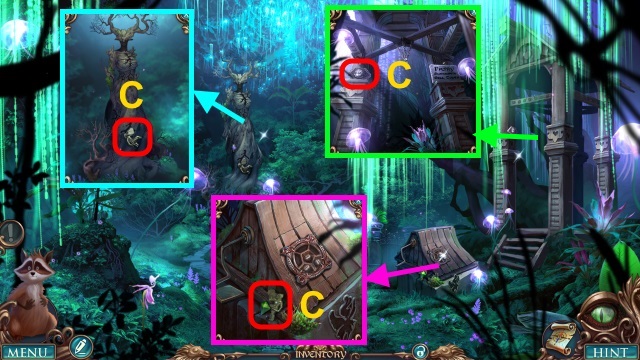
- Place WOODEN LEAF (C); take DRAGON WING.
- 2 DRAGON WINGS and DRAGON HEAD on WISE DRAGON AMULET; take DRAGON AMULET.
- Walk forward.
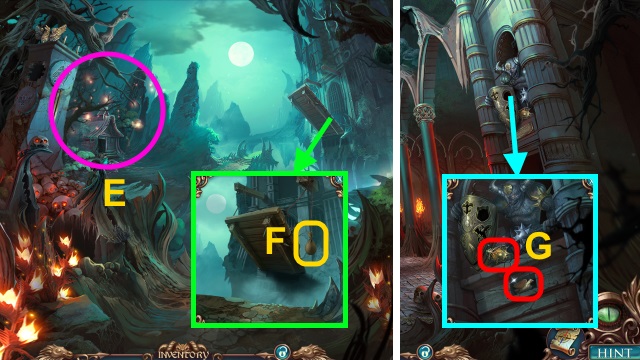
- Place DRAGON AMULET (D).
- Play HOP (E).
Chapter 2: The Wise Dragon
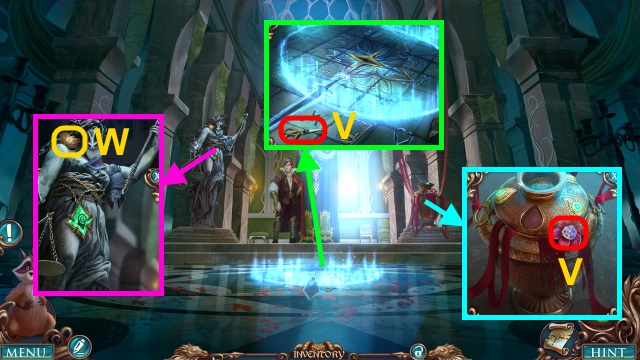
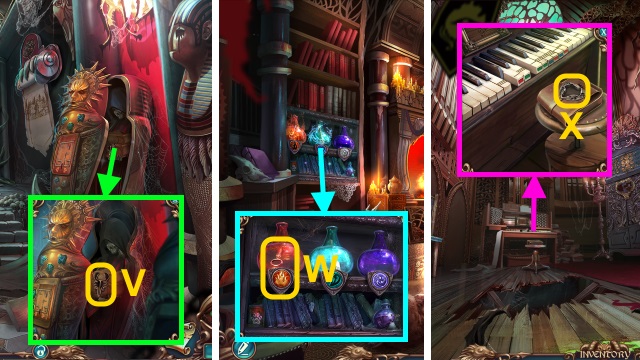
- Take STATUE PIECE (1/2), AIR SYMBOL, and FIRE SYMBOL (F).
- Scroll down; take CHEST (G). Use Raccoon; take STATUE PIECE (2/2).
- Use TONGS; take EARTH SYMBOL (H).
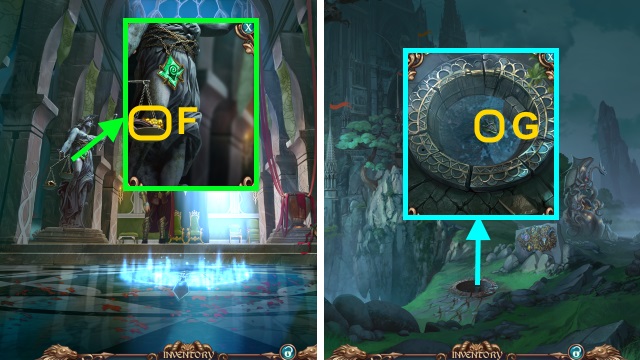
- Place STATUE PIECE; take OWL EMBLEM (I).
- Scroll up; place FIRE SYMBOL, EARTH SYMBOL, and AIR SYMBOL (J). Take JUSTICE EMBLEM (K).
- OWL EMBLEM and JUSTICE EMBLEM on CHEST; take GATE KEY.
- Use GATE KEY (L).
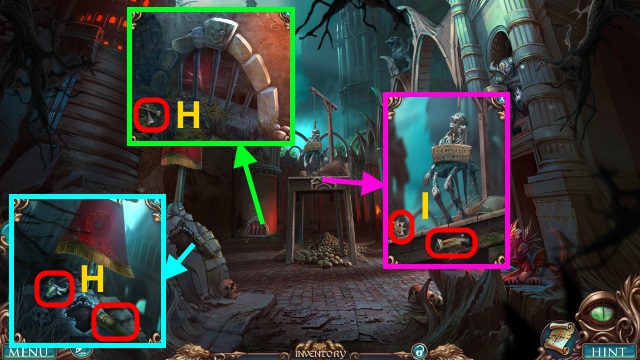
- Walk forward.
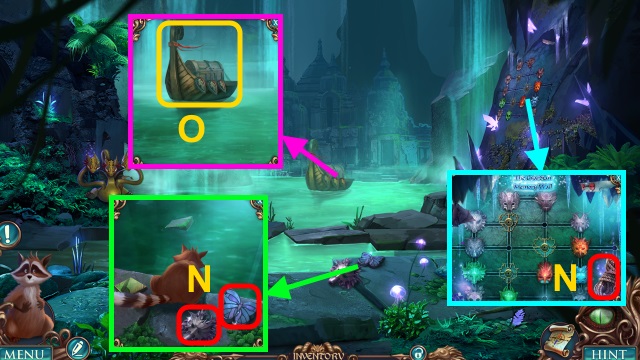
- Talk; receive CRYSTAL.
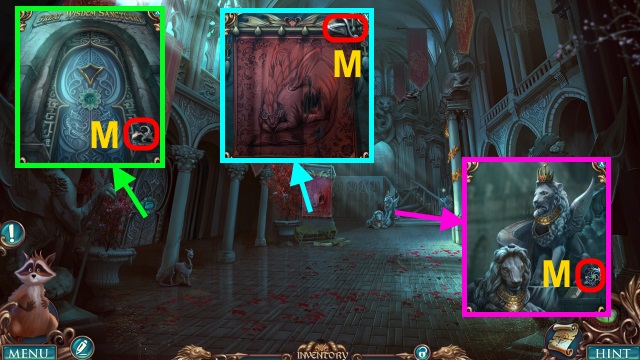
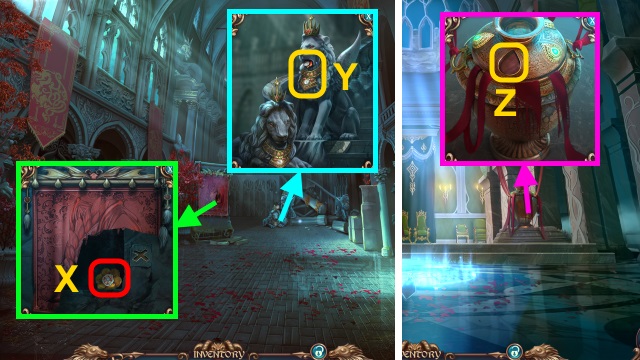
- Take STATUE PATTERN (1/2), CARVING SHAPE, and LOCKET (M).
- Take CRYSTAL (N).
- Walk down.
- Place 3 CRYSTALS (O).
- Solution (P).
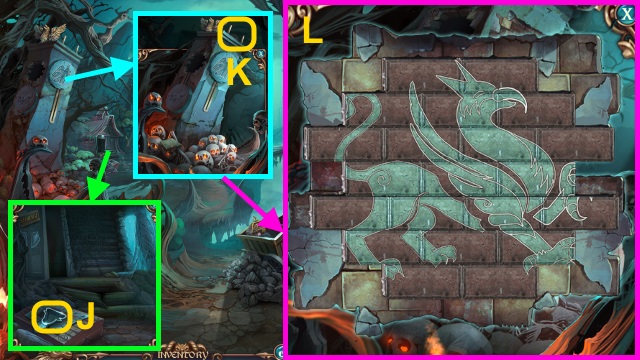
- Play HOP; take STATUE PATTERN (2/2) and CROWN.
- Scroll right. Place STATUE PATTERN; take STATUE INITIAL (Q).
- Walk forward.
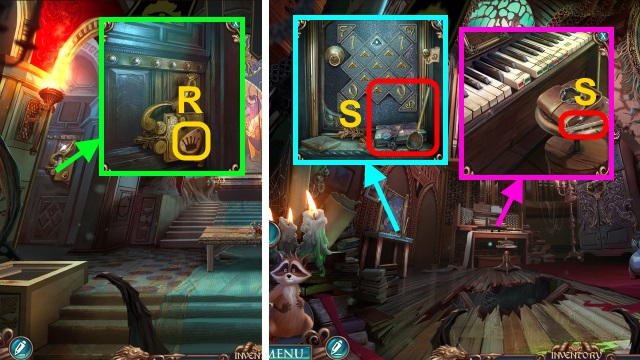
- Place CROWN (R); take STATUE INITIAL (S).
- Walk down.
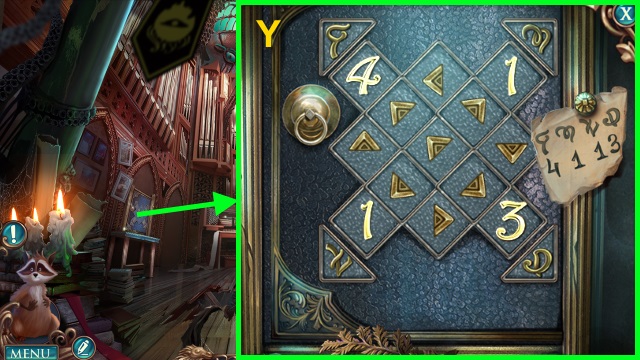
- Scroll down. Place 2 STATUE INITIALS (T); take HAMMER.
- Walk forward.
- Use HAMMER (U).
- Walk forward.
- Examine scene.
- Take SCISSORS and LOCKET PIECE (V).
- Use Raccoon (W); receive COLLAR PIECE.
- Walk down.
- Use SCISSORS; take LOCKET PIECE (X).
- Place COLLAR PIECE; take SILVER COIN and LOCKET PIECE (Y).
- 3 LOCKET PIECES on LOCKET; take VASE AMULET.
- Walk forward.
- Place VASE AMULET (Z).

- Play HOP; receive SANCTUARY SIGN (A).
- Walk down.
- Place SANCTUARY SIGN (B).
- Solution (C).
- Walk left.

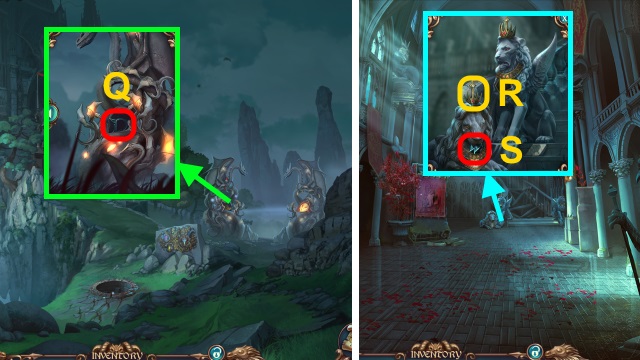
- Take GOLD NUGGET and SIGNET RING (D).
- Walk down.
- Use SIGNET RING; take CARVING SHAPE (E).
- Walk forward.
- Place GOLD NUGGET and HORSESHOE (F); receive LONG HOOK.
- Walk down twice.
- Use LONG HOOK (G); receive CARVING SHAPE.
- Walk forward, then left.
- Place 3 CARVING SHAPES (H).
- Play HOP; receive AMBER SPIRAL (I).
- Walk down, then forward.
- Place AMBER SPIRAL (J); take MAGIC PENDANT.
- Walk down, then left.
- Give MAGIC PENDANT (K).
- Solution is random (L).
- Solution order is randomized.
- Solution (M): A-B-C-A-E-F-D-E-C-D-B.
- Solution (N).
- Solution (O): (H-E-F-G)-(B-F-E-A)-(I-H-E-F)-(A-E-H-I-J)-(F-E-H-I)-(G-F-B-C).
- Solution (P).
- Take ENCHANTED SWORD.
- Walk down, then forward.
- Place ENCHANTED SWORD (Q).
- Talk (R).
Chapter 3: The Tree of Wisdom
- Solution (S).
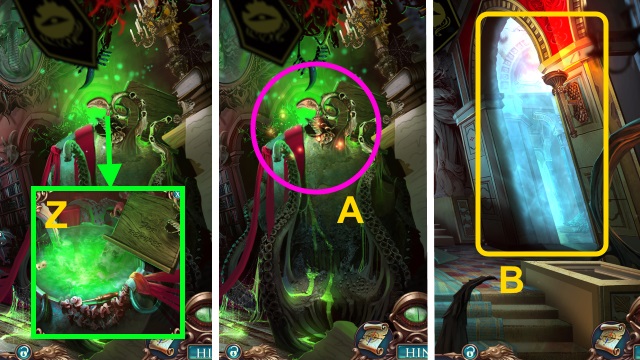
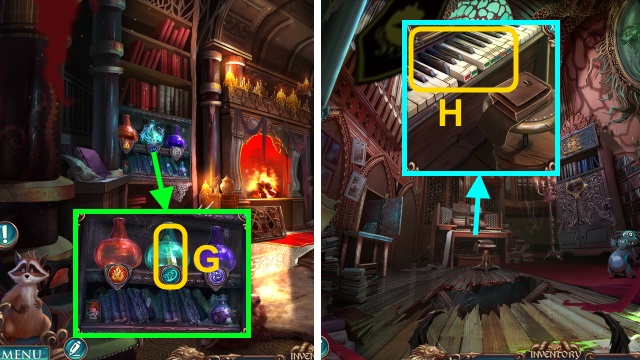
- Take FIRE SYMBOL, SCYTHE, IRON FISH, CANDLESTICK, SHAFT, and WELL PIECE (T).
- Examine SHAFT; place SCYTHE. Take WORKING SCYTHE.
- Take FIRE SYMBOL (U).
- Take CANDLE (V); use WORKING SCYTHE (W). Place 2 FIRE SYMBOLS.
- Solution (X).
- Take TOOL INLAY and FLINT.
- CANDLE and FLINT on CANDLESTICK; take LAMP.
- Place LAMP (Y); take SPIKE INLAY (Z).
- Place TOOL INLAY and SPIKE INLAY (A); receive PICKAXE.
- Use PICKAXE (B); play HOP.
- Walk forward.
- Take WELL PIECE, 2 SILHOUETTES, and EMERALD (C).
- Use Raccoon; take SILHOUETTE (D).
- Walk down.
- Place 3 SILHOUETTES; take DRAGON EMBLEM (E).
- Place EMERALD (F); take WELL PIECE and MASK.
- Walk forward.

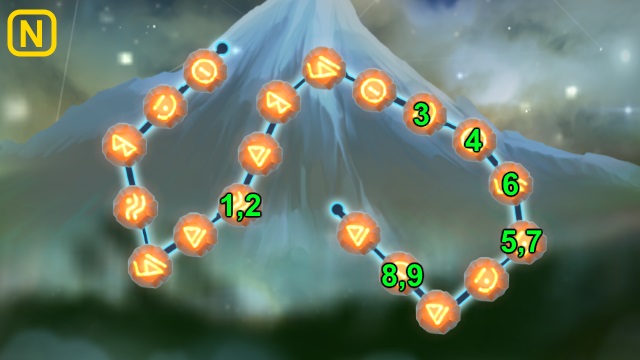
- Place 3 WELL PIECES (G).
- Solution (1-6).
- Use Raccoon; turn handle (H). Examine bucket; take DRAGON EMBLEM.
- Walk down.
- Place 2 DRAGON EMBLEMS (I).
- Play HOP; receive BELL (J).
- Walk forward.
- Place BELL (K); receive IRON FISH.
- Place 2 IRON FISH (L).
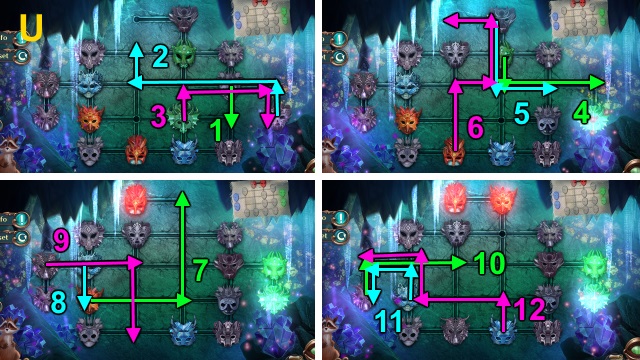
- Solution (M): (A-E)-(B-J)-(E-I)-(C-G)-(I-A)-(J-F).
- (A-E)-(D-L)-(E-I)-(F-B)-(I-A)-(G-K)-(A-E)-(B-J)-(E-I).
- Walk forward.
- Take MASK, BUTTERFLY, and ROPE (N).
- Use ROPE (O). Open chest; take BUTTERFLY and FAIRY SHAPE.
- Walk down.
- Place FAIRY SHAPE (P); take MASK (Q).
- Walk down.
- Place 2 BUTTERFLIES; take DIRTY FABRIC (R).
- Walk forward twice.
- Give DIRTY FABRIC (S); receive DIAGRAM.
- Place 3 MASKS and DIAGRAM (T).
- Solution (U).
- Take TREE OF WISDOM AMULET.
- Walk down.
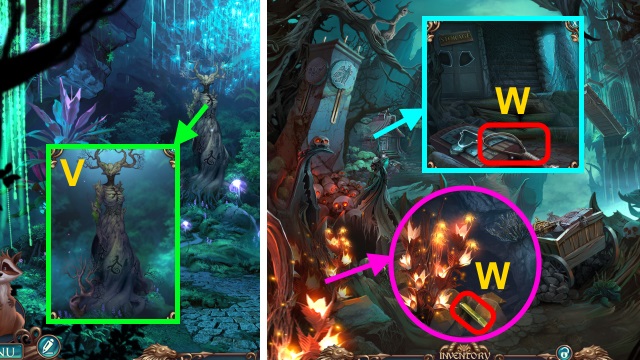
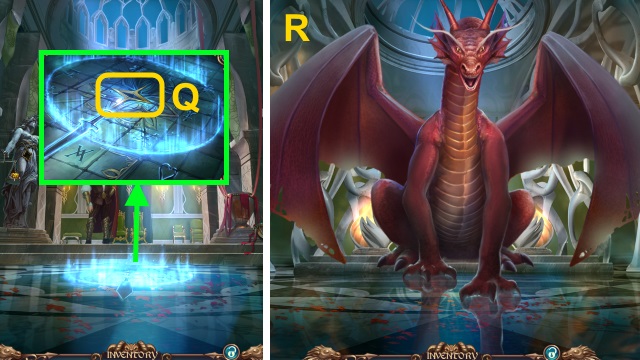
- Use TREE OF WISDOM AMULET (V).
- Take NET and CHISEL (W).
- Take COMBAT WEAPON (X); use CHISEL and HAMMER. Take NET.
- Combine 2 NETS; take WORKING NET.
- Use WORKING NET (Y); use Raccoon (Z). Take DOOR SHIELD and RAVEN FIGURINE.
- Take DOOR SHIELD (A); place RAVEN FIGURINE (B).

- Solution (C).
- Take BULLET and FLEUR-DE-LIS.
- Place 2 DOOR SHIELDS (D).
- Play HOP; receive GUNPOWDER (E).
- GUNPOWDER and BULLET on COMBAT WEAPON.
- Use COMBAT WEAPON (F).
- Walk right.
- Use SILVER COIN; take GRIFFON FIGURINE and MASTER'S AMULET (G).
- Take CROSSBONES, CLUB, and BULL SYMBOL (H).
- Place CROSSBONES; take GRIFFON FIGURINE and DARK STAR SYMBOL (I).
- Walk down.
- Place BULL SYMBOL (J); take HERALDIC LION.
- Place 2 GRIFFON FIGURINES (K).
- Solution (L).
- Take HERALDIC DRAGON.
- Walk right.
- Place FLEUR-DE-LIS, HERALDIC DRAGON, and HERALDIC LION (M). Play HOP; receive DARK PLANET SYMBOL.
- DARK PLANET SYMBOL and DARK STAR SYMBOL on MASTER'S AMULET.
- Place MASTER'S AMULET (N); receive BANNER ON STAFF.
- Use BANNER ON STAFF (O); receive ALCHEMIST'S KEY.
- Walk down.
- Use ALCHEMIST'S KEY (P).
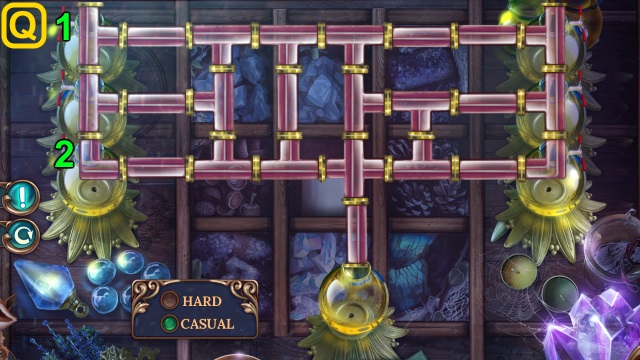
- Arrange tubes.
- Casual Solution (Q).
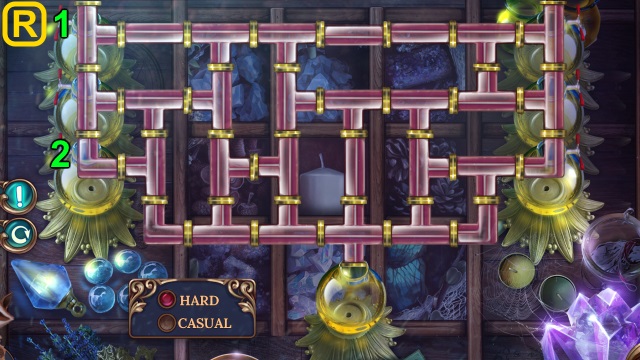
- Hard Solution (R).
- Turn knobs (1-2).
- Take ACID.
- Walk right.
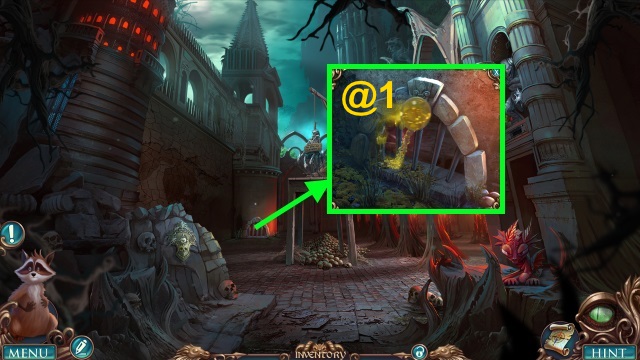
- Pour ACID (@1).
- Go forward.
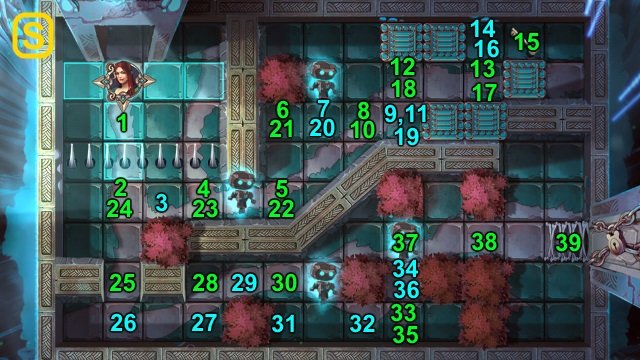
Chapter 4: The Dark Order
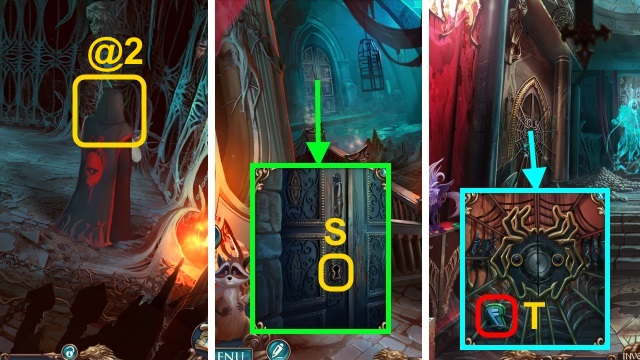
- Use CLUB (@2).
- Examine scene 2x; receive LOCKPICK.
- Use LOCKPICK (S).
- Walk left.
- Take TOMB RUNE (T).
- Take 2 TOMB RUNES and HORN (U).
- Place 3 TOMB RUNES (V).
- Solution (W): B-A-Bx2-D-Ax2-Bx3-D-B-C-A-Bx2-A.
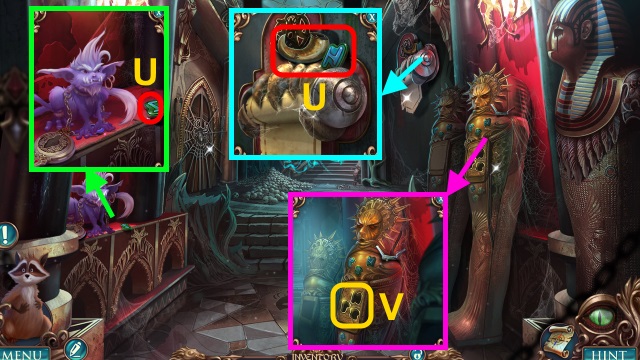
- Take 2 SPIDER LEGS.
- Take SPIDER (X).
- 2 SPIDER LEGS on SPIDER.
- Place SPIDER (Y).
- Walk left.
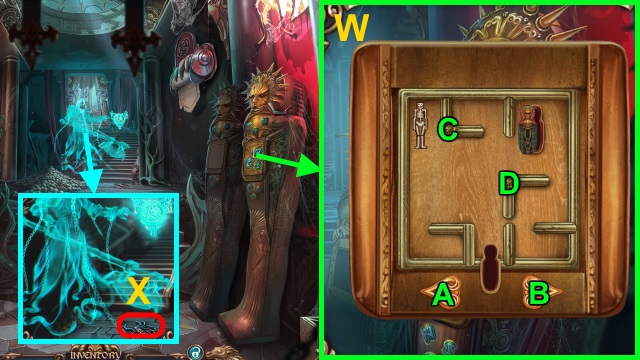
- Take SCROLL SIGN PIECE, TONGS, and HAMBURGER (Z).
- Take HORN, RED VIAL, and AMULET PART (A).
- Take ADEPT SIGN BASE (B). Place 2 HORNS (C); receive SCROLL SIGN PIECE.
- Walk down.
- Give HAMBURGER; take AIR SYMBOL (D).
- Walk left.
- Place AIR SYMBOL; examine (E). Receive SCROLL SIGN PIECE.
- Walk down.
- Place 3 SCROLL SIGN PIECES (F).
- Play HOP; receive TIMEKEEPER SHAPE (G).
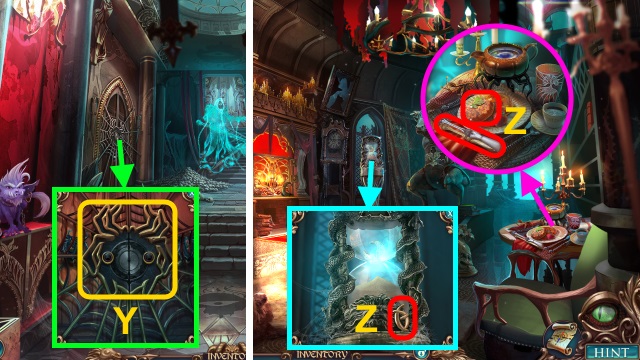
- Walk left.
- Place TIMEKEEPER SHAPE (H); take AMULET PART (I).
- 2 AMULET PARTS on ADEPT SIGN BASE; take ADEPT SIGN.
- Walk down.
- Use ADEPT SIGN (J).
- Walk forward.
- Examine scene.
- Take SCREWDRIVER, 2 MINOTAUR PIECES, and SCORPION HALF (K).
- Walk down, then left.
- Place 2 MINOTAUR PIECES (L); take STAINED-GLASS PIECES.
- Use SCREWDRIVER and TONGS (M); receive HOT PIECE.
- Use HOT PIECE (N); receive MONSTER PIECE.
- Walk down.
- Place MONSTER PIECE (O); take STUDY KEY.
- Walk forward.
- Use STAINED-GLASS PIECES (P).
- Solution (Q).
- Take LEADER SIGN.
- Place LEADER SIGN (R); use STUDY KEY.
- Walk left.
- Play HOP.
- Take BOOK, SPOON, and PLIERS (S).
- Take FIRE SYMBOL, SAFE PIECE, and SCORPION HALF (T).
- Walk down.
- Use PLIERS (U); receive BAG SHAPE.
- Walk down.
- Place 2 SCORPION HALVES (V); take BLUE POWDER.
- Walk left.
- Place FIRE SYMBOL; examine (W). Receive BOOK KEY.
- BOOK KEY on BOOK; take ANTI-BARRIER RECIPE.
- Go to Master's Study.
- Place BAG SHAPE (X); take SHAPE and CODE.
- Place SAFE PIECE and CODE; solution (Y).
- Take BLUE VIAL.
- Place ANTI-BARRIER RECIPE; use BLUE VIAL, RED VIAL, BLUE POWDER, and SPOON (Z).
- Play HOP; receive BLACKFIRE CRYSTAL (A).
- Walk down.
- Use BLACKFIRE CRYSTAL (B).
- Walk right.
- Examine scene.
- Take CROSSBOW, SHAPE, and CABINET HANDLE (C).
- Use COMBAT WEAPON (D); place 2 SHAPES.
- Solution (E): B-D-B-C-Bx3-F-B-E-Bx3-C-Ax2-D.
- Ax3-F-E-Ax3-C-Ax3-D-Ax2-F-A-E-Ax2-D-Ax2.
- C-A-E-Bx4-F-Ax2-C-Bx2-D-Ax3-E-Bx4-F-Ax2.
- Take SHEET MUSIC.
- Walk down, then left.
- Place CABINET HANDLE; take KEY and WATER SYMBOL (F).
- Go to Common Room.
- Place WATER SYMBOL; examine (G). Receive KEY.
- Go to Master's Study.
- Place 2 KEYS and SHEET MUSIC (H).
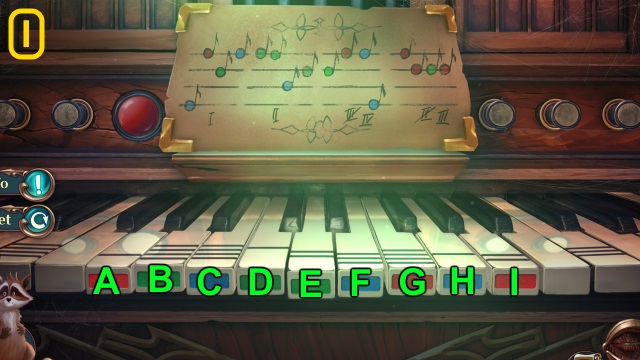
- Solution (I): C-A-E-H-Dx2-F-E-A-I-E-I-E-A-H-C.
- Walk forward.
- Take EYE (J).
- Use Raccoon; take TRIDENT (K).
- Place EYE (L); take WOLF and ROSE (M).
- Go to Ritual Hall.
- Place TRIDENT (N); take SKULL.
- Place ROSE (O); take RAVEN (P).
- Go to Secret Room.
- Place SKULL (Q); take OWL.
- Walk down.
- Place WOLF, RAVEN, and OWL (R).
- Play HOP; receive PENTAGRAM (S).
- Walk forward.
- Place PENTAGRAM (T); take SIGN OF THE DRAGON.
- Go to Ritual Hall.
- Use CROSSBOW (U).
- Solution (V): Trace symbol.
- Solution (W): Stop balls in their matching slots.
- Solution (X): Move stars into center of target.
- Use SIGN OF THE DRAGON (Y).
Created at: 2017-09-15