

Walkthrough Menu
- General Tips
- Chapter 1: The Front Yard
- Chapter 2: The Mansion Foyer
- Chapter 3: Sleepy Hollow
- Chapter 4: Oliver Twist
- Chapter 5: Canterbury
- Chapter 6: Our Mutual Friend
- Chapter 7: Cloisterham
General Tips
- This is the official guide for Midnight Mysteries: Ghostwriting.
- Hidden-object puzzles are referred to as HOPs. This guide will not show screenshots of the HOPs, however, it will mention when an HOP is available and the inventory item you'll collect from it.
- This guide will not mention each time you have to zoom into a location; the screenshots will show each zoom scene.
Chapter 1: The Front Yard
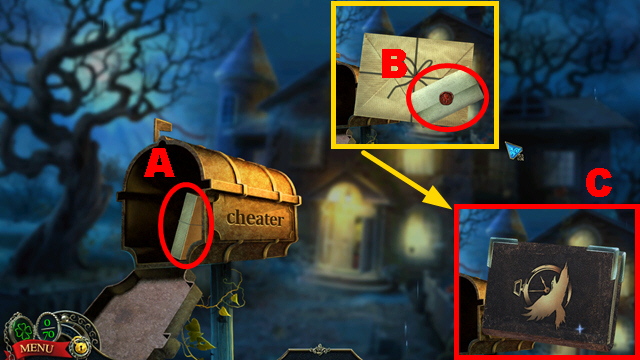
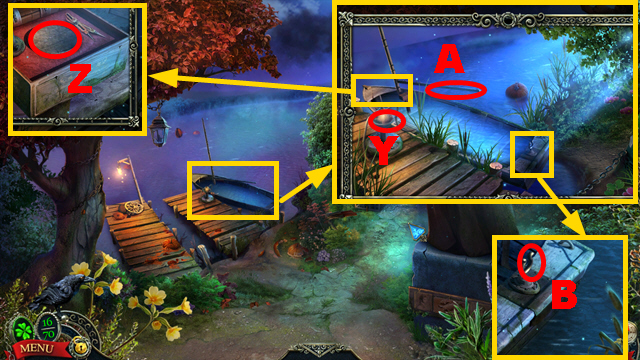
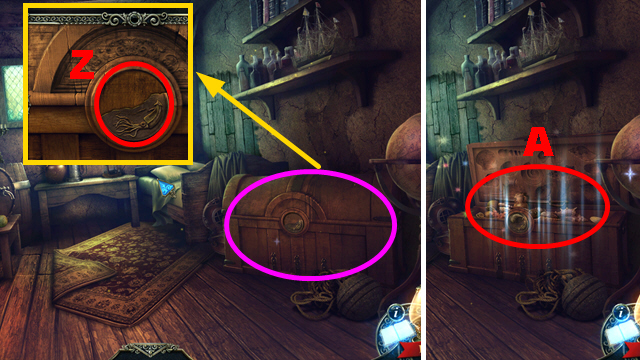
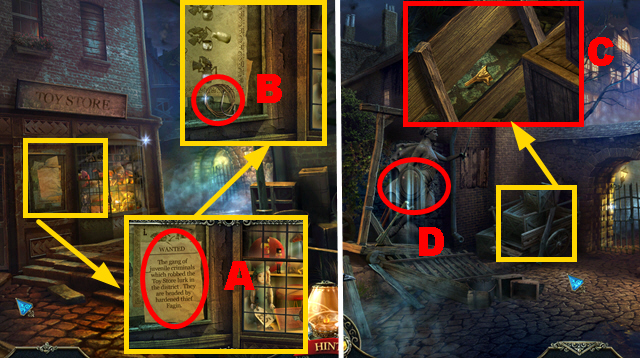
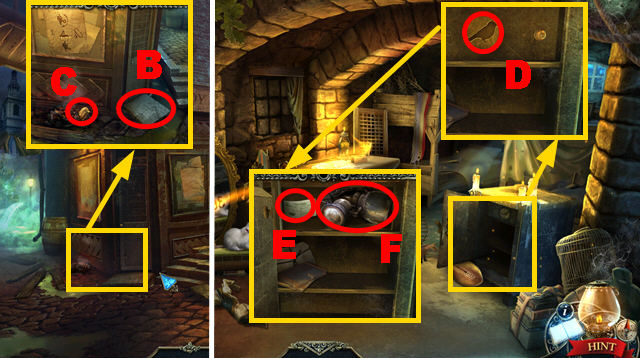
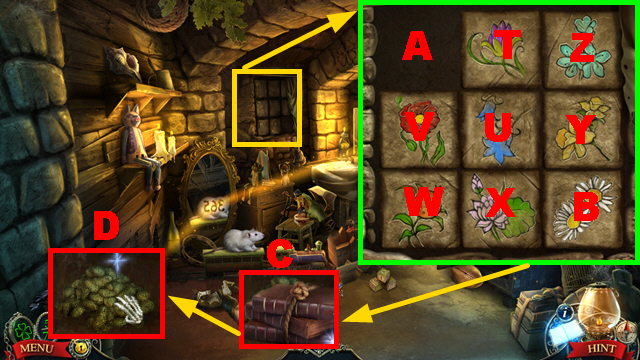
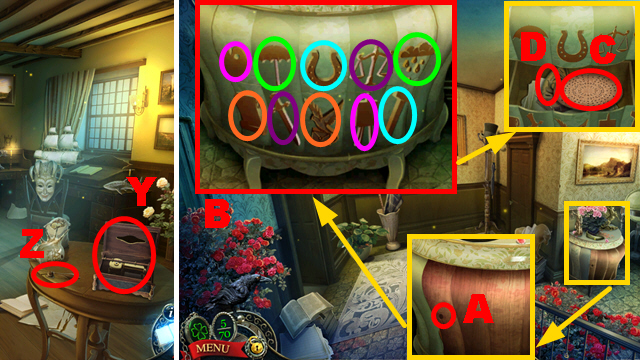
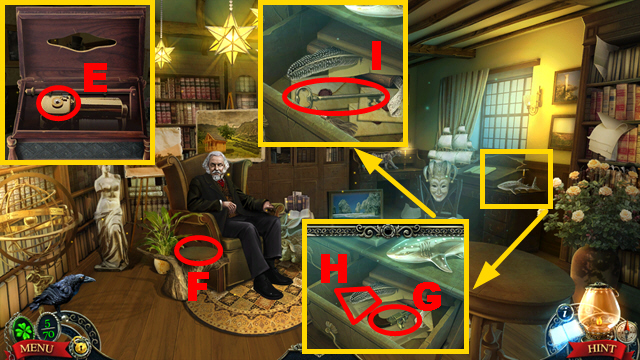
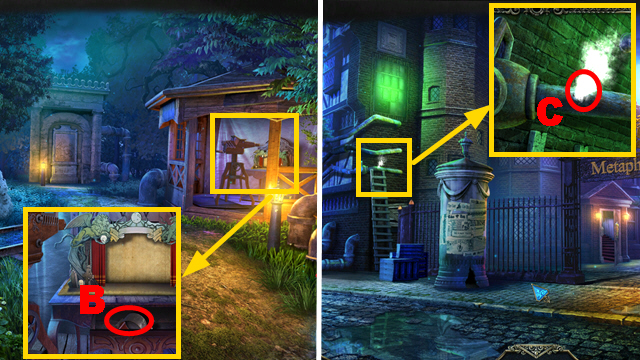
- Open the mailbox; take the package (A).
- Read the letter (B); open the package and book (C).
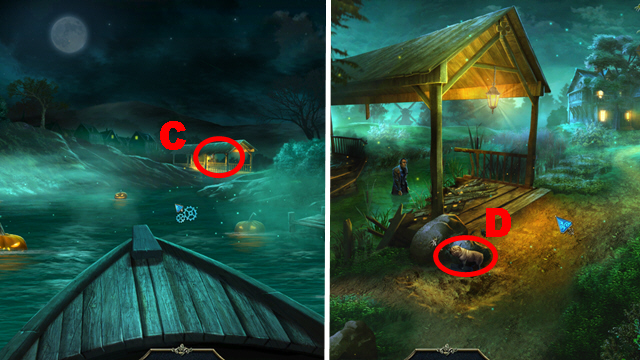
- Try to move forward.
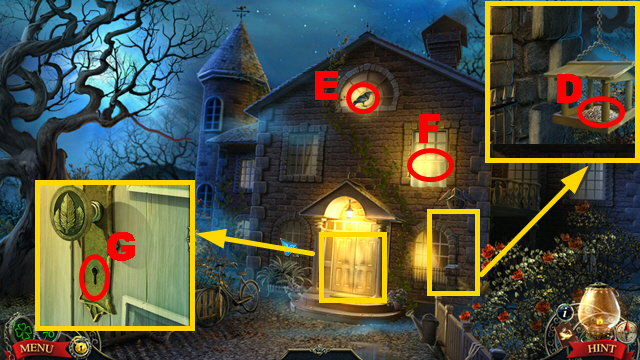
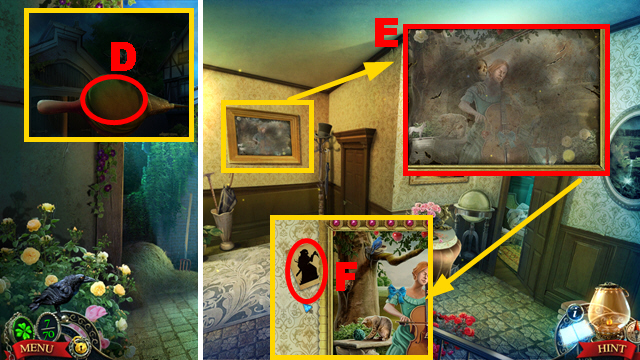
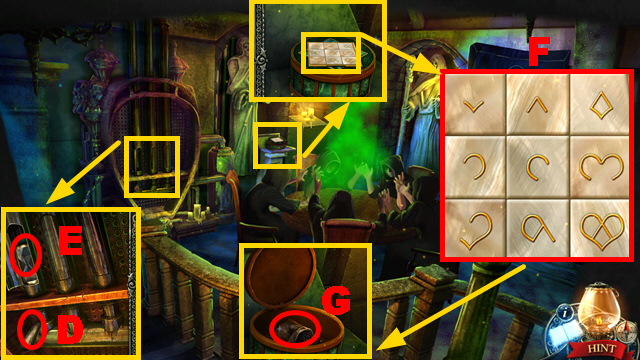
- Take the SEEDS (D).
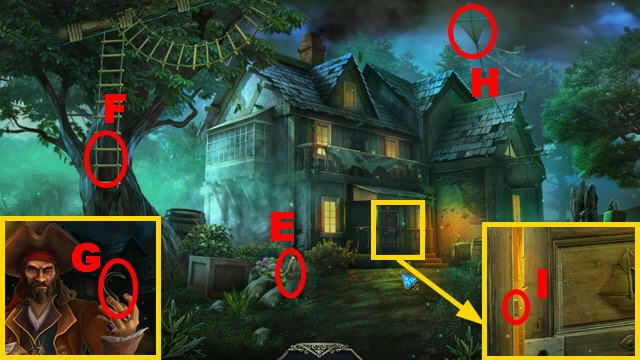
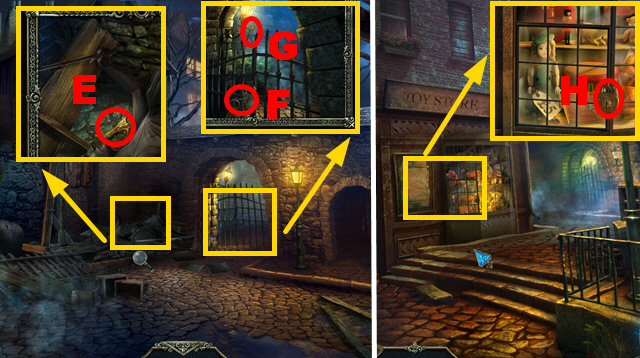
- Use the SEEDS (E).
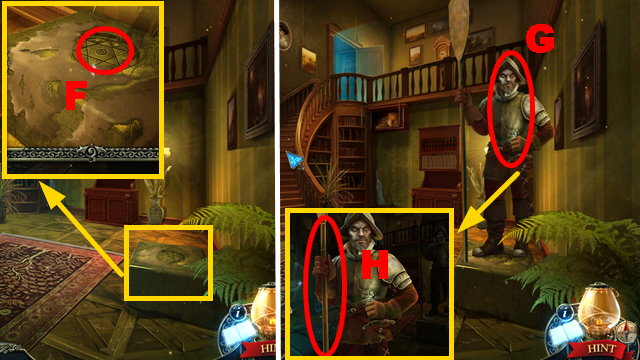
- Use the raven (F) to receive the KEY.
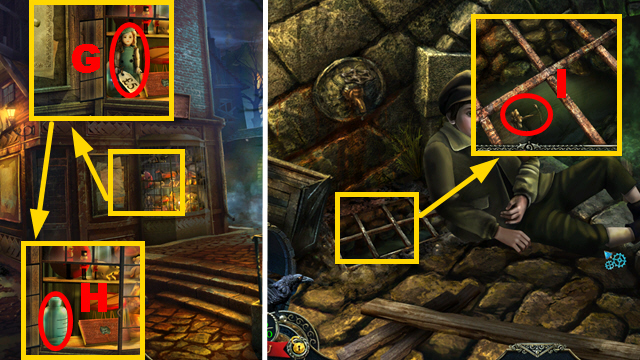
- Place the KEY (G); turn it.
- Open the door.

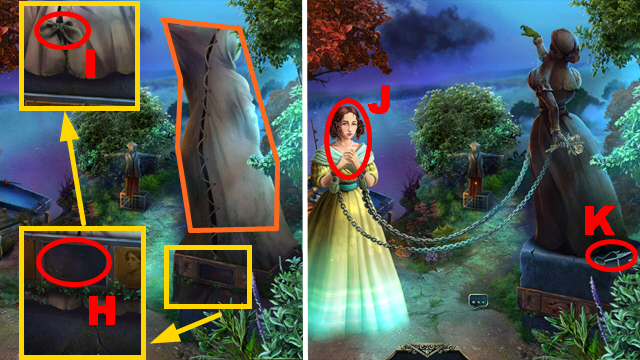
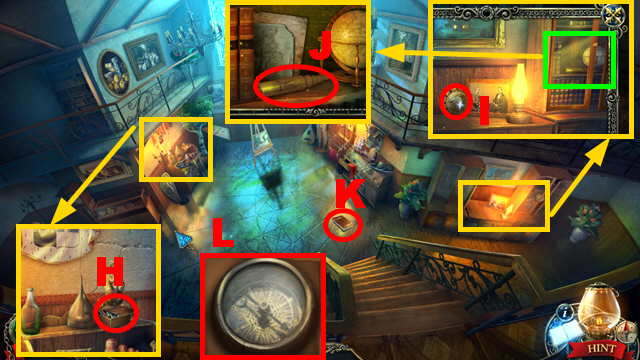
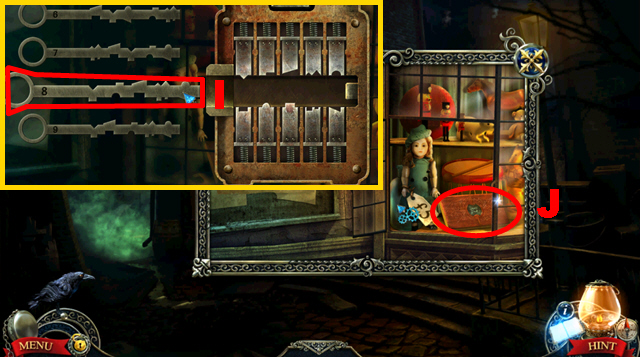
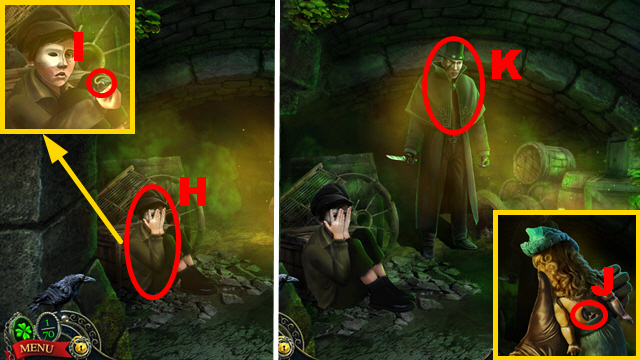
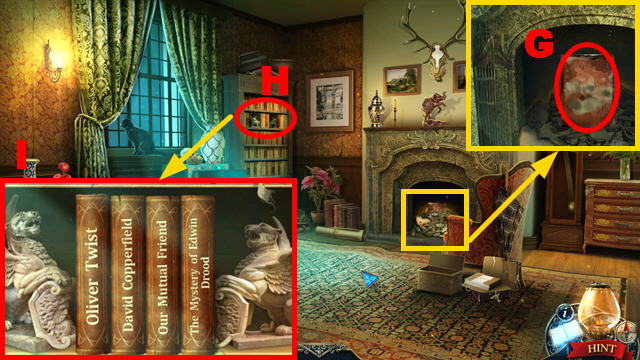
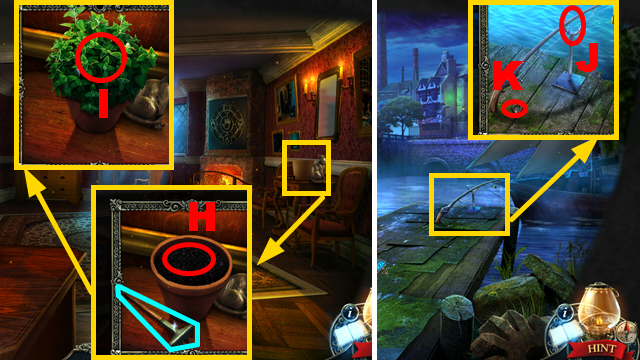
- Open the trapdoor (H).
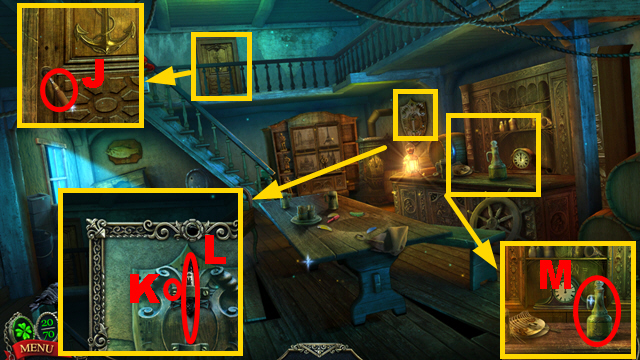
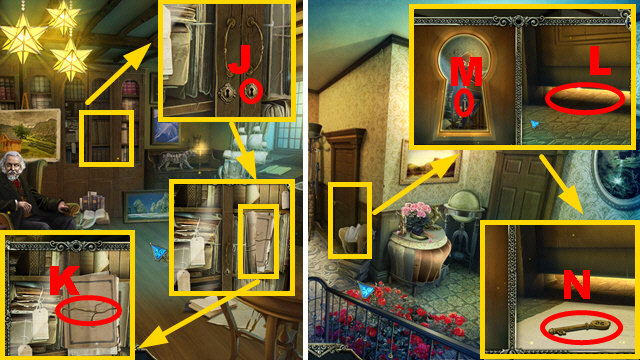
- Take the MATCHES (I); read the book (J).
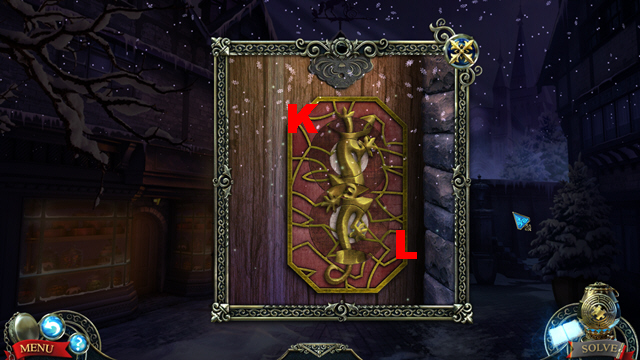
- Talk to the girl; take the FLOWER (K).
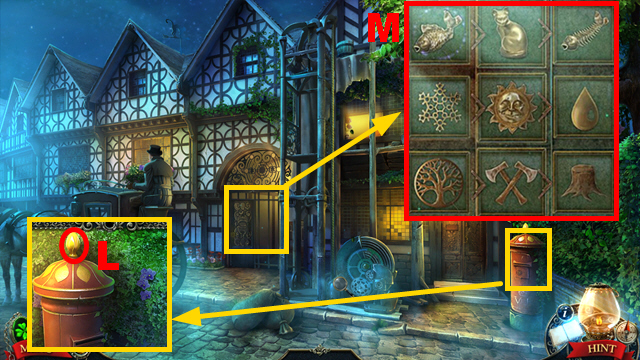
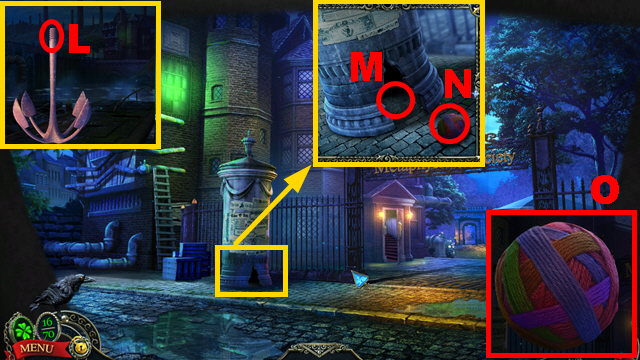
- Take the WRENCH (L).

- Use the WRENCH twice (purple).
- Enter the Attic.
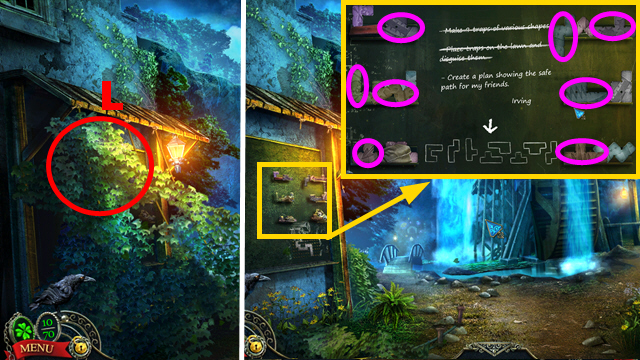
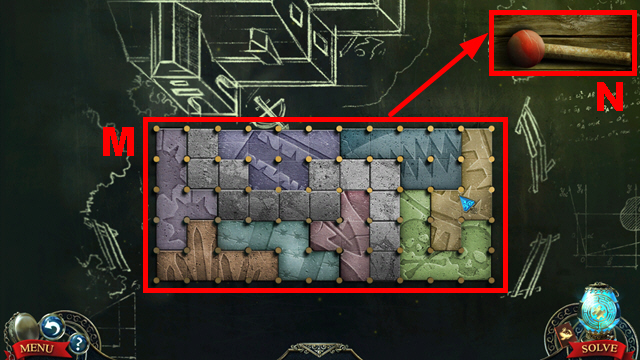
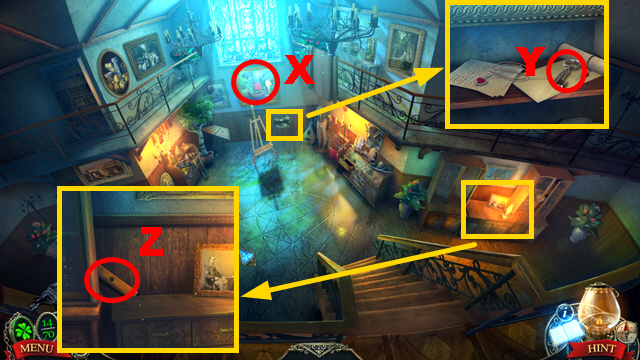
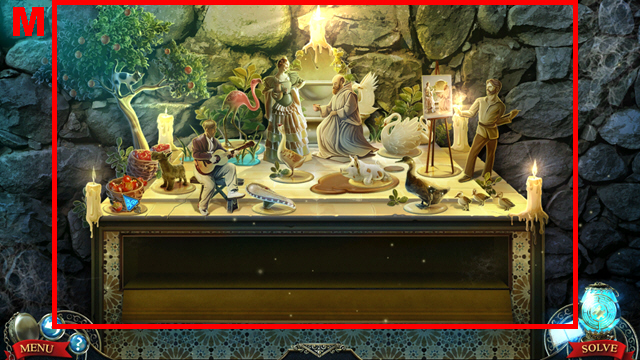
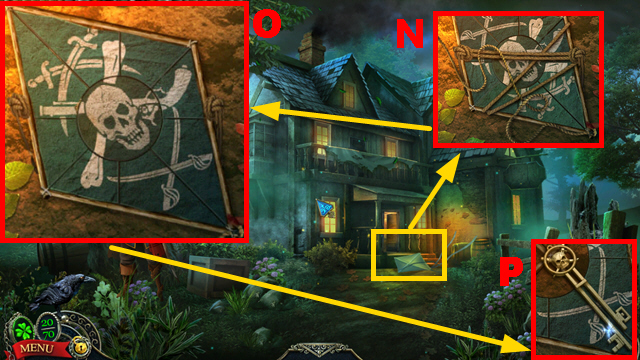
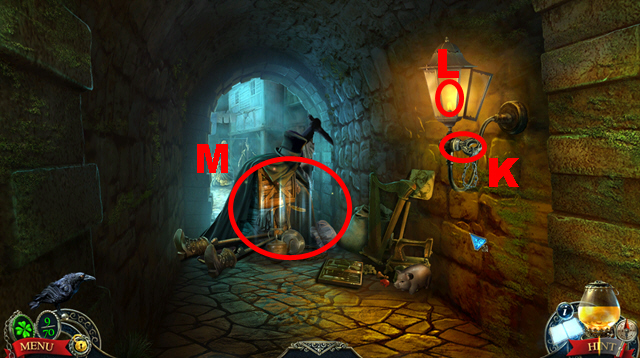
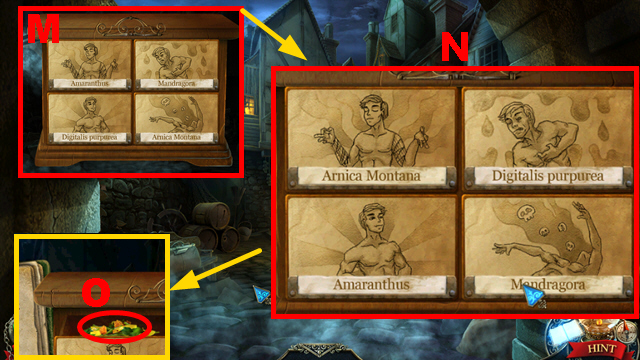
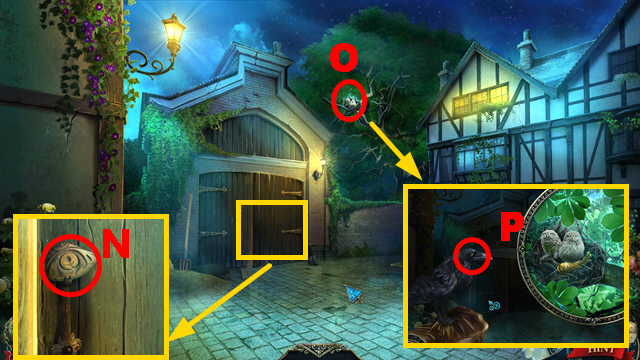
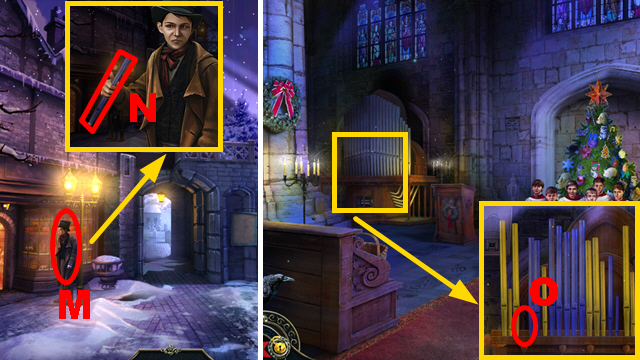
- Play the HOP (M) to receive the AROMA LAMP.
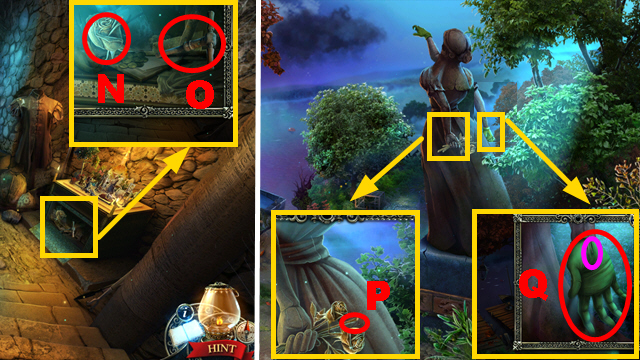
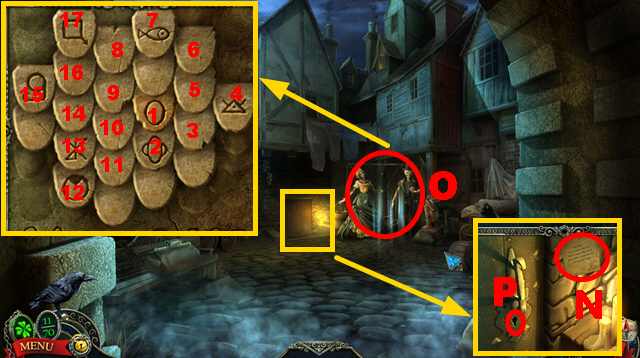
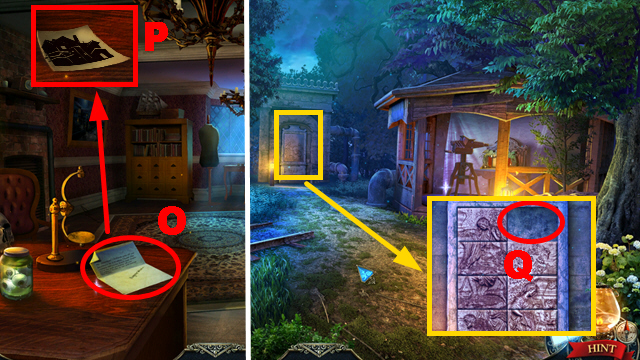
- Use the MATCHES (N) and FLOWER (O) on the AROMA LAMP.
- Walk down.
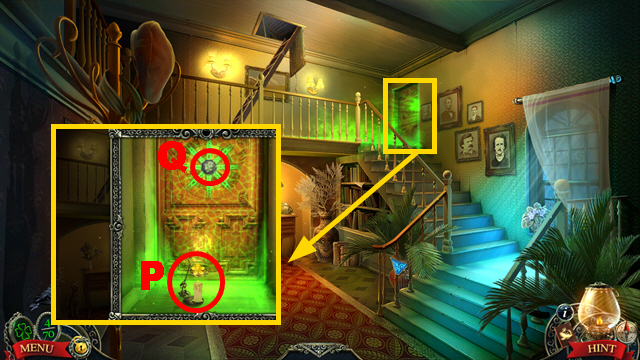
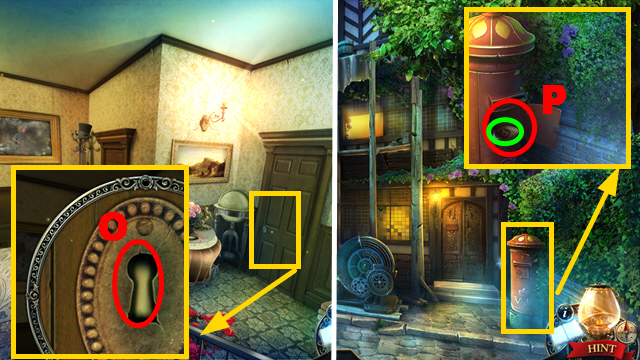
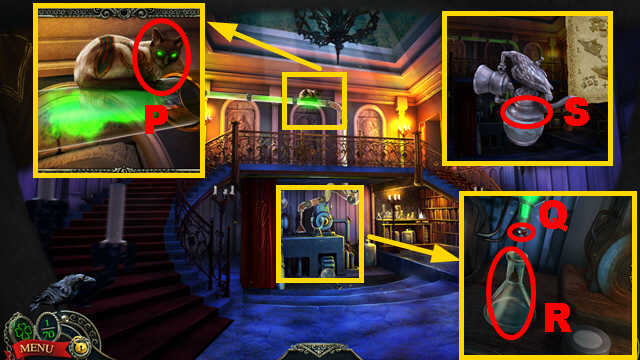
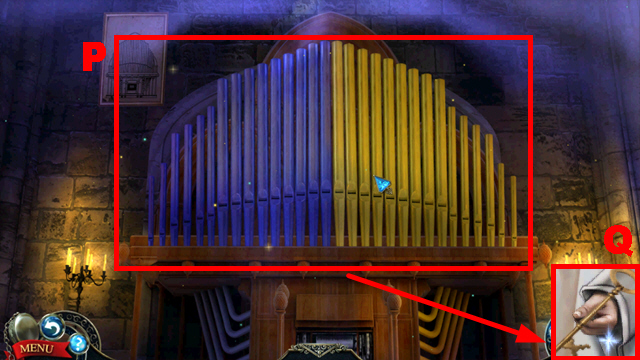
- Place the AROMA LAMP (P).
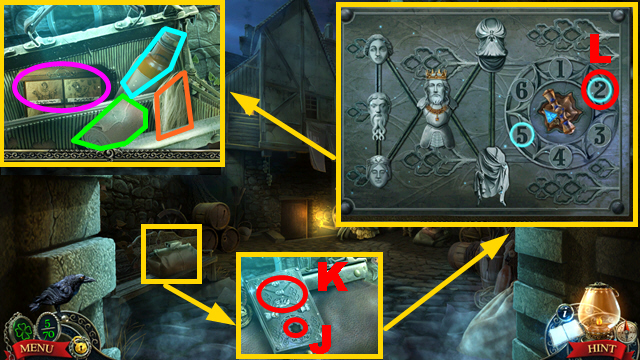
- Examine the door (Q).
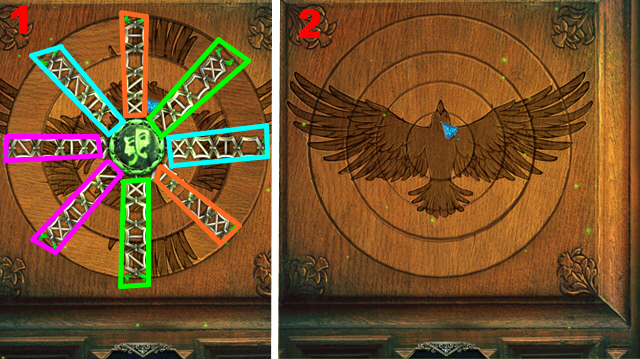
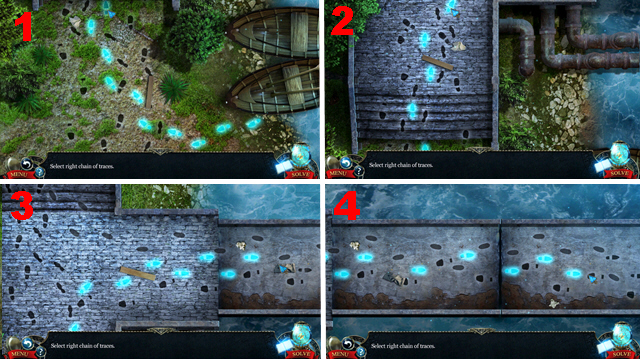
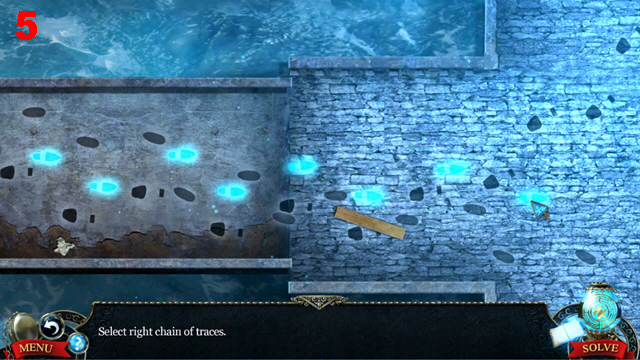
- Play the mini-game.
- Solution: 1-2.
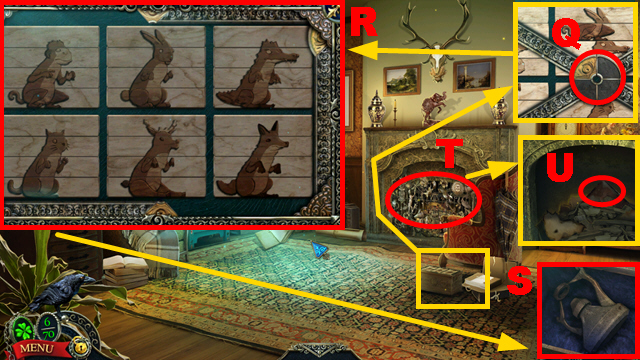
- Enter the Study to play the HOP.
- Go through the portal.
Chapter 2: Sunny Side
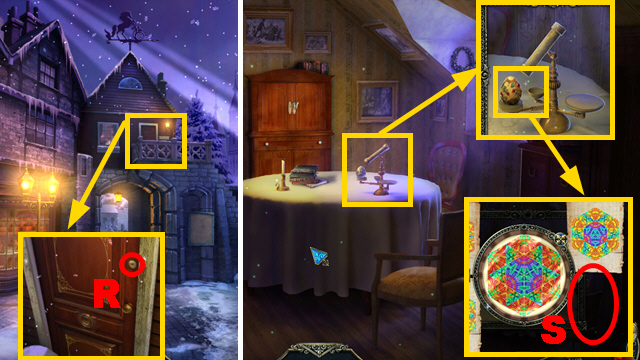
- Try to move forward.
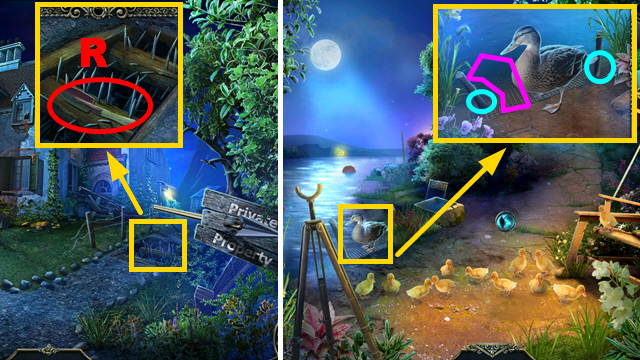
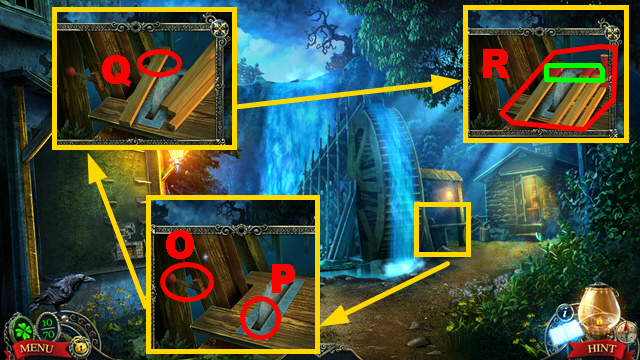
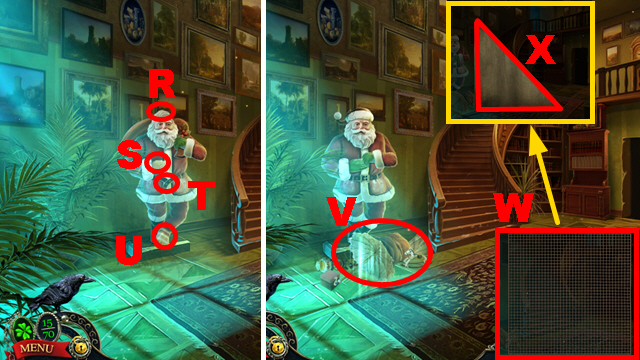
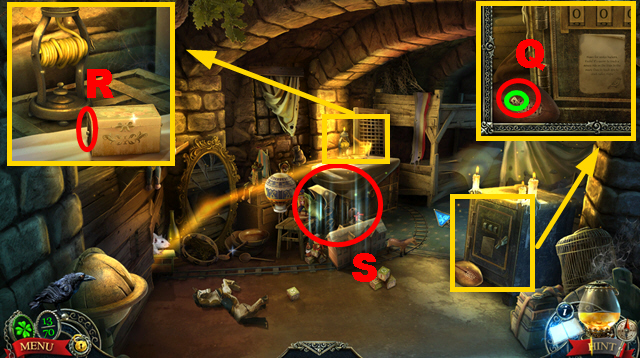
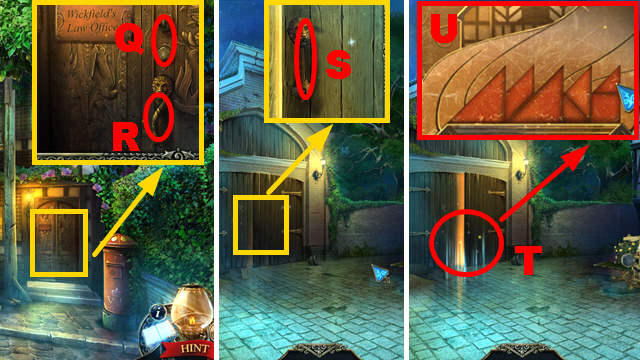
- Take the SCOOP (R).
- Turn left.
- Use the SCOOP twice (blue); take the NET (purple).
- Move forward.
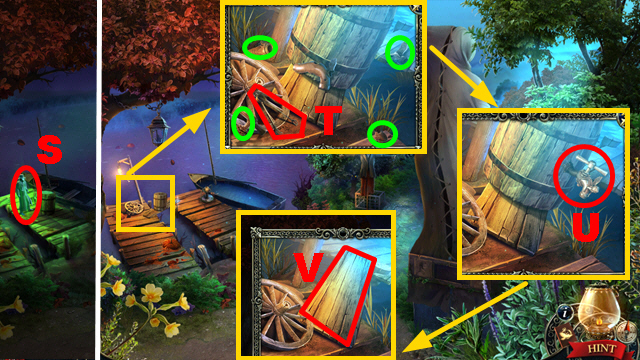
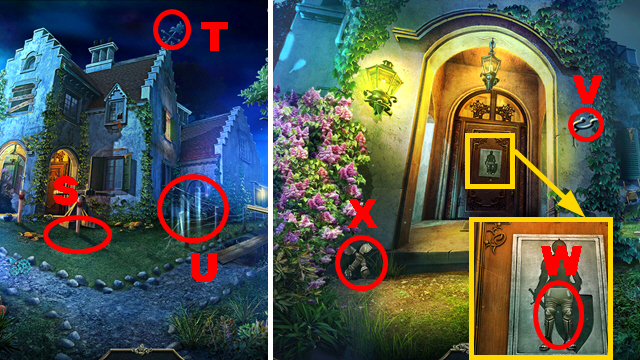
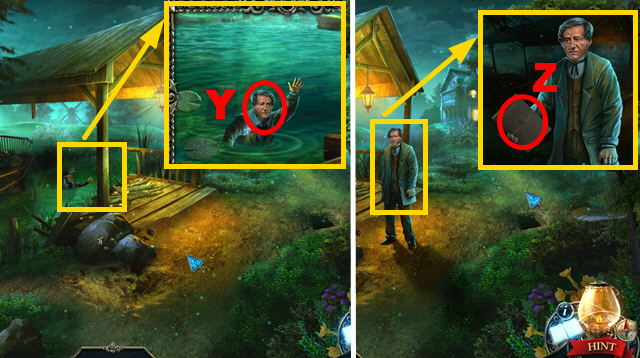
- Talk to the man (S).
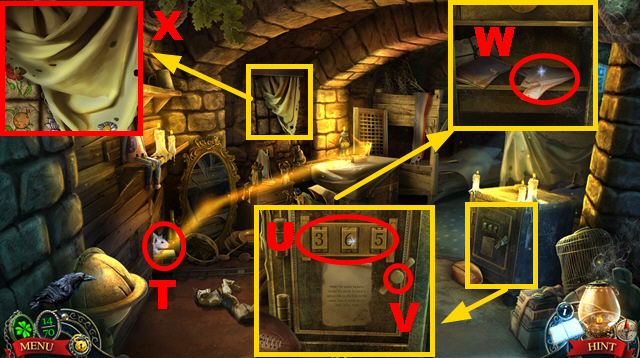
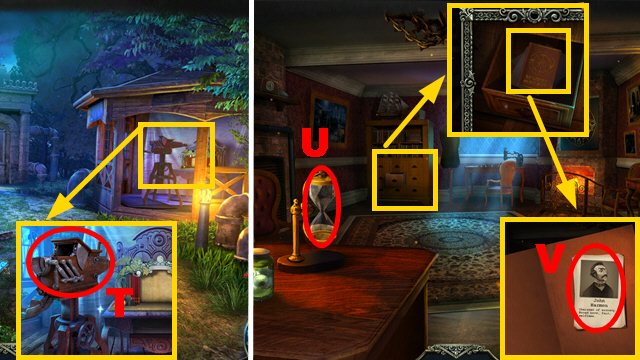
- Take the TONGS (T); collect 4 pieces (green).
- Place the faucet (U); turn it on.
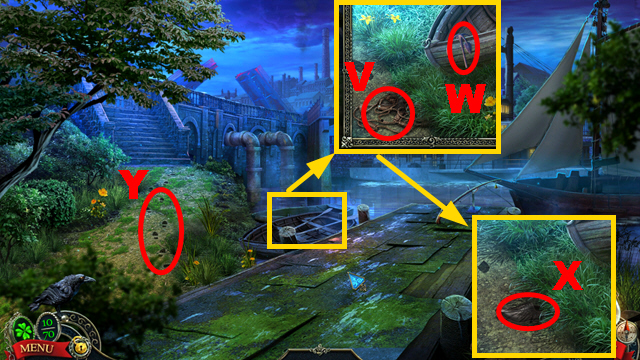
- Move the barrel; take the WOODEN PLANK (V).
- Walk down twice.

- Place the WOODEN PLANK (W).
- Turn right.
- Use the raven (X).
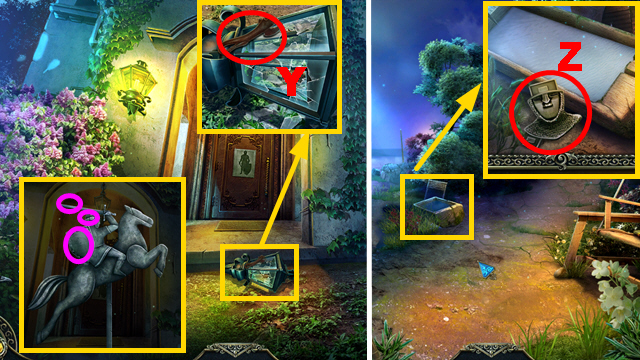
- Take the BOARD (Y).
- Turn right.
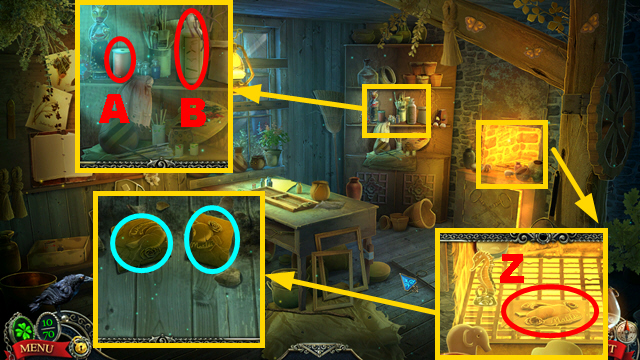
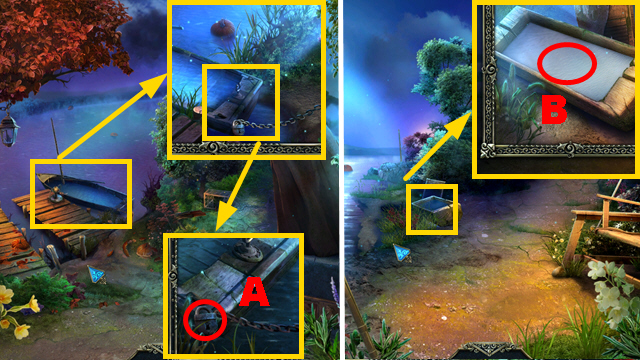
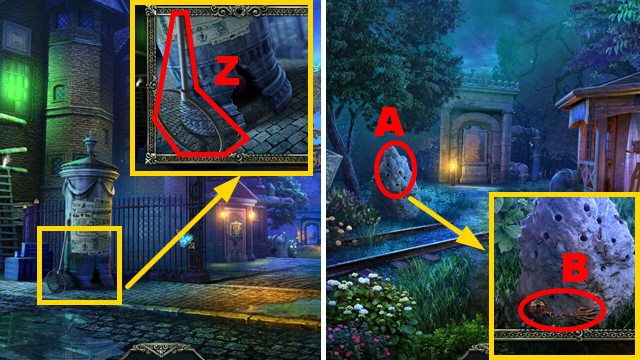
- Use the TONGS (Z); take 2 PLATE PARTS (blue).
- Take the LONG RIBBON (A) and GLUE (B).
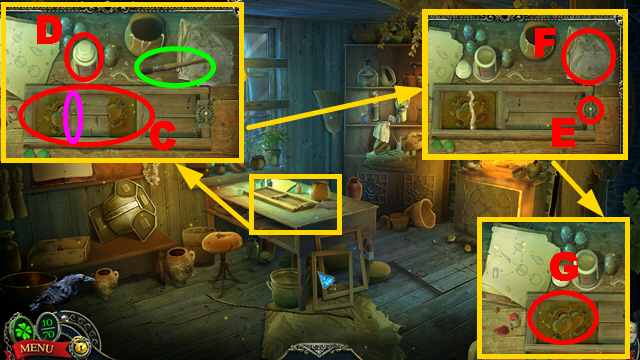
- Place 2 PLATE PARTS (C) and GLUE (D); open the glue.
- Use the brush (green) to apply the glue to the plate part (purple); push the lever three times (E).
- Use the cloth (F); pull the lever.
- Take the CLAY PLATE (G).
- Go to Irving's Dock.
- Place the CLAY PLATE (H); open and remove the ribbon (I).
- Take the CLOTH (orange).
- Talk to the woman (J).
- Take the PRUNING SHEARS (K).
- Go to Irving's Backyard.
- Use the PRUNING SHEARS (L).
- Select 8 correct pieces (purple).
- Play the mini-game.
- Solution: (M).
- Take the LEVER (N).
- Place the LEVER (O); pull it.
- Place the BOARD (P); push the lever.
- Use the LONG RIBBON (Q) and PRUNING SHEARS (green).
- Take 4 MARKED PEGS (R).
- Walk down.
- Place 4 MARKED PEGS (S).
- Use the raven (T).
- Play the HOP (U) to acquire the WEATHER VANE.
- Move forward.
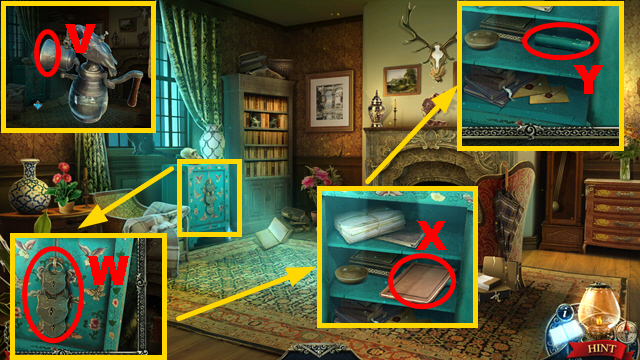
- Take the ROWLOCK (V), SUIT OF ARMOR 1/7 (W), and SUIT OF ARMOR 2/7 (X).
- Take the CAN OPENER (Y).
- Apply the CAN OPENER to the WEATHER VANE three times (purple) to acquire 3 SUITS OF ARMOR.
- Walk down, turn left.
- Take SUIT OF ARMOR 6/7 (Z).
- Walk down, turn right twice.

- Take SUIT OF ARMOR 7/7 (A).
- Go to the Mansion Entrance.
- Assemble 7 SUITS OF ARMOR correctly (B) to acquire the KNIGHT.
- Place the KNIGHT (C).
- Move forward.
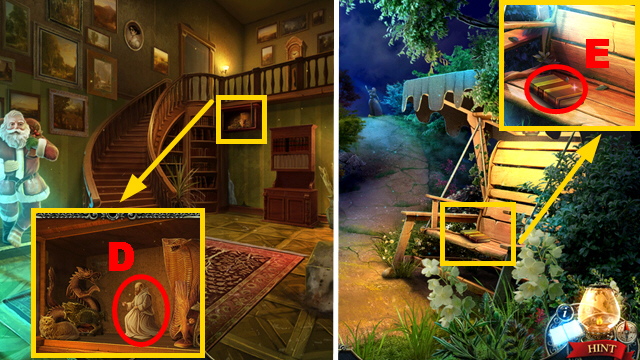
- Move aside six statues; take the PRIEST FIGURINE (D).
- Walk down twice, turn left.
- Take the BOOK (E).
- Go to the Mansion Foyer.
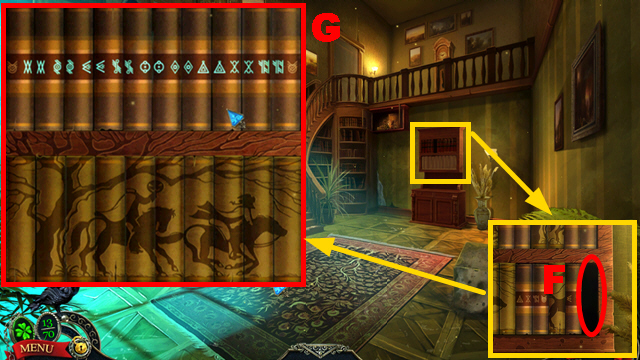
- Place the BOOK (F).
- Play the mini-game.
- Solution: (G).
- Move forward.
- Take the BOX OF CHALK (H) and GEAR (I); open the cupboard (green).
- Take the SPYGLASS (J).
- Open the book (K); turn a page to play the HOP.
- Take the COMPASS (L).
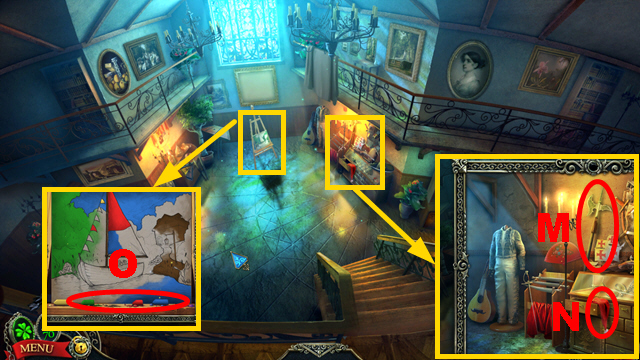
- Take the HALBERD (M) and HAT (N).
- Place the BOX OF CHALK (O).
- Go to Irving's Dock.
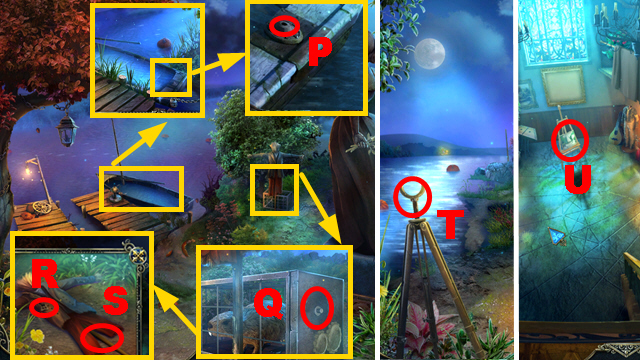
- Place the ROWLOCK (P) and GEAR (Q); take the BUCKET (R) and WOODEN POLE (S).
- Walk down.
- Place the SPYGLASS (T).
- Go to the Hallway.
- Examine the canvas (U).
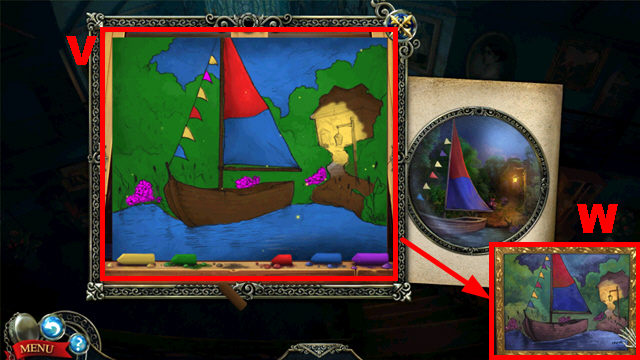
- Play the mini-game.
- Solution: (V).
- Take the FINISHED ARTWORK (W).
- Place the FINISHED ARTWORK (X).
- Take the KEY (Y).
- Place the WOODEN POLE (Z) to acquire the BRUSH.
- Go to Irving's Dock.
- Use the KEY (A).
- Walk down.
- Place the BRUSH (B) to acquire the SOAPY BRUSH.
- Go to the Mansion Foyer.
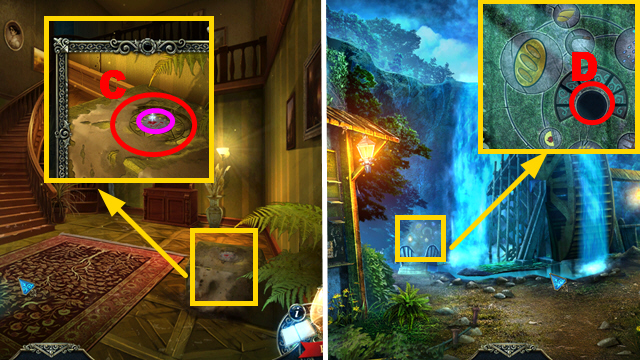
- Use the SOAPY BRUSH (C); take the ROUND PLATE (purple).
- Walk down twice, turn right.
- Place the ROUND PLATE (D).
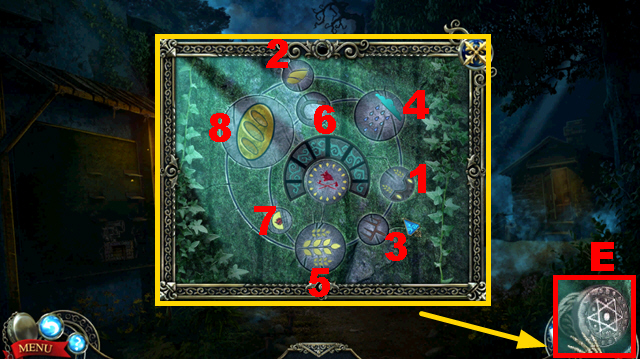
- Play the mini-game.
- Solution: 1-8.
- Take SOLOMON'S SEAL (E).
- Go to the Mansion Foyer.
- Place SOLOMON'S SEAL (F).
- Talk to the spirit (G); take the PADDLE (H).
- Give the HALBERD to the spirit.
- Enter the Soldier's Cellar.

- Take the LADY FIGURINE (I) and BOOT (J).
- Place the LADY FIGURINE (K) and PRIEST FIGURINE (L).
- Play the mini-game.
- Solution: (M).
- Take the BRONZE ROSE (N) and PUMP HANDLE (O).
- Go to Irving's Dock.
- Place the BRONZE ROSE (P); open the ribbon (purple) and take SANTA'S GLOVE (Q).
- Go to the Mansion Foyer.
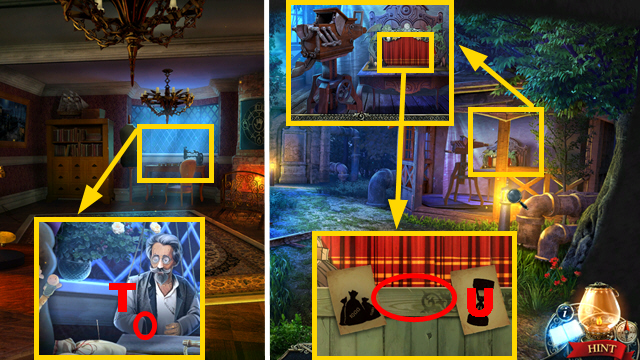
- Place the HAT (R), SANTA'S GLOVE (S), BUCKET (T), and BOOT (U).
- Play the HOP (V) to acquire the SEWING KIT.
- Connect the CLOTH to the NET (W); use the SEWING KIT (X) to acquire the SAIL.
- Go to Irving's Dock.
- Place the PUMP HANDLE (Y); push it three times.
- Open the box; place the COMPASS (Z), SAIL (A), and PADDLE (B).
Chapter 3: Sleepy Hollow
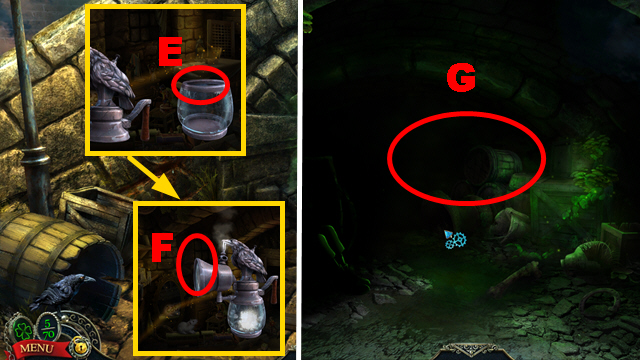
- Use the SPYGLASS (C).
- Take the BULLDOG (D).
- Turn right.
- Take the BOTTLE OF WATER (E).
- Pull the ladder (F); take the PIRATE'S HOOK (G).
- Use the raven (H) and PIRATE'S HOOK (I).
- Enter the Parlour.
- Take the SCREWDRIVER (J).
- Use the SCREWDRIVER (K); take the DAGGER (L).
- Take the VINEGAR (M).
- Walk down.
- Use the DAGGER (N).
- Play the mini-game.
- Solution: (O).
- Take the BEDROOM KEY (P).
- Move forward.
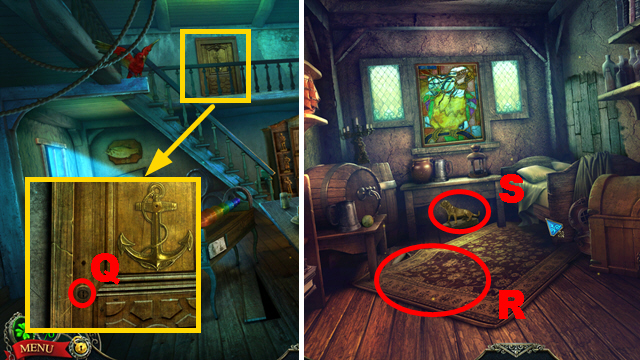
- Place the BEDROOM KEY (Q).
- Move forward.
- Move the carpet (R).
- Take the BORDEAUX MASTIFF (S).
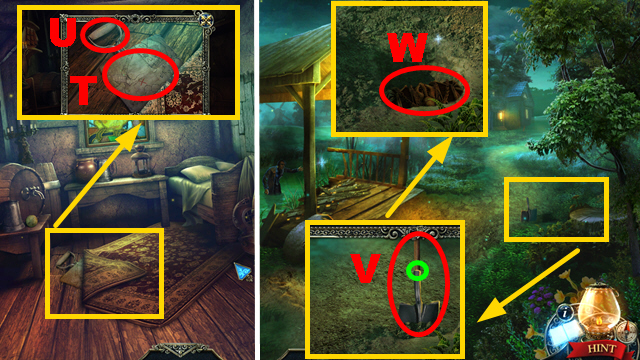
- Take the map (T) and SHOVEL HANDLE (U).
- Walk down three times.
- Place the SHOVEL HANDLE (green); dig with the shovel (V).
- Take the PIRATE'S CHEST (W).
- Inspect the PIRATE'S CHEST.
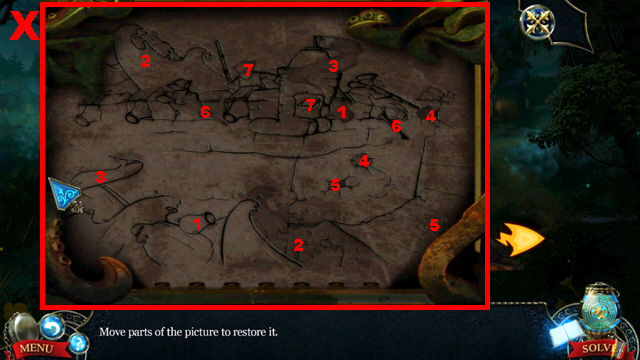
- Play the mini-game.
- Solution: (X).
- Play the mini-game.
- Solution: (Y).
- Take the HARMONICA BOWL (blue) and WHALE KEY (green).
- Go to the Pirate's Room.
- Place the WHALE KEY (Z).
- Open the chest (purple).
- Play the HOP (A) to acquire the MUD SHOES.
- Walk down three times.
- Use the MUD SHOES (B).
- Play the mini-game.
- Solution: (C).
- Take the TURTLE JACK (D).
- Go to the Parlour.
- Take the BORZOI (E); place the TURTLE JACK (F).
- Push the jack twice and open the drawer; take the CORKSCREW (G).
- Place the BORDEAUX MASTIFF, BULLDOG, and BORZOI (H).
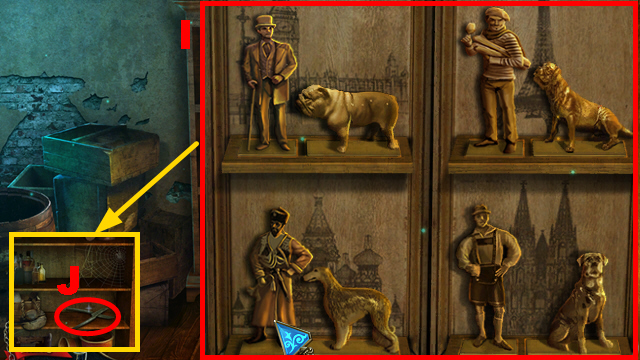
- Play the mini-game.
- Solution: (I).
- Take the PRUNING SHEARS (J).
- Open the BOTTLE OF WATER with the CORKSCREW (K) to acquire the UNCORKED BOTTLE.
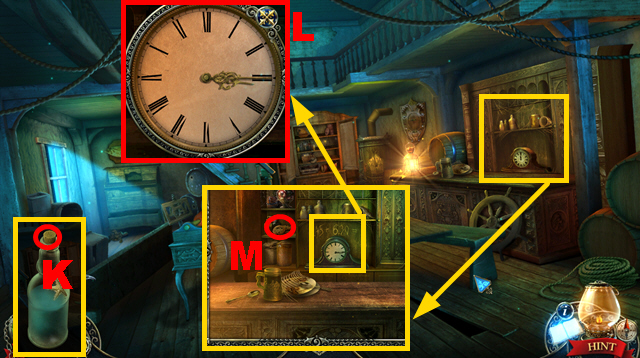
- Enter the correct time (L); take the COOKIES (M).
- Move forward.
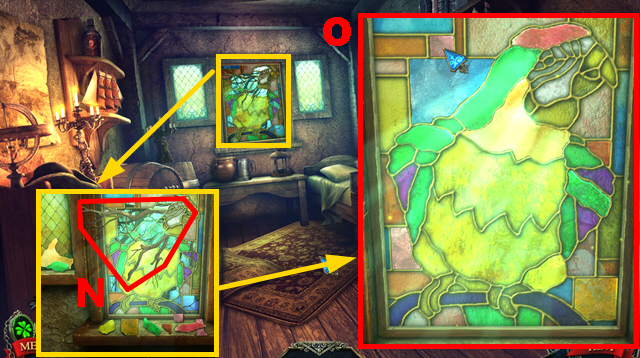
- Use the PRUNING SHEARS (N).
- Play the mini-game.
- Solution: (O).

- Use the SCREWDRIVER: 1-8.
- Take the CAGE (P) and SHEET MUSIC (Q).
- Walk down.
- Place the SHEET MUSIC (R) and HARMONICA BOWL (S); pour the VINEGAR and UNCORKED BOTTLE (T).
- Take the CAGE DOOR (U).
- Place the CAGE DOOR and COOKIES on the CAGE (V) to acquire the CAGE WITH COOKIES.
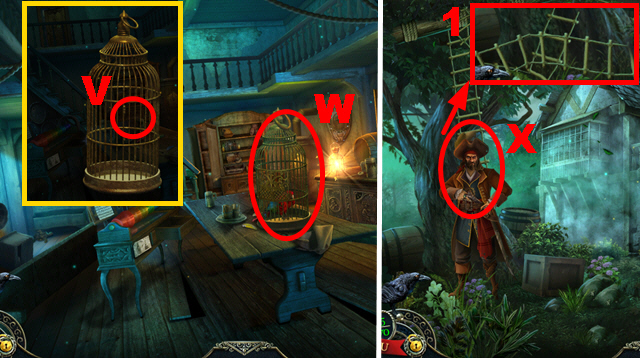
- Place the CAGE WITH COOKIES (W); take the CAGED PARROT.
- Walk down.
- Give the CAGED PARROT to the pirate (X); take the ROPE LADDER (1).
- Walk down.
- Use the ROPE LADDER (Y).
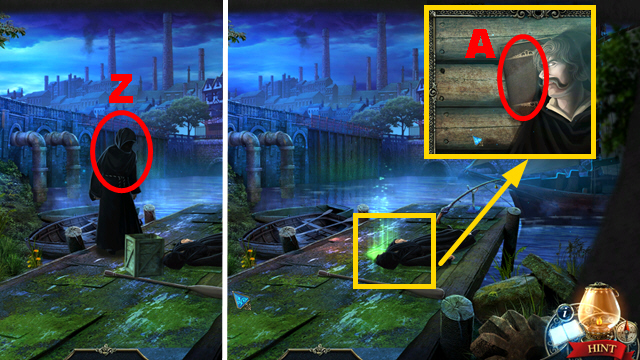
- Take the book (Z).
Chapter 4: Oliver Twist
- Use the DAGGER (A); take the FISH HOOK (B).
- Turn right.
- Push the cart (C).
- Play the HOP (D) to move the statue.
- Take BIRD KEY 1/2 (E).
- Take the LOCKPICKS (F); use the raven (G) to acquire the GAS LAMP KEY.
- Walk down.
- Use the LOCKPICKS (H).
- Play the mini-game.
- Solution: (I).
- Open the box (J) to play the HOP; you receive the FLINT AND STEEL.
- Turn right twice.
- Place the GAS LAMP KEY (K); turn it.
- Use the FLINT AND STEEL (L).
- Play the HOP (M) to receive the CLINICIAN'S HANDBOOK.
- Move forward.
- Read the note (N).
- Play the HOP (O).
- HOP mini-game solution: 1-17.
- You receive the KEY.
- Place the KEY (P); turn it.
- Move forward.
- Use the DAGGER (Q); take the MUSIC BOX KEY (green).
- Place the MUSIC BOX KEY (R).
- Play the HOP (S) to acquire the LOCOMOTIVE.
- Place the LOCOMOTIVE (T).
- Enter the correct code (U); turn the handle (V).
- Take the SCENTED HANDKERCHIEF (W).
- Remove the blanket (X).
- Walk down four times.

- Use the SCENTED HANDKERCHIEF (Y) to play the HOP.
- Remove the wooden plate (Z).
- Take the CROWBAR (A).
- Walk down.
- Use the CROWBAR (B); take BIRD KEY 2/2 (C).
- Go to the Lair of Thieves.
- Place 2 BIRD KEYS (D); take the FIVE-POUND NOTE (E) and CARBIDE LAMP (F).
- Walk down four times.
- Use the FIVE-POUND NOTE (G) to acquire EDDIE'S DOLL; take the EMPTY BOTTLE (H).
- Turn left.
- Collect the FLOWER KEY with the FISH HOOK (I).
- Go to the Thieves Patio.
- Use the FLOWER KEY (J); examine the bag (K).
- Play the mini-game.
- Solution: Lx5.
- Take the BANDAGE (green), ANTISEPTIC (blue), LINT (orange), and HERBAL BOX (purple).
- Place the CLINICIAN'S BOOK on the HERBAL BOX (M).
- Play the mini-game.
- Solution: (N).
- Take the ARNICA MONTANA (O).
- Walk down three times, turn left.

- Use the CLINICIAN'S HANDBOOK, LINT, ANTISEPTIC, ARNICA MONTANA, and BANDAGE (P).
- Take the FLOWER SCHEMATIC (Q).
- Place the EMPTY BOTTLE (R); turn the handle (S) to acquire the BOTTLE WITH WATER.
- Go to the Lair of Thieves.
- Place the FLOWER SCHEMATIC (green).
- Play the mini-game.
- Solution: T-U-V-W-X-U-Y-Z-T-A-V-U-Y-B.
- Take the BOOKS (C) and CALCIUM CARBIDE (D).
- Go to the Cloaca.
- Use the CALCIUM CARBIDE, BOTTLE WITH WATER (E), and FLINT AND STEEL on the CARBIDE LAMP (F) to acquire the LIT CARBIDE LAMP.
- Move forward.
- Use the LIT CARBIDE LAMP (G).
- Use the BOOKS (H); take the DOLL MECHANISM (I).
- Connect the DOLL MECHANISM to EDDIE'S DOLL (J); turn the mechanism to acquire the TALKING DOLL.
- Use the TALKING DOLL (K).
- Go through the portal.
Chapter 5: Canterbury
- Take the GOLDEN GARNISH (L).
- Play the mini-game (M).
- Move forward.
- Take KEY PART 1/3 (N).
- Use the SPYGLASS (O) and GOLDEN GARNISH (P) to acquire the DOOR KNOCKER.
- Walk down.
- Place the DOOR KNOCKER (Q); push it.
- Take the DOOR HANDLE (R).
- Move forward.
- Place the DOOR HANDLE (S); open the door.
- Play the HOP (T).
- HOP mini-game solution: (U).
- You receive the GEAR.
- Walk down.
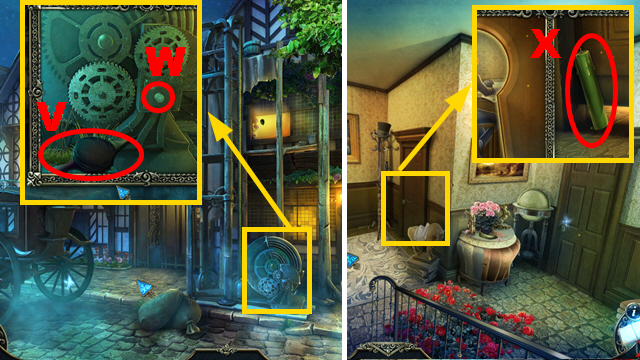
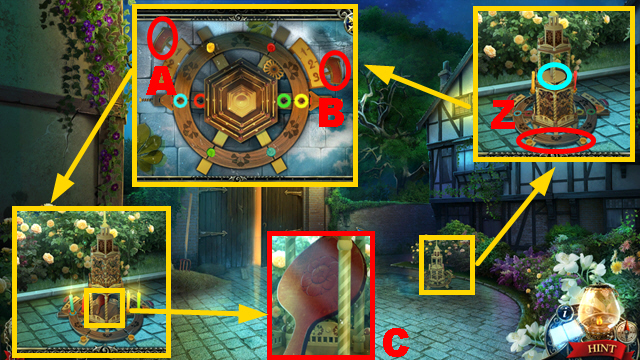
- Take the BELLOWS (V).
- Place the GEAR (W); turn it.
- Enter the elevator.
- Take the GREEN CANDLE (X).
- Turn left.
- Take the SOPORIFIC MUSIC BOX (Y) and BUREAU HANDLE (Z).
- Walk down.
- Place the BUREAU HANDLE (A); open it.
- Play the mini-game.
- Solution: (B).
- Take the MUSIC BOX CYLINDER (C) and KEY PART 2/3 (D).
- Turn left.
- Connect the MUSIC BOX CYLINDER to the SOPORIFIC MUSIC BOX (E) to acquire the MUSICAL BOX.
- Place the MUSICAL BOX (F).
- Open the drawer; take the PISTOL (G), NOTICE OF BANKRUPTCY (H), and KEY (I).
- Use the KEY (J); move the folders.
- Take the WIRE (K); read the file.
- Walk down.
- Use the NOTICE OF BANKRUPTCY (L) and WIRE (M); pull the notice.
- Take the KEY (N).
- Place the KEY (O).
- Walk down.
- Use the PISTOL (P); take KEY PART 3/3 (green).
- Go to Wickfield's Lounge.
- Place 3 KEY PARTS (Q).
- Play the mini-game.
- Solution: (R).
- Take the NOZZLE (S).
- Play the HOP (T); pull out the diary (U).
- Place the NOZZLE on the LIT CARBIDE LAMP (V) to acquire the MODERNIZED CARBIDE LAMP.
- Use the MODERNIZED CARBIDE LAMP three times (W); take the folder (X) and BLUE CANDLE (Y).
- Go to the Canterbury Patio.
- Place the BLUE CANDLE and GREEN CANDLE (Z); inspect the area (blue).
- Play the mini-game.
- Solution: A-Bx2-A.
- Take the BELLOWS PART (C).
- Connect the BELLOWS PART to the BELLOWS (D).
- Go to Wickfield's Law Office.
- Use the BELLOWS (E).
- Play the HOP; take the DEATH FIGURE (F).
- Turn right.
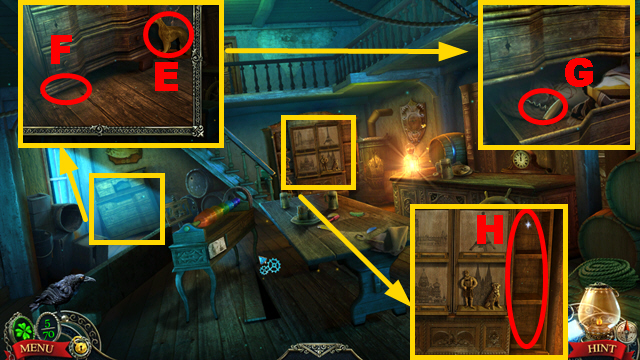
- Use the BELLOWS (G); open and take the diary.
- Examine the shelf (H).
- Play the mini-game.
- Solution: (I).
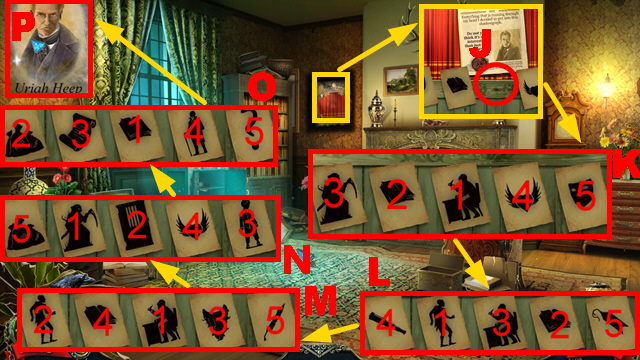
- Place the DEATH FIGURE (J).
- Play the mini-game.
- Solution: K-O.
- The position of the pictures is randomized each round, but the sequence remains the same.
- Take URIAH HEEP'S PHOTO (P).
- Walk down.
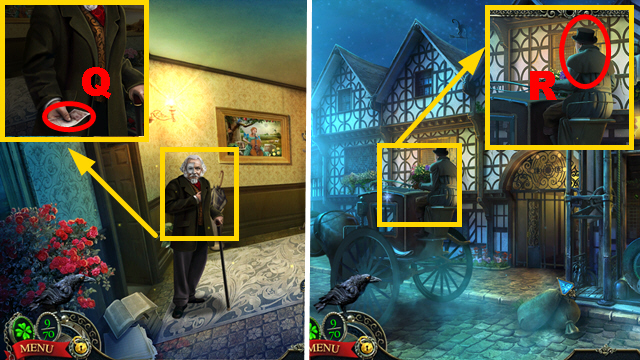
- Take the BANKNOTE (Q).
- Walk down.
- Use the BANKNOTE (R).
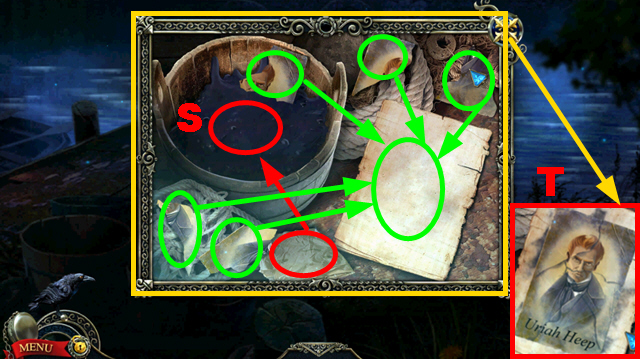
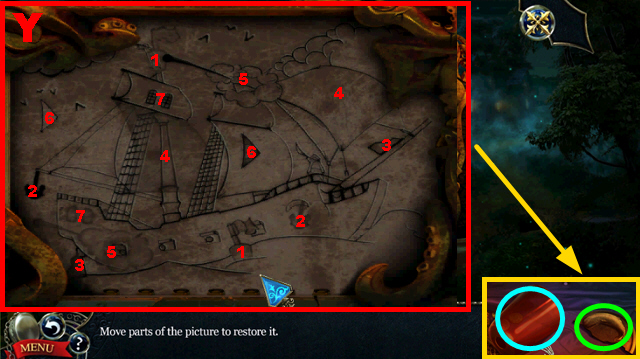
- Use the cloth (S); restore the photo (green).
- Take URIAH HEEP'S PHOTO (T).
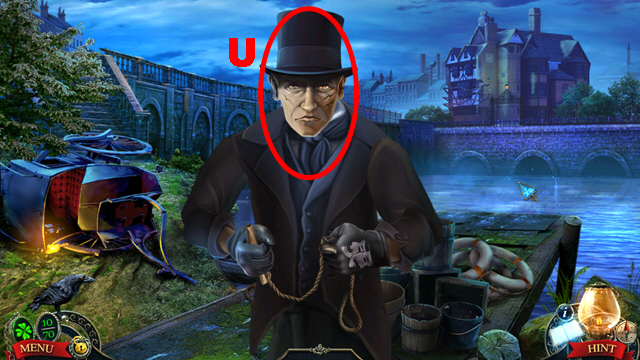
- Use URIAH HEEP'S PHOTO (U).
- Go through the portal.
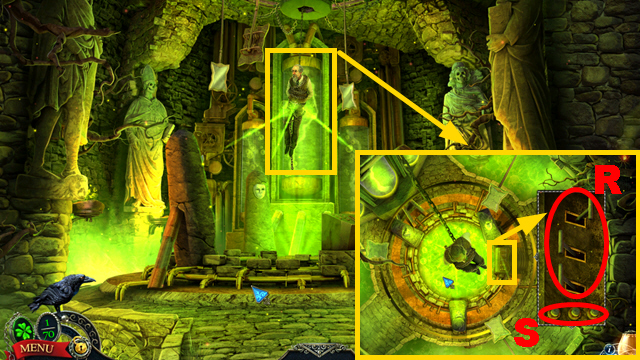
Chapter 6: Our Mutual Friend
- Take the ROPE (V), ANCHOR (W), and VILLAIN'S BOOT (X).
- Use the VILLAIN'S BOOT (Y).
- Play the mini-game.
- Solution: 1-5.
- Take the SCOOP NET (Z).
- Move forward.
- Use the raven (A); take the HANDLE (B).
- Walk down.
- Place the HANDLE (C).
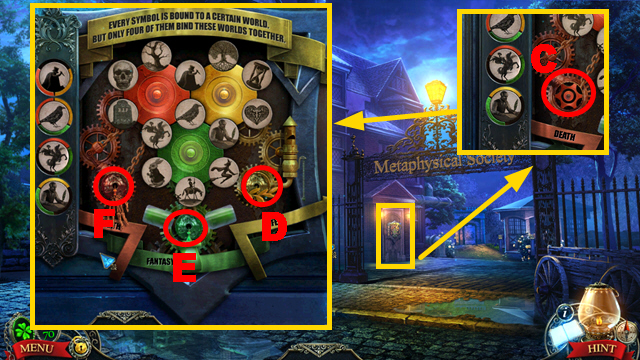
- Play the mini-game.
- Solution: Dx3-Ex4-Fx5.
- Enter the Metaphysical Society Hall.
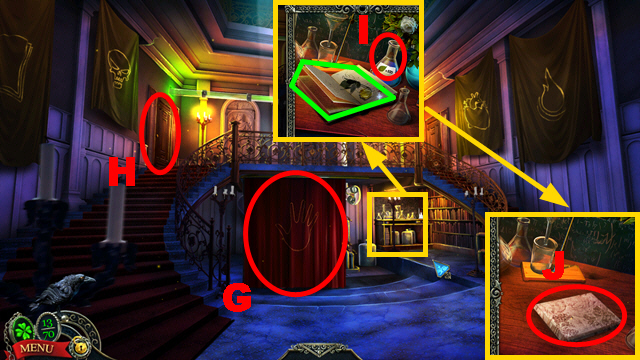
- Open the curtain (G) and door (H).
- Take the PLANT FOOD (I), book (green), and BAS-RELIEF PART (J).
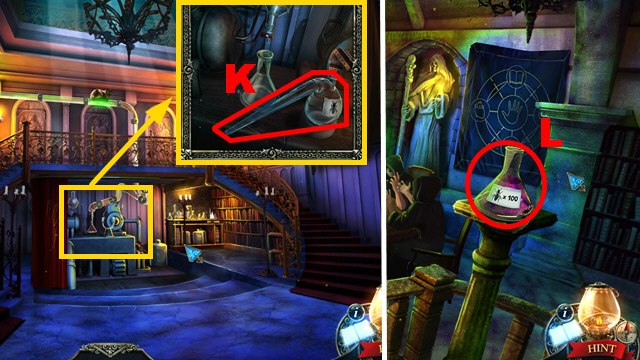
- Take the RETORT (K).
- Turn left.
- Take the TERMITE FOOD (L).
- Go to the Metaphysical Society Park.
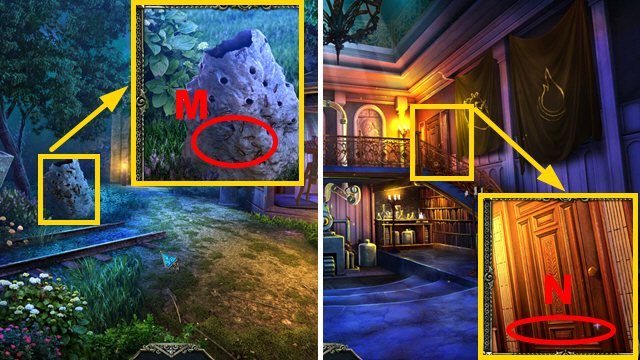
- Place the RETORT (M) to acquire the RETORT WITH TERMITES.
- Go to the Metaphysical Society Hall.
- Use the RETORT WITH TERMITES and TERMITE FOOD (N).
- Turn right.
- Take the note (O) and HORSEMAN FIGURE (P).
- Walk down twice, turn right.
- Place the BAS-RELIEF PART (Q).
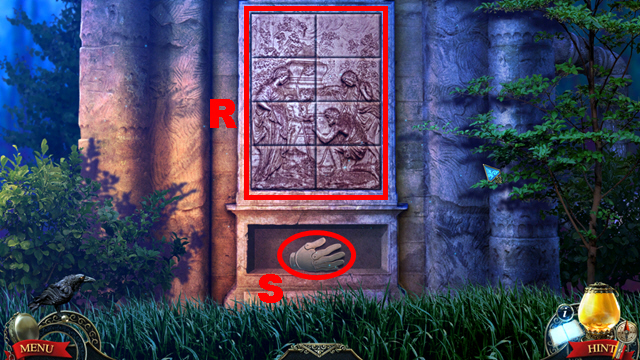
- Play the mini-game.
- Solution: (R).
- Take the HAND (S).
- Go to the Chairman's Study.
- Place the HAND (T) to play the HOP; you receive the hood.
- Walk down twice, turn right.
- Place the HORSEMAN FIGURE (U).
- Play the mini-game.
- Solution: V-A.
- The picture positions in each round are randomized, but the sequence remains the same.
- Take the CLAMP (B).
- Walk down.
- Place the CLAMP (C).
- Turn left twice.
- Pull the lever (D); take the HOURGLASS (E).
- Play the mini-game.
- Solution: (F).
- Take the CATNIP SEEDS (G).
- Walk down, turn right.
- Use the CATNIP SEEDS, rake (blue), and PLANT FOOD on the pot (H).
- Take the CATNIP (I).
- Walk down three times.
- Use the SCOOP NET (J); take the ANCHOR RING (K).
- Turn left.
- Connect the ANCHOR RING and ROPE to the ANCHOR (L) to acquire the ROPED ANCHOR.
- Use the ROPED ANCHOR (M); take the BALL OF YARN (N).
- Apply the CATNIP to the BALL OF YARN (O) to acquire the COATED CLEW.
- Turn left.
- Throw the COATED CLEW (P).
- Turn the switch (Q); take the FLASK (R).
- Pour the FLASK into the CARBIDE LAMP (S).
- Walk down, turn right.
- Take the CAMERA OTTICA (T).
- Go to the Chairman's Study.
- Place the HOURGLASS (U).
- Take the MUGSHOTS (V).
- Walk down, turn left.
- Connect the CAMERA OTTICA (W) and MUGSHOTS (X) to the CARBIDE LAMP; you receive the OBSCURA LAMP.
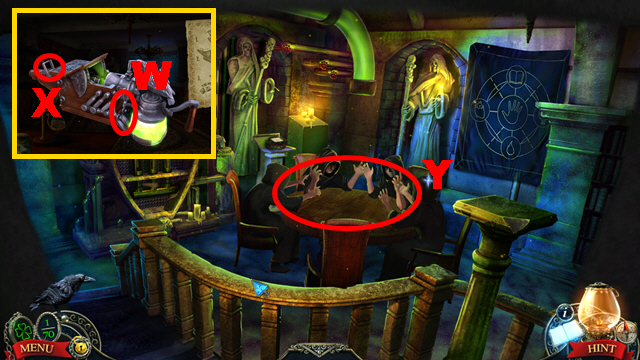
- Use the OBSCURA LAMP (Y).
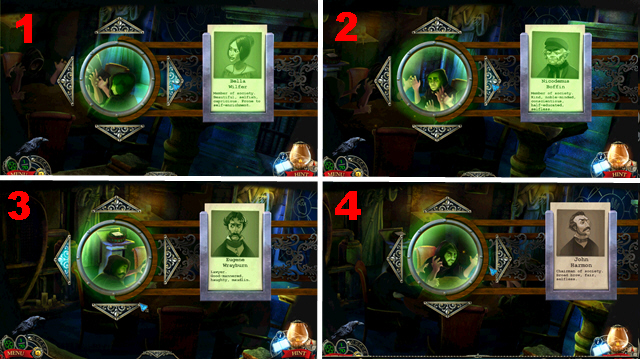
- Identify the four members: 1-4.
- Walk down three times.
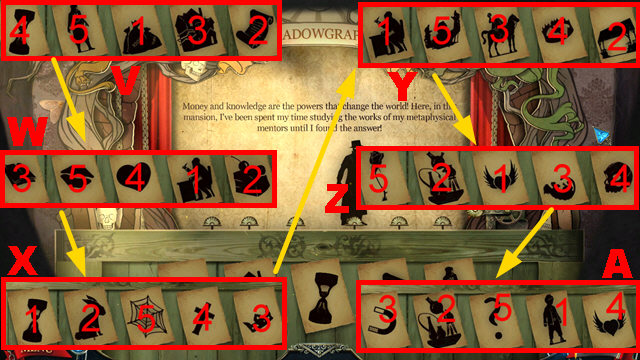
- Use the OBSCURA LAMP (Z) to play the HOP.
- Open the book (A).
Chapter 7: Cloisterham
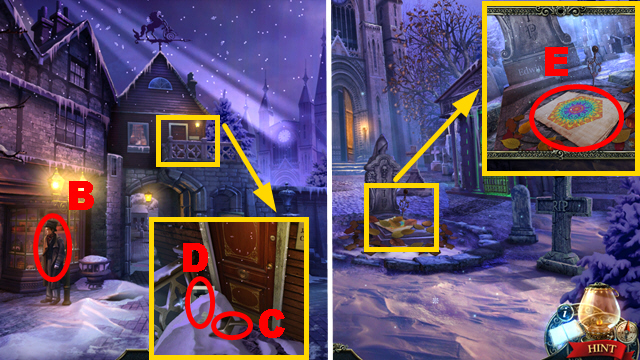
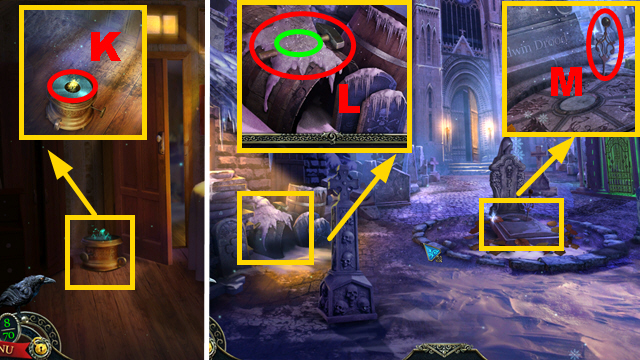
- Talk to the boy (B).
- Use the shovel (C); take JOHN JASPER'S PHOTO (D).
- Move forward.
- Remove leaves three times; take the KALEIDOSCOPE IMAGE (E).
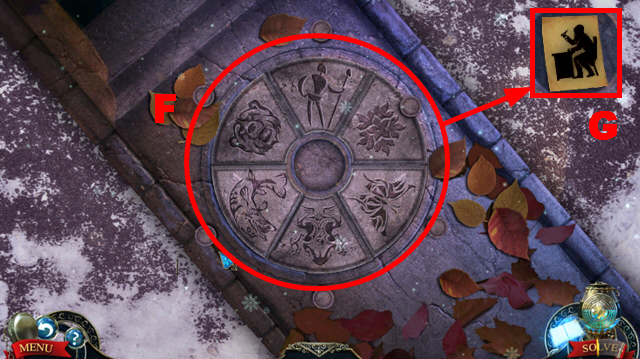
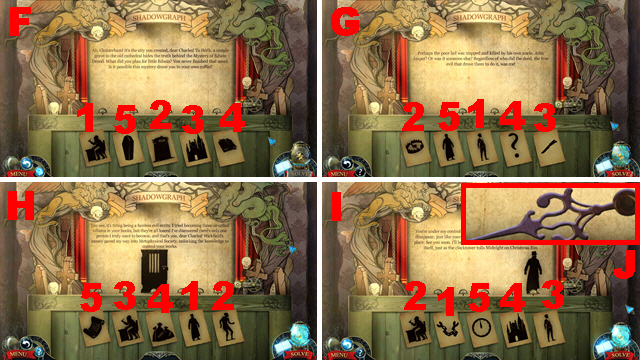
- Play the mini-game.
- Solution: (F).
- Take the CHARLES DICKENS FIGURE (G).
- Move forward.
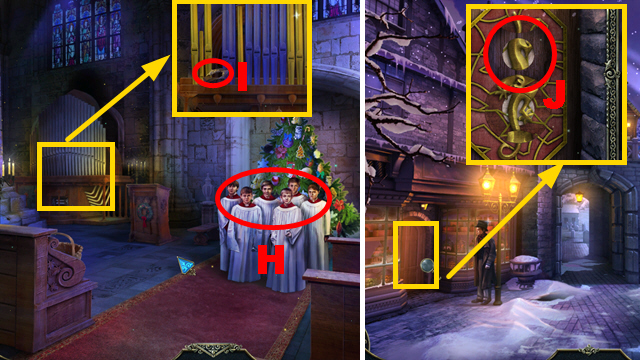
- Talk to the choir (H).
- Take the LOCK PIECE (I).
- Walk down twice.
- Place the LOCK PIECE (J).
- Play the mini-game.
- Solution: L-K-L-K.
- Turn left to play the HOP; you receive the TURKISH DELIGHT.
- Give the TURKISH DELIGHT to the boy (M); take the PIPE (N).
- Move forward twice.
- Place the PIPE (O).
- Play the mini-game.
- Solution: (P).
- Take the JASPER KEY (Q).
- Walk down twice.
- Use the JASPER KEY (R).
- Go through the door.
- Place the KALEIDOSCOPE IMAGE (S).
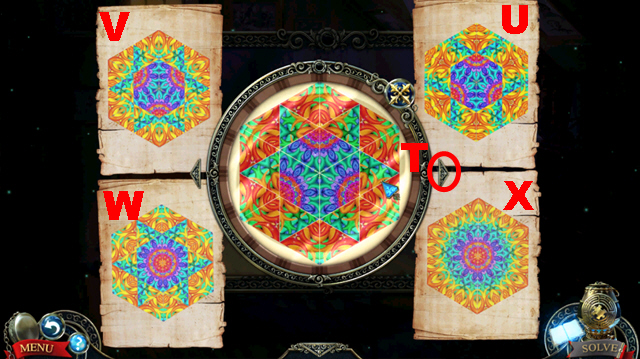
- Play the mini-game.
- Solution: Tx2-U-Tx2-V-Tx2-W-T-X.

- Play the HOP (Y) to acquire the EMPTY KETTLE.
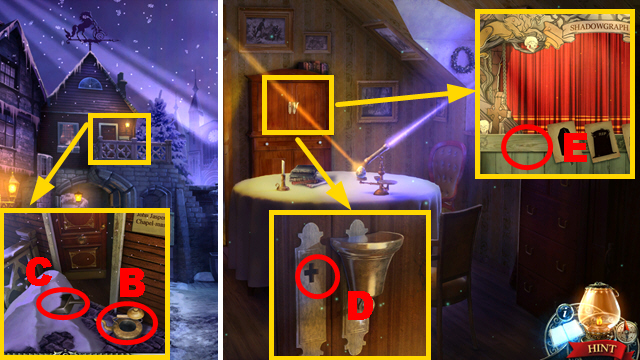
- Go to the Cathedral.
- Play the HOP (Z); take the BELL KEY (A).
- Walk down twice.
- Place the EMPTY KETTLE (B); use the shovel (C) to acquire the KETTLE OF SNOW.
- Go through the door.
- Place the BELL KEY (D) and CHARLES DICKENS PICTURE (E).
- Play the mini-game.
- Solution: F-I.
- The picture positions in each round are randomized, but the sequence remains the same.
- Take the CATHEDRAL CLOCK HAND 1/2 (J).
- Place the KETTLE OF SNOW (K) to acquire the BOILING KETTLE.
- Go to the Cemetery.
- Use the BOILING KETTLE (green); take the HAMMER (L).
- Use the HAMMER (M); take CATHEDRAL CLOCK HAND 2/2.
- Walk down.

- Use the SPYGLASS (N) and 2 CATHEDRAL CLOCK HANDS (O).
- Move forward, turn right.
- Use the OBSCURA LAMP (P) and JOHN JASPER'S PHOTO (Q).
- Pull three levers (R); push three buttons (S).
- Congratulations, you have completed Midnight Mysteries: Ghostwriting.
Created at: 2015-02-01