

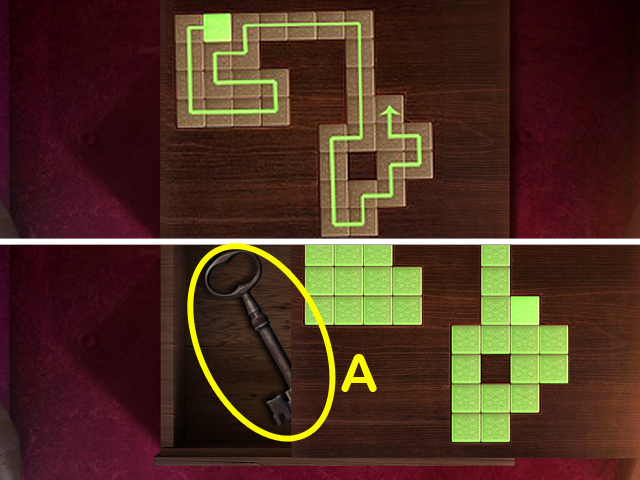
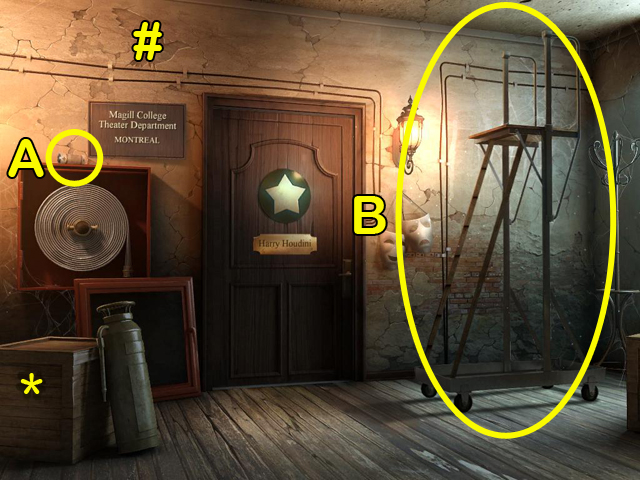
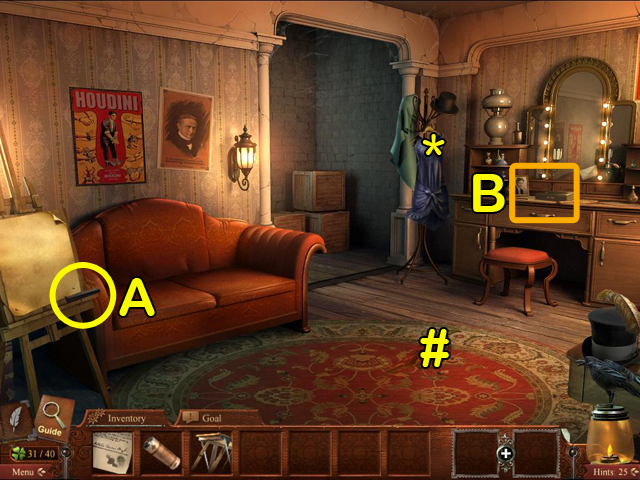
General Tips
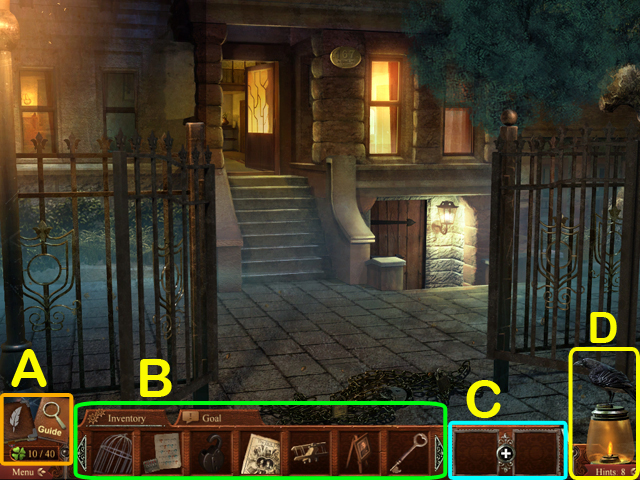 • This walkthrough is not broken into chapters, here are some
tips to help you navigate this guide. • The best way to use
this walkthrough is by clicking on the “CTRL” and “F” keys on
your keyboard simultaneously to bring up a search box. • Type
the keyword into the search box at the bottom of your screen
and click on “NEXT” to find the section you need help with.
Clicking “NEXT” again will bring up all instances in which
that keyword was mentioned in the guide. • Hidden Object
Scenes and some mini-games are randomized - your solution may
vary. • Hidden Object Scenes will be referred to as HOS. • The
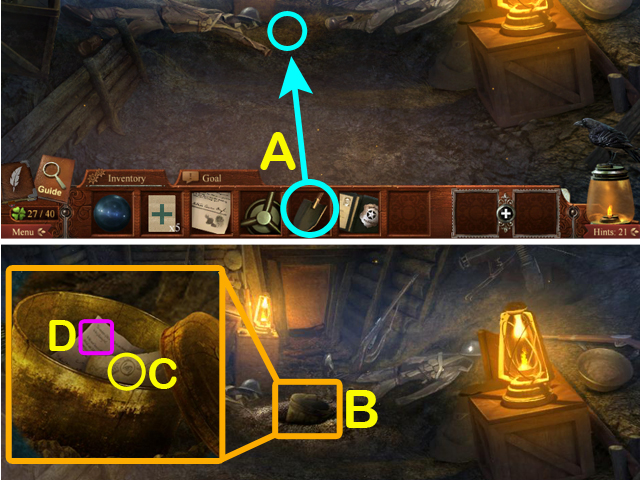
journal (A) will track your progress and note clues. • Collect
40 clovers (A) to unlock Unlimited Hidden Object Mode. • Tools
that you collect will go into your Inventory (B). • If you
have more than seven tools, left-click the arrow buttons (B)
to scroll left or right. • Some items need to be combined to
create a tool. Move the two items to the combined item slots
and left-click the plus button to create the tool (C). •
Collect ravens to use as hints. Left-click the Hints button
(D) to use a hint. • During HOS, left-click an item in the
list to see its shape in the lantern (D). Left-click the Hints
button to see the location of the item in the scene.
Walkthrough
• This walkthrough is not broken into chapters, here are some
tips to help you navigate this guide. • The best way to use
this walkthrough is by clicking on the “CTRL” and “F” keys on
your keyboard simultaneously to bring up a search box. • Type
the keyword into the search box at the bottom of your screen
and click on “NEXT” to find the section you need help with.
Clicking “NEXT” again will bring up all instances in which
that keyword was mentioned in the guide. • Hidden Object
Scenes and some mini-games are randomized - your solution may
vary. • Hidden Object Scenes will be referred to as HOS. • The
journal (A) will track your progress and note clues. • Collect
40 clovers (A) to unlock Unlimited Hidden Object Mode. • Tools
that you collect will go into your Inventory (B). • If you
have more than seven tools, left-click the arrow buttons (B)
to scroll left or right. • Some items need to be combined to
create a tool. Move the two items to the combined item slots
and left-click the plus button to create the tool (C). •
Collect ravens to use as hints. Left-click the Hints button
(D) to use a hint. • During HOS, left-click an item in the
list to see its shape in the lantern (D). Left-click the Hints
button to see the location of the item in the scene.
Walkthrough
Walkthrough
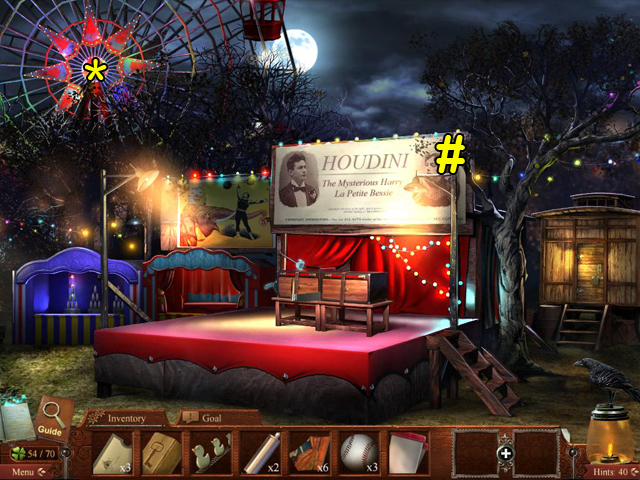
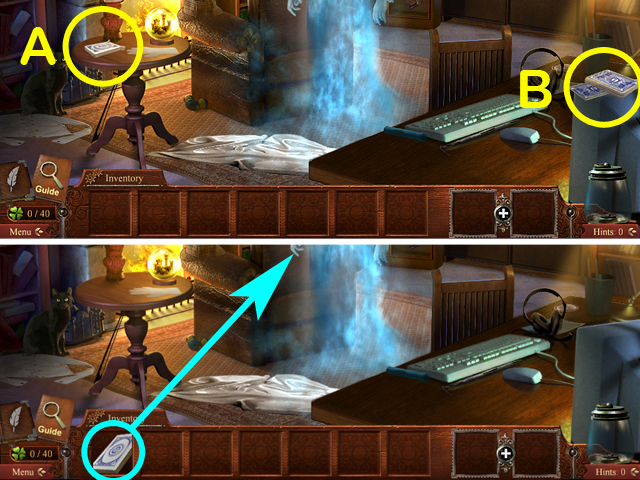 • Take the EMPTY CARD BOX (A). • Take the CARDS (B). • Combine
the EMPTY CARD BOX with the CARDS to create a BOX OF CARDS. •
Give the BOX OF CARDS to Bess. • Pick one of the cards that
Bess throws out.
• Take the EMPTY CARD BOX (A). • Take the CARDS (B). • Combine
the EMPTY CARD BOX with the CARDS to create a BOX OF CARDS. •
Give the BOX OF CARDS to Bess. • Pick one of the cards that
Bess throws out.
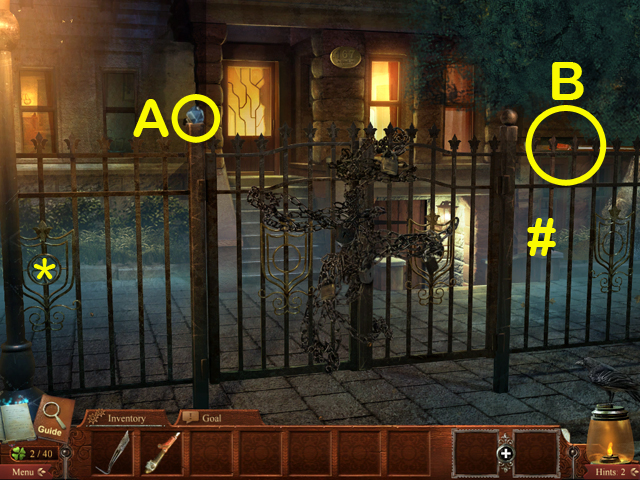
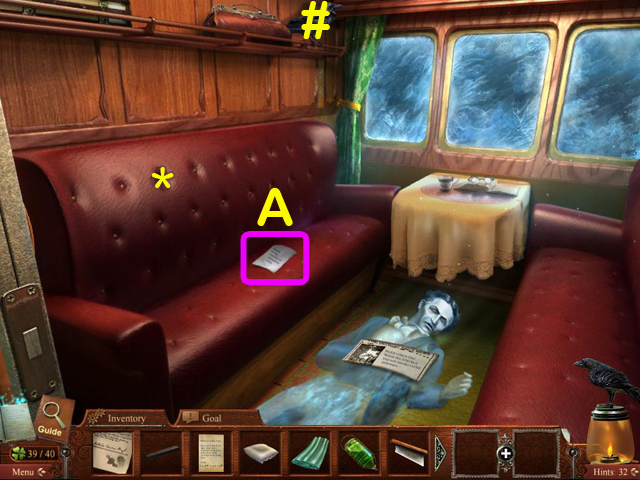
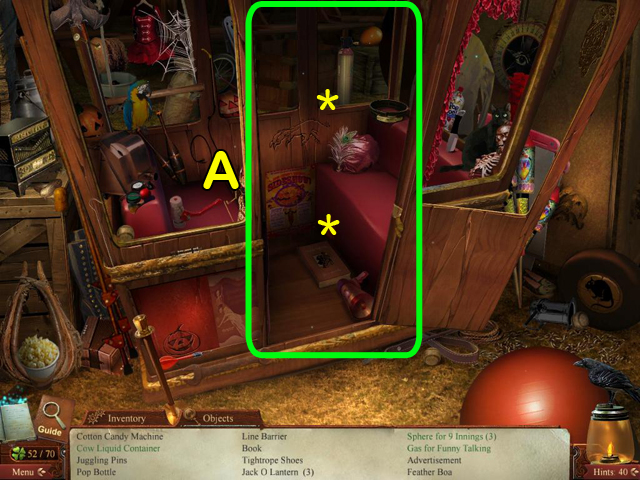
 • Locate all of the items in the list. • Open the balcony
doors and take the 1/52 RAVEN (#). • Take the 1/70 CLOVER (*).
• The last item to find is the DENTAL PICK (A). • Talk to
Bess. • Take Bess' hand when she offers it to you.
• Locate all of the items in the list. • Open the balcony
doors and take the 1/52 RAVEN (#). • Take the 1/70 CLOVER (*).
• The last item to find is the DENTAL PICK (A). • Talk to
Bess. • Take Bess' hand when she offers it to you.
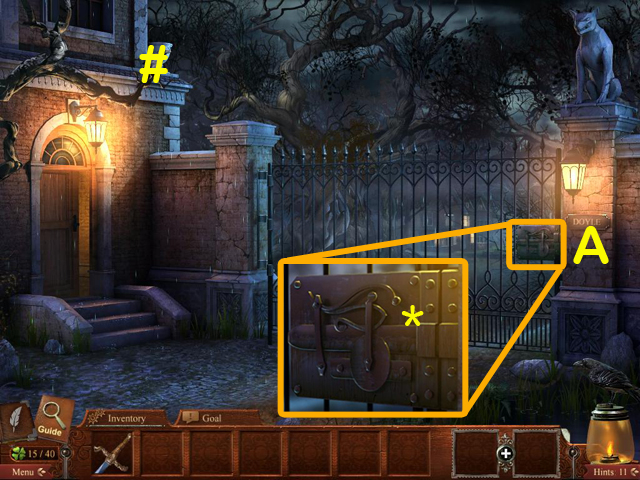
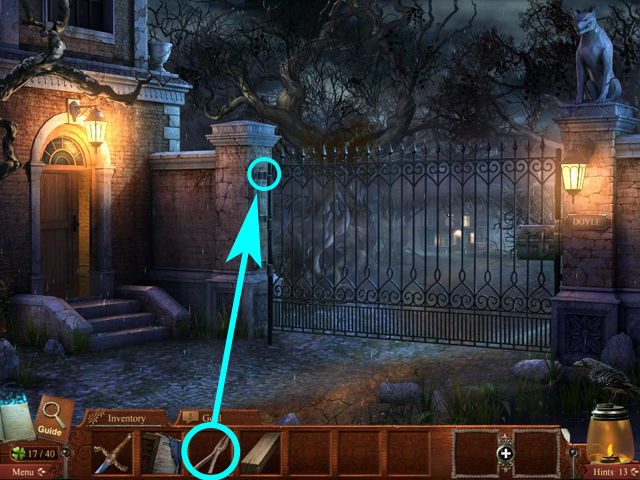
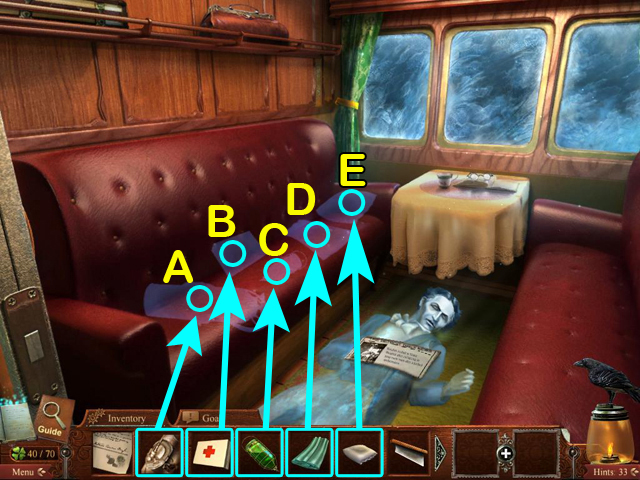
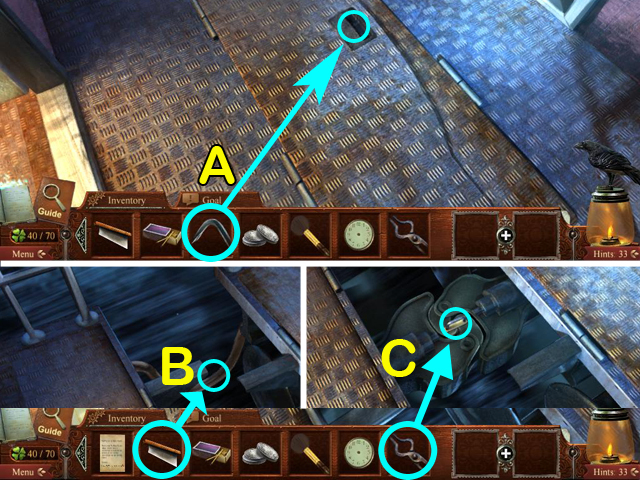
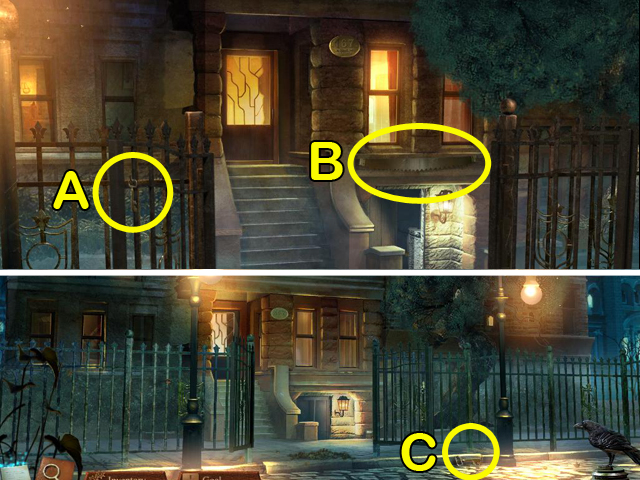
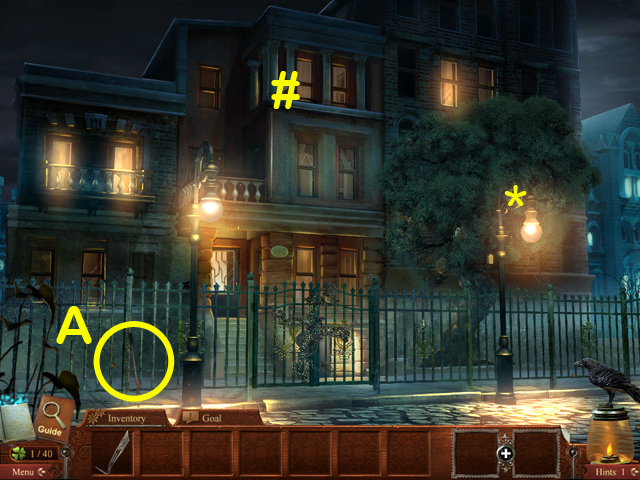 • Take the BOLT CUTTER HALF (A). • Take the 2/52 RAVEN (#). •
Take the 2/70 CLOVER (*). • Move up to the gate.
• Take the BOLT CUTTER HALF (A). • Take the 2/52 RAVEN (#). •
Take the 2/70 CLOVER (*). • Move up to the gate.
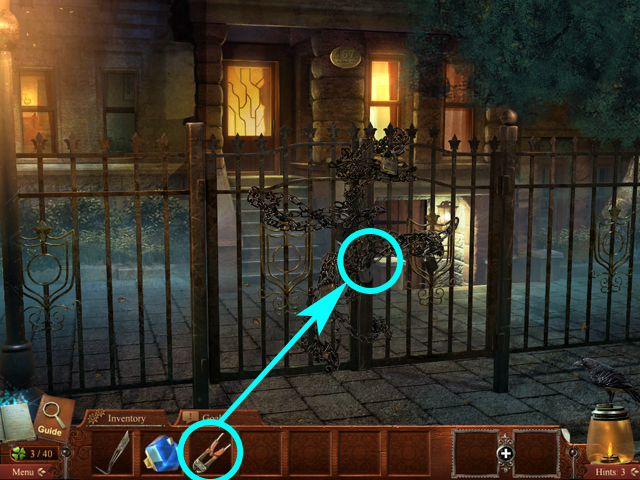
 • Take the DOORKNOB (A). • Take the BOLT CUTTER HALF (B). •
Take the 3/52 RAVEN (#). • Take the 3/70 CLOVER (*). • Combine
the two BOLT CUTTER HALVES to create a BOLT CUTTER.
• Take the DOORKNOB (A). • Take the BOLT CUTTER HALF (B). •
Take the 3/52 RAVEN (#). • Take the 3/70 CLOVER (*). • Combine
the two BOLT CUTTER HALVES to create a BOLT CUTTER.
 • Use the BOLT CUTTER to cut the lock off the gate.
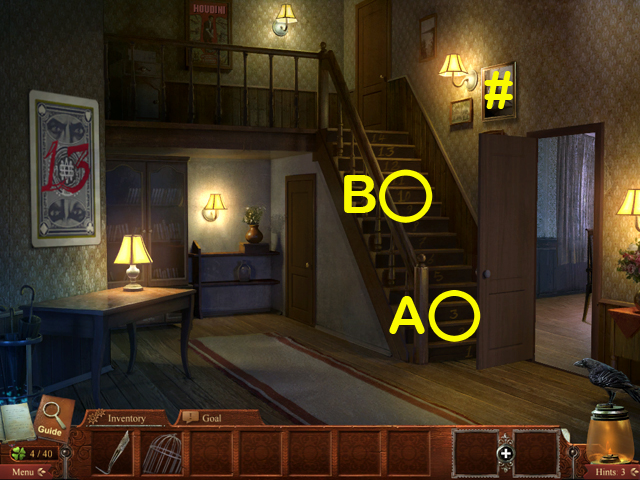
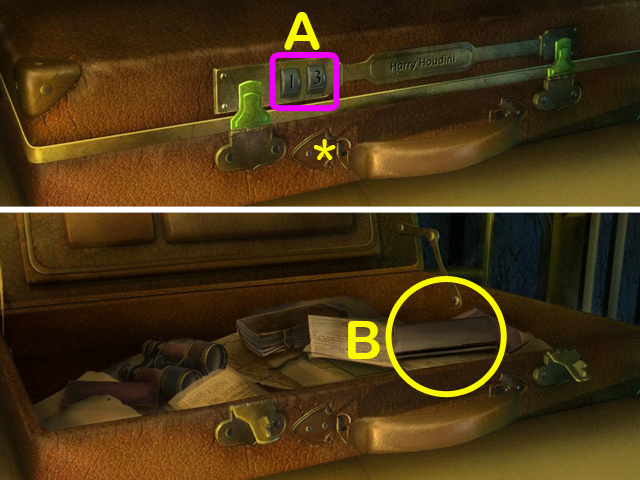
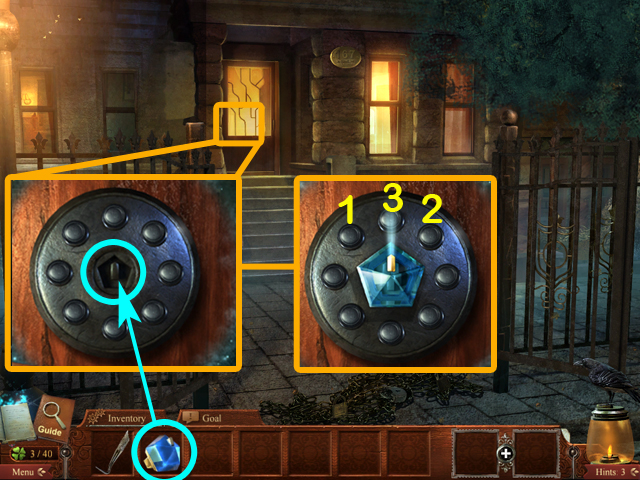 • Examine the front door. • Put the DOORKNOB into the hole. •
Press the buttons around the doorknob in numerical order
(1-3). • Go into the house.
• Examine the front door. • Put the DOORKNOB into the hole. •
Press the buttons around the doorknob in numerical order
(1-3). • Go into the house.
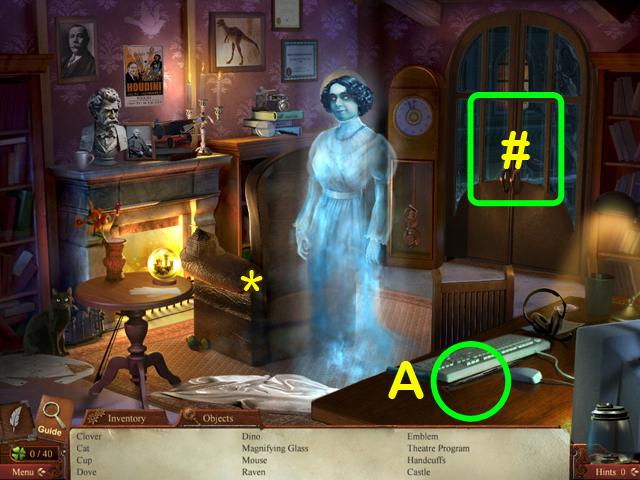
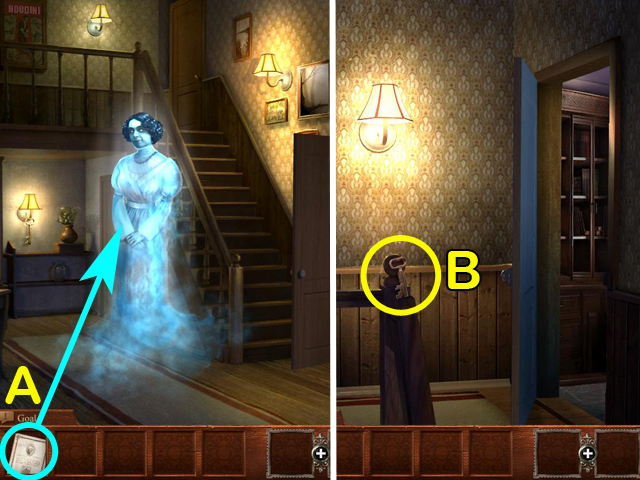
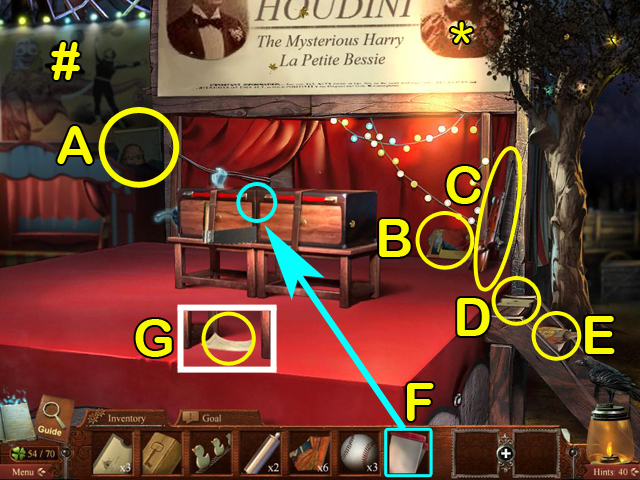
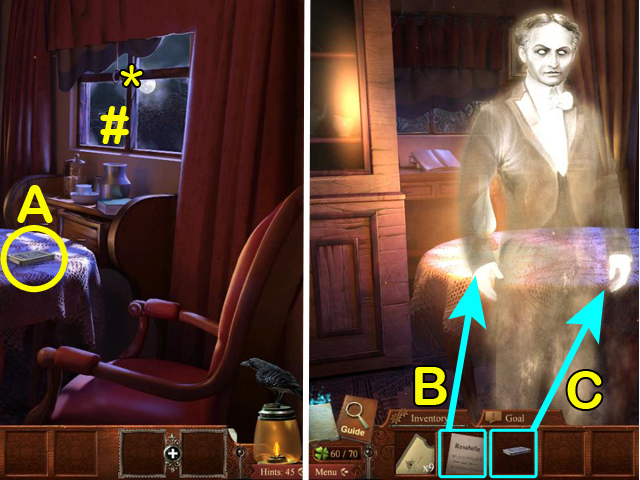
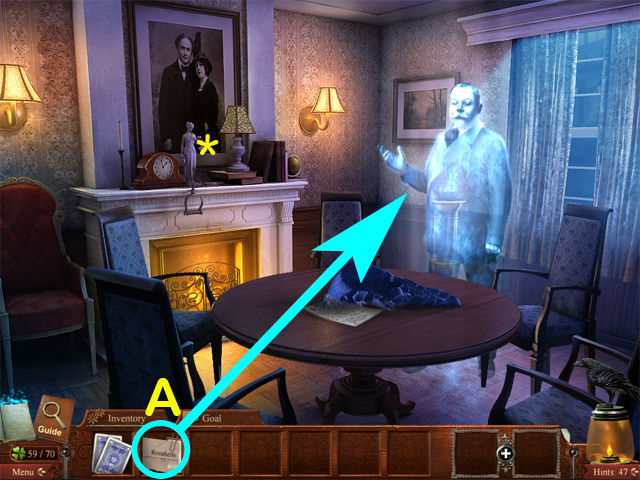
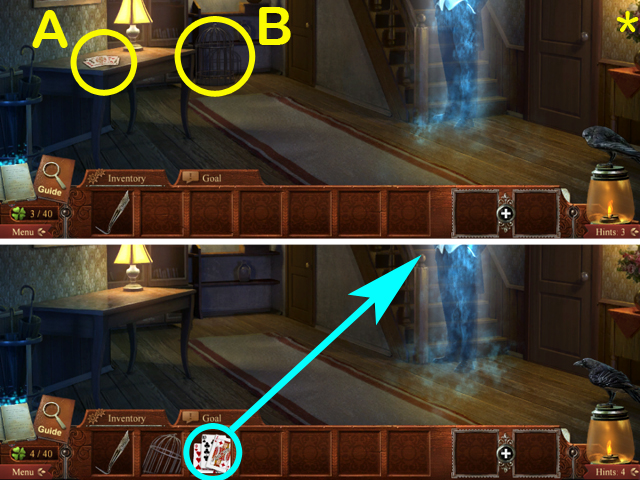 • Take the CARDS (A). • Take the BIRD CAGE (B). • Take the
4/70 CLOVER (*). • Give the CARDS to the ghost. • Talk to
Thurston.
• Take the CARDS (A). • Take the BIRD CAGE (B). • Take the
4/70 CLOVER (*). • Give the CARDS to the ghost. • Talk to
Thurston.
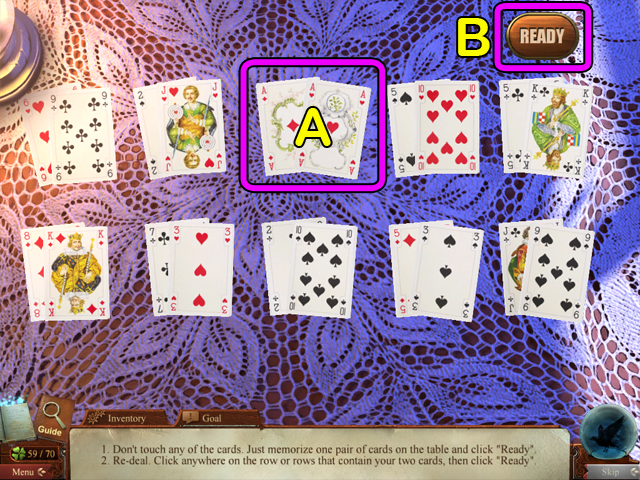
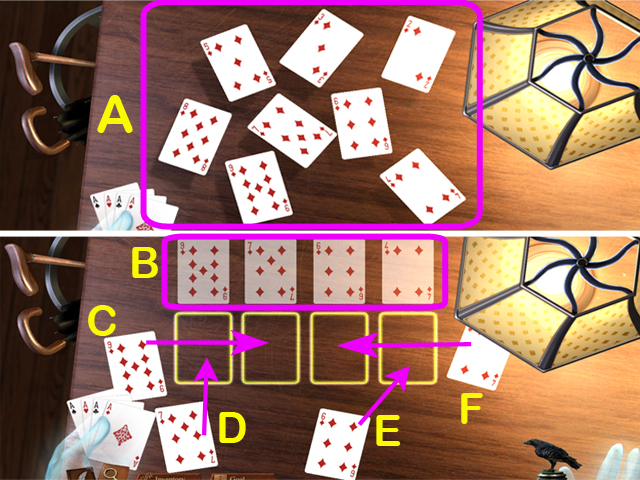 • Pick any four cards (A). • Arrange those four cards (C-F) in
a different sequence than the cards at the top (B). • Thurston
will perform the rest of the trick.
• Pick any four cards (A). • Arrange those four cards (C-F) in
a different sequence than the cards at the top (B). • Thurston
will perform the rest of the trick.
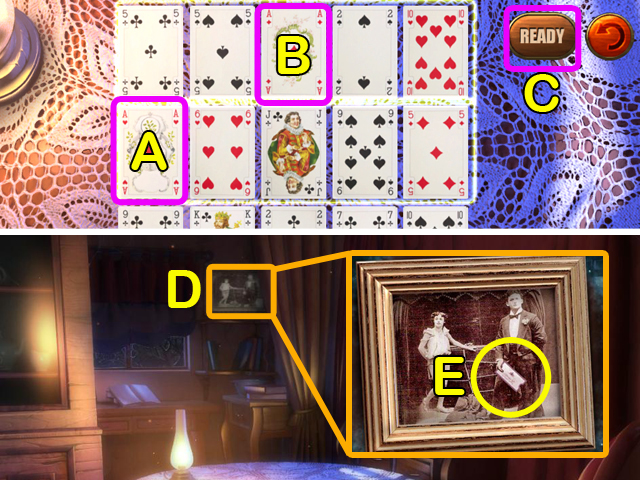
 • Take the NUMBER 3 (A). • Take the NUMBER 1 (B). • Take the
4/52 RAVEN (#). • Combine the NUMBER 3 with the NUMBER 1 to
create a CUSTOM KEY. • Go upstairs.
• Take the NUMBER 3 (A). • Take the NUMBER 1 (B). • Take the
4/52 RAVEN (#). • Combine the NUMBER 3 with the NUMBER 1 to
create a CUSTOM KEY. • Go upstairs.
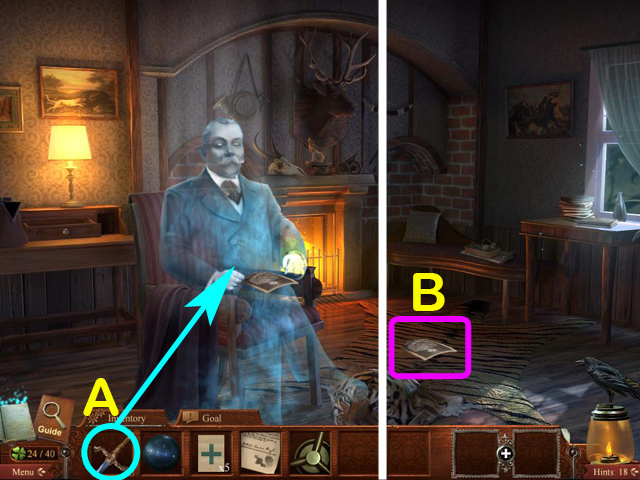
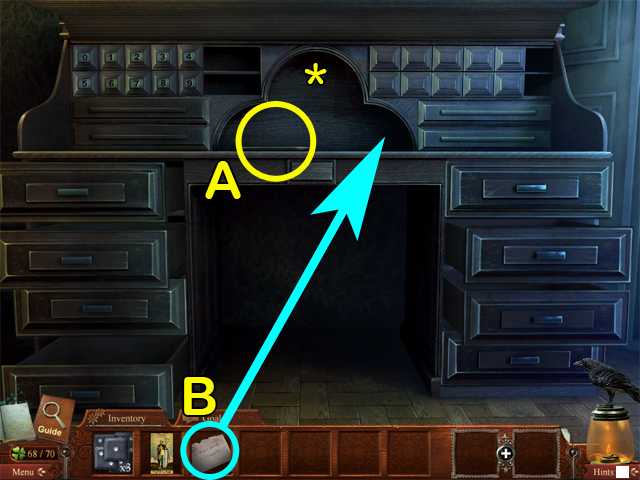
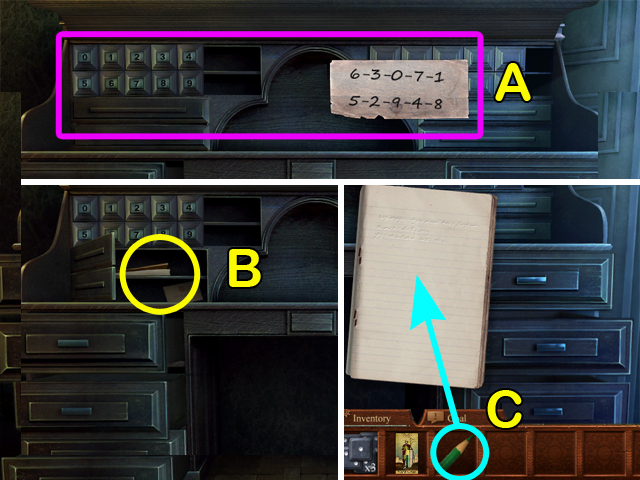
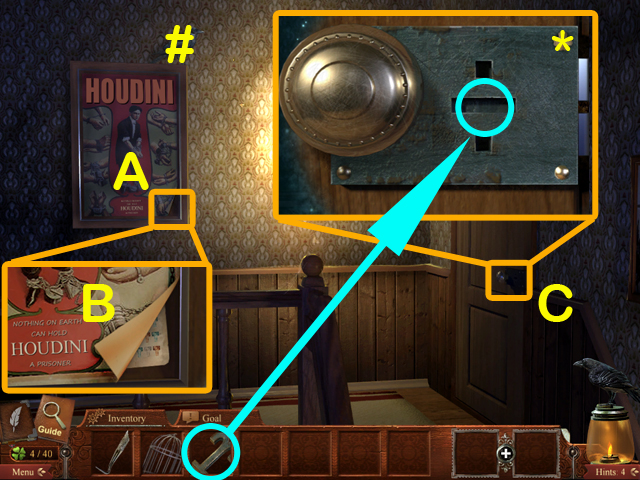 • Take the 5/52 RAVEN (#). • Examine the picture on the wall
(A) and take the Lock Diagram (B). • Examine the lock on the
door (C). • Take the 5/70 CLOVER (*). • Use the CUSTOM KEY to
unlock the door. • Go into the study.
• Take the 5/52 RAVEN (#). • Examine the picture on the wall
(A) and take the Lock Diagram (B). • Examine the lock on the
door (C). • Take the 5/70 CLOVER (*). • Use the CUSTOM KEY to
unlock the door. • Go into the study.
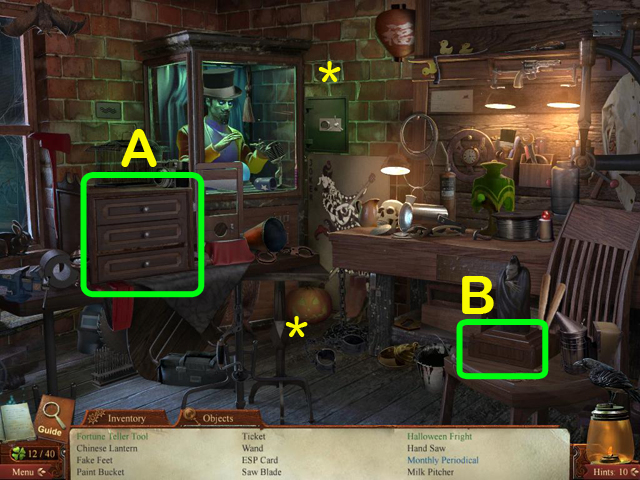
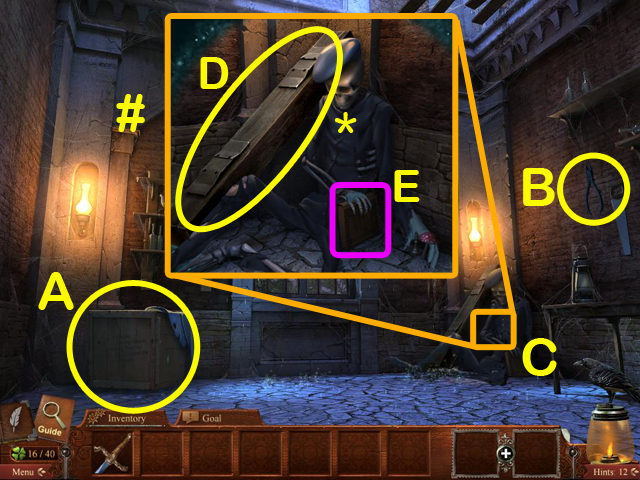
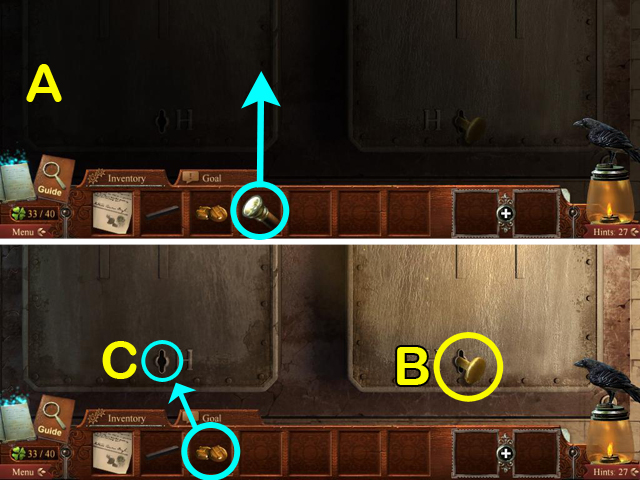
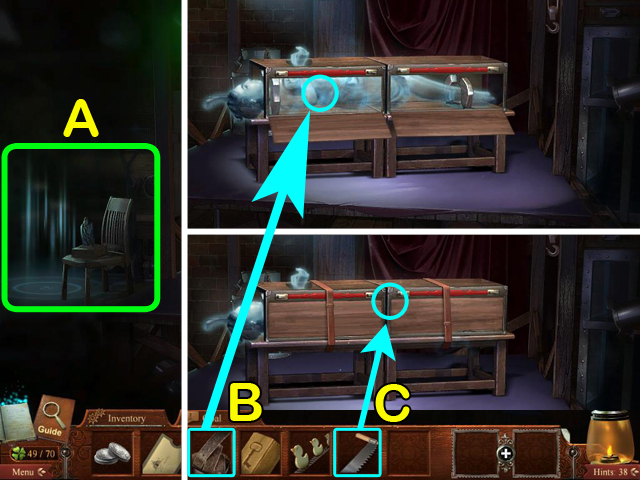
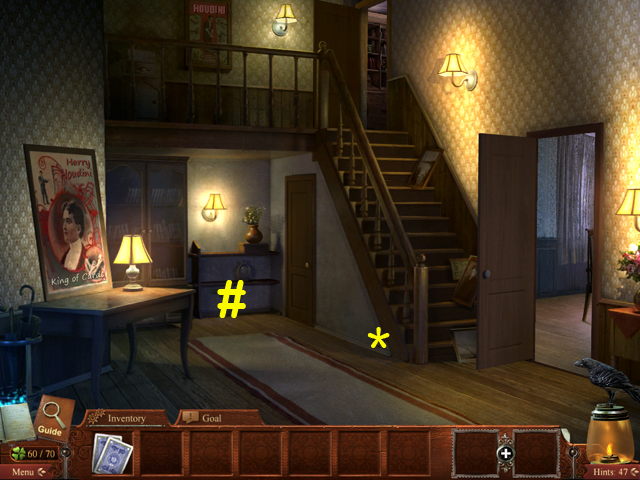
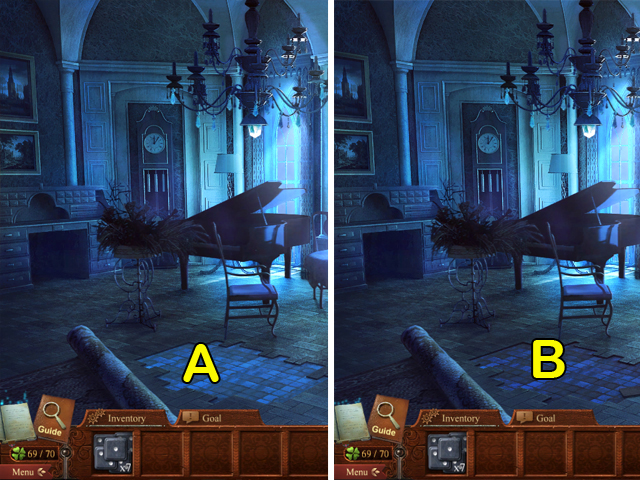
 • Take the 6/70 CLOVER (*). • Take the 6/52 RAVEN (#). •
Examine the trunk (A) to access a HOS.
• Take the 6/70 CLOVER (*). • Take the 6/52 RAVEN (#). •
Examine the trunk (A) to access a HOS.
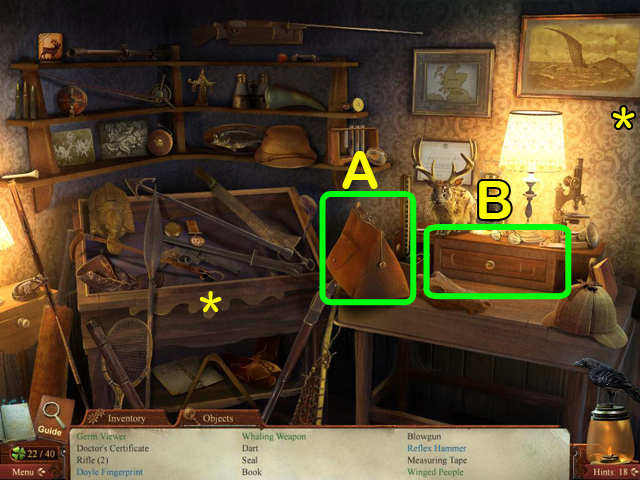
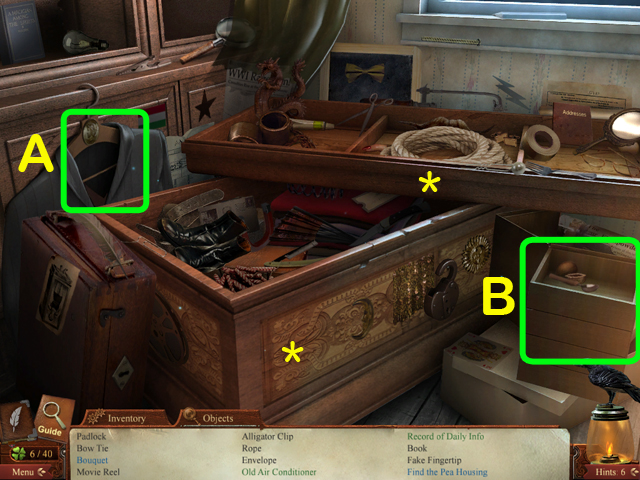 • Take the 7/70 and 8/70 CLOVERS (*). • Find the items listed.
Some items may be hidden within interactive areas (A, B). •
After completing the HOS you will have the PADLOCK and the
POSTER. • Go to the desk.
• Take the 7/70 and 8/70 CLOVERS (*). • Find the items listed.
Some items may be hidden within interactive areas (A, B). •
After completing the HOS you will have the PADLOCK and the
POSTER. • Go to the desk.
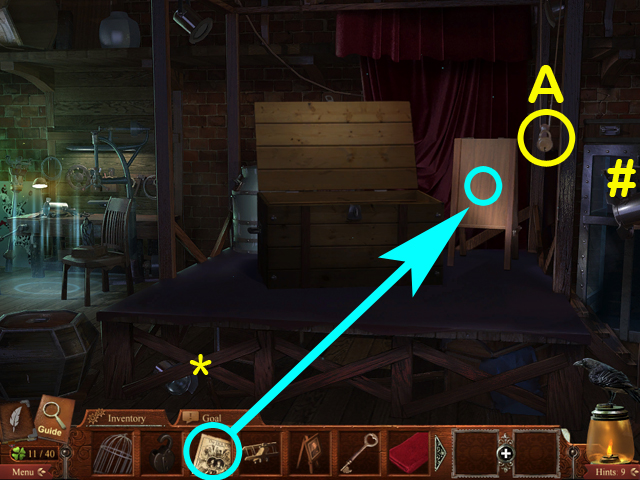
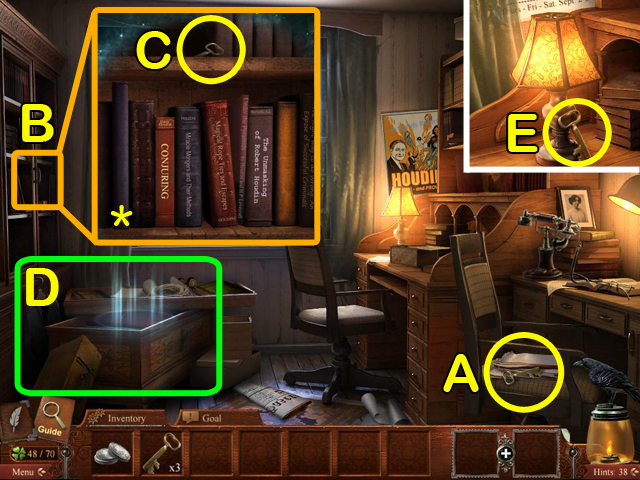
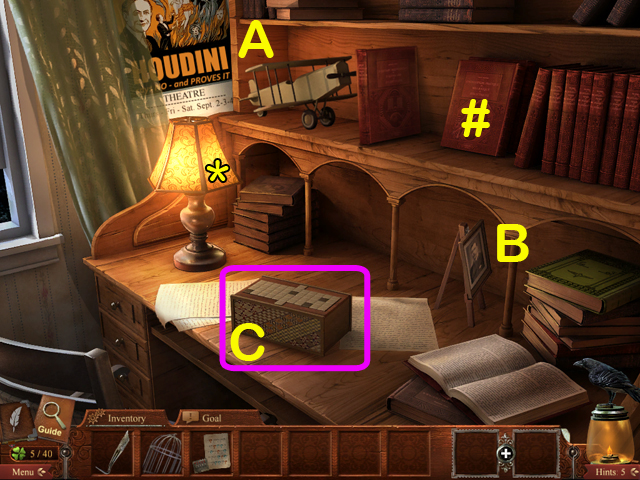 • Take the AIRPLANE (A) and the PICTURE FRAME (B). • Take the
9/70 CLOVER (*) and the 7/52 RAVEN (#). • Examine the box (C).
• Take the AIRPLANE (A) and the PICTURE FRAME (B). • Take the
9/70 CLOVER (*) and the 7/52 RAVEN (#). • Examine the box (C).
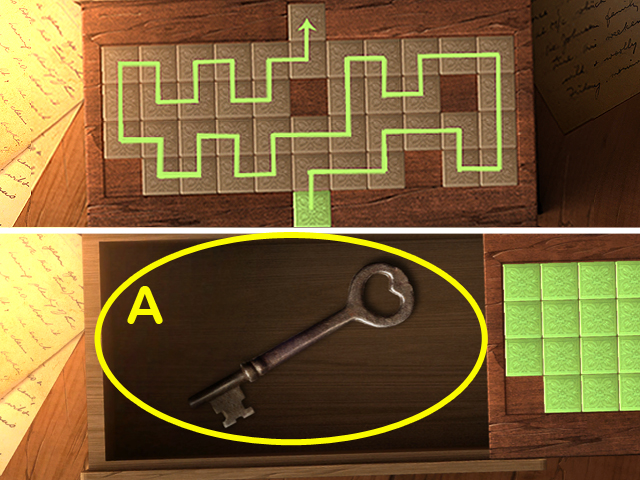 • Starting with the highlighted square at the bottom, use the
mouse to trace a path that highlights every square on the box.
• Take the KEY (A). • Go downstairs and enter the parlor door
on the right.
• Starting with the highlighted square at the bottom, use the
mouse to trace a path that highlights every square on the box.
• Take the KEY (A). • Go downstairs and enter the parlor door
on the right.
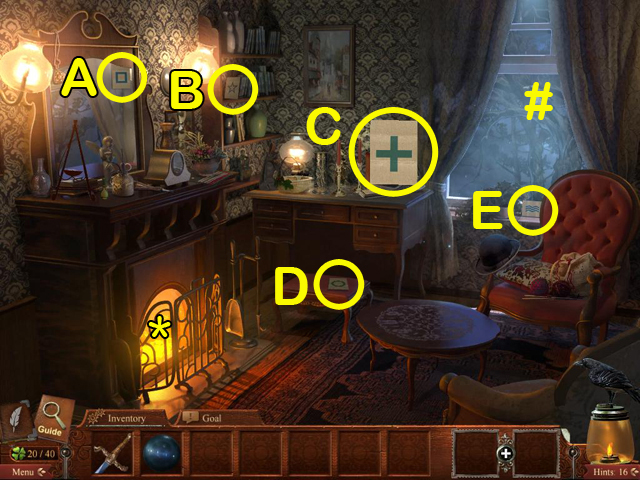
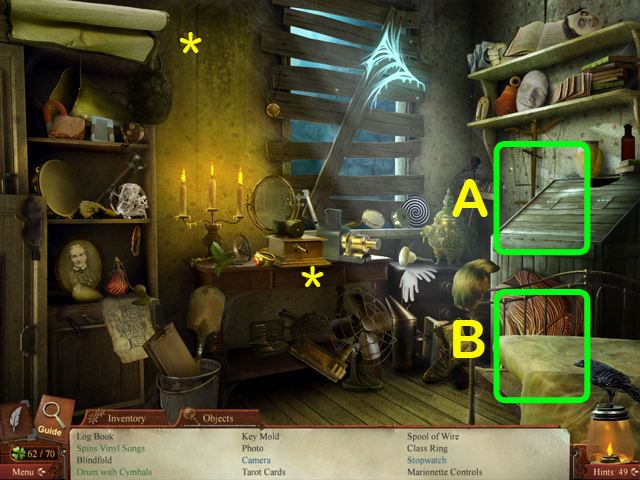
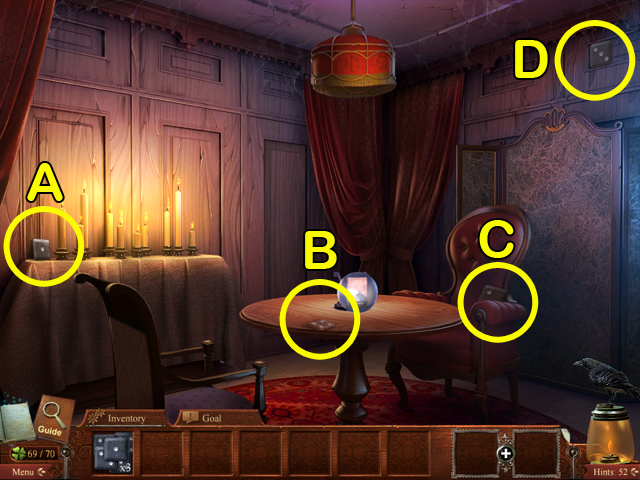
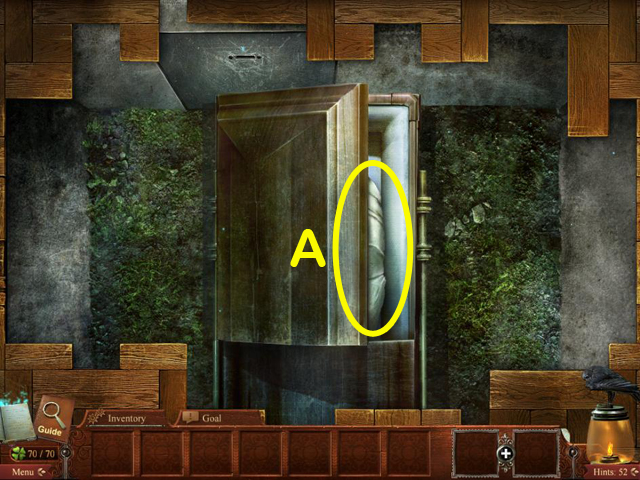
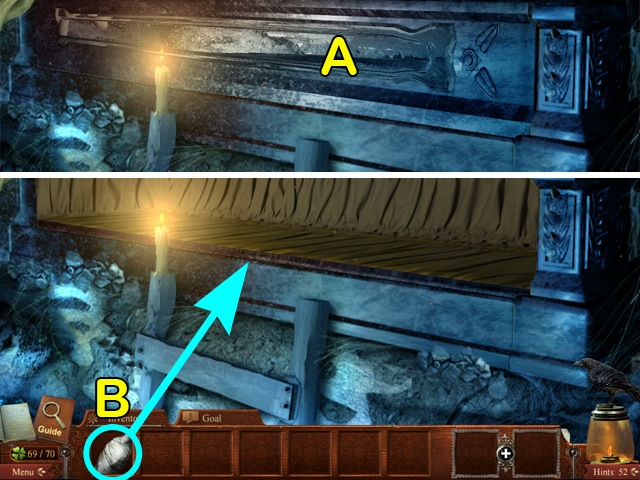
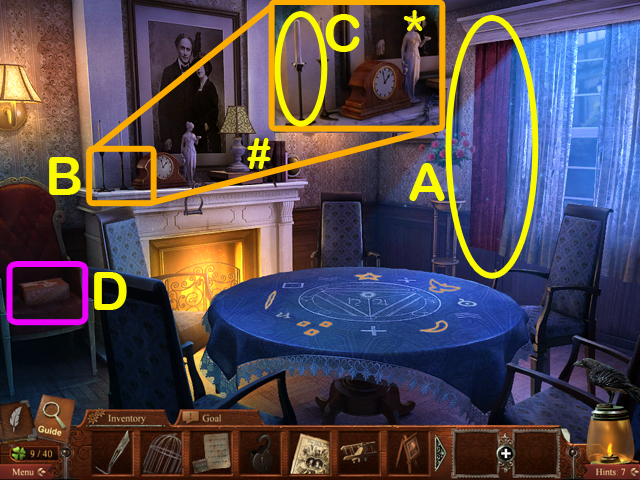 • Take the 8/52 RAVEN (#). • Take the CURTAIN (A). • Examine
the fireplace mantle (B). • Take the CANDLE HOLDER (C) and the
10/70 CLOVER (*). • Examine the box on the chair (D).
• Take the 8/52 RAVEN (#). • Take the CURTAIN (A). • Examine
the fireplace mantle (B). • Take the CANDLE HOLDER (C) and the
10/70 CLOVER (*). • Examine the box on the chair (D).
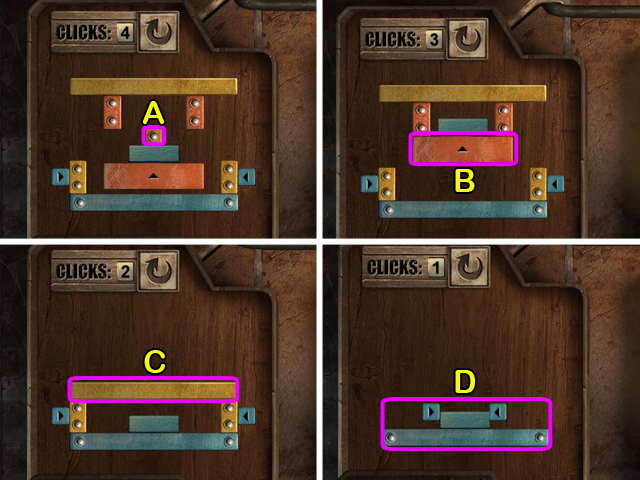
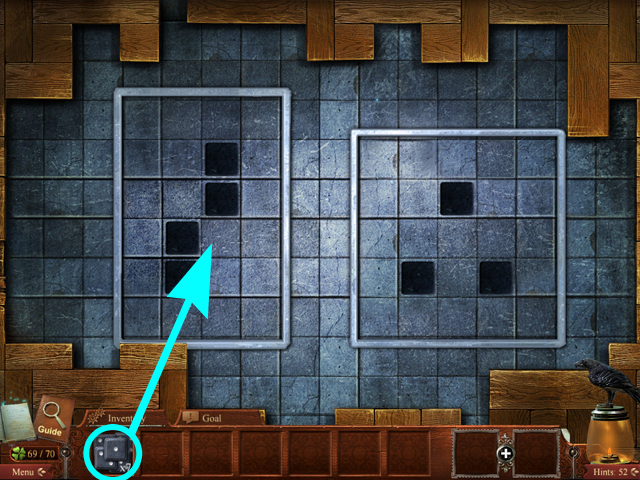
 • Starting with the highlighted square at the bottom, use the
mouse to trace a path that highlights every square on the box.
• Take the KEY (A). • Exit the house and go down to the
workshop door.
• Starting with the highlighted square at the bottom, use the
mouse to trace a path that highlights every square on the box.
• Take the KEY (A). • Exit the house and go down to the
workshop door.
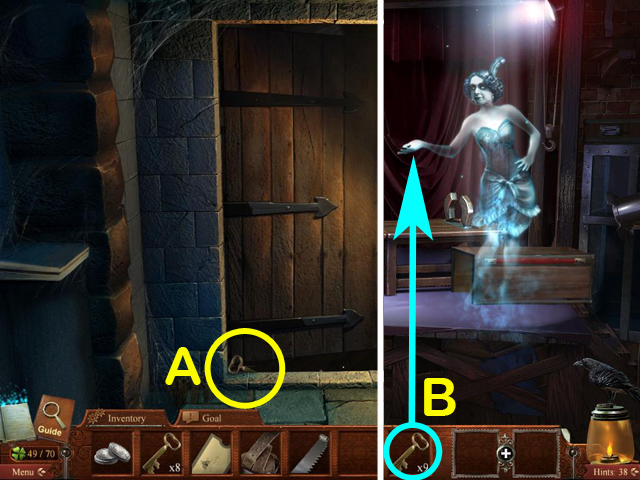
 • Take the 9/52 RAVEN (#). • Take the 11/70 CLOVER (*). • Use
the DENTAL PICK on the door lock.
• Take the 9/52 RAVEN (#). • Take the 11/70 CLOVER (*). • Use
the DENTAL PICK on the door lock.
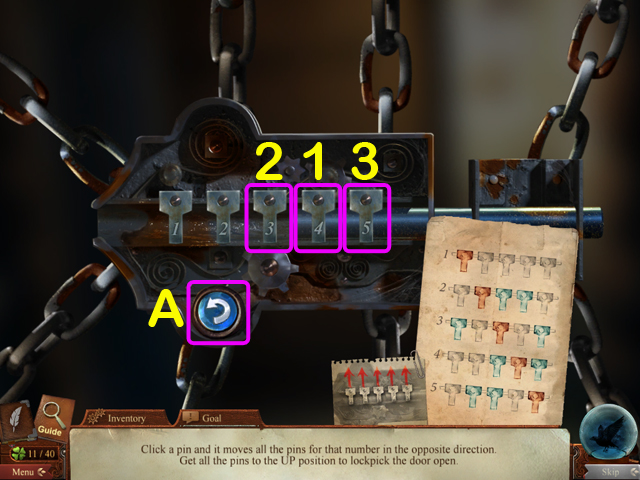 • Flip up the #4 pin first, then flip up the #3 pin and
finally the #5 pin (1-3). • If you need to reset the pins and
start over, left-click the reset button (A).
• Flip up the #4 pin first, then flip up the #3 pin and
finally the #5 pin (1-3). • If you need to reset the pins and
start over, left-click the reset button (A).
 • Take the PADLOCK (A). • Take the 10/52 RAVEN (#). • Take the
12/70 CLOVER (*). • Put the POSTER on the stand.
• Take the PADLOCK (A). • Take the 10/52 RAVEN (#). • Take the
12/70 CLOVER (*). • Put the POSTER on the stand.
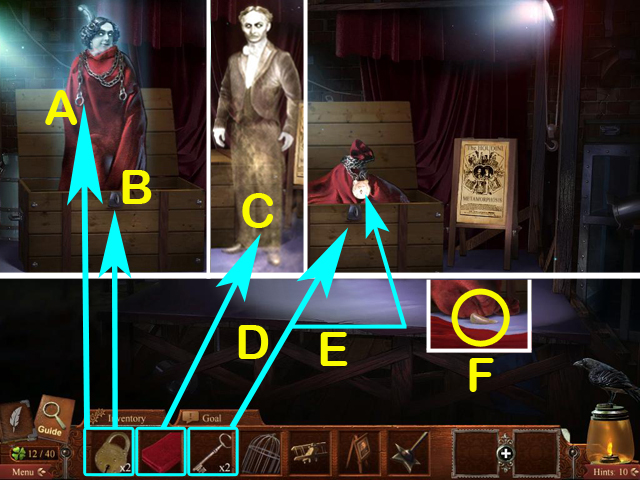 • Use a PADLOCK to lock the chains around Bess (A). • Use the
other PADLOCK to lock the trunk (B). • Give the CURTAIN to
Houdini (C) and then left-click on Bess to continue the trick.
• Use a KEY to unlock the trunk (D). • Use the other KEY to
unlock the chain (E). • Take the DOG'S FANG (F). • Examine the
workbench in the back to access a HOS.
• Use a PADLOCK to lock the chains around Bess (A). • Use the
other PADLOCK to lock the trunk (B). • Give the CURTAIN to
Houdini (C) and then left-click on Bess to continue the trick.
• Use a KEY to unlock the trunk (D). • Use the other KEY to
unlock the chain (E). • Take the DOG'S FANG (F). • Examine the
workbench in the back to access a HOS.
 • Take the 13/70 and 14/70 CLOVERS (*). • Find all the items
listed. Some items may be hidden within interactive areas (A,
B). • After completing the HOS you will have the MAGIC SCARF.
• Combine the MAGIC SCARF with the BIRD CAGE to create a
PIGEON. • Go back to the parlor inside the house.
• Take the 13/70 and 14/70 CLOVERS (*). • Find all the items
listed. Some items may be hidden within interactive areas (A,
B). • After completing the HOS you will have the MAGIC SCARF.
• Combine the MAGIC SCARF with the BIRD CAGE to create a
PIGEON. • Go back to the parlor inside the house.
 • Examine the table. • Take the 15/70 CLOVER (*). • Take the
11/52 RAVEN (#). • Put the AIRPLANE on the table (A). • Put
the PICTURE FRAME on the table (B). • Put the CANDLE HOLDER on
the table (C). • Put the DOG'S FANG on the table (D). • Put
the PIGEON on the table (E).
• Examine the table. • Take the 15/70 CLOVER (*). • Take the
11/52 RAVEN (#). • Put the AIRPLANE on the table (A). • Put
the PICTURE FRAME on the table (B). • Put the CANDLE HOLDER on
the table (C). • Put the DOG'S FANG on the table (D). • Put
the PIGEON on the table (E).
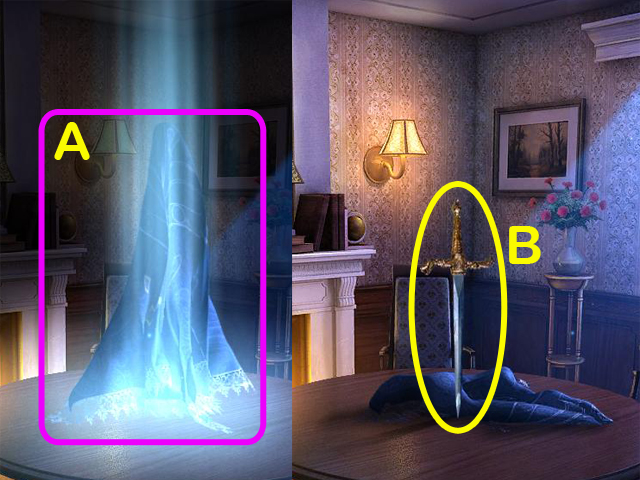 • Pull the table cloth away (A). • Take the SWORD (B).
 • Take the 12/52 RAVEN (#). • Examine the gate lock (A) and
take the 16/70 CLOVER (*). • Go into the gatehouse on the
left.
• Take the 12/52 RAVEN (#). • Examine the gate lock (A) and
take the 16/70 CLOVER (*). • Go into the gatehouse on the
left.
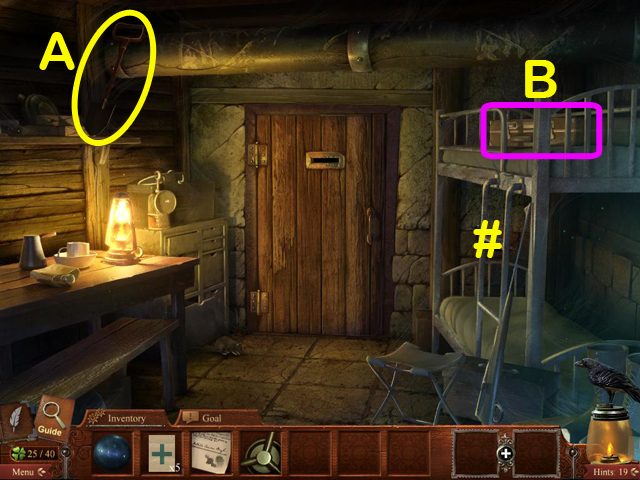
 • Take the 13/52 RAVEN (#). • Take the CRATE (A). • Take the
PLIERS (B). • Examine the skeleton (C). • Take the 17/70
CLOVER (*). • Take the 1/4 RAILROAD TIE (D). • Examine the
book (E). • Go back to the entrance gate.
• Take the 13/52 RAVEN (#). • Take the CRATE (A). • Take the
PLIERS (B). • Examine the skeleton (C). • Take the 17/70
CLOVER (*). • Take the 1/4 RAILROAD TIE (D). • Examine the
book (E). • Go back to the entrance gate.
 • Use the PLIERS to pull off the hinges on the gate. • Enter
the manor grounds.
• Use the PLIERS to pull off the hinges on the gate. • Enter
the manor grounds.
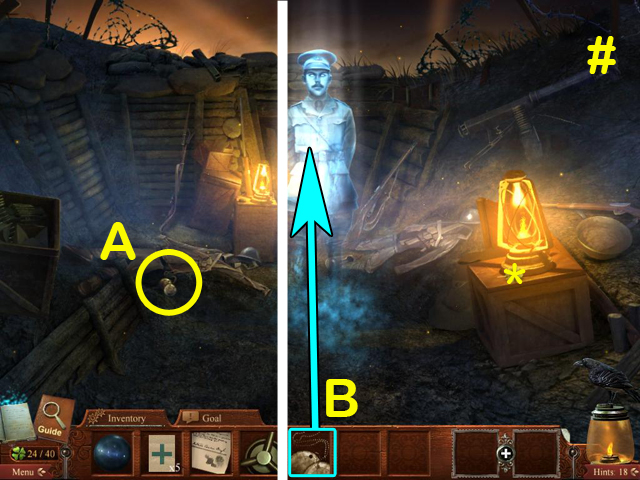
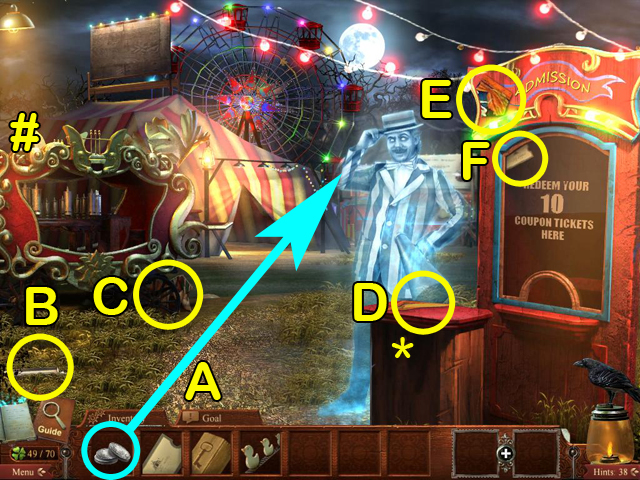
 • Take the 18/70 CLOVER (*). • Take the 14/52 RAVEN (#). •
Take the 2/4 RAILROAD TIE (A). • Take the 1/2 BARREL (B). • Go
to the manor entrance.
• Take the 18/70 CLOVER (*). • Take the 14/52 RAVEN (#). •
Take the 2/4 RAILROAD TIE (A). • Take the 1/2 BARREL (B). • Go
to the manor entrance.
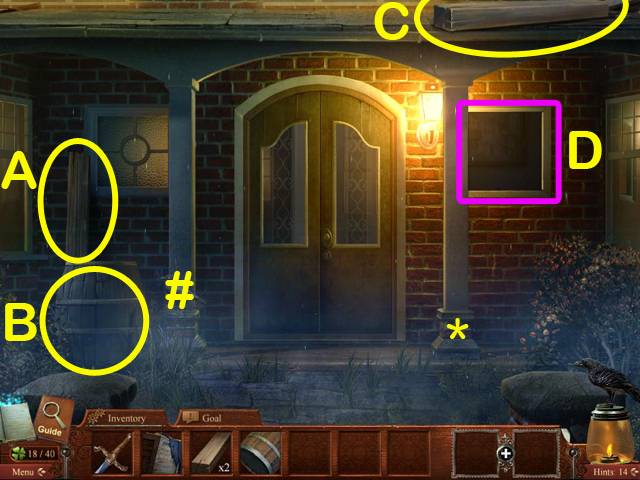 • Take the 19/70 CLOVER (*). • Take the 15/52 RAVEN (#). •
Take the 3/4 RAILROAD TIE (A). • Take the 2/2 BARREL (B). •
Take the 4/4 RAILROAD TIE (C). • Examine the window (D).
• Take the 19/70 CLOVER (*). • Take the 15/52 RAVEN (#). •
Take the 3/4 RAILROAD TIE (A). • Take the 2/2 BARREL (B). •
Take the 4/4 RAILROAD TIE (C). • Examine the window (D).
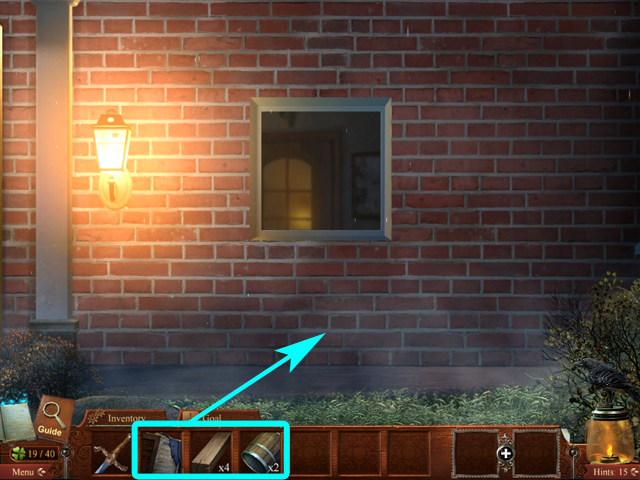 • Place the CRATE, BARRELS and RAILROAD TIES on the ground.
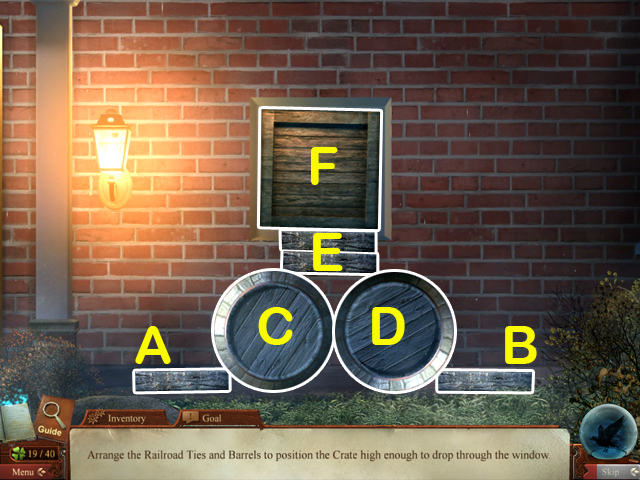 • Arrange the BARRELS and RAILROAD TIES so that they make a
platform that reaches the window sill (A-E). • Place the CRATE
on top of the platform (F). • Climb through the window.
• Arrange the BARRELS and RAILROAD TIES so that they make a
platform that reaches the window sill (A-E). • Place the CRATE
on top of the platform (F). • Climb through the window.
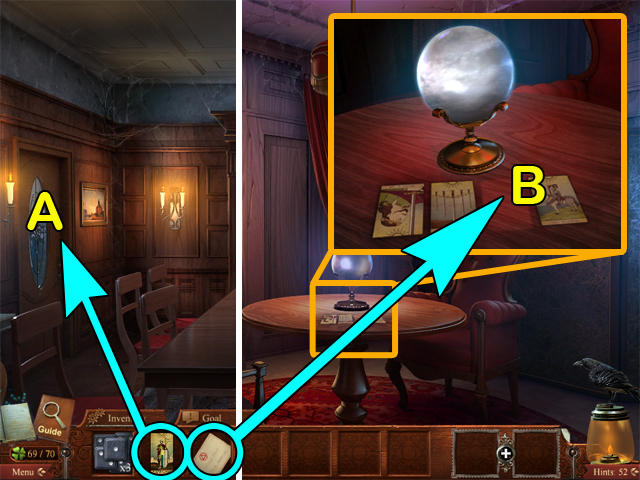
 • Take the 20/70 CLOVER (*). • Take the 16/52 RAVEN (#). •
Take FOUNTAIN PEN (A). • Take the CRYSTAL BALL (B).
• Take the 20/70 CLOVER (*). • Take the 16/52 RAVEN (#). •
Take FOUNTAIN PEN (A). • Take the CRYSTAL BALL (B).
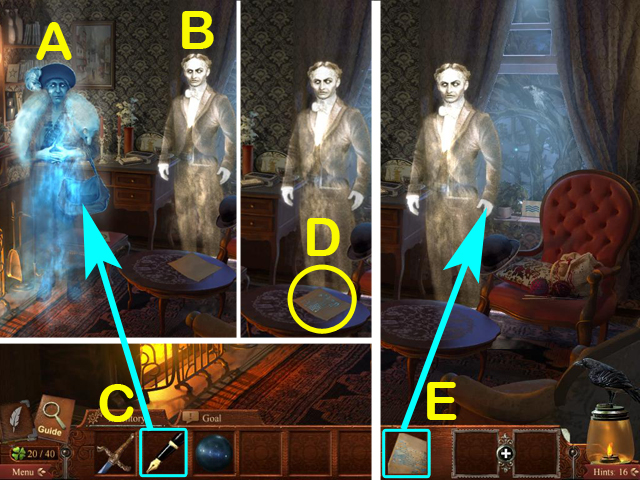 • Talk to Lady Doyle (A), then talk to Houdini (B). • Give
Lady Doyle the FOUNTAIN PEN (C). • Take the GHOST MESSAGE (D).
• Give it to GHOST MESSAGE to Houdini (E).
• Talk to Lady Doyle (A), then talk to Houdini (B). • Give
Lady Doyle the FOUNTAIN PEN (C). • Take the GHOST MESSAGE (D).
• Give it to GHOST MESSAGE to Houdini (E).
 • Take the 21/70 CLOVER (*). • Take the 17/52 RAVEN (#). •
Take the 5 ESP CARDS (A-E). • Go back to the foyer and examine
the door on the right.
• Take the 21/70 CLOVER (*). • Take the 17/52 RAVEN (#). •
Take the 5 ESP CARDS (A-E). • Go back to the foyer and examine
the door on the right.
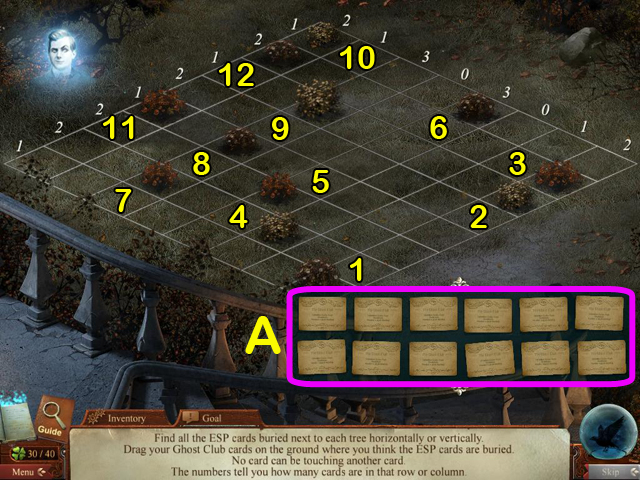
 • Place each ESP CARD into its corresponding slot (A).
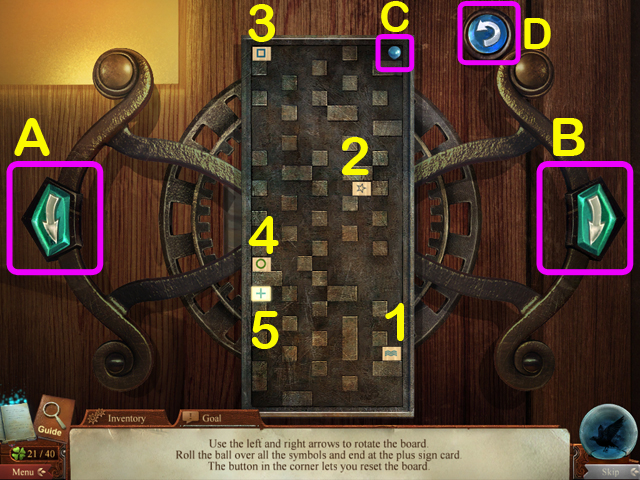 • Use the arrow buttons on the left and right side (A, B) to
rotate the board. • Roll the ball (C) so that it passes over
each card in numerical order (1-5), making sure to end on the
plus sign card (5). • Use the reset button (D) to return the
ball to its original position on the board if you need to
start over.
• Use the arrow buttons on the left and right side (A, B) to
rotate the board. • Roll the ball (C) so that it passes over
each card in numerical order (1-5), making sure to end on the
plus sign card (5). • Use the reset button (D) to return the
ball to its original position on the board if you need to
start over.
 • Take the 22/70 CLOVER (*). • Take the 18/52 RAVEN (#). •
Examine the desk (A) to access a HOS.
• Take the 22/70 CLOVER (*). • Take the 18/52 RAVEN (#). •
Examine the desk (A) to access a HOS.
 • Take the 23/70 and 24/70 CLOVERS (*). • Find all the items
listed. Some items may be hidden within interactive areas (A,
B). • After completing the HOS you will have the DOYLE
FINGERPRINT and the SAFE HANDLE.
• Take the 23/70 and 24/70 CLOVERS (*). • Find all the items
listed. Some items may be hidden within interactive areas (A,
B). • After completing the HOS you will have the DOYLE
FINGERPRINT and the SAFE HANDLE.
 • Give the SWORD to Doyle (A). • Talk to Doyle. • Examine the
photo on the floor (B).
• Give the SWORD to Doyle (A). • Talk to Doyle. • Examine the
photo on the floor (B).
 • Take the DOG TAGS (A). • Give the DOG TAGS to Kingsley (B).
• Take the 25/70 CLOVER (*). • Take the 19/52 RAVEN (#). •
Talk to Kingsley. • Go into the tunnel.
• Take the DOG TAGS (A). • Give the DOG TAGS to Kingsley (B).
• Take the 25/70 CLOVER (*). • Take the 19/52 RAVEN (#). •
Talk to Kingsley. • Go into the tunnel.
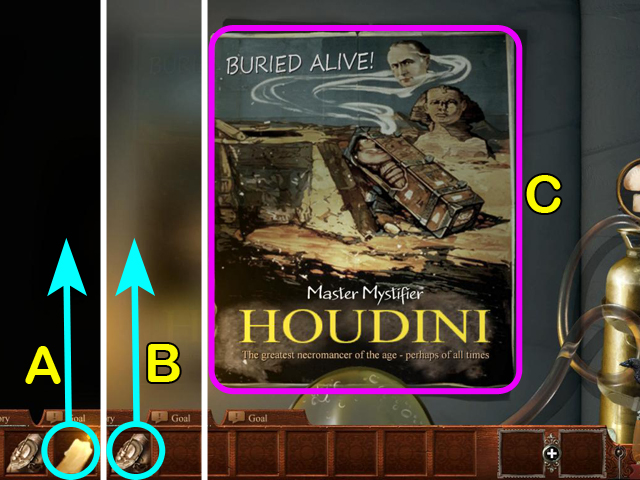
 • Take the 26/70 CLOVER (*). • Take the 20/52 RAVEN (#). •
Examine the poster on the door (A). • Enter the bunker.
• Take the 26/70 CLOVER (*). • Take the 20/52 RAVEN (#). •
Examine the poster on the door (A). • Enter the bunker.
 • Take the 21/52 RAVEN (#). • Take the SHOVEL (A). • Examine
the briefcase (B).
• Take the 21/52 RAVEN (#). • Take the SHOVEL (A). • Examine
the briefcase (B).
 • Take the 27/70 CLOVER (*). • Left-click each wheel on the
briefcase to change the numbers to 1 and 3 (A). • Take the
BADGE (B). • Go back to the trench.
• Take the 27/70 CLOVER (*). • Left-click each wheel on the
briefcase to change the numbers to 1 and 3 (A). • Take the
BADGE (B). • Go back to the trench.
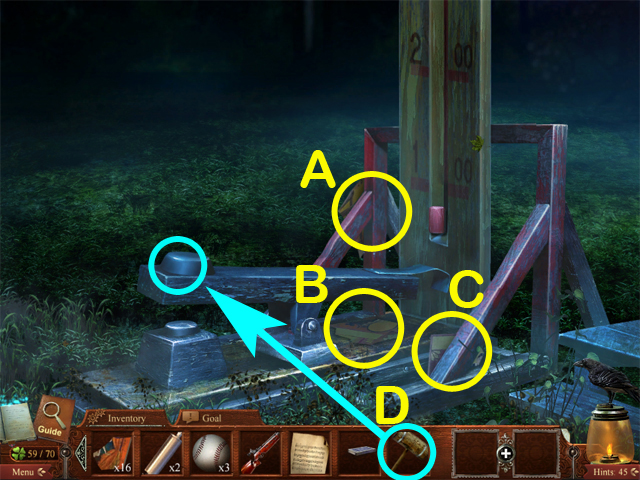
 • Use the SHOVEL to dig up the canister (A). • Examine the
canister (B). • Take the 1/12 GHOST CLUB CARD (C). • Examine
the note (D). • Go back to the bunker.
• Use the SHOVEL to dig up the canister (A). • Examine the
canister (B). • Take the 1/12 GHOST CLUB CARD (C). • Examine
the note (D). • Go back to the bunker.
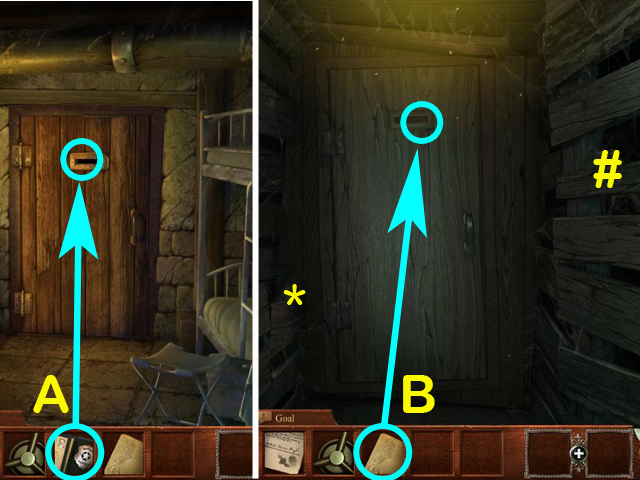 • Place the BADGE on the door (A). • Go through the secret
passageway to the door on the other side. • Take the 28/70
CLOVER (*). • Take the 22/52 RAVEN (#). • Place the GHOST CLUB
CARD on the door (B). • Go into the Ghost Club room.
• Place the BADGE on the door (A). • Go through the secret
passageway to the door on the other side. • Take the 28/70
CLOVER (*). • Take the 22/52 RAVEN (#). • Place the GHOST CLUB
CARD on the door (B). • Go into the Ghost Club room.
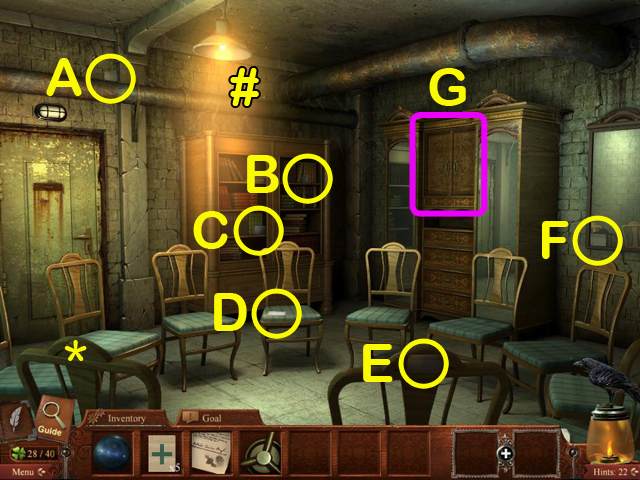 • Take the 29/70 CLOVER (*). • Take the 23/52 RAVEN (#). •
Take the 2/12, 3/12, 4/12, 5/12 and 6/12 GHOST CLUB CARDS
(A-F). • Examine the cabinet and open it (G).
• Take the 29/70 CLOVER (*). • Take the 23/52 RAVEN (#). •
Take the 2/12, 3/12, 4/12, 5/12 and 6/12 GHOST CLUB CARDS
(A-F). • Examine the cabinet and open it (G).
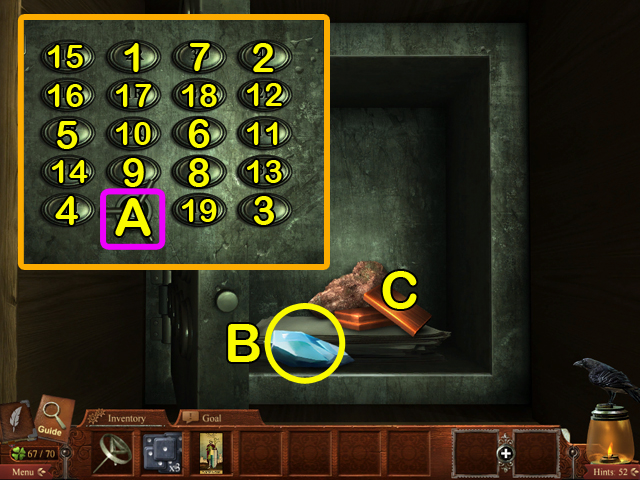
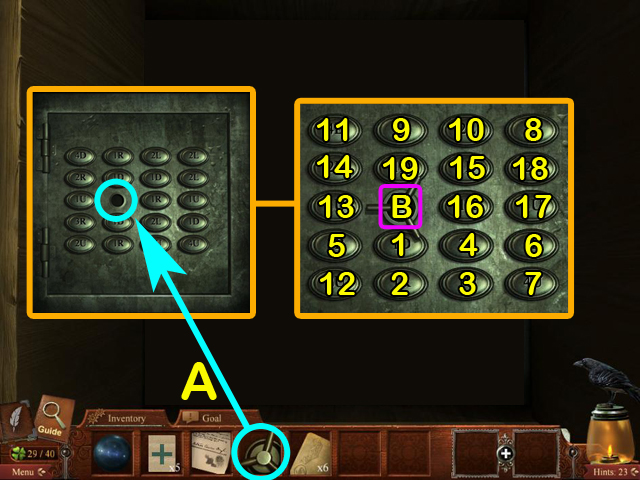 • Place the SAFE HANDLE in the slot (A). • Press the buttons
in numerical order (1-19). • Turn the safe handle (B).
• Place the SAFE HANDLE in the slot (A). • Press the buttons
in numerical order (1-19). • Turn the safe handle (B).
 • Take the 7/12 GHOST CLUB CARD (A). • Take the DOOR KEY (B).
• Use the DOOR KEY to unlock the door (C). • Go into the
séance room.
• Take the 7/12 GHOST CLUB CARD (A). • Take the DOOR KEY (B).
• Use the DOOR KEY to unlock the door (C). • Go into the
séance room.
 • Take the 30/70 CLOVER (*). • Take the 24/52 RAVEN (#). •
Take the 8/12, 9/12, 10/12, 11/12 and 12/12 GHOST CLUB CARDS
(A-E).
• Take the 30/70 CLOVER (*). • Take the 24/52 RAVEN (#). •
Take the 8/12, 9/12, 10/12, 11/12 and 12/12 GHOST CLUB CARDS
(A-E).
 • Examine the table (A). • Place the ESP CARDS on the table
(B). • Give the CRYSTAL BALL to Mina (C). • Talk to Mina. • Go
out to the garden.
• Examine the table (A). • Place the ESP CARDS on the table
(B). • Give the CRYSTAL BALL to Mina (C). • Talk to Mina. • Go
out to the garden.
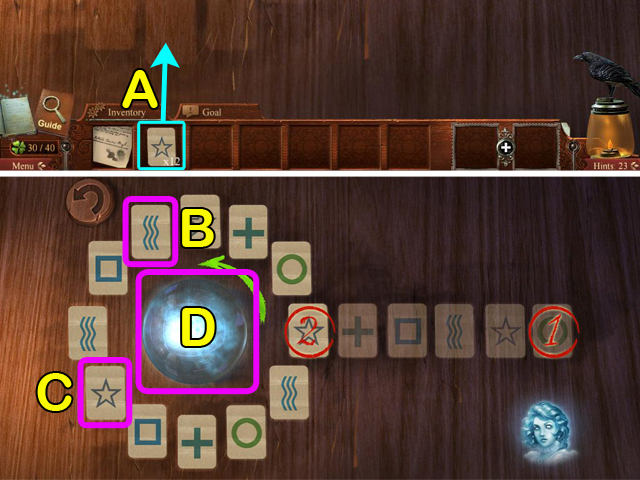
 • Place the GHOST CLUB CARDS onto the screen. • Left-click
each card (A) and drag it to the specific squares marked on
the grid (1-12). • When the mini-game is finished, you will
have 12 ESP CARDS.
• Place the GHOST CLUB CARDS onto the screen. • Left-click
each card (A) and drag it to the specific squares marked on
the grid (1-12). • When the mini-game is finished, you will
have 12 ESP CARDS.
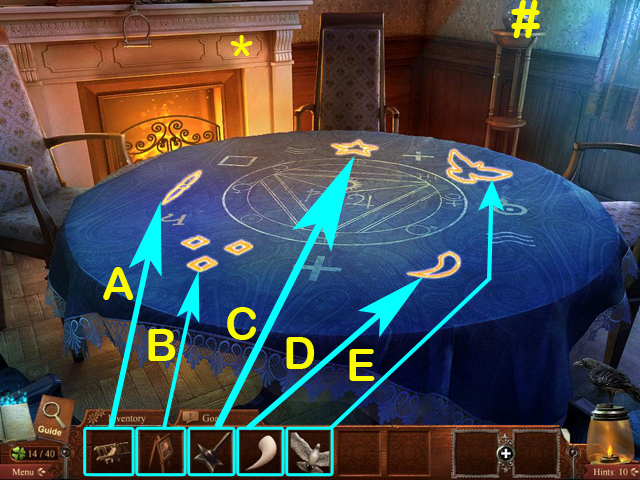
 • Go back inside and talk to Mina. • Place the ESP CARDS
around the crystal ball (A). • First, left-click the waves
card (B). Next, left-click on the star card (C). Lastly,
left-click on the crystal ball (D).
• Go back inside and talk to Mina. • Place the ESP CARDS
around the crystal ball (A). • First, left-click the waves
card (B). Next, left-click on the star card (C). Lastly,
left-click on the crystal ball (D).
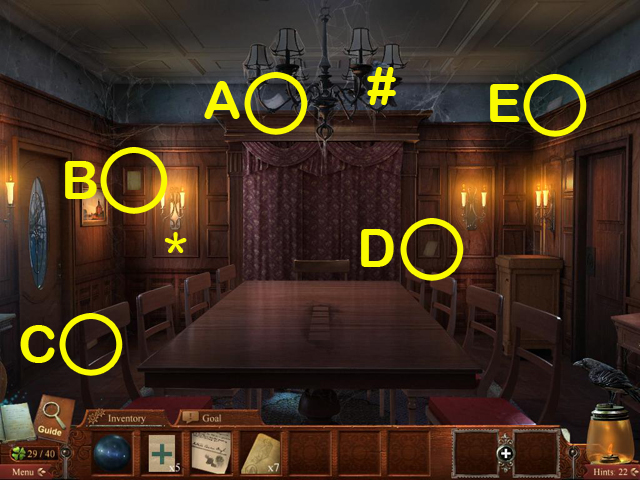
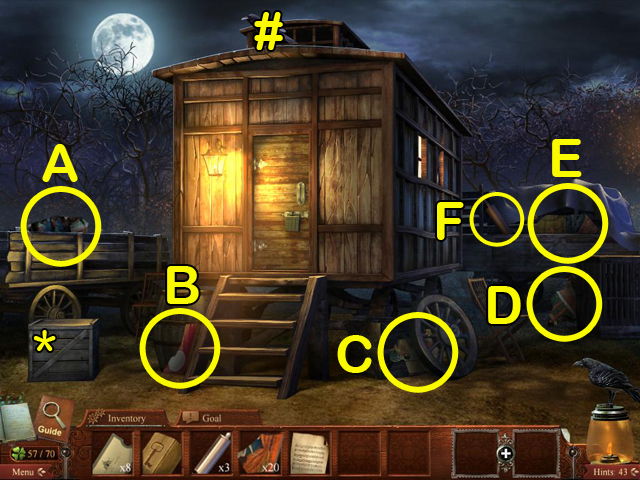
 • Take the 31/70 CLOVER (*). • Take the 25/70 RAVEN (#). •
Take the BATTERY (A). • Take the LADDER FRAME (B). • Go into
the dressing room.
• Take the 31/70 CLOVER (*). • Take the 25/70 RAVEN (#). •
Take the BATTERY (A). • Take the LADDER FRAME (B). • Go into
the dressing room.
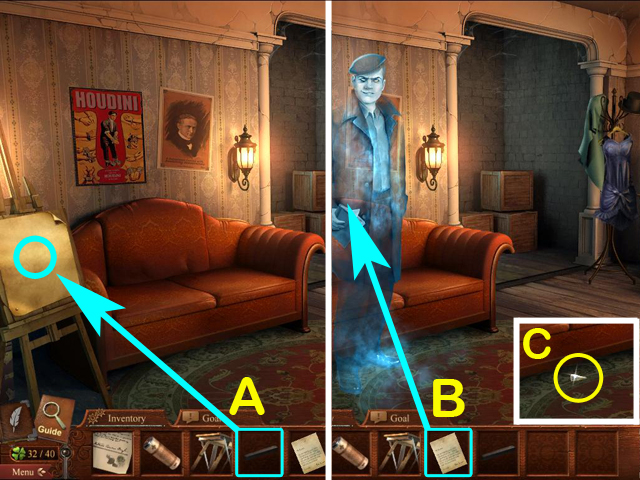
 • Take the 32/70 CLOVER (*). • Take the 26/70 RAVEN (#). •
Take the CHARCOAL (A). • Examine the vanity (B).
• Take the 32/70 CLOVER (*). • Take the 26/70 RAVEN (#). •
Take the CHARCOAL (A). • Examine the vanity (B).
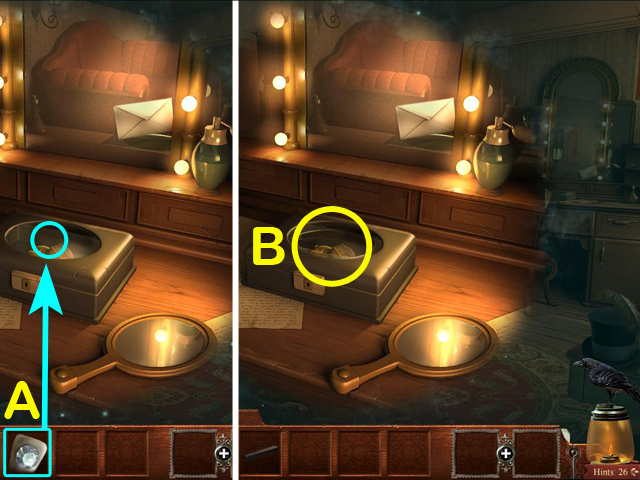
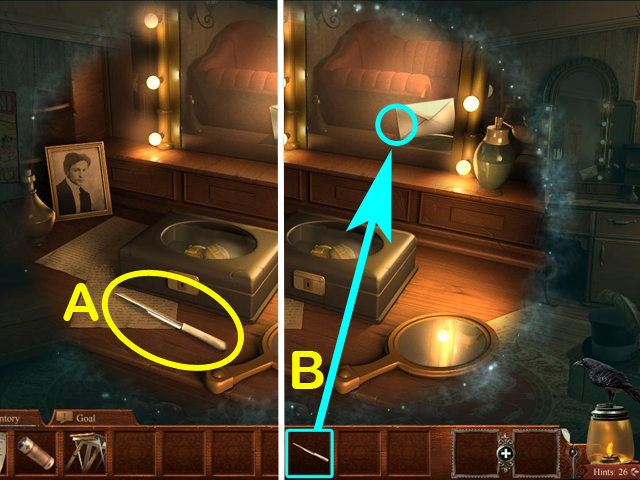 • Take the LETTER OPENER (A). • Use the LETTER OPENER to cut
open the envelope (B). • Take the DOCTOR'S NOTE.
• Take the LETTER OPENER (A). • Use the LETTER OPENER to cut
open the envelope (B). • Take the DOCTOR'S NOTE.
 • Use the CHARCOAL on the blank canvas (A). • Give the
DOCTOR'S NOTE to Whitehead (B). • Talk to Whitehead. • Take
the DIAMOND STUD TOOTH (C).
• Use the CHARCOAL on the blank canvas (A). • Give the
DOCTOR'S NOTE to Whitehead (B). • Talk to Whitehead. • Take
the DIAMOND STUD TOOTH (C).
 • Go back to the vanity. • Use the DIAMOND STUD TOOTH to cut
the glass on the jewelry box (A). • Go to the back room.
• Go back to the vanity. • Use the DIAMOND STUD TOOTH to cut
the glass on the jewelry box (A). • Go to the back room.
 • Take the 33/70 CLOVER (*). • Take the 27/52 RAVEN (#). •
Take the STEPS (A). • Take the FLASHLIGHT HOUSING (B). •
Combine the FLASHLIGHT HOUSING with the BATTERY to make the
FLASHLIGHT. • Combine the STEPS with the LADDER FRAME to
create the LADDER. • Stand the LADDER under the trap door (C).
• Climb up to the trap door.
• Take the 33/70 CLOVER (*). • Take the 27/52 RAVEN (#). •
Take the STEPS (A). • Take the FLASHLIGHT HOUSING (B). •
Combine the FLASHLIGHT HOUSING with the BATTERY to make the
FLASHLIGHT. • Combine the STEPS with the LADDER FRAME to
create the LADDER. • Stand the LADDER under the trap door (C).
• Climb up to the trap door.
 • Use the FLASHLIGHT to light the area (A). • Take the PAPER
FASTENER (B). • Use the CUFF LINKS to open the panels (C).
• Use the FLASHLIGHT to light the area (A). • Take the PAPER
FASTENER (B). • Use the CUFF LINKS to open the panels (C).
 • Left-click the red block in the mini-game on the left side
(A). • Left-click the larger red block (B). • Left-click the
orange block (C). • Left-click any blue block (D).
• Left-click the red block in the mini-game on the left side
(A). • Left-click the larger red block (B). • Left-click the
orange block (C). • Left-click any blue block (D).
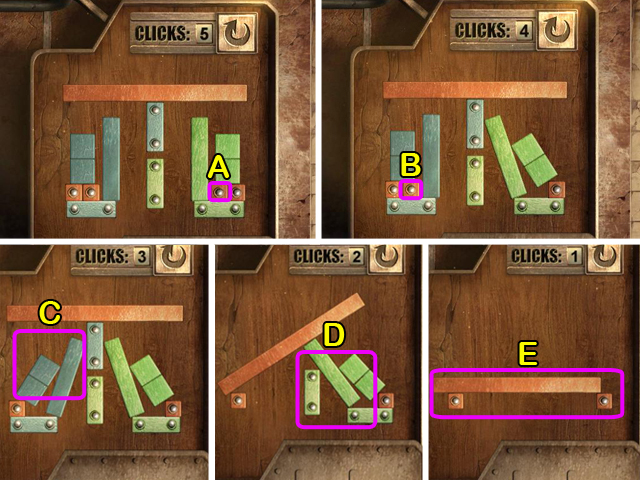 • Left-click the red block in the mini-game on the right side
(A). • Left-click the red block (B). • Left-click any blue
block (C). • Left-click any green block (D). • Left-click any
red block (E). • Go up through the trap door.
• Left-click the red block in the mini-game on the right side
(A). • Left-click the red block (B). • Left-click any blue
block (C). • Left-click any green block (D). • Left-click any
red block (E). • Go up through the trap door.
 • Talk to the ghost. • Take the 34/70 CLOVER (*). • Take the
28/52 RAVEN (#). • Take the AX (A).
• Talk to the ghost. • Take the 34/70 CLOVER (*). • Take the
28/52 RAVEN (#). • Take the AX (A).
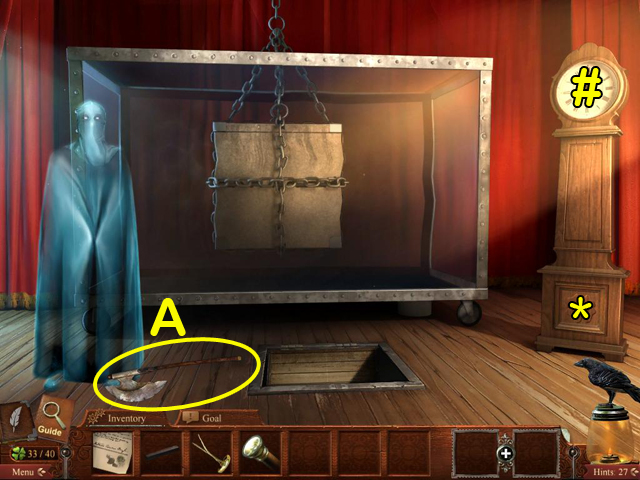
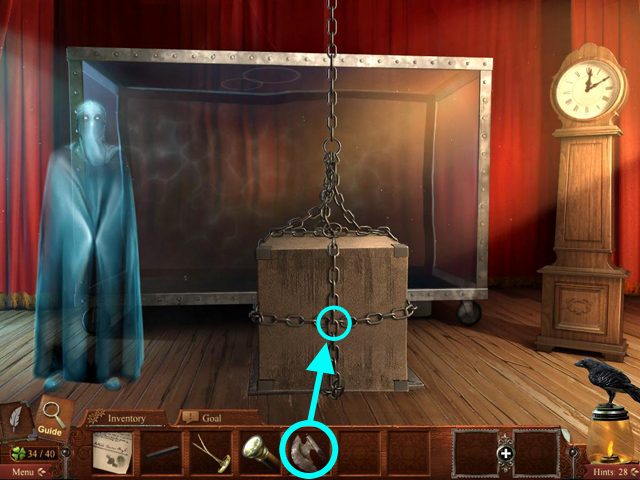 • Use the AX to cut the chain off the box. • Talk to Bess and
she will give you the ADMITTANCE LETTER. • Climb into the box.
• Use the AX to cut the chain off the box. • Talk to Bess and
she will give you the ADMITTANCE LETTER. • Climb into the box.
 • Use the FLASHLIGHT to light the area (A). • Use the PAPER
FASTENER to unlock the panel (B).
• Use the FLASHLIGHT to light the area (A). • Use the PAPER
FASTENER to unlock the panel (B).
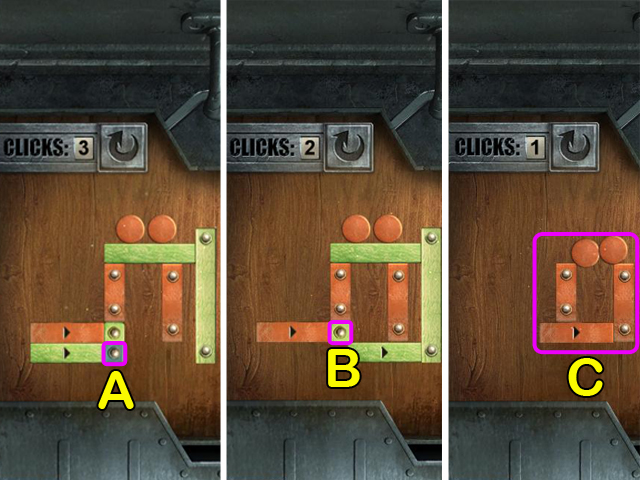 • Left-click the blue block (A). • Left-click the green block
(B). • Left-click any red block (C).
• Left-click the blue block (A). • Left-click the green block
(B). • Left-click any red block (C).
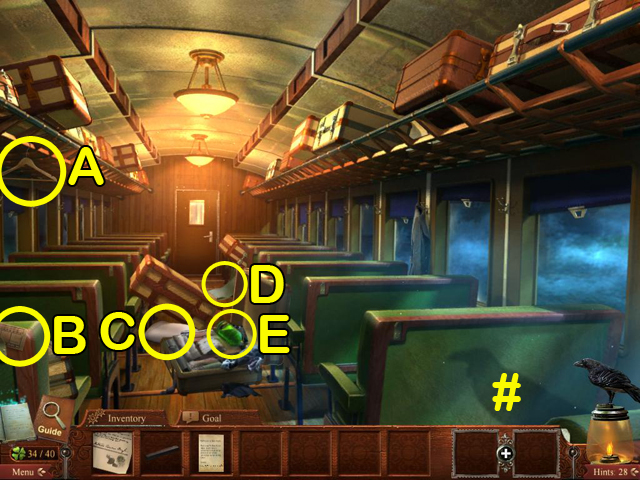 • Follow the ghost into the passenger car and talk to him. •
Take the 29/52 RAVEN (#). • Take the COAT HANGER (A). • Take
the TICKET (B). • Take the PILLOW (C). • Take the BLANKET (D).
• Take the IV BAG (E).
• Follow the ghost into the passenger car and talk to him. •
Take the 29/52 RAVEN (#). • Take the COAT HANGER (A). • Take
the TICKET (B). • Take the PILLOW (C). • Take the BLANKET (D).
• Take the IV BAG (E).
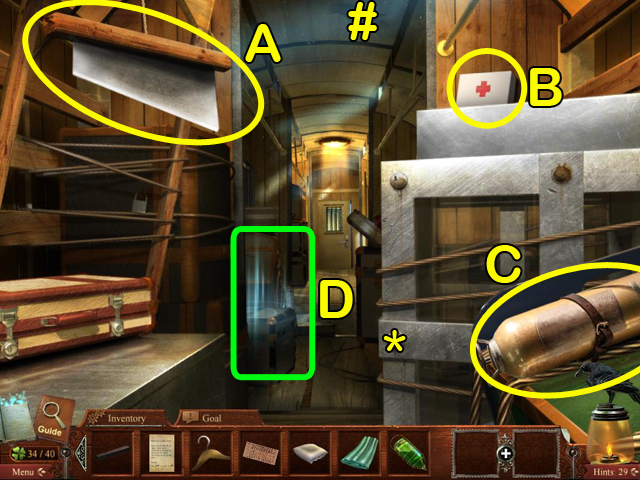 • Take the 35/70 CLOVER (*). • Take the 30/52 RAVEN (#). •
Take the GUILLOTINE BLADE (A). • Take the FIRST AID (B). •
Take the OXYGEN TANK (C). • Examine the trunk (D) to access a
HOS.
• Take the 35/70 CLOVER (*). • Take the 30/52 RAVEN (#). •
Take the GUILLOTINE BLADE (A). • Take the FIRST AID (B). •
Take the OXYGEN TANK (C). • Examine the trunk (D) to access a
HOS.
 • Take the 36/70 and 37/70 CLOVERS (*). • Find all the items
listed. Some items may be hidden within interactive areas (A,
B). • After completing the HOS you will have the MATCHES,
CROWBAR, SILVER DOLLARS, FINGERPRINT BRUSH, CLOCK FACE and
OXYGEN MASK. • Go forward to the coupling platform.
• Take the 36/70 and 37/70 CLOVERS (*). • Find all the items
listed. Some items may be hidden within interactive areas (A,
B). • After completing the HOS you will have the MATCHES,
CROWBAR, SILVER DOLLARS, FINGERPRINT BRUSH, CLOCK FACE and
OXYGEN MASK. • Go forward to the coupling platform.
 • Take the 38/70 CLOVER (*). • Take the 31/52 RAVEN (#). •
Take the PUNCH (A). • Take the RAILROAD TONGS (B). • Go into
the luxury car on the right.
• Take the 38/70 CLOVER (*). • Take the 31/52 RAVEN (#). •
Take the PUNCH (A). • Take the RAILROAD TONGS (B). • Go into
the luxury car on the right.
 • Combine the PUNCH with the TICKET. • Give the PUNCHED TICKET
to the ghost. • Take the 39/70 CLOVER (*). • Take the 32/52
RAVEN (#). • Examine the door to the luxury cabin on the left.
• Combine the PUNCH with the TICKET. • Give the PUNCHED TICKET
to the ghost. • Take the 39/70 CLOVER (*). • Take the 32/52
RAVEN (#). • Examine the door to the luxury cabin on the left.
 • Slide the COAT HANGER through the window to reveal the lock
mechanism. • Left-click a bearing to bring up directional
arrows around it. Left-click a directional arrow to move the
bearing. • Move the bronze bearings next to each other to
clear them (1-6). • Move the silver bearings next to each
other to clear them (7-11). • Go into the luxury cabin.
• Slide the COAT HANGER through the window to reveal the lock
mechanism. • Left-click a bearing to bring up directional
arrows around it. Left-click a directional arrow to move the
bearing. • Move the bronze bearings next to each other to
clear them (1-6). • Move the silver bearings next to each
other to clear them (7-11). • Go into the luxury cabin.
 • Take the 40/70 CLOVER (*). • Take the 33/52 RAVEN (#). •
Examine the list (A).
• Take the 40/70 CLOVER (*). • Take the 33/52 RAVEN (#). •
Examine the list (A).
 • Combine the OXYGEN TANK with the OXYGEN MASK to create the
RESUSCITATOR. • Place the RESUSCITATOR on the bench (A). •
Place the FIRST AID on the bench (B). • Place the IV BAG on
the bench (C). • Place the BLANKET on the bench (D). • Place
the PILLOW on the bench (E). • Go back to the coupling
platform.
• Combine the OXYGEN TANK with the OXYGEN MASK to create the
RESUSCITATOR. • Place the RESUSCITATOR on the bench (A). •
Place the FIRST AID on the bench (B). • Place the IV BAG on
the bench (C). • Place the BLANKET on the bench (D). • Place
the PILLOW on the bench (E). • Go back to the coupling
platform.
 • Use the CROWBAR to pry open the plates (A). • Use the
GUILLOTINE BLADE to cut the brake line (B). • Use the RAILROAD
TONGS to uncouple the cars (C). • Go back to the luxury cabin
and examine Houdini.
• Use the CROWBAR to pry open the plates (A). • Use the
GUILLOTINE BLADE to cut the brake line (B). • Use the RAILROAD
TONGS to uncouple the cars (C). • Go back to the luxury cabin
and examine Houdini.
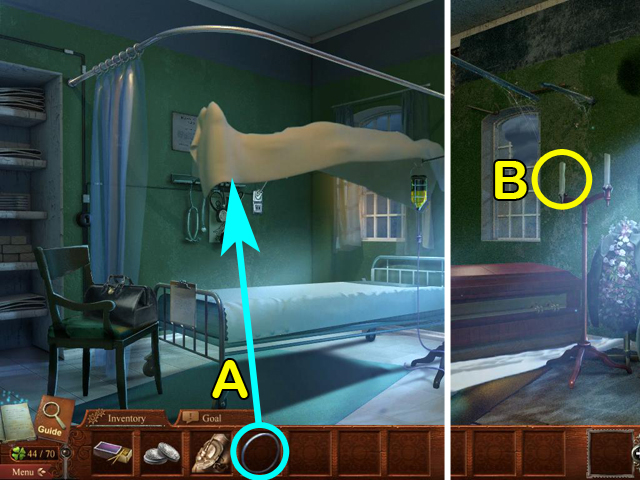
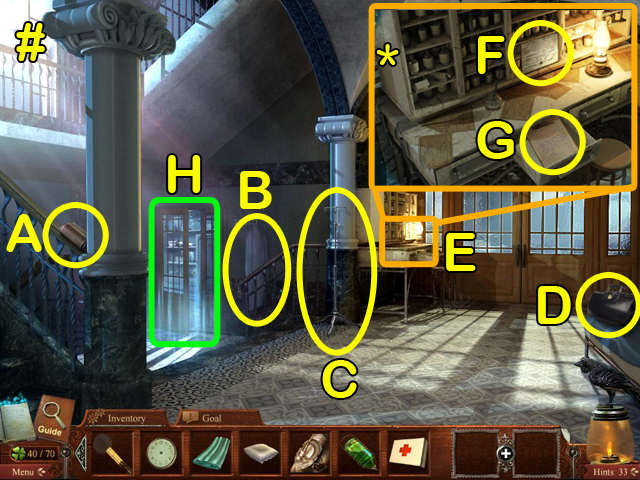 • Take the 34/52 RAVEN (#). • Take the BLOOD PRESSURE CUFF
(A). • Take the LAB COAT (B). • Take the IV STAND (C). • Take
the DOCTOR'S BAG (D). • Examine the nurse's stand (E). • Take
the 41/70 CLOVER (*). • Take the DOCTOR'S DIPLOMA (F). • Take
the MEDICAL CHART (G). • Go through the door on the left to
access a HOS (H).
• Take the 34/52 RAVEN (#). • Take the BLOOD PRESSURE CUFF
(A). • Take the LAB COAT (B). • Take the IV STAND (C). • Take
the DOCTOR'S BAG (D). • Examine the nurse's stand (E). • Take
the 41/70 CLOVER (*). • Take the DOCTOR'S DIPLOMA (F). • Take
the MEDICAL CHART (G). • Go through the door on the left to
access a HOS (H).
 • Take the 42/70 and 43/70 CLOVERS (*). • Find all the items
listed. Some items may be hidden within interactive areas (A,
B). • After completing the HOS you will have the CLOCK HANDS,
BLOOD PRESSURE BULB and METAL HOOP.
• Take the 42/70 and 43/70 CLOVERS (*). • Find all the items
listed. Some items may be hidden within interactive areas (A,
B). • After completing the HOS you will have the CLOCK HANDS,
BLOOD PRESSURE BULB and METAL HOOP.
 • Go back to the waiting room and place the ADMITTANCE LETTER
on the door of room 401 (A). • Go inside the room. • Take the
35/52 RAVEN )#). • Take the WHEELCHAIR WHEEL (B). • Take the
SWING LIGHT (C).
• Go back to the waiting room and place the ADMITTANCE LETTER
on the door of room 401 (A). • Go inside the room. • Take the
35/52 RAVEN )#). • Take the WHEELCHAIR WHEEL (B). • Take the
SWING LIGHT (C).
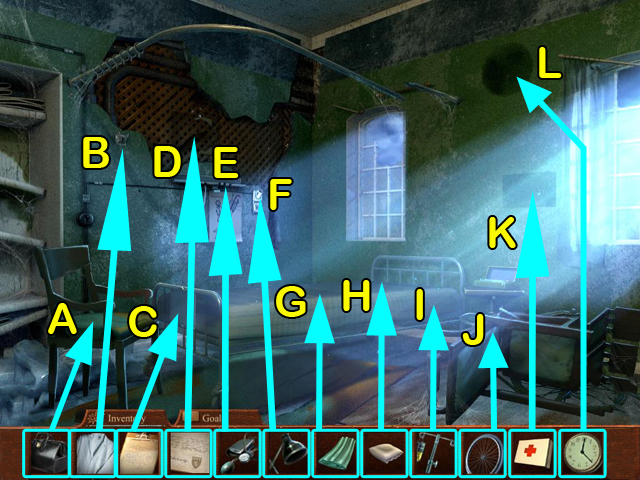 • Combine the CLOCK FACE with the CLOCK HANDS to make a CLOCK.
• Combine the BLOOD PRESSURE CUFF with the BLOOD PRESSURE BULB
to make a BLOOD PRESSURE DEVICE. • Combine the IV STAND with
the IV BAG to make the IV UNIT. • Place the DOCTOR'S BAG on
the chair (A). • Hang the LAB COAT on the wall (B). • Put the
MEDICAL CHART on the bed frame (C). • Hang the DOCTOR'S
DIPLOMA on the wall (D). • Hang up the BLOOD PRESSURE DEVICE
(E). • Hang the SWING LIGHT (F). • Put the BLANKET on the bed
(G). • Put the PILLOW on the bed (H). • Set up the IV UNIT
(I). • Put the WHEELCHAIR WHEEL on the wheelchair (J). • Put
the FIRST AID on the wall (K). • Hang the CLOCK on the wall
(L).
• Combine the CLOCK FACE with the CLOCK HANDS to make a CLOCK.
• Combine the BLOOD PRESSURE CUFF with the BLOOD PRESSURE BULB
to make a BLOOD PRESSURE DEVICE. • Combine the IV STAND with
the IV BAG to make the IV UNIT. • Place the DOCTOR'S BAG on
the chair (A). • Hang the LAB COAT on the wall (B). • Put the
MEDICAL CHART on the bed frame (C). • Hang the DOCTOR'S
DIPLOMA on the wall (D). • Hang up the BLOOD PRESSURE DEVICE
(E). • Hang the SWING LIGHT (F). • Put the BLANKET on the bed
(G). • Put the PILLOW on the bed (H). • Set up the IV UNIT
(I). • Put the WHEELCHAIR WHEEL on the wheelchair (J). • Put
the FIRST AID on the wall (K). • Hang the CLOCK on the wall
(L).
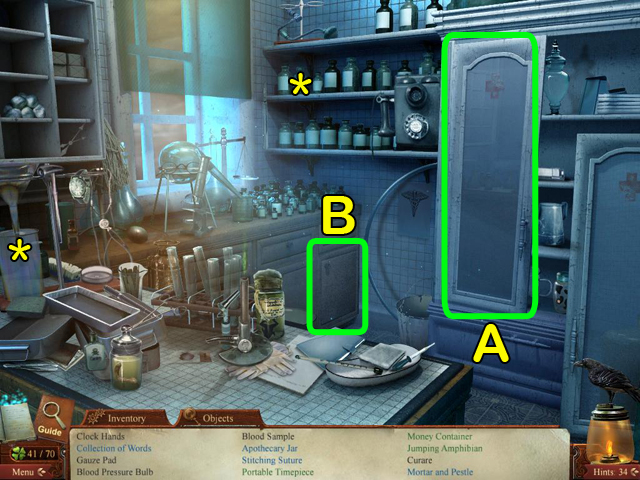
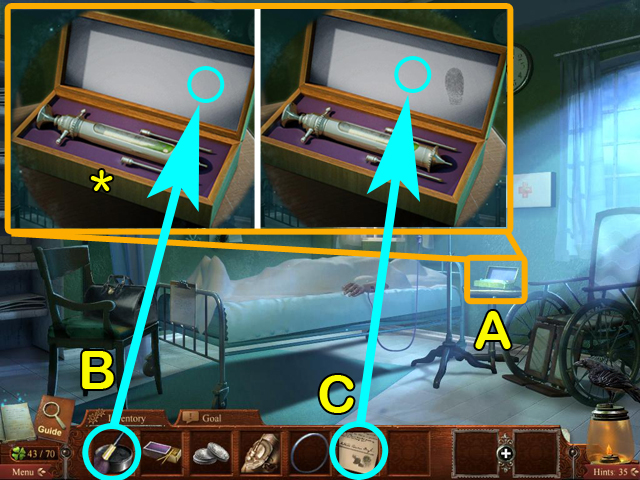 • Combine the FINGERPRINT BRUSH with the CHARCOAL to make a
FINGERPRINT KIT. • Examine the table (A). • Take the 44/70
CLOVER (*). • Use the FINGERPRINT KIT on the syringe box (B).
• Put DOYLE'S FINGERRINT on the syringe box (C).
• Combine the FINGERPRINT BRUSH with the CHARCOAL to make a
FINGERPRINT KIT. • Examine the table (A). • Take the 44/70
CLOVER (*). • Use the FINGERPRINT KIT on the syringe box (B).
• Put DOYLE'S FINGERRINT on the syringe box (C).
 • Pass the METAL HOOP through the floating body (A). • Take
the CANDLE (B).
• Pass the METAL HOOP through the floating body (A). • Take
the CANDLE (B).
 • Combine the CANDLE with the MATCHES to make a LIT CANDLE. •
Use the LIT CANDLE to light the area (A). • Use the
RESUSCITATOR to breathe (B). • Pull the poster away (C).
• Combine the CANDLE with the MATCHES to make a LIT CANDLE. •
Use the LIT CANDLE to light the area (A). • Use the
RESUSCITATOR to breathe (B). • Pull the poster away (C).
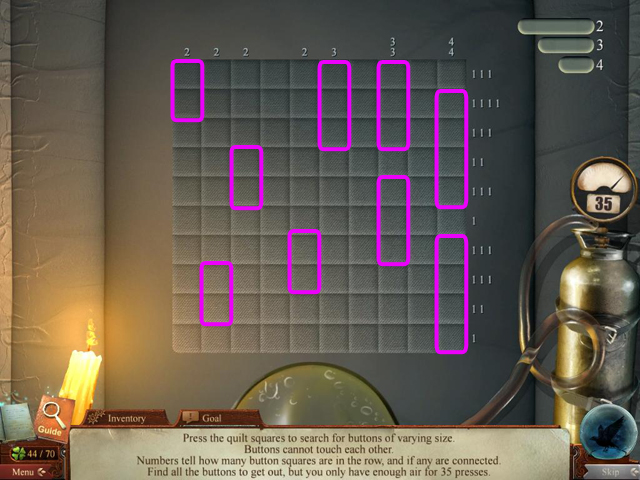 • Use the numbers along the top and right side of the grid to
find the hidden buttons. • Left-click a square in the grid to
reveal part of a button. • The numbers in the top right show
how many buttons of each length there are in the grid.
• Use the numbers along the top and right side of the grid to
find the hidden buttons. • Left-click a square in the grid to
reveal part of a button. • The numbers in the top right show
how many buttons of each length there are in the grid.
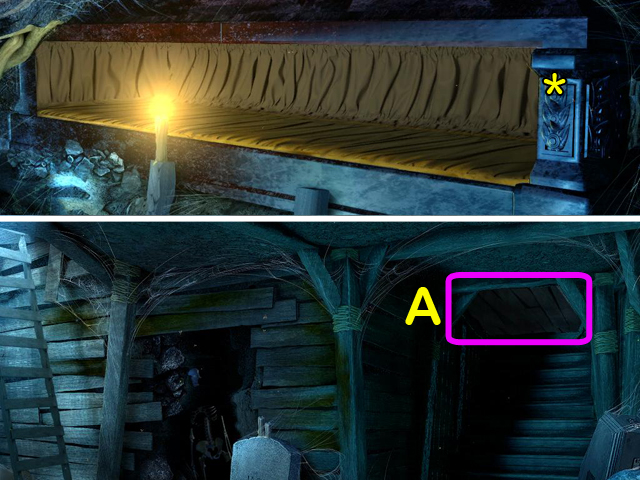 • Take the 45/70 CLOVER (*). • Climb down the ladder. • Open
the trap door (A). • Climb out of the grave.
• Take the 45/70 CLOVER (*). • Climb down the ladder. • Open
the trap door (A). • Climb out of the grave.
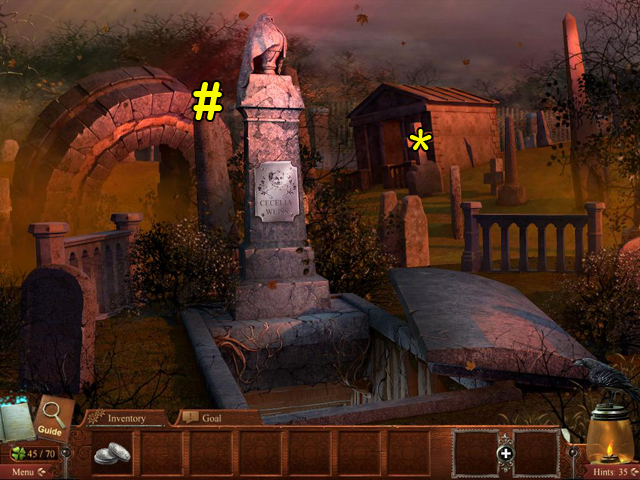 • Take the 46/70 CLOVER (*). • Take the 36/52 RAVEN (#). • Go
to the graves on the right.
• Take the 46/70 CLOVER (*). • Take the 36/52 RAVEN (#). • Go
to the graves on the right.
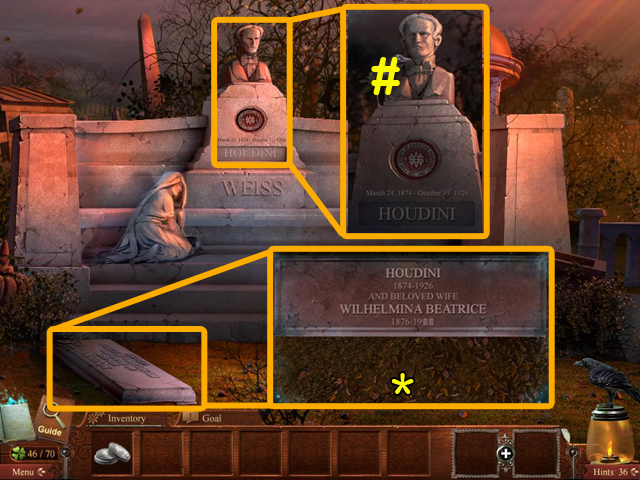 • Examine the marker on the ground (A). • Take the 47/70
CLOVER (*). • Examine the gravestone (B). • Take the 37/52
RAVEN (#).
• Examine the marker on the ground (A). • Take the 47/70
CLOVER (*). • Examine the gravestone (B). • Take the 37/52
RAVEN (#).
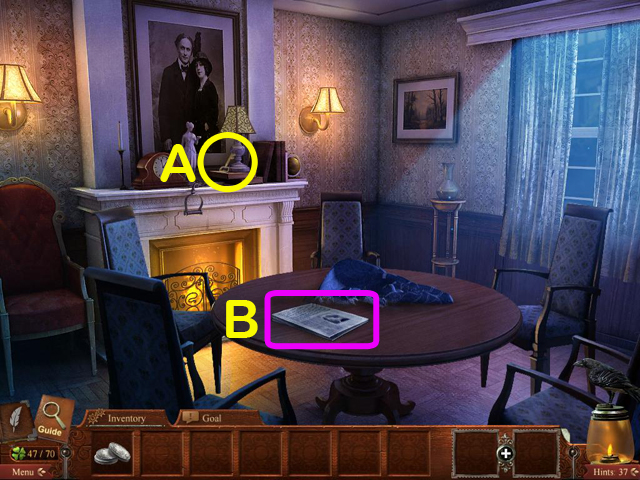 • Take the 1/9 KEY (A). • Examine the newspaper (B). • Go to
the foyer.
• Take the 1/9 KEY (A). • Examine the newspaper (B). • Go to
the foyer.
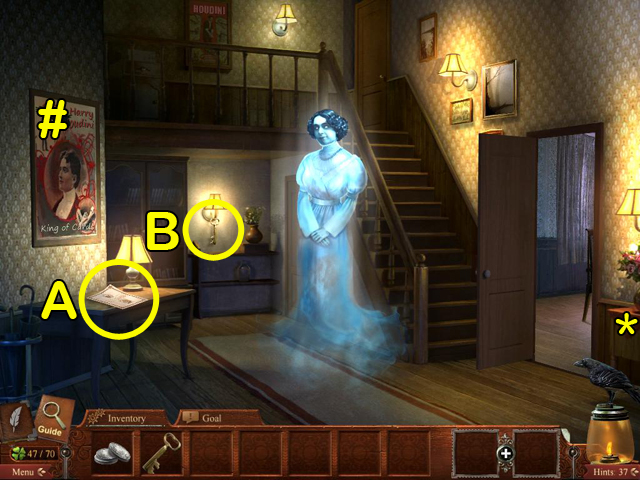 • Take the 48/70 CLOVER (*). • Take the 38/52 RAVEN (#). •
Take the FUNERAL PROGRAM (A). • Take the 2/9 KEY (B).
• Take the 48/70 CLOVER (*). • Take the 38/52 RAVEN (#). •
Take the FUNERAL PROGRAM (A). • Take the 2/9 KEY (B).
 • Give the FUNERAL PROGRAM to Bess (A). • Go upstairs. • Take
the 3/9 KEY (B).
• Give the FUNERAL PROGRAM to Bess (A). • Go upstairs. • Take
the 3/9 KEY (B).
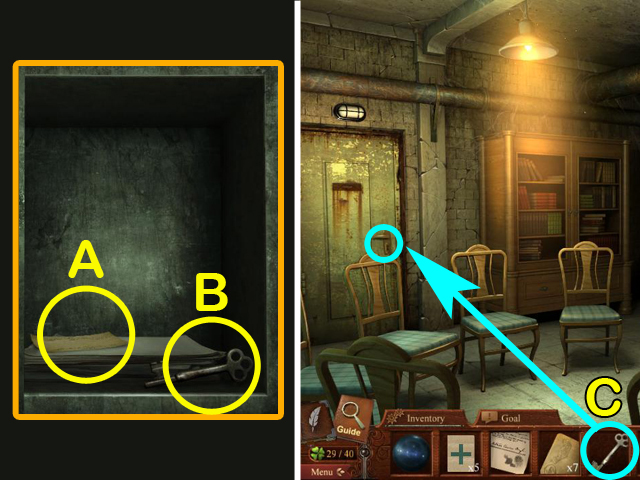
 • Take the 4/9 KEY (A). • Examine the bookshelf (B). • Take
the 49/70 CLOVER (*). • Take the 5/9 KEY (C). • Examine the
trunk (D) to access a HOS. • After completing the HOS you will
have the 1/10 COUPON TICKET and the STRAPS. • Go to the desk
and take the 6/9 KEY (E). • Go outside to the entrance gate.
• Take the 4/9 KEY (A). • Examine the bookshelf (B). • Take
the 49/70 CLOVER (*). • Take the 5/9 KEY (C). • Examine the
trunk (D) to access a HOS. • After completing the HOS you will
have the 1/10 COUPON TICKET and the STRAPS. • Go to the desk
and take the 6/9 KEY (E). • Go outside to the entrance gate.
 • Take the 7/9 KEY (A). • Take the SAW BLADE (B). • Go back to
the street. • Take the 8/9 KEY (C). • Go forward to the
workshop door.
• Take the 7/9 KEY (A). • Take the SAW BLADE (B). • Go back to
the street. • Take the 8/9 KEY (C). • Go forward to the
workshop door.
 • Take the 9/9 KEY (A). • Go into the workshop. • Give the 9
KEYS to Bess (B) and she will give you the BOX OF KEYS.
• Take the 9/9 KEY (A). • Go into the workshop. • Give the 9
KEYS to Bess (B) and she will give you the BOX OF KEYS.
 • Examine the workbench to access a HOS (A). • After
completing the HOS you will have the DUCK TARGETS and LOGGER'S
SAW HANDLES. • Combine the LOGGER'S SAW HANDLES with the SAW
BLADE to create the SAW. • Tie the STRAPS around the box (B).
• Use the SAW to cut the box in half (C).
• Examine the workbench to access a HOS (A). • After
completing the HOS you will have the DUCK TARGETS and LOGGER'S
SAW HANDLES. • Combine the LOGGER'S SAW HANDLES with the SAW
BLADE to create the SAW. • Tie the STRAPS around the box (B).
• Use the SAW to cut the box in half (C).
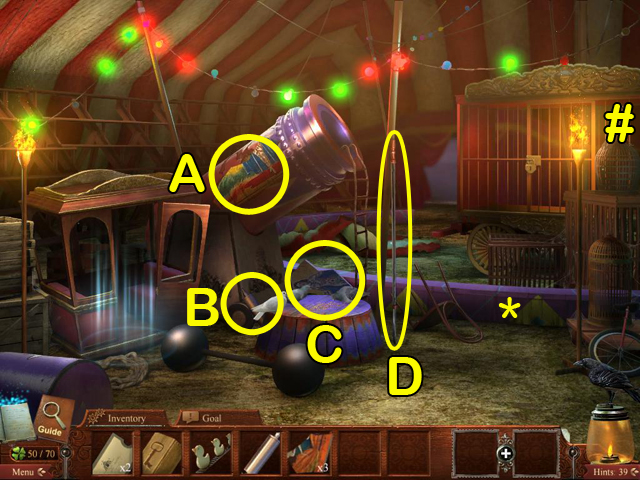
 • Give the SILVER DOLLARS to the ghost (A). • Take the 50/70
CLOVER (*). • Take the 39/52 RAVEN (#). • Take the 1/4
CALLIOPE PIPE (B). • Take the 1/32 BILLBOARD PIECE (C). • Take
the 2/32 BILLBOARD PIECE (D). • Take the 3/32 BILLBOARD PIECE
(E). • Take the 2/10 COUPON TICKET (F). • Go forward into the
tent.
• Give the SILVER DOLLARS to the ghost (A). • Take the 50/70
CLOVER (*). • Take the 39/52 RAVEN (#). • Take the 1/4
CALLIOPE PIPE (B). • Take the 1/32 BILLBOARD PIECE (C). • Take
the 2/32 BILLBOARD PIECE (D). • Take the 3/32 BILLBOARD PIECE
(E). • Take the 2/10 COUPON TICKET (F). • Go forward into the
tent.
 • Take the 51/70 CLOVER (*). • Take the 40/52 RAVEN (#). •
Take the 4/32 BILLBOARD PIECE (A). • Take the 2/4 CALLIOPE
PIPE (B). • Take the 5/32 BILLBOARD PIECE (C). • Take the
SPIKED LITTER ROD (D).
• Take the 51/70 CLOVER (*). • Take the 40/52 RAVEN (#). •
Take the 4/32 BILLBOARD PIECE (A). • Take the 2/4 CALLIOPE
PIPE (B). • Take the 5/32 BILLBOARD PIECE (C). • Take the
SPIKED LITTER ROD (D).
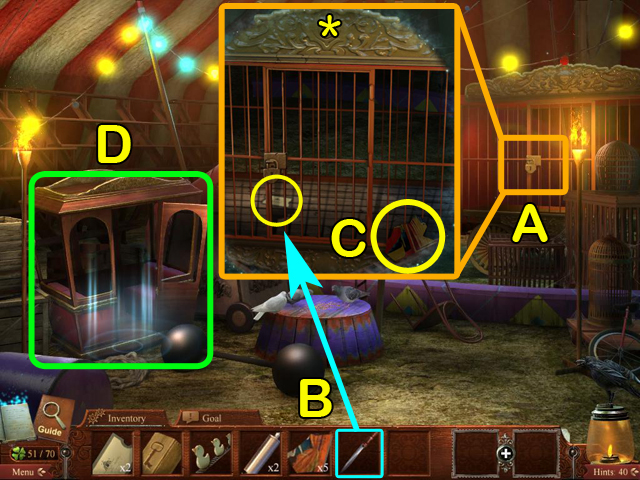 • Examine the cage (A). • Take the 52/70 CLOVER (*). • Use the
SPIKED LITTER ROD to get the 3/10 COUPON TICKET (B). • Take
the 6/32 BILLBOARD PIECE (C). • Examine the carriage to access
a HOS (D).
• Examine the cage (A). • Take the 52/70 CLOVER (*). • Use the
SPIKED LITTER ROD to get the 3/10 COUPON TICKET (B). • Take
the 6/32 BILLBOARD PIECE (C). • Examine the carriage to access
a HOS (D).
 • Take the 53/70 and 54/70 CLOVERS (*). • Find all the items
listed. Some items are hidden within the interactive area (A).
• After completing the HOS you will have the MAGIC TRICK
BLADES and three BASEBALLS. • Leave the tent and go to the
midway on the right.
• Take the 53/70 and 54/70 CLOVERS (*). • Find all the items
listed. Some items are hidden within the interactive area (A).
• After completing the HOS you will have the MAGIC TRICK
BLADES and three BASEBALLS. • Leave the tent and go to the
midway on the right.
 • Take the 55/70 CLOVER (*). • Take the 41/52 RAVEN (#). • Go
forward to the stage.
• Take the 55/70 CLOVER (*). • Take the 41/52 RAVEN (#). • Go
forward to the stage.
 • Take the 56/70 CLOVER (*). • Take the 42/52 RAVEN (#). •
Take the 7/32 BILLBOARD PIECE (A). • Take the 8/32 BILLBOARD
PIECE (B). • Take the RIFLE (C). • Take the 4/10 COUPON TICKET
(D). • Take the 9/32 BILLBOARD PIECE (E). • Use the MAGIC
TRICK BLADES to separate the box (F). • Take the SHEET MUSIC
(G). • Go to the Games of Skill on the left.
• Take the 56/70 CLOVER (*). • Take the 42/52 RAVEN (#). •
Take the 7/32 BILLBOARD PIECE (A). • Take the 8/32 BILLBOARD
PIECE (B). • Take the RIFLE (C). • Take the 4/10 COUPON TICKET
(D). • Take the 9/32 BILLBOARD PIECE (E). • Use the MAGIC
TRICK BLADES to separate the box (F). • Take the SHEET MUSIC
(G). • Go to the Games of Skill on the left.
 • Take the 57/70 CLOVER (*). • Take the 43/52 RAVEN (#). •
Take the 10/32 BILLBOARD PIECE (A). • Take the SLEDGEHAMMER
(B). • Take the 11/32 BILLBOARD PIECE (C). • Go to the Test of
Strength game on the left.
• Take the 57/70 CLOVER (*). • Take the 43/52 RAVEN (#). •
Take the 10/32 BILLBOARD PIECE (A). • Take the SLEDGEHAMMER
(B). • Take the 11/32 BILLBOARD PIECE (C). • Go to the Test of
Strength game on the left.
 • Take the 12/32, 13/32 and 14/32 BILLBOARD PIECES (A-C). •
Place the SLEDGEHAMMER above the striking pad (D).
• Take the 12/32, 13/32 and 14/32 BILLBOARD PIECES (A-C). •
Place the SLEDGEHAMMER above the striking pad (D).
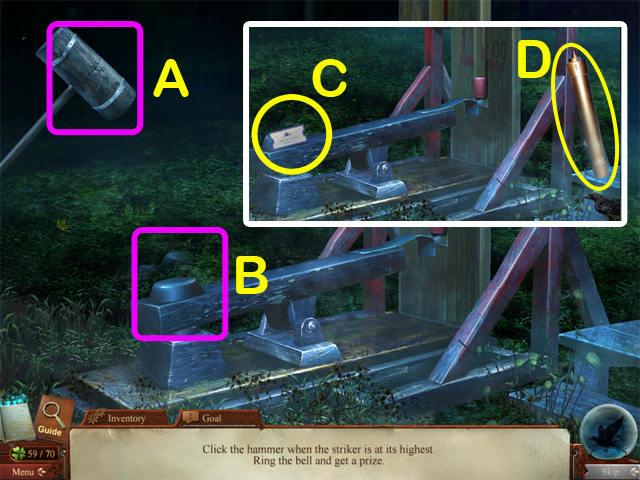 • Left-click the sledgehammer (A) when the striking pad (B) is
at its highest point. This will cause the weight to hit the
bell at the top. • Take the 5/10 COUPON TICKET (C). • Take the
3/4 CALLIOPE PIPE (D). • Go to the fortune teller machine.
• Left-click the sledgehammer (A) when the striking pad (B) is
at its highest point. This will cause the weight to hit the
bell at the top. • Take the 5/10 COUPON TICKET (C). • Take the
3/4 CALLIOPE PIPE (D). • Go to the fortune teller machine.
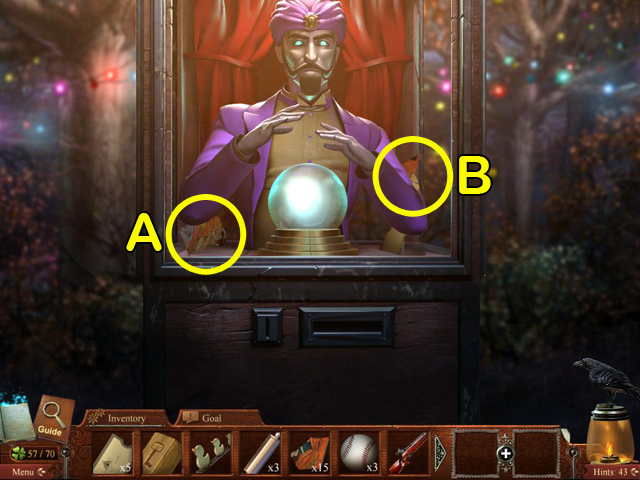 • Take the 15/32 and 16/32 BILLBOARD PIECES (A,B). • Go to the
Milk Bottle Toss.
• Take the 15/32 and 16/32 BILLBOARD PIECES (A,B). • Go to the
Milk Bottle Toss.
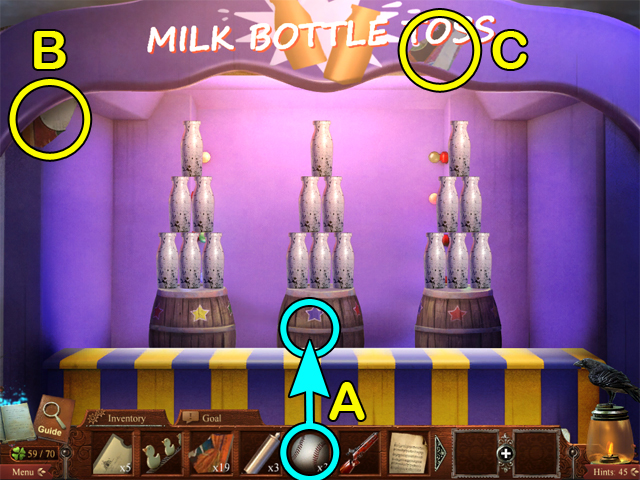 • Place the BASEBALLS on the stand (A). • Take the 17/32 and
18/32 BILLBOARD PIECES (B,C).
• Place the BASEBALLS on the stand (A). • Take the 17/32 and
18/32 BILLBOARD PIECES (B,C).
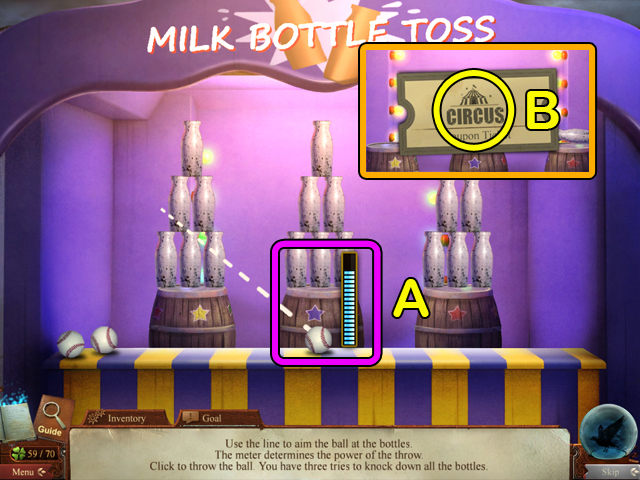 • Use the dotted line to aim the ball at the bottles. The
Meter (A) determines the power of the throw. Click to throw
the ball. You have three tries to knock down all the bottles.
• Take the 6/10 and 7/10 COUPON TICKETS (B). • Go to the Duck
Shoot.
• Use the dotted line to aim the ball at the bottles. The
Meter (A) determines the power of the throw. Click to throw
the ball. You have three tries to knock down all the bottles.
• Take the 6/10 and 7/10 COUPON TICKETS (B). • Go to the Duck
Shoot.
 • Take the DUCK TARGETS (A). • Take the 19/32, 20/32 and 21/32
BILLBOARD PIECES (B-D). • Place both DUCK TARGETS on the posts
(E). • Place the RIFLE on the stand (F).
• Take the DUCK TARGETS (A). • Take the 19/32, 20/32 and 21/32
BILLBOARD PIECES (B-D). • Place both DUCK TARGETS on the posts
(E). • Place the RIFLE on the stand (F).
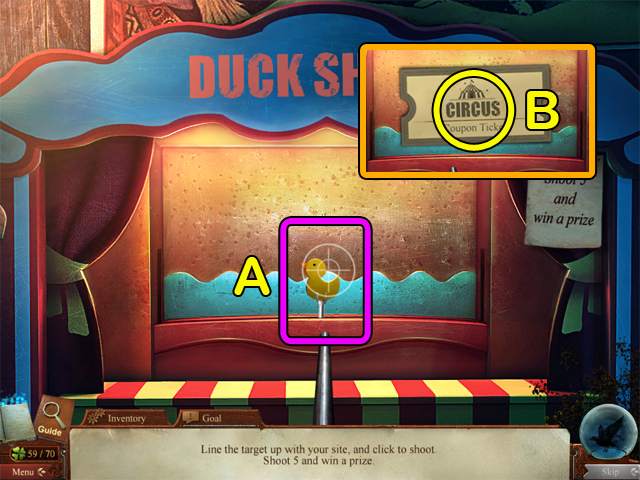 • The crosshairs (A) will bob up and down and sway left and
right. You can also move the rifle up, down, left and right.
Left-click to shoot the rifle. Time it so that the crosshairs
are on the duck before firing. Shoot five targets. • Take 8/10
COUPON TICKET (B). • Go to the wagon.
• The crosshairs (A) will bob up and down and sway left and
right. You can also move the rifle up, down, left and right.
Left-click to shoot the rifle. Time it so that the crosshairs
are on the duck before firing. Shoot five targets. • Take 8/10
COUPON TICKET (B). • Go to the wagon.
 • Take the 58/70 CLOVER (*). • Take the 44/52 RAVEN (#). •
Take the 22/32, 23/32, 24/32, 25/32 and 26/32 BILLBOARD PIECES
(A-E). • Take the 4/4 CALLIOPE PIPE (F). • Go to the calliope
at the circus entrance.
• Take the 58/70 CLOVER (*). • Take the 44/52 RAVEN (#). •
Take the 22/32, 23/32, 24/32, 25/32 and 26/32 BILLBOARD PIECES
(A-E). • Take the 4/4 CALLIOPE PIPE (F). • Go to the calliope
at the circus entrance.
 • Take the 59/70 CLOVER (*). • Take the 45/52 RAVEN (#). •
Take the 27/32 and 28/32 BILLBOARD PIECES (A, B). • Place the
four CALLIOPE PIPES into the calliope (C).
• Take the 59/70 CLOVER (*). • Take the 45/52 RAVEN (#). •
Take the 27/32 and 28/32 BILLBOARD PIECES (A, B). • Place the
four CALLIOPE PIPES into the calliope (C).
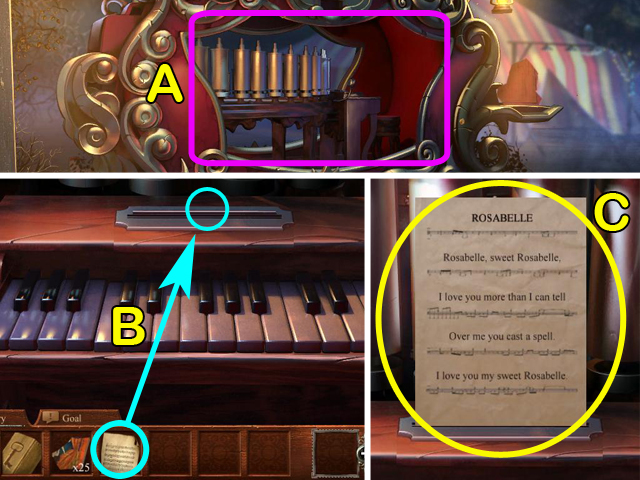 • Examine the interior of the calliope (A). • Put the SHEET
MUSIC into the slot (B). • Take the ROSABELLE LYRICS (C).
• Examine the interior of the calliope (A). • Put the SHEET
MUSIC into the slot (B). • Take the ROSABELLE LYRICS (C).
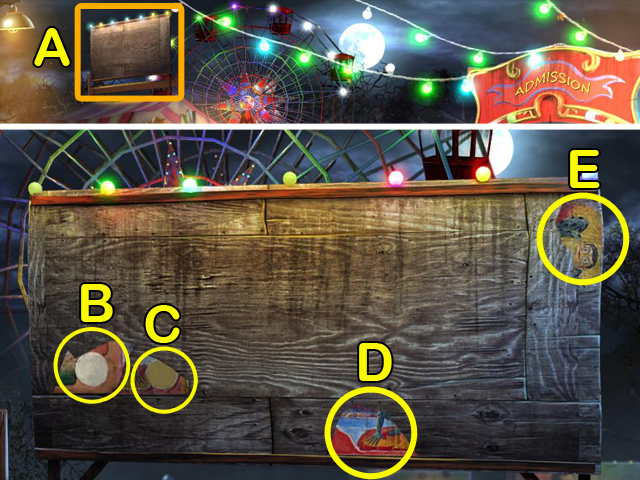 • Examine the billboard (A). • Take the 29/32, 30/32, 31/32
and 32/32 BILLBOARD PIECES (B-E).
• Examine the billboard (A). • Take the 29/32, 30/32, 31/32
and 32/32 BILLBOARD PIECES (B-E).
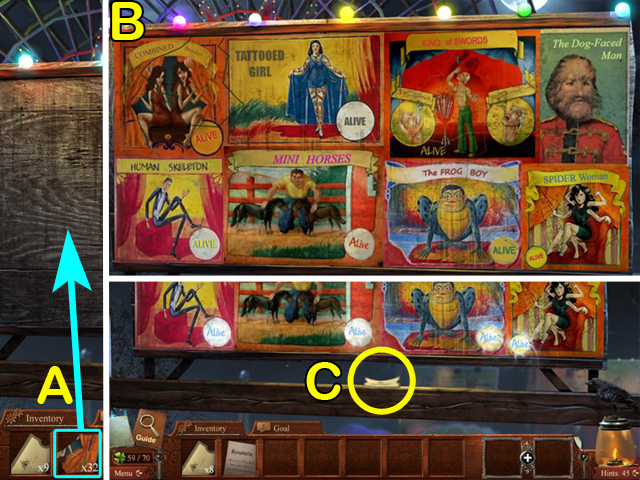 • Place the BILLBOARD PIECES onto the billboard (A). • Put the
pieces together like a jigsaw puzzle. Left-click a piece and
drag it to the desired location. Each piece will freeze into
place when it is in its correct location. Fit all pieces
together until the billboard is complete (B). • Take the 9/10
COUPON TICKET (C). • Go back to the wagon.
• Place the BILLBOARD PIECES onto the billboard (A). • Put the
pieces together like a jigsaw puzzle. Left-click a piece and
drag it to the desired location. Each piece will freeze into
place when it is in its correct location. Fit all pieces
together until the billboard is complete (B). • Take the 9/10
COUPON TICKET (C). • Go back to the wagon.
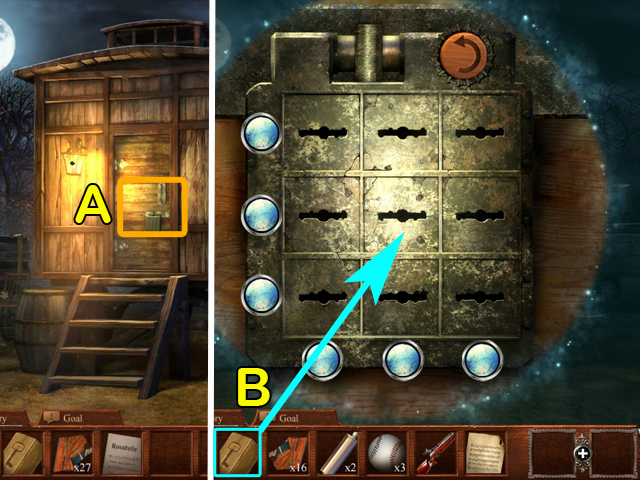 • Examine the wagon door (A). • Use the BOX OF KEYS to fill
the 9 slots (B).
• Examine the wagon door (A). • Use the BOX OF KEYS to fill
the 9 slots (B).
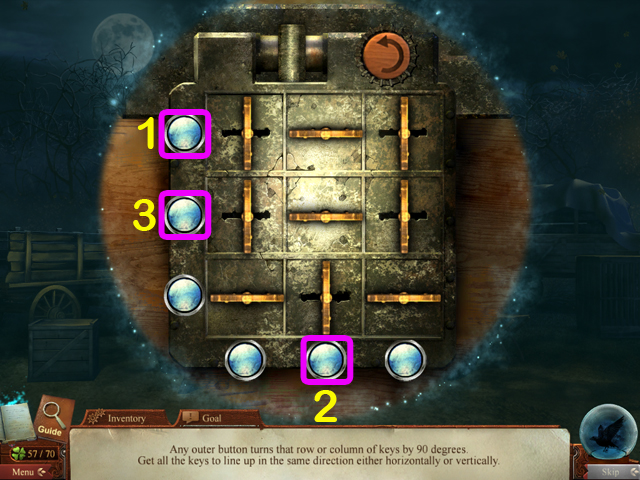 • Press the buttons in numerical order (1-3). • Go inside the
wagon.
• Press the buttons in numerical order (1-3). • Go inside the
wagon.
 • Take the 60/70 CLOVER (*). • Take the 46/52 RAVEN (#). •
Take the CARDS (A). • Give the ROSABELLE LYRICS to Houdini
(B). • Give the CARDS to Houdini (C).
• Take the 60/70 CLOVER (*). • Take the 46/52 RAVEN (#). •
Take the CARDS (A). • Give the ROSABELLE LYRICS to Houdini
(B). • Give the CARDS to Houdini (C).
 • Memorize any pair of cards. The aces will be used in this
example (A). • Click the Ready button (B).
• Memorize any pair of cards. The aces will be used in this
example (A). • Click the Ready button (B).
 • Left-click each card from the pair you memorized (A, B). •
Click the Ready button (C). • After the trick you will have
the TWO CARDS. • Examine the picture (D). • Take the 10/10
COUPON TICKET (E). • Go back to the circus entrance.
• Left-click each card from the pair you memorized (A, B). •
Click the Ready button (C). • After the trick you will have
the TWO CARDS. • Examine the picture (D). • Take the 10/10
COUPON TICKET (E). • Go back to the circus entrance.
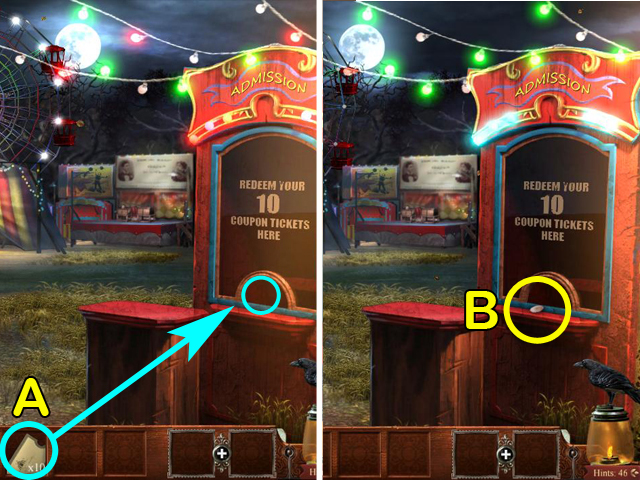 • Give the COUPON TICKETS to the admission booth (A). • Take
the TOKEN (B). • Go back to the fortune telling machine.
• Give the COUPON TICKETS to the admission booth (A). • Take
the TOKEN (B). • Go back to the fortune telling machine.
 • Insert the TOKEN into the slot (A). • Take the BELIEVE
NOTEBOOK (B).
• Insert the TOKEN into the slot (A). • Take the BELIEVE
NOTEBOOK (B).
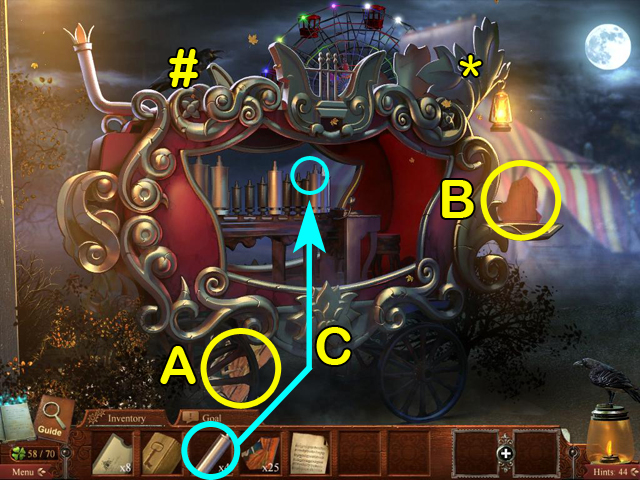
 • Take the 61/70 CLOVER (*). • Combine the ROSABELLE LYRICS
with the BELIEVE NOTEBOOK to make ROSABELLE, BELIEVE!. • Give
ROSABELLE, BELIEVE! to Doyle (A). • Go to the foyer.
• Take the 61/70 CLOVER (*). • Combine the ROSABELLE LYRICS
with the BELIEVE NOTEBOOK to make ROSABELLE, BELIEVE!. • Give
ROSABELLE, BELIEVE! to Doyle (A). • Go to the foyer.
 • Take the 62/70 CLOVER (*). • Take the 47/52 RAVEN (#). •
Follow Ford upstairs to the study.
• Take the 62/70 CLOVER (*). • Take the 47/52 RAVEN (#). •
Follow Ford upstairs to the study.
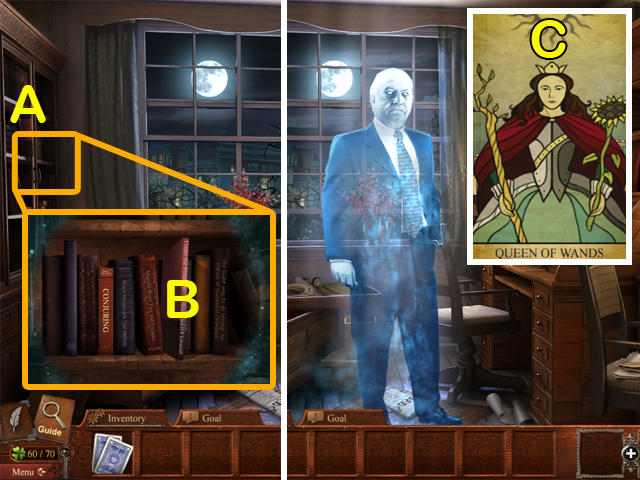 • Examine the bookshelf (A). • Examine the book (B). • Talk to
Ford. • Left-click the card (C).
• Examine the bookshelf (A). • Examine the book (B). • Talk to
Ford. • Left-click the card (C).
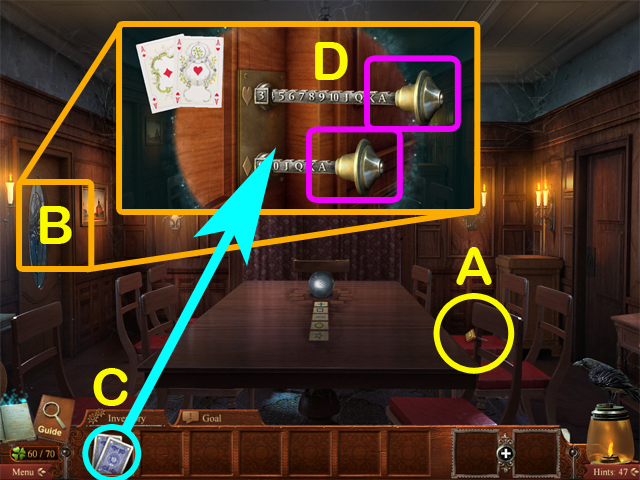 • Take the UPHOLSTERY BUTTON (A). • Examine the door on the
left (B). • Place the TWO CARDS next to the lock (C). • Push
each handle until the correct number or letter is inside the
silver squares (D). The correct numbers are from the cards you
chose during Houdini’s trick. • Enter the fortune teller room
on the left.
• Take the UPHOLSTERY BUTTON (A). • Examine the door on the
left (B). • Place the TWO CARDS next to the lock (C). • Push
each handle until the correct number or letter is inside the
silver squares (D). The correct numbers are from the cards you
chose during Houdini’s trick. • Enter the fortune teller room
on the left.
 • Take the 63/70 CLOVER (*). • Take the 48/52 RAVEN (#). •
Examine the chair (A). • Put the UPHOLSTERY BUTTON in the
chair (B). • Left-click the buttons on the chair in numerical
order (1-7). • Enter the back room to access a HOS.
• Take the 63/70 CLOVER (*). • Take the 48/52 RAVEN (#). •
Examine the chair (A). • Put the UPHOLSTERY BUTTON in the
chair (B). • Left-click the buttons on the chair in numerical
order (1-7). • Enter the back room to access a HOS.
 • Take the 64/70 and 65/70 CLOVERS (*). • Find all the items
listed. Some items may be hidden within the interactive areas
(A, B). • After completing the HOS you will have the TAROT
CARDS, CLASS RING and BRAND.
• Take the 64/70 and 65/70 CLOVERS (*). • Find all the items
listed. Some items may be hidden within the interactive areas
(A, B). • After completing the HOS you will have the TAROT
CARDS, CLASS RING and BRAND.
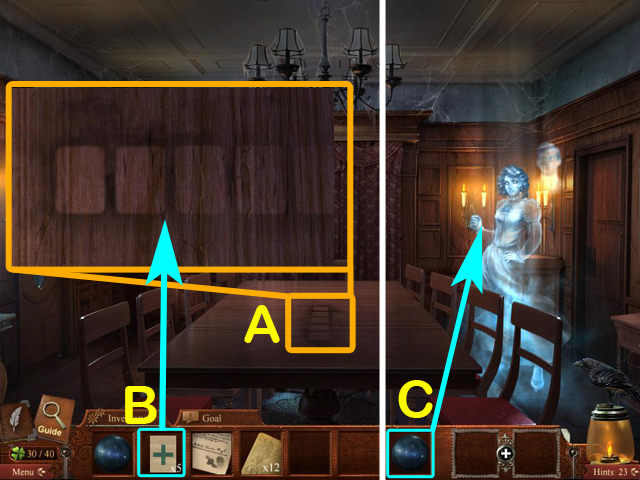
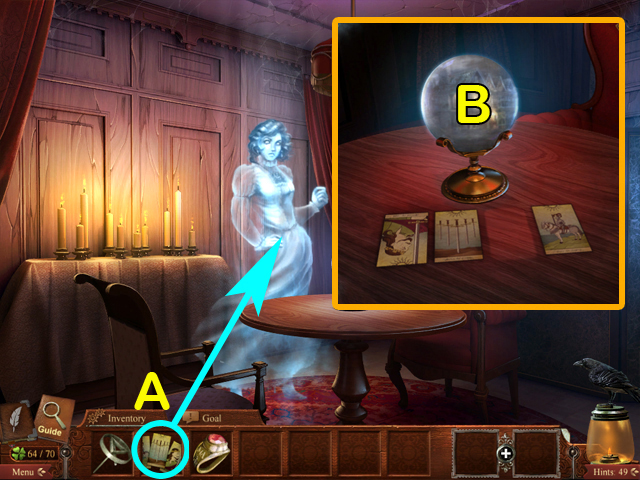 • Give the TAROT CARDS to Mina (A). • After Mina gives the
reading, left-click the crystal ball (B).
• Give the TAROT CARDS to Mina (A). • After Mina gives the
reading, left-click the crystal ball (B).
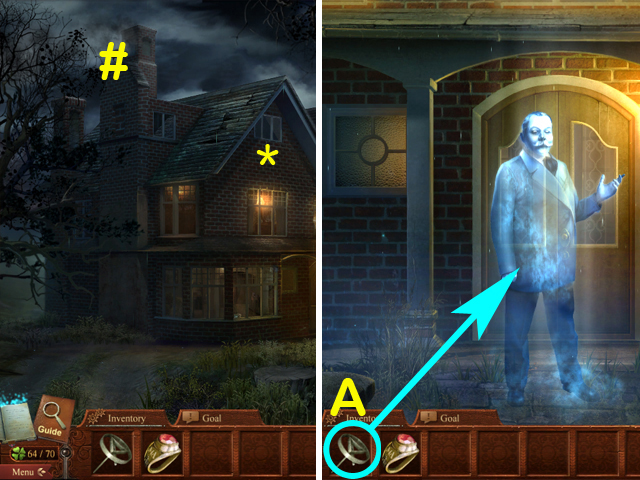 • Take the 66/70 CLOVER (*). • Take the 49/52 RAVEN (#). • Go
to the manor entrance. • Give Doyle the BRAND (A). • Talk to
Doyle. • Enter the manor.
• Take the 66/70 CLOVER (*). • Take the 49/52 RAVEN (#). • Go
to the manor entrance. • Give Doyle the BRAND (A). • Talk to
Doyle. • Enter the manor.
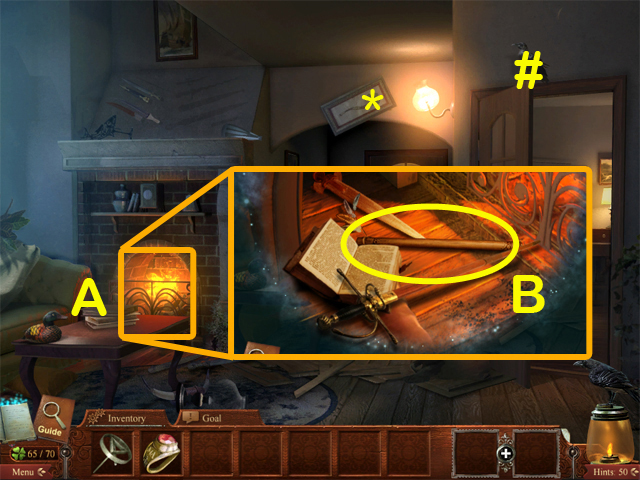 • Take the 67/70 CLOVER (*). • Take the 50/52 RAVEN (#). •
Examine the fireplace (A). • Take the BLOWGUN (B). • Go to the
den on the right. • Examine the desk to access a HOS. • After
completing the HOS you will have the LANTERN. • Go out to the
gatehouse.
• Take the 67/70 CLOVER (*). • Take the 50/52 RAVEN (#). •
Examine the fireplace (A). • Take the BLOWGUN (B). • Go to the
den on the right. • Examine the desk to access a HOS. • After
completing the HOS you will have the LANTERN. • Go out to the
gatehouse.
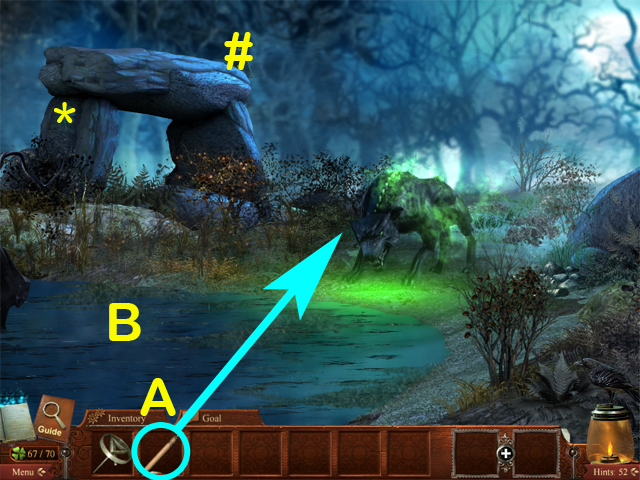
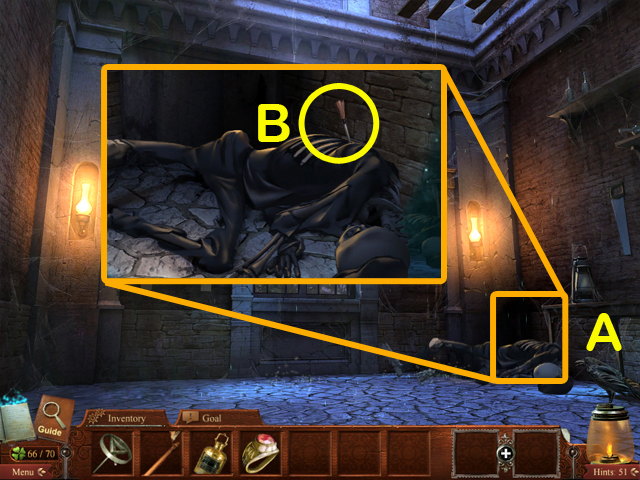 • Examine the skeleton (A). • Take the DART (B). • Combine the
BLOWGUN with the DART to make a LOADED BLOWGUN. • Return to
the manor grounds and go to the bog on the right.
• Examine the skeleton (A). • Take the DART (B). • Combine the
BLOWGUN with the DART to make a LOADED BLOWGUN. • Return to
the manor grounds and go to the bog on the right.
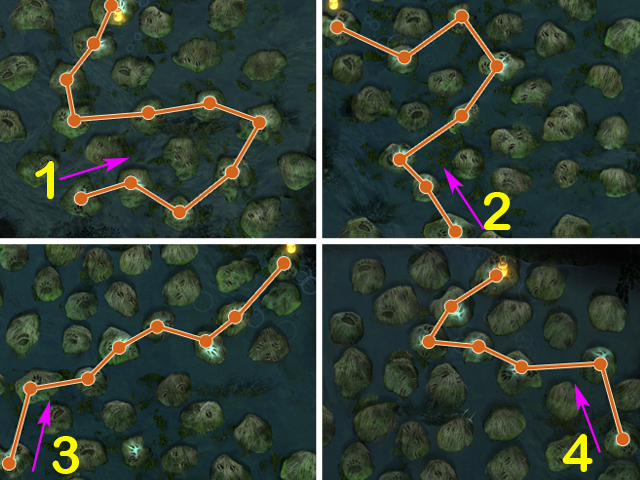 • Use the LANTERN to light the area. • Cross the bog by
stepping only on the stones that have a hound footprint on
them. • Follow the pattern for each scene (1-4).
• Use the LANTERN to light the area. • Cross the bog by
stepping only on the stones that have a hound footprint on
them. • Follow the pattern for each scene (1-4).
 • Take the 68/70 CLOVER (*). • Take the 51/52 RAVEN (#). • Use
the LOADED BLOWGUN to sedate the hound (A). • Go into the
water.
• Take the 68/70 CLOVER (*). • Take the 51/52 RAVEN (#). • Use
the LOADED BLOWGUN to sedate the hound (A). • Go into the
water.
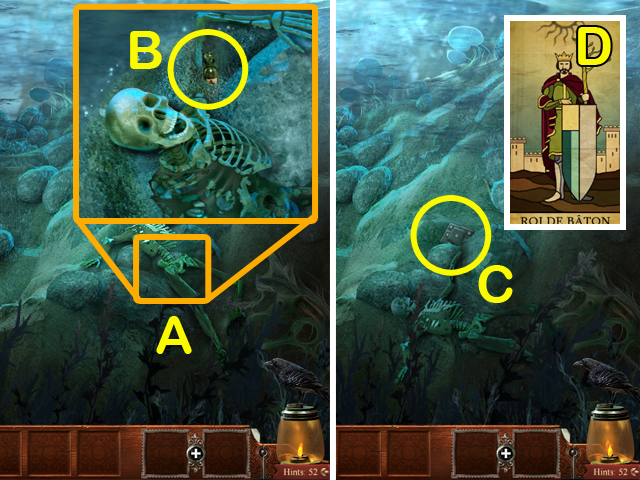 • Examine the skeleton (A). • Examine the arsenic bottle (B).
• Take the 1/7, 2/7 and 3/7 NUMBERED TILES (C). • Get out of
the water and talk to Doyle. • Take the ROI DE BATON (D).
• Examine the skeleton (A). • Examine the arsenic bottle (B).
• Take the 1/7, 2/7 and 3/7 NUMBERED TILES (C). • Get out of
the water and talk to Doyle. • Take the ROI DE BATON (D).
 • Back out to the Ghost Club room. • Go to the safe in the
cabinet on the right. • Left-click the buttons in numerical
order (1-19). • Turn the safe handle (A). • Take the CRYSTAL
(B). • Examine the copper (C). • Go back to the séance room.
• Back out to the Ghost Club room. • Go to the safe in the
cabinet on the right. • Left-click the buttons in numerical
order (1-19). • Turn the safe handle (A). • Take the CRYSTAL
(B). • Examine the copper (C). • Go back to the séance room.
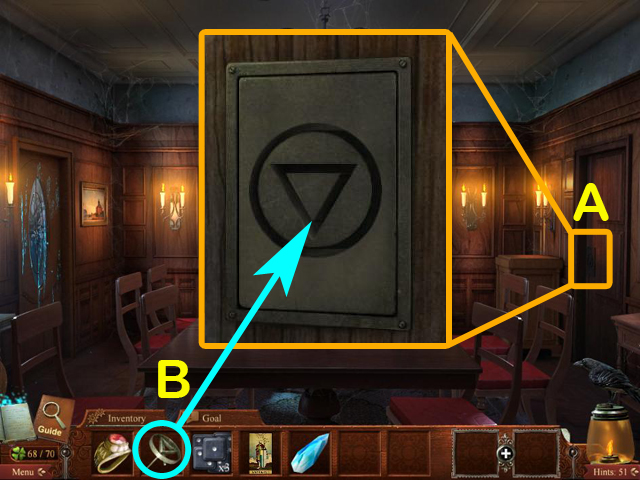 • Examine the lock on the door to the right (A). • Use the
BRAND to unlock the door (B). • Go into the living room.
• Examine the lock on the door to the right (A). • Use the
BRAND to unlock the door (B). • Go into the living room.
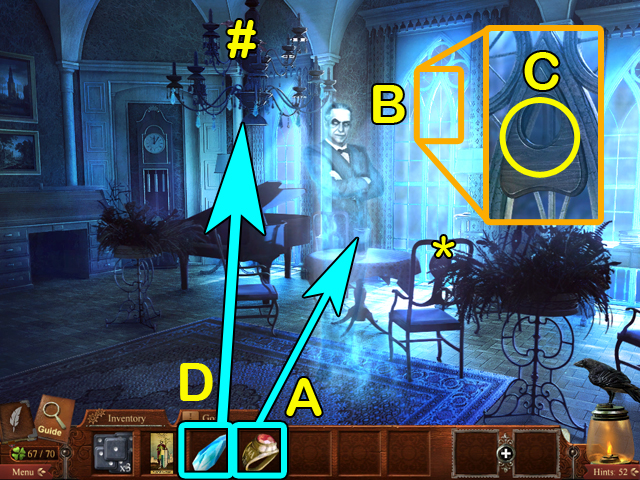 • Take the 69/70 CLOVER (*). • Take the 52/52 RAVEN (#). •
Give the CLASS RING to Cranston (A). • Talk to Cranston. •
Examine the window (B). • Take the SPIRIT BOARD POINTER (C). •
Put the CRYSTAL into the chandelier (D).
• Take the 69/70 CLOVER (*). • Take the 52/52 RAVEN (#). •
Give the CLASS RING to Cranston (A). • Talk to Cranston. •
Examine the window (B). • Take the SPIRIT BOARD POINTER (C). •
Put the CRYSTAL into the chandelier (D).
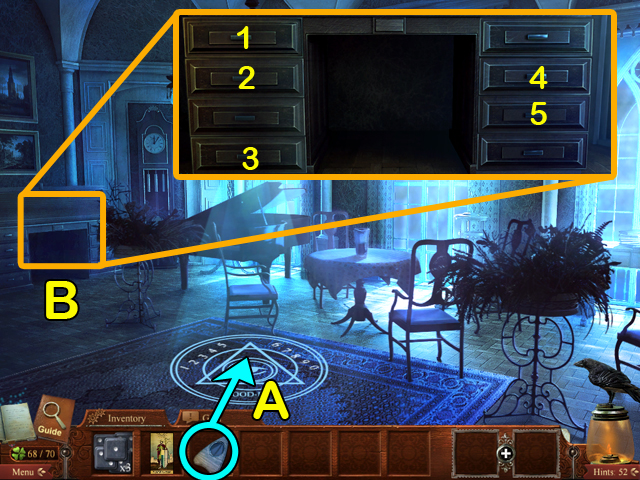 • Place the SPIRIT BOARD POINTER on the floor (A) and this
will give you the SPIRIT CODE. • Go to the desk (B). • Open
the drawers in numerical order (1-5).
• Place the SPIRIT BOARD POINTER on the floor (A) and this
will give you the SPIRIT CODE. • Go to the desk (B). • Open
the drawers in numerical order (1-5).
 • Take the 70/70 CLOVER (*). • Take the PENCIL (A). • Place
the SPIRIT CODE on the desk (B).
• Take the 70/70 CLOVER (*). • Take the PENCIL (A). • Place
the SPIRIT CODE on the desk (B).
 • Arrange the numbered boxes on the desk to match the numbers
on the spirit code (A). Left-click a numbered box to move it.
• Take the SECRET SOCIETY CARD and examine the notebook (B). •
Use the PENCIL to reveal the message on the notepad (C). • Go
back to the séance room.
• Arrange the numbered boxes on the desk to match the numbers
on the spirit code (A). Left-click a numbered box to move it.
• Take the SECRET SOCIETY CARD and examine the notebook (B). •
Use the PENCIL to reveal the message on the notepad (C). • Go
back to the séance room.
 • Use the SECRET SOCIETY CARD to open the door on the left
(A). • Go into the fortune teller room. • Examine table and
place down the ROI DE BATONS card (B).
• Use the SECRET SOCIETY CARD to open the door on the left
(A). • Go into the fortune teller room. • Examine table and
place down the ROI DE BATONS card (B).
 • Take the 4/7, 5/7, 6/7 and 7/7 NUMBERED TILES (A-D). • Go
back to the living room.
• Take the 4/7, 5/7, 6/7 and 7/7 NUMBERED TILES (A-D). • Go
back to the living room.
 • Pull back the carpet (A). • Examine the floor (B).
 • Place the NUMBERED TILES on the floor (A).
 • Move each tile into its correct position (A-G).
 • Take HOUDINI’S BODY (A). • Go underground to the coffin.
 • Open the coffin (A). • Place HOUDINI’S body in the coffin
(B). • Climb back out of the grave and talk to Houdini. • Talk
to Bess.
• Open the coffin (A). • Place HOUDINI’S body in the coffin
(B). • Climb back out of the grave and talk to Houdini. • Talk
to Bess.
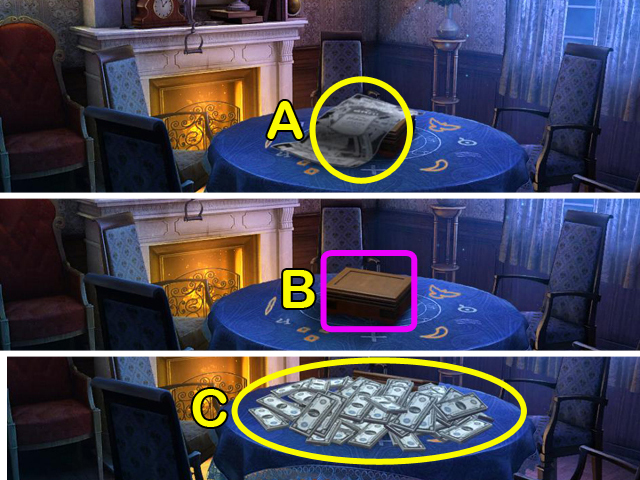 • Examine the paper (A). • Open the box (B). • Take the money
(C). • Congratulations! You have completed Midnight Mysteries:
Haunted Houdini Deluxe Edition!
• Examine the paper (A). • Open the box (B). • Take the money
(C). • Congratulations! You have completed Midnight Mysteries:
Haunted Houdini Deluxe Edition!
Created at: 2012-02-15