

- Welcome to the Ms. Holmes: Five Orange Pips Walkthrough
- An intruder's puzzling calling-card means certain doom for the Holmes family line!
- Whether you use this document as a reference when things get difficult or as a road map to get you from beginning to end, we're pretty sure you'll find what you're looking for here.
- This document contains a complete Ms. Holmes: Five Orange Pips game walkthrough featuring annotated screenshots from actual gameplay!
- We hope you find this information useful as you play your way through the game. Use the walkthrough menu below to quickly jump to whatever stage of the game you need help with.
- This walkthrough was created by Margie B, and is protected under US Copyright laws. Any unauthorized use, including re-publication in whole or in part, without permission, is strictly prohibited.
Walkthrough Menu
General Tips
- This is the official guide for Ms. Holmes: Five Orange Pips.
- This guide won't tell you when to zoom into a location; the screenshots show each zoom scene.
- Hidden-object puzzles are referred to as HOPs. Only the locations of the HOPs will be shown.
- Use the Map to fast travel to a location.
Chapter 1: Drawing Room
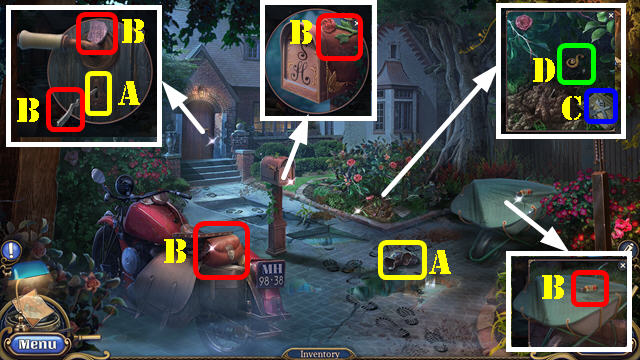
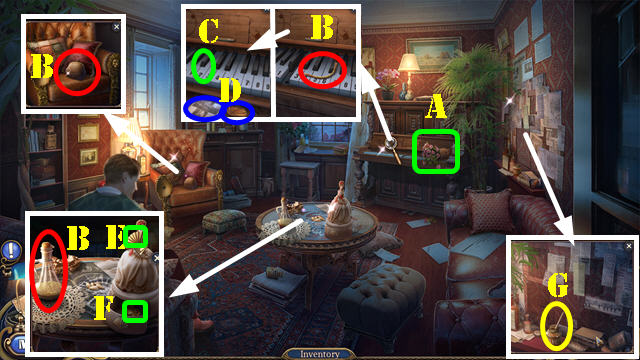
- Select lock and broken vase (A).
- Take PICKLOCK PART, SHARLOTTE'S BAG, PAINTING PART 1/3, METAL FLOWER, and SOLVENT (B).
- Look at newspaper clipping; take TOOLS AMULET (C).
- PICKLOCK PART on SHARLOTTE'S BAG; look at newspaper and wallet; take LIPSTICK, GLOVE, and MONOGRAM H.
- Use GLOVE; take MONOGRAM S (D).
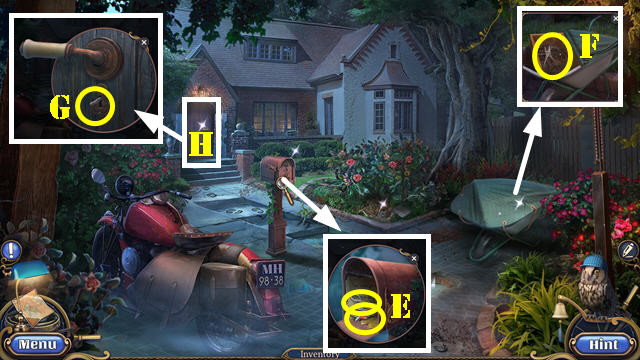
- Place MONOGRAM S and MONOGRAM H and look at note; take RUBY BIRD and SCISSORS (E).
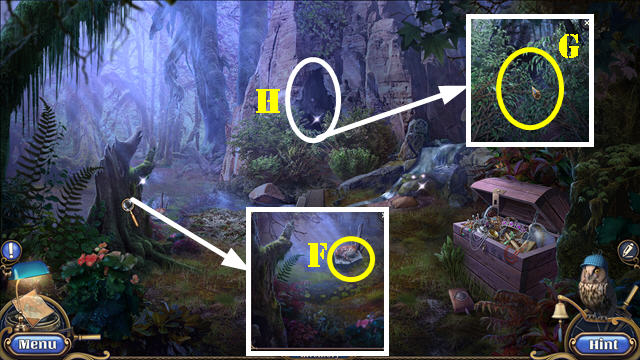
- Use SCISSORS and place TOOLS AMULET; take PLIERS (F).
- Use PLIERS (G).
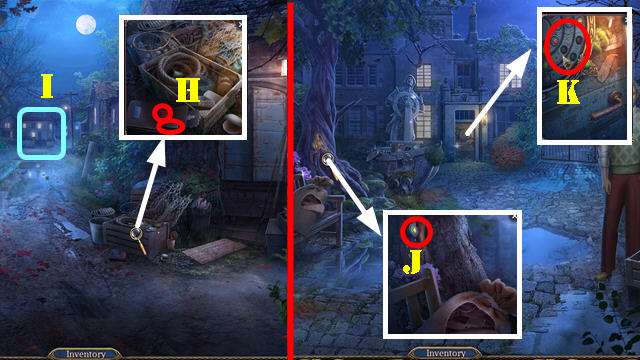
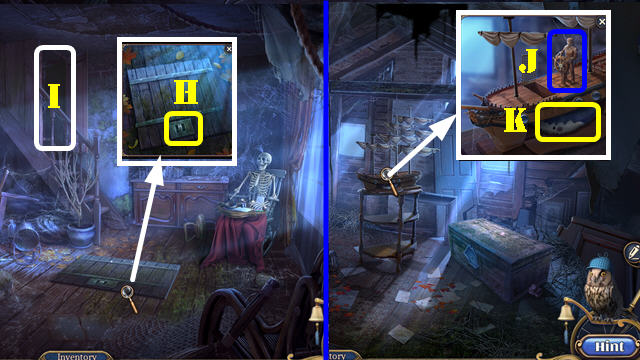
- Go (H).
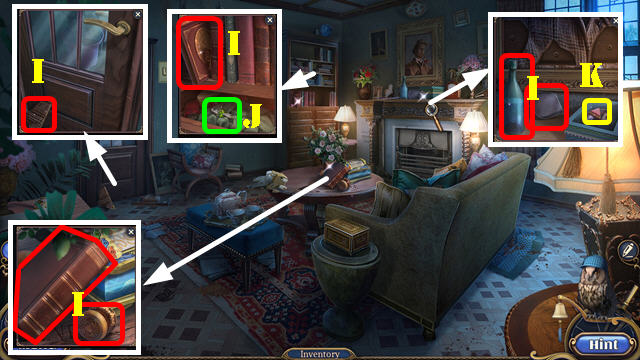
- Play automatic HOP.
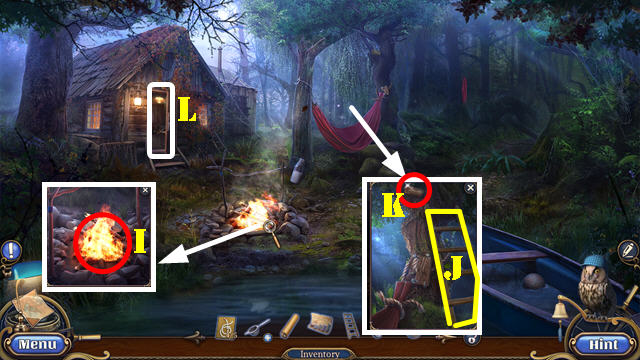
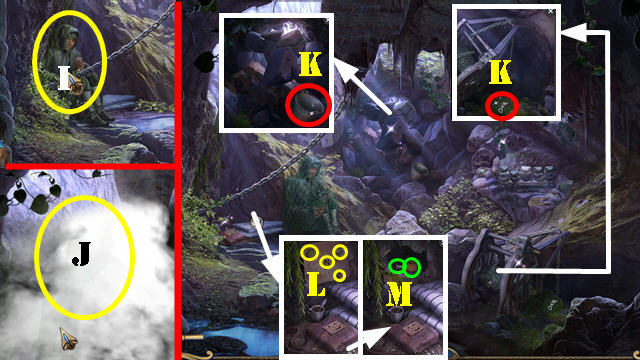
- Take PAINTING PART 2/3, FIREPLACE SCOOP, WATER BOTTLE, ALBUM, BOOK, and KNOB, (I).
- Place KNOB; take EMERALD BIRD (J).
- Place METAL FLOWER; take ALBUM BUTTON (K).
- ALBUM BUTTON on ALBUM; take PAINTING PART 3/3 and SAPPHIRE BIRD.
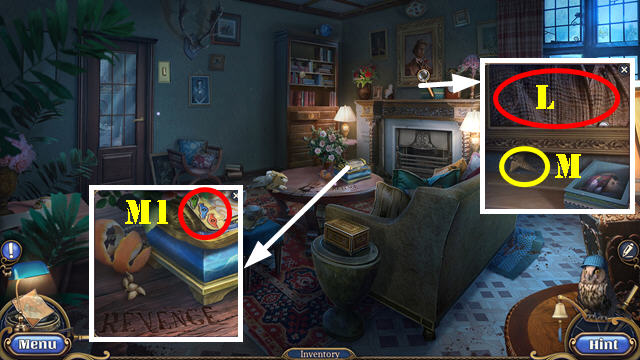
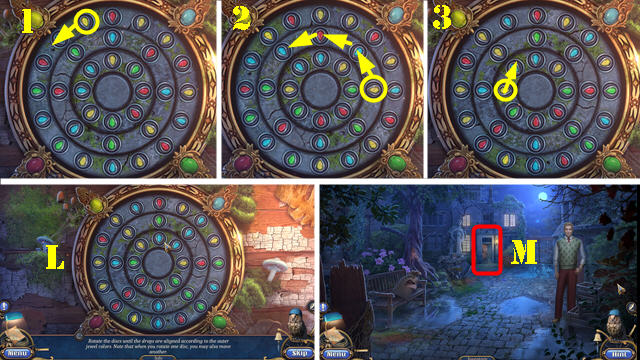
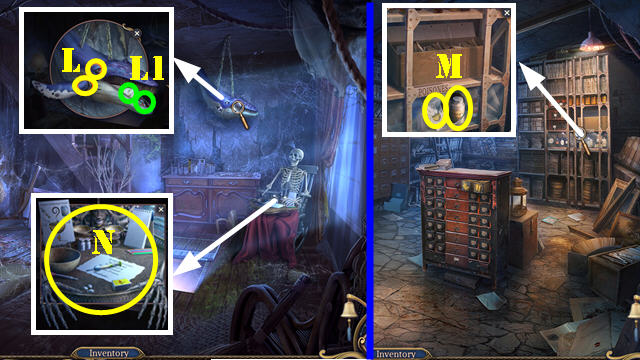
- Place PAINTING PART 3/3 (L); take CADUCEUS (M).
- Place EMERALD BIRD, SAPPHIRE BIRD, and RUBY BIRD (M1).
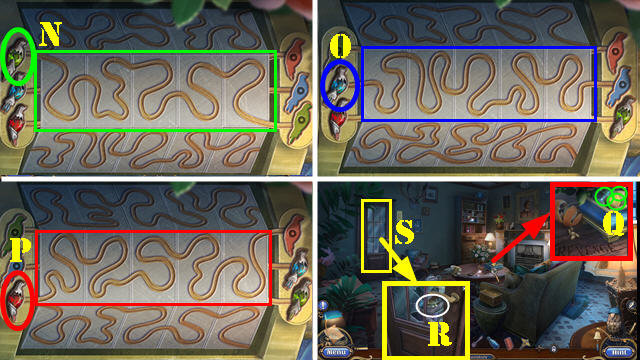
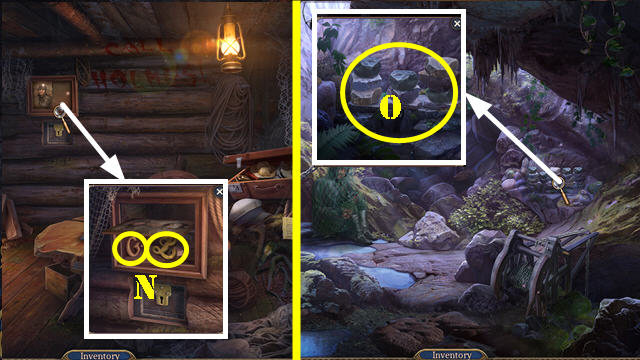
- Solution one: select green bird (N).
- Solution two; select blue bird (0).
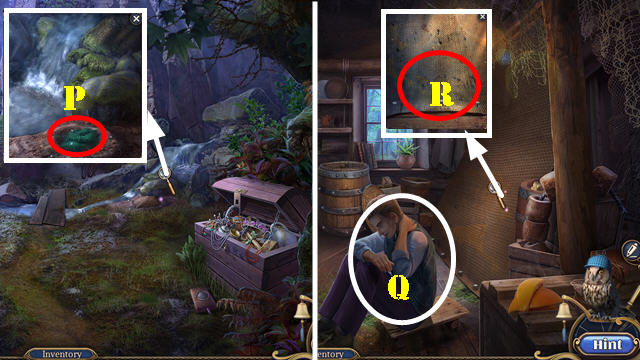
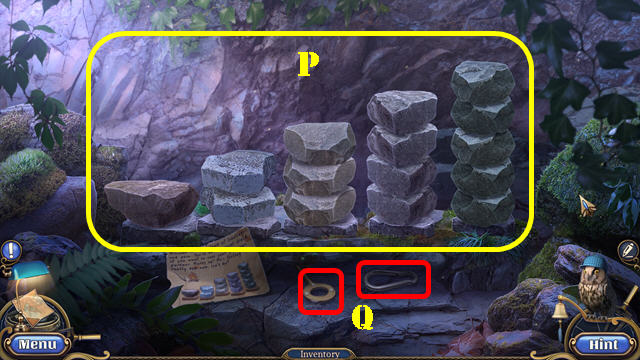
- Solution three; select red bird (P).
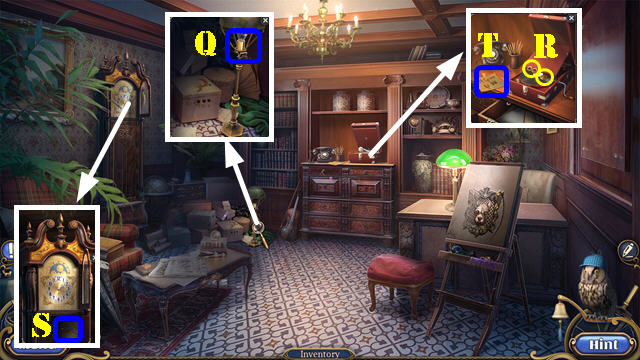
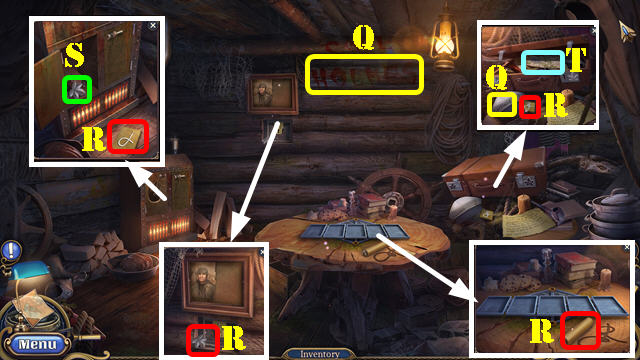
- Take HEART AMULET and MIRROR; look at note (Q).
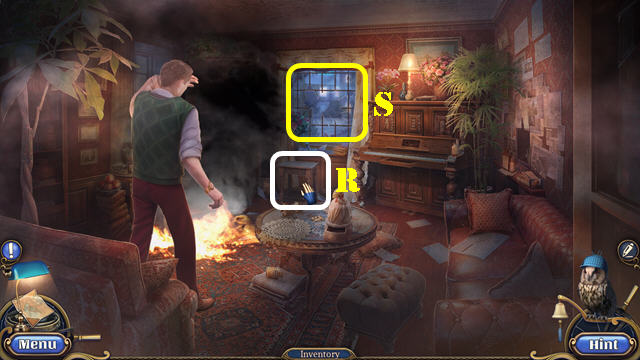
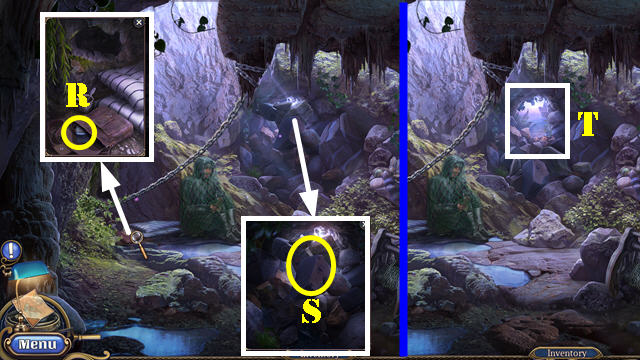
- Use GLOVE and MIRROR; select mirror (R).
- Go (S).
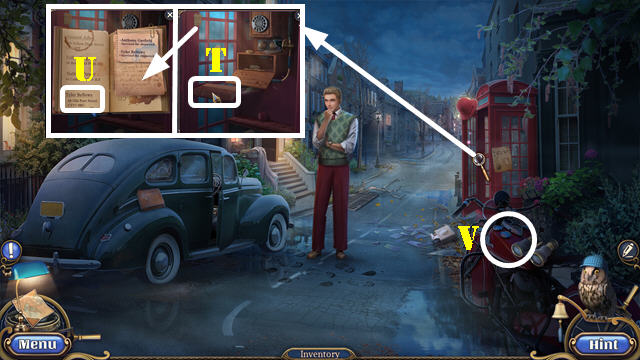
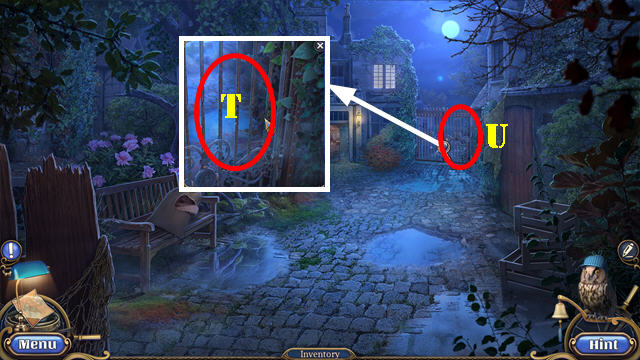
- Select spilled paint and broken flowerpot (T).
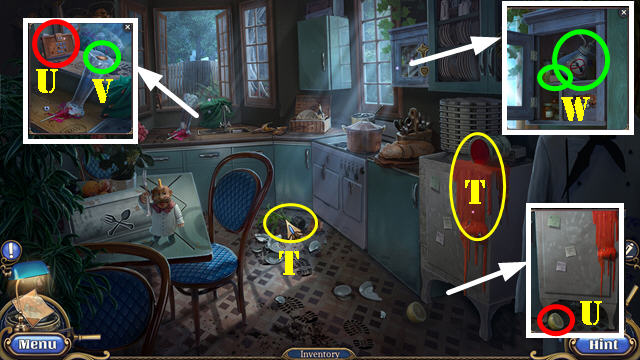
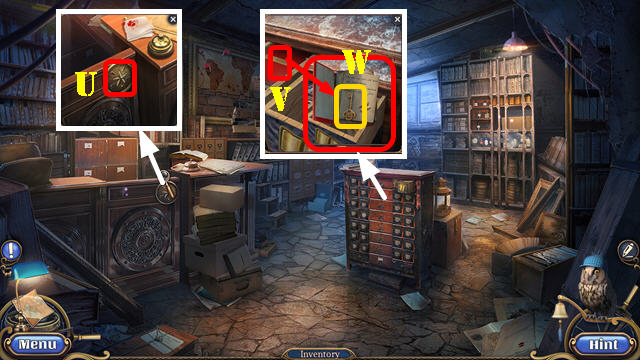
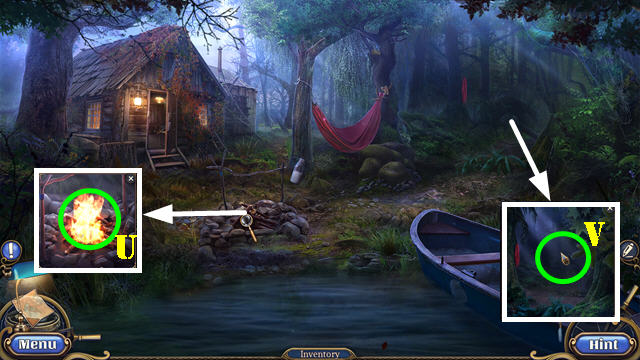
- Take INTRUDER'S NOTEBOOK and LEMON (U).
- Use WATER BOTTLE; take WOODEN ORNAMENT (V).
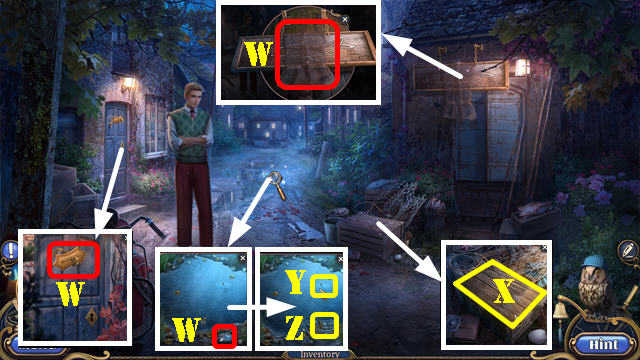
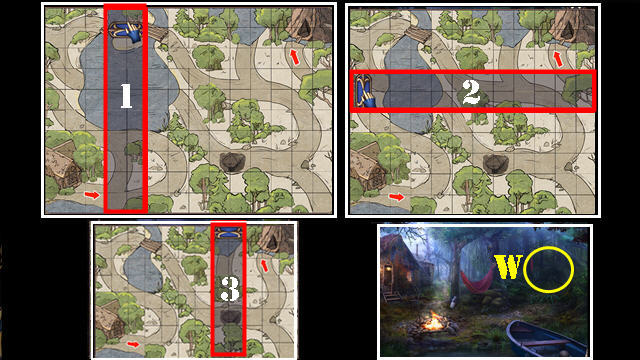
- Place CADUCEUS and HEART AMULET; take ANT SPRAY and MATCHES (W).
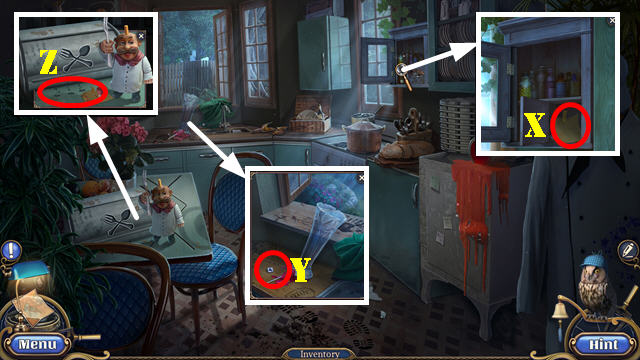
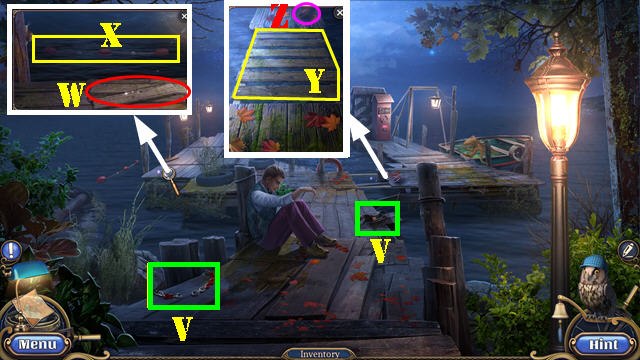
- Use LEMON; take PAPER (X).
- Use ANT SPRAY; take BUTTON (Y).
- Use LIPSTICK and PAPER (Z); receive CODE.
- Walk down twice.
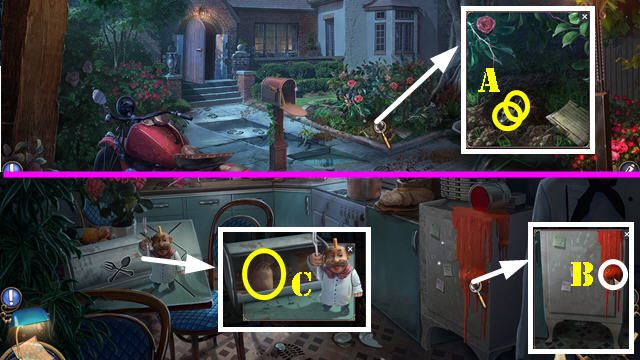
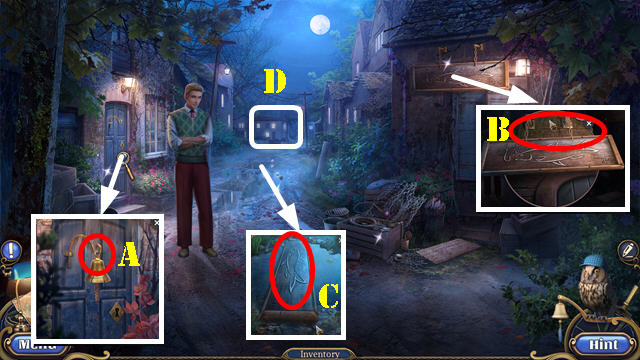
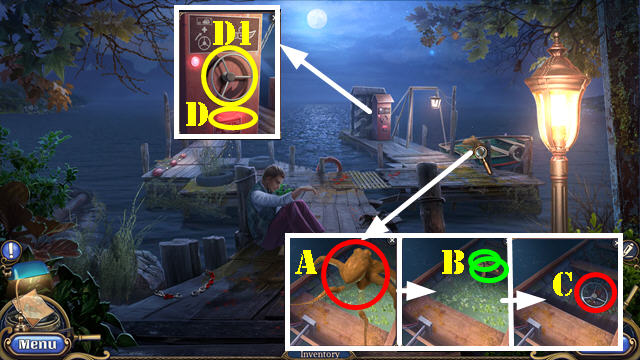
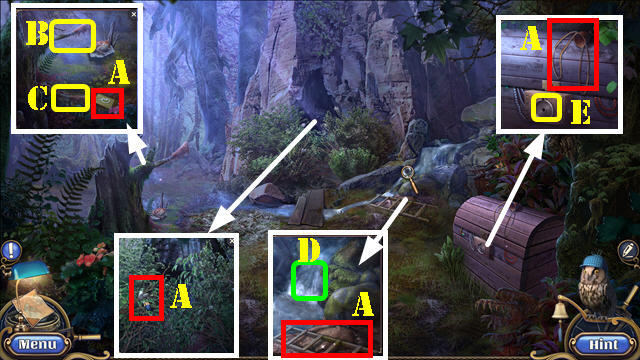
- Use FIREPLACE SCOOP; take FRIDGE HANDLE and CUTLERY AMULET (A).
- Go to Kitchen.
- Use SOLVENT and place FRIDGE HANDLE (B). Play HOP; receive BUTTON.
- Place CUTLERY AMULET; take FLOUR (C).
- Walk down.
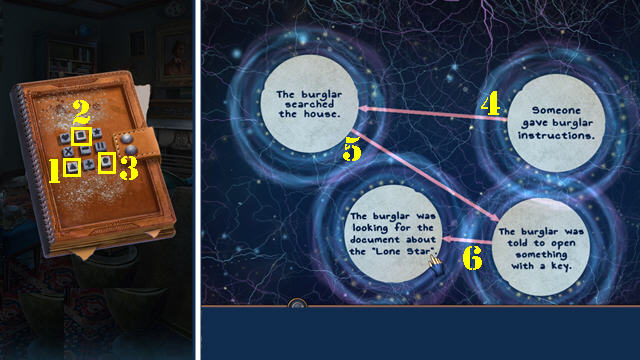
- Place two BUTTONS and FLOUR on INTRUDER'S NOTEBOOK; select (1-2-3).
- Solution: (4-5-6).
- Take STUDY KEY.
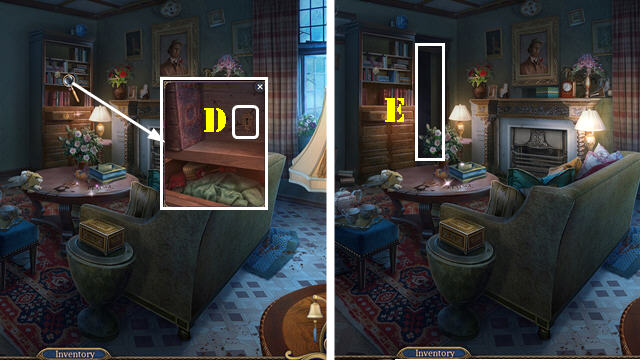
- Place BOOK and use STUDY KEY (D).
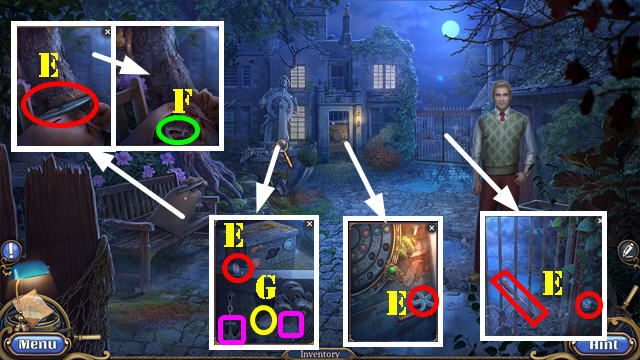
- Go (E).
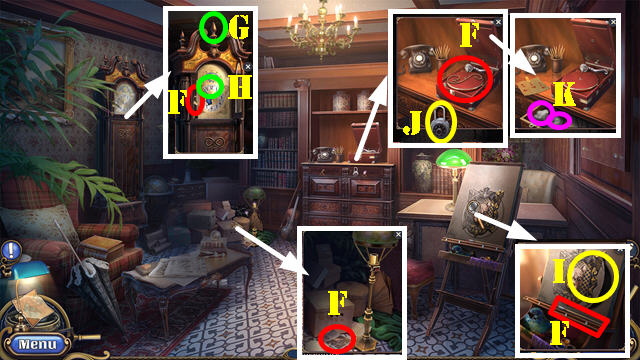
- Take LAMP CHAIN, ROPE, PAINTBRUSH, and NEWSPAPER CLIPPINGS 1/4 (F).
- Place WOODEN ORNAMENT (G); take CLOCK HAND (H).
- Use CLOCK HAND; take RECORD (I).
- Place CODE and select lock (J); take CHEF'S HAT and ADHESIVE TAPE (K).
- Go to Kitchen.
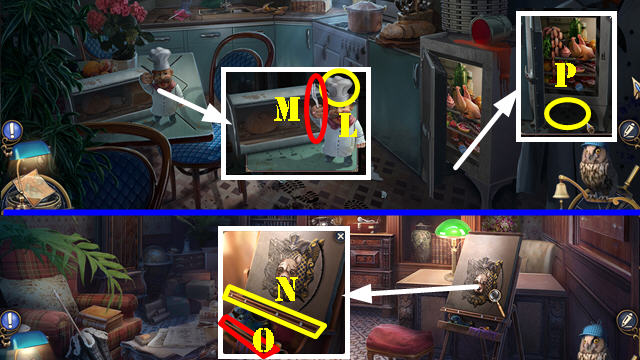
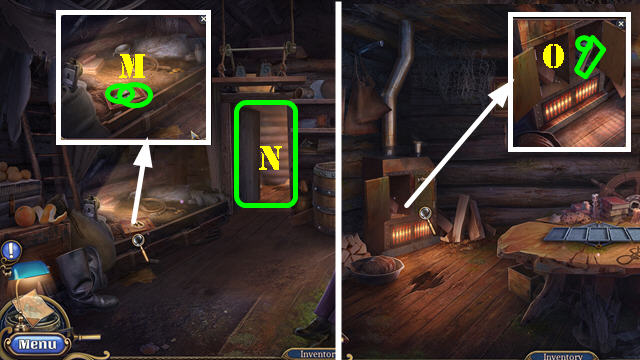
- Place CHEF'S HAT (L); take TWO-PRONGED FORK (M).
- Go to Study.
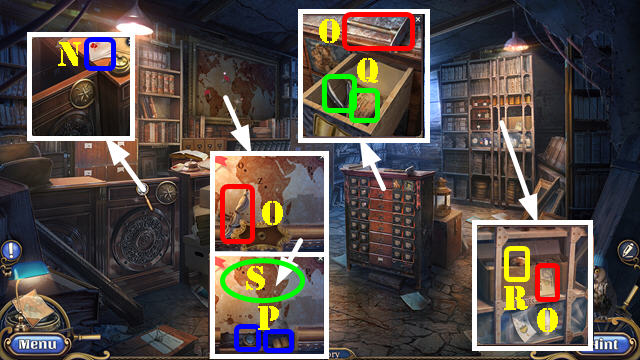
- Use TWO-PRONGED FORK (N); take WOODEN STRIP (0).
- Go to Kitchen.
- Use WOODEN STRIP (P); receive LIGHTBULB.
- Go to Study.
- Place LIGHTBULB and LAMP CHAIN (Q). Play HOP; receive GRAMOPHONE LEVER.
- Place RECORD and GRAMOPHONE LEVER; take COIN and INFINITY AMULET (R).
- Place INFINITY AMULET; take DOCUMENTS (S).
- Take ADDRESS (T).
- Go to Yard.
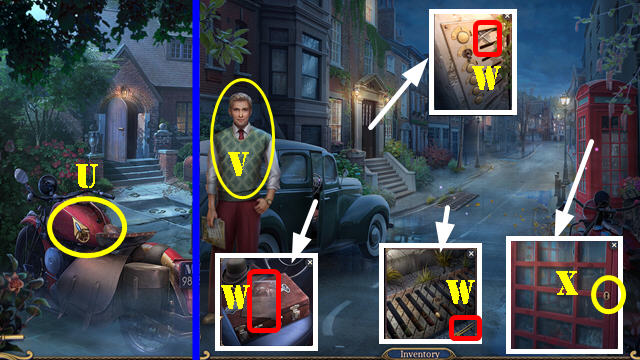
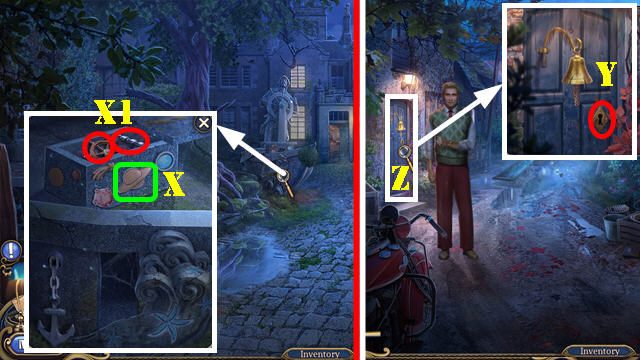
- Place ADDRESS (U).
- Talk; give DOCUMENTS (V); receive PHONE DIAL and CAR AMULET.
- Take HAIRPIN, NEWSPAPER CLIPPINGS 2/4, and PLANE AMULET (W).
- Use HAIRPIN (X). Play HOP; receive PIANO KEY.
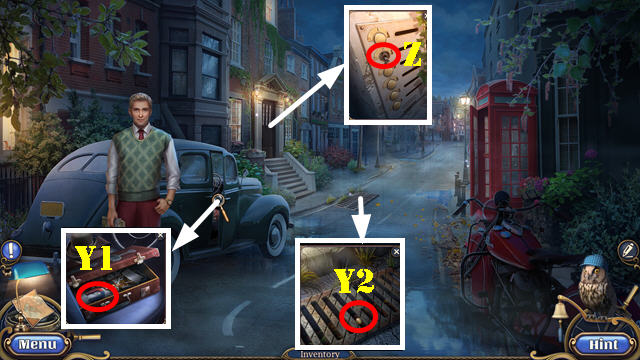
- Place CAR AMULET and PLANE AMULET; take MAGNET (Y1).
- MAGNET on ROPE and select; take ROPE WITH MAGNET.
- Use ROPE WITH MAGNET (Y2); receive INTERCOM BUTTON.
- Place INTERCOM BUTTON (Z).
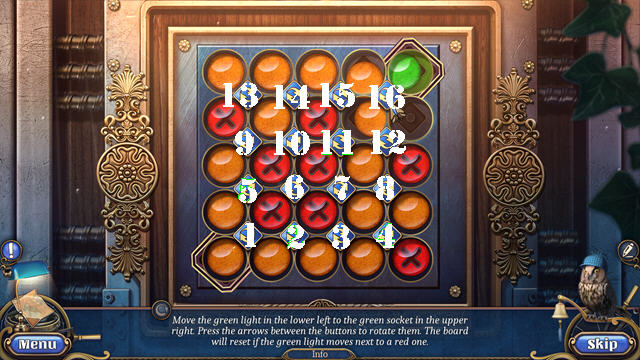
- Solution (2-5-1-5-13-9-13x2-14-15-16).
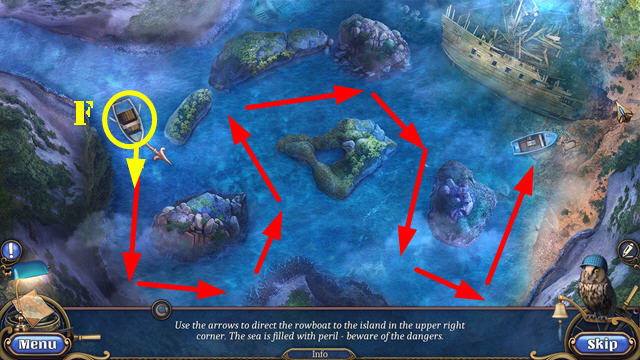
- Select scene.
- Select flowers (A).
- Take PURSE, VINEGAR, and WIRE (B).
- Place PIANO KEY (C); take NEWSPAPER CLIPPINGS 3/4 and MINI FAN (D).
- Place MINI FAN (E); take LION PART (F).
- Place PAINTBRUSH; take PAINTBRUSH WITH GLUE (G).
- Walk down.
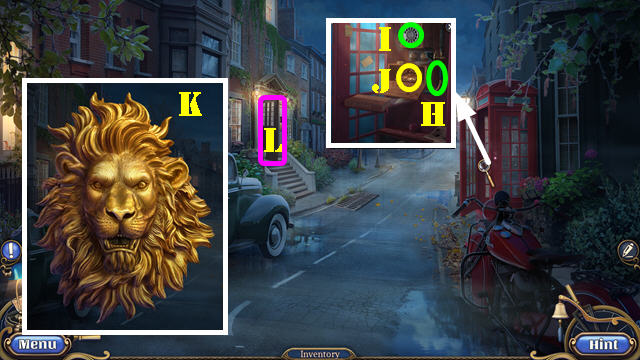
- Use WIRE and ADHESIVE TAPE (H); place PHONE DIAL (I); take BROKEN LION (J).
- LION PART and PAINTBRUSH WITH GLUE on BROKEN LION. Arrange as shown (K). Take LION AMULET.
- Go (L).
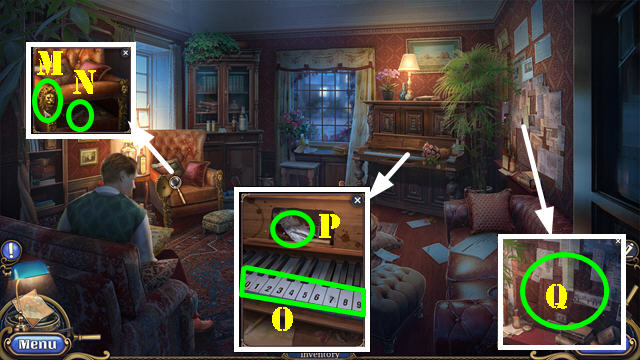
- Place LION AMULET (M); take MUSIC NOTES (N).
- Place MUSIC NOTES on piano; select (051271025) (O); take FOIL and CORKSCREW (P).
- VINEGAR and FOIL on COIN PURSE and select; look at note and take NEWSPAPER CLIPPINGS 4/4.
- Place NEWSPAPER CLIPPINGS 4/4 (Q). Play HOP; receive MANUSCRIPT.
Chapter 2: Archives
- Take STOOL (R).
- Use STOOL and go (S).
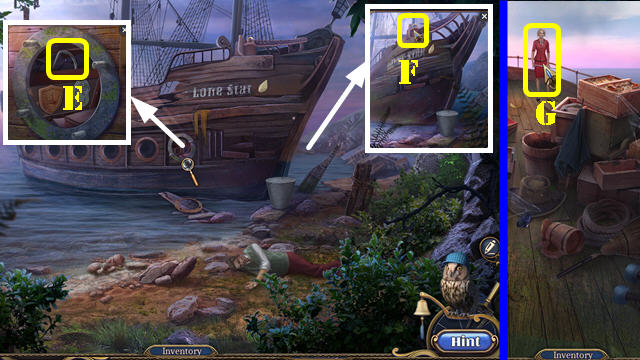
- Play automatic HOP; receive LONE STAR MEDALLION.
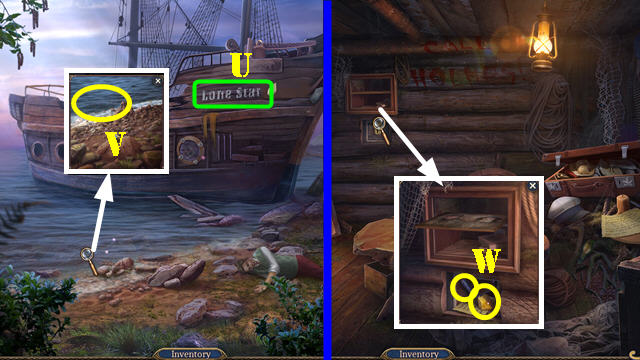
- Place MANUSCRIPT (T); take BELLOWS ADDRESS (U).
- Place BELLOWS ADDRESS (V).
- Take PLATE, TOKEN 1/4, and NET (W).
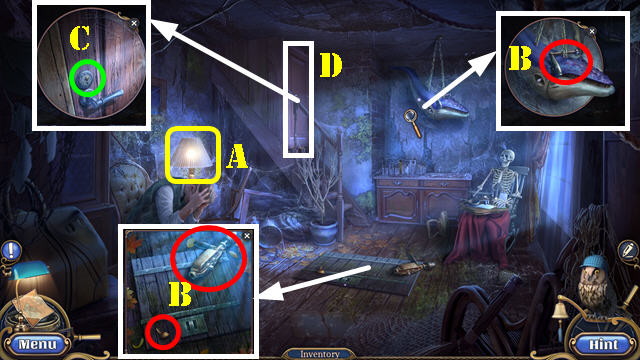
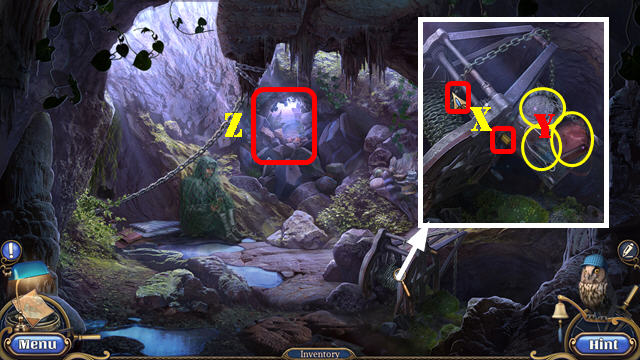
- Use COIN (X). Play HOP; receive BROKEN BELL.
- Use NET (Y); take BELL JINGLET (Z).
- Select BROKEN BELL and place BELL JINGLET; take BELL.
- Place BELL (A); receive CUTTERS.
- Use CUTTERS (B); receive SIGNBOARD.
- Use SIGNBOARD (C).
- Go (D).
- Take TOKEN 2/4-3/4, BRUSH, HARPOON, and STAR (E).
- Use HARPOON; take ANCHOR (F).
- Place STAR and ANCHOR (purple); take BAG LABEL (G).
- Walk down.
- Place BAG LABEL; take FLAGS and CHISEL (H).
- Go (I).
- Use CHISEL; receive TAR; take TOKEN 4/4 (J).
- Place TOKEN 4/4 (K).
- Solution (1-3). Solved image (L).
- Go (M).
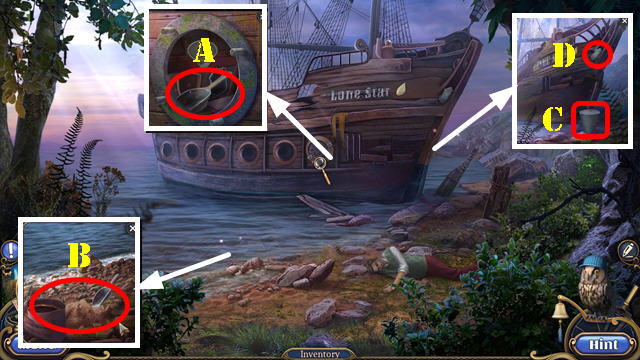
- Select handkerchief (N).
- Take MAST, DRILL SUPPORT, and CARD (O).
- Place PLATE; take PORTHOLE and BOOK AMULET (P).
- Place BOOK AMULET; take COORDINATES and STAPLE REMOVER (Q).
- Use STAPLE REMOVER and select; take SEAL HANDLE (R).
- Place FLAGS and COORDINATES (S).
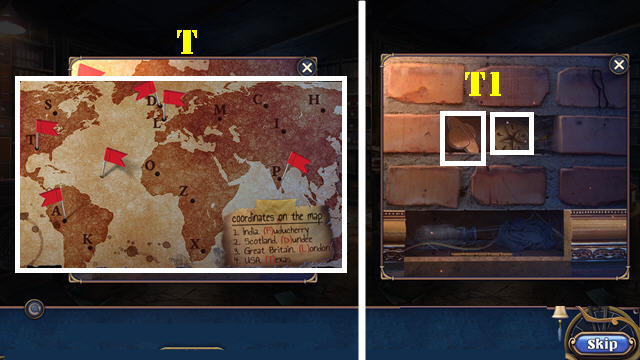
- Solution (T).
- Take PLANET AMULET and SEAL (T1).
- TAR and SEAL on SEAL HANDLE; take SEAL.
- Use SEAL (U). Play HOP; receive FEATHER AMULET.
- Use BRUSH and place FEATHER AMULET; open folder and select (V); take BELLOWS HOUSE KEY (W).
- Walk down.
- Place PLANET AMULET (X); take WHEEL and DRILL BIT (X1).
- Walk down.
- Use BELLOWS HOUSE KEY (Y).
- Enter (Z).
- Automatically receive DART.
- Select lamp (A).
- Take DRILL HANDLE, BROKEN DRILL, and MINI CAP (B).
- DRILL BIT, DRILL SUPPORT, and DRILL HANDLE on BROKEN DRILL; take DRILL.
- Use DRILL (C).
- Go (D).
- Take FILM REEL, NAILS, CANE, and EYE (E).
- Place MAST and PORTHOLE (orange); take HATCH RING (F).
- Use CARD; take TWEEZERS and GLASSCUTTER (G).
- Walk down.
- Place HATCH RING (H). Play HOP; receive BROKEN FIGURINE.
- Go (I).
- TWEEZERS, MINI CAP, and WHEEL on BROKEN FIGURINE; take SAILOR FIGURINE.
- Place SAILOR FIGURINE (J); take FIN (K).
- Walk down.
- Place FIN and EYE (L); take FLASHLIGHT and SWITCH (L1).
- Go to Archives.
- Use GLASSCUTTER; take DEVELOPER and BROCHURE OF POISONS (M).
- Go to Old Room.
- Place MATCHES, DART, BROCHURE OF POISONS, and DEVELOPER (N).
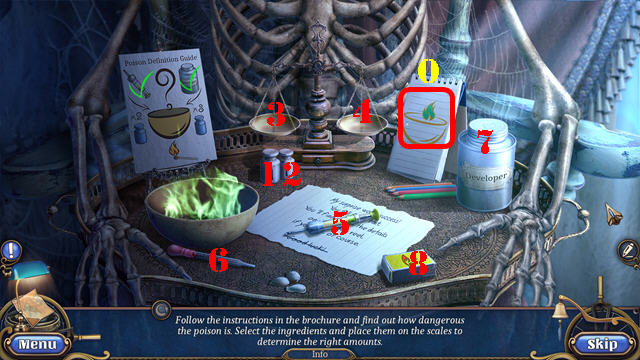
- Place (1) in (3). Select (5) 4 times and (4) once.
- Place (2) in (3). Select (6) and place in (7) twice. Select (4).
- Select (8).
- Take POISON DESCRIPTION (O).
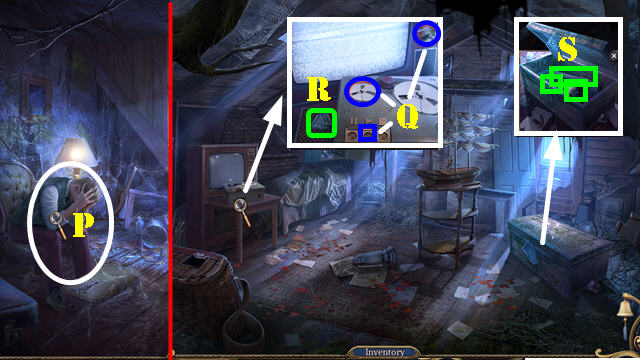
- Give POISON DESCRIPTION (P); receive VCR BUTTON.
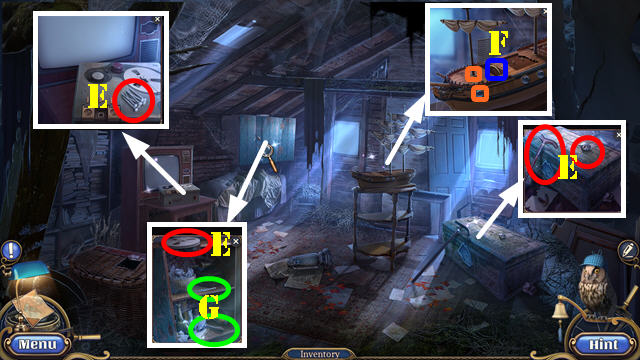
- Go to Attic.
- Place VCR BUTTON, FILM REEL, and SWITCH (Q). Select switch. Take SHIP AMULET (R).
- Place SHIP AMULET; take AXE, ACID, and HAMMER (S).
- Go to City Square.
- CORKSCREW on ACID.
- Use ACID (T).
- Go (U).
- Select torn chain and hat and gloves (V).
- Take PLANKS (W).
- Use CANE (X). Play HOP; receive FISH.
- Place PLANKS and NAILS; use HAMMER (Y); take BOWL (Z).
- Give FISH (A); take FORKED STICK and BANKNOTE (B).
- Use BOWL; take VALVE (C).
- Place BANKNOTE (D) and VALVE (D1).
- Solution (E-F).
Chapter 3: Boiler Room
- Select bottle and fabric (G).
- Take PIPS, FISH SKELETON, NOTE, and NAIL CLIPPERS (H).
- NAIL CLIPPERS on FISH SKELETON; take SKELETON KEY.
- Place SKELETON KEY (I).

- Solution (@1): (Ax4-Bx6)-(Cx5-Dx7)-(Ex4-Fx7)-(Gx3-Hx6).
- Place the skeletons as shown (red-yellow-green-blue).
- Enter (J).
- Take FLINT, SIEVE, BARREL HANDLE, and CARD 1/5 (K).
- Place BARREL HANDLE; take WEIGHT and FLAME AMULET (L).
- Use AXE; take BOWL (M).
- Use FLASHLIGHT (N). Play HOP; receive WEIGHT.
- Place two WEIGHTS (O).
- Go (P).
- Select Garfield and Holmes (Q).
- Take CARD 2/5-3/5, SMOKE FLARE, and METAL BUTTON (R).
- Place FLAME AMULET; take METAL BUTTON (S).
- Place two METAL BUTTONS; take MAP (T).
- Walk down twice.
- Use FLINT and place NOTE (U); receive STONE CLUE.
- Place MAP (V).
- Solution (1-3).
- Go (W).
- Take CARD 4/5, RUBBER SLING, LADDER, and TRIGGER (A).
- Use AXE (B); take TORCH (C).
- Use BOWL (D); receive DIRTY WATER.
- Place LONE STAR MEDALLION (E). Play HOP; receive SIGNET RING.
- RUBBER SLING and PIPS on FORKED STICK; take SLINGSHOT.
- Use SLINGSHOT; take FLAT STONE (F).
- Use AXE (G).
- Go to Cave (H). Walk down twice.
- Use TORCH (I); receive BURNING TORCH.
- Place LADDER (J); take WALL CLUE (K).
- Go (L).
- Place SIGNET RING; take BOILER HANDLE and CARD 5/5 (M).
- Go (N).
- Place BOILER HANDLE and select; take COAL and SHOEHORN (O).
- Go to Forest.
- Use SHOEHORN; take LARGE NET (P).
- Go to Hut.
- COAL and DIRTY WATER on SIEVE; take CLEAN WATER.
- Give CLEAN WATER (Q); receive MINI NAIL PULLER.
- Use MINI NAIL PULLER (R). Play HOP; receive NET GUN.
- Walk down.

- Use MINI NAIL PULLER (S); receive ROPE.
- Go to Boiler Room.
- Place ROPE and CARD 5/5 (T).
- Solution (C-F)-(B-G)-(D-B)-(E-D)-(F-E)-(A-C)-(G-A).
- Take KNOT (H).
- Go to Cave.
- Use SMOKE FLARE (I).
- LARGE NET and TRIGGER on NET GUN; take LOADED NET GUN.
- Use LOADED NET GUN (J). Receive PHOTO HALF.
- Take BUCKET and ZIPPER PULL (K).
- Place WALL CLUE; select 4 stones (L); take AMULET CREST and PEG (M).
- Go to Boiler Room.
- Place PHOTO HALF; take MONOGRAM L and GARFIELD'S AMULET (N).
- Go to Cave.
- Place STONE CLUE and FLAT STONE (O).
- Solution (P).
- Take KEY and CARABINER (Q).
- Place GARFIELD'S AMULET; take HAMMER (R).
- Place PEG and use HAMMER (S).
- Go (T).
- Select Lone Star sign (U).
- Use BUCKET (V); receive BUCKET WITH WATER.
- Go to Boiler Room.
- Use KEY and look at note; take LEVER and WAX (W).
- Go to Cave.
- Place CARABINER and LEVER (X); take KNAPSACK, HOOK PART and DRY CONCRETE (Y).
- ZIPPER PULL and WAX on KNAPSACK; take SACK and WRENCH.
- Go (Z).
- Use WRENCH; take DUSTPAN (A).
- Use DUSTPAN and SACK (B); receive SANDBAG.
- SANDBAG, DRY CONCRETE, and BURNING TORCH on BUCKET WITH WATER; take CONCRETE STEP.
- Place CONCRETE STEP (C); take INSPECTOR'S BADGE (D).
- Place AMULET CREST, INSPECTOR'S BADGE, and MONOGRAM L; take HOOK PART (E).
- Two HOOK PARTS on KNOT; take GRAPPLING HOOK.
- Place GRAPPLING HOOK (F). Play HOP; receive SWORD.
- Use SWORD (G).
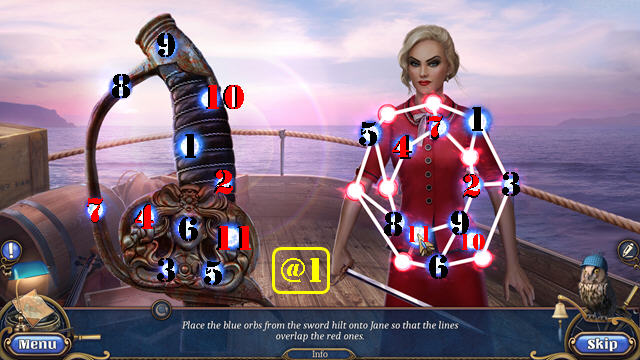
- Solution one (@1): (1-11).
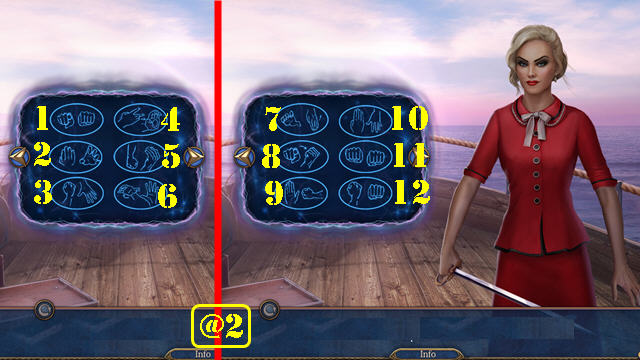
- Solution two (@2): (1-5-8)-(2-7-12)-(3-9-11).