

Walkthrough Menu
General Tips
- This is the official guide for Ms. Holmes: The Monster of the Baskervilles.
- This guide won't tell you when to zoom into a location; the screenshots show each zoom scene.
- Hidden-object puzzles are referred to as HOPs. Only the locations of the HOPs will be shown.
- Use the Map to fast travel to a location.
Chapter 1: Mansion
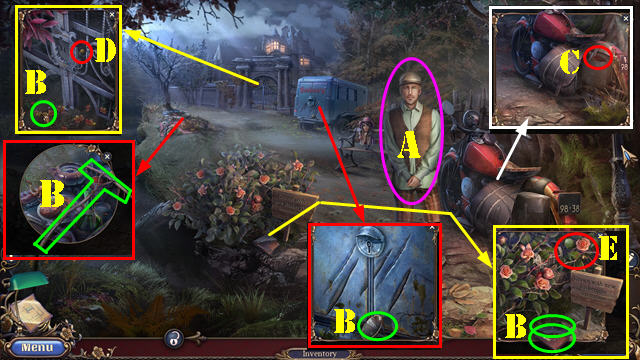
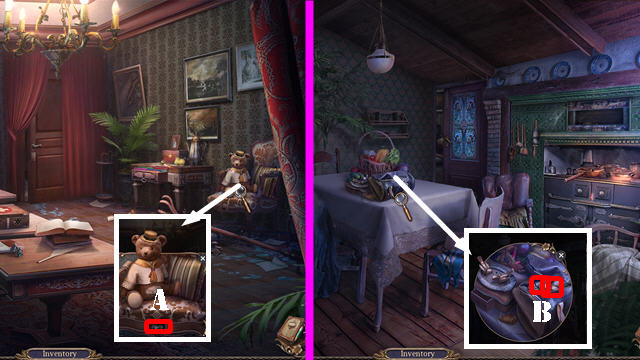
- Talk (A).
- Take PICTURE PART 1/4, WALLET, RAKE, WALLET BUTTON 1/3, and FUNNEL (B).
- Open bag and look at wallet; take MAGNET and HYPNOTIC SERUM (C).
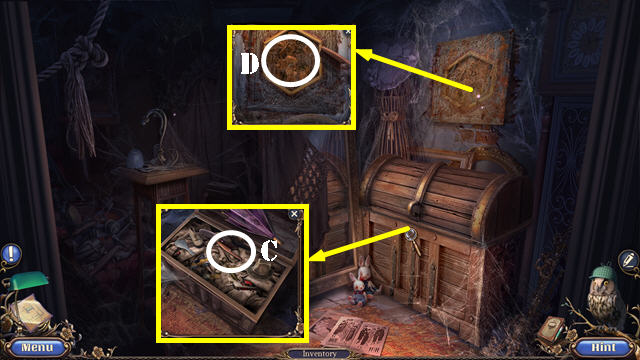
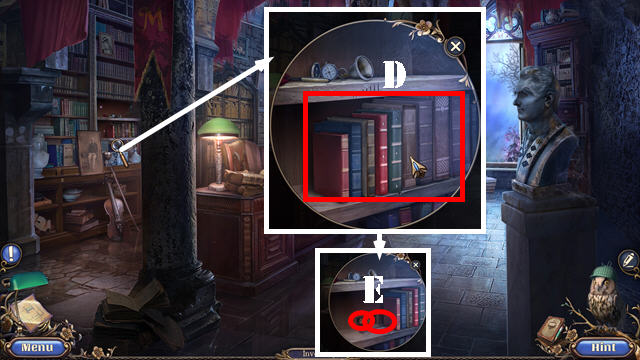
- Use MAGNET (D); receive WALLET BUTTON 2/3.
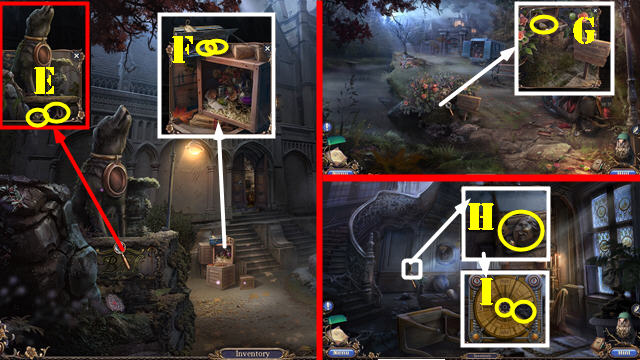
- Use RAKE (E); receive WALLET BUTTON 3/3.
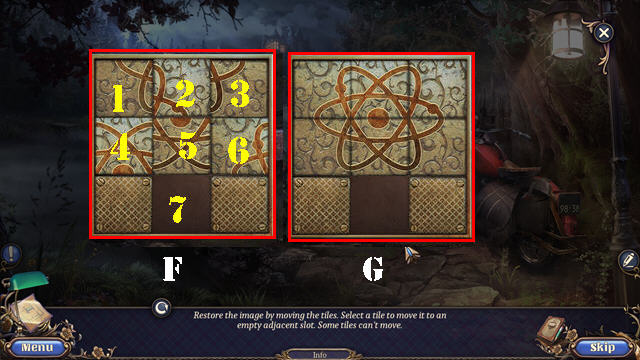
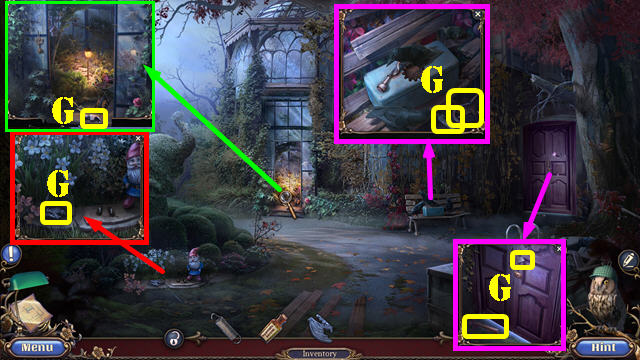
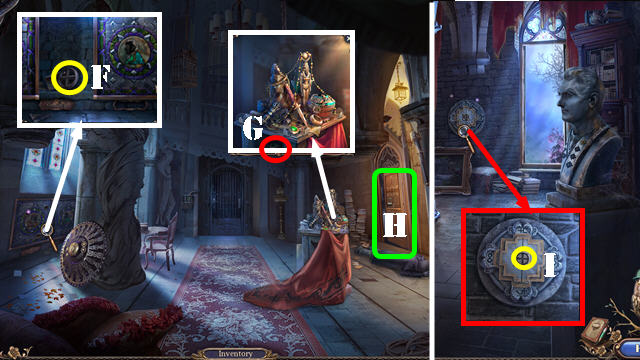
- WALLET BUTTON 3/3 on WALLET. Solution (F): (5-6-3-2-5-4-1-2-5-7).
- Solved Image (G).
- Look at card in wallet; take BENT CLIP.
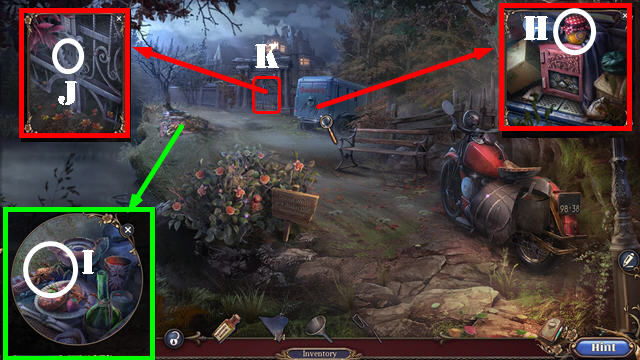
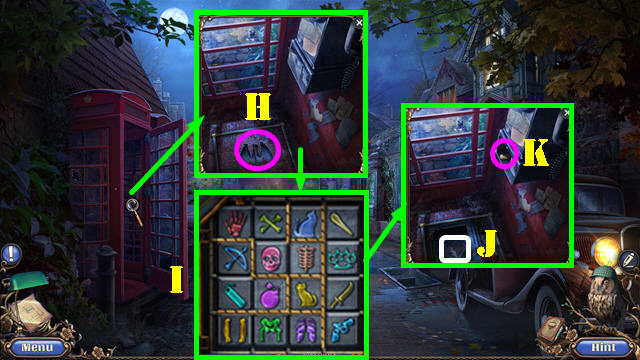
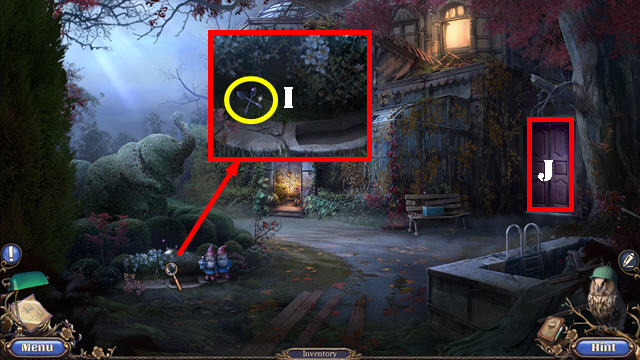
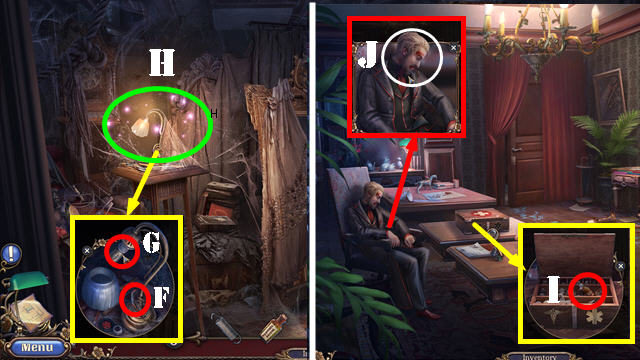
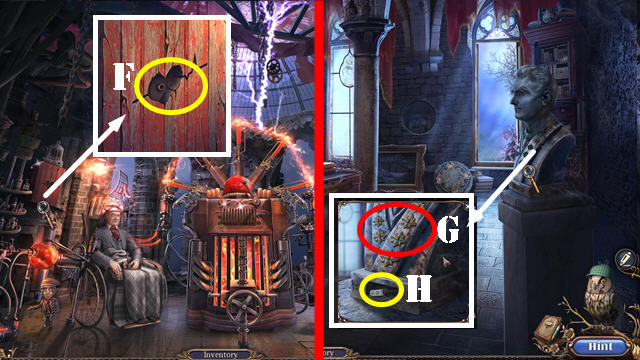
- Use BENT CLIP; take HONEY (H).
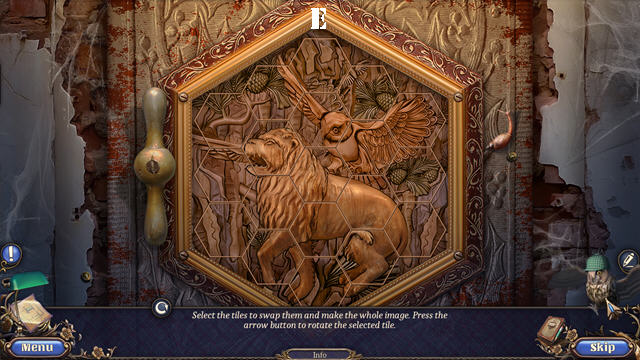
- Use HONEY (I). Play HOP: receive BASKERVILLE AMULET.
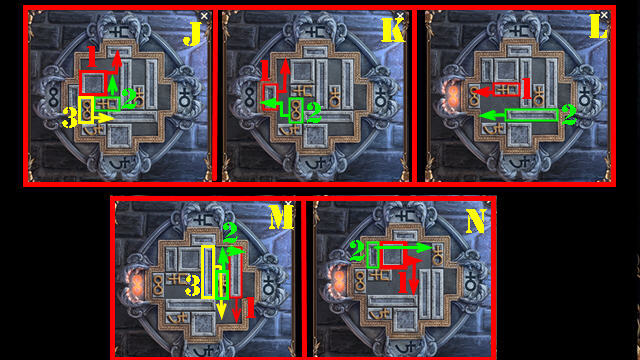
- Place BASKERVILLE AMULET (J).
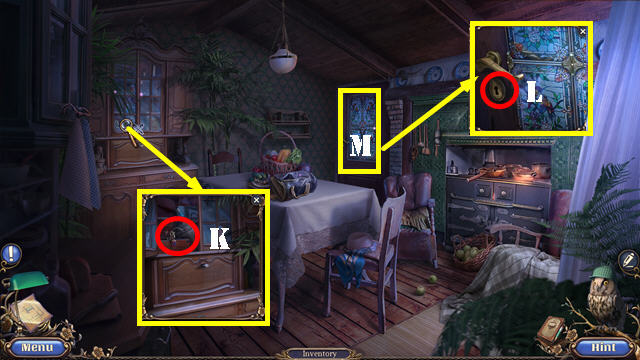
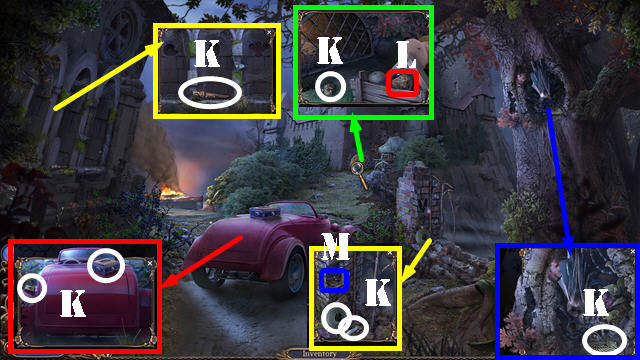
- Go (K).
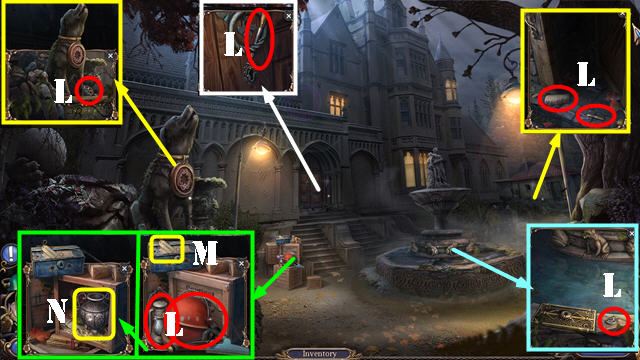
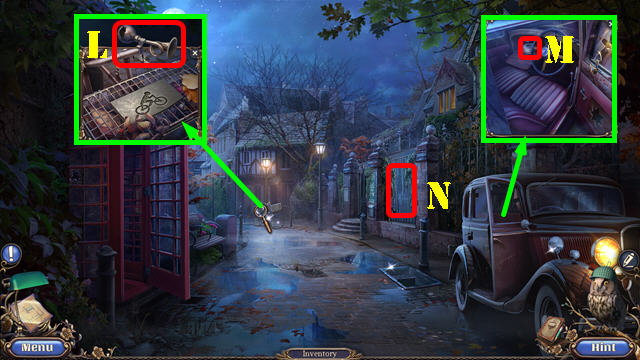
- Take WICK, MITTEN, two MECHANISM PARTS, VACUUM CLEANER, LANTERN, and SCREWDRIVER (L).
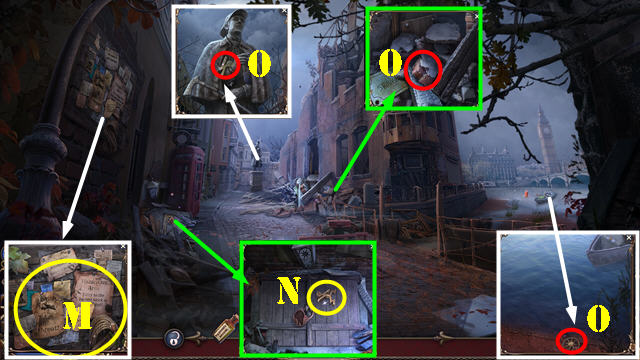
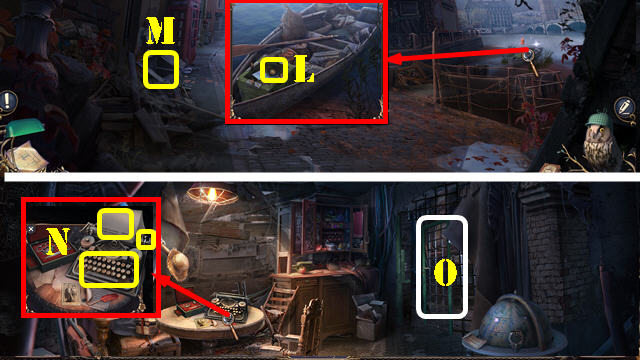
- Look at tag (M).
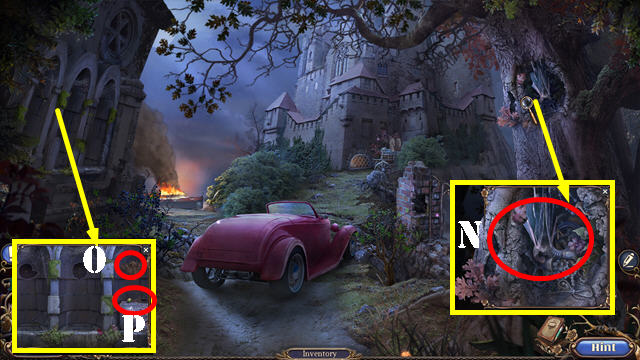
- Use SCREWDRIVER; take VASE (N).
- Walk down.

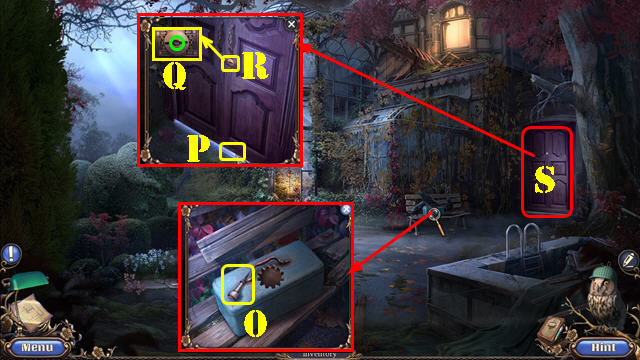
- Use MITTEN; take HOSE (O).
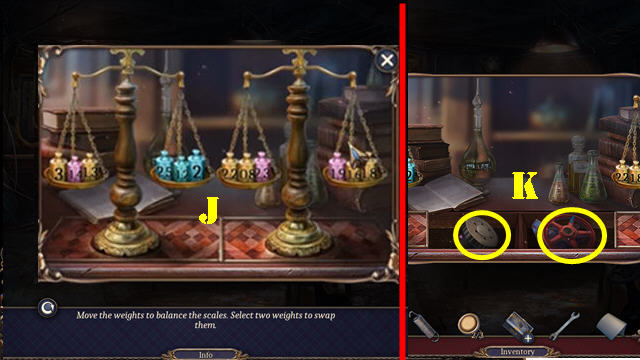
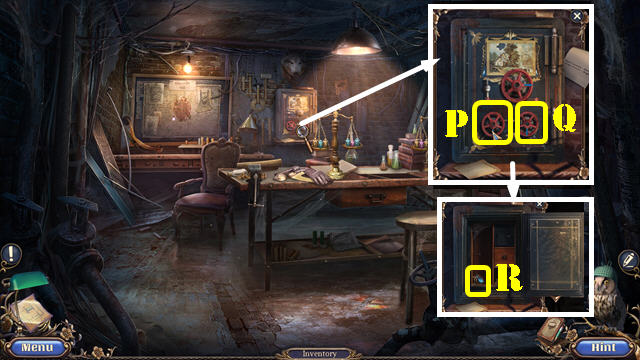
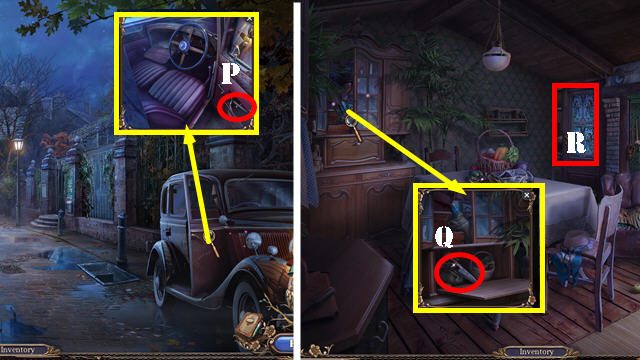
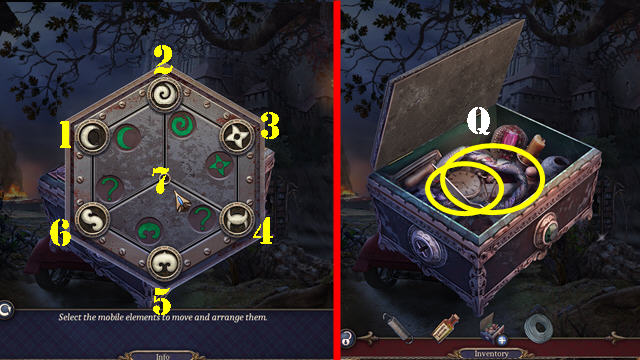
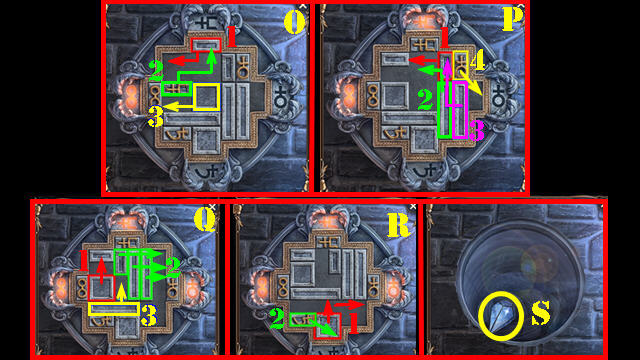
- Place two MECHANISM PARTS (P).
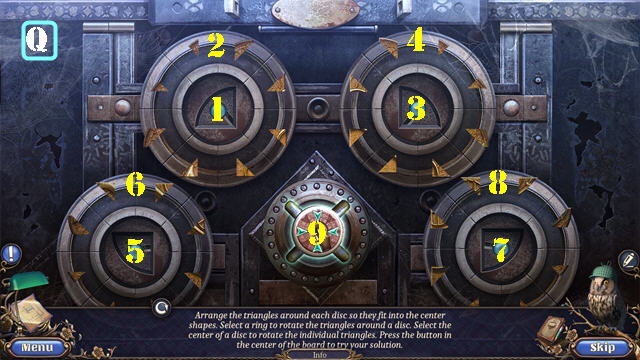
- Solution (Q): (1x7)-(2x7)-(4x3)-(5x4)-(6x5)-(7x6)-(8)-(9).
- Take LIGHTER.
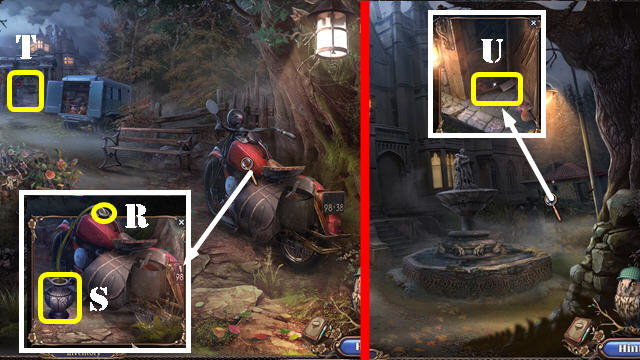
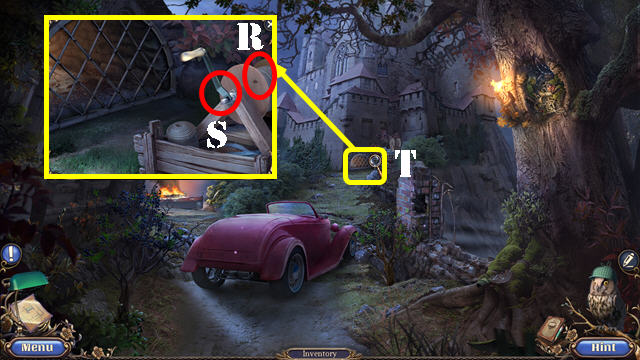
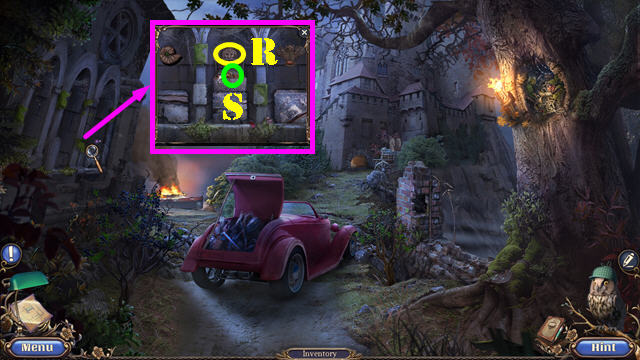
- Open cap and place HOSE (R). Put down VASE and take VASE WITH FUEL (S).
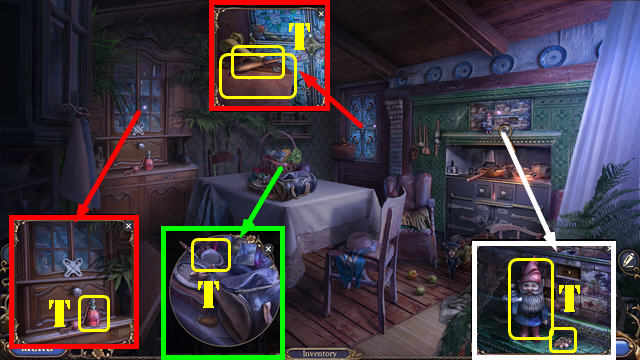
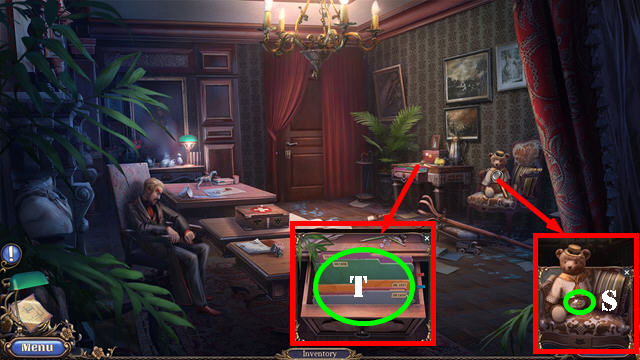
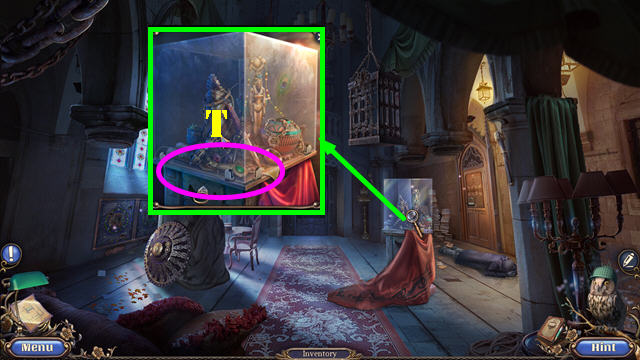
- Go (T).
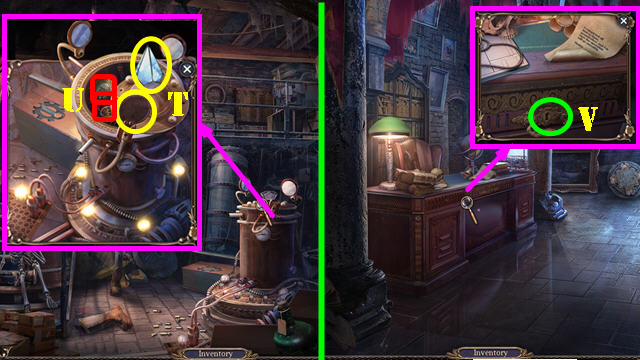
- Select LANTERN; place WICK and FUNNEL. Use VASE WITH FUEL on funnel. Use LIGHTER on wick; take LANTERN.
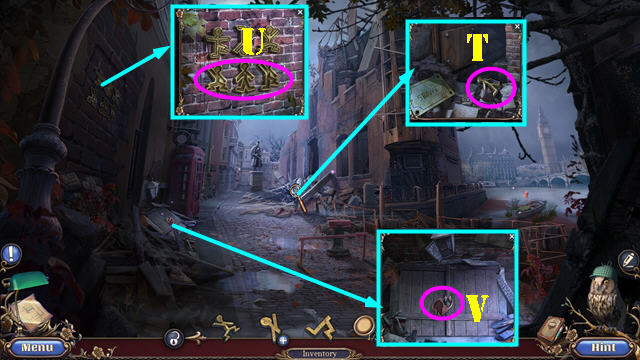
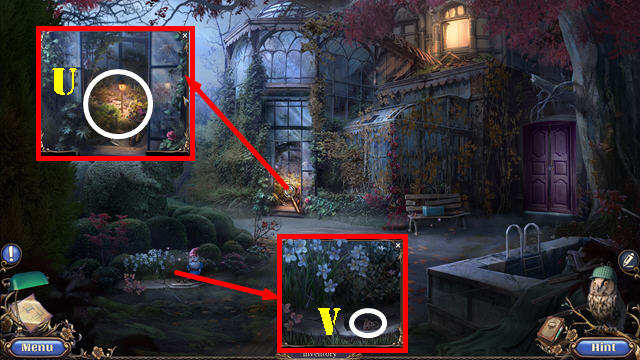
- Place LANTERN; take CLEAVER (U).
- Walk down.
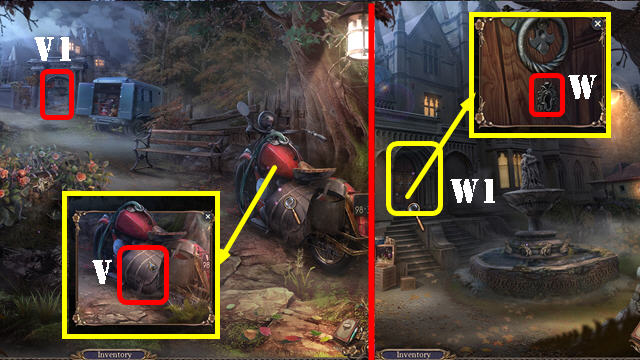
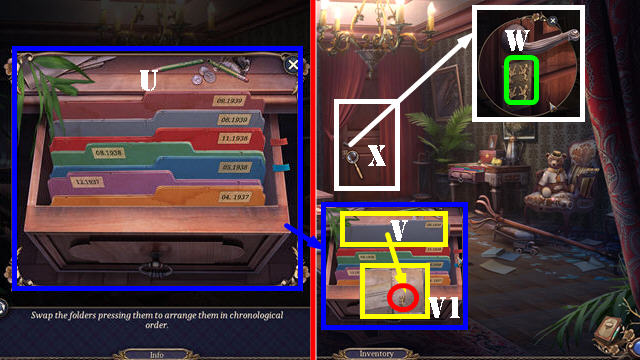
- Use CLEAVER (V). Play HOP: receive LOCK PICKER.
- Go (V1).
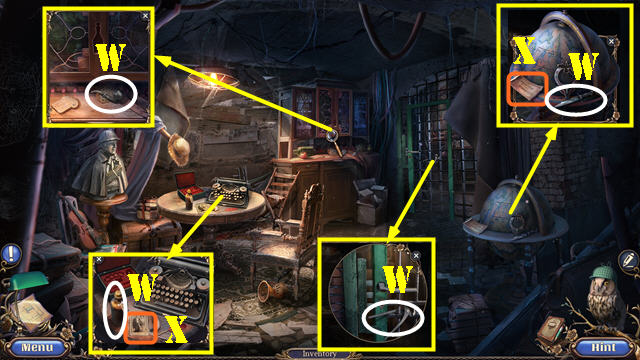
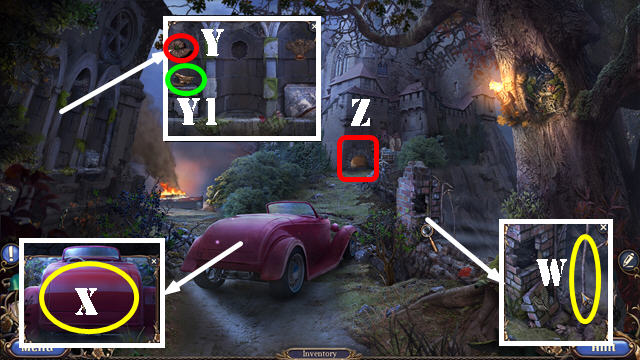
- Use LOCK PICKER (W).
- Enter (W1).
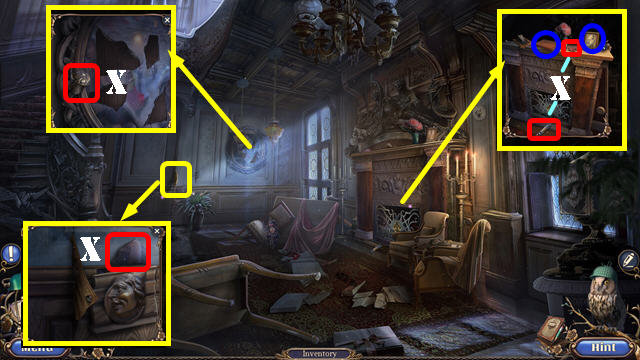
- Play automatic HOP.
- Take PICTURE PART 2/4, STAR AMULET, GLUE, and SWITCH KNOB (X).
- Look at book and framed picture (blue).
- Walk down.
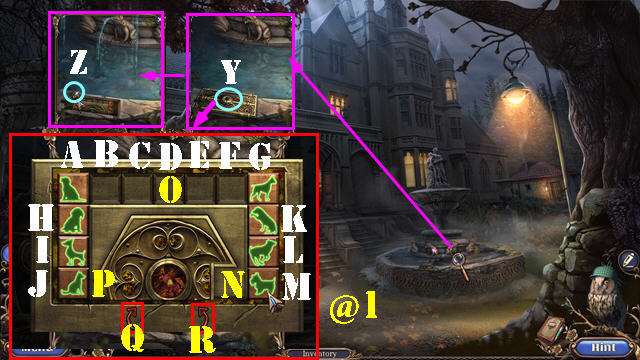
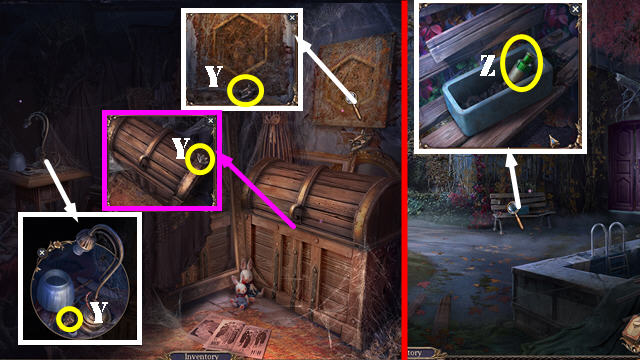
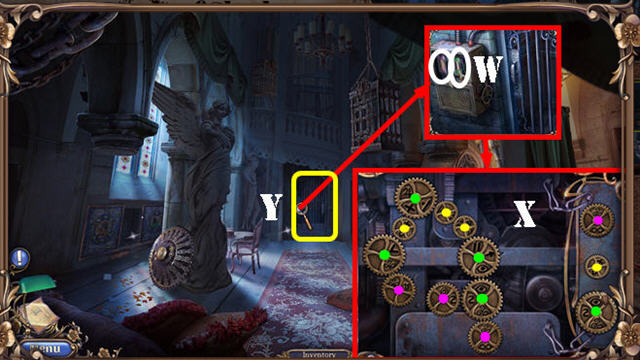
- Place SWITCH KNOB (Y).
- Solution (@1): (A-F)-(H-E)-(M-N)-(R)-(O-D)-(I-C)-(J-B)-(Q)-(L-N)-(Q)-(P-A).
- (R)-(K-N)-(G-M)-(F-G)-(E-F)-(D-E)-(R)-(O-D).
- (Q)-(M-N)-(Q)-(P-I)-(A-H)-(B-A)-(C-B)-(D-C).
- (E-D)-(Q)-(D-O)-(R)-(P-J).
- (C-D)-(B-C)-(A-B)-(H-A)-(I-H)-(J-I).
- (Q)-(D-O)-(R)-(P-J)-(C-D)-(Q)-(D-O)-(Q)-(N-K).
- (B-D)-(R)-(D-O)-(Q)-(N-L)-(F-D)-(R)-(D-O)-(Q)-(N-M).
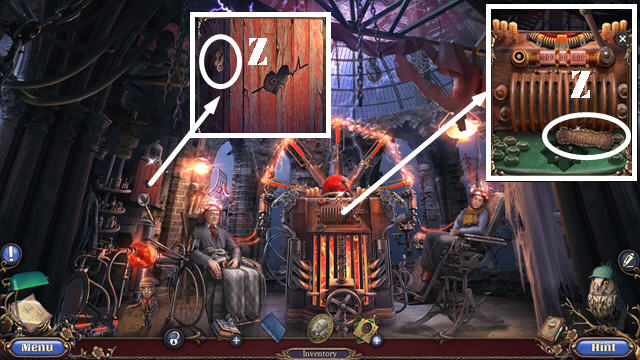
- Take FLEUR-DE-LIS (Z).
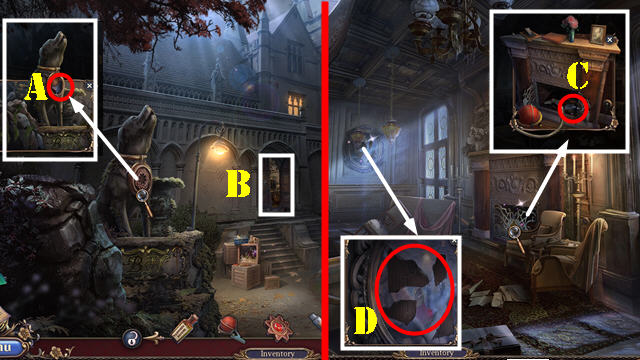
- Place STAR AMULET; take PICTURE PART 3/4 (A).
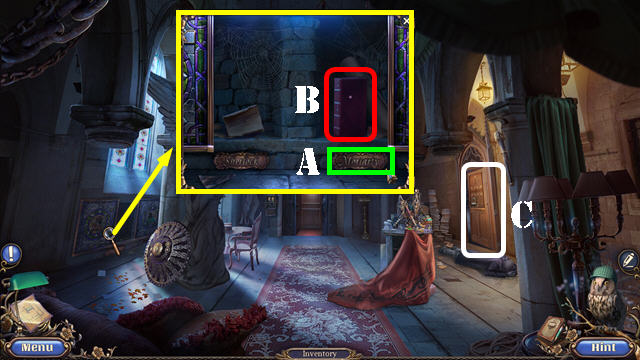
- Go (B).
- Place FLEUR-DE-LIS and use VACUUM CLEANER; take PICTURE PART 4/4 (C).
- Use GLUE; place PICTURE PART 4/4 (D). Play HOP; receive MONOGRAM PART.
- Walk down.
- Place MONOGRAM PART; take HOUND KEY and TRIANGULAR KEY (E).
- Use TRIANGULAR KEY; take SPRING and BUTTON (F).
- Walk down.
- Use HOUND KEY; take LOCK PART (G).
- Go to Hall.
- Select wall (H). Place LOCK PART and BUTTON (I).
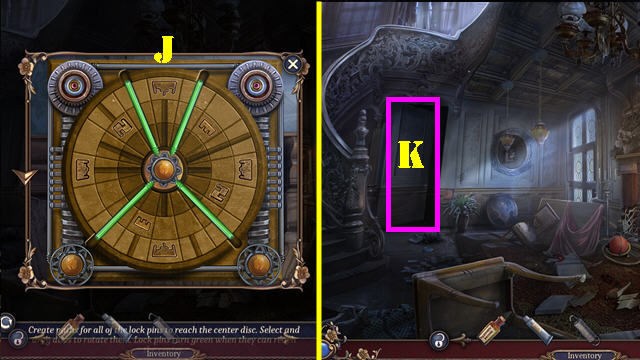
- Solution (J).
- Enter (K).
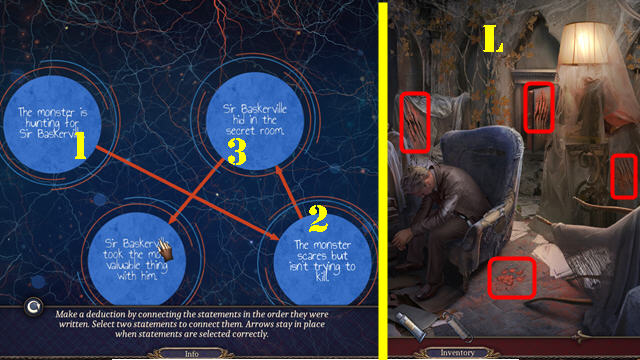
- Connect statements (1-3).
- Find prints (L).
- Select board twice; receive ROPE (M).
- Select boards twice; take MAN FIGURINE (N).
- Take BROKEN FIGURINE, COBBLESTONE, and LIGHT SIGN (O).

- Use COBBLESTONE; receive CANE HANDLE (P).
- Place LIGHT SIGN; take FIGURINE HALF and KEYS 1/3 (Q).
- CANE HANDLE on ROPE; take GRAPPLING HOOK.
- Use GRAPPLING HOOK (R); take PICKAX (S).
- Use PICKAX; take MAN FIGURINE (T).
- Select BROKEN FIGURINE and apply GLUE; place FIGURINE HALF; take MAN FIGURINE.
- Place three MEN FIGURINES (U). Play HOP; receive BEAGLE SYMBOL.
- Place BEAGLE SYMBOL (V).
- Solution (1-3).
- Select scene.
- Take RUST REMOVER, PIPE, PINCERS, and DAGGER (W).
- Look at photo and check (X).
- Walk down.
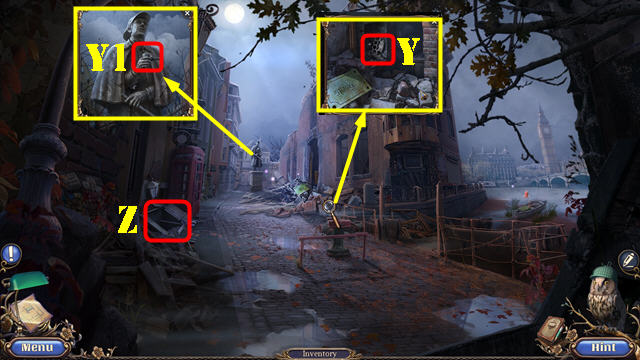
- Use PINCERS; take BRASS KNUCKLES (Y).
- Place PIPE (Y1); receive SKULL.
- Go (Z).
- Place DAGGER, SKULL, and BRASS KNUCKLES (A). Take ALCOHOL AMULET (B).
- Place ALCOHOL AMULET (C). Play HOP; receive CORKSCREW.
- Walk down.
- CORKSCREW on RUST REMOVER; take RUST REMOVER.
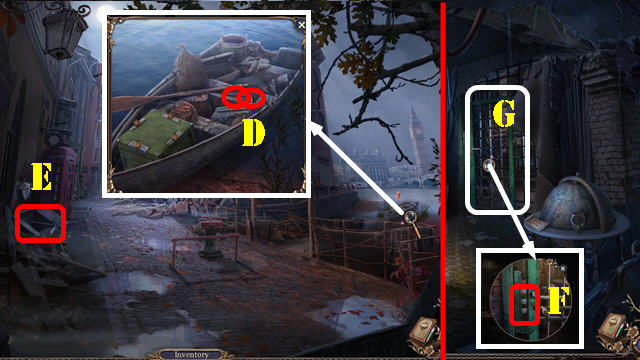
- Use RUST REMOVER and select latch; take BLACK BOX and HACKSAW (D).
- Go (E).
- Use HACKSAW (F).
- Go (G).

- Take HEAVY WEIGHT, KEYS 2/3, WRENCH, LIGHT WEIGHT, and PAPER (H).
- Place SMALL WEIGHT and LIGHT WEIGHT (I).
- Solution (J).
- Take SAFE HANDLE and TYPEWRITER WHEEL (K).
- Walk down twice.
- Use WRENCH; take KEYS 3/3 (L).
- Go (M).
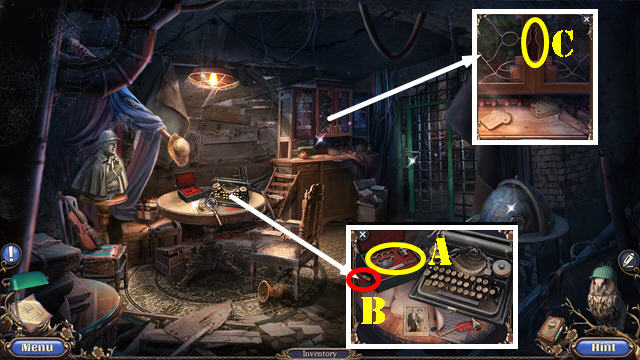
- Place TYPEWRITER WHEEL, PAPER, and KEYS 3/3 (N). Select typewriter and take HINT.
- Go (O).
- Place SAFE HANDLE and HINT; select (Qx3-Px4).
- Take SPIDER AMULET (R).
- Walk down.
- SPIDER AMULET on BLACK BOX; look at letter and take GLOBE LENS.
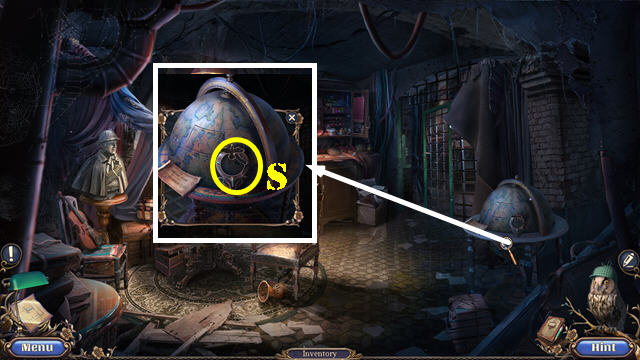
- Place GLOBE LENS (S).
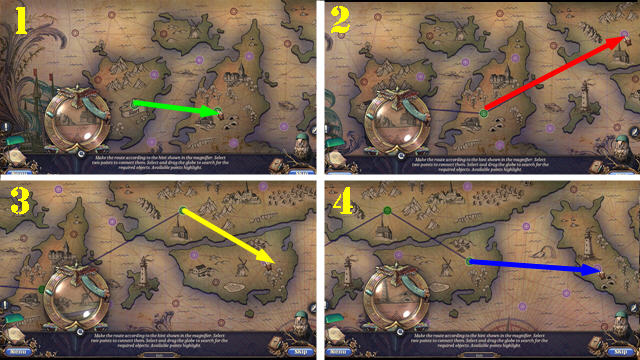
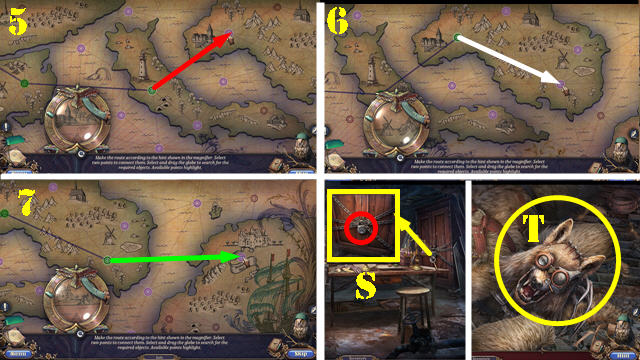
- Solution (1-7).
- Take PAW PRINT.
- Go to Preparation Room.
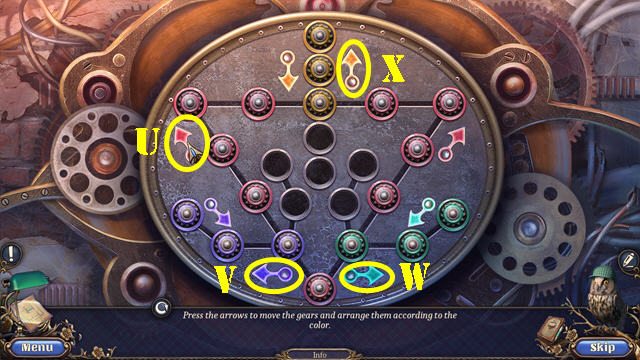
- Place PAW PRINT (S).
- Select head (T).
- Solution: (Ux2-Vx2-Wx2-Xx2-Ux3).
Chapter 2: Kitchen
- Take WRENCH, HANDKERCHIEF, BRASS KNUCKLES, WING AMULET, FLOWER BUTTON 1/3, and BACKPACK (A).
- Use WRENCH and remove grid; take FLOWER BUTTON 2/3 (B).

- Use BRASS KNUCKLES and HANDKERCHIEF; open door and take FLOWER BUTTON 3/3 (C).
- FLOWER BUTTON 3/3 on BACKPACK. Solution (D). Take JACK.
- Use JACK (E).
- Go (F).
- Play automatic HOP.
- Take WING AMULET, HAMMER HEAD, SICKLE, GLOVE BOX HANDLE, HAMMER HANDLE, and RUBBER PIECE (G).
- Walk down.
- Place two WING AMULETS (H). Solution (I).
- Take PHOTO (J).
- HAMMER HANDLE on HAMMER HEAD; take HAMMER.
- Use HAMMER; take COIN (K).
- Use COIN; take BROKEN HORN (L).
- Place GLOVE BOX HANDLE; take ADHESIVE TAPE (M).
- Go (N).
- RUBBER PIECE and ADHESIVE TAPE on BROKEN HORN; take HORN.
- Use HORN; take AWL (O).
- Place PHOTO (P) and use AWL (Q). Select photo and take key (P). Use key (R).
- Enter (S).
- Take TOOLBOX AMULET 1/3, GNOME, BROKEN HANDLE, BRIEFCASE, BROKEN LADLE, and INSECT SPRAY (T).
- Walk down.
- Use INSECT SPRAY (U). Play HOP; receive MOLDING CLAY.
- Place GNOME; take BIKER AMULET (V).
- Walk down.

- Use MOLDING CLAY and place BROKEN HANDLE on BROKEN LADLE. Use MOLDING CLAY again and take LADLE.
- Use LADLE (W); receive PAINTED BRICK.
- Place BIKER AMULET (X).
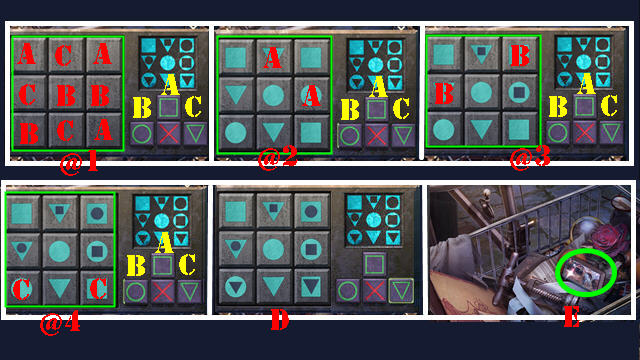
- Solution (@1-@4). Solved Image (D).
- Take PAINTED BRICK (E).
- Go to Kitchen.
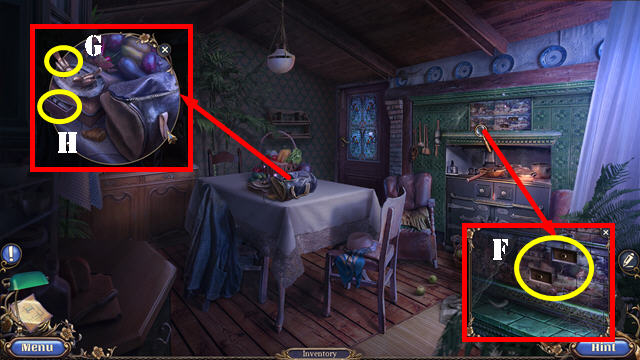
- Place 2 PAINTED BRICKS (F). Play HOP; receive SALTSHAKER.
- Place SALTSHAKER (G); take KNIFE SHARPENER (H).
- Walk down.
- KNIFE SHARPENER on SICKLE; take SHARPENED SICKLE.
- Use SHARPENED SICKLE; take KITCHEN AMULET (I).
- Go (J).
- Place KITCHEN AMULET; take DOOR KEY (K).
- Use DOOR KEY (L) and select.
- Enter (M).
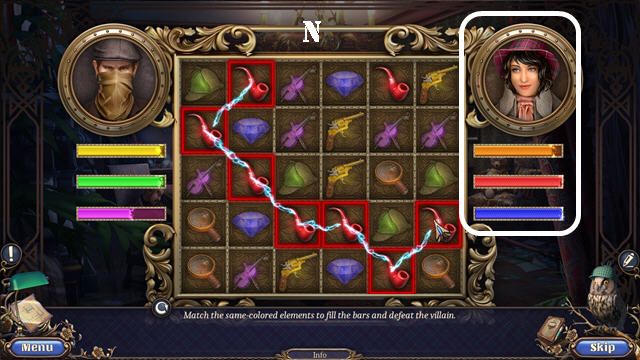
- Solution is random (N).
- Take STAR AMULET, LOCK PARTS 1/4-2/4, RED FOLDER, and BRIEFCASE BUTTON (O).
- Go to Gloomy Street.
- Place STAR AMULET; take TONGS (P).
- Go to Kitchen.
- Remove knob and use TONGS; take KITCHEN KNIFE (Q).
- Go (R).
- Use KITCHEN KNIFE; take LOCK PARTS 3/4 (S).
- BRIEFCASE BUTTON on BRIEFCASE and select. Play HOP; receive BLUE FOLDER.
- Place RED FOLDER and BLUE FOLDER (T).
- Solution (U).
- Select folder twice (V); take LOCK PARTS 4/4 (V1).
- Place LOCK PARTS 4/4 (W).
- Go (X).
- Take TOOLBOX AMULET 2/3-3/3, and CAT AMULET (Y).
- Go to Backyard.
- Place TOOLBOX AMULET 3/3; take CLEANING SOLVENT (Z).
- Go to Living Room.
- Place CAT AMULET; take ZIPPER SLIDER (A).
- Walk down.
- Place ZIPPER SLIDER; take CADUCEUS and METAL RING (B).
- Go to Storeroom.
- Use METAL RING and select twice; take BRUSH (C).
- Use CLEANING SOLVENT and BRUSH (D).
- Solution (E).
- Take BULB.
- Use ADHESIVE TAPE (F) and place BULB (G).
- Play HOP (H); receive STAR OF LIFE.
- Walk down.
- Place CADUCEUS and STAR OF LIFE; take SMELLING SALTS (I).
- Use SMELLING SALTS (J).
Chapter 3: Castle of Shadows
- Take TORCH, MATCHES, CHEST, OWL PART, CABLE, WINGS AMULET, and IRON SHARD (K).
- Use IRON SHARD; take STRAW (L).
- Place WINGS AMULET; take OWL PART (M).
- Use STRAW and MATCHES on TORCH; take BURNING TORCH.
- Use BURNING TORCH (N). Play HOP; receive OWL PART.
- Place three OWL PARTS (O); take CROSS KEY (P).
- Use CROSS KEY on CHEST. Solution (2-3-4-5-6-7-2-1-6-7-4-3-2-1-6-7-2-1-6-7-4-5-6-1-2-7).
- Take ROLLED UP TOWEL and HAND CRANK (Q).
- Place CABLE (R) and HAND CRANK(S). Select handle twice.
- Go (T).

- Take SHELL AMULET, LION PART, MAKESHIFT ROPE, HOLSTER, and STONE (U).
- Throw STONE (V); receive RASP.
- Walk down.
- Use RASP (W); receive IRON ROD.
- Use IRON ROD (X). Play HOP; receive ROLLED UP SHEET.
- Place SHELL AMULET (Y); take STAPLE REMOVER (Y1).
- Go (Z).
- Use STAPLE REMOVER (A); receive HOOK.
- ROLLED UP SHEET, ROLLED UP TOWEL, and HOOK on MAKESHIFT ROPE; take ROPE WITH HOOK.
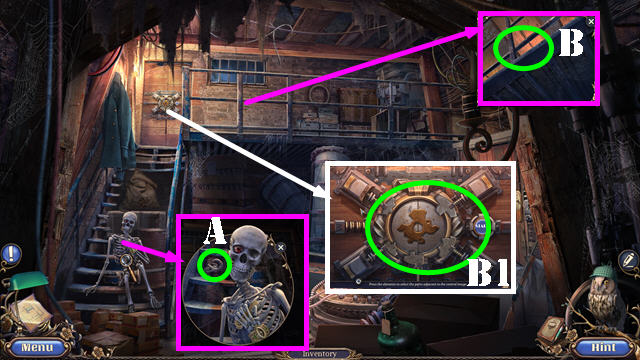
- Use ROPE WITH HOOK (B).
- Play puzzle (B1).
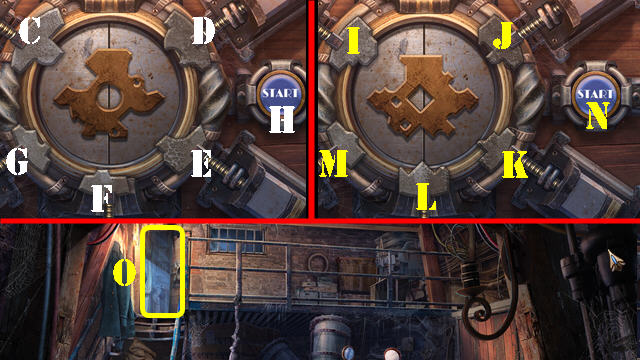
- Solution one (Cx1-Dx5-Ex6-Fx2-Gx4-H).
- Solution two (Ix2-Jx7-Kx5-Lx7-Mx3-N).
- Enter (O).

- Use HYPNOTIC SERUM (P).
- Take BULLET, CASE, HOLSTER BUTTON, STAINED GLASS SHARD 1/3, LION PART, and JEWEL (Q).
- Walk down twice.
- Place two LION PARTS (R).
- HOLSTER BUTTON on HOLSTER and select. Select revolver and insert BULLET. Take REVOLVER.
- Use REVOLVER; take DIAMOND RING (S).
- Go to Gloomy Hall.
- Use DIAMOND RING (T). Play HOP; receive GLASS EYE.
- Walk down.
- Place GLASS EYE (U); take STUDY KEY (V).
- Place JEWEL (W); receive DOOR HANDLE.
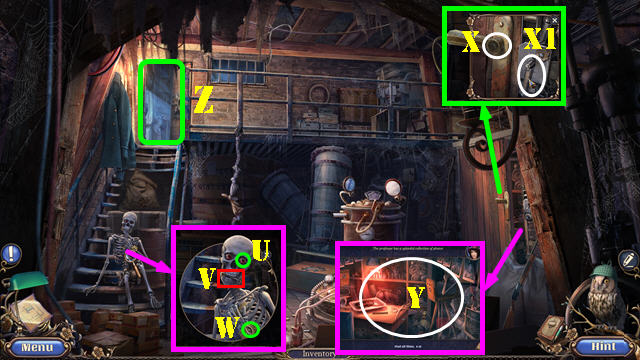
- Place DOOR HANDLE (X) and SPRING (X1). Play HOP (Y); receive DOOR CODE.
- Go (Z).
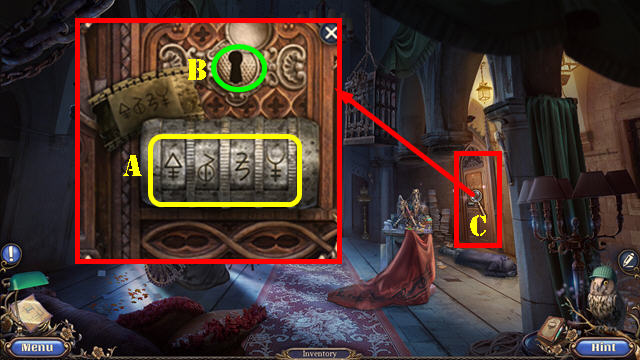
- Place DOOR CODE. Solution (A).
- Use STUDY KEY (B).
- Enter (C).
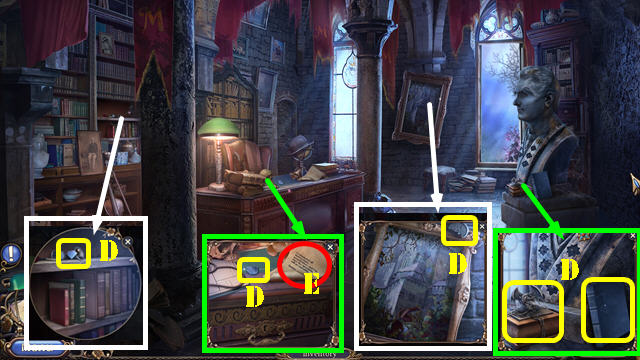
- Take STAINED GLASS SHARD 2/3-3/3, CHAINED BOX, BLUE BOOK, and EGYPTIAN AMULET (D).
- Look at note (E).
- Walk down.
- Place STAINED GLASS SHARD 3/3; look at note and take WHEEL AMULET (F).
- Place EGYPTIAN AMULET; take GREEN BUTTON (G).
- Go (H).
- Place WHEEL AMULET (I).
- Solution (J-R).
- Take PRISM (S).
- Go to Basement.
- GREEN BUTTON on CASE; take MIRROR.
- Place MIRROR and PRISM (T). Take LOCKET PHOTO and DRAWER KEY (U).
- Go to Moriarty's Study.
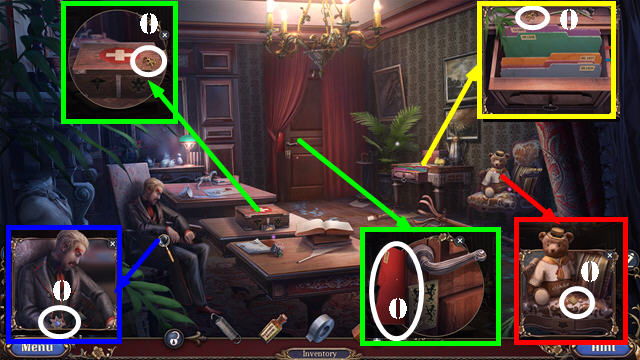
- Use DRAWER KEY (V). Play HOP; receive ELEVATOR FUSE.
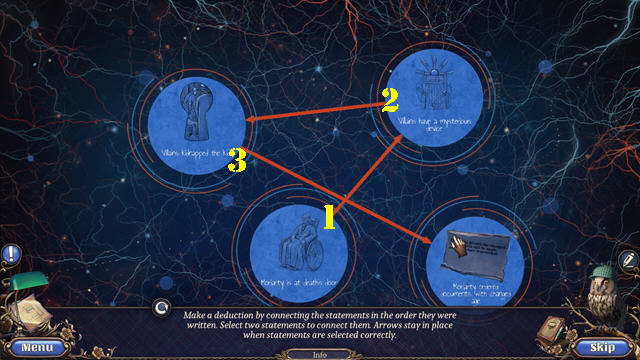
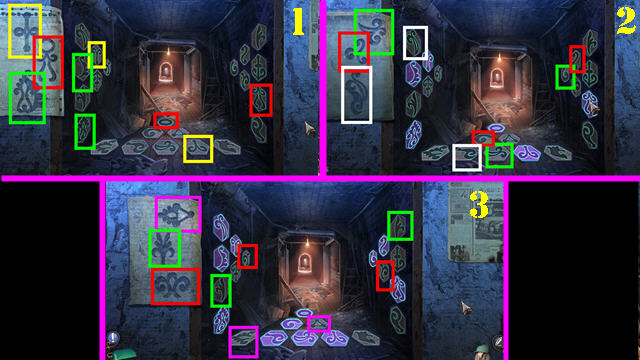
- Make connections (1-3).
- Receive ELEVATOR FUSE and MORIARTY'S LOCKET.
- Walk down.
- Place two ELEVATOR FUSES (W) and select puzzle.
- Solution (X).
- Go (Y).
- Take NAMEPLATE and TOOLBOX AMULET (Z).
- Walk down.
- Place NAMEPLATE (A); take RED BOOK (B).
- Go (C).
- Place BLUE BOOK and RED BOOK. Solution (D).
- Take LOCKET MONOGRAM and HEART AMULET (E).
- Go to the Laboratory.
- Place HEART AMULET (F). Play HOP; receive STARS.
- Go to Moriarty's Study.
- Place STARS (G); take MASTER SWITCH (H).
- Go to Basement.
- Place TOOLBOX AMULET (I); take JAB SAW.
- Go to Laboratory.
- Place JAB SAW on CHAINED BOX and remove cover; take LOCKET ELEMENT.
- Place LOCKET PHOTO, LOCKET MONOGRAM, and LOCKET ELEMENT on MORIARTY'S LOCKET; take MORIARTY'S LOCKET.
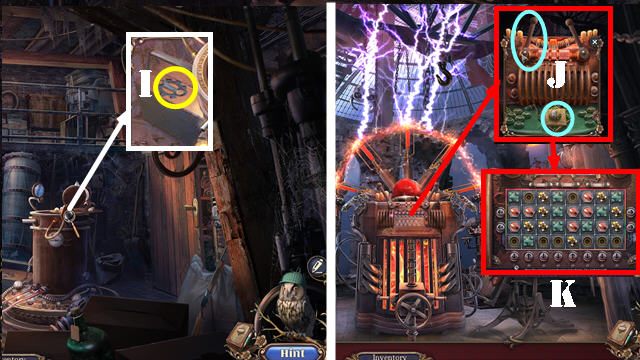
- Place MASTER SWITCH and MORIARTY'S LOCKET (J).
- Play puzzle (K).
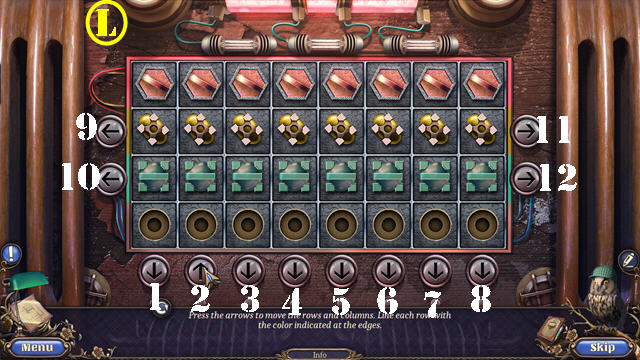
- Solution (L): (2-3-4-5-11-11-12-12-3-10-1-11-12-1-7-4-9-7).
- (11-8-9-12-8-7-12-7-10-1-10-1-9-2-10-2).
- Congratulations, you've completed Ms. Holmes: The Monster of the Baskervilles!
Created at: 2019-06-21