

Walkthrough Menu
- General Tips
- Chapter 1: Lake Bliss
- Chapter 2: Town Center
- Chapter 3: Moon Towers
- Chapter 4: Castle
- Chapter 5: Caves
- Chapter 6: Moon Towers
- Chapter 7: Lair
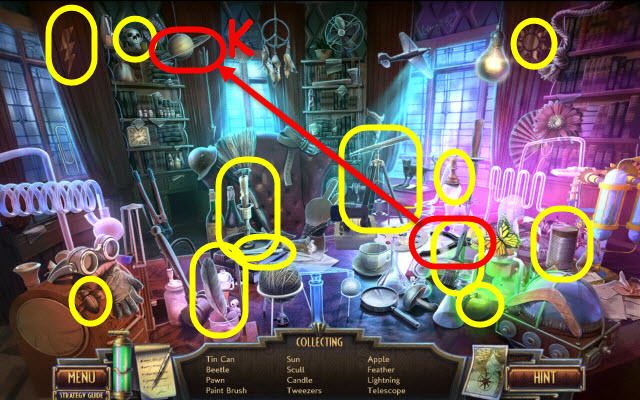
General Tips
- This is the official guide for Mysterium: Lake Bliss.
- This guide will not mention each time you have to zoom into a location; the screenshots will show each zoom scene.
- We will use the acronym HOP for Hidden-object puzzles. Interactive items will be color-coded and some will be numbered; please follow the numbers in sequence.
- The HOP lists may be random; our lists may vary from yours.
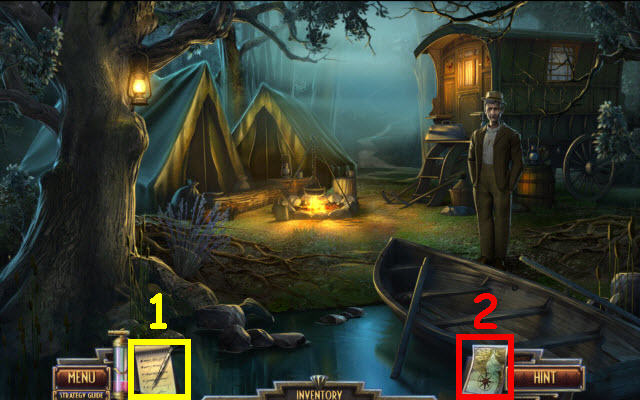
- Select the journal (1) for story updates and objectives.
- Use the map (2) to check objective locations and fast travel to previously unlocked locations.
Chapter 1: Lake Bliss
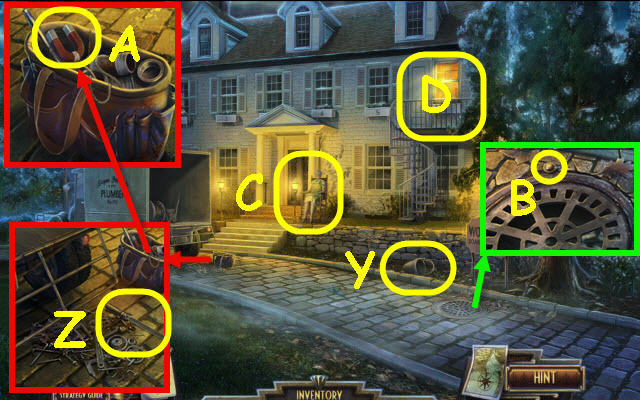
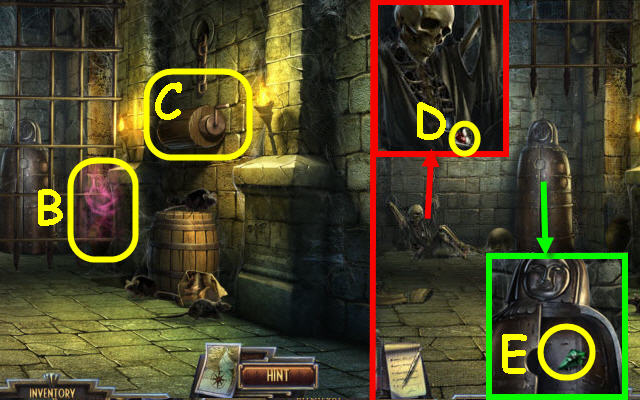
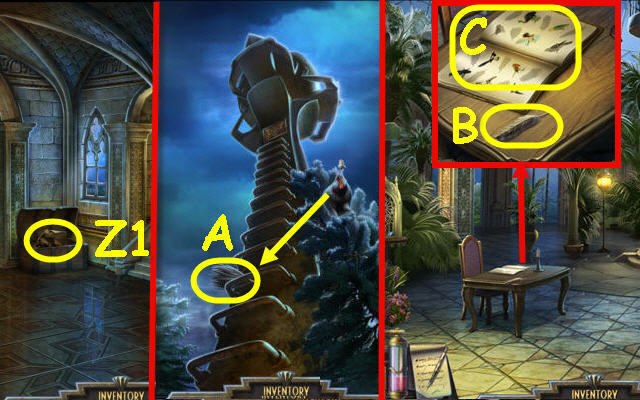
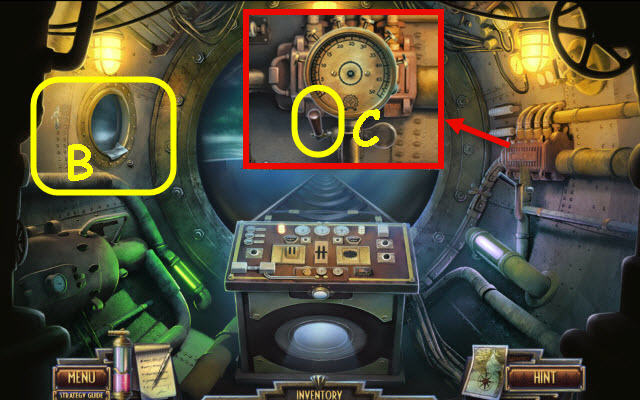
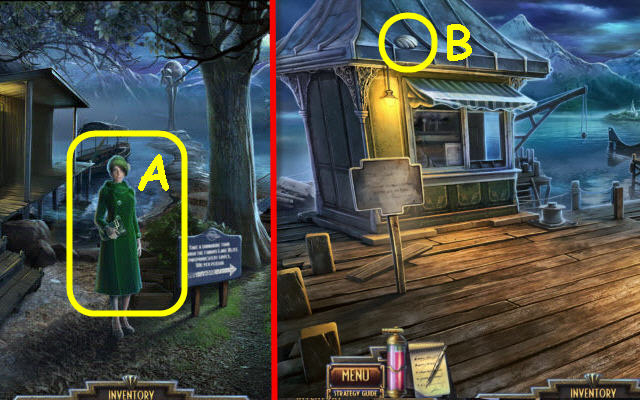
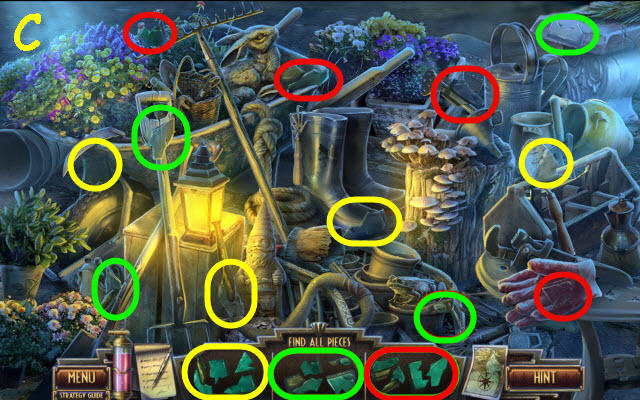
- Go through the opening (A).
- Take the 5C COIN (B).
- Go right.
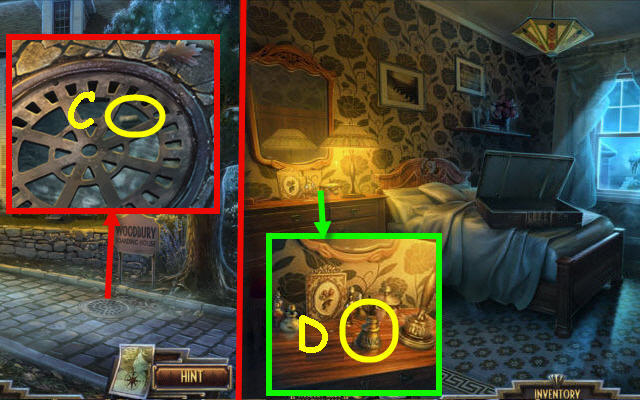
- Take the HAND RAKE (C).
- Use the HAND RAKE on the leaves; take the TOOLBOX KEY (D).
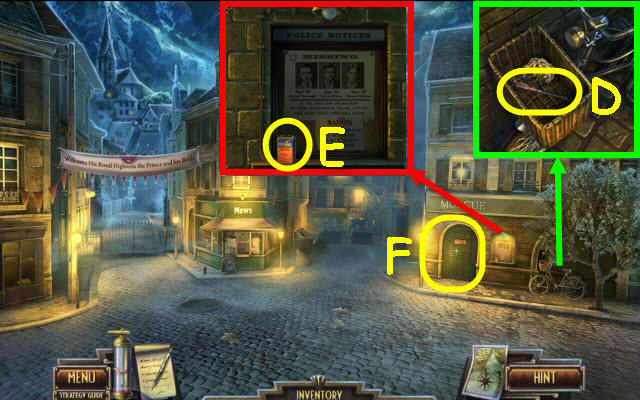
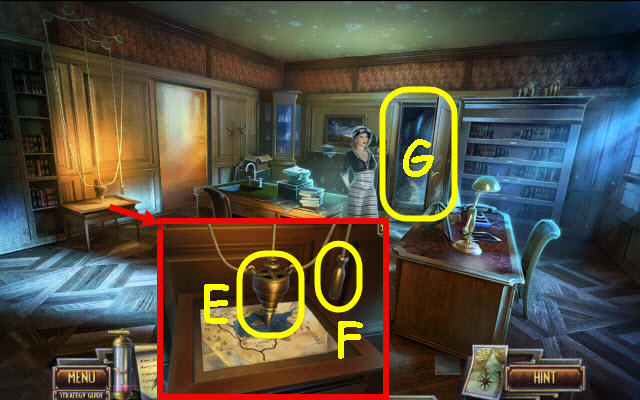
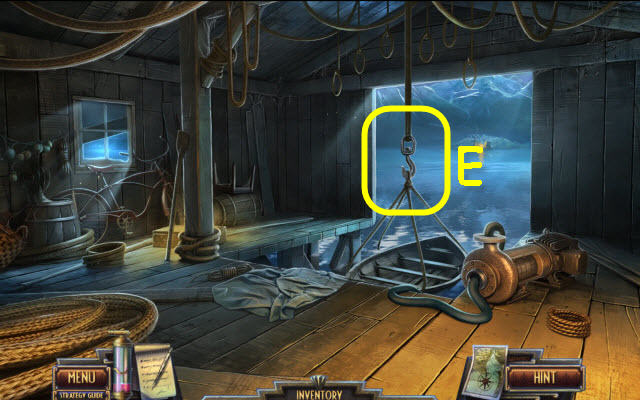
- Use the TOOLBOX KEY on the toolbox; take the WIRE CUTTERS (E) and OIL CAN (F).
- Back out.
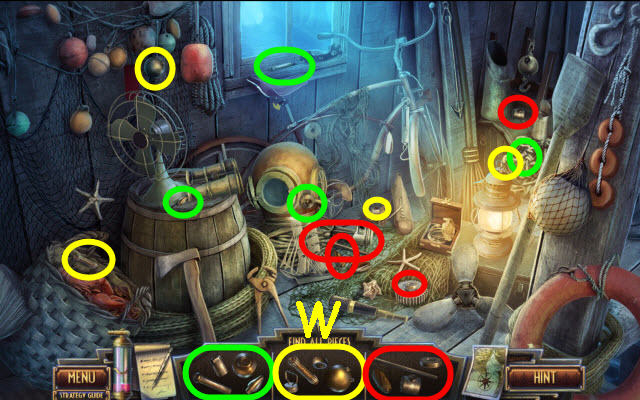
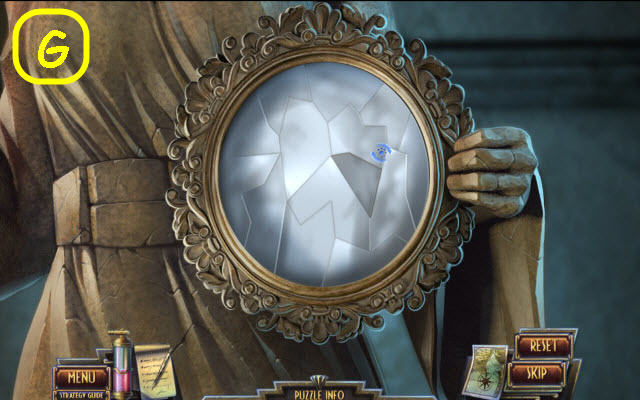
- Use the OIL CAN on the hinges; open the hatch to trigger a HOP (G).
- Play the HOP.
- You receive a WINDER KEY (H).
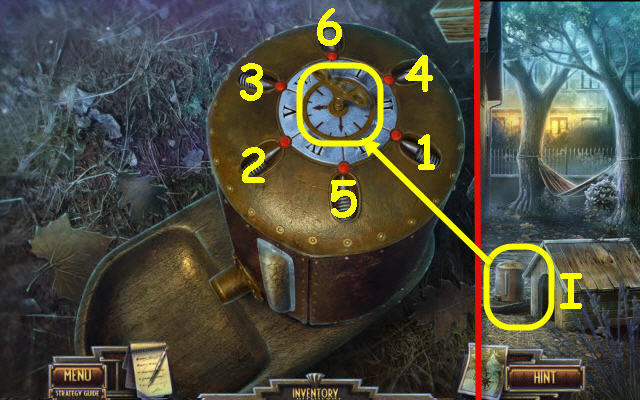
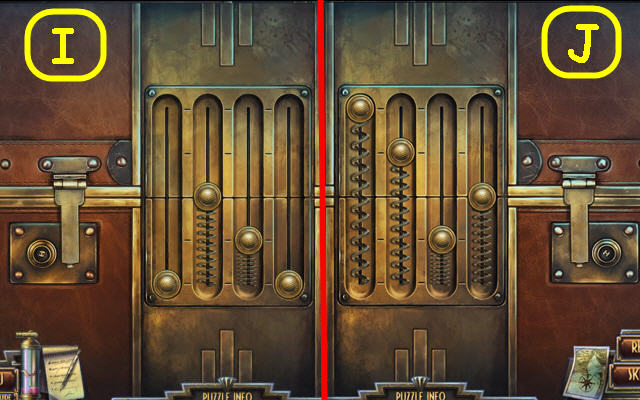
- Use the WINDER KEY on the waterer; turn it to trigger a puzzle (I).
- Select the springs in order: 1-6.
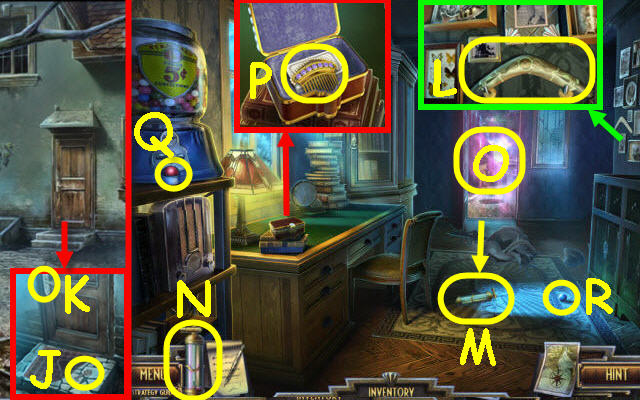
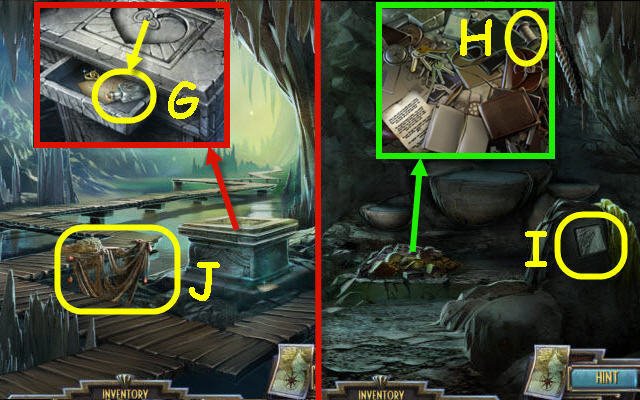
- Lift the mat; take the DOOR KEY (J).
- Use the DOOR KEY in the lock (K).
- Enter the house.
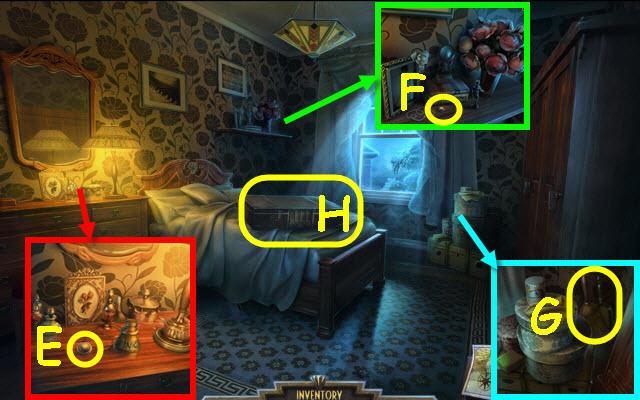
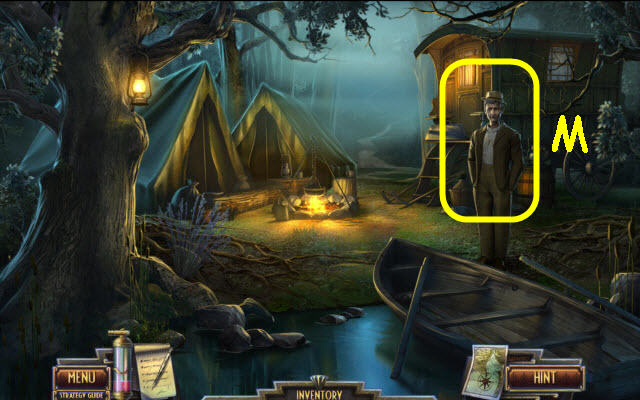
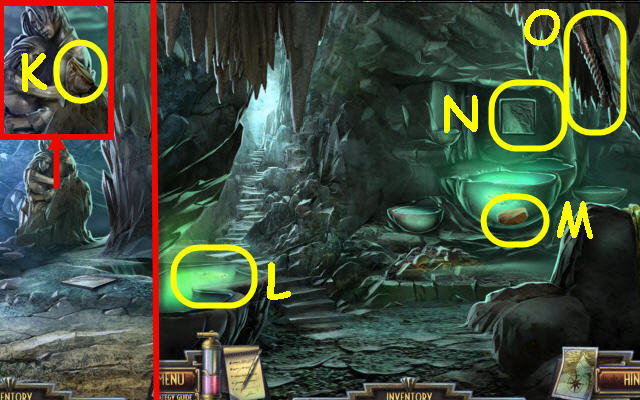
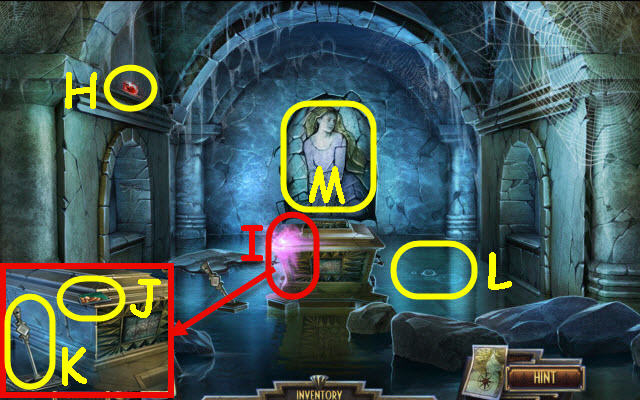
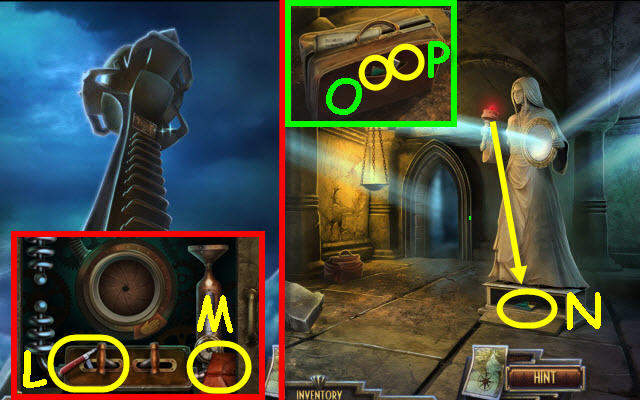
- Take the BOOMERANG (L).
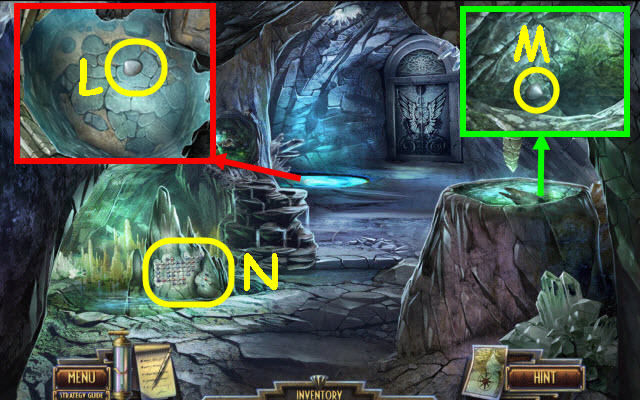
- Open the door; read the note and take the Spectral Fluid Jar (M) which will be added to your toolbar (N).
- Use the Spectral Fluid Jar on the fluid (O).
- Open the box; take the COMB (P) and note.
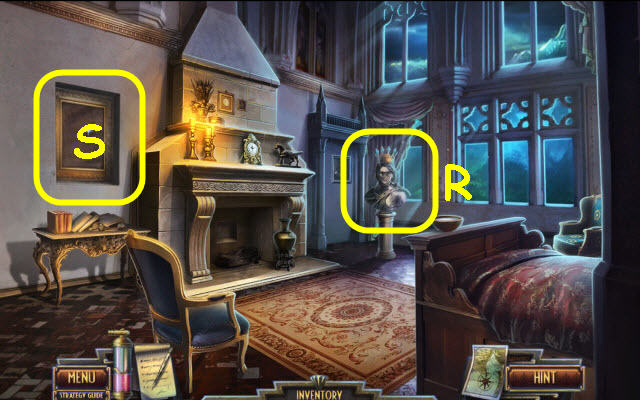
- Use the 5C COIN on the dispenser; turn the handle and take the MARBLE 1/4 (Q).
- Take the MARBLE 2/4 (R).
- Go forward.
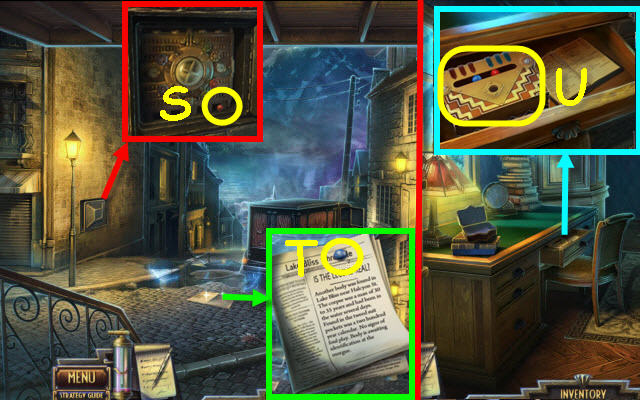
- Open the panel; take the MARBLE 3/4 (S).
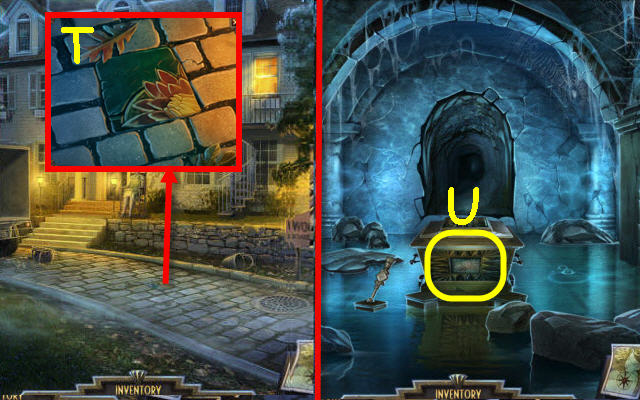
- Take the MARBLE 4/4 (T).
- Back out.
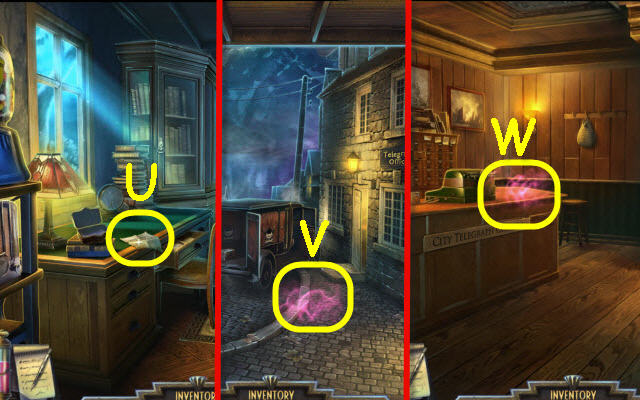
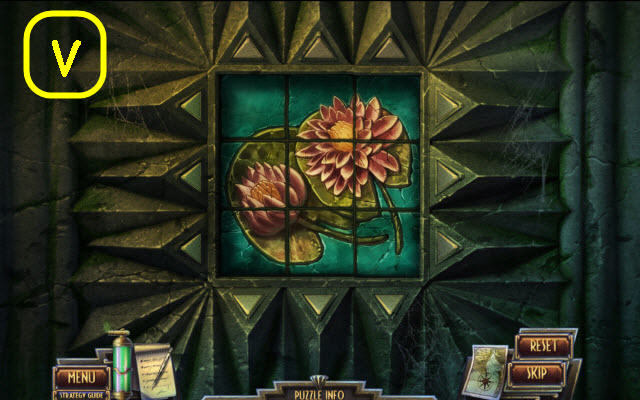
- Open the drawer and read the checkbook; place the 4 MARBLES in the box to trigger a puzzle (U).
- Swap the colored marbles.
- Select the following marbles: C, E, F, D, B, A, C, E, G, F, D, B, C, E and D.
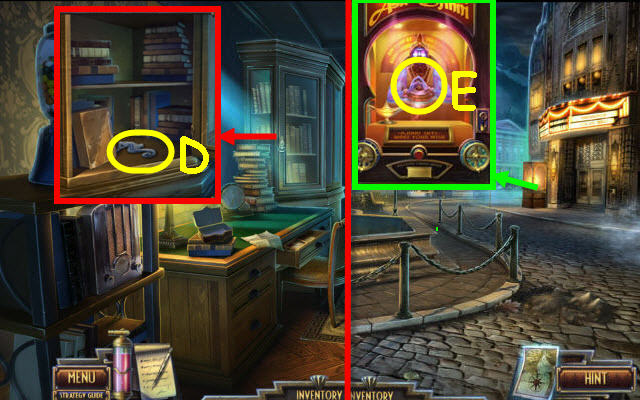
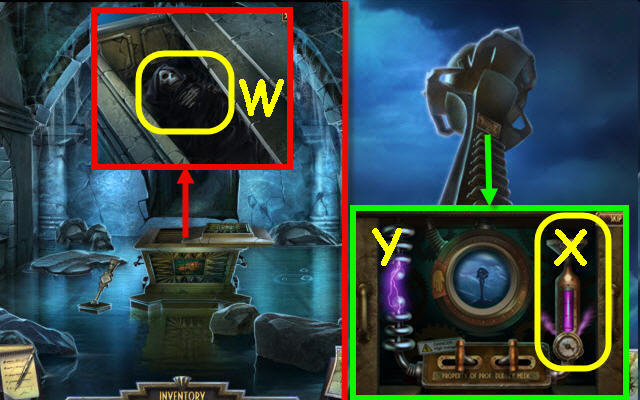
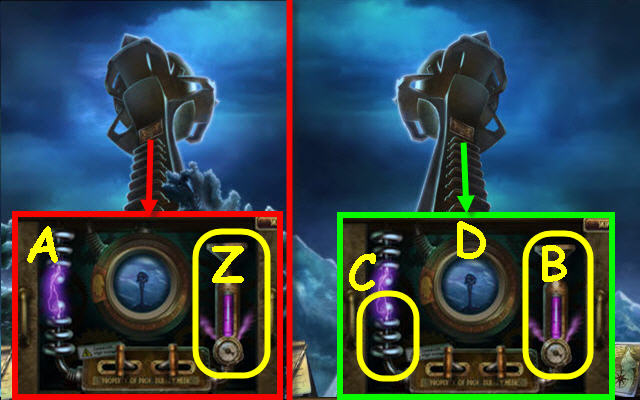
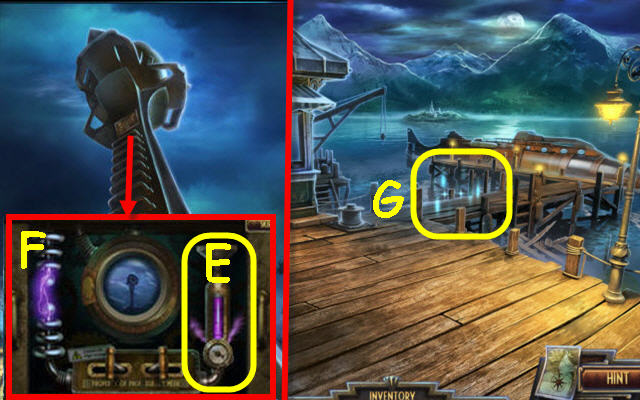
- Examine the various papers; take the VALVE (V).
- Go forward.
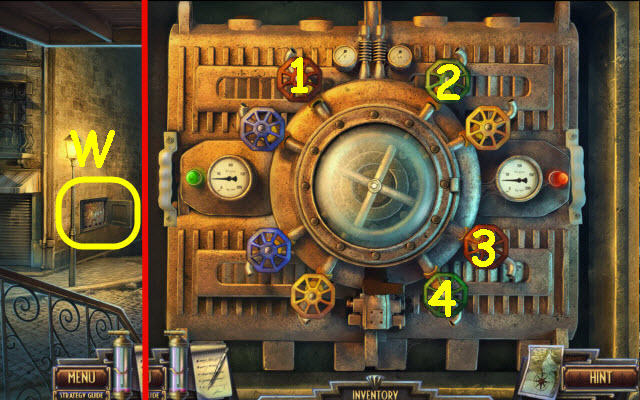
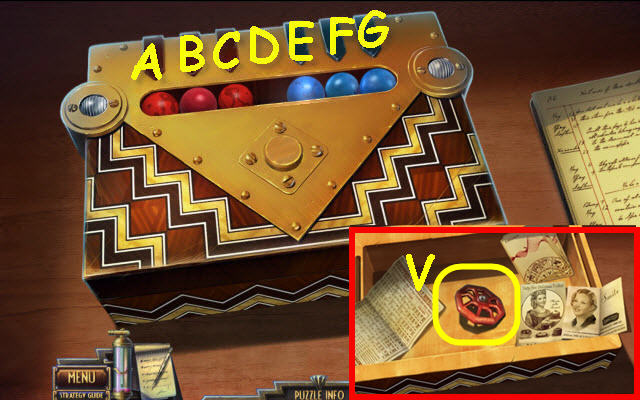
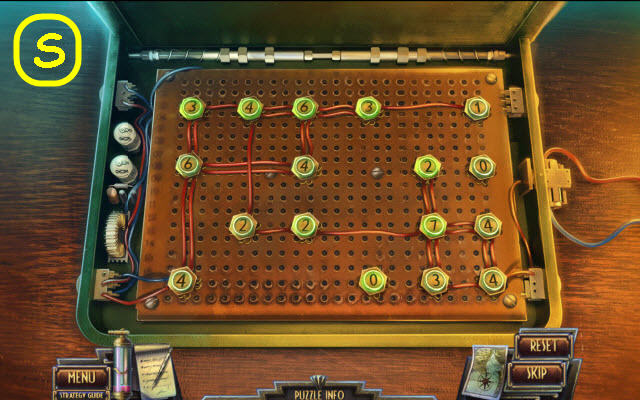
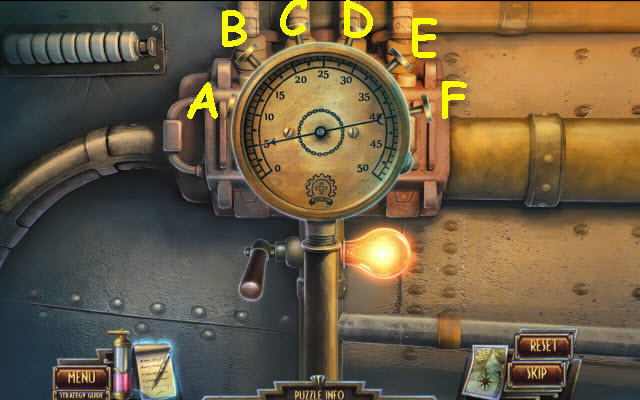
- Place the VALVE on the mechanism and push both red buttons to trigger a puzzle (W).
- Select the valves in order (1-4).
- Turn the wheel when complete.
- Go right into the Telegraph office.
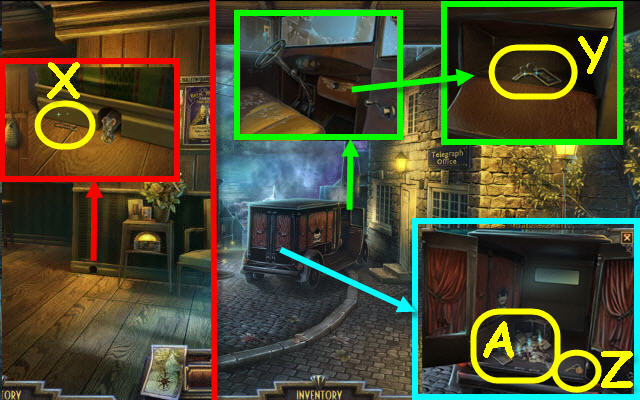
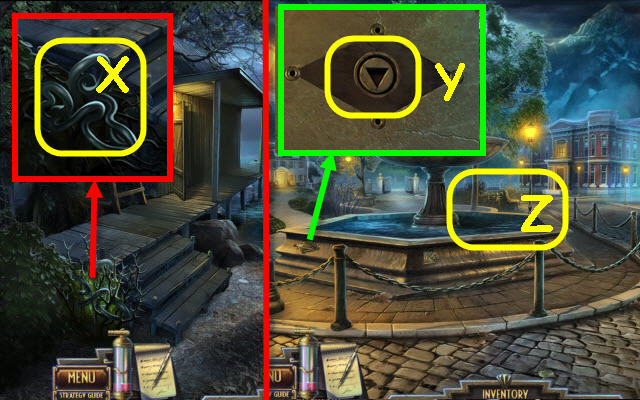
- Take the HAIRPIN (X).
- Back out.
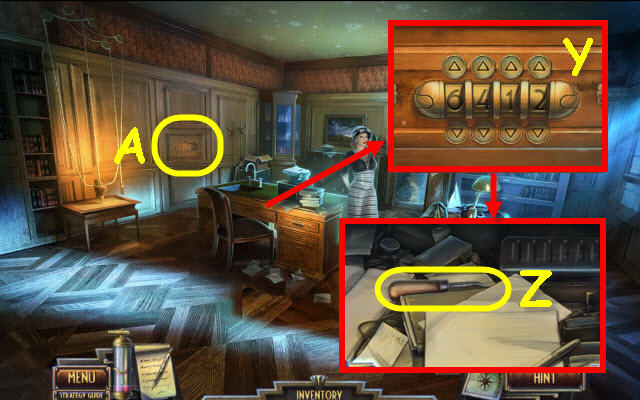
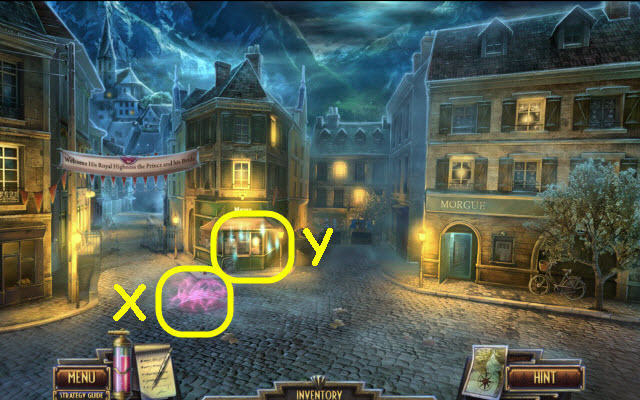
- Use the HAIRPIN on the glove box; take the HEARSE KEY (Y).
- Use the HEARSE KEY on the rear door; take the MORGUE KEY (Z).
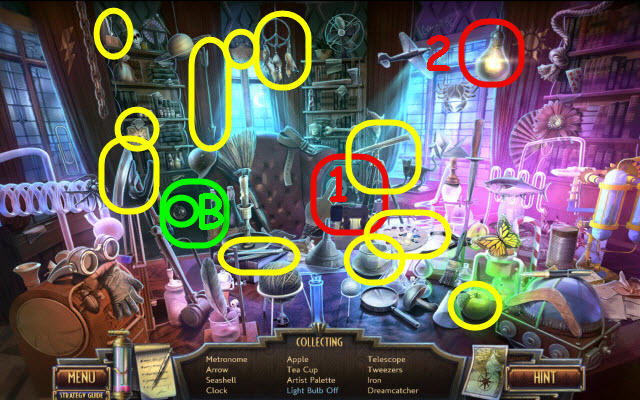
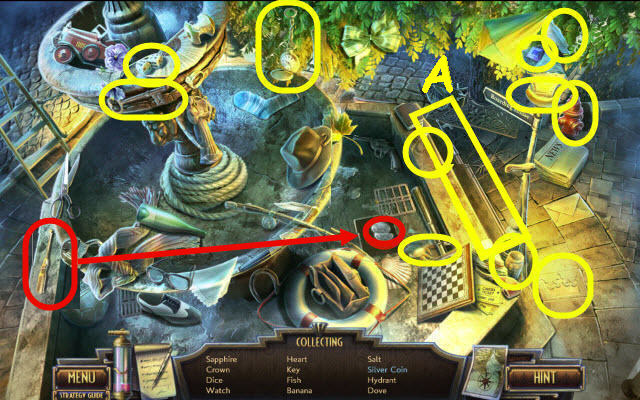
- Examine the supplies to access a HOP (A).
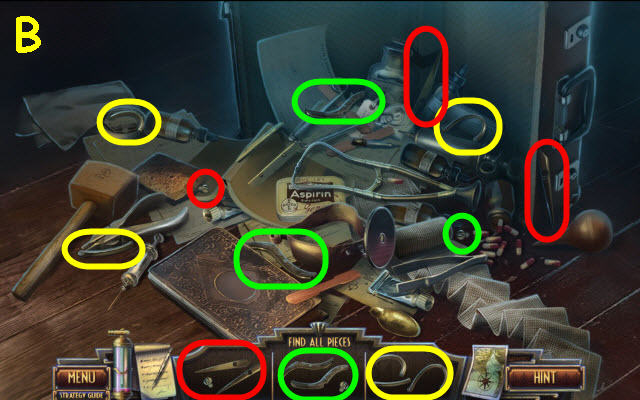
- Play the HOP.
- You receive SCISSORS (B).
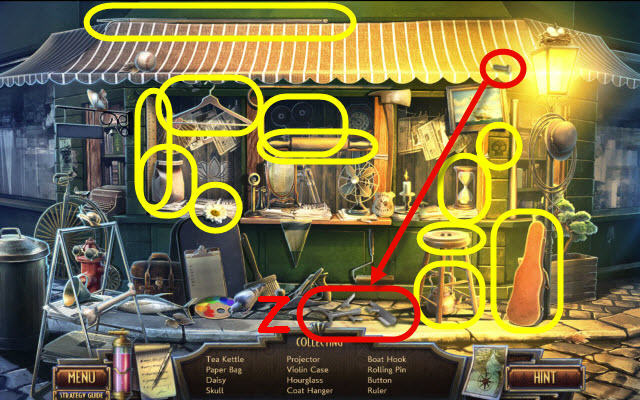
- Go forward; examine the newsstand to access a HOP.
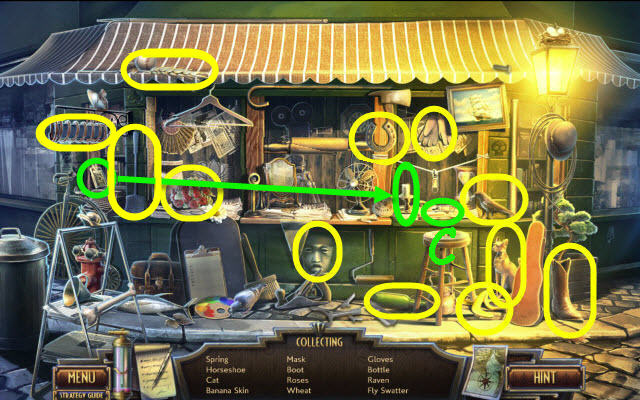
- Play the HOP.
- You receive a ZIPPER (C).
- Take the SCREWDRIVER (D).
- Use the WIRE CUTTERS on the wires; take the BATTERY (E).
- Use the MORGUE KEY on the door and enter (F).
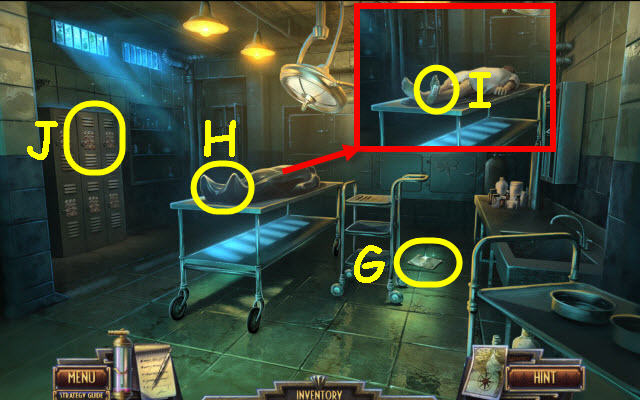
- Take the code (G).
- Use the ZIPPER on the body bag (H).
- Select the toe tag (I) and his hand.
- Examine locker 312 to trigger a puzzle (J).
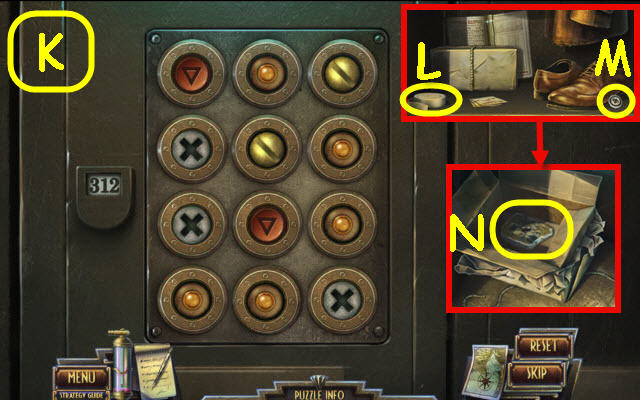
- Set the correct code.
- See screenshot for solution (K).
- Take the INSULATING TAPE (L), and CUFF LINK 1/2 (M). Examine the journal and cards.
- Open the package; take the STINKY CHEESE (N).
- Back out.
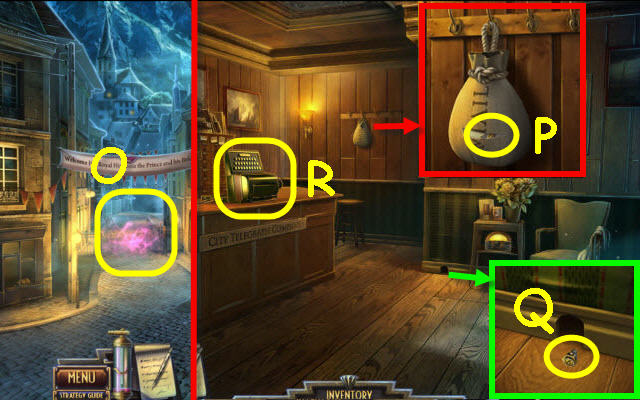
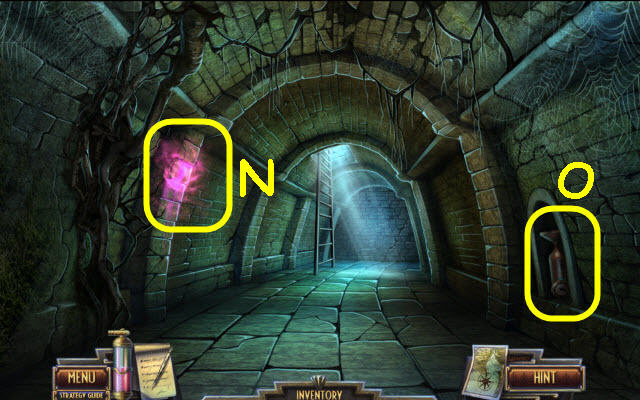
- Use the Spectral Fluid Jar on the fluid (O).
- Go to the Telegraph Office.
- Use the SCISSORS on the sack; take the FUSE 1/2 (P).
- Give the STINKY CHEESE to the mouse; take the FUSE 2/2 (Q).
- Place the 2 FUSES on the circuit and the BATTERY on the wire to trigger a puzzle (R).
- Connect the fuses.
- See screenshot for solution (S).
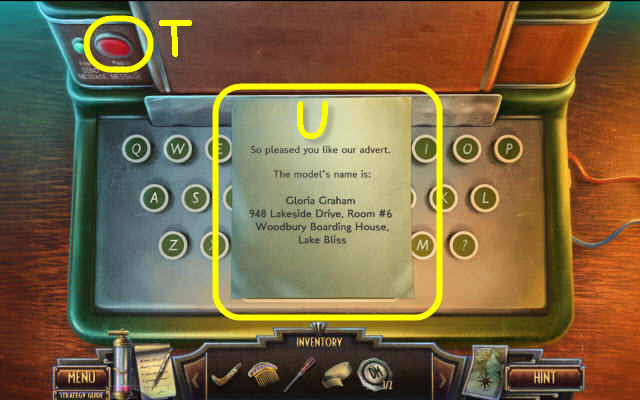
- Take the note; press the button (T) and take the RECEIVED MESSAGE (U).
- Go to Main Street and forward to Town Center.
Chapter 2: Town Center
- Use the BOOMERANG to get the TRUNK PUZZLE PIECE 1/4 (V).
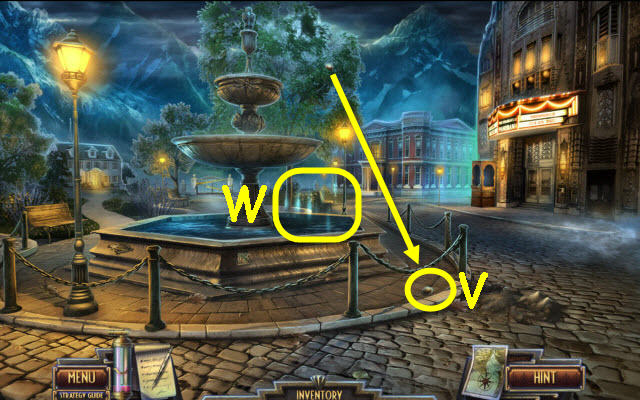
- Examine the fountain to access a HOP (W).
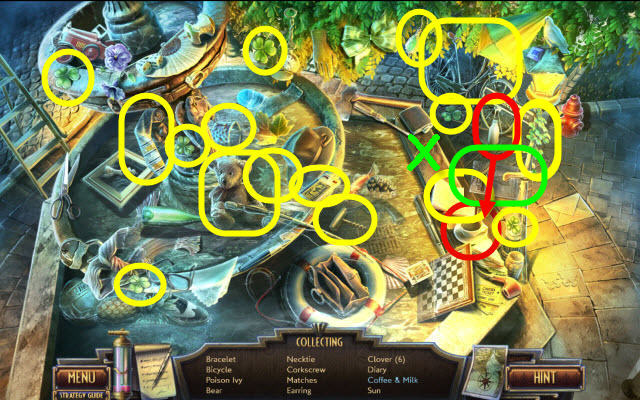
- Play the HOP.
- You receive an article (X) and TOKEN.
- Go up the left path.
- Take the BUCKET (Y).
- Take the METAL FILE (Z).
- Take the MAGNET ON ROPE (A).
- Take the TRUNK PUZZLE PIECE 2/4 (B).
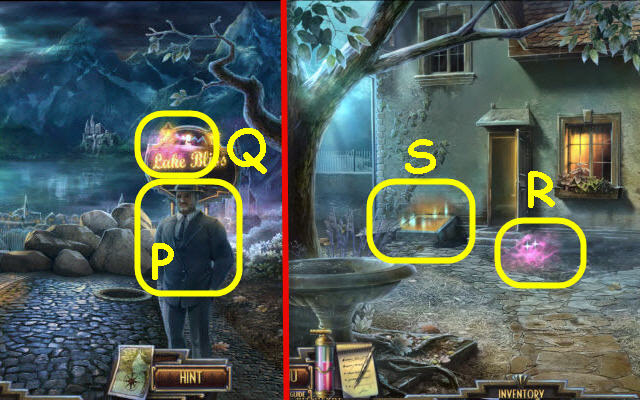
- Give the RECEIVED MESSAGE to Selma; receive a LAKE MAP (C).
- Go to Room 6 (D).
- Take the TRUNK PUZZLE PIECE 3/4 (E).
- Take the TRUNK PUZZLE PIECE 4/4 (F).
- Take the WISK BROOM (G).
- Place the 4 TRUNK PUZZLE PIECES on the trunk to trigger a puzzle (H).
- Set the pins to the correct settings.
- Set the pins as shown: Left (I) and right (J).
- Read the note; take the GLOVE.
- Go to Town Center.
- Use the INSULATING TAPE on the wire (K).
- Use the GLOVE on the plug (L).
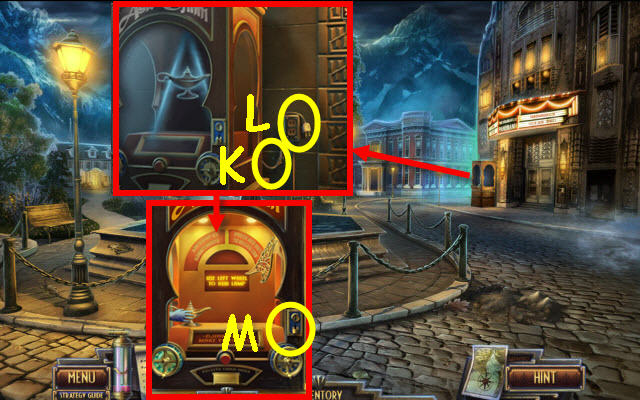
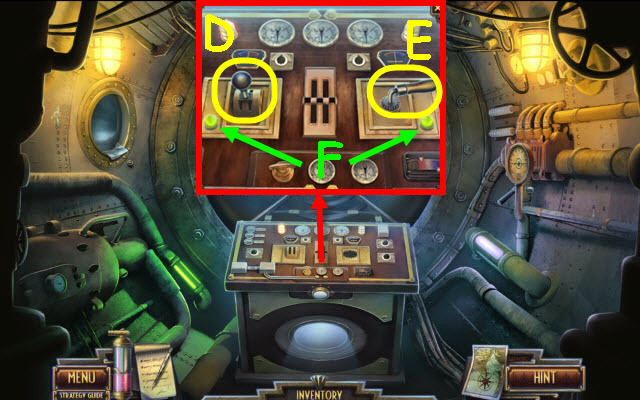
- Place the TOKEN in the slot to trigger a puzzle (M).
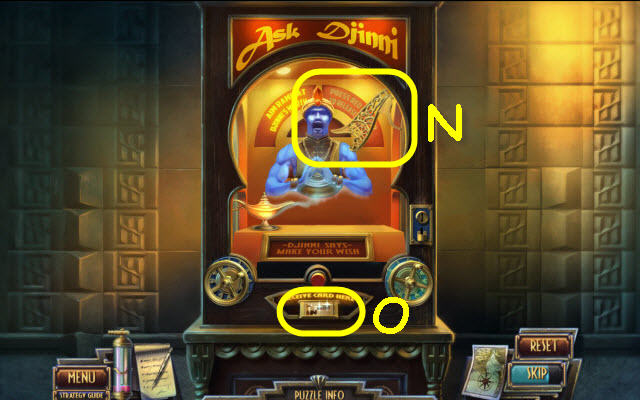
- Aim the token in Djinni's mouth.
- Turn the left wheel repeatedly to rub the lamp.
- Turn the right wheel to set the arm as shown to aim into the mouth (N).
- Take the FORTUNE CARD (O).
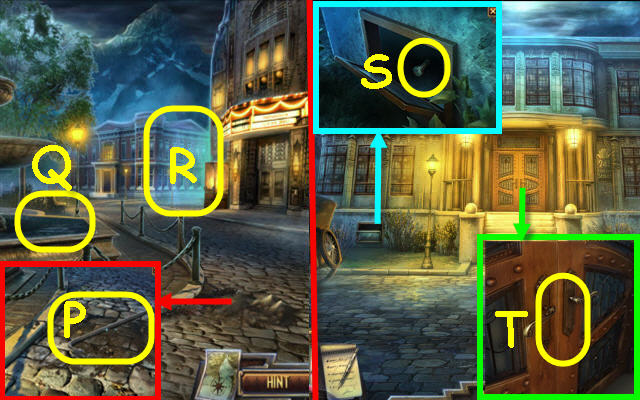
- Use the WISK BROOM on the dirt; take the CROWBAR (P).
- Use the BUCKET on the fountain; receive a BUCKET FULL OF WATER (Q).
- Go right between the buildings (R).
- Use the MAGNET ON ROPE to get the FLASHLIGHT (S).
- Select the handle twice and exhaust all conversation; use the FORTUNE CARD in between the doors (T).
- Go forward.
- Take the BATTERY (U).
- Take the BOTTLE CAP (V) and read the note.
- Back out.
- Use the CROWBAR on the sewer cover and the METAL FILE on the grate. Place the BOTTLE CAP on the box to trigger a puzzle (W).
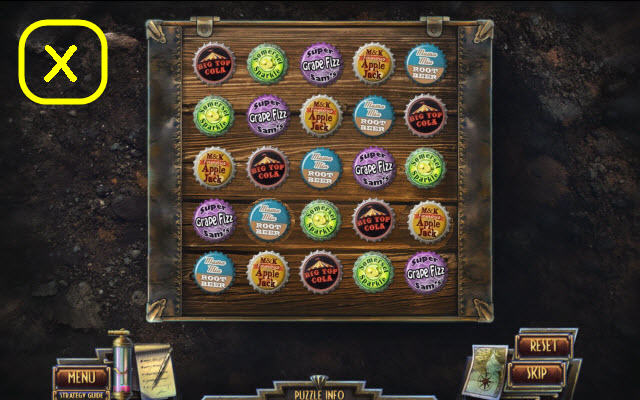
- Arrange the caps.
- See screenshot for solution (X).
- Take the CUFF LINK 2/2 and get a code in your journal.
- Go forward.
- Enter the code; 6412 (Y).
- Take the NAIL PULLER (Z).
- Place the 2 CUFF LINKS on the panel to trigger a puzzle (A).
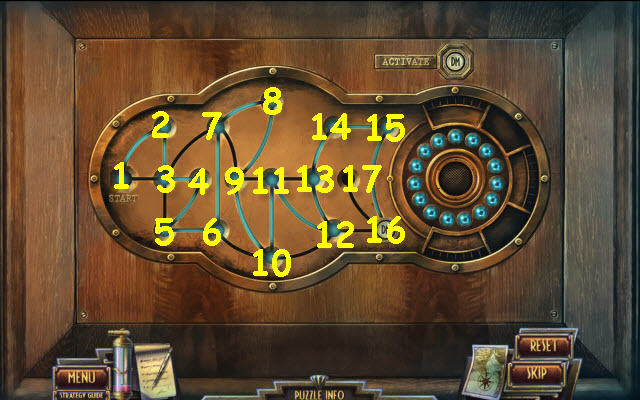
- Move the cufflink through each point.
- Move as follows: 1-17.
- Select the doorway to access a HOP.
- Play the HOP.
- You receive a COMPASS (B).
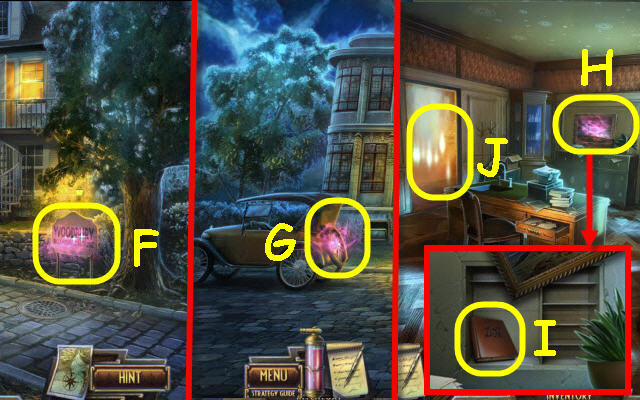
- Go to Woodbury Boarding House.
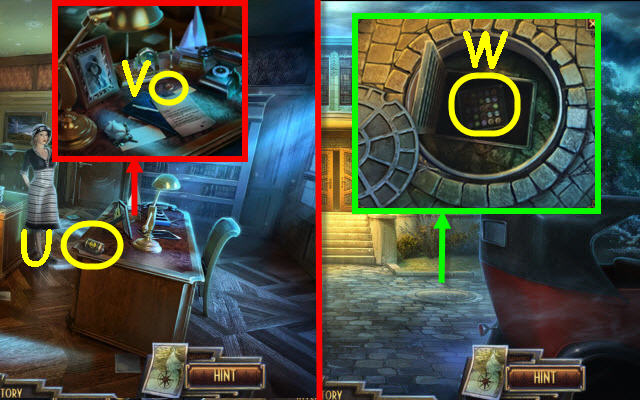
- Dump the BUCKET FULL OF WATER in the drain; take the CORK (C).
- Go to Room 6.
- Place the CORK on the ink to receive an INKPOT (D).
- Go to 241 Halcyon Office Interior.
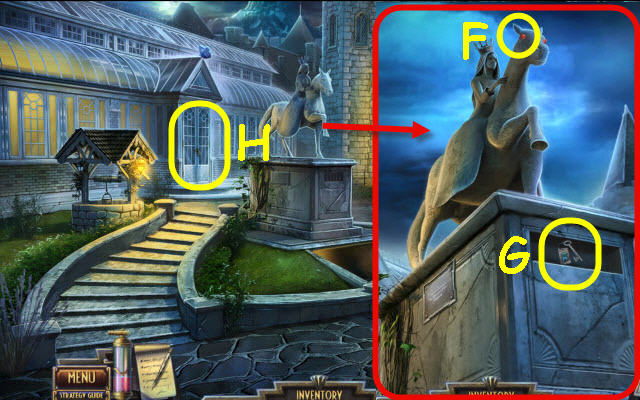
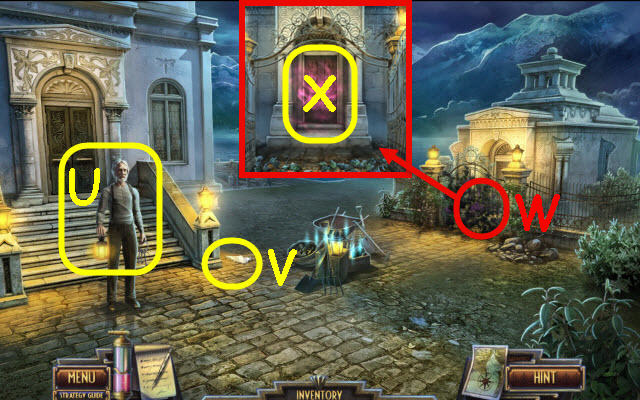
- Place the LAKE MAP on the table; pour the INKPOT in the pendulum (E).
- Pull the cord (F) to get directions.
- Open the door (G); go forward.
Chapter 3: Moon Towers

- Go through the maze by heading NE each time (H).
- Go right, right, left, forward and left.
- Examine the shoe (I).
- Take TOMMY DRAKE'S JACKET (J).
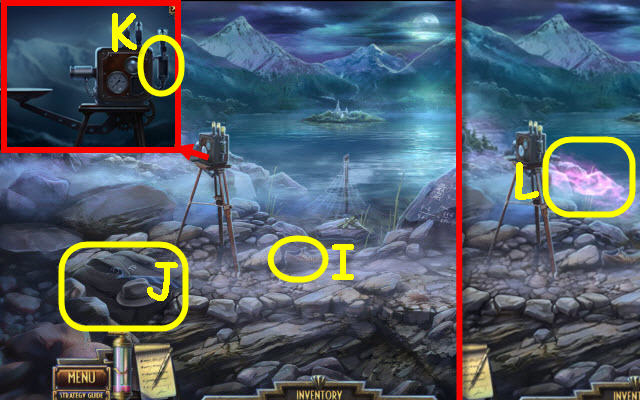
- Place the BATTERY on the camera (K); select the camera.
- Use the Spectral Fluid Jar on the fluid (L).
- Go to Town Center; go forward to Police Headquarters.
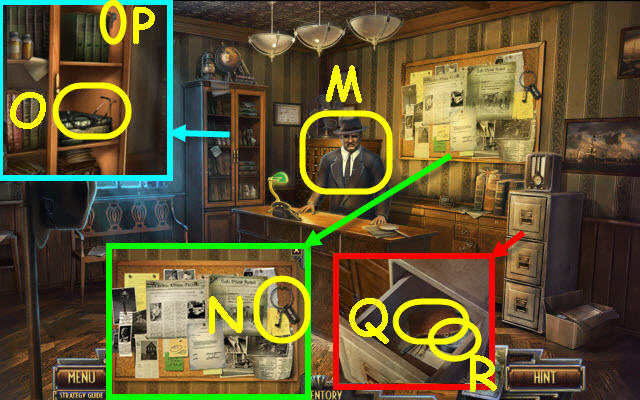
- Speak to the Constable (M) and give him TOMMY DRAKE'S JACKET; receive CRAZY HARRY SUMMON.
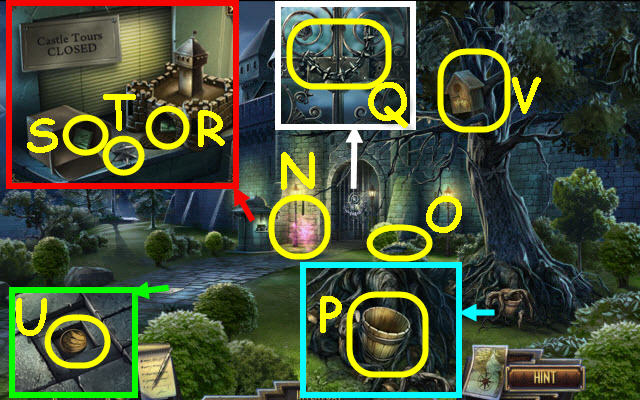
- Read the news clippings; take the CITY SKELETON KEY (N).
- Open the cabinet; take the STETHOSCOPE (O) and EVIDENCE DRAWER KEY (P).
- Use the EVIDENCE DRAWER KEY on the drawer; take the SAFE CRACKERS TOOL (Q) and PRISONER PLAQUE (R). Read the note.
- Back out.
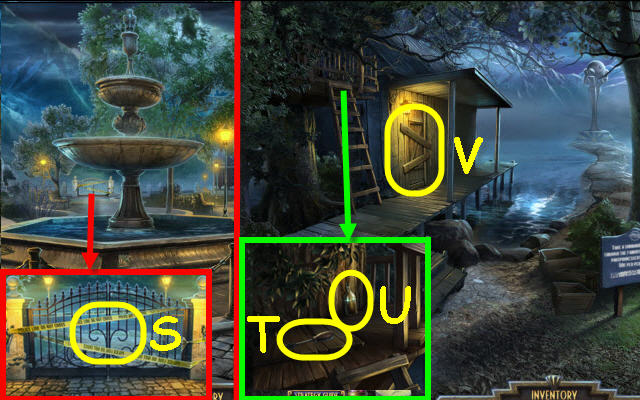
- Use the CITY SKELETON KEY on the gate (S).
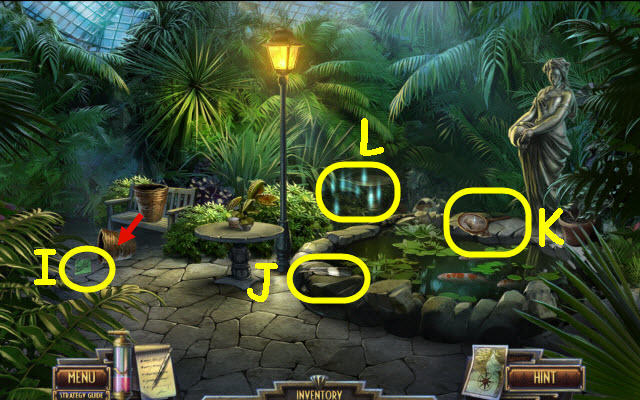
- Go forward to Lakeshore Park.
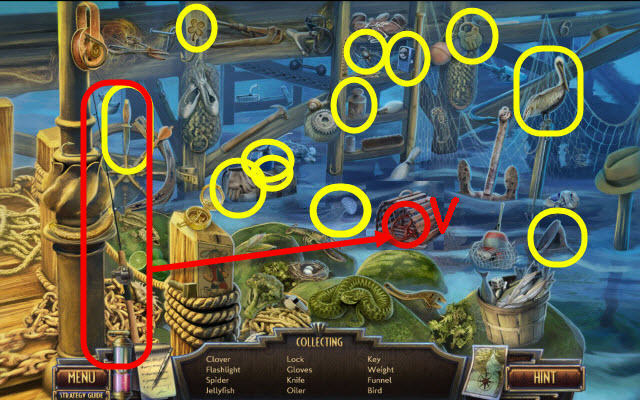
- Take the SMALL CHISEL (T) and EMPTY BOTTLE (U).
- Use the NAIL PULLER on the boards; enter the boathouse (V).
- Examine the bicycle to access a HOP.
- Play the HOP.
- You receive a WEED KILLER (W).
- Back out.
- Use the WEED KILLER on the weeds; take the RUBBER HOSE (X).
- Back out.
- Use the SCREWDRIVER on the plaque; use the CITY SKELETON KEY in the slot (Y).
- Examine the fountain to access a HOP (Z).
- Play the HOP.
- You receive a BOATHOOK (A).
- Go to Boathouse.
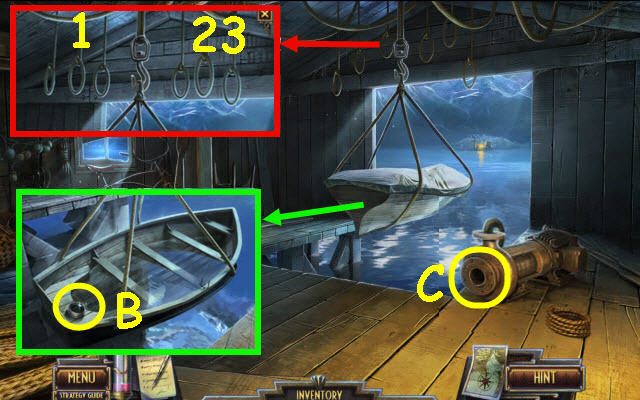
- Use the BOATHOOK to pull the ropes in the correct order (1-3).
- Use the BOATHOOK on the tarp; take the RUBBER SEAL (B).
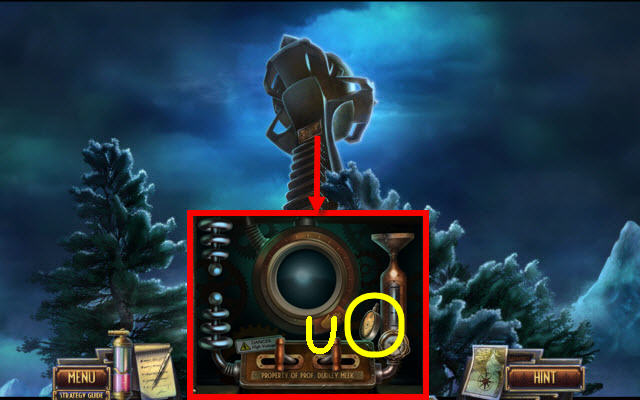
- Use the RUBBER SEAL and RUBBER HOSE on the pump to trigger a puzzle (C).

- Set the pipes to complete the connections.
- See screenshot for solution (D).
- Use the BOAT HOOK on the hook (E).
- Go forward.
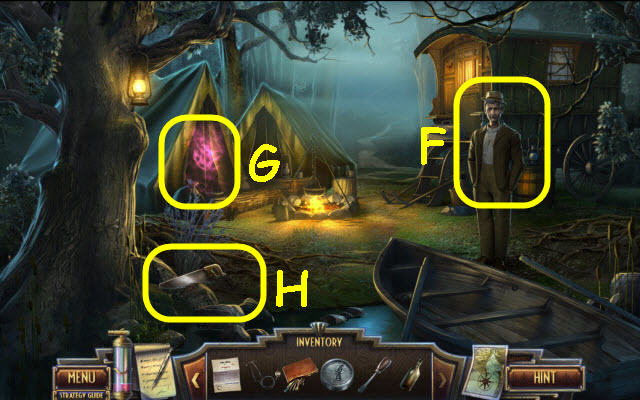
- Give the CRAZY HARRY SUMMON to Harry (F); receive a BIRD MEDALLION 1/2.
- Use the Spectral Fluid Jar on the fluid (G).
- Take the SAW (H).
- Go to Woodbury Boarding House and enter the Living Room.
- Take the map (I) and SOUVENIR TOWER REPLICA (J); read the letter.
- Select his left arm twice; select her right (it will move her left hand) arm twice (K).
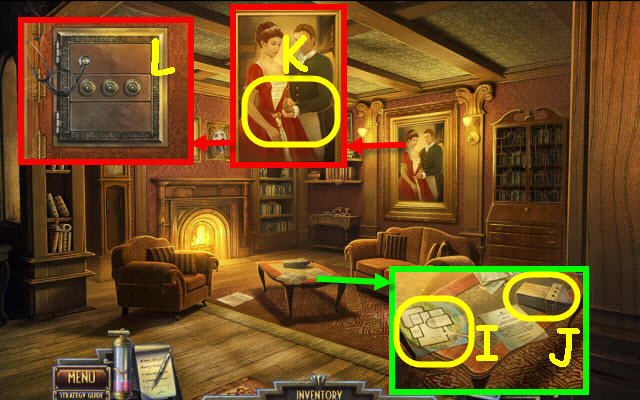
- Place the STETHOSCOPE and SAFE CRACKERS TOOLS on the safe to trigger a puzzle (L).
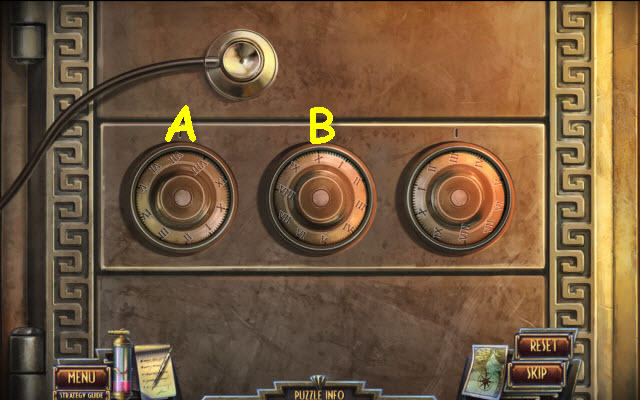
- Open the safe.
- Select the following knobs: Turn A to VII, turn B all the way around to X.
- Take the URN OF ASHES.
- Go to Tramp Camp.
- Give the URN OF ASHES to Harry (M); receive a POUCH OF ASHES.
- Go forward.
Chapter 4: Castle
- Use the Spectral Fluid Jar on the fluid (N).
- Take the BIRD FEATHER 1/6 (O).
- Use the SAW on the roots; take the EMPTY BUCKET (P).
- Take the CHAIN (Q).
- Place the SOUVENIR TOWER REPLICA on the castle; take the HYDRA EMBLEM 1/5 (R).
- Open the box; take the HYDRA EMBLEM 2/5 (S).
- Take the SPIKY KNOB (T).
- Use the SMALL CHISEL on the tile; take the BIRD MEDALLION 2/2 (U).
- Place the 2 BIRD MEDALLIONS on the birdhouse to trigger a puzzle (V).
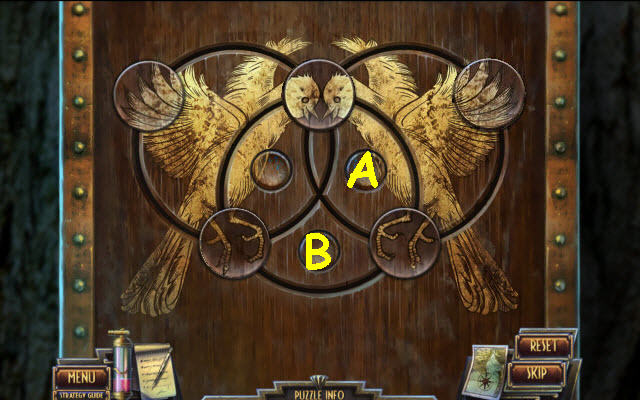
- Complete the image.
- Select the following: A and B.
- Take the GATE KEY.
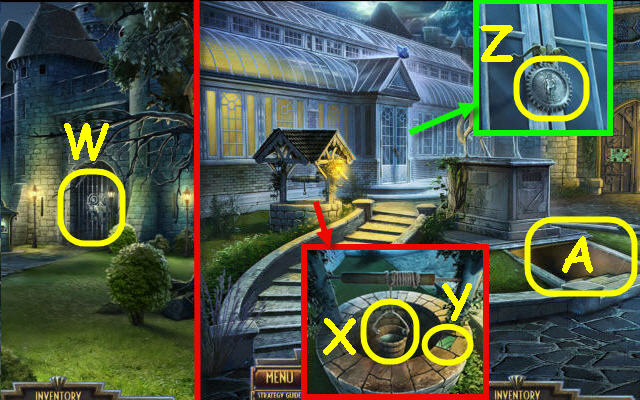
- Use the GATE KEY on the gate; enter the Gardens (W).
- Hang the EMPTY BUCKET on the rope; use the EMPTY BOTTLE on it to receive a BOTTLE OF WATER (X).
- Use the SMALL CHISEL to get the HYDRA EMBLEM 3/5 (Y).
- Take the GUARD PLAQUE (Z).
- Go down to the Dungeon (A).
- Use the Spectral Fluid Jar on the fluid (B).
- Place the CHAIN on the winch (C).
- Open the locket and read the note; take the BLOODSTONE (D).
- Place the GUARD PLAQUE, PRISONER PLAQUE and SPIKY KNOB in their matching shaped slots; take the HYDRA CRYSTAL (E).
- Back out.
- Place the BLOODSTONE in the socket (F); take the GREENHOUSE KEY (G).
- Use the GREENHOUSE KEY on the lock; enter the Greenhouse (H).
- Tip the basket; take the HYDRA EMBLEM 4/5 (I).
- Take the BIRD FEATHER 2/6 (J).
- Move the boards; take the BUTTERFLY NET (K).
- Examine the table to access a HOP (L).
- Play the HOP.
- You receive a HAMMER (M).
- Back out.
- Use the BUTTERFLY NET to get the BUTTERFLY (N).
- Enter the Greenhouse.
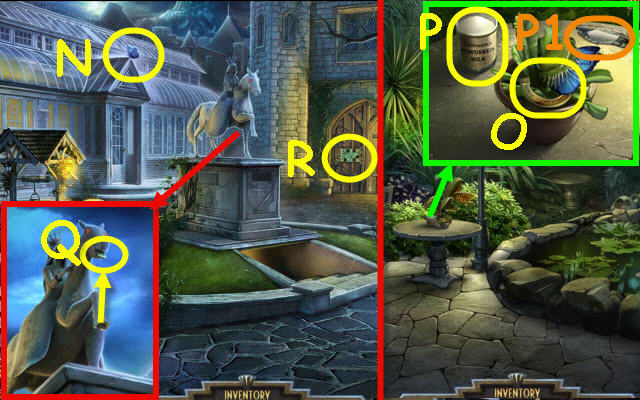
- Give the BUTTERFLY to the plant; take the GOLDEN HORSESHOE (O), POWDERED MILK (P) and BIRD FEATHER 3/6 (P1).
- Back out.
- Place the GOLDEN HORSESHOE on the hoof; take the HYDRA EMBLEM 5/5 (Q).
- Use the 5 HYDRA EMBLEMS, HYDRA CRYSTAL and BOTTLE OF WATER on their appropriate slots of the panel to trigger a puzzle (R).
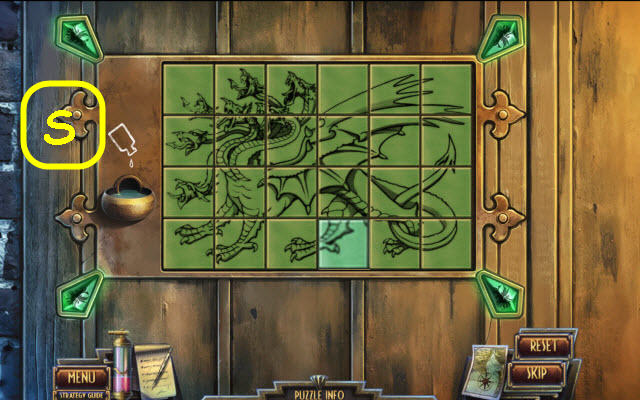
- Swap and turn the tiles to complete the puzzle.
- Starting layouts are random; see screenshot for solution (S).
- Go forward into the Staircase.
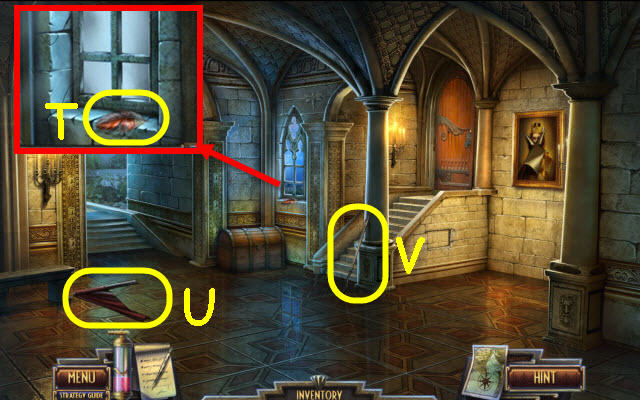
- Take the BIRD FEATHER 4/6 (T).
- Take the FLAG (U) and POKER (V).
- Go down the hall to the Aviary.
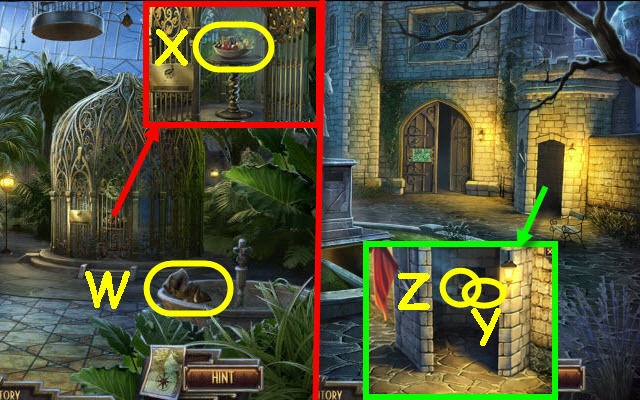
- Take the PORTRAIT FRAGMENT 1/7 (W).
- Read the plaque and open the gate; take the BOWL OF FRUITS (X).
- Go to Gardens.
- Place the FLAG in the holder; take the PORTRAIT FRAGMENT 2/7 (Y) and CHEST KEY (Z).
- Enter the Staircase.
- Use the CHEST KEY on the chest; take the PORTRAIT FRAGMENT 3/7 (Z1).
- Go to Castle Gates and up the left to the Moon Tower.
- Give the BOWL OF FRUITS to the bird; take the BIRD FEATHER 5/6 (A).
- Go to Aviary.
- Take the BIRD FEATHER 6/6 (B).
- Place the 6 BIRD FEATHERS on the book to trigger a puzzle (C).
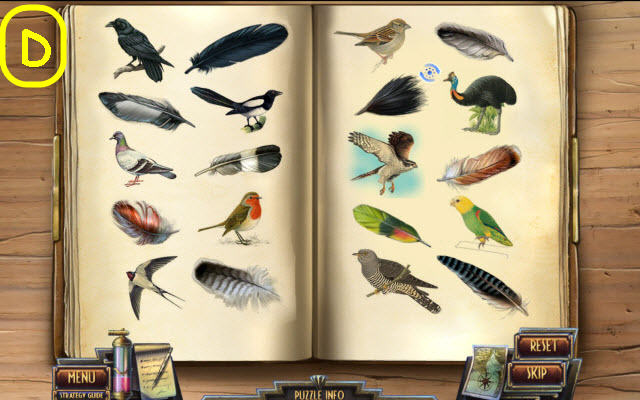
- Place the feathers with their matching birds.
- See screenshot for solution (D).
- Take the CHAMBER DOOR KEY.
- Back out.
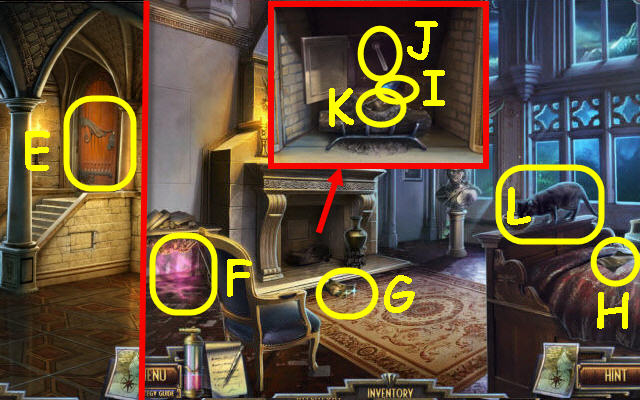
- Use the CHAMBER DOOR KEY on the lock (E).
- Enter the Princess Chamber.
- Use the Spectral Fluid Jar on the fluid (F).
- Take the PORTRAIT FRAGMENT 4/7 (G) and 5/7 (H).
- Open the panel; take the MOONSTONE 1/4 (I) and move the lever (J).
- Use the POKER on the ashes; take the PORTRAIT FRAGMENT 6/7 (K).
- Place the POWDERED MILK and BOTTLE OF WATER in the bowl; take the CAT (L).
- Go to Aviary.

- Slide the lever left; take the MOONSTONE 2/4 (M).
- Back out.
- Open the panel and slide the lever; take the MOONSTONE 3/4 (N).
- Back out.
- Take the MOONSTONE 4/4 (O).
- Place the 4 MOONSTONES on the crown; receive a JEWELED CROWN (P).
- Go to Dungeon.
- Place the CAT by the rats; take the PORTRAIT FRAGMENT 7/7 (Q).
- Go to Princess Chamber.
- Place the JEWELED CROWN on the bust (R).
- Place the 7 PORTRAIT FRAGMENTS in the frame to trigger a puzzle (S).

- Complete the image.
- See screenshot for solution (T).
- Go to Castle Gates; go up the left to Moon Tower.
Chapter 5: Caves
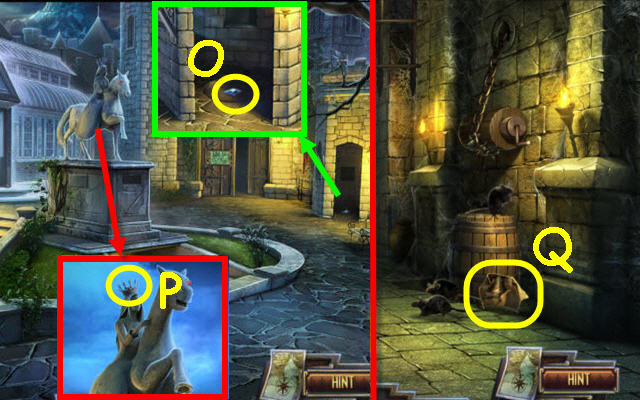
- Open the panel and select the mechanism; take the PRESSURE GAUGE (U).
- Go to Lakeshore Park; go up the Private Pier.
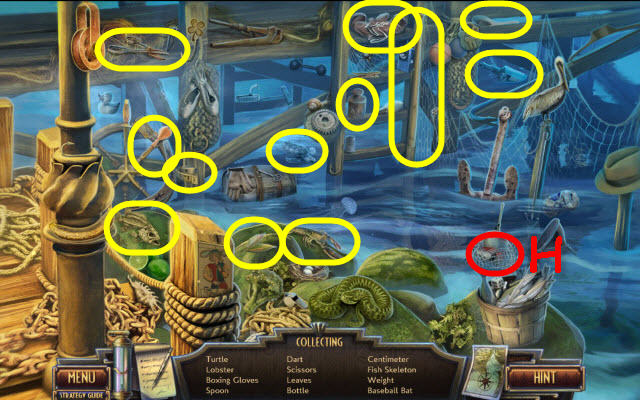
- Examine the dock to access a HOP.
- Play the HOP.
- You receive a PRESSURE DOOR HANDLE (V).
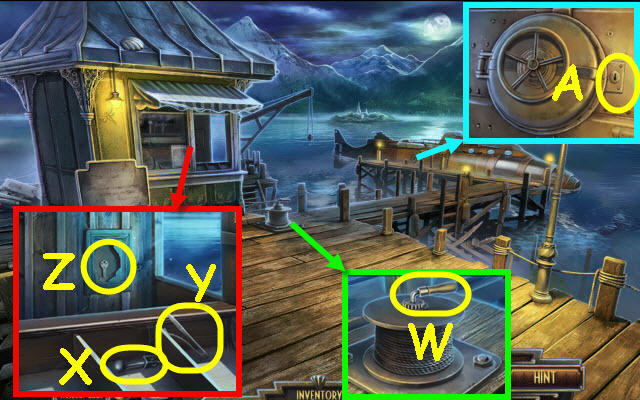
- Take the CRANK (W).
- Take the SMALL LEVER (X) and CLAM OPENER (Y).
- Use the HAMMER on the cabinet; take the SUBMARINE KEY (Z).
- Place the PRESSURE DOOR HANDLE on the hatch; use the SUBMARINE KEY in the lock (A).
- Enter the Submersible.
- Examine the note and ghost figure (B).
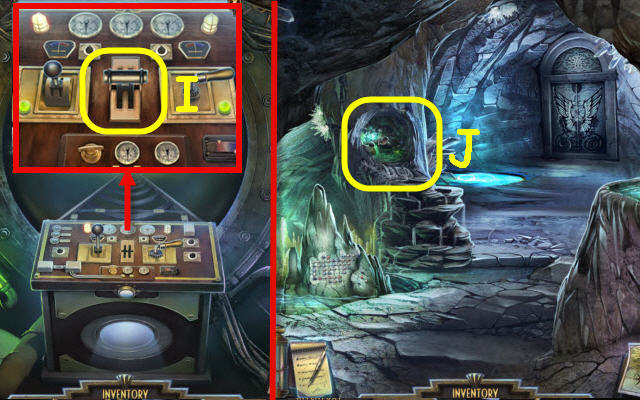
- Place the PRESSURE GAUGE on the mechanism and pull the lever to trigger a puzzle (C).
- Set the pressure gauges using the lucky numbers in your journal.
- Select the number on the dial and then push the buttons as follows: 5-A, 9-B, 16-C, 17-D, 24-E and 43-F.
- Place the SMALL LEVER in the left slot (D) and the CRANK in the right (E).
- Select the lever and then the crank twice to turn both lights green (F).
- Push the wedding bands; take the HOLY WATER (G). Read and select the note to get a clue.
- Go forward.
- Take the SPOOL OF THREAD (H) and read the note.
- Move the cloth; take the STONE TILE 1/3 (I).
- Back out.
- Use the SPOOL OF THREAD on the net; receive a FISHING NET (J).
- Go forward twice.
- Take the PIECE OF FLINT ROCK 1/2 (K).
- Back out.
- Use the FISHING NET in the pool; receive a GLOWING FISH (L).
- Place the GLOWING FISH in the basin; take the PIECE OF FLINT ROCK 2/2 (M).
- Use the SMALL CHISEL to get the STONE TILE 2/3 (N).
- Use the 2 PIECES OF FLINT ROCK to get the TORCH (O).
- Go forward.

- Select the tile (Q) and use the TORCH on the creature (P); take the STONE TILE 3/3 (Q).
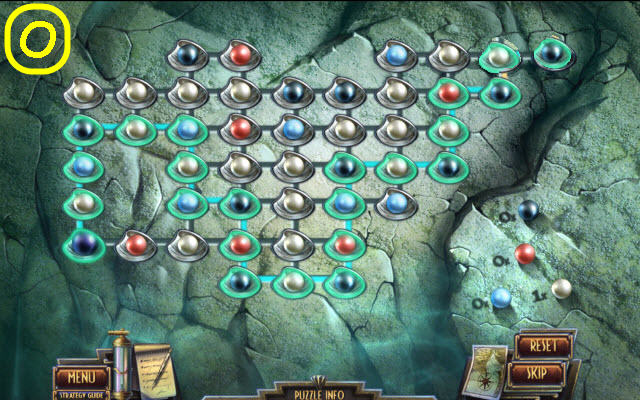
- Place the 3 STONE TILES on the stone to trigger a puzzle (R).
- Rotate and swap the tiles to complete the image.
- See screenshot for solution (S).
- Go forward.
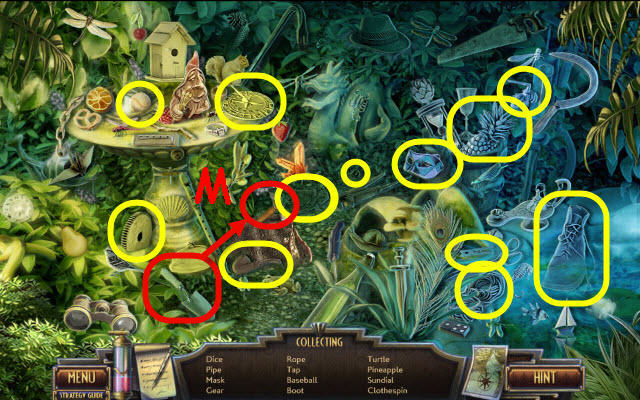
- Examine the garden tools to access a HOP.
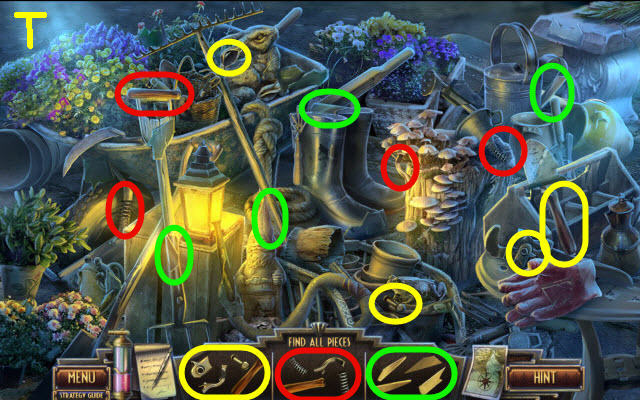
- Play the HOP.
- You receive SHEARS (T).
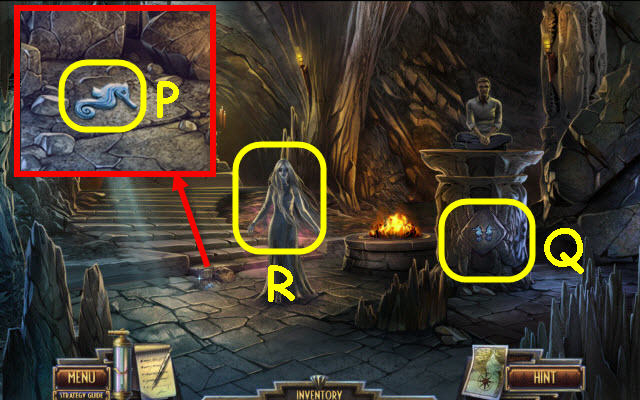
- Speak to Bassani; receive PRIEST'S KEYS (U).
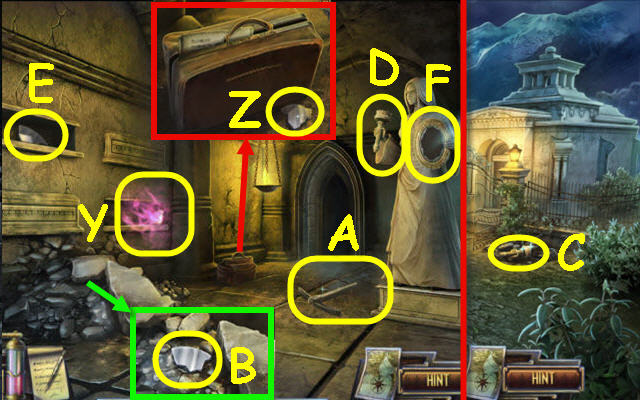
- Take the MIRROR SHARD 1/5 (V).
- Use the HOLY WATER and SHEARS on the gate (W).
- Use the Spectral Fluid Jar on the fluid (X) and the PRIEST'S KEYS on the door.
- Enter the Crypt.
- Use the Spectral Fluid Jar on the fluid; take the MIRROR SHARD 2/5 (Y).
- Read the note; take the MIRROR SHARD 3/5 (Z).
- Take the PICKAXE (A).
- Use the PICKAXE on the rubble; take the MIRROR SHARD 4/5 (B).
- Back out.
- Use the PICKAXE on the rubble; take the STATUE HAND (C).
- Enter the crypt.
- Place the STATUE HAND on the statue (D); take the MIRROR SHARD 5/5 (E).
- Place the 5 MIRROR SHARDS in the frame to trigger a puzzle (F).
- Assemble the mirror.
- See screenshot for solution (G).
- Go forward.
- Take the RED GEM (H).
- Use the Spectral Fluid Jar on the fluid (I).
- Take the PIECE OF RELIEF 1/9 (J).
- Pull the lever (K).
- Use the FISHING NET on the water; receive a PIECE OF RELIEF 2/9 (L).
- Use the PICKAXE on the mural twice (M); go forward.
- Use the Spectral Fluid Jar on the fluid (N).
- Take the MOONTOWER FUEL CELL (O).
- Go up the ladder.
Chapter 6: Moon Towers
- Speak to the Constable (P).
- Use the Spectral Fluid Jar on the fluid (Q).
- Go through the gates.
- Use the Spectral Fluid Jar on the fluid (R).
- Examine the cellar door to access a HOP (S).

- Play the HOP.
- You receive BEEF JERKY (T).
- Go forward.
- Read the note (U).
- Go forward.
- Use the Spectral Fluid Jar on the fluid (V).
- Go right.
- Use the Spectral Fluid Jar on the fluid (W).
- Go to Main Street.
- Use the Spectral Fluid Jar on the fluid; get a TOKEN (X).
- Examine the newsstand to access a HOP (Y).
- Play the HOP.
- You receive a GRABBER (Z).
- Go to Town Center and then to Lakeshore Park.
- Receive a MOON TOWER COIL RING and DRAKE INSIGNIA RING from Molly (A).
- Go to Private Pier.
- Use the GRABBER to get the CLAM 1/4 (B).
- Go to Church.
- Examine the garden tools to access a HOP.
- Play the HOP.
- You receive a PIECE OF RELIEF 3/9 (C).
- Go to Drake's House Interior.
- Use the DRAKE INSIGNIA RING on the lock; read the book and take the CRYSTAL SEA HORSE 1/2 (D).
- Go to Town Center.
- Place the TOKEN in the slot; select Djinni to receive a MOON TOWER COIL RING 2/3 (E).
- Go left.
- Use the Spectral Fluid Jar on the fluid (F).
- Go to 241 Halcyon Street.
- Use the Spectral Fluid Jar on the fluid (G).
- Go forward.
- Use the Spectral Fluid Jar on the fluid (H). You should now have a full green Spectral Fluid Jar.
- Move the painting; read the book (I).
- Examine the doorway to access a HOP (J).
- Play the HOP.
- You receive a MOON TOWER COIL RING 3/3 (K).
- Go to the Church; go forward to the Moon Tower.
- Open the compartment and examine the lens. Take the POCKET KNIFE (L) and book (M).
- Go to Crypt.
- Place the RED GEM on the torch; take the PIECE OF RELIEF 4/9 (N).
- Use the POCKET KNIFE on the stitching; take the PIECE OF RELIEF 5/9 (O) and BIG CHISEL (P).
- Go to Hilltop Lane.

- Use the BIG CHISEL on the tile; take the PIECE OF RELIEF 6/9 (Q).
- Go to Telegraph Office.
- Use the BIG CHISEL on the tile; take the PIECE OF RELIEF 7/9 (R).
- Go to Town Center.
- Use the BIG CHISEL on the tile; take the PIECE OF RELIEF 8/9 (S).
- Go to Woodbury Boarding House.
- Use the BIG CHISEL on the tile; take the PIECE OF RELIEF 9/9 (T).
- Go to Flooded Crypt.
- Place the 9 PIECES OF RELIEF on the sarcophagus to trigger a puzzle (U).
- Complete the image.
- The starting layout is random; see screenshot for solution (V).
- Take LILLY'S BONES (W).
- Go the Church; go forward to the Moon Tower.
- Use the Spectral Fluid Jar on the fuel cell to trigger a puzzle (X).
- Use the levers until you see the tower outline in the center of the screen and then rotate the lens to focus (Y).
- Go to Castle Gates; go up the left to the Moon Tower.
- Place the Spectral Fluid in the fuel cell to trigger a puzzle (Z).
- Center and focus the tower (A).
- Go to Lakeshore Park; go forward to Moon Tower.
- Open the compartment and examine the lens. Place the MOONTOWER FUEL CELL on the right (B) and the 3 MOON TOWER COIL RINGS on the left (C).
- Use the Spectral Fluid Jar on the fuel cell to trigger a puzzle.
- Center and focus the tower (D).
- Go to Test Site; go left to Moon Tower.
- Open the compartment and examine the lens. Use the Spectral Fluid Jar on the fuel cell to trigger a puzzle (E).
- Center and focus the tower (F).
- Go to Private Pier.
- Examine the dock to access a HOP (G).
- Play the HOP.
- You receive a LEVER (H).
- Enter the Submersible.
Chapter 7: Lair
- Place the LEVER on the panel; push it (I).
- Examine the cavern to access a HOP (J).
- Play the HOP.
- You receive a CLAM 2/4 (K).
- Use the FISHING NET to get CLAM 3/4 (L).
- Give the BEEF JERKY to the eel; take the CLAM 4/4 (M).
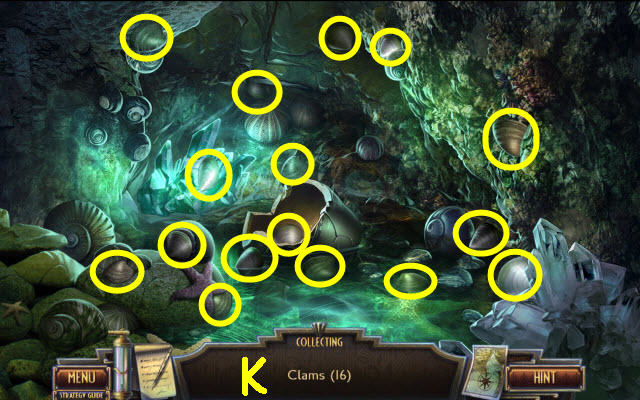
- Place the 4 CLAMS by the clams; use the CLAM OPENER on them to trigger a puzzle (N).
- Create a path using the correct colored pearls.
- See screenshot for solution (O).
- Go forward.
- Take the CRYSTAL SEA HORSE 2/2 (P).
- Place the 2 CRYSTAL SEA HORSES on the pillar (Q).
- Speak to Rusalka twice; give her the POUCH OF ASHES, COMB and LILLY'S BONES (R).
- Congratulations! You have successfully completed Mysterium: Lake Bliss.
Created at: 2014-01-26