

Walkthrough Menu
- General Tips
- 1: Arrival
- 2: Repair the Boat
- 3: Unlock the Tower
- 4: Grow the Vine
- 5: Feed the Bear
- 6: The Tower Fire Level
- 7: Release the Griffin
- 8: Cross the Bridge
- 9: Unlock the Library
- 10: Enter the Statue
- 11: Help the Unicorn
- 12: Tame the Eagle
- 13: The Lonely Dragon
- 14: Unlock the Witch House
- 15: Chop Down the Fence
- 16: Sneeze Potion
- 17: Unlock the Treasure Vault
- 18: The Secret Chamber
- 19: The Crystal Skull
- 20: The Monument
- 21: The Angel’s Heart
- 22: Restore the Guardian
General Tips
- “Mystery Age: The Dark Priests” is a Hidden Object Puzzle Adventure game!
- Use the “MENU” icon in the lower left to return to the Main Menu.
- The Journal in the lower left has information about the various tasks you have to do. This includes drawings of Quest Items you may need to use.
- A large gear on a black background means the game is loading.
- Once you collect the Imperial Staff in the first scene, it will always be in the far left slot of your Inventory tray. Use it on hostile ghosts and animals to make them disappear!
- When the cursor changes to a magnifying glass, click again: you may get more information about the item at the top of the screen, trigger a mini-game, or open a Hidden Object Scene.
- A pointing hand cursor indicates the location of a Quest Item or an animation trigger, like a candle lighting.
- You can return to previous locations by finding the down arrow at the bottom of the screen.
- As you find each fragmented piece in a Hidden Object Scene, its picture is removed from the Quest Item slot at the bottom.
- Once you have found all of the pieces of the Quest Item, the item will move to the far right side of the tray, into a slot marked “INVENTORY.”
- Take the completed Quest Item out of the Inventory Slot and put it back into the scene.
- Some Quest Items will be used later in another location. You will need to revisit some locations several times before you will be able to complete all the activities there.
- In several locations the Hidden Object Scene will be available again after you have done other activities.
- The HINT button recharges very quickly. At first the hints will show you all of the Quest Items in the scene. After you have collected all of the available Quest Items, the hint will show you where to use one of the items.
- If there is nothing more to do in the location now, the hint will say “There are no more items to find.” However, you may be able to find additional items after you come back with different Quest Items in your inventory.
- Many puzzles have a random starting position, which means the solutions shown in the guide may be random.
- The “RESET” button on the puzzles does not always return to your original starting position.
- If you cannot solve a mini-game, you can use the “SKIP” button in the lower right once it is fully charged. There is no penalty for skipping a puzzle.
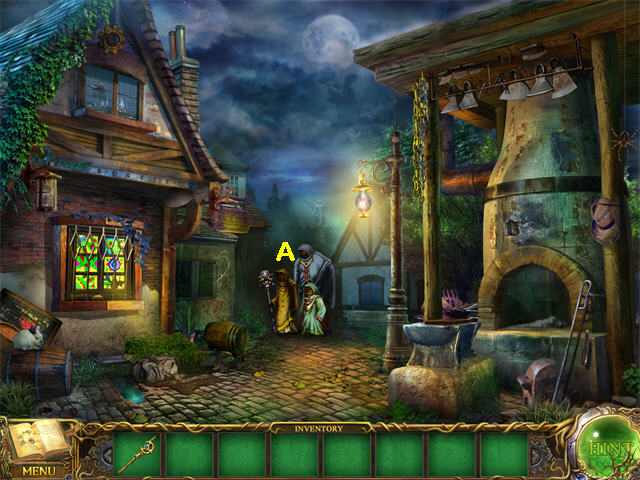
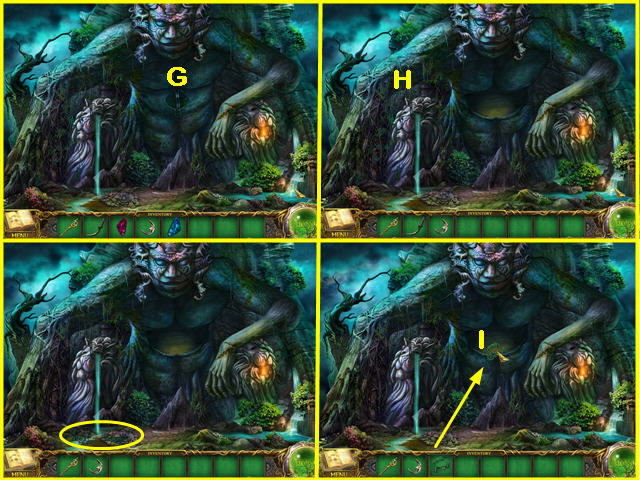
1: Arrival
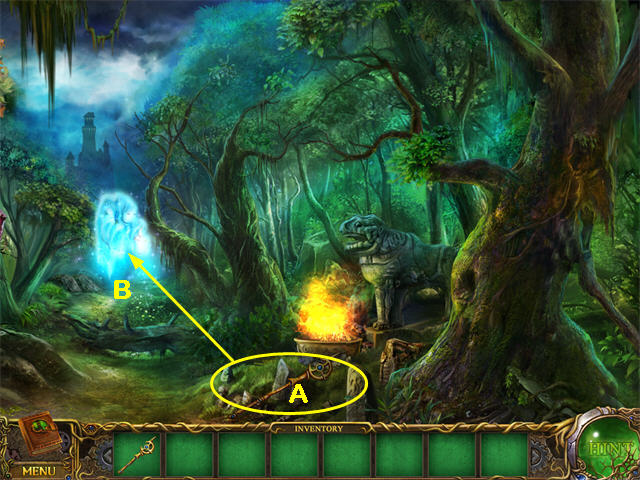
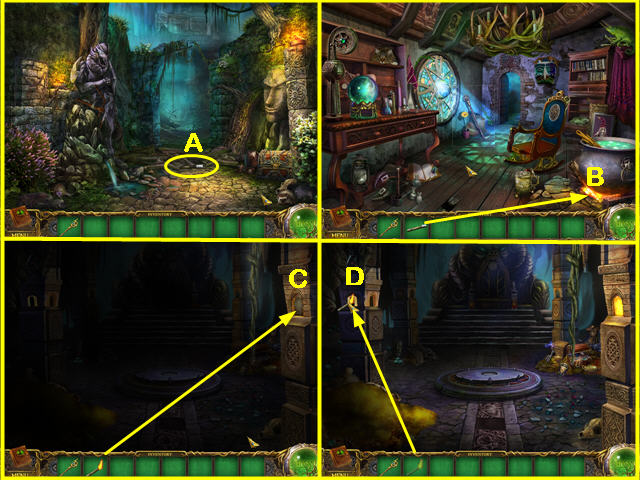
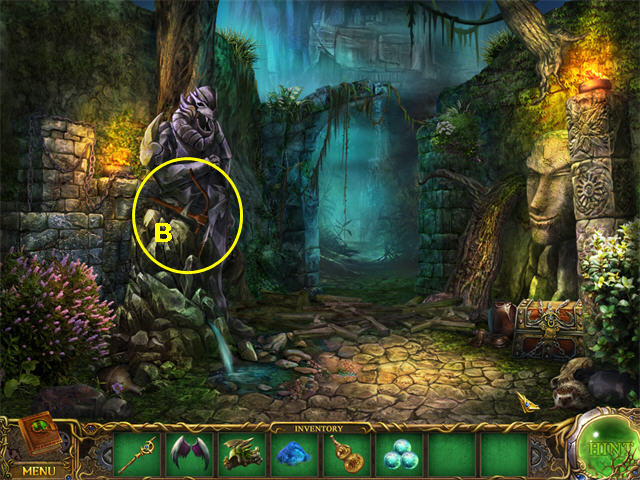
- Pick up the STAFF (A).
- Use the STAFF on the blue Ghost (B).
- Exit on the path to the Caravan, behind the Ghost.
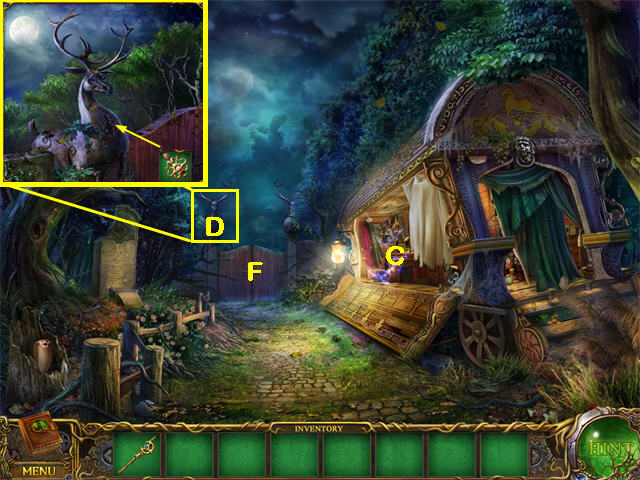
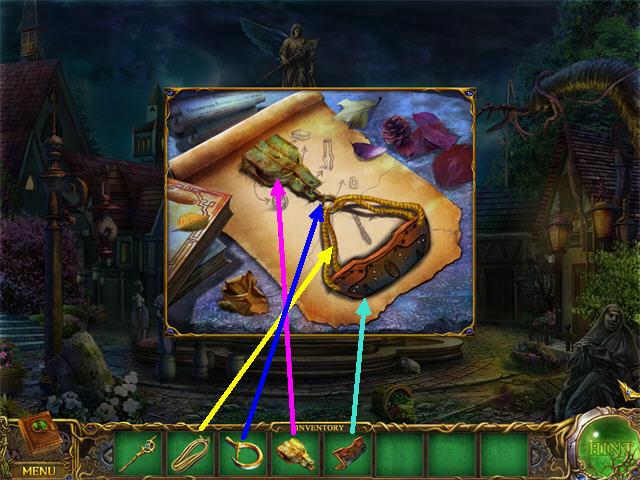
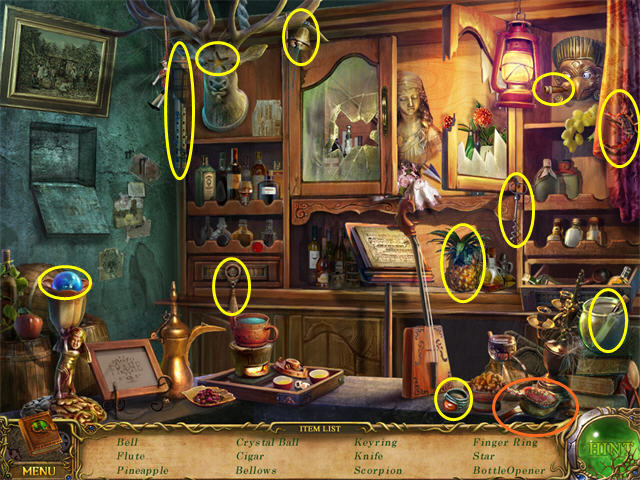
- Zoom in on the Caravan (C).
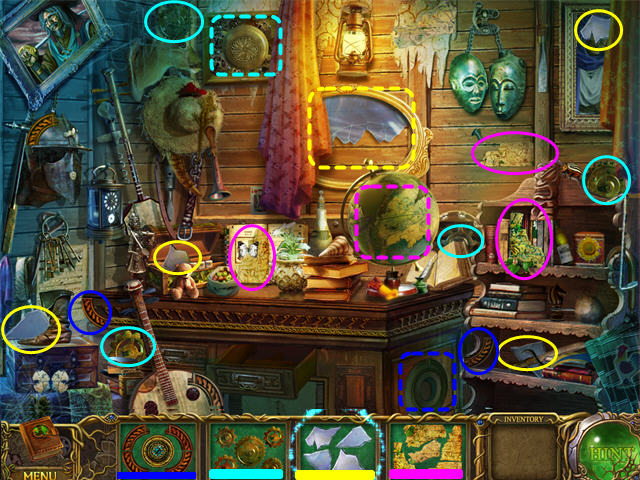
- The GLASS (yellow) goes on the Mirror. Collect the first GEAR piece from inside the mirror.
- The GEARS go on the Mechanism in the upper left. It will open to reveal the first MAP piece.
- The MAP goes on the Globe. It will open to reveal a piece of the AMULET.
- The AMULET goes on the right side of the counter. It will open to reveal the FOREST SPIRIT KEY.
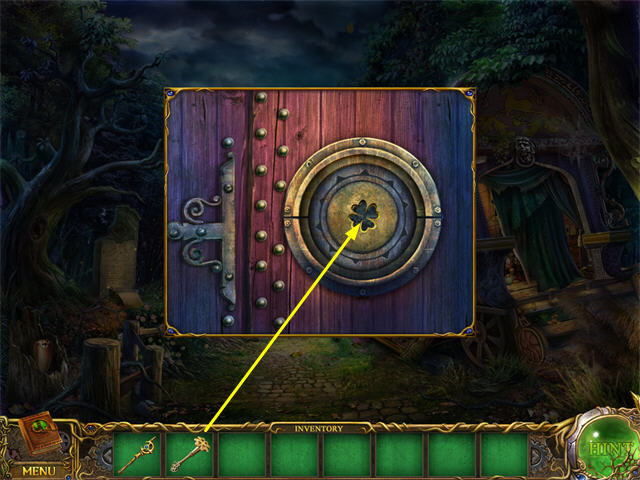
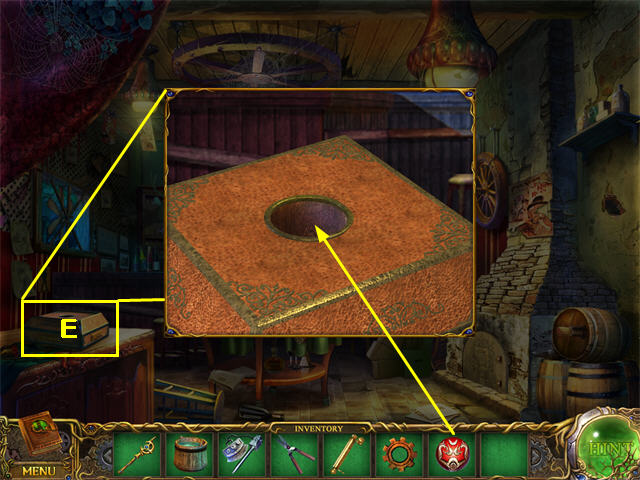
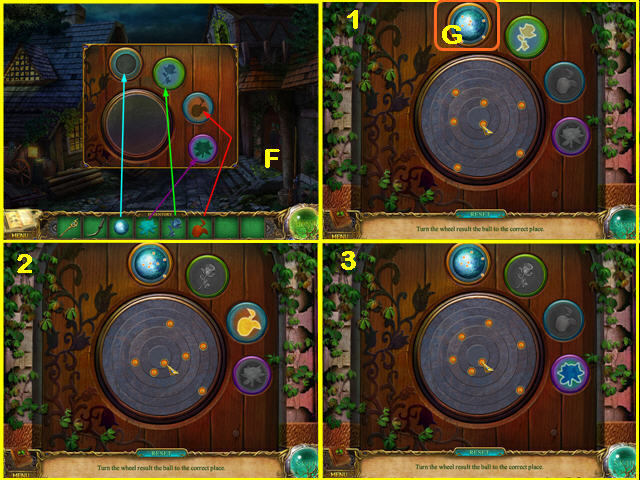
- Back in the main scene, zoom in on the Deer Statue (D) above the gate. Put the Forest Spirit key from the Caravan in the indentation on its chest.
- Click on the panel below the Forest Statue KEY to open it.
- Zoom in to reveal a puzzle.

- The puzzle will open to reveal the GATE KEY (E).
- Use the GATE KEY on the Gate (F), then click to turn the key.
- Click on the open gate to go through.
2: Repair the Boat
- Use the STAFF on the Dark Priests.
- Exit to the Statue Square (A).
- Take the exit straight ahead to the Main Road, which has houses on both sides. Continue down the Main Road to the Dock.
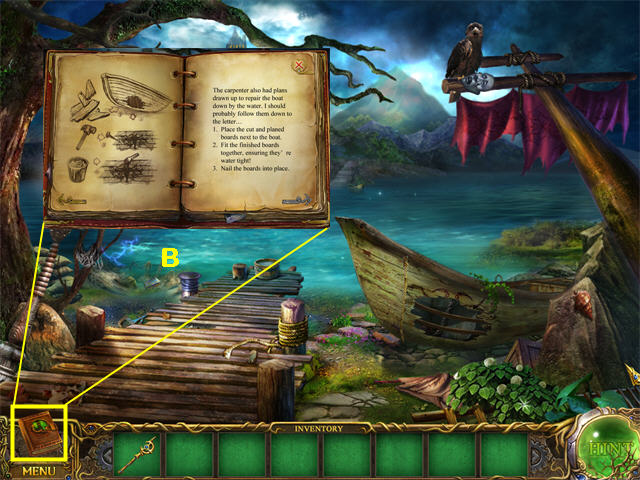
- Read the instructions for repairing the Boat in the Journal.
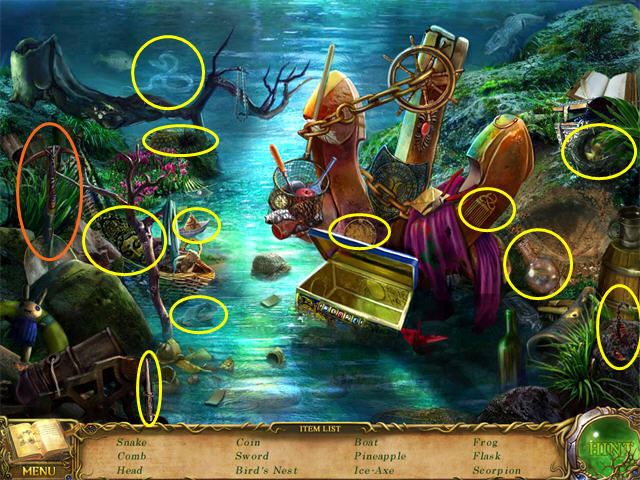
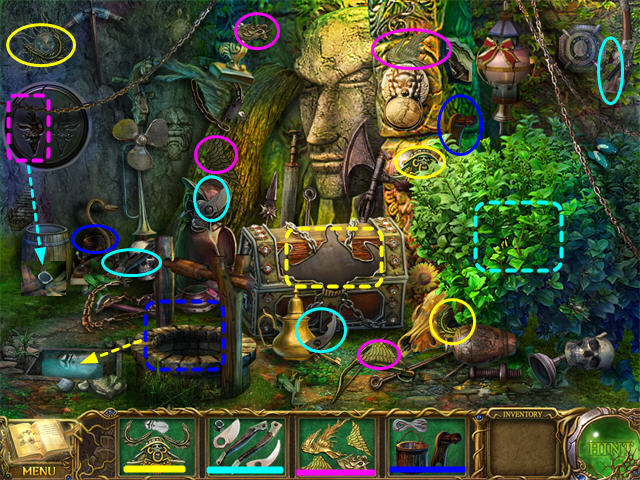
- Zoom in on the Hidden Object Scene (B).
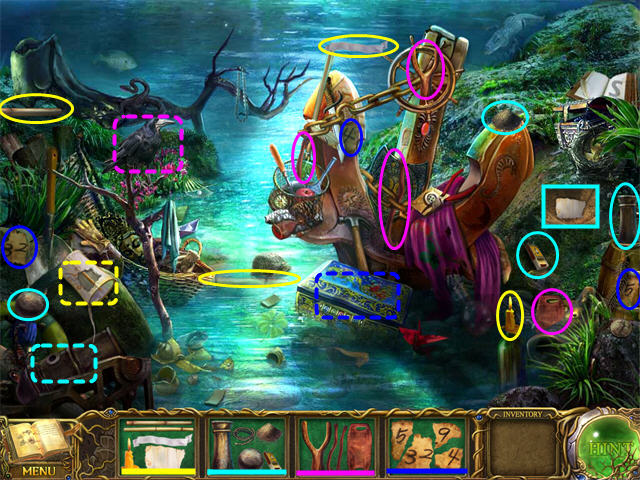
- Use the SLINGSHOT on the Crow to reveal part of the CANNON PIECES.
- Use the CANNON PIECES to repair the Cannon. It will fire, revealing part of the PAPER LANTERN.
- Repair the Paper Lantern and it will float away, revealing part of the CODE.
- Put the CODE on the Jewelry Box and it will open revealing the KEY to the CARPENTER’S HOUSE.
- Click down to the Main Road.
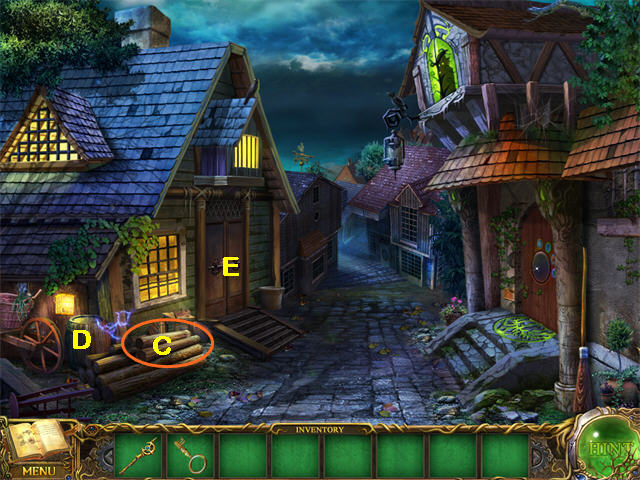
- Collect the LOGS (C) from next to the House.
- Zoom in on the Hidden Object Scene (D).
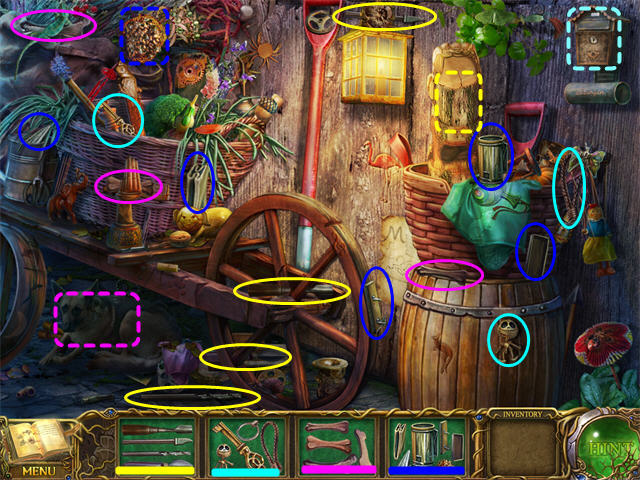
- Use the CARVING TOOLS on the wood Statue to reveal part of the BEE SMOKER.
- Use the BEE SMOKER on the Beehive to reveal part of the KEYS.
- Use the KEYS on the Mailbox to reveal a BONE.
- Give the BONES to the Dog to reveal the OARS.
- Back on the street, zoom in on the door to the Carpenter’s House (E).
- Put the KEY in the lock and click to turn.
- Enter the House. The first room is the Workroom.
- Zoom in on the Workbench (F).
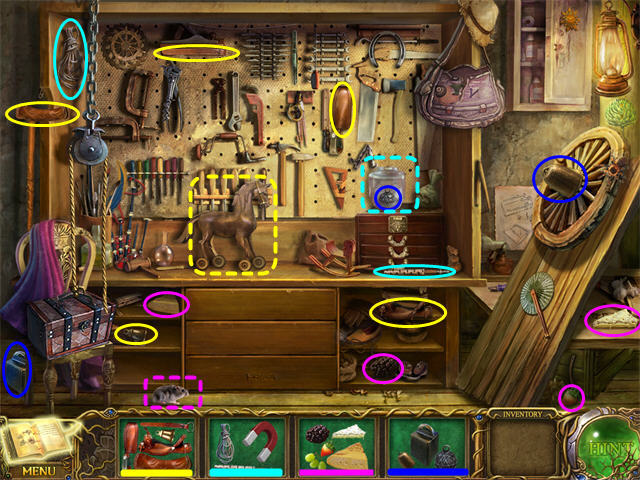
- Put the SADDLE on the large Toy Horse and it will reveal part of the FOOD.
- Feed the FOOD to the Mouse and it will reveal the MAGNET.
- Use the MAGNET to get the ROUND WEIGHT out of the Jar. Collect it.
- Use the PULLEY to open the Box and reveal the SAW.
- Put the LOGS on the Table (H).
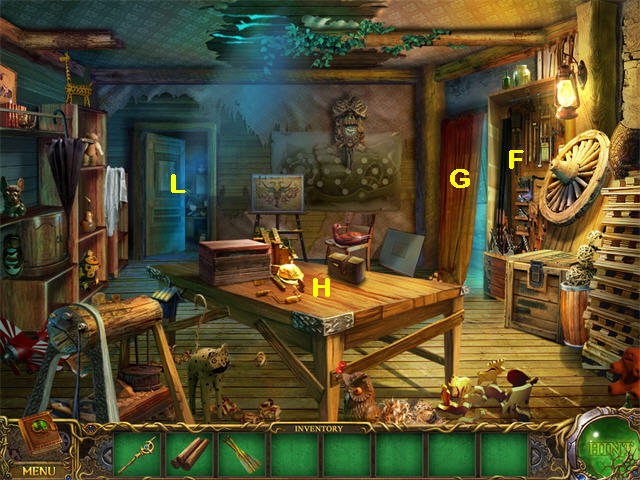
- Enter the Bedroom through the Curtain (G).

- Open the Drawer (I) and collect the HAMMER.
- Take the FEATHER DUSTER (J).
- Click down and then enter the Kitchen (L).
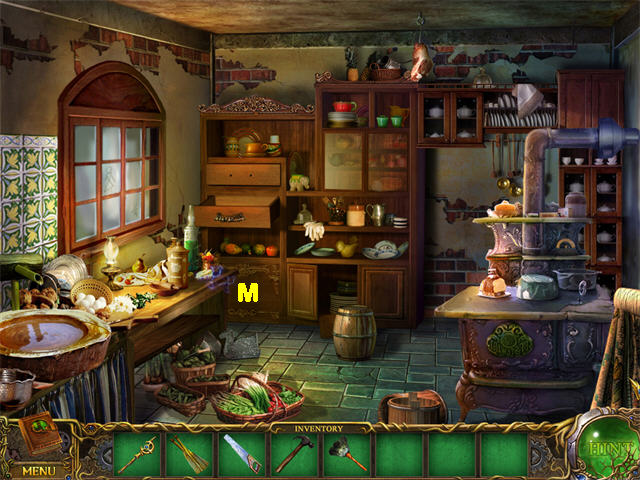
- Zoom in on the Cabinet (M).
- Put the BEETLE on the Spider Web. The Spider will move, revealing a piece of the PAPER.
- Put the PAPER on the Spirit Jar to reveal a piece of the PRINCE.
- Put the PRINCE on the Dollhouse, revealing the YARN.
- Put the YARN on the Doll without Clothes to reveal the HANDLE FOR A BOX.
- Note that this is not the handle that goes on the drawer in this scene; you will use this handle elsewhere.
- Click down 3 times and head left towards the Bridge.
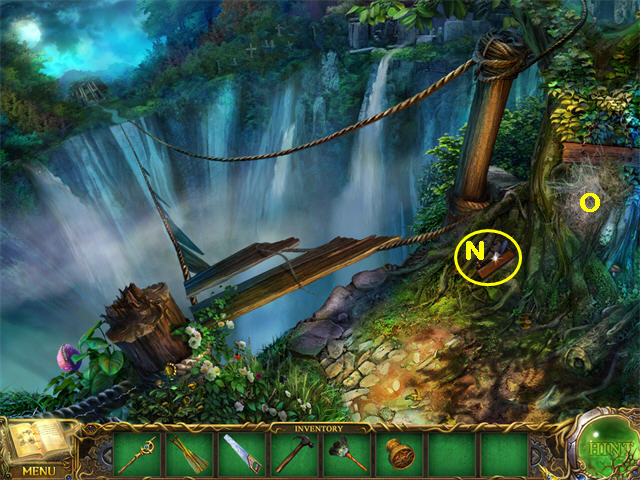
- Collect the WOOD PLANE (N).
- Use the FEATHER DUSTER on the Spider Web (O).
- Zoom in on the Hidden Object Scene.
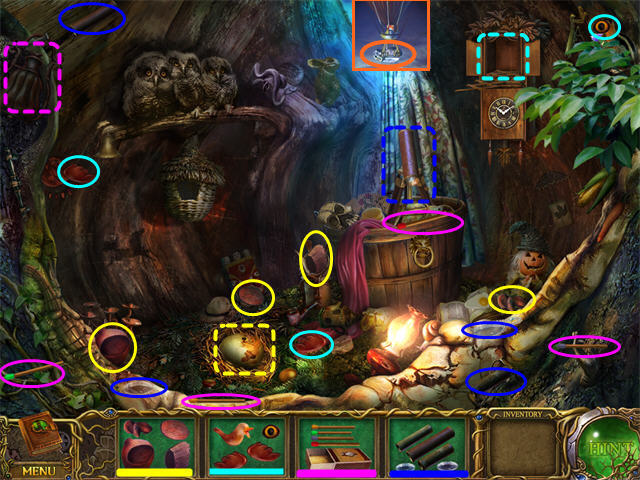
- Use the CLAY CHICKEN on the Egg. The Egg will hatch, revealing part of the CUCKOO.
- Put the CUCKOO in the Clock. The Clock Door will open revealing the MATCHBOX.
- Put the MATCHBOX on the Lantern to light it, revealing part of the TELESCOPE just beneath the Lantern.
- Put the TELESCOPE in the Tripod. You will be able to see the POCKET KNIFE (marked in orange) hanging from a Balloon in the Sky.
- Click down, go straight and enter the Carpenter’s House on the left.
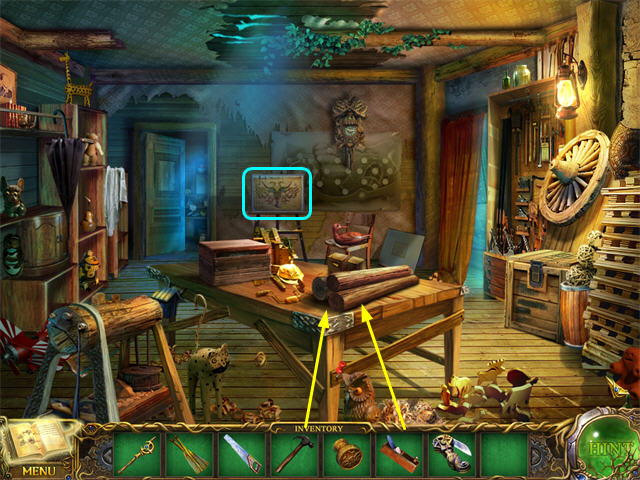
- Use the SAW from the Hidden Object Scene on the LOGS that are on the Table.
- Use the PLANE from the Bridge on the rough BOARDS.
- Collect the BOAT BOARDS.
- Examine the painting of Rimalock. It will be copied to your journal.
- Enter the Bedroom through the Curtain.
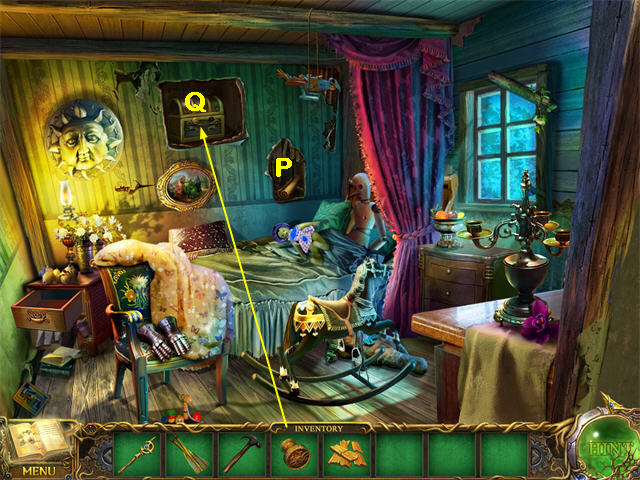
- Move the Painting behind the Bed to reveal a scroll.
- Examine the Scroll (P), then click on the main scene to close it again.
- Use the POCKETKNIFE 3 times on the wall to reveal a BOX (Q).
- Put the HANDLE from the Kitchen on the Box.
- Open the Box to reveal the NAILS.
- Click down twice and go forward to reach the Dock.
- Put the BOAT BOARDS from the Workshop on the Boat.
- Zoom in on the Boards to reveal a puzzle.
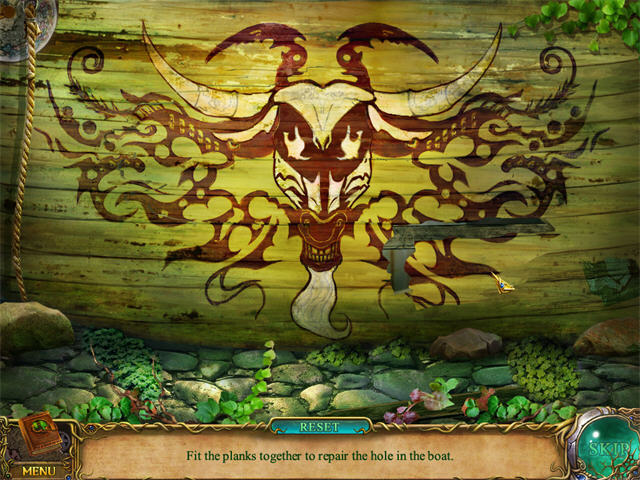
- Assemble the puzzle so it looks like the painting from the Workshop in the Carpenter’s House. This was copied to your Journal so you can refer to it. Note that it has not yet been painted.
- Use the NAILS from the Bedroom on the BOARDS.
- Use the HAMMER from the Bedroom on the NAILS.
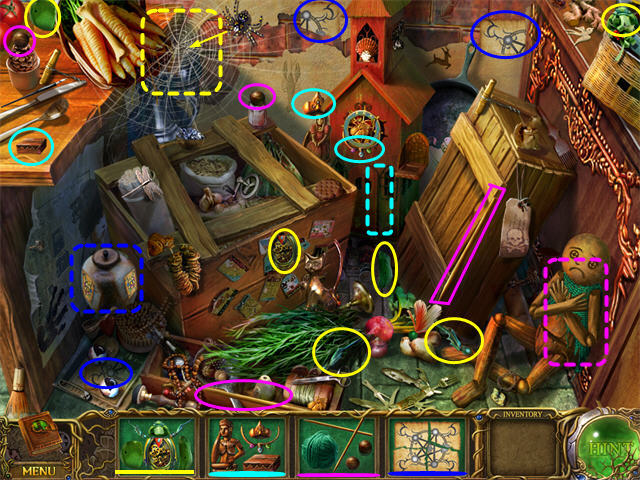
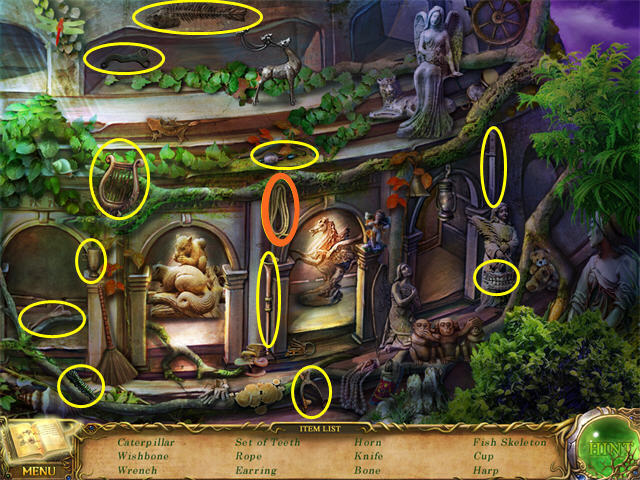
- Zoom in left of the Dock (R).
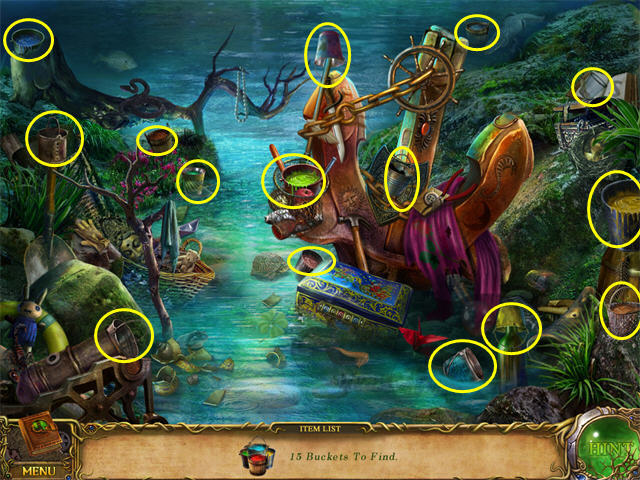
- Collect the 15 Buckets as shown. These will go into your inventory as a single item, “SEALANT.”
- Put the SEALANT on the side of the boat. Click again to trigger a puzzle.
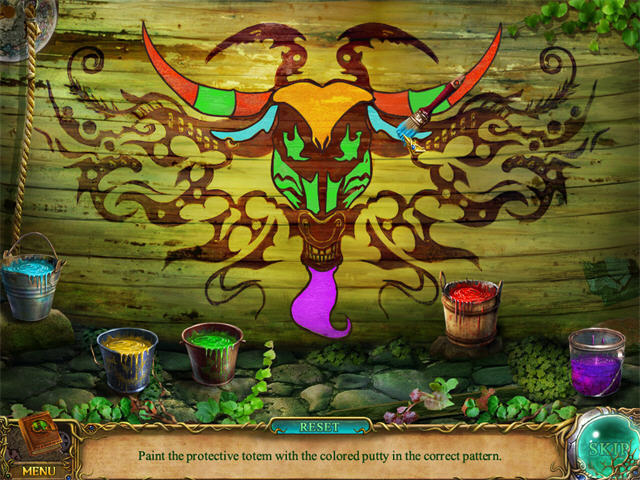
- Paint the picture so it matches the journal.
- If you make a mistake just paint over it with the right color.
- The “RESET” button will blank out the entire painting.
- Click on the Boat once to put it in the water.
- Add the OARS from the Main Road.
- Now the Boat is available to travel to the Tower, but don’t go yet!
3: Unlock the Tower
- Start at the Main Road.
- Zoom in on the Hidden Object Scene next to the Carpenter’s House.
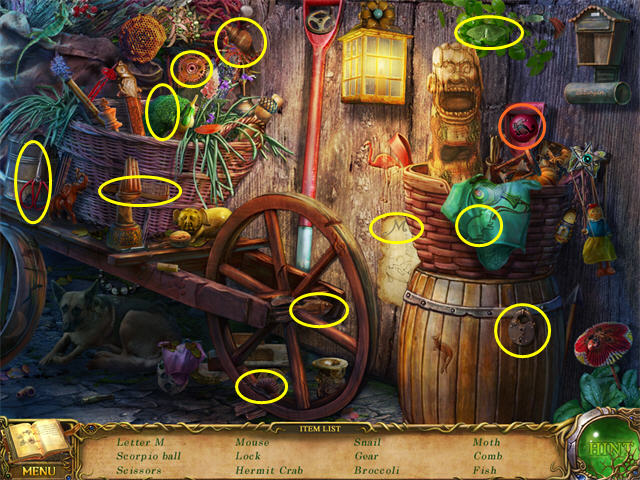
- The SCORPIO BALL will go into your inventory.
- Go to the Dock.
- Click on the Boat to cross over to the Tower.
- Zoom in on the Door.
- Use the SCORPIO BALL from the Main Road.
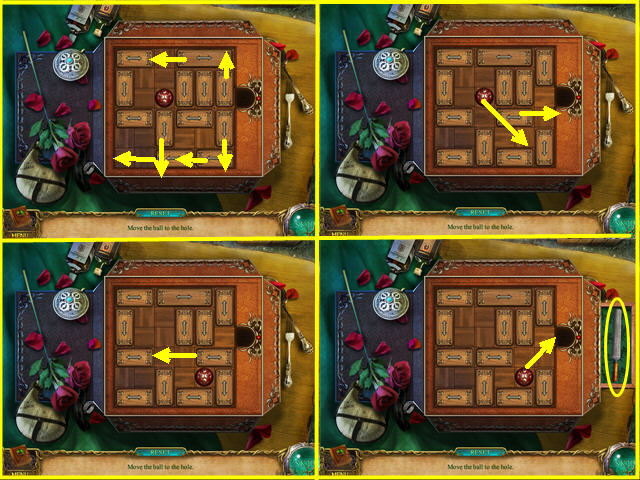
- Click again and the puzzle will start.
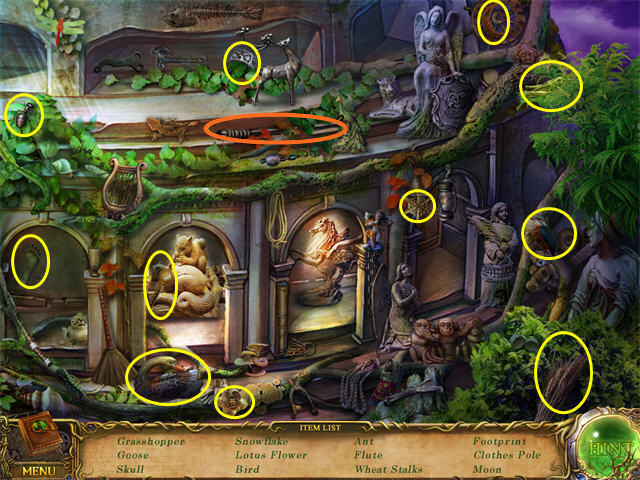
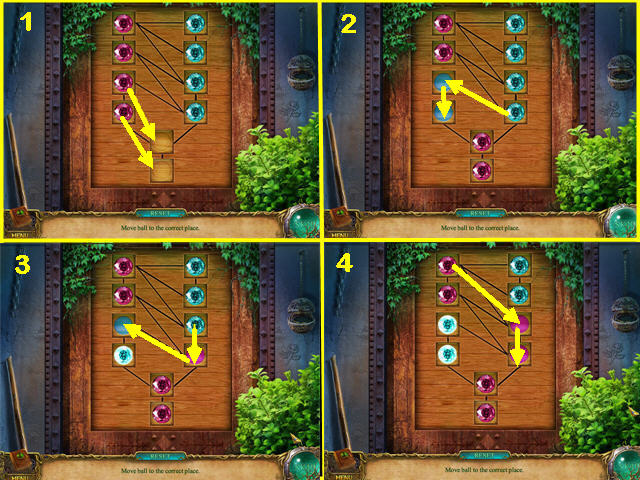
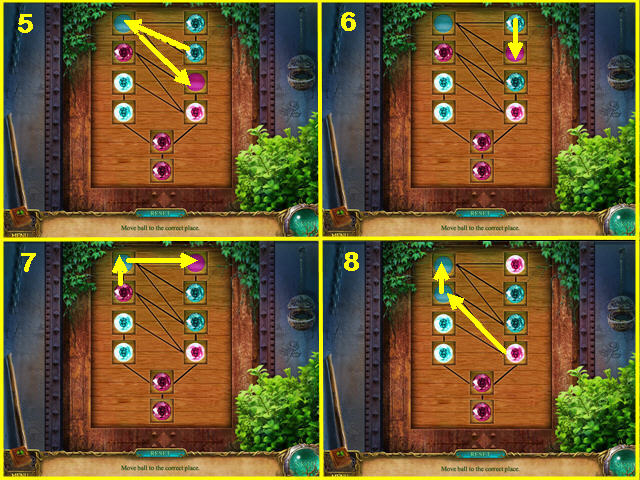
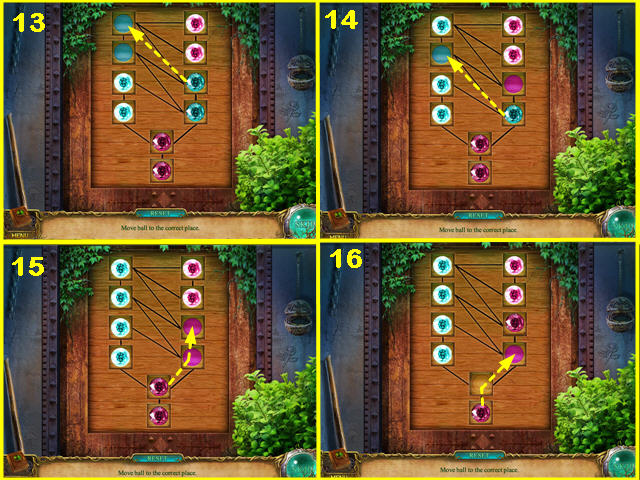
- You must put each ball on its matching picture slot.
- Your journal has the final diagram.
- You can move each ball one space into an empty slot. No jumping over other balls.
- See the screenshot for a sample solution.
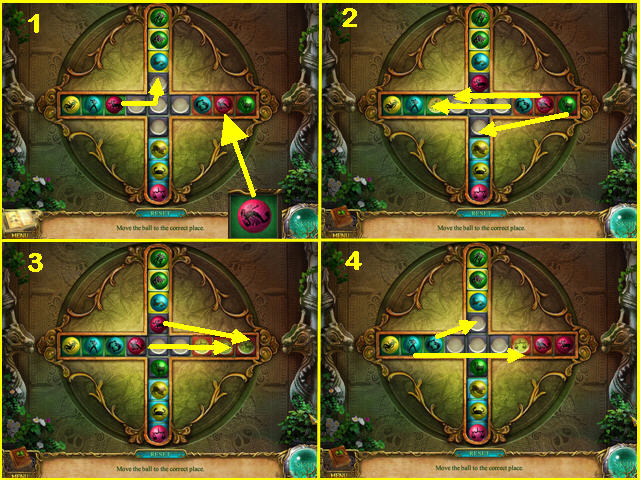
- Once the SCORPIO BALL is in place, begin by positioning the pink balls from right to left.
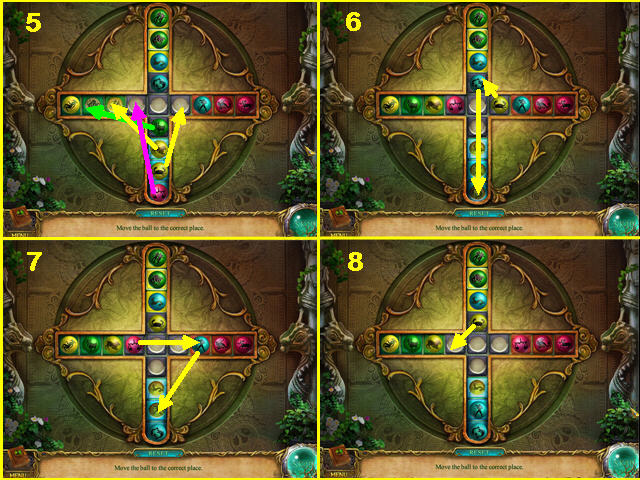
- Because the last pink ball is at the bottom of the next row, we will have to move a lot of other balls out of the way first.
- Now do the turquoise balls, and begin working on the yellow ones.
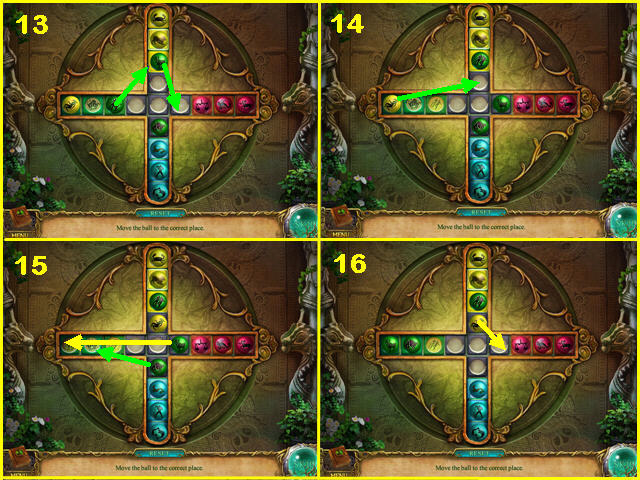
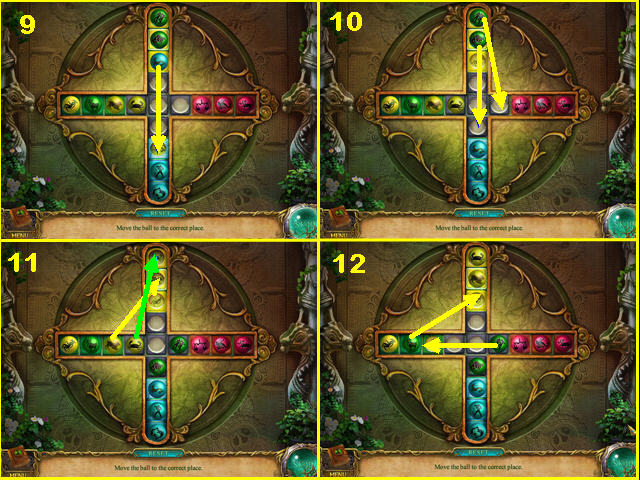
- While you are working on the yellow ones, get the green ones ready to move back in the correct order.
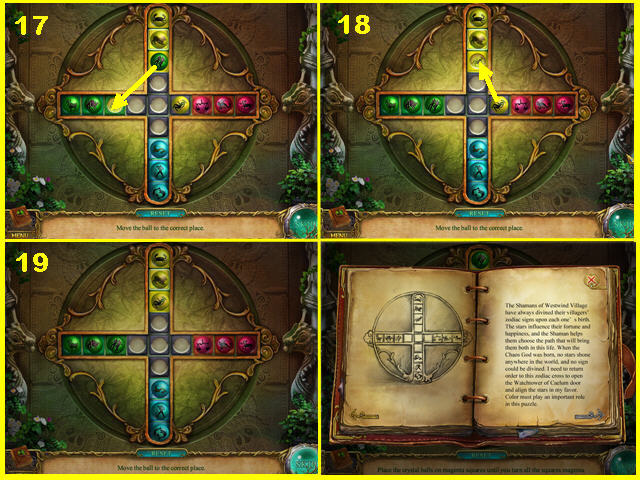
- Complete the sequence. You may check the journal page any time you need.
- The door to the Tower Garden is now available.
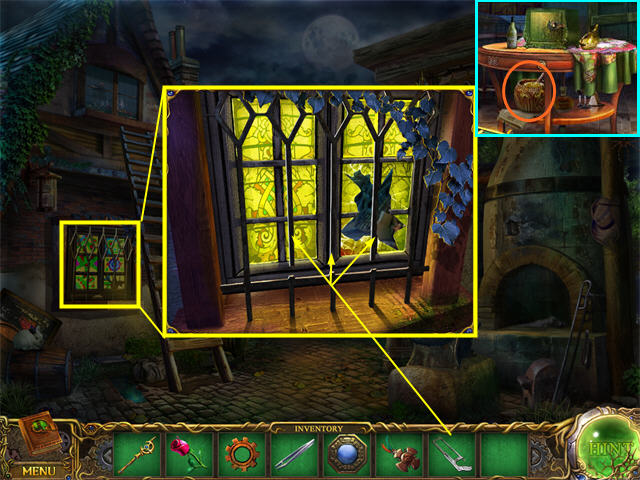
4: Grow the Vine
- To advance to the second Tower level, you must grow a vine to reach the roof.
- Start Outside of the Tower.
- Zoom in on the Hidden Object Scene to the right of the door.
- The CLOTHES POLE will go into your inventory.
- Click down twice and enter the Carpenter’s House on the left.
- Go into the Kitchen.
- Use the CLOTHES POLE from Outside the Tower to get the MEAT that is hanging from the ceiling.
- Return to the Dock.
- Give the MEAT to the EAGLE and it will drop the MASK so you can collect it.
- Take the Boat back to the Tower.
- Put the MASK from the Dock on the right Statue. The GROWTH POTION will be revealed.
- Go through the door into the Tower Garden.
- Complete the Hidden Object Scene (A). .

- The Scoop is a twisted thin spoon in the center of the scene.
- The WATERING CAN will go into your inventory.
- Put the WATERING CAN into the Stream (B) and it will go back into your inventory as a FULL WATERING CAN.
- Put the GROWTH POTION from Outside the Tower on the Bud (C) and it will produce a SEED.
- Zoom in on the Hole (D).
- Put the SEED in the Hole.
- Click on the dirt several times to cover the SEED.
- Use the FULL WATERING CAN and the SEED will grow.
- Now the roof exit (E) is available. It goes to the Tower Ice Level.
5: Feed the Bear
- The second level of the Tower is the Ice Level.
- You want to help the wounded Unicorn, but you are going to need things from higher in the Tower, so first you’ll have to get past the Bear. It wants a fish.
- If you are on the Tower Ice Level, Click down to the Tower Garden, and then downscene to Outside the Tower.
- Complete the Hidden Object Scene on the right side of the Tower.
- Collect the items on the Find List.
- The FISHING ROD will go into your inventory.
- Click down to the Dock.
- There is a Bucket here for fishing, but you don’t have all the things you need yet.
- Zoom in on the Hidden Object Scene on the left of the Dock.
- The ICE AXE will go into your inventory.
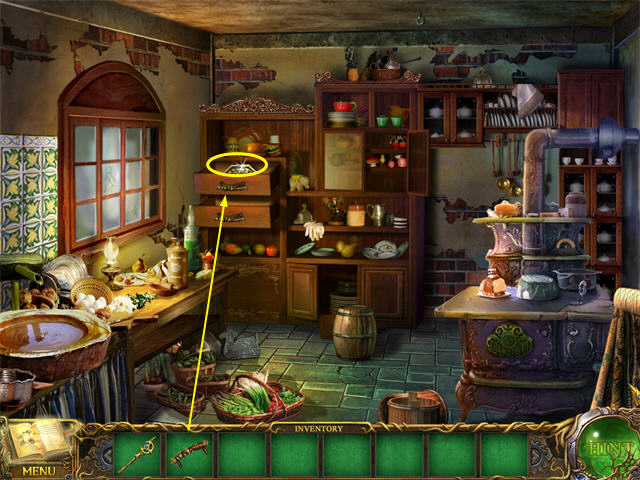
- Go back to the Carpenter’s House on the Main Road and go into the Kitchen.
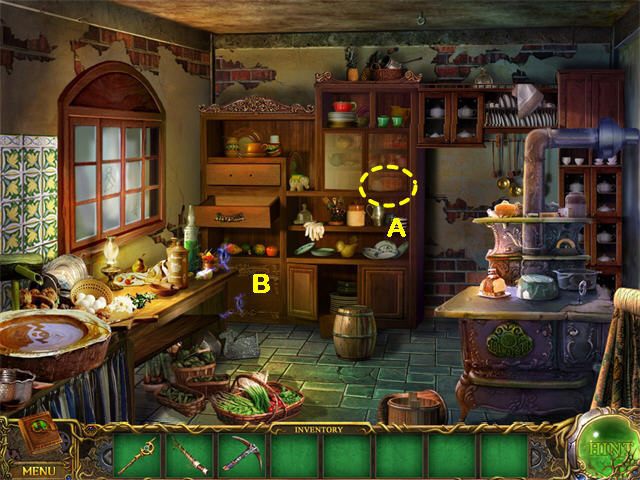
- Open the Cabinet and take the BREAD (A).
- Complete the Hidden Object Scene (B).
- The FISHING REEL will go into your inventory.
- Return to the Tower.
- Climb the Vine to the Tower Ice Level.
- Use the ICE AXE from the Dock on the Ice to the right of the Polar Bear, and you can collect a FISH HOOK.
- Return to the Tower Garden.
- The Hidden Object Scene on the left is now available again.
- The HACKSAW will go into your inventory.
- Return to town and go Outside the Pub.
- Zoom in on the Pub Window.
- Use the HACKSAW from the Tower Garden to cut each of the 3 bars on the Window, then click one more time to open it.
- The Window entrance to the Pub is now available.
- Go through the Window and collect the wicker pot of HONEY from under the Table in the center of the room. That is all you need to do here at this time.
- You now have everything you need to catch a fish, so go back to the Dock.
- Zoom in on the Bucket at the end of the Dock.
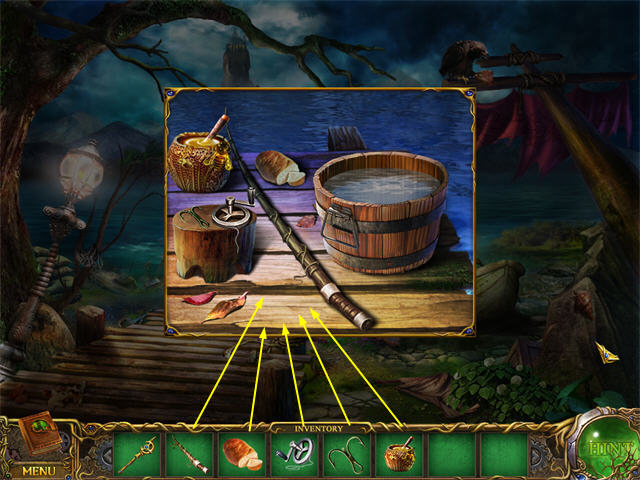
- Put the following in the zoom scene: BREAD from the Kitchen, REEL from the Kitchen, FISHING HOOK from the Tower Ice Level, FISHING POLE from Outside the Tower, and the HONEY from the Pub.
- Once all the items are placed, click on the zoom scene to trigger the Fishing mini-game.
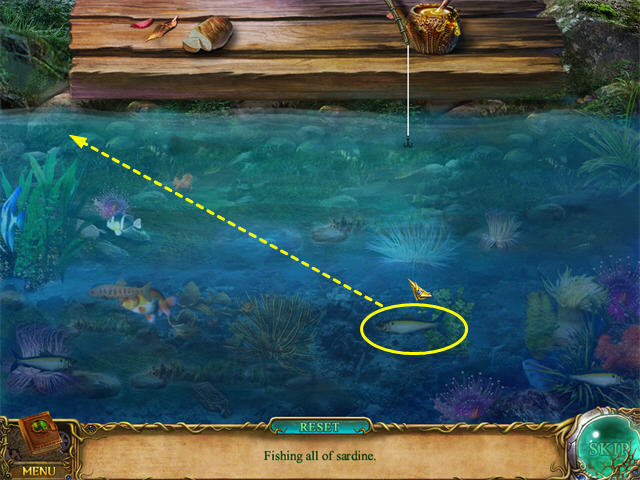
- Your goal is to catch all the HERRING. These are the slowest moving fish.
- If you bump into another fish, the HERRING will fall off the line.
- Click once to send the line down below the HERRING; click again to bring it back up. It will hook the fish on the way up.
- Once the HERRING is on the line, you can move your pole left or right to avoid other fish.
- You can pull the HERRING with your pole faster than it would swim on its own.
- Wait until the other fish have passed the HERRING.
- Hook a HERRING, then quickly pull up to the far left, out of the way of fish that are swimming from the right.
- When the HERRING gets to the Dock it will disappear and count as caught.
- When you catch all the HERRING, you win.
- One HERRING will go into your inventory.
- Go back to the Tower and up to the Ice Level.
- Give the HERRING to the Polar Bear. Click again on the Polar Bear and it will walk away.
- You now have access to level 3, the Tower Fire Level, by clicking at the bottom of the Ice Staircase.
6: The Tower Fire Level
- This level is a transition between the Tower Ice Level and the Tower Sky Level. First though, you have to get Cerberus to move.
- Begin by going to the Bridge.
- Zoom in on the Hidden Object Scene on the right.

- The DRAWER HANDLE will go into your inventory.
- Go to the Carpenter’s House and enter the Kitchen.
- Put the DRAWER HANDLE from the Bridge on the Drawer.
- Click to open.
- Remove the TRIPOD MIRROR.
- Go to the outside of the Pub, and then click down to the Caravan.
- Zoom in on the Caravan.
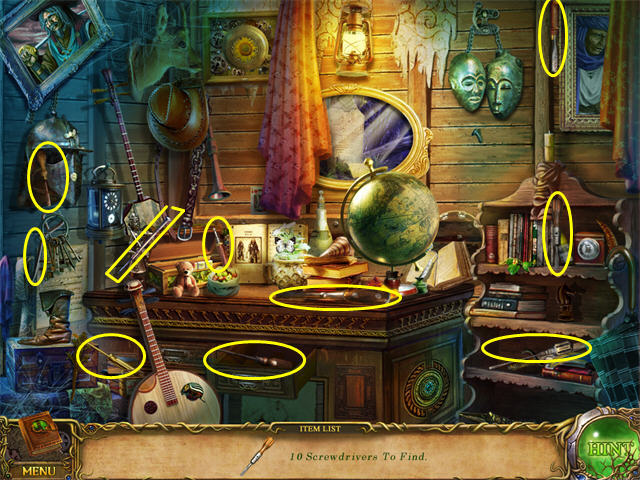
- Collect the Screwdrivers. One will go into your inventory.
- Go back through the Gate so you are standing outside the Pub, then enter through the Window.
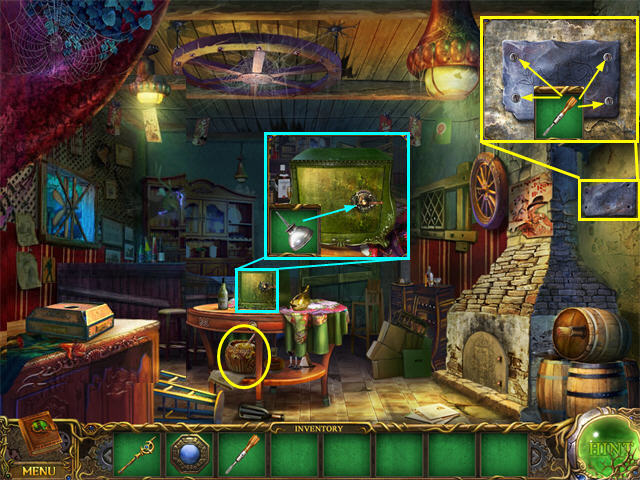
- Zoom in on the Panel on the Wall.
- Use the SCREWDRIVER from the Caravan on each of the 4 screws, revealing the LUBE (Oil Can).
- Zoom in on the Safe.
- Use the LUBE on the Safe Handle, then click again to open it.
- Take the TRIPOD PART.
- Go back to the Tower Fire Level.

- Put the TRIPOD PART from the Pub on the left side of the Tripod.
- A holder will rise out of the Tripod.
- Put the TRIPOD MIRROR from the Kitchen on the holder.
- Click on the TRIPOD MIRROR to turn it so it shines on the Chest on the right.
- The Chest will open, revealing the STONE HAT.
- Take the STONE HAT and go back Outside the Temple.
- Put the STONE HAT on the left Statue and the MIRROR will fall onto the steps so you can collect it.
- Return to the Tower Fire Level.
- Put the MIRROR from Outside the Tower on the left holder.
- Click on the TRIPOD MIRROR so the beam turns and hits the MIRROR you placed on the left.
- When Cerberus leaves, click the Switch on the left wall.
- The steps to level 4, the Tower Sky Level, will appear.
7: Release the Griffin
- Once you have access to the Tower Sky Level, the next thing you can do is fly to the Tower Laboratory on the Dark Island.
- You need to release the Griffin.
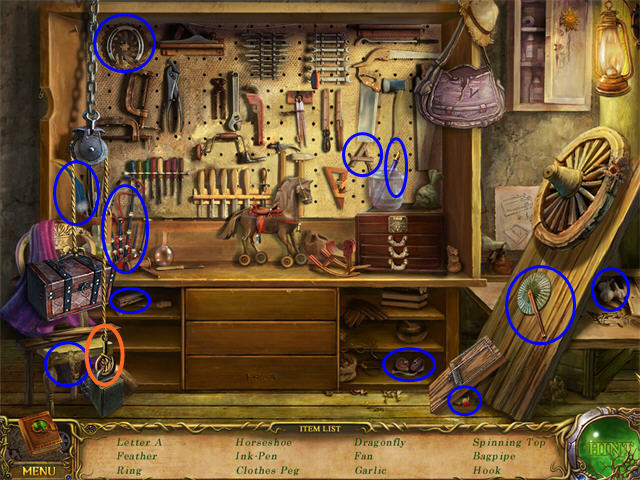
- Go to the Workshop in the Carpenter’s House and zoom in on the Hidden Object Scene on the right.
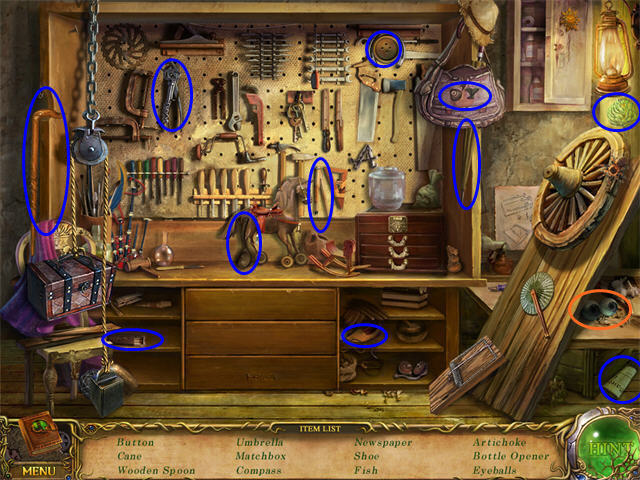
- The EYEBALLS will go into your inventory.
- Go to the Tower Ice Level.
- Put the EYEBALLS from the Workroom on the Skeleton.
- The Cane’s mouth will open, revealing the SINISTER KEY.
- Go up two levels to the Tower Sky Level.
- Zoom in on the Griffin.
- Put the SINISTER KEY into the zoom scene.
- Click on the SINISTER KEY to open the lock.
- When you return to the main view, click on the Griffin again so it will move.
- The Griffin is now available to fly to the Tower Laboratory.
8: Across the Bridge
- You must have access to the Tower Laboratory (Chapter 7) before you will be able to build a device to access the Library.
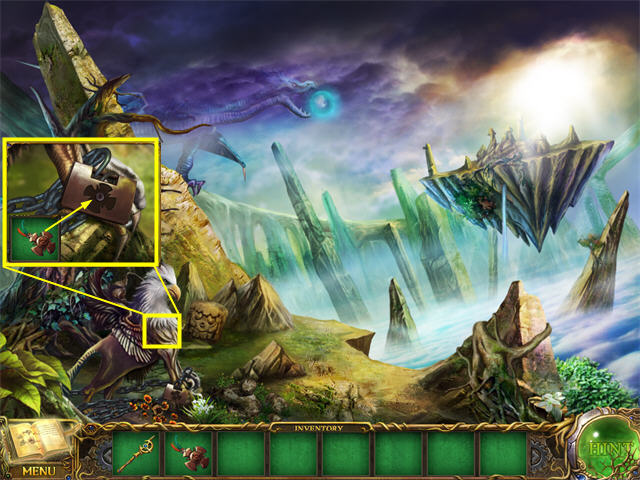
- Start at the Tower Sky Level.
- Click on the Griffin to fly to the Tower Laboratory.
- Collect the BLUEPRINT piece from the Chair on the right.
- Click down to the Tower Sky Level.
- Stop Outside the Tower and zoom in on the Hidden Object Scene on the right side of the Tower.
- The Wrench is horizontal near the top of the scene.
- The ROPE will go into your inventory.
- Go to the Carpenter’s House.
- Zoom in on the Hidden Object Scene in the Workshop.
- The HOOK will go into your inventory.
- Return to the Statue Square.
- Zoom in on the Carpenter.
- Put the BLUEPRINT from the Tower Laboratory in place.
- Now you know how to build a pulley seat for the Bridge, but you are still missing a Pulley.
- Exit left to the Bridge.
- Zoom in on the Hidden Object Scene.
- The PULLEY will go into your inventory.
- Click down to the Statue Square.
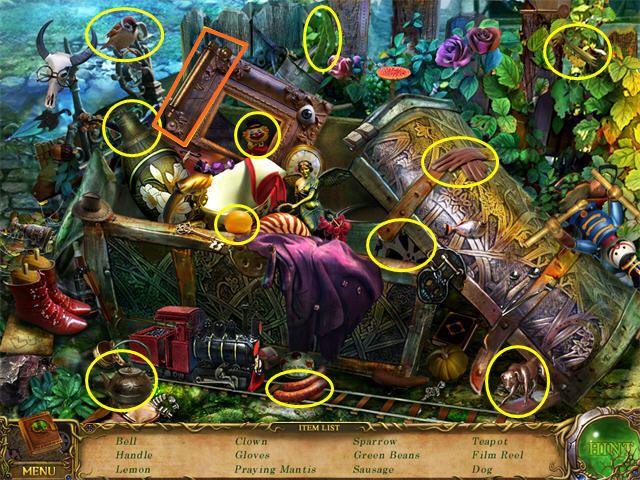
- There is now a Hidden Object Scene on the far right side.
- Zoom in.
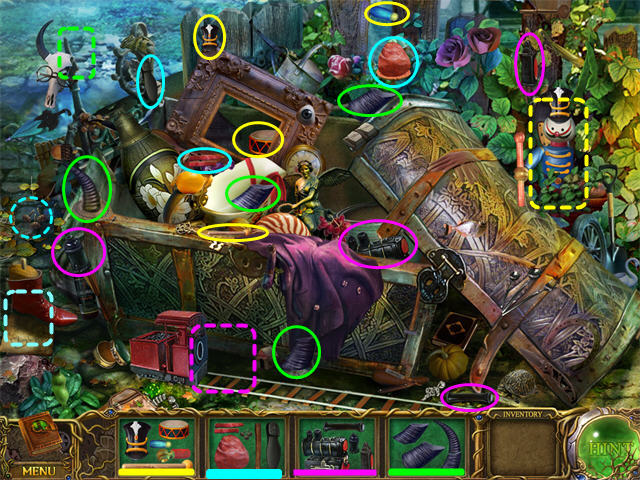
- Use the CATTLE HORN on the Cattle Skull. It will snort, blowing away the leaves that cover the nails that are part of the TRAIN.
- Put the SHOE in place, and it will reveal part of the TRAIN.
- Put the TRAIN on the tracks and it will reveal part of the PUPPET. Put the missing pieces on the PUPPET on the right and it will reveal the CUSHION, which will go into your inventory.
- Zoom in on the Carpenter again. This time you will see the completed Blueprint.
- Match the ZIP LINE pieces to their place on the picture.
- You need the ROPE from Outside the Tower, the IRON HOOK from the Workshop, the CUSHION from the Statue Square, and the PULLEY from the Bridge.
- Click to collect the assembled ZIP LINE.
- Exit left to the Bridge.
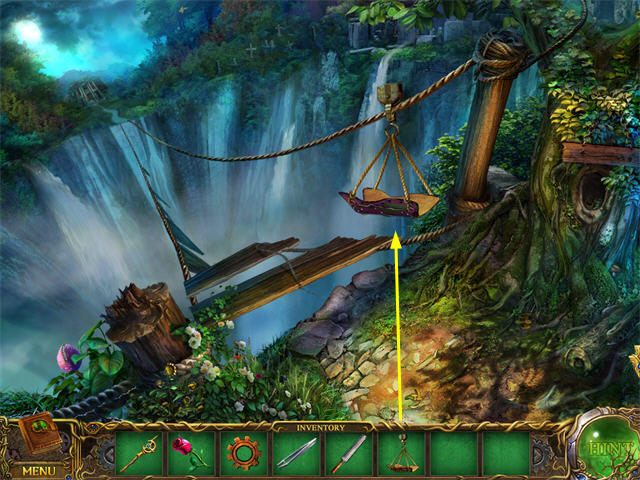
- Put the ZIP LINE that you made in the Statue Square on the Rope.
- This is now available to take you to the Library.
9: Unlock the Library
- Zoom in on the Library Door to trigger a puzzle.
- You must swap the jewels, so the pink jewels are on the right and the blue jewels are on the left.
- Jewels may move one square at a time along the marked lines.
- They do not jump.
- The trick here is that not all of the squares are connected, so sometimes a jewel will have to back up to let another one through.

- There are many possible solutions.
- The Library door is now unlocked.
10: Enter the Statue
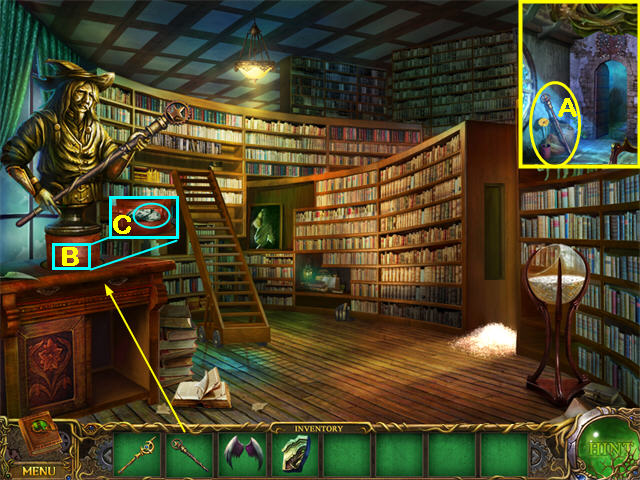
- Start inside the Library.
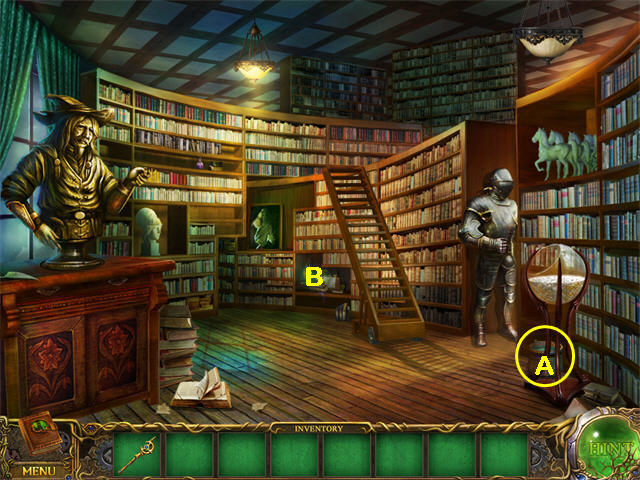
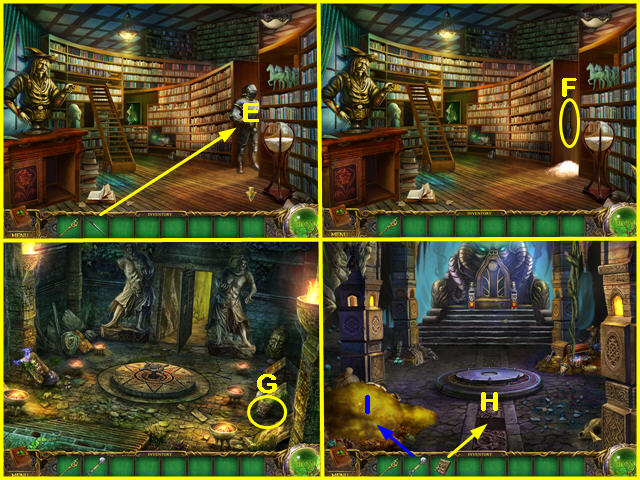
- Collect the WATER (A).
- Zoom in on the Hidden Object Scene (B).
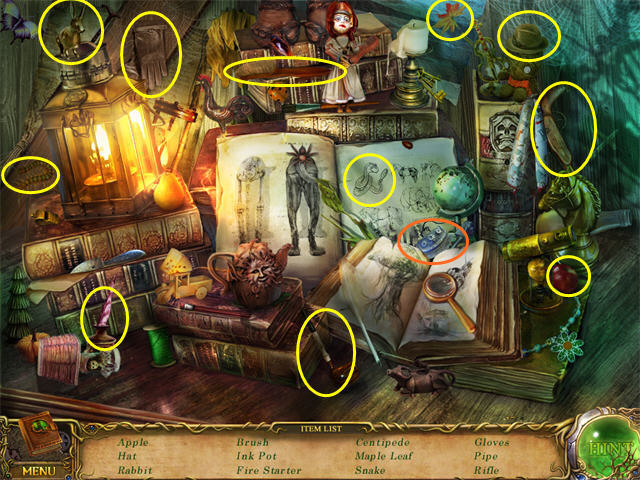
- The only Brush that counts is the large clothes brush.
- The “rifle” is a handgun.
- Go to the Dock and take the Boat to the Tower.
- Go to the Tower Sky Level.
- Zoom in on the Tree below the Dragon.

- The GARDEN SHEARS will go into your inventory.
- Return to the Dock.
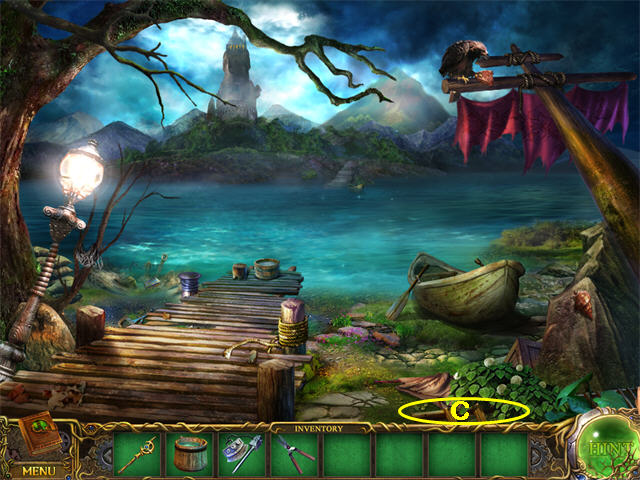
- Collect the LADDER (C).
- Go to the Statue Square.
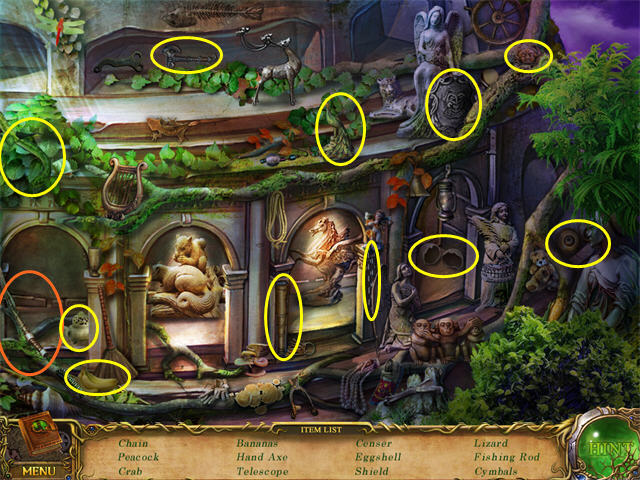
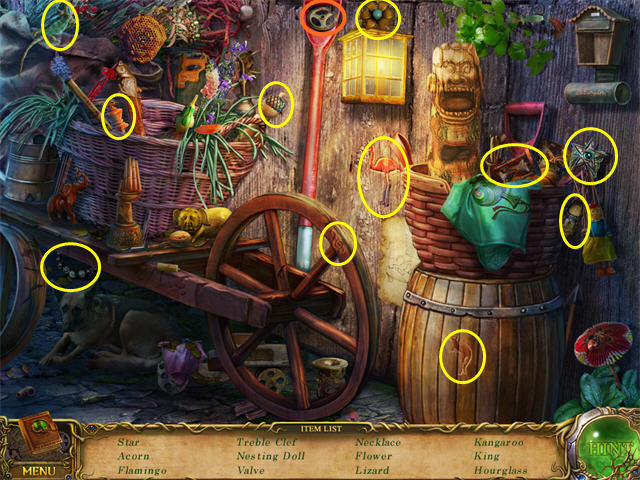
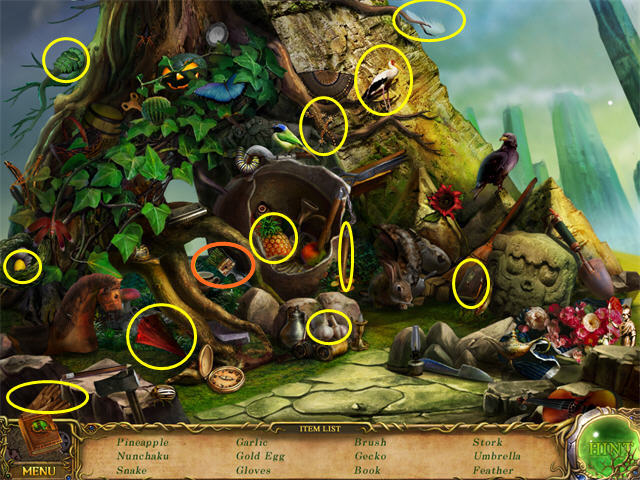
- Zoom in on the Hidden Object Scene.
- Collect the items on the Find List.
- The HANDLE is a long thin handle for a fireplace.
- Go to Outside the Pub.
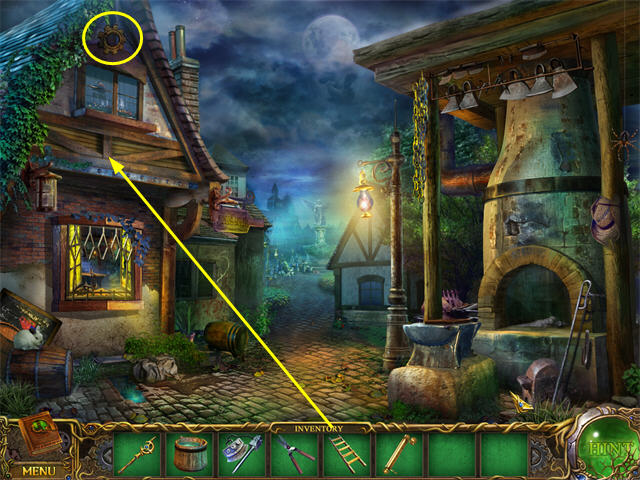
- Put the LADDER from the Dock by the upper Pub Window.
- Collect GEAR A from the top of the building.
- Go through the lower Window into the Pub.
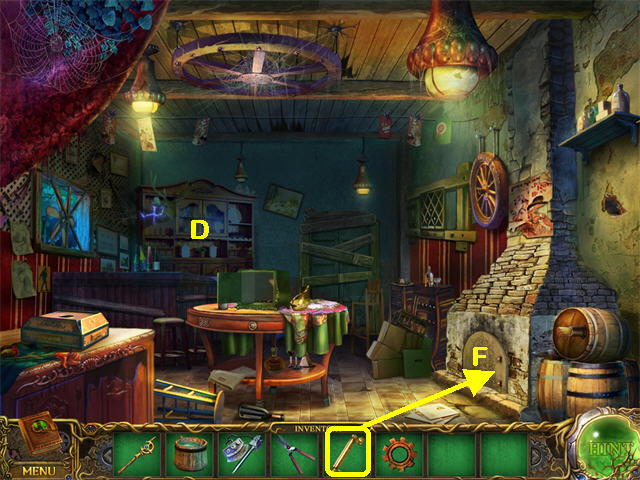
- Use the HANDLE FOR A FIREPLACE from the Statue Square on the Fireplace door (F).
- Click again to open the door.
- Collect the COAL.
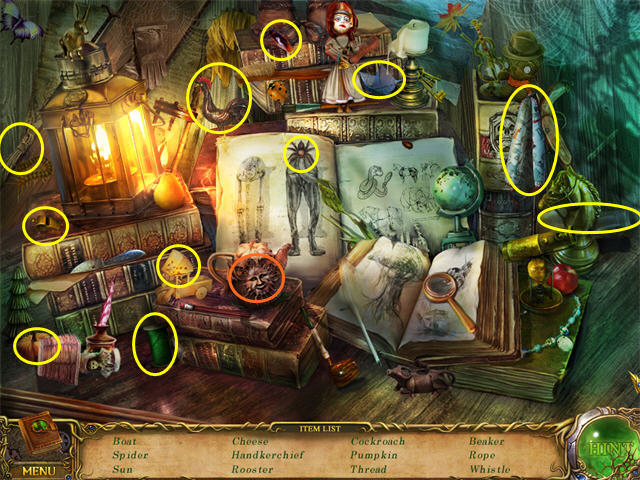
- Complete the Hidden Object Scene on the left side (D).
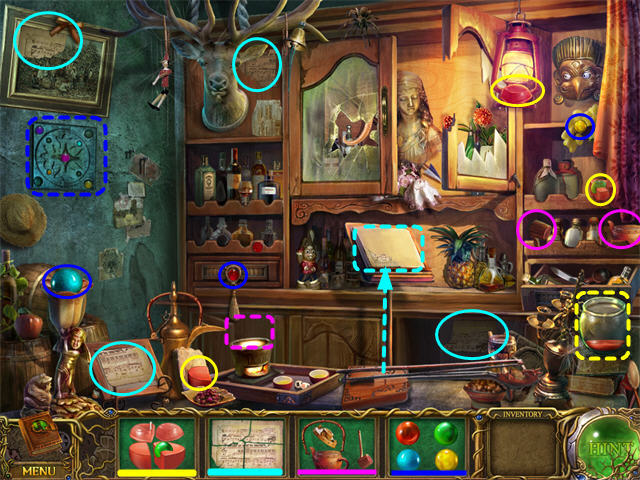
- Put the SHEET MUSIC on the Music Stand.
- The musical instrument will stand up and reveal part of the TEAPOT on the counter.
- Put the TEAPOT on the Teapot Stand. It will open, revealing part of the CANDLE.
- Put the CANDLE in the Candleholder. It will melt down, revealing the GREEN BALL.
- Put the BALLS on the Wall Panel. It will open, revealing the GAME BALL.
- Zoom in on the Game Box (E).
- Put the GAME BALL in the Game.
- Click on the Box again to trigger a Slider Puzzle.
- Move the Ball to the goal, then collect the FILE.
- Zoom in on the Hidden Object Scene again.
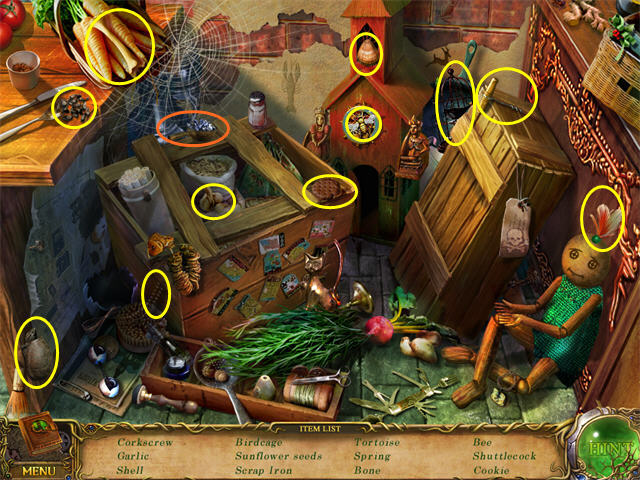
- The CLAY will go into your inventory.
- Go to the Carpenter’s House and enter the Kitchen.
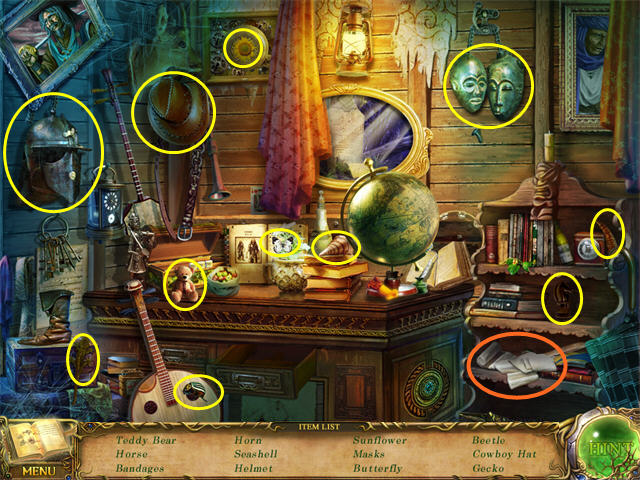
- Zoom in on the Hidden Object Scene in the back Cabinet.
- The SCRAP IRON is a scoop of iron shavings. It will go into your inventory.
- Return to the Forge Outside the Pub.
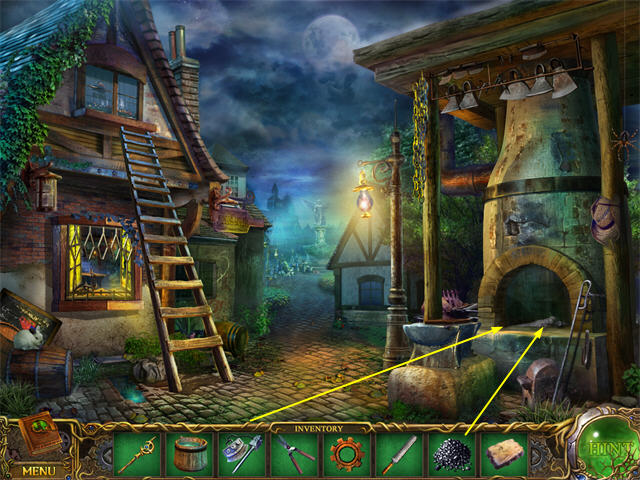
- Put the COAL from the Pub Fireplace in the forge.
- Light it with the FIRE STARTER from the Library.
- Go in the Pub.
- Zoom in on the Hidden Object Scene in the back.
- The “Bottle Opener” is a corkscrew.
- The BELLOWS will go into your inventory.
- Go back out to the Forge.
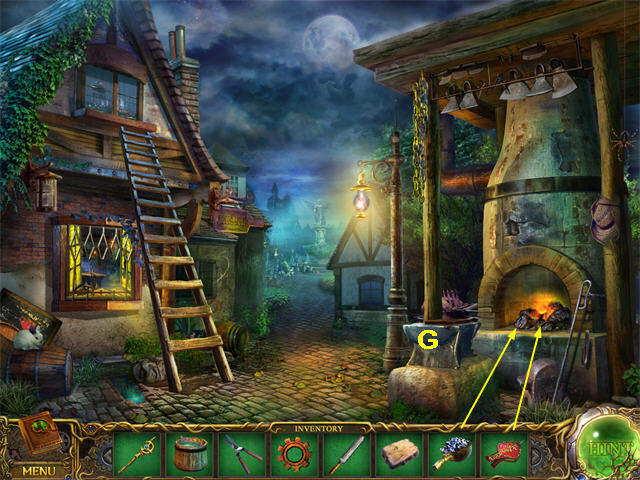
- Use the BELLOWS from the Pub to make the fire hotter.
- Put the IRON SCRAPS from the Kitchen in the fire. Click again and you will get back the MELTED METAL. (The text label says “WATER BUCKET.”)
- Zoom in on the Anvil (G).
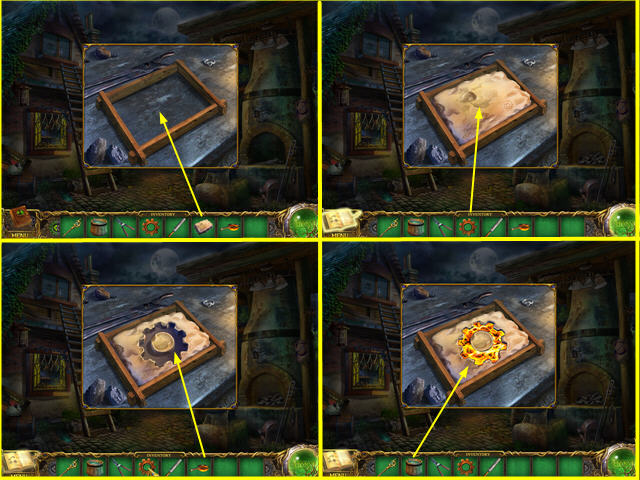
- Put the CLAY from the Pub in the Frame.
- Put GEAR A, from the above the Pub window, on the Clay and click to make a mold.
- Click on the slot for GEAR A again to put it back in your inventory.
- Put the MELTED METAL (“Water Bucket”) into the Mold.
- Put the WATER from the Library on the Mold.

- Use the FILE from the Pub on the Gear until it is all smooth.
- Click to collect GEAR B.
- Go to the Main Road.
- Zoom in on the Hidden Object Scene next to the Carpenter’s House.
- “Nesting Doll” is a painted wooden shoe next to the marionette on the right side.
- The VALVE will go into your inventory.
- Go to Statue Square.
- Use the GARDEN SHEARS from the Tower Sky Level several times to clear the Ivy (H).
- Zoom in on the Door.
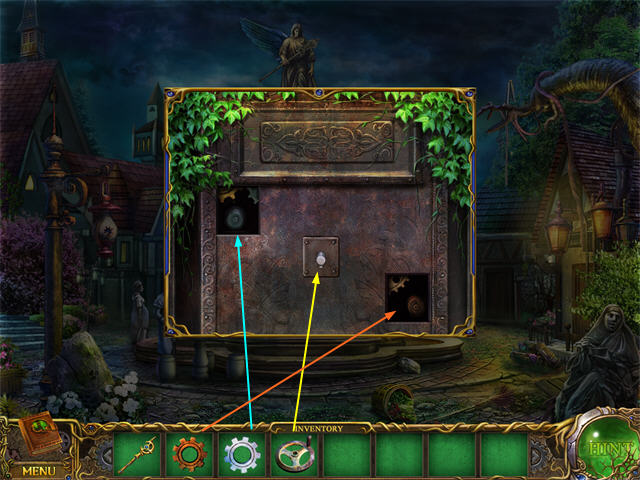
- Put the VALVE from the Main Road on the center post.
- Put GEAR B on the Silver Post.
- Put GEAR A on the Gold Post.
- Click to trigger a puzzle.
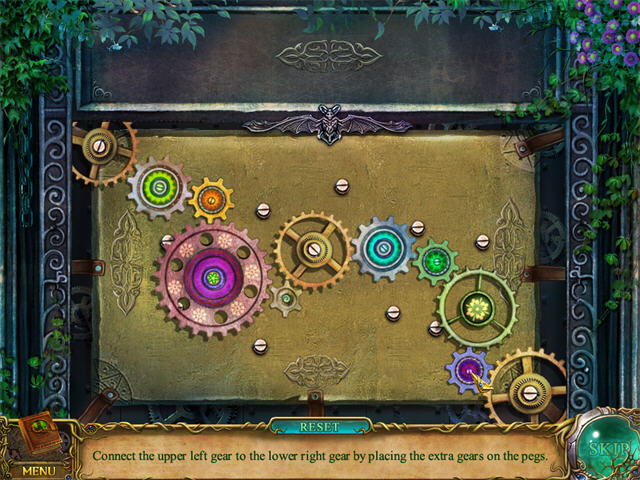
- There are several possible solutions.
- The door to the Inside of the Angel Statue is now available.
11: Help the Unicorn
- You will not be able to complete this task until you have opened the door into the Angel Statue (Chapter 10).
- Go Inside the Angel Statue.
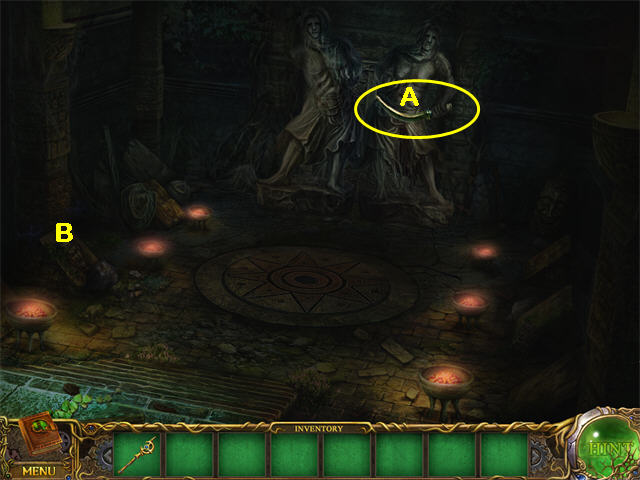
- Collect the SICKLE (A) and the lights will come on.
- Zoom in on the Hidden Object Scene (B) on the left.
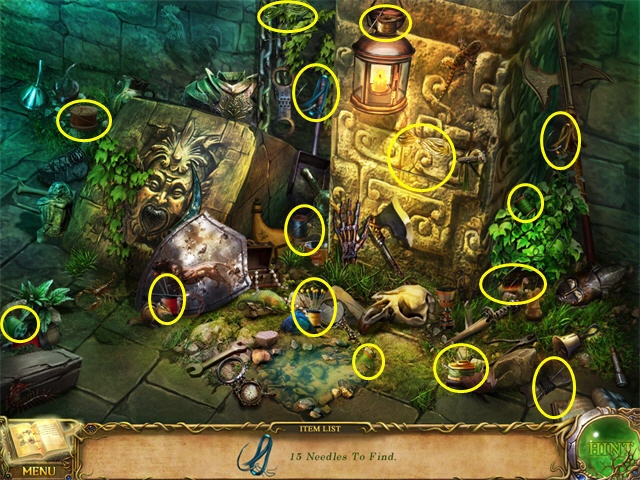
- Collect the Needles. One will go into your inventory.
- Click down to the Statue Square.
- Zoom in on the Hidden Object Scene on the right.
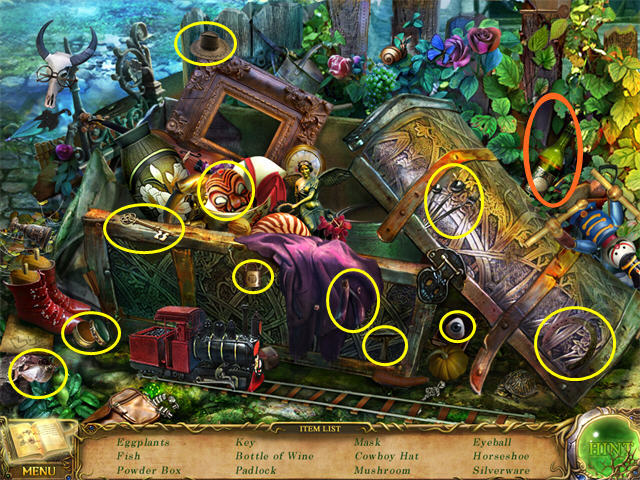
- The “Powder Box” is a round green box in the lower left.
- The WINE will go into your inventory.
- Go to the Caravan.
- Zoom in on the Hidden Object Scene.
- The BANDAGES will go into your inventory.
- Go to the Workshop in the Carpenter’s House.
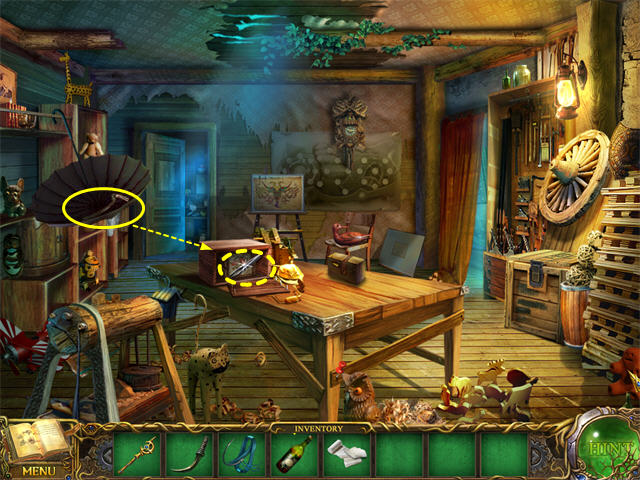
- Open the Umbrella and collect the CROWBAR.
- Use the CROWBAR on the Toolbox to reveal the TWEEZERS.
- Go to the Tower Laboratory.

- Zoom in on the small Table on the left (C).
- Put the WINE from the Statue Square into the Flask on the left.
- Collect the ALCOHOL.
- Go to the Tower Ice Level.
- Zoom in on the Unicorn.
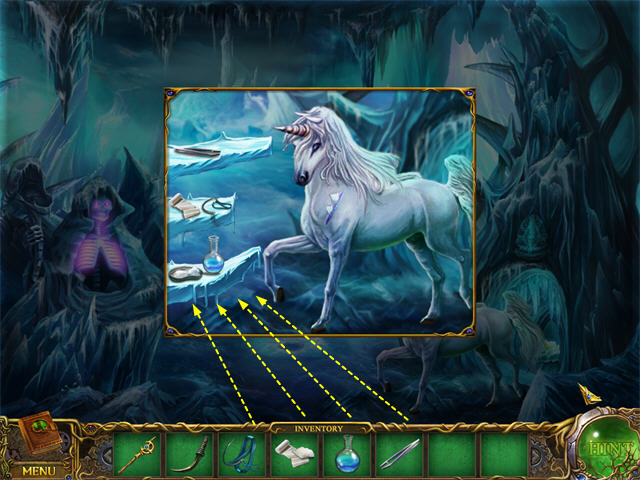
- You must have the TWEEZERS from the Workshop, the ALCOHOL you refine in the Tower Laboratory, the NEEDLE from Inside the Angel Statue, and the BANDAGE from the Caravan.
- Put each of these items in the small tray on the ledge, and they will position themselves in the scene.
- Click on the small tray one more time to zoom in further.
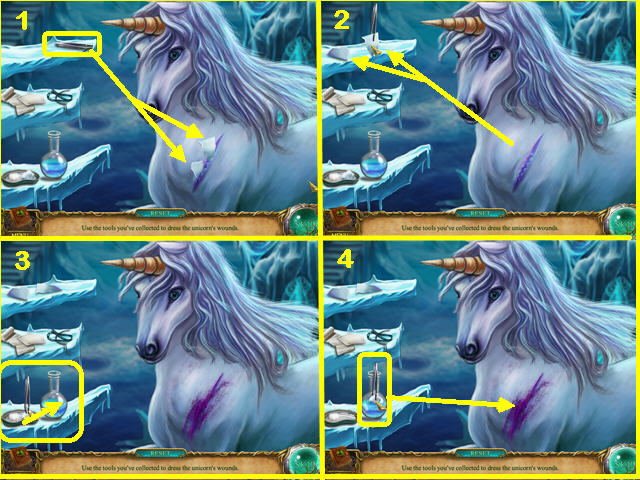
- The instructions are in your journal.
- Use the Tweezers to pick up each piece of GLASS from the wound.
- Put the GLASS on the top shelf.
- Use the TWEEZERS to pick up a COTTON BALL from the Small Tray.
- Dip the COTTON BALL in the ALCOHOL.
- Use the WET COTTON BALL on the wound.
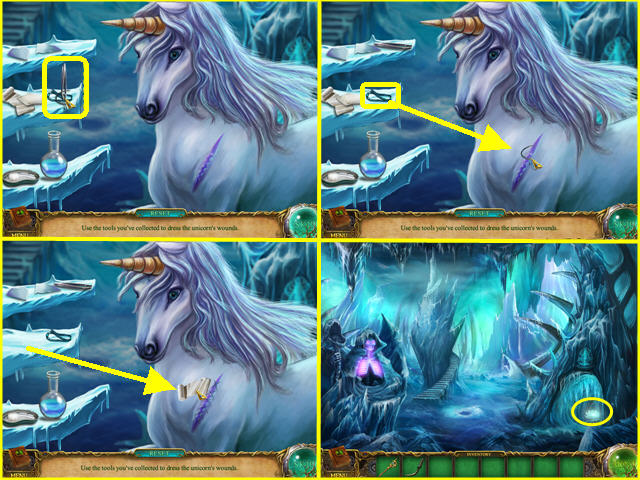
- Pick up the NEEDLE and the TWEEZERS will go back on the top shelf.
- Use the NEEDLE on the Wound.
- Pick up the BANDAGE and use it on the wound.
- The Unicorn will walk away from the cave, revealing the SNOW LOTUS.
12: Taming an Eagle
- Go to Statue Square and then Inside the Angel Statue.
- Zoom in on the Hidden Object Scene.
- The SCOOP will go into your inventory. The text calls this a SHOVEL once it is in your inventory.
- Go to the Kitchen in the Carpenter’s House.
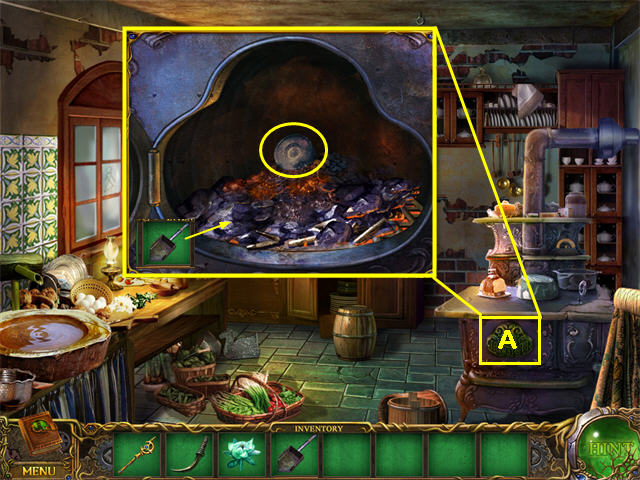
- Open the small green Door on the Stove (A).
- Zoom in on the open Door.
- Use the SHOVEL/SCOOP from inside the Angel Statue on the hot ashes to reveal the WHEEL.
- Click to collect the Wheel.
- Go to Outside the Library.
- Collect the NET (B).
- Enter the Library.

- Put the WHEEL from the Kitchen on the broken Ladder.
- Click on the Ladder and it will slide left so you can reach the shelves.
- Zoom in on the TAMING POTION (C).
- Click to Collect it.
- Go to the Dock.
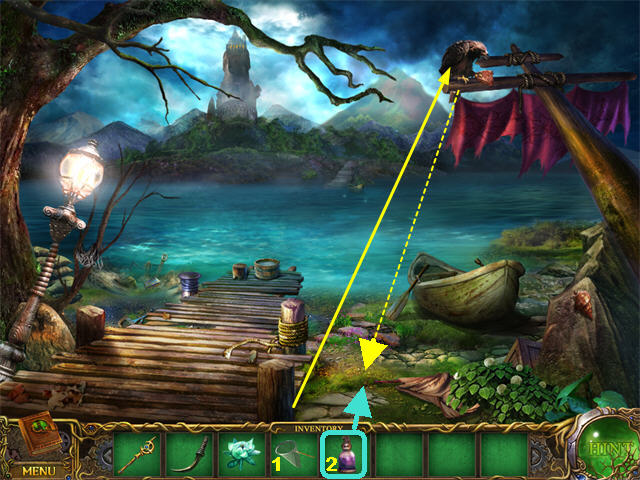
- Put the NET from Outside the Library on the Eagle. It will come down to the ground.
- Give the TAMING POTION from the Library to the Eagle.
- Click on the EAGLE to collect it.
- Go to the Tower Garden.
- Put the Eagle from the Dock on the Snake and it will drop the APPLE so you can collect it.
13: The Lonely Dragon
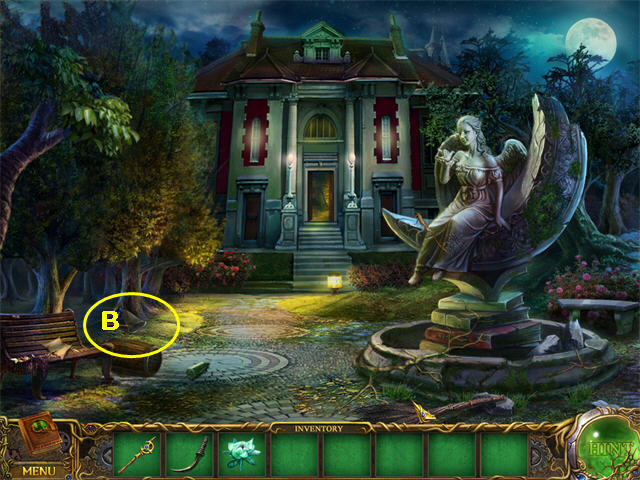
- Go to the area Outside the Library.
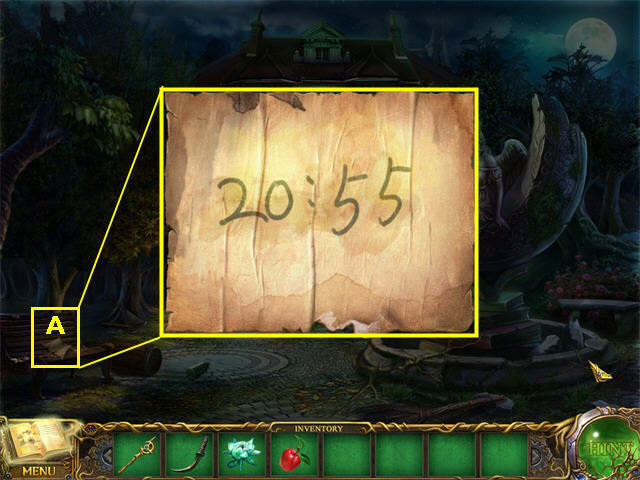
- Examine the CODE on the Paper on the Bench (A). It will be copied to your Journal.
- Enter the Library.
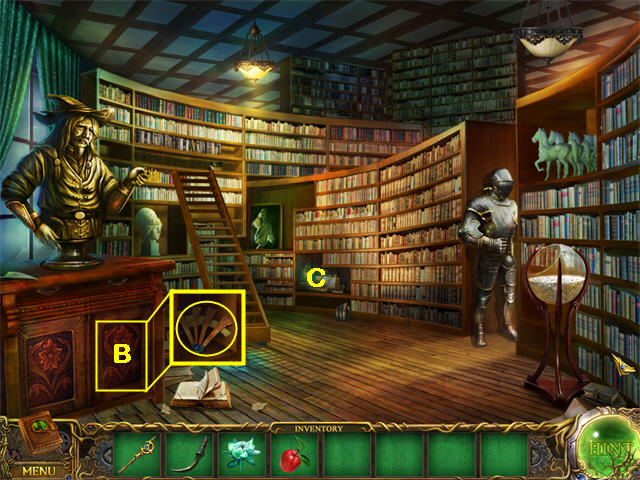
- Open the Cabinet (B) beneath the Founder’s Statue and collect the WOODEN WING.
- Zoom in on the Hidden Object Scene (C).
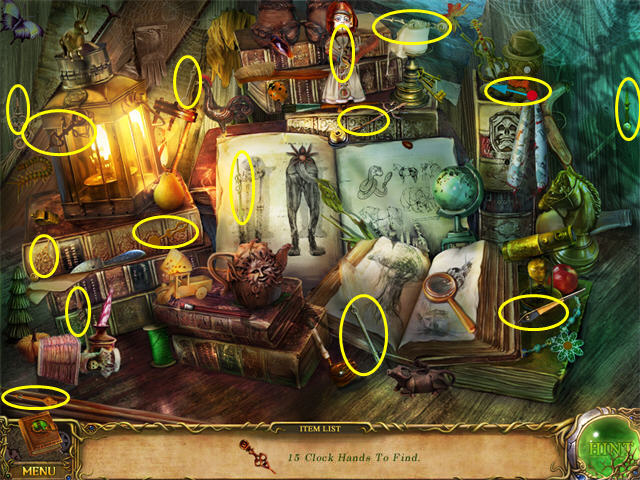
- Collect the 15 Clock Hands. One will go into your inventory.
- Go to the Tower Laboratory.
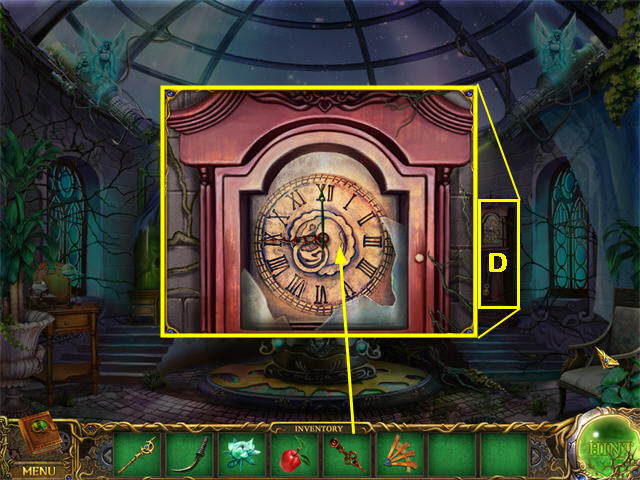
- Zoom in on the Clock (D).
- Use the CLOCK HAND from the Library on the Clock.
- Click one more time to start the puzzle.
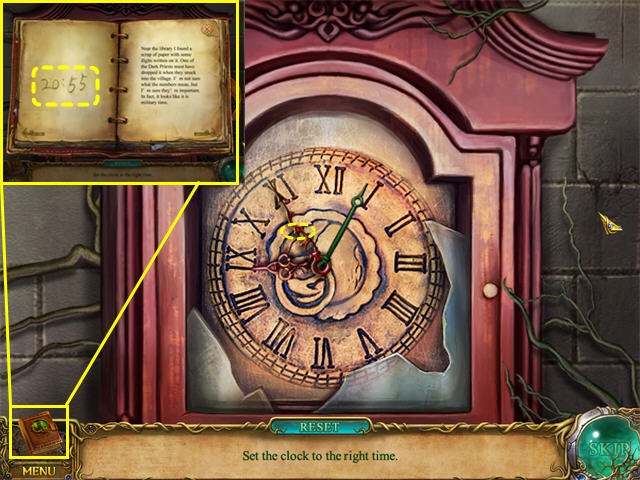
- Set the time to the CODE from the bench Outside the Library: 20:55 (8:55).
- The puzzle will only work if you move the minute hand (“big hand”) around the clock until the correct position is reached.
- Grab the minute hand in the middle and drag it to rotate it.
- Stop in the correct position, shown in the screenshot; you will hear the clock chime.
- The clock will open, revealing the WINDUP KEY.
- Go to the Bedroom in the Carpenter’s House.
- Zoom in on the Broken Wooden Bird (E) that is hanging from the ceiling.
- Put the WOODEN WING from the Library on the side.
- Put the WINDUP KEY from the Tower Laboratory on the top.
- Click to collect it.
- Go to the Tower Sky Level.
- Give the WOODEN BIRD from the Carpenter’s Bedroom to the Dragon.
- The Dragon will fly away and the blue DRAGON PEARL will fall down so you can collect it.
14: Unlock the Witch House
- Go to the Statue Square.
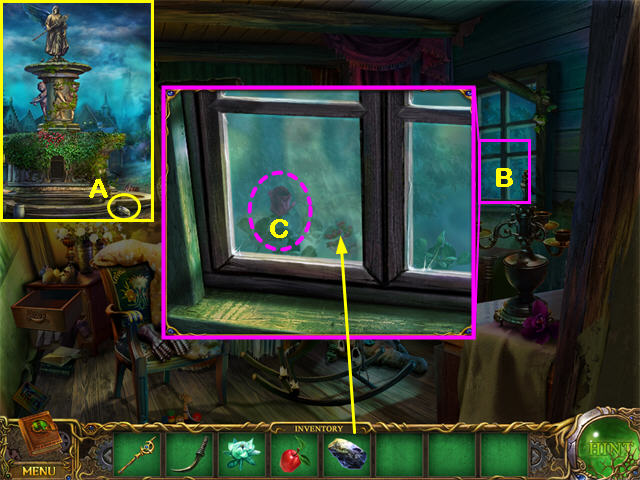
- Collect the STONE (A) on the ground.
- Go to the Bedroom in the Carpenter’s House.
- Zoom in on the Window (B).
- Use the STONE from the Statue Square and tap the Window 3 times.
- When the Window breaks, collect the ROSE (C).
- Go to the Library.
- Dip the ROSE from the Carpenter’s Bedroom in the Silver Sand (D).
- Collect the SILVER ROSE.
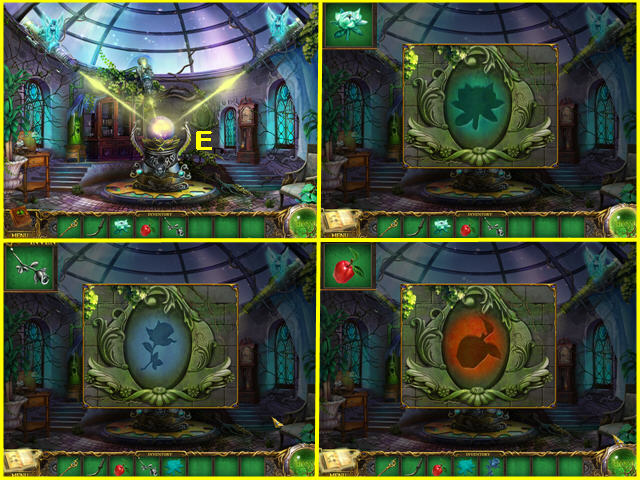
- Go to the Tower Laboratory.
- Zoom in on the Magic Mirror (E), and it will reveal a lotus shape.
- Put the SNOW LOTUS that you got from the Tower Ice Level Unicorn Cave on the Mirror. Click several times to convert it to a Logo and collect it.
- Repeat for the SILVER ROSE from the Library and the APPLE from the Tower Garden.
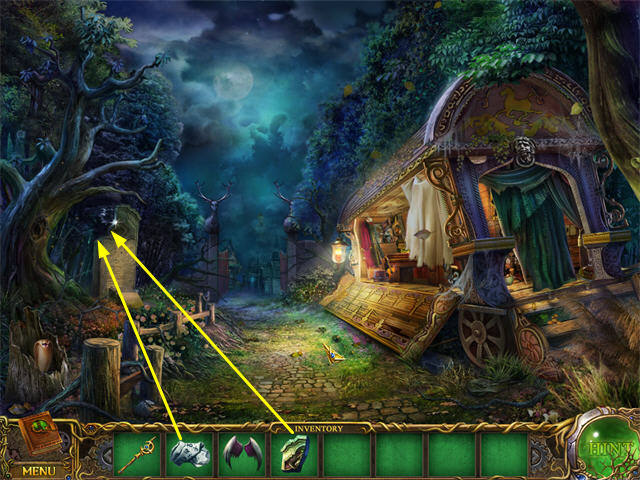
- Go to the Witch House in the Main Road.
- Zoom in on the door (F).
- Insert the 3 logos from the Tower Laboratory (APPLE, LOTUS, and ROSE).
- Insert the DRAGON PEARL from the Tower Sky level.
- Click to trigger the puzzle.
- The DRAGON PEARL (G) holds a pattern that you must match for each logo.
- To begin with, the dots on the DRAGON PEARL are red.
- As you move the rings to reposition the red dots, the dots on the DRAGON PEARL will change from red to orange as each dot is lined up exactly right.
- Move one ring at a time, and watch the DRAGON PEARL. When the dot turns from red to orange, stop.
- The screenshot shows the completed pattern for each of the 3 logos.
- Once you have completed all 3, the door will be unlocked.
15: Chop Down the Fence
- Enter the Witch Yard through the back Door (A) in the Witch House.
- Zoom in on the Chest to do the Hidden Object Scene.
- Put the PHOENIX on the Phoenix Picture on the right wall.
- A ball will fall down and smash the Barrel, revealing part of the PRUNING SHEARS.
- Use the PRUNING SHEARS on the Bush to reveal the ROPE for the BUCKET.
- Put the BUCKET on the Well to bring up the last part of the PIRATE LOGO. The BUCKET will pour water out next to the Well so you can collect the FEATHER.
- Put the PIRATE LOGO on the Chest to reveal the AXE.
- Use the AXE to chop through the Fence and open the Exit to the Mountain Giant Statue.
- You will need to use the AXE and then push the boards with your hand, repeating until the way is clear.
16: The Sneeze Potion

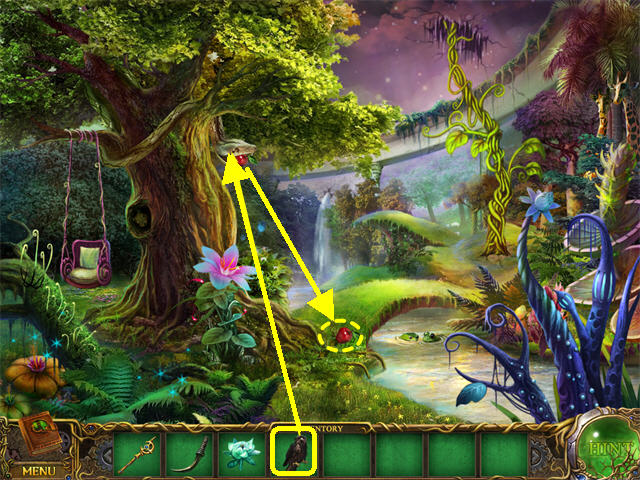
- Pick the RED HERB (A) in the Witch Garden.
- Go through the fence to the Mountain Giant Statue.
- Pick the BLUE HERB (B).
- Go inside the Witch House.
- Put the RED HERB from the Witch Yard in the Cauldron. Click the Spoon (C) to stir.
- Put the BLUE HERB from the Mountain Giant Statue in the Cauldron. Click to stir.
- Click the Spoon again and the Sneeze POTION will pour into a jar and the jar will go into your inventory.
- Go through the door to the Witch Yard.
- Give the SNEEZE POTION to the Stone Man (D).
- He will sneeze and reveal the RUBY (E).
17: Unlock the Treasure Vault
- Go to the Tower Sky Level.
- Zoom in on the Tree below the Dragon.

- Collect 15 Crescent Moons. One of these will go into your inventory as the MOON KEY.
- Immediately zoom in on the same spot again.
- The BRUSH will go into your inventory.
- Go to the Tower Garden Level.
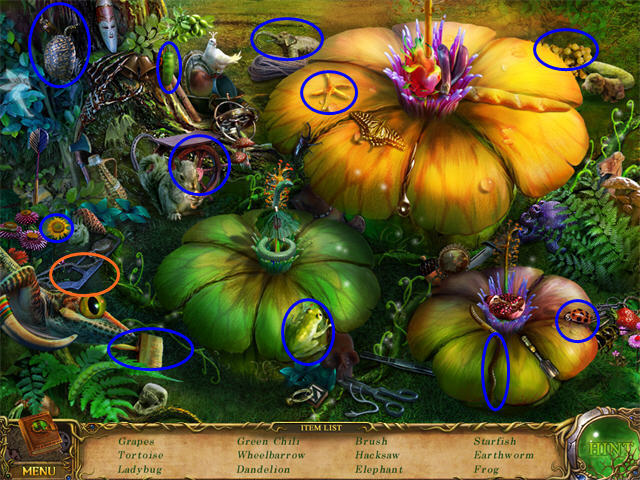
- Zoom in on the Hidden Object Scene on the left.

- The only Mushrooms that count are the brown ones on the right.
- The CHISEL will go into your inventory.
- Go to the area Outside the Library.

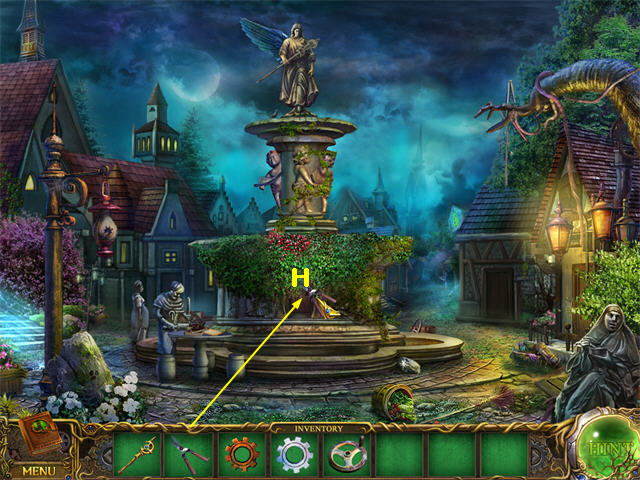
- Zoom in on the base of the Fountain (A).
- Use the CHISEL from the Tower Garden several times to clear the blocked area.
- Collect the STONE FLOWER (B).
- Use the BRUSH from the Tower Sky Level to clean the side of the Fountain (C). This will reveal a flower-shaped indentation.
- Put the STONE FLOWER you got from the base of the Fountain into the indentation (C). It will move, revealing the SIEVE (D).
- Go to the MOUNTAIN GIANT Statue.
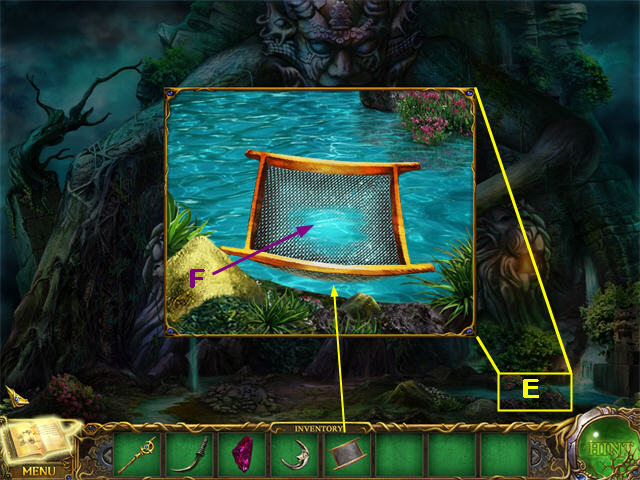
- Zoom in on the Lake (E) on the right.
- Put the SIEVE that you got Outside the Library into the zoom scene.
- Take the Dirt (F) from the left side of the zoom scene and put it in the SIEVE. Click in the center of the SIEVE to shake it. You will have to do this several times until you reveal the SAPPHIRE.
- Put the RUBY from the Witch Garden and then the SAPPHIRE into the Lock (G).
- Use the SICKLE from Inside the Angel Statue on the VINES (H). They will fall down so you can collect them.
- Put the VINES on the Opening (I). The entrance to the Treasure Vault is now available.
18: The Secret Chamber
- Go to the Witch Yard.
- Zoom in on the Chest to do the Hidden Object Scene.
- The HELM (Ship’s Wheel) is marked in orange.
- Go to the Library.
- Zoom in on the Hidden Object Scene on the back shelf.
- The SUN KEY will go into your inventory.
- Go Inside the Angel Statue.
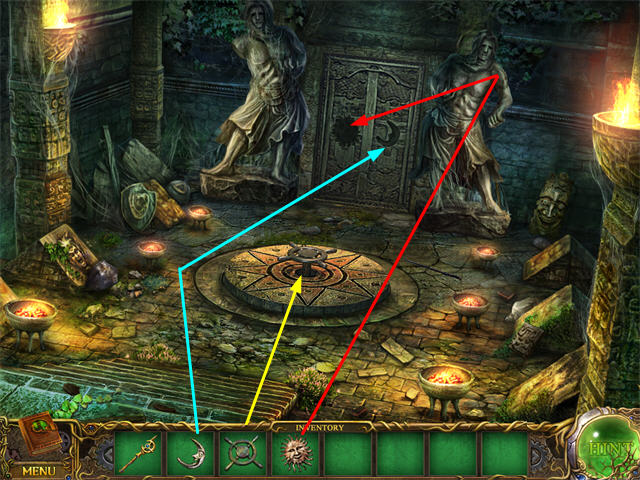
- Put the HELM from the Witch Yard on the center post.
- Click to turn the HELM until the statues pull aside completely.
- Put the SUN KEY from the Library on the left side.
- Put the MOON KEY from the Tower Sky Level on the right side.
- Click to open the door to the Secret Chamber.
- Enter the Secret Chamber and read the text clues for the Guardian. She is missing her Helmet, Wings, and Heart. You will have to find them and replace them to save the village.
19: The Crystal Skull
- Go to the Witch Yard.
- Collect the UNLIT TORCH (A).
- Enter the Witch House.
- Light the UNLIT TORCH on the fire under the Cauldron (B).
- Enter the Treasure Vault. It’s dark.
- Use the TORCH on the Column on the right (C), and the room will brighten.
- Use it again on the Column on the left (D) for full brightness.
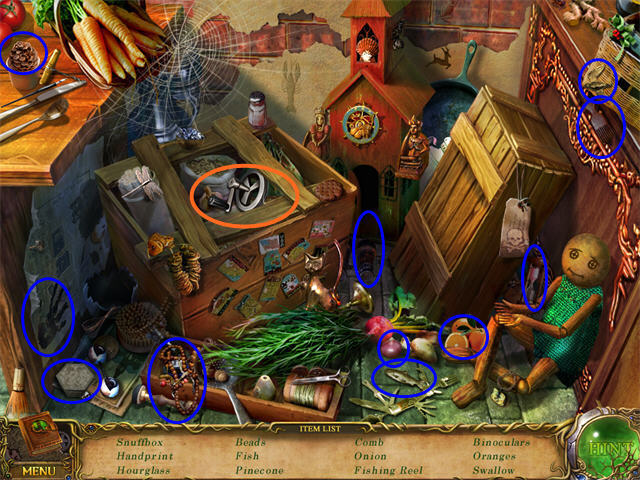
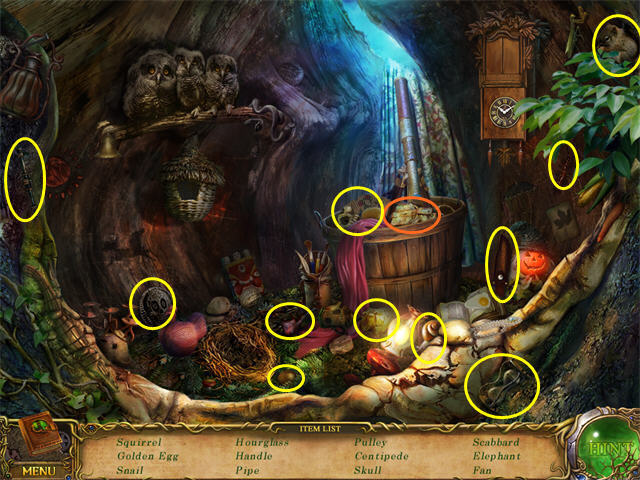
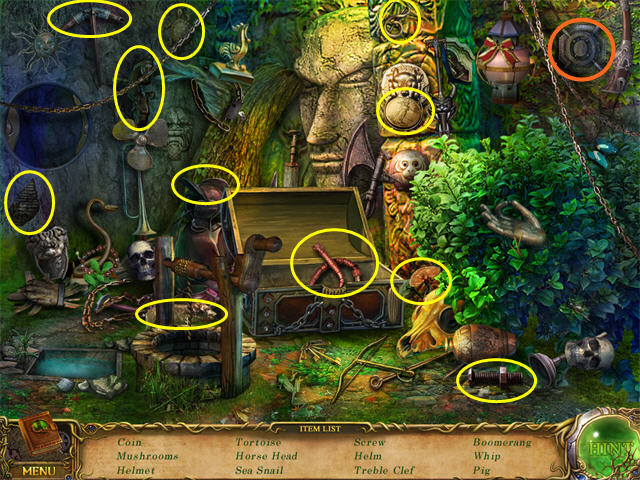
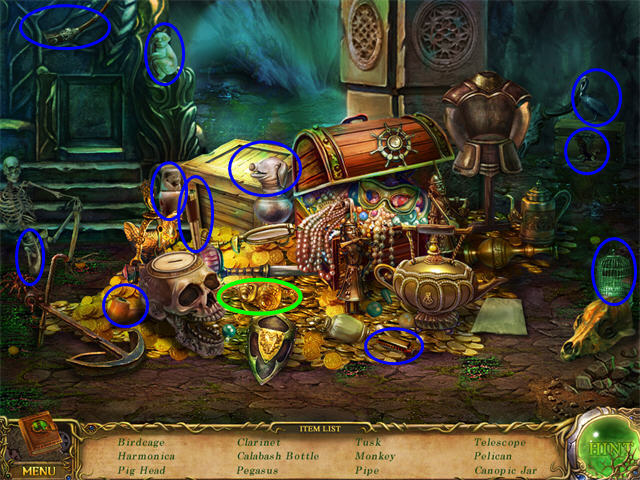
- Zoom in on the pile of treasure on the right for the Hidden Object Scene.
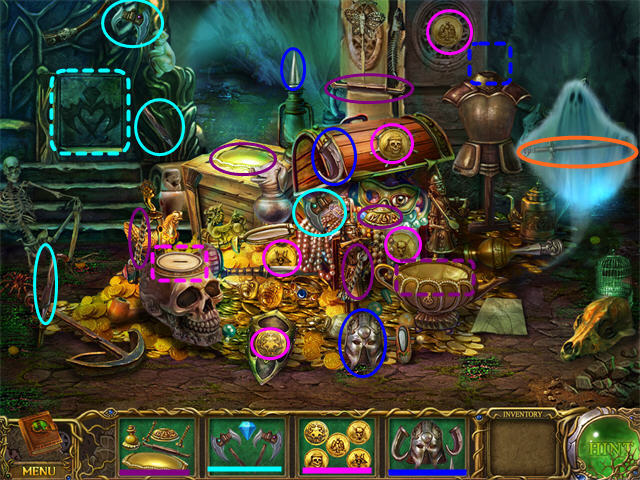
- Put the COINS in the Skull Bank and it will spit out part of the CREST.
- Put the CREST in the plate on the wall and it will reveal part of the HELMET.
- Put the HELMET on the Armor and it will reveal part of the LID.
- Put the LID on the Lamp and it will trap the ghoul so you can collect the SWORD.
- There is no down exit from the Treasure Vault. You have to find the place where the cursor changes to an up arrow in the upper right part of the screen, and click there to exit to the Mountain Giant Statue.
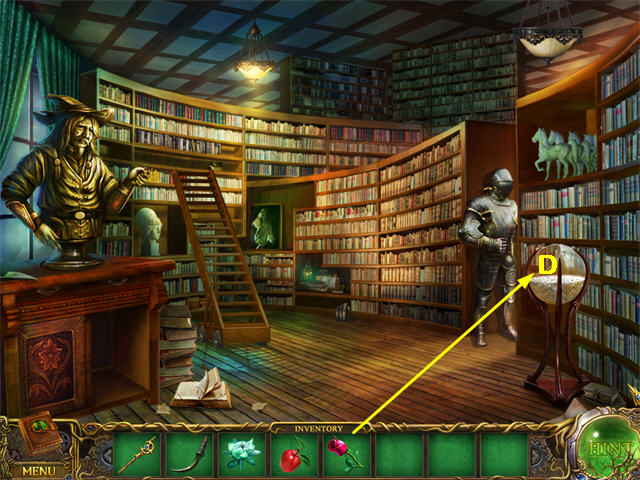
- Go to the Library.
- Give the SWORD from the Treasure Vault to the Knight (E).
- Click on the Knight and it will dissolve, revealing the SHOVEL (F).
- Go to Statue Square and go Inside the Angel Statue.
- Collect the TILE (G) on the right.
- Return to the Treasure Vault.
- Put the TILE from Inside the Angel Statue in the Hole in the Floor (H). A Stone Table will rise up.
- Use the SHOVEL from the Library on the Dirt pile on the left (I) to reveal a Chest.
- Zoom in on the Hidden Object Scene on the right.
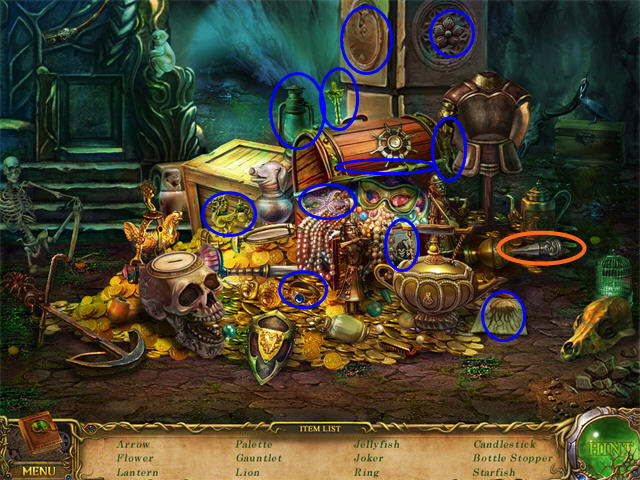
- The BOTTLE STOPPER is marked in orange.
- Use the BOTTLE STOPPER on the Chest and it will open to reveal the CRYSTAL SKULL.
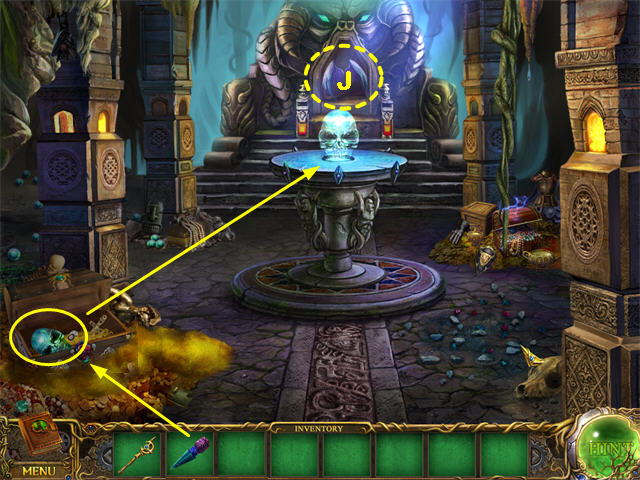
- Put the CRYSTAL SKULL in the center of the Stone Table and the back will open to reveal the ANGEL’S WINGS (J).
20: The Monument
- Go to the Witch Yard.
- Zoom in on the Chest to do the Hidden Object Scene.
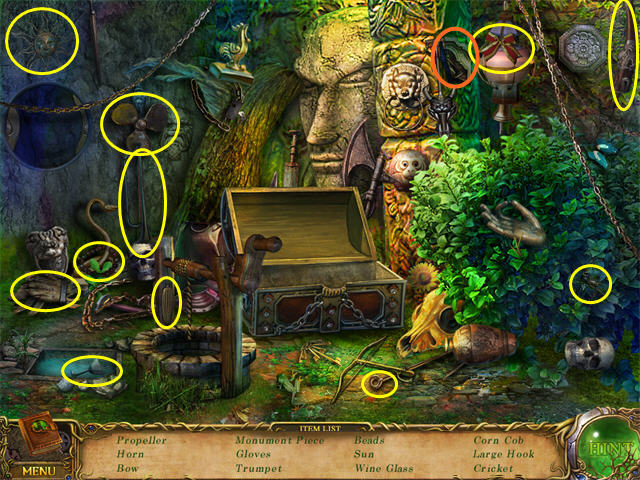
- The MONUMENT PIECE will go into your inventory.
- Go into the Witch House.
- Collect the CROSIER (A).
- Go to the Library.
- Give the CROSIER from the Witch House to the Founder’s Statue.
- The Statue will rise up, revealing a Wood Base (B).
- Click on the Wood Base to reveal a secret compartment and collect the RUNE DECODER (C).
- Go to the Caravan.
- Put the MONUMENT PIECE on the Monument.
- Put the RUNE DECODER on top of the Monument.
- Zoom in to trigger the puzzle.
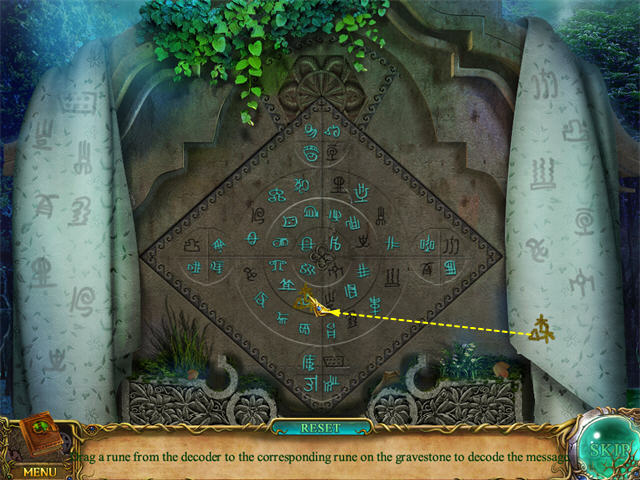
- Drag each symbol from the RUNE DECODER to its matching symbol on the stone.
- When all the symbols are placed, the stone will open, and you will receive the ANGEL’S HELMET.
21: The Angel’s Heart
- Go to the Statue Square, then Inside the Angel Statue.
- Zoom in on the Hidden Object Scene.
- The MAGIC POWDER will go into your inventory, where it will be called MAGIC SALT.
- Go to the Treasure Vault.
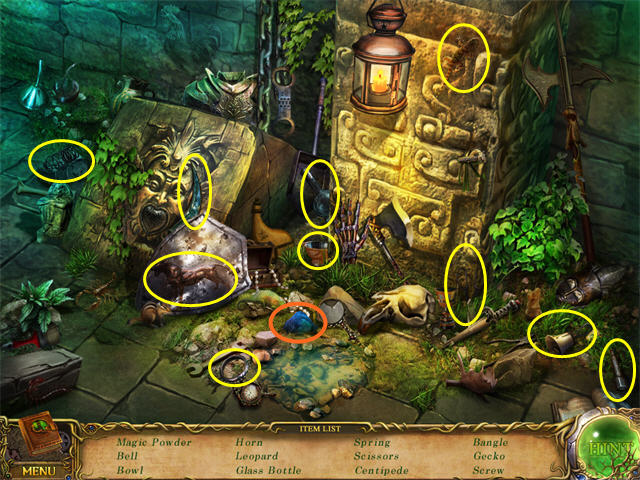
- Zoom in on the Hidden Object Scene on the right.
- The CALABASH BOTTLE will go into your inventory.
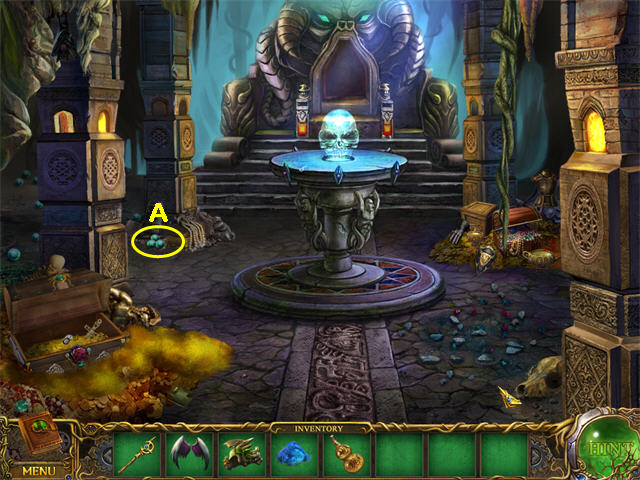
- Collect the set of 3 CRYSTAL BALLS (A).
- Go to the Witch Yard.
- Collect the CROSSBOW (B).
- Go into the Witch House.
- Put the MAGIC SALT from Inside the Angel Statue into the hole in the bottom of the Crystal Ball (C).
- Use the CALABASH BOTTLE to collect the Blue Powder from under the Crystal Ball. It will go back into your inventory as EXORCISM CALABASH.
- Go to the Tower Laboratory.
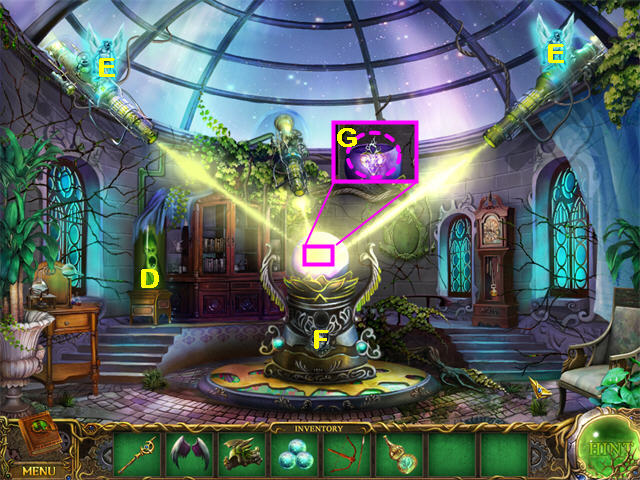
- Use the EXORCISM CALABASH to capture the evil fairy in the green tank (D).
- Use the CROSSBOW on each of the two evil fairies (E) controlling the lasers.
- Put the CRYSTAL BALLS into the hole in the center (F).
- Click just below the hole to trigger a puzzle.
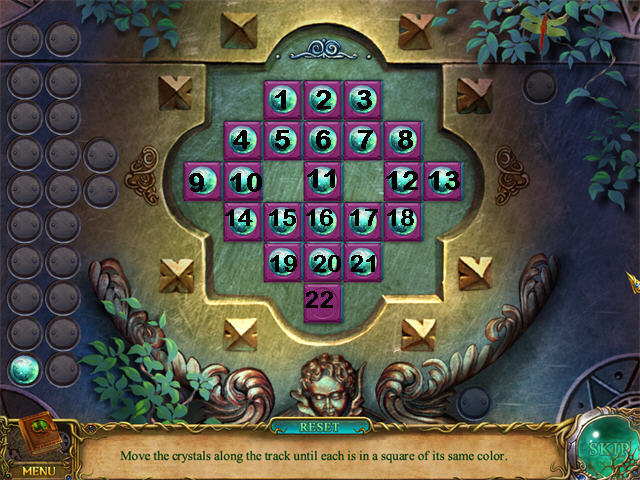
- You must place all the spheres on the board.
- A sphere may only be placed on a pink square.
- Once a sphere is placed on a pink square, it will stay pink.
- Each square will change some of the other squares.
- You can take a sphere off the board again and put it back in the reserve area. This will change back some of the squares.
- There are many possible solutions. Here is one example.
- Add spheres in this order: 7, 3, 1, 6, 2, 5, 4, 14, 15, 19, 20, 16, 18, and 8.
- Remove the sphere from 18.
- Add spheres in this order: 12, 13, 17, 18, 21.
- Remove the sphere from 14.
- Add spheres to 10 and then 9.
- Remove the sphere from 15.
- Add a sphere to 14.
- Remove the sphere from 19.
- Add a sphere to 15.
- Remove the sphere from 20.
- Add the last spheres in this order: 11, 19, 20, and 22.
- When the purple glass opens, click twice on the ANGEL’S HEART (G) to collect it.
22: Restore the Guardian
- Go to the Statue Square, then Inside the Angel Statue and on to the Secret Chamber.
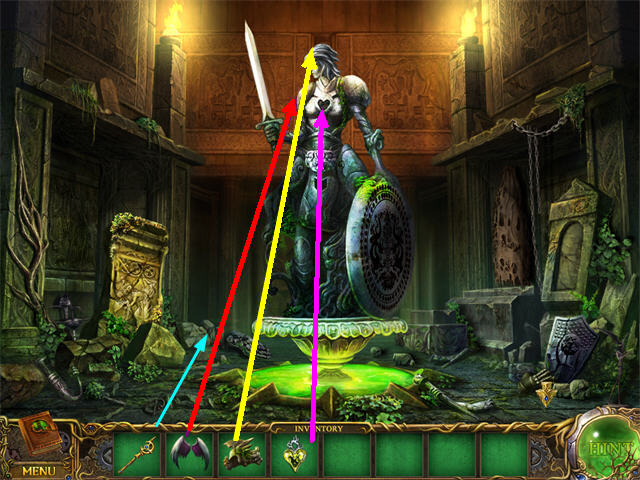
- Place the HELMET from the Caravan, the WINGS from the Treasure Vault, and the HEART from the Tower Laboratory on the Guardian.
- Then touch the Guardian with the IMPERIAL STAFF to bring her to life.
- Congratulations! You’ve completed Mystery Age: The Dark Priests!
Created at: 2010-11-04