
Walkthrough Menu
- General Tips & Information
- Lake Bluesky
- The Protector
- Snake Mountain
- The Wizard
- Ned Desert
- Loulan City
- Trang City
- The Valley
- The Seaside
- The Ship
- Atlantis
- The Battlefield
General Tips & Information
- There is no time limit for this game. You may skip mini-games after the timer fills up on the skip button.
- At the bottom of the screen are the quest items you must find. The number of pieces needed will be noted in the bottom right corner of each item.
- If you get stuck, explore other areas. Look for your cursor to change if interactions are possible with a quest item.
- Many pieces are hidden by other items or require that you take some action before they are revealed. Some quest items are used in other scenes.
- Hints are unlimited but have a slow refresh rate. You can speed up the meter by locating eyes within each scene. Tip: Do not click on the eyes unless you need to refill the hint meter.
Game Walkthrough
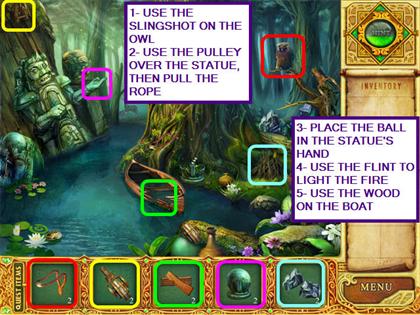
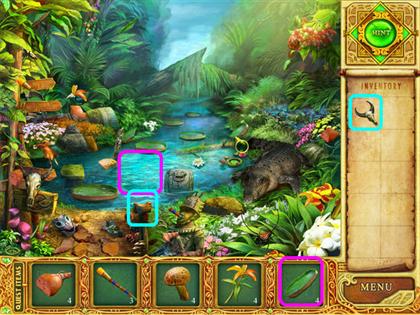
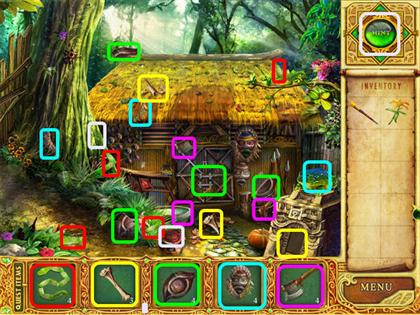
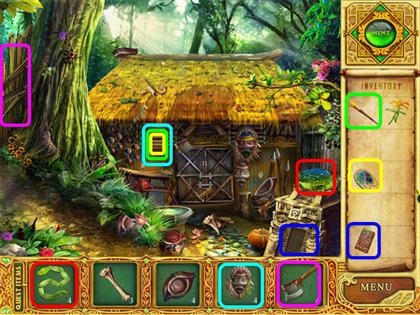
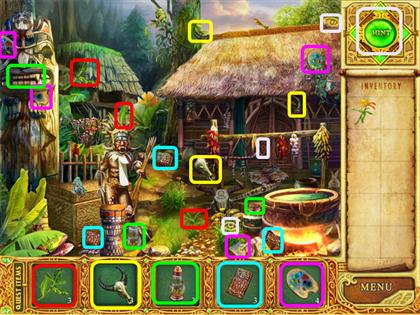
- One screenshot will have color coded locations of all the pieces in a scene and the next will show where each quest item is used.
- Some objects are used in scenes other than where they were originally located.
- This walkthrough will list the quest item usage in sequence.
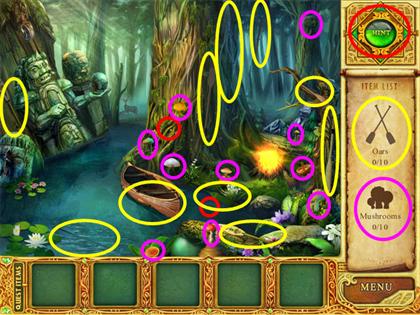
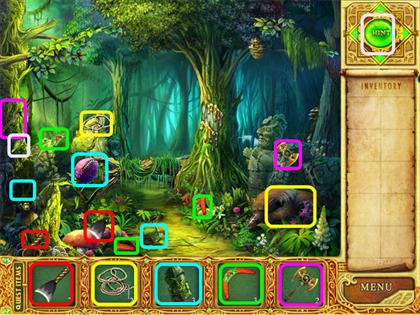
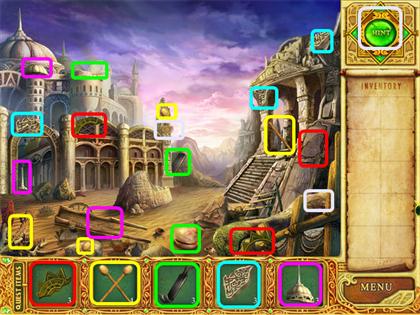
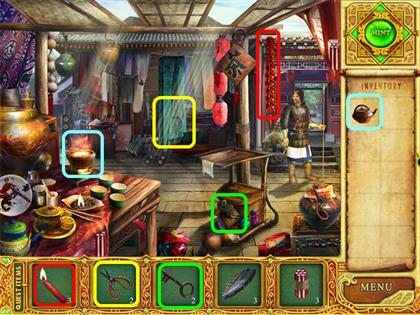
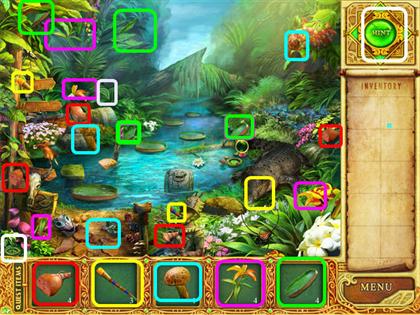
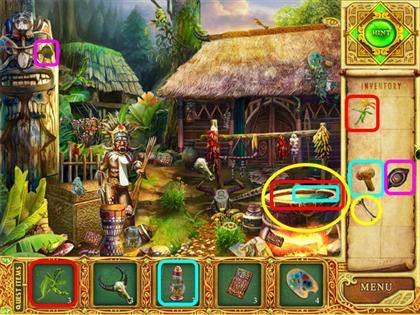
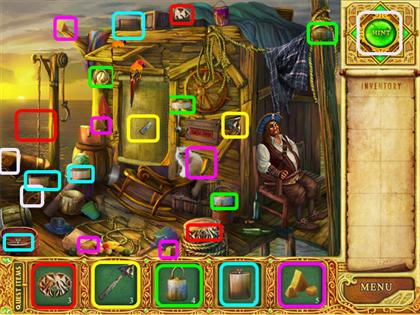
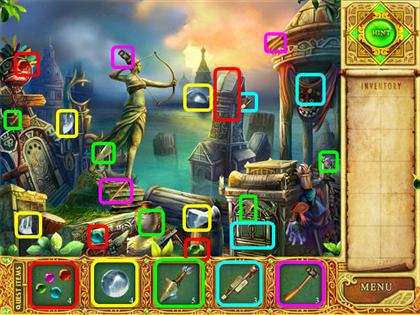
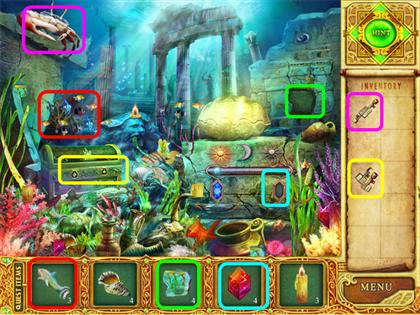
Lake Bluesky
- Locate the pieces of the quest items as they become available.
- Use the slingshot on the owl.
- Place the pulley over the statue head.
- Click on the rope that appears on the pulley to raise the statue.
- Place the stone ball in the statue's hand.
- Use the flint to light the fire.
- Place the wood on the boat.
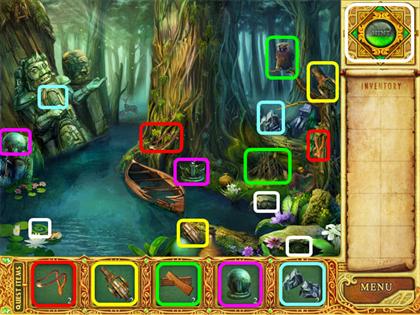
- Locate the 10 oars and the 10 mushrooms.
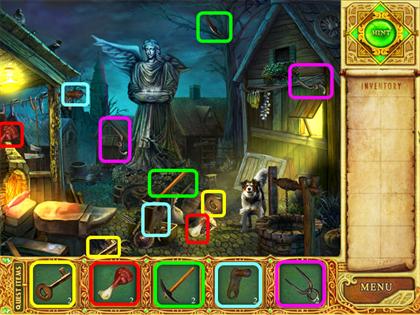
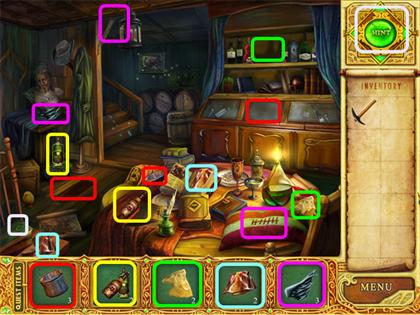
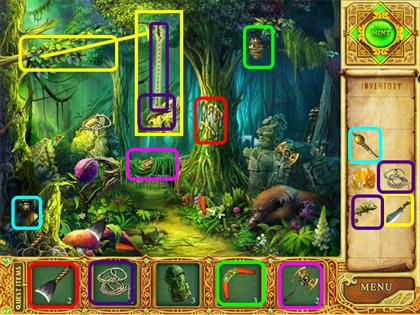
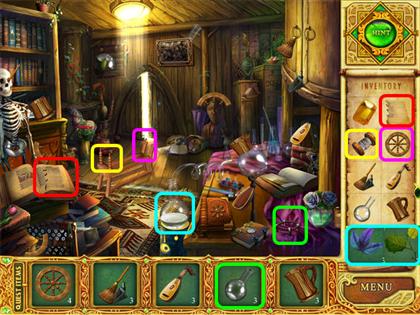
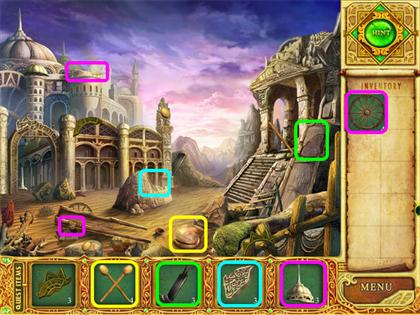
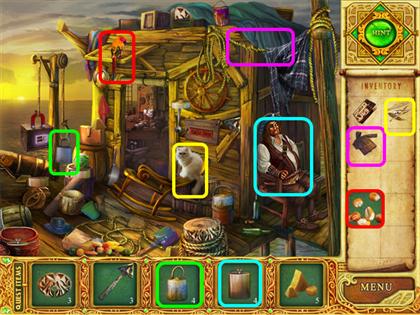
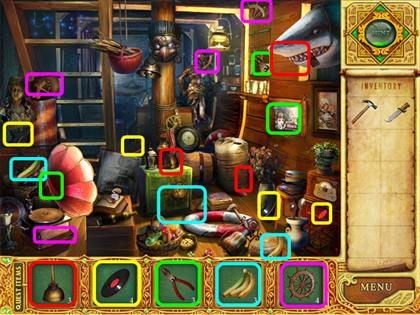
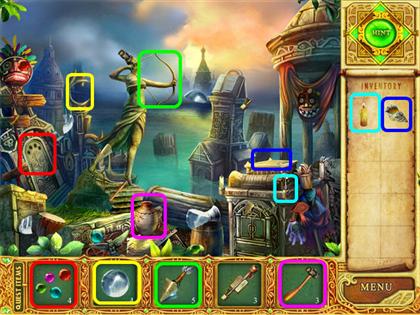
The Protector
- Locate the pieces of the quest items as they become available.
- Give the bone to the dog.
- Use the key on the lock.
- Put the crank on the well.
- Use the pincers on the hot metal.
- Click on the unlocked area to enter the basement.
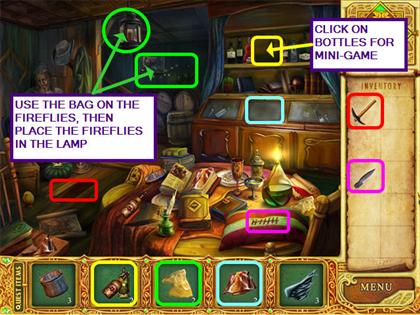
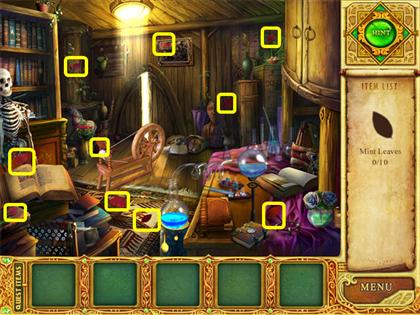
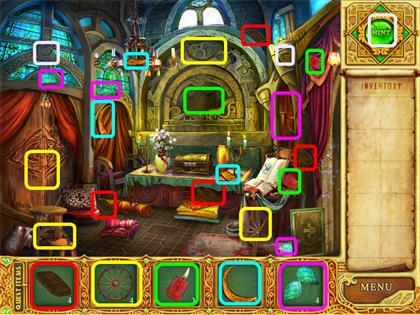
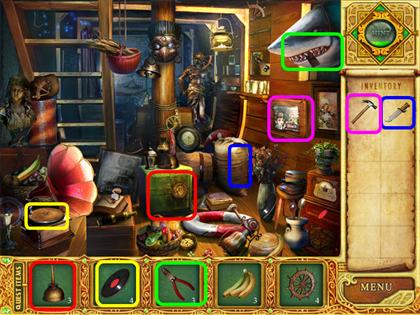
- Locate the pieces of the quest items as they become available.
- Use the pick on the loose floorboard.
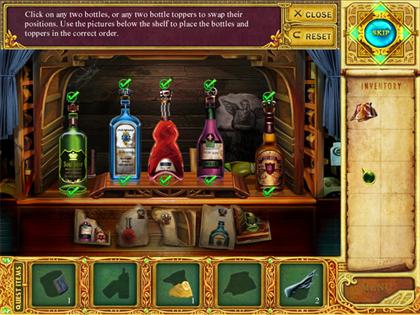
- Place the bottles on the shelf.
- Click on the bottles to trigger a mini-game.
- Using the picture fragments at the bottom, swap the bottles and caps until they are in the correct position.
- Use the paper bag on the fireflies.
- Place the fireflies on the lamp.
- Use the cloth on the glass.
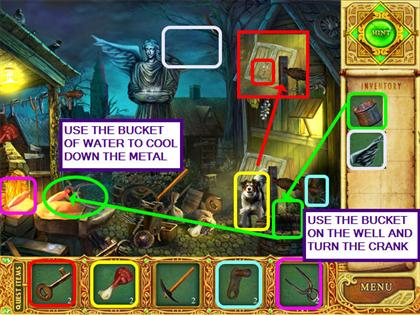
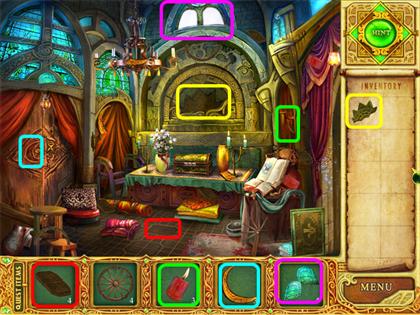
- Exit the basement and use the bucket on the well.
- Turn the well crank.
- Use the bucket of water on the hot metal.
- Take the knife and return to the basement.
- Use the knife on the pillow.
- Exit the basement and use the wing on the protector.
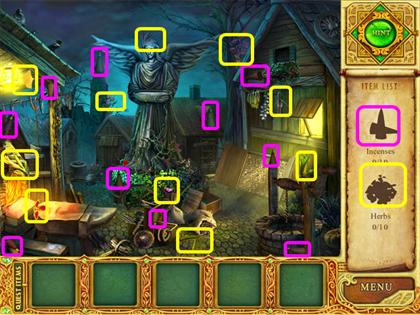
- Locate the 10 herbs and the 10 incense cones.
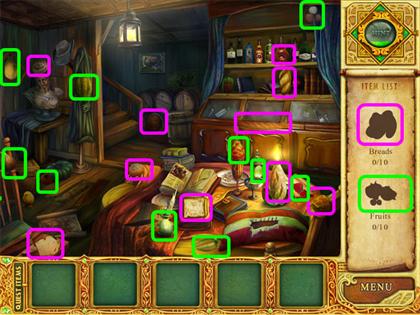
- Locate the 10 fruits and breads.
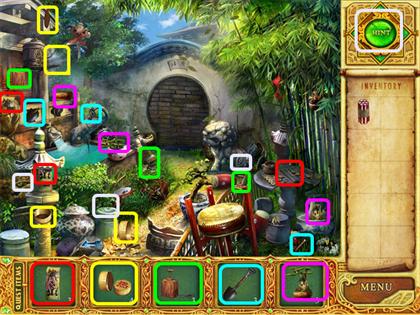
Snake Mountain
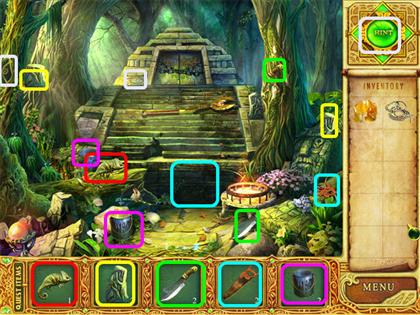
- Locate the pieces of the quest items as they become available.
- Use the spade to get pitch from the tree.
- Throw the boomerang at the beehive.
- Use the axe on the fallen tree.
- Select the sparkling area to change scenes.
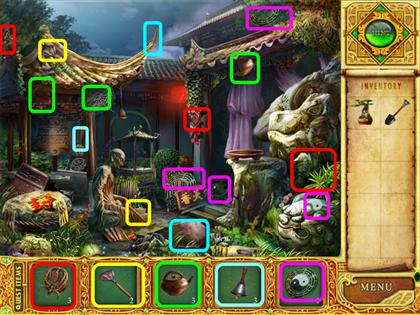
- Locate the pieces of the quest items as they become available.
- Use the lever in the slot.
- Pull the lever down.
- Place the eye in the cobra.
- Use the torch where the fire has gone out.
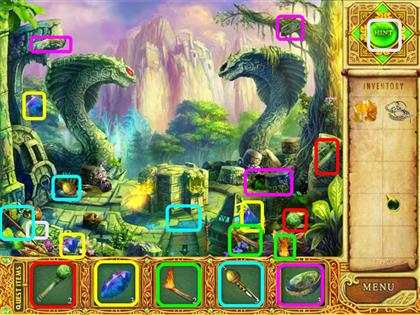
- Climb down, through the secret entrance.
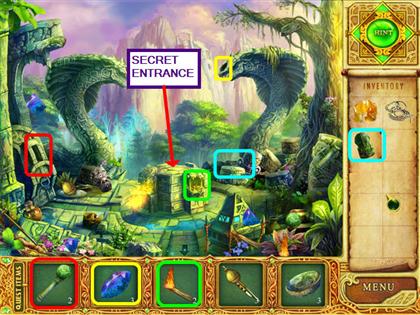
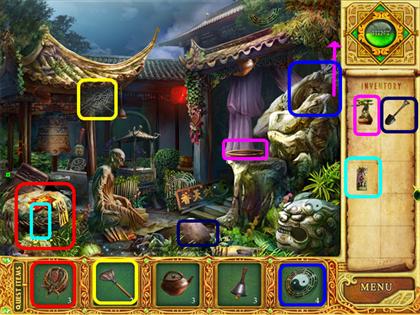
- Locate the pieces of the quest items as they become available.
- Return to the path and use the flute on the cobra.
- Use the knife on the large, leafy branch.
- Hang the rope from the hook.
- Use the chameleon on the rope.
- Return to the altar.
- Place the statue on the pedestal.
- Click in the same area to trigger a mini-game.
- The object of this mini-game is to unscramble the four totems into the correct color.
- Move the pieces between each pedestal until all are in the correct order.

- Watch Video on Big Fish Games Tips YouTube Channel
- Return to the secret entrance.
- Place the carving on the left side of the entrance.
- Use the saw on the chained door.
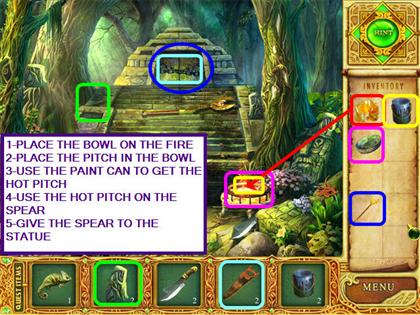
- Place the bowl on the fire.
- Put the pitch into the bowl.
- Use the paint can to take the hot pitch.
- Use the hot pitch to repair the spear.
- Give the spear to the statue.
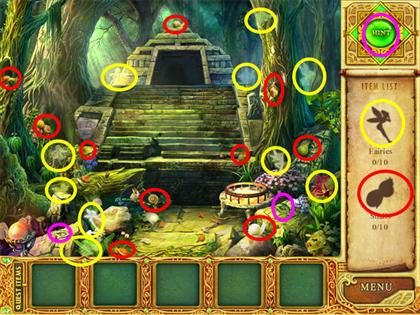
- Locate the 10 fairies and 10 snails.
The Wizard
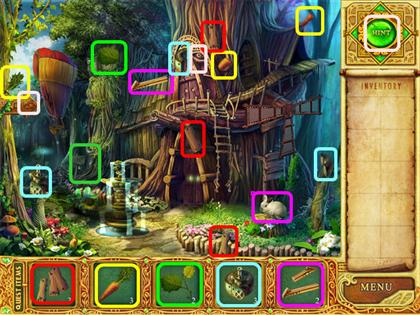
- Locate the pieces of the quest items as they become available.
- Give the carrot to the bunny.
- Use the heater on the hot air balloon.
- Place the slats on the ladder.
- Climb the ladder, into the wizard's home.

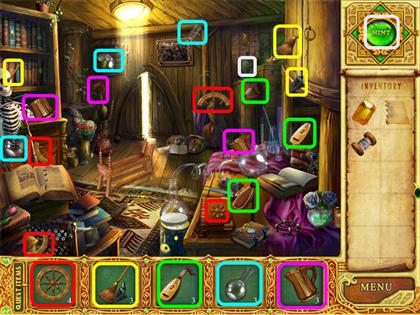
- Locate the pieces of the quest items as they become available.
- Place the frame pieces on the picture.
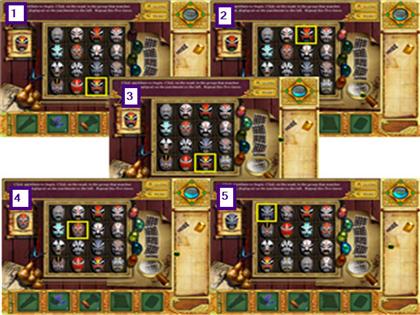
- Select the picture to trigger a mini-game.
- The object of the game is to locate the mask that matches the one displayed on the upper left.
- Click anywhere to begin.
- The sixteen masks in the grid will appear briefly.
- Select the one mask that matches the mask on the left.
- Repeat this five times.
- This puzzle is random, so your solution may vary.
- Go back outside and use the blade on the windmill.
- Enter the wizard's workshop.
- Locate the pieces of the quest items as they become available.
- Place the wheel and the thread on the spinning wheel.
- The cloth will automatically go into your inventory.
- Place the page in the book.
- Select the repaired book to see the potion recipe.
- Click to close the book.
- Exit the workshop.
- Use the newly woven cloth on the hole in the hot air balloon.
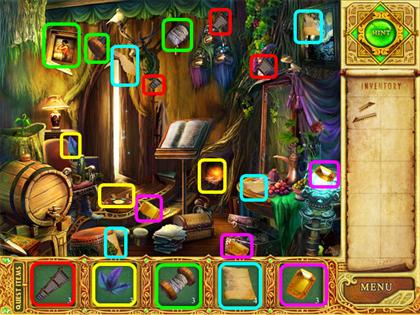
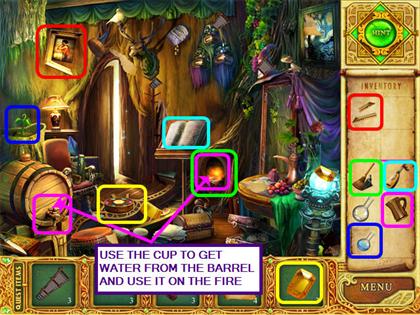
- Enter the wizard's home.
- Use the cup on the barrel tap.
- Pour the water onto the fire.
- Use the broom to sweep up ashes.
- Place the instrument with the sheet music.
- Place the gem in the slot of the newly revealed jeweled box.
- Exit the room and return to the wizard's workshop.
- Put the purple leaf and the green leaf in the beaker.
- Use the glass beaker on the stand.
- The potion will automatically go into your inventory.
- Return to the wizard's home and use the potion on the sapling.
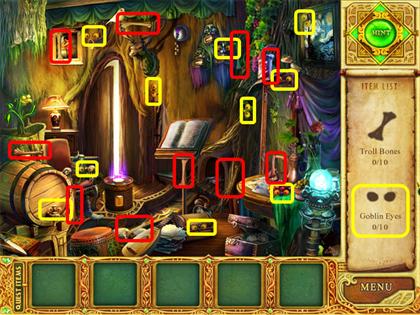
- Locate the 10 mint leaves.
- Locate the 10 troll bones and 10 goblin eyes.
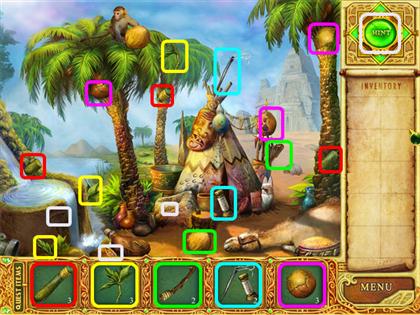
Ned Desert
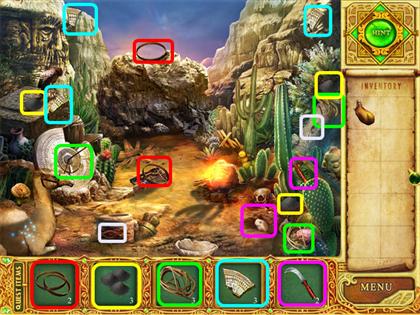
- Locate the pieces of the quest items as they become available.
- Place the herbs in the mortar.
- Use the pestle on the mortar.
- The medicine will go automatically into your inventory.
- Use the medicine on the sick camel.
- Throw the ball at the monkey.
- Use the needle and thread to repair the wineskin.
- Use the repaired wineskin on the water.
- Click on the camel to enter the desert.

- Locate the pieces of the quest items as they become available.
- Use the wineskin on the empty bowl.
- Place the rings on the barrel.
- Put the gun powder inside the barrel.
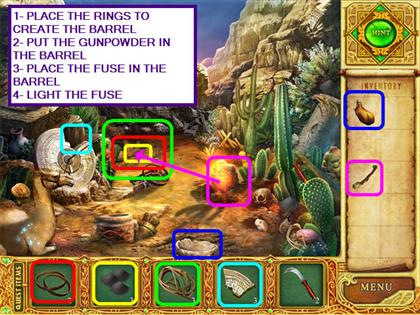
- Replace the missing piece of the sundial.
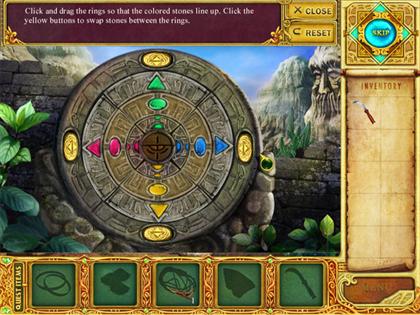
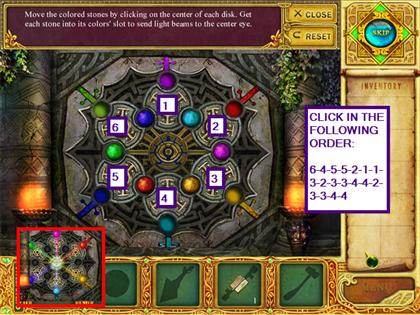
- Click on the sundial for a mini-game.
- The object of this mini-game is to line up all the colored stones.
- Click and drag the two rings around the center.
- Push the yellow buttons to swap stones.
- Watch Video on Big Fish Games Tips YouTube Channel
- Click on the camel to return to the desert's edge.
- Use the knife on the coconut.
- Click on the camel to return to the desert.
- Place the fuse in the barrel.
- Use the twig on the fire.
- Use the lit twig on the fuse.
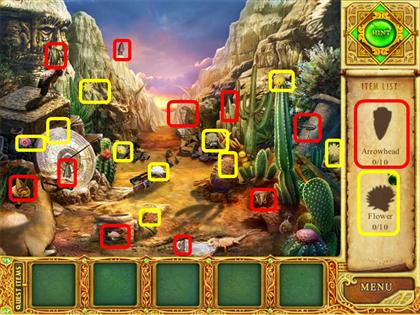
- Locate the 10 arrowheads and the 10 flowers.
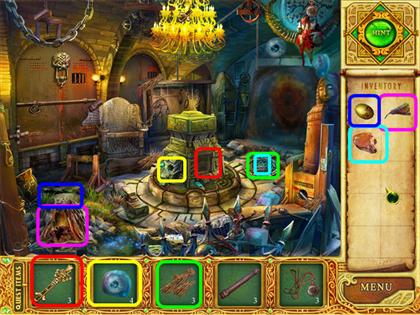
Loulan City
- Locate the pieces of the quest items as they become available.
- Use the drumsticks on the the shell.
- Replace the piece of the carving to reveal the temple.
- Enter the temple.
- Locate the pieces of the quest items as they become available.
- Place the moon on the cabinet.
- Put the tile in the empty spot.
- Exit the temple.
- Place the wheel on the cart.
- Put the dome on top of the building.
- Use the crowbar on the broken wall.
- Return to the temple and use the sun piece in the mural.
- Put the candle in the wall sconce.
- Replace the glass at the top of the church.
- Take note of the 3 digit number that appears on the floor.
- Look at the chest to activate a mini-game.
- Locate the six symbols that are at the top and bottom of the three dials.
- Turn the dials to 8-1-3.
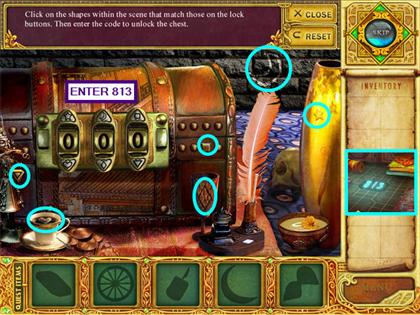
- Take the scroll from the open chest.
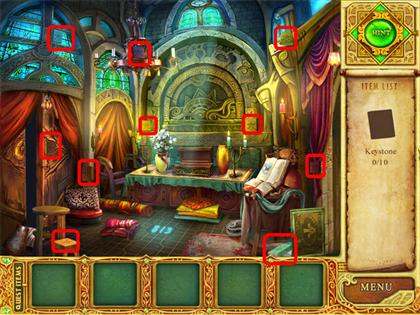
- Locate the 10 keystones.
- You are automatically returned to the Wizard's yard.
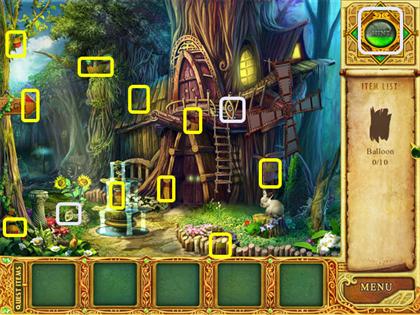
- Locate the 10 missing balloon pieces.
Trang City
- Locate the pieces of the quest items as they become available.
- Use the key on the lock.
- Light the firecrackers with the candle.
- Click on the doorway to enter the garden.
- Locate the pieces of the quest items as they become available.
- Place the dynamite near the bricked-in doorway.
- Use the detonator on the dynamite.
- Walk through the doorway to the inner garden.

- Locate the pieces of the quest items as they become available.
- Place the bonsai tree on the pedestal.
- Put the Yin-Yang symbol in the circle.
- Use the shovel on the mound of dirt.
- Exit the inner garden.
- Use the teapot on the water.
- Use the bell on the birdcage.
- Go back to the market area.
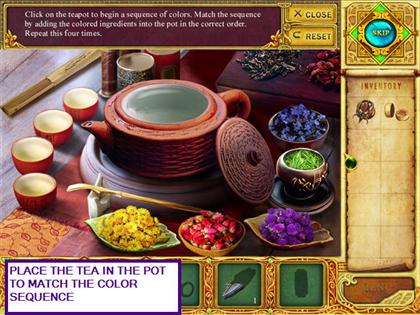
- Place the pot of water on the burner.
- Click on the teapot to open a mini-game.
- A color sequence will play in the teapots water.
- Choose the correct color tea and place the tea in the pot.
- You will need to complete 4 sequences.
- Red – Green – Blue.
- Yellow- Blue – Purple – Red.
- Purple -Yellow – Blue – Green – Blue.
- Green -Purple- Yellow – Purple – Red – Blue.
- Go to the garden.
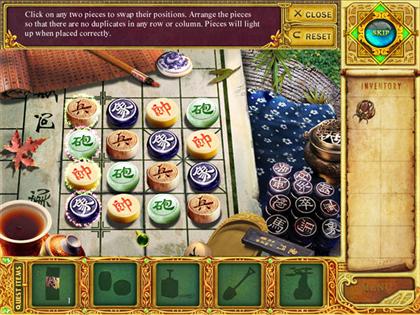
- Place the piece of the chessboard with the broken chessboard.
- Place the playing pieces on the board.
- Select the chessboard to open a mini-game.
- The object of this mini-game is to have one of each pieces in each row and column without any duplicates.
- Return to the inner garden and place the symbol on the rock.
- Use the hook and rope on the hole.
- Locate 10 runes and 10 jade.
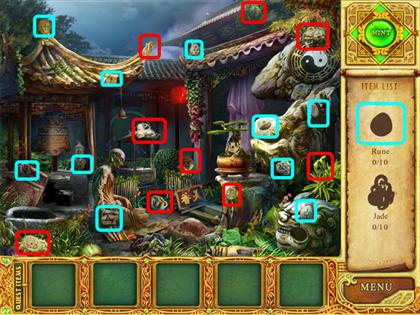
- You automatically fly back to the wizard's workshop.
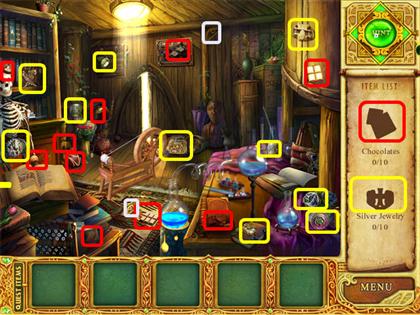
- Locate the 10 chocolates and 10 silver jewelry.
The Valley
- Locate the pieces of the quest items as they become available.
- Give the ham to the alligator.
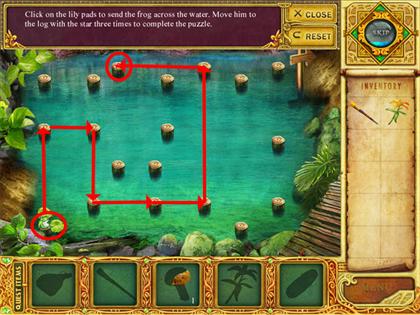
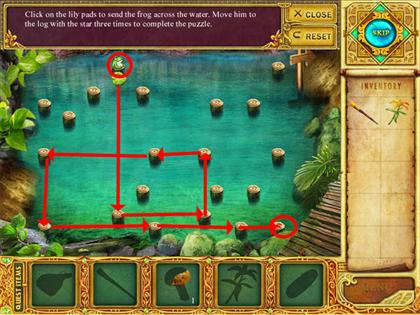
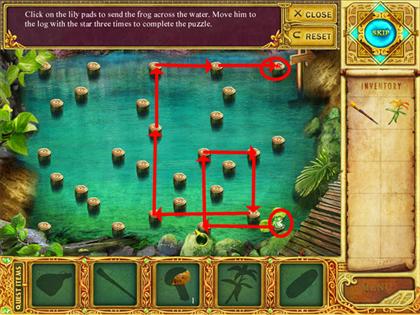
- Place the lily pad in the river.
- Click on the lily pads to activate a mini-game.
- The object is to move the frog safely across the water.
- You will need to do this three times.
- The lily pads indicate the direction the frog can move.
- Click on the lily pads to move.
- Walk to the depths of the forest.
- Locate the pieces of the quest items as they become available.
- Use the snake on the frog.
- Use the axe on the fence.
- Hang the mask on the wall.
- Use the paintbrush on the mask.
- Walk left, to the village.
- Locate the pieces of the quest items as they become available.
- Put the wormwood and tiger lily into the stew pot.
- Return to the river.
- Place the skull on the stand.
- Walk to the depths of the forest.
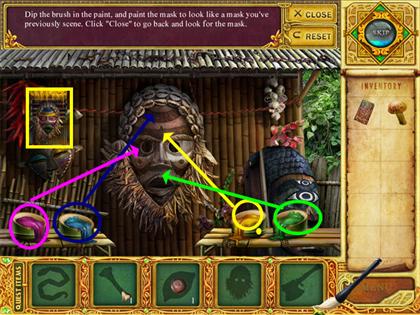
- Use the palette on the mask.
- Click on the mask to bring up a mini-game.
- Paint the mask to match the other mask in the scene.
- Dip the paintbrush in a color, then click on the area you want to paint.
- Place the pattern slate in the stone block.
- Read the recipe scroll.
- Walk left to the village.
- Place the eye in the totem.
- Put the mushroom in the stew pot.
- Use the bone to stir the pot.
- Put some pepper in the pot.
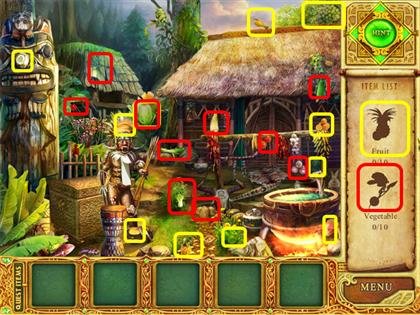
- Locate 10 fruit and 10 vegetables.
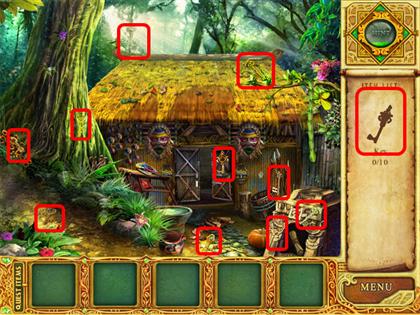
- Find the 10 keys.
The Seaside
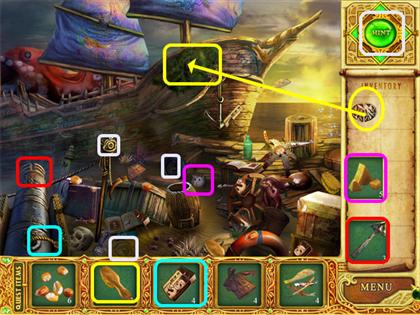
- Locate the pieces of the quest items as they become available.
- Give the rum to the captain.
- Use the weight on the hook to raise the safe.
- Click in the safe for a mini-game.
- The object object is to light up all the lights.
- Each button controls a set of lights.
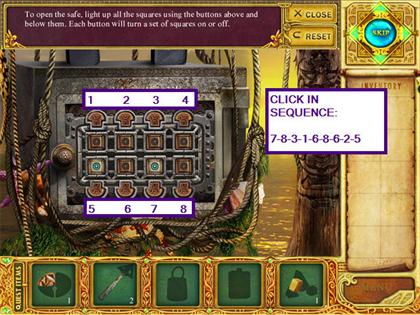
- Watch Video on Big Fish Games Tips YouTube Channel
- Walk right to the ship.
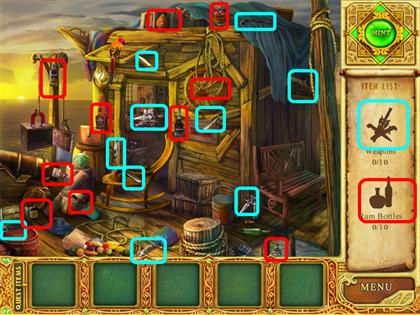
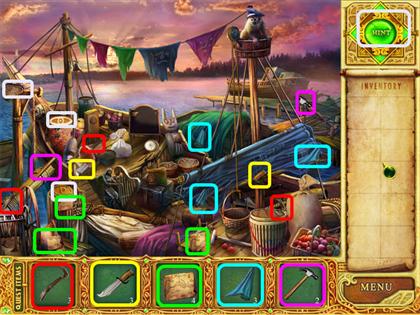
- Locate the pieces of the quest items as they become available.
- Use the brush to scrub away the moss.
- Place the emblem on the ship.
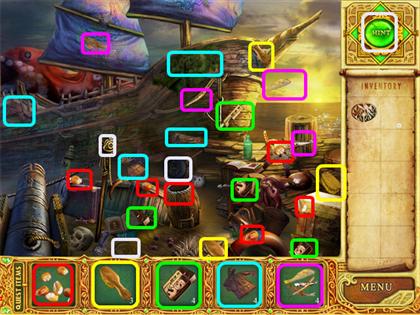
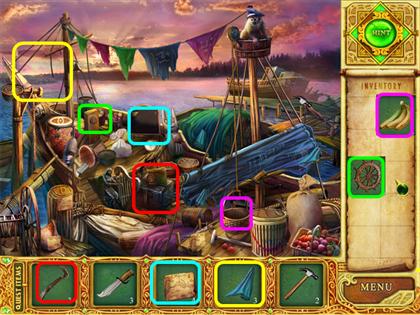
- Return to the tackle shop.
- Give the fish to the cat.
- Hang the coat on the frayed rope.
- Return to the ship and give the mouse the cheese.
- Return to the tackle shop and give the parrot the corn.
- Put the harpoon in th cannon.
- Use the matches to light the cannon.
- Locate the 10 weapons and the 10 rum bottles.
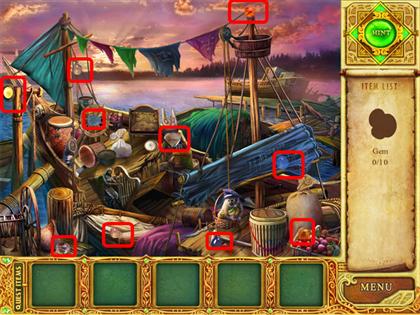
The Ship
- Locate the pieces of the quest items as they become available.
- Place the sail on the mast.
- Use the crowbar to move the cargo.
- Enter the hold of the ship.
- Locate the pieces of the quest items as they become available.
- Use the knife on the sack.
- Place the record on the Victrola.
- Use the hammer on the nailed cupboard.
- Use the pliers on the sharks mouth.
- Use the oil can on the safe.
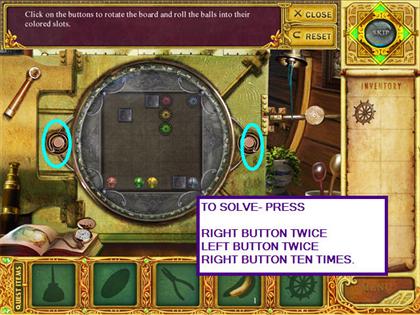
- Click on the safe to activate a mini-game.
- The object is to place the balls in the matching, colored spots.
- Turn the grid by pressing either the right or left buttons.
- To solve, press the right button twice, left button twice, and the right button ten times.
- Return to the deck.
- Place the bananas in the basket.
- Put the map on the board.
- Click on the map for a jigsaw-style mini-game.

- Place the wheel on the helm.
- Locate the ten gems.
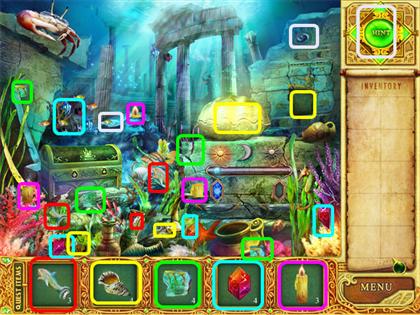
Atlantis
- Locate the pieces of the quest items as they become available.
- Use the hammer on the vase.
- Place the sphere in the stand.
- Place the gems in the rock grate and click on them to open a mini-game.
- The object is to move the colored balls into the matching slots.
- Starting at the top and numbering the dials clockwise, click these dials: 6-4-5-5-2-1-1-3-2-3-3-4-4-2-3-3-4-4.
- Locate the pieces of the quest items as they become available.
- Use the shark on the school of fish.
- Place the crystal in the slot.
- Place the fresco piece into the wall.
- Return to the island.
- Place the candle and the shell on the altar.
- Return under the sea.
- Use the double key on the crab.
- Use the pair of keys on the chest.
- Take the staff piece.
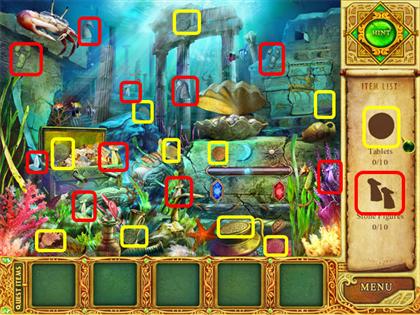
- Locate the 10 tablets and 10 stone figures.
- You are automatically back at the wizard's home.
- Locate the 10 sunshine orbs and the 10 raindrop pops.

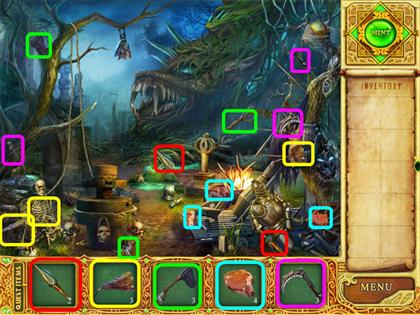
The Battlefield
- Locate the pieces of the quest items as they become available.
- Use the sickle on the vines.
- Use the javelin on the eye that was under the vines.
- Use the net to take the golden egg.
- Walk into the tree.

- Locate the pieces of the quest items as they become available.
- Place the eyeball in the skull.
- Place the straw on the trap.
- Return to the battlefield.

- Use the stick on the turnstile.
- Push the turnstile to raise the skeleton.
- Use the amulet on the bat.
- Return to the tree.
- Use the bellows on the dying fire.
- Place the meat on the straw.
- Place the egg on the hot fire.
- Use the key on the keyhole.
- Open the trap by clicking on the hand print.
Created at: 2009-08-20