

Walkthrough Menu
- General Tips
- Chapter 1: Mrs. Lawson and the Cleaning Lady
- Chapter 2: Three Dirty Windows
- Chapter 3: Magnolia’s Crayons and the Cellar Rats
- Chapter 4: Lewis and the Attic
- Chapter 5: The Tavern
- Chapter 6: Cooter and Charlotte Landry
- Chapter 7: Pippi’s Trash
- Chapter 8: Momma Aimee
- Chapter 9: Lewis and the Graveyard Keys
- Chapter 10: The Graveyard and the Secret Passage
- Chapter 11: Toilet, Shack and Computer Password
- Chapter 12: Find MAP STAMPS and Raise Cannons
- Chapter 13: The 13th Skull
General Tips
- Mystery Case Files: 13th Skull is a Hidden Object Puzzle Adventure.
- The best way to use this walkthrough is by clicking on the 'CTRL' and 'F' keys on your keyboard to simultaneously bring up a search box.
- Type the keyword into the search box at the bottom of your screen and click on 'NEXT' to find the section you need help with. Clicking 'NEXT' again will bring up all instances in which that keyword was mentioned in the guide.
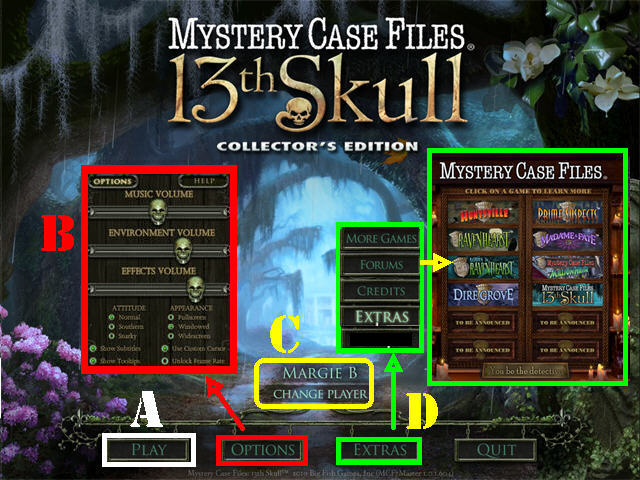
- Click on PLAY (A) to begin your adventure.
- The OPTIONS (B) button allows you to adjust the environment, effects, music, cursor, attitude, appearance, and sound.
- The CHANGE PLAYER button (C) can be used to manage your profiles in the game.
- The EXTRAS (D) tab has the MORE GAMES, FORUMS, and CREDITS, and EXTRAS.
- Clicking randomly in a Hidden Object Scene will make several leaves appear on the screen.
- Use the arrows (marked in purple) on the sides of the inventory tray to scroll through all possible options.
- Talk to all the character’s in the game and exhaust all conversation possibilities to obtain clues regarding the game.
- If you wish to skip some of the dialogue, hover your mouse over the character and click on them when you see ‘Skip Dialogue’; do so for each topic of conversation.
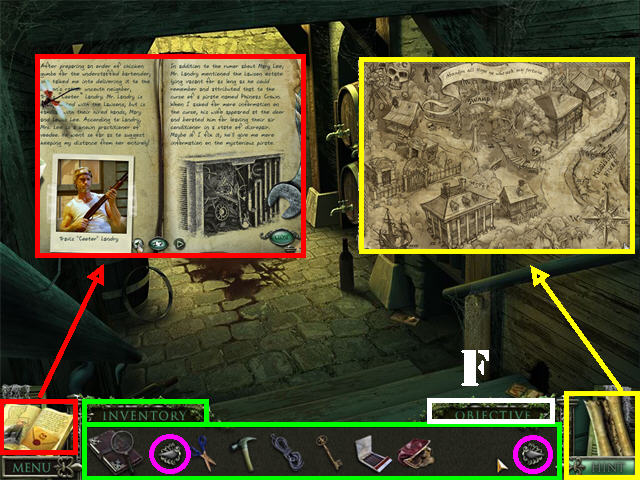
- The objectives (F) panel above the inventory tray shows the items you need to find.
- Once an inventory item has been picked up it will be added to your inventory tray below the Objective.
- Hover your mouse at the bottom of the screen to make the inventory tray appear.
- Click on the HINT in the lower right corner if you get stuck in the game.
Chapter 1: Mrs. Lawson and the Cleaning lady
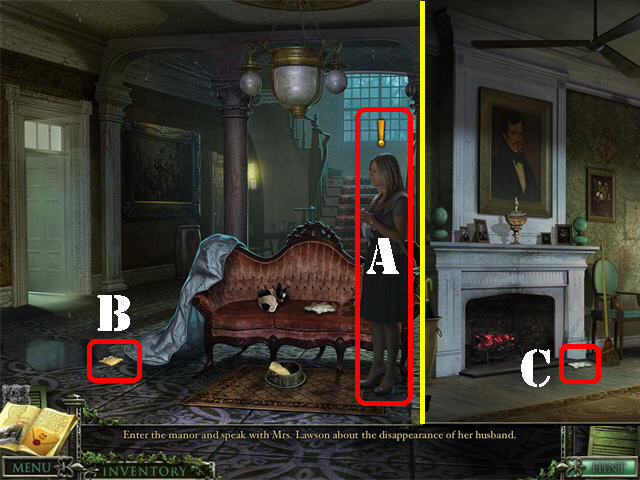
- Go inside the mansion and talk to Mrs. Lawson (A) about her husband. Exhaust all conversation possibilities.
- She will ask you to find all the MAP PIECES.
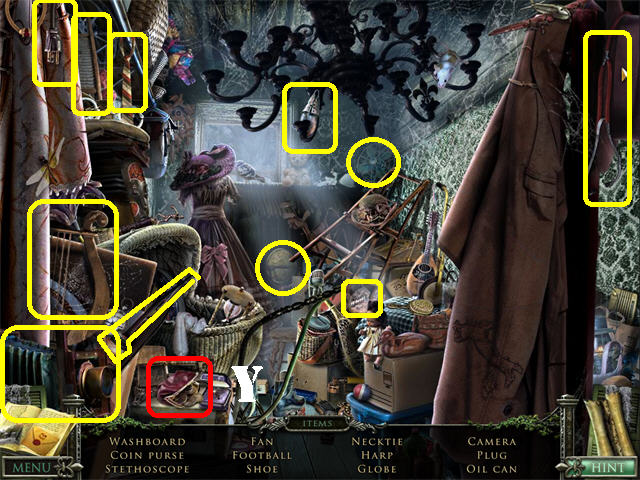
- Take MAP PIECE 1/ 6 (B) on the left side of the ground.
- Head right into the Sitting Room.
- Take MAP PIECE 2/ 6 (C) by the fireplace.
- Click down and head left into the Dining Room.
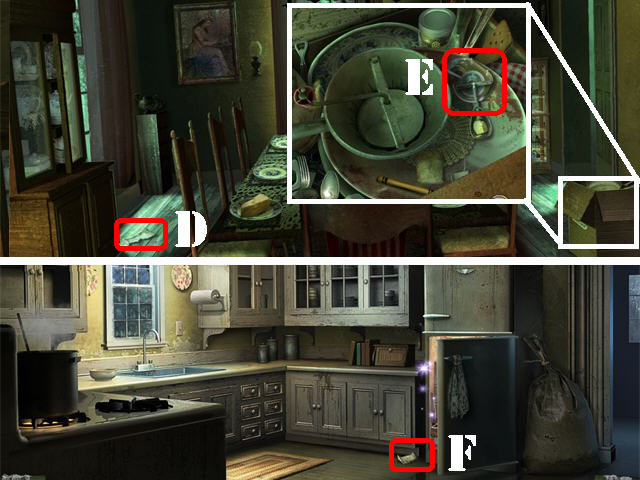
- Take MAP PIECE 3/ 6 (D) on the left side of the ground.
- Zoom into the box in the lower right corner; take the TAPE DISPENSER (E).
- Head right into the Kitchen.
- Take MAP PIECE 4/6 (F) by the refrigerator.
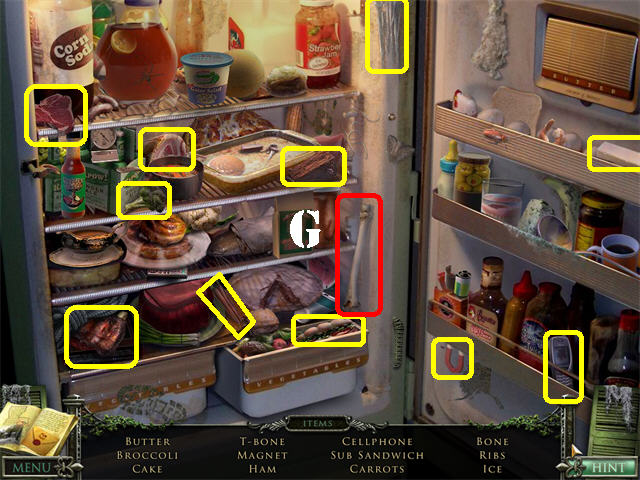
- Open the refrigerator to trigger a search scene.
- The BONE (G) will be added to inventory after your search.
- Go right into the Pantry.
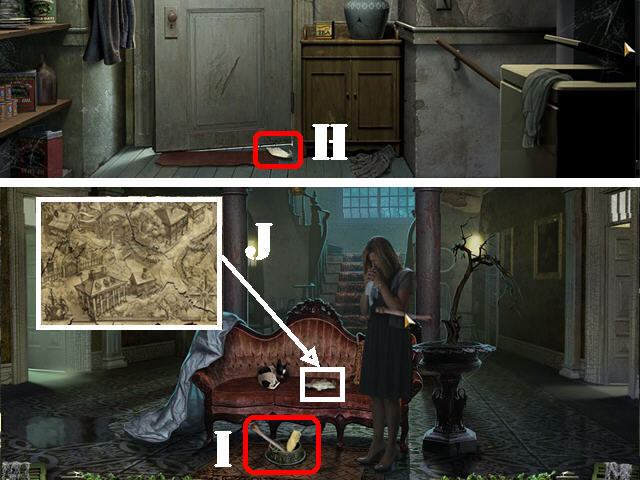
- Take MAP PIECE 5/6 (H) by the door.
- Return to the Foyer.
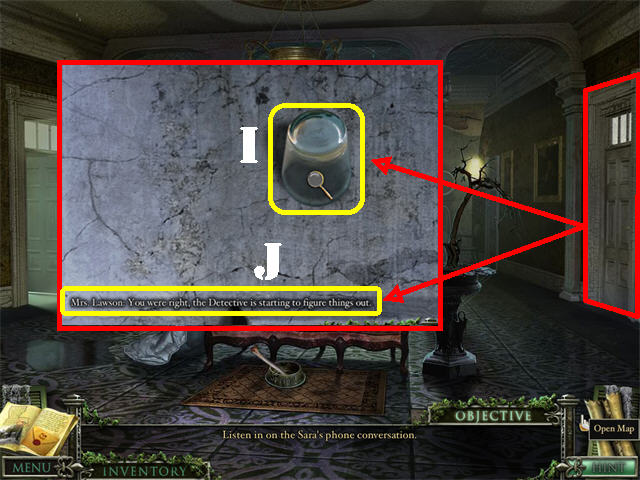
- Zoom into the dog bowl by the couch; place the BONE in the bowl and the MAP PIECE will fall on the ground (I).
- Take MAP PIECE 6/6 next to the bowl.
- Zoom into the map on the couch (J).
- Place the 6 MAP PIECES on the board.
- Place the TAPE DISPENSER over the map.
- The MYSTERIOUS MAP will be added to the lower right corner of the scene.
- Talk to Mrs. Lawson and she will ask you to speak to Mary Lee upstairs.
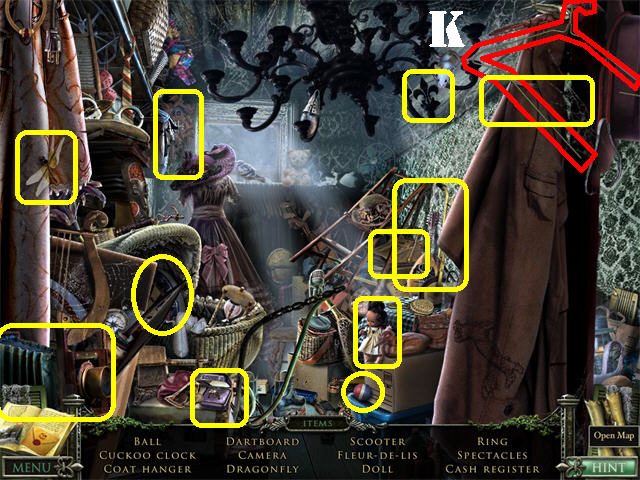
- Go forward, up the steps, make a left and enter the Master Bedroom on the right.
- Talk to Mary Lee, the cleaning lady, and exhaust all conversation possibilities.
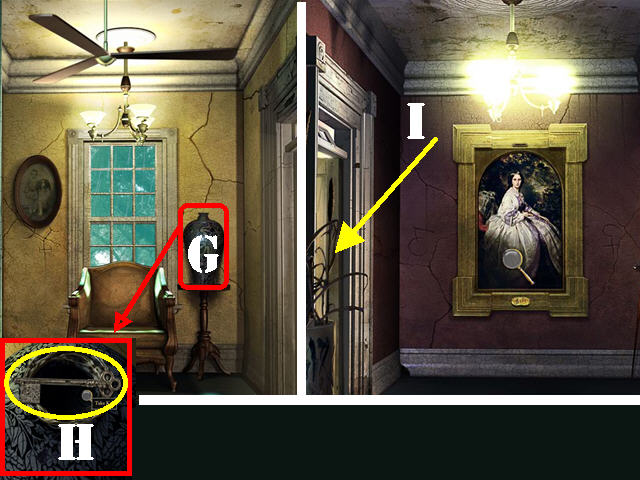
- Open the closet door on the right to activate a search scene.
- The COAT HANGER (K) will be added to inventory after your search.
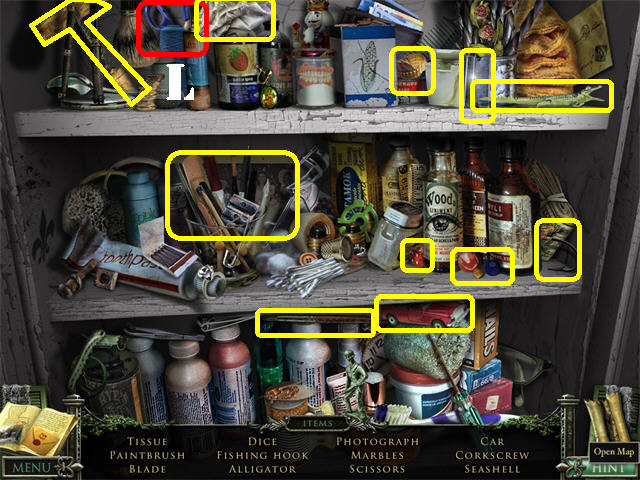
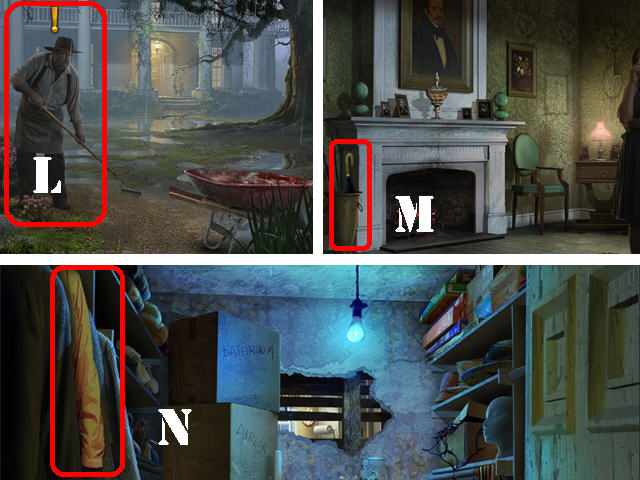
- Click down twice, make a right and head right into the Bathroom.
- Open the cabinet to trigger a search scene.
- The SCISSORS (L) will be added to inventory after your search.
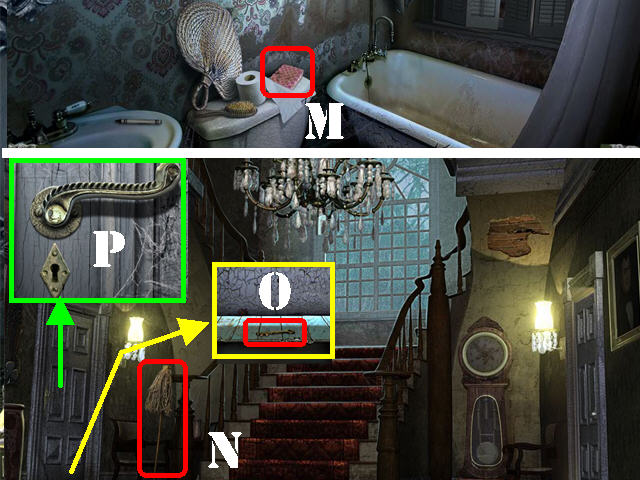
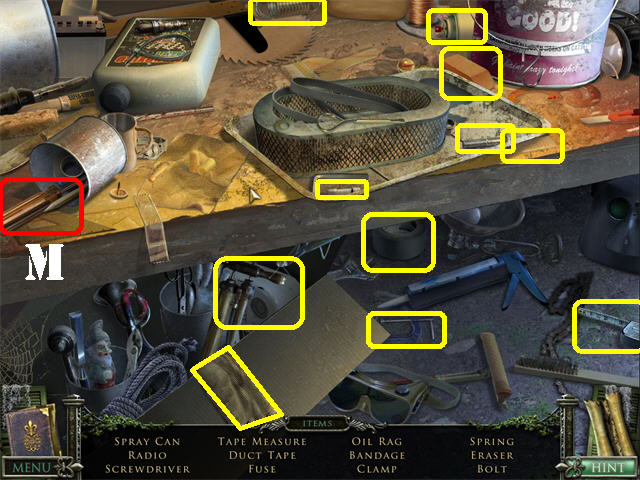
- Take the SPONGE (M) above the toilet.
- Click down 3 times to move to the Staircase.
- Take the MOP (N) by the left side of the staircase.
- Zoom into the bottom of the left door (O).
- Place the COAT HANGER at the bottom of the door to retrieve the KEY underneath.
- Take the CLOSET KEY.
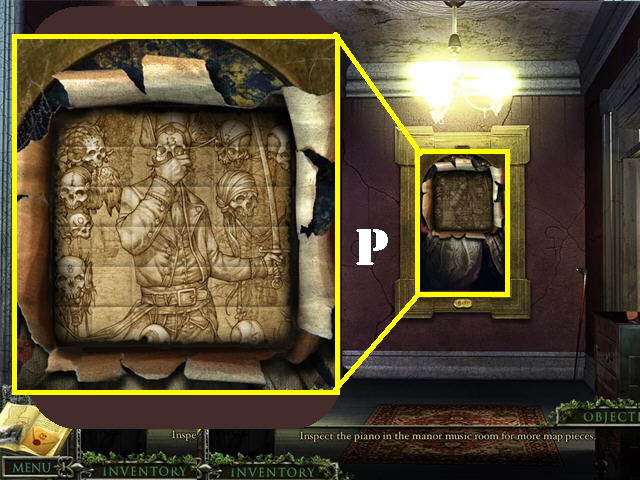
- Zoom into the doorknob; place the CLOSET KEY into the keyhole and go into the door (P).
- Open the second dresser drawer to trigger a search scene.
- The OIL CAN (Q) will be added to inventory after your search.
- Take the VACUUM CLEANER (R) in the lower right.
- Exit the closet, click down, and go through right door to access the Sitting Room.
- Take the BROOM (S) by the fireplace.
- Return to the Pantry.
- Take the SOAP (T) in the upper right shelf.
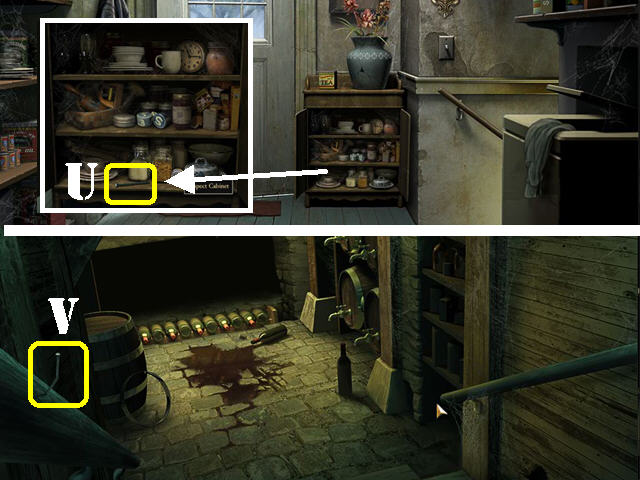
- Open the cabinet by the door, zoom into it and take the SCRUBBING BRUSH (U).
- Go through the back door, and enter the shed.
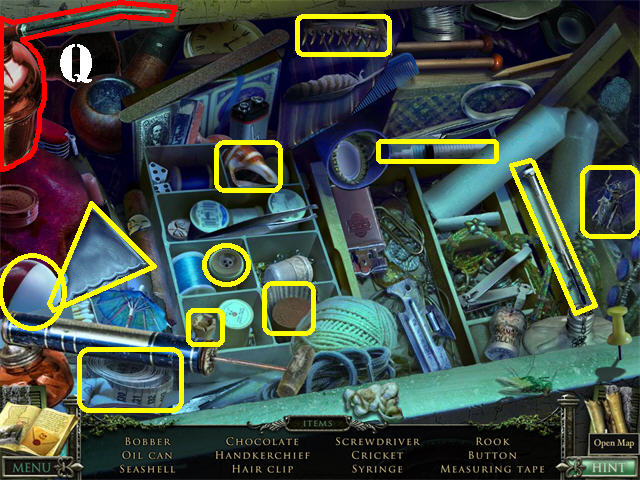
- Play the Hidden Object Scene on the left to obtain the HAMMER (V).
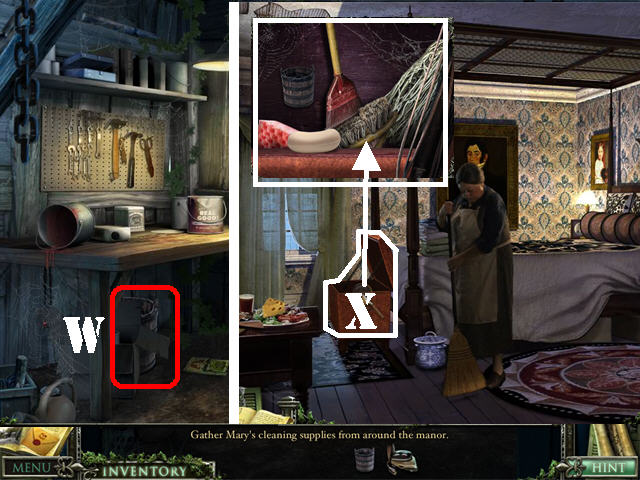
- Grab the BUCKET (W) below the workbench.
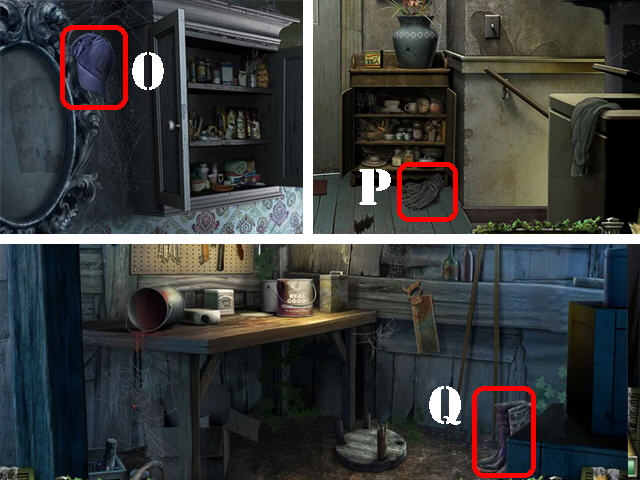
- Return to the Master Bedroom by the Left Hallway upstairs.
- Open the chest by the bed and zoom into it (X).
- Place the BUCKET, SCRUBBING BRUSH, VACUUM CLEANER, SPONGE, MOP, BROOM, and SOAP into the chest.
- Talk to Mary Lee in the bedroom; exhaust all conversation possibilities.
- Take the MUSIC ROOM KEY and the WET RAG from her hand after she has finished talking.
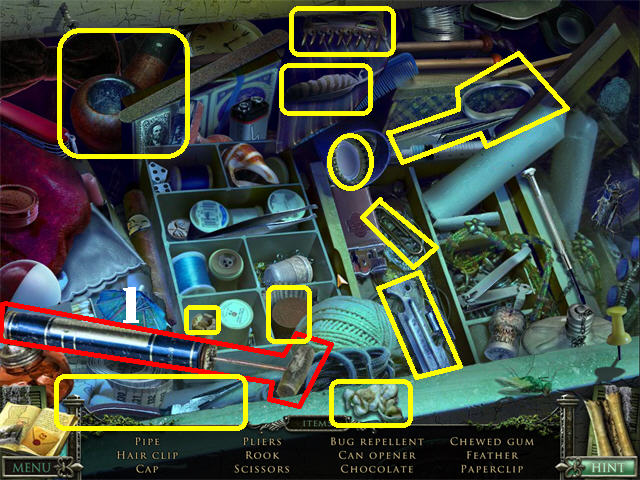
Chapter 2: Three Dirty Windows
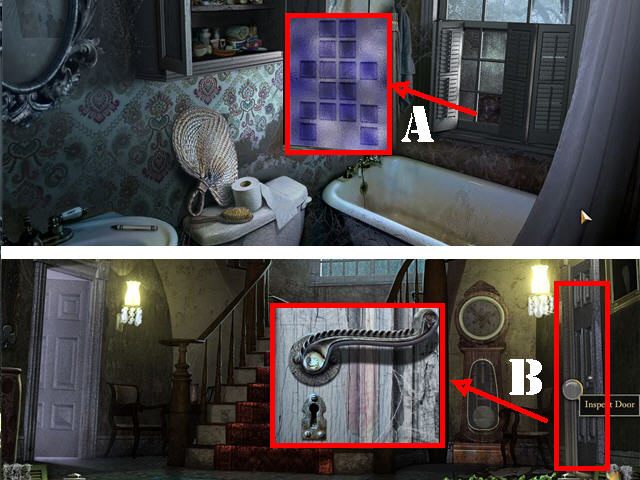
- Go to the Bathroom on the Right Hallway.
- Place the OIL CAN on the left shutter and open it.
- Zoom into the window.
- Clean the window with the WET RAG until the rag goes back into inventory.
- Count the number of squares on the window. The number of squares is unique to your game.
- Go down to the Staircase.
- Inspect the door on the right (B).
- Place the MUSIC ROOM KEY in the keyhole and go through the door.
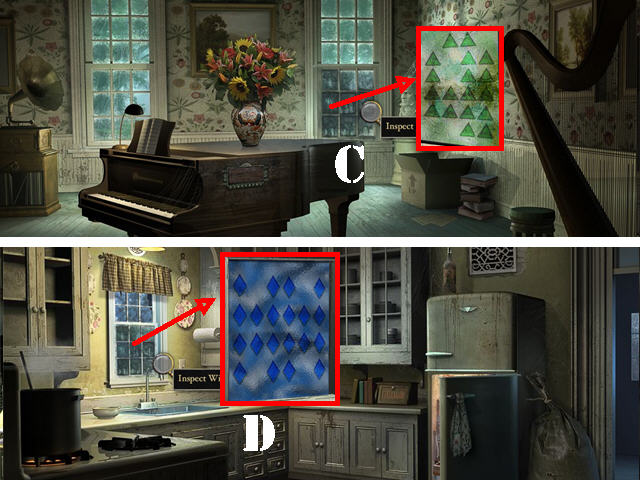
- Zoom into the right window (C).
- Clean the window with the WET RAG until the rag goes back into inventory.
- Count the number of triangles on the window. The number of triangles is unique to your game.
- Return to the Kitchen.
- Zoom into the window above the sink (D).
- Clean the window with the WET RAG until the rag goes back into inventory.
- Count the number of diamonds on the window. The number of diamonds is unique to your game.
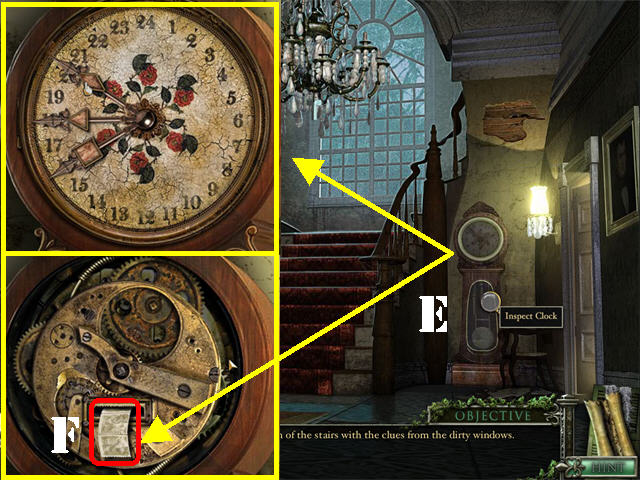
- Go to the Staircase.
- Inspect the clock in the back (E).
- Using the unique amount of squares, diamonds, and triangles you found on the windows in the Manor, set the clock hands on the correct numbers according to the shape at the end of the clock hand.
- Once all the hands have been placed correctly the clock face will open automatically.
- In the example in our game, the square hand belongs on 16, the triangle on 18, and the diamond on 20.
- Take the 2 MAP STAMPS (F) that appear in the clock.
- Return to the Master Bedroom.
- Talk to Mary Lee and exhaust all conversation options.
Chapter 3: Magnolia’s Crayons and the Cellar Rats
- Exit the Master Bedroom to access the Hallway.
- Inspect the Vase by the door (G).
- Place the OIL CAN inside the vase 3 times, reach inside the vase and take the BEDROOM SPARE KEY (H).
- Go into the Right Hallway.
- Inspect the door on the left; place the BEDROOM SPARE KEY into the keyhole and go inside (I).
- Talk to Magnolia and exhaust all conversation options to obtain the next objective.
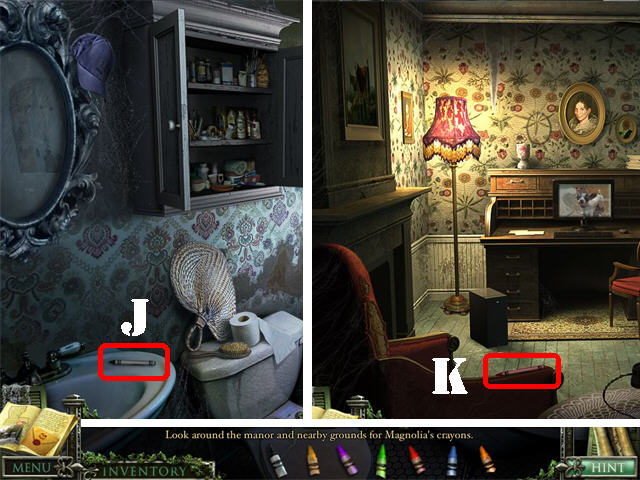
- Return to the Bathroom.
- Take the BLACK CRAYON (J) on the sink.
- Return to the Music Room and go left into the Den.
- Take the RED CRAYON (K) on the red chair in the lower right.
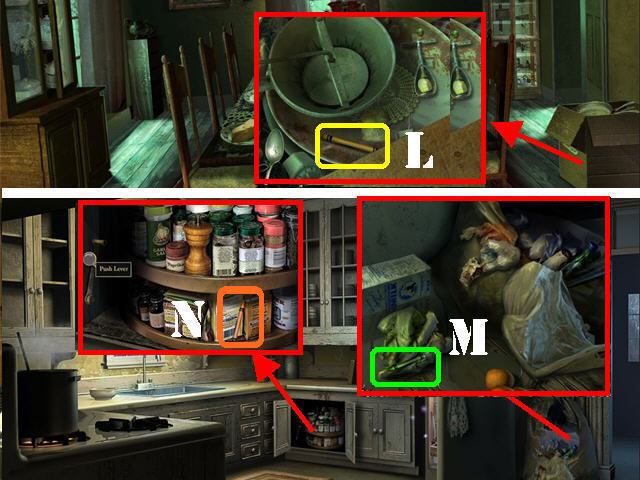
- Return to the Dining Room.
- Inspect the moving box in the lower right; take the YELLOW CRAYON (L).
- Go into the Kitchen.
- Open the trash bag by the fridge with the SCISSORS; take the GREEN CRAYON (M).
- Open the bottom cabinet close to the fridge.
- Inspect the Lazy Susan; turn the handle twice and take the ORANGE CRAYON (N).
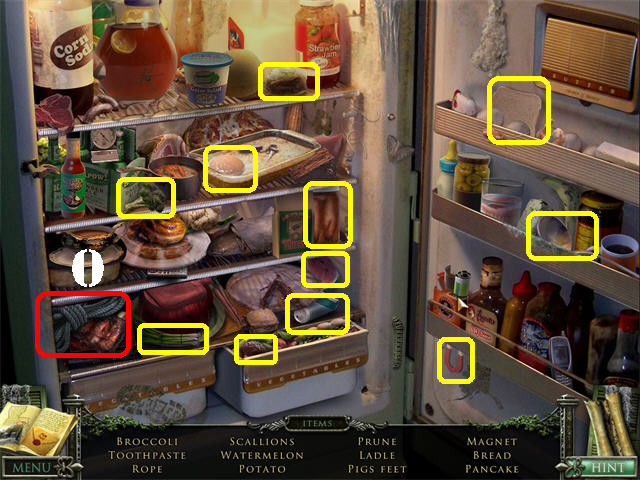
- Play the Hidden Object Scene by the fridge to obtain the ROPE (O).

- Go out the back door by the pantry.
- Zoom into the barbecue grill outside the Shed; take the BLUE CRAYON (P).
- Go into the Shed.
- Knock down the Rake Handle in the lower right. (Q).
- Take the PURPLE CRAYON (R) in the lower right corner.
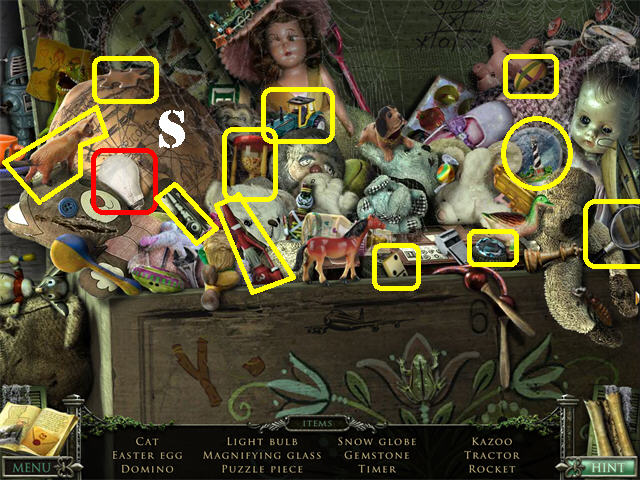
- Return to Magnolia’s Room.
- Open the toy chest in the lower right to trigger a search scene.
- The LIGHT BULB (S) will be added to inventory after your search.
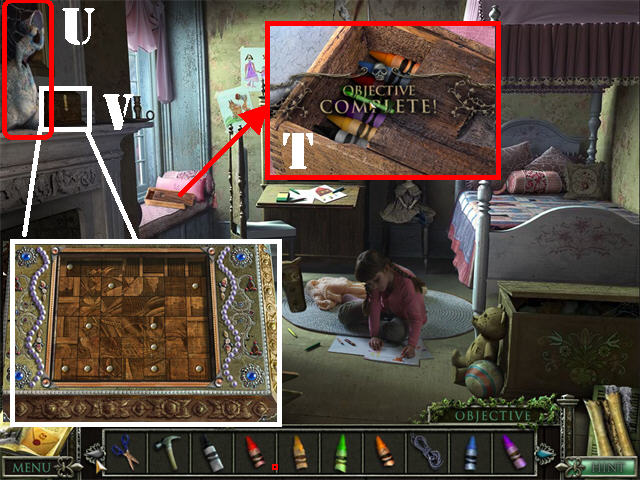
- Inspect the crayon box by the window (T).
- Place the ORANGE CRAYON, RED CRAYON, YELLOW CRAYON, BLACK CRAYON, BLUE CRAYON, GREEN CRAYON and PURPLE CRAYON into the box.
- Talk to Magnolia and exhaust all conversation possibilities.
- Move aside the doll above the fireplace (U).
- Open the jewelry box to trigger a puzzle (V).
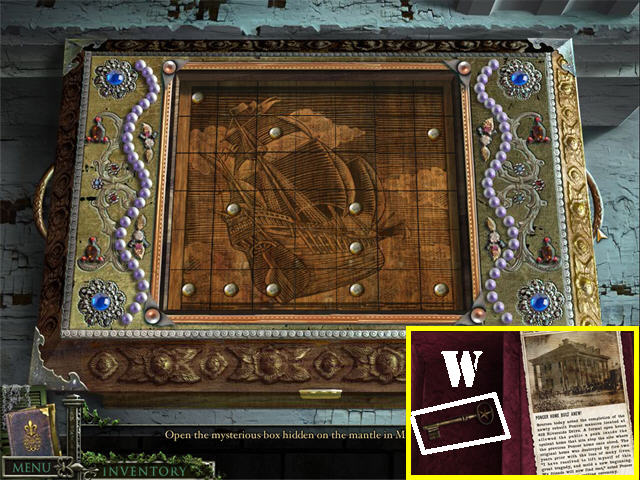
- Click on the tiles to reset the image on the jewelry box.
- Click on a tile and it will rotate the one you touched and the surrounding tiles.
- The tiles with the silver pins will not move, however, clicking on them will move the neighboring tiles.
- Start by positioning the tiles on the lower right first and doing the lower left corner last. The beginning configuration for this puzzle is random.
- Please look at the screenshot for the final image.
- Check out our video solution!
- Take the STAR SYMBOL KEY (W) in the box after the puzzle has been completed.
- The newspaper clipping on right gives you the date in which the house was built; please look for the date in your game.
- Talk to Magnolia and exhaust all conversation possibilities.
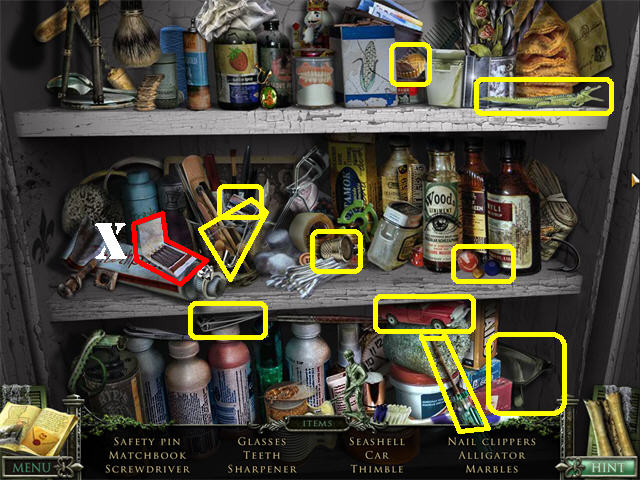
- Go to the Bathroom.
- Play the Hidden Object Scene to obtain the MATCHBOOK (X).
- Go to the Master Bedroom.
- Play the Hidden Object Scene to obtain the COIN PURSE (Y).
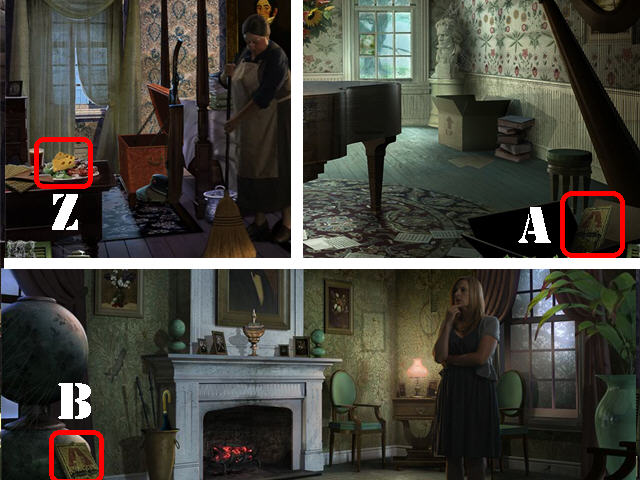
- Take CHEESE 1/3 (Z) on the table in the lower left side of the Master Bedroom.
- Go to the Music Room; take the LARGE MOUSETRAP 1/3 (A) in the box in the lower right corner.
- Return to the Sitting Room; take the LARGE MOUSETRAP 2/ 3 (B) in the lower left corner.
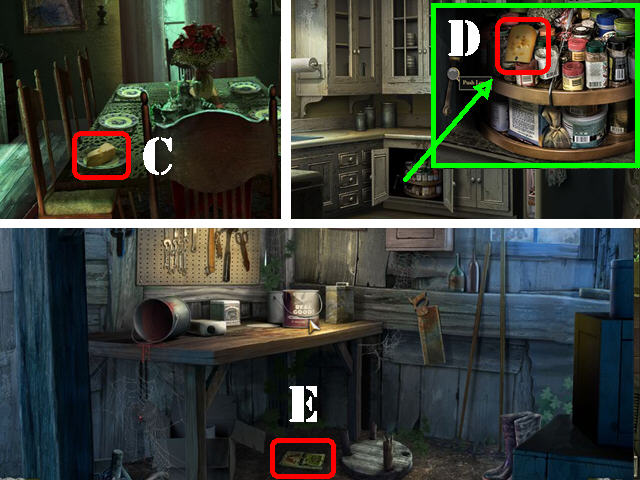
- Go into the Dining Room: take CHEESE 2/3 (C) on the table.
- Go into the Kitchen.
- Inspect the Lazy Susan; click on the handle and take CHEESE 3/3 (D).
- Go into the Shed; take LARGE MOUSETRAP 3/3 (E) below the workbench.
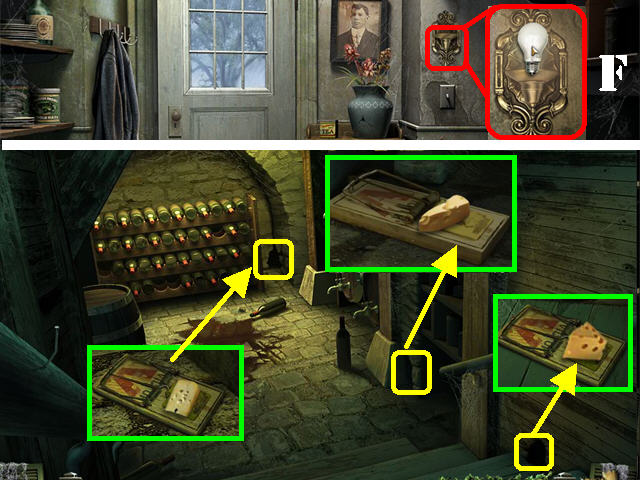
- Go to the Pantry.
- Inspect the light fixture by the steps; place the LIGHT BULB (F) in the fixture.
- Go down to the Wine Cellar.
- Inspect the 3 rat holes marked in yellow in the screenshot and; place one MOUSETRAP in each rat hole.
- Also place one CHEESE wedge on each of the 3 LARGE MOUSETRAPS.
- Go back to the Pantry and wait until all 3 rats have been caught. The message: “That sounded like the last trap! I should go have a look.” will appear when done.
- Return to the Wine Cellar.
- Inspect all 3 rat holes and take the 3 RATS.
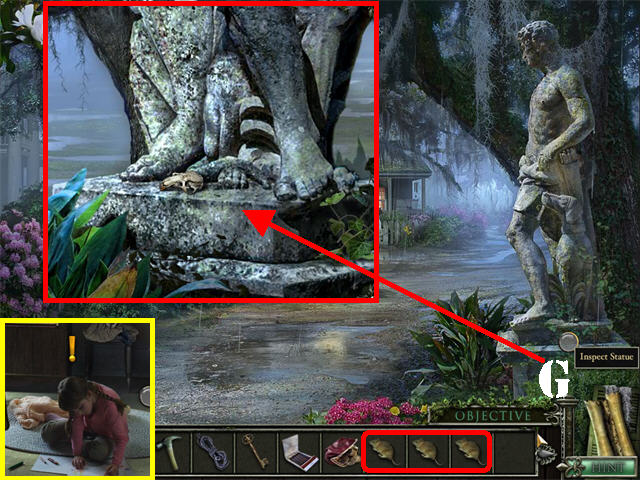
- Go to the Front Yard and make a right towards the Carriage House Path.
- Inspect the base of the statue (G).
- Place the 3 RATS IN MOUSETRAP at the base of the statue.
- Return to Magnolia’s Bedroom.
- Talk to Magnolia and exhaust all conversation options.
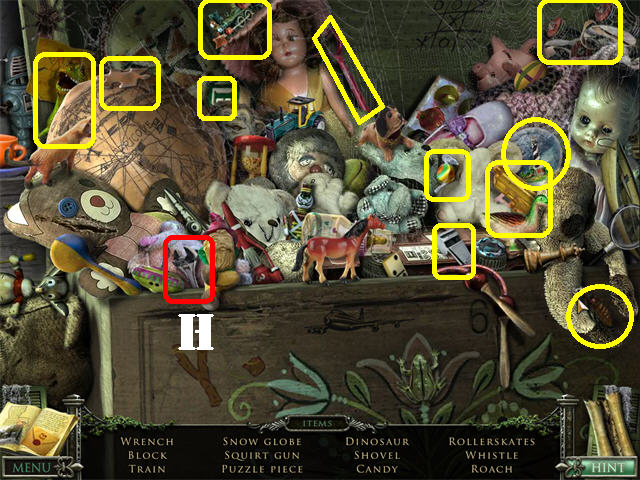
- Play the Hidden Object Scene in Magnolia’s Room to obtain the WRENCH (H).
- Return to the Wine Cellar.
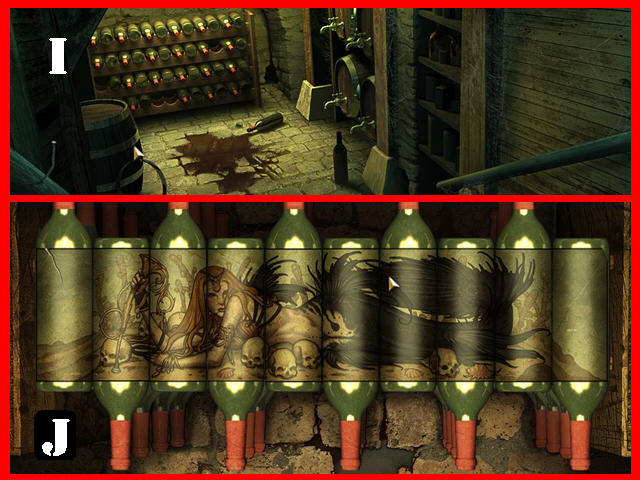
- Inspect the Wine Rack in the back of the cellar to trigger a puzzle (I).
- Arrange the labels on the bottle to form the correct image.
- Click on a bottle to pick it up.
- Move the bottle to the spot you want to place it in and the other bottles will slide to the side.
- Flip a bottle by left-clicking it while it is at the bottom and place it in the right spot.
- Check out our video solution!
- Please look at the screenshot for the final image (J).
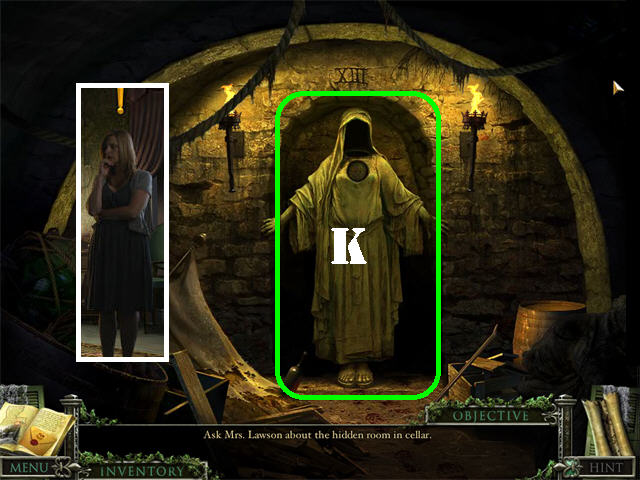
- Go through the wall to access the Secret Room.
- Inspect the figure on the back wall (K).
- Return to the Sitting Room.
- Talk to Mrs. Lawson and exhaust all conversation options.
Chapter 4: Lewis and the Attic
- Go to the Front Yard.
- Talk to Lewis and exhaust all conversation options (L).
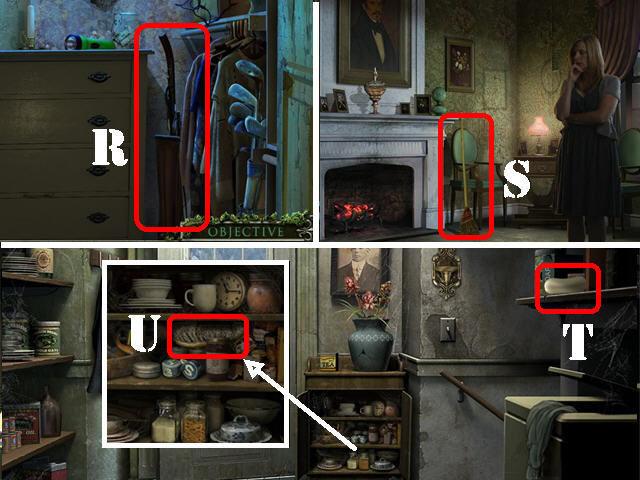
- Go to the Sitting Room; take LEWIS’ UMBRELLA (M) next to the fireplace.
- Go to the Closet; take LEWIS’ COAT (N) in the upper left.
- Go to the Bathroom; take LEWIS’ CAP (O) in the upper left.
- Go to the Pantry; take LEWIS’ GLOVES (P) on the ground.
- Return to the Shed; take LEWIS’ BOOTS (Q) on the lower right.
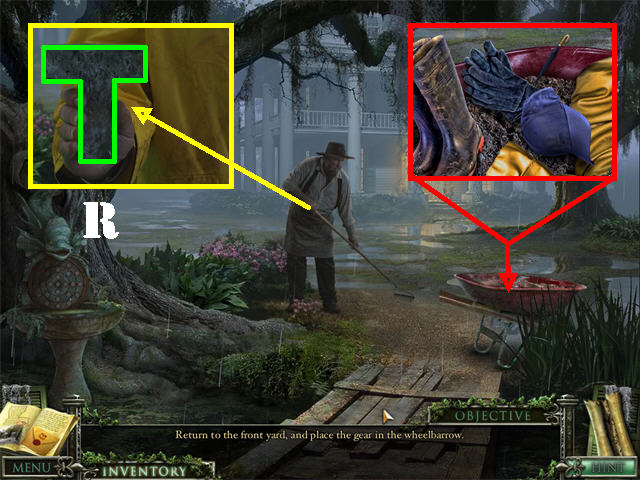
- Return to the Front Yard.
- Inspect the wheelbarrow; place LEWIS’ UMBRELLA, RAINCOAT, BOOTS, COAT, and GLOVES into the wheelbarrow.
- Click on Lewis; take T SHAPE 1/3 (R) from Lewis’ hand.
- Talk to Lewis and exhaust all conversation options.
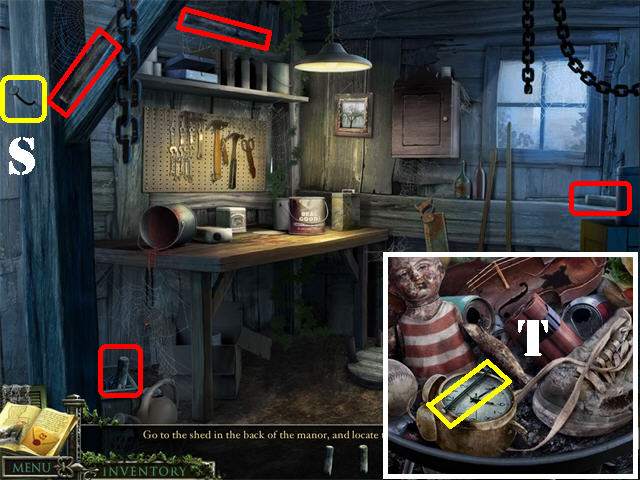
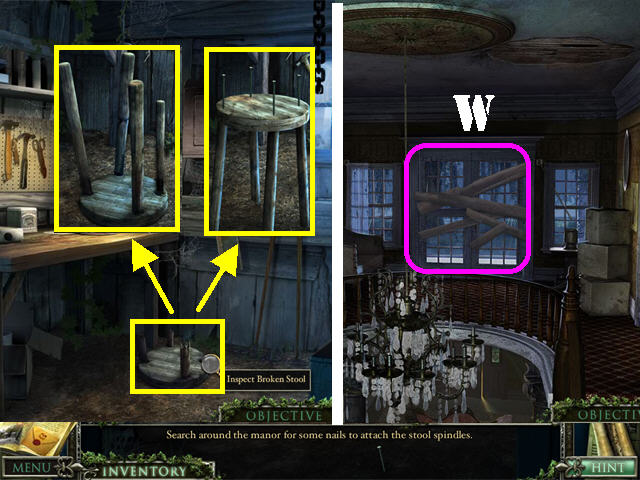
- Return to the Shed.
- Take the 4 STOOL SPINDLES marked in red.
- Take the NAIL 1/4 (S) in the upper left.
- Exit the shed.
- Open the grill; take NAIL 2/4 (T).
- Return to the Pantry.
- Inspect the cabinet; take NAIL 3/4 (U) in the bottom shelf.
- Go down to the Wine Cellar.
- Remove NAIL 4/4 (V) in the lower left with the HAMMER.
- Return to the Shed.
- Inspect the broken stool.
- Place the 4 STOOL SPINDLES on the broken stool.
- Place the 4 NAILS on top of the stool.
- Hammer in the 4 NAILS with the HAMMER.
- Take the STOOL.
- Go to the Stair Top.
- Inspect the Barred Doorway; remove the 5 boards with the HAMMER (W).
- Move to the Balcony.
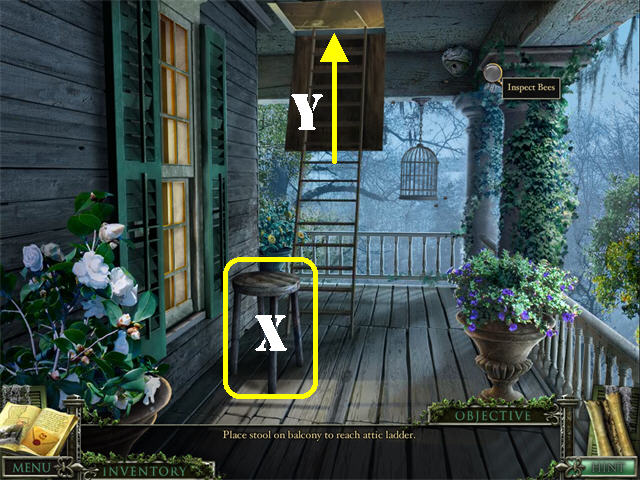
- Place the STOOL by the window (X).
- Inspect the Attic Door; go into the Attic (Y).
- Inspect the chest in the lower right to trigger a puzzle.
- Use the buttons to change the colors of the contraption to all blue once and then all orange to unlock it.
- The Blue Button (B) moves the center 3 spaces.
- The Orange Button (O) rotates the center 2 spaces.
- To solve the first part of the puzzle, click on the buttons in this manner: O X 1, B X 2, O X 1, B X 1, 0 X 2.
- To solve the second part of the puzzle, click on the buttons in this manner: O X 3, B X 1, O X 2.
- Check out our video solution!
- Inspect the chest again.
- Take the MOON SYMBOL KEY (Z).
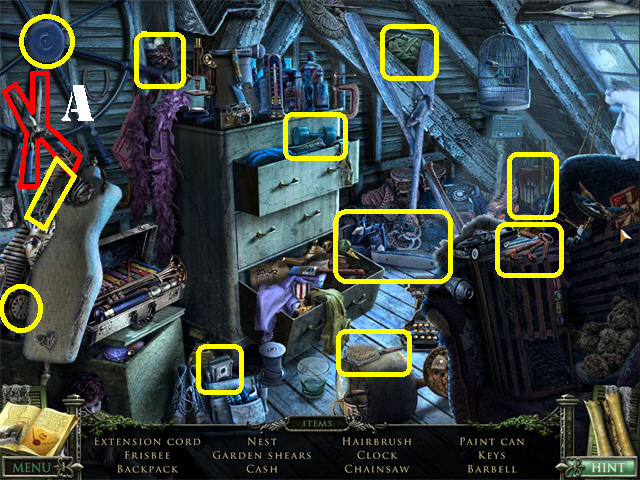
- Play the Hidden Object Scene to obtain the GARDEN SHEARS (A).
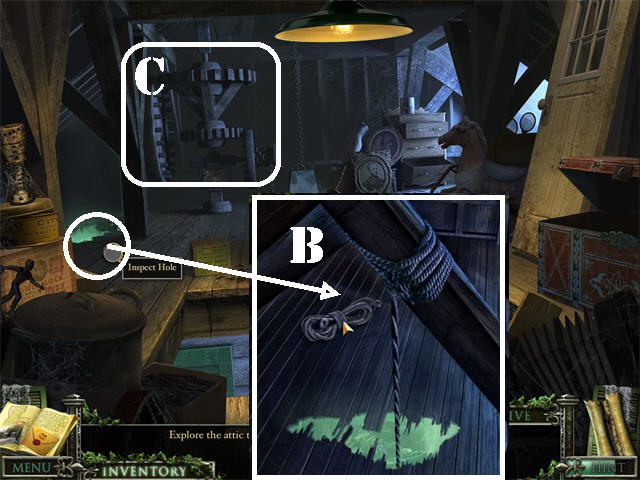
- Inspect the Hole on the left; place the ROPE around the beam (B).
- Inspect the machinery in the back to trigger a puzzle (C).
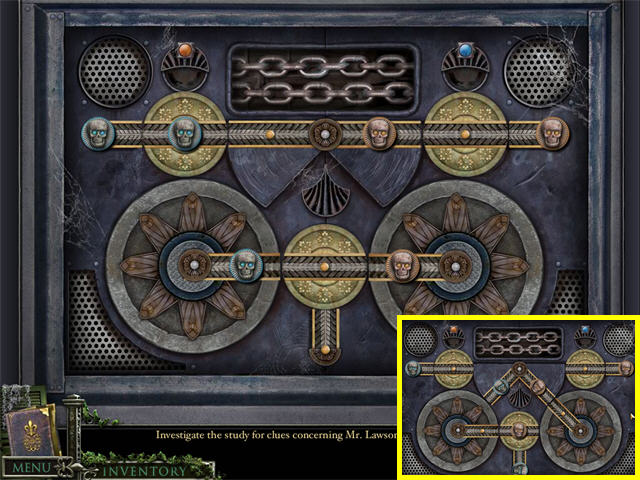
- Slide the pieces along the tracks to place all the pieces into their matching colored slots in the upper part of the puzzle.
- Click on the tracks to move them. Use the tracks to move the pieces into the other areas.
- Check out our video solution!
- Solving this puzzle will lower the chandelier down to the Staircase.

- Climb down the ROPE in the lower left to access the Study.
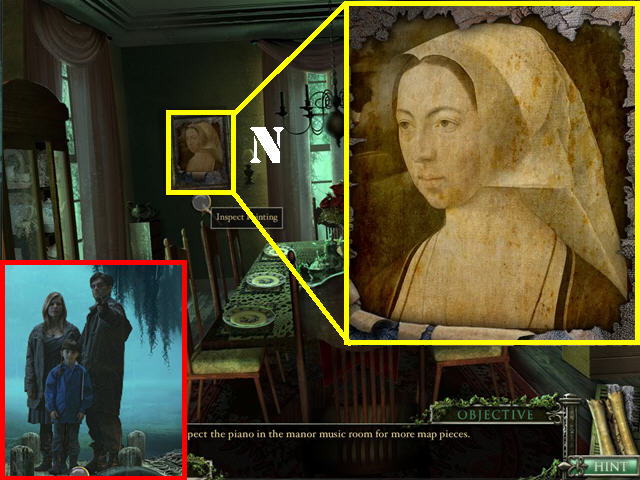
- Inspect the Illustration in the upper left (D).
- Inspect the Phineas Crown book in the lower left corner (E).
- Inspect the Phineas Crown Portrait by the door (F).
- Inspect the handkerchief on the right (G).
- Open the door to go into the Hallway.
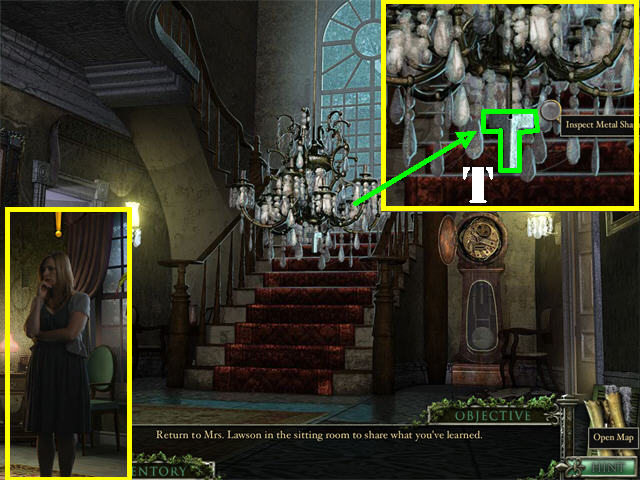
- Go down to the Staircase.
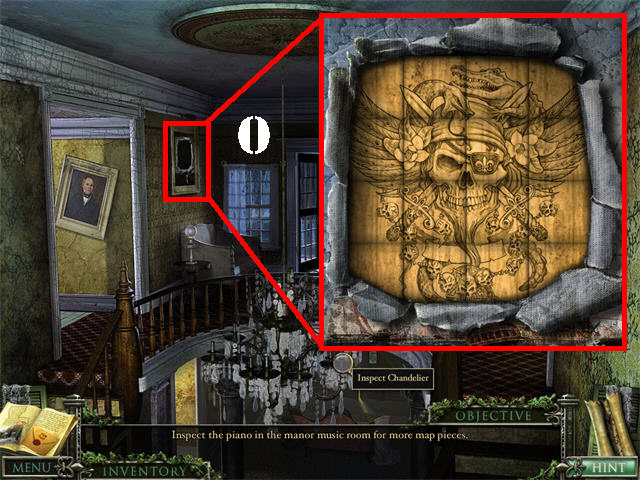
- Inspect the chandelier that is now at the bottom of the staircase; take the T-SHAPE (T) and the chandelier will go back up.
- Go to the Sitting Room.
- Talk to Mrs. Lawson and exhaust all conversation possibilities.
- Go to the Closet.
- Play the Hidden Object Scene to obtain the BUG REPELLENT SPRAY (1).
Chapter 5: The Tavern
- Go to the Front Yard and make 2 rights to access the Down Path.
- Play the Hidden Object Scene to obtain the CHLORINE BOTTLE (A).
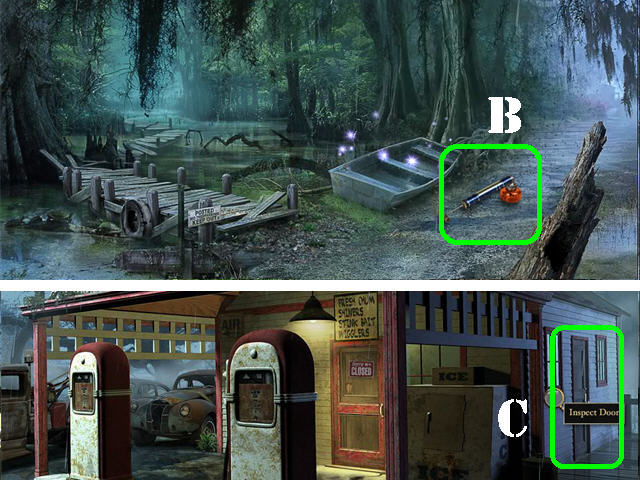
- Spray the BUG REPELLENT SPRAY on the right side of the scene a total of 3 times to get rid of the mosquitoes (B).
- Head right towards Town, make a right towards the Service Station.
- Inspect the door on the side of the station (C).
- Click on the doorknob to unlock the door and go inside.
- Play the Hidden Object Scene in the gas station interior to obtain the GAS CAN (D).
- Click down twice and head towards the Tavern. Go into the Tavern.
- Talk to Vinton and exhaust all conversation options.
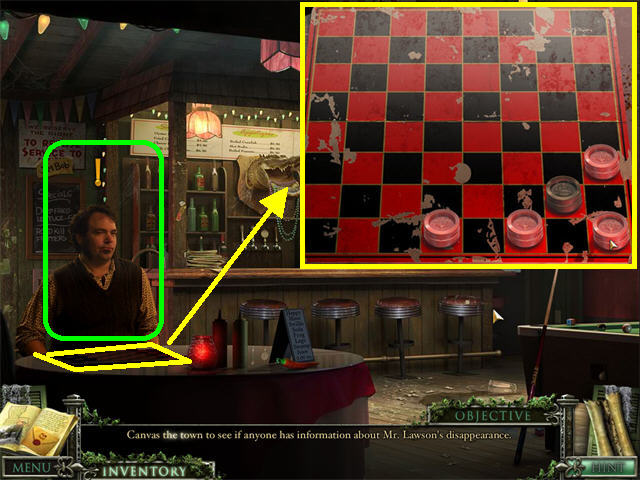
- Click on the chessboard in front of Vinton to trigger a mini-game.
- The same rules of checkers apply to this mini-game. Beat your opponent by eliminating all his pieces.
- Your chips are red and Vinton’s chips are black. Pieces can move one space forward diagonally.
- Try to keep the pieces in the back row as long as possible to keep Vinton from crowning his pieces.
- Your chips will be crowned as soon as your reach the back row in Vincent’s side of the board. Crowned pieces can jump diagonally, backwards, and forward.
- Try to have more crowned pieces than Vinton so towards the end of the game you can corner him and get rid of his pieces.
- Check out our video solution!
- Vinton agrees to have a coworker send a fax to Lawson’s den in the Mansion regarding the historical data for the Lawson Estate.
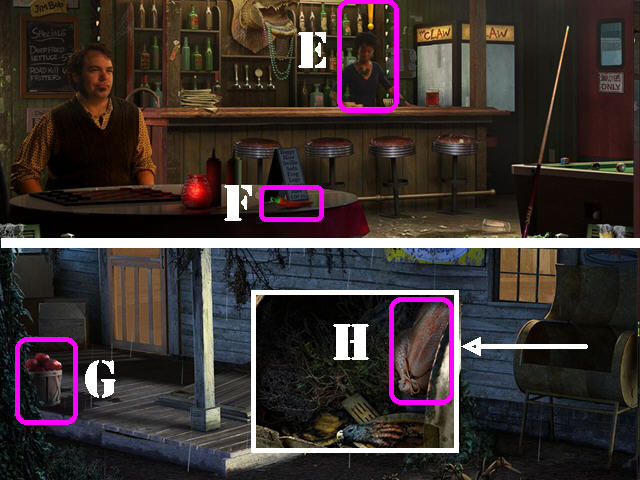
- Talk to the Bartender and exhaust all conversation options. Find all the Gumbo ingredients (E).
- Take the RED PEPPER (F) on Vinton’s table.
- Go outside and go left towards the Tavern Side.
- Take the TOMATOES (G) on the porch.
- Zoom into the smoker; take the CHICKEN (H).
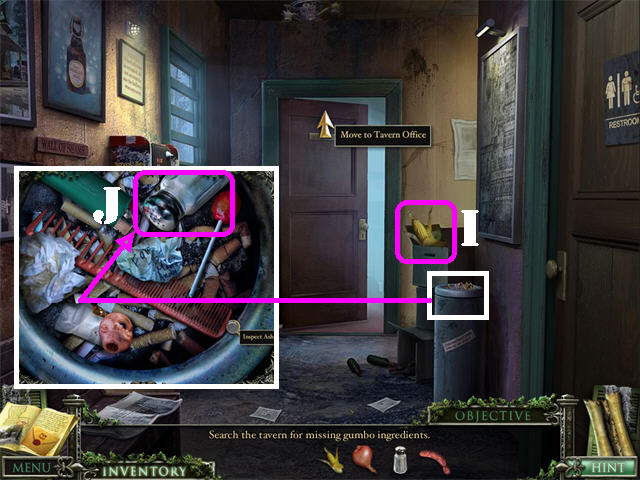
- Move inside to the Tavern Hallway.
- Take the CORN (I) by the box.
- Inspect the ashtray; take the SALT (J).
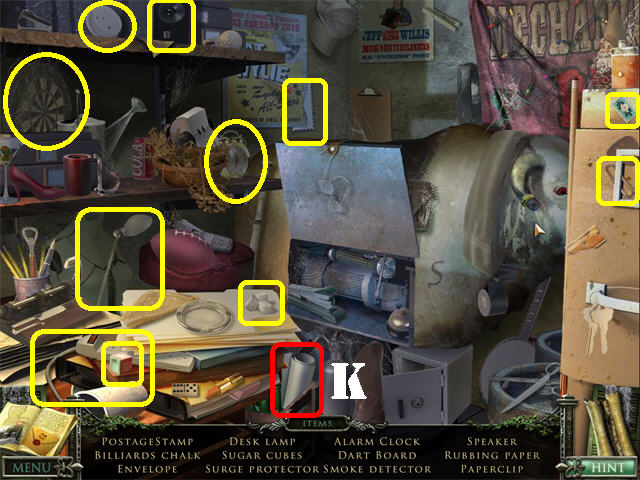
- Go into the Tavern Office.
- Play the Hidden Object Scene to obtain the RUBBING PAPER (K).
- Return to the inside of the Tavern and head right into the Tavern Kitchen.
- Play the Hidden Object Scene to obtain the HONEY JAR (L).
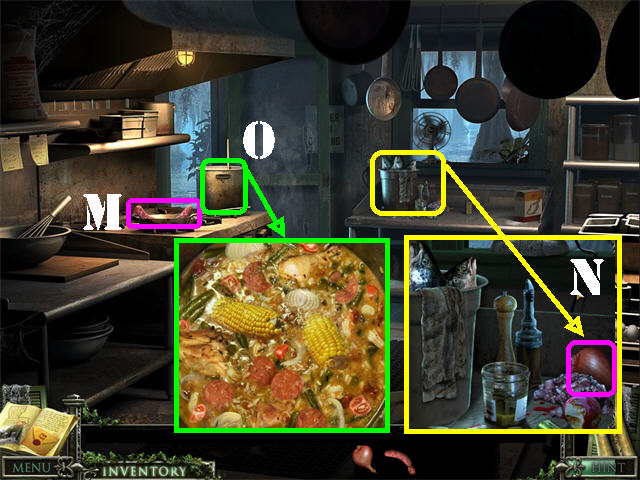
- Take the SAUSAGE (M) in the frying pan on the stove.
- Inspect the shelf by the window; take the ONION (N).
- Inspect the gumbo pot on the stove (O).
- Add the ONION, PEPPER, CHICKEN, SALT, SAUSAGE, TOMATOES, and CORN into the pot to automatically receive the GUMBO ORDER.
Chapter 6: Cooter and Charlotte Landry
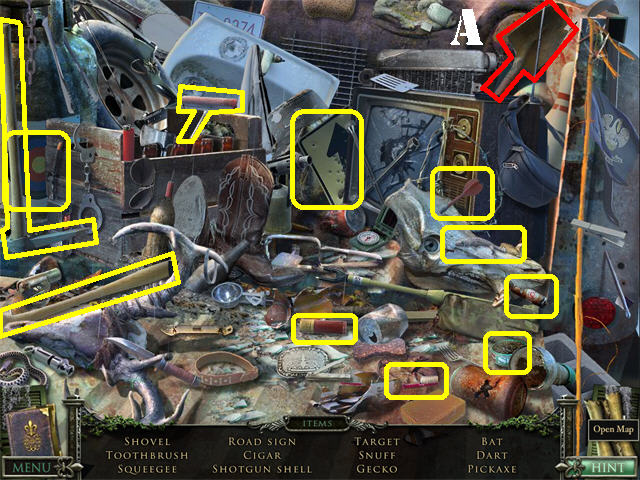
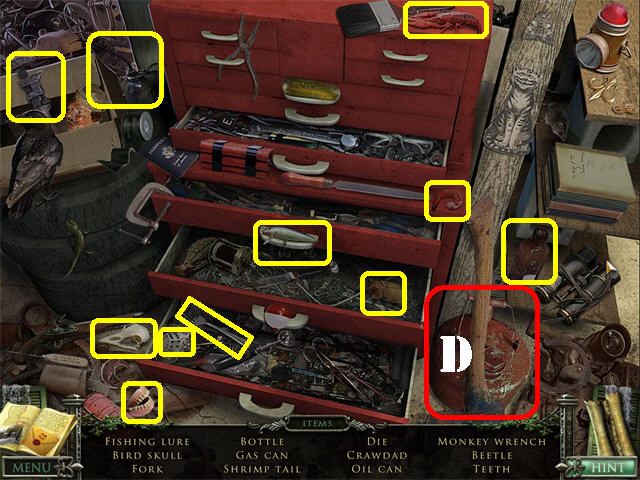
- Exit the Tavern, return to the Front Yard, move to the left Side of the Manor. Go through the archway towards the Graveyard Path, head right towards the Down Path.
- Play the Hidden Object Scene on the truck to obtain the SHOVEL (A).
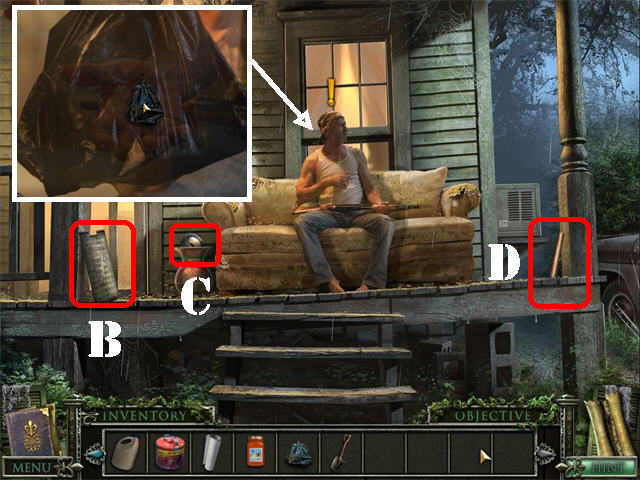
- Head towards Cooter’s Front Yard.
- Click on Cooter and hand him the GUMBO ORDER.
- Talk to Cooter and exhaust all conversation possibilities.
- Take the COVER (B) on the left side of the porch.
- Grab the DUCT TAPE (C) in the urn next to the couch.
- Take the PIPE (D) on the right side of the porch.
- Go back to the Cooter’s Front Yard.
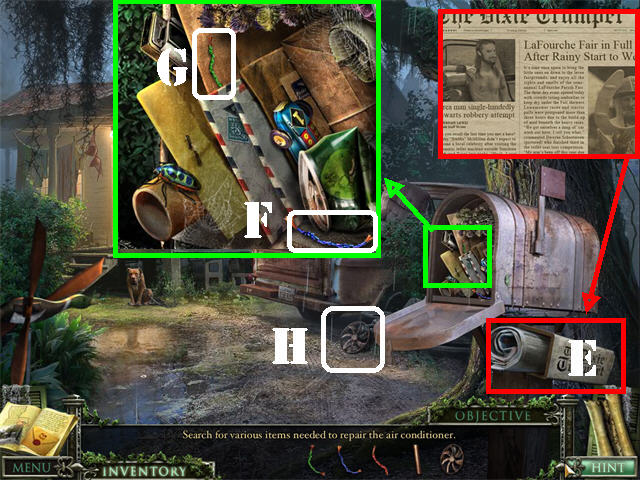
- Inspect the newspaper (E) in the lower right.
- Inspect the mailbox; take the BLUE WIRE (F) and the GREEN WIRE (G).
- Pick up the FAN (H) by the truck.
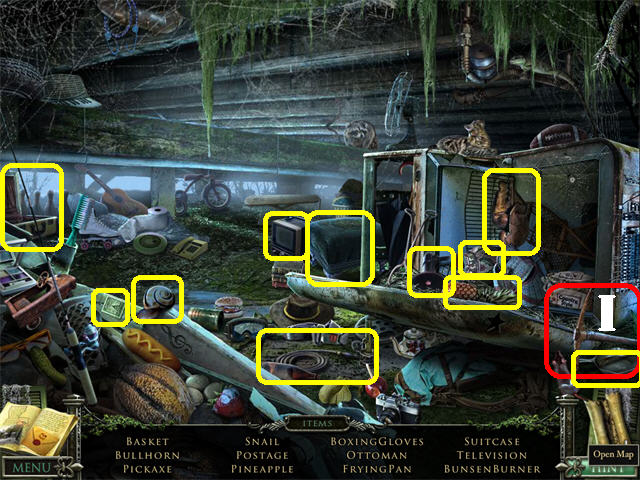
- Go towards Cooter’s Front Porch and head right towards the Side of the House.
- Play the Hidden Object Scene to obtain the PICKAXE (I).
- Grab the RED WIRE (J) on the toilet.
- Take the PIPE (K) on the right side of the ground.
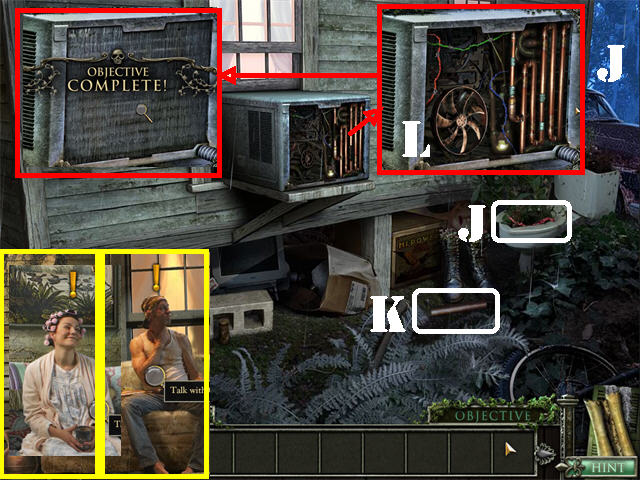
- Inspect the Air Conditioner (L).
- Place the RED WIRE, GREEN WIRE, BLUE WIRE, 2 PIPES, and the FAN into the Air Conditioner.
- Put the DUCT TAPE over the pipes.
- Place the COVER on the air conditioner to complete the objective.
- Go back to Cooter. Talk to him and exhaust all conversation possibilities.
- Go inside the house.
- Talk to Charlotte and exhaust all conversation options.
- Return to the Tavern.
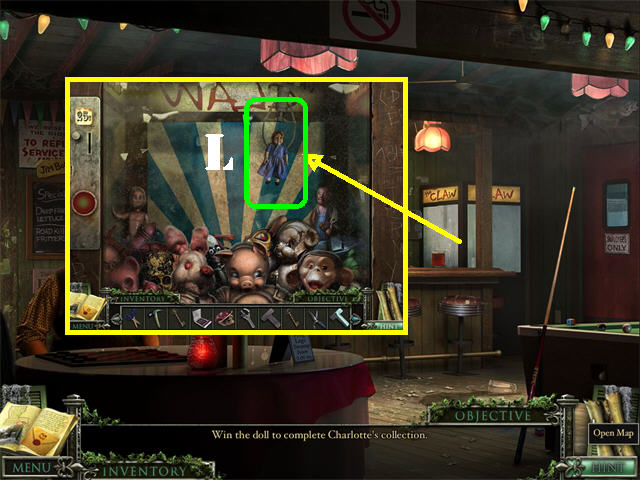
- Click on the Claw Machine next to the bartender.
- Take a QUARTER from the COIN PURSE in your inventory and place it in the slot. Use the arrow on your inventory tray to scroll through all items.
- Press the RED BUTTON once to move the claw and a second time to pick up the item.
- It may take several times before you can catch the doll which can appear in any part of the machine.
- The correct DOLL (L) will be added automatically once caught.
- Go to the Shed.
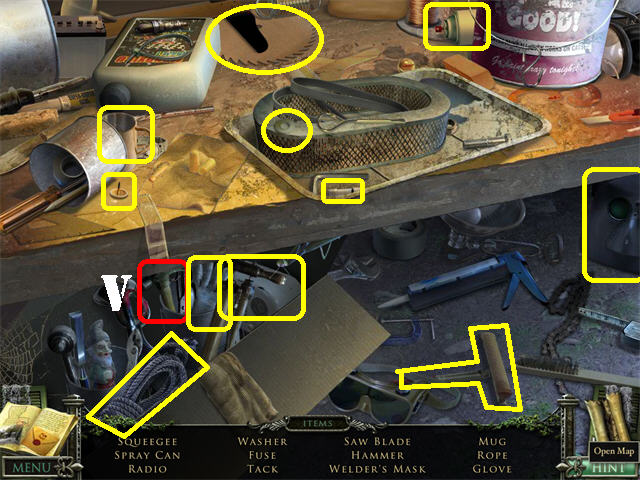
- Play the Hidden Object Scene to obtain the SCREWDRIVER (M).
- Go to the Balcony in the Mansion.
- Throw the HONEY JAR anywhere in the scene and the bees will swarm towards the honey.
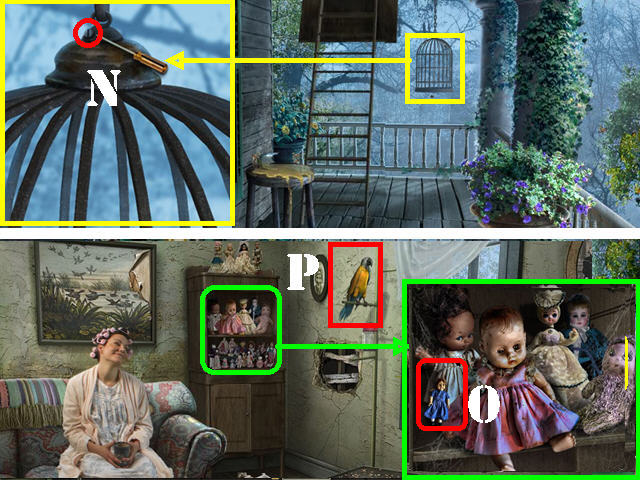
- Inspect the Birdcage; remove the screw (N) above the cage with the SCREWDRIVER to automatically obtain the BIRDCAGE.
- Head back to Charlotte.
- Zoom into the doll shelf on the back wall.
- Place the DOLL on the shelf (O).
- Talk to Charlotte.
- Place the BIRDCAGE over MR. CRICKETS the parrot (P) to enter it into inventory or clicking on the bird will automatically add it to the cage.
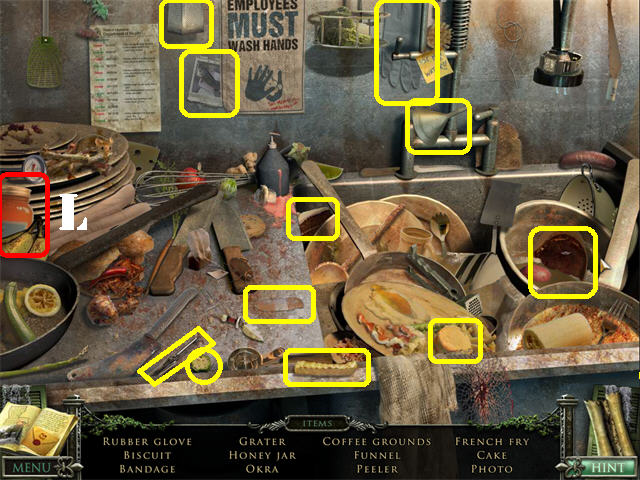
Chapter 7: Pippi’s Trash
- Return to the Master Bedroom in the Mansion.
- Talk to Mary Lee and exhaust all conversation possibilities.
- Exit the Master Bedroom.
- Take the HOTDOG (Q) on the chair.
- Move to the Right Hallway; take the WATERMELON RIND (R) on the ground.
- Go to the Music Room; take the FROZEN DINNER (S) by the books on the floor.
- Head left into the Den; take the PIECE OF PIE (T) on the floor.
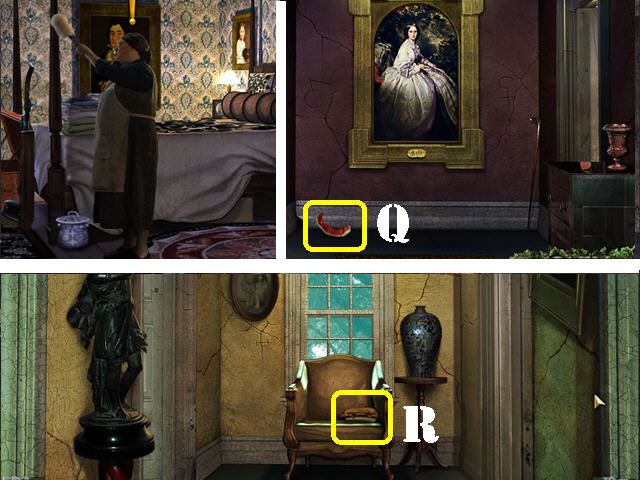
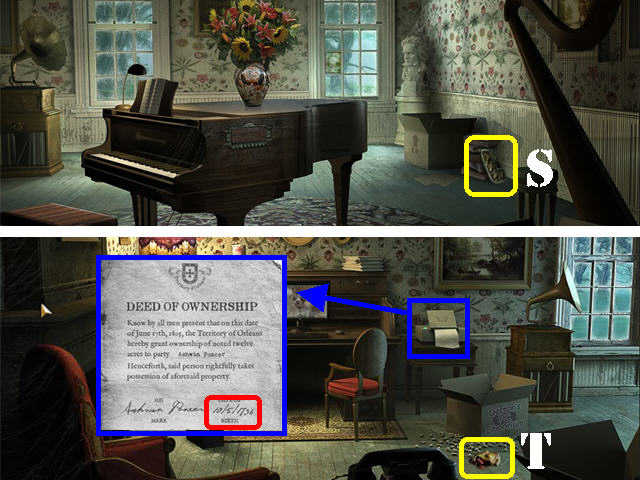
- Zoom into the fax machine; click on the fax regarding the deed of ownership. Note the date of birth.
- Move to the Foyer; take the EGG SHELLS (U) on the couch.
- Go into the Dining Room; take the CHICKEN BONE (V) on the right chair.
- Go into the Pantry; take the CHEWED TENNIS BALL (W) by the door.
- Move to the Kitchen.
- Zoom into the garbage disposal in the sink.
- Place the CHEWED TENNIS BALL, EGG SHELLS, PIECE OF PIE, HOTDOG, CHICKEN BONE, WATERMELON RIND, and FROZEN DINNER into the garbage disposal.
- Return to the Master Bedroom.
- Talk to Mary Lee; exhaust all conversation possibilities to obtain the next objective.
Chapter 8: Momma Aimee

- Go to the Front Yard; make 3 rights to access the Town.
- Go into the Voodoo Shop (A).
- Play the Hidden Object Scene to obtain the CHARCOAL (B).
- Talk to Momma Aimee behind the counter and exhaust all conversation possibilities (C).
- Go to the Side of the Tavern; inspect the smoker and take the MONKEY PAW (D).
- Return to the Carriage House Path.
- Take the MAGNOLIA FLOWER (E) in the upper left.
- Inspect the Statue Base; take the POSSUM SKULL (F).
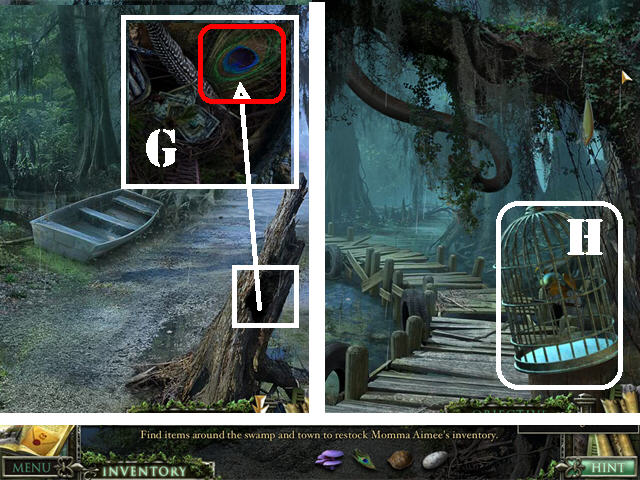
- Head right towards the Down Path; inspect the tree stump on right and take the BLUE FEATHER (G).
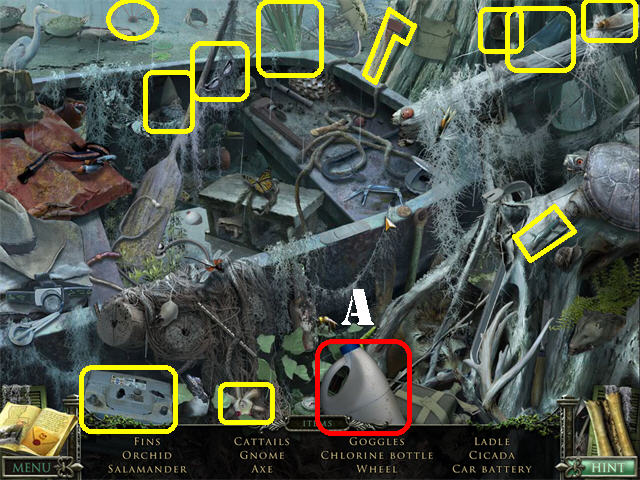
- Head left towards the Swamp Entrance.
- Place MR. CRICKETS (H) on the snake and it will land in the lower right side of the scene. To obtain Mr. Crickets you must first take down the birdhouse in the Mansion’s balcony and then take the Parrot (Mr. Crickets) from Charlotte after you give her the Doll.
- Move forward towards the Swamp.
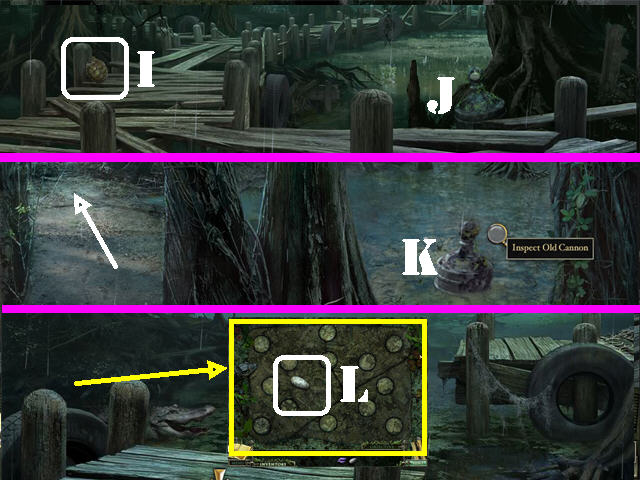
- Take the TORTOISE SHELL (I) on the left side of the boardwalk.
- Inspect the old cannon on the right (J).
- Move right towards the Swamp Path.
- Inspect the second cannon and remove the debris from it (K).
- Head left towards the Swamp Clearing.
- Inspect the alligator nest on the left; clear the foliage and take the SPOTTED EGG (L).
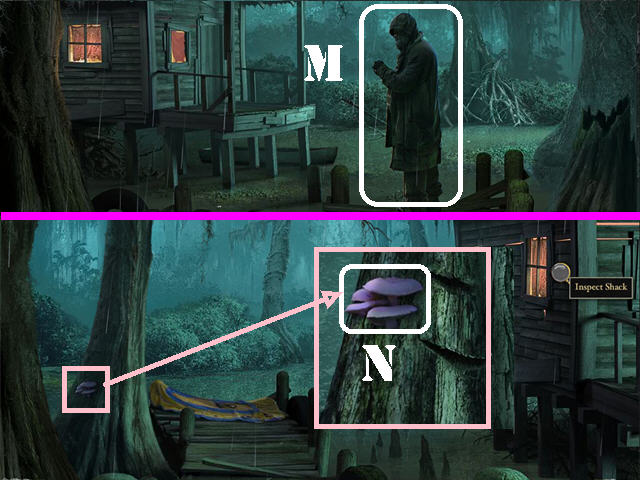
- Exit the nest and click down twice, move left towards the Swamp Shack and you will encounter a Stranger.
- Talk to the Stranger and exhaust all conversation possibilities (M).
- Move left towards the Shack Side.
- Note the inflatable boat in the water.
- Inspect the left tree; take the MUSHROOM (N).
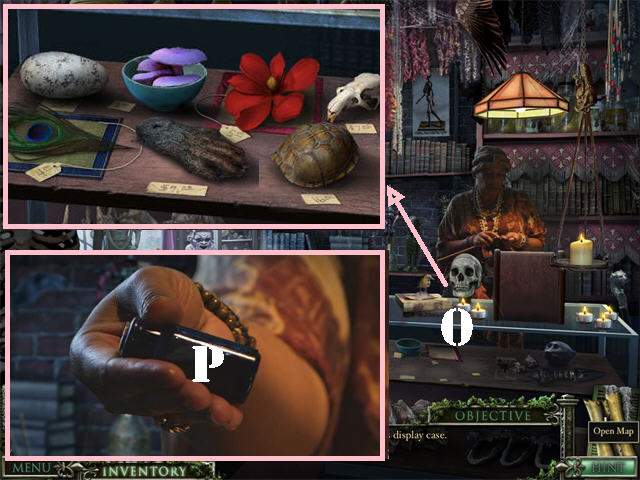
- Return to the Voodoo Shop.
- Inspect the shelf in front of Momma Aimee (O).
- Place the MUSHROOM, SPOTTED EGG, TORTOISE SHELL, MAGNOLIA FLOWER, MONKEY PAW, POSSUM SKULL, and BLUE FEATHER on the shelf.
- Click on Momma Aimee; take the SLEEPING POTION (P) from her hand.
- Keep talking to Momma Aimee and exhaust all conversation choices.
Chapter 9: Lewis and the Graveyard Keys
- Return to the Sitting Room in the Mansion.
- Speak with Mrs. Lawson and exhaust all conversation.
- Go to the Front Yard.
- Speak with Lewis and exhaust all conversation choices.
- Move to the Side of the Manor.
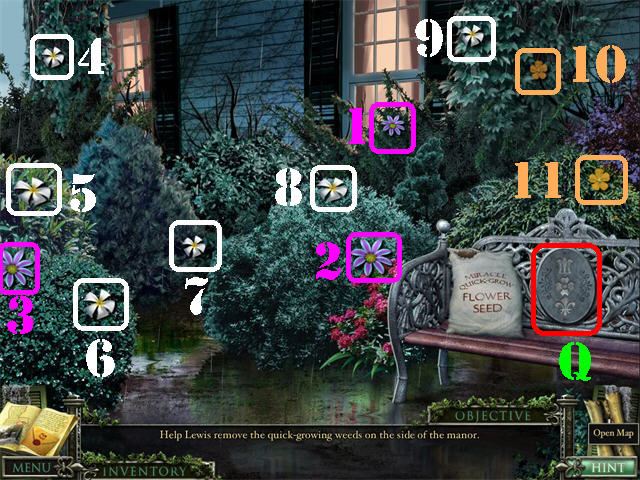
- Inspect the Bench; note the symbols on the bench (Q).
- You must cut all the weeds very quickly with the GARDEN SHEARS before any of them get a chance to grow back. In order to do so, the weeds must be cut on order of the ones that grow back the slowest.
- Cut the purple weeds first, cut the white ones next, and the orange ones last.
- Check out our video solution!
- Go to the Front Yard.
- Speak with Lewis and exhaust all conversation choices. You need to find the keys to open the gate in the Graveyard.
- The STAR SYMBOL KEY was located in the jewelry box in Magnolia’s Bedroom. The solution for that puzzle can be found in Chapter 3 of this guide.
- The MOON SYMBOL KEY can be obtained by solving the chest puzzle in the attic. The solution for that puzzle can be found in Chapter 4 of this guide.
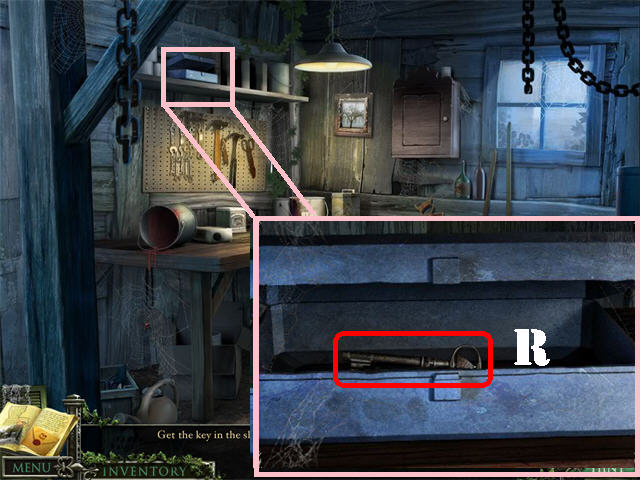
- Go to the Shed.
- Inspect the blue box in the upper left.
- Take the TRIANGLE SYMBOL KEY (R).
- Go to the Foyer.
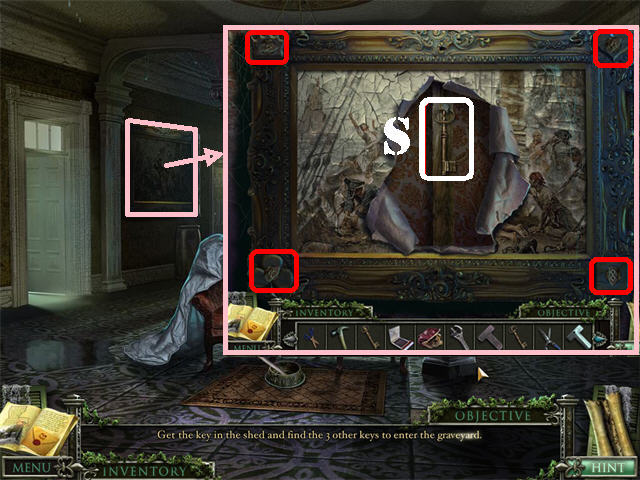
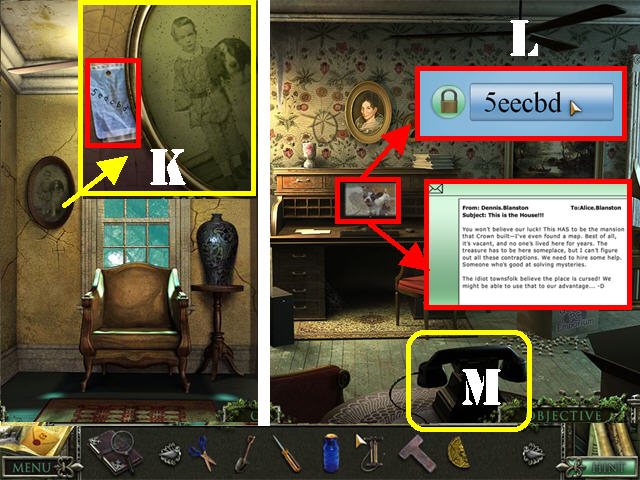
- Inspect the Painting on the left side of the wall.
- Cut the painting with the SCISSORS 3 times; take the DIAMOND SYMBOL KEY (S).
- Note the symbols and the positions in each corner of the frame. The symbols are the same as the 4 KEYS you’ve just collected. The position and rotation of the symbols vary with each game so it’s important that you note the ones you received.
- Move to the Side of the Manor.
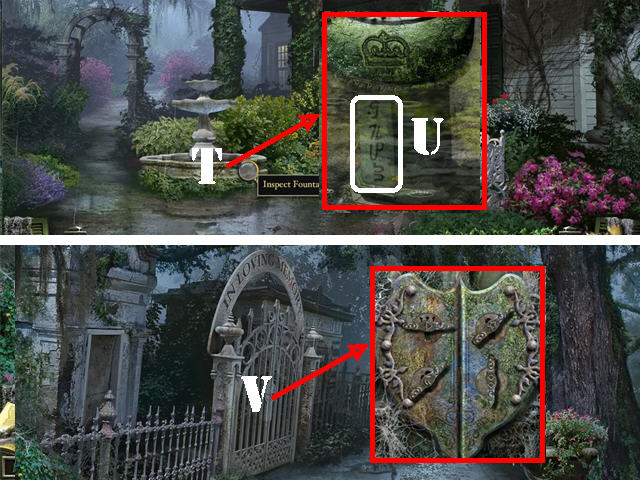
- Inspect the Fountain (T).
- Place the CHLORINE bottle in the water 3 times to clean the water.
- Look at the symbols (U) etched into the fountain; they will be noted in your case report.
- Head left towards the Graveyard Path.
- Inspect the Gate (V).
- Place the keys in the keyholes using the symbols found in the frame inside the Mansion.
- Regardless of what the symbols look like on the keyholes, place the KEY found in the upper left corner of the frame into the keyhole in the upper left. The same goes for all the other corners.
- Once the keys are in the correct keyholes, rotate each KEY by clicking on the key so it matches the rotation of the symbols found in the corners of the painting frame that you noted earlier.
- Once all the keys are in place and rotated correctly to match the rotation of the symbols on the painting frame, the gate will automatically open.
- Go into the Graveyard.
Chapter 10: The Graveyard and the Secret Passage

- Look at the date in the upper center (A).
- Move forward to the Mausoleum once inside the Graveyard.
- Zoom into the lantern in the upper left (B).
- Open the lantern and light the candle with the MATCHBOOK.
- Take the LANTERN.
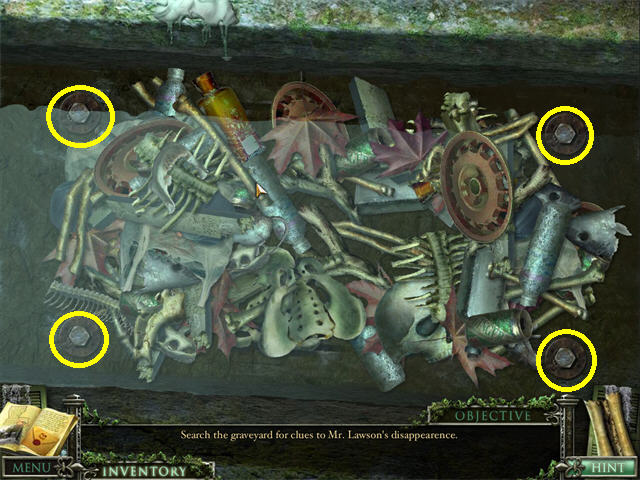
- Inspect the water-filled coffin on the right.
- Drag all the items aside in each corner to reveal 4 bolts.
- Remove the BOLTS with the WRENCH to drain all the water out of the coffin.
- Inspect the drained coffin again.
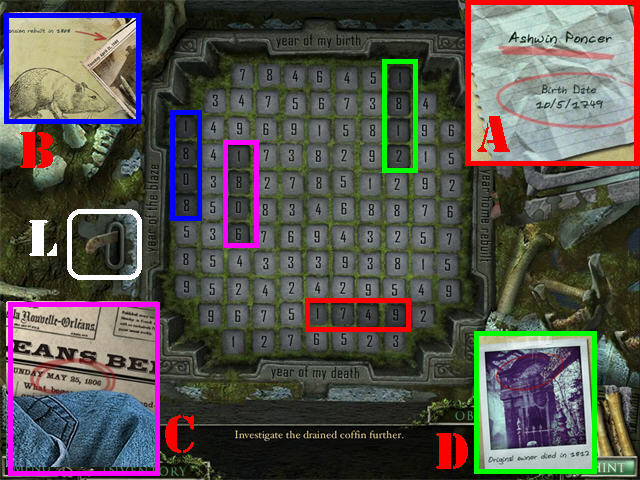
- Remove the cover to reveal a lot of numbers.
- You need to enter 4 different dates into the contraption by pressing on the numbers on the cover.
- The dates are unique to your game, so make sure to enter dates that refer to your game only.
- The birth date can be found on the fax machine in the den (A).
- The date the Mansion was rebuilt is entered into the case report after the rats have been taken out of the cellar (B).
- The date of the Fire will be entered into the case report after you unlock the chest in the Attic (C).
- The date of death is in front of the Mausoleum (D).
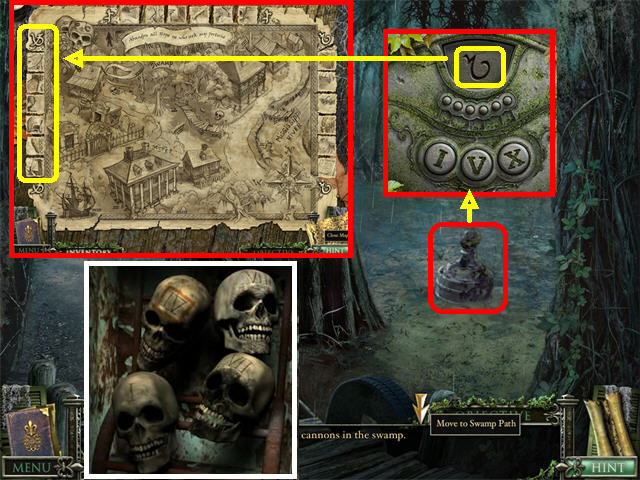
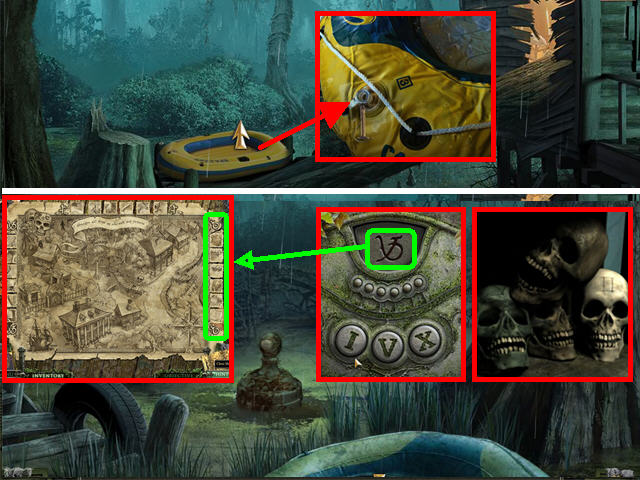
- In my case the dates were 1806, 1808, 1749, and 1812. Click on the LEVER (L) on the side of the contraption to enter your selection.
- Go through the gates into the Down Passage.
- Place the LANTERN on the hand of the large statue to light up the place.
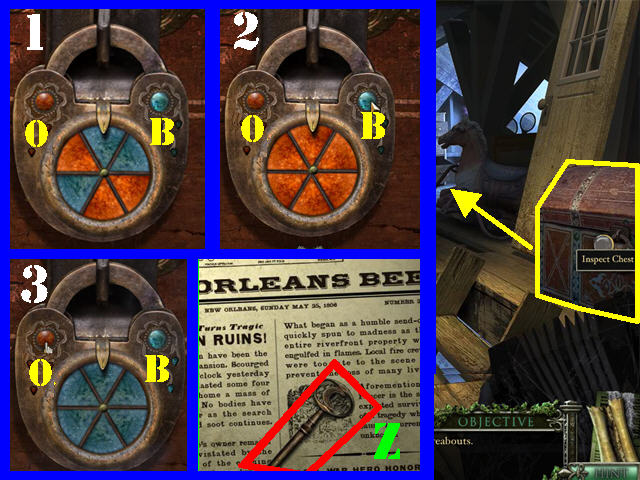
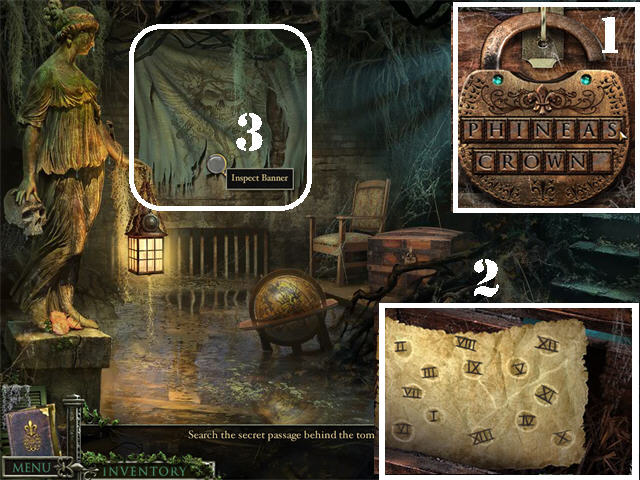
- Inspect the chest in the lower right to reveal a combination lock with the name ASHWIN PONCER.
- To solve this anagram rearrange the letters to form PHINEAS CROWN as shown in the screenshot (1). Click on two letters to swap their positions.
- Inspect the chest to find a parchment with Roman Numerals (2).
- Cut the banner on the back wall with the GARDEN SHEARS (3).
- Break the back wall with the PICKAXE 3 times. Go through the back wall.
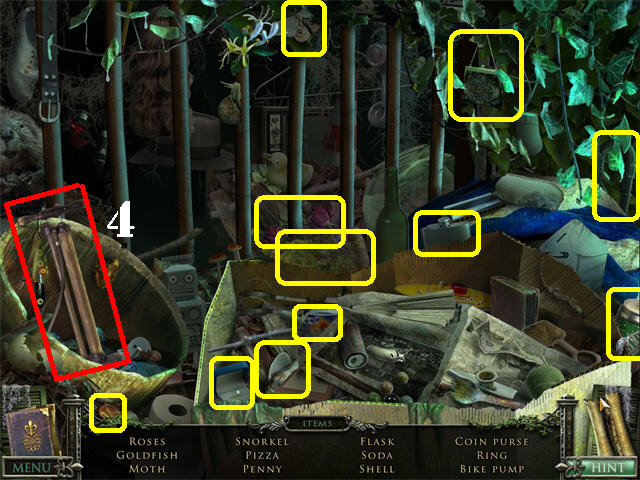
- Play the Hidden Object Scene in the Secret Passage to obtain the BICYCLE PUMP (4).
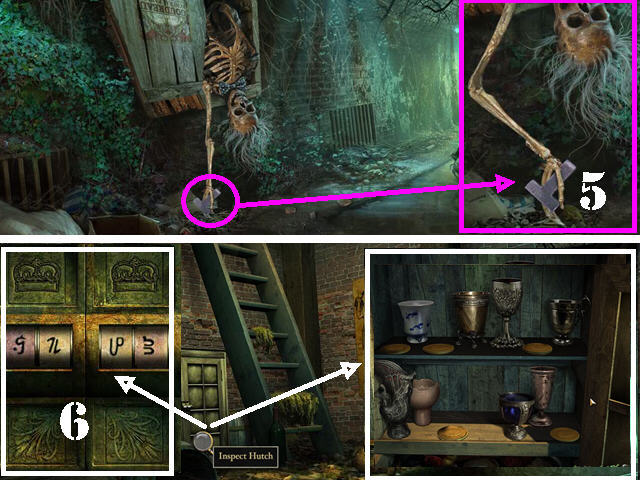
- Open the coffin lid in the upper left by hitting it with the HAMMER 3 times.
- Zoom into the skeleton that falls out of the coffin.
- Grab the T-SHAPE (5) from the skeleton’s hand by using the SCREWDRIVER to release it.
- Move forward to the Down Tunnel.
- Inspect the hutch.
- Using the symbols you found in the fountain after you added the bottle of chlorine enter them into the door (6).
- Click on the hutch to receive a new objective for finding the goblets.
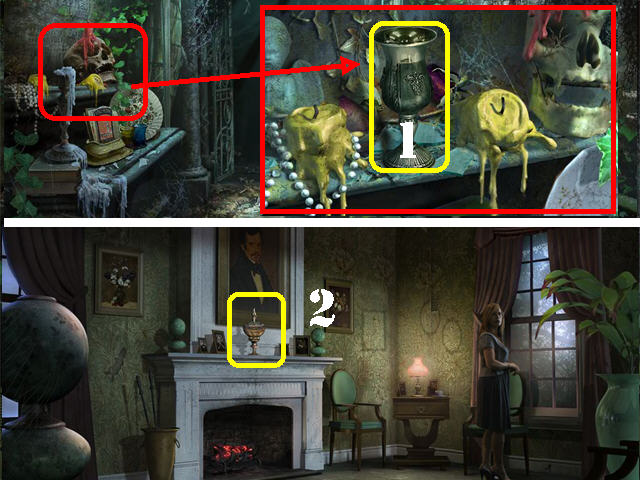
- Go to the Tomb; zoom into the shelf in the upper left; take GOBLET 1/5 (1).
- Go to the Sitting Room in the Mansion; take GOBLET 2/ 5 (2) above the fireplace.
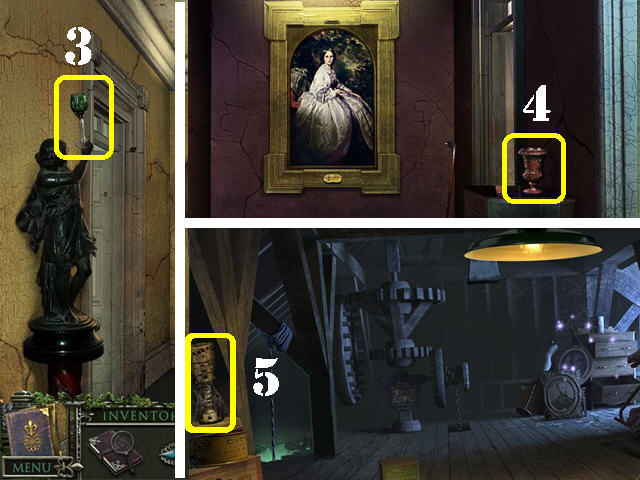
- Go to Left Hallway in the Mansion; take GOBLET 3/5 (3) from the statue.
- Go to the Right Hallway; take GOBLET 4/ 5 (4) in the lower right.
- Return to the Attic; take GOBLET 5/5 (5) in the lower left.
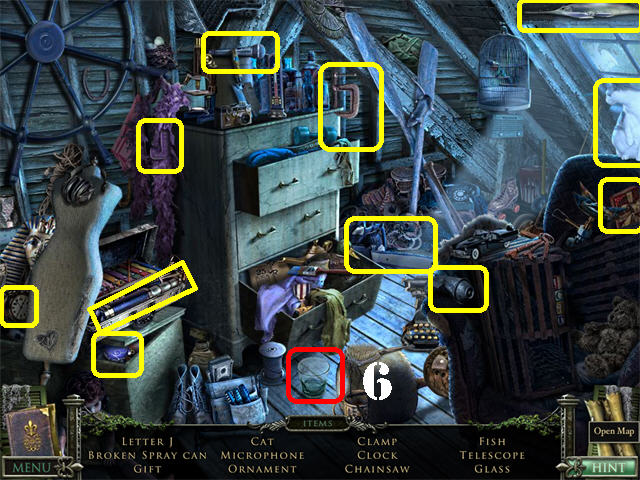
- Play the Hidden Object Scene in the Attic to obtain the GLASS (6).
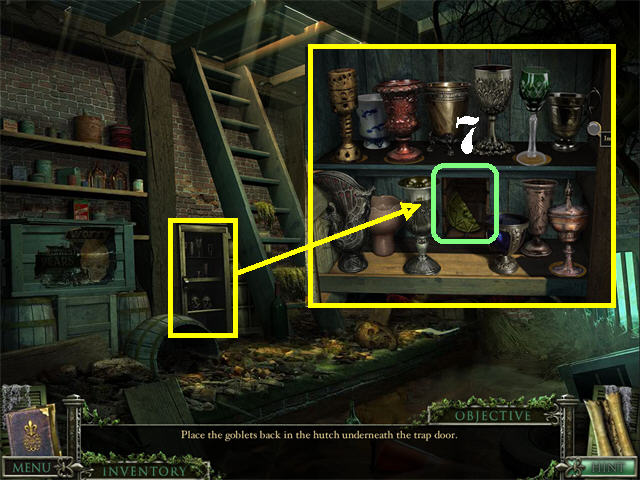
- Return to the Hutch below the trap door.
- Inspect the Hutch.
- Place the 5 GOBLETS on the shelves.
- Take the MEDALLION PIECE 1/2 (7).
- Climb the stairs to enter the Carriage House.
- Move to the Bedroom on the right.
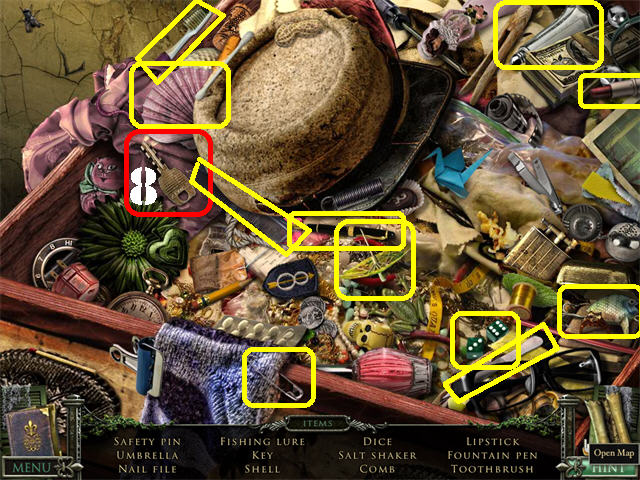
- Inspect the dresser in the lower right to trigger a search scene.
- The VOODOO BOX KEY (8) will be added to inventory after your search.
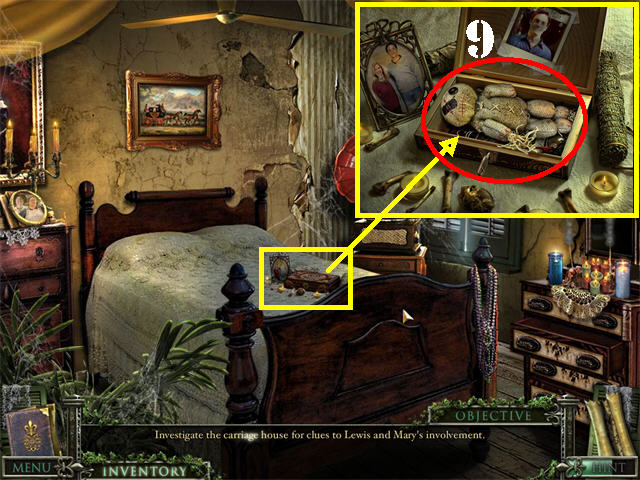
- Inspect the bed.
- Open the box using the VOODOO BOX KEY in the keyhole.
- Take the VOODOO DOLL (9) inside the box.
Chapter 11: Toilet,Shack and Computer Password
- Return to the Voodoo Shop.
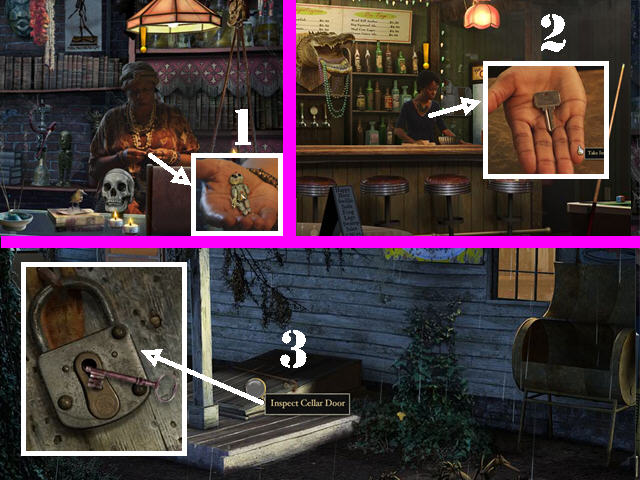
- Click on Momma Aimee; give her the VOODOO DOLL (1).
- Talk to Momma Aimee and exhaust all conversation options.
- Return to the Tavern.
- Talk to the Bartender and exhaust all conversation options. She mentions that Lamont usually fixes the bathroom.
- Take the TAVERN CELLAR KEY from the bartender’s hand once she extends it to you (2).
- Go to the Side of the Tavern.
- Zoom into the cellar door; unlock it with the TAVERN CELLAR KEY (3).
- Go down into the cellar.

- Grab the PLUNGER (4) in the lower left.
- Click on the poster in the back wall to remove it.
- Zoom into the wall to reveal a barely-visible pattern (5).
- Put the RUBBING PAPER on the wall.
- Rub the CHALK over the rubbing paper to reveal the pattern; it will be entered into your case report.
- Note the chainsaw (6) in need of gas on the counter.
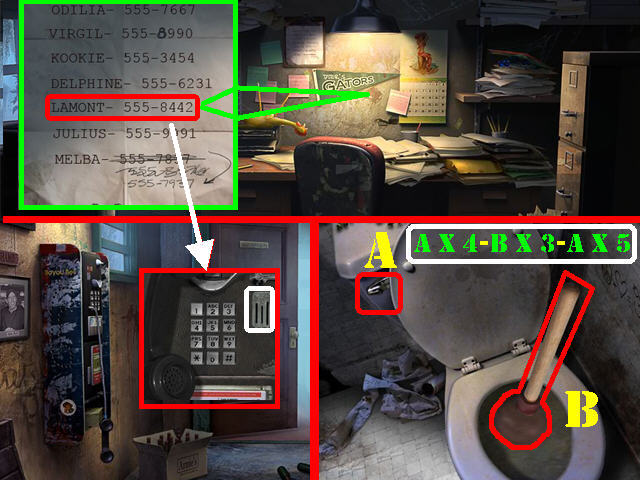
- Go up to the Tavern Office.
- Inspect the desk; make note of Lamont’s phone number (note number in your game).
- Click down to go to the Hallway.
- Zoom into the phone on the left side of the wall.
- Take a QUARTER from your COIN PURSE and put it into the slot.
- Dial Lamont’s number (see number in your game) and listen carefully to his instructions; they will be added to the case journal as well.
- Inspect the Bathroom on the right.
- Put the PLUNGER into the toilet.
- Using the instructions given by Lamont over the phone, flush 4 times, hit plunger 3 times, and flush 5 more times to solve the objective.
- Return to the Tavern.
- Talk to the Bartender and exhaust all conversations (A).
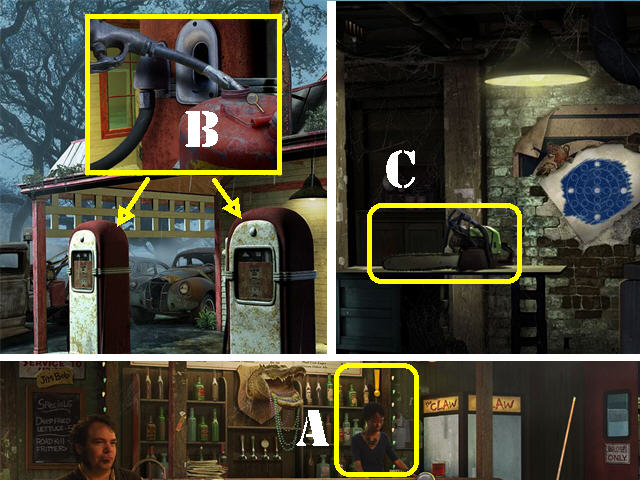
- Exit the Tavern, click down and head right towards the Service Station.
- Zoom into any of the gas pumps; place the GAS CAN over it to fill it (B).
- Return to the Tavern Cellar.
- Place the GAS CAN on the chainsaw; take the CHAINSAW (C).
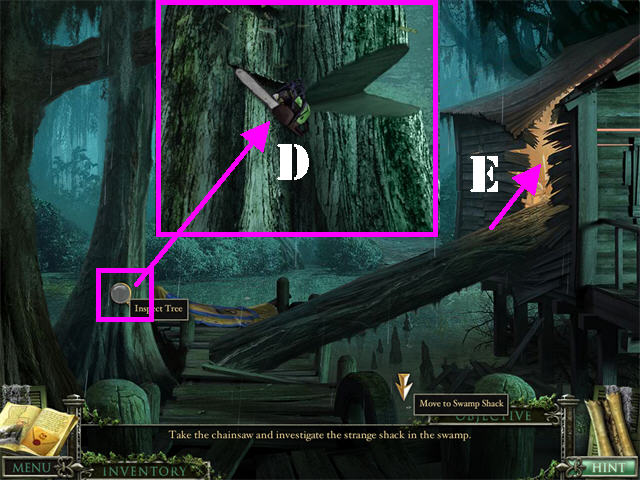
- Head back to the Swamp Entrance, go forward and turn left towards the Swamp Shack and left again towards the Shack Side.
- Inspect the tree on the left.
- Place the CHAINSAW on the tree and left-click rapidly until the tree gets cut (D).
- Climb the tree into the shack (E).
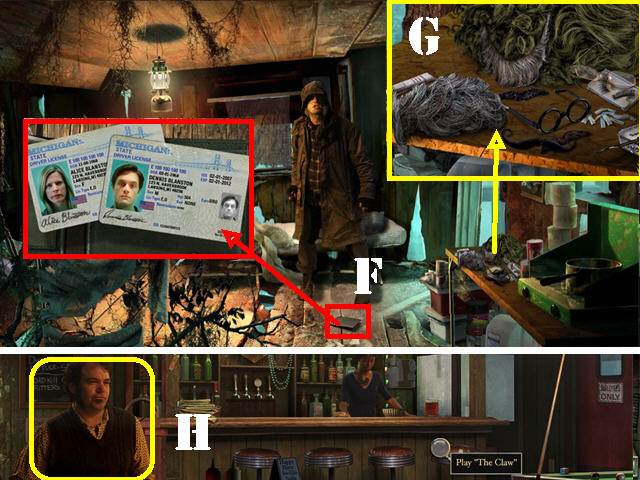
- The Strange Man inside drops his wallet on the floor.
- Zoom into the wallet, open it and look at the fake I.D.’s for Mr. and Mrs. Blanston (F).
- Inspect the wig on the right (G).
- Return to the Tavern.
- Talk to the Librarian at the table and exhaust all conversation options (H).
- Go to the Mansion’s Foyer.
- Examine the Sitting Room door on right.
- Place the GLASS over the door and click on it to position it (I).
- Slide the GLASS AROUND until you can eavesdrop on the conversation clearly. The subtitles (J) appear when you are in the right spot.
- Check out our video solution!
- Mrs. Lawson said the password for the computer was stored behind a picture of a little boy and his dog.
- Go up to the left hallway.
- Zoom into the picture of the little boy and dog (K) on the back wall; click on it to reveal the computer password. (5eecbd).
- Go down to the Den.
- Zoom into the computer; click on the monitor for the box to appear.
- Using your keyboard enter the password you just found behind the picture (L).
- Press “ENTER” on your keyboard to view the email.
- Answer the ringing telephone to hear what the Librarian has to say (M).
Chapter 12: Find MAP STAMPS and Raise Cannons
- Return to the Swamp Clearing to confront the Blanstons. Go to the Swamp Entrance, go forward, right towards the Swamp Path, and left to the Swamp Clearing.
- They want you to find the 13 skulls.
- The first 2 MAP STAMPS were found early on in the game once the clock puzzle had been solved.
- Go to the Dining Room.
- Examine the painting on the back wall; cut it open with the SCISSORS to reveal a puzzle.
- Slide the pieces around to position them according to the image on the screenshot (N).
- Check out our video solution!
- Take the 3 MAP STAMPS above the painting.
- Go up the Staircase to the Stair Top.
- Inspect the painting on the left; cut it open with the SCISSORS 3 times to reveal a puzzle.
- Rearrange the tiles to form the correct image as shown in the screenshot (O).
- Check out our video solution!
- Take the 3 MAP STAMPS above the painting.
- Go to the Right Hallway.
- Investigate the painting on the back wall; cut it open with the SCISSORS 3 times to reveal a puzzle.
- Drag the pieces around to form the image shown in the screenshot (P).
- Take the 3 MAP STAMPS above the painting.
- Go into the Music Room.
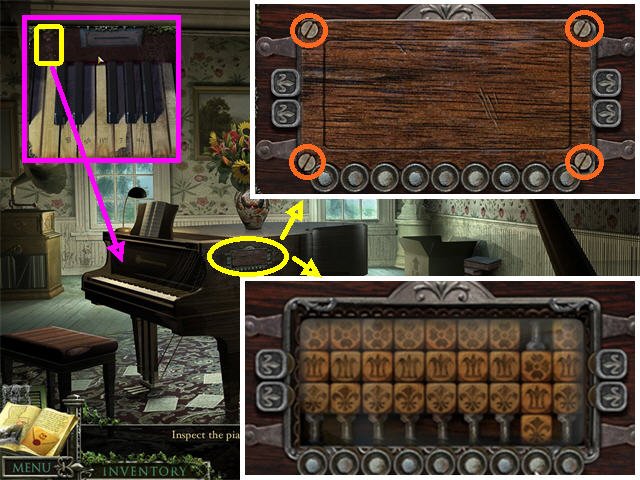
- Investigate the strange panel on the side of the piano.
- Remove the 4 SCREWS circled in orange with the SCREWDRIVER to reveal some symbols. The same symbols can be found in the bench when you cut the weeds by the fountain or in the front of the piano close to the keyboards.
- Using the symbols in your game use the buttons to place the symbols in the same spots.
- Check out our video solution!
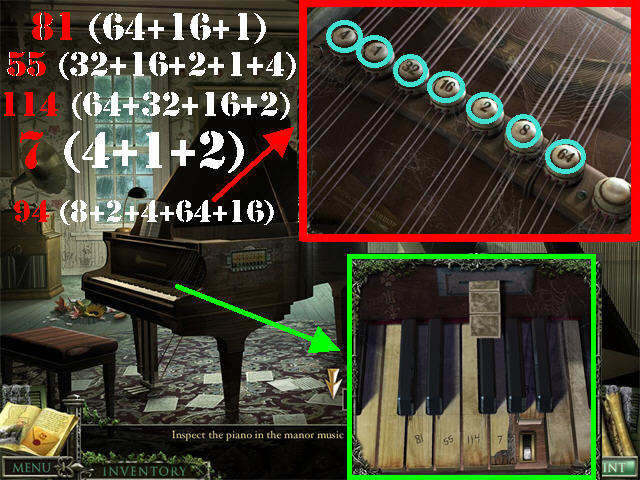
- Zoom into the top of the piano to see several numbered buttons inside.
- Look at the piano keys; there are several numbers etched onto it.
- You must click on the numbers inside the piano so they add up to each number on the keys.
- Once you have the correct numbers depressed inside the piano, zoom back into the piano keys and slide the button in the key.
- Repeat this process for all the keys to receive the 3 MAP STAMPS.
- 81 (64 + 16 +1).
- 55 (32 + 16+ 2 + 1 +4).
- 114 (64 + 32 + 16 + 2).
- 7 (4 + 1 + 2).
- 94 (8 + 2 +4 + 64 + 16).
- Check out our video solution!
- Take the 2 MAP STAMPS after the painting has been solved.
- Go to the Front Yard.
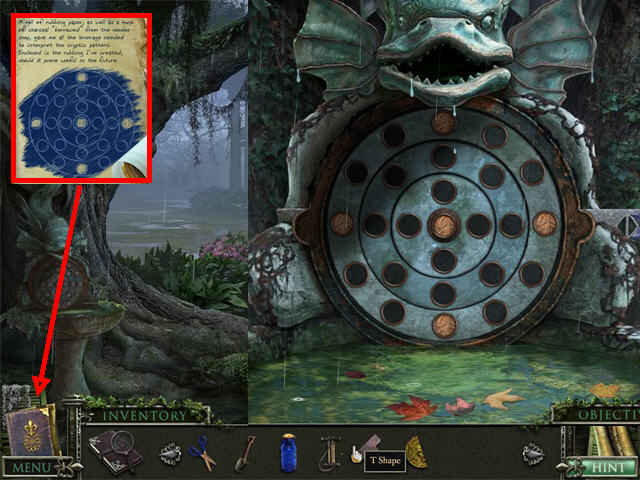
- Zoom into the fountain in the lower left to trigger a puzzle.
- Place the coins in the same positions as shown in the sketch in your case report.
- Cheeck out our random video solution!.
- Take the 2 MAP STAMPS after the painting has been solved.
- Go to the Graveyard.
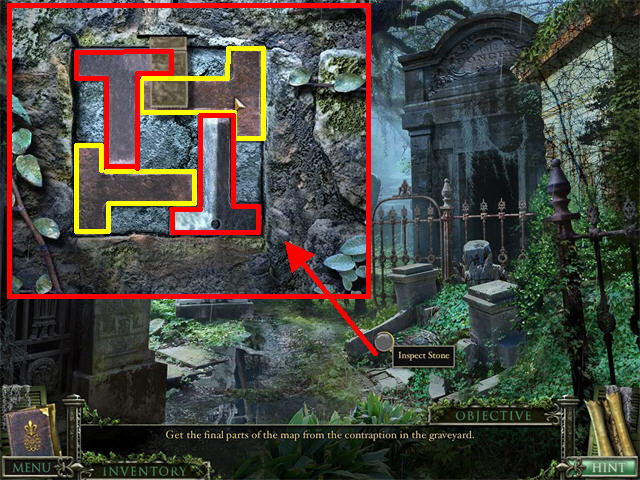
- Inspect the Foliage in the lower right; remove it with the Garden Shears.
- Place the 3 T-SHAPES in your inventory on the ground. The T- Shapes can be found on the chandelier inside the mansion, Lewis gives you one after you cut the weeds, and the last one is in the coffin in the Secret Passage.
- Arrange the T-SHAPES so they can all fit into the square without overlapping.
- Click on the shapes to rotate them.
- Please look at the screenshot for the solution.
- Take the 3 MAP STAMPS in the top slot.
- Your map is now complete.
- Go to the Swamp Entrance and forward towards the Swamp.
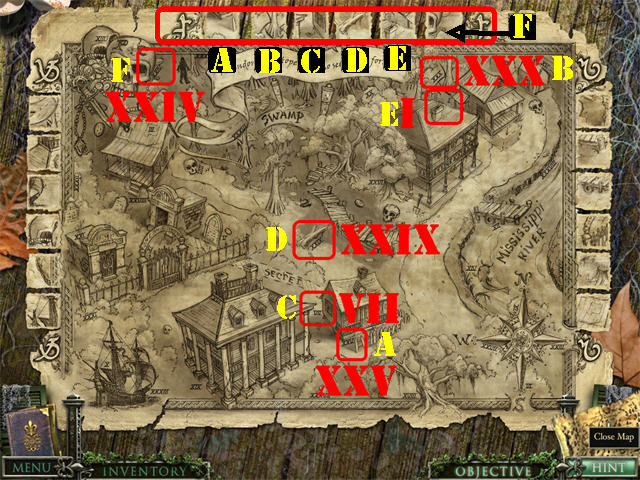
- Inspect the CANNON in the lower right; notice the symbol attached to it.
- Open your MAP and look for the same symbol on the very top. You can click on sections of the map for a closer view.
- You need to follow these steps for all 3 cannons. Look at the symbol on the map that matches your cannon. The symbols will either be on top, on the left side, or the right side.
- Between each section of map, there are 5 pieces torn that can be found somewhere on the map itself.
- Note the Roman numerals attached to each section of the map.
- Then enter the numbers in order into the corresponding cannon.
- In the example shown in the screenshot enter: XXV – XXX-VII-XXIX-I-XXIV.
- Click on the raised cannon; take the 4 SKULLS.
- Go right towards the Swamp Path.
- Inspect the CANNON on the right.
- Follow the same steps mentioned above using the illustrations in your map.
- Click on the raised cannon; take the 4 SKULLS.
- Click down to move to the Swamp Path. Head left towards the Swamp Shack and move left towards the Shack Side.
- Zoom into the Boat.
- Blow it up with the BICYCLE PUMP you obtained in the Secret Passage.
- Cross the Swamp in the Boat.
- Inspect the Old Cannon in the water.
- Follow the same steps mentioned above using the illustrations in your map.
- Click on the raised cannon; take the 4 SKULLS.
Chapter 13: The 13th Skull
- Return to the Swamp Entrance.
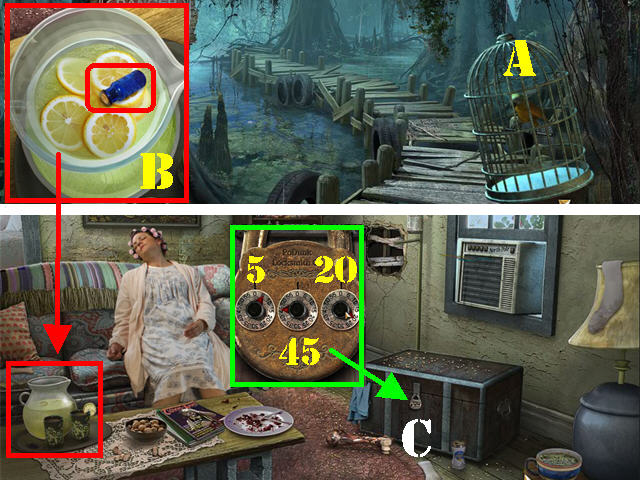
- Click on MR. CRICKET and he will give you a set of numbers “5-45-20” (A).
- Pay Charlotte Landry a visit.
- Zoom into the lemonade on the table (B).
- Put the SLEEPING POTION Momma Aimee gave you into the lemonade.
- Exit Charlotte’s Living Room to give her time to drink the lemonade.
- Go back into the Living Room and Charlotte will be asleep.
- Inspect the Lock on the chest in the lower right.
- Using the numbers given to you by Mr. Cricket, turn the dials from left to right to “5-45-20”.
- Open the chest; take the METAL DETECTOR (C).
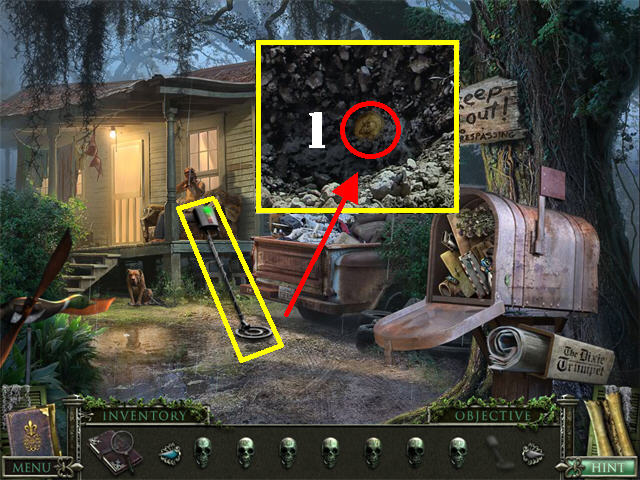
- You have to use the METAL DETECTOR to find the 3 missing coins.
- Pass the metal detector in different parts of the scene, red means you are off base, yellow means you are closer and green means you’re in the right spot.
- Once the light turns completely green, click on that area and your cursor will automatically hold the SHOVEL.
- Use the shovel to dig up the dirt.
- Go to the Landry’s Front Yard.
- Examine the ground near the back of the truck to obtain GOLD PIECE 1/3 (1).
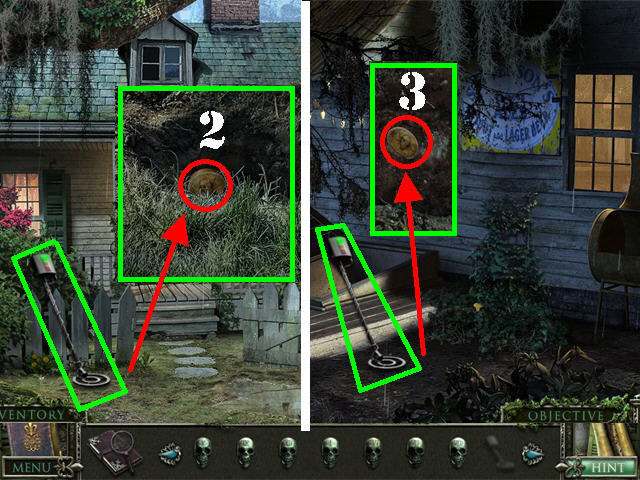
- Move to the outside of the Carriage House; use the metal detector around the left side of the ground truck to obtain GOLD PIECE 2/3 (2).
- Go to the Side of the Tavern.
- Examine the ground near the center of the ground to obtain GOLD PIECE 3/3 (3).
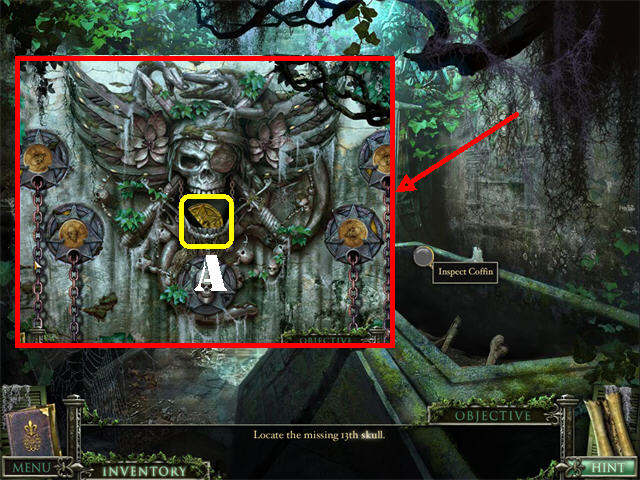
- Go to the Mausoleum.
- Zoom into the right wall to reveal a puzzle.
- Place the 3 GOLD PIECES in the empty slots.
- Rotate the pieces into the correct positions.
- Check out our video solution!
- Pull on the chains to reveal in which direction the coins should be facing.
- You have to pull on the chain several times before it rolls back up to see a gold spot.
- Take MEDALLION PIECE 2/2 (A) after the puzzle has been solved.
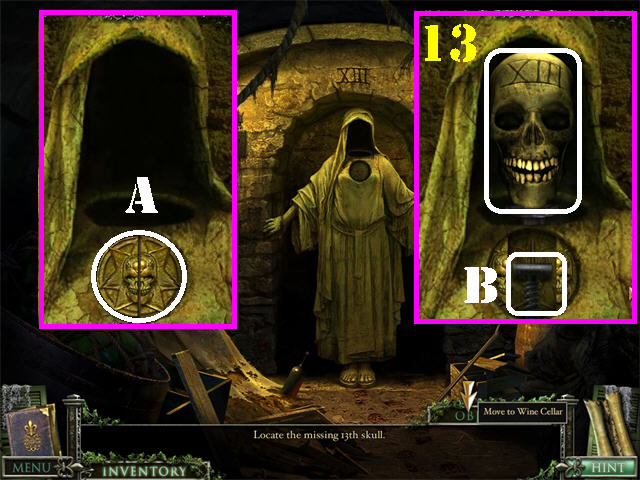
- Go down to the Secret Room in the Cellar in the Mansion.
- Zoom into the headless figure in the back; insert the 2 MEDALLION PIECES (B).
- Pull the LEVER (C).
- Take the 13th Skull (13).
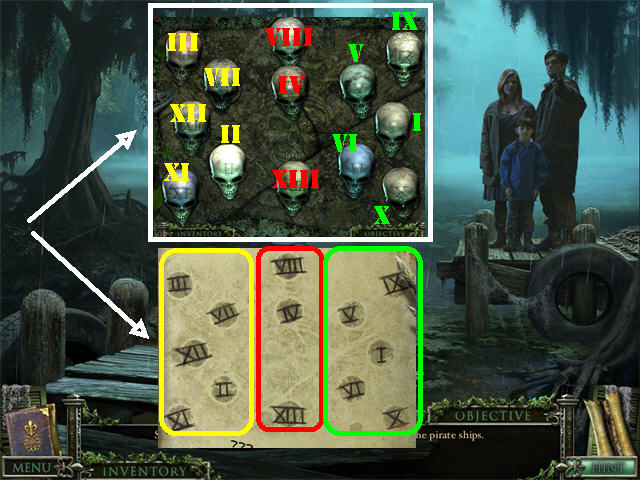
- Return to the Swamp Clearing.
- Inspect the Alligator Nest in the lower left corner.
- Place the 13 SKULLS in your inventory according to the parchment you found in the chest in the Secret Passage.
- When skulls are placed correctly they will light up.
- Congratulations! You have completed Mystery Case Files:13th Skull!
Created at: 2011-01-07