

Walkthrough Menu
- General Tips
- Chapter 1: Huxley's Boarding House
- Chapter 2: First Floor
- Chapter 3: Secret Hallway
- Chapter 4: Library
- Chapter 5: Crematorium
- Chapter 6: Workshop
- Chapter 7: Cold Storage
General Tips
- This is the official guide for Mystery Case Files: Broken Hour.
- This guide will not tell you when you have to zoom into a location; the screenshots will show each zoom scene.
- Hidden-object puzzles are referred to as HOPs. This guide will not show screenshots of the HOPs, however, it will mention when an HOP is available and the inventory item you'll collect from it.
- Use the Map to fast travel to a location.
Chapter 1: Huxley's Boarding House
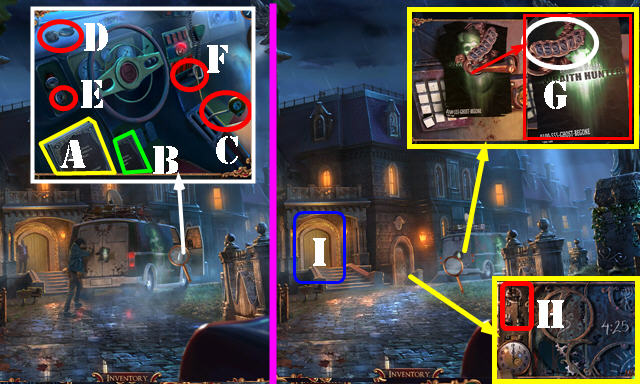
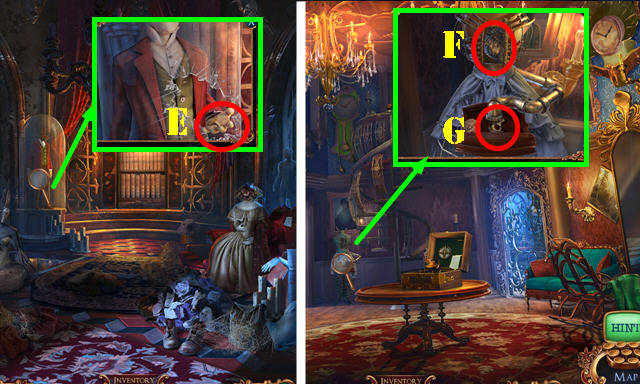
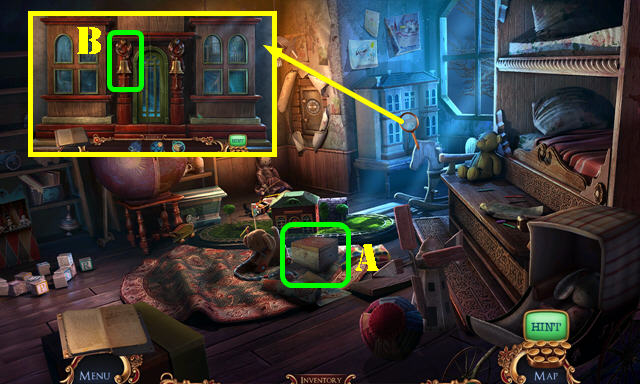
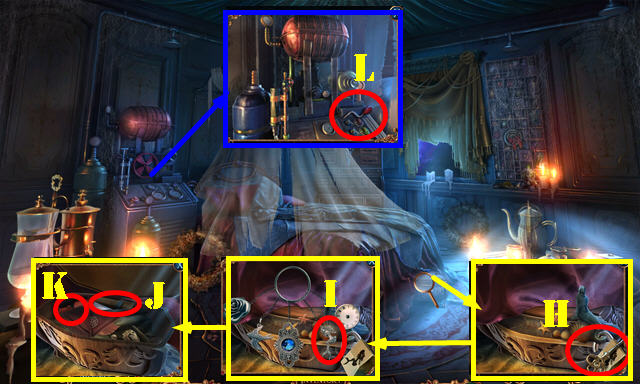
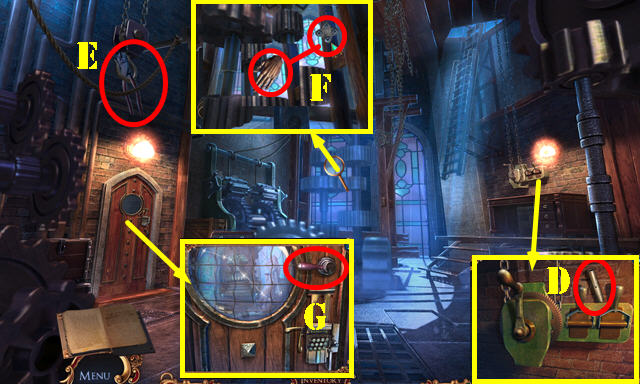
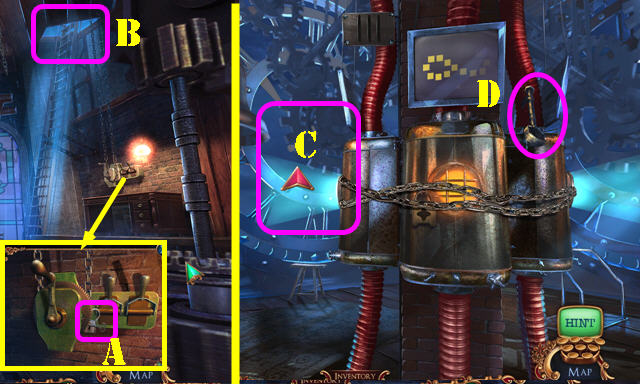
- Take the HEAVY BOOK (A) and place it on the clutch (B). Select the shift stick (C). Place the key (D) in the ignition (E) and select it. Select the slider (F).
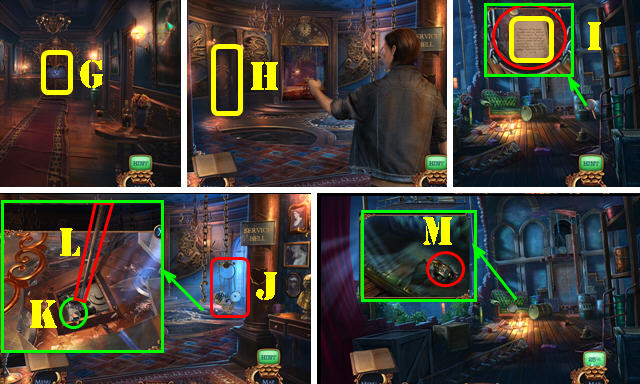
- Look at the note and take the ROYAL SIGIL (G).
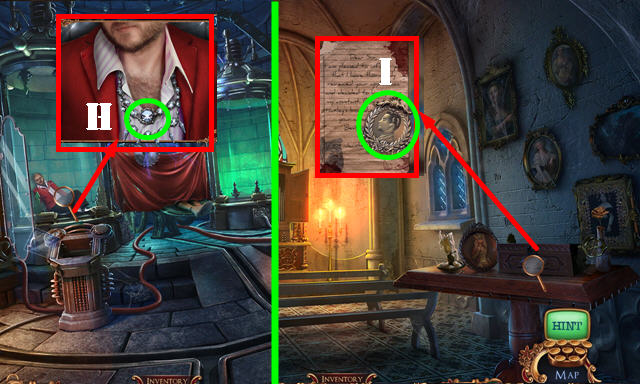
- Remove the switch (H).
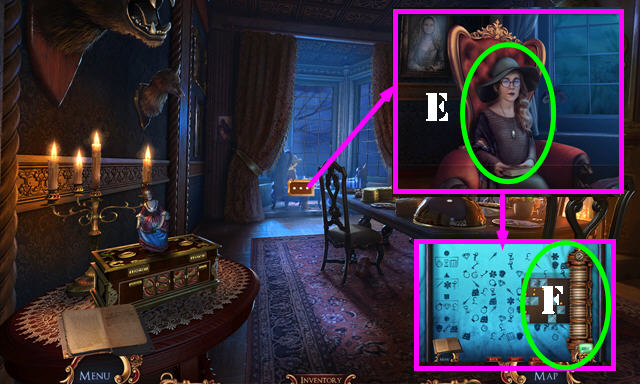
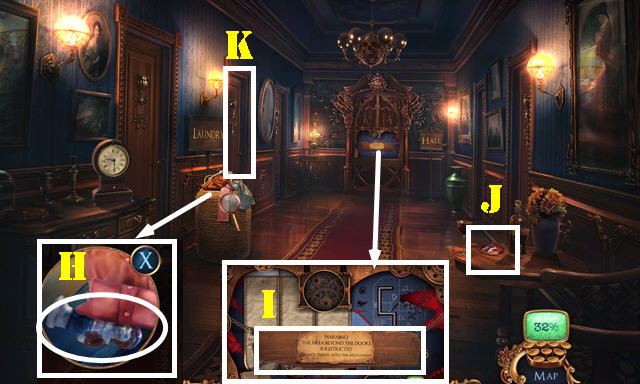
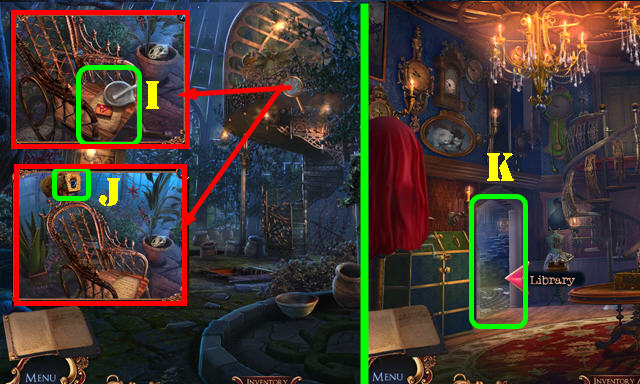
- Enter Reception (I).
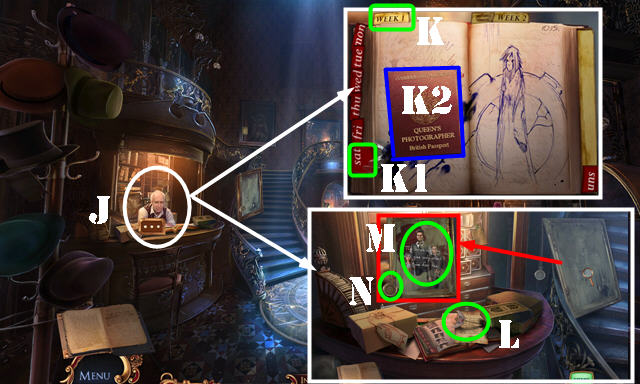
- Talk to Mr. Harold (J).
- Select week 1 (K) on the tab and then Sat (K1). Open the passport book (K2).
- Take the BOX KEY (L).
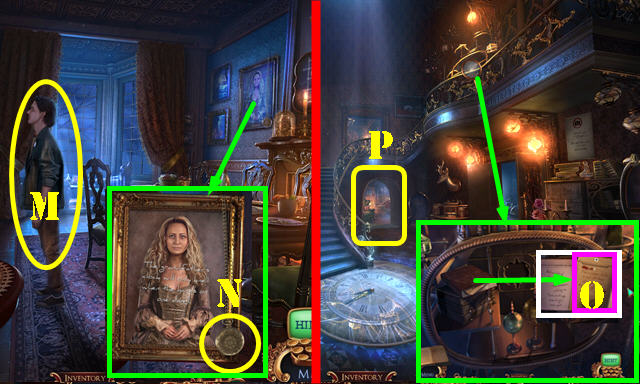
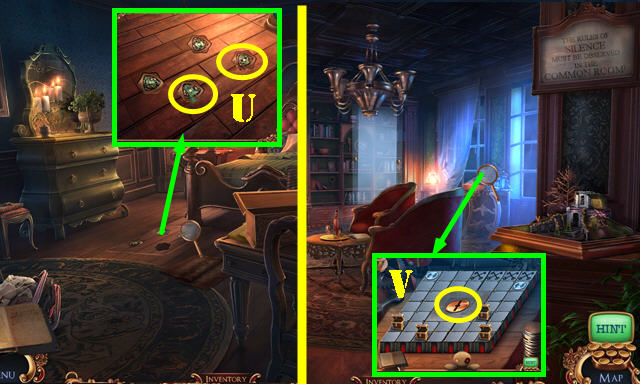
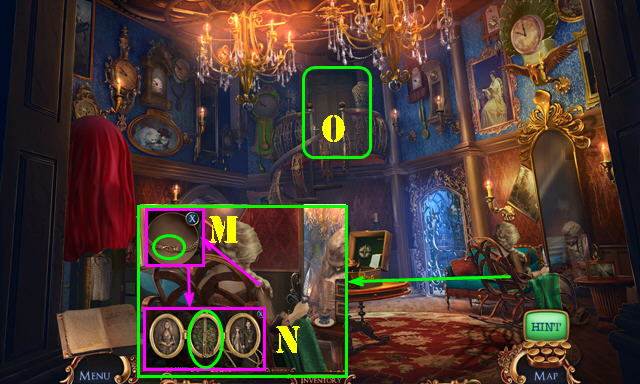
- Select the mirror (M); take the POCKET WATCHES 1/5 (N).
- Walk down.
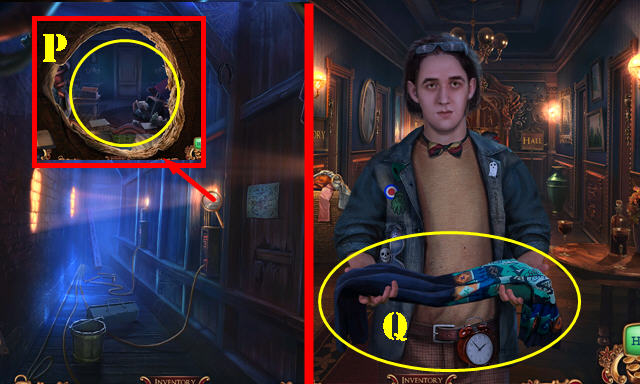
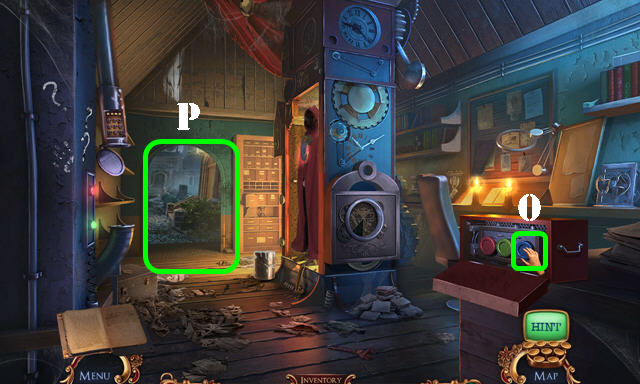
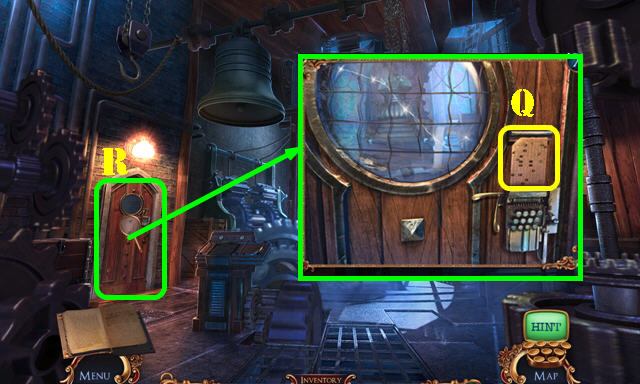
- Use the BOX KEY (O); play the HOP to receive PRITCHARD'S BAG.
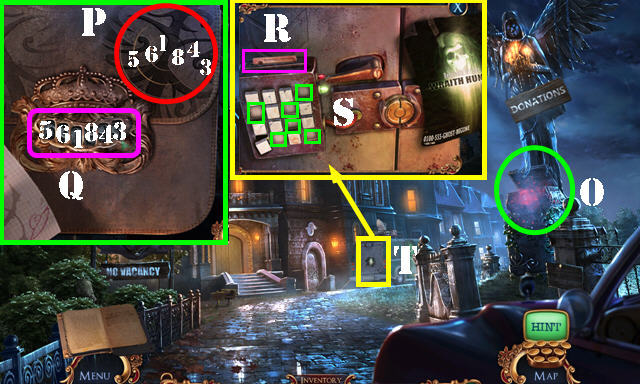
- Select PRITCHARD'S BAG; select the note. Arrange the puzzle as shown (P). Place the ROYAL SIGIL and enter 561843 (Q). Take the CRYPTEX and PUNCH CARD.
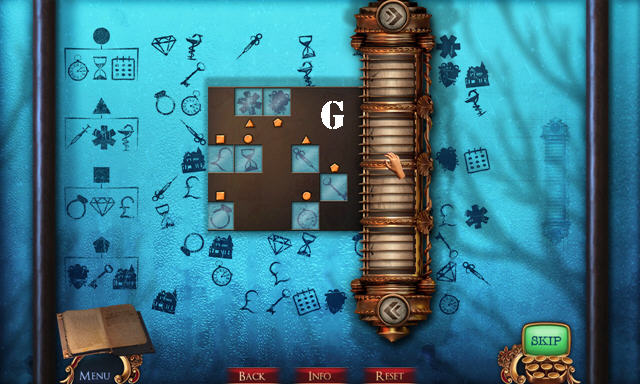
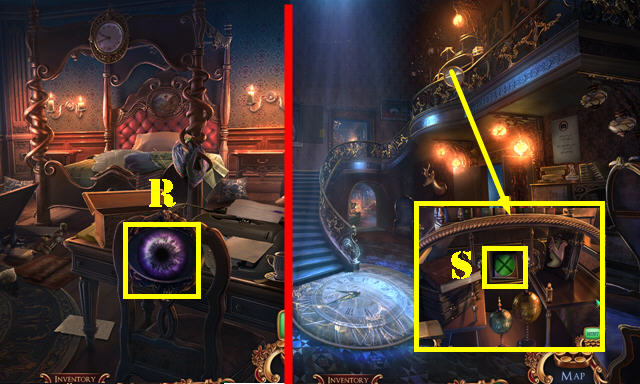
- Place the PUNCH CARD (R); select it and look at. Insert the punch card and reproduce the pattern on the keys (S).
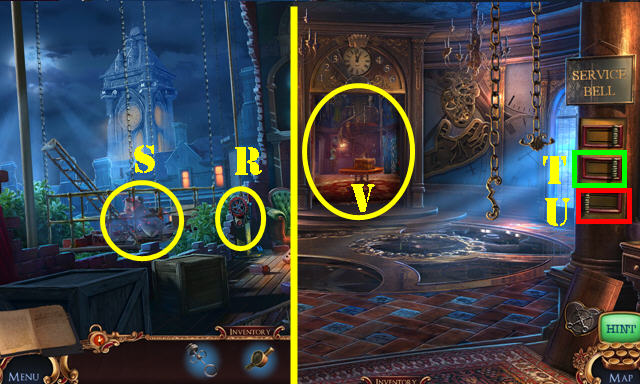
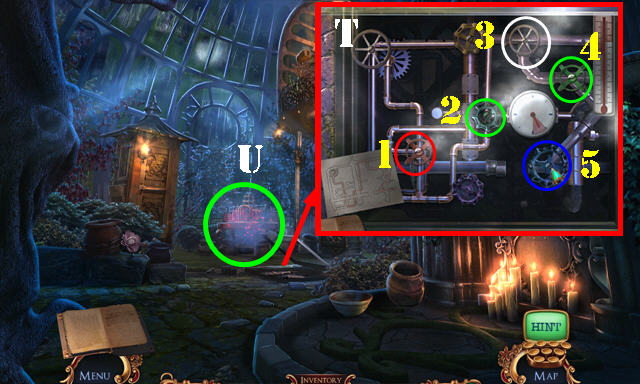
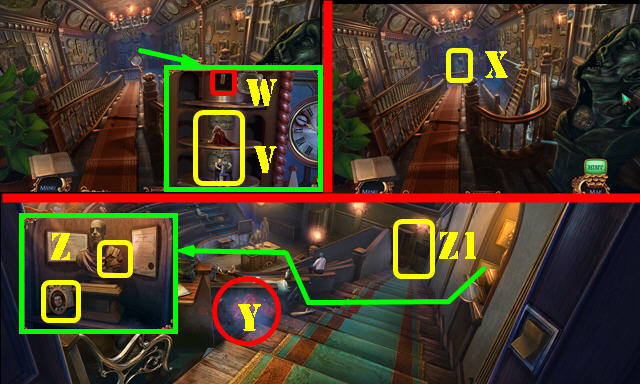
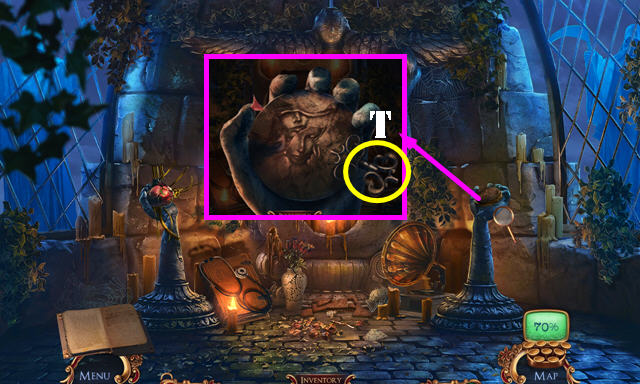
- Enter the Van-cave (T).

- Select the balloon on the screen.
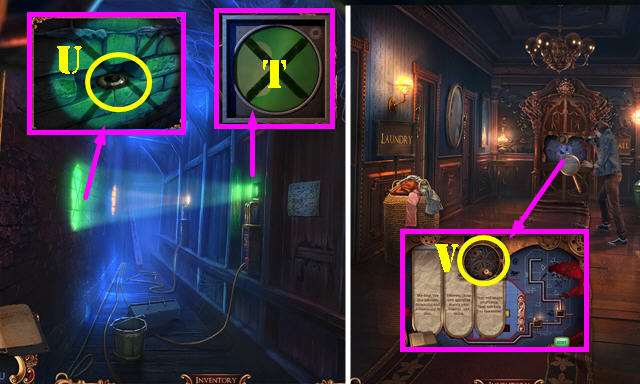
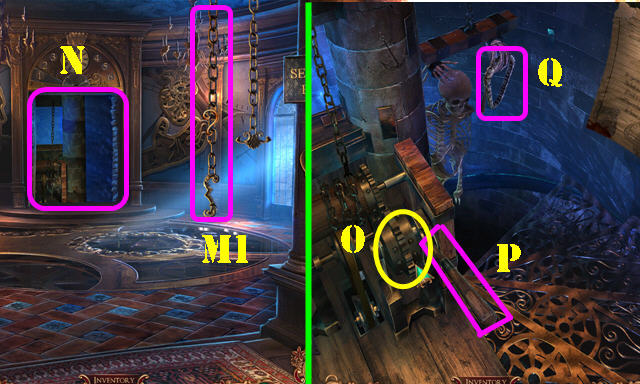
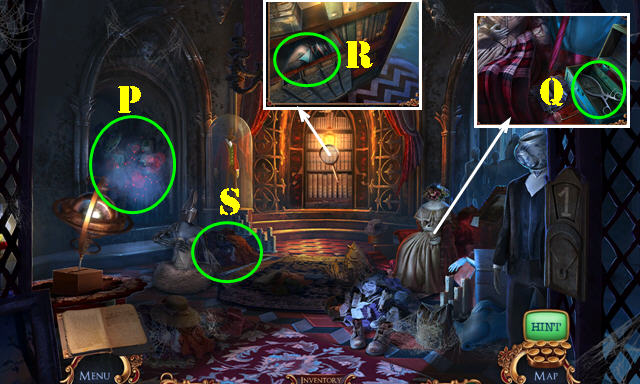
- Open the first folder; take the POCKET WATCHES 2/5 (U). Look at the second folder. Open the third folder; take the UNION JACK (U1). Remove the cover; take the METAL SWITCH (U2).
- Look at the book (V); take the RUBBER GLOVE (W).
- Open the curtain; place the RUBBER GLOVE (X) and press the button (Y). Open the glass; take the BOTTLE OF SAND and BEN'S PLAN (Z).
- Walk down.
- Place the METAL SWITCH (A); take the LEFT SPEAKER (B).
- Return to Reception.
- Look at the note (C).
- Enter the Dining room (D).
- Talk to Rachel (E).
- Place the CRYPTEX for a puzzle (F).
- Solution one (G).
- Solution two (H).
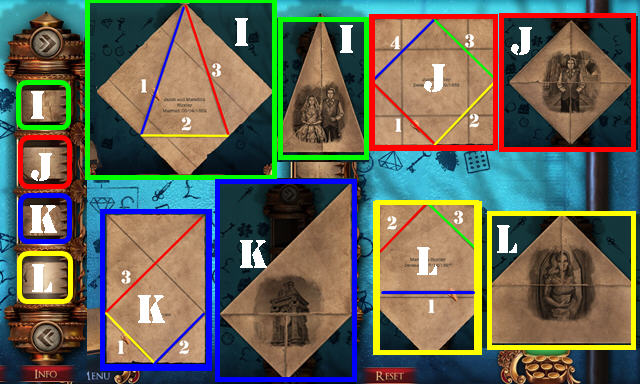
- Select the first scroll. Solution three (1-3)-(I).
- Select the second scroll. Solution four (1-4)-(J).
- Select the third scroll. Solution five (1-3)-(K).
- Select the fourth scroll. Solution six (1-3)-(L).
- Give BEN'S PLAN (M); receive the CASSETTE.
- Take the POCKET WATCHES 3/5 (N).
- Walk down.
- Select the folder (O); receive the POCKET WATCHES 4/5.
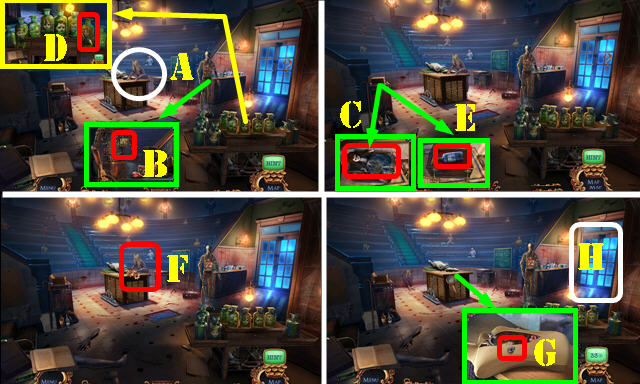
- Go to the Common room (P).
- Remove the pillow; take the HEADPHONES (Q).
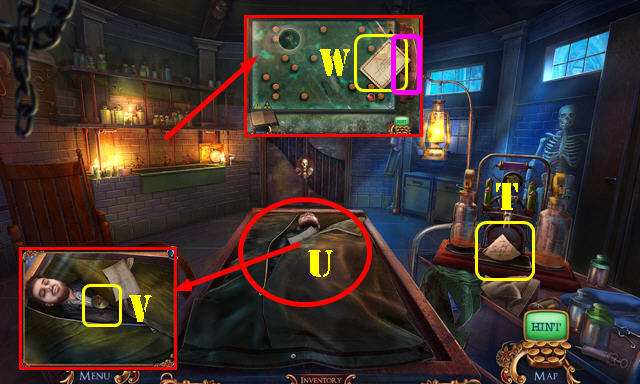
- Open the cabinet; play the HOP (R) to get the MYSTERIOUS BOOK.
- Take the METAL SPRING from the MYSTERIOUS BOOK. Open it and take the POCKET WATCHES 5/5. Select the left page; take the SYRINGE TOP.
- Return to the Courtyard.
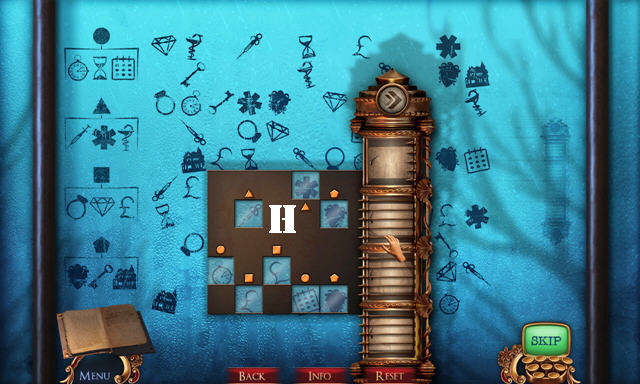
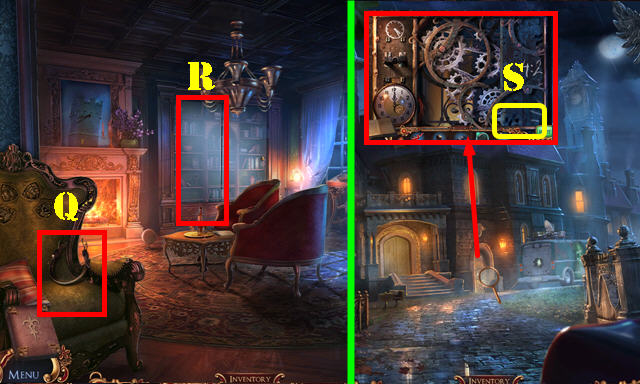
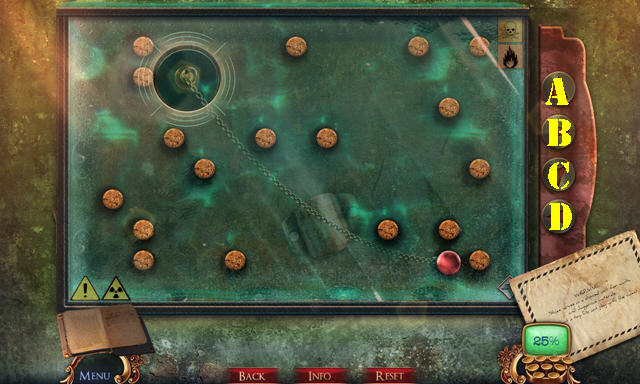
- Place the METAL SPRING for a puzzle (S).
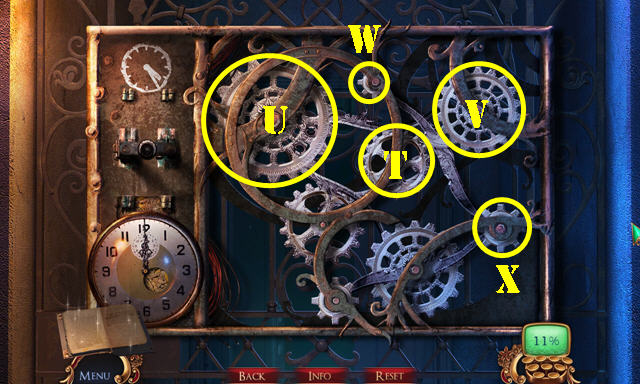
- Solution: Tx2-Ux4-T-V-Wx2-X.
- You automatically enter the Basement.
- Open the compartment (Y).
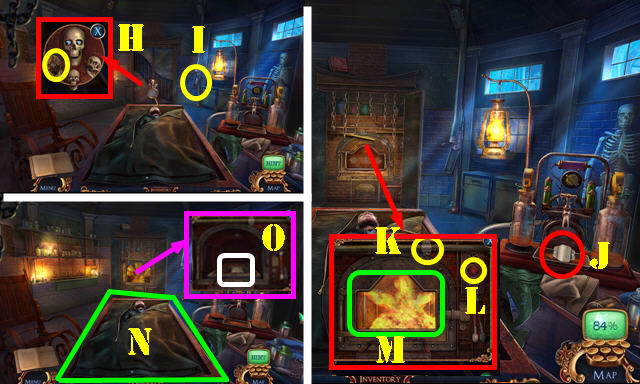
- Take the NIGHTINGALE EMBLEM (Z). Place the POCKET WATCHES 5/5 on the clocks for a puzzle.
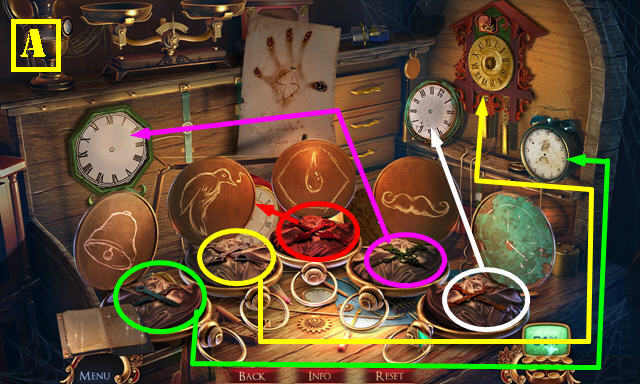
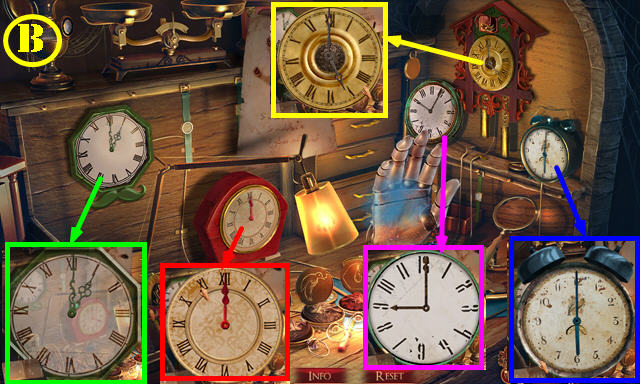
- Place the clock hands (A).
- Set the times as shown (B).
- You receive the HOURGLASS.
- Return to Reception.
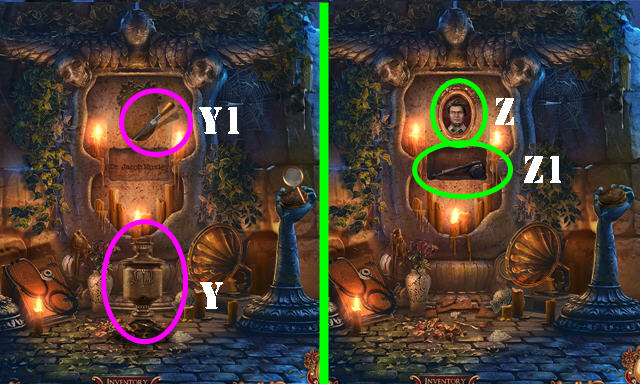
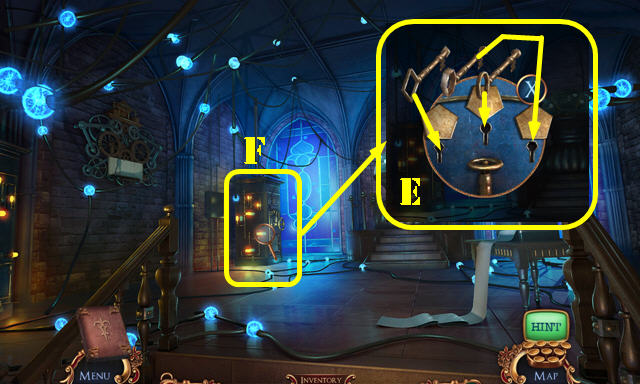
- Remove the three screws and the top from the HOURGLASS; place the BOTTLE OF SAND in it.
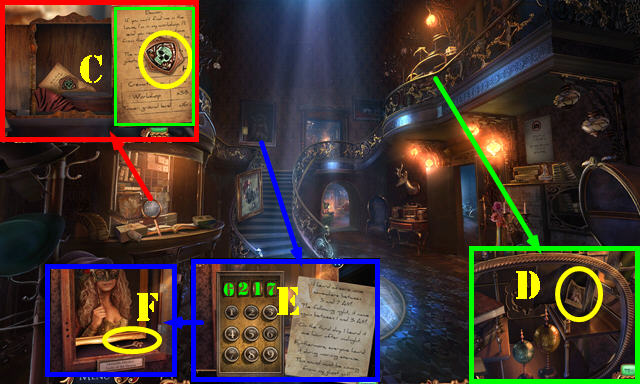
- Place the HOURGLASS and select the note. Take the SKULL TILE and NOTE (C).
- Place the NIGHTINGALE EMBLEM; take the OLD PHOTO and RIGHT SPEAKER (D).
- Place the OLD PHOTO; enter 6217 (E). Take the DIAL KEY (F).
- Return to the Basement.
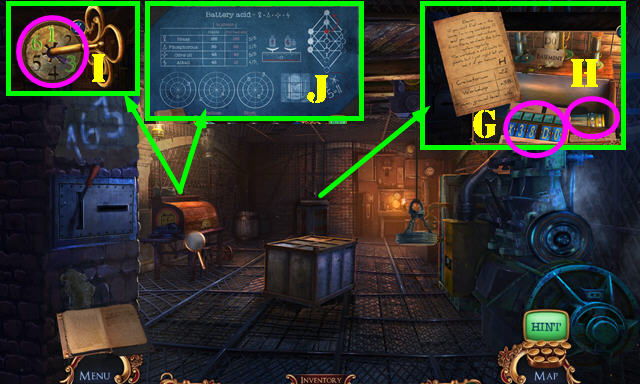
- Place the NOTE. Enter X38DO (G). Take the TUBE (H).
- Open the TUBE; receive the BLUEPRINT and JUMPER CABLES.
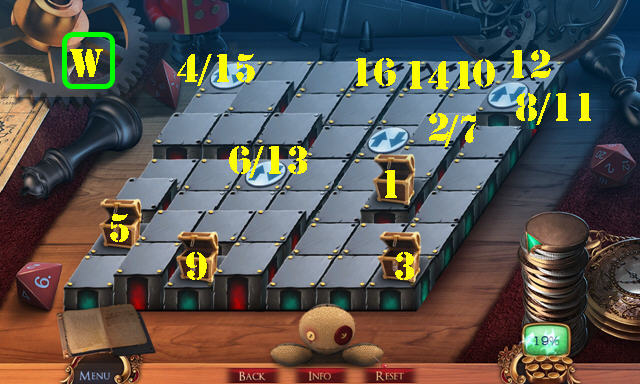
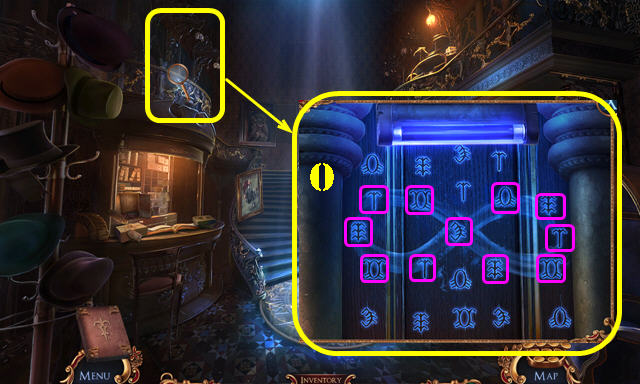
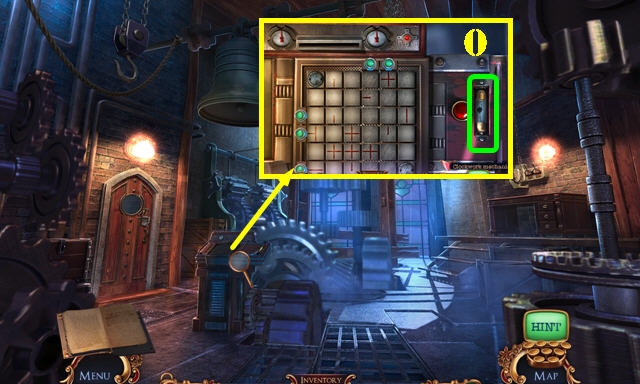
- Place the DIAL KEY; select 163 (I). Place the BLUEPRINT (J) and select it for a puzzle.
Chapter 2: First Floor
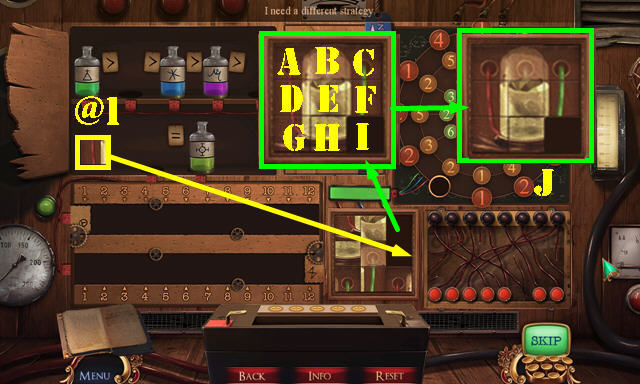
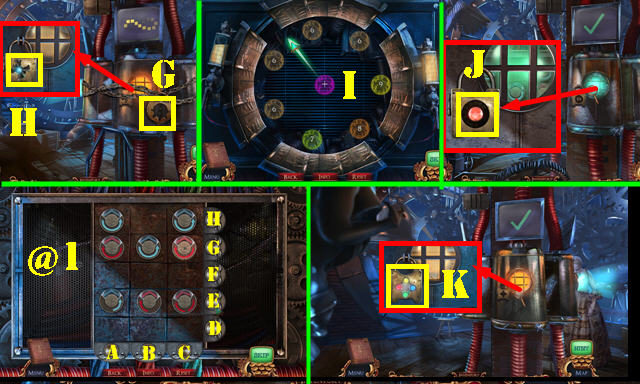
- Place the tile (@1).
- Solution: B-E-F-I-H-G-D-A-B-E-F-I-H-G-D-A-B-E-D-A-B-E-F-I.
- H-E-F-C-B-E-F-E-B-C-F-I-H-E-F-I-H-E-F-C-B-E-F-I-H-E-B-C-F-E-H-I.
- Final Image (J).
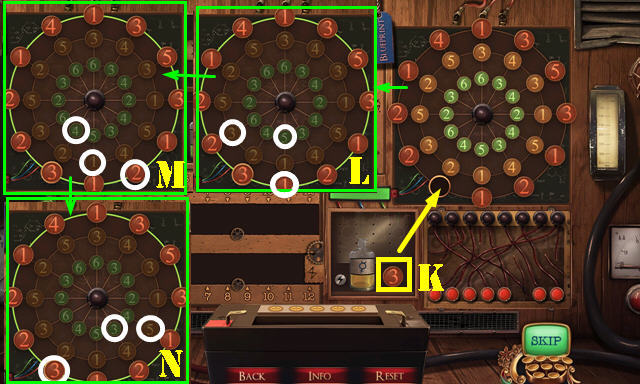
- Place K. Select L-M-N.
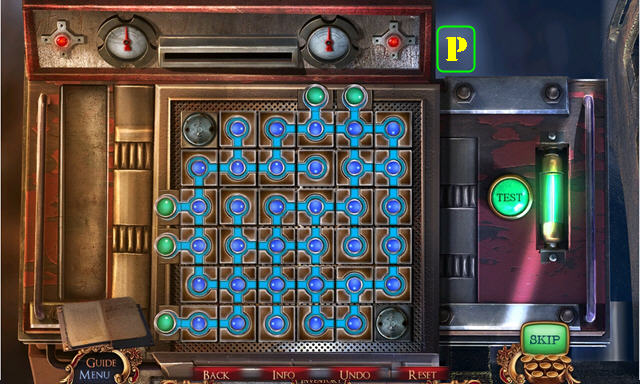
- Place (O) for a puzzle.
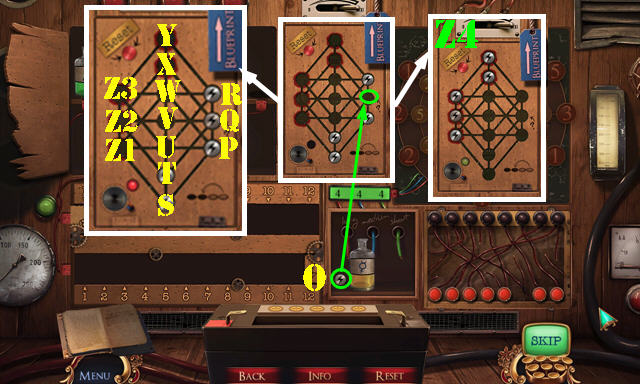
- Solution: (S-U)-(T-V)-(P-Z1)-(Q-Z2)-(U-W)-(R-Z3)-(V-X)-(W-Y).
- Final Image (Z4).
- Move 1-4 as shown.
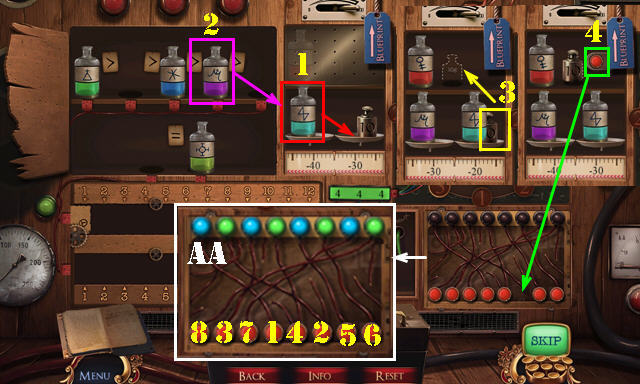
- Select 1-8 (AA).
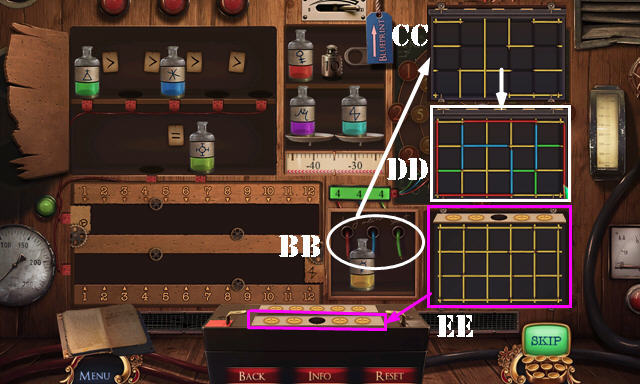

- Place the wires from (BB) to (CC). Solution (DD). Move (EE) to the slot.
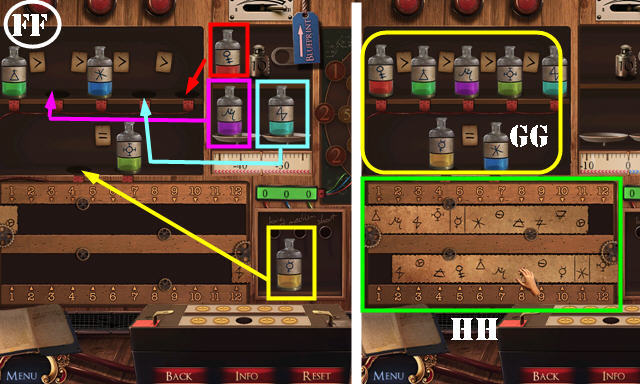
- Place all the bottles (FF). Arrange as shown (GG).
- Slide the rulers as shown (HH).
- Place the bottles as shown (II).
- Use the plus and minus symbols to change the numbers as shown (JJ). Select Mix (KK). Pour (LL) into (MM).
- Receive the WORKING BATTERY.
- Return to the Van-cave.
- Place the WORKING BATTERY and JUMPER CABLES (A).
- Place the RIGHT SPEAKER and LEFT SPEAKER on the HEADPHONES.
- Insert the CASSETTE and HEADPHONES for a puzzle (B).
- Solution: Fx8-C-Fx6-C.
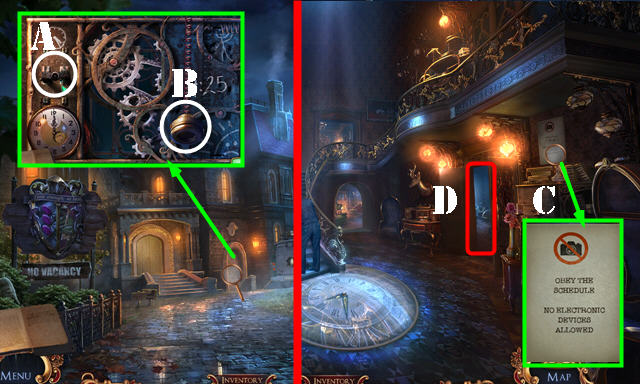
- Return to Reception and go to the First Floor (G).
- Select the clothes twice; take the KID STATUE 1/2 (H).
- Look at the sign (I).
- Move the two glasses; take the HEART MOSAIC 1/3 (J).
- Open the door; enter Rachel's room (K).
- Take the HEART MOSAIC 2/3 (L) and MILITARY FIGURINE (M).
- Lift the rug (N).
- Return to the Common room.
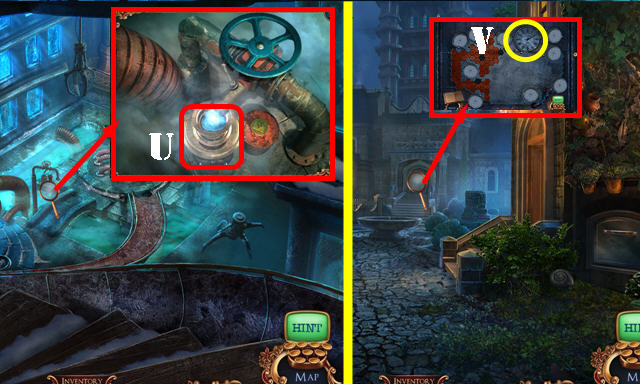
- Place the MILITARY FIGURINE (O); take the BURNER VALVE and push the button (P).
- Hang the UNION JACK (Q); take the HEART MOSAIC 3/3 (R).
- Return to the Dining room.
- Put down the HEART MOSAIC 3/3; place as shown (S). Select the paper; take the GRAVE TILE (T).
- Return to Rachel's room.
- Place the SKULL TILE and GRAVE TILE (U); play the HOP to get the CAMCORDER.
- Return to the Common room.
- Look at the note on the CAMCORDER; open the side compartment and take the GAME TOKEN.
- Place the GAME TOKEN for a puzzle (V).
- Solution: (1-2)-(3-4)-(5-6)-(7-8)-(9-10)-(11-12)-(13-14)-(15-16) (W).
- Take the KID STATUE 2/2.
- Return to the Dining room.
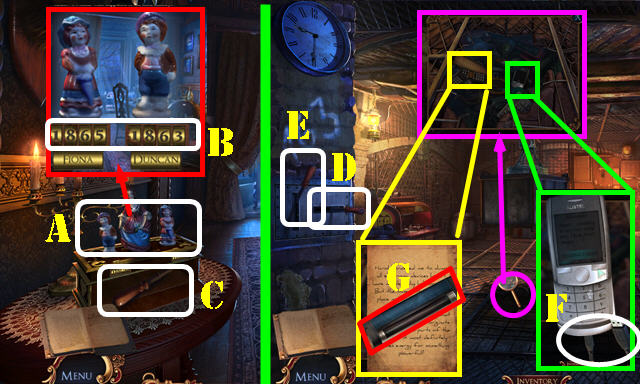
- Place the KID STATUE 2/2 (A). Enter 1865 and 1863 (B).
- Take the LEVER (C).
- Return to the Basement.
- Place the LEVER (D). Select E-D-E.
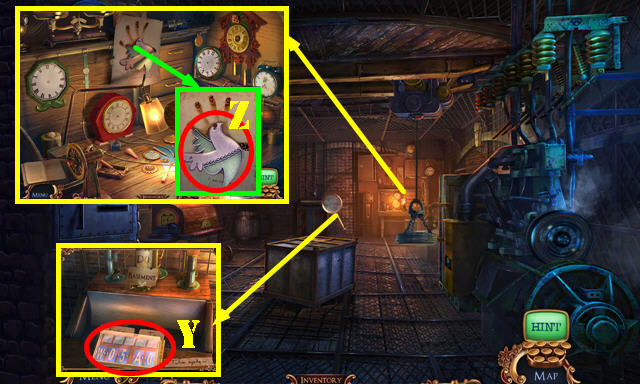
- Select the phone 3x; take the USB CABLE (F). Look at the note; take the UV LAMP (G).
- Return to the Van-cave.
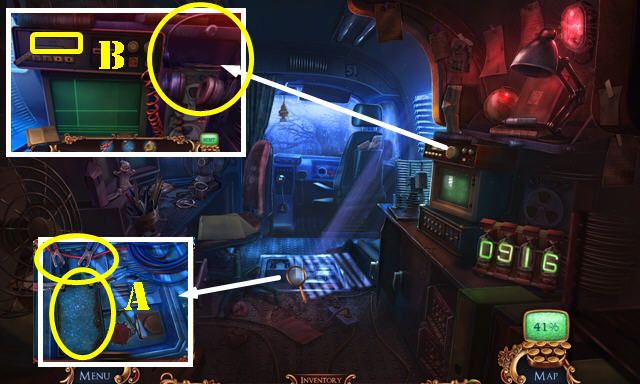
- Place the USB CABLE on the CAMCORDER.
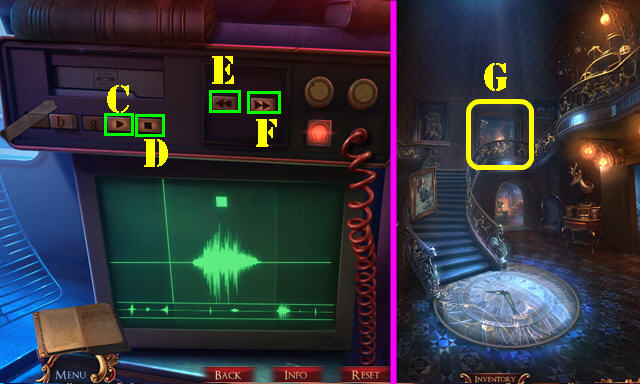
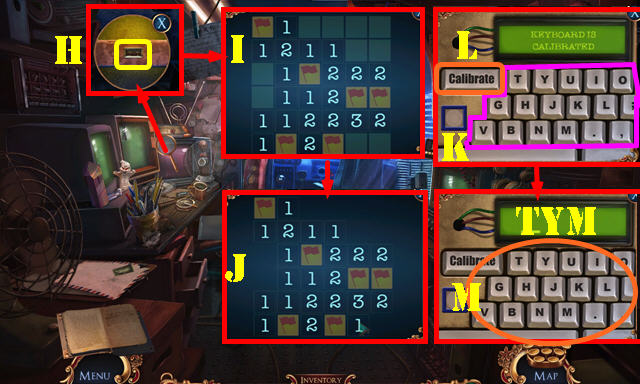
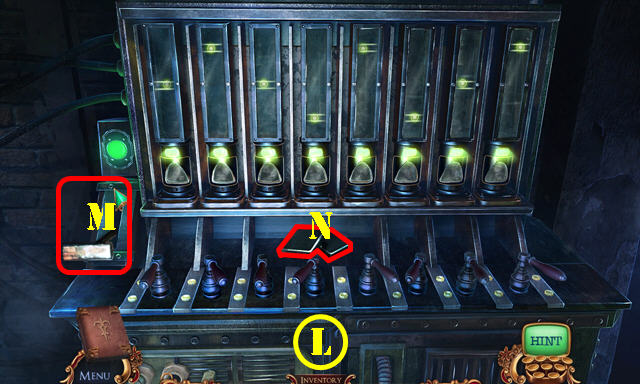
- Plug in the CAMCORDER (H); play the HOP to get the RECEPTION PHOTOS. HOP puzzle solution: Flag and number as shown. Then place a checkmark on the blank spots (I). Final Image (J).
- Use the blue square (K) to swap letters as shown (purple) and select 'Calibrate' (L). Type in 'TYM' (M).
- Return to Reception.

- Place the RECEPTION PHOTOS on the scene. Place the photos as shown (N).
- Use the UV LAMP; select all the symbols inside the infinity symbol.
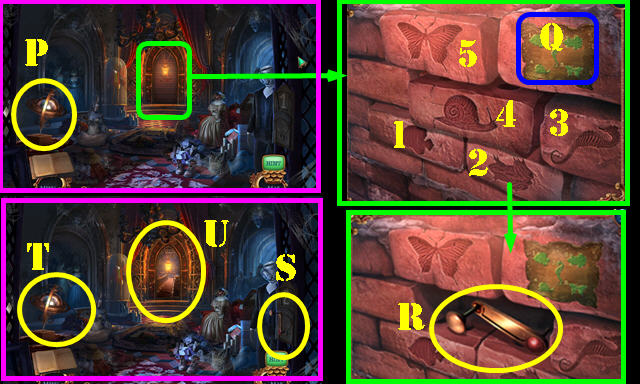
- Go to the Secret hallway (O).
Chapter 3: Secret Hallway
- Look at the door (P).
- Return to the First floor.
- Take the SASH SCARF (Q).
- Enter Rachel's room.
- Take the BLACK EYE (R).
- Return to Reception.
- Place the BLACK EYE; take the PHOTO FILTER (S).
- Return to the Secret hallway.
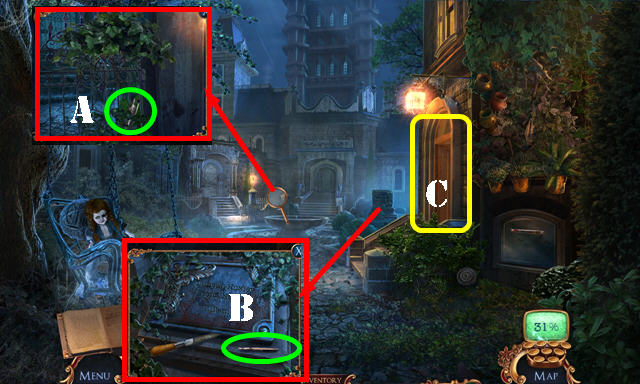
- Place the PHOTO FILTER (T).
- Remove the brick; take the SMALL WATCH (U).
- Return to the First floor.
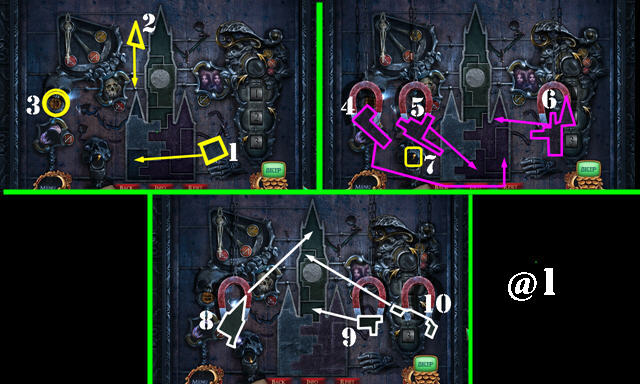
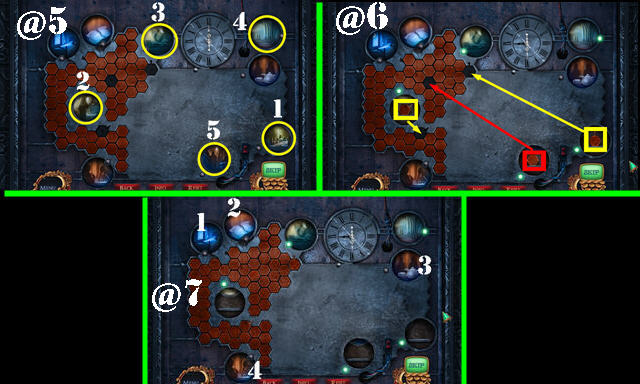
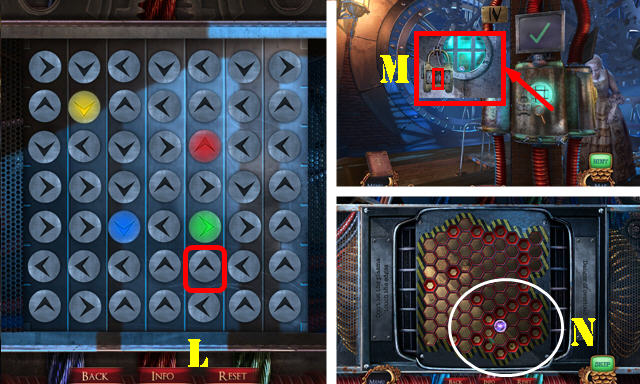
- Place the SMALL WATCH for a puzzle (V).
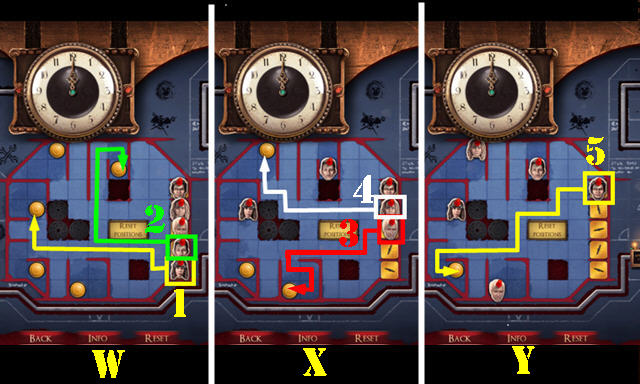
- Move the characters as shown (W-X-Y).
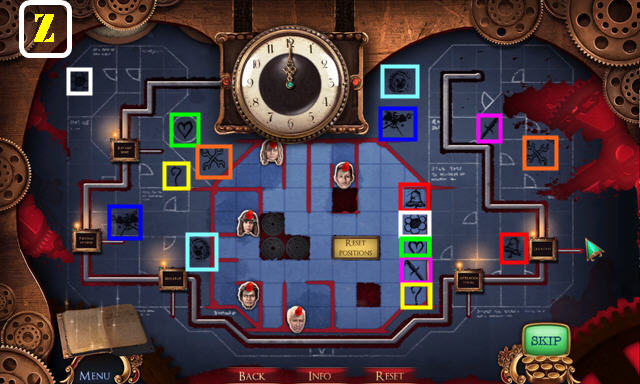
- Select all the matching pairs (Z).
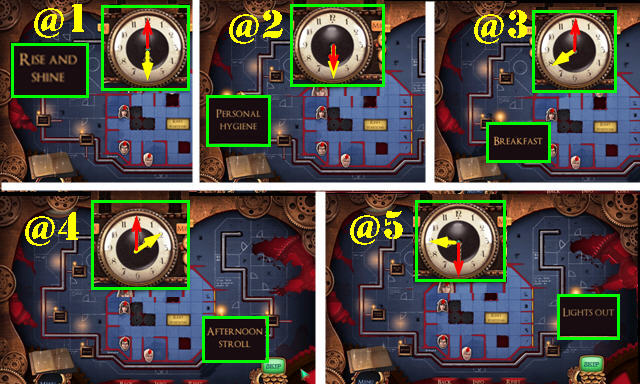
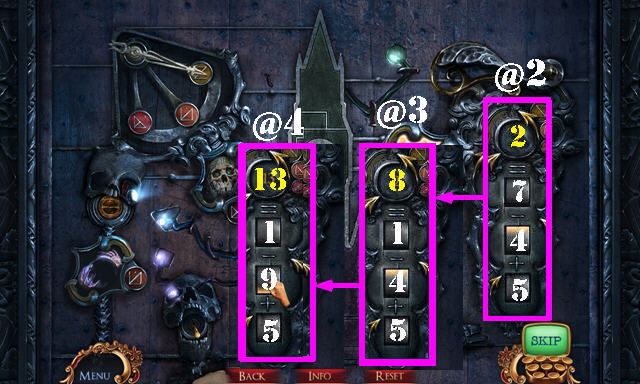
- Set the clocks (@1-@5).
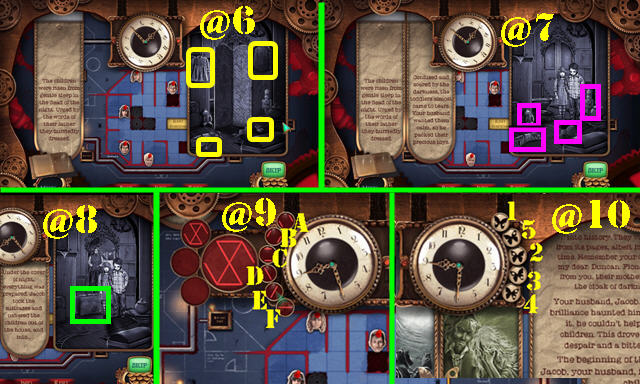
- Find the items (@6-@8).
- Solution one: (A-C-D-E) (@9).
- Solution two: (B-C-D-E) (@9).
- Solution three: (A-B-C-F) (@9).
- Select 1-5 (@10).
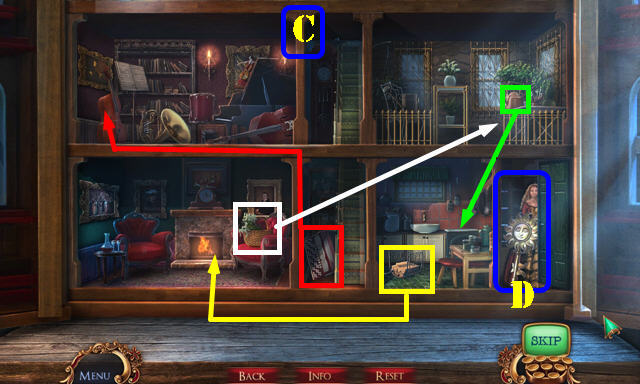
- Go to the Hall (G) and then to the Unfinished room (H).
- Pull the red curtain on the left. Read the note; open the lid (I).
- Walk down.
- Take the CHARM BRACELET (J).
- Use the SASH SCARF 3x; take the GLASS PIECE (K); remove the pole (L).
- Return to the Unfinished room.
- Use the GLASS PIECE; take the COGWHEEL (M).
- Walk down.
- Pull the chain (M1).
- Go to the Spiral staircase (N).
- Place the COGWHEEL (O); pull the handle (P). Take the GEAR CHAIN (Q).
- Return to the Unfinished room.
- Place the GEAR CHAIN (R); play the HOP (S) to receive the HUXLEY MEDALLION.
- Walk down.
- Place the HUXLEY MEDALLION; select (T-U).
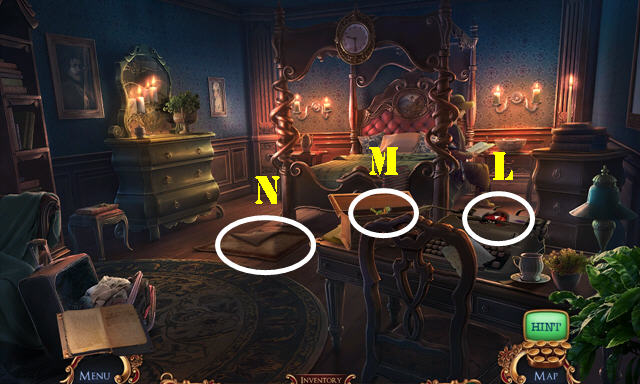
- Go to Meredith's boudoir (V).
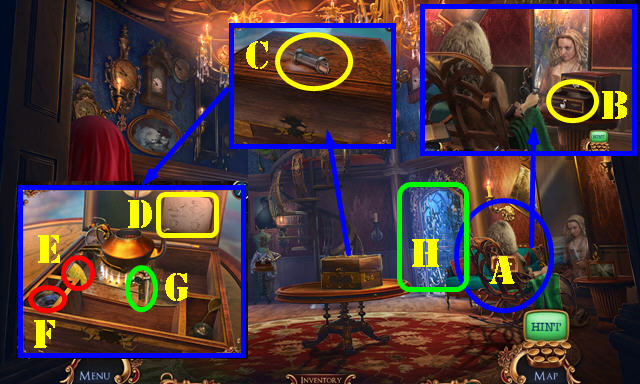
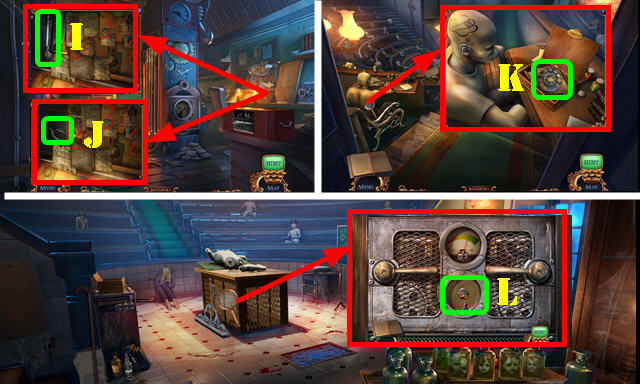
- Talk to Meredith (A). Open the drawer; take the TEA RECIPE (B).
- Take the SYRINGE (C).
- Open the case; place the RECIPE (D); take the LEMON HALF (E) and select the teacup (F). Place the BURNER VALVE (G).
- Read the note in the SYRINGE and place the SYRINGE TOP on it.
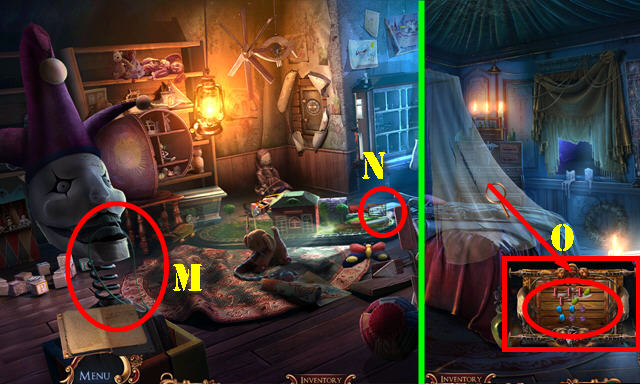
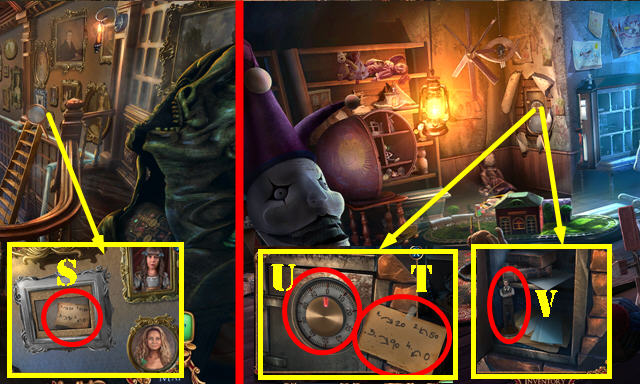
- Go to the Indoor garden (H).
- Take the MORTAR AND PESTLE and the MATCHES and read the note (I).
- Use the LEMON HALF; take the CRYSTAL TEAR 1/3 (J).
- Walk down and go to the Library (K).
Chapter 4: Library
- Look at the book; take the CRYSTAL TEAR 2/3 (L).
- Open the book; take the WORMWOOD (M).
- Use the SYRINGE; receive the FILLED SYRINGE (N).
- Take the GARDEN FLOW INSTRUCTIONS (O).
- Return to the Unfinished room.
- Use the MATCHES (P).
- Play the puzzle (Q).
- Solution (R).
- Select the stones and open the case; take the PRESSURE METER (S).
- Return to the Indoor garden.
- Remove the cover; place the GARDEN FLOW INSTRUCTIONS and PRESSURE METER. Select 1-5 (T).
- Play the HOP (U) to receive the CHOCOLATE LILY.
- Place the WORMWOOD and CHOCOLATE LILY in the MORTAR AND PESTLE; receive the HERBAL MIX.
- Walk down.
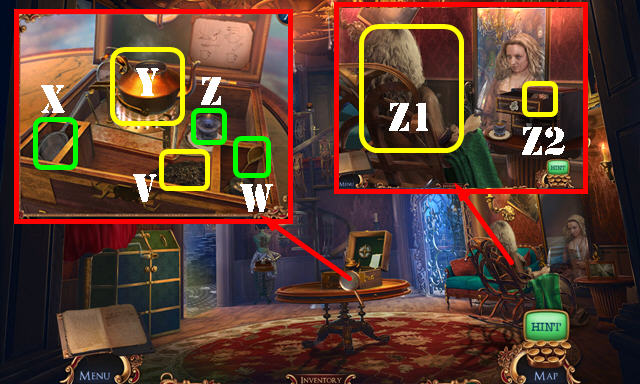
- Place the HERBAL MIX (V); select the spoon (W), strainer (X) and kettle (Y). Use the FILLED SYRINGE; take the TEA CUP (Z).
- Give the TEA CUP (Z1).
- Open the drawer; take MEREDITH'S PORTRAIT (Z2).
- Return to the Library.
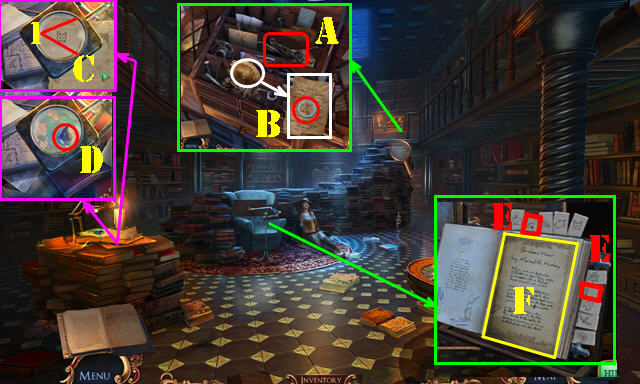
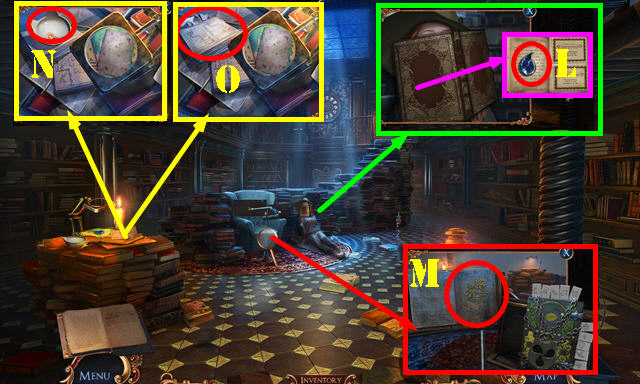
- Place MEREDITH'S PORTRAIT; take the TIGHTENING SCREW (A). Open the note; take the MAGNIFYING GLASS (B).
- Place the MAGNIFYING GLASS. Place the paper over the number one (C); take the CRYSTAL TEAR 3/3 (D).
- Place the CRYSTAL TEAR 3/3; select the flower and bird (E); take MEREDITH'S POEM (F).
- Return to the Indoor garden.
- Use the TIGHTENING SCREW; take the MAGNET (G).
- Walk down.
- Use the MAGNET to guide both balls to their exits (H). Open the compartment; take MEREDITH'S HAIRPIN (I).
- Give MEREDITH'S HAIRPIN and MEREDITH'S POEM for a puzzle (J).


- Solution one (K).
- Solution two (L).
- Undo the clasp (M) and open the medallion; take the SMALL KEY (N).
- Use the SMALL KEY; go to the Curiosity room (O).
- Play the HOP to receive the PUSH BUTTON 1/2 (P).
- Open the chest; take the TISSUE SPREADER (Q).
- Open the drawer; take the URN (R).
- Open the URN; take the SMALL HAMMER.
- Move the pile and go to the Crematorium (S).
Chapter 5: Crematorium
- Unfold the note; take the SCHEDULE (T).
- Open the body bag (U); look at the note and take the PUSH BUTTON 2/2 (V).
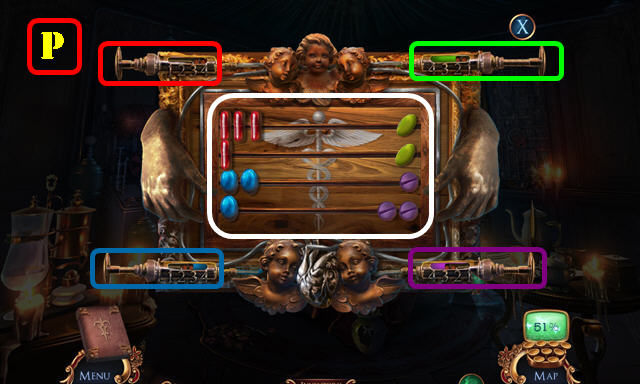
- Look at the note (W); place the PUSH BUTTON 2/2 (purple) for a puzzle.
- Solution: D-A-B-C-D-A-B-A-D.
- Take the CORRODED CLAMP.
- Walk down.
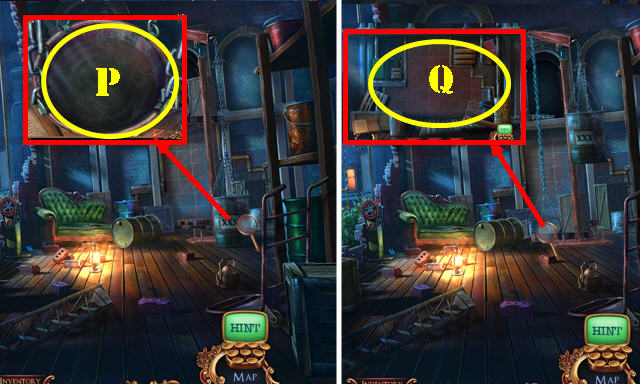
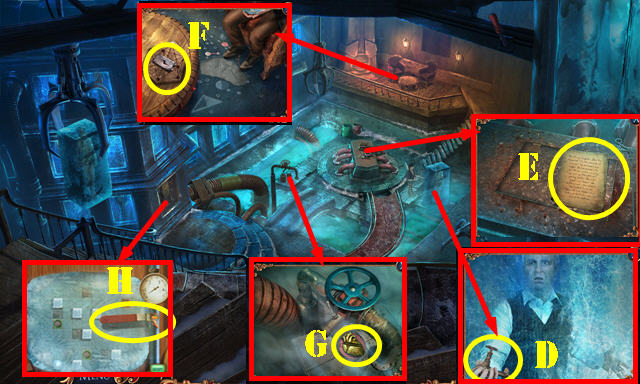
- Use the SMALL HAMMER; take the WIND-UP KEY (E).
- Walk down.
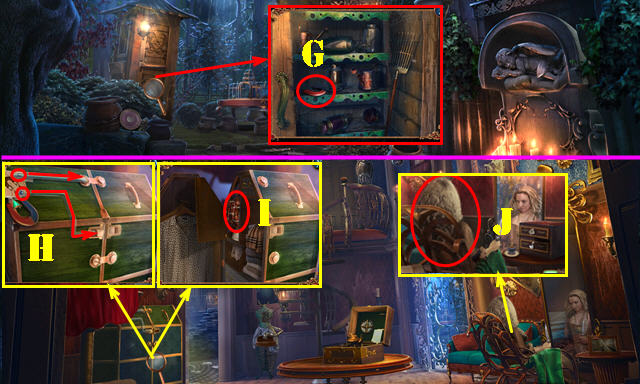
- Use the TISSUE SPREADER and WIND-UP KEY (F). Look at the note and take the SKULL FIGURINE (G).
- Return to the Crematorium.
- Place the SKULL FIGURINE (H).
- Take the TUBE (I).
- Open the TUBE; look at the note and receive the SULFURIC ACID.
- Use the CORRODED CLAMP and SULFURIC ACID; take the CLAMP (J).
- Use the CLAMP (K); push the button (L) and select the furnace (M).
- Select the gurney (N).
- Use the URN; take the METAL PLAQUE (O).
- Walk down.
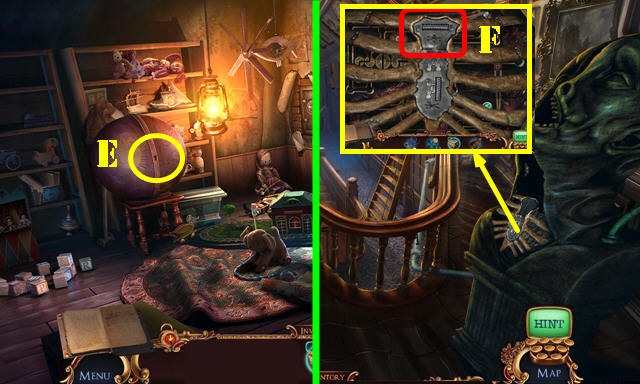
- Spin the globe (P).
- Place the METAL PLAQUE (Q). Select 1-5. Take the ELEVATOR CONTROLLER (R).
- Insert the ELEVATOR CONTROLLER (S) and select it. Spin the globe (T).
- Go to Portrait hall (U).
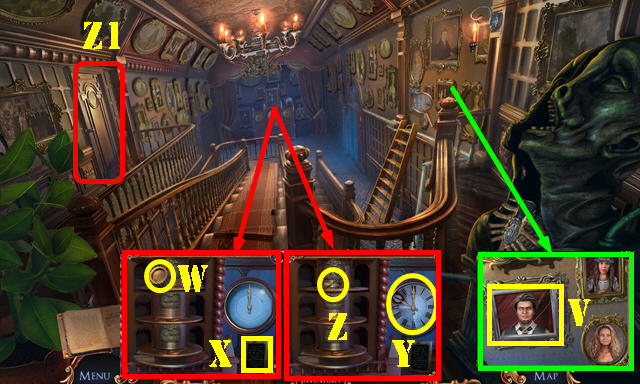
- Remove the portrait (V).
- Take the OXYGEN STAND PART 1/3 (W).
- Look at the sign (X); place the SCHEDULE and set the clock to 10 (Y); take the DOOR CHIME (Z).
- Go to the Children's room (Z1).
- Take the JACK-IN-THE-BOX (A).
- Place the DOOR CHIME (B) for a puzzle.
- Solution (C).
- Take the SUN KEY and MEREDITH'S FIGURINE (D).
- Use the SUN KEY (E); play the HOP to receive the SPINNING TOP.
- Select the SPINNING TOP 3x; take the METAL STERNUM.
- Walk down.
- Place the METAL STERNUM (F) for a puzzle.
- Solution: 1-7. Repeat step 2 four times (G).
- Enter the Bedroom on the right.
- Take the KEY 1/2 (H). Place the CHARM BRACELET; select the siren (I). Look at the book (J); take the TRAIN (K).
- Take the HANDLE (L).
- Place the HANDLE on the JACK-IN-THE-BOX; take the METAL BUTTON.
- Return to the Children's room.
- Take the OXYGEN STAND PART 2/3 (M).
- Place the TRAIN; take the ABACUS (N).
- Return to the Bedroom.
- Place the ABACUS for a puzzle (O).
- Solution (P).
- Take the WOODEN DOLL; look at the note and take the OXYGEN STAND PART 3/3.

- Select the WOODEN DOLL 4x; receive the KEY 2/2.
- Place the OXYGEN STAND PART 3/3 (Q).
- Play the HOP (R) to receive the SEAL.
- Walk down.
- Use the SEAL; take the SAFE CLUE (S).
- Go to the Children's room.
- Place the SAFE CLUE (T). Turn clockwise to 20, counterclockwise to 50, clockwise to 90, counterclockwise to 0 (U). Take JACOB'S FIGURINE (V).
- Walk down.
- Place MEREDITH'S FIGURINE and JACOB'S FIGURINE (V). Pull the chain (W).
- Go to the Amphitheater (X).
- Play the HOP (Y) to receive the BONE CUTTER.
- Take JACOB'S PICTURE and look at the note (Z).
- Go to the Operating hall (Z1).
- Talk to Emily (A).
- Use the BONE CUTTER; receive HAROLD'S INITIALS (B). Open the cage door.
- Take the CREEPY DOLL (C) and EMILY'S EYES (D).
- Use the KEY 2/2; look at the note; take the ELECTROLYTE SOLUTION (E).
- Give EMILY'S EYES (F).
- Use the METAL BUTTON (G); receive the MECHANICAL HEART.
- Go to the Woskshop (H).
Chapter 6: Workshop
- Take the METAL POINTER (I). Remove the blueprint; place HAROLD'S INITIALS; take the CHAINSAW (J).
- Return to the Amphiteater.
- Use the CHAINSAW on the arms; take the DIAL (K).
- Go to the Operating hall.
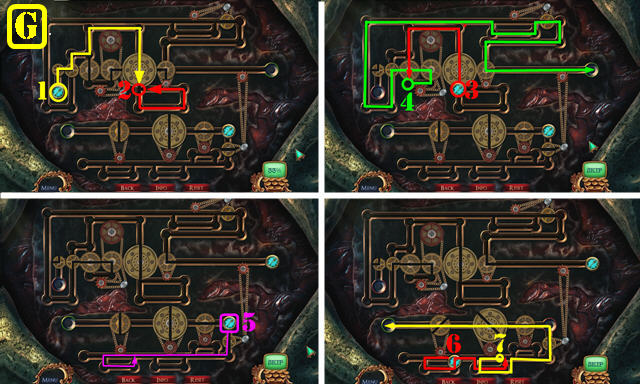
- Place the DIAL for a puzzle (L).
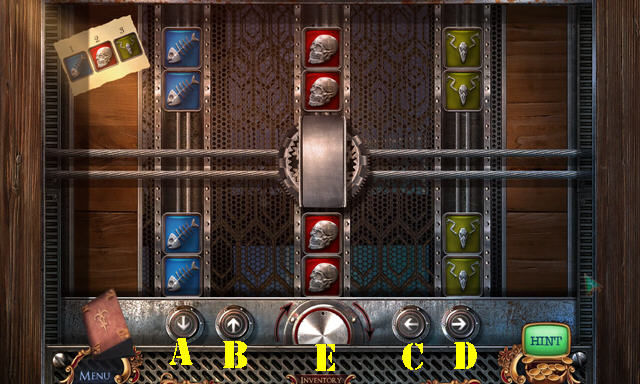
- Solution: Ax2-E-B-C-A-E-B-D-Bx3-E-A-D-B-E-A-C-A.
- D-A-Cx2-B-E-A-Dx2-A-E-B-C-A-E-B-D-B.
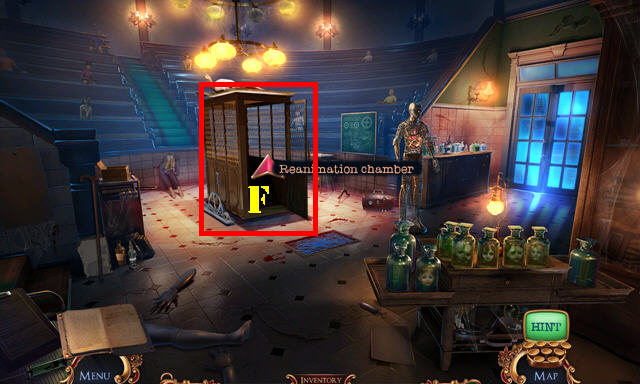
- Go to the Reanimation chamber (F).
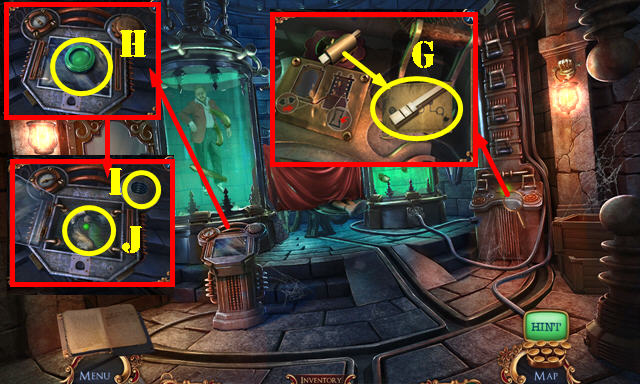
- Look at the note; take the ORGAN KEY (G).
- Take the GREEN BUTTON (H). Remove the cap and use the ELECTROLYTE SOLUTION (I). Open the compartment and place the MECHANICAL HEART; take the CHARGED HEART (J).
- Walk down.

- Place the CHARGED HEART (K) and the other organs as shown (L). Take the CABLE (M).
- Return to the Reanimation chamber.
- Place the CABLE (N). Attach the cable (O). Pull the handle (P).
- Play the HOP (Q) to receive the PROSTHETIC HOOK.
- Return to the Workshop.

- Use the PROSTHETIC HOOK; receive the TUBE CONTAINER (R).
- Open the TUBE CONTAINER; take the RED BUTTON and BOX MECHANISM.
- Place the BOX MECHANISM (S). Place the RED BUTTON and GREEN BUTTON (T) and press the red button.
- Go to the Small chapel (U).
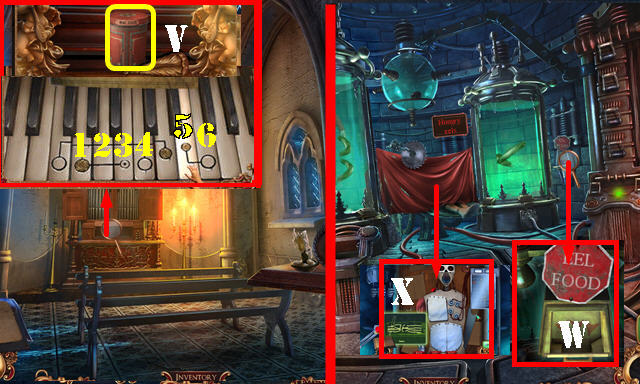
- Place the ORGAN KEY. SELECT 1-6; take the EEL FOOD (V).
- Return to the Reanimation chamber.
- Open the chute; place the EEL FOOD (W).
- Play the puzzle (X).
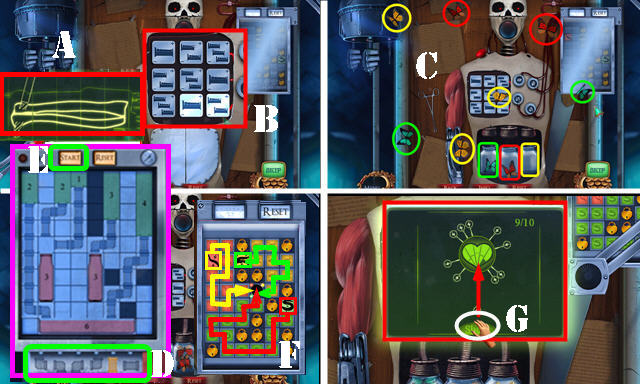
- Arrange the x-ray image (A).
- Swap the metal plates (B).
- Select the loose butterflies so they fly into their jars (C).
- Place the pipes (D) on the board as shown and select start (E).
- Drag the paths (F).
- Shoot electricity into the empty spots six times (G).
- Take the DIAMOND (H).
- Return to the Small chapel.
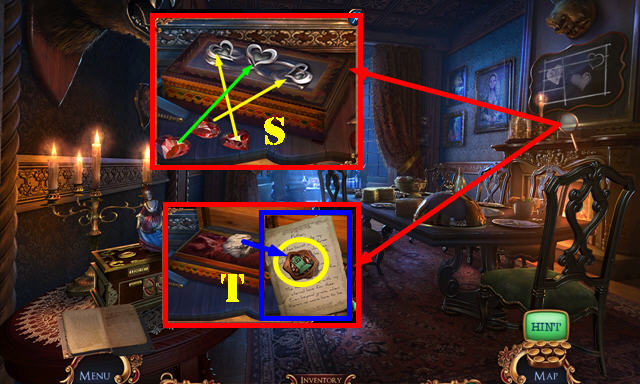
- Place the DIAMOND; take LANSWILLER'S MEDAL and look at the note (I).
- Return to the Amphitheater.
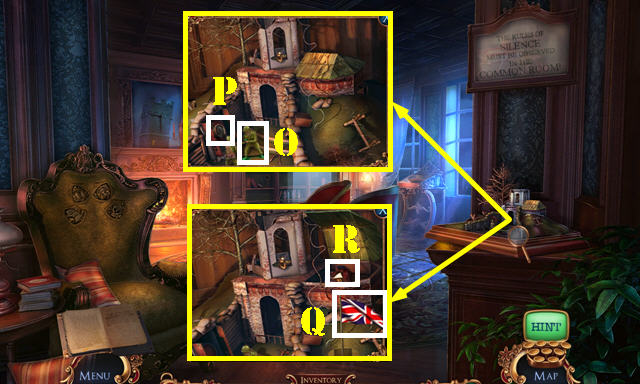
- Place LANSWILLER'S MEDAL (J); play the HOP to receive the PATTERN PIECE.
- Return to the Workshop.
- Place the PATTERN PIECE for a puzzle (K).
- Solution (L).
- Select 8-3-1 (M).
- Play the puzzle (N). Solution (1-8).
- Take the BLUE BUTTON.
- Place the BLUE BUTTON (O) and press it.
- Go to the Old courtyard (P).

- Talk to Ben (Q).
- Take the note (R).
- Remove the vines (S).
- Play the HOP (T) to receive the EXTENDABLE ROLLER.
- Take the WRITING CLOCK FIGURINE 1/2 (U) and FAMILY EMBLEM 1/3 (V).
- Place the CREEPY DOLL (W).
- Go to Jacob's memorial (X).
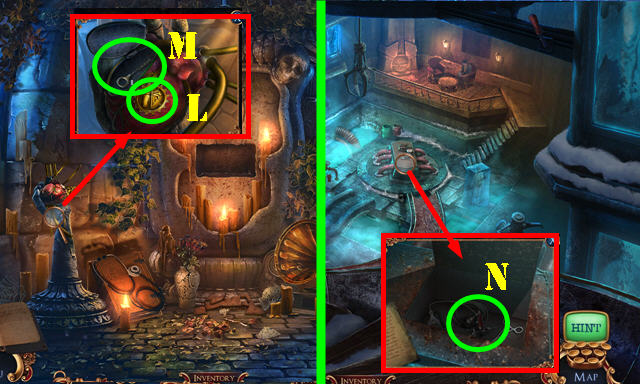
- Take the METAL CONTAINER (Y). Remove the cobwebs; take the METAL FILE (Y1).
- Place JACOB'S PICTURE (Z); take the HERBICIDE (Z1).
- Walk down.
- Use the HERBICIDE; take the OLD LIGHTER (A).
- Use the METAL FILE; take the FAMILY EMBLEM 2/3 (B).
- Enter the Cold storage (C).
- Look at the note; take the TAP (D).
- Read the note (E).
- Take the OLD BATTERY (F) and FAMILY EMBLEM 3/3 (G).
- Remove the broken handle (H).
- Return to the Workshop.
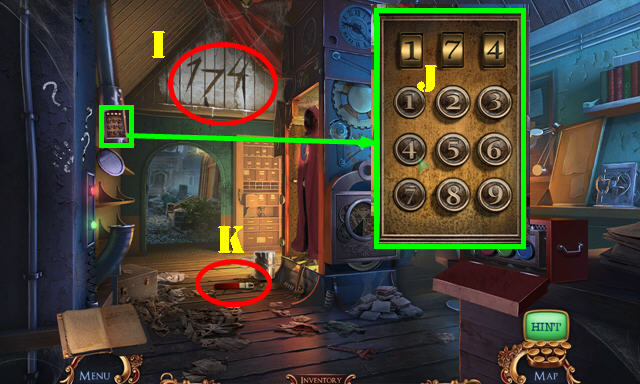
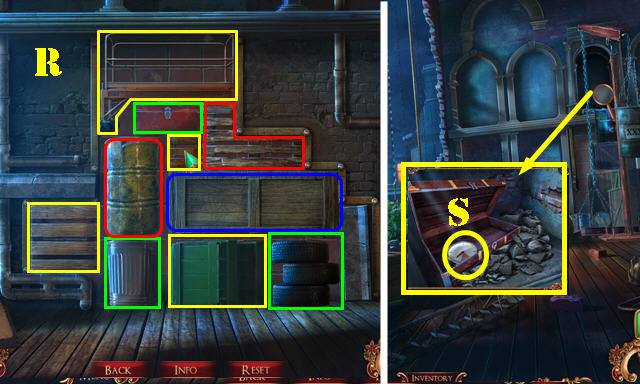
- Use the EXTENDABLE ROLLER (I).
- Enter 174 (J).
- Take the REGULATOR (K).
- Return to Jacob's memorial.
- Place the FAMILY EMBLEM 3/3 (L); take the GIMLET DRILL (M).
- Return to the Cold storage.
- Use the GIMLET DRILL; take the PRESSURE VALVE 1/3 (N).
- Place the REGULATOR for a puzzle.
- Solution 1-4 (O).
- Move the two jars; take the CLOCK WINDER (P).
- Use the OLD LIGHTER; take the CARPET PART (Q).
- Move the feet; place the CARPET PART (R). Select 1-6; take the CLOCK HANDLE (S).
- Return to Jacob's memorial.
- Use the CLOCK WINDER (T); play the HOP to receive the CONTAINER HANDLE.
- Place the TAP and CONTAINER HANDLE on the METAL CONTAINER; receive the LIQUID NITROGEN CONTAINER.
- Return to the Cold storage.
Chapter 7: Cold Storage
- Place the LIQUID NITROGEN CONTAINER; select it and then take it (U).
- Walk down.
- Place the CLOCK HANDLE (V) for a puzzle.
- Place 1. Remove the note; place 2 and select 3. Place 4-6 as shown; select 7. Place 8-10 as shown (@1).
- Select the numbers in white so they add up to the numbers in yellow (@2-@3-@4).
- Select 1-5 (@5).
- Place the tiles as shown (@6).
- Select 1-4 (@7).
- Mark the flags and numbers as shown (@8).
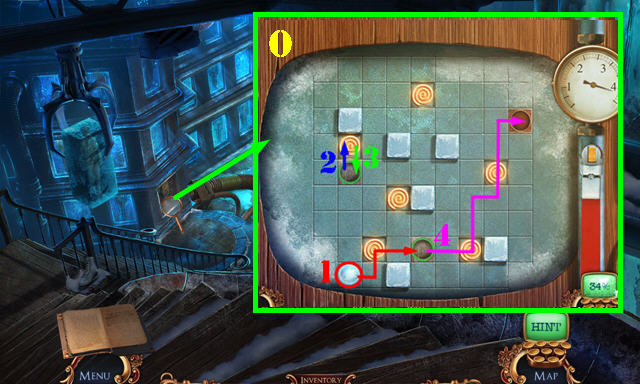
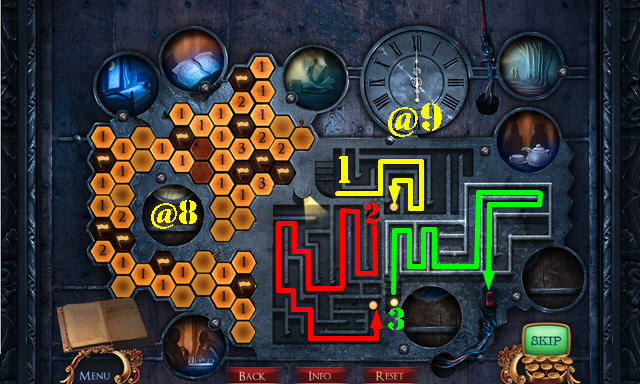
- Drag the circles through the maze 1-3 (@9).
- Place the beds as shown (@10).
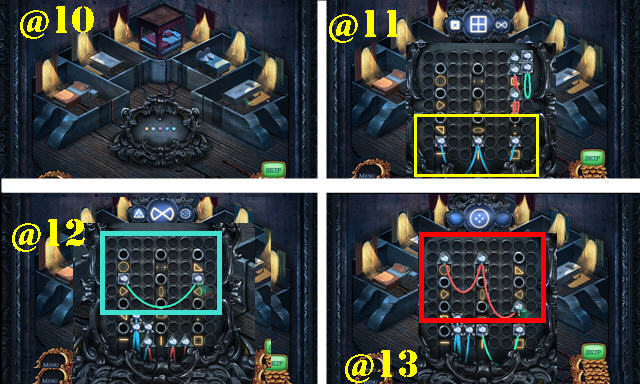
- Place the colored cables as shown (@11-@12-@13).
- Go forward to the Tower, ground level.
- Take the WIRE (A).
- Use the METAL POINTER; receive the PRESSURE VALVE 2/3 (B).
- Go to the Clockwork mechanism (C).
- Take the SMALL CYLINDER (D) and HAND BOLT CUTTERS (E).
- Take the LAMP TOKEN and GOLDEN HAND (F).
- Take the PRESSURE VALVE 3/3 (G).
- Use the WIRE on the SMALL CYLINDER; receive the CYLINDER OPENER.
- Walk down.

- Place the GOLDEN HAND; take the ROTATING DIAL and PADLOCK KEY (H).
- Use the HAND BOLT CUTTERS (I); play the HOP to receive the FUSE.
- Use the CYLINDER OPENER; take the ELECTRICAL CABINET KEY 1/3 (J).
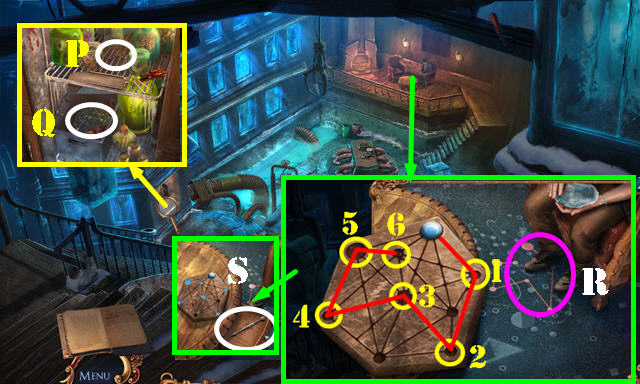
- Place the PRESSURE VALVE 3/3 for a puzzle (K).
- Solution (L). Then pull the handle (M).
- Take the KEYPAD BUTTONS (N).
- Return to the Clockwork mechanism.
- Remove the old fuse and replace it with the FUSE for a puzzle (O).
- Solution (P).
- Take the POWER ROOM KEY CARD.
- Place the POWER ROOM KEY CARD (Q).
- Enter the Power collector (R).

- Take the WRITING CLOCK FIGURINE 2/2 (S).
- Use the LIQUID NITROGEN CONTAINER; select the case 3x; take the BULB (T).
- Look at the note; place the WRITING CLOCK FIGURINE 2/2. Take the SYMBOL TOKEN and WRITING NEEDLE (U).
- Place the WRITING NEEDLE; take the ELECTRICAL CABINET KEY 2/3 (V).
- Place the KEYPAD BUTTONS; select the buttons as shown (W). Place the BULB (X). Take the PADLOCK (Y).
- Use the PADLOCK KEY on the PADLOCK; receive the OPEN PADLOCK.
- Walk down.
- Use the OPEN PADLOCK (A).
- Go to Tower, top level (B).
- Move forward twice (C); take the ELECTRICAL CABINET KEY 3/3 (D).
- Return to the Power collector.
- Use the ELECTRICAL CABINET KEY 3/3. Place the keys in the right spots (E). Play the HOP (F) to receive the THUNDER EMBLEM.
- Return to the Tower, top level.
- Place the THUNDER EMBLEM (G). Place the SYMBOL TOKEN (H) for a puzzle.
- The solution is random; please look at the screenshot an example (I).
- Place the ROTATING DIAL for a puzzle (J).
- Solution: Cx2-E-Ax2-G-Hx2-Cx3-E-C-E-C-E-Cx2-Ex7 (@1).
- Place the LAMP TOKEN (K) for a puzzle.
- Solution. Select the marked button (L).
- Place the OLD BATTERY for a puzzle (M).
- The solution is random (N).
- Congratulations, you've completed Mystery Case Files: Broken Hour.
Created at: 2016-12-23