

Walkthrough Menu
- General Tips
- Chapter 1: What Happened?
- Chapter 2: Mistwalkers Attack
- Chapter 3: Samuel Crawford
- Chapter 4: An Old Grudge
- Chapter 5: Derek and the Mistwalkers
- Chapter 6: Where Is Derek?
General Tips
- This is the official guide for Mystery Case Files: Dire Grove, Sacred Grove.
- This guide will not mention each time you have to zoom into a location; the screenshots will show each zoom scene.
- Hidden-object puzzles are referred to as HOPs. This guide will not show HOP solutions. It will identify the location of the HOP and the inventory item acquired.
- This guide will show solutions for non-random puzzles. Please read the in-game instructions for each puzzle.
- Some of the longer puzzle solutions may be posted on different pages.
Chapter 1: What Happened?
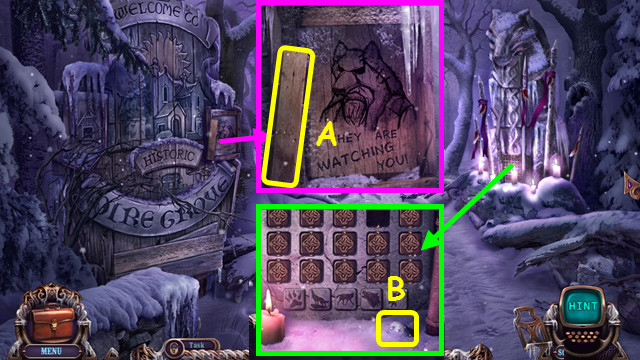
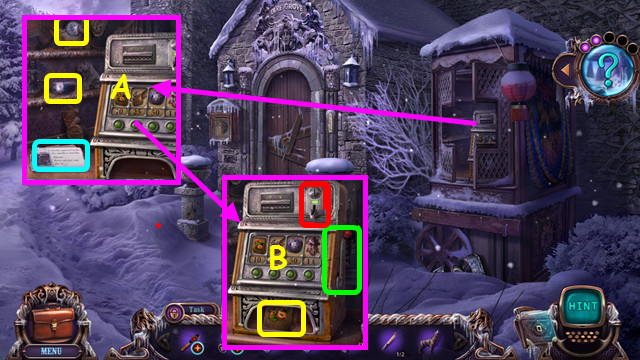
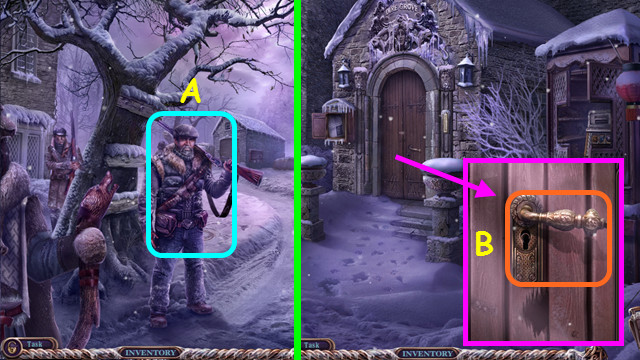
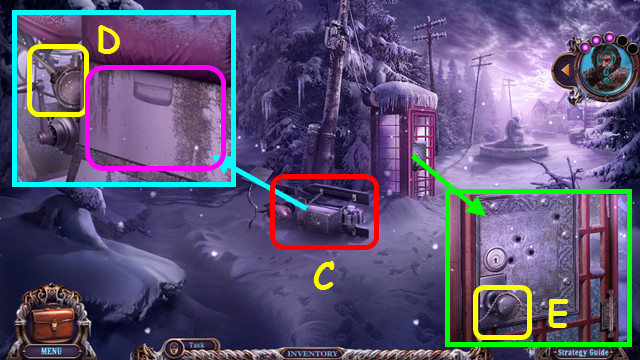
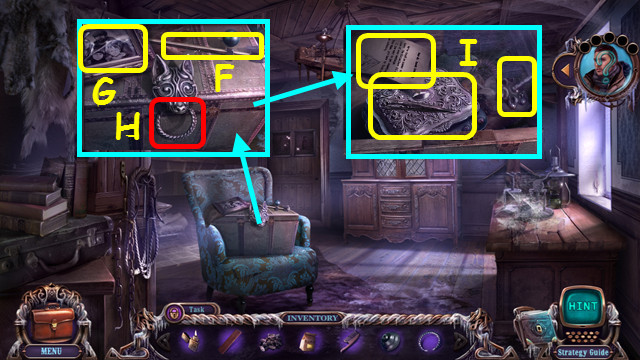
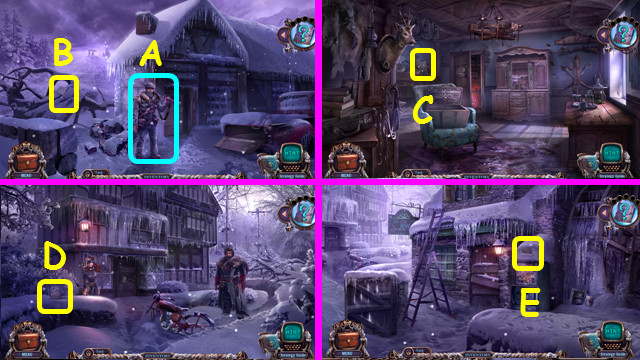
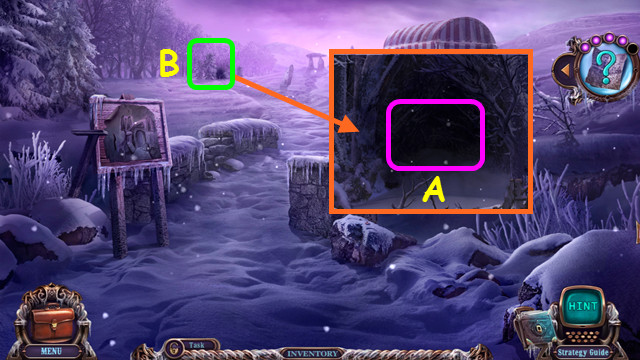
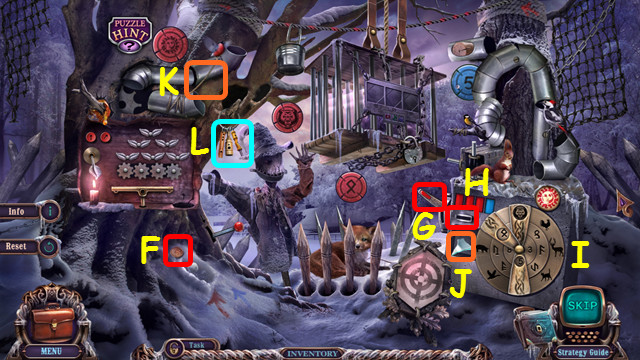
- Enter 3-7-5-8 on the SUITCASE and open the case; play the HOP to earn the BADGE (inventory).
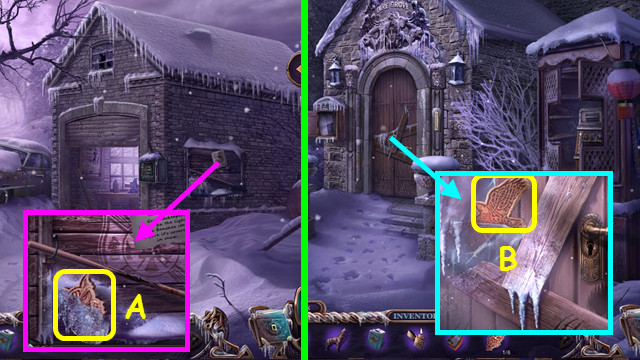
- Take the PLANK (A); brush the snow twice and take the first BATTERY (B).
- Walk forward.
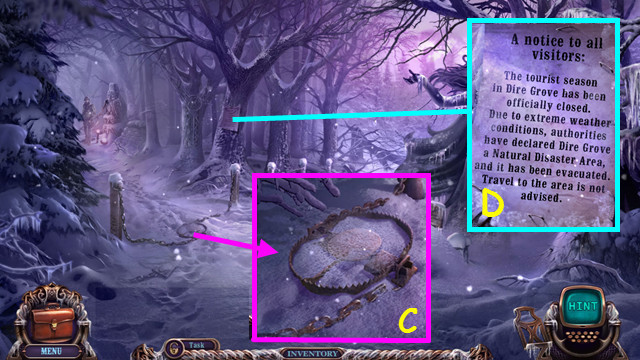
- Place the PLANK (C).
- Read the notice (D).
- Walk left.
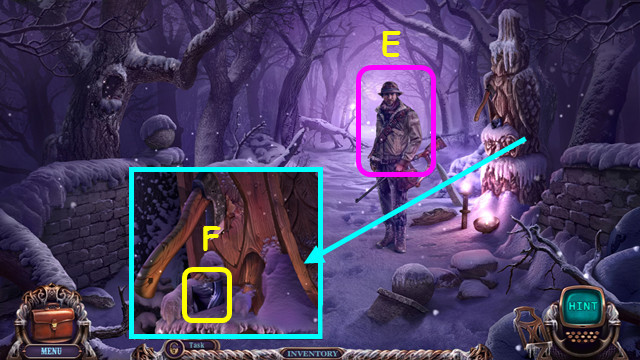
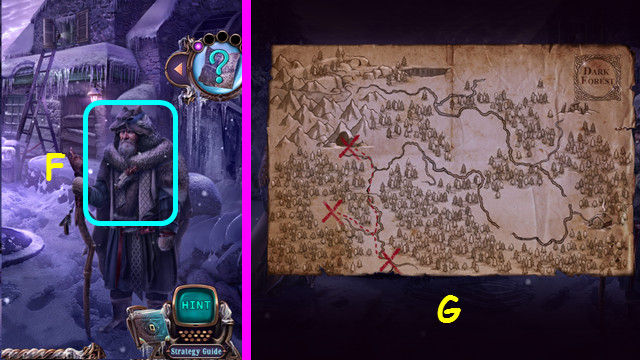
- Talk to the Hunter; give him the BADGE (E).
- Take the first BANSHEE-STATUE PART (F).
- Walk forward.
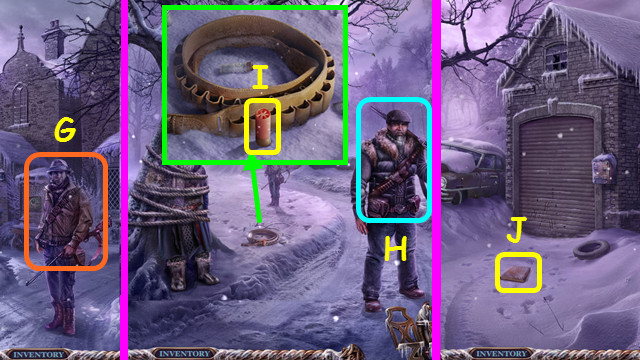
- Select the Hunter (G).
- Walk right.
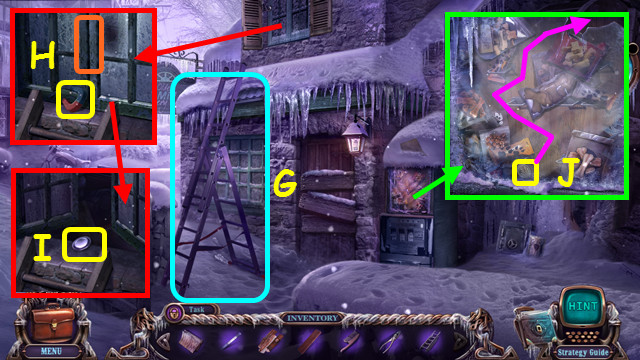
- Talk to the Samuel thoroughly to receive the RIFLE (H). Take the RIFLE CARTRIDGE (I). Combine the RIFLE and RIFLE CARTRIDGE to make the LOADED GUN (inventory).
- Walk forward.
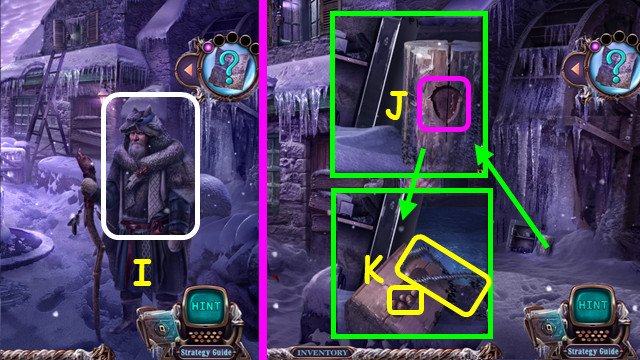
- Take and read SAMUEL'S DIARY (J).
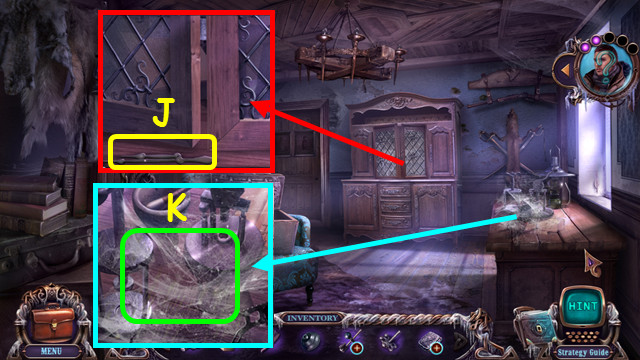
- Walk left.
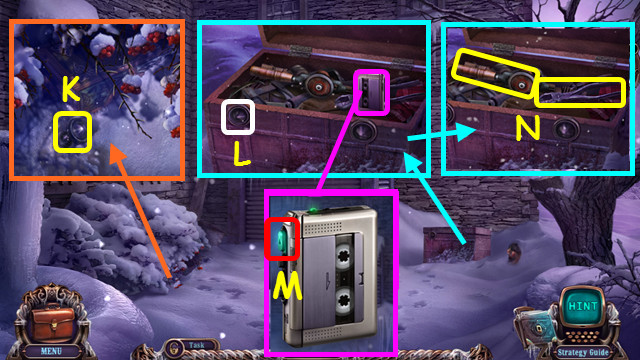
- Take the BUTTON (K).
- Remove the ice and place the BUTTON (L).
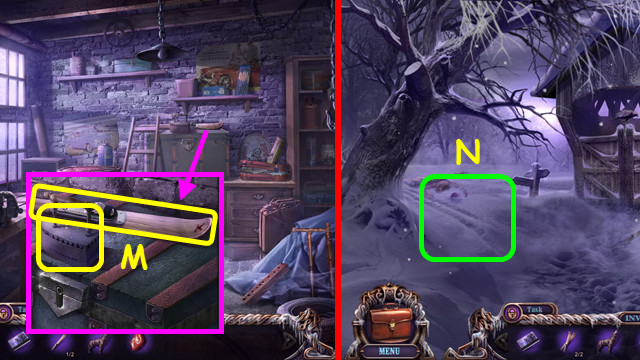
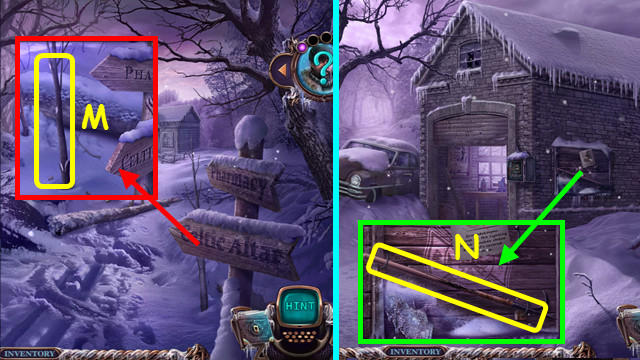
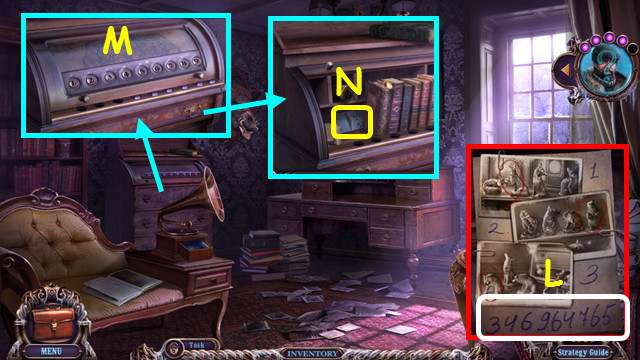
- Press both buttons, open the chest, select the DICTAPHONE MESSAGE, and push the play button (M).
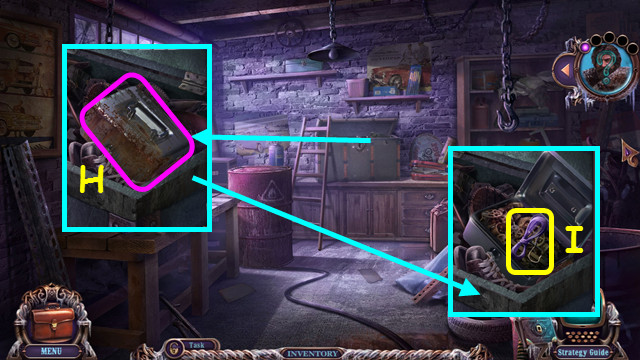
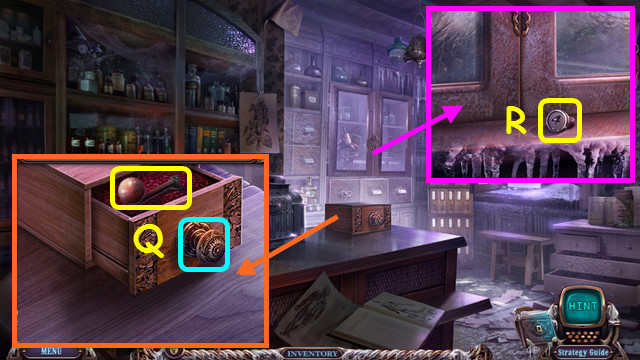
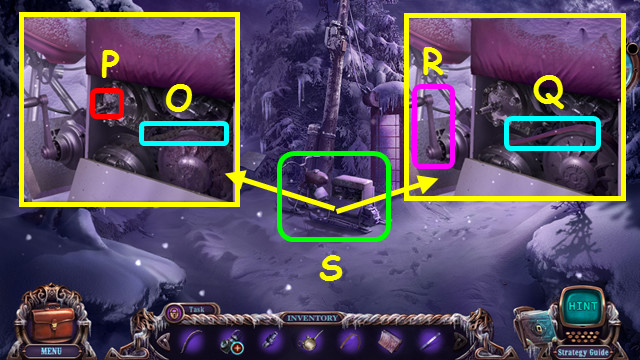
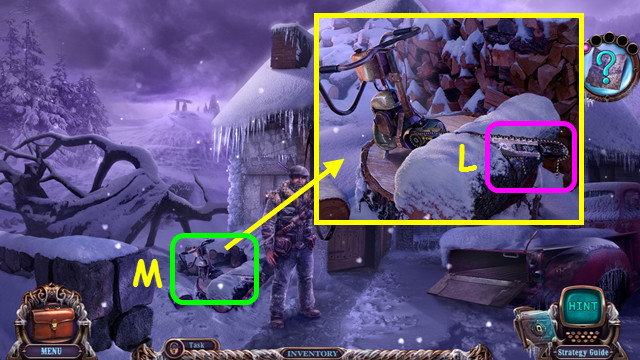
- Take the BROKEN DRILL and WIRE CUTTERS (N).
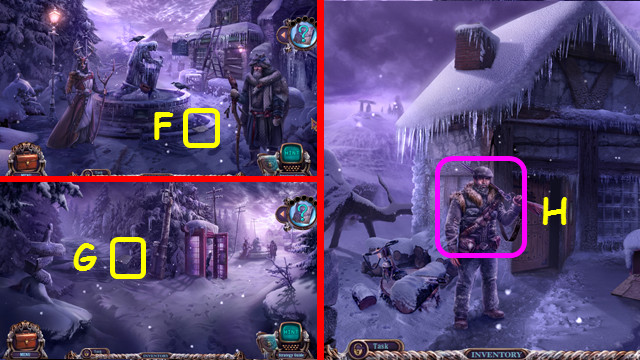
- Walk down.
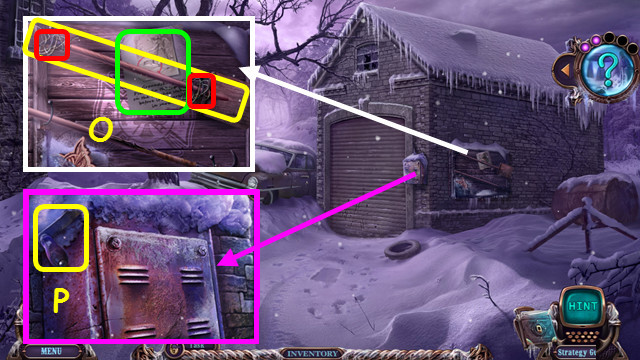
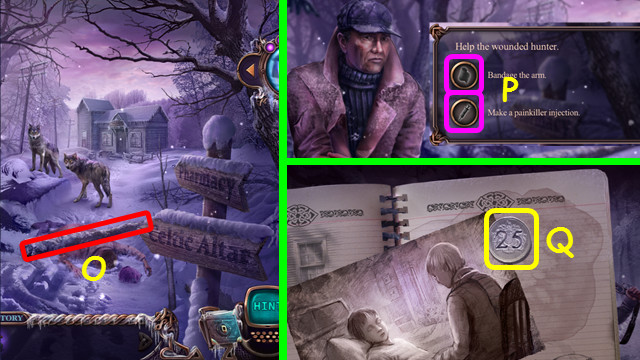
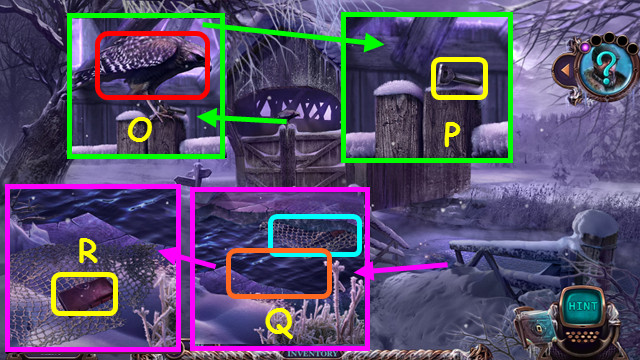
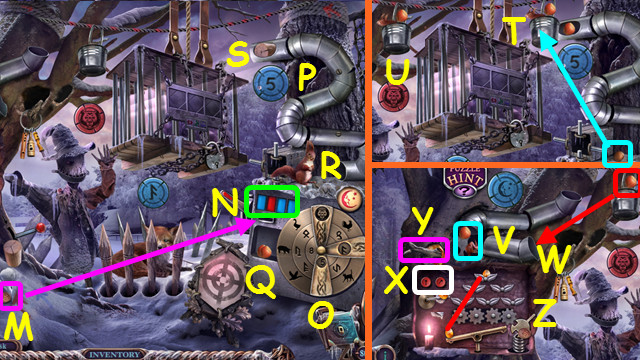
- Use the WIRE CUTTERS twice; take the SPADE and read the note (O).
- Take the DRILL PART (P).
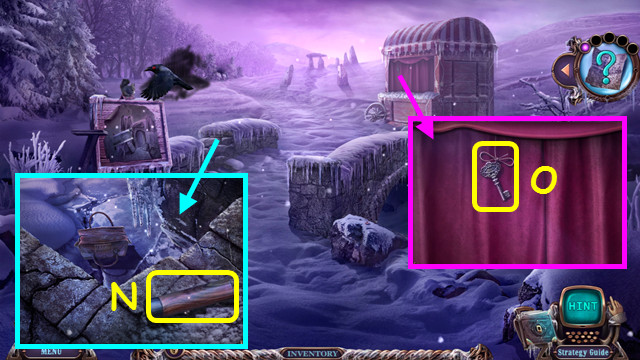
- Walk down 4 times.
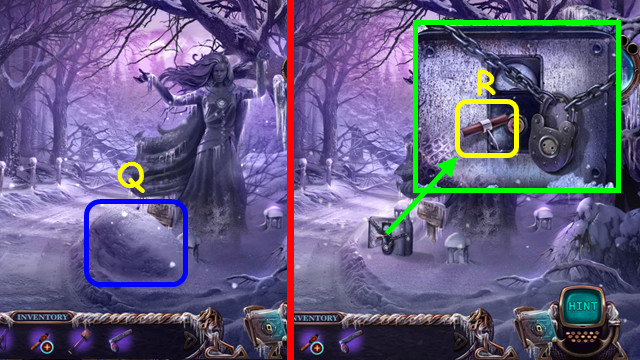
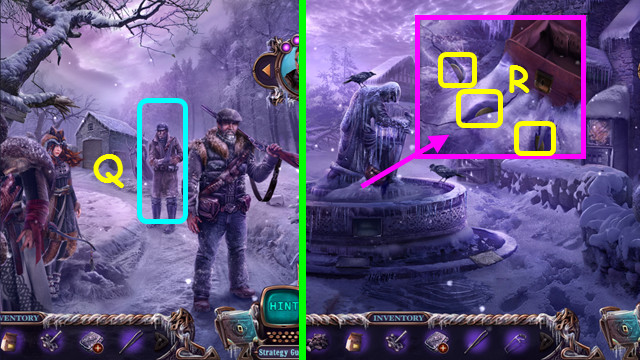
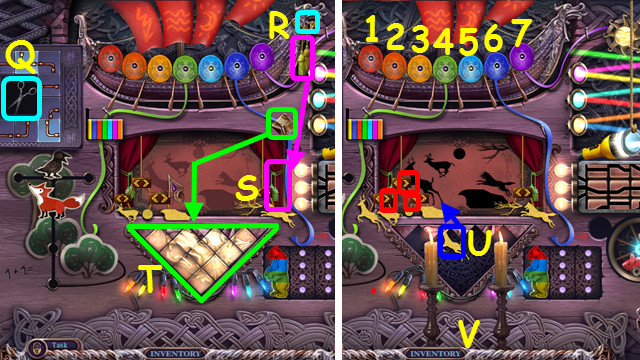
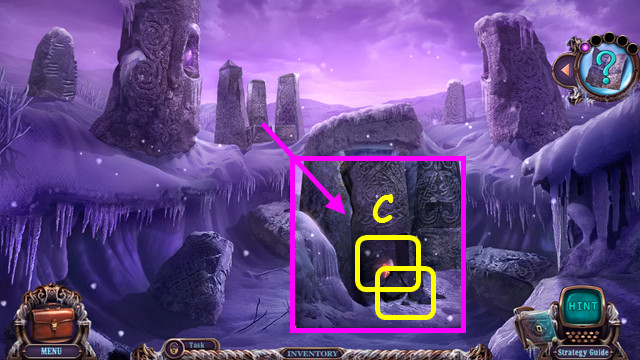
- Use the SPADE on the snow 3X (Q).
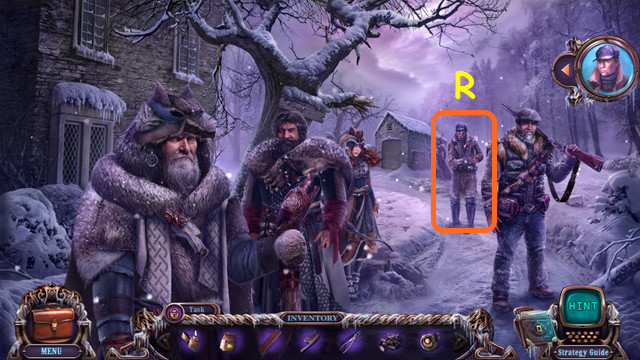
- Take the CORKSCREW (R).
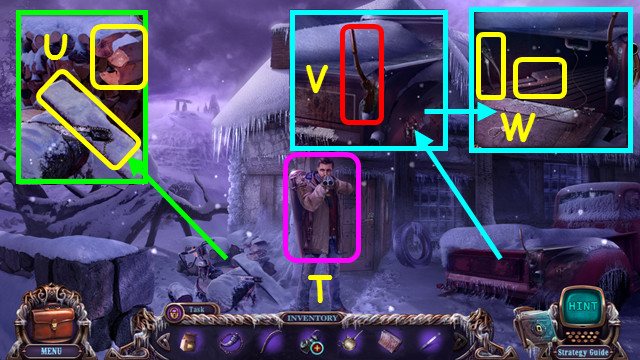
- Walk left and forward.
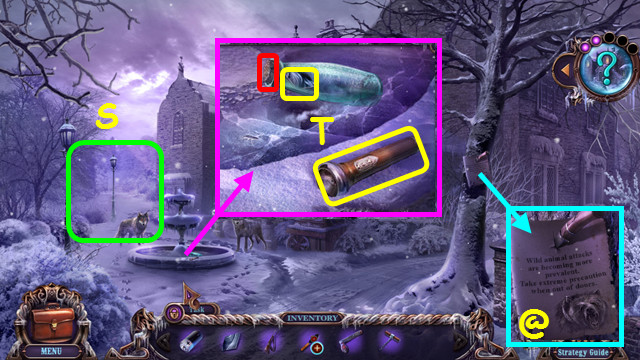
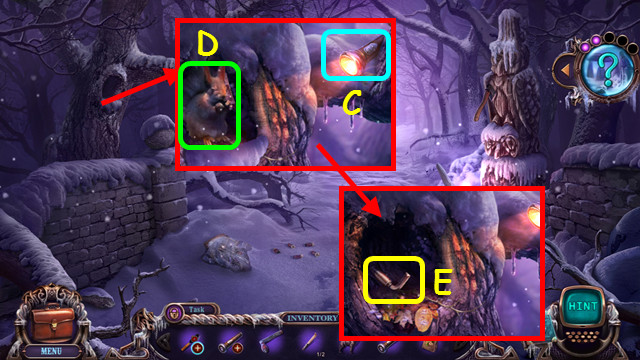
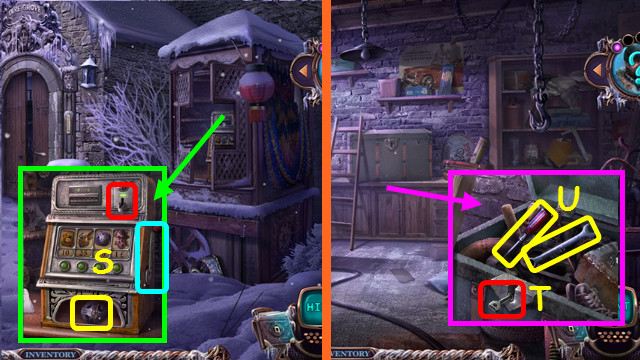
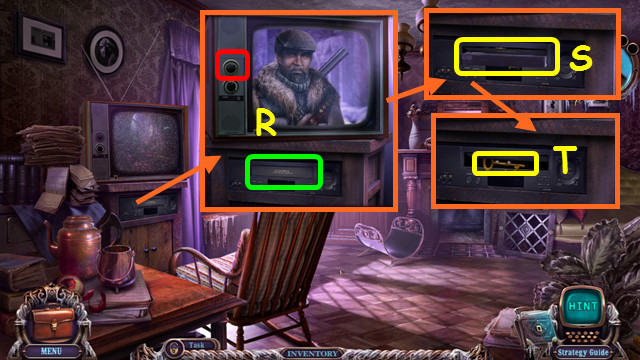
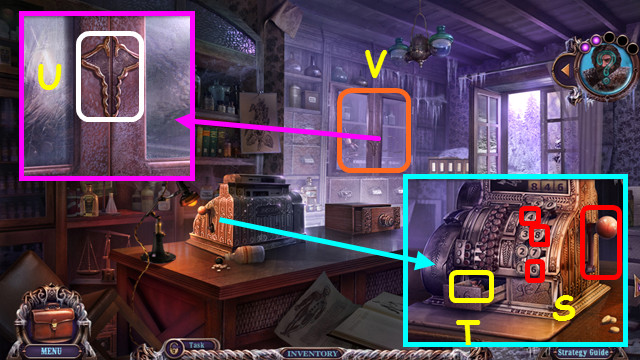
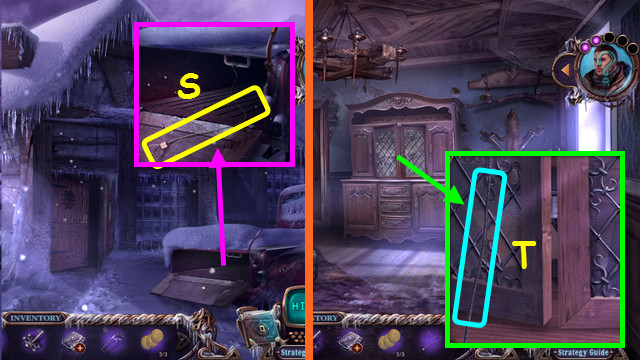
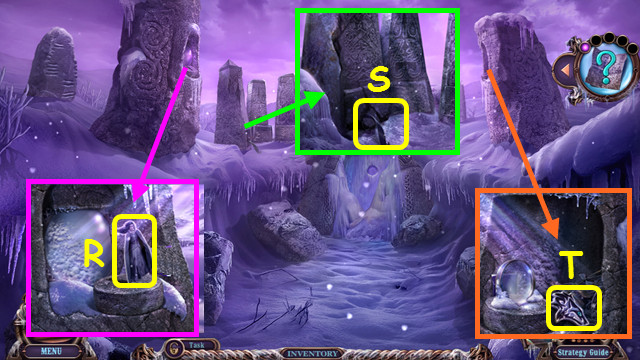
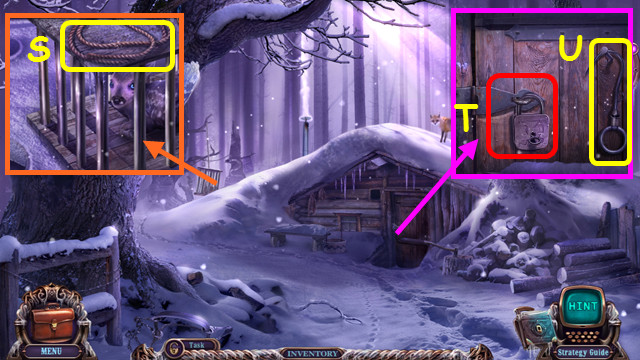
- Use the LOADED GUN (S).
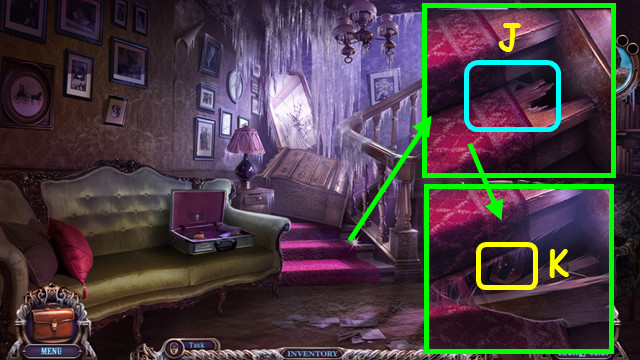
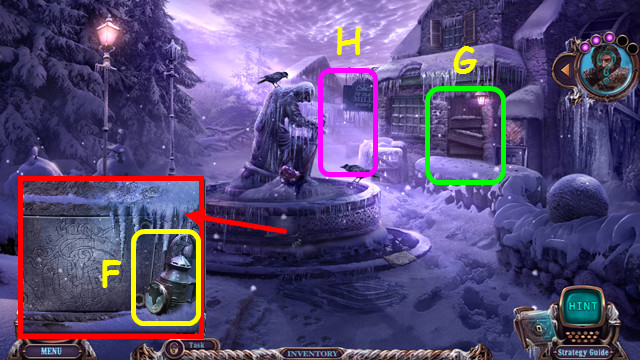
- Use the CORKSCREW on the cork; take the second BANSHEE-STATUE PART and BROKEN FLASHLIGHT (T). Read the notice (@).
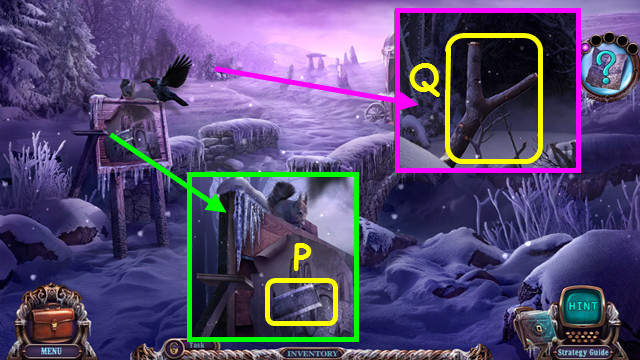
- Walk left.
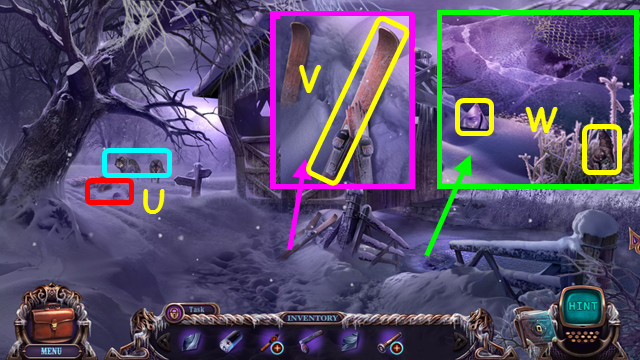
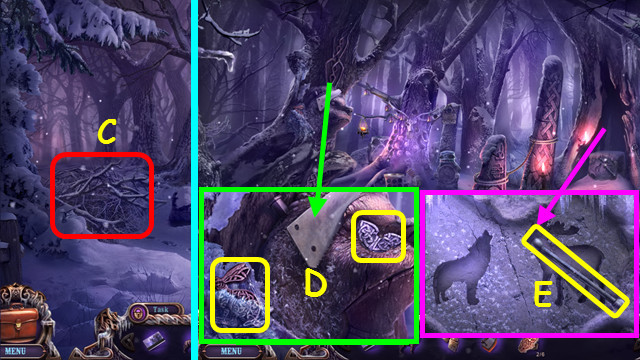
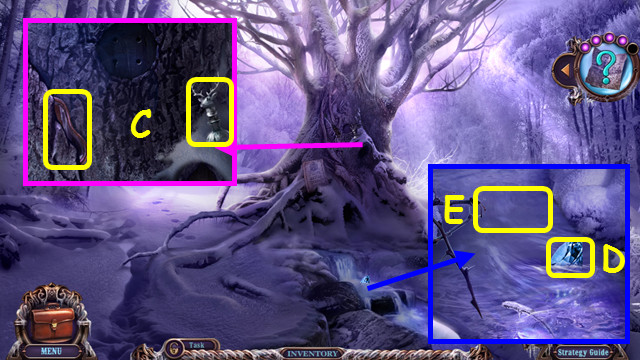
- Look at the wolves, and then the man in the snow (U).
- Take the 1/2 SKI (V).
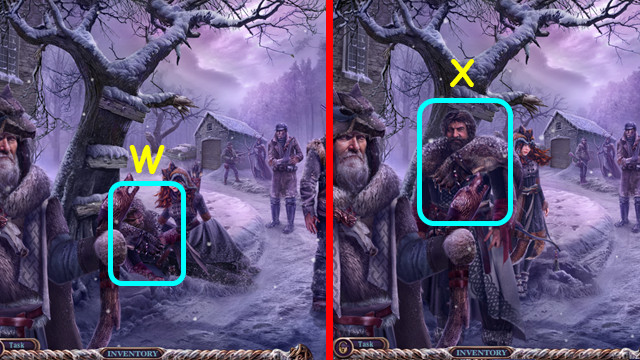
- Take the third BANSHEE-STATUE PART and WOLF FIGURINE (W).
- Walk down.
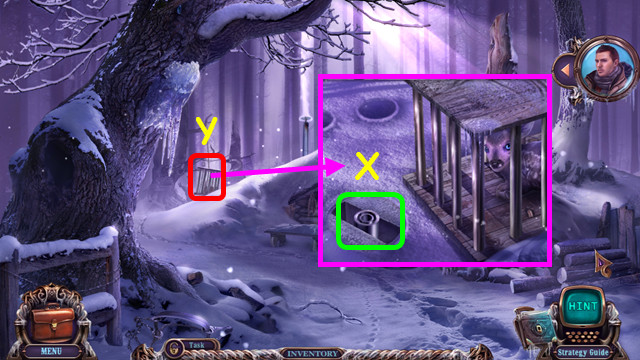
- Wiggle twice and take the second BATTERY (X).
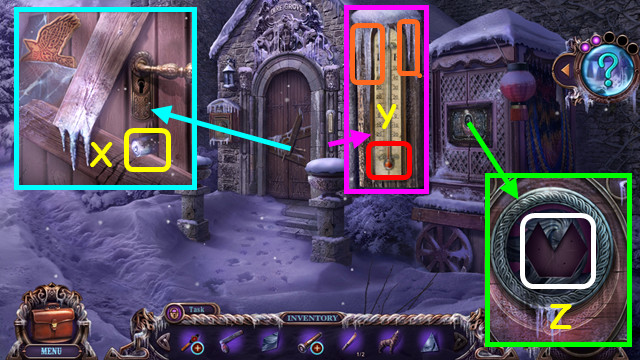
- Remove the ice and touch the thermometer (Y).
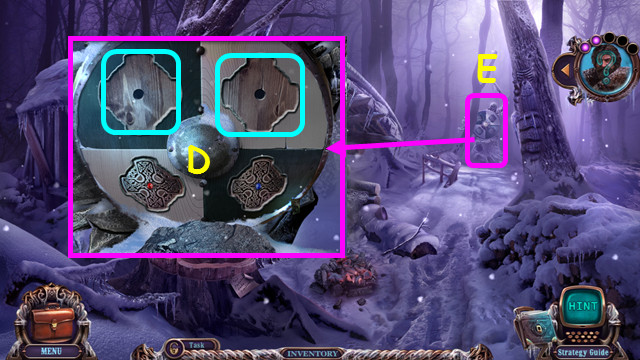
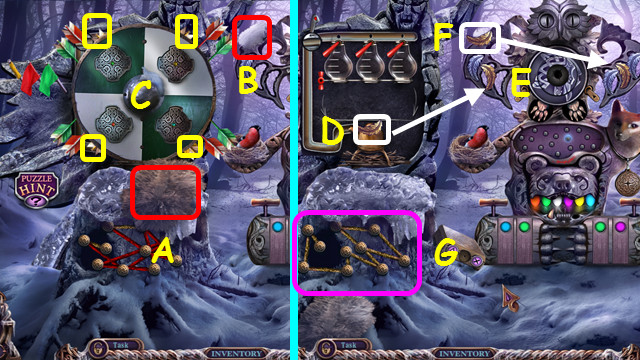
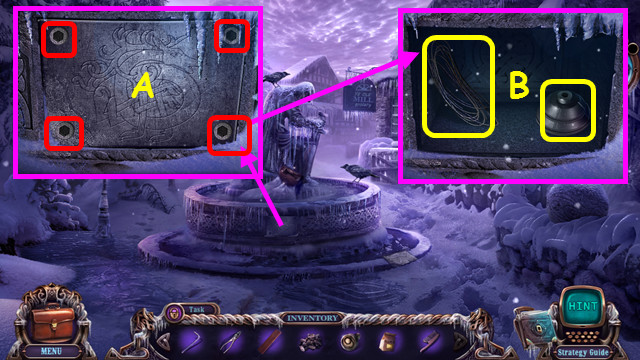
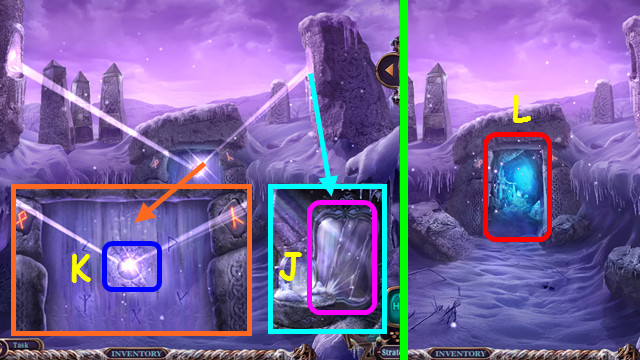
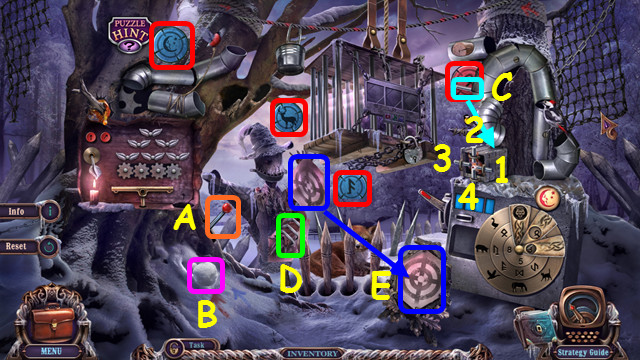
- Place the 3 BANSHEE-STATUE PARTS (Z).
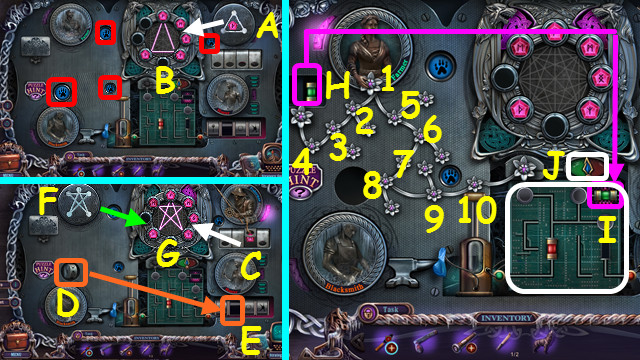
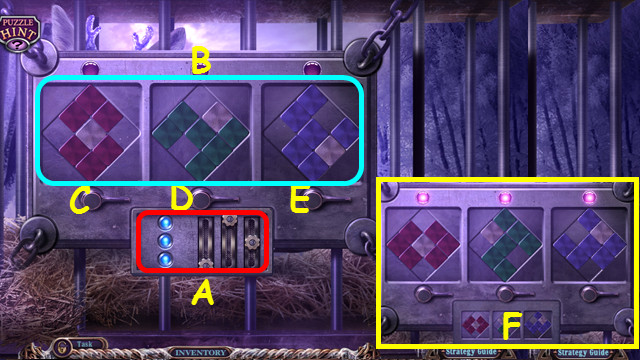
- Flip the fisherman (A), place the rune in the holder, and duplicate the symbol (B). Turn all the prints to bear (red).
- Use the fisherman's hook on the third compartment; take the rune and place it in the holder (C). Place the wheel (D) in the device (E).
- Flip the farmer (F) and duplicate the symbol (G). Select the flowers (1-10).
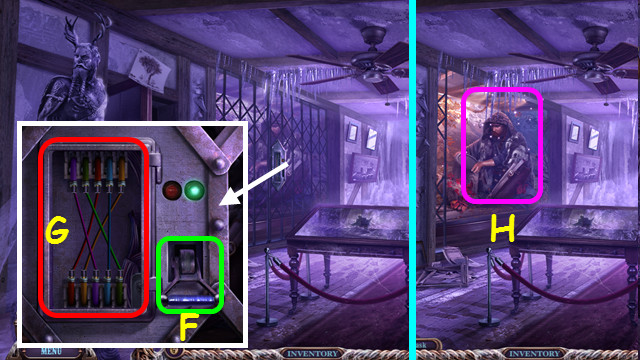
- Place the green fuse (H) in the holder (I).
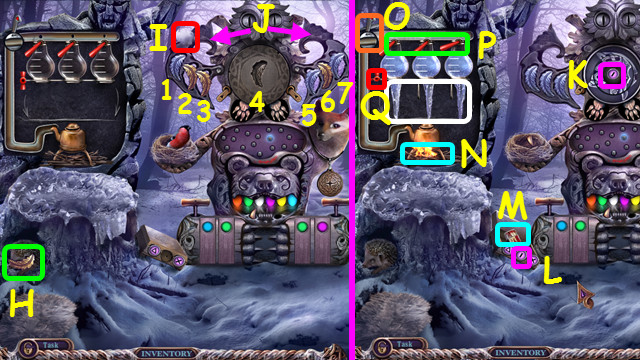
- Move the connections as shown and press the green power, and then the red power (J).
- Move the rune to the holder (K). Move the hook to the fourth compartment (L). Flip the hunter (M) and duplicate the symbol (N).
- Place the green fuse, move the connections as shown, and press the green power (O). Press the pump handle, select the balloon once (P).
- Press the angle and strength each once; select the hunter (Q). Place the rune in the holder (R).
- Flip the blacksmith and duplicate the symbol (S). Place the red fuse and press the red power twice (T).
- Turn the wheels (U) so the number of spokes matches the numbers 4-0-2-1 (green).
- Place the chest (V) on the anvil (W) and select the blacksmith (X).
- Turn the wheels as shown (Z) and use the key (Y) in the wheels.
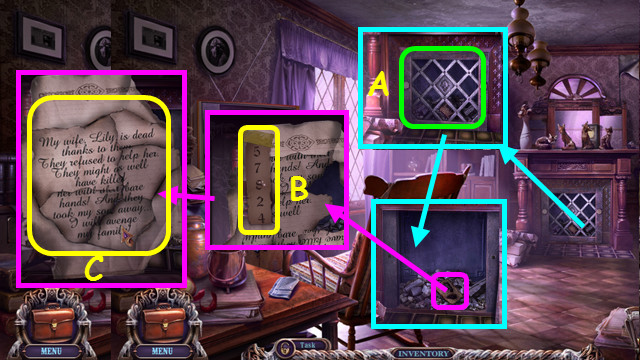
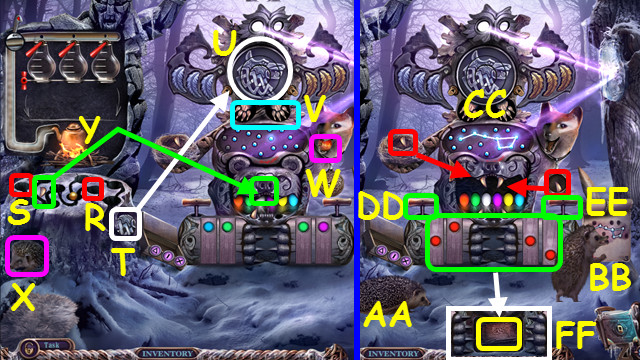
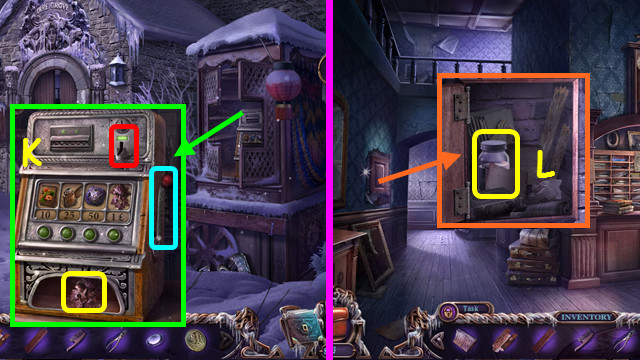
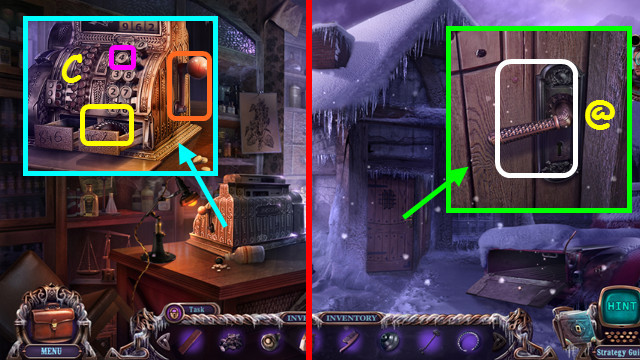
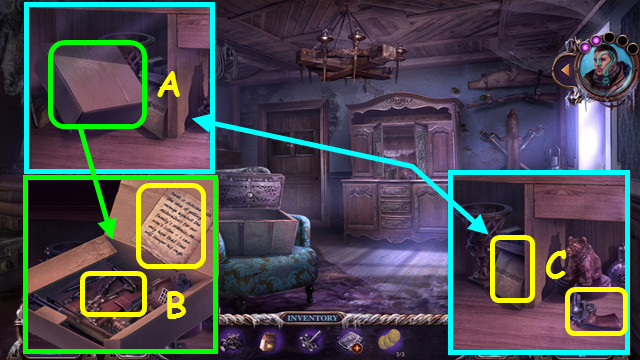
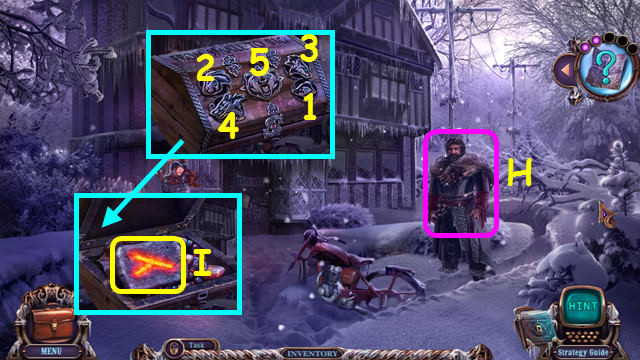
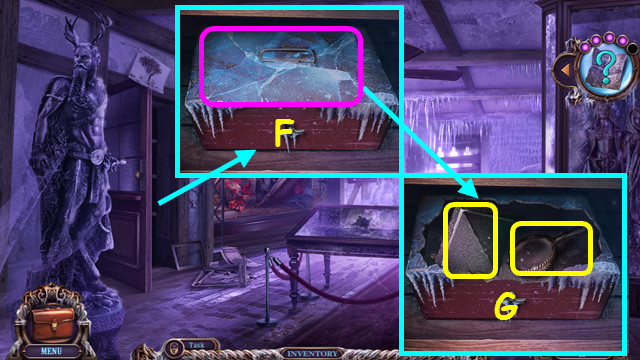
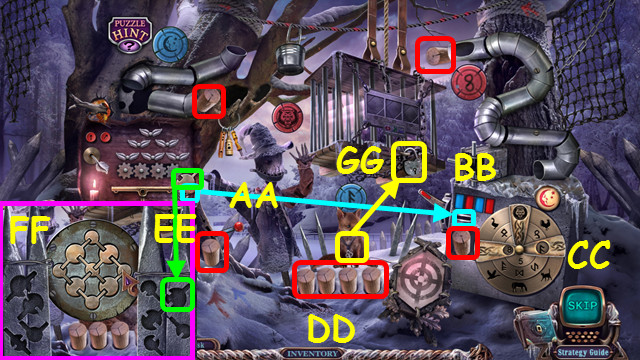
- Open the door; take the TEN PENCE, third BATTERY, and read the note (A).
- Place the TEN PENCE in the slot, pull the lever, and take the NUTS (B).
- Combine the BROKEN FLASHLIGHT and 3 BATTERIES to make the FLASHLIGHT (inventory).
- Walk down twice.
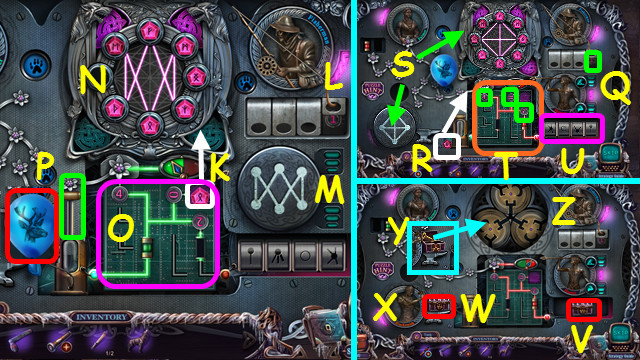
- Place the FLASHLIGHT and turn it on (C).
- Give the NUTS (D).
- Take the MAIL HANDLE (E).
- Walk forward twice.
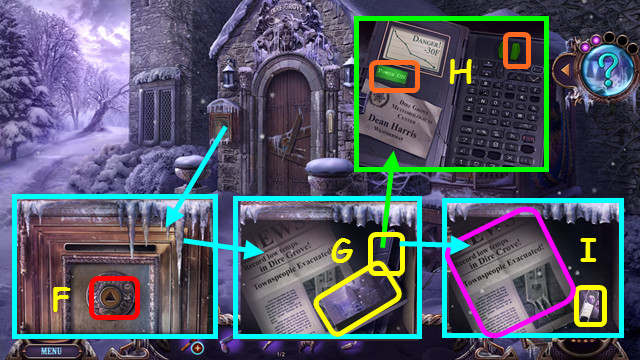
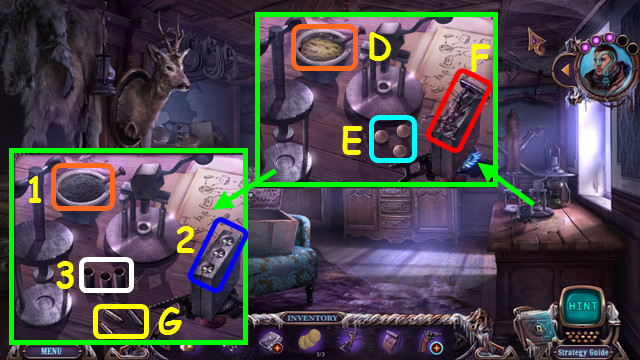
- Use the MAIL HANDLE (F); take the KEY CARD and CLIMATE RESEARCH (G).
- Press the power; play all the recordings (H).
- Read the paper; take the ZIPPER SLIDER (I).
- Walk down twice.
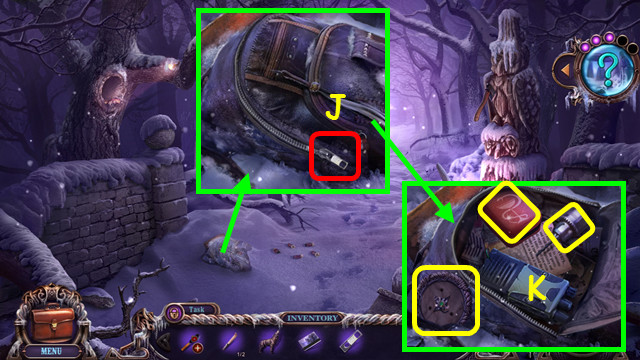
- Brush off the snow twice; place the ZIPPER SLIDER (J).
- Take the MEDICAL KIT, DRILL BIT, and DRUID AMULET (K).
- Combine the BROKEN DRILL, DRILL PART, and DRILL BIT to make the DRILL (inventory).
- Walk to the Yard.
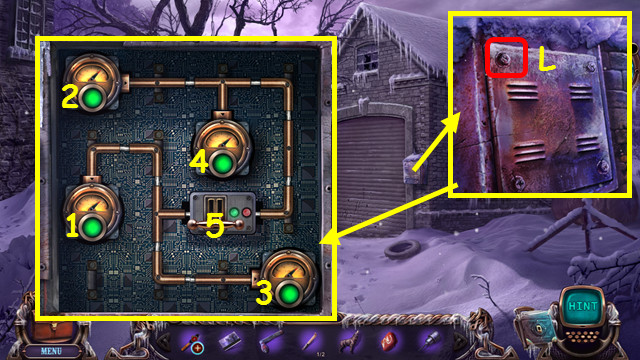
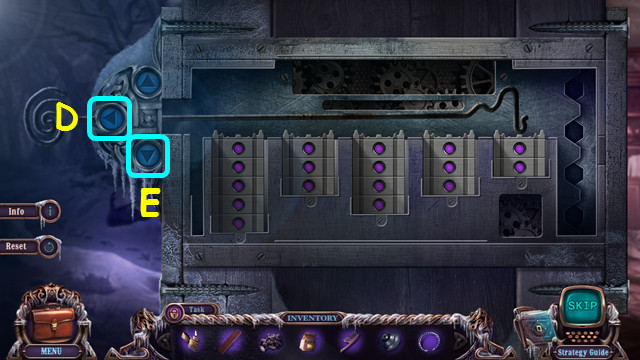
- Use the DRILL on the screws (L).
- Rotate the pipes as shown and press the buttons (1-5).
- Walk forward.
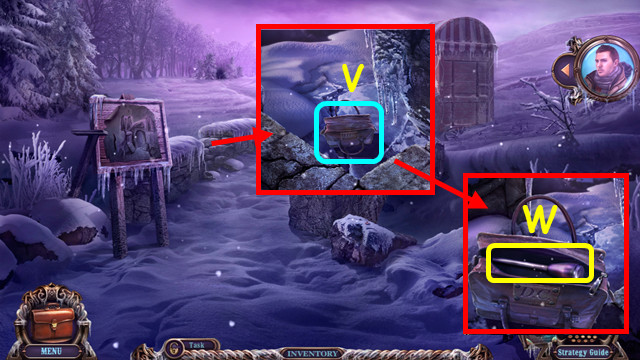
- Take the COLD IRON and 2/2 SKI (M).
- Walk to the Old Bridge.
- Use the 2 SKIS (N).
- Remove the log (O).
- Bandage the arm; give the man a painkiller (P).
- Read the TORN PAGES; take the COIN (Q).
- Walk down and forward.
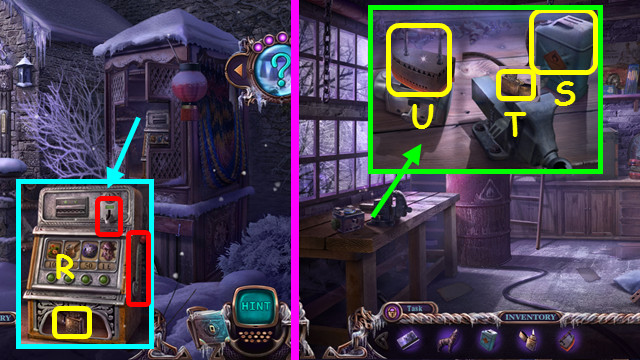
- Place the COIN and pull the lever; take the LIGHTER (R).
- Go to the Garage.
- Use the LIGHTER to earn the GASOLINE (S).
- Touch and take the FUELED LIGHTER (T).
- Place the COLD IRON; take the HOT IRON (U).
- Walk down.
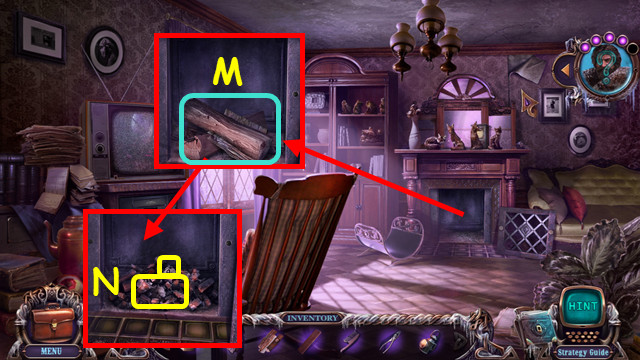
- Use the HOT IRON; take the 1/6 FIGURINE (A).
- Walk to the Hotel Entrance.
- Use the HOT IRON; take the 2/6 FIGURINE (B).
- Walk left twice.
- Use the GASOLINE and FUELED LIGHTER (C).
- Walk left.
- Use the HOT IRON; take the 3/6 FIGURINE and first DRUID AMULET PIECE (D).
- Take the LATCH VALVE (E).
- Go to the Garage.
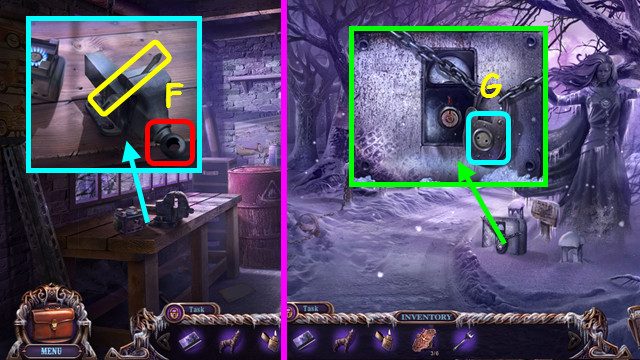
- Use the LATCH VALVE; take the FORK (F).
- Remove the middle tine on the FORK to make the BROKEN FORK (inventory).
- Go to the Crossroads.
- Use the BROKEN FORK (G).
- Connect the wires (H).
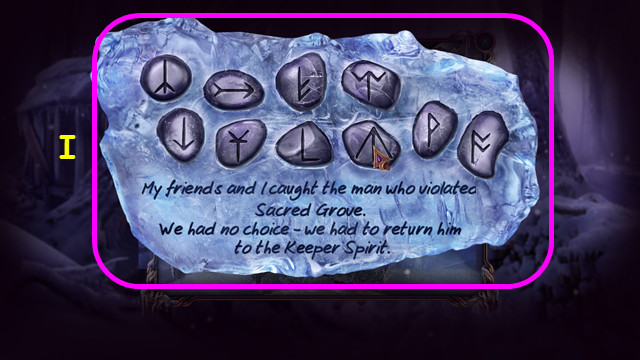
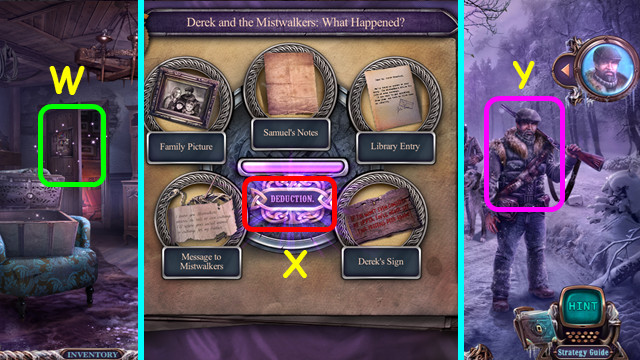
- Play the HOP (I); use the pin on the lock and restore the page to earn A HISTORY OF THE MISTWALKERS.
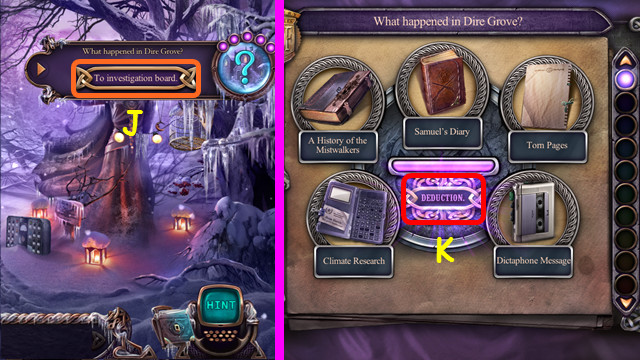
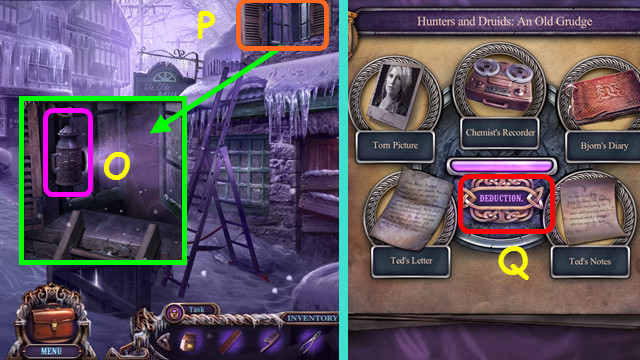
- Select the button (J).
- Press deduction (K).
- Walk to the Old Tree.
Chapter 2: Mistwalkers Attack
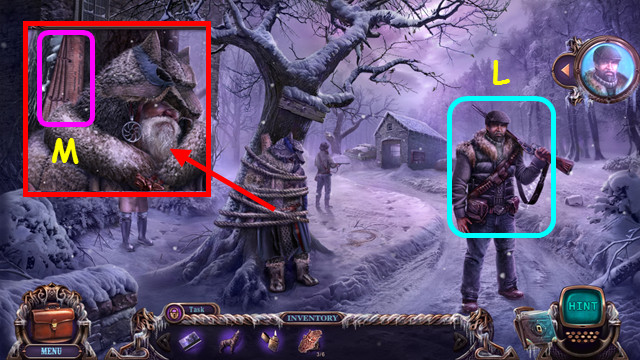
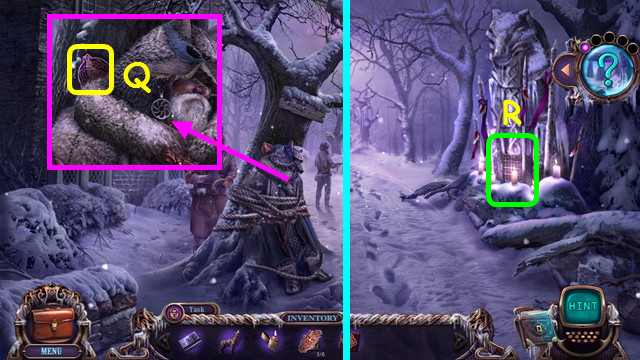
- Talk to Samuel; earn the WOLF SYMBOL (L).
- Select the slats (M).
- Press the button (N).
- Restore the picture and push the button (O).
- Take the MISTWALKER'S OATH (P).
- Take the 4/6 FIGURINE (Q).
- Walk down 4 times.
- Select the mini-game (R).
- Place the WOLF SYMBOL.
- Select the pairs (color-coded).
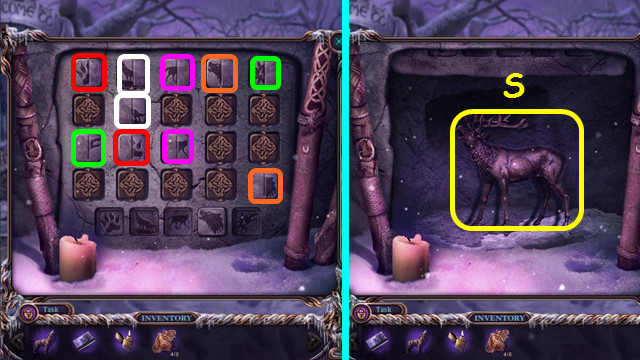
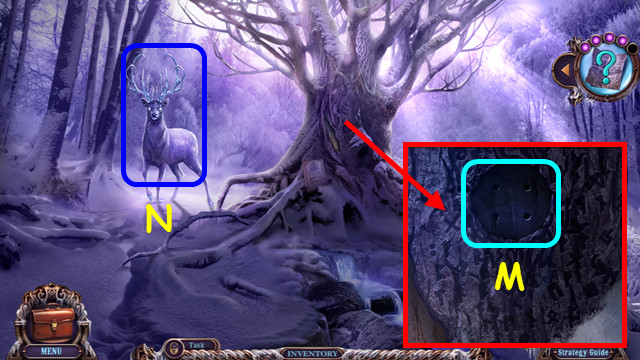
- Take the DEER FIGURINE (S).
- Return to the Druid Shrine.
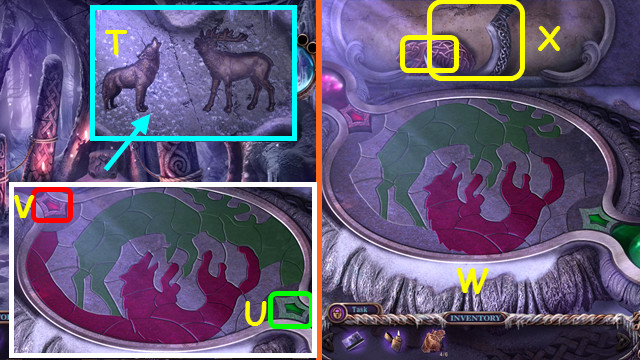
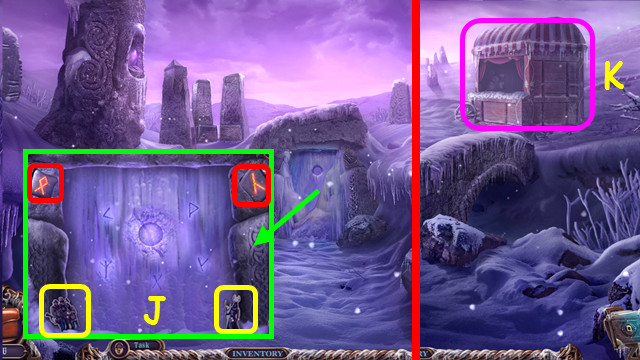
- Place the WOLF FIGURINE and DEER FIGURINE (T).
- Select the green pieces shown; press the green arrow (U).
- Select the red pieces shown; press the red arrow (V).
- Select the excess pieces (W).
- Take the 5/6 FIGURINE and SICKLE (X).
- Walk to the Hotel Side Yard.
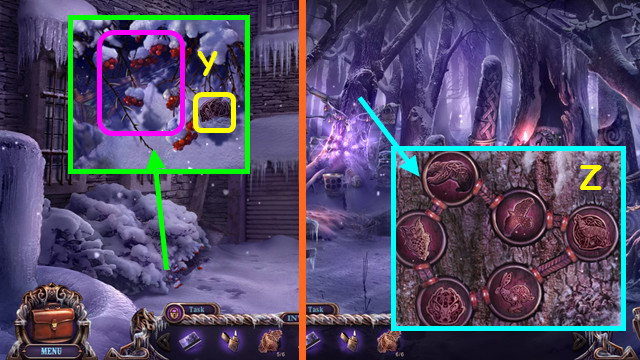
- Use the SICKLE; take the 6/6 FIGURINE (Y).
- Return to the Druid Shrine.
- Select the tree; place the 6 FIGURINES (Z).
- Select the tree again.
- Play the bells (1-5).
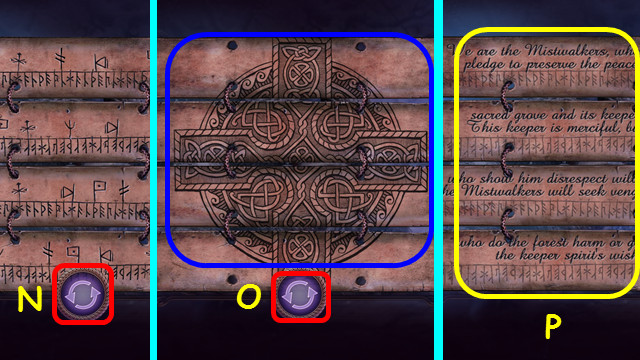
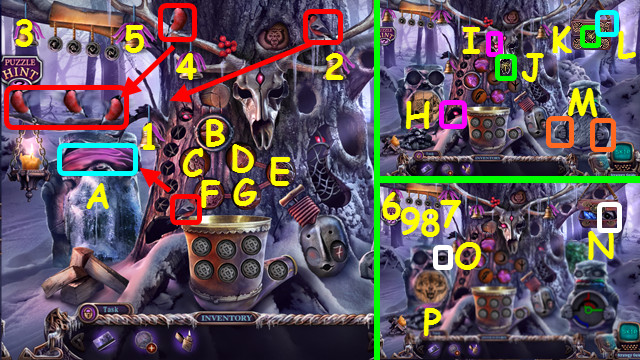
- Move the birds to the branch (red). Remove the blindfold (A).
- Select C-G-C-G-B-F-E-F-E-D-C-D-G-C-D-G-E-B-C-B-C-G-B-B-F-D-F-E.
- Move the stone (H) to the eye (I). Move the head (J) to the bag (K); turn the upper right disc once (L).
- Select each hand 4 times (M). Place the eye (N) in the right socket (O). Press each half twice, press the eye twice to make the wolf (P).
- Pull the cords (6-9).

- Place the horn (Q) on the face (R).
- Configure the runes as shown (S).
- Press the bellows (T). Place the coal (U) in the mouth and press the right hand (V).
- Place the crystal (W) in the mouth and press the right hand.
- Place the leaf (X) in the mouth and press the right hand.
- Place the berries (Y) in the mouth.
- Press V-Z-V-Z-Vx3-Z-Vx3.
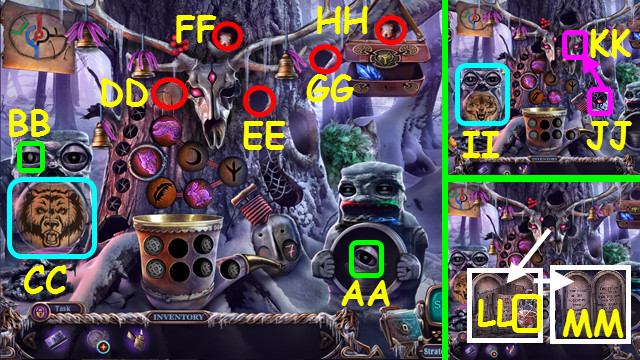
- Place the eye (AA) in the socket (BB); press each half twice, press the left eye to make the bear (CC).
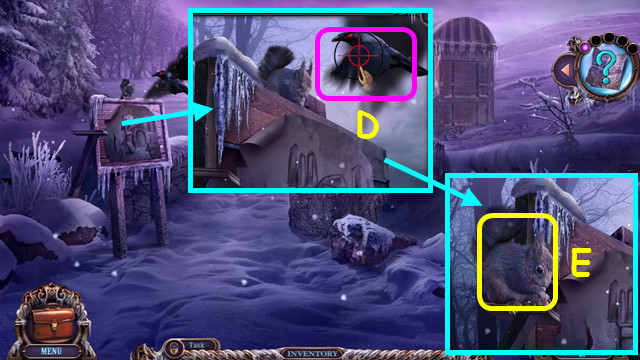
- Move the cork (DD) to (EE), select the squirrel at (FF). Move the cork from (EE) to (FF); select the squirrel at (DD) and then at (EE).
- Move the cork to (EE) and select the squirrel at (GG). Move the cork to (GG) and select the squirrel at (HH).
- Change the picture back to the wolf; select each half once, and then the left eye twice (II). Place the stone (JJ) in the skull (KK).
- Take the REVIVING POTION (LL). Restore and take the MISTWALKER'S PROPHECY (MM).
- Return to the Old Tree.
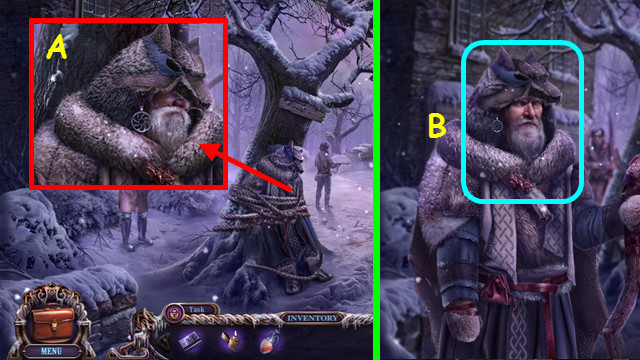
- Use the REVIVING POTION (A).
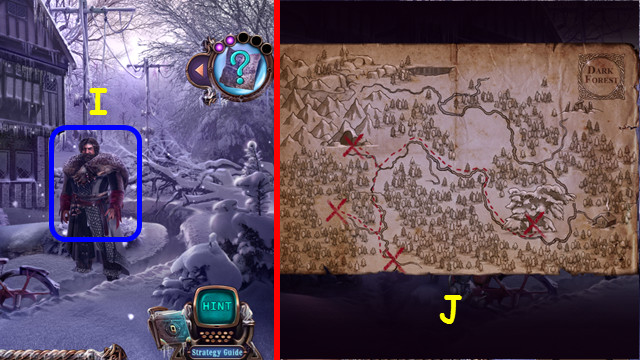
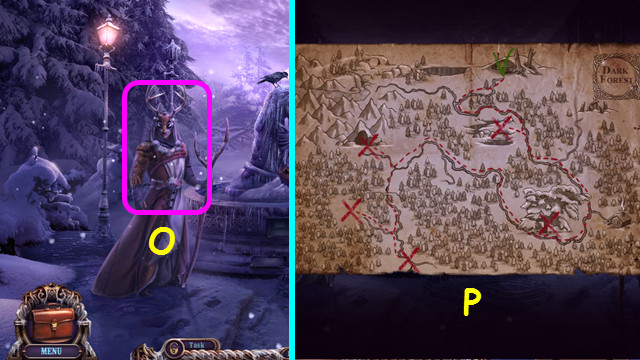
- Talk to Ulf; receive the MAP and RUNE SKULL (B).
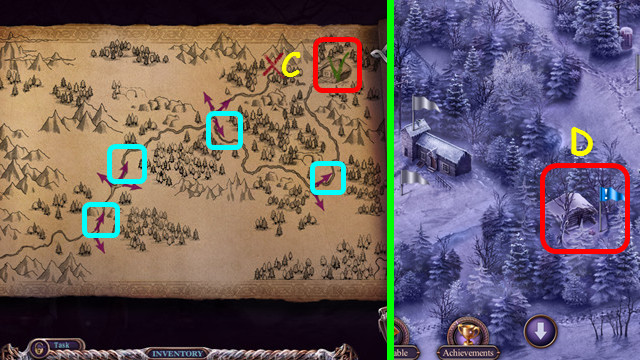
- Select and open the MAP (inventory).
- Select the arrows (C).
- Open the briefcase; select the Mistwalker Camp (D).
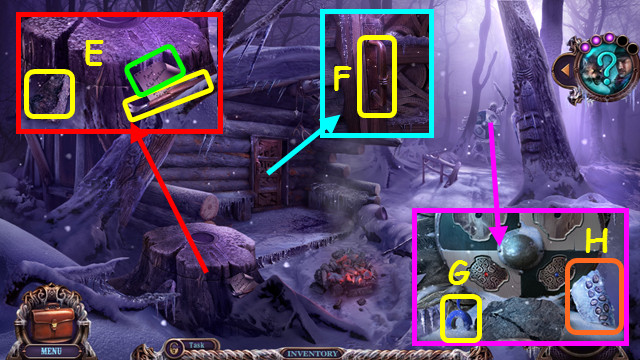
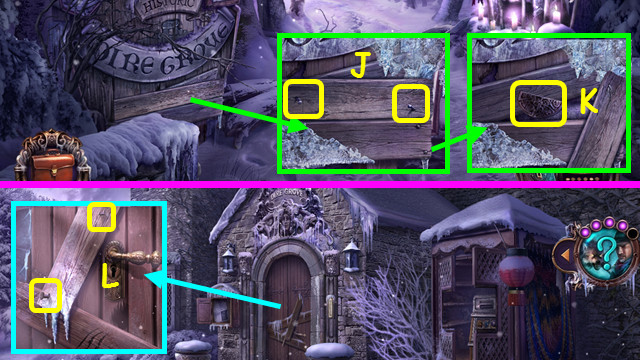
- Take the STONE, BROKEN CROWBAR, and note (E).
- Take the HANDLE (F).
- Brush the snow; take the INSULATING TAPE (G).
- Combine the BROKEN CROWBAR and INSULATING TAPE to make the CROWBAR (inventory).
- Select the ice (H).
- Restore the runes to find the ICE MESSAGE (I).
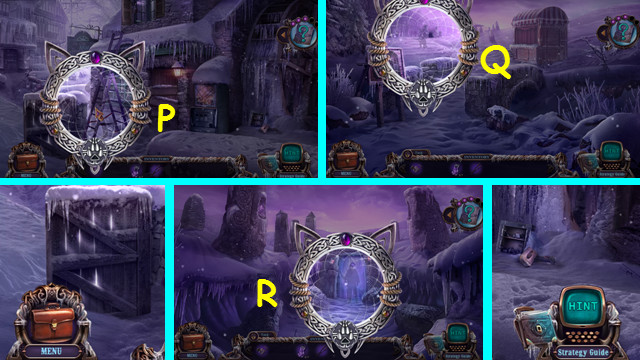
- Travel to Outside Dire Grove.
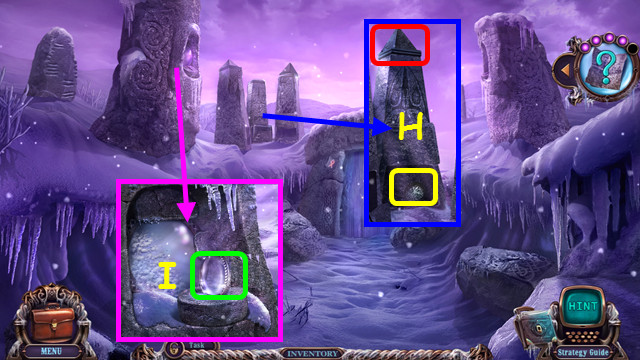
- Use the CROWBAR to take the 1/4 and 2/4 NAILS (J).
- Take the first SUN HALF (K).
- Go to the Hotel Entrance.
- Use the CROWBAR to take the 3/4 and 4/4 NAILS (L).
- Return to the Mistwalker Camp.
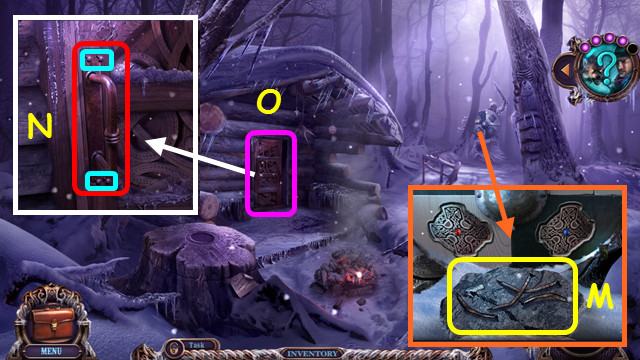
- Place the 4 BENT NAILS; use the STONE to make the 4 NAILS (M).
- Place the HANDLE and NAILS; use the STONE (N).
- Open and select the door; play the HOP to earn the SACRIFICE WHISTLE SCROLL (O).
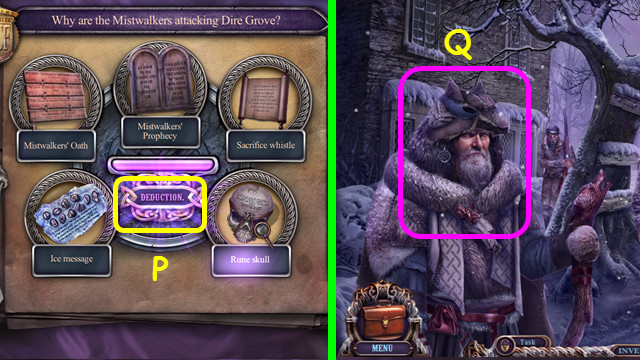
- Go to the investigation board and select deduction (P).
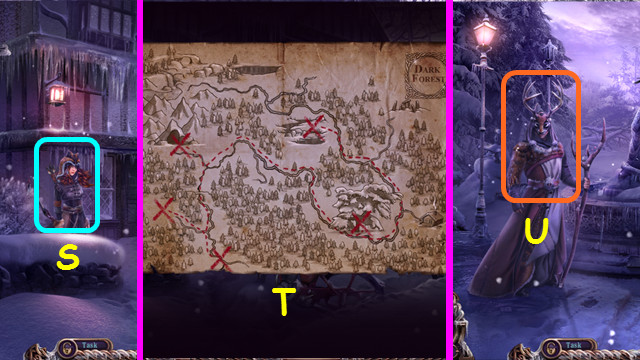
- Travel to the Old Tree.
- Talk to the Mistwalker (Q).
Chapter 3: Samuel Crawford
- Talk to Samuel; earn the HOTEL KEY (A).
- Go to the Hotel Entrance.
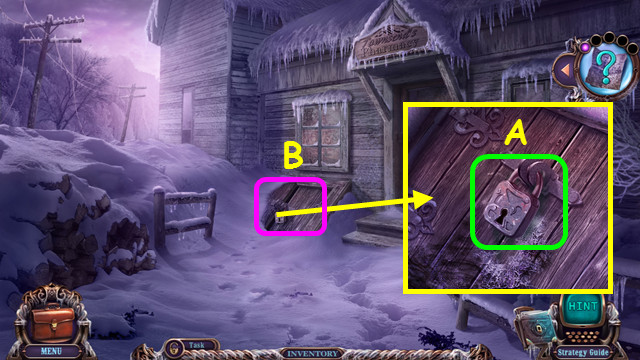
- Use the HOTEL KEY, turn the handle, and enter the Hotel Hall (B).
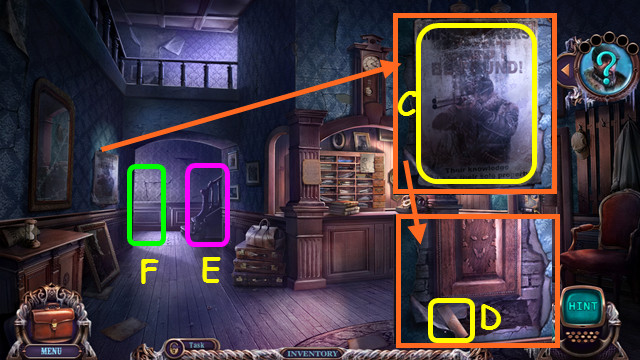
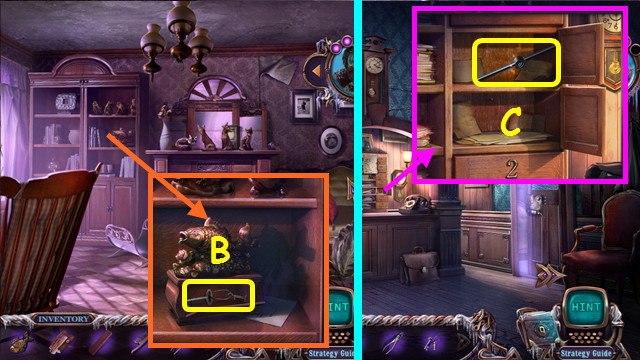
- Clean off and take the POSTER (C).
- Brush the cobwebs and take the GRINDSTONE (D).
- Note the Staircase (E).
- Go to the Sitting Room (F).
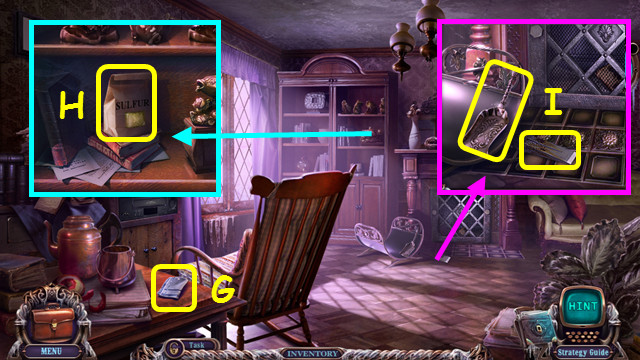
- Take the HANKY (G).
- Take the SULFUR (H).
- Take the BLUNT WEDGE and SCOOP (I).
- Use the GRINDSTONE 3X on the BLUNT WEDGE to make the WEDGE (inventory).
- Go to the Path.
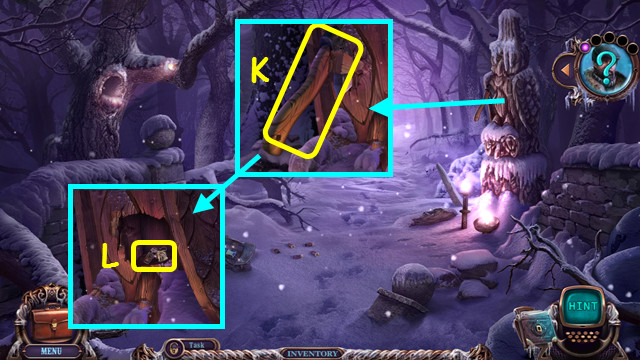
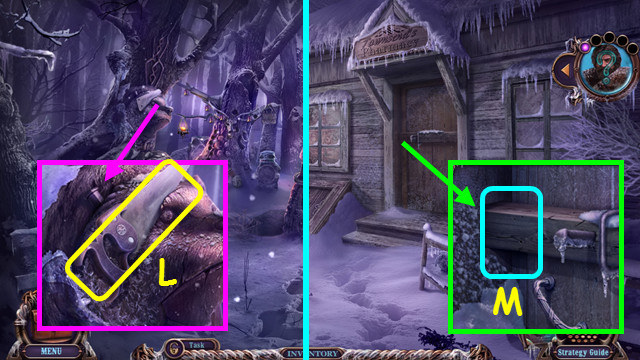
- Use the WEDGE and STONE to take the AXE (K).
- Take the WHISTLE (L).
- Walk to the Snowdrifted Street.
- Use the AXE 3 times to take the STICK (M).
- Go to the Yard.
- Remove the broken handle and add the STICK; take the HUFF (N).
- Go to the Old Bridge.
- Use the WHISTLE (O).
- Take the LATCH (P).
- Use the AXE on the ice, and then the HUFF on the net (Q).
- Take the WALLET (R).
- Open the WALLET; take the MAGNET KEY and COIN (inventory).
- Walk down.
- Place the COIN, pull the lever, and take the first CELTIC CROSS (S).
- Go to the Garage.
- Place the LATCH; open the chest (T).
- Take the SCREWDRIVER and WRENCH (U).
- Go to the Sitting Room.
- Use the WRENCH (A).
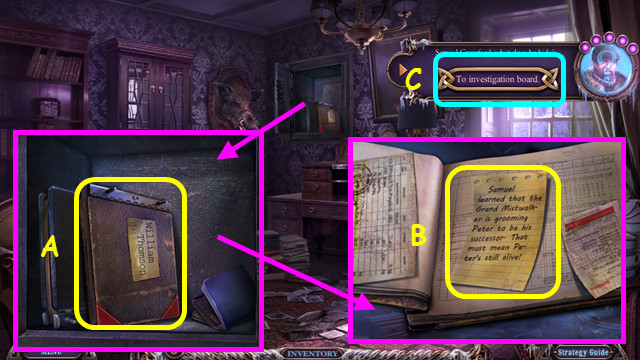
- Take the CODE (B).
- Restore the BURNED NOTE (C).
- Walk down.
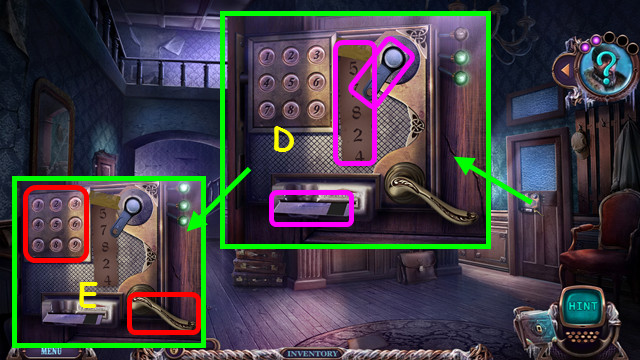
- Place the KEY CARD, CODE, and MAGNET KEY (D).
- Enter the code 5-7-8-2-4 and pull the handle (E).
- Walk right.
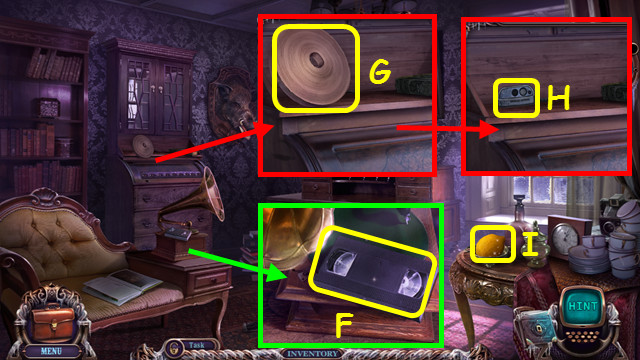
- Take the VIDEO TAPE (F).
- Take and read the TELEGRAPH TAPE (G).
- Take the GENERATOR-DOOR REMOTE (H) and LEMON (I).
- Go to the Path.

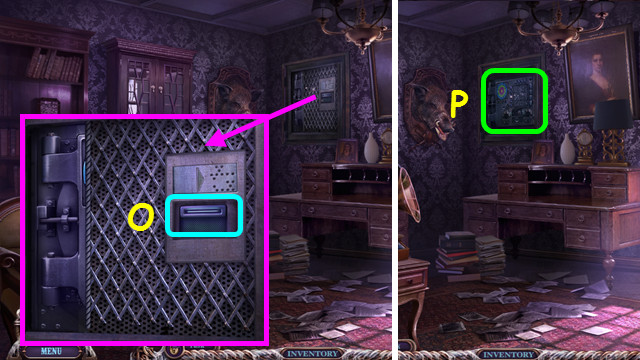
- Use the SCREWDRIVER (J).
- Remove the cover; take the first SAFETY LOCK (K).
- Go to the Staircase.
- Use the SCREWDRIVER (L).
- Take the second SAFETY LOCK (M).
- Go to the Hotel Side Yard.
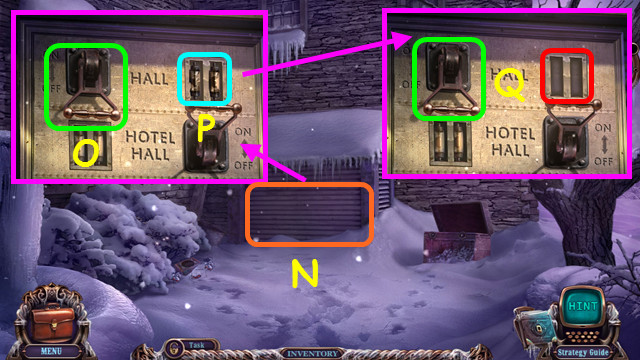
- Use the GENERATOR-DOOR REMOTE (N).
- Flip the switch (O); remove the burnt fuses (P).
- Place the 2 SAFETY LOCKS; flip the switch (Q).
- Go to the Sitting Room.
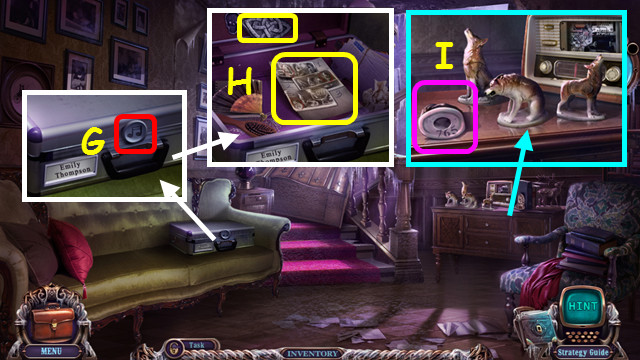
- Place the VIDEOTAPE; turn the knob 3X (R).
- Take the CAMERA RECORDING (S) and OWNER'S DRAWER KEY (T).
- Walk down.
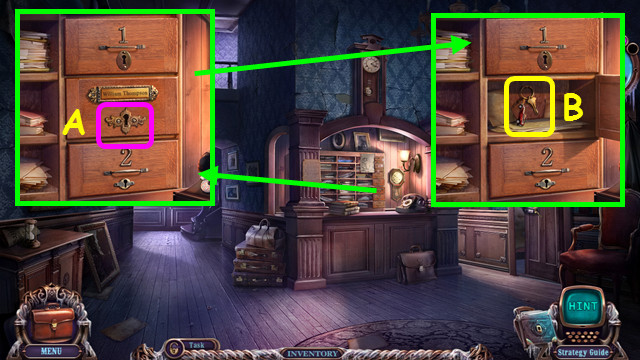
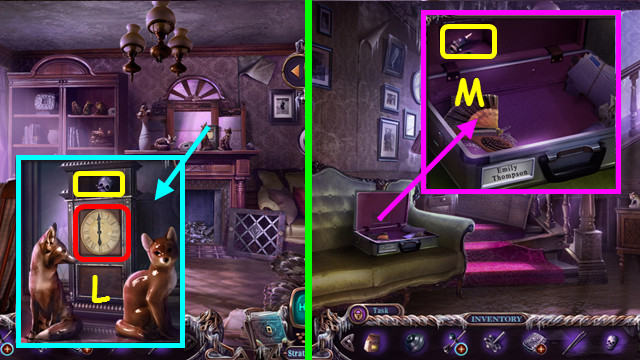
- Use the OWNER'S DRAWER KEY (A).
- Move the papers; take the CAR KEY (B).
- Travel to the Yard.
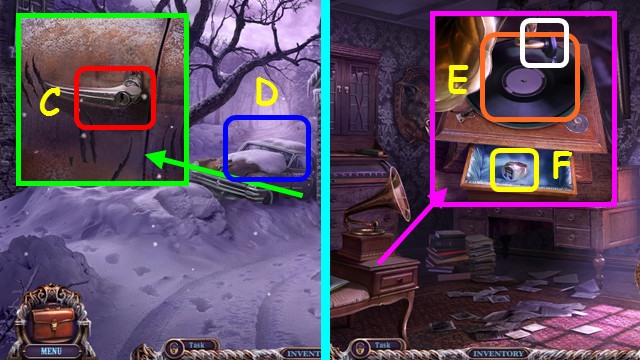
- Use the CAR KEY; open the door (C).
- Play the HOP to earn the RECORD (D).
- Go to the Office.
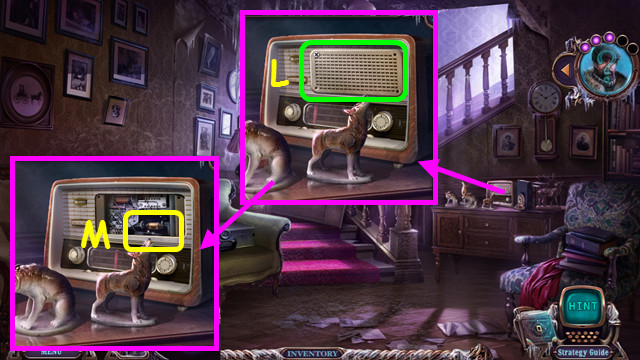
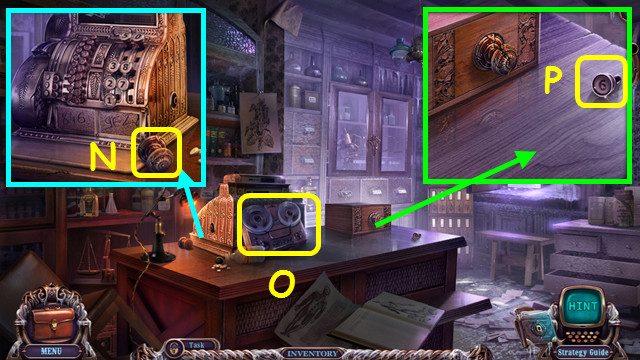
- Place the RECORD; select the spindle twice (E).
- Take the SIGNET (F).
- Go to the Staircase.
- Use the SIGNET (G).
- Move the items; take the HINT and second DRUID AMULET PIECE (H).
- Tip the wolf figurine (I).
- Walk down and left.

- Tip the bear figurine (J).
- Tip the fox figurine (K).
- Walk to the Office.
- Refer to the HINT (L).
- Press 3-4-6-9-6-4-7-6-5 (M).
- Move the letters; take the PUNCHCARD (N).
- Place the PUNCHCARD (O).
- Select the safe (P).
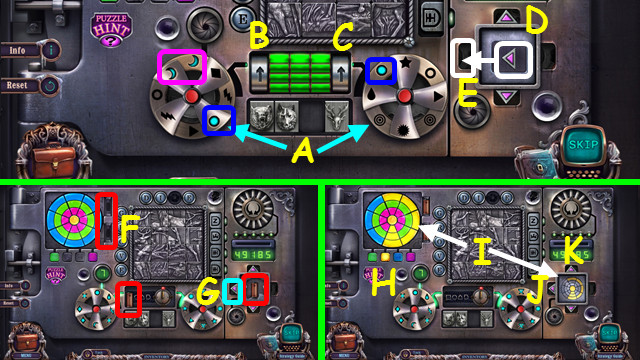
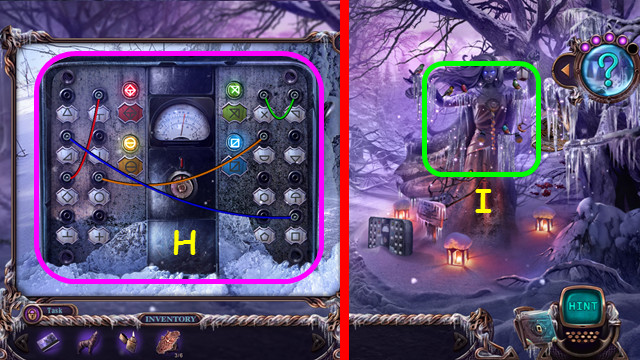
- Select matching pairs between the two wheels; use the red buttons to turn the blades (A).
- Match all the pairs; locations are random. Press Bx4-Cx2. Press Dx2, place the left arrow (E), press Dx2-E.
- Place the 2 batteries (red) into the holders (F). Press G.
- Press yellow (H). Duplicate the yellow pattern (I). Press J-Kx2.

- First, change all the green to blue (L), and then duplicate the green pattern (M). Press N-O.
- Change all the pink to blue (P). Add the pink pattern (Q). Press R.
- Press the button (S). Press Tx2. Move the fox head (U); Change so all heads are the same (V).
- Move the button (W) and the 'R' (X). Move the toggle to the left (Y).
- Slide the letters as shown (Z). Press the button; slide the 'W' up and right.
- Press the button, slide the 'S' right; press the button and slide the 'S' up.
- Point the toggle down (AA).
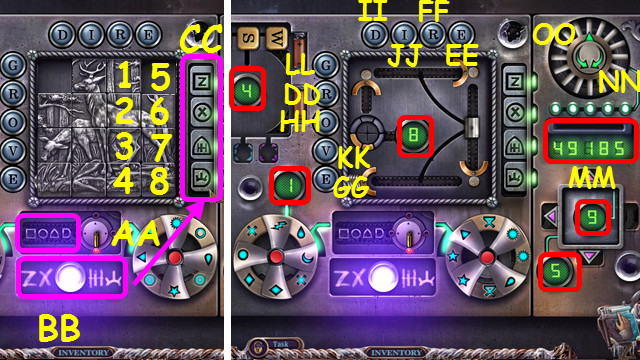
- Combine the shapes and symbols (BB); change the tiles to match (CC).
- Select the locations 6-7-8-4-3-7-6-2-1-5. Select DDx6-EEx2-FF-GG-HH-II-EE-JJ-EE-KK-JJ-LL.
- Change the numbers (red) to match the display (MM).
- Select the green arrows NNx4-OOx4-NNx6-OO-NNx3.
- Take and open the ledger (A).
- Locate the HOTEL OWNER'S NOTE (B).
- Go to the investigation board (C).
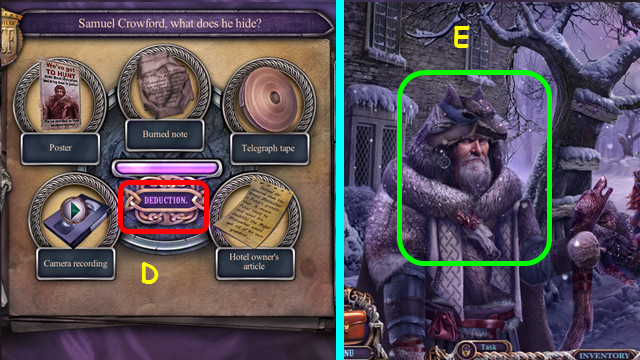
- Select deduction (D).
- Go to the Old Tree.
- Talk to the Ulf; earn the third DRUID AMULET PIECE (E).
- Restore the DRUID AMULET (inventory).
- Go to the Mistwalker Camp.
Chapter 4: An Old Grudge
- Place the DRUID AMULET (A).
- Take the WOLF HORN and select the scraps (B).
- Restore and take the TORN PICTURE (C).
- Go to the Snowdrifted Street.
- Use the WOLF HORN (D).
- Walk forward (E).
- Take the KNIFE (F); use the FUELED LIGHTER (G).
- Cut the LEMON with the KNIFE; squeeze the LEMON onto the HANKY to make the HANKY WITH JUICE (inventory).
- Go to the Garage.
- Use the HANKY WITH JUICE (H); open the case and take the LINE WITH HOOK (I).
- Go to the Staircase.
- Use the CROWBAR (J); use the LINE WITH HOOK to take the SAW HANDLE (K).
- Go to the Druid Shrine.
- Use the SAW HANDLE; take the SAW (L).
- Go to Outside Pharmacy.
- Use the SAW (M), open the door, and walk forward.
- Take the BOX KNOB (N).
- Take the CHEMIST'S RECORDER (O).
- Take the first REGISTER BUTTON (P).
- Remove the old handle and place the BOX KNOB; open the drawer and take the REGISTER LEVER (Q).
- Take the second REGISTER BUTTON (R).
- Place the 2 REGISTER BUTTONS and REGISTER LEVER (S).
- Press 8-4-6, pull the lever, and take the CADUCEUS (T).
- Place the CADUCEUS (U); open the doors.
- Play the HOP to earn the MEDICINE BOX (V).
- Go to the Old Tree.
- Use the MEDICINE BOX (W).
- Talk to Bjorn to earn the BEAR EAR (X).
- Go to the Druid Shrine.

- Place the BEAR EAR; take the second SUN HALF (A).
- Go to the Hotel Side Yard.
- Place the 2 SUN HALVES (B); take the second CELTIC CROSS (C).
- Go to the Mistwalker Camp.
- Place the 2 CELTIC CROSSES (D).
- Select the shield (E).
- Remove the fur (A) and snow (B). Select the 4 yellow arrows; select the 4 yellow arrows again (C).
- Do the same for the 4 red arrows, and then the 4 green arrows. Place the FEATHER (D) on the owl (E).
- Place the FEATHER (F) on the owl. Untangle the ropes (G). Place the FEATHER (H) on the owl.
- Remove the snow twice (I).
- Select the positions 3-5-7-6-4-2-3-5-4.
- Push both wings down 3x (J).
- Move the button (K) to the box (L). Press the buttons center-left-right.
- Use the matches (M) on the wood (N).
- Select the valve (O).
- Select the 3 levers until each flask is full (P).
- Turn the knob; select the icicles (Q).
- Select R-S; place the shield piece (T).
- Restore the shield (U). Select the owl claws until you see the light beam (V).
- Give the apple (W) to the hedgehog (X). Move the tooth to the bear (Y).
- Select the hedgehog (AA). Turn to page 3 (BB); recreate the dipper (CC).
- Place the 2 teeth (red) in the bear. Select DDx3; turn the reels to red. Select EEx3; turn the reels to green.
- Select DDx3; turn the reels to white. Select EEx3; turn the reels to pink. Select DDx3; turn the reels to yellow. Select EEx3; turn the reels to blue.
- Take BJORN'S DIARY (FF); open it and take the HUNTER'S BADGE.
- Go to the Old Tree.
- Use the HUNTER'S BADGE (A); talk to Samuel and earn SAMUEL'S AMULET.
- Go to the Old Bridge.
- Talk to the hunter (B).
- Walk forward.
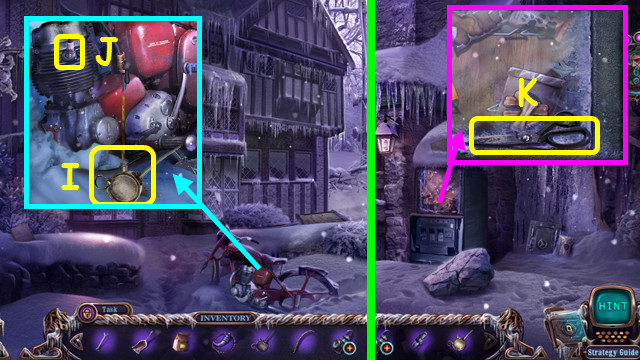
- Stand up the snow bike (C).
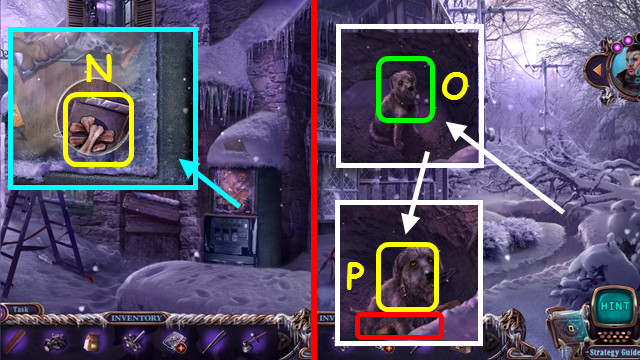
- Take the EMPTY OILCAN; open the compartment (D).
- Take the WICK (E).
- Walk right.
- Take the BROKEN LANTERN (F).
- Note the path to the Shop (G).
- Go to Outside Museum (H).
- Place the EMPTY OILCAN; take the OILCAN (I).
- Use the WRENCH to take the SPARK PLUG (J).
- Go to the Shop.
- Take the SCISSORS (K).
- Walk down.
- Use the SCISSORS to take the BELT (L).
- Use the OILCAN (M).
- Open the bag; take the PAPER and RULER (N).
- Walk down.
- Remove the old belt and use the OILCAN (O).
- Remove the old sparkplug and place the SPARKPLUG (P).
- Place the BELT (Q); turn the crank (R).
- Select the snow bike (S).
- Show SAMUEL'S AMULET (T).
- Talk to Derek to earn the envelope; open it to find TED'S LETTER and FISH AMULET.
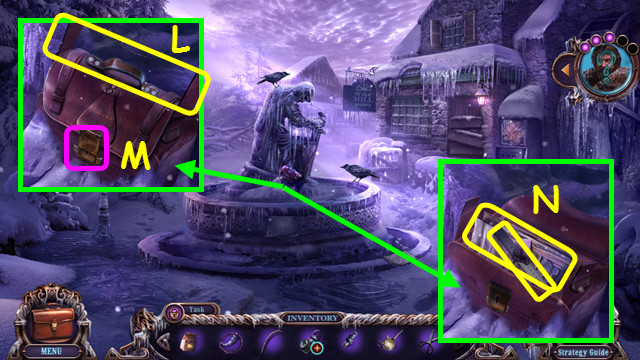
- Take the WOOD; remove the snow and take the BOARD (U).
- Use the OILCAN; pull the lever (V).
- Take the BRUSH and NIPPERS (W).
- Go to the Sitting Room.
- Place the FISH AMULET; take the HOTEL-DRAWER KEY (B).
- Walk down.
- Use the HOTEL-DRAWER KEY; take the JACK PART (C).
- Travel to Outside Museum.
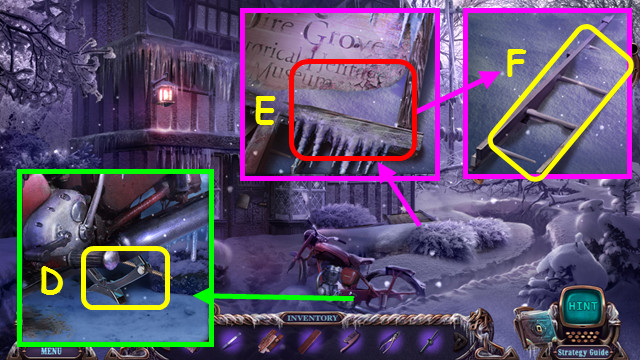
- Place the JACK PART to earn the JACK (D).
- Use the JACK (E).
- Take the LADDER (F).
- Go to the Shop.
- Place the LADDER, use the OILCAN, and select the ladder (G).
- Take the MAGNET; use the RULER (H).
- Take the LENS (I).
- Use the MAGNET to drag the POUND COIN up (J).
- Travel to the Hotel Entrance.
- Place the POUND COIN, pull the lever, and take the MASK (K).
- Walk forward.
- Place the MASK; take the ALCOHOL (L).
- Combine the BROKEN LANTERN, LENS, ALCOHOL, WICK, and FUELED LIGHTER to make the LANTERN (inventory).
- Walk left.
- Use the WOOD, PAPER, and FUELED LIGHTER (M).
- Use the SCOOP to take the COAL; take the REGISTER BUTTON (N).
- Return to the Shop.
- Use the LANTERN (O); play the HOP to earn TED'S NOTES (P).
- Go to the investigation board and select deduction (Q).
- Return to the Old Tree.
- Talk to Ted to earn the FURNITURE WRENCH (R).
- Return to the Square.
Chapter 5: Derek and the Mistwalkers
- Use the FURNITURE WRENCH; remove the cover (A).
- Take the WIRE and the first GLASS-CUTTER PART (B).
- Combine the WIRE and NIPPERS; bend the wire several times to make the LOCKPICK (inventory).
- Go to the Pharmacy.
- Place the REGISTER BUTTON, press 9-6-2, pull the handle, and take the RING (C).
- Go to Derek's House.
- Use the LOCKPICK; turn the handle (@).
- Select E-D-Ex2-D-Ex3-D-Ex3-D-Ex4-D.
- Walk forward.
- Take the GLASS-CUTTER BASE (F).
- Remove the glass; take the FAMILY PICTURE (G).
- Place the RING and pull (H).
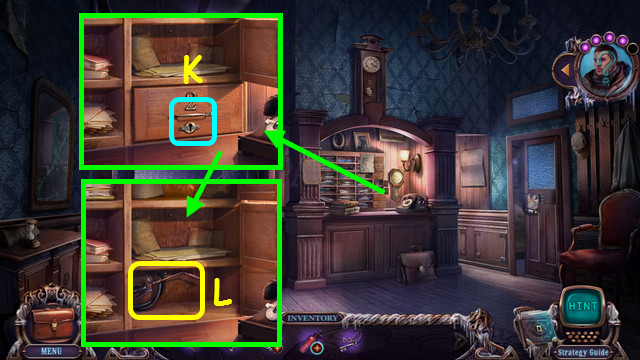
- Take the LIBRARY ENTRY, BOX and VALVE (I).
- Look at the box; take the TWEEZERS (inventory).
- Take the CLOCK HANDS (J).
- Use the BRUSH (K).
- Return to the Sitting Room.
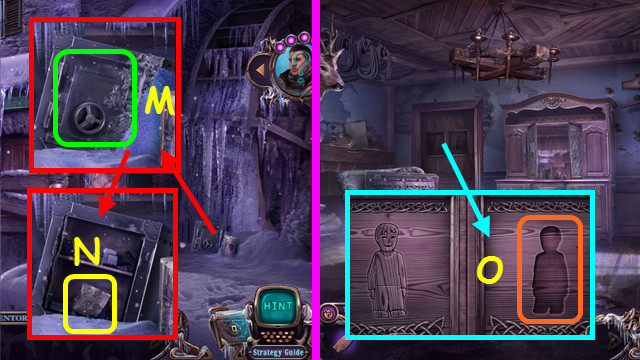
- Place the CLOCK HANDS and select the face; take the SKULL (L).
- Go to the Staircase.
- Place the SKULL; take the second GLASS-CUTTER PART (M).
- Combine the GLASS-CUTTER BASE and the 2 GLASS-CUTTER PARTS to make the GLASS CUTTER (inventory).
- Go to the Shop.
- Use the GLASS CUTTER; take the DOG FOOD (N).
- Walk down and forward.
- Give the DOG FOOD (O).
- Place the BOARD; take THUNDER (P).
- Go to the Old Tree.
- Give THUNDER to Ted; you receive the HANDSAW (Q).
- Travel to the Square.
- Use the TWEEZERS to take the 3 BRASS CIRCLES (R).
- Return to Derek's House.
- Use the HANDSAW; take the CABLE (S).
- Walk forward.
- Use the CABLE, pull the cable, and open the doors (T).
- Open the box (A); take the LEAD TOY and SAMUEL'S NOTES (B).
- Take the SALTPETER and UNLOADED GUN (C).
- Place the COAL, SULFUR, and SALTPETER; select the mortar (D).
- Place the BRASS CIRCLES; select each, one at a time (E). Place the LEAD TOY (F).
- Select the mortar, lead cap, and case to make a bullet (1-3). Do this 3x.
- Take the AMMO (G). Combine the UNLOADED GUN and AMMO to make the LOADED GUN (inventory).
- Travel to the Street.
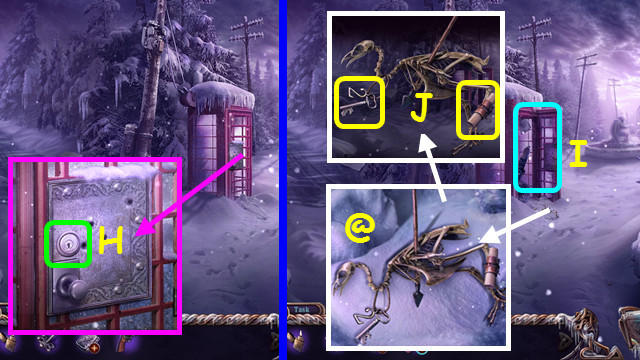
- Use the LOADED GUN (H).
- Play the HOP to earn the TORCH BASE (I).
- Brush the snow and select the skeleton (@); take the MESSAGE TO MISTWALKERS and HOTEL-DRAWER KEY (J).
- Go to the Hotel Hall.
- Use the HOTEL-DRAWER KEY (K).
- Take the TORCH HOSE (L).
- Combine the TORCH BASE, TORCH HOSE, VALVE, and FUELED LIGHTER to make the TORCH (inventory).
- Travel to the Shop.
- Use the TORCH; remove the door (M).
- Take the HINT (N).
- Combine the BOX and HINT; select the runes per the hint and take the DEREK FIGURE (inventory).
- Go to Inside House.
- Place the DEREK FIGURE (O).

- Place the gold ball (A) in the holder (B).
- Move the starfish, fish, and bumpers as shown; press start (C).
- Press the green shield 5x (D), press the blue shield twice (E), and press the purple shield 3x (F).
- Move the fox and press him twice (G); press the crow (H).
- Move the colored pieces of the bear to the columns indicated: red-1, blue-2, red-3, blue-1, red-1, green-2, red-3, blue-2, red-1, blue-3, red-3, green-1, red-1, blue-2, red-3, blue-1, red-1, yellow-2, red-3, blue-2, red-1, blue-3, red-3, green-2, red-1, blue-2, red-3, blue-1, red-1, green-3, red-3, blue-2, red-1, blue-3, red-3, yellow-1, red-1, blue-2, red-3, blue-1, red-1, green-2, red-3, blue-2, red-1, blue-3, red-3, green-1, red-1, blue-2, red-3, blue-1, and red-1.
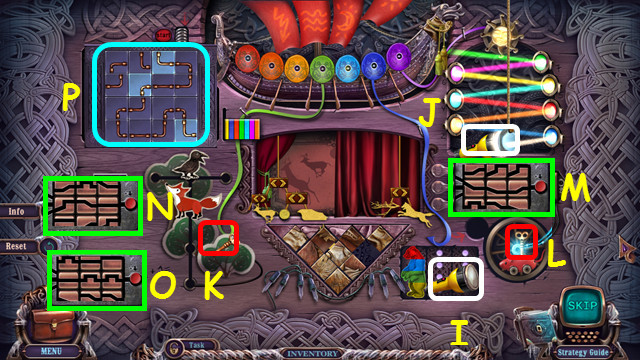
- Place the flashlight (I) by the reflectors; adjust the reflectors as shown ( J).
- Take the key (K) and use it on the mouse (L).
- Move the paths as shown; press the button (M).
- Move the paths as shown; press the button (N).
- Move the paths as shown; press the button (O).
- Swap the tiles as shown (P).
- Use the scissors (Q) on the ship (R); Use the ropes on the curtain (S).
- Place the tile; swap the tiles to restore the carving (T).
- Move the stag to the stage (U).
- Press the circled arrows once (red).
- Move the candles to the positions shown (V).
- Select the shields: 3-6-1-4-5-7-2, 7-5-1-3-2-4-6, 2-3-1-4-7-5-6, and 6-2-1-5-3-7-4.
- Play the HOP to earn DEREK'S SIGN (W).
- Go to the investigation board and select deduction (X).
- Go to the Old Tree.
- Talk to Samuel (Y).
- Go to Derek's House.
Chapter 6: Where Is Derek?
- Talk to Samuel; you earn the 0/6 FOLDER (A). Take the 1/6 FOLDER (B).
- Walk forward.
- Take the 2/6 FOLDER (C).
- Travel to Outside Museum.
- Take the 3/6 FOLDER (D).
- Go to the Shop.
- Take the 4/6 FOLDER (E).
- Walk down.
- Take the 5/6 FOLDER (F).
- Walk down.
- Take the 6/6 FOLDER (G).
- Walk left.
- Talk to Samuel to earn the MAP (H).
- Go to the Square.
- Talk to Ulf; you earn the ACORN (I).
- Go to the Shop.
- Place the ACORN (J).
- Take the ACORNS and CHAIN (K).
- Travel to Derek's House.
- Place the SAW'S CHAIN (L).
- Select the saw (M).
- Walk left.
- Take the HATCHET HANDLE (N).
- Take the CELLAR KEY; open the curtains (O).
- Use the HATCHET HANDLE; take the HATCHET (P).
- Use the HATCHET twice; take the SLINGSHOT BASE (Q).
- Walk forward.
- Take the first FIGURINE (R).
- Use the HATCHET to take the LEATHER BAND (S).
- Take the HEAD (T).
- Return to Outside Pharmacy.
- Use the CELLAR KEY to take the KEY LOCK (A).
- Play the HOP to earn the PICK AXE (B).
- Return to Banshee Hall.
- Use the PICK AXE; take the first FIRE RUNE and STONES (C).
- Combine the SLINGSHOT BASE, LEATHER BAND, and STONES to make the SLINGSHOT (inventory).
- Walk down.
- Use the SLINGSHOT on the crow 3x (D).
- Place the ACORNS; take the SQUIRREL (E).
- Return to the Square.
- Talk to Ulf (F).
- Select the map to take ULF'S INFORMATION (G).
- Walk forward.
- Talk to Bjorn to earn BJORN'S BOX (H).
- Combine BJORN'S BOX and the HEAD; Select the heads 1-5.
- Take the second FIRE RUNE (I).
- Return to Banshee Hall.
- Place the 2 FIRE RUNES (red); take the second and third FIGURINES (J).
- Walk down; select the puppet stage (K).
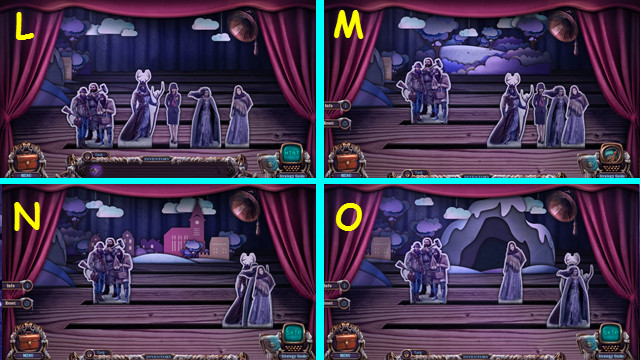
- Place the 3 FIGURINES (L).
- Select the trees and citizens (M).
- Select the town and citizens (N).
- Select the cave, citizens, and young woman (O).
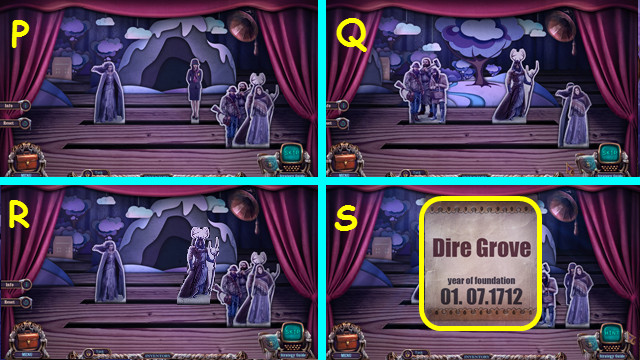
- Select the cave, banshee, and detective (P).
- Select the Sacred Grove, citizens, and Mistwalker (Q).
- Select the cave, Mistwalker, and Banshee (R).
- Take the DATE OF FOUNDING (S).
- Travel to Outside Museum.
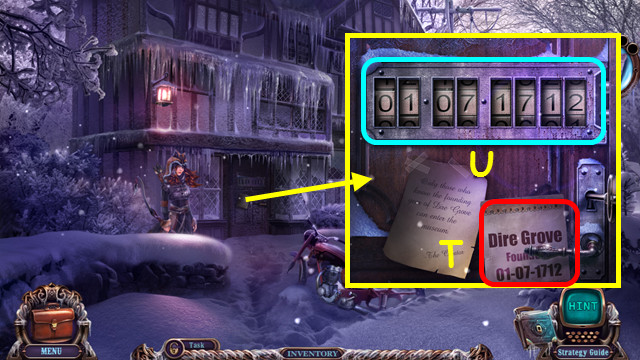
- Place the DATE OF FOUNDING (T).
- Enter the date (U).
- Walk forward.
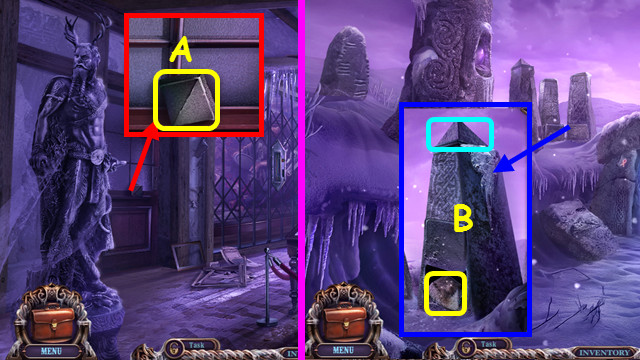
- Take the OBELISK TOP (A).
- Go to Banshee Hall.
- Place the OBELISK TOP; take the GLOVE (B).
- Return to Inside Museum.
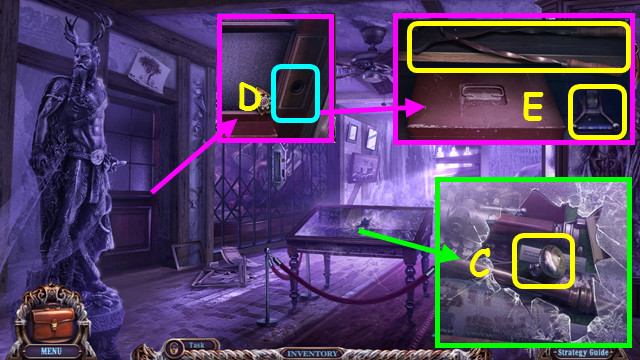
- Use the GLOVE on the glass; take the DOOR KNOB (C).
- Use the DOOR KNOB (D).
- Take the TONGS and SWITCH (E).
- Place the SWITCH (F).
- Swap the wires as shown; lift the switch (G).
- Play the HOP to earn the BEAR TOTEM (H).
- Walk down.
- Talk to Bjorn (I).
- Select the map to take BJORN'S INFORMATION (J).

- Talk to Camryn; earn the 0/7 MEMORY HOLDER and MEMORY LENS (K). Use the MEMORY LENS to collect the 1/7 MEMORY HOLDER (L).
- Walk forward.
- Use the MEMORY LENS to collect the 2/7 MEMORY HOLDER (M).
- Return to Derek's House.
- Use the MEMORY LENS to collect the 3/7 MEMORY HOLDER (N).
- Walk forward.
- Use the MEMORY LENS to collect the 4/7 MEMORY HOLDER (O).
- Go to The Shop.
- Use the MEMORY LENS to collect the 5/7 MEMORY HOLDER (P).
- Walk to Banshee Road.
- Use the MEMORY LENS to collect the 6/7 MEMORY HOLDER (Q).
- Walk forward.
- Use the MEMORY LENS to collect the 7/7 MEMORY HOLDER (R).
- Return to Outside Museum.
- Talk to Camryn (S).
- Select the map to take CAMRYN'S INFORMATION (T).
- Walk down.
- Talk to the Masked Druid; earn the THICKET AMULET (U).
- Go to Banshee Road.
- Use the THICKET AMULET (A).
- Walk to the Grove (B).
- Take the BROKEN WINDOW and EMPTY VIAL (C).
- Restore the BROKEN WINDOW to make the MIRROR (inventory).
- Use the TONGS to take the DIAMOND (D).
- Use the EMPTY VIAL to make the ICE VIAL (E).
- Return to Inside Museum.
- Use the ICE VIAL; crack the ice several times (F).
- The EMPTY VIAL returns to inventory.
- Take the MAGNIFIER and OBELISK TOP (G).
- Return to Banshee Hall.
- Place the OBELISK TOP; take the SUMMONING DISK (H).
- Place the MAGNIFIER; touch the magnifier (I).
- Place the MIRROR; touch the mirror (J).
- Place the DIAMOND (K).
- Play the HOP to earn the BANSHEE'S FLOWER (L).
- Return to the Grove.
- Place the SUMMONING DISK (M).
- Talk to the Ancient Spirit; you earn the TEAR VIAL (N).
- Go to the Square.
- Talk to the Masked Druid (O).
- Select the map to receive the MASKED DRUID'S INFORMATION (P).
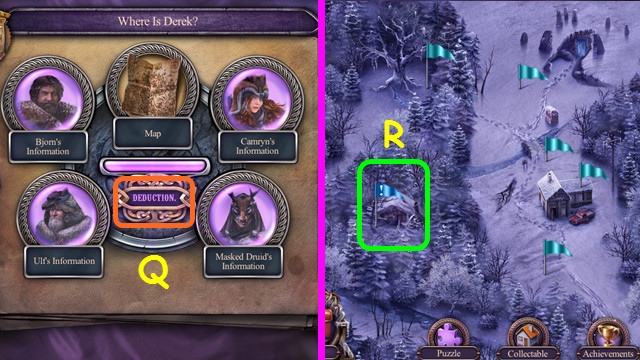
- Go to the investigation board and select deduction (Q).
- Go to the Hideout (R).
- Take the ROPE (S).
- Close the door and use the KEY LOCK (T).
- Take the HOOK (U).
- Combine the HOOK and ROPE to make the ROPE KEY (inventory).
- Go to Banshee Road.
- Use the ROPE KEY (V).
- Open the bag; take the CARVED LEVER (W).
- Return to the Hideout.
- Place the CARVED LEVER (X).
- Select the cage (Y).
- Pull the lever (A).
- Make a snowball (B); throw one at each target (red).
- Move the rod to the squirrel cage (C); press the rods 1-4.
- Remove the 3 clamps (D); move the target to the frame (E).
- Throw a snowball at the target.
- Place the coin (F) in the slot; pull the lever (G). Use snowballs to change the colored targets to match the bars (H).
- Move the arms as shown; press the button (I). Use the shard (J) on the rope (K).
- Select each of the 3 whistles (L). Place the coin (M) in the slot and pull the lever.
- Use snowballs to change the colored target to match the bars (N).
- Move the arms as shown; press the button (O).
- Turn the pipes (P).
- Give an acorn (Q) to the squirrel (R).
- Place an acorn (S). Slide the bucket all the way right; place the acorn in it (T). Slide the bucket all the way left (U). Place the acorn from the right pipe and turn the cog twice (V).
- Place the acorn (W). Press the left arrow 3x (X). Press the branch 4x (Y).
- Press the left arrow twice, the right once, and the left twice more (X).
- Select the left leaves to move the drop to the bar; Select the left and right sides of the bar until the drop disappears (Z).
- Place the COIN in the machine; pull the lever (AA).
- Use snowballs to change the colored targets to match the bars (BB).
- Move the arms as shown (CC).
- Place the 4 corks (red) on the spikes (DD).
- Move the button to the machine (EE).
- Place the buttons in the panel (FF).
- Use the key on the lock (GG).
- Slide the knobs as shown (A).
- Change the tiles as shown (B).
- Select C-Dx3-Ex3.
- The final solution (F).
- Congratulations! You have completed Mystery Case Files: Dire Grove, Sacred Grove!
Created at: 2014-12-19