
Walkthrough Menu
- General Tips
- Chapter 1: Into the Manager’s Office
- Chapter 2: Find Student 1
- Chapter 3: Find Student 2
- Chapter 4: Find Student 3
- Chapter 5: Find Student 4
- Chapter 6: Into the Portal!
- Chapter 7: End
- List of VHS Tapes and Morphing Objects
General Tips
- There are no timers in the game so you can play at your own leisure.
- If you click randomly on the screen in a Hidden Object section, the screen will freeze up for a few seconds. You will not be able to click on any items until the frost disappears.
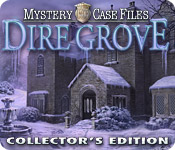
- From the Main Menu you can access the options for the game, your Case Achievements, Player Selection, and the Madame Fate Bobble Head.
- In the Options section you can click on the word ATTITUDE in the lower left corner. The options for attitude are Normal, Motivational, and Snarky. These adjust the types of comments you receive from the game when you interact with different areas in the game.
- The Case Achievements are in the upper right corner of the Main Menu. You can click there anytime to see how many trophies you’ve won.
- Click on the Madame Fate Bobble Head above the steering wheel to hear what she has to say.
- You can change players by clicking on the visor in the upper left corner.
- You can also interact with different parts of the car, like the stick shift and the steering wheel.
- Open your Journal from time to time to gain valuable information that will help you in the game. Each time a new entry is added to the journal, the journal will flip open.
Hints & Skips
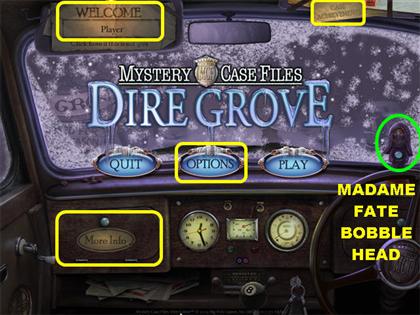
- There are unlimited hints in the game; however, you have to wait 5 minutes for the Hint button to recharge.
- The Hint feature is only available in the Hidden Object scenes.
- Click on the Hint button in the lower right to be shown the location of one random item from the list.
- You can skip any of the mini-games by clicking on the Skip button in the lower right. The Skip button takes the place of the Hint button in the mini-games section.
- You can only skip a mini-game once the Skip button is charged.
Hidden Object Scenes
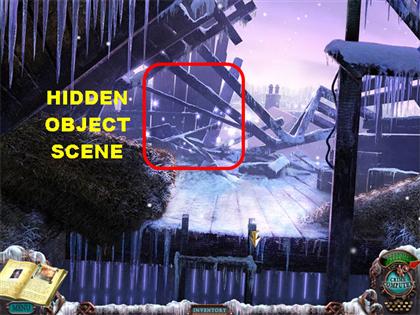
- There are several Hidden Object Scenes in the game. You can enter a Hidden Object section by clicking on the cluster of sparkly lights in a scene.
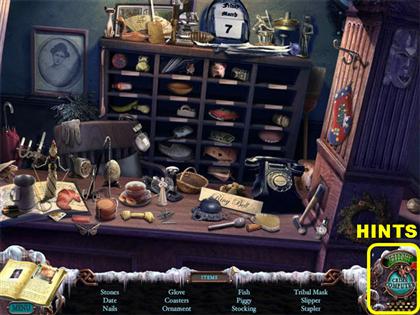
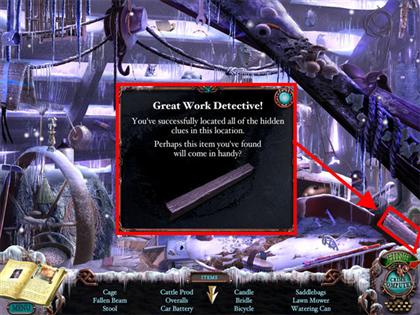
- Each time you visit a Hidden Object scene you will have an Inventory Item added to your Inventory Tray at the bottom of the scene.
- You can also obtain Inventory Items by using some of your existing Inventory Items in different areas of the game.
- Use the Inventory Items to unlock other areas in the game, like a door or access to a new path.
- You may revisit the same Hidden Object scene more than once, but you will find a different Inventory Item each time.
- You have to perform other actions before you will be able to enter the same Hidden Object scene twice.
- To use an Inventory Item, place your cursor at the bottom of the screen to make the Inventory Tray appear. Grab the item you want to use and click it onto the desired area.
Mysterious Morphing Objects
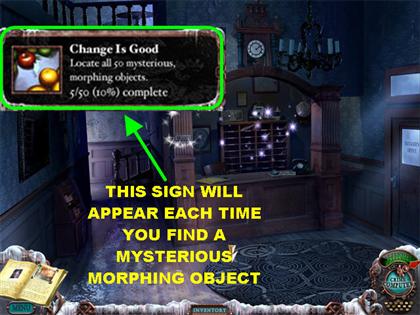
- The Mysterious Morphing Objects are back!
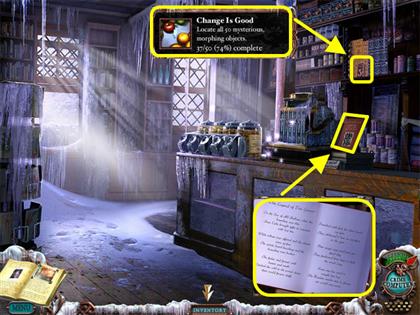
- There are 50 Mysterious Morphing Objects that you can collect throughout the game.
- Look for items that morph into other items in the scene. Some items can be easy to find; others require a keen eye.
- You cannot find Mysterious Morphing Objects in the Hidden Object sections of the game.
- The morphing objects could be a glass that changes shapes, a sign that changes images or a variety of other things.
- Make sure you look closely at each scene so you can collect them all.
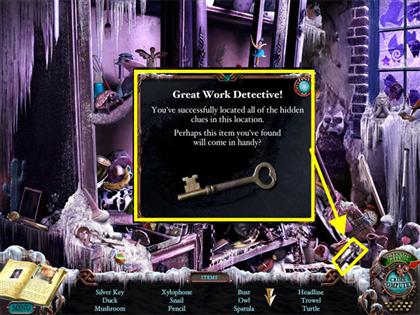
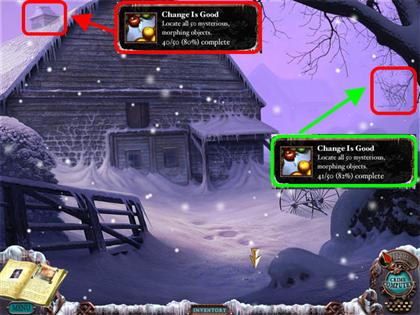
- Each time you find a Mysterious Morphing Object, the game will show you a sign letting you know how many you’ve collected thus far.
- Collecting the items will not affect the outcome of the game; however, you will not receive that trophy at the end of the game if you don’t collect them all.
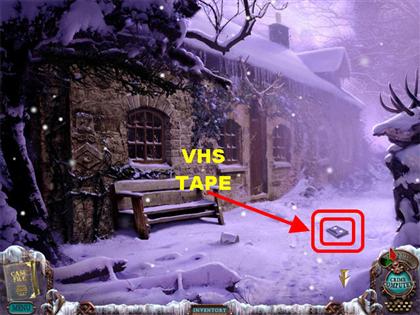
VHS Tapes
- There are 16 Video Tapes you can collect throughout the game.
- The Video Tapes could be in any scene, except the Hidden Object sections.
- You may see a sparkle appear near a VHS Tape.
- You can click on the Achievements section in the Main Menu to see how many tapes you’ve collected.
- You can play the tapes all at once, or one by one.
- Looking at the tapes will give you clues about what to do in the game.
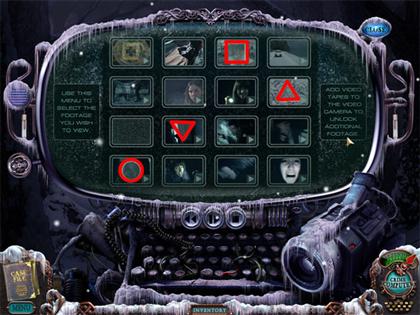
Crime Computer
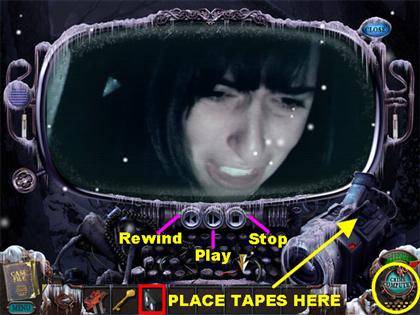
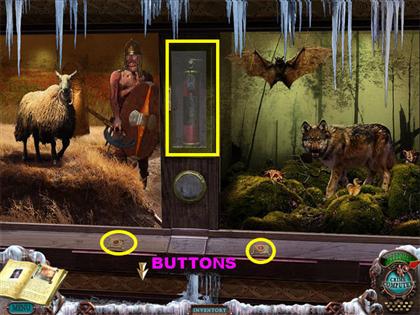
- The Video Camera is broken; you will need to use the Crime Computer in the lower right to view its recordings.
- Click on the Crime Computer in the lower right to activate it.
- Grab a VHS Tape from inventory and place it into the slot on the right side of the camera.
- Press Play to activate the recording.
- You can also Rewind or Stop the tape by clicking on the appropriate buttons on the Crime Computer.
Achievements
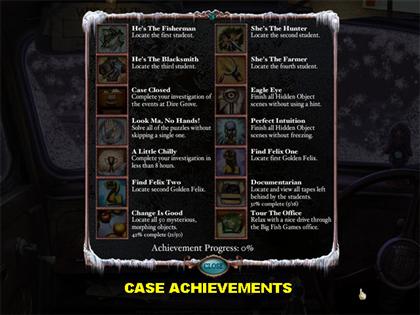
- There are 14 Achievements you can strive for in this game.
- Each time you complete one of these Achievements a note will appear on the upper left side of the scene.
- You can view and read about the Achievements by clicking on the “Case Achievements” section in the upper right side of the Main Menu.
Walkthrough
- There are many ways to navigate the game, the walkthrough tries to show you the shortest way.
- The locations of all the Mysterious Morphing Objects and the VHS Tapes are shown in order of appearance in the walkthrough.
- You can also go to the end of the walkthrough to view a complete list of the locations of the VHS Tapes and the Mysterious Morphing Objects.
Chapter 1: Into the Manager’s Office!
Abandoned Car
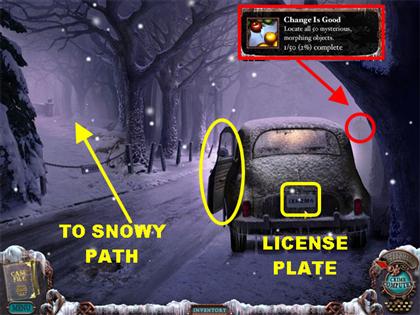
- Walk towards the abandoned car by clicking in the center of the scene.
- Make note of the license plate number in the back of the car: “JXH2M6.”
- Click on the morphing yellow sign above the right side of the car. This is the 1st of 50 Mysterious Morphing Objects in the game. Find all 50 to earn a trophy!
- Click on the car’s open door to enter the vehicle.
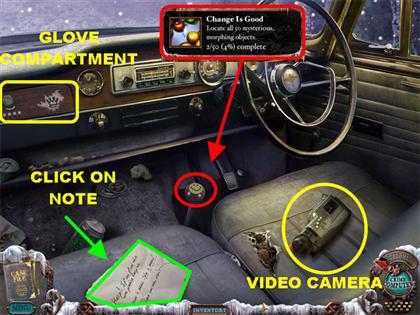
- Click on the stick shift of the car to obtain the Mysterious Morphing Object #2.
- Click on the note on the left side of the scene for a closer view. A new entry has been added to your Journal in the lower left side of the scene.
- Pick up the Video Camera on the seat and watch the tape.

- Click on the Glove Compartment for a closer view.
- Your goal is to enter the right combination so you can unlock it.
- The code to unlock the glove compartment is the number found on the license plate in the back of the car.
- Click on the dials to change the numbers.
- The Solution from left to right is: “J-X-H-2.” The “M6” is carved onto the wood grain.
- Click on the silver button to open the glove compartment.
- Pick up the Car Keys inside the glove compartment.
- Place your cursor downwards to exit the car.
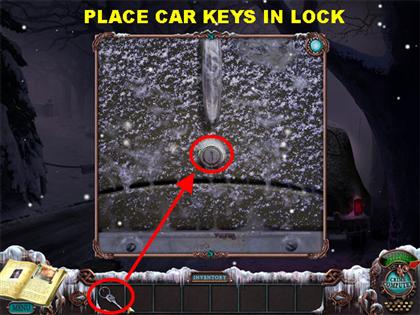
- Click on the trunk of the car for a closer view.
- Place the Car Keys in the lock to trigger a Hidden Object Scene.
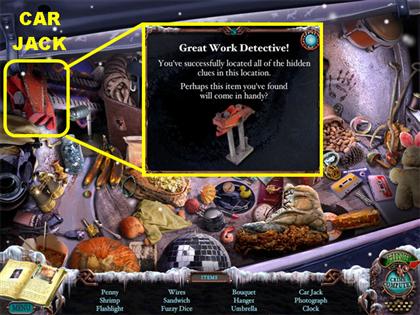
- Click on the sparkly area on the trunk of the car to access the Hidden Object scene.
- Pick up the Car Jack in the upper left side of the scene.
Snowy Path

- It’s time to leave this scene; step over the chains on the left.
- Notice the pile of wood in the snow; you will come back to this later.
- Click forward to see a closer view of the Dire Grove Hotel.
Dire Grove View
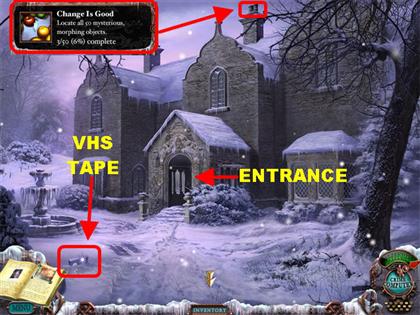
- If you click on the squirrel in the lower right, it will look at you and then run away.
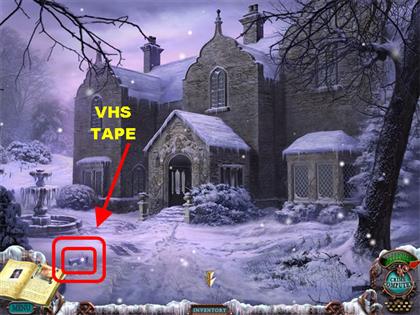
- Pick up VHS Tape #1 on the left side of the snow.
- Click on the Mysterious Morphing Object #3 in the top center of the scene.
- Click on the entrance of the Hotel for a closer view.
Hotel Entrance
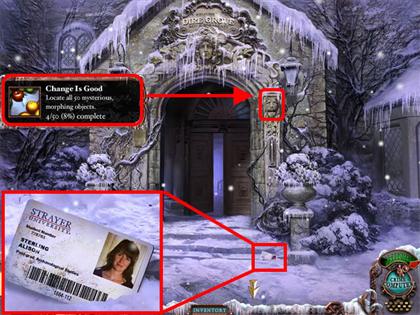
- Click on the ID card in the lower right side of the scene. The badge belongs to Alison Sterling.
- Click on the morphing carving on the upper right side of the entrance to obtain the Mysterious Morphing Object #4.
- Enter the hotel.
Front Desk
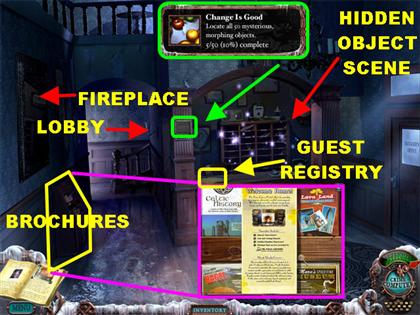
- Click on the morphing sign on the front desk to obtain the Mysterious Morphing Object #5.
- Click on the brochures on the left side of the scene for a closer view.
- Click on the Dire Grove Hotel Brochure in the upper center.
- Click on the brochure one more time to open it.
- Click on the Guest Registry on the left side of the desk for a closer view.
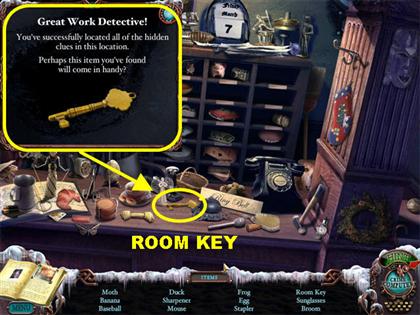
- Click on the sparkly spot on the front desk to trigger a Hidden Object scene.
- Pick up the Hotel Room Key in the center of the desk.
- From the lobby you can go left or right. Click on the left side to enter the fireplace scene.
Fireplace
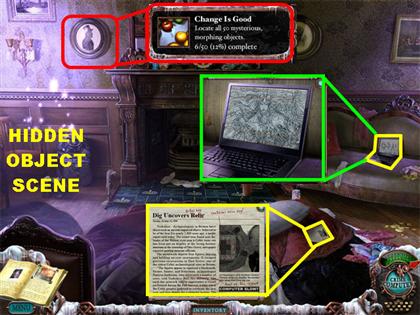
- Click on the painting in the upper left to obtain the Mysterious Morphing Object #6.
- Click on the laptop on the couch on the right for a closer view.
- Click on the newspaper clipping in the lower right side of the scene. A new entry will be added to your Journal.
- Click on the Hidden Object scene to the left of the fireplace.
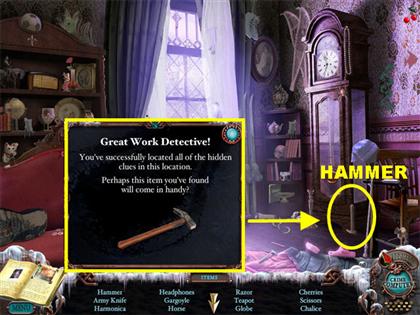
- Find the Hammer in the lower right side, next to the Grandfather clock.
- Let’s go to the lobby. Place your cursor on the right side of the scene to enter the lobby.
Hotel Lobby
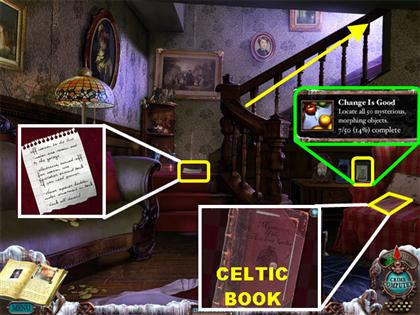
- Click on the morphing picture closest to the red chair to obtain the Mysterious Morphing Object #7.
- Click on the red book in the lower right side of the scene for a closer view.
- Click on the note above the 3rd step for a closer view.
- Click on the top of the steps to go upstairs.
Hotel Stairwell

- Click on the morphing painting on the right side of the scene to obtain the Mysterious Morphing Object #8.
- Click on the sparkling spot to trigger a Hidden Object scene.
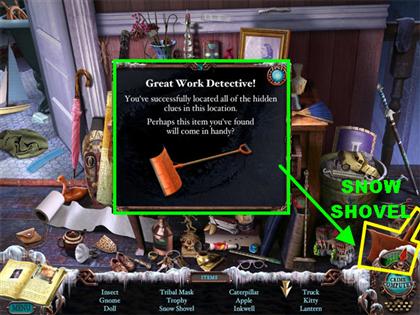
- Find the Snow Shovel in the lower right corner.
- After you complete the Hidden Object scene, go towards your right.
Hotel Hallway
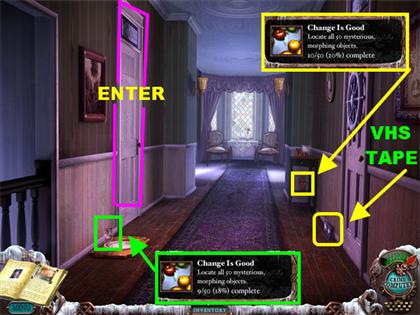
- Pick up the morphing glass on the tray on the left to obtain the Mysterious Morphing Object #9.
- Pick up the morphing vase on the right side of the scene to obtain the Mysterious Morphing Object #10.
- Pick up VHS tape #2 in front of the right door.
- Click on the left door.
First Bedroom
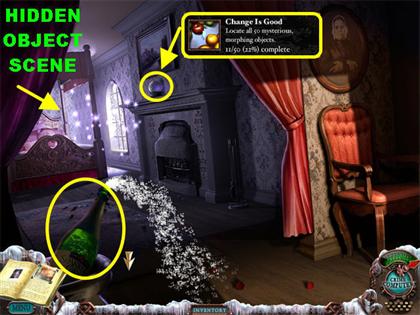
- Click on the Sparkling Cider bottle to watch it pop.
- Click on the snowglobe to obtain the Mysterious Morphing Object #11.
- Click on the Hidden Object scene.
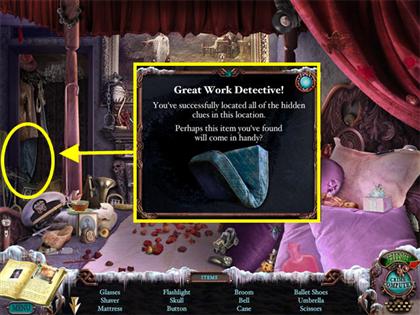
- Pick up the Mattress inside the closet, on the left side of the room.
- Leave the bedroom.
Hotel Hallway
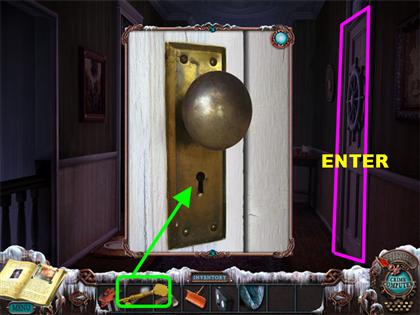
- Click on the door on the RIGHT for a closer look. You’ve just entered the nautical bedroom.
- Use the Hotel Room Key on the lock to enter the scene.
Nautical Bedroom
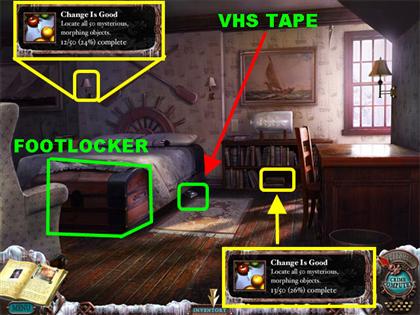
- Click on the morphing sconce in the upper left side of the wall to obtain the Mysterious Morphing Object #12.
- Click on the morphing books in the lower right side of the small bookshelf to obtain the Mysterious Morphing Object #13.
- Pick up VHS Tape #3 under the bed.
- Click on the footlocker in front of the bed to trigger a puzzle.
Footlocker Puzzle
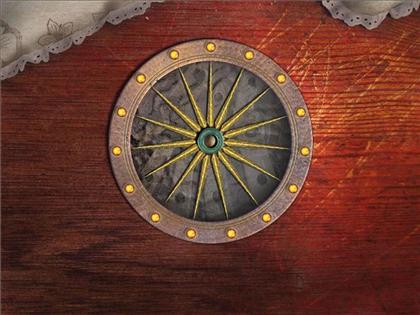
- Please watch the video for a step-by-step solution for this puzzle.
- Your goal is to place the clock hands in the middle of the clock until all the buttons turn yellow.
- Place the clock hands on the center of the puzzle.
- CLICK on the clock hands to rotate them. You cannot have any of the hands overlapping each other.
- You can rotate the hands either on the clock face or on outside of it. I would recommend rotating them in the clock face so you can use the yellow lights as a guide.
- Once the puzzle has been completed, you will receive the Generator Instructions in your journal.
- Leave the bedroom.
Hotel Hallway
- Click forward to go to the end of the hallway.
- Click on the morphing picture in the upper left side to obtain the Mysterious Morphing Object #14.
- Click on the morphing vase by the window to obtain the Mysterious Morphing Object #15.
- Click on the LEFT door to enter the library.
Library
- Click on the piece of paper on the mirror in the back wall for a closer view.
- Click on the morphing pillow on the couch on the right to obtain the Mysterious Changing Object #16.
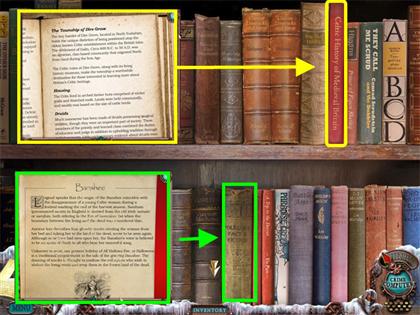
- Click on the books on the left for a closer view.
- Click on the book marked “Celtic History of Medieval Britain” for a closer view.
- Click on the book in the lower right marked “Folklore Fact & Fiction.” The book opens to a page titled “Banshee.”
- Exit the book scene.
- Go back to the front desk by clicking downwards 5 Times.
Front Desk
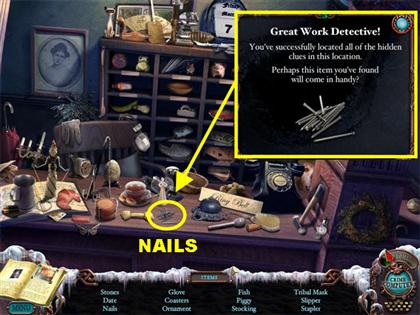
- Click on the Hidden Object scene by the front desk.
- Pick up the Nails on the desk.
- Go to the generator area by exiting the house, turning right, and then left by the birdbath.
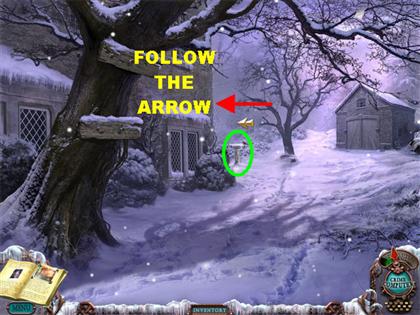
Generator
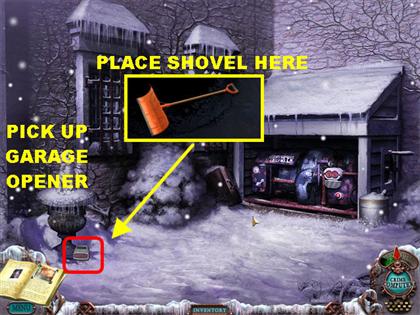
- Use the Shovel on the spot in front of the bunny statue, on the left, 3 times.
- Pick up the Garage Door Opener in the scene add it to your inventory.
- Walk towards the garage by clicking downwards first, and then on the garage on the right.
Garage
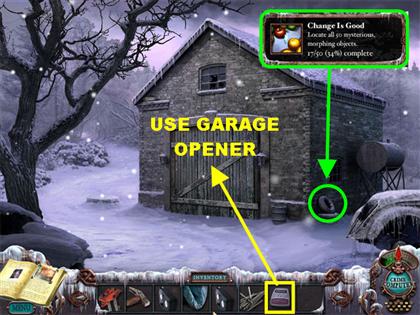
- Pick up the morphing tires on the right side of the garage to obtain the Mysterious Morphing Object #17.
- Place the Garage Door Opener on the garage door.
- Enter the Garage.
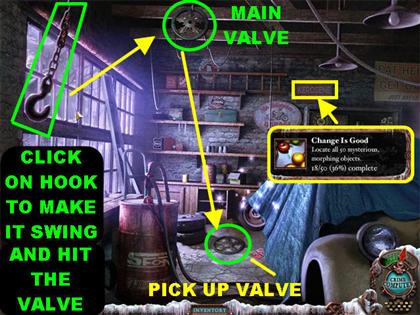
- Pick up the morphing sign in the upper right side of the scene to obtain the Mysterious Morphing Object #18. You have to click on the words KEROSENE or GASOLINE, on the sign, to obtain the item.
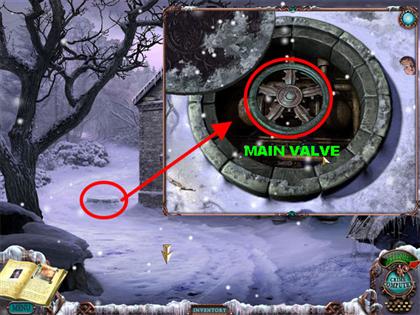
- There is a hanging hook in the upper left side of the scene. You must knock it down.
- Click on the hanging hook several times to start it swinging. Clicking on it a couple of times will make the Main Valve fall to the ground.
- Pick up the Main Valve to add it to your inventory.
- Click on the Hidden Object scene.
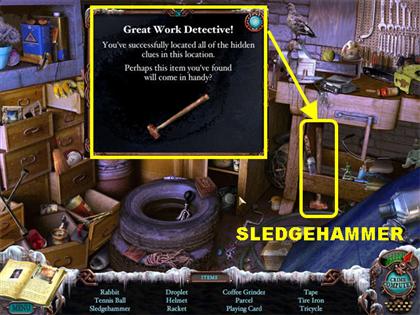
- Pick up the Sledgehammer on the right side of the scene.
- Return to the Stairwell, in the hotel, and turn left to go into the bathroom.
Hotel Bathroom

- Pick up the morphing bar of soap in the lower right, next to the bathtub, to obtain the Mysterious Morphing Object #19.
- Use the Sledgehammer 3 times on the damaged floor to create a hole.
- Leave the bathroom and return to the garage.
Garage
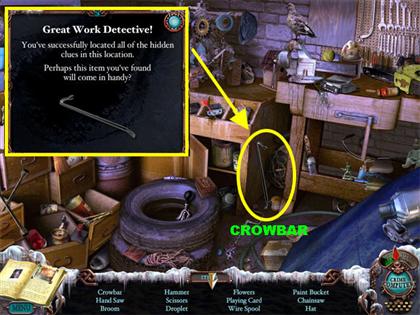
- Click on the Hidden Object scene.
- Pick up the Crowbar in the lower right.
- Leave the garage and go outside.
- Click on the manhole cover on the left for a closer view.
- Place the Crowbar on the manhole cover 3 times to remove it.
- Place the Valve Handle on the main valve.
- Click on the Valve Handle to shut off the water.
- Go back to the hotel bathroom at the top of the stairs and make a left.
Hotel Bathroom
- Place the Mattress in the hole in the bathroom floor until the mattress falls through it.
- Click on the hole to reach the manager’s office.
Chapter 2: Find the First Student!
Manager’s Office
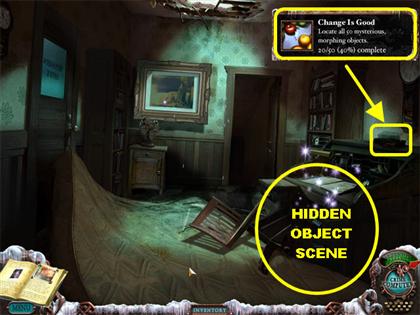
- Click on the morphing books on top of the desk to obtain the Mysterious Changing Object #20.
- Click on the desk to trigger a Hidden Object scene.
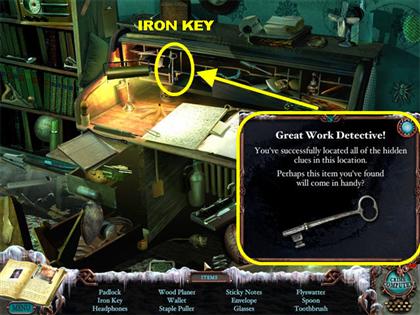
- Pick up the Iron Key on the left side of the desk.
- Exit the manager’s office by clicking on the door on the left.
- Go to the boathouse by turning left at the garage and following the snowy path.
Snowy Path
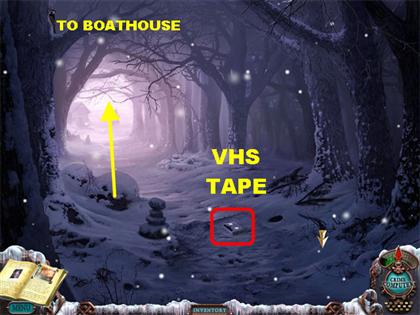
- Pick up VHS Tape #4 in the lower center.
- Proceed forward to reach the boathouse.
Boathouse
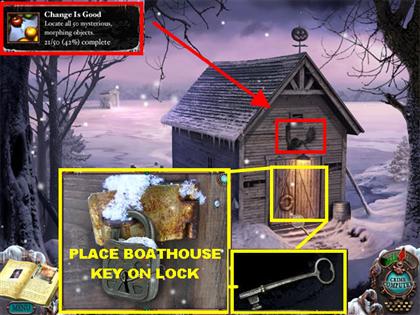
- Pick up the morphing antlers above the boathouse door to obtain the Mysterious Morphing Object #21.
- Click on the boathouse door for a closer view.
- Place the Iron Key (Boathouse Key) on the padlock.
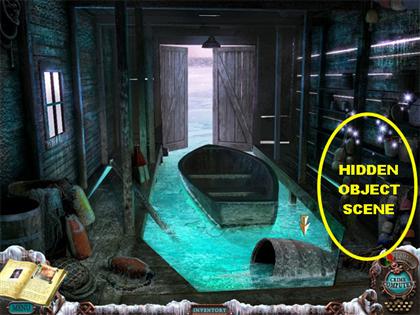
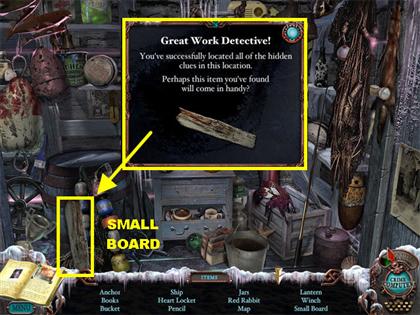
- Click on the Hidden Object scene.
- Pick up the Small Board on the lower left side of the scene.
- Go to the treehouse by placing your cursor downwards 4 times.
Treehouse
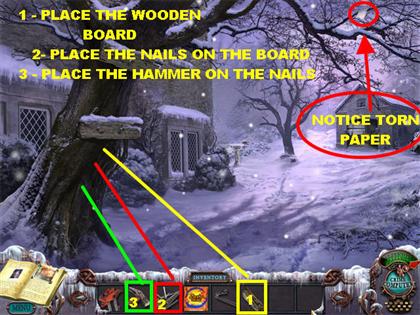
- Notice the Torn Paper caught on the branch in the upper right side; you need to get it, but you will have to come back to it later.
- Place the Wooden Board on the tree.
- Place the Nails on the Wooden Board.
- Place the Hammer on the Nails.
- Go back to the First Bedroom in the upstairs hallway of the hotel.
First Bedroom
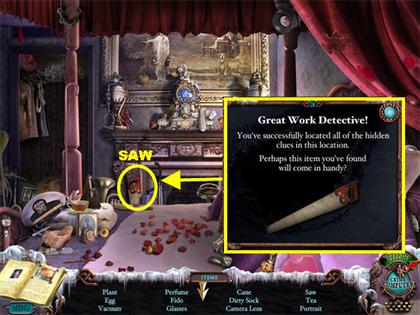
- Click on the Hidden Object scene.
- Pick up the Saw on the left side of the fireplace.
- Go back to the Treehouse by turning right outside the hotel.
Treehouse
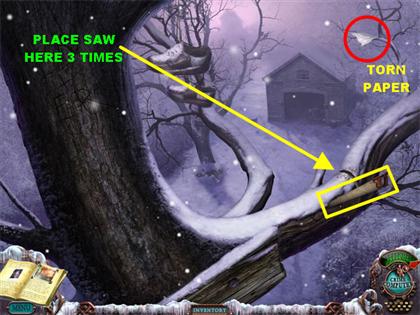
- Place your cursor on the wooden boards to climb the tree.
- Use the Saw on the branch on the right 3 times to cut it off.
- Go back down the tree.
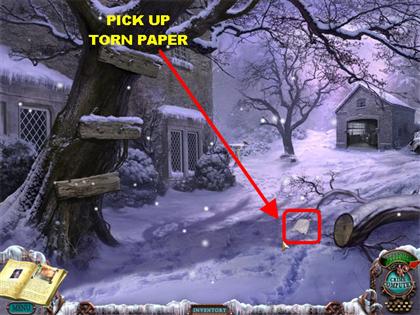
- Pick up the Torn Paper on the right side of the snow.
- Go back to the Library in the hotel by clicking on the left door at the end of the Hotel Hallway.
Library

- Click on the mirror on the back wall for a closer view.
- Place the Torn Paper next to the piece of paper on the mirror to reveal the code.
- The code is a random number; it will be added to your Journal.
- Go back to the front desk area by clicking downwards 5 times. Click on the door on the right to enter the manager’s office.
Manager’s Office
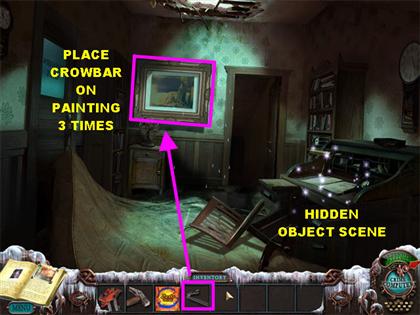
- Place the Crowbar on the painting on the back wall 3 times to reveal a safe.
- Click on the safe for a closer view.
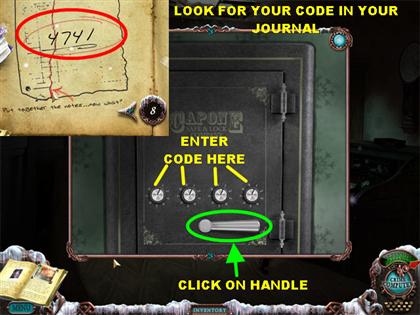
- Open your Journal and look at the code on the page 8.
- Enter the code into the safe that appears in your Journal.
- Click on the Handle after all the numbers have been placed correctly.
- Grab the Small Metal Key inside the safe.
- Click on the Hidden Object scene.
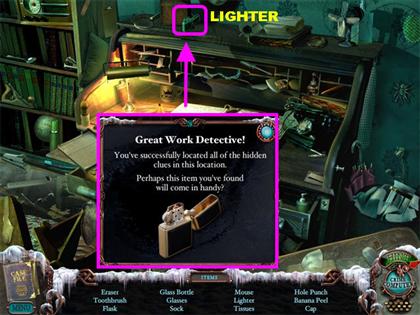
- Pick up the Lighter on the upper left side of the desk.
- Go back to the garage by turning right outside the hotel.
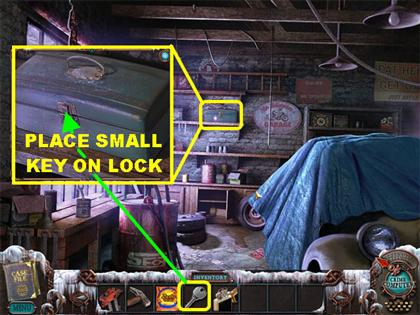
- Click on the green metal box on top of the shelf for a closer view.
- Place the Small Metal Key in the lock.
- Pick up the Wire Clippers inside the metal box.
- Go back to the Nautical Room by clicking on the right door in the upstairs hallway.
Nautical Bedroom
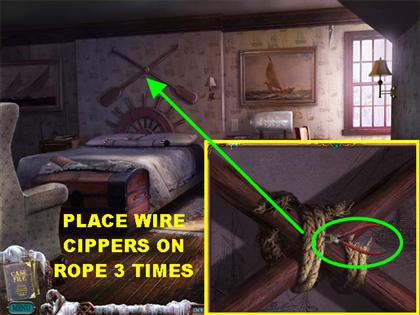
- Click on the Oars on the wall for a closer view.
- Place the Wire Clippers on the rope 3 times to cut the rope and obtain the Oars.
- Go back to the boathouse by going right outside the hotel, and then turning left by the garage.
Boathouse
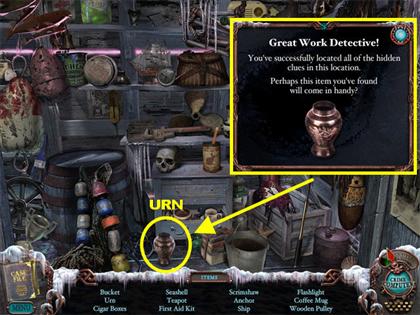
- Click on the Hidden Object scene.
- Pick up the Urn in the lower center of the scene.
- Place the Oars on the boat.
- Click on the boat to board it and cross the lake.
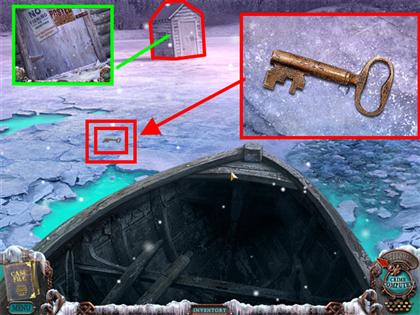
- Click on the Key on the left side of the lake for a closer view.
- Pick up the Hotel Room Key.
- Click on the Fishing Shanty to get closer.
Fishing Shanty
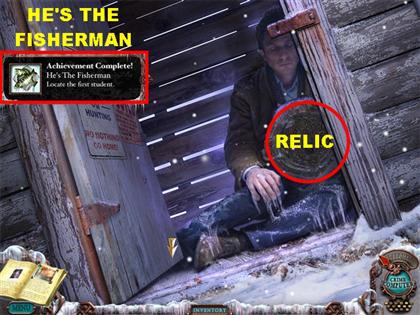
- Click on the door to open it.
- You’ve just found the 1st Frozen Student!
- Click on the relic held by the frozen student to trigger a puzzle.
Relic Puzzle
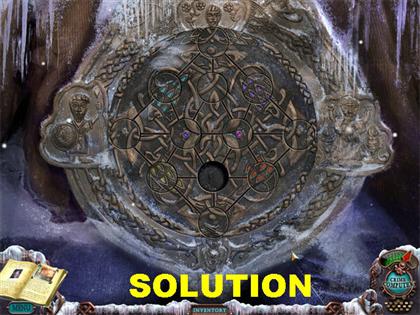
- Please watch the video for a step-by-step solution for this puzzle.
- Your goal in this puzzle is to move each of the circles into the right slots.
- Click on a circle that has an empty spot next to it and the circle will move into that empty spot.
- Keep in mind that the circles can only travel through the carved tracks on the puzzle.
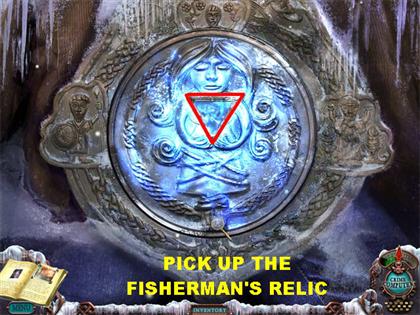
- Take the Fisherman’s Relic once the puzzle has been solved.
- Return to the back of the Hotel Hallway in the top floor of the hotel. You can click your cursor downwards several times to reach the hotel.
Chapter 3: Find the Second Student!
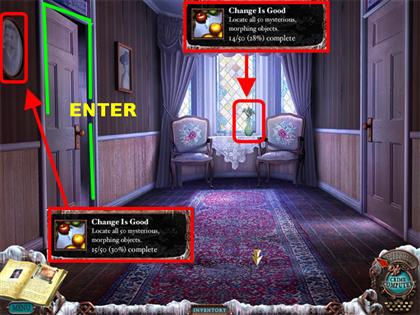
Floral Bedroom
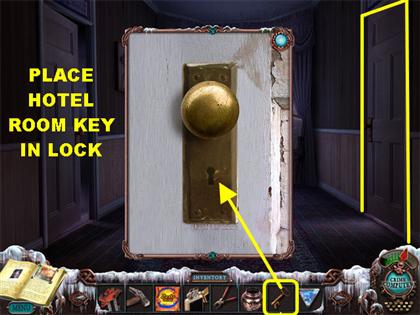
- Click on the door on the right.
- Place the Hotel Room Key in the lock.
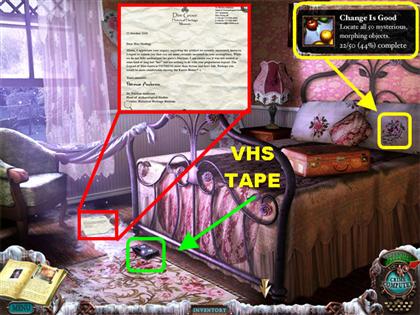
- Pick up VHS Tape #5 on the floor.
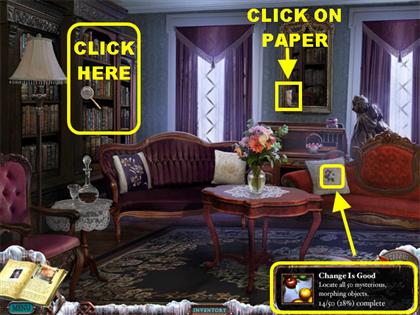
- Click on the morphing pillow on the right side of the bed to obtain the Mysterious Morphing Object #22.
- Click on the paper on the lower left side of the room for a closer view.
- Click on the window to go outside the room.
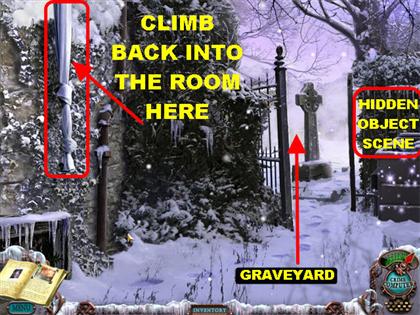
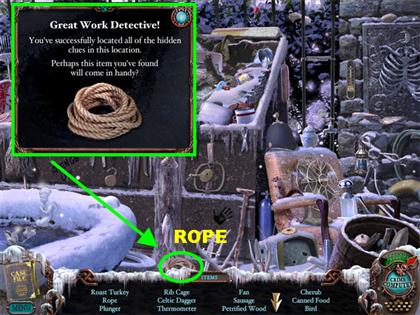
- Click on the dumpster to trigger a Hidden Object scene.
- Pick up the Rope in the lower center of the scene add it to your inventory.
- Click on the tied sheet in the upper left to go back inside the room.
- Go to the covered bridge by clicking left outside the hotel.
Covered Bridge
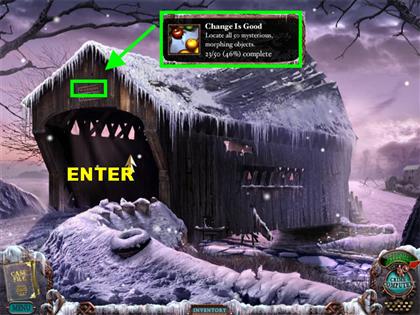
- Pick up the morphing sign above the covered bridge to obtain the Mysterious Object # 23.
- Enter the covered bridge.
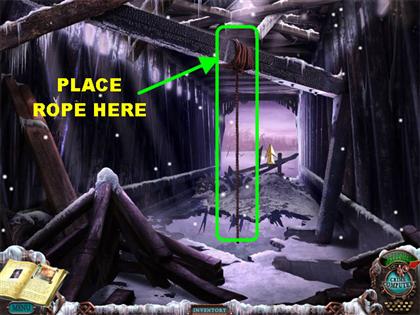
- Place the Rope on the beam in the ceiling.
- Click on the back of the scene to get to the area with live wires.
Live Wires Scene
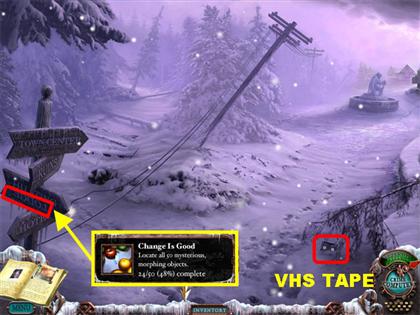
- Pick up the VHS Tape #6 in the lower right side of the snow.
- Click on the morphing sign on the left side of the scene to pick up the Mysterious Morphing Object# 24. You have to click on the word “LODGE” to obtain the item.
- Click in the back of the scene.
Grocery Store Path
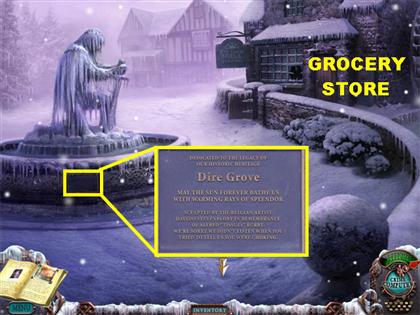
- Click on the sign on the base of the statue for a closer view.
- Click on the grocery store for a closer view.
Grocery Store
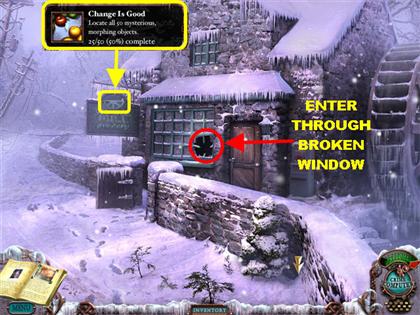
- Click on the morphing sign in the upper left side of the grocery store to pick up the Mysterious Morphing Object #25.
- Click on the broken window to enter the grocery store.
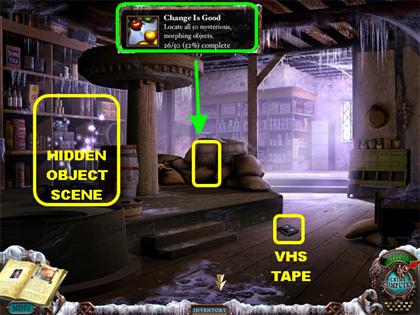
- Pick up VHS Tape #8 on the floor.
- Click on the morphing sack on the left to obtain the Mysterious Morphing Object #26.
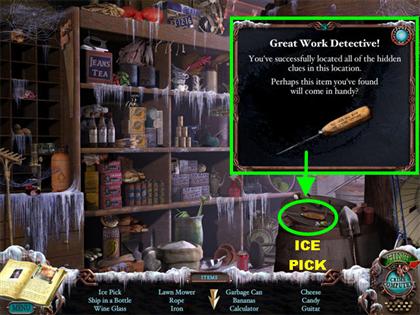
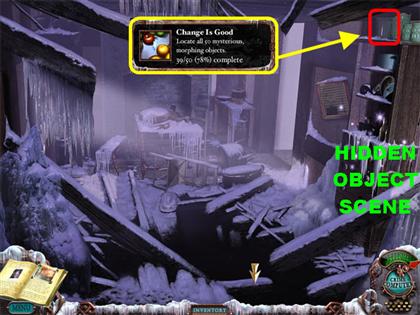
- Click on the Hidden Object Scene by the shelves on the left.
- Pick up the Ice Pick in the lower right.
- Click on the back room of the grocery store.
Back Room
- Click on the file cabinet on the left for a closer look at the diary.
- Click on the diary to open it.
- Click on the cabinet on the right, below the microwave to open it.
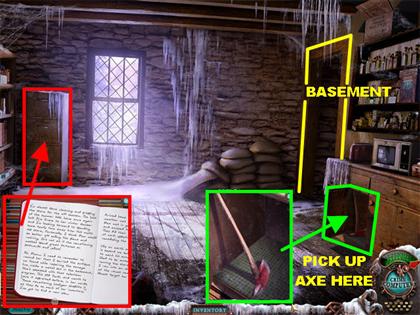
- Pick up the Axe inside the cabinet.
- Click on the entryway on the right to access the basement of the grocery store.
Basement
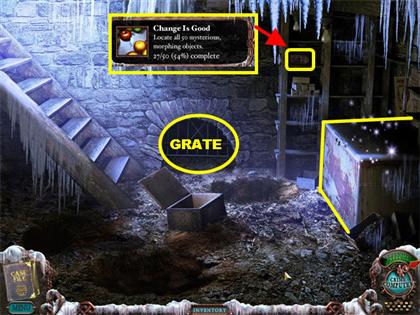
- Click on the morphing piece of wood on the shelf on the right to obtain the Mysterious Morphing Object #27.
- Click on the loose grate on the back wall for a closer view.
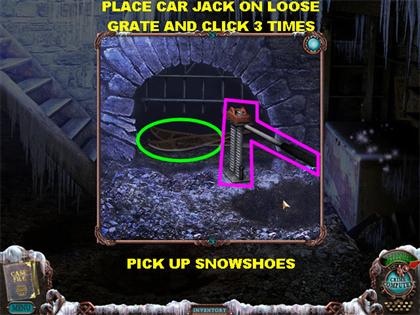
- Place the Car Jack in front of the loose grate.
- Click on the Car Jack 3 times to lift the grate.
- Pick up the Snowshoes to add them to your inventory.
- Click on the freezer to trigger a Hidden Object scene.
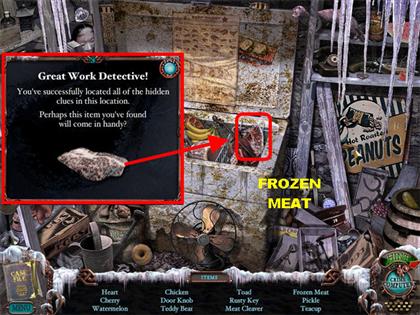
- Pick up the Frozen Meat in the upper right side of the freezer.
- Return to the grocery Back Room store by clicking on the steps.
Back Room
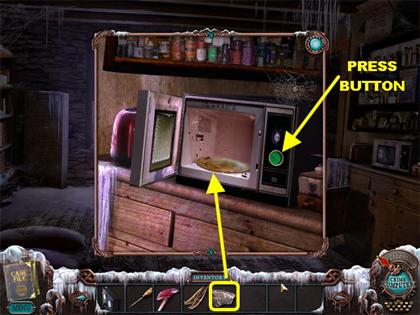
- Click on the Microwave for a closer view.
- Click on the microwave again to open the door.
- Place the Frozen Meat inside the microwave.
- Close the microwave door.
- Push the green button on the microwave to turn it on.
- Let the microwave run its course and click on the door to open it.
- Pick up the Thawed Meat from the microwave.
- Return to the back of the Hotel Hallway by clicking downwards 8 times, to get back to the front of the hotel, and then go upstairs.
- Click on the door on the right. Go through the window to access the dumpster.
Dumpster Scene
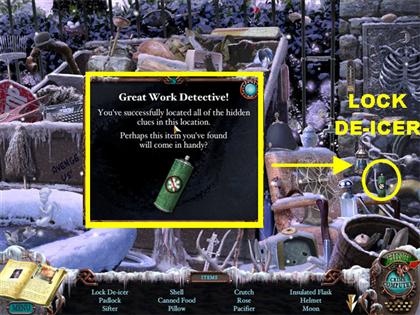
- Click on the dumpster to trigger a Hidden Object scene.
- Pick up the Lock De-icer in the lower right side.
- Go to the graveyard by clicking in the back of the scene.
Graveyard
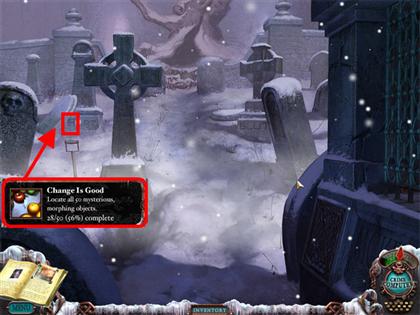
- Click on the letters “F” or “H” on the morphing tombstone sign, on the left side of the scene, to obtain the Mysterious Morphing Object #28.
- Click in the back of the graveyard to access the Wolf.
Wolf Tree
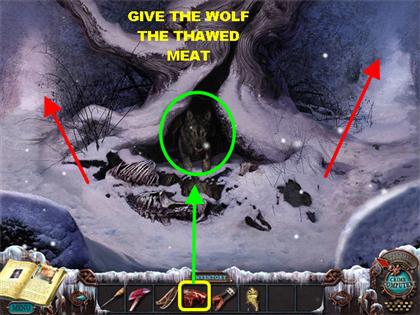
- If you try to click on the left or right side of the scene, the wolf will appear, not letting you pass.
- Give the Thawed Meat to the wolf. It will throw the bone out after it has finished eating it.
- You now have access to the left and right paths.
- Go to the right side of the tree.
Hunting Lodge
- Pick up VHS Tape #9 in the lower right corner of the lodge.
- Enter the hunting lodge.
- Click on the morphing animal head in the upper center of the scene to obtain the Mysterious Morphing Object #29.
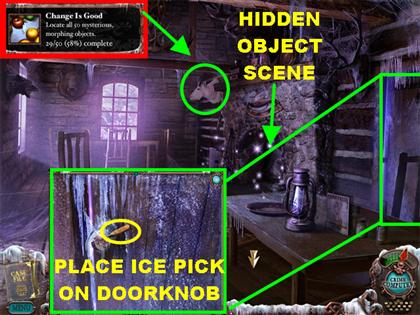
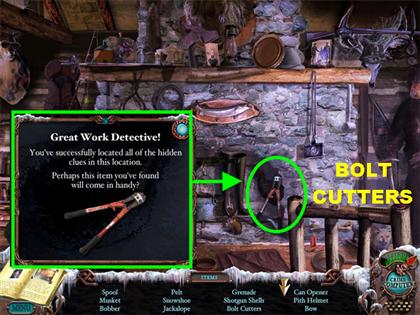
- Click on the Hidden Object scene.
- Pick up the Bolt Cutters in the lower right side.
- Click on the frozen door on the right for a closer view.
- Use the Ice Pick on the doorknob 3 times.
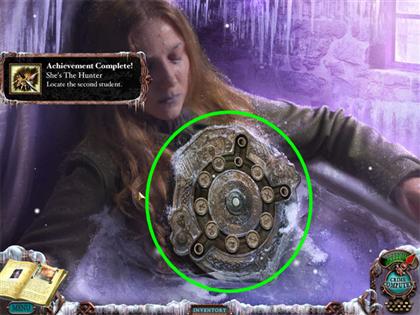
- Click on the door to discover the 2nd Frozen Student!
- Click on the frozen student for a closer view.
- Click on the Relic, on the student, to trigger a puzzle.
Relic Puzzle 2
- Please watch the video for a step-by-step solution for this puzzle.
- Your goal is to line up each symbol, on the outer rings of the puzzle, with the matching symbols, in the middle of the puzzle.
- Click on a symbol that has an empty spot next to it and the symbol will move to the empty spot.
- Use the holding spots on the side of the puzzle to move some symbols out of your way, so you can move the symbols into the right slots.
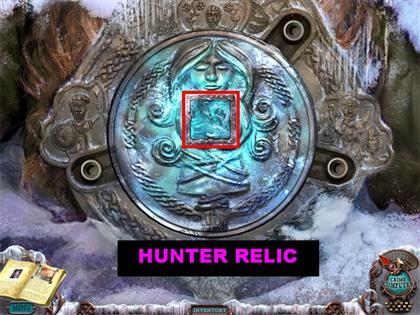
- Pick up the Hunter Relic from the student to add it to your inventory.
- Go to the frozen river by turning left by the wolf’s tree.
Chapter 4: Find the Third Student!
Frozen River
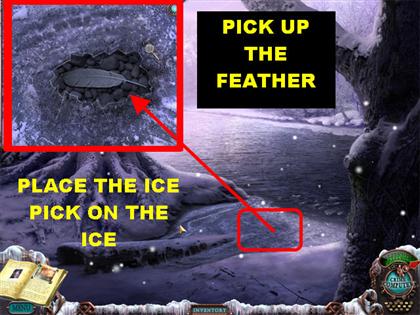
- Click on the frozen ice in the lower right side for a closer view.
- Use the Ice Pick 4 times to break the ice.
- Pick up the Feather under the ice.
- You need to go back by the snowy path, close to the car. Go through the window in the hotel; leave the hotel and keep clicking downwards until you hit the snowy path.
Snowy Path
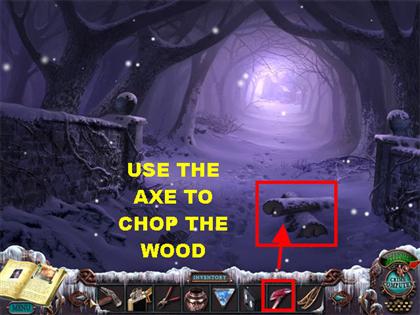
- Place the Axe on the wood a total of 3 times to chop it.
- Pick up the Firewood to add it to your inventory.
- Go back to the fireplace scene in the hotel by going left past the front desk.
Fireplace Scene
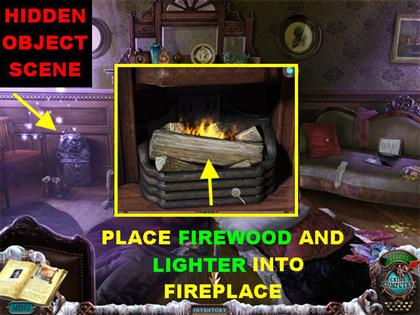
- Click on the fireplace for a closer view.
- Place the Firewood in the fireplace.
- Place the Lighter on the Firewood. Close the pop-up window.
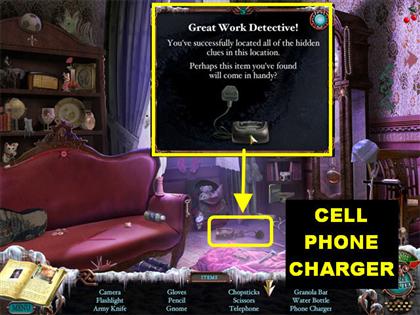
- Click on the Hidden Object scene on the left.
- Pick up the Cell Phone Charger in the middle of the floor.
- Go to the Museum by going left outside the hotel; go through the covered bridge, click on the upper right and then go left.
Museum
- Click on the chimney on the roof to obtain the Mysterious Morphing Object #30.
- Click on the morphing symbol on the sign outside the museum to obtain the Mysterious Morphing Object #31.
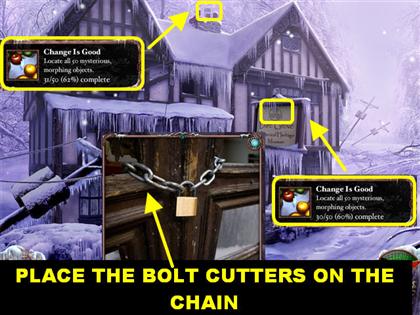
- Click on the museum door for a closer look.
- Use the Bolt Cutters on the chain of the door.
- Go inside the museum.
- Click on the VHS Tape #10 in the lower right.
- Click on the morphing bust on the upper left side of the scene to obtain the Mysterious Morphing Object #32.
- Click on the left side of the wall for a closer view.
- Click on the fire extinguisher for a closer view.
- Use the Hammer to break the glass around the Fire Extinguisher.
- Pick up the Fire Extinguisher.
- Click on the two red buttons at the bottom of the scene and some images will appear on both sides of the glass.
- If you click on the left button several times, the animal’s head will explode.
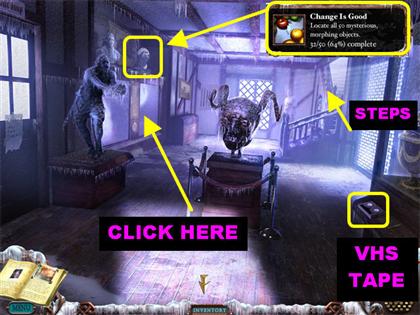
Downstairs Hallway
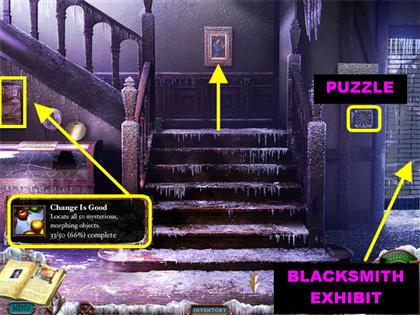
- Click on the steps In the back of the museum.
- Click on the morphing picture on the left side of the scene to obtain the Mysterious Morphing Object #33.
- Click on the puzzle to the right of the stairs, next to the gate.
Alphabet Puzzle
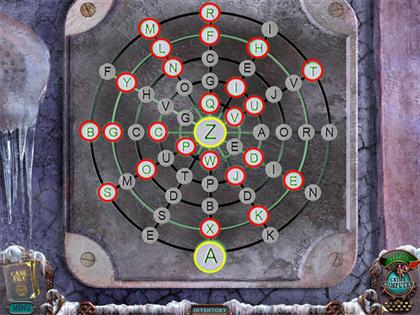
- Please watch the video for a step-by-step solution for this puzzle.
- Your goal is to click on each letter in alphabetical order.
- Each letter must be connected to the next letter by the glowing energy bars. If a letter is not connected by one of the energy bars, you will not be able to use it.
- If you want to reset the puzzle, you can exit it and come back later, or you can click on an incorrect choice.
- The gate will rise after the puzzle has been solved.
- Enter the Blacksmith exhibit on the right once the gate has been raised.
Blacksmith Exhibit

- Click on the VHS Tape #11 on the right side of the scene.
- Click on the morphing ball on top of the ropes in the lower right corner to obtain the Mysterious Morphing Object #34.
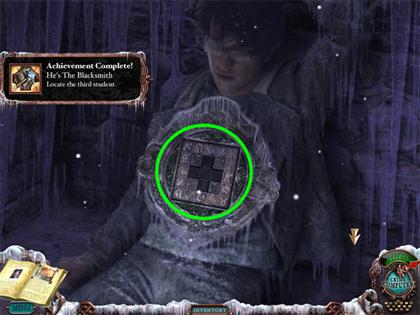
- Click on the back wall to find the 3rd Frozen Student!
- Click on the relic the student is holding to trigger a puzzle.
Relic Puzzle 3
- Please watch the video for a step-by-step solution for this puzzle.
- Your goal is to slide each shape into the correct position. Hold down the tile and drag it to an empty spot.
- As you move the pieces around, you will see some symbols below the tiles; you have to place the matching tiles above them.
- When a shape is in the correct location, it will glow yellow.
- Start placing the pieces in the upper row first and work your way down.

- Click on the Blacksmith Relic after the puzzle has been solved to add it to your inventory.
- Leave the exhibit and go up the steps.
Chapter 5: Find the Fourth Student!
Upstairs Hallway
- Click on the morphing footprint on the lower left side of the scene to obtain the Mysterious Morphing Object #35.
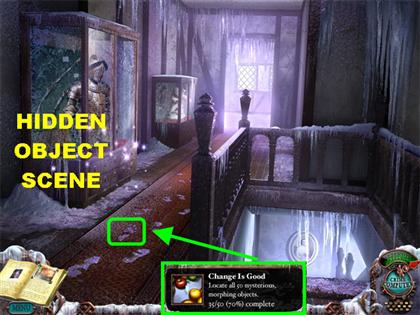
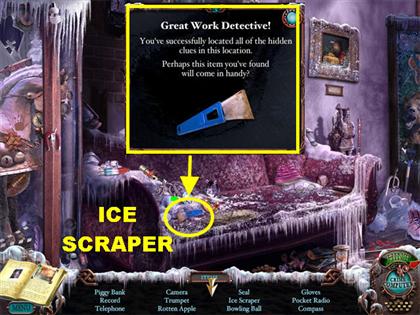
- Click on the Hidden Object scene.
- Pick up the Ice Scraper on the left side of the couch.
- Go to the office by clicking on the entryway in the back of the scene.
Museum Office
- Click on the morphing lamp on the right side of the desk to obtain the Mysterious Morphing Object #36.
- Click on the desk for a closer view of a letter. The letter will be added to your Journal.
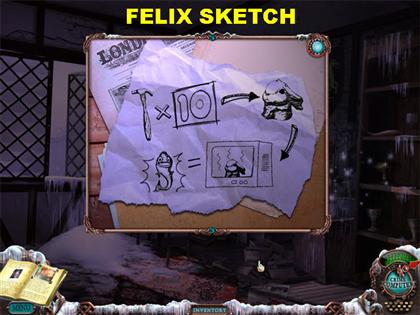
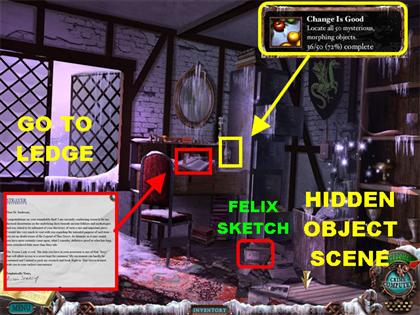
- Click on the paper on the lower right side of the scene for a closer view. It is a sketch of a hammer, a bunny head, Felix the Fish, and the microwave. This is an important clue in the game!
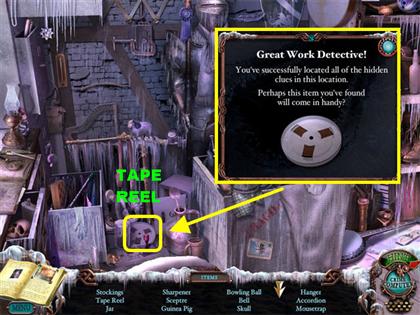
- Click on the Hidden Object scene.
- Pick up the Tape Reel in the lower left side of the scene.
- Go out the window to access the ledge.
Ledge
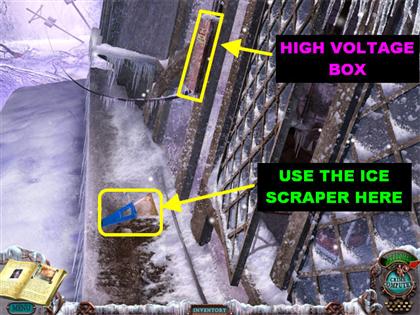
- Use the Ice Scraper on the ledge 3 times.
- Click on the High Voltage Box in the upper center.
- Open the High Voltage Box by clicking on the Handle on the right.
High Voltage Puzzle
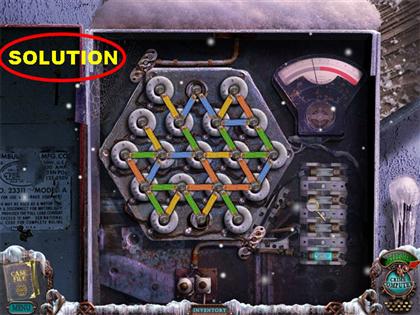
- Your goal is to connect the pieces so that all the touching pieces have the same matching color.
- Drag one piece over another to swap them around.
- Start with the pieces that cannot be moved. They are located in the upper and lower center of the puzzle.
- Go back to the Upstairs Hallway.
Upstairs Hallway
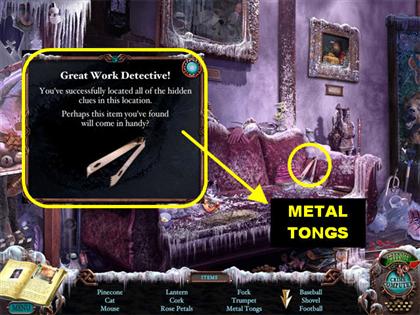
- Click on the Hidden Object scene by the glass case.
- Pick up the Metal Tongs on the right side of the couch.
- Go back downstairs and enter the gift shop through the door on the left.
Gift Shop
- Click on the red book in the lower right for a closer view.
- Click on the book again to open it.
- Click on the card in the upper right shelf to obtain the Mysterious Morphing Object #37.
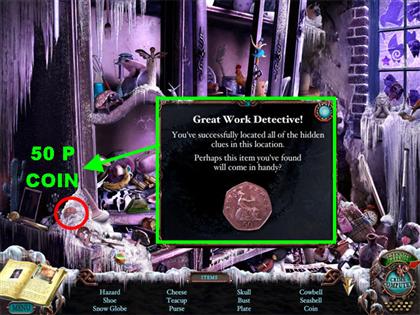
- Click on the Hidden Object scene.
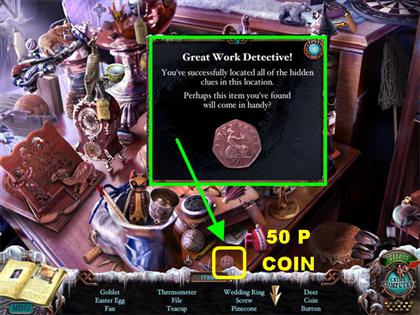
- Pick up the 50p Coin in the lower center.
- Go back to the grocery store by exiting the museum and turning right.
Grocery Store
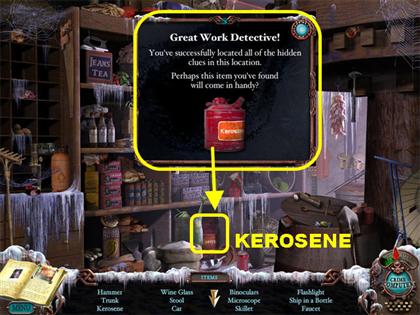
- Click on the Hidden Object scene.
- Pick up the Kerosene on the lower center.
- Go down to the basement of the grocery store.
Basement
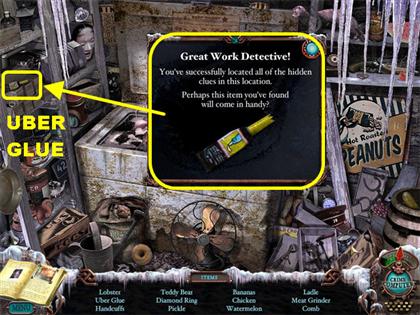
- Click on the Hidden Object scene.
- Pick up the Uber Glue in the upper left.
- Go back to the hotel fireplace area by clicking downwards several times; pass through the bridge and enter the hotel.
Fireplace
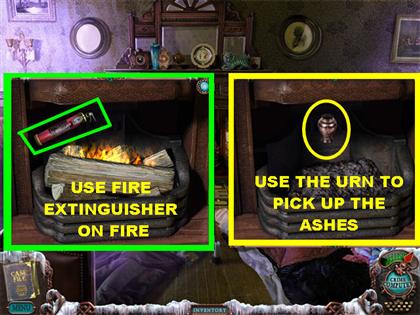
- Click on the fireplace for a closer view.
- Use the Fire Extinguisher on the fire.
- Place the Urn on the Ashes to collect the Ashes.
- Go back to the Graveyard by going through the window of Floral Bedroom at the end of the Hotel Hallway. Once you get to the dumpster, click forward to reach the graveyard.
Graveyard
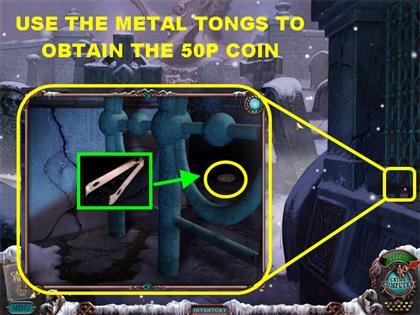
- Click on the grate in the lower right for a closer view.
- Use the Metal Tongs to retrieve the 50P Coin behind the grate.
- Click on the back of the scene. Walk down the path to the right of the wolf tree.
- Go into the Hunting Lodge.
Hunting Lodge
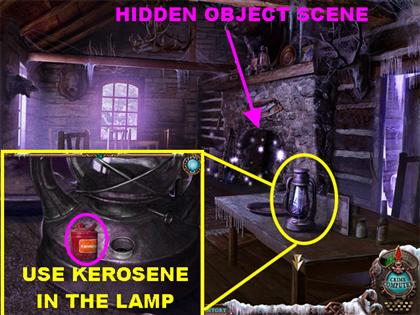
- Click on the Lantern for a closer view.
- Use the Kerosene to fill the Lantern.
- The Lantern goes into your inventory.
- Click on the Hidden Object scene.
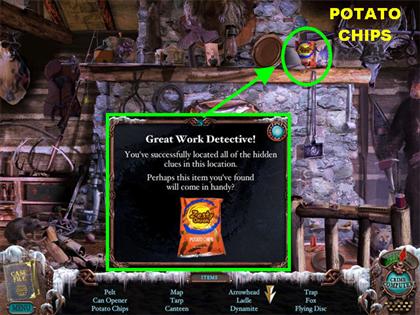
- Pick up the Potato Chips on the upper right side.
- Go to the Farmhouse by clicking downwards 4 times; go in through the window in the hotel. Leave the hotel and go to the left, through the covered bridge and take the left path.
Farmhouse Path
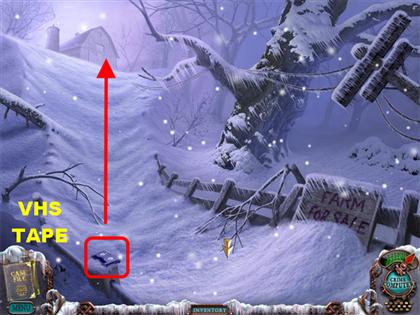
- Pick up the VHS Tape #12 on the lower left side.
- Click on the back of the path and go towards the right.
Farmhouse
- Click on the morphing chimney to obtain the Mysterious Morphing Object #38.
- Enter the Farmhouse.
- Click on the morphing container in the upper right side of the scene to obtain the Mysterious Morphing Object #39.
- Click on the Hidden Object scene.
- Pick up the Silver Key in the lower right corner.
- Go to the Barn by placing your cursor downwards 2 times.
Barn
- Click on the morphing chimney to obtain the Mysterious Morphing Object #40.
- Click on the morphing branch in the upper right to obtain the Mysterious Morphing Object #41.
- Click on the door for a closer view.
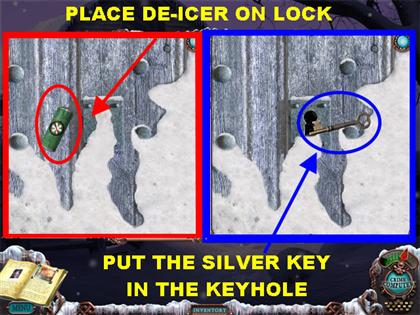
- Put the De-icer on the lock.
- Place the Silver Key in the keyhole.
- Enter the Barn.
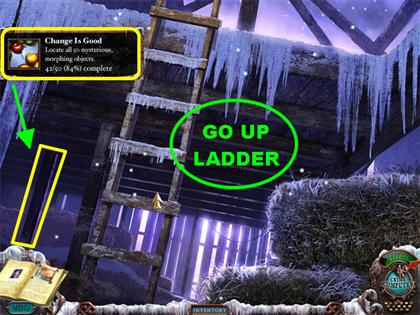
- Click on the morphing wooden beam in the lower left to obtain the Mysterious Morphing Object #42.
- Click on the ladder to go upstairs.
Barn Loft
- Click on the Hidden Object scene.
- Pick up the Fallen Beam in the lower right corner.
- Go back to the Farmhouse by going right, once you’re outside.
Farmhouse
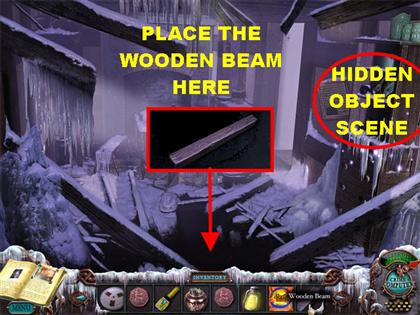
- Place the Wooden Beam in the hole in the floor.
- Click on the Hidden Object scene.
- Pick up the 50P Coin in the lower left side of the scene.
- Walk into the hallway on the right.
Farmhouse Hallway

- Pick up the VHS Tape #13 in the lower left side of the scene.
- Click on the morphing glass on the table to obtain the Mysterious Morphing Object #43.
- Click on the drawer on the right for a closer view.
- Click on the drawer again to open it.
- Pick up the Wrench inside the drawer.
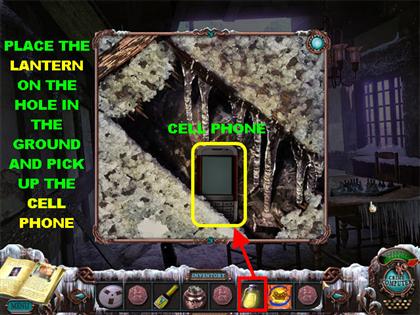
- Click on the hole in the ground.
- Place the Lantern in the hole in the floor.
- Retrieve the Cell Phone in the hole.
- Go back to the barn.
Barn
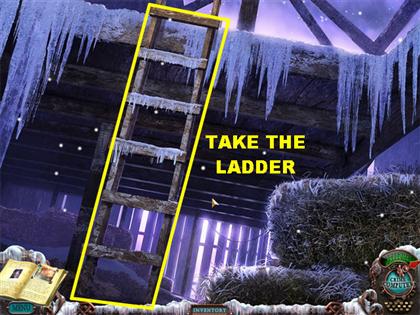
- Go inside the barn.
- Take the Ladder.
- Go back to the Farmhouse.
Farmhouse
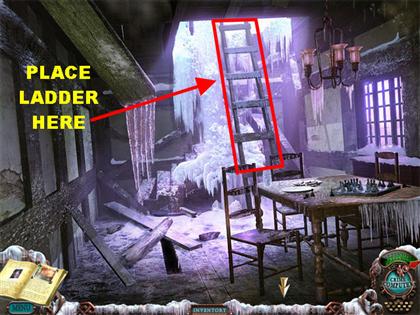
- Cross the wooden beam and go into back room.
- Use the Ladder at the base of the ice fall.
- Go up the ladder.
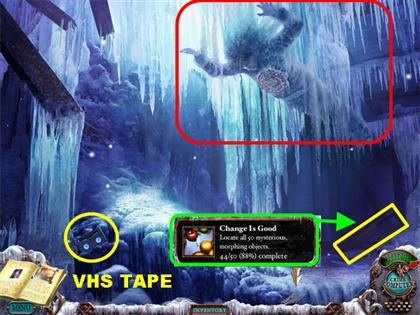

- You’ve discovered the 5th student!
- Pick up the VHS Tape #15 in the lower left corner.
- Click on the morphing stick in the lower right to obtain the Mysterious Morphing Object #44.
- Click on the frozen student in the upper right.
- Click on the relic to trigger a puzzle.
Relic Puzzle 4
- Please watch the video for a step-by-step solution for this puzzle.
- Your goal is to drag each shape until it is located in the right place.
- Each shape moves independently of the other.
- Use the images on the outside of the puzzle as a guide for placing your next item.
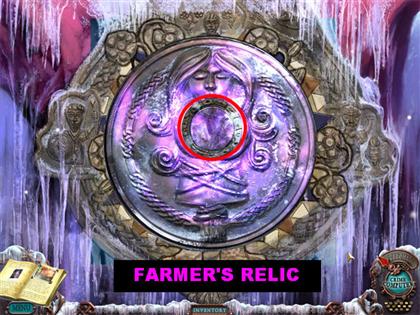
- Pick up the Farmer’s Relic
- Go back outside.
Chapter 6: Into the Portal!
Farmhouse
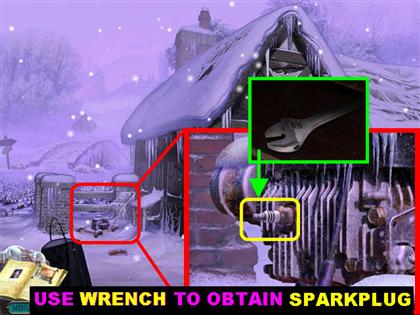
- Click on the lawnmower on the left side of the house for a closer view.
- Use the Wrench on the old lawnmower to obtain the Boldman Brand Sparkplug.
- Go to the grocery store by clicking downwards 3 times; go right and click on the grocery store for a closer view.
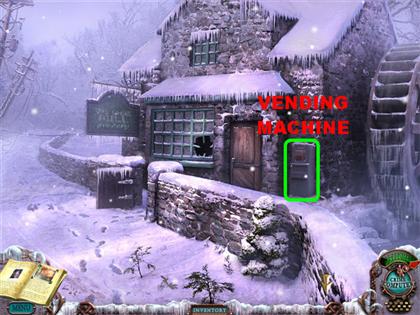
- Click on the vending machine outside the grocery store for a closer view.
Vending Machine
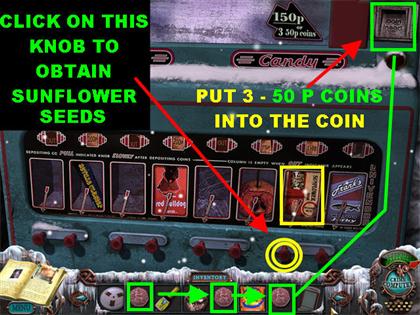
- Insert the three 50P Coins into the coin slot in the upper right side of the vending machine.
- Pick up the Sunflower Seeds by clicking on the red button below the sunflower seeds.
- Go back to the hotel by clicking downwards several times; make a right by the hotel and a left by the birdbath.
Generator
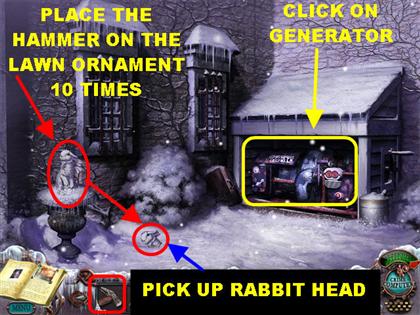
- Grab the Hammer and hit it against the bunny lawn ornament on the left 10 Times.
- The rabbit’s head will fall in the snow; pick it up.
- Click on the generator on the right for a closer view.
 http://www.youtube.com/watch?v=6suPg8XqZ0I
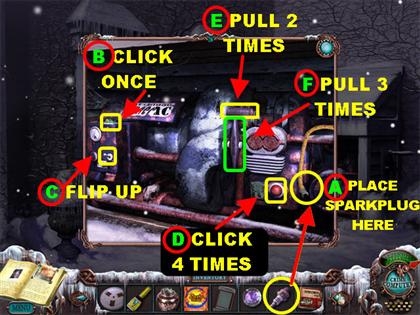
- Use the directions in the journal to start the generator. The directions are on page 5 of the Journal.
- Use the Sparkplug on the loose wire on the right side of the generator.
- Toggle power switch B to the position shown. Flip the green switch on the left 1 time.
- Set selector toggle C to the position shown. Flip the metal switch to the UP position.
- Press the primer button D 4 times. Click on the red button in the lower right 4 times.
- Pull the throttle lever E, 2 times; it is in the upper center of the generator.
- Pull the ignition cord F 3 times. It is in the center of the generator.
- Go upstairs to the Nautical Bedroom located through the right door of the hallway.
Nautical Bedroom
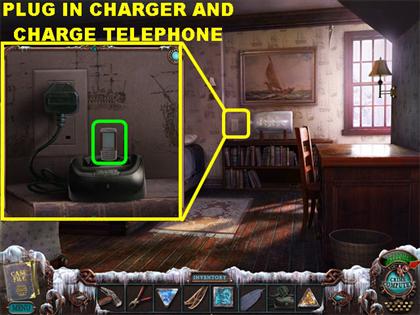
- Click on the outlet below the painting on the right for a closer view.
- Place the Cell Phone Charger in the outlet.
- Put the Cell Phone in the Cell Phone Charger to trigger a puzzle.
Cell Phone Puzzle
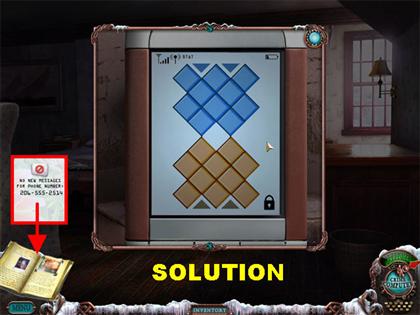
- Please watch the video for a step-by-step solution for this puzzle.
- Your goal is to switch the sides of the squares in the puzzle. The blue squares need to be on top, and the yellow squares need to be at the bottom. Pieces can jump each other.
- Once the puzzle has been solved, a phone number will appear on your screen.
- Close out the pop-up window and the phone number will be added to your Journal.
- Go into the Floral Bedroom on the right side of the stained Hotel Hallway.
Floral Bedroom
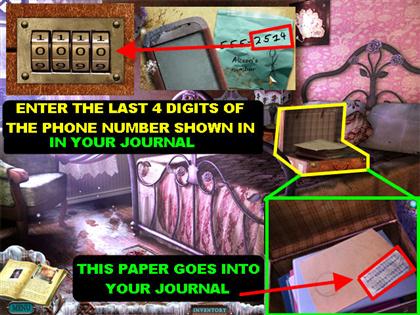
- Click on the suitcase for a closer view.
- Open your Journal to page 22 to see the number you’ve been given. The number is random; it will be different for everyone.
- Use the last 4 digits of the phone number on the locked suitcase. Click on each digit to change it.
- As soon as the number has been entered correctly, the suitcase will open.
- Click on the suitcase for a closer view.
- The paper with the numbers and the symbols will be added to your Journal.
- Go to the manager’s office first and then into the basement.
Basement
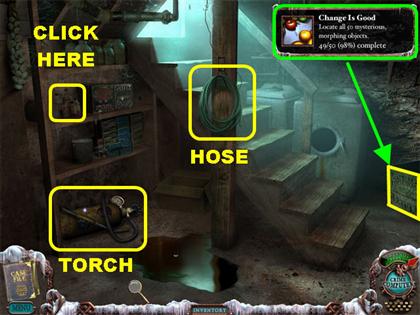
- Click on the morphing crate in the lower right to obtain the Mysterious Morphing Object #45.
- Click on the shelf on the left for a closer view.
- Pick up the Sea Salt from the shelf.
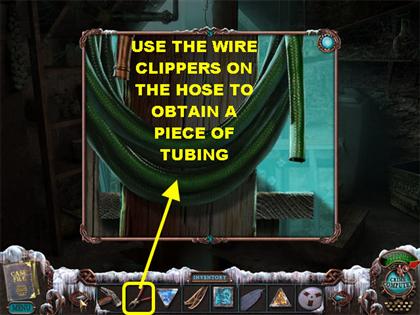
- Click on the hose on the pillar for a closer view.
- Use the Wire Clippers on the hose.
- The Rubber Tubing will be added to your inventory.
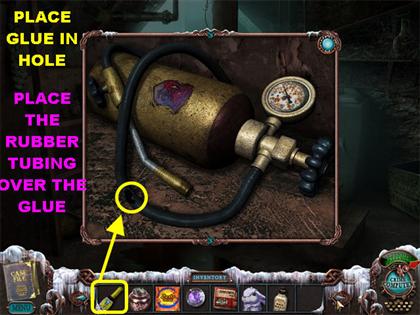
- Click on the torch in the lower left for a closer view.
- Place the Glue on the hole in the rubber tubing.
- Place the Rubber Tubing on the hole you just covered with glue.
- The Acetylene Torch will automatically go into your inventory.
- Go back to the wolf’s tree by going out the window of the Floral Bedroom at the end of the Hotel Hallway and go forward twice.
Wolf’s Tree
- Place the bag of Potato Chips in the tree hole and the wolf will come out to get it. This action triggers a Hidden Object scene.
- Click on the Hidden Object scene above the tree.
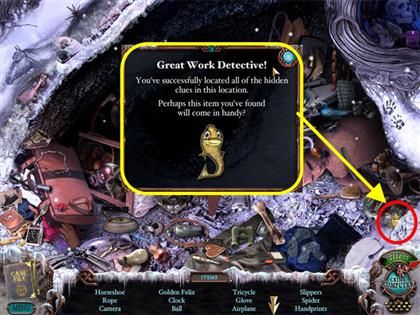
- Pick up the Golden Felix in the lower right corner.
- Go back to the grocery store. Go through the hotel window; go to the left of the hotel, through the bridge, and take the right path.
Grocery Store
- Enter the grocery store and go to the back room where the microwave is located.
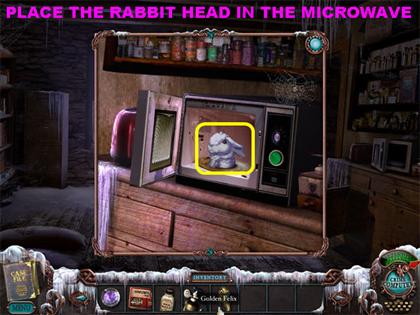
- Click on the microwave for a closer view.
- Click on the microwave door to open it.
- Place the rabbit head in the microwave and close the door.
- Click on the green button to trigger a Hidden Object scene.
- Click on the Hidden Object scene above the microwave.
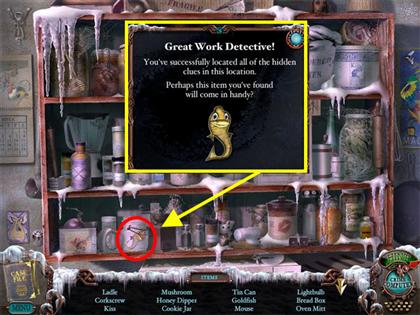
- Pick up the Golden Felix in the lower left. Find the rest of the items on the list.
- Click on the round rug on the floor to move it aside.
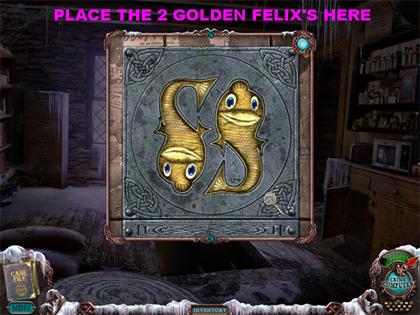
- Click on the trapdoor to make a metal panel appear.
- Place the 2 golden Felixes into the metal indentations.
- A secret panel appears below the ground.
- Go through the hole in the ground.
- To exit this room, go through the ladder on the left.
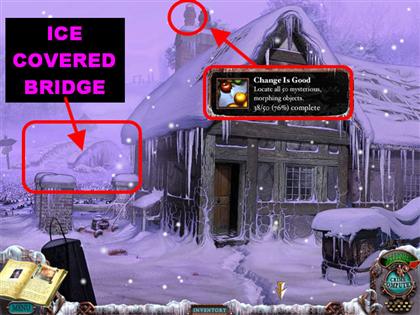
- Go to the ice covered bridge. Leave the grocery store and make a left at the snowy path. Go past the barn and make a left by the farmhouse.
Ice Covered Bridge

- Click on the 3rd and 4th letter of the sign that says Runes/ Ruins to obtain the Mysterious Morphing Object #46.
- Use the Torch on the Bridge until all the ice has been cleared (hold the button down).
- Click forward to get closer to the tent.
Tent
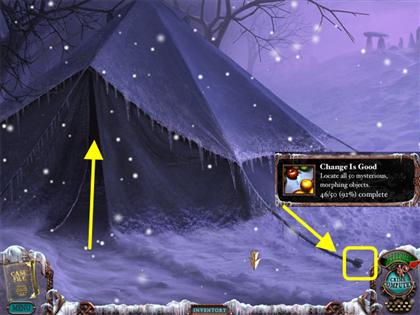
- Click on the morphing nail in the lower right, at the end of the rope, to obtain the Mysterious Morphing Object #47.
- Go into the Tent.
- Click on the morphing boots under the bed to obtain the Mysterious Morphing Object # 48.
- Click on the morphing bowl in the lower right to obtain the Mysterious Morphing Object #49.
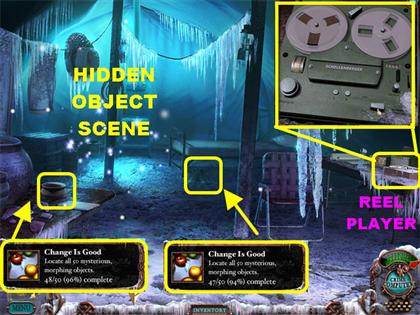
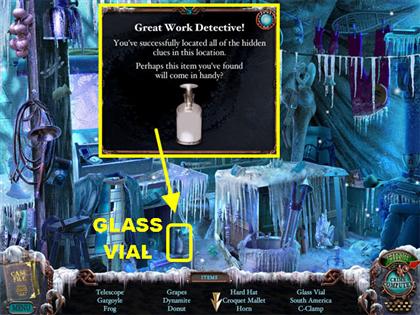
- Click on the Hidden Object scene.
- Pick up the Glass Vial in the lower center.
- Click on the table on the right side of the tent.
- Use the Tape Reel on the Player.
- Click on the large button in the lower right.
Mercury
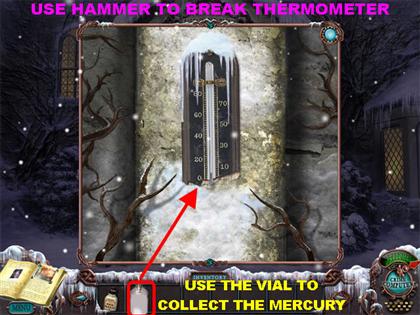
- Please use the video map to search for all the locations you may have missed in the game. If you haven’t completed all your tasks you will not be able to reach the last part of the game..
- Use the Hammer on the thermostat outside the main door.
- Use the Glass Vial to collect the mercury.
- Go back to the Celtic Ruins by going to the left of the hotel, through the covered bridge; take the left path, and pass the barn. Click to the left of the farmhouse, through the bridge and past the tent.
Chapter 7: The End
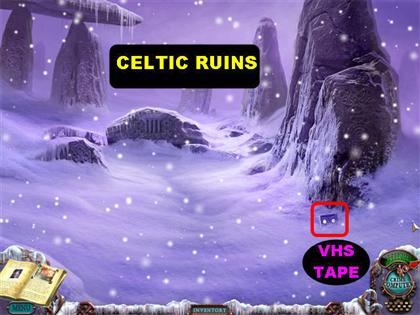
Celtic Ruins
- Please watch the video for a step-by-step solution for this puzzle.
- Pick up VHS Tape #15 in the lower right.
- Click on the ruins in the center to trigger a puzzle.
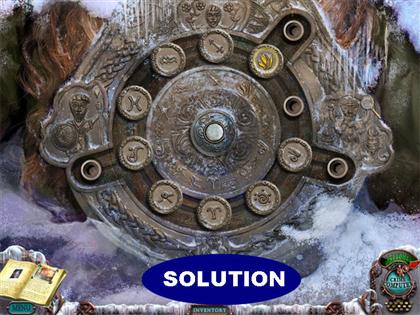
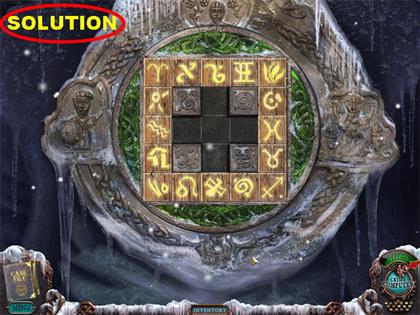
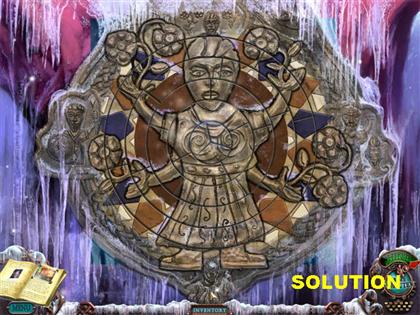
Standing Stone Puzzle
- The solution to the puzzle is found on the Crime Computer screen.
- If you look at the Crime Computer screen, you will see certain symbols appear over some of the screens.
- Your goal is to place the relics in the same locations as their matching symbols on the screen.
- Use the rocks on the left and right sides of the puzzle to adjust the height of your relics.
- If one of your symbols is all the way at the top, place 3 rocks in the corresponding slot before you place the relics. That will give them the height they need.
- If the relic is at the bottom of the screen, all you have to do is place the relic without any stones.
- You do not have to place a stone above any of the relics.
- If you make a mistake and want to clear the board, click on the large circle below the puzzle.
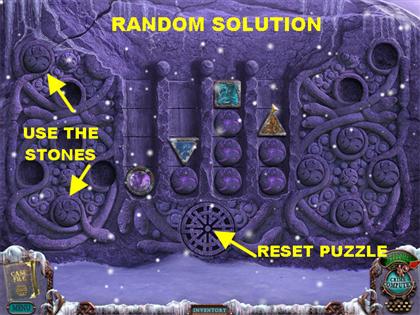
- The solution for this puzzle is random; please look at the screenshot for a random solution.
- Once all the relics are correct, the gate will open.
- Descend the tunnel.
- Your Journal will open; click on it to read it. It says you need the ladder from the farmhouse.
- Return to Farmhouse and go into the door on the right. Your Journal opens again and tells you that the ladder has been stolen.
- Go back to the ruins through the path to the left of the farmhouse.
- The ladder is in the tunnel. If the ladder is not in the tunnel for you, make sure that you have not missed any steps. Go back in the game to see what you may have missed.
- Climb down the ladder.
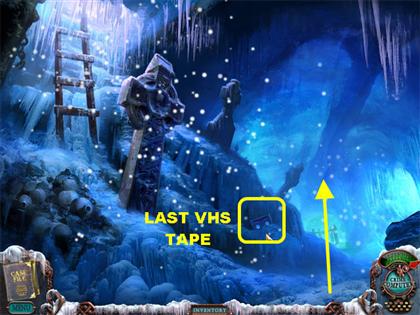
- Pick up the last tape in the lower center of the scene and play it in the Crime Computer.
- March forward.
- Watch the students drop relics into the portal.
- Click on the hole in the ground below the students.
Riddle Puzzles
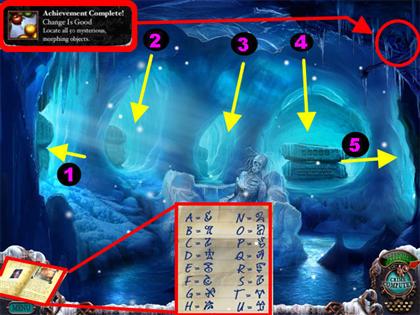
- Pick up the morphing skull in the upper right corner of the scene to obtain the Mysterious Morphing Object #50. This is the last morphing object in the game.
- There are 5 riddles in the 5 caves you must go into. Each cave has a different riddle.
- Your goal is to decipher the riddles shown on each stone.
- Click on the symbols on the rocks to form the correct words.
- Open your Journal and look for the page with all the symbols. Use those symbols to form the correct words.
- Click on a cave and decipher the correct word. Each time the solution is correct, a stone slab will rise to the top. Place the appropriate item from your inventory onto the stone.
- Once you finish one riddle, move on to the next one until they are all solved.
Feather
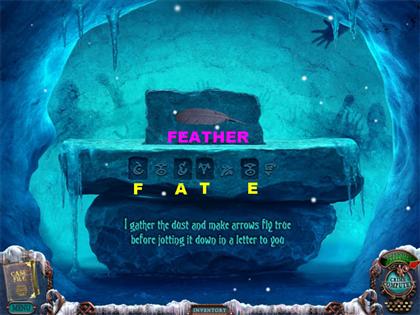
- Riddle: I gather the dust and make arrows fly true before jotting it down in a letter to you.
- Spell out the word ‘FATE’ and place the feather on top.
Sunflower Seeds
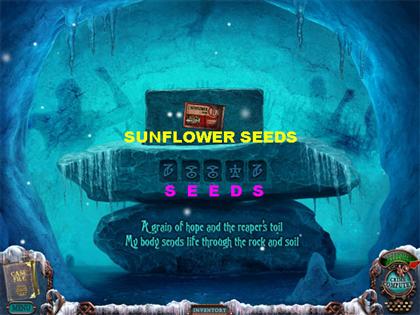
- Riddle: A grain of hope and the reaper’s toil. My body sends life through the rock and soil.
- Spell out the word ‘SEEDS’ and place the Sunflower Seeds on top.
Sea Salt
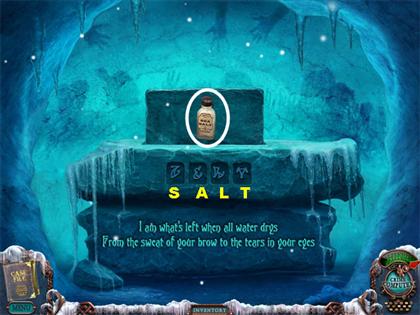
- Riddle: I am what’s left when all water drys. From the sweat of your brow to the tears in your eyes.
- Spell out the word ‘SALT’ and place the Sea Salt above.
Urn with Ashes
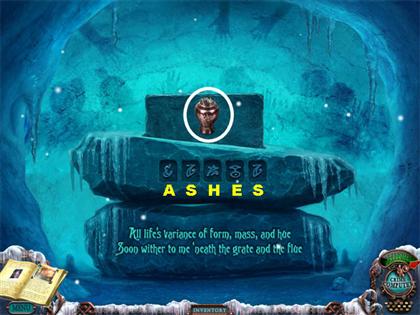
- All life’s variance of form, mass, and hue. Soon wither to me ‘neath the grate and the flue.
- Spell out the word ‘ASHES’ and place the Urn with Ashes above.
Mercury
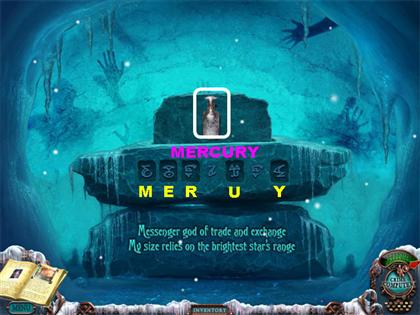
- Messenger god of trade and exchange. My size relies on the brightest stars range.
- Spell out the word ‘MERUY’ and place the Mercury Vial above.
- Congratulations! You’ve completed Mystery Case Files: Dire Grove!
Mysterious Morphing Objects Locations
- Abandoned Car: Interior – Click on the stick shift.
- Abandoned Car: Exterior – Click on the morphing sign above the right side of the car.
- Alcove (Banshee Scene) The morphing skull is in the upper right side.
- Barn: Outside – Click on the morphing chimney.
- Barn: Outside – Click on the morphing branch in the upper right.
- Barn: Inside – Click on the morphing wood beam in the lower left.
- Boathouse: Outside – Click on the morphing antlers above the door.
- Covered Bridge – Click on the morphing sign above the entry of the bridge.
- Ice Covered Bridge: Close to Tent – Click on the changing letters on the sign in the upper left.
- Farmhouse: Living Room – Click on the morphing glass on the table.
- Farmhouse: Inside – Click on the morphing container in the upper right side.
- Farmhouse: Outside – Click on the morphing chimney.
- Farmhouse: Top Level – Click on the morphing stick in the lower right.
- Garage: Outside – Pick up the morphing tires on the right side of the garage.
- Garage: Inside: Pick up the morphing sign in the upper right side of the wall. Click on the word “Gasoline” or “Kerosene” that flashes on the sign.
- Graveyard: Click on the morphing tombstone sign on the left.
- Grocery Store: Basement – Click on the morphing piece of wood on the upper left side of the shelf.
- Grocery Store: Inside – Click on the morphing sack next to the pile of sacks.
- Grocery Store: Outside – Click on the morphing symbol on the sign close to the windows.
- Hotel: Basement – Click on the morphing crate in the lower right.
- Hotel: Bathroom – Pick up the morphing bar of soap in the lower right, next to the bathtub.
- Hotel Entrance: Click on the morphing carving in the upper right side of the entrance.
- Hotel: Fireplace Scene – Click on the morphing picture on the upper left side of the wall.
- Hotel: Front Desk – Click on the morphing sign in the upper left side of the front desk.
- Hotel: Hallway up the Steps – Click on the painting on the right side of the wall.
- Hotel: Hallway - Pick up the morphing glass on the tray on the floor.
- Hotel: Hallway – Pick up the morphing vase on the right side of the scene.
- Hotel: Library – Click on the morphing pillow on the sofa on the right.
- Hotel: Lobby – Click on the morphing picture on the table next to the stairs.
- Hotel: Manager’s Office – Click on the morphing books on top of the desk.
- Hotel: Room Service Tray Bedroom – Click on the snowglobe.
- Hotel: Nautical Room - Click on the morphing sconce in the upper left side the wall.
- Hotel: Nautical Room- Click on the morphing books in the lower right side of the small bookshelf on the right side of the room.
- Hotel: Outside – Click on the chimney on top of the hotel, in the upper center.
- Hotel: Stained Glass Hallway – Click on the morphing picture in the upper left side of the scene.
- Hotel: Stained Glass Hallway – Click on the morphing vase by the window.
- Hotel: Stained Glass Hallway (Right Door) – Click on the morphing pillow on the right side of the bed.
- Hunting Lodge: Inside – Click on the morphing animal head in the upper center.
- Live Wires Scene – Click on the morphing sign on the lower left side of the scene.
- Museum: Blacksmith Exhibit – Click on the morphing knob in the lower right, by the ropes.
- Museum: Gift Shop – Click on the morphing card in the upper right.
- Museum: Inside – Click on the morphing bust in the upper left.
- Museum: Stairway – Click on the morphing picture on the left, above the case.
- Museum: Office - Click on the morphing lamp on the right side of the desk.
- Museum: Outside – Click on the morphing chimney.
- Museum: Outside – Click on the morphing sign on the right side of the building.
- Museum: Upstairs Hallway – Click on the snowy morphing footprint in the lower left.
- Tent: Inside – Click on the morphing boots in the center of the scene.
- Tent: Inside – Click on the morphing bowl on the left table.
- Tent: Outside – Click on the nail at the end of the rope.
List of VHS Tapes Locations
- Abandoned Car: Interior – This is automatically added into inventory once you pick up the video camera.
- Barn: Snowy Path – It is on the lower left side. This is the path that takes you to the barn.
- Boathouse Path: In the lower center. This is the path that leads you to the boathouse.
- Celtic Ruins Path – It is on the lower right side. This is the path just before you begin the relic puzzle.
- Farmhouse: Living Room – On the lower left side of the ground.
- Farmhouse: Upstairs – It is in the lower left corner.
- Grocery Store: Inside – In the middle of the floor.
- Hotel Hallway – Pick up the VHS Tape in front of the right door.
- Hotel: Nautical Room – The VHS Tape is under the bed.
- Hotel: Outside – It is on the lower left side, buried in the snow.
- Hotel: Stained Glass Hallway (Right Door) – The VHS Tape is on the left side of the floor.
- Hunting Lodge: Outside – The VHS Tape is in the lower right.
- Live Wires Scene – Pick up the VHS Tape in the lower right corner.
- Museum: Blacksmith Exhibit – On the lower right side.
- Museum: Inside – The VHS Tape is in the lower right.
- Tunnel – It is in the lower center of the scene. This is the tunnel that opens up after the relic puzzle has been solved.
Created at: 2009-12-10