
Walkthrough Menu
- General Tips
- Chapter 1: The Carnival
- Chapter 2: Attractions
- Chapter 3: Slot Machines
- Chapter 4: Outside Trailer
- Chapter 5: Madame Fate's Trailer
- Chapter 6: The Theater Hall
- Chapter 7: Roller Coaster Car
- Chapter 8: Rail's End
- Chapter 9: Terminal Point
- Chapter 10: Ferris Wheel Car
- Chapter 11: The Corridor
- Chapter 12: The Laboratory
- Chapter 13: The Bridge
- Chapter 14: Raven Cote
- Bonus Chapter
- Bobbleheads and Secret Cards
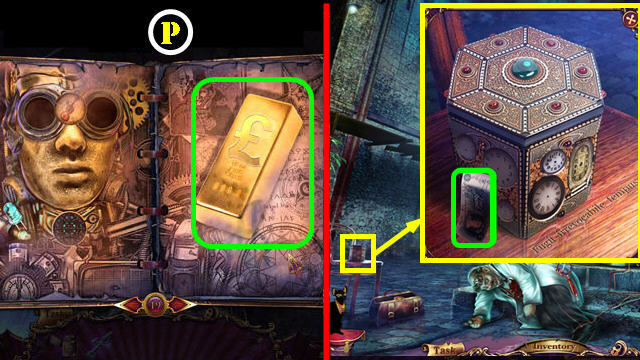
- Old Pounds
General Tips
- This is the official guide for Mystery Case Files: Fate's Carnival Collector's Edition.
- Skips are only available in Easy Knievel and Swallow Hard.
- Select the Puzzle Hint during the puzzles to get progressive hints for solving the puzzle.
- This guide will not mention each time you have to zoom into a location; the screenshots will show each zoom scene.
- We will use the acronym HOP for Hidden-object puzzles. Interactive items will be color-coded.
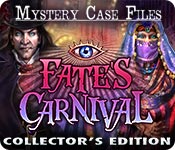
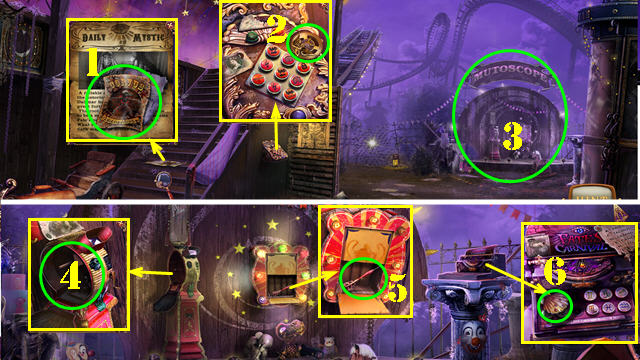
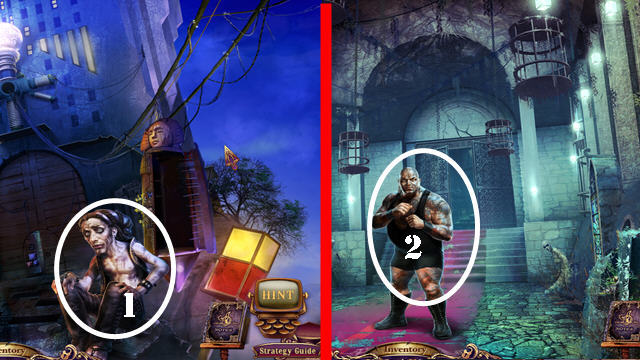
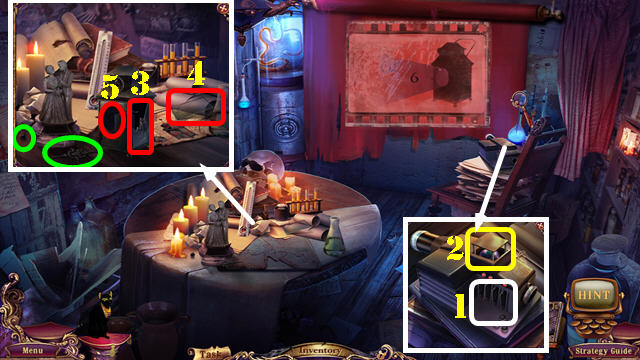
- Open the Case Files (1) to access the map and other goodies. Use the map to fast travel to a location.
- Your tasks are located here (2).
- Lock your inventory here (3).
- The Black Diary (4) contains clues, information and puzzles.
- Use a Hint if you get stuck (5).
Chapter 1: The Carnival
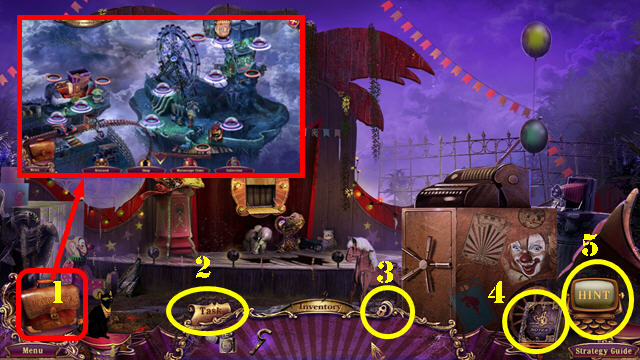
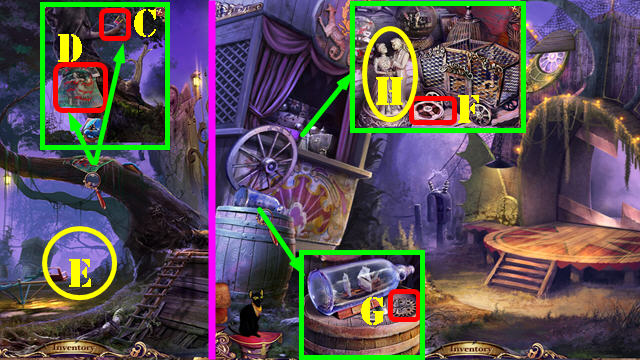
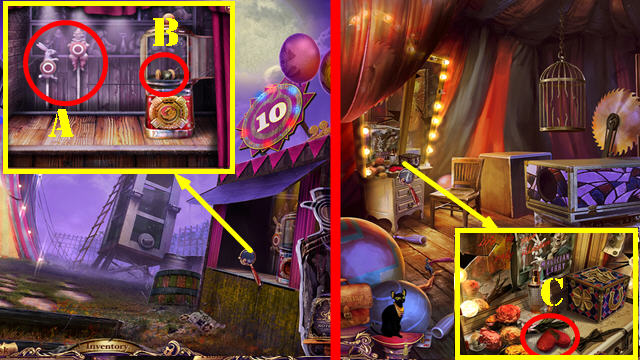
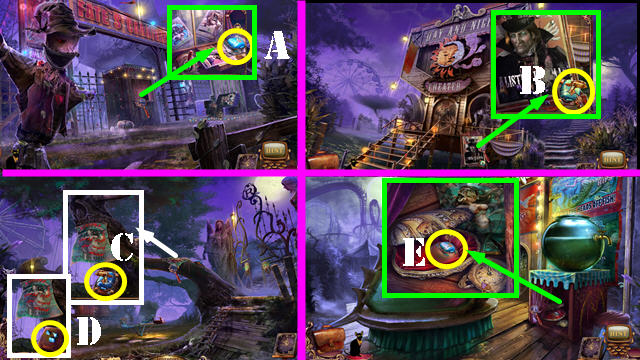
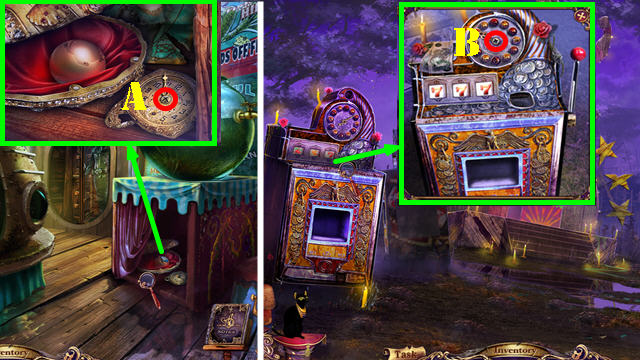
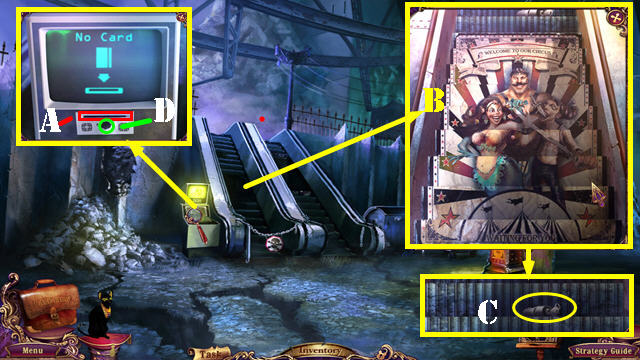
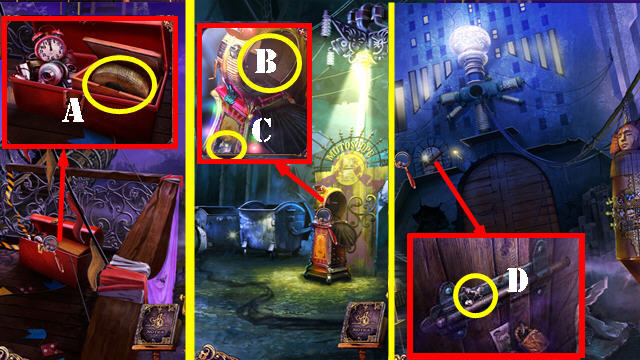
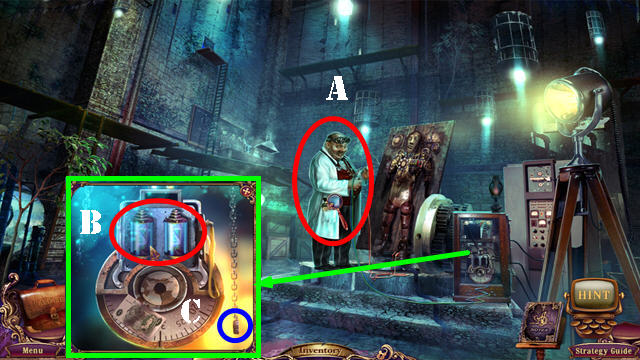
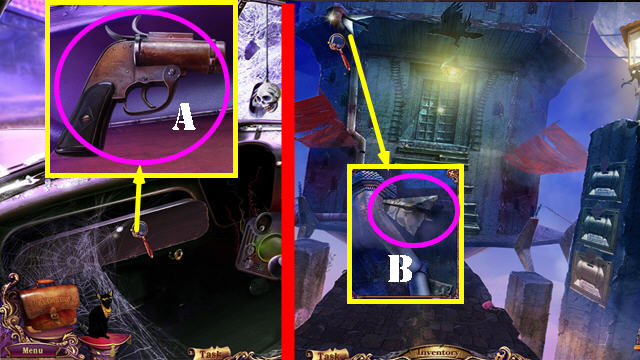
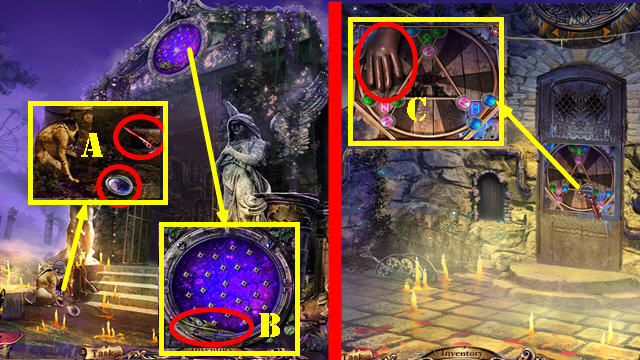
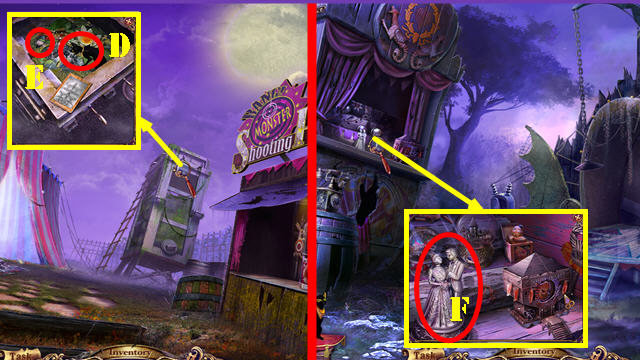
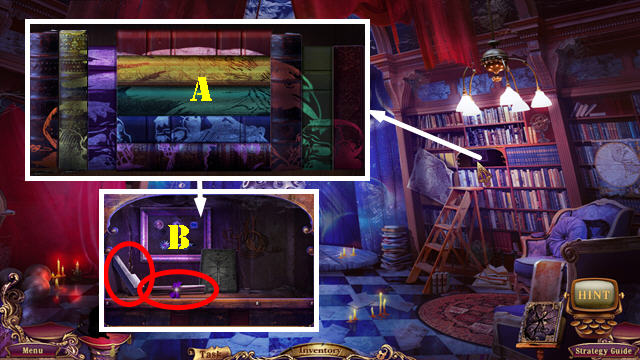
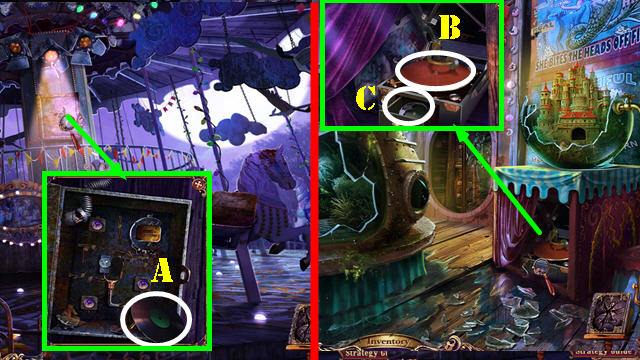
- Touch the raven (A).
- Open the coat; take the BRONZE KEY (B).
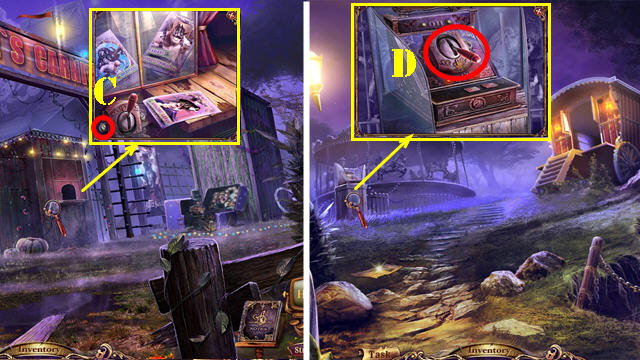
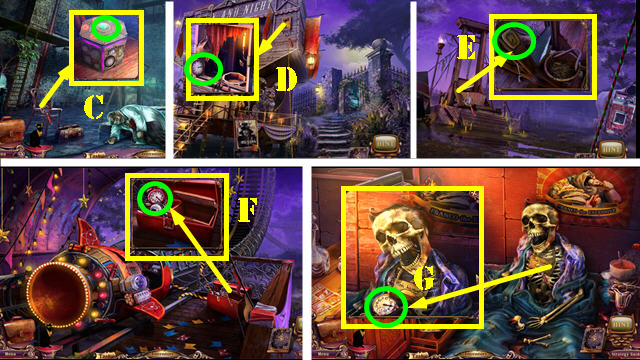
- Take the GAME COIN (C).
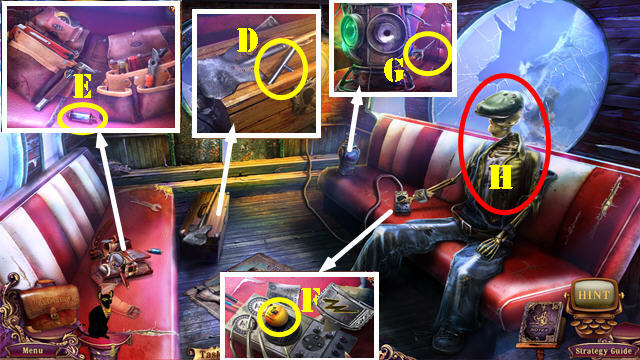
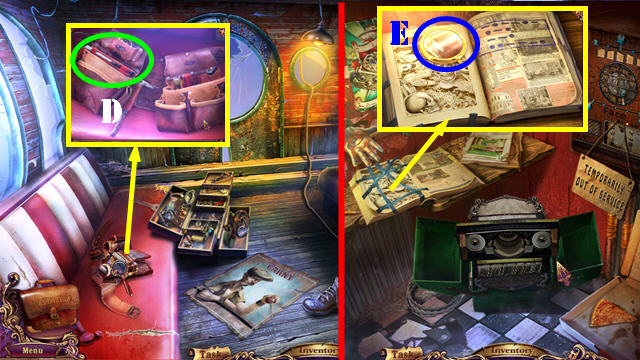
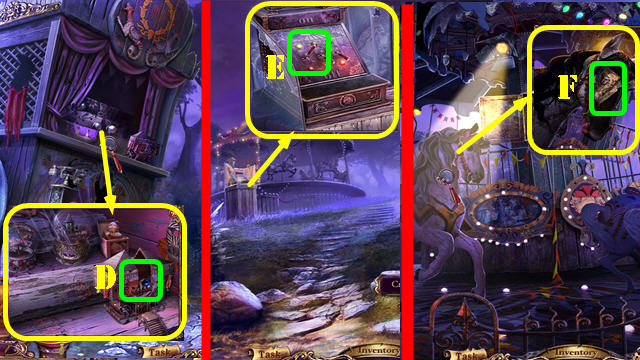
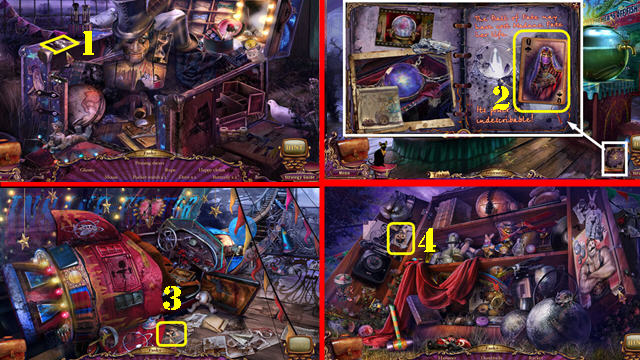
- Examine the chest; take the CORKSCREW (D). Insert the BRONZE KEY into the lock and turn it to activate a HOP.
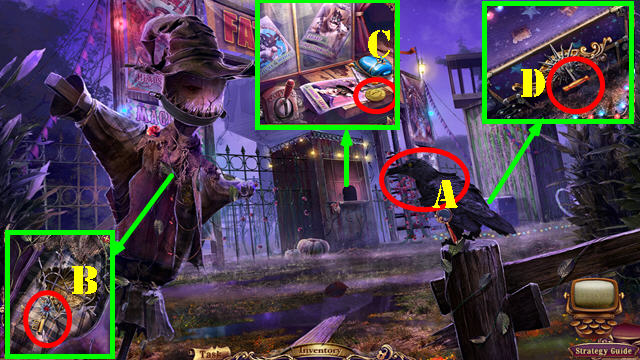
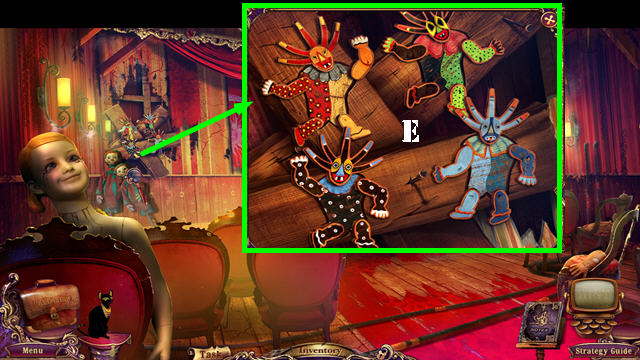
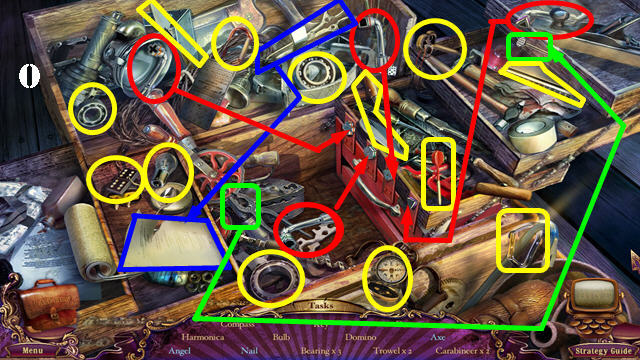
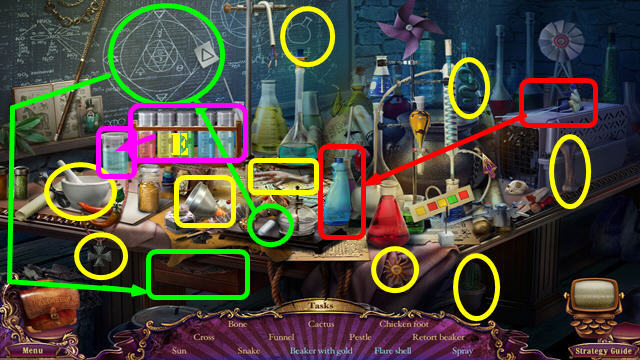
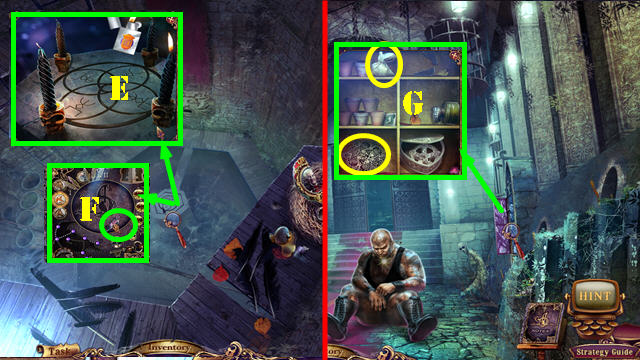
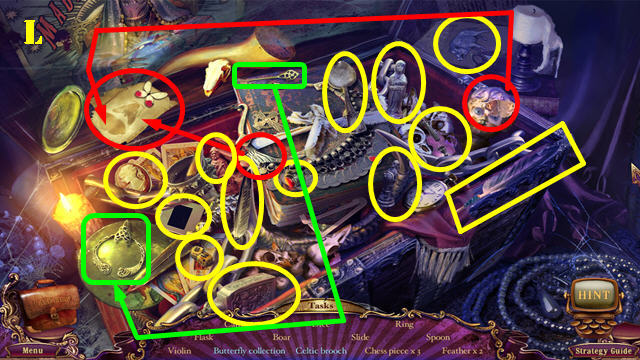
- Play the HOP.
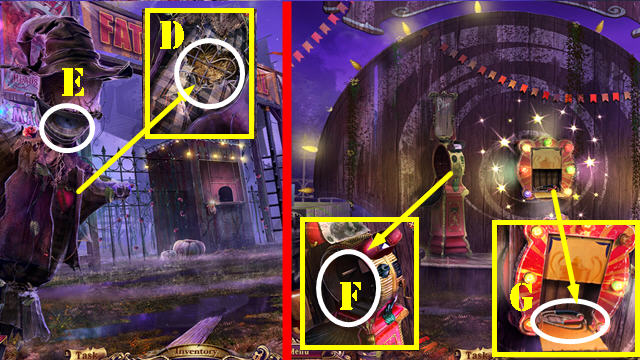
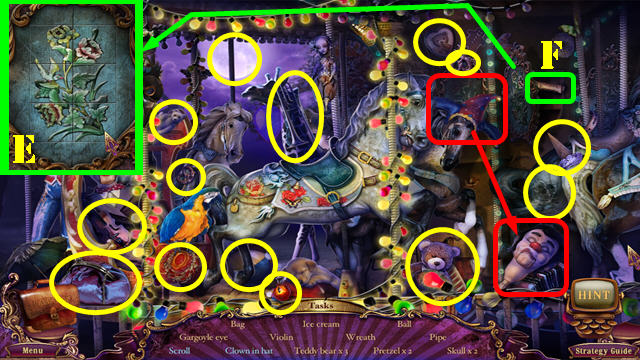
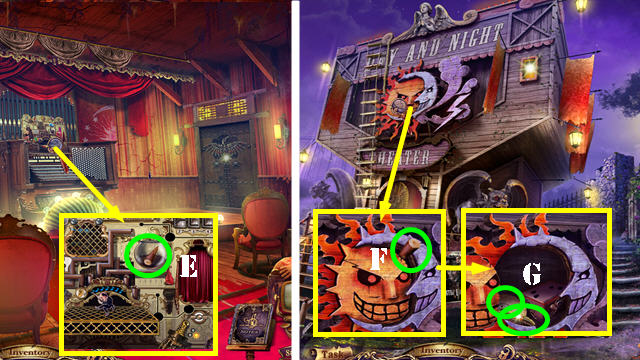
- You receive the PRUNING SHEARS (E).
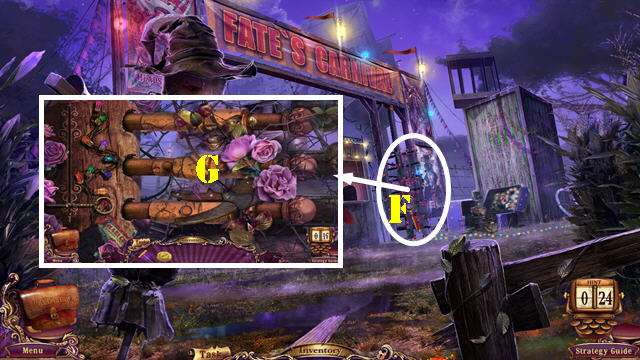
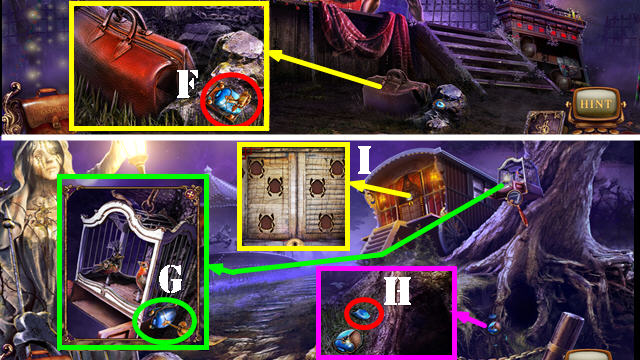
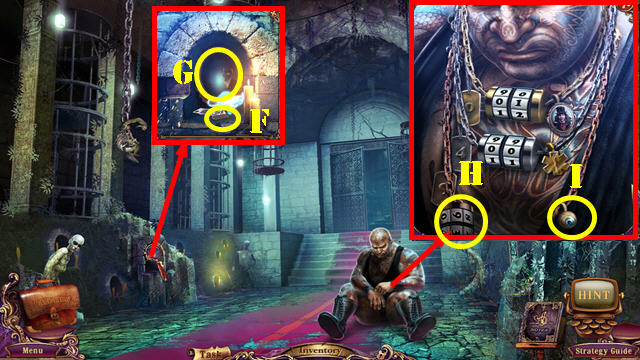
- Zoom into the gate (F).
- Use the PRUNING SHEARS on the vines to activate a puzzle (G).
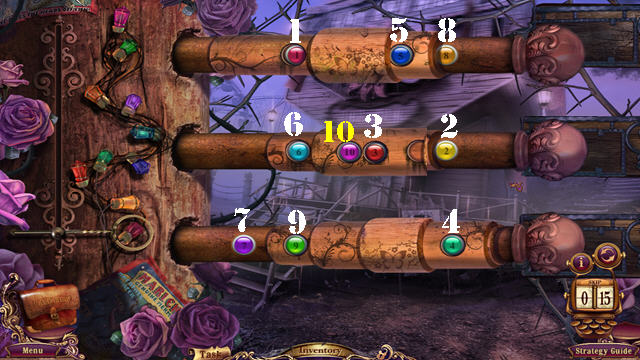
- Slide the pieces back and forth and press on the numbers in numerical order.
- Solution (1-10).
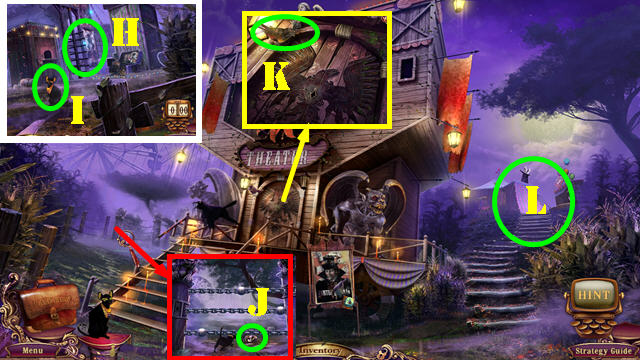
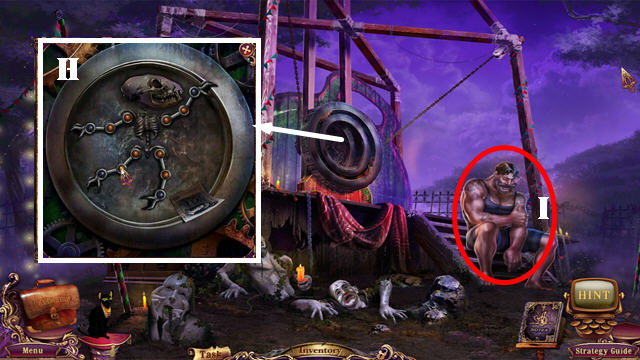
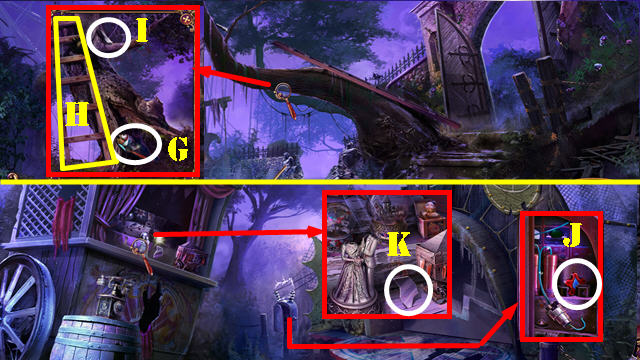
- Try to go through the gate (H).
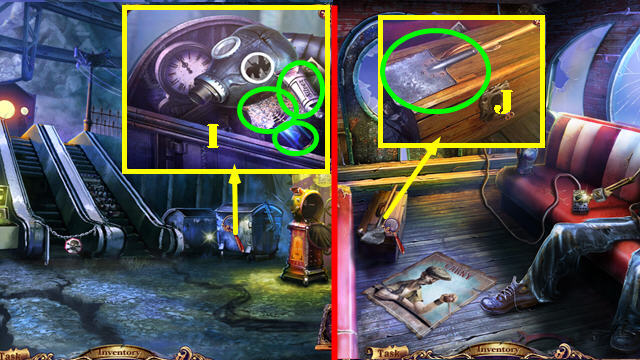
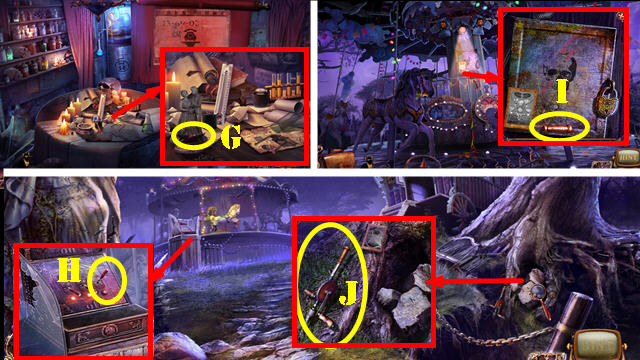
- Take Isis (I).
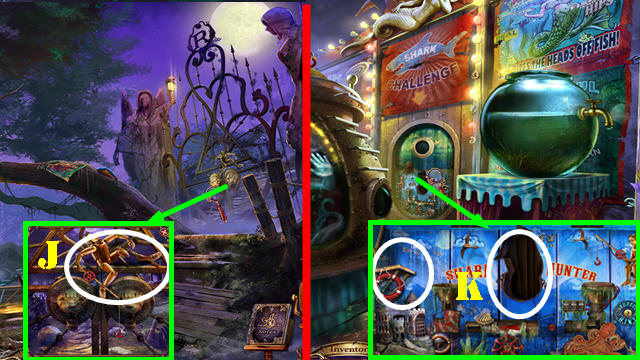
- Go through the gate (H).
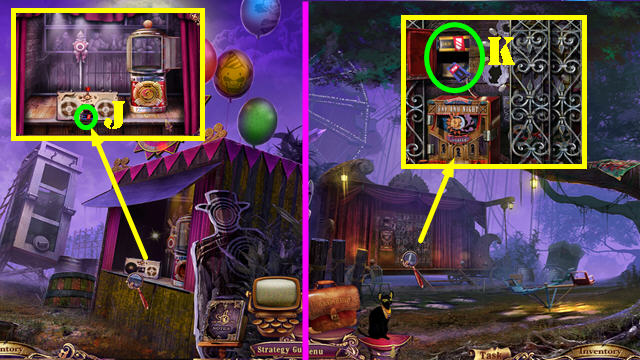
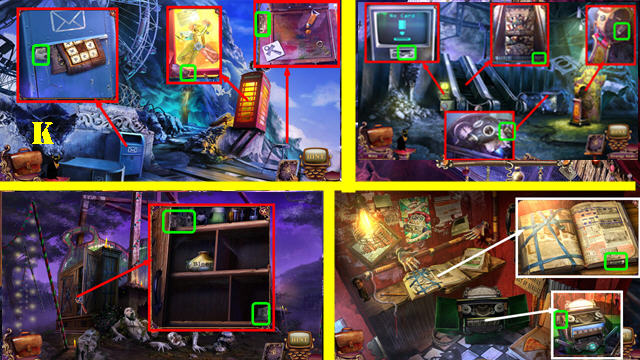
- Use Isis under the fence to get the COMEDY mask (J).
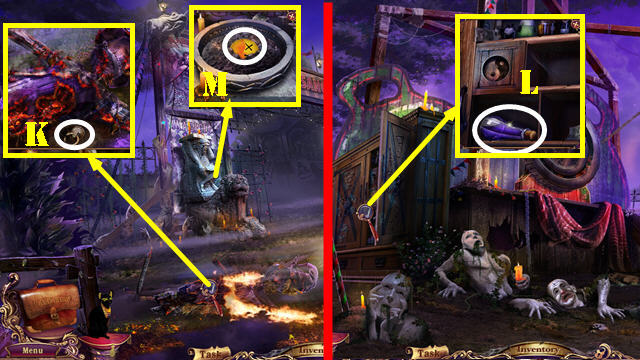
- Take the MECHANICAL BIRD (K).
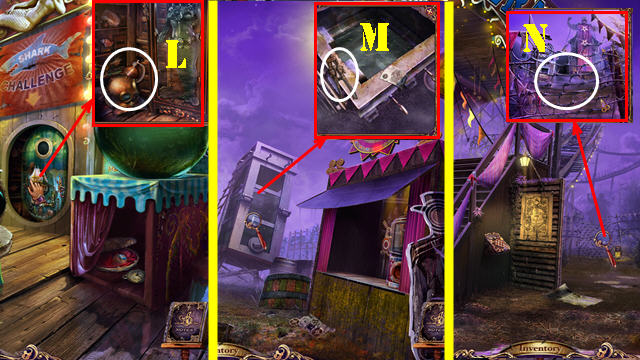
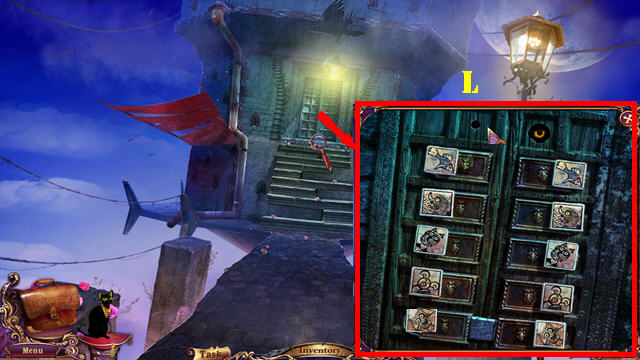
- Go to Outside Tent (L).
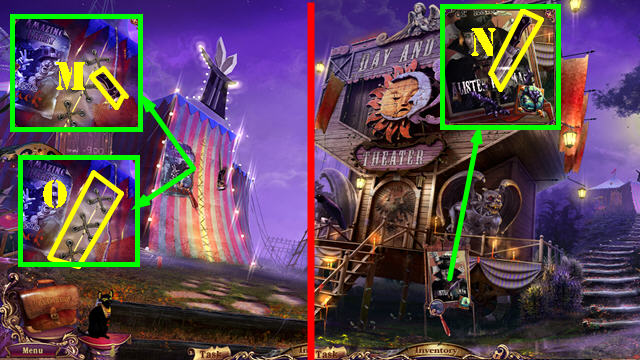
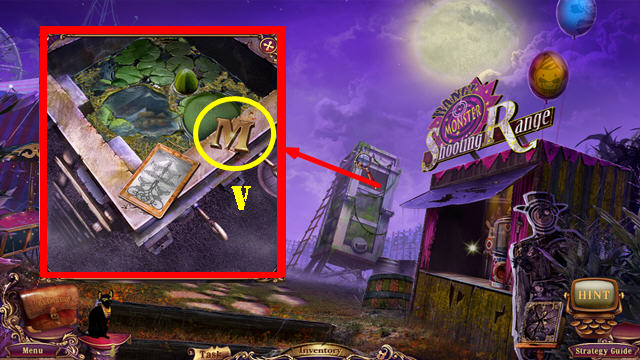
- Take the KNIFE HANDLE (M).
- Walk down.
- Place the KNIFE HANDLE on the blade; take the KNIFE (N).
- Return to Outside Tent.
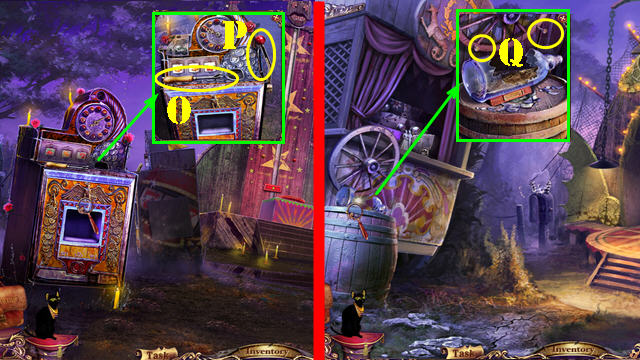
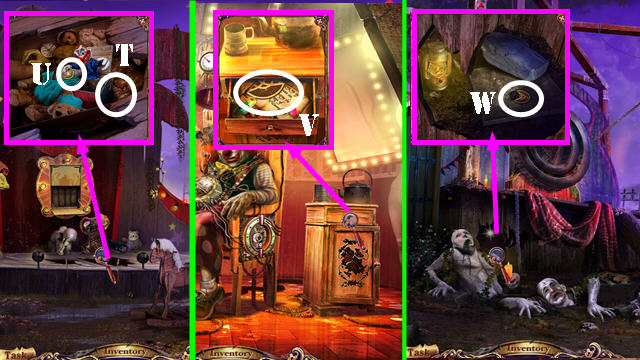
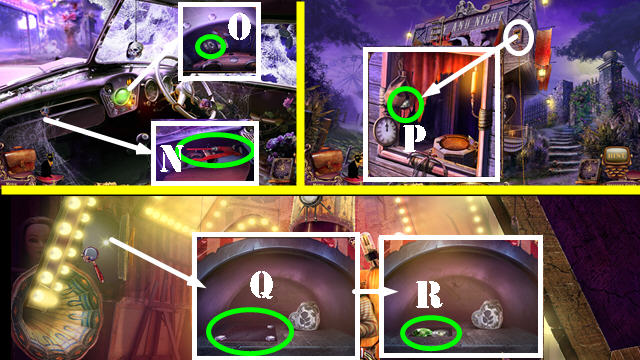
- Cut the rope with the KNIFE (O); enter Larry's Tent.
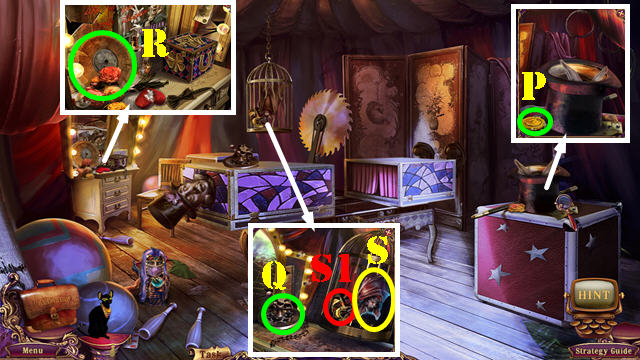
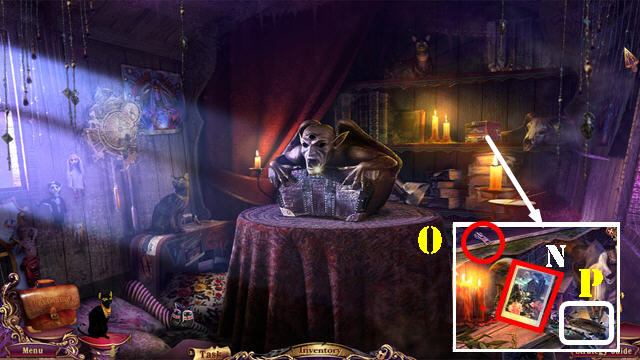
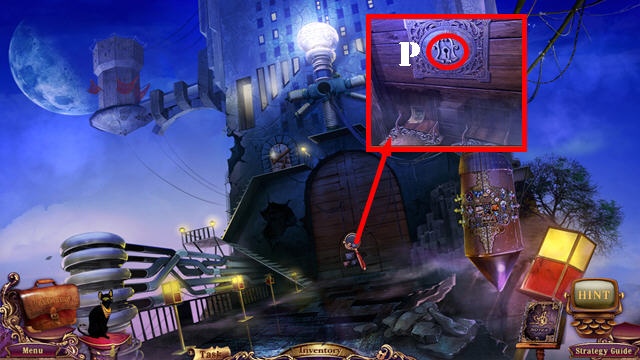
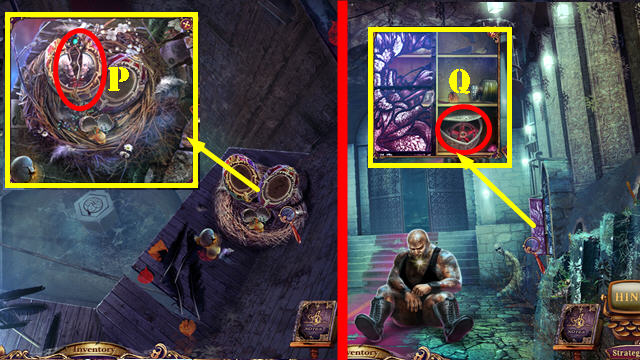
- Touch anywhere on the scene.
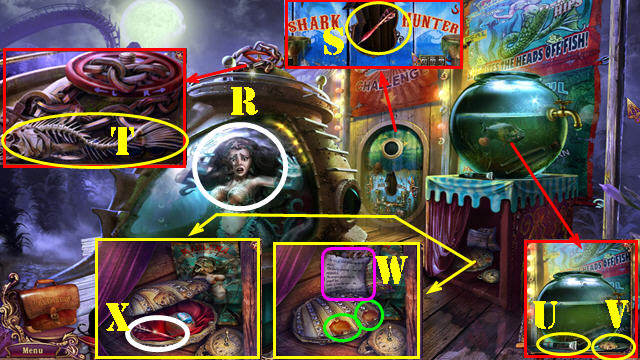
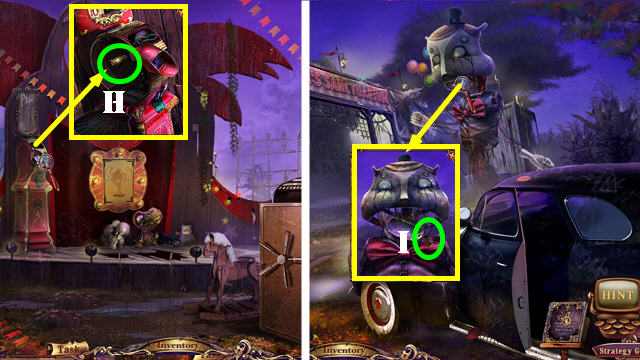
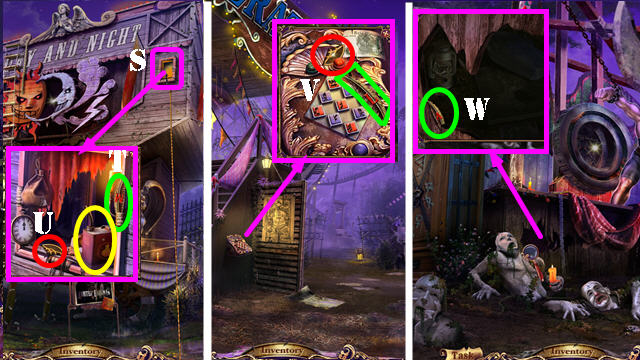
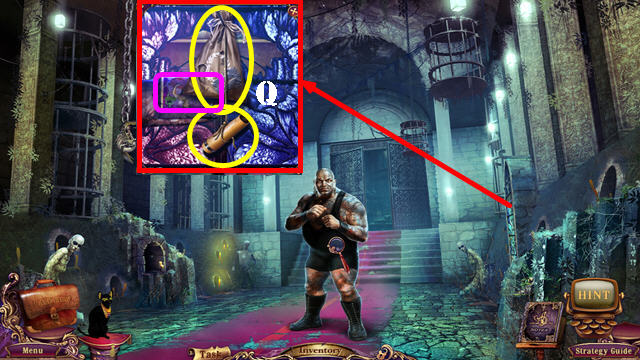
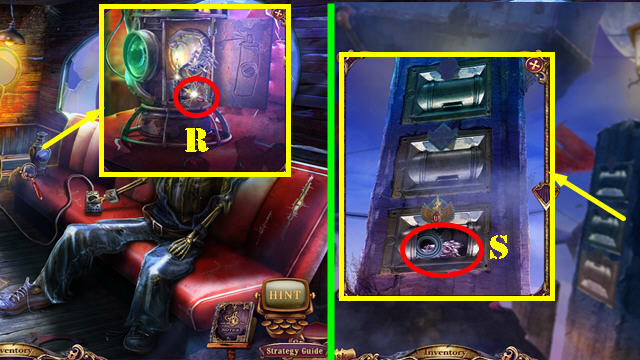
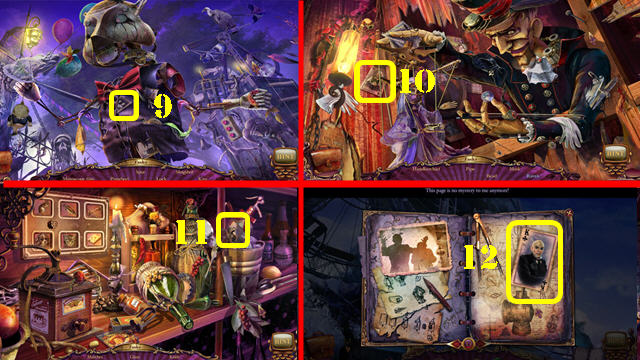
- Take the RAVEN CHARM (P), WINDUP HANDLE (Q), and MUTOSCOPE FILM (R).
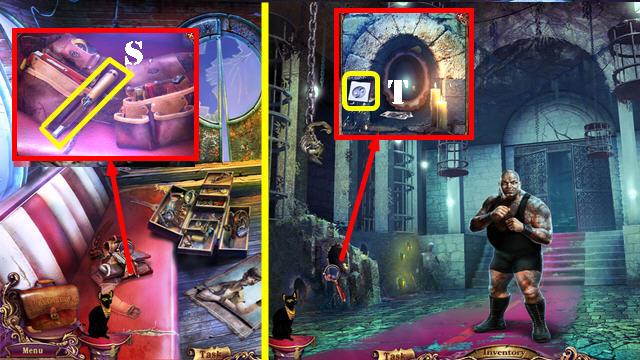
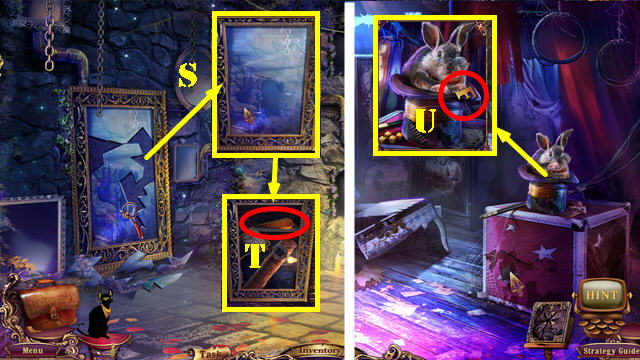
- Use Isis on the bat (S); take the TRAGEDY mask (S1).
- Walk down.
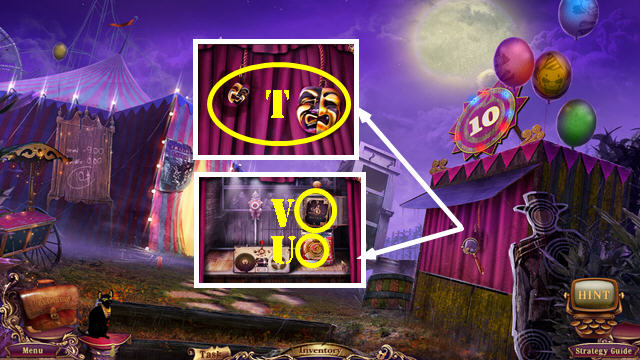
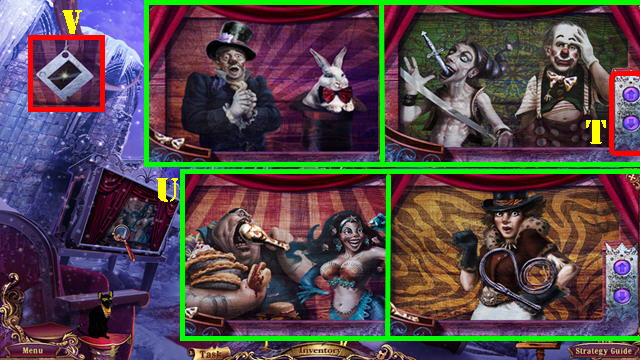
- Place the TRAGEDY and COMEDY masks on the curtain (T).
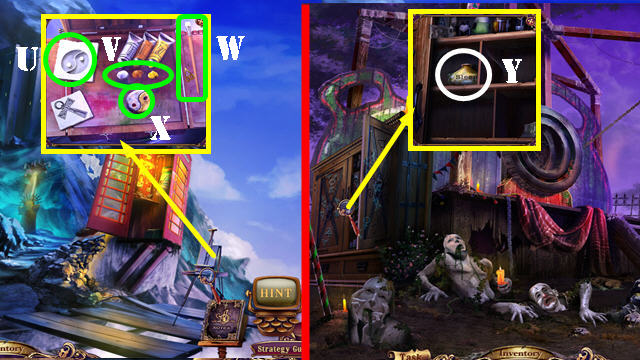
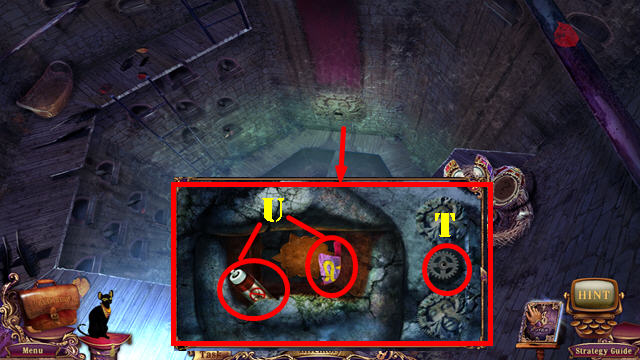
- Place the RAVEN CHARM in the slot (U); take the Black Diary and the LEVER below it (V).
- Walk down.
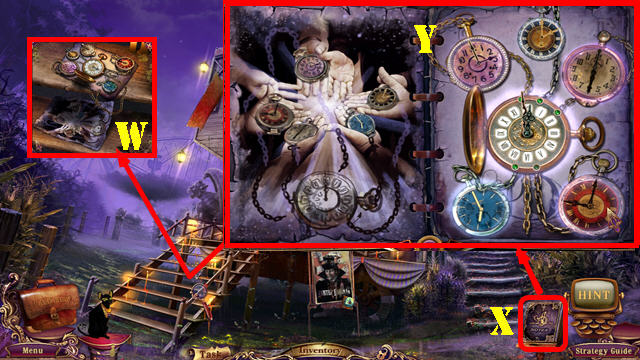
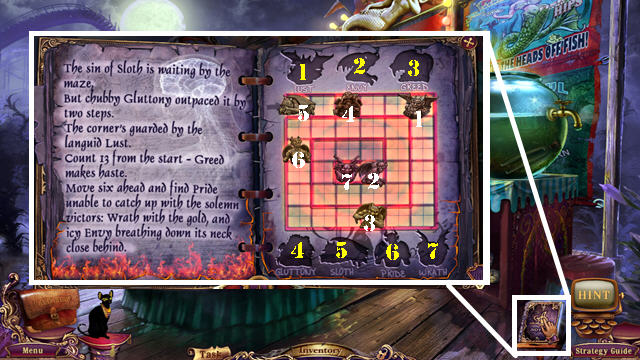
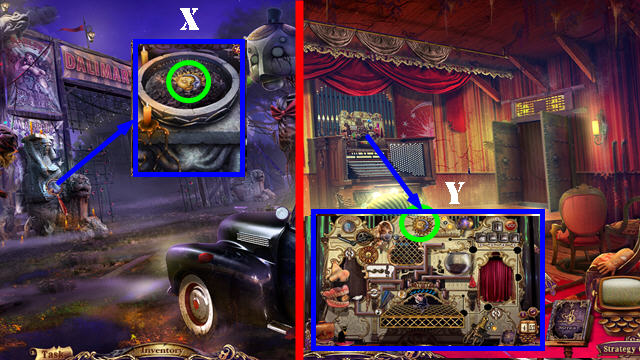
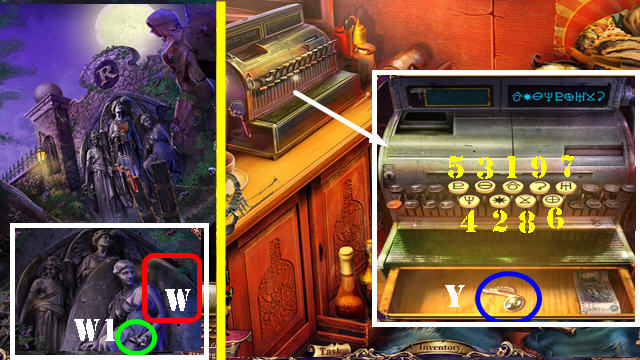
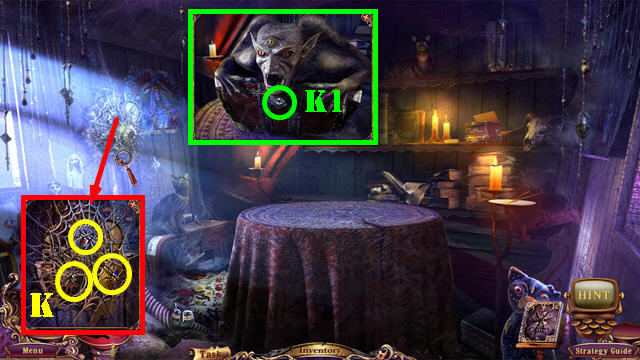
- Take the Black Diary Pages (W). Open the diary (X).
- Arrange the clocks on the right page according to the clues on the left.
- Solution (Y).
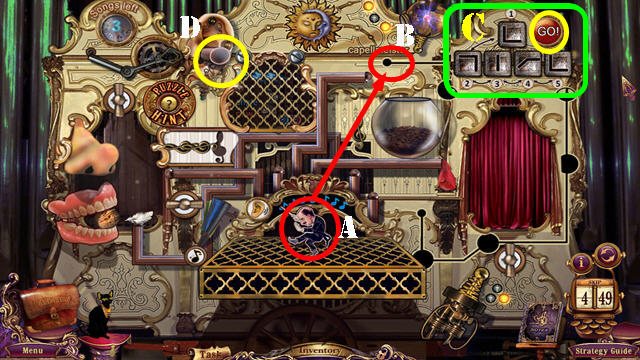
- Place the LEVER (A) and the WINDUP HANDLE (B) in the slots to activate a puzzle.
- Move the handle and the lever to align the balls.
- Solution: Ax2, Bx2, Ax2, Bx5, Ax2, Bx7, Ax2, Bx9, Ax2, and B.
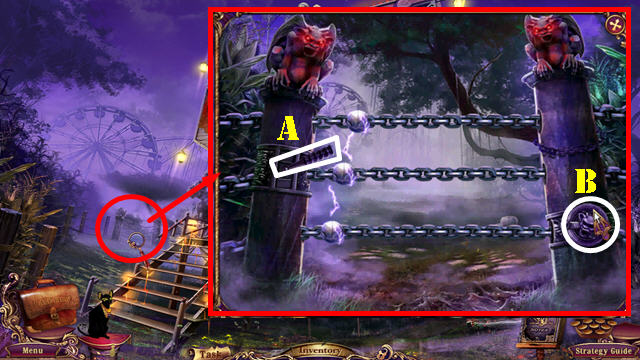
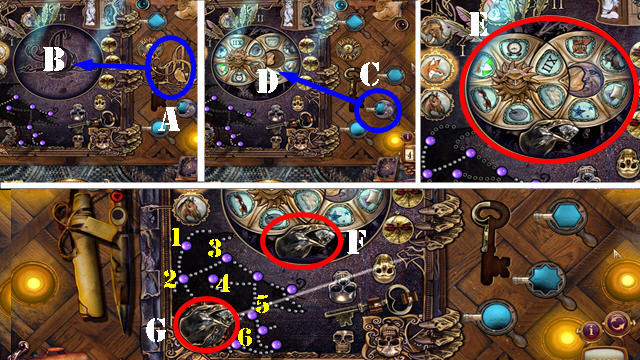
- Go to the Crossroads.
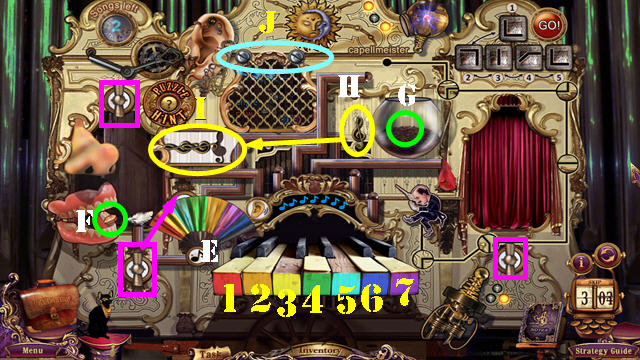
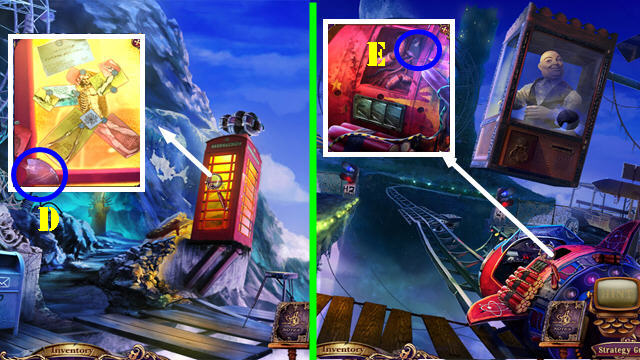
- Use Isis to get the BATTERY (C).
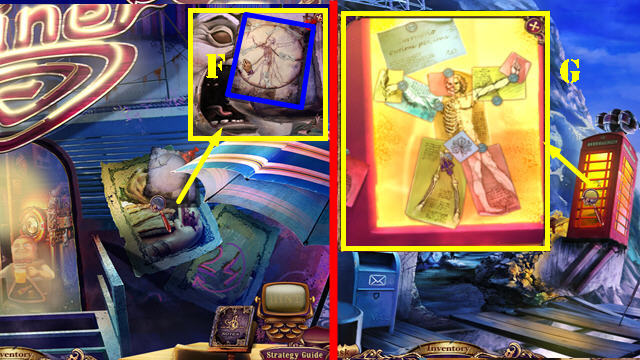
- Look at the poster (D).
- Go to the Fish Gates (E).
- Take the DICTATION TAPE (F) and GEAR (G).
- Touch the figurine (H).
- Return to Outside Tent.
- Place the DICTATION TAPE on the device; touch it and take the BATTERY (J).
- Return to the Crossroads.
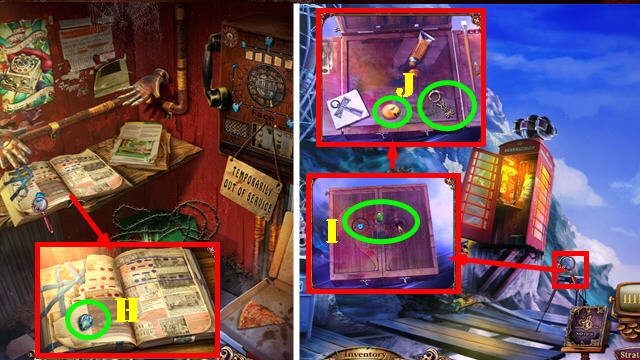
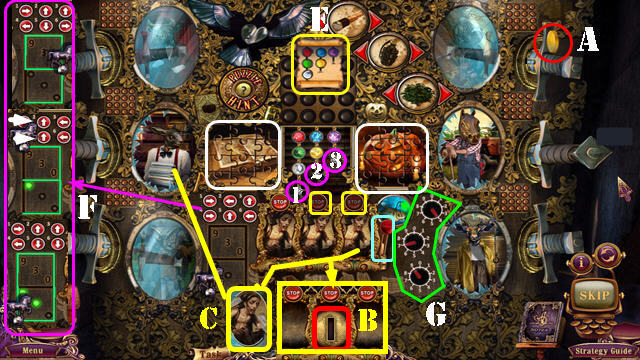
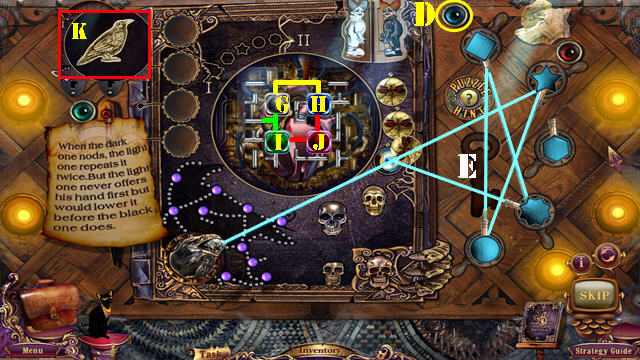
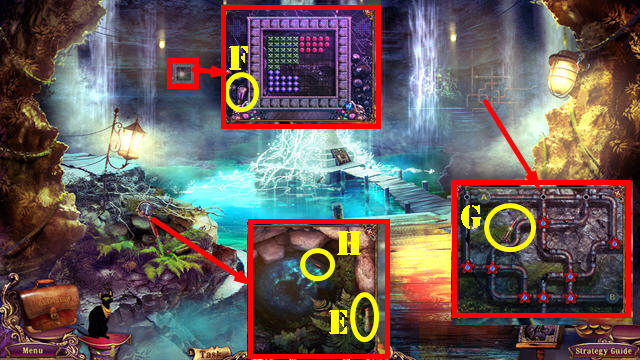
- Insert the 2 BATTERIES (K). Open the gate to activate a puzzle.
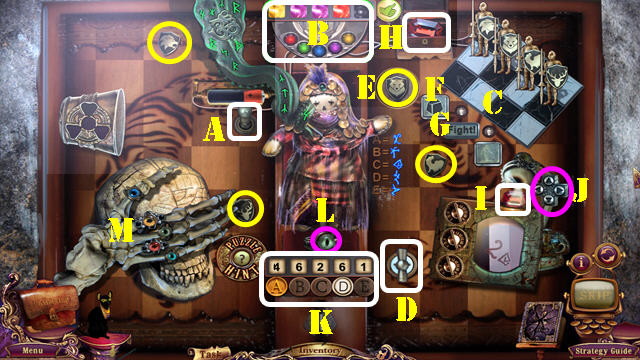
- Make a combination of 13. We used 4 plus 9 (L).
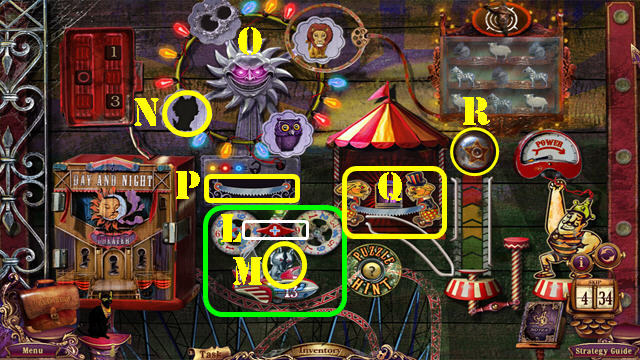
- Place the wolf (M) in the slot (N).
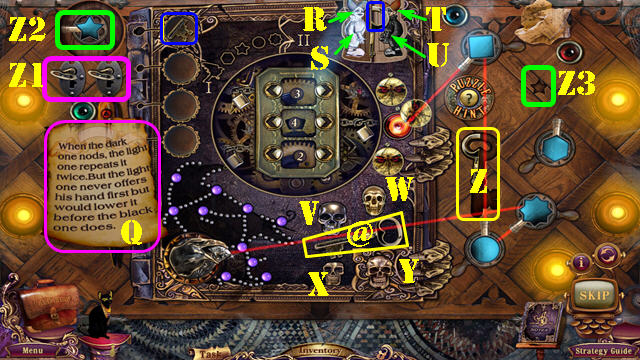
- Turn off all the lights (O) except the blue ones.
- Turn off all the lights (O), then turn back on only the yellow ones.
- Turn off all the lights (O) and only turn on the red ones.
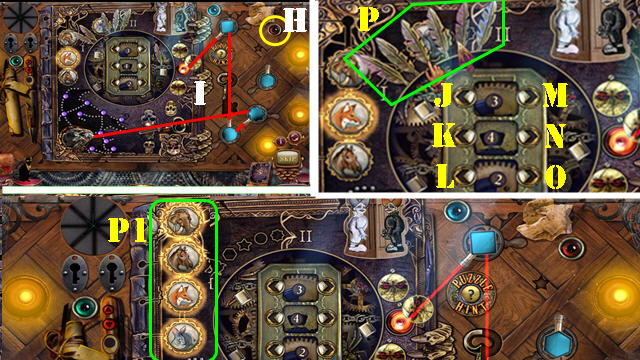
- Give the saw (P) to the rabbits (Q). Touch them in this order; left, right, left, right, and left.
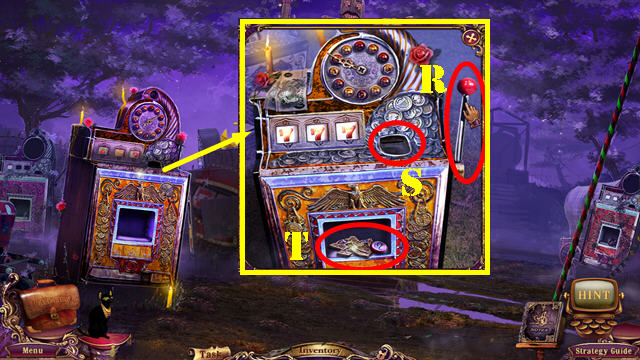
- Remove the bell (R).
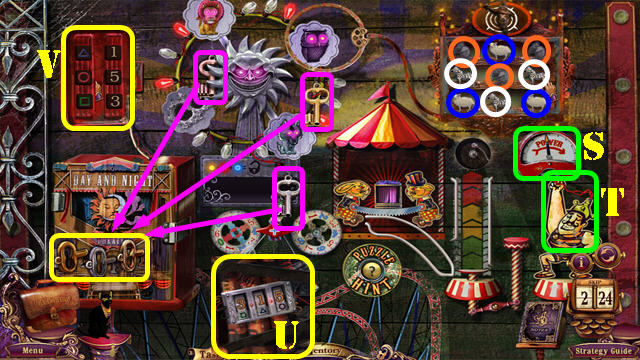
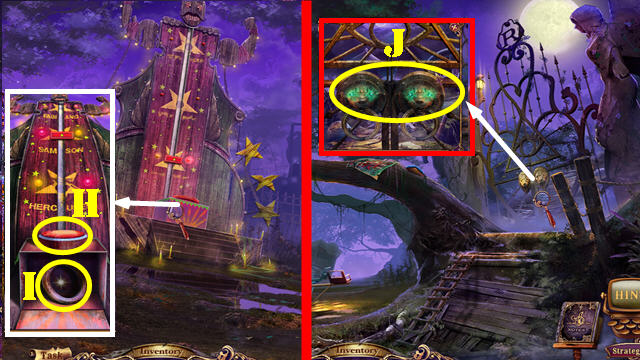
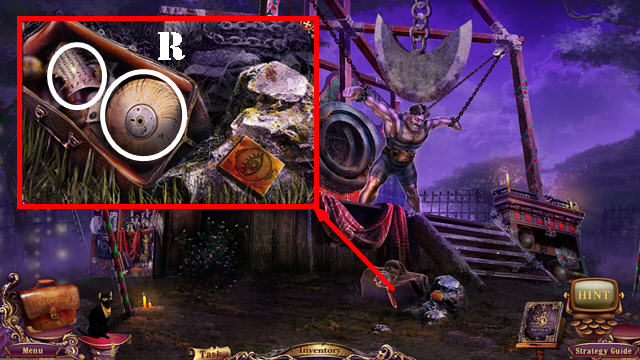
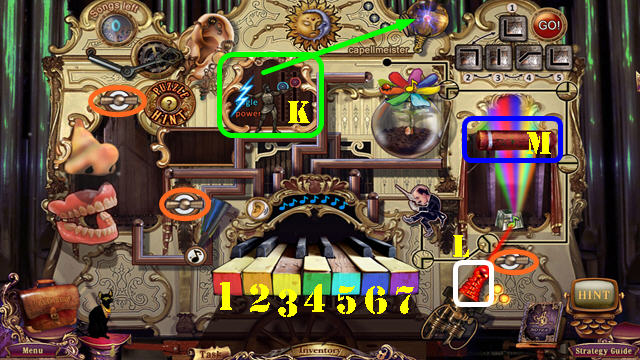
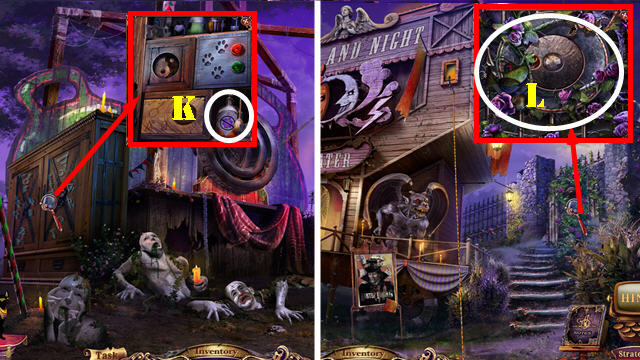
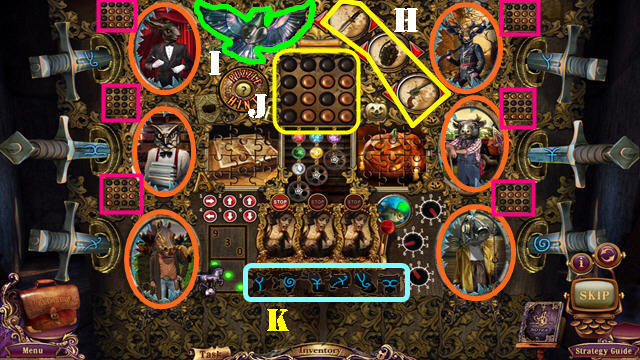
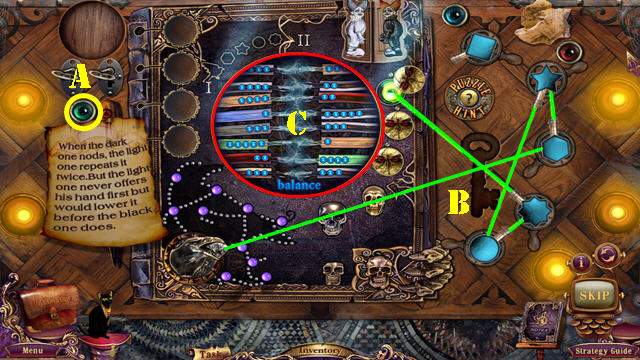
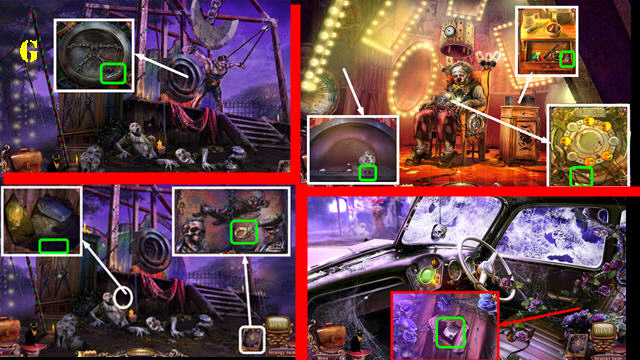
- Change the needle on the power meter as shown (S). Use the arm on the strongman (T) to shatter the glass above.
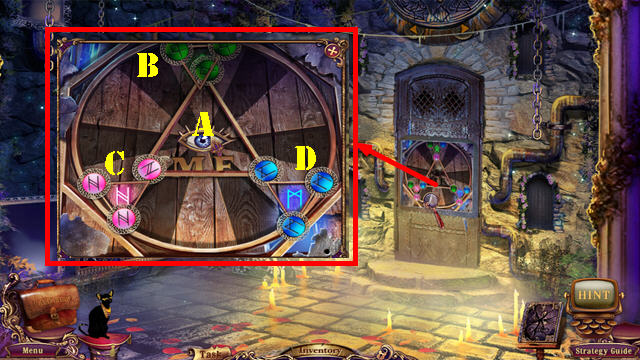
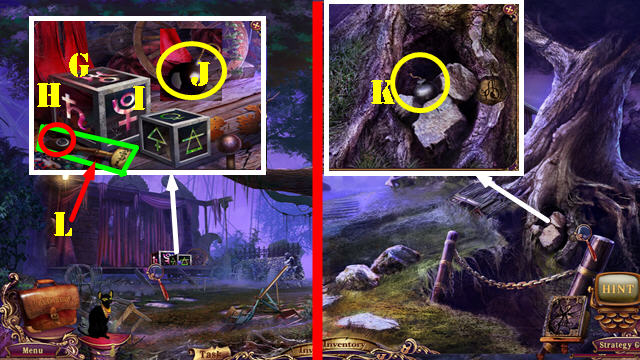
- Rotate the 3 zebras (white); place the key (purple) in the lock.
- Rotate the wheel twice; rotate the 3 sheep (blue); place the key (purple) in the lock.
- Rotate the wheel once. Rotate the 3 mice (orange); place the key (purple) in the lock.
- Change the code to 315 (U) by using the symbols as a clue (V).
- Go to the Attractions.
Chapter 2: Attractions
- Take the Black Diary Page (1) and look at the Black Diary.
- Grab the GEAR (2).
- Go forward to the Mutoscope (3).
- Open the cover and place the MUTOSCOPE REEL in it (4); take the DART (5).
- Take the CLAM SHELL (6).
- Return to Outside Tent.
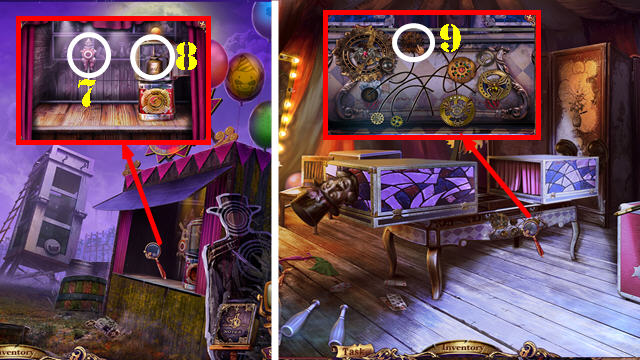
- Throw the DART at the target (7); take the OIL CAN (8).
- Go into Larry's Tent.
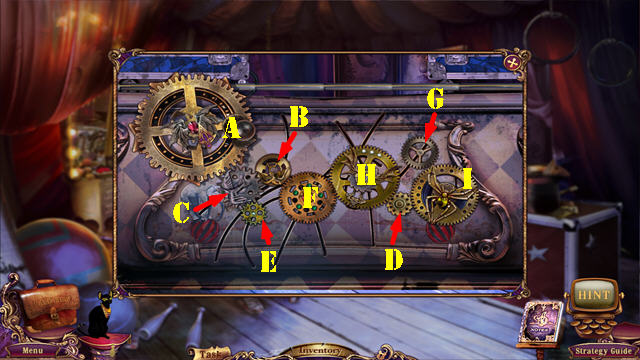
- Remove the rusty gear (9); place the 2 GEARS on the puzzle; use the OIL CAN on the large gear (A) to activate a puzzle.
- Place the gears in the right spots so they all spin.
- Solution: F, H, D, G, H, A, B, C, B, F, E, and A.

- Touch Larry and talk to him (J) to get the TICKET (K).
- Return to the Attractions.
- Remove the ticket and place the TICKET in the slot (L).
- Select the buttons from 1-4 to activate a HOP.

- Play the HOP.
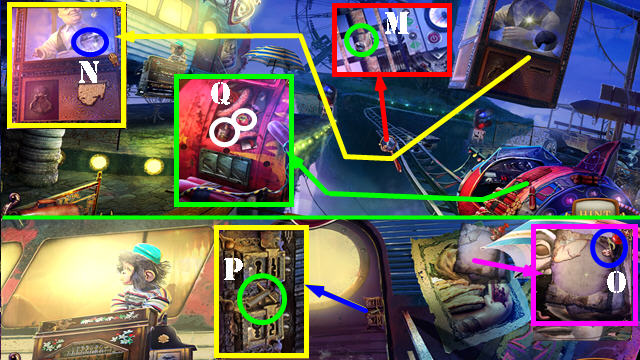
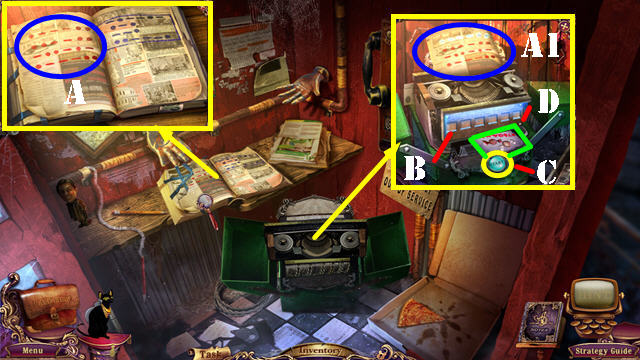
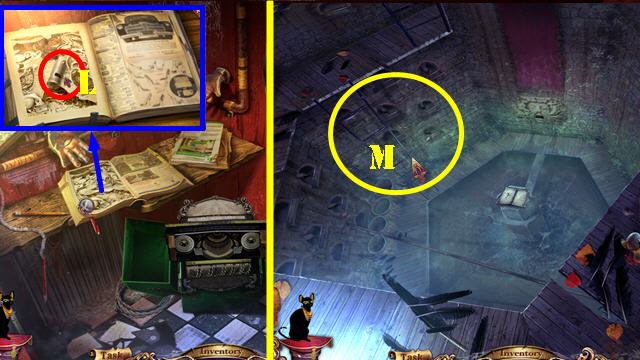
- Open the book (M). Remove the panel to access the disc (N). Rotate the disc and press the symbols that appear in the book (from top to bottom). Take the Driver's Seat (O).
- You receive the RUBBER GLOVES.
- Return to the Fish Gates.
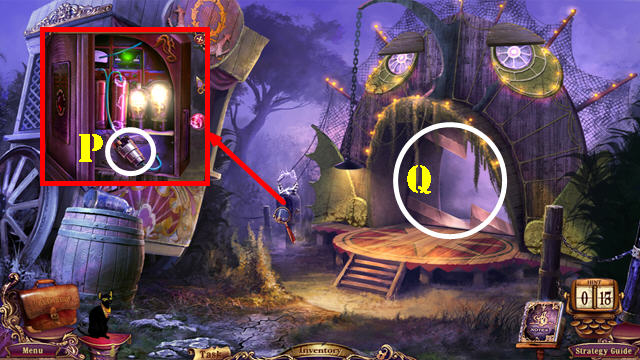
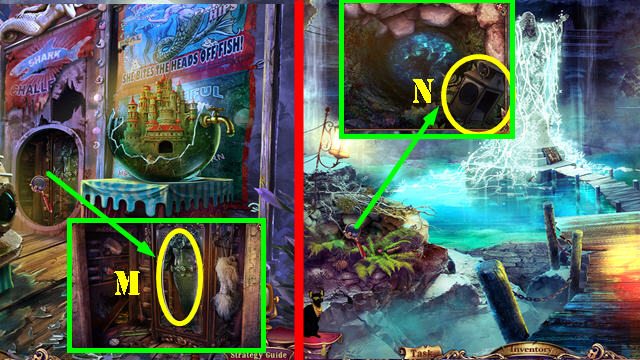
- Use the RUBBER GLOVES on the plug (P).
- Go to Marlena's Tank (Q).
- Touch Marlena's Tank (R).
- Take the DART (S), FISH SKELETON (T) and GLUE (U). Use Isis in the tank and take the SCALLOP SHELL (V).
- Open the curtains; take the Black Diary Page (W).
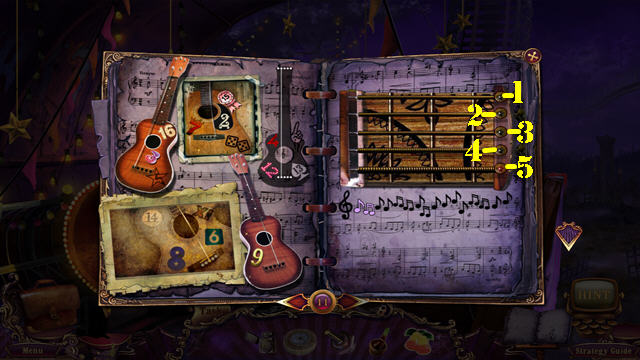
- Open the diary and solve the puzzle by placing the pieces in the right spots (1-7) using the clue on the left.
- Place the SCALLOP SHELL and the CLAM SHELL in the slots (green); take the DART (X).
- Return to Outside Tent.
- Use the 2 DARTS on the targets (A); take the NEEDLE AND THREAD (B).
- Return to Larry's Tent.
- Use the NEEDLE AND THREAD on the heart; take the MENDED HEART (C).
- Return to Outside Carnival.
- Place the MENDED HEART on the scarecrow (D); take the MUTOSCOPE FILM (E).
- Return to the Mutoscope.
- Place the MUTOSCOPE REEL in the device (F) take the MAGNET ON A ROPE (G).
- Return to Marlena's Tank.
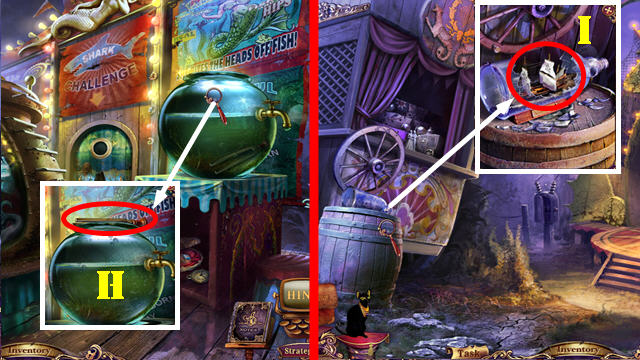
- Use the MAGNET ON A ROPE in the fish bowl; take the TUNING FORK (H).
- Return to the Fish Gates.
- Use the TUNING FORK on the bottle; take the SHIP (I).
- Return to the Crossroads.
- Use the GLUE on the PUPPET (J), then take it.
- Return to Marlena's Tank.
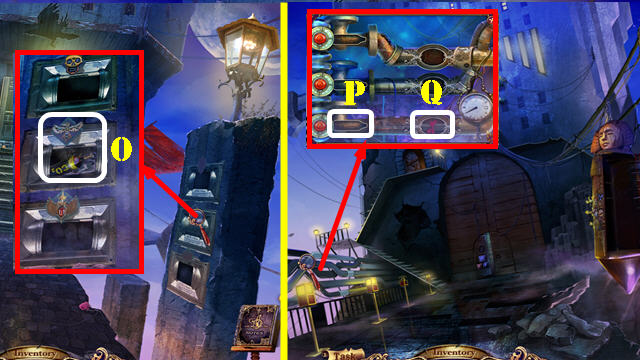
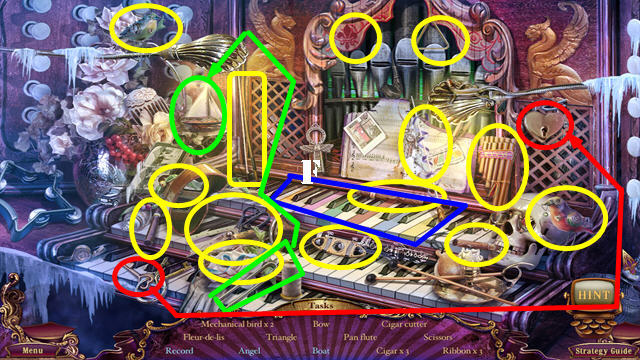
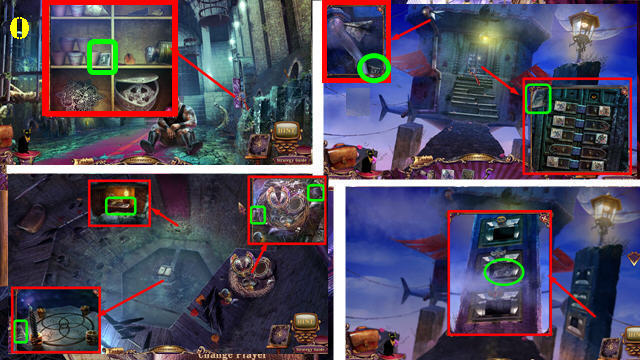
- Place the PUPPET and the SHIP to activate a puzzle (K).
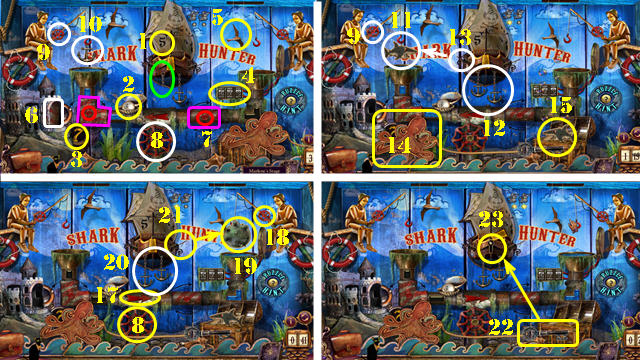
- Touch items 1, 2, and 3. Enter the code 573 here (4).
- Touch the bird (5) and place the tube (6) here (7). Press the red buttons to arrange both pipes as shown (purple).
- Select the valve (8), then turn the left reel (9) until the anchor appears (10). Place the anchor on the left chain (green).
- Select the left reel (9) until the shark (11) appears. Position the anchors as shown (12), then shoot the harpoon (13) so it hits the shark.
- Touch the octopus nine times (14) so the key is visible. Open the chest (15).
- Flip the arrow (17); turn the valve (8). Touch the right reel (18) until the mine appears (19). Position the anchors as shown (20), then shoot the harpoon (21) to make it hit the mine.
- Place the key (22) in the keyhole (23).
- Open the door and look in it; take the DIVING SUIT (L).
- Return to Outside Tent.
- Use the DIVING SUIT in the water; take the BOLT CUTTERS (M).
- Return to the Attractions.
- Cut through the fence with the BOLT CUTTERS (N).
- Go to the Slot Machines.
Chapter 3: Slot Machines
- Take the NAIL PULLER (O).
- Pull the lever (P) to break it.
- Return to the Fish Gates.
- Use the NAIL PULLER on the nails (Q); take the WHEEL.
- Return to the Slot Machines.
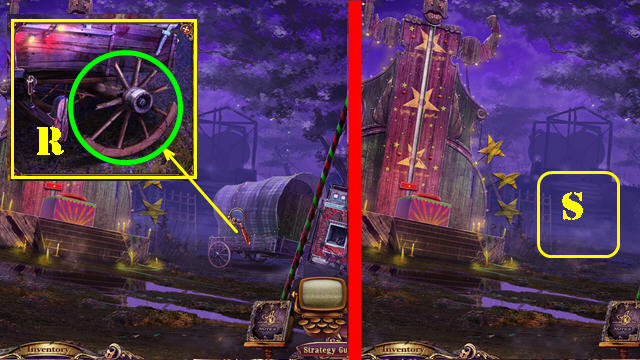
- Remove the wagon wheel and place the WHEEL on it (R).
- Push the wagon and go forward to Fabiano's Stage (S).
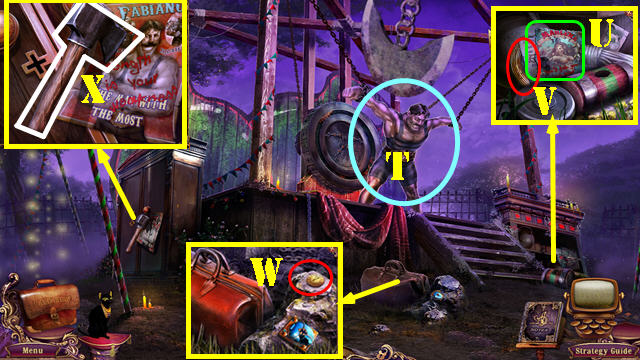
- Touch Fabiano (T).
- Remove the Black Diary Page (U) for a clue and take the DOOR RING (V).
- Take the GAME COIN (W) and AXE (X).
- Return to the Crossroads.
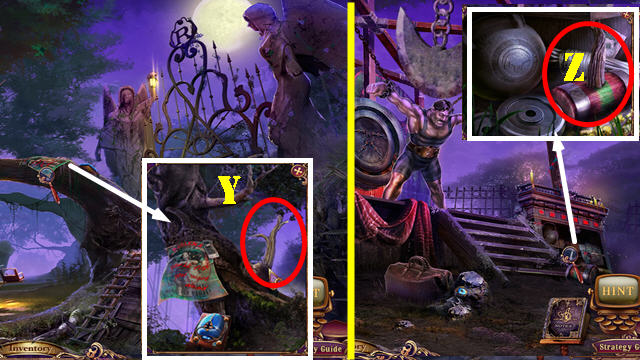
- Use the AXE on the STICK (Y), then take it.
- Return to Fabiano's Stage.
- Use the STICK in the mallet head; take the WEAK HAMMER (Z).
- Return to the Slot Machines.
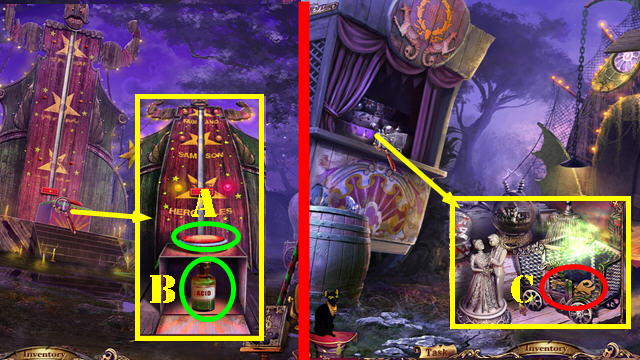
- Use the WEAK HAMMER on the device (A); take the ACID (B).
- Return to the Fish Gates.
- Use the ACID on the cage; take the SEA KEY (C).
- Return to Marlena's Tank.
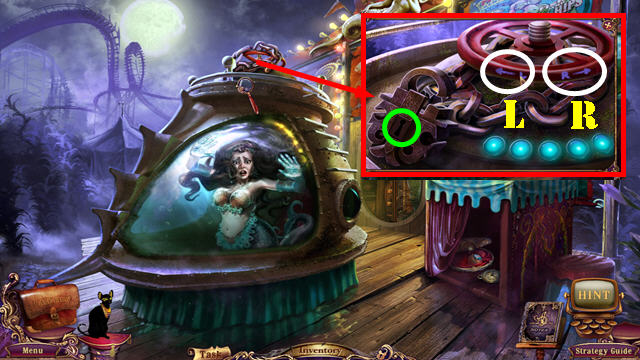
- Open the lock and use the SEA KEY in it (green); turn the valve: Rx2, L, R, and L.
- Talk to Marlena to receive the BONE HEAD.
- Return to Fabiano's Stage.

- Place the BONE HEAD on the skeleton.
- Set the joints as shown in the screenshot (D).
- Take the BUTTON and CLOSET KEY (E).
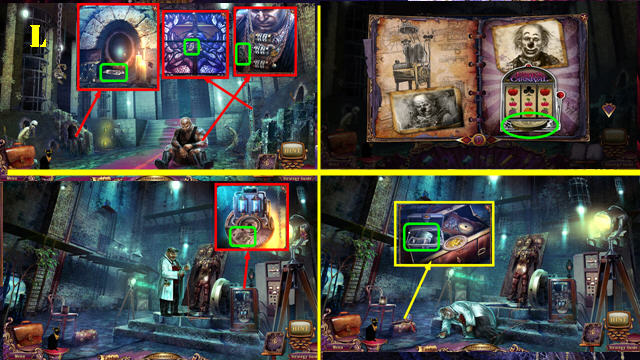
- Use the CLOSET KEY in the lock (F); turn it to activate a HOP.

- Play the HOP.
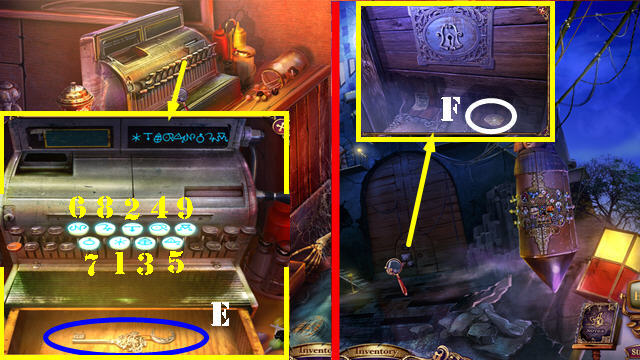
- Touch the poster to reveal a code (G); touch the code and dial it on the phone (1-5). Take the card (purple).
- You receive the MIDDLE HAMMER.
- Return to the Slot Machines.
- Use the MIDDLE HAMMER on the device (H); take the DOOR RING (I).
- Return to the Crossroads.
- Place the 2 DOOR RINGS on the gate; pull the rings and go forward (J).
Chapter 4: Outside Trailer
- Touch anywhere for a cut scene.
- Look at the newspaper (K).
- Take the BUTTON (L), GAME COIN (M), and HORSESHOE AMULET (N).
- Use Isis in the tree hole (yellow); take the MECHANICAL BIRD (O).
- Place the 2 MECHANICAL BIRDS in the cage (P).
- Touch the birds; take the CARROT and the LEVER (Q).
- Return to the Slot Machines.
- Place the LEVER on the machine (R).
- Insert a GAME COIN in the slot (S); pull the lever. Insert the next 2 GAME COINS and pull the lever twice.
- Take the BUTTON and the JACKPOT AMULET (T).
- Return to Larry's Tent.
- Give the CARROT to the bunny; take the FOUR-LEAF AMULET (U).
- Place the FOUR-LEAF AMULET, JACKPOT AMULET, and HORSESHOE AMULET in the slots (V).
- Take the SOLVENT and the SCARAB KEY (W).
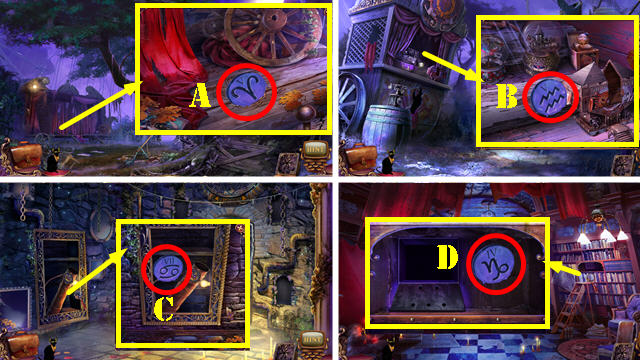
- Return to Outside Carnival. Use the SCARAB KEY in the lock; turn the key and take the 1/6 SCARAB(A).
- Go to Theater of Day and Night. Use the SOLVENT on the scarab. Use the SCARAB KEY in the lock; turn the key and take the 2/6 SCARAB (B).
- Go to the Crossroads. Use the SCARAB KEY in the lock; turn the key and take the 3/6 SCARAB (C) and the SCARAB FRAGMENTS (D).
- Go to Marlena's Tank. Use the SCARAB KEY in the lock; turn the key and take the 4/6 SCARAB (E).
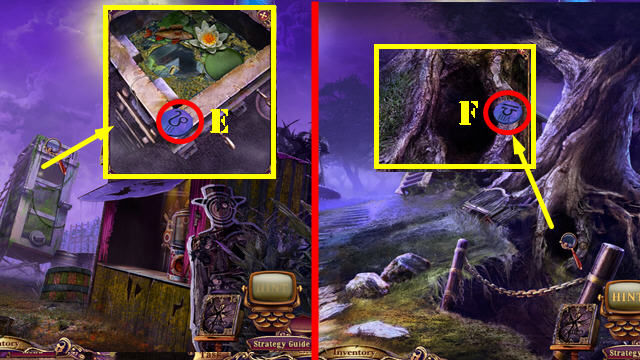
- Return to Fabiano's Stage. Use the SCARAB KEY in the lock; turn the key. Place the SCARAB FRAGMENTS on the scarab and take the 5/6 SCARAB (F).
- Return to Outside Trailer. Use the SCARAB KEY in the lock (G); touch the scarab (it will fall). Touch the scarab fragment (H); take the 6/6 SCARAB.
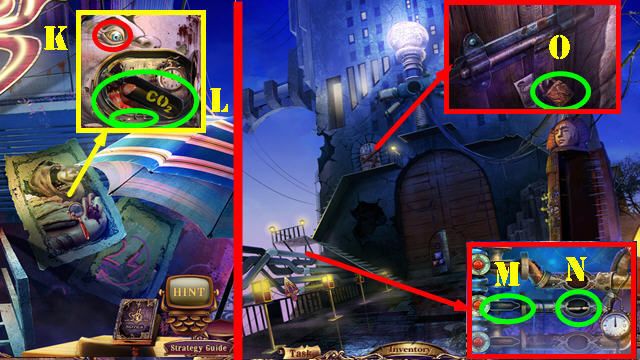
- Zoom into the trailer; place the 6 SCARABS in the slots to activate a puzzle (I).
- Place the handle (1) on the box and crank it (2). Note the time (3). Change the clock to 3:45 (4).
- Swap the batteries as shown (5). Turn on the flashlight (6). Flip the can (7) twice.
- Touch the buttons: Jx2 and Lx2. Place the chalk (8) on the chalkboard (9).
- Connect the dots as shown (10). Touch the eye (12).
- Press the buttons: Kx2, Mx2, J, L; touch the eye (11).
- Place the coin (13) in the slot (14). Push the button (15).
- Enter Madame Fate's Trailer.
Chapter 5: Madame Fate's Trailer

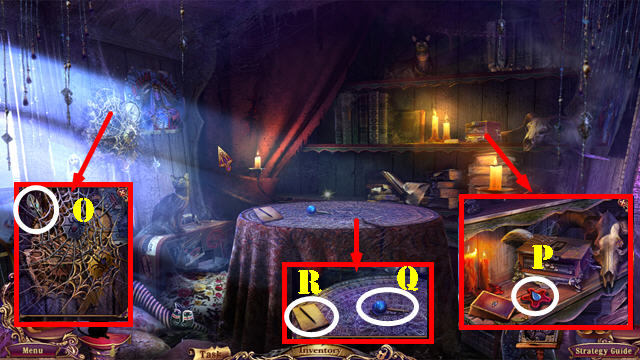
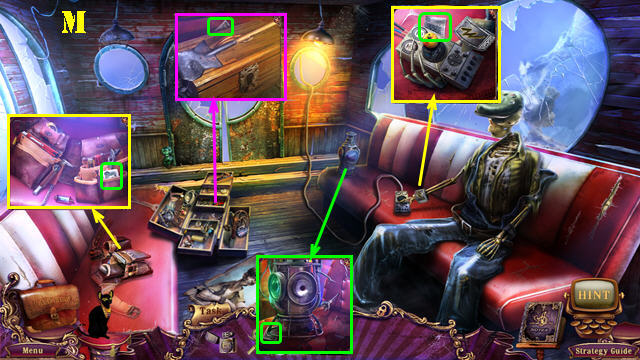
- Touch the postcard and read it (N).
- Grab the ZIPPER SLIDER (0).
- Take the Black Diary Page (P).
- Open the Black Diary. Position the birds correctly by rotating the birds and the triangles.
- Solution (Q).
- Return to Fabiano's Stage.
- Place the ZIPPER SLIDER on the bag.
- Open the bag; take the MUTOSCOPE REEL and the PIECE OF PAPER (R).
- Return to the Mutoscope.
- Place the MUTOSCOPE REEL in the device (S); take the SCREWDRIVER (T).
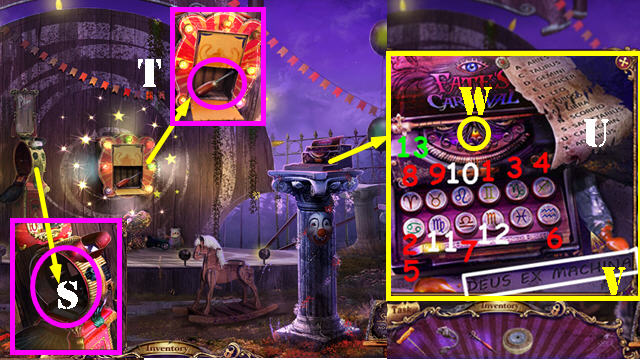
- Place the 3 BUTTONS on the typewriter. Use the SOLVENT on the paint. Attach the PIECE OF PAPER to the other one (U) to activate the puzzle.
- Spell out the phrase 'DEUS EX MACHINA' using the buttons and the clue (V).
- Solution (1-13).
- Take the GARGOYLE'S EYE (W).
- Return to Marlena's Tank. Use the SCREWDRIVER on the screw; take the CLOCK HAND (A).
- Return to the Slot Machines. Use the SCREWDRIVER on the screw; take the CLOCK HAND (B).
- Return to Outside Carnival. Use the SCREWDRIVER on the screws; take the TOGGLE SWITCH (C).
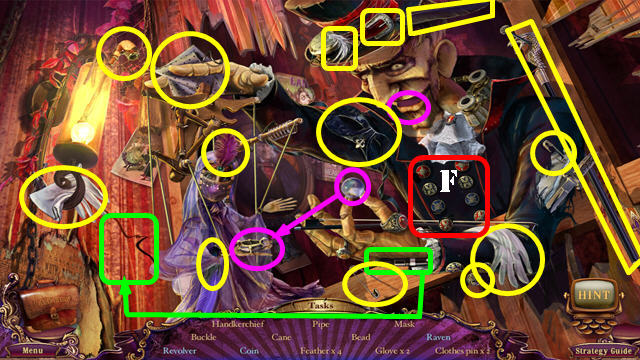
- Return to Outside Trailer. Place the TOGGLE SWITCH on the register (D); flip the switch to activate a HOP.
- Play the HOP.
- Rotate the picture as shown (E). Take the scroll (F).
- You receive the second GARGOYLE'S EYE.
- Return to Madame Fate's Trailer.
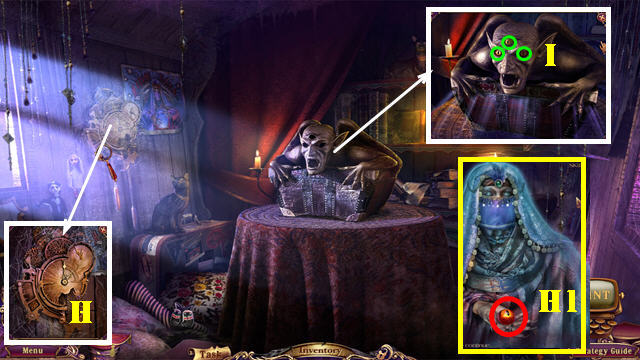
- Remove the cobwebs.
- Place the 2 CLOCK HANDS on the clock and spin them for a cut scene (H). You receive the GARGOYLE'S EYE (H1).
- Place the 3 GARGOYLE'S EYE in the slots (I). Touch the gargoyle and zoom into the chest to activate a puzzle.
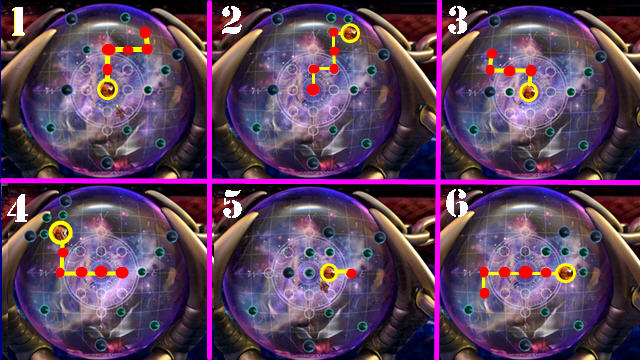
- Drag the yellow bead around the puzzle and attach it to the green and blue beads until you form the pattern on the surface of the sphere.
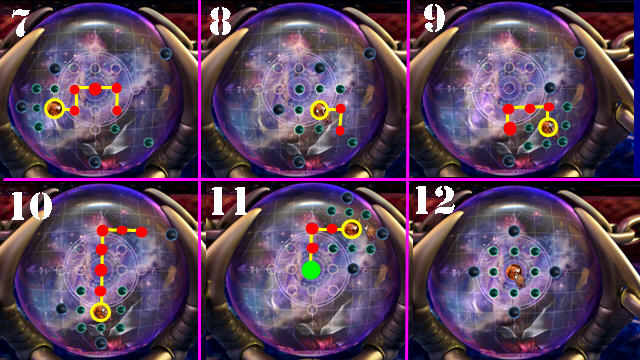
- Follow steps 1-12 to solve the puzzle. Step 12 is the solved puzzle.
- You will be automatically taken to Outside Carnival.
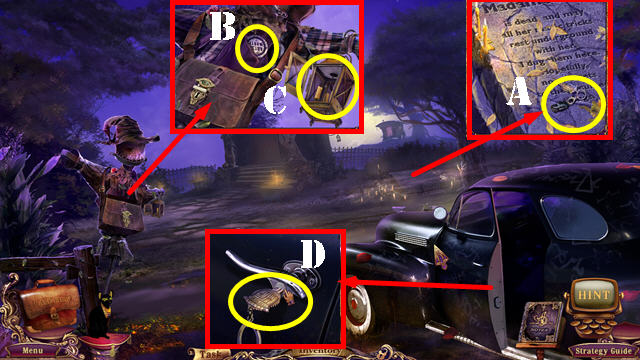
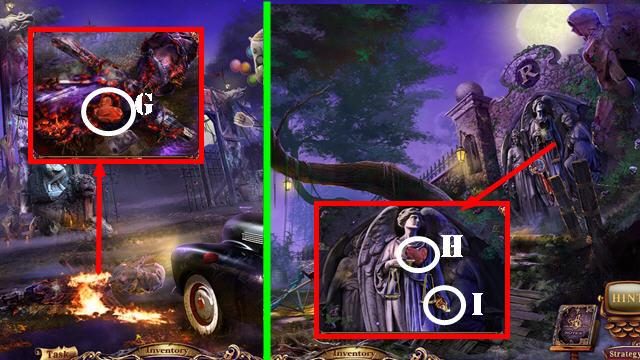
- Take the KEYS (A) and RING (B).
- Open the lantern (C).
- Use the KEYS in the lock (D); turn the key for a cut scene.
- Enter the Detective's Car.


- Grab the ANGEL'S AMULET (E).
- Take the Black Diary Page (F) and open the diary for a puzzle.
- Place the eyes on the tree according to the animal they belong to on the left page.
- Solution (G).
- Walk down. Move forward to the Tomb.
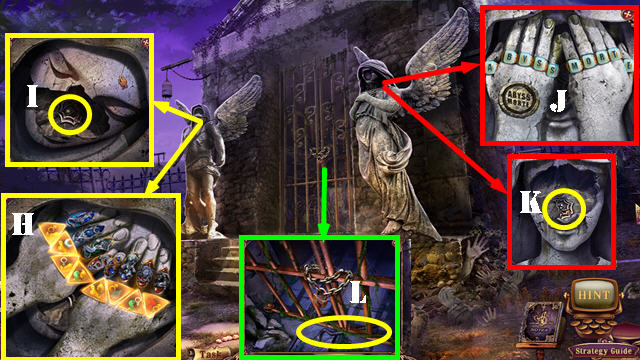
- Place the ANGEL'S AMULET in the slot. Swap adjacent rings as shown in the screenshot (H).
- Take the SEAL HALF (I).
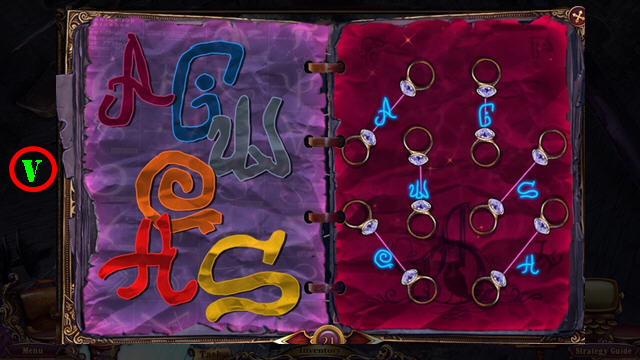
- Place the RING in the slot. Swap adjacent rings to form the words: 'ABYSS MORTE' (J).
- Take the SEAL HALF (K).
- Use Isis in the cell; take the CROWBAR (L).
- Return to the Detective's Car.
- Place the 2 SEAL HALVES in the slot M.
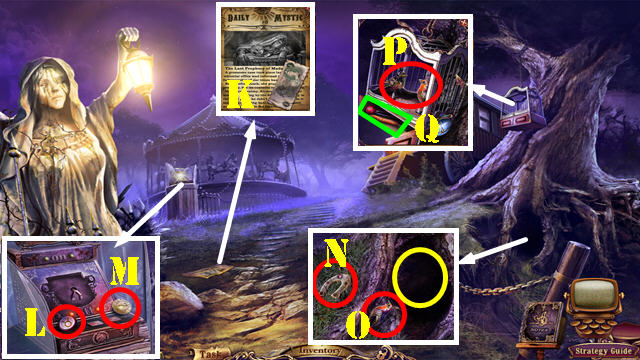
- Remove the debris and open the compartment; take the LIGHTER (N).
- Walk down.
- Use the LIGHTER on the candles; take the LIT LANTERN (O).
- Remove the leaves; use the CROWBAR on the slab (P). Place the LIT LANTERN in the crypt to activate a HOP.
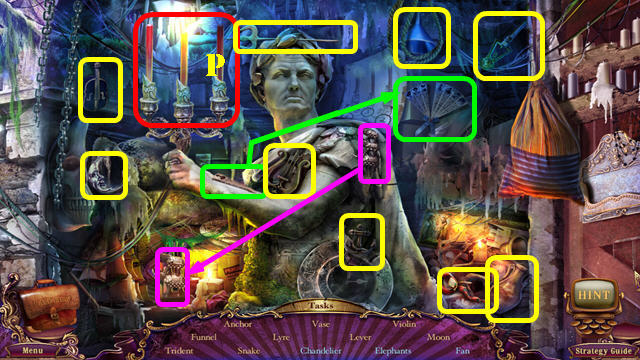
- Play the HOP.
- Place the paws over the right animals (4). Take the Gauntlet.
- You receive the GAUNTLET.
- Enter the Detective's Car.
- Use the GAUNTLET on the thorns; take the DISC SAW (Q).
- Return to the Tomb.
- Cut the chain with the DISC SAW (R).
- Look in the tomb and take the RUSTY KEY (S).
- Walk down twice.
- Use the RUSTY KEY in the lock; turn the key and take the MOON CRYSTAL (T).
- Return to the Tomb.
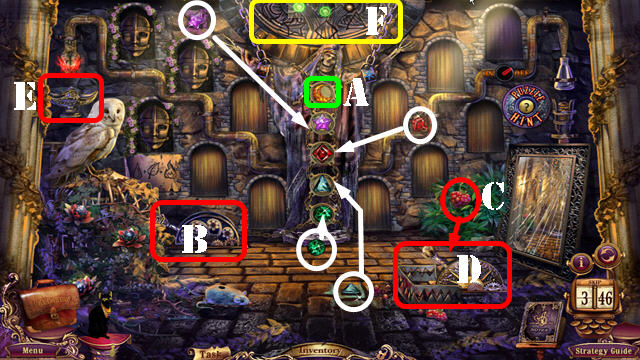

- Place the MOON CRYSTAL in the slot to activate a puzzle (A).
- Pull the lever (B). Place the raspberry on the trap (C). Pull the lever (D).
- Tilt the bowl (E). Collect the gems and put them in the slots (white arrows).
- Select the gems according to the 3 random sequences above (F).
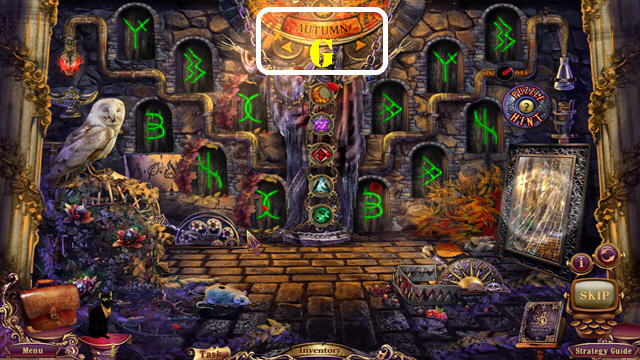
- Use the arrows (G) to toggle through the four seasons. Open the doors with masks to see the symbols, then find the matching symbol to complete this section. The solution is random.
- Flip the 4 masks. Enter (5931) (purple).
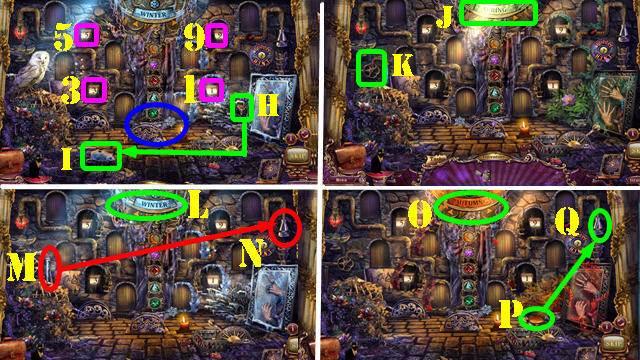
- Switch to winter. Place the key (H) on the wind-up mouse (I). Turn the key thrice. Pull the lever (blue).
- Switch to spring (J). Turn the valve (K).
- Switch to winter (L). Place the icicle (M) in the flask (N).
- Switch to autumn (O). Place the leaf (P) in the flask (Q). Use the candle (R) on the burner (S).
- Flip the switch (T). Flip the bowl (U).
- Switch to spring (V). Open the cage and pull the lever (W).
- You receive the THEATER KEY.
- You will be transported to Outside Carnival.
Chapter 6: The Theater Hall
- Take the HAMMER (A).
- Return to the Theater of Day and Night.
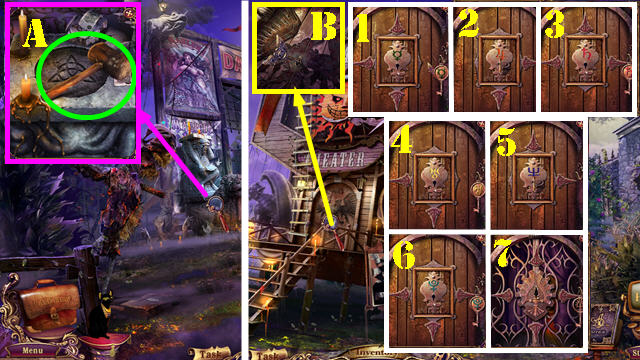
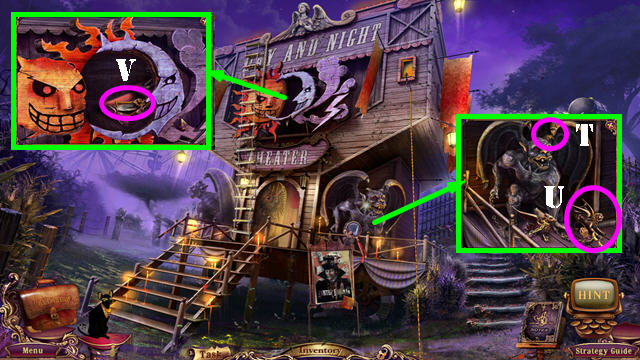
- Use the THEATER KEY in the lock (B); turn the key. Zoom into the door for a puzzle.
- Place the right keys into the lock. Place a key on the hook to store it. Use the arrows to switch between locks.
- Right (1). Left twice and up (2). Down twice and right (3). Right and up twice (4). Left twice and down twice (5). Right and up twice (6). Down (7).
- Enter the Theater Hall.
- Take the WEDGE (E).
- Walk down.
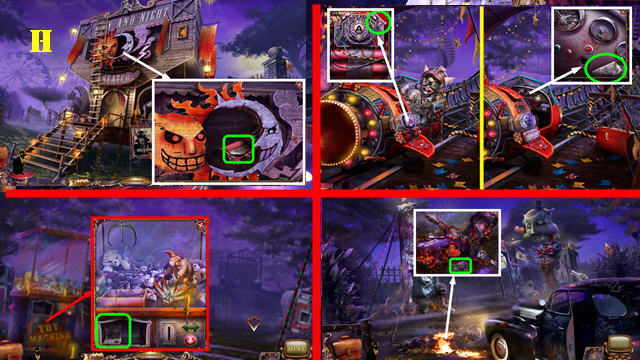
- Place the WEDGE on the sign (F); use the HAMMER on it.
- Take the MUTOSCOPE FILM and the RAVEN FEATHER 1/6 (G).
- Return to the Mutoscope.
- Take the SPRING (H).
- Return to Outside Carnival.
- Remove the spring and replace it with the SPRING (I) to activate a HOP.
- Play the HOP.
- Select the first and third buttons; take the rose (J).
- You receive the MUTOSCOPE PART.
- Return to the Mutoscope.

- Place the MUTOSCOPE PART and the MUTOSCOPE FILM on the mutoscope (K).
- Take the HOOK (L), STETHOSCOPE (M) and TOKEN 3 (N).
- Remove the bear head and take the RAVEN FEATHER 2/6 (O).
- Return to the Gaming Machines.
- Take the RAVEN FEATHER 3/6 (P).
- Take the Black Diary Page for a clue (Q).
- Place the HOOK on the rope (R); take the HOOK AND ROPE.
- Return to the Theater of Day and Night.
- Use the HOOK AND ROPE on the window (S). Take the FUEL (yellow) and RAVEN FEATHER 4/6 (T).
- Use Isis in the window; take the TRYAD 2 (U).
- Return to the Attractions.
- Take the RAVEN FEATHER 5/6 and TRYAD 3 (V).
- Return to Fabiano's Stage.
- Take the RAVEN FEATHER 6/6 (W).
- Return to the Theater Hall.
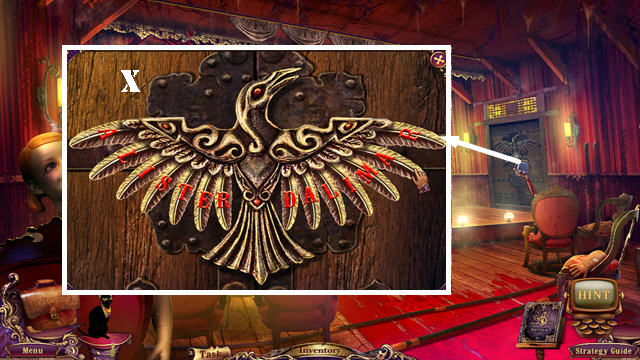
- Place the 6 RAVEN FEATHERS on the door to activate a puzzle.
- Swap adjacent feathers to spell out ALISTER DALIMAR (X).
- Enter the Dressing Room.
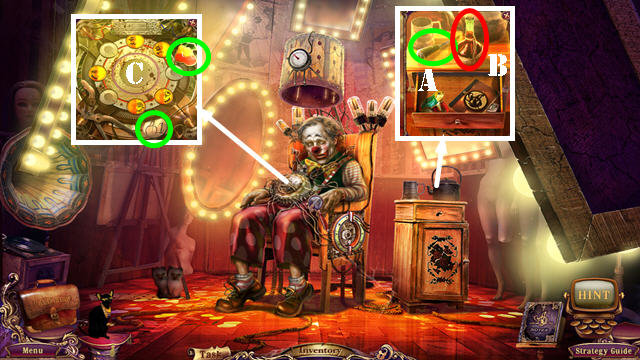
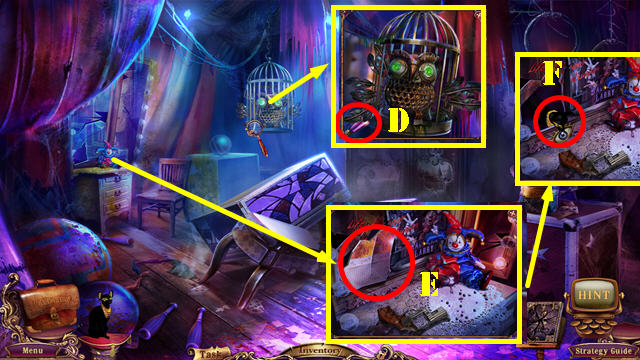
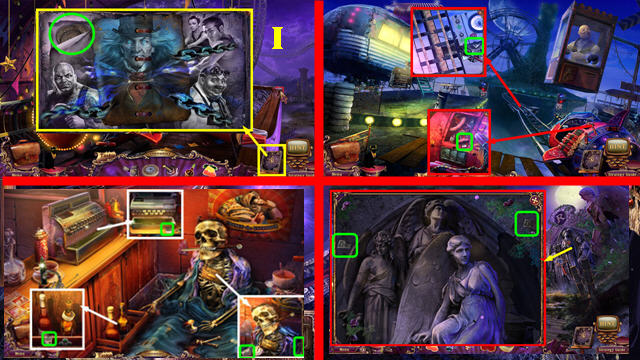
- Touch the clown for a cut scene.
- Take the GUILLOTINE LEVER (A).
- Remove the cork with the CORKSCREW and take the BOTTLE OF WINE (B).
- Take the MAGNET 1 and TOKEN 1 (C).
- Return to the Gaming Machines.
- Place the GUILLOTINE LEVER in the slot (D) and pull it; take the HEAD (E).
- Return to the Crossroads.
- Touch the left statue; place the HEAD on it (F). Take the SKELETON HEAD (G).
- Return to Fabiano's Stage.
- Place the SKELETON HEAD on the skeleton to activate a puzzle.
- Adjust the joints as shown (H).
- Talk to Fabiano (I) to receive the DIGITAL REEL.
- Return to the Dressing Room.
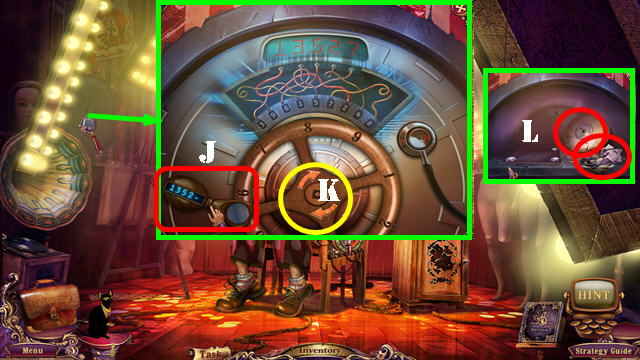
- Place the DIGITAL REEL and the STETHOSCOPE on the safe.
- Turn the wheel the correct way to get the 13527 code. Trace the wires on the machine to the numbers below.
- Move the lens (J) out of the way and then put it back once the right number is on the wheel in the spot where the lens was originally set. Use the arrows (K) to rotate the wheel.
- Solution: place the wheel on these numbers: 2, 5, 3, 4, 6 and then place the lens after each one to record the number. Make sure to move the lens out of the way before placing the next number.
- Take the MUTOSCOPE FILM and the Black Diary Page for a clue (L).
- Return to the Mutoscope.
- Take the WIND-UP KEY (M).
- Return to the Dressing Room.
- Place the WIND-UP KEY on the frog (N); take the WICK (O).
- Return to Fabiano's Stage.
- Use the FUEL and then the WICK on the lantern (P); use the LIGHTER on the wick.
- Use Isis on the HANDLE and then take it (Q).
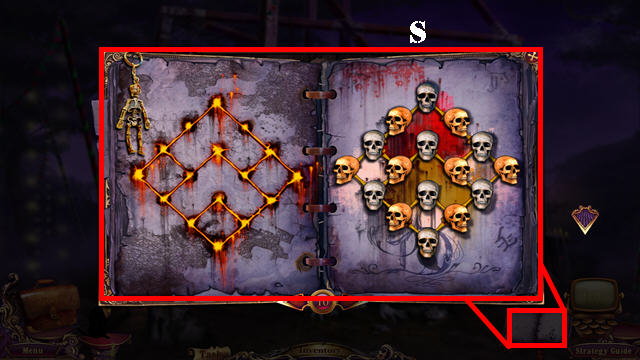
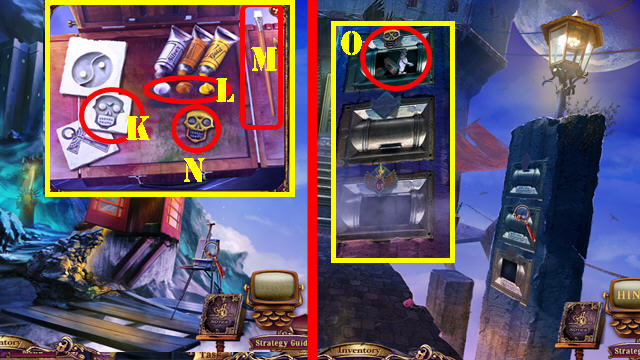
- Take the Black Diary Page (R).
- Arrange the bones on the skulls according to the clue on the left page.
- Transfer bones between skulls.
- Solution (S).
- Return to the Mutoscope.
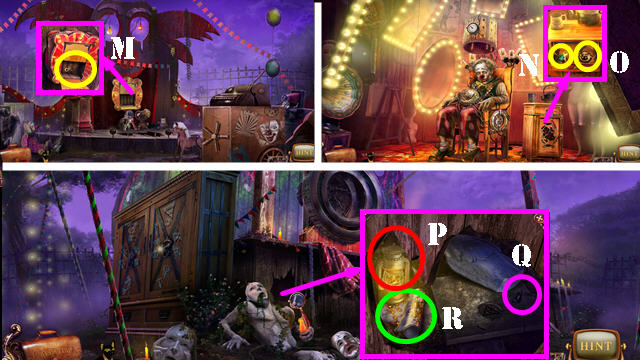
- Place the HANDLE on the box (T); take the MONOGRAM (U).
- Return to the Dressing Room.
- Place the MONOGRAM in the slot; take TRYAD I (V).
- Return to Fabiano's Stage.
- Place TRYADS 1, 2, and 3 in the slot (W); take the BOWL.
- Return to Outside Carnival.
- Place the BOWL on the stand; take the AMULET OF DAY AND NIGHT (X).
- Return to the Theater Hall.
- Place the AMULET OF DAY AND NIGHT in the slot to activate a puzzle (Y).
- Move the conductor (A) here (B).
- Arrange the squares as shown (C). Press GO to make the conductor move.
- Remove the plug (D).
- Open the fan (E). Play the first music sequence shown on the fan. Solution: 1, 3, 5, 4, 2, 7, 6.
- Press the fifth key (5) to put the feather into the air. Press the first key (1) to send the feather into the nose. Place the seed (F) into the dirt (G).
- Close the fan. Flip the 3 switches as shown (purple).
- Place the treble clef (H) into the slot (I). Rotate the treble clefs into the vertical position.
- Use the screwdriver to undo the two bolts on the register (J).
- Adjust the angle and power of the lightning to make it hit the electrode (K). Press Zeus to make him shoot.
- Press the fourth key (4) five times to burst the balloon.
- Flip the 3 switches as shown (orange).Play the second sequence shown in the bowl: 2, 1, 7, 6, 3, 5, 4.
- Touch the laser (L). Play the third music sequence shown on the prism. 4, 7, 1, 6, 3, 5, 2. Take the SWICH (M).
- Return to the Attractions.

- Place the SWICH in the slot to activate a puzzle.
- Press the buttons in the right sequence (1-9) and then pull the handle (N).
- Go to the Roller Coaster Car (O).
Chapter 7: Roller Coaster Car

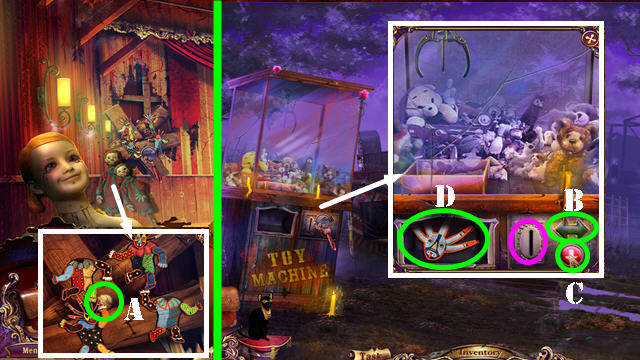
- Touch Bianca for a cut scene (P).
- Take the CLOWN TOY (Q) and SCISSORS (R).
- Return to the Detective's Car.
- Cut the seat with the SCISSORS (S); take the GARGOYLE HORN 1.
- Return to the Theater of Day and Night.
- Place the GARGOYLE HORN 1 (T) on the gargoyle; take the MYTHOLOGICAL BEAST (U).
- Place the MYTHOLOGICAL BEAST on the box; take ALISTER'S KEY (V).
- Go to the Roller Coaster Car.
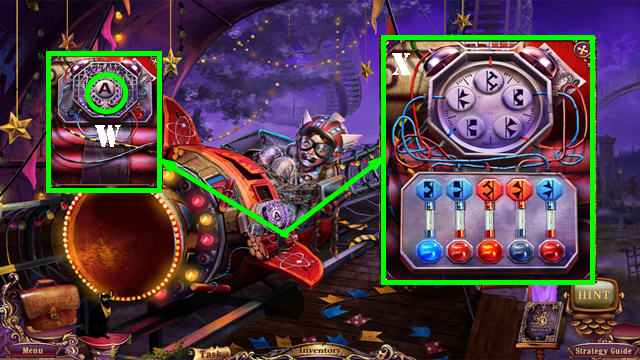
- Use ALISTER'S KEY in the lock (W) and turn it to activate a puzzle.
- Deactivate the bomb. Swap the emblems according to the signs on the dial. Then replace the fuses to match the right colors.
- Solution (X).
- Talk to Bianca to get the JOYSTICK.
- Return to the Theater Hall.
- Take the TOKEN 2 (A).
- Return to the Gaming Machines.
- Place the JOYSTICK in the slot (B).
- Put TOKEN 1 in the slot (purple); touch B and C.
- Put TOKEN 2 in the slot (purple); touch Bx2 and C.
- Put TOKEN 3 in the slot (purple); touch Bx2 and C. Take the CLOWN TOY (D).
- Return to the Theater Hall.
- Place the 2 CLOWN TOYS on the heads to activate a puzzle.
- Swap the doll parts.
- Solution (E). Solving this puzzle activates a HOP.
- Play the HOP.
- Swap the left buttons so they match the ones on the right (F).
- You receive the CANE.
- Return to Outside Carnival.
- Use the CANE on the heart; take the HEART (G).
- Return to the Crossroads.
- Touch the middle statue and place the STONE HEART in the slot (H). Take the ROCKET AMULET (I).
- Return to the Roller Coaster Car.
- Place the ROCKET AMULET in the slot. Take the SWITCH (K) and the Black Diary Page.
- Open the Black Diary for a puzzle. Solution: 2, 5, 1, 2, 1, 3, 5, 3, 4, 5, 3, 2, 2, 3, 5, and 1.
- Place the SWITCH in the ignition and pull it (L) to be transported to the Rail's End.
Chapter 8: Rail's End
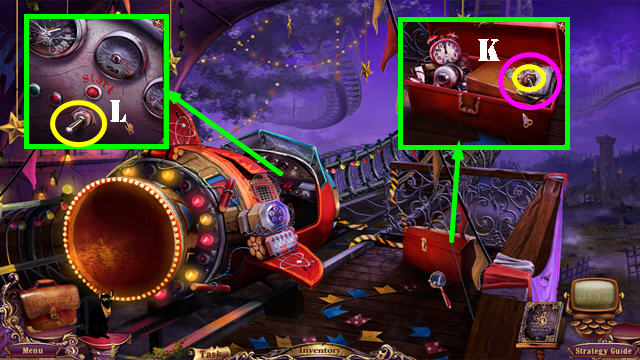
- Take the DIAMOND NOTE (M) and Black Diary Page (N).
- Go forward to Outside the Snack Bar.
- Take the DIAMOND NOTE (O) and the TRIANGLE KEY (P).
- Walk down.
- Use the TRIANGLE KEY in the lock; take the MAGNET 2 and the ROLLER 1 (Q).
- Return to Outside the Snack Bar.
- Place ROLLER 1 in the slot (R); take the LATCHKEY (S).
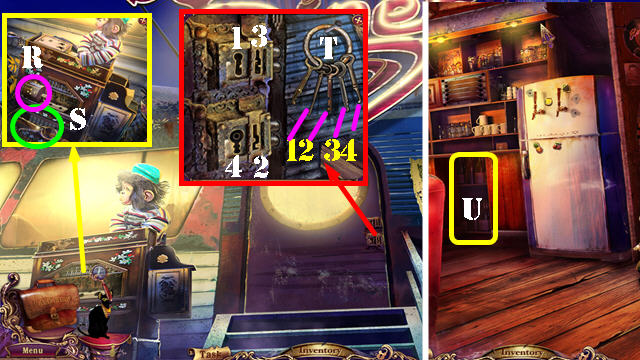
- Place the LATCHKEY on the nail (T).
- Place the keys as shown (1-4).
- Enter the Snack Bar. Go to the Snack Bar Counter (U).
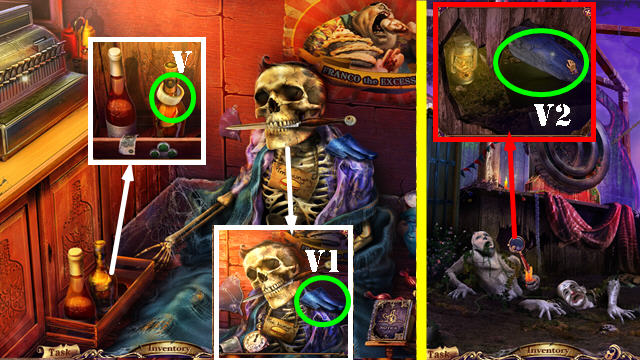
- Take the ADHESIVE TAPE (V).
- Touch the skeleton. Take the WING PART (V1).
- Return to Fabiano's Stage.
- Place the WING PART on the other one; take the WING (V2).
- Return to the Crossroads.
- Touch the right statue and place the WING on it (W). Take the REGISTER LEVER (W1).
- Return to the Snack Bar Counter.
- Place the REGISTER LEVER on the register and pull it (X).
- Enter the code in the order shown (1-9).
- Take the DIAMOND NOTE (Y).
- Return to the Snack Bar.
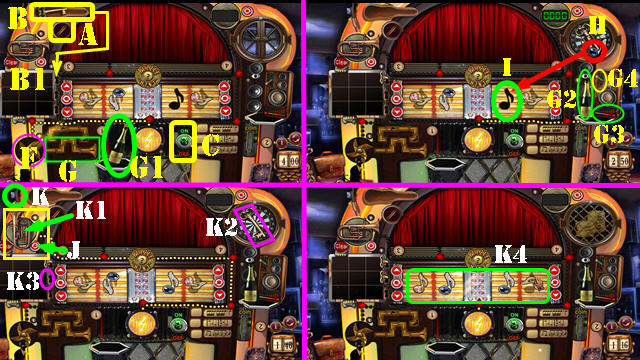
- Place the 3 DIAMOND NOTES on the jukebox to activate a puzzle.
- Choose the bow (A). Open the violin case; put the key (B) into the keyhole (B1).
- Flip the switch (C).
- Flip the knobs as shown to turn on the fan (F). Arrange the pipes as shown (G).
- Use the red switches to connect the electricity to the loudspeaker. Put the bottle (G1) here (G2) and slide the volume to the maximum (G3). Flip the switch (G4).
- Open the window above the bottle. Place the music note (H) here (I).
- Use the red switches to connect the electricity to the trumpet. Press the button (J) to turn the trumpet vertically, press the dart (K) to drop it into the trumpet. Press the button (J) and then select the trumpet (K1) to make it hit the target. Place the key (K2) here (K3).
- Use the red switches to connect the electricity to the central remote control. Turn all the notes upright and vertical (K4).
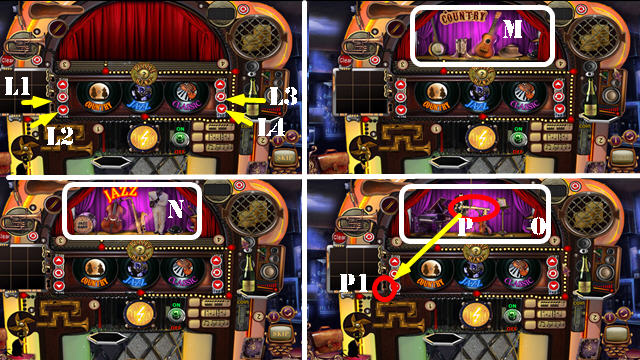

- Press the buttons in this order: L2x4, L1, L4, L2, L2x2, and L4x2.
- Point the switches at the stage.
- Touch the records to flip between scenes. Grab objects from each scene and place them into the right scenes.
- Country: cowboy hat, spur boots, guitar and banjo (M). Jazz: cello, saxophone, black hat, man in a suit and drums (N). Classic: black evening coat, royal piano and music stand (O).
- Place the key (P) here (P1).
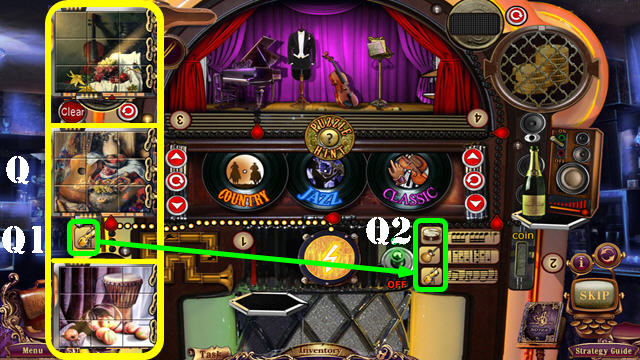
- Connect the switches to the puzzle. Complete three puzzles by flipping and swapping the tiles. Once a picture has been completed, all the tiles will turn black. Solution (Q).
- Place the 3 icons (Q1) here (Q2).
- Use the red switches to connect the electricity to the dial. Enter the correct code: 5174 (R).
- Place the coin (S) in the slot (T).
- Take the PUNCHED CARD PART (U).
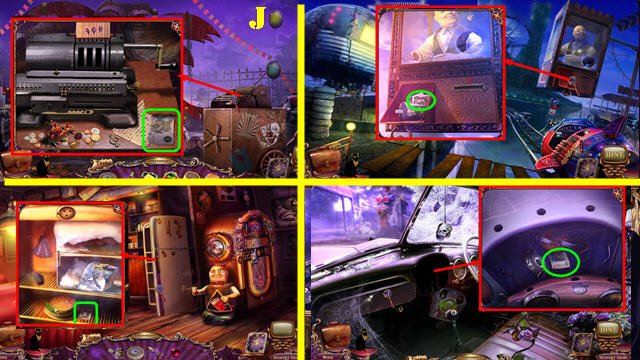
- Return to the Mutoscope.
- Place the PUNCHED CARD PART on the other one (A). Place the ADHESIVE TAPE on it. Take the PUNCHED CARD 1.
- Return to the Rail's End.
- Remove the old punched card and place the PUNCHED CARD 1 in the slot (B).
- Take the ROLLER 2 (C).
- Return to Outside the Snack Bar.
- Place ROLLER 2 in the slot (D); take the DRUMSTICK (E).
- Return to the Snack Bar.
- Use the BOTTLE OF WINE on the glass (F); take the FISH SKELETON 2 (G).
- Take the EMPTY BOTTLE (H).
- Go to the Snack Bar Counter.
- Put down the EMPTY BOTTLE and the DRUMSTICK to activate a puzzle.
- Recreate the sequence.
- Round 1: 2, 1, 3, 1.
- Round 2: 1, 3, 2, 2, 3, 1.
- Round 3: 1, 3, 2, 3, 1, 2, 1, 3.
- Take the RUBY and the MAGNET 3 (I).
- Walk down.
- Place the 3 MAGNETS on the fridge as shown (J).
- Take the HAMBURGER and KNOB (K).
- Go to the Snack Bar Counter.
- Give the HAMBURGER to the skeleton; take the KITCHEN KNIFE (L).
- Return to the Rail's End.
- Cut the tubes with the KITCHEN KNIFE; take the PIPE WRENCH PART and ACTIVATOR 3 (M).
- Return to the Detective's Car.
- Place the PIPE WRENCH PART on the other part; take the PIPE WRENCH (N).
- Loosen the bolts with the PIPE WRENCH. Take the CODE REEL 1 (O).
- Return to the Theater of Day and Night.
- Cut the bag with the KITCHEN KNIFE; take the CODE REEL 2 (P).
- Return to the Dressing Room.
- Loosen the bolts with the PIPE WRENCH (Q); take the EMERALD and the CODE REEL 3 (R).
- Return to the Mutoscope.
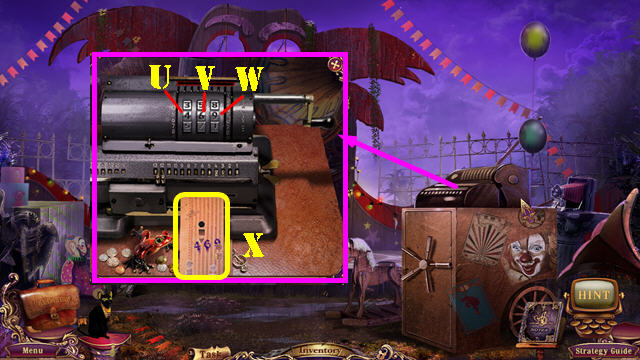
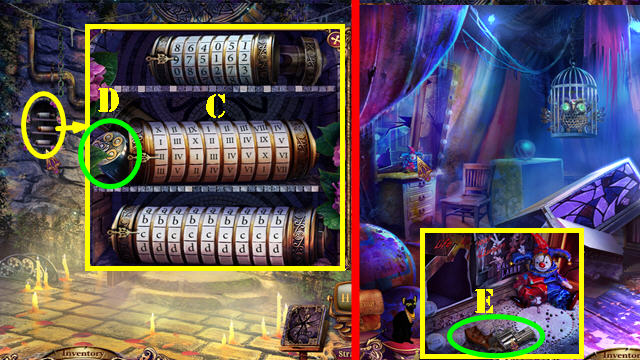
- Place CODE REELS 1, 2, and 3 in the slots.
- Enter 469 on the machine by turning the wheels.
- Solution: U, Wx4, Vx2, Wx6.
- Take the PUNCH CARD 2 (X).
- Return to the Rail's End.

- Place the PUNCH CARD 2 in the slot (A); take the CAN OPENER PART (B).
- Place the CAN OPENER PART on the other one and take the CAN OPENER (C).
- Return to the Snack Bar Counter.
- Use the CAN OPENER on the can; take the FISH SKELETON 3 (D).
- Walk down.
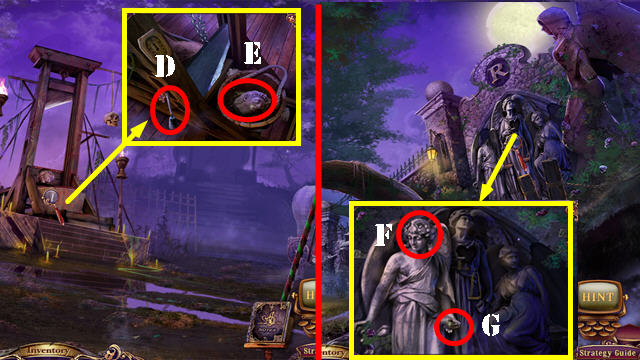
- Place the FISH SKELETONS 1, 2, and 3 on the door to activate a HOP (E).
- Play the HOP.
- Match the animals with their food (F).
- You receive the KNOB.
- Return to the Rail's End.
- Place the 2 KNOBS on the controls to activate a puzzle.
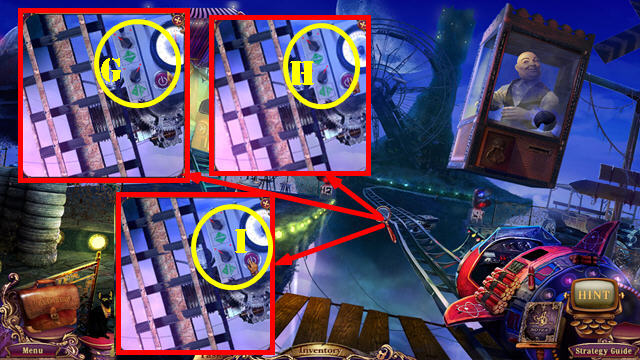
- Position the buttons as shown on G, H, I, and push the button after each set.
- Go forward to the Terminal Point.
Chapter 9: Terminal Point

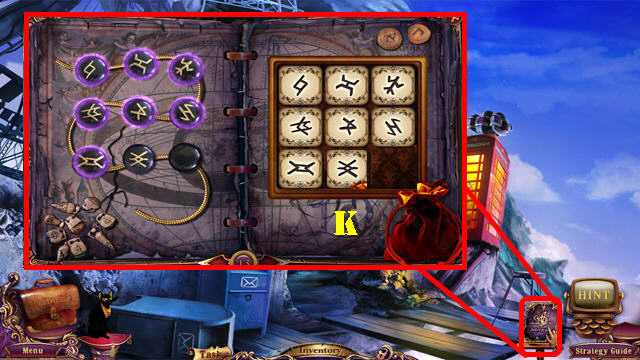
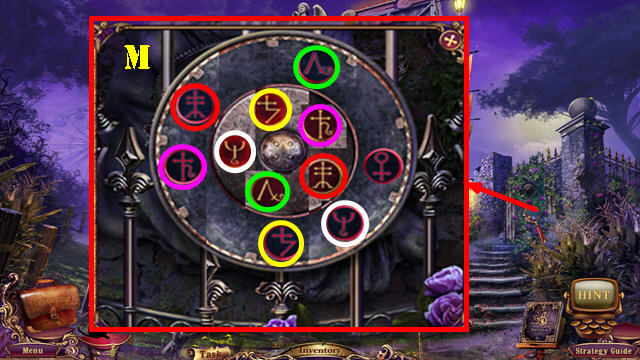
- Take the Black Diary Page for a puzzle (J).
- Open the Black Diary. Place the runes in the right spots (K).
- Go forward to the Ferris Wheel.
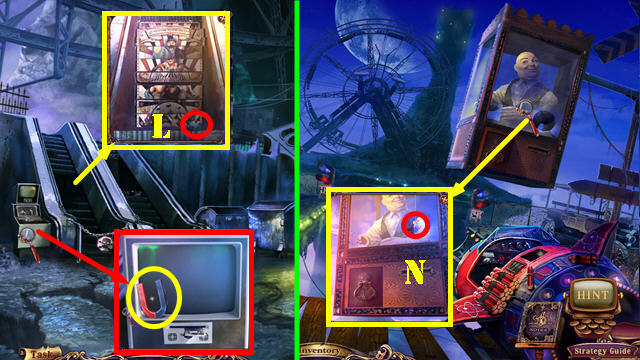
- Use Isis on the stairs; take the TIMER (L).
- Take the MAGNET (M).
- Walk down twice.
- Use the MAGNET on the screw; take the SCREW (N).
- Return to the Dressing Room.

- Place the SCREW on the PLIERS and then take them (O).
- Return to the Detective's Car.
- Use the PLIERS on the metal. Take the REGULATOR (P).
- Return to the Snack Bar.
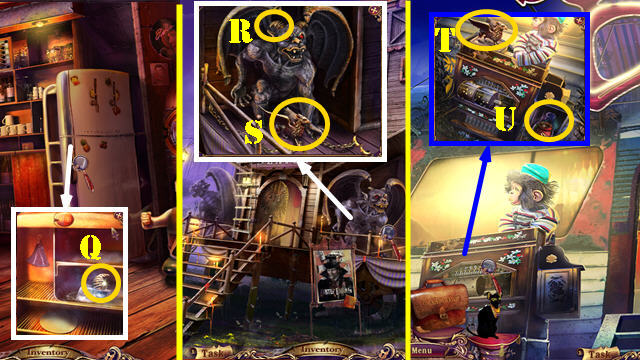

- Place the REGULATOR in the slot; take the GARGOYLE HORN 2 (Q).
- Return to the Theater of Day and Night. Place the GARGOYLE HORN 2 on the gargoyle (R); take the GRIFFON (S).
- Return to the Outside the Snack Bar. Place the GRIFFON on the box (T); take the RED FLASK (U).
- Go to Outside Carnival. Use the RED FLASK in the bowl; take the WIND CHART (U).
- Return to the Theater of Day and Night. Place the WIND CHART in the slot; take the DISCHARGED BATTERY (V).
- Return to the Dressing Room. Place the DISCHARGED BATTERY in the slot; take the BATTERY (W).
- Return to the Ferris Wheel.
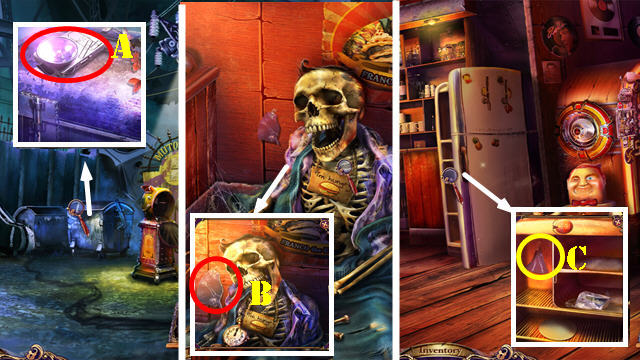
- Place the BATTERY in the slot; take the DEVELOPER (A).
- Return to the Snack Bar Counter. Use the DEVELOPER on the picture; take the PICTURE (B).
- Walk down.
- Use the DEVELOPER on the picture; take the PICTURE (C).
- Return to the Terminal Point.
- Use the DEVELOPER on the picture; take the PICTURE (D).
- Return to the Rail's End.
- Use the DEVELOPER on the picture; take the PICTURE (E).
- Return to Outside the Snack Bar.
- Place the 4 PICTURE pieces; take the Black Diary Page (F).
- Return to the Terminal Point.
- Recreate the picture by positioning the joints. Solution (G).
- Enter the Telephone Booth.
- Take the SAPPHIRE (H).
- Walk down.
- Place the SAPPHIRE, RUBY, and EMERALD in the slots (I).
- Take the NEUTRAL SMILEY and TWISTED KEY (J).
- Return to Fabiano's Stage.
- Use the TWISTED KEY in the lock and turn the key. Take the POISON ROSE KILLER (K).
- Return to the Theater of Day and Night.
- Use the POISON ROSE KILLER on the roses to activate a puzzle (L).
- Select one symbol, rotate the disk and select the matching symbol. Matching symbols do not have to appear in the window at the same time.
- Solution (M). Solving the puzzle activates a HOP.
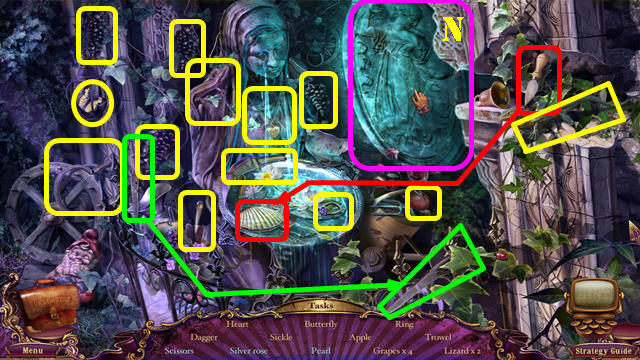
- Play the HOP.
- Arrange the picture as shown (N).
- You receive the SILVER ROSE.
- Return to the Dressing Room.
- Place the SILVER ROSE in the slot; take the STAMP (O).
- Return to Fabiano's Stage.
- Use Isis on the lock and then open it (P).
- Take the IRON MAN and the Black Diary Page for a puzzle (Q).
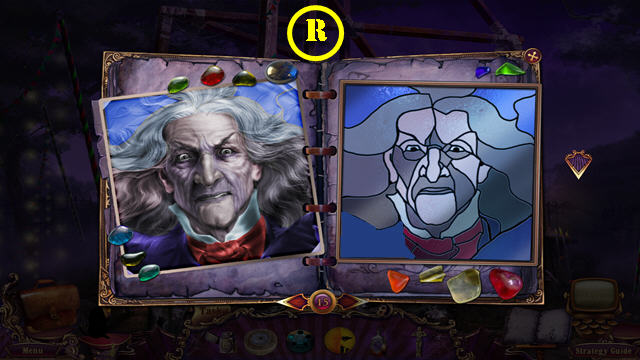
- Color the puzzle using the clue on the left.
- Solution (R). Note: make sure you change the eye color.
- Return to the Telephone Booth.
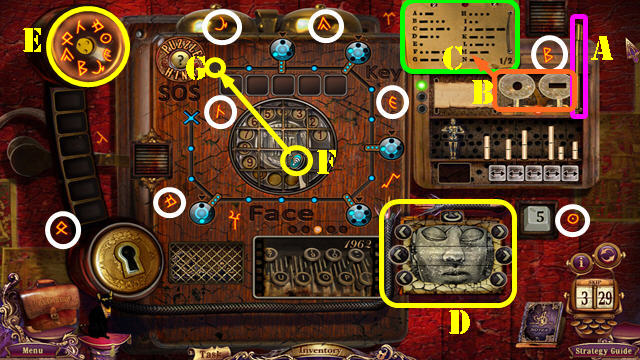
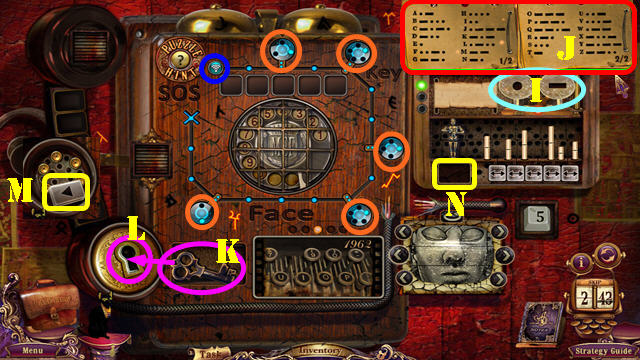

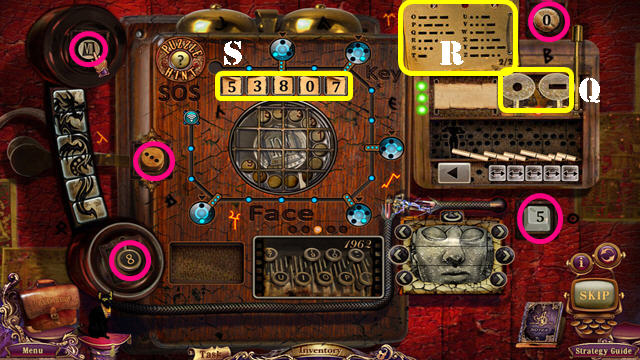
- Place the STAMP, IRON MAN, and TIMER in the slots to activate a puzzle.
- Pull up the antenna (A). Type 'FACE' here (B) using the Morse Code clue on the paper (C). You can flip the pages. Solution: dot, dot, dash, dot, dot, dash, dash, dot, dash, dot, and dot.
- Use the arrows to complete this image (D).
- Turn off all the runes shown on the phone (E) by selecting all the runes circled in white.
- Place the timer (F) here (G).
- Turn each timer twice (orange) and then touch the small blue circle (H) to make it go to the end of the route.
- Type 'KEY' (I) using the Morse Code (J). Solution: dash, dot, dash, dot, dash, dot, dash, and dash.
- Use the key (K) here (L). Place the button (M) here (N).
- Use the buttons to arrange the sticks so they drop one and drop knock the statuette. Select the buttons in this order: 1, 2, 3, and press the button (P).
- Enter the correct combination in the lower part of the telephone rung (1-6).
- Type SOS (Q) using the Morse Code (R). Solution: dot, dot, dot, dash, dash, dash, dot, dot, and dot.
- Dial 53807 (S) using the numbers circled in pink.
- Return to the Ferris Wheel.
- Place the MUTOSCOPE FILM in the device (T).
- Take the ROLLER 3 (U).
- Return to Outside the Snack Bar.
- Place the ROLLER 3 in the slot (V); take the ACCESS CARD (W).
- Return to the Ferris Wheel.
- Place the ACCESS CARD in the slot (A).
- Zoom into the stairs for a puzzle. Swap the pieces to form the image shown (B).
- Place the CONTROL KEY (C) in the slot (D).
- Go up to the Ferris Wheel Car.
Chapter 10: Ferris Wheel Car
- Take the CONTAINER LEVER (D), FUSE 1 (E), GOOD SMILEY (F) and BLOWPIPE NEEDLE (G).
- Touch the Carny (H).
- Walk down.
- Use the CONTAINER LEVER on the container; take the SILVER PAINT, STONE, and FUSE 2 (I).
- Return to the Ferris Wheel Car.
- Use the STONE on the SPADE and then take it (J).
- Return to Outside Carnival.
- Use the SPADE in the dirt; take the BRONZE HANDLE (K).
- Return to Fabiano's Stage.
- Place the BRONZE HANDLE in the niche. Pull the handle and take the VIOLET FLASK (L).
- Return to Outside Carnival.
- Use the VIOLET FLASK in the bowl; take the EVIL SMILEY (M).
- Return to the Dressing Room.
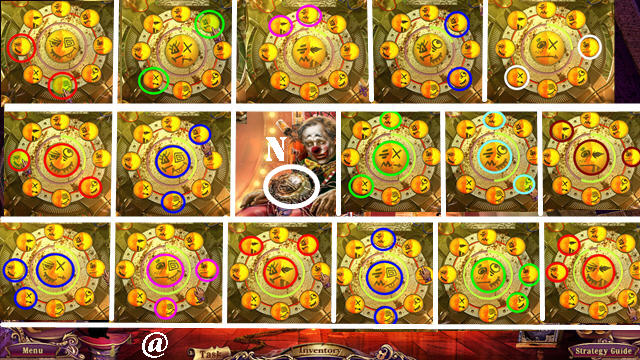
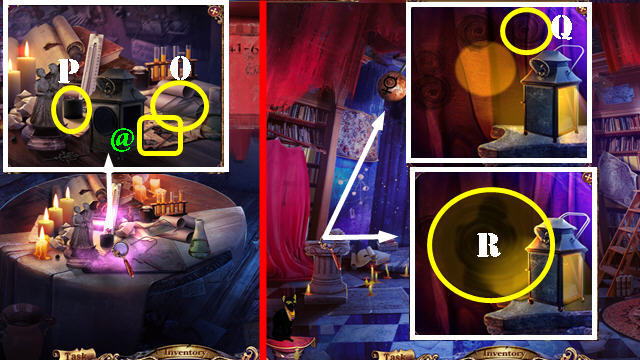
- Place the EVIL SMILEY, GOOD SMILEY, and NEUTRAL SMILEY in the slots (N).
- Match the smiley faces.
- Select the two images that match up to the image in the center.
- Solution (@).
- Talk to the Clown to receive the POSTMAN BADGE.
- Return to the Terminal Point.
- Zoom into the mailbox; place the POSTMAN BADGE in the slot to activate a HOP (not pictured).
- Play the HOP.
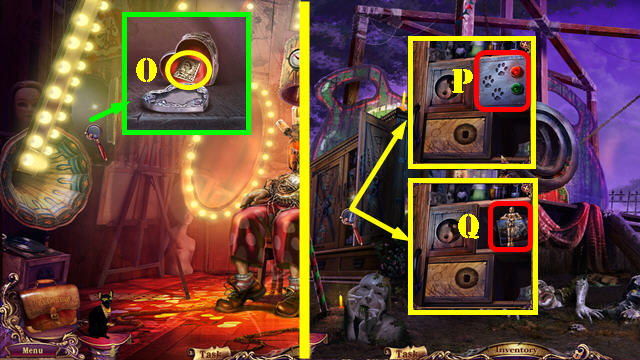
- Place the puzzle piece (O) and solve it (P).
- You receive the CONTROL BUTTON.
- Return to the Ferris Wheel Car.
- Place the CONTROL BUTTON and push it (Q).
- Go forward to the Gates.
- Touch the device for a cut scene (R).
- Use Isis to get the KEY 1 (R1).
- Take the GOLDEN PAINT (S).
- Place KEY 1 in the lock and open it; take the CUTTERS PART (T).
- Walk down.
- Place the CUTTERS PART on the other one; take the CUTTERS (U).
- Return to the Telephone Booth.
- Use the CUTTERS on the wires; open the box; take the LIGHTNING CHARM (V).
- Return to the Ferris Wheel Car.
- Place the LIGHTNING CHARM on the bracelet; take the PAPER PIECE (W).
- Return to the Telephone Booth.
- Place the PAPER PIECE on the other one; take the CYPHER I (A).
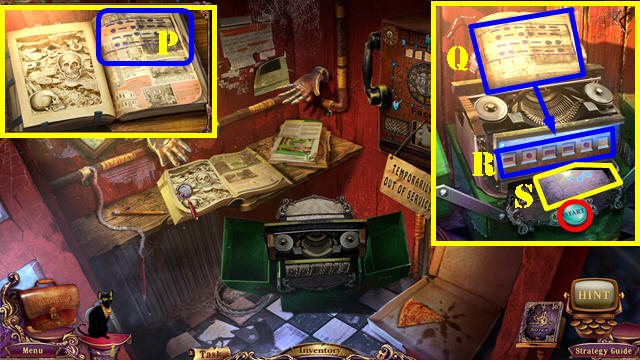
- Place the CIPHER I (A1) on the decoding device. Enter the 4 codes on the cipher here (B).
- Push the 'Start' Button (C) after all 4 codes have been entered; take the Black Diary Page for a clue (D).
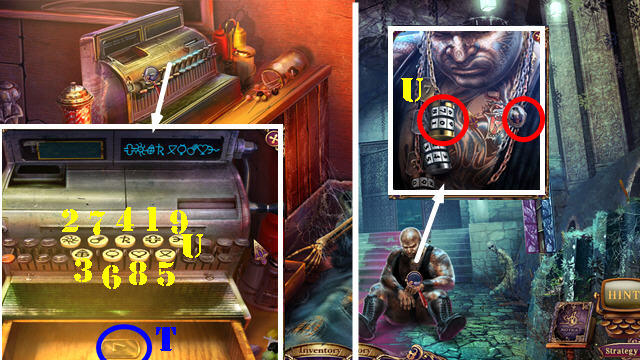
- Return to the Snack Bar Counter.
- Enter the code shown in the notebook (1-9).
- Take the KEY 2 (E).
- Return to the Gates.
- Use the KEY 2 in the lock and open it; take the CLAY 1 (F).
- Return to the Terminal Point.
- Put down the GOLD PAINT and SILVER PAINT. Squeeze both tubes.
- Place the CLAY 1 on the mold (G) and then touch it; dip the paintbrush (H) in the bronze, silver, and gold paints (I) and apply them to the ankh. After using all three paints, take the ANKH.
- Return to the Snack Bar Counter.
- Place the ANKH on the pyramid; take the CYLINDER 1 (K).
- Go to the Gates.
- Place the CYLINDER 1 in the slot (L); open the tube and take the FIRECRACKER (M).
- Return to the Ferris Wheel Car.
- Place the FIRECRACKER in the box (N) and light it with the LIGHTER to activate a HOP.
- Play the HOP.
- You receive the KEY 3 (O).
- Return to the Gates.
- Use KEY 3 in the lock and open it (P).
- Go into the Corridor.
Chapter 11: The Corridor

- Talk to Dante.
- Take the CLAY 2, CHISEL HANDLE, and Black Diary Page for a clown puzzle (Q).
- Open the Black Diary. Position the clown the same as the ballerina (R).
- Return to the Ferris Wheel Car.
- Place the CHISEL HANDLE on the blade; take the CHISEL (S).
- Return to the Corridor.
- Use the CHISEL on the stone; take the STENCIL (T).
- Return to the Terminal Point.
- Put down the STENCIL and place the CLAY 2 over it; touch the stencil (U).
- Paint the yin-yang silver, gold and bronze (V) using the brush (W); take the BALANCE AMULET (X).
- Return to Fabiano's Stage.
- Place the BALANCE AMULET in the slot. Open the door. Use the BLOWPIPE NEEDLE on the bottle; take the POISONED NEEDLE (Y) and the DOVE'S LEFT WING.
- Return to the Roller Coaster Car.
- Use the CHISEL on the box; take the MUTOSCOPE FILM (A).
- Return to the Ferris Wheel.
- Place the MUTOSCOPE FILM in the device (B); take the DOVE'S RIGHT WING (C).
- Return to the Gates.
- Take the IRON HORSE (D).
- Zoom into the device for a puzzle.
- Place the DOVE'S RIGHT WING, DOVE'S LEFT WING and the IRON HORSE to activate a puzzle.
- Place the coin (A) in the slot (B).
- Put the picture (C) in the slot (D).
- Press the third stop button (yellow) and pull the lever (blue) once. Press the first stop button, and then pull the lever (blue) to make the machine display 3 identical pictures.
- Open the scroll (E). Select the reels (purple) in this order: 1,3,2,1,2,3.
- Arrange the puzzles as shown. Book on left and pumpkin on right (white).
- Program the horse to create the numbers 9, 3 and 0. Use the arrows above the field to set the correct route for the horse. Some arrows won't move if you start touching the horse. Solution (F).
- Position the knobs as shown (G) to light the fish.
- Select knife, grenade and revolver (H). Create a dove by pressing the left wing, right wing, tail, and head (I).
- Swap the heads to place them on the right bodies (orange).
- Press the spheres (J) according to the puzzle clues next to each of the dagger handles (pink). The daggers will pull out when a right combination is entered. Complete all six diagrams.
- Press the runes on the lower panel to choose the ones that match the symbols and the animals (K).
- Talk to Lance to receive the BLOWPIPE. It will combine with the POISONED NEEDLE to create the BLOW PIPE WITH NEEDLE (I).
- Go into the Corridor.
- Use the BLOWPIPE WITH NEEDLE on the Tattooed Man (2).
- Go forward to the Laboratory.
Chapter 12: The Laboratory
- Talk to Goodwell (A).
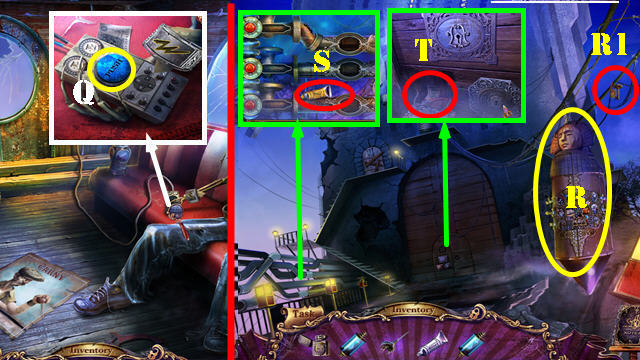
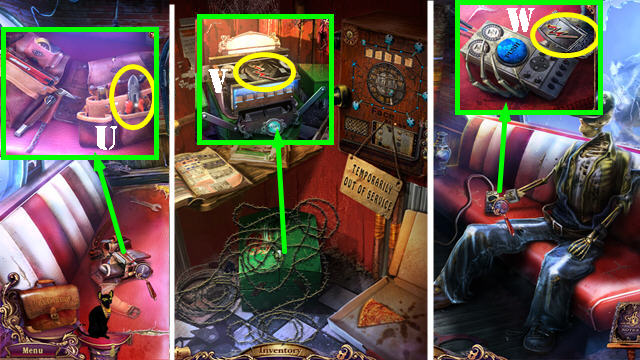
- Place FUSE 1 and FUSE 2 in the slots (B).
- Take the KNIFE PART (C).
- Go to the Ferris Wheel Car.
- Place the KNIFE PART on the knife; take the PAPER KNIFE (D).
- Return to the Telephone Booth.
- Cut the page with the PAPER KNIFE; take the LITTLE MIRROR (E).
- Return to the Corridor.
- Use Isis in the mirror. Take the TATTOOED MAN'S BADGE 1 (F).
- Place the LITTLE MIRROR on the frame (G). Take Isis.
- Place the TATTOOED MAN'S BADGE 1 on his necklace. Enter the code 93 (H) and take the EYE (I).
- Return to Outside the Snack Bar.
- Put the EYE in the socket (K); take the BOOK PART 2 and CYLINDER 2 (L).
- Return to the Gates.
- Place the CYLINDER 2 here (M); touch the tube and take the FILE (N).
- Use the FILE on the lock (O); slide the latch to activate a HOP.
- Play the HOP.
- Touch the 3rd candle; take the chandelier (P).
- You receive the SWITCH.
- Return to the Laboratory.

- Place the SWITCH in the slot to activate a puzzle. Manipulate the switch and wheel to solve the puzzle.
- Drag the wheel to display 55 and center the switch on it (S).
- Take the RUBBER GLUE, ACTIVATOR 2, and the Black Diary Page for a clue (purple).
- Push the button (T).
- Return to the Theater of Day and Night. Place the clock hand on 4 (A).
- Go to the Gaming Machines. Place the clock hand on 11 (B).
- Return to the Roller Coaster Car. Place the clock hand on 7 (C).
- Return to the Snack Bar Counter. Place the clock hand on 4 (D).
- Return to Outside the Snack Bar. Place the clock hand on 6 (E).
- Return to the Gates. Place the clock hand on 10 (F).
- Return to the Ferris Wheel. Place the clock hand on 9 (G).
- Return to the Laboratory. Push the green button; take the BLUE SHATTERED GLASS I (H).
- Take the ladder up to the Bridge.
Chapter 13: The Bridge
- Talk to Mao and Amber (green).
- Take the RIVET 2 and BLUE SHATTERED GLASS 2 (I).
- Walk down.
- Take the BLUE SHATTERED GLASS 3 (J).
- Walk down.

- Place the BLUE SHATTERED GLASS 1, 2, and 3 on the window. Take the LENS and the TATTOOED MAN'S BADGE 2 (K).
- Place the TATTOOED MAN'S BADGE 2 on his necklace; enter 24 on lock (L); take the MEDICINE AMULET (M).
- Go to the Laboratory.
- Place the MEDICINE AMULET in the slot; open the bag; take the ACTIVATOR I, RIVET 3, and Black Diary Page for a clue (N).
- Open the Black Diary. Solve the puzzle by pressing on the numbers from 1-9.
- Place ACTIVATORS 1, 2, and 3 to activate the puzzle.
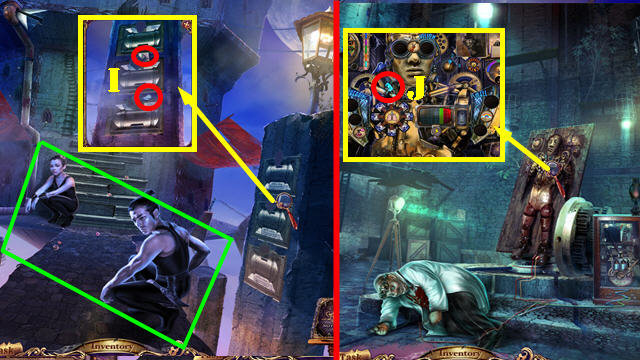
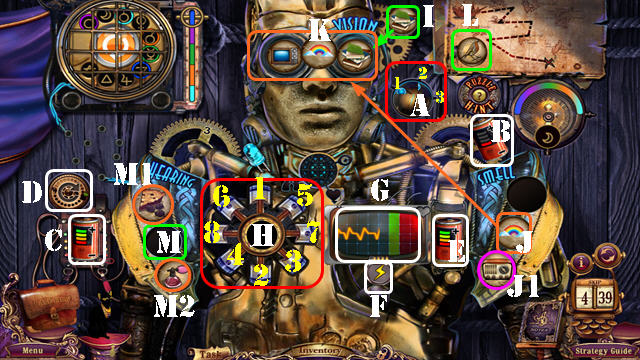
- Set the switch on number 2 (A). Press gear 2; place the battery (B) here (C). Rotate the switch (D) until the battery is charged.
- Place the charged battery here (E). Press the lightning button (F) to make the line hit the green area but not reach the red area (G).
- Select the pistons in order (1-8) (H).
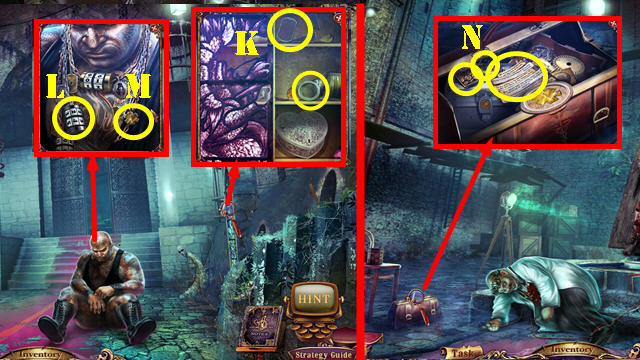
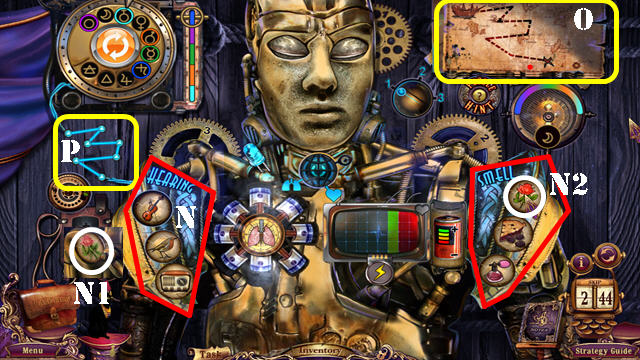
- Move the violin token from the Vision area (K) into the Hearing section (M).
- Set the switch on number 1 (A). Rotate gear 1 and place the book (I) in the Vision area. The Vision section should have the book, TV and rainbow (J) tokens.
- Place the pie slice (M1) and perfume (M2) in the Smell section (J).
- Change the pictures until you find the bird token (L) and place it in the Hearing section (M1).
- Place the radio (J1) in the Hearing section (M2). The Hearing area should have the bird, radio, and violin tokens (N).
- Move the rose token that appears after the hearing section is complete (N1) to the Smell section (N2).
- Use the clue on the map (O) to connect the wires as shown (P) by selecting the two dots to connect them.
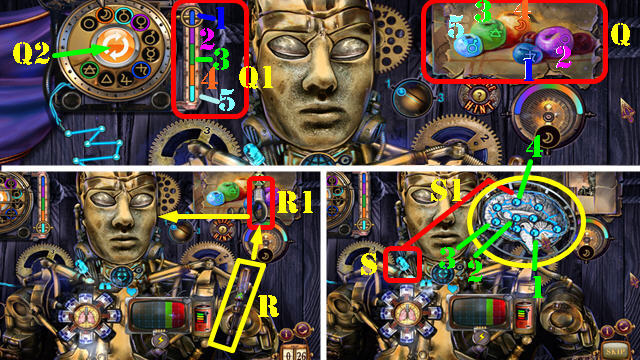
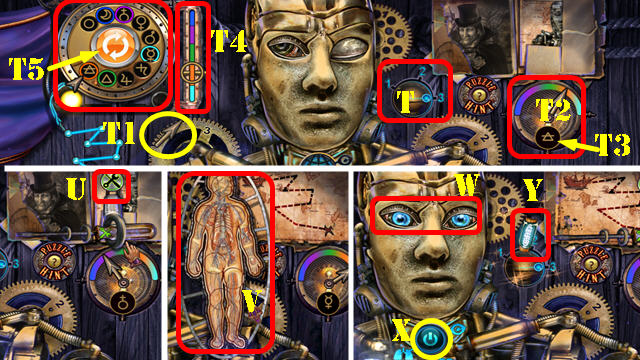
- Select the runes picture (Q). Use it to choose the right circles for the runes on the dial. Slide the bar up and down (Q1).
- Look at the picture to determine which rune belongs to each circle. For example, when you select the orange bar (4), press on the arrows (Q2) until the orange circle lands on the moon symbol. Complete the steps for each colored rune.
- Place the screwdriver (R) on the tool icon (R1) and the press it to go into the brain. Place the diode (S) on the brain (S1). Press the diodes in order (1-4) to light them all up.
- Set the toggle switch at number 3 (T). Select gear 3 and place the arrow (T1) into the color wheel (T2).
- Slide the arrow on the color wheel to view a symbol here (T3). Slide the bar (T4) to the color the color wheel's arrow points to. Use the arrows (T5) to place the circle on the correct symbol.
- Select the tools icon (U). Arrange the circles on the human figure correctly (V).
- Press the eyes until they look in one direction (W). Press the button (X); take the FUSE FOR CONTROLS (Y).
- Return to the Ferris Wheel.
- Place the FUSE FOR CONTROLS in the slot (yellow); take the MAGNET KEY (red) (A).
- Return to the Laboratory.
- Use the MAGNET KEY in the lock; take the FILTER (B).
- Return to the Ferris Wheel.
- Place the FILTER, GLUE, and LENS on the mask; take the GAS MASK (C).
- Return to the Laboratory.
- Place the GAS MASK on the fumes to activate a HOP (D).
- Play the HOP.
- Place the colored tubes in the beaker in this order: yellow, red, yellow, green, and red (E).
- You receive the SIGNAL CARTRIDGE.
- Return to the Detective's Car.
- Place the SIGNAL CARTRIDGE in the gun to get the SIGNAL FLARE (A).
- Return to the Bridge.
- Use the SIGNAL FLARE on the scene.
- Use Isis on the roof to take the Black Diary Page (B).
- Return to the Laboratory. Press the button (C).
- Return to the Theater of Day and Night. Place the clock hand on 3 (D).
- Return to the Gaming Machines. Place the clock hand on 7 (E).
- Return to the Roller Coaster Car. Place the clock hand on 5 (F).
- Return to the Snack Bar Counter. Place the clock hand on 3 (G).
- Return to the Outside Snack bar. Place the clock hand on 5 (H).
- Return to the Gates. Place the clock hand on 8 (I).
- Return to the Ferris Wheel. Set the clock to 6 (J).
- Return to the Laboratory. Press the Button; take RIVET 1 (K).
- Return to the Bridge.
- Place the RIVETS 1, 2, and 3 in the slots to activate a puzzle.
- Swap the pieces until each side of the latch has the matching piece.
- Solution (L).
- Enter the Raven Cote.
Chapter 14: Raven Cote

- Take the RED SPLINTERS 3 and PAPER FIGURINE 2 (M).
- Take the WIND-UP KEY (N).
- Return to the Laboratory.
- Place the WIND-UP KEY in the lock; take the AMULET PORTRAIT (O).
- Return to the Raven Cote.
- Place the AMULET PORTRAIT in the slot; touch it and take the HAIRPIN (P).
- Return to the Corridor.
- Use the HAIRPIN in the lock; take the VALVE (Q).
- Return to the Ferris Wheel Car.
- Place the VALVE on the lantern; spin it and take the COAT OF ARMS (R).
- Return to the Bridge.
- Place the COAT OF ARMS in the slot; take the STEEL GEAR and the RED SPLINTERS 2 (S).
- Return to the Raven Cote.
- Place the STEEL GEAR in the slot (T) and turn it; take the INSECTICIDE and the Black Diary Page for a puzzle (U).
- Open the Black Diary. Solve the ring puzzle (V).
- Return to the Ferris Wheel Car.
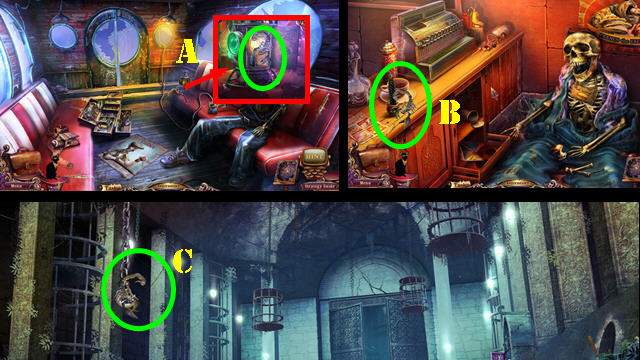
- Use the INSECTICIDE on the scorpion; take the CANDLE 2 (A).
- Return to the Snack Bar Counter.
- Use the INSECTICIDE on the scorpion; take the CANDLE 1 (B).
- Return to the Corridor.
- Use the INSECTICIDE on the scorpion (C); lower the hook to activate a HOP.
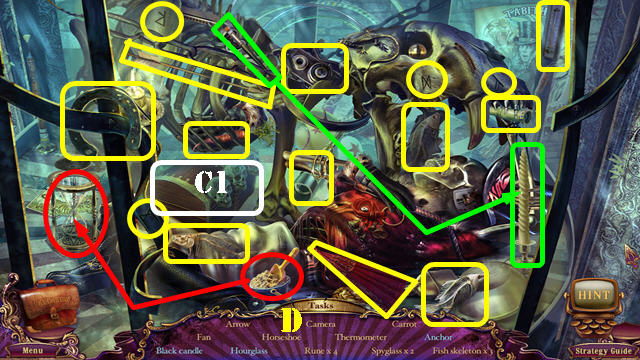
- Play the HOP.
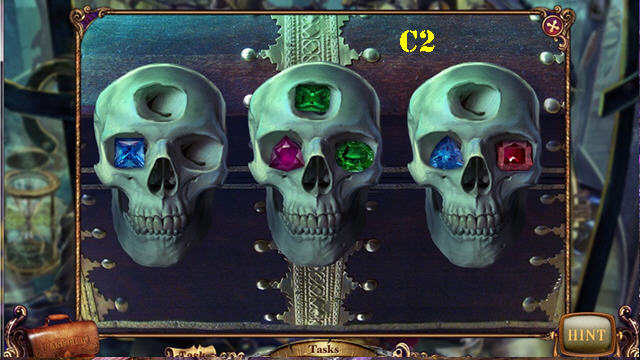
- Zoom into the chest (C1); place the correct number of gems in each of the skulls (C2).
- You receive the CANDLE 3 (D).
- Return to the Raven Cote.
- Place CANDLES 1, 2, and 3 in the holders; use the LIGHTER on the candles (E).
- Take the RED SPLINTERS 1 (F).
- Return to the Corridor.
- Place the RED SPLINTERS 1, 2, and 3 in the slots; take the CLAY 3 and the HEXAGONAL AMULET (G).
- Return to the Raven Cote.

- Place the HEXAGONAL AMULET in the slot; take the PAPER FIGURINE 3 (H).
- Return to the Ferris Wheel.
- Place the MUTOSCOPE FILM in the device (I); take the STENCIL (J).
- Return to the Terminal Point.
- Put down the STENCIL and place the CLAY 3 over it; touch the clay (K).
- Paint the skull silver, bronze, and gold (L) with the brush (M); take the SKULL (N).
- Return to the Bridge.
- Place the SKULL in the slot; take the BOOK PART 3 and SEAL (O).
- Return to the Telephone Booth.
- Use the SEAL on the right page; take the CYPHER 2 (P).
- Place the CYPHER 2 in the decoding device (Q).
- Enter the 4 codes here (R) and press start (red). Take the Black Diary Page for a clue (S).
- Return to the Snack Bar Counter.
- Enter the clue on the register (1-9): take the TATTOOED MAN'S BADGE 3 (T).
- Return to the Corridor.
- Place the TATTOOED MAN'S BADGE 3 on his necklace; enter 70 on the lock; take the AMULET PORTRAIT (U).
- Return to the Raven Cote.

- Place PORTRAIT 2 in the slot; touch it and take the BOOK PART 1 (V).
- Place the BOOK PARTS 1, 2, and 3 on the book to activate a puzzle (W).
- Place the monogram (A) here (B). Place the moon (C) here (D). Swap the tokens as shown (E).
- Place the raven head (F) here (G). Press the purple spheres near the raven head to make all the dots glow (1-6).
- Press the red eye (H) to open a peephole. Guide the ray from the raven to the peephole by rotating the raven and the pieces as shown (I).
- Use the arrows to solve the puzzle. Select the arrows in this order: Mx2, Ox3, K, J, and L.
- Take the feather from the slot with gears and put it with the other feathers. Swap the feathers so the adjacent ones have the same amount of cuts. Solution (P).
- Place the rabbit token in the upper left next to the others. Arrange the pieces from largest to smallest: elephant, horse, fox, and rabbit (P1).
- Open the scroll (Q) for a clue regarding the clowns. Select the heads and hands of the clowns in this order: Tx2, Rx4, U, Sx2, and U.
- Select the skulls in this order: Wx2, Y, and X.
- Place the 2 key pieces (dark blue) in the slot (Z). Take both keys (Z and @) and place them in the locks (Z1). Turn both keys. Place the star (Z2) here (Z3).
- Press the green eye (A) to open the green peephole. Guide the ray to the green peephole by rotating the raven head and the pieces as shown (B).
- Swap the wires so that the sum of the dots of the connected wires equals 6 (C).
- Press the blue eye (D) to open the blue peephole. Guide the ray to the blue peephole by rotating the raven head and the pieces as shown (E).
- Move the colored spheres to the corresponding squares. You can only move the sphere to an empty square. Connect the necessary square with the empty one to move the sphere there.
- Solution: Rotate the green wire in place and press (I).
- Rotate the red wires as shown and press (J and H).
- Rotate the marked yellow wires in place and press (G).
- Take the PAPER FIGURINE 1 (K).
- Return to the Telephone Booth.
- Place the PAPER FIGURINES 1, 2, and 3 on the page. Take the ULTRASONIC WHISTLE (L).
- Return to the Raven Cote.
- Use the ULTRASONIC WHISTLE on the crow to activate a HOP (M).
- Play the HOP.
- Select the runes (N) in the order shown here (purple).
- You receive the RAVEN AMULET.
- Return to the Bridge.
- Place the RAVEN AMULET in the slot; take the CYLINDER 3 (O).
- Return to the Gates.
- Place CYLINDER 3 in the slot (P); touch it and take the Black Diary Page (Q).
- Return to the Laboratory. Press the button (R).
- Return to the Theater of Day and Night. Set the clock hand on 2 (S).
- Return to the Gaming Machines. Set the hand on 6 (T).
- Return to the Roller Coaster Car. Set the clock hand on 9 (U).
- Return to the Snack Bar Counter. Set the clock hand on 2 (V).
- Return to Outside the Snack Bar. Set the clock hand on 2 (W).
- Return to the Gates. Set the clock hand on 7 (X).
- Return to the Ferris Wheel. Set the clock hand on 3 (Y).
- Return to the Laboratory. Press the button; take the GOLD CARD (Z).
- Return to the Mutoscope.
- Place the GOLD CARD in the slot to activate a puzzle (A1).
- Select the wheels in this order: A, C, A, C, Ax8, B.
- Take the GOLDEN PUNCH CARD (A2).
- Return to the Rail's End.
- Place the GOLDEN PUNCH CARD in the slot (D); take the SILVER DAGGER (E).
- Return to the Raven Cote.
- Use the SILVER DAGGER on the cursed book (F).
Bonus Chapter
- Select Bonus Content in the Main Menu and then choose Play Game to begin your bonus adventure.
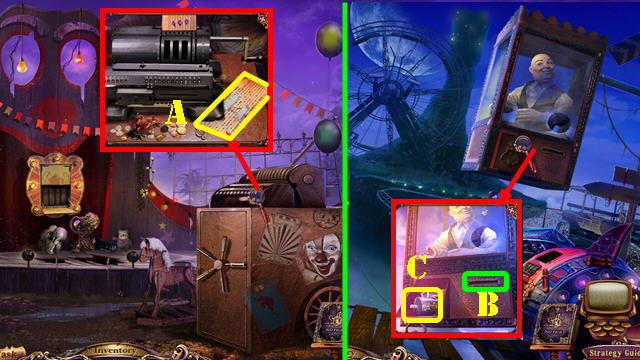
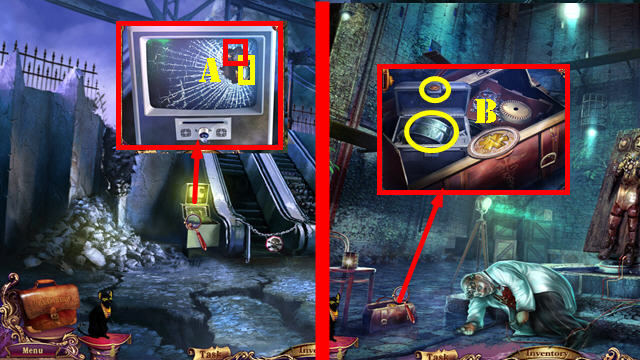
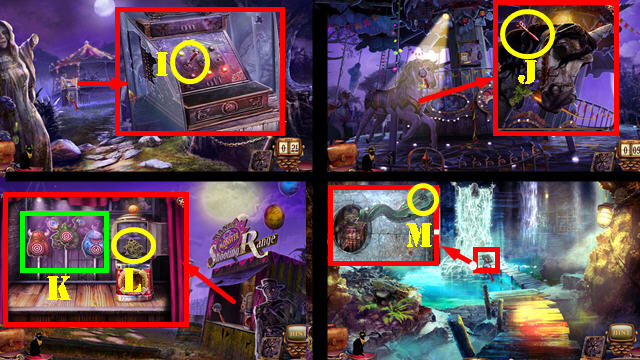
- Take the PLANET LENS and DART (A).
- Take the BRONZE FEATHER (B).
- Go to Inside Tomb.
- Take the LEATHER GLOVE (C).
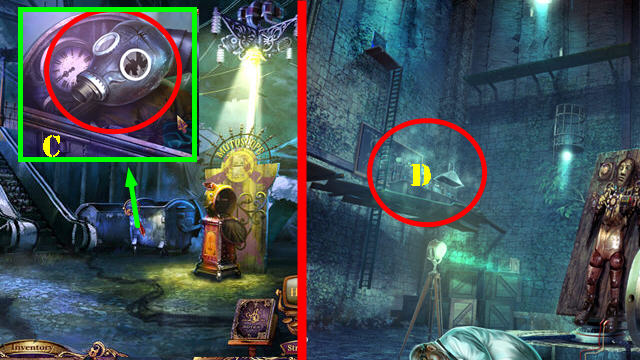
- Go to Larry's Tent.
- Take the FUSE (D).
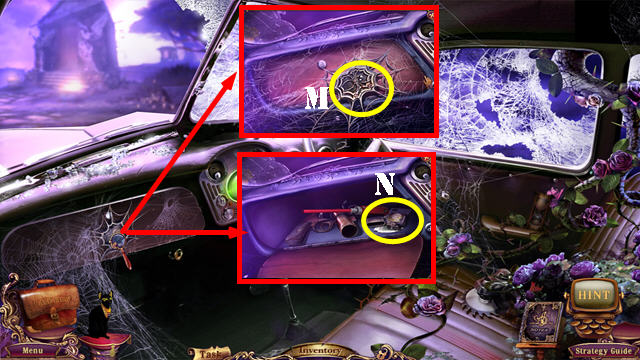
- Use the LEATHER GLOVE on the BROKEN MIRROR PIECE and then take it (E).
- Use Isis in the hole; take the BRONZE EYE (F).
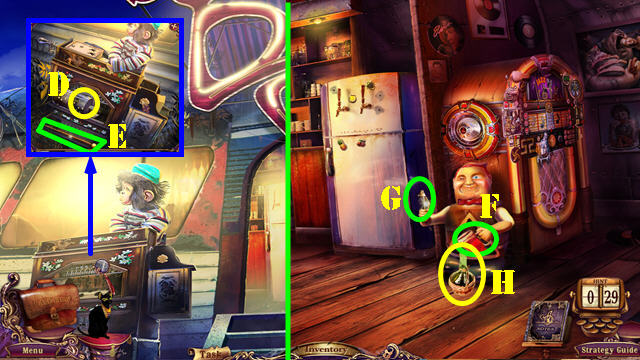
- Go to the Crossroads.
- Take the DOLL PART (G) and LADDER (H).
- Use Isis on the key (I); take the ORGAN KEY.
- Go to the Fish Gates.
- Take the VALVE (J).
- Use the LEATHER GLOVE on the BROKEN MIRROR PIECE and then take it (K).
- Go to Outside Trailer.

- Use the LEATHER GLOVE on the BROKEN MIRROR PIECE and then take it (L).
- Take the BRONZE SPIDER (M).
- Take the DOLL PART and SILVER SPIDER (N).
- Go into Madame Fate's Trailer.
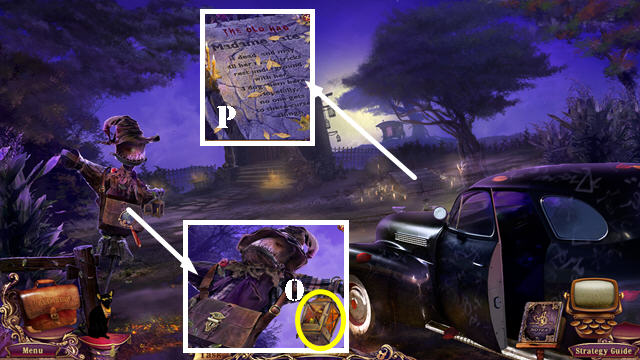
- Take the BRONZE FEATHER (O), VALVE (P), LEVER (Q), and NOTEPAD (R).
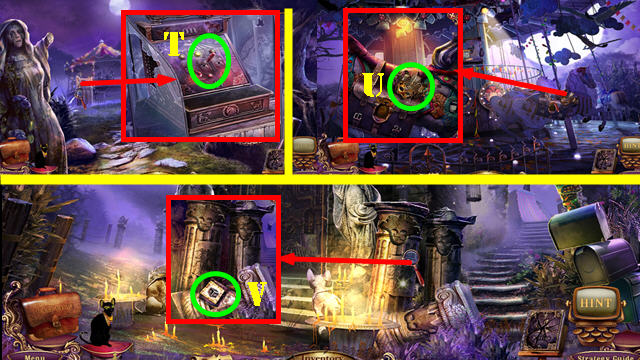
- Return to Inside Tomb.
- Place the 3 BROKEN MIRROR PIECES on the mirror to activate a puzzle.
- Arrange the shards as shown (S).
- Take the CARROT (T).
- Return to Larry's Tent.
- Give the CARROT to the rabbit; take the LETTER F (U).
- Return to Outside Tent.
- Place the LADDER on the tank; take the LETTER M (V).
- Go to Inside Tomb.
- Place the LETTER M, LETTER F, and BRONZE EYE in the slots to activate a puzzle.
- Place the runes in their matching spots.
- Solution: A, C, Bx2, and A.
- Go forward to the Grotto.
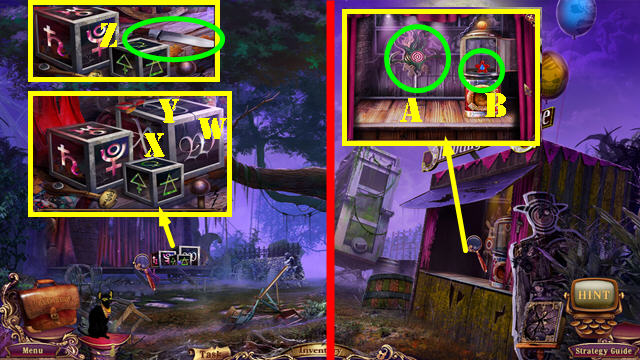
- Take the CASTLE PART (E), FUSE (F) and the DART (G).
- Use Isis to get the TOGGLE SWITCH and then take it (H).
- Return to Outside Trailer.
- Place the TOGGLE SWITCH and flip it up (I).
- Go to the Merry-go-round.
- Take the DART (J).
- Go to Outside Tent.
- Throw the 3 DARTS at the 3 targets (K).
- Take the MYSTERIOUS AMULET (L).
- Return to the Grotto.
- Place the MYSTERIOUS AMULET in the slot to activate a puzzle (M).

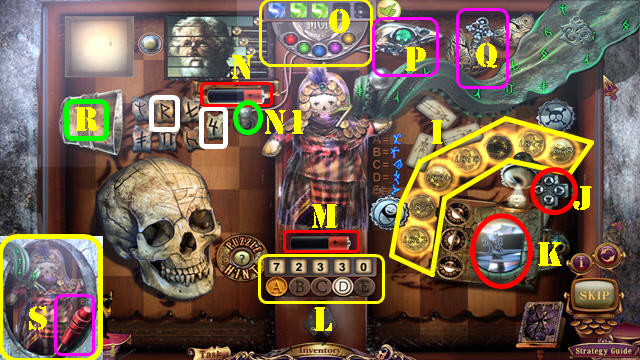
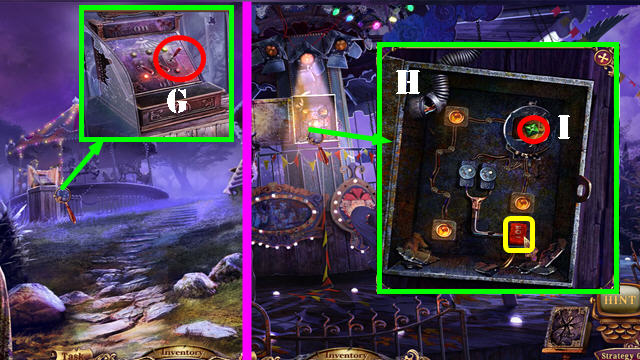
- Press the buttons on the lock as shown (A). Remove the skeleton's goggles.
- Place the 3 picture pieces (green) here (B). Slide the gold knobs as shown (C), then press the button (D).
- Place the baby token (E) here (F).
- Arrange the coins in ascending order. The dark coin is from 1876. Solution (I). Place the dial (G) here (H).
- Rotate the 3 TV dials until the image on the TV is steady. Use the arrows (J) to find the diamonds with the symbols on them (K). Enter the code 72330 here (L).
- Place the battery (M) in the slot (N) and flip the switch (N1).
- Enter blue, green, and green here (O).
- Press the bird's head (P). Tap the egg; place the key (Q) here (R).
- Press the bowl to throw dice. Press the dice you don't need to put them back in the bowl. In this example we highlighted in white the dice not present on the tentacle to put them back in. Repeat the process until the dice you have left all match the ones on the tentacle.
- Take the TOGGLE SWITCH (S).
- Return to the Outside Trailer.
- Place the TOGGLE SWITCH (T) and flip it.
- Return to the Merry-go-round.
- Take the MASK (U).
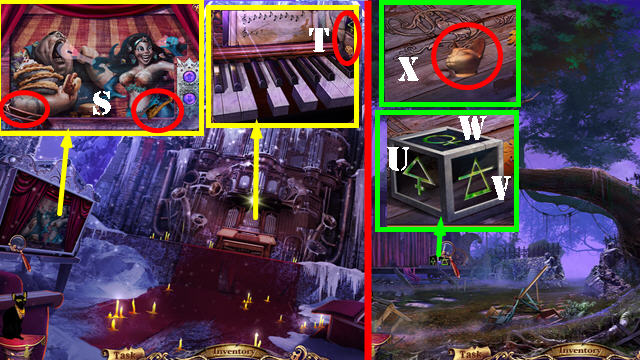
- Return to Outside Tomb.
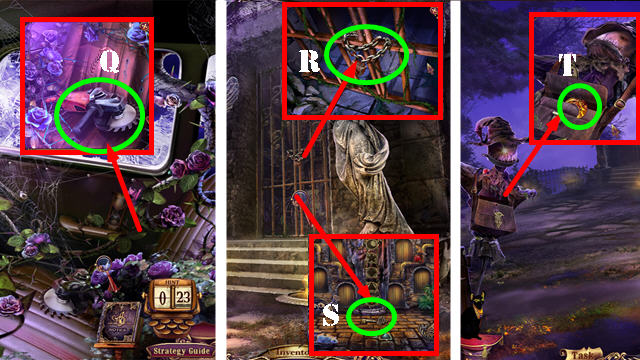
- Place the MASK in the slot. Take the Black Diary Page (V).
- Return to the Crossroads.
- Zoom into the cube puzzle.
- Use the clue from the notebook and select the symbols in this order: Y, W, X, W, X, Y.
- Take the THROWING KNIFE (Z).
- Return to Outside Tent.
- Throw the THROWING KNIFE at the target (A); take the VALVE (B).
- Return to the Grotto.
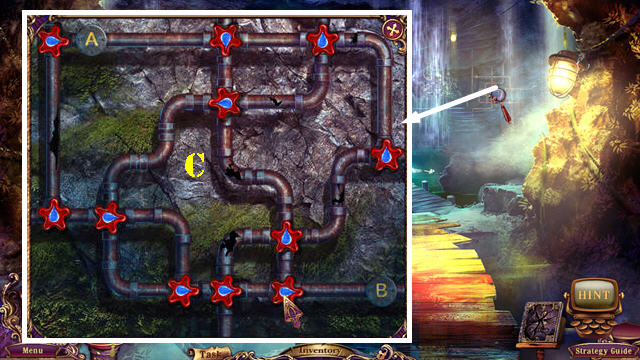
- Place the 3 VALVES on the pipes to activate a puzzle.
- Use the direction of the water drops to direct the water from point A to point B without any leaky pipes.
- Solution (C).
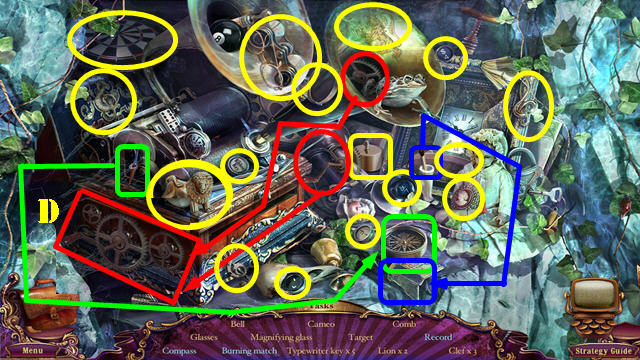
- Play the HOP.
- Place the gears (red). Arrange them as shown and press the gears (D).
- You receive the RECORD.
- Return to the Fish Gates.
- Place the 2 FUSES in the sockets (E).
- Replace the broken LEVER (F).
- Pull the lever to open the door. Go to Marlena's Tank (G).
- Take the DRILL PART (H) and the BRONZE FEATHER (I).
- Place the RECORD on the gramophone (J).
- Turn the crank; take the Black Diary Page (K).
- Return to Inside Tomb.
- Change the numbers on the top puzzle to 975162 (L).
- Take the BRONZE FEATHER (M).
- Return to Larry's Tent.
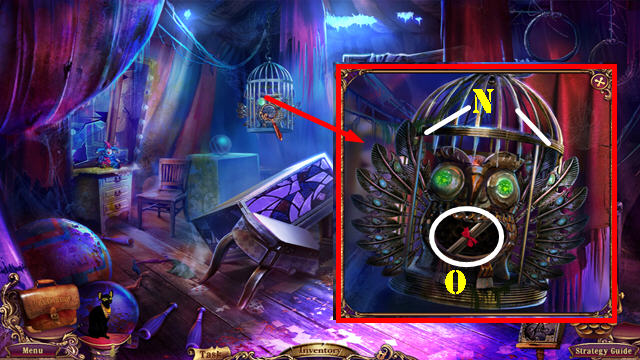
- Place the 4 BRONZE FEATHERS on the owl to activate a puzzle.
- Swap the feathers as shown (N).
- Take the Black Diary Page (O). Press on the Black Diary Page to enter the Laboratory.
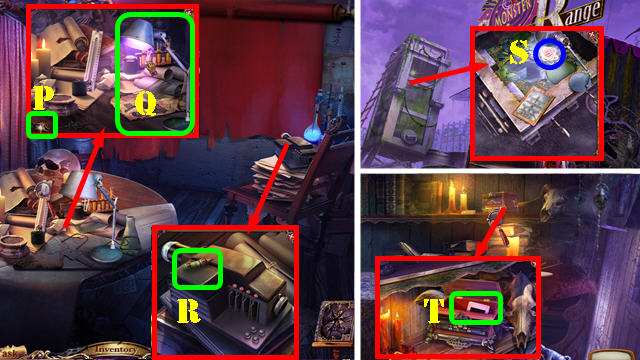
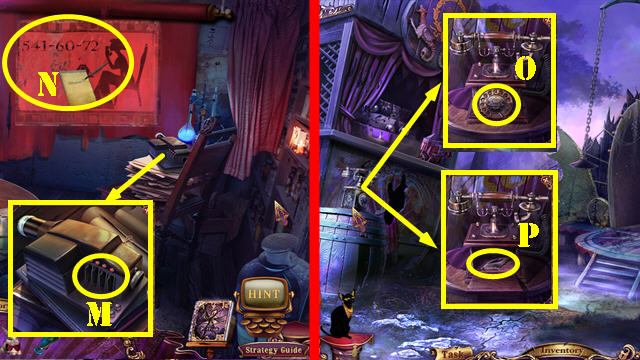
- Take the GOLDEN SPIDER (P), LAMP (Q) and CASTLE PART (R).
- Return to Outside Tent.
- Put down the LAMP; take the MUSIC NOTE (S).
- Return to Madame Fate's Trailer.
- Place the MUSIC NOTE on the music box; open it and take the SLIDE (T).
- Return to the Laboratory.
- Place the SLIDE in the projector (U).
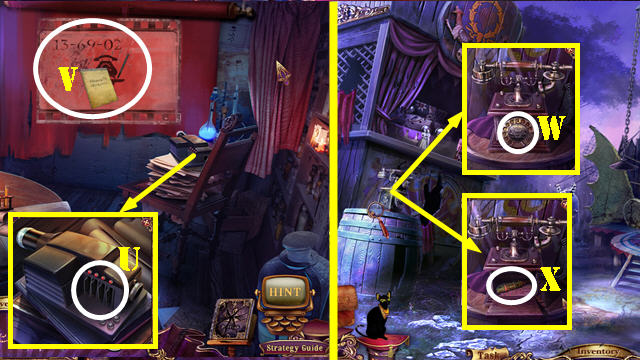
- Place the NOTEPAD on the clue to get a Black Diary Page (V).
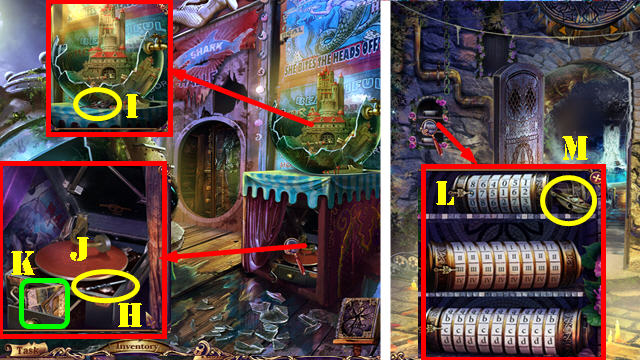
- Return to the Fish Gates.
- Dial 136902 on the phone (X). Take the CASTLE PART (X).
- Go to Marlena's Tank.
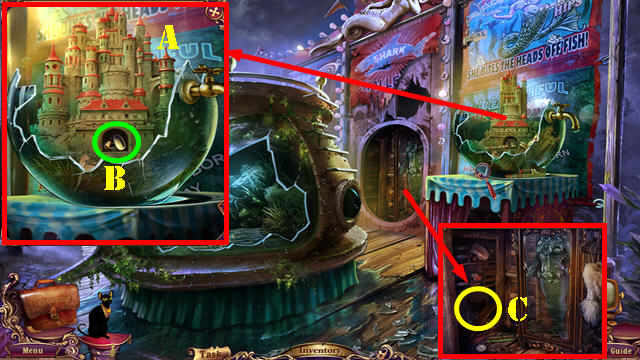
- Put down the 3 CASTLE PARTS to activate a puzzle. Place the parts in the right spots (A).
- Take the LURE (B).
- Use Isis in the hole (C); take the STATUETTE HEAD.
- Return to Outside Tent.
- Place the LURE in the water and place Isis in there (D). Take the STATUETTE HEAD (E).
- Go to the Fish Gates.
- Place the 2 STATUETTE HEADS on the statues; take the STATUETTE (F).
- Return to the Laboratory.
- Place the STATUETTE on the base; touch the base and take the TOGGLE SWITCH (G).
- Return to Outside Trailer.
- Place the TOGGLE SWITCHES on the register. Flip the last switch (H).
- Go to the Merry-go round.
- Take the DRILL PART (I).
- Walk down.
- Place the 2 DRILL PARTS on the drill; take the DRILL (J).
- Return to Madame Fate's Trailer.
- Place the SILVER SPIDER, BRONZE SPIDER, and the GOLDEN SPIDER in the slots. Touch the 3 spiders and then the gears for a cut scene (K).
- Use the DRILL on the lock (K1); open the box to activate a HOP.
- Play the HOP.
- You receive the SLIDE (L).
- Return to the Laboratory.
- Place the SLIDE in the projector (M). Place the NOTEPAD on the clue (N).
- Go to the Fish Gates.
- Dial the number 5416072 (O).
- Take the HORSE EAR (P).
- Return to Outside Trailer.
- Flip the first switch up (Q).
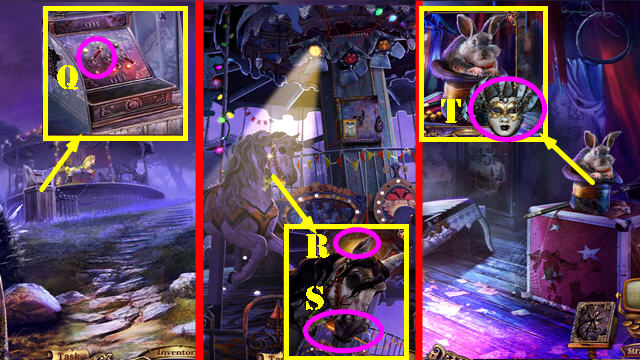
- Go to the Merry-go round.
- Place the HORSE EAR (R). Take the CARROT (S).
- Go to Larry's Tent.
- Give the CARROT to the rabbit to get the MASK (T).
- Return to Outside Tomb.
- Place the MASK in the slot (U). Take the Black Diary Page.
- Go through the diary page to access the Library (V).
- Take the LOCK PART (W) and BOOK (X).
- Return to Outside Trailer.
- Flip the middle switch up (Y).
- Go to the Merry-go round.
- Place the LOCK PART in the slot and open the bag; take the BOOK and the PLANET LENS (Z).
- Return to the Library.
- Place the two books on the shelf to activate a puzzle.
- Arrange the books as shown (A) by swapping books with the same orientation with each other.
- Take the Black Diary Page and the ORGAN KEY (B).
- Return to Inside Tomb.
- Enter these numbers on the cryptex: II, IV, I, III, IV, V, X, VI (C).
- Take the BARREL (D).
- Go to Larry's Tent.
- Place the BARREL in the REVOLVER and then take it (E).
- Walk down.

- Use the REVOLVER on the target (F); take the RUBY (G).
- Return to the Library.
- Use Isis on the device; take the RUBY (H).
- Go to the Grotto.
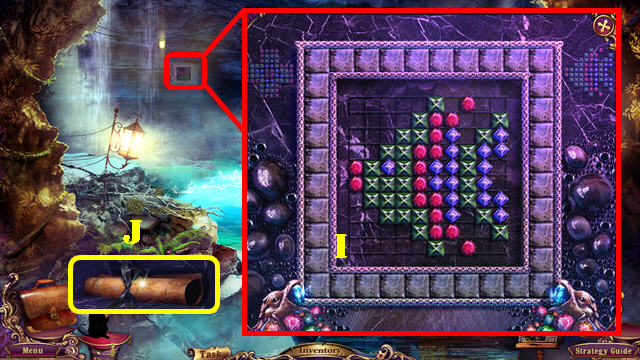
- Place the 2 RUBIES on the puzzle to activate it.
- Arrange the gems to form this image (I).
- Take the Black Diary Page (J).
- Return to Outside Tomb.
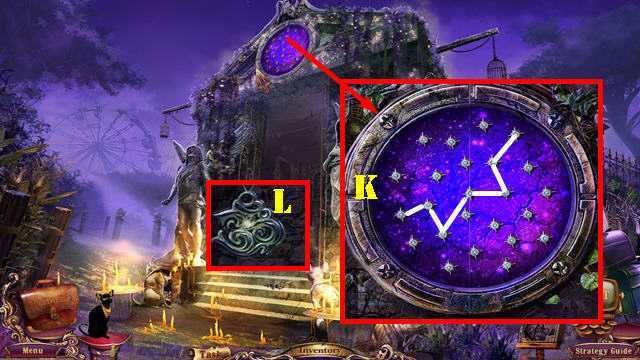
- Draw a line between two stars to draw a line until you have the image in the diary.
- Solution (K).
- Take the MYSTERIOUS AMULET (L).
- Go to the Grotto.

- Place the MYSTERIOUS AMULET in the slot to activate a puzzle.
- Flip the switch (A). Press yellow, purple, purple, and red (B).
- Place the banners marked in yellow on the checkerboard (C). Flip the switch (D) until you see the bear banner appear (E). Place it on the checkerboard.
- Each knight should defeat an opposing enemy. Use the clue in the top left corner to fulfill this task. The enemy always sets the signs clockwise. To solve the puzzle, choose paper, rock, scissors, and rock (F); press fight (G) after each entry.
- Place the ruby (H) here (I). Use the arrows (J) to examine the numbers and symbols on the ruby. Enter 46261 here (K).
- Place the ring (L) on the skeleton's hand (M). Select the rings in the correct order: yellow, blue, red, green, and light blue.
- Press the balls marked in green for numbers to appear. Flip the knob (N) until the clock appears. Place the clock hands on these numbers: green arrow on 6, gold on 11, and gray on 4 (O).
- Place the buttons (P) on the bowl (Q). Press the bowl to throw dice. The only dice left should be the ones present on the tentacle.
- Select the dice you don't need to put them back in the bowl. The dice highlighted in orange are not present on the tentacle; press them to put them back in the bowl. Repeat until the dice you have left only match the ones on the tentacle.
- Take the BRUSH (R).
- Return to the Library. Use the BRUSH on the card; take the TAROT CARD (S).
- Return to Outside Trailer. Use the BRUSH on the card; take the TAROT CARD (T).
- Return to Outside Tent. Use the BRUSH on the card; take the TAROT CARD (U).
- Return to Inside Tomb. Use the BRUSH on the card; take the TAROT CARD (V).
- Return to Outside Trailer. Flip the last switch (W).
- Return to the Merry-go-round. Use the BRUSH on the card; take the TAROT CARD (X).
- Return to Madame Fate's Trailer.
- Place the 5 TAROT CARDS on the deck to activate a puzzle.
- Select 10 matching card sets to solve the puzzle. Sample solution (Y).
- Take the KEY.
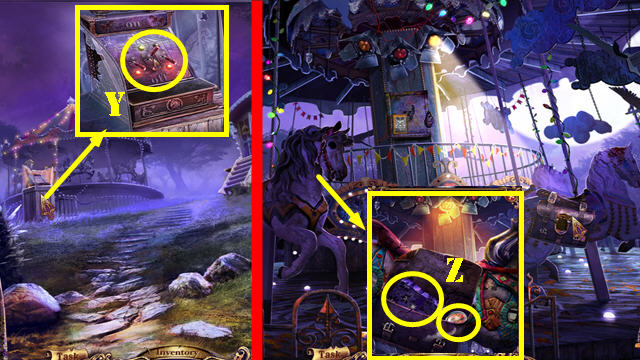
- Return to the Merry-go-round.
- Use the KEY in the lock; take the RECORD (A).
- Return to Marlena's Tank.
- Place the RECORD on the gramophone (B).
- Turn the crank; take the CRESCENT (C).
- Return to the Fish Gates.
- Place the CRESCENT on the theater and open it; take the HORSE EYE (D).
- Return to Outside Trailer.
- Flip up the first switch (E).
- Return to the Merry-go-round.
- Place the HORSE EYE in the socket and touch it; take the Black Diary Page (F).
- Return to the Crossroads.
- Select the symbols in this order: H, G, I, H, H, I, G, H, I.
- Take the BOMB (J).
- Return to Outside Trailer.
- Place the BOMB in the tree hole and light it with the LIGHTER (K). Send Isis into the tree hole; take the DIAMOND.
- Return to the Crossroads.
- Place the DIAMOND in the slot (L) and take the GLASS CUTTER.
- Return to Marlena's Tank.
- Use the GLASS CUTTER on the glass; take the DIVING SUIT (M).
- Return to the Grotto.
- Use the DIVING SUIT in the water; take the BROKEN LANTERN (N).
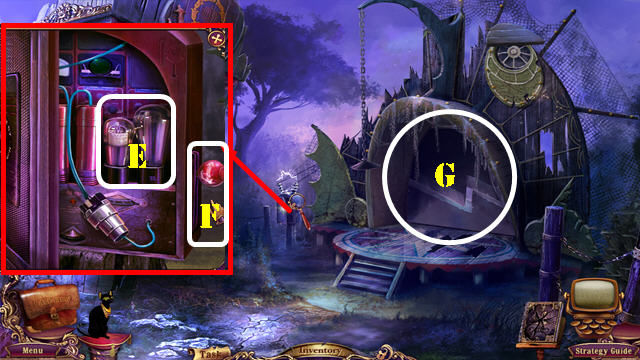
- Return to the Laboratory.
- Put down the BROKEN LANTERN.
- Place the glass pieces (O), the candle (P), and handle (@). Use the LIGHTER on the candle. Take the BLACK LANTERN.
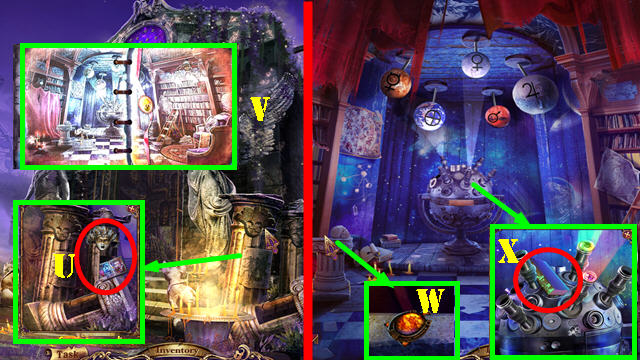
- Return to the Library.
- Put down the BLACK LANTERN to activate a puzzle. Select fully-formed whirlwinds (Q) to eliminate them until you fill the spotlight with them (R).
- Take the BROKEN LANTERN.
- Go through the Black Diary to reach the Organ Room.
- Take the CAT'S PAW and ELECTRIC CIRCUIT (S).
- Take the Black Diary Page (T).
- Return to the Crossroads.
- Select the symbols in this order: W, V, U, W, U, V, V, W, U, W, U, V.
- Take the CAT'S HEAD (X).
- Return to Outside Tomb.

- Place the CAT'S HEAD and the CAT'S PAW on the statue (A). Use Isis on the statue; take the CROWN (B).
- Go Inside Tomb.
- Place the CROWN in the slot (C); take the CANVAS (D).
- Return to the Organ Room.
- Place the CANVAS in the frame to activate a puzzle.
- Find 10 differences between the images (E).
- Take the ELECTRIC CONTROLLER and EMERALD (F).
- Return to Outside Trailer.
- Flip up the last switch (G).
- Return to the Merry-go-round.
- Place the ELECTRIC CIRCUIT and the ELECTRIC CONTROLLER on the panel to activate a puzzle.
- Touch the wires to rotate them; select the controllers to change the direction of the charge.
- The switch (yellow) has to be turned off before you can flip the wires. Turn it back on to test your selections.
- Solution (H). Take the EMERALD (I).
- Return to the Grotto.
- Place the 2 EMERALDS on the board.
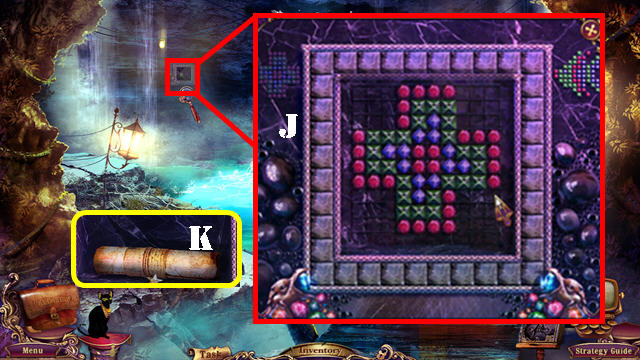
- Arrange the gems to form this image (J).
- Take the Black Diary Page for a clue (K).
- Return to Outside Tomb.
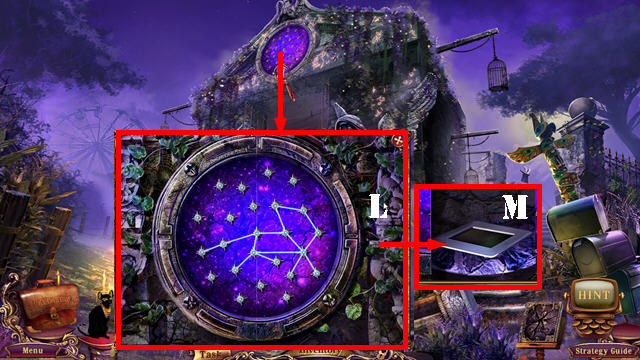
- Form the constellation shown in your Black Diary Page.
- Solution (L).
- Take the SLIDE (M).
- Return to the Laboratory.
- Place the SLIDE in the projector (N). Place the NOTEPAD on the clue (O).
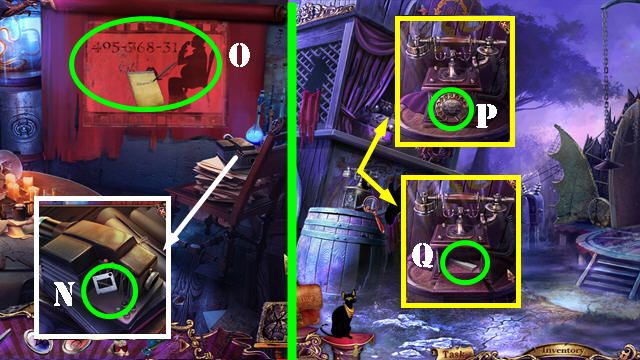
- Go to the Fish Gates.
- Dial the number 49576831 (P).
- Take the KEY 1 (Q).
- Return to the Organ Room.
- Place the 3 ORGAN KEYS on the keyboard to activate a puzzle.
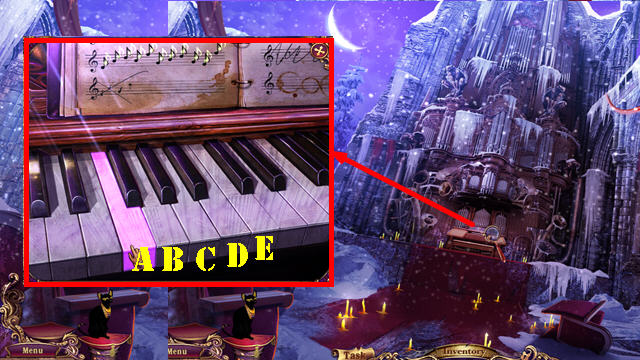
- Solution: A, C, D, C, E, B, C, D, B, A, E. A HOP will activate. A HOP will activate.
- Play the HOP.
- Press the organ keys in this order: red, green, purple, blue, yellow, and orange (F).
- You receive the RECORD.
- Return to Marlena's Tank.
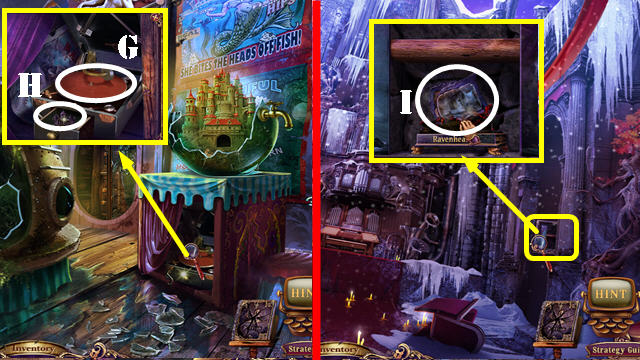
- Place the RECORD on the gramophone (G).
- Turn the crank; take the RAVENHEARST (H).
- Return to the Organ Room.
- Place RAVENHEARST on the stand; take the Black Diary Page for a clue (I).
- Return to Outside Tomb.
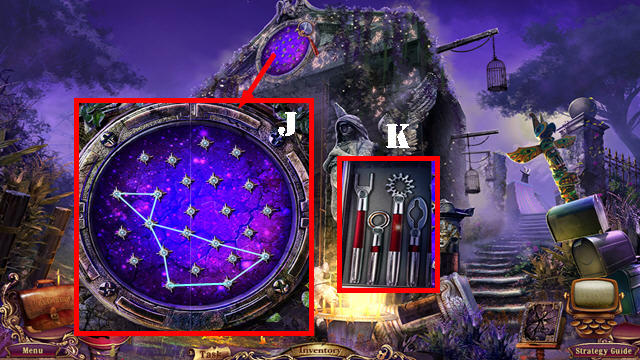
- Form the constellation shown in your Black Diary Page.
- Solution (J).
- Take the SCREWDRIVERS SET (K).
- Return to the Library.
- Put down the SCREWDRIVERS SET to activate a puzzle. Use the right tools to remove the screws. Touch a screw and then the right tool.
- Solution (L).
- Take the PLANET LENS (M).
- Place the 5 PLANETS LENSES on the device to activate a puzzle.
- Swap the PLANETS as shown (N).
- Take the MASK (O).
- Return to Outside Tomb.

- Place the MASK in the slot. Take the Black Diary Page for a clue (P).
- Return to Inside Tomb.
- Enter these numbers on the cryptex: c, a, f, b, e, d, a, h, i (Q).
- Take the BARREL (R).
- Take the GOLDEN CARROT (R).
- Return to Larry's Tent.
- Give the GOLDEN CARROT to the rabbit to get the DOLL PART (S).
- Return to the Organ Room.
- Place the 3 DOLL PARTS on the board to activate a puzzle.
- Grab and place items on the right images. Use the buttons (T) to switch between images.
- Solution (U).
- Take the SLIDE (V).
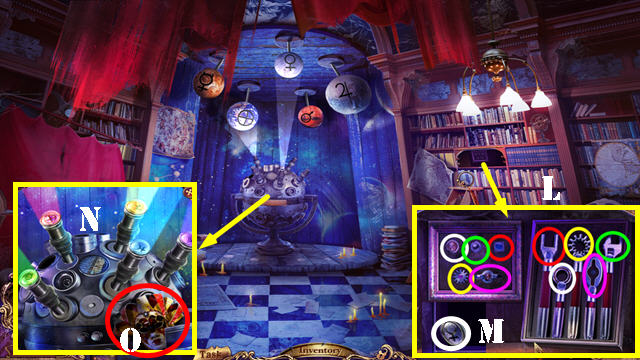
- Return to the Laboratory.
- Place the SLIDE in the projector (1). Take the BLACK LENS (2).
- Put down the BROKEN LANTERN; remove the broken glass (3) and replace it (4).
- Touch the two green pieces.
- Use the LIGHTER on the lantern and place the BLACK LENS on it (5). Take the BLACK ULTRAVIOLET LANTERN.
- Return to the Crossroads. Put down the BLACK ULTRAVIOLET LANTERN; take the RUNE 1/6 (A).
- Return to the Fish Gates. Put down the BLACK ULTRAVIOLET LANTERN; take the RUNE 2/6 (B).
- Return to the Inside Tomb. Put down the BLACK ULTRAVIOLET LANTERN; take the RUNE 3/6 (C).
- Return to the Library. Put down the BLACK ULTRAVIOLET LANTERN; take the RUNE 4/6 (D).
- Return to the Outside Tent. Put down the BLACK ULTRAVIOLET LANTERN; take the RUNE 5/6 (E).
- Return to the Outside Trailer. Put down the BLACK ULTRAVIOLET LANTERN; take the RUNE 6/6 (F).
- Return to Inside Tomb.
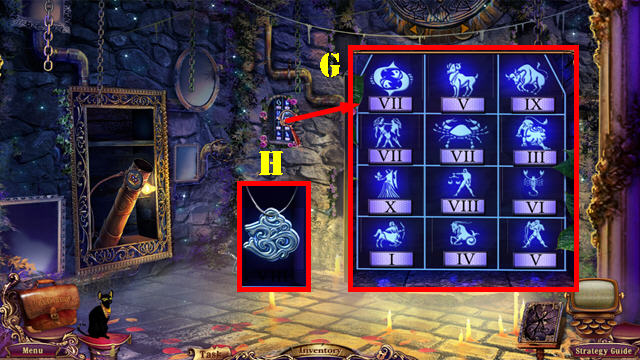
- Enter the correct Roman numeral below each sign to solve the puzzle (G).
- Take the MYSTERIOUS AMULET (H).
- Go to the Grotto.
- Place the MYSTERIOUS AMULET in the slot to activate a puzzle.
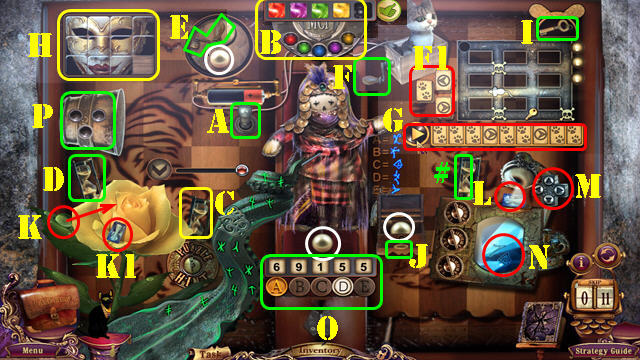
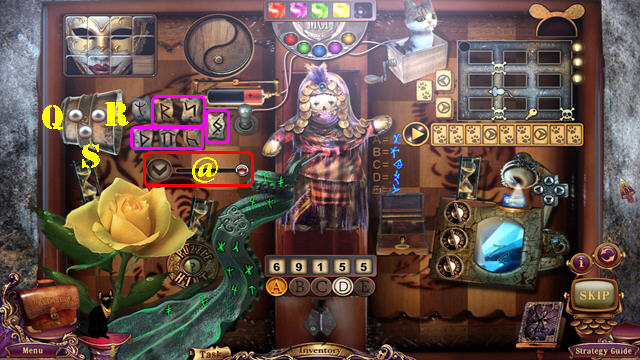
- Flip the switch (A). Select the colors in this order: red, purple, green, and yellow (B).
- Flip the hourglass (#); attach the lever (I) to the box (F). Turn the lever.
- Select the icons (F1) to make your way through the maze. Solution (G); push the button.
- Flip the three hourglasses (#, C, and D).
- Arrange the mask picture by placing the tiles in the right spots (H).
- Use the key (I) here (J). Put the water drop (K) on the rose bud. Place the gem (K1) here (L). Use the arrows (M) to find the numbers on the gem (N). Enter the code 69155 here (O).
- Place the 3 pearls (white) on the bowl (P). Slide the button (@) to see which pearls you should press. Solution: Rx2, S, R, Qx2, S, R, Sx2.
- Press the bowl to throw dice. You should only leave the dice depicted on the tentacle. Press the dice you don't need to put them back in the bowl. Press the bowl to throw new dice. In the example on the screenshot, the ones not on the tentacle are marked in purple.
- Congratulations, you have completed Mystery Case Files; Fate's Carnival Collector's Edition.
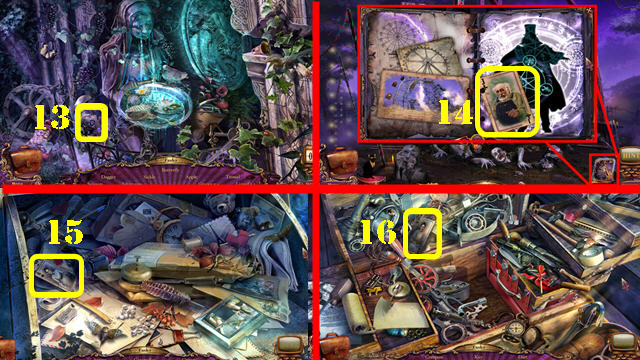
Bobbleheads and Secret Cards
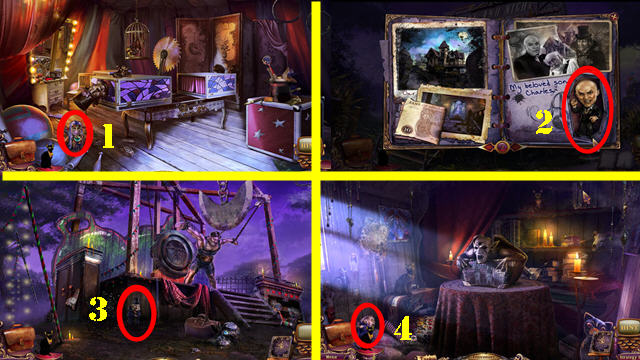
- The Bobbleheads and Secret Cards are located below. They can only be picked up when the items are in their true state.
- The items are listed in the order we found them; your order may vary.
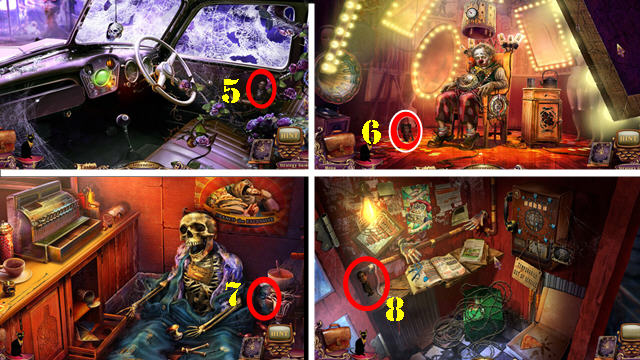
- Bobbleheads 1-4.
- Bobbleheads 5-8.
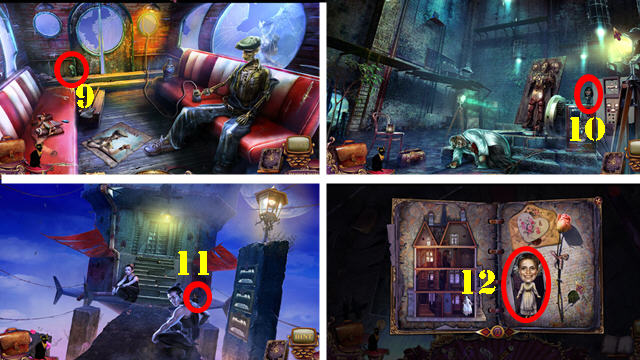
- Bobbleheads 9-12.

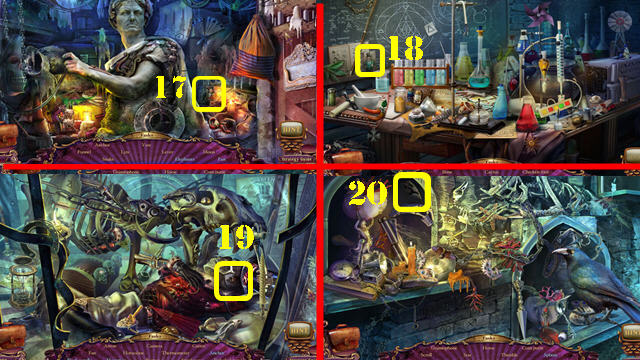
- Collect Special cards throughout the game to unlock the Solitaire game in the Bonus Content.
- Secret Cards 1-4.
- Secret Cards 5-8.
- Secret Cards 9-12.
- Secret Cards 13-16.
- Secret Cards 17-20.
Old Pounds
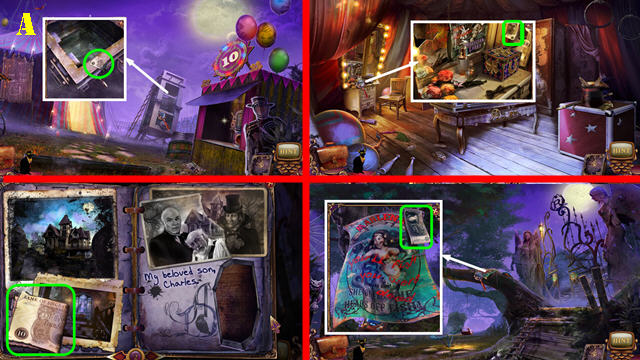
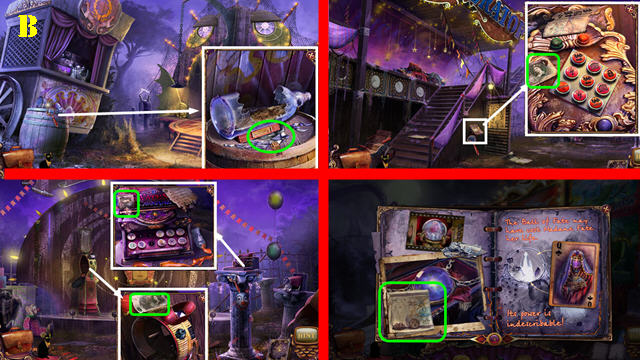
- This section contains the locations of all the Old Pounds in the game.
- The total amount of Pounds that can be gained through the main game (including completion of all the riddles of the Black Diary) is 320. You can earn additional Pounds by playing Solitaire.
- The items are listed in the order we found them; your order may vary.
- You may not be able to collect some items once the close-up window closes or you no longer have access to an area. You may have to visit the same locations many times to collect all the pounds.
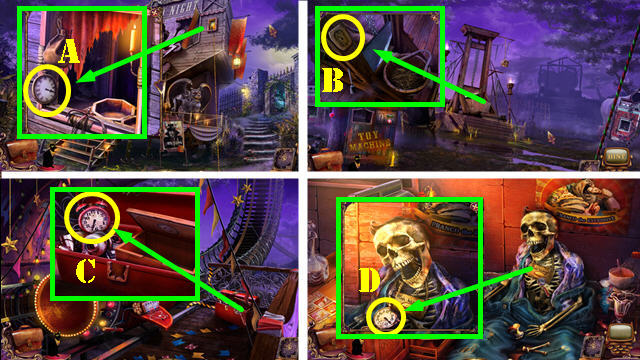
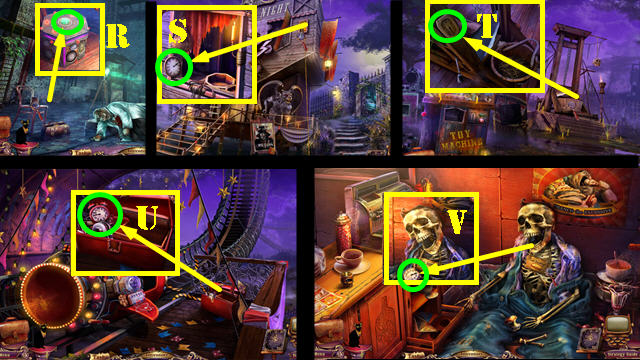
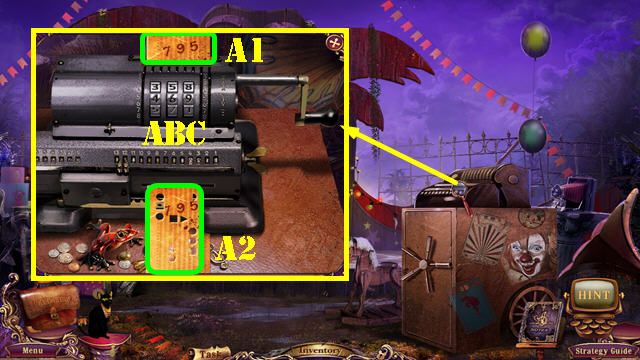
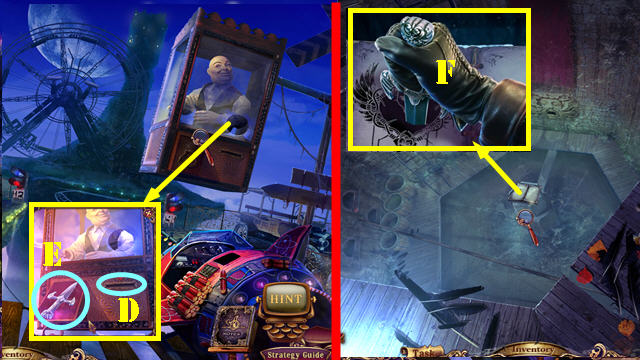
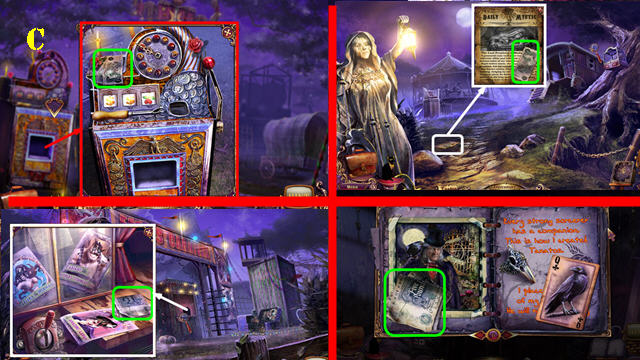
- Old Pounds (A).
- Old Pounds (B).
- Old Pounds (C).
- Old Pounds (D).
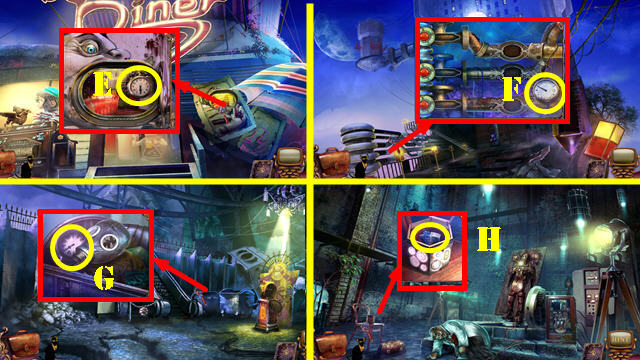
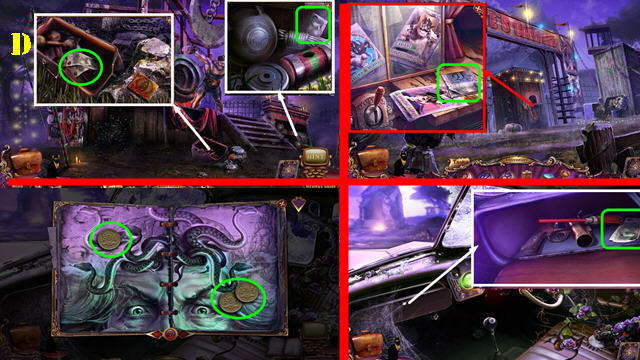
- Old Pounds (E).
- Old Pounds (F).
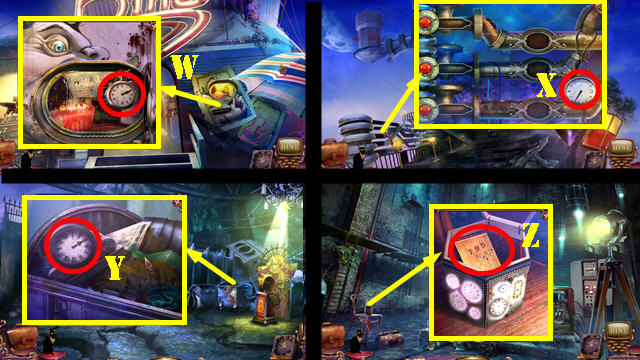
- Old Pounds (G).
- Old Pounds (H).
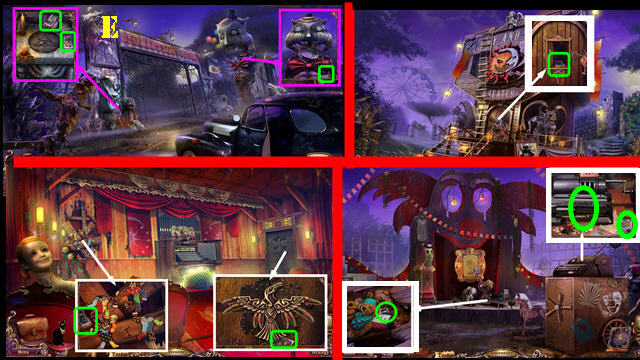
- Old Pounds (I).
- Old Pounds (J).
- Old Pounds (K).
- Old Pounds (L).

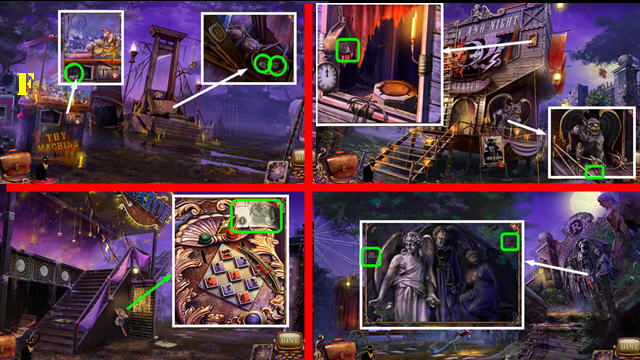
- Old Pounds (M).
- Old Pounds (N).
- Old Pounds (O).
- Old Pounds (P).
Created at: 2013-11-26