

Walkthrough Menu
- General Tips
- Chapter 1: The Cottage
- Chapter 2: Ravenhearst Museum
- Chapter 3: The Lighthouse
- Chapter 4: The Beach
- Chapter 5: The Panic Room
- Chapter 6: The Secret Room
General Tips
- This is the official guide for Mystery Case Files: Key to Ravenhearst.
- This guide will not tell you when you have to zoom into a location; the screenshots will show each zoom scene.
- Hidden-object puzzles are referred to as HOPs. This guide will not show screenshots of the HOPs, however, it will mention when an HOP is available and the inventory item you'll collect from it.
- Use the Map to fast travel to a location.
- On the master Puzzles, select Info to view a clue for the next step. You can select 'skip this part' to skip only that part of the puzzle.
Chapter 1: The Cottage

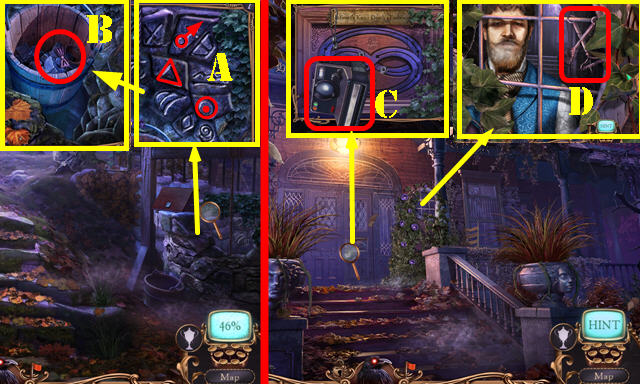
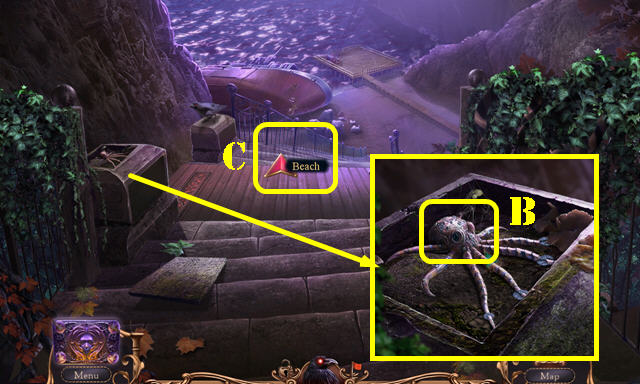
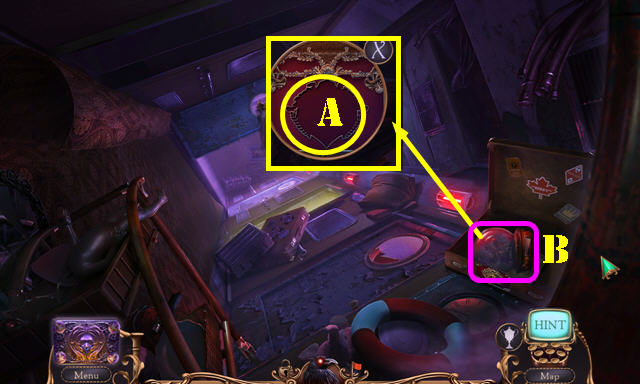
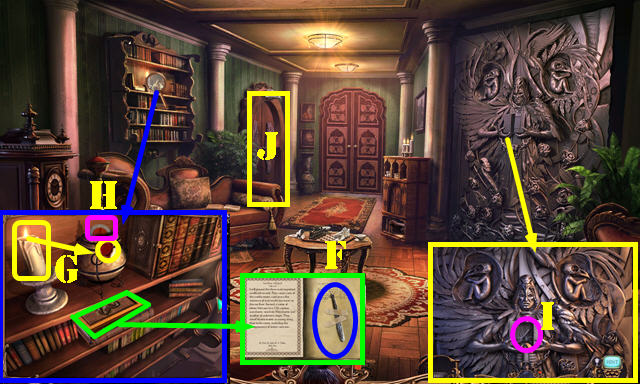
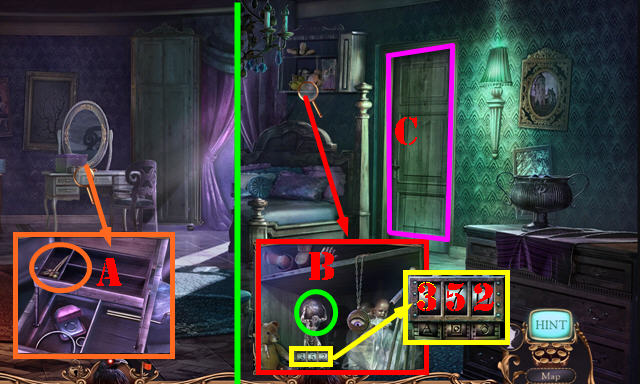
- Take the POCKET KNIFE (A).
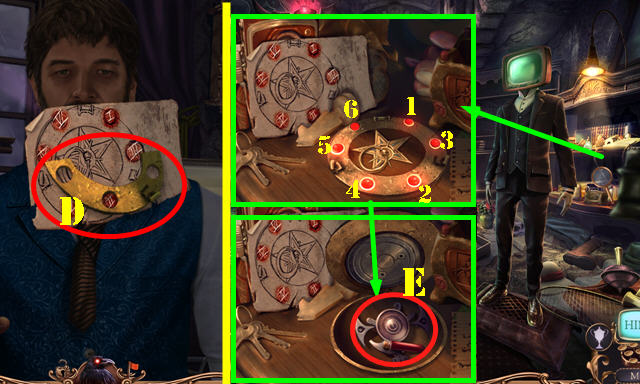
- Open the letter; take the RAVENHEARST CREST (B). Look at the letter and touch the broken Madame Fate (C). Select the marble (D).
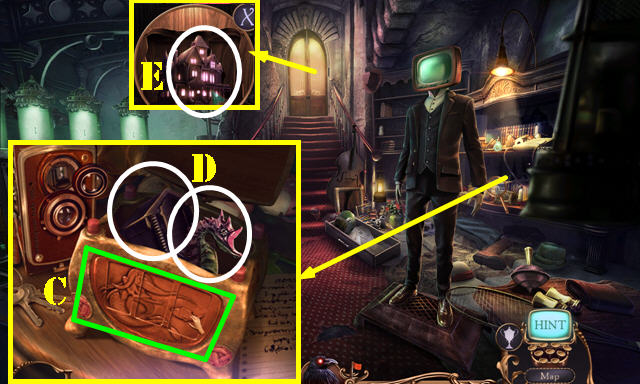
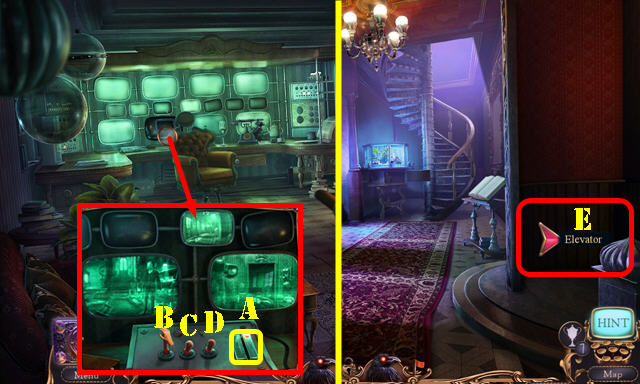
- Select the POCKET KNIFE (inventory). Use the POCKET KNIFE (C); take MADAME FATE'S HEAD.
- Use MADAME FATE'S HEAD (E); open the diary and touch it 4x. Open the wallet (F); take the NAIL CLIPPER and MCF BADGE.
- Exit the vehicle.
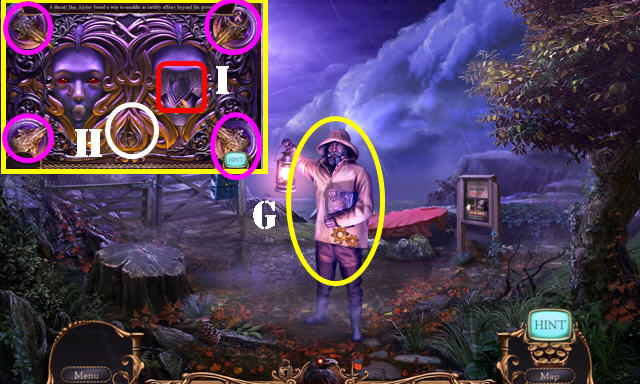
- Give the MCF BADGE (G) and talk to the agent.
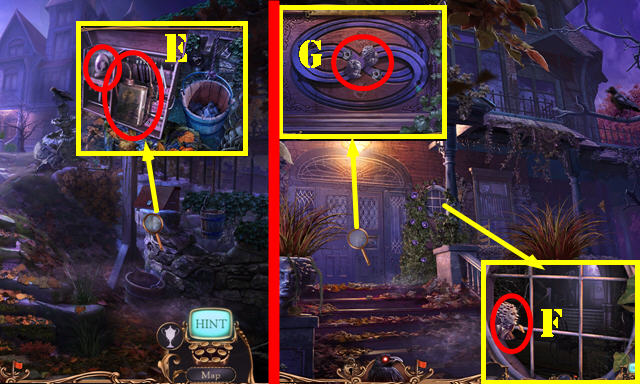
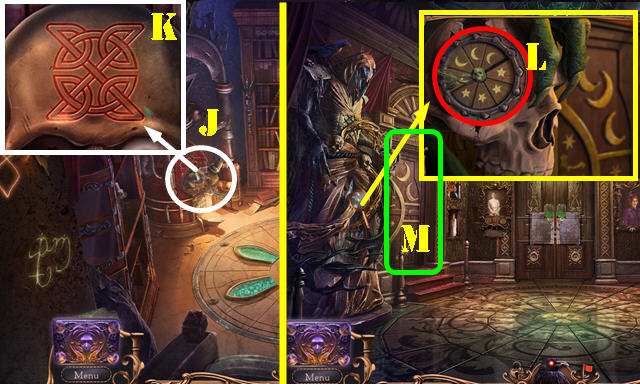
- Select the 4 skulls (purple). Place the RAVENHEARST CREST (H).
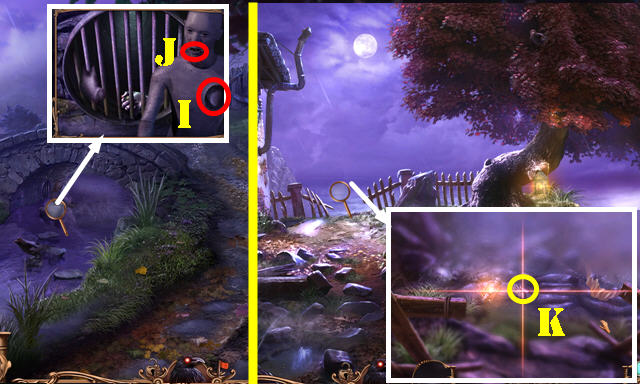
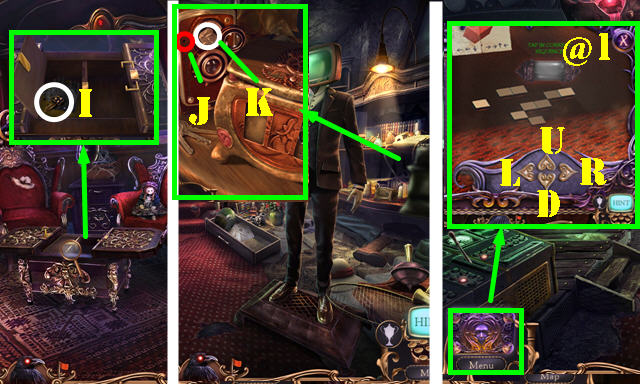
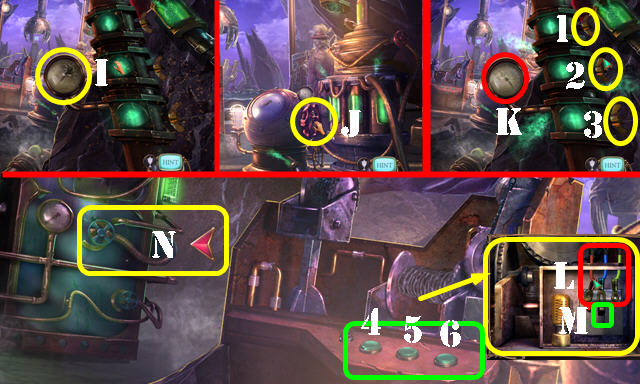
- Take the STONE LEAVES 1/2 (I).
- Exit.
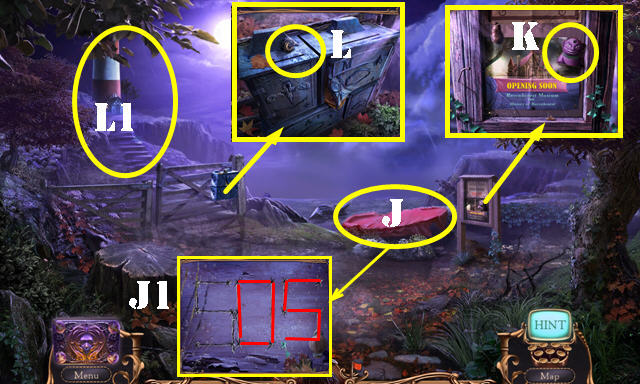
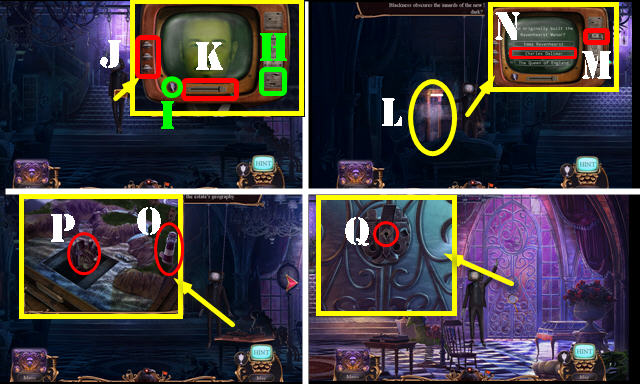
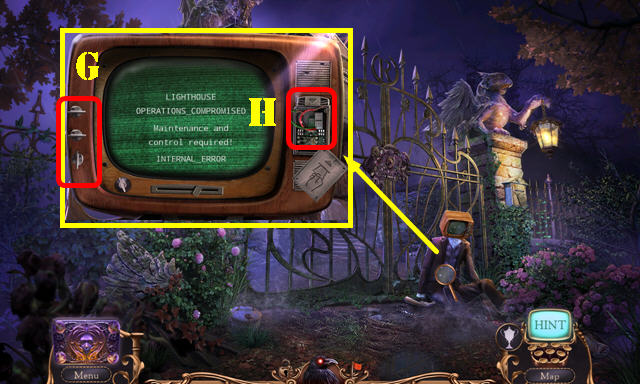
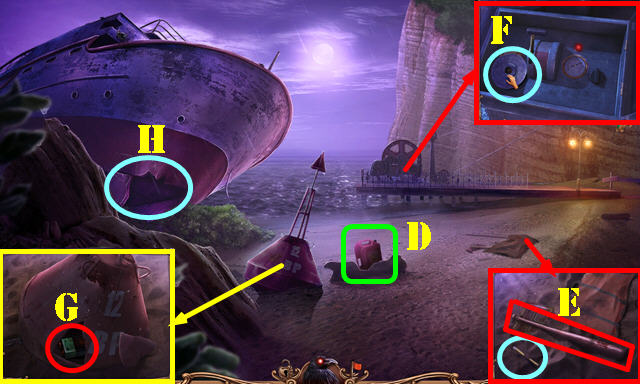
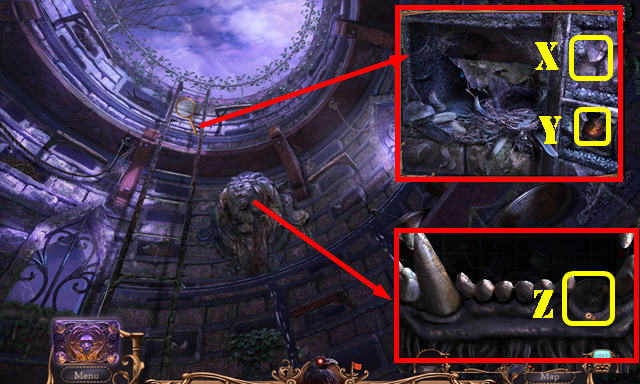
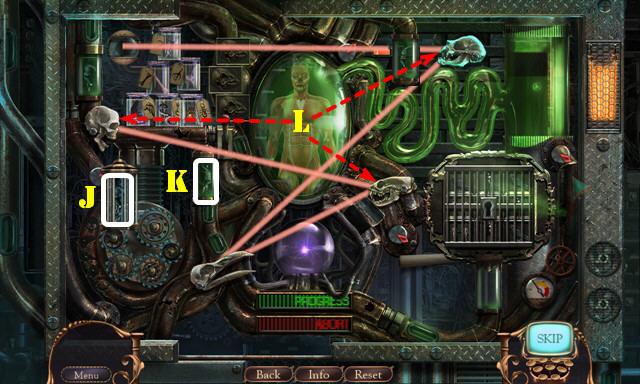
- Remove the cover (J) for a HOP; play it to get the FLARE GUN. HOP puzzle solution (J1).
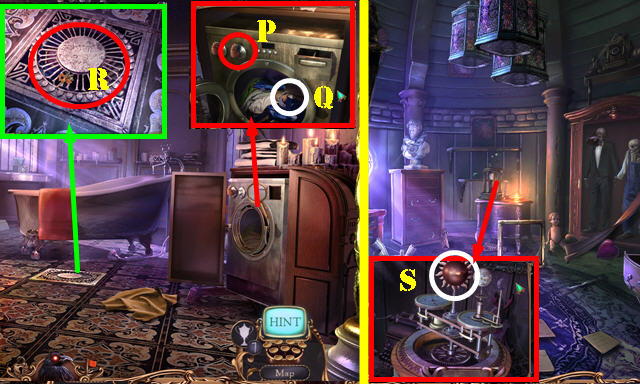
- Use the NAIL CLIPPER to get the TROLLS 1/3 (K).
- Take the FISHING LINE (L).
- Go to the Lighthouse yard (L1).
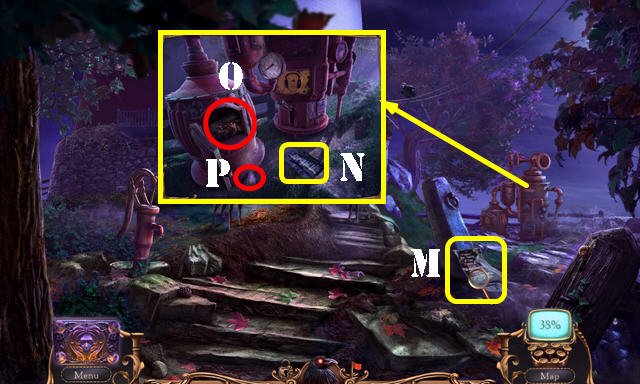
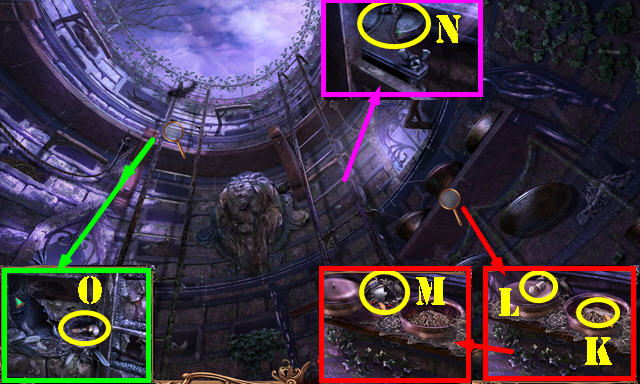
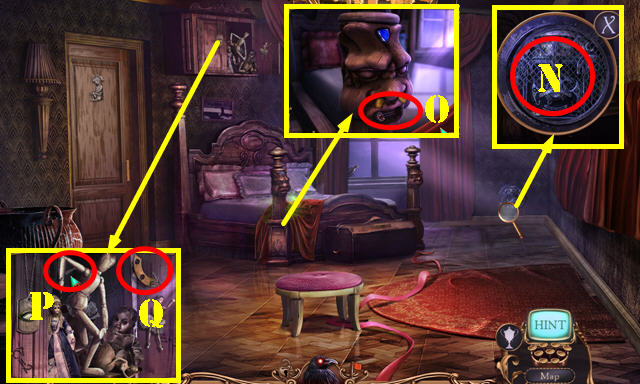
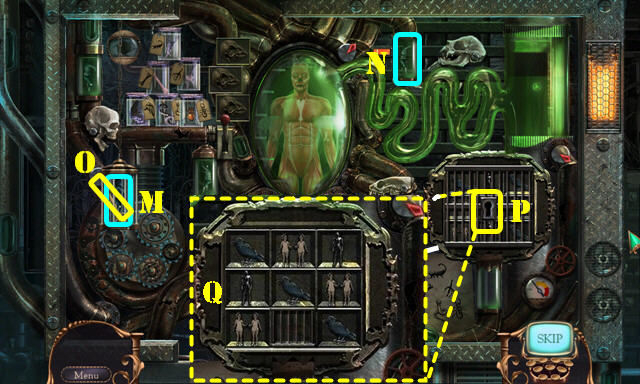
- Read the 2 notes (M-N).
- Open the door (O); take the STONE LEAVES 2/2 (P).
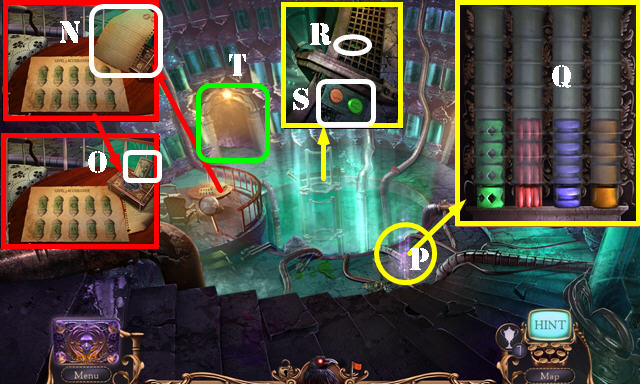
- Walk down and go right to the Road.
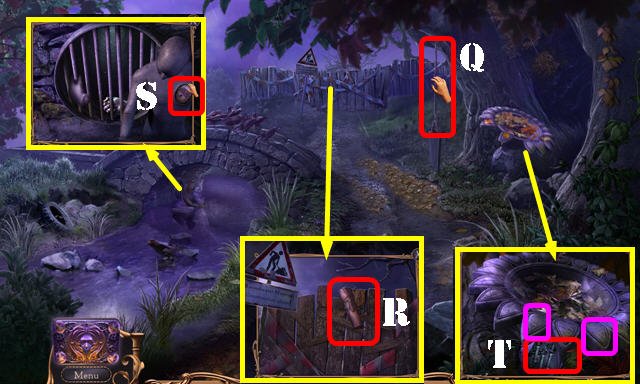
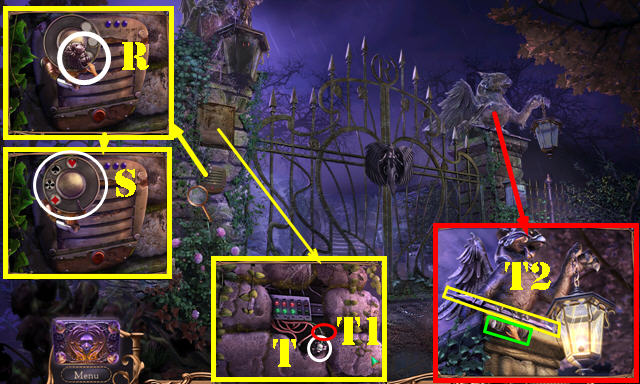
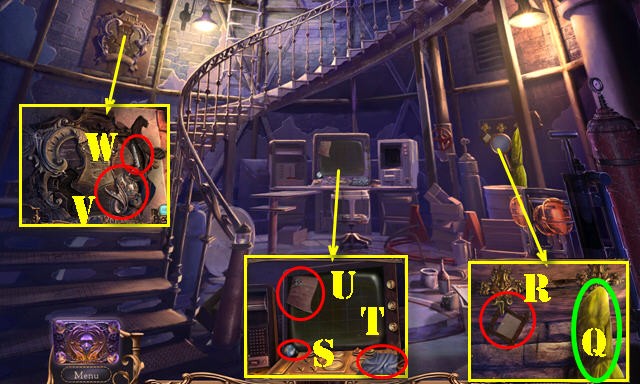
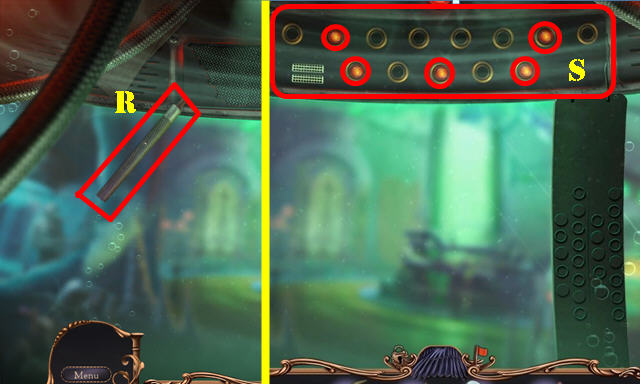
- Take the ROPE (Q), FISHING BAG (R) and METAL BRUSH (S).
- Open the FISHING BAG; take the FISHING ROD (inventory).
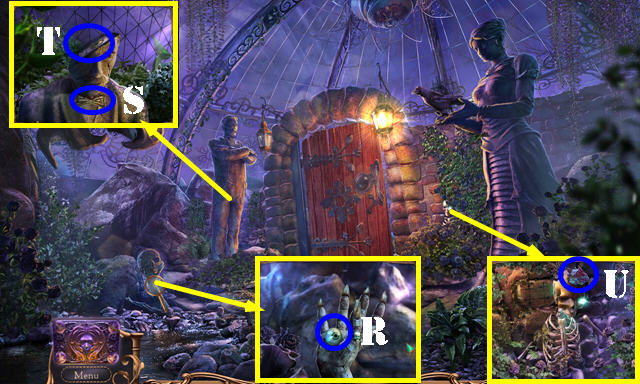
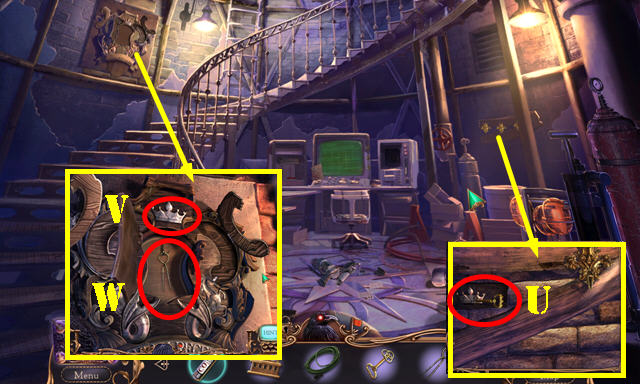
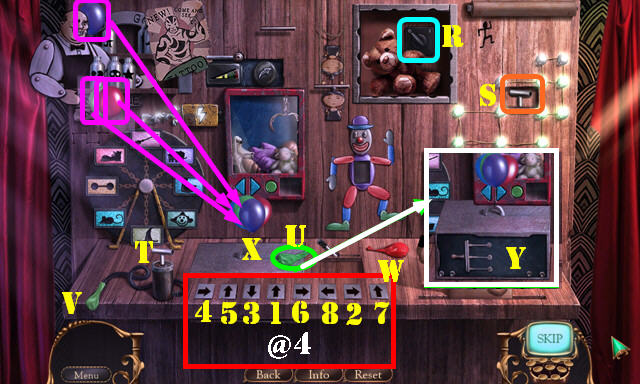
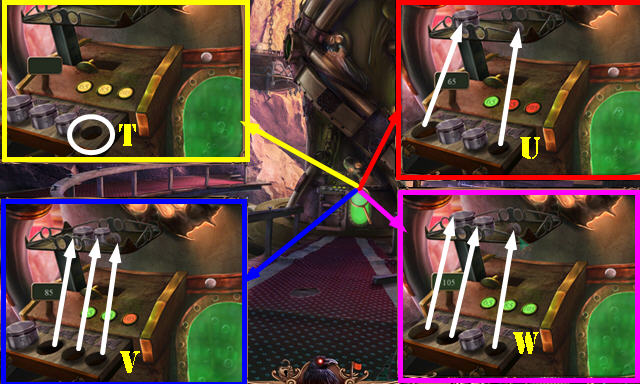
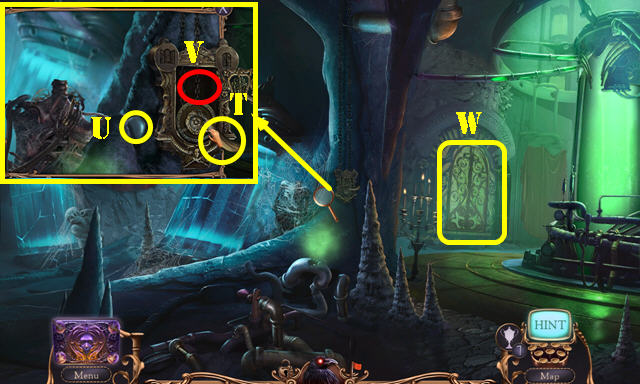
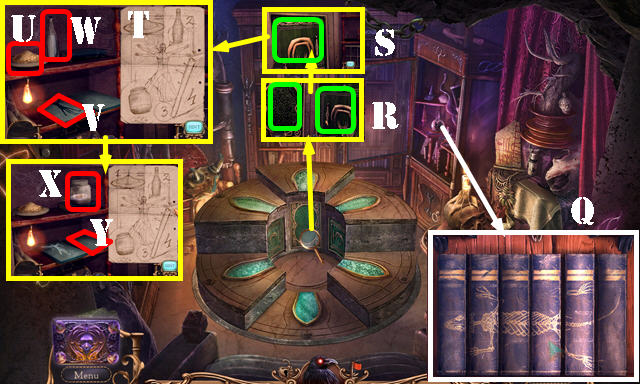
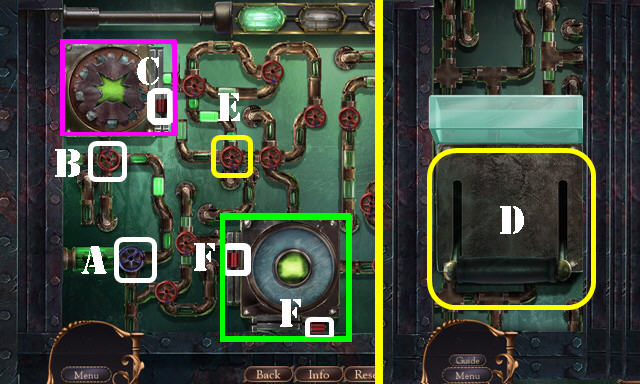
- Place the 2 STONE LEAVES (purple); select the pipes (T) for a puzzle.
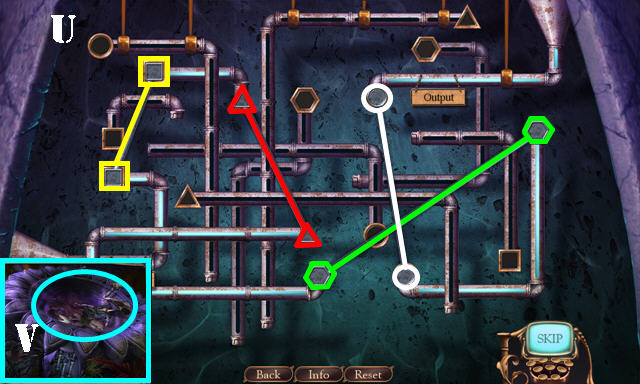
- Solution (U).
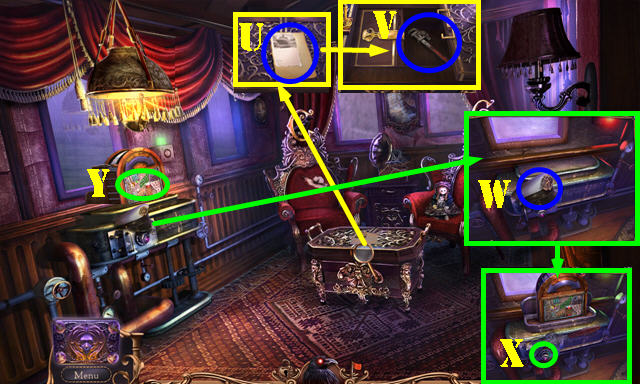
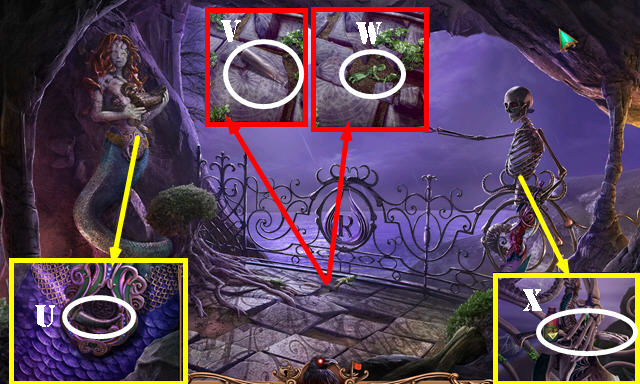
- Select the doll (V); remove the legs and arms. Read the note to get the MAILBOX KEY.
- Walk down.
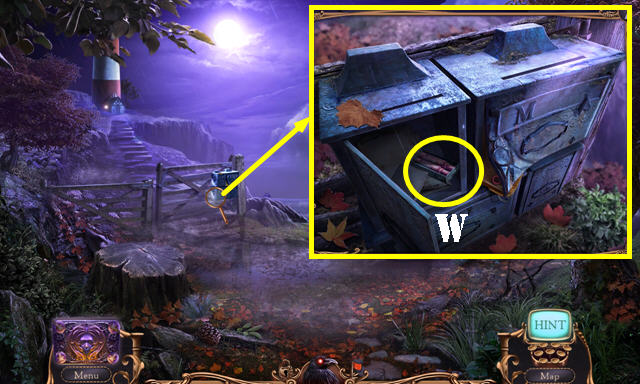
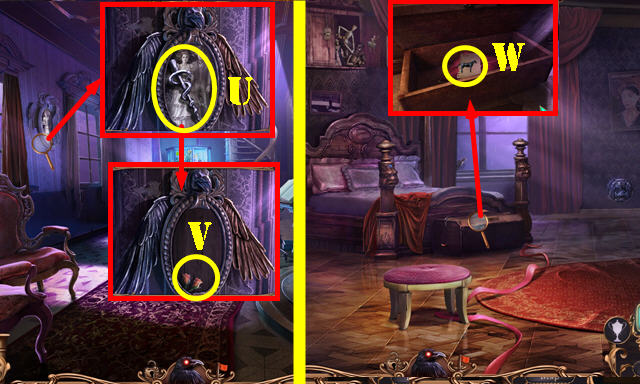
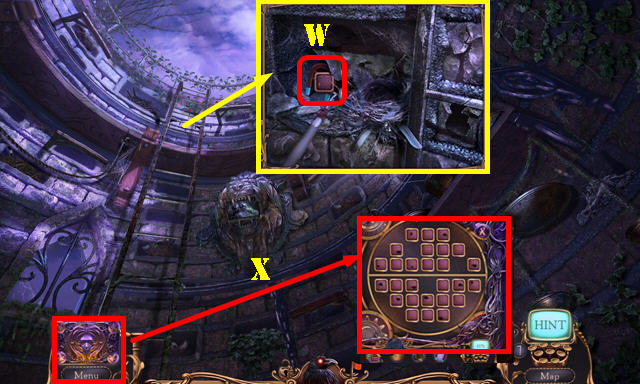
- Use the MAILBOX KEY; read the letter; take the FLARES (W).
- Open the FLARE GUN and place the FLARES in it to get the LOADED FLARE GUN (inventory).
- Go to the Road.
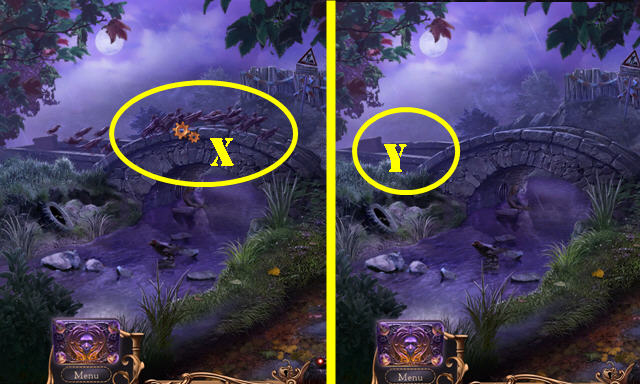
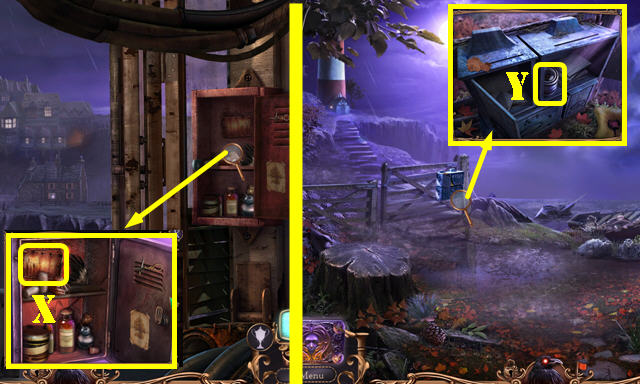
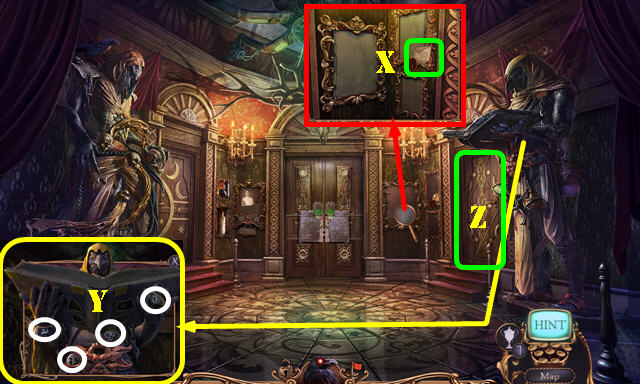
- Use the LOADED FLARE GUN (X).
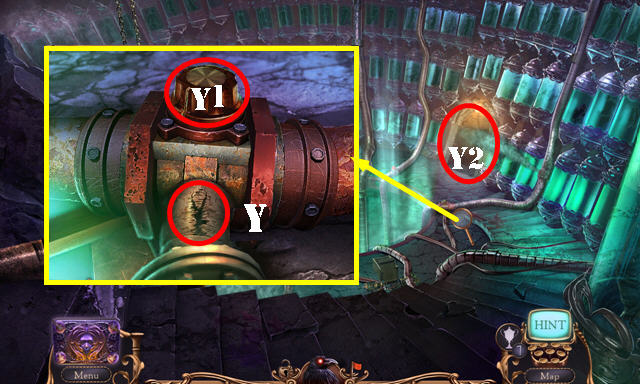
- Go to the Cottage (Y).

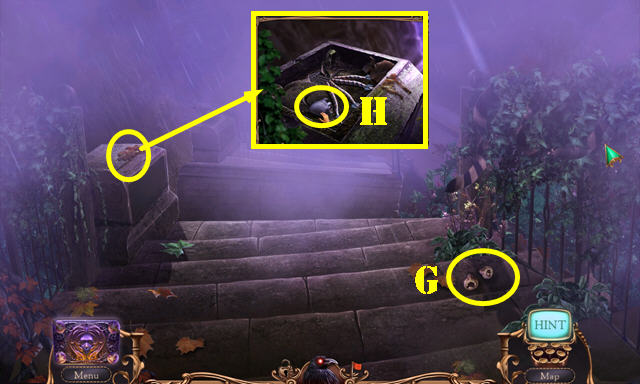
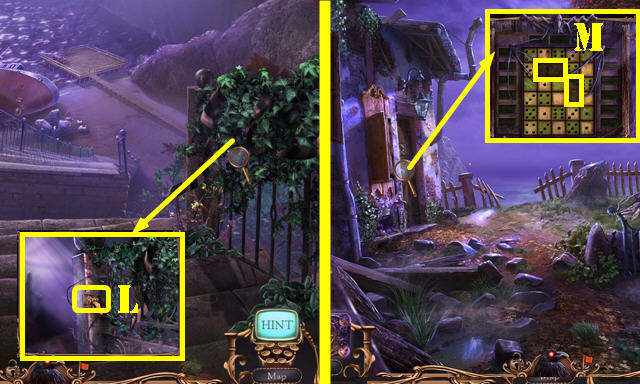
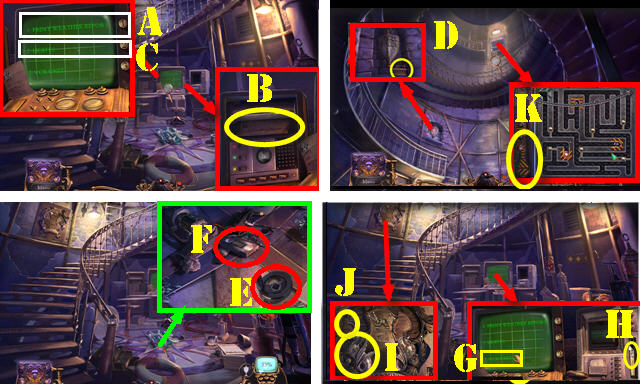
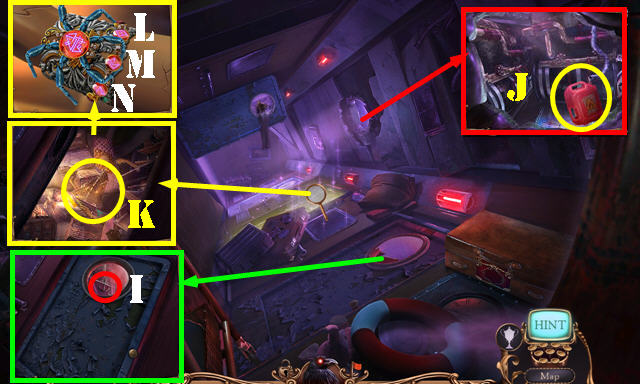
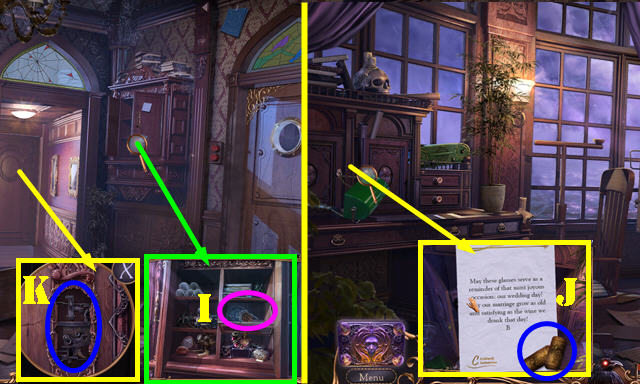
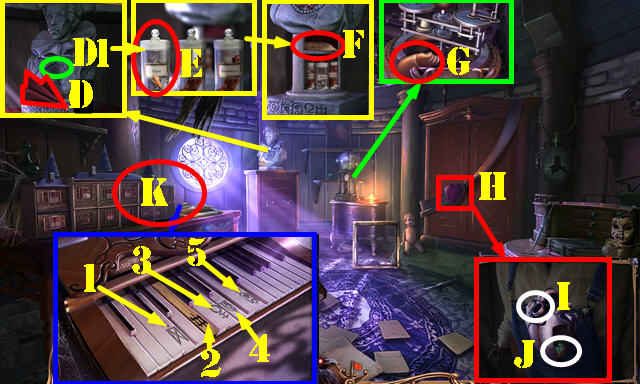
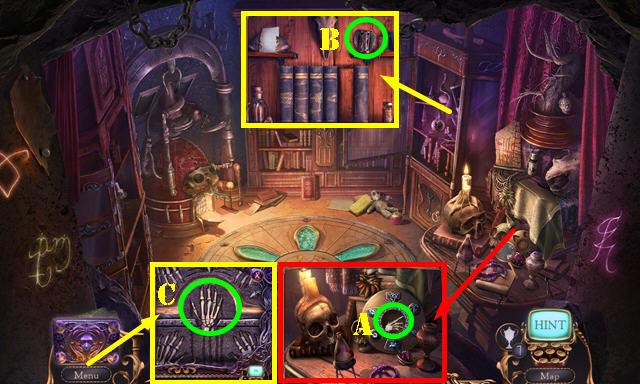
- Take the DOMINOS 1/2 (A). Read the note (B); note the symbols (C).
- Take the ADHESIVE TAPE (D). Remove the sheet, log, board and wall piece; take the METAL BOX (D1).
- Select the SOLVENT 3x (E).
- Go to the Cliff stairs (F).
- Take the TYPEWRITER KEYS (G).
- Use the SOLVENT; remove the cover; take the MANNEQUIN HEART (H).
- Place the TYPEWRITER KEYS on the METAL BOX; look at the letter and take the BOXING-GLOVE GUN (inventory).
- Walk down twice.
- Place the MANNEQUIN HEART (I); take the FISHING LURE (J).
- Place the FISHING LINE and FISHING LURE on the FISHING ROD (inventory).
- Go to the Cottage.
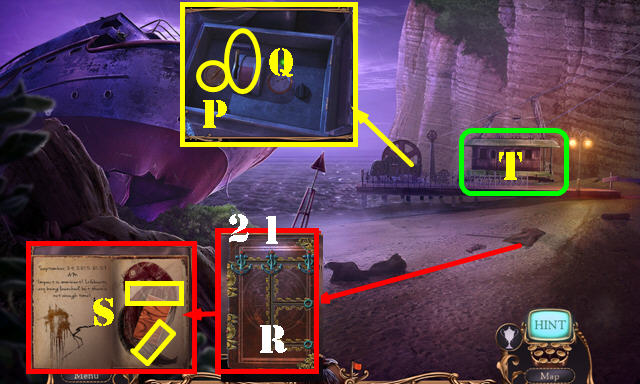
- Place the FISHING ROD for a puzzle. Solution (K).
- You receive the WORK GLOVES.
- Go to the Cliff stairs and slide down.
- Use the WORK GLOVES; take the DOMINOS 2/2 (L).
- Walk down.
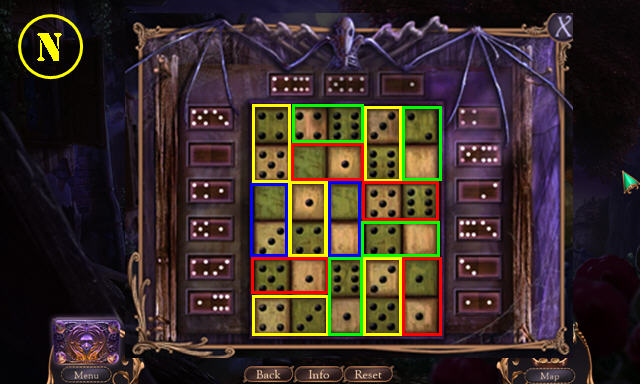
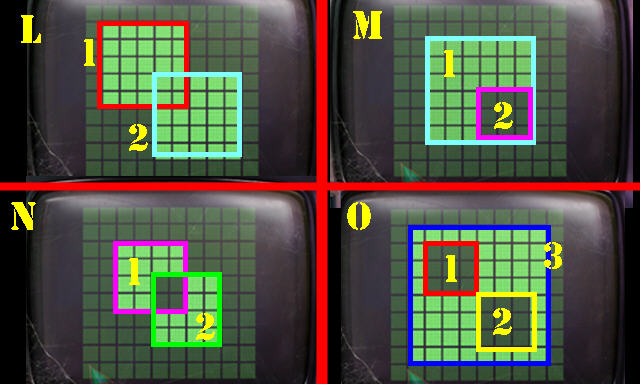
- Place the 2 DOMINOS for a puzzle (M).
- Solution (N).
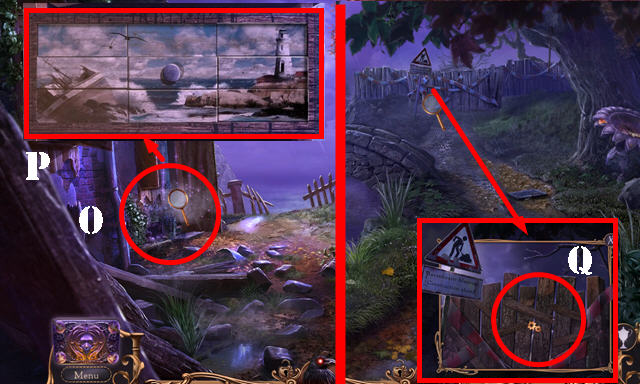
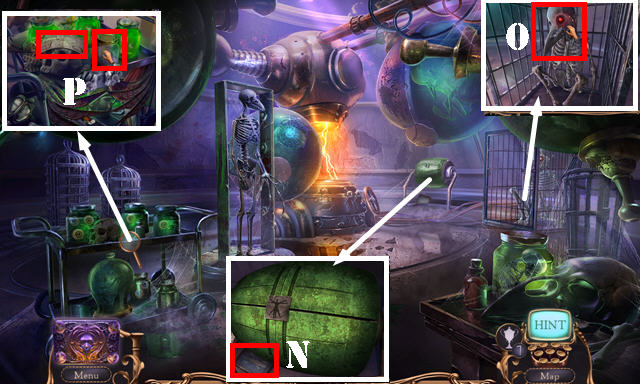
- Play the HOP (O) to get the AXE. HOP Puzzle solution (P).
- Walk down.
- Use the AXE (Q) 3x and go through the gate.
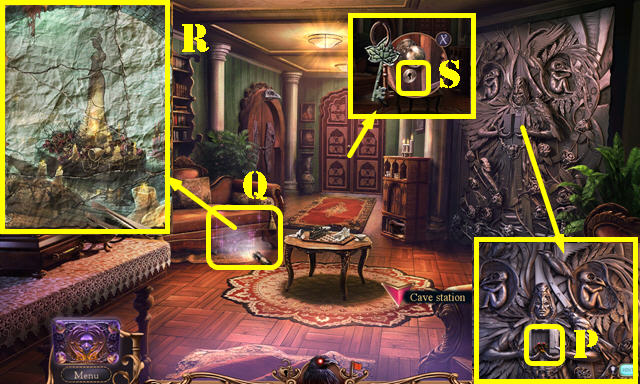
- Take the WOMAN'S HEAD (R).
- Dial heart-clover-heart (S).
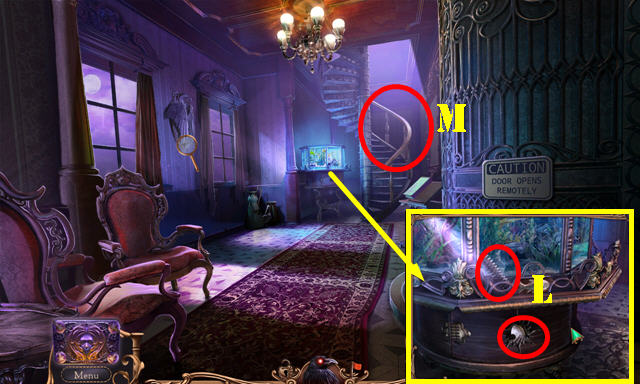
- Remove the sign; take the SKULL RING (T). Use the ADHESIVE TAPE (T1).
- Take the LIGHTHOUSE MODEL and RAILING PIECE (T2).
- Walk down.
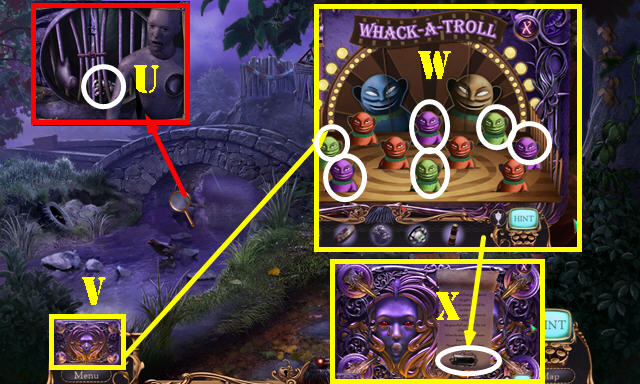
- Place the ROPE and use the RAILING PIECE; take the DOLL HAND (U).
- Open the DOLL HAND; take TROLLS 2/3 and TROLLS 3/3 (inventory).
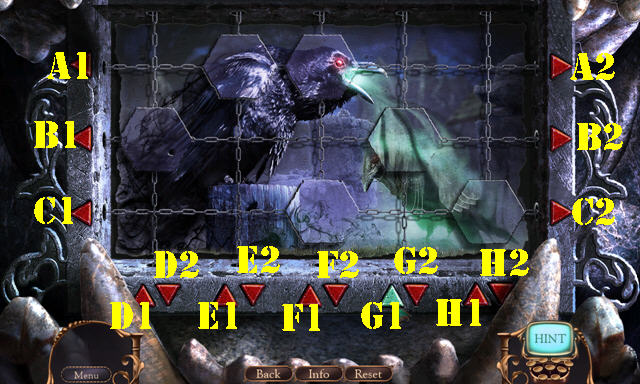
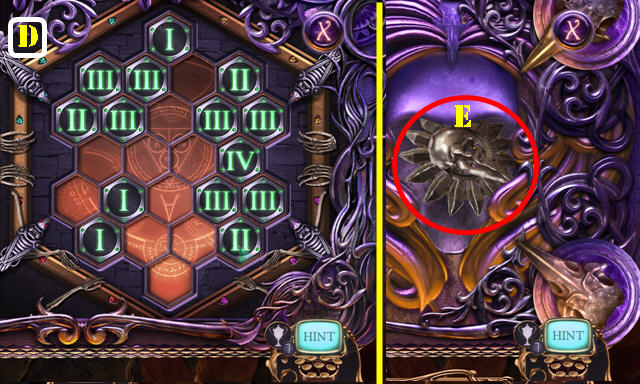
- Open Alister's Enigma (V); place the 3 TROLLS. Remove all the purple and green trolls (W).
- Open the scroll and take the INK CONTAINER (X).
- Go to Ravenhearst gate.
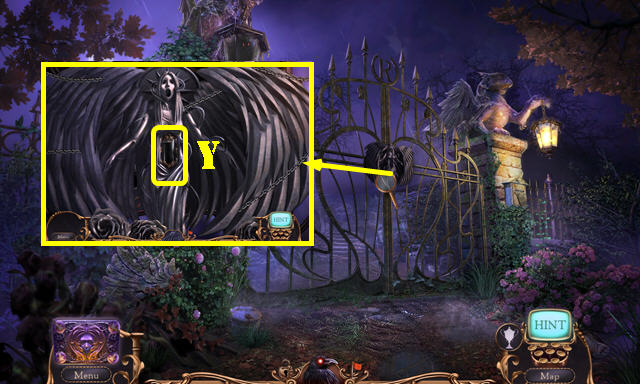
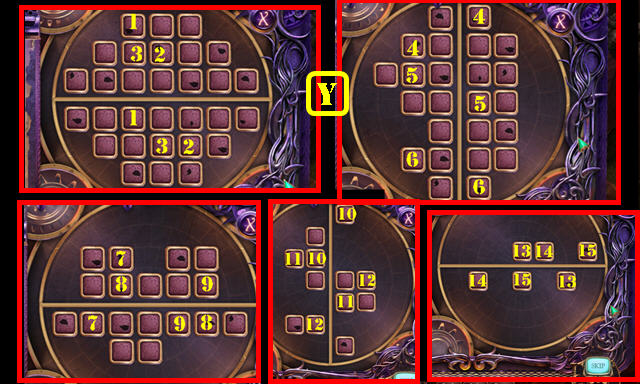
- Place the INK CONTAINER (Y) for a puzzle.
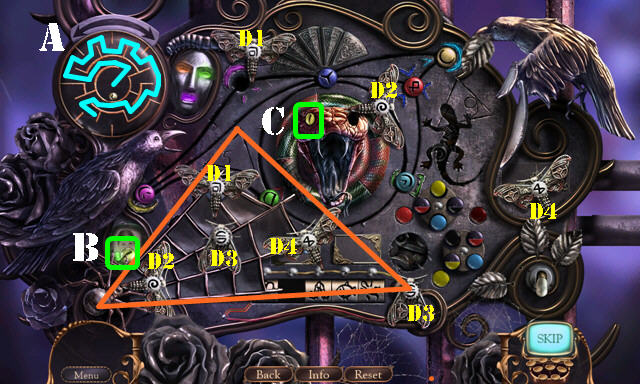
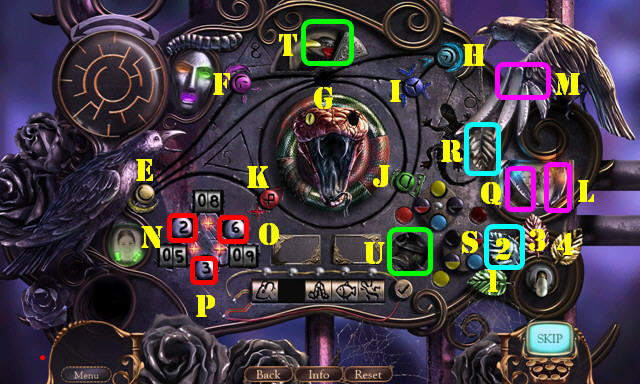
- Guide the ball to the exit (A).
- Take the eye (B); place it (C).
- Place the moths as shown (D1-D4).
- Select the stones: E-K-J-I-H-G-K-J-I-H-G-E-K-J-G-K-E-G.
- Take the feather (L); place it (M).
- Solution: Nx2-Ox6-Px3.
- Take the feather (Q); place it (M).
- Take the stone leaf (R); place it (S). Select the leaves 1-3-2-4.
- Take the color wheel (T); place it (U).
- Turn the wheels as shown (V).
- Take the animal wheel (W); place it (X).
- Solution (Y). Change the images as shown.
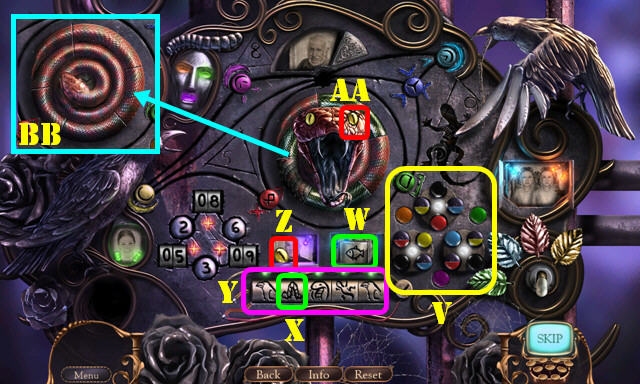
- Take the eye (Z); place it (AA).
- Arrange the snake as shown (BB).
- Go through the gate.
Chapter 2: Ravenhearst Museum
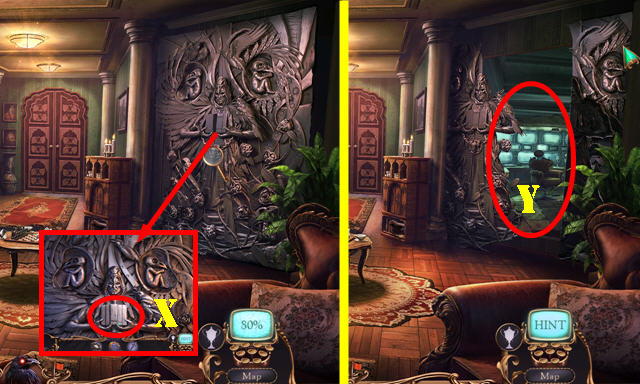
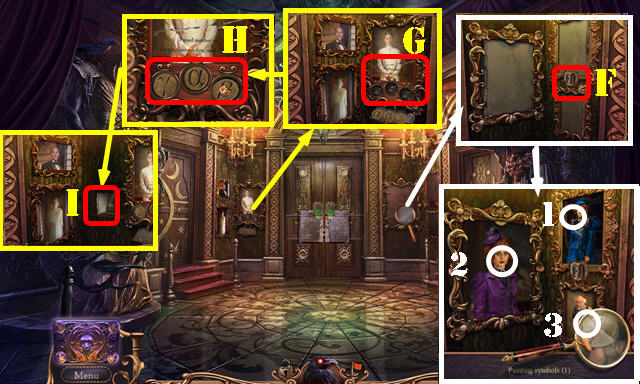
- Use the BOXING-GLOVE GUN; select the symbols (A). Take the BOW TIE (B).
- Go forward.
- Take the BROKEN CAMERA (C).
- Take the CROSSED GARDEN RAKES (D).
- Walk down.
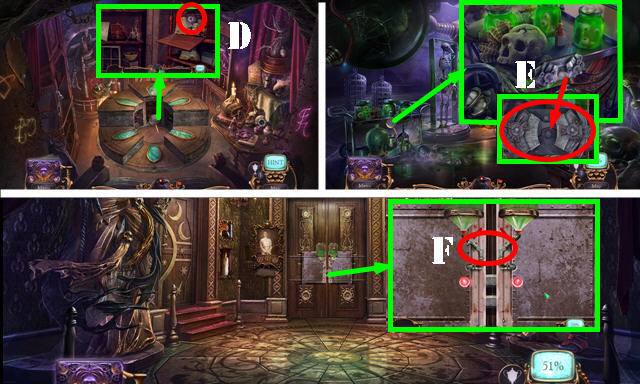
- Place the CROSSED GARDEN RAKES; take the HERBICIDE and EGG TIMER (E).
- Select the EGG TIMER; take the DIAL (inventory).
- Go forward.
- Use the HERBICIDE twice; take the MAN'S HEAD (F).
- Place the WOMAN'S HEAD and the MAN'S HEAD (G); select each head 3x.
- Enter the Ravenhearst Museum.
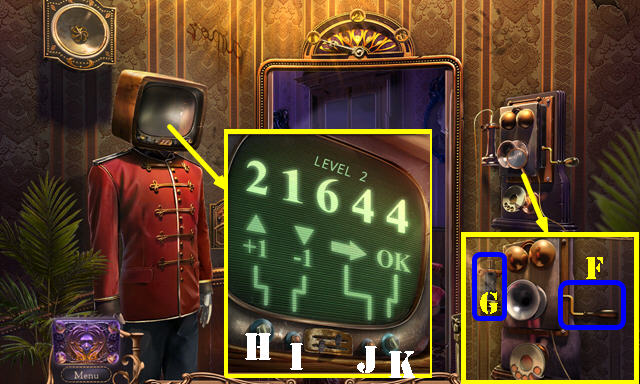
- Read the note (H). Place the DIAL (I). Select the three dials (J); slide the switch to the right (K).
- Play the HOP (L) to get the ESTATE-MODEL PUNCH CARD.
- Insert the ESTATE-MODEL PUNCH CARD (M). Answer: Charles Dalimar (N).
- Place the LIGHTHOUSE MODEL (O); take the GARDEN KEY (P).
- Open the lock; insert the GARDEN KEY (Q).
- Go through the gate.
- Place the SKULL RING; take the EYEBALL (R).
- Place the BOW TIE (S); take the MEMORIAL PUNCH CARD (T).
- Take the RAVENHEARST MODEL (U).
- Walk down.

- Place the RAVENHEARST MODEL; take the DRAGONFLY WINGS (V).
- Insert the MEMORIAL PUNCH CARD (V1). Answer: Three (V2).
- Open the door; take the RIPPED BELLOWS (W). Read the note (W1).
- Place the EYEBALL. Select the knobs as shown (X). Take the book and look at it. Take the HOUSE PIECES (Y).
- Open Alister's Enigma; place the HOUSE PIECES for a puzzle (Z).
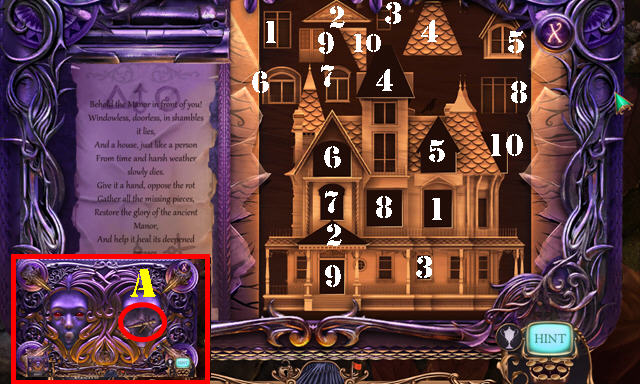
- Solution (1-10).
- Take the DRAGONFLY BODY (A).
- Return to the Garden memorial.
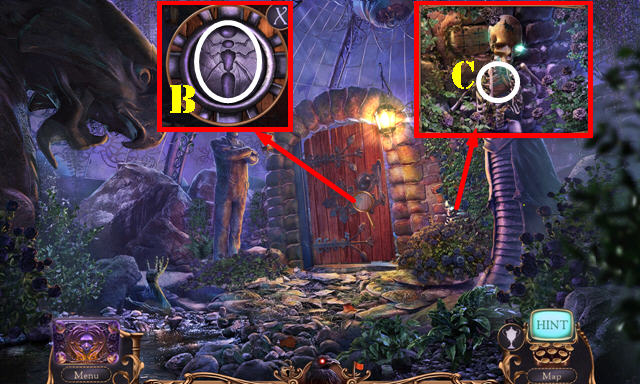
- Place the DRAGONFLY WINGS on the DRAGONFLY BODY to get the DRAGONFLY (inventory).
- Place the DRAGONFLY (B) for a HOP; play it to get the RIB SPREADER.
- Use the RIB SPREADER; take the WALLET (C).
- Look at the card in the WALLET; take the RIGHT HIPPOCAMPUS and MAINTENANCE PUNCH CARD (inventory).
- Walk down and slide left.

- Insert the MAINTENANCE PUNCH CARD (D). Answer: Open blast door (E).
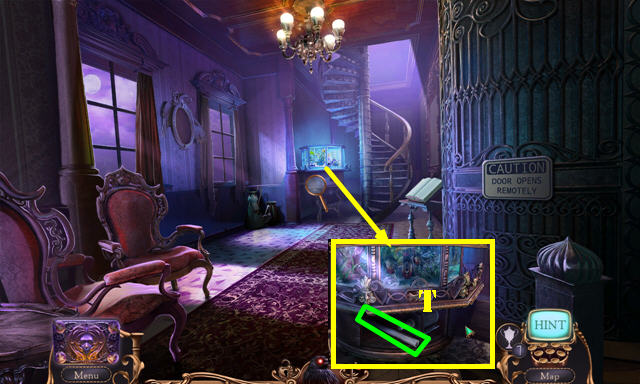
- Go to the Enclosed deck (F); you will be automatically transported to the Ravenhearst gate after the conversation.
- Select any knob (G); take the WIRES (H).
- Use the WIRES on the RIPPED BELLOWS to get the BELLOWS (inventory).
- Return to the Lighthouse yard.

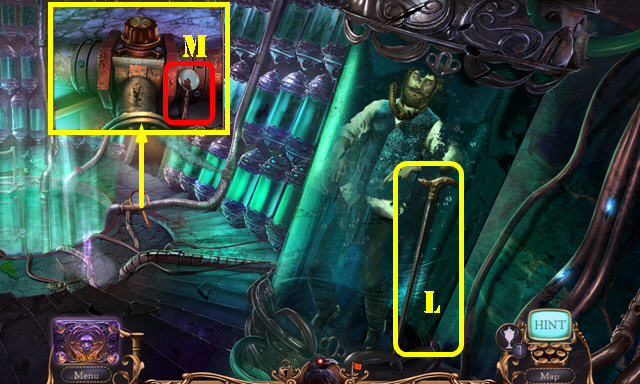
- Use the BELLOWS (I). Pull the lever (J).
- Pump the handle (K); take the LIGHTHOUSE KEY (L).
- Lower the ladder (M).
- Open the cover and remove the fuse (N). Look at the note (O).
- Use the LIGHTHOUSE KEY (P).
- Enter the Lighthouse.
Chapter 3: The Lighthouse
- Slide down.
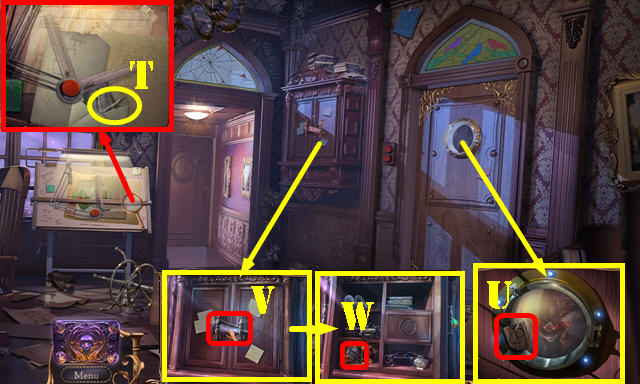
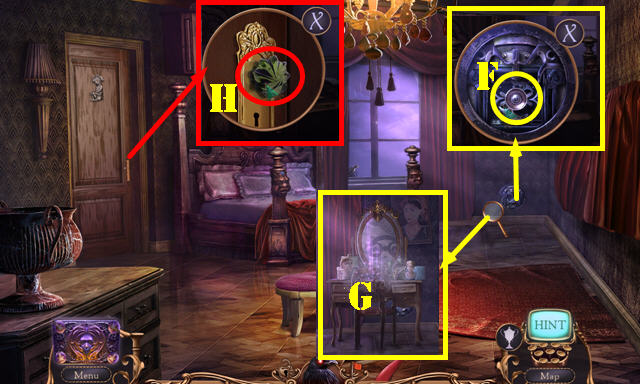
- Remove the cloth (Q); look at the picture (R) and flip it to get the SLIDER.
- Take the FUSE (S) and RAG (T).Read the note (U).
- Look at the sign. Place the RIGHT HIPPOCAMPUS (V); read the note and take the CO2 BOTTLE (W).
- Walk down.

- Place the FUSE (X).
- Put down the RAG (Y); pump the handle (Y1) to get the WET RAG.
- Place the SLIDER for a puzzle.
- Solution (Z). An HOP will automatically start after the puzzle, Play the HOP to get the LEFT HIPPOCAMPUS.
- Enter the Lighthouse.
- Select Print Weather Report (A). Take the report (B). Select Lights (C).
- Slide up.
- Take the CABLE-CAR CONTROL TOKEN (D).
- Slide down.
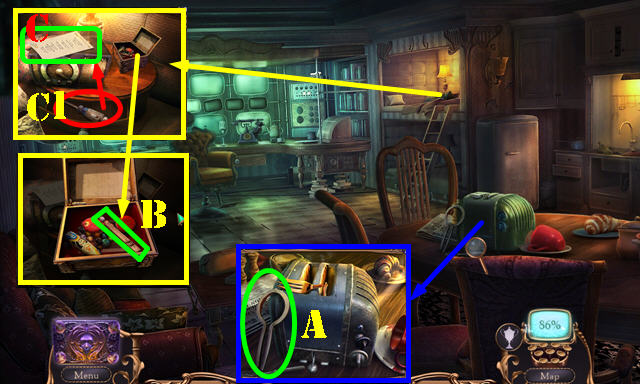
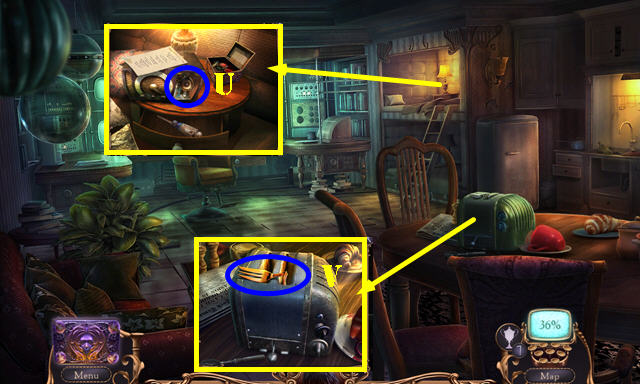
- Select the paper twice; take the ROTATING HANDLE (E). Remove the cloth; select the VIDEOTAPE 4x (F).
- Select VCR unit (G). Insert the VIDEOTAPE; take the LOCK CODE (H).
- Place the LEFT HIPPOCAMPUS (I); take the SWITCH KNOB (J).
- Slide up.
- Place the SWITCH KNOB for a puzzle (K).

- Solution: L-1-L-2-3-L-4-L-5-6-L-7-8-L-9.
- Go to the Lighthouse top (M).
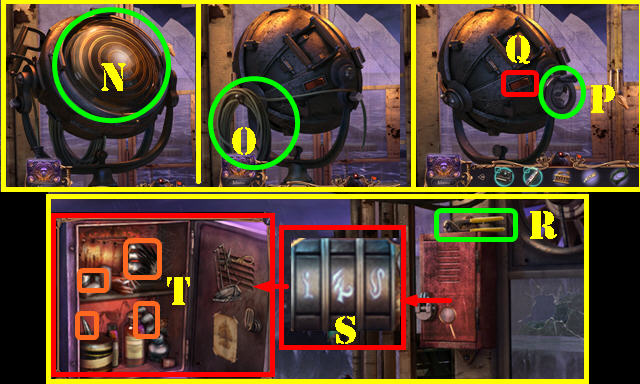
- Use the WET RAG; select the cover (N). Take the CABLE (O).
- Place the ROTATING HANDLE (P) and select it; flip the switch (Q).
- Take the NAIL PULLER (R).
- Place the LOCK CODE. Enter the combination (S).
- Select the paper for a mini-HOP. Play it (T) to get the SHIP AND CROWN 1/2.
- Walk down and slide down.
- Use the NAIL PULLER; look at the note; take the ORNAMENTED KEY and SHIP AND CROWN 2/2 (U).
- Place the 2 SHIPS AND CROWNS (V); take the NAVAL DIVIDER (W).
- Go to the Lighthouse top.
- Use the NAVAL DIVIDER to get the CO2 ACTIVATOR (X).
- Place the CO2 ACTIVATOR on the CO2 BOTTLE to get the CO2 CARTRIDGE (inventory).
- Return to the Lighthouse gate.
- Use the CO2 CARTRIDGE; remove the vest; take the CAMERA LENS (Y).
- Return to the Cliff stairs and slide up.
- Select the BROKEN CAMERA and look at the photo. Place the CAMERA LENS on the BROKEN CAMERA to get the CAMERA (inventory).
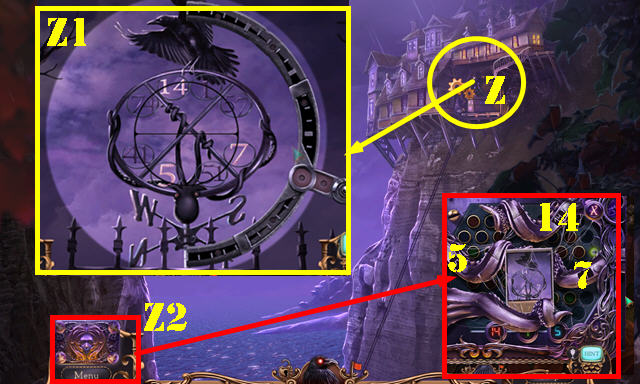
- Use the CAMERA (Z) for a puzzle. Solution (Z1). Take the CLUE PHOTO.
- Open Alister's Enigma (Z2); place the CLUE PHOTO for a puzzle and change the numbers to 14, 5, 7 for a puzzle.
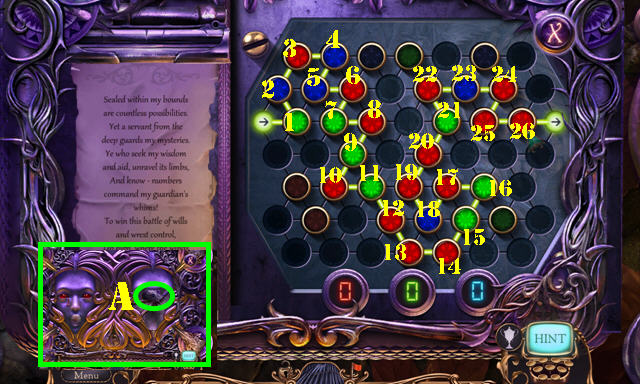
- Solution (1-26).
- Take the OCTOPUS (A).
- Slide down.
- Place the OCTOPUS (B).
- Go to the Beach (C).
Chapter 4: The Beach
- Take the EMPTY FUEL CAN (D).
- Remove the life vest; take the BASEBALL BAT and GLOW STICK (E).
- Place the CABLE-CAR CONTROL TOKEN; take the METAL WHEEL (F); remove the cap.
- Use the METAL BRUSH; remove the piece and take the BATTERY (G).
- Go to the Shipwreck (H).
- Use the CABLE twice. Use the BASEBALL BAT; take the ANCHOR (I).
- Select the pipe; use the EMPTY FUEL CAN to get the FUEL CAN (J).
- Use the GLOW STICK for a HOP (K); play it to get the FOUNTAIN PEN. HOP Puzzle solution: (L-M-Nx2)-(Lx2-Mx2-Nx2)-(Lx2-Mx2-Nx2).
- Walk down.
- Use the FUEL CAN (P). Pull the lever (Q).
- Place the ANCHOR; select 1, then 2 (R). Flip the page and remove both pieces of tape (S); take the SLATE 1/2.
- Go to the Cable car (T).
- Read the note; select it 4x (U).
- Use the ORNAMENTED KEY; take the WRENCH (V).
- Take the CAPTAIN'S HAT (W). Use the WRENCH 3x (X). Select the puzzle (Y).
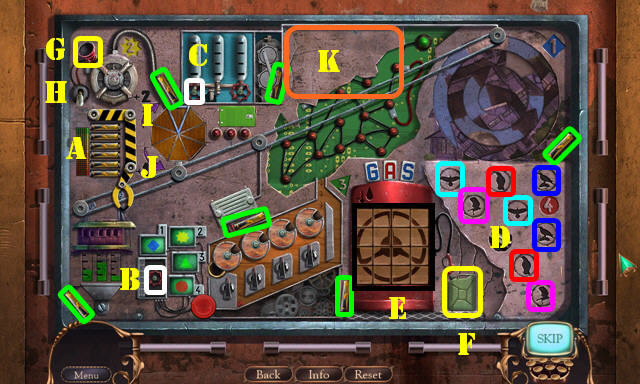
- Find the 6 batteries (green); place them here (A).
- Change the shapes, take the valve (B), and place it ( C).
- Find the matching pairs (D).
- Swap the pieces as shown (E).
- Pour the gas (F) in the funnel (G); press the switch (H).
- Select: J-I-J-Ix3-Jx4.
- Remove the plate (K).
- Take the mosaic piece (L); place it here and restore the picture (M).
- Take the fuse (N) and place it (O).
- Solution (1-17).
- Take the valve (P) and place it (Q).
- Change the levels as shown (R).
- Place the ball (S) in the hole (T). Change the levers as shown (U) and press the button (V).

- Select the lever (A) and walk down once the cable car stops.
- Place the BATTERY (B). Answer: Panic Room Surveillance, Caves Surveillance and then Print Report (C). Take the SCHEME 1/2 (D).
- Play the HOP (E) to get the GOLF CLUB. HOP puzzle solution (3515).
- Take the SPINDLE (F). Use the GOLD CLUB; take the WINDING KEY (G).
- Look at the note (H).
- Walk down.
- Use the WINDING KEY; take the BROOCH (I).
- Walk down.
- Use the BROOCH (J); take the SCHEME 2/2 (K).
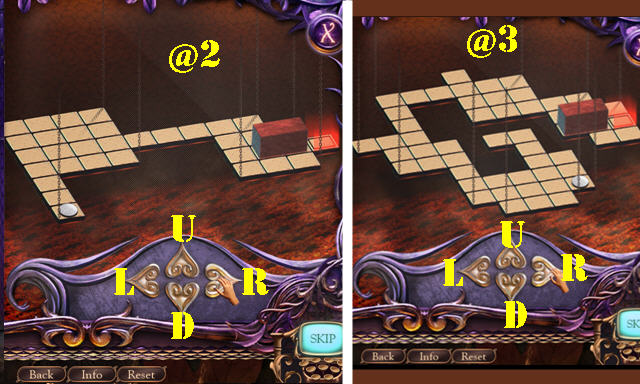
- Open Alister's Enigma; place the 2 SCHEMES for a puzzle. Solution one: L-L-D-R-R-U-L (@1).
- Solution two: R-D-L-U-L-Dx3-Ux2-R-U-Rx4-D-R-D-Lx2-U-R-D-R (@2).
- Solution three: R-Dx2-R-Dx2-R-D-R-U-R-Lx4-Ux2-L-Ux3-Rx2-D-Rx2-U-L-Dx2-Rx2-Dx2-R (@3).
- Take the POD.
- Return to the Shipwreck.
- Use the FOUNTAIN PEN on the CAPTAIN'S HAT to get the CAPTAIN'S BADGE (inventory).
- Place the CAPTAIN'S BADGE (A); take the SNOW GLOBE and look at the note (B).
- Flip the photo on the SNOW GLOBE; shake the snow globe to get the SLATE 2/2 (inventory).
- Return to the Cave station.
- Place the 2 SLATES. Arrange as shown (C). Take the SEA HORSE and HOUSE MECHANISM (D).
- Place the POD in the HOUSE MECHANISM to get the RAVENHEARST MODEL (inventory).
- Place the RAVENHEARST MODEL (E). Enter the Lobby.
Chapter 5:The Panic Room
- Pull out the book; place the SEA HORSE; flip the pages 3x; select the note and take the SILVER FEATHER (F).
- Take the candle and use it (G). Open the lid; take the DRAFTING-MACHINE CONTROLLER (H).
- Take the RAVEN CLAW (I).
- Enter the Aviary (J).
- Select the hay 3x; Use the RAVEN CLAW on the box; look at the note and take the RAVEN CARETAKING NOTE (K).
- Take the SMALL LIGHT BULB (L); move the box and take the ORNATE PLAQUE FRAME (M).
- Place the METAL WHEEL and SPINDLE (N).
- Take the BROKEN FLASHLIGHT (O).
- Walk down.
- Place the RAVEN CARETAKING NOTE; take the CABINET PENDANT (P).
- Place the SMALL LIGHT BULB in the BROKEN FLASHLIGHT to get the FLASHLIGHT (inventory).
- Use the FLASHLIGHT (Q) for a HOP; play it to get the IVY KEY. HOP puzzle solution (R).
- Place the IVY KEY. Select the keys 3x and enter the Study (S).
- Place the DRAFTING-MACHINE CONTROLLER; take the DENTAL PROBE (T).
- Take the LETTER G (U).
- Take the LION FANG (V) and PLAQUE RAVEN (W).
- Return to the Aviary.
- Use the DENTAL PROBE (X); take the WIFE'S PENDANT (Y).
- Place the WIFE'S PENDANT on the CABINET PENDANT (inventory).
- Place the LION FANG (Z) for a puzzle.
- Solution: H1x2-A1-F1-A1-B2x2-G1-H2-B1x3-C2x2-G1.
- Look at the note; take the RING CUTTER.
- Return to the Study.
- Use the CABINET PENDANT; move three items; take the ORNATE MONOGRAM (I).
- Slide left.
- Use the RING CUTTER. Read the note and take the CORKS (J).
- Place the LETTER G on the ORNATE MONOGRAM to get CALDWELL'S MONOGRAM (inventory).
- Slide right.
- Place CALDWELL'S MONOGRAM (K). Enter the Anteroom.
- Take the PLAQUE and SPRING (L).
- Place the PLAQUE RAVEN and PLAQUE in the ORNATE PLAQUE FRAME to get the ORNATE PLAQUE (inventory).
- Go to the Master bedroom (M).
- Remove the screen (N).
- Use the CORKS; take the HAIRPIN (O).
- Place the SPRING (P); take the METAL DISK 1/2 (Q).
- Walk down.

- Use the HAIRPIN (R) for a HOP; play it to get the NEWSPAPER CLIPPINGS. HOP puzzle solution (S).
- Return to the Lobby.
- Place the NEWSPAPER CLIPPINGS; take the BRONZE FEATHER (T).
- Return to the Anteroom.
- Place the SILVER FEATHER and BRONZE FEATHER; take the ROD OF ASCLEPIUS (U). Select the photo twice; take the ROSEBUDS (V).
- Go to the Master bedroom.
- Place the ROSEBUDS; select the paper and take the MURDER EVIDENCE (W).
- Return to the Lobby.
- Place the MURDER EVIDENCE (X).
- Enter the Panic room (Y).
- Take the JAR OPENER (A).
- Read the note; take the PIANO KEY (B).
- Look at the note (C). Move the two pillows and open the drawer; Use the screwdriver (C1).
- Return to the Study.
- Take the METAL DISK 2/2 (D).
- Return to the Anteroom and then to the Cave station.
- Place the 2 METAL DISKS; select 1-6. Take the FAKE BLOOD and CRANK HANDLE (E).
- Return to the Master bedroom.
- Place the CRANK HANDLE (F) for a HOP; play it (G) to get the BATHROOM DOORKNOB.
- Place the BATHROOM DOORKNOB (H) and enter the Bathroom.

- Move the cloth (I).
- Open the cabinet; take the MUSIC CYLINDER (J).
- Place the ROD OF ASCLEPIUS. Open the cabinet; take the SAFETY PIN (K).
- Use the SAFETY PIN; move the items twice and take the TICKET (L).
- Walk down and slide right.
- Place the TICKET for a puzzle (M).
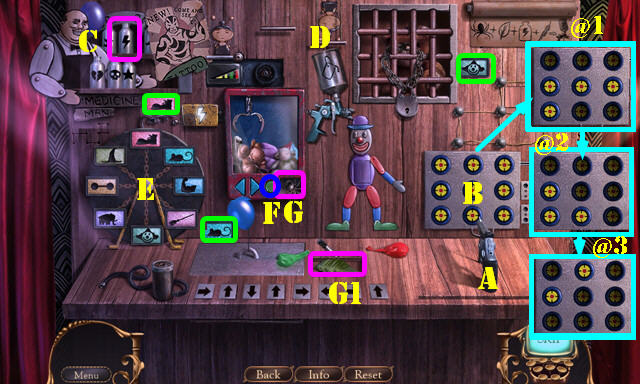

- Pick up the pistol (A) and shoot the targets (B) to make solutions: @1-@2-@3.
- Move the bottles; place bottle (C) into (D).
- Grab the 3 pictures (green) and place them on the wheel; arrange as shown (E).
- Press Fx2; take the spider (G) and place it (D).
- Pull the lever and take the leaf (G1); place it (D).
- Place the feather (H) in (I).
- Ink the tattoos on Dante (J) with the tattoo gun (I).
- Place the button (K) here (L). Guide the acrobat: Mx3-L-Mx3-L.
- Place the arm (N) on the clown and arrange as shown (O).
- Use the key (P) in the lock (Q). Select the lock. Slide the bars in order: (1 down)- (2 left)-(3 down)-(4 left)-(5 down)-(6 down)-(7 left).
- Move the bear and press the switch (R).
- Press the arrows in order (1-8) (@4).
- Place the pump handle (S) here (T).
- Move the green balloon (U) to (V); press (T) 3x. Repeat the process with the red balloon (W).
- Move the 3 balloons (pink) to (X).
- Flip the switch (Y).
- Place the MUSIC CYLINDER; remove the cover and take the HAIR CLIP (A).
- Slide right.
- Change the numbers to 352; take the EARTH MODEL (B).
- Enter the Secret room (C).
Chapter 6: The Secret Room
- Take the HANDKERCHIEF (D). Place the ORNATE PLAQUE and push it (D1). Take the SCISSORS (E). Read the note (F).
- Remove the dome; take the DOLL ARM (G).
- Read the sign (H) and open the door; select the heart and use the FAKE BLOOD (I); take the TILES 1/3 (J).
- Place the PIANO KEY. Select 4-1-5-3-2 for a HOP; play it (K) to get the RIBBON. HOP solutions (L-M-N-O). Drag the cursor over the boxes to light them up; drag again over a spot to darken the squares.
- Return to the Bathroom.
- Place the DOLL ARM (P); read the note and move an item; take the CRESCENT MOON and GAME TOKEN (Q).
- Use the HAIR CLIP (R) to get TILES 2/3.
- Return to the Secret room.
- Place the EARTH MODEL and CRESCENT MOON; take the BRONZE SUN (S).
- Return to the Anteroom.
- Place the BRONZE SUN; take the PLASTIC PIPE (T).
- Return to the Panic room.
- Use the SCISSORS to get the SPEAKER (U).
- Use the HANDKERCHIEF to get the BENT FORK (V).
- Use the RIBBON and the BENT FORK on the PLASTIC PIPE to get the REACHING POLE (inventory).
- Return to the Aviary.
- Use the REACHING POLE; take the MAGNET and TILES 3/3 (W).
- Open Alister's Enigma and place the 3 TILES for a puzzle (X).
- Solution: 1-15 (Y). Pieces may shift as you select them; the solution shows the original positions of the tiles.
- Take the SECURITY CARD.
- Return to the Panic room.
- Use the SECURITY CARD (A); Select: C-D-B.
- Return to the Anteroom.
- Enter the Elevator (E).
- Crank the handle (F); select the receiver 3x (G) and place the SPEAKER. Crank the handle again.
- Select I-Hx2-J-H-J-Hx6-J-Hx4-J-Hx4-K.
- Exit the elevator to the Pod storage.
- Take the WALKING STICK (L) and MAGNIFIER FRAME (M).
- Slide left.
- Read the note (N). Insert the GAME TOKEN; take the BLACKSMITHS 1/2 (O).
- Play the HOP (P) to get the ACID. HOP puzzle solution (Q).
- Use the MAGNET (R); press the green button and take the BROKEN CONTROLS (S).
- Go to the Cliff terrace (T).
- Take the HORNS 1/2 (U) and SILICONE GLUE (V).
- Use the WALKING STICK; select the ground and take the BLACKSMITHS 2/2 (W).
- Use the ACID to get the SWORD (X).
- Walk down.
- Use the SILICONE GLUE (Y) and JAR OPENER (Y1).
- Go to the Mechanism chamber (Y2).
- Take the TORN CANVAS and GRAPHITE PENCIL (Z).
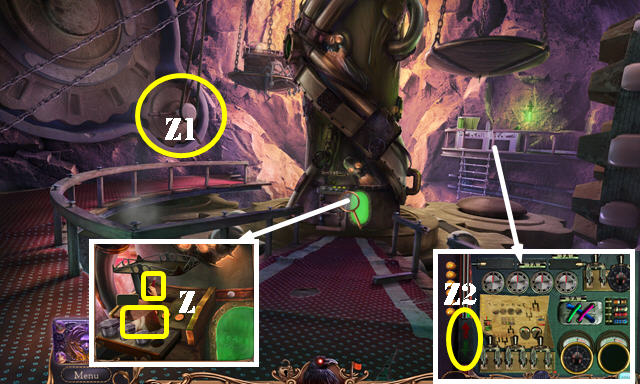
- Use the SWORD (Z1).
- Read the note and flip it over. Place the BROKEN CONTROLS (Z2) for a puzzle.
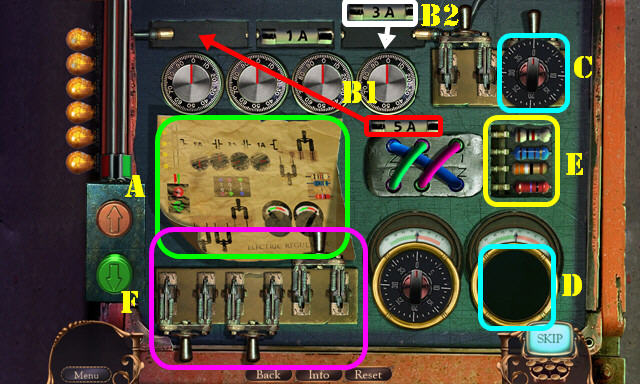
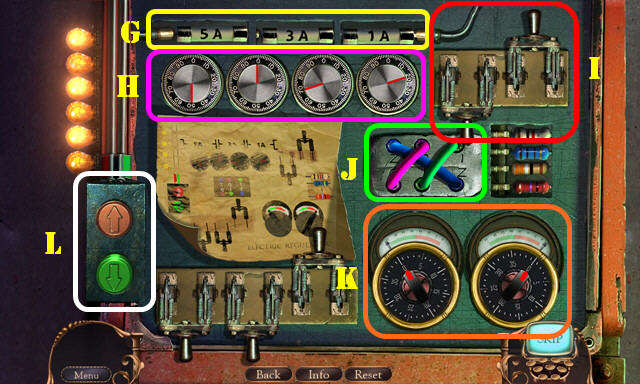
- Use the schematic as a reference (A).
- Move the 2 fuses to the holder (B1-B2).
- Move the dial face (C) to the dial (D).
- Swap the resistors as shown (E).
- Flip the switches as shown (F).
- Swap the fuses as shown (G).
- Set the 4 dials (H).
- Flip the switches as shown (I).
- Arrange the wires (J).
- Set the dials (K).
- You receive the CONTROLS (L).
- Walk down.
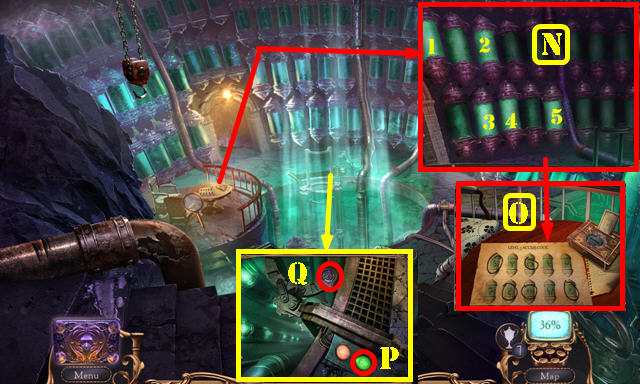
- Use the GRAPHITE PENCIL. Slide up and down and select the 5 marked pods (N) one at a time. Each selection checks of a pod on the paper (O). You receive the PAPER CODE.
- Place the CONTROLS; select the green button (P); take the STAR BUCKLE (Q).
- Go to the Cliff terrace.
- Place the STAR BUCKLE. Select the symbols (R).
- Play the HOP (S) to get the CANNONBALL.
- Return to the Mechanism chamber.
- Place the CANNONBALL (T) for a puzzle.
- Solution one: 50-15 (U).
- Solution two: 40-30-15 (V).
- Solution three: 50-40-15 (W).
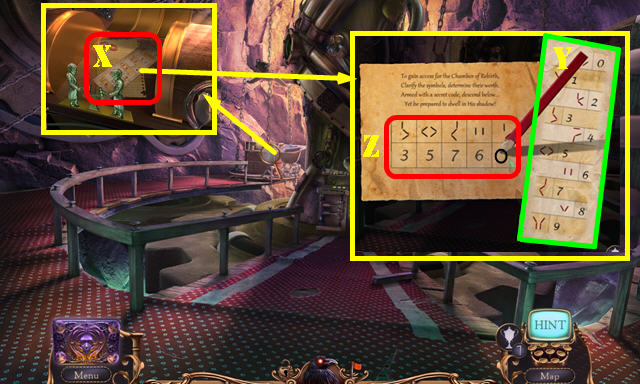
- Place the 2 BLACKSMITHS; take the SYMBOL CIPHER (X).
- Place the SYMBOL CIPHER on the PAPER CODE. Select the number on the paper (Y) and then select the correct box (Z) to place it on. Solution: 35760 to get the 5-DIGIT CODE (inventory).
- Travel to the Elevator.
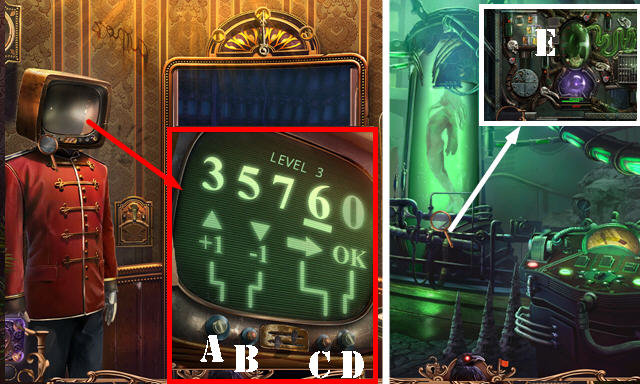
- Place the 5-DIGIT CODE. Select C-Ax3-C-Ax5-C-Ax7-C-Ax6-C-D.
- Exit to Alister's revival hall.
- Play the puzzle (E).
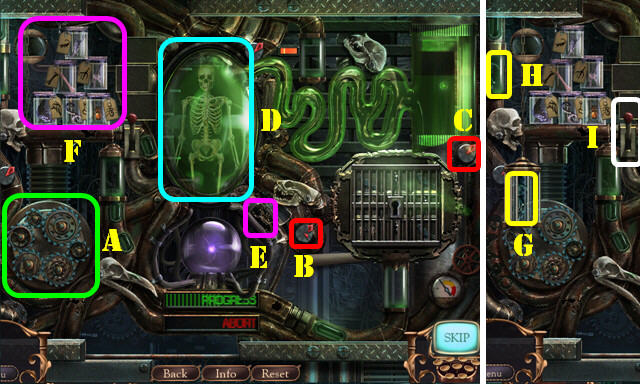
- Remove the three plates and arrange as shown (A).
- Select the buttons: B-C.
- Select the skeleton 3x (D).
- Take the scorpion (E); place it and arrange the jars as shown (F).
- Take the body (G) and place it (H).
- Press the lever 2x (I).
- Take the body (J) and place it (K).
- Position the skulls as shown (L).
- Take the body (M) and place it (N).
- Use the key (O) in the lock (P).
- Arrange as shown (Q).
- Take the METAL FILE (R).
- Position the bulbs as shown (S).
- Slide left.
- Pull the handle (T); take the LENS (U). Use the METAL FILE (V).
- Enter Crossroad hall (W).
- Read the note (X).
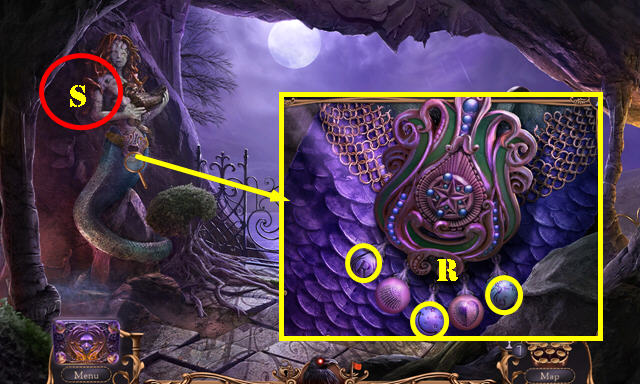
- Select the 4 symbols (Y) to get the TALISMANS.
- Go to the Knowledge repository (Z).
- Place the TALISMANS; take the HAND (A).
- Read the note; take the FLYING HOURGLASS (B).
- Open Alister's Enigma; place the HAND for a puzzle (C).
- Solution (D).
- Take the RAVEN COGS 1/2 (E).
- Walk down.
- Place the FLYING HOURGLASS (F) to get the PADLOCK PIECE.
- Remove the broken lens. Place the LENS in the MAGNIFIER FRAME to get the MAGNIFIER (inventory).
- Use the MAGNIFIER and find the 3 symbols (1-3). You receive the PAINTING SYMBOLS.
- Place the TORN CANVAS and the PAINTING SYMBOLS (G). Place the symbols (H). Read the note; take the HORNS 2/2 (I).
- Go to the Knowledge repository.
- Place the 2 HORNS (J) for a HOP; play it to get the SKULL DISK. HOP Puzzle solution (K).
- Walk down.
- Place the SKULL DISK (L); select it twice.
- Enter the Laboratory (M).
- Take the BOOK (N).
- Place the PADLOCK PIECE; take the SKULL (O).
- Take the JAR OF PLASTER and CASTING INSTRUCTIONS (P).
- Go to the Knowledge repository.
- Place the BOOK; arrange as shown (Q).
- Select both panels (R). Slide left; select the panel (S).
- Place the CASTING INSTRUCTIONS (T).
- Place (U) on (V). Place (W) on (V). Put down the JAR OF PLASTER (X) and use it on (V). Place the cover (Y) to get the VITRUVIAN MAN.
- Return to the Laboratory.

- Place the VITRUVIAN MAN; look at all the notes. Take the BELT (A).
- Go to Alister's revival hall.
- Place the SKULL (B); take the SKELETON KEY (C).
- Go to the Knowledge repository.
- Slide right. Use the SKELETON KEY; read the note; move the skull to get the RAVEN COGS 2/2 (D).
- Return to the Laboratory.
- Place the 2 RAVEN COGS and BELT (E) for an HOP; play it to get the TUBES.
- Walk down.
- Place the TUBES (F); select the left lever for a puzzle.

- Solution one (G).
- Select the right lever. Solution two (H).
- Go forward to the Soul Collector chamber.
- Remove the broken pipe piece (I); go forward.
- Turn the valve (J) to get the PIPE PIECE.
- Walk down.
- Place the PIPE PIECE (K); select 3-1-3-2-2.
- Go forward.
- Turn the valve (J).
- Approach the workstation; arrange the wires (L) and flip the switch (M).
- Select (4-5-5).
- Go left (N) for a puzzle.
- Select Ax2-Bx2.
- Move the slider to align the opening (C).
- Pull the lever (D).
- Select valve (E).
- Move the 2 sliders to align the opening (F).
- Pull the lever (G).
- Select valves Hx2-Ix2-Jx3.
- Move the 3 sliders to align the opening (K).
- Pull the lever (L).
- Congratulations, you've completed Mystery Case Files: Key to Ravenhearst!
Created at: 2015-12-09