
Walkthrough Menu
- General Tips
- Chapter 1: Zenith Museum of Oddities
- Chapter 2: Broken Room
- Chapter 3: Book Room
- Chapter 4: Tower Mechanism
- Chapter 5: Road
- Chapter 6: Station
General Tips
- This is the official guide for Mystery Case Files: Moths to a Flame.
- This guide won't tell you when to zoom into a location; the screenshots show each zoom scene.
- Hidden-object puzzles are referred to as HOPs. Only the locations of the HOPs will be shown.
- Use the Map to fast travel to a location.
Chapter 1: Zenith Museum of Oddities
- Select envelope on scene; take QUEEN'S LETTER.
- Select scene 3x; receive M.A.C.
- Use M.A.C. on scene.
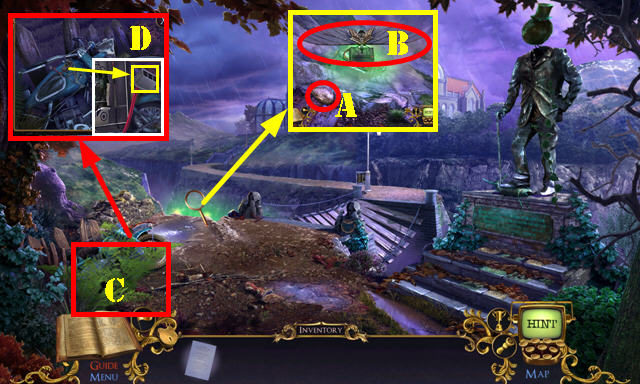
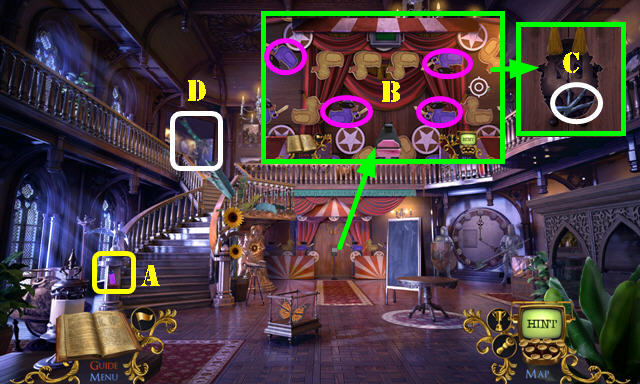
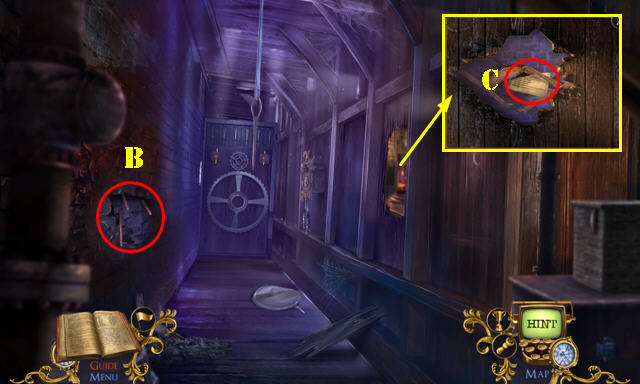
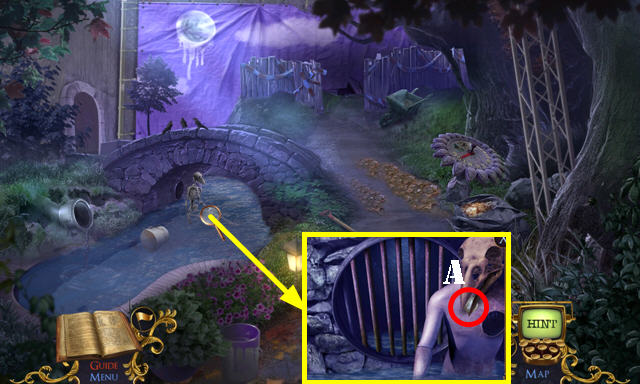
- Select rock (A); take DAMAGED GPS and M.A.C. (B).
- Select ferns twice (C); take WIRE CONNECTOR (D).
- WIRE CONNECTOR on DAMAGED GPS; slide red button down (E); receive GPS.
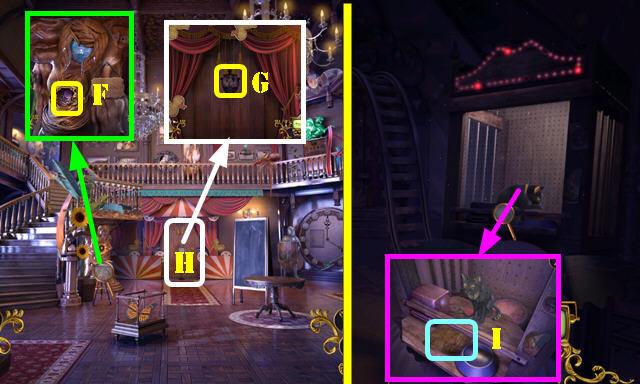
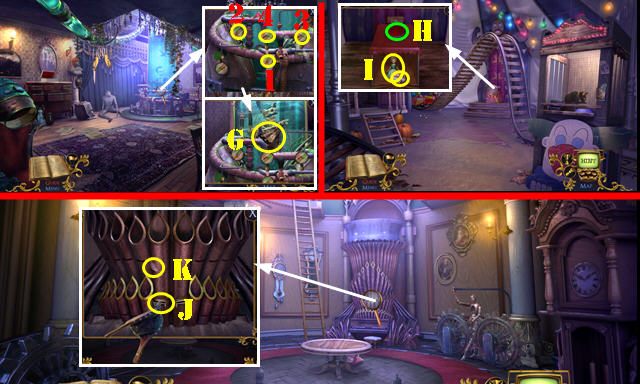
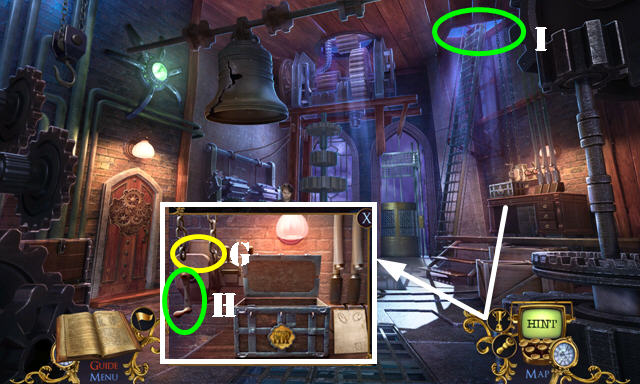
- Place GPS (F); select ID and take BAG OF BOLTS and SMUDGED NOTE (G).
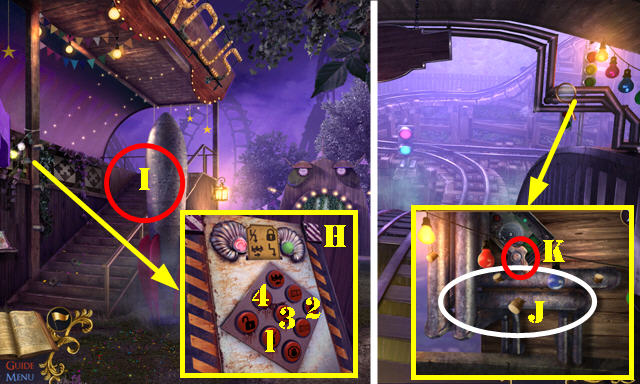
- Take STROLLER TILE (H).
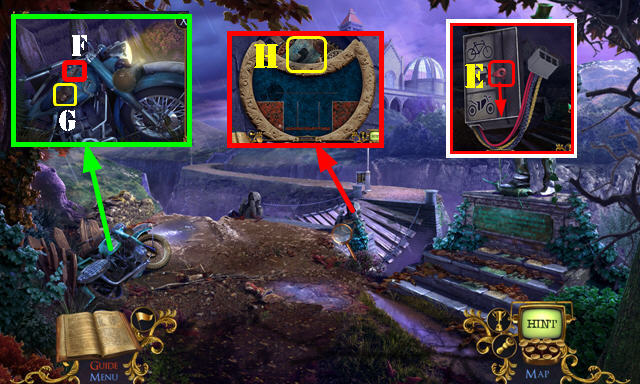
- Move down (@).
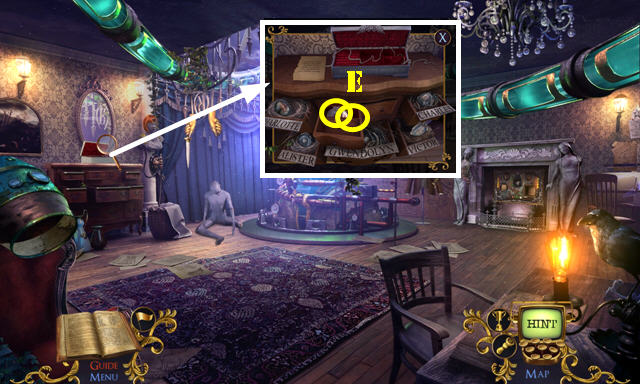
- Place STROLLER TILE and SMUDGED NOTE. Solution (1-8).
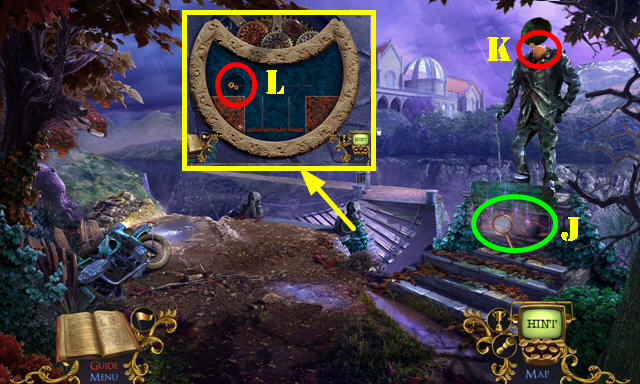
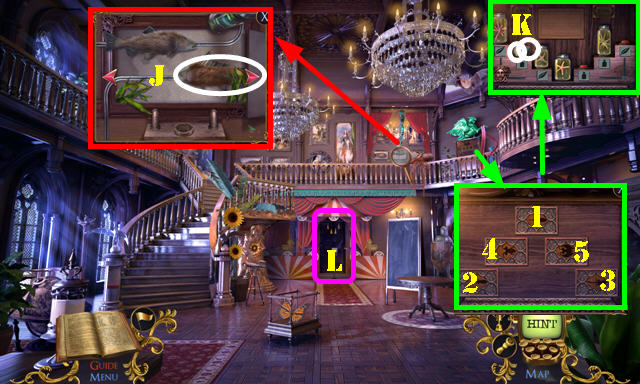
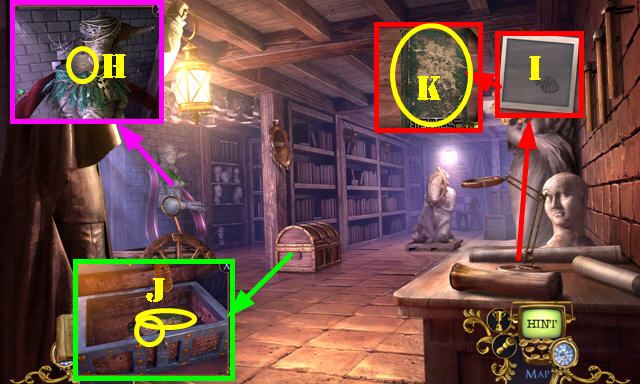
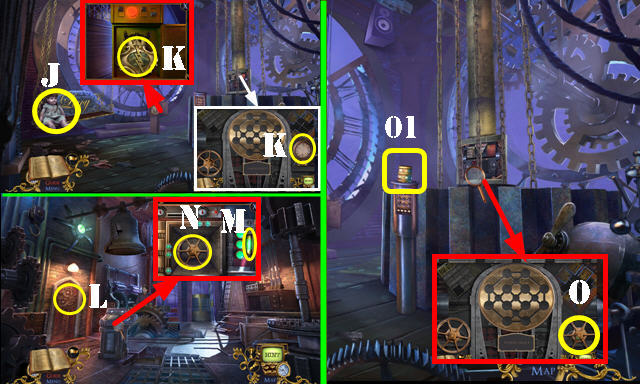
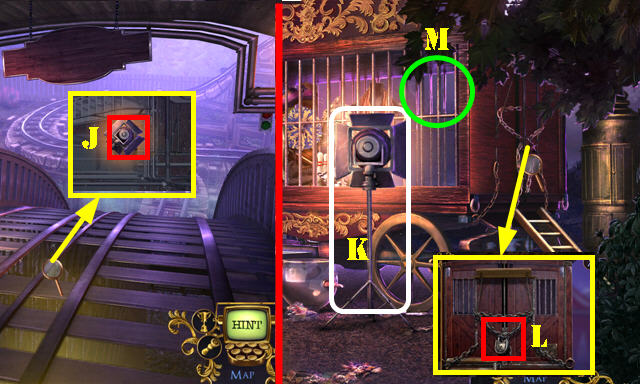
- Play HOP (J); receive WALLET.
- Open WALLET and look at ID; take STRANGE CODE.
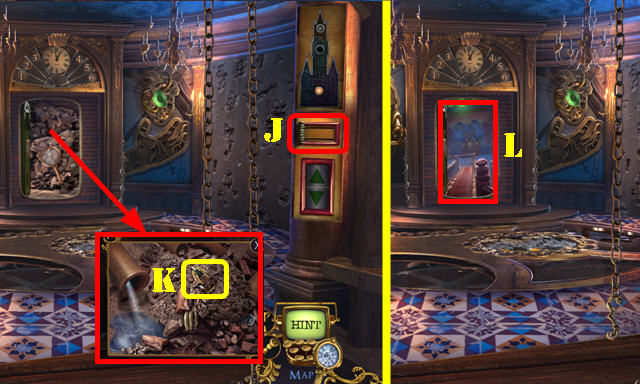
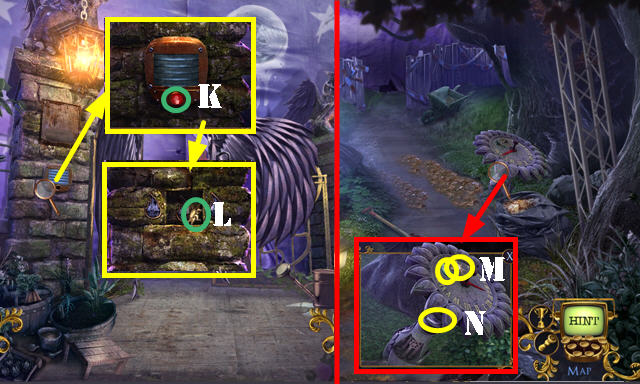
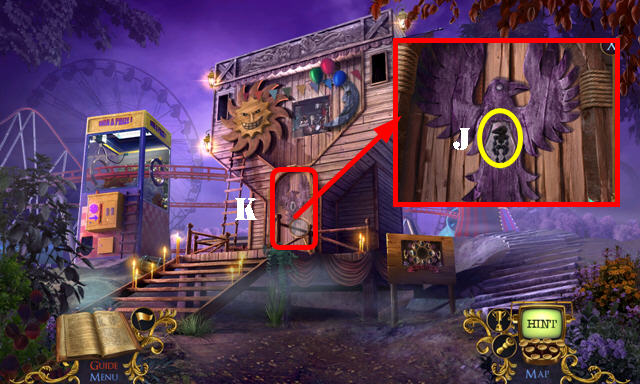
- Use M.A.C. (K); receive OLD BICYCLE and M.A.C.
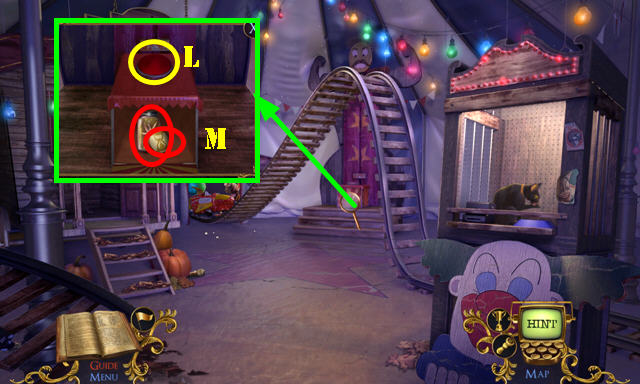
- Place OLD BICYCLE (L).
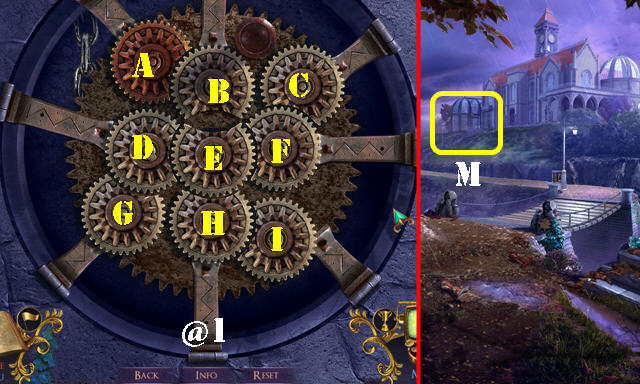
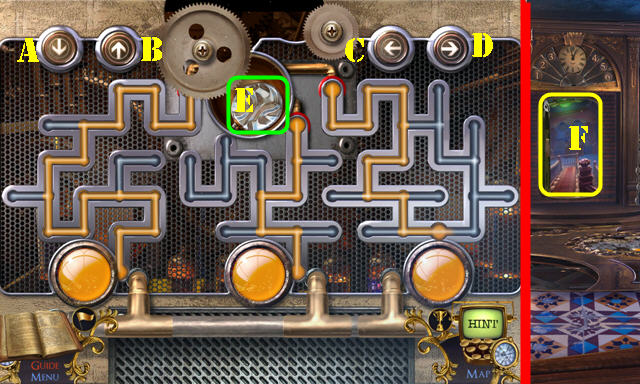
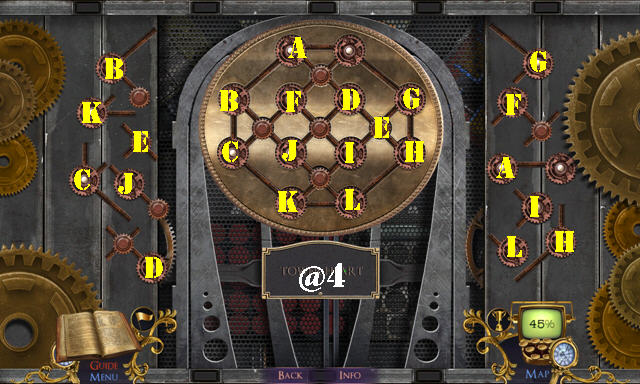
- Solution (@1): (Bx2)-(B-E-Fx2)-(Fx2-C)-(C-Fx2-E-H-I)-(I-H)-(H-E-Dx2)-(Dx2-G)-(G-Dx2-E-B-A).
- Go (M).
- Move forward.
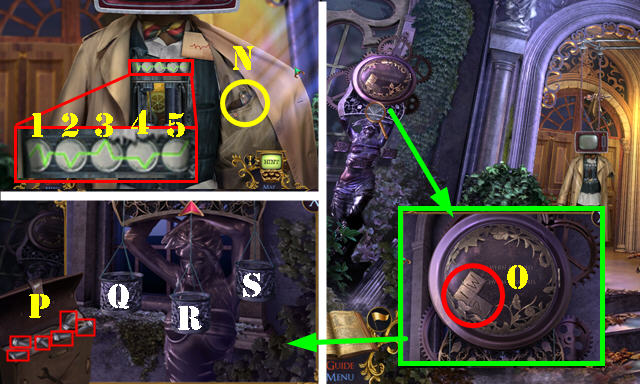
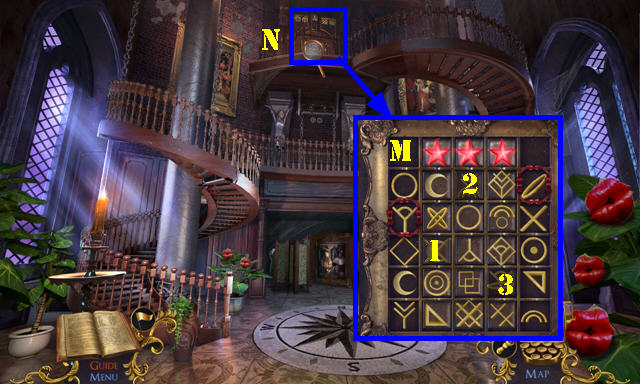
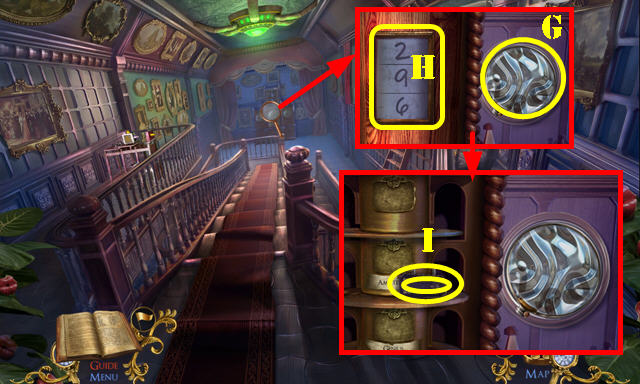
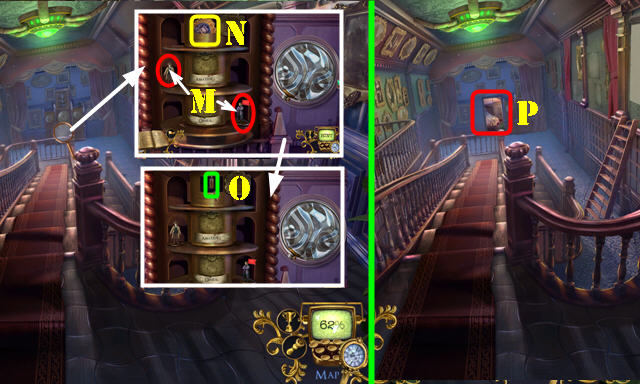
- Look at ID and note; take RAZOR (N).
- Select 1-1-2-3-3-4-4-4-5.
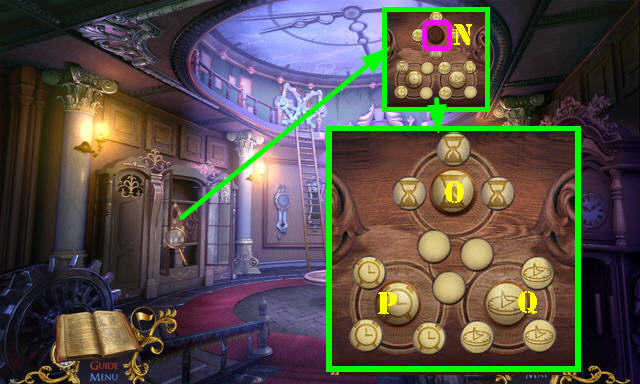
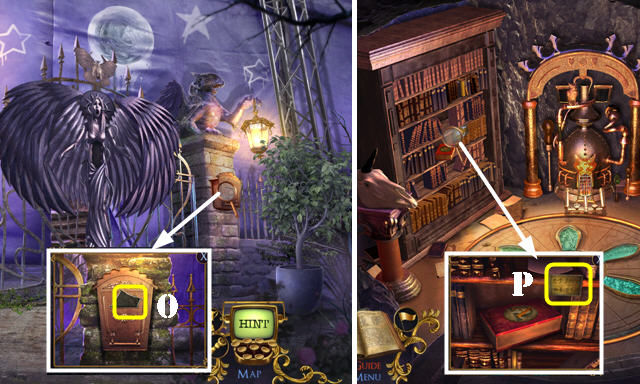
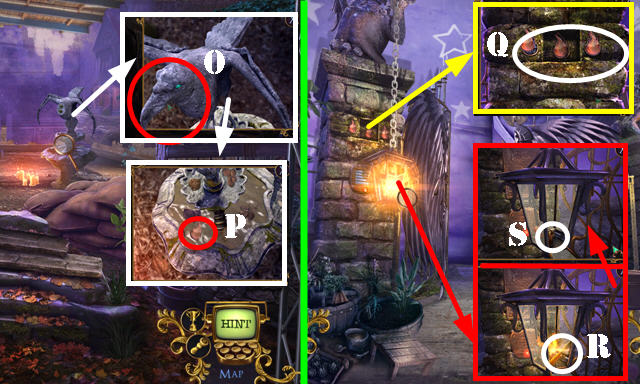
- Take ALPHABET PART (O).
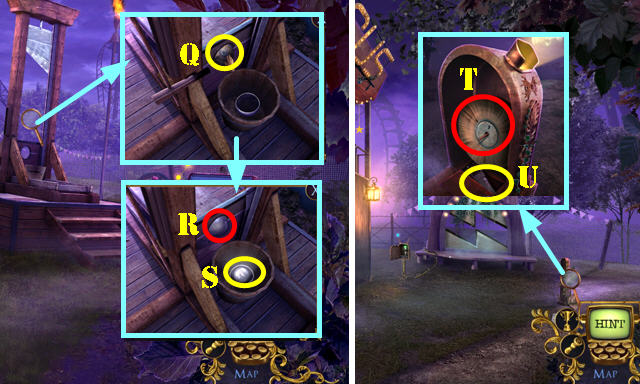
- Place BAG OF BOLTS (P-Q)x2-(P-R)-(P-S)x3.
- Walk down.
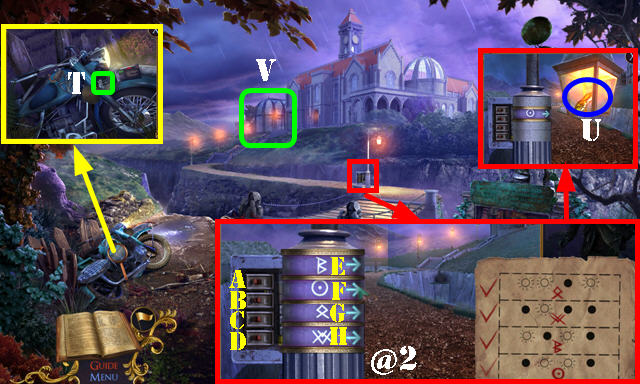
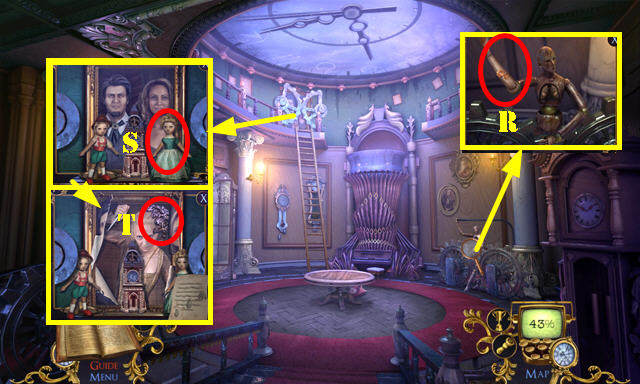
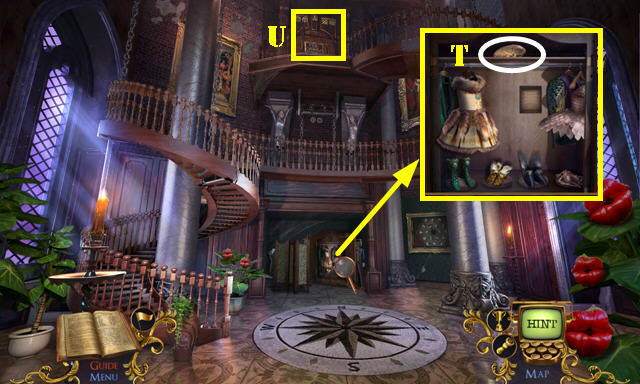
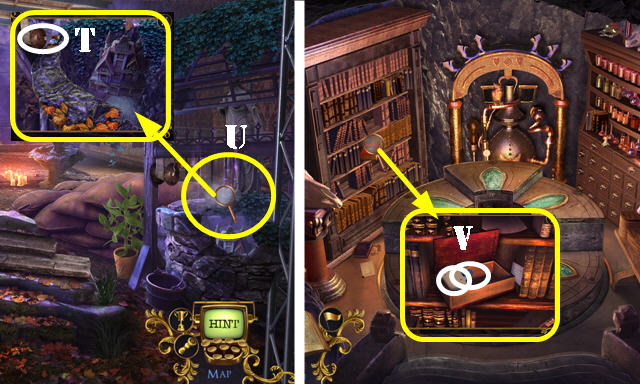
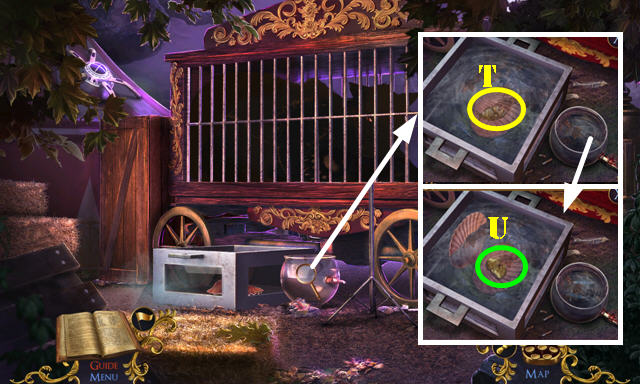
- Use RAZOR and select recorder; take CHLOE'S HAIRPIN (T).
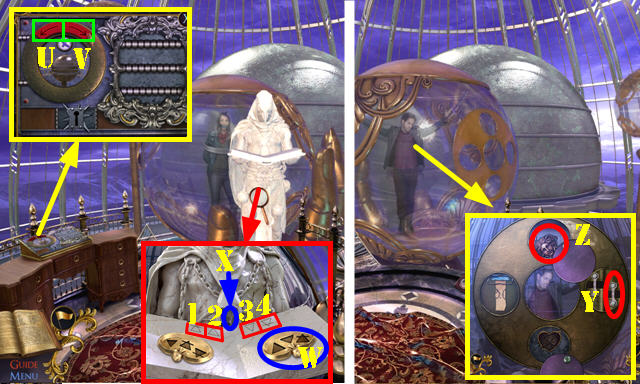
- Place STRANGE CODE; select A-Ex3-B-Fx5-C-Gx5-D-Hx4.
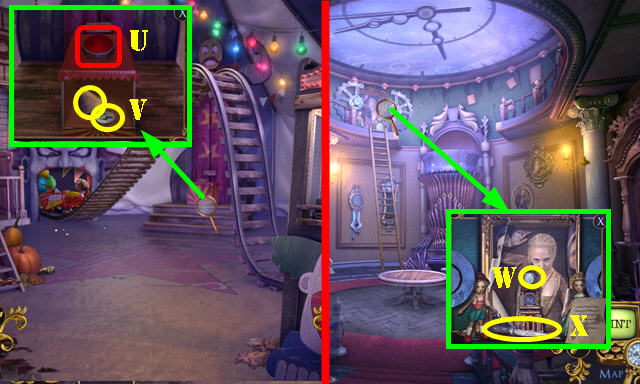
- Take TIN COCOON (U).
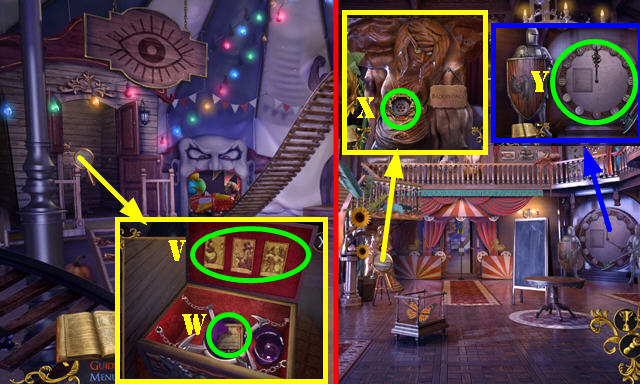
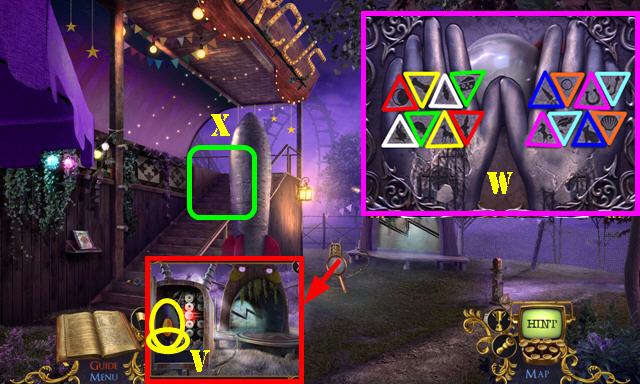
- Go (V).
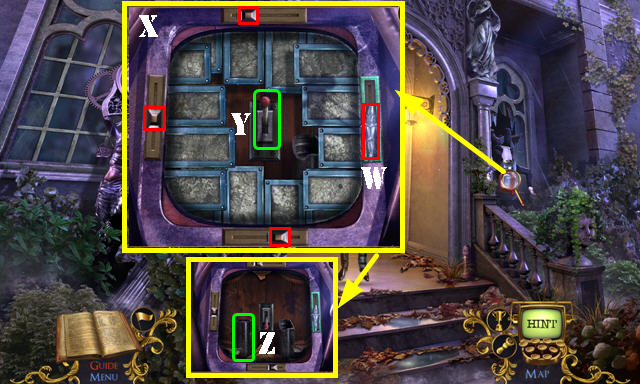
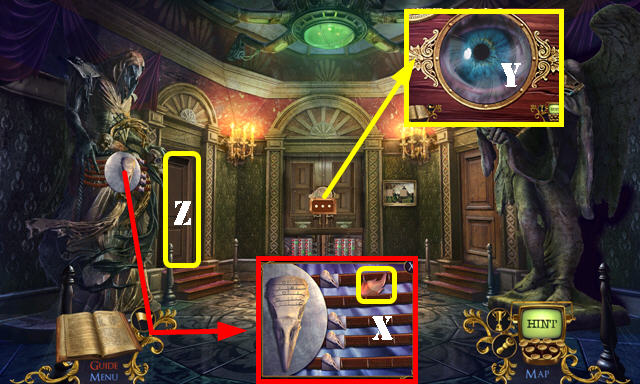
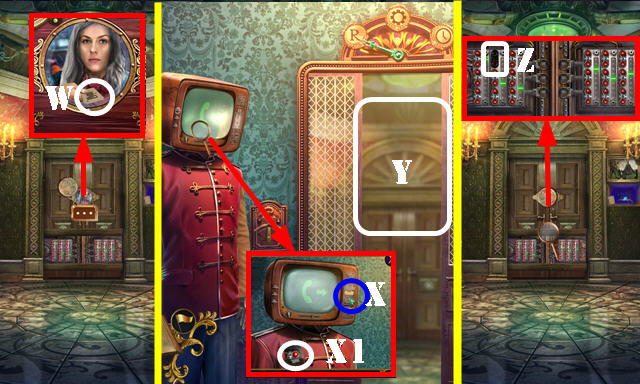
- Place CHLOE'S HAIRPIN (W); solution (X). Pull lever (Y).
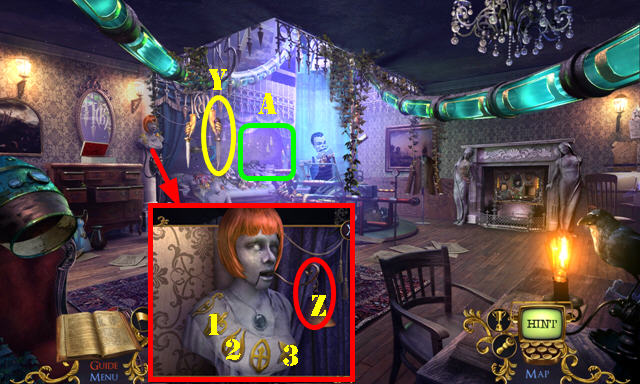
- Take DIALOGUE CYLINDER (Z).
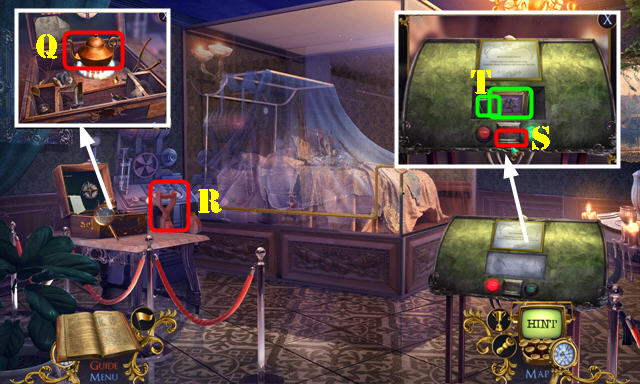
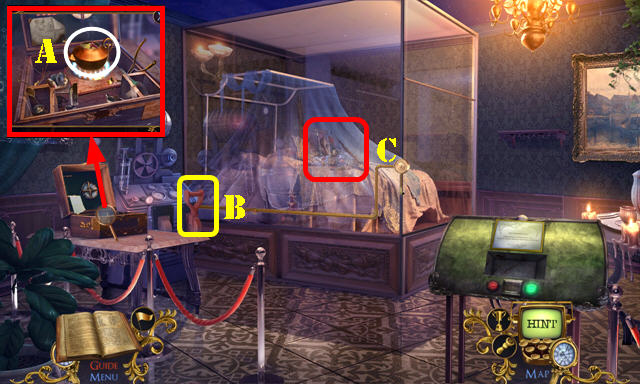
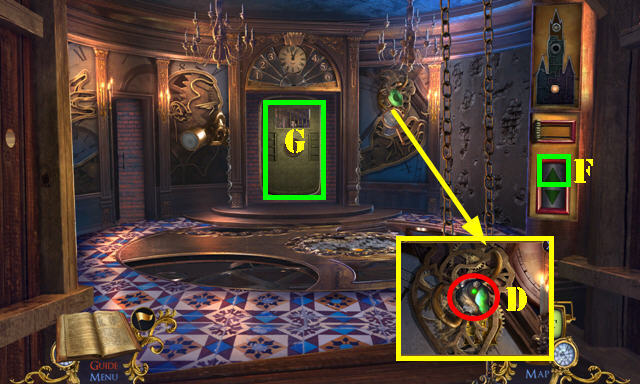
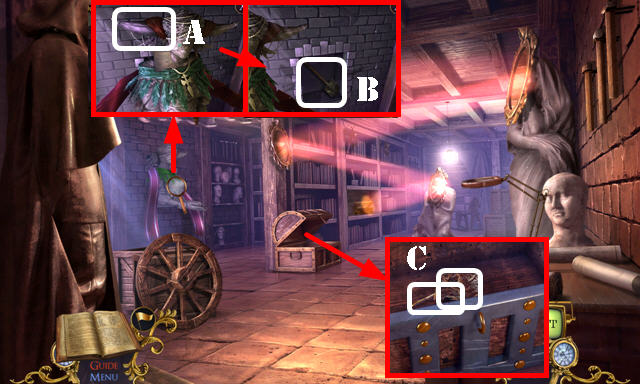
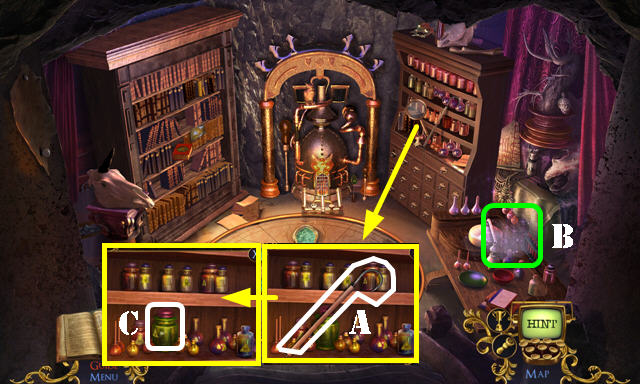
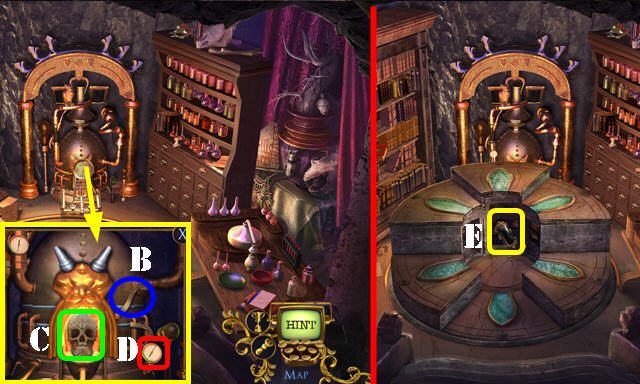
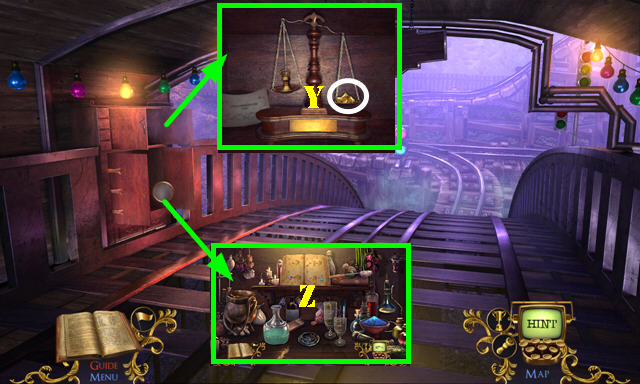
- Place DIALOGUE CYLINDER (A).
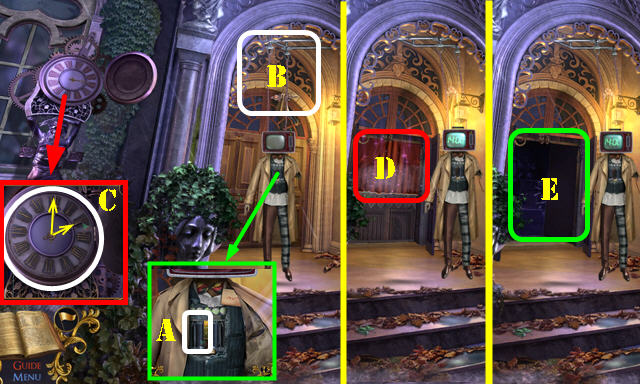
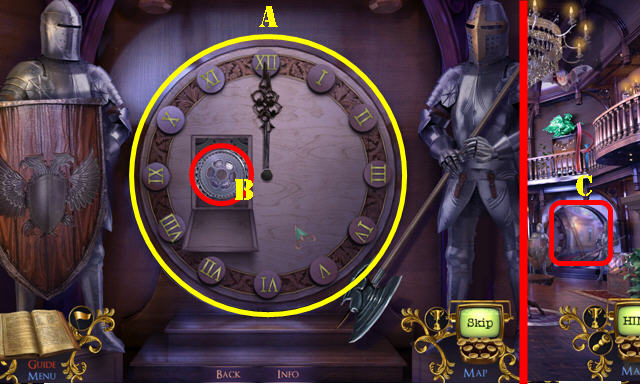
- Use M.A.C. (B); receive M.A.C. and CLOCK HAND.
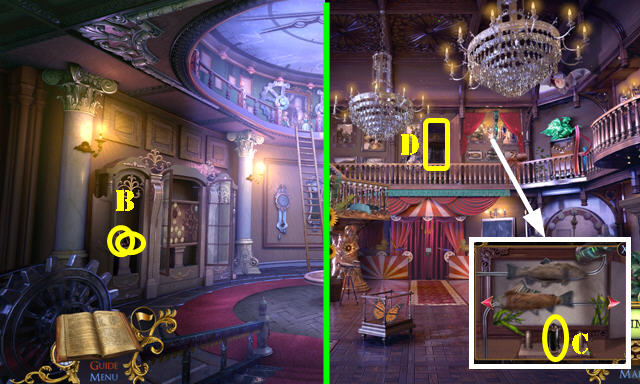
- Place CLOCK HAND; set clock to 2:00 (C).
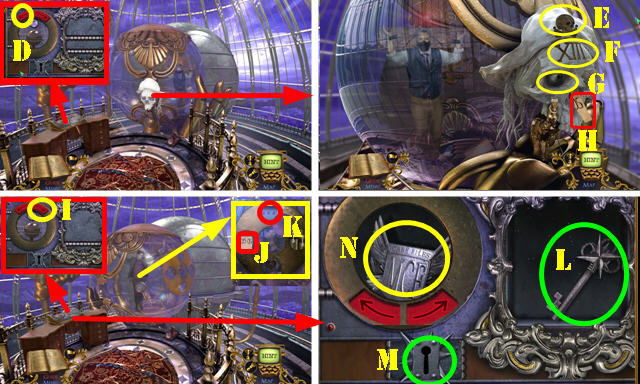
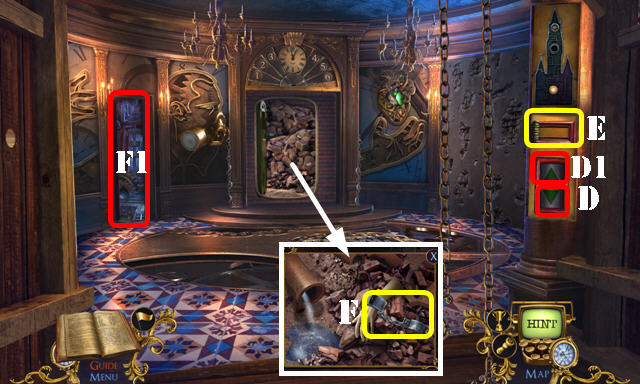
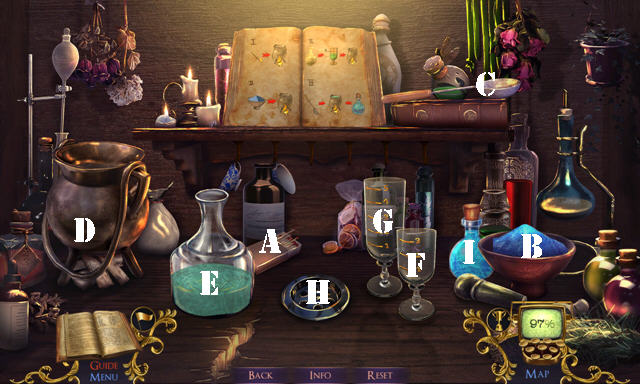
- Play HOP (D).
- Enter (E).
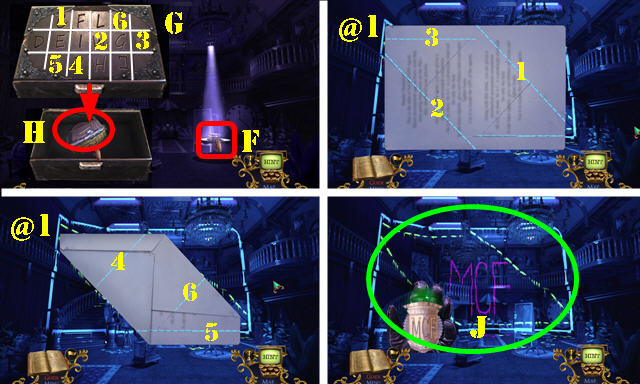
- Take MYSTERIOUS BOX (F).
- ALPHABET PART on MYSTERIOUS BOX; Solution: 1-6 (G).
- Place TIN COCOON in MYSTERIOUS BOX and select IDs and folders; take FUSED BADGE (H).
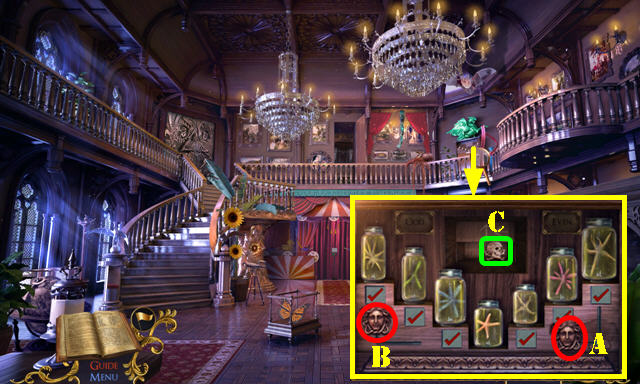
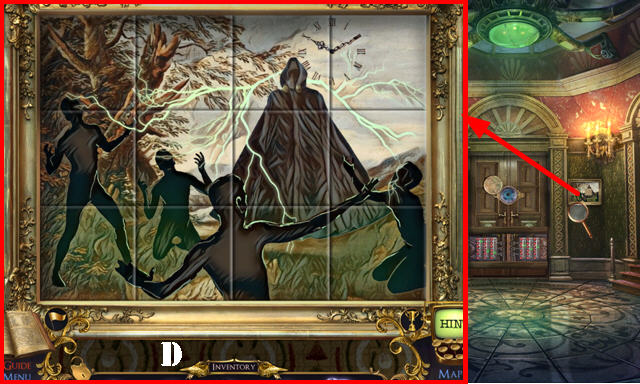
- Place QUEEN'S LETTER on scene; select dotted lines 1-6 (@1).
- Use M.A.C. on scene and select (J).
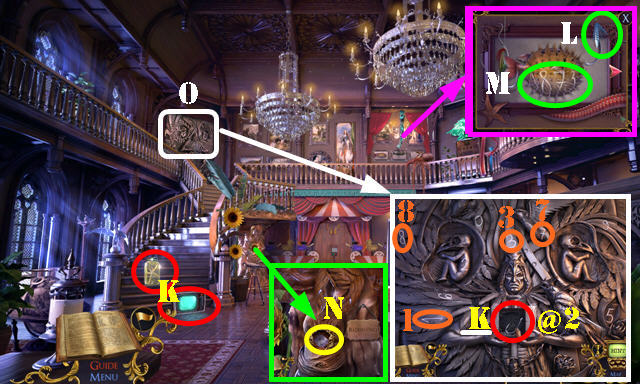
- Take AUTOMATON HEAD, STRANGE JARS 1/3, and FISHING HOOK (K).
- Place FISHING HOOK (L); note numbers (M).
- Place FUSED BADGE (N); receive DALIMAR NECKLACE; take RAVEN BADGE (N).
- Place RAVEN BADGE (@2); select 1-8-7-3 (orange).
- Go (O).

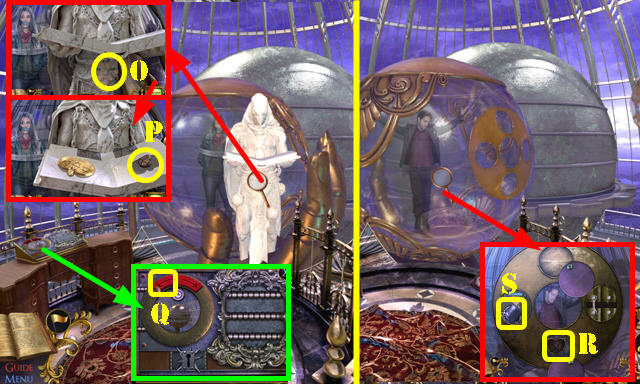
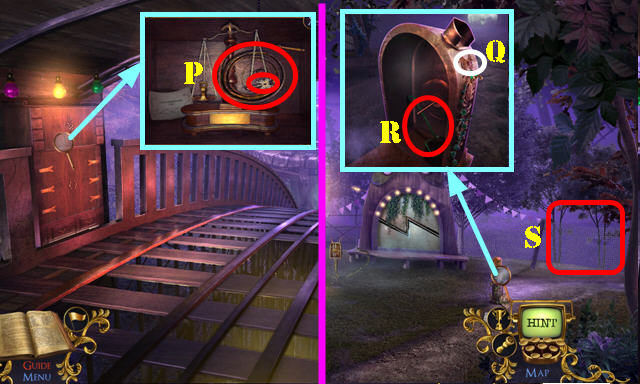
- Take TAROT CARDS 1/2, BELLOWS, and TAXIDERMIED TROUT (P).
- Place DALIMAR NECKLACE; solution (Q).
- Take PRESSURE GAUGES 1/3 and CRAB CLAW (R).
- Walk down.
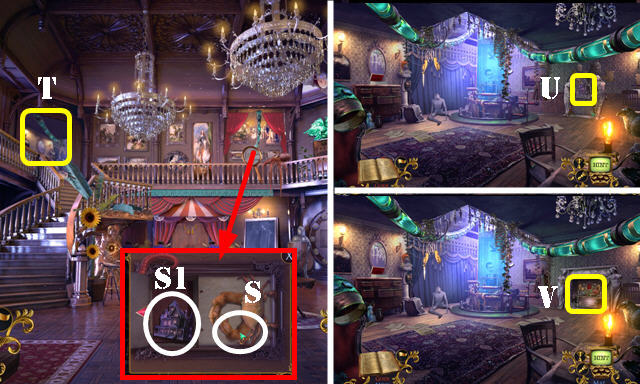
- Pan right x2; place CRAB CLAW (S); take KEY TO RAVENHEARST (S1).
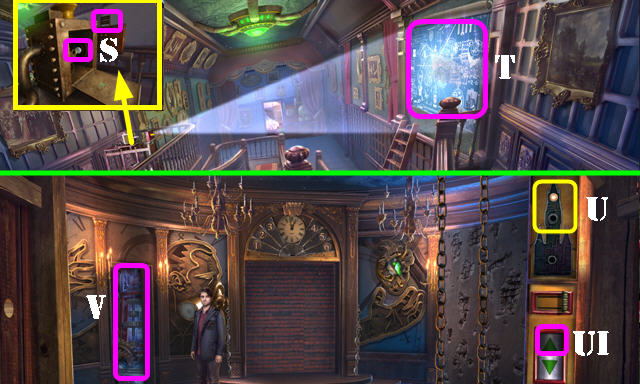
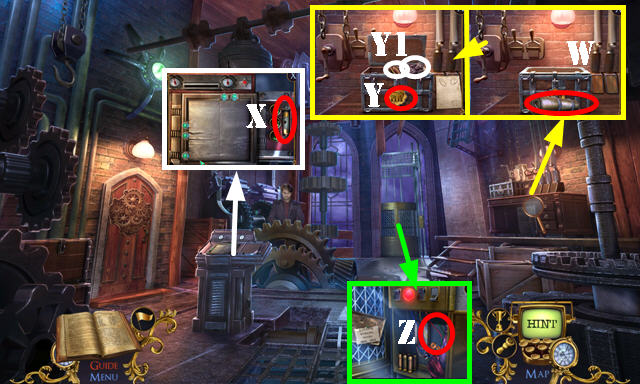
- Go (T).
- Place KEY TO RAVENHEARST (U).
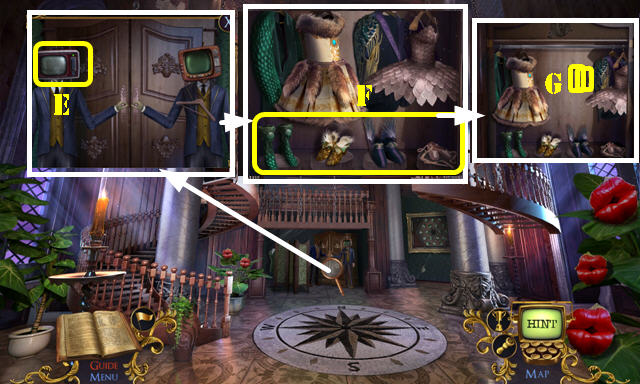
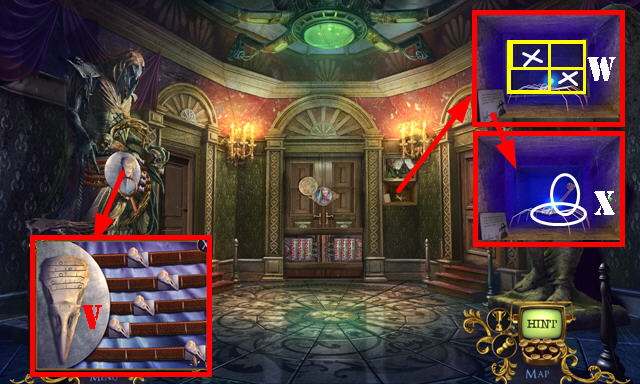
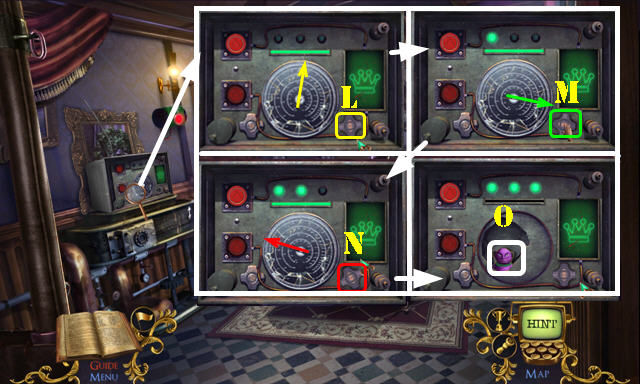
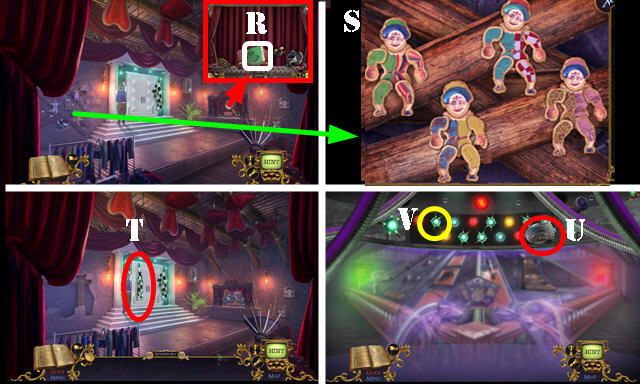
- Play puzzle (V).
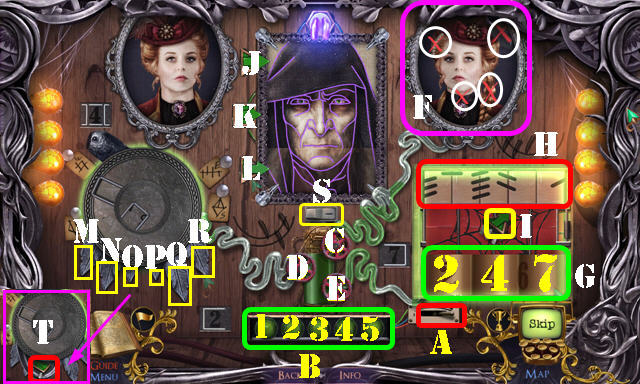
- Flip switch (A). Select (B): (3-1-4)-(3-1-4-2)-(3-1-4-2-5).
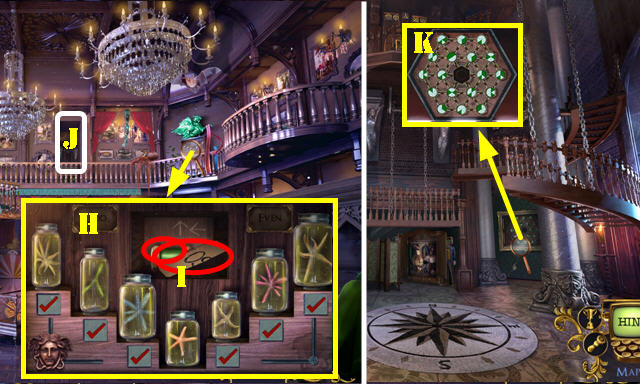
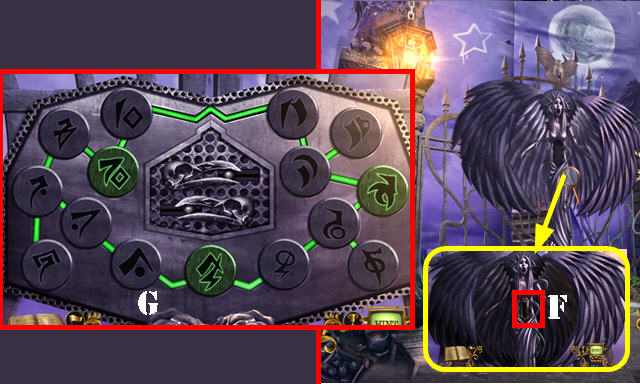
- Select valve (C). Find 4 differences (F).
- Select valve (E). Enter 247 (G). Select bars and then arrange symbols (H).
- Take button (I) and place it (J).
- Select valve (D). Select: M-N-Ox2-Px2-R.
- Take button (T) and place (K).
- Flip switch (S). Select Jx2-K-Lx2.
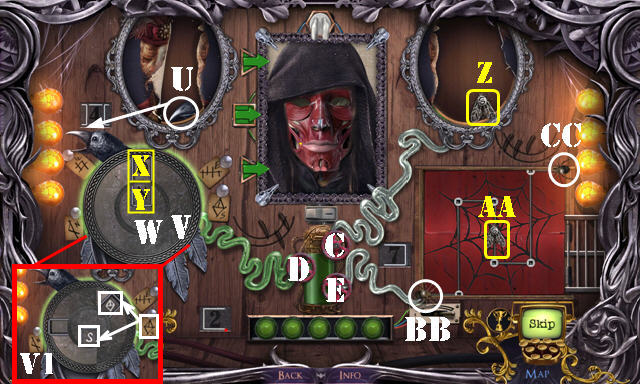
- Take raven beak and place (U).
- Rotate Rings (V-W); select two symbols in (X and Y) that match the clues attached to that section of the puzzle. Your selection stays tagged even if you can't see the symbol. The clue paper will disappear once the correct combination has been chosen. Solution is random. Example (V1).
- Take fly (Z) and place it (AA). Select valve (E). Select: BB-CCx2-BB-CC-BB.
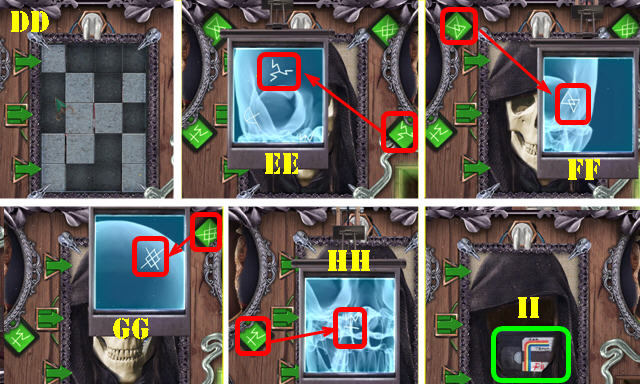
- Select squares as shown (DD).
- Move x-ray around and select 4 symbols shown (EE-FF-GG-HH).
- Take CASSETTE A (II).
- Walk down.
- CASSETTE A on AUTOMATON HEAD.
- Open compartment; take BB AMMO (A).
- Place BB AMMO on board. Solution is random; hit all the bad ducks (B).
- Take RAVEN CLAW (C).
- Go (D).
- Place RAVEN CLAW and look at note; take GARGOYLE EYE and FUSED BADGE (E).
- Walk down.
- Place FUSED BADGE; receive PRESSURE GAUGES 2/3; take CRYSTAL BADGE (F).
- Place CRYSTAL BADGE (G).
- Go (H).
- Take FUR PATCH (I).
- Walk down.
- FUR PATCH on TAXIDERMIED TROUT; receive FUR-BEARING TROUT.
- Pan left; place FUR-BEARING TROUT (J); receive TADPOLE TILE.
- Place TADPOLE TILE; select 1-5.
- Take PRESSURE GAUGES 3/3 and CAT FOOD (K).
- Go (L).
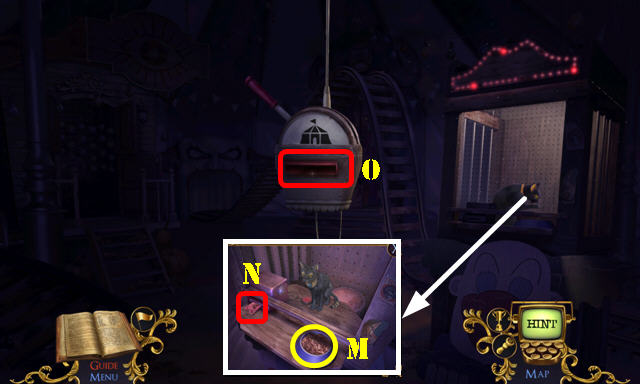
- Place CAT FOOD and select (M); take CARNIVAL TICKET (N).
- Place CARNIVAL TICKET (O).
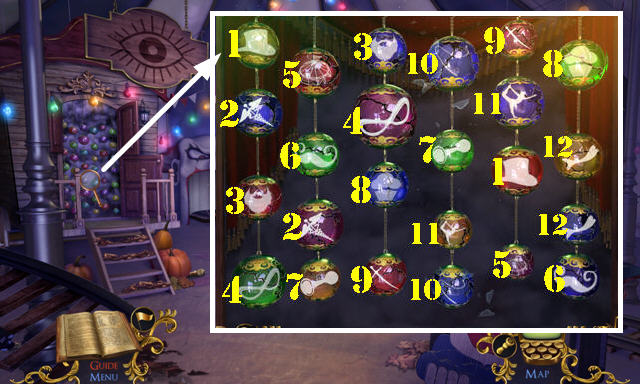
- Play puzzle. Solution (1-12).
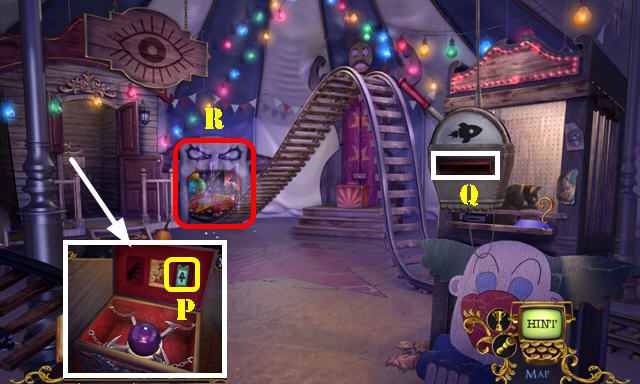
- Place GARGOYLE EYE; take ROLLER COASTER TICKET (P).
- Place ROLLER COASTER TICKET (Q).
- Play HOP (R); receive CASSETTE B.
- CASSETTE B on AUTOMATON HEAD.
- Go to Ravenhearst Chamber.
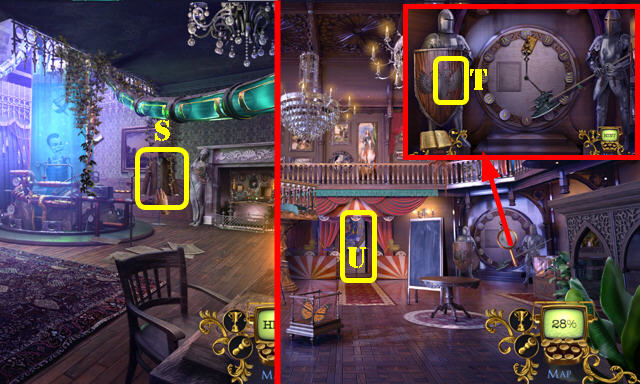
- Open coat (S); receive COAT OF ARMS.
- Walk down.
- Place COAT OF ARMS (T); receive TAROT CARDS 2/2.
- Go (U).
- Place TAROT CARDS 2/2 (V). Look at note; take FUSED BADGE (W).
- Walk down.
- Place FUSED BADGE (X); receive LUNGS; take GEAR BADGE (X).
- Play puzzle (Y).
- Arrange Roman numerals in order (A).
- Place GEAR BADGE (B).
- Go (C).
Chapter 2: Broken Room
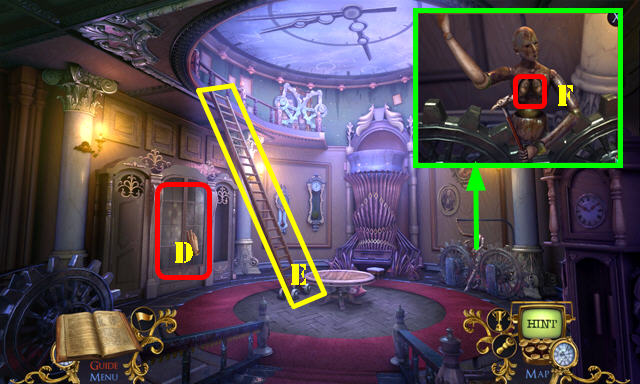
- Open doors (D).
- Move ladder (E).
- Place LUNGS (F); receive RAVEN CANE.
- Go to Ravenhearst Chamber.
- Pan down; place PRESSURE GAUGES 3/3. Select 1-4. Use RAVEN CANE on glass; take CARNIVAL HAMMER (G).
- Go to Carnival Tent.
- Use CARNIVAL HAMMER (H); receive CARNIVAL HAMMER; take CHEWING GUM and CHILD DOLL (I).
- Go to Broken Room.
- Place BELLOWS (J) and CHEWING GUM (K). Select bellows and receive WEIGHTED MUSTACHE.
- Go to Carnival Tent.
- WEIGHTED MUSTACHE on CARNIVAL HAMMER; receive WEIGHTED HAMMER.
- Use WEIGHTED HAMMER (L); receive WEIGHTED HAMMER. Take HOURGLASS and STRANGE JARS 2/3 (M).
- Go to Broken Room.
- Place HOURGLASS (N).
- Solution: Q-O-Q-O-Px3-O-Px5-O-P.
- Take HANDSAW.
- Use HANDSAW (R).
- Place CHILD DOLL (S); look at note and take WEIGHTED HAIR (T).
- Go to Carnival Tent.
- WEIGHTED HAIR on WEIGHTED HAMMER; take FABIANO'S HAMMER.
- Use FABIANO'S HAMMER (U); take LIGHTNING EMBLEM and DINNER BELL (V).
- Go to Broken Room.
- Place LIGHTNING EMBLEM (W); take MEREDITH'S KNIFE (X).
- Go to Ravenhearst Chamber.
- Place MEREDITH'S KNIFE (Y).
- Hang DINNER BELL (Z); select symbols (1-3).
- Play HOP (A); receive CASSETTE C.
- CASSETTE C on AUTOMATON HEAD.
- Go to Broken Room.
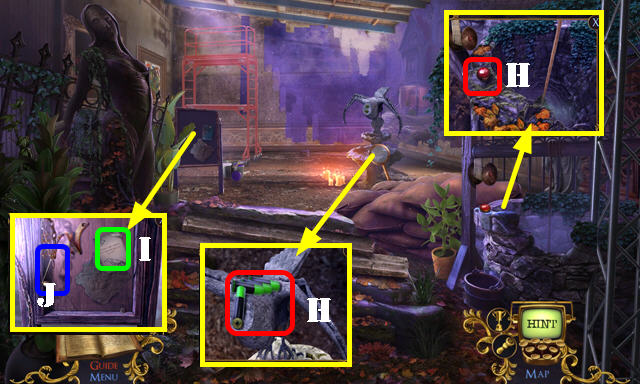
- Open door; take COSMIC SLIDER and INK CONTAINER (B).
- Walk down.
- Place INK CONTAINER (C).
- Go (D).
- Place AUTOMATON HEAD (E); swap shoes (F).
- Take STRANGE JARS 3/3 and BELT CENTERPIECE (G).
- Walk down.
- Place STRANGE JARS 3/3; solution (H).
- Take MEREDITH'S SCHEDULE and HYDRAULIC TANK (I).
- Go (J).
- Place HYDRAULIC TANK (K).
- Solution (L).
- Place COSMIC SLIDER (M). Solution (1-3).
- Go (N).
- Place BELT CENTERPIECE (O); take CLOCKWORK STARTER (P).
- Select button (Q).
- Place CLOCKWORK STARTER (R); take TOP HAT (S).
- Walk down.
- Place TOP HAT; take BOOK ORNAMENT (T).
- Go to Spire Top.
- Select button (V). Place BOOK ORNAMENT (W); select; 3-1-4-2-3-1.
- Take CONNECTOR (X).
- Select button (U).
- Place CONNECTOR (Y); take ORNAMENTAL HANDLE (Z).
- Go to Grand Hall.
- Place ORNAMENTAL HANDLE (A); select (B-Ax3).
- Take JOLLY ROGER (C).
- Go to Spire Top.
- Select button (D).
- Place JOLLY ROGER (E); select (F-G-E). Take MEREDITH'S SCHEDULE (H).
- Select button (I). Place two of MEREDITH'S SCHEDULE (J). Enter 0905 (K).
- Take key (L) and use it (M).
- Take APPRENTICE BADGE (N).
Chapter 3: Book Room
- Place APPRENTICE BADGE (O).
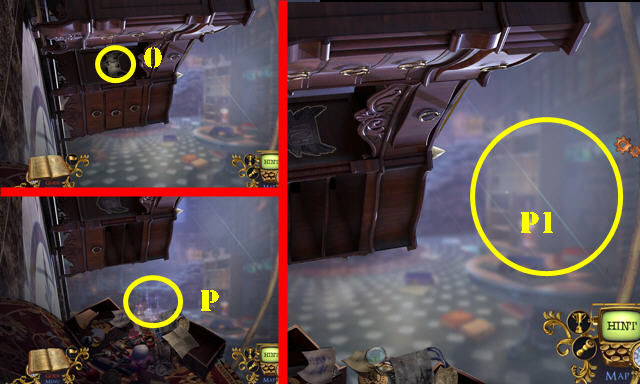
- Play HOP (P); receive FENCE TIP.
- Use FENCE TIP on scene (P1).
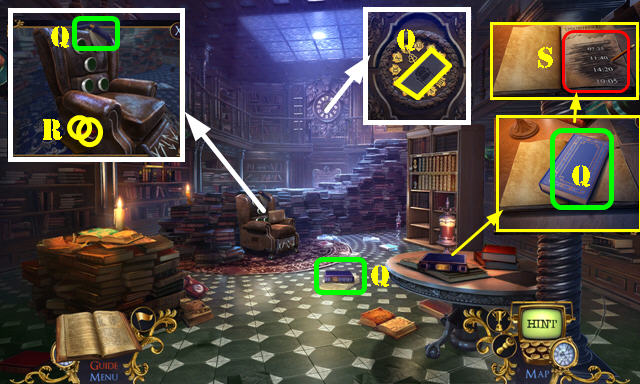
- Take ACTIVITY BOOK 1/5-3/5 and CHAIR CONTROLS (Q).
- Place CHAIR CONTROLS; take PENCIL and ACTIVITY BOOK 4/5 (R).
- Use PENCIL (S); receive UPDATED HOUSE RULES.
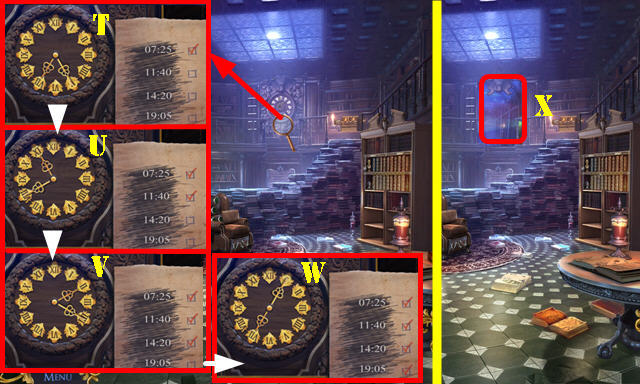
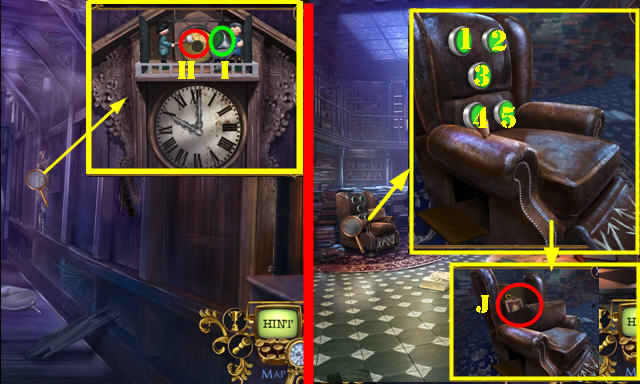
- Place UPDATED HOUSE RULES on clock; change clock to 7:25 (T), 11:40 (U), 14:20 (V), and 19:05 (W).
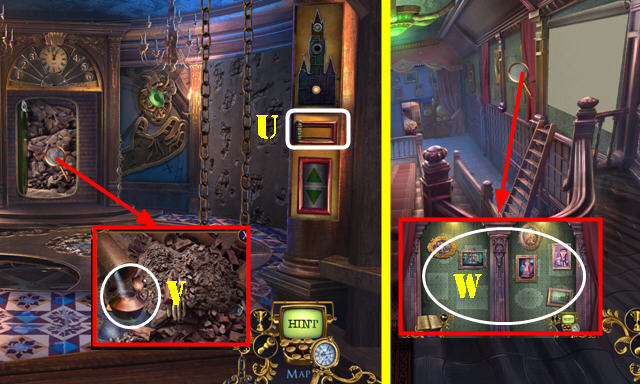
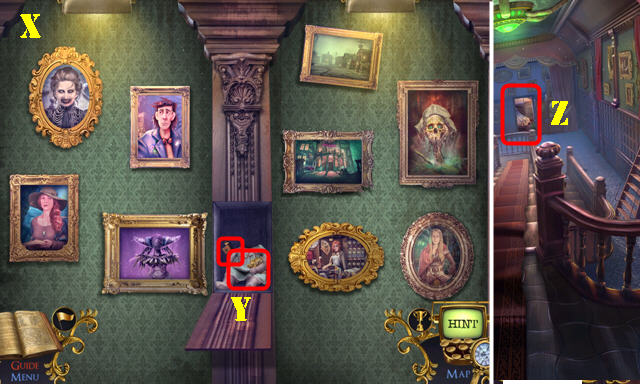
- Go (X).
- Take ACTIVITY BOOK 5/5 (Y).
- Examine door (Z); receive BOOK RECOMMENDATION.
- Walk down.
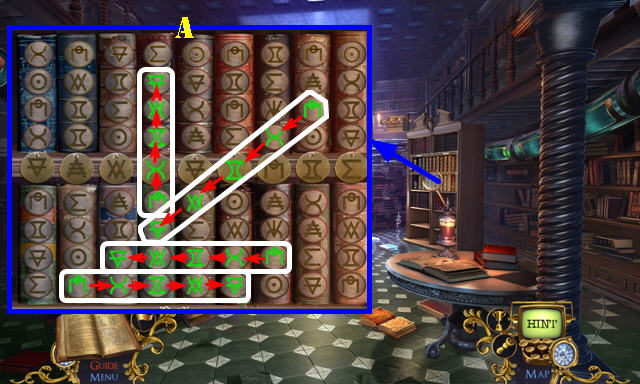
- Place BOOK RECOMMENDATION. Solution (A).
- Receive BOOK.
- Go to Secret Hallway.
- Open BOOK; take ARCHIVIST FIGURINE and NITROGLYCERINE FLASK.
- Use NITROGLYCERINE FLASK (B).
- Examine door; take BANNER PART (C).
- Walk down.
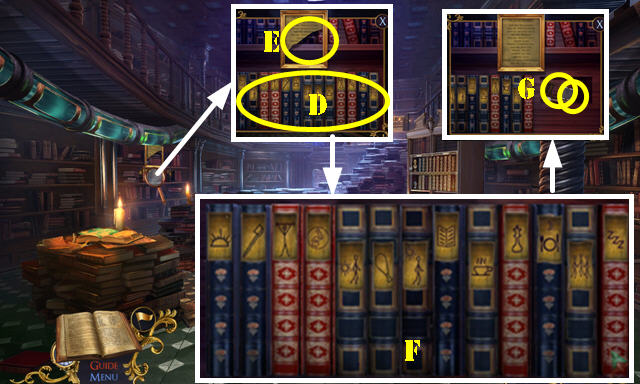
- Place ACTIVITY BOOK 5/5 (D) and BANNER PART (E). Use clue to arrange books. Solution (F).
- Take PROJECTOR TRAY and MINIATURE HAMMER (G).
- Go to Secret Hallway.
- Use MINIATURE HAMMER (H); take ARMCHAIR BUTTON (I).
- Walk down.
- Place ARMCHAIR BUTTON (2); select 3-2-5-1-4; take MISSING CANVAS 1/3 and WINDING KEY (J).
- Go to Secret Hallway.
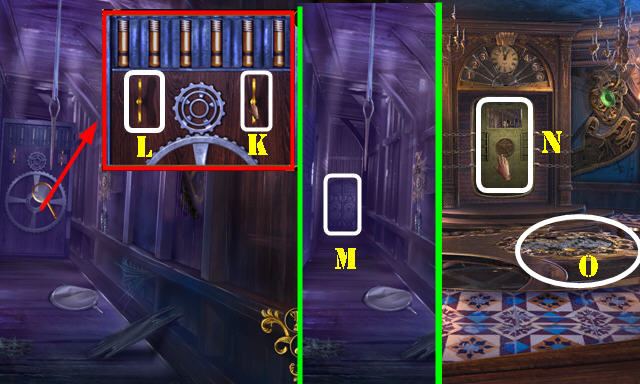
- Place WINDING KEY (K); select: L-Kx2-L-K-L.
- Go (M).
- Select 3x (N).
- Play puzzle (O).
- Solution: B-C-B-D-Bx2-Cx2-A-C-Bx2-D-B-D-Bx2-C-A-C-B-D-B-D-A-D-B.
- Take KALEIDOSCOPE.
- Go (F).
- Place KALEIDOSCOPE (G); select 290 (H).
- Take CUSTODIAN CARD and HORIZONTAL SLIDER (I).
- Walk down.
- Place HORIZONTAL SLIDER (J) and select.
- Take AGENT FIGURINE (K).
- Select slider (J).
- Go (L).
- Place ARCHIVIST FIGURINE and AGENT FIGURINE (M).
- Take MISSING CANVAS 2/3 (N). Pull handle (O).
- Go (P).
- Take EMPTY TEAPOT (Q).
- Select handle (R).
- Use CUSTODIAN CARD (S); take MISSING CANVAS 3/3 and PROJECTOR SLIDES 1/2 (T).
- Walk down twice.
- Select slider (U).
- Place EMPTY TEAPOT (V); receive FILLED TEAPOT.
- Select slider (U); go forward.
- Place MISSING CANVAS 3/3 (W).
- Solution (X).
- Take DOLL BODY and RESTORED KEY (Y).
- Go (Z).
- Take LUMP OF WAX from DOLL BODY.
- Place FILLED TEAPOT and LUMP OF WAX (A); receive PRESSURE HANDLE.
- Place PRESSURE HANDLE and select (B).
- Play HOP (C); receive MECHANICAL HEART.
- Go to Rotating Hall.
- Place MECHANICAL HEART (D); receive HAROLD'S INITIALS.
- Select Up button (F).
- Go (G).
- Look at note (H).
- Take PROJECTOR SLIDES 2/2 (I).
- Use RESTORED KEY; take IRON BOOKMARK and STRANGE TOME (J).
- Place STRANGE TOME (K).
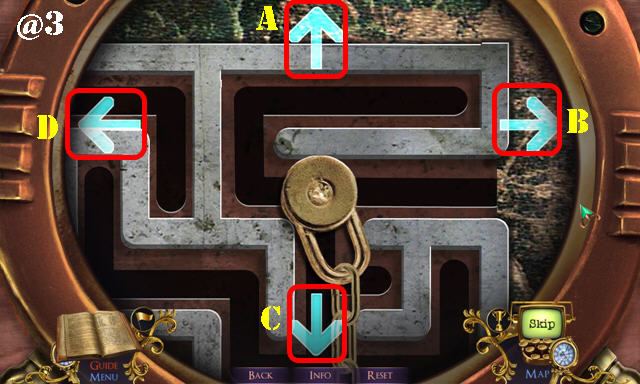
- Solution (@3): B-A-D-A-Bx2-C-D-C-B-A-D-A-B-A-B-C.
- B-A-B-C-D-A-D-C-B-C-B-Ax3-B.
- Take LAMP FRAME.
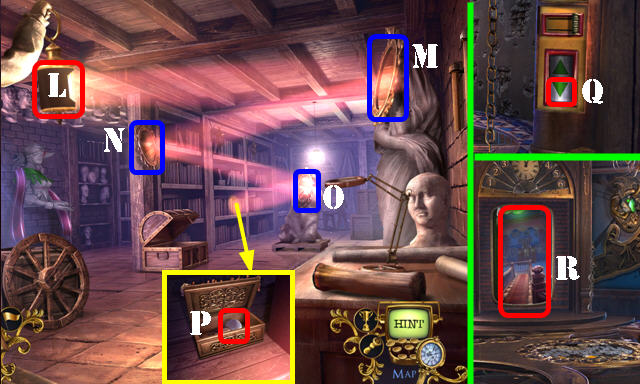
- Place LAMP FRAME (L). Select (M-N-Ox2).
- Select books; use IRON BOOKMARK and take PROJECTOR BULB (P).
- Walk down. Press Down button (Q).
- Go (R).
- PROJECTOR SLIDES 2/2 on PROJECTOR TRAY; take ARRANGED SLIDES.
- Place PROJECTOR BULB and ARRANGED SLIDES (S).
- Play HOP (T); receive TOWER ACCESS.
- Walk down.
- Place TOWER ACCESS (U). Select Up button twice (U1).
- Go (V).
Chapter 4: Tower Mechanism
- Take CANISTER (W).
- Remove fuse (X).
- Place HAROLD'S INITIALS (Y). Look at note; take RECEIVER UNIT and CHEST BUTTON (Y1).
- Open CANISTER; take DOLL HEAD and ISOLATION TAPE.
- Use ISOLATION TAPE (Z); receive STATUE HORN.
- Walk down. Press the Down Button; go forward to Restoration Room.
- Place STATUE HORN (A); take SHOVEL (B).
- Place CHEST BUTTON; take CANVAS PIECES 1/2 and THREADED NEEDLE (C).
- Walk down.
- Select Down button (D); use slider (E).
- Use SHOVEL; take SHACKLE (F).
- Select slider (E) and the Up button (D1) twice. Go (F1).
- Use SHACKLE (G) and select handle (H).
- Go (I).
- DOLL HEAD and THREADED NEEDLE on DOLL BODY; receive LUCY.
- Place LUCY (J).
- Take POWER SEAL and BROKEN POCKET WATCH (K).
- Walk down.
- Place POWER SEAL (L). Play HOP; receive FUSE.
- Place FUSE (M); take GOLDEN GEAR (N).
- Go to Tower Top.
- Look at note (O1).
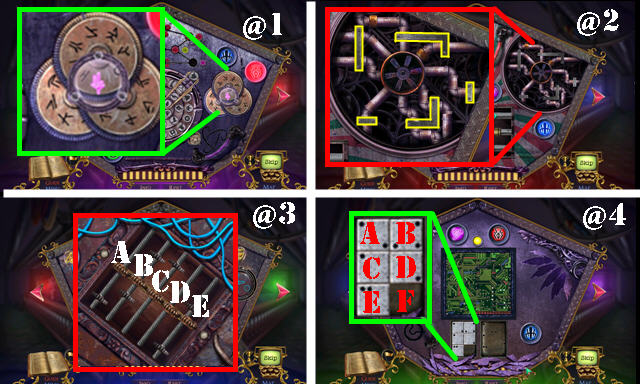
- Place GOLDEN GEAR (O).
- Arrange gears (@4): (A-L).
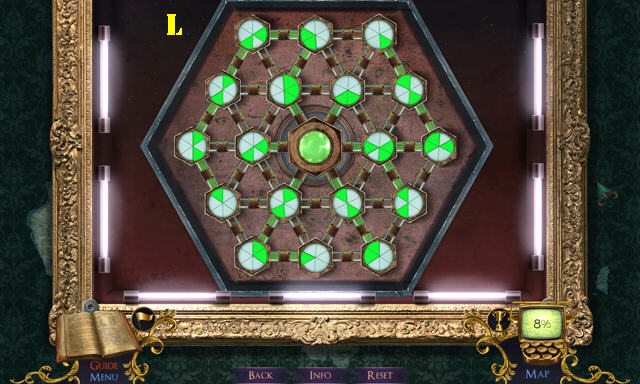
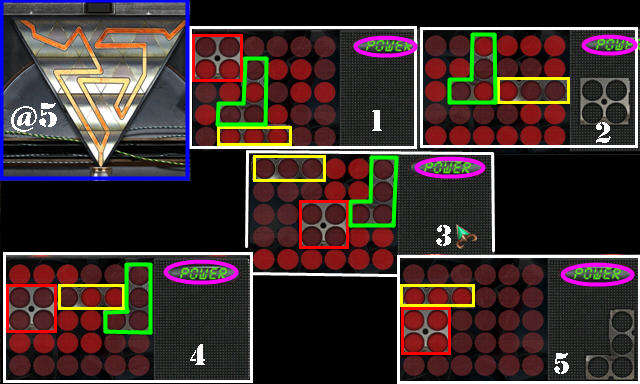
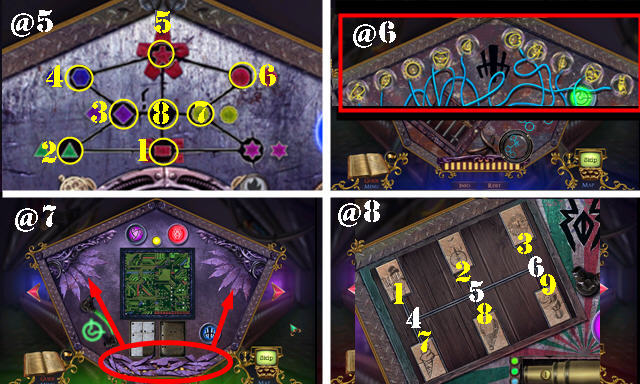
- Rotate triangular pieces (@5).
- Place iron frames in the correct spots and then select Power (purple) after each placement. Solution 1-5.
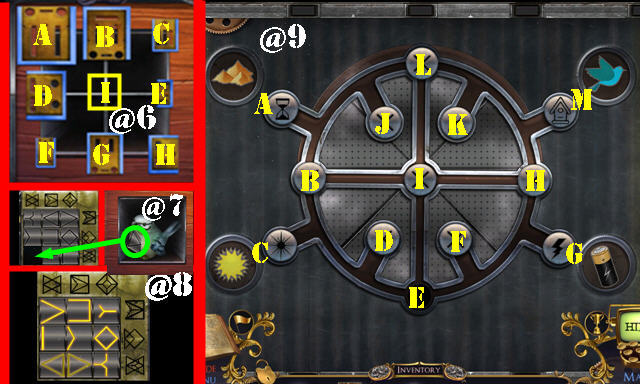
- Slide boxes (@6): (E-I)-(H-E)-(G-H)-(F-G)-(G-I)-(H-G)-(G-F)-(E-H)-(H-G)-(C-E)-(E-H).
- (I-E)-(E-H)-(G-H)-(F-G)-(G-I)-(H-G)-(I-G)-(D-I)-(I-E)-(G-I)-(I-E)-(E-I)-(B-I)-(A-D)-(D-F)-(F-G)-(G-I).
- Take tile and place (@7).
- Swap tiles (@8).
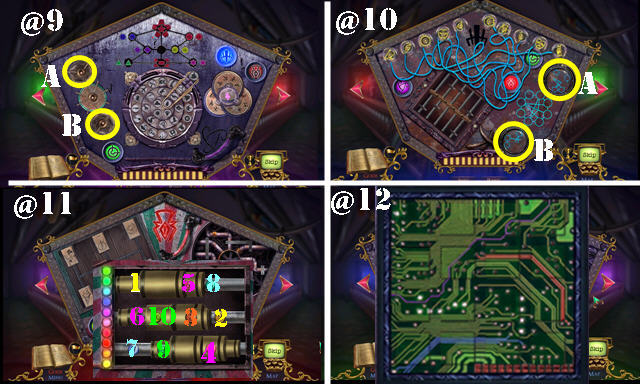
- Solution (@9): E-H-I-L-M-H-I-B-E-G-H-I-B-E-G-H-I-B-A-L-B-C-E-F-H-I-B-C-E.
- Take AGENT BADGE.
- Place AGENT BADGE (P).
- Go (Q).
- Take LIFE COIN and PLIERS (R).
- Place RECEIVER UNIT (S); take ELEVATOR CARD (T).
- Place ELEVATOR CARD (U); receive ELEVATOR HANDLE.
- Place ELEVATOR HANDLE (V).
- Go (W).
- Take FIRE EMBLEMS 1/3 (X).
- Select peephole (Y).
- Go (Z).
- Take POLE HOOK (A).
- Play HOP (B); receive RAIL CUTTER.
- Use PLIERS; receive CANVAS PIECES 2/2 (C).
- Walk down.
- Place CANVAS PIECES 2/2; solution (D).
- Look at note; take CUTTER BLADE.
- CUTTER BLADE on RAIL CUTTER; receive GLASS CUTTER.
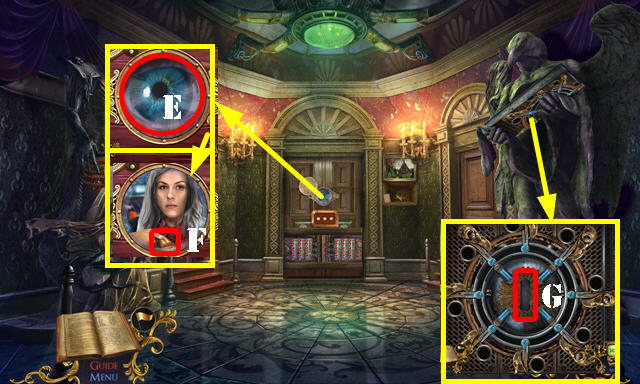
- Use GLASS CUTTER (E); take SOUL POD (F).
- Place SOUL POD (G).
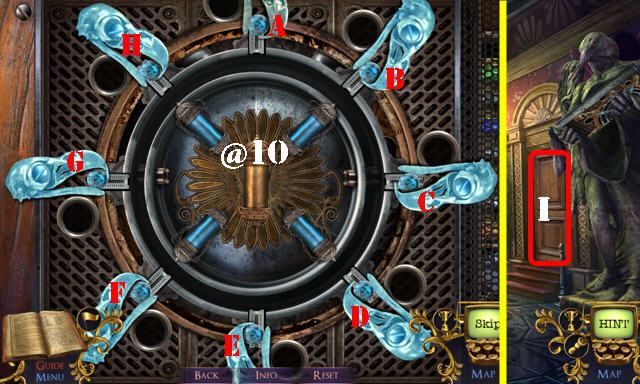
- Solution (@10): (F-E-D-C-Dx2-G-B-H-Gx2-A).
- Go (I).
Chapter 5: Road
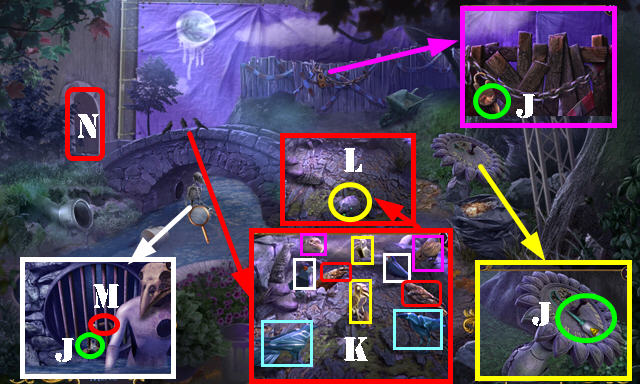
- Take WINDING WRENCH, FIRE EMBLEMS 2/3, and GLUE THINNER (J).
- Select matching birds (K). Take RAVEN HEAD (L).
- Use POLE HOOK (M); take FURNACE HANDLE.
- Go (N).
- Take BLACK PLATE (O).
- Go to Repository Room.
- Use GLUE THINNER; take CALLING CARD (P).
- Walk down twice.
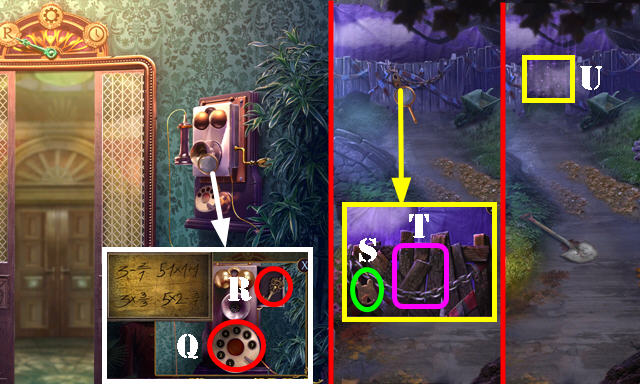
- Use CALLING CARD; dial 1-5-3-7 (Q). Take SKELETON KEY (R).
- Go to Road.
- Use SKELETON KEY (S). Select boards 5x (T).
- Play HOP (U); receive SKULL BUCKLE.
- Walk down.
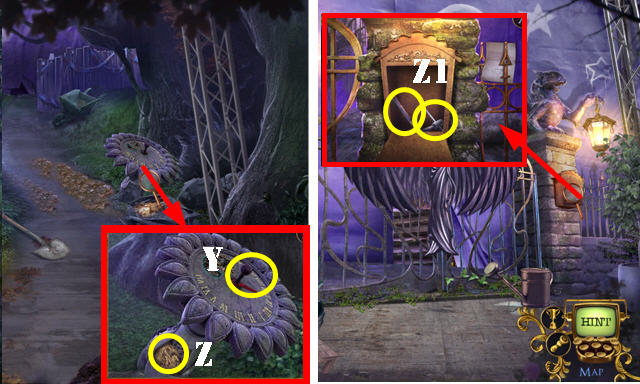
- Place SKULL BUCKLE; solution (V). Take SPREADER FRAME and MOON STONE.
- Use WINDING WRENCH and BLACK PLATE; select the two marked areas (W).
- Take MAILBOX HANDLE and SUNDIAL ARROW (X).
- Go to Road.
- Place BROKEN POCKET WATCH and SUNDIAL ARROW on sundial; select arrow (Y).
- Take WAXED SKULL (Z).
- Go to Gate.
- Place MAILBOX HANDLE and look at note; take RASP and WINGED BOLT (Z1).
- Walk down.
- WINGED BOLT on SPREADER FRAME; receive SPREADER TOOL.
- Use SPREADER TOOL; take DEATH COIN (A).
- Go to Repository Room.
- Place FURNACE HANDLE and select (B). Place WAXED SKULL; take ALCHEMIST'S SKULL (C).
- DEATH COIN and LIFE COIN on ALCHEMIST'S SKULL; take PRESSURE VALVE.
- Place PRESSURE VALVE (D).
- Open doors; take VIAL OF OOZE (E).
- Go to Gate.
- Place VIAL OF OOZE (F).
- Solution (G).
- Go forward to Manor.
- Take BATTERIES and RED BUTTON (H).
- Look at note (I).
- Use RASP (J); receive SNUFFER.
- Walk down.
- Place RED BUTTON and select (K); take SUN STONE (L).
- Walk down.
- Place MOON STONE and SUN STONE (M); take RAVEN BEAK (N).
- Go to Manor.
- Place RAVEN HEAD and RAVEN BEAK (O); take FIRE EMBLEMS 3/3 (P).
- Walk down.
- Place FIRE EMBLEMS 3/3 (Q). Open lantern; take CHISEL (R). Use SNUFFER; take WELL HANDLE (S).
- Go to Manor.
- Place WELL HANDLE (T). Play HOP (U); receive OMEGA SYMBOL.
- Go to Repository Room.
- Place OMEGA SYMBOL and look at note; take BLANK AUTOMATON CARD and CAMRA CARTRIDGE (V).
- Walk down.
- Give BLANK AUTOMATON CARD; take OVERRIDE CARD (W).
- Walk down.
- Insert OVERRIDE CARD (X); take POWER ADJUSTER (X1).
- Go (Y).
- Place POWER ADJUSTER (Z).
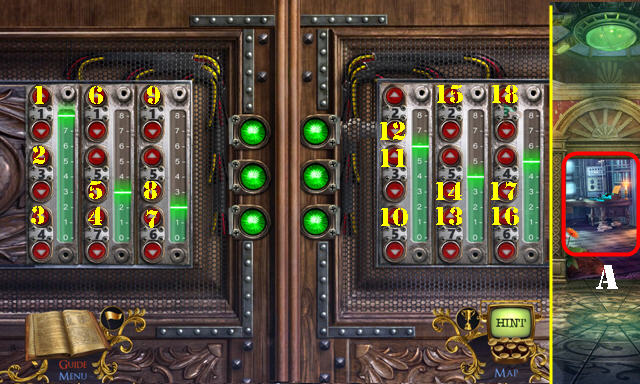
- Solution (1-18).
- Go (A).
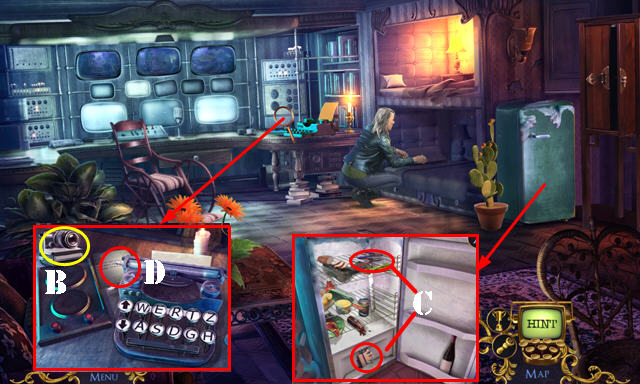
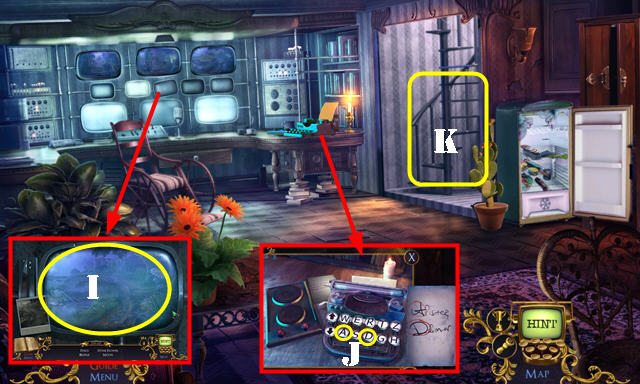
- Take EMPTY CAMERA (B).
- Open fridge; take KING FIGURE and JUMPER CABLES (C).
- Look at note (D).
- Go to Road.
- CAMERA CARTRIDGE and BATTERIES in EMPTY CAMERA; receive INSTANT CAMERA.
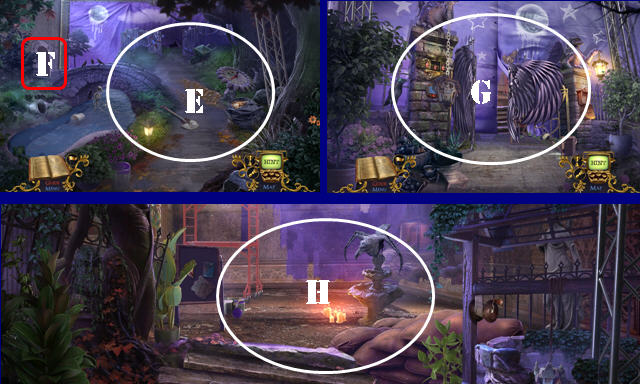
- Use INSTANT CAMERA (E); receive PHOTOS 1/3.
- Go (F).
- Use INSTANT CAMERA (G); receive PHOTOS 2/3.
- Go to Manor.
- Use INSTANT CAMERA (H); receive PHOTOS 3/3.
- Go to Panic Room.
- Place PHOTOS 3/3 (I). Play HOP; receive NAME PLATE.
- Place NAME PLATE; select A and D (J).
- Go (K).
- Use CHISEL; take SNOWFLAKE BADGE (L). Place JUMPER CABLES (M).
- Walk down.
- Place SNOWFLAKE BADGE; take VACUUM TUBE (N).
- Go (O).
- Place VACUUM TUBE (P).
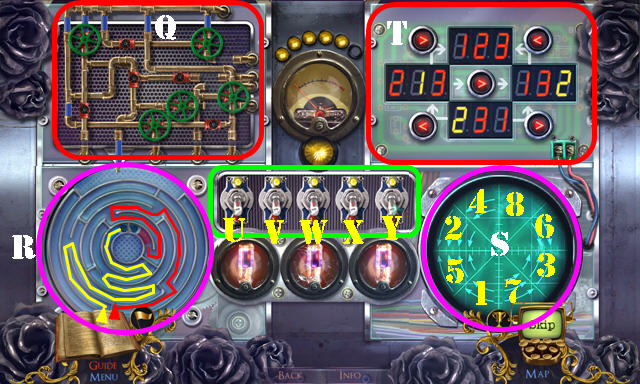
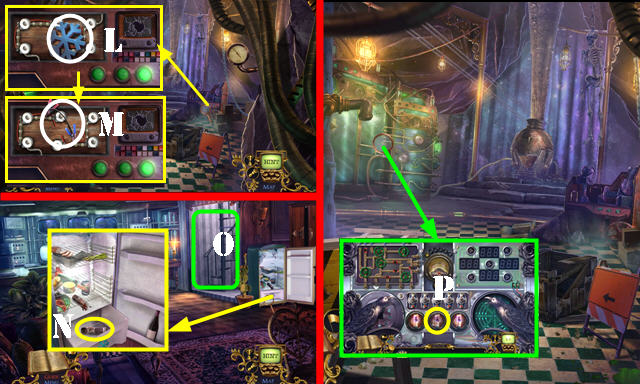
- Arrange valves (Q).
- Rotate balls into matching slots (R).
- Select 1-8 (S).
- Sequence solution (T).
- Flip switches (U-V-Y).
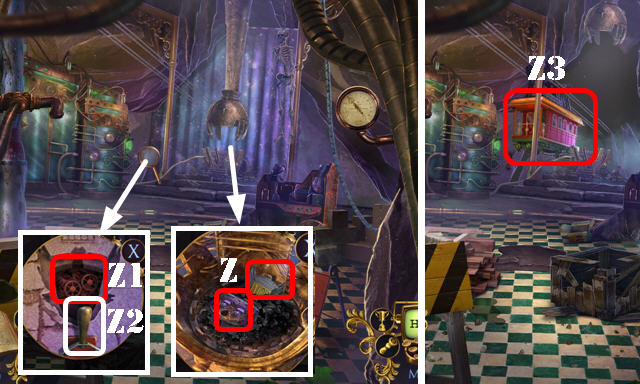
- Take RAVENHEARST BOX and DETECTIVE BADGE (Z).
- Place DETECTIVE BADGE (Z1); pull handle (Z2).
- Go (Z3).
Chapter 6: Station

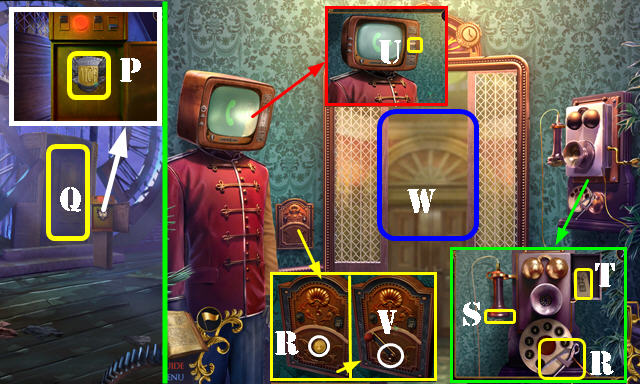
- Place KING FIGURE and look at note; take CORKS and RADIO DIAL (A).
- Place RADIO DIAL (B).
- Play HOP (C); receive RAVENHEARST EMBLEM.
- RAVENHEARST EMBLEM on RAVENHEARST BOX; take EXIT BUTTON.
- Place EXIT BUTTON and select (D).
- Go (E).
- Go (F).
- Take ROLLERCOASTER TICKET (G).
- Walk down.
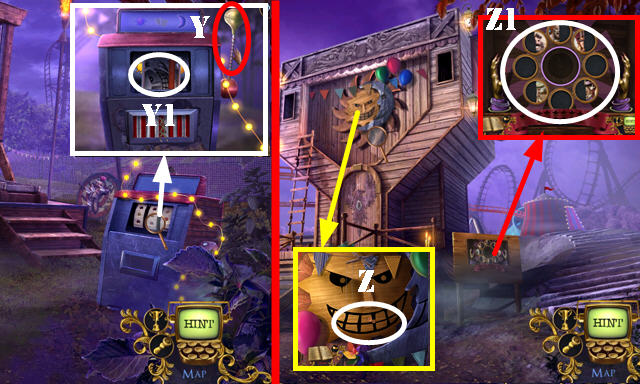
- Insert ROLLERCOASTER TICKET; select 1-4 (H).
- Go (I).
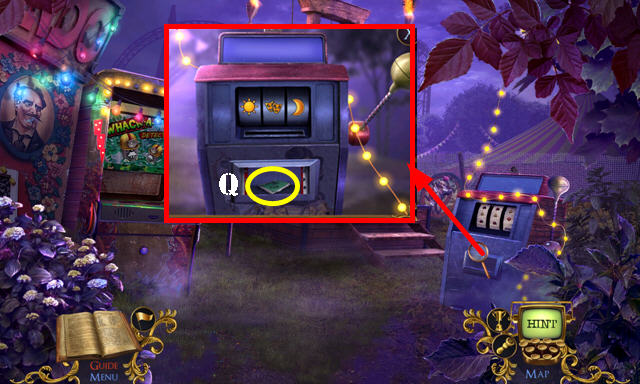
- Place CORKS (J); take FREQUENCY DIAL (K).
- Go to Cable Car.
- Place FREQUENCY DIAL (L). Turn knob until the meter fills with green. Solution (L-M-N).
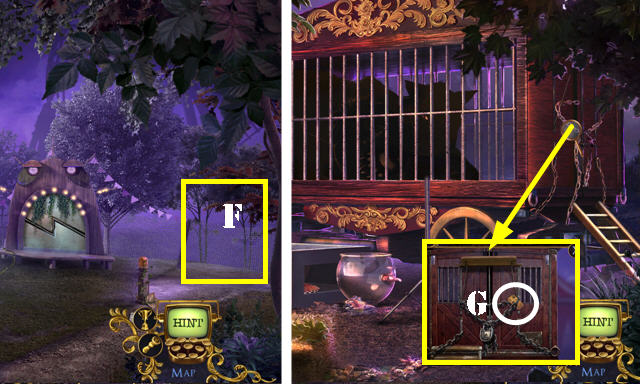
- Take PINK TROLL (O).
- Go to Race Finish Line.
- PINK TROLL on RAVENHEARST BOX; take TWO-HEADED SNAKE and CLAM OPENER.
- Place TWO-HEADED SNAKE and look at note; take MUTOSCOPE KEY and LION TAMER'S WHIP (P).
- Walk down.
- Use MUTOSCOPE KEY (Q); take AQUARIUM NET (R).
- Go (S).
- Use AQUARIUM NET; take PIRANHA MEDAL (T).
- Use CLAM OPENER; take GOLD NUGGET (U).
- Walk down.
- Place PIRANHA MEDAL; take CALMING RECORD and INDEX FINGER (V).
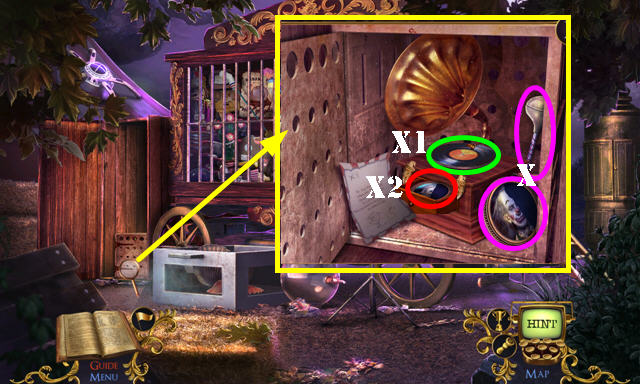
- INDEX FINGER on RAVENHEARST BOX. Select items in common (W)(color-coded); take HORSESHOE MAGNET and CRYSTAL BALL.
- Go (X).
- Place GOLD NUGGET (Y).
- Play puzzle (Z).
- Take a match and strike it on matchbox (A).
- Place (B-D)-(E-F)-(F-G)-(E-F)-(F-G)-(G-H)-(F-G)- (E-F)-(F-G)-(G-D)-(C-D)-(I-D).
- Take STRONGEST ELIXIR (I).
- HORSESHOE MAGNET on LION TAMER'S WHIP; take WHIP WITH MAGNET.
- Use WHIP WITH MAGNET (J); receive SPOTLIGHT.
- Go to Petting Zoo.
- Place SPOTLIGHT (K).
- Use STRONGEST ELIXIR (L). Play HOP (M); receive MASTER SWITCH.
- Walk down.

- Place MASTER SWITCH and select (N).
- Go (O-P).
- Take MUTOSCOPE REEL (Q).
- Place CRYSTAL BALL (R); take CRYSTAL CORE (S).
- Go to Station.
- Place MUTOSCOPE REEL (T); take STUN GUN (U).
- Go to Fun Square.
- Use STUN GUN (V). Solution (1-8).
- Take FIRST PRIZE (W).
- Go to Petting Zoo.
- Open FIRST PRIZE; take CLOWN HEADS 1/2 and SNAKE OIL.
- Use SNAKE OIL and look at note; take CLOWN POSTER and CIRCUS BATON (X).
- Place CALMING RECORD (X1); take MARLEENA POSTER (X2).
- Go to Fun Square.
- Place CIRCUS BATON and pull (Y); take BACKSTAGE ACCESS (Y1).
- Walk down.
- Use BACKSTAGE ACCESS (Z). Play HOP: receive BEARDED LADY POSTER.
- Place BEARDED LADY POSTER, MARLEENA POSTER, CLOWN POSTER, and CRYSTAL CORE (Z1).
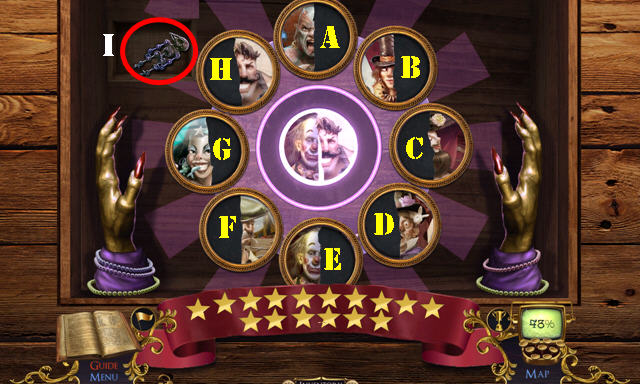
- Solution: (B-C)-(A-H)-(G-D)-(E-F)-(B-F)-(C-E)-(G-H)-(A-D)-(E-D).
- (F-G)-(A-C)-(B-H)-(G-C)-(A-F)-(B-D)-(E-H).
- Take RAVEN DOLL (I).
- Place RAVEN DOLL (J).
- Go (K).

- Take GIANT COIN (L).
- Walk down.
- Insert GIANT COIN (M) and zoom in.
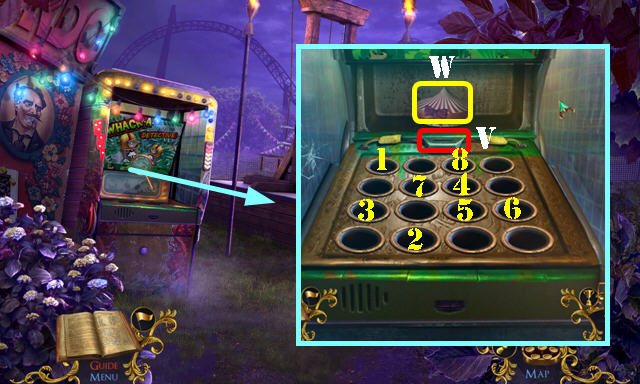
- Solution: 7-1-3-2-5-6-7-1-3-2-5-6-N.
- Receive FAKE SWORD.
- Go to Theater.
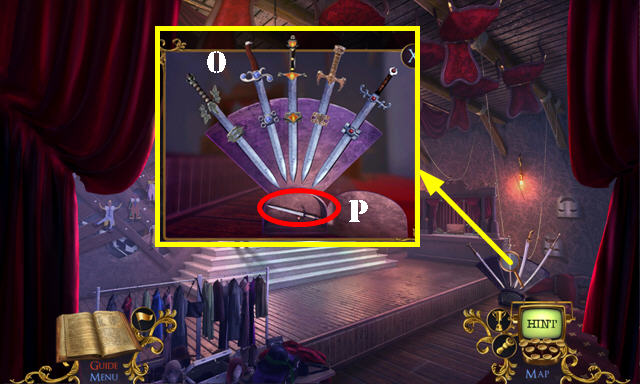
- Place FAKE SWORD. Solution (O).
- Take SHARP DAGGER (P).
- Go to Fun Square.
- Use SHARP DAGGER; take FINAL DRAFT (Q).
- Go to Theater.
- Place FINAL DRAFT (R). Play HOP; receive CLOWN HEADS 2/2.
- Place CLOWN HEADS 2/2; solution (S). Take RACING FINISH FLAG.
- Place RACING FINISH FLAG (T).
- Take MASTER DETECTIVE BADGE (U).
- Use MASTER DETECTIVE BADGE (V).
- Solution (@1). Rotate marked elements in circle. Press Right Arrow.
- Solution (@2). Select Right Arrow.
- Solution (@3): Move (A) up to center, Move (B) down to center, Move (C) up to center, Move (A) down to center, Move (E) up to center, Move (A) down to center. Press Right Arrow.
- Solution (@4): A-C-D-F-E-C-D-B-A-C-D-F-E-C-D-F. Press Right Arrow.
- Solution (@5): 1-8. Press Right Arrow 2x.
- Solution (@6). Swap pieces. Press Right Arrow.
- Solution (@7): Place the feather halves from the bottom in matching slots at top. Just pass the leaves over the blank spaces until you find the one that fits. Press Right Arrow 2x.
- Solution (@8): (7-6)-(2-7)-(6-4)-(9-2)-(4-9)-(1-6)-(2-1)-(6-4)-(3-2)-(8-3)-(4-8)
- Solution (@9): (Bx2)-(Ax4-Bx2)-(Ax4-B)-(A-Bx2). Press Right Arrow 2x.
- Solution (@10): Ax3-Bx7. Press Left Arrow.
- Solution (@11): Move cylinders to expose numbers, then select the numbers from 1-10. If you select the incorrect number, the puzzle will reset. Press Left Arrow 2x.
- Tiles solution (@12). Press Right Arrow.
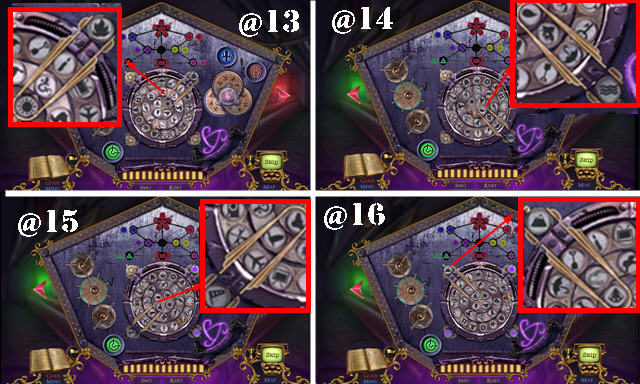
- Rotate elements in Ring to match those of center.
- Solution one (@13): Candle-Dragon-Sun.
- Solution two (@14): Umbrella-Fish-Waterdrop.
- Solution three (@15): Airplane-Bird-Cloud.
- Solution four (@16): Shovel-Worm-Diamond.
- Congratulations, you've completed Mystery Case Files: Moths to a Flame!
Created at: 2019-09-20