

Walkthrough Menu
- General Tips
- Chapter 1: Galloway Estate
- Chapter 2: Richard's Study
- Chapter 3: The Crypt
- Chapter 4: Printing Factory
- Chapter 5: Abandoned Park
- Chapter 6: Recreation Area
- Chapter 7: Crimson Chasm
General Tips
- This is the official guide for Mystery Case Files: The Black Veil.
- This guide will not tell you when you have to zoom into a location; the screenshots will show each zoom scene.
- Hidden-object puzzles are referred to as HOPs. This guide will not show screenshots of the HOPs, however, it will mention when an HOP is available and the inventory item you'll collect from it.
- Use the Map to fast travel to a location.
Chapter 1: Galloway Estate
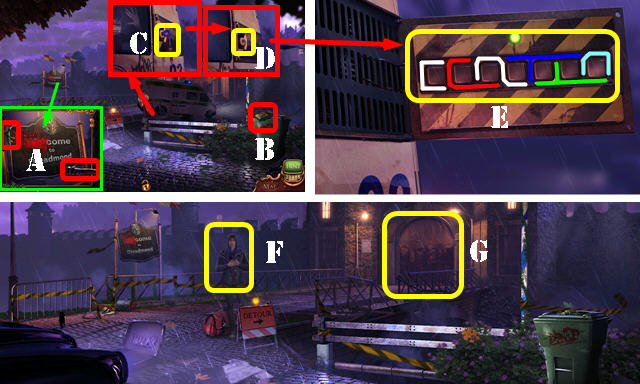
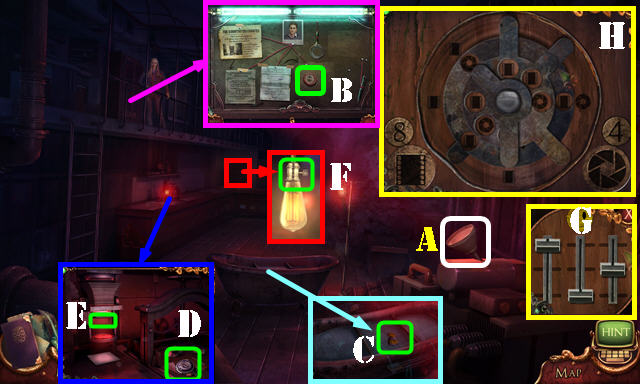
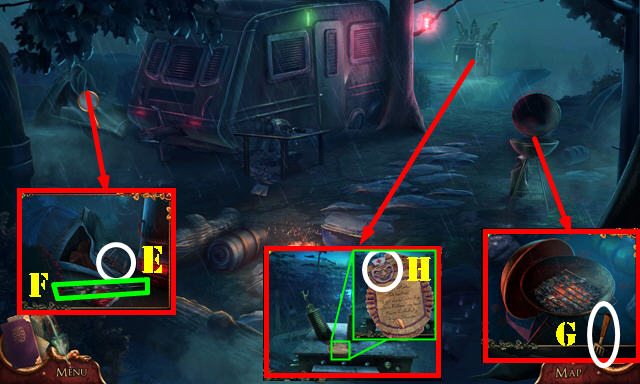
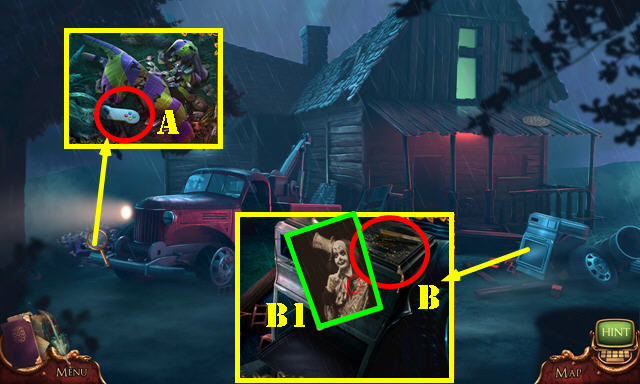
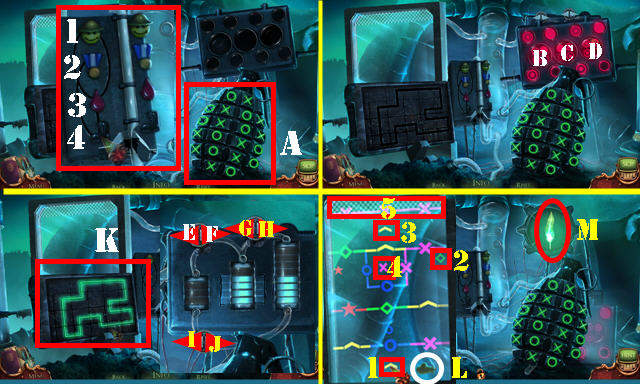
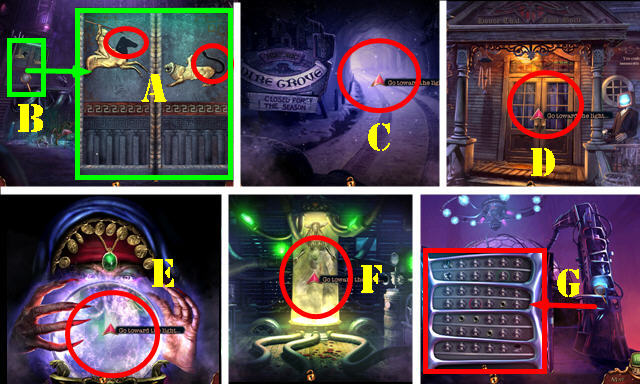
- Take the RUBBER BAND and WRENCH (A).
- Take the CHALK (B).
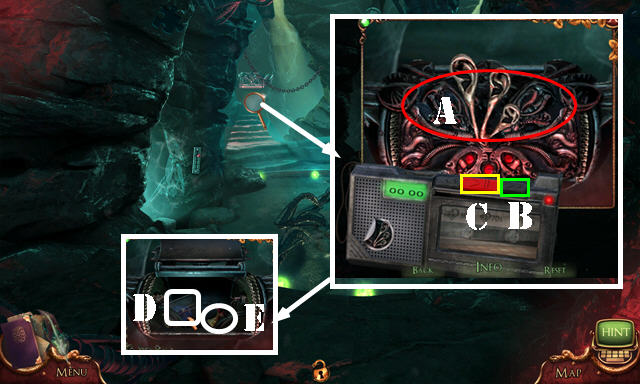
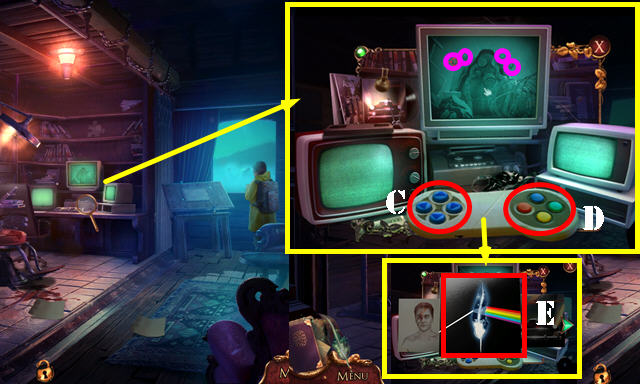
- Take the SYRINGE PENDANT (C). Use the WRENCH (D).
- Solve the puzzle (E).
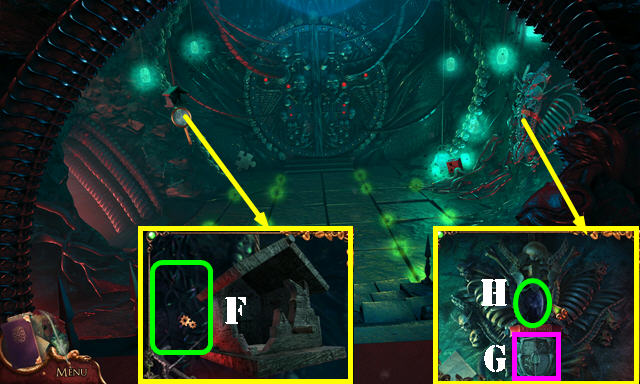
- Talk to Alison (F).
- Go to the Newlywed Square (G).
- Take the HEART KEY (H).
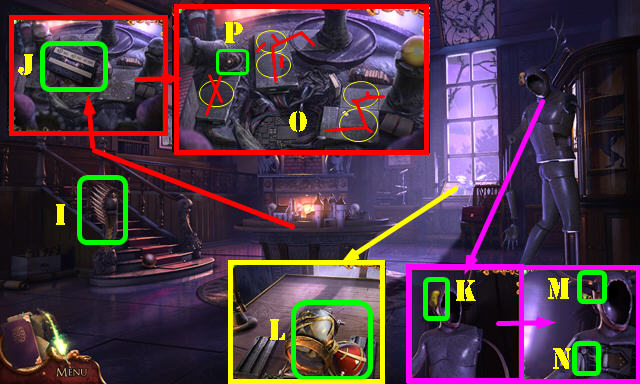
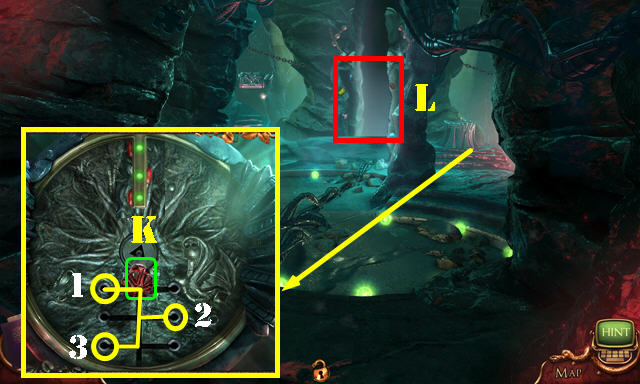
- Pan left. Use the CHALK (I).
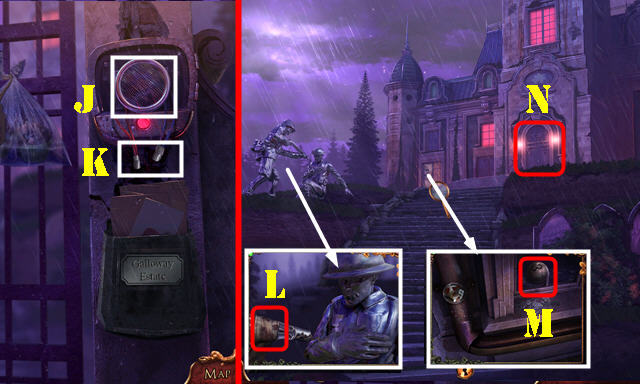
- Go to Galloway Estate (J).
- Take the SLINGSHOT FRAME (K).
- Place the RUBBER BAND on the SLINGSHOT FRAME; take the SLINGSHOT.
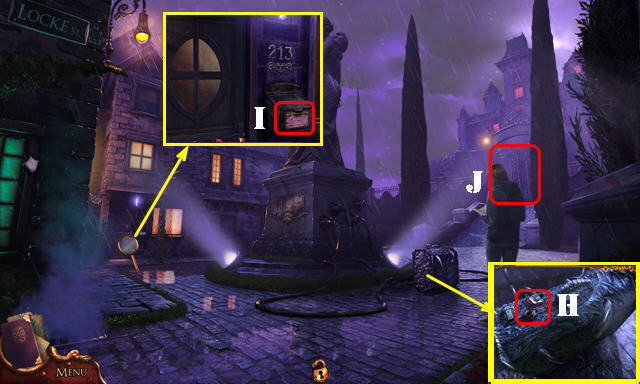
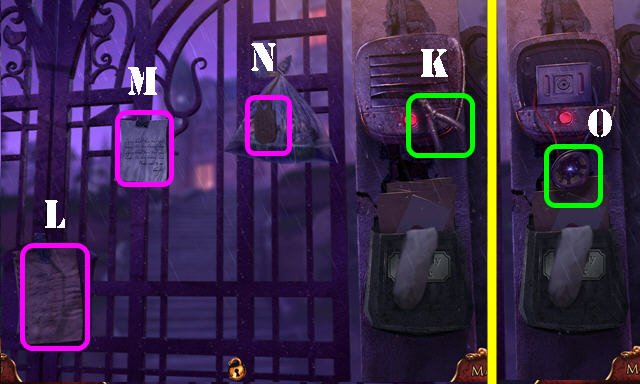
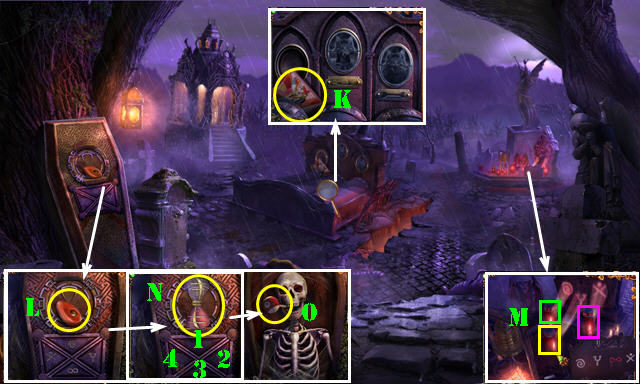
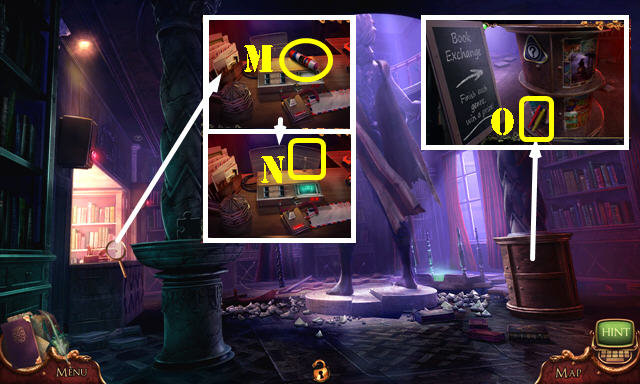
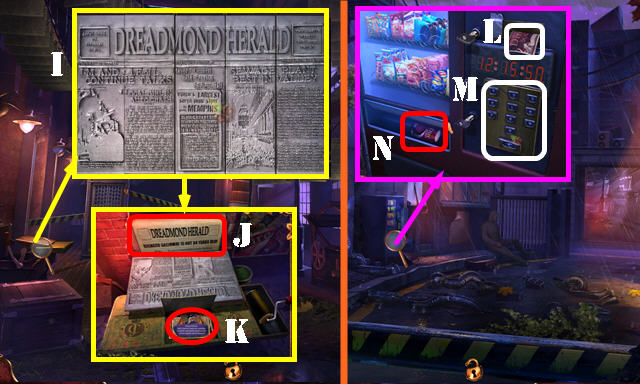
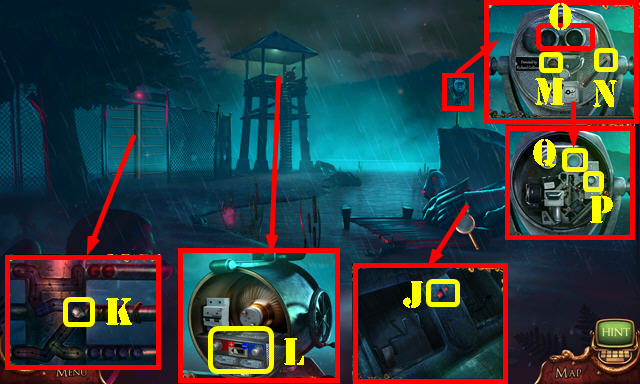
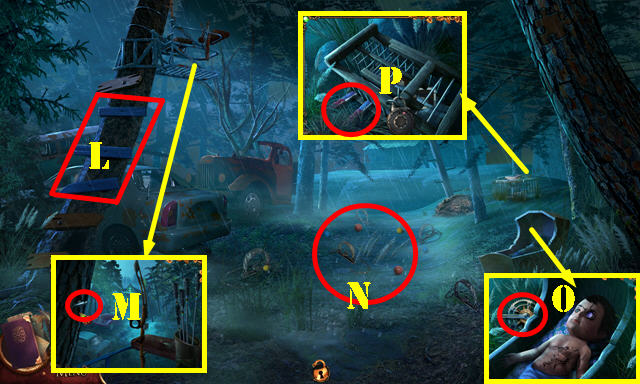
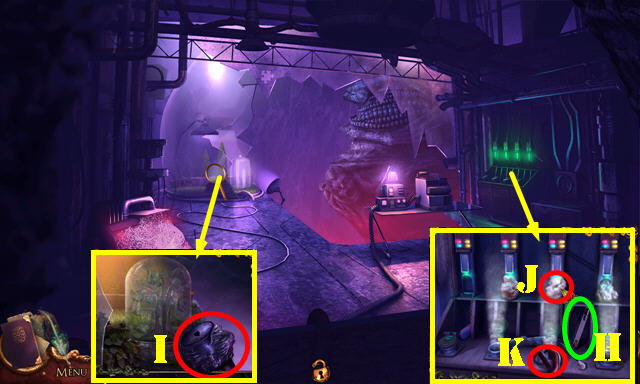
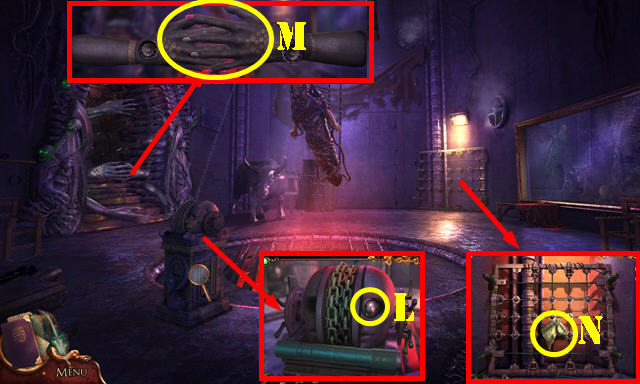
- Look at the notes and dog tag (L-M-N).
- Remove the broken speaker (O).
- Walk down twice.
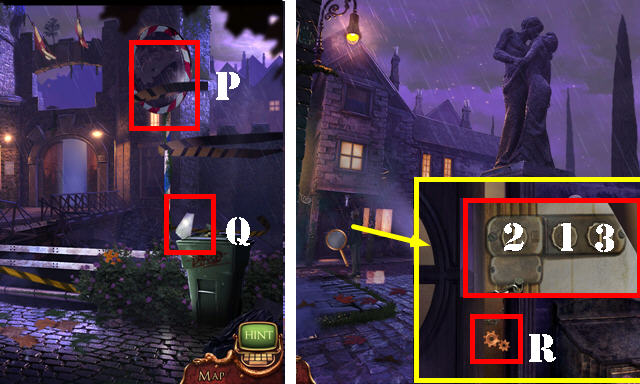
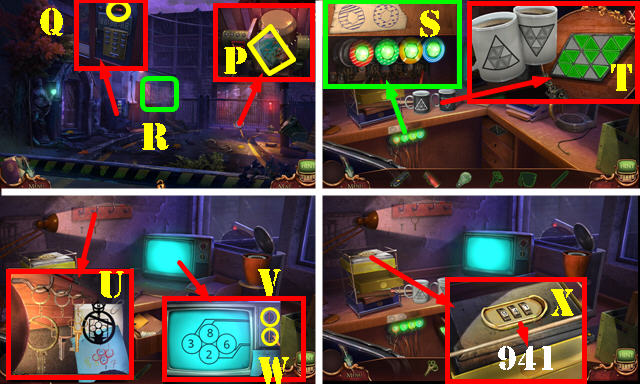
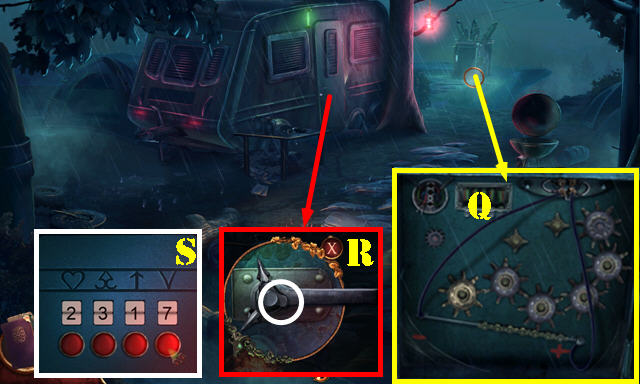
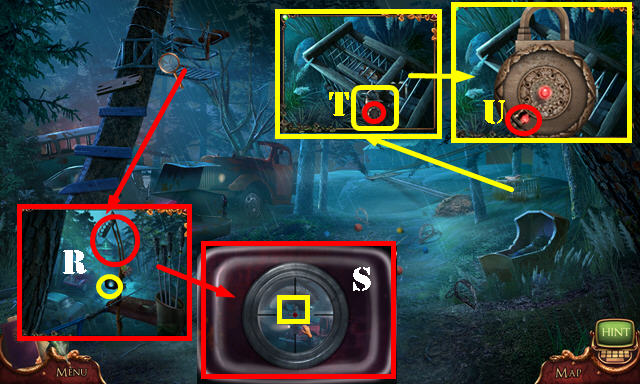
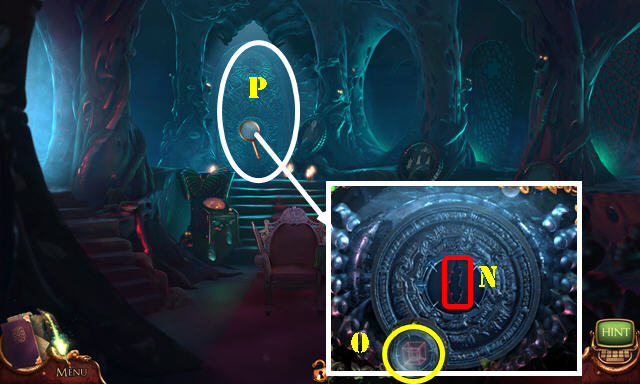
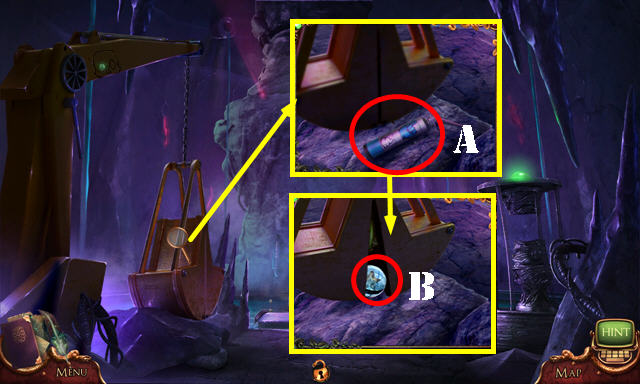
- Use the SLINGSHOT (P); take the MIRROR SHARD (Q).
- Go to Newlywed Square.
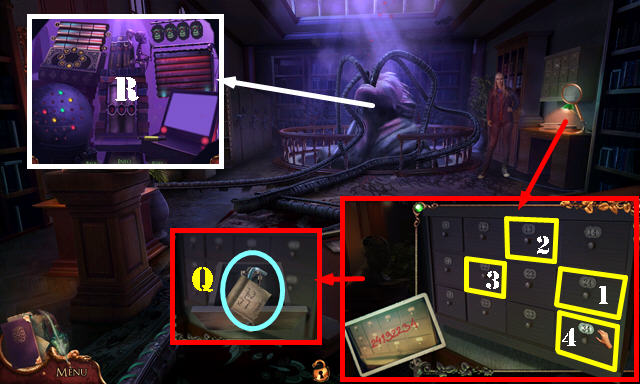
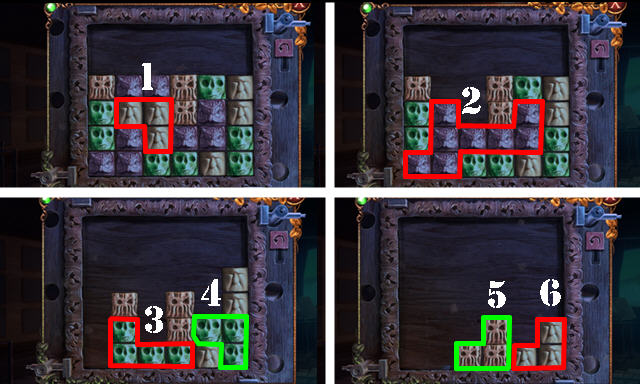
- Place the MIRROR SHARD (R); select 1-2-3.
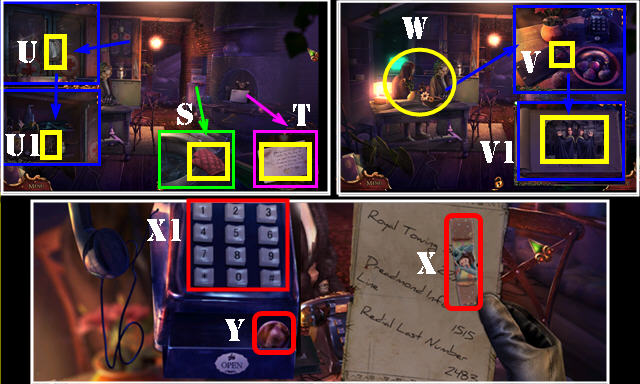
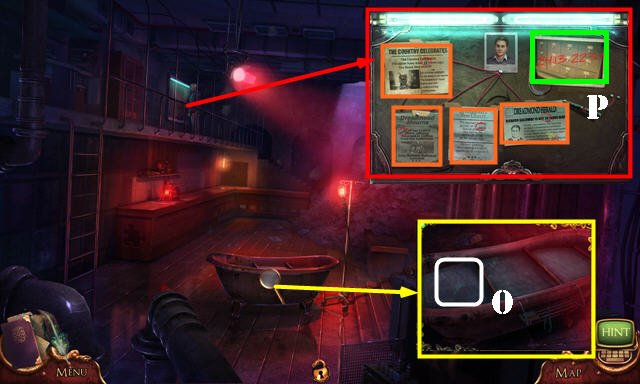
- Take the OVEN MITT (S).
- Look at the note (T).
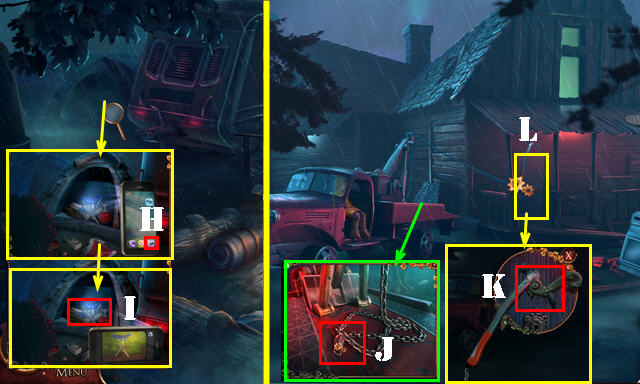
- Take the TAPE (U); Place the SYRINGE PENDANT and take the BANDAGE SCISSORS (U1).
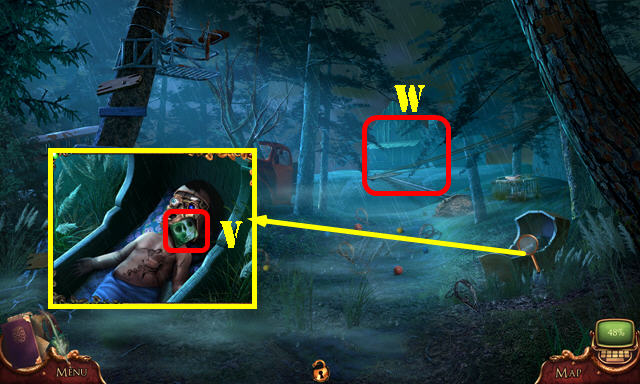
- Use the HEART KEY (V); select the page and take the GRADUATION PHOTO (V1).
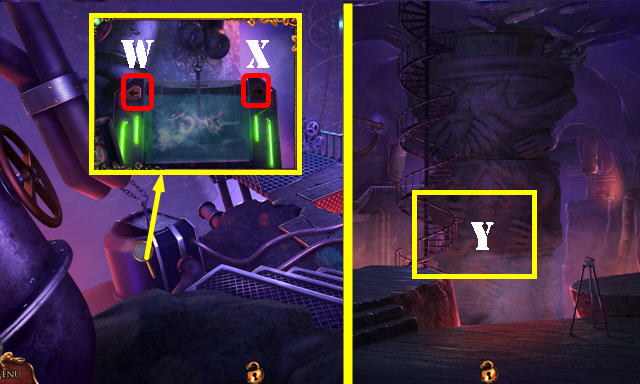
- Use the GRADUATION PHOTO (W) and select it. Remove the bandage (X) and dial 2483 (X1).
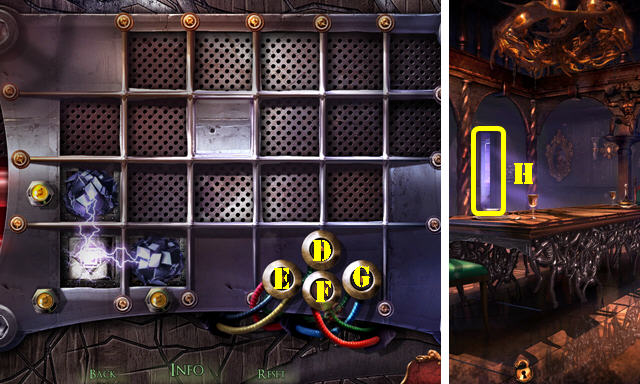
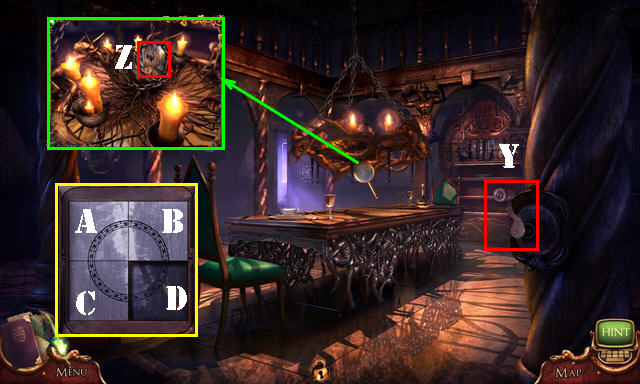
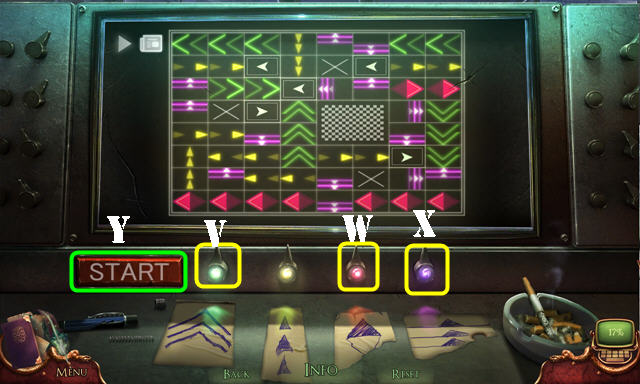
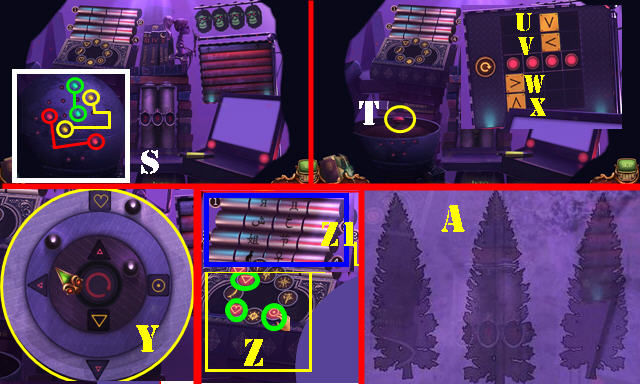
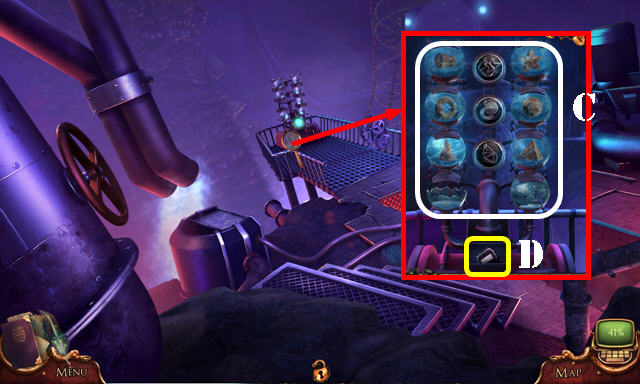
- Take the INSECT MARBLE (Y).
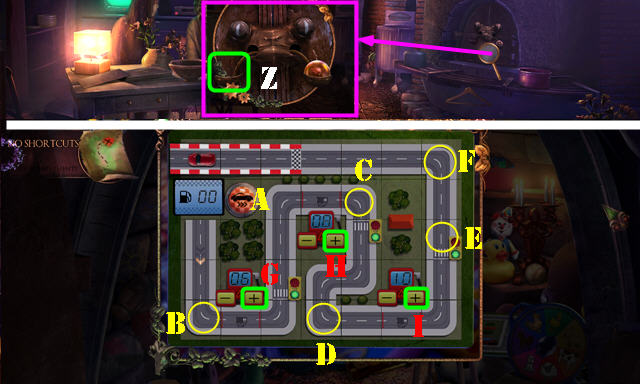
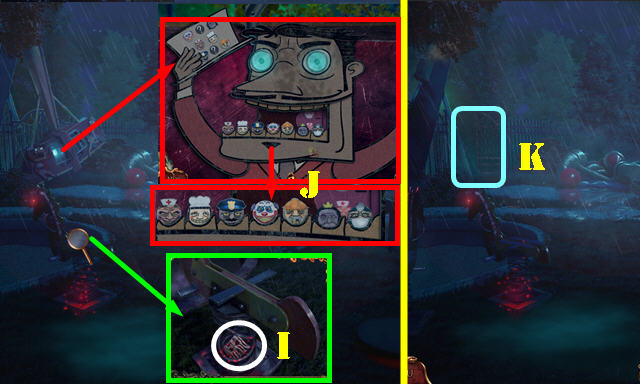
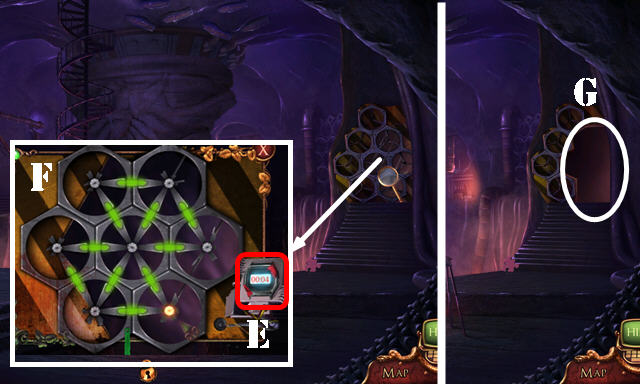
- Place the INSECT MARBLE (Z); play the HOP to get the WALKIE-TALKIE.
- HOP puzzle solution: Bx3-Cx2-Dx3-Ex2-Fx3-A-Gx6-A-Hx8-A-Ix10-A.
- Select the WALKIE-TALKIE; take the battery. Select it two more times; take the DISMANTLED SPEAKER.
- Go to Galloway Estate.
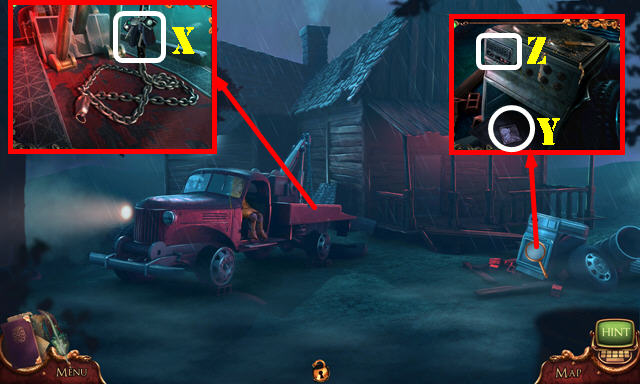
- Place the DISMANTLED SPEAKER (J); use the TAPE (K).
- Use the BANDAGE SCISSORS (L); receive the CORKSCREW.
- Use the OVEN MITT; take the WEIGHTS 1/2 (M).
- Go to the Grand Hall (N).
- Take the BRONZE EMBLEMS 1/4 (O) and ROUGH BRUSH (P).
- Open the note; take the BRONZE EMBLEMS 2/4 (Q).
- Go to the Dining Room (R).
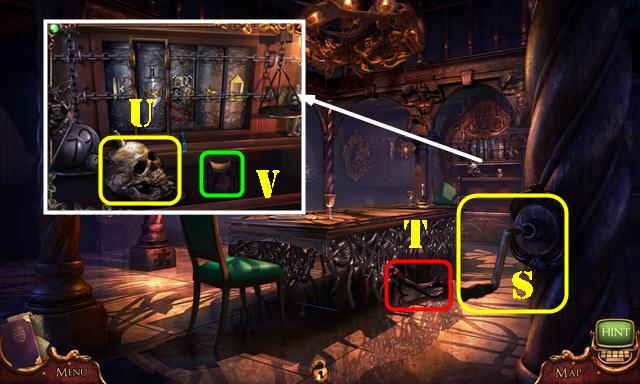
- Select the handle (S); take the ANTLER (T).
- Take the SKULL SPRAYER (U). Use the CORKSCREW; take the BRONZE EMBLEMS 3/4 (V).
- Select the SKULL SPRAYER'S jaw; receive the AZTEC EMBLEM.
- Walk down.

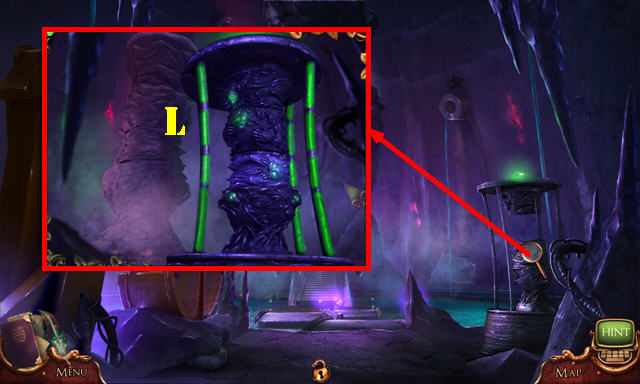
- Place the AZTEC EMBLEM (A); play the HOP to get the POISON BOTTLE.
- HOP puzzle one; make matches of three or more colors (B).
- HOP solution two (C).
- HOP solution three (D).
- Use the POISON BOTTLE on the SKULL SPRAYER; receive the HERBICIDE.
- Walk down.
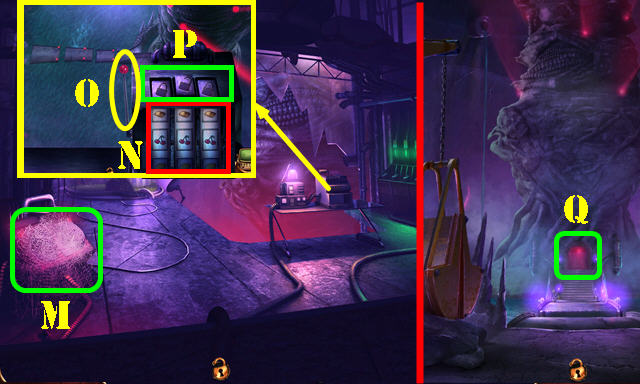
- Use the HERBICIDE; take the WEIGHTS 2/2 (E).
- Go to the Dining Room.
- Place the WEIGHTS 2/2; arrange the weights as shown (F). Take the STAINED HANDKERCHIEF (G).
- Talk to the man (H); receive the ACTIVATOR.
- Go to Maggie's Home.
- Automatically receive the TRAVEL CASE KEY.
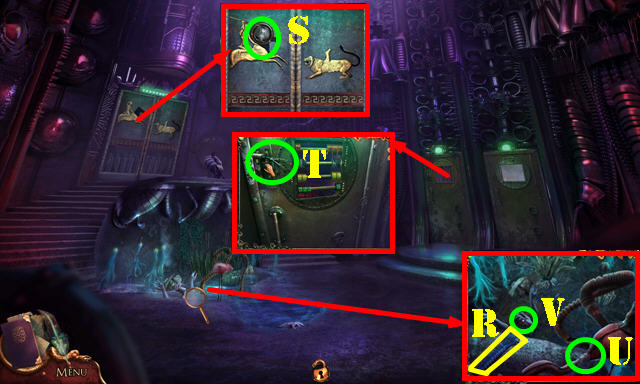
- Dip the STAINED HANDKERCHIEF and select it (I); receive the CODED HANDKERCHIEF.
- Walk down.
- Use the TRAVEL CASE KEY (J); look at the note and take the Depleted Quill (K). Use the ACTIVATOR (L).
- Play the puzzle (M).
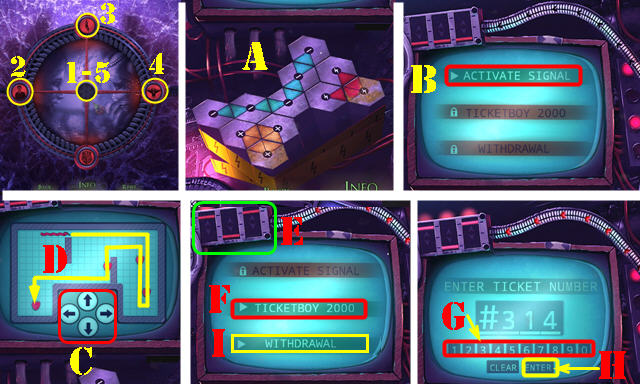
- Select (1-5).
- Swap the battery tiles as shown (A). Select Activate Signal (B).
- Move the snake with the arrows (C) as shown (D). The fruits are random after each start.
- Position the sliders (E). Select Ticketboy 2000 (F).
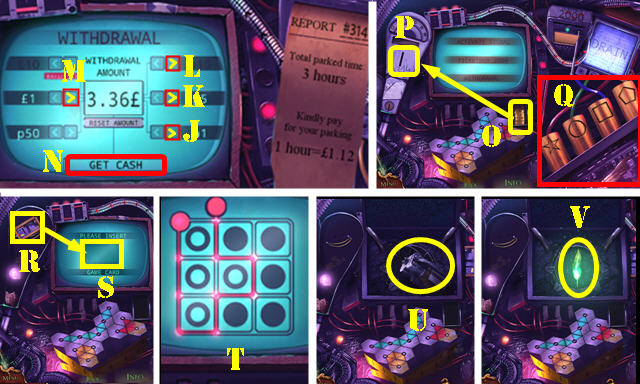
- Select 314 (G) and Enter (H). Select Withdrawal (I).
- Select J-Kx3-Lx2-Mx3-Get Cash (N).
- Place the coins (O) in the slot (P).
- Arrange the cylinders as shown (Q).
- Place the game card (R) on the screen (S).
- Follow the pattern as shown (T).
- Take the HYDRAULIC HAND PUMP (U) and Charged Quill (V).
- Go to the Galloway Estate.
Chapter 2: Richard's Study
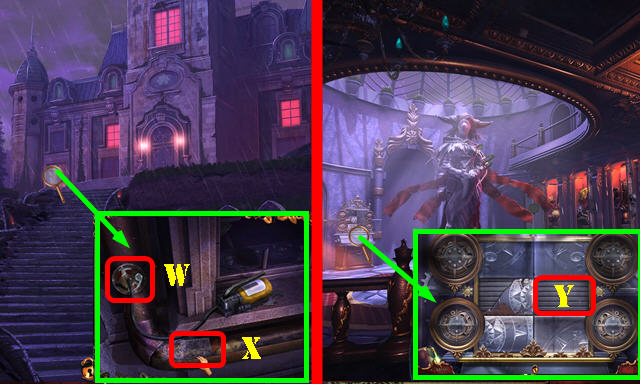
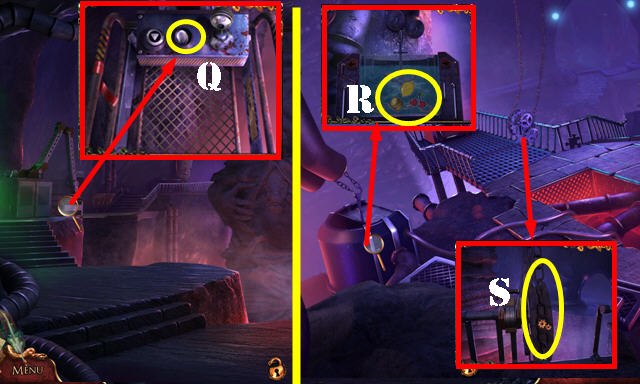
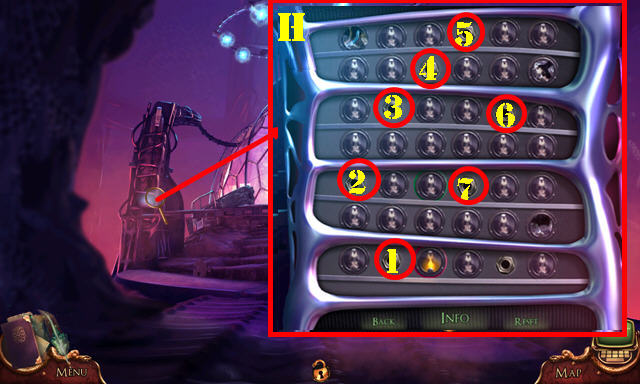
- Use the HYDRAULIC HAND PUMP (W); take the METAL PLATE (X).
- Go to the Grand Hall.
- Place the METAL PLATE for a puzzle (Y).
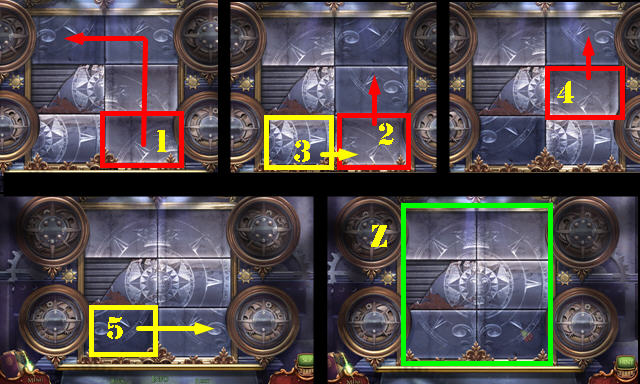
- Solution 1-5. Solved Image (Z).
- Take the FUNERAL CANDLE and BADGE OF VALOR.
- Walk down.
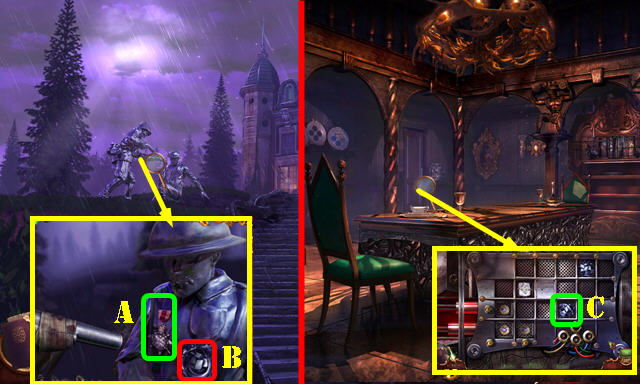
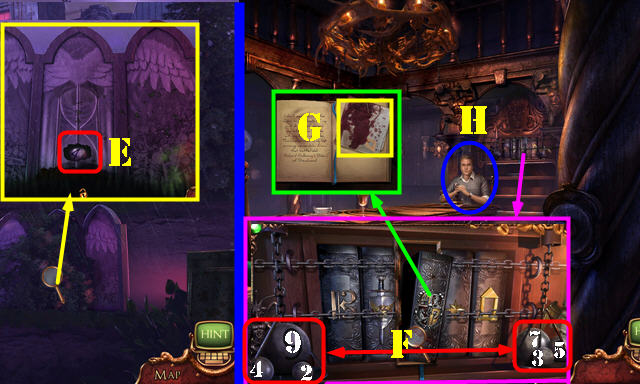
- Place the BADGE OF VALOR (A); take the RARE METAL (B).
- Return to the Dining Room.
- Place the RARE METAL for a puzzle (C).
- Solution: D-Gx3-Fx2-Ex3-Dx2-Gx3-F-E-F-Ex3-F.
- Enter Richard's Study (H).
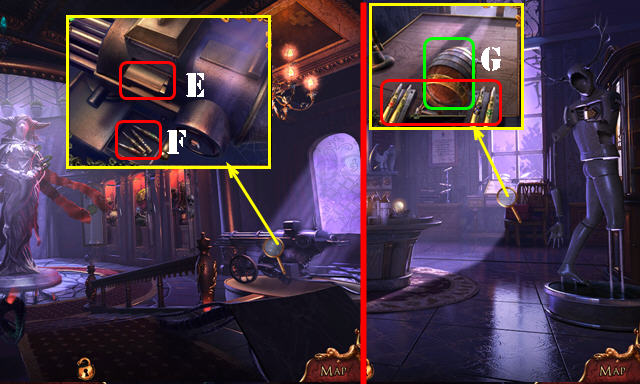
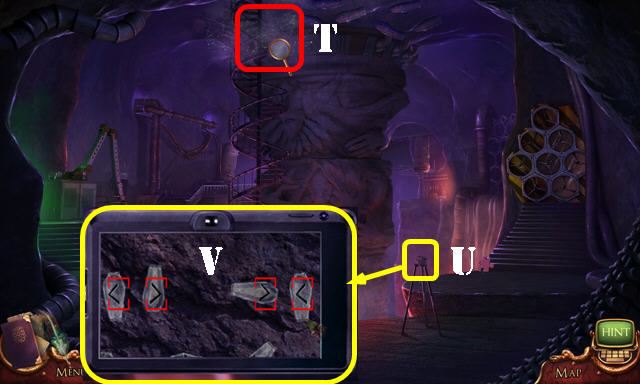
- Take the AMMUNITION BELT (I), CASSETTE TAPE (J), CLIMBING HOLDS 1/3 (K), and HOURGLASS (L).
- Place the ANTLER (M); take the MUSICAL CRANK (N).
- Use the ROUGH BRUSH; spin the circles as shown (O). Select the top; take the BRONZE EMBLEMS 4/4 (P).
- Walk down.
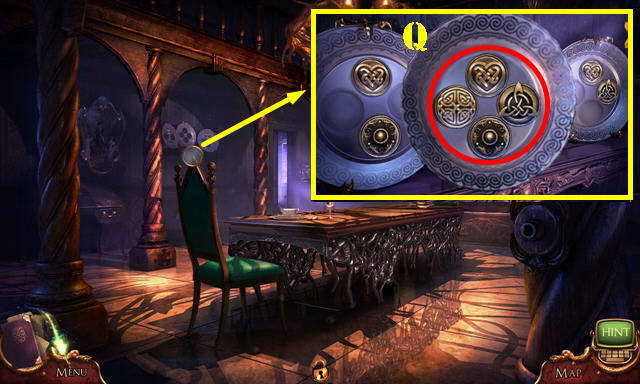
- Place the BRONZE EMBLEMS 4/4: arrange the coins as shown (Q).
- Take the BLUEPRINT.
- Go to Richard's Study.
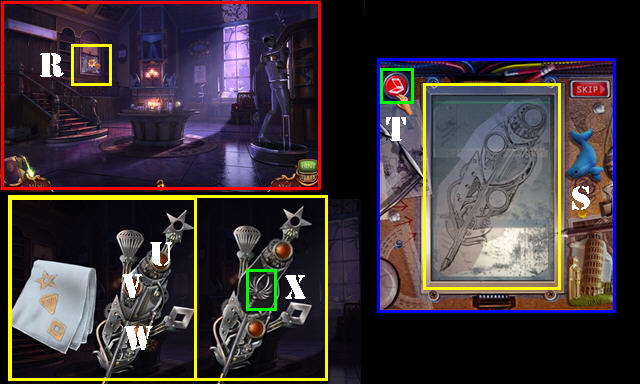
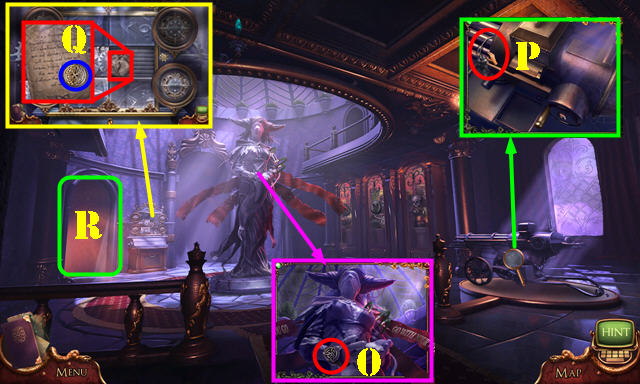
- Place the BLUEPRINT (R); play the HOP to get the MECHANICAL QUILL.
- HOP puzzle solution: arrange the blueprint (S) and press the button (T).
- Place the CODED HANDKERCHIEF on the MECHANICAL QUILL. Select Ux4-V-Wx2. Take the PHOENIX KEY (X).
- Walk down.
- Place the MUSICAL CRANK (Y) and PHOENIX KEY (Z) for a puzzle.
- Solution: Cx2-Ax2-Bx2-Dx2-Cx2-A-B-D.
- Take the GOLDEN EGG.
- Walk down.
- Place the AMMUNITION BELT (E); take the MARKED BULLETS (F).
- Go to Richard's Study.
- Place the GOLDEN EGG and MARKED BULLETS for a puzzle (G).
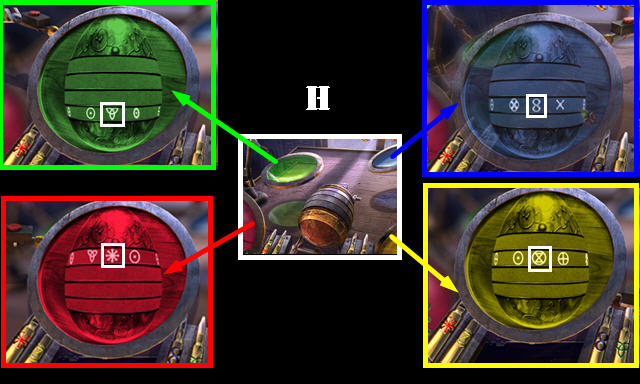
- Solution (H).
- Take the MECHANICAL HEART.
- Return to the Grand Hall.
- Place the MECHANICAL HEART (I).
- Go to the Family Crypt (J).
Chapter 3: The Crypt
- Take the CHILDREN'S BOOK (K) and CLIMBING HOLDS 2/3 (L).
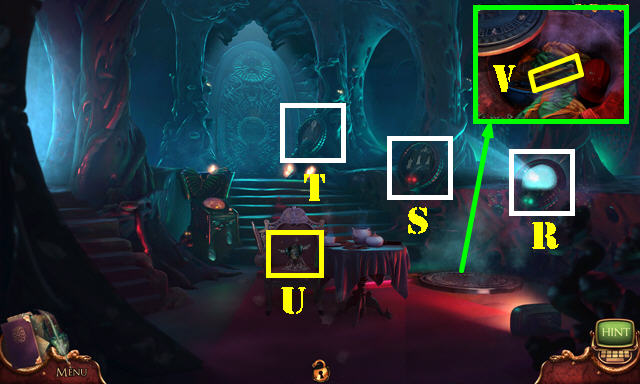
- Place the FUNERAL CANDLE; select each candle (M).
- Place the HOURGLASS (N). Select 1-4. Pull the handle (O) to trigger a puzzle.
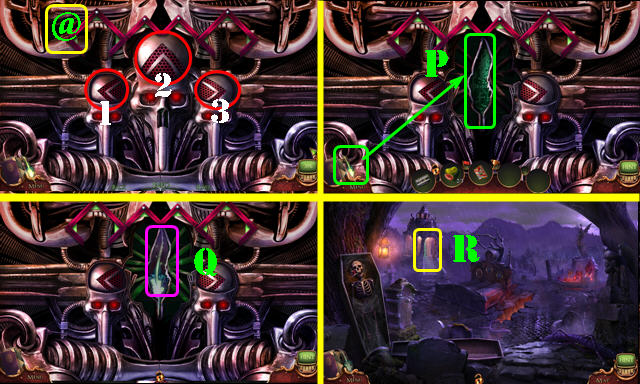
- Select 1-2-3-2-2-1-2-3 (@).
- Place the Charged Quill (P); take the Depleted Quill (Q).
- Go to the Crypt Stairway (R).
- Place the shapes as shown (S).
- Look at the note (T).
- Take the TAPE RECORDER (U).
- Press the red button on the TAPE RECORDER; place the CASSETTE TAPE in it to receive RICHARD'S RECORDING.
- Take the CLIMBING HOLDS 3/3 (V).
- Go to the Ruptured Corridor (W).
- Use the CLIMBING HOLDS 3/3 (X); play the HOP to get the DARK CREST.
- HOP puzzle, swap: (1-6)-(2-4)-(3-5)-(1-4)-(2-6)-(3-5).
- Take the CIRCULAR KEYS 1/2 (Y).
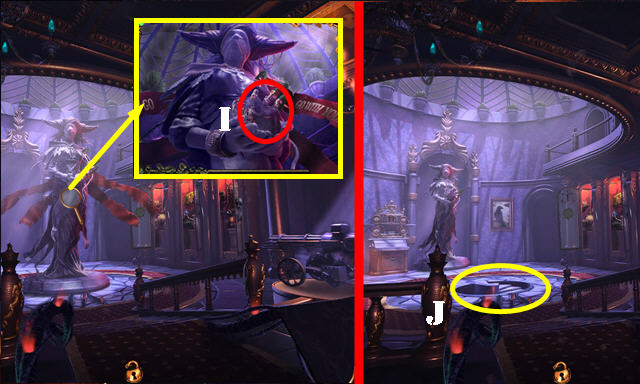
- Pull the lever (Z); take the HARPOON (Z1).
- Use RICHARD'S RECORDING for a puzzle (A).
- Select Bx3-C-Bx4-C-Bx4-C.
- Take the ANTENNA (D); select the apple core (E).
- Walk down.
- Use the HARPOON (F); receive the CHRISTMAS LIGHTS.
- Place the DARK CREST (G); take the GRAVESTONE PHOTO (H).
- Go to the Ruptured Corridor.

- Place the CHRISTMAS LIGHTS (I).
- Return to the Family Crypt.
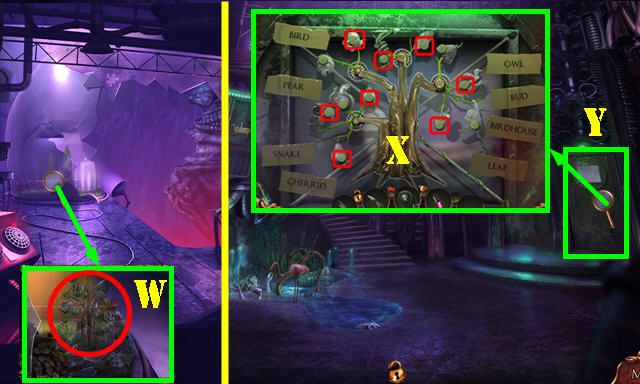
- Place the GRAVESTONE PHOTO and arrange as shown (J). Take the GEAR STICK.
- Return to the Ruptured Corridor.
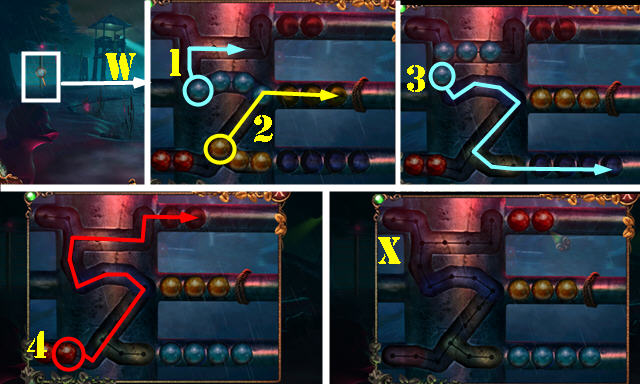
- Place the GEAR STICK (K). Move as shown (1-3).
- Go to the Historic District (L).
- Take the GLUE STICK (M). Place the ANTENNA (N). Select the device.
- Take the RATTLE (O).
- Walk down.
- Take the OCEAN BOOK (P) and KNIGHT TOKEN (Q).
- Play the HOP (R) to get the HORROR BOOK.
- HOP puzzles solutions (S-X). Select Vx2-Wx3.
- Go to the Public Library.
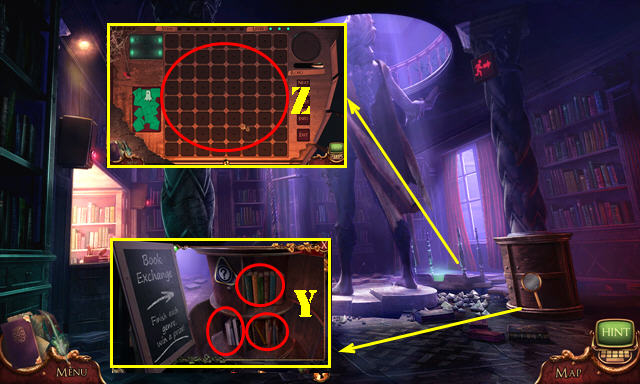
- Place the HORROR BOOK, CHILDREN'S BOOK, and OCEAN BOOK (Y). Receive ENGINEERING 101.
- Place the KNIGHT TOKEN for a puzzle (Z).
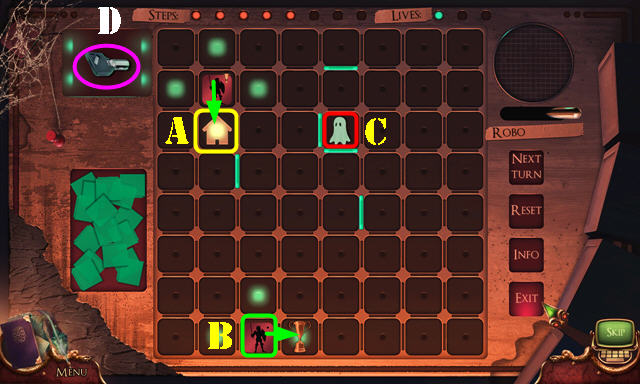
- The solution is random. Place the knight on any space (A). Pick up the trophy (B) and return to home base (A) without being captured by the ghost (C).
- Take the CIRCULAR KEYS 2/2 (D).
- Walk down.
- Take the ENGINE CODE from the ENGINEERING 101.
- Place the ENGINE CODE for a puzzle. Solution: C-D-B-A (@1).
- Pull the lever (E).
- Enter the Printing Factory (F).
Chapter 4: Printing Factory
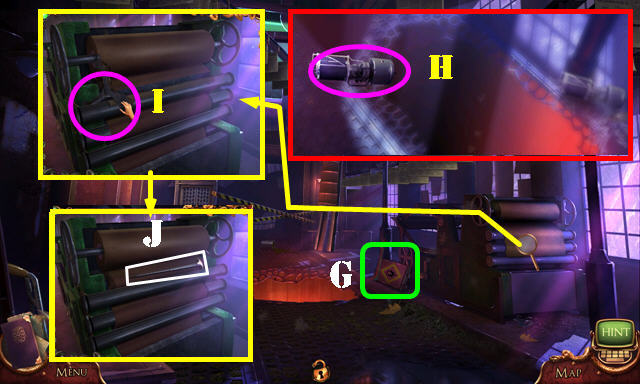
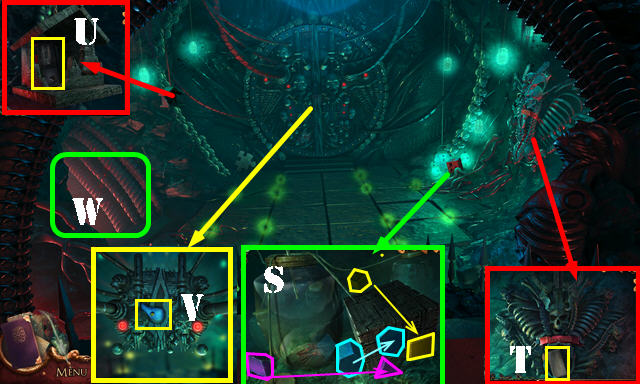
- Take the GASOLINE (G).
- Catch the VACUUM TUBES 1/2 while it's in the air (H). Take the SHELF CRANK (I).
- Use the GLUE STICK; take the LOBOTOMY INSTRUMENT (J).
- Walk down.
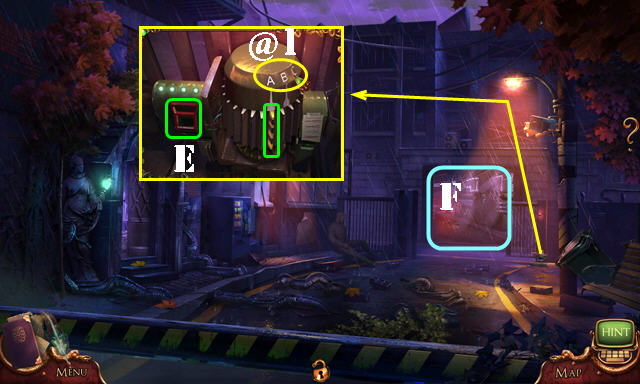
- Insert the CIRCULAR KEYS 2/2 (K). Remove the ball; take the BRASS KNUCKLES (L). Select 1-4.
- Go to the Printing Factory.
- Use the BRASS KNUCKLES; take the RESCUE LADDER (M).
- Go to the Public Library.
- Place the RESCUE LADDER (N); go to the Dusty Archives (O).
- Use the LOBOTOMY INSTRUMENT; select red-blue-yellow-pink (P).
- Take the FILM NEGATIVE (Q).
- Place the SHELF CRANK; take the EDISON BULB (R).
- Use the RATTLE (S); play the HOP to get the VACUUM TUBES 2/2.
- Return to the Printing Factory.
- Pull the lever (T). Place the VACUUM TUBES 2/2 for a puzzle. Solution (U). Pull the lever for second puzzle.
- Select: V-W-X-Y.
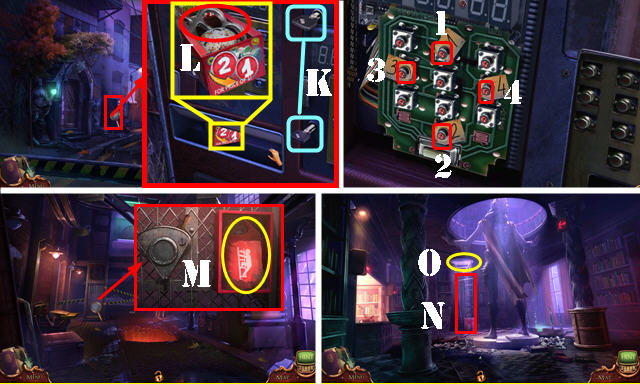
- Go to the Darkroom (Z).
- Use the GASOLINE (A).
- Take the TOKEN (B).
- Take the ANTI-RUST SPRAY (C).
- Take the JOURNALIST'S BADGE and read the note (D). Place the FILM NEGATIVE (E); take the UNDEVELOPED PHOTO.
- Place the EDISON BULB (F); play the HOP to get the PRINTING PLATE.
- HOP Puzzle Solutions (G-H).
- Walk down.
- Place the PRINTING PLATE for a puzzle. Solution (I).
- Take the UNPUBLISHED ARTICLE (J).
- Place the JOURNALIST'S BADGE; look at the sign and take the BEVERAGE COUPON (K).
- Walk down.
- Insert the BEVERAGE COUPON (L). Select 121550 (M); Take the SODA (N).
- Return to the Darkroom.
- Pour the SODA and dip the UNDEVELOPED PHOTO (O); receive the DEVELOPED PHOTO.
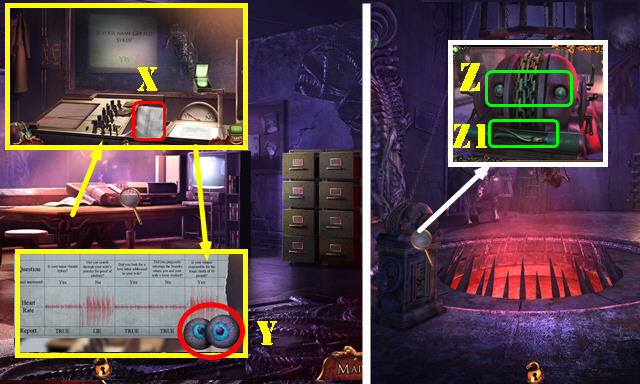
- Place the UNPUBLISHED ARTICLE and DEVELOPED PHOTO. Select each note (orange). Take the DRAWER CODE (P).
- Return to the Dusty Archives.
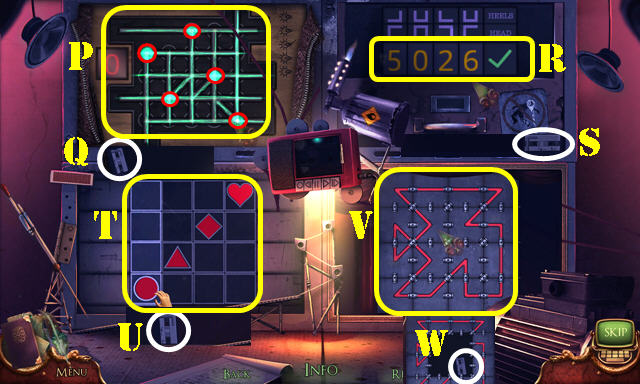
- Place the DRAWER CODE; select (1-4). Look at the note (Q); receive the HEX WRENCH. Select the mechanism.
- Play the puzzle (R).
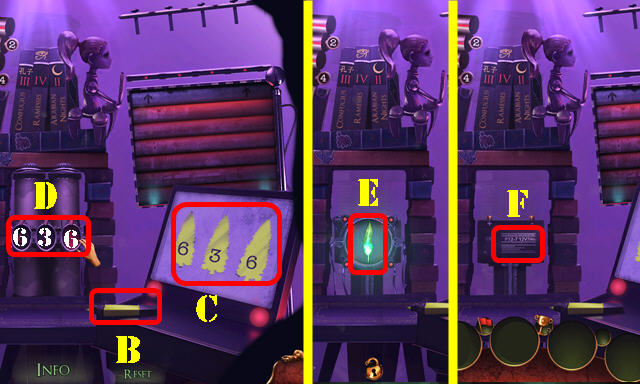
- Connect the dots (S). Push the button (T).
- Select X-Wx3-U-V-X-U.
- Rotate the discs as shown (Y). Select the three buttons (Z).
- Swap the symbols (Z1).
- Select the drawing (A).
- Drag the marker (B) across the trees (C). Enter 636 (D).
- Take the Charged Quill (E) and CAR BATTERY (F).
- Go to the Crypt Stairway.
- Place the Charged Quill; take the Depleted Quill (G).
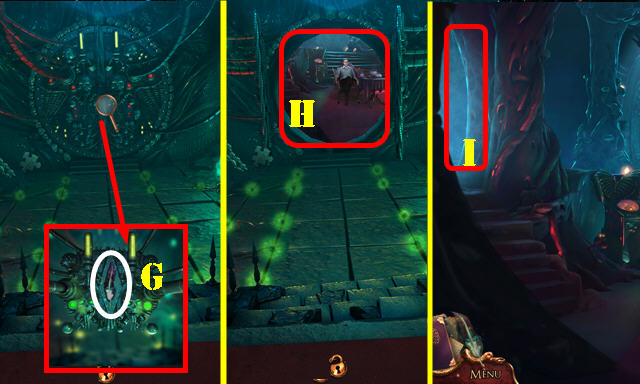
- Go to the Inner Sanctum (H) and then to Dreadmond Loch (I).
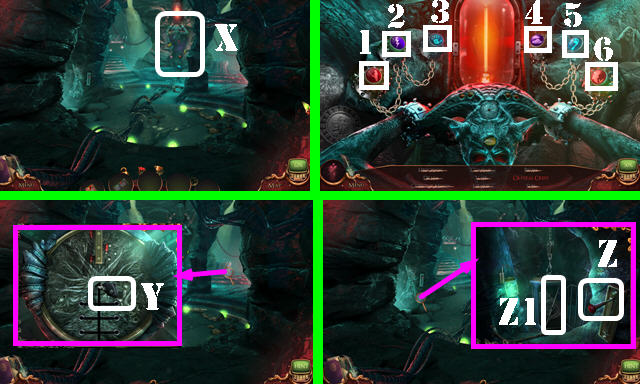
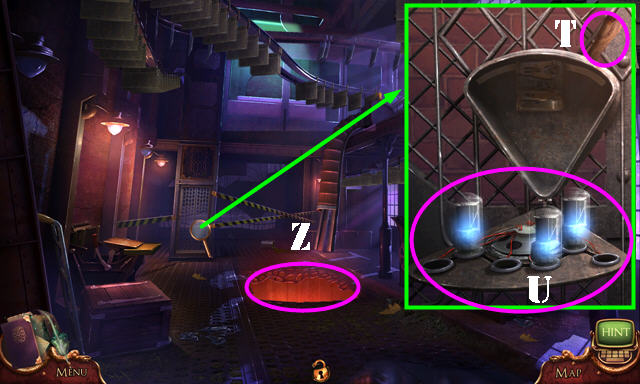
- Take the RED WAX (J) and RIDE TOKENS 1/2 (K).
- Remove the cover; place the CAR BATTERY (L).
- Insert the TOKEN (M) and HEX WRENCH (N). Select the lens (O).
- Push the button twice (P). Take the LENS (Q).
- Walk down.
- Play the three HOPs (R-S-T).
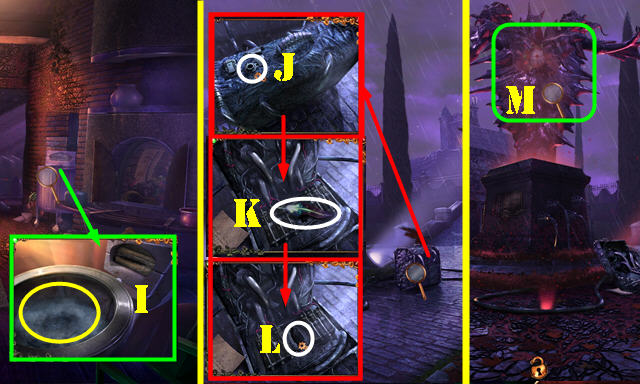
- Take the ANKOU BUST (U).
- Use the ANTI-RUST SPRAY. Select the clothes; take the GLASS CUTTER (V).
- Use the GLASS CUTTER on the ANKOU BUST; take the MARBLES.
- Go to Dreadmond Loch.
- Place the MARBLES for a puzzle (W). Solution (1-4). Solved Puzzle (X).
- Go to the Abandoned Park (W).
Chapter 5: Abandoned Park
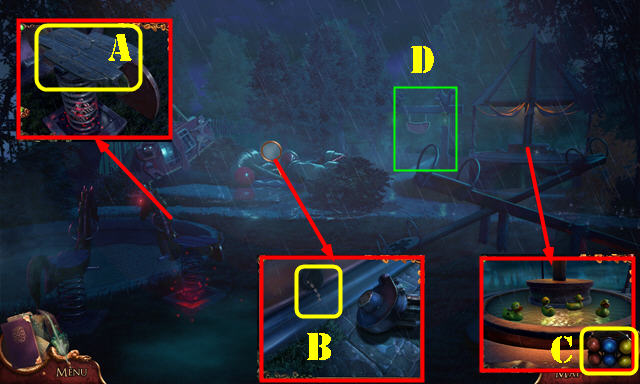
- Take the PLANKS (A), BRACES (B), and CROQUET BALLS (C).
- Go to the Camper's Hill (D).
- Take the SPREADER TOOL (E) and select the pole (F).
- Take the METAL SPATULA (G) and RIDE TOKENS 2/2 (H).
- Walk down.
- Use the SPREADER TOOL; take the STONE TILES 1/3 (I).
- Place the RIDE TOKENS 2/2 for a puzzle. Solution (J).
- Go to the Forgotten Path (K).
- Place the PLANKS (L). Take the ARROWHEAD (M).
- Throw the CROQUET BALLS (N).
- Take the GEAR (O) and MAGNET (P).
- Return to the Camper's Hill.
- Open the cover; place the GEAR for a puzzle. Solution (Q).
- Place the ARROW HEAD (R); play the HOP to get the FISHING ROD.
- HOP Puzzle Solution (S).
- Walk down.

- Place the MAGNET on the FISHING ROD; receive the MAGNETIC FISHING ROD.
- Use the MAGNETIC FISHING ROD (T); take the PACIFIER MOLD.
- Go to the Camper's Hill.
- Place the PACIFIER MOLD and RED WAX; take the WAX PACIFIER (U).
- Go to the Forgotten Path.
- Place the WAX PACIFIER; take the STONE TILES 2/3 (V).
- Go to the Cabin in the Woods (W).
- Take the CAR KEYS (X).
- Open the door; take the STONE TILES 3/3 (Y).
- Use the METAL SPATULA (Z); receive the DIGITAL CLOCK.
- Walk down.
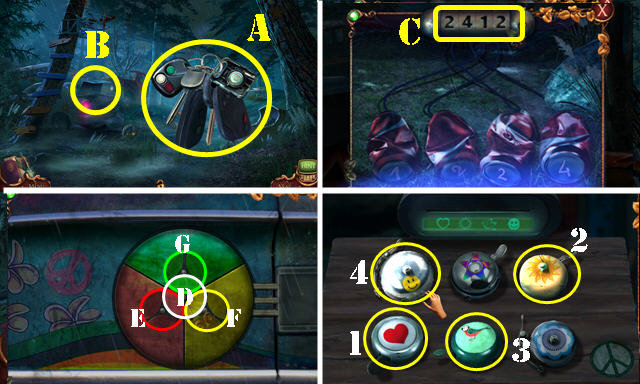
- Use the CAR KEYS; select any three different keys (A); play the HOP (B) to get the BACKPACK.
- HOP puzzle solution one (C).
- HOP puzzle solution two (Gx2-F-E-Dx2).
- HOP puzzle solution three (1-4).
- Return to the Camper's Hill.
- Open the BACKPACK; look at the postcard and take the CELL PHONE.
- Place the CELL PHONE; select the last button (H) and find the five items on the screen (I). Receive the CLIMBING HOOK.
- Go to the Cabin in the Woods.
- Place the CLIMBING HOOK (J) and attach it to the door (K).
- Enter the Recreation Area (L).
Chapter 6: Recreation Area

- Open the curtain and pull the lever (M).
- Place the BRACES; take the PADLOCK EMBLEM (N).
- Take the WINDING KEY (O) and PADLOCK (P).
- Place the STONE TILES 3/3 for a puzzle (Q).
- Solution (1-6).
- Take the GARROTTE.
- Return to the Forgotten Path.
- Place the LENS and GARROTTE (R). Select the target (S).
- Place the PADLOCK EMBLEM (T); stop the button 3x on the landing zone (U). Take the RIPPED PHOTO.
- Go to the Cabin in the Woods.
- Select the mask; take the CONTROLLER (A).
- Place the RIPPED PHOTO (B); take the MISSING PHOTO (B1).
- Go to the Recreation Area.
- Connect the CONTROLLER; use the left buttons (C) to move the hand directly onto each target (purple). Use the right buttons (D) to shoot.
- Select the arrow 3x; take the VINYL RECORD (E).
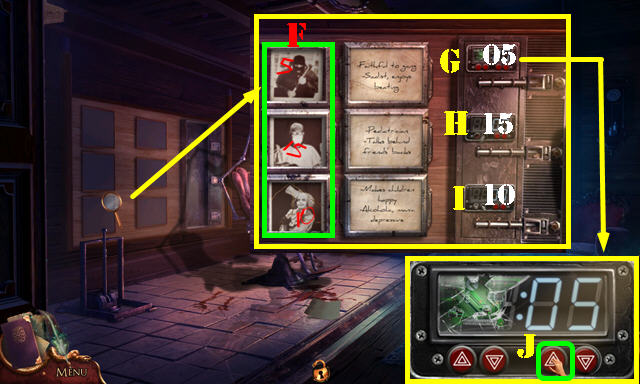
- Place the DIGITAL CLOCK and MISSING PHOTO. Swap the photos as shown (F).
- Change the clocks (G to 05)-(H to 15)-(I to 10) using the button (J).
- Take the LEAF BLOWER.
- Go to the Abandoned Park.
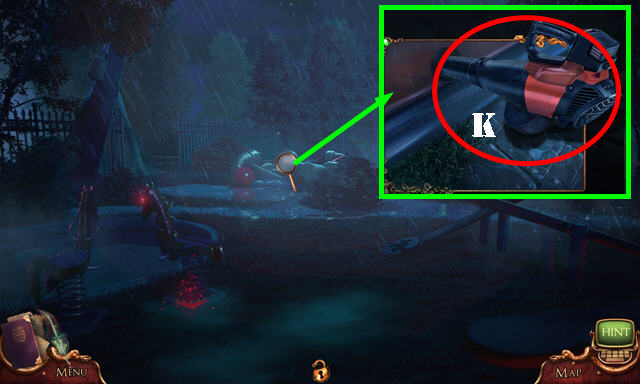
- Use the LEAF BLOWER (K); play the HOP to get the TOY WINDMILL.
- Use the WINDING KEY on the TOY WINDMILL; select it 3x; take the PADDLE WHEEL.
- Go to the Inner Sanctum.
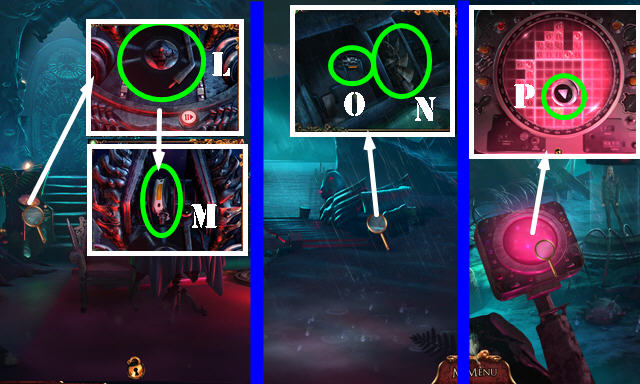
- Place the VINYL RECORD (L); take the PEDAL (M).
- Go to Dreadmond Loch.
- Place the PADDLE WHEEL (N) and PEDAL (O).
- Take the CONTROL BUTTON (P) and play the puzzle.
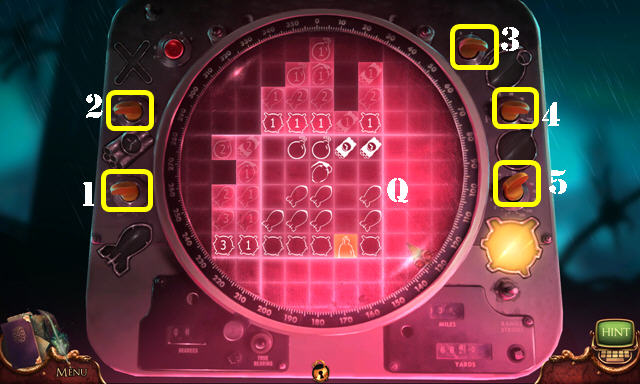
- Select (1-5).
- Arrange as shown (Q).

- Play the puzzle (R).
- Grenade solution (A).
- Swap the symbols: (2-4)-(3-4)-(1-3)-(3-4).
- Rotate the symbols (Bx2-Dx2).
- Water Solution: I-F-I-F-Hx2-G-F.
- Slide the tracks (K).
- Activate the doors in order (1-5) and guide the submarine (L) to the exit (5).
- Take the Charged Quill (M); receive the INFLATABLE CAR JACK.
- Return to the Inner Sanctum.
- Place the Charged Quill (N); take the Depleted Quill.
- Rotate as shown (O).
- Go to the Crimson Chasm (P).
Chapter 7: Crimson Chasm
- Take the CELL BATTERY. Place and press the CONTROL BUTTON (Q) to get transported to the Waterworks.
- Take the SLOT MACHINE STICKERS (R).
- Use the PADLOCK (S).
- Walk down.
- Play the HOP (T) to get the CAMERA.
- Place the CAMERA (U). Position the arrows as shown (V); receive the COMBINATION CODE.
- Go to the Waterworks.
- Place the COMBINATION CODE; select W-X-X-W.
- Walk down and go to the Tower Precipice (Y).
- Take the INSULATION FOAM (A).
- Use the INFLATABLE CAR JACK; take the CRYSTAL BALL (B).
- Go to the Waterworks.
- Place the CRYSTAL BALL; swap the balls as shown (C). Take the BROKEN WATCH (D).
- Select the BROKEN WATCH; place the CELL BATTERY; take the WATCH.
- Walk down.
- Place the WATCH for a puzzle (E).
- Solution (F).
- Go to the Ventilation (G).
- Take the VIDEOTAPE (H) and TOWER PIECE (I).
- Use the INSULATION FOAM (J); take the FLAMINGO HEAD (K).
- Go to the Tower Precipice.
- Place the TOWER PIECE for a puzzle. Solution (L).
- Take the PORTABLE BLOWER.
- Go to the Ventilation.
- Use the PORTABLE BLOWER (M); play the HOP to get the SLOT MACHINE REEL.
- Place the SLOT MACHINE STICKERS on the SLOT MACHINE REEL.
- Place the SLOT MACHINE REEL for a puzzle (N). The solution is random. Pull the lever (O) to spin the reels (N). When you get a cherry in the middle of any reel, select the padlock (P) above the column to lock it in place.
- Go to the Tower Precipice and then to Inside the Tower (Q).
- Take the GLASS BREAKER (R), BULBS 1/2 (S), and GUITAR CABLE (T).
- Place the FLAMINGO HEAD (U); take the NAIL POLISH (V).
- Go to the Ventilation.
- Use the GLASS BREAKER; take the MECHANICAL TREE (W).
- Return to the Inside the Tower.
- Place the MECHANICAL TREE; select the marked buttons (X).
- Enter the Interrogation Room (Y).
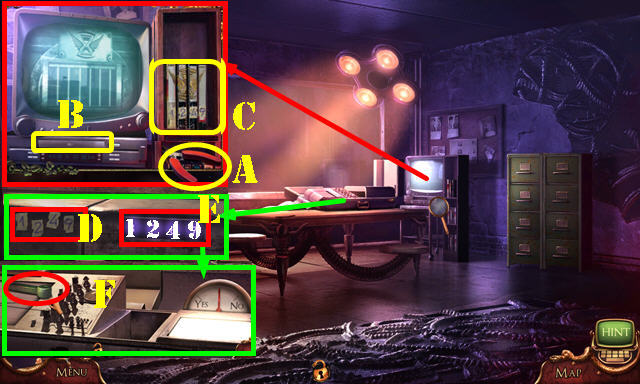
- Take the WIRE CUTTERS (A). Insert the VIDEOTAPE (B) and swap the tapes (C); receive the NUMBER SEQUENCE.
- Place the NUMBER SEQUENCE (D); enter 1249 (E).
- Take the DOOR LEVER (F).
- Walk down.
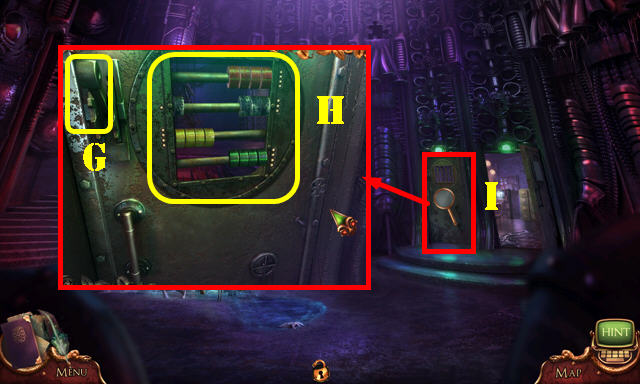
- Place the DOOR LEVER for a puzzle (G).
- Arrange the beads as shown (H). Pull the lever (G).
- Enter the Absolution Hall (I).
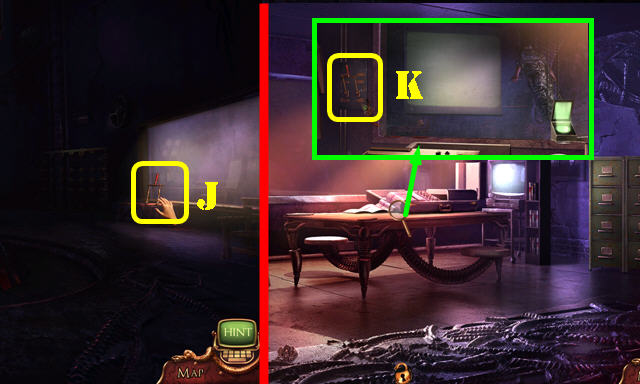
- Take the LEVER (J).
- Return to the Interrogation Room.
- Place the LEVER (K).
- Go to Absolution Hall.
- Take the BULBS 2/2 (L).
- Use the NAIL POLISH (M); play the HOP to get the SHERIFF'S BADGE.
- Use the WIRE CUTTERS; take the HORSE HEAD (N).
- Go to the Interrogation Room.
- Place the SHERIFF'S BADGE for a puzzle (O).
- Light up the tunnels (P). Take the cassette (Q).
- Input 5026 (R). Take the cassette (S).
- Align the symbols (T). Take the cassette (U).
- Rotate the pipes (V). Take the cassette (W).
- Take the INTERROGATION QUESTIONS.
- Place the INTERROGATION QUESTIONS; select them 5x (X). Take the EYEBALLS (Y).
- Go to Absolution Hall.
- Place the EYEBALLS and select them (Z); take the SNAKE TAIL (Z1).
- Walk down.
- Place the HORSE HEAD and SNAKE TAIL (A).
- Go to the Black Altar (B) and then go toward the light 4x (C-F).
- Place the GUITAR CABLE for a puzzle (G).

- Solution (1-3).
- Place the BULBS 2/2 for a puzzle (H). Solution (1-7).
- Congratulations, you've completed Mystery Case Files: The Black Veil!
Created at: 2017-04-21