

Walkthrough Menu
- General Tips
- Chapter 1: Guardhouse
- Chapter 2: Dungeon
- Chapter 3: William's Study
- Chapter 4: Knights' Passage
General Tips
- This is the official guide for Mystery Case Files: The Countess.
- This guide won't tell you when to zoom into a location; the screenshots show each zoom scene.
- Hidden-object puzzles are referred to as HOPs. Only the locations of the HOPs will be shown.
- Use the Map to fast travel to a location.
Chapter 1: Guardhouse
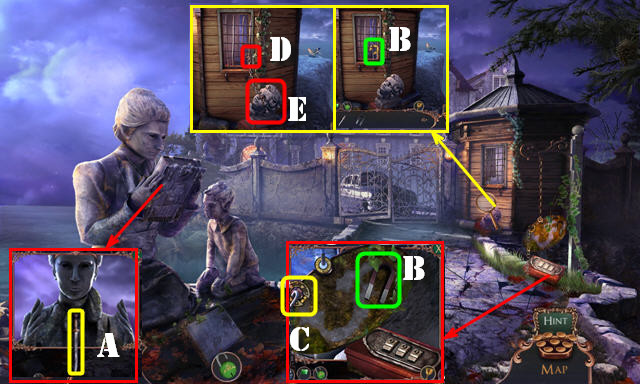
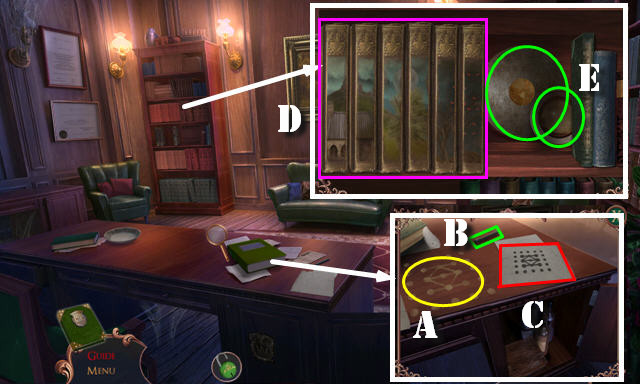
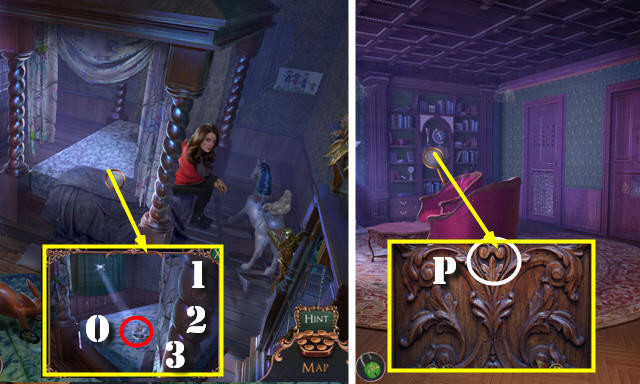
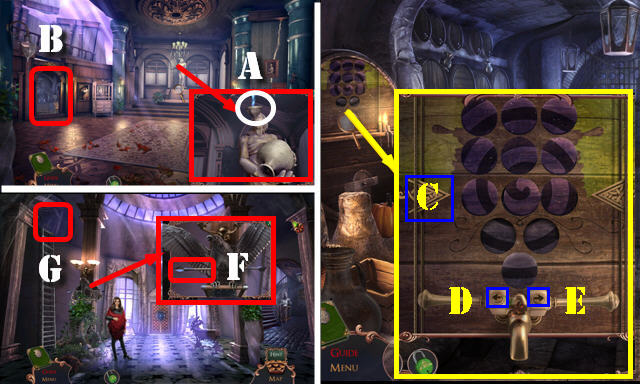
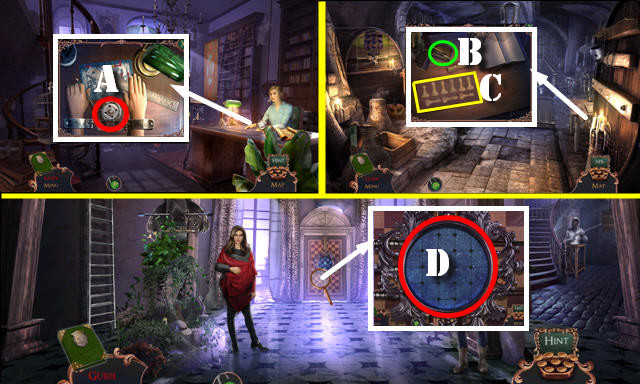
- Select book twice; take MINIATURE SWORD (A).
- Take MAGNET and GATE ORNAMENT (B).
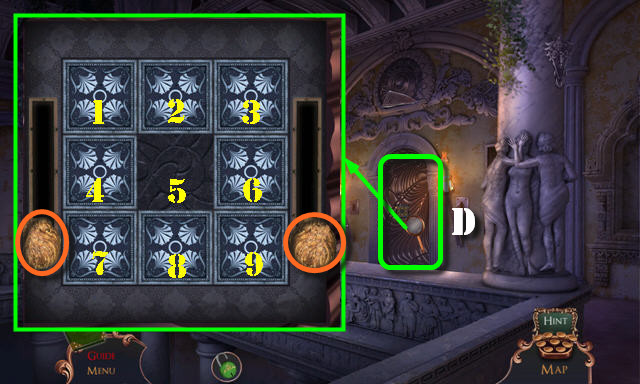
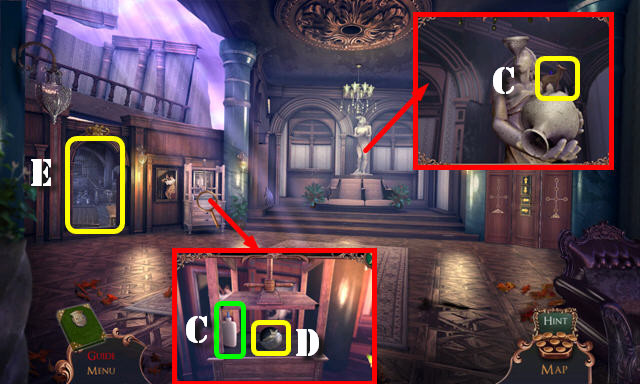
- Place GATE ORNAMENT (C); receive METAL CHAIN.
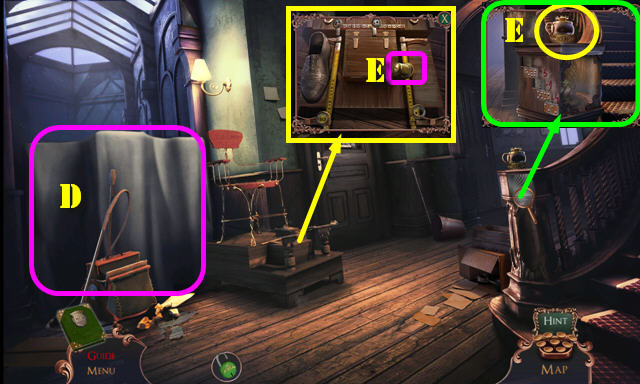
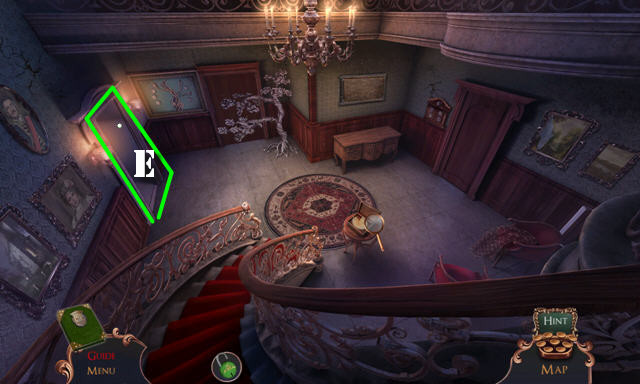
- Place METAL CHAIN (D) and select stone head (E).
- Go forward.
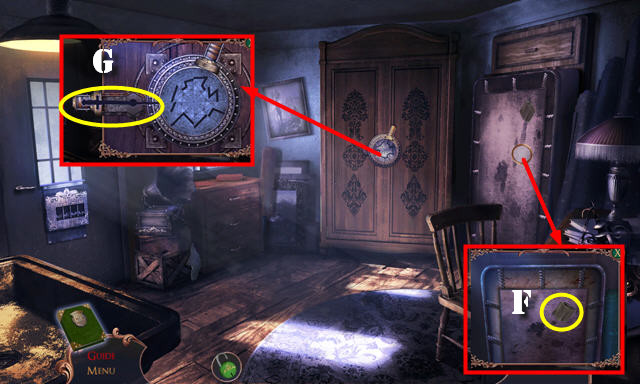
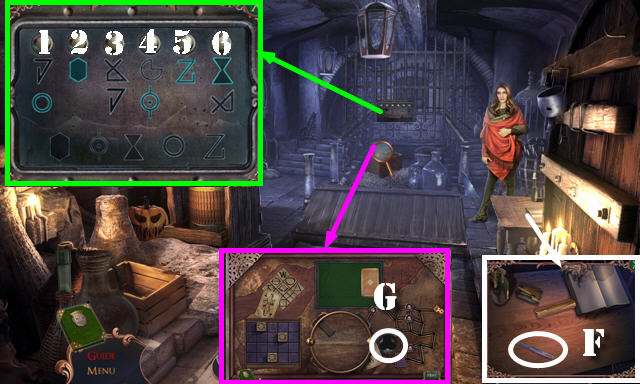
- Take WINDING KEY (F).
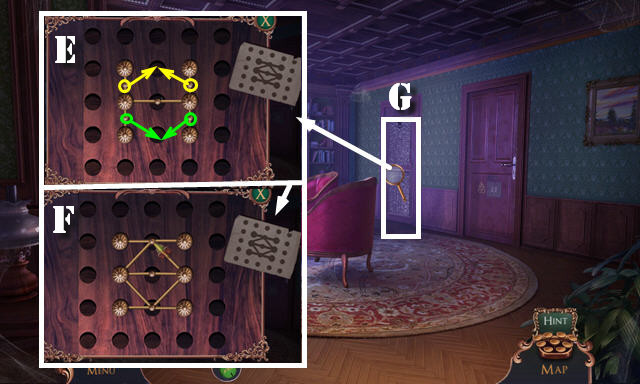
- Use MINIATURE SWORD (G).
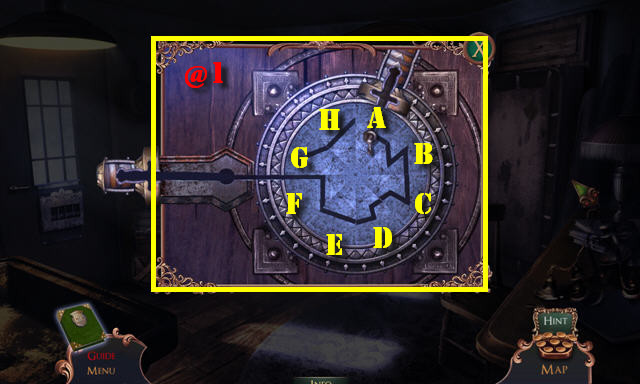
- Solution (@1): (F-E)-(G-E)-(H-D)-(C-A).
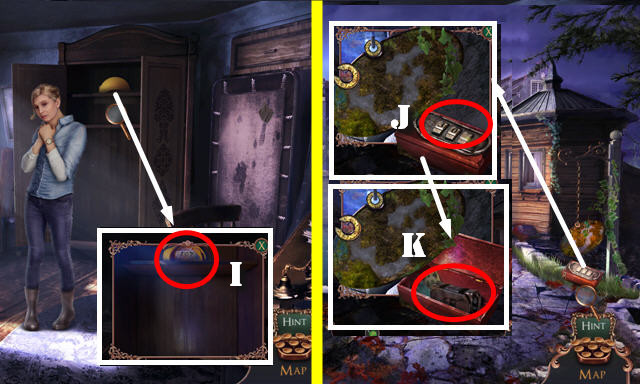
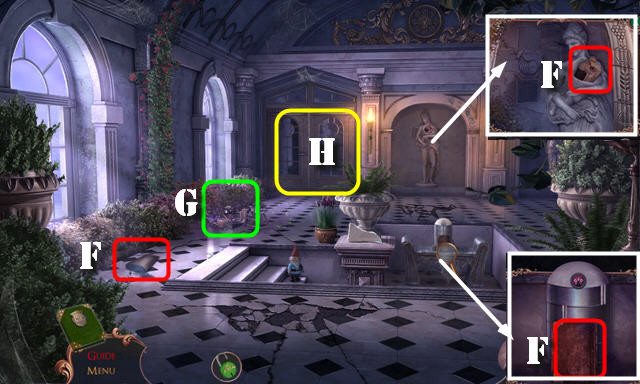
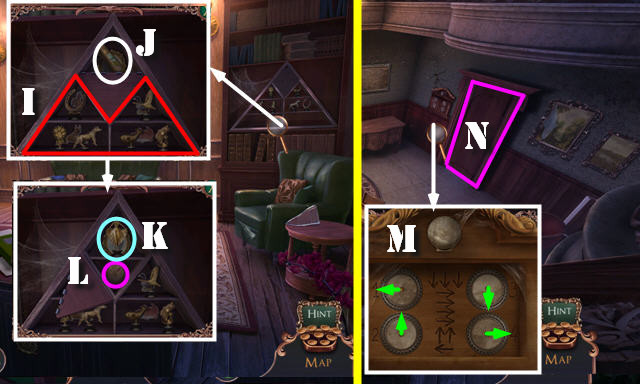
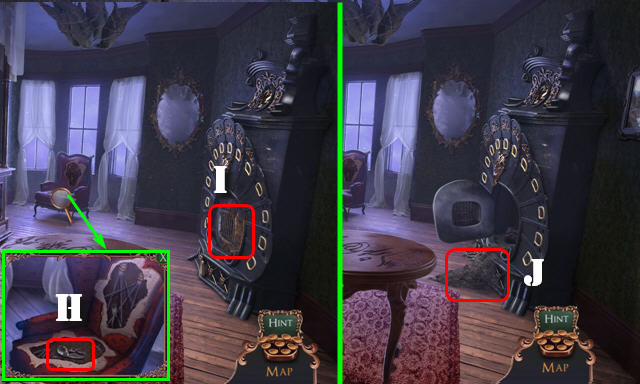
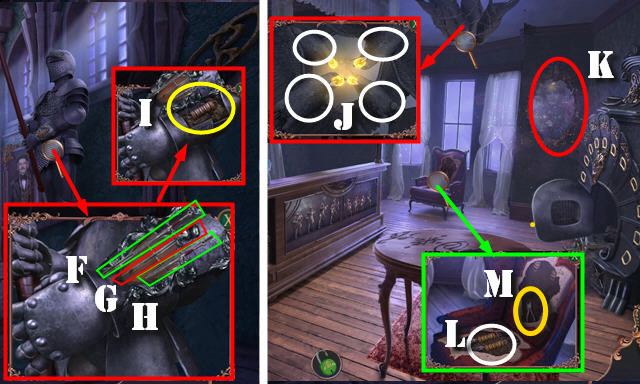
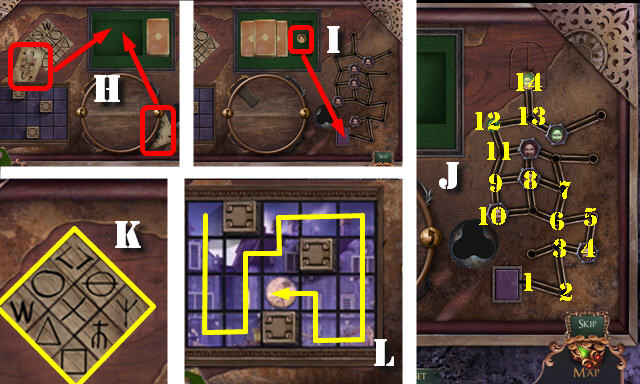
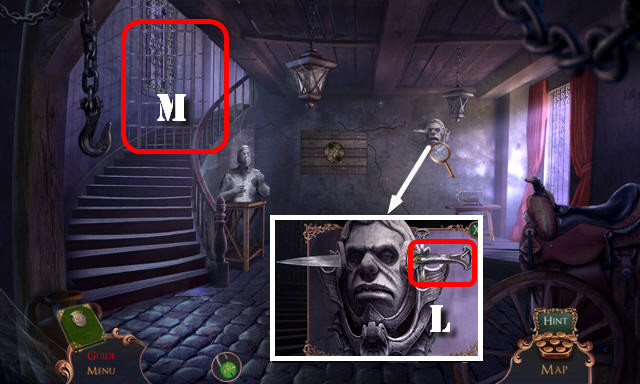
- Select helmet (I); note 307.
- Walk down.
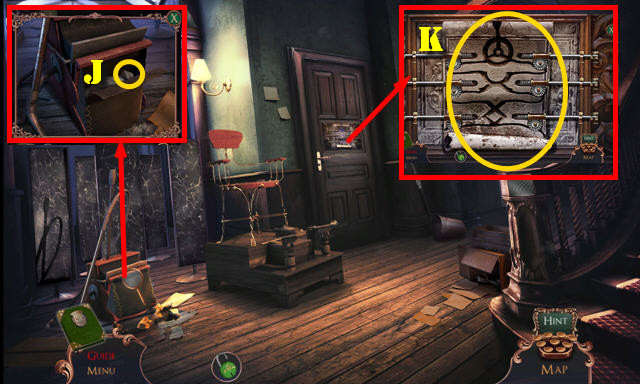
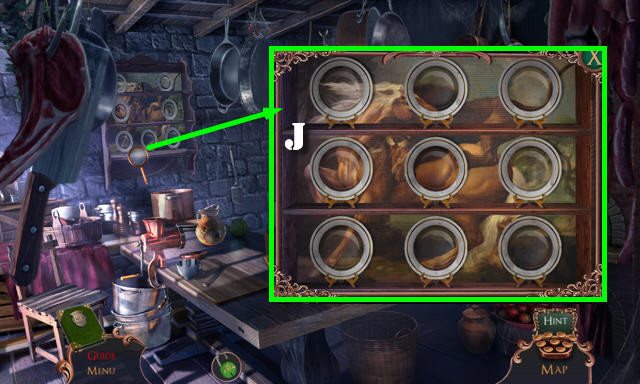
- Enter 307 (J); take LOCKPICK HOLDER (K).
- Go to Guardhouse.
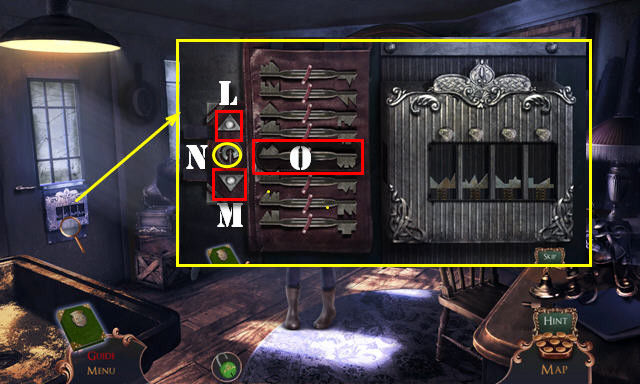
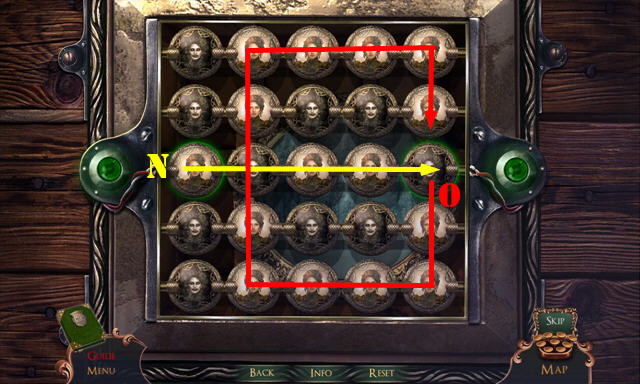
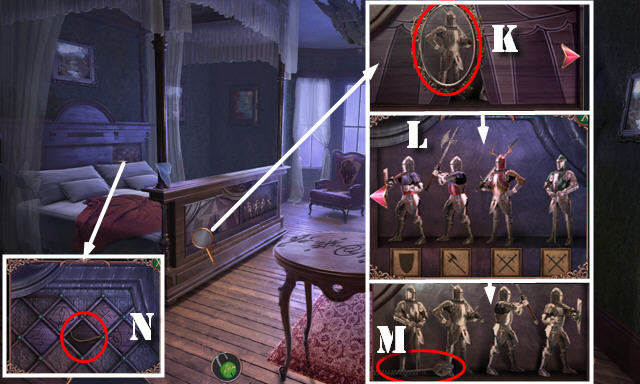
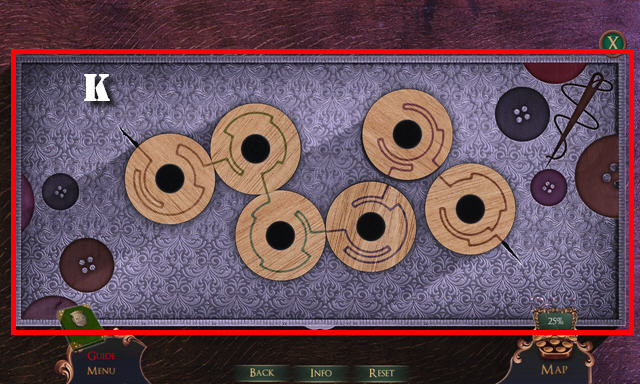
- Use LOCKPICK HOLDER. Solution (Mx2-O)-(Lx2-N-O)-(Lx2-N-O)-(Lx3-N-O).
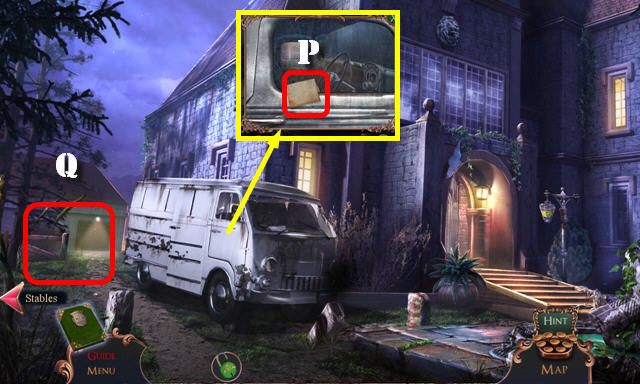
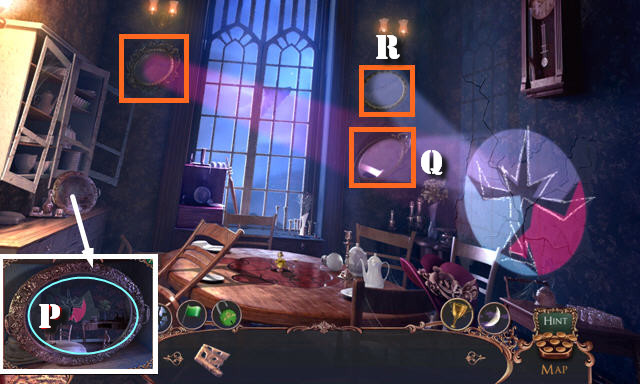
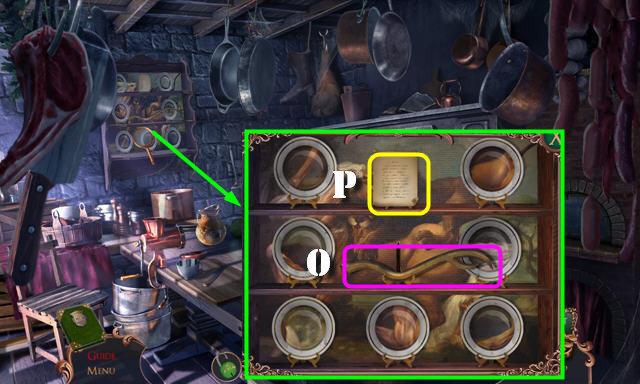
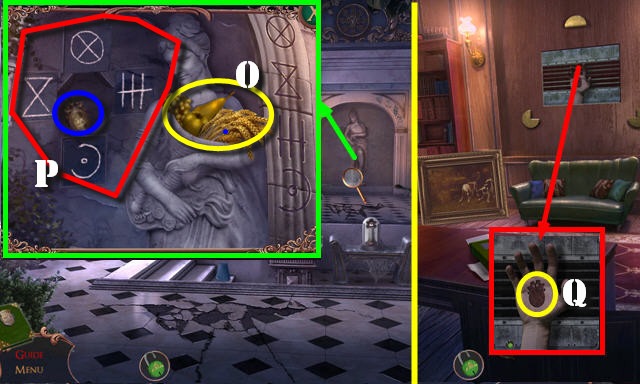
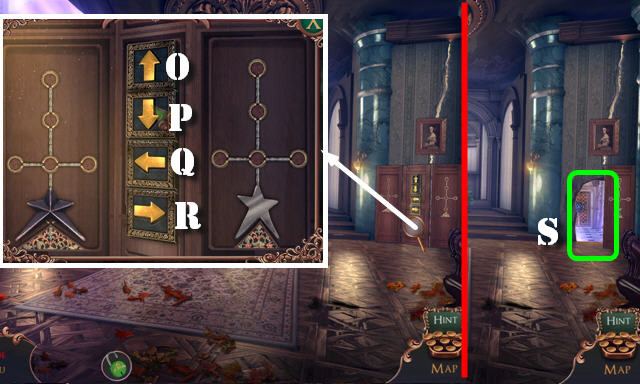
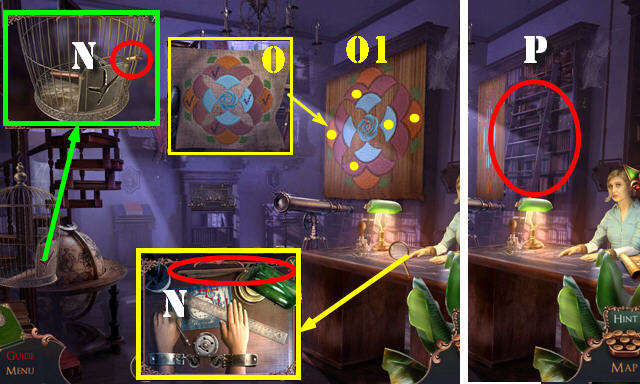
- Try to go left. Read note and open door (P).
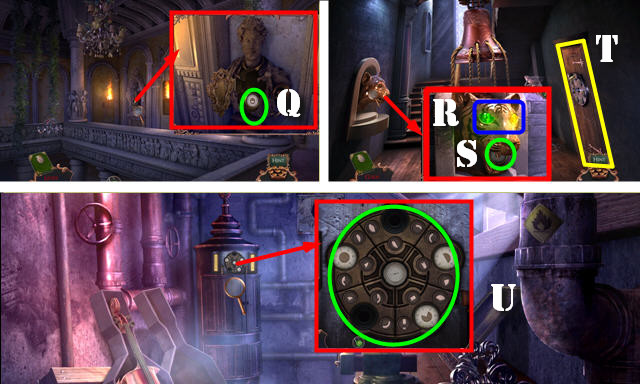
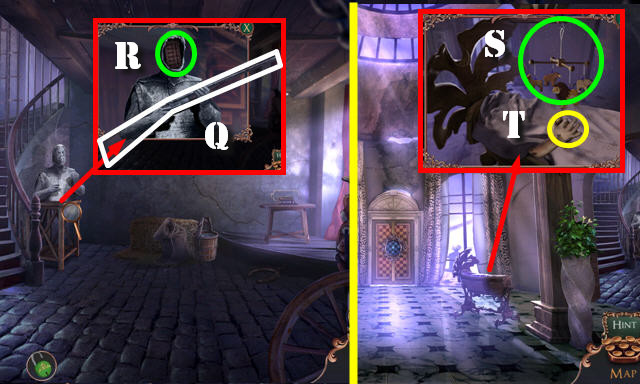
- Go (Q).
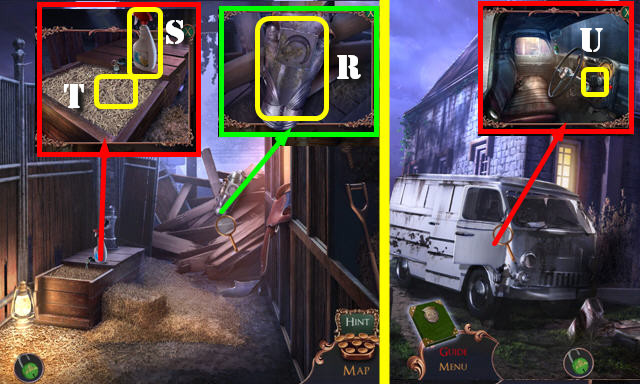
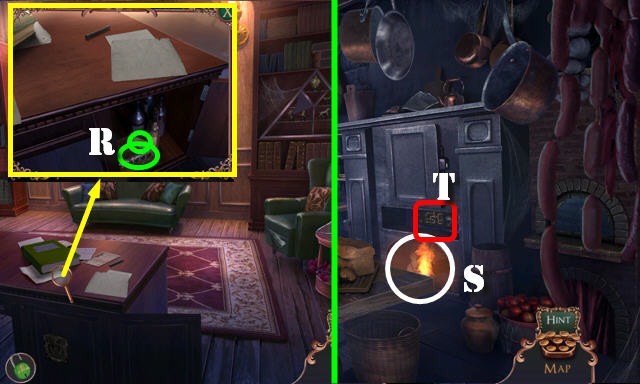
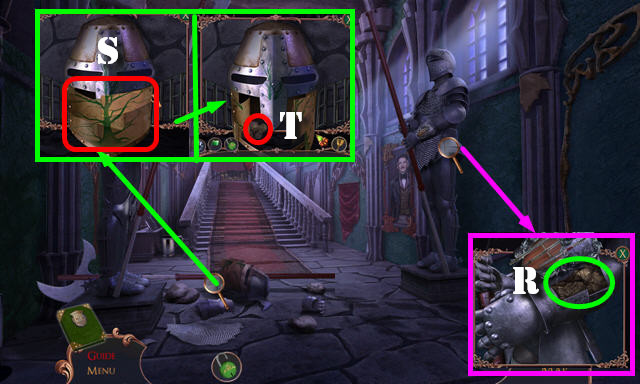
- Select armor (R); receive GOLDEN LEAVES.
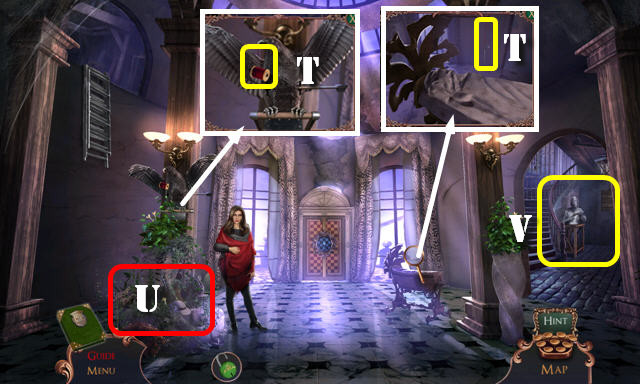
- Take RUBBING ALCOHOL (S). Use MAGNET (T); receive CAR KEYS.
- Walk down.
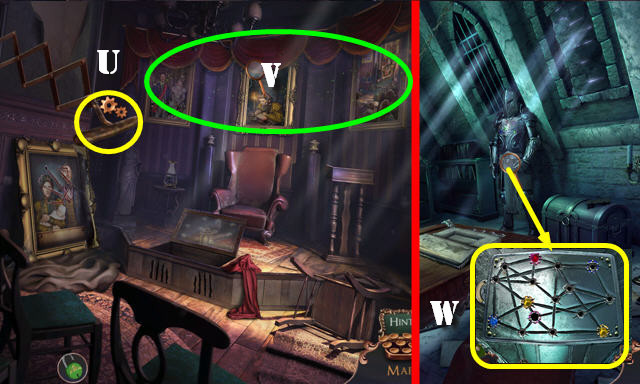
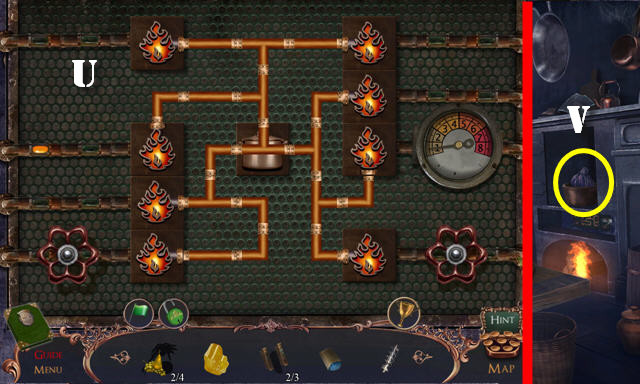
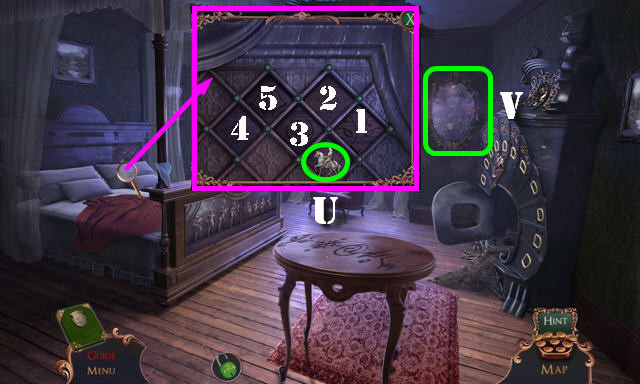
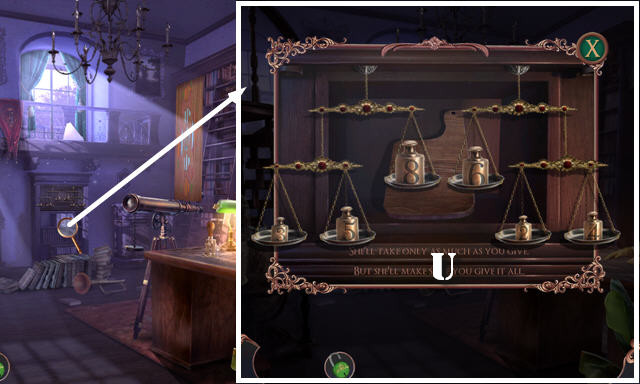
- Use CAR KEYS (U); play HOP: receive PLIERS.
- Walk down.
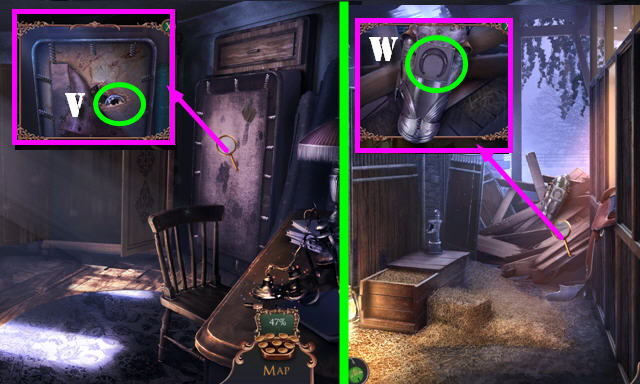
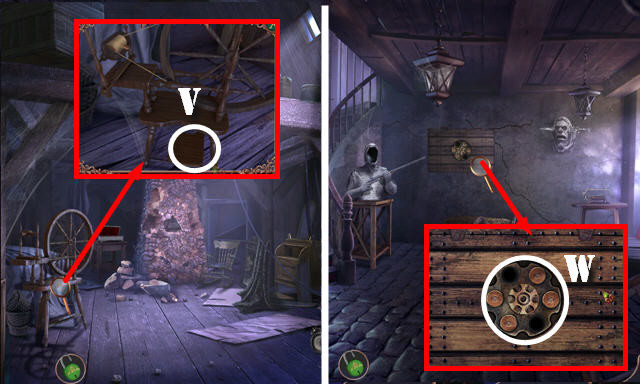
- Use PLIERS; take HORSESHOE (V).
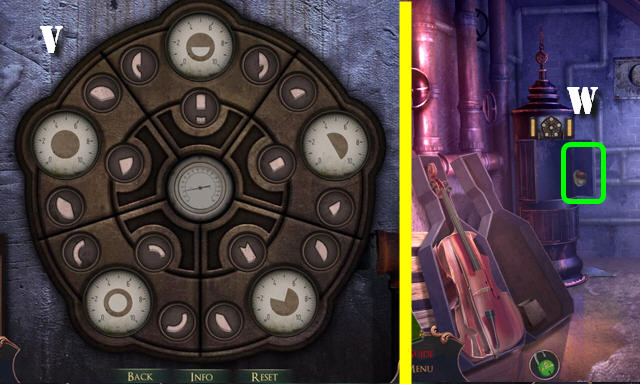
- Return to Stables.
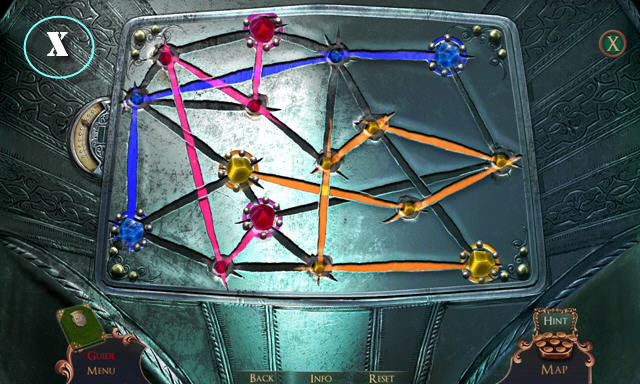
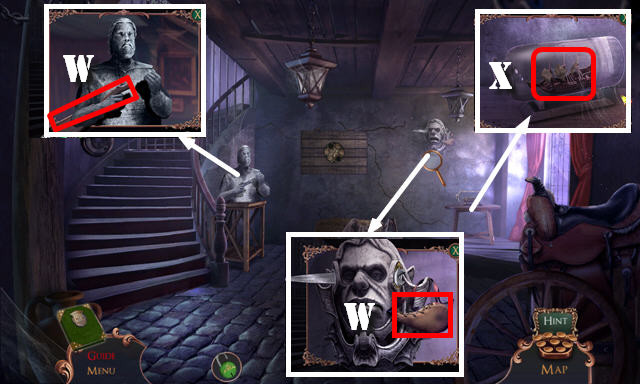
- Place HORSESHOE (W).
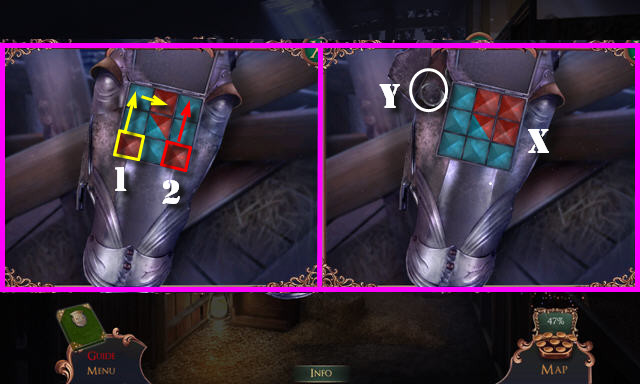
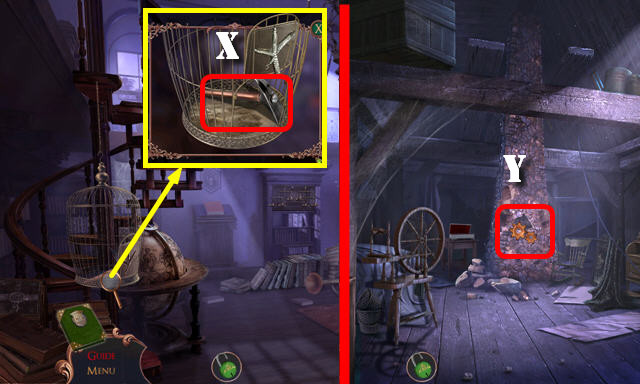
- Solution (1-2). Solved image (X).
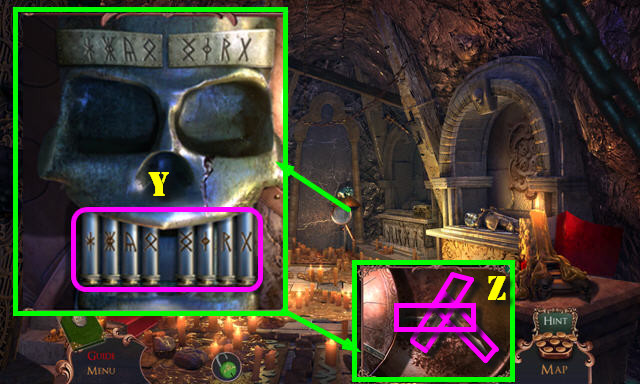
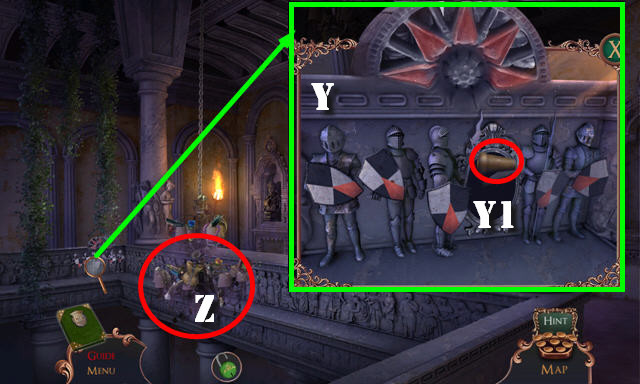
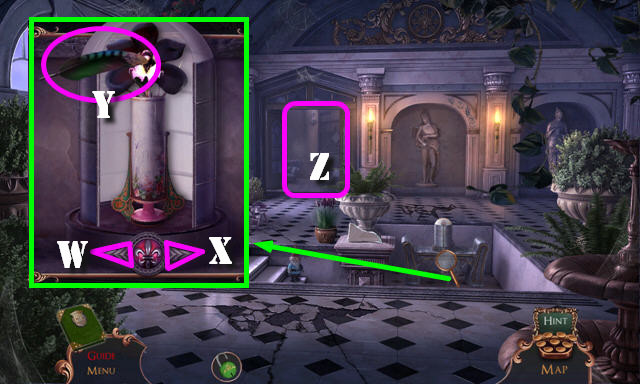
- Take SCISSORS (Y).
- Walk down.
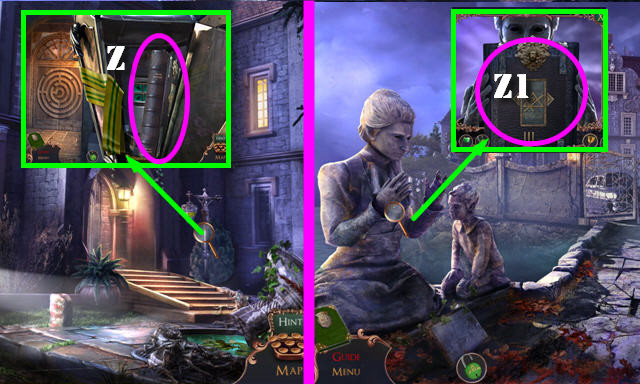
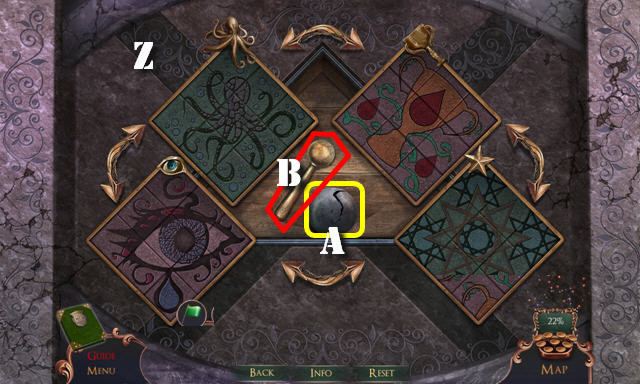
- Use SCISSORS and open door; take EARL'S BOOK (Z).
- Go to Codington Bridge.
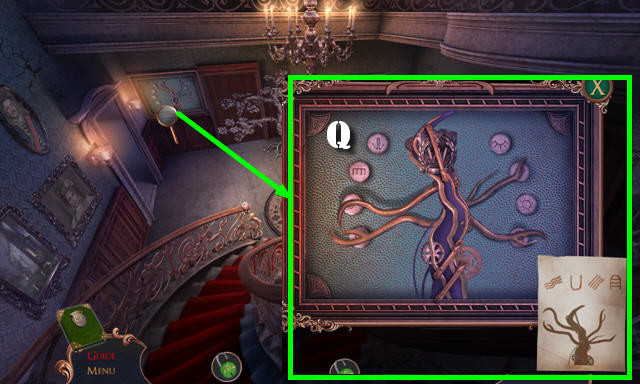
- Place EARL'S BOOK (Z1).
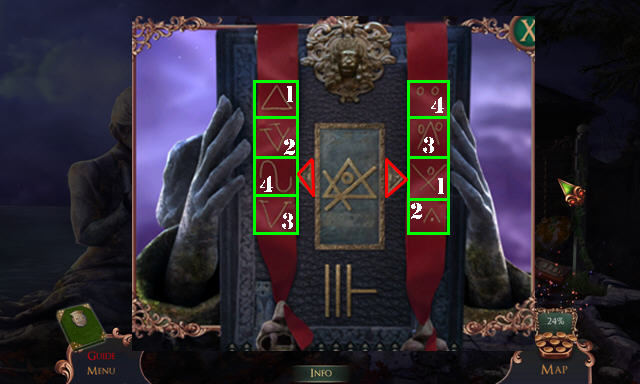
- Drag the correct symbols (1-4) next to the arrows marked in red.
- Take STABLES KEY.
- Return to Stables.
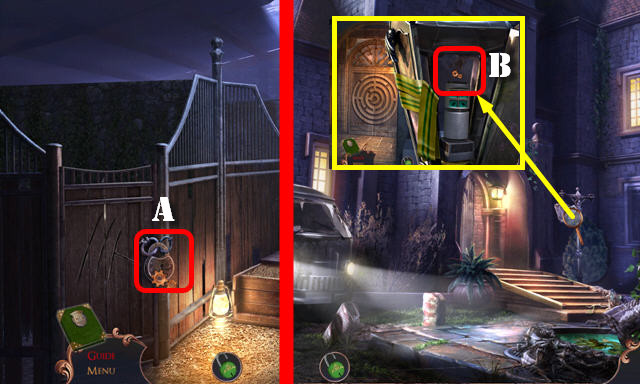
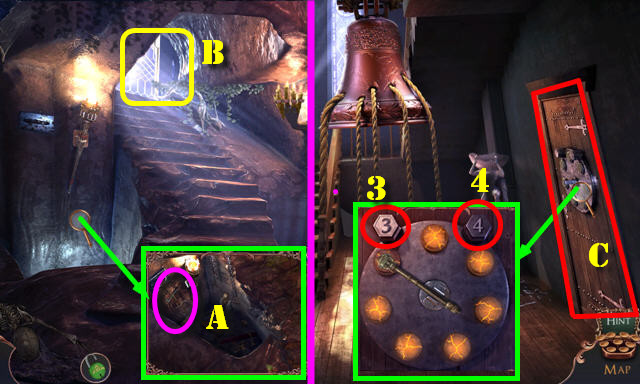
- Use STABLES KEY (A). Play HOP; receive STRANGE DOLL.
- Walk down.
- WINDING KEY on STRANGE DOLL; receive DOLL HEAD.
- Place DOLL HEAD (B).

- Solution (@2): (4-2-3-4-2-1-4-4-2).
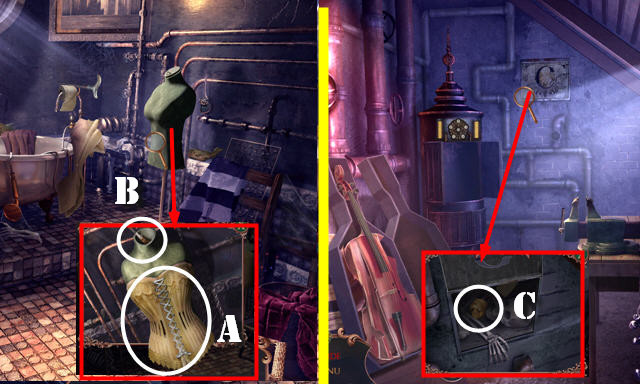
- Enter (C).
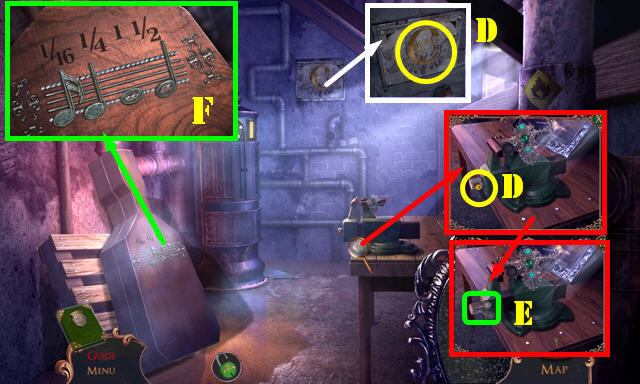
- Remove blanket (D); receive OLD BLANKET.
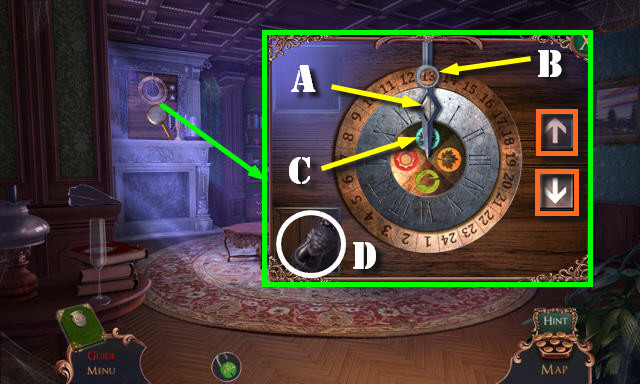
- Take BRASS DIAL and OIL LAMP (E).
- Go right.
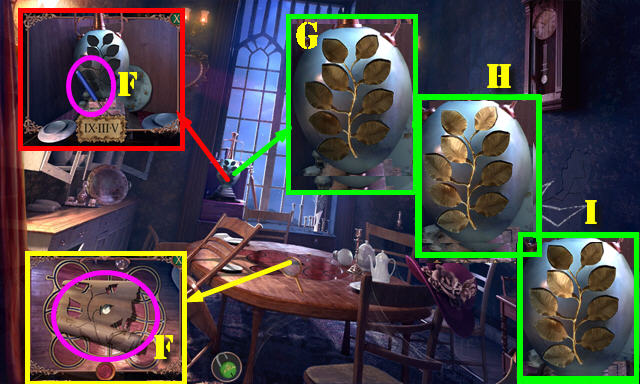
- Take SEAM RIPPER and OLD STENCIL (F).
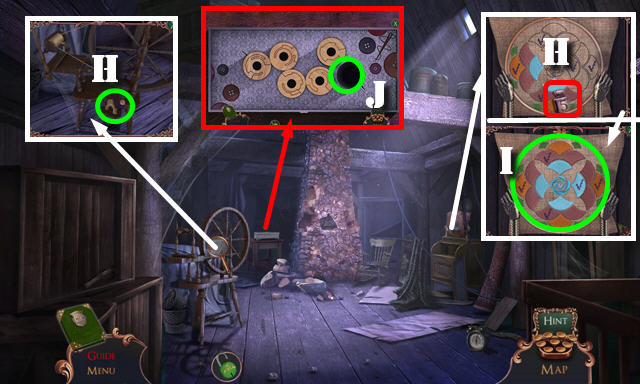
- Use GOLDEN LEAVES; turn leaves as shown (G-H-I); receive FLOWER VASE.
- Walk down.
- Use SEAM RIPPER; take FLOWER CUBE (J).
- Use FLOWER VASE (K).
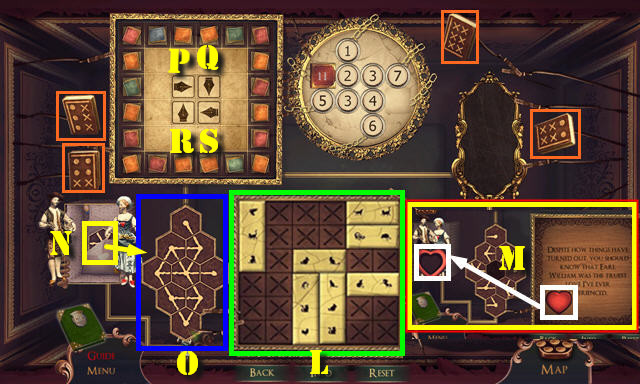
- Select books (orange). Drag tiles into spots shown (L).
- Take heart and place it (M).
- Take hexagon and place it (N).
- Rotate (O).
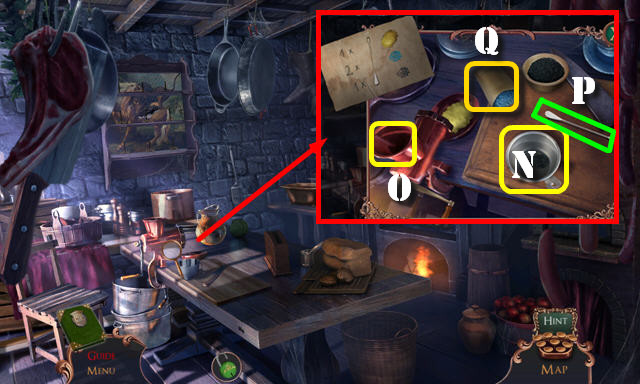
- Select ink: Px2-Sx2-Qx2-Rx2-Px2-Sx2.
- Solution: Ux3-T-Ux3-T.
- Take book and place it (V).
- Move books as shown (W).
- Enter (X).
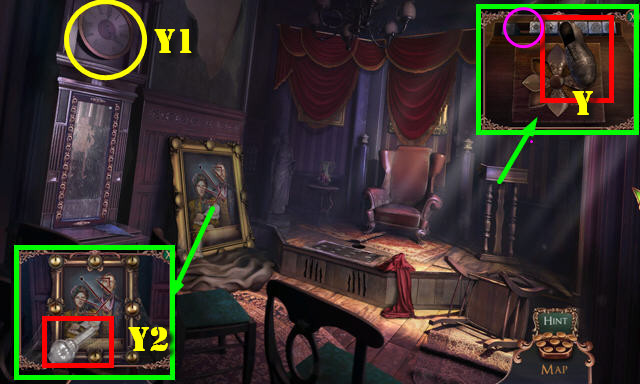
- Take GENTLEMAN'S SHOE (Y).
- Select clock (Y1).
- Remove sheet; take LAMP GLASS (Y2).
- Place FLOWER CUBE (purple).
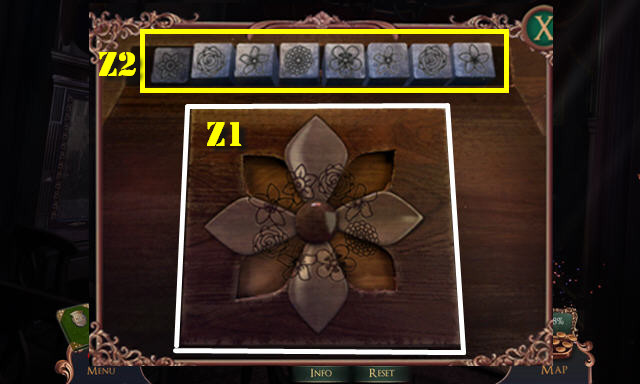
- Rotate Petals as shown (Z1).
- Swap cubes (Z2).
- Take COUNTESS FIGURINE.
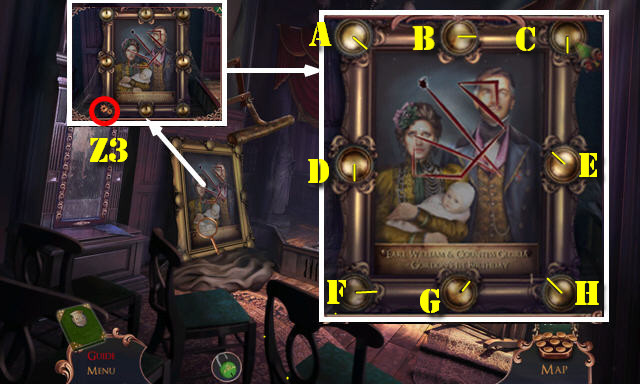
- Place BRASS DIAL (Z3).
- Solution (Ax5-H-Dx4-Fx6-Gx7-E-Bx6-Cx4).
- Look at note: take MIRROR SHARD 1/2.
- Walk down.
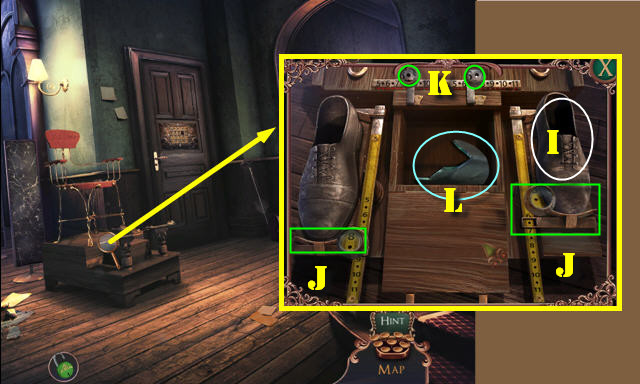
- Place GENTLEMAN'S SHOE (I).
- Slide both levers up (J). Slide the other levers as shown (K).
- Take MIRROR SHARD 2/2 (L).
- Go to Dining Room.
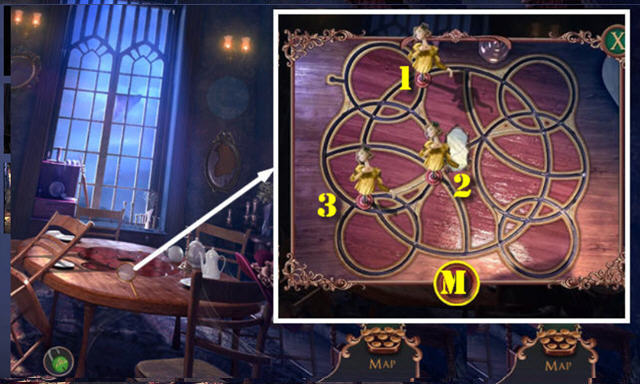
- Place COUNTESS FIGURINE. Select (M) when figurine is in the following positions (1-2-3).
- Take OIL.
- Go to Commemoration Room.
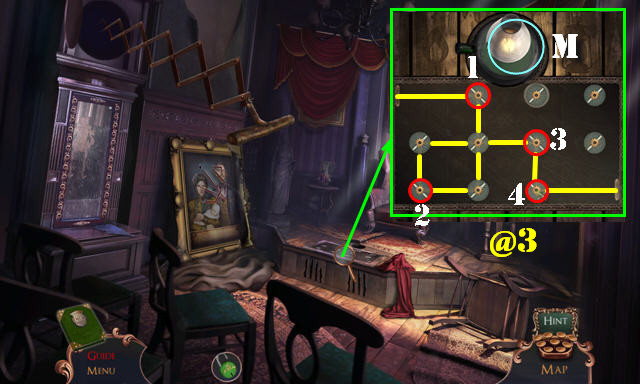
- OIL on OIL LAMP; place LAMP GLASS; receive FIXED LAMP.
- Place OIL LAMP (M).
- Solution one (@3): (1-4).
- Solution two (N-O).
- Take HAND MIRROR.
- Return to Dining Room.
- Use RUBBING ALCOHOL and OLD BLANKET (P).
- Place MIRROR SHARD 2/2 (Q).
- Place HAND MIRROR (R); rotate mirrors as shown (orange).
- Go right to Mirror Study.

- Take MECHANICAL BIRD (S).
- Place OLD STENCIL. Solution (T).
- Take COLORED CRYSTALS 1/2.
- Go to Commemoration Room.
- Place MECHANICAL BIRD (U).
- Play HOP (V); receive COLORED CRYSTALS 2/2.
- Go to Mirror Study.
- Place COLORED CRYSTALS 2/2 (W).
- Solution (X).
- Take DOMINOES.
- Walk down twice.
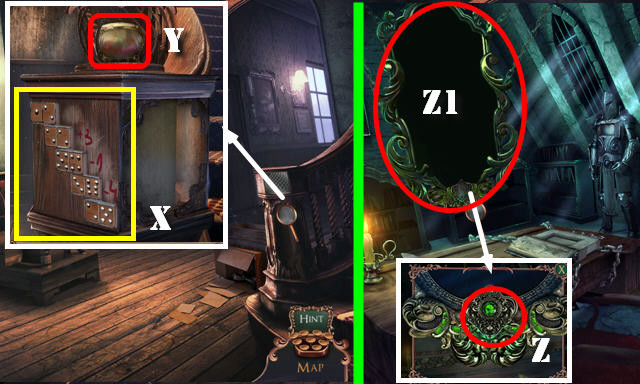
- Place DOMINOES. Solution (X).
- Take GLORIA'S PENDANT (Y).
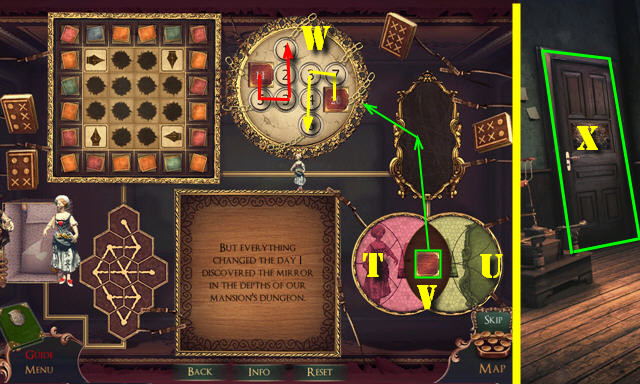
- Go to Mirror Study.
- Place GLORIA'S PENDANT (Z).
- Zoom into mirror (Z1).
- Solution: (A-B-C).
Chapter 2: Dungeon
- Take KNIGHT'S DAGGER and HELMET WINGS 1/2 (D).
- Go (E).
- Take GUNPOWDER POUCH and GOLDEN SUN (F).
- Select tomb (G). Play HOP; receive MACE.
- Use KNIGHT'S DAGGER; select video camera 2x (H). Take HELMET WINGS 2/2 (I).
- Place HELMET WINGS 2/2 (J); receive RINGS.
- Walk down.
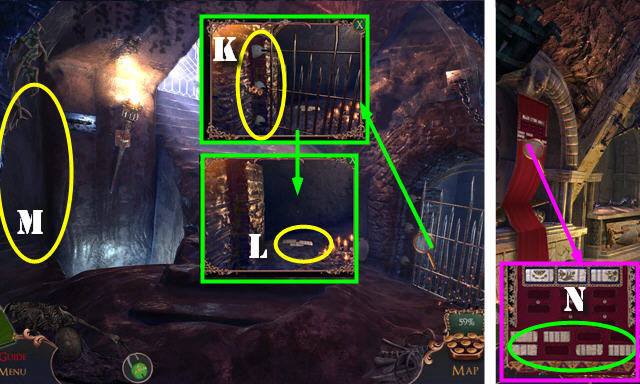
- Use MACE (K) and open gate; take BANNER PATCHES (L).
- Go (M).
- Place BANNER PATCHES (N).
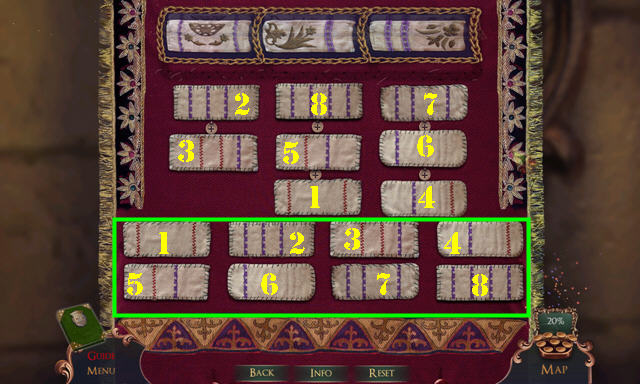
- Solution (1-8).
- Take OLD SCROLL.
- Walk down.
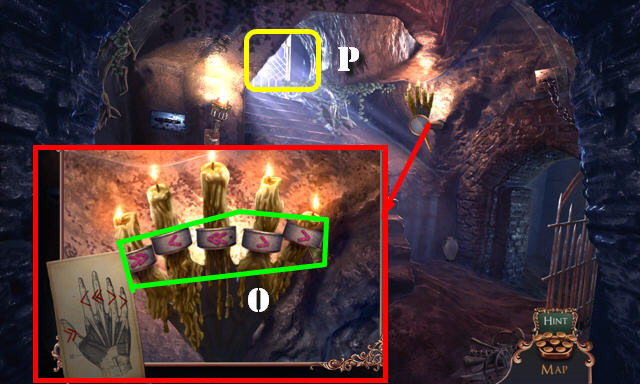
- Place RINGS and OLD SCROLL; solution (O).
- Go (P).
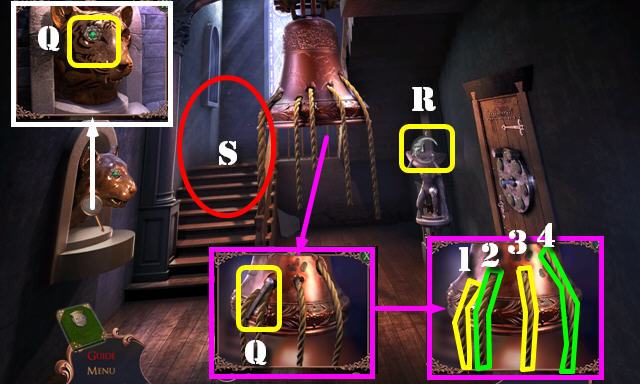
- Take RIGHT ORNAMENT and VISE CRANK (Q).
- Use GUNPOWDER POUCH; pull 1-2-4-3. Take SILVER MOON (R).
- Go (S).
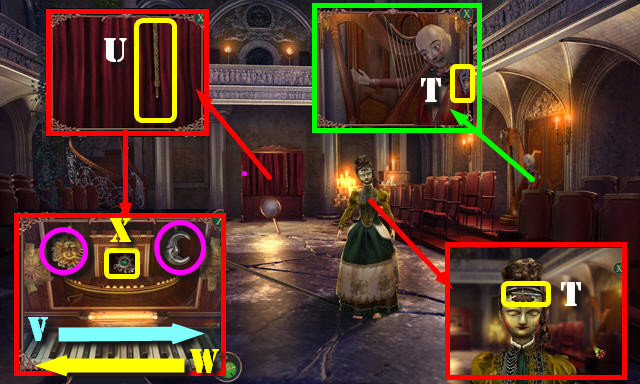
- Take CYLINDER PENDANT and MUSIC NOTE (T).
- Pull on rope (U); receive CURTAIN ROPE.
- Place SILVER MOON and GOLDEN SUN (purple).
- Drag the piano keys from left to right to move the moon to the right. Repeat this step one more time (V).
- Drag the piano keys from right to left to move the sun to the left. Repeat this step one more time (W).
- Take LEFT ORNAMENT (X).
- Go to Knights' Tomb.
- Place CYLINDER PENDANT; swap symbols (Y).
- Take OLD BONES 1/3-3/3 (Z).
- Walk down.
- Place CURTAIN ROPE and OLD BONES 3/3 (A). Play HOP; receive HAMMER.
- Go (B).
- Place HAMMER (3-4-4-4-4-4-4).
- Go (C).
- Take YELLOW GEM and BRASS DECORATION (D).
- Place VISE CRANK (E); receive INCOMPLETE TIARA.
- Place MUSIC NOTE; arrange as shown (F). Take MANNEQUIN ARM.
- Go to Ballroom.
- LEFT ORNAMENT and RIGHT ORNAMENT on INCOMPLETE TIARA; receive RESTORED TIARA.
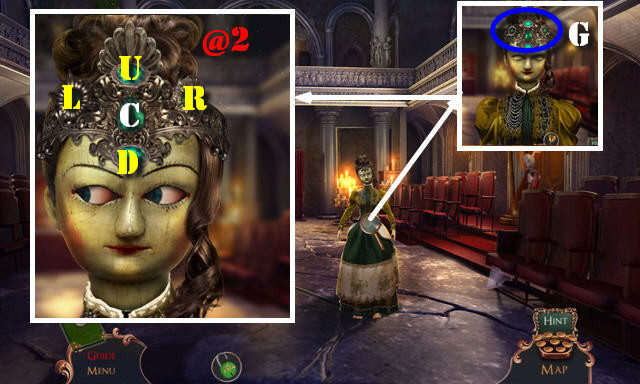
- Place RESTORED TIARA (G).
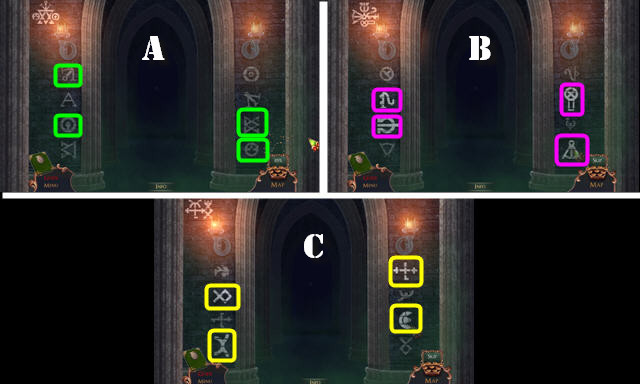
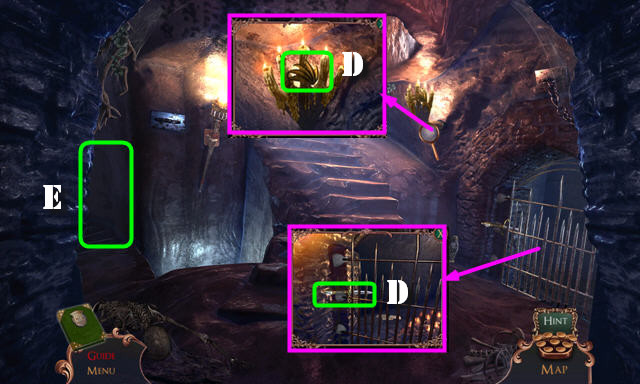
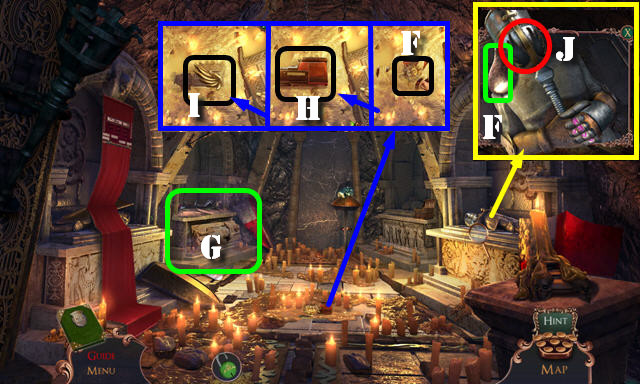
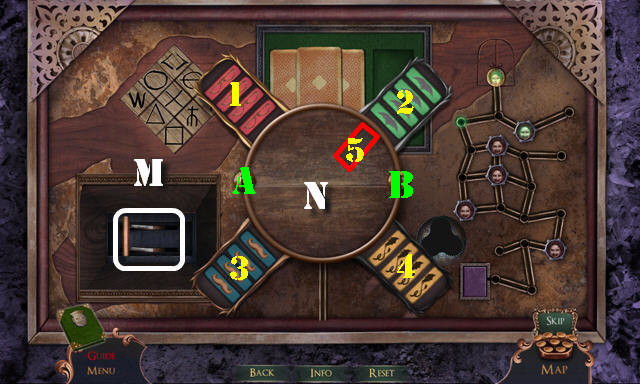
- Solution one (@4): (L-U-D-R) – (U-R-C-D-R-L).
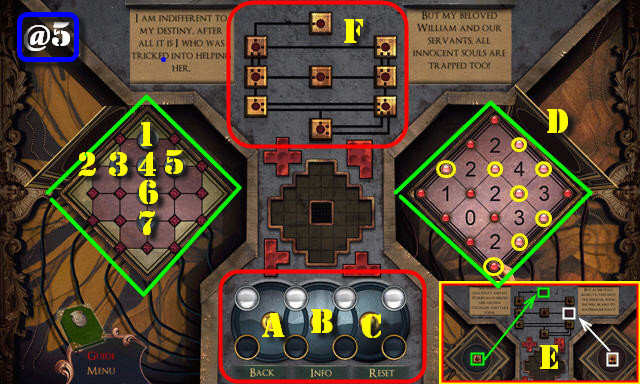
- Solution two (@5): Ax2-Cx2.
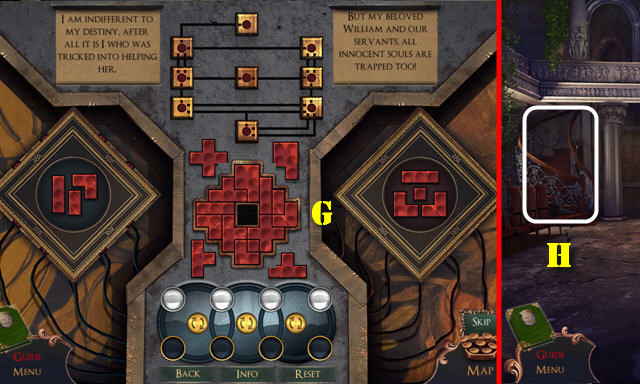
- Drag (4-2)-(7-4)-(5-3)-(2-4)-(1-6).
- Solution (D).
- Move squares (E) into place.
- Arrange squares as shown (F).
- Solution (G).
- Take MAGNIFYING GLASS.
- Go (H).
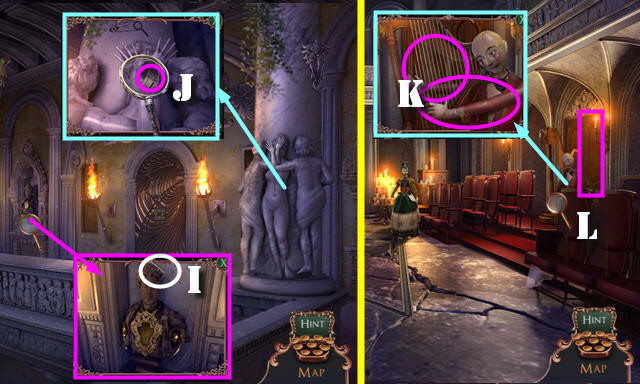
- Take COMB (I).
- Use MAGNIFYING GLASS; look at note and take FISHING LINE (J).
- Walk down.
- Place MANNEQUIN ARM and FISHING LINE (K).
- Enter (L).
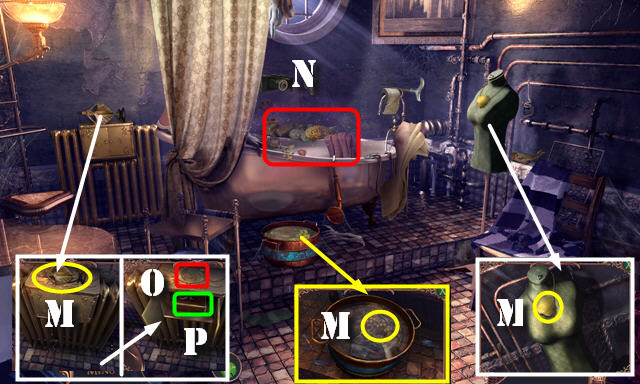
- Take LADY TROPHY, GOLDEN FRUIT 1/4, and SULPHUR CHUNK (M).
- Pull curtain; play HOP (N); receive GREEN GEM.
- Place BRASS DECORATION (O); take SHAVING KIT (P).
- Go to Upper Gallery.
- COMB on SHAVING KIT; take FAMILY PICTURE.
- Place FAMILY PICTURE; take GAUGES 1/2 (Q).
- Walk down twice.
- Place YELLOW GEM and GREEN GEM (R); take GAUGES 2/2 (S).
- Go (T).
- Place GAUGES 2/2 (U).
- Solution (V).
- Take FOOT BRUSH (W).
- Go to Bathroom.

- Use FOOT BRUSH (X); receive DECORATIVE SHIELD.
- Go to Upper Gallery.
- Place DECORATIVE SHIELD; arrange shields as shown (Y) and pull lever (Y1).
- Play HOP (Z); receive CORSET.
- Go to the Bathroom.
- Place CORSET and select (A); take ANTIQUE SCREWDRIVER (B).
- Go to Basement.
- Use ANTIQUE SCREWDRIVER and look at note; take HEAD-SHAPED LEVER (C).
- Go to Upper Gallery.
- Place HEAD-SHAPED LEVER; select both levers (orange).
- Solution: (8-7-4-5-6-3-2-1)-(4-5-2-3-6-5-2-1-4-5-2-3-6-9)-(8-5-4-7-8-5-4-1-2-5-6-3-2-5).
- Go (D-E).
- Take FERTILIZER, STORY DRAFT 1/3, and FIREWOOD (F).
- Play HOP (G); receive WILLOW SKETCH.
- Go (H).
Chapter 3: William's Study
- Arrange symbols (I); take STORY DRAFT 2/3 (J).
- Place LADY TROPHY (K); take SCHEDULE CLOCK (L).
- Walk down twice.
- Place SCHEDULE CLOCK; solution (M). Take GOLDEN FRUIT 2/4.
- Go (N).
- Take SCULPTURE BRANCH (O).
- Look at note (P).
- Walk down.
- Place SCULPTURE BRANCH and WILLOW SKETCH; solution (Q).
- Receive WILLIAM'S CREST.
- Go to William's Study.
- Place WILLIAM'S CREST; take MATCHES and GRINDING SCREW (R).
- Go to Kitchen.
- Place FIREWOOD and use MATCHES (S); play puzzle (T).
- Solution (U).
- Take POUCH (V).
- Go to Interior Garden.
- Open POUCH; take STORY DRAFT 3/3 and DELICATE FEATHER.
- Wx2-Xx3-W. Use DELICATE FEATHER; take POLLEN (Y).
- Go (Z).
- Use POLLEN (A); select charcoal stick (B) and take PATTERN SKETCH (C).
- Place STORY DRAFT 3/3; solution (D).
- Take DECORATIVE PLATE 1/2 and NEW RECORD (E).
- Go to Grand Foyer.

- Place NEW RECORD (F). Select lever (G); take HORSE FIGURINE and DECORATIVE PLATE 2/2 (H).
- Select lever (G); take SCRATCHED RECORD (F).
- Go (I).
- Place DECORATIVE PLATE 2/2; solution (J).
- Take MEAT HOOK.
- Walk down.

- Use MEAT HOOK (K). Play HOP; receive POWDER RECIPE.
- Go (L).
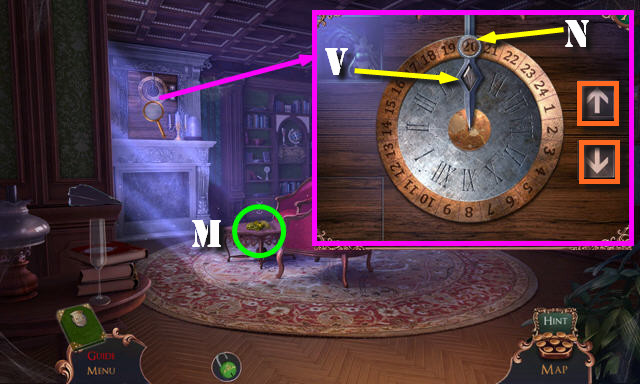
- Take GOLDEN FRUIT 3/4 (M).
- Place SCRATCHED RECORD; Select record and use arrows (orange) to move to (V). Select outer ring and place on 20 (N).
- Take SHELL KNOCKER and GOLDEN FRUIT 4/4.
- Go to Interior Garden.
- Place GOLDEN FRUIT 4/4 (O); select symbols (P).
- Look at note and take GORDON'S LOCKET (blue).
- Go to William's Study.
- Remove picture; place GORDON'S LOCKET (Q).
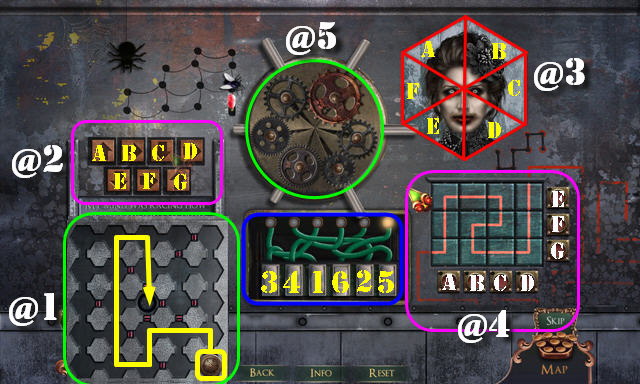
- Flip switch (1); drag Token as shown (@1).
- Flip switch (2); E-F-A-B-G-D-C (@2).
- Flip switch (3); Cx2-E-B-Dx2-C-Bx2-Fx2-D-C-B-A-F-E-Ax2-Cx2-B (@3).
- Flip switch (4); F-B-D (@4).
- Flip switch (5); swap cogs (@5).
- Flip switch (6); take IVORY KEY.
- Go to Parlor.
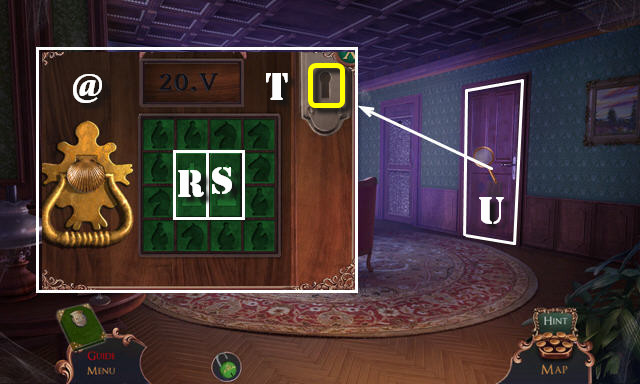
- Place SHELL KNOCKER and select (@). R-Sx3-Rx3-S-R-S-R.
- Insert IVORY KEY (T).
- Enter (U).
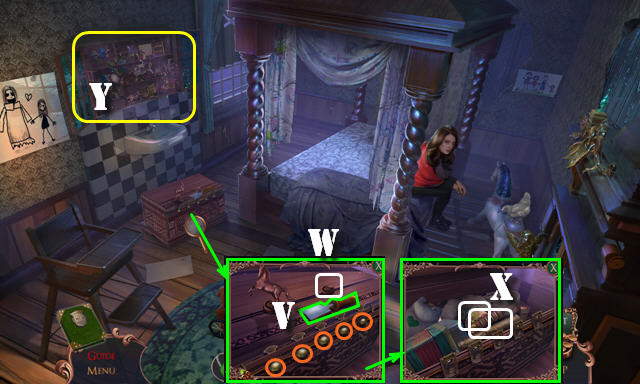
- Take SCRAPER (V).
- Place HORSE FIGURINE (W); select all latches (orange).
- Look at note; take SEASONS DISK and CHAIR CYLINDERS 1/2 (X).
- Play HOP (Y); receive MIRROR ORNAMENT.
- Walk down.
- Use the arrows (orange) to move the disks. Place SEASONS DISK; select middle disk; stop on XII (A).
- Select outer (brass) disk and stop on 13 (B). Select center disk and stop on blue (C).
- Take LION'S HEAD KNOCKER and TORTURE DEVICE BASE (D).
- Place LION'S HEAD KNOCKER and PATTERN SKETCH. Solution (E). Solved Image (F).
- Enter (G).
- Look at note; take FLINT AND STEEL (H).
- Use SCRAPER (I); take CHARCOAL (J).
- Place MIRROR ORNAMENT (K). Pan right; solution (L).
- Take CENTRAL SCREW (M).
- Take FUSE (N).
- Go to Children's Room.
- CENTRAL SCREW on TORTURE DEVICE BASE; take PEAR OF ANGUISH.
- Select 3-1-2; remove sheet and select mattress: use PEAR OF ANGUISH (O); receive CARVING ORNAMENT.
- Walk down.
- Place CARVING ORNAMENT (P).
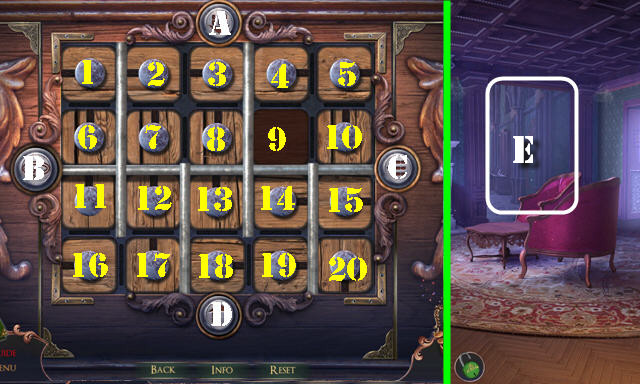
- Solution; Bx3-4-B-5-Bx2-10-C-Bx3-14-15-C-19-Bx3-20-Bx2-18-Bx2-13.
- D-Bx3-12-17-C-B-7-8-D-16-C-B-2-3-A-Bx3-1-Bx2-6-Bx2-11.
- Take GARDENING SCISSORS.
- Go (E).
Chapter 4: Knights' Passage
- Select: (Fx2-G-H); take CHAIR CYLINDERS 2/2 (I).
- Return to Master Bedroom.
- Place GARDENING SCISSORS and use 4x (J). Play HOP (K); receive KNIGHT MEDAL.
- Place CHAIR CYLINDERS 2/2 (L); select 3x; take WIRE CUTTERS (M).
- Go to Kitchen.
- Place POWDER RECIPE (N), CHARCOAL (Q), FERTILIZER (Q), GRINDING SCREW (O), and SULPHUR CHUNK (O).
- Select spoon (P); take BLACK POWDER (N).
- Return to Knights' Passage.
- BLACK POWDER and FUSE on POUCH; take POWDER POUCH.
- Place POWDER POUCH and FLINT AND STEEL (R).
- Use WIRE CUTTERS and then select the topmost pieces (S). Take MAID'S KEY and BED TILE (T).
- Go to Master Bedroom.
- Place BED TILE; select 1-5; take MEDAL CENTERPIECE (U).
- Go to Knights' Passage.

- MEDAL CENTERPIECE on KNIGHT MEDAL; receive KNIGHT INSIGNIA.
- Remove sheet and select bricks; 2-4-5-3-1. Place KNIGHT INSIGNIA (W).
- Look at note; take FRACTURED PLATE and CENTRAL TILE (X).
- Place CENTRAL TILE (Y).
- Arrange tiles as shown (Z) and then swap.
- Take GLOBE MODEL (A).
- Pull lever (B).
- Take MODEL GLUE and DEER TOY (C).
- Place GLOBE MODEL and select; take WHITE STAR (D).
- Go (E).
- Take TWEEZERS (F).
- Place FRACTURED PLATE; select 2-4-4-6-1-1-5.
- Place MAID'S KEY (G).
- Place two cards (H).
- Place coin (I).
- Solution: 2-1-2-3-4-5-6-7-8-9-10-9-10-9-11-12-13-14 (J).
- Swap tiles (K).
- Follow path (L).
- Pull lever (M).
- Solution (N); 1x2-Ax2-4-Ax2-5-Ax2-5-A-3x2-A-5-A-2-Ax2-5-Ax2-5-A.
- 4x2-A-5-B-5x2-B-2x2-A-4-B-5x2-A-4-B-2-A-5-B-2-A-5-B-5x2.
- Take BLACK STAR.
- Walk down.
- Place WHITE STAR and BLACK STAR: Px2-R-Q-P.
- Go (S).
- Take THREAD ROLL and SEWING NEEDLE (T).
- Play HOP (U); receive UNFINISHED CAROUSEL.
- Go (V).
- Take RIFLE STOCK and BOTA BAG (W).
- Use TWEEZERS (X); receive SINGLE MATCH.
- Go to Precipice.
- Use BOTA BAG (A); receive BARREL SPOUT.
- Go (B).
- Place BARREL SPOUT and select: (Dx2)-(C down)-(D)-(C down)-(D). Take METAL ARROW.
- Go to Grand Hall.
- Place METAL ARROW (F).
- Go (G).
- Take LION TOY and SCALE WEIGHTS 1/2 (H).
- Use SEWING NEEDLE; take EMBROIDERED CLOTH (I).
- Place THREAD ROLL (J).
- Solution (K).
- Take SWORD HANDLE.
- Go to Tack Room.
- Place SWORD HANDLE (L).
- Go (M).
- Take BULLETS 1/2 and RIFLE BARREL (N).
- Place EMBROIDERED CLOTH (O) and select marked areas (O1).
- Play HOP (P); receive ELEPHANT TOY.
- Walk down.
- MODEL GLUE and RIFLE BARREL on RIFLE STOCK; take ASSEMBLED RIFLE.
- Place ASSEMBLED RIFLE (Q); take CHESS PIECE MOLD (R).
- Walk down.
- DEER TOY, ELEPHANT TOY, and LION TOY on UNFINISHED CAROUSEL; receive CAROUSEL MOBILE.
- Place CAROUSEL MOBILE (S); take SCALE WEIGHTS 2/2 (T).
- Go to Atelier.
- Place SCALE WEIGHTS 2/2 and arrange as shown (U).
- Take SPINNING WHEEL PEDAL.
- Go to Attic.
- Place SPINNING WHEEL PEDAL (V); receive BULLETS 2/2.
- Return to Tack Room.
- Place BULLETS 2/2 (W).
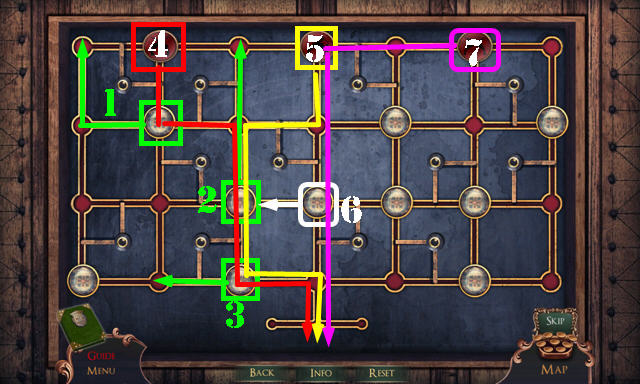
- Solution (1-7).
- Take BIRD FOOT.
- Go to Atelier.
- Place BIRD FOOT; take PICKAX (X).
- Go to Attic.
- Use PICKAX (Y). Play HOP; receive SHACKLES KEY.
- Go to Atelier.
- Use SHACKLES KEY (A); receive CONSTELLATION SKETCH.
- Go to Wine Cellar.
- Place SINGLE MATCH (B) and CHESS PIECE MOLD (C); select match and take CHESS PIECES (C).
- Go to Grand Hall.
- Place CONSTELLATION SKETCH and CHESS PIECES (D).
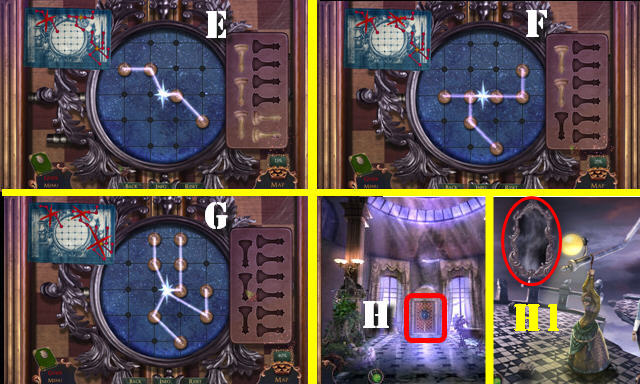
- Solution (E-F-G).
- Go (H).
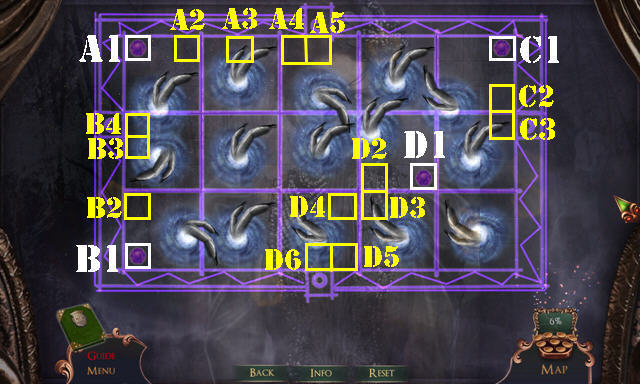
- Select mirror (H1).
- Solution (A1-A2)-(A2-A3)-(A3-A4)-(B1-B2)-(C1-C2)-(B2-B3)-(C2-C3)-(B3-B4)-(D1-D2)-(D2-D3)-(D3-D4)-(D4-D5)-(D5-D6)-(A4-A5).
- Congratulations, you've completed Mystery Case Files: The Countess!
Created at: 2018-12-19