

Walkthrough Menu
- General Tips
- Chapter 1: The Willow Tree
- Chapter 2: Main Street
- Chapter 3: Trophy Room
- Chapter 4: Trailer
- Chapter 5: Vermont Avenue
- Chapter 6: Greenhouse
General Tips
- This is the official guide for Mystery Case Files: The Revenant's Hunt.
- This guide won't tell you when to zoom into a location; the screenshots show each zoom scene.
- Hidden-object puzzles are referred to as HOPs. Only the locations of the HOPs will be shown.
- Use the Map to fast travel to a location.
Chapter 1: The Willow Tree
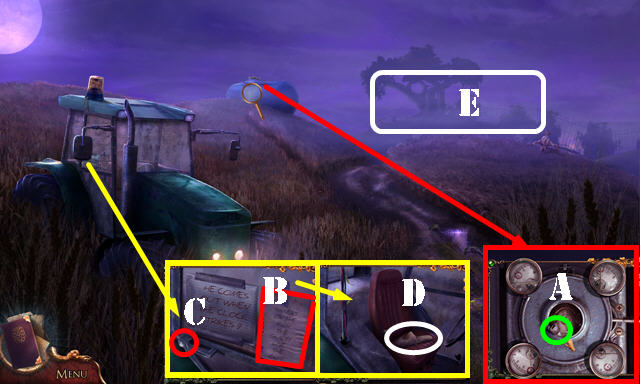
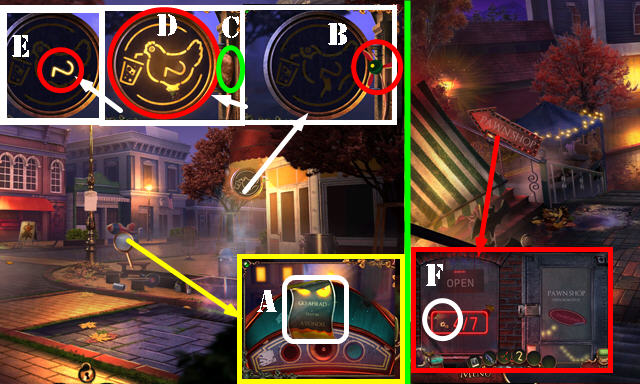
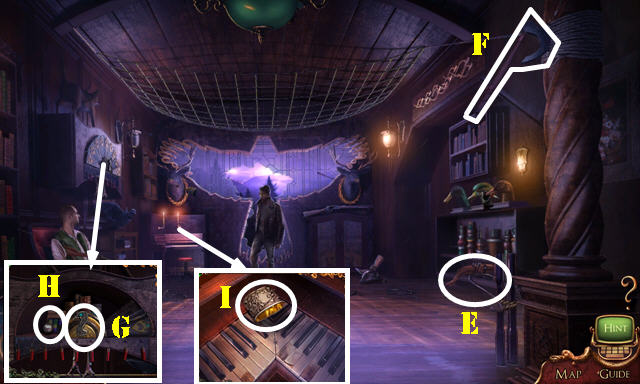
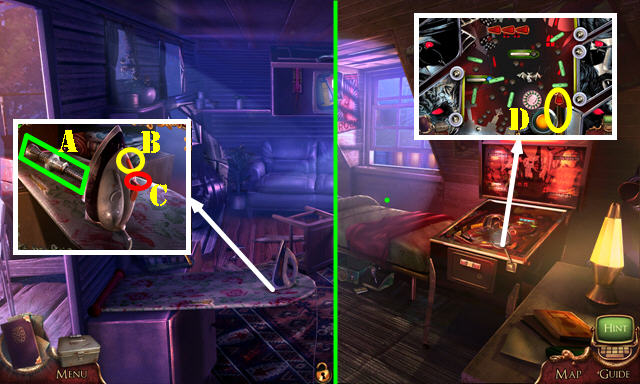
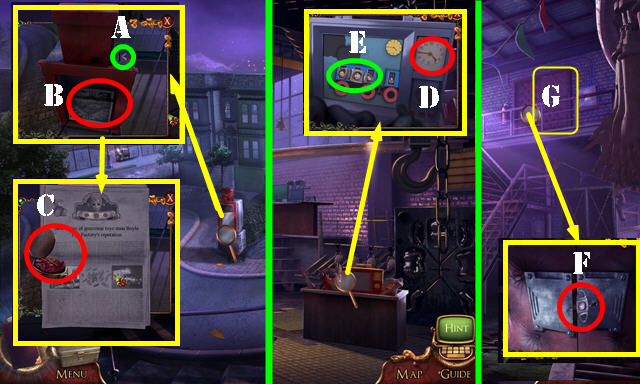
- Take TRACTOR KEY (A).
- Select note (B); use TRACTOR KEY (C).
- Take SLIPPER (D).
- Go (E).
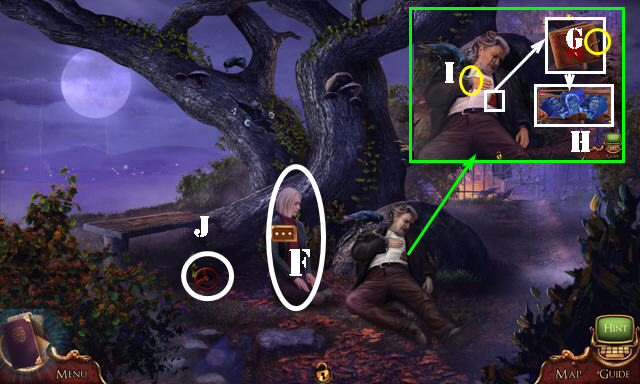
- Talk (F).
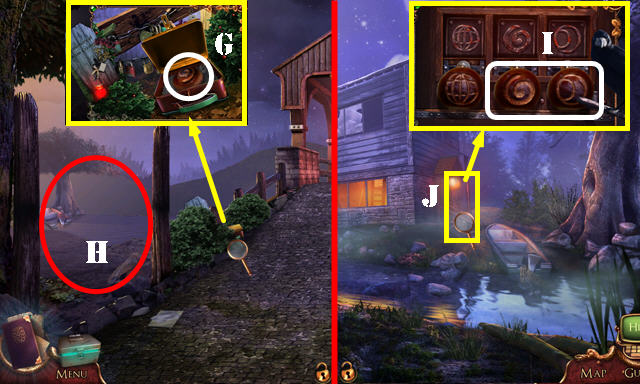
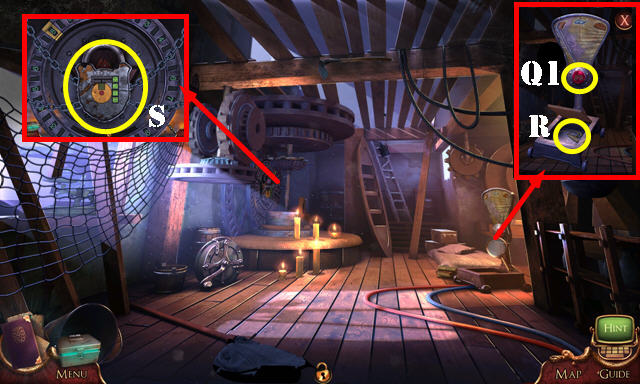
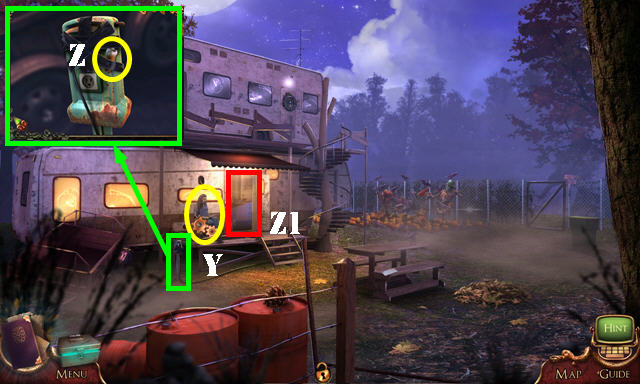
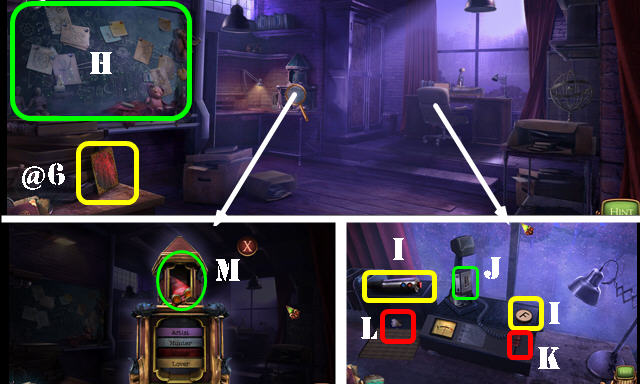
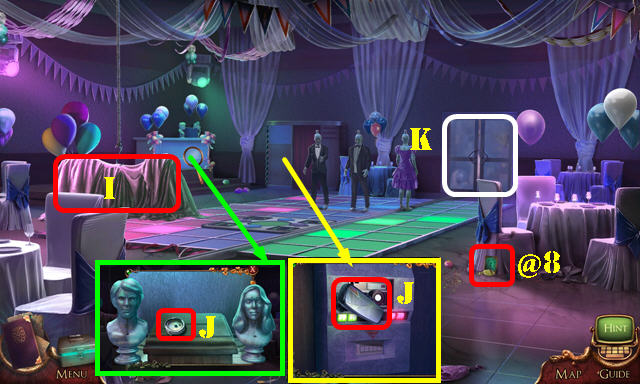
- Take WIRE from wallet (G); look at all items; take PHOTOS 3/4 (H).
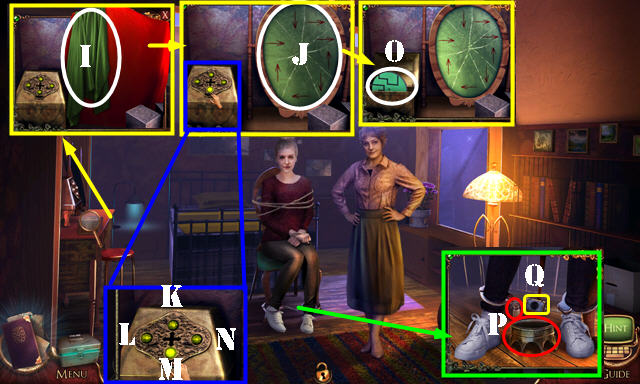
- Take MALCOLM'S WATCH (I).
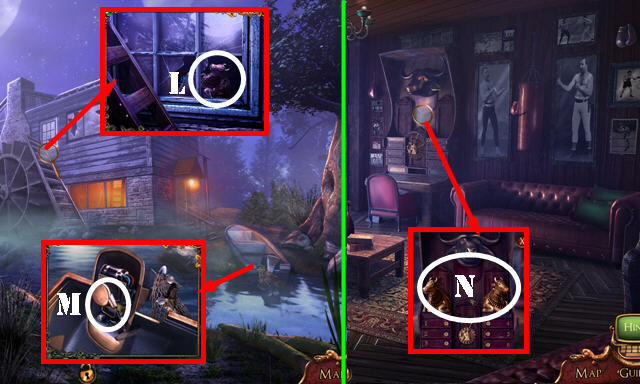
- Take RED VALVE (J).
- Walk down.
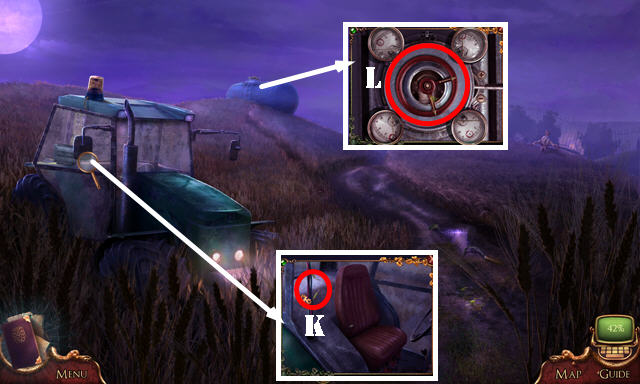
- Use WIRE (K).
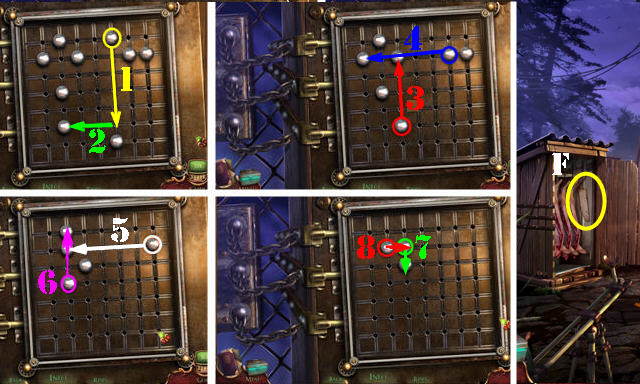
- Place RED VALVE (L).
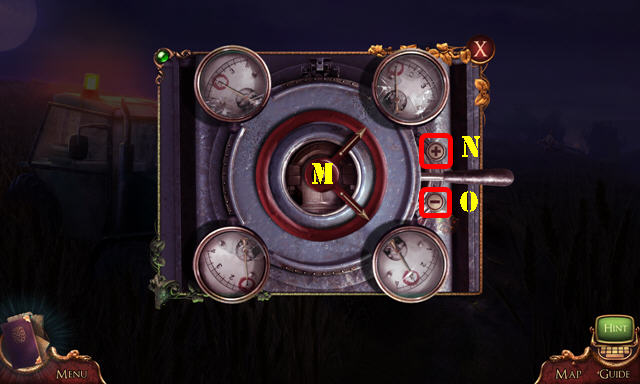
- Solution: M-Nx3-M-Ox3-M-N-M-O.
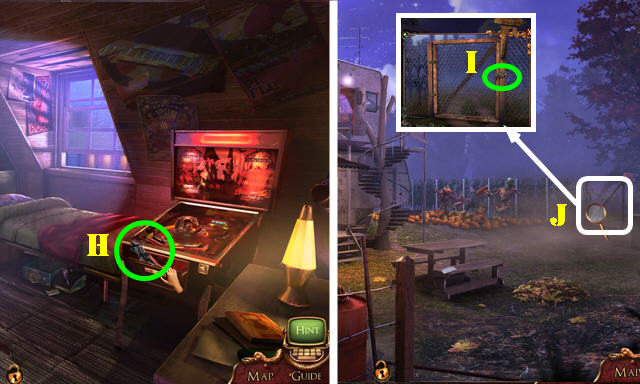
- Take WELDING TORCH.
- Go to The Willow Tree.
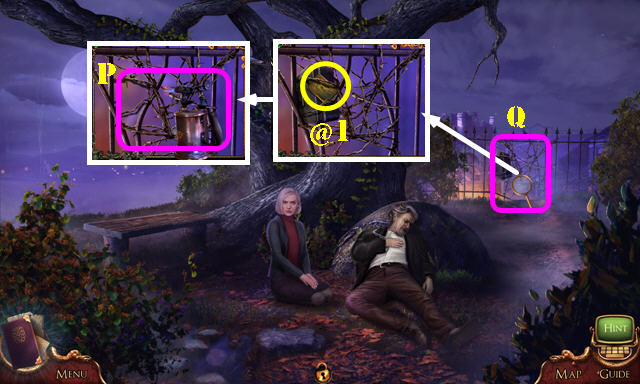
- Take Lore Cards 1/9 (@1).
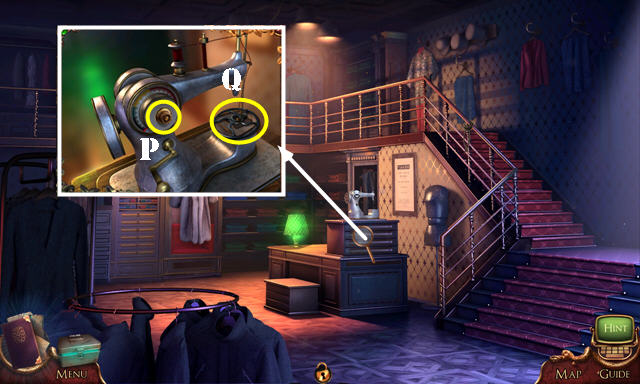
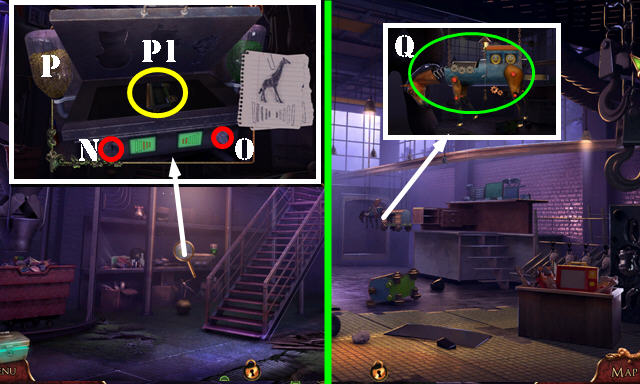
- Use WELDING TORCH (P).
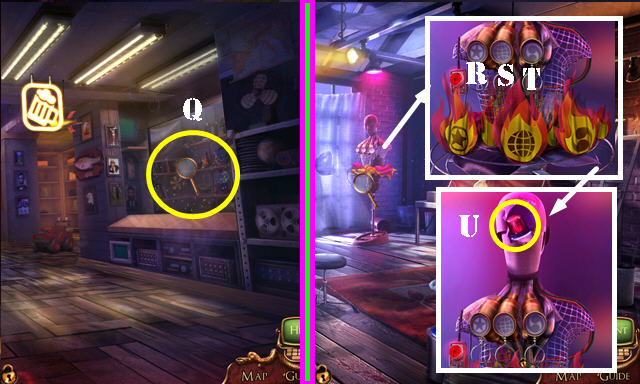
- Go (Q).
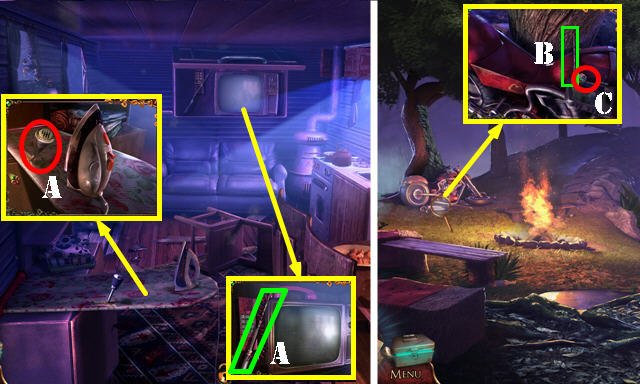
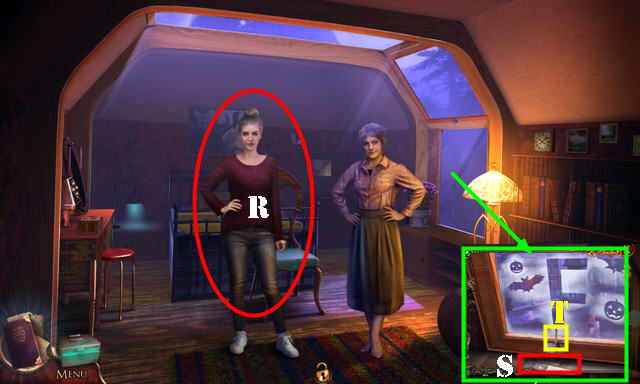
- Select scene. Take SCREWDRIVER and look at note (R).
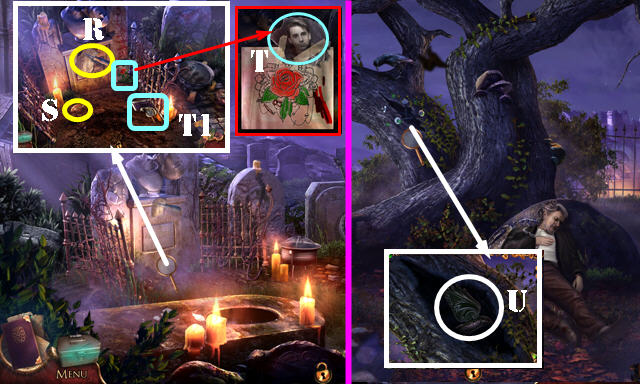
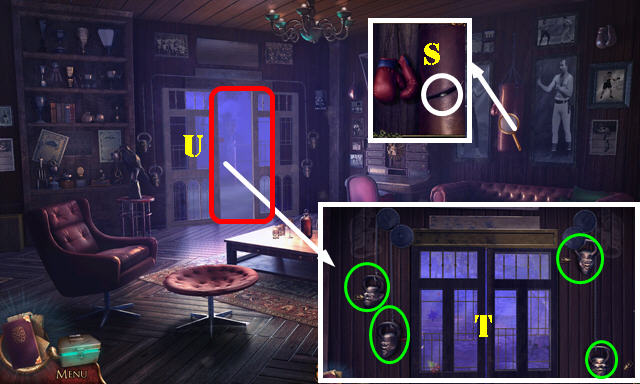
- Take BOOK WHEEL 1/2 (S).
- Look at note; take PHOTOS 4/4 (T).
- Look at note (T1).
- Walk down.
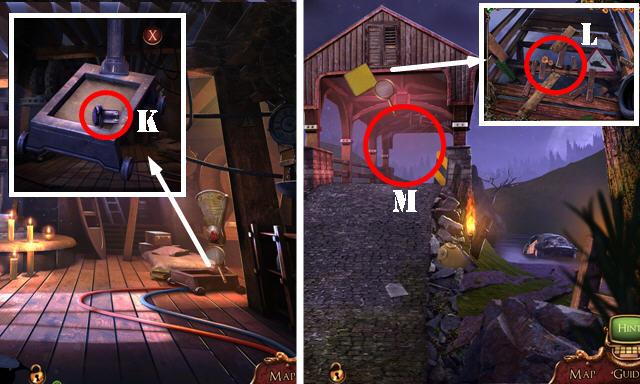
- Use SCREWDRIVER; take METAL SPARROW (U).
- Go to Cemetery.
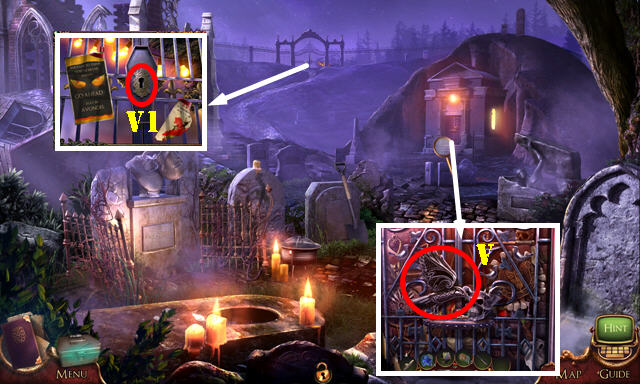
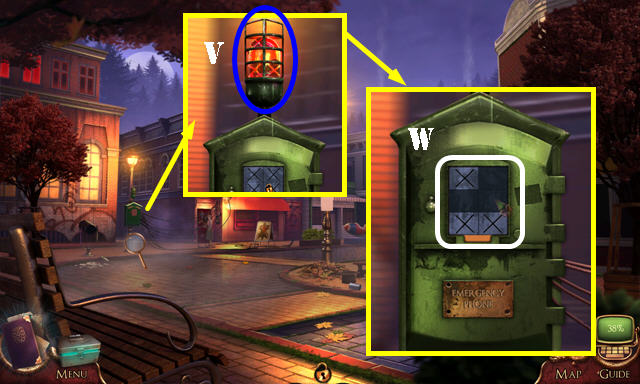
- Place METAL SPARROW (V). Play HOP; receive CEMETERY KEY.
- Remove casket door; use CEMETERY KEY (V1).
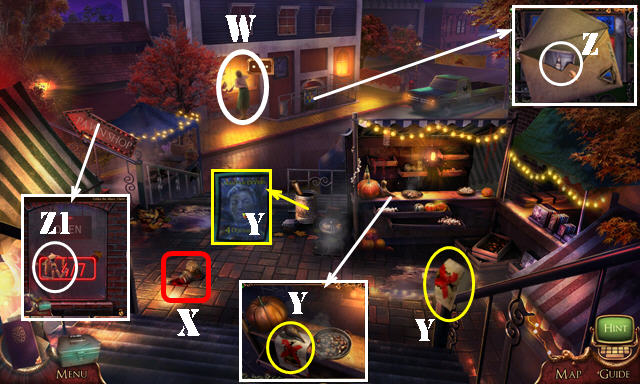
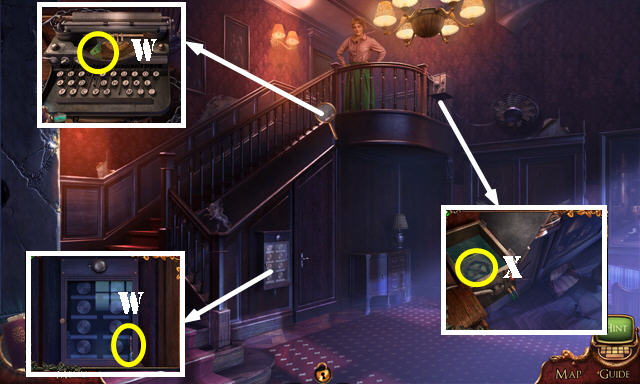
- Talk (W).
- Take RED INK (X).
- Look at 3 notes (Y).
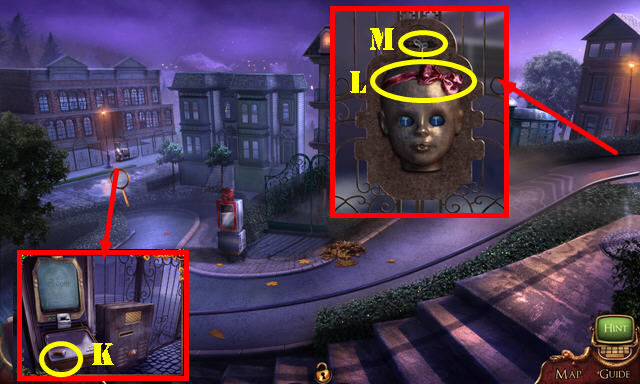
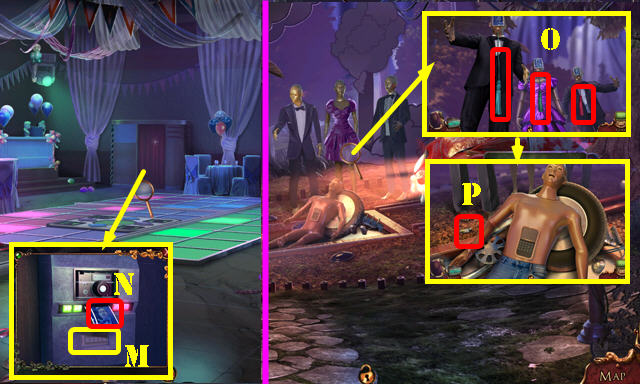
- Open envelope; remove money; take TUSK PHOTO (Z).
- Remove banner; take KEY CHAIN (Z1).

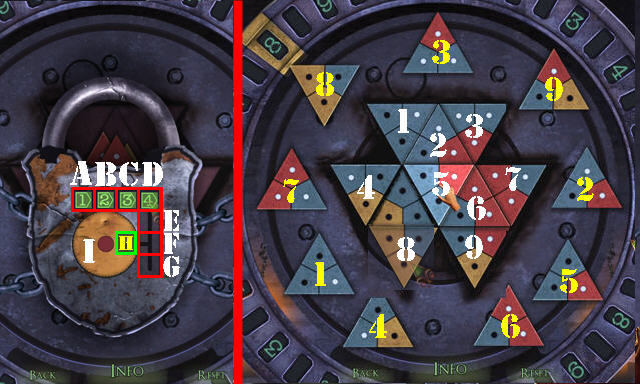
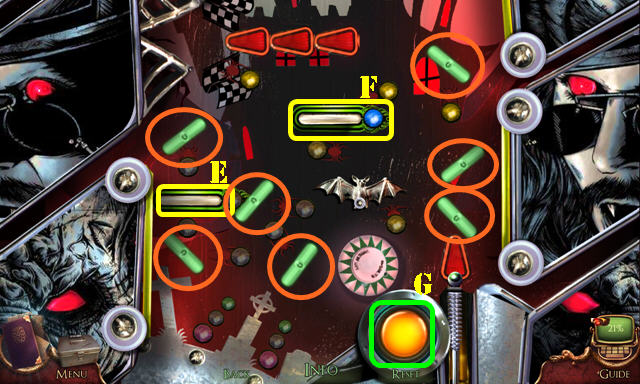
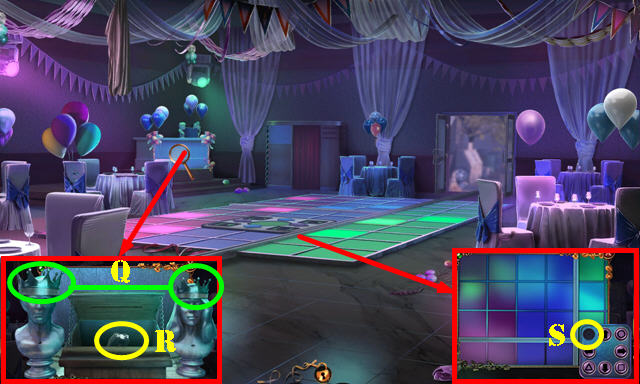
- Place MALCOLM'S WATCH. Solution: Drag (K-I)-(D-G)-(A-C)-(L-A)-(D-F).
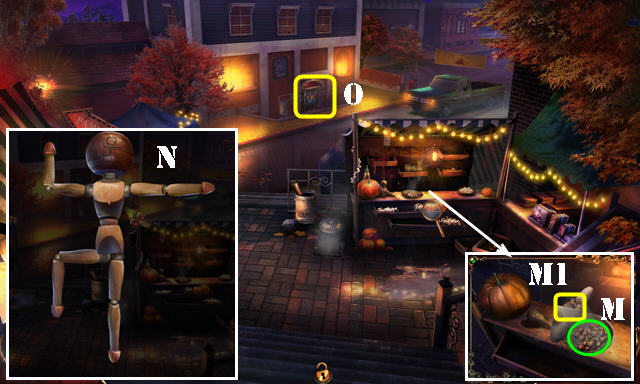
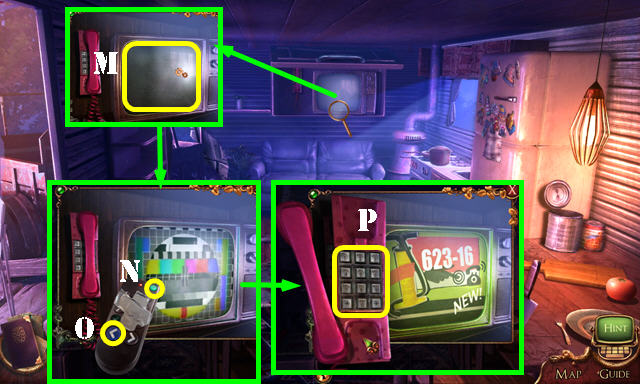
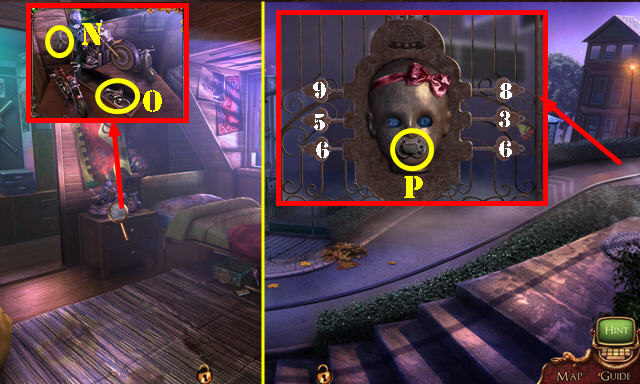
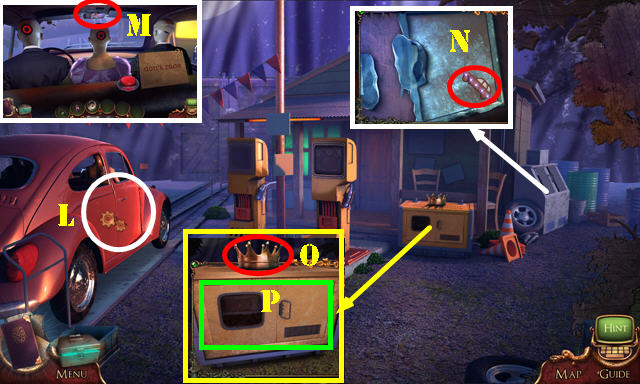
- Use SLIPPER (M); take WOODEN HEAD (M1).
- WOODEN HEAD on KEY CHAIN; position as shown (N); receive DRAWER KEY.
- Enter (O).
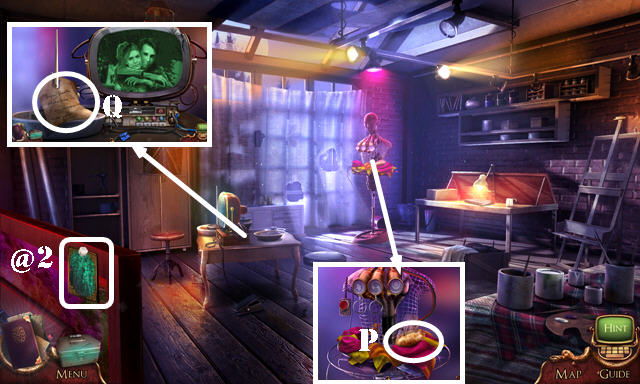
- Take Lore Cards 2/9 (@2).
- Take POTATO (P).
- Look at note (Q).
- Go to Cemetery.
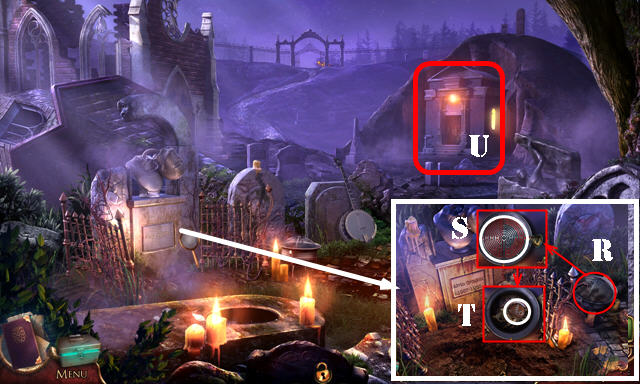
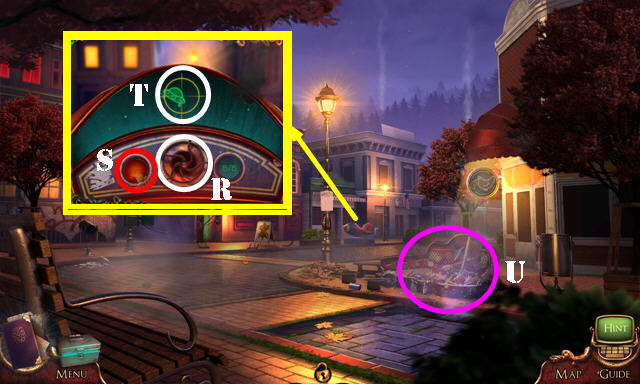
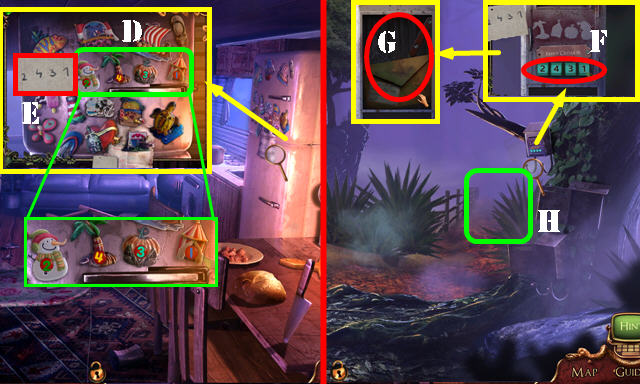
- Remove cover (R); use RED INK (S).
- Look at 4 scraps; take BOOK WHEEL 2/2 (T).
- Play HOP (U); receive FLAG PIECE 1/2.
- Go to Malcolm's Workshop.
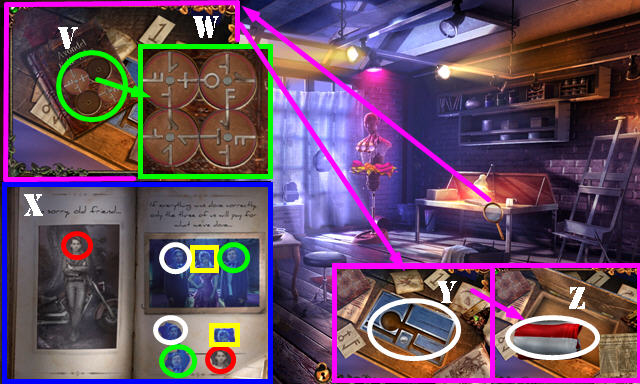
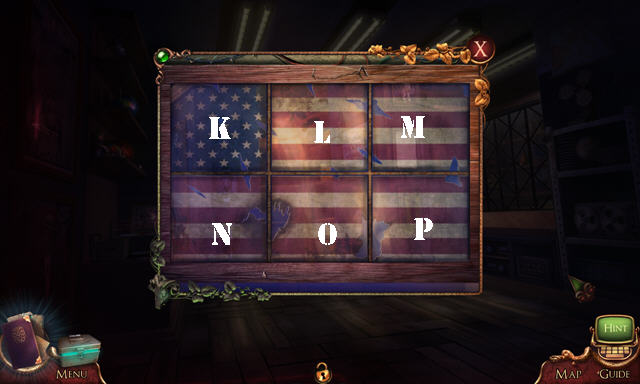
- Place BOOK WHEEL 2/2 (V). Solution (W).
- Select page; place PHOTOS 4/4. Solution (X). Select book twice.
- Select papers; place DRAWER KEY (Y).
- Look at newspaper piece; take FLAG PIECE 2/2 (Z).
- Walk down. Go forward to Main Street.
Chapter 2: Main Street
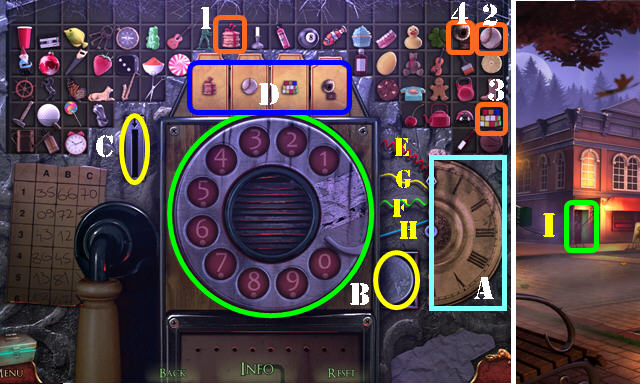
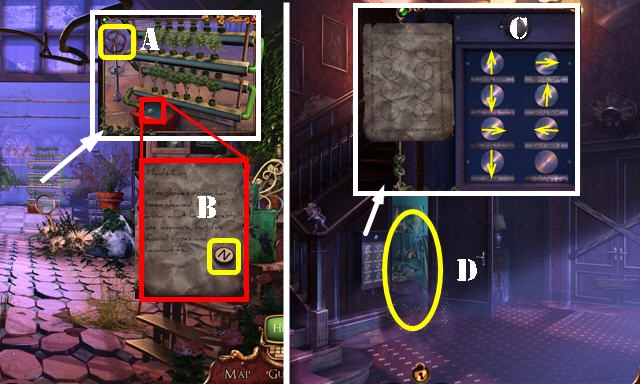
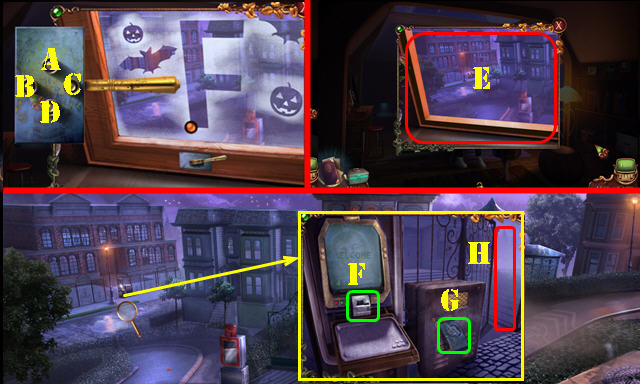
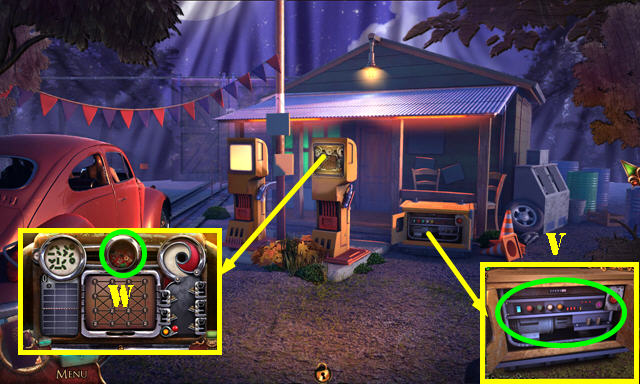
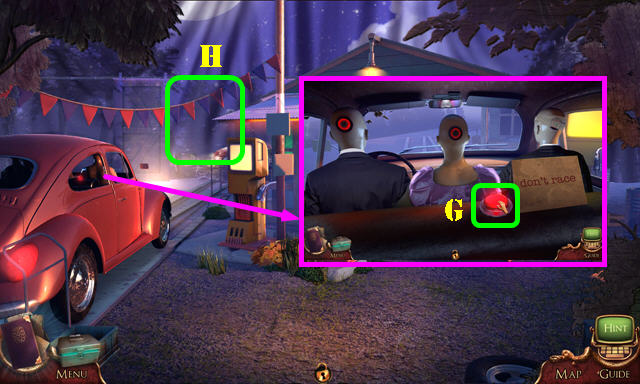
- Look at note (A).
- Take ROCKET PROPELLER (B).
- Place POTATO (C) and flip (D).
- Take NEON SIGN (E).
- Walk down.
- Place NEON SIGN (F).

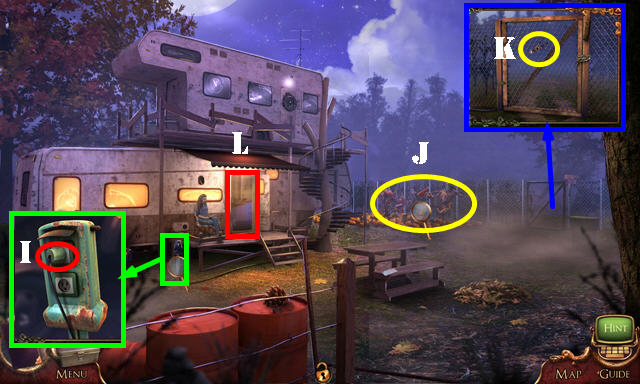
- Take WEATHER VANE (G) and PULL RING (H).
- Move ladder (I).
- Place FLAG PIECE 2/2 (J).
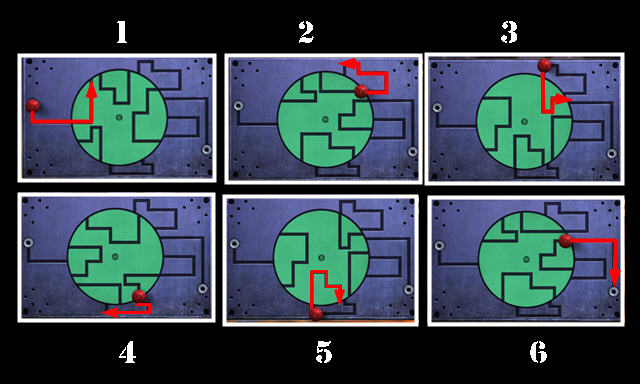
- Solution: (O-K)-(N-L)-(N-O)-(M-N).
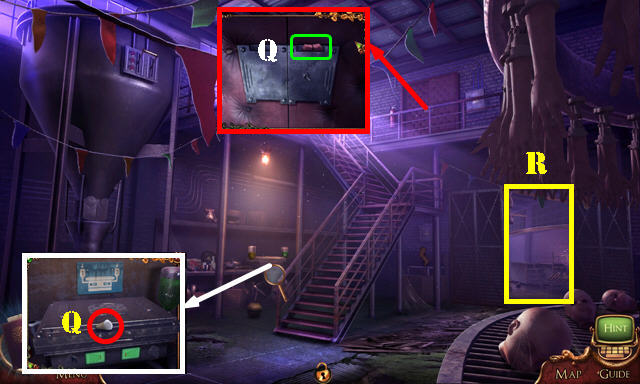
- Play HOP (Q); receive BROKEN EMERGENCY LIGHT.
- Go to Malcolm's Workshop.
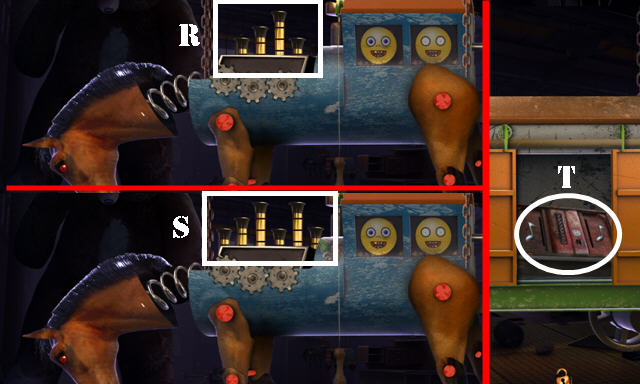
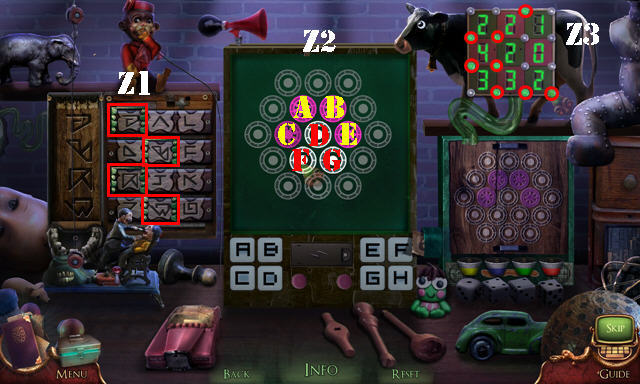
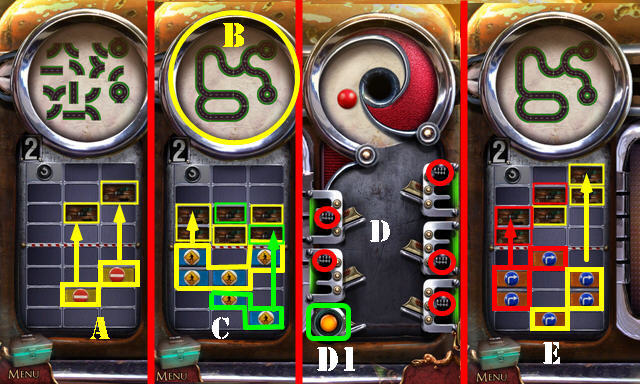
- Place PULL RING and push button. Solution: Rx2-Sx5-T.
- Take EMERGENCY LIGHT PIECE (U).
- Go to Main Street.
- EMERGENCY LIGHT PIECE on BROKEN EMERGENCY LIGHT; receive EMERGENCY LIGHT.
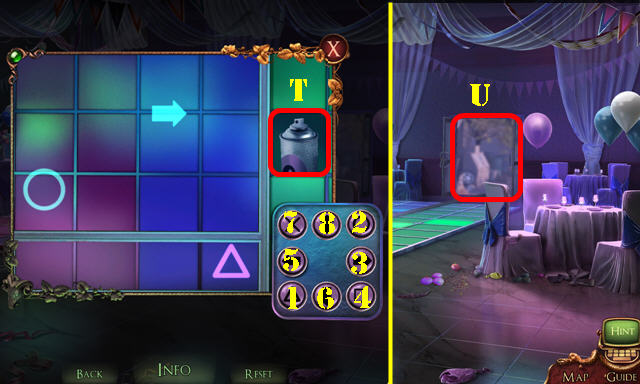
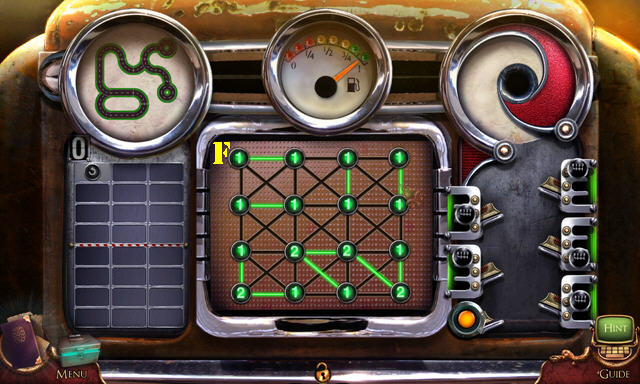
- Place EMERGENCY LIGHT (V). Solution (W).
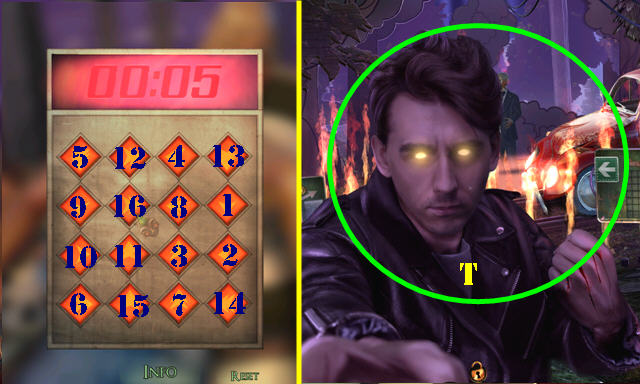
- Symbols are randomly generated; your game may vary from examples shown. The numbers you dial and wires you cut remain the same.
- Watch the time limit (A); if time runs out, new symbols will appear.
- Take coin (B) and insert (C). Find the two symbols on the board (orange) that match your example (D).
- Insert your symbols into slots in the order they appear for you (1-2). Solution for B3: dial 12.
- Take coin (B) and insert (C). Find the three symbols on the board (orange) that match your example (D).
- Insert your symbols into slots in the order they appear for you (1-3). Solution for A1: dial 35.
- Take coin (B) and insert (C). Find the four symbols on the board (orange) that match your example (D).
- Insert your symbols into slots in the order they appear for you (1-4). Solution for B4: dial 45.
- Take coin (B) and insert (C). Select (E-F-G-H).
- Enter (I).
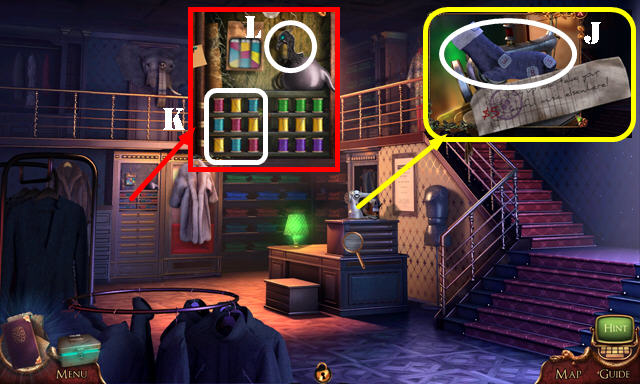
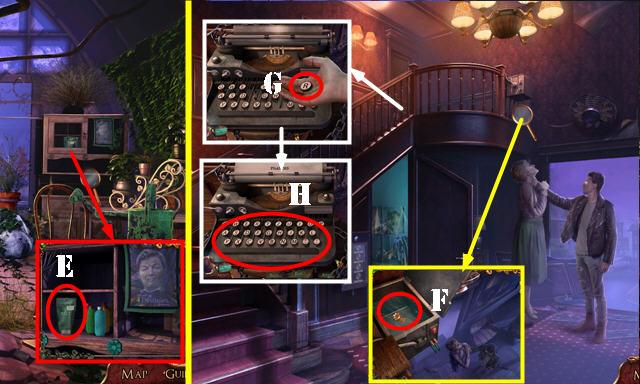
- Look at note; take MUSICIAN'S SOCK (J).
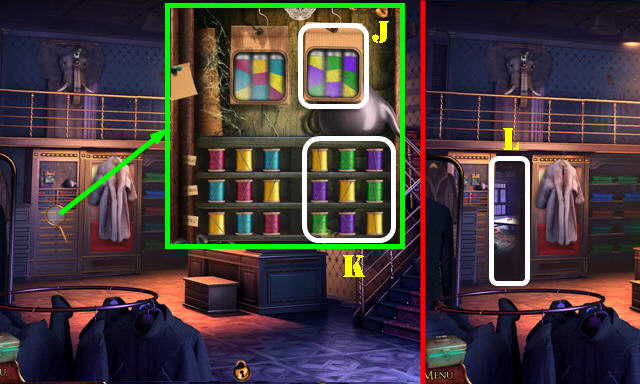
- Swap spools (K); take PEACOCK LEVER (L).
- Walk down.
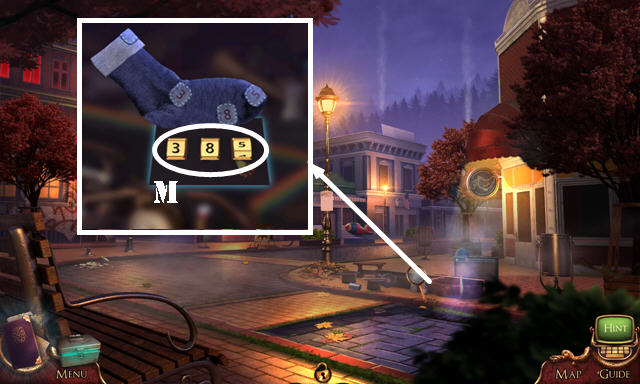
- Place MUSICIAN'S SOCK; enter 385 (M). Play HOP; receive GUITAR TUNER.
- Go to Pawn Shop.
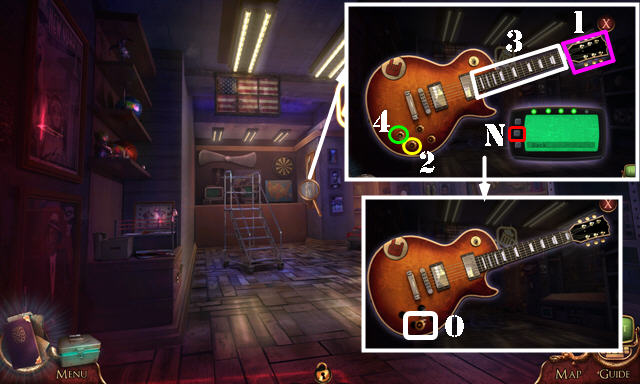
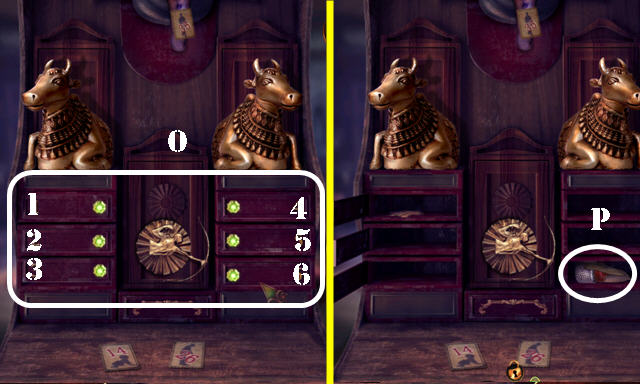
- Place GUITAR TUNER; select (N-1-2-3-4).
- Take CONTROL KNOB (O).
- Return to Irving's Pelt Store.
- Place CONTROL KNOB (P); take CONTROL WHEEL (Q).
- Walk down.
- Place CONTROL WHEEL (R).
- Press button (S) once ship is inside target (T).
- Play HOP (U); receive TOY ROCKET.
- Go to Pawn Shop.
- ROCKET PROPELLER on TOY ROCKET; take WRESTLING FIGURINE.
- Place WRESTLING FIGURINE (V) and select (W); take MODELING CLAY (X).
- Go to Malcolm's Workshop.
- Insert TUSK PHOTO (Y) and place MODELING CLAY (Z).
- Solution (A).
- Take CUSTOM TUSK (B).
- Go to Irving's Pelt Store.
- Place CUSTOM TUSK (C).
- Enter (D).
Chapter 3: Trophy Room
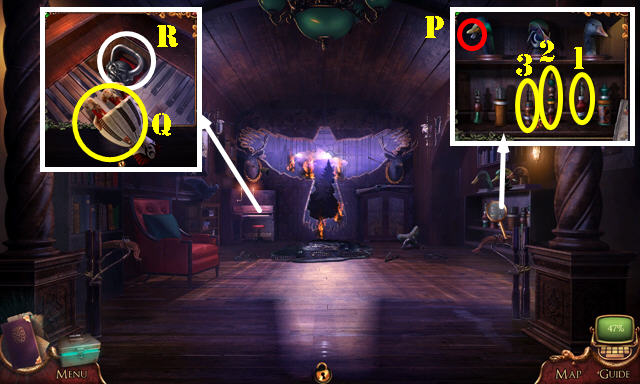
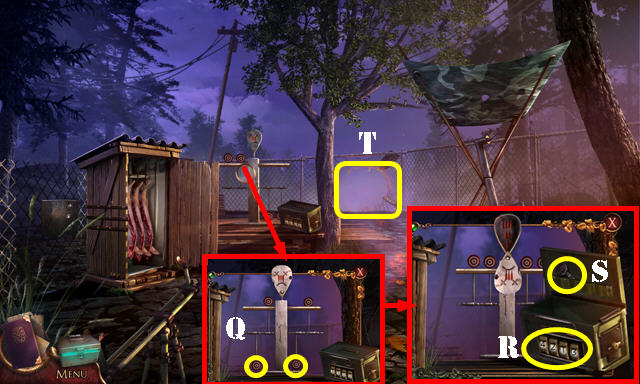
- Use WEATHER VANE (E).
- Select axe (F).
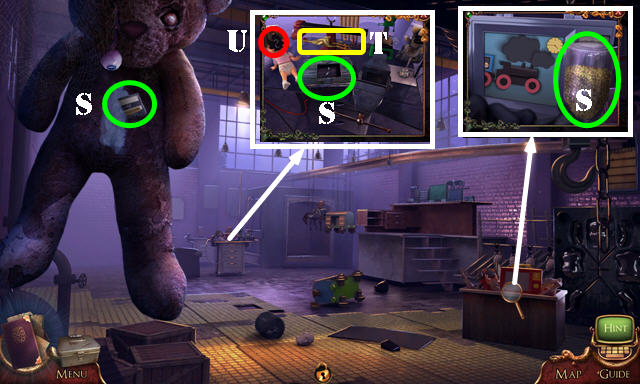
- Place PEACOCK LEVER (G); take METAL BEARINGS 1/5 and HANDKERCHIEF (H).
- Take SILVER LABEL (I).
- Walk down.
- Place HANDKERCHIEF (J); swap spools (K).
- Enter (L).
- Take Lore Cards 3/9 (@3).
- Open; flip switch (M).
- Play HOP (N); receive MONKEY WEIGHTS 1/2.
- Take PIANO HAND and BIRD JOURNAL (O).
- Go to Theodore's Study.
- Place BIRD JOURNAL. Select 1-3. Take RAZOR (P).
- Place PIANO HAND (Q); take MONKEY WEIGHTS 2/2 (R).
- Go to Trophy Room.
- Use RAZOR; take METAL BEARINGS 2/5 (S).
- Place MONKEY WEIGHTS 2/2; solution (T).
- Go (U).
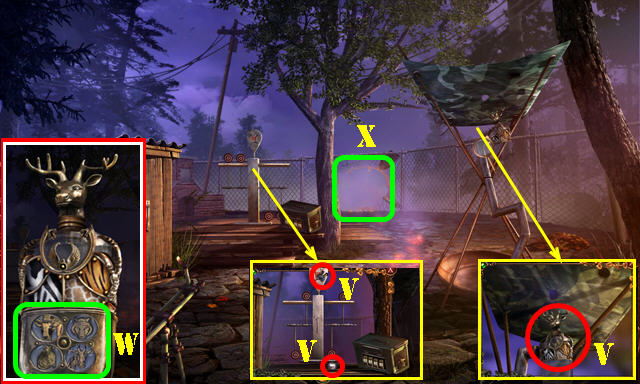
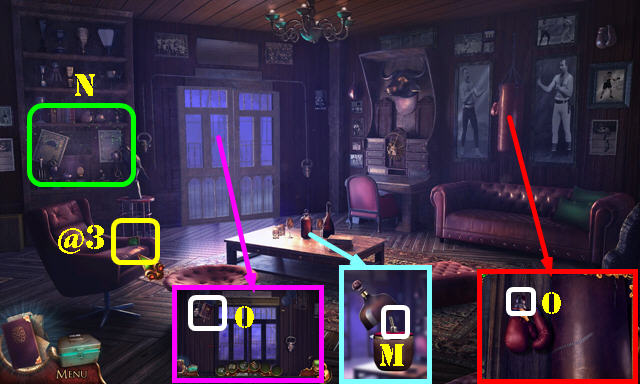
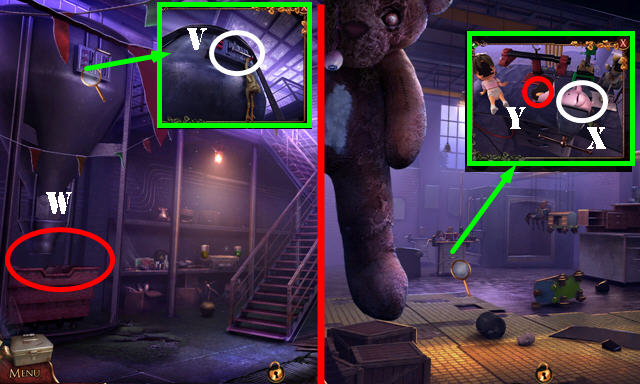
- Take HUNTER'S FLASK, BOAT KEY, and METAL BEARINGS 3/5 (V).
- SILVER LABEL on HUNTER'S FLASK. Swap tokens (W); receive DEER KEY.
- Go (X).
- Look at note; take METAL BEARINGS 4/5 (Y).
- Take OLD BUN 1/3 (Y1).
- Move sign (Z); go (Z1).
- Take FISHING SPEAR, METAL BEARINGS 5/5, and NAIL GUN CLIP (A).
- Use DEER KEY; look at note and take COW FIGURINE 1/2 (B).
- Use BOAT KEY; take CAN OPENER (C).
- Go to Backyard.

- Use FISHING SPEAR (D); select twice; receive OLD BUN 2/3.
- Place METAL BEARINGS 5/5 (E).
- Solution 1-8.
- Take SAW (F).
- Go to Wooden Bridge.
- Use SAW; take OLD BUN 3/3 (G).
- Go (H).
- Place OLD BUN 3/3; swap last two (I).
- Enter (J) for an HOP; receive RUSTY NAIL GUN.
- Take NAIL GUN BATTERY (K).
- NAIL GUN BATTERY and NAIL GUN CLIP on RUSTY NAIL GUN; receive NAIL GUN.
- Go to Wooden Bridge.
- Use NAIL GUN (L).
- Go (M).
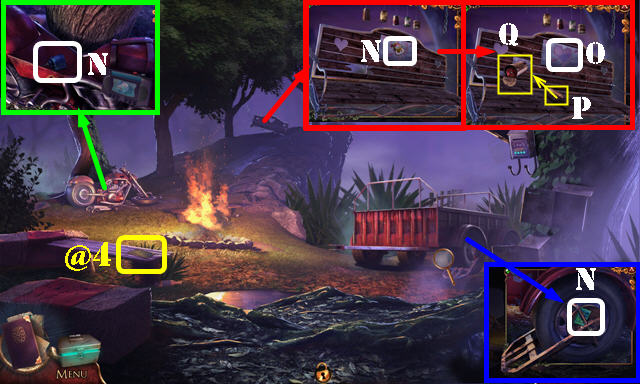
- Take Lore Cards 4/9 (@4).
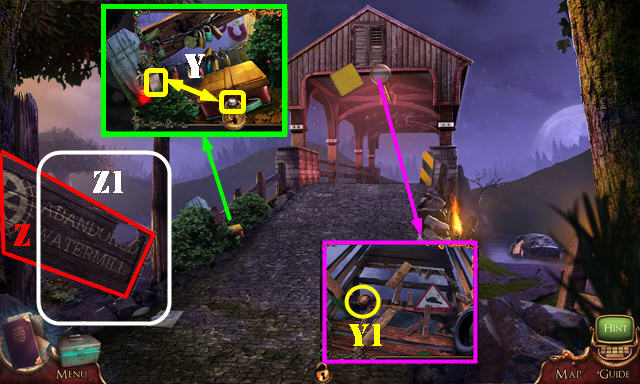
- Take BASEBALL CARD 1/2, FRIDGE MAGNET 1/2, and OIL CAN (N).
- Use CAN OPENER (O); take CODED HEART.
- Select can (P); Use CAN OPENER (Q); receive SCALE DIAL.
- Go Inside the Mill.
- Place SCALE DIAL; select 2x (Q1); take STARTER ROPE (R).
- Use OIL CAN (S).
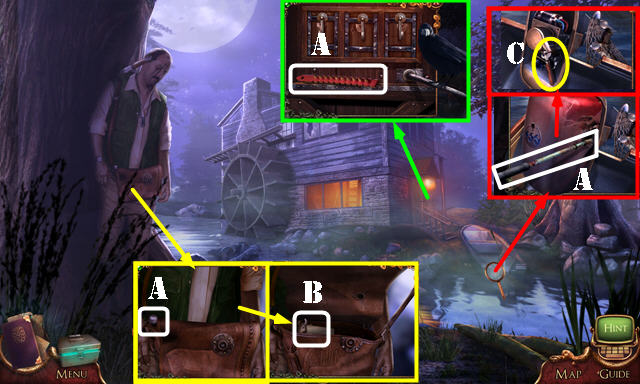
- Solution one: (D-C)-(E-D)-(F-E)-(G-F)-(I)-(F-H)-(I)-(H-A)-(C-H)-(I)-(H-G)-(I)-(D-H)-(I)-(H-F).
- (I)-(E-H)-(A-D)-(H-C)-(I)-(F-H)-(I)-(H-A)-(C-H)-(I)-(H-E)-(I)-(A-H)-(I)-(H-F)-(D-A)-(E-B)-(F-C)-(G-D).
- Solution two (1-9).
- Solution three (J).
- Solution four: Rotate screws (K) and gears (purple).
- Walk down.
Chapter 4: Trailer
- Take COW FIGURINE 2/2 (L).
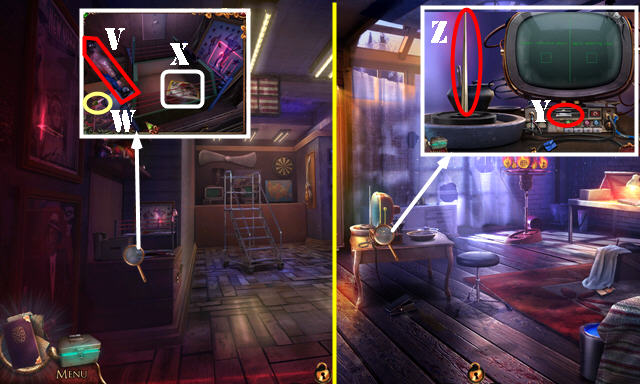
- Use STARTER ROPE (M); receive AIRSOFT GUN.
- Go to Trophy Room.
- Place COW FIGURINE 2/2 (N).
- Select: 1-4-3-5-2-6 (O).
- Take THEODORE'S MONEY and AIRSOFT PELLETS (P).
- Go to Backyard.
- AIRSOFT PELLETS in AIRSOFT GUN; take LOADED GUN.
- Use LOADED GUN; shoot two targets (Q).
- Enter 4-2-1-3 (R).
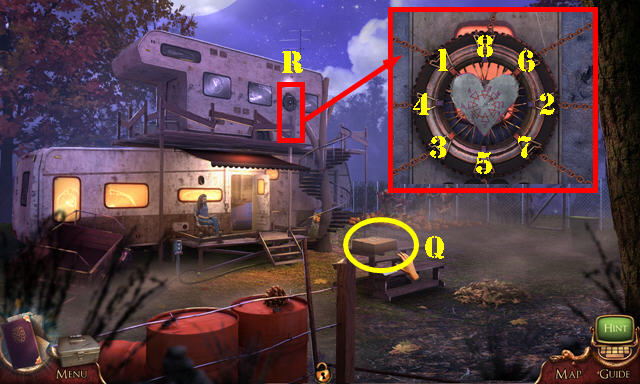
- Take CAR KEY (S).
- Go (T).
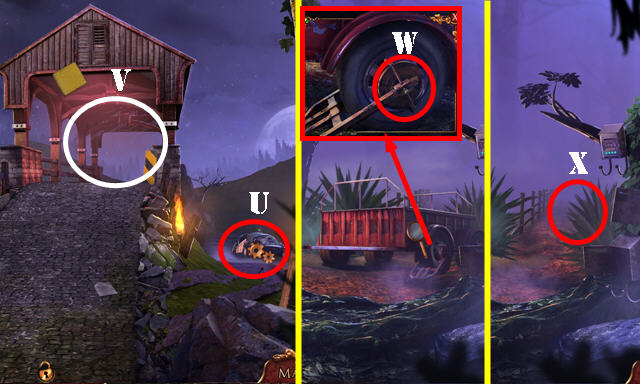
- Use CAR KEY (U). Play HOP; receive LUG WRENCH.
- Go (V).
- Use LUG WRENCH (W).
- Go (X).
- Give THEODORE'S MONEY (Y).
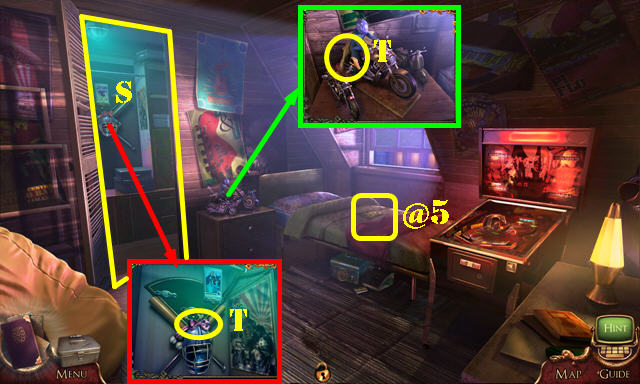
- Take FAKE TEETH 1/4 (Z).
- Enter (Z1).
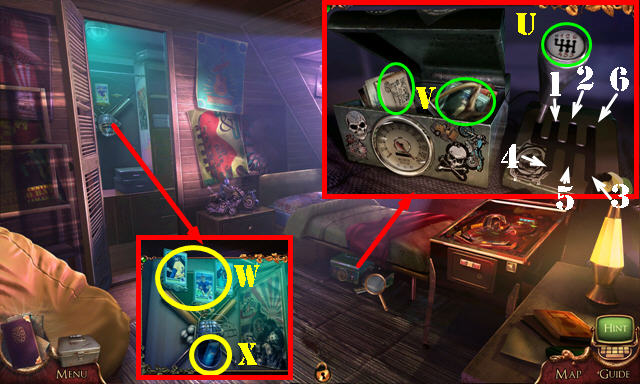
- Take GEAR STICK and RADIO ANTENNA (A).
- Walk down twice.
- Place RADIO ANTENNA (B); take FRIDGE MAGNET 2/2 (C).
- Go to Trailer.
- Place FRIDGE MAGNET 2/2; swap magnets (D).
- Take LETTERBOX COMBINATION (E).
- Go to Lover's Nest.
- Place LETTERBOX COMBINATION; enter 2431 (F).
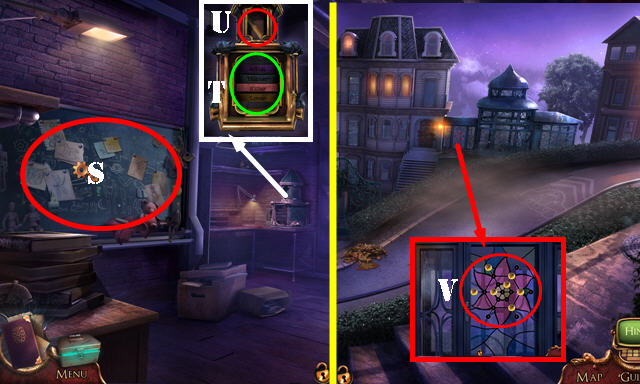
- Look at envelope; take LETTER OPENER (G).
- Go (H).
- Use LETTER OPENER; pull plug (I).
- Play HOP (J); receive TV REMOTE.
- Take GREASY LAUNCHER (K).
- Enter (L).
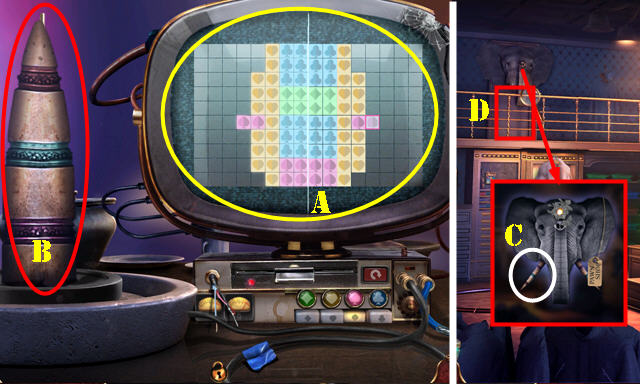
- Use TV REMOTE (M).
- Select N-Ox2.
- Dial 62316 (P).
- Walk down.
- Take ORDERED PACKAGE (Q).
- Open ORDERED PACKAGE; take TIRE PUMP.
- Use TIRE PUMP and CODED HEART; select 1-8.
- Enter (R).
- Open door (S).
- Take Lore Cards 5/9 (@5).
- Take RUBBER CHICKEN and PINK BOW (T).
- Place GEAR STICK (U). Move stick to 1-6.
- Take BASEBALL CARD 2/2 and ALVIN'S SONG (V).
- Place BASEBALL CARD 2/2 (W); take WATER BOTTLE (X).
- Return to Trailer.
- Place GREASY LAUNCHER (A).
- Use WATER BOTTLE (B). Push button (C); take BALL LAUNCHER (A).
- Go to Alvin's Room.
- Place BALL LAUNCHER (D).
- Rotate obstructions (orange). Select (E-F-G).
- Take WIRE CUTTER (H).
- Walk down.
- Use WIRE CUTTER (I).
- Go (J).
Chapter 5: Vermont Avenue
- Take FAKE TEETH 2/4 (K).
- Place PINK BOW (L); take WINDING KEY (M).
- Go to Alvin's Room.
- Use WINDING KEY (N); take IRON PACIFIER (O).
- Go to Vermont Avenue.
- Place IRON PACIFIER (P). Rotate keys as shown.
- Select scene.
- Take FAKE TEETH 3/4 and VOLUME SLIDER (Q).
- Go (R).
- Take CONFESSION TAPE, BROKEN MUSIC BOX, and TOY RUBBER (S).
- Place RUBBER CHICKEN (T).
- Grab hook (U) and place it on chicken. Take GRAPPLING CHICKEN.
- Walk down.
- Use GRAPPLING CHICKEN (V).
- Play HOP (W); receive PIGGY BANK.
- Go to Testing Room.
- Place PIGGY BANK (X); take COIN (Y).
- Go to Vermont Avenue.
- Use COIN (A).
- Select newspaper (B); take CLOCK HANDS (C).
- Go to Testing Room.
- Place CLOCK HANDS (D); take CIGAR CUTTER (E).
- Walk down.
- Use CIGAR CUTTER (F).
- Enter (G).
- Take Lore Cards 6/9 (@6).
- Play HOP (H); receive TOY BLUEPRINT.
- Take TYPEWRITER BUTTONS 1/3 and BLACKBOARD CONTROLLER (I).
- Insert CONFESSION TAPE (J).
- Place VOLUME SLIDER (K). Slide button.
- Take FAKE TEETH 4/4 (L).
- Take GNOME'S CAP (M).
- Walk down.
- Place TOY RUBBER and TOY BLUEPRINT; select papers. Select: Nx2-O-P.
- Take TRAIN WAGON (P1).
- Go to Testing Room.
- Place TRAIN WAGON (Q).
- Solution one (R).
- Solution two (S).
- Take MUSIC BOX PART (T).

- MUSIC BOX PART and ALVIN'S SONG on BROKEN MUSIC BOX; take ELIZA'S BIRTH CERTIFICATE and PAPER CUTOUTS 1/2.
- Place FAKE TEETH 4/4 (U).


- Position sliders (Z1).
- Select A-Dx2-B-Dx4-Fx2 (Z2).
- Select lamps (Z3).
- Select maze shown (H); press green ball (I).
- Select maze shown (J); press red ball (K).
- Select maze shown (L); press yellow ball (M).
- Select maze shown (N); press blue ball (O).
- Type in GHCA (P).
- Select: A-H-C-E-D-G-B-F (Q).
- Take CONTROLLER BATTERY (R).
- Go to Frances' Office.
- CONTROLLER BATTERY on BLACKBOARD CONTROLLER.
- Use BLACKBOARD CONTROLLER (S). Play HOP; receive PAPER CUTOUTS 2/2.
- Place PAPER CUTOUTS 2/2; select artist, hunter, lover, and killer 3x (T); take FLOWER CODE (U).
- Go to Vermont Avenue.
- Place FLOWER CODE (V).
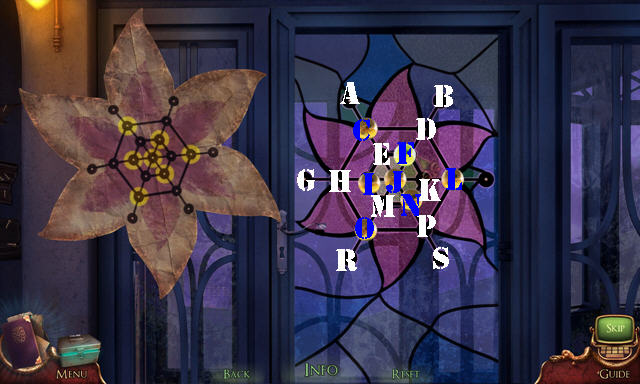
- Solution: (F-E)-(G-H)-(H-O)-(L-K)-(E-J)-(E-F).
Chapter 6: Boyle Greenhouse
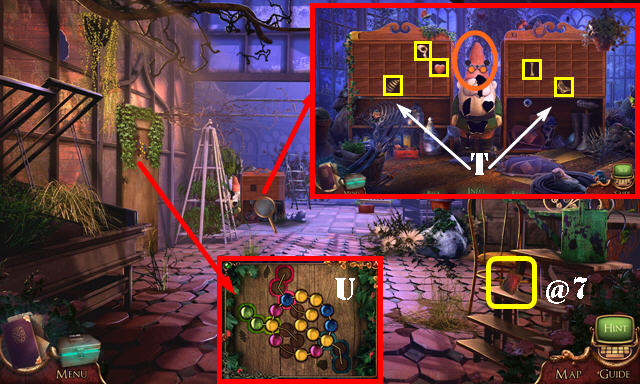
- Take Lore Cards 7/9 (@7).
- Place GNOME'S CAP (orange); solution (T). Play HOP; receive DOOR MARBLES.
- Place DOOR MARBLES (U).
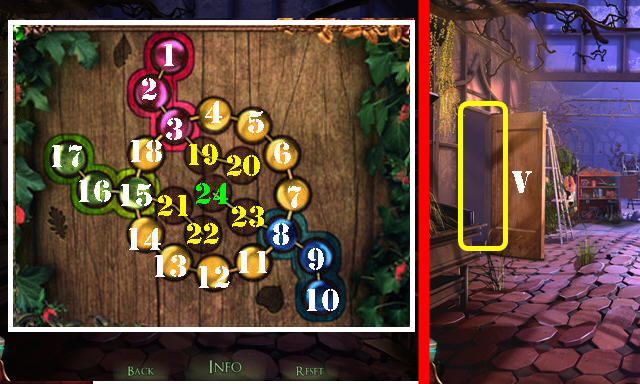
- Solution (18-3)-(8-9)-(7-8)-(9-10)-(18-3)-(3-2)-(5-3)-(8-23)-(4-11)-(2-1)-(11-8)-(9-10)-(14-8).
- Enter Boyle Hall (V).
- Take DINNER BELL and MIRROR SHARD (W).
- Open door; take PRESSURE VALVE (X).
- Walk down.
- Place PRESSURE VALVE (A).
- Look at note; take TYPEWRITER BUTTONS 2/3 and MAID'S SCHEDULE (B).
- Go to Boyle Hall.
- Place MAID'S SCHEDULE; rotate arrows as shown (C).
- Play HOP (D); receive MAID'S KEY.
- Walk down.
- Use MAID'S KEY; take SALT BAG (E).
- Go to Boyle Hall.
- Use SALT BAG (F).
- Take TYPEWRITER BUTTONS 3/3 (G).
- Place TYPEWRITER BUTTONS 3/3. Type F-R-A-N-C-E-S (H).
- Take BED SHEETS (I).
- Place MIRROR SHARD (J).
- Select M-Nx2-K-M-L-K-N.
- Take HANDCUFF LOCK (O).
- Take QUEEN'S CROWN and BLOOD VIAL (P).
- Place HANDCUFF LOCK (Q).
- Solution (1-6). Rotate to positions shown and slide ball.
- Give ELIZA'S BIRTH CERTIFICATE (R).
- Take MUSEUM TICKET (S). Select latch (T).
- Solution: A-C-D-B-D-C-D-B-D-B.
- Use BED SHEETS (E).
- Insert MUSEUM TICKET (F); take ticket (G).
- Go (H).
- Take Lore Cards 8/9 (@8).
- Use DINNER BELL (I). Play HOP; receive RED CAR KEY.
- Take FUEL GAUGE and REARVIEW MIRROR (J).
- Go (K).
- Use RED CAR KEY (L).
- Place REARVIEW MIRROR and select twice (M); receive X BUTTON.
- Take CAR PLATE (N).
- Take KING'S CROWN (O); open cabinet (P).
- Walk down.
- Place KING'S CROWN and QUEEN'S CROWN (Q).
- Take ELECTROSHOCK WEAPON (R).
- Place X BUTTON (S).
- Select 1-8.
- Take FLAMETHROWER 1/2 (T).
- Go (U).
- Use ELECTROSHOCK WEAPON (V).
- Place FUEL GAUGE (W).
- Select groups of blocks and drag (A). Light up first block in group and drag to light the attached ones; drag them up to position shown.
- Rotate as shown (B).
- Drag groups of blocks (C).
- Position gears (D). Press button (D1).
- Select and drag blocks (E).
- Activate lines (F).
- Push button 4x (G).
- Go (H).

- Take Lore Cards 9/9 (@9).
- Take PHOTO FILM (I).
- Place CAR PLATE (J). Mark squares (K).
- Take ALVIN'S JACKET (L).
- Walk down twice.
- Place PHOTO FILM (M); take TRIO'S PHOTOS (N).
- Go to Act III: The Accident.
- Use TRIO'S PHOTOS; select all the ropes (O).
- Take FLAMETHROWER 2/2 (P).
- Walk down.

- Use FLAMETHROWER 2/2; open door; take DEFIBRILLATOR (Q).
- Go (R).
- Use DEFIBRILLATOR (S).
- Solution (1-16).
- Use ALVIN'S JACKET on scene (T).
- Congratulations, you've completed Mystery Case Files: The Revenant's Hunt!
Created at: 2018-01-19