

Walkthrough Menu
- General Tips
- Chapter 1: A Mysterious Death
- Chapter 2: Down the Well
- Chapter 3: Following the Clues
- Chapter 4: A Visit to the Monastery
- Chapter 5: Taking a Swim
- Chapter 6: Through the Crypt
- Chapter 7: Mr. Gale's Castle
- Chapter 8: Across the Bridge
General Tips
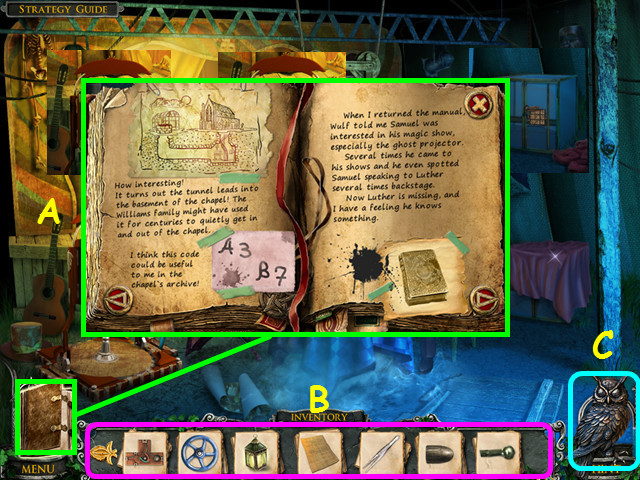
- Read your Journal for important clues that you have found (A).
- Your inventory (B) is located in the lower panel – move your cursor down to reveal your inventory.
- Hints are unlimited, but you must wait for the meter to refill (C).
- Hidden Object Scenes and mini-games are often randomized - your solution may vary.
- Hidden Object Scenes will be referred to as HOS in this walkthrough.
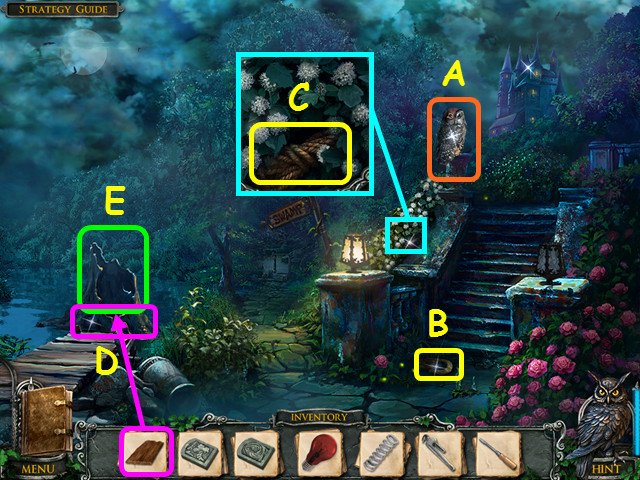
Chapter 1: A Mysterious Death
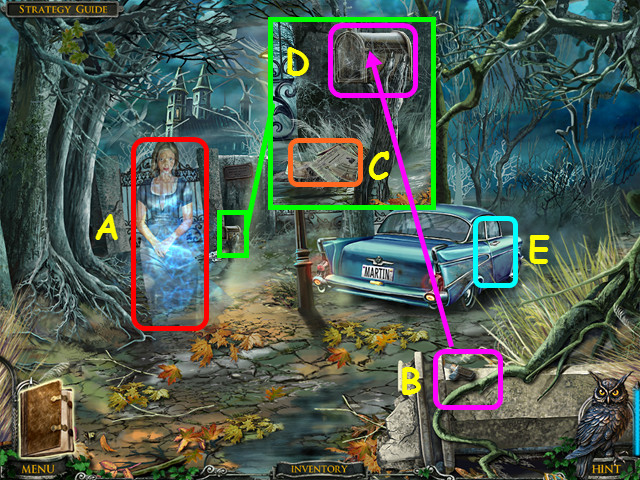
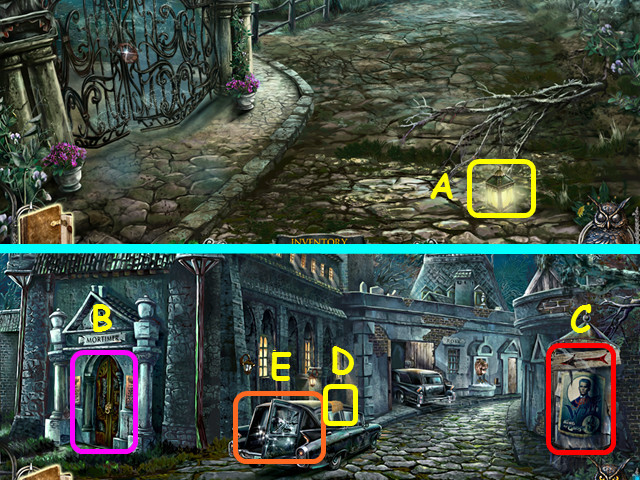
- Try to talk to the ghost (A).
- You will have the option of a brief tutorial.
- Talk to Samuel, who is now standing where the ghost was initially.
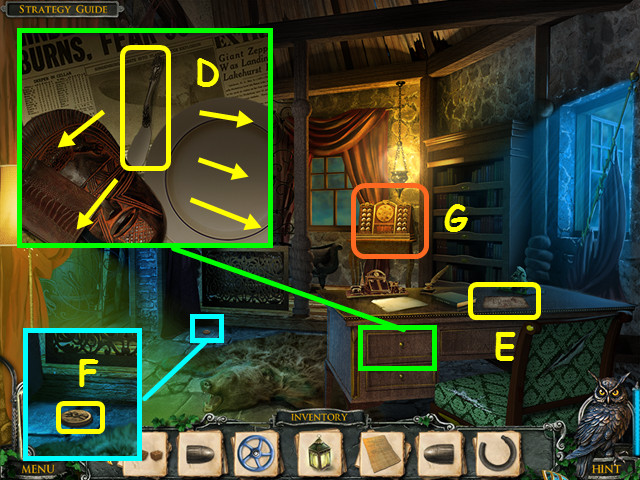
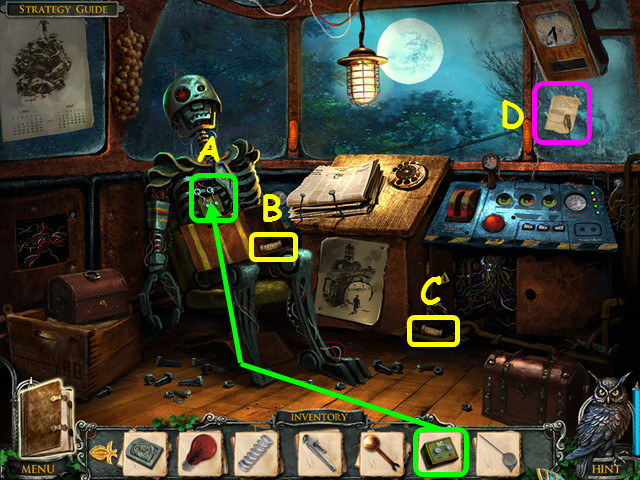
- Take the LIGHTER (B).
- Look at the mailbox and read the newspaper (C).
- Use the LIGHTER to burn off the cobwebs, then open the mailbox and take the OWL EYE (D).
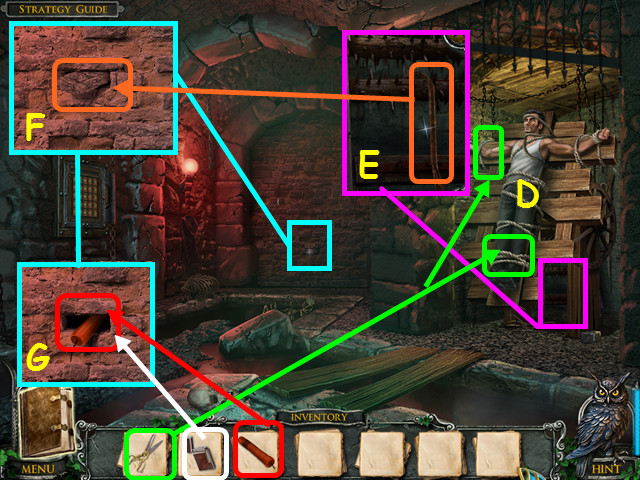
- Open the car door and look inside (E).
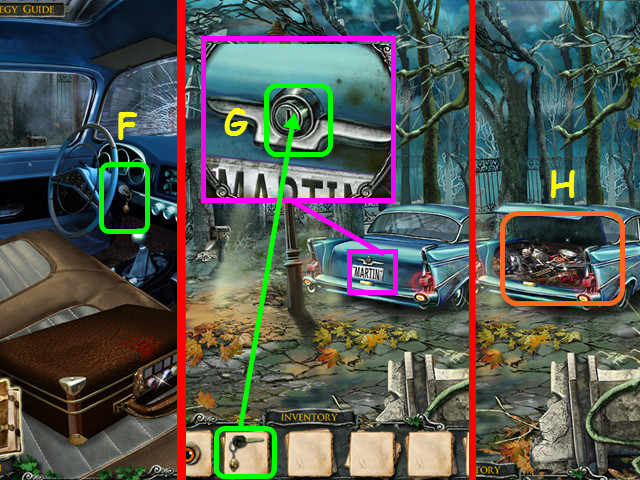
- Take the CAR KEYS from the ignition then exit the car (F).
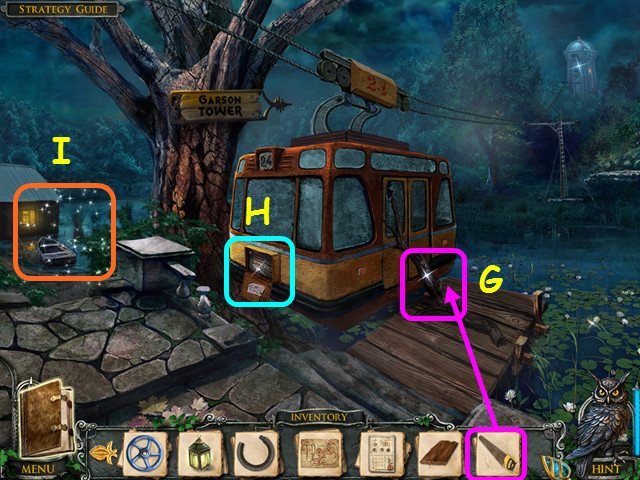
- Look at the trunk, use the CAR KEYS on the lock and then turn the keys (G).
- Open the trunk and look inside for a HOS (H).
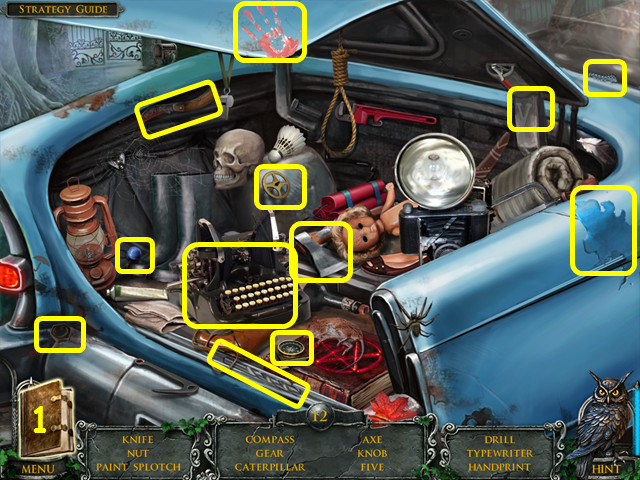
- Locate all the items on the list (1).
- You will earn the GLOVE BOX KNOB.
- Look inside the car.
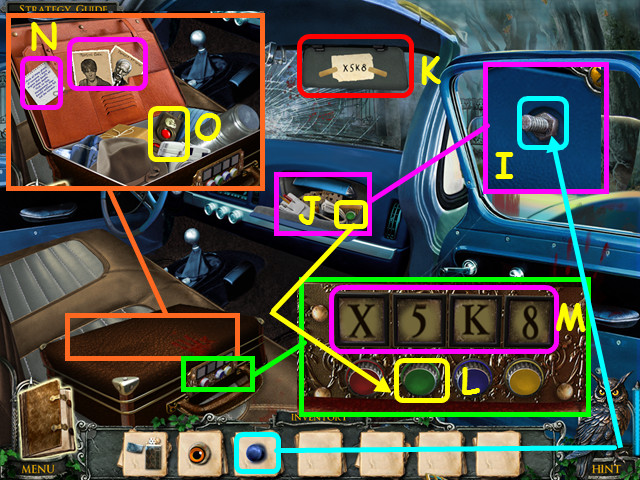
- Look at the glove box and attach the GLOVE BOX KNOB (I).
- Open the glove box and take the SUITCASE KNOB (J).
- Flip down the visor to find a code (K).
- Look at the suitcase and attach the SUITCASE KNOB (L).
- Enter the code X-5-K-8 (M).
- Look at the photos and the note (N).
- Take the DOG REMOTE CONTROL (O).
- Exit the car, talk to Samuel, then walk forward.
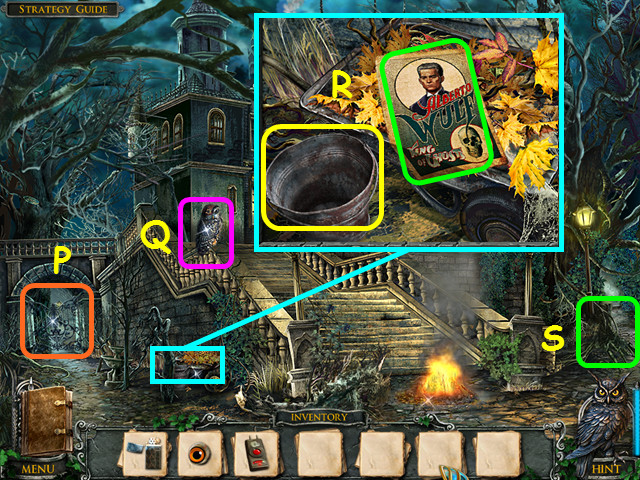
- Look at the gate to find someone watching you (P).
- Try to take the owl (Q).
- Look at the wheelbarrow; read the poster and take the BUCKET (R).
- Walk to the right (S).
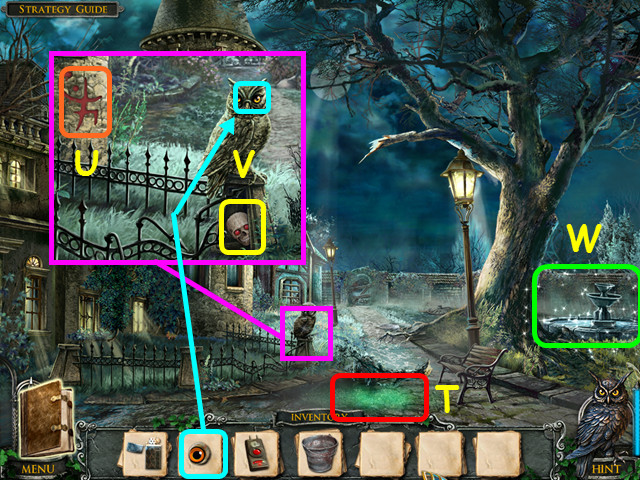
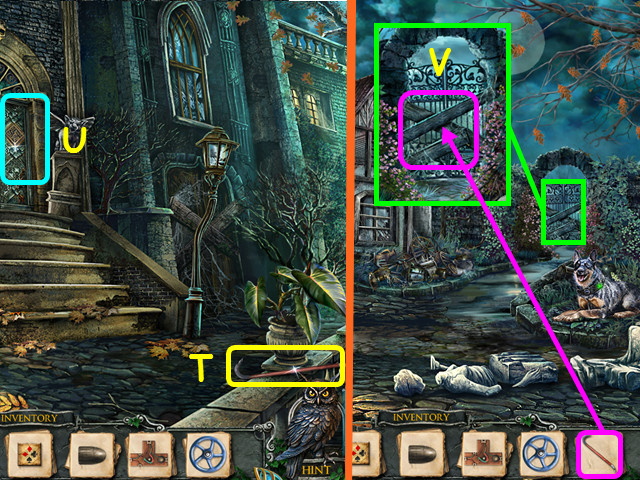
- Look at the glowing powder (T).
- Look at the owl and note the strange symbol (U).
- Place the OWL EYE into the owl, then take the SKULL (V).
- Select the fountain for a HOS (W).
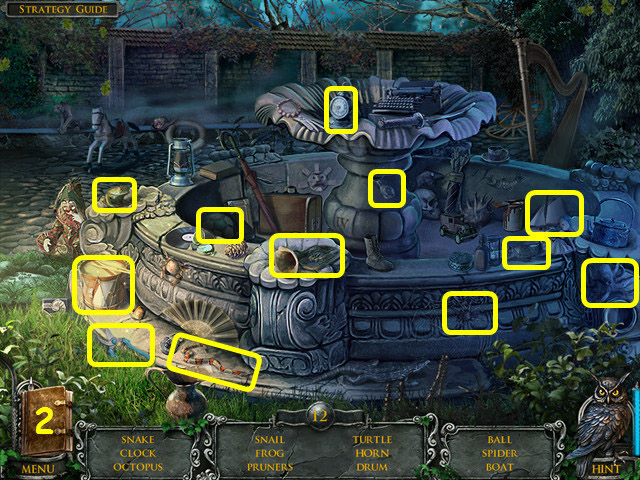
- Locate all the items on the list (2).
- You will earn the PRUNERS.
- Walk forward, then take the left path.
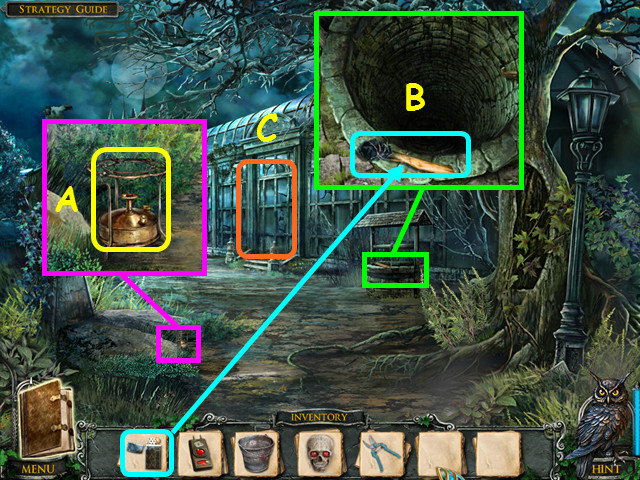
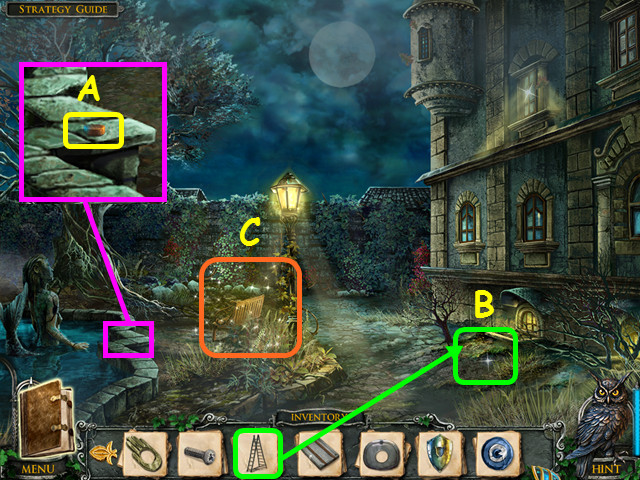
- Look at the ground and take the BURNER (A).
- Look at the well; use the LIGHTER on the torch then take it (B).
- Open the door to the greenhouse and go inside (C).
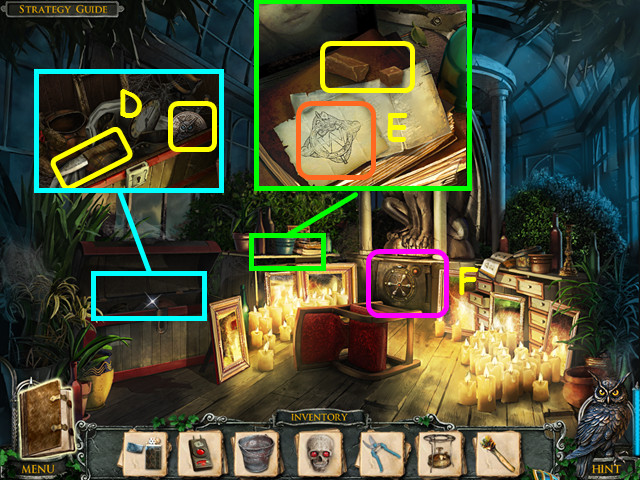
- Look in the chest; take the KNIFE and the OWL PIECE (D).
- Look at the counter; take the crest drawing and the SEALING WAX (E).
- Note the mini-game at the base of the gargoyle (F).
- Walk down twice.
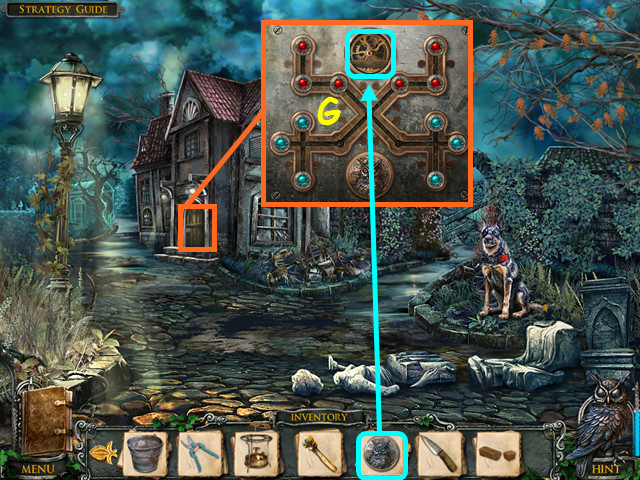
- Look at the door and place the OWL PIECE into the indentation (G).
- This will trigger a mini-game.
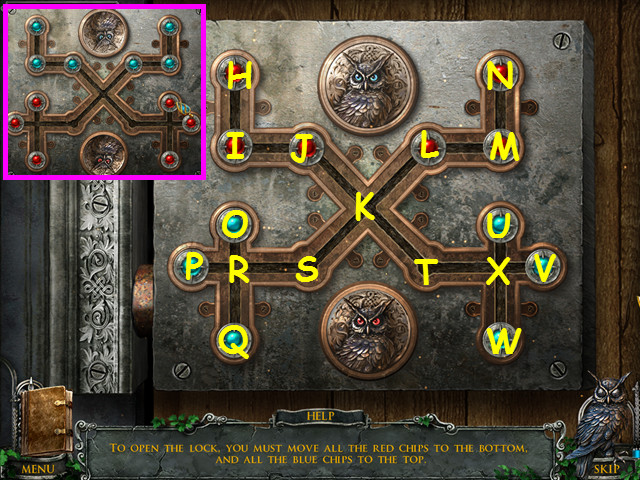
- Reverse the positions of the red and blue chips.
- Move the chips in this sequence: U-R, V-S, L-V, M-U, N-X, S-N, R-M, Q-L, X-Q, W-R, J-W, I-X, H-T, R-H, O-I, P-J, T-P, and X-O.
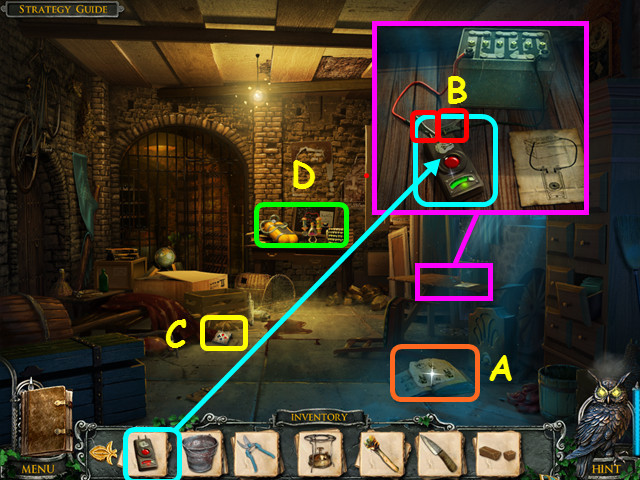
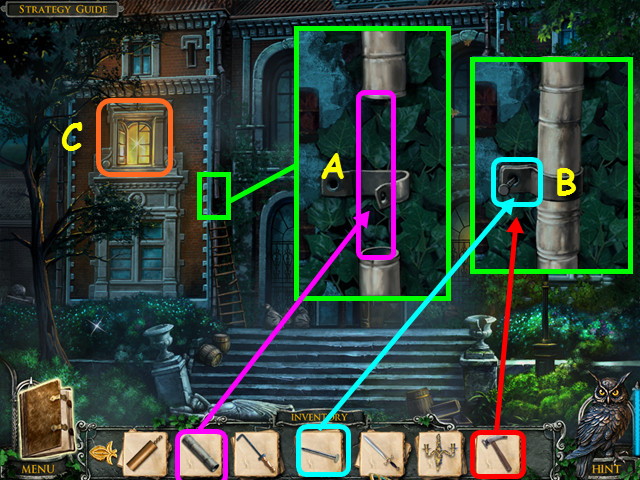
- Look at the book for the remote instructions (A).
- Look at the table; place the DOG REMOTE CONTROL on it, then attach the 2 clips (B).
- Take the CHARGED REMOTE CONTROL.
- Take the first PUZZLE TILE (C).
- Note the scuba tank refill station on the table (D).
- Walk down once.
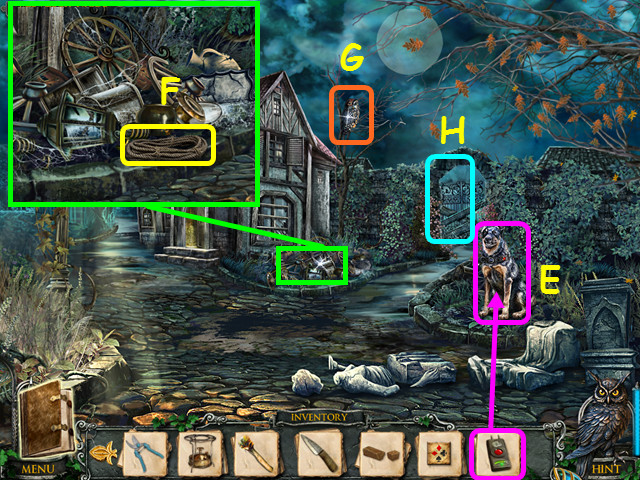
- Use the CHARGED REMOTE CONTROL on the dog (E).
- Look at the trash pile and take the ROPE (F).
- Try to catch the owl (G).
- Note the gate on the right (H).
- Walk forward on the left.
Chapter 2: Down the Well
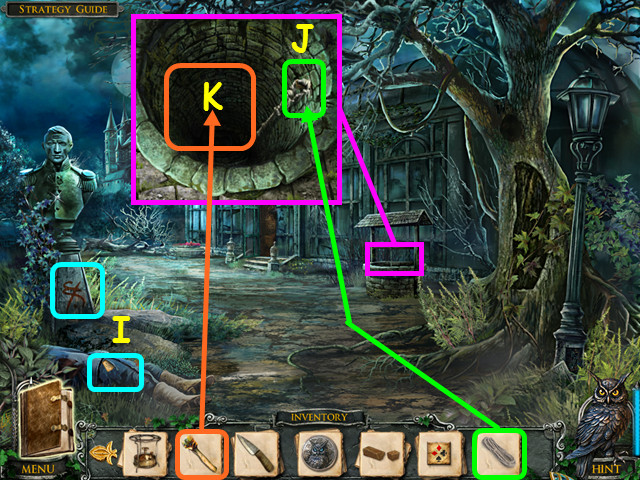
- Look at the symbol on the statue and take the note from the gardener's pocket (I).
- Look at the well and tie the ROPE to the hook (J).
- Throw the TORCH down the well, then climb down the rope (K).
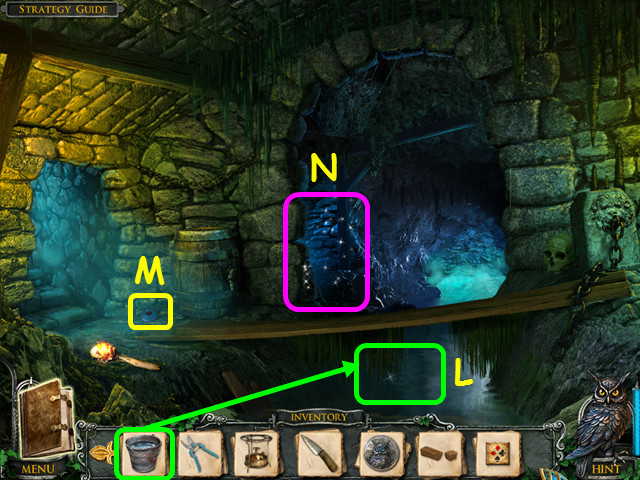
- Use the BUCKET on the water to get the FILLED BUCKET (L).
- Take the INSULATING TAPE (M).
- Select the dark corner for a HOS (N).
- Locate all the items on the list (3).
- You will earn the CIRCUIT BOARD PIECE.
- Walk left to exit the well.
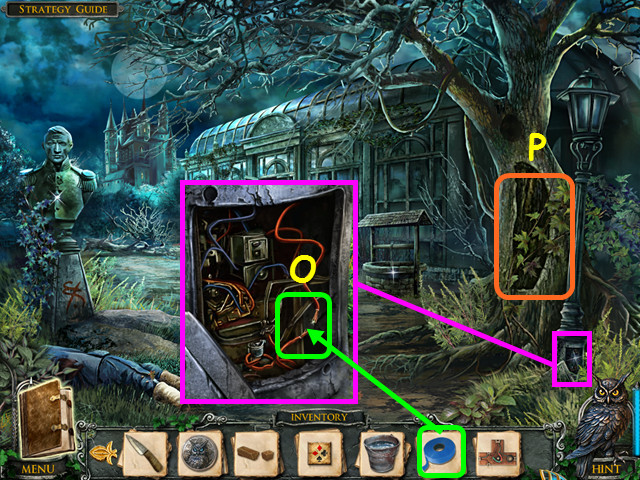
- Look at the base of the lamp and use the INSULATING TAPE on the cut wire (O).
- Select the tree for a HOS (P).
- Locate all the items on the list (4).
- You will earn the first BULLET.
- Talk to Samuel.
- Walk down 3 times.
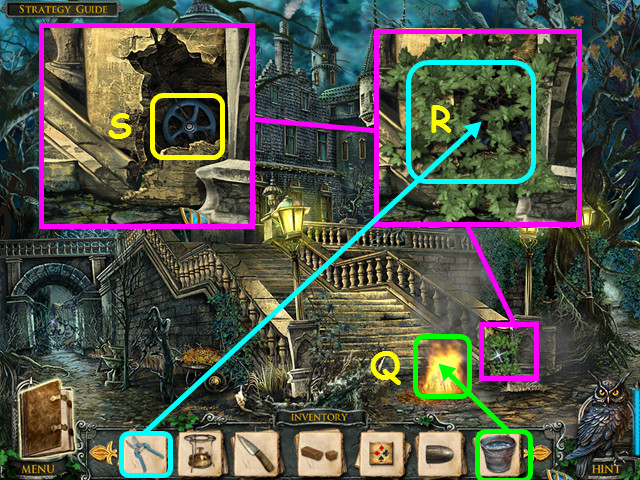
- Use the FILLED BUCKET on the fire (Q).
- Look at the base of the light and use the PRUNERS 3 times on the vines (R).
- Take the VALVE (S).
- Walk up the stairs.
- Take the CROWBAR (T).
- Note the mini-game on the door (U).
- Walk down; go to the right, then forward.
- Look at the gate and use the CROWBAR 3 times on the boards (V).
- Open the gate and walk through.
- Take the LANTERN (A).
- Walk forward.
- Look at and knock on the door to learn you need a permission slip (B).
- Read the poster (C).
- Take the BLANK PAPER (D).
- Select the hearse for a HOS (E).

- Locate all the items on the list (5).
- You will earn the TWEEZERS.
- Walk forward.
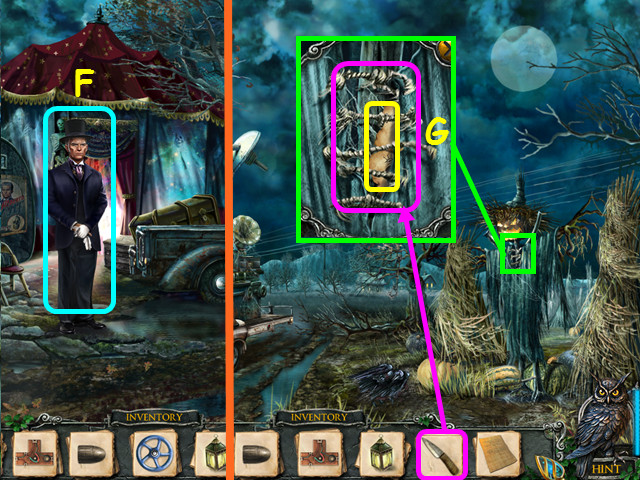
- Talk to Wulf (F).
- Walk to the right.
- Look at the scarecrow; use the KNIFE on the laces then take the CLUE PIECES (G).
- Walk down 4 times, go forward on the left, then enter the greenhouse.
- Look at the base of the gargoyle statue for a mini-game.
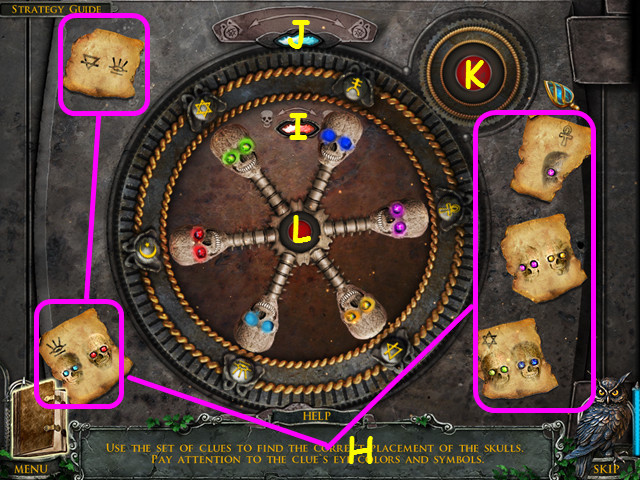
- Place the SKULL on the wheel, then place the CLUE PIECES 5 times on the safe (H).
- Using the clues, move the skulls and symbols to the correct positions.
- Use the red (I) and blue arrows (J) to swap the positions of the 2 pieces on either side.
- Use the outer red button to rotate the symbols (K), and use the center red button (L) to rotate the skulls.
- Our solution is: I, Lx1, I, Lx3, I, Kx3, J, Kx1, J, Kx4, J, Kx1, and J.
- Look inside the safe and take the BOTTLE WITH GLOWING POWDER.
- Walk down twice, walk right, then go forward twice.
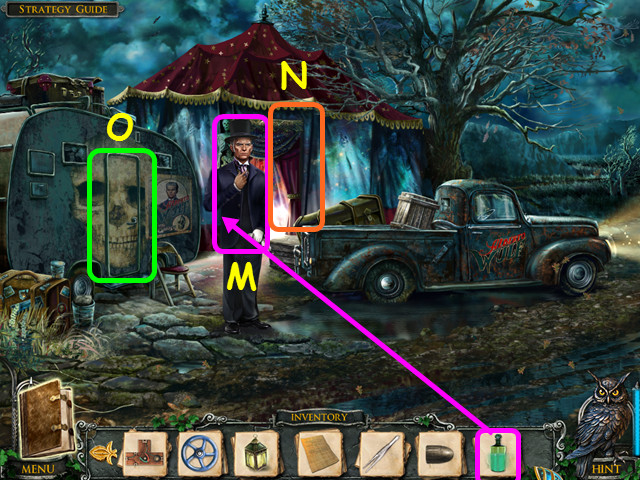
- Give the BOTTLE WITH GLOWING POWDER to Wulf (M).
- Note the entrance to the tent (N).
- Open the trailer door and look inside for a HOS (O).
- Locate all the items on the list (6).
- You will earn the LATCH HANDLE.
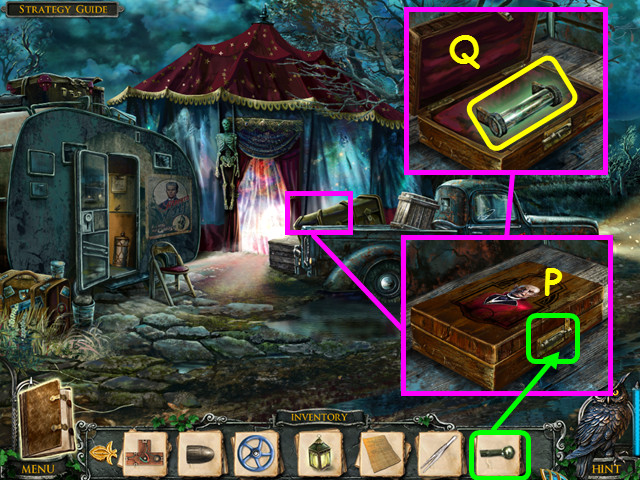
- Look in the bed of the truck and place the LATCH HANDLE on the latch (P).
- Open the box and take the FUSE (Q).
- Enter the tent.
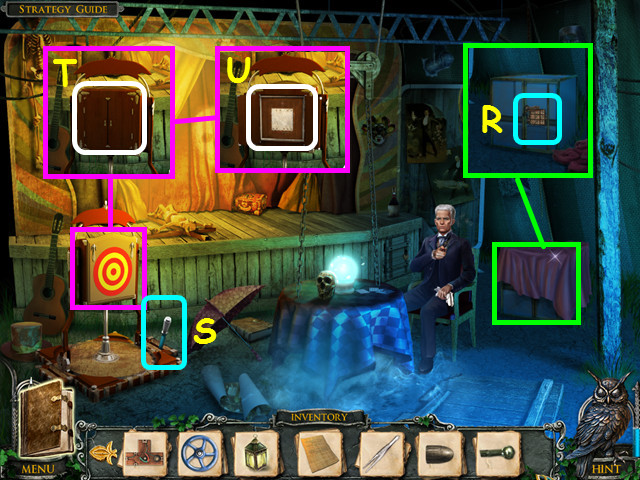
- Remove the blanket from the box and note the mini-game (R).
- Pull the lever (S).
- Open the cabinet (T) and select the mini-game (U).
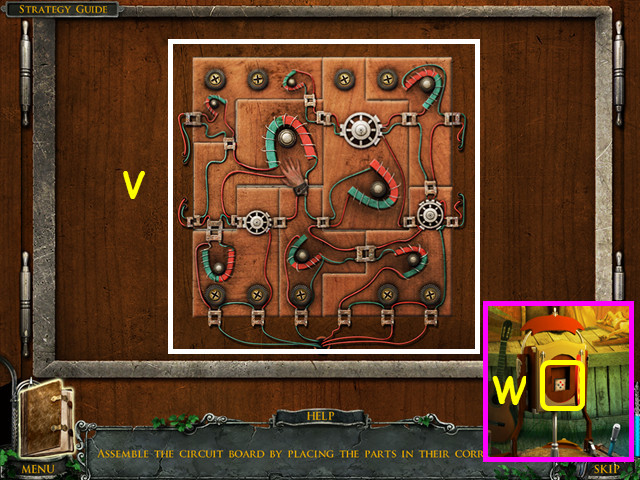
- Place the CIRCUIT BOARD PIECE on the board to trigger the mini-game.
- Place all the pieces inside the square so that all the circuits meet (V).
- Take the second PUZZLE TILE from the cabinet (W).
- Select the mini-game on the box.

- Place the 2 PUZZLE TILES into the grid to begin the mini-game.
- Arrange the tiles so that the suits match where they touch (X).
- Look inside the box and take the GENERATOR (Y).
- Walk down, then go to the right.
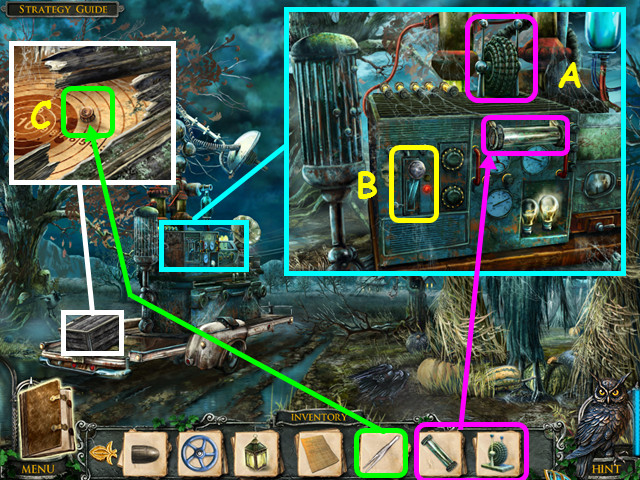
- Look at the machinery on the cart.
- Place the GENERATOR and the FUSE into the machine (A), then pull the lever (B).
- After the cut-scene, look inside the small crate and use the TWEEZERS to take the second BULLET (C).
- Walk down.
Chapter 3: Following the Clues
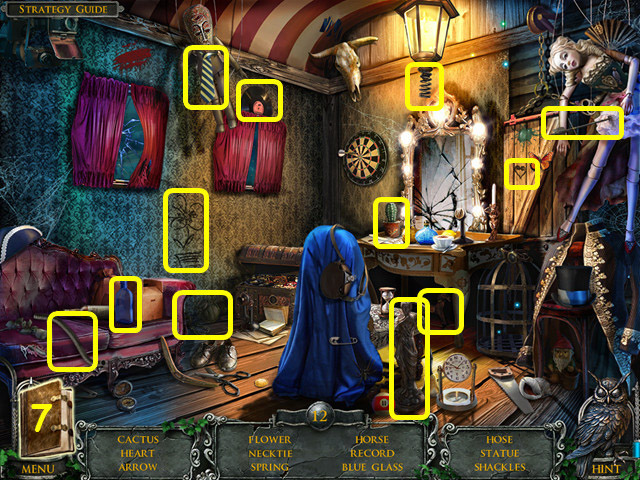
- Select the trailer door for a HOS.
- Locate all the items on the list (7).
- You will earn the AIR HOSE.
- Walk down and select the hearse for a HOS.
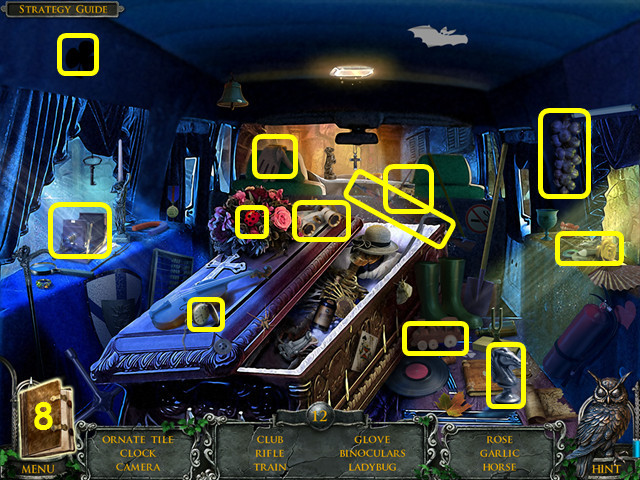
- Locate all the items on the list (8).
- You will earn the first ORNATE TILE.
- Walk down 3 times and select the fountain for a HOS.
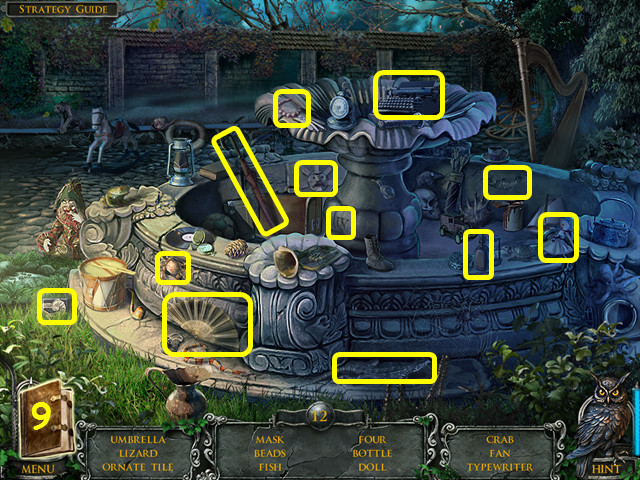
- Locate all the items on the list (9).
- You will earn the second ORNATE TILE.
- Walk down, go up the stairs then look at the door for a mini-game.
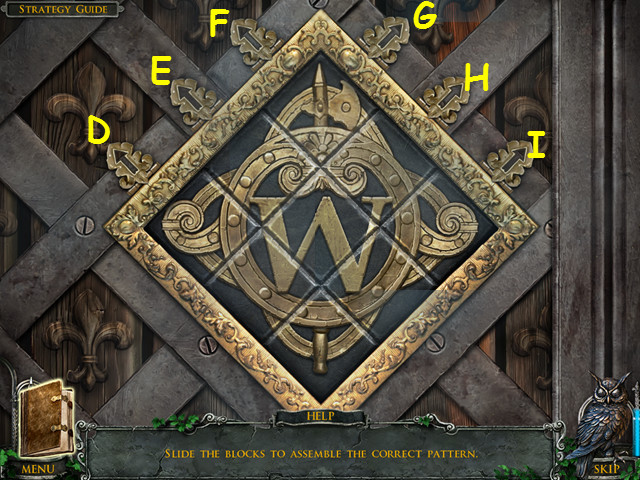
- Place the 2 ORNATE TILES into the grid to activate the mini-game.
- Slide the tiles using the arrows to reform the insignia.
- Press on the arrows in this sequence: D, D, I, F, I, I, H, F, F, G, E, G, G, E, E, G, F, G, F, and F.
- Enter the mansion.
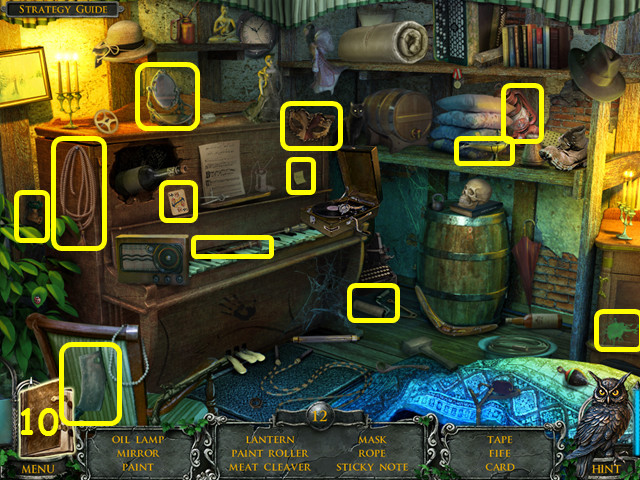
- Select the area under the stairs for a HOS.
- Locate all the items on the list (10).
- You will earn the ROPE.
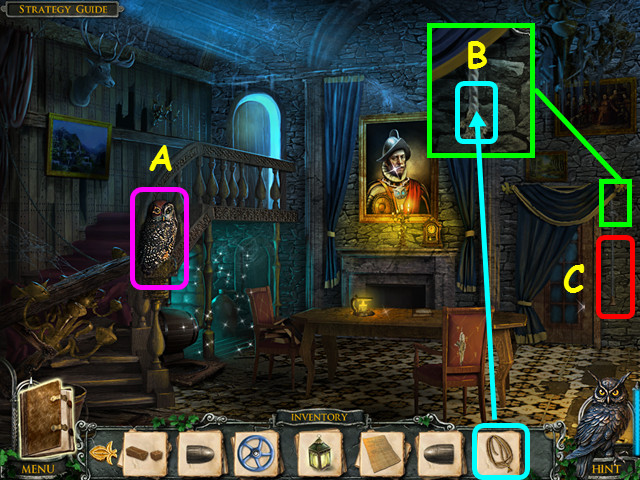
- Try to capture the owl (A).
- Look at the broken door pull and attach the ROPE (B).
- Pull the repaired door pull (C).
- Enter the door.
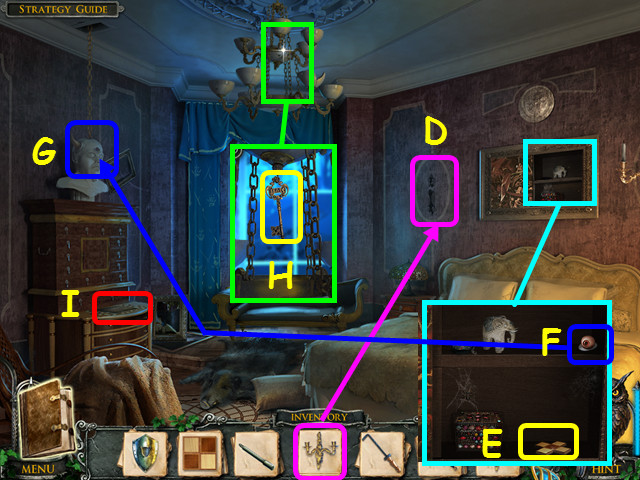
- Open the drawer and look inside; move the items around to find the WAX SPOON (D).
- Take the DIAGRAM (E).
- Look at the ground and take the ROUND CHIP (F).
- Look at the cabinet for a mini-game (G).
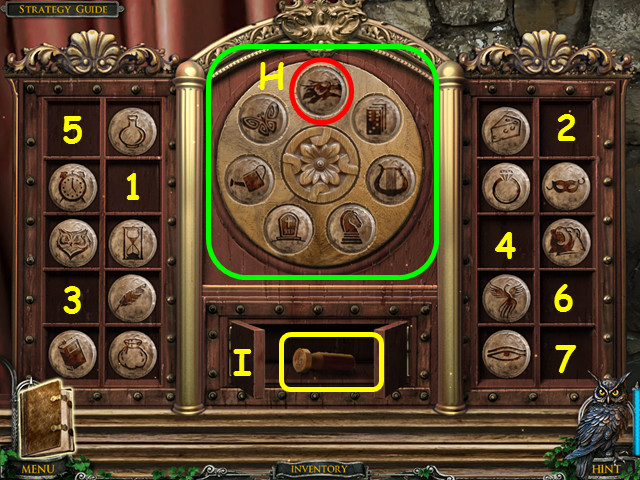
- Use the ROUND CHIP on the board to trigger the mini-game.
- Place a wood chip that relates to the symbol in the top position on top of it (H).
- Place the chip in numerical order (1-7).
- Take the SEAL (I).
- Walk to the left and select the area under the stairs for a HOS.
- Locate all the items on the list (11).
- You will earn the WIRE BRUSH.

- Look at the table.
- Place the SEALING WAX, WAX SPOON, BLANK PAPER, and the SEAL in the outlined areas of the table (J).
- Place the sealing wax over the candle (K).
- Use the wax spoon to take the melted wax over the candle, then pour it on the paper (L).
- Use the seal on the paper (M).
- Take the PERMISSION SLIP.
- Walk down twice, go to the right, go forward, go out the gate on the right, then walk forward once more.
Chapter 4: A Visit to the Monastery
- Look at the door and use the PERMISSION SLIP on the monk (N).
- Enter the monastery.

- Open the door to the storeroom (O).
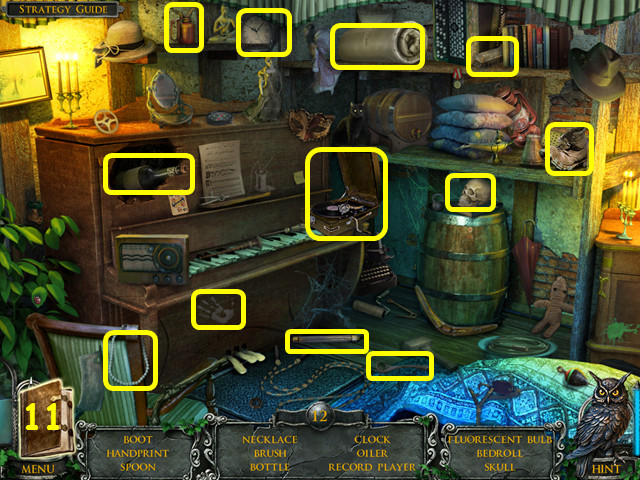
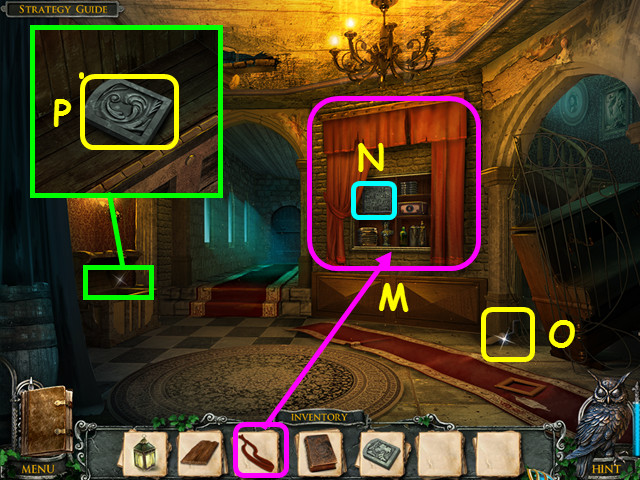
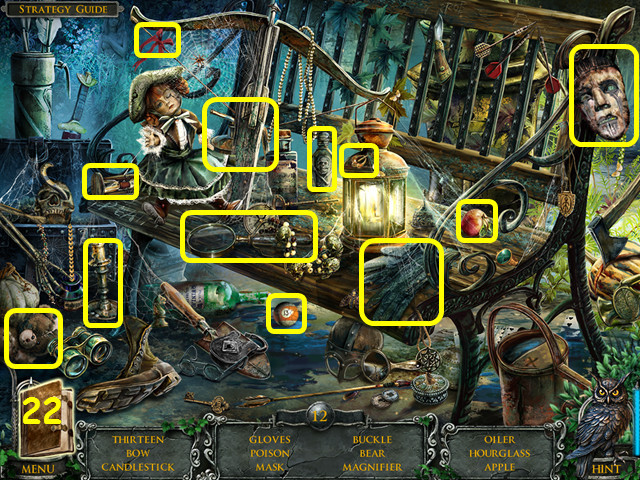
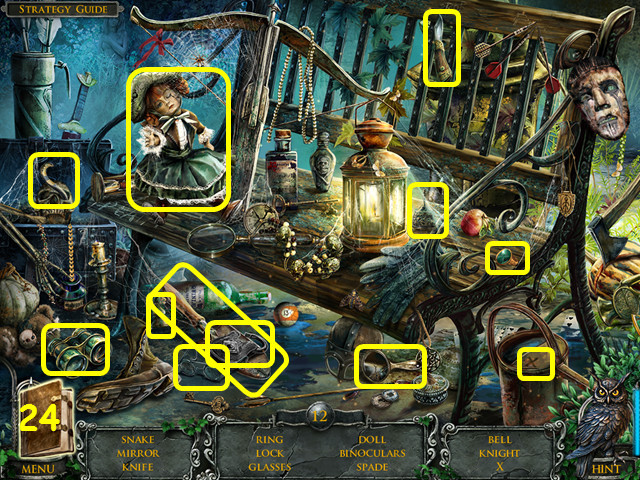
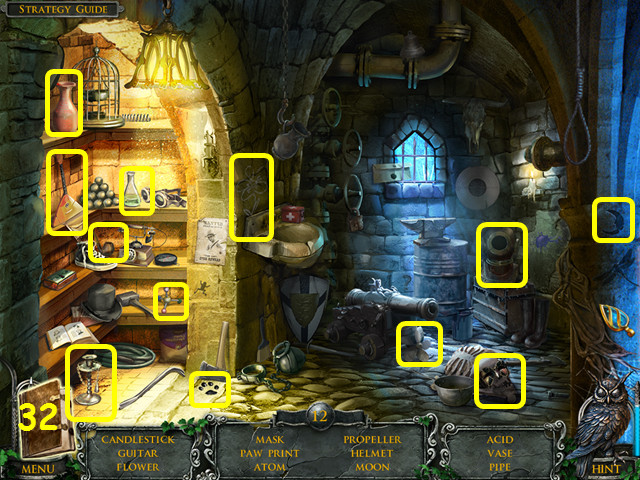
- Open the panel, then select the area for a HOS (P).
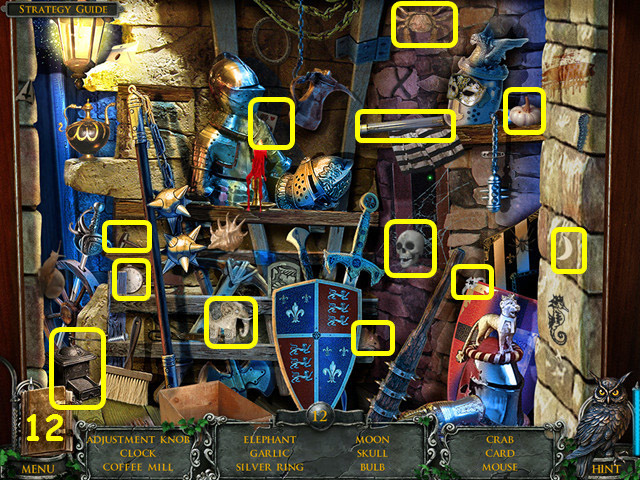
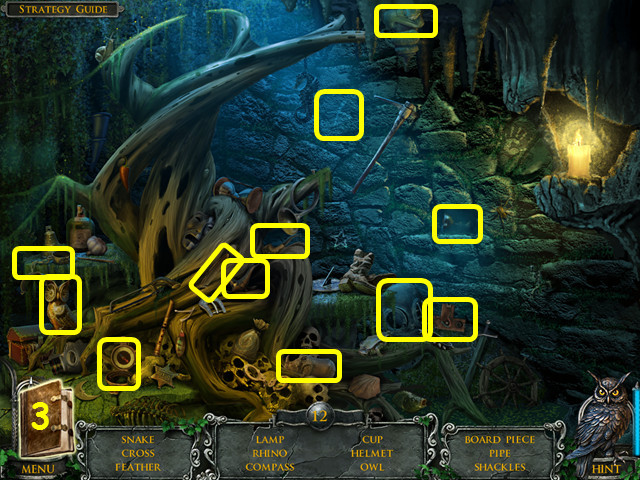
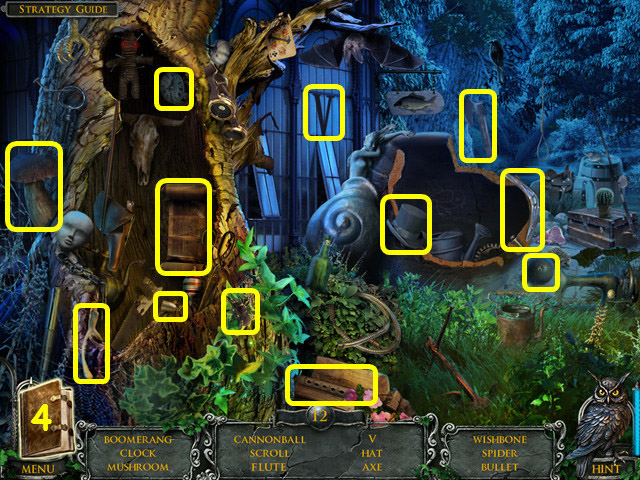
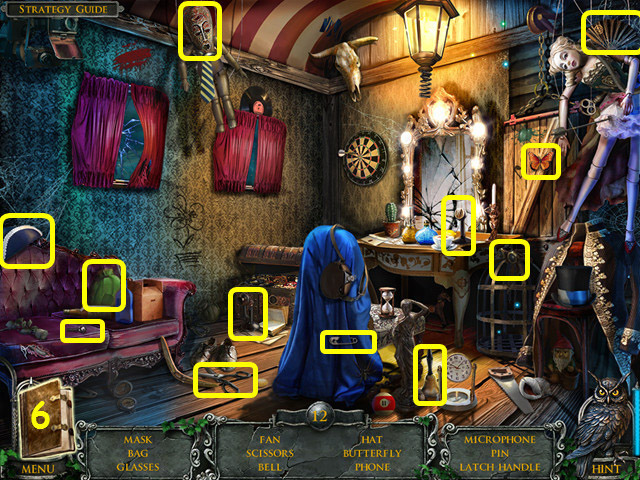
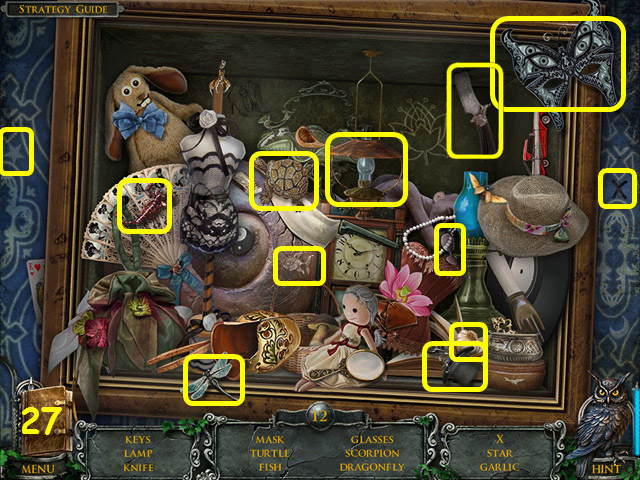
- Locate all the items on the list (12).
- You will earn the MICROSCOPE KNOB.
- Walk forward through the door.
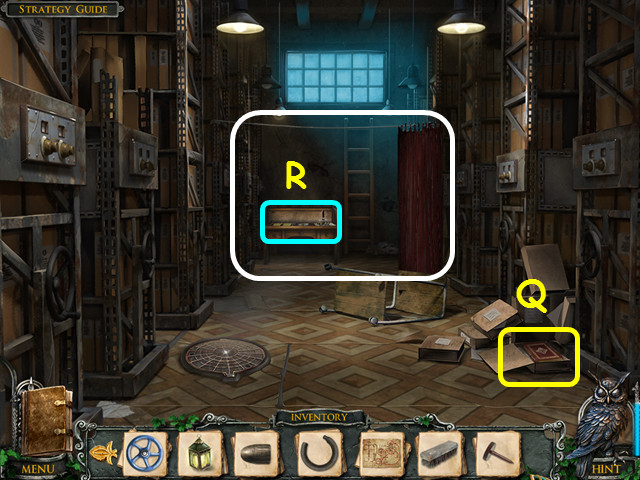
- Take the FAMILY HISTORY BOOK (Q).
- Pull back the curtain, open the desk and look inside for a mini-game (R).
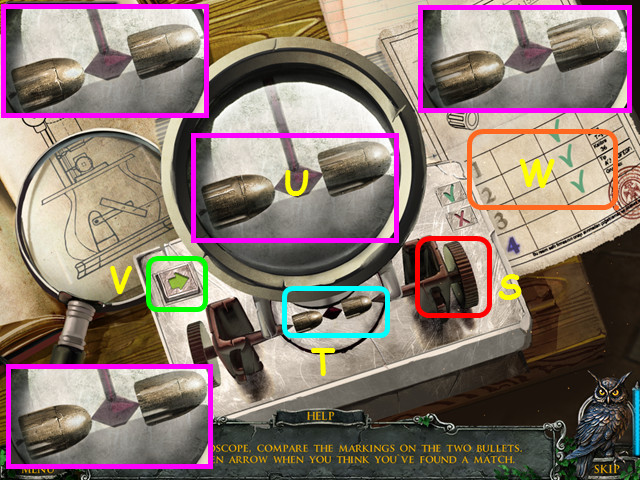
- Place the MICROSCOPE KNOB on the right (S).
- Place the 2 BULLETS in the center (T).
- Use the right microscope knob to turn the right bullet until the striations match the left bullet in the viewer (U).
- Press the green arrow (V) to confirm the match; a green check confirms the match (W).
- There are 4 markings to match.
- You will earn the BULLET COMPARISON.
- Walk down.
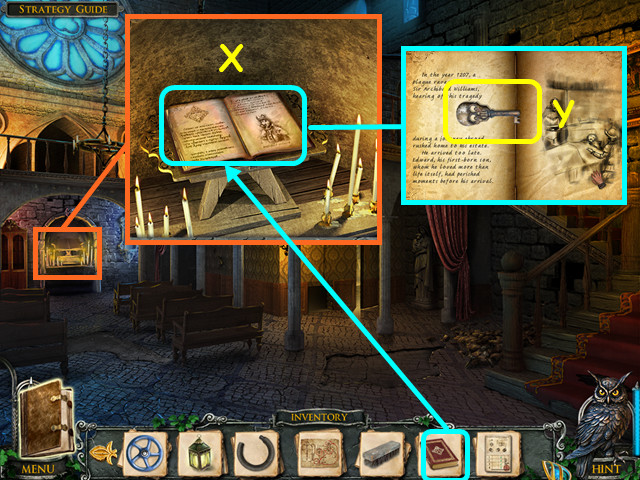
- Look at the alcove and place the FAMILY HISTORY BOOK on the stand (X).
- Look at the book; turn the pages to find the CEMETERY KEY (Y).
- Walk down, go forward, then enter the tent.
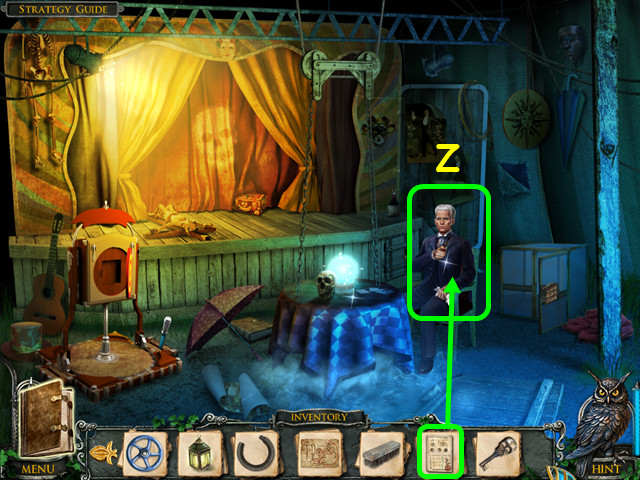
- Give the BULLET COMPARISON to Wulf (Z).
- He will give you the REVEALING INK.
- Walk down 3 times.
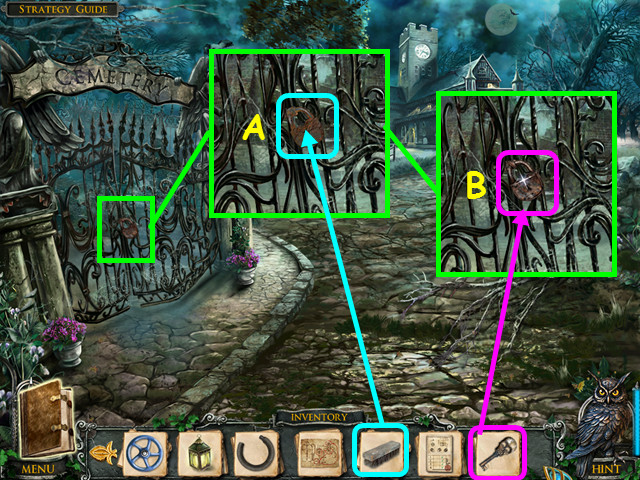
- Look at the gate and use the WIRE BRUSH on the lock (A).
- Use the CEMETERY KEY in the lock; turn the key and open the gate (B).
- Enter the cemetery.
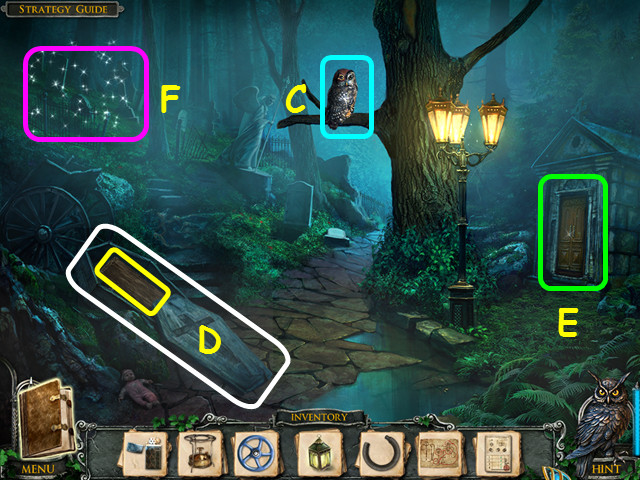
- Try to take the owl (C).
- Open the coffin and take the PLANK (D).
- Note the mausoleum door (E).
- Select the graveyard for a HOS (F).
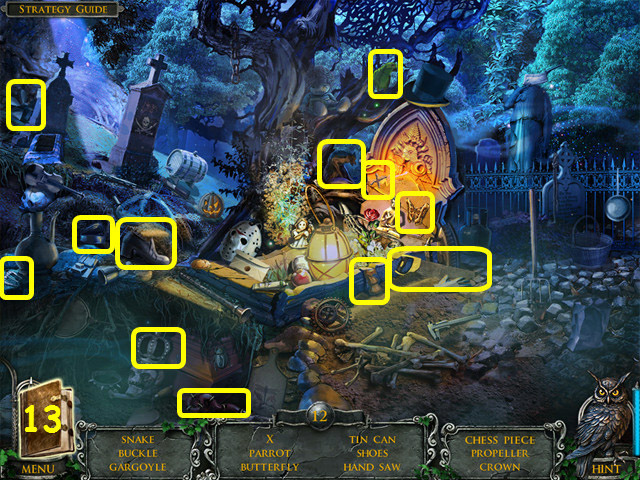
- Locate all the items on the list (13).
- You will earn the HAND SAW.
- Walk forward on the path.
- Use the HAND SAW on the branch (G).
- Note the power box (H).
- Select the boat for a HOS (I).
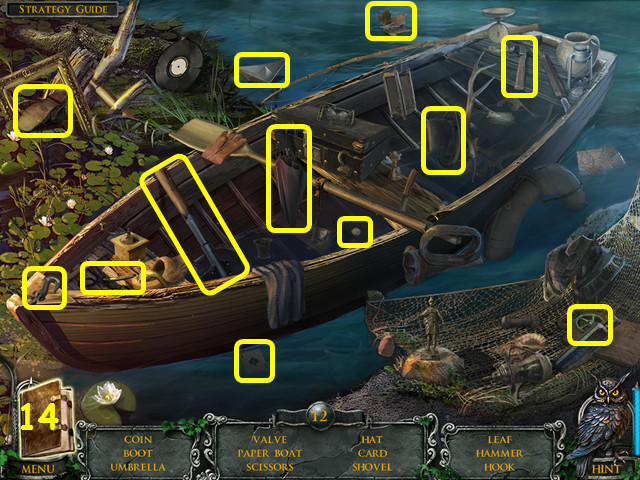
- Locate all the items on the list (14).
- You will earn the GREEN VALVE.
- Walk down 3 times and enter the building.
- Look at the back table with the scuba tank for a mini-game.
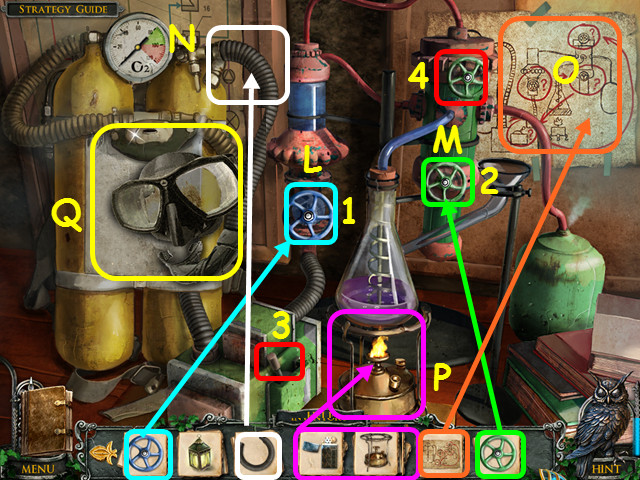
- Place the VALVE on the blue stem (L).
- Place the GREEN VALVE on the green stem (M).
- Place the HOSE on the tank (N).
- Place the DIAGRAM on the wall (O).
- Place the BURNER under the flask, then use the LIGHTER to start the flame (P).
- Turn the blue valve (1), turn the lower green valve 3 times (2), flip the switch (3), then turn the upper green valve twice (4).
- Take the SCUBA GEAR (Q).
- Exit the close-up, walk down, then go forward on the left.
- Select the tree on the right for a HOS.
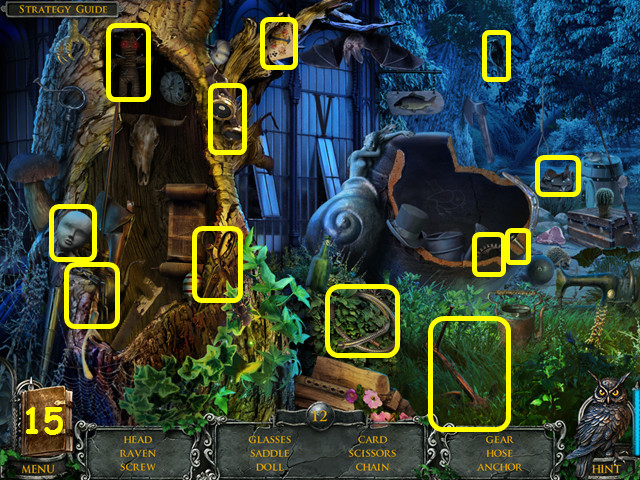
- Locate all the items on the list (15).
- You will earn the first GEAR.
- Enter the well.
Chapter 5: Taking a Swim
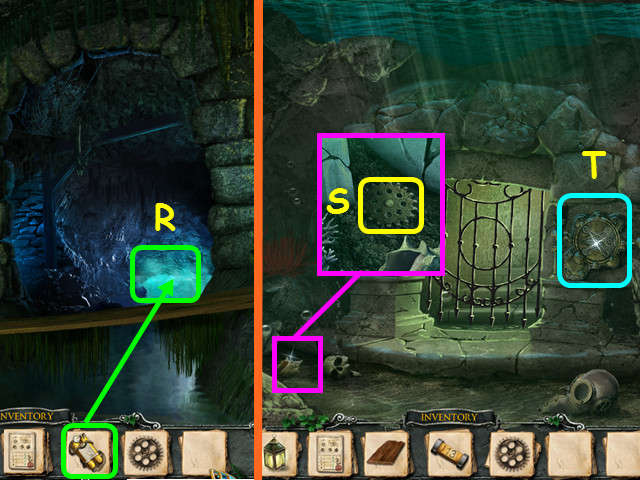
- Use the SCUBA GEAR on the cave (R).
- Look at the shell and take the second GEAR (S).
- Look at the mechanism for a mini-game (T).
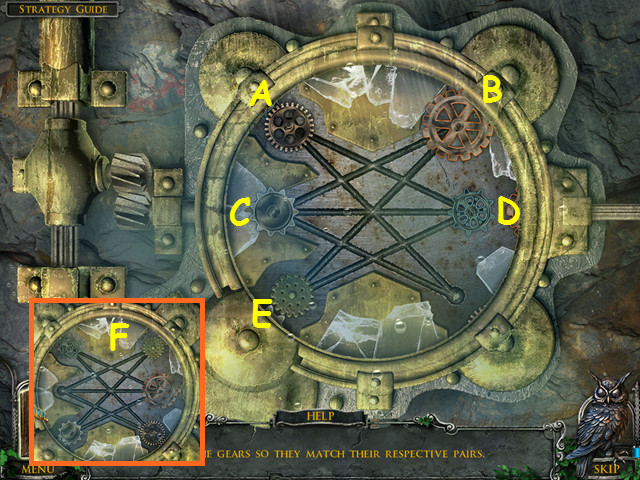
- Place the 2 GEARS into the mechanism to trigger the mini-game.
- Move the gears to match the hidden gears on the outer edge.
- From the start position shown, move the gears in this sequence: A, D, C, B, E, D, and C.
- The final solution is shown here (F).
- Go forward through the gate.

- Take the CURTAIN TIE (G).
- Look at the map (H).
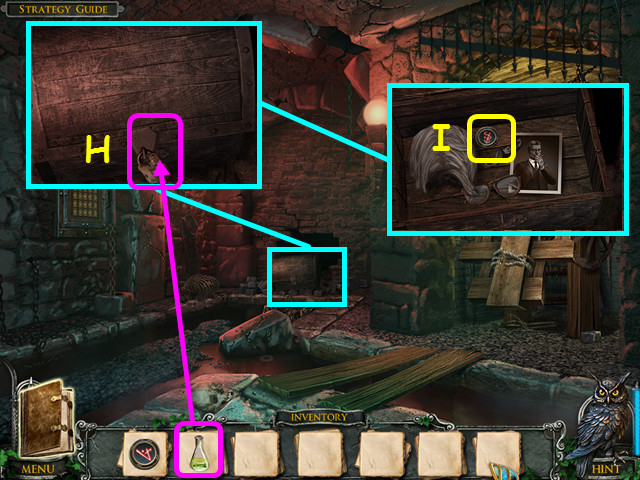
- Look at the desk and use the REVEALING INK on the paper (I).
- Take the code, then go up the stairs.
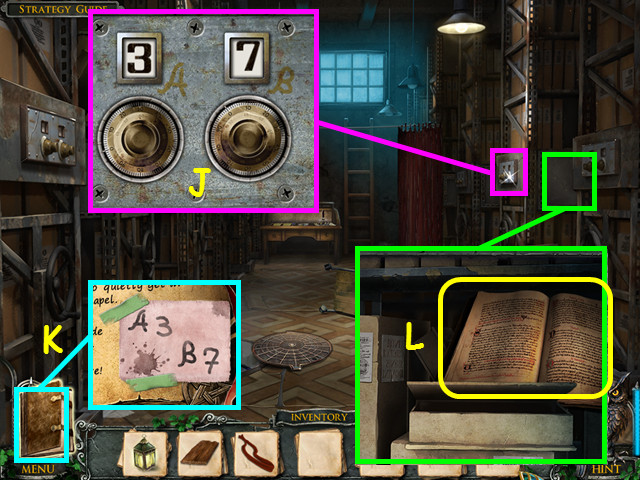
- Look at the safe and enter the code A3 B7 (J). Refer to your journal if necessary (K).
- Look in the compartment and take the OPERATOR’S MANUAL (L).
- Walk down and select the compartment for a HOS.
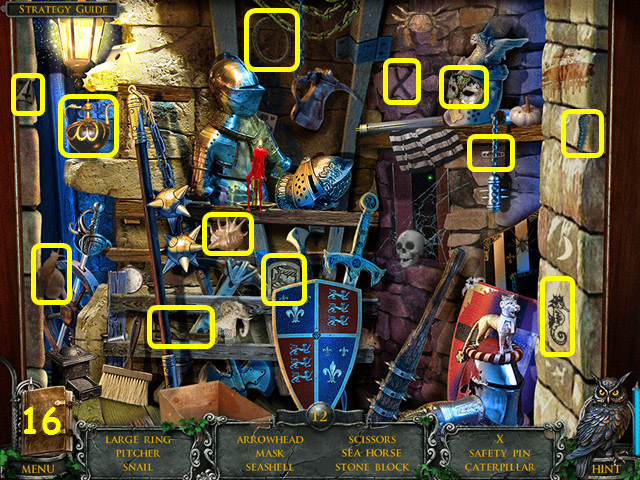
- Locate all the items on the list (16).
- You will earn the first STONE BLOCK.
- Enter the door at the top of the stairs.
- Use the CURTAIN TIE on the curtains (M).
- Note the mini-game (N).
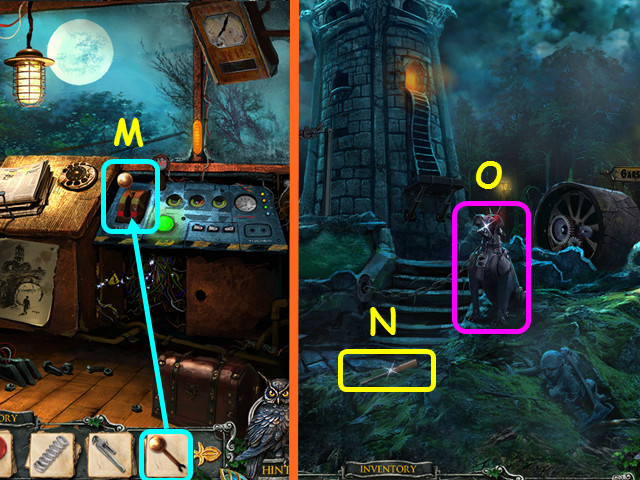
- Take the CRYPT CRANK (O).
- Look in the trunk and take the second STONE BLOCK (P).
- Walk down, enter the storeroom, then go down the manhole.
- Walk down twice, go left, walk down, go through the gate on the right, then go forward three times.
- Give the OPERATOR’S MANUAL to Wulf (Q).
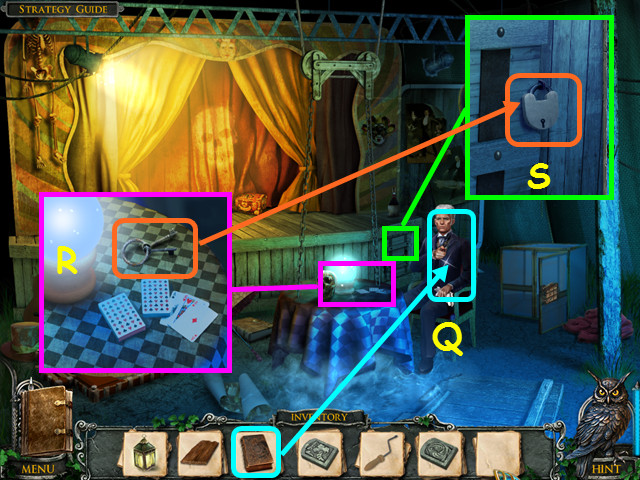
- Look at the table and take the STAGE KEYS (R).
- Look at the stage door and use the STAGE KEYS on the lock (S).
- Go through the door.

- Look in the back and take the RED BULB (T).
- Take the GLASS SHARD and use it on the jack-in-the-box (U).
- Take the SPRING that pops up.
- Take the WRENCH (V).
- Note the body and the symbol (W).
- Walk down 4 times, enter the cemetery on the left, then enter the mausoleum on the right.
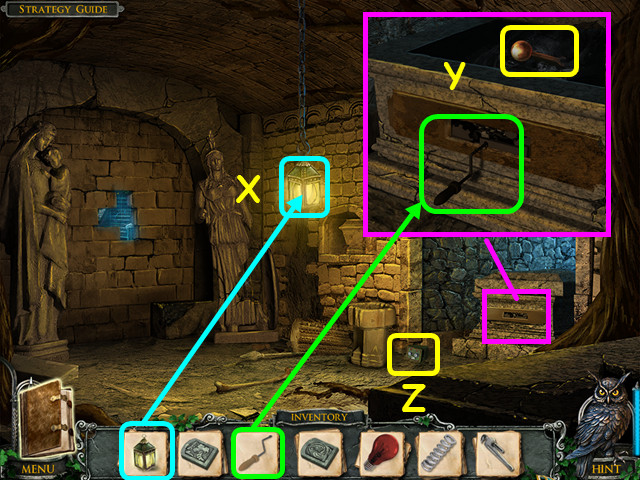
- Hang the LANTERN from the hook (X).
- Look at the crypt, use the CRYPT CRANK on the hole, turn the crank, then take the CABLE CAR LEVER (Y).
- Take the BATTERY (Z).
- Walk down and select the graveyard for a HOS.
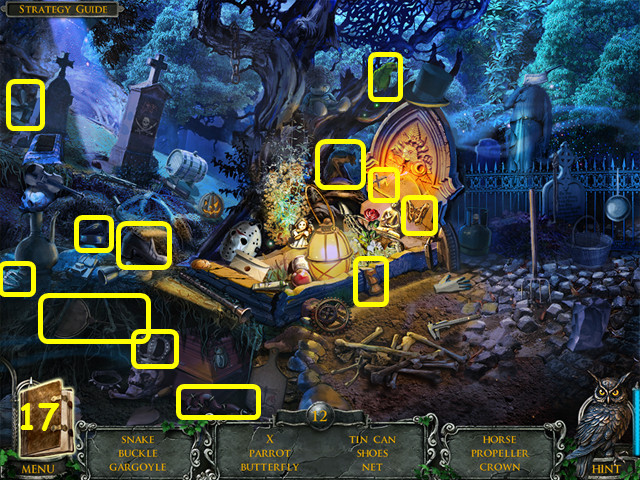
- Locate all the items on the list (17).
- You will earn the SCOOP NET.
- Walk forward on the path, then enter the cable car.
- Place the BATTERY into the robot (A).
- Take the FUSE 40 (B).
- Take the FUSE 13 (C).
- Read the note (D).
- Walk down.
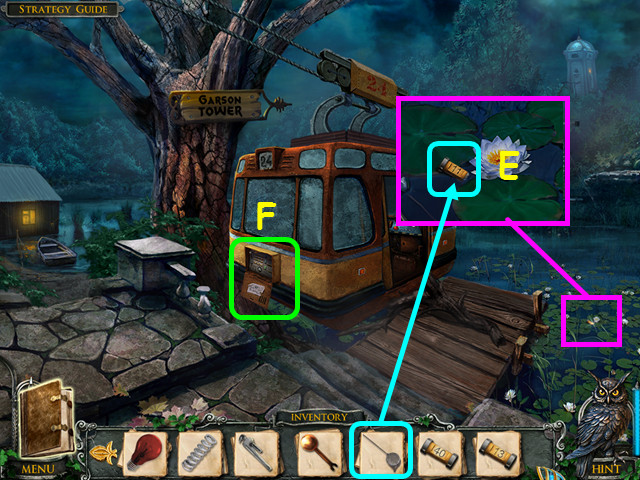
- Look at the water and use the SCOOP NET to collect the FUSE 11 (E).
- Open the power box then look inside for a mini-game (F).
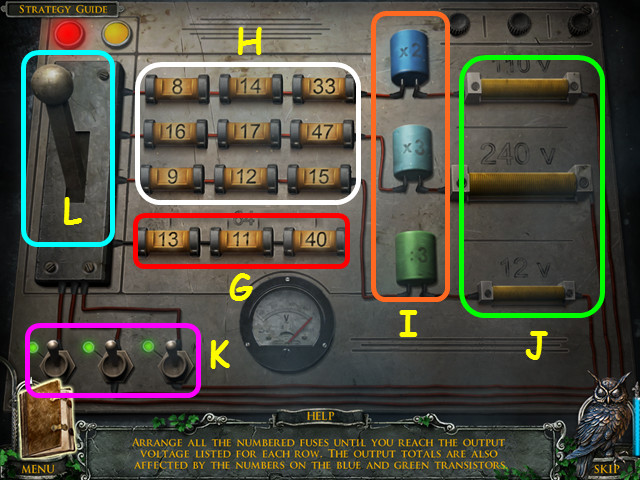
- Place the FUSE 11, FUSE 13, and the FUSE 40 into the lower row to trigger the mini-game (G).
- Arrange the fuses in the upper three rows (H) so that the total once affected by the blue and green transistors (I) equals the final voltage (J).
- Drag a fuse to another position to swap them.
- Flip the three switches (K).
- Pull the lever (L).
- Select the boat for a HOS.
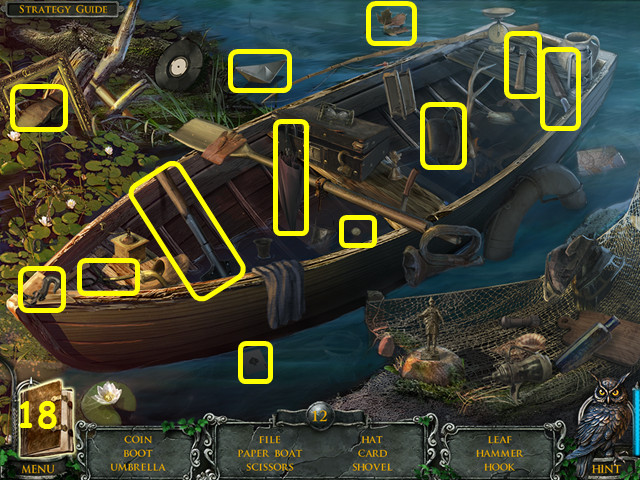
- Locate all the items on the list (18).
- You will earn the FILE.
- Enter the cable car.
- Place the CABLE CAR LEVER into the console and pull it down (M).
- Take the SCREWDRIVER (N).
- Note the mechanical dog (O).
- Enter the cable car, walk down, then enter the mausoleum on the right.
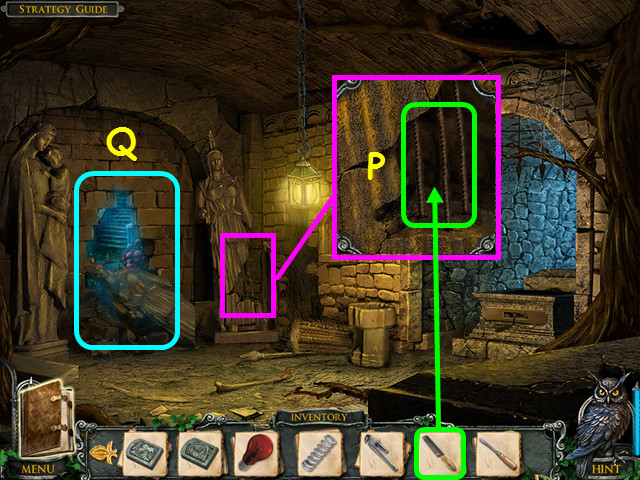
- Look at the statue and use the FILE on the bars (P).
- Walk through the hole in the wall (Q).
Chapter 6: Through the Crypt
- Try to take the owl (A).
- Take the STONE HAND (B).
- Look in the vines and take the ROPE (C).
- Place the PLANK between the dock and the stump (D).
- Select the stump for a HOS (E).
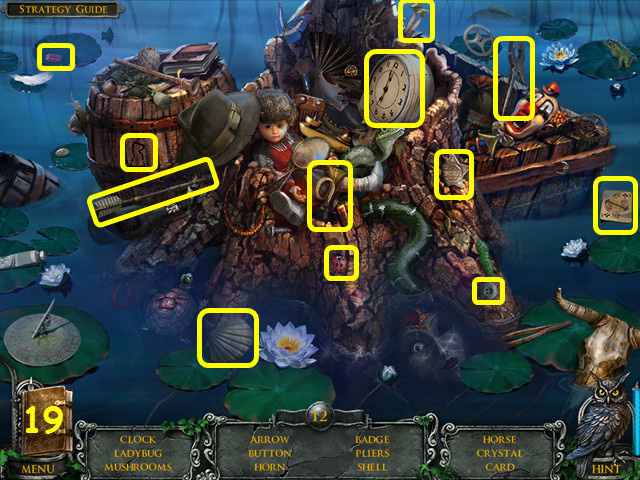
- Locate all the items on the list (19).
- You will earn the PLIERS.
- Walk down 4 times, go forward on the left, then enter the well. Go forward twice, up the stairs, walk down, then enter the upper room.
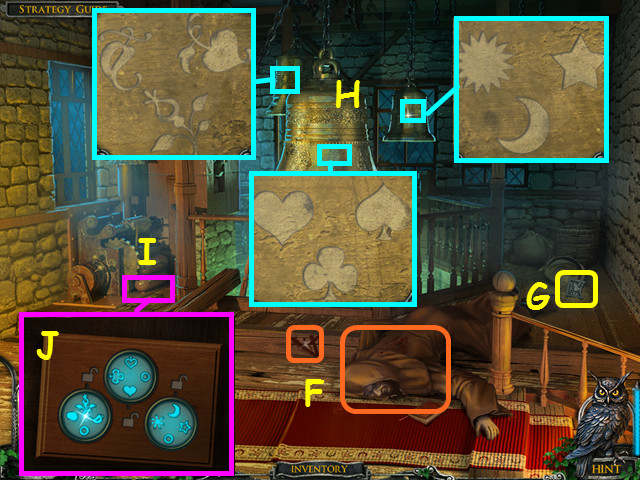
- Use the ROPE on the ceiling beam, then climb up to the bell tower.
- Look at the body and the symbol (F).
- Take the third STONE BLOCK (G).
- Look at the 3 symbols on each bell (H).
- Look at the floor and remove the 3 boards (I); enter the symbols on the dials based on the bell's height (J).
- One bell is much lower so use its first symbol, the other bells are about midway between the lower bell and the ceiling, so use the second symbols.
- Take the METAL BONE and note from inside the box.
- Walk down and look at the mini-game by the curtain.
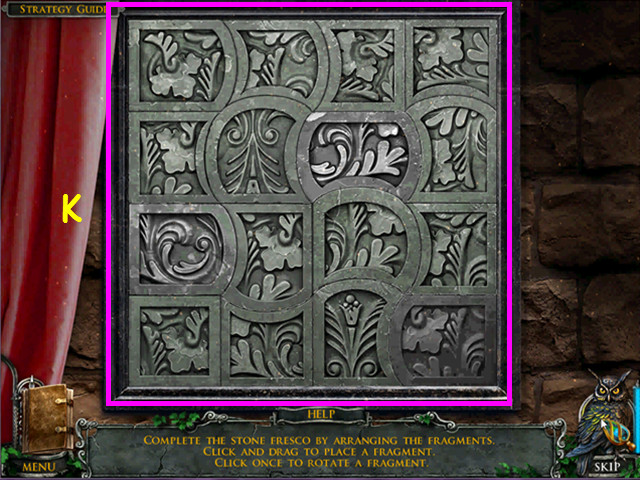
- Place the 3 STONE BLOCKS onto the board to trigger the mini-game.
- Select a piece to rotate it in place; then drag the piece into position.
- Pieces in the correct position will lock into place.
- Place all the pieces into the square (K).
- Take the CANE and note from the compartment that opens beneath the mini-game.
- Walk down; enter the storeroom, then the manhole. Walk down twice, go left, walk down, go through the gate on the right, then enter the cemetery. Walk forward on the path, then enter the cable car.
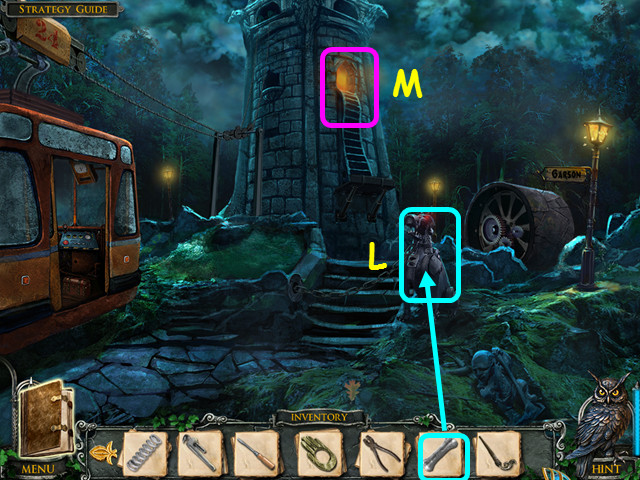
- Give the METAL BONE to the mechanical dog (L).
- Enter the tower (M).
- Look at the symbol and the body (N).
- Look in the corner and take the SCREW (O).
- Open the door and walk to the left (P).

- Look at the vice; place the CANE inside, then use the WRENCH on the cane to get the GATE KEY (Q).
- Take the BLOWTORCH and the LADDER (R).
- Look at the telescope and take the TELESCOPE PHOTO (S).
- Select the stairs for a HOS (T).
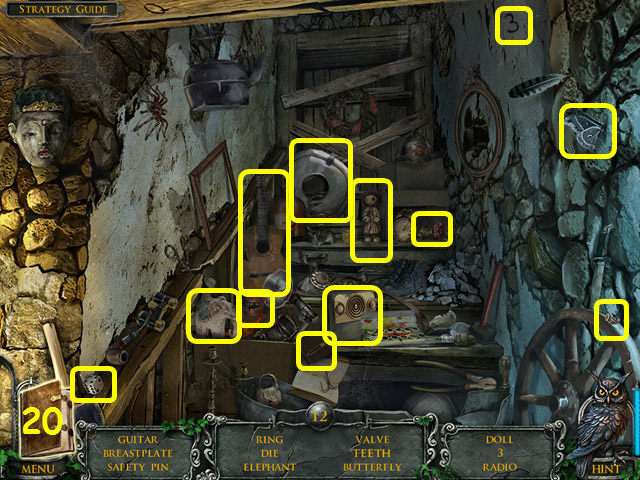
- Locate all the items on the list (20).
- You will earn the BREASTPLATE.
- Walk down twice, enter the cable car, walk down once and enter the mausoleum. Climb through the hole, then go up the stairs on the right.
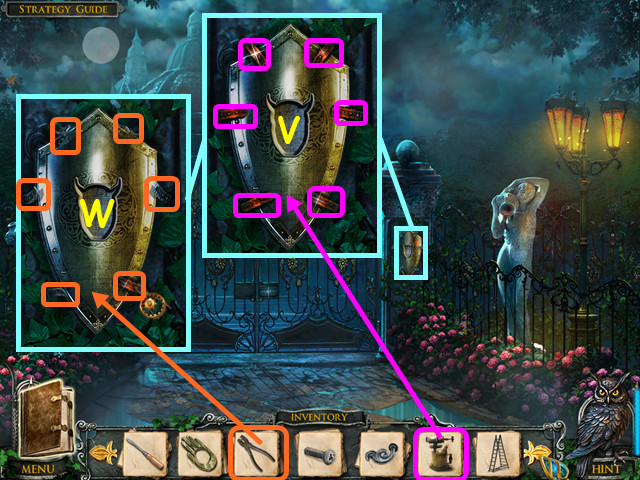
- Look at the shield and use the BLOW TORCH on the 6 clips (V).
- Use the PLIERS on the 6 clips then take the SHIELD (W).
- Walk down and select the stump for a HOS.
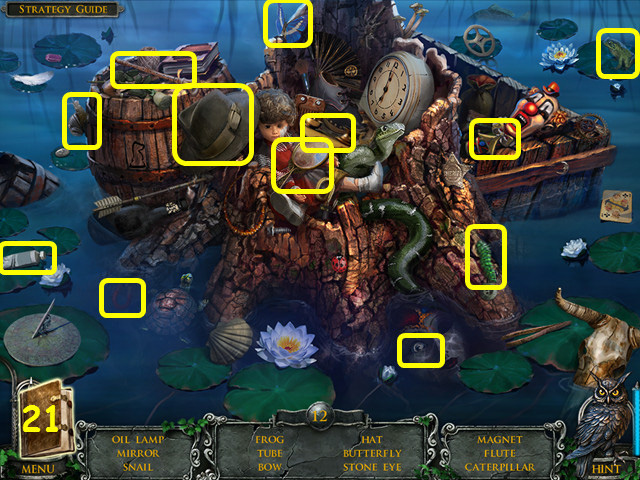
- Locate all the items on the list (21).
- You will earn the STONE EYE.
- Walk down 6 times.
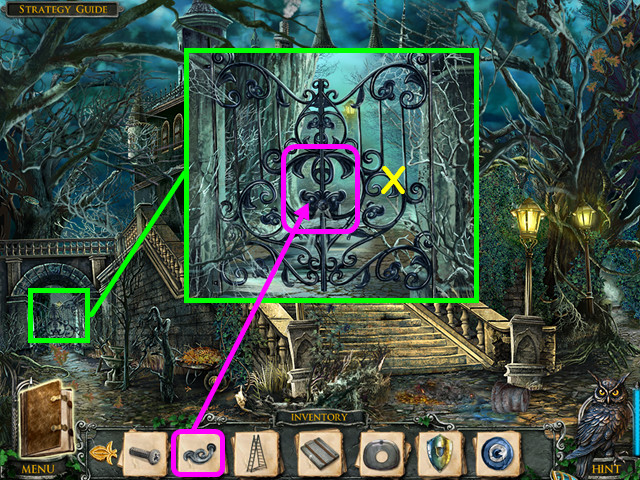
- Look at the gate and use the GATE KEY on the lock (X).
- Walk through the gate.
- Look at the edge of the pool and take the TABLE BUTTON (A).
- Place the LADDER on the ground (B).
- Select the bench for a HOS (C).
- Locate all the items on the list (22).
- You will earn the OILER.
- Walk down, go right, forward, right, left into the cemetery, go forward, enter the cable car, then enter the tower.
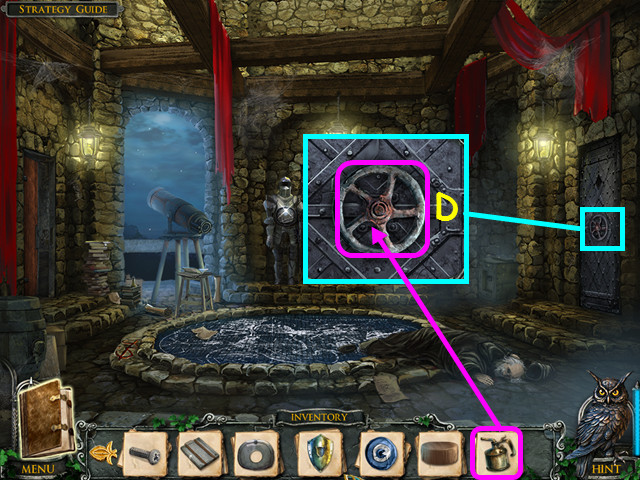
- Look at the metal door and use the OILER on the handle (D).
- Turn the handle then walk to the right.
- Take the RAG (E).
- Look at the table for a mini-game (F).
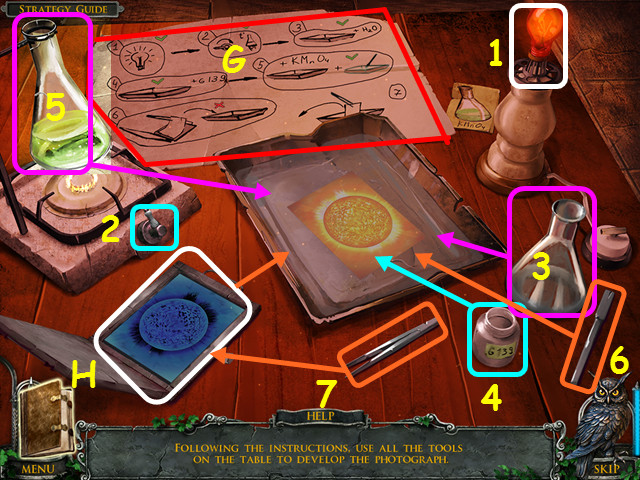
- Refer to the directions (G).
- Place the RED BULB in the outlet (1).
- Place the TELESCOPE PHOTO on the table and open it (H).
- Turn on the burner (2).
- Pour the water in the tray (3).
- Pour the G139 into the tray (4).
- Pour the flask on the burner into the tray (5).
- Use the spatula to stir the mixture in the pan (6).
- Use the tweezers to place the photo in the tray (7).
- Use the tweezers again to remove the photo from the tray.
- Walk down, then go left.
- Select the stairs for a HOS.

- Locate all the items on the list (23).
- You will earn the WIRE CUTTERS.
- Walk down, then go to the right.
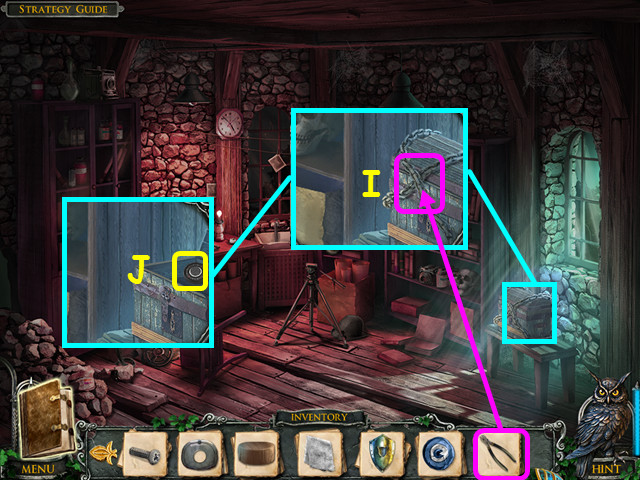
- Look at the chest and use the WIRE CUTTERS on the chains (I).
- Take the TELESCOPE DIAL (J).
- Walk down.
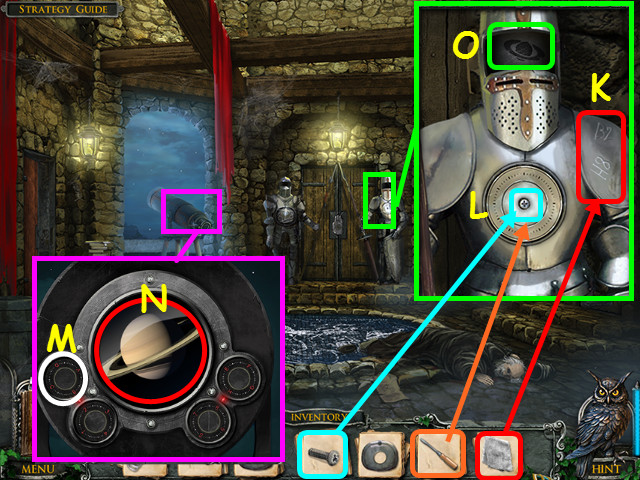
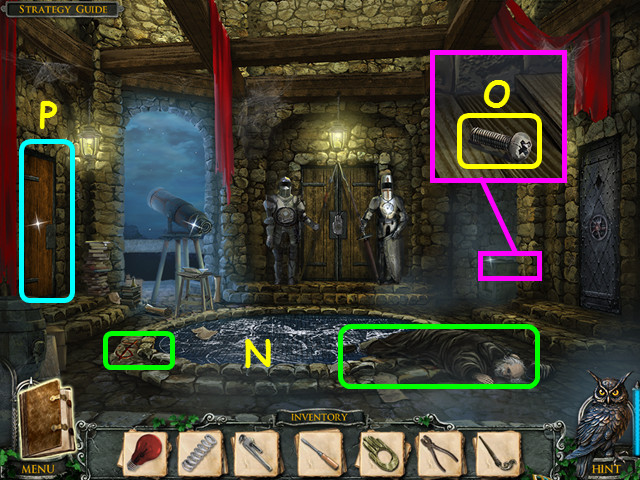
- Look at the right knight and use the RAG on the shoulder to find the code (K).
- Place the SCREW in the center of the chest, then use the SCREWDRIVER to tighten it (L).
- Look at the telescope and place the TELESCOPE DIAL in the empty hole (M).
- Turn the dials to B-2-H-8 which will show Saturn (N).
- Look again at the right knight and turn the chest dial until Saturn is shown in the visor (O).
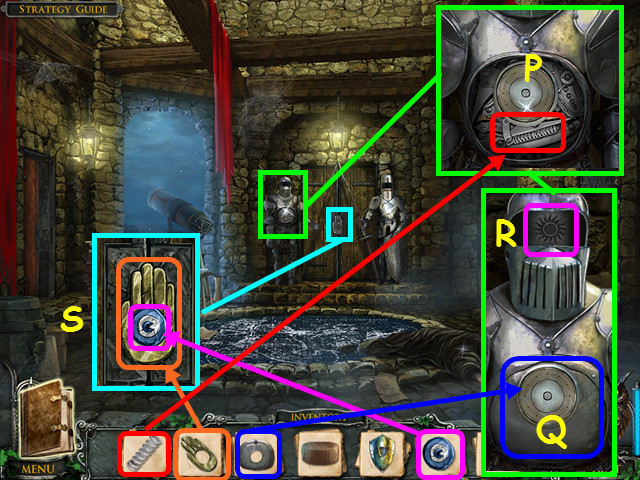
- Look at the left knight and place the SPRING inside the mechanism (P).
- Place the BREASTPLATE over the mechanism (Q).
- Turn the dial so the Sun appears in the visor (R).
- Look at the door and place the STONE HAND, then the STONE EYE into the indentation (S).
- Walk forward.

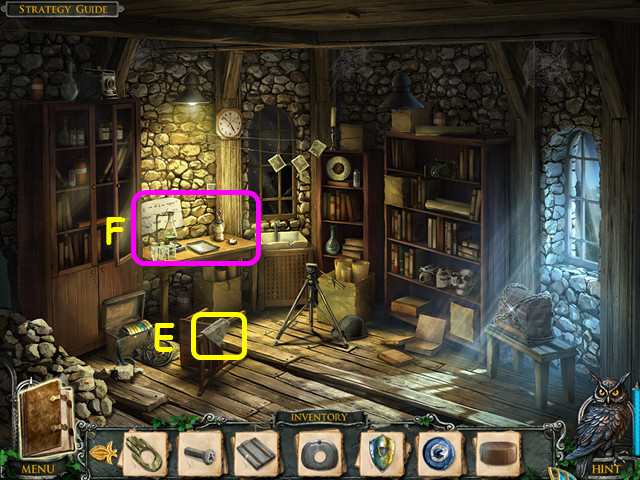
- Take the LADDER (T).
- Take the DUST BRUSH (U).
- Look at the desk and read the diary (V).
- Look at the diagram (W).
- Walk down twice, enter the cable car, walk down 5 times, then enter the gate on the left.
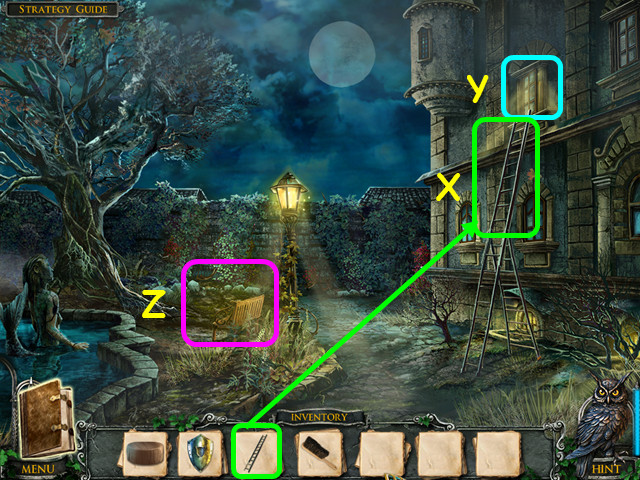
- Place the LADDER atop the previously placed ladder (X).
- Note the window (Y).
- Select the bench for a HOS (Z).
- Locate all the items on the list (24).
- You will earn the GARDEN SPADE.
- Enter the window over the ladder.
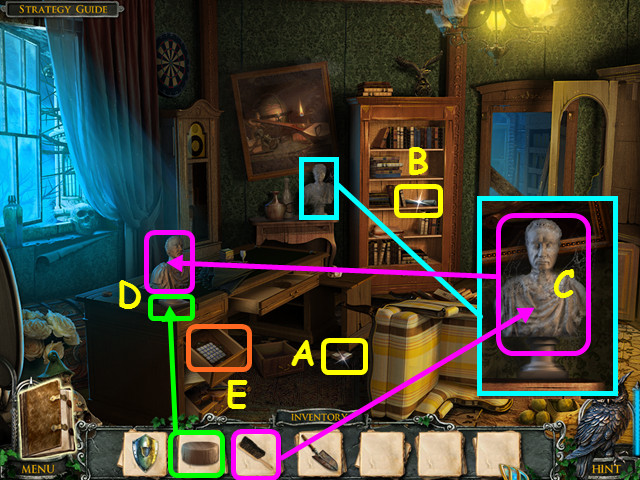
- Take the first CHESSBOARD PART (A).
- Take the BRIDGE LEVER (B).
- Look at the bust; use the DUST BRUSH on it then take the BUST (C).
- Place the TABLE BUTTON in the corner of the desk, then place the BUST on top (D).
- Look in the drawer for a mini-game (E).
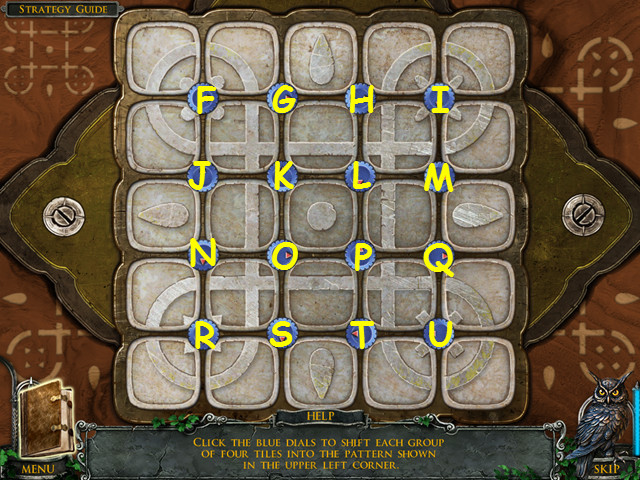
- Move the tiles to restore the pattern.
- Select the blue buttons to rotate the tiles around each button.
- Select the buttons in this order to solve the puzzle: Ix1, Hx1, Gx1, Hx2, Fx1, Gx1, Fx1, Hx2, Ix1, Hx1, Gx2, Ux1, Mx1, Qx1, Mx1, Hx3, Mx1, Lx1, Hx1, Ix1, Qx1, Lx2, Mx2, Ix1, Px2, Mx3, Px1, Mx1, Ux2, Qx1, Tx2, Qx1, Nx2, Ux3, Tx2, Ox1, Nx1, Sx2, Ox2, Nx1, Sx2, Rx2, Sx3, Tx3, Ux3, Tx2, Ux3, Tx1, Ux3.
- Take the BAT from the center when it opens.
- Go out the window, walk down, go right, go forward, then through the gate. Enter the cemetery, go into the mausoleum, then go through the hole in the wall.
- Go up the stairs.
Chapter 7: Mr. Gale's Castle
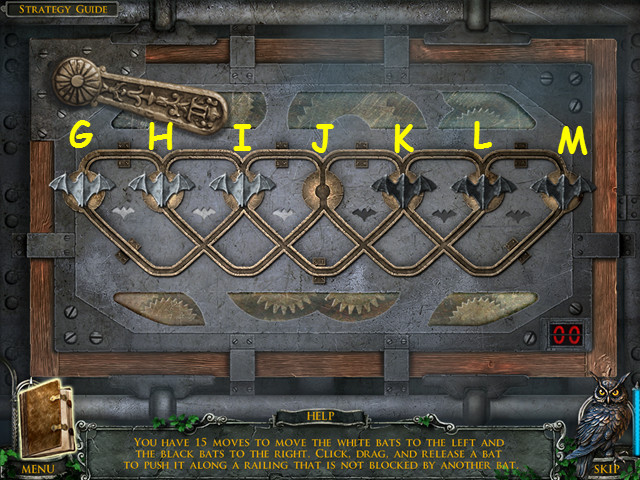
- Look at the gate for a mini-game.
- Place the BAT on the machinery to activate the mini-game.
- Swap the black and white bats in 15 moves. If you move more than 15 times, the mini-game will reset.
- Drag a bat in the direction you want to move it.
- Move the bats in this order: I-J, K-I, L-K, J-L, H-J, G-H, I-G, K-I, M-K, L-M, J-L, H-J, I-H, K-I, and J-K.
- Walk forward.
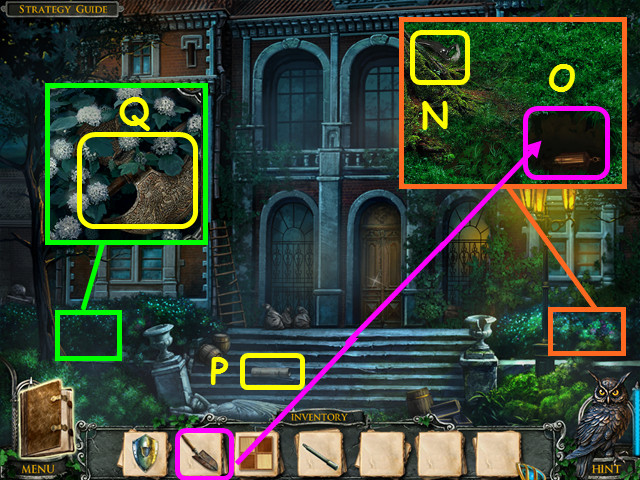
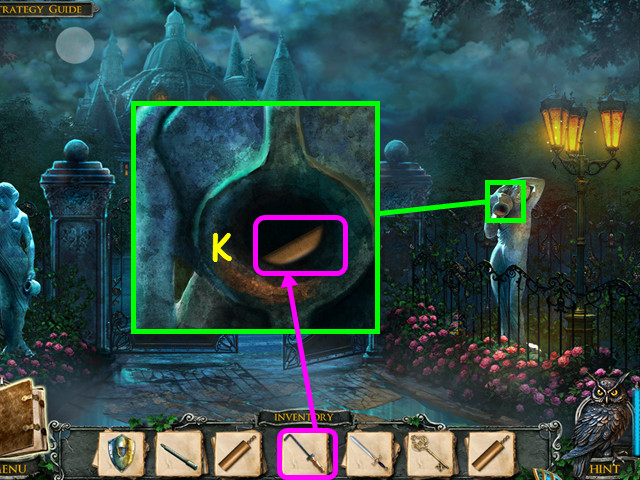
- Look in the right shrubs and take the PINCERS (N).
- Use the GARDEN SPADE to dig up the first WEIGHT (O).
- Take the PIPE (P).
- Look in the left shrubs and take the AXE (Q).
- Open the door and go inside.
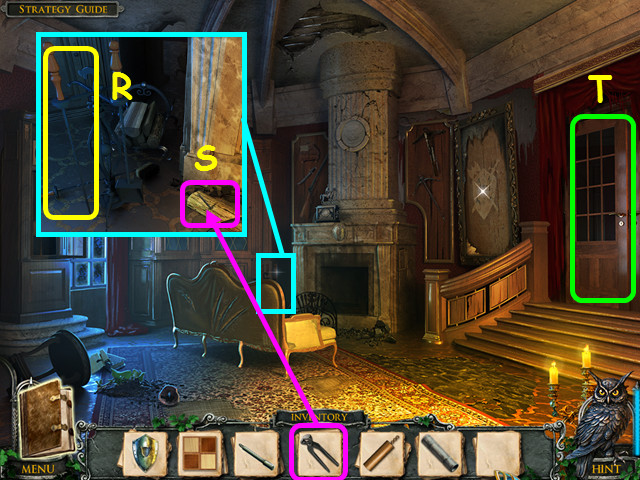
- Look in the corner and take the POKER (R).
- Use the PINCERS on the log to take the NAIL (S).
- Open the doors on the right, then go through them (T).
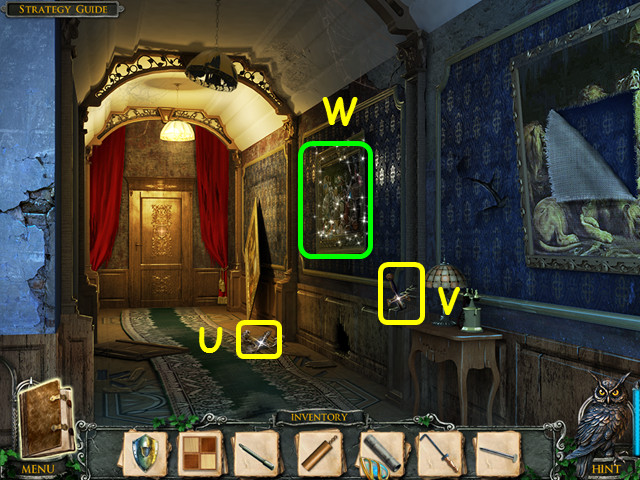
- Take the WALL SCONCE (U).
- Take the SWORD (V).
- Select the painting for a HOS (W).

- Locate all the items on the list (25).
- You will earn the HAMMER.
- Walk down twice.
- Look at the drain pipe and place the PIPE in the empty spot (A).
- Use the NAIL on the clamp, then use the HAMMER on the nail (B).
- Enter the window (C).
- Place the WALL SCONCE into the wall then turn it (D).
- Look into the compartment and take the second CHESSBOARD PART (E).
- Take the STATUE EYE (F) and place it in the statue (G).
- Look at the lowered chandelier and take the CASTLE KEY (H).
- Look at the dresser for a mini-game (I).
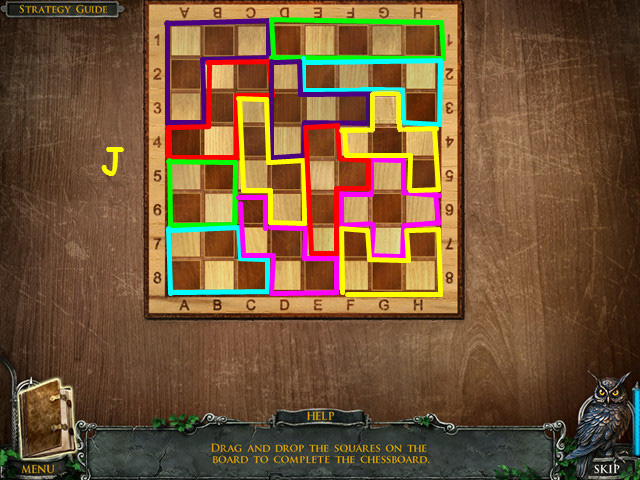
- Place the all the pieces into the grid to complete the chessboard (J).
- Look in the drawer; take the second WEIGHT and the weights diagram.
- Go out the window and walk down once.
- Look at the statue and use the POKER to retrieve the third WEIGHT (K).
- Walk forward twice.
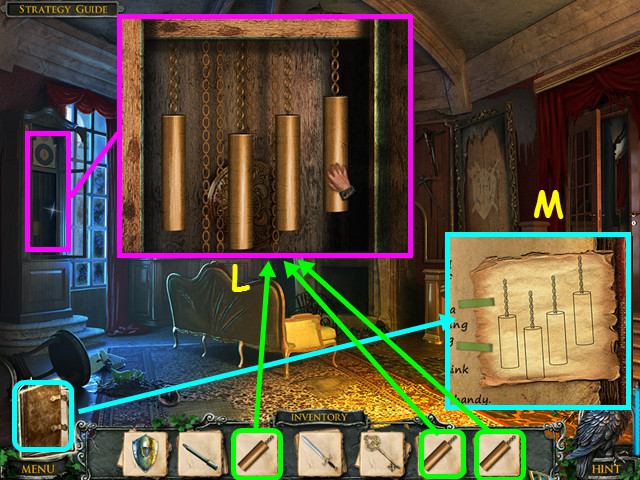
- Look at the grandfather clock and place the 3 WEIGHTS on the chains (L).
- Move the weights to match the diagram from your journal (M).
- Select the area behind the clock for a HOS.
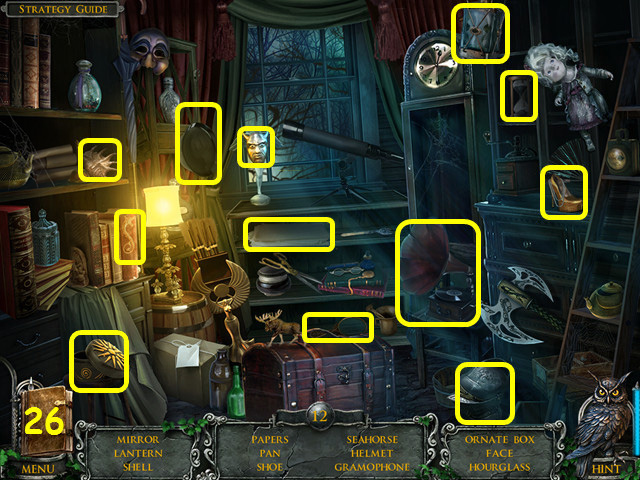
- Locate all the items on the list (26).
- You will earn the FACE.
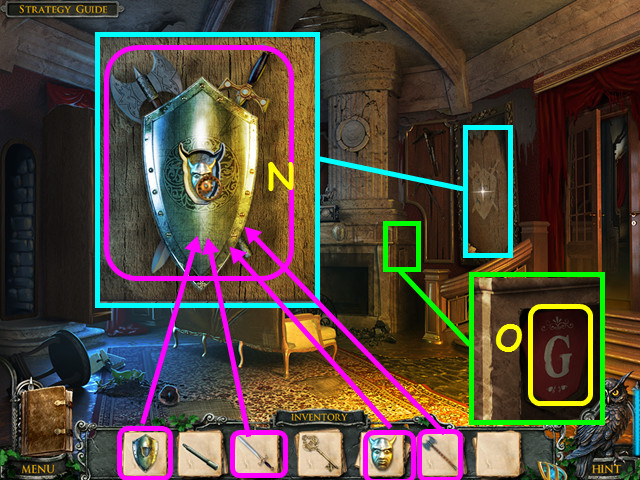
- Look at the outline; place the SHIELD, SWORD, AXE, and the FACE inside (N).
- Take the GALE CREST (O).
- Walk to the right.
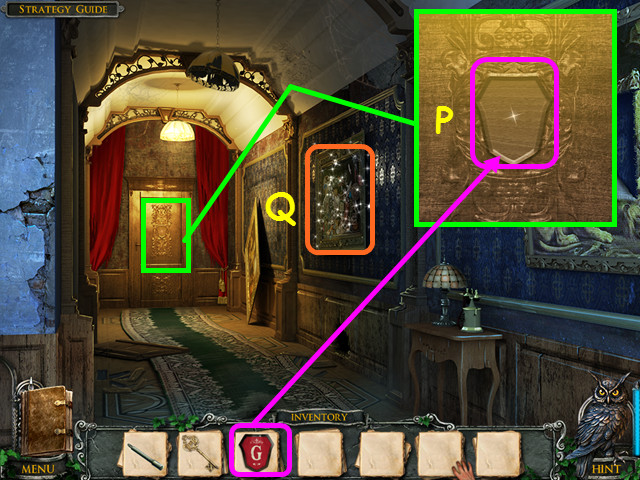
- Look at the door and place the GALE CREST in the niche (P).
- Select the painting for a HOS (Q).
- Locate all the items on the list (27).
- You will earn WULF'S KEYS.
- Walk down 3 times.
- Try to talk to the ghost, then talk to Samuel.
- Walk down 4 times, then go forward twice.
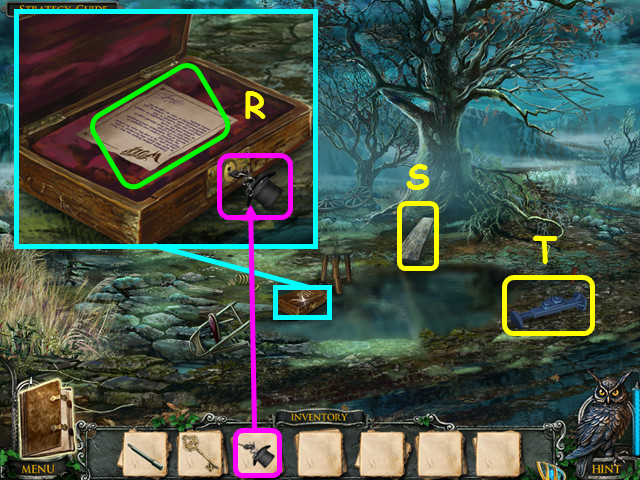
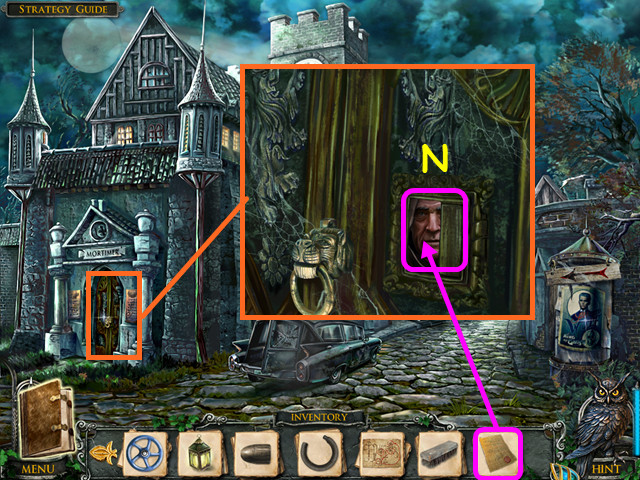
- Look at the box and use WULF'S KEYS on the lock then read the note (R).
- Take the PLANK (S) and the JACK (T).
- Walk down twice, enter the cemetery, then enter the mausoleum. Go through the hole in the wall, walk up the steps, then go forward 4 times.
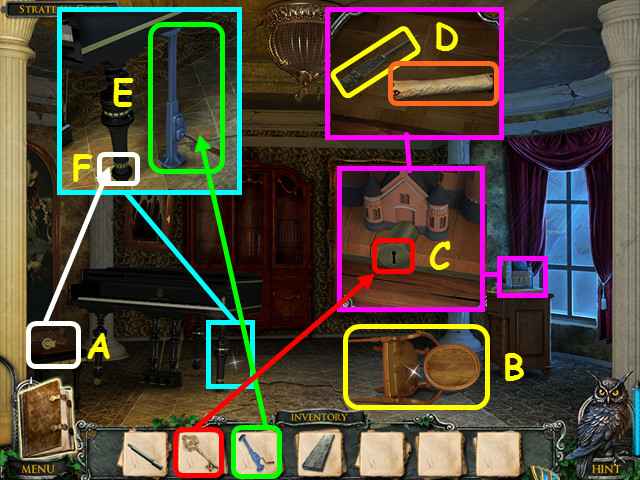
- Take the PIANO WHEEL (A) and the CHAIR (B).
- Look at the castle and use the CASTLE KEY on the lock (C).
- Take the LETTER OPENER and the letter (D).
- Look at the piano leg and place the JACK underneath, then turn the crank (E).
- Place the PIANO WHEEL on the leg (F).
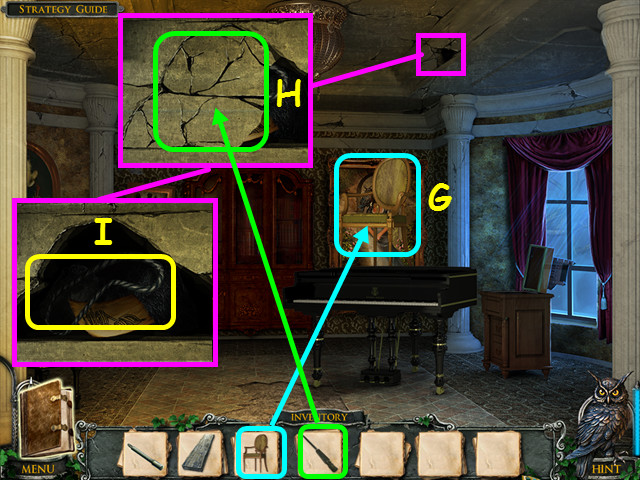
- Push the piano to the right.
- Place the CHAIR on the piano (G).
- Look at the crack in the ceiling and use the LETTER OPENER twice on the cracks (H).
- Take the BRIDGE ROPE and the diagram (I).
- Walk down twice then select the area behind the grandfather clock for a HOS.
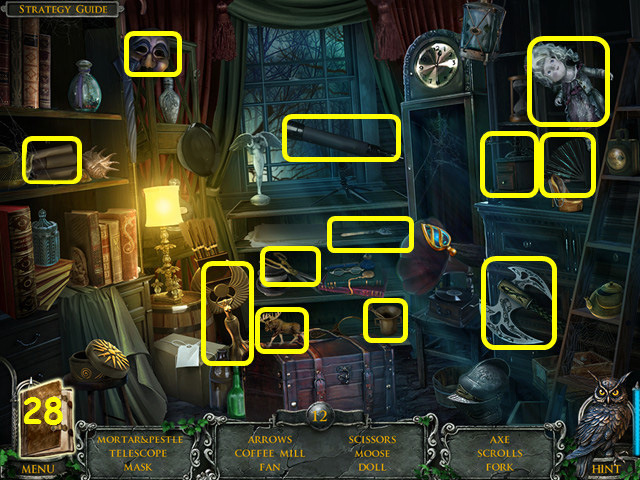
- Locate all the items on the list (28).
- You will earn the SCISSORS.
- Walk down 3 times, then go forward to the swamp.
Chapter 8: Across the Bridge
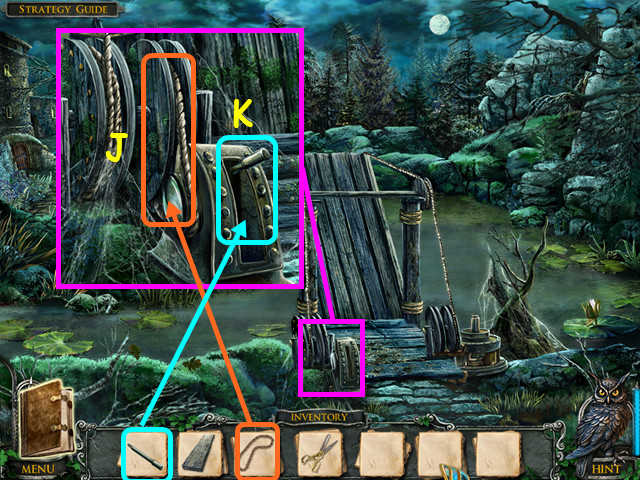
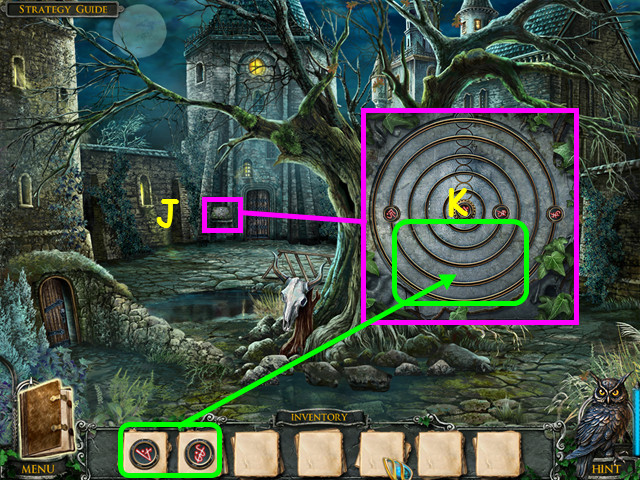
- Look at the control; place the BRIDGE ROPE on the pulley (J).
- Place the BRIDGE LEVER in the control, then pull the lever (K).
- Walk forward and select the tree for a HOS.
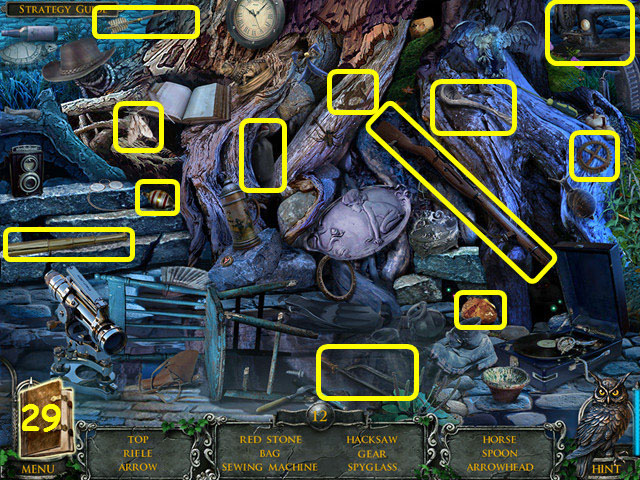
- Locate all the items on the list (29).
- You will earn the RED STONE.
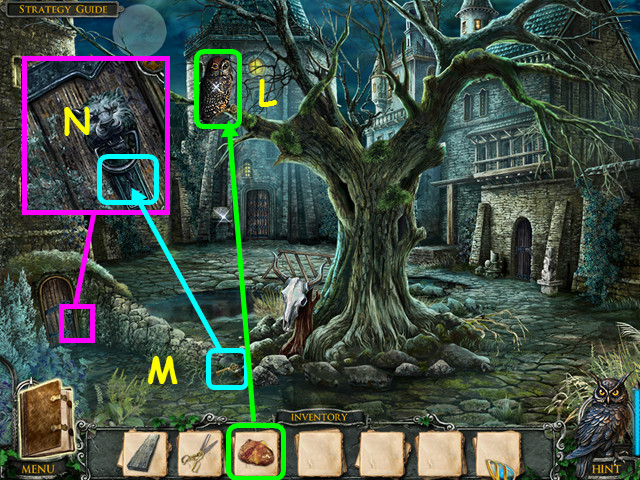
- Throw the RED STONE at the owl (L).
- Take the GENERATOR KEY (M).
- Look at the left door and use the GENERATOR KEY on the lock (N).
- Walk left to the generator room.
- Place the PLANK down over the water (O).
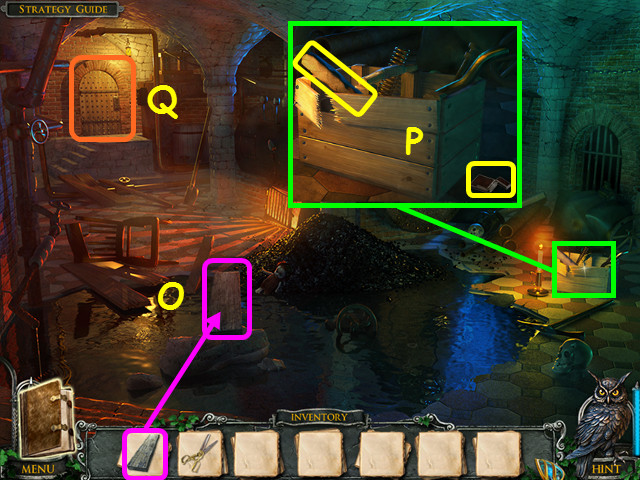
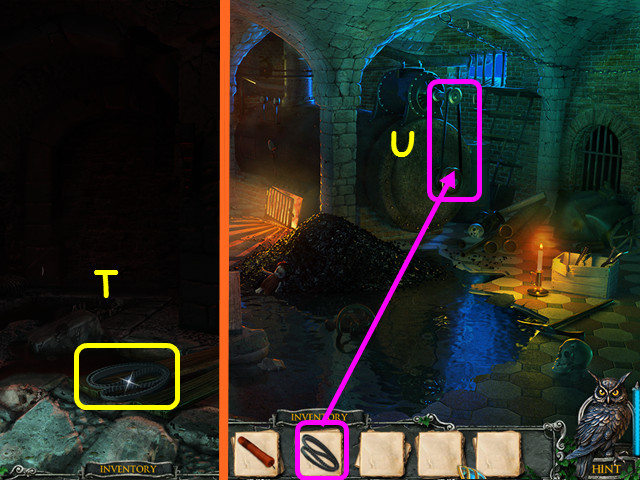
- Look at the crate; take the LIGHTER and the CAT LEVER (P).
- Open the door and look inside for a HOS (Q).
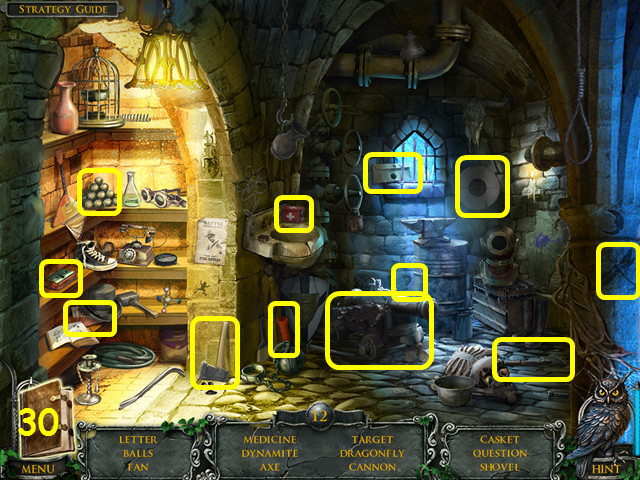
- Locate all the items on the list (30).
- You will earn the DYNAMITE.
- Walk down.
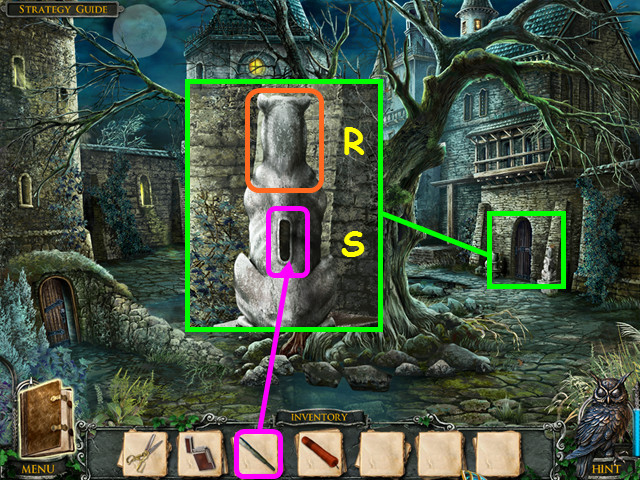
- Look at the right door and turn the statue around (R).
- Place the CAT LEVER in the hole on the statue's back (S).
- Enter the door.
- Take the BELT (T).
- Walk down, then enter the room on the left.
- Place the BELT on the generator (U).
- Walk down, then enter the room on the right.

- Look on the left wall for a mini-game.
- Move the tile so the gems have the same shape as the bottom symbols (A) and the lower symbols on the tiles match those on the left (B).
- Select a tile to move it to an adjacent empty spot.
- See our solution here (C).
- Use the SCISSORS to cut the rope in 2 places (D).
- Look behind the rack and take the CROWBAR (E).
- Look at the wall and use the CROWBAR to remove the brick (F).
- Place the DYNAMITE in the hole, then use the LIGHTER on the fuse (G).
- Walk down and select the tree for a HOS.

- Locate all the items on the list (31).
- You will earn the first BUTTON.
- Walk left and choose the backroom for a HOS.
- Locate all the items on the list (32).
- You will earn the ACID.
- Walk down, then go to the right.
- Look at the hole, pull the chest out and use the ACID on the lock (H).
- Open the chest and take the second BUTTON (I).
- Walk down.
- Look at the panel near the far door (J).
- Place the 2 BUTTONS on the rings to trigger a mini-game (K).
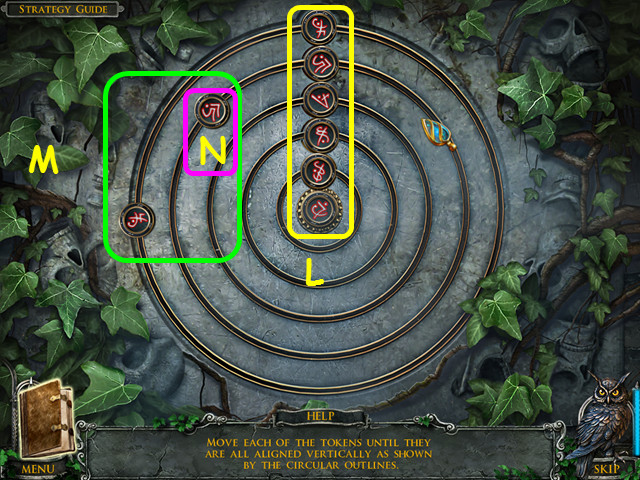
- Drag the tokens into the marked circles (L).
- Moving a token will move one or more tokens at the same time.
- Starting with the innermost ring and working out, move the first 3 tokens to the circles.
- Move the final 2 tokens to the position noted (M).
- Drag the token on the second ring to the circle (N). This will move the outer token to the circle.
- Walk forward.
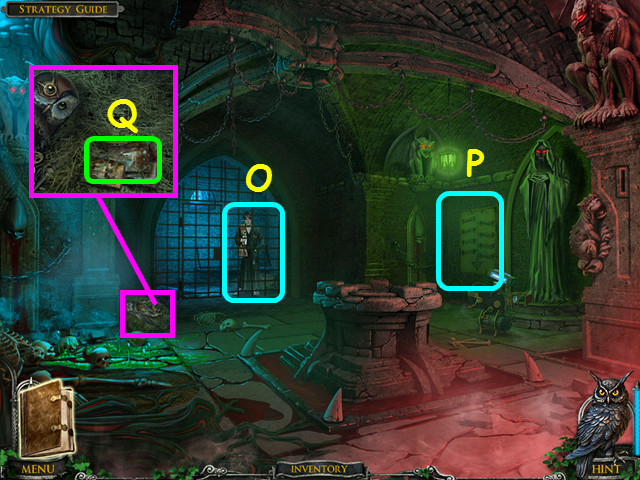
- Talk to Thomas in the cell (O).
- Look at the family tree (P).
- Look at the fallen owl and look at the photos (Q).
- Talk to Thomas once more.
- Congratulations, you have completed Mystery Heritage: Sign of the Spirit Standard Edition!
Created at: 2012-09-08