

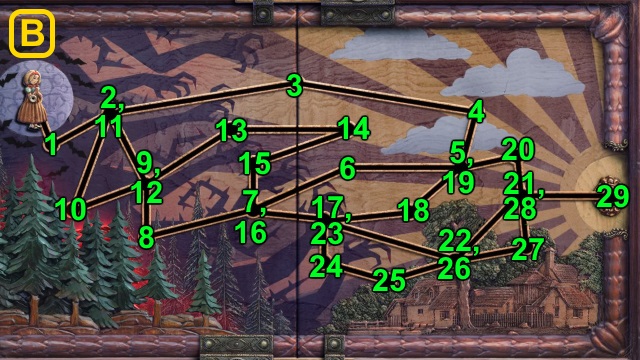
Walkthrough Menu
- General Tips
- Chapter 1: The Dark Forest
- Chapter 2: The Hospital
- Chapter 3: The Aircraft
- Chapter 4: Frank's Room
- Chapter 5: The Castle
- Chapter 6: Beatrice
General Tips
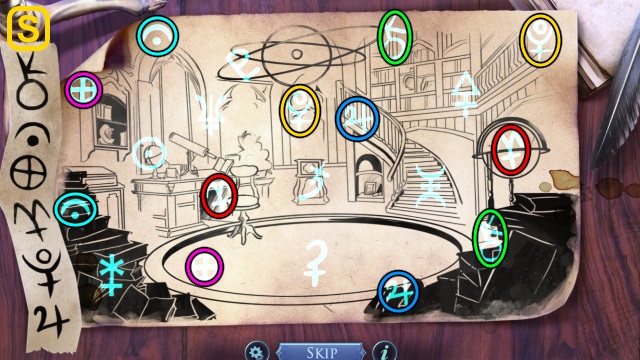
- This is the official guide for Mystery of the Ancients: No Escape.
- This guide won't tell you when to zoom into a location; the screenshots show each zoom scene.
- Hidden-object puzzles are referred to as HOPs. Only the locations of the HOPs will be shown.
- Use the Map to fast travel to a location.
Chapter 1: The Dark Forest
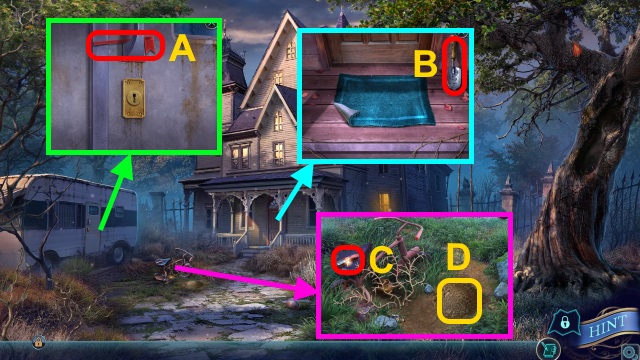
- Take FLAG (A).
- Examine door; take GARDEN SHOVEL (B).
- Take RUSTY KNIFE (C). Use GARDEN SHOVEL (D); take FLAG.
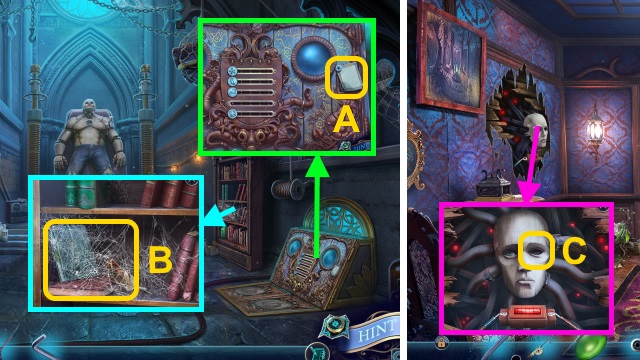
- Remove flag; place 2 FLAGS (E). Take picture and ENVELOPE.
- Open ENVELOPE; read letter. Examine necklace; take HOOKED NECKLACE.
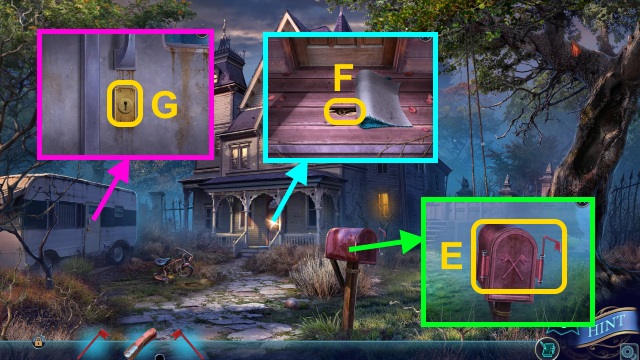
- Remove mat; use HOOKED NECKLACE (F). Receive TRAILER KEY.
- Use TRAILER KEY (G).
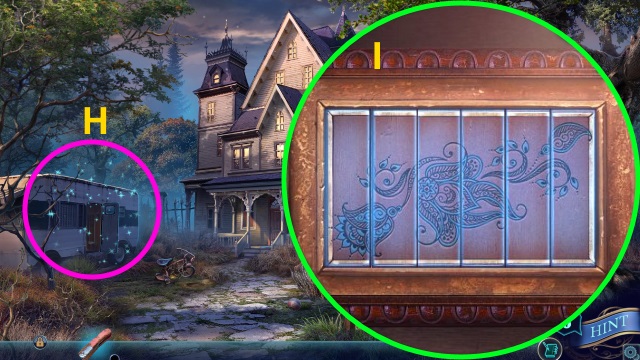
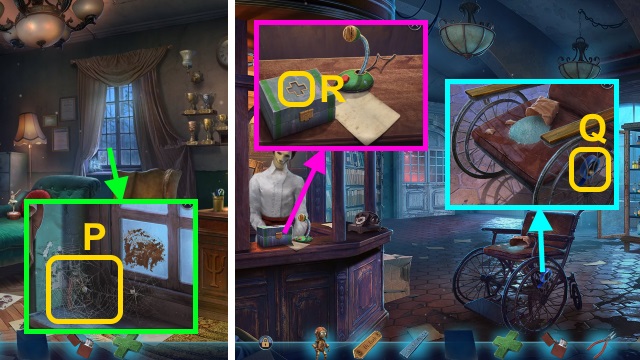
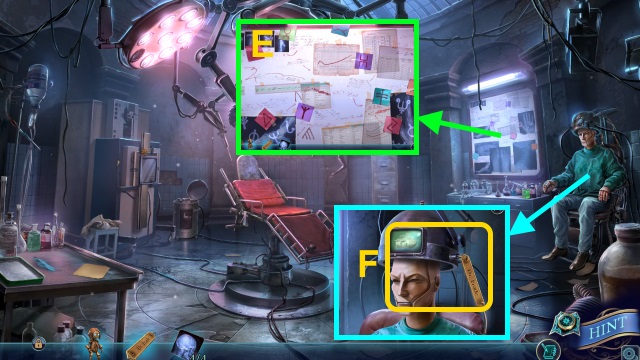
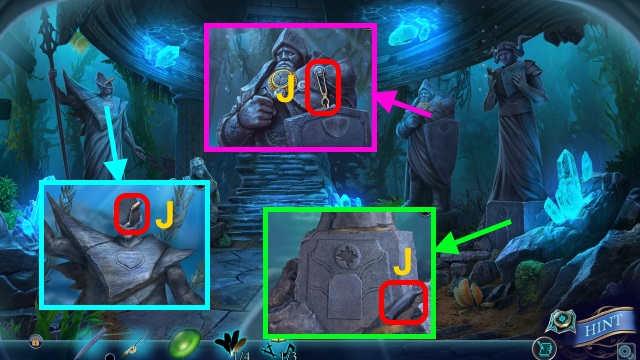
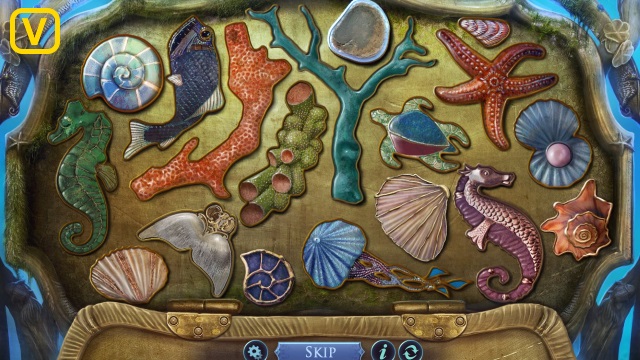
- Play HOP; receive HOOK (H).
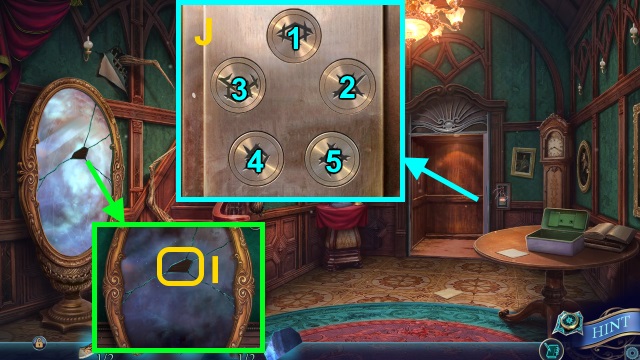
- HOP solution (I).
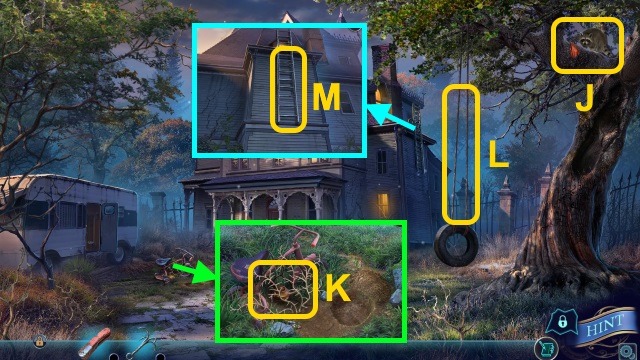
- Examine (J); receive LEATHER GLOVES.
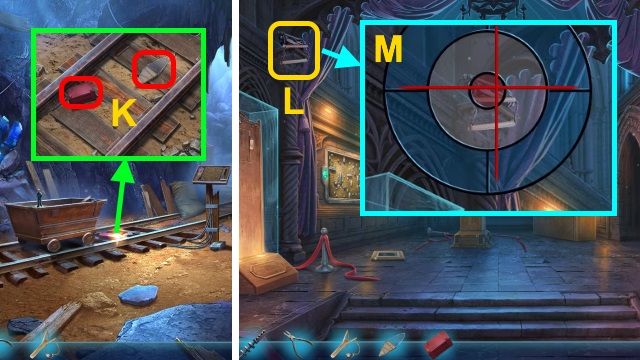
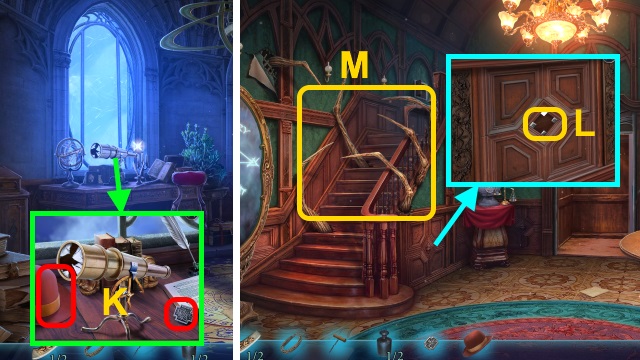
- Use LEATHER GLOVES (K); take OILER.
- OILER on RUSTY KNIFE; take KNIFE.
- Use KNIFE (L); receive ROPE.
- ROPE on HOOK; receive GRAPPLING HOOK.
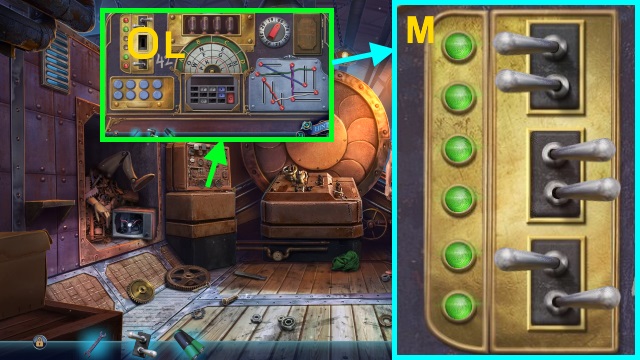
- Use GRAPPLING HOOK (M).
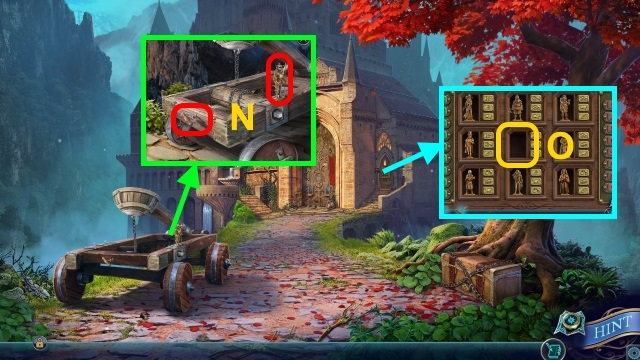
- Enter Safe Room.
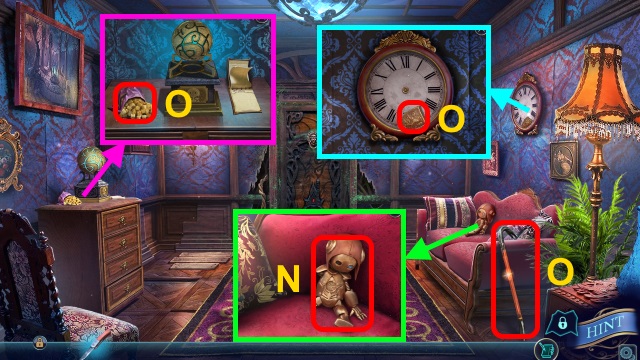
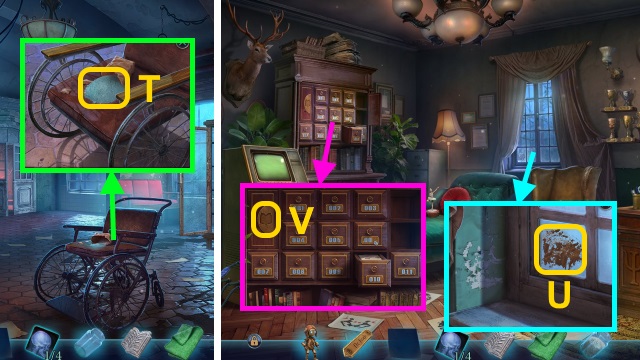
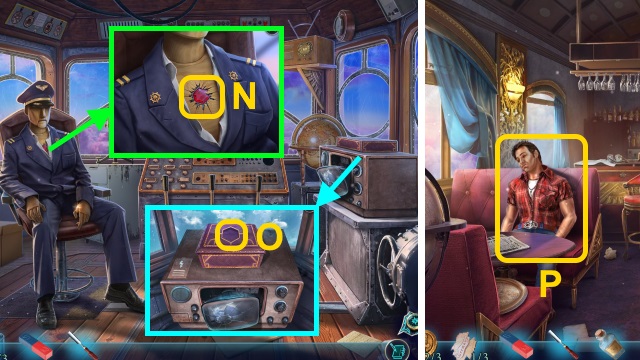
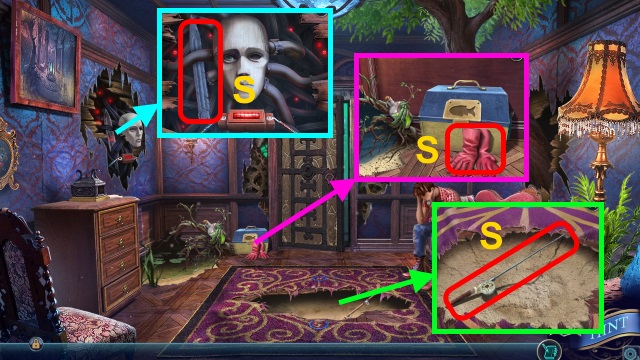
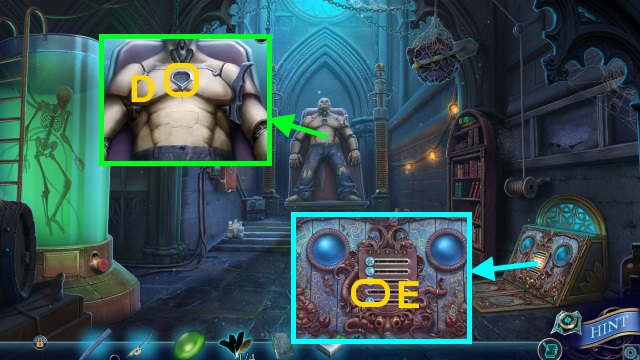
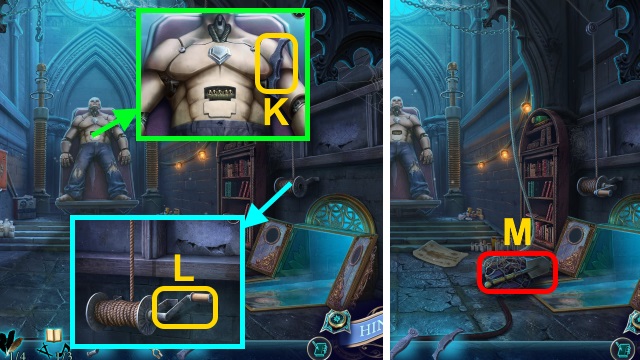
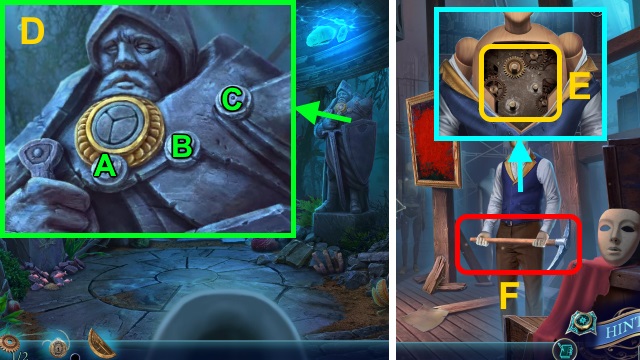
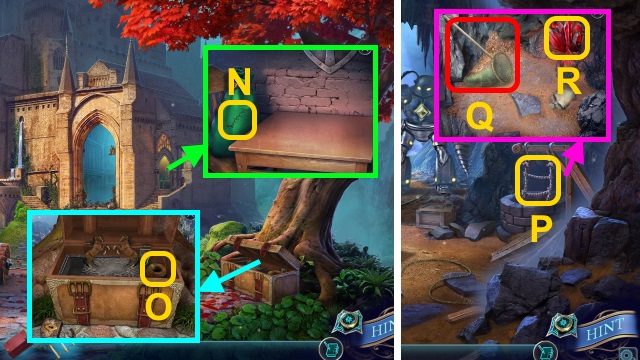
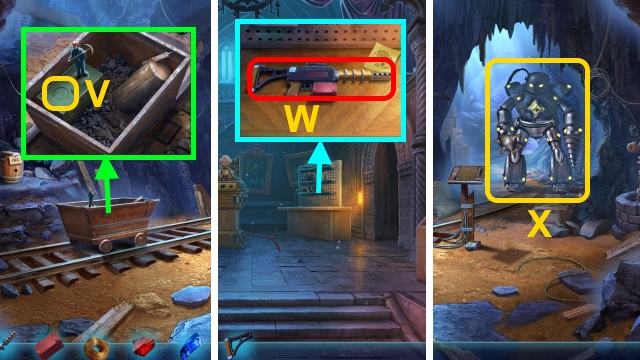
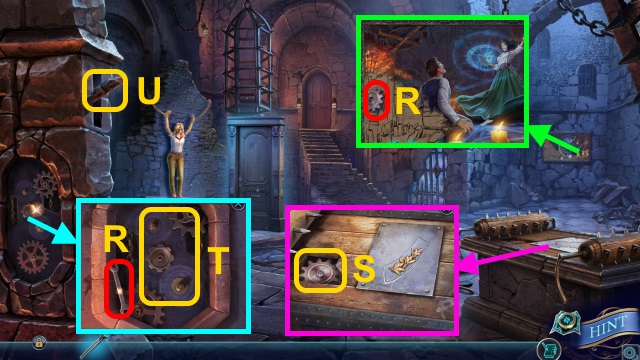
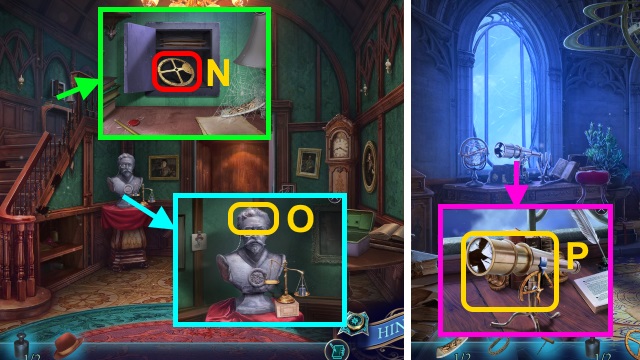
- Take ROBOT PAL (N); use KNIFE. Take ORNATE BOX.
- Take CROWBAR, SHIELD, and CROUTONS (O).
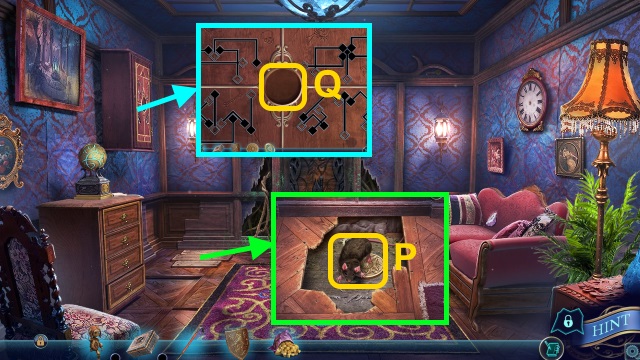
- Use CROWBAR; give CROUTONS (P). Take DECORATIVE EMBLEM and GLIMMERING GEAR.
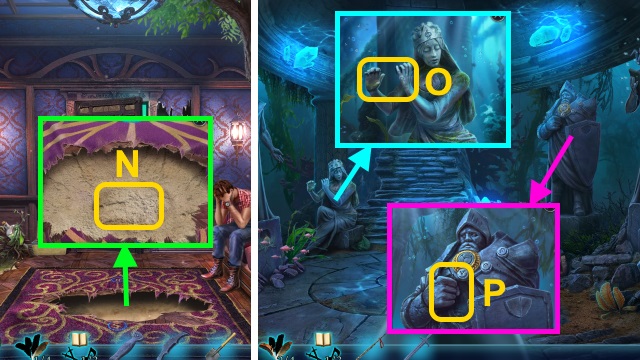
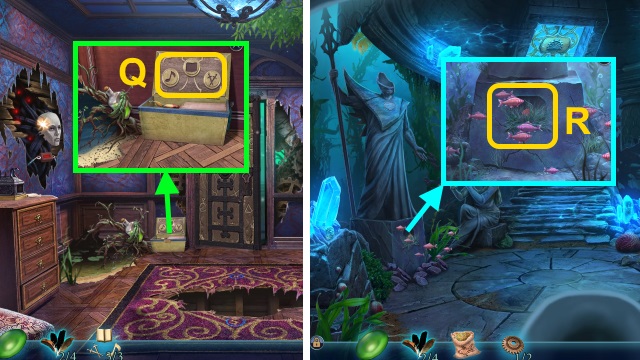
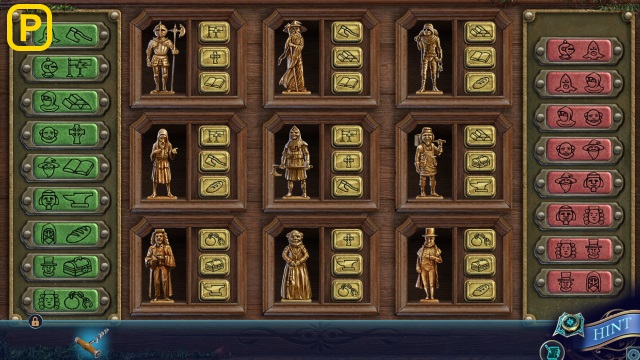
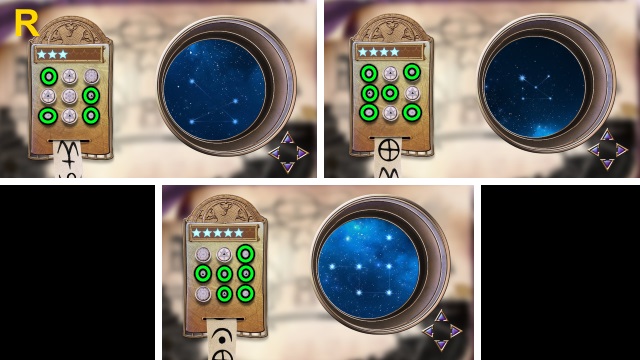
- Place DECORATIVE EMBLEM (Q).
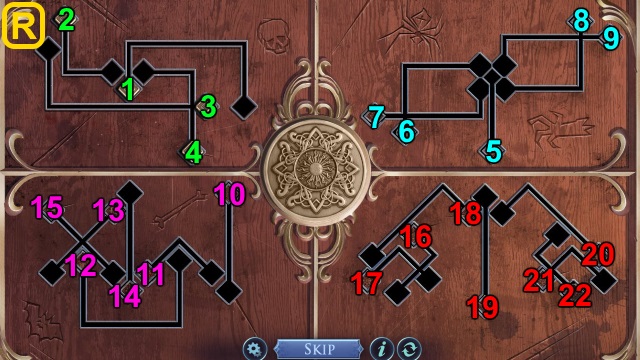
- Solution (R).
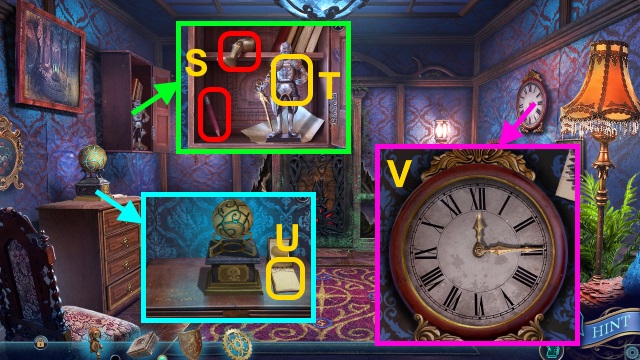
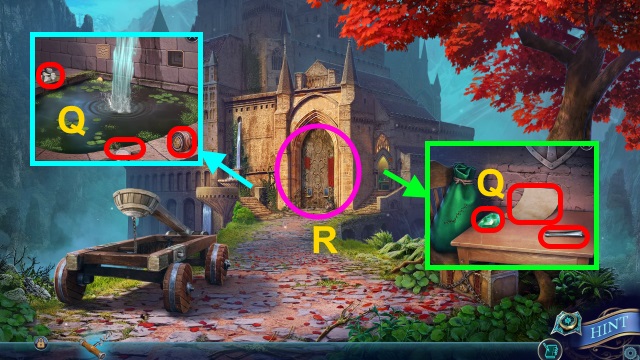
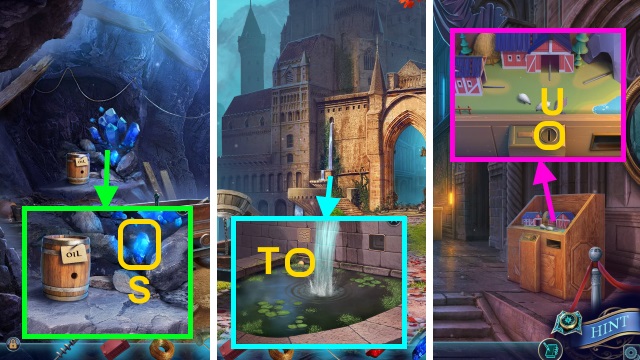
- Take ROBOT LEG and PENCIL (S). Give SHIELD (T); take CLOCK HANDS.
- GLIMMERING GEAR on ORNATE BOX; take ROBOT EYE.
- Use PENCIL (U); take CLOCK CLUE.
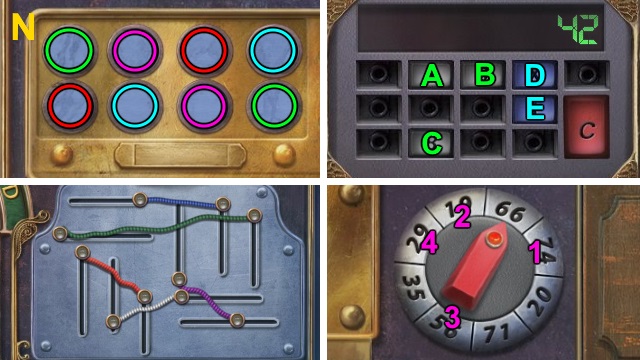
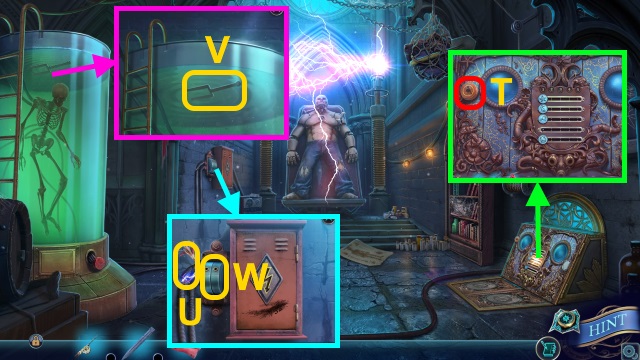
- Place CLOCK HANDS; set time (V). Take ROBOT HAND.
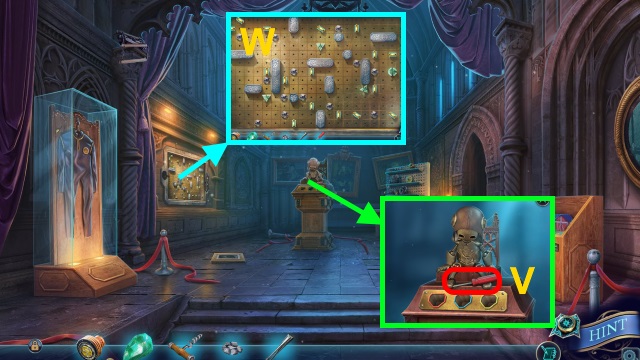
- ROBOT LEG, ROBOT EYE, and ROBOT HAND on ROBOT PAL; examine. Receive Map.
- Walk forward.
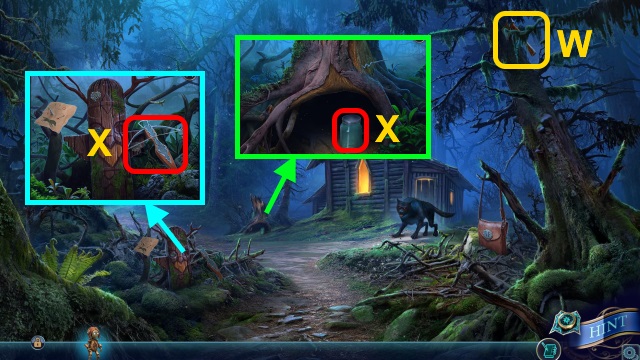
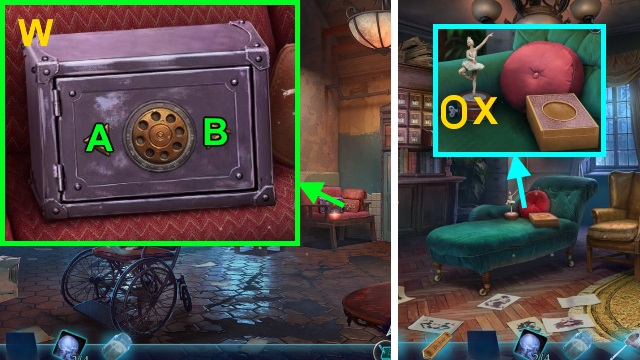
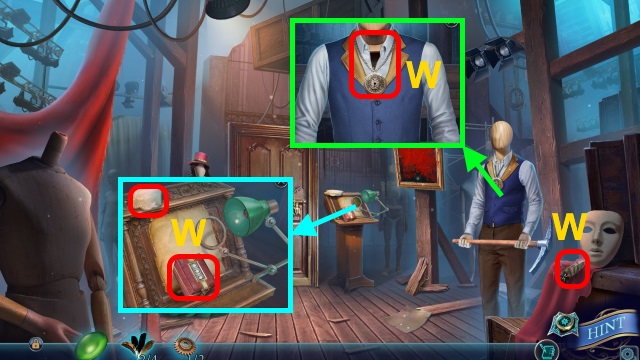
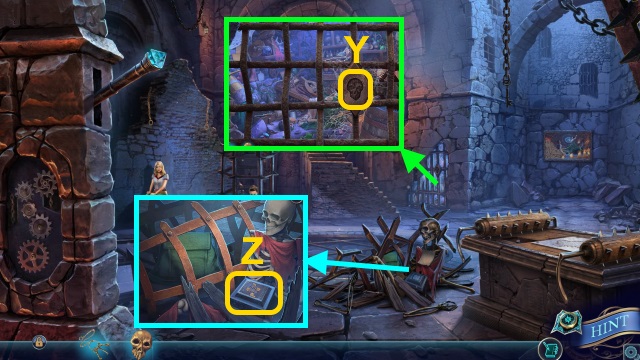
- Use ROBOT PAL (W); receive AXE.
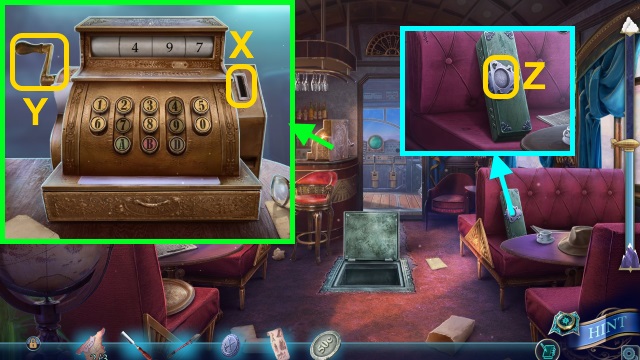
- Take JAR and CROSSBOW (X).
- Walk left.
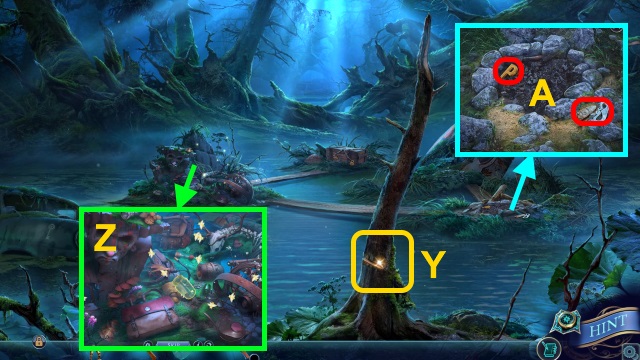
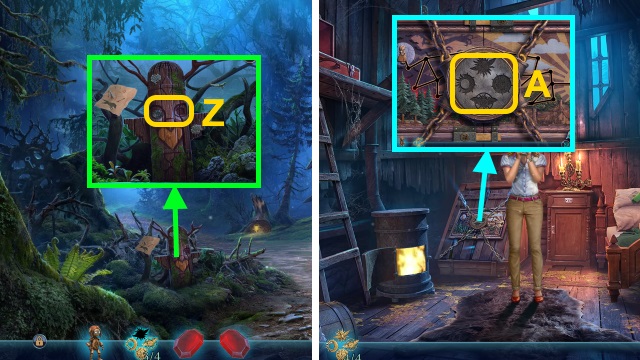
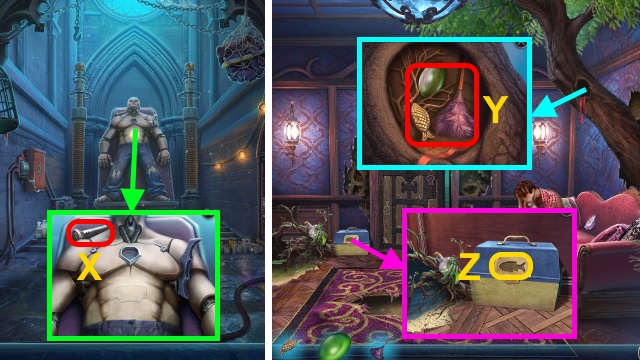
- Use AXE (Y).
- Use JAR. Solution (Z): use jar to catch fireflies.
- Receive JAR OF FIREFLIES.
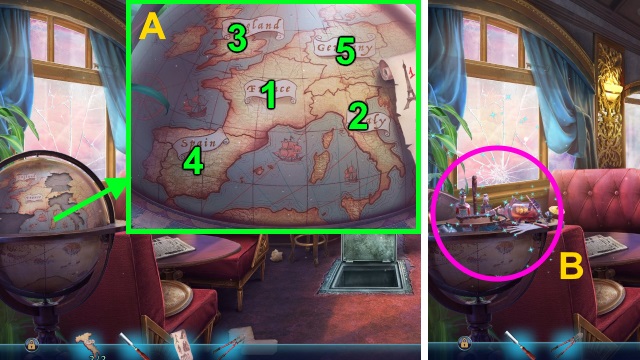
- Take FLINT WITH STEEL and MONOGRAM (A). Examine ashes; take CORKSCREW HANDLE.
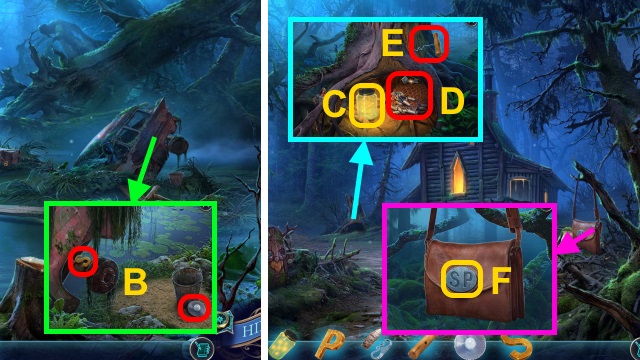
- Take CAMERA FLASH and MONOGRAM (B).
- Walk down.
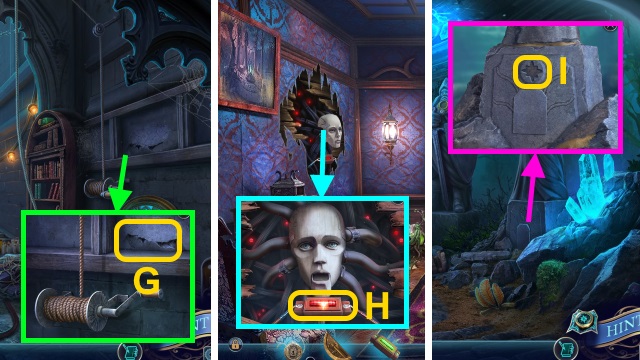
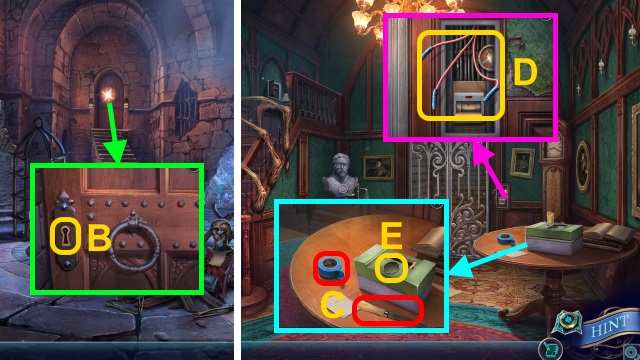
- Place JAR OF FIREFLIES (C); take DIAMOND KEY and FISHING NET (D). Place CORKSCREW HANDLE; take CORKSCREW (E).
- Place 2 MONOGRAMS (F); open. Take DIARY and CIRCLE KEY.
- Open DIARY. Play HOP; take WOLF TILE.
- Walk left.
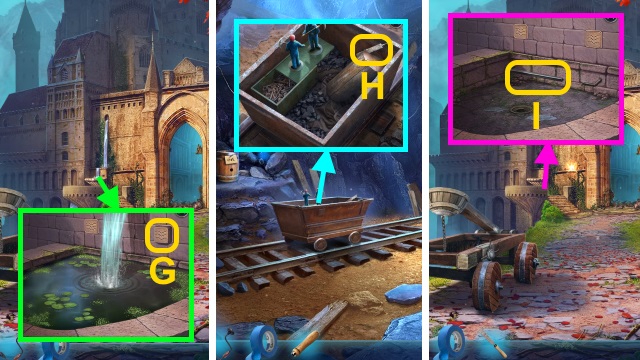
- Use FISHING NET (G); receive POUCH.
- WOLF TILE on POUCH; take ARROWS and COIN WITH WAX.
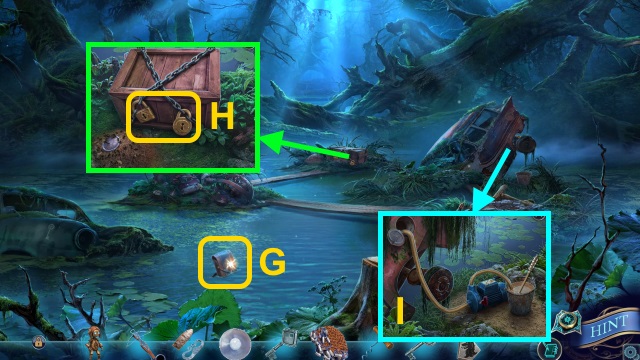
- Use CIRCLE KEY and DIAMOND KEY (H); take PUMP.
- Open car. Place PUMP; examine. Use ARROWS; receive GAS-SOAKED ARROWS (I).
- GAS-SOAKED ARROWS and FLINT WITH STEEL on CROSSBOW; receive FIERY GROSSBOW.
- Walk down.
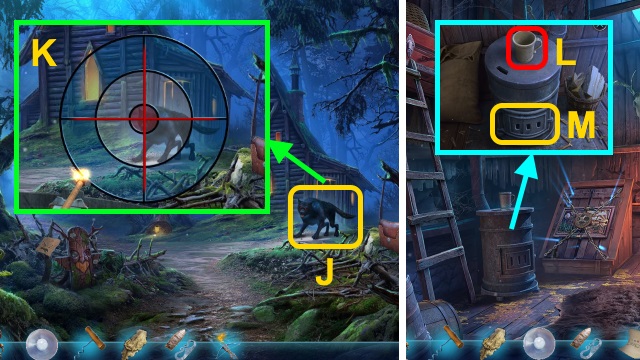
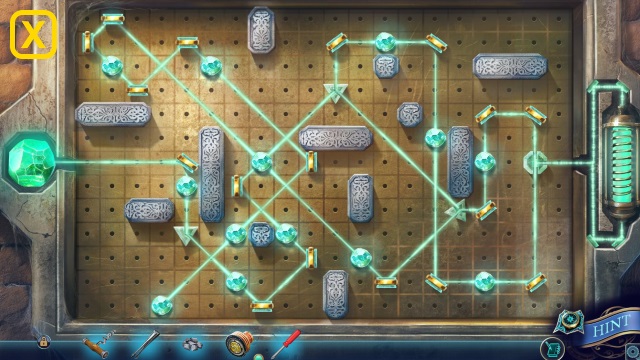
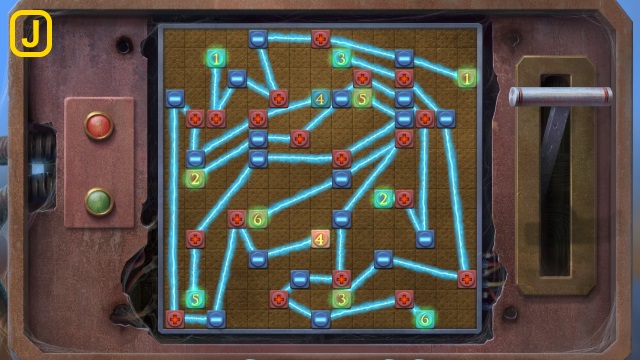
- Use FIERY CROSSBOW (J).
- Solution (K): stop red lines inside target.
- Walk forward.
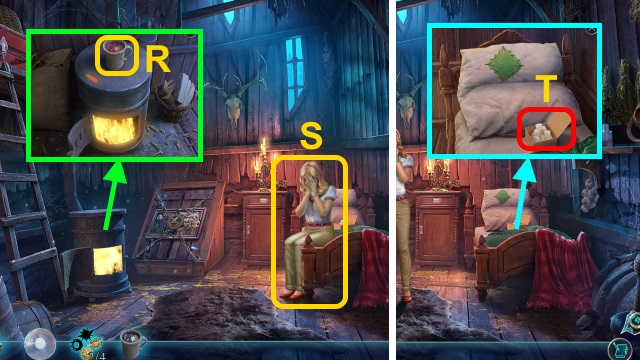
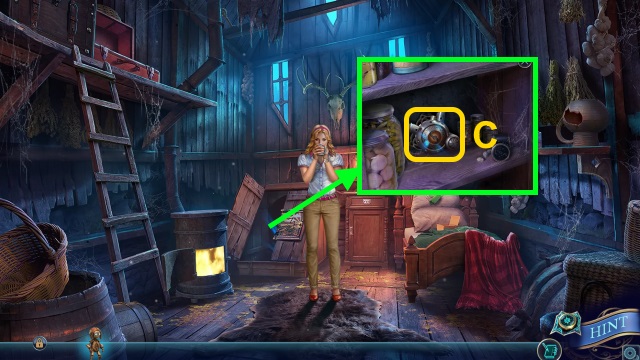
- Take MUG (L). Open; use FLINT WITH STEEL (M). Use COIN WITH WAX on stove; receive GOLDEN AMULET (1/4).
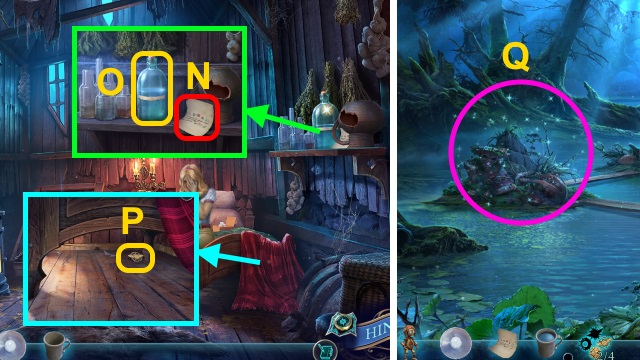
- Take TEA INGREDIENTS (N). Use CORKSCREW and MUG (O); receive MUG OF COLD WATER.
- Use ROBOT PAL (P); receive GOLDEN AMULET (2/4).
- Walk down, then left.
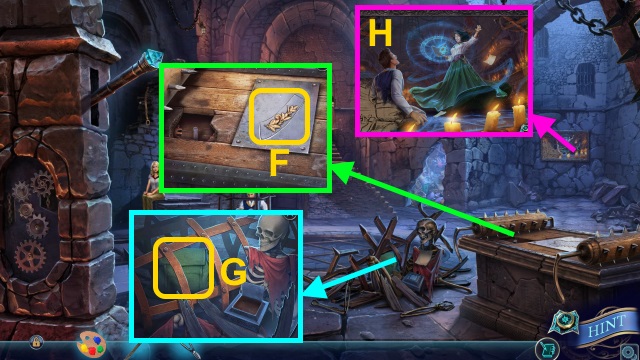
- Play HOP; receive HERBS (Q).
- HERBS on MUG OF COLD WATER; take UNPREPARED BLEND.
- Walk down, then forward.
- Place UNPREPARED BLEND (R); take HERBAL TEA.
- Give HERBAL TEA (S); receive GOLDEN AMULET (3/4).
- Take SUGAR CUBES (T).
- Walk down, then left.
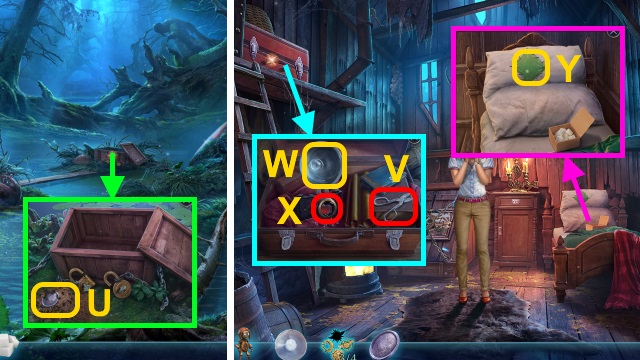
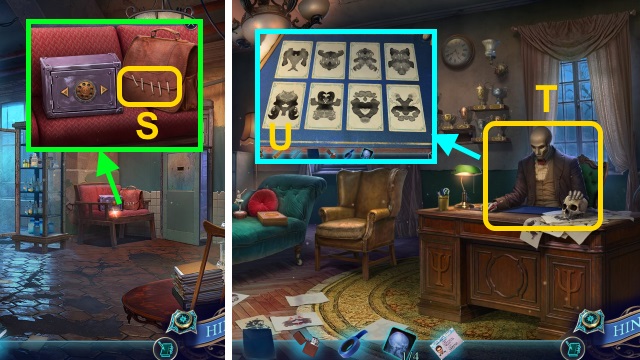
- Use SUGAR CUBES (U); take SUITCASE EMBLEM.
- Walk down, then forward.
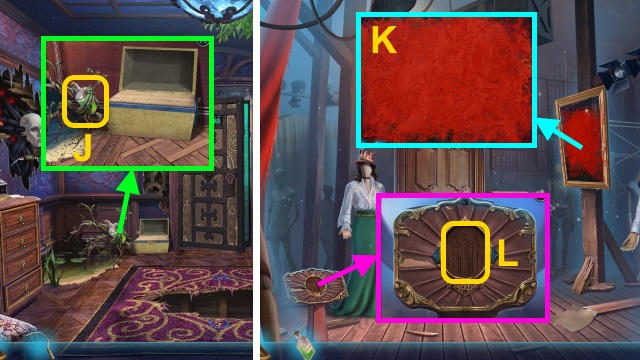
- Place SUITCASE EMBLEM; take SCISSORS (V). Replace CAMERA FLASH (W); take RUBY (X).
- Use SCISSORS (Y); take RUBY.
- Walk down.
- Examine (Z); place 2 RUBIES. Take GOLDEN AMULET (4/4).
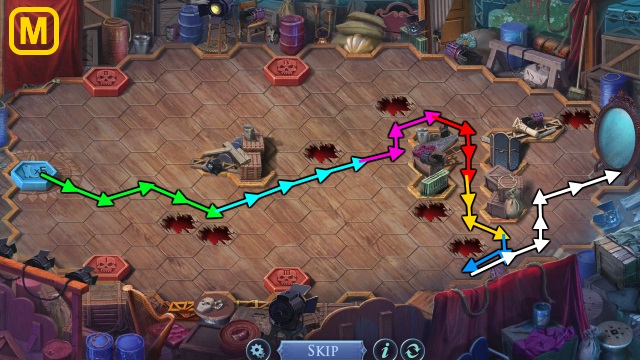
- Walk forward.
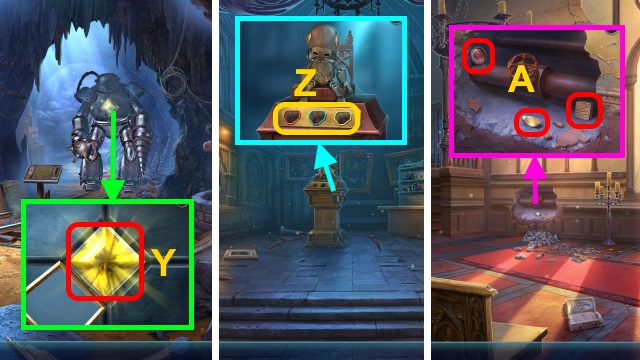
- Place GOLDEN AMULET (4/4) (A).
- Solution (B).
- Take device (C).
- Walk forward.
Chapter 2: The Hospital
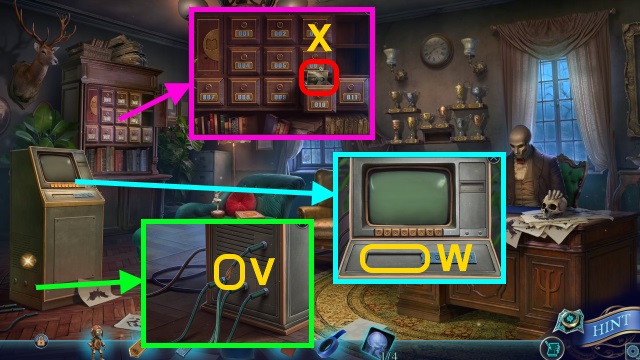
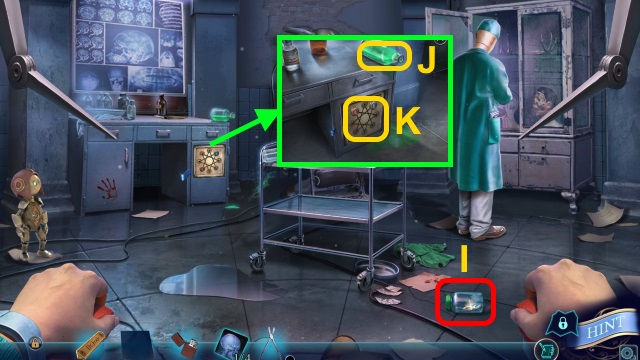
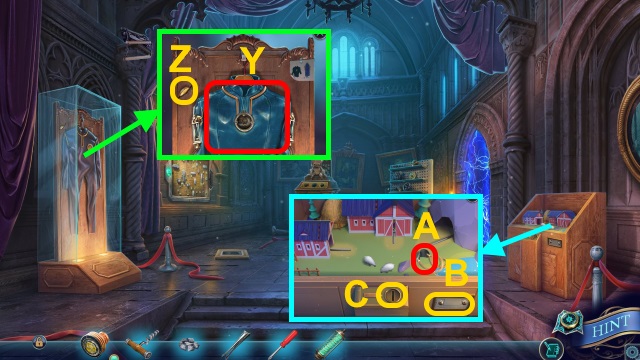
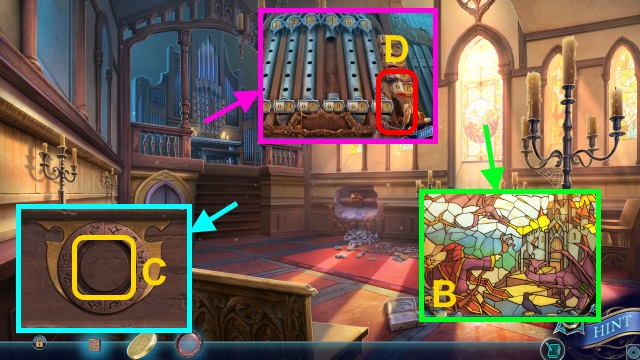
- Take OLD COIN and PASSWORD PLATE HALF (D).
- Use OLD COIN (E); receive METAL NAMEPLATE. Take RED BUTTON.
- Take CLIPBOARD (F). Place RED BUTTON (G); press.
- Examine CLIPBOARD; take CADUCEUS TILE.
- Walk right.
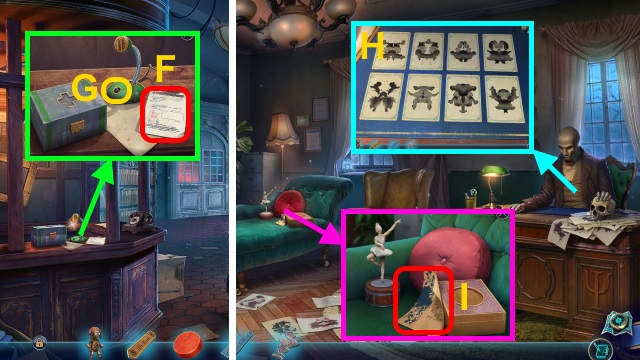
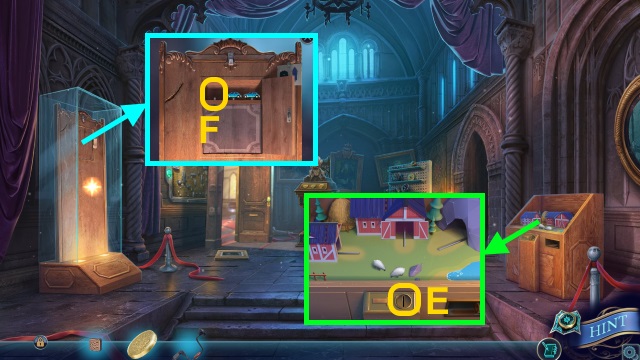
- Select any pictures (H).
- Take PAINT-STAINED PAPER (I).
- Place CADUCEUS TILE (J); take SILVER KEY.
- Walk down.
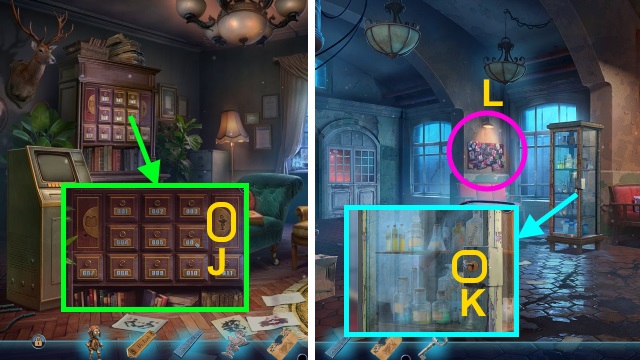
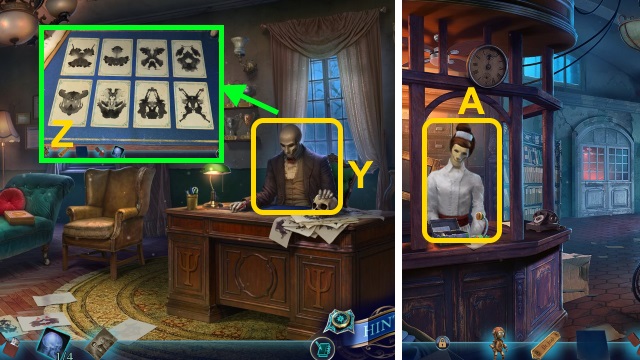
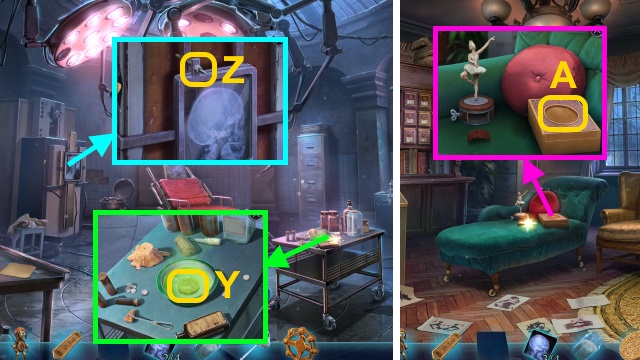
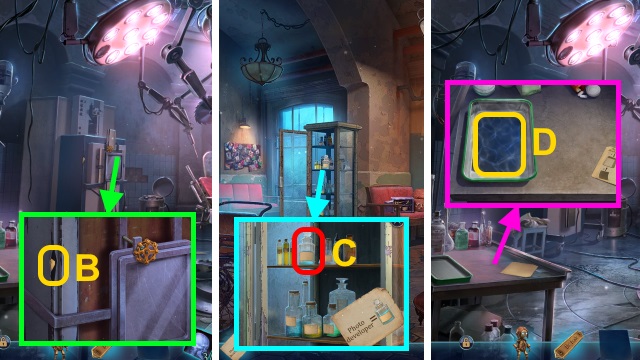
- Use SILVER KEY (K); turn. Take TROPHY, SOLVENT, and UNDEVELOPED X-RAY.
- SOLVENT on PAINT-STAINED PAPER; take item LIST.
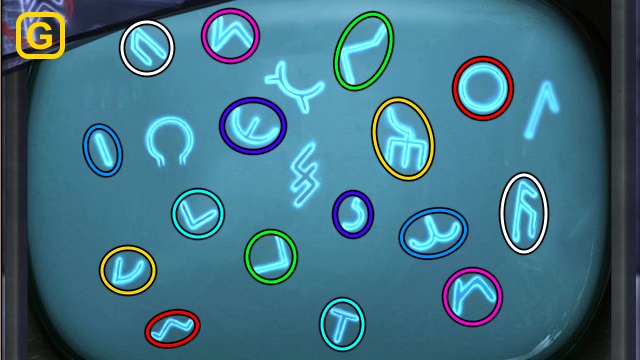
- Play HOP; receive LIGHTER (L).
- HOP solution (M).
- Walk right.
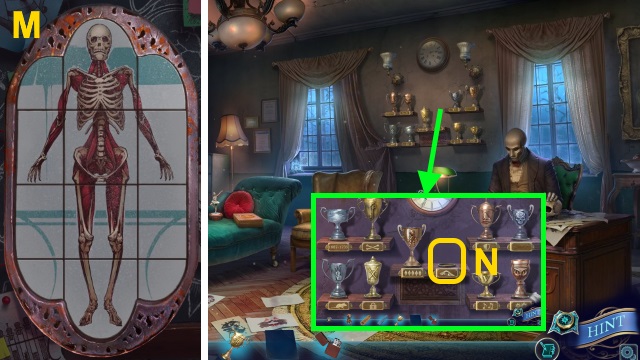
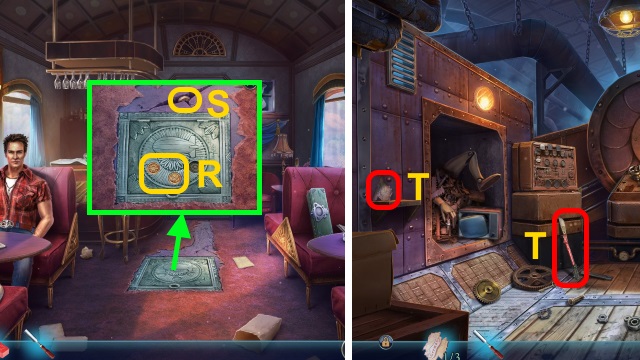
- Place TROPHY (N).
- Solution (O).
- Take GREEN CROSS.
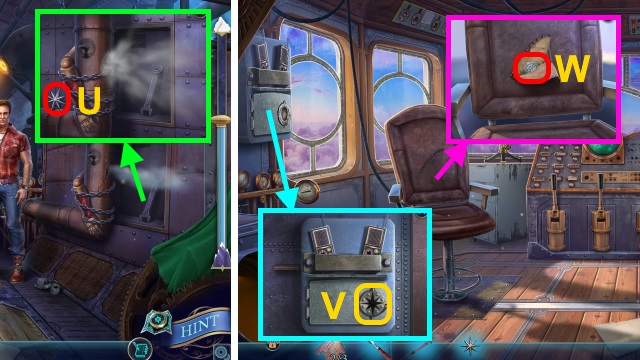
- Use LIGHTER (P); take WIRE CUTTERS.
- Walk down.
- Use WIRE CUTTERS (Q); take ELECTRICAL TAPE.
- Place GREEN CROSS (R); take SCALPEL.
- Use SCALPEL (S); open. Take X-RAY (1/4) and DRIVER'S LICENSE.
- Walk right.
- Give DRIVER'S LICENSE (T).
- Select any cards (U).
- Examine each cord; use ELECTRICAL TAPE (V).
- Place PASSWORD PLATE HALF (W); take FILE NUMBER.
- Take FAMILY PHOTO (X).
- Give FAMILY PHOTO (Y).
- Select any cards (Z); take PATIENT DOCUMENTS.
- Walk down.
- Give PATIENT DOCUMENTS (A).
- Walk forward.

- Take RUBBER TOURNIQUET and WIRE (B).
- Examine WIRE 4x; receive BENT WIRE.
- Examine paper and packages (C); receive PILLS (1/5)-(3/5). Take PILLS (4/5)-(5/5) (D-E).

- Use BENT WIRE (F); receive MEDICAL NIPPERS.
- RUBBER TOURNIQUET and PILLS on MEDICAL NIPPERS; take LOADED IMPROVISED SLINGSHOT.
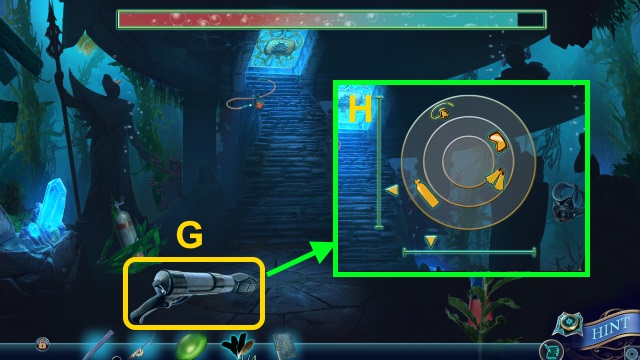
- Use LOADED IMPROVISED SLINGSHOT (G).
- Solution (H): stop red lines inside target.
- Take SEALED JAR (I).
- Examine SEALED JAR.
- Use SEALED JAR (J); receive OPENED JAR.
- Examine OPENED JAR; receive RED AND BLUE BUTTONS.
- Examine (K); place RED AND BLUE BUTTONS.
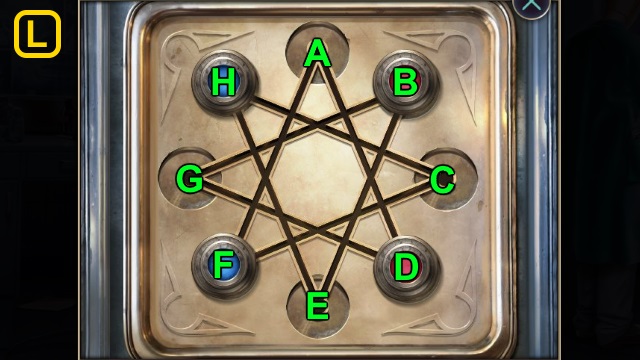
- Solution (L): (B-E)-(D-G)-(H-C)-(F-A).
- (G-B)-(E-H)-(C-F)-(A-D)-(B-E)-(H-C).
- (F-A)-(D-G)-(E-H)-(C-F)-(A-D)-(G-B).
- Take INSULATING TAPE.
- INSULATING TAPE on MEDICAL NIPPERS; take INSULATED NIPPERS.
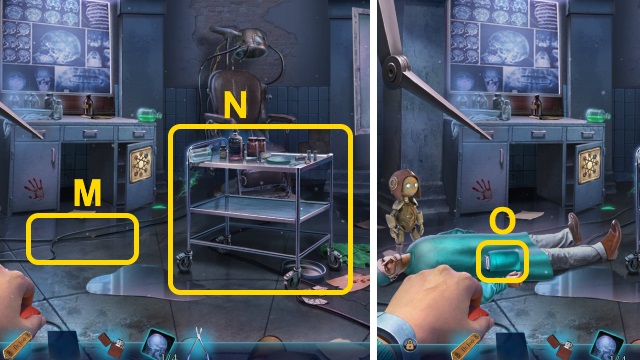
- Use INSULATED NIPPERS (M).
- Examine (N).
- Examine (O).
- Examine (P).
- Take GLASS JAR (Q). Use LIGHTER (R); take BOOK TILE.
- Take RAG (S).
- Walk down.
- Use GLASS JAR (T); receive X-RAY POWDER.
- Walk right.
- Use RAG (U).
- Place BOOK TILE (V); take X-RAY (2/4).
- Walk down.
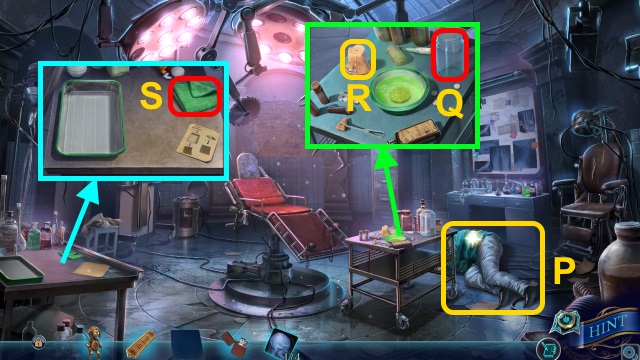
- Solution (W): Ax2-B-A.
- Take WINDING KEY and SIEVE.
- Walk right.
- Place WINDING KEY (X); examine. Take VALVE.
- Walk down, then forward.
- Use SIEVE (Y); receive CHEST DECORATION.
- Use VALVE (Z); take X-RAY (3/4).
- Walk down, then right.
- Place CHEST DECORATION (A); take TWEEZERS.
- Walk down, then forward.
- Use TWEEZERS (B); receive CHEMICAL CLUE.
- Walk down.
- Take PHOTO DEVELOPER (C).
- Walk forward.
- Use PHOTO DEVELOPER and UNDEVELOPED X-RAY (D); examine. Use X-RAY POWDER; examine. Take X-RAY (4/4).
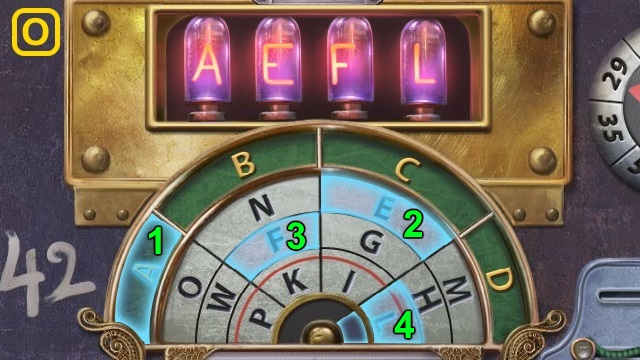
- Place X-RAY (4/4) (E). Play HOP; receive X-RAY WITH RUNES.
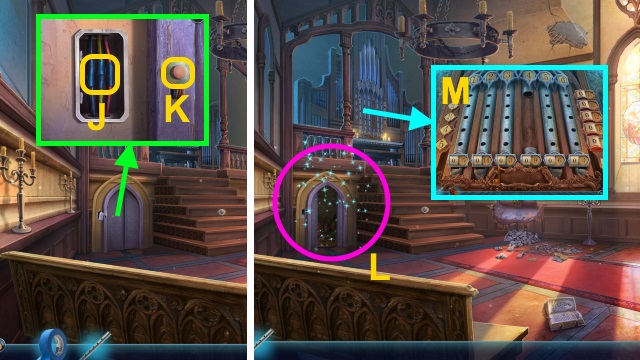
- Place METAL NAMEPLATE and X-RAY WITH RUNES (F).
- Solution (G).
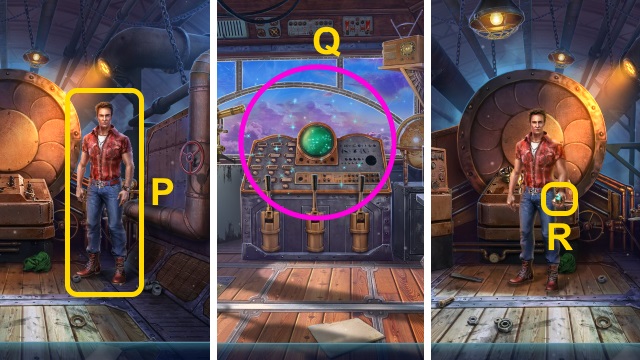
- Take device.
Chapter 3: The Aircraft
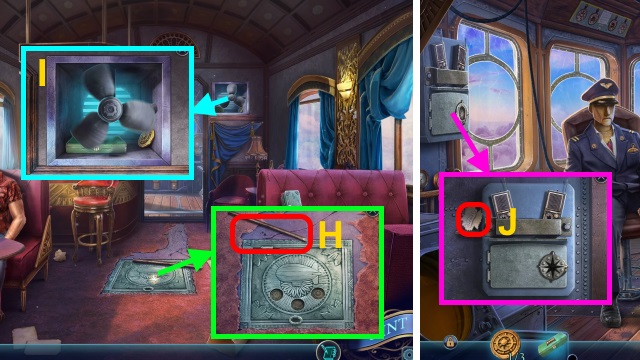
- Take METAL BAR (H).
- Use METAL BAR (I); take HATCH TILE (1/3) and TOOLBOX.
- Walk forward.
- Take GLOBE PART (1/3) (J).
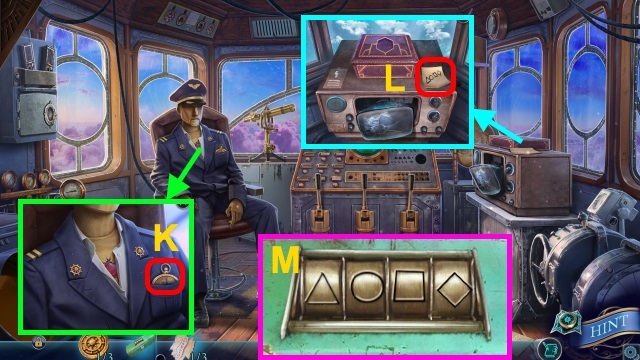
- Take COMPASS (K).
- Open COMPASS; take MAGNET.
- Take TOOLBOX CODE (L).
- Examine TOOLBOX; solution (M).
- Take CHISEL.
- Examine; use CHISEL (N). Take RUBY PENDANT.
- Place RUBY PENDANT (O); take HATCH TILE (2/3) and AMMONIA.
- Walk down.
- Use AMMONIA (P).
- Solution (Q).
- Receive HATCH TILE (3/3).
- Place HATCH TILE (3/3) (R); use MAGNET (S). Use HATCH TILE.
- Enter Engine Room.
- Take BOLT CUTTER HALF and GLOBE PART (2/3) (T).
- Take STAR EMBLEM (U).
- Walk down, then forward.
- Place STAR EMBLEM (V); take TOOLBOX EMBLEM and GLOBE CLUE.
- Open; take COIN (W).
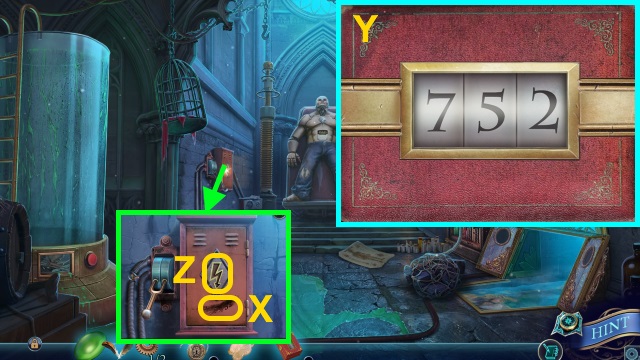
- Walk down.
- Use COIN (X); select 497. Pull handle (Y); take GLOBE PART (3/3).
- Place TOOLBOX EMBLEM (Z); take BOLT CUTTER HALF.
- Combine 2 BOLT CUTTER HALVES; take BOLT CUTTERS.
- Place GLOBE PART (3/3) and GLOBE CLUE; solution (A).
- Play HOP; receive VALVE (B).
- Enter Engine Room.

- Place VALVE (C); turn. Take WRENCH (D). Use BOLT CUTTERS (E); receive ROBOT ARM.
- Examine ROBOT ARM; remove cloth. Take METAL BRACELET.
- Examine; use BOLT CUTTERS (F). Take SCREEN. Use BOLT CUTTERS (G); receive DUMMY FINGER.
- CHISEL on DUMMY FINGER; take RING.
- Walk down, then forward.
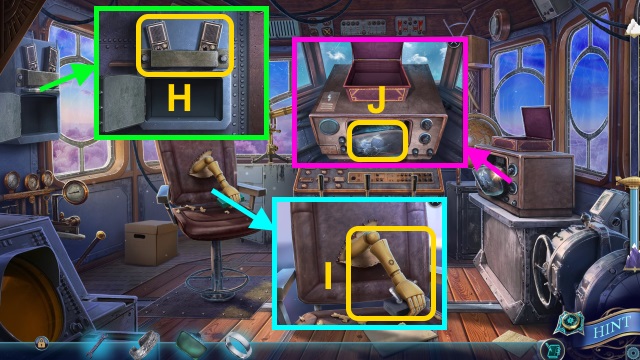
- Use WRENCH (H); receive WALKIE-TALKIES.
- Use RING and METAL BACELET (I); take TUMBLER SWITCH.
- Replace SCREEN (J); examine.
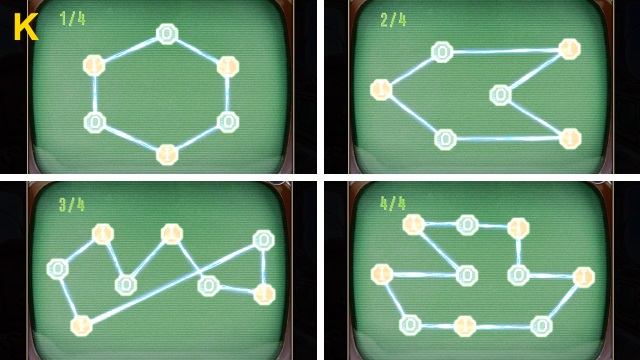
- Solution (K).
- Take BATTERIES.
- Go to Engine Room.
- Place TUMBLER SWITCH (L).
- Solution (M).
- Solution (N): A-D-C-D-A-E-C-E-A.
- Solution (O).
- Take BATTERIES.
- Open WALKIE-TALKIES; use 2 BATTERIES.
- Give WALKIE-TALKIES (P).
- Walk down, then forward.
- Play HOP (Q).
- Go to Engine Room.
- Take device (R).
Chapter 4: Frank's Room
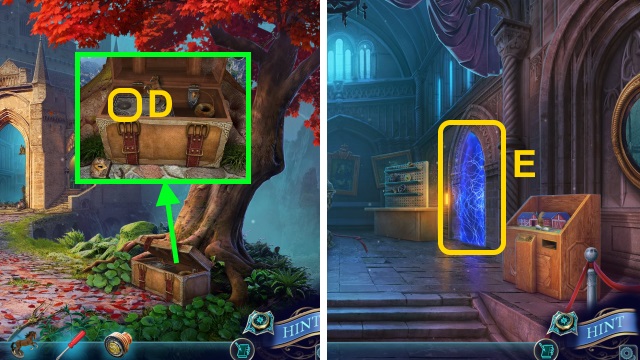
- Take BROKEN FISHING ROD, STONE BLADE, and RUBBER GLOVES (S).
- Walk forward.
- Take FISHING LINE (T).
- Use RUBBER GLOVES (U); receive FISHHOOK.
- FISHING LINE and FISHHOOK on BROKEN FISHING ROD; take FISHING ROD.
- Use FISHING ROD (V); receive FORKED LEVER.
- Place FORKED LEVER (W); pull.
- Take FLASHLIGHT (X).
- Walk down.
- Use FLASHLIGHT; take FISH TILE, FEATHER DUSTER, and MAGNIFYING LENS (Y).
- Place FISH TILE (Z); open. Take HEX WRENCH.
- Walk forward.
- Use HEX WRENCH (A); take ROBOT EYE.
- Use FEATHER DUSTER (B); take FEATHER (1/4) and STONE BOOK.
- Walk down.
- Place ROBOT EYE (C); take GOLEM HEART.
- Walk forward.
- Place GOLEM HEART (D); take SHELL BUTTON.
- Place SHELL BUTTON (E).
- Solution (F).
- Go right.
- Examine (G).
- Solution (H): align yellow cursors to take each object.
- Examine (1-4).
- Give STONE BOOK (I); take BOX TILES (1/3).
- Take STONE HILT, WINCH HANDLE, and PLIERS (J).
- Walk down.
- Use PLIERS (K); receive STONE CROSS GUARD.
- Place WINCH HANDLE (L); turn.
- Take SHOVEL (M).
- Walk down.
- Use SHOVEL (N); take INDUSTRIAL-STRENGTH GLUE and FEATHER (2/4). Use FISHING ROD; receive FLUTE.
- STONE HILT, STONE CROSS GUARD, and INDUSTRIAL-STRENGTH GLUE on STONE BLADE; take STONE SWORD.
- Go forward, then right.
- Give FLUTE (O); take BOX TILES (2/3).
- Give STONE SWORD (P); take BOX TILES (3/3).
- Walk down twice.
- Place BOX TILES (3/3) (Q); take FISH FOOD and GEAR (1/2).
- Go forward, then right.
- Give FISH FOOD (R); take WATER TANK BUTTON.
- Walk down.

- Replace WATER TANK BUTTON (S); press. Take SKULL.
- Go right.
- Place SKULL (T); take shell.
- Play HOP; receive SHELL EMBLEM.
- Place SHELL EMBLEM (U).
- Solution (V).
- Go up.
- Take FEATHER (3/4), FLOWER PENDANT, HANDKERCHIEF, and SMALL CHEST (W).
- Walk down twice.
- Use HANDKERCHIEF (X).
- Examine SMALL CHEST; solution (Y).
- Take FEATHER (4/4) and LIGHTNING TILE.
- Place LIGHTNING TILE (Z). Press button; take LIGHTBULB.
- Walk right, then forward.
- Place FEATHER (4/4); solution (A).
- Take CASTLE TILE HALF (B).
- Examine; place LIGHTBULB and MAGNIFYING LENS (C).
- Walk down.
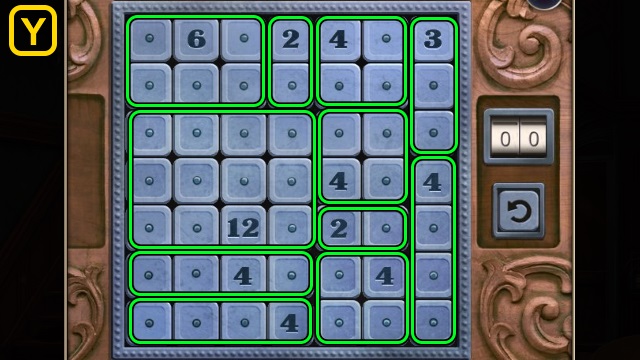
- Solution (D): A-Cx2-B-A-B.
- Take GEAR (2/2).
- Go forward.
- Open; place GEAR (2/2) (E).
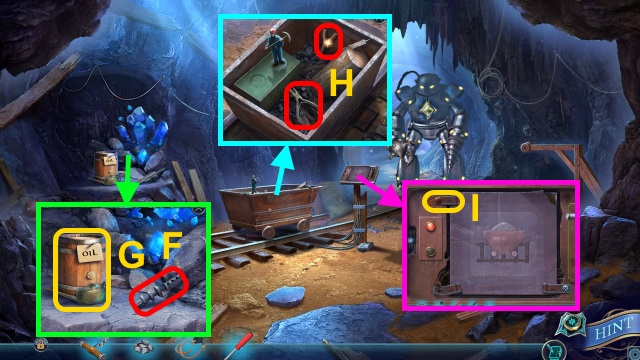
- Take MINING PICK (F).
- Walk down twice.
- Use MINING PICK (G); take CHARGED BATTERY.
- Walk down.
- Examine; place CHARGED BATTERY (H). Take TINY KEY.
- TINY KEY on FLOWER PENDANT; take FLOWER AMULET.
- Walk forward, then right.
- Place FLOWER AMULET (I); take SICKLE.
- Walk down twice.
- Use SICKLE; take SOLVENT (J).
- Go Backstage.
- Pour SOLVENT (K). Play HOP; take CASTLE TILE HALF.
- Place 2 CASTLE TILE HALVES (L).
- Solution (M).
Chapter 5: The Castle
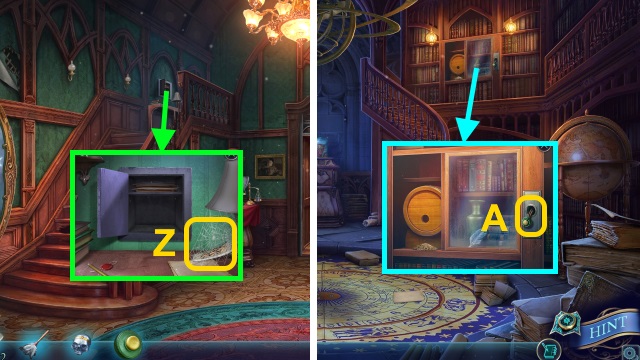
- Take KNIGHT FIGURINE and CORKSCREW (N).
- Place KNIGHT FIGURINE (O).
- Solution (P).
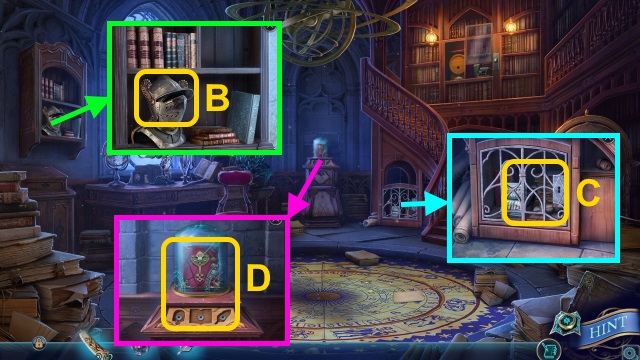
- Take TWEEZERS, DOOR CLUE, GREEN CRYSTAL, PEBBLES, BROKEN REACTOR, and CATAPULT HANDLE (Q).
- Play HOP; receive CHEST KEY (R).

- Use CHEST KEY (S); open. Take CHAIN.
- Place CATAPULT HANDLE and CHAIN (T).
- Examine; solution is random (U).
- Walk forward.
- Take SCREWDRIVER (V).
- Place GREEN CRYSTAL (W).
- Solution (X).
- Take COSTUME REACTOR.
- Try to walk right.
- Take DISCHARGED SUIT (Y). Use TWEEZERS (Z); receive COIN.
- Take SLING (A). Use SCREWDRIVER (B); take REACTOR BATTERY. Use COIN (C); take HORSE FIGURINE.
- Examine BROKEN REACTOR; use SCREWDRIVER. Open; use REACTOR BATTERY. Take COSTUME REACTOR.
- Walk down.
- Place HORSE FIGURINE (D); take COSTUME REACTOR.
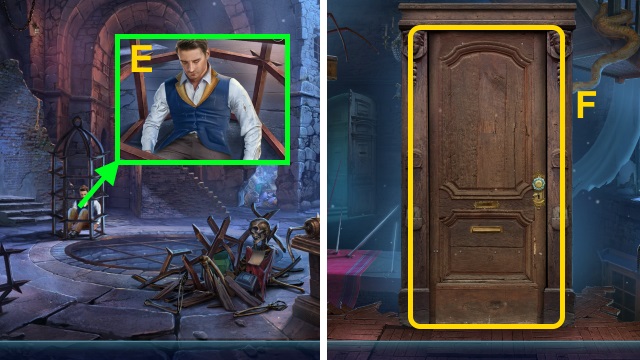
- 3 COSTUME REACTORS on DISCHARGED SUIT; take CHARGED SUIT.
- Walk forward.
- Use CHARGED SUIT (E).
- Take GUN BARREL (F). Use CORKSCREW (G); take OILER.
- Take FORKED BRANCH and NIPPERS (H).
- SLING and PEBBLES on FORKED BRANCH; take LOADED SLINGSHOT.
- Use OILER and SCREWDRIVER (I).
- Solution (J).
- Take GUN CARTRIDGE and SHARP GLASS (K).
- Walk down.
- Use LOADED SLINGSHOT (L).
- Solution (M): stop red lines inside target.
- Take ROPE LADDER.
- Walk down.
- Use SHARP GLASS (N); take MALLET WITH CHISEL.
- Use NIPPERS (O); receive WIRE.
- Walk forward, then right.
- Use ROPE LADDER (P).
- Take SCOOP NET (Q). Use MALLET WITH CHISEL (R); receive RED CRYSTAL.
- Use MALLET WITH CHISEL (S); receive BLUE CRYSTAL.
- Walk down twice.
- Use SCOOP NET (T); receive COIN.
- Walk forward.
- Use COIN (U); take MINER STATUETTE.
- Walk right.
- Place MINER STATUETTE (V); take GUN STOCK.
- Walk down.
- Place GUN CARTRIDGE, GUN BARREL, WIRE, and GUN STOCK; take LASER GUN (W).
- Walk right.
- Use LASER GUN (X).
- Open; take YELLOW CRYSTAL (Y).
- Walk down.
- Place RED CRYSTAL, BLUE CRYSTAL, and YELLOW CRYSTAL (Z).
- Walk left.
- Take COIN, WATER TILE, and MAGIC LENS (A).
- Use MAGIC LENS (B); play HOP.
- Place MAGIC LENS (C).
- Take DRILL (D).
- Walk down.
- Use COIN (E); take MODEL CAR.
- Open; place MODEL CAR (F). Take FRICTION TAPE.
- Walk down.
- Place WATER TILE; press (G). Take RASP HANDLE.
- Walk forward, then right.
- Place RASP HANDLE (H); take RASP.
- Walk down twice.
- Use RASP (I); receive PIPE.
- DRILL on PIPE; take ORGAN PIPE.
- Walk forward, then left.
- Examine; use FRICTION TAPE (J). Press button (K).
- Play HOP; receive MUSICAL NOTES (L).
- Place ORGAN PIPE and MUSICAL NOTES (M).
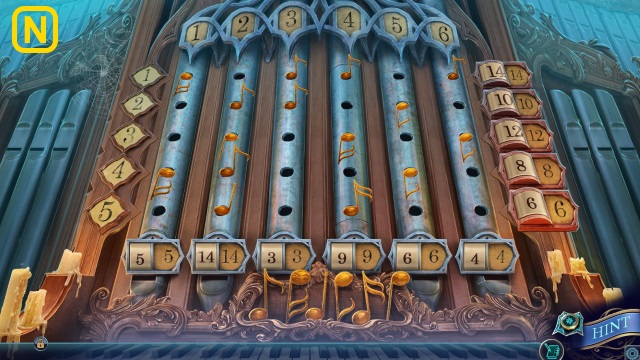
- Solution (N).
Chapter 6: Beatrice
- Examine scene.
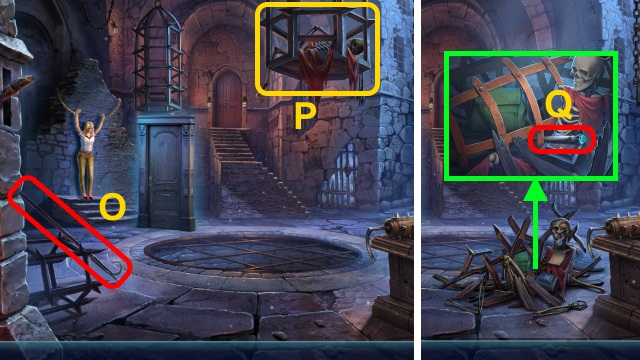
- Take PIKE POLE (O).
- Use PIKE POLE (P).
- Take LEVER (Q).
- Take GEAR and WRENCH (R).
- Use WRENCH (S); take GEAR.
- Place 2 GEARS (T).
- Replace LEVER (U); pull.

- Take KEYS (V).
- Use KEYS (W).
- Talk (X); receive SKULL TILE.
- Place SKULL TILE (Y). Play HOP; receive PUZZLE TILE.
- Examine (Z); place PUZZLE TILE.

- Solution (A): (A-B)-(F-J)-(L-K)-(G-C)-(D-A)-(E-F).
- (I-E)-(H-I)-(C-D)-(K-G)-(I-L)-(L-K)-(J-L).
- (F-J)-(B-F)-(E-B)-(D-E)-(E-I)-(G-C)-(C-D).
- (F-E)-(I-H)-(H-G)-(L-I)-(G-H)-(J-L).
- Take PALETTE.
- Use KEYS (B).
- Walk forward.
- Take ELECTICAL TAPE and FILE (C).
- Use ELECTRICAL TAPE (D); take TOOLBOX TOKEN. Flip switch.
- Place TOOLBOX TOKEN (E); take SHEARS.
- Walk down.
- Use SHEARS (F); receive HELMET DECORATION (1/2).
- Use FILE (G). Open; take ROPE and CORKSCREW.
- Use PALETTE (H). Play HOP; take WEIGHT (1/2) and GLASS SHARD.
- Walk forward.
- Use GLASS SHARD (I).
- Solution (J).
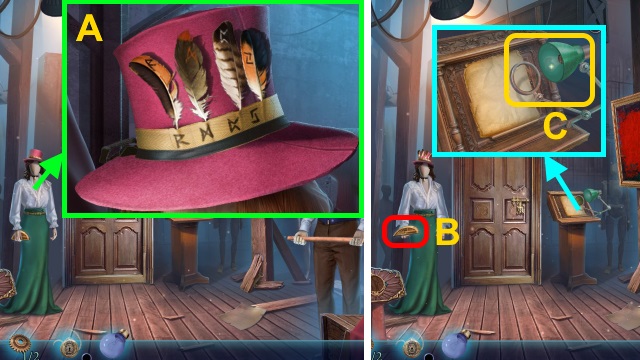
- Take DECORATIVE TILE and HAT (K).
- Walk down.
- Place DECORATIVE TILE (L); take CHAINSAW.
- Use CHAINSAW (M).
- Take TELESCOPE HANDLE (N).
- Place HAT (O); take MONOCLE.
- Examine MONOCLE; take LENS.
- Walk forward.
- Replace LENS and TELESCOPE HANDLE (P).

- Solution (Q-R).
- Solution (S).
- Use CORKSCREW (T); take WEIGHT (2/2).
- Use ROPE (U); take FEATHER DUSTER.
- Use FEATHER DUSTER (V); take SKULL TOKEN.
- Walk down.
- Place WEIGHT (2/2) (W); examine (X).
- Solution (Y).
- Take CABINET BUTTON.
- Use FEATHER DUSTER (Z); take HELMET DECORATION (2/2).
- Walk forward.
- Replace CABINET BUTTON (A); take FEATHER TOKEN.
- Place HELMET DECORATION (2/2) (B); take LIBRARY KEY.
- Use LIBRARY KEY; take BOOK TOKEN (C).
- Place SKULL TOKEN, FEATHER TOKEN, and BOOK TOKEN; read book (D).
- Play HOP; receive BLACK BOOK.
- Walk down twice.
- Use BLACK BOOK (E).
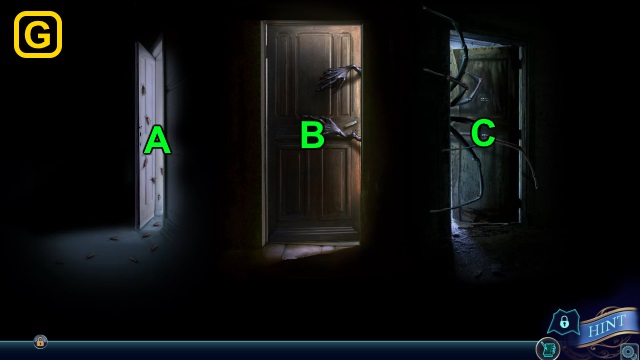
- Open door (F).
- Walk forward.
- Solution (G): A-Bx2-Ax2.
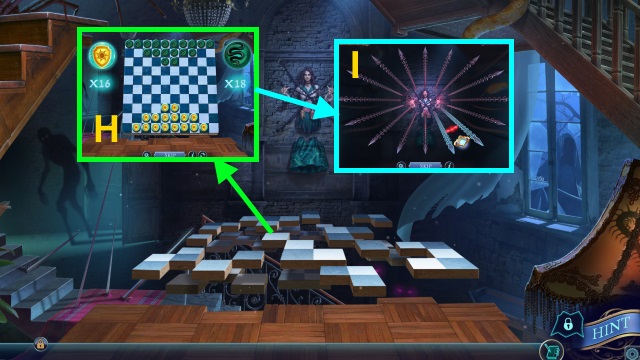
- Solutions are random (H-I).
- Congratulations! You have completed Mystery of the Ancients: No Escape.
Created at: 2019-03-22