

Walkthrough Menu
- General Tips
- Chapter 1: Palmer's Estate
- Chapter 2: The Catacombs
- Chapter 3: The Shrine
- Chapter 4: The Tree
- Chapter 5: Devona
General Tips
- This is the official guide for Mystery of the Ancients: The Sealed and Forgotten.
- This guide will not show when you have to zoom into a location; the screenshots will show each zoom scene.
- Hidden-object puzzles are referred to as HOPs. This guide will not show screenshots of the HOPs, however, it will mention when an HOP is available and the inventory item you'll collect from it.
- Use the Map to fast travel to a location.
- There are multiple ways to play through this game; this guide shows one way the game can be played.
Chapter 1: Palmer's Estate
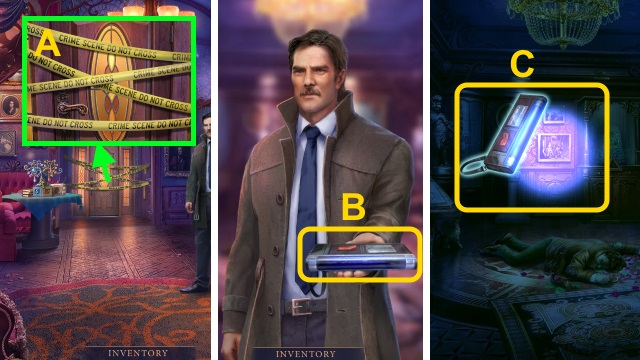
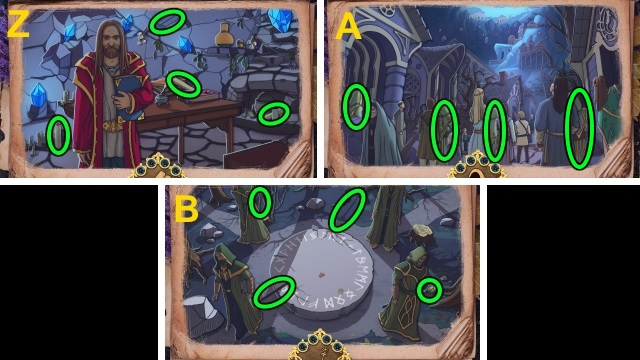
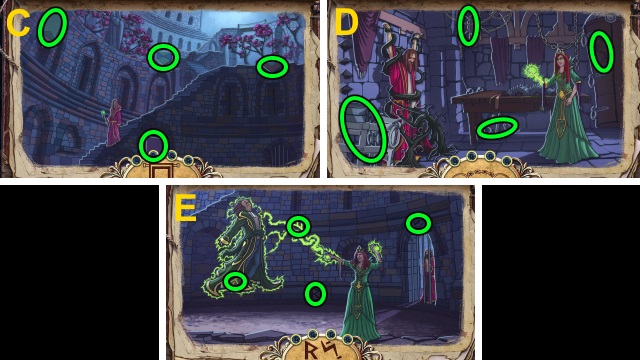
- Examine the scene.
- Move the tape; open the door (A).
- Walk forward.
- Take the ULTRAVIOLET LAMP (B).
- Use the ULTRAVIOLET LAMP on the scene (C).
- Play the HOP; receive the EMP BULB.
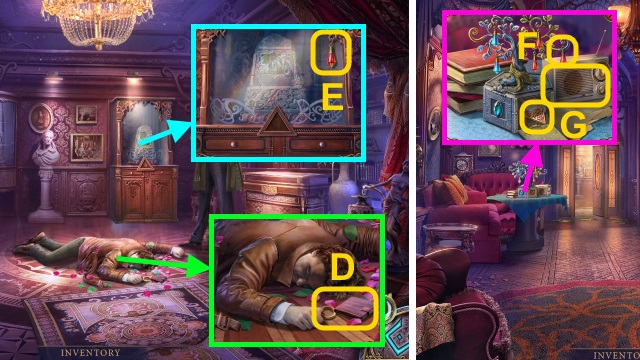
- Take the WALLET and RING HANDLE (D).
- Open the WALLET; examine the papers. Take the STRANGE NOTE.
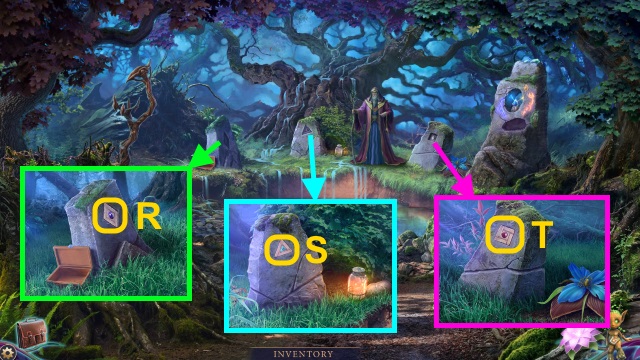
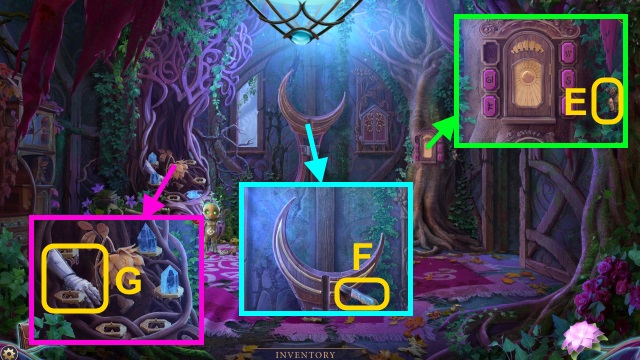
- Take the RED CRYSTAL (E).
- Walk down.
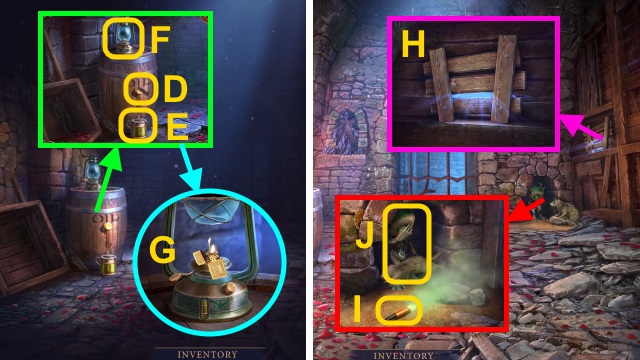
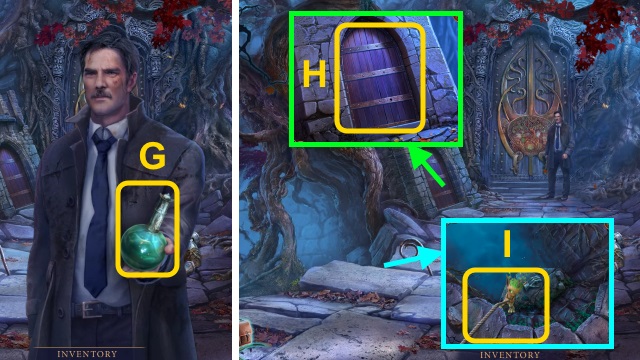
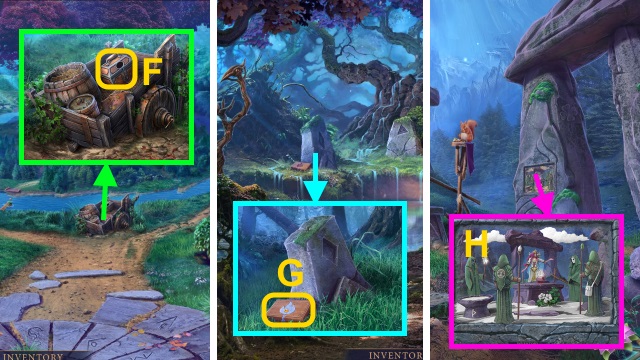
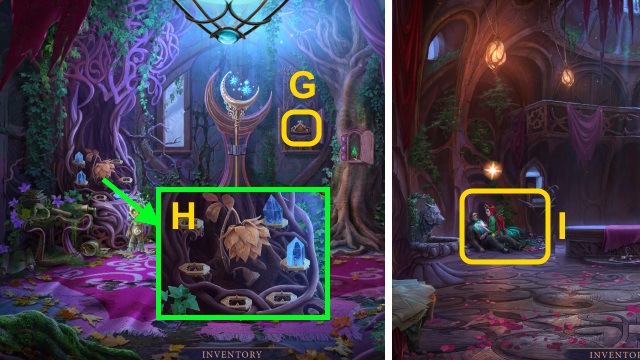
- Place the RED CRYSTAL (F); take the TRIANGLE KEY and RADIO (G).
- Walk forward.
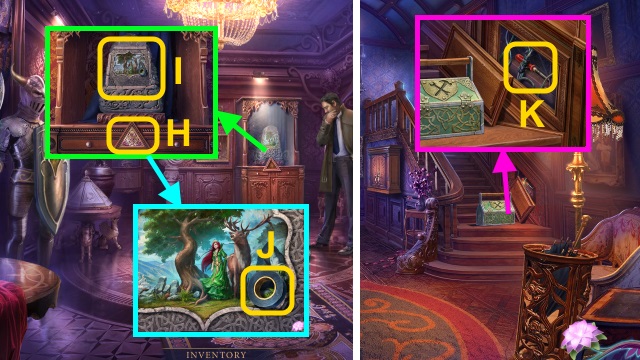
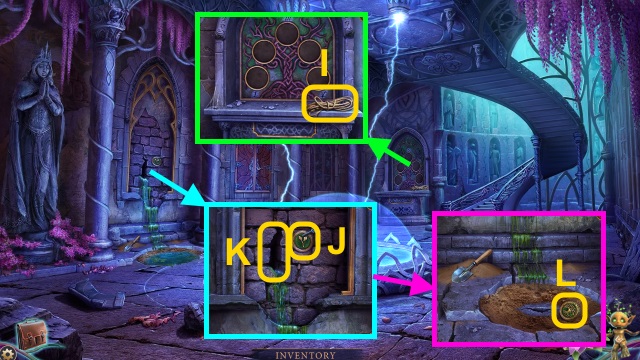
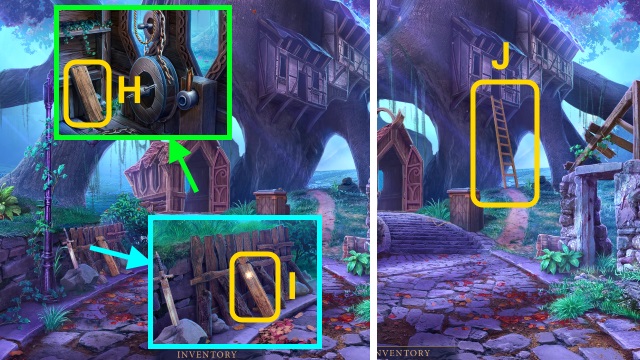
- Place the TRAINGLE KEY (H); examine the stone (I).
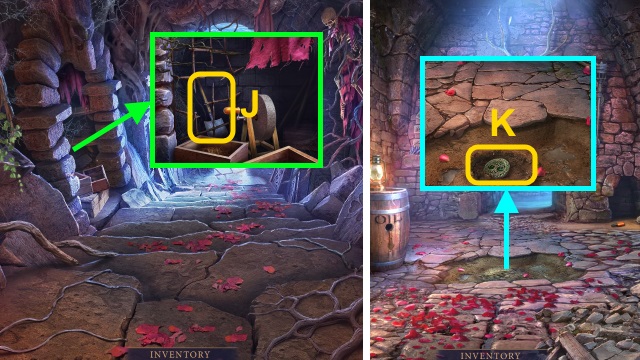
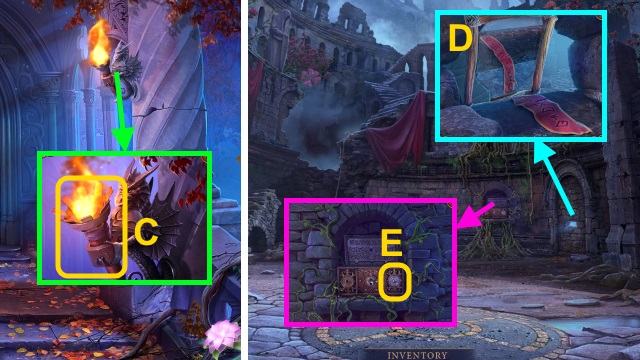
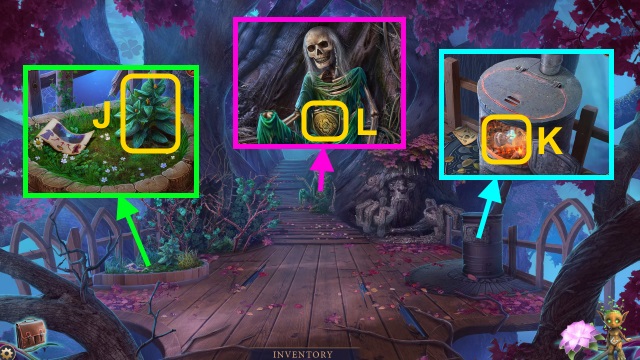
- Take the ELECTRICAL TAPE (J).
- Walk down.
- Remove the cover; use the ELECTRICAL TAPE. Take the SCREWDRIVER (K).
- Examine the RADIO; use the SCREWDRIVER. Take the BATTERIES.
- Combine the ULTRAVIOLET LAMP, EMP BULB, and BATTERIES. Press the button; take the EMP LAMP.
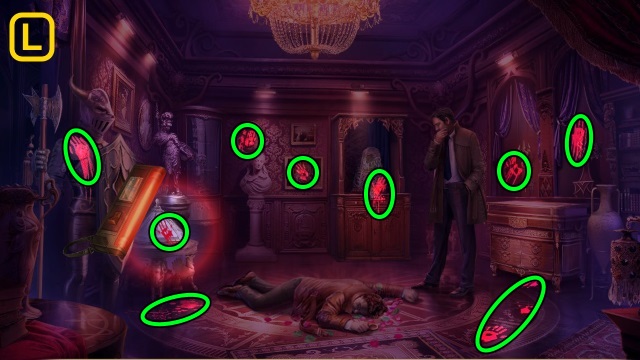
- Walk forward.
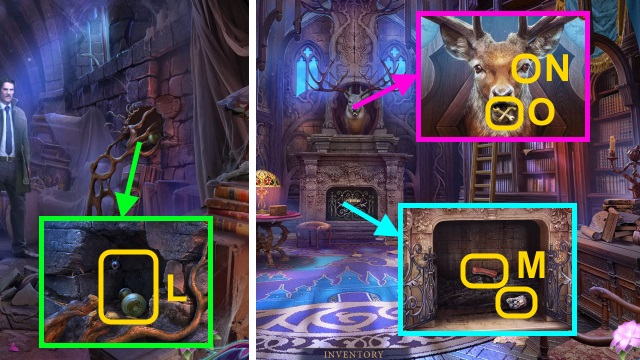
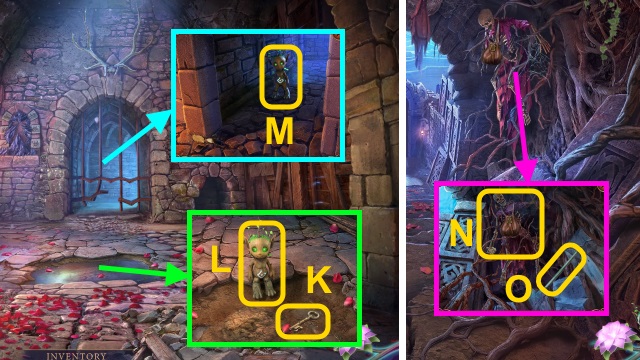
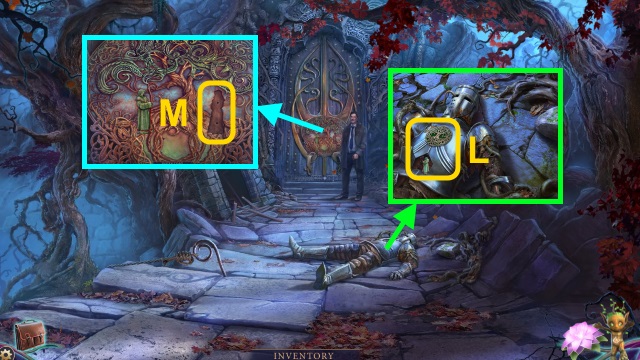
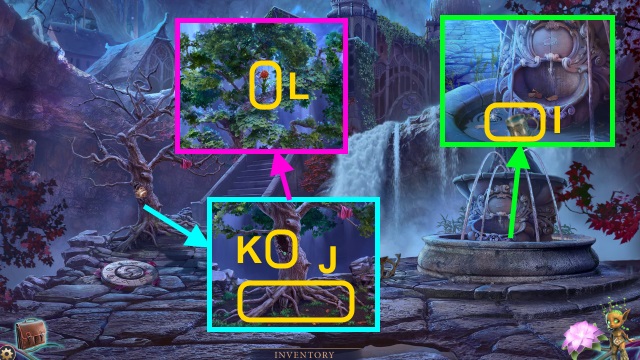
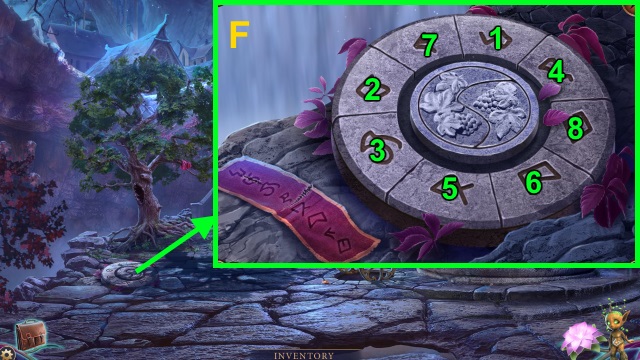
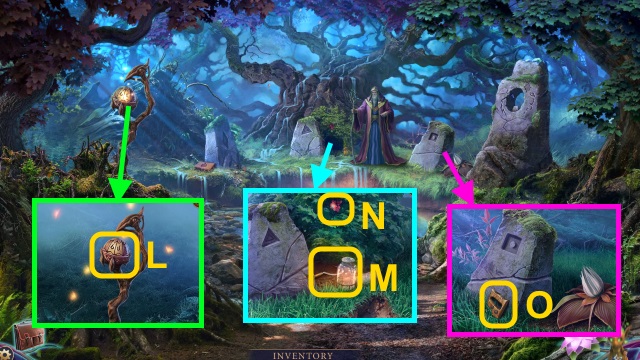
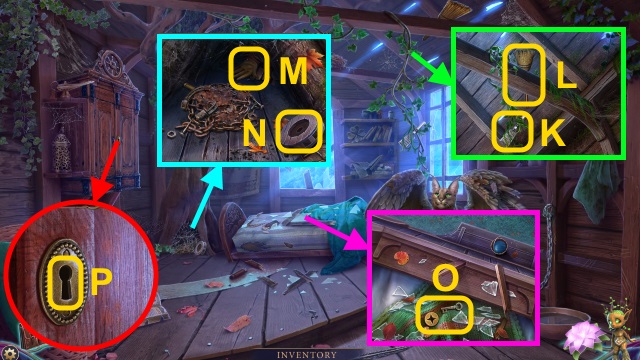
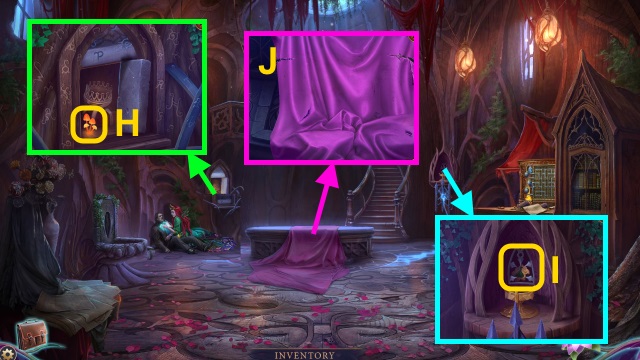
- Use the EMP LAMP on the scene for a mini-game; solution (L).
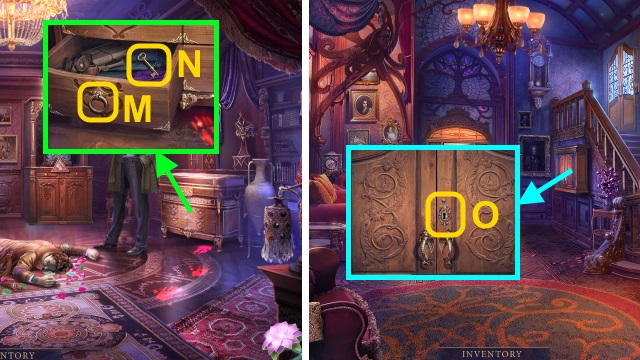
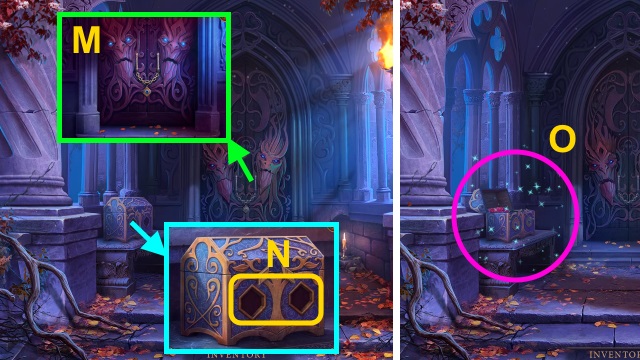
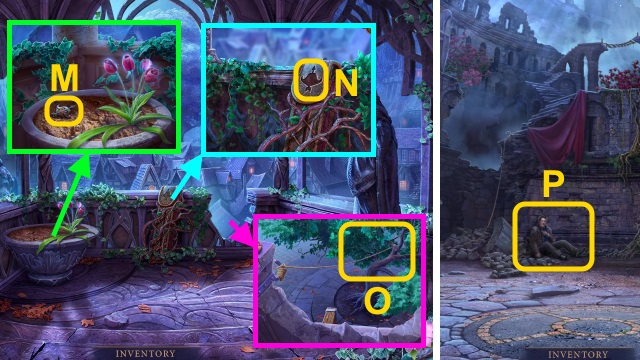
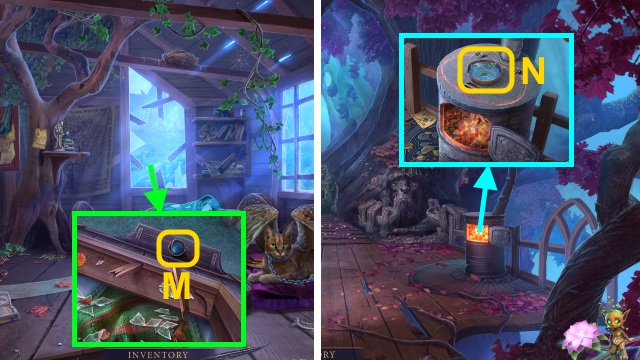
- Place the RING HANDLE (M); open the drawer. Take the BRONZE KEY (N).
- Walk down.
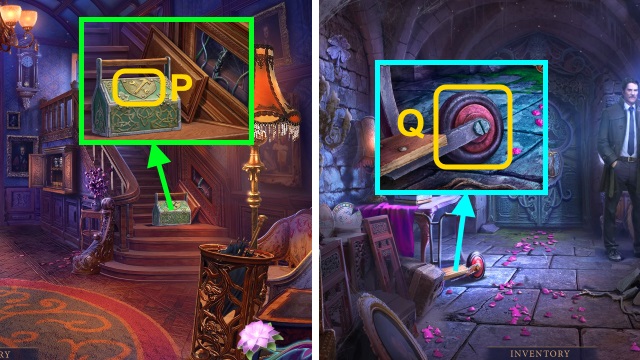
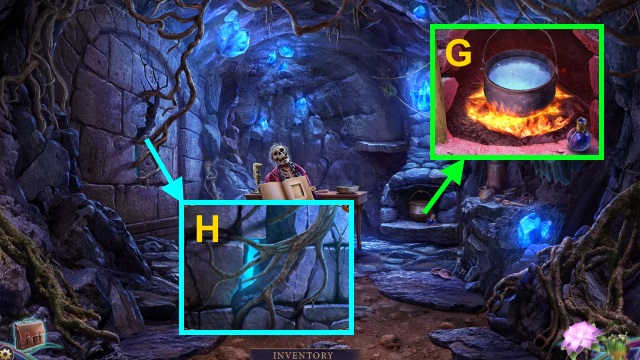
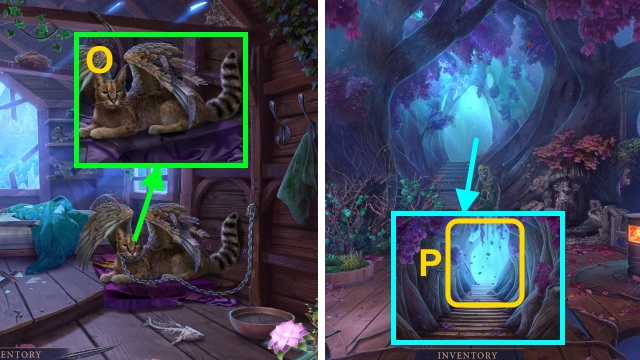
- Use the BRONZE KEY for a mini-game (O).
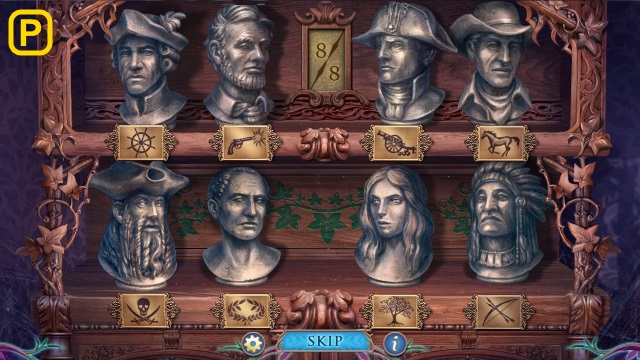
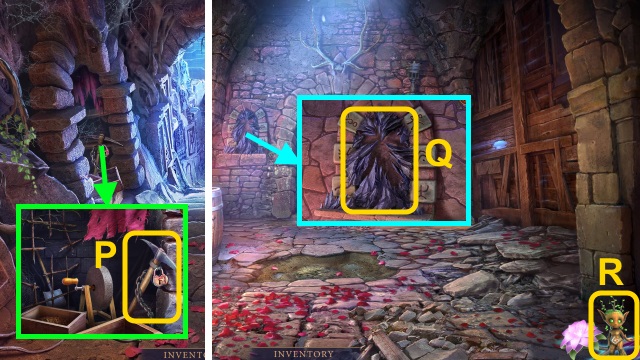
- Solution (P).
- Take the CANE.
- Walk forward.
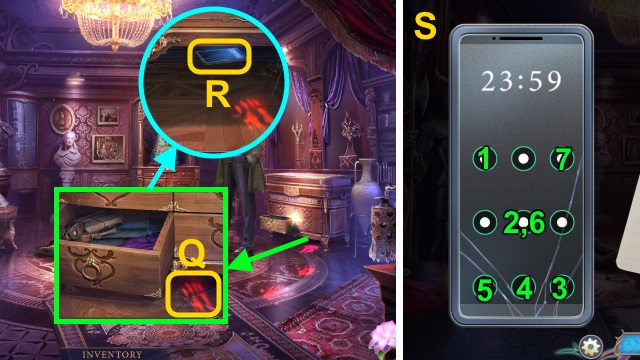
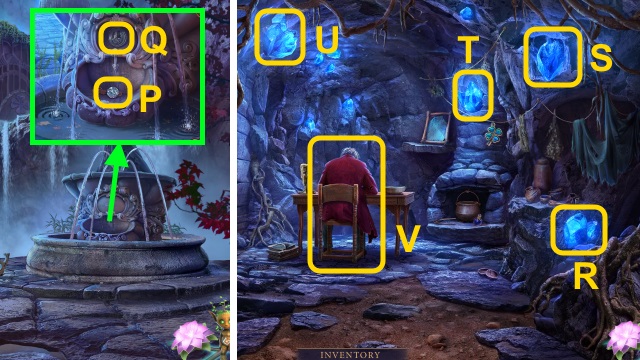
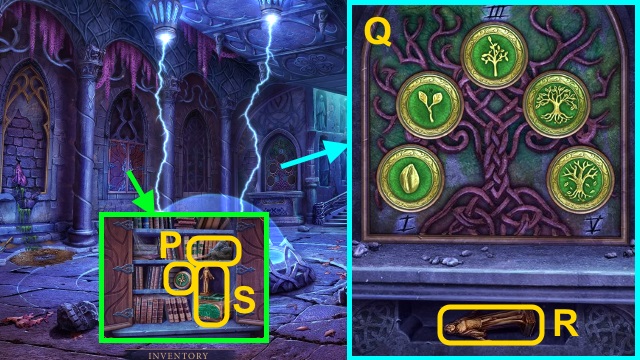
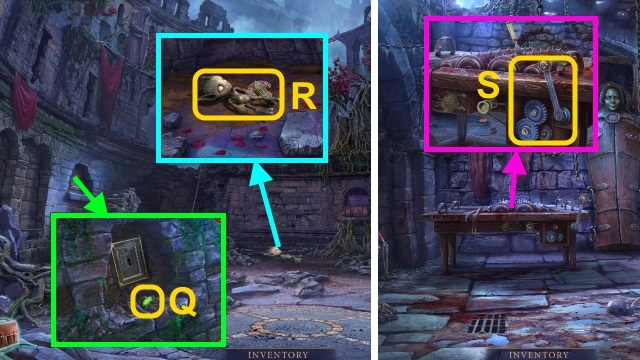
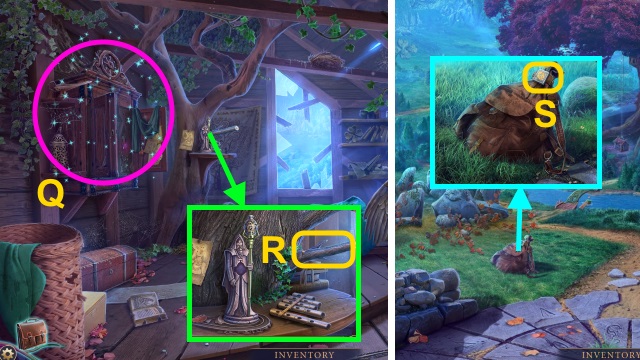
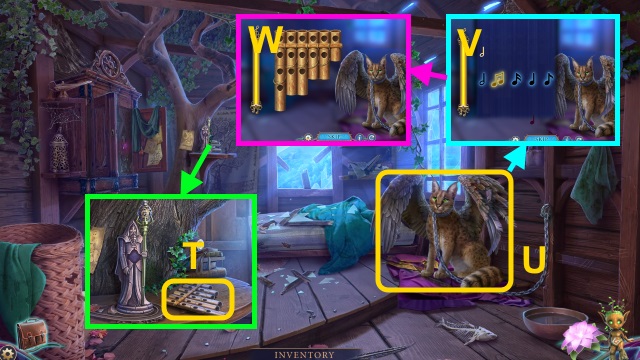
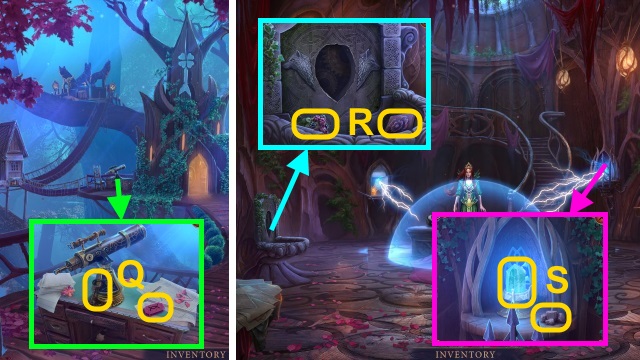
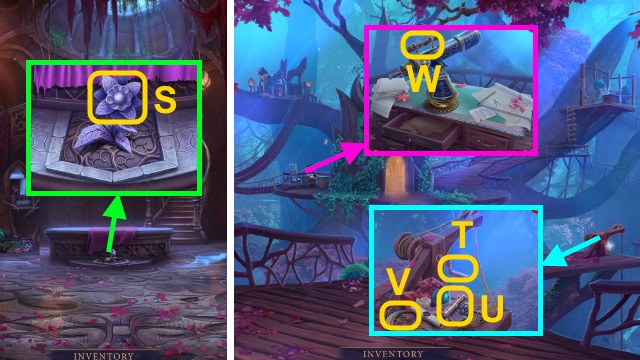
- Examine the handprint (Q); use the CANE (R). Receive the SMARTPHONE.
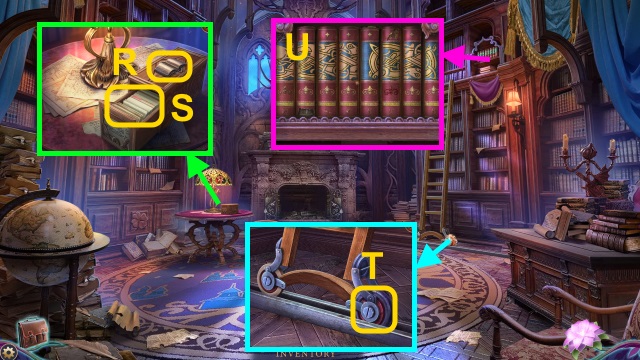
- Examine the SMARTPHONE for a mini-game; solution (S).
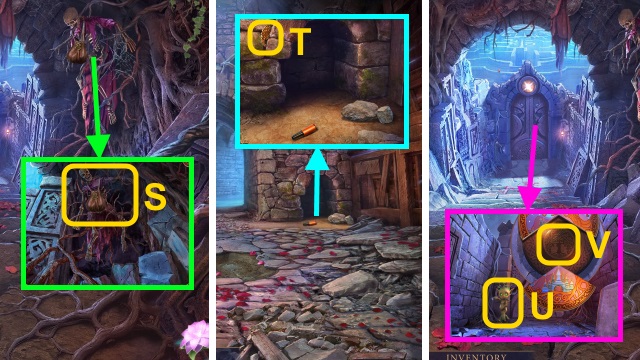
- Select 'Photos'; examine the photos. Take the SMARTPHONE.
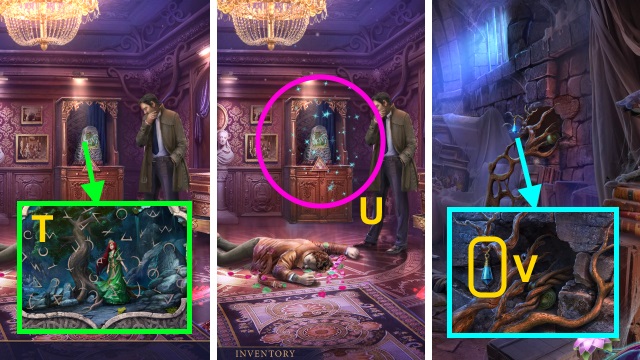
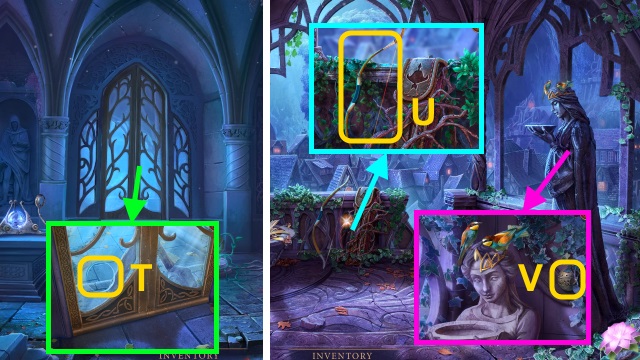
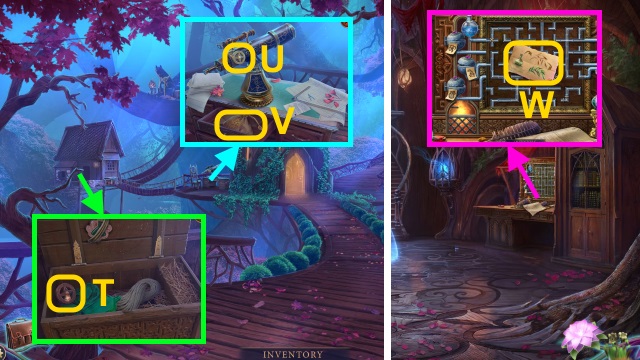
- Use the SMARTPHONE (T).
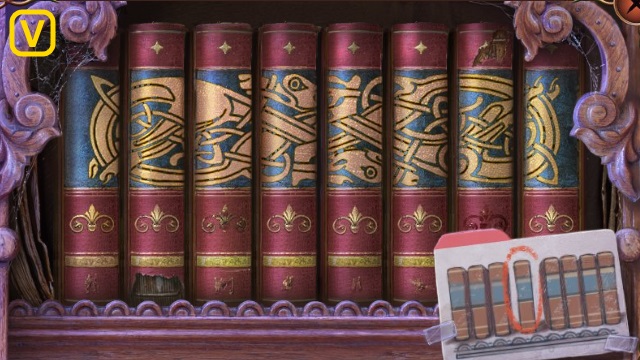
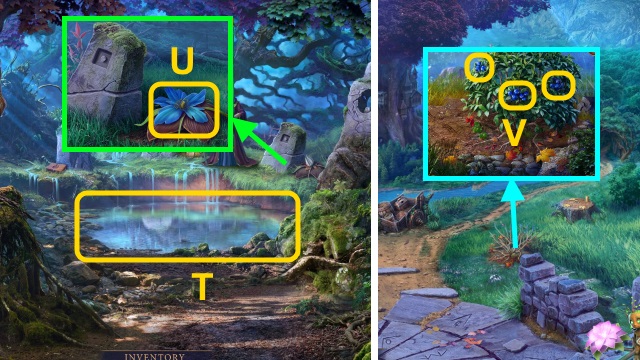
- Play the HOP (U).
- Walk forward.
- Examine the scene.
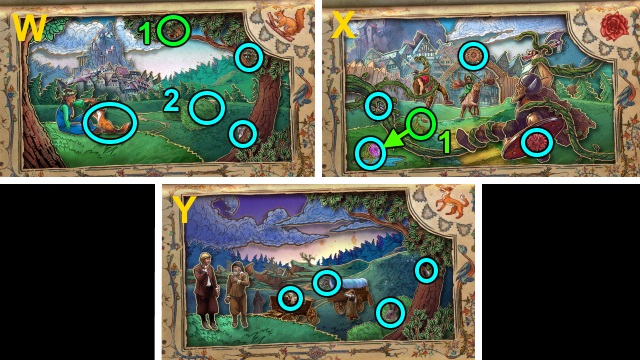
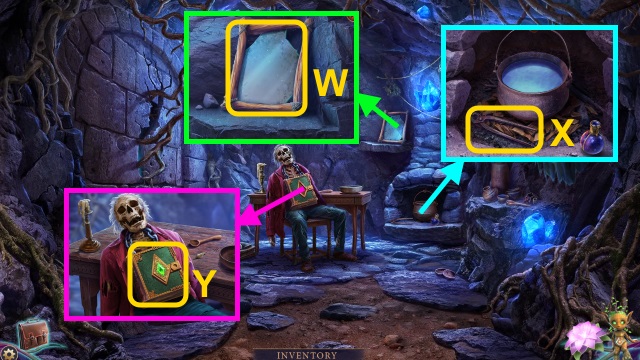
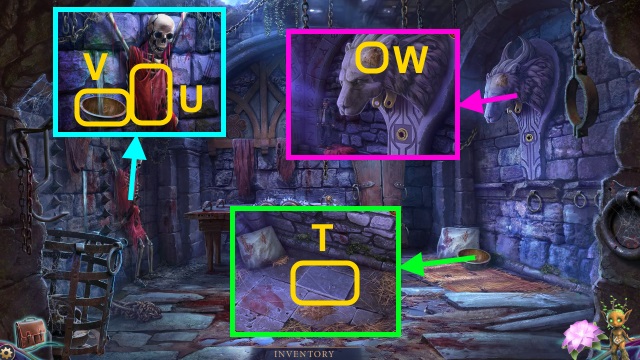
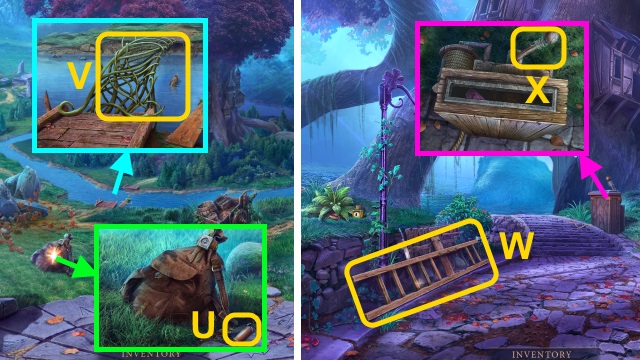
- Take the BLUE CRYSTAL (V).
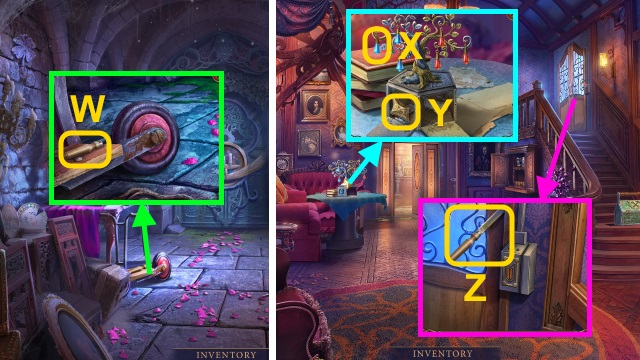
- Take the TOOL HANDLE (W).
- Walk down twice.
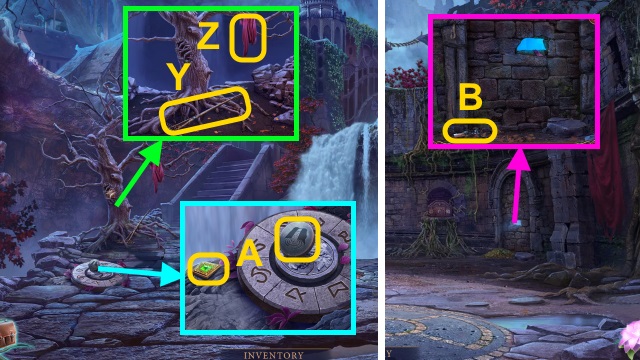
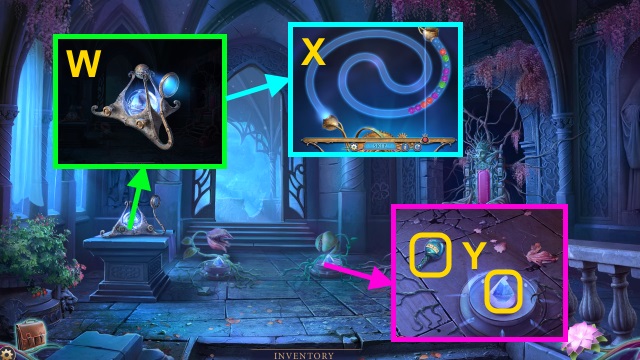
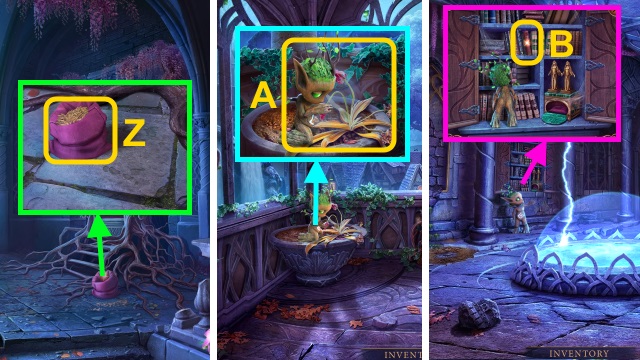
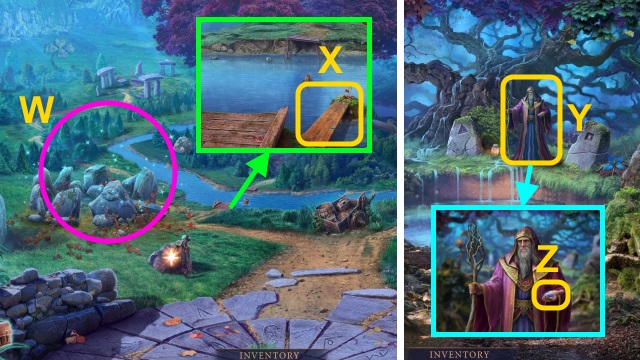
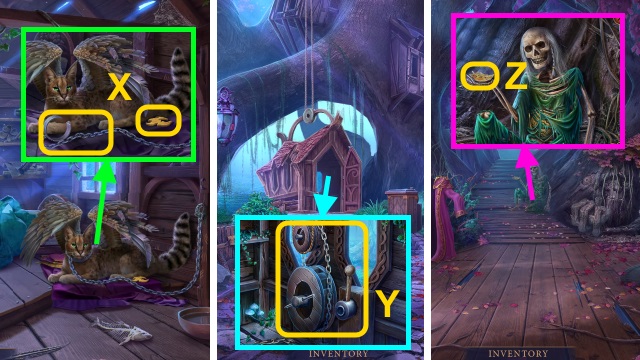
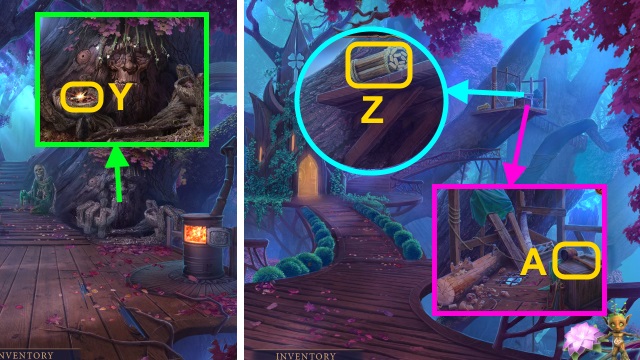
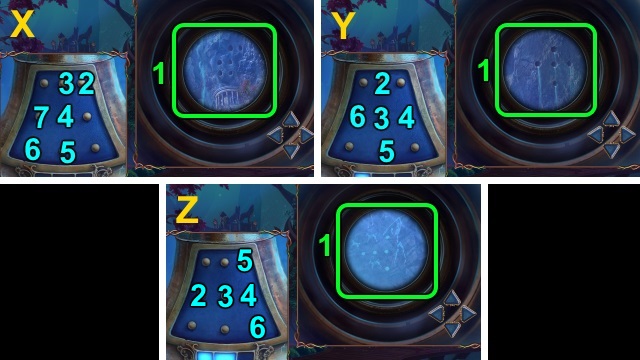
- Place the BLUE CRYSTAL (X); take the ORNATE EMBLEM (Y).
- Place the TOOL HANDLE; take the FILE (Z).
- Walk forward.
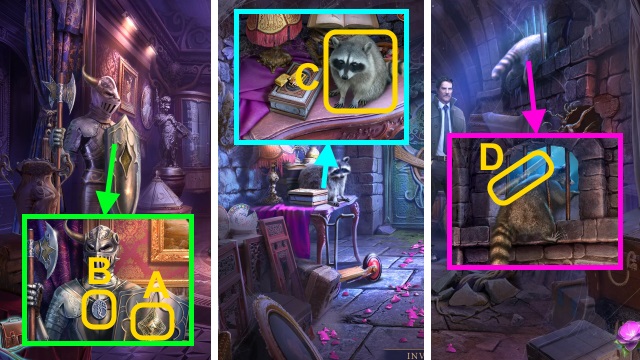
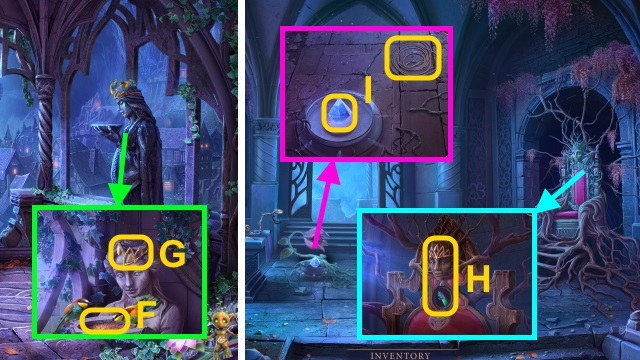
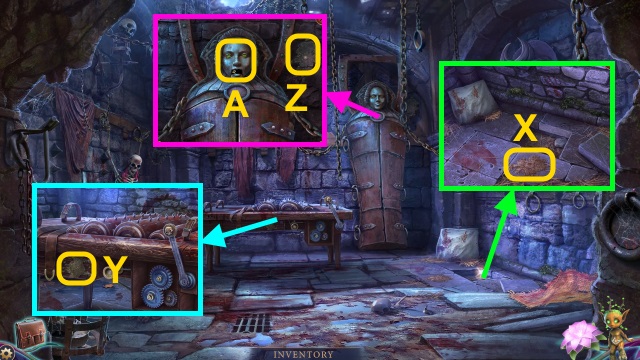
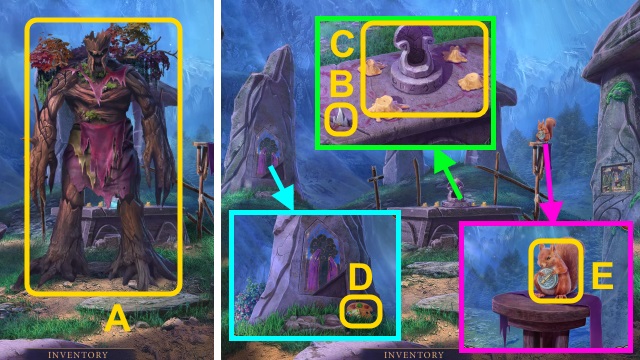
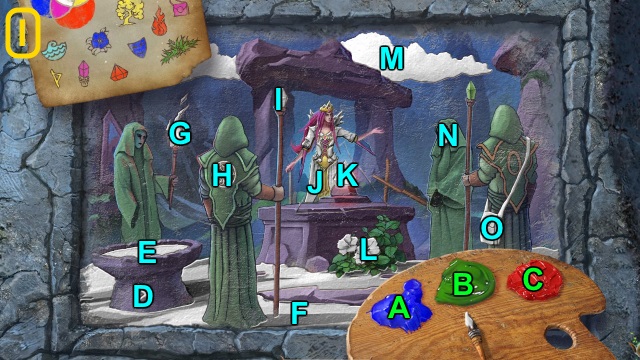
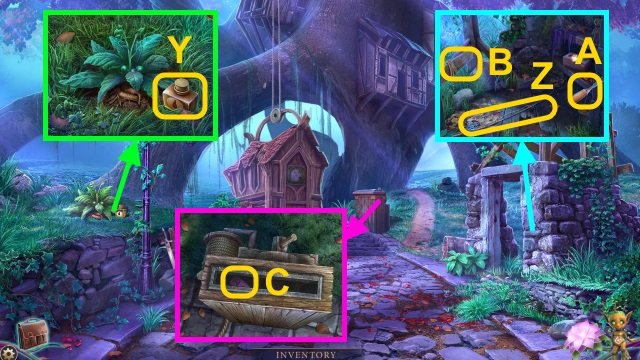
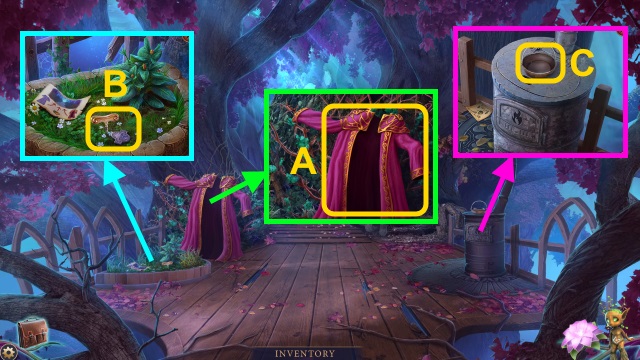
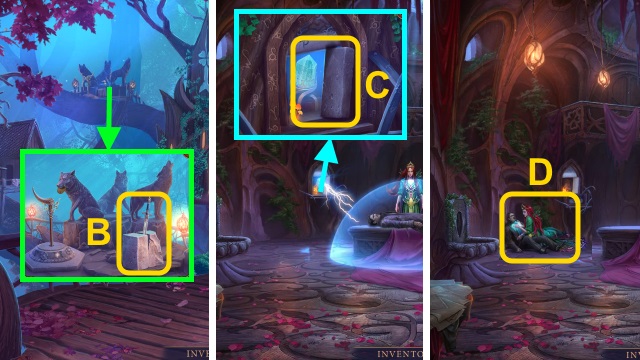
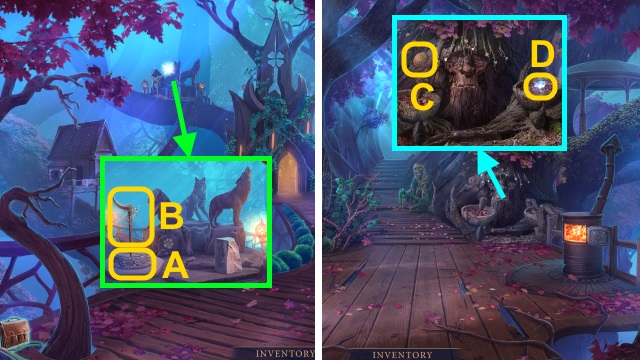
- Place the ORNATE EMBLEM (A); take the SILVER TREE TOKEN (B).
- Walk forward.
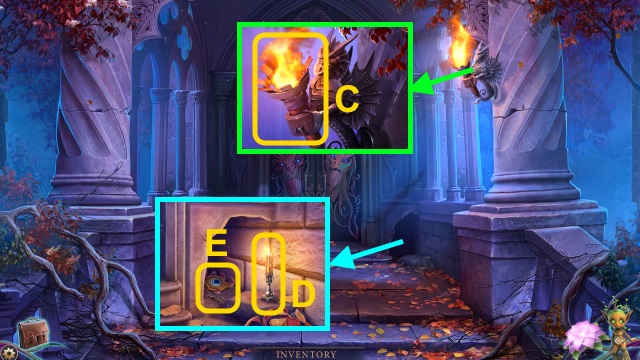
- Examine the raccoon (C).
- Use the FILE (D); receive the DRAINED LIGHTER.
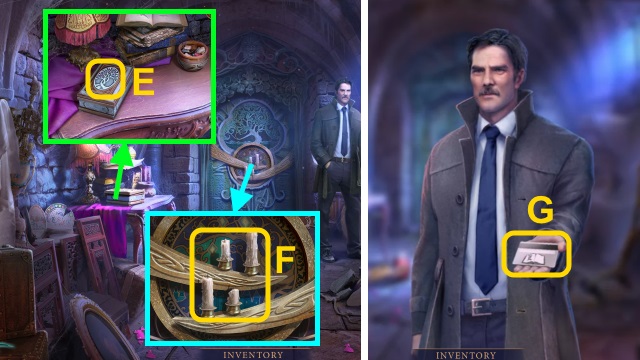
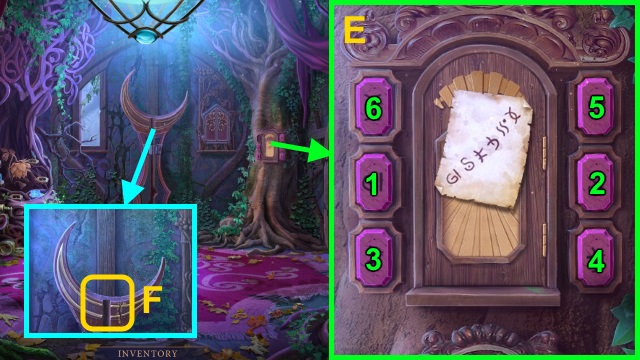
- Place the SILVER TREE TOKEN (E); open the box. Take the LIGHTER FLUID.
- Combine the DRAINED LIGHTER and LIGHTER FLUID; take the LIGHTER.
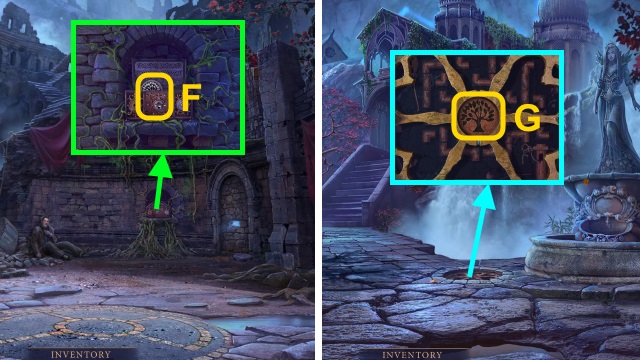
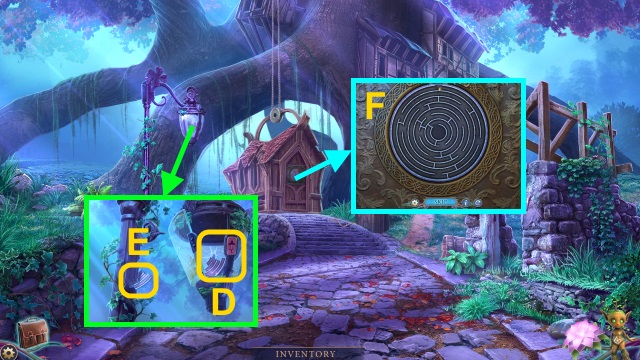
- Use the LIGHTER (F).
- Take the KEY CARD (G).
- Walk down twice.
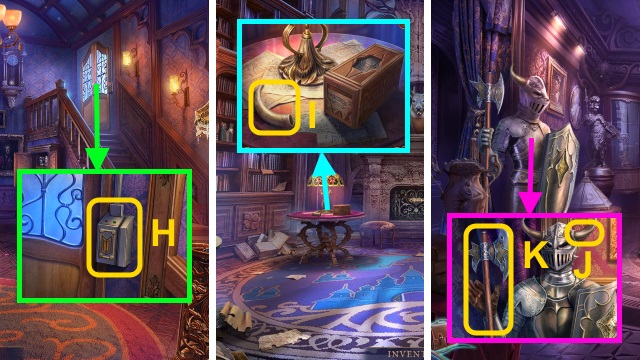
- Use the KEY CARD (H).
- Walk right.
- Take the HORN (I).
- Walk down, then forward.
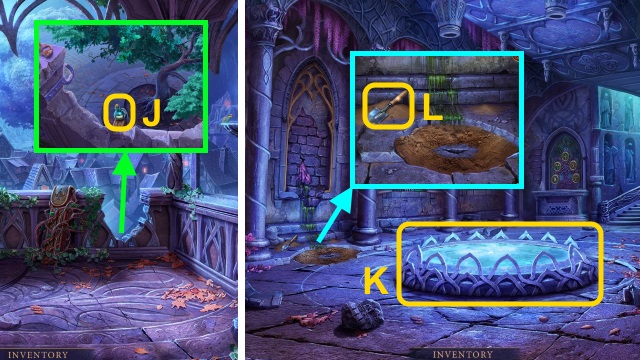
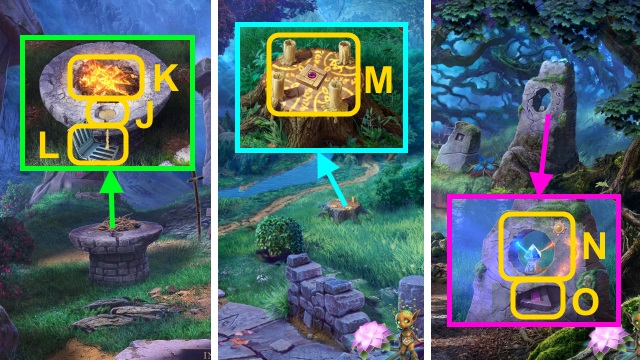
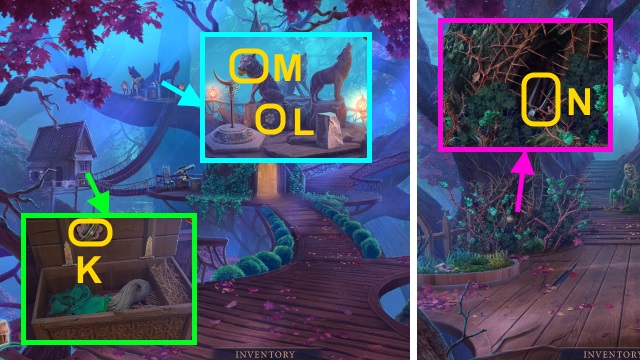
- Place the HORN (J); take the AXE (K).
- Walk forward.
- Use the AXE; take the KNOB and GLASS EYE (L).
- Walk down twice, then right.
- Place the KNOB; pull it. Take the MULTI-TOOL and CHARCOAL (M).
- Examine the MULTI-TOOL 4x; receive the CORKSCREW.
- Place the GLASS EYE (N); take the TOOLS TOKEN (O).
- Walk down.
- Place the TOOLS TOKEN (P); open the box. Take the OILER and BOOK EMBLEM.
- Walk forward twice.
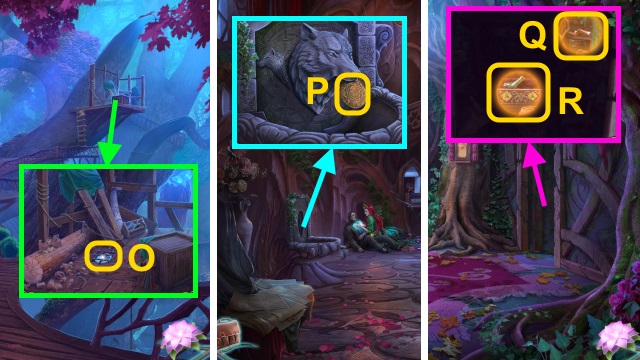
- Use the OILER and SCREWDRIVER (Q); take the WHEEL.
- Walk down twice, then right.
- Place the BOOK EMBLEM (R); take the BOOK LOCATION (S).
- Use the SCREWDRIVER; place the WHEEL and bolt (T).
- Place the BOOK LOCATION for a mini-game (U).
- Solution (V).
- Receive the OLD BOOK.
- Read the OLD BOOK for a mini-game.
- Solution (W-Y).
- Use the CHARCOAL; take the OLD BOOK.
- Go to the Secret Room.
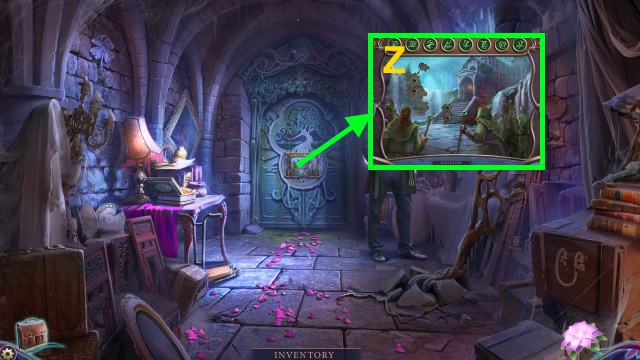
- Use the OLD BOOK for a mini-game (Z).
- Solution (A-C).
- Walk forward.
- Use the CORKSCREW (D); take the CUP WITH OIL (E). Examine the lantern (F).
- Examine the lantern 2x; use the CUP WITH OIL and LIGHTER (G).
- Examine the CORKSCREW 3x; receive the KNIFE.
- Use the KNIFE (H); receive the FLARE.
- Use the FLARE (I); take the FAINTED BUDDY (J).
- Place the FAINTED BUDDY. Take the BRASS KEY (K); examine the Creature (L).
- Examine the Creature (M); select 'YES'.
- Walk forward.
- Examine the skeleton (N); receive the BAG KEY. Take the IRON BAR (O).
- Use the BRASS KEY (P); take the PICKAXE.
- Walk down.
- Use the PICKAXE (Q); receive the SHARP CRYSTAL.
- Examine the SHARP CRYSTAL; use the Creature (R).
- Walk forward.
- Use the Creature; receive the BAG (S).
- Combine the BAG and BAG KEY. Play the HOP; receive the TWEEZERS.
- Walk down.
- Examine the object (T); use the TWEEZERS. Receive the GOLDEN TREE TOKEN.
- Walk forward.
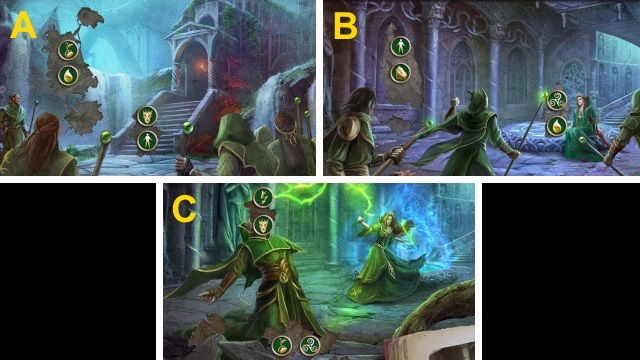
- Pull the lever; use the Creature (U). Place the GOLDEN TREE TOKEN (V); take the CODE.
- Walk down.
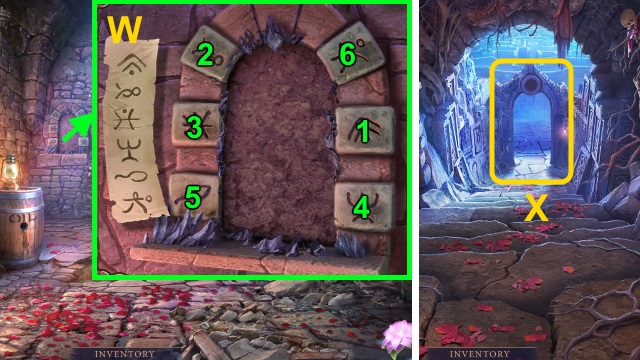
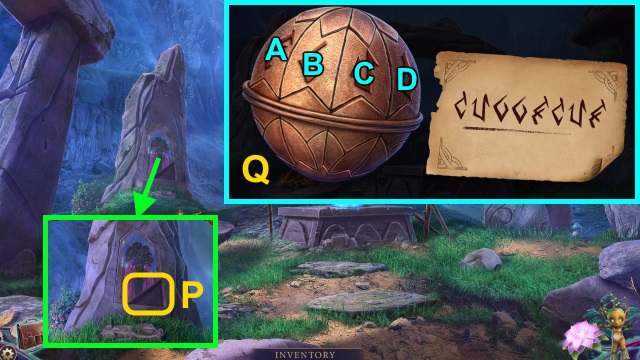
- Place the CODE for a mini-game; solution (W).
- Take the LABYRINTH MAP.
- Walk forward.
- Use the LABYRINTH MAP (X); examine each door for a mini-game.
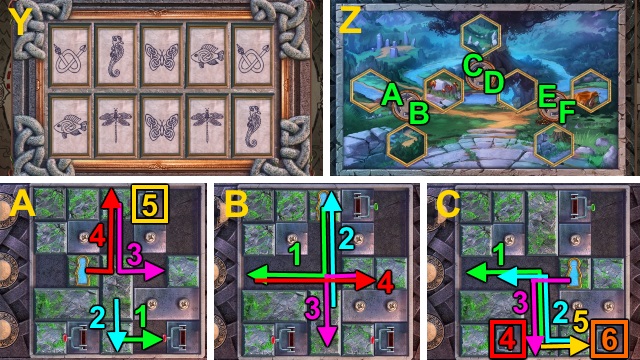
- Solution is random (Y).
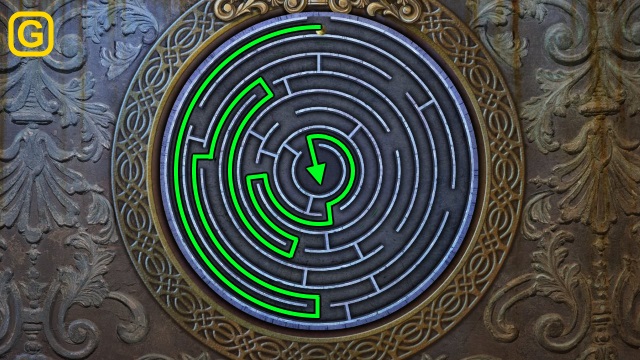
- Solution (Z): D-Fx2-B-D-Fx2-C-B-C-A-Cx2.
- Solution (A-C).
Chapter 2: The Catacombs

- Use the IRON BAR; take the RUSTY SWORD (D).
- Walk down.
- Use the RUSTY SWORD (E); receive the SWORD.
- Walk forward.
- Use the SWORD (F).
- Take the POWER POTION (G).
- Examine the POWER POTION; use the Creature.
- Use the Creature (H); take the ROPE.
- Use the ROPE and Creature (I); receive the GAUNTLET.
- Walk down.
- Use the GAUNTLET (J); take the SHOVEL.
- Walk down.
- Use the SHOVEL; take the TREE MEDALLION (K).
- Walk forward twice.
- Place the TREE MEDALLION; take the DRUID EMBLEM (L).
- Place the DRUID EMBLEM (M); play the HOP. Play the mini-game.
- Solution (A).
- Walk forward.
- Examine the scene.
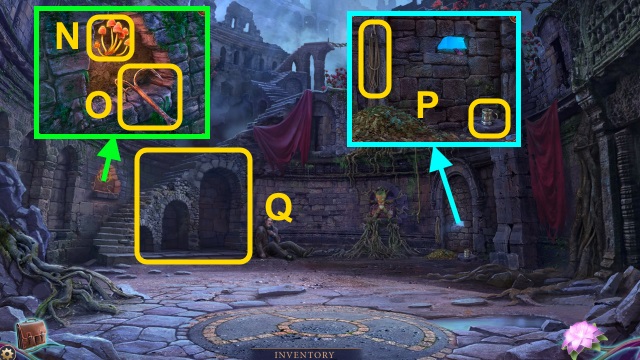
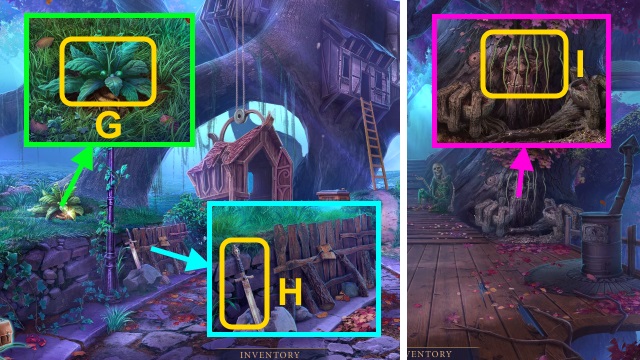
- Take the MUSHROOMS (N). Use the IRON BAR (O); receive the HOOK.
- Take the CUP and ROPE (P).
- Combine the HOOK and ROPE; take the ROPED HOOK.
- Examine the staircase (Q).
- Use the ROPED HOOK (R).
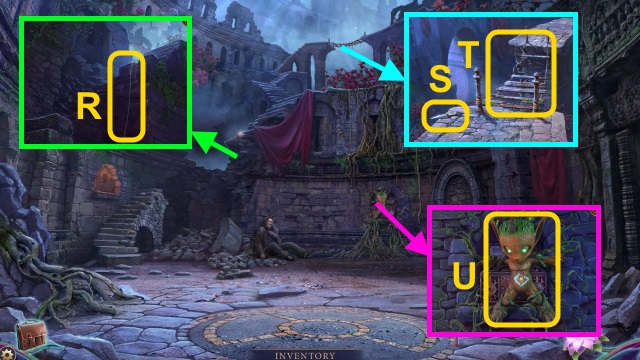
- Take the KNIFE (S); examine the bridge (T).
- Use the KNIFE (U); select 'YES.'
- Use the Creature (V); receive the ROPE BRIDGE.
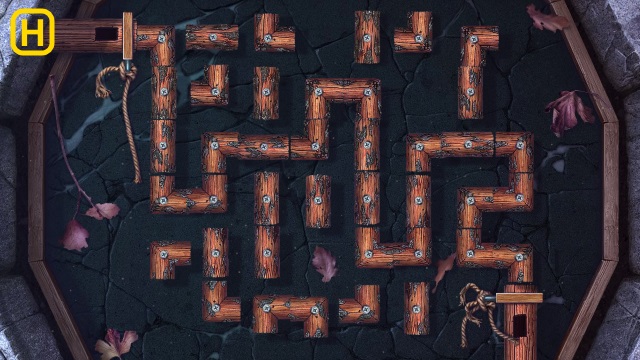
- Use the ROPE BRIDGE (W); cross the bridge for a mini-game.
- Solution is random (X).
- Take the RAKE (Y). Use the KNIFE (Z); receive the RAG.
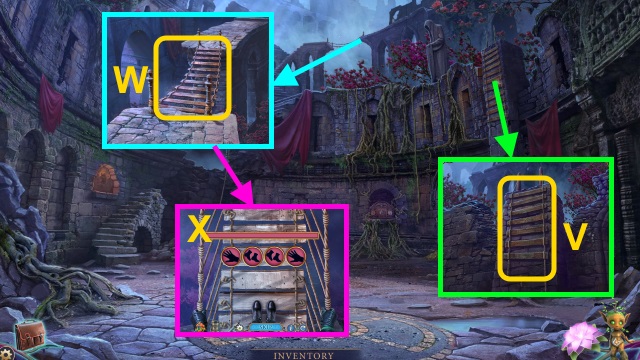
- Take the BOOK TILE and FOUNTAIN BUTTON (A).
- Walk down.
- Use the RAKE; take the CANDLE (B).
- Go up, then forward.
- Use the CANDLE; receive the LIT CANDLE (C).
- Place the LIT CANDLE (D); take the CHEST KEY and CHEST TILE (E).
- Walk down twice.
- Use the CHEST KEY; take the PLUMBING TREE KEY (F).
- Go up.
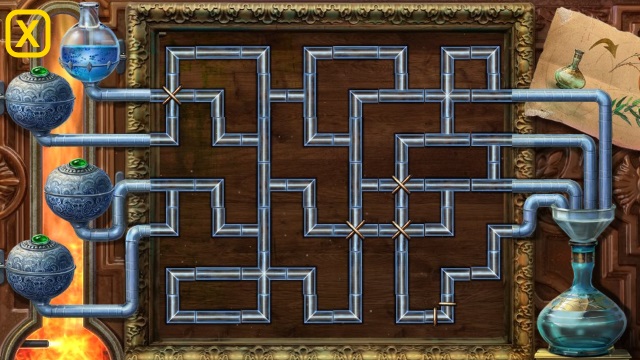
- Place the PLUMBING TREE KEY for a mini-game (G).
- Solution (H).
- Use the CUP (I); receive the CUP OF WATER.
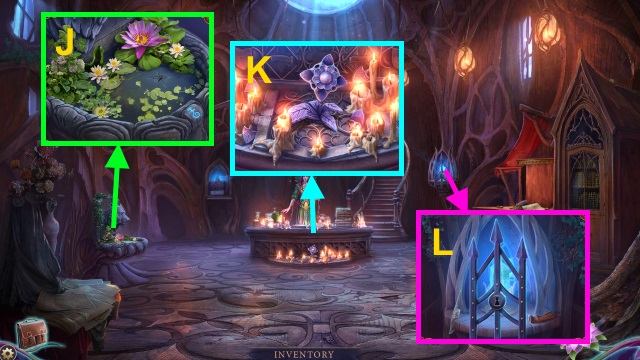
- Pour the CUP OF WATER (J). Examine the branches (K); take the INVISIBILITY POTION.
- Use the Creature (L); receive the FLOWER.
- Examine the INVISIBILITY POTION; use the Creature.
- Walk forward.
- Use the Creature (M); receive the CHEST TILE.
- Place the 2 CHEST TILES (N).
- Play the HOP; receive the COINS (O).
- Walk down.
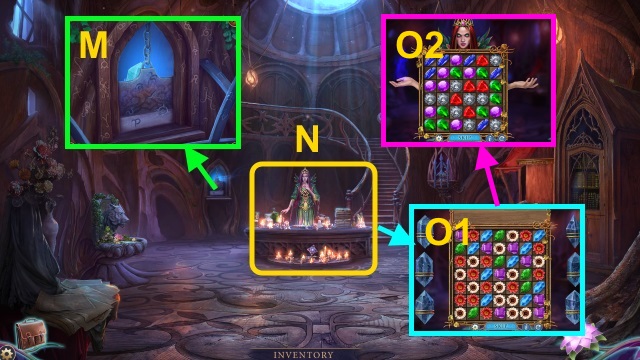
- Use the COINS (P). Place the FOUNTAIN BUTTON (Q); press it.
- Enter the Cave.
- Examine the crystals (R-U); examine the chair (V).
- Use the RAG; take the MIRROR (W).
- Take the PLIERS (X).
- Place the BOOK TILE (Y); read the book for a mini-game.
- Solution (Z-B).
- Take the ALTAR TILE (1/5) and GROWTH POTION RECIPE.
- Walk down, then forward.
- Use the PLIERS; take the TORCH (C).
- Walk down twice.
- Examine the ribbon. Use the MIRROR; take the CLOTH WITH CODE (D).
- Use the COIN (E); receive the GEAR.
- Go up.
- Play the mini-game; solution (F).
- Take the FRUIT.
- Enter the Cave.
- Use the TORCH, FLOWER, MUSHROOMS, and FRUIT (G); receive the GROWTH POTION.
- Pour the GROWTH POTION (H).
- Walk left.
Chapter 3: The Shrine
- Take the ROPE (I).
- Use the PLIERS (J); receive the ALTAR TILE (2/5). Use the RAG (K).
- Take the ALTAR TILE (3/5) (L).
- Walk right.

- Take the CABINET KEY (M).
- Take the MECHANISM KNOB (N).
- Take the ALTAR TILE (4/5) (O).
- Walk down.
- Use the CABINET KEY; open the cabinet. Take the ALTAR TILE (5/5) and DUSTER (P).
- Place the ALTAR TILE (5/5) for a mini-game; solution (Q).
- Take the STATUETTE (R).
- Place the STATUETTE; take the DIAMOND RING (S).
- Walk right.
- Use the DIAMOND RING (T); receive the LENS. Use the Creature.
- Walk forward.
- Take the BOW (U).
- Take the SPHERE (V).
- Walk down.
- Remove the parts; place the MECHANISM KNOB, LENS, and SPHERE (W). Examine the device for a mini-game.
- Solution (X); match the colored balls.
- Take the CRYSTAL and RECUPERATIVE POTION (Y).
- Examine the RECUPERATIVE POTION.
- Use the DUSTER; take the SEEDS (Z).
- Walk forward.
- Give the RECUPERATIVE POTION (A).
- Walk down twice.
- Take DEVONA'S DIARY (B).
- Read DEVONA'S DIARY for a mini-game.
- Solution (C-E).
- Take the TIARA PART.
- Walk right, then forward.
- Use the SEEDS (F); take the TIARA PART (G).
- Combine the 2 TIARA PARTS; take the TIARA.
- Walk down.
- Place the TIARA; take the POISON (H).
- Use the POISON; take the CRYSTAL and ROPED HOOK (I).
- Walk forward.
- Use the ROPED HOOK; receive the BUG REPELLENT (J).
- Examine the BUG REPELLENT.
- Walk down twice.
- Use the CUP; receive the WATER OF LIFE (K).
- Use the BUG REPELLENT; take the TROWEL (L).
- Walk right, then forward.
- Use the TROWEL; take the ARROW TILE (M).
- Place the ARROW TILE; take the ARROWS (N).
- Combine the BOW, ROPE, and ARROWS; take the BOW.
- Use the BOW (O); examine the tree.
- Walk down.
- Give the WATER OF LIFE (P).
- Take the GREEN EYE (Q).
- Use the WATER OF LIFE; take DONOVAN'S AMULET (R).
- Walk right.
- Place the GEAR; pull the lever (S). Receive the CHISEL.
- Take the BOWL; move the mat. Use the CHISEL (T); take the BOOK.
- Take the RAG (U). Use the BOWL (V); receive the BOWL WITH WATER.
- Combine the BOWL WITH WATER and RAG; take the RAG IN WATER.
- Use the RAG IN WATER (W).
- Use the RAG IN WATER (X-Z). Place the GREEN EYE; take the KEY (A).
- Examine the BOOK for a mini-game.
- Solution (B).
- Solution (C-E).
- Take the IRON MAIDEN TILE.
- Place the IRON MAIDEN TILE; take the JAW (F).
- Walk down.
- Use the KEY (G); open the door. Take the BUTTON.
- Walk right.
- Place the JAW, CRYSTAL, and BUTTON (H); press the button. Take the POWDER.
- Combine DONOVAN'S AMULET and the POWDER; take the DONOVAN'S AMULET.
Chapter 4: The Tree
- Take the CANDLE MOLD and TWEEZERS (I).
- Take the JAR (J).
- Walk right.
- Give DONOVAN'S AMULET (K).
- Use the JAR; receive the JAR WITH FIREFLIES. Take the SPHERE (L).
- Use the JAR WITH FIREFLIES (M); take the SICKLE and RED FRUIT (N).
- Take the SAW HANDLE (O).

- Take the NUTS (P).
- Walk down.
- Use the SICKLE. Place the SAW HANDLE; take the SAW (Q) and JUG (R). Use the SAW (S); receive the BOARD.
- Walk right.
- Use the JUG (T); receive the JUG OF WATER.
- Pour the JUG OF WATER; take the PETALS (1/3) (U).
- Walk down.
- Pour the JUG OF WATER; take the BLUE FRUIT (1/3)-(3/3) (V).
- Use the JUG OF WATER. Play the HOP; receive the PETALS (2/3) (W).
- Place the BOARD (X). Use the Creature; give the JUG OF WATER. Receive the PETALS (3/3).
- Walk right.
- Give the PETALS (3/3) (Y); take the MAGIC POWDER (Z).
- Walk down, then left.
- Use the MAGIC POWDER (A).
- Use the TWEEZERS; receive the FIRE TILE (B). Take the WAX PIECE (1/4)-(4/4); place DONOVAN'S AMULET (C).
- Take the PALETTE (D).
- Give the NUTS (E); take the CHEST TILE.
- Walk down.
- Examine the chest (F). Place the CHEST TILE; take the BRUSH.
- Combine the PALETTE, RED FRUIT, BLUE FRUIT, and BRUSH; take the PALETTE.
- Walk right.
- Place the FIRE TILE (G); open the box. Take the FLINT.
- Walk down, then left.
- Use the PALETTE for a mini-game (H).
- Solution (I): (B-F-J)-(A-M-E)-(Ax2-N-L)-(C-I-O)-(Bx2-C-D-H)-(Cx2-K-G).
- Take the STONE PLATE TILE and FORCE STONE.
- Place the WAX PIECE (J); use the FLINT (K). Use the CANDLE MOLD (L); receive the CANDLES.
- Walk down.
- Place the CANDLES; take the FORCE STONE (M).
- Walk right.
- Place the STONE PLATE TILE and CRYSTAL (N); take the FRESCO PART (O).
- Walk down, then left.
- Place the FRESCO PART (P); take the SPHERE CODE.
- Examine the SPHERE; enter the code (Q): D-C-Bx2-A-D-C-A.
- Take the FORCE STONE.
- Walk down, then right.
- Place the 3 FORCE STONES (R-T).
- Walk down.
- Take the CUTTER HANDLE (U).
- Examine the Creature (V).
- Cross the bridge.
- Take the BROKEN LADDER (W).
- Pull the lever. Use the SAW; receive the FISHING LINE and LEVER (X).
- Take the OIL BOTTLE (Y).
- Take the FISHING ROD (Z). Place the CUTTER HANDLE (A); take the TREE CUTTER. Use the SICKLE (B); take the LADDER PART (1/3).
- Combine the FISHING ROD and FISHING LINE; take the FISHING ROD.
- Use the FISHING ROD (C); receive the LANTERN TILE.
- Use the LANTERN TILE; take the LABYRINTH PART (1/2) (D). Use the TWEEZERS; receive the LABYRINTH PART (2/2) (E).
- Place the LABYRINTH PART (2/2) for a mini-game (F).
- Solution (G).
- Take the LADDER PART (2/3) (H).
- Use the SAW; receive the LADDER PART (3/3) (I).
- Combine the BROKEN LADDER and LADDER PART (3/3); take the LADDER.
- Use the LADDER (J).
- Go right.
- Take the GRATER (K). Use the Creature (L); receive the BROOM.
- Use the BROOM; take the GLOVES (M) and GEAR (N).
- Use the GLOVES; take the KEY and BAG TILE (O).
- Use the KEY (P).
- Play the HOP; receive the ACID POTION (Q).
- Use the SAW; receive the BRANCH (R).
- Walk down twice.
- Place the BAG TILE (S); open the bag. Take the DRILL.
- Combine the BRANCH, TREE CUTTER, and DRILL; take the FLUTE PART.
- Walk forward, then right.
- Place the FLUTE PART; take the FLUTE (T).
- Use the FLUTE for a mini-game (U).
- Solution (V): select the notes when they align with the holes.
- Solution is random (W).
- Examine the chain; use the ACID POTION on it. Take the CHAIN and OVEN TILE (X).
- Walk down.
- Examine the chain and lever; place the LEVER, GEAR, and CHAIN (Y). Pull the lever.
- Walk forward.
- Take the BOX CODE (Z).
- Take the CLOAK (A); use the GLOVES. Take the CRATE TILE.
- Take the CORKSCREW and STATUE PART (B).
- Combine the OIL BOTTLE and CORKSCREW; take the OIL BOTTLE.
- Take the EMPTY BUCKET (C).
- Walk down.

- Enter the code (D).
- Take the ICE STATUE.
- Walk right.
- Use the OIL BOTTLE (E). Move the items; take the SHOVEL.
- Place the STATUE PART; take the SWORD POMMEL (F).
- Walk down.
- Use the SHOVEL (G); receive the MANDRAKE ROOT.
- Combine the MANDRAKE ROOT and GRATER; take the MANDRAKE POWDER.
- Place the SWORD POMMEL; take the SWORD (H).
- Walk forward.
- Use the SWORD (I); receive the VINES.
- Arrange the VINES; use the EMPTY BUCKET. Take the ROPE AND BUCKET.
- Use the SHOVEL (J); receive the MAGIC HERB.
- Place the OVEN TILE; open the door. Use the FLINT and ICE STATUE (K); receive the DRUID AMULET.
- Give the DRUID AMULET; take the BELT (L).
- Walk down, then right.
- Use the ROPE AND BUCKET (M); receive the BUCKET WITH WATER.
- Combine the BUCKET WITH WATER, MAGIC HERB, and MANDRAKE POWDER; take the UNFINISHED HEALING POTION.
- Walk down, then forward.
- Place the UNFINISHED HEALING POTION (N); take the HEALING POTION.
- Walk down, then right.
- Give the HEALING POTION; take the TUNIC (O). Use the BROOM; receive the SEEDS.
- Combine the CLOAK, BELT, and TUNIC; take the PRIEST ROBES.
- Walk down, then forward.
- Examine the walkway (P); use the PRIEST ROBES.
Chapter 5: Devona
- Take the BUTTON and KEY (Q).
- Walk forward.
- Take the CRATE TILE and BERRIES (R).
- Use the KEY; take the STONES and BLUE CRYSTAL (S).
- Walk down.
- Place the 2 CRATE TILES; take the TELESCOPE KNOB (T).
- Place the TELESCOPE KNOB (U); take the POUCH (V).
- Walk forward.
- Read the note (W); use the POUCH, BERRIES, and SEEDS for a mini-game.
- Solution (X).
- Take the GROWTH POTION.
- Walk down twice.
- Use the GROWTH POTION; take the SLINGSHOT (Y).
- Combine the SLINGSHOT and STONES; take the LOADED SLINGSHOT.
- Walk forward.
- Use the LOADED SLINGSHOT (Z).
- Take the MALLET (A).
- Use the SWORD and MALLET (B); receive the STONE.
- Walk forward.
- Use the STONE; take the BLUE CRYSTAL (C).
- Talk to DEVONA (D).
- Walk forward.
- Take the WOLF PAW (E).
- Use the OIL BOTTLE; take the KNIFE (F).
- Take the GAUNTLET (G).
- Walk down.
- Use the KNIFE (H); receive the GLOWING MUSHROOMS.
- Use GAUNTLET (I); receive the TILE.
- Use the KNIFE (J); receive the RAG.
- Walk down.
- Use the KNIFE (K); take the TILE.
- Place the WOLF PAW (L); take the WOLF HEAD (M).
- Walk down.
- Use the GAUNTLET (N); receive the METAL CUTTERS.
- Walk forward.
- Use the METAL CUTTERS (O); take the BLUE CRYSTAL.
- Walk forward.
- Place the WOLF HEAD; take the DISK (P).
- Walk forward.
- Use the GLOWING MUSHROOM; take the LEVER (Q). Place the 2 TILES; take the STONE POTION (R).
- Walk down.
- Use the STONE POTION; take the STONE FLOWER (S).
- Walk down.
- Use the LEVER (T); turn it. Examine the net; take the FINDERSCOPE (U). Use the RAG; take the STAFF PART (V).
- Place the FINDERSCOPE for a mini-game (W).
- Solution (X-Z).
- Take the CODE.
- Examine the stand; place the STONE FLOWER (A). Take the BROKEN STAFF (B).
- Combine the BROKEN STAFF and STAFF PART; take the STAFF.
- Walk down.
- Place the DISK (C); take the BLUE CRYSTAL (D).
- Walk forward 3x.
- Place the BUTTON; enter the code (E).
- Take the GREEN CRYSTAL.
- Place the STAFF (F).
- Take the BROKEN CROWN (G).
- Place the 4 BLUE CRYSTALS (H).
- Walk down.
- Receive the CROWN PART.
- Combine the BROKEN CROWN, GREEN CRYSTAL, and CROWN PART; take the CROWN.
- Give the CROWN (I).
- Play the HOP; receive the BLUE CRYSTAL (1/4) (J).
- Play the HOP; receive the BLUE CRYSTAL (2/4) (K).
- Play the HOP; receive the BLUE CRYSTAL (3/4) (L).
- Play the HOP; receive the BLUE CRYSTAL (4/4) (M).
- Give the BLUE CRYSTAL (4/4) for a mini-game (N).
- Solutions are random (O1-O2).
- Congratulations! You have completed Mystery of the Ancients: The Sealed and Forgotten.
Created at: 2017-03-31