

Walkthrough Menu
- General Tips
- Chapter 1: The Town
- Chapter 2: Across the River
- Chapter 3: The Summit
- Chapter 4: The Caves
General Tips
- This is the official guide for Mystery Tales: Alaskan Wild.
- This guide will not show when you have to zoom into a location; the screenshots will show each zoom scene.
- Hidden-object puzzles are referred to as HOPs. This guide will not show screenshots of the HOPs, however, it will mention when an HOP is available and the inventory item you'll collect from it.
- Use the Map to fast travel to a location.
Chapter 1: The Town
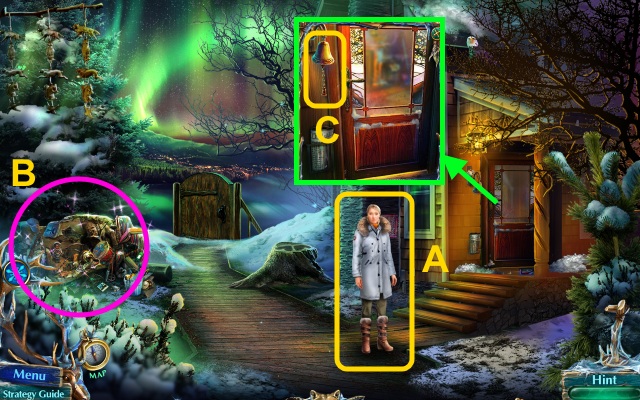
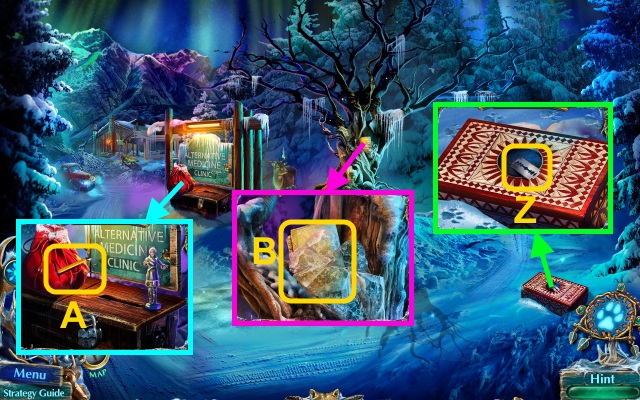
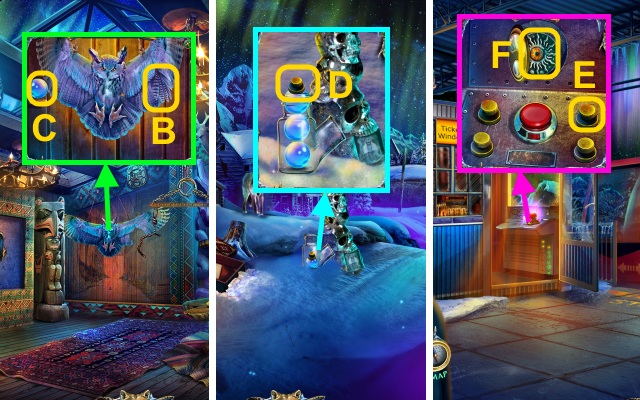
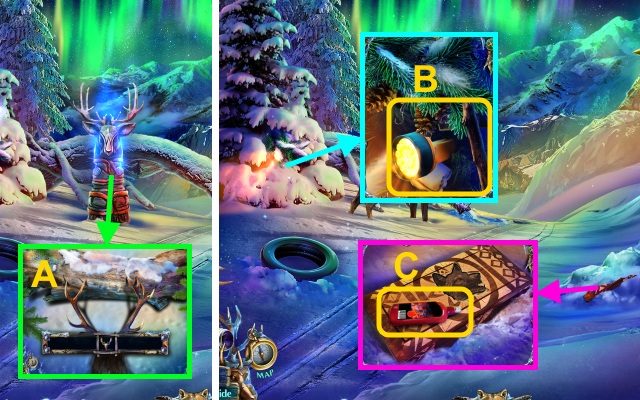
- Talk to Ellie (A).
- Move the cloth; play the HOP to receive the BELL CHAIN (B).
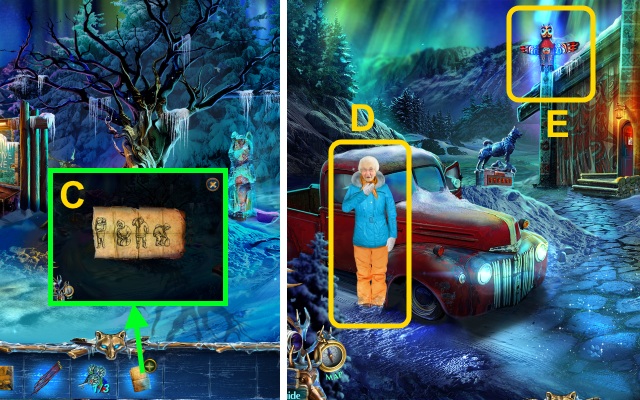
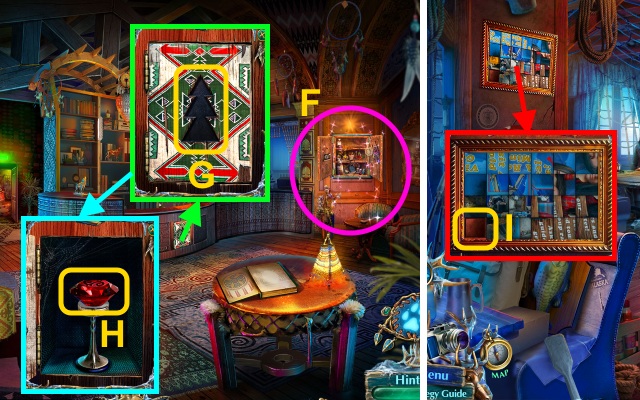
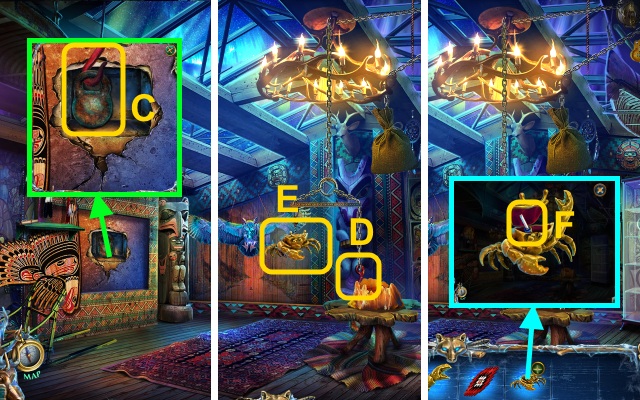
- Place the BELL CHAIN (C); ring it.
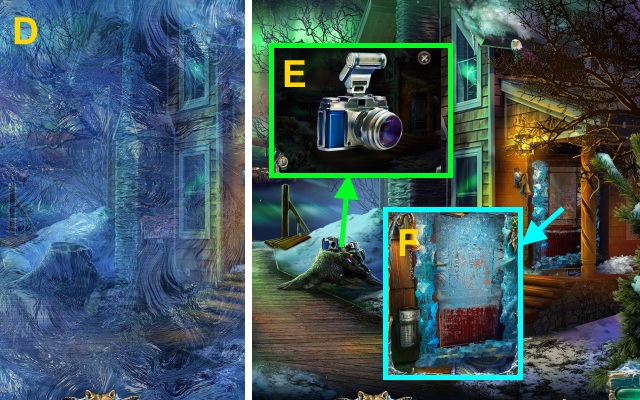
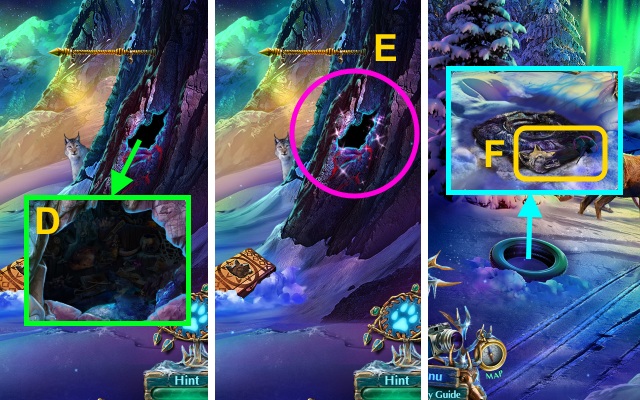
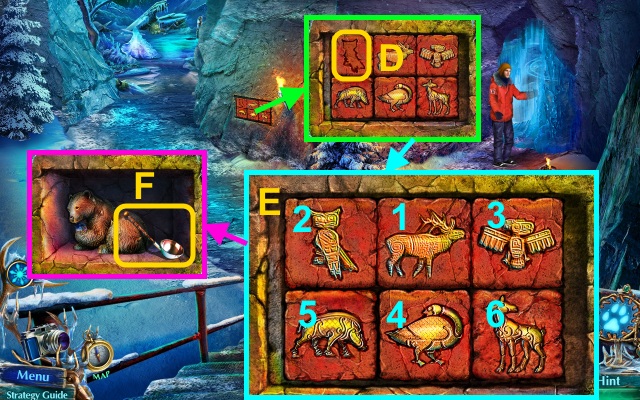
- Hit the ice 3x (D).
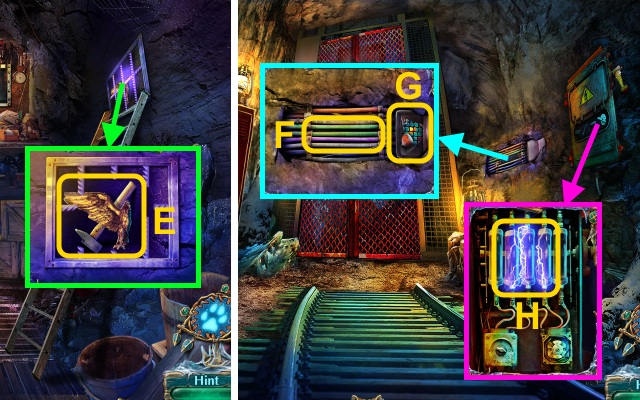
- Take the CAMERA; place the pieces (E).
- Take the Camera.
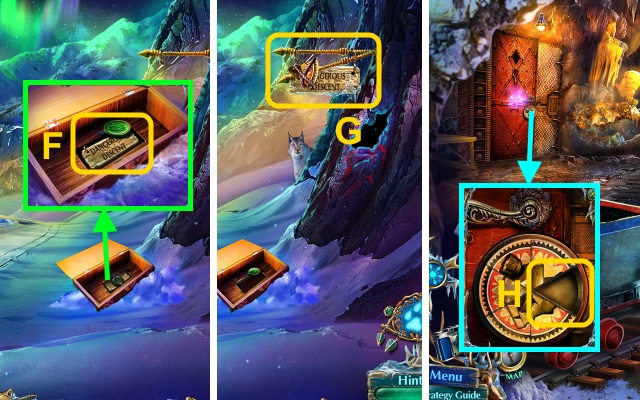
- Examine the door (F).
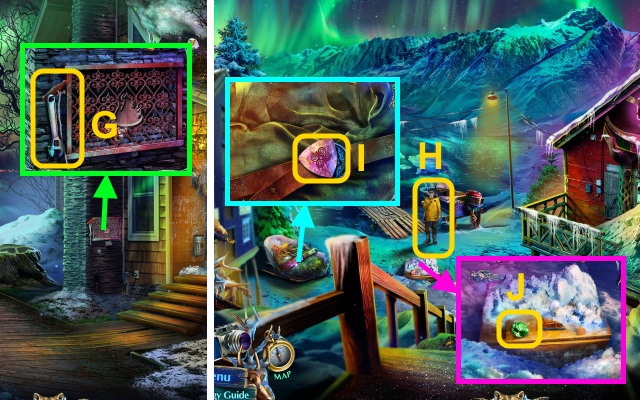
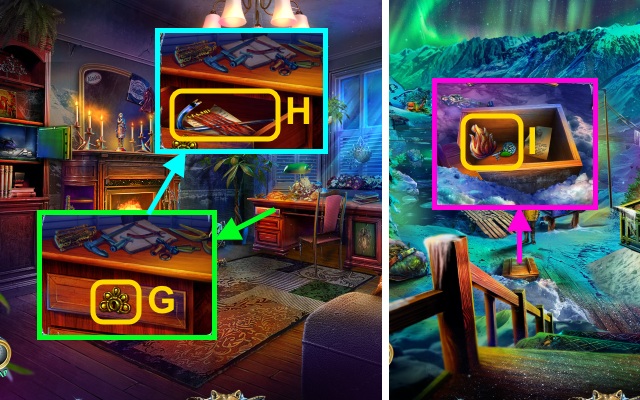
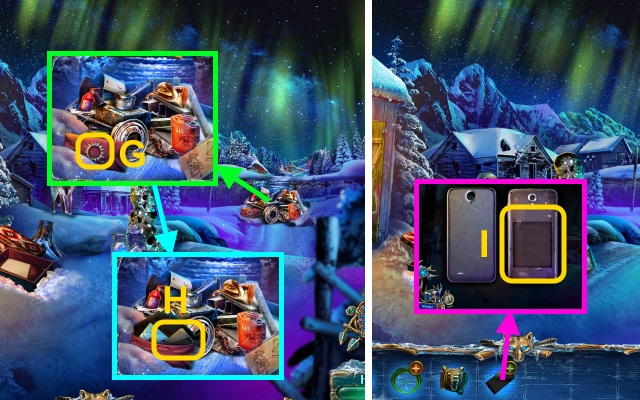
- Take the WRENCH and STARTER CORD (G).
- Walk left.
- Talk to Charles (H); receive the SNOW SHOVEL.
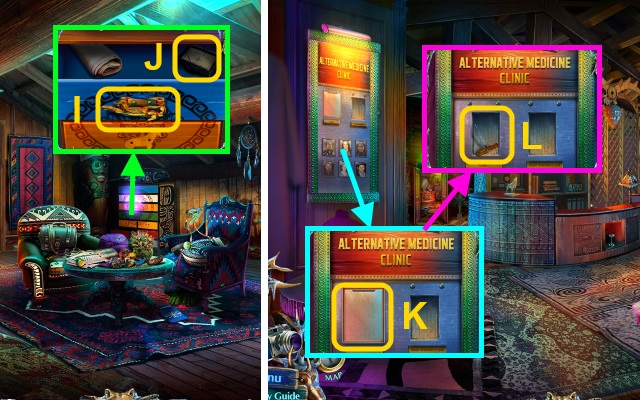
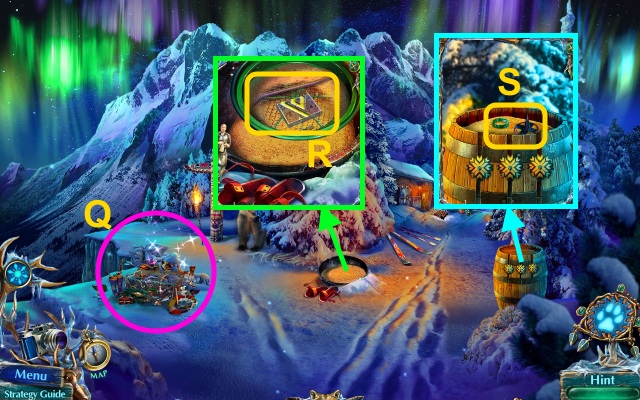
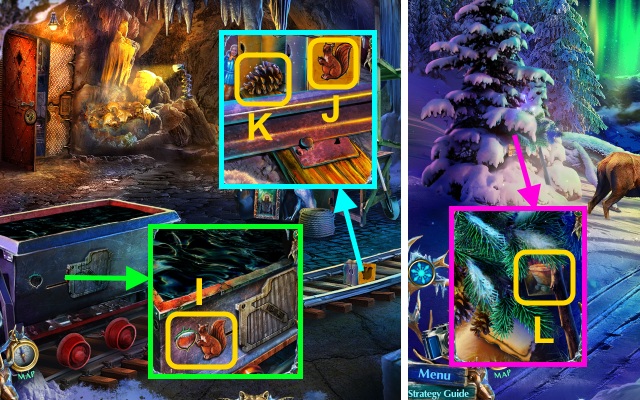
- Take the GEMS (1/4) (I).
- Take the GEMS (2/4) (J).
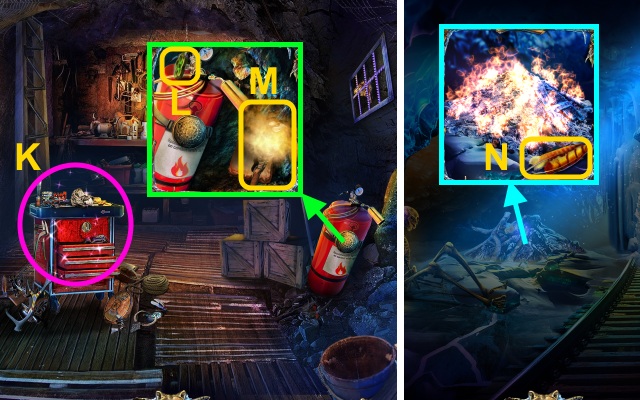
- Use the SNOW SHOVEL (K).
- Walk right.
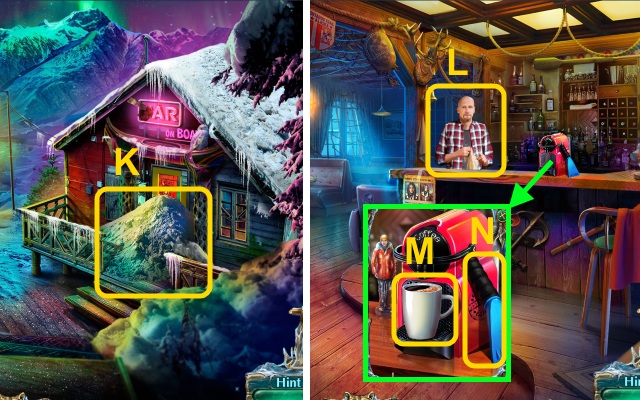
- Talk to Chris (L); receive the COFFEE CUP.
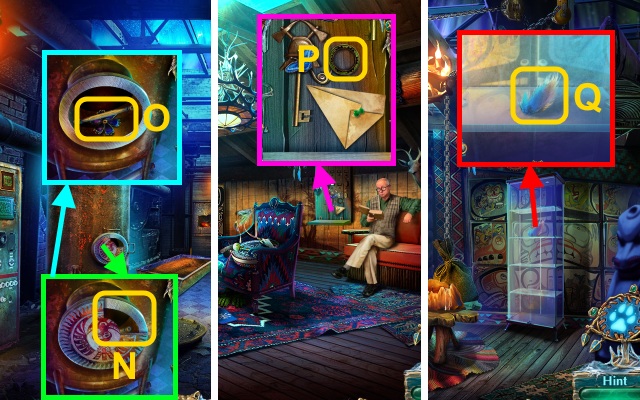
- Use the COFFEE CUP (M); take the COFFEE and SCRAPER (N).
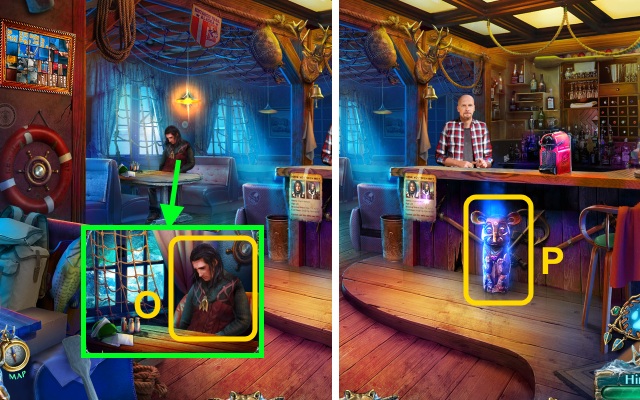
- Give the COFFEE (O).
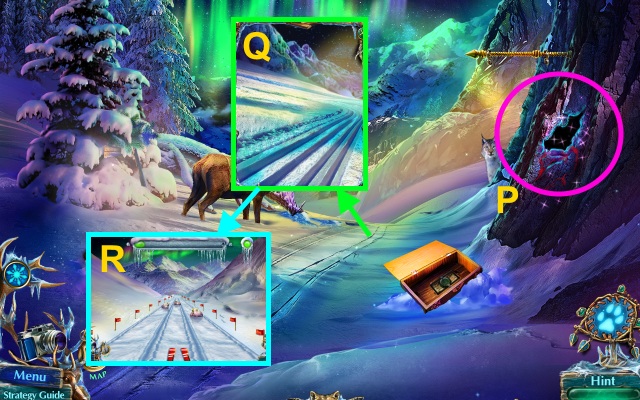
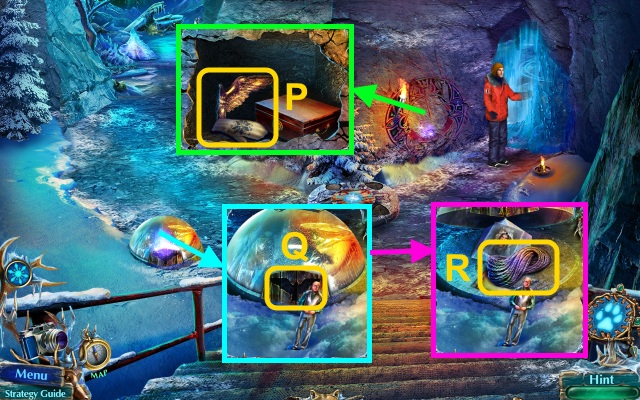
- Talk to Cody; receive the Magic Amulet.
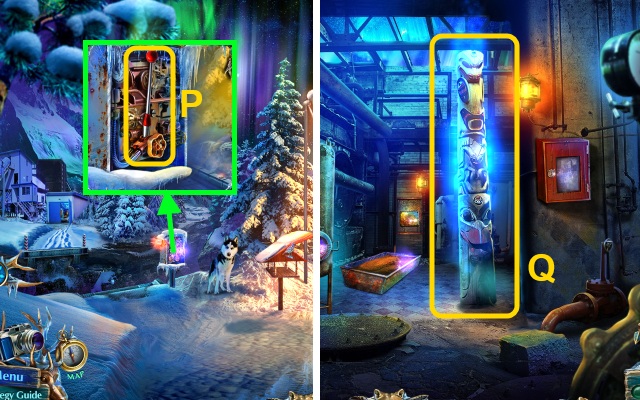
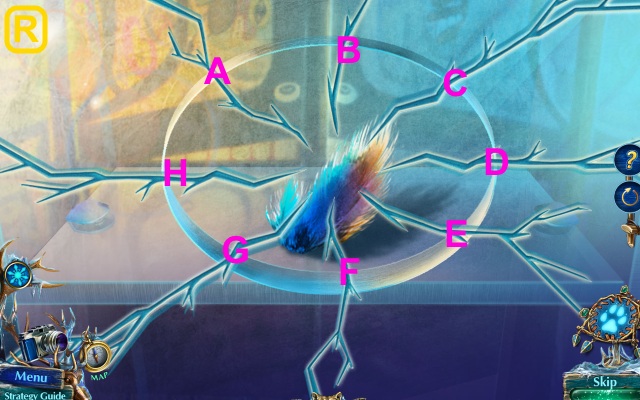
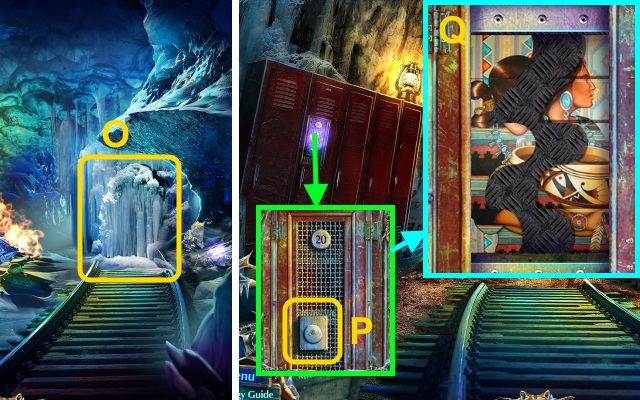
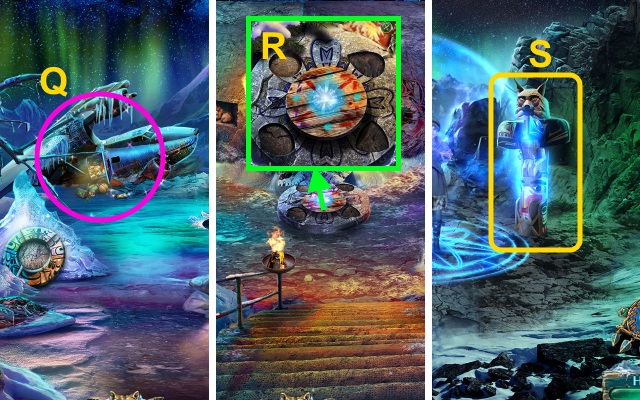
- Use the Magic Amulet for a mini-game (P).
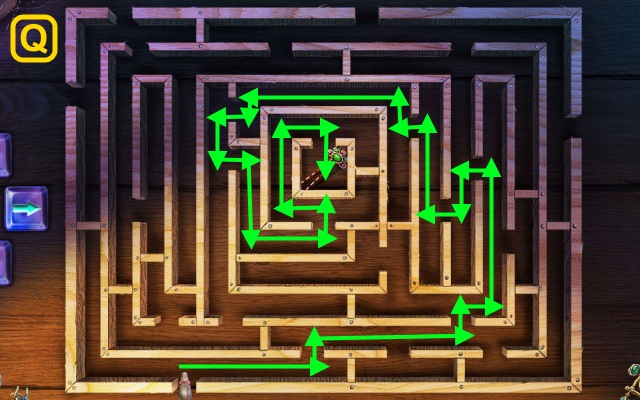
- Solution (Q).
- Receive the BOBBY PIN.
- Walk down.
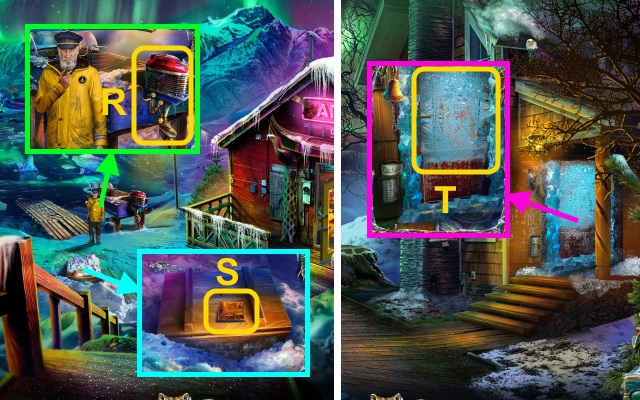
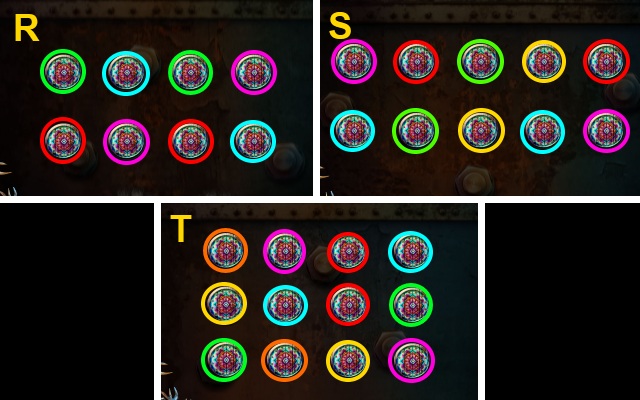
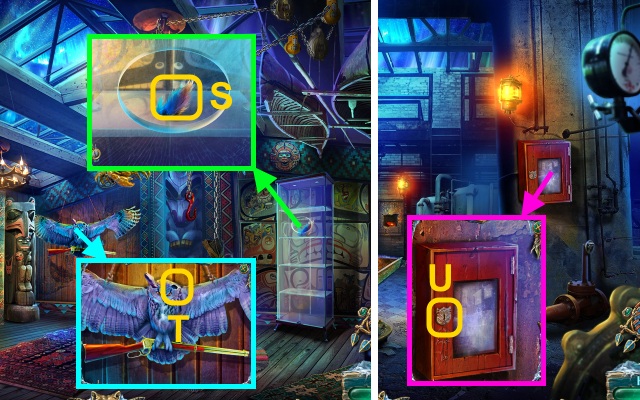
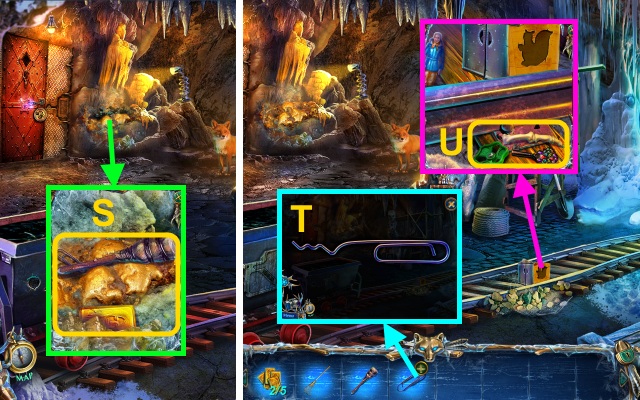
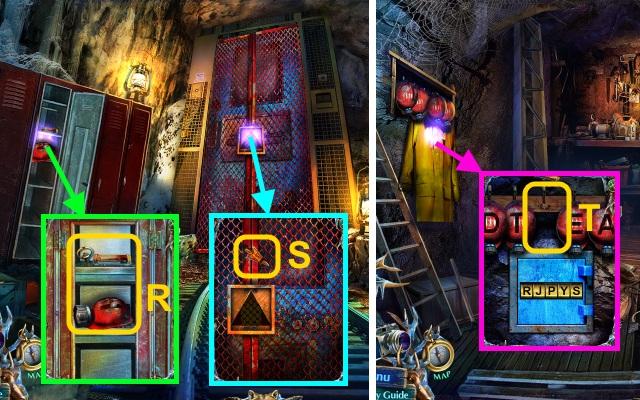
- Use the WRENCH (R); receive the BROKEN MOTOR.
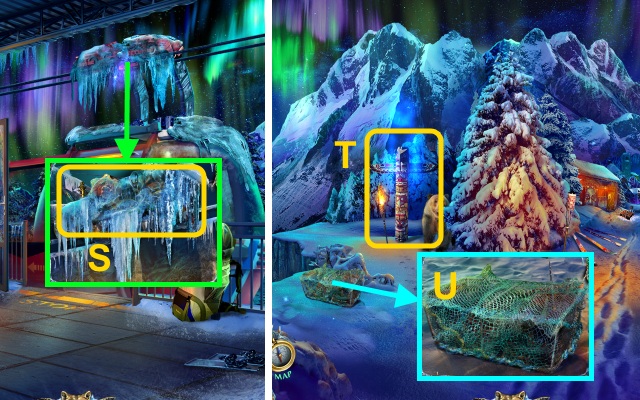
- Use the SNOW SHOVEL; take the PICTURE PART (S).
- Walk down.
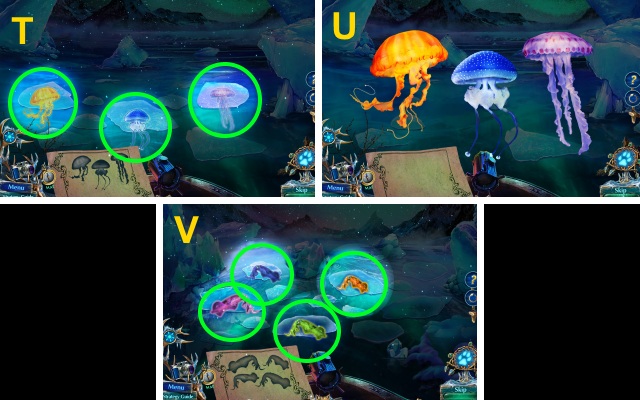
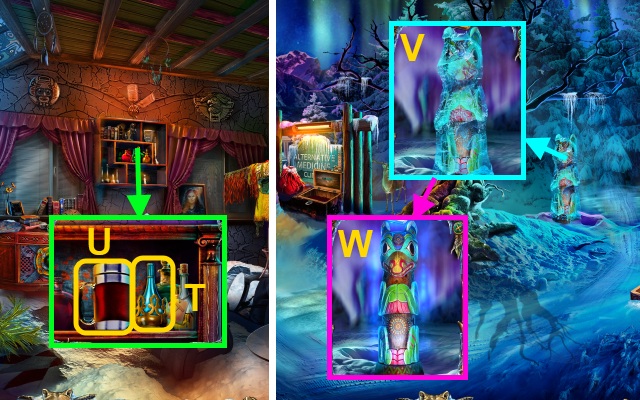
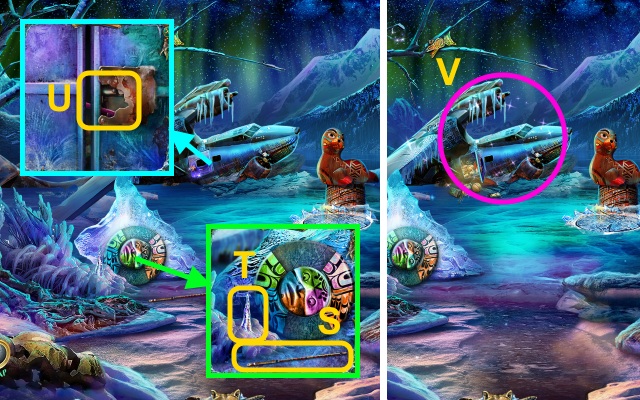
- Use the SCRAPER (T).
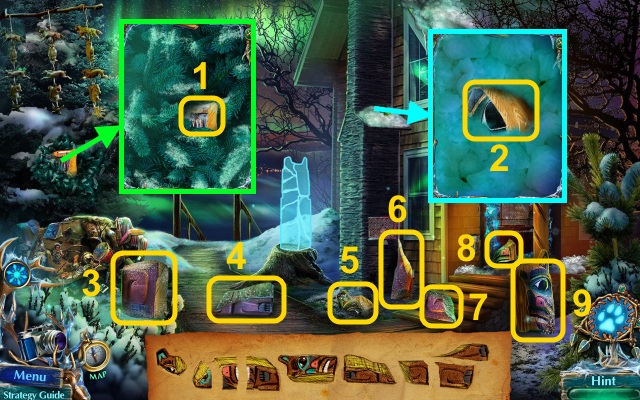
- Collect the pieces (1-9).
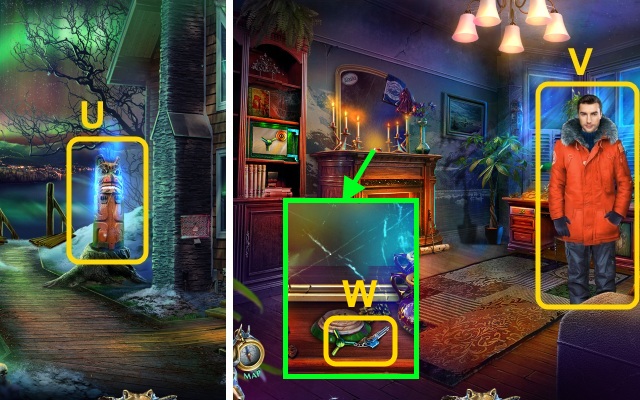
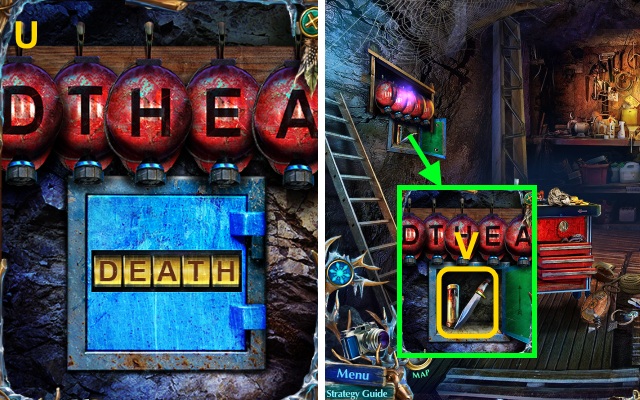
- Use the Magic Amulet (U).
- Walk right.
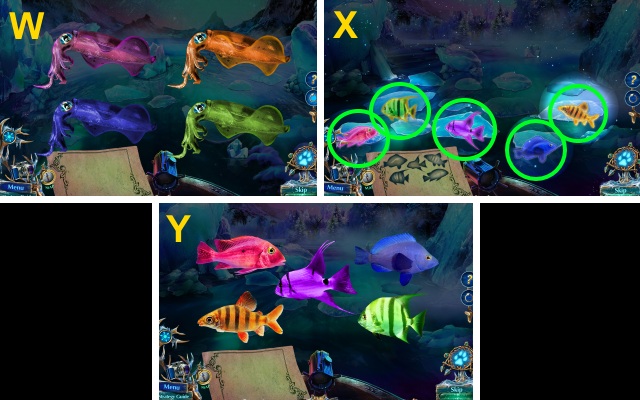
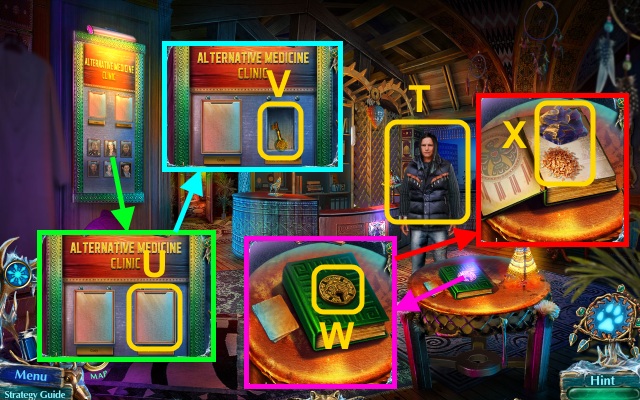
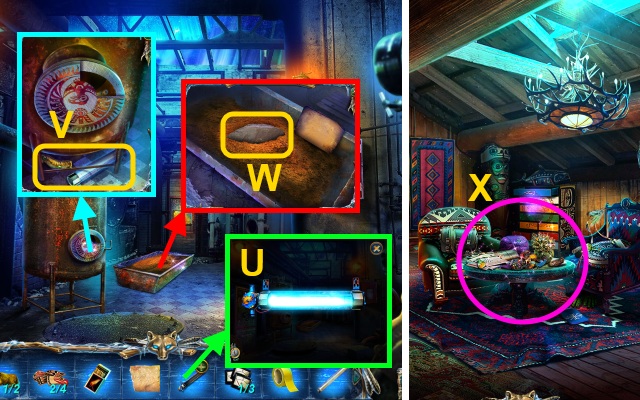
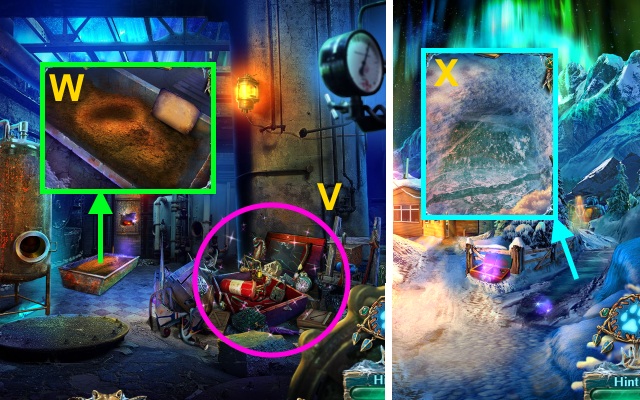
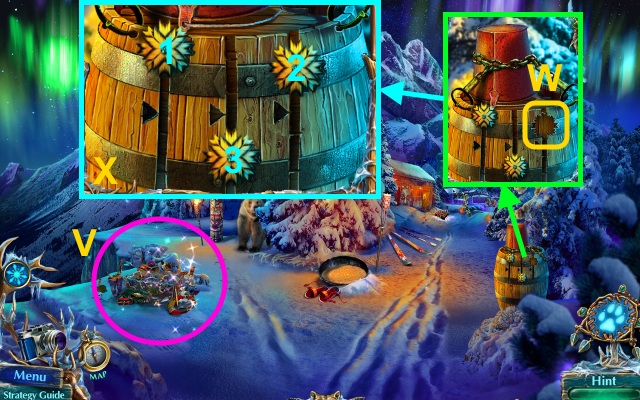
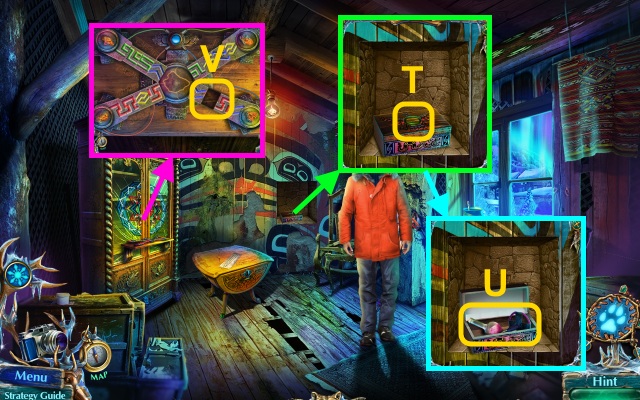
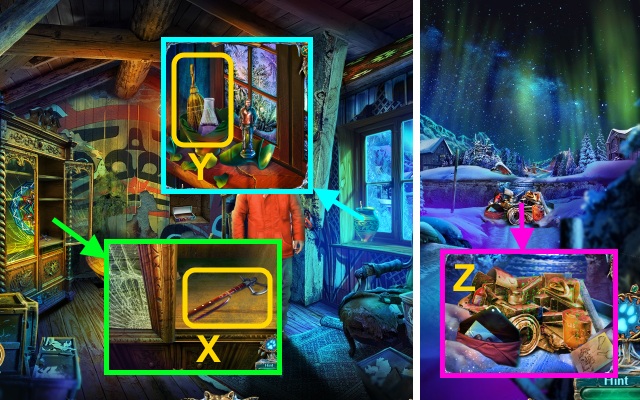
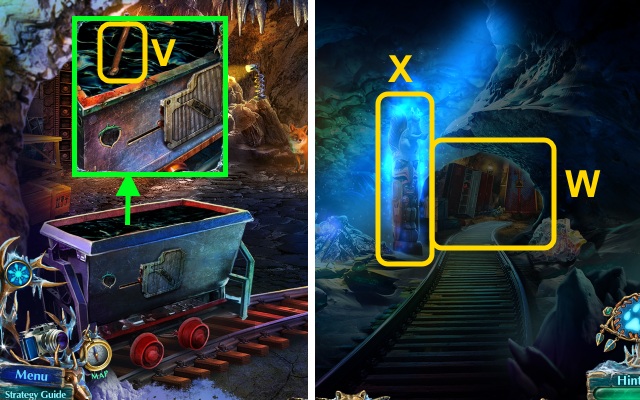
- Talk to Daniel (V); receive the SANDPAPER.
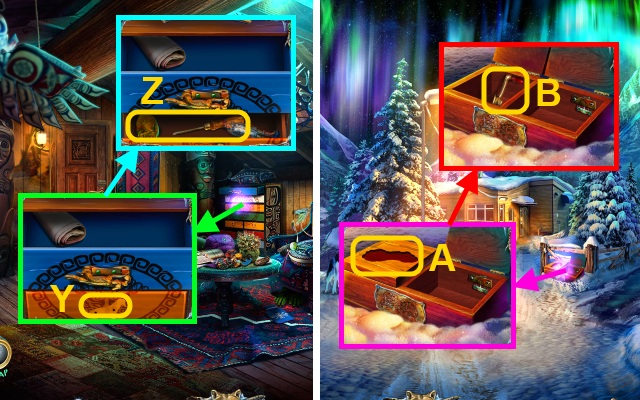
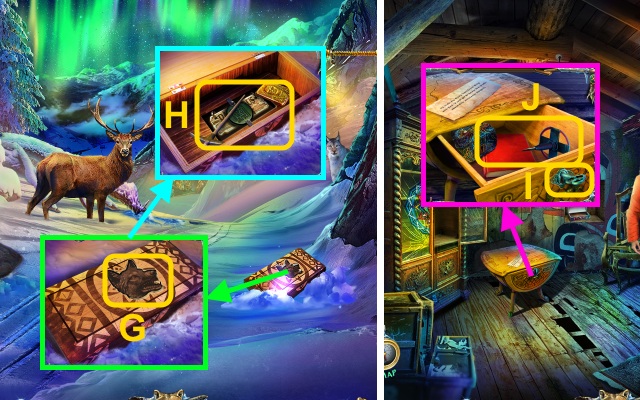
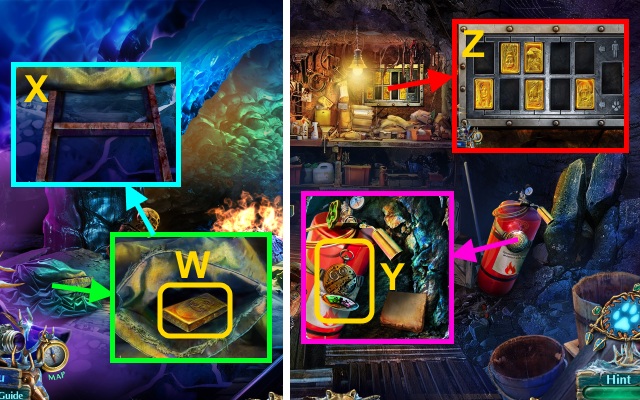
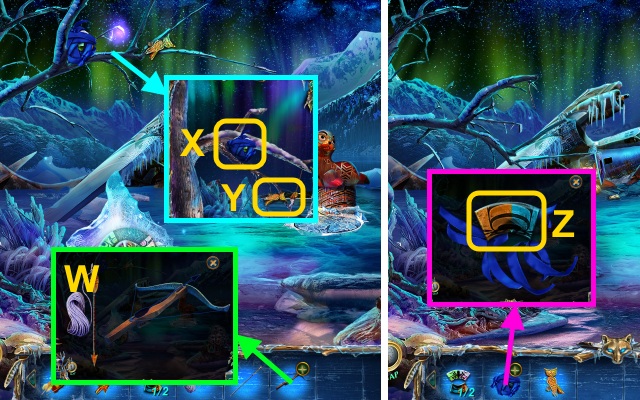
- Take the SAFE KEY (W).
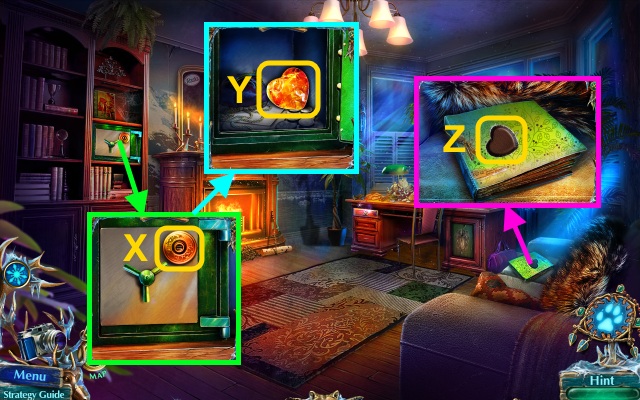
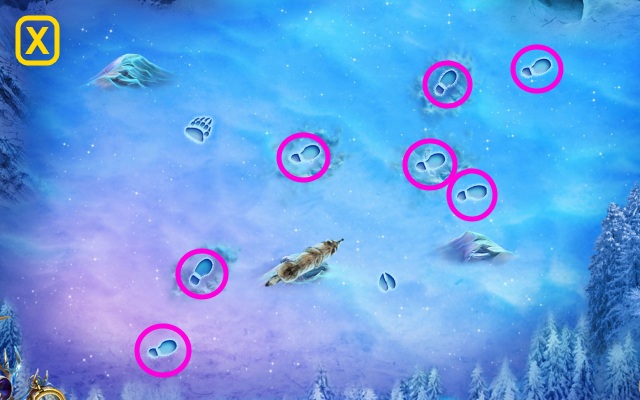
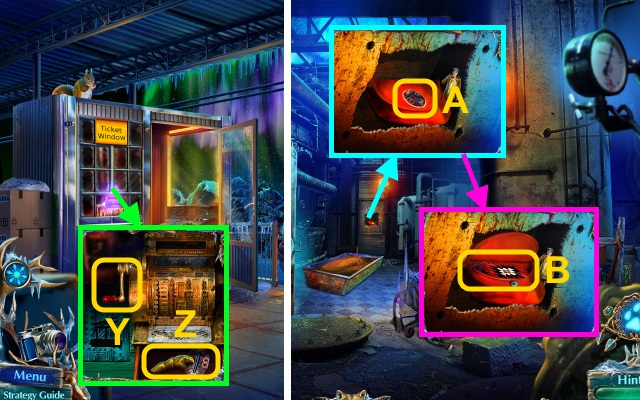
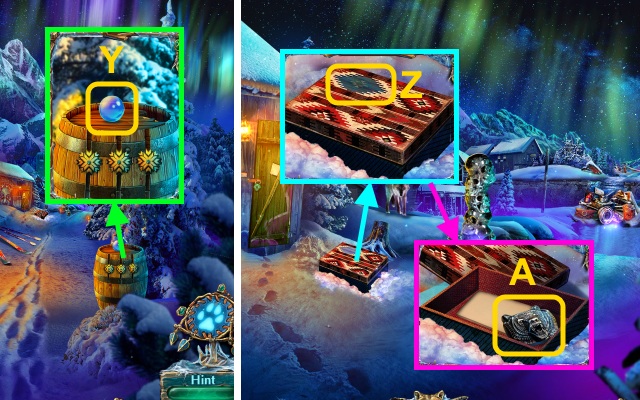
- Use the SAFE KEY (X); take the AMBER HEART (Y).
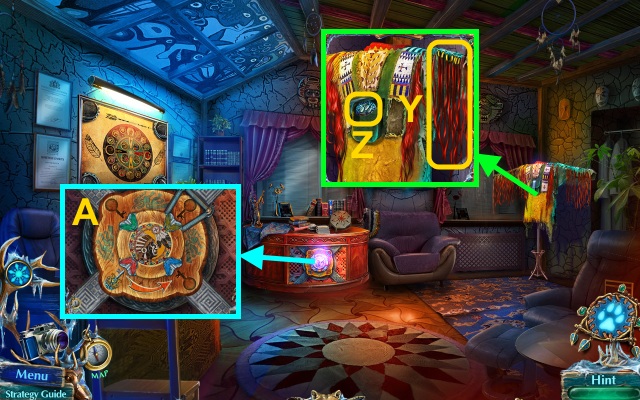
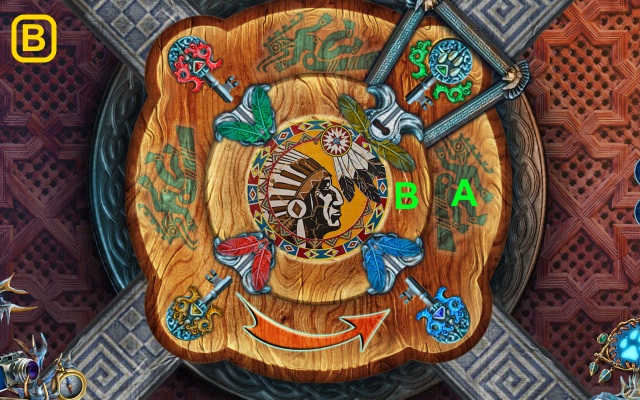
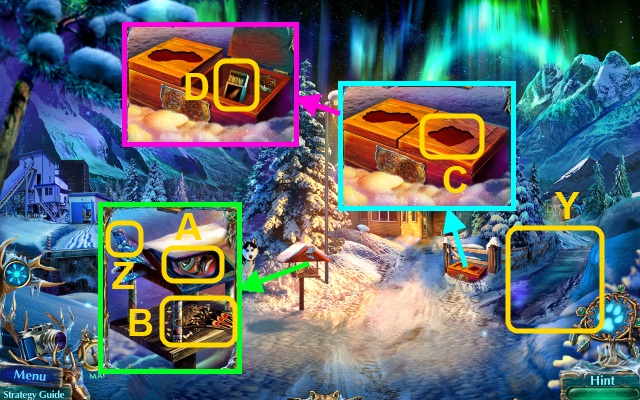
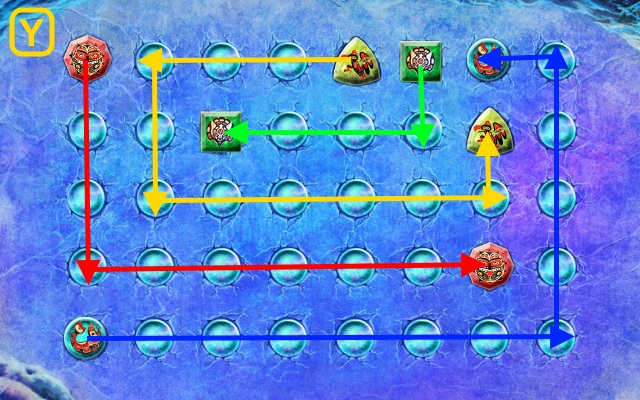
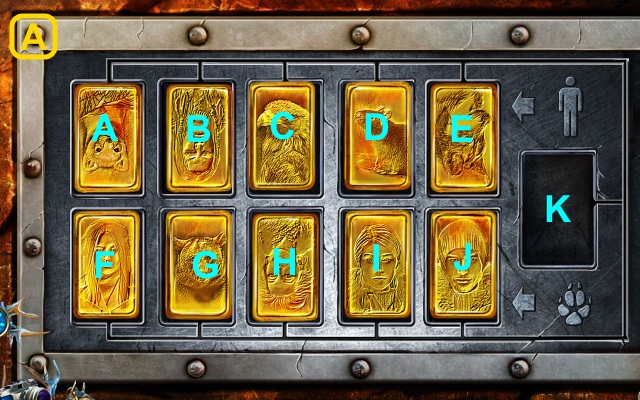
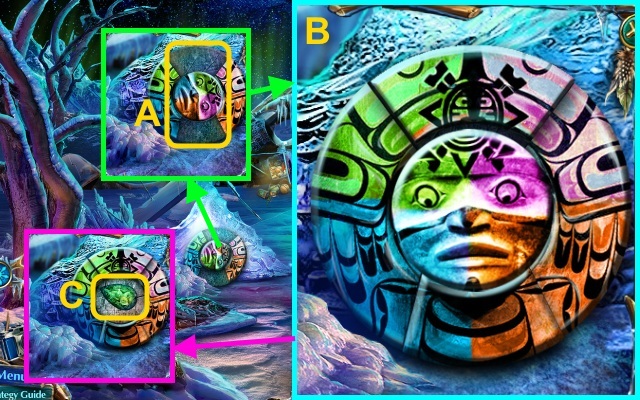
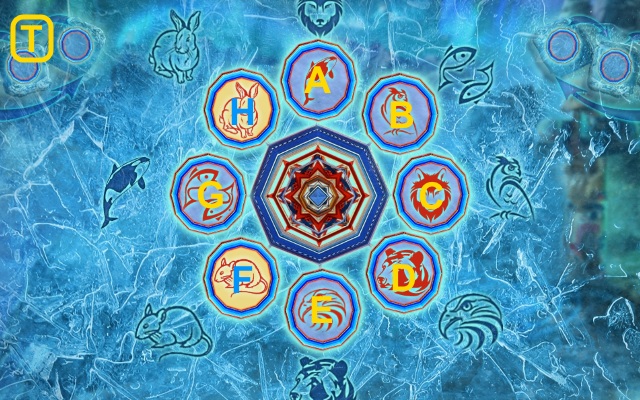
- Place the AMBER HEART for a mini-game (Z).
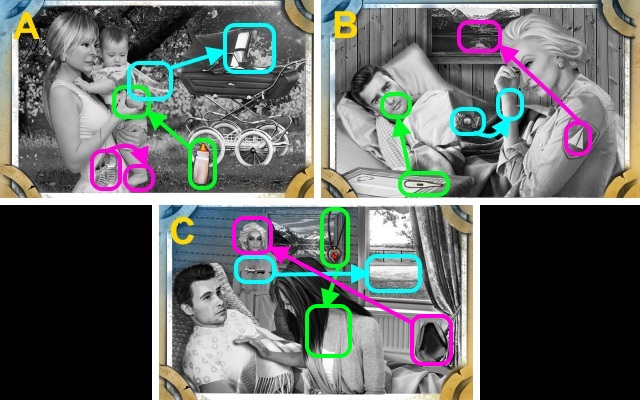
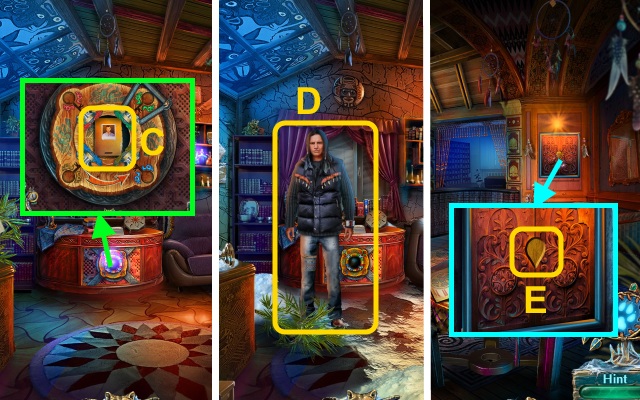
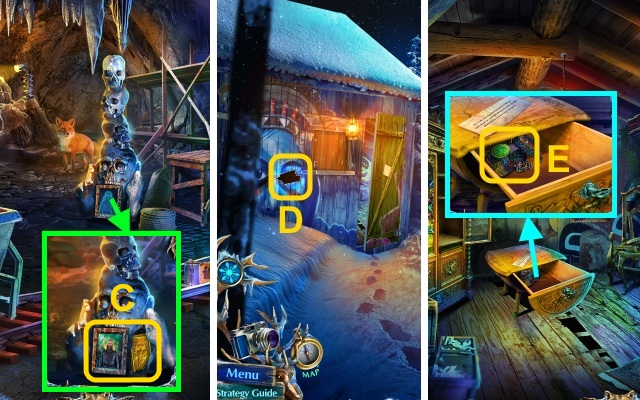
- Solution (A-C).
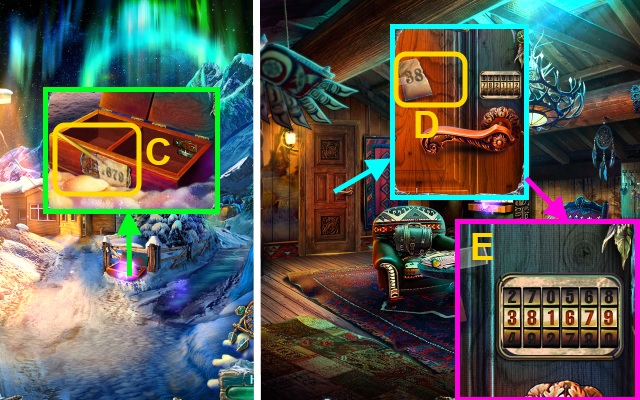
- Take the ABIGAIL FIGURINE (D).
- Place the ABIGAIL FIGURINE (E).
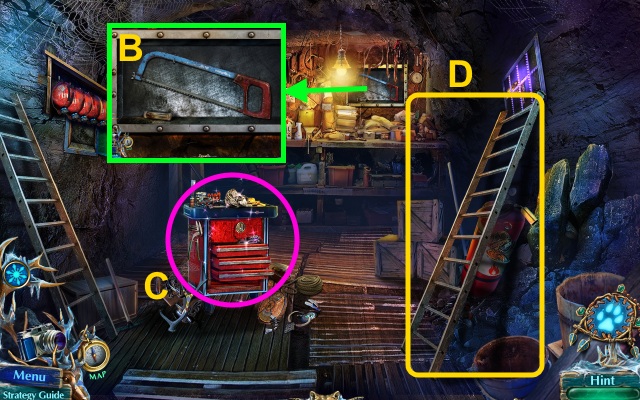
- Play the HOP to receive the PROPELLER (F).
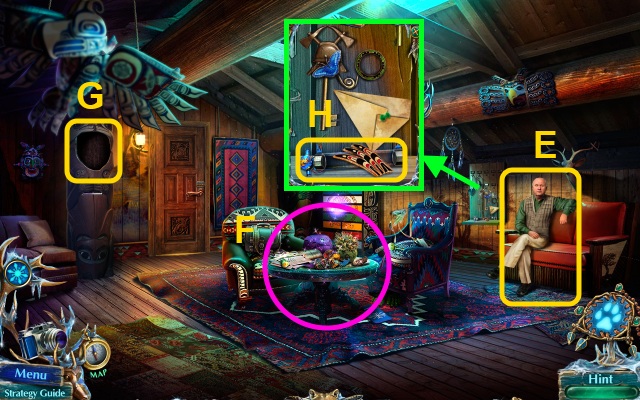
- Use the BOBBY PIN (G); take the LEATHER FRINGE and CROWBAR (H).
- Walk down, then left.
- Use the CROWBAR; take the PAW KEYS (1/3) and FIRE EMBLEM (I).
- Walk down.
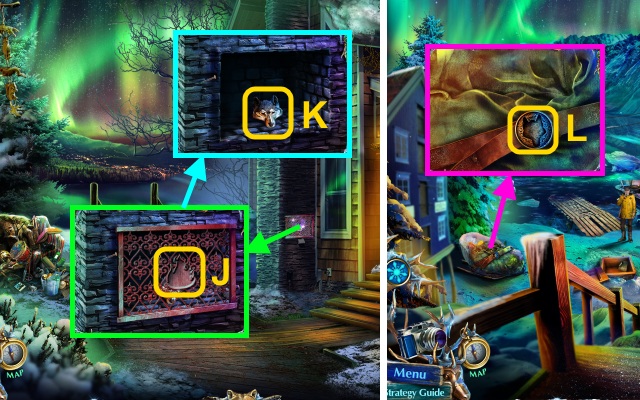
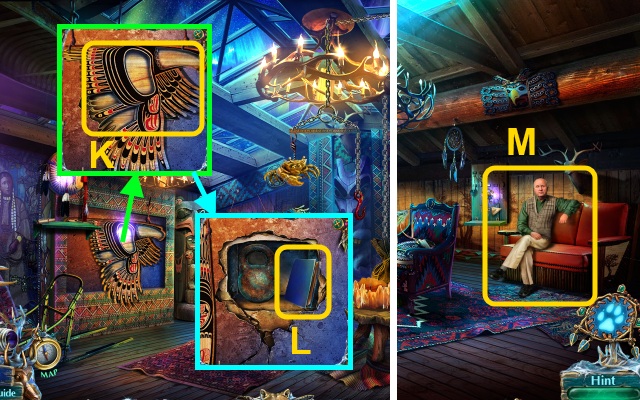
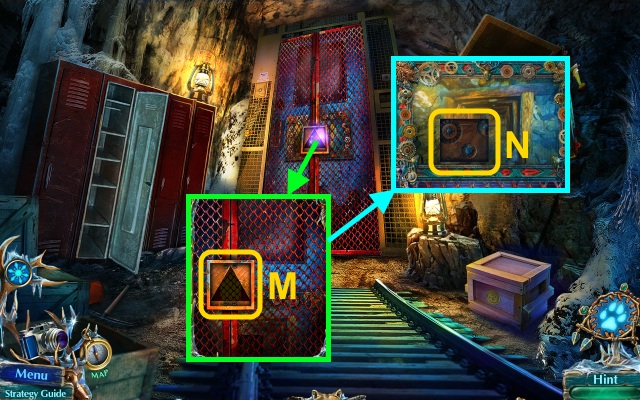
- Place the FIRE EMBLEM (J); take the WOLF EMBLEM (K).
- Walk left.
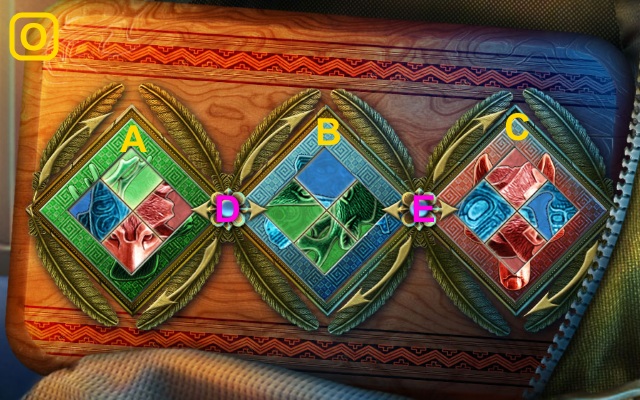
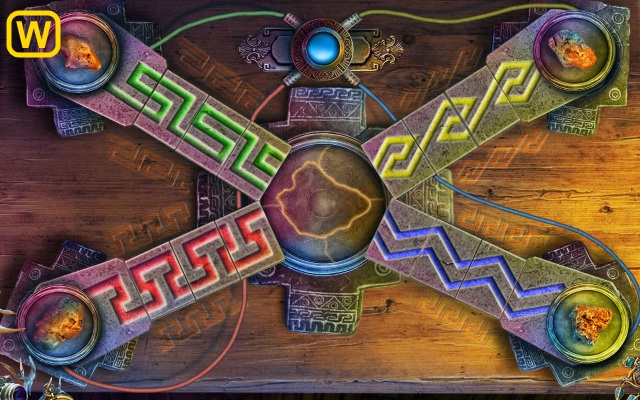
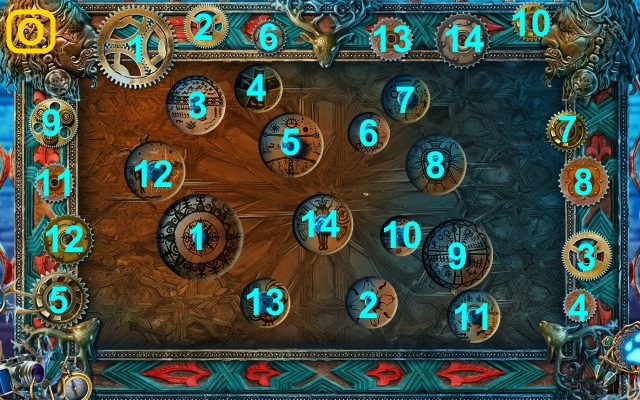
- Place the WOLF EMBLEM for a mini-game (L).
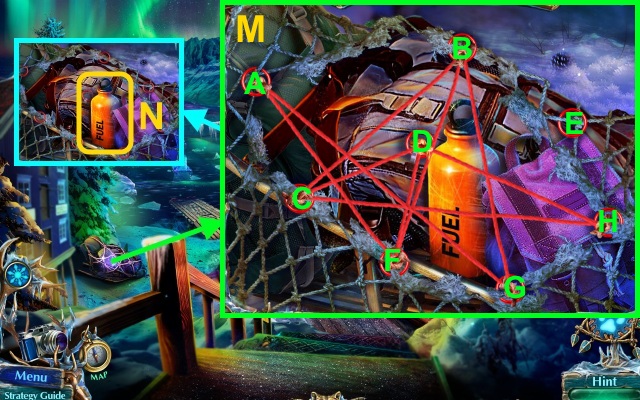
- Solution (M): (G-E)(D-G)(C-D)(A-C)(E-A)(D-E).
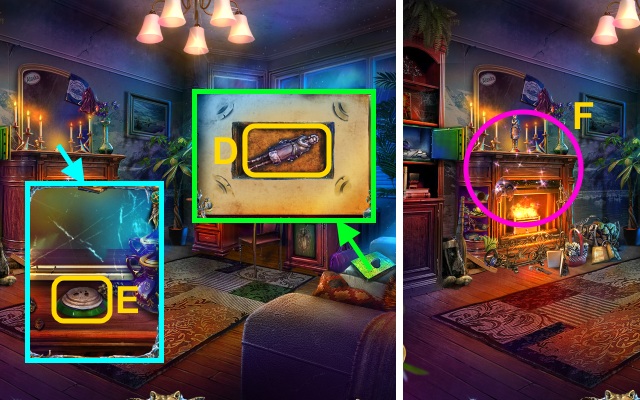
- Take the FUEL (N).
- Combine the STARTER CORD (O), PROPELLER (P), and FUEL (Q) with the BROKEN MOTOR; use the SANDPAPER.
- Take the FIXED MOTOR (R).
- Give the FIXED MOTOR (S).
- Go forward.
- Play the mini-game; solution (T-Y).
Chapter 2: Across the River
- Take the RAZOR BLADE (Z).
- Use the RAZOR BLADE; take the ICE PICK (A).
- Use the ICE PICK (B); take the FOLDED NOTE.
- Open the FOLDED NOTE (C); take the TORN SKETCH.
- Walk left.
- Talk to the woman (D).
- Use the Magic Amulet for a mini-game (E).
- Solution (F-I).
- Receive the KEY CARD.
- Place the TORN SKETCH for a mini-game (J).
- Solution (K).
- Take the WEIGHT (L).
- Place the WEIGHT (M).
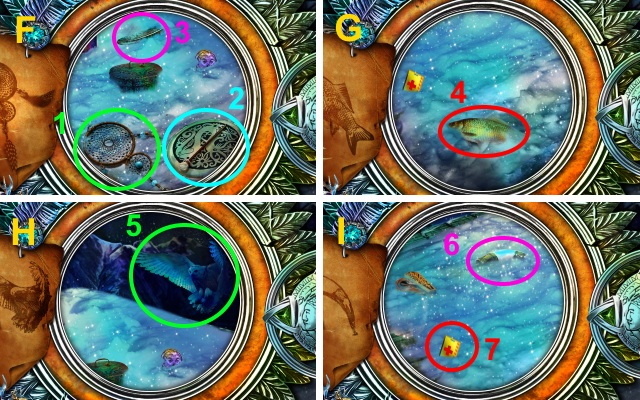
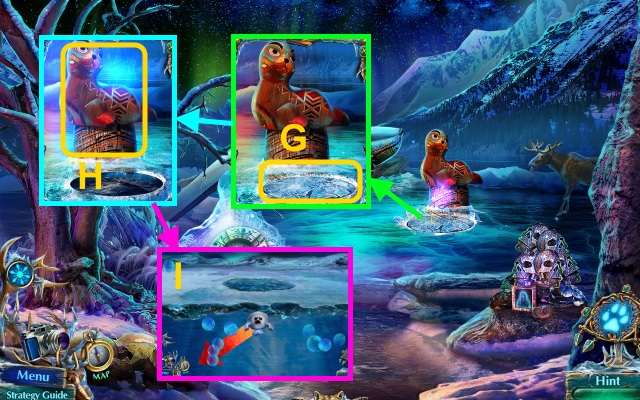
- Play the HOP to receive the MEDALLION (N).
- Walk down.
- Place the MEDALLION (O); take the FOOT PUMP (P).
- Walk left.
- Use the FOOT PUMP (Q); receive the HAMMER.
- Take the PAW KEYS (2/3) (R).
- Use the KEY CARD (S).
- Walk forward.
- Talk to Inupik (T); receive INUPIK'S PHOTO.
- Place INUPIK'S PHOTO (U); take the GOLDEN KEY (V).
- Use the GOLDEN KEY (W); take the SEEDS and MOUNTAIN MODEL (X).
- Walk left.
- Place the LEATHER FRINGE (Y); take the PAW KEYS (3/3) (Z).
- Use the PAW KEYS (3/3) for a mini-game (A).
- Solution (B): Ax3-B-A-B-A-B-A.
- Take DANIEL'S FILES (C).
- Give DANIEL'S FILES (D); receive the FLORAL TILE.
- Walk down.
- Place the FLORAL TILE (E).
- Play the HOP to receive the TREE EMBLEM (F).
- Place the TREE EMBLEM (G); take the GEMS (3/4) (H).
- Go to Chris's Bar.
- Place the PICTURE PART for a mini-game (I).
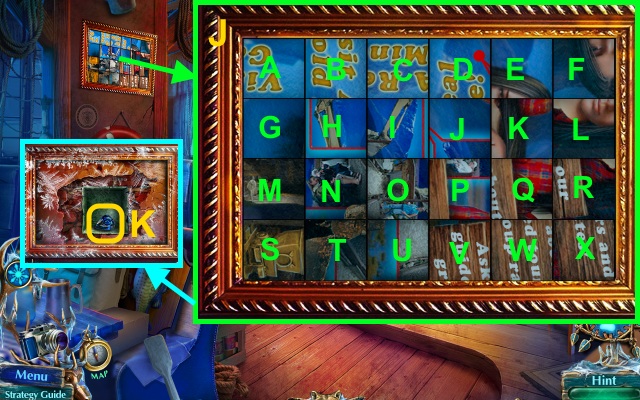
- Solution (J): Ix3-J-Cx3-Hx2-Bx3-Ax3-K.
- E-L-Fx2-Px3-Ox3-Nx2-Tx2-M-Sx3.
- Take the GEMS (4/4) (K).
- Go to Inupik's Office.
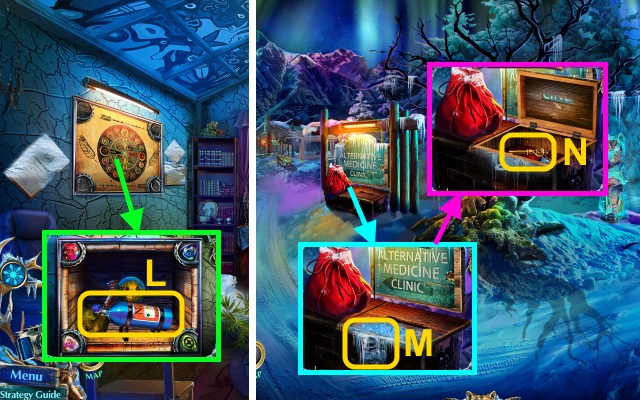
- Place the GEMS (4/4); take the LIQUID NITROGEN and GOLDEN WOLF (1/2) (L).
- Walk down three times.
- Use the LIQUID NITROGEN and HAMMER (M); take the HANDBAG KEY (N).
- Walk left.
- Use the HANDBAG KEY (O); take the BEAKER (P).
- Play the HOP to receive the EMBROIDERED FABRIC (Q).
- Walk forward, then left.
- Place the EMBROIDERED FABRIC (R); take the BIRD HEAD (S).
- Place the BEAKER (T); take the HOT COFFEE (U).
- Walk down three times.
- Use the HOT COFFEE (V); use the Magic Amulet for a mini-game (W).
- Solution (X).
- Examine the path (Y).
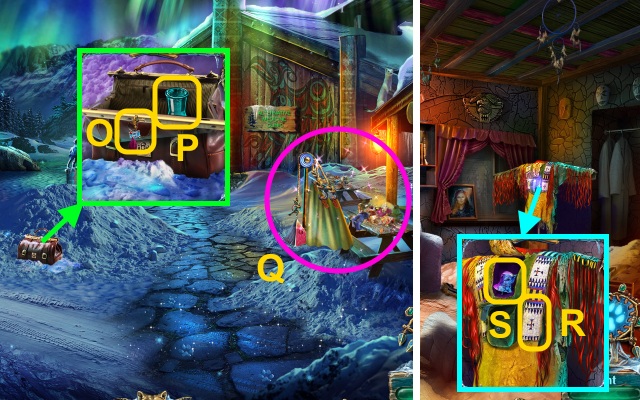
- Place the BIRD HEAD (Z); take the MASK (A).
- Give the SEEDS; take the CARVED EAGLE (1/4) (B).
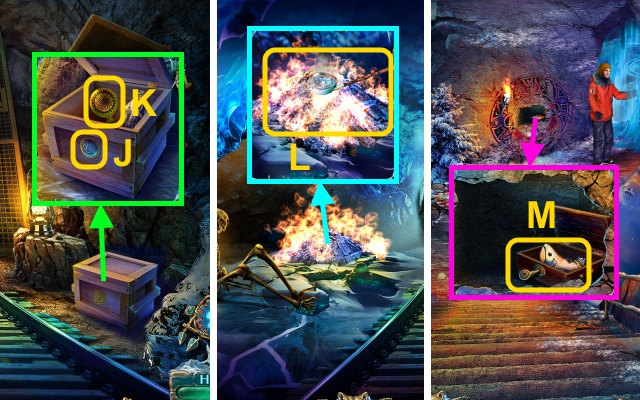
- Place the MOUNTAIN MODEL (C); take the MATCHES (D).
- Walk forward.
- Talk to the man (E); receive the SHEET.
- Move the chair; play the HOP to receive the FOX HANDLE (F).
- Place the MASK (G); receive the PHOTO OF CODY.
- Take the CARVED EAGLE (2/4) and LAMP FRAME (H).
- Place the FOX HANDLE (I); take the METERS (1/3) (J).
- Go to the Clinic.
- Place the PHOTO OF CODY (K); take the CORKSCREW (L).

- Play the HOP to receive the BEAR STATUE (M).
- Walk left.
- Place the BEAR STATUE; take the ADHESIVE TAPE (N).
- Use the CORKSCREW (O); take the OIL.
- Go to the Old Mining Town.
- Use the OIL; pull the handle (P).
- Walk left.
- Use the Magic Amulet for a mini-game (Q).
- Solution (R-T).
- Receive the LIGHT BULB.
- Combine the LAMP FRAME and LIGHT BULB; take the GLOWING LAMP (U).
- Place the GLOWING LAMP; take the WALRUS HANDLE (V).
- Take the SHARP STONE (W).
- Walk down, then forward.
- Play the HOP to receive PENCIL (X).
- Place the WALRUS HANDLE (Y); take the SCREWDRIVER and GOLDEN WOLF (2/2) (Z).
- Walk down.
- Place the GOLDEN WOLF (2/2) (A); take the REGISTER HANDLE (B).
- Place the SHEET and ADHESIVE TAPE; use the PENCIL (C).
- Take the CODE SCRAP.
- Walk forward.
- Place the CODE SCRAP for a mini-game (D).
- Solution (E).
- Walk left.

- Use the MATCHES; take the DRUMSTICK (F).
- Use the DRUMSITCK (G); take the METERS (2/3) and CARVED EAGLE (3/4) (H).
- Go to the Abandoned Factory.
- Use the SCREWDRIVER (I); take the CARVED EAGLE (4/4) (J).
- Go to the Museum.
- Place the CARVED EAGLE (4/4) (K).
- Take the file (L); receive the GLASSES.
- Walk down.
- Give the GLASSES (M); receive the CIRCLE.
- Walk down, then left.
- Place the CIRCLE (N); take the GLASS CUTTER and FLOWER (O).
- Walk down, then forward.
- Place the FLOWER (P); receive the FIREBOX KEY.
- Walk left.
- Use the GLASS CUTTER for a mini-game (Q).
- Solution (R): A-B-H-D-G-H-E-B.
- Take the FLUFFY FEATHER (S).
- Place the FLUFFY FEATHER (T); receive the RIFLE.
- Go to the Abandoned Factory.
- Use the FIREBOX KEY (U).
- Play the HOP to receive the FIRE BUCKET (V).
- Use the FIRE BUCKET (W); receive the BUCKET OF SAND.
- Walk down.
- Use the BUCKET OF SAND (X).
- Walk right.
Chapter 3: The Summit
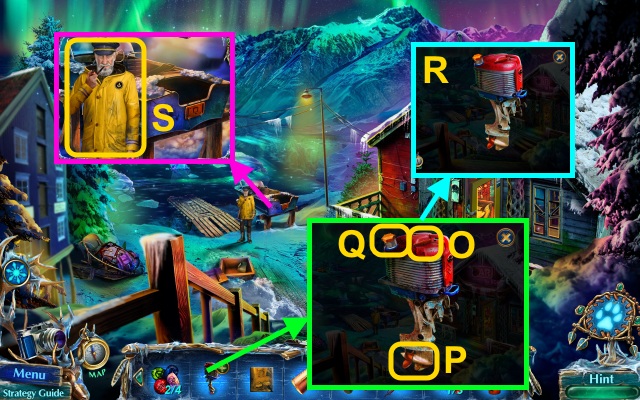
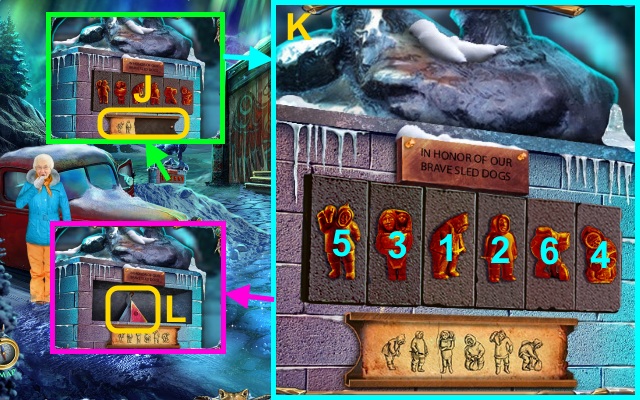
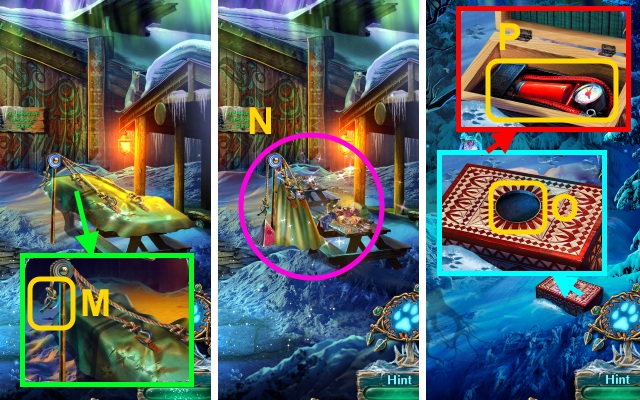
- Place the REGISTER HANDLE (Y); take the CLAW and PICKAX TOKEN (Z).
- Walk down, then left.
- Place the PICKAX TOKEN (A); take the PAINTED DESIGN and HOOK (B).
- Go to the Museum.
- Use the HOOK (C); receive the WEIGHT.
- Place the WEIGHT (D); take the CRAB (E).
- Combine the CRAB and CLAW; take the TRIANGULAR SCREWDRIVER (F).
- Walk down twice.
- Use the TRIANGLUAR SCREWDRIVER (G); receive the FUNICULAR EMBLEM.
- Walk right.
- Place the FUNICULAR EMBLEM (H); take the METERS (3/3) (I).
- Walk down, then left.
- Play the HOP to receive the OWL FEATHERS (J).
- Place the METERS (3/3) for a mini-game (K).
- Solution (L): A-B-C-A-A.
- Take the RED BUTTON and ZIPPER PULL (M).
- Walk down, then right.
- Use the ZIPPER PULL for a mini-game (N).
- Solution (O): D-Ax3-B-D-B-Cx2-E-Cx2.
- B-E-C-E-Cx2-E-Cx2-E-Bx2-Ax3-D-B-D.
- A-D-Ax3-D-A-D-A-Cx2.

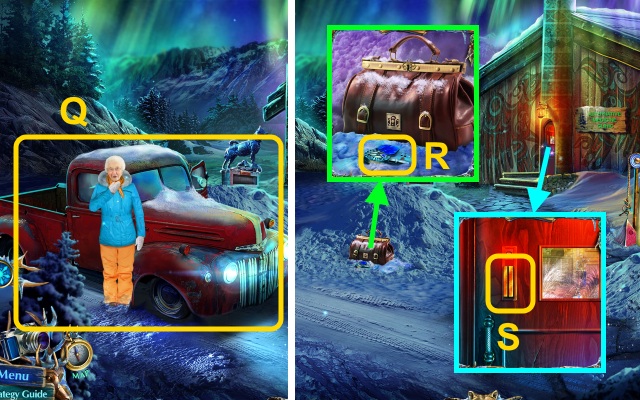
- Take the AMMO BOX and BATTERY (P).
- Combine the RIFLE and AMMO BOX (Q).
- Load the bullet.
- Take the LOADED RIFLE.
- Place the RED BUTTON (R); press it.
- Use the LOADED RIFLE (S).
- Walk forward.
- Use the Magic Amulet (T); receive the STAR.
- Use the SHARP STONE (U).
- Play the HOP to receive the SIEVE (V).
- Place the STAR for a mini-game (W).
- Solution (X).
- Take the ORBS (1/2) (Y).
- Walk forward.
- Place the PAINTED DESIGN (Z); take the BEAR EMBLEM (A).
- Go to the Museum.
- Place the OWL FEATHERS (B); take the ORBS (2/2) (C).
- Go to the Ghost Town.
- Place the ORBS (2/2); take the KNOB (D).
- Walk down twice.
- Place the KNOB (E); take the SUN COIN (F).
- Walk forward twice.
- Place the SUN COIN (G); take the PHONE (H).
- Open the PHONE; place the BATTERY (I).
- Close the PHONE for a mini-game.
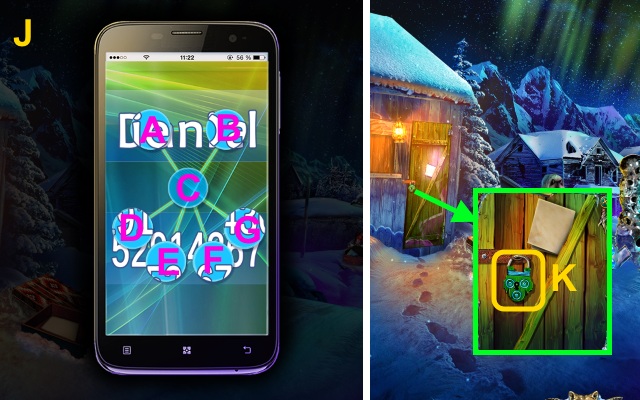
- Solution (J): A-B-C-G-F-C-E-D-C.
- Receive the KEY.
- Use the KEY (K).
- Walk left.
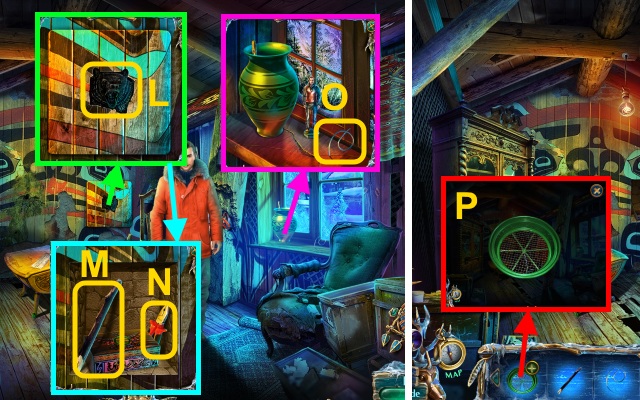
- Place the BEAR EMBLEM (L); take the STICK (M) and PLIERS (N).
- Use the PLIERS (O); receive the WIRE.
- Combine the SIEVE and WIRE (P); take the SIEVE.
- Walk down twice.
- Play the HOP to receive the LIGHTER (Q).
- Use the SIEVE; take the GOLD BAR and NAIL PULLER (R).
- Use the NAIL PULLER; take the SKI POLE HEAD (1/4) and RING (S).
- Walk forward, then left.
- Place the RING (T); take the PINK CHEMICAL and SKI POLE HEAD (2/4) (U).
- Place the GOLD BAR for a mini-game (V).
- Solution (W).
- Take the TOMAHAWK (X).
- Use the TOMAHAWK; take the PURPLE CHEMICAL and BROOM (Y).
- Walk down.
- Use the PINK CHEMICAL and PURPLE CHEMICAL (Z).
- Walk right.
- Use the Magic Amulet for a mini-game; move the log 7x (A).
- Place the STICK; take the FLASHLIGHT (B).
- Use the BROOM; take the LIGHTER FLUID (C).
- Place the FLASHLIGHT (D).
- Play the HOP to receive the EMERALD KEY (E).
- Use the LIGHTER FLUID and LIGHTER; take the WOLF HEAD and SKI POLE HEAD (3/4) (F).
- Place the WOLF HEAD (G); take the PICK and GOLD BAR (1/5) (H).
- Walk down, then left.
- Use the EMERALD KEY (I).
- Take the SKI POLE HEAD (4/4) and book (J); receive the PHOTO OF PILOT.

- Place the SKI POLE HEAD (4/4) (K); receive the SKI POLES.
- Walk down.
- Place the PHOTO OF PILOT (L); receive the BUCKLE.
- Walk down.
- Place the BUCKLE; receive the SKI BINDINGS (M).

- Place the SKI BINDINGS; take the SKIS (N).
- Combine the SKIS and SKI POLEs for a mini-game; solution (O).
- Take the SKIS.
- Walk right twice.
- Play the HOP to receive the RAKE (P).
- Use the SKIS for a mini-game (Q).
- Avoid the obstacles (R).
Chapter 4: The Caves
- Use the PICK; take the GOLD BAR (2/5), TORCH, and PAPER CLIP (S).
- Bend the PAPERCLIP; take the LOCKPICK (T).
- Use the RAKE; take the JEWELED KEY, FINGER, and VALVE (U).
- Use the TORCH (V); receive the COATED TORCH.
- Walk right.
- Try to walk right (W).
- Use the Magic Amulet for a mini-game (X).
- Solution (Y).

- Take the CHISEL (Z).
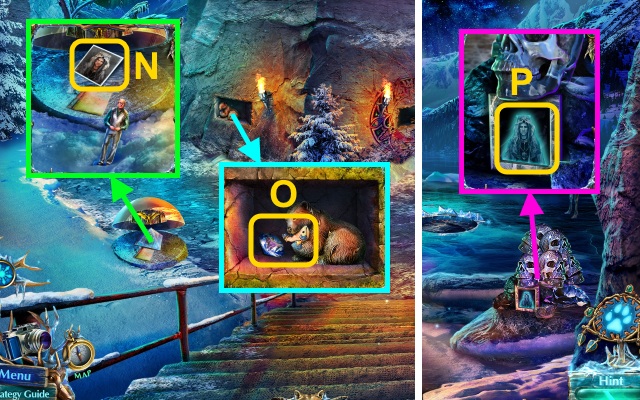
- Place the FINGER; take the PHOTO OF MINER (A).
- Use the CHISEL; Take the GOLD BAR (3/5), WIRE (1/2) and TWEEZERS (B).
- Walk down.
- Place the PHOTO OF MINER to receive the WOODEN EYE; take the GOLD BAR (4/5) (C).
- Walk down twice.
- Place the WOODEN EYE (D); receive the WELDING TORCH.
- Walk left.
- Use the JEWELED KEY; take the GREEN TOKEN (E).
- Walk down, then right.
- Place the GREEN TOKEN; take the WOODEN SIGN (F).
- Place the WOODEN SIGN; take the PART OF CIRCLE (G).
- Walk forward.
- Place the PART OF CIRCLE for a mini-game (H).

- Solution (I).
- Walk left.
- Use the LOCKPICK (J).
- Play the HOP to receive the SHEARS (K).
- Place the VALVE (L).
- Use the COATED TORCH (M); receive the BURNING TORCH.
- Walk down, then right.
- Use the BURNING TORCH; take the FEATHERS (N).
- Use the WELDING TORCH (O).
- Walk forward.
- Use the SHEARS (P); remove the lock for a mini-game.
- Solution (Q).
- Take the HELMET, FUSE (1/3) and WATCH PART (R).
- Use the TWEEZERS; receive the ARROWHEAD (S).
- Go to Storage.
- Move the coat; place the HELMET for a mini-game (T).
- Solution (U).
- Take the KNIFE and FUSE (2/3) (V).
- Walk down, then right.
- Use the KNIFE; take the GOLD BAR (5/5) (W) and LADDER (X).
- Walk down, then left.
- Place the WATCH PART; take the RING PART (1/2) (Y).
- Place the GOLD BAR (5/5) for a mini-game (Z).
- Solution (A): D-B-H-K-J-F-A-K-C-J-K-I-E-K.
- Take the SAW and FUSE (3/3) (B).
- Play the HOP to receive the WIRE (2/2) (C).
- Place the LADDER (D).
- Use the SAW; take the EAGLE EMBLEM (1/2) and HAMMER (E).
- Go to the Elevator.
- Place the WIRE (2/2) (F); take the ACORN EMBLEM and ELEVATOR KEY (G).
- Remove the cover; place the FUSE (3/3) (H).
- Walk down twice.
- Place the ACORN EMBLEM; take the SQUIRREL EMBLEM (I).
- Place the SQUIRREL EMBLEM (J); take the PINECONE (K).
- Walk down.
- Place the PINECONE; take the MINECART TILE (L).
- Go to the Elevator.
- Place the ELEVATOR KEY (M).
- Place the MINECART TILE for a mini-game (N).
- Solution (O).
- Walk forward.
- Use the HAMMER; take the EAGLE EMBLEM (2/2) and MITTEN (P).
- Place the EAGLE EMBLEM (2/2) (Q); take the ROPE (R).
- Walk left.
- Take the ARROW SHAFT (S).
- Use the MITTEN (T); receive the ICICLE.
- Use the ICICLE (U).
- Play the HOP to receive the CROSSBOW (V).
- Combine the CROSSBOW, ARROW SHAFT, ROPE, FEATHERS, and ARROWHEAD (W); take the LOADED CROSSBOW.
- Use the LOADED CROSSBOW; take the WRAPPED ITEM (X) and CARVED OWL (Y).
- Examine the WRAPPED ITEM; unwrap it (Z).
- Take the RING PART (2/2).
- Place the RING PART (2/2) for a mini-game (A).
- Solution (B).
- Take the GEMSTONE (1/4) (C).
- Walk down.
- Place the CARVED OWL for a mini-game (D).
- Solution (E).
- Take the SCOOP (F).
- Walk left.
- Use the SCOOP (G); receive the SCOOP WITH WATER.
- Use the Magic Amulet for a mini-game (H).
- Gather the bubbles (I).
- Receive the PAWPRINT COIN.
- Walk down twice.
- Place the PAWPRINT COIN (J).
- Take the CHEST KEY (K).
- Walk down.
- Use the SCOOP WITH WATER (L); receive the SCOOP WITH HOT WATER.
- Walk forward twice.
- Use the CHEST KEY; take the FISH TRINKET (M).
- Pour the SCOOP WITH HOT WATER (N); receive the DARK SHAMAN PHOTO.
- Place the FISH TRINKET (O); take the GEMSTONE (2/4).
- Walk left.
- Place the DARK SHAMAN PHOTO (P); receive the GEMSTONE (3/4).
- Play the HOP to receive the GEMSTONE (4/4) (Q).
- Walk down.
- Place the GEMSTONE (4/4) (R).
- Walk right.
- Use the Magic Amulet for a mini-game (S).
- Solution (T): C-G-E-D-D-F-G-G.
- Congratulations! You have completed Mystery Tales: Alaskan Wild.
Created at: 2015-09-27