

Walkthrough Menu
- General Tips
- Chapter 1: Outside the Museum
- Chapter 2: Olivia's Office
- Chapter 3: Outside Florence's House
- Chapter 4: Library
- Chapter 5: Mysterious Island
General Tips
- This is the official guide for Mystery Tales: Dangerous Desires.
- This guide will not mention each time you have to zoom into a location; the screenshots will show each zoom scene.
- Hidden-object puzles are referred to as HOPs. This guide will not show HOP solutions. It will identify the location of the HOP and the inventory item acquired.
- This guide will show solutions for non-random puzzles. Please read the in-game instructions for each puzzle.
Chapter 1: Outside the Museum
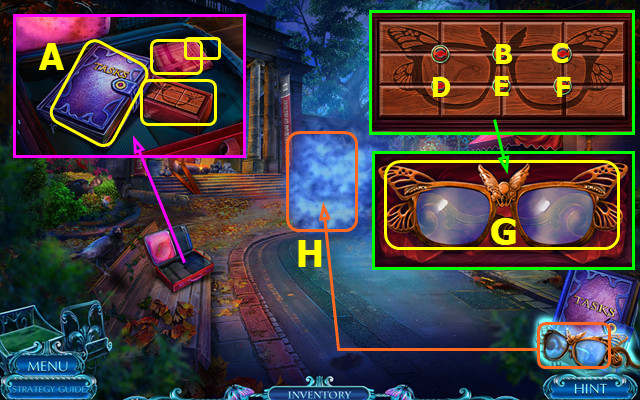
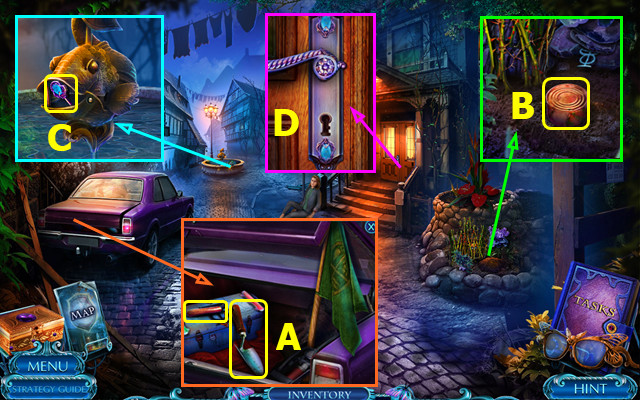
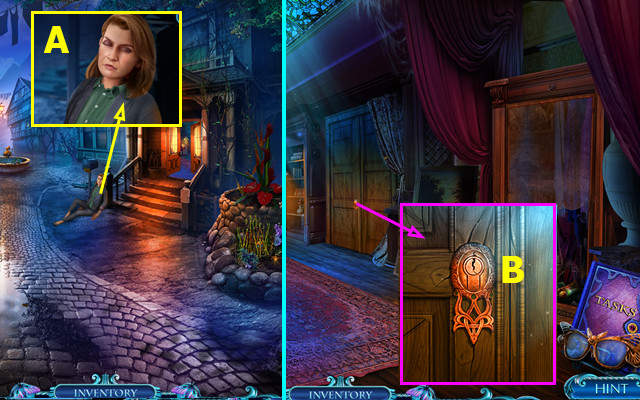
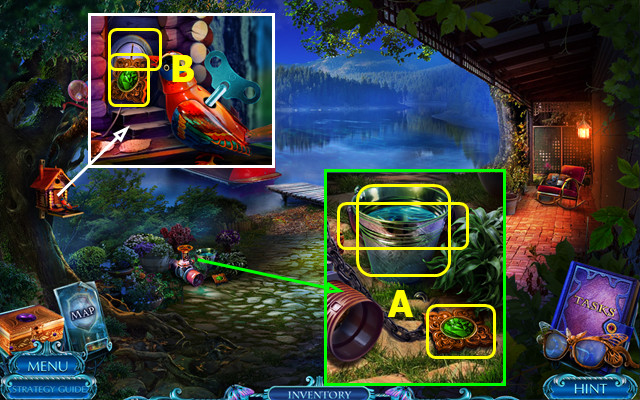
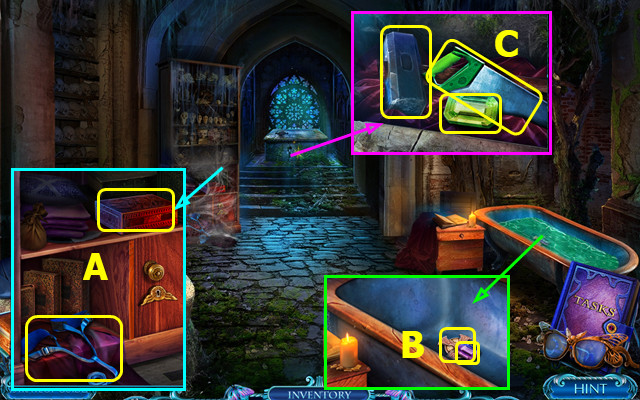
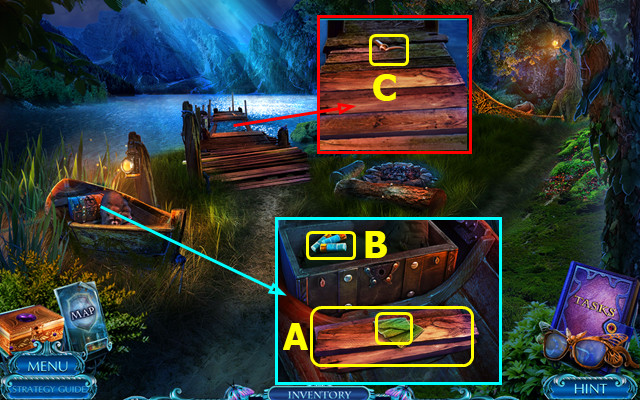
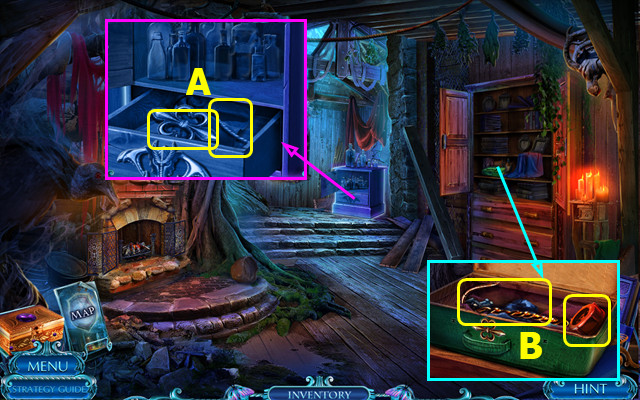
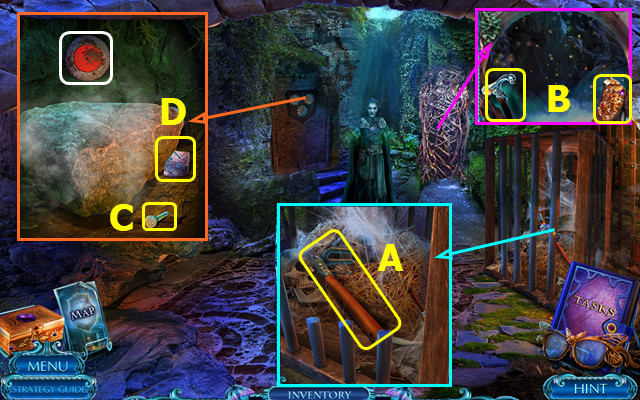
- Open briefcase; take TASKS, WOODEN CASE, HANDKERCHIEF, and HAIRPIN (A).
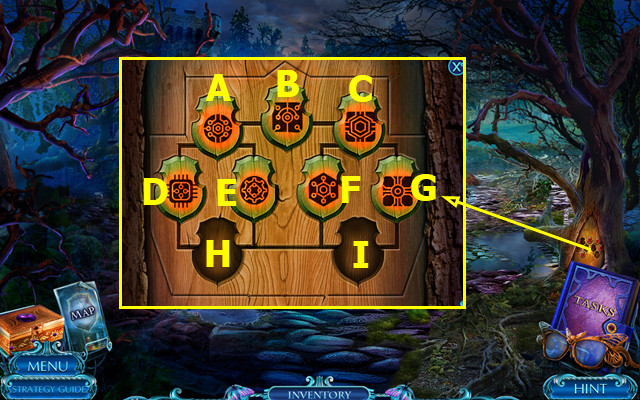
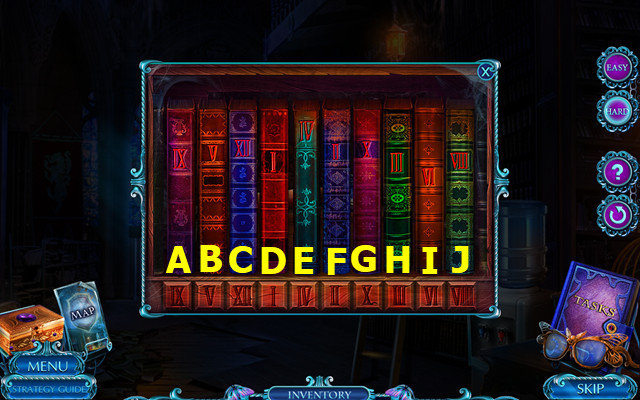
- HAIRPIN on WOODEN CASE.
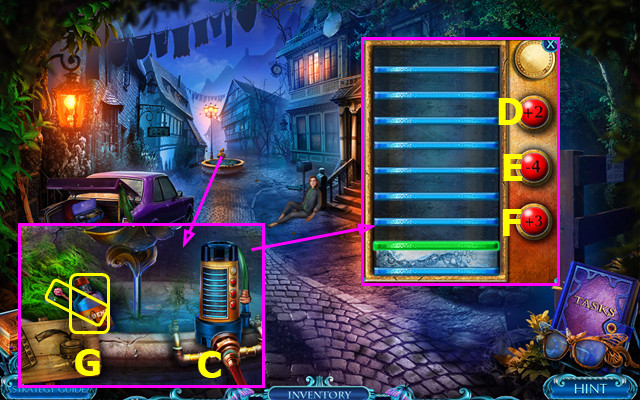
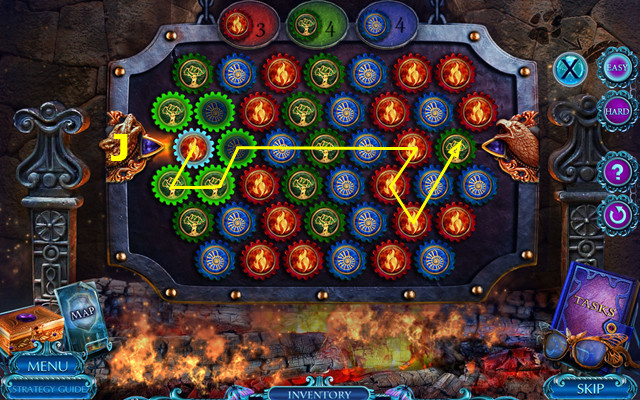
- Easy solution (Dx3)-(Bx2)-(Cx2)-(B)-(Fx3)-(C).
- Hard solution (Dx3)-(Bx2)-(Fx3)-(C)-(Fx3).
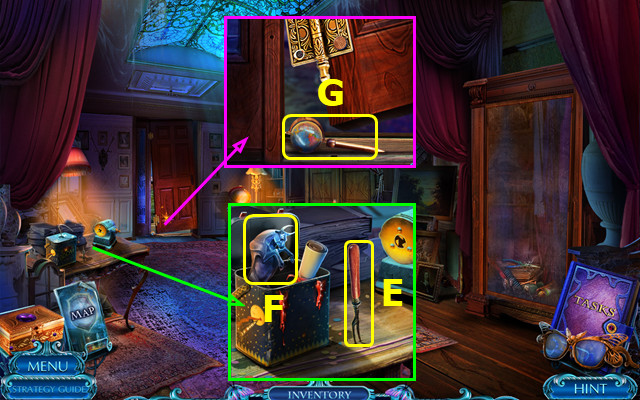
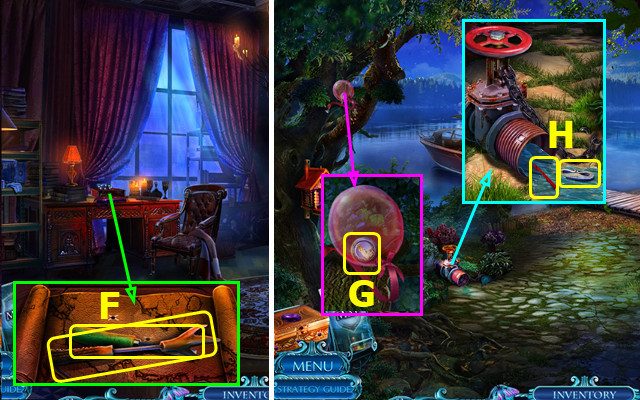
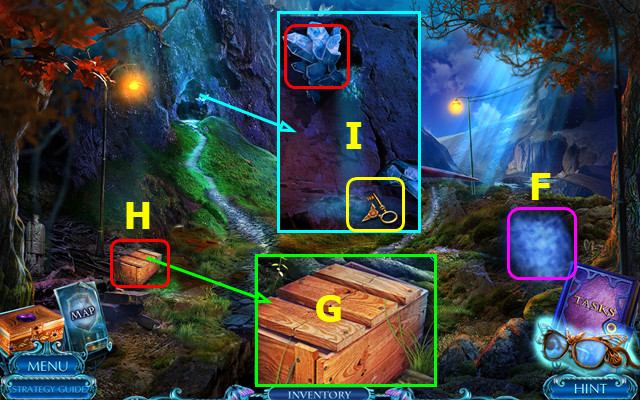
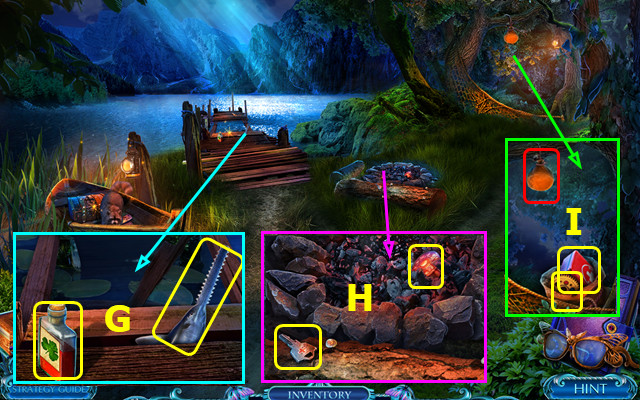
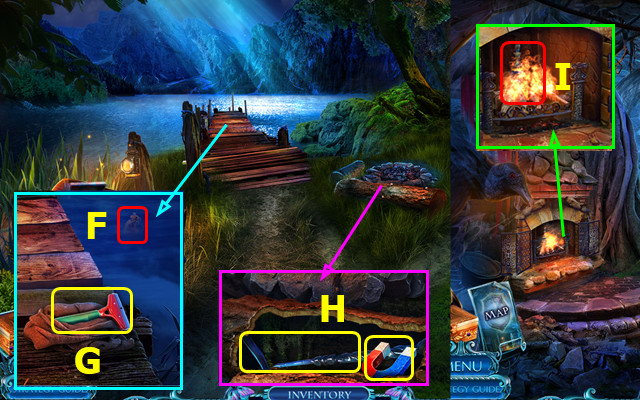
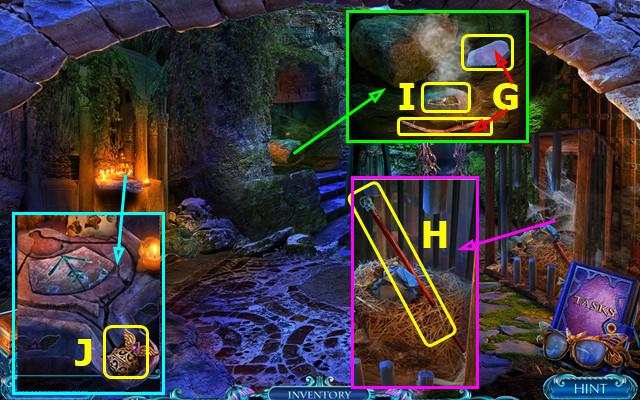
- Take SPECIAL GLASSES (G).
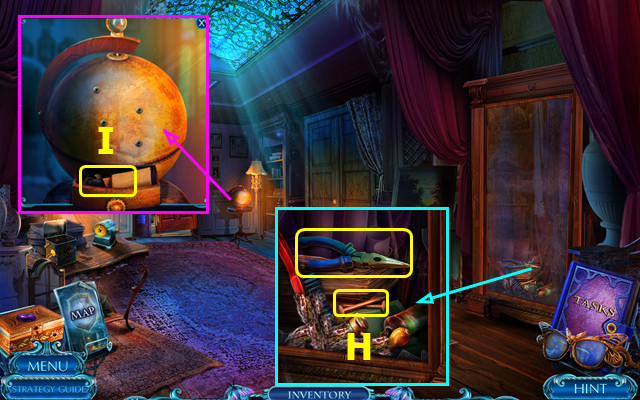
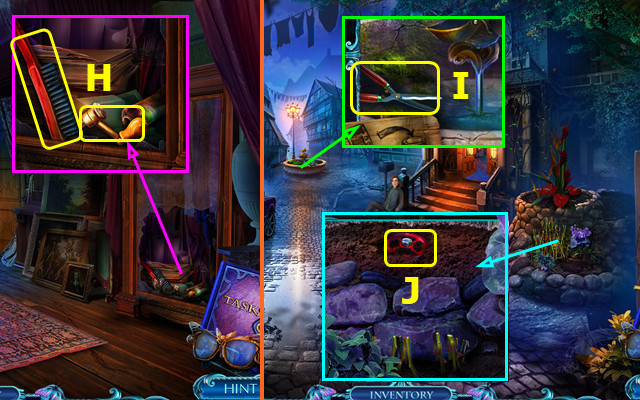
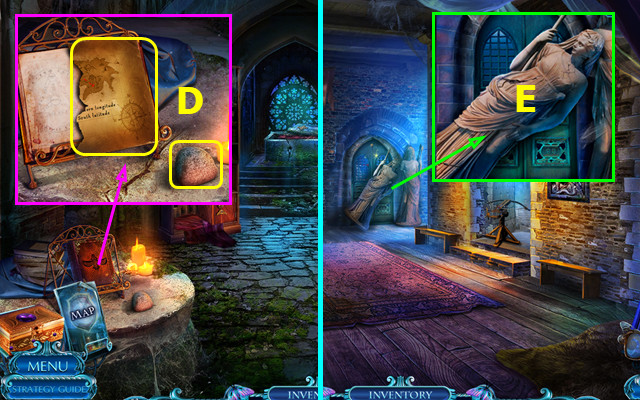
- Use SPECIAL GLASSES (H).
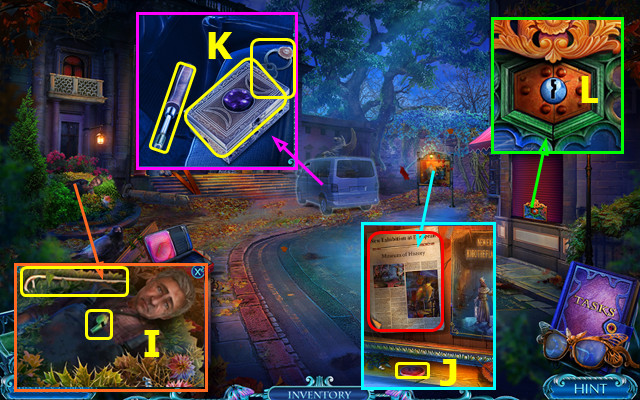
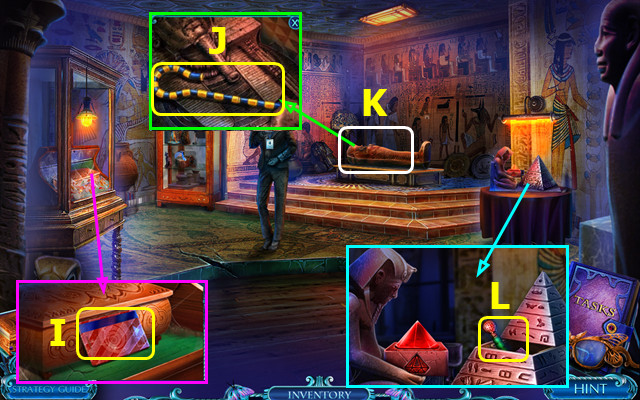
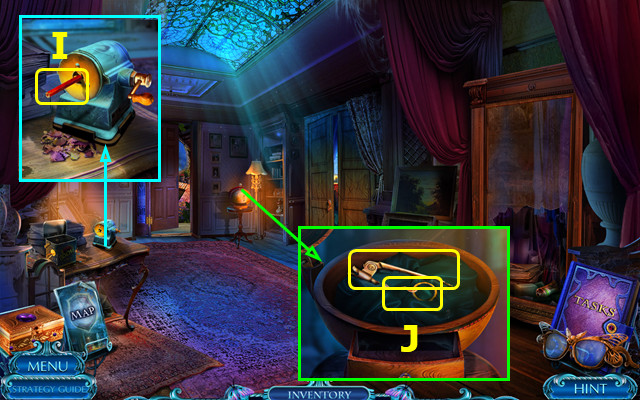
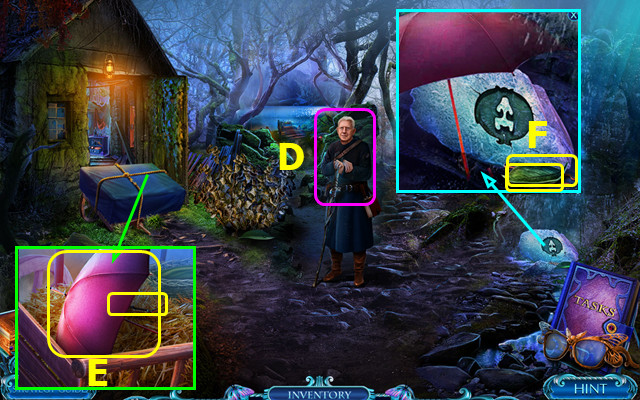
- Talk; take WHISTLE and LONG HOOK (I).
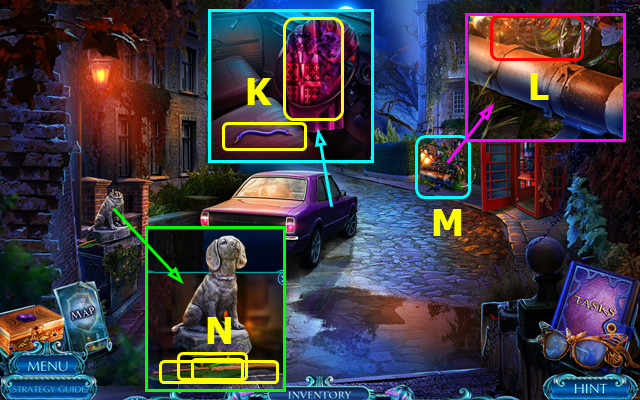
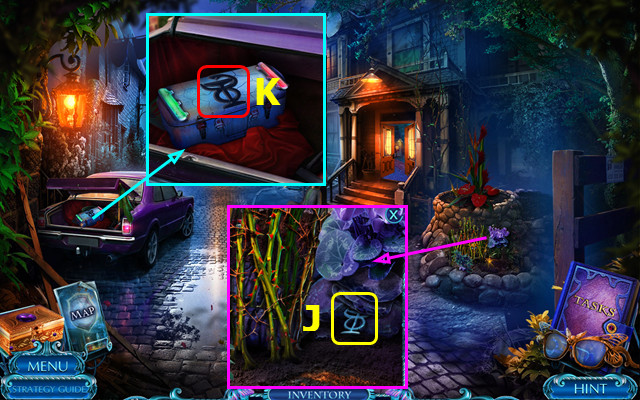
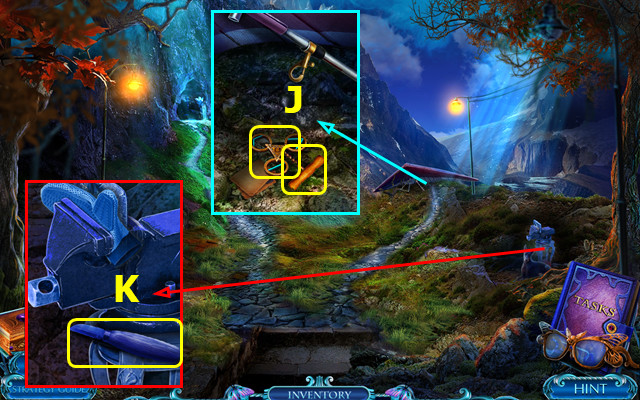
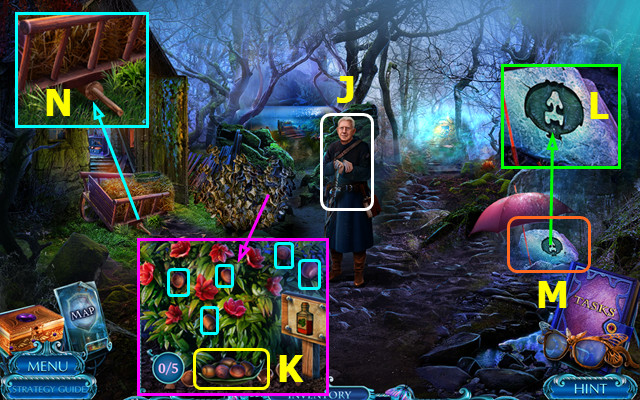
- Use WHISTLE; take 1/2 COIN; read newspaper (J).
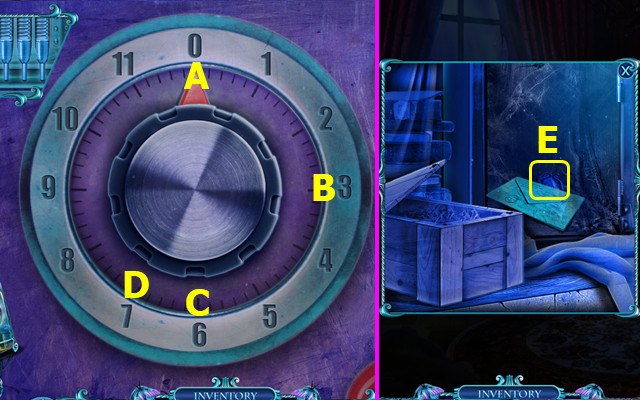
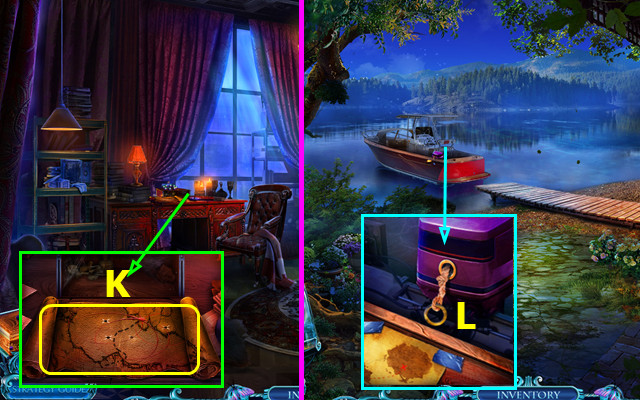
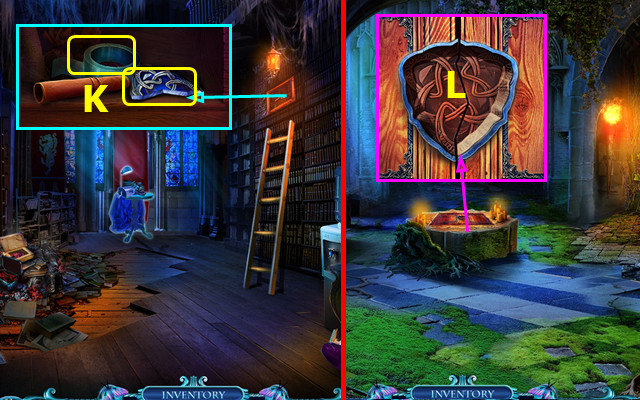
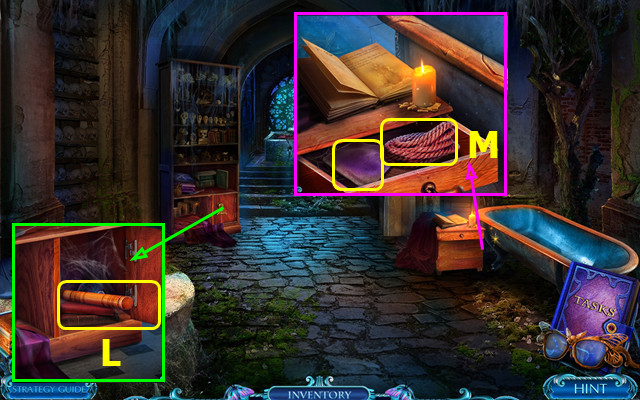
- Use LONG HOOK; take DIARY PAGES, LEVER, and GIFT SHOP KEY (K).
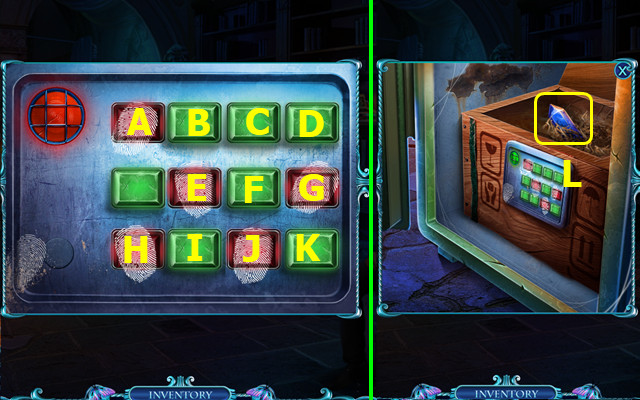
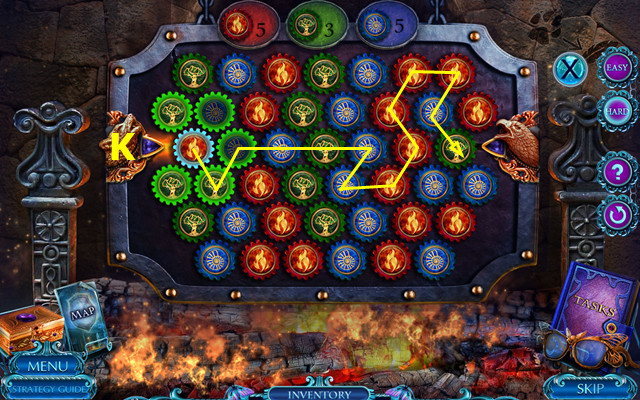
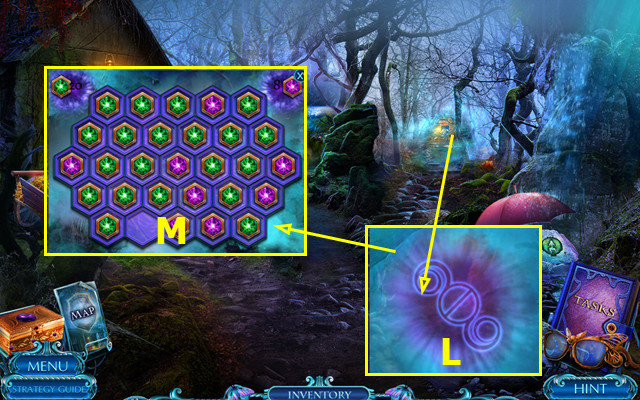
- Use GIFT SHOP KEY (L).
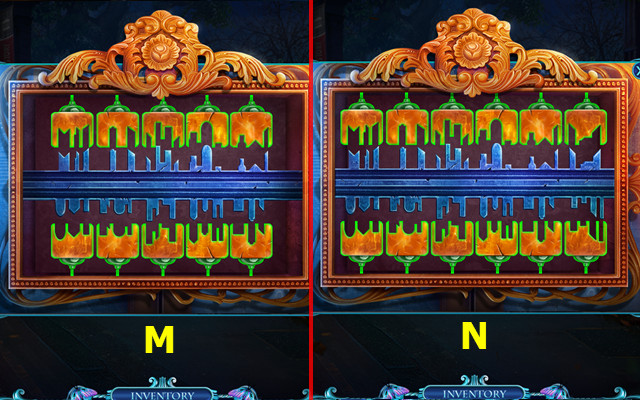
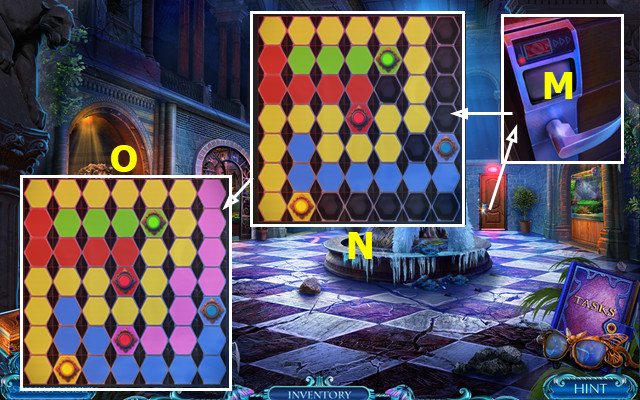
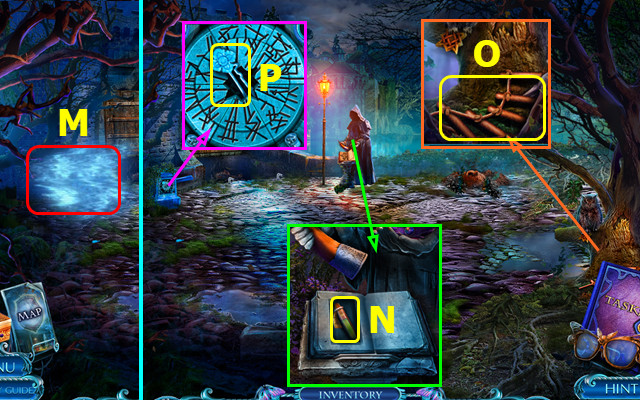
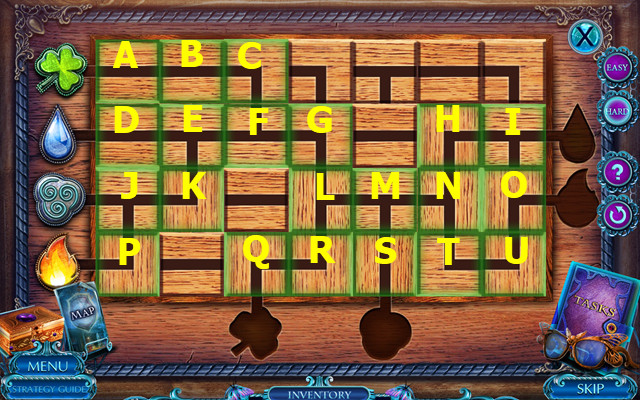
- Easy solution (M).
- Hard solution (N).
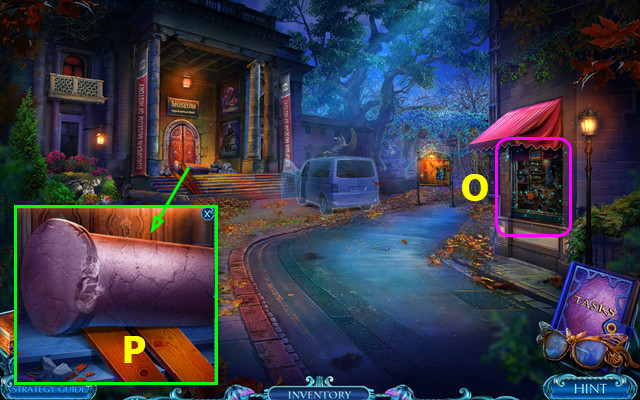
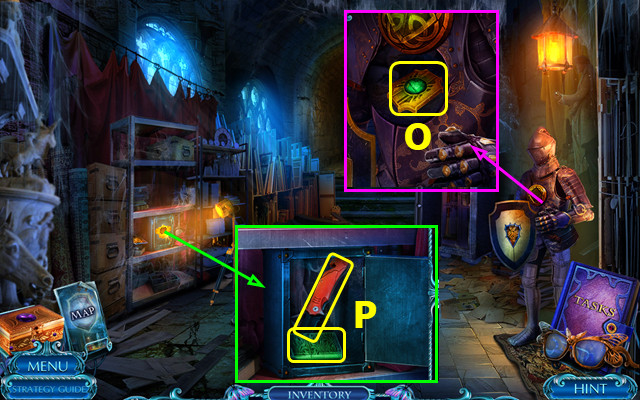
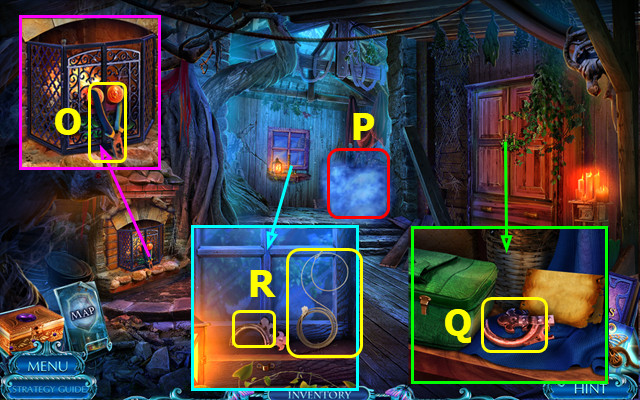
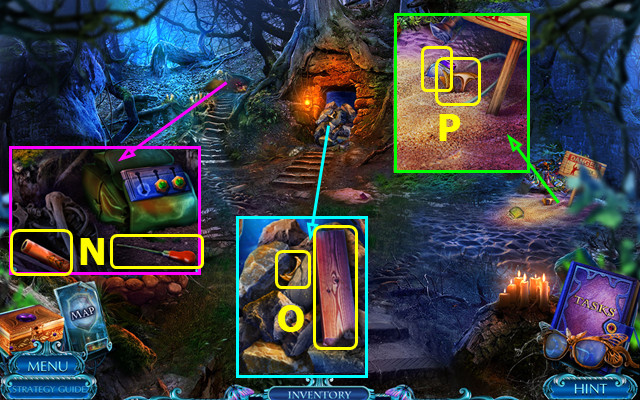
- Play HOP; earn CROWBAR (O).
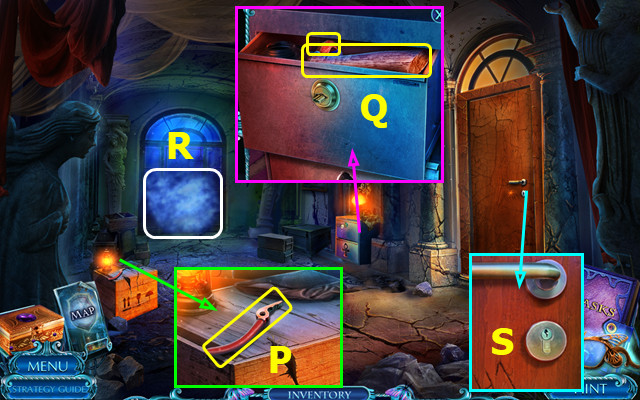
- Move boards; use CROWBAR (P).
- Go forward.
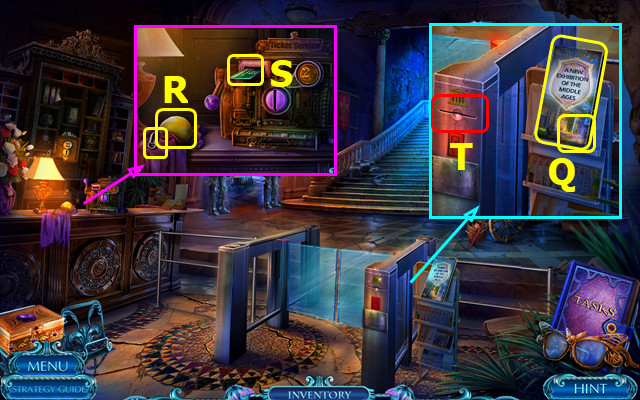
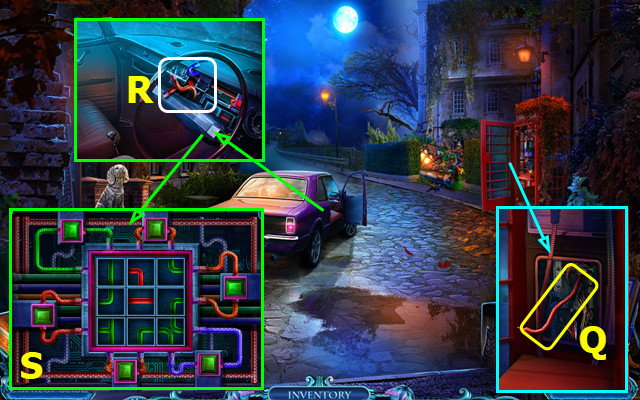
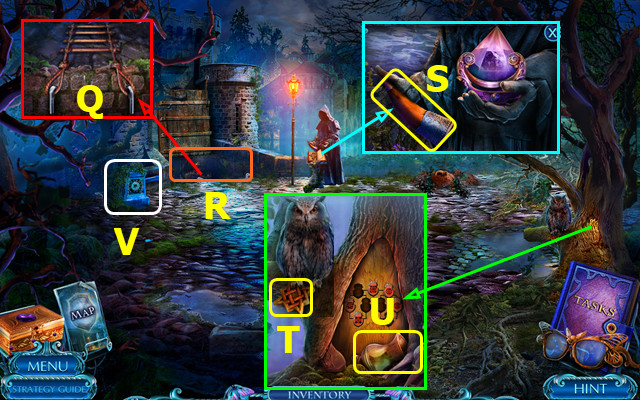
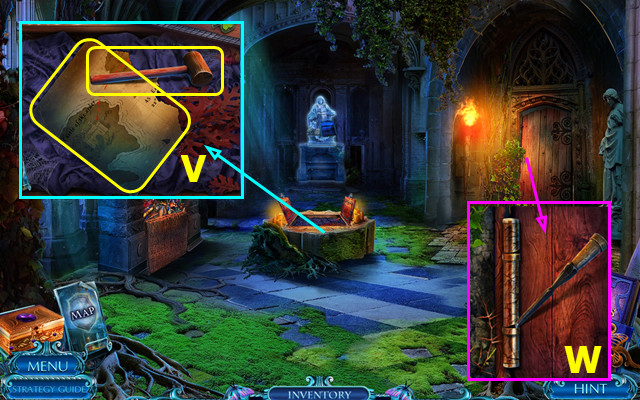
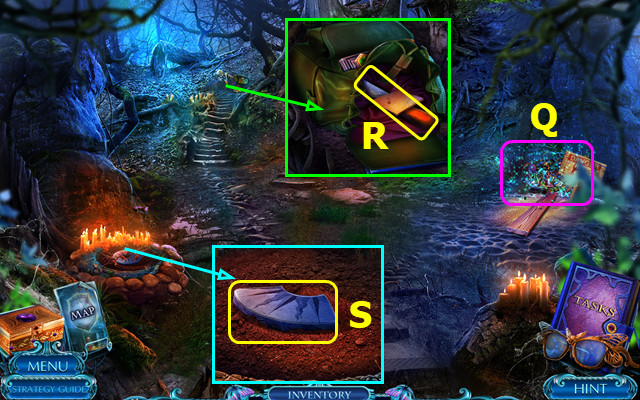
- Take MAP and 2/2 COIN (Q).
- Take PAPER CLIP and LEMON (R).
- Use 2 COINS; take MUSEUM TICKET (S).
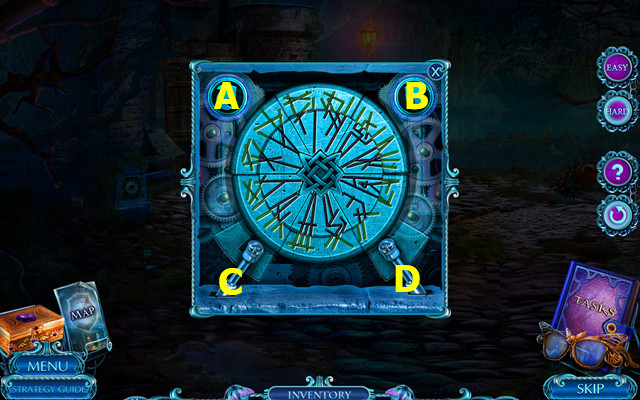
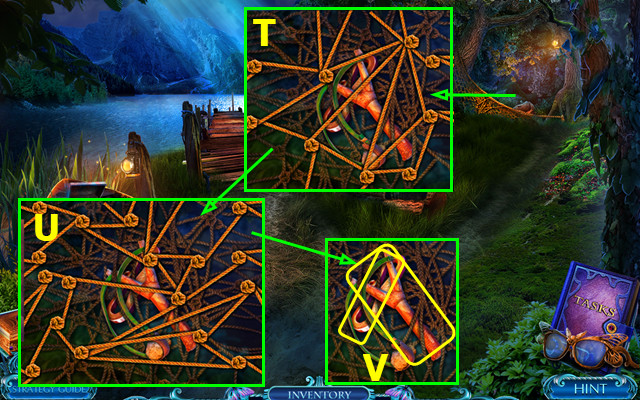
- Use MUSEUM TICKET (T).
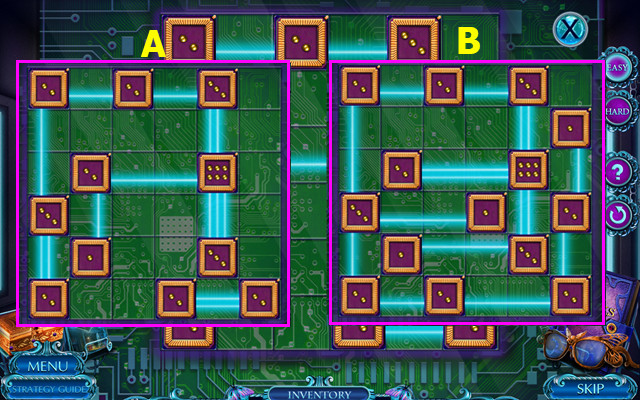
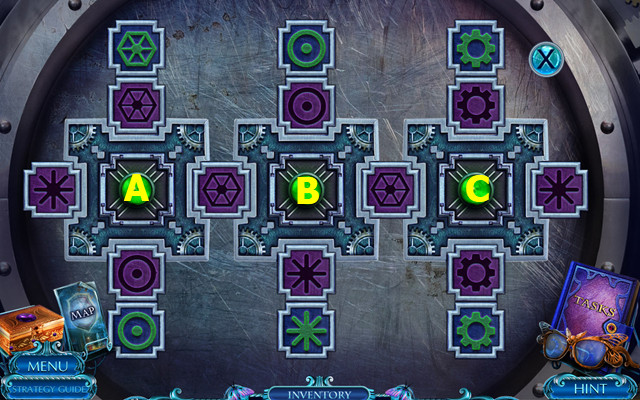
- Easy solution (A).
- Hard solution (B).
- Go forward.
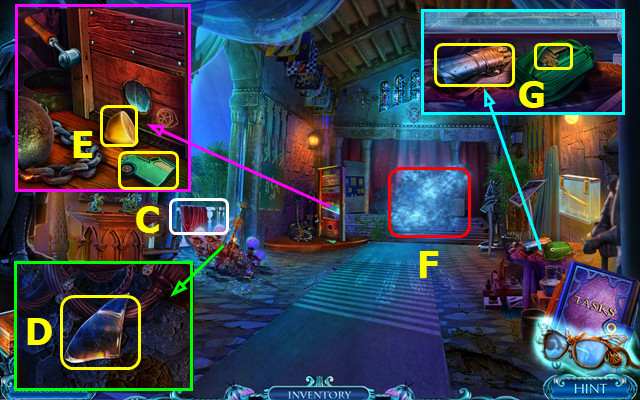
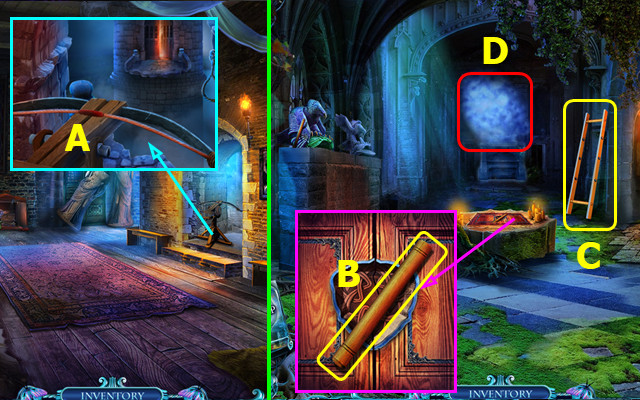
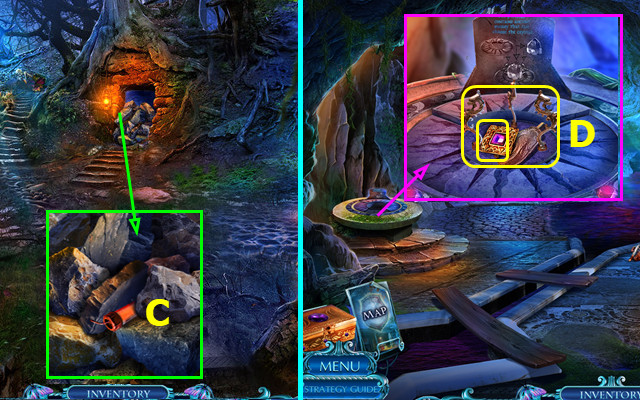
- Select (C).
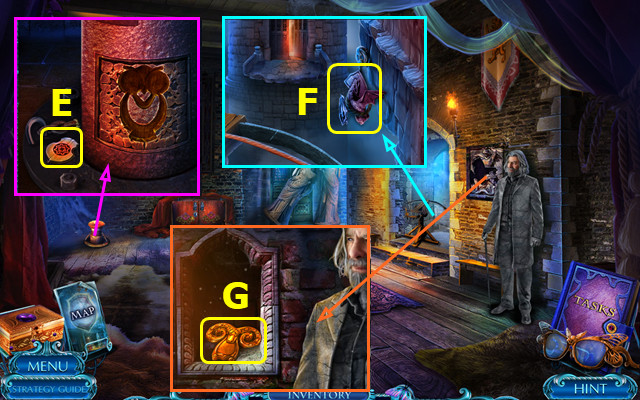
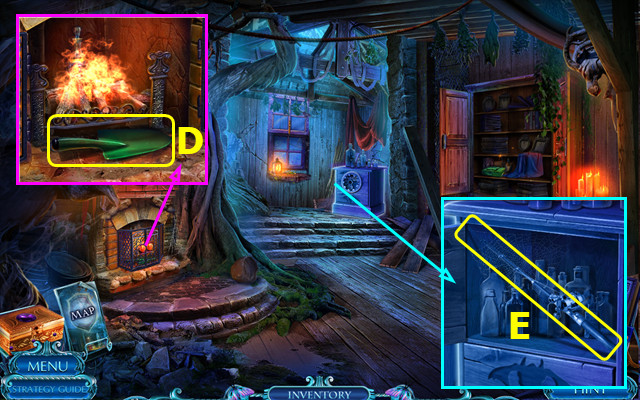
- Use HANDKERCHIEF; earn SHARP GLASS (D).
- Use LEVER and LEMON; take LEMON HALF and 1/2 CAR INLAY (E).
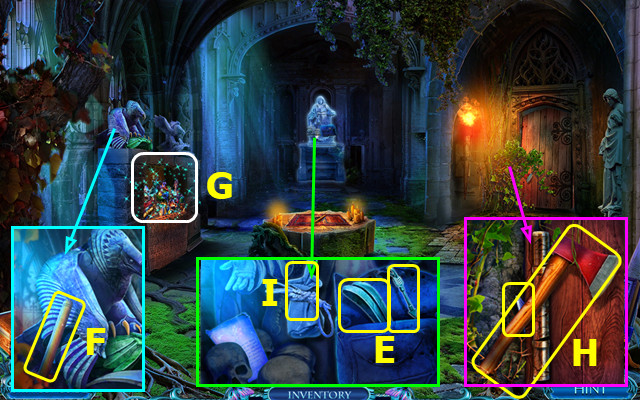
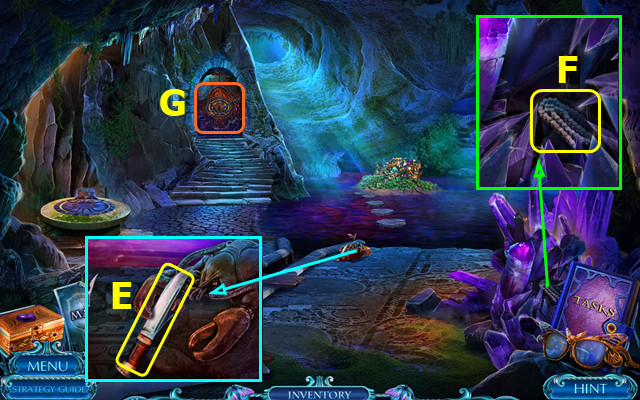
- Use SPECIAL GLASSES (F).
- Use PAPER CLIP; read note; take LIGHTER and GAUNTLET (G).
- Walk down 2x.
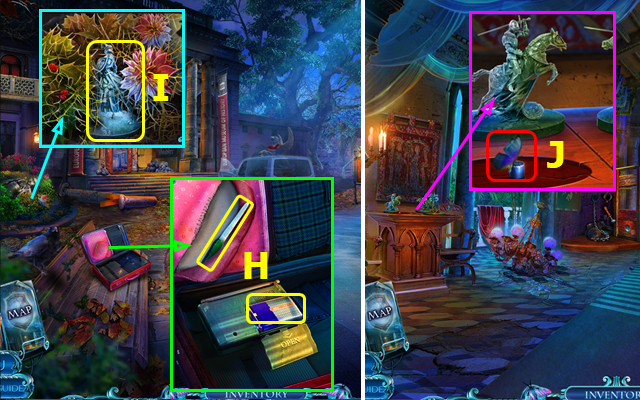
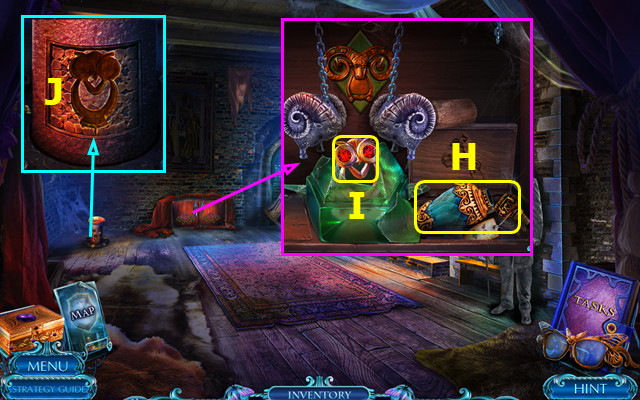
- Use SHARP GLASS; open compartment; take NAIL FILE and BATTERY (H).
- Use GAUNTLET; take KNIGHT FIGURINE (I).
- Go forward 2x.
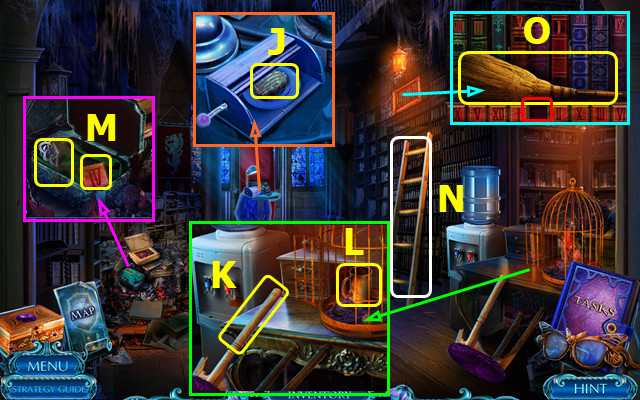
- Select butterfly; place KNIGHT FIGURINE (J).
- Play HOP; earn ACID.
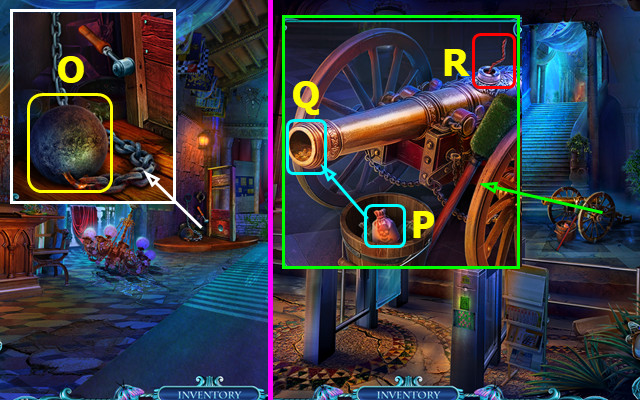
- Use ACID; take IRON BALL (O).
- Walk down.
- Move P-Q; place IRON BALL (Q); use LIGHTER (R).
- Go left.
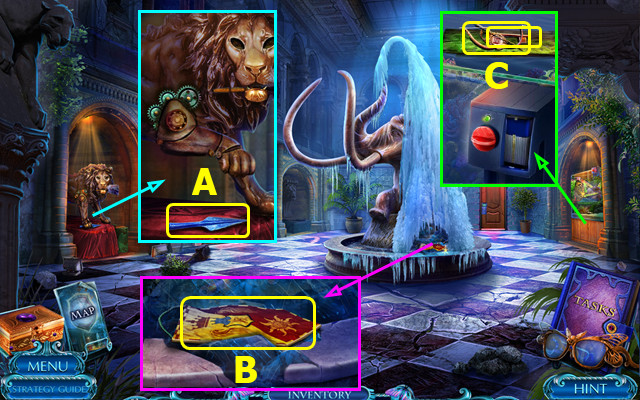
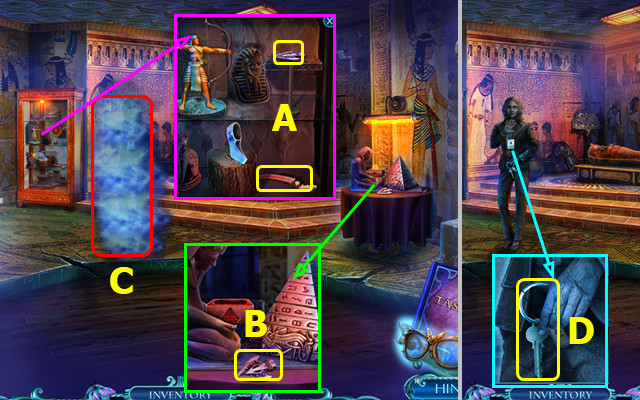
- Use LEMON HALF; take SPEARHEAD (A).
- Take FLAG (B).
- Use NAIL FILE; place BATTERY; take SMALL BOW and CABINET KEY (C).
- Walk down.
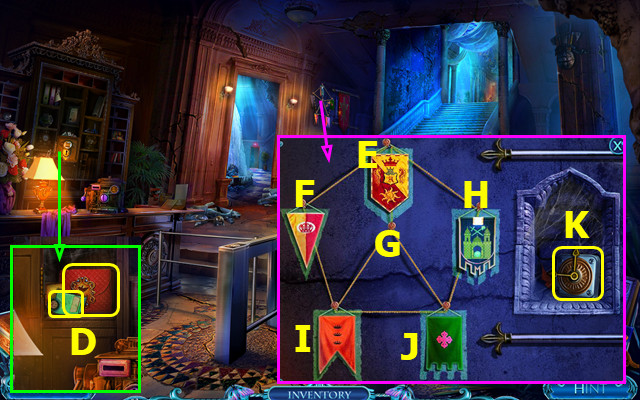
- Use CABINET KEY; take 2/2 CAR INLAY; read note and take BAG (D).
- Place FLAG; solution J-H-E-F-I-G.
- Take 1/2 CLOCK HANDS (K).
- Walk down.
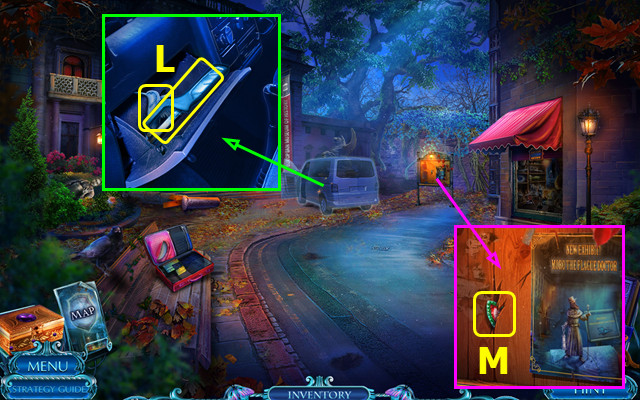
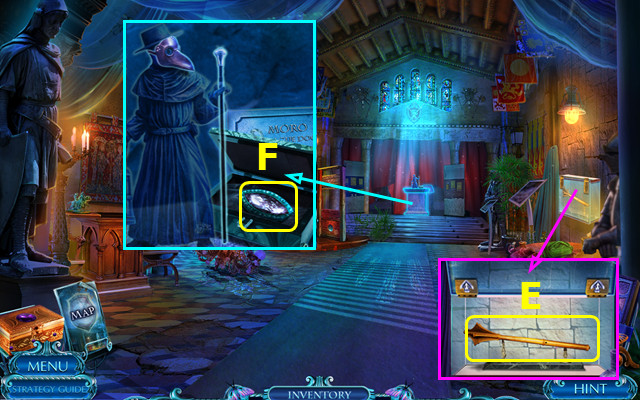
- Place 2 CAR INLAYS; take HACKSAW and BIRD INLAY (L).
- BIRD INLAY on BAG; take PLAGUE DOCTOR MASK and 2/2 CLOCK HANDS; read note.
- Use SPEARHEAD; earn 1/2 RUBY EYE (M).
- Go forward, left.
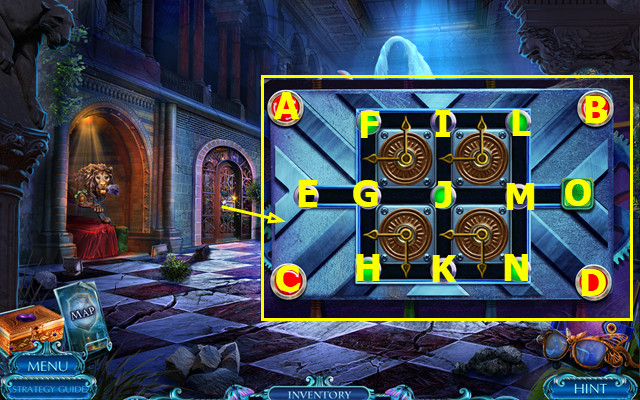
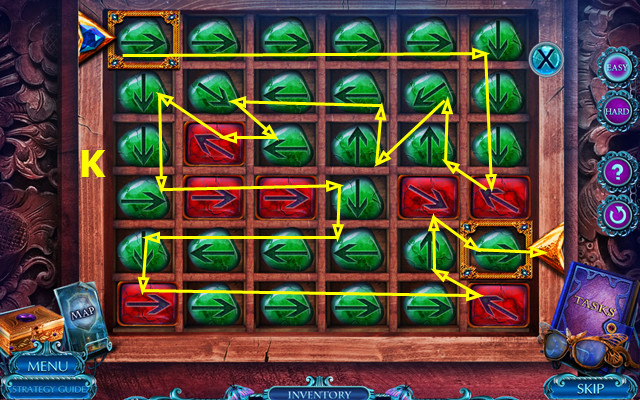
- Place CLOCK HANDS.
- Easy solution A-D-(E-G-F-G-J-M-N-M-O).
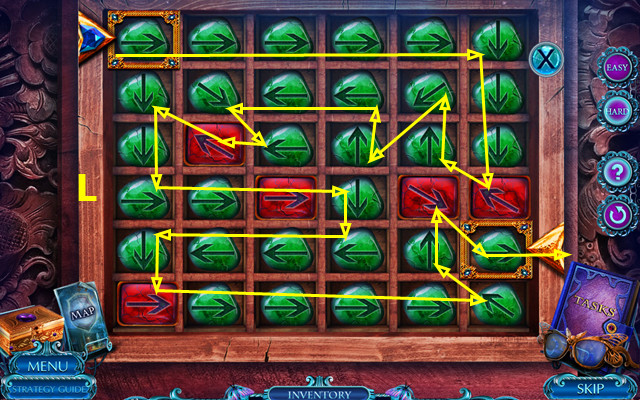
- Hard solution Cx3-Ax2-B-(E-G-H-G-F-I-L-I)-Ax2.
- C-(I-J-K)-Bx2-(K-J-K-J-M)-D-(M-N-M-O).
- Walk left.
- Place SMALL BOW; take 1/2 SPEAR INLAY and BROKEN PLIERS (A).
- Take 2/2 SPEAR INLAY (B).
- Use SPECIAL GLASSES (C).
- Use HACKSAW; earn OLIVIA'S OFFICE KEY (D).
- Walk down 2x; go forward.
- Place 2 SPEAR INLAYS; take MACE (E).
- Place PLAGUE DOCTOR MASK; take 2/2 RUBY EYE (F).
- Walk down, left.
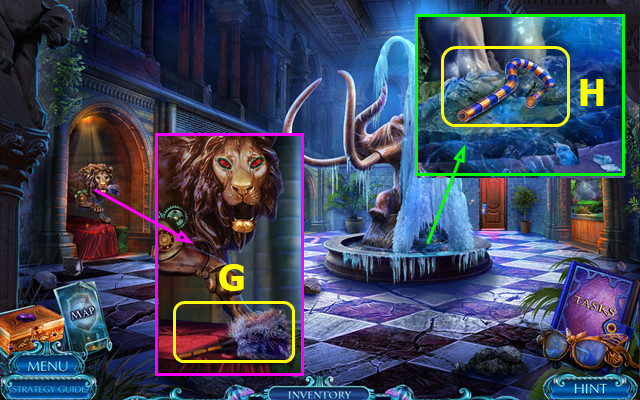
- Place 2 RUBY EYES; take DUSTER (G).
- Use MACE; take SCEPTER PART (H).
- Walk left.
- Use DUSTER; take KEY CARD (I).
- Place SCEPTER PART (J).
- Play HOP; earn GEMSTONE (K).
- Place GEMSTONE; take DAGGER (L).
- Walk down.
- Use KEY CARD (M).
- Easy solution (N).
- Hard solution (O).
- Go forward.
- Take PLIERS PART (P).
- PLIERS PART on BROKEN PLIERS; earn PLIERS.
- Select key; use PLIERS; take AXE HANDLE and MAGNET (Q).
- Use SPECIAL GLASSES (R).
- Use OLIVIA'S OFFICE KEY (S).
- Go right.
Chapter 2: Olivia's Office
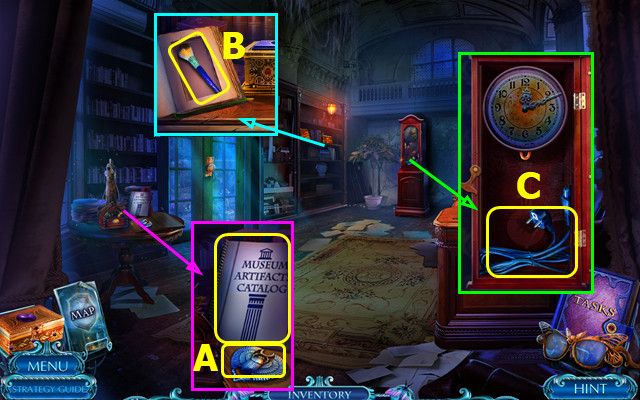
- Take MUSEUM CATALOG and SCARAB INLAY (A).
- Read MUSEUM CATALOG; take CONTACTS.
- Use DAGGER; take BRUSH (B).
- Use MAGNET; take POWER CORD (C).
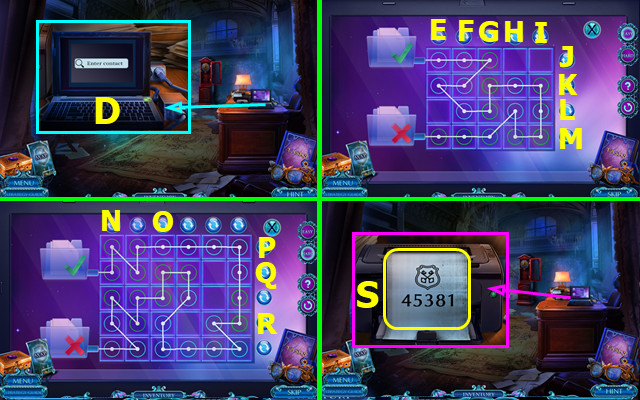
- Use POWER CORD and CONTACTS (D).
- Easy solution F-K-Ex2-L-Gx2-Jx2-H-Ix2-Mx2.
- Hard solution Nx2-P-Qx3-N-Px3-O-Rx3-Ox2.
- Take LOCK CODE (S).
- Walk down 2x; go left.
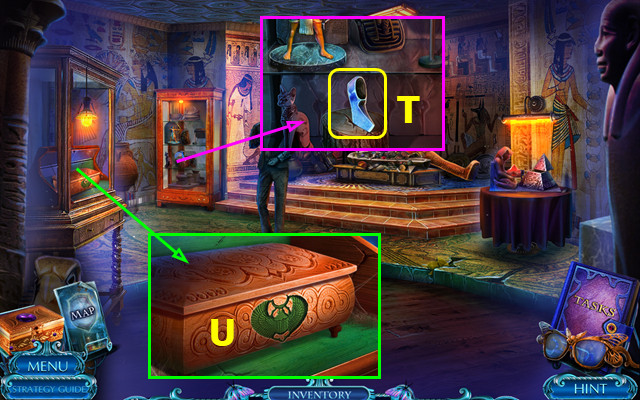
- Place AXE HANDLE; earn AXE (T).
- Place SCARAB INLAY (U).
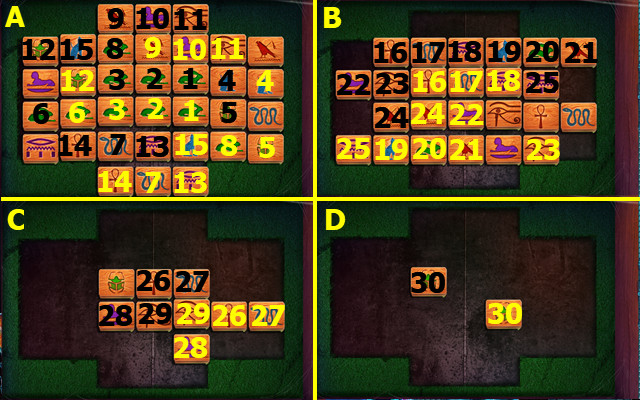
- Hard solution (A-D); select numbered pairs 1-30.
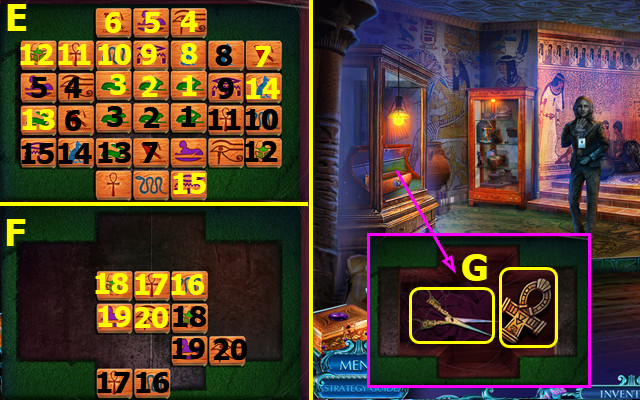
- Easy solution (E-F); select numbered pairs 1-20.
- Take SCISSORS and ANKH AMULET (G).
- Walk down, forward.
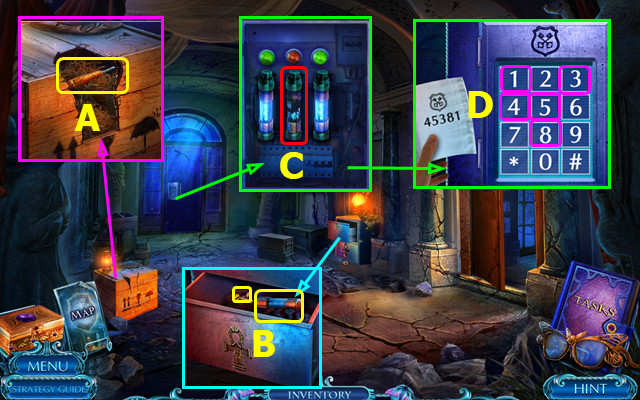
- Use AXE; take SCREWDRIVER (A).
- Place ANKH AMULET; take FUSE and SCREWS (B).
- Open panel, replace FUSE (C).
- Use LOCK CODE; select 4-5-3-8-1 (D).
- Go left.
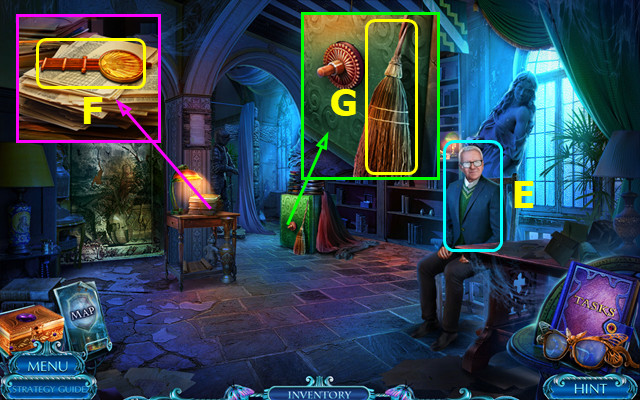
- Talk; earn HOOK (E).
- Use SCISSORS; take PENDULUM (F).
- Take BROOM (G).
- Walk down, right.
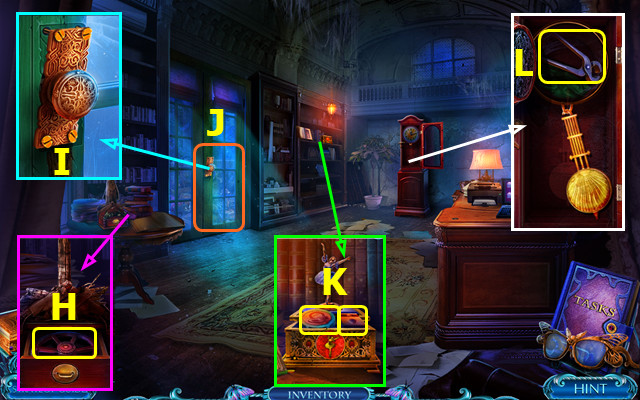
- Use HOOK; take HANDLE (H).
- Use SCREWS and SCREWDRIVER (I).
- Play HOP; earn BALLERINA FIGURINE (J).
- Place BALLERINA FIGURINE; take FACE POWDER and EJECT BUTTON (K).
- BRUSH on FACE POWDER; earn BRUSH WITH POWDER.
- Place PENDULUM; take NAIL PULLER (L).
- Walk down, left.
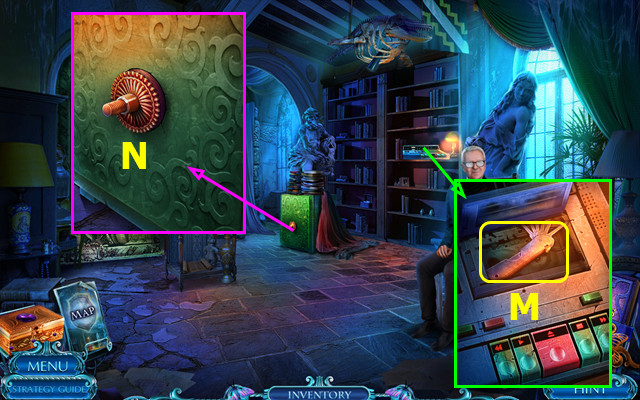
- Use EJECT BUTTON; take LOCKPICK (M).
- Place HANDLE (N).
- Use BRUSH WITH POWDER; easy solution A-E-G-K-J-D-F-C-B.
- Hard solution J-C-B-E-K-H-I.
- Select (L).
- Go left.

- Use BROOM; take JACK (O).
- Take LANCE; use LOCKPICK (P).
- Easy solution B-Cx2-B-Cx3-Ax2-B.
- Hard solution B-Cx2-B-Cx3-Ax2-Cx2-B.
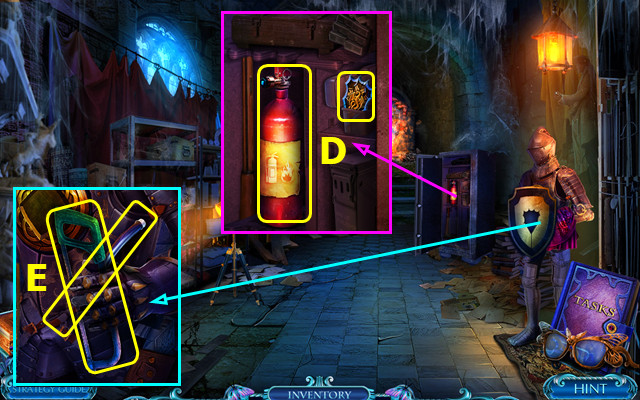
- Take BROKEN FIRE EXTINGUISHER and SHIELD PART (D).
- Place SHIELD PART; take HACKSAW and HOSE (E).
- Walk down.

- Use LANCE; earn NOZZLE (F).
- HOSE and NOZZLE on BROKEN FIRE EXTINGUISHER; earn FIRE EXTINGUISHER.
- Go left.
- Use FIRE EXTINGUISHER (G).
- Go forward.
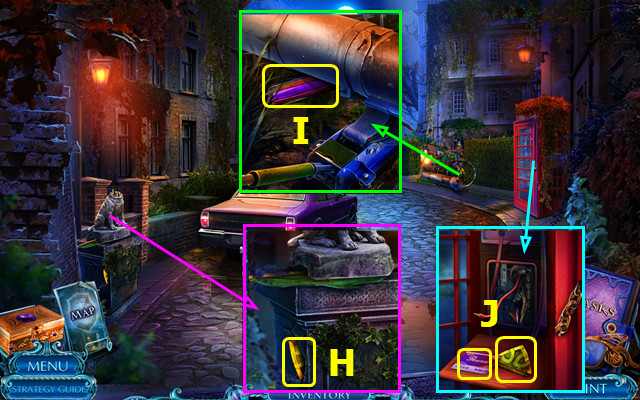
- Use NAIL PULLER; earn 1/2 BREASTPLATE PART (H).
- Use JACK; take CAR DOOR HANDLE (I).
- Use HACKSAW; take FLORENCE'S ADDRESS and 2/2 BREASTPLATE PART (J).
- Use CAR DOOR HANDLE; take 1/3 WIRE and CLOTH (K).
- Use CLOTH (L).
- Play HOP; earn STATUE'S HEAD (M).
- Place STATUE'S HEAD; take FLAG, ROD, and 2/3 WIRE (N).
- Walk down.
- Place 2 BREASTPLATE PARTS; take BOX EMBLEM (O).
- Place BOX EMBLEM; take LIGHTER and KNIFE (P).
- Go forward.
- Use KNIFE; take 3/3 WIRE (Q).
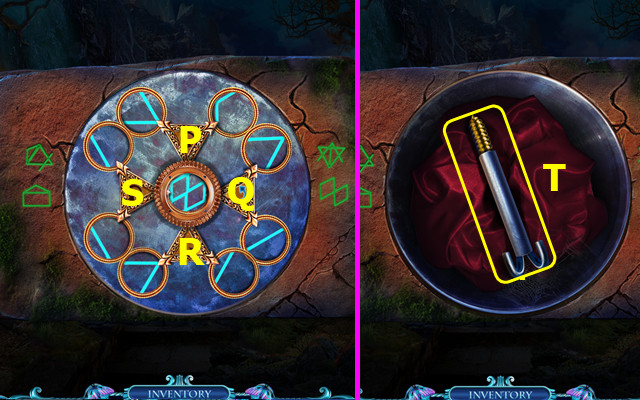
- Select (R).
- Place 3 WIRES; solution (S).
Chapter 3: Outside Florence's House
- Place FLAG; take TROWEL and WOODEN HANDLE (A).
- Use TROWEL; take TIN CAN (B).
- Use ROD; take HOUSE KEY (C).
- Use HOUSE KEY (D).
- Go right.
- Use WOODEN HANDLE; take FORK (E).
- Use LIGHTER; take BULL STATUETTE and read note (F).
- Take GLOBE DETAIL (G).
- Use BULL STATUETTE; take NAILS and PLIERS (H).
- Place GLOBE DETAIL; read note; take CAN OPENER (I).
- CAN OPENER on TIN CAN; earn TIN CAN LID.
- Walk down.
- Use PLIERS; earn CADUCEUS INLAY (J).
- Place CADUCEUS INLAY (K).
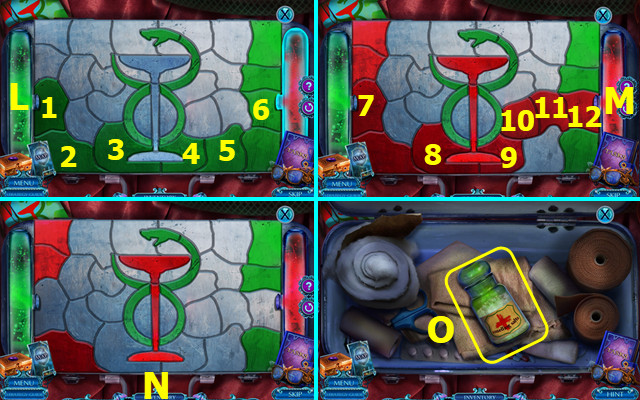
- Select green areas; press (L).
- Select (1-6).
- Select red areas; press (M).
- Select (7-12).
- Final solution (N).
- Take SMELLING SALTS (O).
- Use SMELLING SALTS; earn STUDY KEY (A).
- Go right.
- Use STUDY KEY (B).
- Go right.
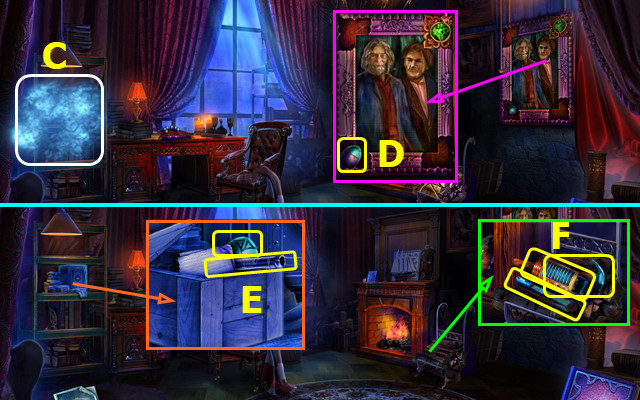
- Use SPECIAL GLASSES (C).
- Take 1/2 DECORATIVE EGGS (D).
- Use FORK; read note; take BLOWGUN and 2/2 DECORATIVE EGG (E).
- Use TIN CAN LID; take FILE, PUMP, and HAMMER (F).
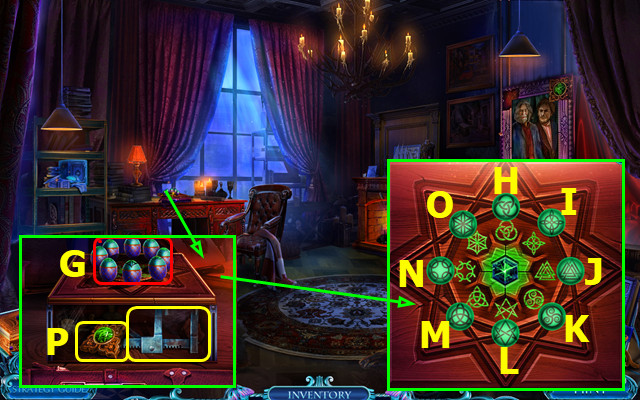
- Place 2 DECORATIVE EGGS (G).
- Easy solution J-N-K-I-M.
- Hard solution L-N-Lx2-K-J-I-L-K-J-L-K-L.
- Take 1/3 FRAME DECORATION and JACK (P).
- Walk down.
- Use JACK, NAILS, and HAMMER (Q).
- Go forward.
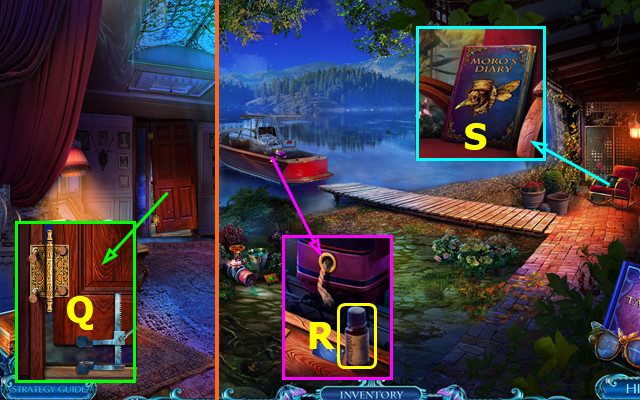
- Take VALERIAN EXTRACT (R).
- Use VALERIAN EXTRACT; open diary (S).
- Play HOP; earn WINDING KEY.
- Use FILE; take BUCKET OF WATER, HOSE, and 2/3 FRAME DECORATION (A).
- Use WINDING KEY; take 3/3 FRAME DECORATION and 1/4 GLOBE TOKENS (B).
- Walk down 2x.
- Place PUMP and HOSE (C).
- Solution E-D-E-F-E.
- Take SOLVENT and DART (G).
- DART in BLOWGUN; earn LOADED BLOWGUN.
- Go right.
- Use SOLVENT; take BRUSH and SHARPENER CRANK (H).
- Walk down.
- Use BRUSH; take OLD CLIPPERS (I).
- Use OLD CLIPPERS; take VALVE (J).
- Go right 2x.

- Use BUCKET OF WATER (K).
- Use (L-M); take 1st STETHOSCOPE PART and 2/4 GLOBE TOKEN.
- Place 3 FRAME DECORATIONS; read note; take 3/4 GLOBE TOKEN and 2nd STETHOSCOPE PART (N).
- Combine 2 STETHOSCOPE PARTS; earn STETHOSCOPE.
- Select (O).
- Place STETHOSCOPE.
- Easy solution B-D-C.
- Hard solution C-B-A-D.
- Read note; take TUBE AMULET (E).
- Place TUBE AMULET; take TELESCOPIC STICK and CHISEL (F).
- Walk down, left.
- Use LOADED BLOWGUN; earn 4/4 GLOBE TOKEN (G).
- Place VALVE; take BROKEN PENCIL and FLINT (H).
- Walk down.
- Use SHARPENER CRANK and BROKEN PENCIL; take SHARP PENCIL (I).
- Place 4 GLOBE TOKENS; take EMPTY COMPASS and 1/2 BOAT HANDLE AND MAP (J).
- SHARP PENCIL on EMPTY COMPASS; earn COMPASS.
- Go right.
- Use COMPASS; take 2/2 BOAT HANDLE AND MAP (K).
- Walk down, left.
- Use BOAT HANDLE AND A MAP (L).
- Use SPECIAL GLASSES (M).
- Use FLINT; take ACID (N).
- Take LADDER (O).
- Take LOCKPICK (P).
- Place LADDER (Q).
- Play HOP; earn PURPLE CRYSTAL (R).
- Place PURPLE CRYSTAL; take HORN (S).
- Use HORN; take GATES AMULET (T).
- Use CHISEL; take JUG (U).
- Select (V).
- Place GATES AMULET.
- Easy solution B-C-D-Ax2-C-Ax2-D-Ax2.
- Hard solution D-C-Ax2-C-B-C-B-C-B-C-Ax2-C-Ax2-D-Ax2.
- Go forward.
- Use ACID; take 1/2 CREST TOKEN (E).
- Use TELESCOPIC STICK; earn BAS-RELIEF PART (F).
- Place BAS-RELIEF PART; take ARIES SYMBOL (G).
- Use HAIRPIN; take EMPTY FLASK (H).
- Place ARIES SYMBOL; take OWL TOKEN (I).
- Place OWL TOKEN (J).
- Easy solution (K).
- Hard solution (L).
- Go upstairs.
Chapter 4: Library
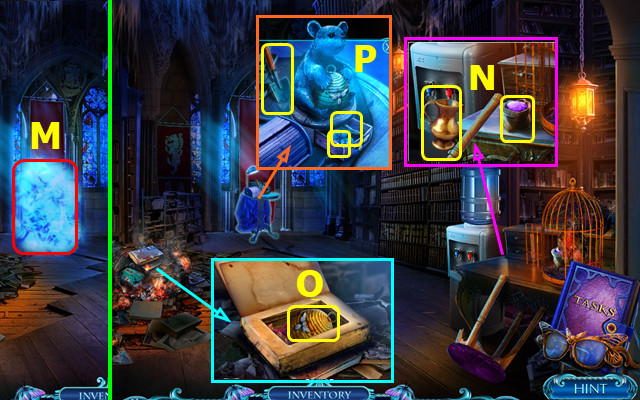
- Use SPECIAL GLASSES (M).
- Use JUG; earn JUG OF WATER; take POWDER (N).
- Use JUG OF WATER; open book; take BEAR STATUETTE PART (O).
- Place BEAR STATUETTE PART; take BERRIES, ARROWHEAD, and SCOOP (P).
- POWDER and BERRIES in EMPTY FLASK; earn DEPETRIFYING POTION.
- Walk down.
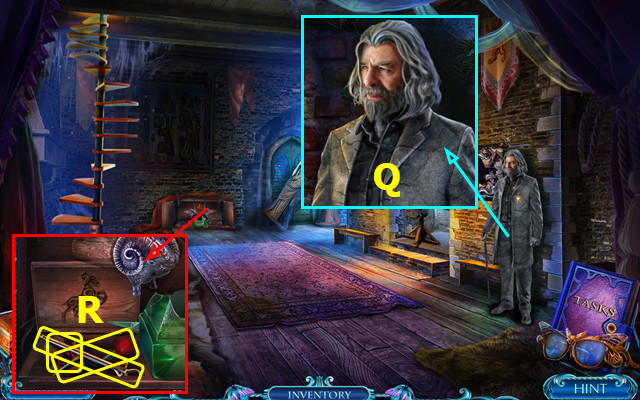
- Use DEPETRIFYING POTION; earn CACHE EMBLEM (Q).
- Place CACHE EMBLEM; take ARROW, BOX CRANK, and 2/2 CREST TOKENS (R).
- Walk down.
- Place 2 CREST TOKENS.
- Easy solution C-F-I-G-C-B-A-E-D-A-B-H-I-D-H-D.
- E-H-I-A-D-A-E-H-D-I-H-E.
- Hard solution A-D-I-G-C-B-A-H-D-E-H-A-I-D-H-E-A-H.
- B-C-F-I-G-C-I-G-F-C-I-B-A-H-D-I-H-E-A-H-D-E-H-I-H.

- Take TWEEZERS and SUGAR (J).
- Place SUGAR; take ROPE (K).
- Use SCOOP; take NIPPERS (L).
- ARROWHEAD and ROPE on ARROW; earn ARROW AND ROPE.
- Go forward.
- Place ARROW AND ROPE (A).
- Take 1/3 WOODEN RUNG (B).
- Take BROKEN LADDER (C).
- Use SPECIAL GLASSES (D).
- Read note; use NIPPERS; take ARROW AMULET and FEATHERS (E).
- Take 2/3 WOODEN RUNG; place FEATHERS (F).
- Play HOP; earn HERBICIDE (G).
- Use HERBICIDE; take AXE. Use TWEEZERS; earn GLASS SHARD (H).
- Use GLASS SHARD; take CHISEL (I).
- Go to Library.
- Use BOX CRANK; take MEAT (J).
- Use AXE; earn 3/3 WOODEN RUNG (K).
- Use MEAT; take MUG (L).
- 3 WOODEN RUNGS on BROKEN LADDER; earn LADDER.
- Place ARROW AMULET; take SHELF NUMBER and 1/2 LOCK AMULET (M).
- Place LADDER (N).
- Take BROOM; place SHELF NUMBER (O).
- Easy solution (J-A)-(I-A)-(G-C)-(B-H)-(G-E)-(F-D)-(F-B).
- Hard solution B-D-F-H-J-C-E-G-D-F-B-D-B.
- Read note; take 2/2 LOCK AMULET and ADHESIVE TAPE (K).
- Walk down, right.
- Place LOCK AMULET (L).
- Easy solution (A)-(Cx3)-(Ex3)-(Fx2)-(G)-(H)-(I)-(J)-(Kx2).
- (Lx3)-(M)-(Nx2)-(Ox2)-(Px2)-(Qx3)-(Rx2)-(S)-(Tx3)-(Ux2).
- Hard solution (Ux2)-(Ox2)-(Hx3)-(Tx3)-(Rx2)-(Qx1)-(Mx2).
- (Lx1)-(Gx3)-(Fx2)-(Ex1)-(Jx1)-(Kx1).
- Take HAMMER and MAP PART (V).
- Use CHISEL and HAMMER (W).
- Go right.
- Use BROOM; take HANG GLIDER HARNESS and BOX (A).
- Use MUG; take 1/2 GEMSTONE INLAY and CROSS EMBLEM (B).
- Place CROSS EMBLEM; take SAW, SLEDGEHAMMER, and 2/2 GEMSTONE INLAY (C).
- 2 GEMSTONE INLAYS on BOX; take DIARY AMULET.
- Place DIARY AMULET; take MAP HALF and STONE (D).
- MAP HALF and ADHESIVE TAPE on MAP PART; earn MARKED MAP.
- Walk down 2x.
- Use SLEDGEHAMMER (E).
- Go forward.
- Use SPECIAL GLASSES (F).
- Use SAW (G).
- Play HOP; earn SAUSAGE (H).
- Use STONE; take BOX KEY (I).
- Take PUZZLE PART and CORKSCREW (J).
- Use SAUSAGE; take KNIFE (K).
- Walk down; go right 2x.
- Use BOX KEY; take LEVER (L).
- Read note; use CORKSCREW; take RAG and ROPE (M).
- Go down 2x, go forward.
- Use RAG; earn WET RAG (N).
- Use LEVER; take GLOVE and TABLET (O).
- WET RAG on TABLET; add PUZZLE PART.
- Easy solution (Qx2-P)-(P-Rx2-Q)-(Sx2-Px2)-(Rx2-Px2-Sx2).
- Hard solution (R-S-Px2-Q)-(S-R)-(S)-(Px2-R).
- Take HANG GLIDER DETAIL (T).
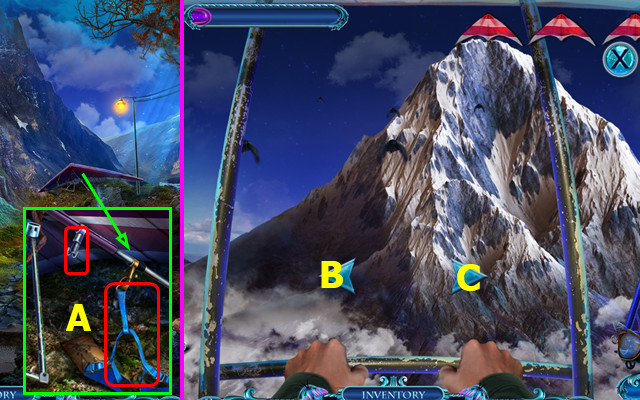
- Place HAND GLIDER HARNESS and HANG GLIDER DETAIL (A).
- Use arrows (B-C) to avoid birds.
Chapter 5: Mysterious Island
- Talk (D).
- Use KNIFE; take UMBRELLA and GRAPPLING HOOK (E).
- ROPE on GRAPPLING HOOK; earn HOOK AND ROPE.
- Use UMBRELLA; take BIG LEAF and TONGS (F).
- Go forward.
- Take FERTILIZER; use glove to take SAWFISH (G).
- Take MEDKIT KEY; use TONGS to take LATCH (H).
- Use HOOK AND ROPE; take 1/2 TABLE MECHANISM and MEDKIT (I).
- MEDKIT KEY on MEDKIT; take AMMONIA.
- Walk down.
- Use AMMONIA; earn FISH EMBLEM (J).
- Use FERTILIZER and BIG LEAF; select 5 berries (blue); take BERRIES (K).
- Place FISH EMBLEM (L).
- Play HOP; earn WHEEL (M).
- Place WHEEL (N).
- Walk left.
- Take PLIERS (O).
- Use SPECIAL GLASSES (P).
- Use SAWFISH; read note; take 1/2 CHEST INLAY (Q).
- Use LATCH; take 2/2 CHEST INLAY and LASSO (R).
- Walk down, forward.
- Give BERRIES, take RAG and BOARDS (A).
- Place CHEST INLAY; take GUN SHELLS (B).
- Place BOARDS; take 2/2 TABLE MECHANISM (C).
- Walk down, left.
- Use RAG; take TROWEL (D).
- Use TABLE MECHANISM; take FISHING ROD (E).
- Walk down, forward.
- Use FISHING ROD (F). Open bag; take SCRAPER (G).
- Use PLIERS and SCRAPER; take POKER and MAGNET (H).
- Walk down, left.
- Use POKER (I).
- Easy solution (J).
- Hard solution (K).
- Take DISSIPATING POTION.
- Walk down.
- Use DISSIPATING POTION (L).
- This mini-game is randomly generated (M).
- Go right.
- Use TROWEL; take DYNAMITE STICK and AWL (N).
- AWL on GUN SHELLS; earn GUNPOWDER.
- Take BOARD; use MAGNET; earn 1/2 CACHE INLAY (O).
- Use LASSO; take EMPTY JAR and 2/2 CACHE INLAY (P).
- Place BOARD (P).
- Play HOP; earn BACKPACK LOCK (Q).
- Place BACKPACK LOCK; take ROPE SOLUTION and FILE (R).
- Use EMPTY JAR; take STONE CIRCLE (S).
- Walk down, forward.
- Place ROPE SOLUTION; easy solution (T).
- Hard solution (U).
- Take LOADED SLINGSHOT and FLINT (V).
- Walk down, left.
- Place CACHE INLAY; take METAL ORNAMENT and WICK (A).
- Place METAL ORNAMENT; take HOOK and SCREWTOP (B).
- GUNPOWDER, SCREWTOP, and WICK on DYNAMITE STICK; earn DYNAMITE.
- Walk down, right.
- Use DYNAMITE and FLINT (C).
- Go forward.
- Place STONE CIRCLE; take AMETHYST AMULET and CLAW (D).
- Place CLAW; take DAGGER (E).
- Use HOOK; earn CHAIN (F).
- Select (G).
- Place AMETHYST AMULET.
- Easy solution Lx2-Nx3-I-Mx2-I-Mx2-J-Hx2-P.
- Hard solution Nx3-Mx2-Ix2-L-Kx2-L-Kx2-L-Hx2-L-Ox2-K-Mx2-J-K-Jx2-P.
- Go forward.
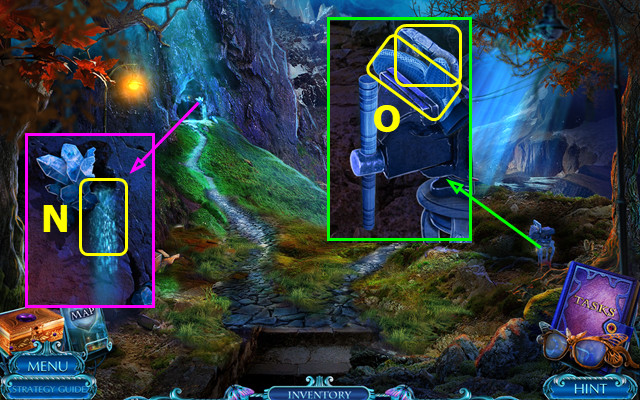
- Use FILE; take BROKEN RAKE (A).
- Use DAGGER; take CANE HANDLE and AMULET MOLD (B).
- Place CHAIN; take BOLT (C).
- Use LOADED SLINGSHOT; take 1/2 RITUAL RUNE (D).
- BOLT on BROKEN RAKE; earn RAKE.
- Walk down 2x.
- Use RAKE; take TUBE and 2/2 RITUAL RUNE (E).
- Go forward 2x.
- Place RITUAL RUNE; take RITUAL GOBLET (F).
- Use TUBE; take BOULDER and BRANCH (G).
- Use BRANCH; take BROKEN CANE and read note (H).
- BROKEN CANE on CANE HANDLE; earn CANE.
- Use CANE; take MAGICAL GEYSER WATER (I).
- Use AMULET MOLD and MAGICAL GEYSER WATER; take AMULET (J).
- Walk down.
- Place BOULDER (K).
- Play HOP; earn PICKAXE (L).
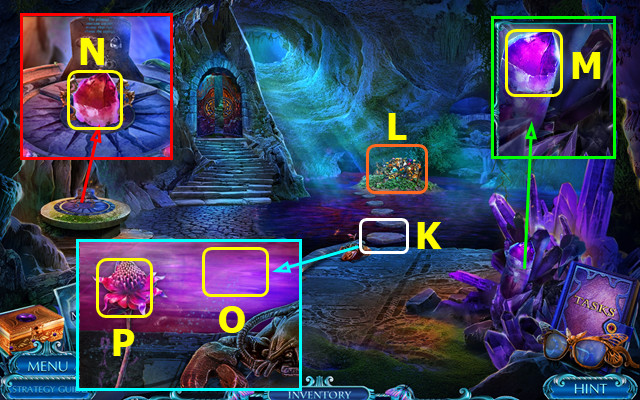
- Use PICKAXE; earn CRYSTAL (M).
- Place CRYSTAL; take FUELED CRYSTAL (N).
- Use RITUAL GOBLET; earn WATER (O).
- Use WATER; take FLOWER (P).
- FUELED CRYSTAL and FLOWER in AMULET; earn CRYSTAL AMULET.
- Go forward.
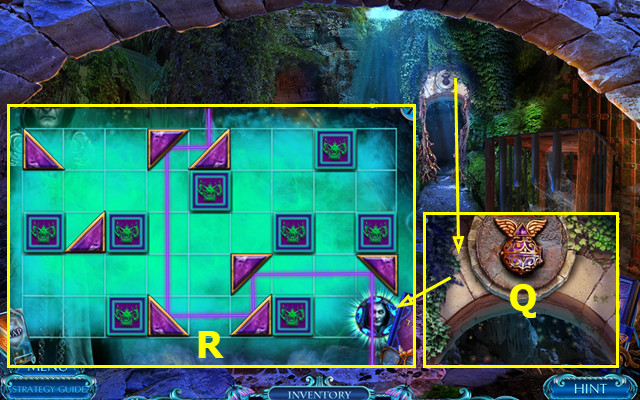
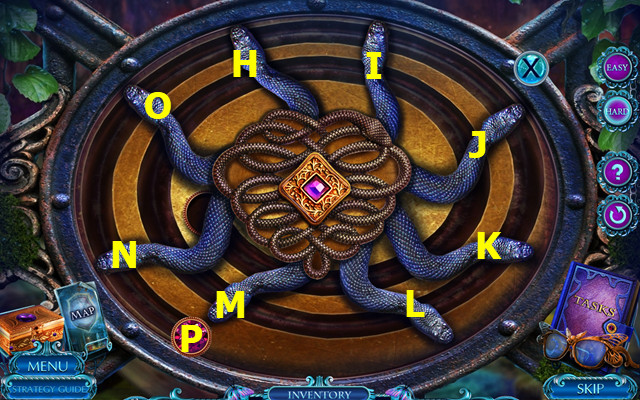
- Place CRYSTAL AMULET (Q).
- Solution (R).
- Congratulations! You have completed Mystery Tales: Dangerous Desires!
Created at: 2017-11-12