

Walkthrough Menu
- General Tips
- Chapter 1: Hallstat
- Chapter 2: Freya's House
- Chapter 3: Across the Bridge
- Chapter 4: The Mayor
- Chapter 5: The Criminal's House
- Chapter 6: The Ritual
General Tips
- This is the official guide for Mystery Tales: Her Own Eyes.
- This guide will not show when you have to zoom into a location; the screenshots will show each zoom scene.
- Hidden-object puzzles are referred to as HOPs. This guide will not show screenshots of the HOPs, however, it will mention when an HOP is available and the inventory item you'll collect from it.
- Use the Map to fast travel to a location.
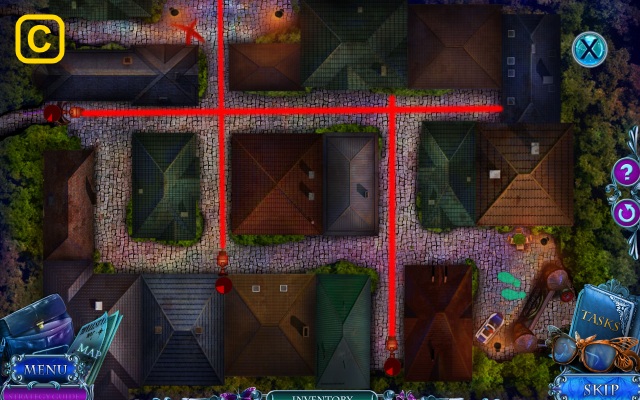
Chapter 1: Hallstat

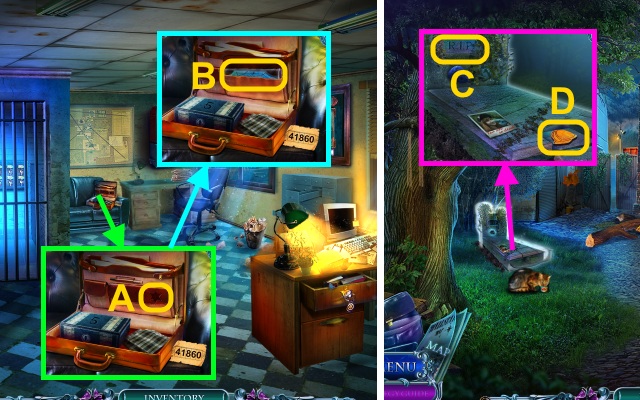
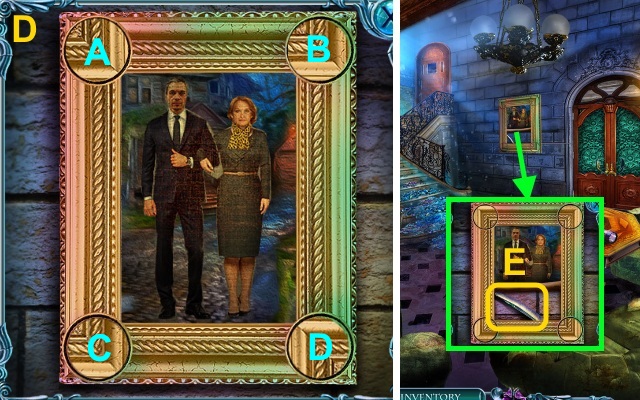
- Read the note (A); open the gift.
- Play the HOP (B); receive the POCKETKNIFE.
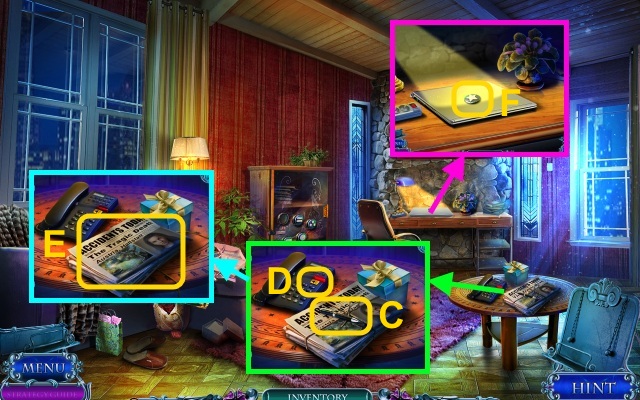
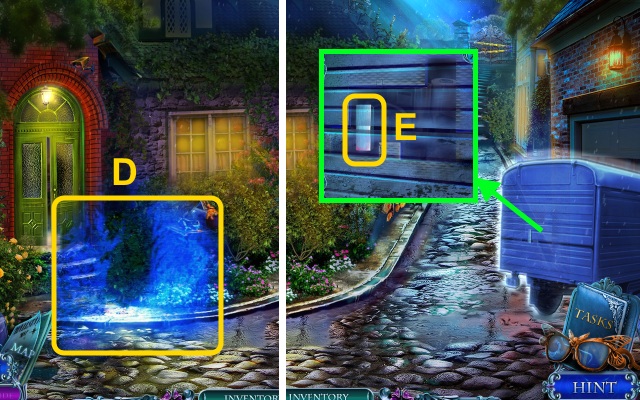
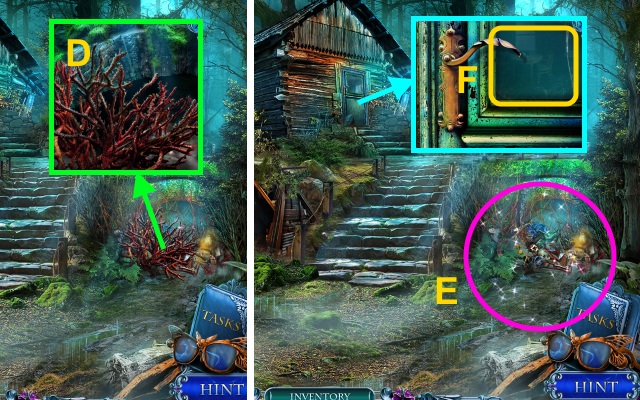
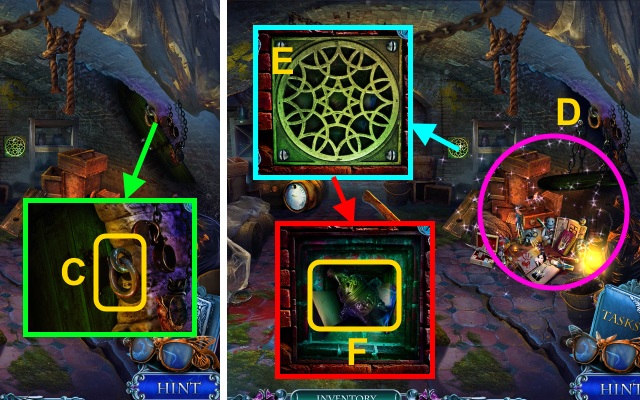
- Take the PEN (C); press the button (D).
- Use the POCKETKNIFE; read the newspaper (E).
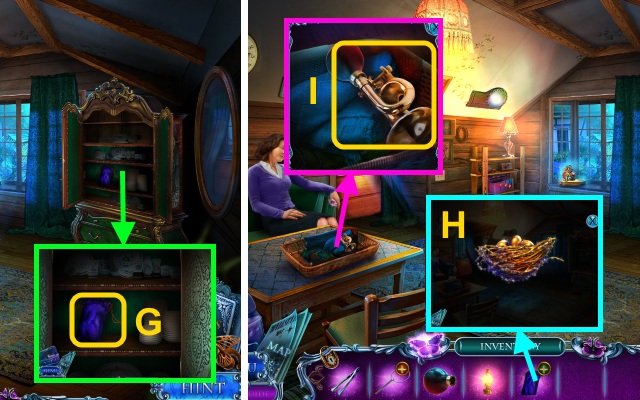
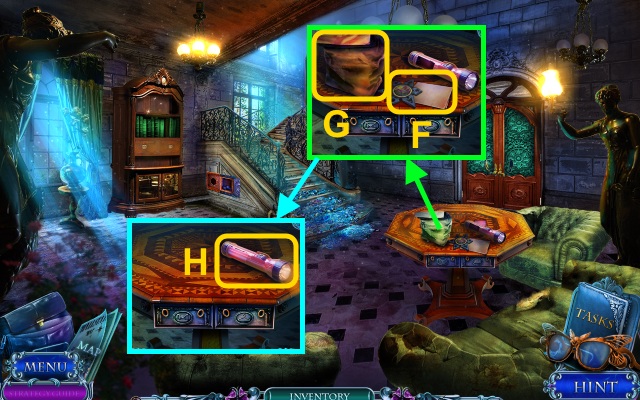
- Take the STAR TOKEN (F).
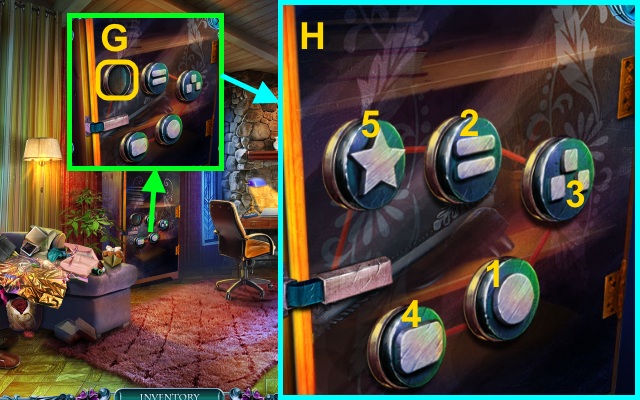
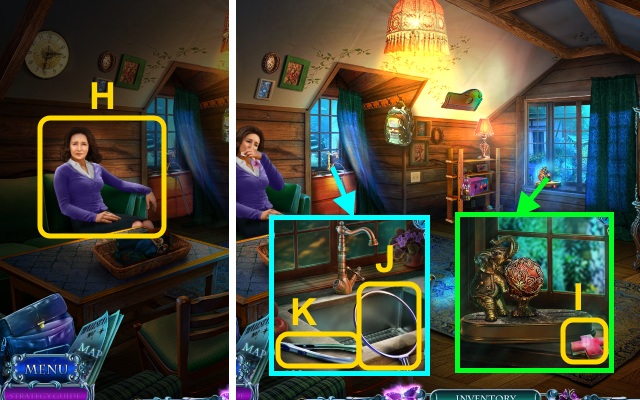
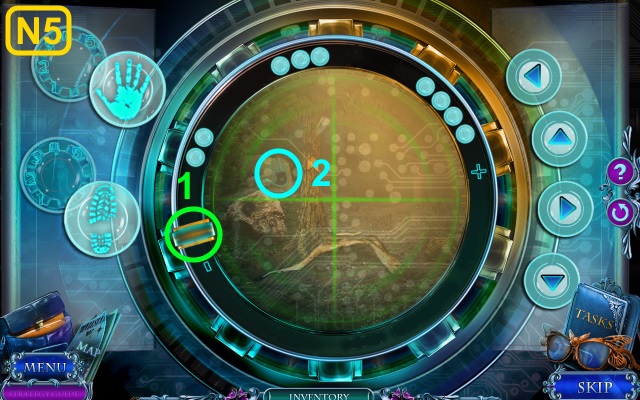
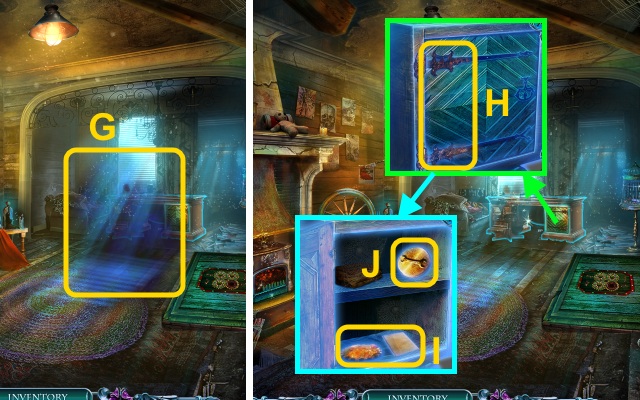
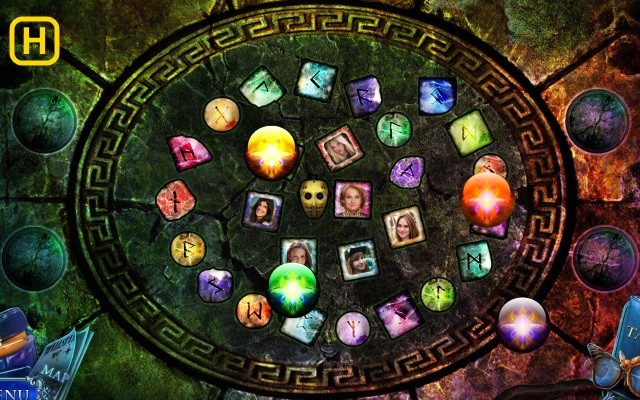
- Place the STAR TOKEN for a mini-game (G).
- Solution (H).
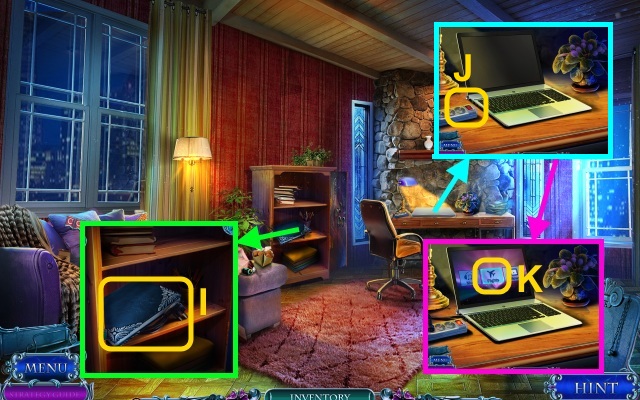
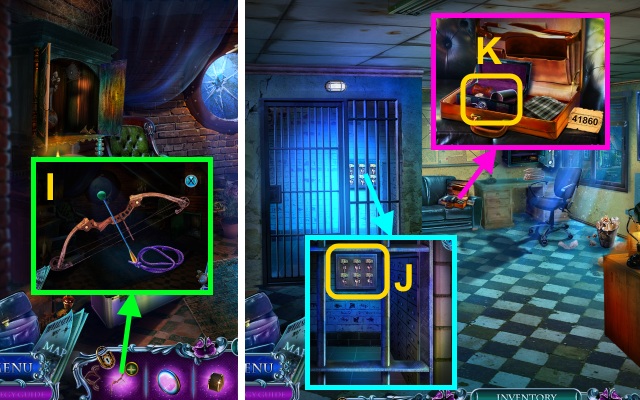
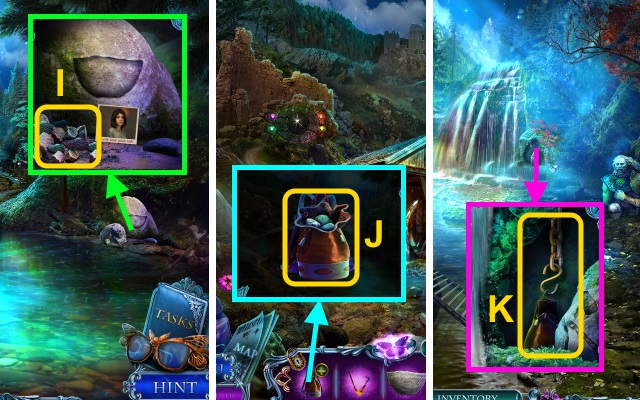
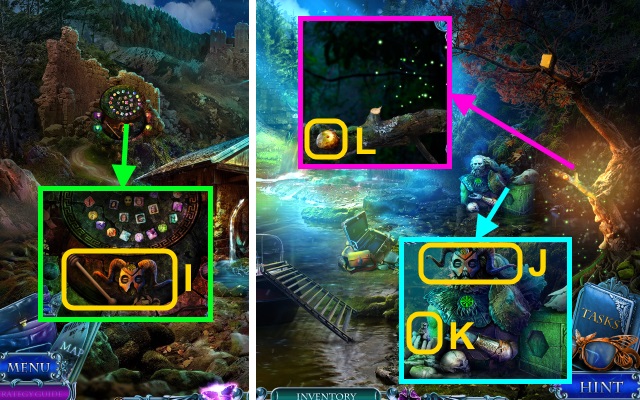
- Take the Notebook and LAPTOP CORD (I).
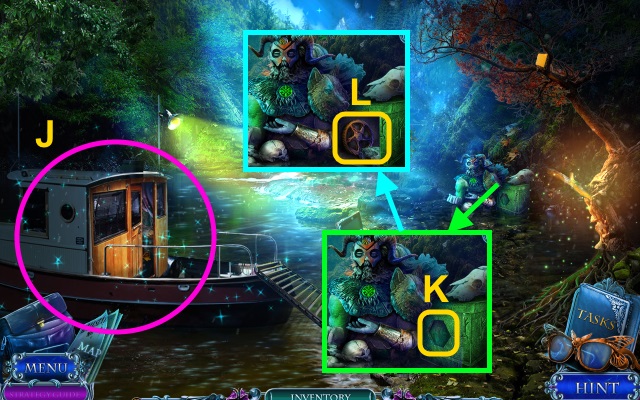
- Open the laptop; use the LAPTOP CORD (J).
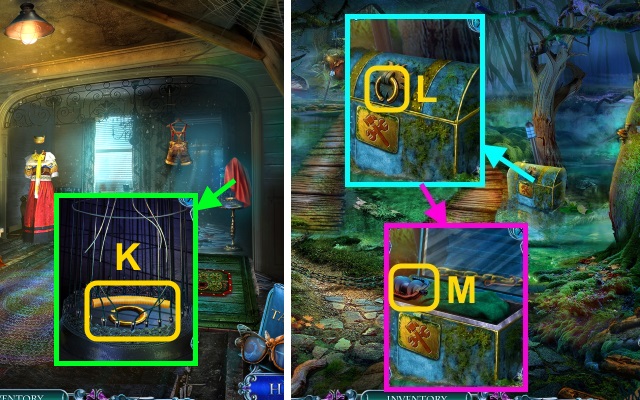
- Press the button for a mini-game (K).

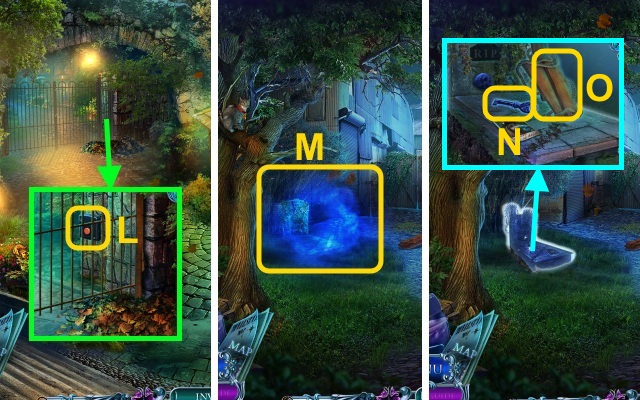
- Solution (L).
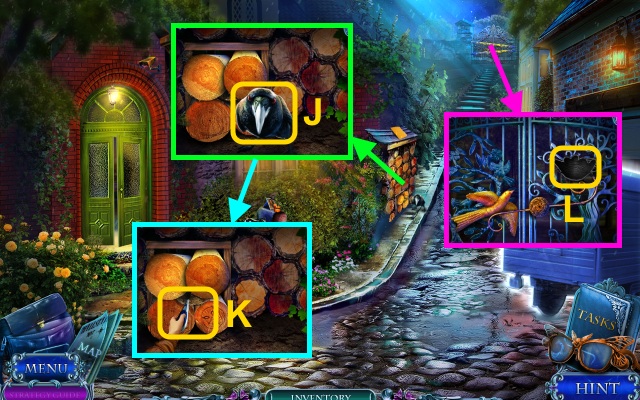
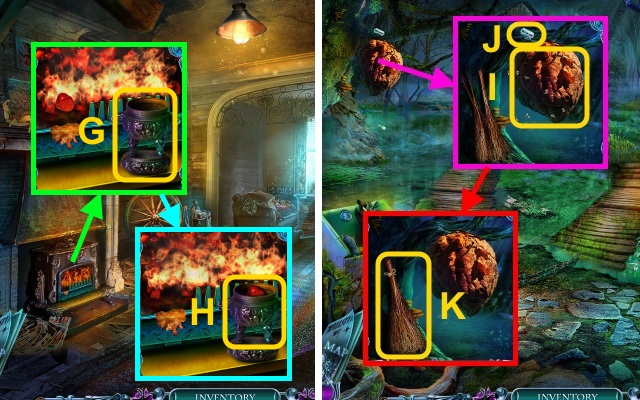
- Press the button (M).
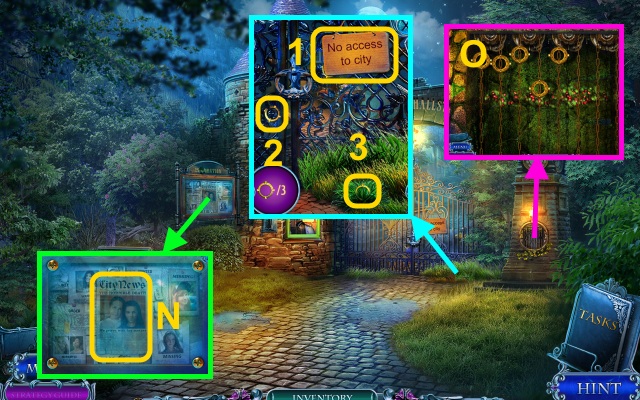
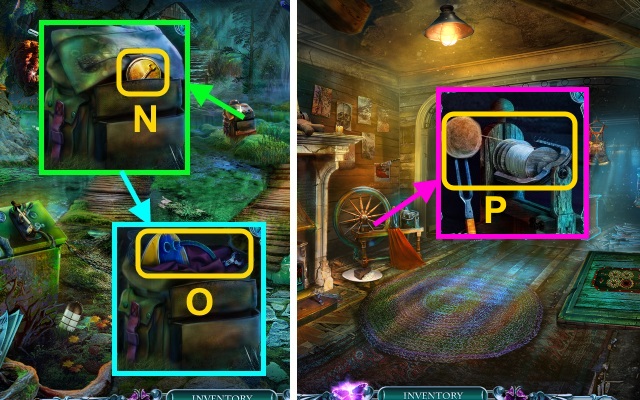
- Use the POCKETKNIFE; take the HALLSTATT NEWSPAPER (N).
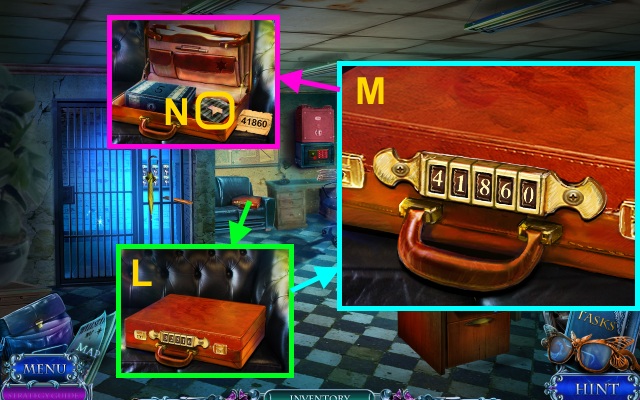
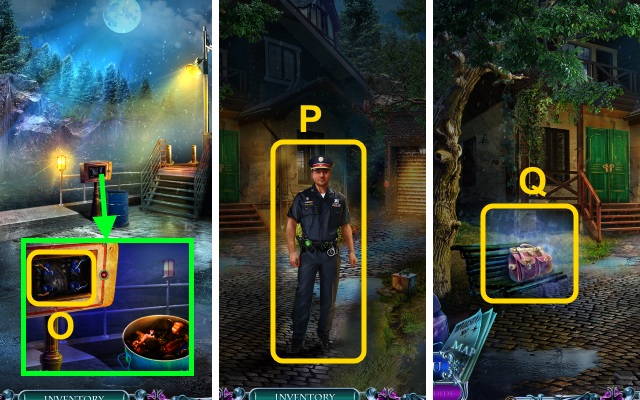
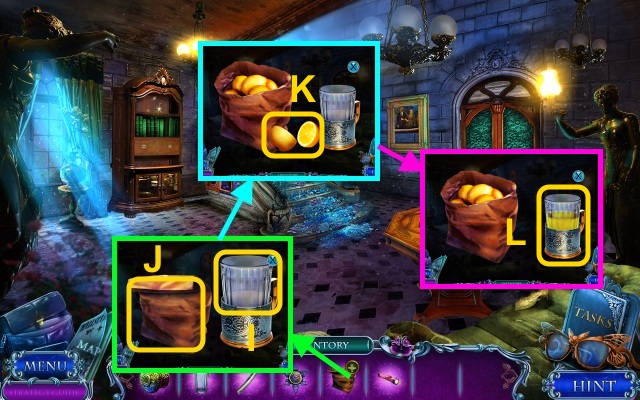
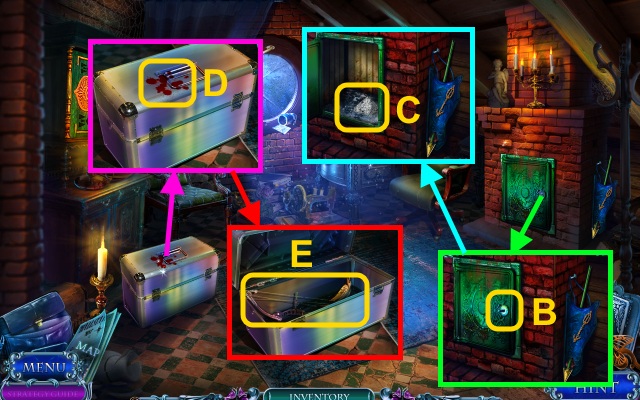
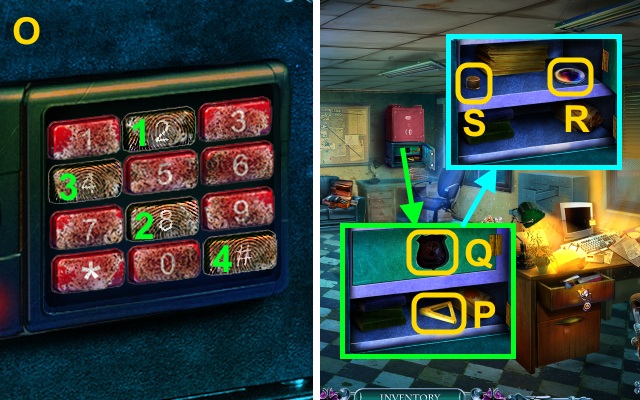
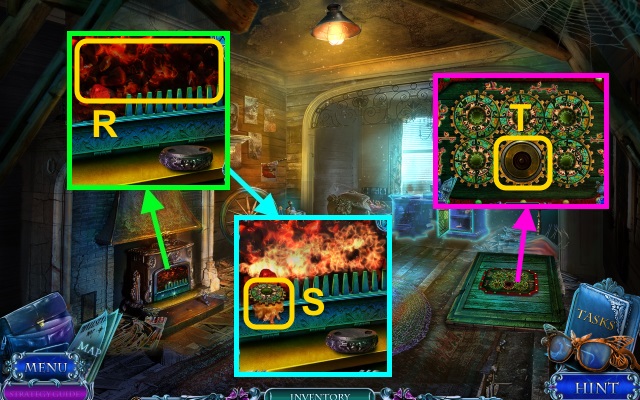
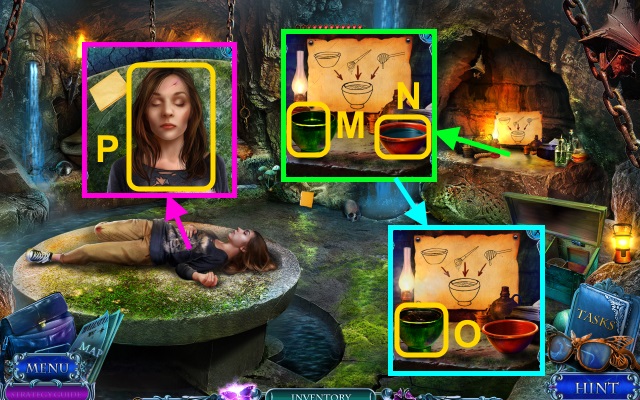
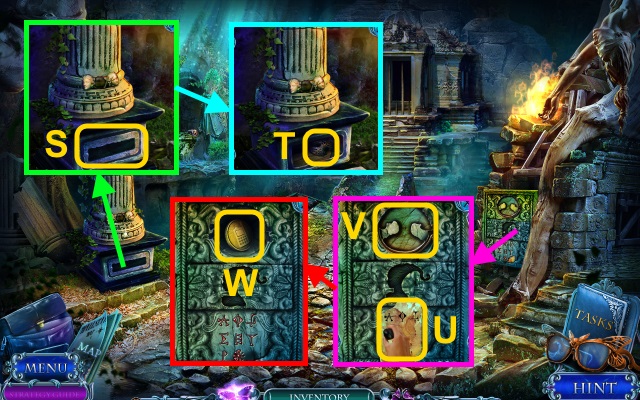
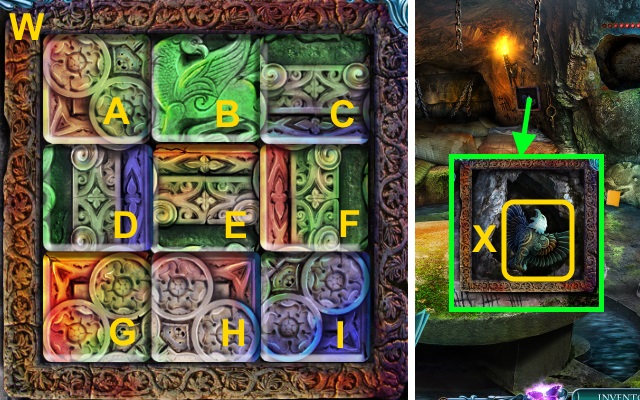
- Move the grass and sign; collect the BRASS LINKS (1-3).
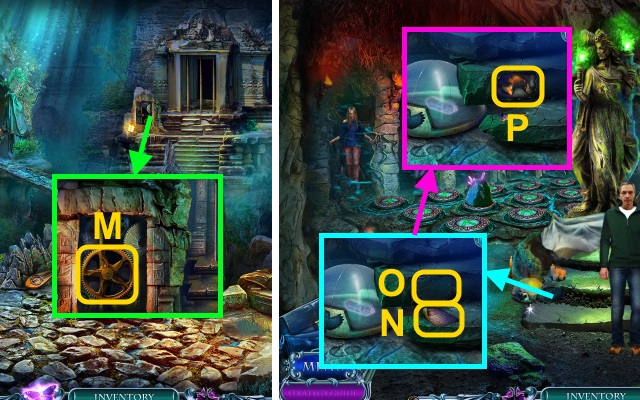
- Place the BRASS LINKS for a mini-game (O).
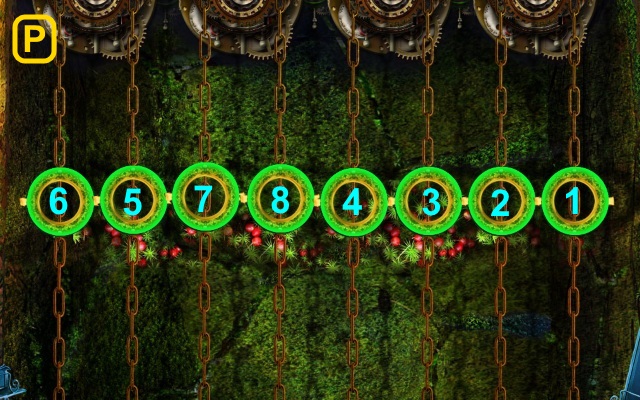
- Solution (P).
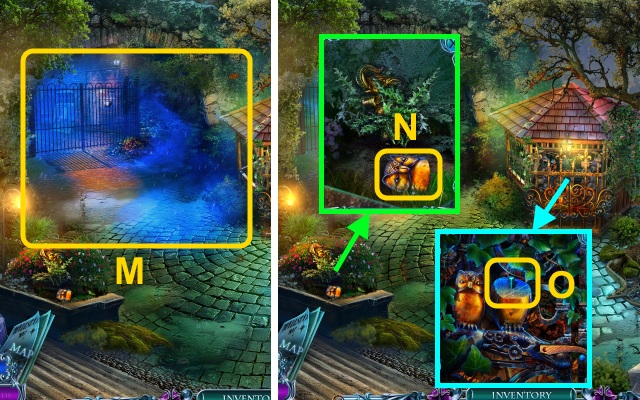
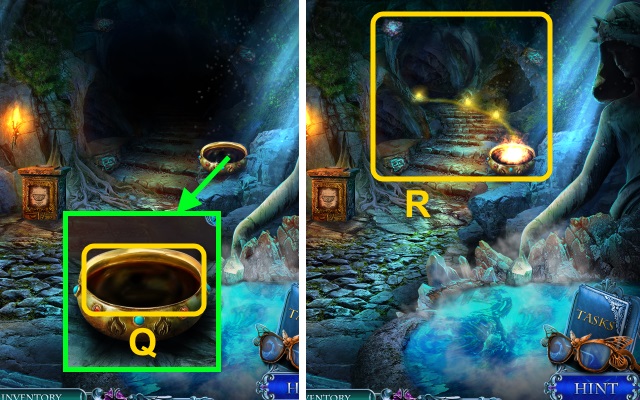
- Receive the BELL CHAIN.
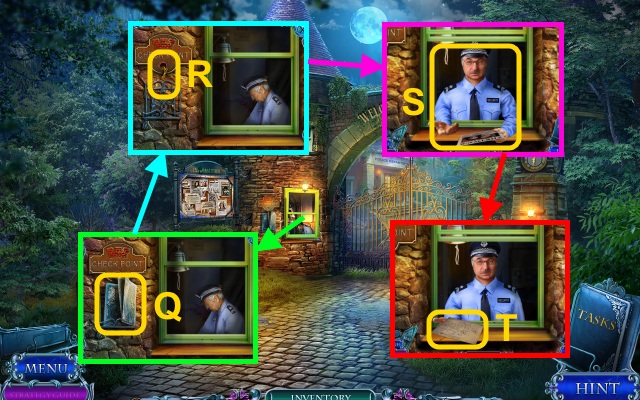
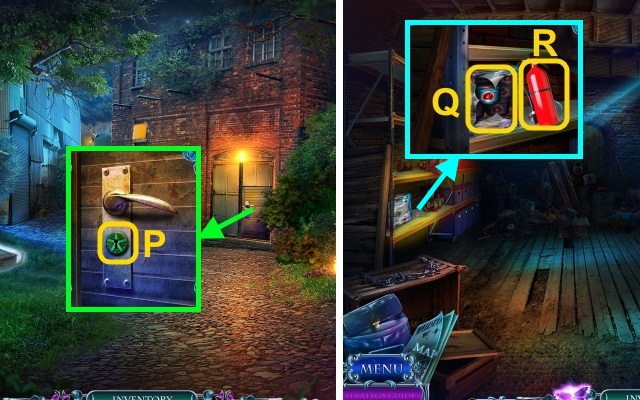
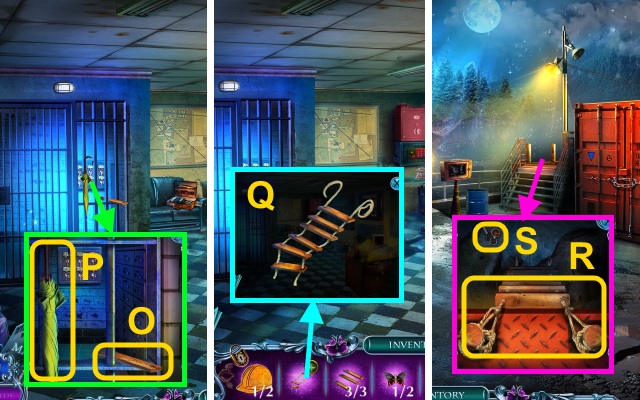
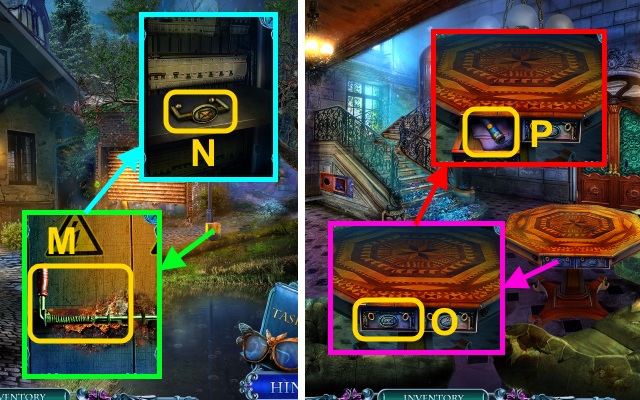
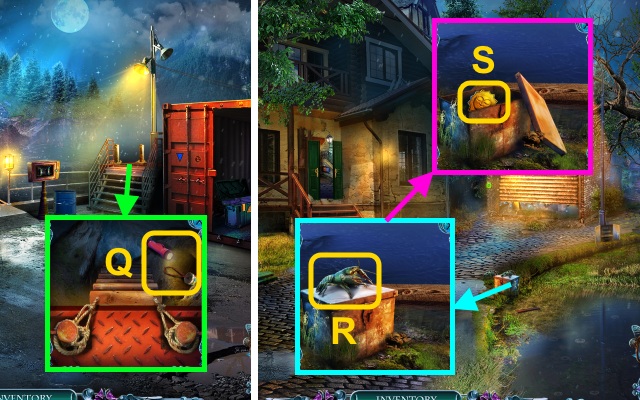
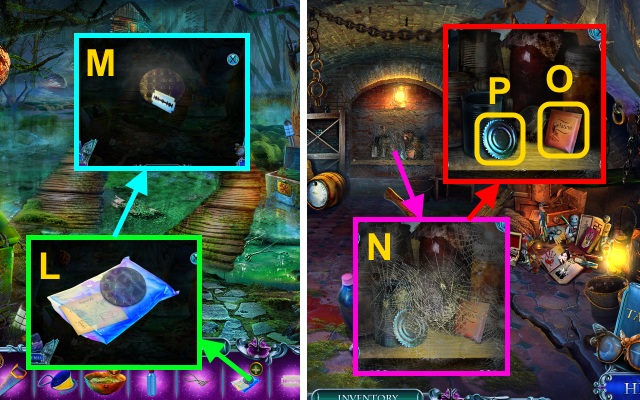
- Take the Map (Q); use the BELL CHAIN (R).
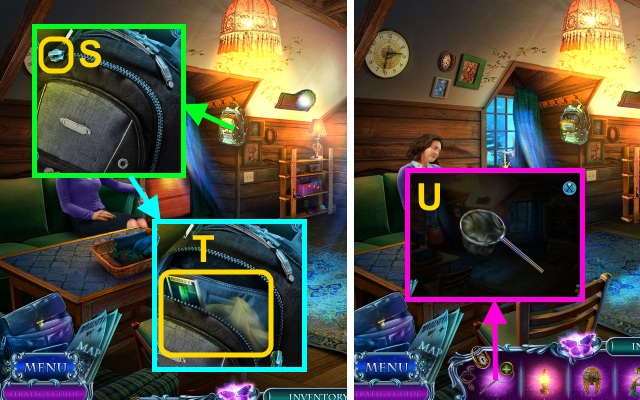
- Give the HALLSTATT NEWSPAPER and PEN (S).
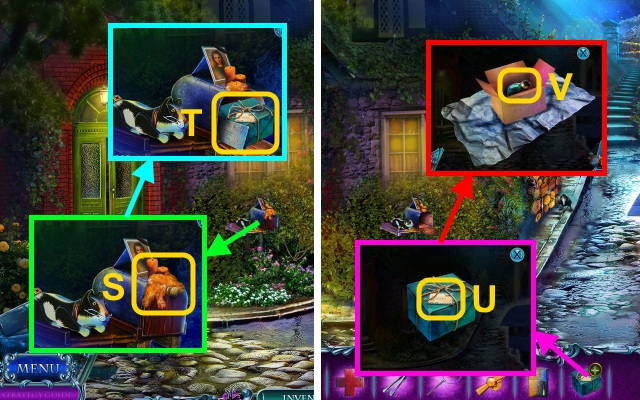
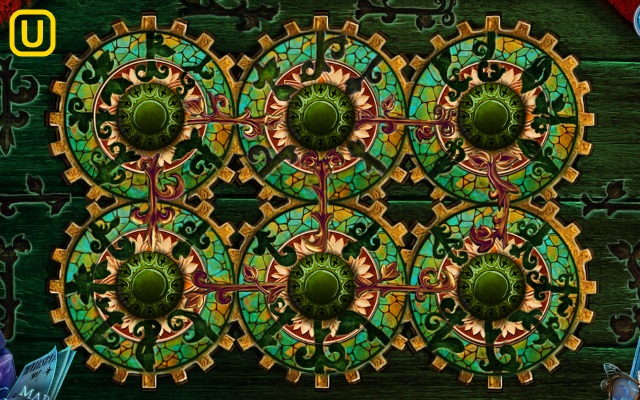
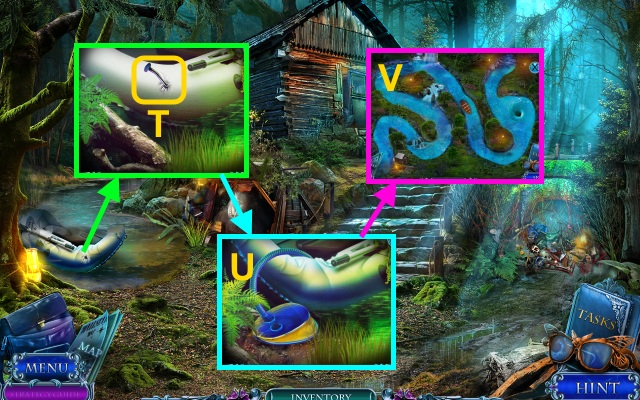
- Take JOHANN'S MAP (T).
- Walk forward.
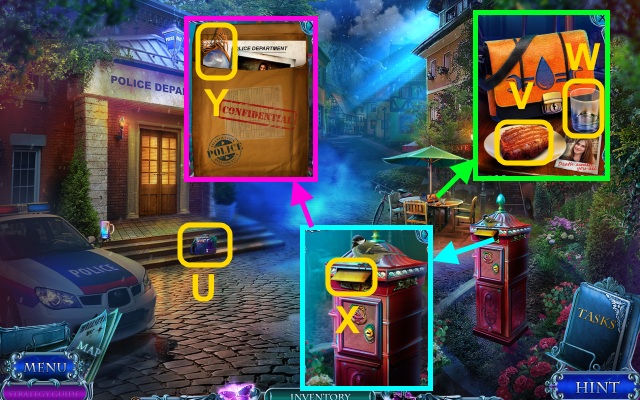
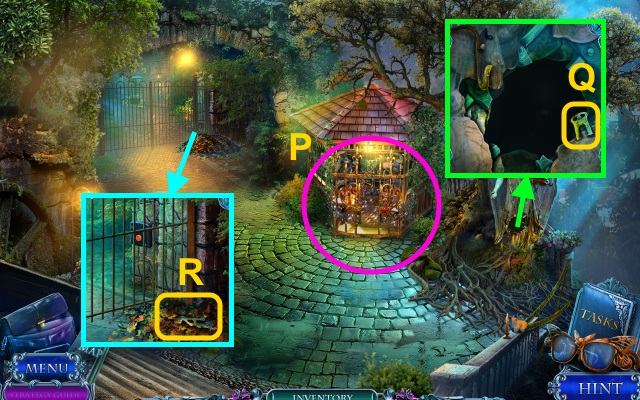
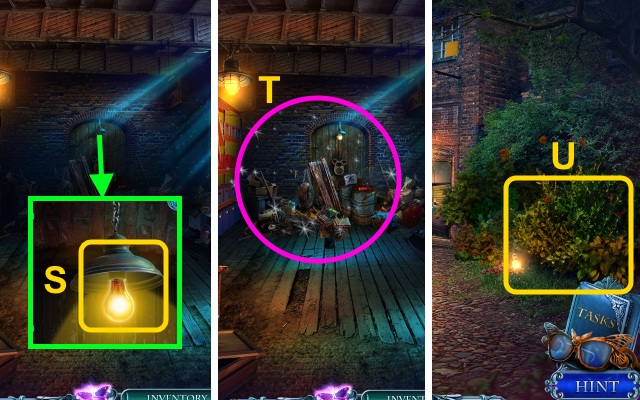
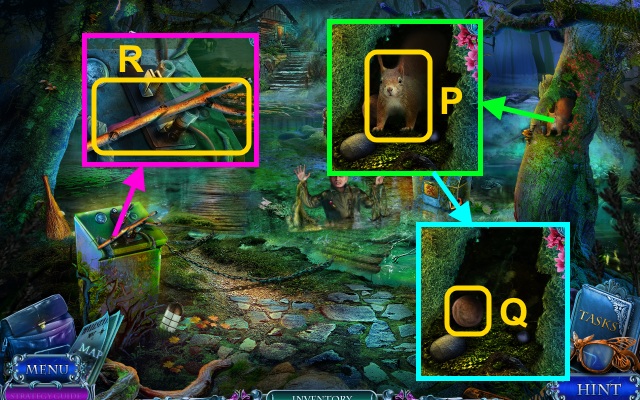
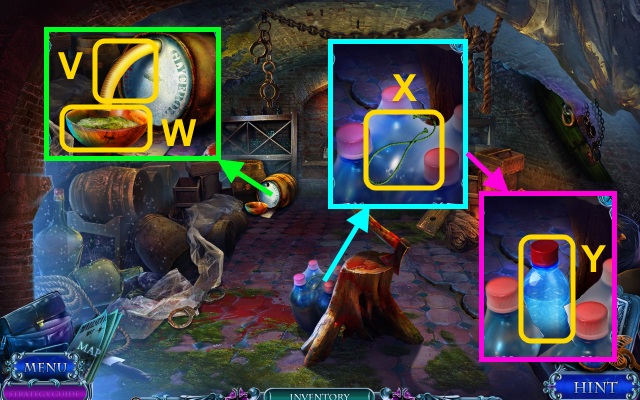
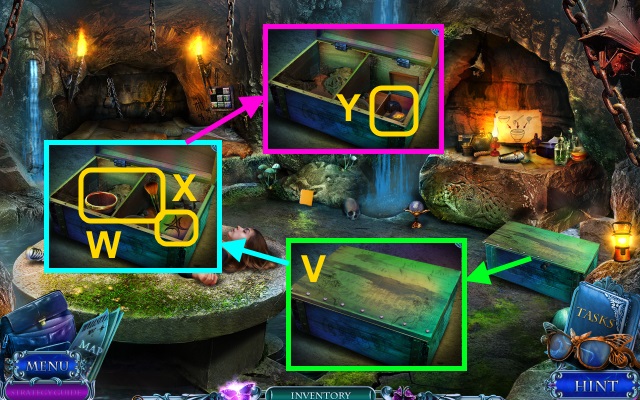
- Take the File (U).
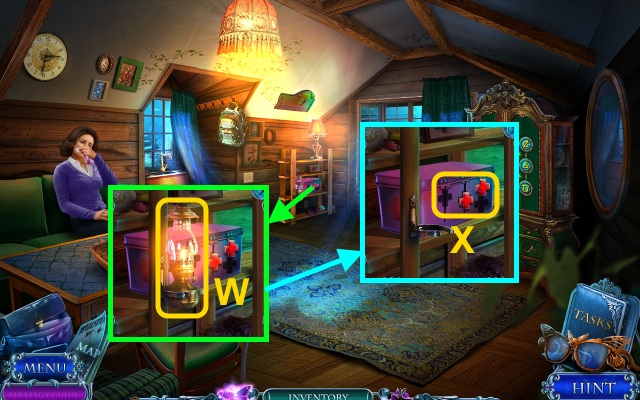
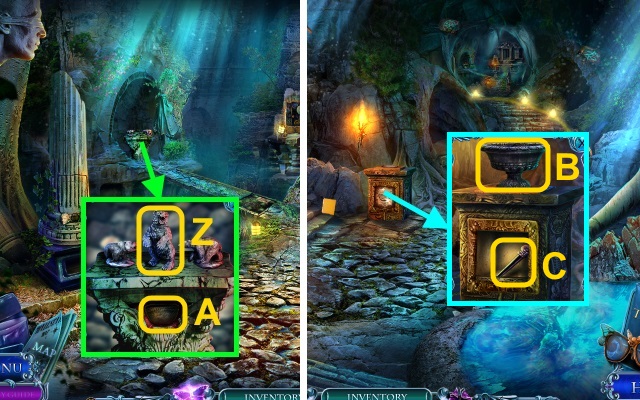
- Take the STEAK (V) and GLASS (W).
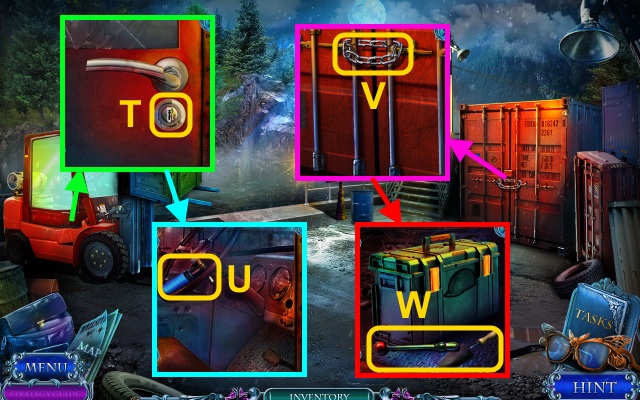
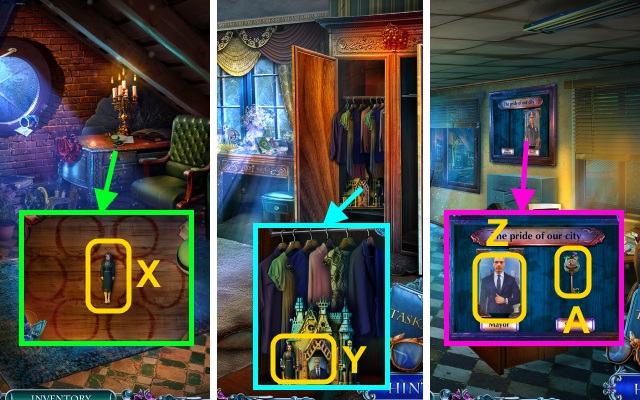
- Examine the package (X).
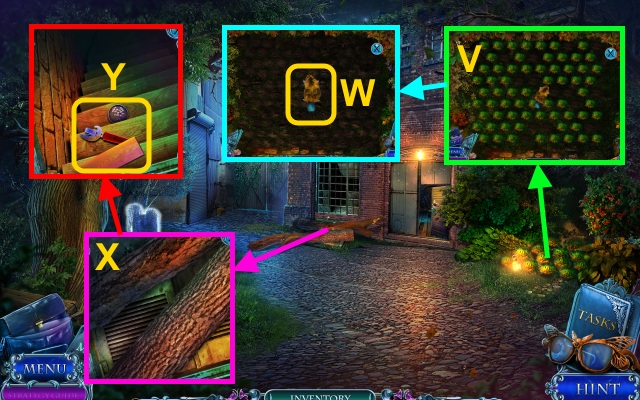
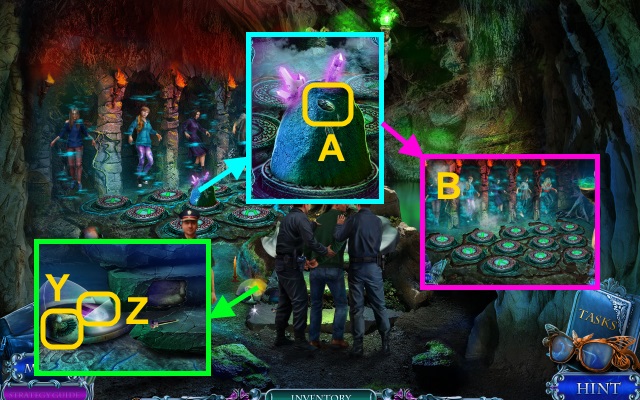
- Take Freya's Glasses (Y) and the papers.
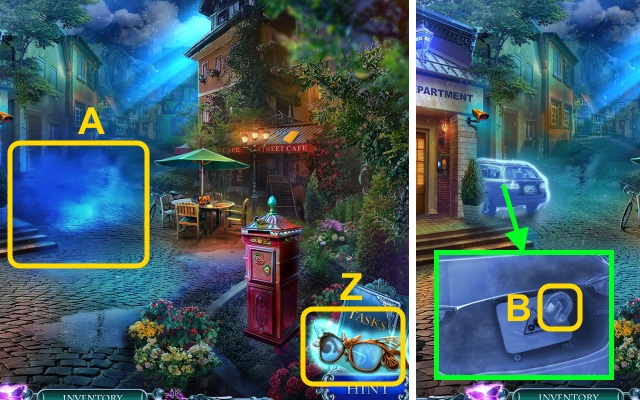
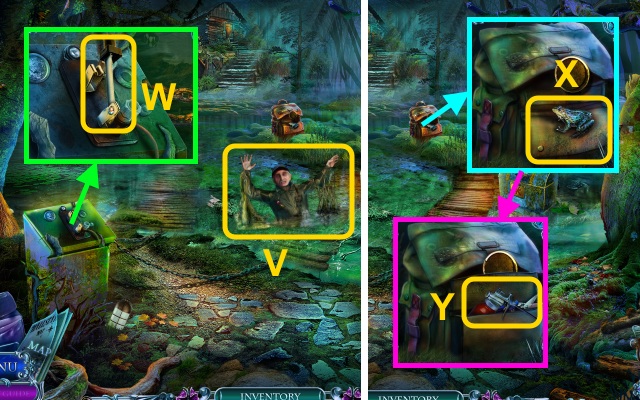
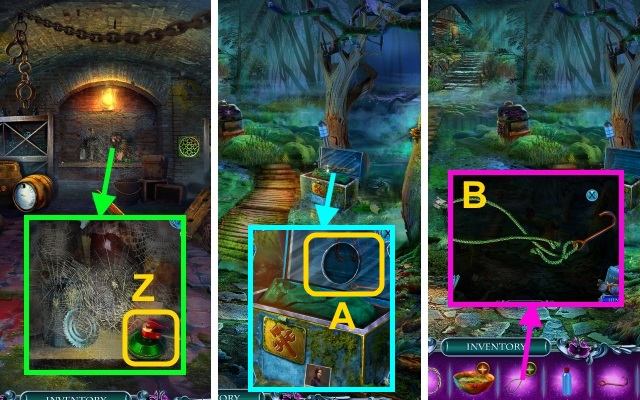
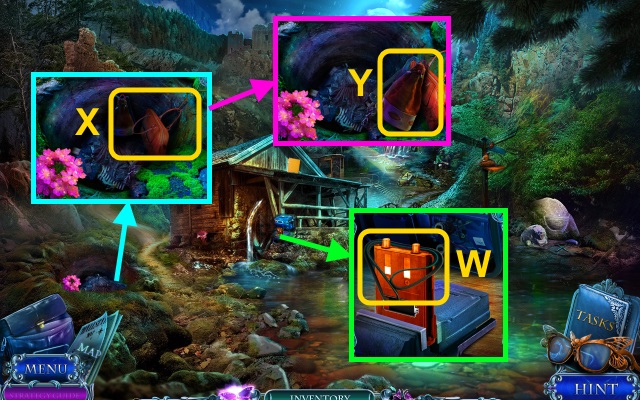
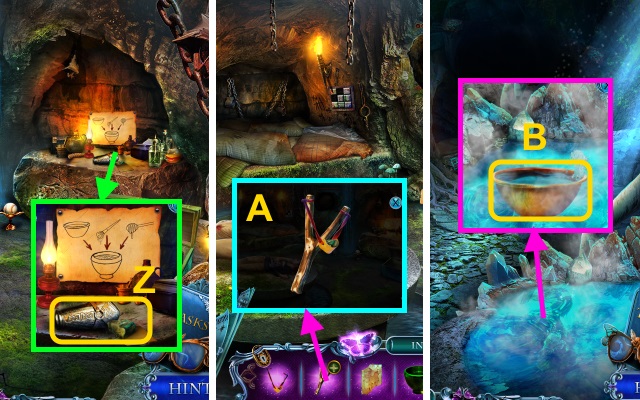
- Use Freya's Glasses (Z) on the mist (A).
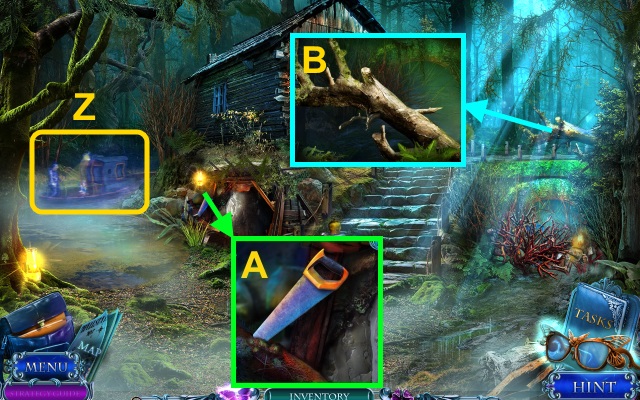
- Take the MAGNET (B).
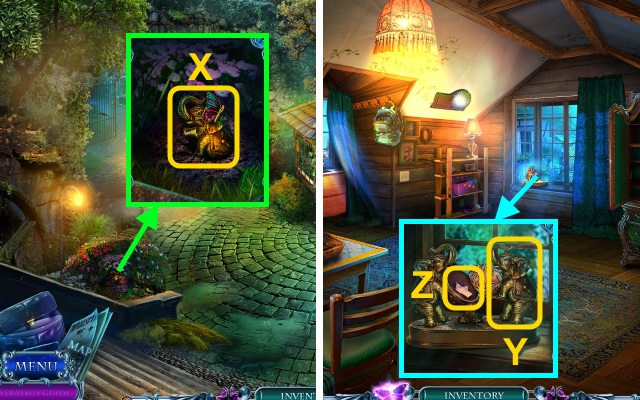
- Walk forward for a mini-game.
- Solution; navigate the 3 mazes without touching the red lines (C).
- Use Freya's Glasses (D).
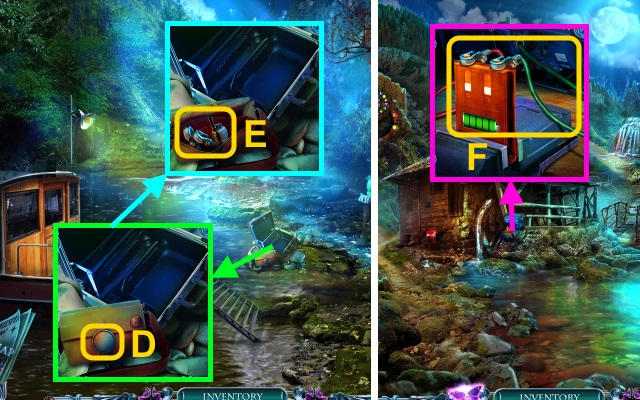
- Use the MAGNET for a mini-game (E).

- Solution (F).
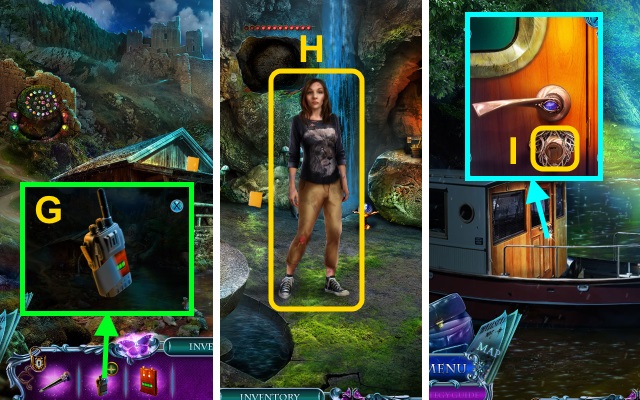
- Play the HOP; receive the LIGHTER FLUID (G).
- Walk left.
Chapter 2: Freya's House
- Talk to Freya's Mother (H).
- Take the RED X (I).
- Take the BROKEN NET (J) and TONGS (K).
- Walk down three times.

- Examine the dog; give the STEAK (L).
- Take the TORN SHOE (M).
- Examine the TORN SHOE; take the BENT NAIL (N).
- Walk forward.

- Use the BENT NAIL (O).
- Take the EMPTY LIGHTER (P) and FAUCET HANDLE (Q).
- Combine the EMPTY LIGHTER and LIGHTER FLUID (R); take the FULL LIGHTER.
- Walk forward.
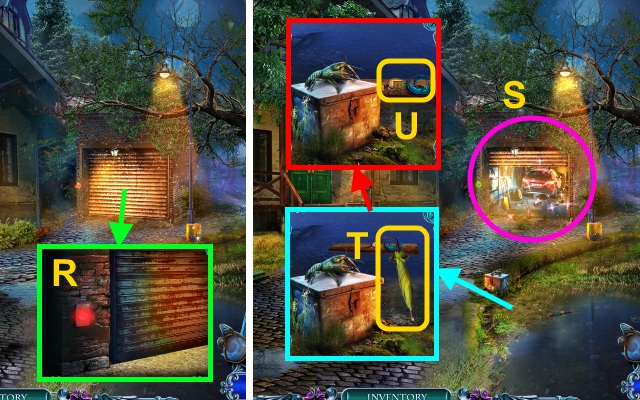
- Use the FULL LIGHTER (S).
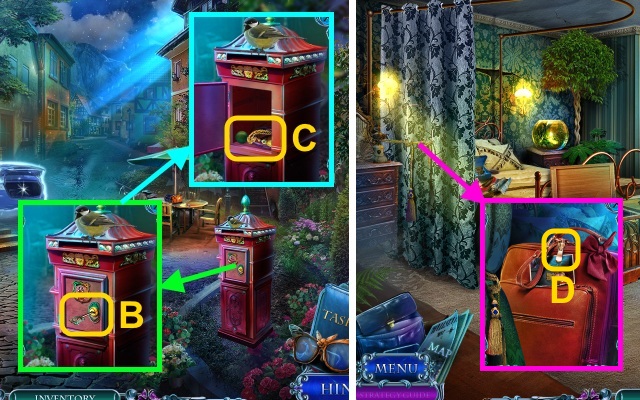
- Open the mailbox; take the note and PACKAGE WITH HORN PIECE (T).
- Examine the PACKAGE WITH HORN PIECE; read the note (U).
- Open the package; take the HORN PIECE (V).
- Walk left.
- Use the FULL LIGHTER; take the KEROSENE LAMP (W).
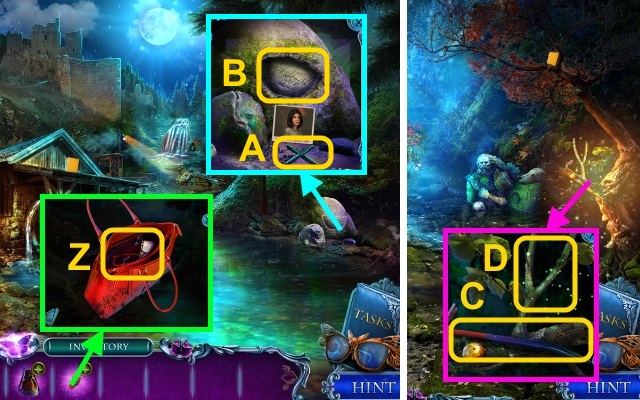
- Place the RED X for a mini-game (X).
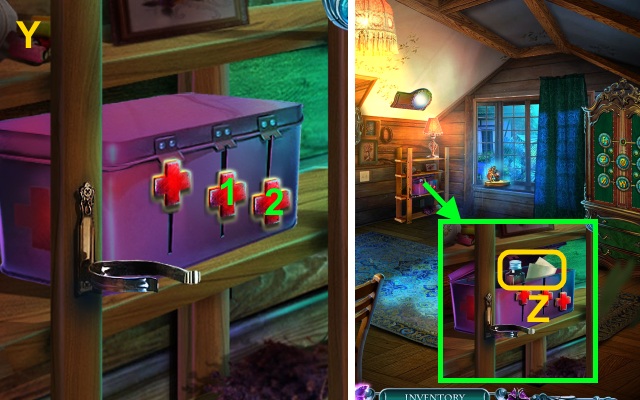
- Solution (Y).
- Take MRS. EKKERT'S SEDATIVE and the note (Z).
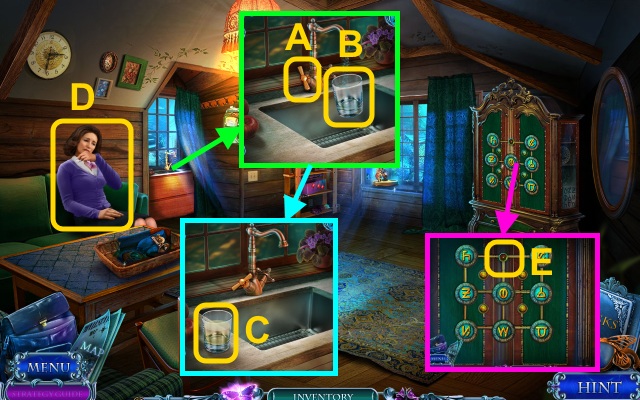
- Use the FAUCET HANDLE (A) and GLASS (B).
- Use MRS. EKKERT'S SEDATIVE; take the GLASS WITH SEDATIVE (C).
- Give the GLASS WITH SEDATIVE (D); receive the TOKEN.
- Place the TOKEN for a mini-game (E).
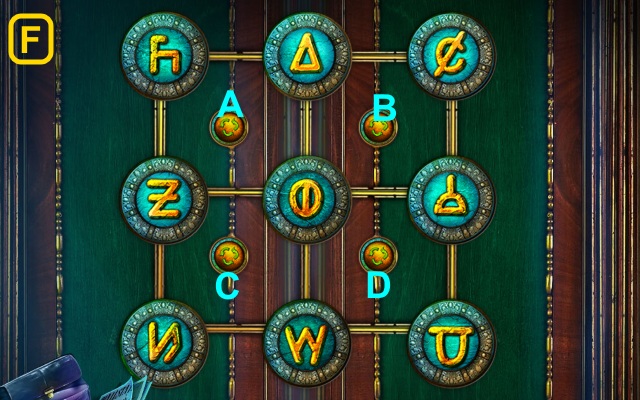
- Solution (F): A-B-A-B-Ax3-C-Dx2-Cx3.
- Take the VELVET BAG (G).
- Open the VELVET BAG; take the BRONZE NEST (H).
- Place the HORN PIECE; take the HORN (I).
- Walk down.
- Use the HORN (J).
- Use the TONGS (K); receive the HELMET SHAPE (1/2).
- Remove the tape; place the BRONZE NEST (L).
- Walk right.
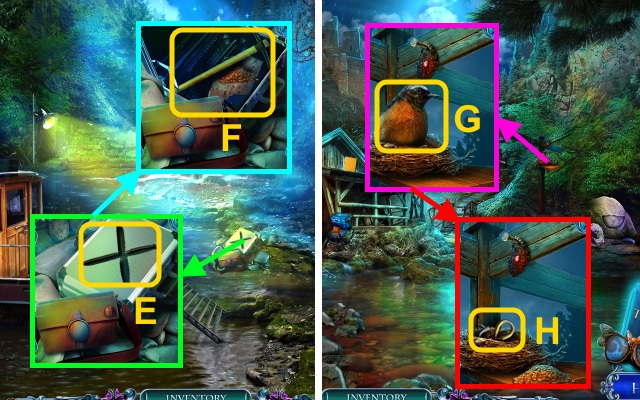
- Use Freya's Glasses (M).
- Take the BIRD'S HEAD (N).
- Place the BIRD'S HEAD (O).
- Play the HOP (P); receive the GARDENING GLOVES.
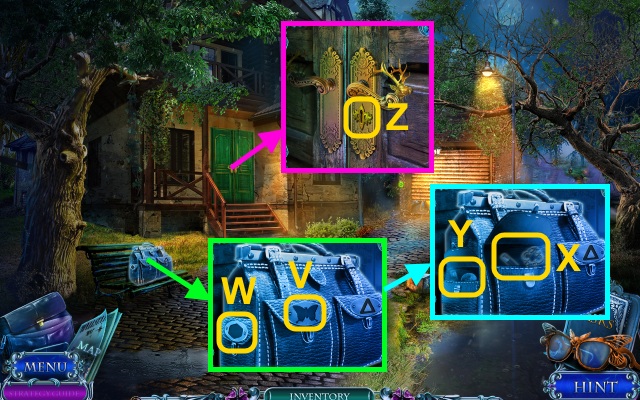
- Take the ZIPPER PULL (Q).
- Use the GARDENING GLOVES; take the CRIMINAL'S SYMBOL (R).
- Walk down, then left.
- Use the ZIPPER PULL (S).
- Take the PHONE BATTERY and NET (T).
- Combine the BROKEN NET and NET (U); take the BUTTERFLY NET.
- Walk down, then right.

- Place the KEROSENE LAMP (V).
- Use the BUTTERFLY NET 2x (W); receive the BROKEN PHONE and TAPE.
- Combine the BROKEN PHONE and PHONE BATTERY (X); place the cover.
- Press the button (Y); take FREYA'S PHONE.
- Walk down twice.
- Use the TAPE (Z); press the button (A).
- Give FREYA'S PHONE (B).
- Take the CAR KEY (C).
- Use the CAR KEY for a mini-game (D).
- Solution (E-G).
- Take the paper and BOX CUTTER (H).
- Place the CRIMINAL'S SYMBOL for a mini-game (I).
- Solution (J): Bx2-A.
- Take the ANTENNA (K).
- Walk forward, then right.
- Use the ANTENNA (L).
- Walk left.
- Use Freya's Glasses (M).
- Take the GHOSTLY KEY (N) and ROPE LADDER (O).
- Use the GHOSTLY KEY (P).
- Walk forward.
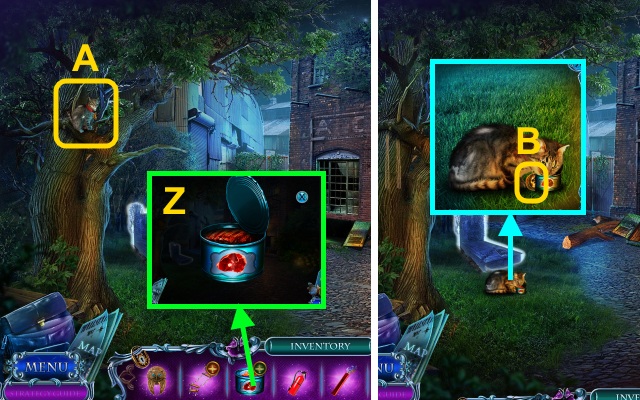
- Use the BOX CUTTER; take the CAT FOOD CAN (Q).
- Take the EXTINGUISHER and LIGHT BULB (R).
- Place the LIGHT BULB (S).
- Play the HOP; receive the RUSTY MACHETE (T).
- Walk down.
- Use the RUSTY MACHETE for a mini-game (U).
- Solution is random (V).
- Take the BEAVER (W).
- Use the BEAVER (X); open the doors.
- Take the CAN OPENER, BOARD (1/3) and LILY MEDALLION (Y).
- Combine the CAT FOOD CAN and CAN OPENER; take the OPENED CAT FOOD (Z).
- Examine the cat (A); give the OPENED CAT FOOD.
- Take the SKULL AMULET (1/2) (B).
- Walk forward.
- Place the LILY MEDALLION (C); take the BUTTERFLY EMBLEM (1/2) and SKULL AMULET (2/2) (D).
- Place the SKULL AMULET (2/2) (E).
- Walk forward, then left.
Chapter 3: Across the Bridge
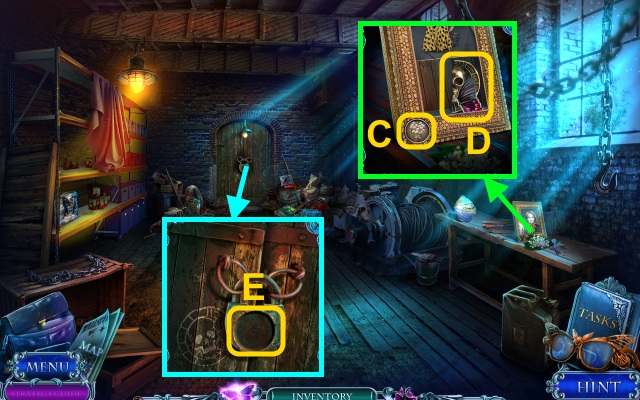
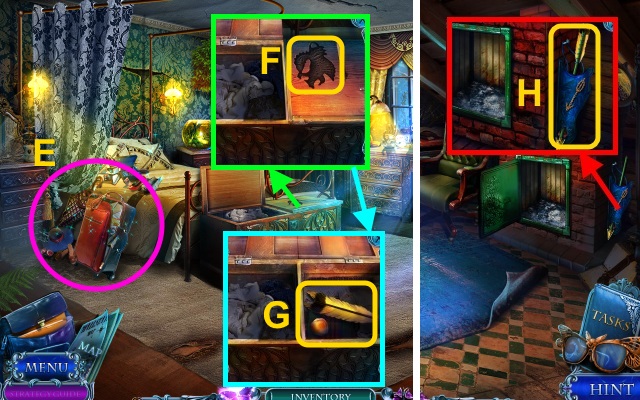
- Use the EXTINGUISHER; take the COVERALLS (F).
- Examine the COVERALLS; take the TABLE KEYS, note, and POLICE PASS (G).
- Take the BOARD (2/3) (H).
- Go to the Town Square.
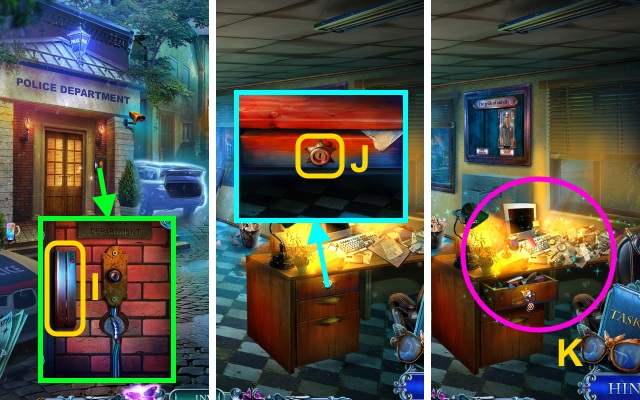
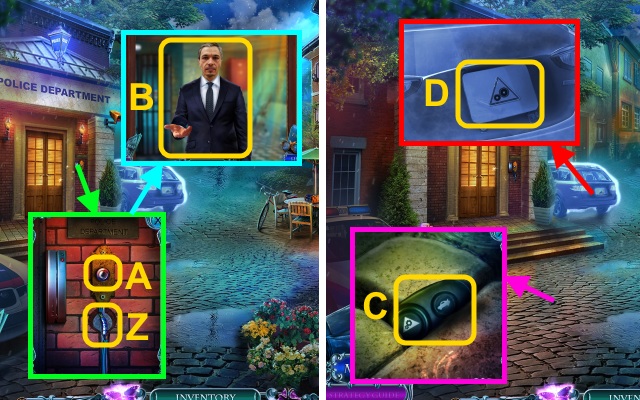
- Use the POLICE PASS (I).
- Walk left.
- Use the TABLE KEYS (J).
- Play the HOP; receive the CASE CODE (K).
- Place the CASE CODE for a mini-game (L).
- Solution (M).
- Take the STAR EMBLEM (1/2) (N).
- Take the BOARD (3/3) (O) and UMBRELLA (P).
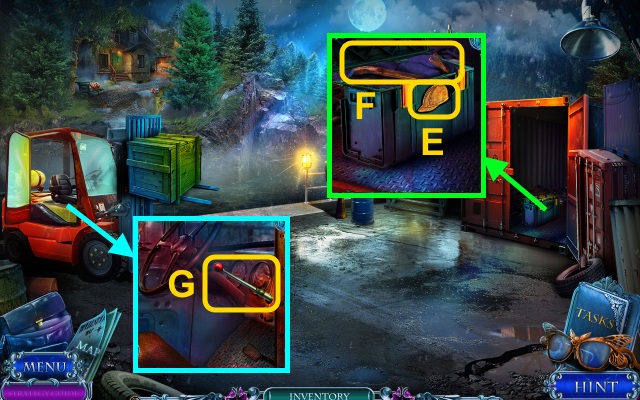
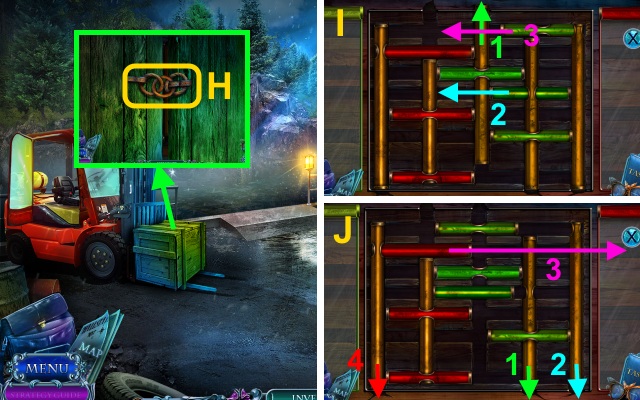
- Combine the ROPE LADDER and BOARD (3/3) (Q); take the ROPE LADDER.
- Go to the Bridge.
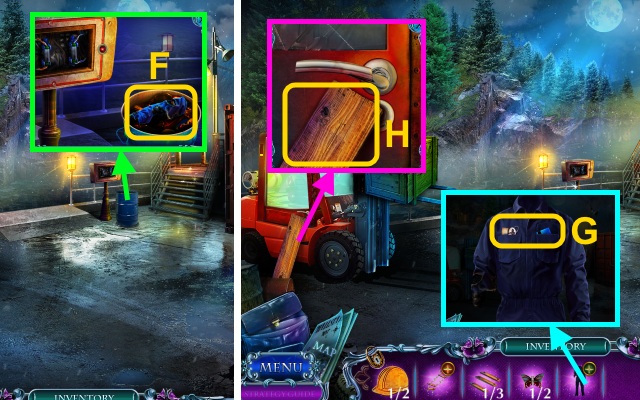
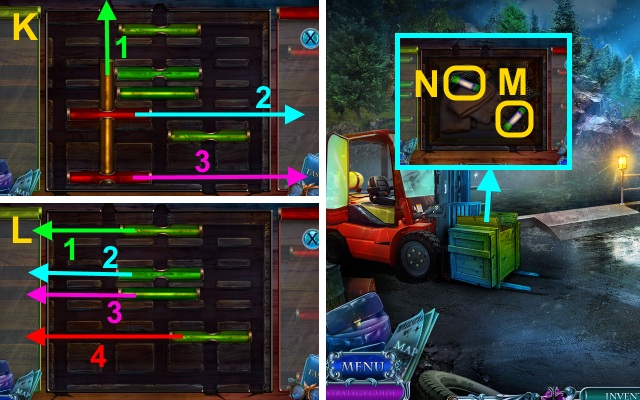
- Use the ROPE LADDER (R); take the CAR KEYS (S).
- Use the CAR KEYS (T).
- Take the BLOWTORCH (U).
- Use the BLOWTORCH (V).
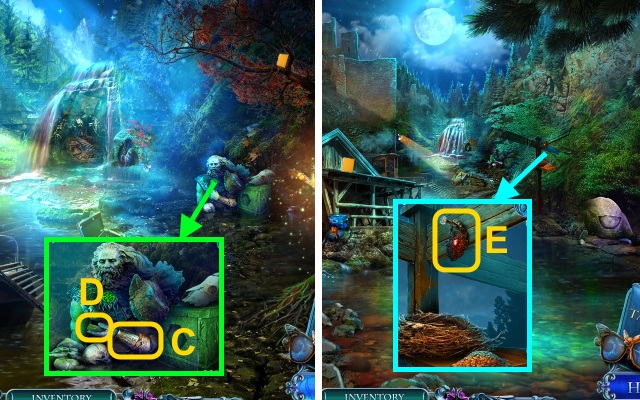
- Take the CAR HANDLE and SHOVEL (W).
- Walk down twice.
- Use the SHOVEL; take the BUTTERFLY EMBLEM (2/2) and ELEPHANT (X).
- Walk down, then left.
- Place the ELEPHANT (2/2) (Y); take the STAR EMBLEM (2/2) (Z).
- Go to the Police Station.
- Place the STAR EMBLEM (2/2) (A).
- Take the RIP PLATE (B).
- Go to the Backyard.
- Place the RIP PLATE (C); take the HELMET SHAPE (2/2) (D).
- Walk forward.
- Place the HELMET SHAPE (2/2) (E); take the CROWBAR (F).
- Use the CAR HANDLE (G).
- Use the CROWBAR for a mini-game (H).
- Solution (I-L).
- Take the FUSE (1/2)-(2/2) (M-N).
- Examine the panel; place the FUSE (2/2) (O).
- Walk forward.
- Talk to the policeman (P); receive the REMOTE CONTROL.
- Use Freya's Glasses (Q).
- Use the REMOTE CONTROL (R).
- Play the HOP; receive the SILVER HEXAGON (S).
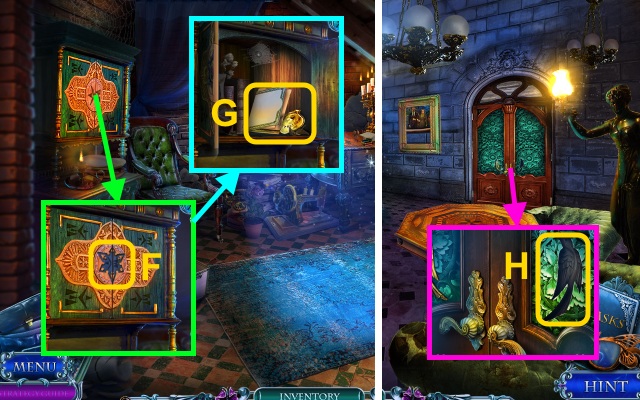
- Use the UMBRELLA (T); take the CRESCENT MOON and FRAME PIECE (U).
- Place the BUTTERFLY EMBLEM (2/2) (V) and SILVER HEXAGON (W).
- Take the HOUSE KEY, BATTERY (1/2) (X), BATTERY (2/2), and KNOB (Y).
- Use the HOUSE KEY (Z).
- Walk forward.
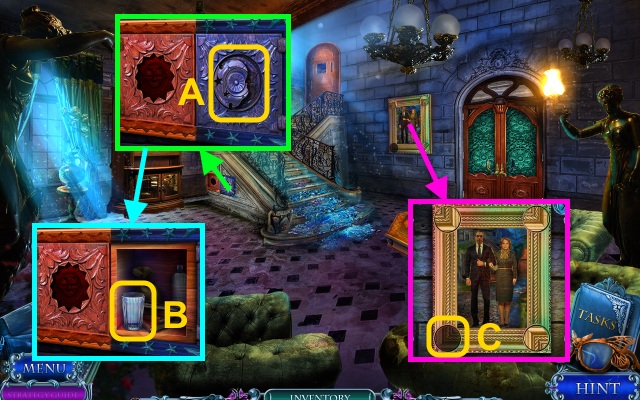
- Place the CRESCENT MOON (A); take the GLASS (B).
- Place the FRAME PIECE for a mini-game (C).
- Solution (D): Dx3-Cx2-B-A.
- Take the RAZOR (E).
- Take the PAGAN SYMBOL, note (F), and PACKAGE (G).
- Place the BATTERY (2/2); take the FLASHLIGHT (H).
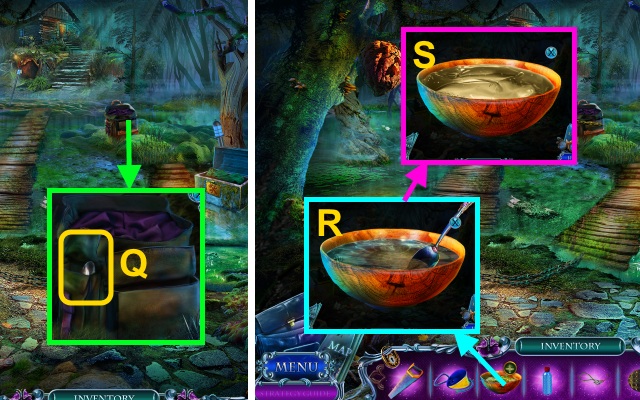
- Combine the PACKAGE and GLASS (I); open the package (J).
- Use the RAZOR (K); add the lemon.
- Take the LEMON JUICE (L).
- Walk down.
- Use the LEMON JUICE (M); open the door.
- Take the DRAWER HANDLE (N).
- Walk forward.
- Use the DRAWER HANDLE (O); take the FIRE CRACKER (1/2) and RAG (P).
- Walk down twice.
- Use the FLASHLIGHT; take the FIRE CRACKER (2/2) (Q).
- Walk forward.
- Use the FIRE CRACKER (2/2) (R).
- Take the SUN EMBLEM (S).
- Walk forward.
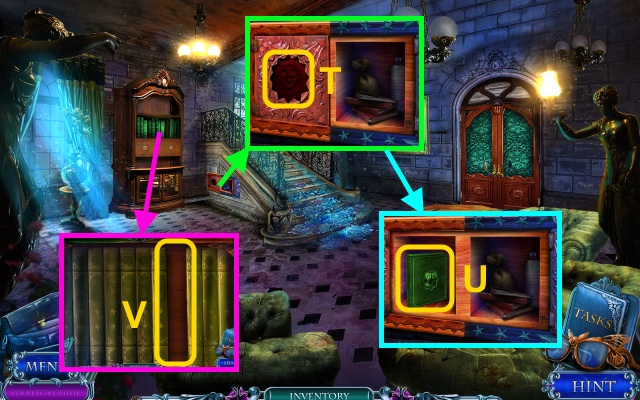
- Place the SUN EMBLEM (T); take the BOOK (U).
- Place the BOOK for a mini-game (V).
- Solution (W): A-D-H-F-A-D-H-B.
- Take the DRAWER HANDLE (X).
- Use the DRAWER HANDLE (Y); take the VACUUM CLEANER (Z).
- Use the VACUUM CLEANER (A).
- Walk forward.
Chapter 4: The Mayor
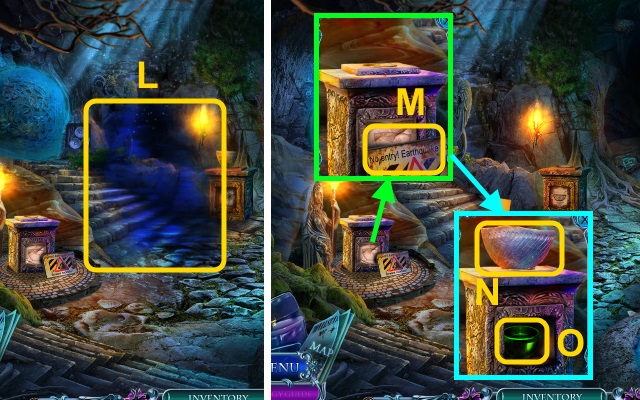
- Place the KNOB (B); take the ASHES (C).
- Use the RAG (D).
- Take the EAGLE FIGURINE and BOW (E).
- Place the PAGAN SYMBOL (F).
- Take the notes and POLICE BADGE (G).
- Walk down.
- Place the EAGLE FIGURINE (H).
- Walk right.
- Use Freya's Glasses (I).
- Play the HOP (J); receive the GRABBER.
- Use the GRABBER (K); receive the WOLF INLAY.
- Place the WOLF INLAY (L); take the THREAD (M).
- Go to the Police Station.
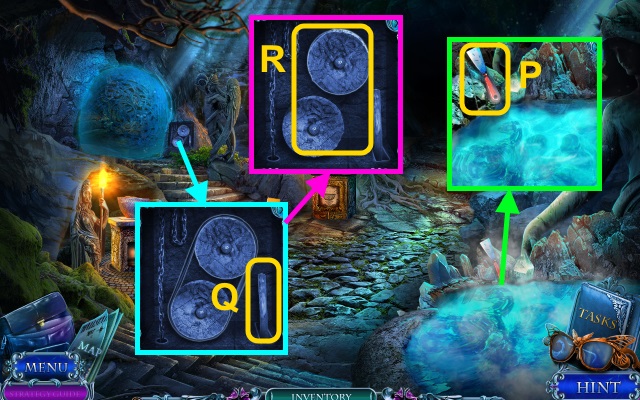
- Use the ASHES for a mini-game (N).
- Solution (O).
- Take the GOLD TRIANGLE (P); place the POLICE BADGE (Q).
- Take the LENS (R) and BOLT (S).
- Go to the Mayor's House.

- Place the GOLD TRIANGLE (T).
- Take the PINCUSHION (U).
- Walk forward twice.
- Use the PINCUSHION for a mini-game (V).

- Solution (W1); press the button (W2).
- Take the IRMA DOLL (X).
- Walk down, then right.
- Place the IRMA DOLL; take the MAYOR'S PHOTO (Y).
- Go to the Police Station.
- Place the MAYOR'S PHOTO (Z); take the POSTBOX KEY (A).
- Walk down.
- Use the POSTBOX KEY (B).
- Take the CLAY and ROPE (C).
- Go to Irma's Room.
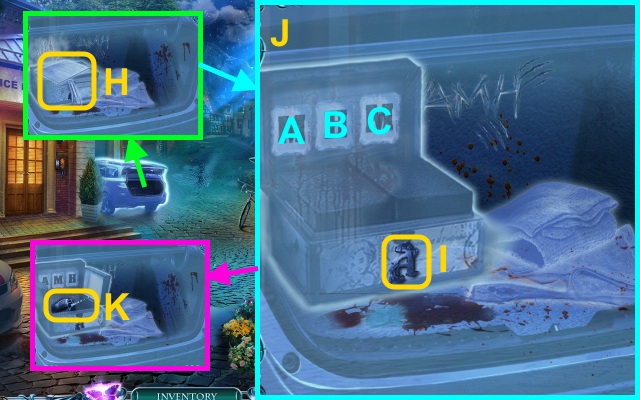
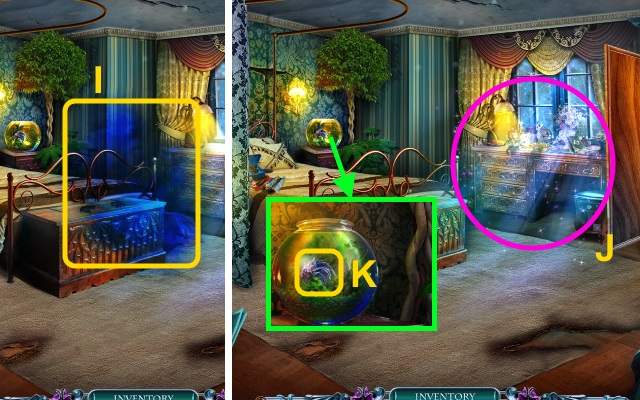
- Open the curtain; unzip the bag (D).
- Play the HOP; receive the LIZARD INLAY (E).
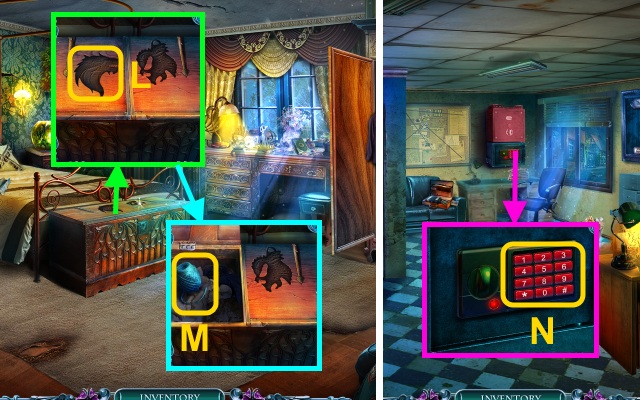
- Place the LIZARD INLAY (F); take the FEATHER and NUT (G).
- Walk down, then forward.
- Use the FEATHER and THREAD; take the ARROW (H).
- Combine the BOW, ARROW, ROPE, and CLAY (I); take the BOW.
- Go to the Police Station.
- Use the BOW (J); receive the CASE 5 KEY.
- Use the CASE 5 KEY; take the AWL and NOZZLE (K).
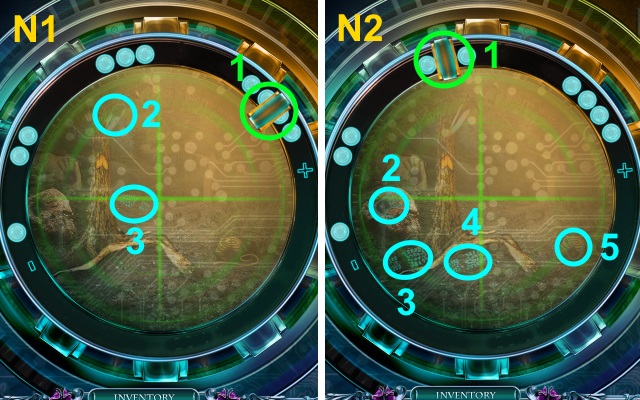
- Go to the Attic.
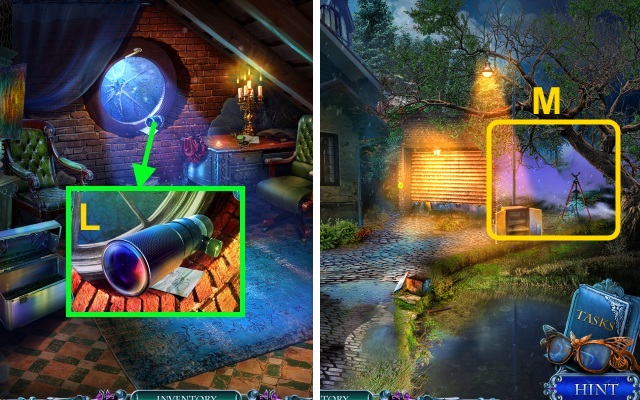
- Place the BOLT, NOZZLE, and LENS (L); take the SPYGLASS.
- Walk down twice.
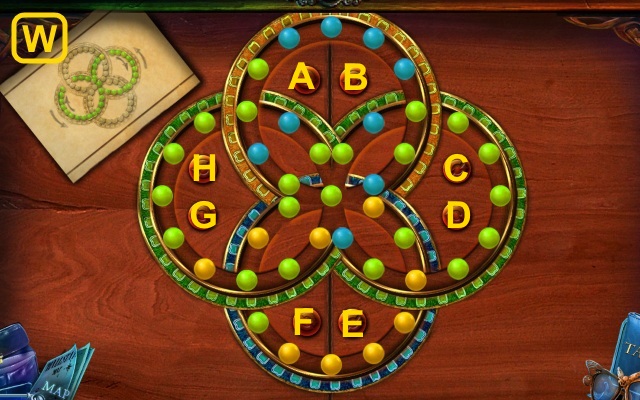
- Use the SPYGLASS for a mini-game (M).
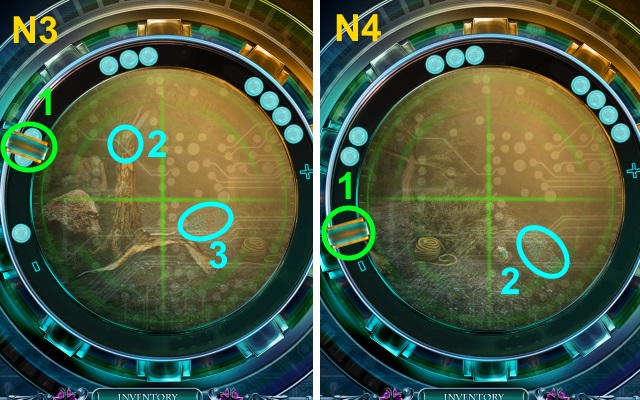
- Solution (N1-4).
- Solution (N5).
- Walk right.
- Give the NUT (P); take the WOOL (Q).
- Take the WOODEN STICK and FILE (R).

- Take the SAW HANDLE (S).
- Go to Irma's Room.
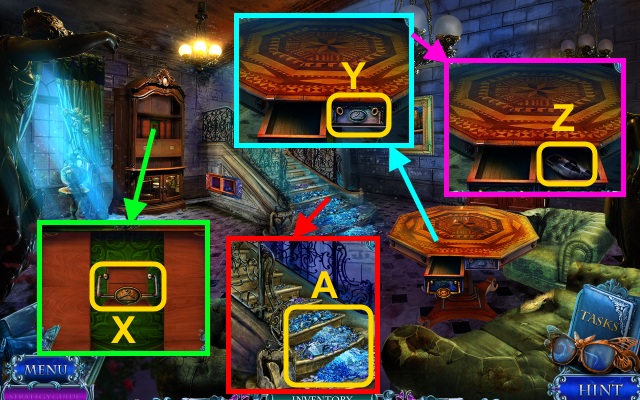
- Use the WOODEN STICK (T); receive the CLOTHES.
- Examine the CLOTHES 2x; take the ROPE OF CLOTHES (U).
- Walk down twice, then right.
- Use the ROPE OF CLOTHES (V); receive the LEVER.
- Use the LEVER (W).
- Move the frog (X).
- Take the OIL CAN and PRUNERS (Y).
- Walk forward.
- Use Freya's Glasses (Z).
- Use the SAW HANDLE (A); receive the SAW.
- Use the SAW (B); receive the BRANCHES.
- Use the PRUNERS (D).
- Play the HOP; receive the HAMMER (E).
- Use the HAMMER (F).
- Walk forward.
Chapter 5: The Criminal's House
- Use Freya's Glasses (G).
- Use the OIL CAN (H).
- Take the KEY IN WAX, note (I), and BACKPACK KEY (J).
- Remove the cloth; use the FILE. Take the RING HANDLE and TUBE (K).
- Walk down twice.
- Place the RING HANDLE (L); take the COIL (M).
- Use the BACKPACK KEY (N); take the TONGS and PUMP (O).
- Walk forward twice.
- Place the WOOL and COIL (P); receive the ROPE.
- Place the BRANCHES (R).
- Place the KEY IN WAX (S); take the KEY AMULET.
- Place the KEY AMULET for a mini-game (T).
- Solution (U).
- Go right.
- Use the TUBE (V); take the CUP WITH GLYCEROL (W).
- Take the HOOK (X); use the AWL.
- Take the BOTTLE (Y).
- Take the GLASS CUTTER (Z).
- Walk down three times.
- Use the GLASS CUTTER; take the HOOK and CHAIN (A).
- Combine the 2 HOOKS (B); take the ROPE.
- Go to the Cellar.
- Examine the chain; use the CHAIN (C).
- Play the HOP; receive the COIN (D).
- Use the COIN (E); take the INCENSE BURNER, REPAIR KIT, and note (F).
- Walk down.
- Place the INCENSE BURNER (G); use the TONGS.
- Take the INCENSE BURNER (H).
- Walk down twice.
- Use the INCENSE BURNER (I); take the BLADE (J).
- Use the ROPE; take the BROOM (K).
- Examine the REPAIR KIT (L); read the note.
- Examine the bag; use the BLADE (M).
- Take the PATCH.
- Go to the Cellar.
- Use the BROOM (N).
- Take the GELATINE (O) and SHARP LID (P).
- Walk down three times.
- Use the use the SHARP LID; take the SPOON (Q).
- Combine the CUP WITH GLYCEROL, GELATINE, and BOTTLE; use the SPOON (R).
- Take the GLUE (S).
- Walk forward.
- Remove the nail (T).
- Use the GLUE, PATCH, and PUMP (U).
- Go left for a mini-game (V).

- Steer the boat through the maze while solving the mini-games.
- Solution (A1-A3).
- Take the BELT (W).
- Use the HOOK (X); take the POUCH and HANDBAG (Y).
- Open the HANDBAG; take the ELASTIC, NAIL FILE, and note (Z).
- Take the CROSSED KNIVES (A).
- Use the NAIL FILE; take the STONE PIECE (B).
- Walk forward.
- Take the CROWBAR (C).
- Use the SAW (D); receive the SLINGSHOT.
- Place the CROSSED KNIVES (E); take the PICKAXE, SEEDS, and PAPER (F).
- Walk down.
- Give the SEEDS (G); take the S-HOOK (H).
- Use the PICKAXE; take the STONES (I).
- Open the POUCH; add the STONES (J).
- Take the FULL POUCH.
- Walk forward.
- Place the S-HOOK and FULL POUCH (K).
- Walk forward.
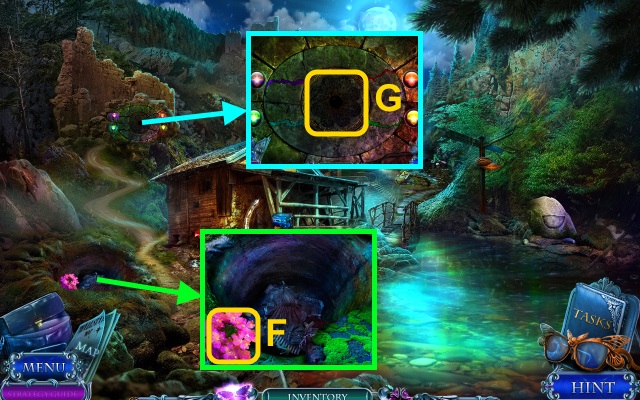
- Use Freya's Glasses (L).
- Examine the sign (M).
- Place the STONE PIECE (N); take the MORTAR (O).
- Take the SCRAPER (P).
- Pull the lever (Q).
- Place the BELT (R).
- Walk left.
Chapter 6: The Ritual
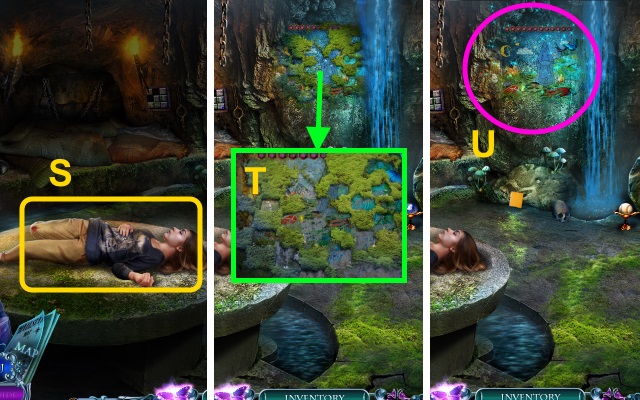
- Examine Helen (S).
- Use the SCRAPER (T).
- Play the HOP; receive the AMULET (U).
- Use the CROWBAR (V).
- Take the BRUSH and CUP (W).
- Place the AMULET (X).
- Take the MATCHES and COAL (Y).
- Take the STONE, BRACELET, and note (Z).
- Combine the SLINGSHOT, ELASTIC, and STONE; take the SLINGSHOT (A).
- Walk down.
- Use the CUP (B); receive the FULL BOWL.
- Walk down.
- Use the BRACELET (C); take the COLUMN PART (D).
- Walk down.
- Use the SLINGSHOT (E); receive the MAGIC STONE.
- Use the BRUSH (F); receive the POLLEN.
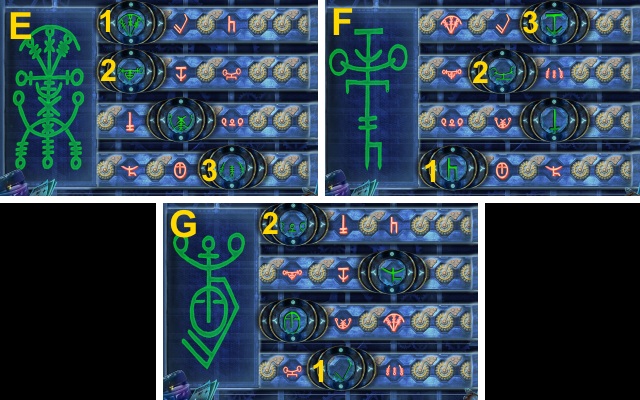
- Place the MAGIC STONE for a mini-game (G).
- Solution (H).
- Take the HELMET and RESIN COLLECTOR (I).
- Walk forward.
- Place the HELMET (J); take the BEAR STATUE (K).
- Use the RESIN COLLECTOR (L); receive the RESIN.
- Walk forward, then left.
- Place the MORTAR; use the RESIN and POLLEN (M).
- Place the FULL BOWL (N); pour it.
- Take the ELIXIR (O).
- Give the ELIXIR (P); receive the NOTE.
- Walk down.
- Use the MATCHES (Q).
- Use the NOTE (R).
- Walk forward
- Place the COLUMN PART (S).
- Take the TREE EMBLEM (T).
- Place the PAPER and COAL (U); take the NOTE WITH SYMBOLS.
- Place the TREE EMBLEM (V); take the BAG KEY (W).

- Place the NOTE WITH SYMBOLS for a mini-game (X).
- Solution (Y).
- Place the BEAR STATUE (Z); take the DARK STONE (A).
- Walk down.
- Place the DARK STONE (B); take the WEDGE (C).
- Walk down.
- Place the BAG KEY (D); take the TERMINAL WIRES and BROKEN RADIO (E).
- Walk down.
- Place the TERMINAL WIRES; take the BATTERY (F).
- Combine the BROKEN RADIO and BATTERY (G); take the RADIO.
- Go to the Cell.
- Give the RADIO (H); receive the PIN.
- Walk down twice.
- Use the PIN (I).
- Play the HOP; receive the AMULET (J).
- Place the AMULET (K); take the GEAR and STONE (L).
- Walk forward twice.
- Place the GEAR (M).
- Walk forward.
- Read the note (N); use the WEDGE and STONE (O).
- Take the FIGURE (P).
- Take the STONE PART (1/2) (Q).
- Walk down.
- Place the FIGURE (R).
- Take the LADY HEAD (S).
- Place the LADY HEAD (T); take the STONE PART (2/2) (U).
- Walk down, then left.
- Place the STONE PART (2/2) for a mini-game (V).
- Solution (W): (A-D)-(D-G)-(D-A)-(F-E)-(E-D).
- (F-E)-(H-E)-(E-B)-(C-B)-(B-E)-(E-H)-(B-E).
- Take the EAGLE (X).
- Go to the Altar.
- Place the EAGLE (Y); take the CRYSTAL (Z).
- Place the CRYSTAL for a mini-game (A).
- Solution varies (B).
- Congratulations! You have completed Mystery Tales: Her Own Eyes.
Created at: 2016-03-18