
Walkthrough Menu
- General Tips
- Chapter 1: Notorious Events in the Silent Hollow
- Chapter 2: The Castle Gate
- Chapter 3: The Bailey
- Chapter 4: The Library
- Chapter 5: The Memorial
- Chapter 6: Morpheus' Tomb Gates
General Tips
- This is the official guide for Mystery Trackers: Silent Hollow.
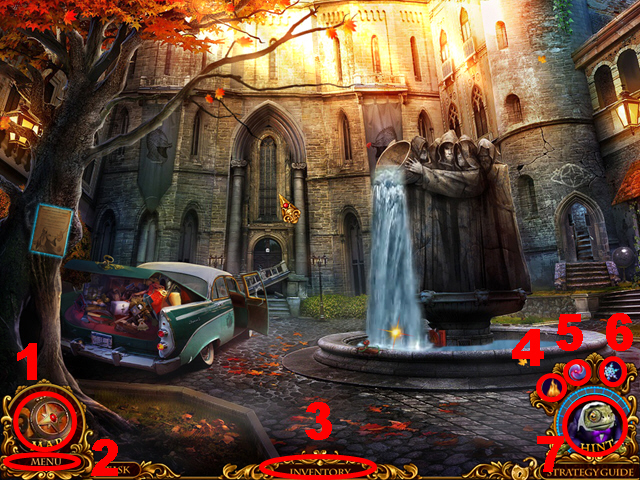
- Access the map (1) to quickly jump to any available location.
- Select the menu (2) to leave the game, adjust the difficulty level, and to adjust sound and display mode.
- Inventory items will be stored in the inventory (3).
- Use the pyrokinesis ability (4) to light objects.
- Use the hypnosis ability (5) to get information from people.
- Use the freezing ability (6) to freeze water.
- Push the hint button (7) whenever you need help.
- Hidden Object Puzzles will be referred to as HOPs throughout this guide. Items listed in yellow are hidden, or they require additional actions to locate. Interactive items in HOPs are color-coded.
- There are 4 grades of difficulty you can choose from in the beginning: Casual, Advanced, Hardcore, and Detective modes.
Chapter 1: Notorious Events in the Silent Hollow
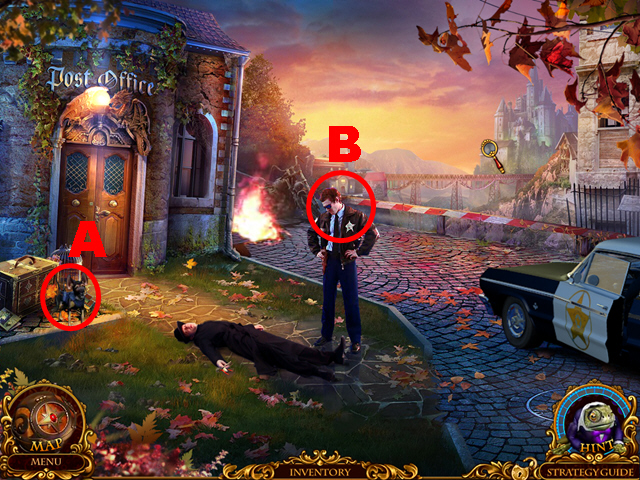
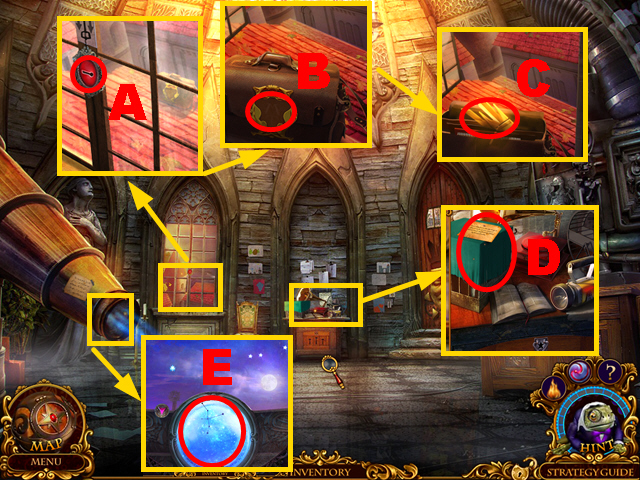
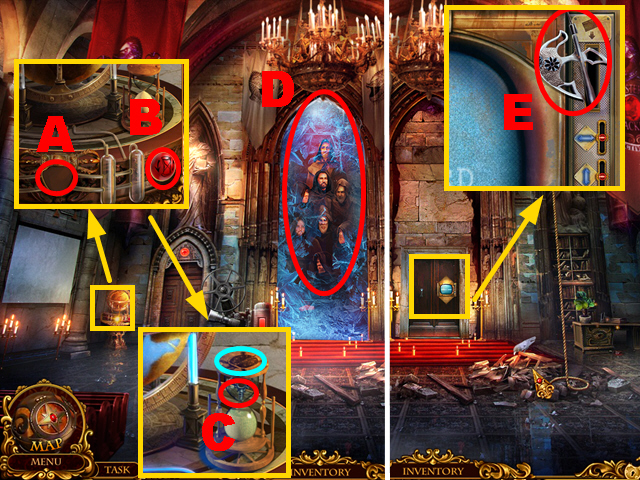
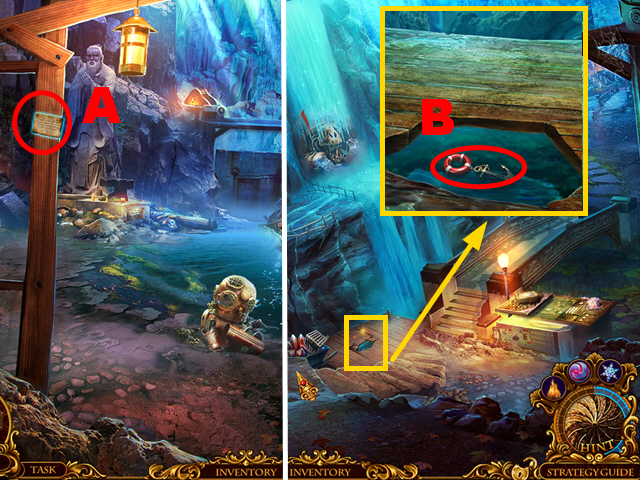
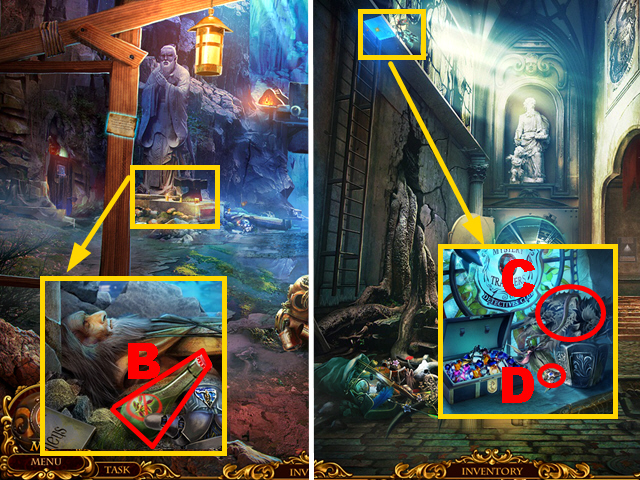
- Take ELF (A).
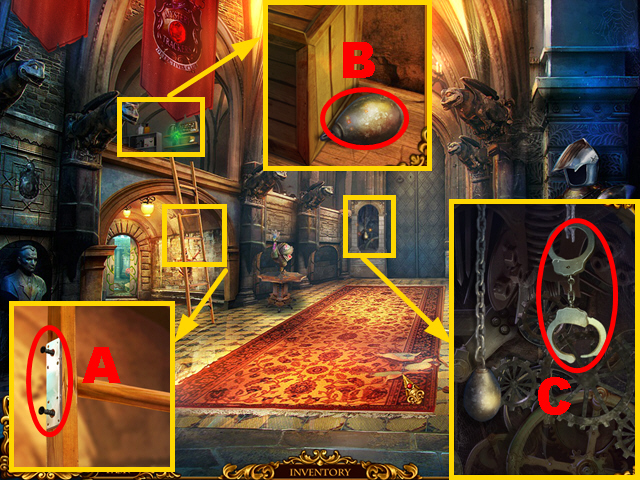
- Talk to the agent (B).
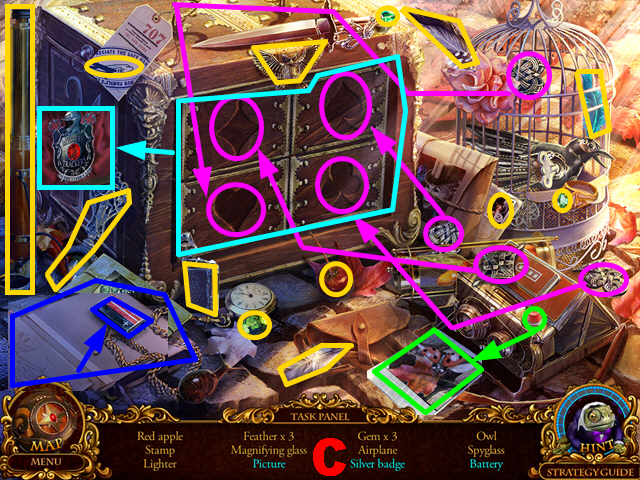
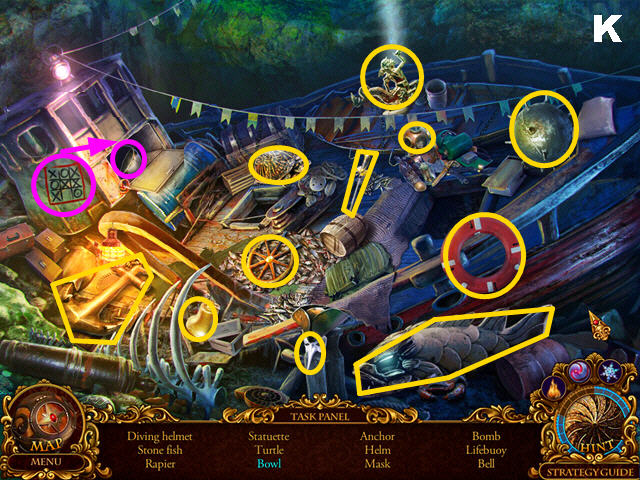
- Play the HOP.
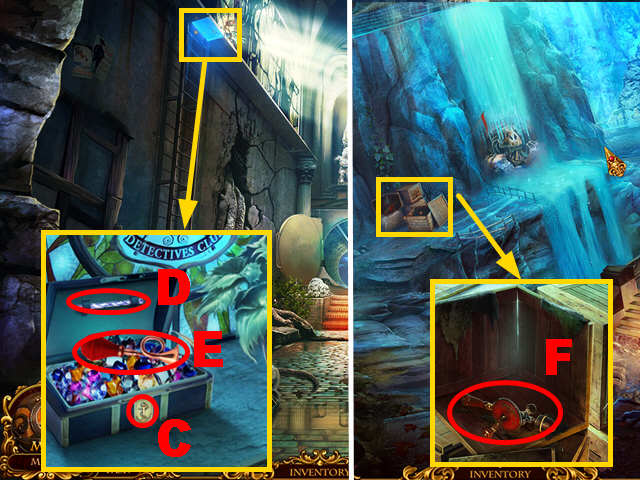
- You will receive the SILVER BADGE (C).
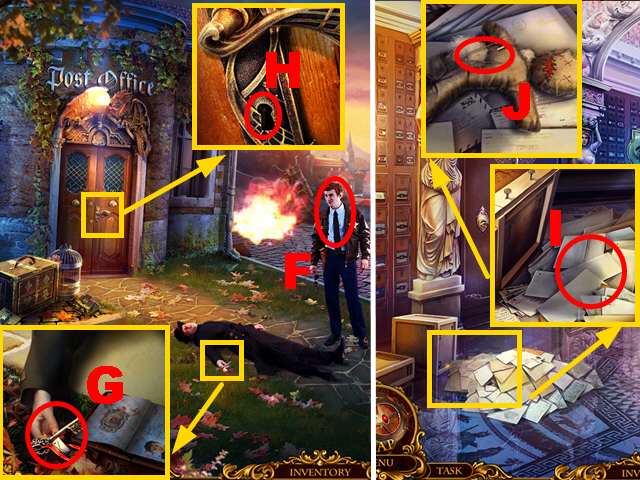
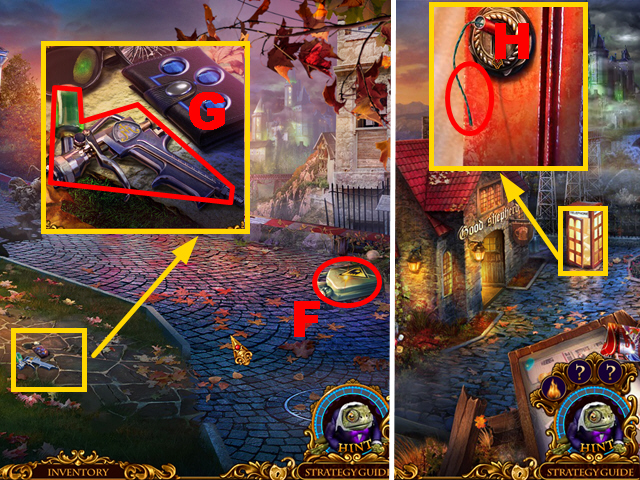
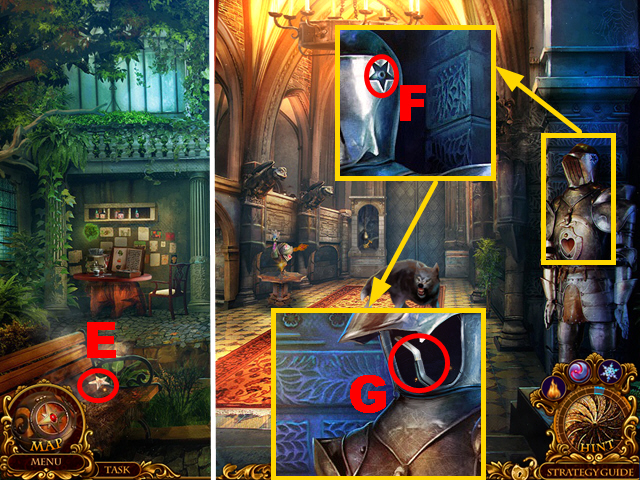
- Give the SILVER BADGE to the agent (F).
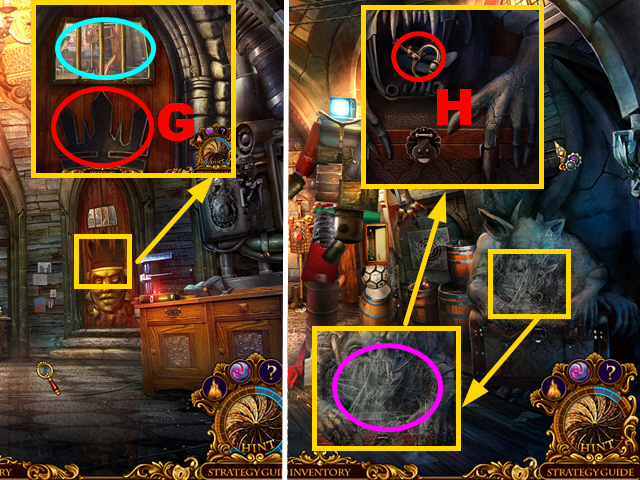
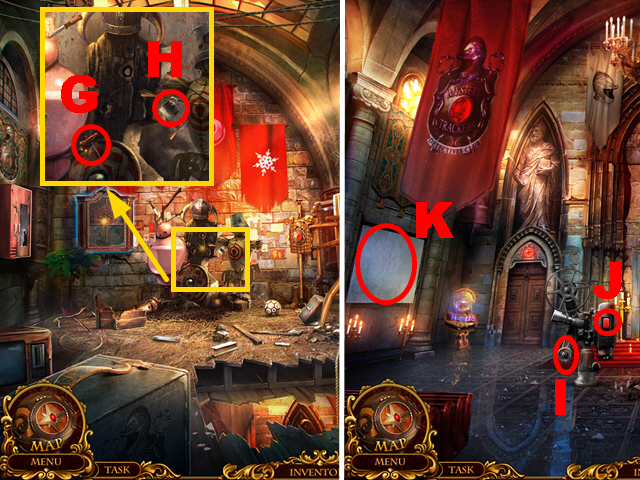
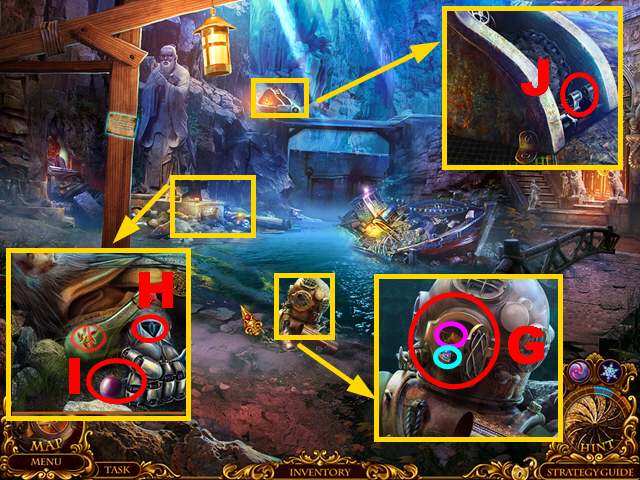
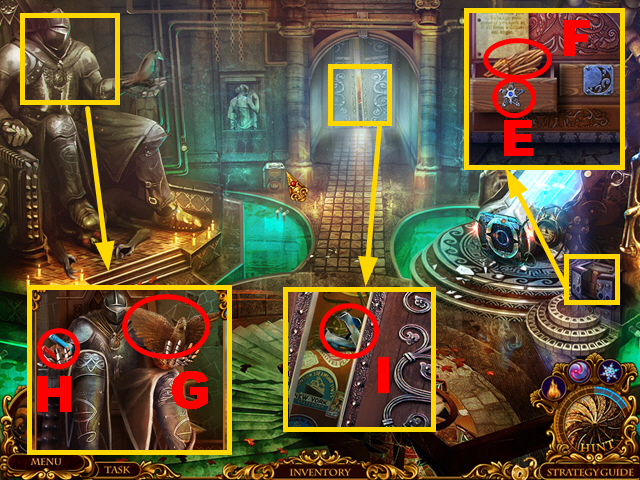
- Zoom into the unconscious agent; take the POST OFFICE KEY (G).
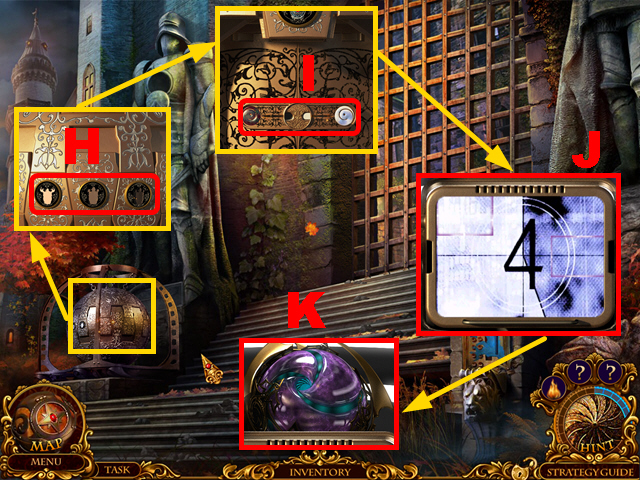
- Zoom into the door; insert the POST OFFICE KEY into the lock (H) and turn the key once.
- Enter the Post Office.
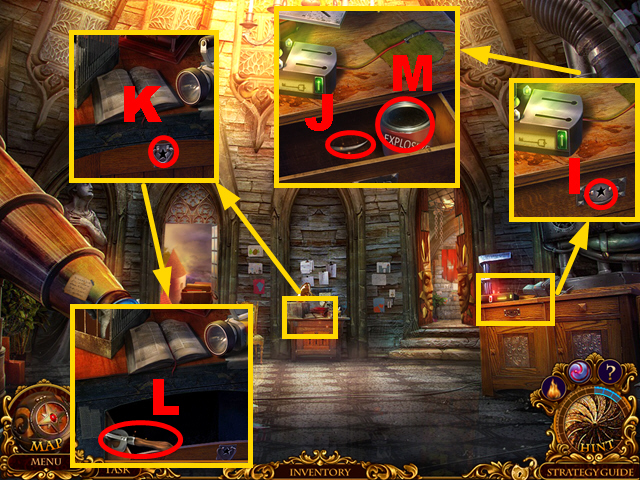
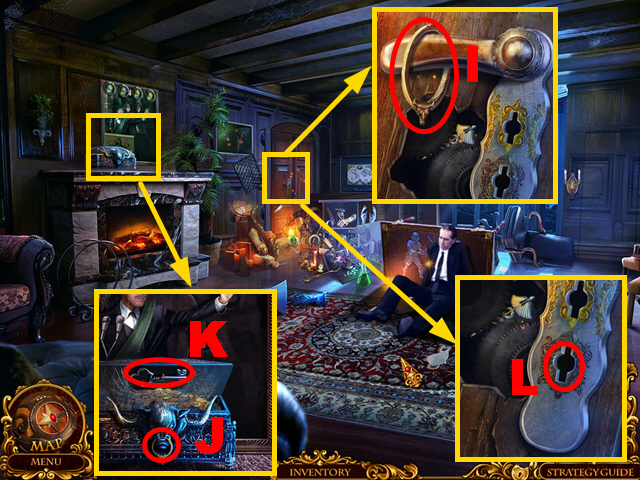
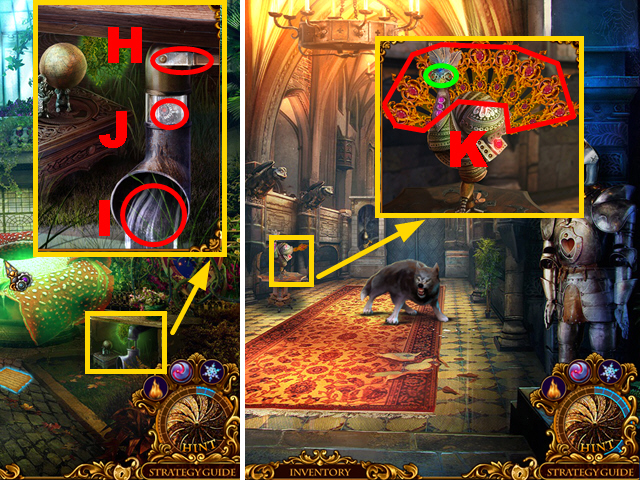
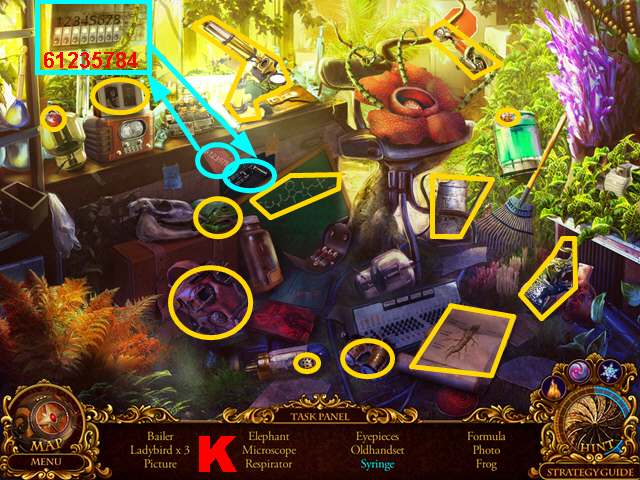
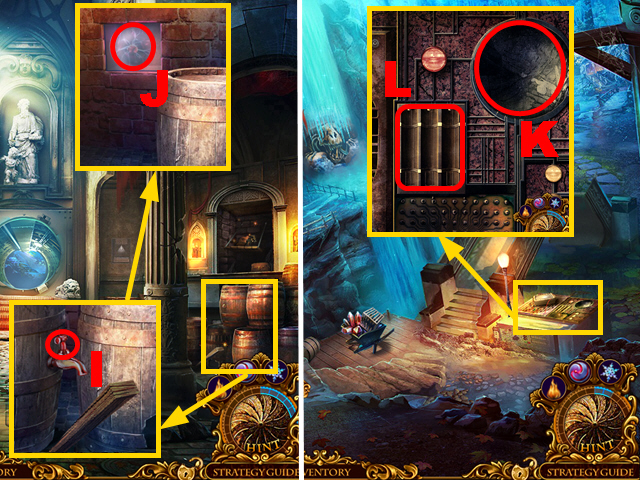
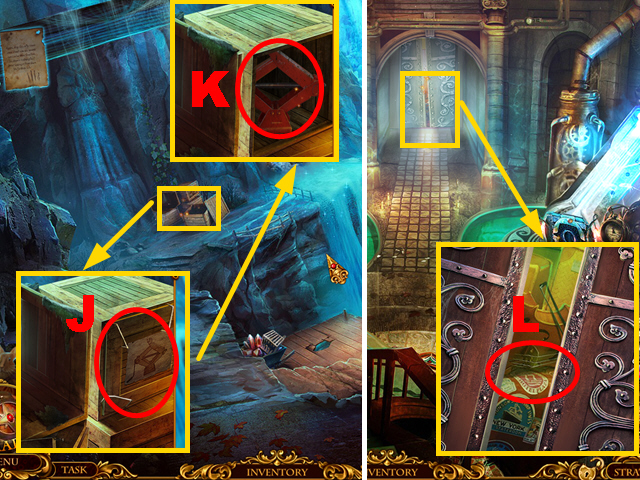
- Zoom into the letters and use ELF to dig through the letters (I); take the PIN (J).
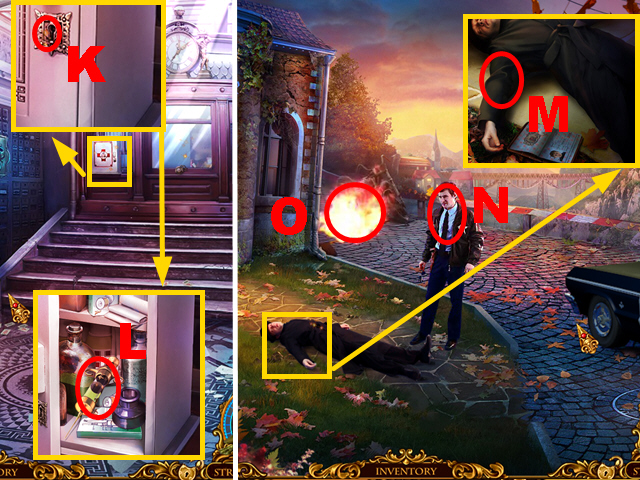
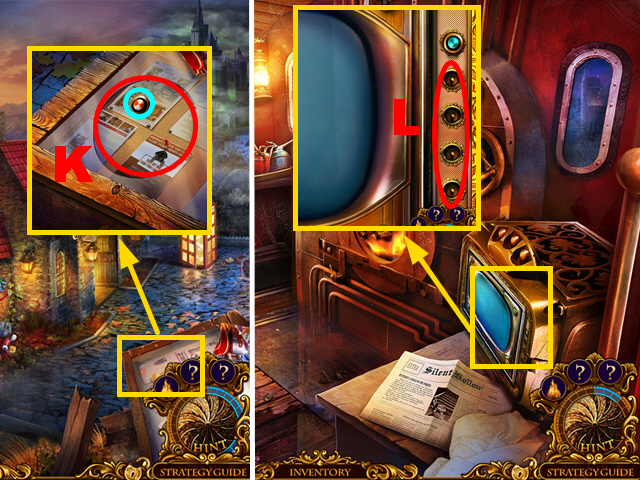
- Zoom into the medicine cabinet and insert the PIN into the lock (K); take the STIMULANT (L).
- Walk down.
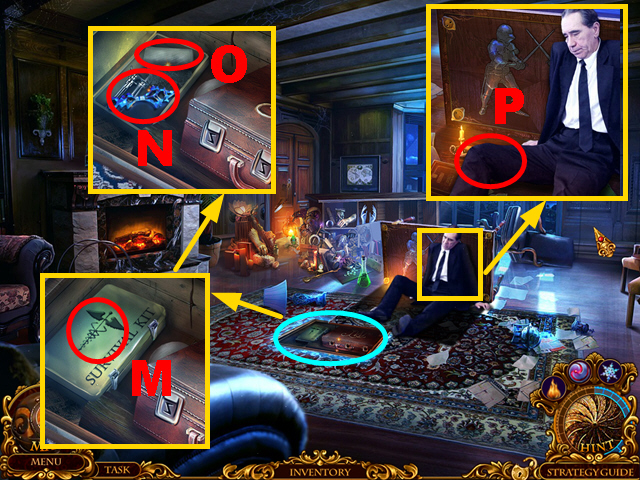
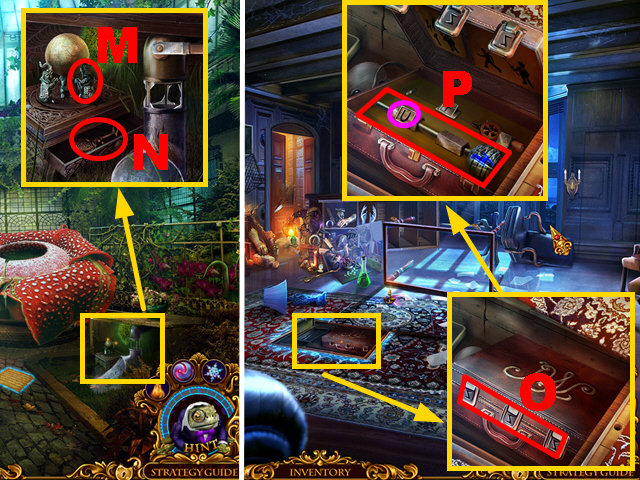
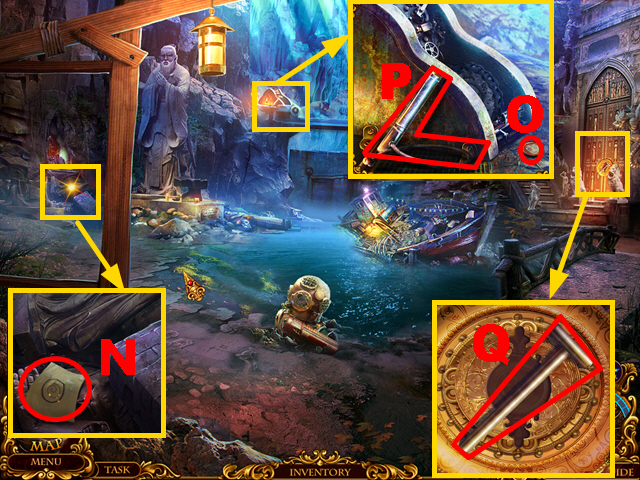
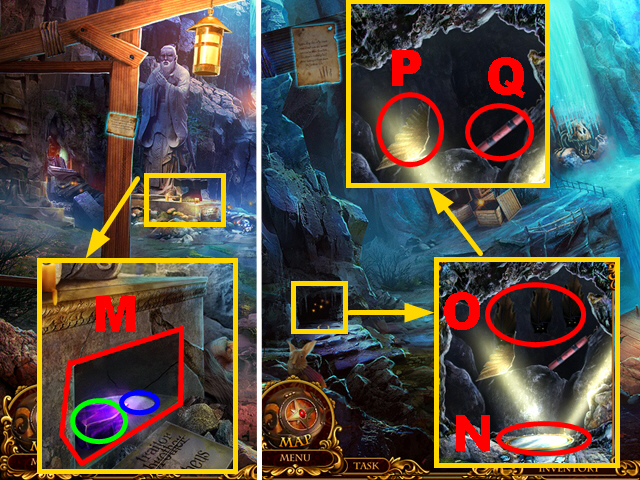
- Zoom into the unconscious agent; inject the STIMULANT into his arm (M).
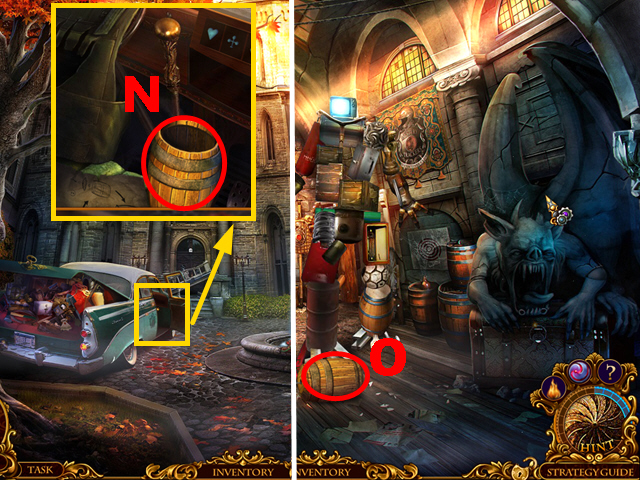
- Talk to the agent (N); you will receive the FIRE EXTINGUISHER.
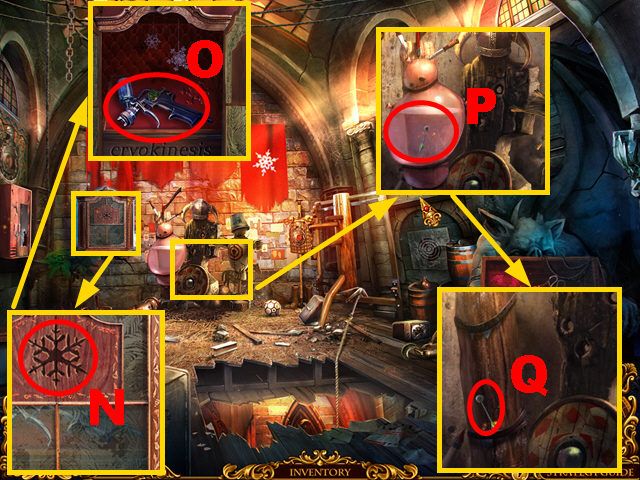
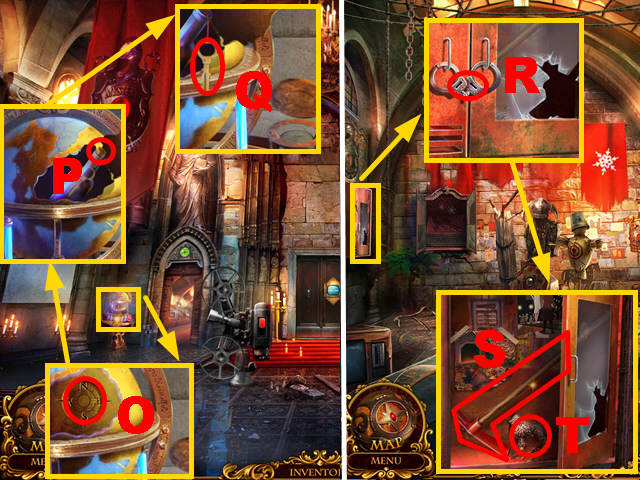
- Extinguish the fire with the FIRE EXTINGUISHER (O).
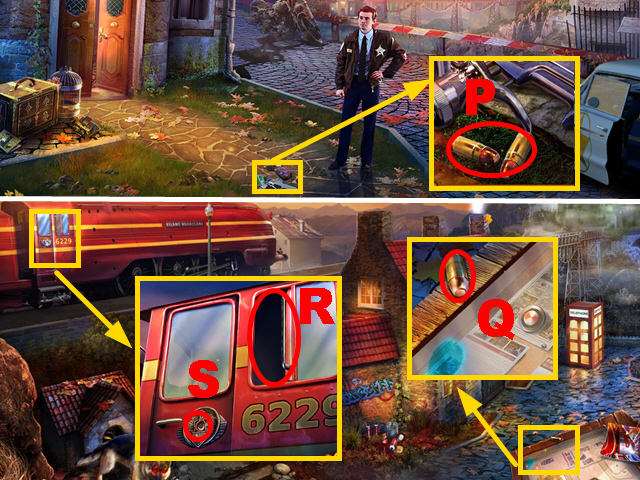
- Zoom into the ground; take the 2 BULLETS (P).
- Go to the Railway Platform.
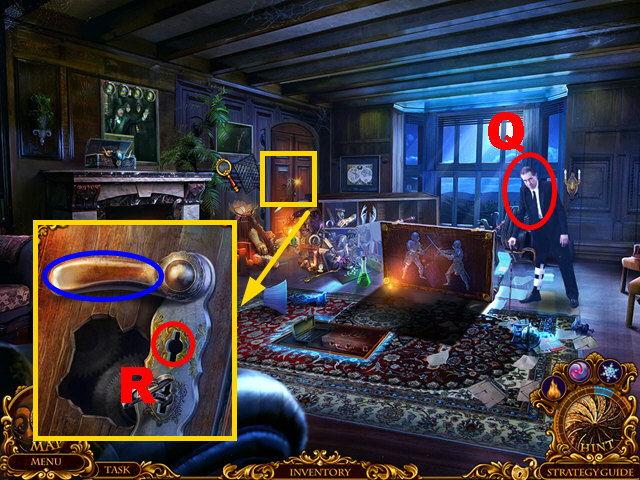
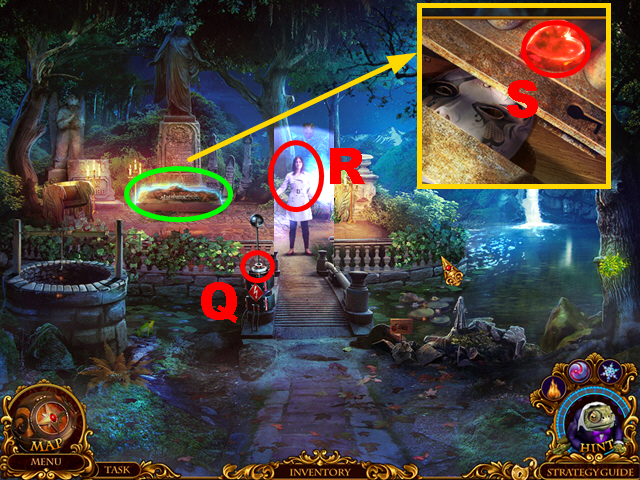
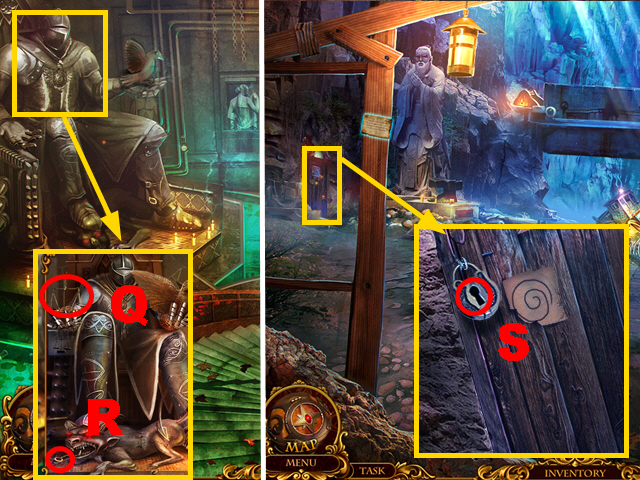
- Zoom into the showcase; take the 3/5 BULLET (Q).
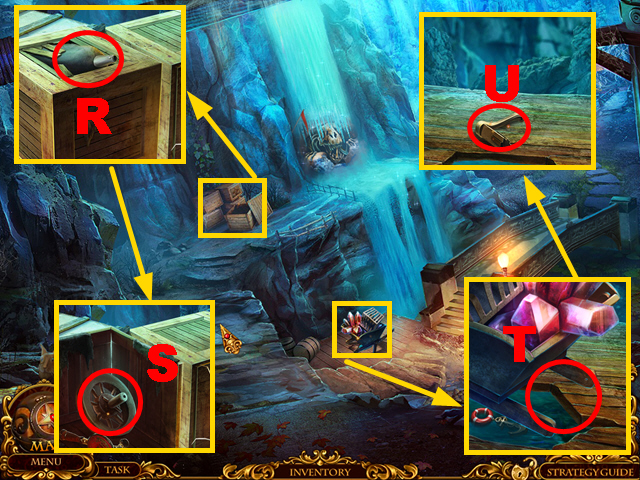
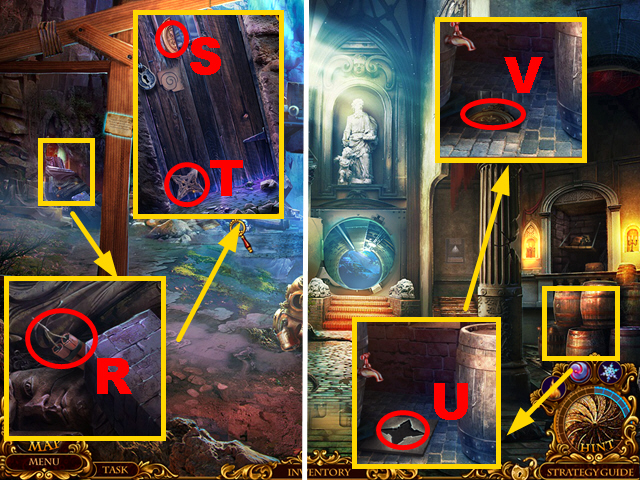
- Zoom into the Train Engine, open the window, and send ELF through the window (R) to acquire the MAGNET KEY. Insert the MAGNET KEY into the niche (S) and turn the key.
- Enter the Train Engine.
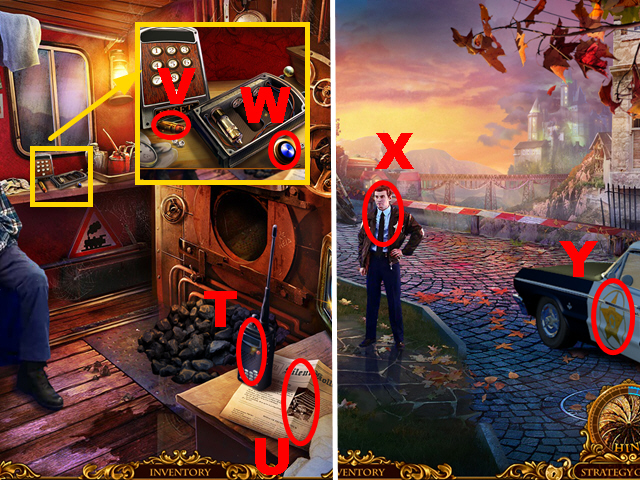
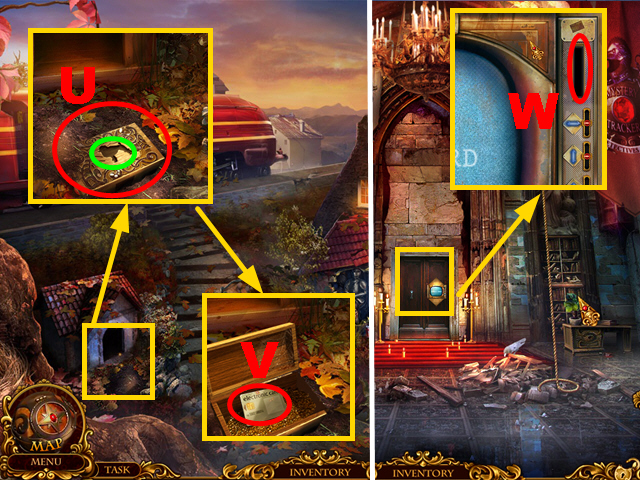
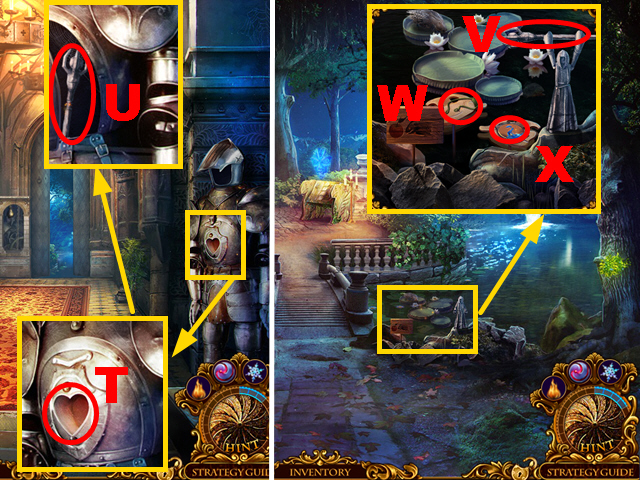
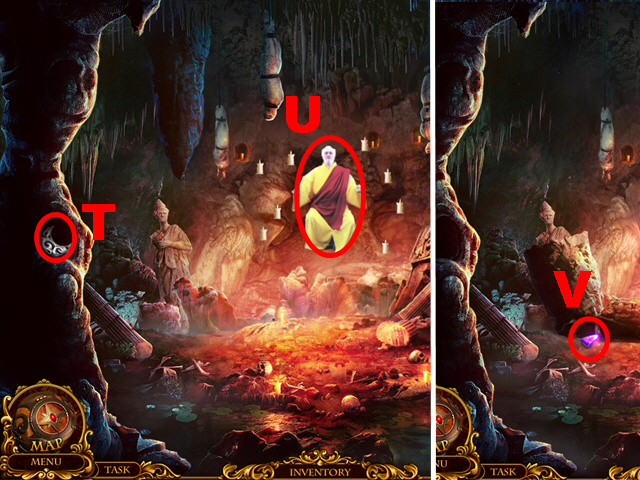
- Take the WALKIE-TALKIE (T) and read the newspaper (U).
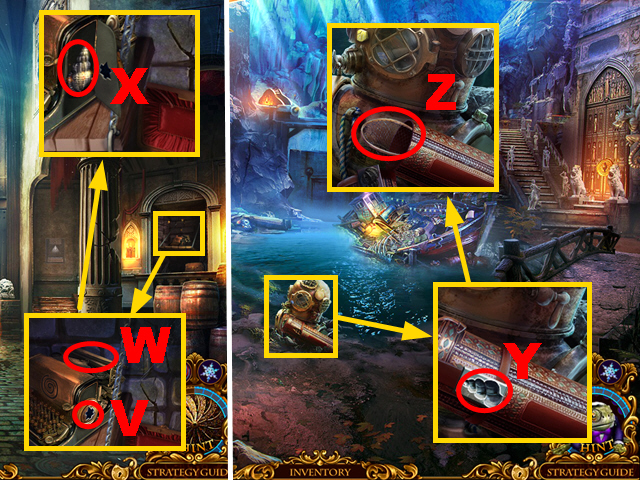
- Zoom into the shelf; take the 4/5 BULLET (V) and the 1/4 BUTTON (W).
- Walk down twice.
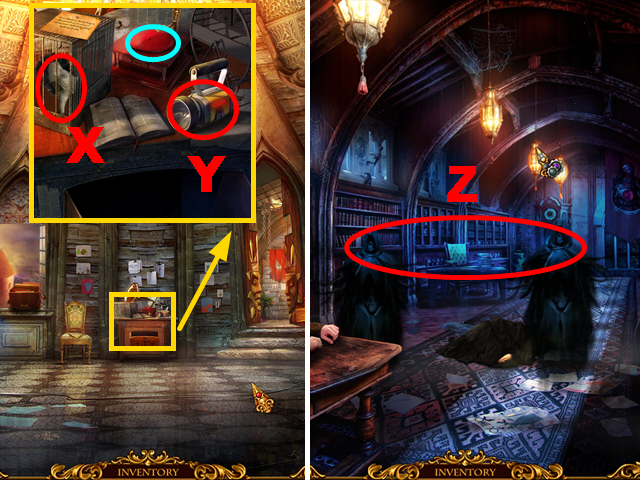
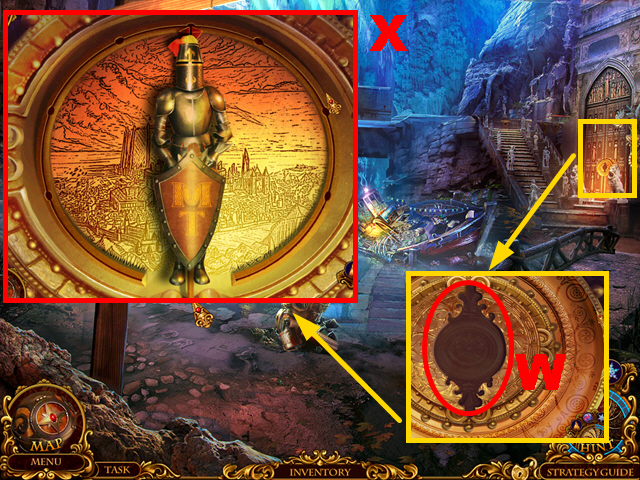
- Give the WALKIE-TALKIE to the agent (X).
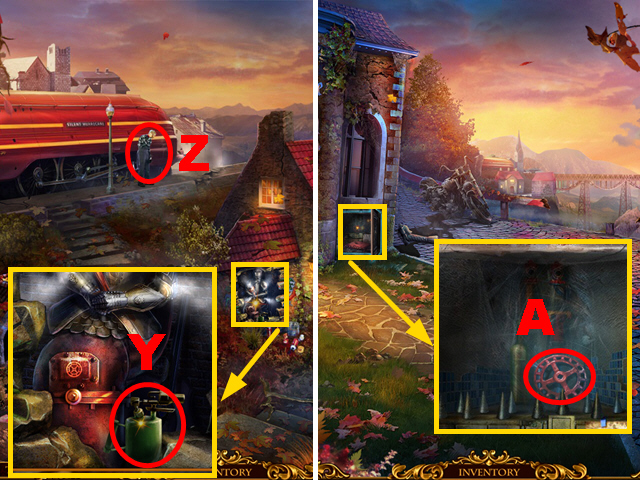
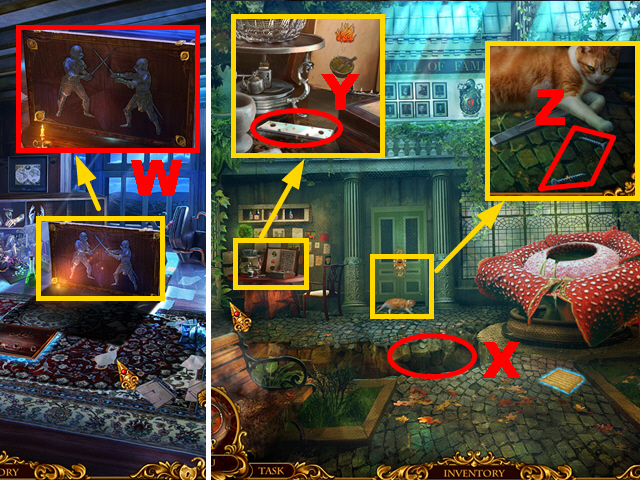
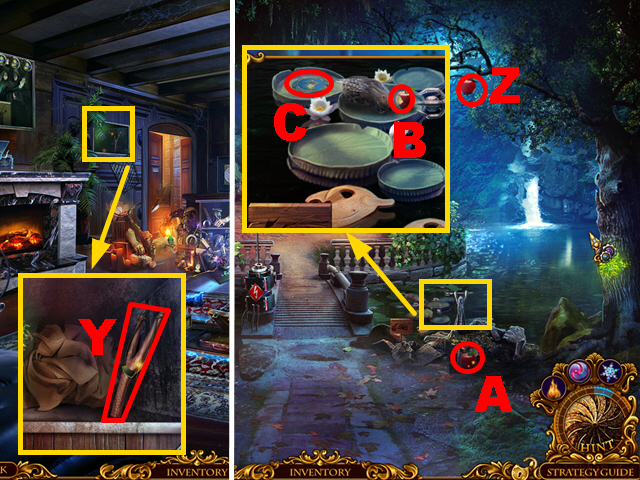
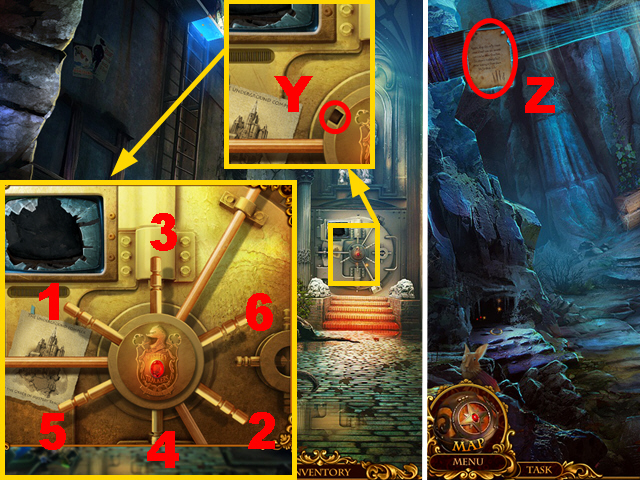
- Try to zoom into the car (Y).
- Go to the Railway Platform, zoom into the Bar, and enter the Bar.
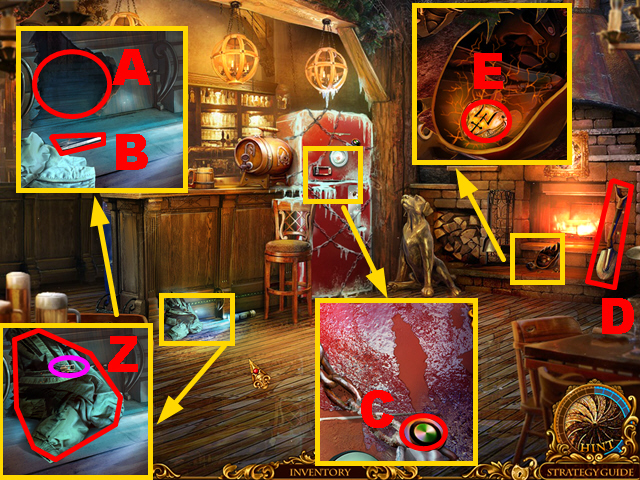
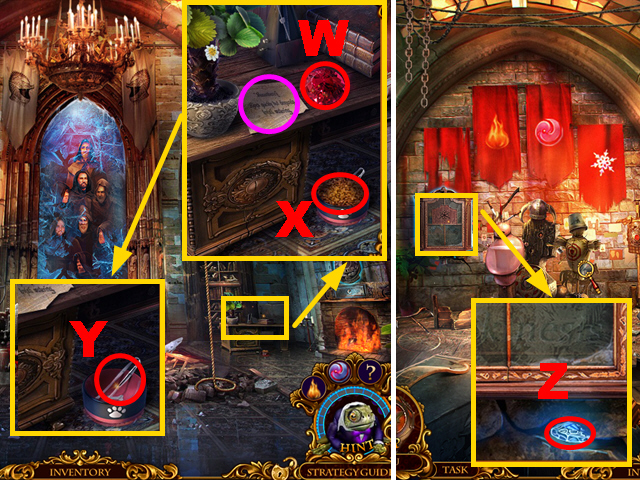
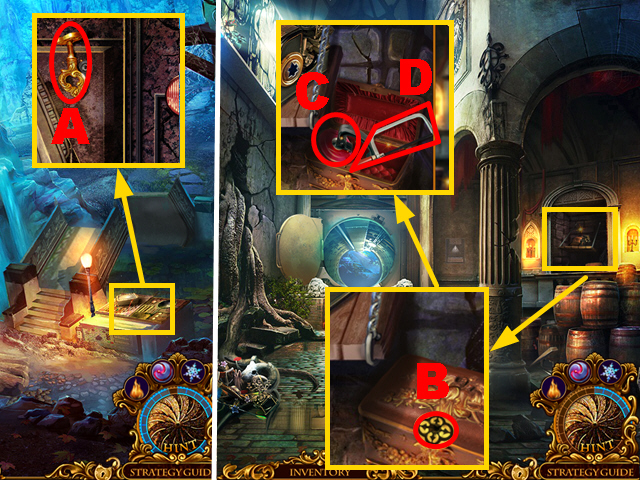
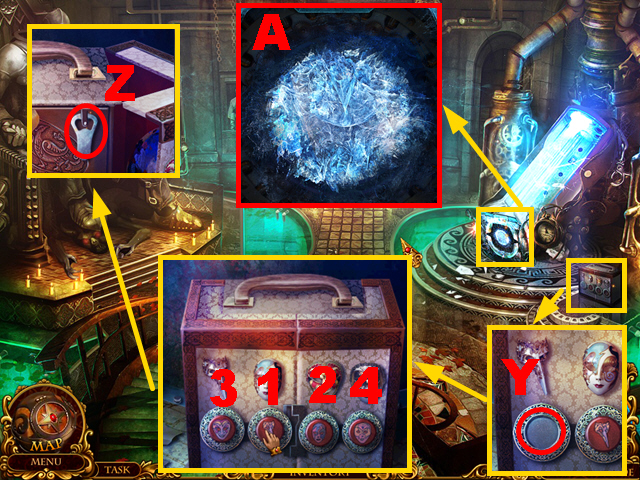
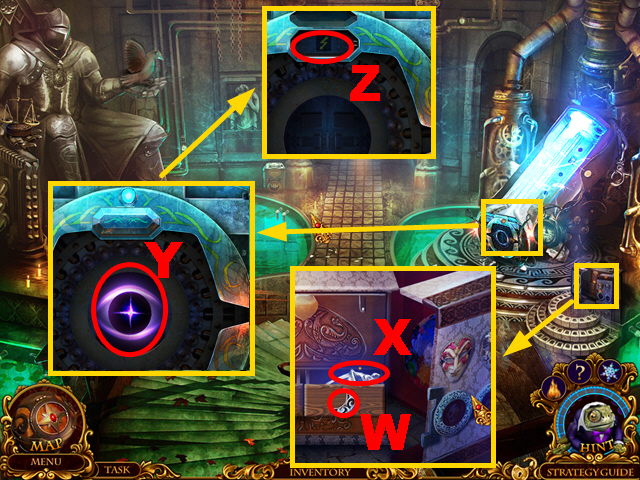
- Zoom into the ground, take the ZIPPER PULL (purple), and remove the jacket (Z); send ELF into the hole (A) and take the TWEEZERS (B).
- Zoom into the fridge; take the 2/4 BUTTON (C).
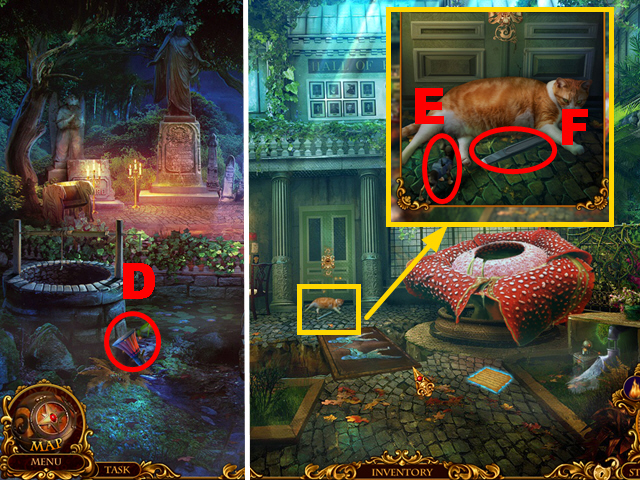
- Take the SPADE (D).
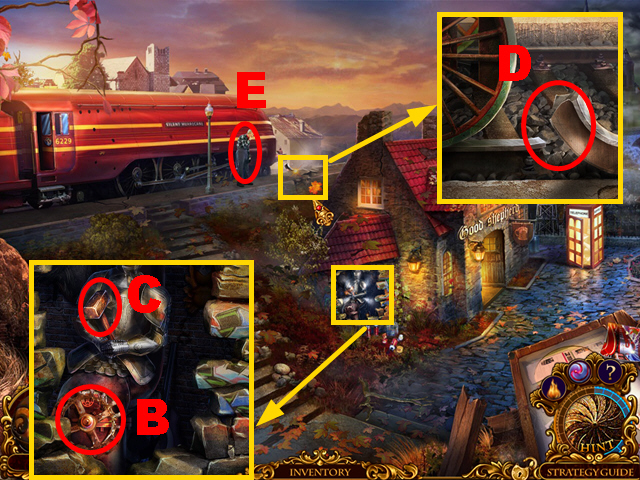
- Zoom into the fireplace; remove the energy pack with the TWEEZERS (E) to acquire the ENERGY PACK.
- Walk down twice.
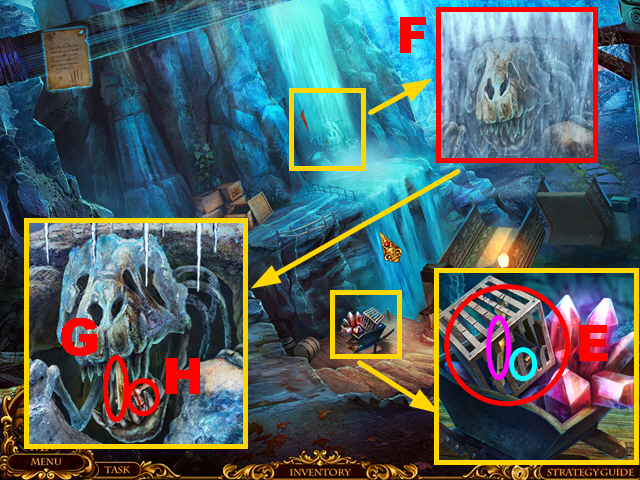
- Take the JERRY CAN WITH FUEL (F).
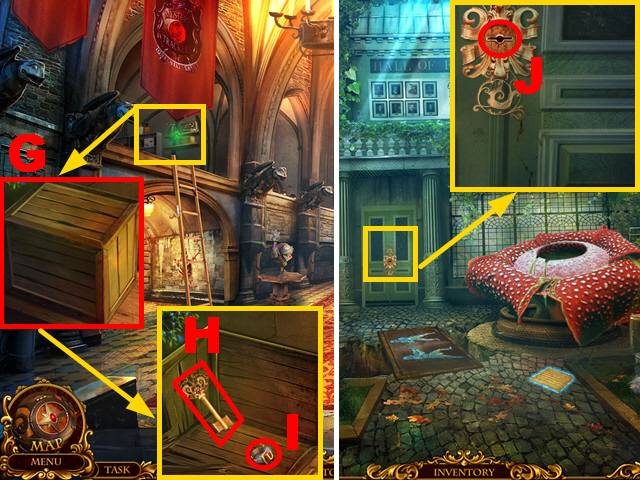
- Zoom into the ground; connect the ENERGY PACK to the device (G) and take the device to acquire the pyrokinesis ability.
- Go to the Railway Platform.
- Zoom into the phone booth; use the pyrokinesis ability to light the fuse (H).
- Enter the Phone Booth.
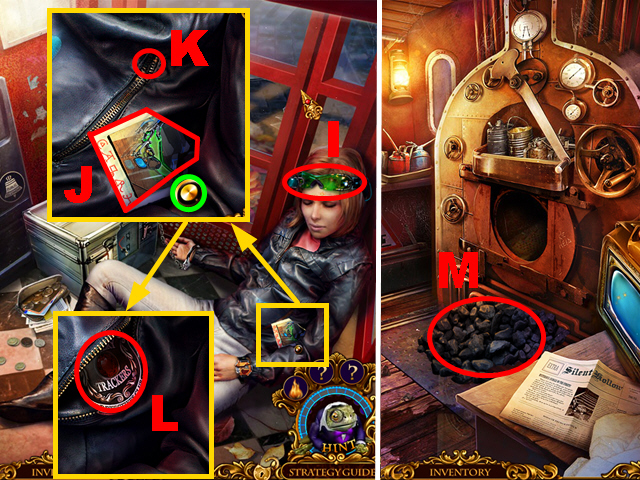
- Take the X-RAY GOGGLES (I).
- Zoom into the jacket and take the TORN PICTURE (J) and the 3/4 BUTTON (green); connect the ZIPPER PULL to the jacket (K), pull it down, and take the BRONZE BADGE (L).
- Go to the Train Engine.
- Use the SPADE to put the coal into the oven (M) and use the pyrokinesis ability to light the coal.
Chapter 2: The Castle Gate
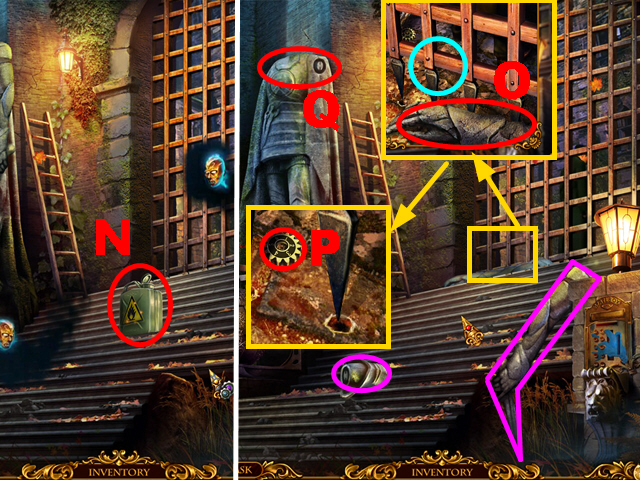
- Put down the FUEL CAN (N) and use the pyrokinesis ability to light it.
- Take the 2 STATUE PARTS (purple).
- Zoom into the gate, take the 3/3 STATUE PART (O).
- Send ELF through the gate (light blue); take the 1/2 TUMBLER (P).
- Connect the 3 STATUE PARTS to the statue (Q).
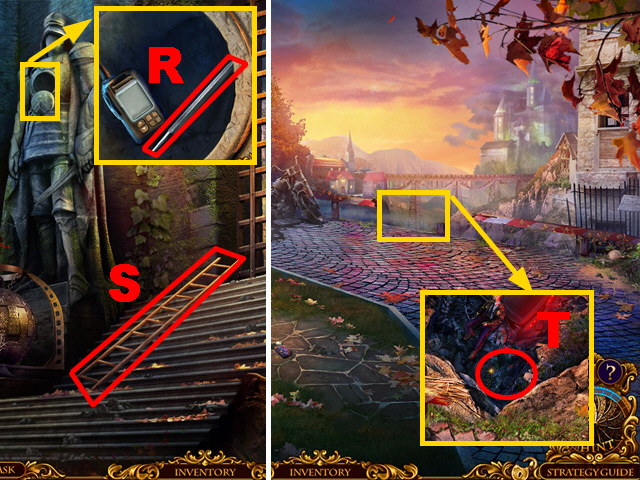
- Zoom into the statue; take the FILE (R).
- Take the LADDER (S).
- Walk down twice.
- Zoom into the abyss; put down the LADDER (T).
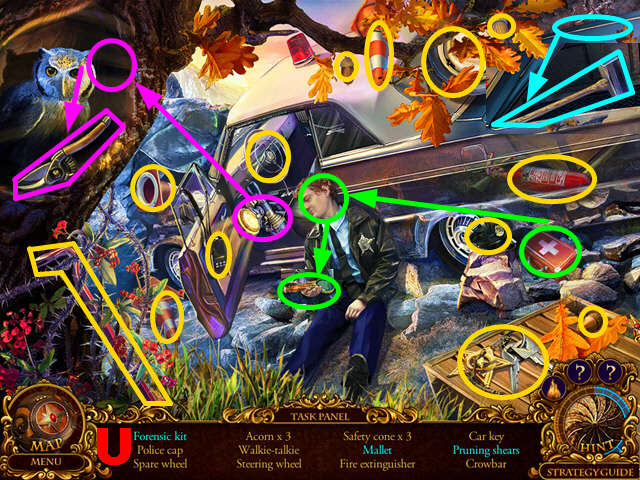
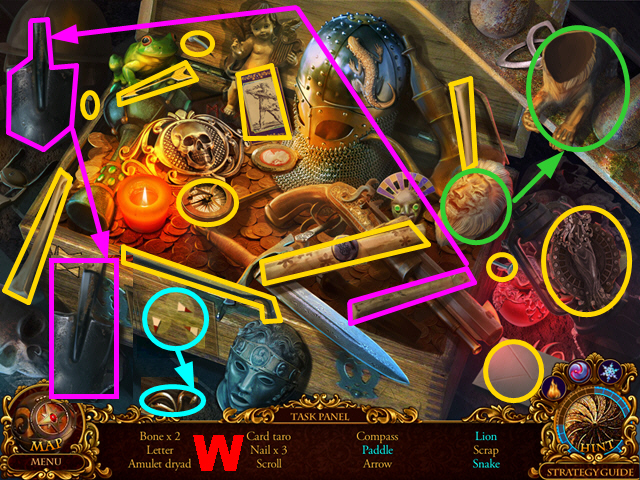
- Play the HOP.
- You will receive the FORENSICS KIT (U).
- Go to the Railway Platform.
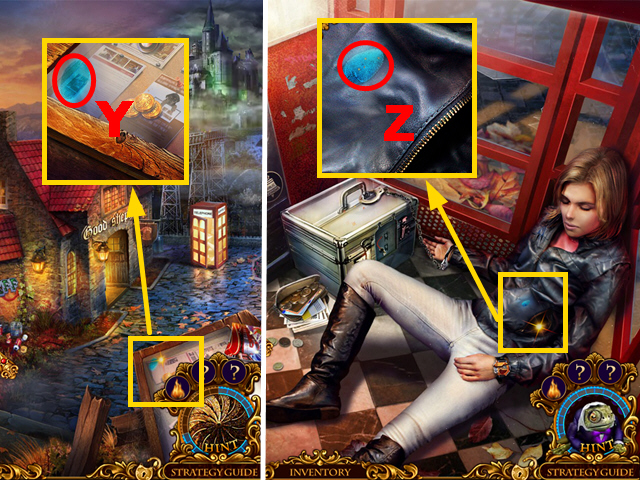
- Zoom into the showcase; acquire the 1/3 FINGERPRINT with the FORENSICS KIT (Y).
- Go to the Phone Booth.
- Zoom into the jacket; acquire the 2/3 FINGERPRINT with the FORENSICS KIT (Z).
- Walk down twice.
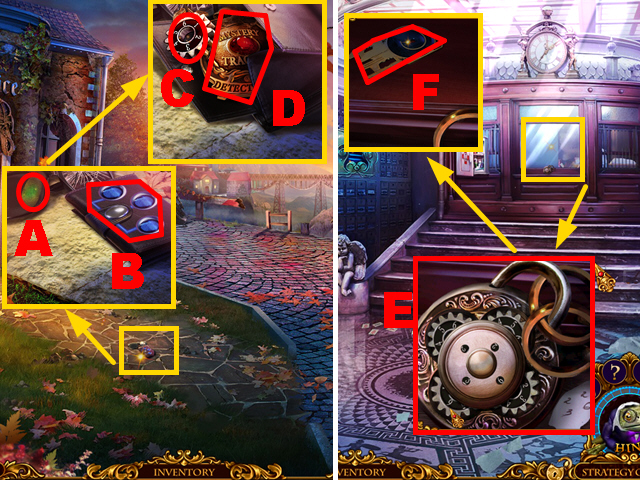
- Zoom into the ground and acquire the 3/3 FINGERPRINT with the FORENSICS KIT (A); put the 3 FINGERPRINTS on the valise (B).
- Take the 2/2 TUMBLER (C) and the GOLD BADGE (D).
- Enter the Post Office.
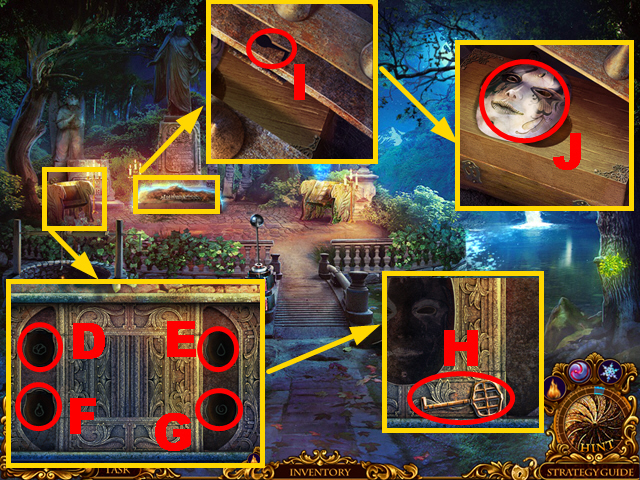
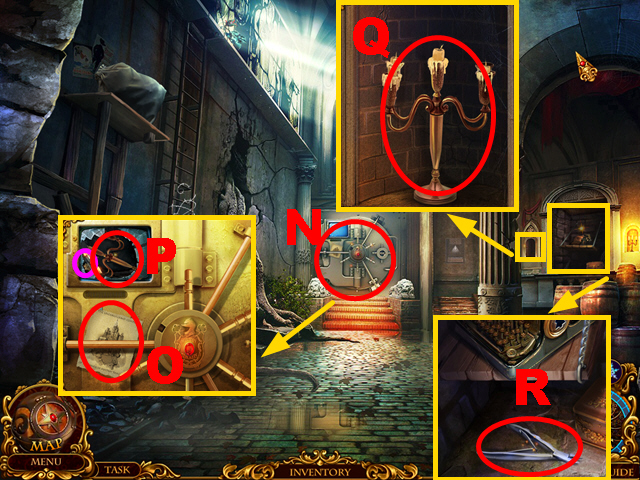
- Zoom into the window, connect the 2 TUMBLERS to the lock (E), and enter the correct code '2263'. Take the BLACK KEY (F).

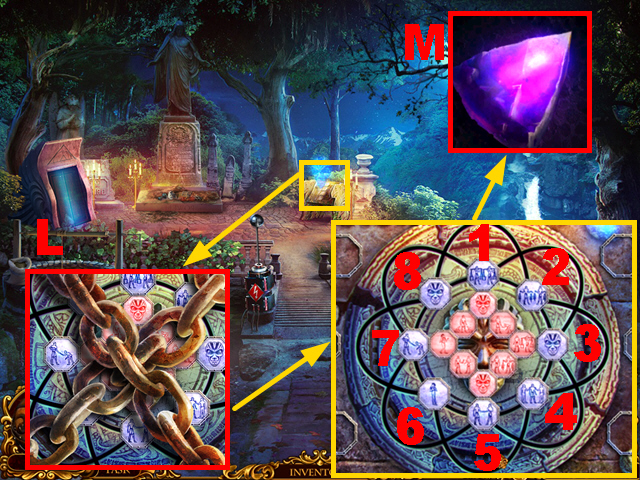
- Zoom into the safe; connect the TORN PHOTO to its other part (G) and use the X-RAY GOGGLES to get the code (H).
- Push the buttons in numerical order 1-5 to open the safe.
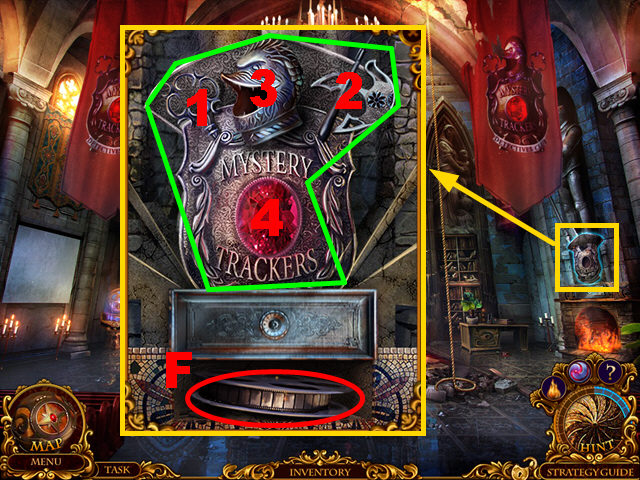
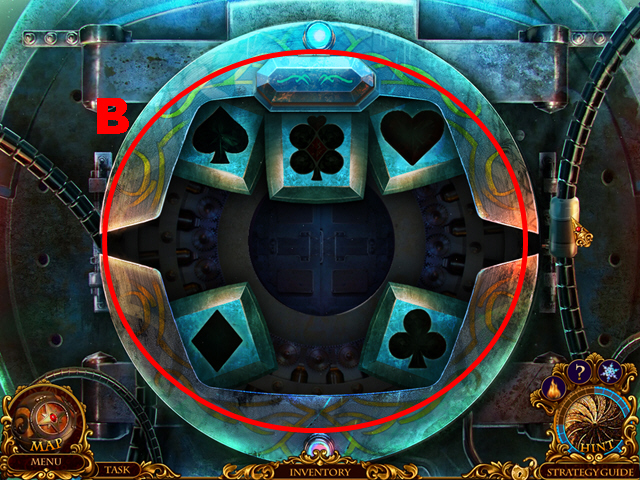
- Play the mini-game.
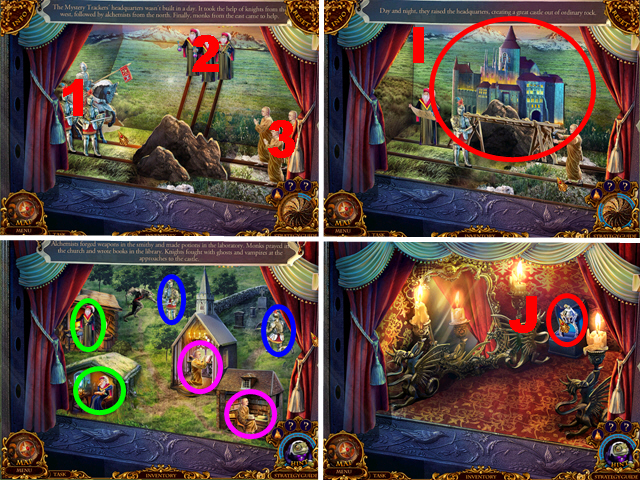
- Activate the figurines in numerical order 1-3.
- Put the castle pieces into the correct position (I).
- Put the alchemists (green), the monks (purple), and the knights (blue) into the correct positions.
- Light the darkness with the pyrokinesis ability and take the DIAMOND RING (J).
- Go to the Railway Platform.
- Zoom into the showcase and cut it open with the DIAMOND RING (K); take the 4/4 BUTTON (light blue).
- Enter the Train Engine.
- Zoom into the television; connect the 4 BUTTONS to it (L).
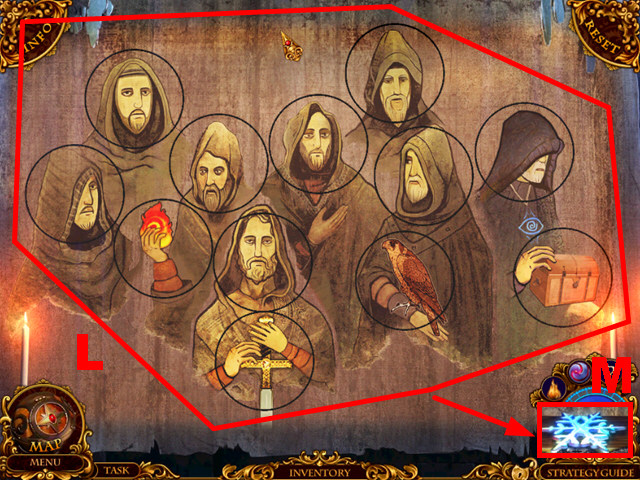
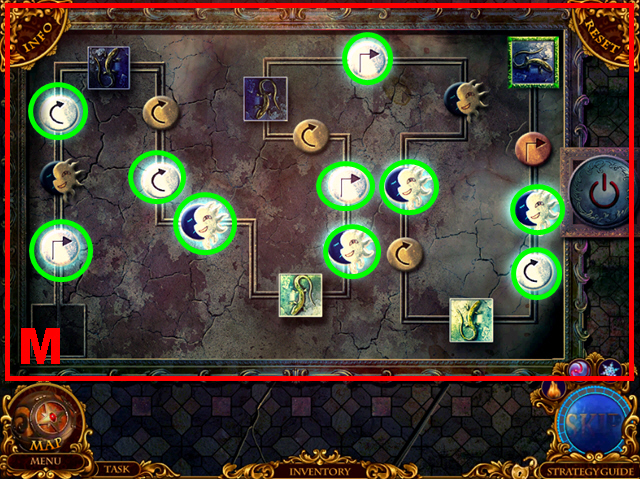
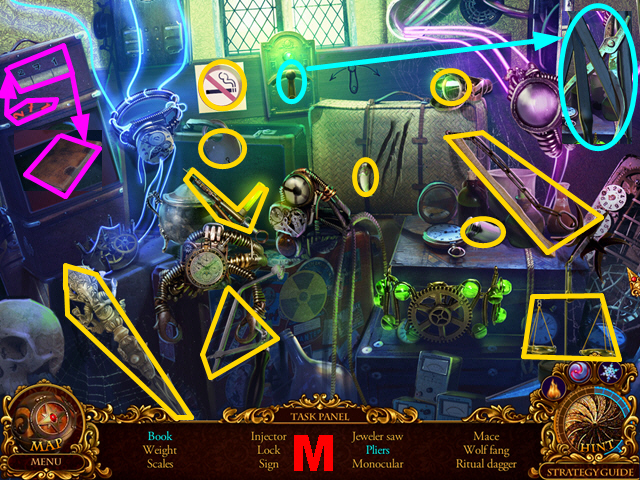
- Play the mini-game.
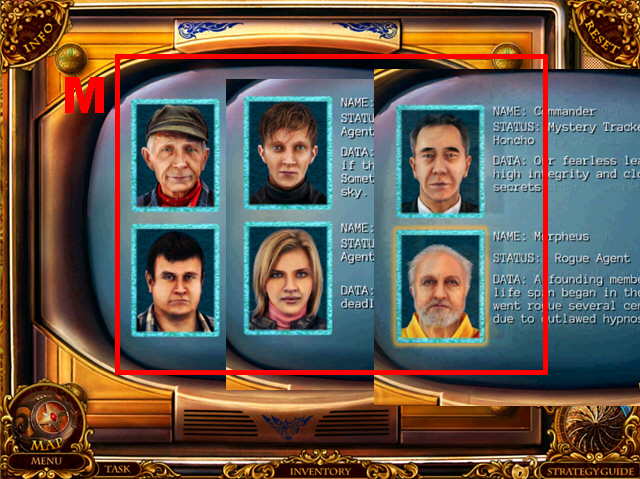
- To solve this puzzle (M), create the 6 correct portraits.
- Go to the Bar.
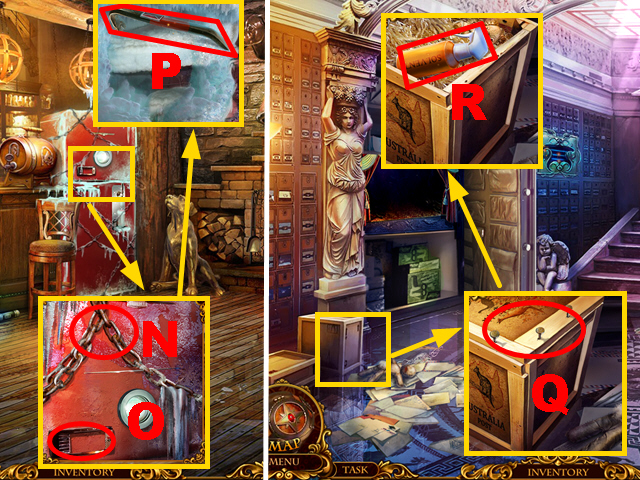
- Zoom into the fridge, cut the chain with the FILE (N), and turn the handle (O).
- Use the pyrokinesis ability to melt the ice and take the CROWBAR (P).
- Go to the Post Office.
- Zoom into the crate and open it with the CROWBAR (Q); take the SOLVENT (R).
- Go to the Castle Gate.
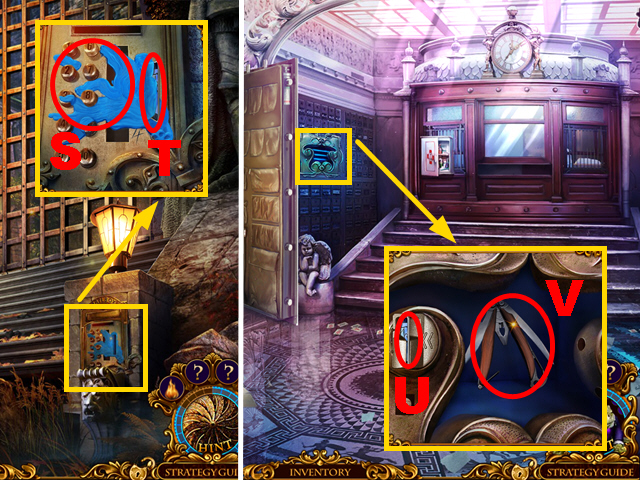
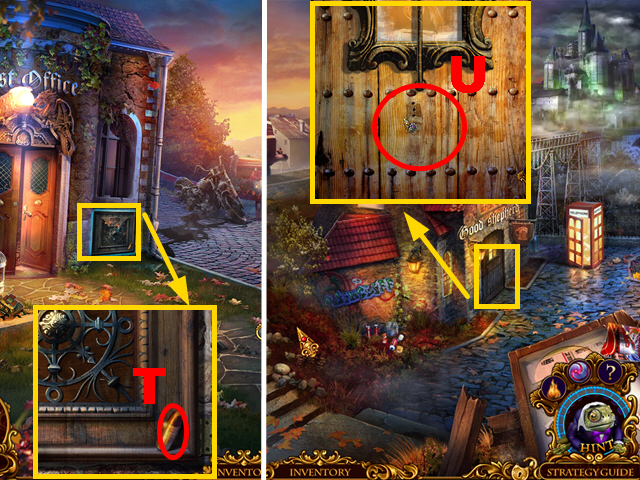
- Zoom into the mailbox and pour the SOLVENT over the gum (S). Enter the code '1984' and take the POST OFFICE ACCESS CARD (T).
- Go to the Post Office.
- Zoom into the compartment and insert the POST OFFICE ACCESS CARD into the slot (U); take the MULTITOOL (V).
- Go to the Phone Booth.
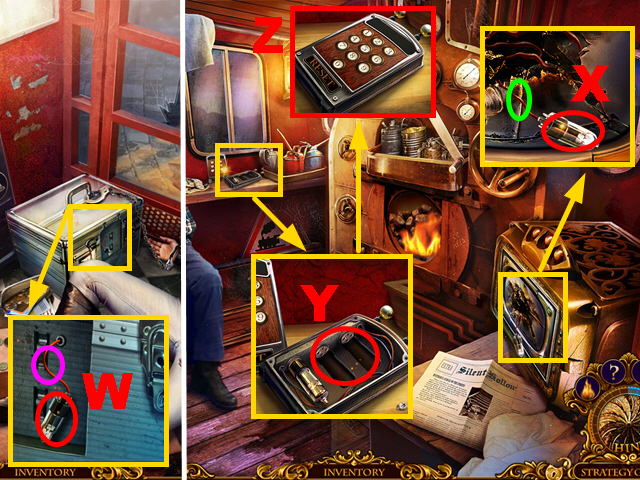
- Zoom into the box; cut the wire with the MULTITOOL (purple) and take the 1/2 RADIO VALVE (W).
- Go to the Train Engine.
- Zoom into the television; cut the wire with the MULTITOOL (green) and take the 2/2 RADIO VALVE (X).
- Zoom into the shelf; insert the 2 RADIO VALVES into the device (Y), fix the device with the MULTITOOL, and take the ELECTRONIC LOCKPICK (Z).
- Go to the Phone Booth.
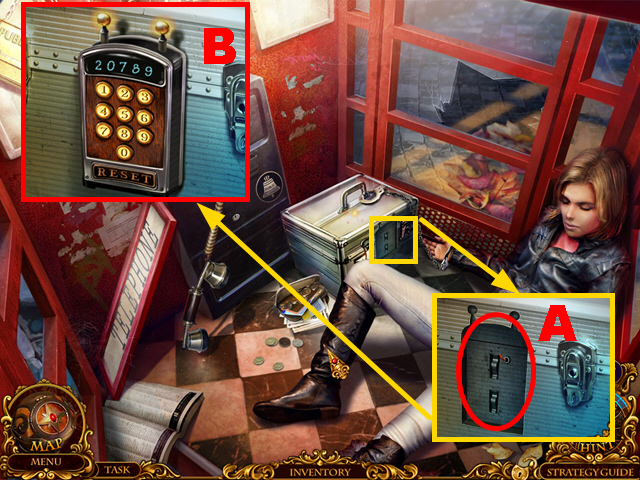
- Zoom into the box and insert the ELECTRONIC LOCKPICK into the niche (A); enter the code '20789' into the electronic lockpick (B).
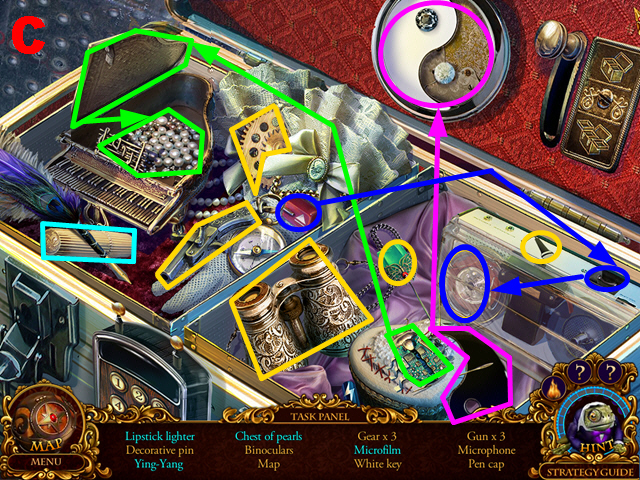
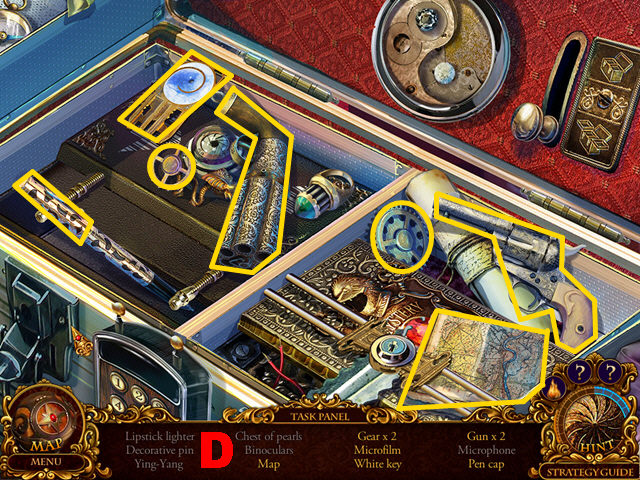
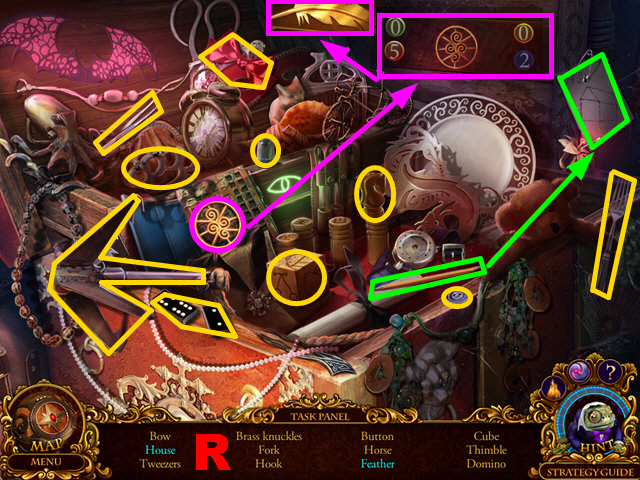
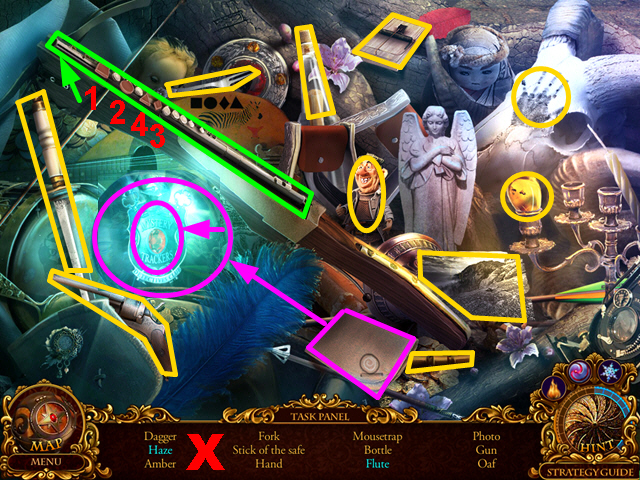
- Play the HOP (C). Pull the lever in the upper right to access the remaining items.
- You will receive the WHITE KEY (D).
- Go to the Castle Gate.
- Zoom into the globe; insert the BRONZE, the SILVER, and the GOLD BADGES into the slots (H).
- Insert the BLACK KEY and the WHITE KEY into the slots (I).
- Swap the picture pieces to create the correct image (J).
- Take the hypnosis ability (K).
- Walk down.
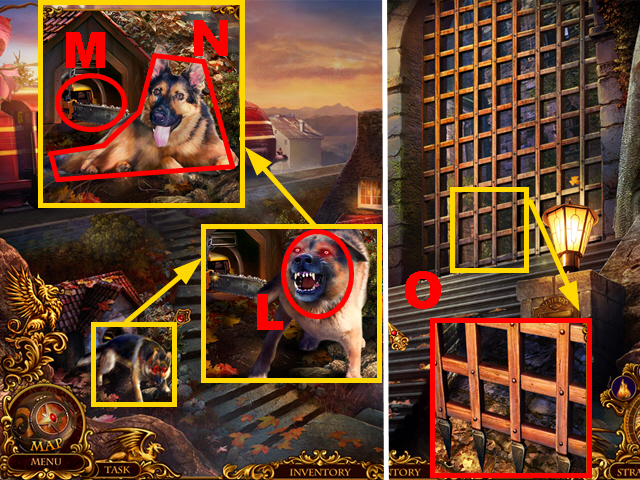
- Zoom into the dog; use the hypnosis ability to calm the dog (L).
- Take the CHAINSAW (M) and JASPER'S DOG (N).
- Go to the Castle Gate.
- Zoom into the gate; break through the gate with the CHAINSAW (O).
- Move forward to the Bailey.
Chapter 3: The Bailey

- Use the hypnosis ability on the agent (P) and talk to him; you will receive the 1/5 SUPER KEY.
- Take the UNLOADED REVOLVER (Q).
- Go to the Post Office.
- Zoom into the package and remove the wire with the MULTITOOL (R); take the MYSTICAL LENS (S).
- Walk down.
- Use the MYSTICAL LENS and zoom into the secret cache; take the 5/5 BULLET (T) to acquire the LOADED REVOLVER.
- Go to the Railway Platform.
- Zoom into the bar; use the LOADED REVOLVER to enter the bar (U).
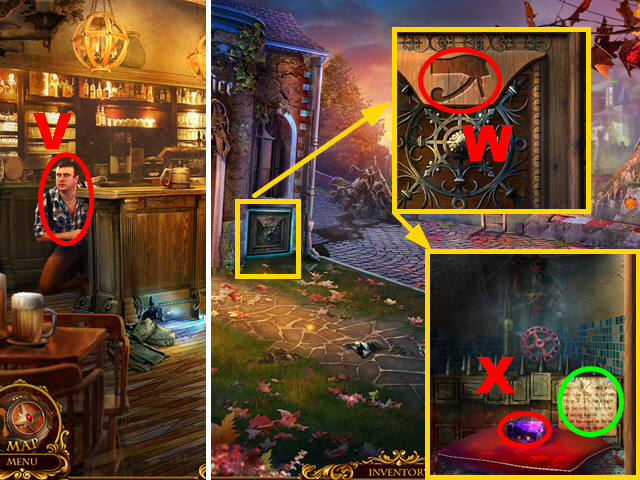
- Give JASPER'S DOG to Jasper (V). Talk to Jasper to receive the EYE OF HORUS.
- Walk down twice.
- Zoom into the secret compartment and insert the EYE OF HORUS into the niche (W); take the 1/4 MORPHEUS' ARTIFACT (X) and read the note (green).
- Go to the Railway Platform.
- Zoom into the broken wall; take the WELDING MACHINE (Y).
- Talk to the engineer (Z); you will receive the CANE.
- Walk down.
- Zoom into the secret compartment; insert the CANE into it to acquire the VALVE (A).
- Go to the Railway Platform.
- Zoom into the broken wall, connect the VALVE to the pipe (B), and turn the valve; take the SLEDGEHAMMER (C).
- Zoom into the rails; hit the bent rail with the SLEDGEHAMMER (D) and fix it with the WELDING MACHINE.
- Talk to the engineer (E).
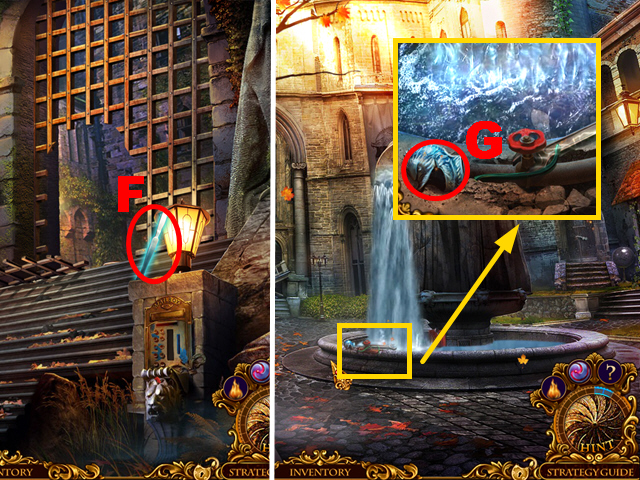
- Use the MYSTICAL LENS to reveal the scalpel; take the SCALPEL (F).
- Move forward.
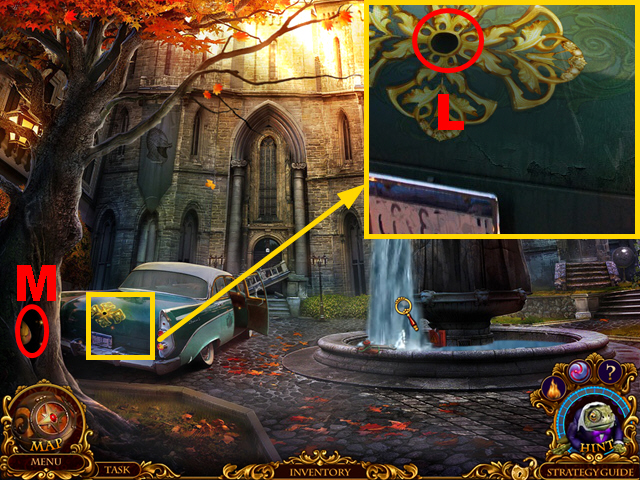
- Zoom into the fountain; take the HELMET AMULET (G).
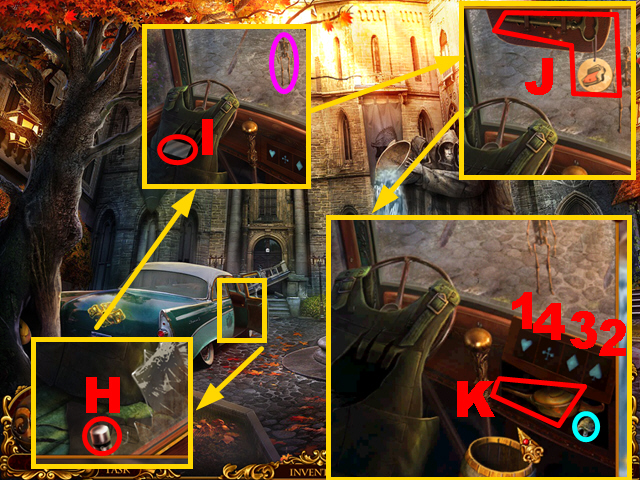
- Zoom into the car front, break the window with the SLEDGEHAMMER. Pull the button (H) and open the door; cut the backpack with the SCALPEL and take the METAL PLATE (I).
- Pull the cord (purple) and take the TRUNK KEY (J).
- Push the buttons in numerical order 1-4.
- Take the OIL CAN (K) and the TURTLE AMULET (light blue).
- Zoom into the car trunk; insert the TRUNK KEY into the slot (L) and turn the key.
- Send ELF into the tree hole (M) to acquire the BARREL LID.
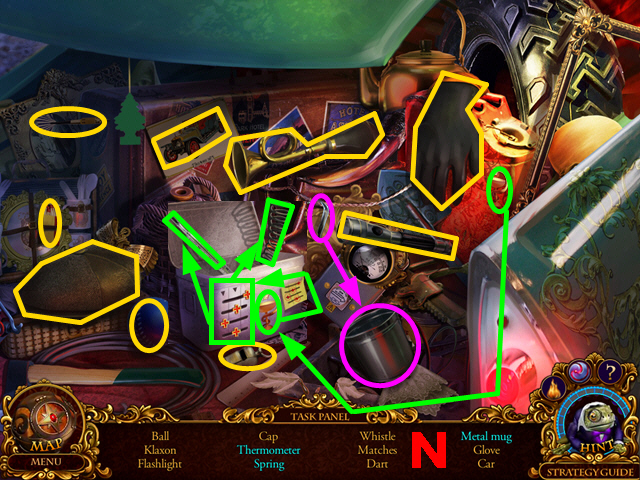
- Play the HOP.
- You will receive the RUBBER GLOVE (N).
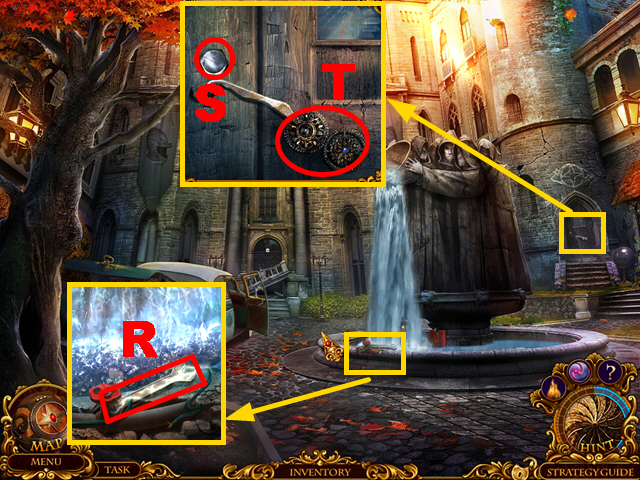
- Zoom into the fountain; use the RUBBER GLOVE to acquire the WRENCH (R).
- Zoom into the door; remove the bolt with the WRENCH (S), pour the OIL CAN over the gears (T) and open the door.
- Enter the Tower.
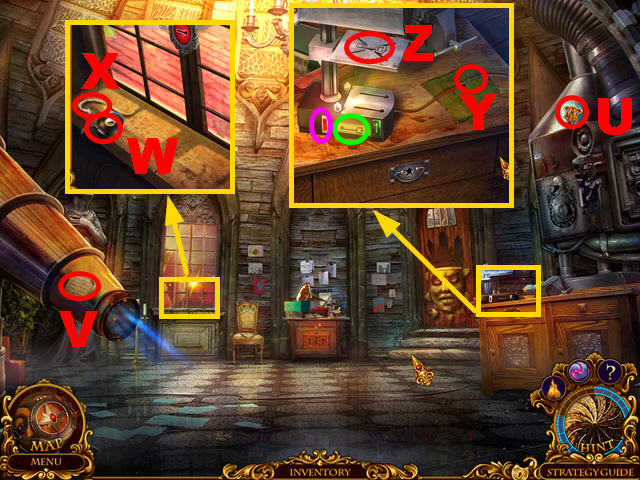
- Use the MYSTICAL LENS to reveal the amulet (U); take the AMULET MT.
- Read the note (V).
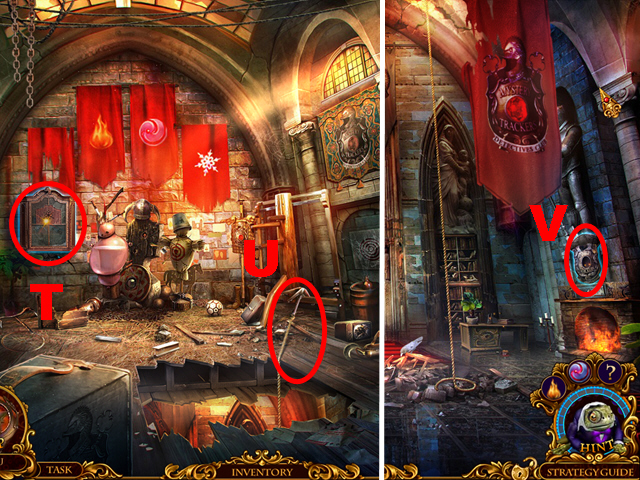
- Zoom into the window; take the ELECTRICAL TAPE (W) and the FUSE (X).
- Zoom into the dresser and fix the wire with the ELECTRICAL TAPE (Y).
- Insert the METAL PLATE into the device, choose the correct key shape (green), push the button (purple), and take the WINDOW KEY (Z).
- Zoom into the window, insert the WINDOW KEY into the lock (A), and turn the key.
- Send ELF through the window, insert the AMULET MT into the niche (B), and take the 1/2 SUN CROWN (C).
- Zoom into the table; take the RAG (D).
- Zoom into the telescope; clean the lens with the RAG (E).
- Play the mini-game.
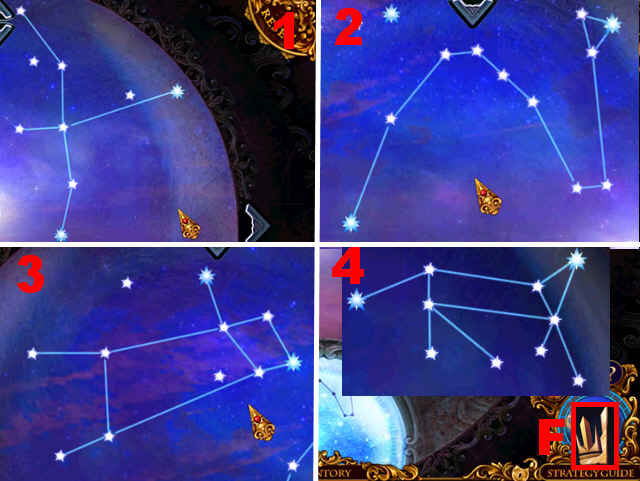
- To solve this puzzle, identify and select the constellations in numerical order 1-4.
- Take the 2/2 SUN CROWN (F).
- Zoom into the door; look through the window (light blue) and insert the 2 SUN CROWNS into the niche (G).
- Enter the Tower Attic.
- Zoom into the gargoyle and use the pyrokinesis ability to remove the cobwebs (purple); take the STAR KEY (H).
- Walk down.
- Zoom into the dresser, insert the STAR KEY into the niche (I), and turn the key; take the 1/2 GARGOYLE'S FANG (J).
- Zoom into the table, insert the STAR KEY into the niche (K), and turn the key; send ELF into the drawer and take the CAN OPENER (L).
- Zoom into the dresser; open the can with the CAN OPENER (M) and take the JAR WITH GUNPOWDER.
- Walk down.
- Zoom into the car front; insert the JAR WITH GUNPOWDER, the BARREL LID, and the FUSE into the barrel (N). Take the BARREL WITH GUNPOWDER.
- Go to the Tower Attic.
- Put down the BARREL WITH GUNPOWDER (O) and use the pyrokinesis ability to light the barrel.
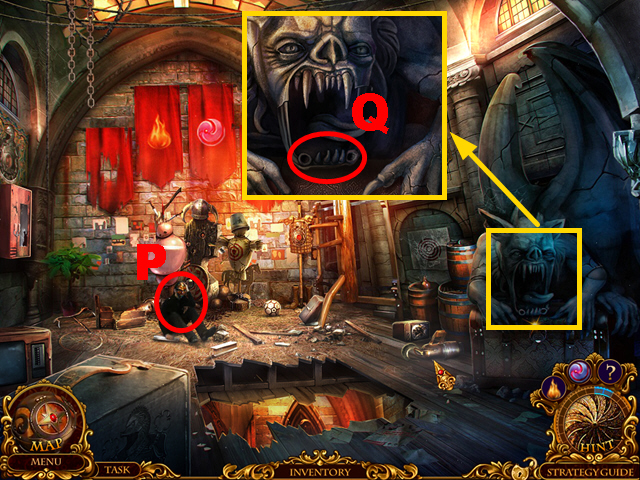
- Use the hypnosis ability on the agent (P) and talk to him; you will receive the 2/5 SUPER KEY and the 2/2 GARGOYLE'S FANG.
- Zoom into the gargoyle; insert the 2 GARGOYLE'S FANGS into its mouth (Q).
- Play the HOP.
- You will receive the GRAPPLING HOOK (R).
- Use the MYSTICAL LENS to reveal the cabinet (T).
- Connect the GRAPPLING HOOK trough the gap in the floor (U).
- Climb down the rope.
- Use the MYSTICAL LENS to reveal the armor (V).
- Zoom into the desk; take the RUBY (W) and read the note (purple). Send ELF to the bowl (X); take the LONG TONGS (Y).
- Climb up the rope.
- Zoom into the cabinet; use the LONG TONGS to acquire the ENERGY CAPSULE (Z).
- Climb down the rope.
- Zoom into the globe, insert the ENERGY CAPSULE into the niche (A), and push the button (B). Insert the TURTLE AMULET into the niche (light blue) and take the KEY AMULET PART (C).
- Use the pyrokinesis ability to burn the tapestry (D).
- Zoom into the door; take the KEY AMULET PART (E).
- Zoom into the armor; insert the 2 KEY AMULET PARTS, the RUBY, and the HELMET AMULET into the slots (green).
- Push the amulet parts in numerical order 1-4; take the FILM (F).
- Climb up the rope.
- Zoom into the training stand; take the CORKSCREW (G) and the MUG (H).
- Climb down the rope.
- Insert the FILM into the projector (I) and push the button (J).
- Zoom into the screen (K).
- Play the mini-game.
- To solve this puzzle (L), swap the pieces to create the correct picture.
- Take the SNOWFLAKE (M).
- Climb up the rope.
- Zoom into the cabinet and insert the SNOWFLAKE into the niche (N); take the gun (O) to acquire the freezing ability.
- Zoom into the training stand and use the freezing ability to freeze the water (P); take the 1/2 CLOCK HAND (Q).
- Go to the Bailey.
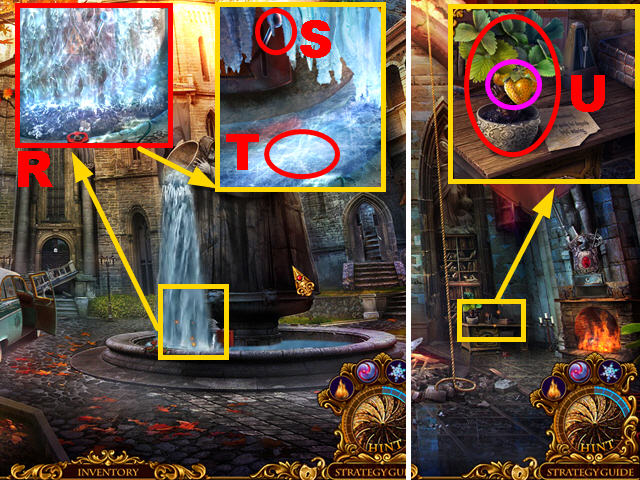
- Zoom into the fountain and use the freezing ability to freeze the water (R). Knock an icicle loose to break the ice. Turn the switch (S) and put the MUG into the water (T) to acquire the MUG WITH WATER.
- Go to the Main Hall.
- Zoom into the desk; pour the MUG WITH WATER over the plant (U) and take the FRUIT (purple).
- Enter the Library.
Chapter 4: The Library
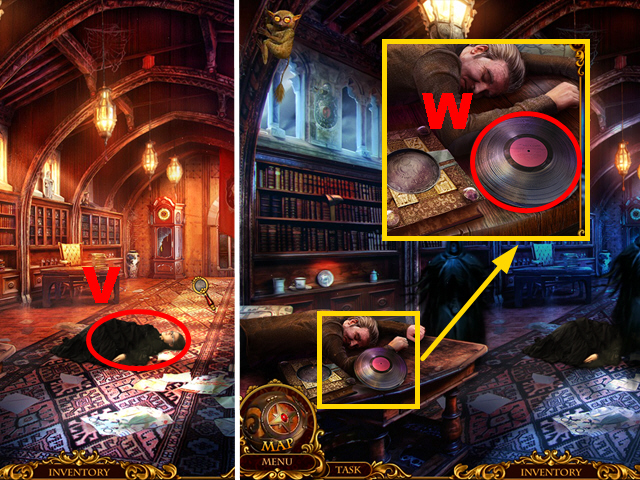
- Zoom into the agent (V).
- Zoom into the desk; take the MUSIC RECORD (W).
- Go to the Tower.
- Zoom into the table, put the MUSIC RECORD on the music player (light blue), and give the FRUIT to the animal (X); take the POWERFUL LANTERN (Y).
- Go to the Library.
- Chase away the ghosts with the POWERFUL LANTERN (Z).
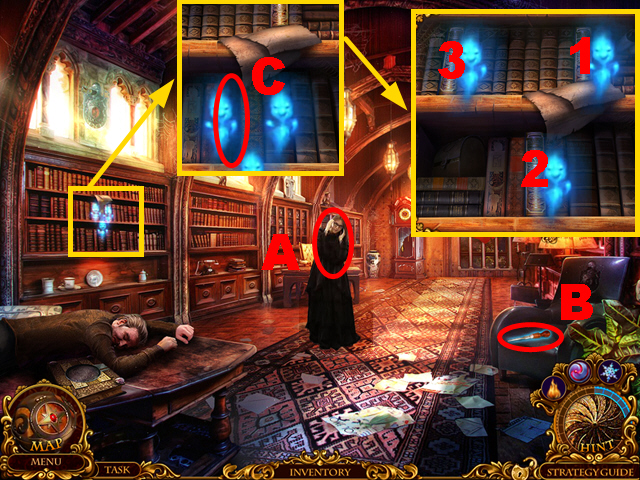
- Talk to the agent (A); you will receive the 3/5 SUPER KEY and the BOOK.
- Use the MYSTICAL LENS to reveal the screwdriver (B) and take the SCREWDRIVER.
- Zoom into the shelf and insert the BOOK (C); push the books in numerical order 1-3.
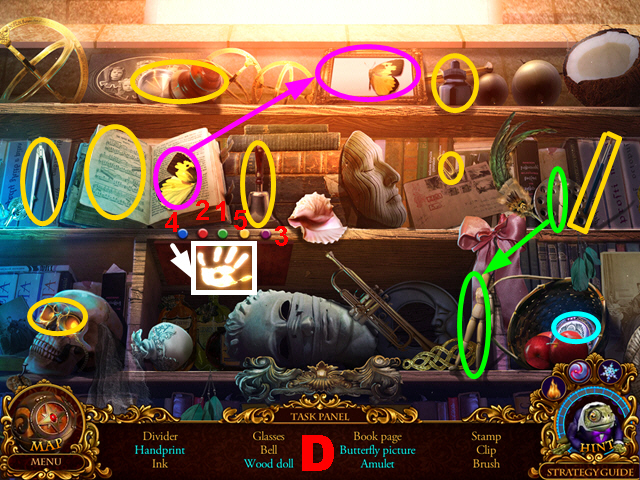
- Play the HOP.
- You will receive the CONFIDENTIALITY BADGE (D).

- Zoom into the desk and insert the CONFIDENTIALITY BADGE into the slot (H); open the book, turn the pages four times, and take the 2/2 ARROW (I).
- Walk down.
- Zoom into the fireplace and use the freezing ability to freeze the fire (green); take the COUNTERBALANCE (J).
- Go to the Library.
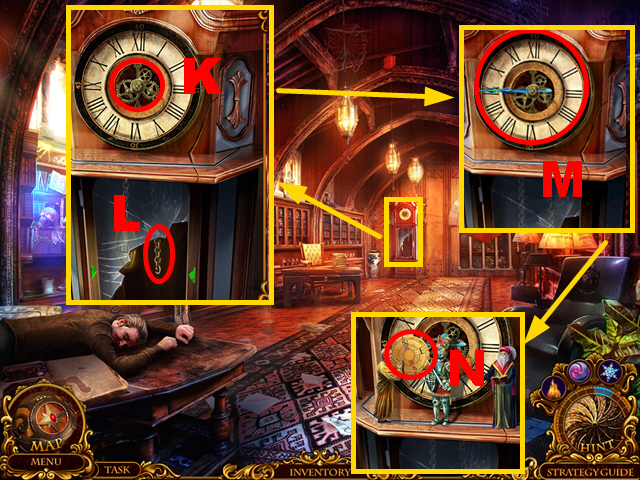
- Zoom into the clock; put the 2 ARROWS (K) and the COUNTERBALANCE (L) into the clock.
- Put the clock hands into the correct position (M) and take the COMPASS (N).
- Walk down.
- Zoom into the globe and insert the COMPASS into the niche (O); open the bottle with the CORKSCREW (P) and take the POLICE KEY (Q).
- Climb up the rope.
- Zoom into the fire cabinet, insert the POLICE KEY into the handcuffs (R), and turn the key to acquire the HANDCUFFS; open the cabinet and take the HAND HOE (S) and the DOG AMULET (T).
- Go to the Railway Platform.
- Zoom into the kennel, remove the soil with the HAND HOE (U) and insert the DOG AMULET into the niche (green); take the ELECTRONIC CARD (V).
- Go to the Main Hall.
- Zoom into the door; insert the ELECTRONIC CARD into the slot (W).
- Play the mini-game.
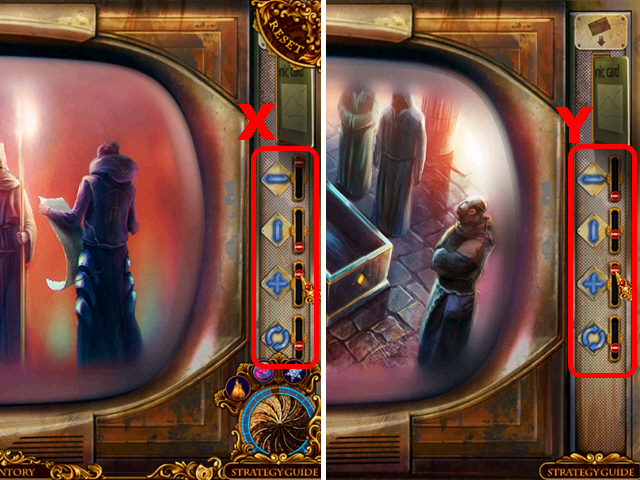
- To solve this puzzle, adjust the sliders correctly for the pictures (X) and (Y).
- Enter the Commander's Office.

- Talk to the agent.
- Zoom into the vent and remove the grate with the SCREWDRIVER (Z); take the GOLF CLUB (A) and the SPRAY (B).
- Take the BOARDS (C).
- Use GOLF CLUB to push over the cabinet (D).
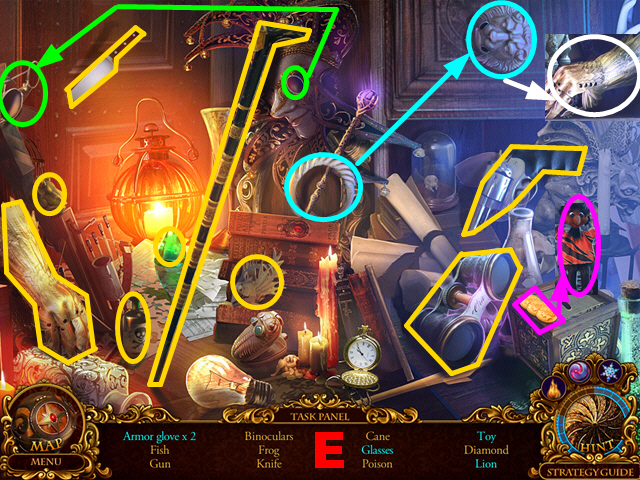
- Play the HOP.
- You will receive the CANE (E).
- Zoom into the door; take the RING (I).
- Zoom into the box and put the RING on the box (J); take the SILVER KEY (K).
- Zoom into the door; insert the SILVER KEY into the lock (L) and turn the key to acquire the CADUCEUS.
- Use the MYSTICAL LENS to reveal a secret compartment (light blue).
- Zoom into the compartment and insert the caduceus into the niche (M); take the 1/2 SAPPHIRE ARROW (N) and the BANDAGE (O).
- Zoom into the commander; fix his leg with the CANE, the BOARDS, and the BANDAGE (P).
- Talk to the commander (Q); you will receive the GOLDEN KEY.
- Zoom into the door; insert the GOLDEN KEY into the lock (R), turn the key, and push the handle (dark blue).
- Enter the Corridor.

- Zoom into the peacock; take the 2/2 SAPPHIRE ARROW (S).
- Walk down.
- Zoom into the box; insert the 2 SAPPHIRE ARROWS into the slots (T).
- Turn the arrows in the following order: Ux2, X, Wx3, V, and X.
- Take the GREENHOUSE KNOB (Y) and the PEACOCK'S EYE (Z).
- Enter the Corridor.
- Zoom into the door; insert the GREENHOUSE KNOB into the slot (A) and pull the knob.
- Enter the Greenhouse.
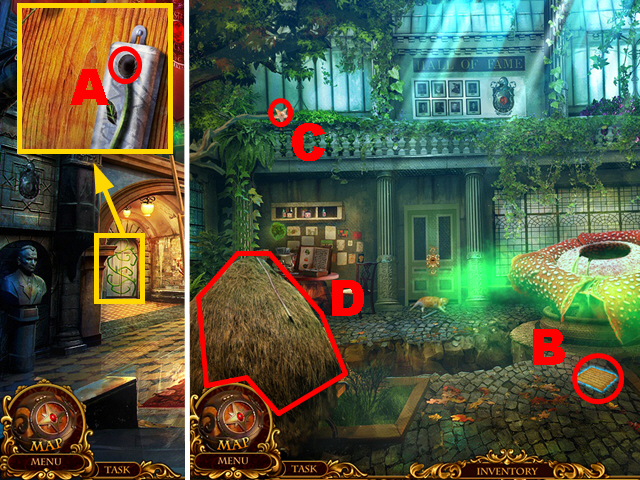
- Use the MYSTICAL LENS to reveal the note (B).
- Try to grab the star (C).
- Use the pyrokinesis ability to burn the haystack (D).
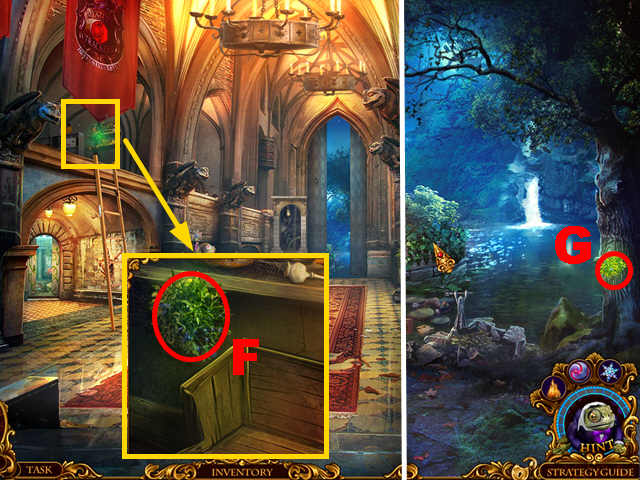
- Take the HELMET STAR (E).
- Walk down.
- Zoom into the armor and insert the HELMET STAR into the niche (F); take the WATER FLOW LEVER (G).
- Enter the Greenhouse.
- Zoom into the small table, connect the WATER FLOW LEVER to the pipe (H), and turn the lever; use the freezing ability to freeze the water (I) and take the PEACOCK'S EYE (J).
- Walk down.
- Zoom into the peacock and insert the 2 PEACOCK'S EYES into the slots (green); take the FAN (K).
- Enter the Greenhouse.
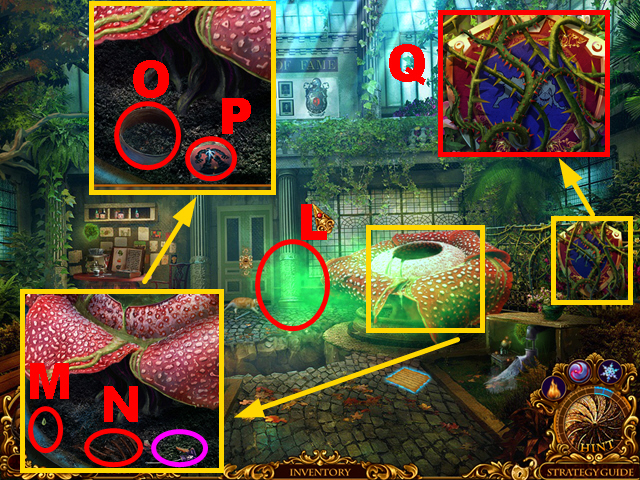
- Use the FAN to remove the poisonous fumes (L).
- Zoom into the plant and put down the SPRAY (M). Put the cap (purple) on the spray, and take the SPRAY WITH POISON.
- Let ELF dig through the soil (N); take the SIEVE (O) and the EARTH EMBLEM (P).
- Zoom into the shield; remove the thorns with the SPRAY WITH POISON (Q).
- Play the mini-game.
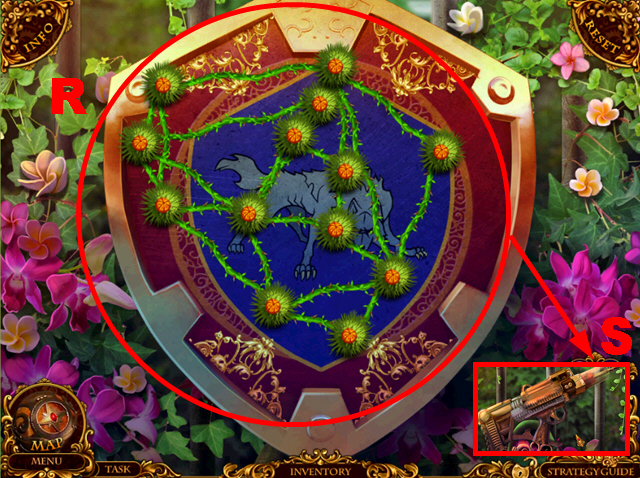
- To solve this puzzle (R), move around the vines so that they do not overlap.
- Take the TRANQUILIZER (S).
- Walk down.

- Shoot the TRANQUILIZER at the wolf (T).
- Talk to the agent (U); you will receive the 4/5 SUPER KEY.
- Zoom into the compartment; take the FORK KEY (V).
- Walk down.
- Zoom into the desk; loosen the desk lid with the FORK KEY (W) and take the DESK LID.
- Go to the Greenhouse.
- Put the DESK LID across the gap (X).
- Zoom into the table; take the MOUNTING PLATE (Y).
- Zoom into the door; take the SCREWS (Z).
- Walk down.
- Zoom into the ladder; connect the MOUNTING PLATE and the SCREWS to the ladder (A) and tighten the screws with the SCREWDRIVER.
- Zoom into the top floor; take the WEIGHT (B).
- Zoom into the mechanism and attach the HANDCUFFS to the chain (C); connect the WEIGHT to the handcuffs.
- Enter the Memorial.
Chapter 5: The Memorial
- Take the LOUDSPEAKER (D).
- Go to the Greenhouse.
- Zoom into the cat and use ELF on it (E). Put the LOUDSPEAKER next to ELF; take the CHISEL (F).
- Walk down.
- Zoom into the top floor and open the crate with the CHISEL (G); take the GLASSHOUSE KEY (H) and the U RING (I).
- Enter the Greenhouse.
- Zoom into the door; insert the GLASSHOUSE KEY into the lock (J) and turn the key.
- Play the HOP.
- You will receive the ELEPHANT (K).
- Zoom into the small table and put the ELEPHANT on the box (M); take the EMERGENCY KEY (N).
- Go to the Commander's Office.
- Zoom into the secret compartment; insert the EMERGENCY KEY into the lock (O), and turn the key. Insert the U RING into the slot (purple) and take the LIGHTNING ROD (P).
- Go to the Memorial.
- Insert the LIGHTNING ROD into the slot (Q).
- Use the hypnosis ability on the agent (R).
- Talk to the agent; you will receive the 5/5 SUPER KEY and the AIR EMBLEM.
- Use the MYSTICAL LENS to reveal the tombstone (green).
- Zoom into the tombstone; take the FLAMING HEART (S).
- Walk down.
- Zoom into the armor and insert the FLAMING HEART into the niche (T); take the STAFF (U).
- Go to the Memorial.
- Zoom into the pond and insert the STAFF into the figurine's hands (V); take the RUBBER BAND (W) and the WATER EMBLEM (X).
- Go to the Commander's Office.
- Zoom into the compartment; attach the RUBBER BAND to the slingshot (Y) and take the SLINGSHOT.
- Go to the Memorial.
- Shoot the SLINGSHOT at the apple (Z).
- Take the APPLE (A).
- Zoom into the pond and put down the APPLE (B); take the FIRE EMBLEM (C).
- Zoom into the marble slab; insert the EARTH EMBLEM (D), the WATER EMBLEM (E), the FIRE EMBLEM (F), and the AIR EMBLEM (G) into the related slots.
- Take the CAGE KEY (H).
- Zoom into the tombstone, insert the CAGE KEY into the lock (I), and turn the key; take the MARBLE MASK (J).
- Zoom into the marble slab; insert the MARBLE MASK into the slot (K).
- Play the mini-game.
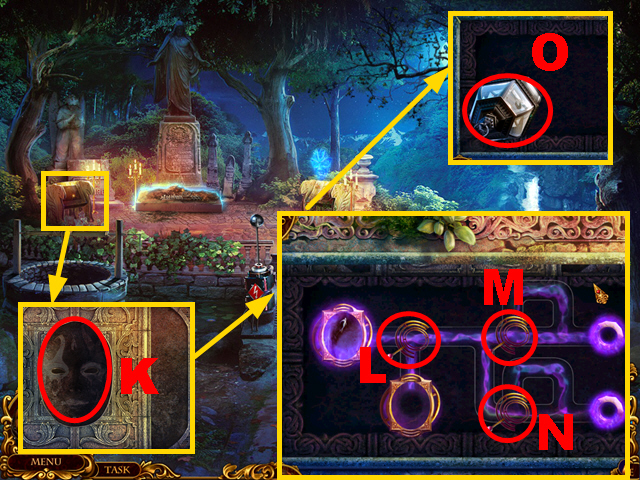
- To solve this puzzle, turn the levers in the following order: M, L, N, and Lx3.
- Take the OIL LAMP (O).
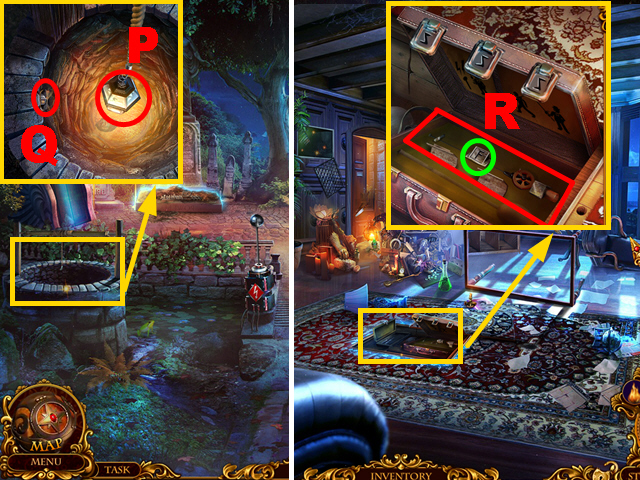
- Zoom into the well, connect the OIL LAMP to the rope (P), and light the oil lamp with the pyrokinesis ability; remove the stone and take the F RING (Q).
- Go to the Commander's Office.
- Zoom into the secret compartment and insert the F RING into the slot (green); take the SUPER FISHING ROD (R).
- Go to the Memorial.

- Zoom into the well and pull up the sack with the SUPER FISHING ROD (S); use the SIEVE to sieve the sand (T) and take the GEAR (U).
- Zoom into the tombstone; insert the GEAR into the niche (V).
- Play the HOP.
- You will receive the DRYAD CHARM (W).
- Go to the Greenhouse.
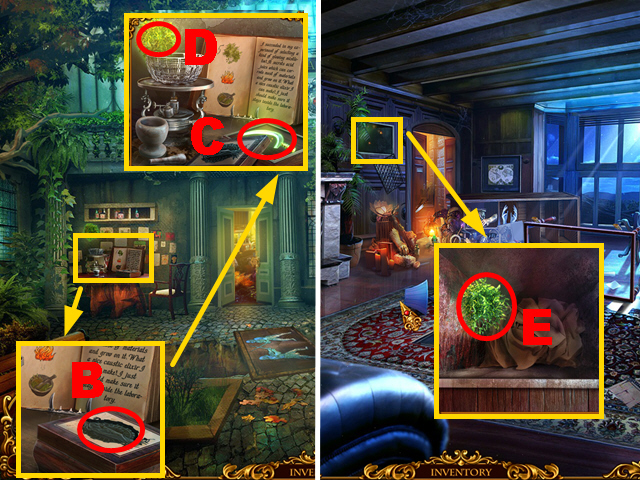
- Zoom into the table and insert the DRYAD CHARM into the niche (B); take the ALCHEMICAL SICKLE (C) and use the ALCHEMICAL SICKLE to acquire the 1/5 MISTLETOE (D).
- Go to the Commander's Office.
- Zoom into the compartment; use the ALCHEMICAL SICKLE to acquire the 2/5 MISTLETOE (E).
- Go to the Corridor.
- Zoom into the top floor; use the ALCHEMICAL SICKLE to acquire the 3/5 MISTLETOE (F).
- Go to the Memorial.
- Use the ALCHEMICAL SICKLE to acquire the 4/5 MISTLETOE (G).
- Go to the Greenhouse.
- Zoom into the small table; use the ALCHEMICAL SICKLE to acquire the 5/5 MISTLETOE (H).
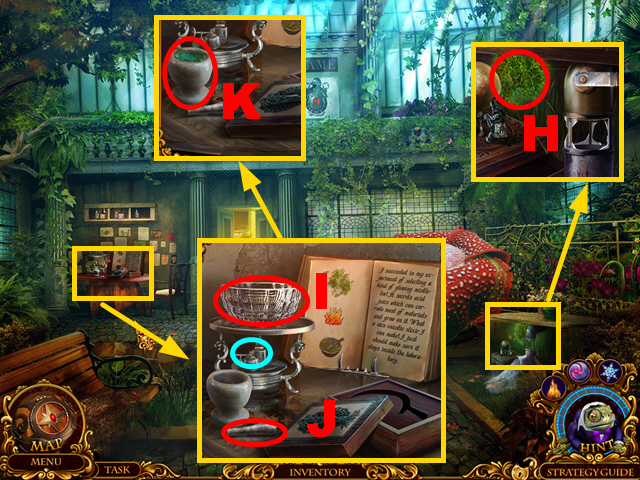
- Zoom into the alchemical table; insert the 5 MISTLETOES into the bowl (I). Use the pyrokinesis ability to light the burner (light blue).
- Take the pestle (J) to pound the mistletoes; take the ACID LIQUID (K).
- Go to the Memorial.
- Zoom into the bas-relief; pour the ACID LIQUID over the chains (L).
- Play the mini-game.
- To solve this puzzle, press the tokens in the following order: 3, 2, 1, 6, 7, 6, 8, 7, 6, 7, 6, 1, 1, 1, 7, 6, 7, 5, 6, 6, 7, 7, and 6.
- Take the 2/4 MORPHEUS ARTIFACT (M).
- Enter the Secret Passage.
- Use the MYSTICAL LENS to reveal a secret door (N).
- Zoom into the secret door and take a look at the note (O); take the 1/3 FUSE (purple) and the CANDLESTICK (P).
- Zoom into the wall; put down the CANDLESTICK (Q) and light it with the pyrokinesis ability.
- Zoom into the compartment; take the NIPPERS (R).
- Zoom into the barrels; send ELF into the barrel (S) and take the AXE HANDLE (light blue).
- Use the NIPPERS to remove the barbed wire (T).
- Zoom into the ceiling; take the 2/3 FUSE (U), connect the AXE HANDLE to the blade (V), and take the AXE.
- Knock off the shelf with the AXE (W).
- Play the HOP.
- You will receive the SAFE HANDLE (X).
- Zoom into the armored door and insert the SAFE HANDLE into the slot (Y); push the safe handles in numerical order 1-6.
- Enter the Secret Cave.
- Use the MYSTICAL LENS to reveal the note (Z).
- Morpheus will talk to you.
- Zoom into the device; take the BOX KEY (A), remove the stone, the shards, and the broken fuses.
- Walk down.
- Zoom into the secret compartment, insert the BOX KEY into the lock (B), and turn the key; take the SUCTION CUP (C) and the HACKSAW (D).
- Move forward.
- Zoom into the wheelbarrow and cut the cage with the HACKSAW (E); take the BONE (purple) and the 3/3 FUSE (light blue).
- Zoom into the waterfall and use the freezing ability to freeze the water (F); insert the BONE into the skull's mouth (G) and take the VALVE (H).
- Walk down.
- Zoom into the barrels, put the VALVE on the faucet (I), turn the valve, and push back the barrel; put the SUCTION CUP on the energy ball (J) and take the ENERGY BALL.
- Move forward.
- Zoom into the device; insert the ENERGY BALL into the niche (K), the 3 FUSES into the slots (L).
- Play the mini-game.
- To solve this puzzle (M), activate the buttons (green).
- Enter Morpheus' Tomb Gates.
Chapter 6: Morpheus' Tomb Gates
- Zoom into the debris; take the SHEET OF PAPER (N).
- Zoom into the door; take the PUMP HANDLE (Q).
- Zoom into the device; take the CHEST BUTTON (O), connect the PUMP HANDLE to the pump (P), and take the PUMP.
- Walk down.
- Zoom into the crate and inflate the ball with the PUMP (R); take the WHEEL (S).
- Zoom into the wheelbarrow and connect the WHEEL to the wheelbarrow (T); take the TYPEWRITER HANDLE (U).
- Walk down.
- Zoom into the secret compartment; connect the TYPEWRITER HANDLE to the typewriter (V) and insert the SHEET OF PAPER into it (W). Take the SHELL AMULET (X).
- Go to Morpheus' Tomb Gates.
- Zoom into the diving suit and insert the SHELL AMULET into the niche (Y); take the NET (Z).
- Use the MYSTICAL LENS to reveal a note (A).
- Walk down.
- Zoom into the broken board; use the NET to acquire the ANCHOR KEY (B).
- Walk down.
- Zoom into the window and insert the ANCHOR KEY into the niche (C); take the DRILL BIT (D) and the HORN (E).
- Move forward.
- Zoom into the crates; connect the DRILL BIT to the drill (F) and take the DRILL.
- Move forward.
- Zoom into the diving suit and open the helmet with the DRILL (G); take the 1/2 DYNAMITE (purple) and the SPARE PART (light blue).
- Zoom into the statue and insert the SPARE PART into the niche (H); take the DAM LEVER (I).
- Zoom into the mechanism; connect the DAM LEVER to it (J) and pull the lever.
- Play the HOP.
- You will receive the RAPIER (K).
- Zoom into the statue and loosen the sign with the RAPIER (M); take the 3/4 MORPHEUS ARTIFACT (green) and the MIRROR (dark blue).
- Walk down.
- Zoom into the cave, insert the MIRROR into the broken mirror (N), and hold the HORN next to the bats (O); take the 1/2 WING (P) and the 2/2 DYNAMITE (Q).
- Move forward.
- Zoom into the debris; put down the 2 DYNAMITES (R), and light them with the pyrokinesis ability; take the 1/2 GATES PART (S) and the STAR (T).
- Walk down twice.
- Zoom into the barrels and insert the STAR into the niche (U); take the 2/2 GATES PART (V).
- Move forward twice.
- Zoom into the right door; insert the 2 GATES PARTS into the niche (W).
- Play the mini-game.
- To solve this puzzle (X), assemble the guardian figurine correctly.
- Enter Morpheus' Tomb.
- Zoom into the chest and connect the CHEST BUTTON to it (Y); push the buttons in numerical order 1-4 and take the OPENER (Z).
- Zoom into the sarcophagus; use the pyrokinesis ability to melt the ice (A).
- Walk down.
- Zoom into the statue and open the bottle with the OPENER (B); take the WEED KILLER.
- Walk down twice.
- Zoom into the window; pour the WEED KILLER over the plant (C) and take the STAR (D).
- Go to Morpheus' Tomb.
- Zoom into the chest and insert the STAR into the niche (E); take the 2/2 WING (F).
- Zoom into the statue and connect the 2 WINGS to the bird (G); take the MAGNET (H).
- Zoom into the elevator; hold down the MAGNET (I) to acquire the STAPLE REMOVER.
- Walk down twice.
- Zoom into the crates and remove the staples with the STAPLE REMOVER (J); take the JACK (K).
- Go to Morpheus' Tomb.
- Zoom into the elevator; open the doors with the JACK (L).
- Play the HOP.
- You will receive the SCALES (M).
- Zoom into the statue and put the SCALES into its left hand (Q); take the MEDITATION GROTTO KEY (R).
- Walk down.
- Zoom into the left door; insert the MEDITATION GROTTO KEY into the lock (S) and turn the key.
- Enter the Grotto.
- Talk to Morpheus.
- Use the MYSTICAL LENS to reveal the moon (T) and take the MOON.
- Try to use the hypnosis ability on Morpheus (U).
- Take the 4/4 MORPHEUS ARTIFACT (V).
- Go to Morpheus Tomb.
- Zoom into the chest and insert the MOON into the niche (W); take the ENERGY VESSEL (X).
- Zoom into the sarcophagus and insert the 4 MORPHEUS ARTIFACTS into the niche (Y); insert the ENERGY VESSEL into the slot (Z).
- Play the mini-game.
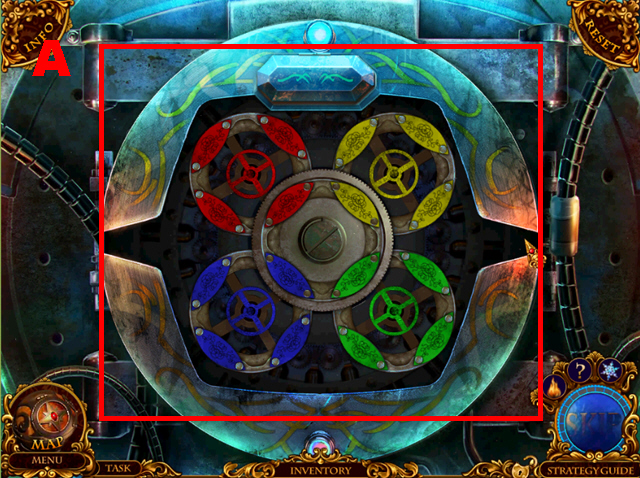
- To solve this puzzle (A), turn the disks so that the disk pieces have the same color as the disk cores.
- Insert the 5 SUPER KEYS into the slots (B).
- Play the mini-game.
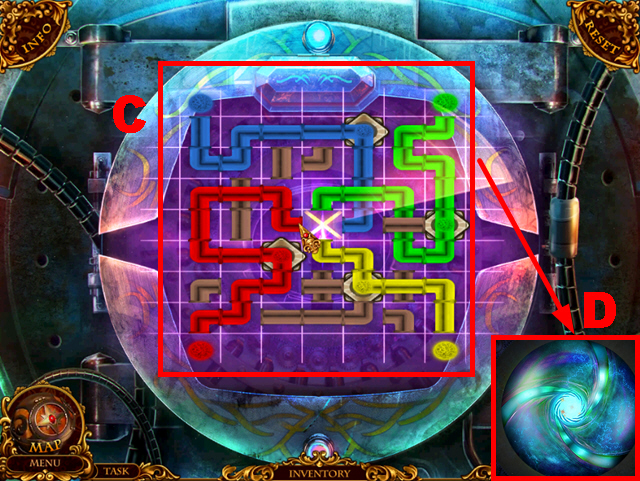
- To solve this puzzle (C), turn the pipes so that each power source is connected to the core and to the other power source of the same color.
- Take the hypnosis ability (D).
- Go to the Grotto.
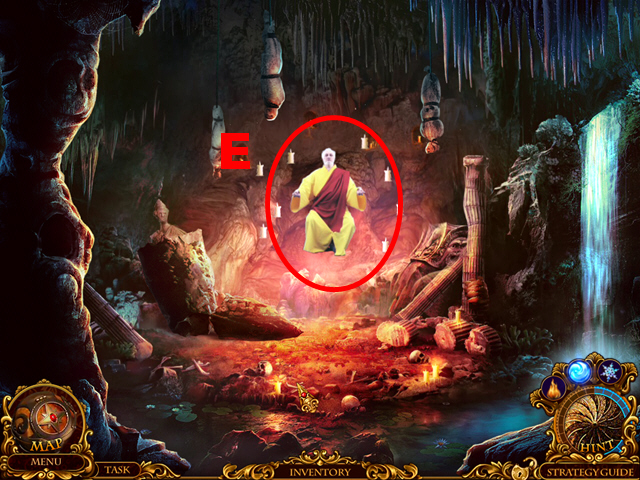
- Use the hypnosis ability on Morpheus (E).
- Congratulations, you have completed Mystery Trackers: Silent Hollow.
Created at: 2013-08-30