
Walkthrough Menu
- General Tips
- Chapter 1: The Train
- Chapter 2: The Dining Car
- Chapter 3: Hellswich
- Chapter 4: The Library
- Chapter 5: The Laboratory
General Tips
- This is the official guide for Mystery Trackers: Train to Hellswich.
- Hidden-object puzzles are referred to as HOPs. This guide will not show screenshots of the HOPs, however, it will mention when an HOP is available and the inventory item you'll collect from it.
- This guide will not mention each time you have to zoom into a location; the screenshots will show each zoom scene.
Chapter 1: The Train
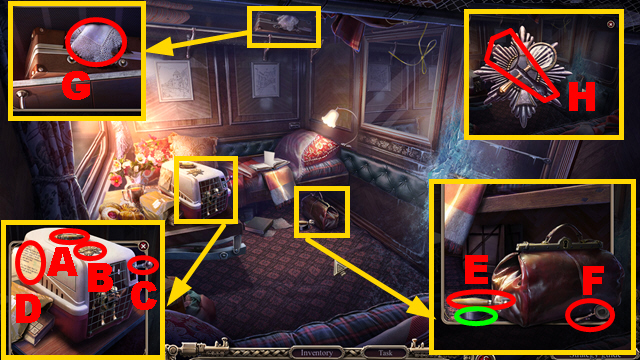
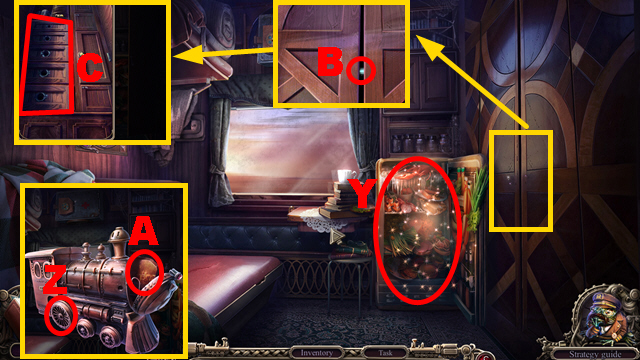
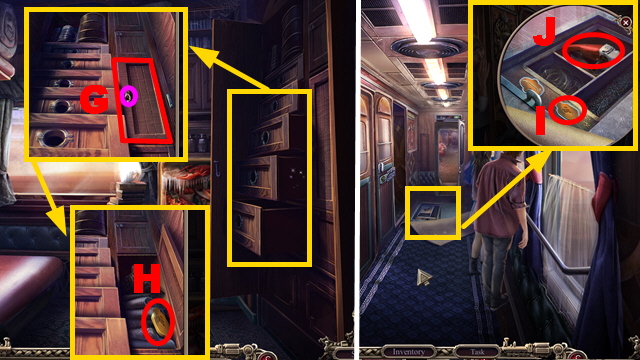
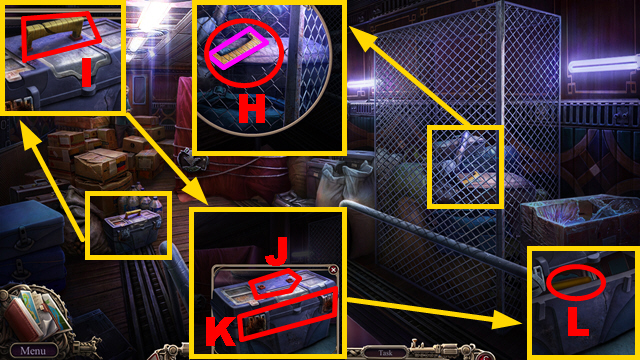
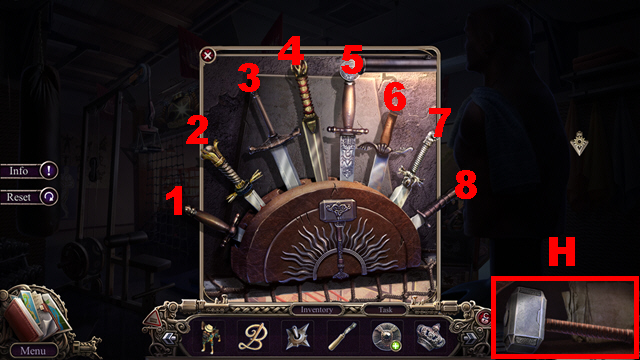
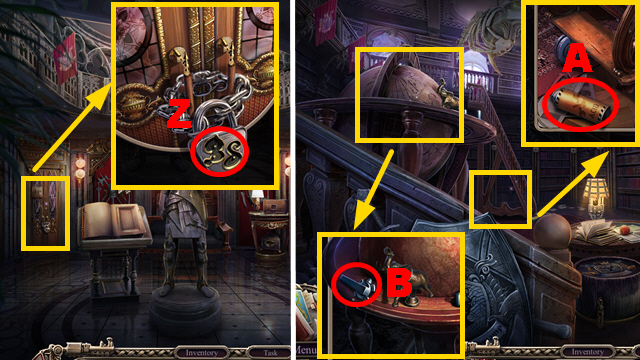
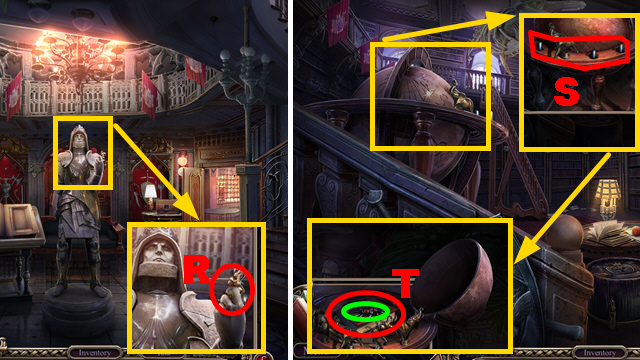
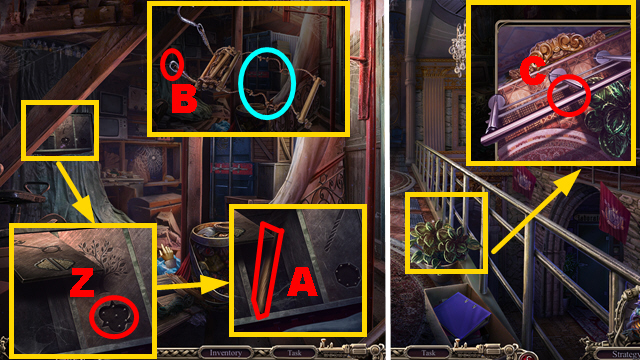
- Take the LIGHTER (A) and DETECTIVE'S EMBLEM (B); pull the lever (C) and read the note (D).
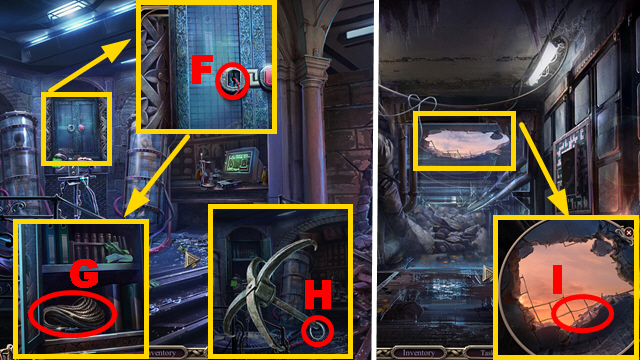
- Take the CAN OPENER (E), ELECTRICAL TAPE (green), MAGNIFYING GLASS (F), and HANDKERCHIEF (G).
- Place the MAGNIFYING GLASS on the DETECTIVE'S EMBLEM (H); take the DETECTIVE BADGE EMBLEM.

- Place the DETECTIVE BADGE EMBLEM (I).
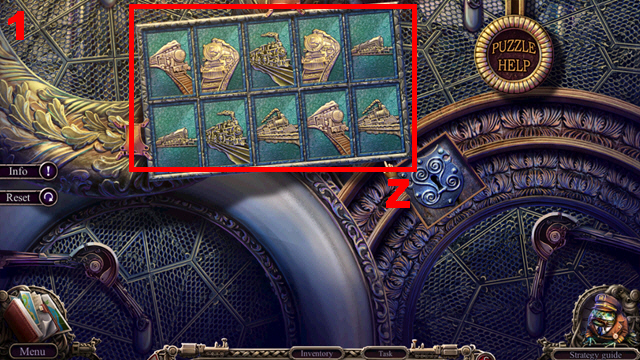
- Play the HOP (J) to acquire the LEVER.
- Place the LEVER (K); pull it.
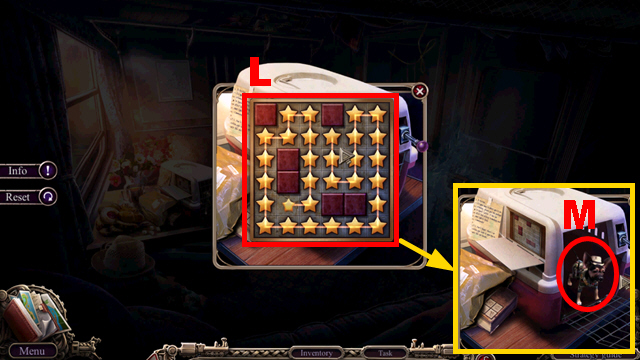
- Play the mini-game.
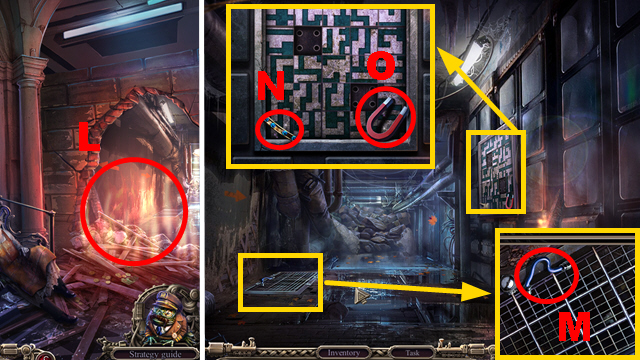
- Solution: (L).
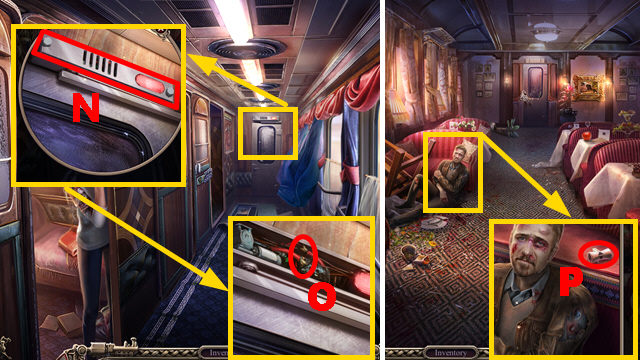
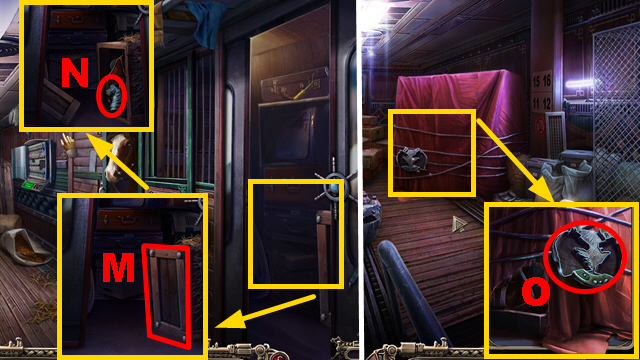
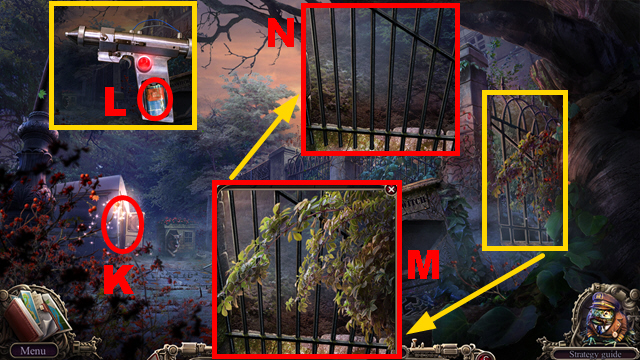
- Take ELF (M).
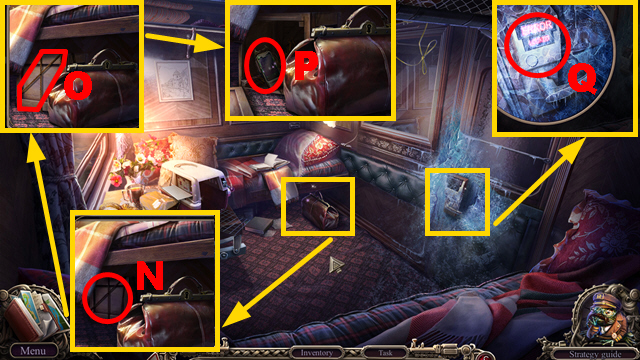
- Use ELF (N); open the package (O).
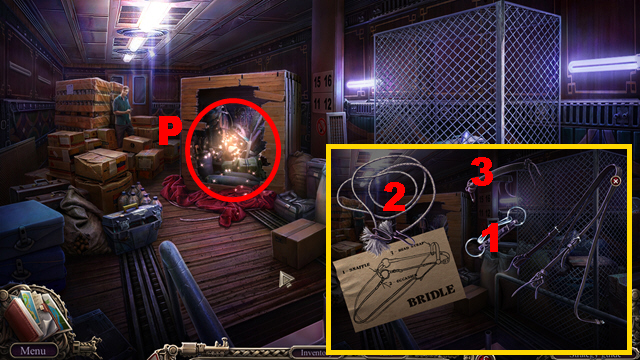
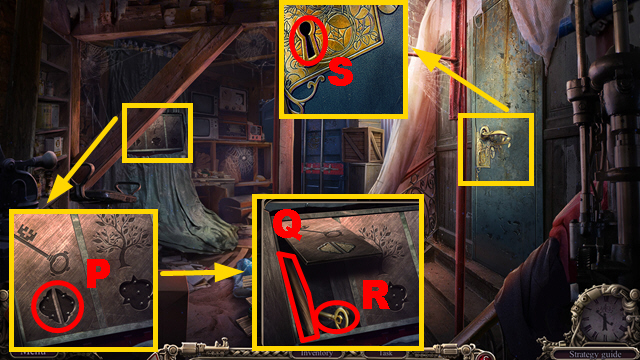
- Take the UNLOCKING DEVICE (P).
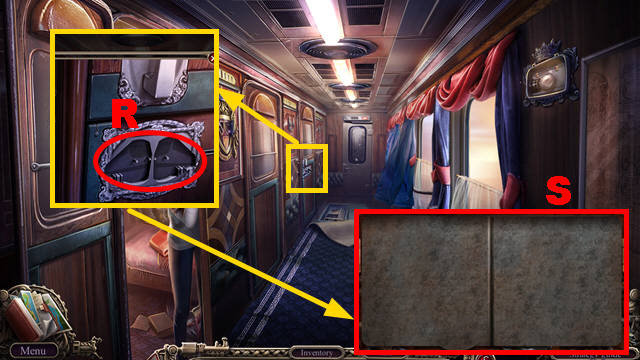
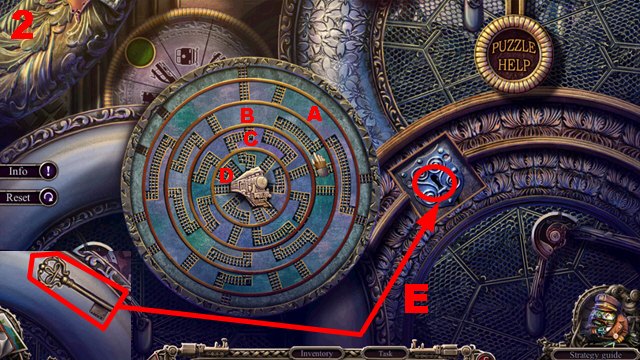
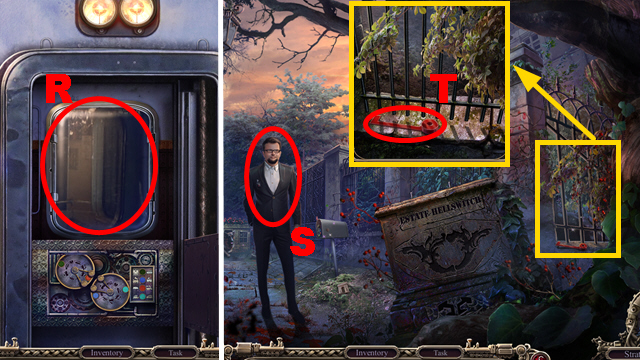
- Use the LIGHTER and UNLOCKING DEVICE (Q).
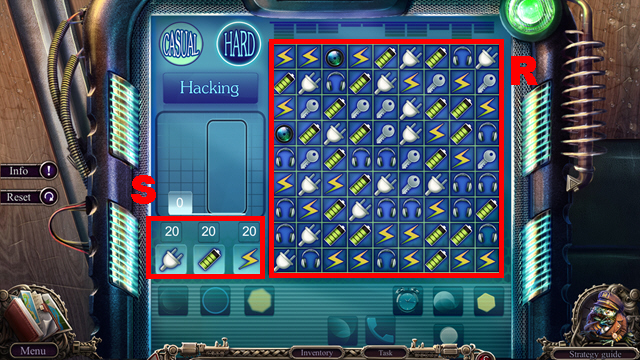
- Play the mini-game.
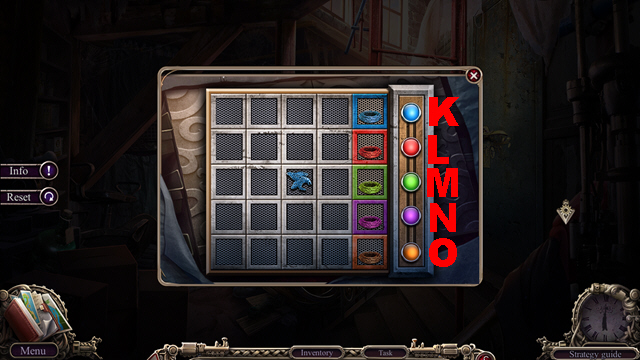
- Solution: Match 3 or more pieces of the same symbols on the grid (R) until you have collected the required symbols (S).
- Move forward.
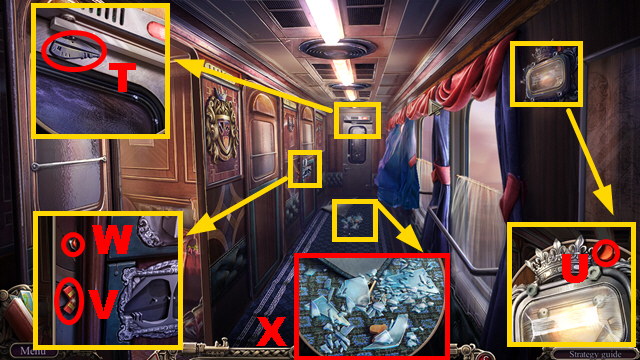
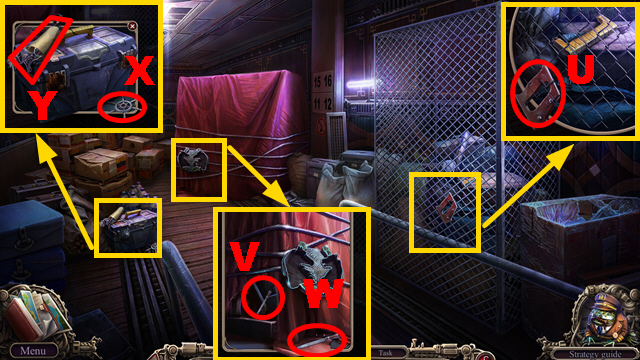
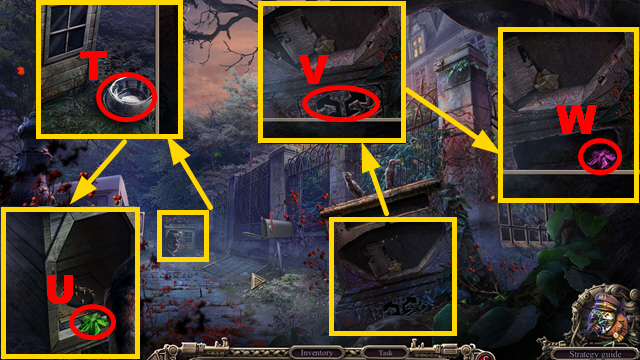
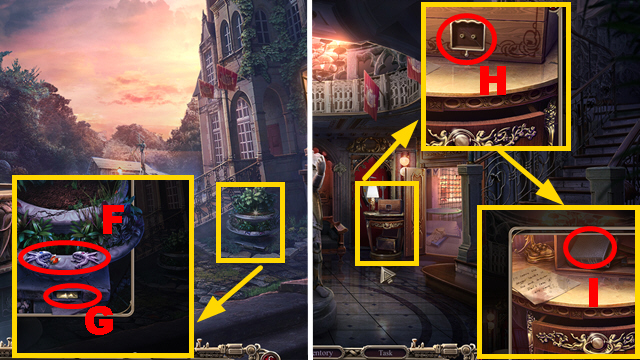
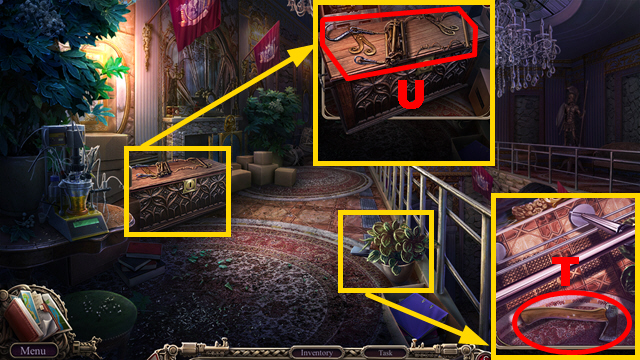
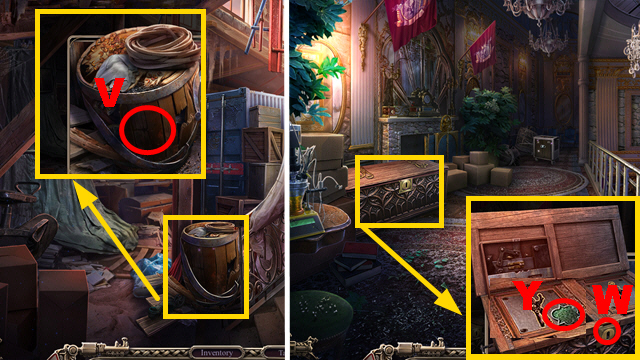
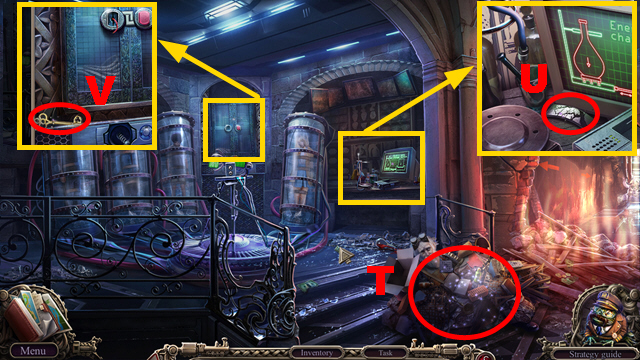
- Take the TRAIN EMBLEM (T), PUSH BUTTON (U), COAT OF ARMS PIECE (V), and PUSH BUTTON (W).
- Use the HANDKERCHIEF (X).
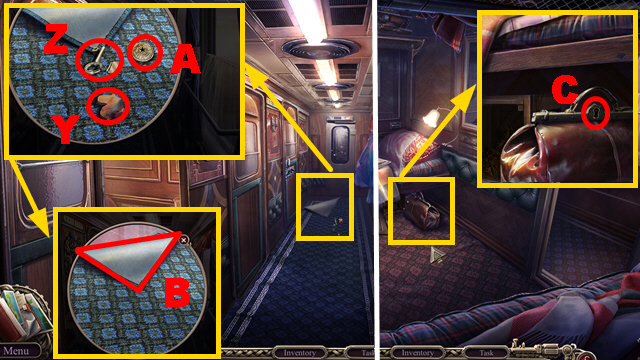
- Take the PICTURE PIECE (Y), SUITCASE KEY (Z), and COIN (A); pull the carpet (B).
- Turn left.
- Use the SUITCASE KEY (C); turn it.
- Turn right.

- Place the COAT OF ARMS PIECE (D); take the TRAIN BOX (E).
- Turn left.
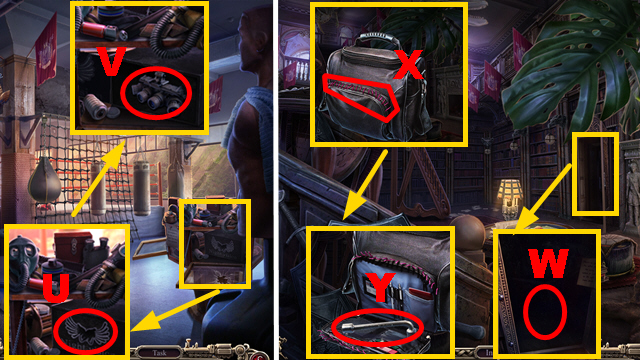
- Place the COIN (F); take the GUN (G).
- Turn right.
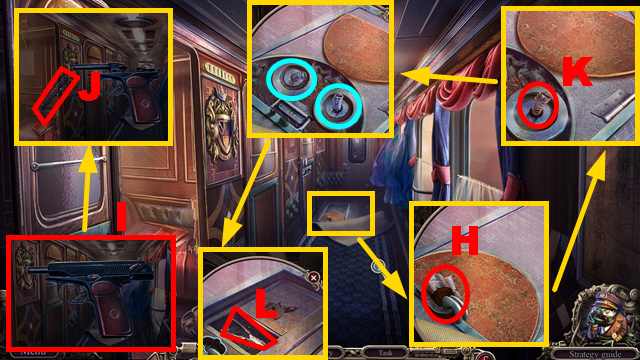
- Use the GUN (H).
- Open the GUN twice (I); take the SPRING (J).
- Replace the broken spring with the SPRING (K).
- Place 2 PUSH BUTTONS (blue); push them.
- Take the METAL CUTTERS (L).
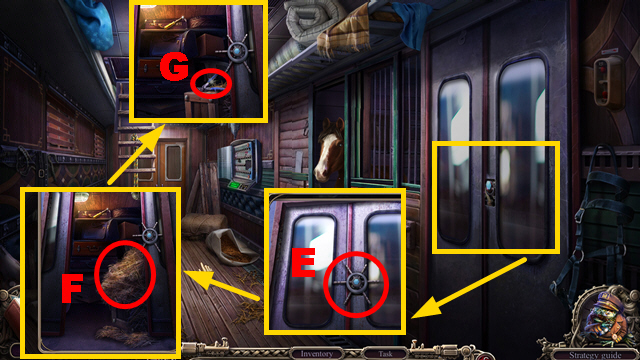
- Turn left.
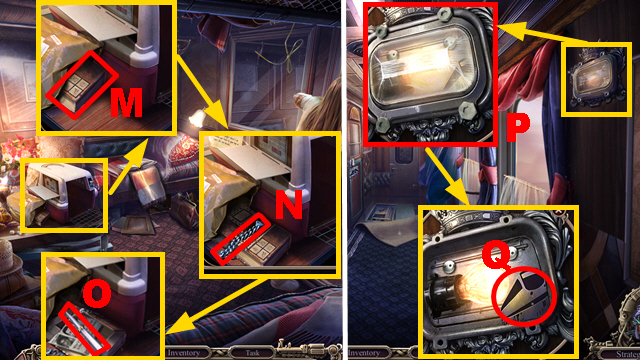
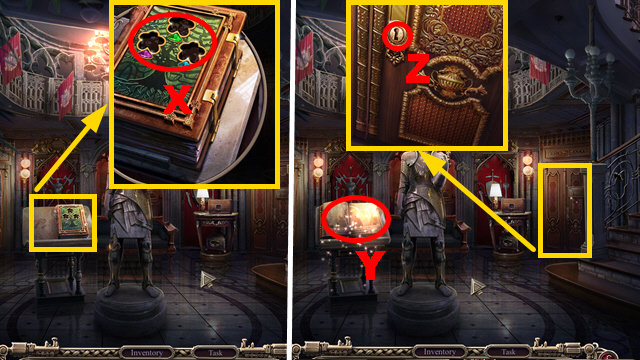
- Pull the book (M); use the METAL CUTTERS (N).
- Take the PENCIL (O).
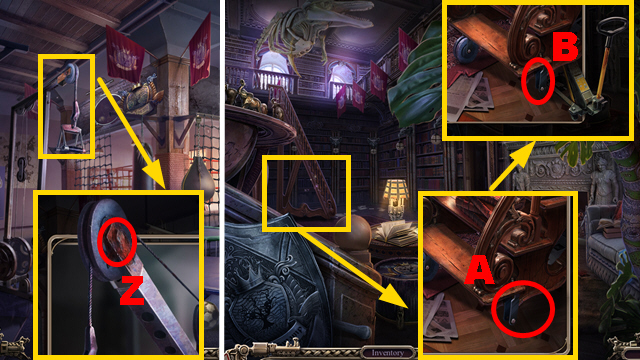
- Turn right.
- Use the PENCIL (P); take the TRAIN EMBLEM (Q).
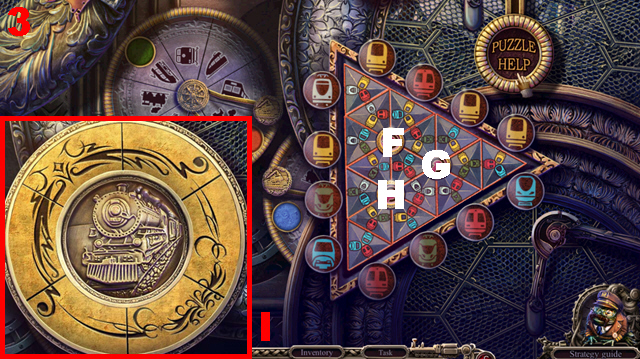
- Place 2 TRAIN EMBLEMS (R).
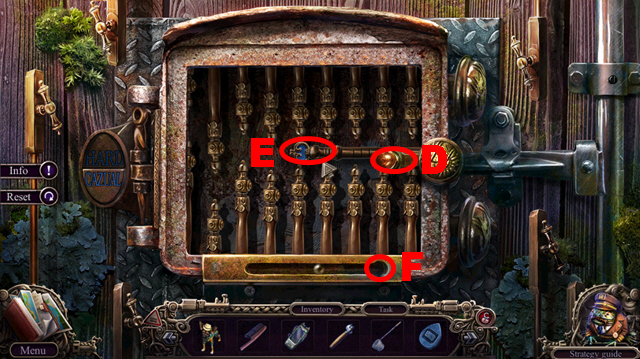
- Open the compartment (S).
- Play the mini-game.
- Solution: 1-8.
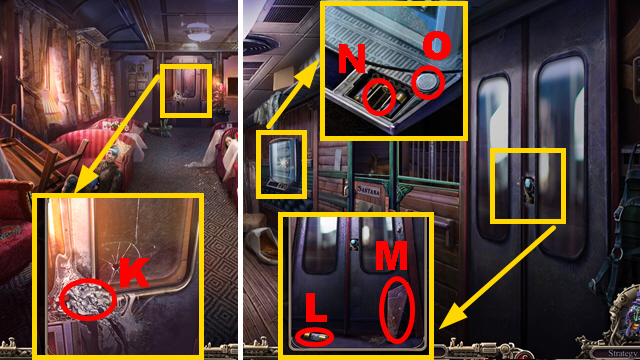
- Enter the Attendant's Car.
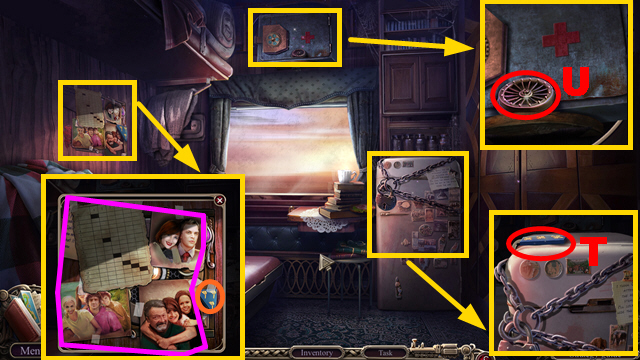
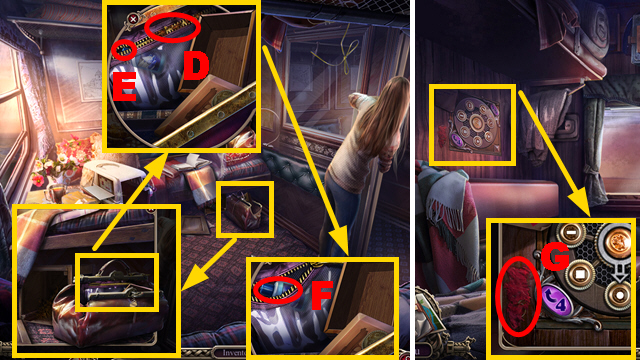
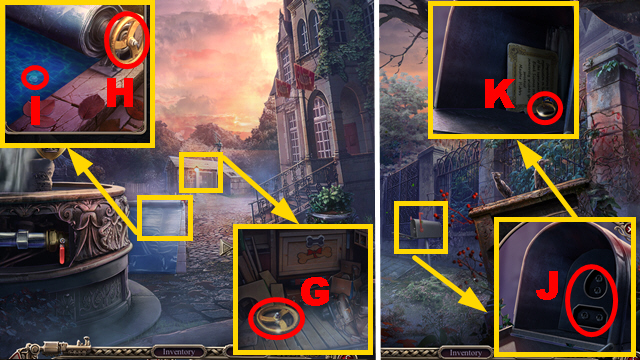
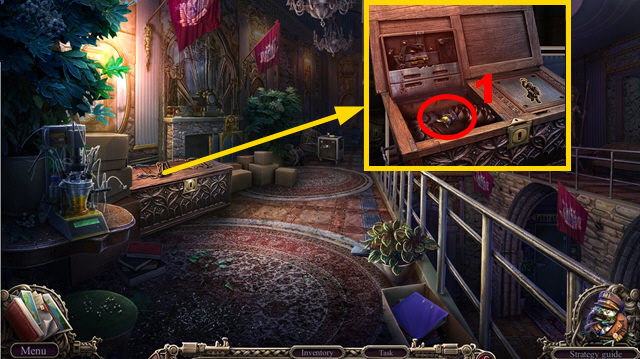
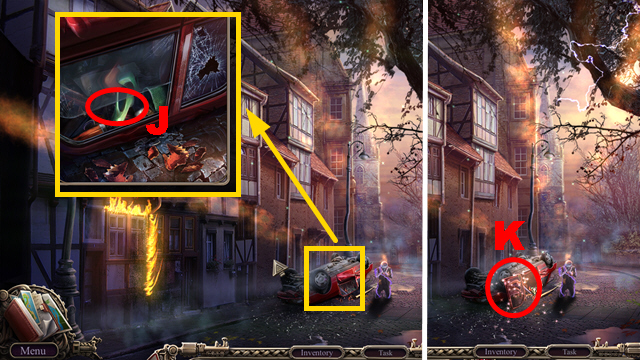
- Remove the page and 3 photos (purple); take the FAMILY CREST PIECE (orange).
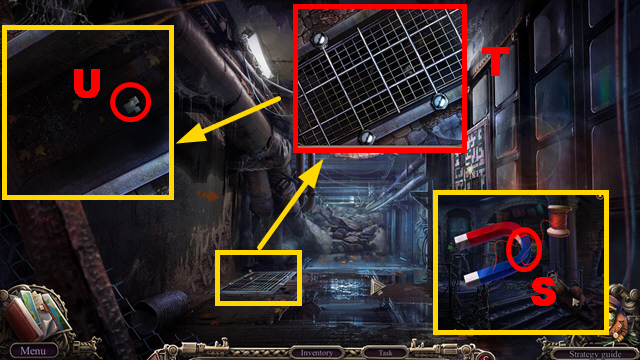
- Take the FAMILY CREST PIECE (T) and WHEEL (U).
- Walk down.
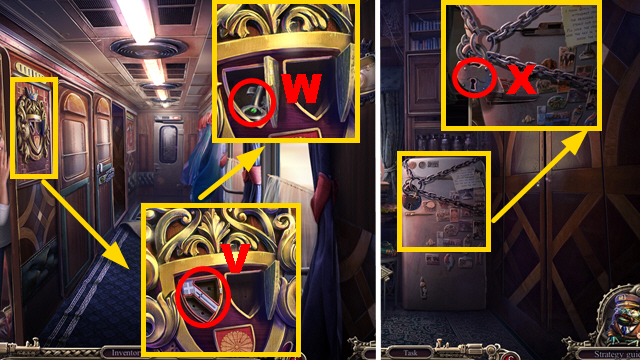
- Place 2 FAMILY CREST PIECES (V); take the FRIDGE KEY (W).
- Enter the Attendant's Car.
- Use the FRIDGE KEY (X); turn it.
- Play the HOP (Y) to acquire the OIL.
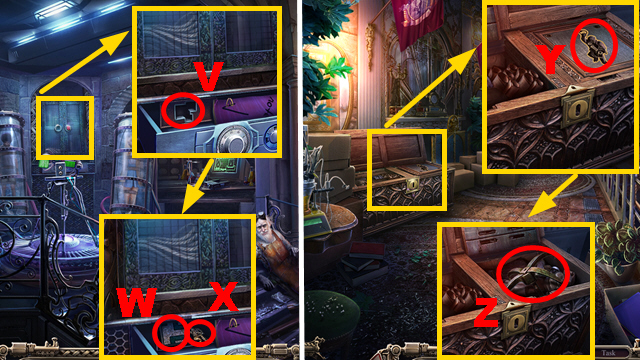
- Place the WHEEL on the TRAIN BOX (Z); take the PICTURE PIECE and HOOK (A).
- Apply the PENCIL (B); use the HOOK and ELF (C) to acquire the ZIPPER PULL.
- Go to the Detective's Car.
- Use the OIL (D) and ZIPPER PULL (E); pull the zipper.
- Take the NAIL POLISH REMOVER (F).
- Go to the Attendant's Car.
- Use the NAIL POLISH REMOVER (G).
- Play the mini-game.
- Solution: Ix4-H.
- Take the CROWBAR FIGURE (J).
- Walk down.
- Place the CROWBAR FIGURE (K); take the CROWBAR (L).
- Enter the Attendant's Car.
- Use the CROWBAR (M) to acquire the WRENCH.
- Walk down.
Chapter 2: The Dining Car
- Use the WRENCH (N) and ELECTRICAL TAPE (O).
- Move forward.
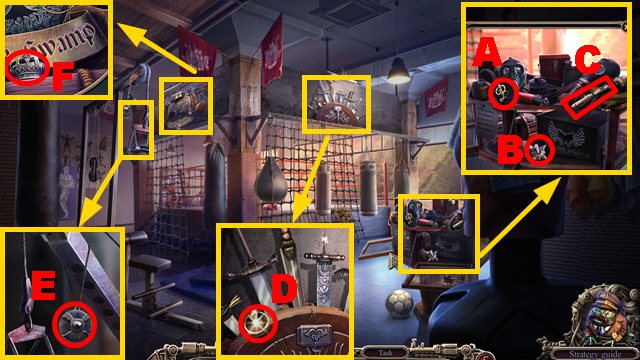
- Take the LEVER (P).
- Take the TWO-PRONGED FORK (Q).
- Place the LEVER (R); take the GEAR (S).
- Walk down.
- Use the TWO-PRONGED FORK (T); take the PICTURE PIECE (U).
- Move forward.
- Place 3 PICTURE PIECES (V); take the GEAR (W).
- Go to the Attendant's Car.

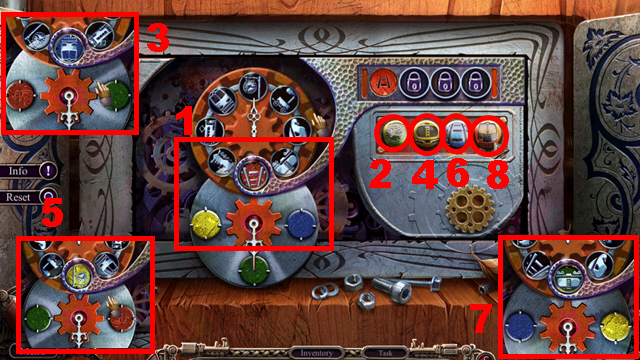
- Open the compartment (X); place 2 GEARS (green).
- Play the mini-game.
- Solution: Y-Zx4-Ax4-B.
- Take the FIRST AID KIT (C).
- Walk down, move forward.
- Use the FIRST AID KIT (D).
- Play the HOP (E) to acquire the KNIFE.
- Use the KNIFE (F); take the CUPBOARD HANDLE (blue).
- Go to the Attendant's Car.
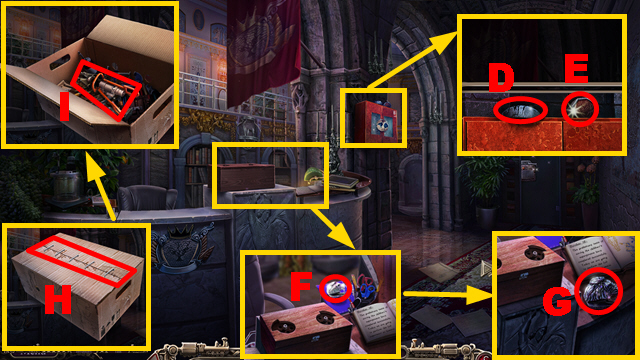
- Try to open the door (G); place the CUPBOARD HANDLE (purple).
- Take the CIRCULAR SAW EMBLEM (H).
- Walk down.
- Place the CIRCULAR SAW EMBLEM (I); take the CIRCULAR SAW (J).
- Move forward.
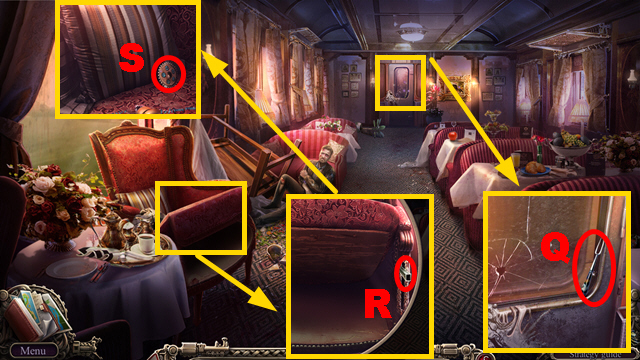
- Use the CIRCULAR SAW (K).
- Take the FUSE (L) and SAW (M).
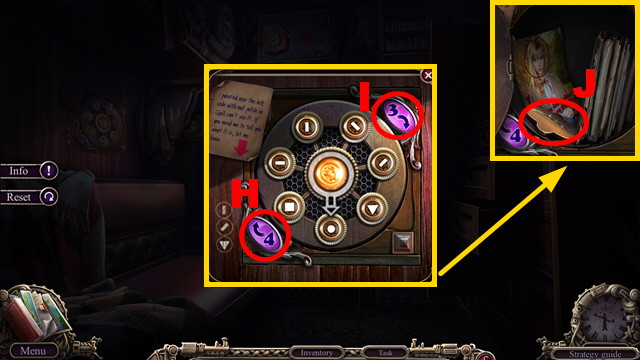
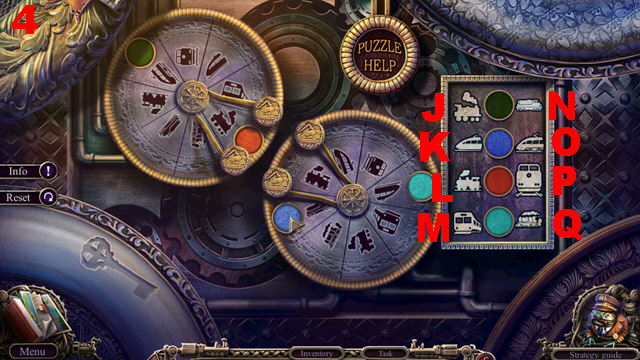
- Place the FUSE (N); use the UNLOCKING DEVICE (O).
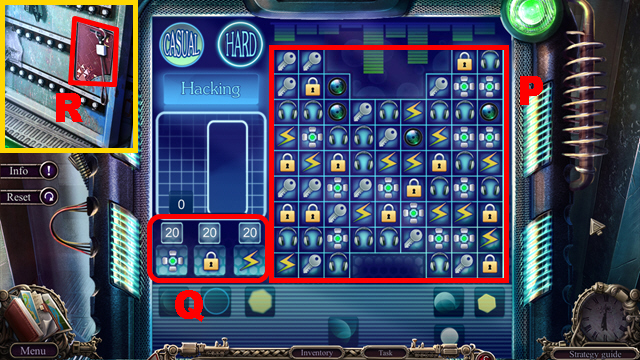
- Play the mini-game.
- Solution: Match 3 or more pieces of the same symbols on the grid (P) until you have collected the required symbols (Q).
- Take the KEY CARD (R).
- Pull the rope (S).
- Use the KEY CARD (T).
- Climb up.
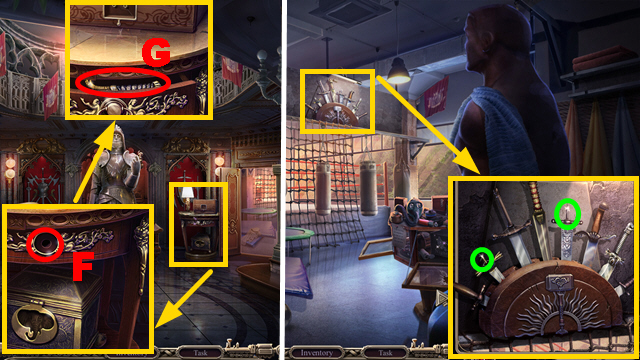
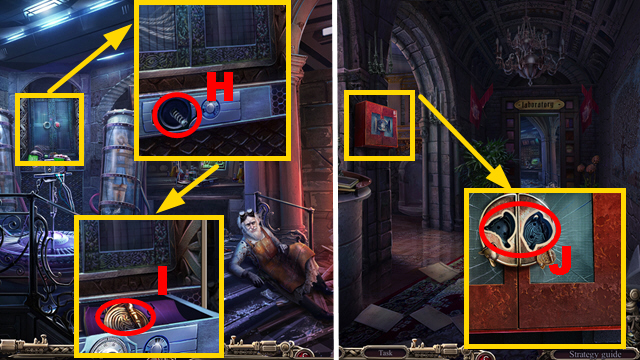
- Take the SAW HANDLE (U).
- Use ELF (V); take the FILE (W).
- Take the HANDLE (X) and BRIDLE PART (Y).
- Walk down.

- Connect the SAW HANDLE to the SAW (Z); sharpen it with the FILE (A) and take the SHARPENED SAW.
- Use the SHARPENED SAW (B); take the BRUSH (C) and HORSE EMBLEM (D).
- Place the HANDLE (E); turn it.
- Use the BRUSH (F); take the WIRE CLIPPERS (G).
- Climb up.
- Use the WIRE CLIPPERS (H); take the TOOL BOX HANDLE (purple).
- Remove the broken handle (I); place the TOOL BOX HANDLE (J).
- Use the OIL (K); take the NAIL PULLER (L).
- Walk down.
- Use the NAIL PULLER (M); take the HORSE EMBLEM (N).
- Climb up.
- Place 2 HORSE EMBLEMS (O).
- Play the HOP (P) to acquire the BRIDLE PIECE.
- Unfold the BRIDLE PART; assemble parts 1-3 and take the BRIDLE PART.
- Walk down.
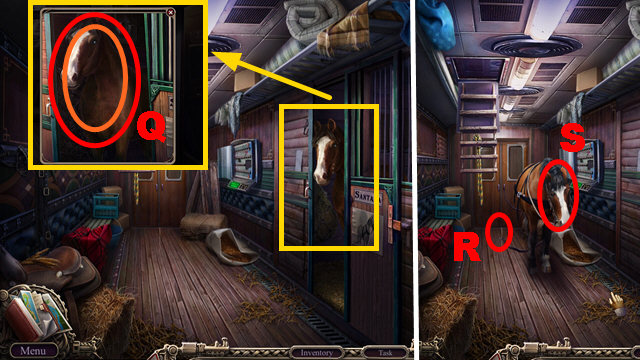
- Use the BRIDLE PART and BRIDLE PIECE (orange); lure out the horse (Q).
- Secure the rope (R); lure the horse (S).
- Move forward.
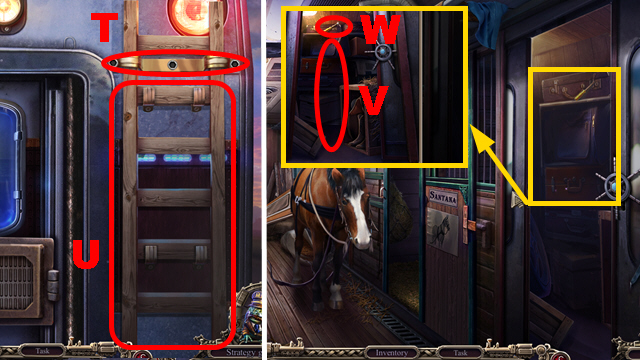
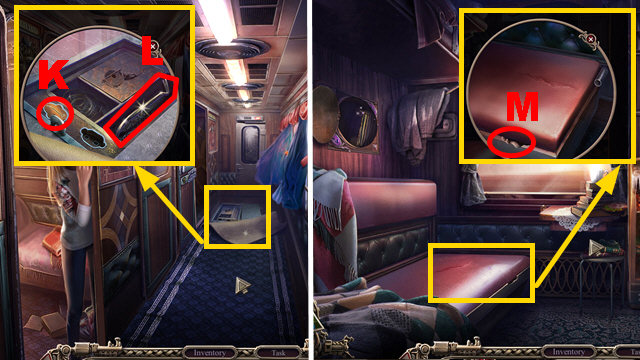
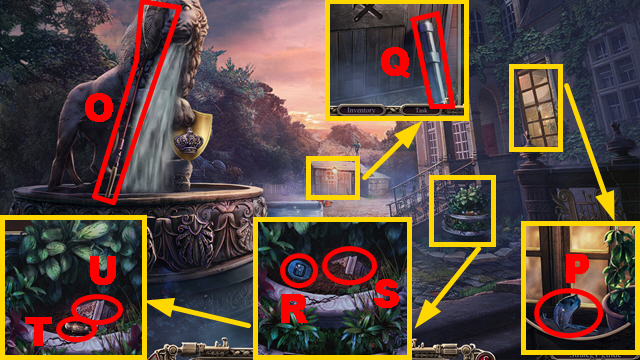
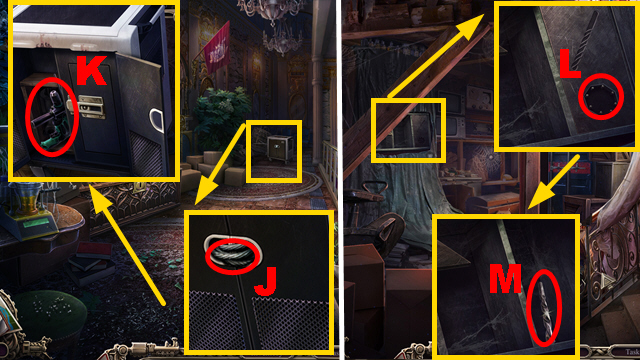
- Use the PENCIL (T); take the LADDER (U).
- Walk down.
- Place the LADDER (V); take the SCREWDRIVER (W).
- Move forward.
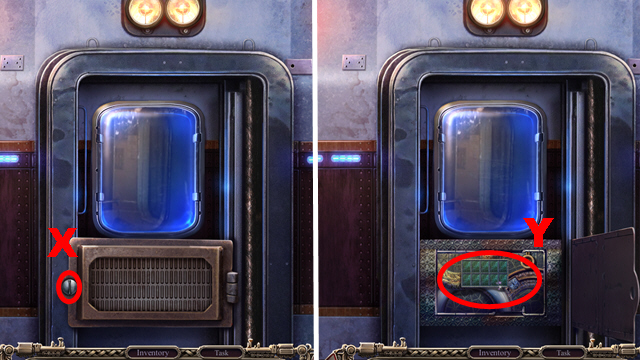
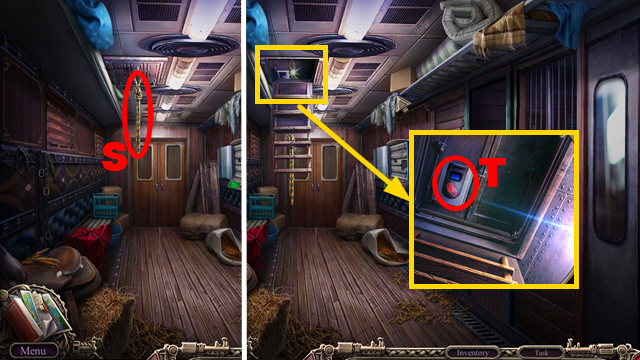
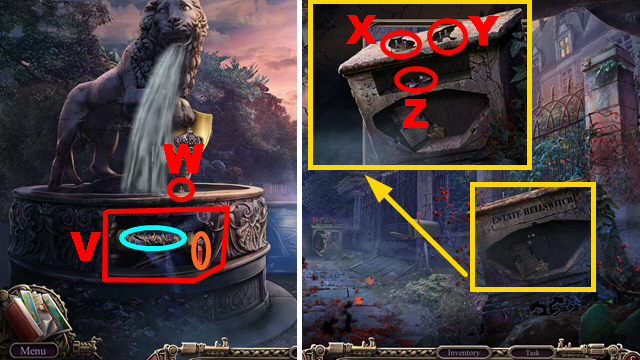
- Use the SCREWDRIVER (X).
- Inspect the area (Y).
- Play the mini-game.
- Solution (1): (Z).
- Solution (2): Ax6-Bx4-Cx5-Dx7-E.
- Solution (3): Hx2-Gx3-Hx4-Fx2-I.
- Solution (4): (J-O)-(M-N)-(K-Q)-(M-O)-(L-M)-(M-P).
Chapter 3: Hellswich
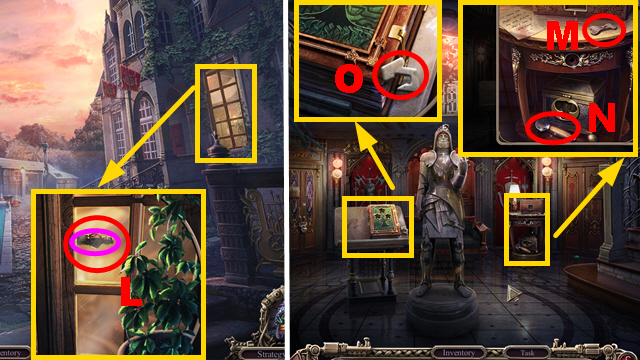
- Open the door (R).
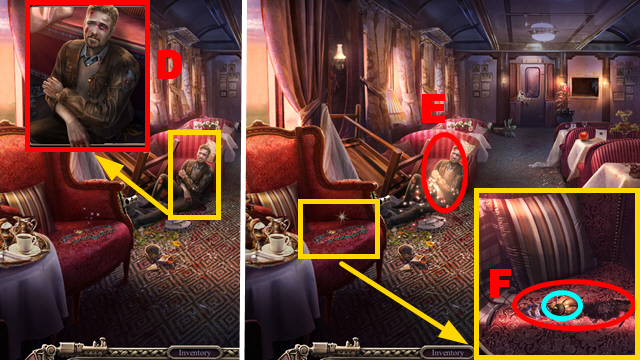
- Talk to the agent (S) to acquire the LASER CUTTER.
- Take the MAILBOX FLAG (T).
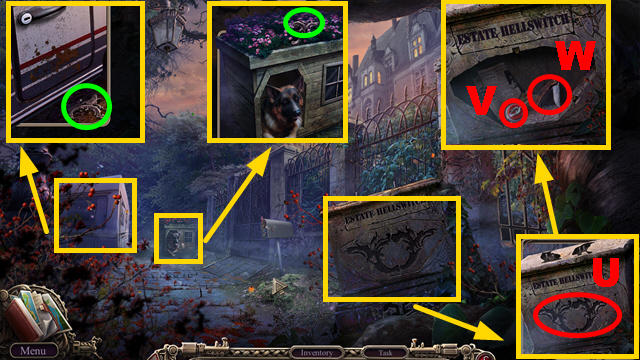
- Take 2 HELLSWICH SYMBOLS (green).
- Place 2 HELLSWICH SYMBOLS (U); take the MAIL SIGN (V) and PENKNIFE (W).
- Place the MAIL SIGN (X) and MAILBOX FLAG (Y).
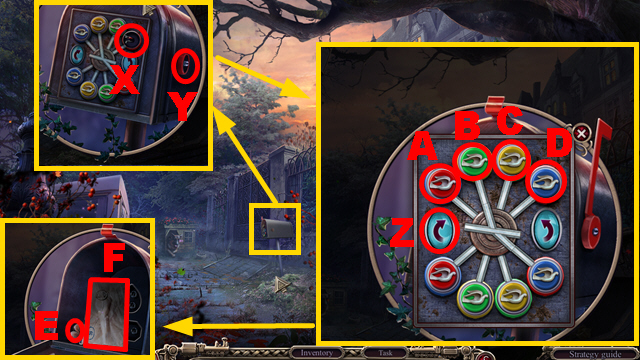
- Play the mini-game.
- Solution: Z-A-Z-B-Z-C-Z-D.
- Take the BOX DECORATION (E) and ENVELOPE (F).
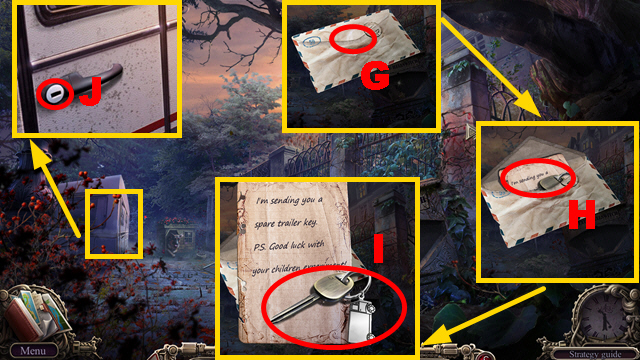
- Open the ENVELOPE with the PENKNIFE (G); unfold the letter (H).
- Take the TRAILER KEY (I).
- Insert the TRAILER KEY (J); turn it.
- Play the HOP (K) to acquire the BATTERY.
- Replace the battery in the LASER CUTTER with the BATTERY (L); take the LASER CUTTER.
- Remove the branches twice (M); use the LASER CUTTER (N).
- Move forward.
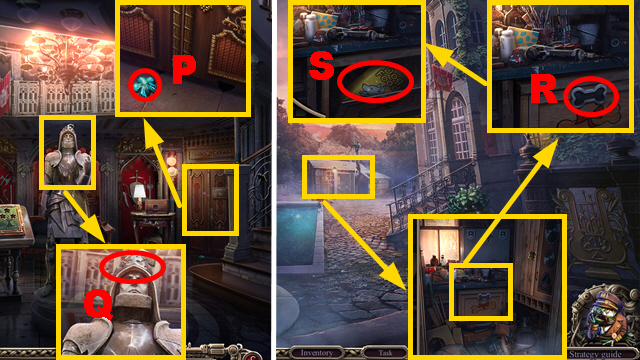
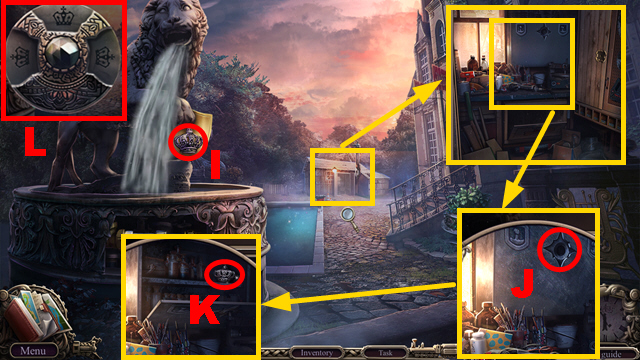
- Take the SCOOP NET (O), BOX DECORATION (P), WATER PIPE (Q), and CRYSTAL (R).
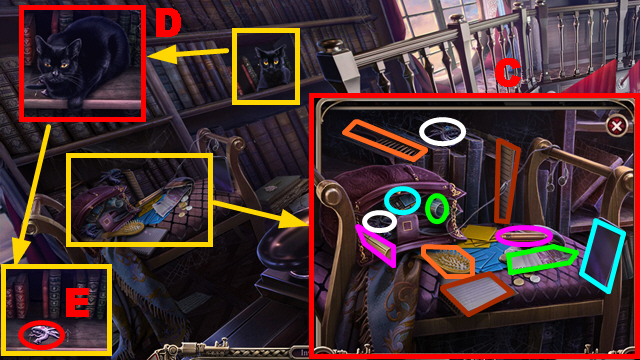
- Use ELF (S); take the RAVEN FIGURE (T) and BOX (U).
- Remove the ornament part (V).
- Turn the lever (orange); replace the pipe with the WATER PIPE (blue).
- Take the CAT FIGURE (W).
- Walk down.
- Place the CAT FIGURE (X) and RAVEN FIGURE (Y); take the BOX DECORATION (Z).
- Move forward.
- Place 3 BOX DECORATIONS on the BOX (A); take the TOOLS FIGURE (B).
- Place the TOOLS FIGURE (C).
- Play the mini-game.
- Solution: Move the handle (D) to guide the lockpick (E) through the locks until the door opens (F).
- Take the CRANK HANDLE (G).
- Place the CRANK HANDLE (H); turn it.
- Use the SCOOP NET to collect the CRYSTAL (I).
- Walk down.
- Place 2 CRYSTALS (J); take the RING (K).
- Move forward.
- Use the RING (L); open the window (purple).
- Move forward.
- Take the STORAGE KNOB (M), DAGGER HANDLE (N), and BASE FRAGMENT (O).
- Take the BOOK FIGURE (P).
- Use ELF to collect the BASE FRAGMENT (Q).
- Walk down.
- Place the STORAGE KNOB (R); take the DOG FOOD (S).
- Walk down.
- Use the DOG FOOD (T); take the BOOK FIGURE (U).
- Place 2 BASE FRAGMENTS (V); take the BOOK FIGURE (W).
- Go to the Hall.
- Place 3 BOOK FIGURES (X).
- Play the HOP (Y) to acquire the GYM KEY.
- Insert the GYM KEY (Z); turn it.
- Move forward.
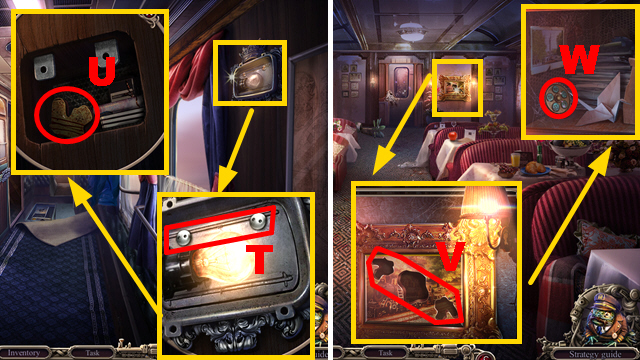
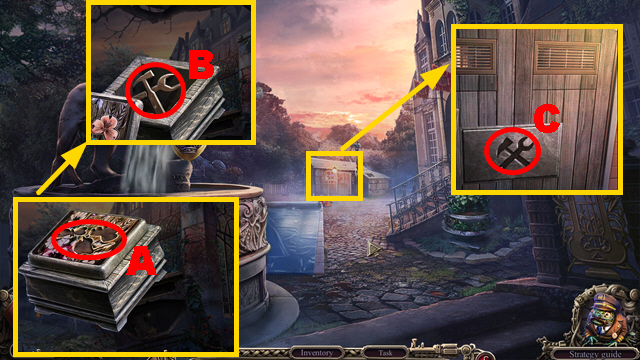
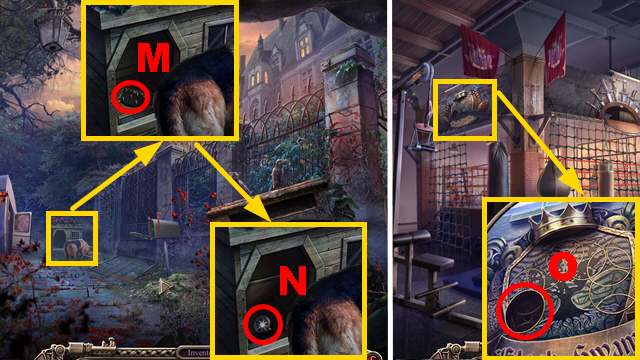
- Take the MONOGRAM (A), TOGGLE SWITCH (B), CHISEL (C), DRAWER HANDLE (D), MEDALLION (E), and MEDALLION FRAGMENT (F).
- Walk down.
- Place the DRAWER HANDLE (F); pull it.
- Take the DAGGER HANDLE (G).
- Move forward.
- Place 2 DAGGER HANDLES (green).
- Play the mini-game.
- Solution: (1-7)-(2-5)-(3-8)-(4-6).
- Take the HAMMER (H).
- Take the HAMMER (H).
- Walk down twice.
- Use the CHISEL and HAMMER (I) to acquire the MEDALLION FRAGMENT.
- Place the TOGGLE SWITCH (J); push it.
- Take the MEDALLION FRAGMENT (K).
- Place 3 MEDALLION FRAGMENTS on the MEDALLION (L).; take the MEDALLION.
- Walk down.
- Place the MEDALLION (M); take the SYMBOL PART (N).
- Move forward three times.
- Place the SYMBOL PART (O).
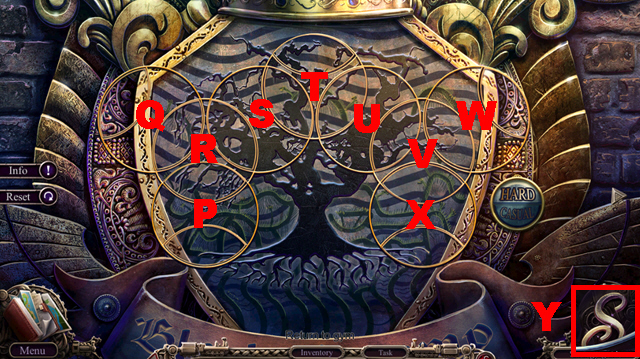
- Play the mini-game.
- Casual solution: W-X.
- Hard solution: W-X-P-Rx2-Q-T-S-Tx2-S-T-S-Tx2-R.
- Take the MONOGRAM (Y).
- Walk down.
Chapter 4: The Library
- Place 2 MONOGRAMS (Z); open the door.
- Turn left.
- Take the ANTI-RUST CLEANER (A) and CUPBOARD HANDLE (B).
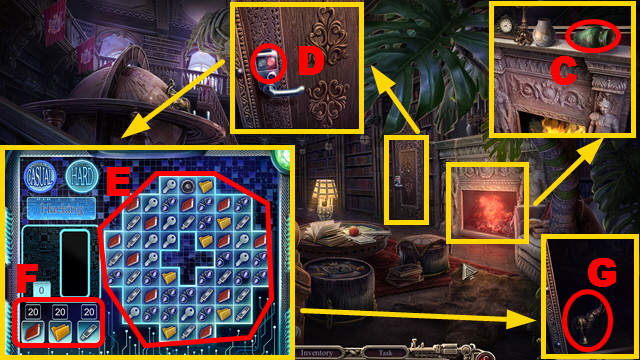
- Take the VASE (C).
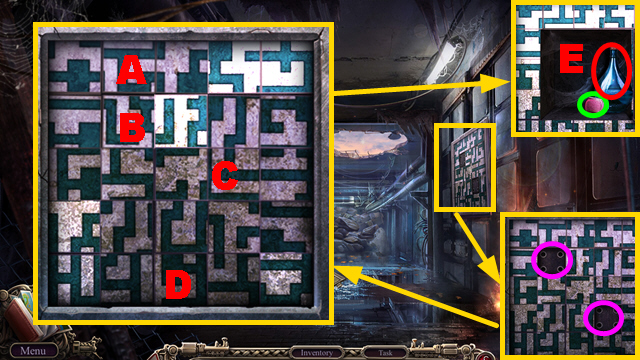
- Use the UNLOCKING DEVICE (D).
- Play the mini-game.
- Solution: Match 3 or more pieces of the same symbols on the grid (E) until you have collected the required symbols (F).
- Take the ELEPHANT (G).
- Walk down twice.
- Hold the VASE (H); take the VASE WITH WATER (I).
- Go to the Library.
- Use the VASE WITH WATER (J) and BRUSH (K); take the CHEST FIGURE (blue).
- Walk down.
- Place the CHEST FIGURE (L); take the ELEPHANT (M).
- Walk down.
- Place the CUPBOARD HANDLE (N); turn it.
- Take the JACK (O), BAG (P), and TONGS (Q).
- Move forward.
- Use the TONGS to collect the ELEPHANT (R).
- Turn left.
- Place 3 ELEPHANTS (S); take the NIGHT VISION FIGURE (green) and BOOK (T).
- Walk down, turn right.
- Place the NIGHT VISION FIGURE (U); take the NIGHT VISION DEVICE (V).
- Walk down, turn left.
- Use the NIGHT VISION DEVICE (W) to play the HOP; you receive the SCISSORS.
- Use the SCISSORS to cut open the BAG (X); take the BOX WRENCH (Y).
- Walk down, turn right.
- Use the ANTI-RUST CLEANER and BOX WRENCH (Z) to acquire the WHEEL.
- Walk down, turn left.
- Place the JACK (A); move it.
- Place the WHEEL (B).
- Go upstairs.
- Select 6 matching pairs (C) to receive the STONE FLOWER.
- Use ELF (D); take the STONE FLOWER (E).
- Walk down three times.
- Place 2 STONE FLOWERS (F); take the BOOK FIGURE (G).
- Move forward.
- Place the BOOK FIGURE (H); take the BOOK (I).
- Go to the Second Floor.
- Place 2 BOOKS (J).
- Examine the compartment (K).
- Play the mini-game.
- Solution part 1: (L).
- Solution part 2: (Q-R)-(S-Q)-(N-U)-(Q-N)-(R-T)-(N-R)-(O-P)-(M-O)-(P-M).
- Solution part 3: (C-Z)-(Z-Y)-(Y-V)-(Y-X)-(X-W)-(C-Z)-(B-A)-(A-X)-(X-Y)-(B-A)-(A-X)-(Z-A)-(A-X)-(Z-A).
- Solution part 4: 5-6-7-1-4-5-3-4-7-6-5-4-1-2-3-4-7-1-4.
- Push the button (D).
- Solution part 5: 14-17-18-15-12-11-14-17-18-15-14-17-16-13-10-11-12-15-14-11-10-13-14-15-12-11-10-13-14-11-10.
- Take the SECTION BUTTON (E), WIRE PIECE (F), and CARTON (G).
- Use ELF to collect the SECTION BUTTON (H).
- Use the SCISSORS (I); inspect the area (J).
- Play the mini-game.
- Solution: Kx8-Lx6-Nx7-Ox7-Nx3-Ox5-Nx2-Ox3-N-Ox4.
- Place 2 SECTION BUTTONS (P); take the STICK (Q) and STOREROOM KEY (R).
- Insert the STOREROOM KEY (S); turn it.
- Move forward.
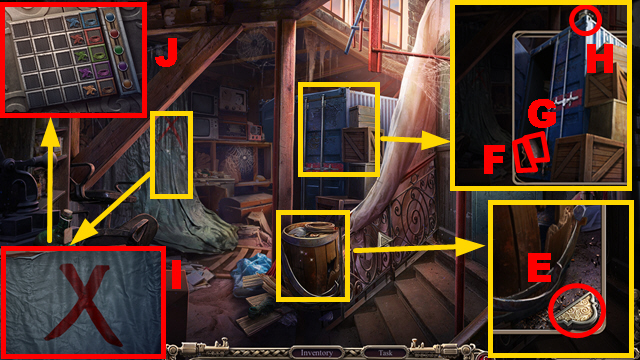
- Take the AXE (T) and ROPE LADDER (U).
- Walk down.
- Use the AXE (V) to play the HOP; you receive the HOOK FIGURE.
- Move forward.
- Use the WIRE PIECE (W); take the DRAWER KNOB (Y).
- Walk down.
- Place the DRAWER KNOB (Z); take the STICK (A).
- Combine 2 STICKS (blue) and the HOOK FIGURE (B) with the ROPE LADDER; take the REPAIRED ROPE LADDER.
- Move forward.
- Place the REPAIRED ROPE LADDER (C).
- Climb down.
- Take the CRYPTEX PIECE (D) and DRILL BIT FIGURE (E).
- Use ELF (F); take the STAPLE REMOVER (G).
- Use the STAPLE REMOVER to open the CARTON (H); take the HYDRAULIC SHEARS (I).
- Turn left.
- Use the HYDRAULIC SHEARS (J); open the doors.
- Take the DRILL (K).
- Walk down.
- Place the DRILL BIT FIGURE (L); take the DRILL BIT (M).
- Go to the Corridor.
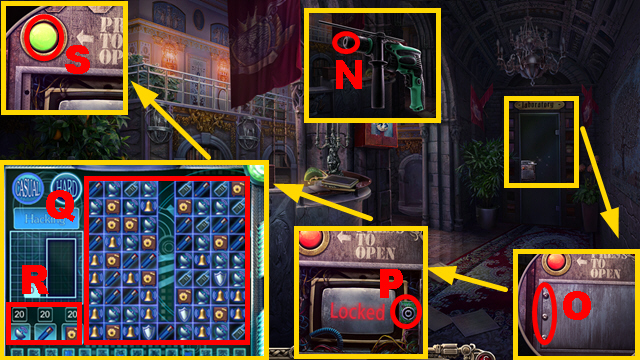
- Place the DRILL BIT on the DRILL (N); take the WORKING DRILL.
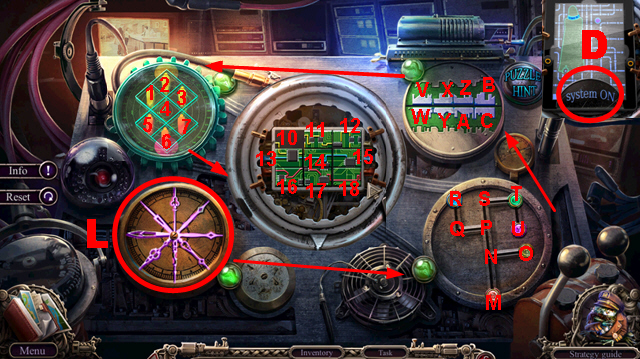
- Use the WORKING DRILL (O) and UNLOCKING DEVICE (P).
- Play the mini-game.
- Solution: Match 3 or more pieces of the same symbols on the grid (Q) until you have collected the required number (R).
- Push the button (S).
- Enter the Laboratory.
Chapter 5: The Laboratory
- Play the HOP (T) to acquire the ADJUSTABLE SPANNER and CRYPTEX.
- Take the CRYPTEX PIECE (U) and RECEPTION KEY (V).

- Place 2 CRYPTEX PIECES on the CRYPTEX (W).
- Play the mini-game.
- Solution: X-Yx2-Z.
- Take the CHEST FIGURE and BOX PART (A).
- Go to the Balcony.
- Place the CHEST FIGURE and take the HELMET EMBLEM (1).
- Go to the Corridor.

- Place the BOX PART (B); pull it.
- Take the LEVER HANDLE (C) and DESIGN PIECE (D).
- Turn left.
- Place the LEVER HANDLE (E); pull it.
- Take the SAFE DIAL (F) and CREST FRAGMENT (G).
- Go to the Laboratory.
- Place the SAFE DIAL (H); turn it.
- Take the FIRE HOSE EMBLEM (I).
- Walk down.
- Place the HELMET EMBLEM and FIRE HOSE EMBLEM (J).
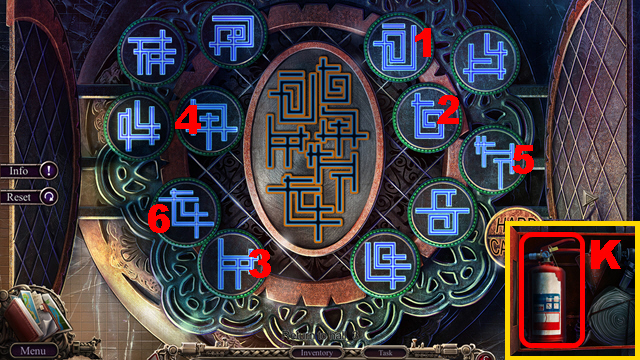
- Play the mini-game.
- Casual solution: 4-6.
- Hard solution: 1-6.
- Take the FIRE EXTINGUISHER (K).
- Turn right.
- Use the FIRE EXTINGUISHER (L).
- Move forward.
- Take the WIRE (M), CREST FRAGMENT (N), and MAGNET (O).
- Walk down twice.

- Place 2 CREST FRAGMENTS (P) and the RECEPTION KEY (Q); turn it.
- Play the HOP (R) to acquire the SPOOL OF THREAD.
- Go to the Tunnel.
- Connect the SPOOL OF THREAD to the MAGNET (S); tie it and take the MAGNET ON THREAD.
- Use the ADJUSTABLE SPANNER (T) and MAGNET ON THREAD (U) to acquire the SAFE EMBLEM.
- Walk down.
- Place the SAFE EMBLEM (V); take the DESIGN PIECE (W) and HOOK FIGURE (X).
- Go to the Balcony.
- Place the HOOK FIGURE (Y); take the HOOK (Z).
- Go to the Tunnel.
- Place 2 DESIGN PIECES (purple).
- Play the mini-game.
- Solution: A-B-Cx2-D.
- Take the LOCK BUTTON (green) and BLUE BOTTLE (E).
- Walk down.
- Place the LOCK BUTTON (F); take the ROPE (G).
- Connect the ROPE to the HOOK (H); take the HOOK ON ROPE.
- Move forward.
- Throw the HOOK ON ROPE (I).
- Climb up.
- Use ELF (J).
- Play the HOP (K) to acquire the TRIHEDRON.
- Walk down twice.
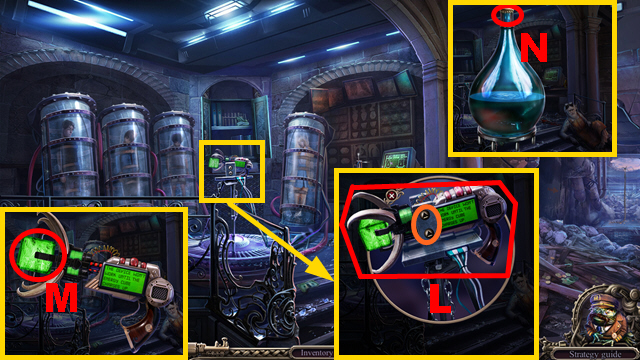
- Use the TRIHEDRON (orange); take the BROKEN DEVICE (L).
- Take the UNCHARGED CUBE from the BROKEN DEVICE (M).
- Use the CAN OPENER to open the BLUE BOTTLE (N); take the OPEN BOTTLE.
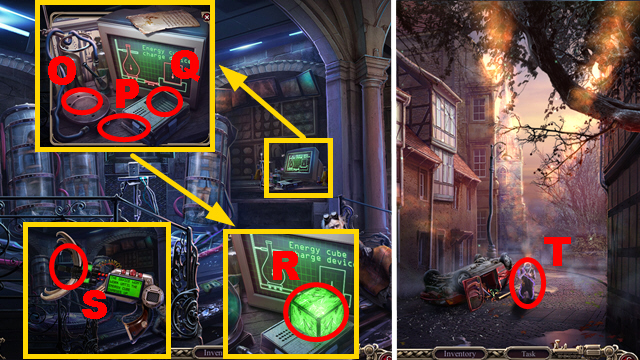
- Place the OPEN BOTTLE (O), WIRE (P), and UNCHARGED CUBE (Q); take the CHARGED CUBE (R).
- Connect the CHARGED CUBE to the BROKEN DEVICE (S); take the WORKING DEVICE.
- Move forward twice.
- Use the WORKING DEVICE (T).
- Play the mini-game.
- Solution: 1-3.
- Walk down twice.

- Use the WORKING DEVICE (U).
- Congratulations! You have completed Mystery Trackers: Train to Hellswich.
Created at: 2016-08-26