
Walkthrough Menu
- General Tips
- Chapter 1: Grandfathers Estate
- Chapter 2: Egypt
- Chapter 3: Brazil
- Chapter 4: Crimea
- Chapter 5: Easter Island
General Tips
- “Mystic Gateways: The Celestial Quest” is an Interactive Hidden Object Adventure Game.
- Click on the Options button to adjust the Music Volume, Sound Volume, Custom Cursor, and Screen options.
- You will be able to choose from Normal Mode, in which tips are frequent and the hint button quickly recharges, or Advanced Mode, in which hints take longer to recharge and tips are rare.
- There is a skip button on the puzzles.
- You have a personal tool belt in the upper right side of the screen; it holds a brush, a hammer, and a shovel (you’ll use those items throughout the game). Click on your character to access the belt.
- Right click to drop the tools.
- There is no penalty for randomly clicking.
- Click on your task bar arrows to scroll left or right and see hidden inventory.
- The gear icon indicates that you can use an inventory item.
- The feet icon appears if you can go to another area.
- The Egyptian eye cursor indicates that you can zoom into an area.
- The hand cursor signifies that you can pick something up.
- The diary in the lower right will sparkle when you have a new entry to read. It is important to read your diary to progress.
- If you get stuck, click on people and exhaust all your conversational choices, or check the diary for updates.
- Click on “Menu,” on top of the task bar, to exit the game.
Chapter 1: Grandfather’s Estate
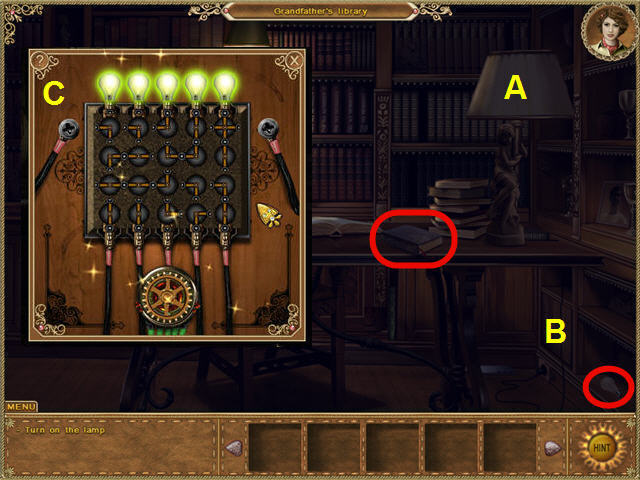
- Click on the lamp (A).
- Pick up the BULB on the bottom right shelf.
- Place the BULB on the lamp and then click the lamp.
- Open the electrical panel (B) and rotate the wires to connect any unlit bulb with any of the bottom wires until all the lights are green (C).
- After successfully lighting a bulb, you will get a new set of wires. Completed bulbs will stay lit.
- Take the DIARY off the desk and it will be added to the bottom, right above your task bar.
- Read the newly added page diary page.
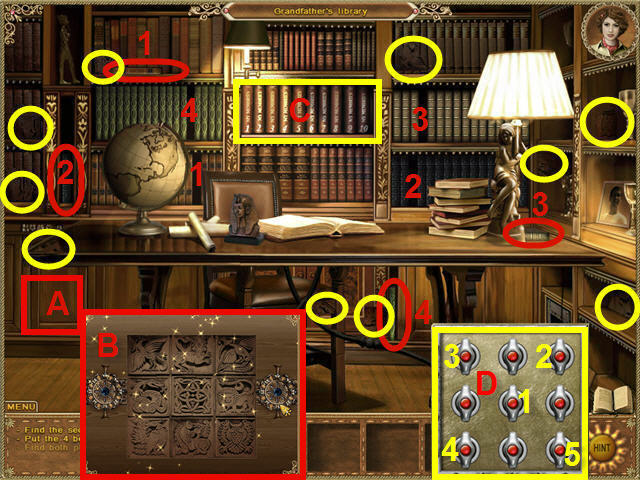
- Find the BOOKS (1-4) and then place them in their matching slots on the bookshelves (1-4).
- Click on the secret metal lockbox (A) and then find the PIECES TO THE PUZZLE, circled in yellow.
- Use the PIECES TO THE PUZZLE on the secret metal lockbox (A) and then complete the jigsaw (B).
- Pieces will lock in place when correct.
- Remove the items from the opened box and then take the paper with the CODE 958.
- Click the CODE on the numbered books (C) and then press the books in this order: 9, 5, 8, 4.
- Click on the closed door.
- Turn all the lights green to complete this puzzle.
- Begin with the middle light, then the upper right light, then the upper left light, then the lower left light, and finally the lower right light (D).
- Go through the door to the secret room.
- Click on the security switch (A) for a tangram puzzle.
- Move any shape on the right to any area on the left into which it will fit to eliminate the area. Continue until all the areas on the left are cleared.
- Rotate the shapes by right-clicking.
- Discard any shapes you do not wish to use by throwing them into the ring of fire.
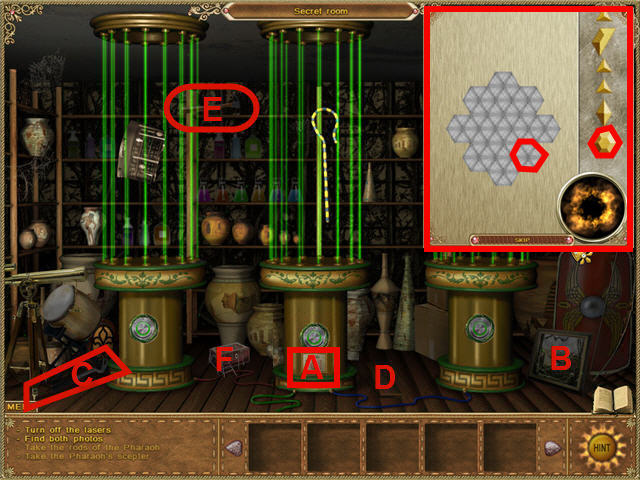
- Click on the red button; take the PHARAOH’S SCEPTER.
- Click on the painting (B; take the WIRE CUTTERS.
- Pick up the CROWBAR (C); use it on the loose board (D).
- Take the BRUSH from behind the loose floorboard; it will be added to your tool belt, in the upper right.
- Pick up the HAMMER (E); it will be added to your tool belt.
- Use the BRUSH from your tool belt on the dusty lockbox (F). You can access the BRUSH by clicking on your character in the upper right.
- Note the colored wires on the floor that power the lasers and then head back to the library via the bottom of the screen.
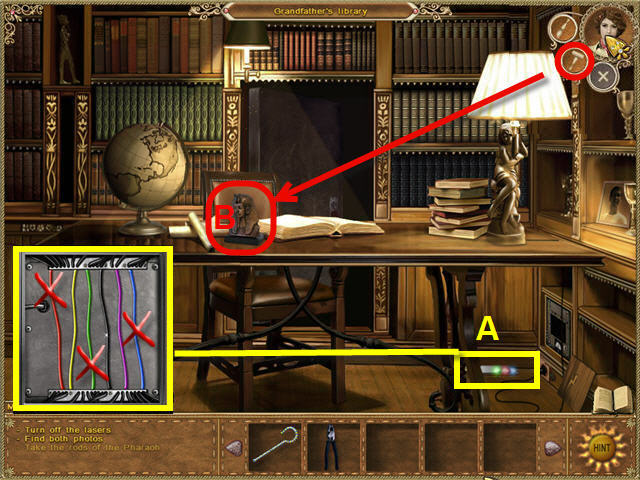
- Click on the alarm control panel on the floor (A); use the WIRE CUTTERS to cut the red, blue, and green wires.
- Click on the porcelain statuette on the desk (B); use the HAMMER from your tool belt to smash it.
- Take the KEY.

- Head back to the secret room; take the PHOTO and PHARAOH’S RODS.
- Use the KEY on the lockbox (A); take the PHOTO from inside.
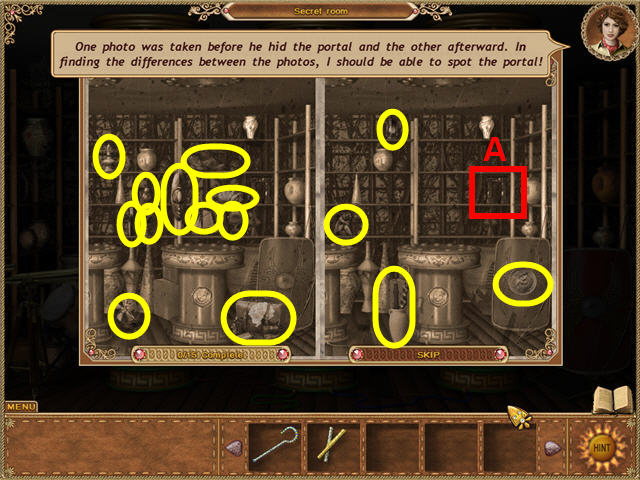
- Find the 15 differences in the photo.
- Your objects may be on the left or right photo. Objects are random, but the same objects will always be in the same places.
- Click on your diary in the lower right to read the update.
- Use the BRUSH from your tool belt on the portal (A).
- Click on and enter the portal.
Chapter 2: Egypt
- Click on the old Bedouin and exhaust all conversation options.
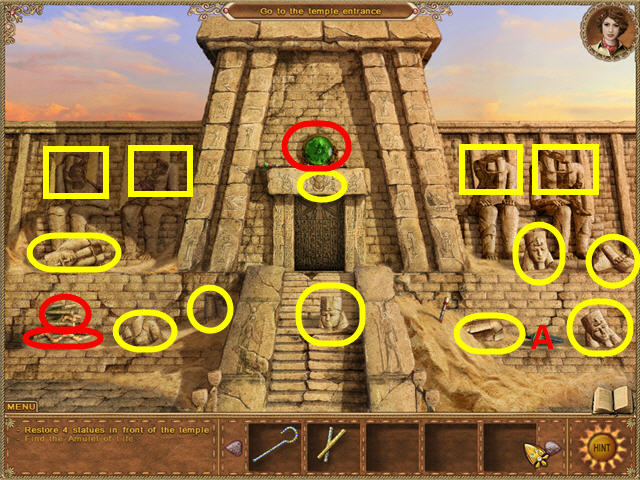
- Move forward, to the temple entrance.
- Find all the statue pieces; place them on the statues.
- Pick up both CONTACT RODS and a SCARAB.
- Use the HAMMER on the bottle (A); take the PAPER.
- Enter the temple.
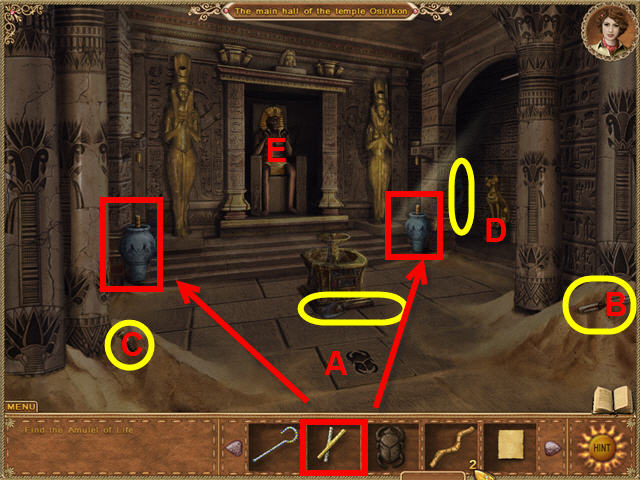
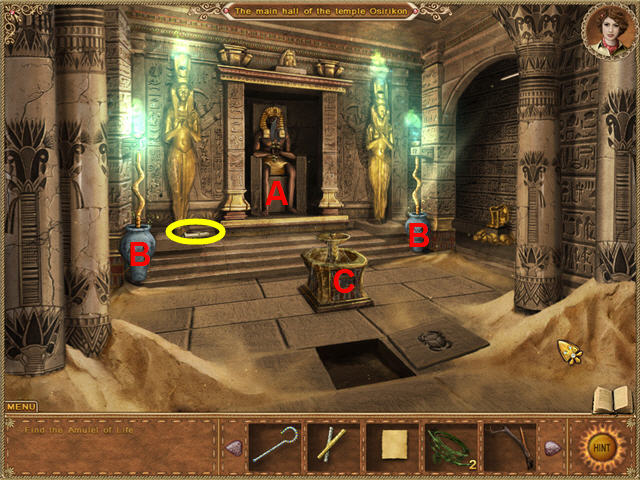
- Place the SCARAB on the scarab tile (A), on the floor; take the EMPTY BOTTLE.
- Take the RUSTY SHOVEL; it will go into your tool belt.
- Pick up the SCROLL (B); read the diary update.
- Place a CONTACT ROD on each Egyptian amphora.
- Use the RUSTY SHOVEL from the tool belt on the handle in the sand (C); pick up the SWORD.
- Use the HAMMER on the porcelain cat statue (D); take the SWORD.
- Use both SWORDS on the Statue of the Pharaoh (E) and then click on the statue.
- Take the CARPET from behind the pillar, next to the cat statue.
- Leave the temple.
- Speak to the old Bedouin, exhausting all conversation options.
- Go forward, to the temple.
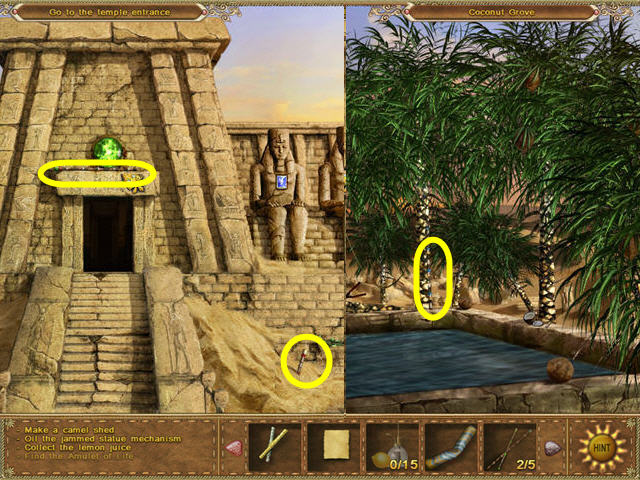
- Take the STICK from above the temple doorway.
- Use the RUSTY SHOVEL on the STICK in the sand, to the right of the staircase.
- Take the stick.
- Head to the Bedouin camp and then go to the coconut grove on the right.
- Take the STICK leaning against the tree and then return to the Bedouin camp.
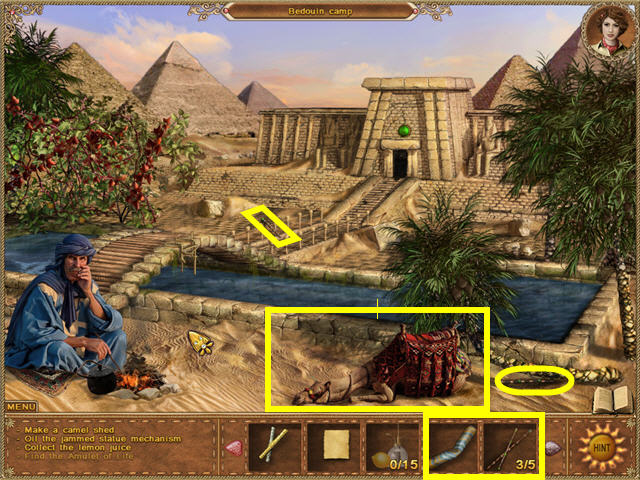
- Pick up the last two STICKS.
- Click the STICKS on the camel.
- Place the CARPET on the camel.
- Take the EMPTY OIL CAN from beneath the camel’s head.
- Head to the coconut grove on the right.
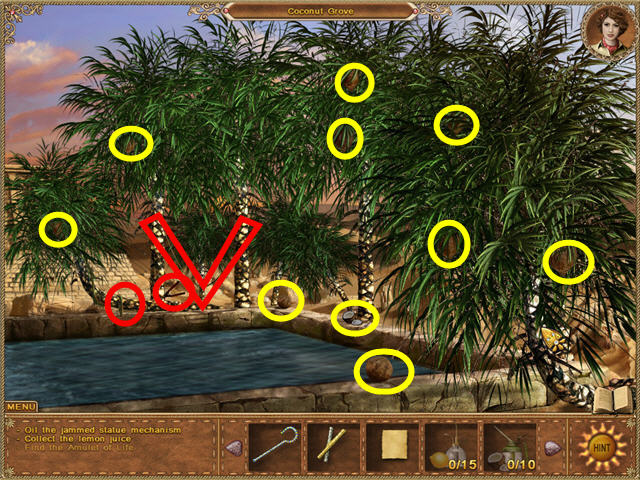
- Find the 10 coconuts to add OIL to your inventory.
- Take the SCISSORS and both LIANA.
- Go back to the Bedouin camp.
- Use the SCISSORS on the barb to the left of the Bedouin.
- Head to the lemon grove on the left.
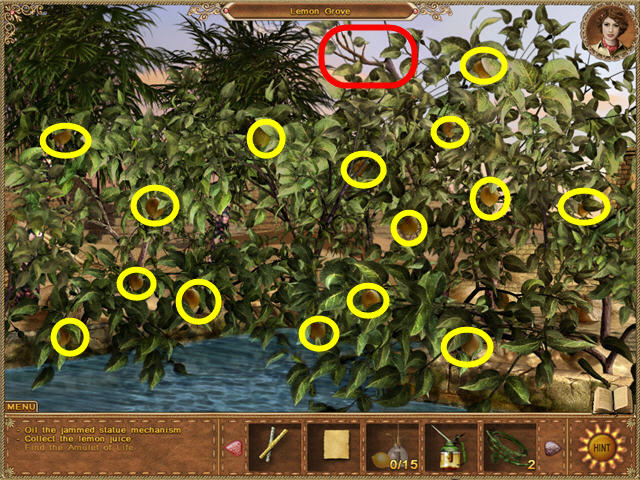
- Collect 15 lemons to get LEMON JUICE.
- Take the BRANCH from the top of the lemon trees.
- Head into the temple.
- Place the OIL on the statue of Pharaoh (A).
- Use the LEMON JUICE on both Egyptian amphorae (B).
- Pick up the SCROLL on the left of the Pharaoh and then read the new diary entry.
- Use the BRUSH on the dusty fountain (C).
- Back out of the temple to the Bedouin camp.

- Use the BRANCH on the arch of the bridge (A).
- Use one of the LIANAS on the BRANCH.
- Dive into the water.
- Use the RUSTY SHOVEL on the sand in front of the flap (B).
- Use the HAMMER on the flap.
- Pull the lever (C).
- Use the RUSTY SHOVEL on the sand pile to the left (D); take the STONE PLATE.
- Head inside the temple.
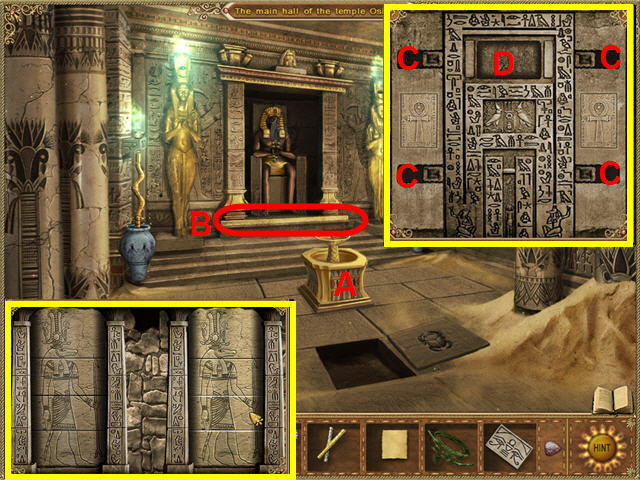
- Click on the fountain (A) to get a puzzle.
- Click on the tiles on the right to make the picture on the right match the tiles on the left. The picture is random.
- Take the CROWBAR from the doorway (B) where the Pharaoh was.
- Go to the entrance of the temple; use the CROWBAR to take the four blue CRYSTALS from the statues.
- Head back into the temple.
- Click on the secret door, where the pharaoh was, to get a door lock.
- Place the four CRYSTALS in the four slots (C).
- Place the STONE PLATE in the top slot (D).
- Take the AMULET OF LIFE from the door.
- Head to the Bedouin.
- Speak to the Bedouin, exhausting all conversation options.
- Click on the Pyramids in the distant left to travel there.
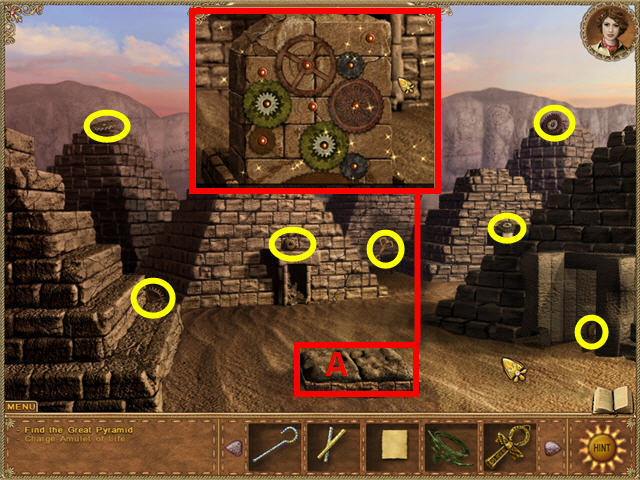
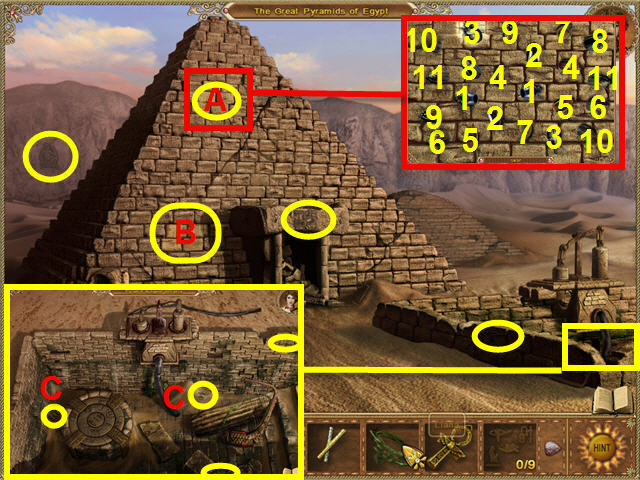
- Use the BRUSH on each of the seven pyramids until they are totally cleaned.
- Collect the six GEARS and the KEY.
- Use the KEY on the cover (A), a mechanism will rise.
- Place the GEARS on the mechanism so that they all turn (see the screenshot).
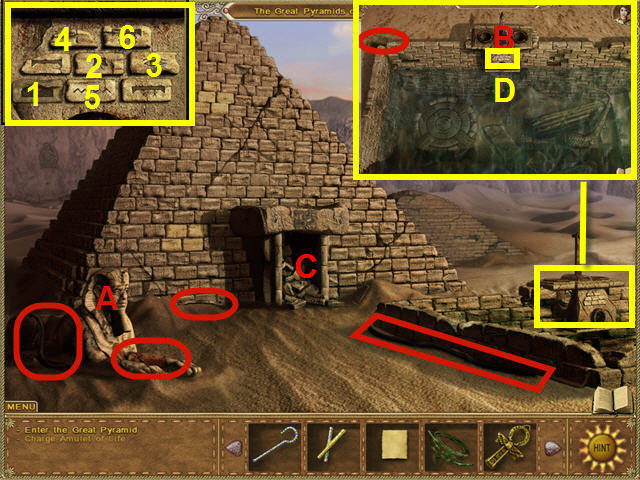
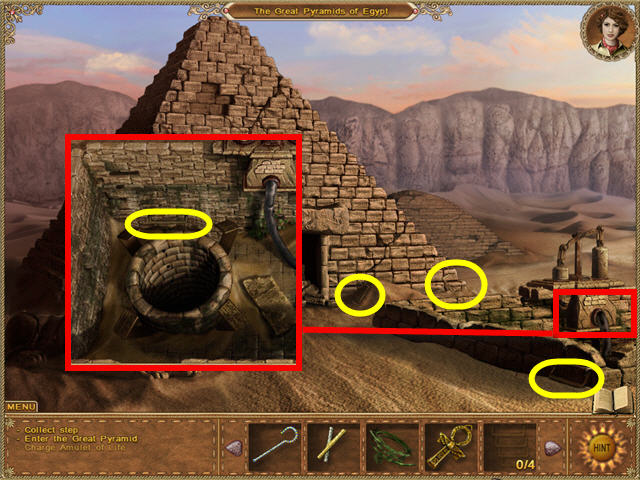
- Click on the sphinx’s beard (A), the entrance to the Great Pyramid (C), and the pump on the well (B).
- Collect the three PUMP PARTS and both HOSES.
- Place the PUMP PARTS on the pump in the well and then add the HOSES.
- You must place the HOSES on the top of the pump to connect them.
- Click on the sphinx’s beard, place the PAPER on the glyphs and then click the paper.
- Head to the Bedouin camp.
- Speak to the Bedouin, exhausting all conversation.
- Take the COAL that is in the sand by the fire.
- Return to the pyramids.
- Click on the sphinx’s beard; place the COAL on the PAPER in the close-up.
- Read the diary update.
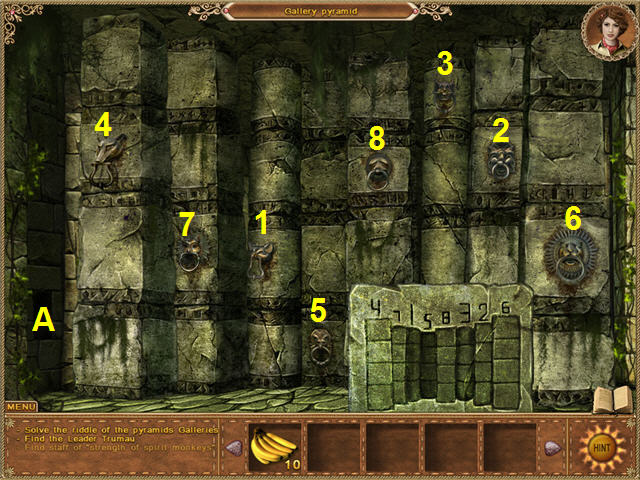
- Click on the light colored bricks under the pump; push the symbols in the order that you got from the sphinx.
- From left to right, starting in the top left, press 6, 4, 5, 1, 7, 2, or push in numerical order on the screenshot.
- Click on the cover to the well; find the symbols.
- Use the HAMMER on the light colored stones on the top (A) to get a matching puzzle.
- Match the beetles to clear the area and then take the SYMBOL.
- Use the HAMMER on the bricks (B); take the SYMBOL.
- Click on the well; take the remaining SYMBOLS (you will need to use the RUSTY SHOVEL on the ones in the sand) (C).
- Use the SYMBOLS on the well lock.
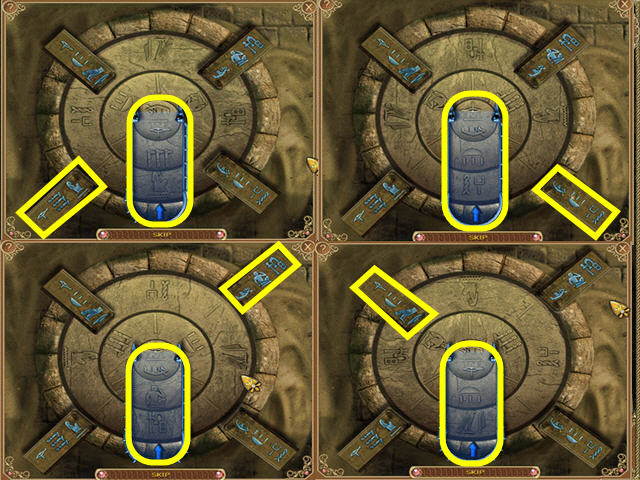
- Turn the rings to line up the symbols on the four locks (see screenshot for solution).
- Attempt to go down the opened well.
- Find the four STEPS to have four RUNGS added to inventory.
- Use the RUNGS on the open well and then enter the well.
- Use the LIANA on the hook (A) and then pull on it to roll the large stone.
- Click on the door.
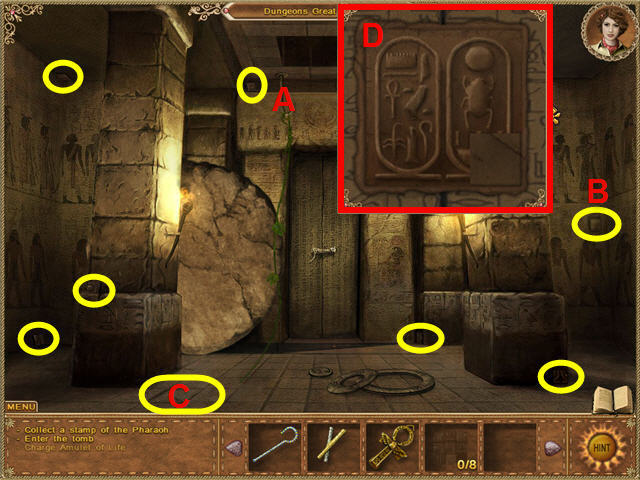
- Find the PIECES OF THE STAMP PHARAOH.
- Use the HAMMER on the suspicious tiles (B) and (C); take the TILES.
- Use the PIECES OF THE STAMP PHARAOH on the door to get a slider puzzle.
- Slide the pieces of the door lock to make a picture (D).
- Enter the tomb.
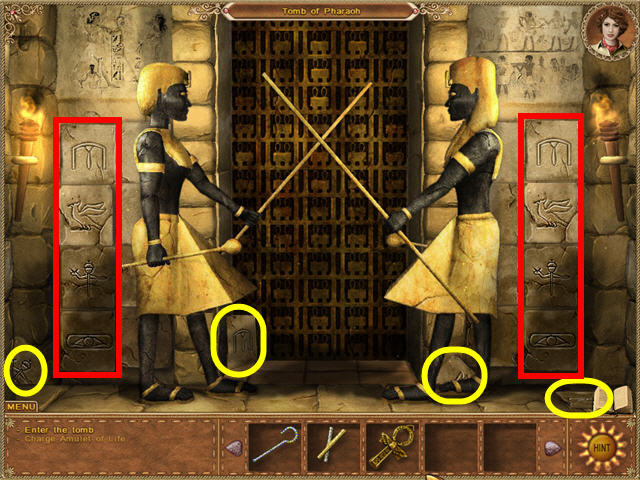
- Collect the GLYPHS and then place them on either side of the guards.
- Place the disks so that the two sides are identical (see the screenshot for completed tiles).
- Enter through the gate to the tomb.
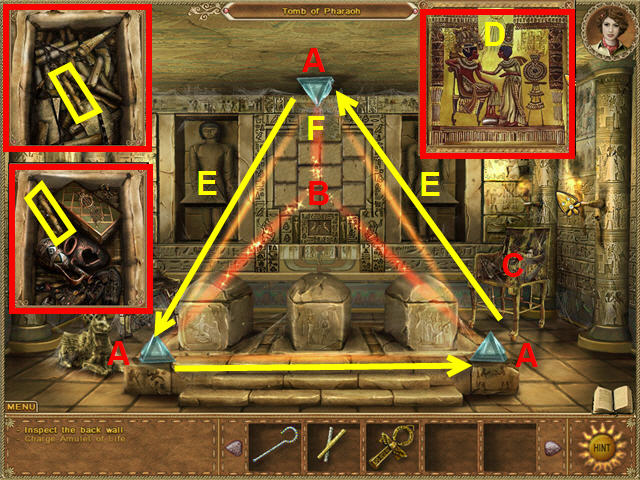
- Use the BRUSH to dust off the three prisms (A).
- Turn the prisms so that the beams form a triangle (follow the arrows in the screenshot).
- Click on the center of the wall that is marked by the beam (B).
- A matching puzzle appears; you’ll need to match identical tiles until the board is cleared.
- Click on the Egyptian eye.
- Click on the far right sarcophagus and then take the SCROLL.
- Read the updated diary page.
- Use the BRUSH on Pharaoh’s chair (C).
- Click on any two tiles to swap them to complete the picture (D).
- Speak to Pharaoh, exhausting all conversation options.
- Place the PHARAOH’S SCEPTER on the now-opened middle sarcophagus.
- Speak to the Pharaoh, exhausting all conversation options.
- Insert PHARAOH’S RODS into the statue’s hands (E) and then speak to the Pharaoh.
- Place the AMULET OF LIFE in the magnetic field and then click on it.
- Click on the far left sarcophagus; take the SCROLL.
- Read the updated diary entry.
- Use the HAMMER on the place shown in the diary (F), above the Egyptian eye.
- Click on and enter the portal.
Chapter 3: Brazil
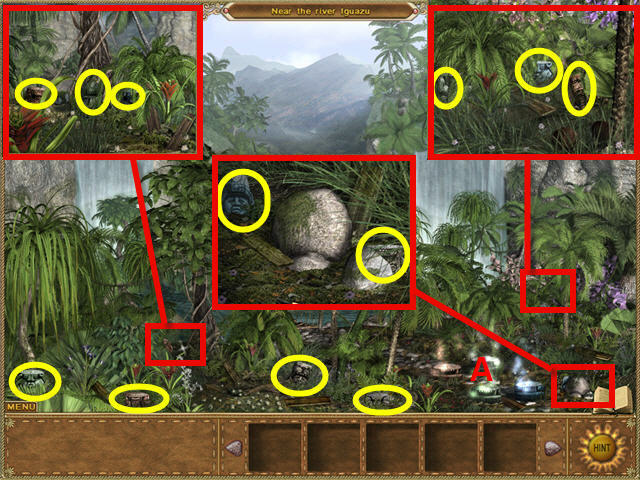
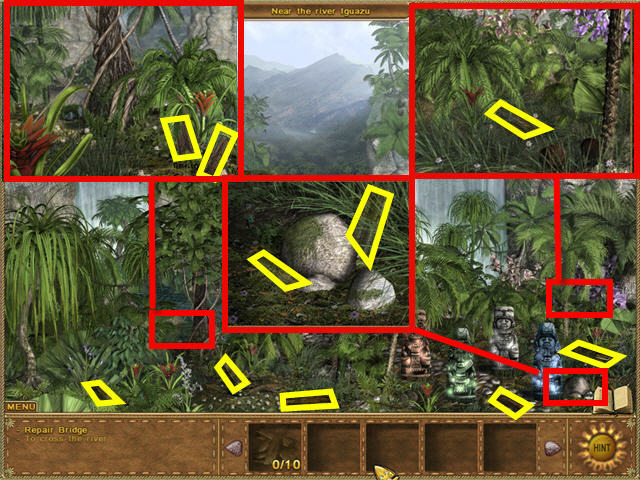
- Click on the shimmering mystical totems (A).
- Search for the PARTS OF THE TOTEM.
- Place the PARTS OF THE TOTEM on the shimmering totems and then click on them.
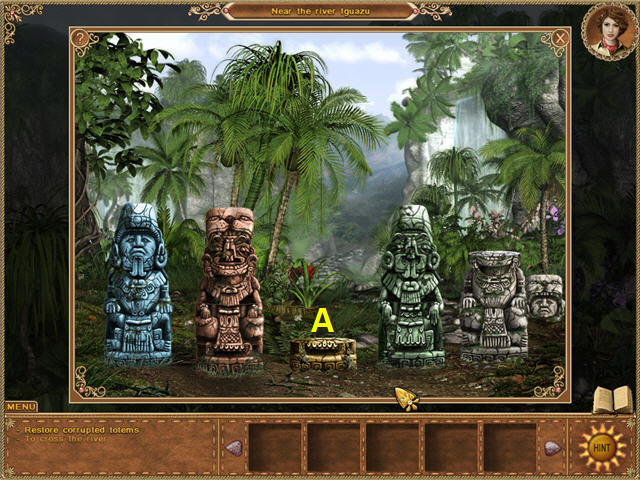
- Move the totem parts around, placing all the like-colored totem pieces in order on their matching bases.
- Use the middle gold base (A) to rest parts on, or to stack parts on a larger or equal sized piece on another totem.
- You cannot place a larger section on a smaller one (see screenshot for solution).
- When complete, click on the bridge in the distance and then click on the broken section when you get up close.
- Go back to the totem area.
- Collect the BOARDS for the bridge.
- Head to the bridge.
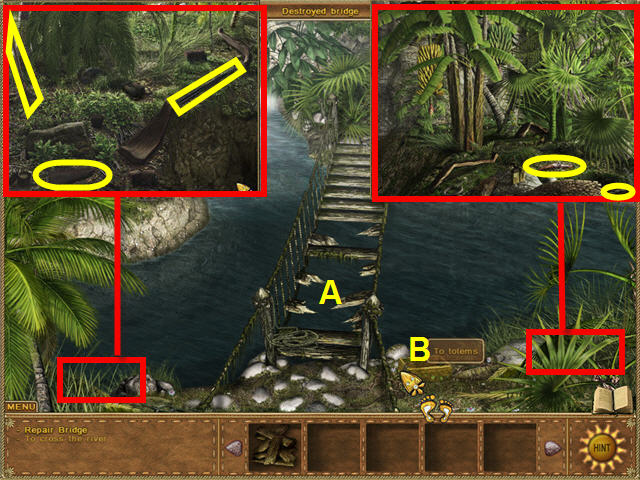
- Click on the box next to the bridge (B); take the NAILS.
- Place the BOARDS on the destroyed bridge (A).
- Place the NAILS on the BOARDS on the bridge.
- Use the HAMMER on the NAILS.
- Cross the repaired bridge.
- Exhaust all conversation options with the hunter.
- Cross back over the bridge to the right and collect the GUN PARTS.
- Cross over the bridge; give the GUN PARTS to the hunter.
- Click on the GUN PARTS in front of the hunter.
- Assemble the gun (A) (give it to the hunter when finished).
- The parts will lock in place if correct.
- Speak to the hunter, exhausting all conversation options.
- Click on the diary for an update.
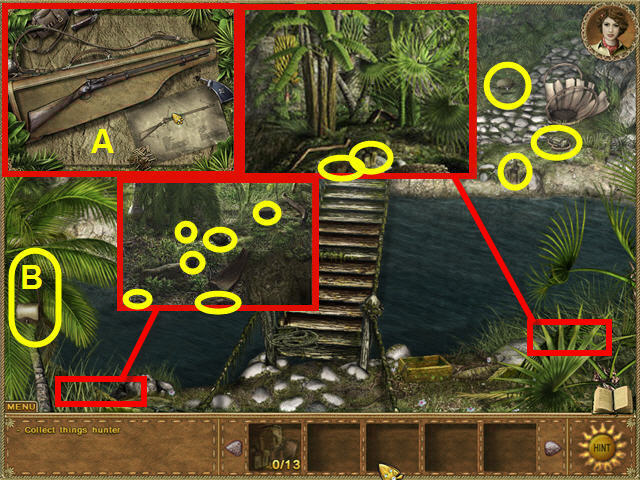
- Collect the hunter’s 13 belongings and get a FULL BACKPACK.
- You will need to take the shirt from the bridge railing by the hunter; the other 12 belongings will be located across the bridge.
- Click on the palm tree on the left of the bridge to remove a leaf (B), uncovering one of the hunter’s belongings.
- Go back to the hunter, give him the FULL BACKPACK and then exhaust all conversation options.
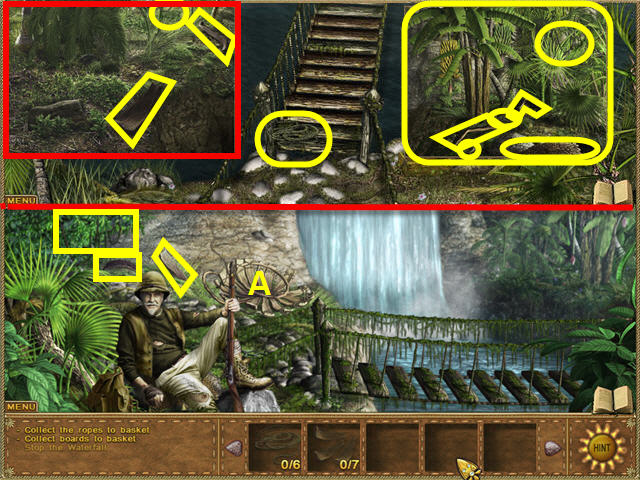
- Collect all of the ROPES and BOARDS from both sides of the bridge.
- Click the BOARDS on the broken basket.
- Click the ROPES on the broken basket.
- Click twice on the assembled basket to get to the top of the waterfall.

- Click on the water on the top of the waterfall.
- Collect the MOUNTAIN STONES for the dam.
- Place the MOUNTAIN STONES on the top of the waterfall (A).
- Click on the hotspot (B); use the BRUSH on the DIARY.
- Take the DIARY and then go down in the basket.
- Give the DIARY to the hunter and then exhaust all conversation options.
- Go back over the bridge.
- Click on the hotspot to the right; take the BANANAS.
- Cross the bridge and go through the tunnel.
- Talk to the Keeper, exhausting all conversation options.
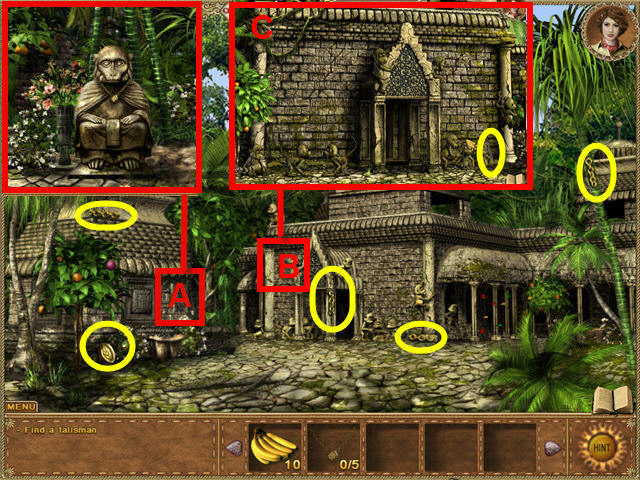
- Find the five pieces of the talisman to get a TALISMAN.
- Go to the house keeper (A).
- Use the BRUSH on the Keeper of the City of Monkey’s statue.
- Place the TALISMAN on the cleaned statue.
- Speak to the Keeper, exhausting all conversation options.
- Exit to the main area.
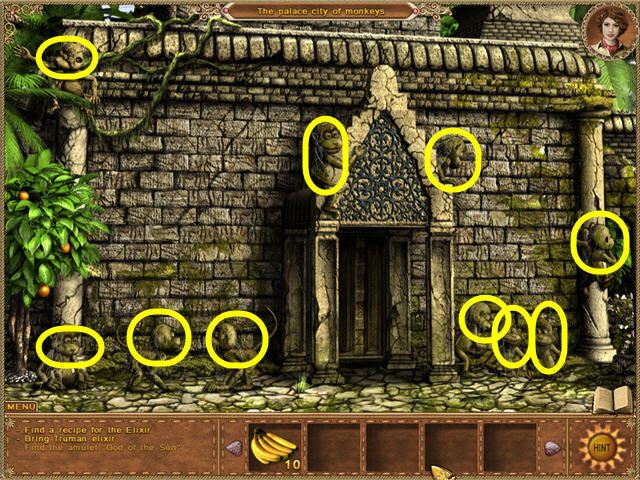
- Click on the façade of the temple (B).
- Use the BRUSH on the top left monkey (C) notice the direction in which it is pointing.
- Take the MACHETE from the bottom right.
- Head to the jungle on the left.
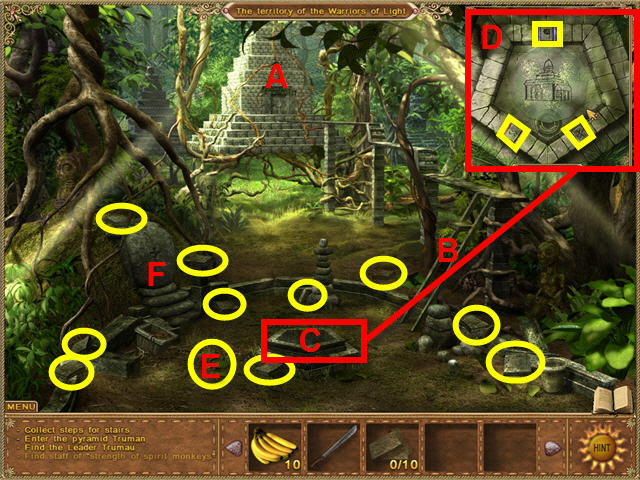
- Use the MACHETE all over the screen to clear it.
- Click on the pyramid (A) and the staircase (B).
- Collect the ten STONE STEPS.
- Place the STONE STEPS on the staircase (B).
- Click on the door to the pyramid.
- Click on the altar (C); use the BRUSH to clear away the leaves.
- Stack all three colored pictures on top of each other using the three colored buttons. You will need to do this three times (D). The symbols may be random.
- Take the SCROLL from the opened altar.
- Read the updated diary.
- Lift the leaves (E) from the ground to the left of the altar.
- Take the STONE KEY from under the altar.
- Use the STONE KEY on the stone door (F); enter through the passage to the storage spirits.
- Use the MACHETE on the rear of the darkened room.
- Click on all the pedestals of the spirits and then exit the room.
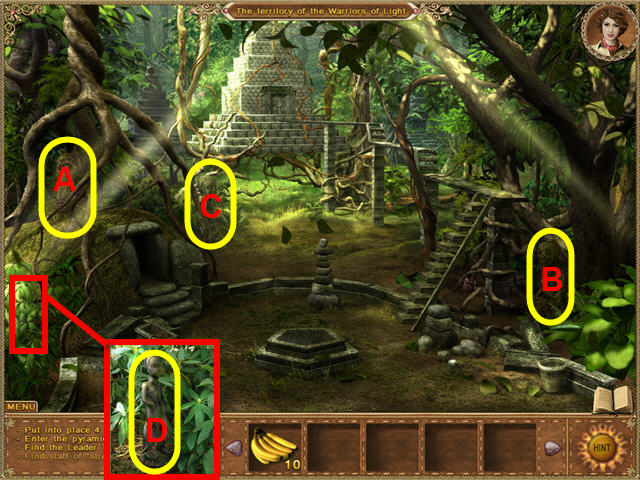
- Use the BRUSH to clean off the SPIRIT OF THE FIRE (A) and then collect it.
- Use the BRUSH to clean off the SPIRIT OF THE SUN (B) and then collect it.
- Use the BRUSH to clean off the SPIRIT OF THE FOREST (C) and then collect it.
- Click on the hotspot in the bottom left.
- Use the BRUSH to clean off the SPIRIT OF THE FALLS (D) and then collect it.
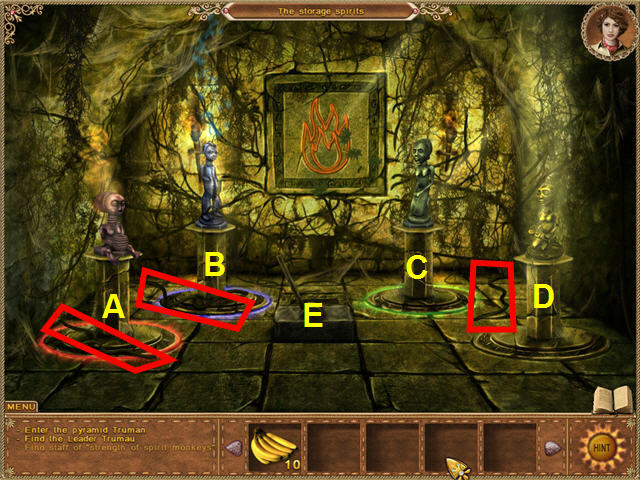
- Enter the passage to the storage spirits.
- Place the SPIRIT OF THE FIRE (A), SPIRIT OF THE FALLS (B), SPIRIT OF THE FOREST (C), and SPIRIT OF THE SUN (D) on their respective pedestals.
- Click on the lever (E) (it will break).
- Find the three pieces of LIANA.
- Use the LIANA on the broken lever.
- Click the fixed lever.
- Exit the room and then head to the now-opened larger pyramid.
- Use the HAMMER on the tile on the left.
- Pull the handles on the columns in the order on the stone tablet (see the screenshot for solution).
- Head through the passage to the Throne Room.
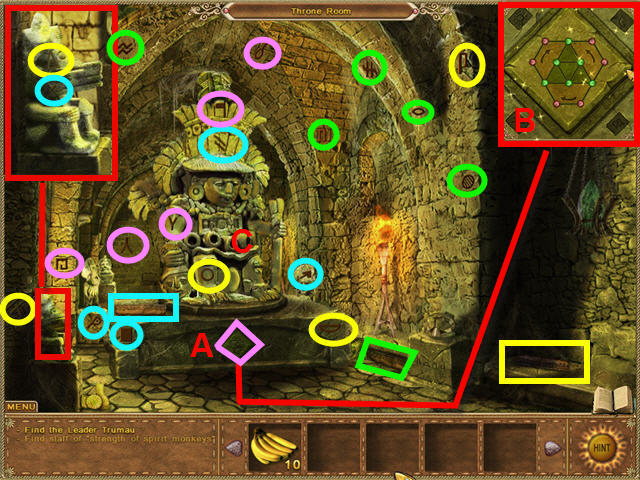
- Click on the throne.
- Exhaust all conversation options with the leader.
- Collect the four SCROLLS.
- As you click on the SCROLLS, you will need to find the matching symbols in the room.
- You need to do one SCROLL at a time. The screenshot is color coded so you can match the scrolls with the symbols.
- The fourth SCROLL can be found in the base of the statue (A).
- Rotate the hexagons so that all the green dots form a triangle in the middle (B).
- Take the SCROLL from the completed puzzle and find the symbols.
- Place the scroll by the slots in the front of the Statue Leader Truman (C).
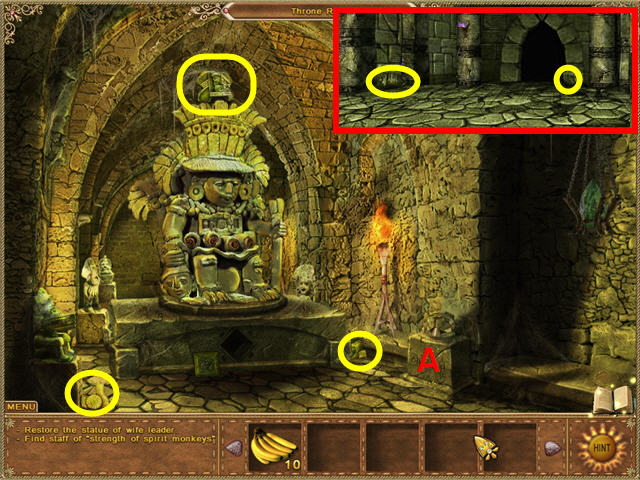
- Click on the statue of Truman’s wife (A) and then read the diary update.
- Collect the five STATUE PIECES.
- Two of the STATUE PIECES are in the Gallery room; exit once, via the bottom of the screen.
- Place the STATUE PIECES on the base of the statue.
- First place the torso, then the head, then the arms, then the headdress.
- Exhaust all conversation options with the Statue Leader Truman.
- Exit the pyramid and return to the Warriors of Light area.
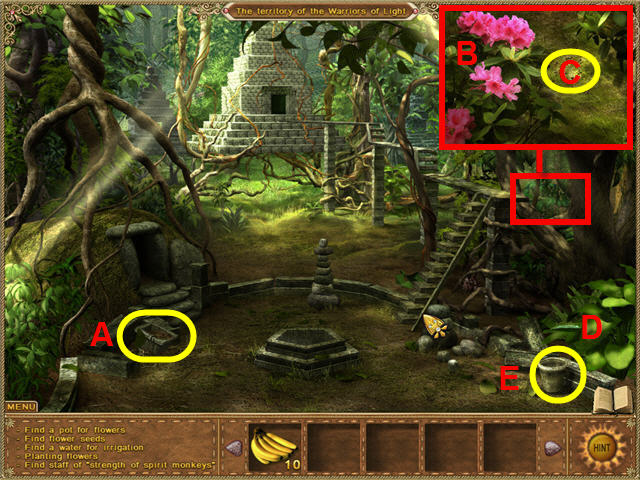
- Take the FLOWERPOT (A).
- Click on the hotspot.
- Shake the flowers (B) and then take the SEEDS (C) from the ground.
- Click on the leaf holding water (D) to fill the pot with water.
- Take the POT WITH WATER (E).
- Go back into the pyramid throne room and place the FLOWERPOT by the base of the Truman’s wife statue.
- Place the SEED in the FLOWERPOT.
- Add A POT WITH WATER to the FLOWERPOT.
- Exhaust all conversation options with Truman.
- Take the STAFF OF “STRENGTH OF SPIRIT MONKEYS” from the right of the Truman’s wife statue.
- Head back to the House Keeper City by backing out of all scenes to the main square and then heading left.
- Give the STAFF OF “STRENGTH OF SPIRIT MONKEYS” to the Keeper statue (A).
- Exhaust all conversation options with the Keeper.
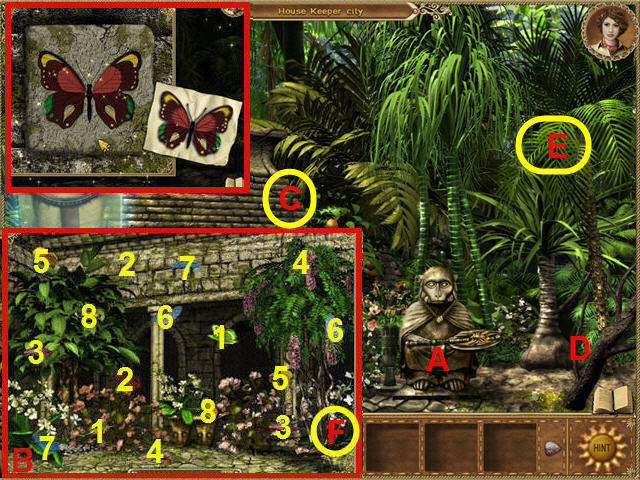
- Back out of the area and then go to the right of the façade of the temple, to the butterflies.
- Clear out the butterflies by matching them (B).
- Try and take the butterfly that is left unmatched (F).
- Head back to the Keeper; take the LIANA (C).
- Click on the BRANCH (D) and then use the HAMMER on it.
- Use the LIANA on the branch pile (D).
- Click on the branch pile with the LIANA to make a ladder.
- Click on the PALM LEAF (E).
- Exit once to the main square.
- Use the BRUSH on the moss-covered branch on the ground; pick it up to get a NET.
- Go to the butterfly area.
- Use the NET on the butterfly (F) and then head to the Keeper.
- Use the BUTTERFLY on the butterfly button next to the sealed entrance to the House of Keeper.
- Click the various parts of the butterfly until its colors match those of the smaller butterfly (see screenshot for solution).
- Head to the façade of the temple.
- Use the BRUSH on all the monkeys except the one in the top left that you brushed earlier.
- Feed a BANANA to each monkey, starting with the bottom ones first.
- Take the ELIXER OF LIFE RECIPE from under the top of the raised tower.
- Read the diary update.
- Head back to the main square.
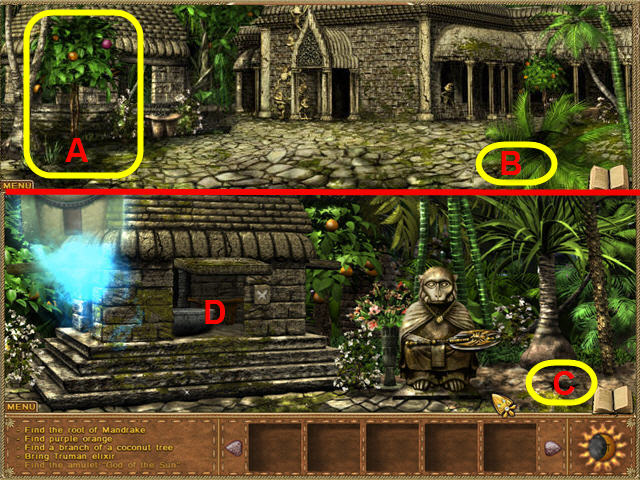
- Shake the tree on the left (A) until the fruit falls off.
- Pick up the PURPLE ORANGE from the ground.
- Take the PALM LEAF from the tree on the bottom right (B).
- Take the CRUSHER that was underneath the PALM LEAF.
- Head to the Keeper area.
- Use the RUSTY SHOVEL on the pit (C); take the MANDRAKE ROOT.
- Click on the entrance to the House of the Keeper.
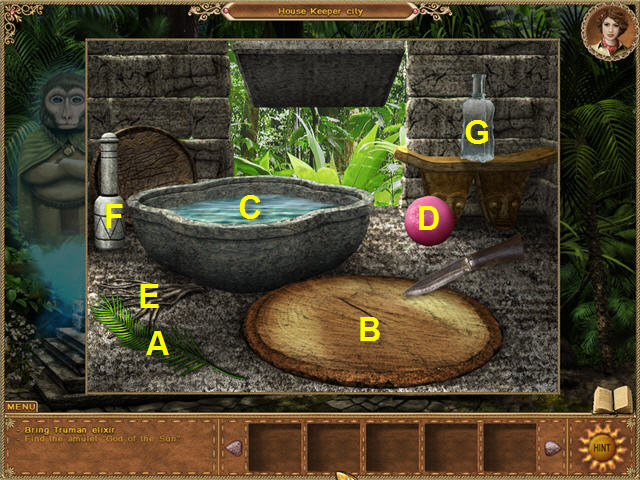
- Place the PALM LEAF (A) on the cutting board (B) and then click on the knife to cut it.
- Pick up the chopped PALM LEAF and place it in the bowl (C).
- Place the PURPLE ORANGE (D) in the bowl.
- Place the MANDRAKE ROOT (E) on the cutting board and then use the knife on it.
- Place the chopped MANDRAKE ROOT in the bowl.
- Use the CRUSHER (F) to stir the bowl.
- Use the bottle (G) on the bowl to get the POTION.
- Head to the throne room and give Truman the ELIXER (POTION).
- Take the AMULET OF THE SUN GOD.
- Click on the green glowing lamp on the right.
- Use the BRUSH on the green lamp; click on the portal reflection on the wall.
- Go through the portal.
Chapter 4: Crimea
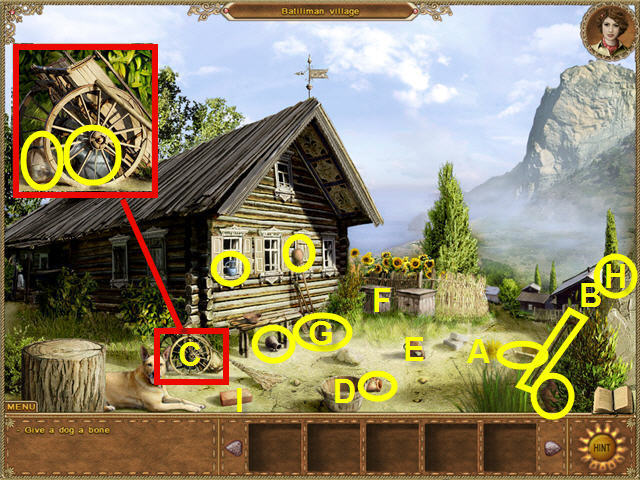
- Click twice on the dog.
- Take the BONE (A) and feed it to the dog.
- Speak to the old man, exhausting all conversation options.
- Take the CANE (B) and give it to the old man.
- Talk twice to the old man.
- Click on the Bees (F).
- Click on the cart (C); take the SUGAR.
- Place the SUGAR in the tub (D); click on the bees.
- Click on the jug (E) and then on the hole in the jug.
- Collect six of the JUGS.
- Take the BAILER (G) and the STICK (H).
- Use the HAMMER on the brick (I) in front of the dog.
- Pick up the shattered BRICK.
- Use the BRICK, the BAILER, and the STICK on the bowl on the bench to have CLAY added to your inventory.
- Use the CLAY on the broken jug; you now have all the JUGS.
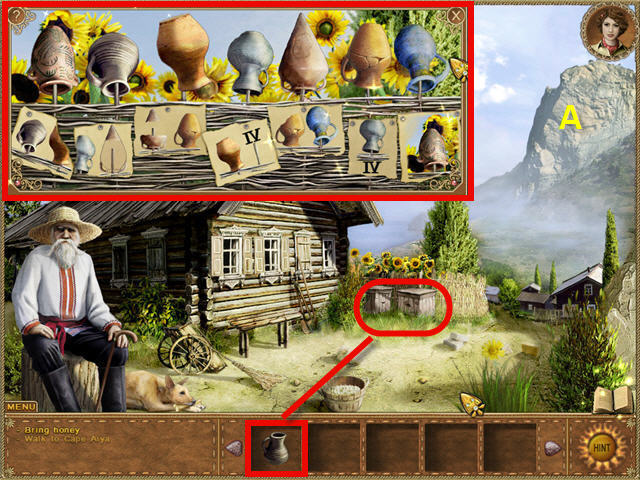
- Arrange the pots in the correct order, using the pictures underneath as clues (see screenshot for solution).
- Use the EMPTY JUG on the beehives to get a JUG OF HONEY.
- Give the JUG OF HONEY to the old man.
- Exhaust all conversation options with the old man.
- Click on the large mountain (A) in the distance to head to the next area.
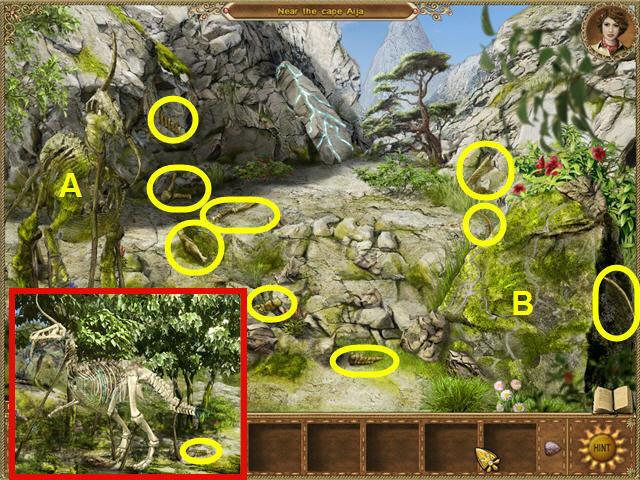
- Click on the skeleton (A); use the BRUSH to clean it.
- Find the 10 BONES and place them on the highlighted areas on the skeleton.
- Some BONES will not be highlighted and cannot be placed until a BONE to which it will be connected is placed.
- Click on the dusty magic stone (B); use the BRUSH to clean it.
- Use the RUSTY SHOVEL on the earthen mound to get an ELEMENT MAGIC STONE.
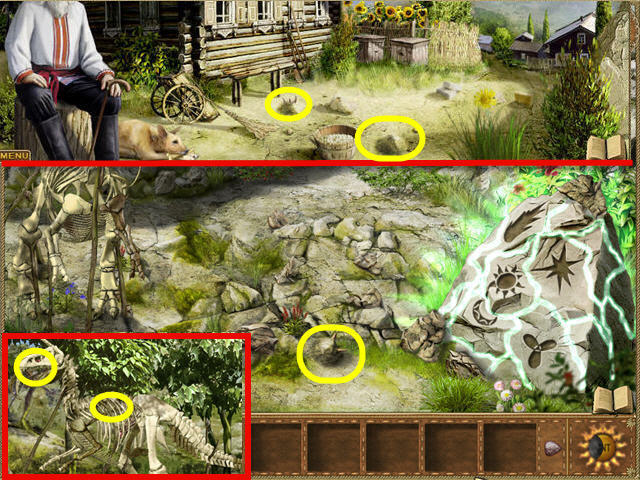
- Click on the skeleton.
- Take the ELEMENT MAGIC STONE from the ribs and get another by clicking the skeleton’s lower jaw.
- Head back to the old man.
- Dig up two earthen mounds with the RUSTY SHOVEL to get the last two ELEMENT MAGIC STONE.
- Go back to the magic stone.
- Place the five ELEMENT MAGIC STONES on their spots.
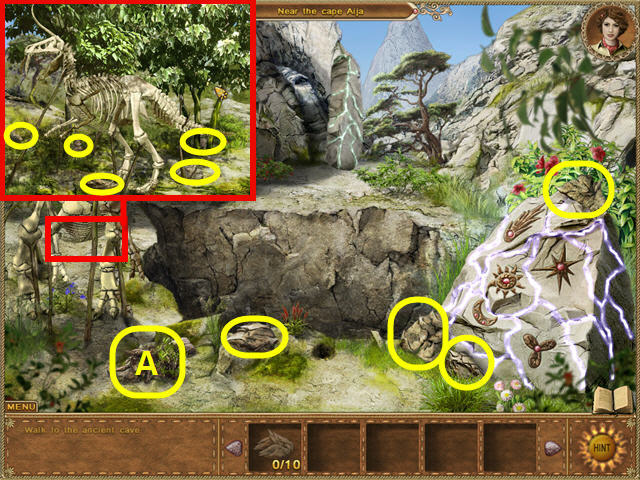
- Click on the abyss.
- Collect 10 MOUNTAIN STONES.
- Move the mossy clump (A); take the MOUNTAIN STONE underneath.
- Place the MOUNTAIN STONES on the abyss and click on them.
- Head back to the old man.
- Talk to the old man, exhausting all conversation options.
- Take the STRAW bale and then go back to the mountains.
- Place the STRAW on the stone-covered abyss.
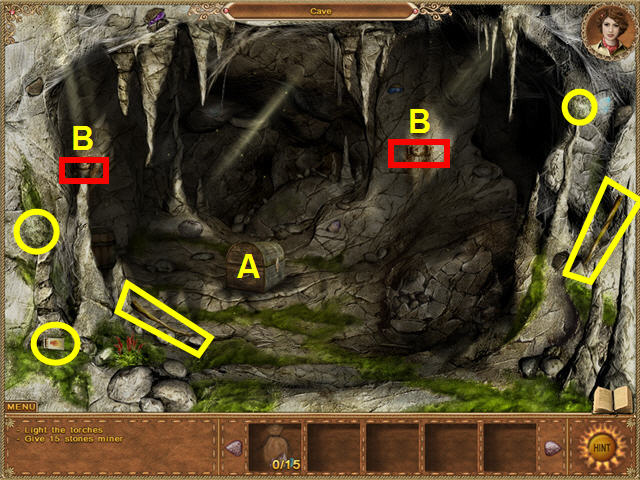
- Click on the entrance to the cave.
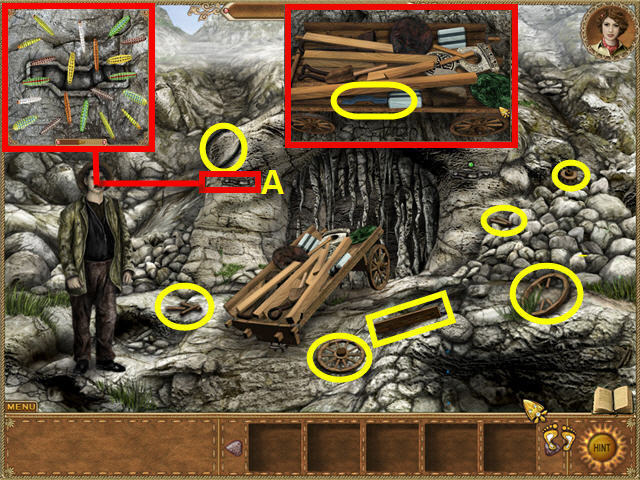
- Speak to the miner, exhausting all conversation.
- Collect the pieces to fix the cart.
- Place the SUPPORTING AXLE and the WHEELS on the cart.
- Speak to the miner, exhausting all conversation.
- Click on the cart and take the MAGIK PLATE.
- Use the MAGIK PLATE on the left stone cover (A).
- Clear the caterpillars off the key slot by matching them two at a time.
- Place the MAGIK PLATE in the slot (A).
- Use the HAMMER on the right stone cover (B).
- Speak to the miner completely and then head back to the village.
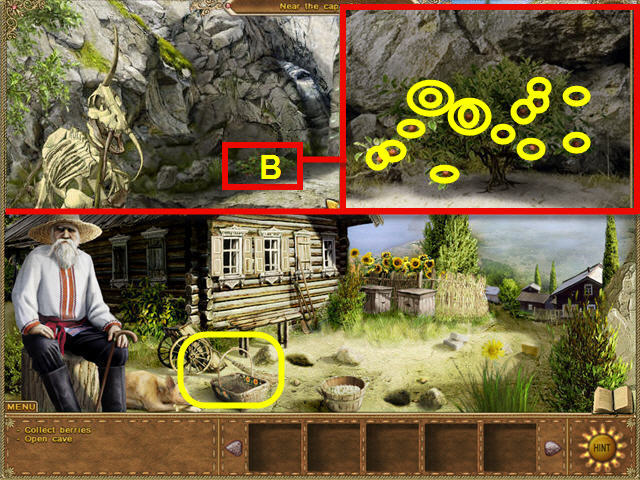
- Speak to the old man and exhaust all conversation.
- Take the BASKET (A) and head towards the mountain one time.
- Click on the berry bush (B); pick all the BERRIES.
- Head back to the old man and give him the BERRIES.
- Exhaust all conversation options with the old man and the MAGIK PLATE will be added to inventory.
- Head back to the cave.
- Place the MAGIK PLATE in the key slot to the right of the entrance.
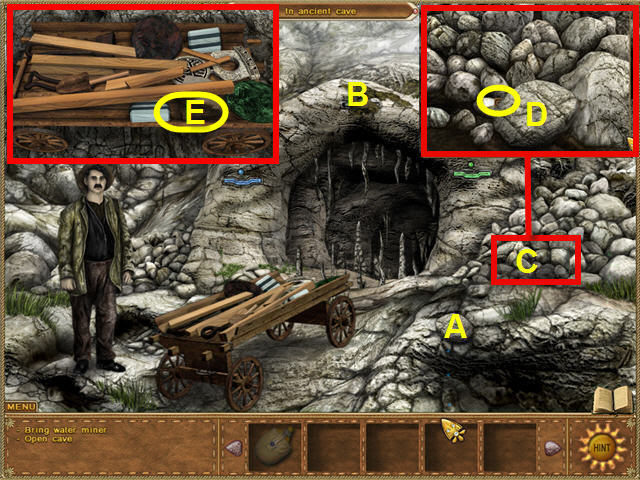
- Speak twice to the miner; he will give you an EMPTY FLASK.
- Remove the stone (A) on the right.
- Use the EMPTY FLASK on the stream where the stone was to get a FLASK WITH WATER.
- Give THE FLASK WITH WATER to the Miner.
- Use the BRUSH on the dusty moss (B).
- Use the HAMMER on the stone cover that was under the moss.
- Click on the secret place stones to the right of the cave (C).
- Use the HAMMER on the large stone (D); take the MAGIK PLATE.
- Place the MAGIK PLATE on the key slot (B).
- Speak to the miner; take the BAG (E) from the cart.
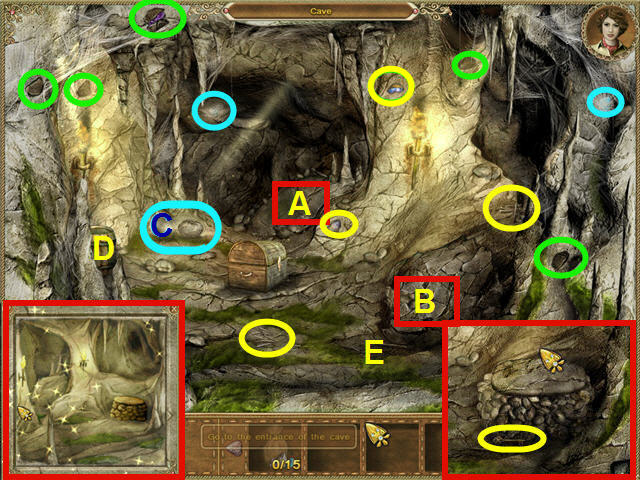
- Head into the cave.
- Click on any area inside the cave and watch the resulting cutscene.
- Use your HAMMER to remove the stalactites.
- Your HAMMER will return to its tool belt location after you have completely removed the stalactites.
- Click on the chest (A) and the torch hooks (B).
- Pick up the MATCHES and both STICKS.
- Place the STICKS in the torch holders (B) and then try to light them.
- Find both pieces of DRY MOSS and place them on the torches.
- Try to light the sticks again with the MATCHES.
- Head out of the cave; talk to the miner.
- Take the BENZINE can left of the miner and then head back into the cave.
- Use the BENZINE on the torches and then light the torches with the MATCHES.
- Click on the fresco (A) and then use the BRUSH on it to get a puzzle.
- Complete the picture by swapping tiles around (see screenshot for solution).
- Click on the fresco and then read the diary update.
- Use the HAMMER on the stone (B); take the KEY.
- Use the KEY on the chest.
- Take the ROPE, NAILS, and SCROLL (read the diary update).
- Take the NAILS from in front of the chest and rocks, above the well.
- Collect 10 of the JEWELS; use the HAMMER on the embedded jewels, circled in green on the screenshot, use the brush on the JEWELS circled in blue.
- Move the stone (C) and then use the BRUSH on the JEWEL behind it.
- Take the BARREL (D).
- Back out of the cave.
- Click on the cart and take seven BOARDS.
- Head back into the cave.
- Place the BOARDS and the NAILS in front of the well (E).
- Use the HAMMER on the well.
- Place the ROPES and the BARREL on the newly-constructed lift.
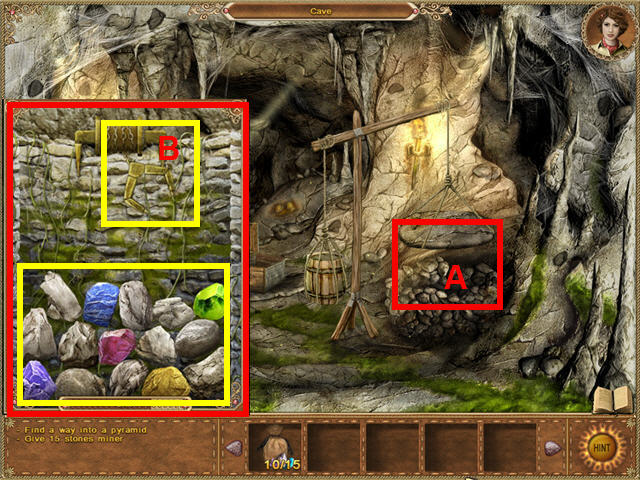
- Head down the well (A).
- Clear out all the rocks to get the five remaining JEWELS.
- Click on the swinging CLAW (B) when you want it to pick up a rock.
- Leave the cave.
- Give the BAG WITH THE JEWELS to the miner.
- Head back into the cave.
- Go down the well to the underground pyramid.
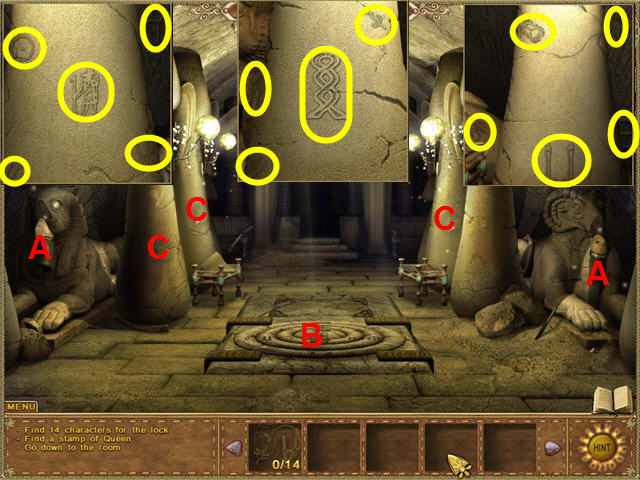
- Click on the shining statue noses (A) on both sides of the room to turn on the lights.
- Use the BRUSH on the plate (B) in the center of the room.
- Collect the 14 CHARACTERS by clicking on the two left pillars and the right back pillar (C).
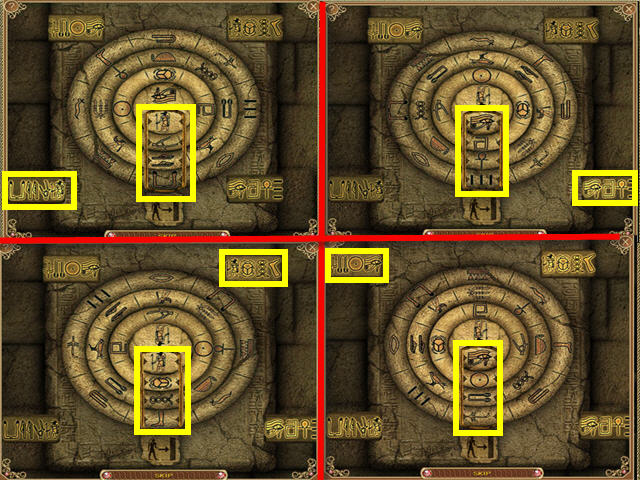
- Unlock each of the four locks in the corner by turning the rings so they match the symbols on the lock (see the screenshot for the solution).
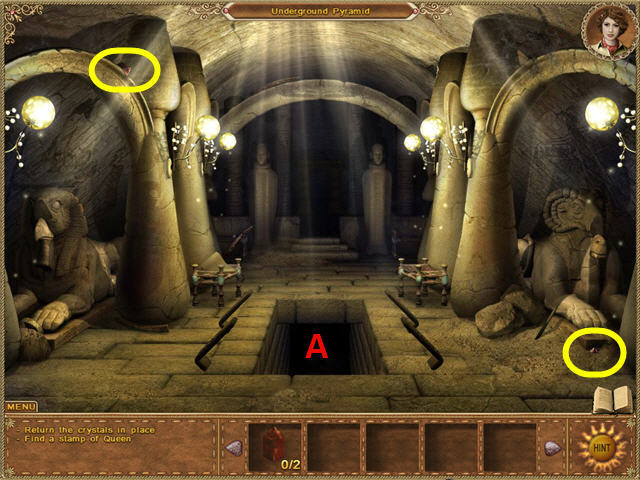
- Head down the opening (A); see the guards and return up the stairs.
- Speak to the guardian, exhausting all conversation options.
- Find the two crystals.
- Use the RUSTY SHOVEL on the bottom right Crystal.
- Head down the stairs.
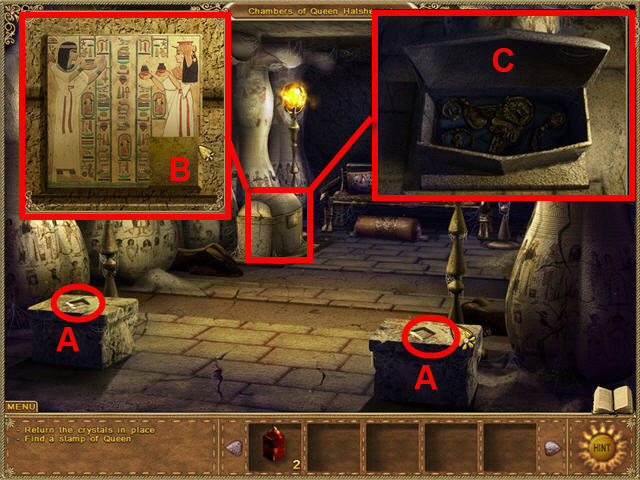
- Place the CRYSTALS on the two pedestals (A).
- Click on the chest to trigger a slider puzzle.
- Slide the pieces to complete the picture (B).
- Pick up the items (C) from inside the chest to get the SYMBOL OF … (STAMP OF THE QUEEN).
- You will be returned upstairs; speak to the guardian.
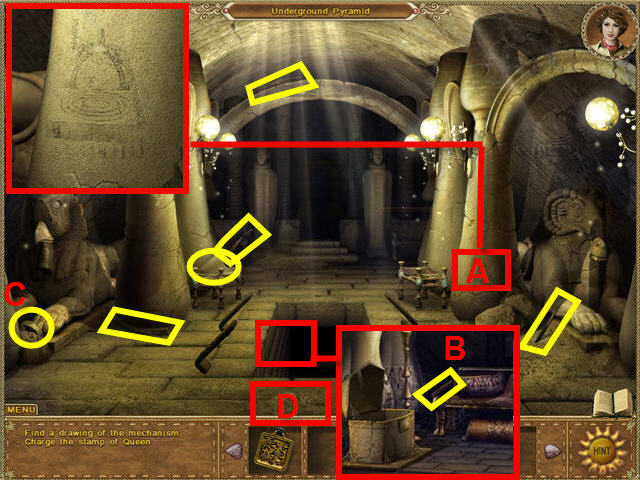
- Click on the lower half of the front right pillar (A) and then click on the fresco in the close-up.
- Find the PAPYRUS STICK and the PAPYRUS.
- Place the PAPYRUS and the PAPYRUS STICK on the pillar fresco (A).
- Click on the finished drawing; read the entry in the diary.
- Pick up the four STICKS OF THE MECHANISM.
- Three of the STICKS are in the chambers; one is down the stairs (B).
- Collect the RING (C) after you speak with the guardian.
- Use the BRUSH on the button (D).
- Press the button.
- Place the four STICKS OF THE MECHANISM on the plate.
- Place the RING on the STICKS OF THE MECHANISM.
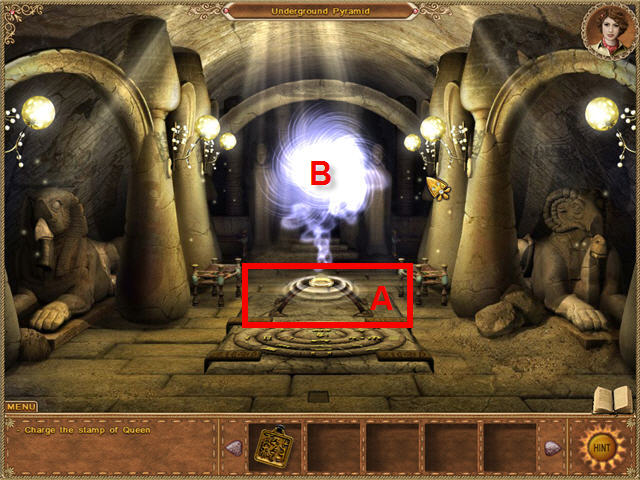
- Place the SYMBOL OF … (STAMP OF THE QUEEN) in the light (B).
- Take the charged stamp and then exhaust all conversation options with the guardian.
- Click on and enter the portal.
Chapter 5: Easter Island
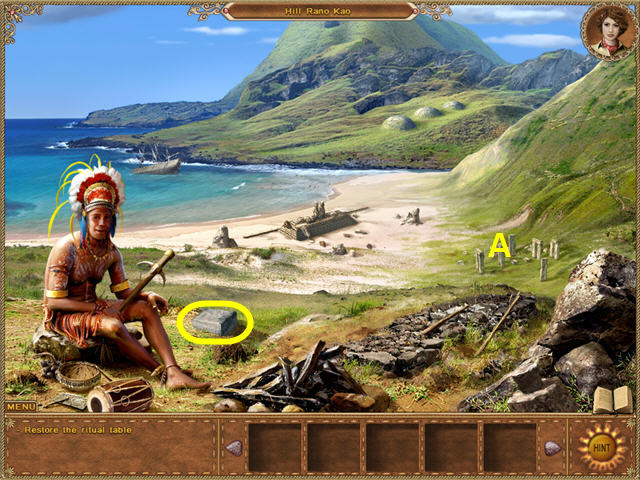
- Speak to the Shaman, exhausting all conversation options.
- Take the PART OF THE RITUAL TABLE from next to the Shaman.
- Head to the Ritual Hall area (A).

- Use the BRUSH twice on the altar area (A).
- Pick up the PARTS OF THE TABLE, the CRYSTAL, and the CLAW.
- Place both PARTS OF THE RITUAL TABLE on the altar pedestal (A).
- Head up to the Shaman; exhaust all conversation options with him.
- Head to the moai statues on the beach.
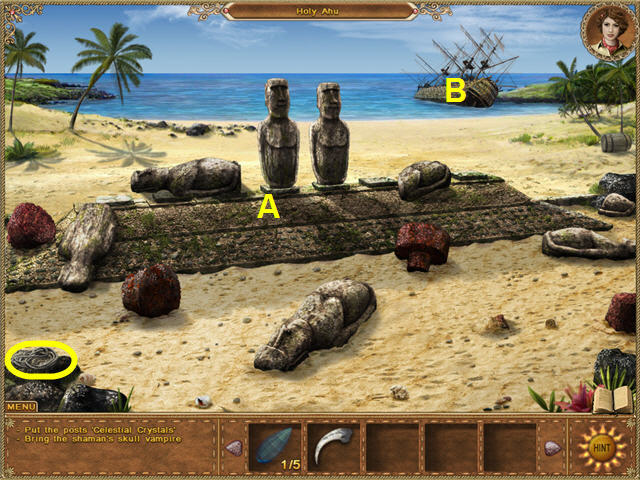
- Click on the pedestal (A); read the diary update.
- Pick up the ROPE.
- Head to the ship to gather more pieces (B).
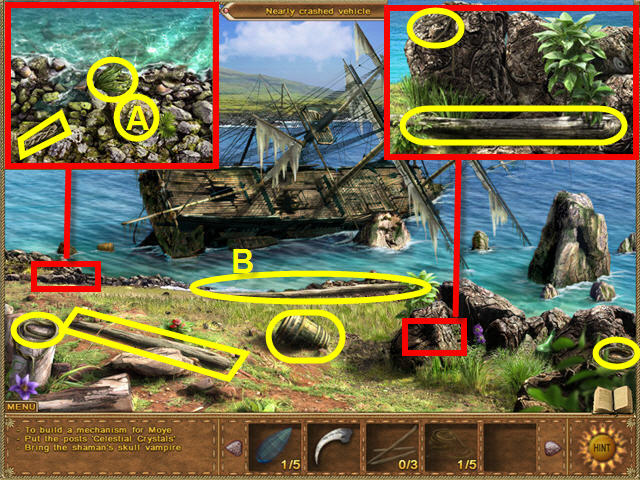
- Click on the water in front of the ship (B).
- Collect the ROPES, BARRELS, WRECKAGE OF MASTS, and ALGAE JUA.
- Move the rock (A) to get a CRYSTAL.
- Head back to the moai statues.
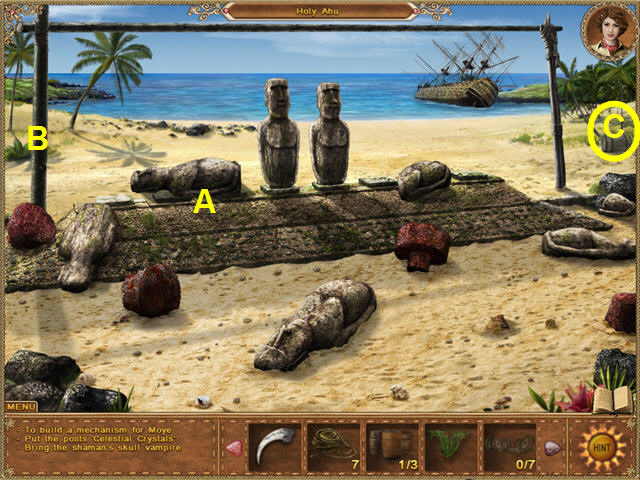
- Use the WRECKAGE OF MASTS on the moai statue pedestal (A).
- Place a ROPE on the WRECKAGE OF MASTS.
- Click on the construction (B); discover you need ROLLERS.
- Take the BARREL (C).
- Head back to the ship.
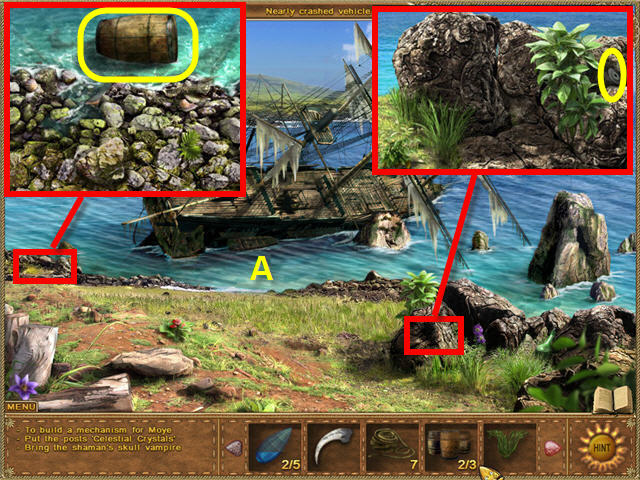
- Click on the hotspot on the right; get the ROLLER.
- Click on the hotspot on the left; take the BARREL.
- Use the BARRELS on the hotspot in the water (A).
- Cross over the BARRELS to the ship.
- Speak to Vasco De Gama, exhausting all conversation options.
- Take the FLAG (A) draped over the hutch.
- Exit the ship.
- Click on the Jolly Roger flag; replace it with the FLAG from your inventory.
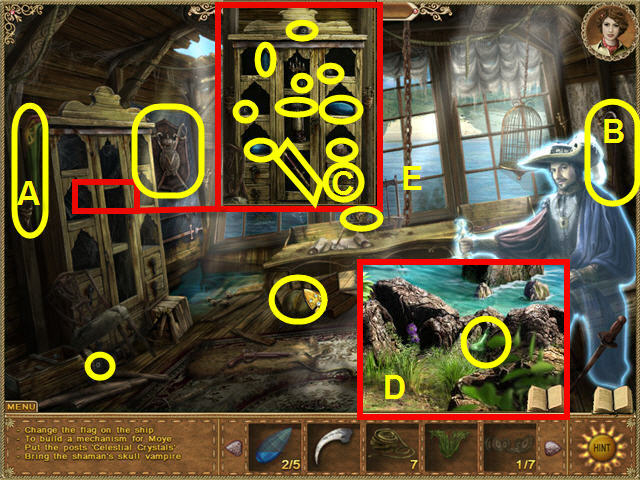
- Head back inside the ship.
- Speak to Vasco.
- Read the diary update.
- Click on the hutch on the left; use the BRUSH to clear off the cobwebs on each pane of glass.
- Collect the CRYSTALS, ROLLERS, and the BELONGINGS OF CAPTAIN.
- Take the JIMMY (B).
- Use the JIMMY on the drawer in the hutch (C); take the KEY.
- Leave the ship; pick up the last of the BELONGINGS OF CAPTAIN (D).
- Head back into the ship; give the BELONGINGS OF CAPTAIN to Vasco.
- Speak to Vasco and then pull the chain (E); take the WHEEL.
- Speak to Vasco again and then leave the ship.
- Place the ROLLS on the mechanism construction (A).
- Place a ROPE on the ROLLS.
- Place the WHEEL on the pole on the left side (B).
- Place a ROPE on each fallen statue (C).
- Turn the WHEEL until all the statues are standing erect.
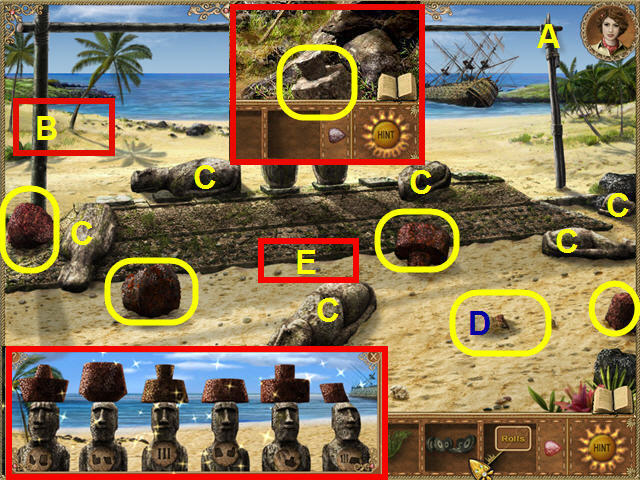
- Pick up four of the MOAI HATS; use the RUSTY SHOVEL to get one that is buried in the sand (D).
- Head up to the Shaman; take the last of the MOAI HATS.
- Go back to the moai statues.
- Place the MOAI HATS on the statues; click on the statues.
- Rearrange the HATS using the clues on their stone chest plates (see the screenshot for the solution).
- Dig in the sand in front of the statues (E) with the RUSTY SHOVEL; take the second skull from the left, the VAMPIRE SKULL.
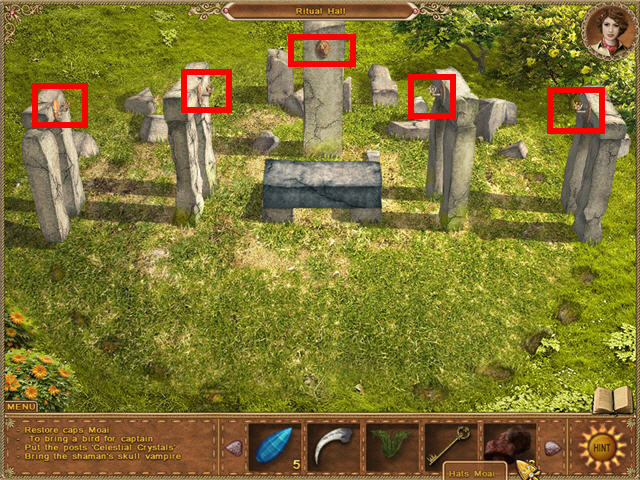
- Head to the ritual hall site; place the CRYSTALS on their holders.
- Click on the feather button on the stone pedestal closest to you.
- Head up to the Shaman and speak with him.
- Click on the three mounds in the distance, in front of the volcano, to get to the bird house.
- Speak to the Shaman’s niece.
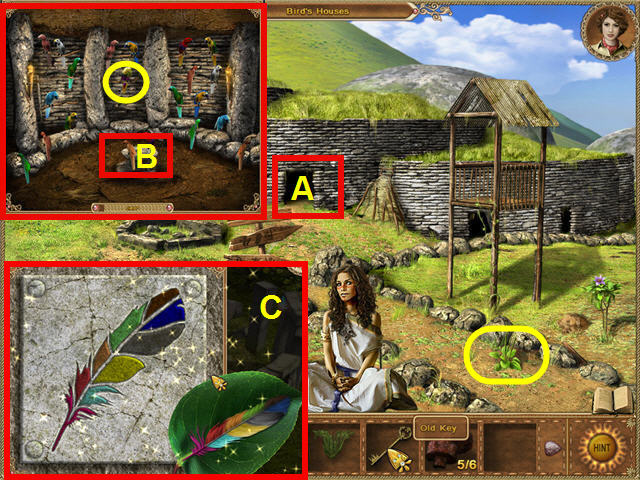
- Pick the PLANTAIN on the path next to her.
- Head into the bird house (A); click on matching birds to eliminate them.
- Click on the CAPTAIN’S PARROT; take the BIRD FEATHER (B) that lands on the middle stone.
- Head back to the Shaman and then down to the Ritual Hall.
- Place the BIRD FEATHER on the pedestal.
- Click on the colored sections of the feather on the stone until the colors match the feather on the leaf (C).
- Take the AMULET from the center of the stones.
- Head to the ship.
- Give the CAPTAIN’S PARROT to Vasco, exhausting all conversation options.
- Exit the ship and then head over to the Ritual Hall.
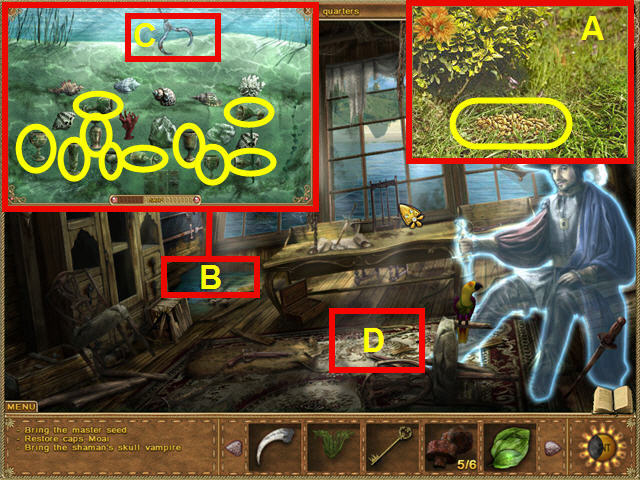
- Click on the hotspot in the lower left (A); take the SEEDS.
- Go back to the ship; give the SEEDS to Vasco.
- Speak to Vasco, exhausting all conversation options.
- Head down the hole (B); collect the CUPS.
- Wait until the claw is facing one of the shells or cups; click the swinging claw to pick up the shell or cup. You will need to pick up the shells in order to get all 10 CUPS.
- Give the CUPS to Vasco.
- Click on the chest that appears (D); use the KEY to unlock it.
- Take items out of the chest until you get THE RAPA NUI’S SUN.
- Head to the Shaman and give him the VAMPIRE SKULL.
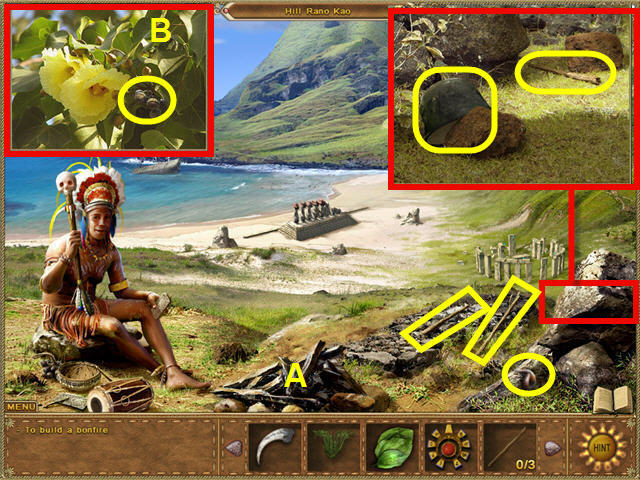
- Collect the three STICKS FOR TRIPOD and the POT.
- Place the three STICKS FOR TRIPOD and the POT on the campfire.
- Read the diary update and then collect the remaining ingredients.
- Take the WORM MAMANGA from the rock to the right of the campfire.
- Go to the ritual hall area.
- Click on the hotspot in the upper right; take the ACORNS.
- Add the ingredients for the brew into the POT.
- The correct ingredient order is: CLAW, ACORN, ALGAE JUA, PLANTAIN, WORM MAMANGA.
- Charge the RAPA NUI’S SUN in the glowing light above the campfire.
- Take the charged RAPA NUI’S SUN.
- Speak to the Shaman, exhausting all conversation.
- Head to the bird houses.

- Speak to the niece.
- Click on the ring (C).
- Click twice on the haystack (A); take the LADDER.
- Place the LADDER on the fort to the right (B).
- Collect the STICKS and the TOTEM KING KAMAKOA.
- Place the STICKS in the ring (C) and the TOTEM KING KAMAKOA on the STICKS.
- Speak to the niece.
- Use the HAMMER on the sticks covering the doorway (D) on the left.
- Click on the doorway (D).
- Place the RAPA NUI’S SUN on the sun slot on the door and then enter.
- Watch the cutscene and then click on the boat.
- Go back to the bird house area; collect five of six pieces of WOOD, circled in blue in the screenshot.
- Head back into the underground lake.
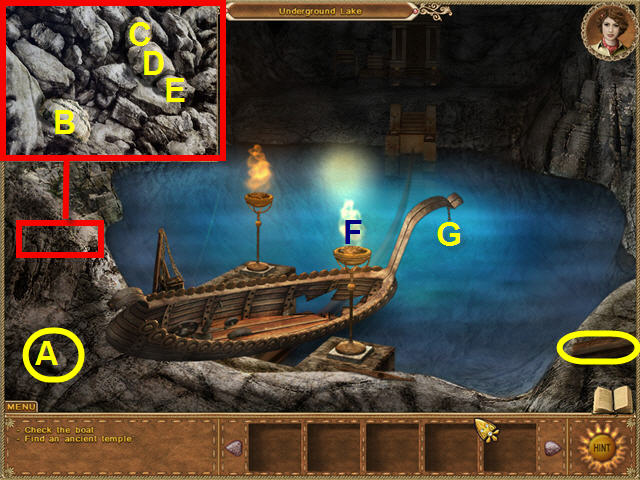
- Click on the rock (A) to move it; take the HAIR PICK.
- Take the last BOARD on the right.
- Click on the hotspot on the left; use the HAMMER on the rock (B) (C) (D) and (E); take the BOAT LANTERN and JIMMY.
- Use the BOARDS on the boat.
- Use the BOAT LANTERN on the flame (F).
- Hang the FLASHLIGHT WITH FIRE on the boat (G).
- Use the JIMMY on the boat.
- Click on the boat and then on the close-up.
- Read the updated diary.
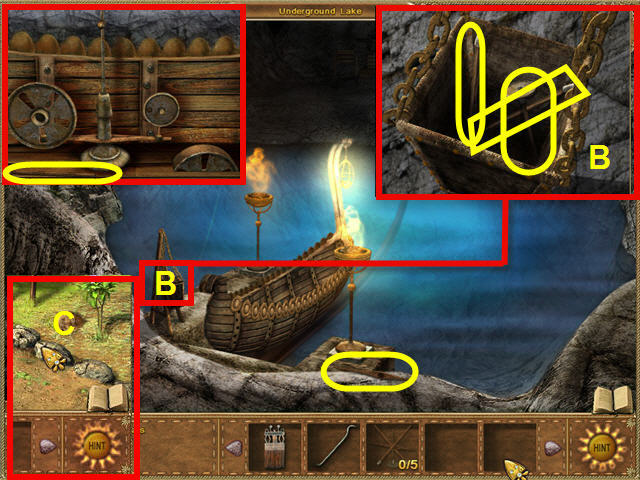
- Find the five PARTS OF THE MECHANISM OF THE BOAT.
- Use the JIMMY on the container (B) on the left dock; take the PARTS OF THE MECHANISM OF THE BOAT.
- Use the PARTS OF THE MECHANISM OF THE BOAT on the boat; click on the completed mechanism.
- Head up to the bird house area and speak to the niece.
- Go speak to the Shaman; he will give you a MIRROR.
- Give the MIRROR and the HAIR PICK to the niece.
- Check the diary update.
- Use the RUSTY SHOVEL on the area marked (C); get the BULB FOR THE MECHANISM.
- Head down to the boat and then click on it.
- Place the BULB FOR THE MECHANISM on the right side of the mechanism and then click on it.
- Go back to the bird house (the doorway to the right of the underground lake); take the TORCH on the right wall.
- Use the TORCH on the FLASK/BULB FOR THE MECHANISM on the ship and then cross to the other side of the lake.
- Click on the landing on the other side of the lake to exit the boat.
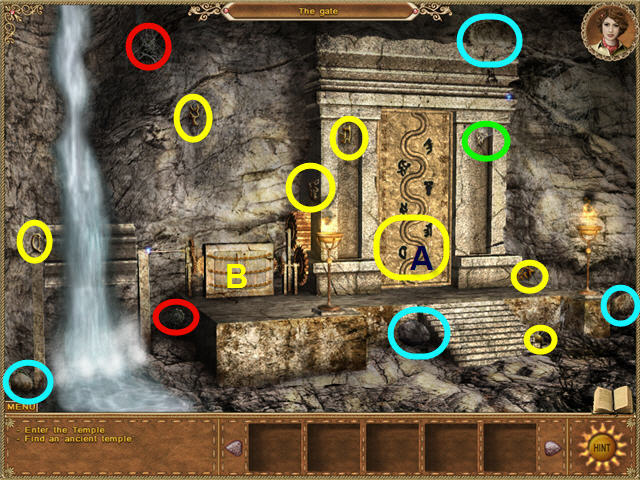
- Click twice on the door; collect the six SYMBOLS OF RONGO and the GOLDEN BALL.
- Use the BRUSH on the dusty SYMBOL OF RONGO marked in green on the screenshot.
- Place the SYMBOLS OF RONGO on the door (A) in their matching slots and then take the NIPPERS.
- Click on the chained cabinet (B); use the NIPPERS on the chains.
- Click on the unchained gear box (B).
- Collect the six GEARS, using the BRUSH on those in red and the HAMMER on those in blue.
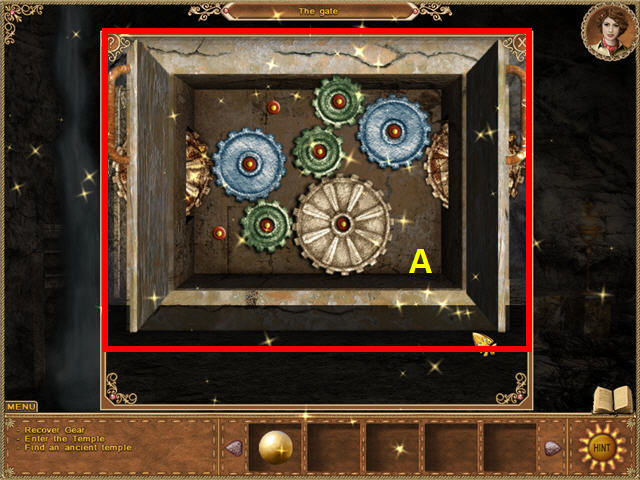
- Place the GEARS in the gear box.
- Arrange the gears on the spindles so they are all turning (A).
- Enter through the now-opened gate.
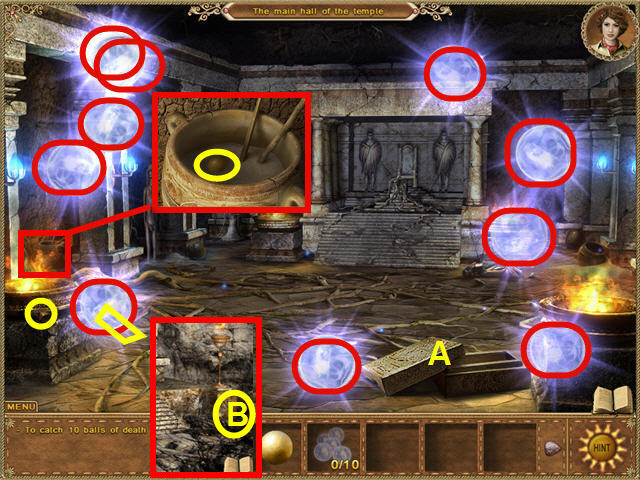
- Speak to the King, exhausting all conversation options.
- Collect 10 DEATH BALLS floating in the air.
- Place the DEATH BALLS in the golden chest (A).
- Click the GOLDEN BALL on the lid of the chest.
- Find both CLAMPS FOR CHEST, the GOLD RHOMB and the GOLD BALL.
- Head out of the room to the boat landing.
- Click on the hotspot to the right (B); take the CLAMP FOR CHEST.
- Use the CLAMP FOR CHEST on the chest.
- Speak to the King.
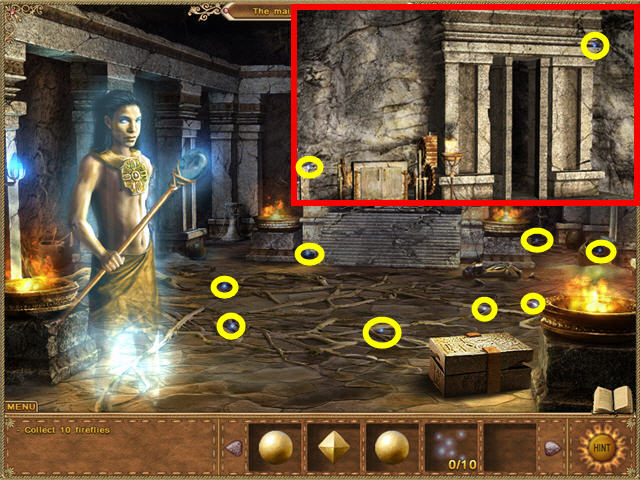
- Collect ten FIREFLIES.
- There are eight FIREFLIES in the main room and another two by the boat landing.
- Give the FIREFLIES to the King, exhausting all conversation options.
- Click on the throne area in the back of the room.
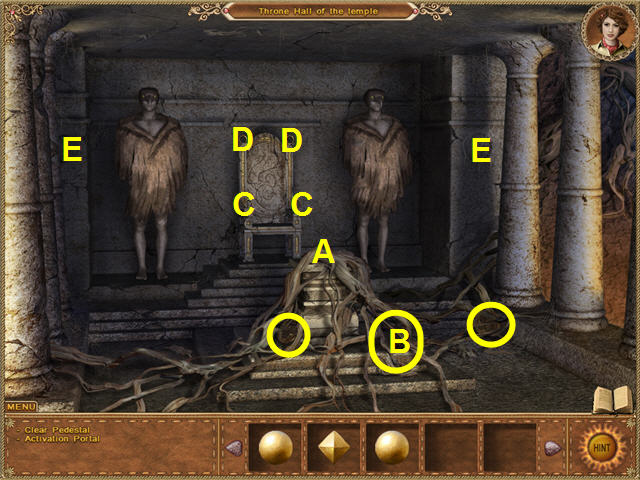
- Use the HAMMER on the top of the pedestal (A).
- Click on the cleaned off pedestal.
- Take the GOLD RHOMB (B).
- Place the GOLD RHOMBS on the armrest of the throne (C).
- Place the GOLDEN BALLS on the backrest of the throne (D).
- Use the BRUSH on the circles on the columns on either side of the throne (E).
- Collect the GOLDEN DISKS from under the roots; place them in the circular slots (E).
- Click both of the statue’s hands; take the two pieces of the LEVER.
- Place the LEVER in the pedestal (A) and push it down.
- Use the HAMMER on the roots holding the rising platform down.
- Click on the platform trying to rise in the center of the room.
- Use the HAMMER on the roots holding the rising platform down.
- Click on the portal and then exhaust all conversation options with the king.
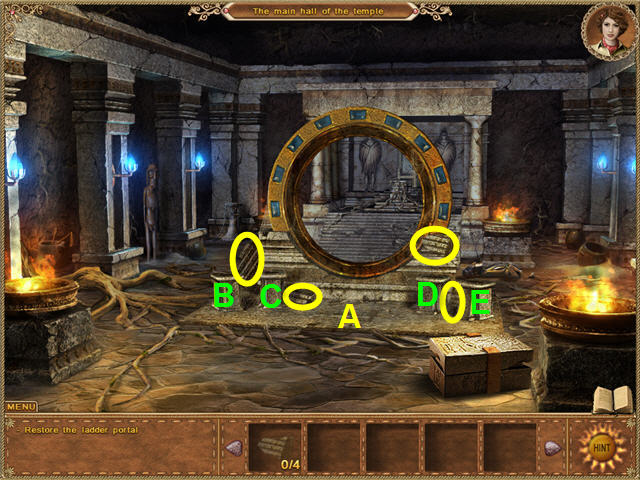
- Find the four STAIRS.
- Place the STAIRS in front of the portal (A).
- Speak to the king, exhausting all conversation options.
- Place the ANKH on the left pedestal (B).
- Place the SUN OF GOD on the next pedestal (C).
- Place the square AMULET on the second pedestal to the right (D).
- Place the totem AMULET on the right pedestal (E).
- Go through the portal; watch the cutscene beyond!
- Congratulations you’ve completed Mystic Gateways: The Celestial Quest!
Created at: 2010-09-11