

Walkthrough Menu
- General Tips
- Chapter 1: Dock
- Chapter 2: The Island
- Chapter 3: Clearing
- Chapter 4: Crossroads
- Chapter 5: Stone Serpent
General Tips
- This is the official guide for Myths of the World: Behind the Veil.
- This guide won't tell you when to zoom into a location; the screenshots show each zoom scene.
- Hidden-object puzzles are referred to as HOPs. Only the locations of the HOPs will be shown.
- Use the Map to fast travel to a location.
Chapter 1: Dock
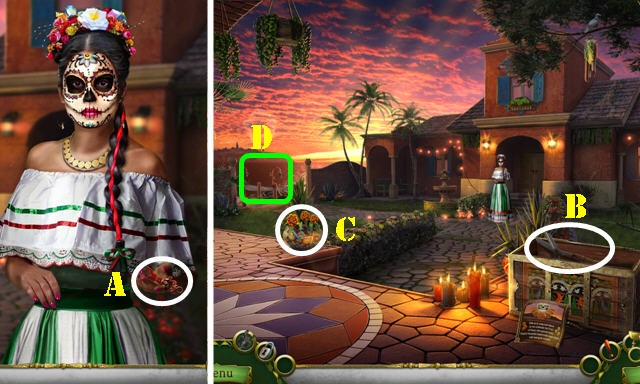
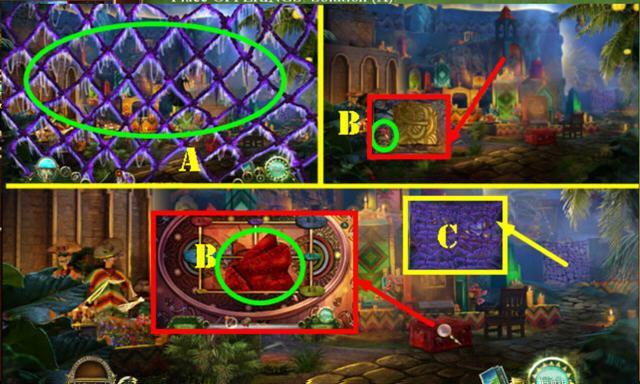
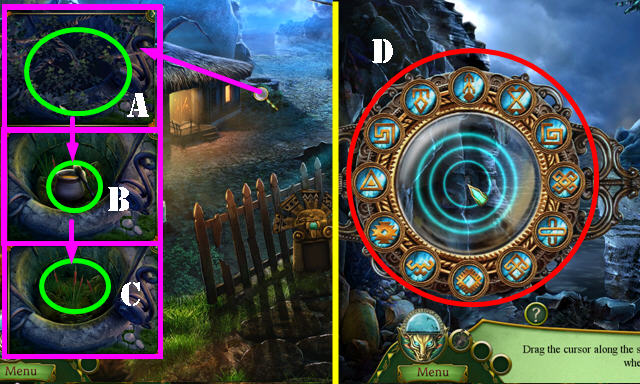
- Take CHEST KEY (A).
- Use CHEST KEY; look at note; take HEDGE CLIPPER (B).
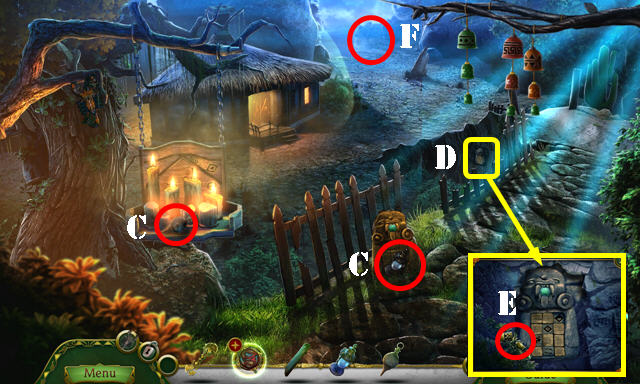
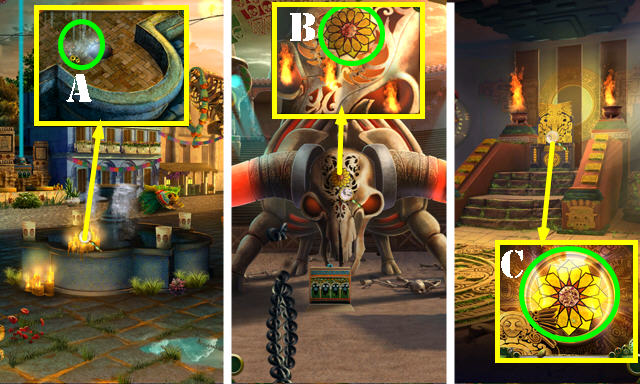
- Use HEDGE CLIPPER (C); receive MARIGOLD WREATH 1/6-3/6.
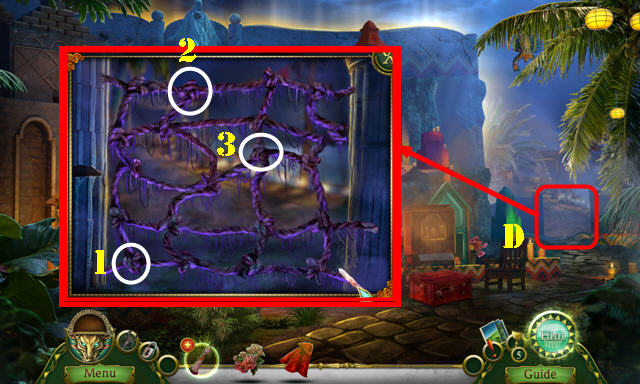
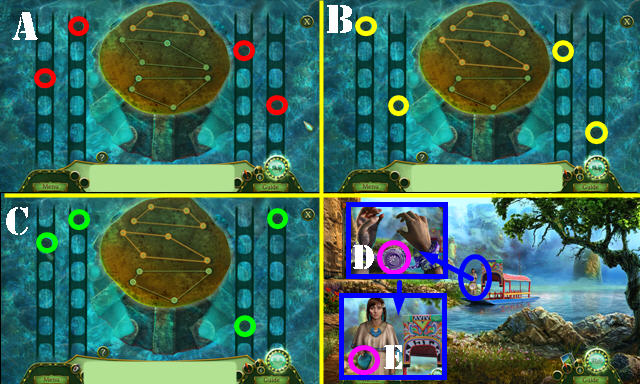
- Go (D).
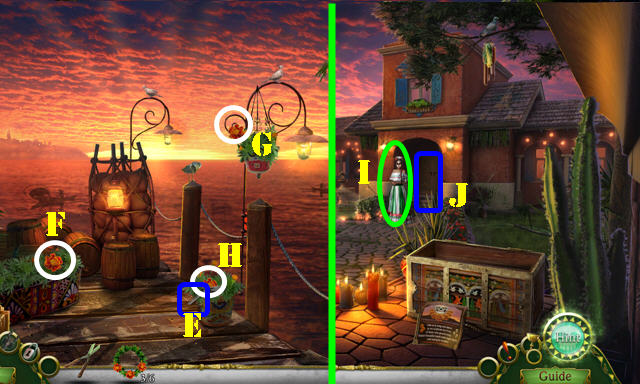
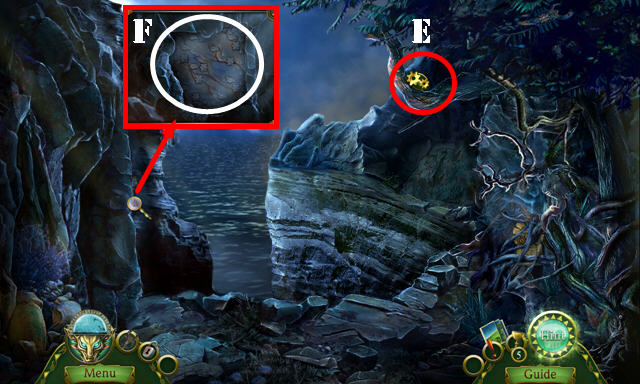
- Take ADJUSTABLE CLAMP (E).
- Use HEDGE CLIPPER 3x (F-G-H); receive MARIGOLD WREATH 4/6-6/6.
- Walk down.
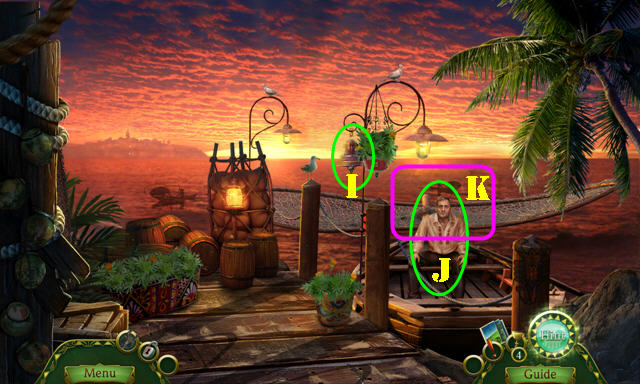
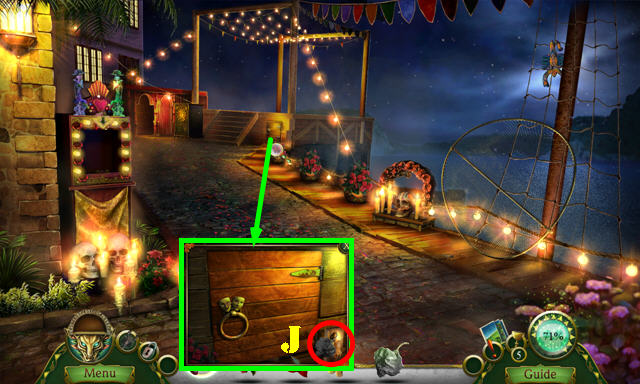
- Give MARIGOLD WREATH 6/6 (I).
- Go (J).
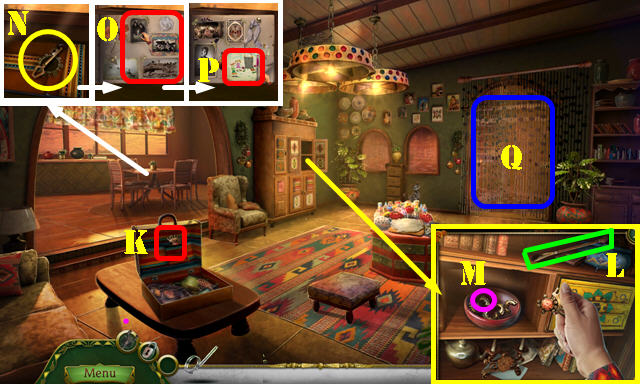
- Open suitcase; take PENDANT PART (K).
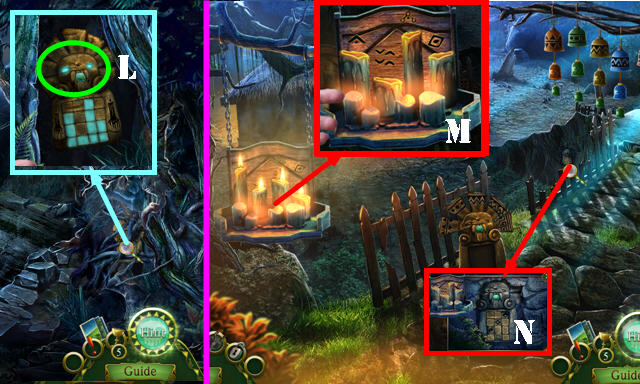
- Open doors; take LONG SHOEHORN (L).
- Place PENDANT PART on bowl; select piece (M); receive SCRAPBOOK PENDANT.
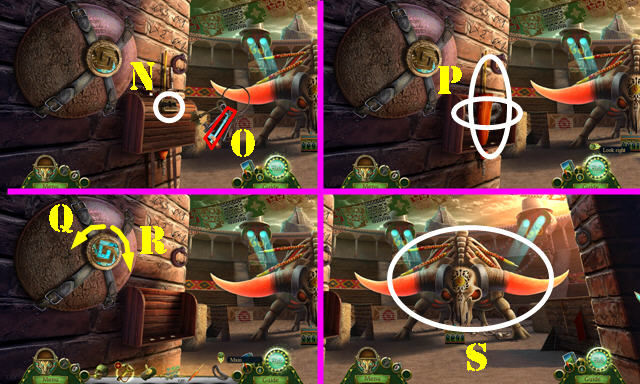
- Take DRAWER KEY (N).
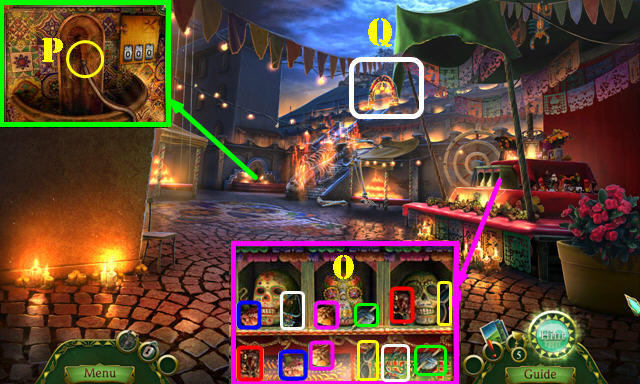
- Place SCRAPBOOK PENDANT; turn page and place photos (O); take Map.
- Select drawing (P) and turn page; take CALAVERA RECIPE.
- Go (Q).
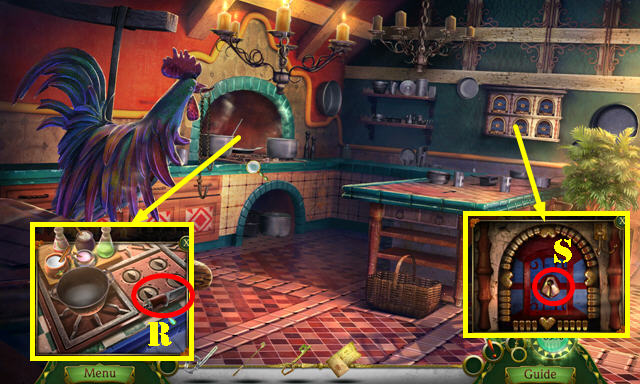
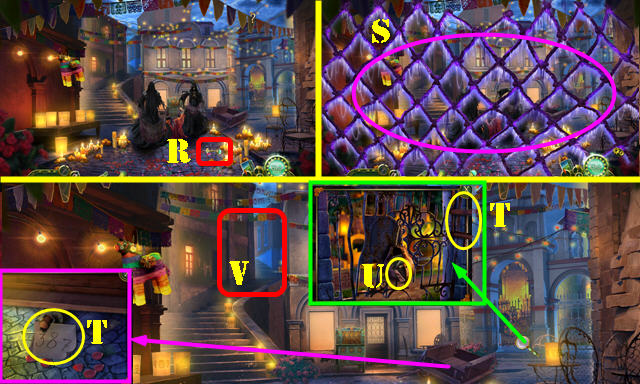
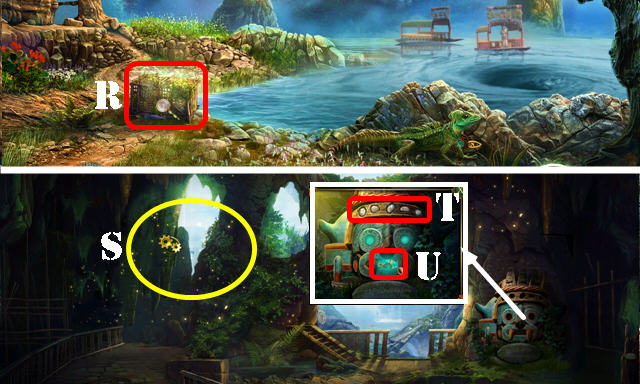
- Take CARVING KNIFE (R).
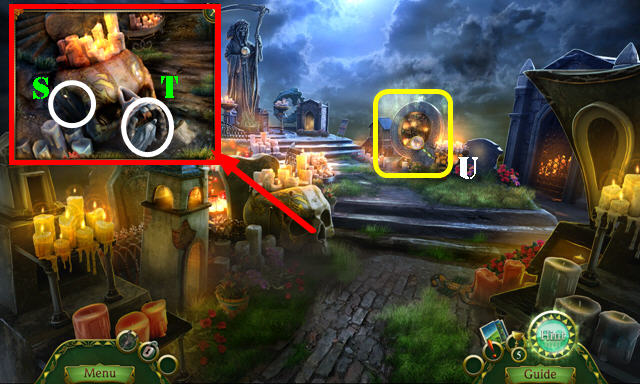
- Use DRAWER KEY (S).
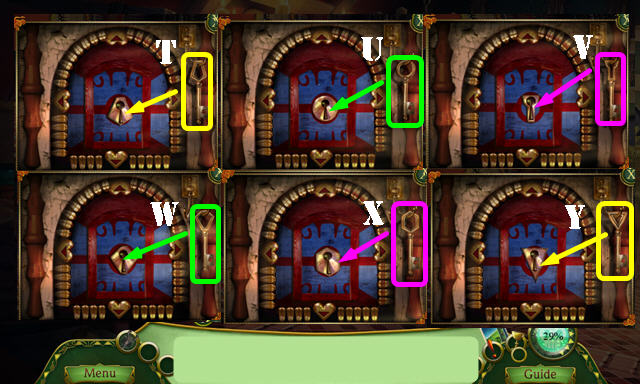
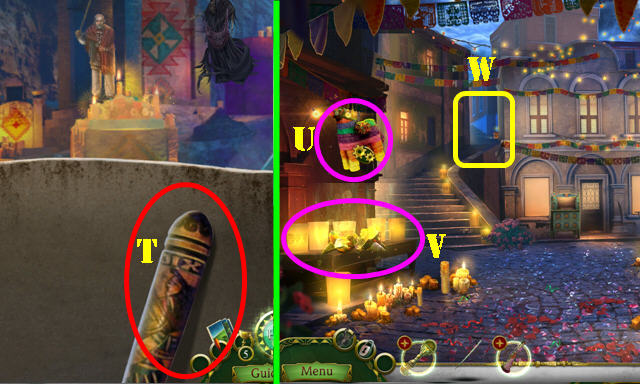
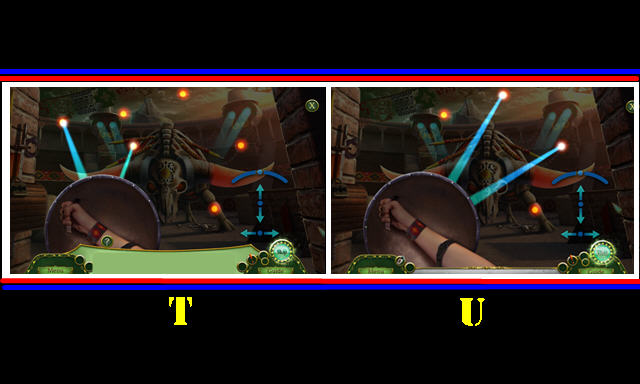
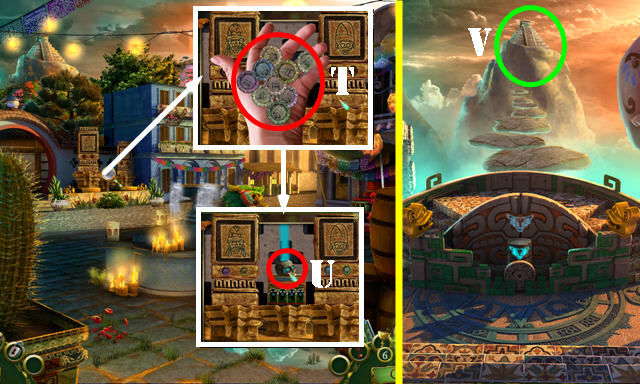
- Insert key (T); take next key.
- Go left and up; insert key (U); take next key.
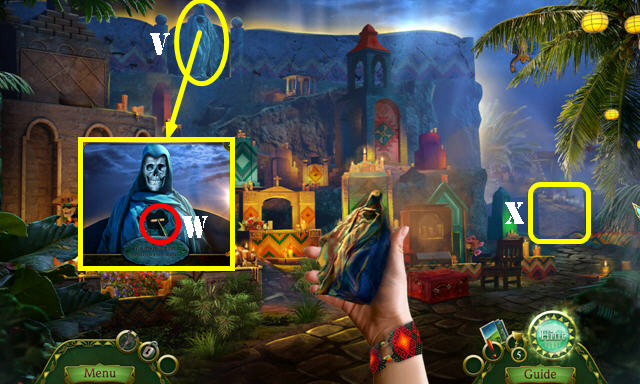
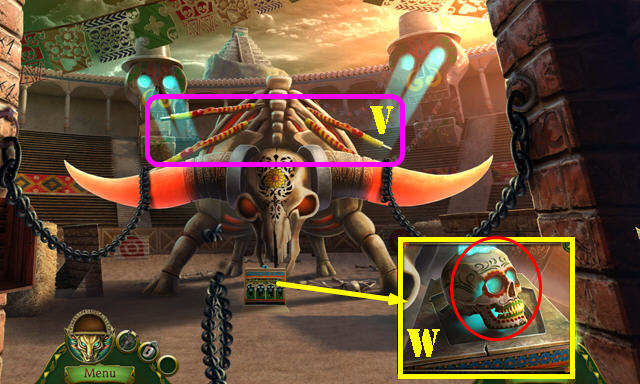
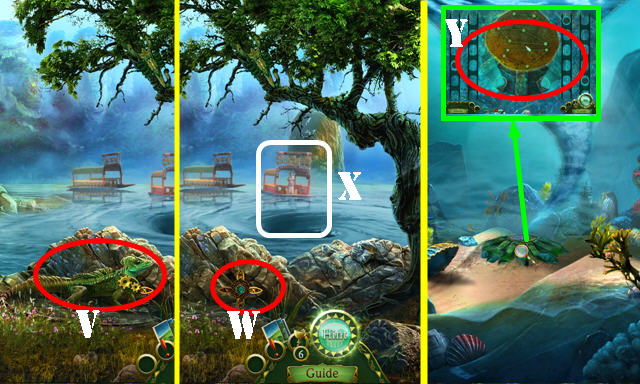
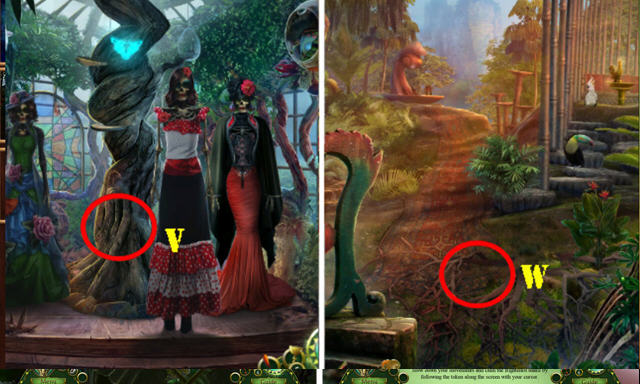
- Go down and right twice; insert key (V); take next key.
- Go up and left; insert key (W); take next key.
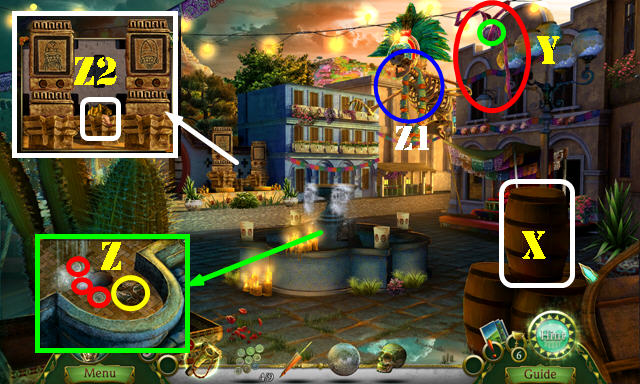
- Go left and down; insert key (X); take next key.
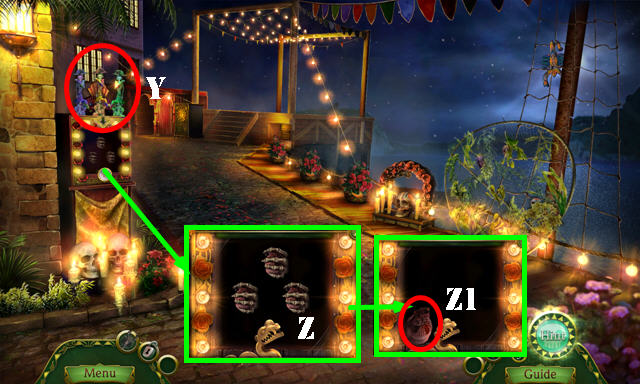
- Go up and right twice; insert key (Y); take CORN WEIGHT 1/2 and MONEY.
- Walk down twice.
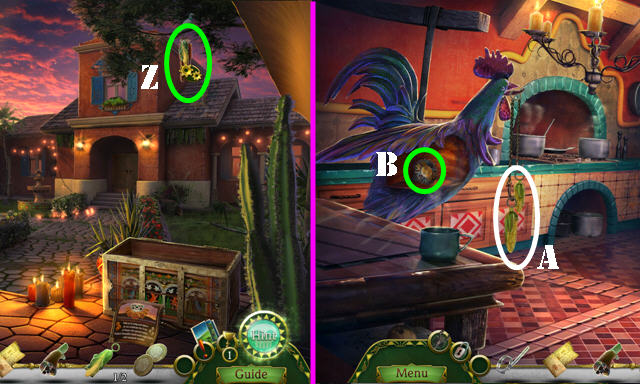
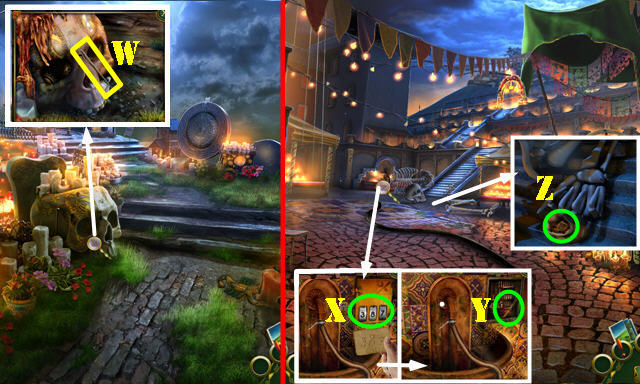
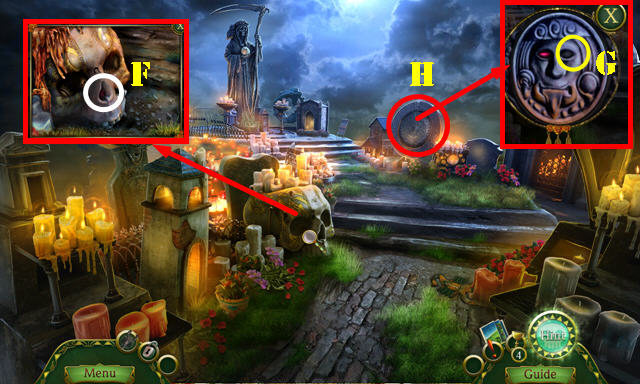
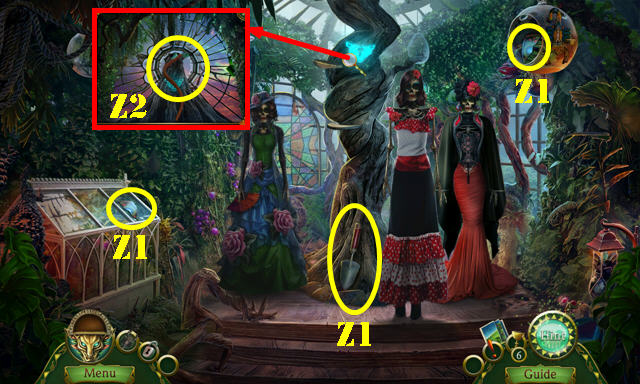
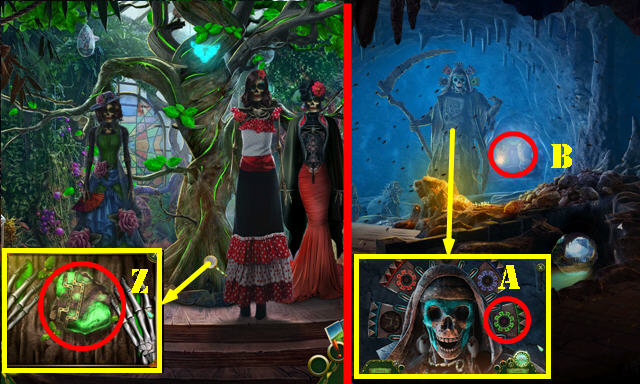
- Use LONG SHOEHORN (Z); receive CORN WEIGHT 2/2.
- Go to Kitchen.
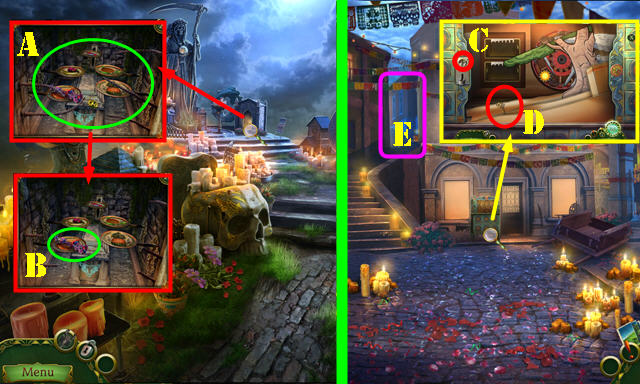
- Place CORN WEIGHT 2/2 and select (A); take SUN HANDLE (B).
- Walk down.
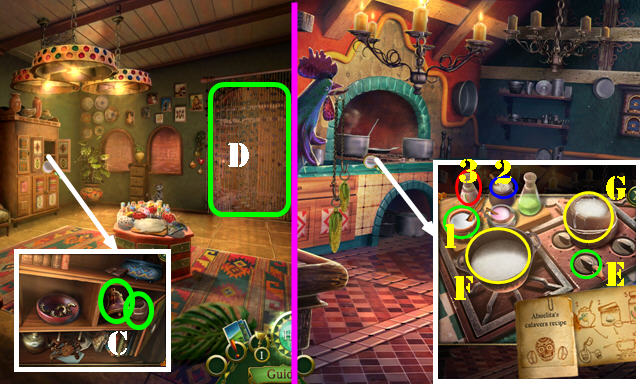
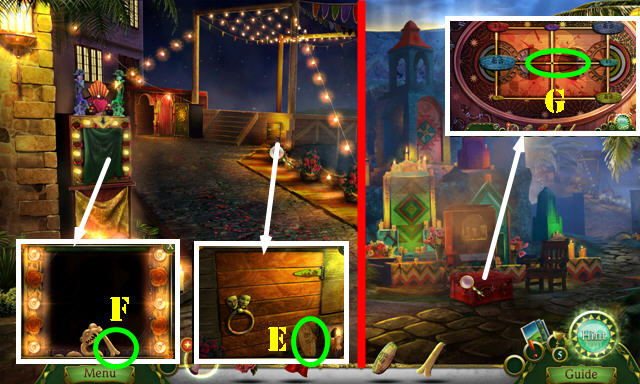
- Place SUN HANDLE; take BELL and MOLD PARTS (C).
- Go (D).
- Place CALAVERA RECIPE and MOLD PARTS; select 1-3, knob (E), and pot (F); take SKULL MOLD (G).
- Walk down.
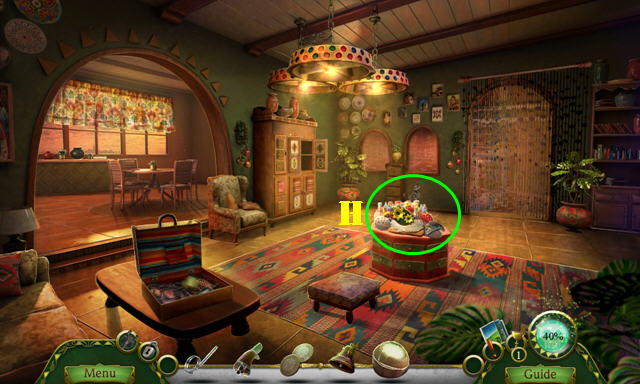
- Select SKULL MOLD and use CARVING KNIFE; receive PLAIN CALAVERA.
- Place PLAIN CALAVERA (H). Play HOP: receive CALAVERA.
- Go to Dock.
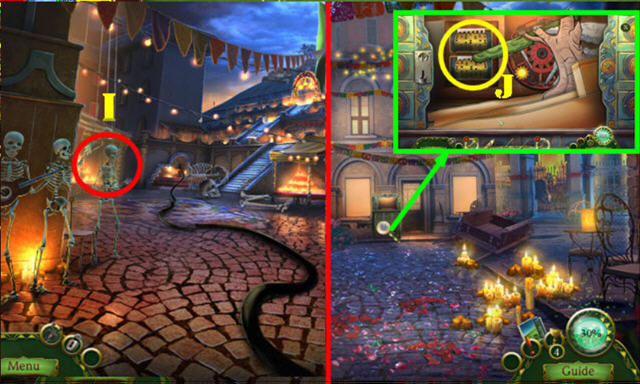
- Place BELL and select (I).
- Give MONEY (J).
- Go (K).
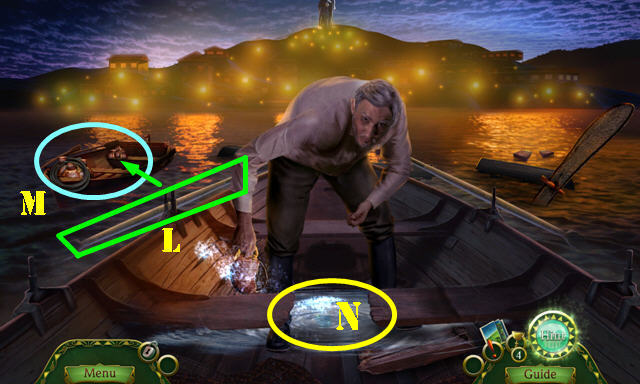
- Use PADDLE (L); take CORKS, RUBBER HOSE, and BROKEN JUG (M).
- Use CORKS and BROKEN JUG (N).
- Go forward.
Chapter 2: The Island
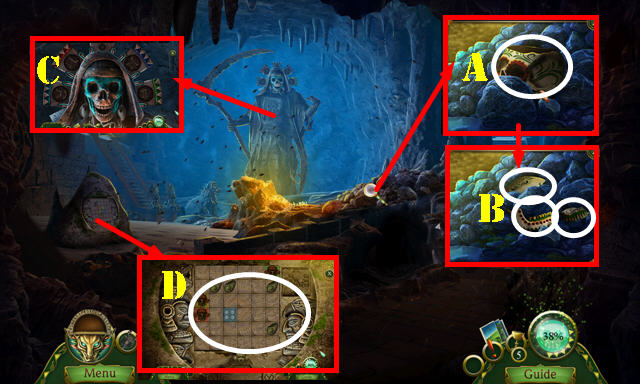
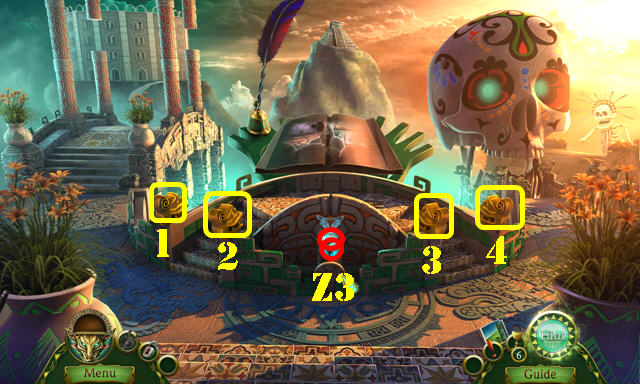
- Place CALAVERA; place as shown (O); take DIORAMA PIECE 1/2.
- Place RUBBER HOSE and ADJUSTABLE CLAMP (P).
- Go (Q).
- Take XOLOTL BLADE (R).
- Use XOLOTL BLADE on scene (S); receive INCOMPLETE BLADE.
- Take CLAMP and REPAIR BOX CODE (T).
- Remove wreath; use CARVING KNIFE 2x; take HAND LOTION (U).
- Go (V).
- Take INCENSE STICK (W).
- Walk down twice.
- Place REPAIR BOX CODE; enter 387 (X); take FILE (Y).
- Use CLAMP; open bag and take SKULL TOKEN (Z).
- Go to Island Center.
- Use FILE 4x (A); receive METAL ROD. Take INCOMPLETE LA CATRINA (B).
- Walk down.
- Insert SKULL TOKEN (C); take HAIRPIN (D).
- Go (E).
- Use HAIRPIN (F); receive JEWEL EYE.
- Place JEWEL EYE (G). Play HOP (H); receive DRUM.
- Walk down twice.
- Use DRUM (I); receive DIORAMA PIECE 2/2.
- Go to Street.
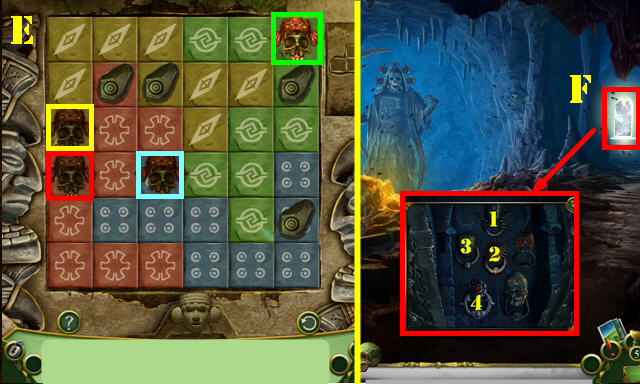
- Place DIORAMA PIECE 2/2 (J).
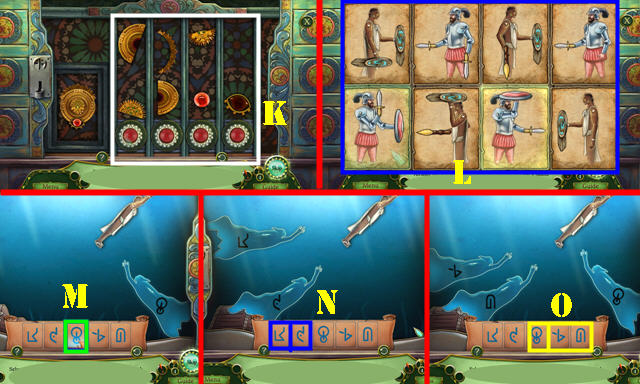
- Solution one (K).
- Solution two (L).
- Solution three (M-N-O).
- Take DIORAMA WHEEL.

- Use HAND LOTION on DIORAMA WHEEL and select 5 pieces (P); take IMPROVISED WHEEL.
- Use IMPROVISED WHEEL and METAL ROD (Q).
- Push cart (R).
- Go (S).
- Go forward 3x; take BAT (T).
- Walk down.
- Use BAT 3x (U).
- Play HOP (V); receive OFFERINGS.
- Go (W).
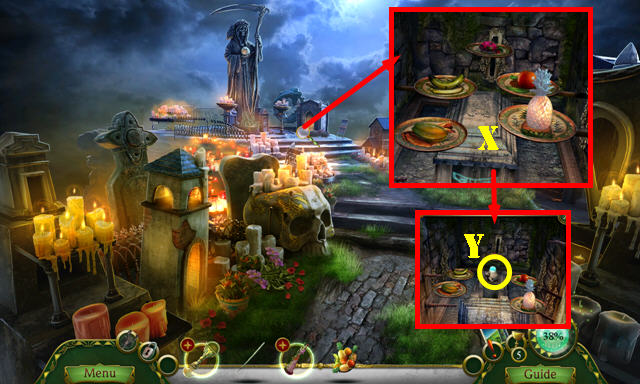
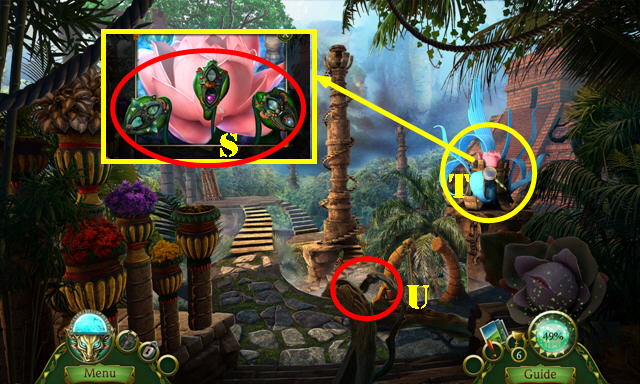
- Place OFFERINGS. Solution (X).
- Take TURQUOISE SOULSTONE (Y).
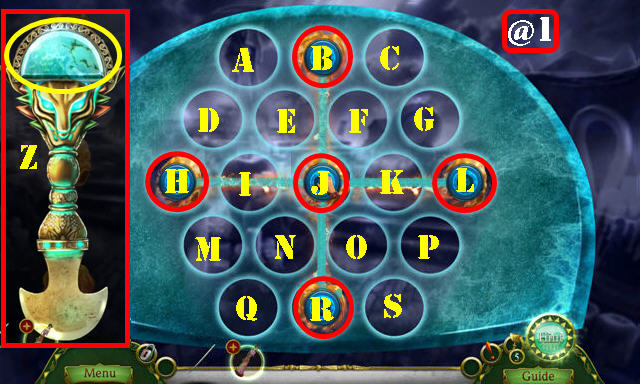
- Remove broken stone from INCOMPLETE BLADE; place TURQUOISE SOULSTONE (Z).
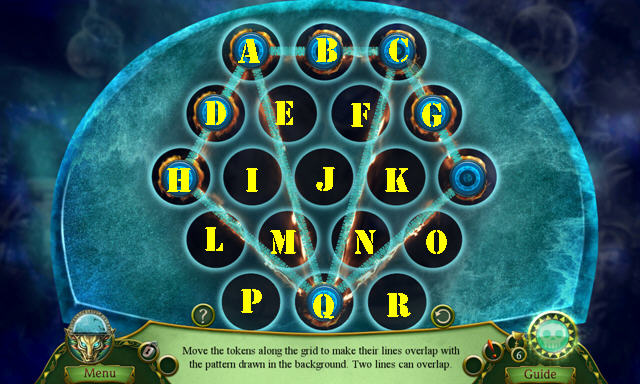
- Solution (@1): (S-J)-(A-B)-(P-R)-(M-H)-(G-L).
- Go to Graveyard.
- Use Blade (A).
- Take CATRINA FLOWERS and SMALL CAPE (B).
- Place INCENSE STICK (C).
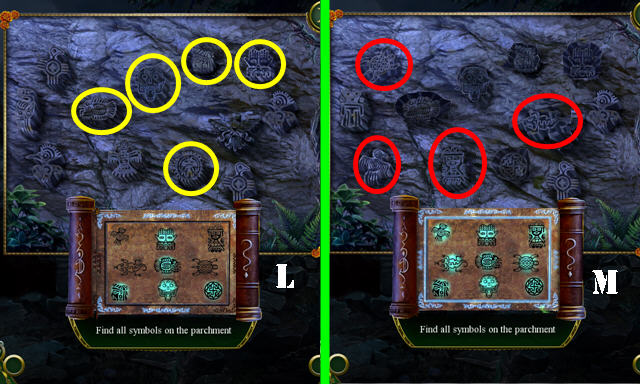
- Solution (1-3).
- Go (D).
- Take SOMBRERO TOKEN (E).
- Remove cloth; take SNAKE TONGUE (F).
- Walk down.
- Place SOMBRERO TOKEN (G).
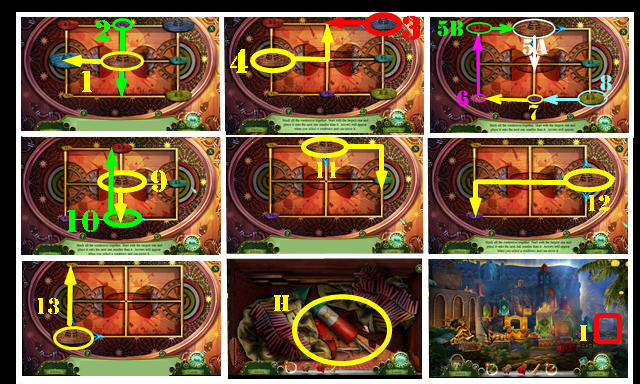
- Solution (1-13).
- Take FIREWORK (H).
- Go (I).
- Select FIREWORK; take EXPLOSIVE POWDER.
- Place EXPLOSIVE POWDER (J).
Chapter 3: Clearing
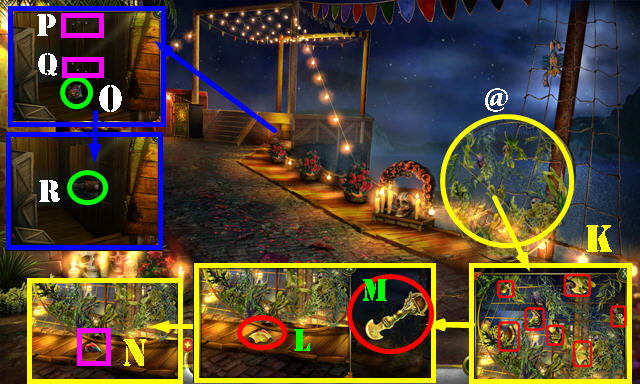
- Select net (@). Move weeds; select pieces (K-L).
- Take DAMAGED BLADE (M) and CATRINA BIRD (N).
- Take SEALED BOX (O).
- Use SNAKE TONGUE twice (P-Q); take ALCOHOL BOTTLE (R).
- Go to Island Center.
- Use SMALL CAPE and ALCOHOL BOTTLE; pull lever (S).
- Look at note; take STATUETTE (T).
- Play HOP (U); receive CATRINA HAT.
- Go to Graveyard.
- Place STATUETTE on scene. Select statue (V).
- Take DIBBLE (W).
- Go (X).
- CATRINA FLOWERS, CATRINA BIRD, and CATRINA HAT on INCOMPLETE LA CATRINA; take LA CATRINA.
- Place LA CATRINA (Y).
- Play puzzle (Z). Solution is random.
- Take PIGMENT (Z1).
- Walk down.
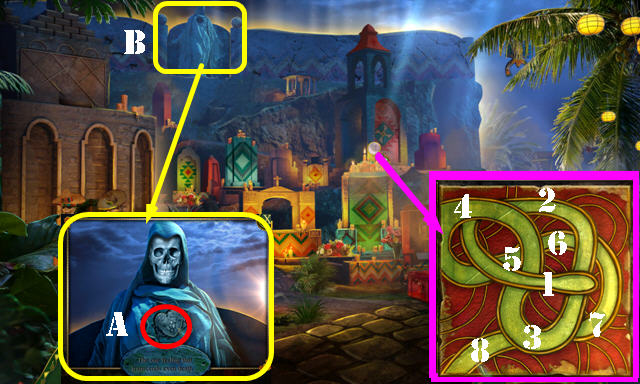
- Select snake and place PIGMENT. Solution (1-8). Take CHARCOAL and STONE HEART.
- Place STONE HEART (A).
- Go (B).
- Take LANTERN and STAINED PENDULUM (C).
- Use DIBBLE (D); take YELLOW CHIME (E).
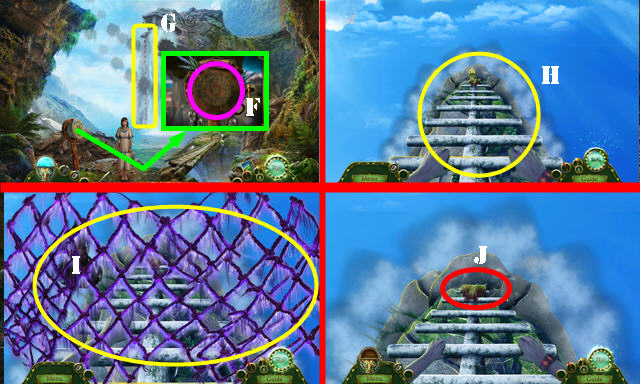
- Go (F).
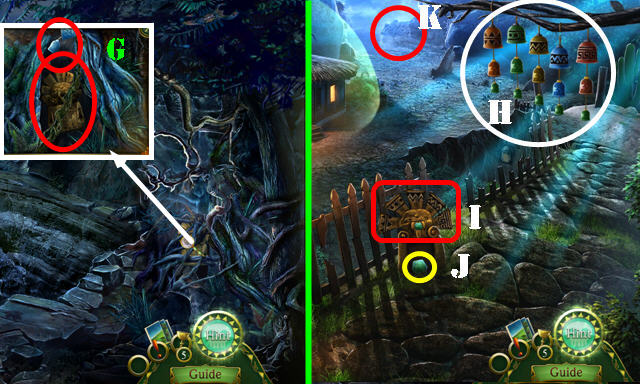
- Take BLUE CHIME and VINE 1/2 (G).
- Walk down.
- Place YELLOW CHIME and BLUE CHIME; swap as shown (H).
- Swap crown pieces (I). Take GREEN GEMSTONE (J).
- Go (K).
- Place GREEN GEMSTONE and use CHARCOAL (L); receive CLUE.
- Walk down.
- Place CLUE; swap candles as shown (M).
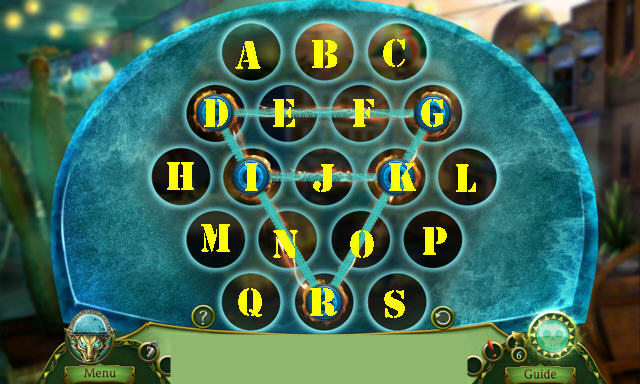
- Play puzzle (N).
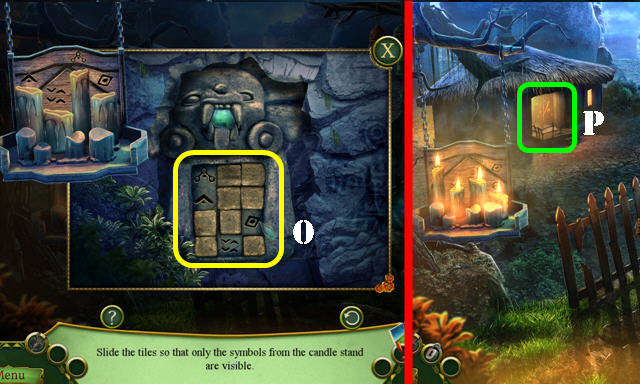
- Solution (O).
- Enter The Bruja's Cottage (P).

- Give DAMAGED BLADE (Q).
- Take WEAVE THREAD 1/3-3/3 (R).
- Dip STAINED PENDULUM (S); receive CRYSTAL PENDULUM.
- Place WEAVE THREAD 3/3; take RITUAL WEAVE (T).
- Look at note; take CABINET KEY (U).
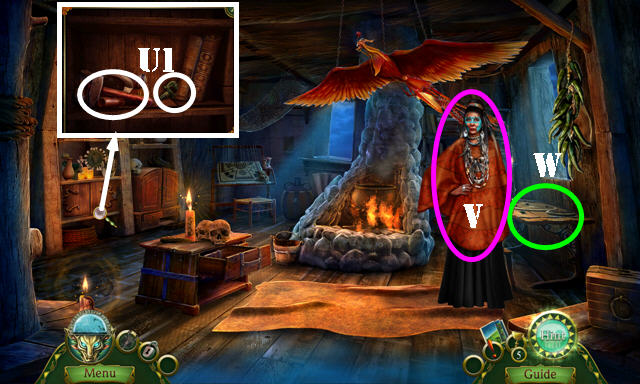
- Use CABINET KEY; take PIN and CHISEL AND HAMMER (U1).
- PIN on SEALED BOX; select and take LENS.
- Give CRYSTAL PENDULUM and LENS (V).
- Play HOP (W); receive ENCHANTED LENS.
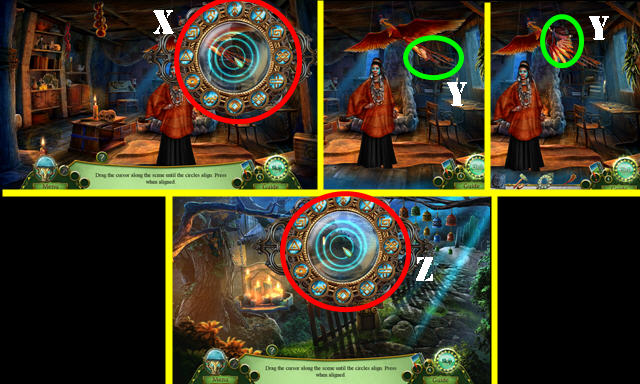
- Align circles and press (X).
- Take RITUAL FEATHERS and GARDENING BELT (Y).
- Take SICKLE from GARDENING BELT.
- Walk down.
- Align circles and press (Z).
- Use SICKLE 3x (A); receive VINE 2/2.
- Place LANTERN; take TREE SAP (B).
- Select reeds 4x (C); receive RITUAL REEDS.
- VINE 2/2 on GARDENING BELT; receive MAKESHIFT HARNESS.
- Go to Cliff.
- Align circles and press (D).
- Use MAKESHIFT HARNESS (E).
- Use CHISEL AND HAMMER; select wall (F).
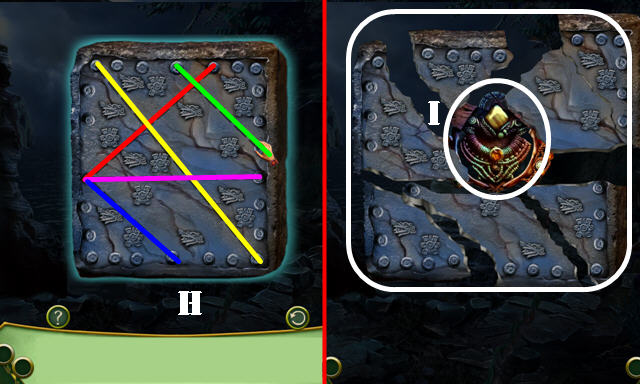
- Solution (G).
- Receive SUN TABLET.
- CHISEL AND HAMMER on SUN TABLET. Solution (H).
- Take PARCHMENT CHARM and RITUAL SUN TABLET PIECES (I).
- Go to The Bruja's Cottage.
Chapter 4: Crossroads

- Look at note and place PARCHMENT CHARM; take PARCHMENT (J).
- Go to Cliff.
- Place PARCHMENT (K).
- Solution one (L-M).
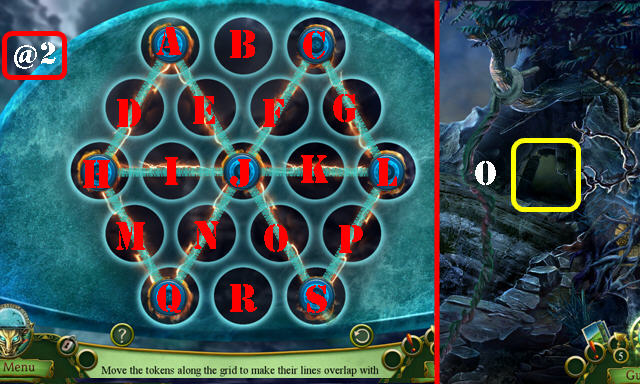
- Solution two (@2): (H-J)-(L-H)-(F-L)-(P-Q)-(R-S).
- Go (O).
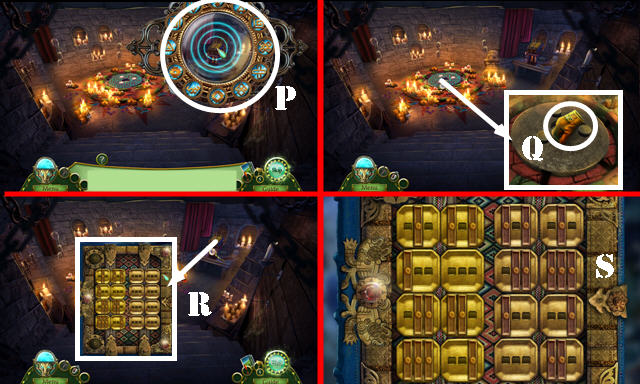
- Align circles and press (P).
- Take GLOVE (Q).
- Play puzzle (R).
- Solution (S).
- Take RITUAL DUST.
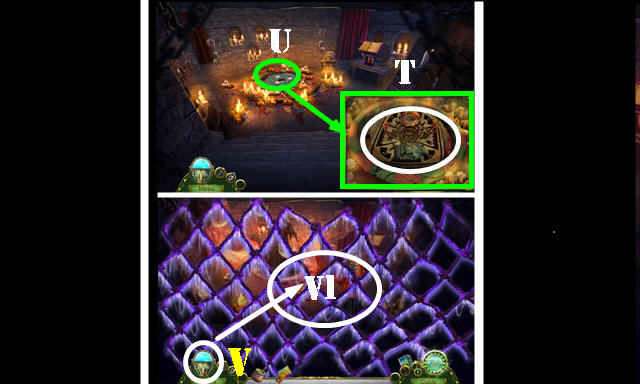
- Place RITUAL WEAVE, RITUAL REEDS, RITUAL FEATHERS, RITUAL SUN TABLET PIECES, and RITUAL DUST (T).
- Play HOP (U).
- Use Blade (V) on scene (V1).
- Move rocks; take CRACKED SKULL (A) and SKULL PIECE 1/3-3/3 (B).
- SKULL PIECE 3/3 and TREE SAP on CRACKED SKULL; take LA MUERTE RELIEF and receive DIEGO.
- Look at statue (C).
- Place LA MUERTE RELIEF (D).
- Solution (E).
- Select 1-4.
- Go (F).
- Take SLINGSHOT (G).
- Go (H).
- Take DEATH'S QUILL (I).
- Walk down.
- Use DEATH'S QUILL (J). Play HOP; receive SHIELD LOCK.
- Go (K).
- Take SANDSTONE POLISHER and KEYS (L).
- Use GLOVE (M); receive BRONZE CHARM 1/9-3/9.
- Go to Corrida.
- Look left. Use KEYS (N). Select middle key (O).
- Move two swords; take PARASOL and CHAIN (P).
- Place SHIELD LOCK; select Qx4-Rx2-Q; receive DIRTY SHIELD.
- SANDSTONE POLISHER on DIRTY SHIELD; receive SHIELD.
- Look right. Use CHAIN and SHIELD (S).
- Solution (T-U).
- Receive SHIELD.
- Select 4 lances (V); receive LANCE.
- Place DIEGO (W) and take it back.
- Select DIEGO'S nose; take BRONZE CHARM 4/9.
- Go to Festival Grounds.
- Use LANCE; select barrel (X).
- Take BRONZE CHARM 5/9 and STRING (Y).
- Use PARASOL; take BRONZE CHARM 6/9-8/9 and PEBBLES (Z).
- PEBBLES on SLINGSHOT; receive SLINGSHOT WITH PEBBLES.
- Use SLINGSHOT WITH PEBBLES (Z1).
- Take SNAKE HEAD (Z2).
- Walk down.
- Place SNAKE HEAD (3); select 1-4.
- Take turquoise stone and BRONZE CHARM 9/9 (Z3).
- Go to Festival Grounds.
- Solution: (A-R)-(F-D)-(C-G)-(H-I)-(S-K).
- Place BRONZE CHARM 9/9; select all coins (T).
- Place DIEGO (U).
- Walk down.
- Go (V).
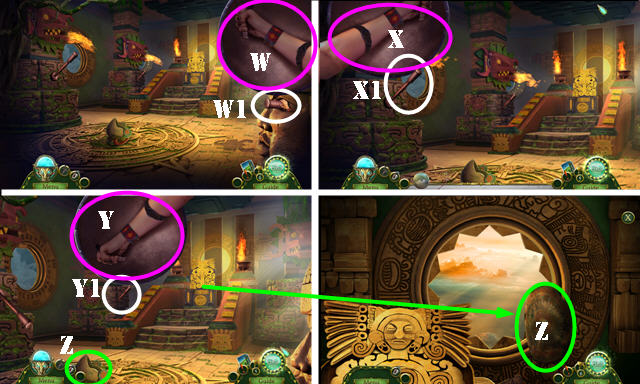
- Use SHIELD (W). Push switch (W1).
- Use SHIELD (X). Pull lever (X1).
- Use SHIELD (Y). Pull lever (Y1).
- Take HELMET and HIDE (Z).
- Go to Festival Grounds.
- Use HELMET (A); receive HELMET WITH WATER.
- Go to Corrida.
- Use HELMET WITH WATER; take SOLAR DISC (B).
- Go to Sun Shrine.
- Place SOLAR DISC (C).
- Use lever (D) up and down to move pins so ball (E) can pass through gaps. Win game once token reaches end (F).
- Take RUBY SOULSTONE (G).
- Go to Crossroads.
- Place RUBY SOULSTONE (H).
- Go (I).
Chapter 5: Stone Serpent

- Take HONEY (J).
- Go (K).
- Look at note; take FORK and STICK (L).
- Go (M-N).
- Take MACHETE (O).
- Select cage 6x (P).
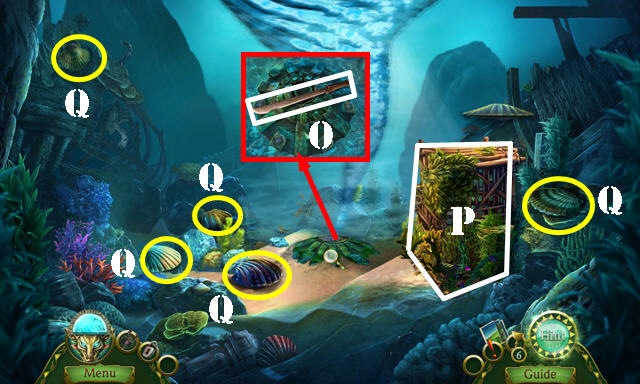
- Use FORK 5x (Q); receive PEARLS 5/5 and SHELL.
- Walk down.
- Play HOP (R); receive JEWELRY.
- Select JEWELRY; take WEDDING PENDANT and JEWELRY SCRAPS.
- Go to Cave Entrance.
- Try to use HONEY; use SHELL and HONEY (S); receive FIREFLIES.
- Place PEARLS 5/5 (T); take ALTAR ORNAMENT (U).
- Go to Regatta.
- Use FIREFLIES (V); take ALTAR CORE (W).
- Go (X).
- Place ALTAR ORNAMENT and ALTAR CORE (Y).
- Solution (A-C).
- Walk down.
- Place WEDDING PENDANT (D).
- Take SILK SCARF (E).
- Walk down.
- SILK SCARF, JEWELRY SCRAPS, and STRINGS on STICK; receive DRUM MALLET.
- Place HIDE and use DRUM MALLET (F). Play HOP.
- Climb (G).
- Go forward 3x (H).
- Use Blade (I).
- Go forward 3x; take FLAG (J). Go forward.
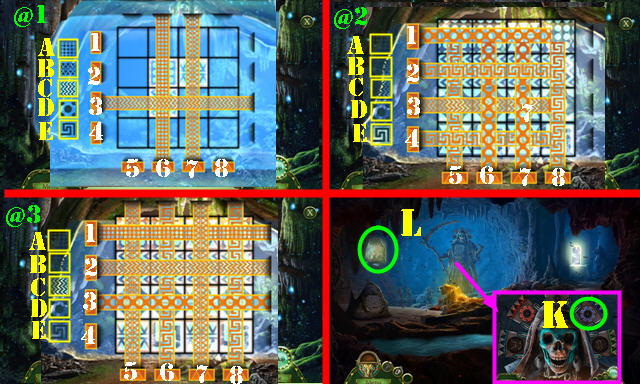
- Solution one (@1): (A-6)-(B-7)-(C-3).
- Solution two (@2): (D-1-6-7)-(E-2).
- Solution three (@3): (B-5)-(E-6-8)-(A-1)-(D-3)-(B-7)-(C-2).
- Receive AZURE SOULSTONE.
- Go to Crossroads. Place AZURE SOULSTONE (K).
- Go (L).

- Play HOP (M); receive POTION BOTTLE.
- Take FAMILY ICON (N).
- Look at note on POTION BOTTLE; take SEEDS.
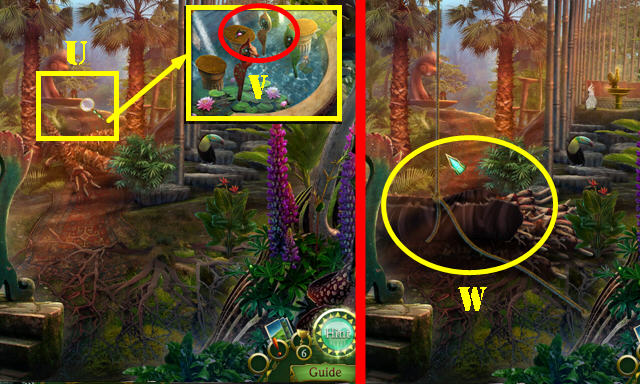
- Use SEEDS; select (1-4); take BERRIES (O).
- Go (P).
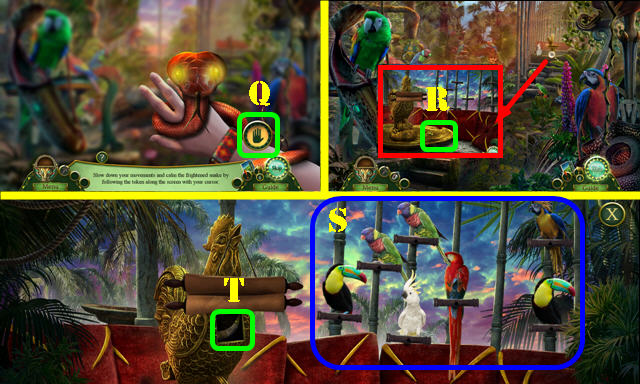
- Select branches on scene 4x.
- Move along with token (Q); receive SNAKE.
- Place BERRIES (R).
- Solution (S).
- Take SEED POWDER (T).
- Use MACHETE (U); take FIGURINES and RADIANT GEM 1/5 (V).
- Place FLAG and select 4 logs (W).
- Walk down.
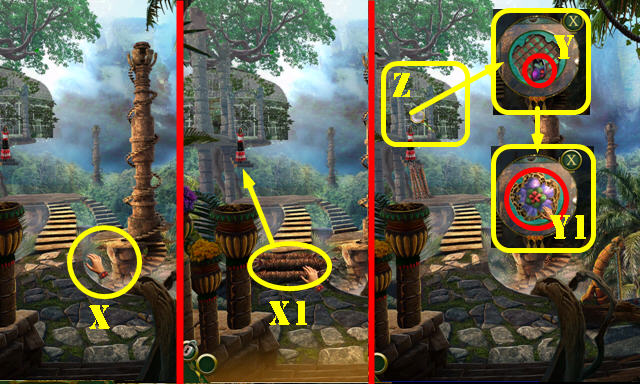
- Select rope (X).
- Move logs (X1).
- Take RADIANT GEM 2/5 (Y).
- Place FAMILY ICON and select (Y1).
- Enter Greenhouse (Z).
- Take TROWEL and RADIANT GEM 3/5-4/5 (Z1).
- Use SNAKE (Z2); receive turquoise stone and RADIANT GEM 5/5.
- Solution: (P-R)-(H-D)-(G-H)-(L-G)-(S-L)-(C-B)-(I-C).
- Walk down.
- RADIANT GEM 5/5 on FIGURINES; receive FLOWER FIGURINES.
- Place FLOWER FIGURINES (S).
- Play HOP (T); receive LOTUS POLLEN.
- SEED POWDER and LOTUS POLLEN on POTION BOTTLE; take LIFE NECTAR.
- Place LIFE NECTAR (U).
- Go to Greenhouse; use LIFE NECTAR (V).
- Go to Aviary: use LIFE NECTAR (W).
- Go to Greenhouse.
- Select tree and take EMERALD SOULSTONE (Z); receive TALAVERA TORCH.
- Go to Crossroads.
- Place EMERALD SOULSTONE (A).
- Go (B).
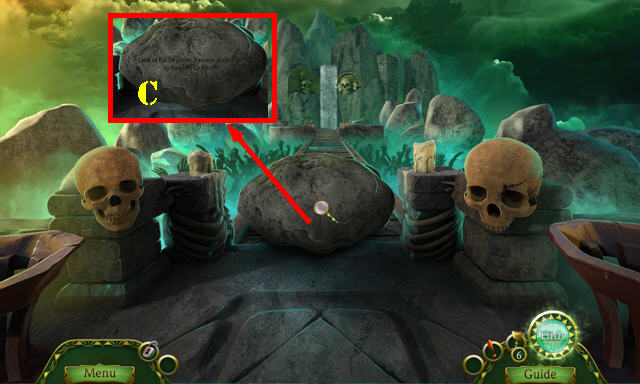
- Read stone (C).
- Go forward.
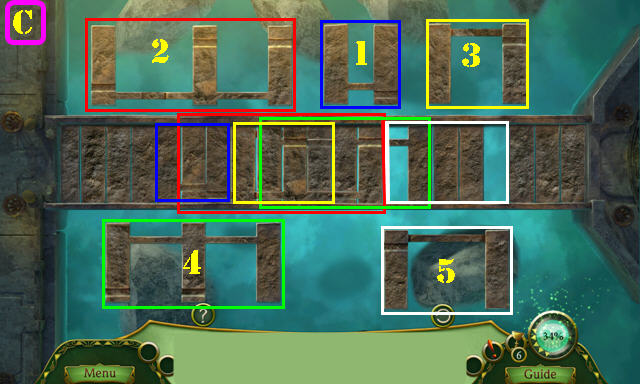

- Solution (C): (1-5).
- Solution (D): (1-7).

- Place TALAVERA TORCH (E).
- Play HOP (F).
- Take BONE AMULET (G).
- Go (H).
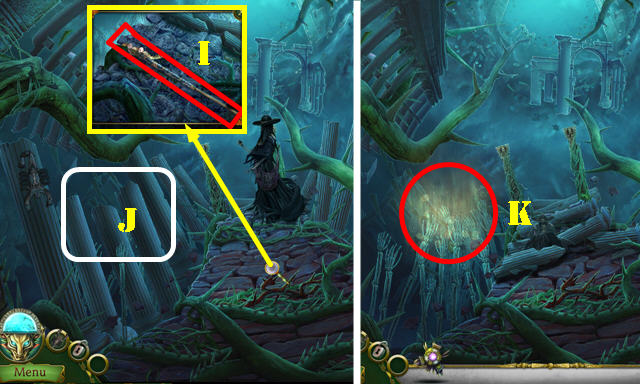
- Use TROWEL; take STAFF (I).
- Use STAFF (J).
- Play HOP (K); receive TURQUOISE.
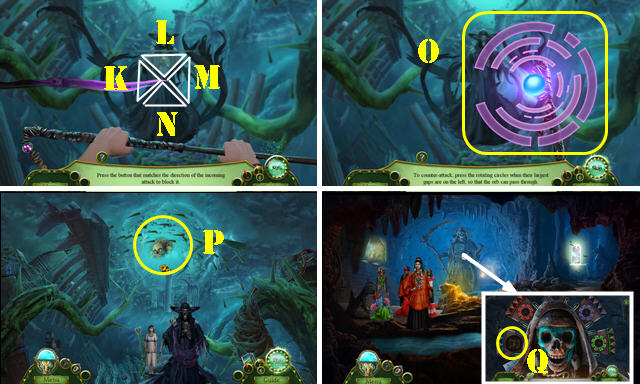
- Solution: K-M-L-M-N-K-L-N-K-N.
- Solution: (O).
- Place BONE AMULET (P).
- Place TURQUOISE (Q).
- Congratulations, you've completed Myths of the World: Behind the Veil!
Created at: 2017-12-10