

Walkthrough Menu
- General Tips
- Chapter 1: The Steamboat
- Chapter 2: Eastmire
- Chapter 3: The Town Hall
- Chapter 4: Finding the Crypt
- Chapter 5: Blackburn Manor
General Tips
- This is the official guide for Myths of the World: Black Rose.
- This guide will not show when you have to zoom into a location; the screenshots will show each zoom scene.
- Hidden-object puzzles are referred to as HOPs. This guide will not show screenshots of the HOPs, however, it will mention when an HOP is available and the inventory item you'll collect from it.
- Use the Map to fast travel to a location.
Chapter 1: The Steamboat

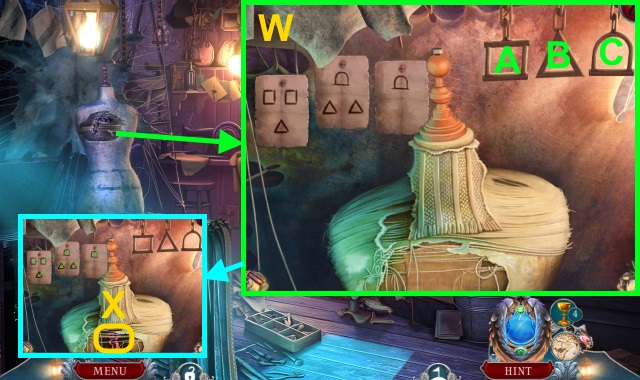
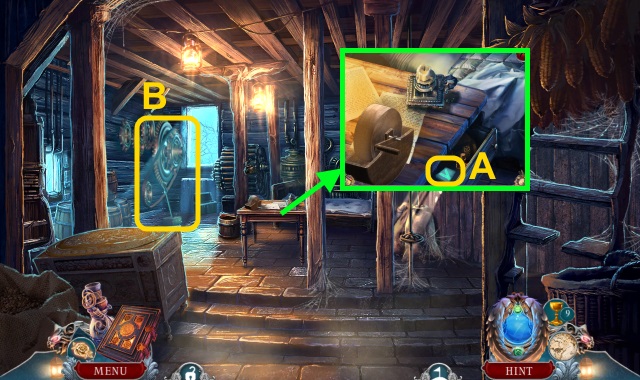
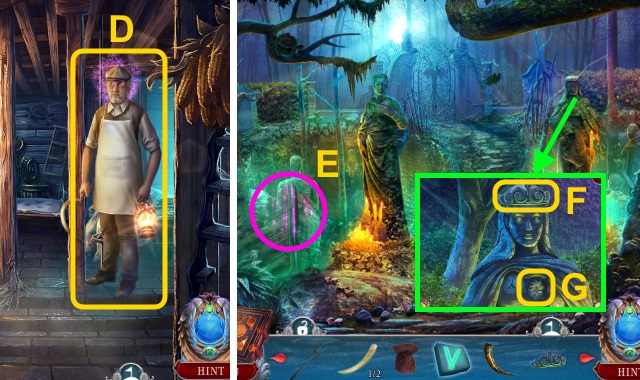
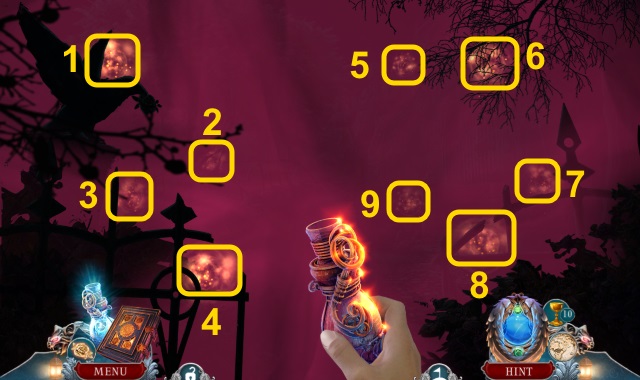
- Talk to Simon (A).
- Take SIMON'S RING and the picture (B).
- Use SIMON'S RING (C).
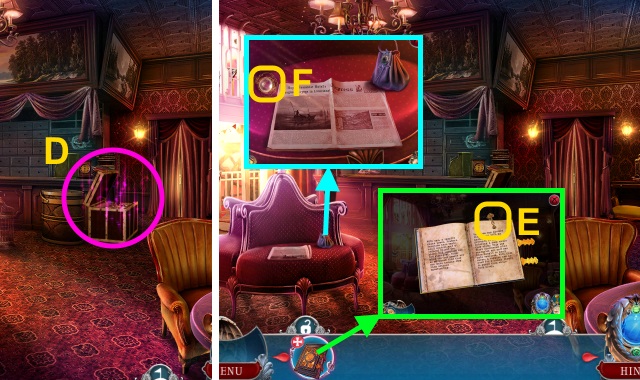
- Play the HOP to receive the VAMPIRE HUNTING MANUAL (D).
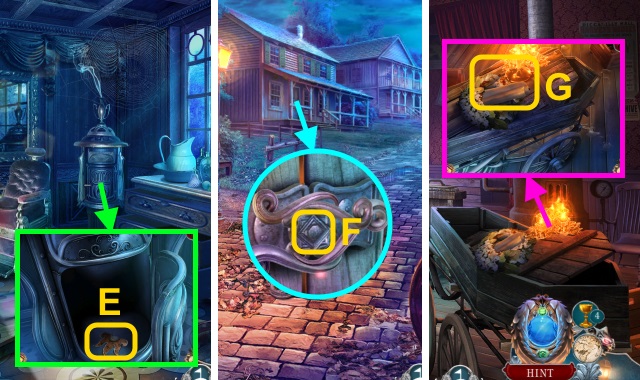
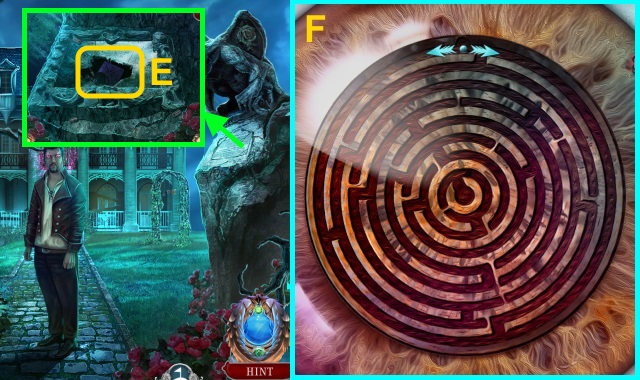
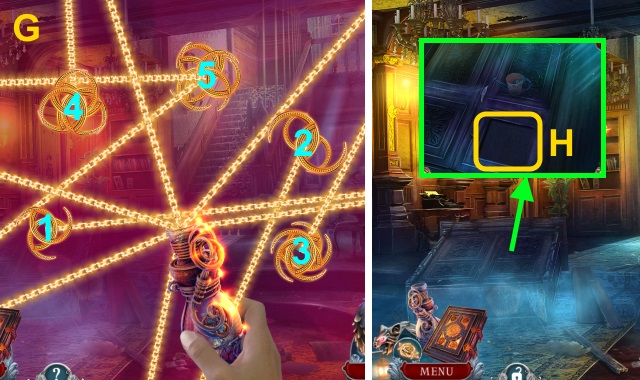
- Open the VAMPIRE HUNTING MANUAL; take the PAPER CLIP (E).
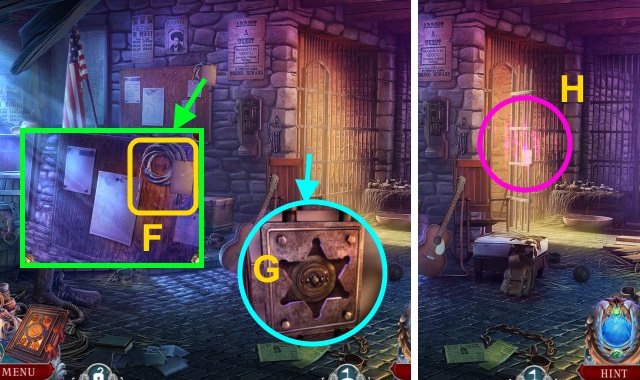
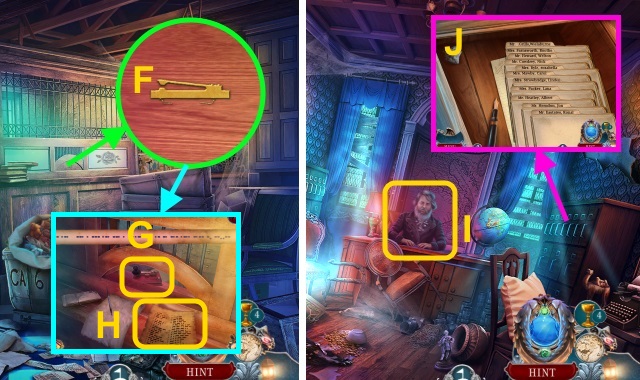
- Open the newspaper; take the MONOCLE (F).
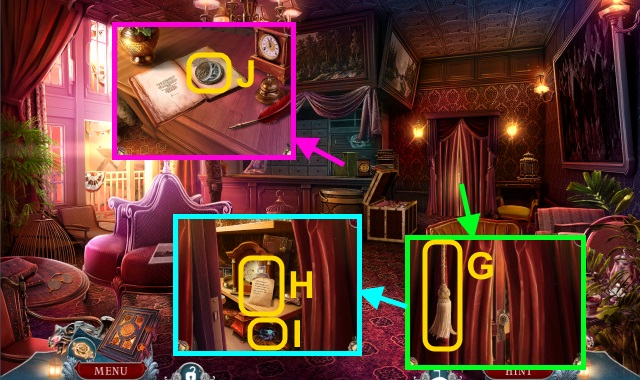
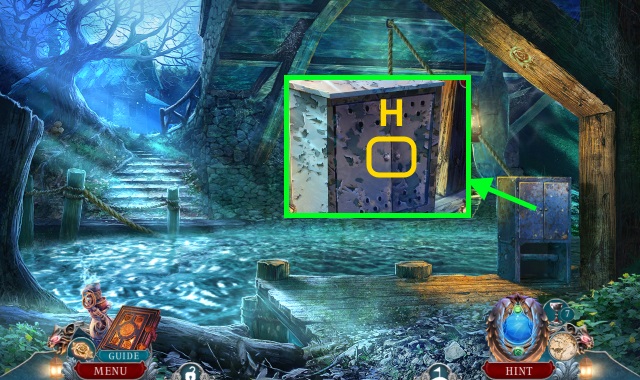
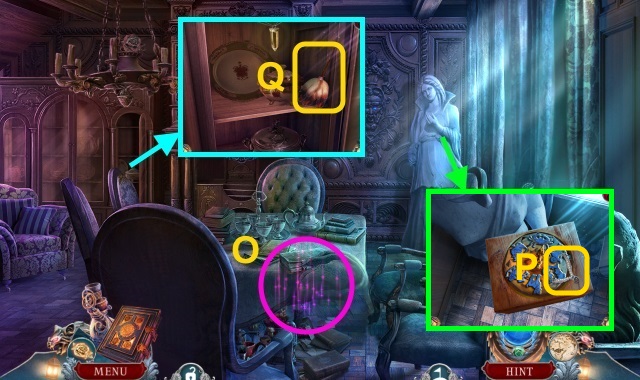
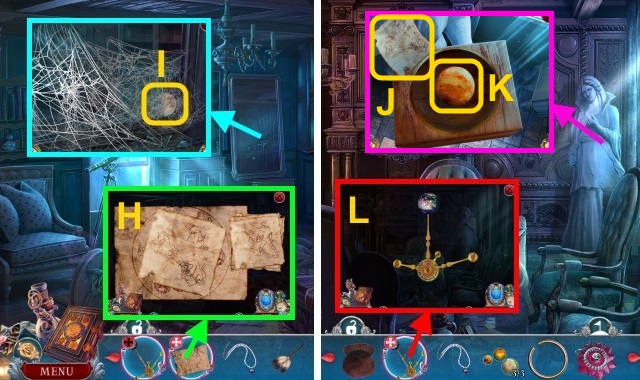
- Take the CORD (G); open the cupboard.
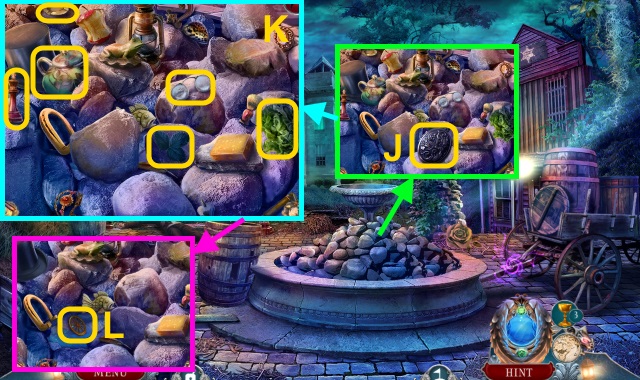
- Take the note (H), SOLVENT, and WOLF HEAD (1/3) (I).
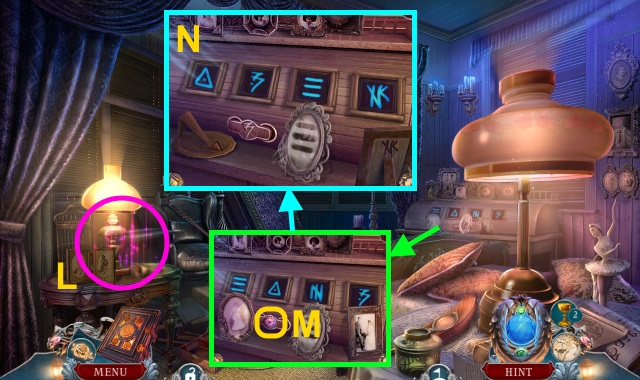
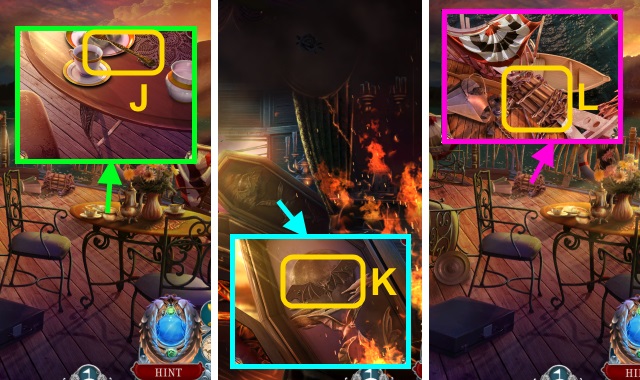
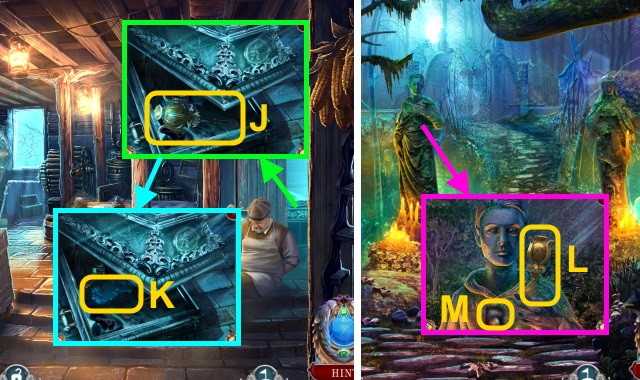
- Open the book, take the IVORY CRESCENT MOON (J).
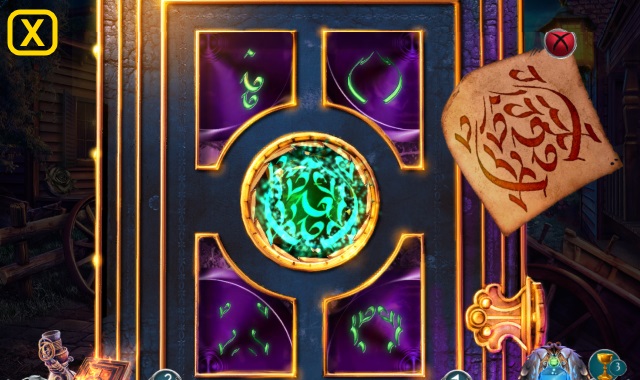
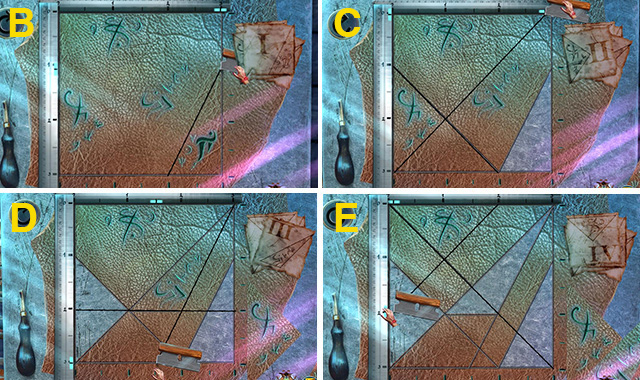
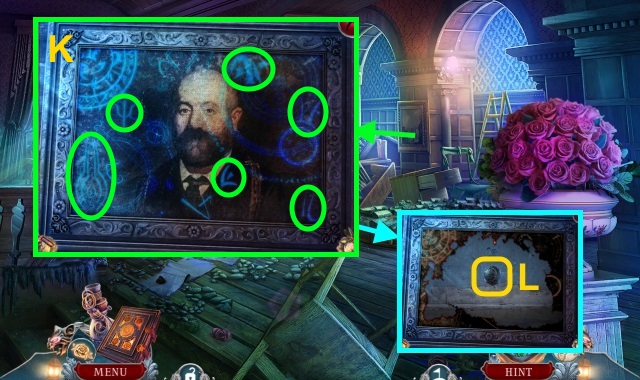
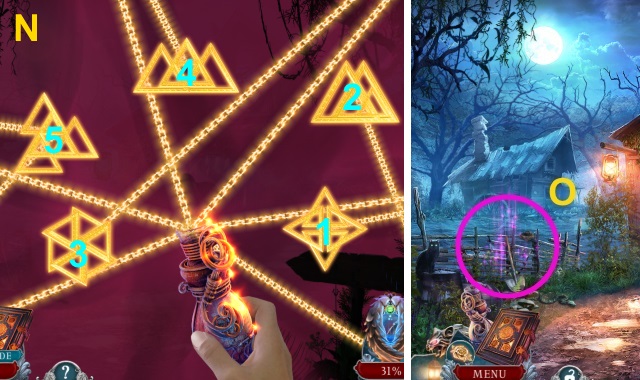
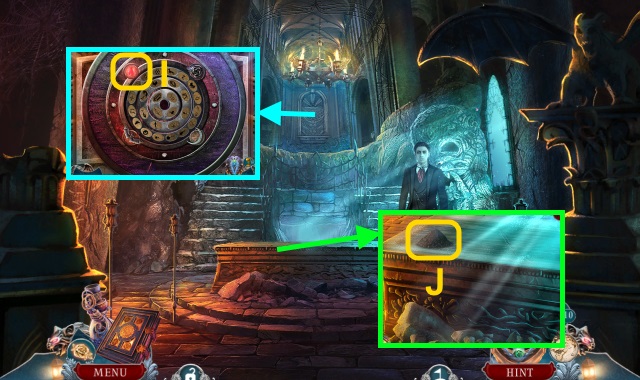
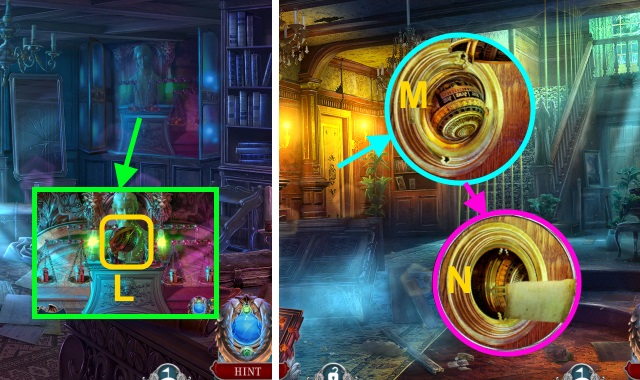
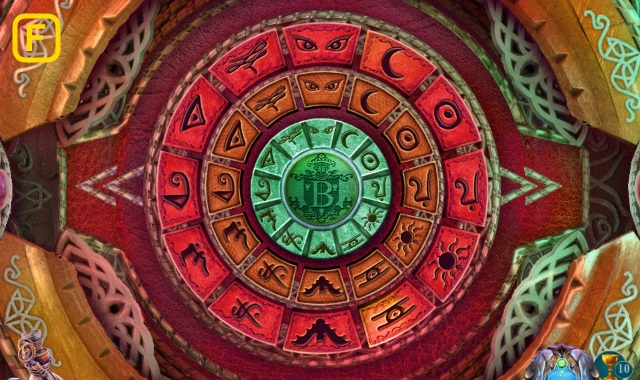
- Use the MONOCLE on the book for a mini-game.
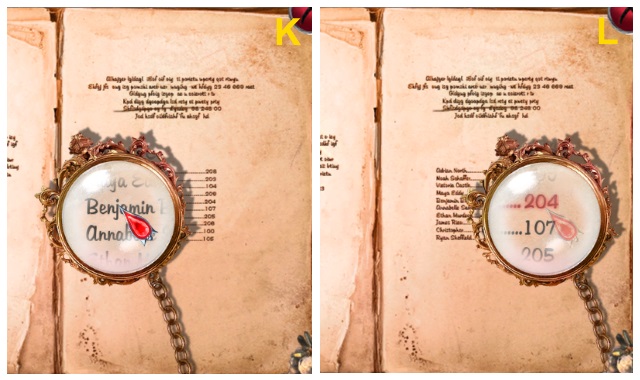
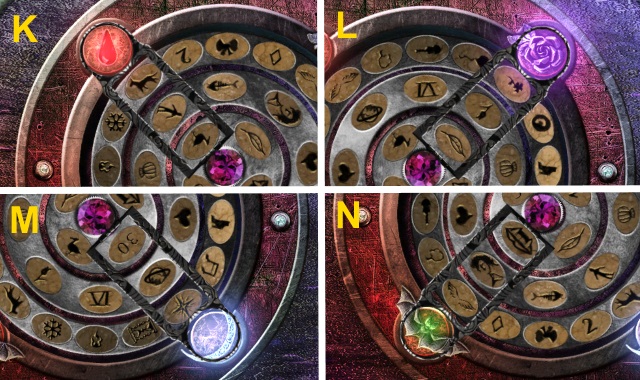
- Solution (K, L).
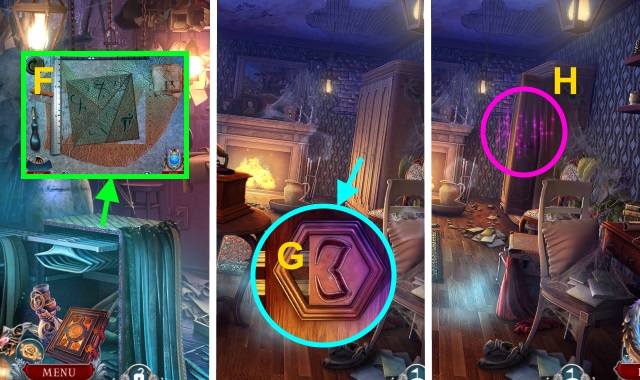
- Walk left.
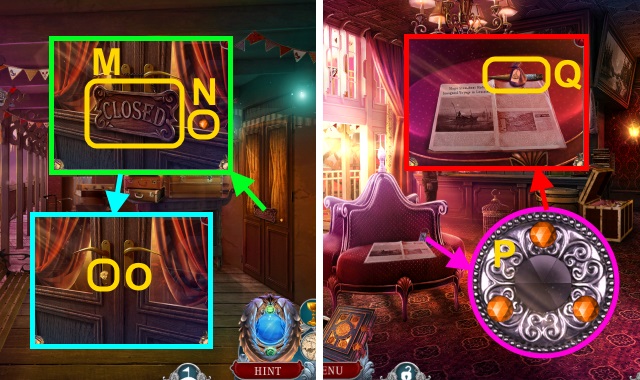
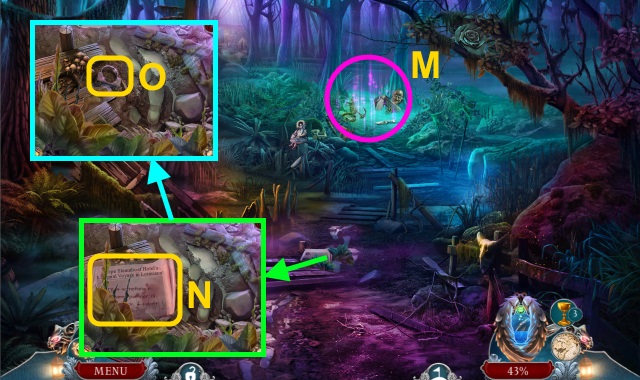
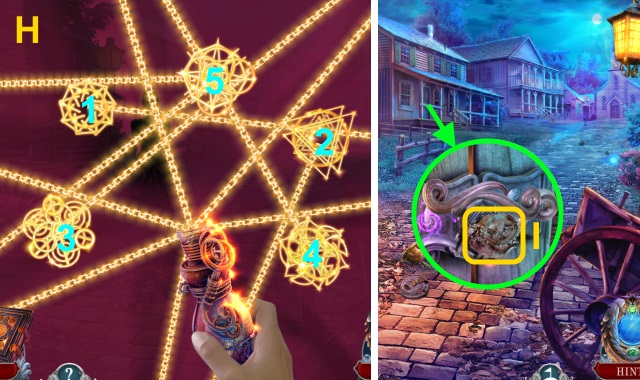
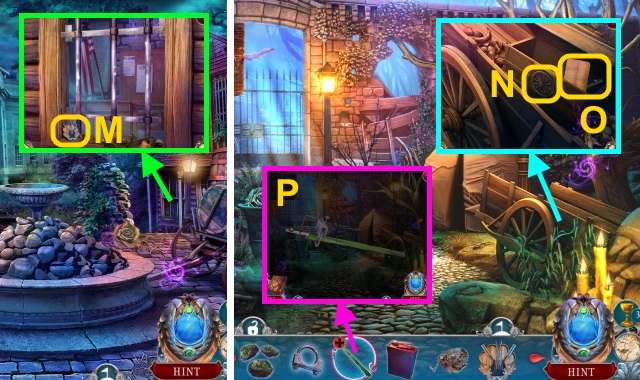
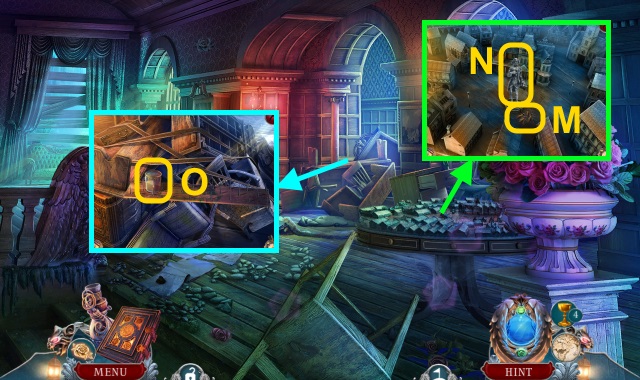
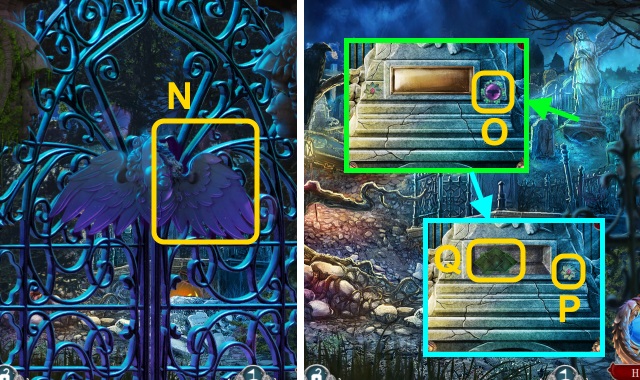
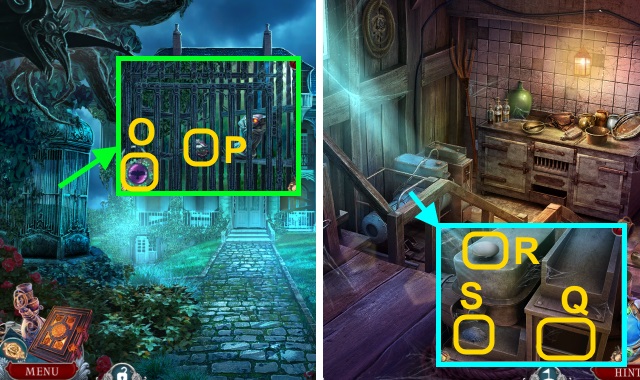
- Move the sign (M); take the ORANGE GEM (N).
- Use the PAPER CLIP to take the LION'S HEAD SYMBOL (O).
- Walk down.
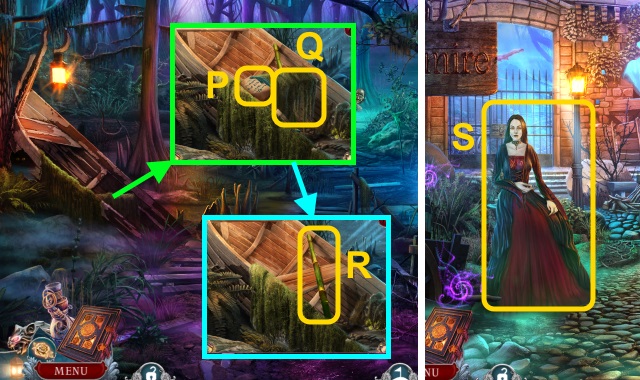
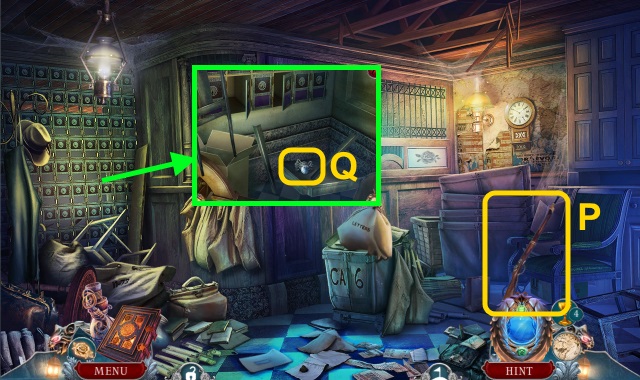
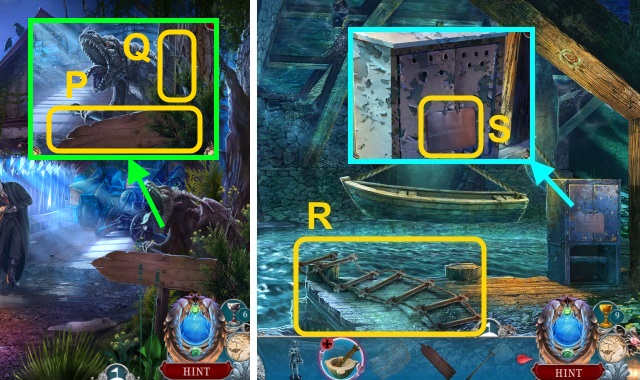
- Place the ORANGE GEM (P).
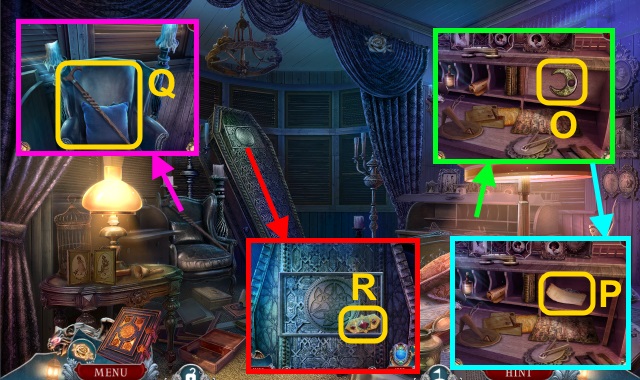
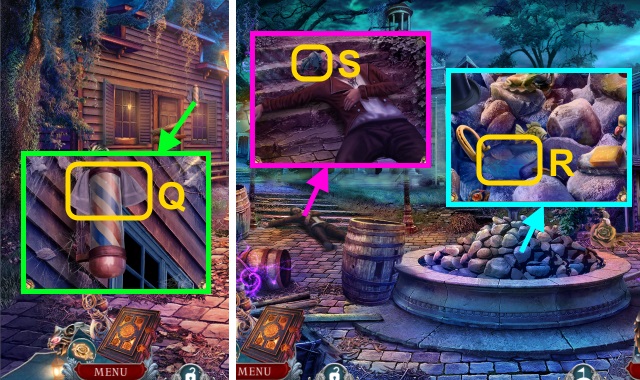
- Dump the pouch; take the CONCENTRATED GARLIC POWDER and WOODEN STAKE (Q).
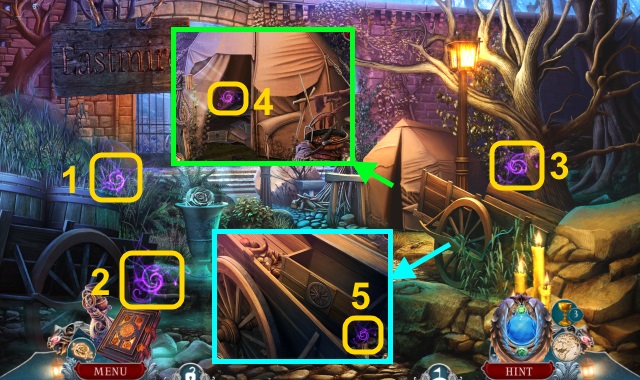
- Walk left.
- Move the carts.
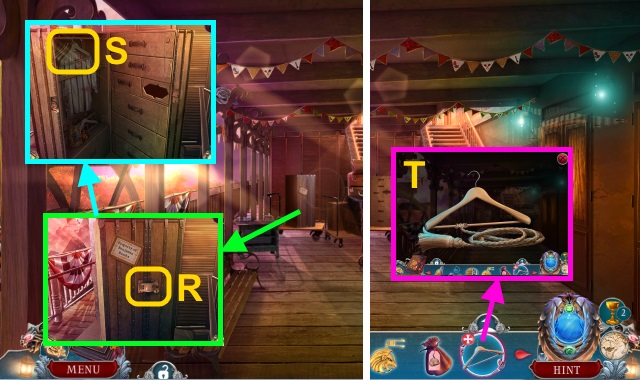
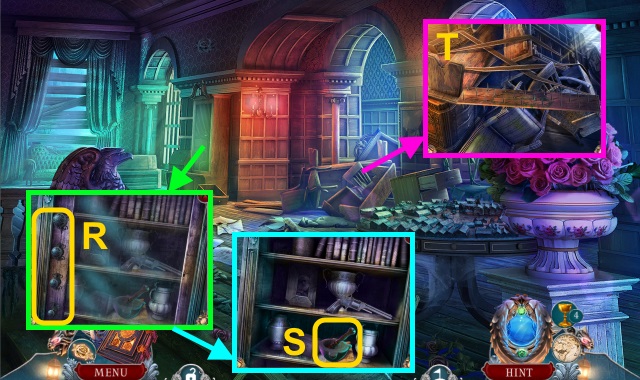
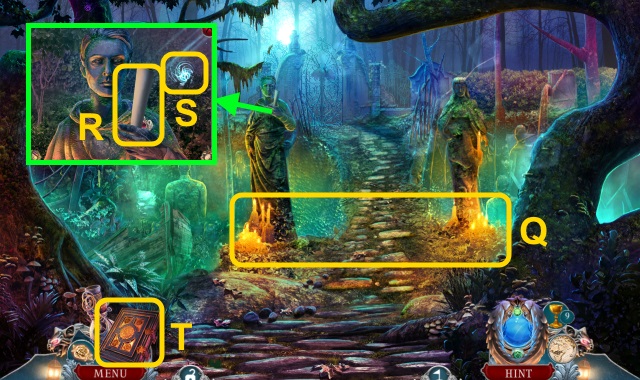
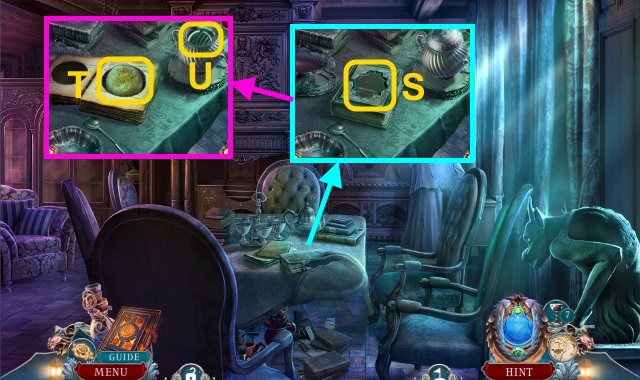
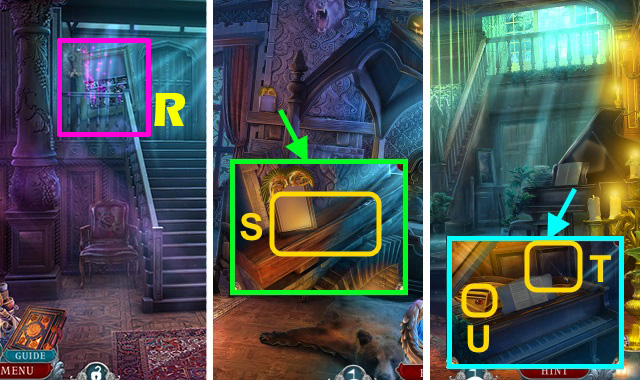
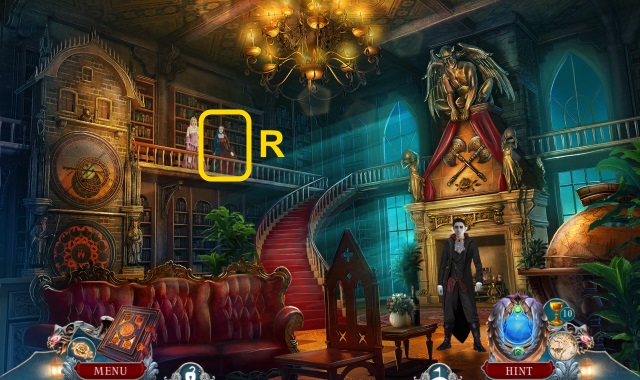
- Use the WOODEN STAKE (R); open the wardrobe.
- Take the COAT HANGER (S).
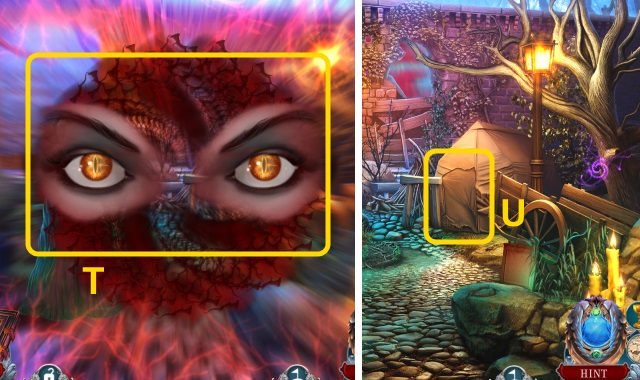
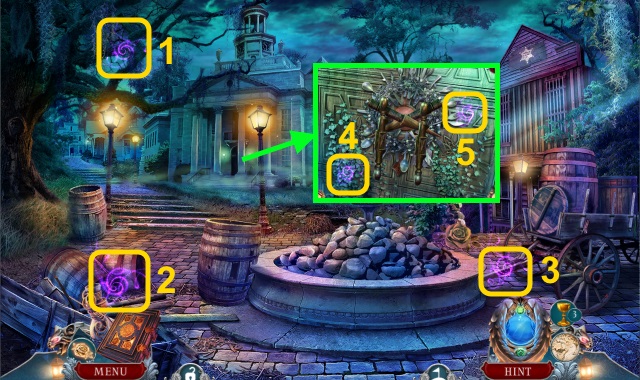
- Examine the COAT HANGER; use the CORD to make the HOOKED CORD (T).
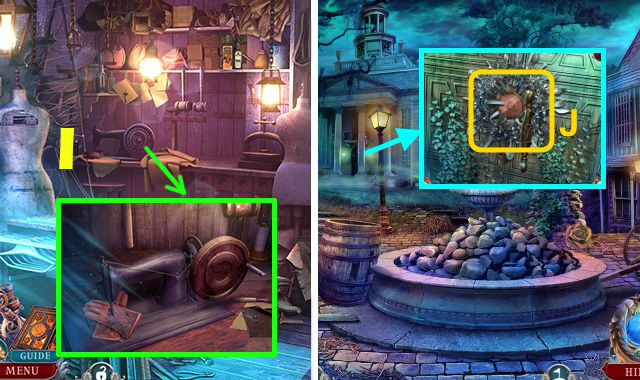
- Try to move the cart.
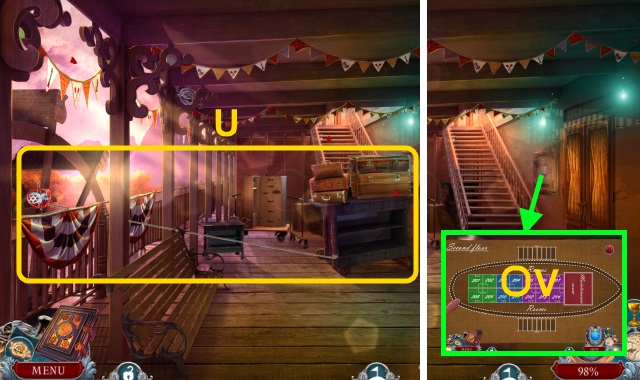
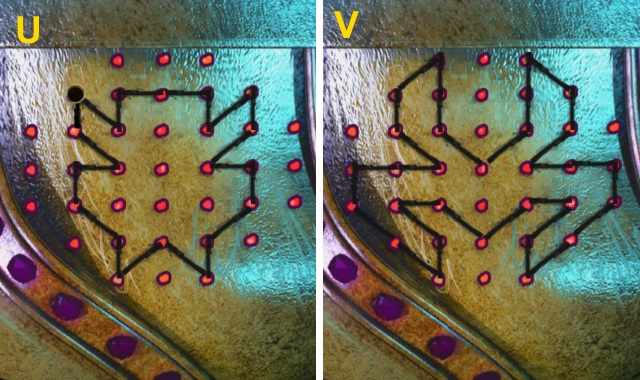
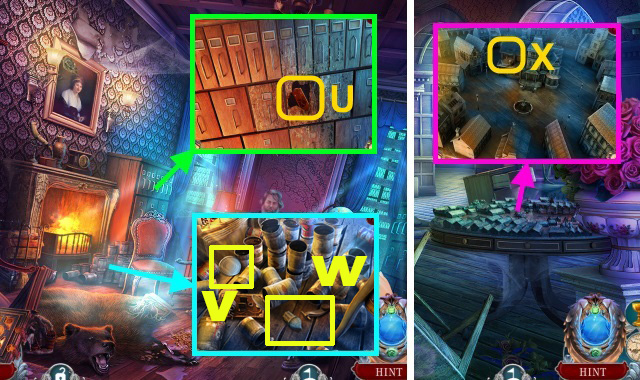
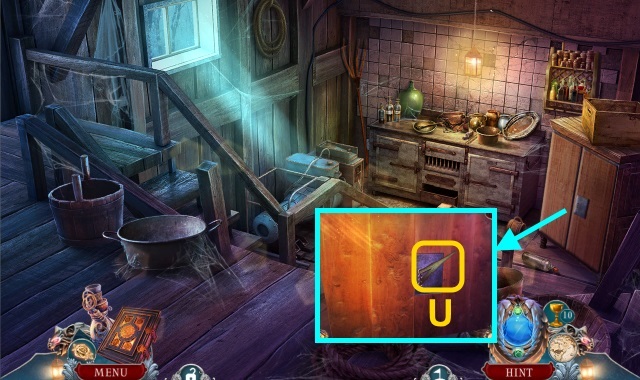
- Place the HOOKED CORD (U); attach the hanger to the wheel.
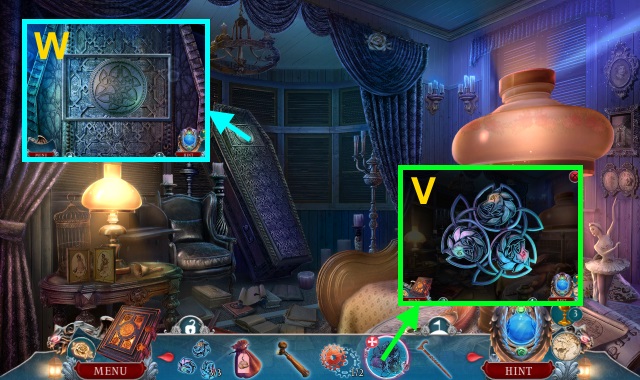
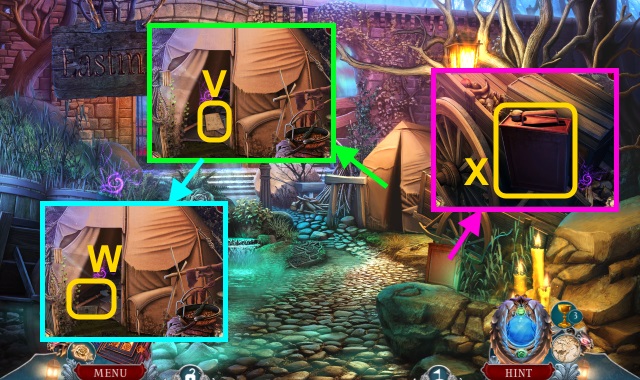
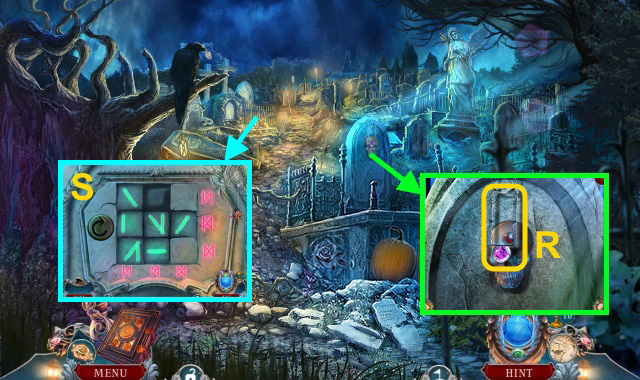
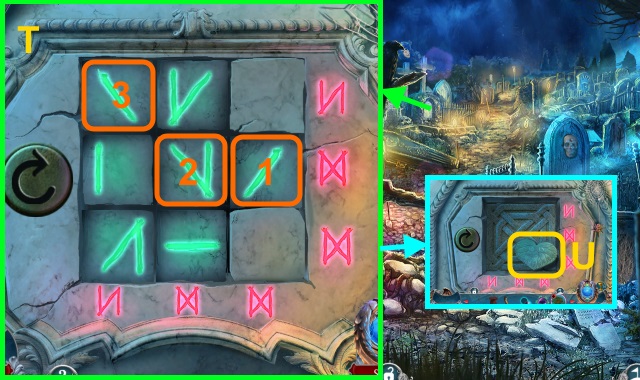
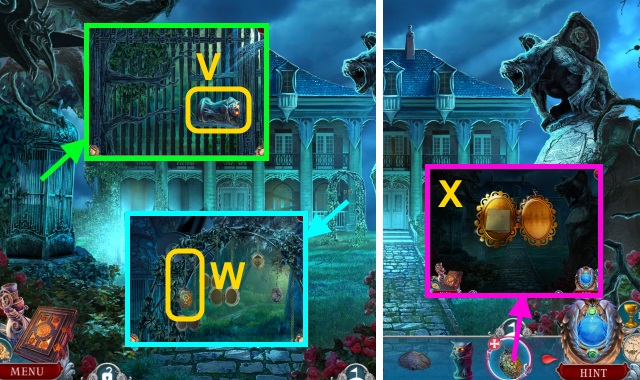
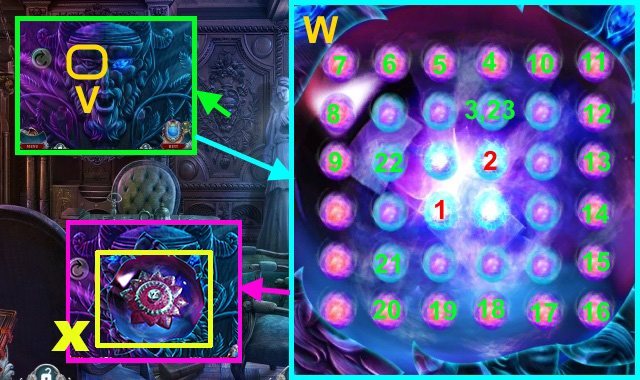
- Sort through the maps; select 204 to move forward (V).
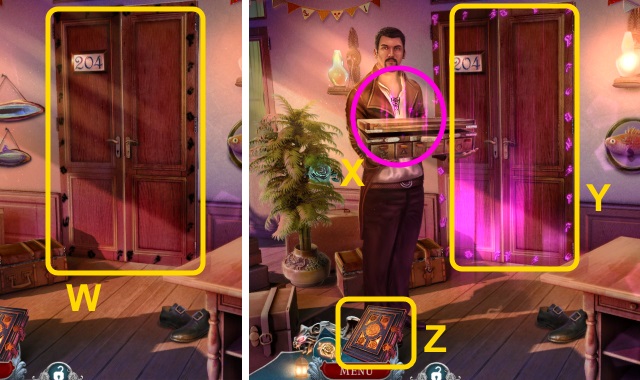
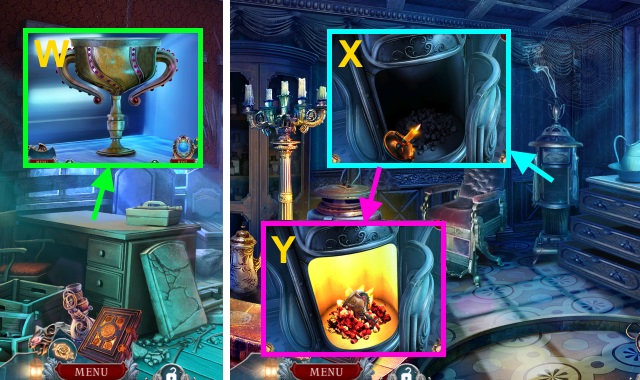
- Try to open the door (W).
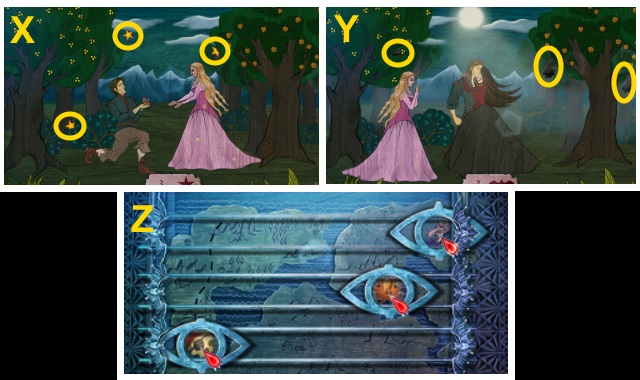
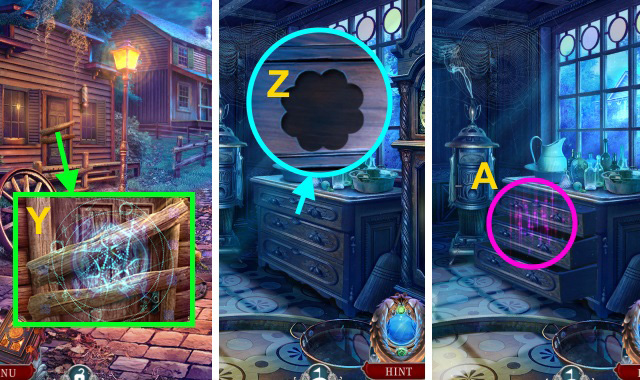
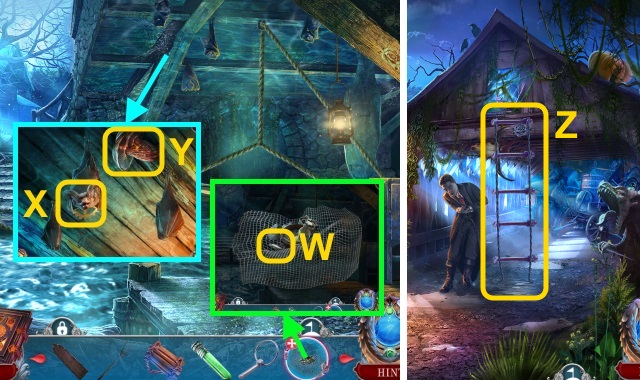
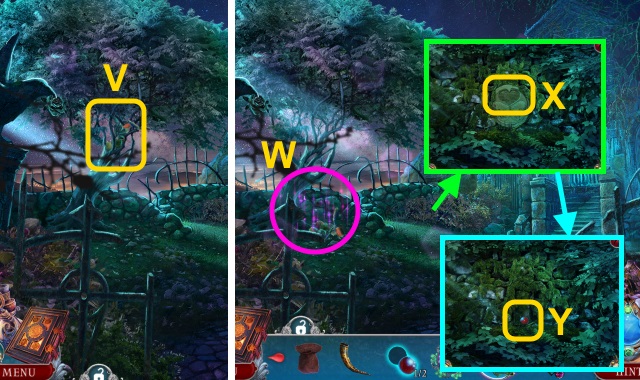
- Play the HOP to receive the CURSE REVEALING SOLUTION (X).
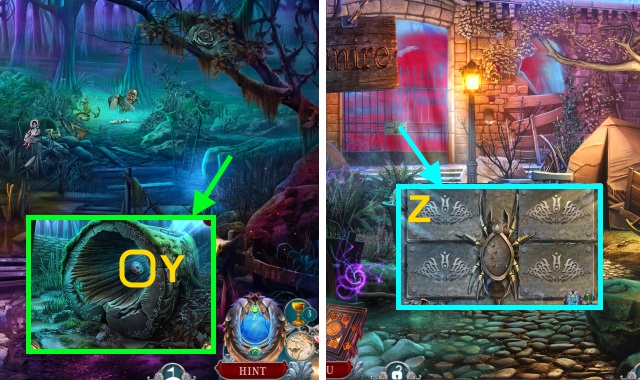
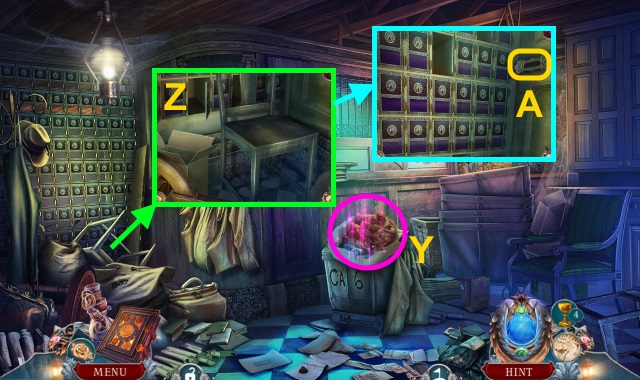
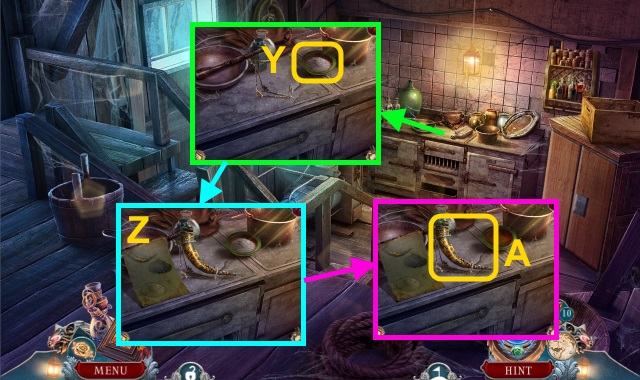
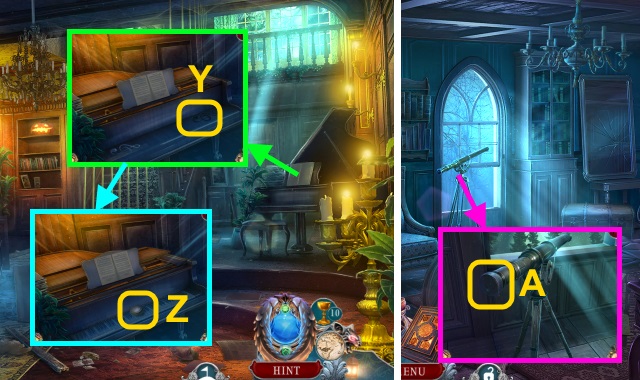
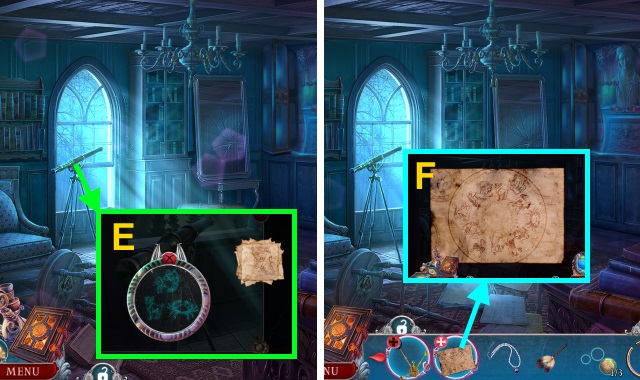
- Use the CURSE REVEALING SOLUTION (Y).
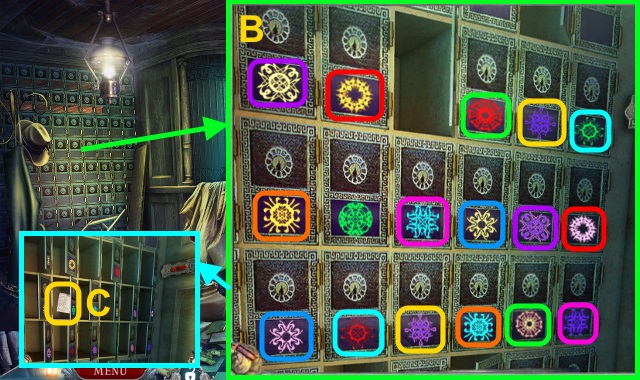
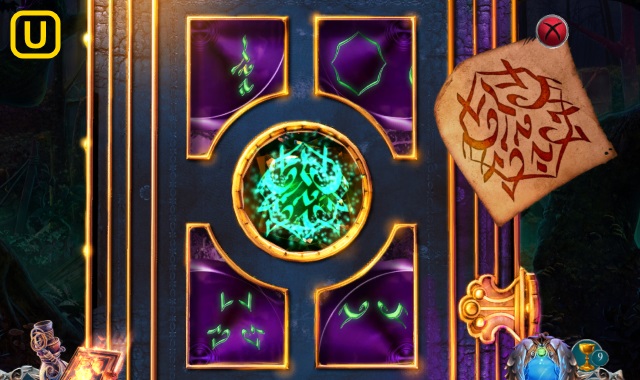
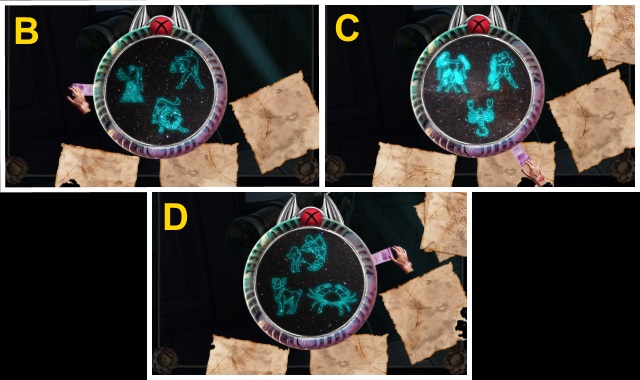
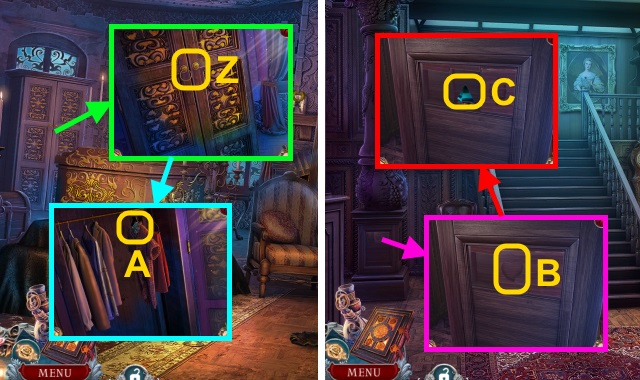
- Open the Vampire Hunting Manual for a mini-game (Z).
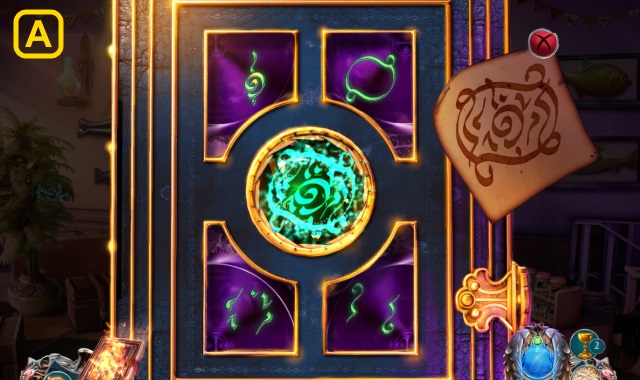
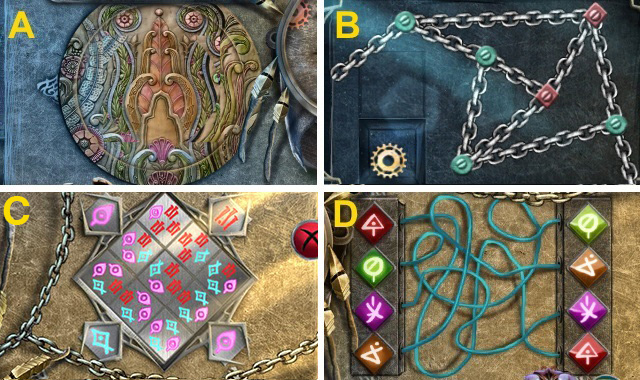
- Solution (A).
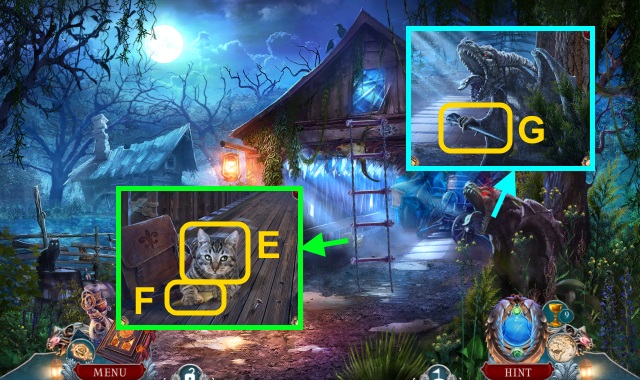
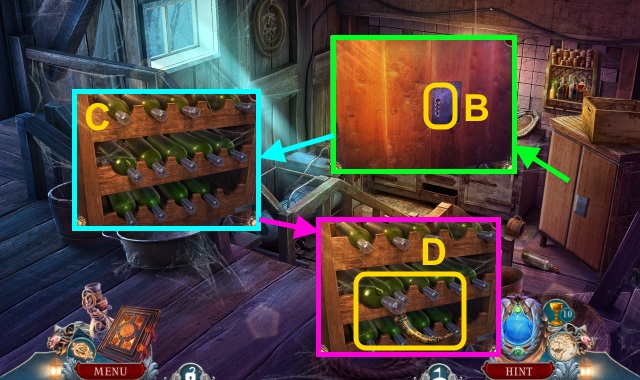
- Move the belt (B); place the LION'S HEAD SYMBOL (C).
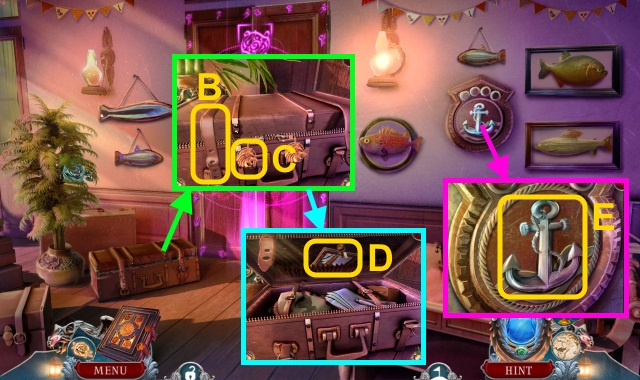
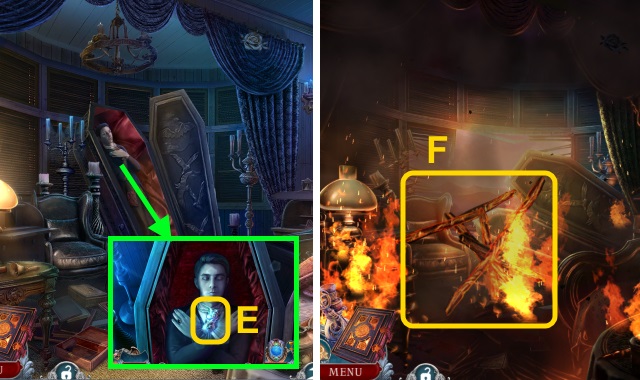
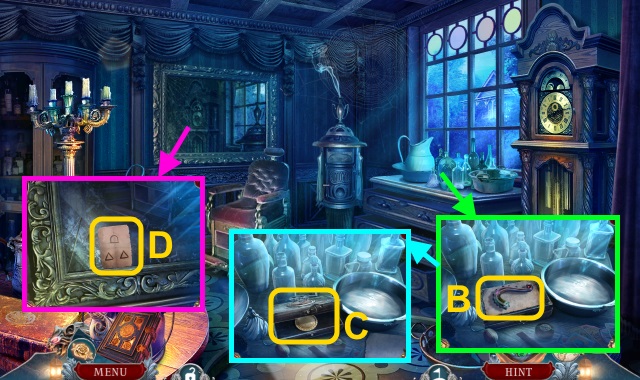
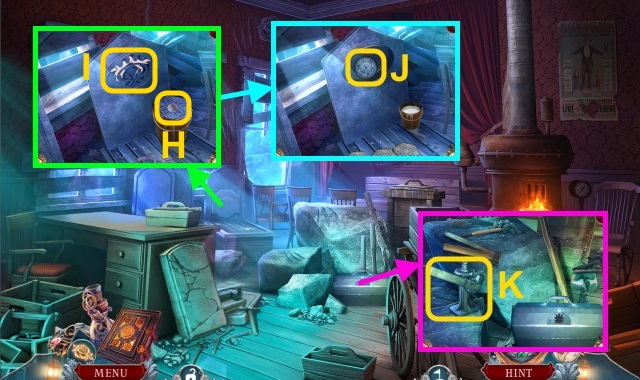
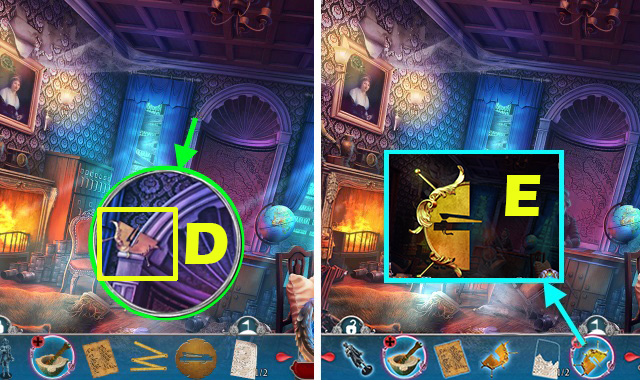
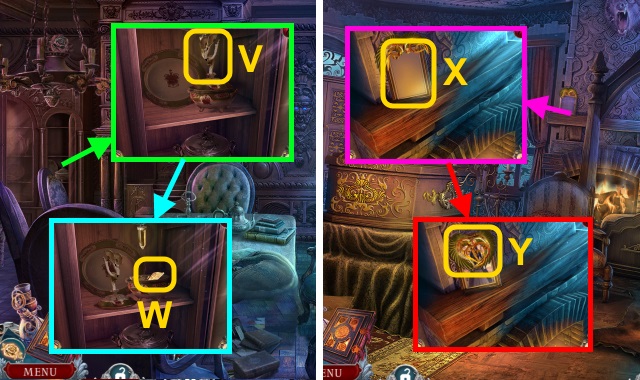
- Open the suitcase; take the HAIR TRIMMER and MIRRORS (1/2) (D).
- Use the SOLVENT (E); take the ANCHOR.
- Take the MIRRORS (2/2) (F).
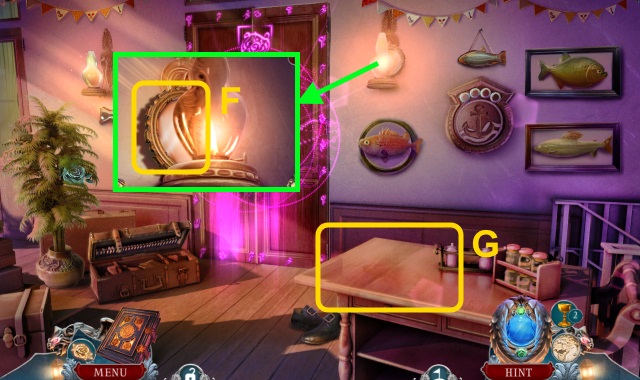
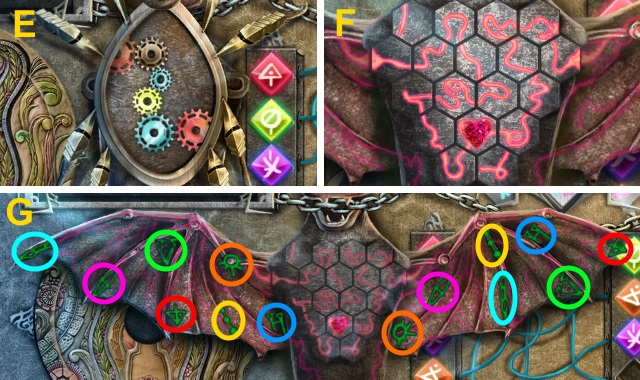
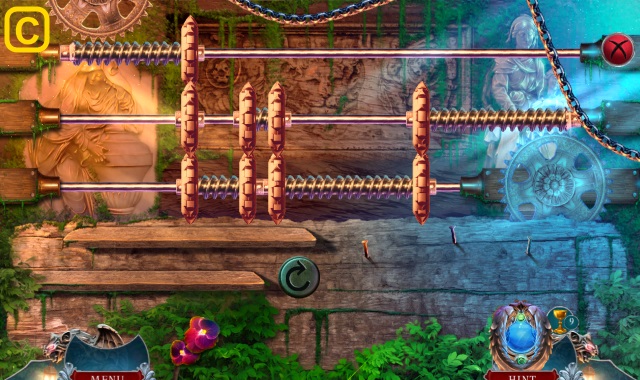
- Place the MIRRORS (2/2) for a mini-game (G).
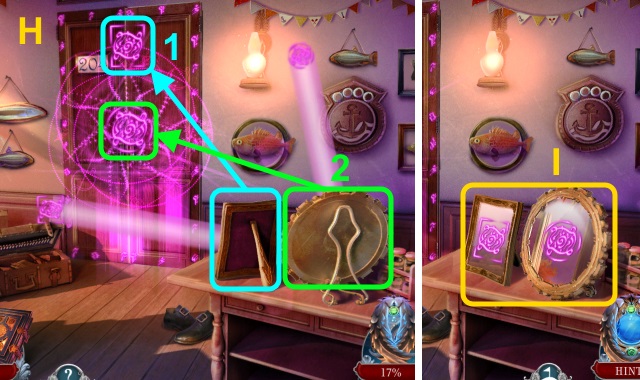
- Solution (H): (1, 2).
- Use the ANCHOR on the mirrors (I).
- Walk forward.
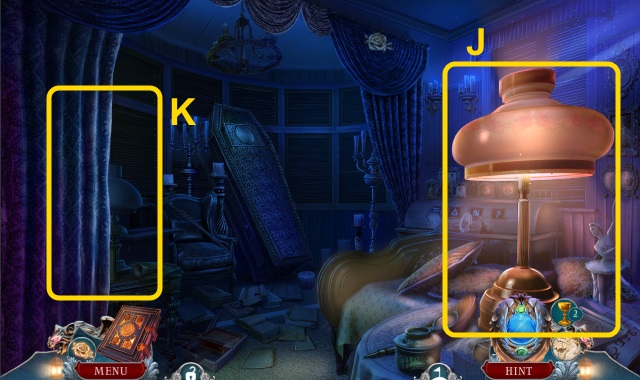
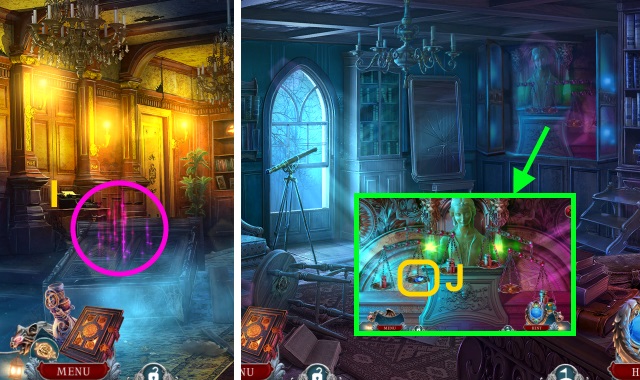
- Turn on the light (J).
- Move the curtain (K); turn on the light.
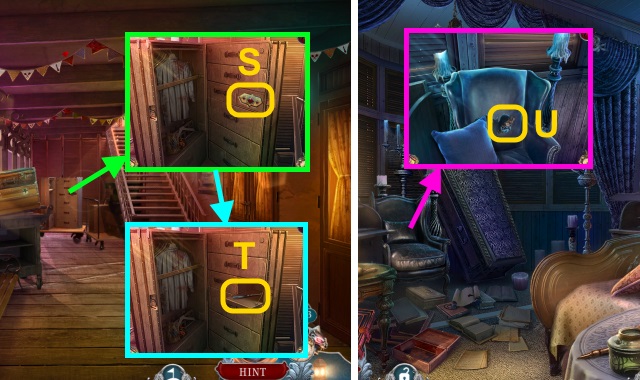
- Play the HOP to receive the WOLF HEAD (2/3) (L).
- Take the COGS (1/2) (M); move the frames.
- Match the symbols (N).
- Place the IVORY CRESCENT MOON (O).
- Take the note and WOLF PENDANT (P).
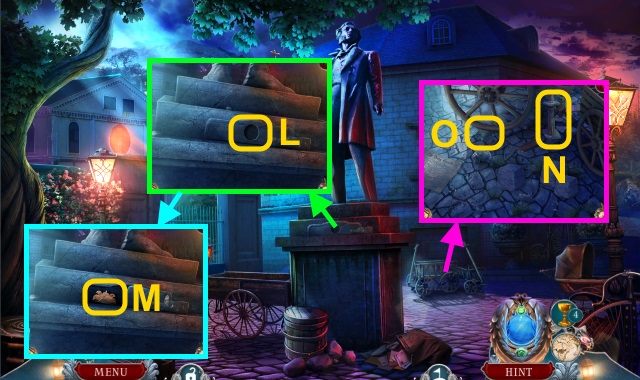
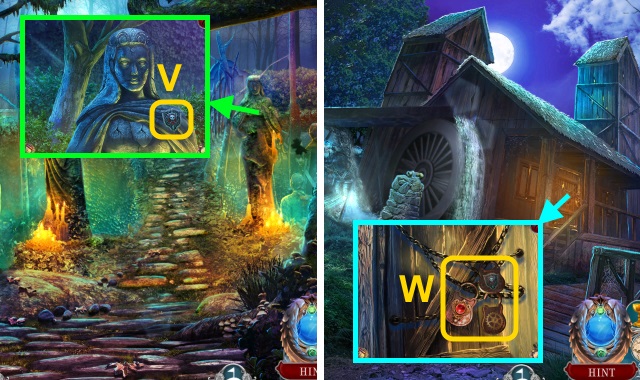
- Take the WALKING CANE (Q).
- Take the JEWELED SYMBOL (R).
- Go to the Deck.
- Place the JEWELED SYMBOL (S); take the METAL PICK (T).
- Go to Suite 204.
- Move the pillow; use the METAL PICK.
- Take the WOLF HEAD (3/3) (U).
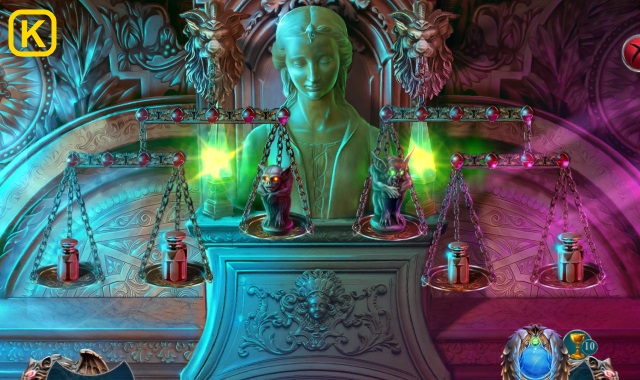
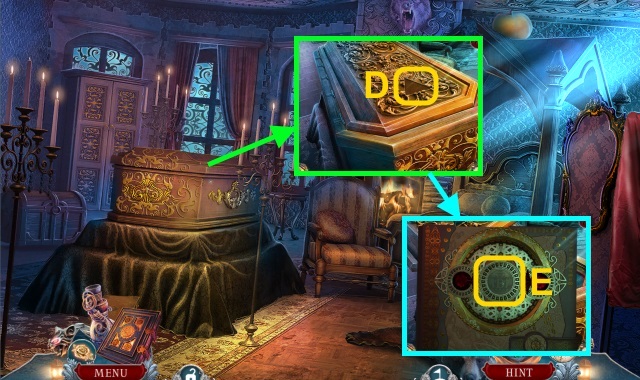
- Examine the WOLF PENDANT; place the WOLF HEAD (3/3) to make the IRON WOLF (V).
- Place the IRON WOLF for a mini-game (W).

- Solution (X-D).
- Take the Vial of Light (E).
- Use the WALKING CANE (F).
- Walk forward.
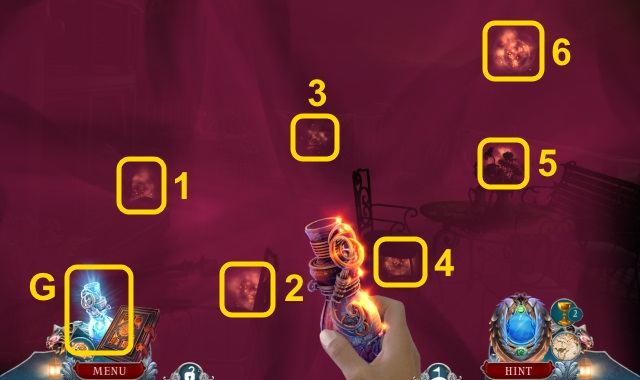
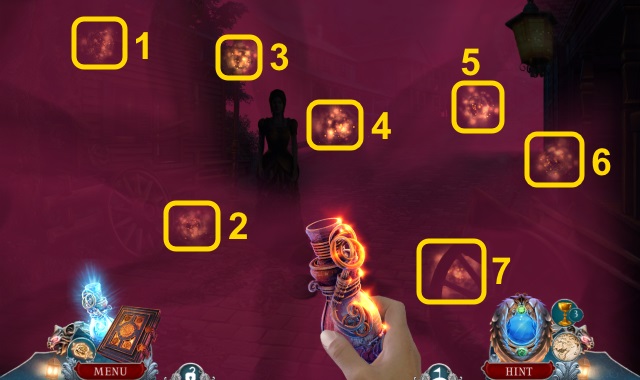
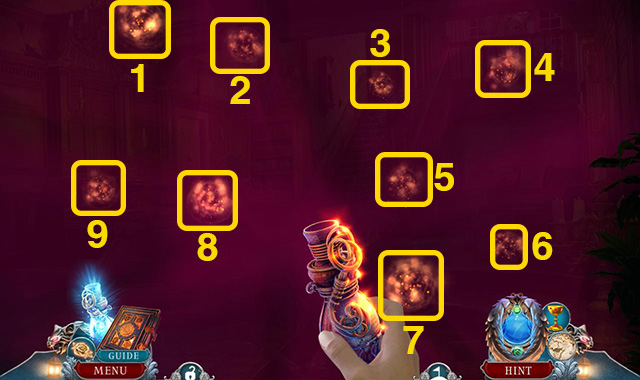
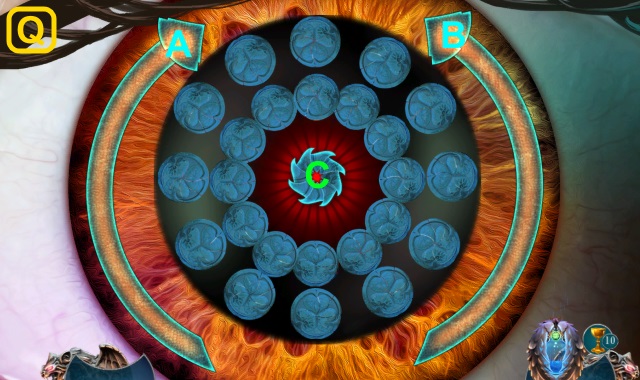
- Use the Vial of Light (G); collect the orbs for a mini-game (1-6).
- Solution (H).
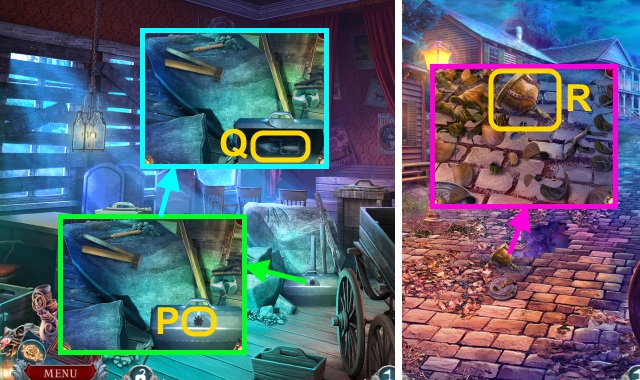
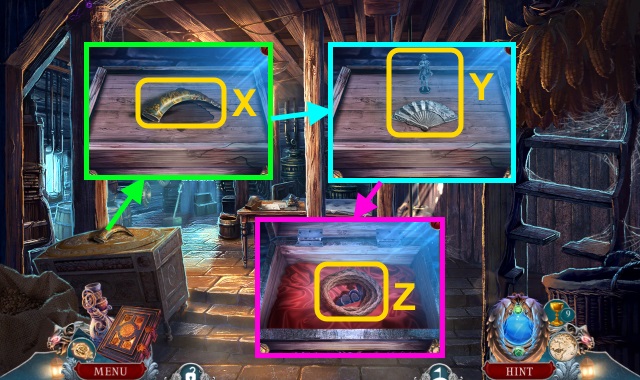
- Take the COAL CHUNK (I).
- Move the dishes; take the FORK (J).
- Walk down; use the FORK to take the SERRATED BAT (K).
- Walk forward.
- Use the SERRATED BAT (L); lower the ladder.
Chapter 2: Eastmire
- Move the plants; play the HOP to receive the SHARP CLAW (M).
- Move the plants; read the newspaper (N).
- Take the METAL CLAMP (O).
- Read the note (P); use the HAIR TRIMMER (Q).
- Take the PUNTING POLE (R).
- Walk forward.
- Talk to the woman (S).
- Use the CONCENTRATED GARLIC POWDER (T).
- Use the SHARP CLAW (U).
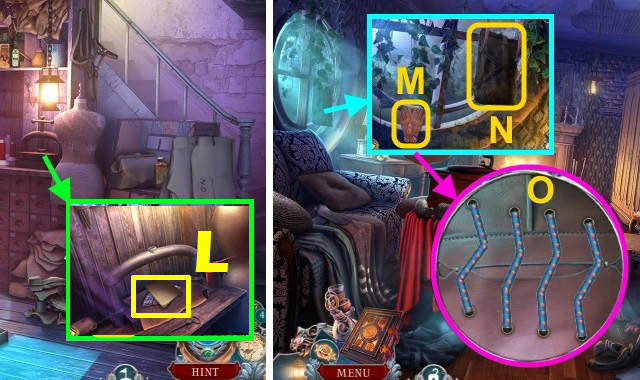
- Read the note (V); move the books.
- Take the SMALL AXE (W).
- Take the PETROL CANISTER (X).
- Walk down.
- Use the SMALL AXE; take the COGS (2/2) (Y).
- Walk forward.
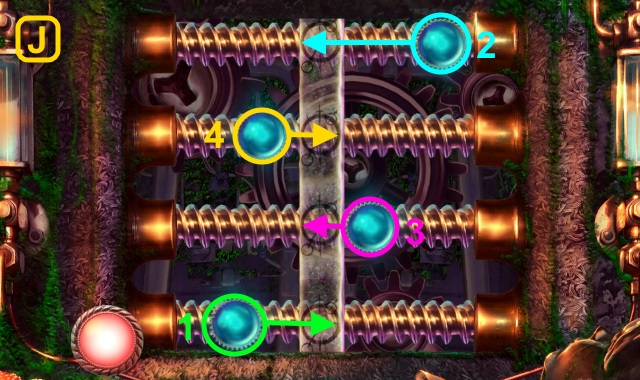
- Place the COGS (2/2) for a mini-game (Z).
- Solution (A-G).
- Walk forward.
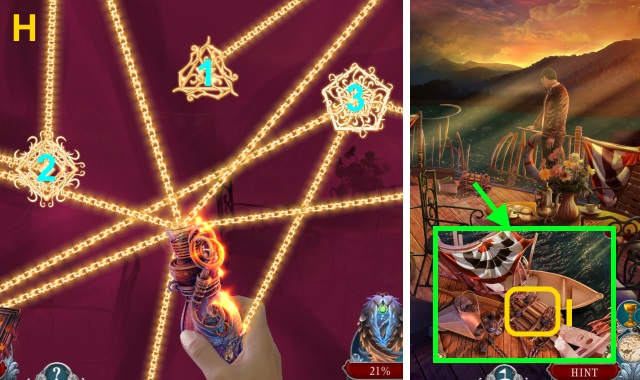
- Use the Vial of Light; collect the orbs for a mini-game (1-7).
- Solution (H).
- Take the SHAVING BOX GEARS (I).
- Walk forward.
- Examine the locket (J); collect the objects (K).
- Take the CART WHEEL EMBLEM (L).
- Move the leaves; take the BARBERS' EMBLEM (M).
- Go to the Eastmire Town Gates.
- Place the CART WHEEL EMBLEM (N); take the note, SHARPENING STRAP and LANTERN HOOK (O).
- Examine the PUNTING POLE; use the LANTERN HOOK and METAL CLAMP to make the HOOKED POLE (P).
- Walk forward.
- Use the HOOKED POLE to take the TOWEL (Q).
- Walk forward.
- Use the TOWEL to make the WET TOWEL (R).
- Place the WET TOWEL (S).
- Take the LIFE ESSENCE (5/15) (1-5).
- Walk left.
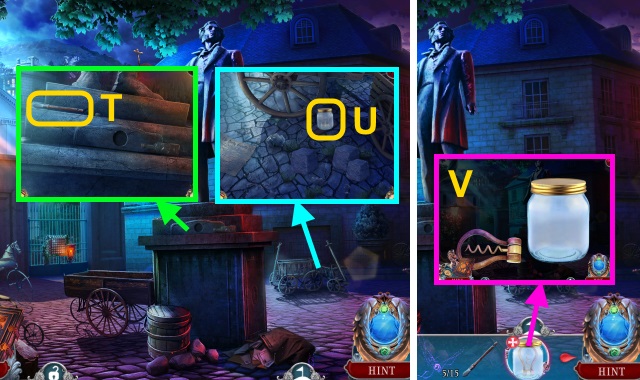
- Take the PAINTBRUSH (T).
- Move the stones; take the JAR (U).
- Examine the JAR; open it and take the IRON CORKSCREW (V).
- Go to Main Street.
- Take the LIFE ESSENCE (10/15) (1-5).
- Use the Vampire Hunting Manual for a mini-game (W).
- Solution (X).
- Walk down.
- Take the LIFE ESSENCE (15/15) (1-5).
- Walk forward.
- Use the LIFE ESSENCE (15/15) (Y).
- Walk left.
- Place the BARBERS' EMBLEM (Z).
- Play the HOP to receive the UNDERTAKER'S LATCH (A).
- Take the GOLDEN HANDLE (B).
- Read the note.
- Place the SHAVING BOX GEARS; take the BRASS PLATE PIECE (C).
- Take the MANNEQUIN DRAWING (1/2) (D).
- Open the furnace; take the picture and TOOLBOX EMBLEM (1/2) (E).
- Walk down.
- Place the UNDERTAKER'S LATCH (F).
- Go to the Undertaker.
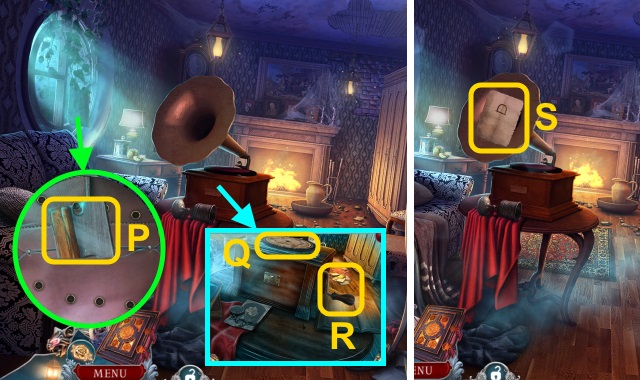
- Read the note; take the CANDLE (G).
- Take the COINS (1/2) (H); move the tile.
- Use the PAINTBRUSH to paint the symbol (I).
- Take the RECORD (J).
- Take the JACK (K).
- Go to the Eastmire Close.
- Place the BRASS PLATE PIECE (L); take the TOOLBOX EMBLEM (2/2) (M).
- Place the JACK (N); take the SHERIFF'S BADGE (O).
- Go to the Undertaker.
- Place the TOMBSTONE EMBLEM (2/2) (P).
- Take the POINTING TROWEL (Q).
- Walk down.
- Use the POINTING TROWEL to take the DAMAGED GOBLET (R).
- Go to the Barber Shop.

- Use the POINTING TROWEL; take the COIN (2/2) (S).
- Go to the Undertaker.
- Take the notes (T); place the GOLDEN HANDLE and DAMAGED GOBLET for a mini-game.
- Solution (U, V).
- Take the REPAIRED GOBLET (W).
- Go to the Barber Shop.
- Place the COAL CHUNK; use the PETROL CANISTER and CANDLE (X).
- Use the REPAIRED GOBLET to make the GOBLET OF BURNING EMBERS (Y).
- Go to the Town Square.
- Use the GOBLET OF BURNING EMBERS to receive the METAL ROD (Z).
- Place the SHARPENING STRAP and METAL ROD (A).
- Walk right.
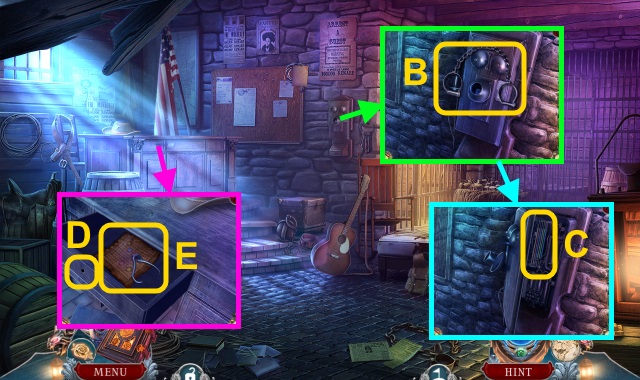
- Take the MANACLES (B).
- Use the COIN (2/2); take the WIRES (C).
- Use the IRON CORKSCREW (D); take the GATE LOCK MECHANISM MAP and TYPEWRITER SPANNER (E).
- Read the notes; take the WHIP (F).
- Place the SHERIFF'S BADGE (G).
- Play the HOP to receive the BOTTLE OF NITRIC ACID (H).
- Go to the Eastmire Close.

- Use the WHIP to take the PRESS HANDLE (I).
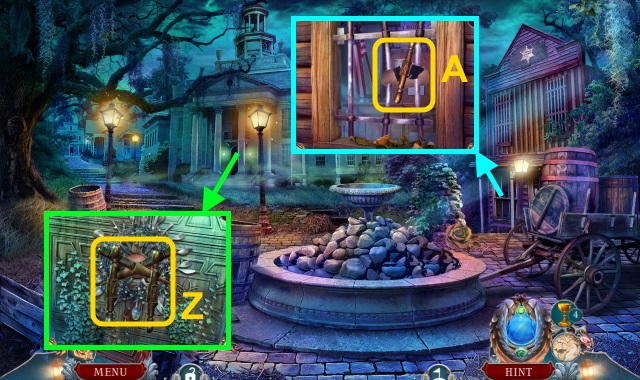
- Place the GATE LOCK MECHANISM MAP and WIRES for a mini-game (J).
- Solution (K).
- Walk left.
Chapter 3: The Town Hall
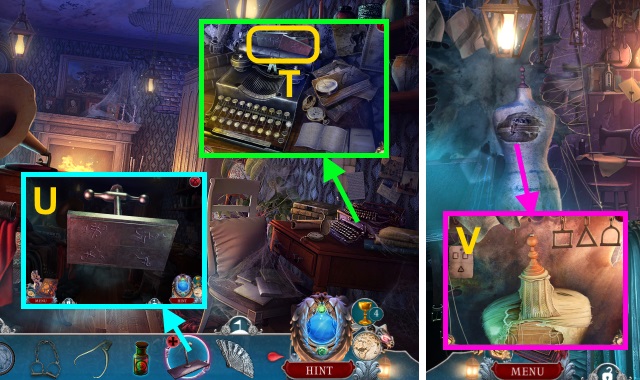
- Take the note and FAN (L).
- Go up.
- Take the PLAIN GLOVES (M).
- Examine the bag for a mini-game (N).
- Solution (O).
- Take the RAZOR (P).
- Place the RECORD (Q); turn the handle (R).
- Take the MANNEQUIN DRAWING (2/2) (S).
- Place the TYPEWRITER SPANNER; take the RUNE PLATES (T).
- Examine the PRESS HANDLE; place the RUNE PLATES to make the RUNE PRESS HANDLE (U).
- Walk down.
- Place the MANNEQUIN DRAWINGS (2/2) for a mini-game (V).
- Solution (W): Ax2, B, C, Bx2, C.
- Take the LEATHER GUILD TOKEN (X).

- Use the RUNE PRESS HANDLE (Y); take the RUNIC LEATHER (Z).
- Place the RAZOR and RUNIC LEATHER for a mini-game (A).
- Solution (B-E).
- Take the PROTECTIVE SIGILS (F).
- Go up.
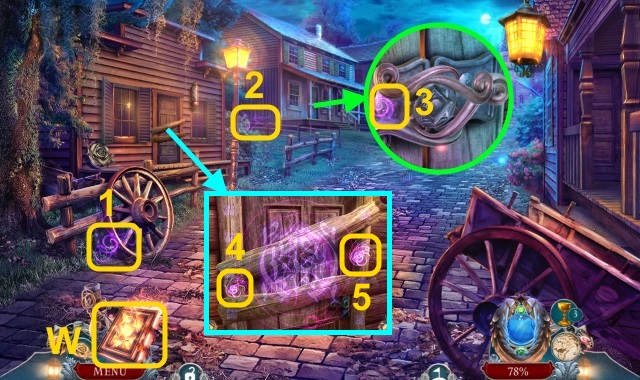
- Place the LEATHER GUILD TOKEN (G).
- Play the HOP to receive the SPOOL OF THREAD (H).
- Walk down.
- Place the PLAIN GOLVES, PROTECTIVE SIGILS, and SPOOL OF THREAD (I); turn the handle.
- Take the PROTECTIVE GLOVES.
- Go to the Town Square.
- Use the BOTTLE OF NITRIC ACID and PROTECTIVE GLOVES (J).
- Walk forward.
- Press the symbols (K).
- Take the DECORATIVE KNOB (1/2) (L).
- Use the EMPTY JAR to receive the JAR OF TERMITES (M).
- Take the MAYOR'S FIGURINE (N).
- Take the WOOD GLUE (O).
- Walk left.
- Take the OLD MUSKET (P).
- Take the DECORATIVE KNOB (2/2) (Q).
- Walk down.
- Place the DECORATIVE KNOBS (2/2) (R); open the cabinet.
- Take the MORTAR AND PESTLE and CODE LEGEND (S).
- Use the OLD MUSKET (T); move the furniture.
- Walk right.
- Use the JAR OF TERMITES; take the CABINET LABEL (U).
- Move the cans; take the JAGGED LID (V) and TOWN HALL MODEL (W).
- Walk down.
- Place the TOWN HALL MODEL to receive the RULER (X).
- Walk left.
- Use the JAGGED LID on the mailbag; play the HOP to receive the NOTARY EMBLEM (Y).
- Move the pieces (Z); use the WOOD GLUE.
- Place the CABINET LABEL for a mini-game (A).
- Solution (B).
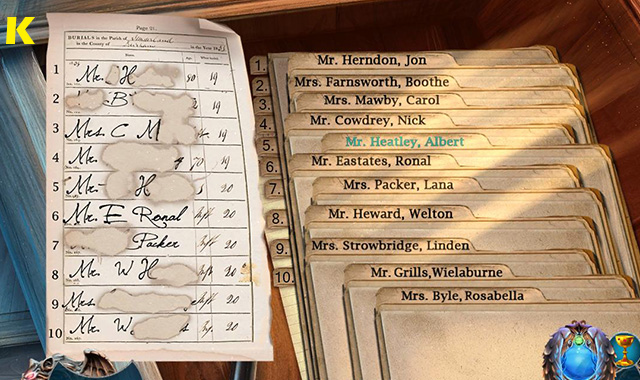
- Open the cabinet; take the BURIAL REGISTER (1/2) (C).
- Go to the Mayor's Office.
- Use the RULER to take the METAL CASING (D).
- Examine the METAL CASING; place the NOTARY EMBLEM to make the NOTARY SEAL (E).
- Go to the Notary.
- Place the NOTARY SEAL (F).
- Take the paper from the machine (G); Place the CODE LEGEND (H).
- Take the TELEGRAPH MESSAGE.
- Go to the Mayor's Office.
- Give the TELEGRAPH MESSAGE (I); you receive the BURIAL REGISTER (2/2).
- Place the BURIAL REGISTER (2/2) for a mini-game (J).
- Solution (K).
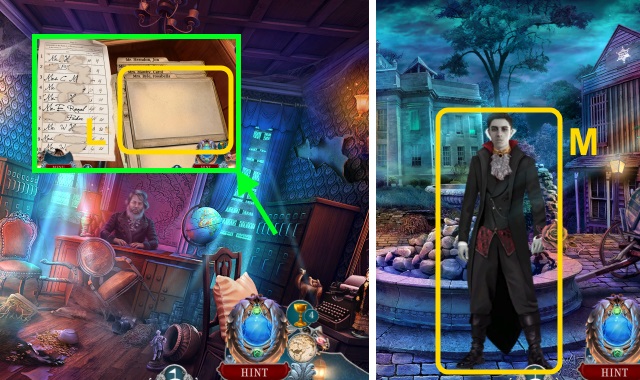
- Take the BURIAL RECORDS (L).
- Go to the Town Square.
- Give the BURIAL RECORDS (M).
Chapter 4: Finding the Crypt
- Use the Vial of Light; collect the orbs for a mini-game (1-7).
- Solution (N).
- Play the HOP to receive the NET (O).
- Take the SIGNPOST (P) and PITCHFORK (Q).
- Go left.
- Take the ROPE LADDER (R).
- Take the BAG (S).

- Open the BAG; take the POISON PHIAL (T), note (U), and LINCHPIN.
- Use the NET (V).
- Examine the net; move the objects to take the FISH (W).
- Take the GEAR TOKEN (X).
- Use the PITCHFORK to take the FUNGUS (Y).
- Walk down.
- Use the ROPE LADDER (Z).

- Use the POISON PHIAL (A).
- Take the LIVING BEAUTY ROOT (B).
- Examine the MORTAR AND PESTLE; place the FUNGUS and LIVING BEAUTY ROOT to make the CURE (C).
- Give the CURE (D).
- Give the FISH (E); take the FISH OIL (F).
- Use the FISH OIL; take the SPIKE (G).
- Walk left.
- Use the SPIKE (H) for a mini-game (I).
- Solution (J).
- Go left.
- Take the LIFE ESSENCE (3/5) (1-3).
- Place the SIGNPOST (K).
- Play the HOP to receive the TUSKS (1/2) (L).
- Take the CONVEYOR BELT (M), EMPTY POUCH, and LIFE ESSENCE (4/5) (N).
- Take the FLINT (O).
- Examine the FLINT; place the LINCHPIN to make the FLINT AND STEEL (P).
- Walk left.
- Use the FLINT AND STEEL (Q).
- Take the note (R), RUBY LOCKET, and LIFE ESSENCE (5/5) (S).
- Examine the Vampire Hunting Manual for a mini-game (T).
- Solution (U).
- Take the MINIATURE SHIELD (V).
- Walk down.
- Place the GEAR TOKEN, RUBY LOCKET, and MINIATURE SHIELD (W).
- Walk right.
- Take the HOLLOW CAPRICORN HORN (X).
- Place the FAN and MAYOR'S FIGURINE (Y).
- Take the ROPE and QUEEN'S CROWN (Z).
- Open the drawer; take the RUNE STONE (A).
- Pull the lever; place the CONVEYOR BELT (B).
- Pull the lever; examine the gears for a mini-game.
- Solution (C).
- Use the LIFE ESSENCE (5/5) (D); use the MANACLES.
- Go to the Cemetery Path.
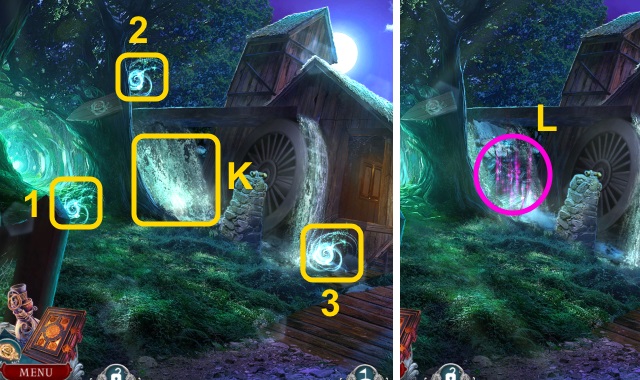
- Use the ROPE on the boat; play the HOP to receive the DULL SPOKESHAVE (E).
- Place the QUEEN'S CROWN (F); take the DECORATIVE FLOWER (G).
- Go to the Mill Interior.

- Use the DULL SPOKESHAVE to make the SHARPENED SPOKESHAVE (H).
- Walk down.
- Use the SHARPENED SPOKESHAVE to take the TUSKS (2/2) (I).
- Walk right.
- Use the TUSKS (2/2); take the SCEPTER (J).
- Move the jewelry; take the BROKEN STATUE PIECE (K).
- Go to the Cemetery Path.
- Place the SCEPTER (L); take the RED JASPER (1/2) (M).
- Walk forward.
- Place the BROKEN STATUE PIECE (N).
- Take the RAVEN BROOCH (O).
- Place the DECORATIVE FLOWER (P); take the ORNATE FRAME (Q).
- Take the ANCIENT JEWELED KEY (R).
- Place the RUNE STONE for a mini-game (S).
- Solution (T).
- Take the HEART PIECE (U).
- Walk forward.
- Use the PITCHFORK (V).
- Play the HOP to receive the DRAGON CREST (W).
- Move the moss; place the HEART PIECE (X).
- Take the RED JASPER (2/2) (Y).
- Walk down.

- Place the RED JASPER (2/2) (Z); take the SERPENT CREST (A).
- Examine the ORNATE FRAME; place the DRAGON CREST and SERPENT CREST (B).
- Walk forward.
- Place the ORNATE FRAME (C).
- Use the Vial of Light; collect the orbs for a mini-game (1-9).

- Solution (D).
- Walk forward.
- Take the MOONSTONE (E).

- Take the PEARL NECKLACE (F).
- Go to the Graveyard.
- Give the PEARL NECKLACE; take the STONE FISH (G).
- Go to Rose's Crypt.
- Place the STONE FISH (H); close the plaque.
- Use the EMPTY POUCH to take the GRAVE DIRT (I).
- Place the ANCIENT JEWELED KEY for a mini-game (J).
- Solution (K-N).
- Go forward.
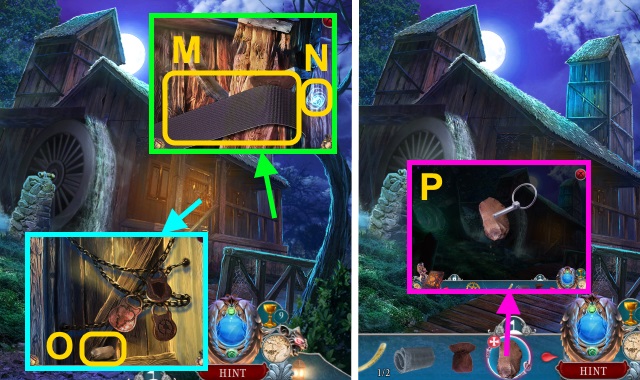
- Place the RAVEN BROOCH (O); take the BUCKLE (P).
- Walk left.
- Place the MOONSTONE (Q); press the button (R).
- Take the MOONSTONE POWDER (S).
- Take the GLOVE STRETCHER (U).
- Walk down.
- Use the GLOVE STRETCHER; take the IMP STATUETTE (V).
- Take the LOCKET (W).
- Open the LOCKET; take the REVELATION TONIC RECIPE and SMALL KEY (X).
- Walk left.
- Move the bottles; open the case (Y).
- Place the REVELATION TONIC RECIPE, HOLLOW CAPRICORN HORN, and MOONSTONE POWDER (Z).
- Place the powder in the horn; take the INCOMPLETE REVELATION TONIC (A).
- Use the SMALL KEY (B); dust the bottles (C).
- Examine the bottle; use the INCOMPLETE REVELATION TONIC to make the REVELATION TONIC (D).
- Walk down.
- Use the REVELATION TONIC; take the JUPITER MOON MODEL and WOODEN CARVING (E) for a mini-game (F).
- Solution : Left, down, left, down, right, down, right, down, right, down, right, down, left, down, left, down.
- Walk forward.
Chapter 5: Blackburn Manor
- Use the Vial of Light; collect the orbs for a mini-game (1-7).
- Solution (G).
- Place the WOODEN CARVING (H).
- Play the HOP to receive the GARGOYLE STATUETTE (I).
- Walk right.
- Open the cabinet.
- Take the BLUE CRYSTAL (J); place the GARGOYLE STATUETTE and IMP STATUETTE for a mini-game.
- Solution (K).
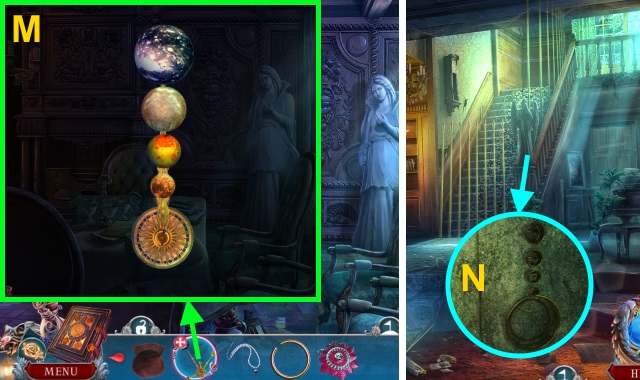
- Take the ORNATE BRASS PLANET (L).
- Walk down.
- Open the lock; place the ORNATE BRASS PLANET (M).
- Take the SKY MAP (N).
- Walk left.
- Move the tablecloth; play the HOP to receive the TREBLE CLEF (O).
- Take the BLACK PEARL (P).
- Take the FEATHER DUSTER (Q).
- Place the BUCKLE (S); take the JUPITER'S MOONS (1/3) (T).
- Open the teapot; take the METAL RING (U).
- Place the BLUE CRYSTAL for a mini-game (V).
- Solution (W).
- Take the ROSE ORNAMENT (X).
- Walk down.
- Place the TREBLE CLEF (Y); open the piano.
- Take the LENS (Z).
- Walk right.
- Move the lid (A); place the LENS.
- Examine the telescope for a mini-game.
- Solution (B-D).
- Take the STAR POSITIONS (E).
- Examine the SKY MAP (F); place the STAR POSITIONS for a mini-game.
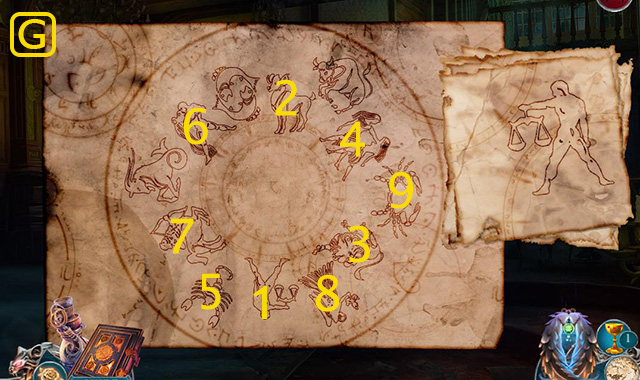
- Solution (G).
- Take the NUMBER CODE (H).
- Use the FEATHER DUSTER; take the JUPITER'S MOONS (2/3) (I).
- Go to the Dining Room.
- Place the NUMBER CODE (J).
- Open the lid; take the JUPITER'S MOONS (3/3) (K).
- Examine the JUPITER MOON MODEL; place the JUPITER'S MOONS (3/3) for a mini-game (L).
- Solution (M).
- Take the JUPITER MOON MODEL PIN.
- Walk down.
- Place the JUPITER MOON MODEL PIN (N).
- Go up.
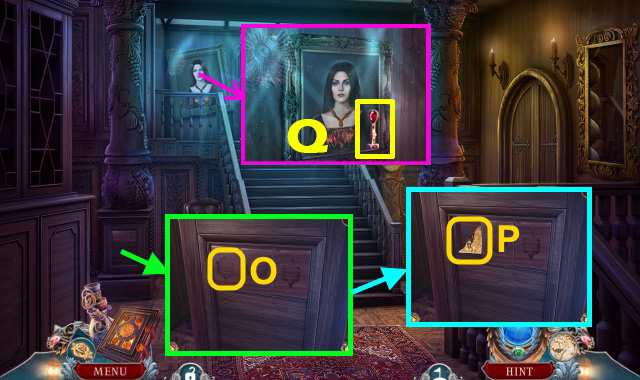
- Place the ROSE ORNAMENT (O); take the PHOTO FRAGMENTS (1/2) (P).
- Take the BLACKBURN SEAL (Q); place the BLACK PEARL.
- Play the HOP to receive the DANCING FIGURINE (R).
- Walk right.
- Take the FIREPLACE POKER (S).
- Walk down twice.
- Use the FIREPLACE POKER (T); take the RED GEMSTONE (U).
- Walk left.
- Place the DANCING FIGURINE (V); turn it.
- Take the PHOTO FRAGMENTS (2/2) (W).
- Go to Rose's Bedroom.
- Place the PHOTO FRAGMENTS (2/2) (X).
- Take the HEART ORNAMENT (Y).
- Place the METAL RING (Z).
- Move the shirts; take the BAT WINGS (1/2) (A).
- Walk down.
- Place the HEART ORNAMENT (B); take the PRISM (C).
- Walk right.
- Place the PRISM (D).
- Place the BLACKBURN SEAL for a mini-game (E).
- Solution (F).
- Place the GRAVE DIRT (G).
- Use the Vial of Light to make the CURE FOR VAMPIRISM (H).
- Take the BAT WINGS (2/2) (I).
- Walk down.
- Place the BAT WINGS (2/2) (J); use the knocker.
- Walk forward.
- Place the RED GEMSTONE (K); press the wings (L).
- Play the HOP to receive the EX LIBRIS SEAL (M).
- Walk down.
- Place the EX LIBRIS SEAL (N); take the SUN CLOCK NEEDLE (O).
- Walk forward.
- Examine the clock; place the SUN CLOCK NEEDLE for a mini-game (P).
- Solution (Q): C, A, Bx6, C, A, Bx7, C, A, Bx9, C, A, Bx4, C, A, Bx9, C, A, Bx4, C, A, B, C, A, Bx4, C, A, Bx9, C, A, Bx2, C, A, Bx2.
- Give the CURE FOR VAMPIRISM (R).
- Congratulations! You have completed Myths of the World: Black Rose.
Created at: 2014-11-23