
Walkthrough Menu
- General Tips
- Chapter 1: Town Square
- Chapter 2: The Marketplace
- Chapter 3: Ancient Graves
- Chapter 4: Executioner's Yard
- Chapter 5: Prison
- Chapter 6: Unfinished Cathedral
General Tips
- This is the official guide for Myths of the World: Born of Clay and Fire.
- This guide will not tell you when you have to zoom into a location; the screenshots will show each zoom scene.
- Hidden-object puzzles are referred to as HOPs. This guide will not show screenshots of the HOPs, however, it will mention when an HOP is available and the inventory item you'll collect from it.
- Use the Map to fast travel to a location.
Chapter 1: Town Square
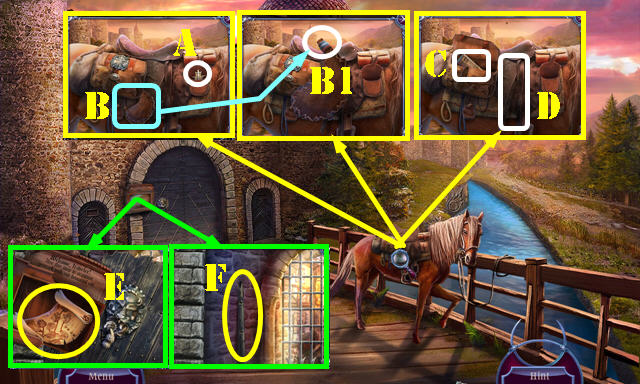

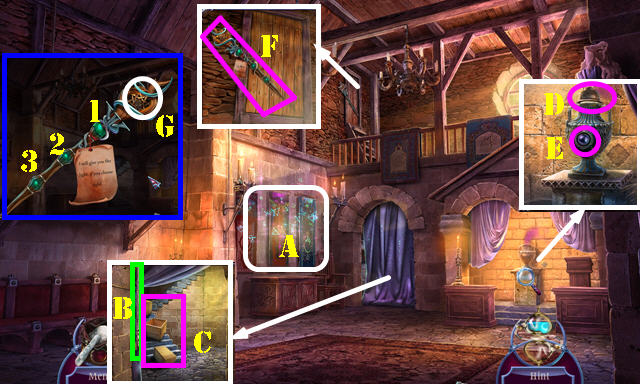
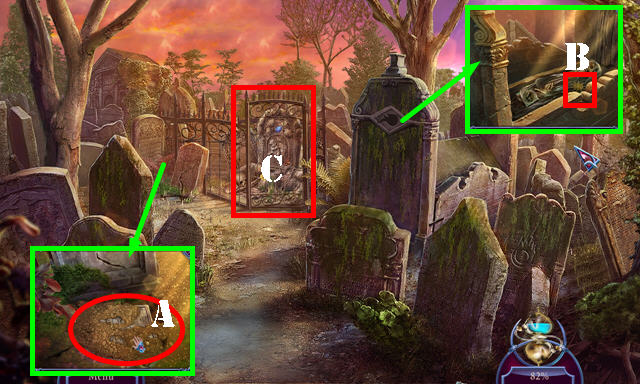
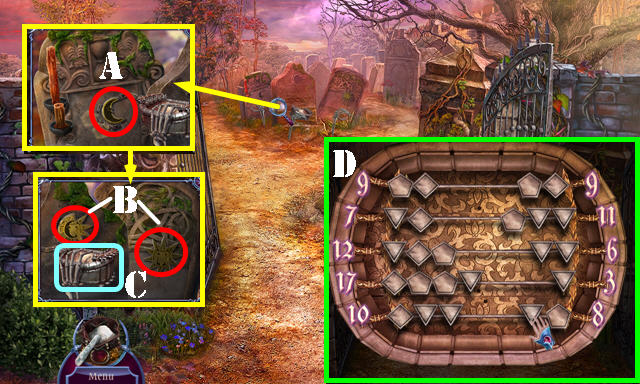
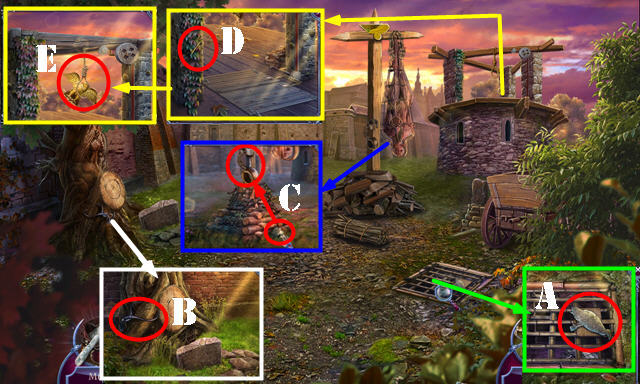
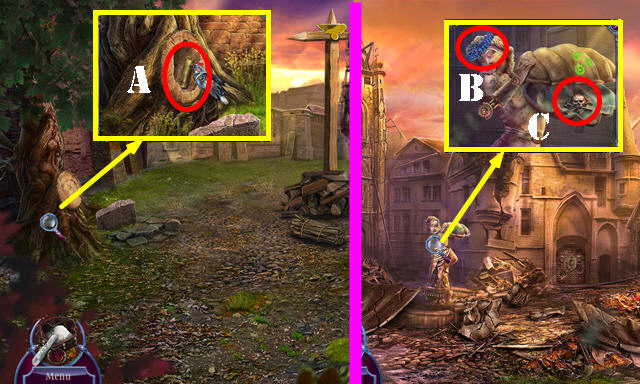
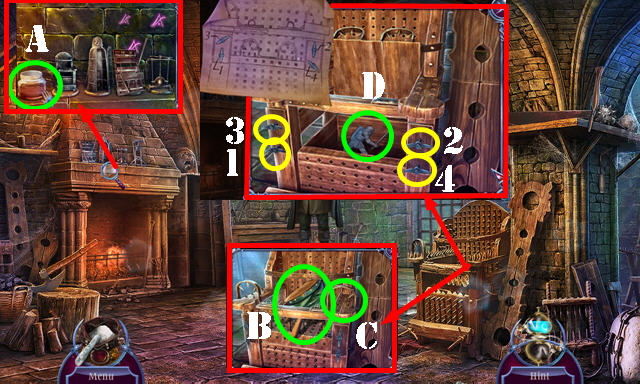
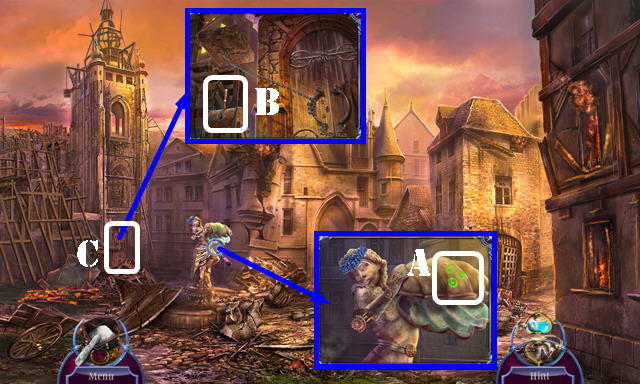
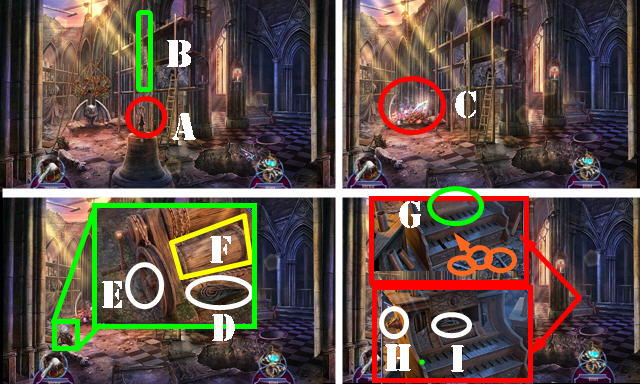
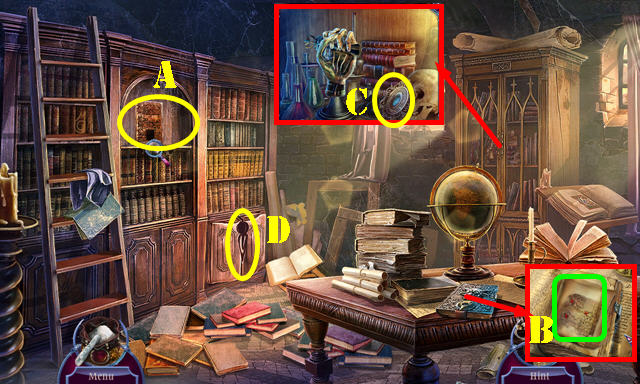
- Open the pouch; take the ORDER MARK (A). Select the waterskin (B); take the TAP (B1).
- Place the ORDER MARK; select it and then open it; take the lucky charm and PAPER (C).
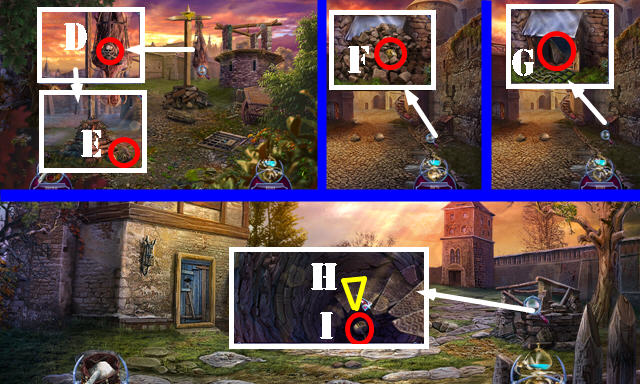
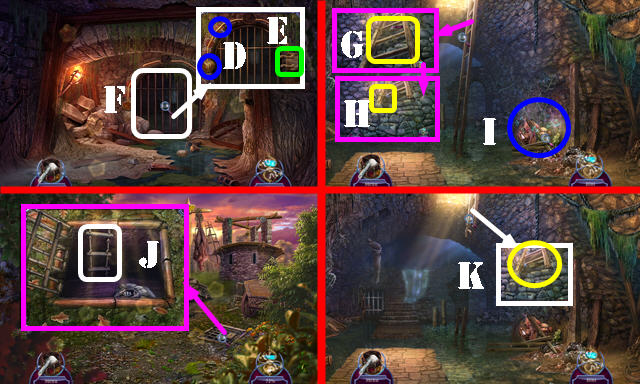
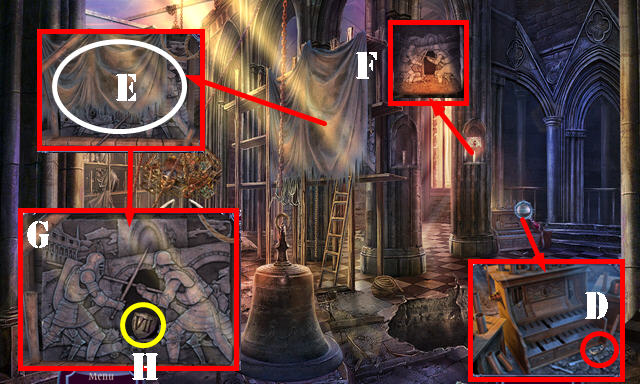
- Take the BELT (D).
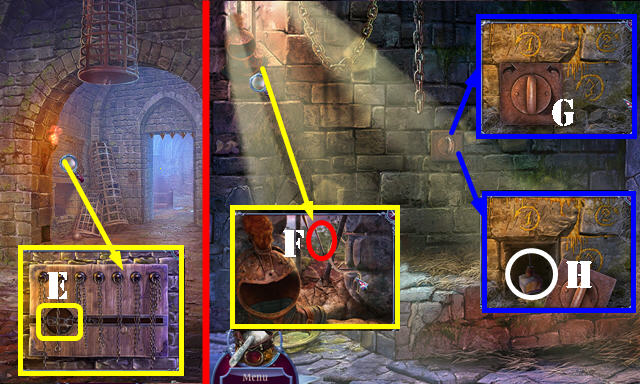
- Remove the shards 3x; take the Map (E).
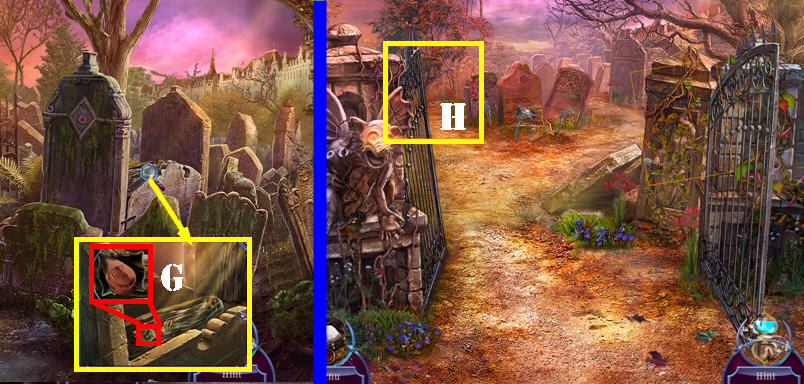
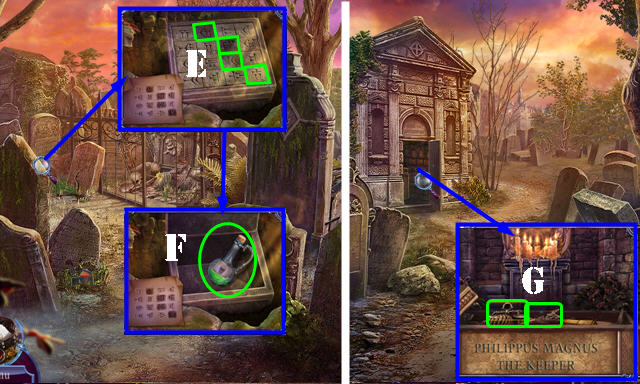
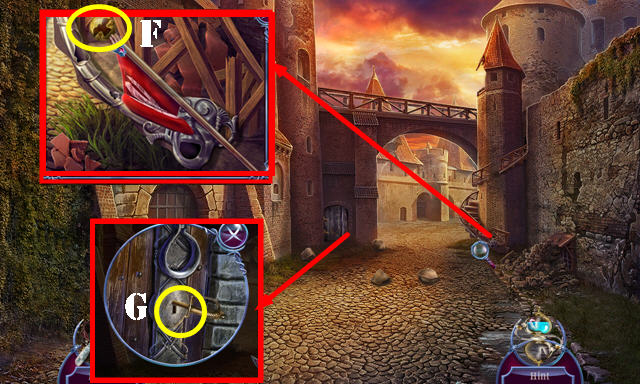
- Use the BELT; take the METAL POLE (F). Scroll right. Select the matching pairs (G). Place the Chain (H).
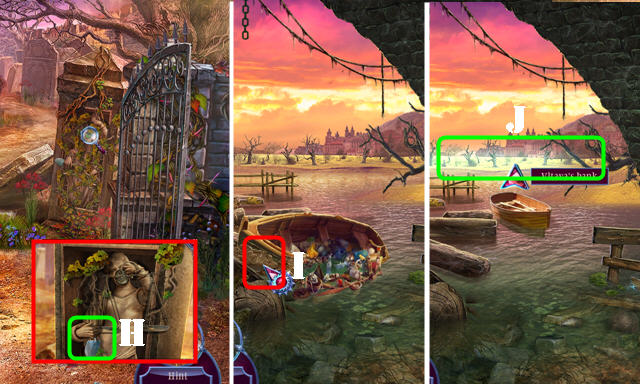
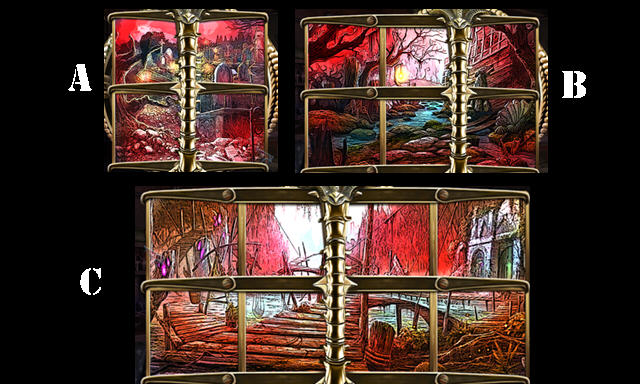
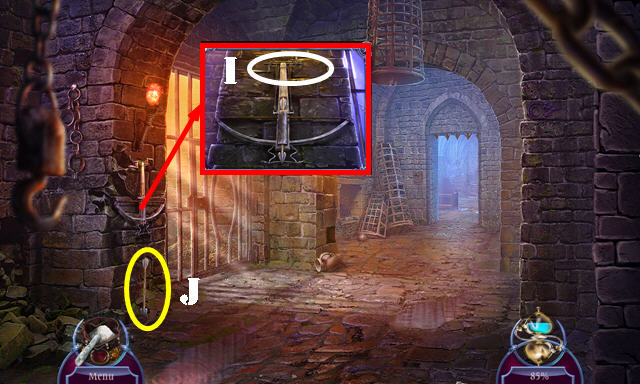
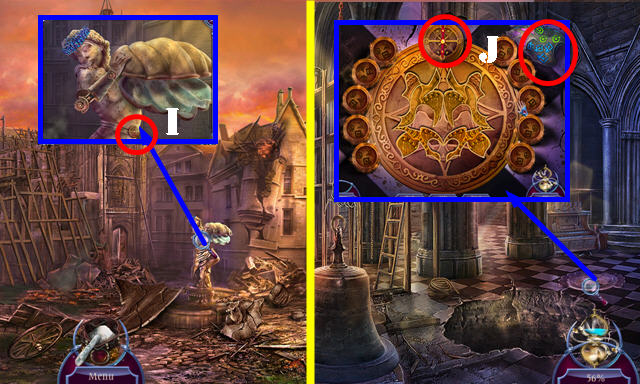
- Go to the Town commons (I).
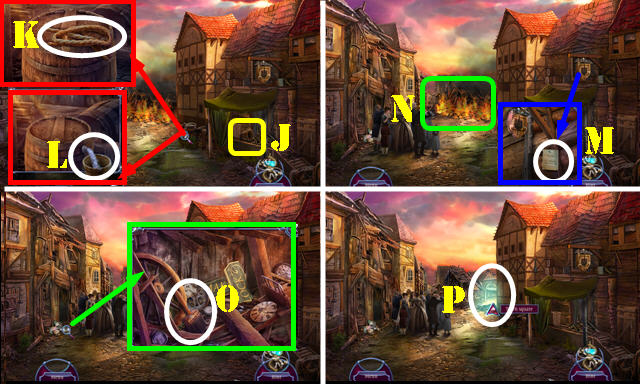
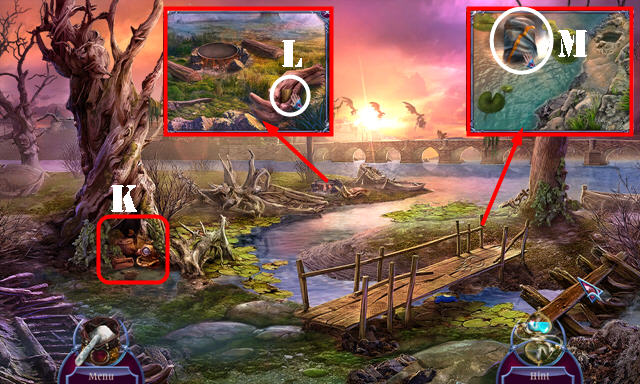
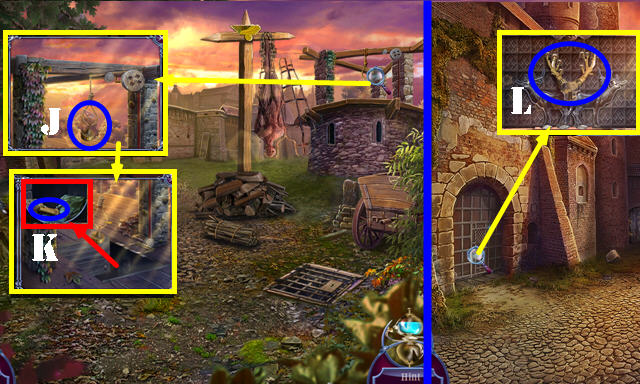
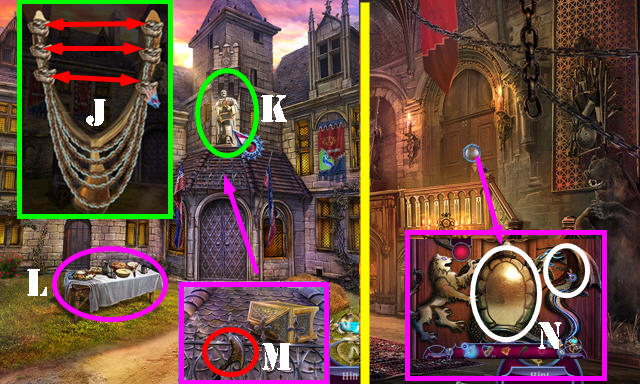
- Use the METAL POLE; take the BUCKET (J).
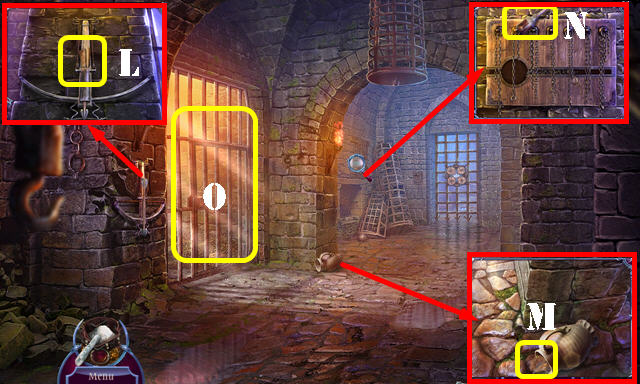
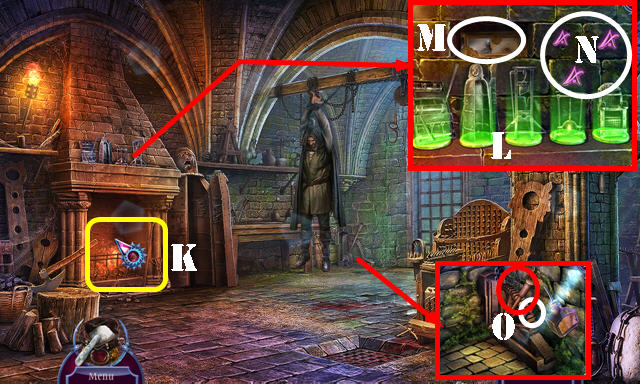
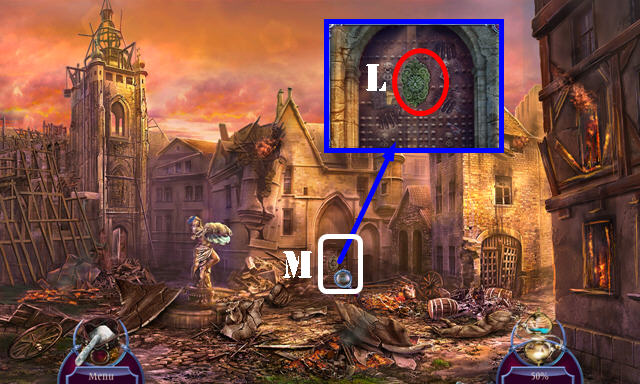
- Take the ROPE (K). Place the TAP; use the BUCKET to get the BUCKET OF WATER (L).
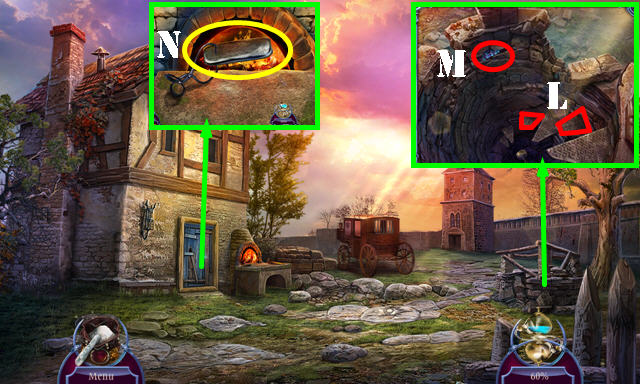
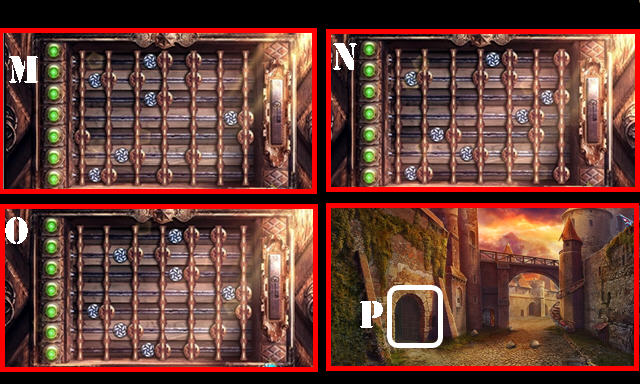
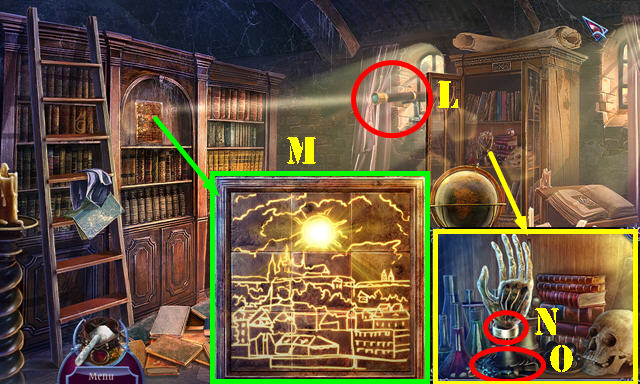
- Read the note (M).
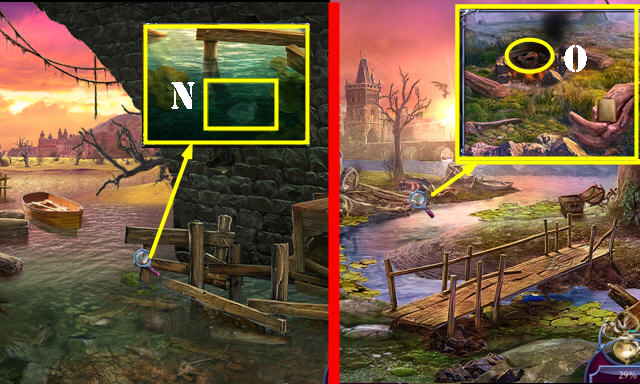
- Use the BUCKET OF WATER 4x (N).
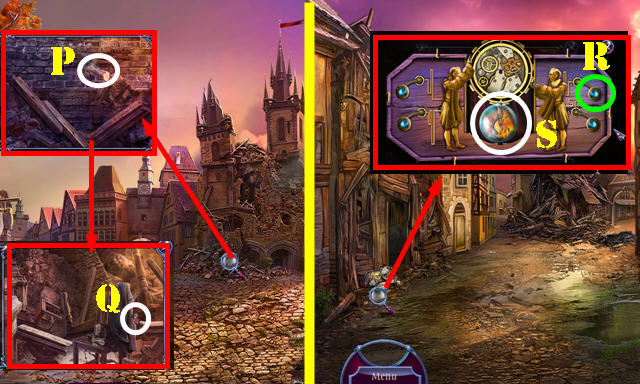
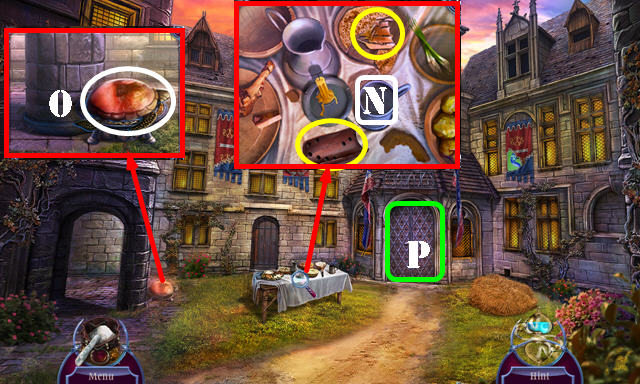
- Take the BRUSH (O).
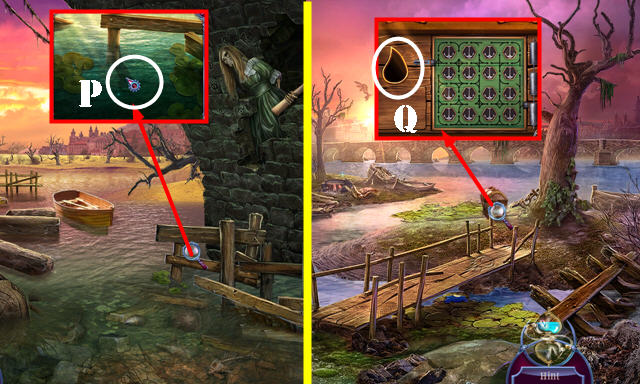
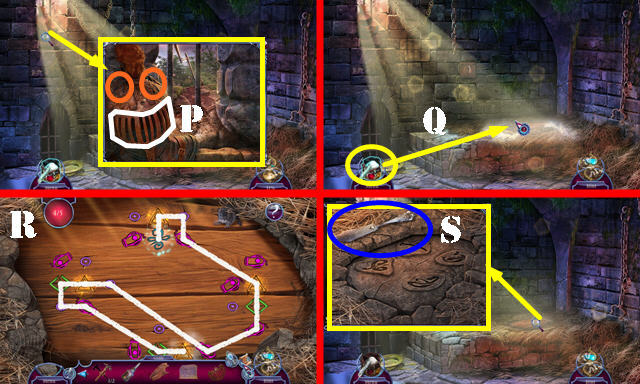
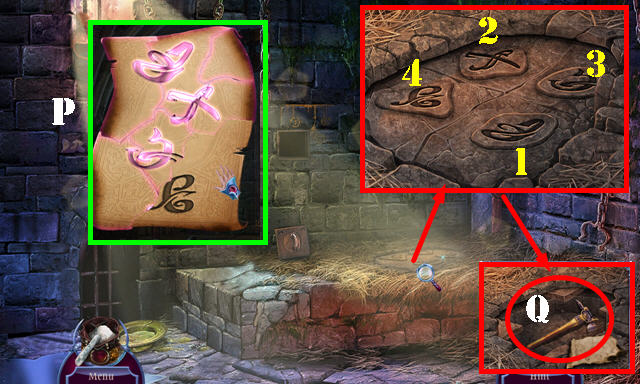
- Go to Town square (P).
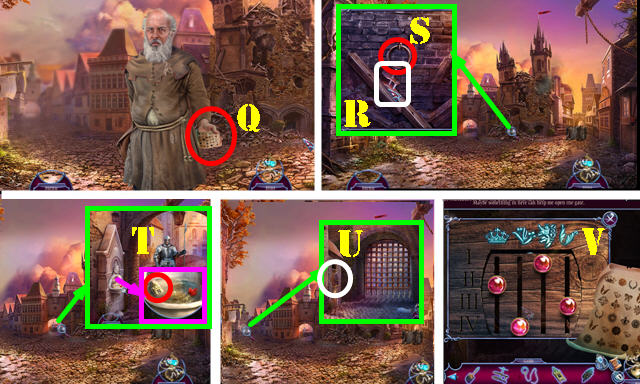
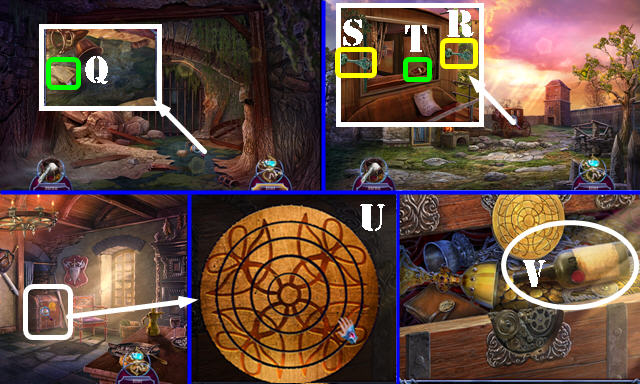
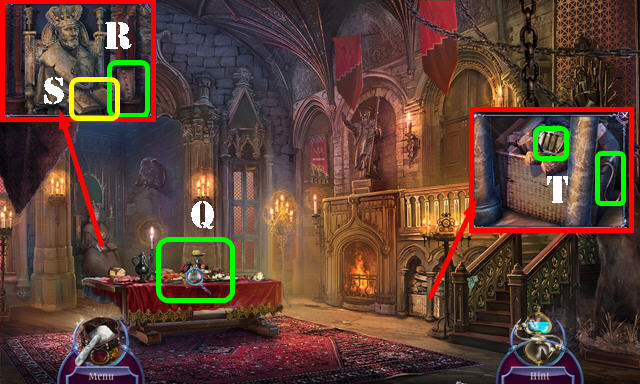
- Take the SYMBOL SHEET (Q).
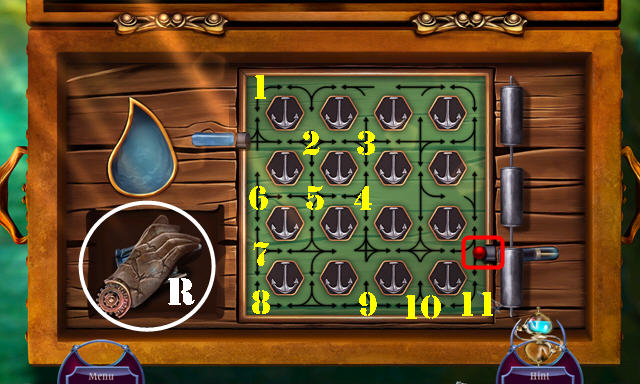
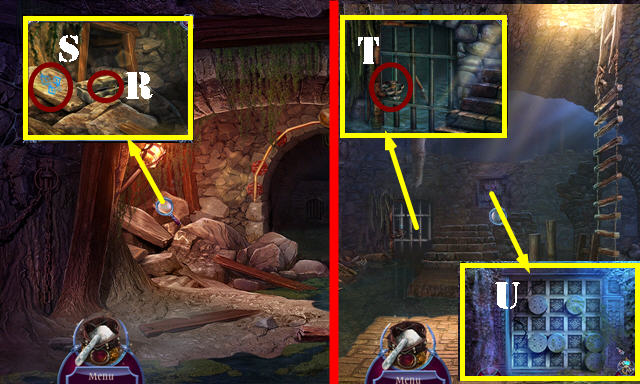
- Take the WOODEN CLAMP (R).
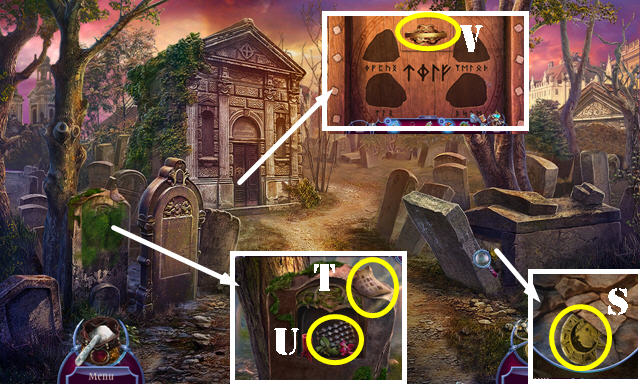
- Use the ROPE to get the IMPROVISED LASSO (S).
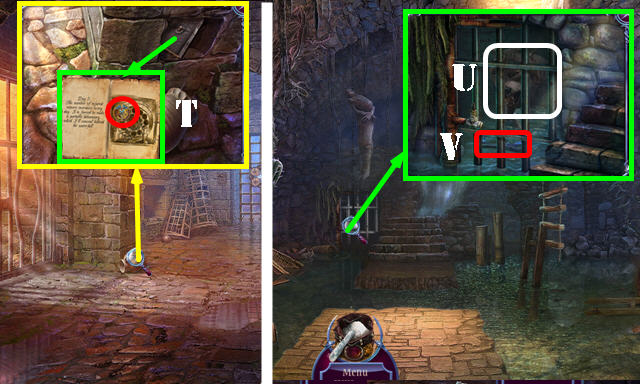
- Take the TOWER CREST (T).
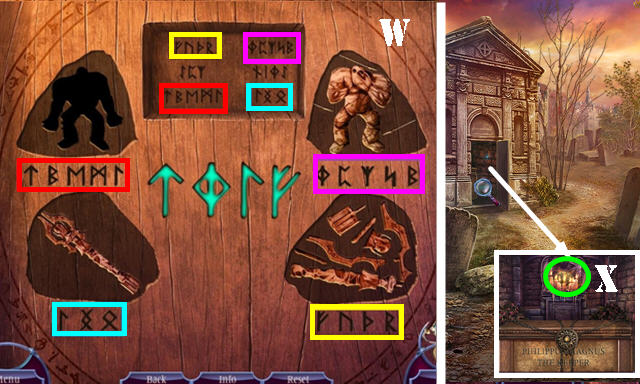
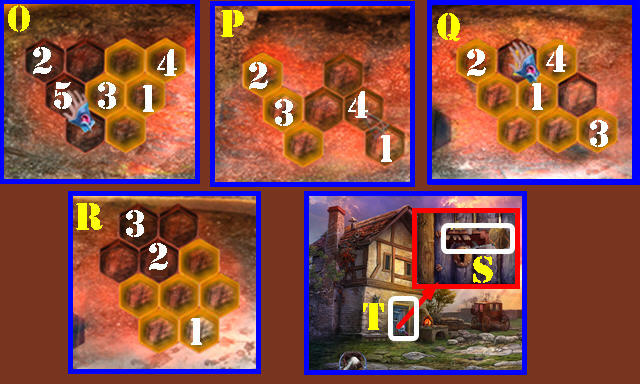
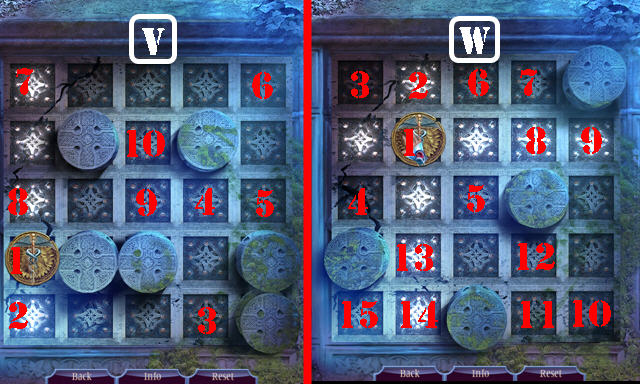
- Take the LEFT WING (U) and place the SYMBOL SHEET for a puzzle. Solution (V). Take the SWORD SHEATH and read the note.
- Walk down twice.
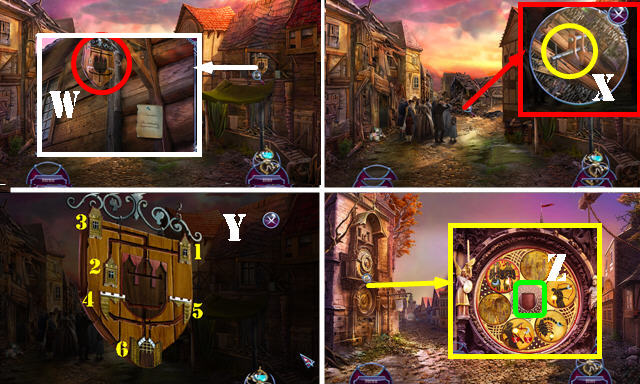
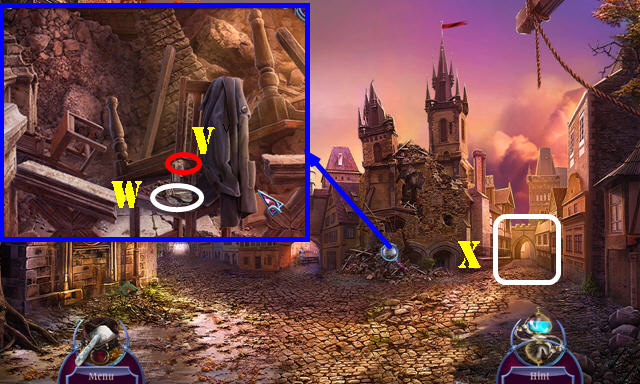
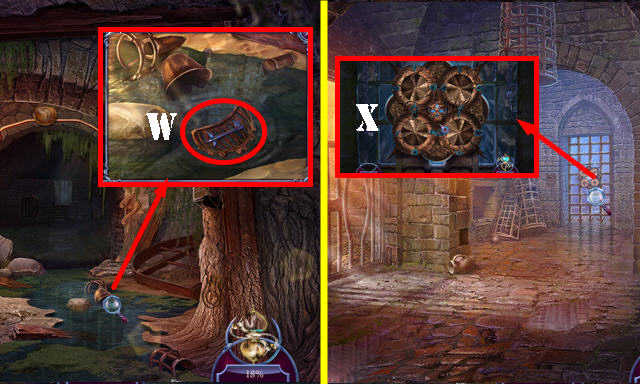
- Use the IMPROVISED LASSO to get the SIGN (W).
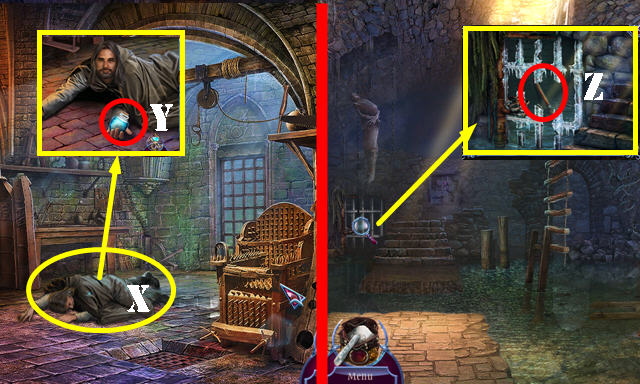
- Use the WOODEN CLAMP (X) for an HOP; play it to get the MINIATURE DOOR.
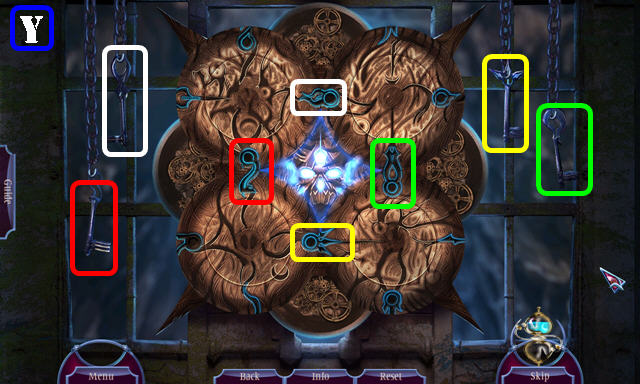
- Place the MINIATURE DOOR and TOWER CREST on the SIGN. Select 1-6 (Y). Take the CITY CREST (inventory).
- Go forward.
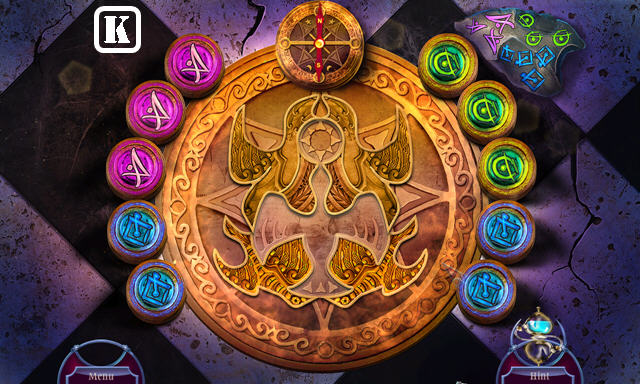
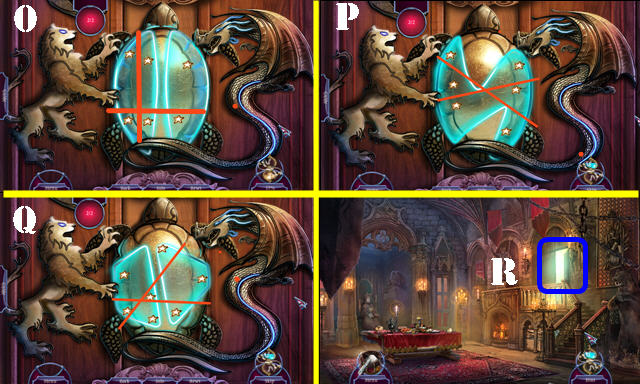
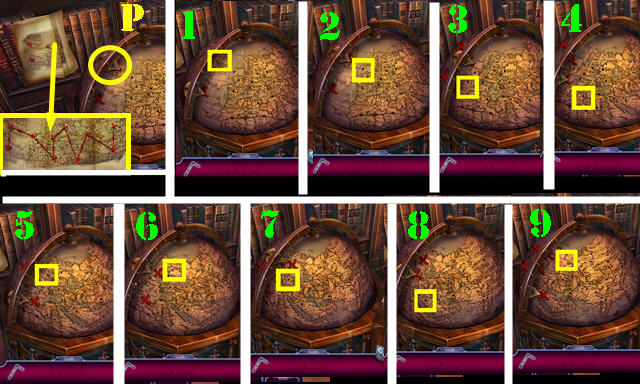
- Place the CITY CREST for a puzzle (Z).
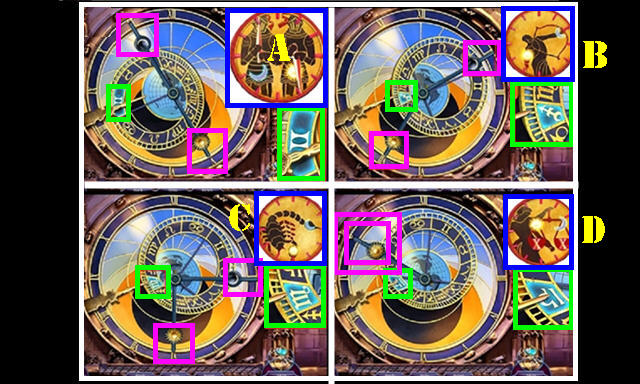
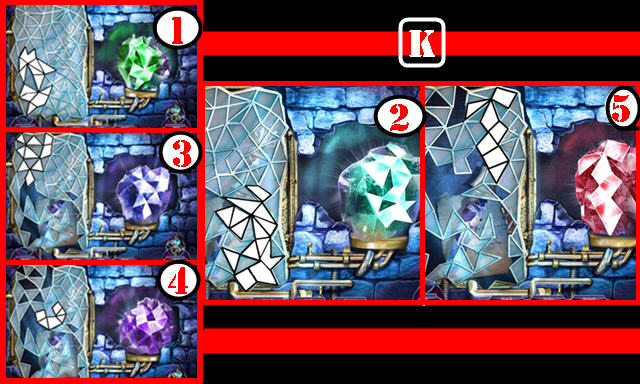
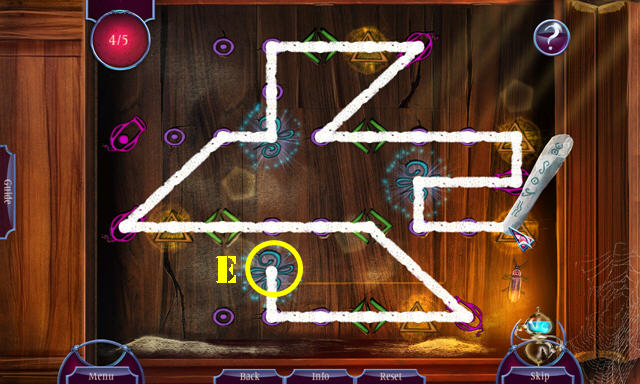
- Select the first image (A) and scroll up. Set the clock hands (purple) and the symbol (green). Repeat the same steps for the rest of the images (B-C-D). On section D, both arrows point to the same number.
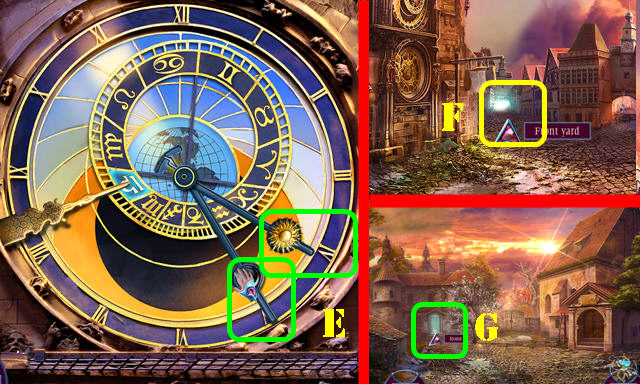
- Set the clock (E).
- Go to the Front yard (F). Go to the Home (G) after mother stops talking.
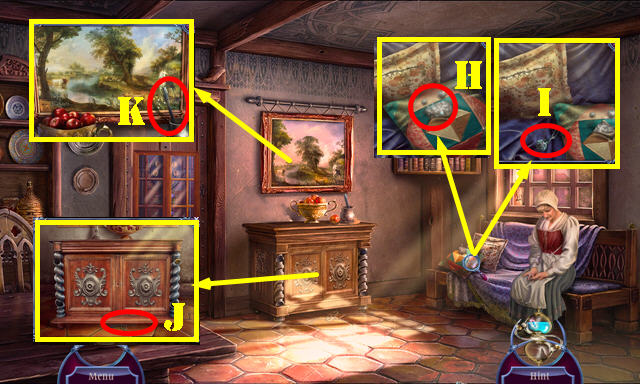
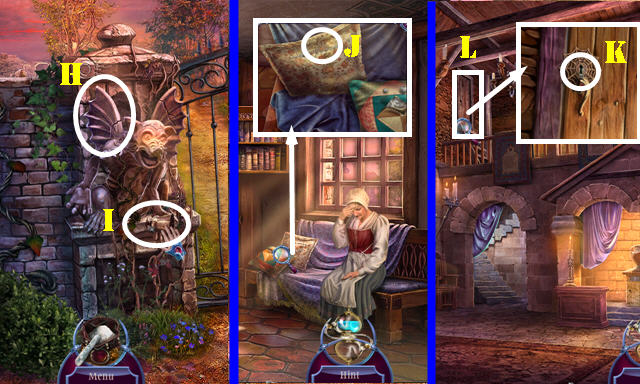
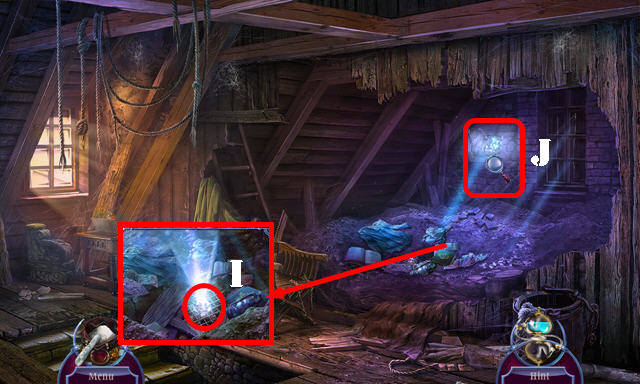
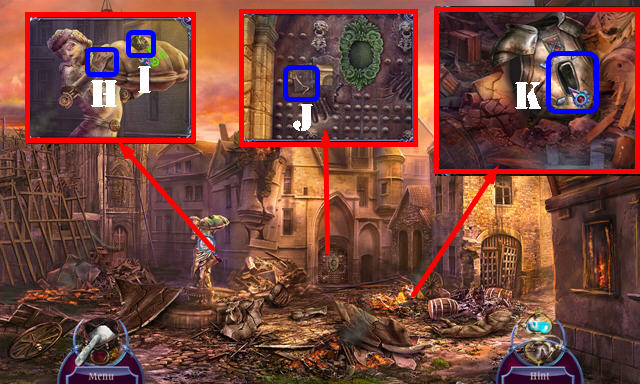
- Take the COTTON (H); move the pillow and take VERA'S LOCKET (I).
- Select VERA'S LOCKET twice; take the STRANGE COIN (inventory).
- Take the WIND-UP KEY (J).
- Take the CHARCOAL STICK (K).
- Walk down.
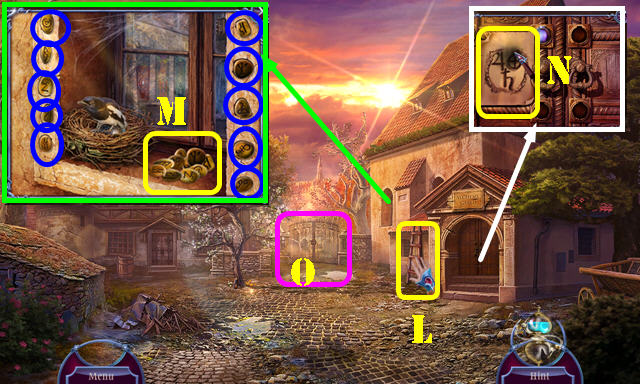
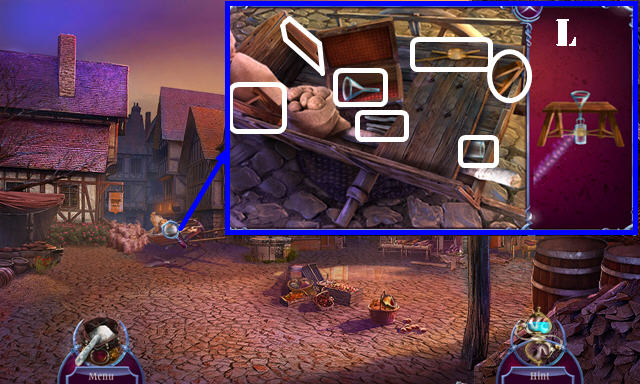
- Move the ladder (L).
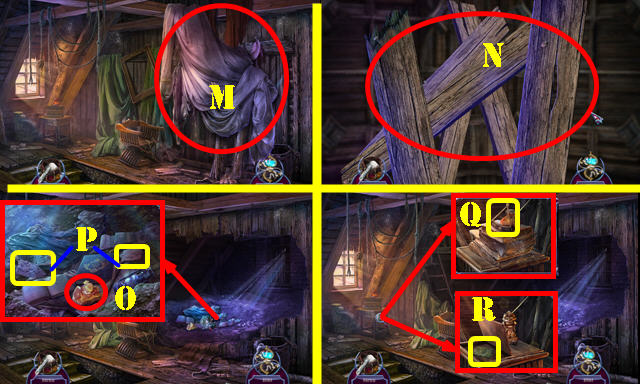
- Select the 10 RUNE STONES (blue) and take them (M).
- Place the PAPER and rub the CHARCOAL STICK on it to get the TRACED SYMBOLS (N).
- Go to the Cemetery gate (O).
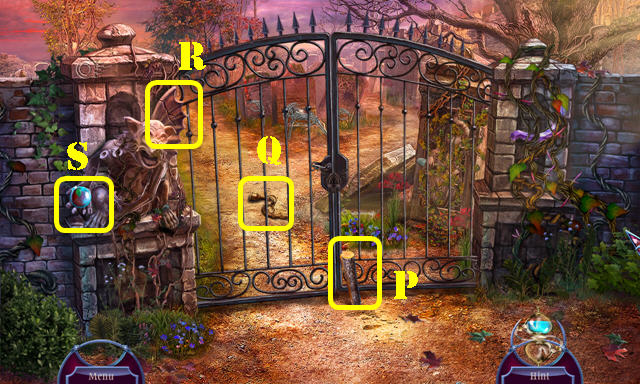
- Take the THIN LOGS 1/3 (P).
- Use the SWORD SHEATH (Q); take the SCONCE.
- Place the LEFT WING (R); take the ELEMENTAL SPHERES 1/3 (S).
- Return Home.


- Open the door; place the STRANGE COIN and TRACED SYMBOLS for a puzzle. Solution one: Zx3-Yx3-Z.
- Solution two: Ax3-Bx3-Cx3-Dx2-E.
- Go to the Alchemy laboratory (F).
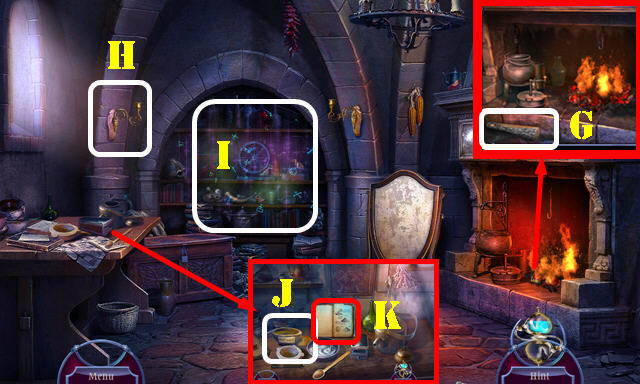
- Take the THIN LOGS 2/3 (G).
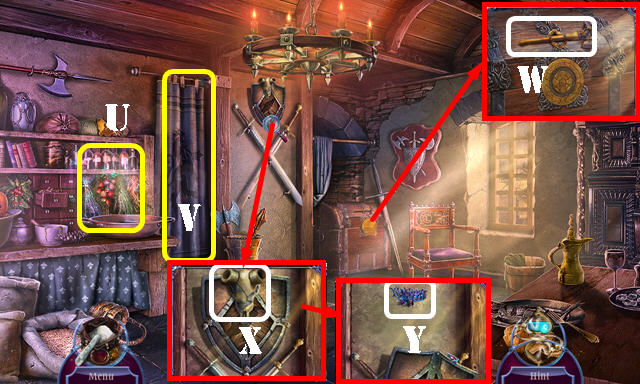
- Place the SCONCE (H); pull it for an HOP; play it (I) to get the BEE TRAP.
- Take the PAINT REMOVER (J). Look at the book (K) and flip the pages twice.
- Walk down.
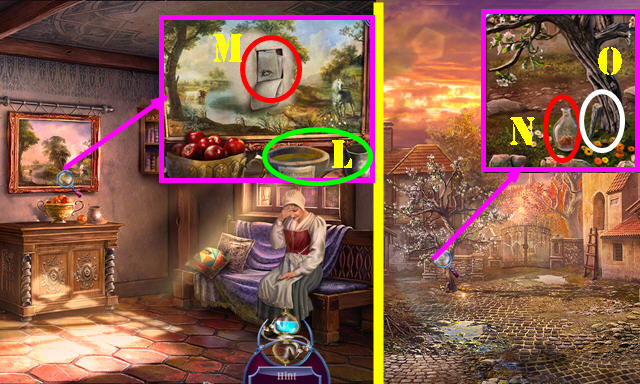
- Place the BRUSH and PAINT REMOVER (L). Select the brush and rub it on the painting. Take the RECIPE PIECE (M).
- Walk down.
- Put down the BEE TRAP (N). Take the THIN LOGS 3/3 (O).
- Walk down.
- Place the THIN LOGS 3/3 three times (P). Take the WIND-UP TOY (Q).
- Use the WIND-UP KEY on the WIND-UP TOY; take the WINDING MECHANISM (inventory).
- Walk down.
- Select the two wood pieces; select the sign and look at the note. Select the board and place the WINDING MECHANISM. Select the button twice (R); take the ELEMENTAL SPHERES 2/3 (S).
- Go to Town square.
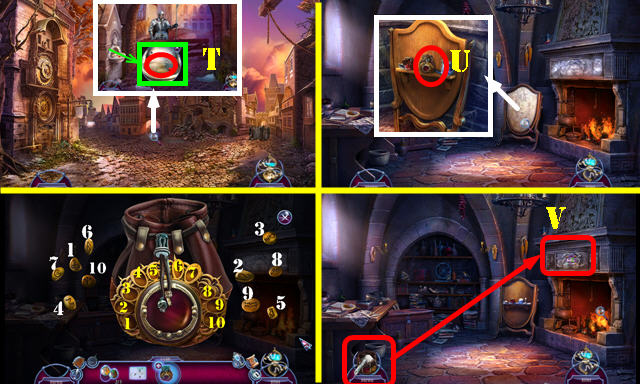
- Use the COTTON (T) to get the WET COTTON.
- Return to the Alchemy laboratory.
- Use the WET COTTON; remove the cloth and move the items; take the SEALED POUCH (U).
- Place the RUNE STONES on the SEALED POUCH. Place the runes (1-10). Open the pouch to get the Chalk and powder (inventory).
- Use the Chalk and powder for a puzzle (V).
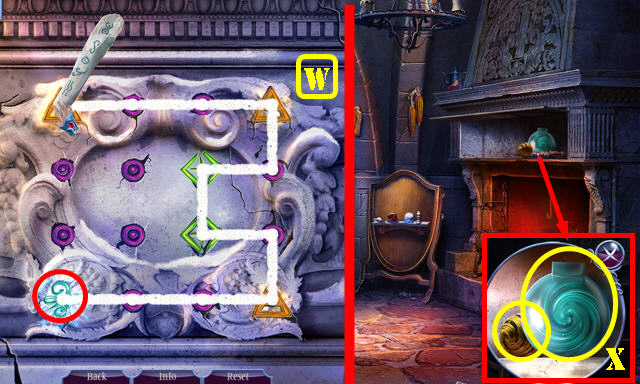
- Solution (W).
- Take the scroll; take the ELEMENTAL SPHERES 3/3 and GOLDEN BALL (X).
- Walk down.
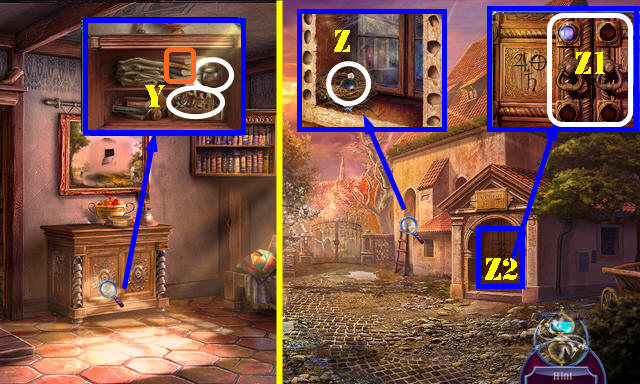
- Place the GOLDEN BALL; look at the book (orange); take the JAR OF WORMS and THIEF STATUE (Y).
- Walk down.
- Throw the JAR OF WORMS; take the VASE LID (Z).
- Place the ELEMENTAL SPHERES 3/3 (Z1).
- Enter the Abandoned building (Z2).
- Play the HOP to get the RIGHT WING (A).
- Pull the cord (B); remove the three boxes (C).
- Place the VASE LID (D); take the CRYSTAL BROOCH (E).
- Take the ALCHEMIST'S STAFF (F).
- Select 2-3-1 on the ALCHEMIST'S STAFF; take the LIGHT SPHERE (G) (inventory).
- Return to the Cemetery gate.
- Place the RIGHT WING (H); take the SILVER URN (I).
- Return Home.
- Use the CRYSTAL BROOCH; take the ATTIC KEY (J).
- Return to the Abandoned building.
- Use the ATTIC KEY (K); enter the Attic (L).
- Select the covers 3x (M).
- Remove the six boards (N).
- Take the RESIN (O). Look at the drawings and notes (P); move the items.
- Take the CODED TRIANGLE (Q); remove the vase and books. Place the THIEF STATUE; take the STONE DECORATION (R).
- Walk down.
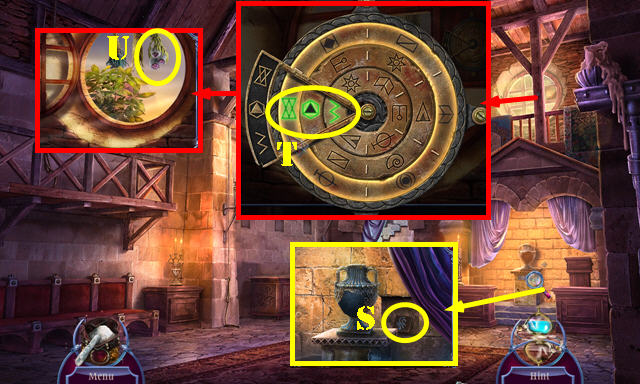
- Place the STONE DECORATION; take the WOODEN TILES 1/2 (S).
- Place the CODED TRIANGLE and select the symbols (T). Use the SILVER URN to get the MIRACLE FRUIT (U).
- Return to Town square.
- Use the RESIN (V); select the statue; take the ALCHEMIST STATUE (W).
- Go to the Marketplace (X).
Chapter 2: The Marketplace
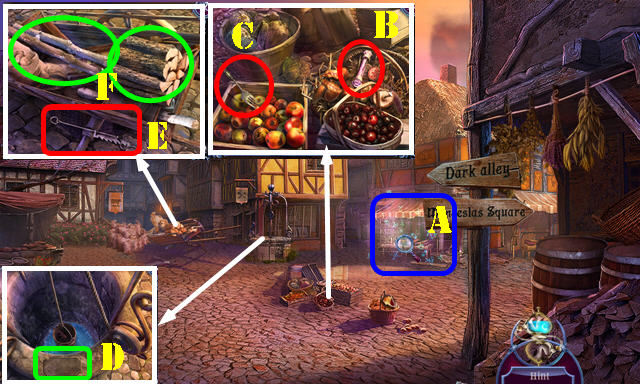
- Play the HOP (A) to get the MANDRAKE ROOT.
- Move three mushrooms; take the SICKLE HANDLE (B). Move four apples; take the FORK (C).
- Take the BROKEN PLAQUE (D).
- Take the TRAMMEL (E). Remove the logs and two sticks (F).
- Select the TRAMMEL 3x to get the ELONGATED TRAMMEL (inventory).
- Return to the Cemetery gate.
- Place the SICKLE HANDLE to get the CRYSTAL SICKLE (G).
- Walk down.
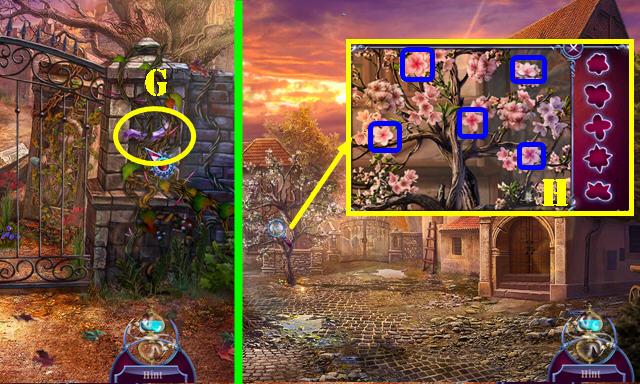
- Use the CRYSTAL SICKLE on the marked flowers to get the SPRING FLOWERS (H).
- Go to the Attic.
- Use the BROKEN PLAQUE; select the crystal (I). Touch the wall and select it for a puzzle (J).
- Solution (K). Take the ALCHEMIST'S ROD; read the note and take the WOODEN TILES 2/2.
- Go to the Marketplace.
- Place the WOODEN TILES 2/2; move the sack of potatoes. Select the pieces to get the FILTER APPARATUS (L).
- Go to the Alchemy laboratory.
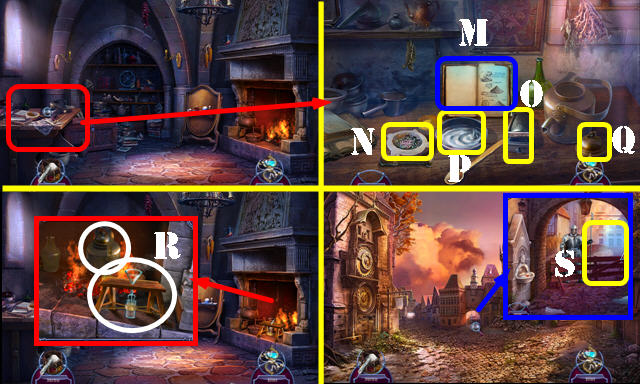
- Place the RECIPE PIECE on the book (M).
- Place the SPRING FLOWERS; select the mortar (N). Grate the MANDRAKE ROOT (O) and select it. Pour the MIRACLE FRUIT and select the bowl (P). Place the top (Q); take the FILLED KETTLE.
- Place the FILLED KETTLE and FILTER APPARATUS (R); select the kettle.
- Return to Town square and Sneak past the guard (S).
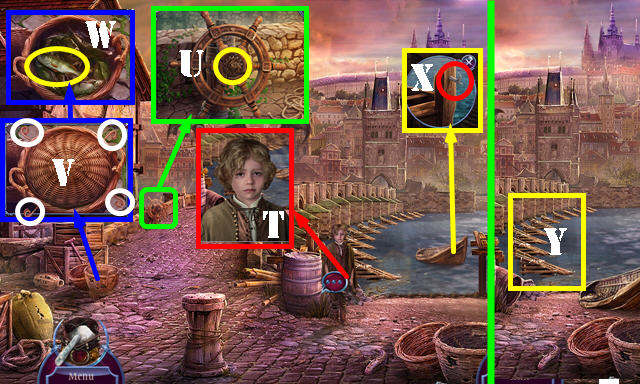
- Talk to the little boy (T).
- Take the COG (U).
- Pull the 4 pins (V); remove the top and take the FISH (W).
- Use the ELONGATED TRAMMEL (X).
- Go to Under the bridge (Y).
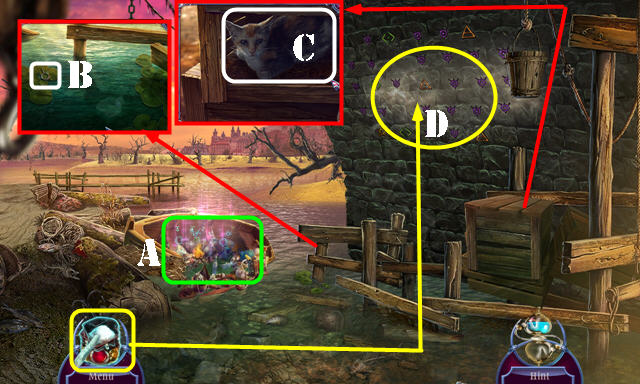
- Play the HOP (A) to get the ANCHOR EMBLEM.
- Take the SCREW EYE (B).
- Use the FORK; use the FISH to get the CAT (C).
- Use the Chalk and Powder; select the wall for a puzzle (D).
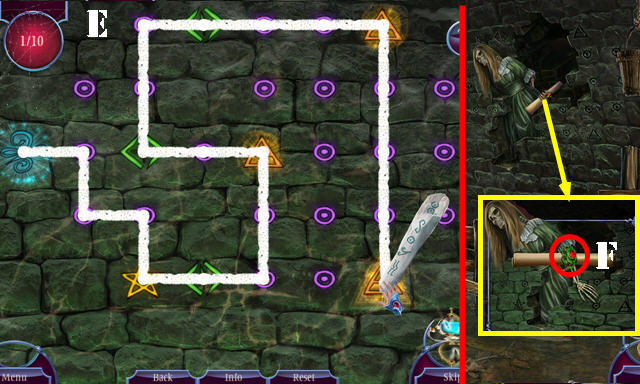
- Solution (E).
- Select the scroll; take the MAUSOLEUM RING (F).
- Walk down.
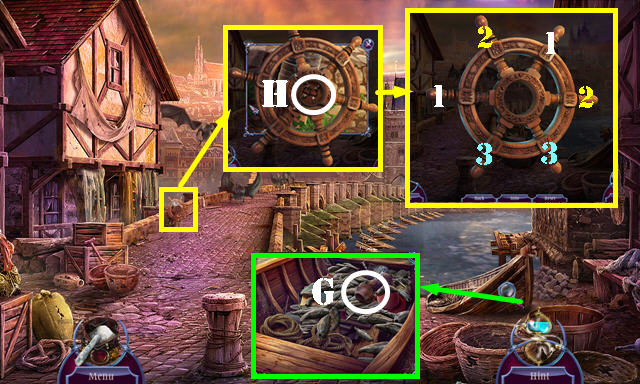
- Use the CAT; take the WHEEL HUB (G).
- Place the ANCHOR SYMBOL and select it (H); take the SHIP'S WHEEL.
- Select the SHIP'S WHEEL for a puzzle (inventory). Select pairs in order (1-3) to get the IMPROVISED WHEEL.
- Return to the Marketplace.
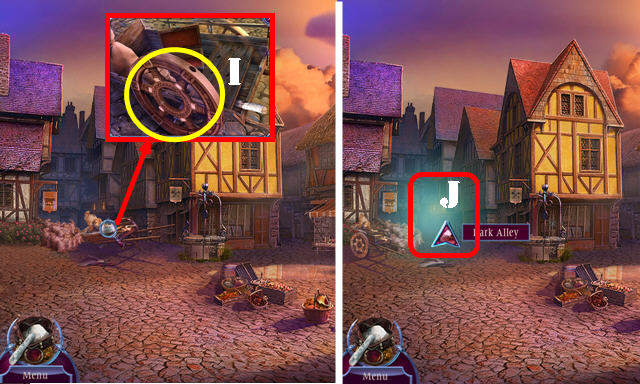
- Place the IMPROVISED WHEEL and WHEEL HUB (I).
- Push the cart; go to the Dark alley (J).
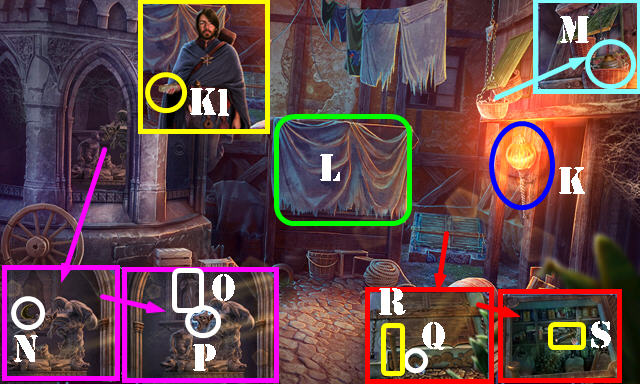
- Use the LIGHT SPHERE (K); take the note (K1).
- Remove the sheet (L); play the HOP to get the GIANT WOODWORMS.
- Take the OIL LAMP (M) and MOON EMBLEM (N).
- Place the ALCHEMIST STATUE (O); take the GARGOYLE HEAD (P).
- Place the COG (Q); pull the handle (R). Touch the jars; take the CRANK (S).
- Walk down.
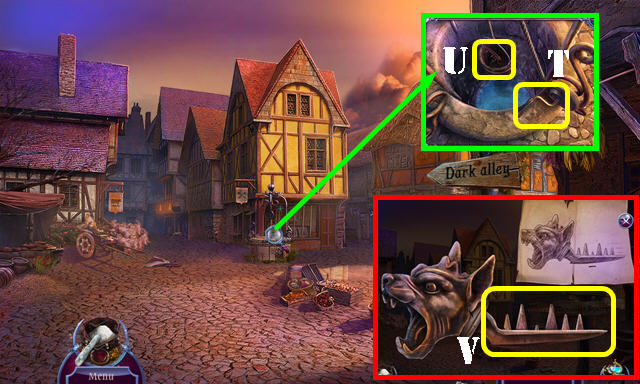
- Place the CRANK; select 3x (T); take the POINTY TAIL (U).
- Select the note; place the POINTY TAIL on the GARGOYLE HEAD (inventory). Arrange the tails as shown (V) to get the GARGOYLE KEY.
- Return to the Cemetery gate.
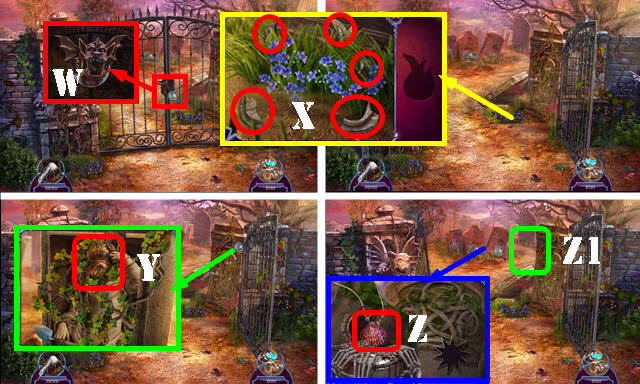
- Use the GARGOYLE KEY (W).
- Select the fragments to get the FIRE SYMBOL (X).
- Take the BROKEN CUP (Y).
- Take the SHELL DECORATION (Z).
- Go to the Ancient graves (Z1).
Chapter 3: Ancient Graves
- Remove the dirt 3x (A).
- Place the FIRE SYMBOL. Remove the board; take the SUN EMBLEM (B).
- Use the OIL LAMP (C) for an HOP; play it to get the FLAME REAPER.
- Walk down.

- Scroll left; use the FLAME REAPER to get the CHARGED FLAME REAPER (D).
- Go to the Dark Alley.
- Use the CHARGED FLAME REAPER (E); take the METAL STAMP (F).
- Return to the Ancient graves.
- Move the hand; use the METAL STAMP; take the CEMETERY MAP (G).
- Walk down.
- Place the CEMETERY MAP (H) for a puzzle.
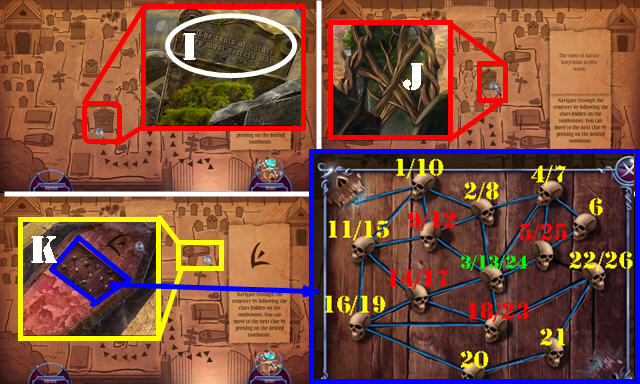
- Select twice (I).
- Select matching pairs. The solution is random (J).
- Select the puzzle (K). Solution 1-26. Select the 4 pieces (L).
- Solution: M-N-P-M-N-O-P-M-N-P.
- Solution (Q).
- Solution (R).
- You will automatically enter the Alchemist's tomb.
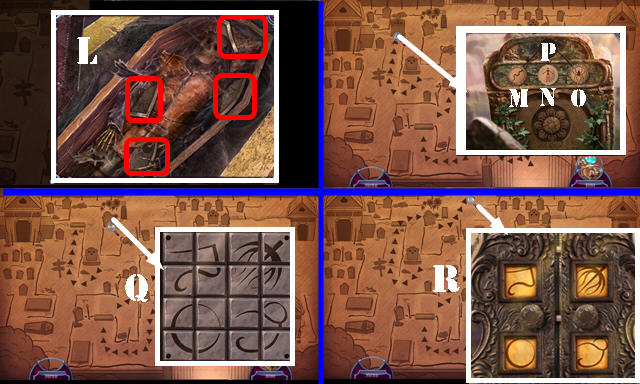
- Move the stone; take the TWILIGHT EMBLEM (S).
- Take the SECRET CODE (T). Use the SHELL DECORATION; select the stone; take the MINIATURE ABACUS (U).
- Place the MAUSOLEUM RING for a puzzle (V).
- Solution (W).
- Take the FAN (X).
- Walk down.
- Place the moon EMBLEM (A). Scroll right; place the TWILIGHT EMBLEM and SUN EMBLEM (B). Take the MONEY CAN (C).
- Place the MINIATURE ABACUS on the MONEY CAN for a puzzle (inventory). Solution (D). Look at the note; take the WATER DIVIDER.
- Go to the Ancient graves.
- Place the SECRET CODE; press the stones (E); take the SEALED BOTTLE (F).
- Use the SCREW EYE on the SEALED BOTTLE to get the ACID BOTTLE (inventory).
- Go to the Alchemist's tomb.
- Use the ACID BOTTLE; take the SCALE and ROD SIDE PLATES (G).
- Walk down.
- Use the GIANT WOODWORMS; place the SCALE; take the TROWEL (H).
- Go to Under the bridge.
- Use the TROWEL (I); push the boat twice; go to Vltava's bank (J).
- Select the tree trunk for an HOP (K); play it to get the FISHING ROD.
- Look at the papers; take the SANDPAPER (L).
- Use the WATER DIVIDER; select the cloak twice (M); look at the note and take the ELEMENTAL CLOAK ().
- Go to Under the bridge.
- Use the FISHING ROD to get the TAR CHUNK (N).
- Go to Vltava's bank.
- Use the FAN; place the TAR CHUNK; take the LID PIECE (O).
- Place the LID PIECE on the BROKEN CUP select it to get the EMPTY CUP (inventory).
- Go to Under the bridge.
- Use the EMPTY CUP to get the FILLED CUP (P).
- Go to Vltava's bank.
- Open the chest; use the FILLED CUP (Q) for a puzzle.
- Solution (1-11).
- Take the STATUE'S HAND and ROD BASE (R).
Chapter 4: Executioner's Yard
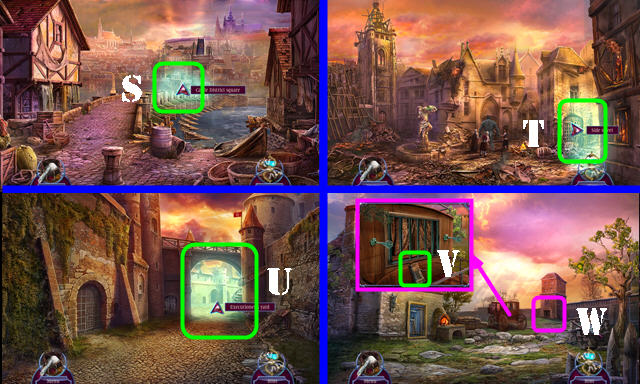
- Go to the Charles Bridge and then go to Castle District square (S).
- Go to the Side street (T).
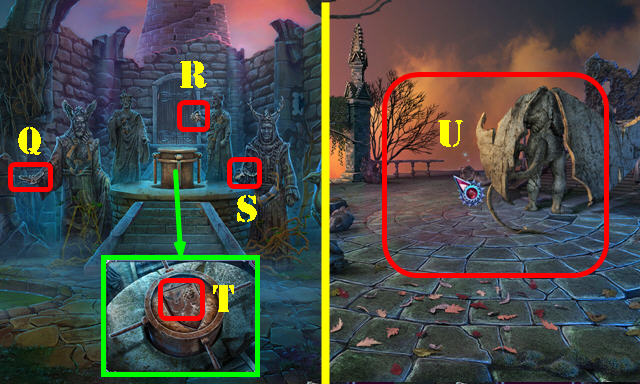
- Go to the Executioner's yard (U).
- Take the WAGON JACK (V).
- Go to Gallows hill (W).
- Move the cart; take the VULTURE SILHOUETTE (A).
- Take the LOG TONGS (B).
- Use the stone; take the MANACLES (C).
- Select the vines; take the SWORD KEY (D). Slide up; take the GOLDEN EAGLE (E).
- Return to the Side street.
- Use the SANDPAPER; take the FLAG TOPPER (F).
- Use the SWORD KEY (G) for an HOP; play it to get the CHAIN MAIL GLOVE.
- Walk down.
- Place the STATUE'S HAND (H); take the FLINT (I).
- Open the small door; take the DOOR HOOK (J).
- Use the ELEMENTAL CLOAK and CHAIN MAIL GLOVE to get the LODESTONE (K).
- Return to the Executioner's yard.
- Select the two steps (L). Use the DOOR HOOK; take the CORAL CROWN PIECES 1/2 (M).
- Use the LODESTONE and LOG TONGS for a puzzle (N).
- Solution (O-P-Q-R).
- Take the MAGNETIC WAND.
- Select two pieces; use the MAGNETIC WAND (S) and enter the Executioner's house (T).
- Play the HOP (U) to get the METAL WOODPECKER.
- Open the curtain (V).
- Take the PICKAX SYMBOL (W).
- Take the DEER HEAD (X).Place the VULTURE SILHOUETTE; take the CORAL CROWN PIECES 2/2 (Y).
- Return to Gallows hill.
- Use the METAL WOODPECKER; take the LEFT ANTLER (A).
- Return to Castle District square.
- Place the CORAL CROWN PIECES 2/2 (B); take the SKULL AND BONES (C).
- Return to Gallows hill.
- Place the SKULL AND BONES (D); take the GUNPOWDER (E).
- Return to the Side street.
- Place the GOLDEN EAGLE on the FLAG TOPPER; twist the off the base; use the GUNPOWDER to get the IMPROVISED BOMB (inventory).
- Place the IMPROVISED BOMB; use the FLINT (F). Use the MANACLES; take the STAIR TREAD and DECORATIVE RINGS 1/2 (G).
- Go to the Executioner's yard.
- Place the STAIR TREAD (H); take the CALIBRATION WEIGHT (I).
- Go to Gallows hill.
- Place the CALIBRATION WEIGHT (J). Take the RIGHT ANTLER (K).
- Place the LEFT ANTLER; select it 4x. Place the RIGHT ANTLER on the DEER HEAD and select it 4x to get the SEWER KEY (inventory).
- Go to Side street.
- Use the SEWER KEY for a puzzle (L).
- Solution (M-N-0).
- Go to the Upper sewers (P).
- Take the GUARD'S NOTES (Q).
- Return to the Executioner's yard.
- Use the GUARD'S NOTES; select S-S-R-S. Take the DECORATIVE RINGS 2/2 and RAIL SEGMENT (T).
- Go to the Executioner's house.
- Place the DECORATIVE RINGS 2/2 for a puzzle. Solution (U).
- Take the WINE BOTTLE (V).
- Return to Side street.

- Use the WINE BOTTLE (W); take the BELT BUCKLE (X).
- Return to the Executioner's house.
- Place the BELT BUCKLE (Y); take the TORTURER'S TREPHINE and EXECUTIONER'S TOKEN ().
- Arrange the images on the EXECUTIONER'S TOKEN for a puzzle (inventory).
- Solution one (A).
- Solution two (B).
- Solution three (C).
- Take the WOLF INSIGNIA.
- Return to the Upper sewer.
- Place the WOLF INSIGNIA (D) and RAIL SEGMENT; pull the handle (E).
- Go to the Lower sewers (F).
- Try to go up the ladder (G). Take the CROSSBOW STRING (H).
- Play the HOP (I) to get the GRINDER.
- Select the 4 screws on the GRINDER; place the TORTURER'S TREPHINE; select it and insert it into the grinder. Take the IMPROVISED DRILL (inventory).
- Go to Gallows hill. Use the IMPROVISED DRILL; take the ROPE LADDER (J).
- Go to the Lower sewers. Use the ROPE LADDER (K). Go up to the Prison.
Chapter 5: Prison
- Take the INTERROGATOR'S MANUAL (L).
- Select the jug; take the DRIED MEAT (M).
- Take the ANTIRUST OIL (N).
- Go to the Cell (O).
- Use the WAGON JACK on the bars. Select the 4 strings (orange); take the FACE SHIELD (P).
- Use the Chalk and powder (Q) for a puzzle. Solution (R).
- Remove the boards; take the BUTTER KNIFE (S).
- Walk down.
- Use the BUTTER KNIFE; open the book; take the APOTHECARY COIN (T).
- Walk down.
- Select the bars; give the DRIED MEAT (U); take the THORN KEYS 1/2 (V).
- Walk down.
- Use the FACE SHIELD to get the THORN KEYS 2/2 (W).
- Return to the Prison.
- Place the THORN KEYS 2/2 for a puzzle (X).
- Solution (Y).
- Go through the back door to access the Torture chamber.
- Move the casket; take the WARM WAX (A).
- Take the BELLOWS (B).Use the ANTIRUST OIL; take the ARCHED STRAP (C).
- Place the INTERROGATOR'S MANUAL; select the knobs 1-4; take the KNIGHT FIGURE (D).
- Walk down.
- Use the BELLOWS; take the MINIATURE GUILLOTINE (E).
- Enter the Cell.
- Use the ARCHED STRAP; take the WINDLASS (F).
- Use the WARM WAX; turn Left-Right-Left (G). Take the BINDER INK (H).
- Walk down.
- Use the WINDLASS and CROSSBOW STRING (I); take the LONG ARROW (J).
- Go to the Torture chamber.
- Use the LONG ARROW for an HOP (K); play it to get the PAPER FRAGMENTS.
- Place the MINIATURE GUILLOTINE; swap as shown (L). Remove the brick, select the box and note; take the REMINISCENCE IMPRINTER (M). Use the REMINISCENCE IMPRINTER (N).
- Use the BINDER INK; pull the lever (O).
- Return to the Cell.
- Arrange the PAPER FRAGMENTS as shown to get IGNAC'S COMBINATION (P)(inventory).
- Place IGNAC'S COMBINATION; select 1-4. Look at the note; take the PICKAX SYMBOL 2/2 (Q).
- Go to the Upper sewers.
- Use the PICKAX SYMBOL 2/2; take the VALVE (R).
- Use the REMINISCENCE IMPRINTER (S).
- Go to the Lower sewers.
- Place the VALVE (T).
- Place the APOTHECARY COIN for a puzzle (U).
- Solutions (V-W).
- Take the SMELLING SALTS.
- Go to the Torture chamber.
- Use the SMELLING SALTS (X); take the FROST DROPS (Y).
- Go to the Lower sewers.
- Use the FROST DROPS; take the CRANE LEVER (Z).
- Return to the Castle District square.
- Use the REMINISCENCE IMPRINTER (A).
- Place the CRANE LEVER and pull it (B).
- Go to the Unfinished cathedral (C).
Chapter 6: Unfinished Cathedral
- Take the SWELL PEDAL (D) and DUST SHEET (E).
- Look at the image (F).
- Place the KNIGHT FIGURE; arrange the limbs as shown (G). Take the NUMBERED SHIELDS 1/3 (H).
- Walk down.
- Use the SWELL PEDAL to get the COMPASS ORNAMENT (I).
- Go to the Unfinished cathedral.
- Place the REMINISCENCE IMPRINTER and COMPASS ORNAMENT for a puzzle (J).
- Solution (K).
- Take the ROYAL CREST.
- Walk down.
- Place the ROYAL CREST (L).
- Go to the Courtyard (M).
- Move the candle; take the MUSIC ROLL 1/2 and MODEL SHIP (N).
- Use the DUST SHEET to get the TURTLE SHELL (O).
- Enter the Main hall (P).
- Play the HOP to get the WISHBONE (Q).
- Take the MUSIC ROLL 2/2 (R); look at the book (S).
- Take the NUMBERED SHIELDS 2/3 and S HOOK (T).
- Return to the Unfinished cathedral.
- Use the S HOOK (A); pull the chain (B). Play the HOP (C) to get the HONING STEEL.
- Take the PEACOCK FEATHER (D). Use the HONING STEEL (E); take the CYLINDER (F).
- Place the MUSIC ROLL 2/2 on the CYLINDER to get the ORGAN BARREL (inventory).
- Place the keys (orange). Place the ORGAN BARREL (G); pull the handle (H); take the CORD PIECE (I).
- Return to the Courtyard.
- Place the CORD PIECE on the WISHBONE. Place the cord as shown (J). Take the IMPROVISED SLINGSHOT (inventory).
- Use the IMPROVISED SLINGSHOT (K); move the table (L); take the DRAGON WING (M).
- Go to the Main hall.
- Place the TURTLE SHELL and DRAGON WING for a puzzle (N).
- Solutions (O-P-Q).
- Go to the Library (R).
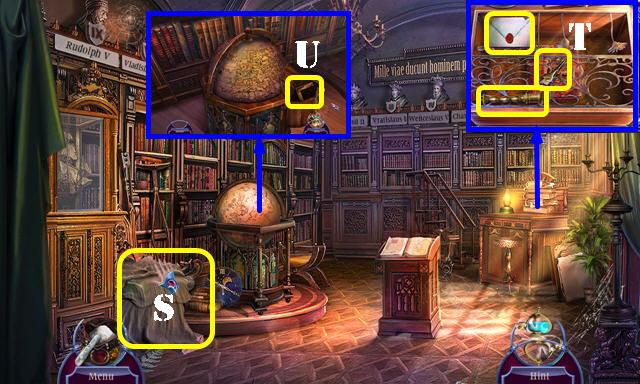
- Remove the sheet (S) for an HOP; play it to get the HOLLOW DODECAHEDRON.
- Read the note; take the LIGHTNING KEY and PRICKET (T).
- Place the MODEL SHIP; take the BRONZE RULER (U).
- Return to the Courtyard.
- Use the HOLLOW DODECAHEDRON; select the 3 yellow bricks; take the NUMBERED SHIELDS 3/3 (V).
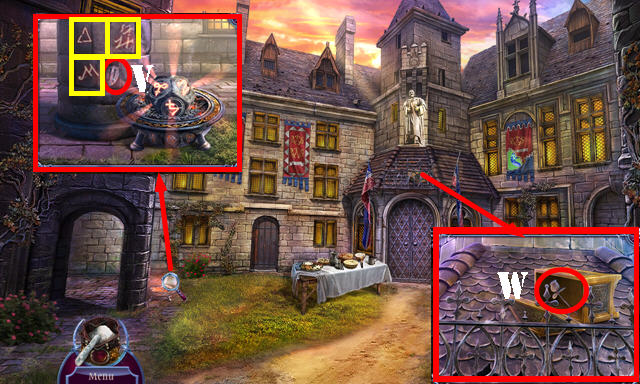
- Use the BRONZE RULER; take the BLACK ROSE (W).
- Return to the Library.
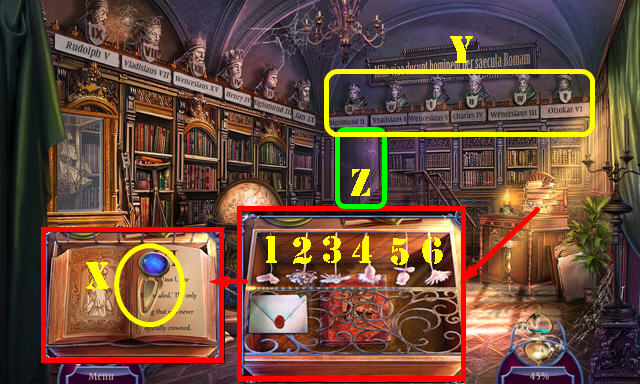
- Place the BLACK ROSE select 6-4-3-5-1-2. Open the book and flip through all the pages; take the GLOWING BOOKMARK (X).
- Place the NUMBERED SHIELDS 3/3. Arrange the shields as shown (Y). Go to the Forbidden library (Z).
- Remove the books (A).
- Use the LIGHTNING KEY; turn the page and take the TRAVEL ROUTE (B).
- Open the door; look at the note; take the KING'S PENDANT (C).
- Place the GLOWING BOOKMARK; use the Chalk and powder for a puzzle (D).
- Solution (E).
- Look at the note; you receive the ROD BINDER.
- Go to the Main hall.
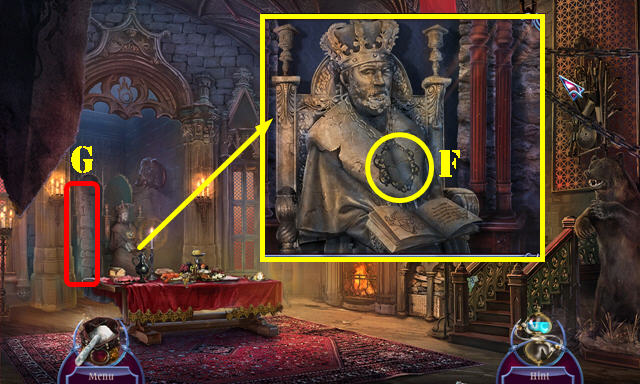
- Place the KING'S PENDANT (F).
- Enter the Wintergarden ruins (G).

- Place the PEACOCK FEATHER (H) for an HOP; play it to get the ARROW POINTER.
- Take the HOLLOW TILE (I) and SMALL TELESCOPE (J).
- Use the PRICKET; take the ROD AMPLIFIER and MONKEY BRACELET (K).
- Return to the Forbidden library.
- Place the SMALL TELESCOPE and select it (L).
- Place the HOLLOW TILE for a puzzle. Solution (M). Take the HUNTER'S HORN.
- Place the MONKEY BRACELET (N); take the CHESS PIECE (O).
- Walk down.
- Place the TRAVEL ROUTE and ARROW POINTER for a puzzle. Look at the TRAVEL ROUTE (P).
- Solution (1-9). Take the GOLDEN LYRE.
- Return to Windergarden ruins.
- Place the GOLDEN LYRE; take the HOUSE ANIMALS 1/3 (Q).
- Place the CHESS PIECE; take the HOUSE ANIMALS 2/3 (R).
- Place the HUNTER'S HORN; take the HOUSE ANIMALS 3/3 (S).
- Place the HOUSE ANIMALS 3/3 (T); turn once; enter the Wintergarden tower.
- Place the ROD SIDE PLATES, ROD BASE, ROD AMPLIFIER and ROD BINDER on the ALCHEMIST'S ROD to get the CLAYBORNE CONTROLLER (inventory).
- Use the CLAYBORNE CONTROLLER on the scene for a puzzle (U).
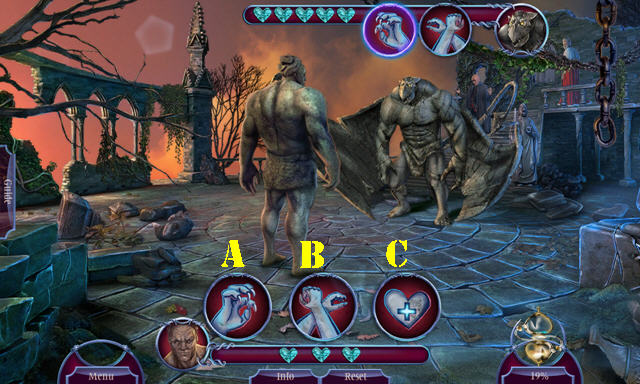
- Solution: A-Cx2-Ax2-C-A-B-C-A.
- Congratulations, you've completed Myths of the World: born of Clay and Fire!
Created at: 2016-04-08