
Walkthrough Menu
- General Tips
- Chapter 1: Beline
- Chapter 2: Adrian and Alina
- Chapter 3: The Temple
- Chapter 4: The Forest
General Tips
- This is the official guide for Myths of the World: Bound by the Stone.
- This guide will not show when you have to zoom into a location; the screenshots will show each zoom scene.
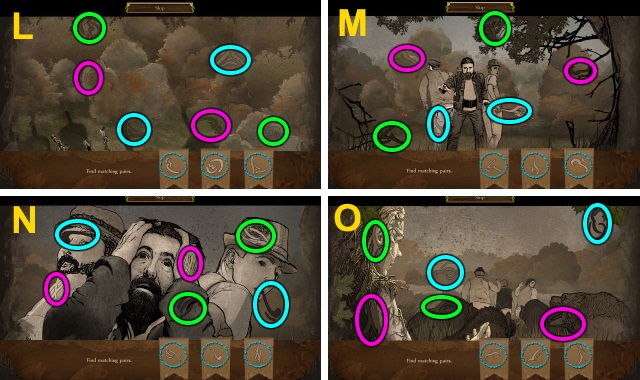
- Hidden-object puzzles are referred to as HOPs. This guide will not show screenshots of the HOPs, however, it will mention when an HOP is available and the inventory item you'll collect from it.
- Use the Map to fast travel to a location.
Chapter 1: Beline
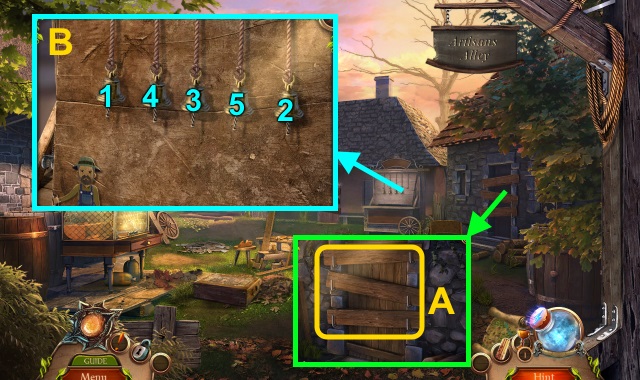
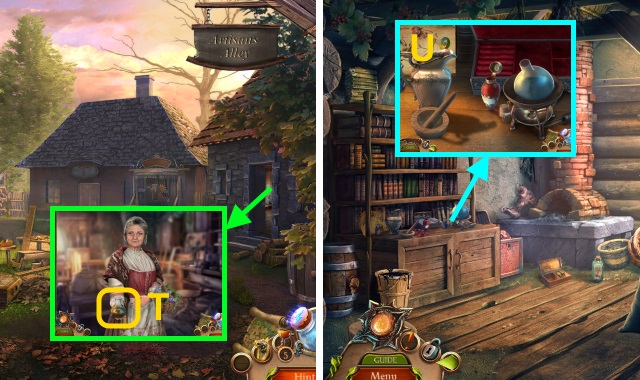
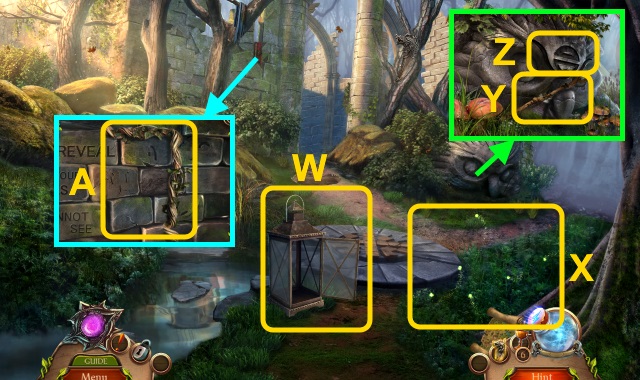
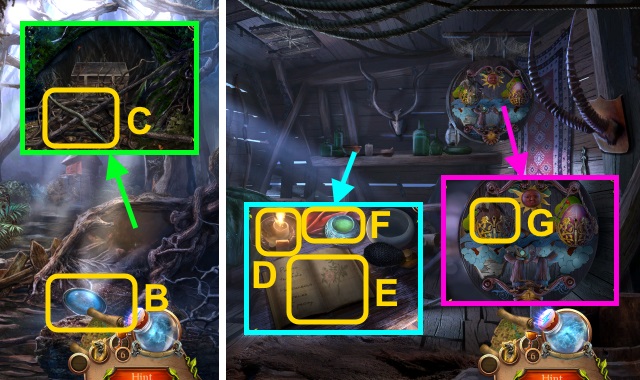
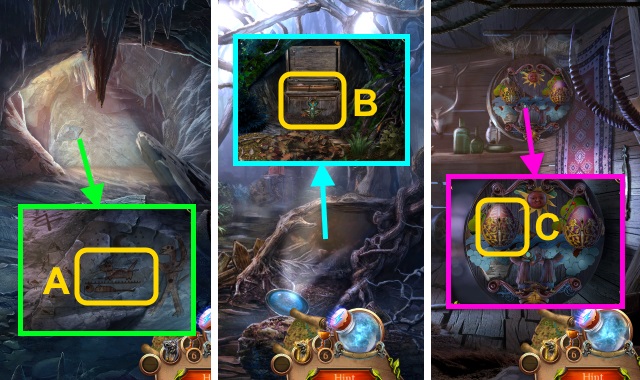
- Talk to the man; take the PROTECTIVE SEAL (A).
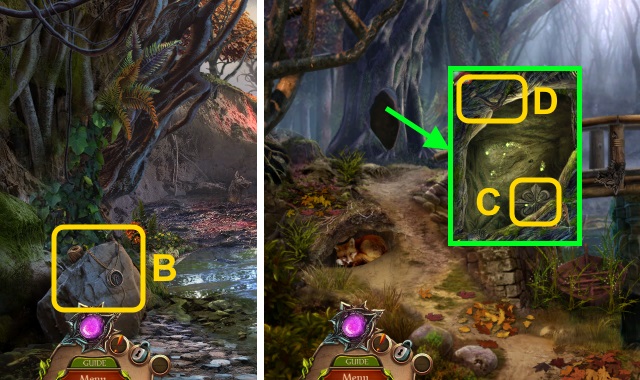
- Open the drawer (B).
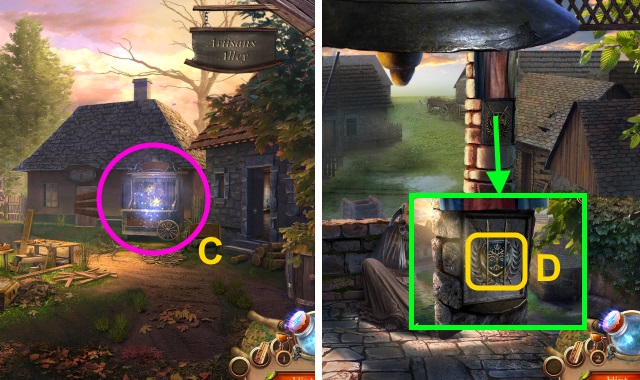
- Use the PROTECTIVE SEAL; press it (C).
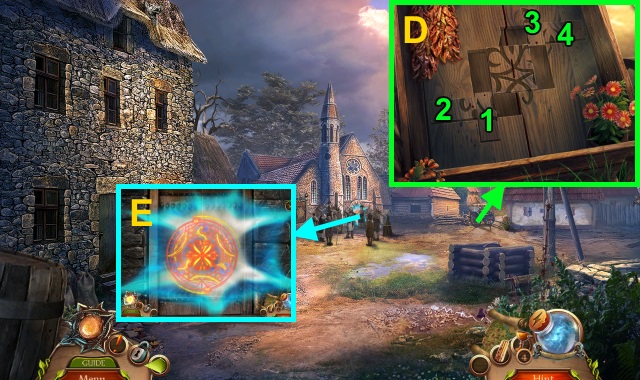
- Take the SCROLL KEEPER (D).
- Open the SCROLL KEEPER; take the INVITATION.

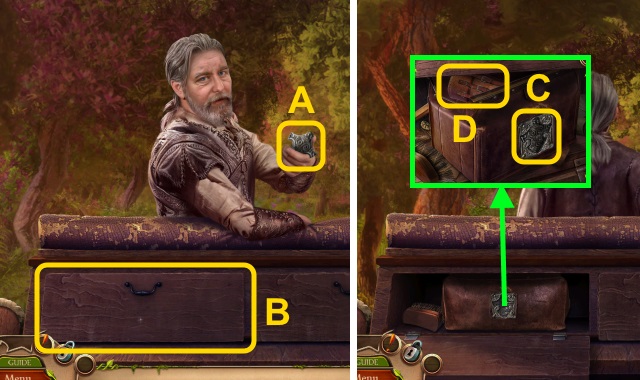
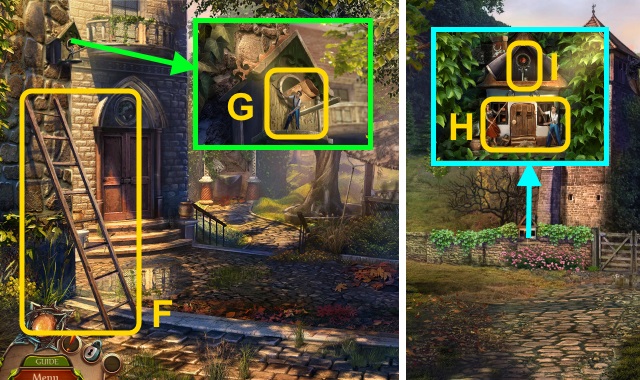
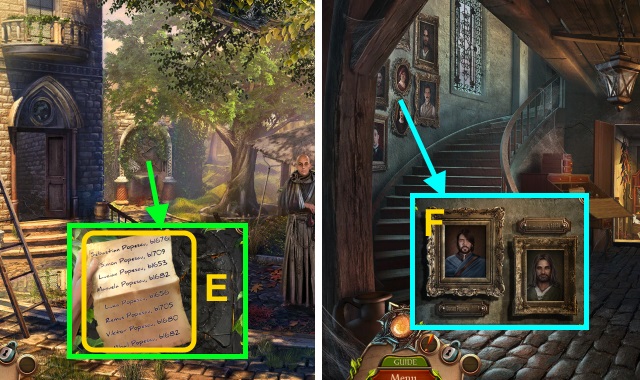
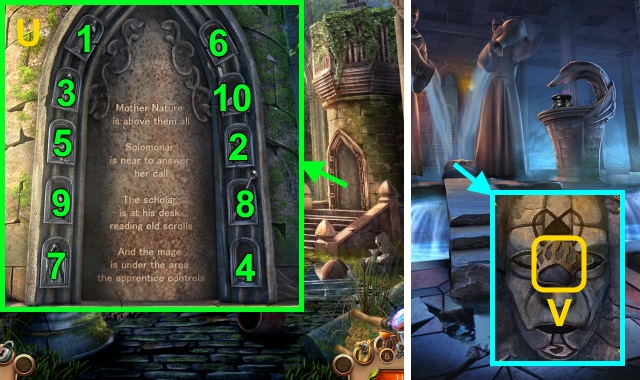
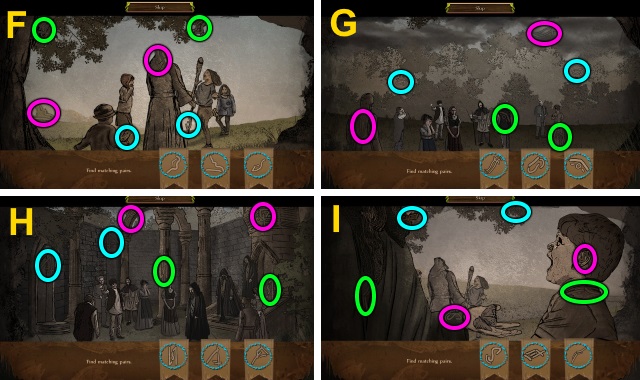
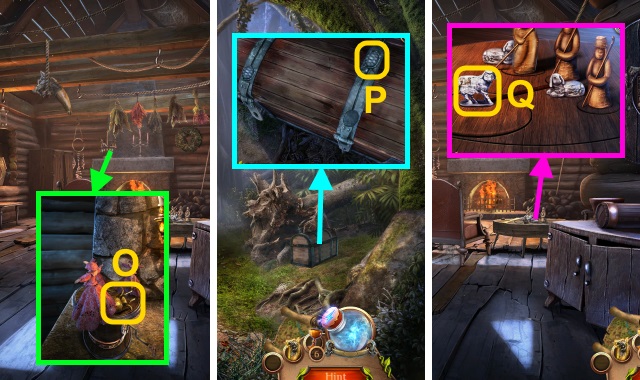
- Take the Medallion (E).
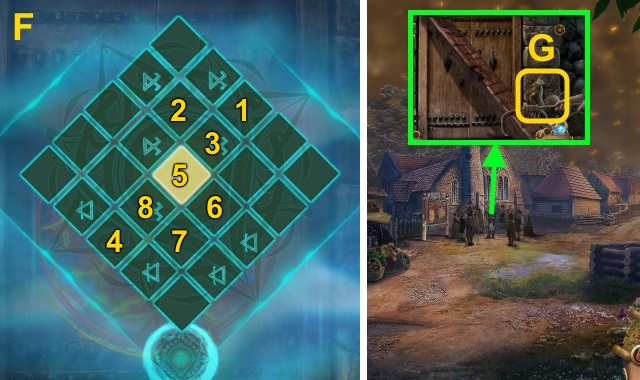
- Use the Medallion for a mini-game (F).
- Solution (G-H).
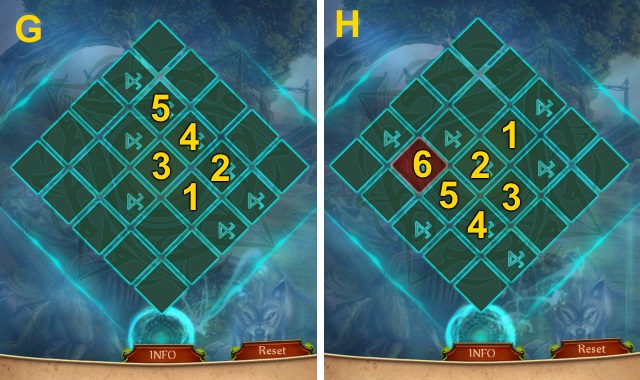
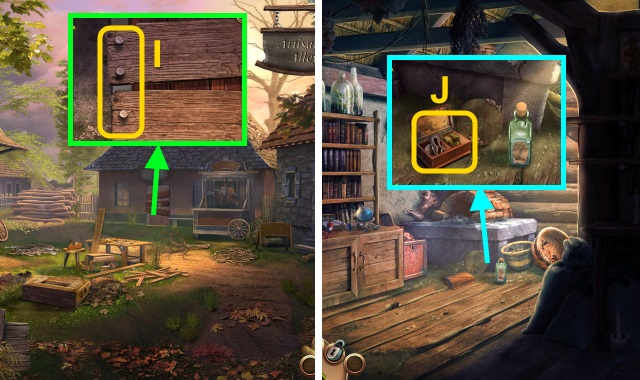
- Play the HOP; receive the AXLE NUT (I).
- Take the AXE HEAD and BENT GEAR (J).
- Walk right.
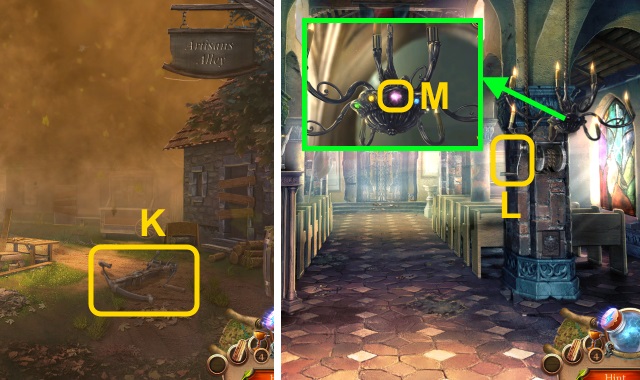
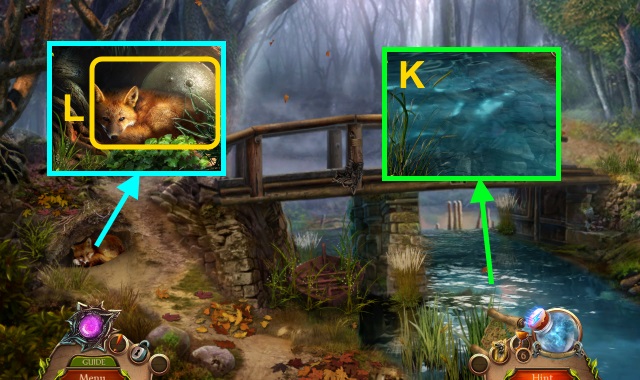
- Use the AXE HEAD; receive the FISHING HOOK (K). Take the FISH OIL (L).
- Enter the Forge.
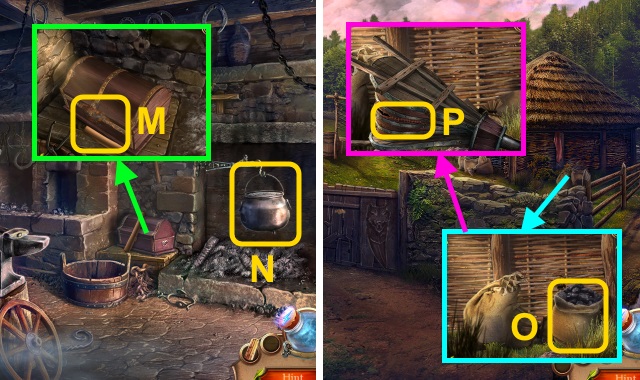
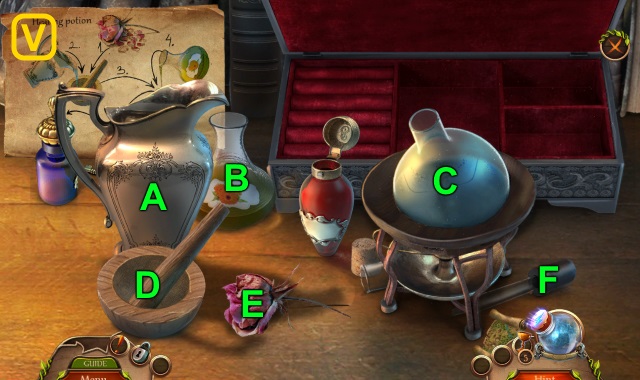
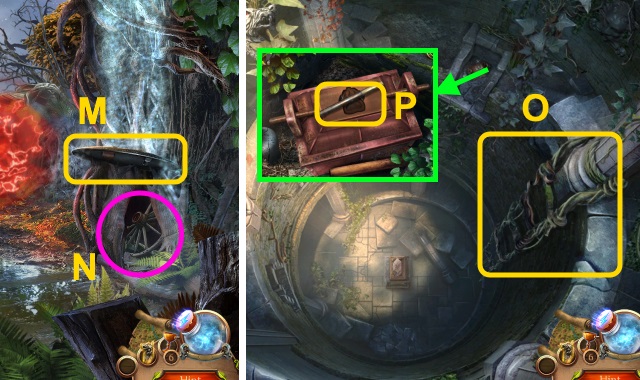
- Read the letter; use the FISH OIL (M). Open the chest; take the Map and THREAD.
- Combine the THREAD and FISHING HOOK; receive the SEWING HOOK.
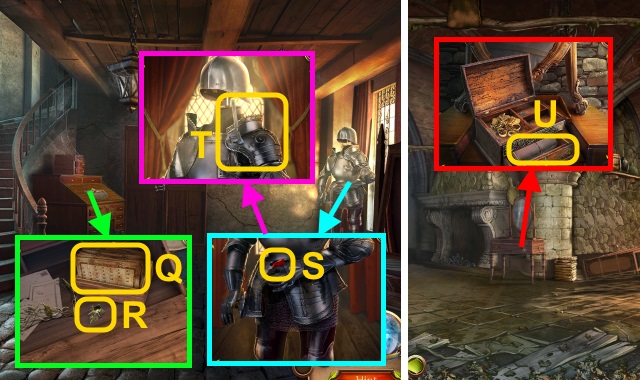
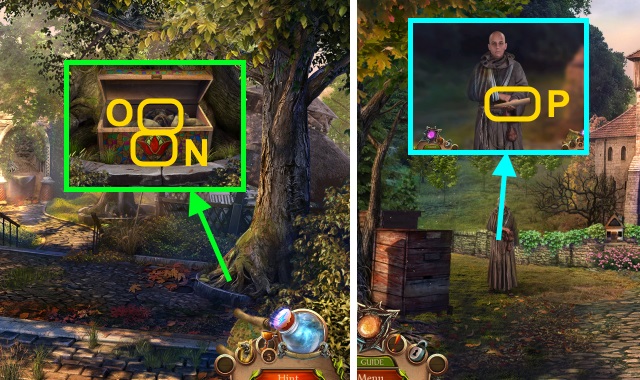
- Take the FULL CAULDRON (N).
- Walk down.
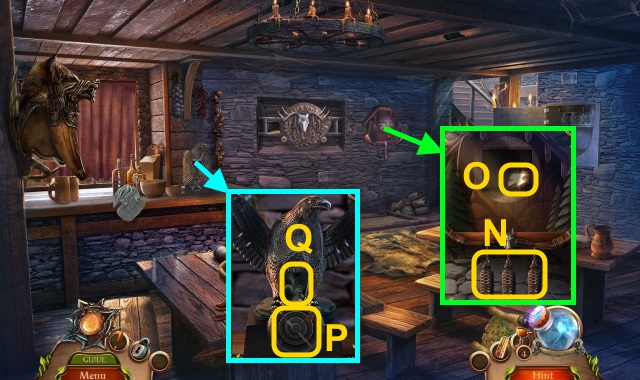
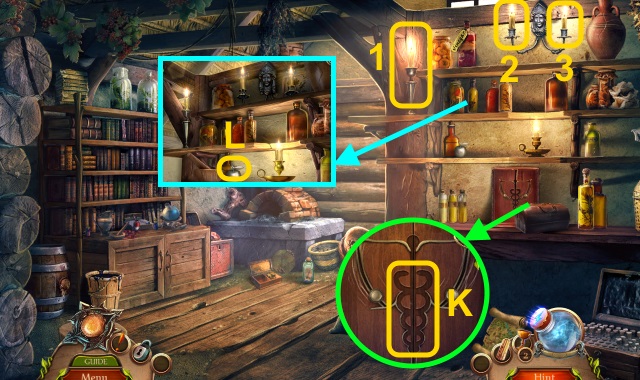
- Take the COAL (O). Move the bags; examine the bellows.
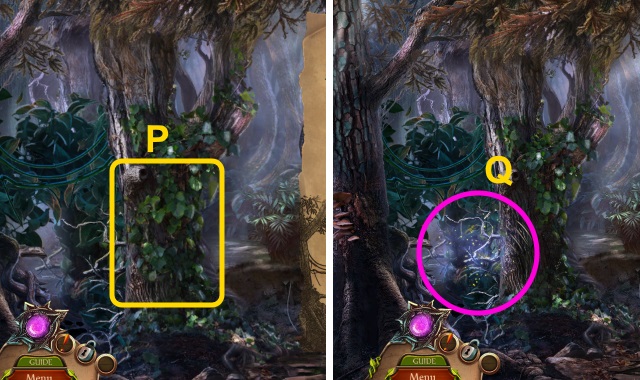
- Use the SEWING HOOK (P); receive the BELLOWS.
- Enter the Forge.
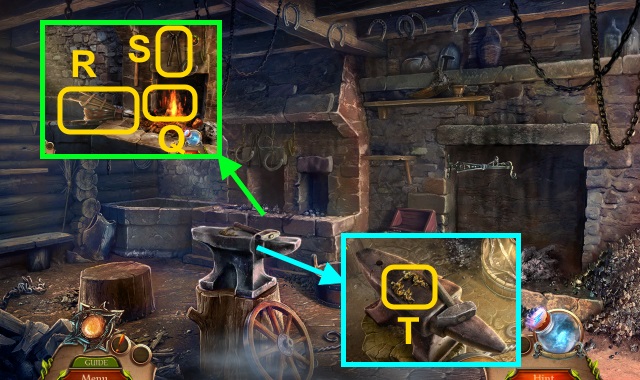
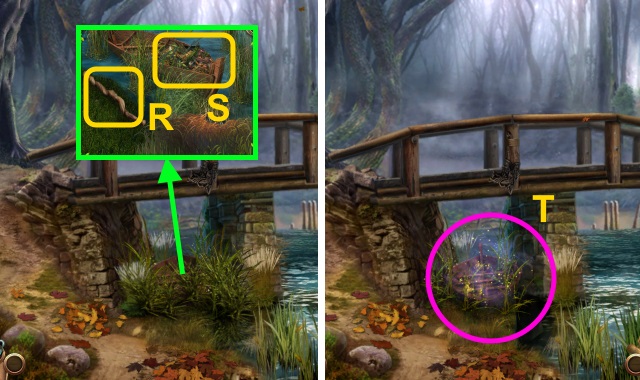
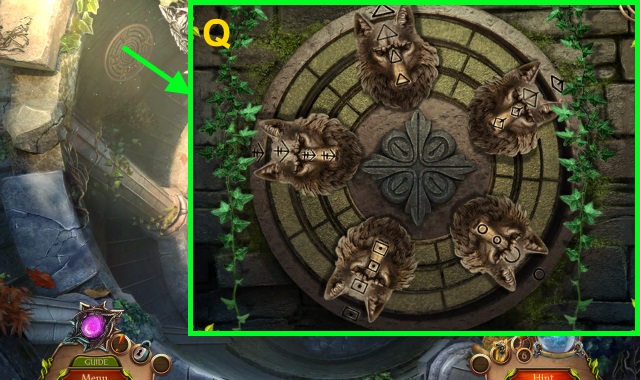
- Use the COAL (Q). Use the BELLOWS (R); examine it.
- Place the BENT GEAR on the fire.
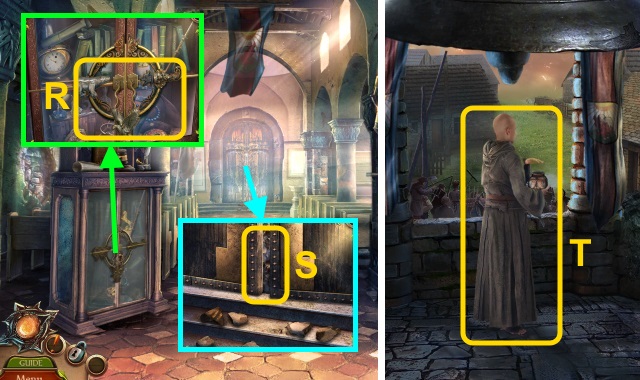
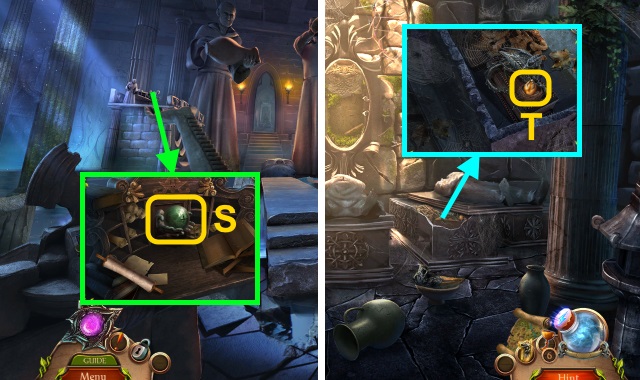
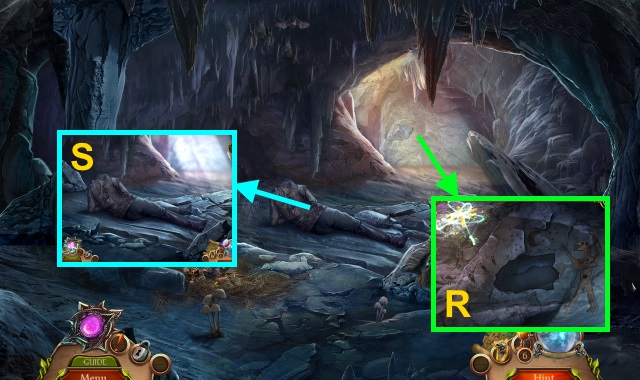
- Move the tools; use the tongs (S). Receive the HOT GEAR.
- Take the CREST FRAME (T); place the HOT GEAR. Receive the STRAIGHTENED GEAR.
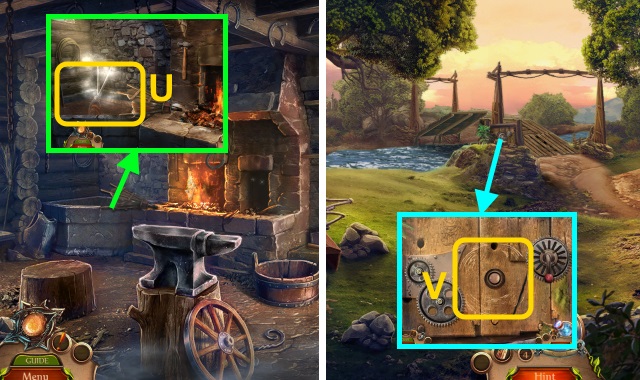
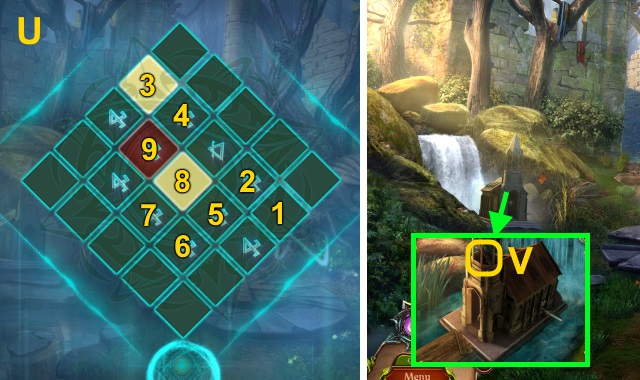
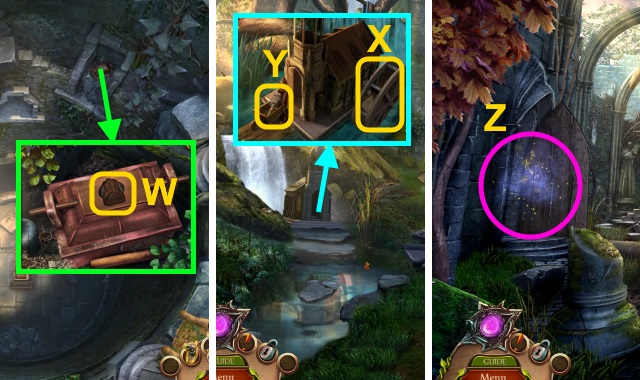
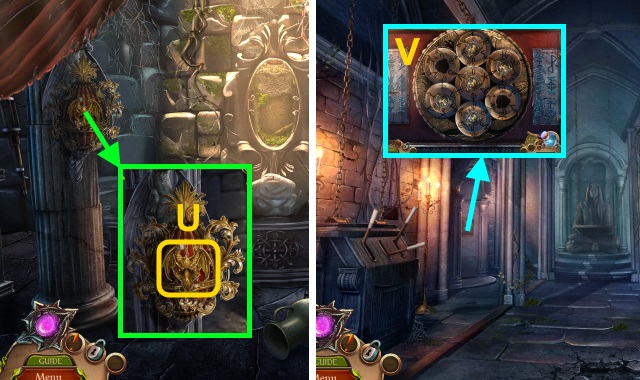
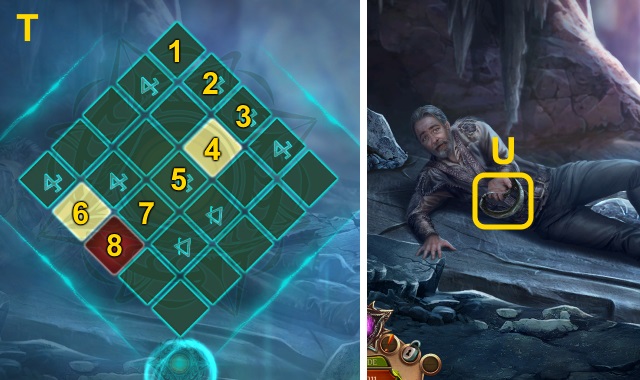
- Pour the FULL CAULDRON; Receive the EMPTY CAULDRON. Use the STRAIGHTENED GEAR (U); receive the GEAR.
- Walk down, then left.
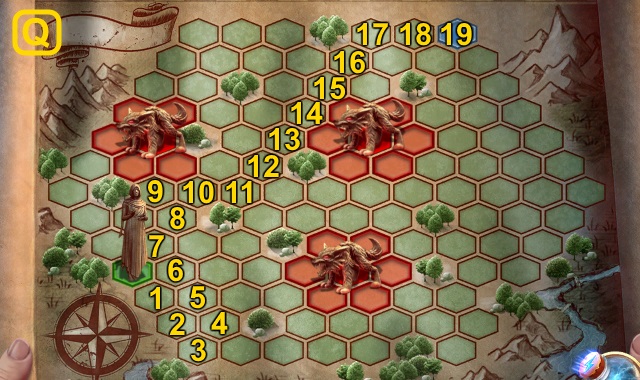
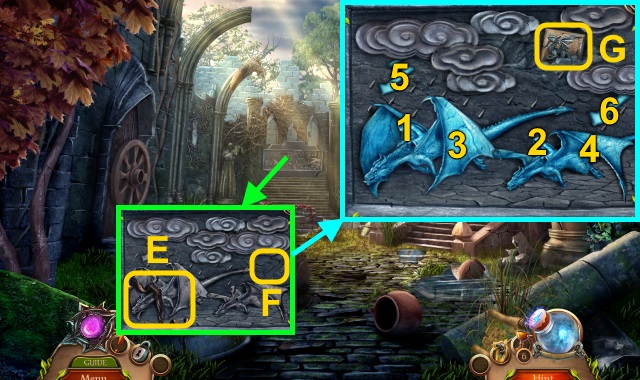
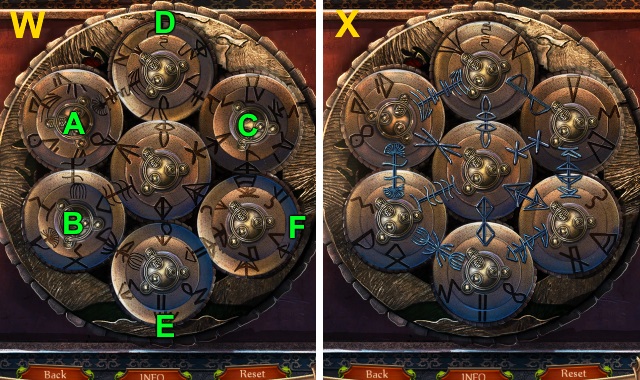
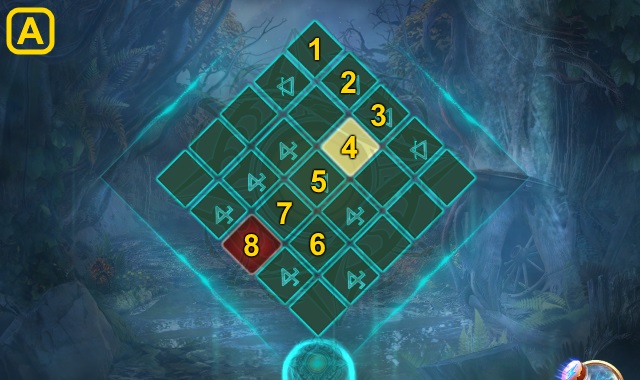
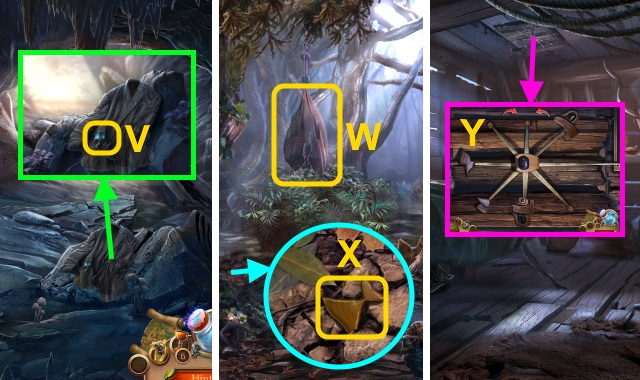
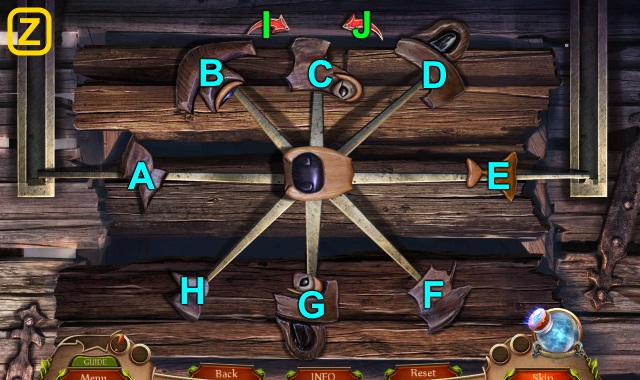
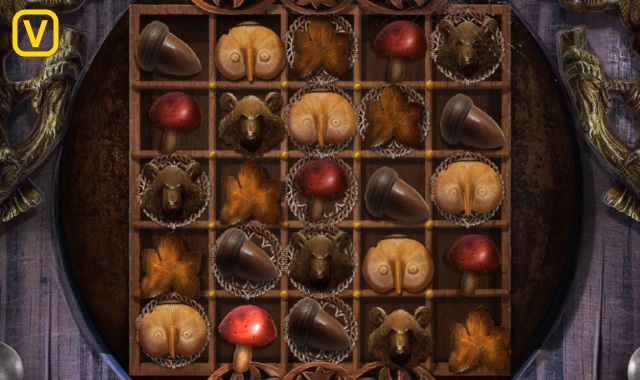
- Place the GEAR and AXLE NUT for a mini-game (V).
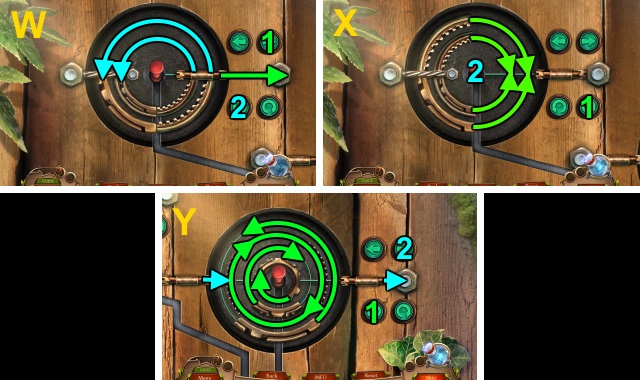
- Solution (W-B).
- Walk forward.
- Talk to the innkeeper; give the INVITATION (C).
- Walk forward.
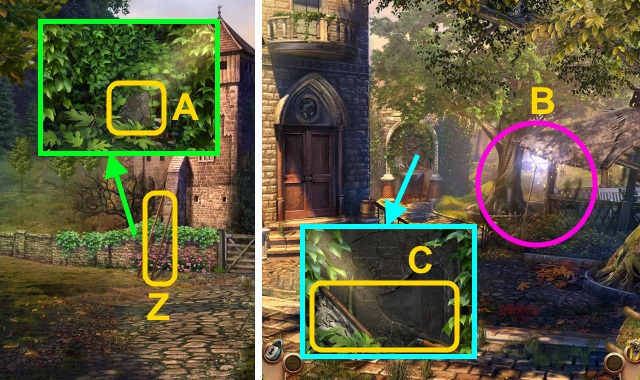
- Take the CANDLE HOLDER (D).
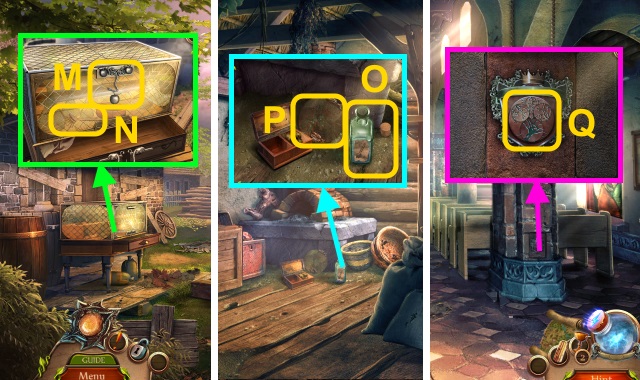
- Move the planks; use the EMPTY CAULDRON. Take the DEER (E).
- Read the notes; take the LOOSE SPIKE and SILVER BEAR (F).
- Walk down.
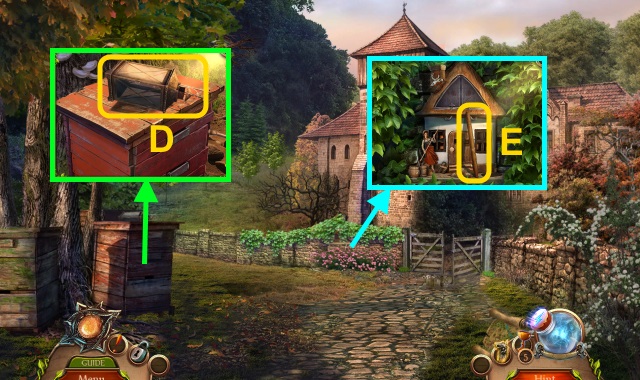
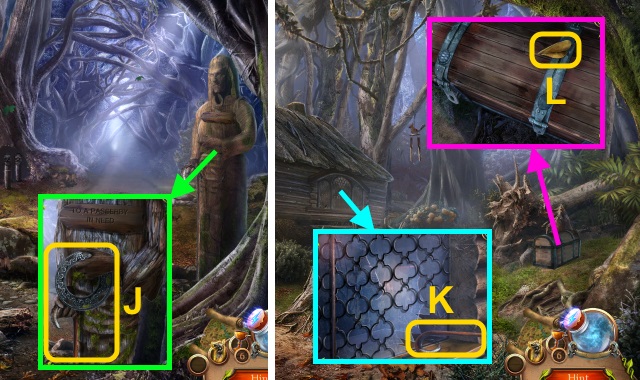
- Move the sign; place the CANDLE HOLDER. Arrange the candle holders (G); take the METAL ORNAMENT.
- Walk forward, then left.
- Talk to the innkeeper (H).
- Walk forward.
- Play the HOP; receive the GLASS CENTERPIECE (I).
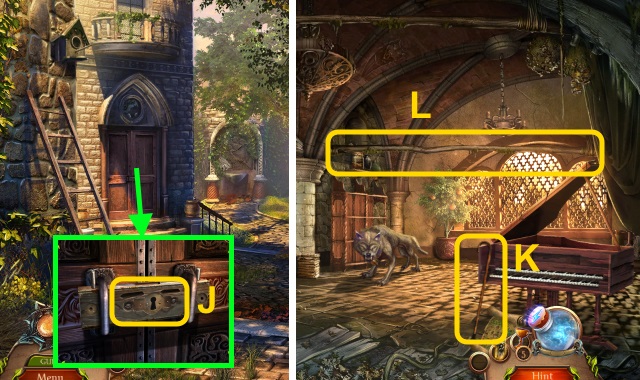
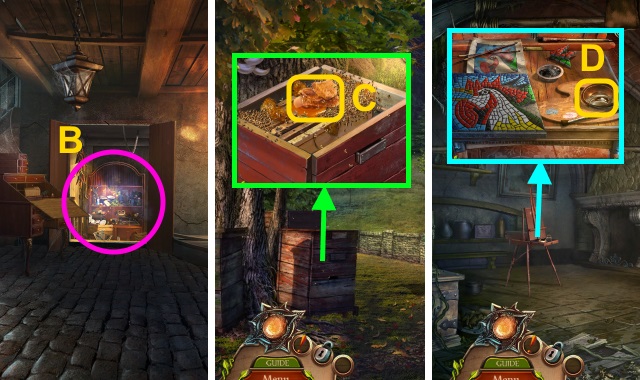
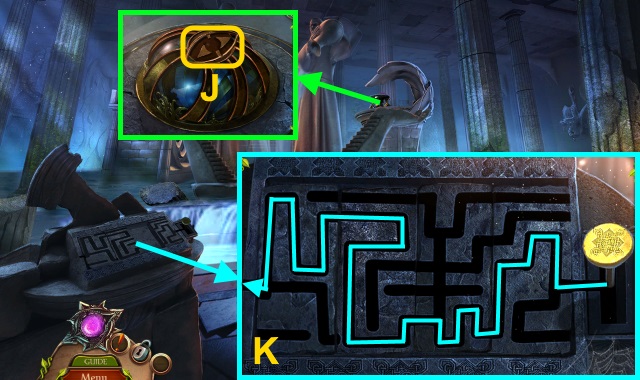
- Use the LOOSE SPIKE; open the cupboard for a mini-game (J).
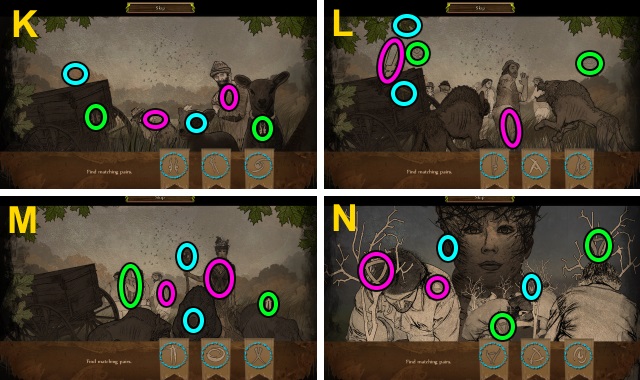
- Solution (K-N).
- Take the SIGNET RING.

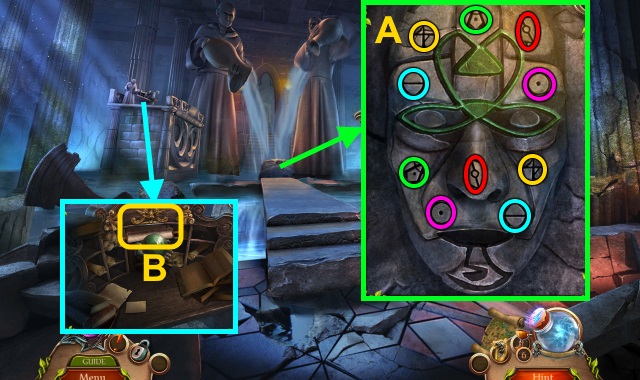
- Take the SOLOMONAR'S BOX (O).
- Examine the SOLOMNAR'S BOX; read the note. Place the GLASS CENTERPIECE; examine it twice. Take the STONE ORNAMENT.
- Take the BRONZE LIZARD (P).
- Walk down.
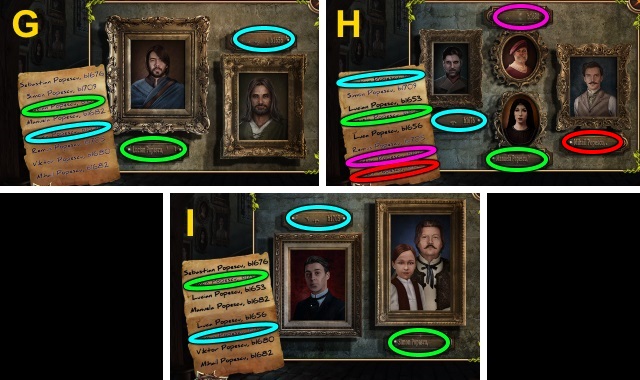
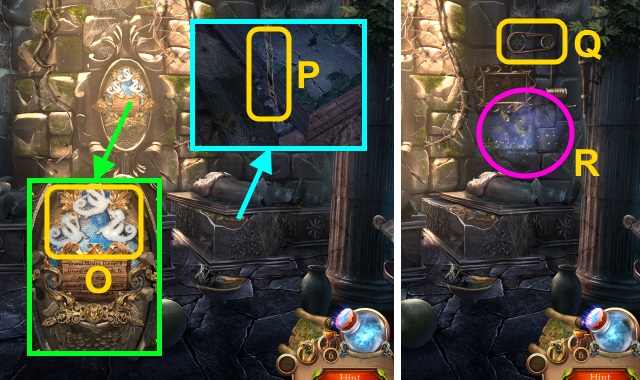
- Use the SIGNET RING; take the FAMILY SHIELD (Q). Place the METAL ORNAMENT (R); take the TROPHY ELEMENTS (1/2).
- Combine the FAMILY SHIELD, DEER, and CREST FRAME; receive the COAT OF ARMS.
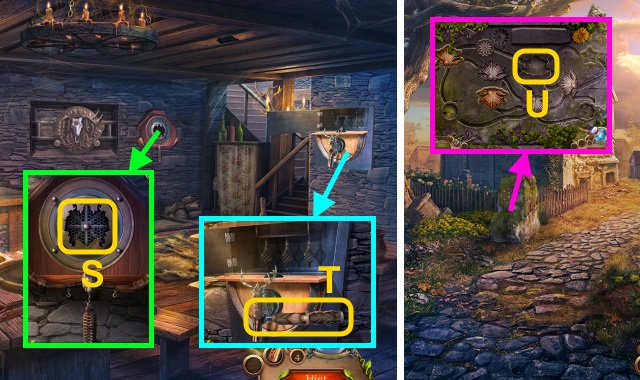
- Place the COAT OF ARMS (S); take the DEER HANDLE.
- Use the DEER HANDLE (T); take the WEIGHTS (1/2).
- Walk down twice.
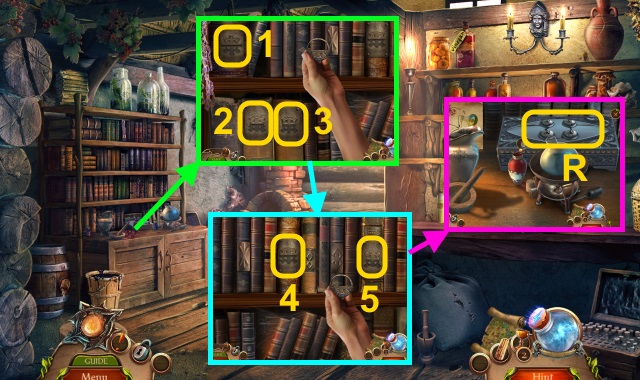
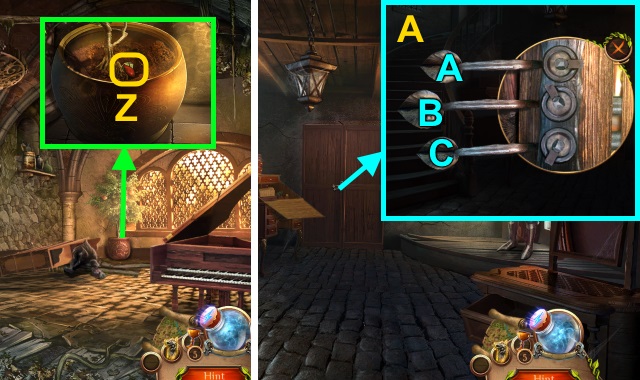
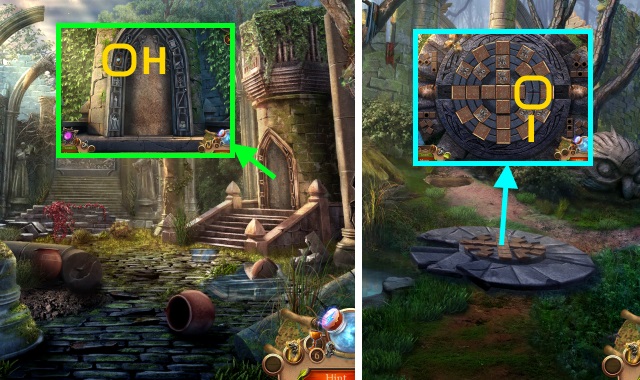
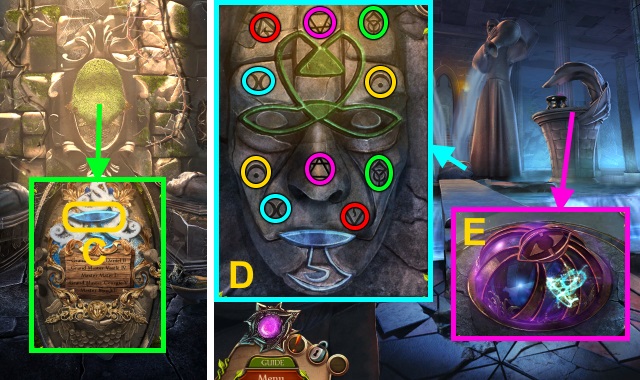
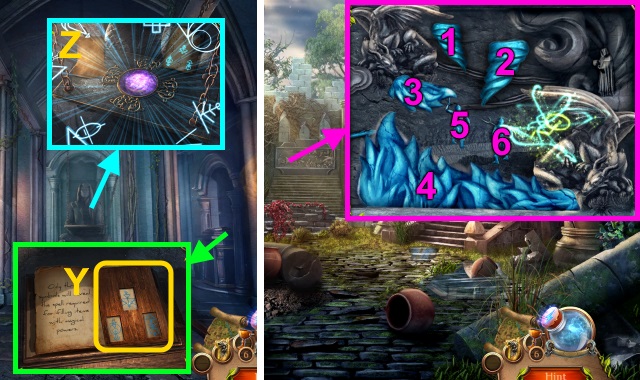
- Place the STONE ORNAMENT for a mini-game (U).
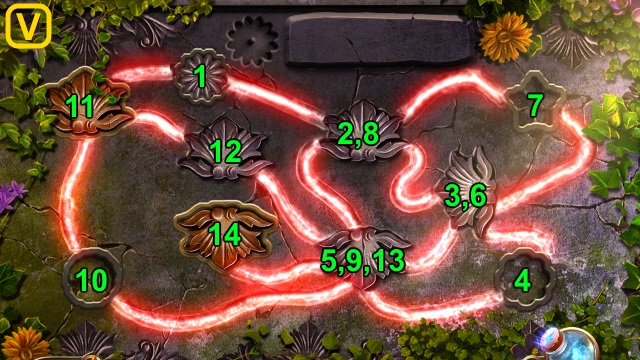
- Solution (V).
- Take the SOLOMNAR'S STAFF and PLATINUM BRACELET.
- Place the PLATINUM BRACELET (W); take the TROPHY ELEMENTS (2/2).
- Walk forward, then left.
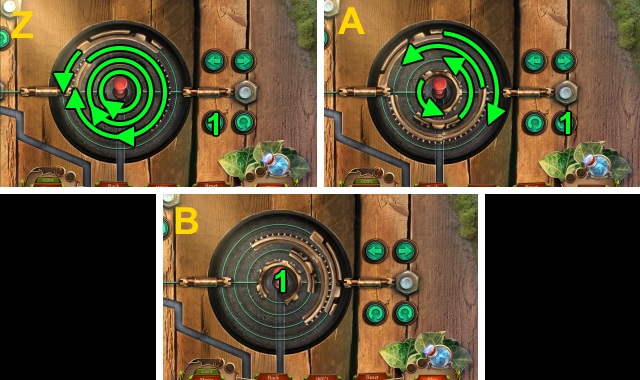
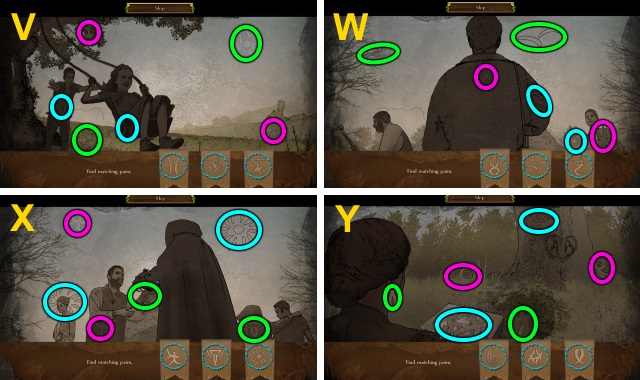
- Place the TROPHY ELEMENTS (2/2) for a mini-game (X).
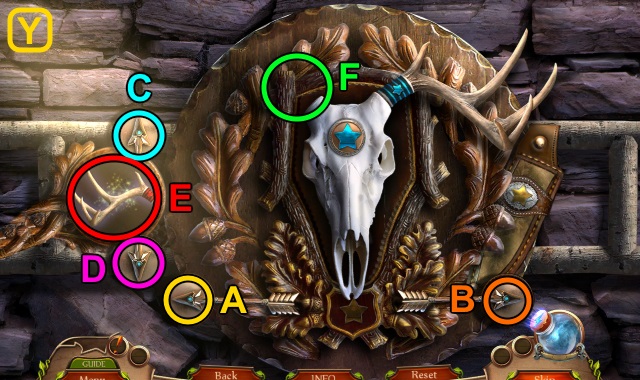
- Solution (Y): (A)-(E-F)-(B)-(E-F)-(B)-(E-F).
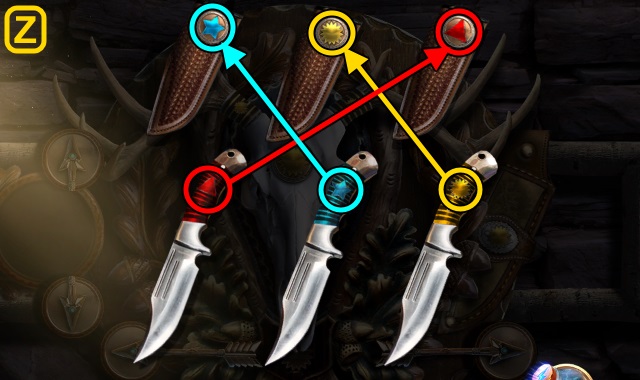
- Solution (Z).
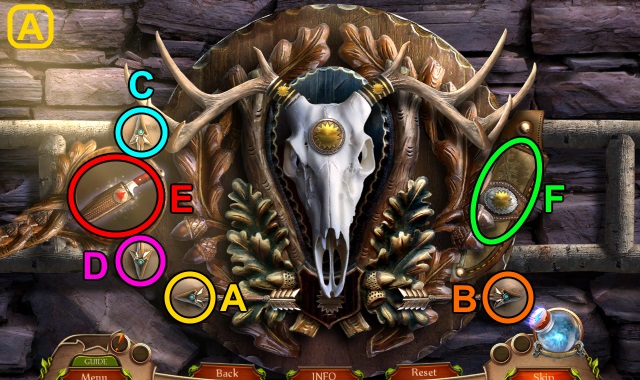
- Solution (A): (D)-(E-F)-(A)-(D)-(E-F)-(A)-(E-F).
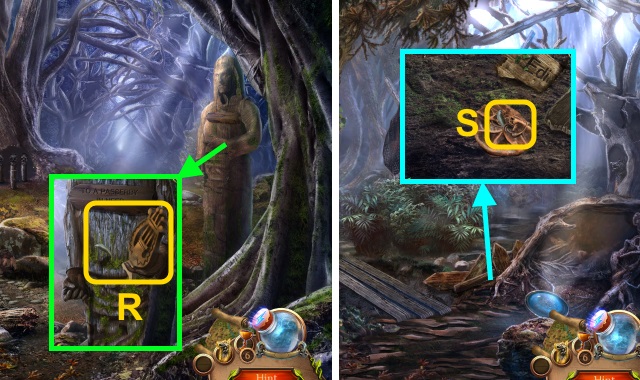
- Take the SNAKE HANDLE and SNARE SPRING.
- Walk right.
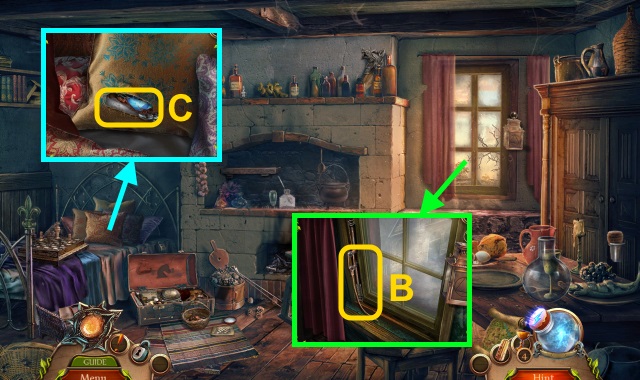
- Use the SNARE SPRING (B); take the TILE SHARD.
- Move the pillows; use the TILE SHARD (C). Take the STORMCALLER'S STONE and MERCHANT'S KEY.
- Walk down twice.
- Move the pieces (D); use the MERCHANT'S KEY. Take the SCISSORS and WINDWALKER'S SPIRAL.
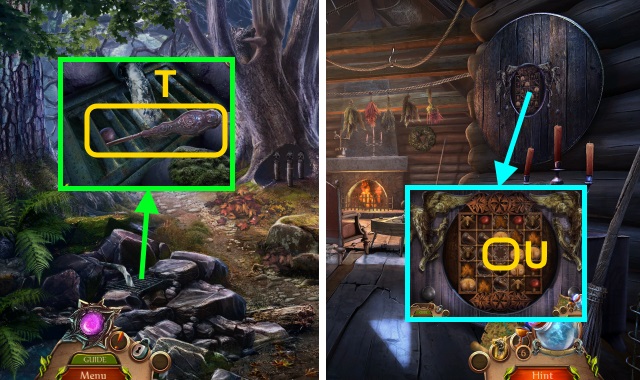
- Combine the SOLOMNAR'S STAFF, WINDWALKER'S SPIRAL, and STORMCALLER'S STONE; use the Medallion.
- Use the Medallion for a mini-game (E).
- Solution (F).
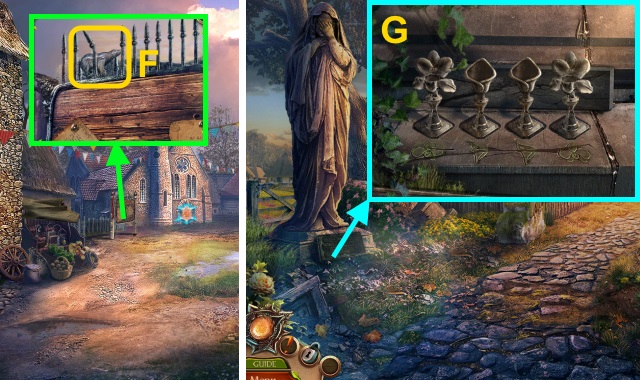
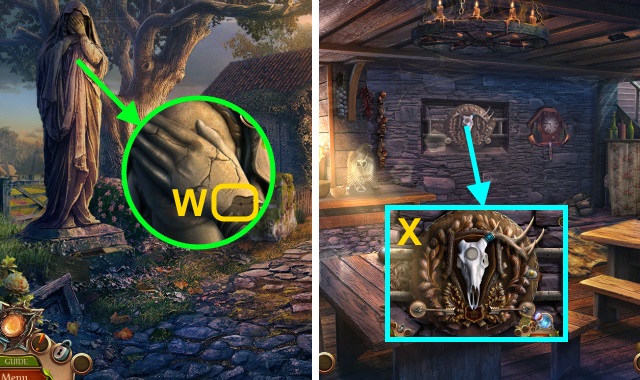
- Examine the beams; take the WEATHER VANE (G). Examine the beam; open the door.
- Walk forward.
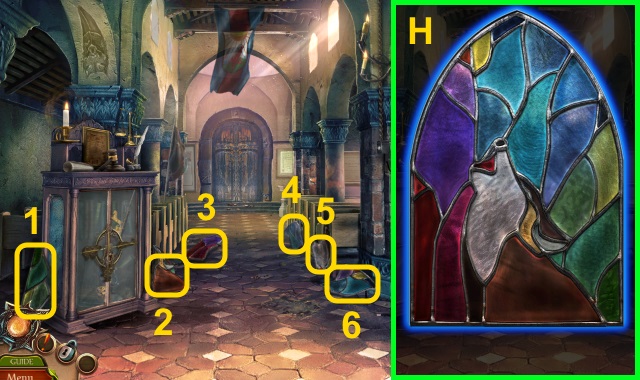
- Take the 6 GLASS SHARDS; receive the STAINED GLASS.
- Examine the STAINED GLASS for a mini-game; solution (H).
- Receive the STAINED GLASS.
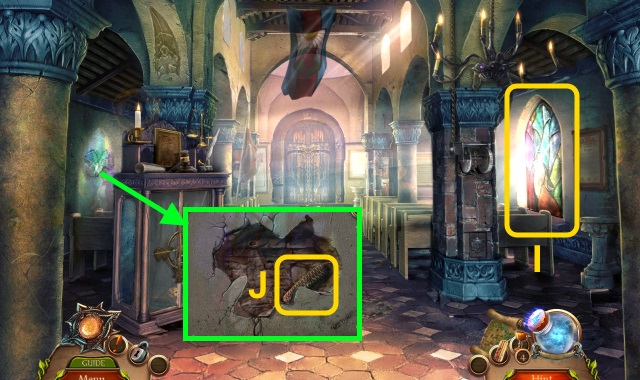
- Place the STAINED GLASS (I).
- Use the WEATHER VANE; take the WEIGHTS (2/2) (J).
- Walk down, then right.
- Examine the crossbow (K); receive the CROSSBOW CRANK.
- Walk down, then forward.
- Place the CROSSBOW CRANK (L); turn it 3x.
- Take FRUMO'S STONE (M).
- Walk down, then left.
- Place the WEIGHTS (2/2) (N); take ILEANA'S STONE (O).
- Place ILEANA'S STONE and FRUMO'S STONE. Examine the lock 3x; place the sword and scepter (P). Take the GOLDEN EAGLE (Q).
- Walk down, then forward.
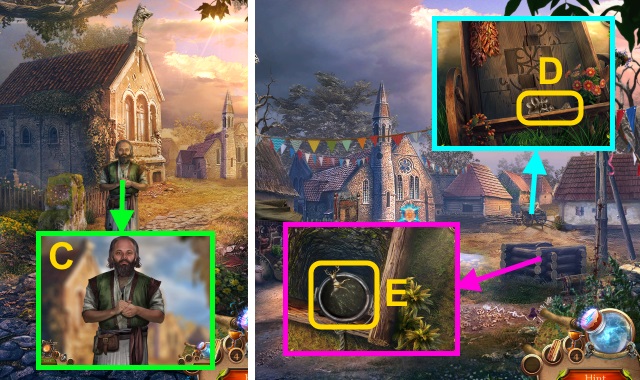
- Place the SILVER BEAR, BRONZE LIZARD, and GOLDEN EAGLE (R). Play the HOP; receive the BROKEN MUSKET.
- Use the BROKEN MUSKET (S).
- Walk forward.
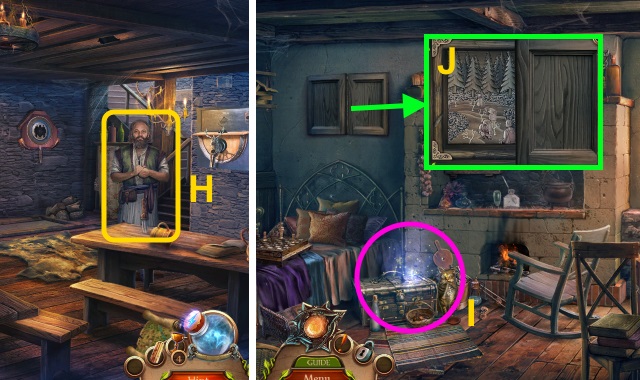
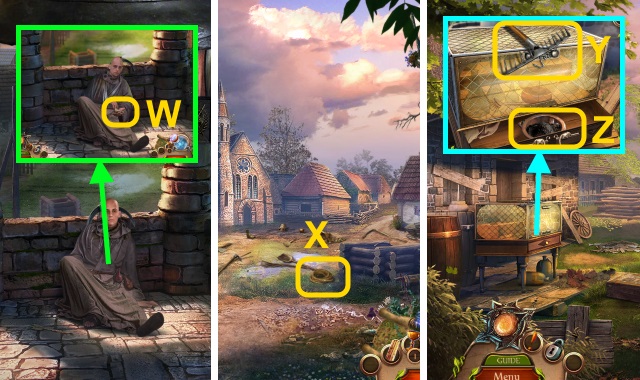
- Talk to the man (T).
Chapter 2: Adrian and Alina

- Use the Medallion twice for a mini-game.
- Solution (U).
- Use the SCISSORS (V); receive the BANNER FRAGMENT.
- Examine the BANNER FRAGMENT twice; take the IMPROVISED SLING.
- Give the IMPROVISED SLING; take the GUARD BELL (W).
- Walk down twice.
- Take the ROPE (X).
- Walk right.
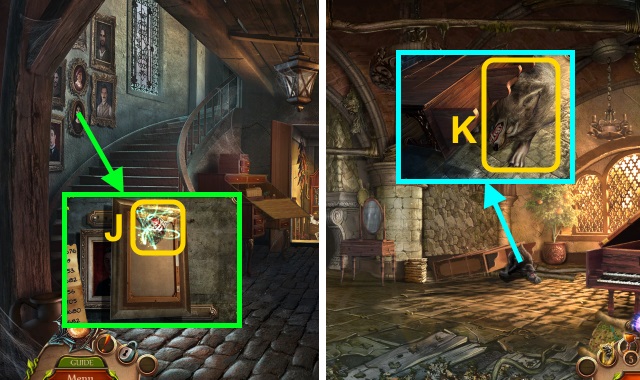
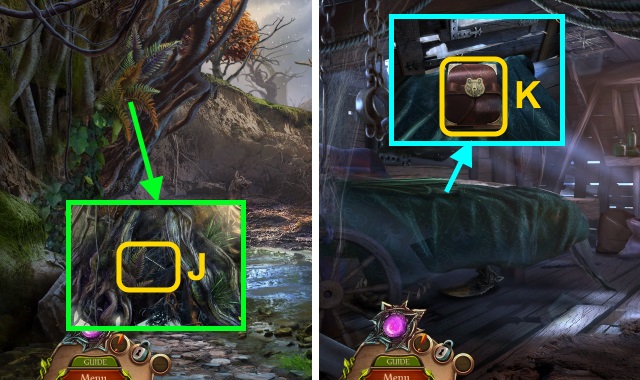
- Take the RAKE (Y). Place the SNAKE HANDLE; take the CHARCOAL and METAL DOMINOES (1/2) (Z).
- Move the boards; receive the BLUNT PIECE (A). Move the board.
- Place the GUARD BELL for a mini-game; solution (B).
- Play the HOP; receive the LAUREL WREATH (C).
- Go to the Tower.
- Place the LAUREL WREATH (D); take the CADUCEUS and CHISEL.
- Go to Artisan Alley.
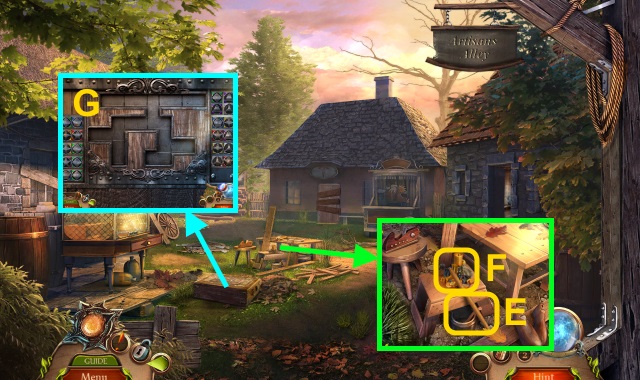
- Take the STEPS (1/3) (E). Use the CHISEL; receive the METAL DOMINOES (2/2) (F). Take the CANDLE.
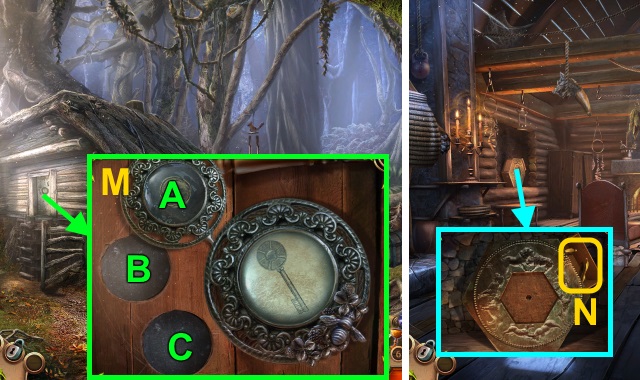
- Place the METAL DOMINOES for a mini-game (G).
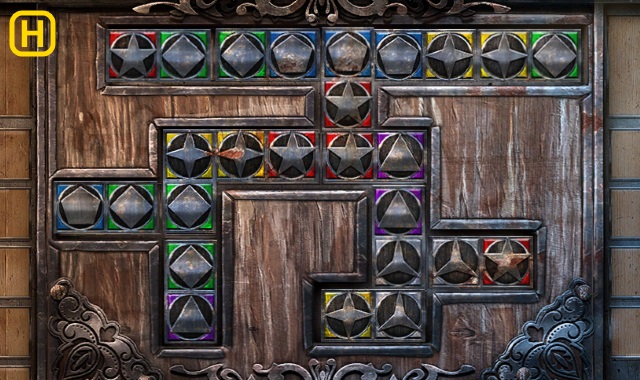
- Solution (H).
- Take the SHARPENING STONE.
- Combine the BLUNT PIECE and SHARPENING STONE; receive the CRAFTED NAIL PULLER.
- Use the CRAFTED NAIL PULLER twice (I).
- Walk forward.
- Open the box; take the FLINT STRIKER (J).
- Combine the CANDLE and FLINT STRIKER; receive the LIT CANDLE.
- Use the LIT CANDLE; light the candles (1-3).
- Place the CADUCEUS (K). Play the HOP; receive the DRIED FLOWER.
- Take the APPLE (L).
- Walk down.
- Place the APPLE (M); take the BRUSH (N).
- Walk forward.
- Open the bottle (O); pour it. Use the BRUSH (P); take the CREST PIECE.
- Go to the Village Hall.
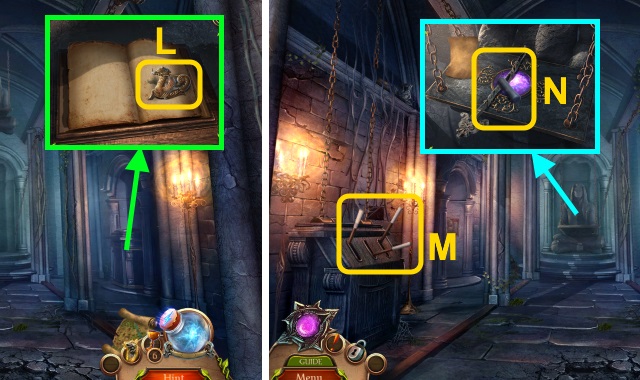
- Place the CREST PIECE (Q); turn each piece. Take the BOOK REGISTER.
- Go to the Healer's Hut.
- Use the BOOK REGISTER; examine the books (1-5). Read the book; take the recipe.
- Examine the box for a mini-game (R).

- Solution (S).
- Take the HEALER'S NOTE and HERBS.
- Walk down.
- Give the HERBS; take the CALENDULA EXTRACT (T).
- Walk forward.
- Place the CALENDULA EXTRACT and DRIED FLOWER for a mini-game (U).
- Solution (V): (E-D)-(A)-(D)-(B-C)-(F-C).
- Take the CURE.
- Go to the Tower.

- Give the CURE and HEALER'S NOTE (W).
- Take the GRAPPLING HOOK (X).
- Combine the GRAPPLING HOOK and ROPE; receive the CLIMBING ROPE.
- Go to Artisan Alley.
- Use the CLIMBING ROPE (Y).
- Walk forward.
- Take the BROKEN LADDER (Z).
- Take the ANCESTRAL PLATE (A).
- Walk right.
- Use the RAKE. Play the HOP; receive the PROTECTIVE GLOVES (B).
- Take the BROKEN SICKLE and STEPS (2/3) (C).
- Walk down.
- Take the FRUIT HUSK LANTERN (D); use the PROTECTIVE GLOVES. Take the PIECE OF WIRE.
- Combine the BROKEN SICKLE and PIECE OF WIRE; receive the GARDENING SICKLE.
- Use the GARDENING SICKLE 3x; take the STEPS (3/3) (E).
- Combine the BROKEN LADDER and STEPS (3/3); receive the CRAFTED LADDER.
- Walk right.
- Place the CRAFTED LADDER (F).
- Take the FARMER STATUE and SHEET MUSIC (G).
- Walk down.
- Place the FARMER STATUE; examine the statues (H).
- Take the MANOR KEY (I).
- Walk right.
- Use the MANOR KEY (J).
- Walk forward, then left.
- Use the cane (K) on the beam (L).
- Take the HEX WRENCH (M).
- Take the SMALL KNIFE (N).
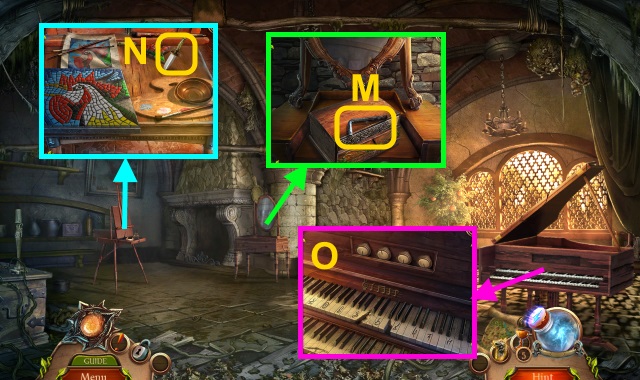
- Place the SHEET MUSIC for a mini-game (O).
- Solution (P).
- Take the WILD ROSE EMBLEM.
- Walk down.
- Use the WILD ROSE EMBLEM; examine the papers (Q).Take the LEAF PIECE (R).
- Take the ORNAMENT PIECES (1/3) (S).
- Use the HEX WRENCH; receive the EPAULET (T).
- Walk left.
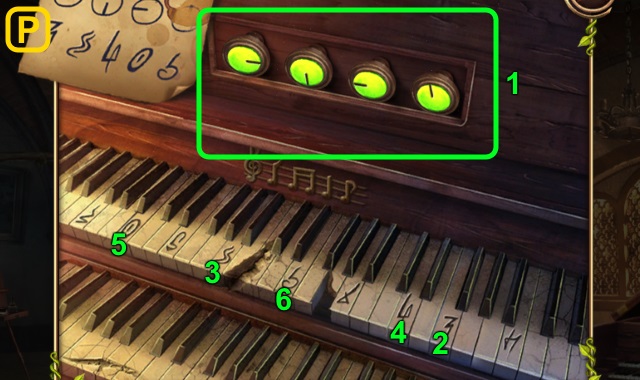
- Place the LEAF PIECE; read the book for a mini-game (U).
- Solution (V-Y).
- Take the KNOB PIECE.
- Use the EPAULET 3x (Z); take the ORNAMENT PIECES (2/3).
- Walk down.
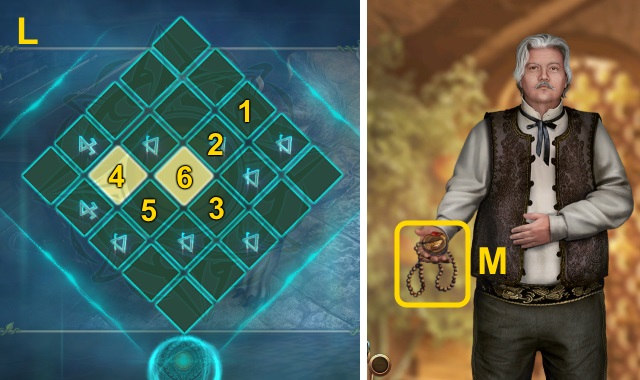
- Use the KNOB PIECE for a mini-game. Solution (A): Bx2-Cx2.
- Play the HOP; receive the HONEY DIPPER (B).
- Walk down twice.
- Use the HONEY DIPPER (C); receive the HONEY.
- Go to Alina's Room.
- Use the HONEY and CHARCOAL; pour the charcoal into the bowl (D). Receive the PAINT.
- Walk down twice.
- Use the HONEY, ANCESTRAL PLATE, and PAINT; examine the brush and rag; take the ANCESTOR LIST (E).
- Walk left.
- Place the ANCESTOR LIST for a mini-game (F).
- Solution (G-I).
- Examine the picture; use the Medallion (J).
- Walk left.
- Use the MEDALLION for a mini-game (K).
- Solution (L).
- Take the DECORATED NECKLACE (M).
- Combine the DECORATED NECKLACE and SMALL KNIFE; receive the ORNAMENT PIECES (3/3).
- Walk down twice.
- Examine the roots; examine the box. Place the ORNAMENT PIECES (3/3) (N); take the PENDANT FRAGMENT (O).
- Walk down.
- Talk to Adrian. Take the stone; examine the map for a mini-game (P).
- Solution (Q).
Chapter 3: The Temple
- Use the SMALL KNIFE; take the LIANA VINE ROPE (1/6) (R). Examine the boat (S).
- Play the HOP; receive the WISDOM SYMBOL (T).
- Walk right.
- Use the Medallion for a mini-game.
- Solution (U).
- Take the STICK (V).
- Place the FRUIT HUSK LANTERN (W); gather the fireflies (X). Receive the CAPTURED FIREFLIES.
- Take the LIANA VINE ROPE (2/6) (Y). Place the WISDOM SYMBOL (Z); take the THUNDER.
- Take the LIANA VINE ROPE (3/6) (A).
- Walk right.
- Take the INCOMPLETE PENDANT and THREAD (B).
- Combine the INCOMPLETE PENDANT and PENDANT FRAGMENT; receive ALINA'S PENDANT.
- Walk down twice.
- Use the CAPTURED FIREFLIES; take the FLOWER CENTERPIECE (C) and LIANA VINE ROPE (4/6) (D).
- Walk right, then forward.
- Take the LIANA VINE ROPE (5/6) (E); place the THUNDER (F).
- Examine the pieces (1-6); take the MOSAIC TILE (G).
- Take the ALL-SEEING EYE (H).
- Walk down.
- Place the MOSAIC TILE for a mini-game (I).
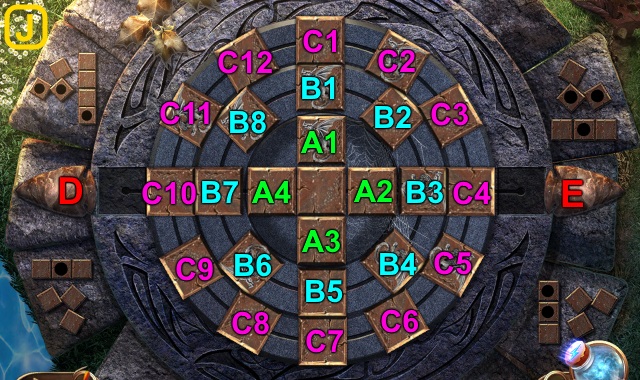
- Solution (J): (B1-B4)-(A1-A4)-(C2-C4)-(D).
- (C10-C11)-(E)-(C11-C1)-(A4-A2)-(D)-(B3-B6).
- (E)-(C10-C1)-(D)-(A2-A3)-(B7-B3)-(C9-C11).
- Take the BRACELET.
- Combine the STICK, BRACELET, and THREAD; receive the FISHING SPEAR.
- Walk down.
- Use the FISHING SPEAR (K); receive the FISH.
- Give the FISH; take the OLD SHIELD (L).
- Walk right twice.
- Use the OLD SHIELD (M).
- Play the HOP; receive the ROPE LADDER (N).
- Examine the ROPE LADDER; examine each vine. Take the ROPE LADDER.
- Walk down, then forward twice.
- Use the ROPE LADDER (O).
- Take the SMALL LEVER (P).
- Place the FLOWER CENTERPIECE for a mini-game; solution (Q).
- Read the note; take the REVEALING POWDER.
- Walk down twice.

- Use the REVEALING POWDER for a mini-game; solution (R).
- Take the COMET DECORATION.
- Walk forward twice.
- Place the COMET DECORATION for a mini-game (S).

- Solution (T): (I-D)-(Q-D)-(J-D)-(R-A-B)-(H-C-B).
- (G-B)-(O-B)-(F-B)-(N-A-B)-(E-B)-(I-C)-(M-B)-(J-D).
- Read the scroll; take the MISSING FIGURINE.
- Walk down.
- Place the MISSING FIGURE for a mini-game; solution (U).
- Walk right.
- Take the CLAW PRINT EMBLEM (V).
- Walk down, then forward.
- Place the CLAW PRINT EMBLEM (W). Take the MINIATURE WATER WHEEL and MISSING ORNAMENTS (1/3).
- Walk down twice.
- Place the MINIATURE WATER WHEEL (X); take the GOLDEN AXLE (Y).
- Walk forward.
- Place the GOLDEN AXLE. Play the HOP; receive the KEY TO KNOWLEDGE (Z).
- Walk right.
- Place the KEY TO KNOWLEDGE for a mini-game; solution (A).
- Read the scroll; take the GOLDEN PLAQUE (B).
- Walk right.
- Use the GOLDEN PLAQUE; take the KEY TO FORESIGHT (C).
- Walk down.
- Place the KEY TO FORESIGHT for a mini-game; solution (D).
- Use the Medallion for a mini-game (E).
- Solution (F-I).
- Place the ALL-SEEING EYE (J); take the SHRINE TILE and MISSING ORNAMENTS (2/3).
- Place the SHRINE TILE for a mini-game; solution (K).
- Walk forward.
- Turn the page; take the MISSING ORNAMENTS (3/3) (L).
- Place the SMALL LEVER (M).
- Take the PESTLE and METAL DECORATION (N).
- Walk down, then right.
- Place the MISSING ORNAMENTS (3/3) (O); take the MIRROR FRAGMENT and SILVER SIGNET.
- Use the METAL DECORATION (P); take the LEATHER BELT.
- Place the LEATHER BELT (Q).
- Play the HOP; receive the METAL DISK (1/2) (R).
- Walk down.
- Use the SILVER SIGNET (S); take the DRAGON EGG.
- Walk right.
- Place the DRAGON EGG (T); take the DRAGON SYMBOL.
- Place the DRAGON SYMBOL; examine the egg 3x (U). Take the METAL DISK (2/2).
- Walk down, then forward.
- Place the METAL DISK (2/2) for a mini-game (V).
- Solution (W): Ax4-Bx4-Cx4-Dx4-Ex4-Fx4.
- Solution (X).
- Take the LANGUAGE DECODER.
- Use the LANGUAGE DECODER; take the SPELL INSTRUCTIONS (Y).
- Place the SPELL INSTRUCTIONS and ALINA'S PENDANT; examine the symbols (Z). Take the ENCHANTED PENDANT and TORNADO; use the Medallion.
- Walk down twice.
- Place the TORNADO. Examine the pieces (1-6); use the Medallion.
- Walk down, then right.
- Use the Medallion for a mini-game.
- Solution (A).
- Walk forward.
Chapter 4: The Forest
- Try to walk forward.
- Use the MIRROR FRAGMENT (B).
- Take the BROKEN BRANCH (C). Move the branches; take the PIECES (1/4).
- Walk right.
- Light the candle (D); turn the pages (E). Take the PIECE OF CLOTH (F).
- Take the PIECES (2/4) (G).
- Walk down twice.

- Use the PIECE OF CLOTH (H); receive the POISONOUS FLOWER.
- Walk forward, then right.
- Place the PESTLE and POISONOUS FLOWER (I); pour the herbs. Receive the HERBICIDE.
- Walk down twice.
- Use the HERBICIDE; take the HUNTER'S LOG KEY (J).
- Walk forward, then right.
- Move the cloth; use the HUNTER'S LOG KEY for a mini-game (K).
- Solution (L-O).
- Turn the page; take the HUNTER'S INSTRUCTIONS.
- Walk down.
- Examine the tree 2x (P); examine the claw marks.
- Play the HOP; receive the SNOWDROP EMBLEM (Q).
- Walk left.
- Use the Medallion (R).
- Use the Medallion for a mini-game (S).
- Solution (T).
- Take the THROWING BLADE (U).
- Take the LENS (V); open the coat. Examine the figure; place the SNOWDROP EMBLEM. Take the PIECES (3/4).
- Walk down.
- Use the THROWING BLADE (W).
- Move the leaves; take the PIECES (4/4) (X).
- Walk right.
- Place the PIECES (4/4) for a mini-game (Y).
- Solution (Z): C-D-E-H-I-G-B-Jx2-F-A.
- Take the PRICOLICI STONE.
- Walk down, then left.
- Place the PRICOLICI STONE (A). Take the SMUGGLER'S SEAL.
- Walk down.
- Place the SMUGGLER'S SEAL; examine it. Read the scroll (B); take the PAINTED EGG.
- Walk right.
- Place the PAINTED EGG (C); take the HUNTING CLAW.
- Combine the HUNTING CLAW and BROKEN BRANCH; receive the IMPROVISED FORK.
- Walk down, then left.

- Use the IMPROVISED FORK. Play the HOP; receive the MOUSE HEAD (D).
- Walk down, then right.
- Place the MOUSE HEAD (E); take the SAW.
- Walk down.
- Examine the sign; use the SAW 3x (F). Take the IMPROVISED BRIDGE and CHIMES (1/3).

- Place the IMPROVISED BRIDGE (G).
- Walk forward.
- Take the MINIATURE MAYPOLE (H).
- Take the CHIMES (2/3) (I).
- Take the BROKEN LOCK TOP and SHEPHERD'S CROOK (J).
- Walk forward.
- Use the SHEPHERD'S CROOK (K); take the MAGNIFYING GLASS.
- Combine the BROKEN LOCK TOP, LENS, and MAGNIFYING GLASS; receive the LOCK TOP.
- Take the METAL WINGS (L).
- Place the LOCK TOP for a mini-game.
- Solution (M): Ax4-Bx4-Cx4.
- Walk left.
- Take the METAL LEGS (N).
- Take the INCOMPLETE BEE (O). Place the MINIATURE MAYPOLE; take the TORTOISE EMBLEM.
- Walk down.
- Place the TORTOISE EMBLEM (P). Play the HOP; receive the MAGICAL EWE.
- Walk left.
- Place the MAGICAL EWE; examine it (Q). Take the LYRE.
- Walk down twice.
- Give the LYRE; take the BEAR TOOTH (R).
- Walk down.
- Use the BEAR TOOTH (S); take the BUTTONHOOK.
- Walk forward.
- Use the BUTTONHOOK (T); take the WOODEN MUSHROOM.
- Walk forward, then left.
- Place the WOODEN MUSHROOM for a mini-game (U).
- Solution (V).
- Take the LION CENTERPIECE.

- Place the LION CENTERPIECE; turn it 3x (W). Take the CHIMES (3/3) (X).
- Walk down.
- Place the CHIMES (3/3) for a mini-game; solution (Y). Take the METAL ABDOMEN (Z).
- Combine the INCOMPLETE BEE, METAL WINGS, METAL LEGS, and METAL ABDOMEN; receive the METAL BEE.
- Walk left.
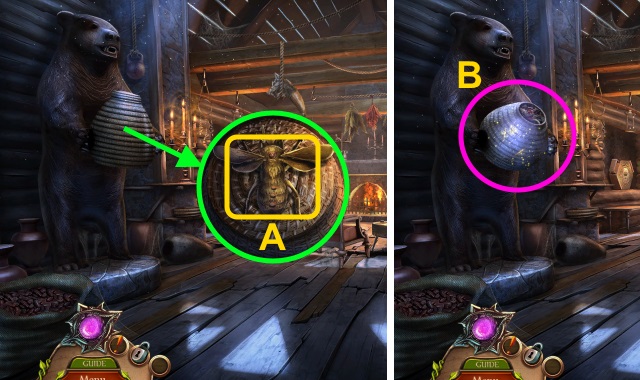
- Place the METAL BEE (A).
- Play the HOP; receive the SKULL (B).
- Walk down twice.
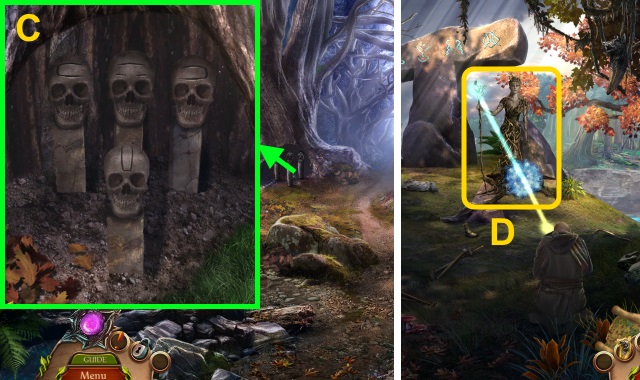
- Place the SKULL; arrange the skulls (C).
- Walk left.
- Use the ENCHANTED PENDANT for a mini-game (D).
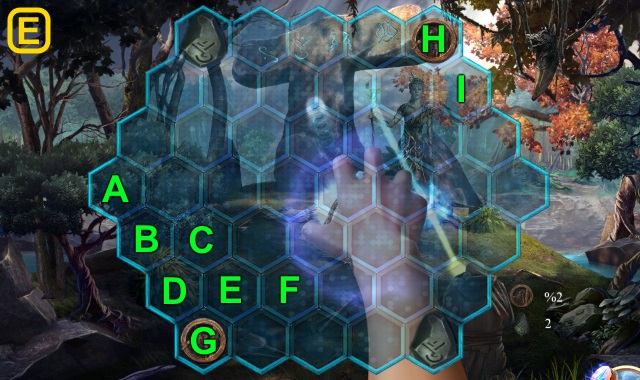
- Solution (E): (G-D)-(D-C)-(C-E)-(E-F)-(H-I)-(D-B)-(B-A).
- Congratulations! You have completed Myths of the World: Bound by The Stone.
Created at: 2017-01-15